Printable Version of Topic
Click here to view this topic in its original format
914World.com _ 914World Garage _ Bringing it back:
Posted by: Van B Aug 16 2022, 05:51 PM
Evening 914 World!
I’ve been gathering parts over the past few months and have finally reached critical mass. So, let the project thread begin!
After working on the FI through the winter, I’m satisfied that the engine remains in good health with it’s original 53k miles. However, the rubber and plastic holding everything together is a different story.
Which brings me to the scope and objective of this project. In short, I am looking for what I will call, “Improved Original”. What the phrase means to me is that I want to maintain the character and feel of the original car, but still take advantage of any and all modern improvements that will either, improve reliability, safety, operability, or any combination there of. This will include a suspension and chassis rebuild, power train reseal and refinishing, brake system rebuild, and fuel system overhaul.
When I’m done, I want to have a car that drives like it’s nearly new, but doesn’t look over restored. Because the car is a survivor, I think it’s important to keep the stories and history of the car intact.
Finally, I’d like to post my thanks to the community and vendors that make it possible to enjoy this hobby. Stay tuned!
Van
Attached thumbnail(s)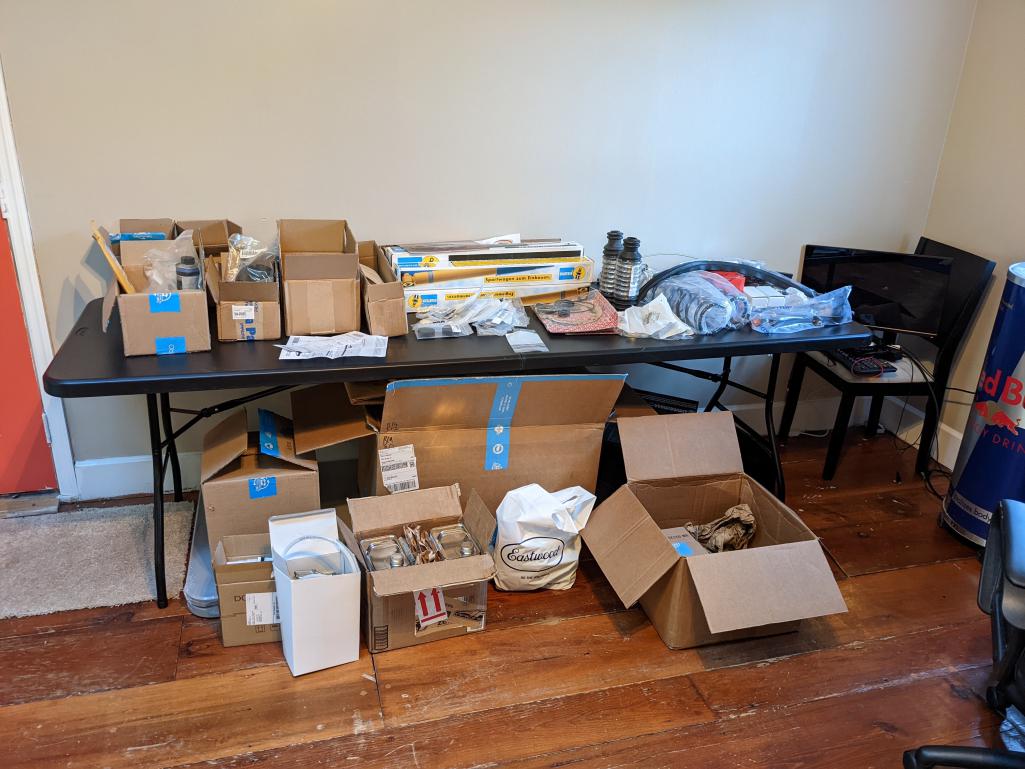
Posted by: Van B Aug 16 2022, 05:53 PM
Day 1: removed the engine 
Attached image(s)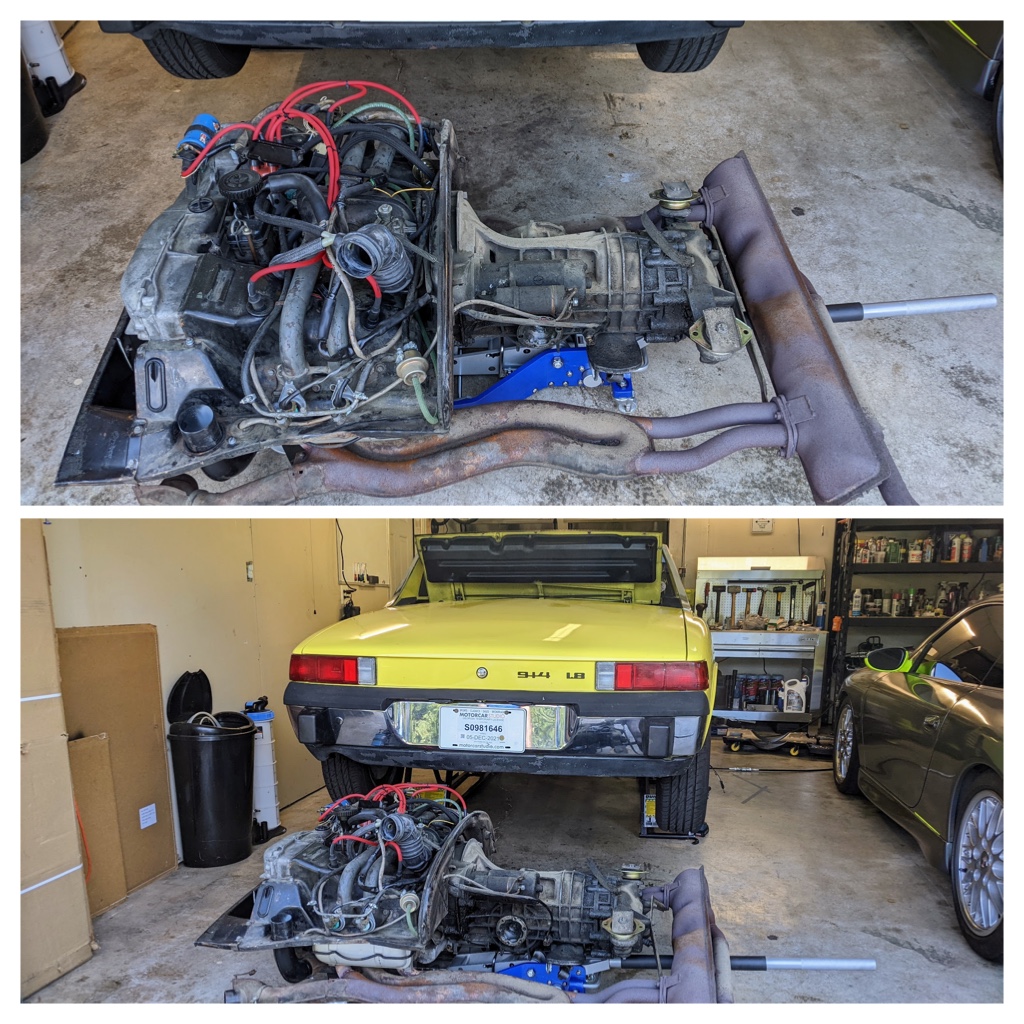
Posted by: StarBear Aug 16 2022, 05:57 PM
![popcorn[1].gif](style_emoticons/default/popcorn[1].gif) Anxious to follow your exploits, Van, particularly the original but better improvement choices. These have been tough to make but safety (fuel pump to front, 3rd brake light, 19mm MC) and reliability (warm start solenoid changeout, modern bushings) are always good choices.
Anxious to follow your exploits, Van, particularly the original but better improvement choices. These have been tough to make but safety (fuel pump to front, 3rd brake light, 19mm MC) and reliability (warm start solenoid changeout, modern bushings) are always good choices.
Let the fun begin!!
Posted by: emerygt350 Aug 16 2022, 06:14 PM
Good luck van! Everytime I dig around in mine I say to myself "well, it's lasted 50 years already..." And cross my fingers.
Posted by: Van B Aug 16 2022, 06:36 PM
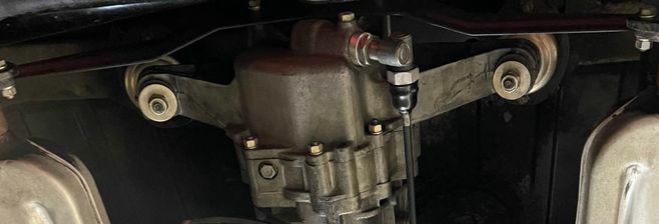
Thanks guys! @http://www.914world.com/bbs2/index.php?showuser=10753 most of those choices have already been made. But I’ll do my best to document the choices on this thread. You might see the first choice I made bolted to the transmission. I went with the firmer 911 mounts and was very pleased.
Posted by: StarBear Aug 16 2022, 06:42 PM

Thanks guys! @http://www.914world.com/bbs2/index.php?showuser=10753 most of those choices have already been made. But I’ll do my best to document the choices on this thread. You might see the first choice I made bolted to the transmission. I went with the firmer 911 mounts and was very pleased.
Might be doing trans rebuild this winter. Which mounts did you use? Trans mounts or the engine mounts?
Posted by: Van B Aug 16 2022, 07:15 PM
These guys: https://www.fcpeuro.com/products/porsche-engine-mount-german-91137504307
Posted by: wonkipop Aug 16 2022, 07:33 PM
you and your car will enjoy those bilsteins i see on the table of goodies.
Posted by: bbrock Aug 16 2022, 07:43 PM
I will watching this for sure! This is very much the philosophy I've followed on my build which is still a work in progress. Some thoughts from my own journey down this path:
For the most part, I decided to restore the car to like new condition because it was so well engineered to begin with. Suspension and brakes remain stock but I did upgrade to Bilstein shocks and turbo tie rods. The engine (2.0L) was rebuilt to european stock specs so displacement remained stock but compression raised. The exception was an unfortunate decision in the late 1980s when bottom end of the engine was rebuilt to install a carb cam. A mild one, but not a decision I'd make today. As a result, the car is currently carbed but I'll return to that later. Other than the carbs, I don't regret any of this. I've taken several 300+ mile trips this summer and the car as Porsche designed performs and handles fantastic. It is just a wonderfully balanced package and I have not wished for more or less of anything.
Now for the mods. First, my rule on mods is they should be as stealth as possible. Invisible is even better. Visible mods should look as if they came from the factory down to the wiring. Mods also need to be non-destructive so no drilling allowed. I want them to be easily reversible in case someone wants to go purist some day. With that philosophy, here are mods I did or plan to do in order of priority.
Safety First - I wanted to leave no compromise here within reasonable limits. Nothing crazy like adding airbags or anything, but there were a number of mods.
- LED lights. This was LED lights all around. Headlights, of course, but also all indicator, tail, and brake lamps to brighten them.
- Porterfield brake pads. No compromise when it comes to stopping.
- Enhanced visibility. I added a third brake light which is a must have on a car that sits this low, and stealth side markers to compensate for deleting the ugly warts to bring the car to Euro spec. Actually, there was a practical reason for deleting the markers, but that's not important. The lights I chose are ultra low profile LED strips most commonly used on motorcyles. They are so low profile nobody notices they are there until turned on and they do enhance visibility substantially. I violated the non-destructive rule with the side marker delete, but I did make a paper template to allow drilling the holes exactly where they were if some future owner has a wart fetish.
Reliability - Like you, this is important and is an ongoing project. I think there is potential for substantial gains in reliability and longevity by modernizing the ignition and fuel systems on these cars. At the top of my list was ditching the points and condensor. Right now I'm running a Pertronix which is nice, but I have higher goals. Here is where I'm hopefully headed this winter.
- Ditch the carbs and go Megasquirt. I can run this with the carb cam and also add a lot of modern fuel management features like sequential injection, real time barometric correction, closed loop fuel mixture adjustment, etc. I'll run this with the stock intake manifold and air cleaner with electronics hidden away in a stock ECU box.
- Upgrade ignition with full sequential coil on plug spark management. Full sequential is a bit over the top but I like a challenge and there are some gains to be had there for efficiency. It is also helpful for the next reliability upgrade.
- Switch to iridium plugs. I love being able to get 50K-100K out of a set of modern plugs. IMO, the less time spent with my head in the engine bay where swear words are invented, the better.
- Synthetic oil. I've read all the debates about synthetic oil in vintage and/or flat tappet engines. I'm convinced it will improve longevity and there are high zinc synthetic blends out there.
Creature comforts - There are some things you've just gotta have, but you don't have to be flashy about them. Here are mine:
[list]
[*]Tunes. I've gotta have decent tunes with bluetooth capabilities so I stuffed a modern Blaupunkt in the dash. I tried to install it in a very factory way so it doesn't draw attention to not being factory correct. Having a period correct radio converted to solid state is tempting, but a little too spendy for me, as is the new(ish) Porsche single DIN radio/navigation system. I've also hidden an amplifier in the center console and a subwoofer in the passenger kick space where the foam block goes. Still waiting on 914R to introduce their subwoofer box to complete the mod. Other than the radio itself, there is no visible hint of a non-stock system.
[*]Cup holder. It's a must have. I don't smoke, but I drink so I converted the ashtray into a pop-out cup holder. Total stealth when closed. Last week I was riding with a friend and popped out the cup holder while making a comment that people think Toyota invented the in-dash cup holder but my 50 year old car had one. He looked at me and asked, "is that stock?" That's the level of stealth I was going for so it made me happy.
[*]Charge ports. Let's face it, we need to be able to run and charge stuff these days. I built a little console that fits inside the center console that contains an extra 12v accessory plug, a USB-b plug, and a USB-c plug. I like to open the console and brag that 914s were so far advanced that they had USB outlets decades before USB was invented

So that's were I've been and going with this "make it better without changing it" concept. I can't wait to see what you do!
Posted by: StarBear Aug 16 2022, 08:02 PM
These guys: https://www.fcpeuro.com/products/porsche-engine-mount-german-91137504307
Great! Direct fitment, or mods needed?
Posted by: Van B Aug 16 2022, 08:10 PM
These guys: https://www.fcpeuro.com/products/porsche-engine-mount-german-91137504307
Great! Direct fitment, or mods needed?
Bolts right up like the original part. But I still used new hardware.
Posted by: Van B Aug 16 2022, 08:14 PM
you and your car will enjoy those bilsteins i see on the table of goodies.
Yeah, that’s good to know. Current suspension was completely gone so, I knew literally anything would be better than what’s on there. But I still looked into what folks here thought about the B6 setup.
Posted by: Van B Aug 16 2022, 08:24 PM
@http://www.914world.com/bbs2/index.php?showuser=20845 I’d say your plans are an order of magnitude beyond mine. I’m loving the L-Jetronic now that I’ve got it working so, that’s staying.
I’m going with LEDs too, but that’s not within scope of this round… daytime VFR for now lol…
Audio is also beyond scope for this phase, but it is in my crosscheck. To that end, I’ve been eyeballing these for a while: https://www.retromanufacturing.com/products/1970-76-porsche-914-hermosa-radio
Will solve Bluetooth and charging requirements.
Posted by: bbrock Aug 16 2022, 08:51 PM
@http://www.914world.com/bbs2/index.php?showuser=20845 I’d say your plans are an order of magnitude beyond mine. I’m loving the L-Jetronic now that I’ve got it working so, that’s staying.
I would do the same. Truth is that if I didn't have that carb cam in the engine, I probably would be restoring the original D-Jet. I'm kind of glad I did it though because it forced me to take a look at Megasquirt. It will probably cost no more than a thorough refurbish of my D-Jet parts but I'll gain a lot of modernization in the bargain. But that doesn't change that the cam is the only reason I'm going this route.
Will solve Bluetooth and charging requirements.
I looked really hard at those too. To be honest, I don't remember why I went a different direction. Must of been missing some feature I thought I must have, but they looked like a good option to me.
Posted by: StarBear Aug 17 2022, 10:42 AM
These guys: https://www.fcpeuro.com/products/porsche-engine-mount-german-91137504307
Great! Direct fitment, or mods needed?
Bolts right up like the original part. But I still used new hardware.
Got the right PET diagram now. Think I'm going to do this - they're still the originals IIRC.

Posted by: StarBear Aug 17 2022, 02:22 PM
These guys: https://www.fcpeuro.com/products/porsche-engine-mount-german-91137504307
Great! Direct fitment, or mods needed?
Bolts right up like the original part. But I still used new hardware.
Got the right PET diagram now. Think I'm going to do this - they're still the originals IIRC.
Van; Rats. Looked under there and the center bolts are upside down (nut on bottom) - must have happened when engine out at 70k miles. So, no way to change out mounts without dropping trans?
Posted by: Van B Aug 17 2022, 02:45 PM
These guys: https://www.fcpeuro.com/products/porsche-engine-mount-german-91137504307
Great! Direct fitment, or mods needed?
Bolts right up like the original part. But I still used new hardware.
Got the right PET diagram now. Think I'm going to do this - they're still the originals IIRC.
Van; Rats. Looked under there and the center bolts are upside down (nut on bottom) - must have happened when engine out at 70k miles. So, no way to change out mounts without dropping trans?
Do one mount at a time with a little support for the transmission if you're uncomfortable.
Posted by: StarBear Aug 17 2022, 03:45 PM
These guys: https://www.fcpeuro.com/products/porsche-engine-mount-german-91137504307
Great! Direct fitment, or mods needed?
Bolts right up like the original part. But I still used new hardware.
Got the right PET diagram now. Think I'm going to do this - they're still the originals IIRC.
Van; Rats. Looked under there and the center bolts (which go through the centers of the mounts?) are upside down (nut on bottom) - must have happened when engine out at 70k miles. So, no way to change out mounts without dropping trans?
Do one mount at a time with a little support for the transmission if you're uncomfortable.
The problem now, with the center bolts upside down (heads at top, nuts on bottom) is that there’s not enough clearance above to remove the bolts and slip the new mounts in. Or am I missing something?
Posted by: Van B Aug 17 2022, 04:34 PM
You only need to loosen it enough to slip the mount and long bolt out of the channel on the transmission support bracket. Remove the two bolts/nuts holding the mount to the chassis, loosen the long bolt from the mount to the transmission and take out the whole thing. Then install the same way.
Posted by: wonkipop Aug 17 2022, 05:22 PM
These guys: https://www.fcpeuro.com/products/porsche-engine-mount-german-91137504307
Great! Direct fitment, or mods needed?
Bolts right up like the original part. But I still used new hardware.
Got the right PET diagram now. Think I'm going to do this - they're still the originals IIRC.
Van; Rats. Looked under there and the center bolts are upside down (nut on bottom) - must have happened when engine out at 70k miles. So, no way to change out mounts without dropping trans?
you can do it.
one at a time.
its tricky finding the torque setting for the 12mm bolt through the centre of the mounts.
i have to remember where that is again in the manual or where i found it.
they give the torque settings for the 2 smaller M8 bolts on the rear mount.
and they give you the torque settings for the front engine mounts.
but that one in centre of gearbox mounts is somewhere else and is obscure.
Van B might know since he has just done it.
anyway if the gearbox is coming out for a rebuild do it all then.
Posted by: wonkipop Aug 17 2022, 05:30 PM
@http://www.914world.com/bbs2/index.php?showuser=26011
are you going to install sway bars?
Posted by: StarBear Aug 17 2022, 05:30 PM
You only need to loosen it enough to slip the mount and long bolt out of the channel on the transmission support bracket. Remove the two bolts/nuts holding the mount to the chassis, loosen the long bolt from the mount to the transmission and take out the whole thing. Then install the same way.
Ah, but I think (?) the problem is that there's no headroom to slip the center bolt up that far - only an inch, tops. Mine looks like the pic below, from another current thread.
Haven't planned to hijack your build thread out of confusion and need, Van, so I apologize.
Yes, @http://www.914world.com/bbs2/index.php?showuser=24231 - but I'm not planning to do that anytime soon. Needs to be done (120k mi), but not urgent though may be the source of the little hum/vibration I get in 4th/5th gear on the highway, hence the idea to replace the mounts as perhaps a faster/cheaper solution attempt as they're the original mounts.
Posted by: wonkipop Aug 17 2022, 05:42 PM
@http://www.914world.com/bbs2/index.php?showuser=10753 - you undo the 2 smaller M8 bolts on each mount as well and slide the whole thing out towards front of car. you loosen the centre bolt only enough allow it to slide through the forked mount and get it out.
then you can take the mount out and take it apart. take a photo. get all the washers and everything back in correctly in sequence with the new mount.
install reverse order or removal.
thats why you need the torque setting of that big central bolt.
normally when you drop engine and trans as unit you just undo the 2 M8 bolts either side and leave the central bolt alone and leave the mounts on the gearbox.
the nuts would be down on yours (as they are on mine) because whoever did it wanted to torque them up with a torque wrench from the bottom. (i realise there are contrary views on that - would be interested to know how the install was done with the nuts up ).
Posted by: Van B Aug 17 2022, 05:53 PM
@http://www.914world.com/bbs2/index.php?showuser=26011
are you going to install sway bars?
I have the OE sway bars from my 996 taking up space in the shed. If I can fit it in next to the steering rack once I mount the two port fuel pump, then I might go for it. Otherwise I’ll leave it all loose and out of control lol… 76hp feels faster with no sway bars anyway

Posted by: Van B Aug 17 2022, 05:59 PM
No worries @http://www.914world.com/bbs2/index.php?showuser=10753 . You’re over thinking it. Get under there with your wrenches and it will become clear real quick. @http://www.914world.com/bbs2/index.php?showuser=24231 I did find the torque value and I remember that it was in an odd place. I’ll look it up again.
Posted by: StarBear Aug 17 2022, 07:53 PM
@http://www.914world.com/bbs2/index.php?showuser=10753 - you undo the 2 smaller M8 bolts on each mount as well and slide the whole thing out towards front of car. you loosen the centre bolt only enough allow it to slide through the forked mount and get it out.
then you can take the mount out and take it apart. take a photo. get all the washers and everything back in correctly in sequence with the new mount.
install reverse order or removal.
thats why you need the torque setting of that big central bolt.
normally when you drop engine and trans as unit you just undo the 2 M8 bolts either side and leave the central bolt alone and leave the mounts on the gearbox.
the nuts would be down on yours (as they are on mine) because whoever did it wanted to torque them up with a torque wrench from the bottom. (i realise there are contrary views on that - would be interested to know how the install was done with the nuts up
).Ohhhhhh. I can see clearly now! SLIDE forward. Will await the torque setting. Still learning, thanks to The Wise Ones.
Posted by: wonkipop Aug 17 2022, 10:16 PM
[/quote]
Van; Rats. Looked under there and the center bolts are upside down (nut on bottom) - must have happened when engine out at 70k miles. So, no way to change out mounts without dropping trans?
[/quote]
one more thing @http://www.914world.com/bbs2/index.php?showuser=10753
i don't think Van B minds me expanding on esoterica - cause he knows i am a sceptic and contrarian (ie trouble making upside down a-hole  )
)
it is my firm opinion your bolts aren't on "upside down".
its a myth that someone has come up with based on the PET diagram?
i'll explain why. its coming back to me because i ghosted these forums when i was recommissioning the wallaby 3 years back and read it all in some long lost thread here were a bunch of guys went at each other about those mounts.
1)
mine were on apparently "upside down". ie nuts at bottom bolt facing down.
photo before we started work. you can see them.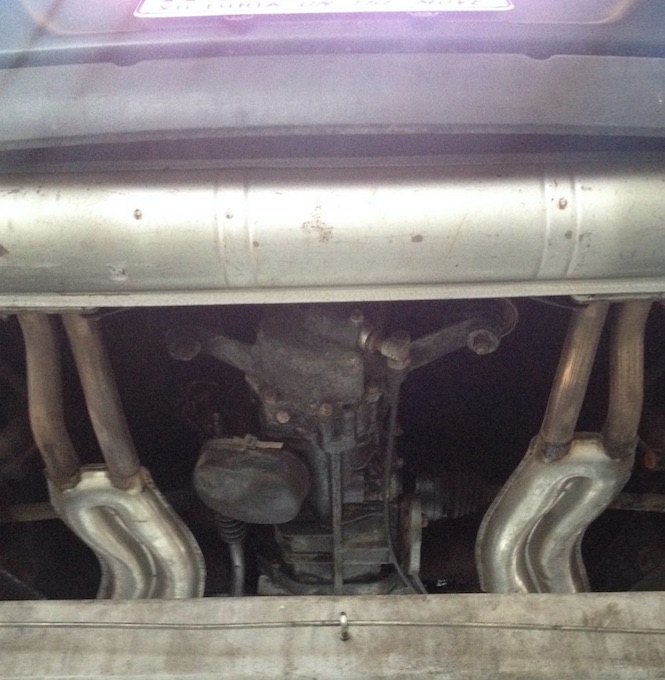
2. here is the top of the mount we removed.
still liberally goobered with original undercoating that got sprayed all around in there by some kook toking on a stoobie back in 74. it had never been off. the evidence was fairly compelling.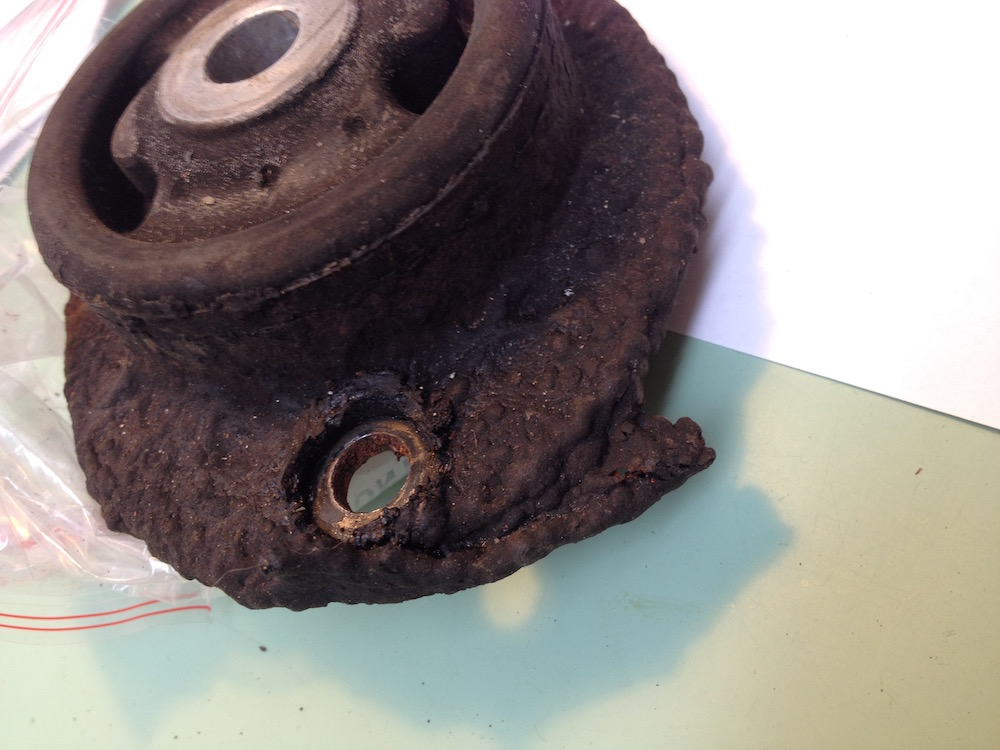
so the mounts before we started where "upside down" and had been so called "upside down" since the day it was built. 99% certain on that.
granted. some stoned german could have screwed it up the wrong way on the assembly line. or they dropped the motor in the workshop before they sold it new or sent it off to the undercoaters for some reason. but i very much doubt it.
additionally if you look through the factory manuals there are photos of the mounts in question in situ in the car with the nuts on the bottom.
so.....if you ask me yours are not upside down at all.
------
i think where the myth comes from is the early cars up to 73. they have forward engine mounts for a solid mounted cross bar. similar or identical mounts to gearbox. and if i am not mistaken the only way you can get the bolt in is from below and do the nut up on top. but i could be wrong. don't have an early car to know. i think they just followed the same convention for the rear mounts. but i can assure you its academic. it makes no difference to the rear mounts because you slide them out through the forked transmission casting. and we don't have forward mounts on our later cars. they are smaller rubber mounts in the centre of the bar where it is joined to the engine.
---------
i also now remember the factory manual is real skinny on the engine mount issue.
seems to have been written for the 70-72 cars with different mounts.
probably the manual i have was supposed to have a revision and its been lost.
we might have just tightened up the transmission mount centre bolt firmly.
i can't remember but i can ask mike next monday for you.
i left that to him. he knows 911s backwards so he probably didn't think twice about it whatever he did.
--------
Posted by: wonkipop Aug 17 2022, 11:55 PM
this might also give you pause to think @http://www.914world.com/bbs2/index.php?showuser=10753 before you fret to much about those bolts.
from the L jet files.
44 K mile car we pulled down material on from BAT last year that was a big clincher for the 1.8 L jet research. sold back in 2016. just about one of the best most original 1.8s i've come across documented. Big Len would probably agree with me. you would be hard pressed to question this one.
to me don't look like anyone has been near the trans mounts since abba entered eurovision. they are "upside down" according to 914 myth. or are they? 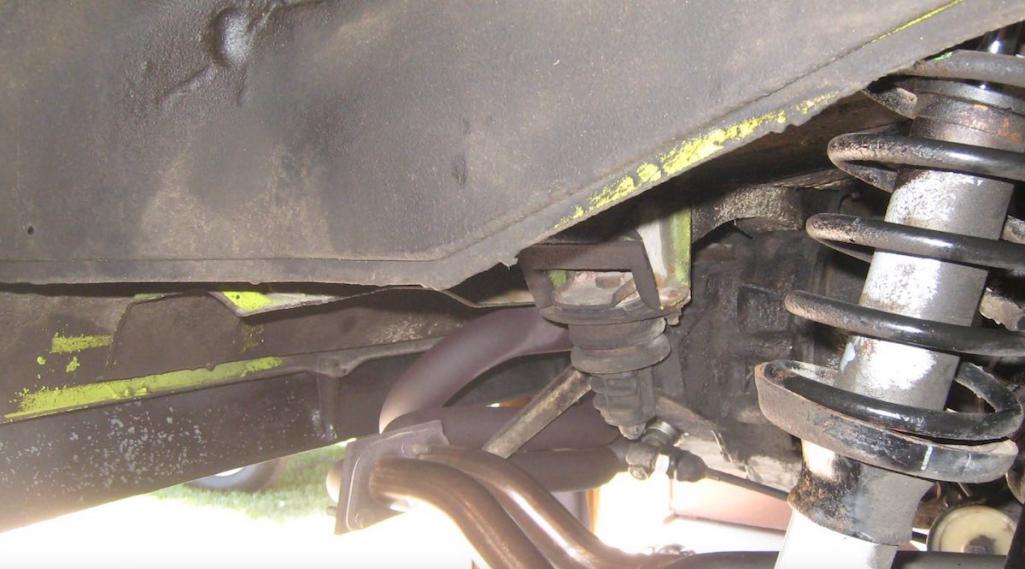
this is from the alleged 29K mile blue car.
don't think it was 29K miles but along with Big Len i don't share everyone's else's scepticism about it and dismissing it as a 129 K car either. not as compelling as the green car.
but......they are "upside - down".
i didn't give ground on the charcoal can plumbing and its not that i was right about it.
but my car (as an artefact) was right. same with the plumbing on throttle bodies and dist vac cans. not saying i am right 100% here, but i'm not falling for the "rules" either.
i'm calling this one as problematic in terms of what the "experts" say.
have hijacked enough, but i think Van likes it when we get into a bit of heresy at his expense. those cold start threads he started up were some of the best explorations of 1.8 misery ever. 
by the way @http://www.914world.com/bbs2/index.php?showuser=26011 thats a pretty clean looking engine you got there when its out of the car. tin ware looks to be in outstanding shape. tends to verify you got hold of a real good car, just getting a bit creaky in the joints after half a century.
Posted by: StarBear Aug 18 2022, 05:42 AM
If it’s good enough for @http://www.914world.com/bbs2/index.php?showuser=24231 , it’s good enough for me. I’m sufficiently convinced. Onward!
Posted by: StarBear Aug 19 2022, 03:13 PM
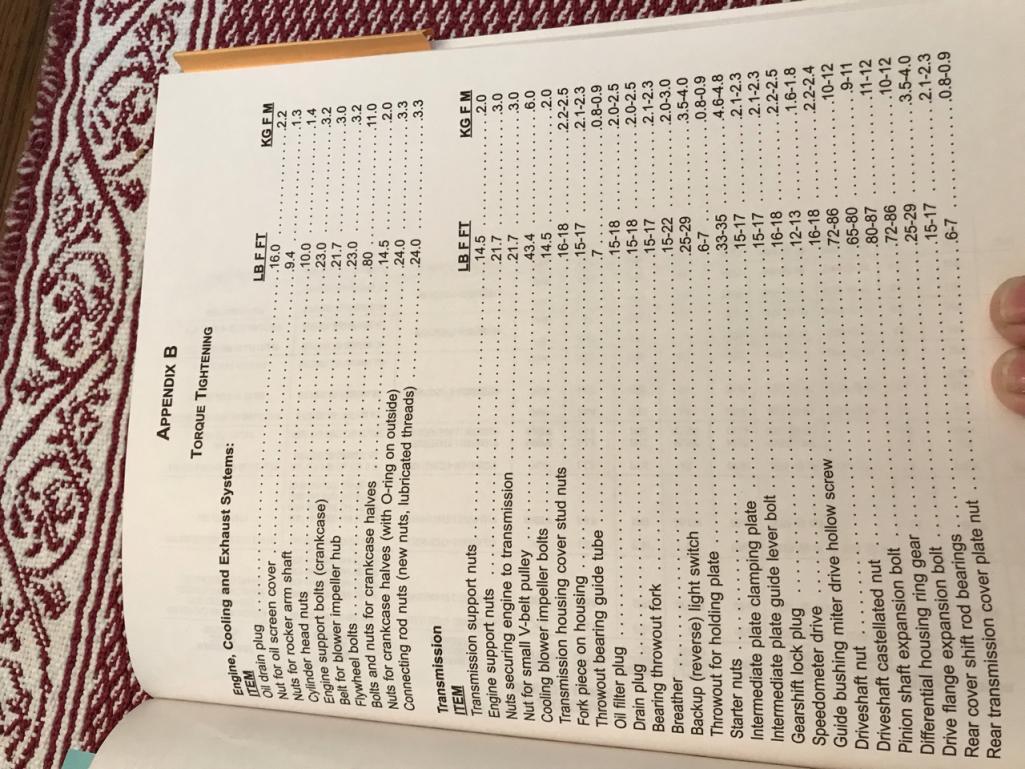
Van; would these be the torques you mentioned? #2 Not specific to the center bolt?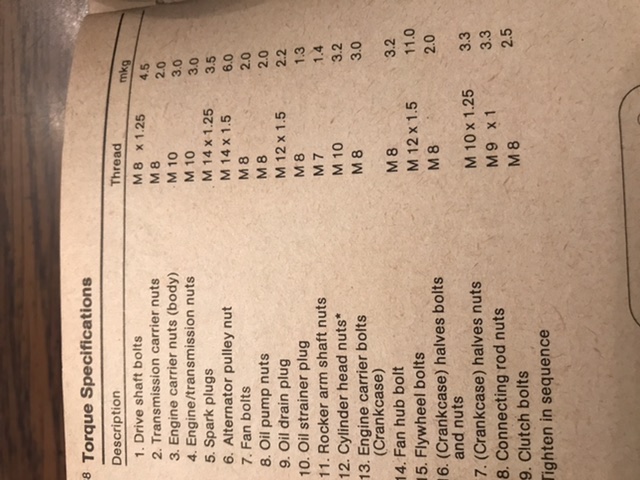
Posted by: Van B Aug 19 2022, 05:09 PM
Steve, for the life of me, I can’t find the M12 bolt reference. But, I use charts like this when I need a standard spec for grade, size, pitch: https://www.fastenermart.com/files/metric_tighten_torques.pdf
So, ~40ft-lbs is a safe bet for the long bolt unless you can confirm the grade as higher than 5.
The small M8 carrier bolts for the transmission mounts are listed in the engine section attached.
Oh and Wonki, I can’t possibly complain about one of the few guys who responds to my cries for help lol!
Attached thumbnail(s)
Posted by: StarBear Aug 19 2022, 05:35 PM

 Onward! Thanks and back to the real thread…..
Posted by: Van B Aug 20 2022, 07:03 PM
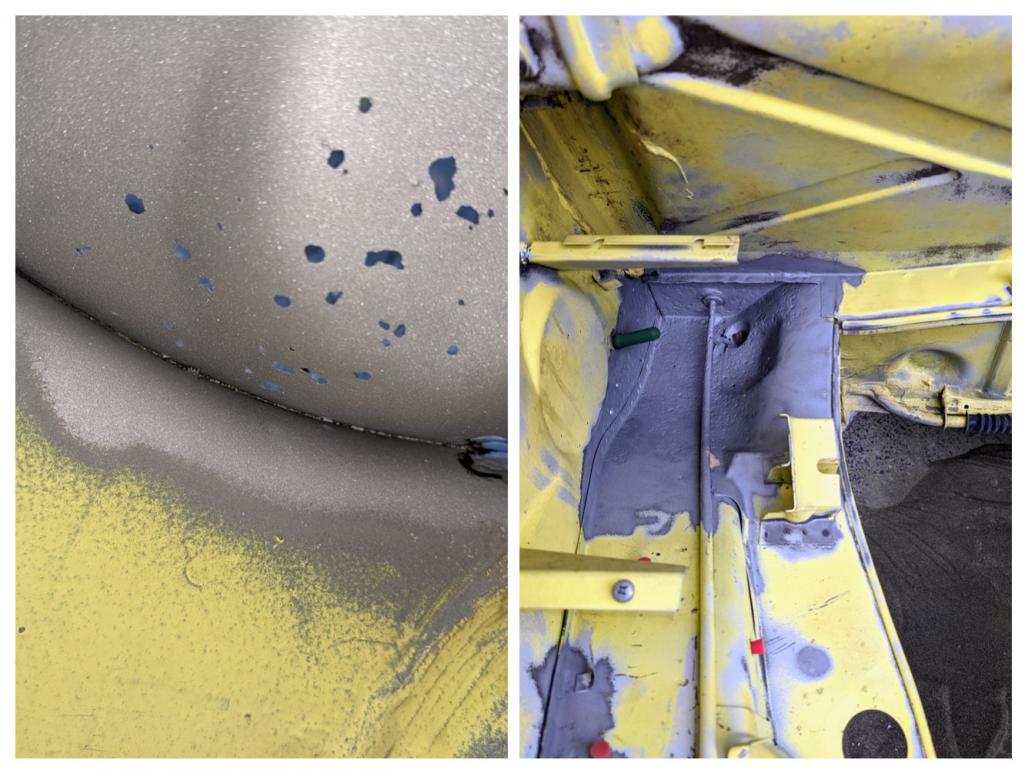
So the theme of today is: Better lucky than good any day of the week!
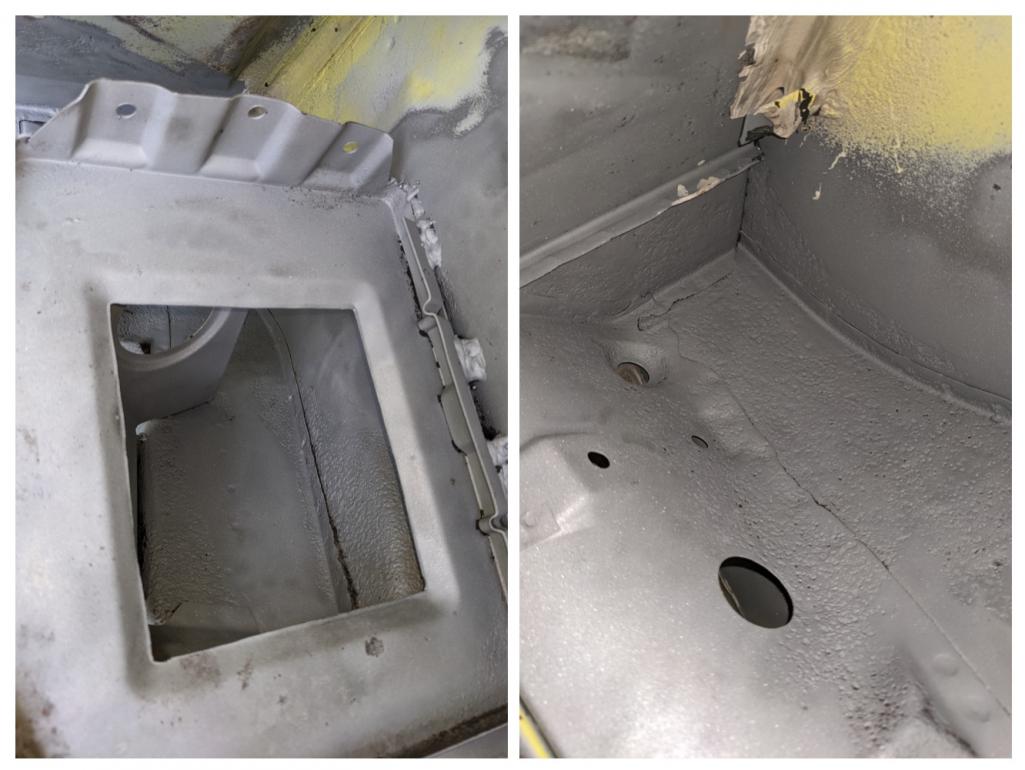
I saw some rust chips under the firewall pad when I pulled the engine so I knew that needed an investigation. But while assessing that, I also saw some inclusions in the coating in the hell hole. Unbelievably, all of the metal is still solid!
I have a lot of grinding still to do before I can phosphate and seal… but man did I get lucky. 
Attached image(s)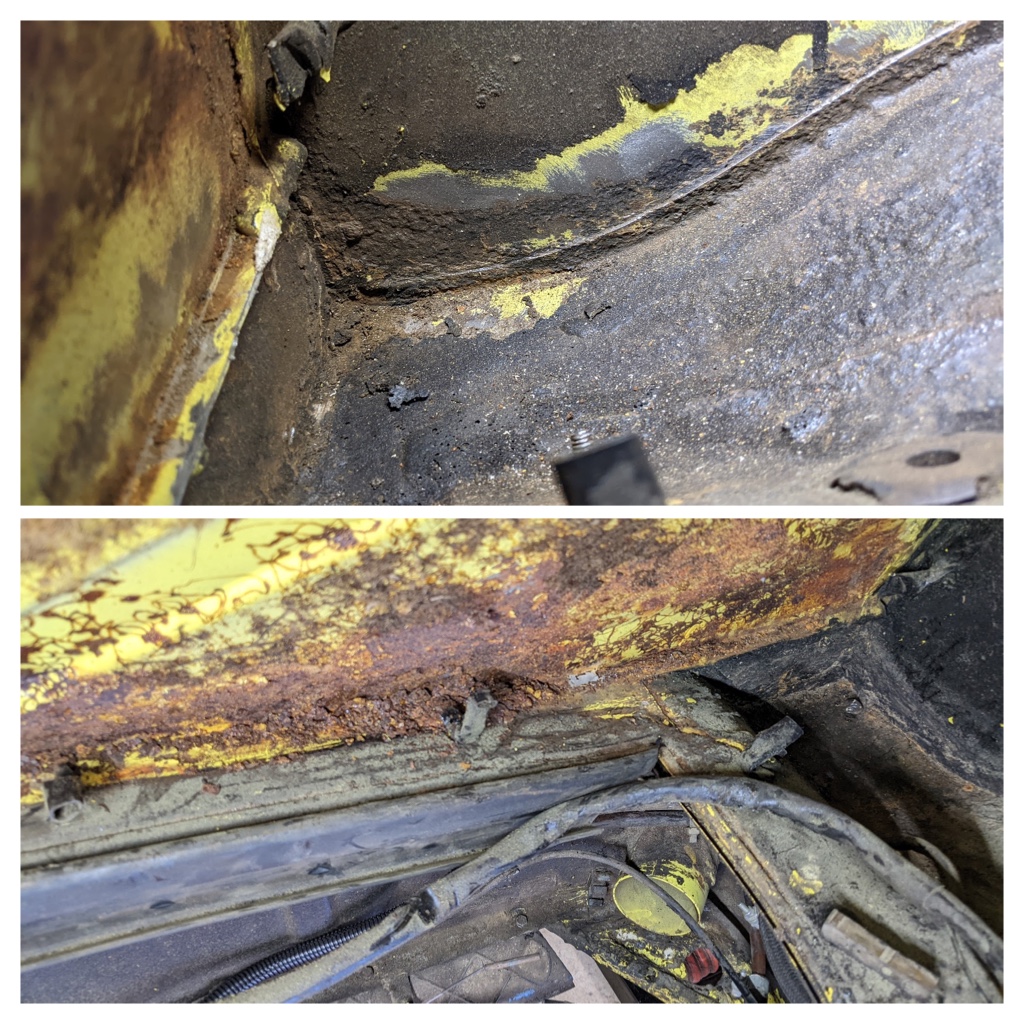
Posted by: Van B Aug 20 2022, 07:09 PM
Another lesson for folks: Don’t use spray adhesive on your firewall pad! You’ll just trap moisture and cause unnecessary and avoidable rust 
Posted by: wonkipop Aug 20 2022, 07:10 PM
car gets better the deeper you go.
Posted by: wonkipop Aug 20 2022, 07:20 PM
Another lesson for folks: Don’t use spray adhesive on your firewall pad! You’ll just trap moisture and cause unnecessary and avoidable rust
the fatal flaw in the 914 is not so much the battery location as the unresolved engine lid.
they couldn't get it right across to the targa bar junction so they put fixed extensions of the grill band in there.
 then didn't bother with a catch tray in that portion and could work out how to do a water draining joint between the two either.
  its real aesthetics over engineering, or form over function stuff. surprising for germans. it does look good and very resolved stylistically but they just pulled up short on engineering it.
ever looked at a fiat X/19 - the eye tal yuns did a much better job. (but its not very pretty).
the original owner of your car got smart when he sprayed all that waterproofing in those areas of the engine bay. guy was probably an engineer? took one look at those side panels and went no no no.
Posted by: Van B Aug 20 2022, 07:28 PM
It’s original zeibart coating and it was sprayed all over the car when new. But to me the hell hole looks like it started rusting and was given a casual derusting and then another thick coat of water proofing.
When I got the car both sides were filled with acorns so, there was at least a year where moisture sat down there and couldn’t drain.
Posted by: wonkipop Aug 20 2022, 07:42 PM
It’s original zeibart coating and it was sprayed all over the car when new. But to me the hell hole looks like it started rusting and was given a casual derusting and then another thick coat of water proofing.
When I got the car both sides were filled with acorns so, there was at least a year where moisture sat down there and couldn’t drain.
yeah i think mine was the same, but not used in engine bay. it was covered in the stuff underneath. a thick kind of goo stuff. still is. i am sure it saved it for the first 2 years it was in use as a more or less daily driver. then it got retired to summer use when the original owners moved to the mid west. from there i don't think it ever got too much, if any, moisture - apart from that hellish mid west summer humidity. i don't know how you guys put up with it!!!
which is just as well as that undercoating starts to break down as it ages and admit moisture into cracks. and then in some ways its even worse than if it wasn't there.
a bit like you and your car. in my case pure luck.
mine had surface corrosion all in that gate to hell area 30 odd years ago. i cleaned it up and hit it with rust convertor way back when i got it. still holding up.
Posted by: Van B Aug 21 2022, 06:37 PM
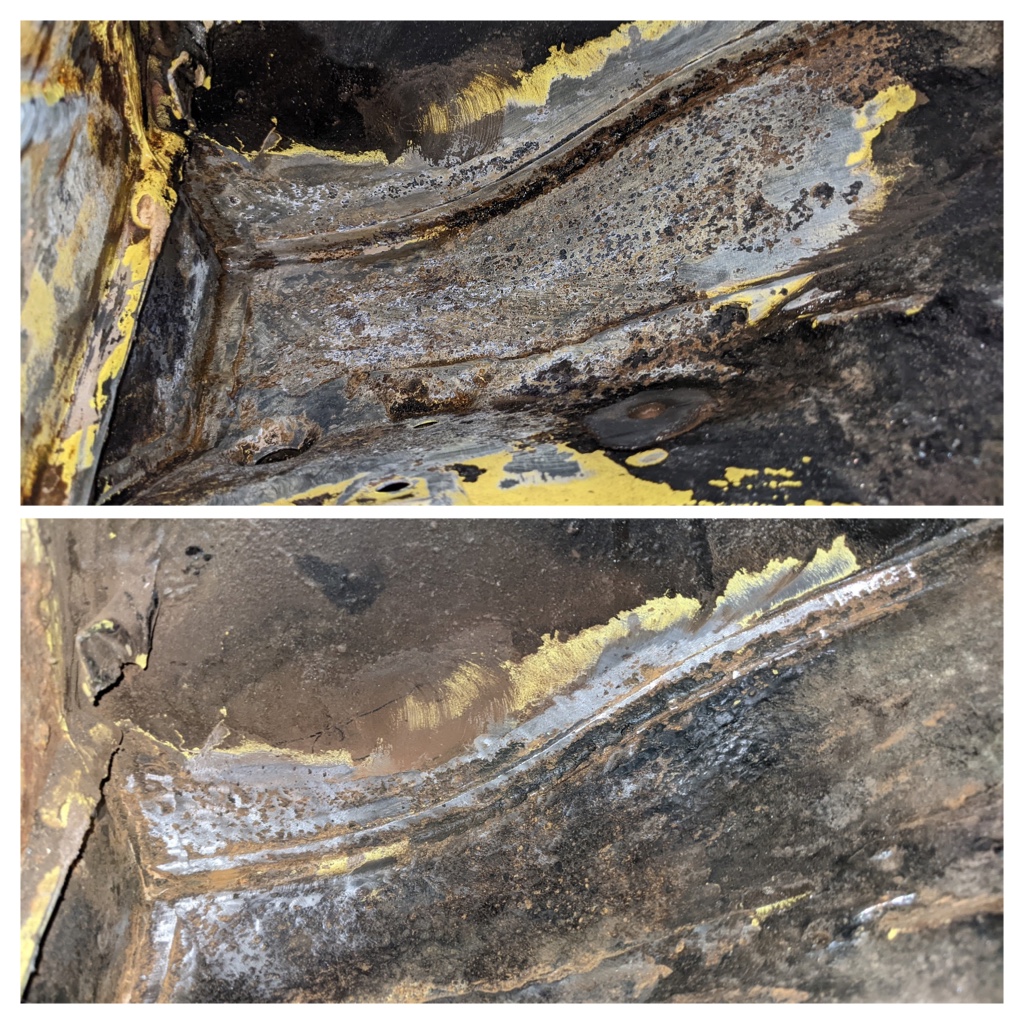
Electrolysis for the win. Only had a couple hours to work today, but I made the most of it. So glad I took out the home made kit, otherwise I wouldn’t have been able to expose that inclusion.
Attached image(s)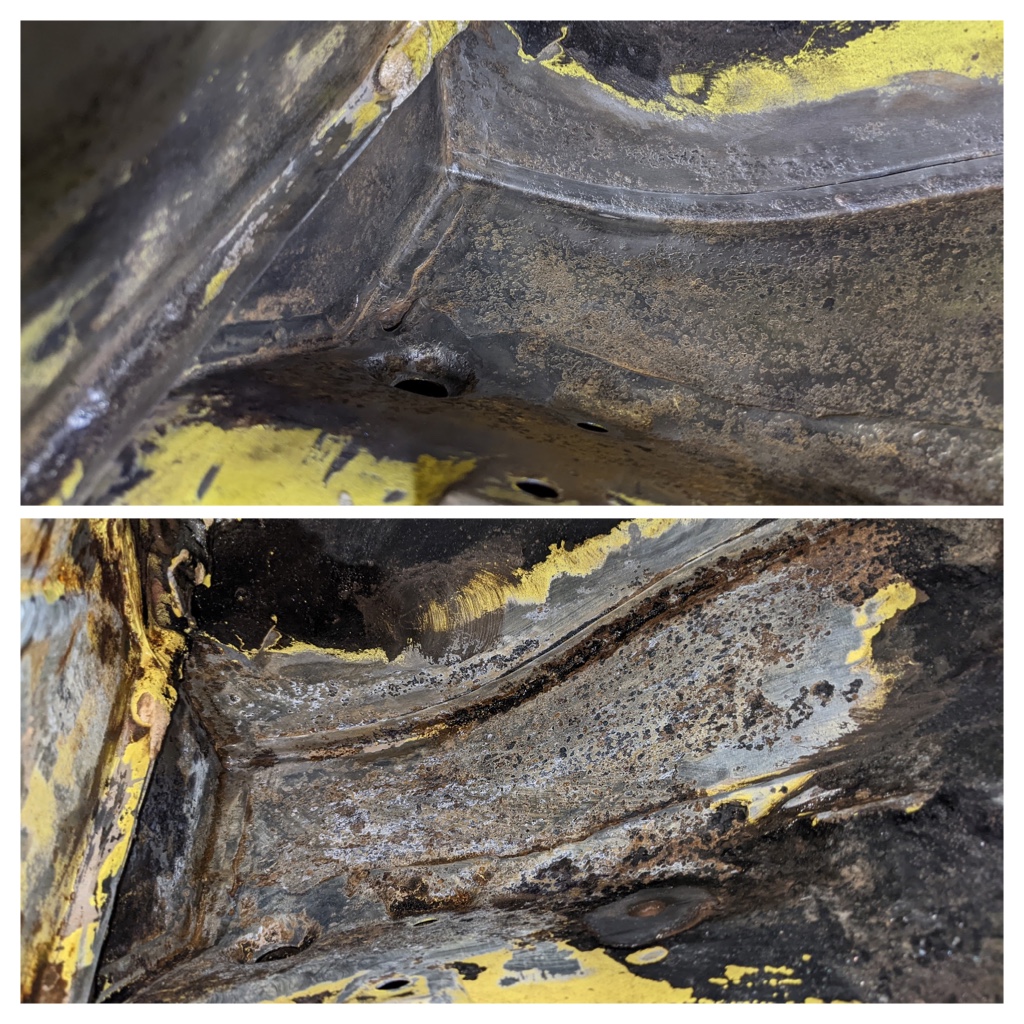
Posted by: wonkipop Aug 21 2022, 11:51 PM
still a lucky man.
have you taken the sill rocker panels off yet to look in around jacking posts?
Posted by: Van B Aug 22 2022, 03:13 PM
Haven’t taken the rockers off yet, but I’m reasonably confident they are fine.
However, I did take the day off and I guess if yesterday was the hell hole, then today was spent in purgatory… turns out, purgatory is worse lol!
I made sure to take a pic of the electrolysis magic today. Gotta love science!
Attached image(s)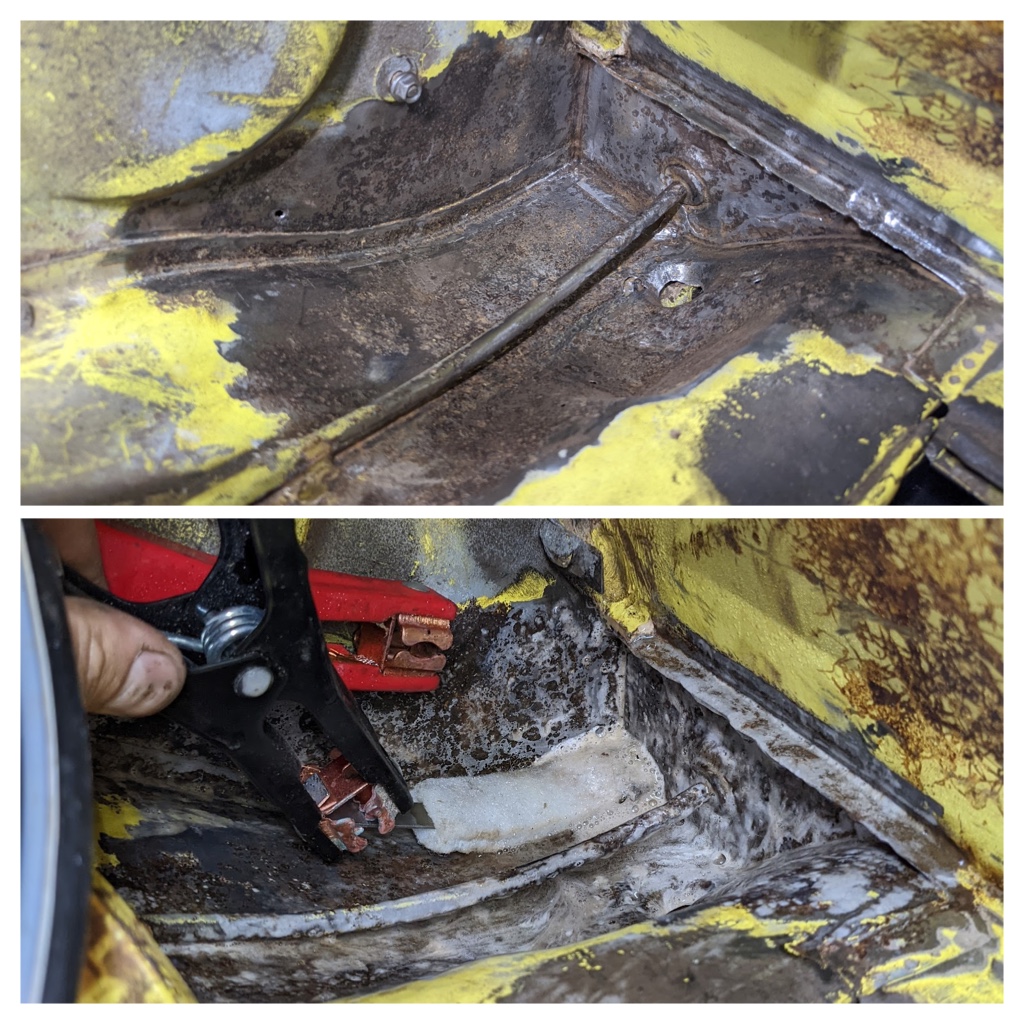
Posted by: Van B Aug 22 2022, 03:15 PM
Bottom line, for the engine bay, I have a few pinholes to deal with. Nothing bad enough to justify cutting metal, but they still need to be plugged all permanent like.
Posted by: wonkipop Aug 23 2022, 03:03 AM
there is one place left after you look behind the rockers.
you will see it after you pull the fuel tank.
Posted by: Van B Aug 23 2022, 11:18 AM
You mean that little box section reinforcement down in the tank cavity? I've already spotted some surface rust there... I may have to get a bead blaster to clean that up.
Posted by: wonkipop Aug 23 2022, 04:38 PM
You mean that little box section reinforcement down in the tank cavity? I've already spotted some surface rust there... I may have to get a bead blaster to clean that up.
yes
they designed in yet another moisture trap. a V joint more or less that does not drain.
moisture can get up in there, condensation too i suspect.
it was the one area i found doing the recommission where rust was just beginning to take hold - and it was not in the area where we did the rhd conversion, it was over on the left hand side. not too hard to do while the fuel tank was out.
Posted by: wonkipop Aug 23 2022, 05:43 PM
quick question for you @http://www.914world.com/bbs2/index.php?showuser=26011 while i think of it.
what colour are the plastic headlight motor guards in the front trunk of your car.
black of grey?
tracking back the change to grey and have it all the way to very early jan 74.
Posted by: Van B Aug 23 2022, 06:05 PM
Black on my car.
Posted by: wonkipop Aug 23 2022, 06:10 PM
Black on my car.
thanks mate.
the change is between 10 Dec 73 and 9 Jan 74.
puts it back a little further in time than spring of 74.
actually winter 73/74.
humble 1.8s are proving to be the key information.
classics as starbear would say.
think mr. b knows when they flipped back to black.
been finding out all sorts of stuff trawling back through the L jet files looking at things other than the EC-A/B question we answered. lot of subtle little changes through time period nov 73 to may 74.
Posted by: Van B Aug 23 2022, 06:45 PM
My only gripe about the 74 1.8 is that emissions forced so many changes in the L-Jet that results in a lot of NLA parts for us that would otherwise be simple parts to replace.
Posted by: wonkipop Aug 25 2022, 02:28 PM
My only gripe about the 74 1.8 is that emissions forced so many changes in the L-Jet that results in a lot of NLA parts for us that would otherwise be simple parts to replace.
though its just as hard if you own a 924. i think for some 928 parts as well to do with L jet.
while i think of it.
one more question if you have time.
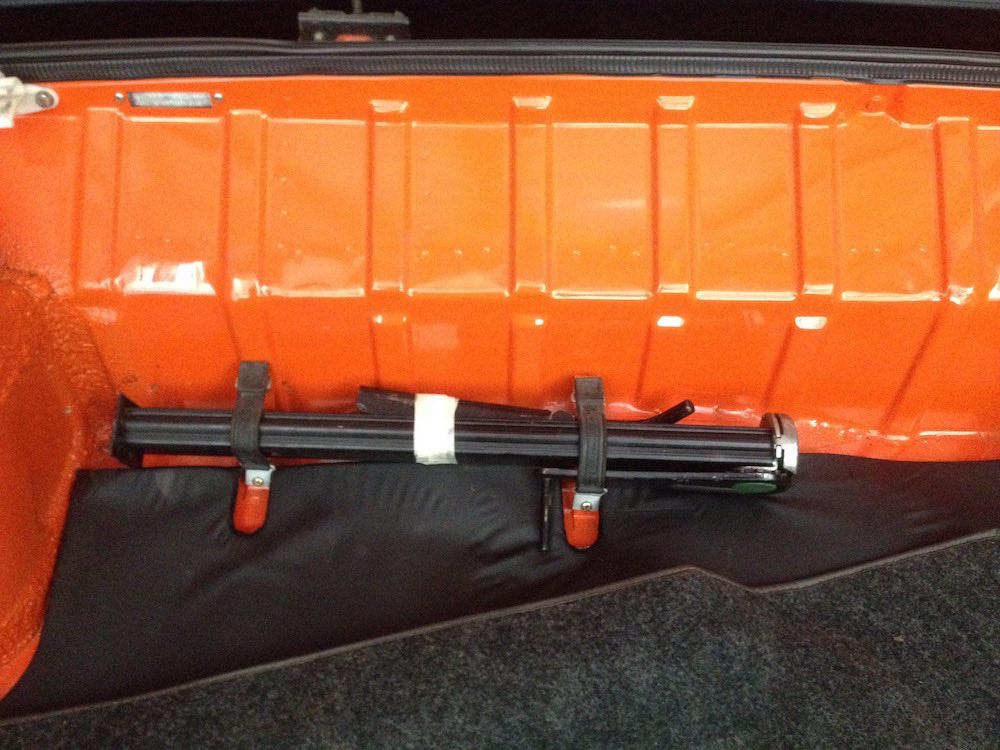
what kind of pad do you have in the rear trunk under carpet.
soft foam or the more solid thinner pad (heat insulation?).
same question for @http://www.914world.com/bbs2/index.php?showuser=10753 if he reads this.
both of you have cars made in 73 so could be of interest.
Posted by: StarBear Aug 25 2022, 03:28 PM
My only gripe about the 74 1.8 is that emissions forced so many changes in the L-Jet that results in a lot of NLA parts for us that would otherwise be simple parts to replace.


Posted by: StarBear Aug 25 2022, 03:31 PM
My only gripe about the 74 1.8 is that emissions forced so many changes in the L-Jet that results in a lot of NLA parts for us that would otherwise be simple parts to replace.
though its just as hard if you own a 924. i think for some 928 parts as well to do with L jet.
while i think of it.
one more question if you have time.
what kind of pad do you have in the rear trunk under carpet.
soft foam or the more solid thinner pad (heat insulation?).
same question for @http://www.914world.com/bbs2/index.php?showuser=10753 if he reads this.
both of you have cars made in 73 so could be of interest.
Mine also has black guards and the rear trunk foam is a rather thick, somewhat stiff foam. More of a pad but not very thin. Contoured in places.
Posted by: wonkipop Aug 25 2022, 03:36 PM
My only gripe about the 74 1.8 is that emissions forced so many changes in the L-Jet that results in a lot of NLA parts for us that would otherwise be simple parts to replace.
though its just as hard if you own a 924. i think for some 928 parts as well to do with L jet.
while i think of it.
one more question if you have time.
what kind of pad do you have in the rear trunk under carpet.
soft foam or the more solid thinner pad (heat insulation?).
same question for @http://www.914world.com/bbs2/index.php?showuser=10753 if he reads this.
both of you have cars made in 73 so could be of interest.
Mine also has black guards and the rear trunk foam is a rather thick, somewhat stiff foam. More of a pad but not very thin. Contoured in places.
does it look like this (mine - soft pad) , or is it the more rigid type that most earlier cars have.
apologies @http://www.914world.com/bbs2/index.php?showuser=26011 . not intending to side track. (excuse = bringing it back/originality).
Posted by: StarBear Aug 25 2022, 03:50 PM
My only gripe about the 74 1.8 is that emissions forced so many changes in the L-Jet that results in a lot of NLA parts for us that would otherwise be simple parts to replace.
though its just as hard if you own a 924. i think for some 928 parts as well to do with L jet.
while i think of it.
one more question if you have time.
what kind of pad do you have in the rear trunk under carpet.
soft foam or the more solid thinner pad (heat insulation?).
same question for @http://www.914world.com/bbs2/index.php?showuser=10753 if he reads this.
both of you have cars made in 73 so could be of interest.
Mine also has black guards and the rear trunk foam is a rather thick, somewhat stiff foam. More of a pad but not very thin. Contoured in places.
does it look like this (mine - soft pad) , or is it the more rigid type that most earlier cars have.
apologies @http://www.914world.com/bbs2/index.php?showuser=26011 . not intending to side track. (excuse = bringing it back/originality).
More of a semi-rigid, high density foam pad. Need a pic?
Posted by: wonkipop Aug 25 2022, 03:56 PM
My only gripe about the 74 1.8 is that emissions forced so many changes in the L-Jet that results in a lot of NLA parts for us that would otherwise be simple parts to replace.
though its just as hard if you own a 924. i think for some 928 parts as well to do with L jet.
while i think of it.
one more question if you have time.
what kind of pad do you have in the rear trunk under carpet.
soft foam or the more solid thinner pad (heat insulation?).
same question for @http://www.914world.com/bbs2/index.php?showuser=10753 if he reads this.
both of you have cars made in 73 so could be of interest.
Mine also has black guards and the rear trunk foam is a rather thick, somewhat stiff foam. More of a pad but not very thin. Contoured in places.
does it look like this (mine - soft pad) , or is it the more rigid type that most earlier cars have.
apologies @http://www.914world.com/bbs2/index.php?showuser=26011 . not intending to side track. (excuse = bringing it back/originality).
More of a semi-rigid, high density foam pad. Need a pic?
not necessary. fairly clear you have the other type. thanks for that.
just tracking that change. happens between yours (nov) and mine (jan 74).
be interesting to see what is in Van's car.
Posted by: Big Len Aug 25 2022, 04:01 PM
My only gripe about the 74 1.8 is that emissions forced so many changes in the L-Jet that results in a lot of NLA parts for us that would otherwise be simple parts to replace.
though its just as hard if you own a 924. i think for some 928 parts as well to do with L jet.
while i think of it.
one more question if you have time.
what kind of pad do you have in the rear trunk under carpet.
soft foam or the more solid thinner pad (heat insulation?).
same question for @http://www.914world.com/bbs2/index.php?showuser=10753 if he reads this.
both of you have cars made in 73 so could be of interest.
Mine also has black guards and the rear trunk foam is a rather thick, somewhat stiff foam. More of a pad but not very thin. Contoured in places.
does it look like this (mine - soft pad) , or is it the more rigid type that most earlier cars have.
apologies @http://www.914world.com/bbs2/index.php?showuser=26011 . not intending to side track. (excuse = bringing it back/originality).
More of a semi-rigid, high density foam pad. Need a pic?
I have the same.
Posted by: wonkipop Aug 25 2022, 04:10 PM
thanks @http://www.914world.com/bbs2/index.php?showuser=16126
apologies @http://www.914world.com/bbs2/index.php?showuser=26011 (predicting you have as per starbear)
Posted by: Van B Aug 25 2022, 05:06 PM
Wonki, this is mine. Glued down and doesn’t come up… I tried but it feels very old lol.
Attached thumbnail(s)
Posted by: Van B Aug 25 2022, 05:10 PM
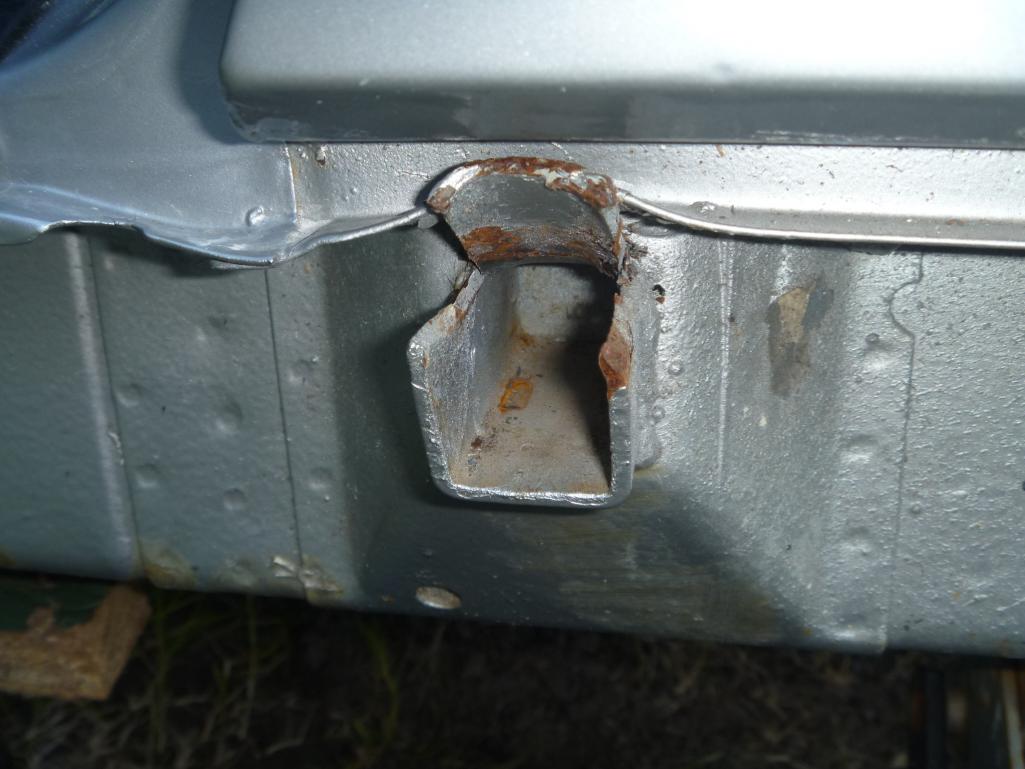
@http://www.914world.com/bbs2/index.php?showuser=1244 sorry for the delay, this is for your interlock research:
Attached image(s)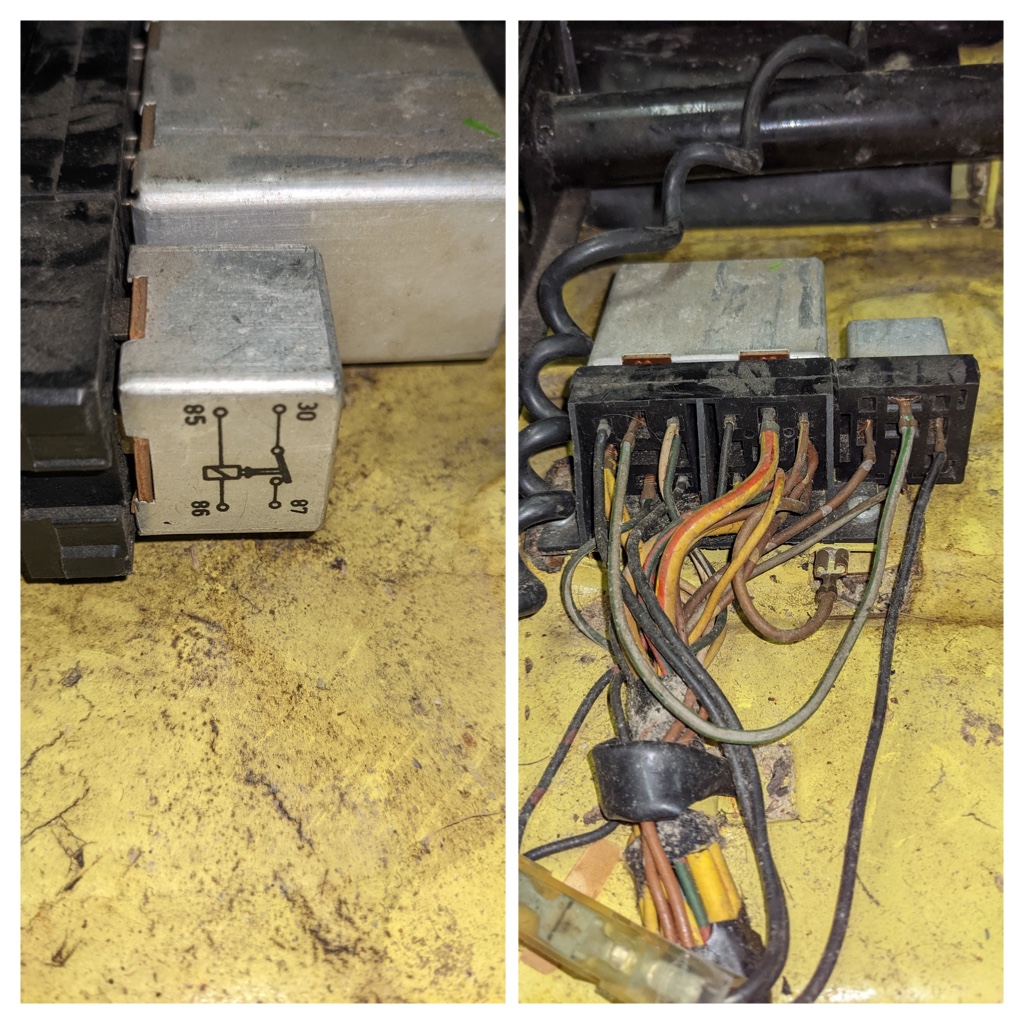
Posted by: wonkipop Aug 25 2022, 05:27 PM
thanks @http://www.914world.com/bbs2/index.php?showuser=26011
(ah the interlock, the horror, the...... )
Posted by: davep Aug 26 2022, 05:24 PM
That is a great photo set. The painted male spade is just the same as mine; paint does not make for the best of connections.
Posted by: StarBear Aug 27 2022, 12:36 PM
Van; does this help? From George’s Tech Tips 700, page 103.
Posted by: Van B Aug 27 2022, 06:28 PM
It ain’t listed there either @http://www.914world.com/bbs2/index.php?showuser=10753 , but if you’re going to reuse the original bolts, go with the same torque listed for the engine support nuts, 21.7ft/lbs.
Posted by: StarBear Aug 27 2022, 08:00 PM
It ain’t listed there either @http://www.914world.com/bbs2/index.php?showuser=10753 , but if you’re going to reuse the original bolts, go with the same torque listed for the engine support nuts, 21.7ft/lbs.
Ok; wasn’t sure. Weird.
Would like to use new ones, not 48 year old ones. Will check the ratings.
Posted by: Van B Aug 28 2022, 07:54 AM
Almost everything new you can buy will be 8.8 at least. As I've been going through my car, I'm finding a lot of grade 5.
Posted by: Van B Sep 2 2022, 06:12 PM
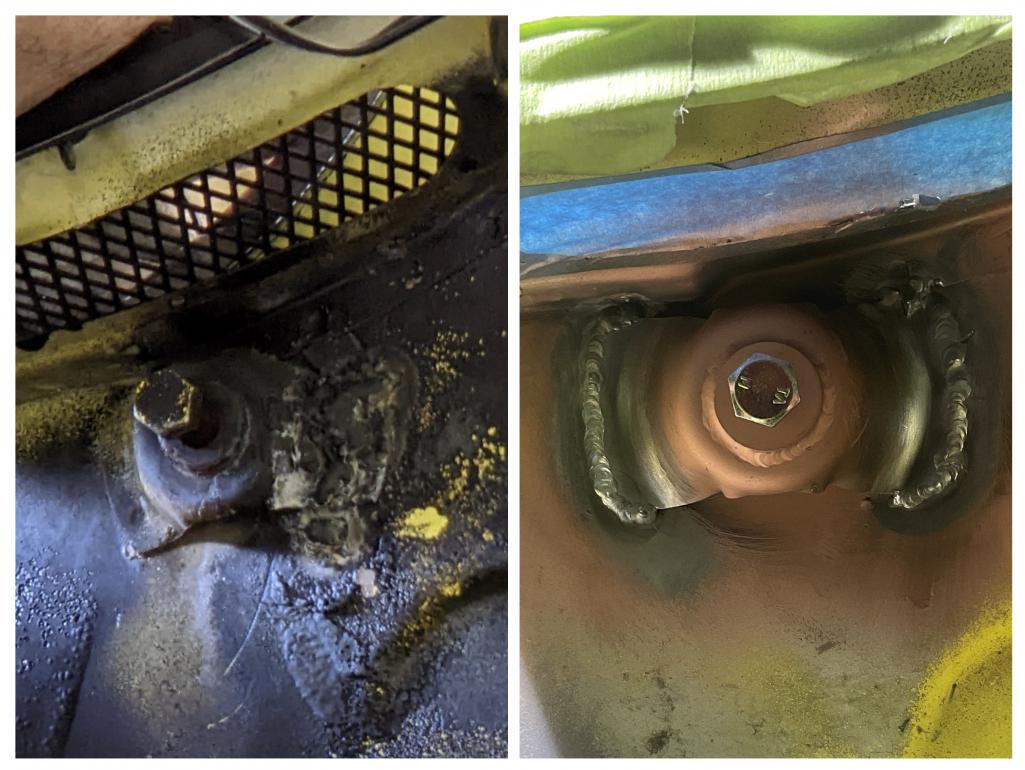
Been spending a lot of time LARPing as a type 4 engine these past weekends lol…. But, I want to uncover any and all issues as well as set myself up for a quality finish with my high dollar 3M undercoating. Today I spent the afternoon soaking the 50yr old Ziebart in mineral spirits and using all manner of tools and rags to remove it.
Pretty pleased with how much I removed today and the condition of the metal and paint underneath. I learned that the battery tray was replaced some time ago… and not properly primed or painted lol.
Attached thumbnail(s)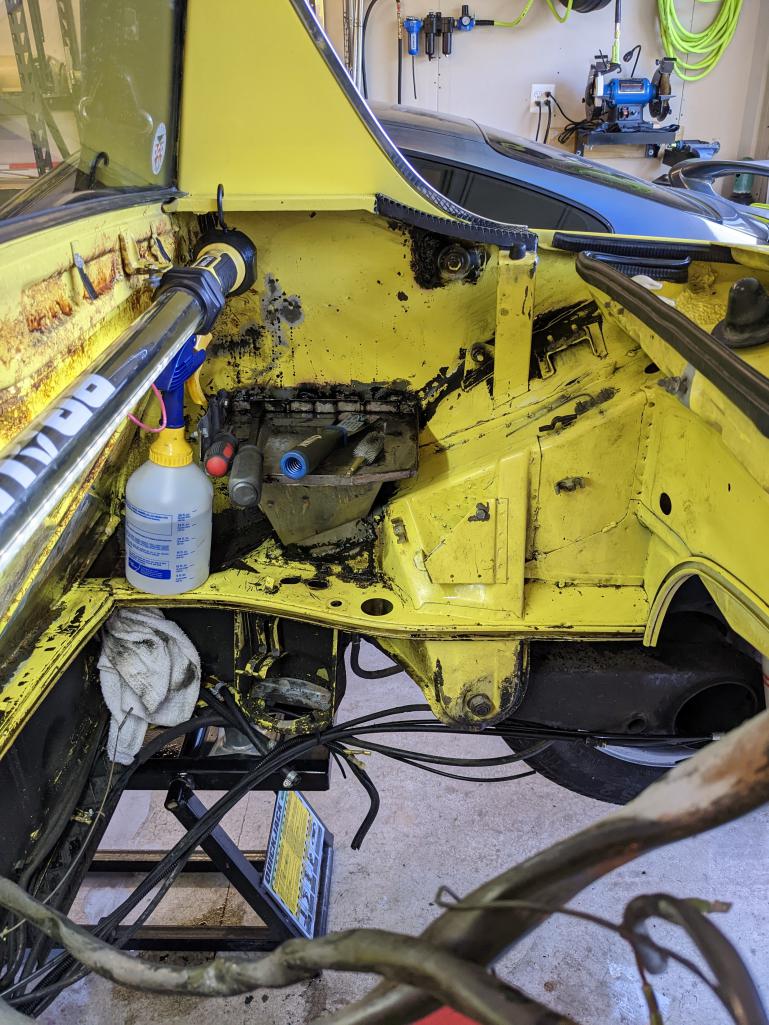
Posted by: StarBear Sep 2 2022, 06:52 PM
Yuck. Keep up the great work, Van!
Posted by: bkrantz Sep 2 2022, 07:45 PM
Been spending a lot of time LARPing as a type 4 engine these past weekends lol…. But, I want to uncover any and all issues as well as set myself up for a quality finish with my high dollar 3M undercoating. Today I spent the afternoon soaking the 50yr old Ziebart in mineral spirits and using all manner of tools and rags to remove it.
Pretty pleased with how much I removed today and the condition of the metal and paint underneath. I learned that the battery tray was replaced some time ago… and not properly primed or painted lol.
Undercoating hides all kinds of sins, especially on 914s.

Posted by: Van B Sep 2 2022, 08:22 PM
So true!
Posted by: type2man Sep 2 2022, 08:59 PM
How come you took it apart. It only had 53k.
Posted by: Van B Sep 2 2022, 09:21 PM
Basically because the car was 100% original in all the wrong ways. Every bit of rubber was leaking pretty aggressively or nearly disintegrated. Then, I found rust that was about to get out of hand.
I will only reseal and refinish the engine though, no rebuild. I want to enjoy the engine for its full lifespan.
Posted by: wonkipop Sep 2 2022, 09:40 PM
How come you took it apart. It only had 53k.
looking good @http://www.914world.com/bbs2/index.php?showuser=26011 .
luscious saturn yellow been protected all those years.
nothing like a bright engine bay to cheer you up when you flip the lid to fret about fast idle and AAVs.
tip - install some new trunk torsion bar rollers if you have not already thought of that.
one of mine shat itself and shattered as we were doing the recommission. sheer age of brittle nylon at this point in time. got some nice new tidy repros from 914 rubber and replaced the broken one and put the other away as a spare.
Posted by: Van B Sep 3 2022, 09:23 AM
@http://www.914world.com/bbs2/index.php?showuser=3348
Mark, in the pic I posted yesterday, the grommet in question is for the hole between the rain tube and the fuel line ports. That's where the hard vent line goes through on my 74. And yes I agree replacing the hard line is a good call. Let me know how to add that to my order
Thanks
Van
Posted by: Van B Sep 3 2022, 09:25 AM
How come you took it apart. It only had 53k.
looking good @http://www.914world.com/bbs2/index.php?showuser=26011 .
luscious saturn yellow been protected all those years.
nothing like a bright engine bay to cheer you up when you flip the lid to fret about fast idle and AAVs.
tip - install some new trunk torsion bar rollers if you have not already thought of that.
one of mine shat itself and shattered as we were doing the recommission. sheer age of brittle nylon at this point in time. got some nice new tidy repros from 914 rubber and replaced the broken one and put the other away as a spare.
I'm still planning to go smooth undercoating for the engine bay. But I may look to leave a second exposed if I have a clean section that makes sense... Maybe the back wall?
Posted by: wonkipop Sep 3 2022, 05:29 PM
How come you took it apart. It only had 53k.
looking good @http://www.914world.com/bbs2/index.php?showuser=26011 .
luscious saturn yellow been protected all those years.
nothing like a bright engine bay to cheer you up when you flip the lid to fret about fast idle and AAVs.
tip - install some new trunk torsion bar rollers if you have not already thought of that.
one of mine shat itself and shattered as we were doing the recommission. sheer age of brittle nylon at this point in time. got some nice new tidy repros from 914 rubber and replaced the broken one and put the other away as a spare.
I'm still planning to go smooth undercoating for the engine bay. But I may look to leave a second exposed if I have a clean section that makes sense... Maybe the back wall?
hard to know. the yellow is very attractive and 1970s.
30+ years ago i treated the areas similar to yours on top of longs.
and repainted just those areas. in black paint. it was just the lower parts of the the tops of the longs where it does the dumbo water trap dip down. i kind of cut the paint into a line around those hollows. its still holding up.
looks like you have more extensive areas to deal with from a repaint point of view.
you are likely correct with your approach.
the original paint does look pretty good where its been hiding under the zebart.
Posted by: Van B Sep 4 2022, 05:40 PM
Man… such an absolutely tedious task. But I know I will be glad I did it in the years to come. The problem with Ziebart and other traditional undercoatings is that when it’s not sprayed properly, it foams… And that traps moisture.
The new stuff, like 3M Dyna-Pro 544, is vastly more expensive, but it doesn’t trap air bubbles and is paintable. After seeing all this yellow for the first time in 50yrs, I’m considering the idea of painting the bay yellow. But also, my original plan was for a smooth satin black finish that would let the refinished engine be the star.
It’s important to me the car should keep its stories. It is a survivor after all.
Attached image(s)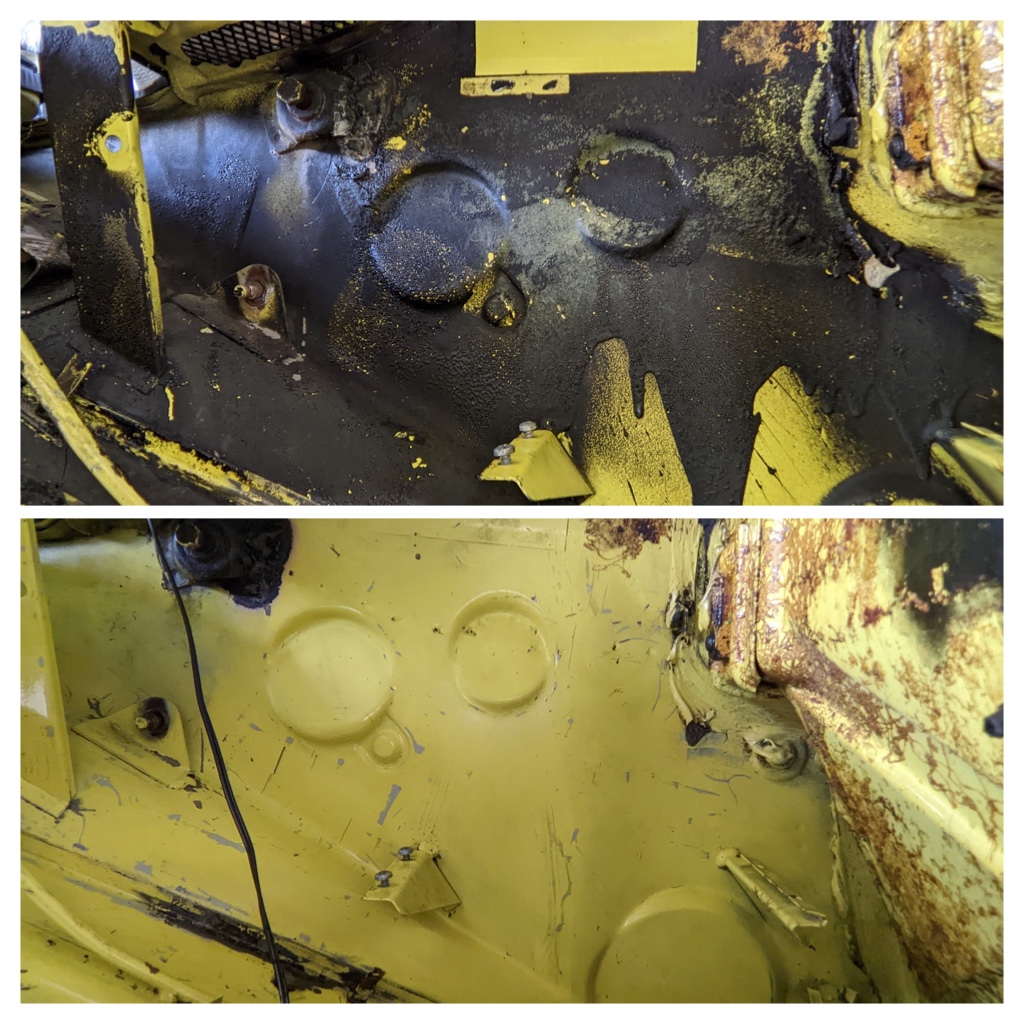
Posted by: wonkipop Sep 4 2022, 06:11 PM
It’s important to me the car should keep its stories. It is a survivor after all.
yes its a survivor.
half the fun is working out a legit and interesting path of preservation alongside making sure it is still functional, useable, reliable and --------->FUN to drive?
i guess folks didn't have that "problem", if it is a indeed a problem, 30 years ago.
you just fixed em up and drove them. they were just another old car.
but the longer time goes on and the thing survives the more interesting it becomes.
imagine a model T ford in 1970. still being driven around and still in the state your 914 is in. you can't. it was unimaginable. but thats what i guess a 914 is now.
Posted by: Van B Sep 4 2022, 07:07 PM
I think a lot of it has to do with the car itself. One day, there will be no Chrysler K cars. Mostly because they were crap, but also because there was nothing about them that made them worth owning or keeping.
Oh I forgot to mention the bird shit on the trunk hinge pin bracket I now get to grind off and weld up correctly lol
Posted by: wonkipop Sep 5 2022, 03:27 AM
I think a lot of it has to do with the car itself. One day, there will be no Chrysler K cars. Mostly because they were crap, but also because there was nothing about them that made them worth owning or keeping.
Oh I forgot to mention the bird shit on the trunk hinge pin bracket I now get to grind off and weld up correctly lol
there is probably some little club of K car fans out there that will keep a few examples rolling. not sure why, but it happens.
the only contemporary USA car that caught my eye when i was there as a post grad in the late 80s was the ford taurus. the wagon version. that thing was so good as an everyman car. really stylish. ford nailed it with that car. they even drove nice.
i wouldn't mind one just to cruise around in here with the steering wheel on the wrong side. just for laughs.
Posted by: Van B Sep 17 2022, 04:46 PM
So, last weekend I bought an abrasive blaster tank to deal with the engine bay only to learn that I need way more drying action on my air lines lol… So, I’ll be dealing with that tomorrow hopefully. Today, however, was dedicated to buying another classic Porsche design. And quite possibly the slowest Porsche ever! 
I was perusing Craigslist, as I often do. And I found a beautiful FA Porsche table and chair set. The owners DID NOT know what they had, only that it was a hand-me-down and good quality. So, $550 dollars, an adventure through Washington DC, and a few hours of polishing later, we have a new breakfast table!
Attached thumbnail(s)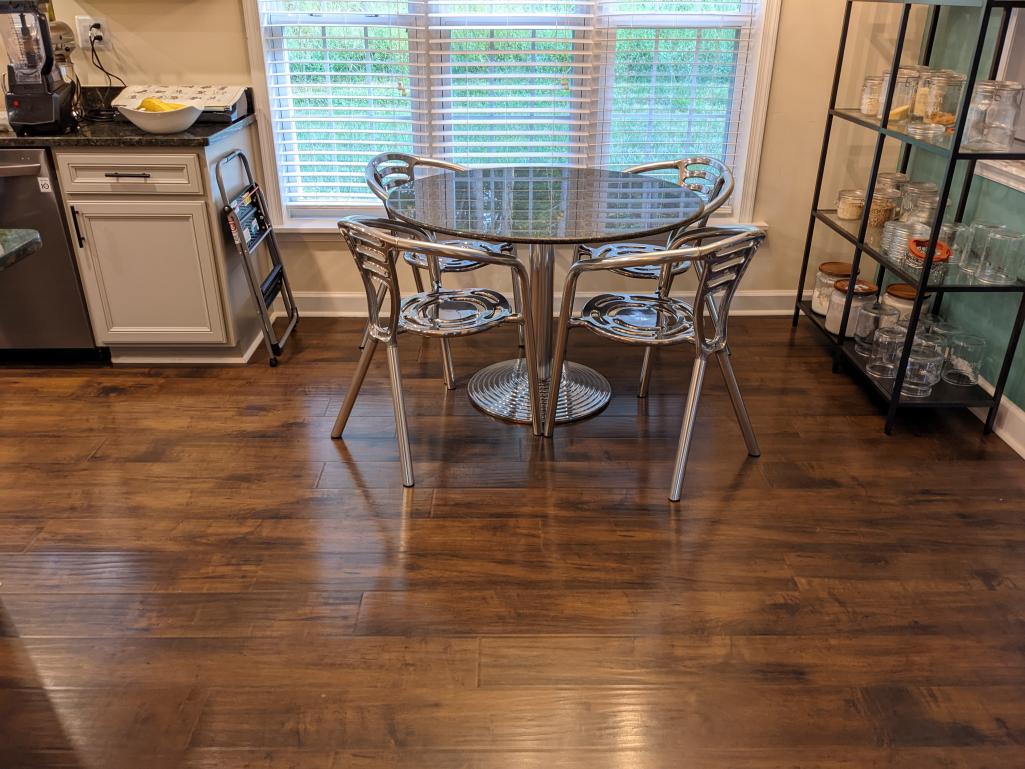
Posted by: Van B Sep 17 2022, 04:47 PM
I’ll be back on task soon, I just thou you all might like to see one of the last furniture designs by the man who penned the 911
Posted by: Cairo94507 Sep 17 2022, 05:49 PM
I like that table and chairs; good find and buy.
Posted by: wonkipop Sep 17 2022, 05:50 PM
So, last weekend I bought an abrasive blaster tank to deal with the engine bay only to learn that I need way more drying action on my air lines lol… So, I’ll be dealing with that tomorrow hopefully. Today, however, was dedicated to buying another classic Porsche design, and quite possibly the slowest Porsche ever!
I was perusing Craigslist, as I often do. And I found a beautiful FA Porsche table and chair set. The owners DID NOT know what they had, only that it was a hand-me-down and good quality. So, $550 dollars, an adventure through Washington DC, and a few hours of polishing later, we have a new breakfast table!
very nice. cast aluminium.
don't get me started on 20th C furniture. rabbit hole.
good buying sniffing those out.
the few sets down here seem to exchange hands for at least double that.
Posted by: Van B Sep 17 2022, 06:25 PM
Thanks guys. I really like the idea that this thing is old enough that old man Ferdinand likely signed off on this design himself.
Posted by: StarBear Sep 17 2022, 07:02 PM
Score!!
Posted by: Van B Sep 24 2022, 07:41 PM
I did some sand blasting in the engine bay yesterday and realized that I will need to learn how to do body soldering/tinning/leading or whatever you want to call it. I’ll post more on that tomorrow if I get the blasting all done. For today though, I cleaned up my mess from poor taping, retaped the car, and took the rockers off… more acorns! The PO tried his damnedest to kill this car. 90% of the rust issues I’ve found were under piles of acorns.
Both sides had a decent stash, but the passenger side still had one bedroom apartment in there. The Ziebart gave its life to save the longs 
Attached thumbnail(s)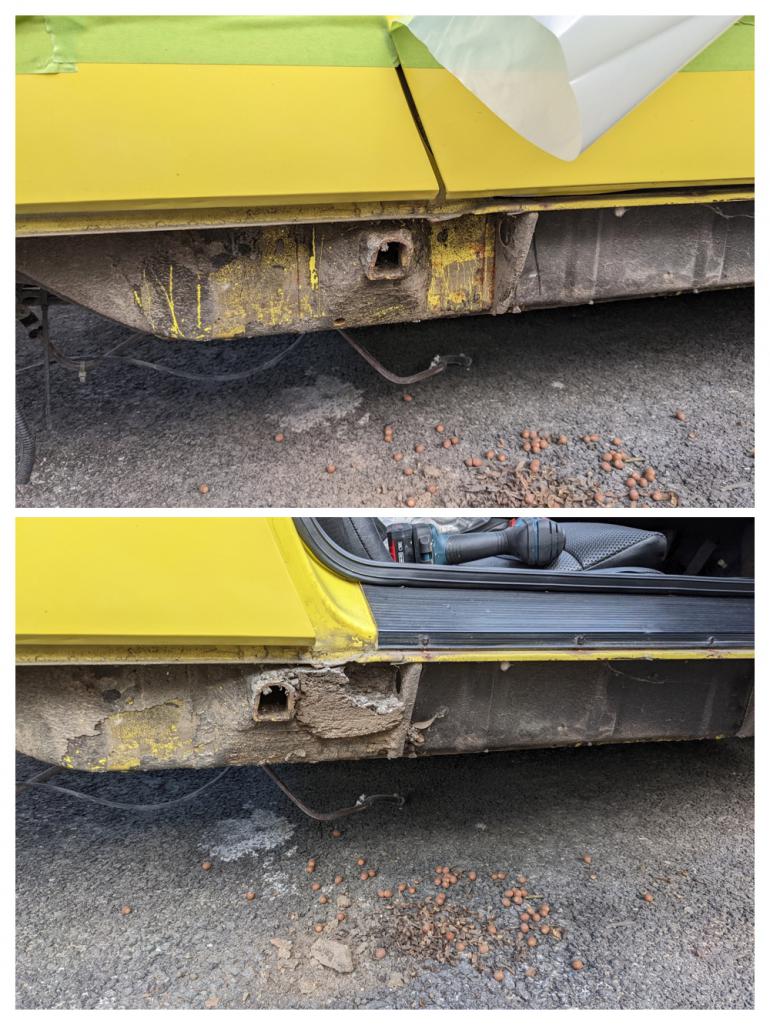
Posted by: Van B Sep 25 2022, 10:53 PM
Did some fine grit soda blasting on the longs… definitely got lucky there!
Attached thumbnail(s)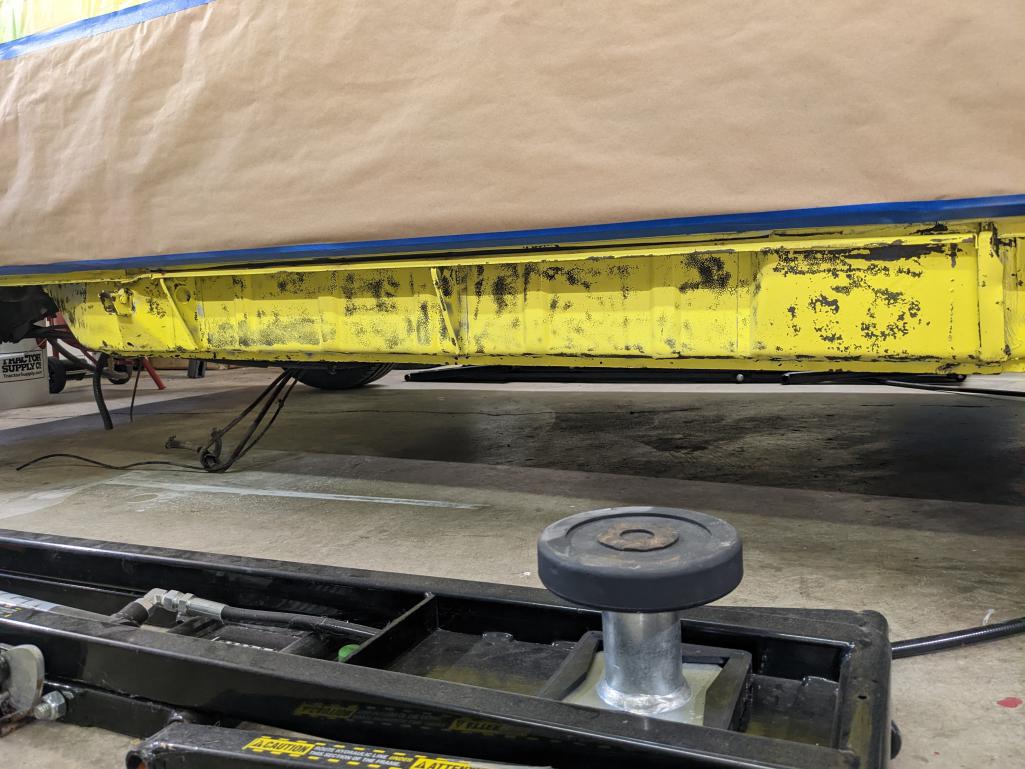
Posted by: Van B Sep 25 2022, 11:03 PM
As for the engine bay, I’ve finally reached the bottom of the rabbit hole… and I found some Swiss cheese on the drivers side. I’ve spent a lot of time in there and despite the perforations, the metal is still strong. So, I’ve decided to do some tinning (lead free). Nothing is structural, thank you Lord! I even ran a scope down into the longs and everything is very clean on the inside.
Attached thumbnail(s)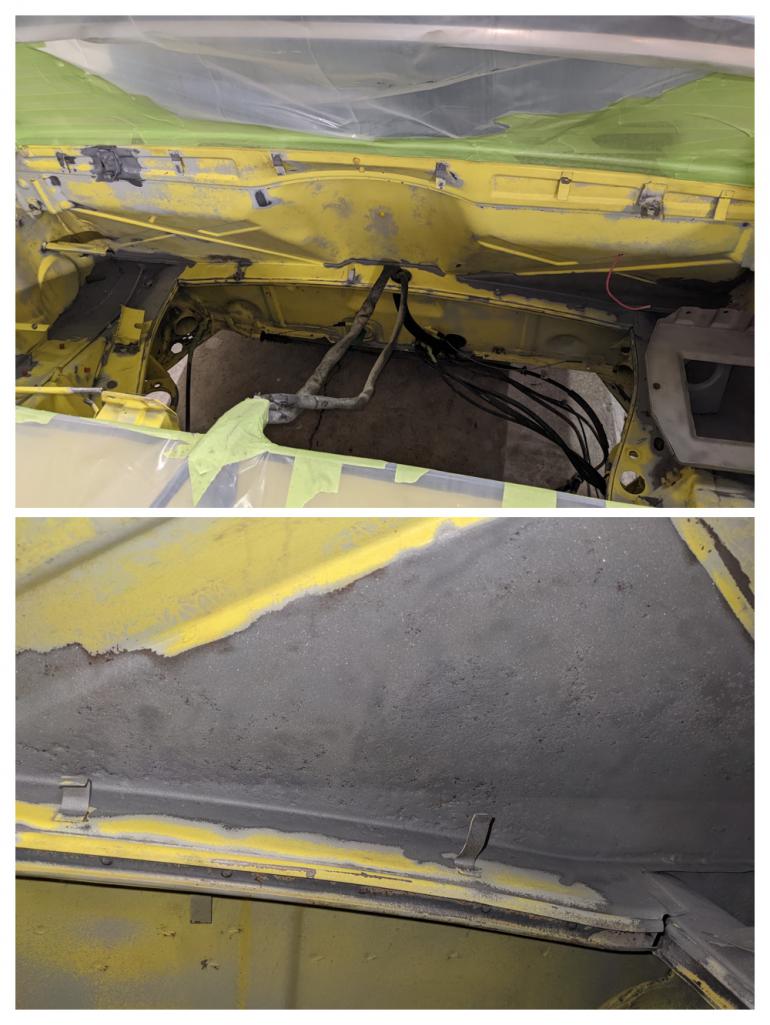
Posted by: wonkipop Sep 26 2022, 04:57 AM
some people are lucky.
blessed with it.
you are one of them.
what a great car.
if i burn my one and only rev limited rotor i'll hop on a plane and bang on your door and demand one of the 2 you have.
Posted by: Van B Oct 12 2022, 11:15 PM
Getting a little behind on updates here. I know this thread is pretty boring up to this point, but I’m also recording here for posterity. Hopefully soon, I can get to some more enjoyable phases and provide some better spectating lol.
I decided that welding was going to be required in a few spots. I decided to start with the firewall just because it was easier access. Unfortunately, what I thought was going to be one spot expanded rapidly once I was both sides. I’m not real happy with how it turned out and will probably go back in there with correct thickness metal in the future. It for now, it’s super solid and will have its ugliness hidden.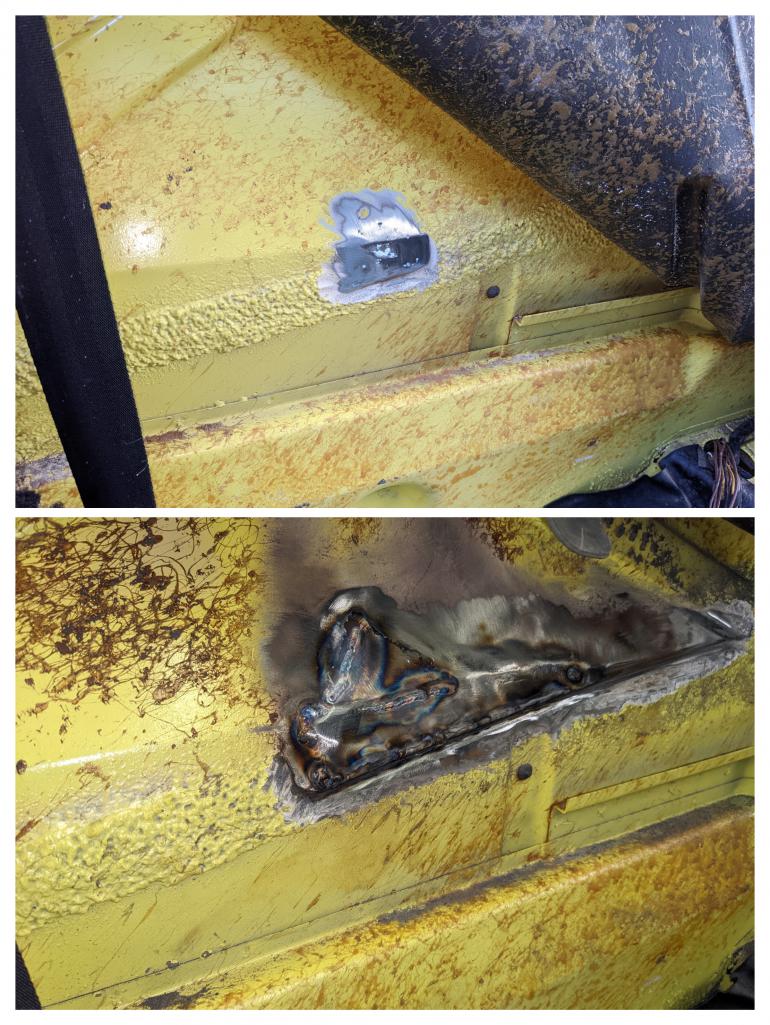
Posted by: Van B Oct 12 2022, 11:18 PM
After the firewall, a lightbulb came on that resulted in a trip to harbor freight for a punch and die set. I adopted the technique of making plugs. I reamed out the larger holes and welded in perfectly fit plugs. I used some aluminum angle and some magnets to keep them from falling through. You have to watch out with how close the magnet is to the welding arc or the magnetic field will destabilize your arc. 6” of aluminum gave enough separation though. And, it also did a pretty good job of holding onto some backing gas. I really like this method if you want to save a panel.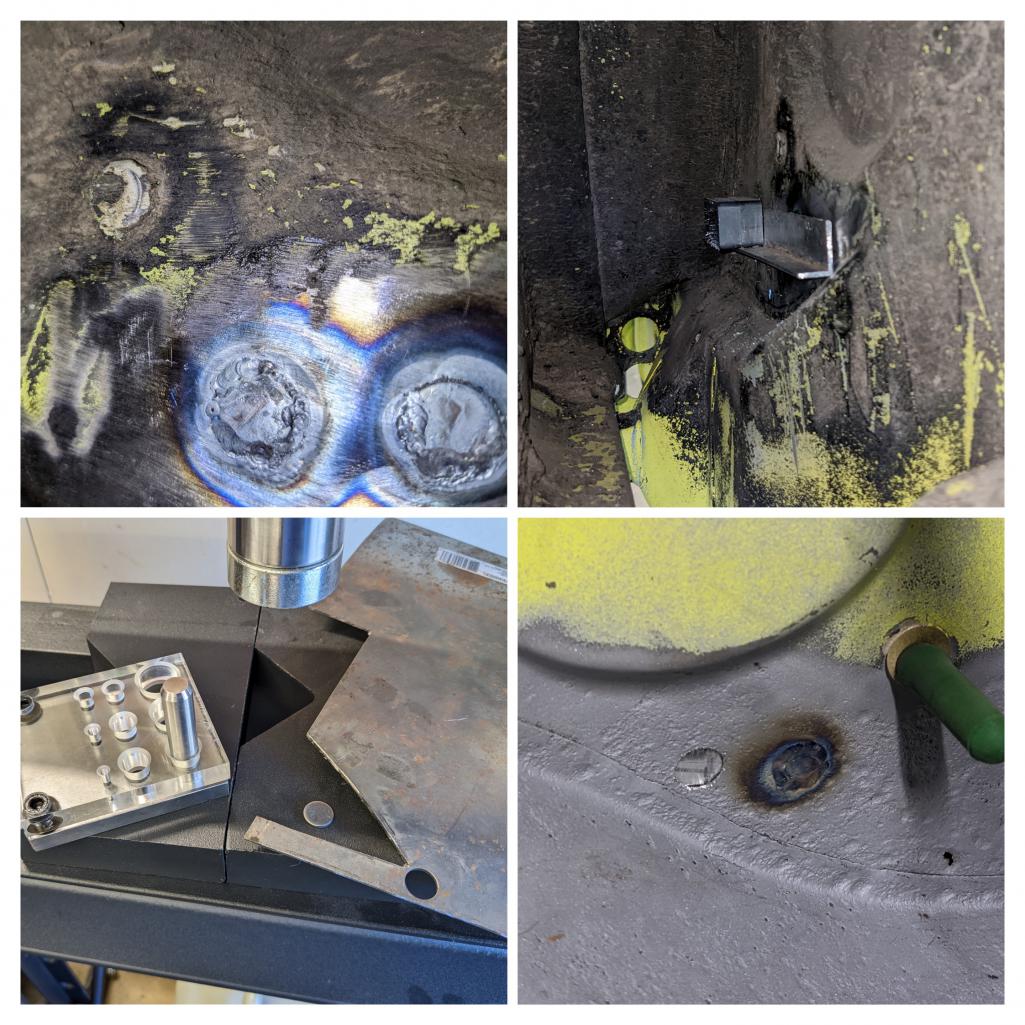
Posted by: TJB/914 Oct 13 2022, 06:06 AM
I’ll be back on task soon, I just thou you all might like to see one of the last furniture designs by the man who penned the 911
Van,
Really like your Table & Chair addition. The wood flooring 5" or 6" wide color/finish really compliments your new addition.

I used to think I wanted to grow up to be like ConeDodger, now your being considered

Tom
Posted by: Van B Oct 15 2022, 09:06 PM
Thanks Tom lol… it’s a tall order to ever get my car as nice as yours
Posted by: Van B Oct 15 2022, 09:52 PM
Been working on the trunk hinges:
It was super difficult to to but I managed to tack a nut in place by threading a bolt through the original hinge. I couldn’t get photos because I was struggling so bad to make those tacks through such a tight space. After I got those in I had to repair some tears that had been hiding behind the poor hinge repair.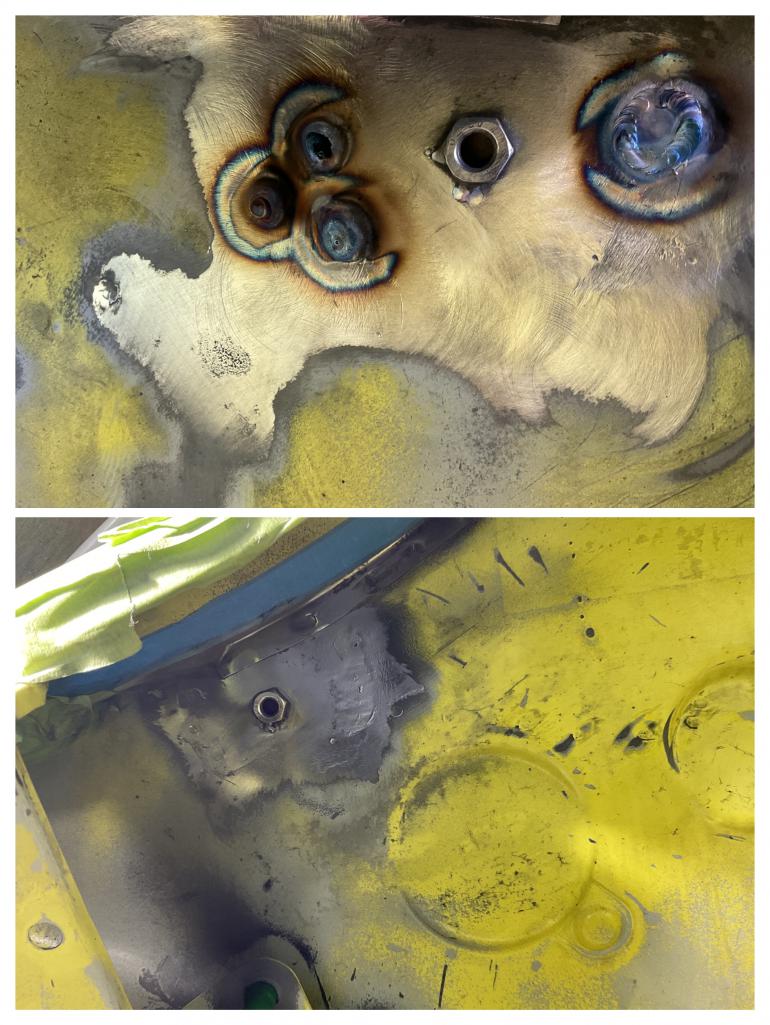
Posted by: Van B Oct 15 2022, 09:53 PM
Then I decided it would be wise to test out this fancy copper based weld-through primer I bought. I’m actually very impressed! It burns away real clean under the tig arc and holds up pretty well around the weld.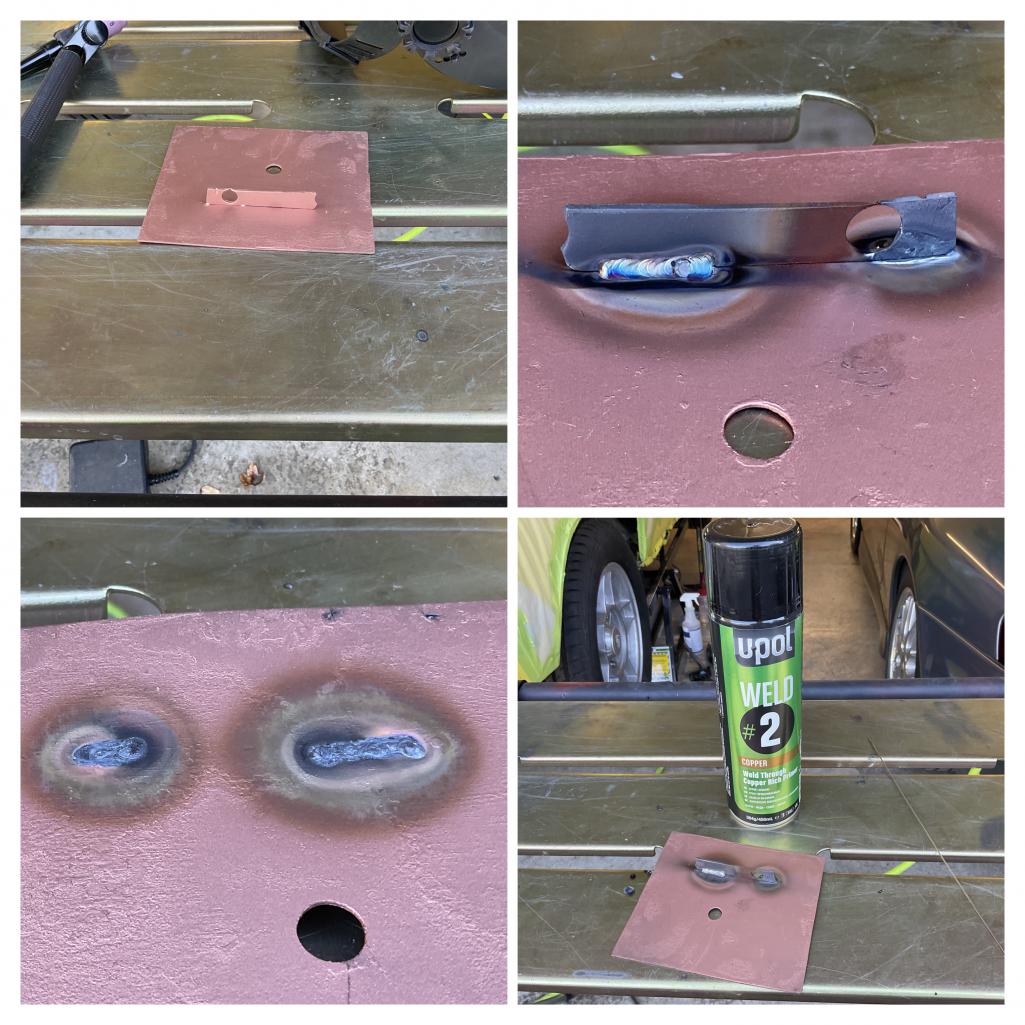
Posted by: Van B Oct 15 2022, 09:58 PM
New hinge assembly time:
Decided to radius the outside edges for aesthetics and to hopefully even out the torsional forces on the hinge. 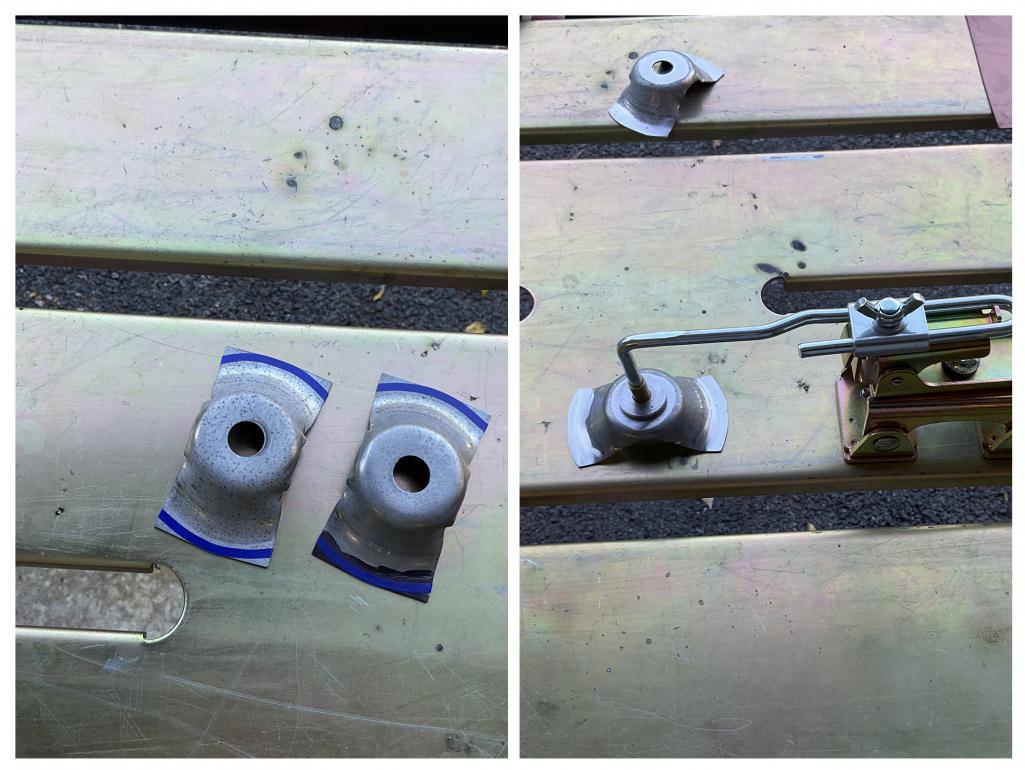
And of course, I had to deal with nasty zinc 
Posted by: Van B Oct 15 2022, 10:01 PM
And this is where I ended up tonight:
I got the hub welded in, and managed a test fit… very pleased. These replacements are 23mm tall while the originals were 22mm, but I’m sure it’ll work fine.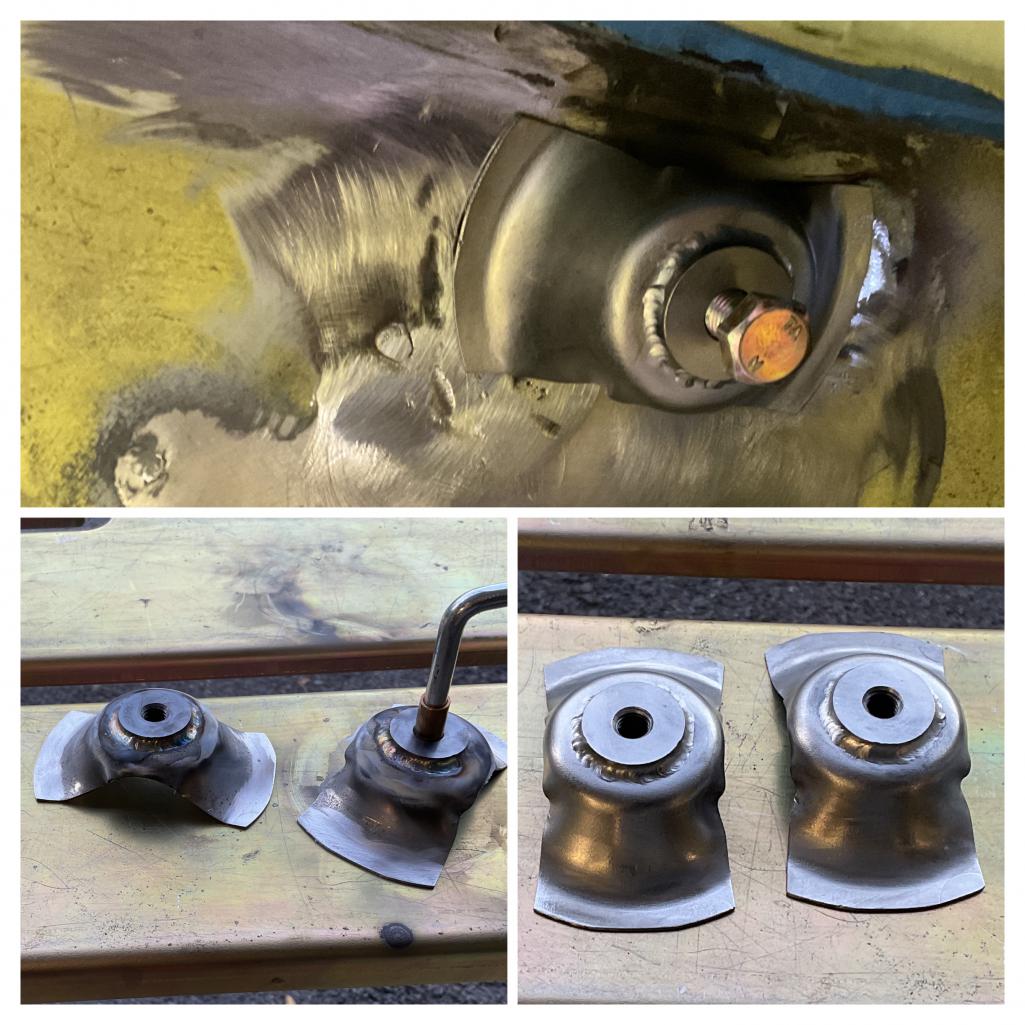
The last thing I did was spray everything in the weld through primer. Tomorrow I’ll weld it all up.
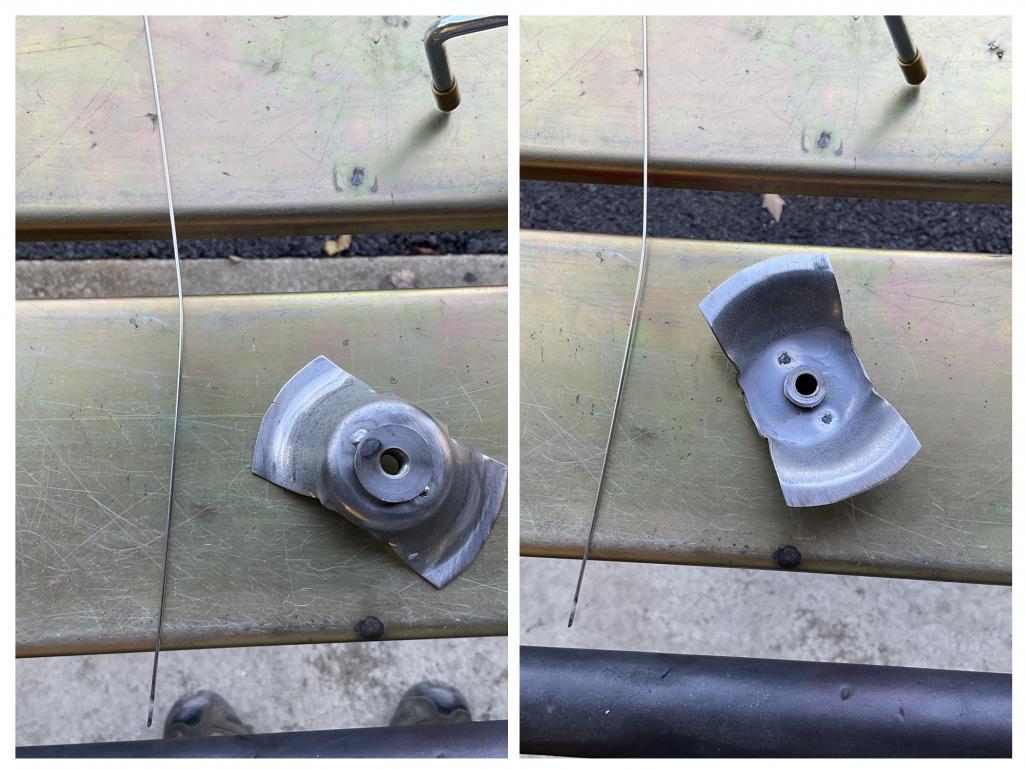
Posted by: Van B Oct 16 2022, 03:43 PM
Glad I thought of the nut as an alignment tool, definitely made setup a breeze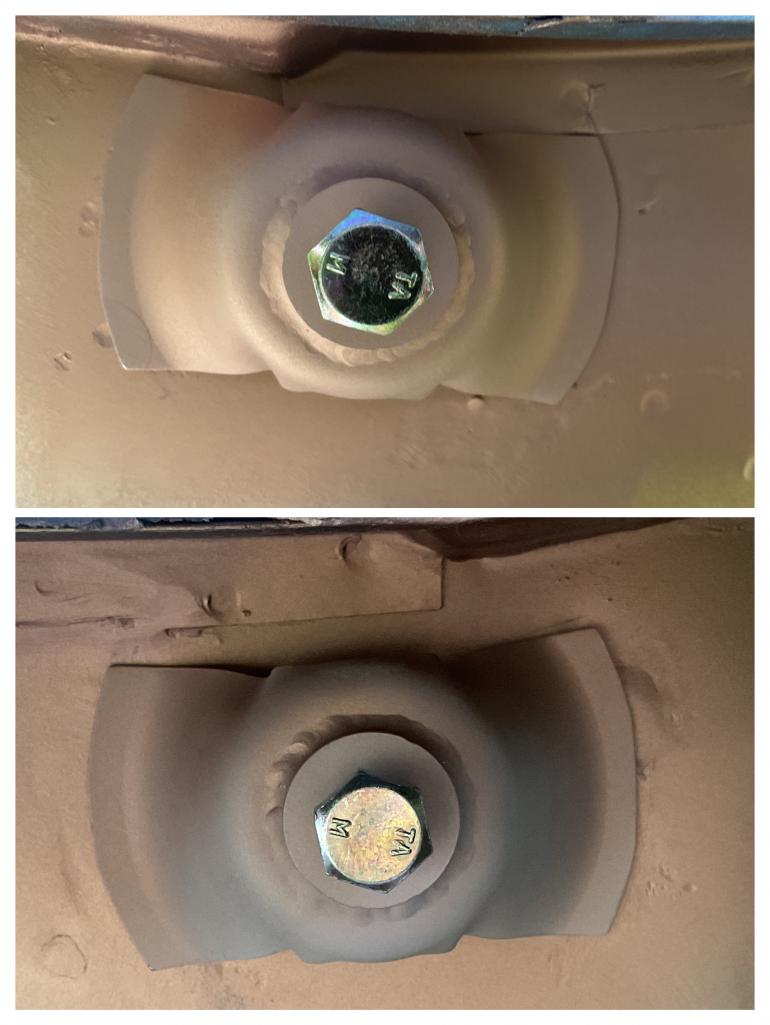
On the other hand, welding was a real challenge I had more blowouts than a Florida highway in July!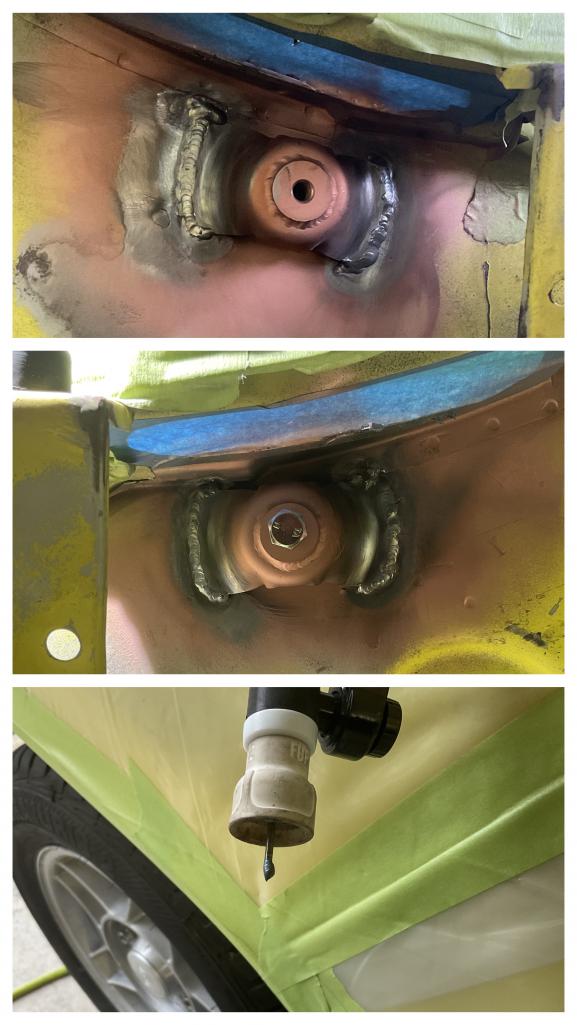
Posted by: Van B Oct 16 2022, 03:49 PM
No doubt those birdshit welds put a lot of trash into the metal… like soviet landmines long forgotten lol…
Attached thumbnail(s)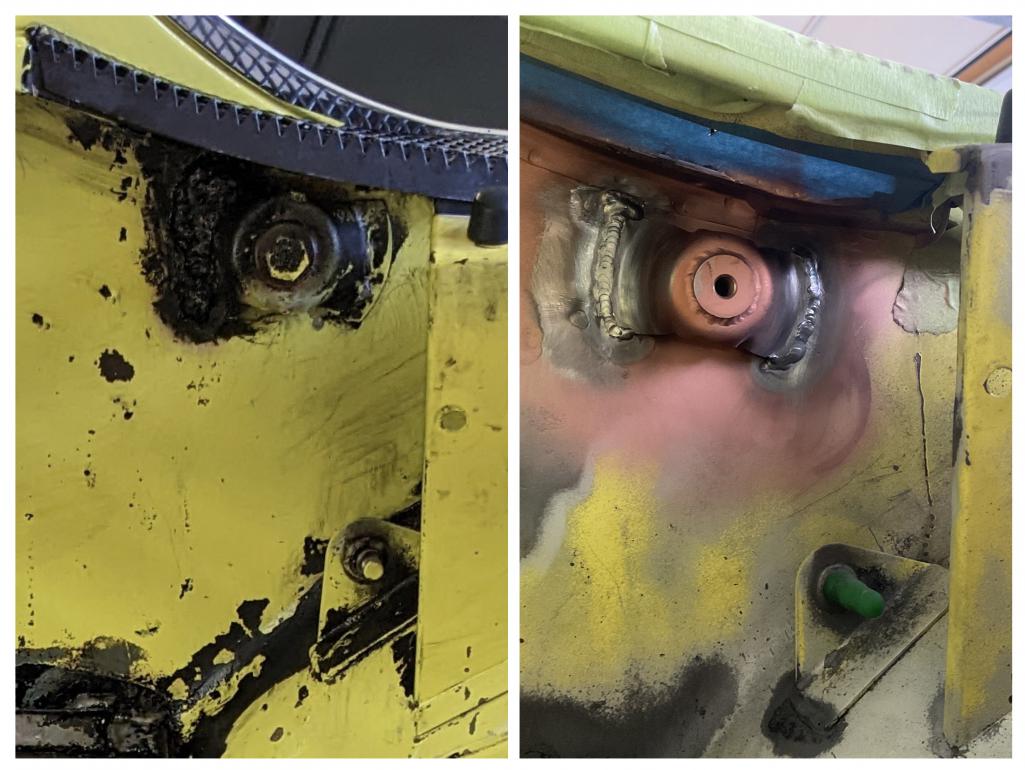
Posted by: wonkipop Oct 16 2022, 05:20 PM
copper weld through primer is good stuff.
used a lot of it on the falcon ute.
nice work on the hinge plates.
Posted by: Van B Oct 16 2022, 05:54 PM
copper weld through primer is good stuff.
used a lot of it on the falcon ute.
nice work on the hinge plates.
I only recently learned about it. Zinc is such nasty stuff when tig welding. One day I googled “weld through primer tig welding” and boom, I discovered magical things lol!
Posted by: Van B Oct 23 2022, 04:12 PM
Finally a step forward. Acid etch primer applied: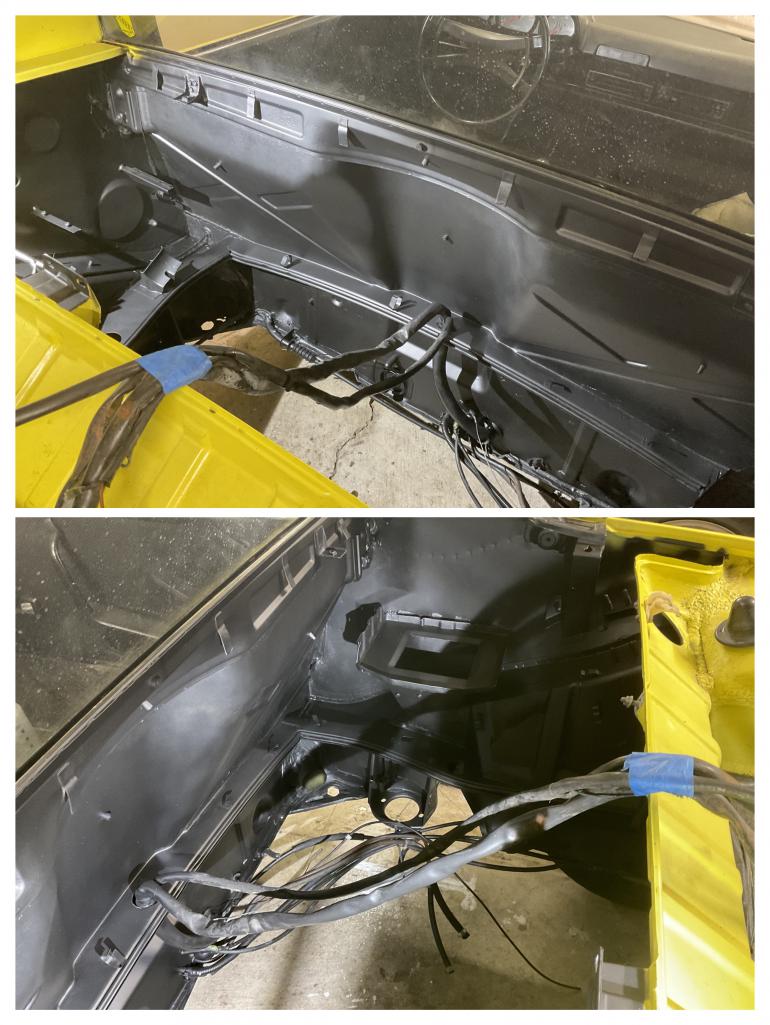
Posted by: Van B Nov 28 2022, 06:15 PM
Evening all! Thanks Andy for bringing the forum back to life!
I came up with an answer to 50yr old undercoating that doesn’t involve gallons of mineral spirits or dozens of rags. A steam pressure washer! This little monster just saved me weeks or scraping and scrubbing! I just wish I’d thought of buying one sooner!
Attached thumbnail(s)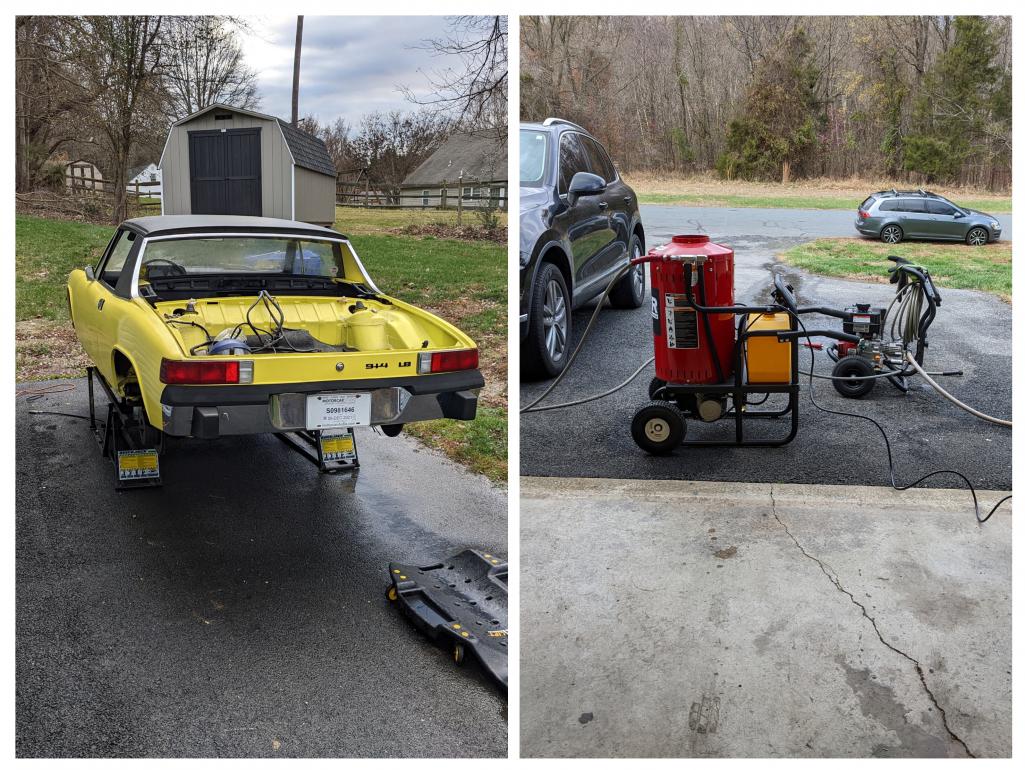
Posted by: Van B Nov 28 2022, 06:19 PM
Didn’t get any proper before shots because I was full effort to get this done in a cold afternoon. But here’s a before shot when I was sorting my fuel pump wiring: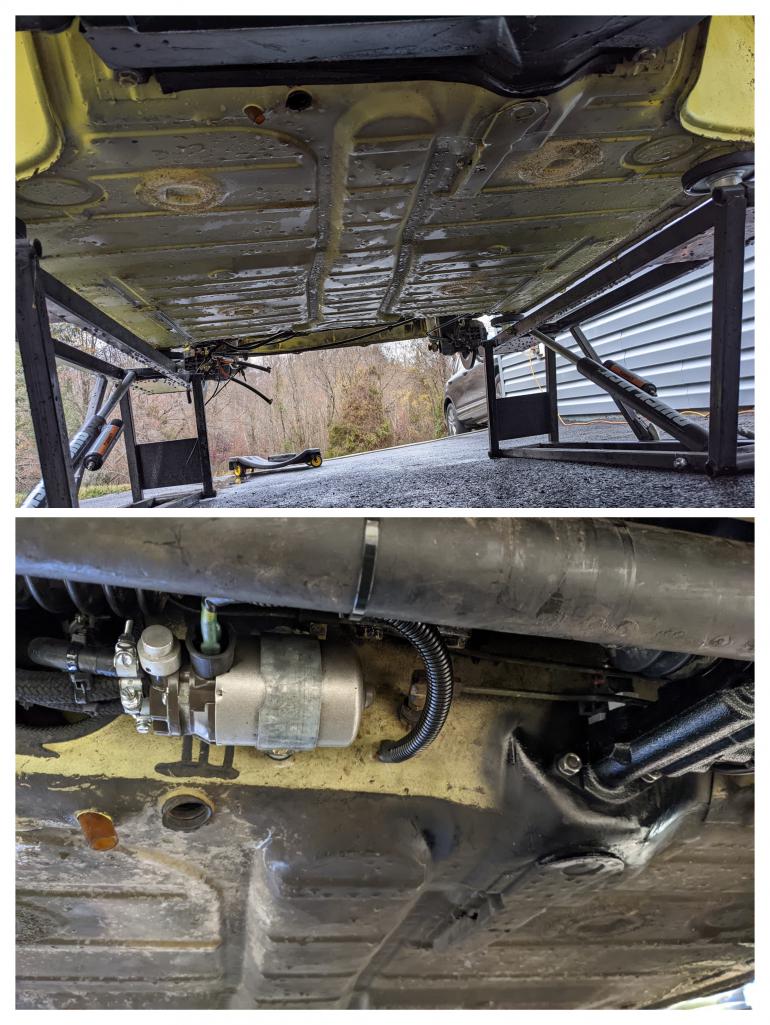
Posted by: Van B Nov 28 2022, 06:21 PM
Couple more: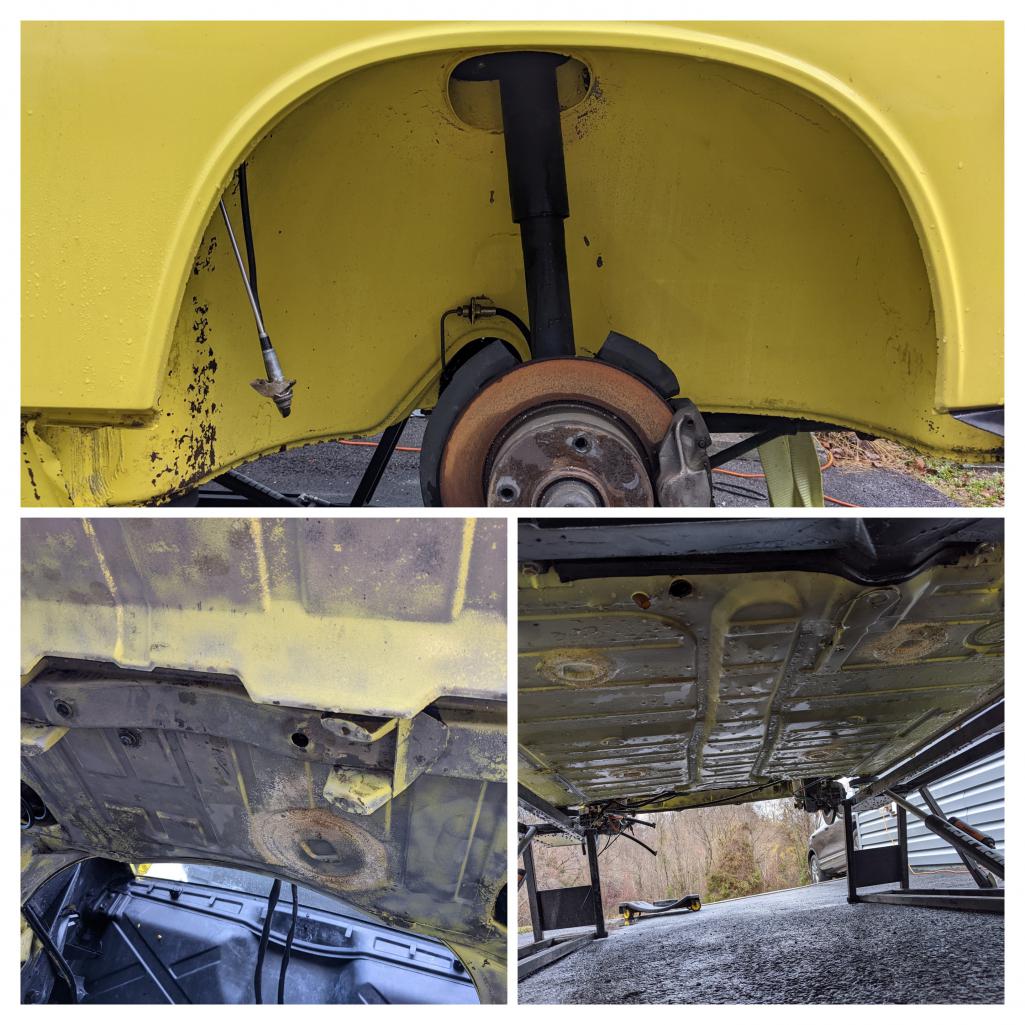
Posted by: Van B Dec 29 2022, 09:17 PM
My cleaning job dislodged enough rust from the weep hole in the jack plates that I decided I need to have a look. Glad I did. This thing was as nasty on the inside as barbra streisand lol!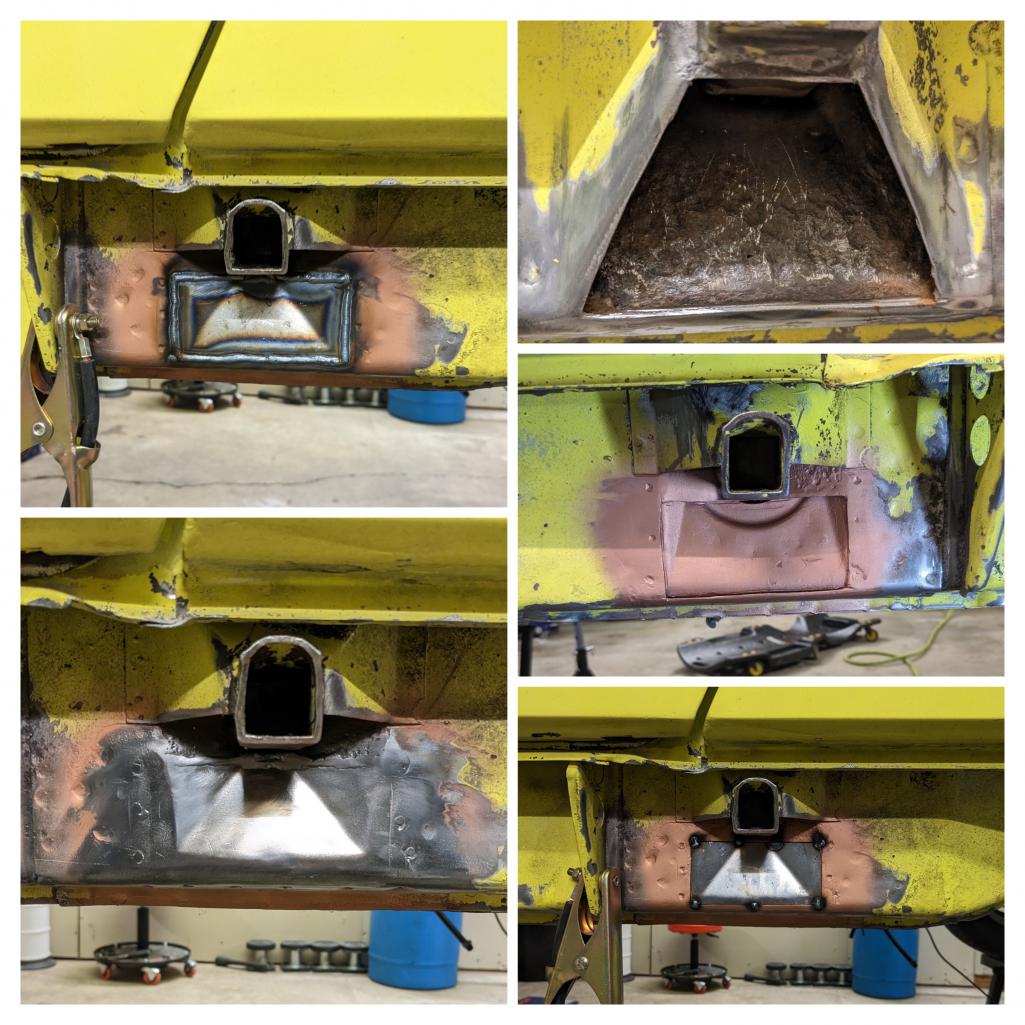
I did get lucky however and the top half of the jack plate still had most of its coating on and only superficial rust. The misery of this bottom half is certainly due to the mud nests that were inside for who knows how long.
Posted by: Superhawk996 Dec 29 2022, 09:26 PM

Done right and will stop the hidden tin worm from continued feasting behind the jack pyramid.
Posted by: Van B Dec 29 2022, 10:14 PM
Thanks brother, that means a lot coming from you. I can definitely see how so many restorations go wrong when people run out of patience, time, or money.
Posted by: wonkipop Dec 30 2022, 05:39 AM
i see you are keeping up with the copper weld through primer.
vastly improving on the flawed original.
nice view from the driveway.
trees? what are they? its bitumen and bluestone around my inner city bunker.
Posted by: Van B Dec 30 2022, 04:19 PM
i see you are keeping up with the copper weld through primer.
vastly improving on the flawed original.
nice view from the driveway.
trees? what are they?
its bitumen and bluestone around my inner city bunker.Deciduous lol… it’s a nice little spot in southern maryland. Flood plain in front of me and old govt land behind me = no neighbors looking in my windows

Posted by: wonkipop Dec 31 2022, 03:37 AM
i see you are keeping up with the copper weld through primer.
vastly improving on the flawed original.
nice view from the driveway.
trees? what are they?
its bitumen and bluestone around my inner city bunker.Deciduous lol… it’s a nice little spot in southern maryland. Flood plain in front of me and old govt land behind me = no neighbors looking in my windows
you have got the perfect pad.
i wouldn't mind pulling out of the driveway to that view. trees!
i am over the city at the moment.
dickhead dan really wrecked the joint.
i am designing a factory flat pack pavilion and looking for a bit of dirt to park it on.
the shed to go with the house for the cars will be bigger than the house.
i've already restored the chair that goes in it so i can sit and watch tv.
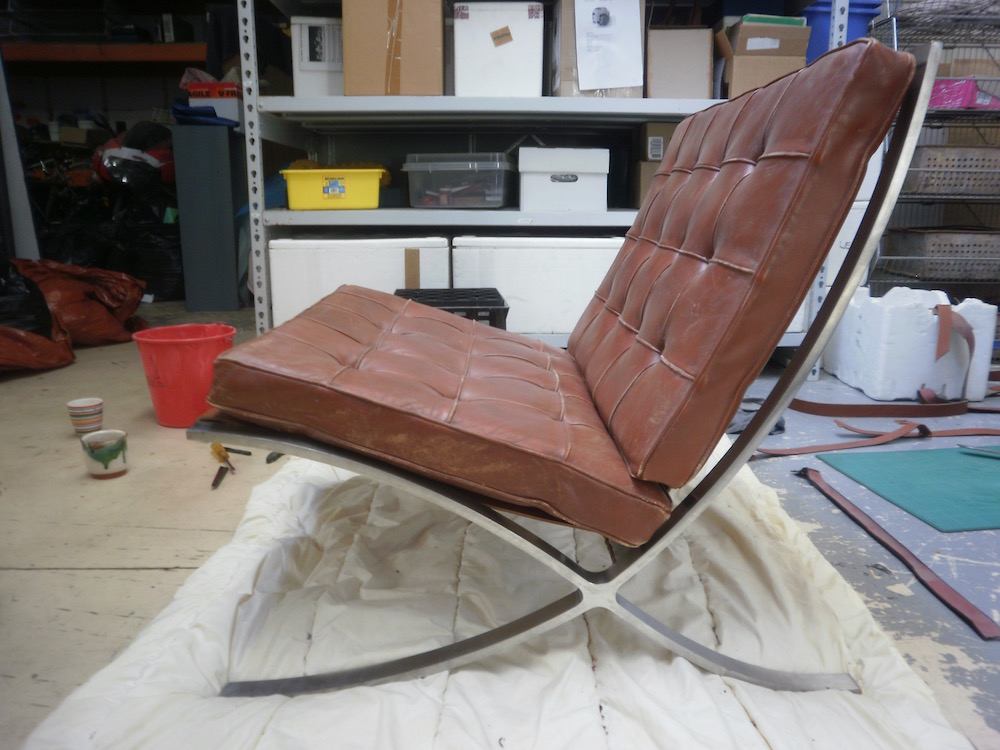
#1 mies van der rohe barcelona chair made under license in aus in 1968.
i picked it up for for peanuts about 20 years ago and fixed it up.
no one knew what it was!
its not as good as your f. a. porsche designed dining suite - that is pretty red hot.
or maybe it is?
it sure leaves the usa manufactured mies barcelona chairs for dead.
i won't discuss chinese copies.
its stainless steel, not chrome. and i cannot detect the welds in the cross members.
@http://www.914world.com/bbs2/index.php?showuser=104 might be interested. he is an architect?
the chair is engraved by the guy who built it.
it is actually a mistake chair. they welded the lower cross member on upside down.
one of a set of 4. the first one was wrong.
they used to be in the department of treasury here in melbourne.
one mies chair.
one 914.
one shed. 2 french cars always broken down with a german car threatening to break down.
and a factory built flat pack passive house standard triple glazed glass pad and i am done.
just need some trees. and an internet connection to some blokes who know where to get bits for an L jet.
Attached image(s)
Posted by: JeffBowlsby Dec 31 2022, 08:37 AM
Nice Barcelona, and the foam core takes me back a few years. We have not figured out an elegant rainwater recapture solution here.
This pushes my buttons in several levels:
https://www.dwell.com/home/mid-century-modern-restovation-192b588f
Attached thumbnail(s)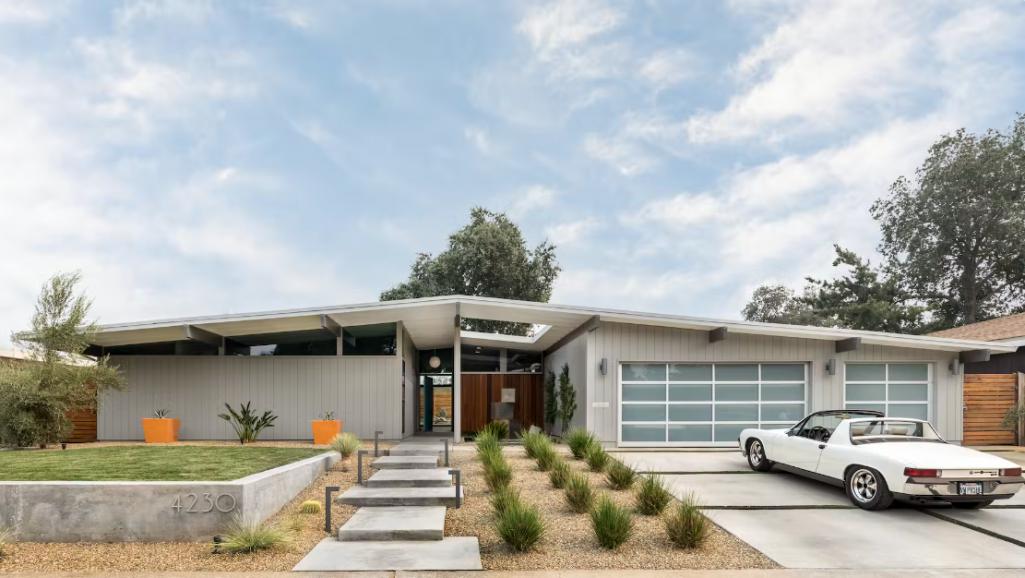
Posted by: Van B Dec 31 2022, 10:10 AM
Wow! You guys are really speaking my design language here!
I sketched this guy many years ago when I was considering buying and old city lot. I envisioned the first floor being all shop space with 2nd floor living and 3rd floor bedrooms… but then I moved to MD and lived in a few multi floor houses and decided I hate it lol. I’m a single floor guy.
Attached thumbnail(s)
Posted by: Van B Dec 31 2022, 10:11 AM
Oh and Happy new year wonki!
Posted by: wonkipop Dec 31 2022, 04:51 PM
ah yes @http://www.914world.com/bbs2/index.php?showuser=104 .
whats not to like about the translation of mid century singular homes the Case Study program did into mass market homes by Streng Brothers and others. there were also the Eichler Homes? back when being progressive meant being progressive!
All the case study architects were my heroes when i was first an architecture student. i was going against the flow - michael graves was at the height of his powers. Later when i was a grad student i got to meet Craig Elwood but thats another story.
just do blunt rainwater storage systems here though flying downpipes are my speciality.
i stack everything on circular concrete tanks. pv cells. heat exchangers. etc.
half the tank is for fire fighting with the country houses.
most architects try to hide the rainwater tanks. why bother is my philosophy. the lunar module is my inspiration when it comes to buildings these days. far as i am concerned the earth is an alien planet. or soon will be.
happy new year.
Posted by: wonkipop Dec 31 2022, 04:53 PM
Wow! You guys are really speaking my design language here!
I sketched this guy many years ago when I was considering buying and old city lot. I envisioned the first floor being all shop space with 2nd floor living and 3rd floor bedrooms… but then I moved to MD and lived in a few multi floor houses and decided I hate it lol. I’m a single floor guy.
love a raking window jamb.
like you i hate stairs.
i did one of those multi storey town houses years ago for my business partner.
right across the lane from the bunker.
its got a lot of stairs.
and the longest piece of glass you could get in australia. 7 meters.
real fun getting it in 4 storeys above the ground.
half the building was already there. we added some more and went to town.
we put the living room on the top floor to grab the view. it has a small lift.
its got a real weird room right up on the roof. his son lives in that room. calls it the attic.
happy new year.
its already 23 here.
Posted by: porschetub Dec 31 2022, 05:18 PM
My cleaning job dislodged enough rust from the weep hole in the jack plates that I decided I need to have a look. Glad I did. This thing was as nasty on the inside as barbra streisand lol!
I did get lucky however and the top half of the jack plate still had most of its coating on and only superficial rust. The misery of this bottom half is certainly due to the mud nests that were inside for who knows how long.
What are your plans for the bent jack reciever ?,mine had the same issue and the top just peeled off when I tried the jack but was lucky as the sill cover was removed and I have a jack stand handy.
On another note I'am using sill spacers so the crap just drops out the gap they make,no build up of road crap as I proved ,got them from Stoddard a while back,part 914-559-127-10 and called a distance washer,cheers.
Posted by: wonkipop Dec 31 2022, 05:32 PM
@http://www.914world.com/bbs2/index.php?showuser=18995
yikes.
i confess i carry around a scissor jack with my car.
i hadn't thought about the jack receiver failing like that but.
my distrust is of the VW jack itself.
i once had my squareback fall of the jack when i was changing the tyre.
i was young. i was way the F#$k in the flinders ranges in the outback miles from anyone. an aboriginal ranger drove past me after a couple of hours and pulled a scissor jack out of his toyota and we managed to get the car back up and change the wheel.
cracked a couple of beers out of my esky with him.
never trusted the VW jack again.
Posted by: Van B Dec 31 2022, 05:35 PM
@http://www.914world.com/bbs2/index.php?showuser=18995
I’ve never used them and hadn’t planned on replacing them, but I suppose now is the time!
Maybe I’ll cut the top and weld in a double thick top plate?
Posted by: wonkipop Dec 31 2022, 05:43 PM
@http://www.914world.com/bbs2/index.php?showuser=18995
I’ve never used them and hadn’t planned on replacing them, but I suppose now is the time!
Maybe I’ll cut the top and weld in a double thick top plate?
its a stress failure at the edge of the fold in the tube.
that says to me VW engineers got that one wrong at the start.
can only take so many loadings?
reinforce it with a U tube wrapping over from top if its possible to get a section to suit.
just a plate on top will not be adequate.
is this kind of jack receiver failure common to older 914s?
its thirty years since i have looked at mine but i don't recall any distortions back then.
and they have had had ZERO use during my ownership of the car.
looking at those i am glad i have always looked at the jack suspiciously.
EDIT
or the receiver tube demands the jack is absolutely perpendicular.
any slight angle of the jack point loads the end of the tube and peels it open?
how many occasions do you have where changing a tyre you cannot get the jack exactly vertical. which is how my squareback slid of the jack.
Posted by: Van B Dec 31 2022, 05:43 PM
@http://www.914world.com/bbs2/index.php?showuser=24231 a small lift as in just big enough for one car? Ha!
Posted by: wonkipop Dec 31 2022, 06:06 PM
@http://www.914world.com/bbs2/index.php?showuser=24231 a small lift as in just big enough for one car? Ha!
he is a motorcycle nut like you. no need for a lift.the lift is for the missus - just big enough for the groceries. you still have to walk up all the stairs.
his garage is too low for a lift. we actually squeezed a semi storey in above the garage.
there is a small independent apartment at ground level that wraps over the garage - he used to rent and now the other son lives in it.
an aprilia lives in the garage next to a non-descript VW passat station wagon. he could talk motor cycle sh#t with you until the cows come home. he used to have a ducatti when we first did the building. so far he hasn't managed to kill himself but he has burned his license a few times. almost impossible not to with the way he rides.
Posted by: wonkipop Dec 31 2022, 07:08 PM
promise not to "hijack" the thread further.
but i know you are a design and chair "perv" @http://www.914world.com/bbs2/index.php?showuser=26011 with your F A Porsche breakfast table and chairs.
and i can see where @http://www.914world.com/bbs2/index.php?showuser=104 's tastes are, namely the right stuff.
california once ruled the world (but not anymore).
i put it down to aerospace industries and the skunk works before sillycone valley took over.
here are a couple of other interesting ones i have.
ray and charles eames chairs.
(out of WW2 plywood splint technology for wounded soldiers and straight into post war high end west coast suburbia).
the ones that have with chrome legs are the USA herman miller "originals".
the black painted leg version is the made under license in australia "copy" from the late 50s. the late Harry Seidler, a famous australian modernist took out the license for local manufacture. they are slightly adjusted - or as Harry would say "improved" for australia. the shells are slightly smaller for smaller australian bodies (backsides) back then (though these days australians have taken over the title of the worlds most obese population - sorry Winsconsin). and the legs are slightly taller. this had something to do with preferred ht of australian dining tables in the late 50s, early 60s believe it or not. or thats the story.
most interesting part is they were made in sydney by the same company that was going to do the full bore/out of this world plywood interior for the Sydney Opera House before Jorn Utzon met his fate at the hands of that most unique breed of human beings,
the Australian Politician. Utzon left before that interior could be manufactured and installed and the whole plan was kyboshed, leaving the Opera House to receive a tacky interior by some third rate hacks from the public works department in sydney who took over the task of "finishing" that masterpiece.
A little later around 77/78 that same plywood company started building skateboard decks for Tony Alva, the famous californian swimming pool skater. these were beautiful plywood skateboard decks, the first high performance skateboard decks. I had a contact in sydney when i was a kid and we used to get the blank decks out the back door before they received their famous SCRATCH graphics and shipped back to the USA. we got em cheap, like we could actually afford them as kids. i still have one somewhere on my shelves.
i found the harry seidler eames chairs on the side of the road broken on a hard rubbish day in one of our posh suburbs back in the late 70s and threw them in my girlfriend's hi-lux ute.
then restored them. still have them. designed a table to go with them a bit later on when i had some money briefly in life.
a bit like the jack receivers on 914s, the rubber shock pads which are glue bonded to the plywood shells always fail on the eames chairs. back in the 80s i managed to score a box full of shock pads from a guy connected with the original manufacturer in sydney.
i routinely have to replace the shock pads about once a decade.
a bit like 914 maintenance. you are always dealing with a slightly flawed but nevertheless magnificent design. 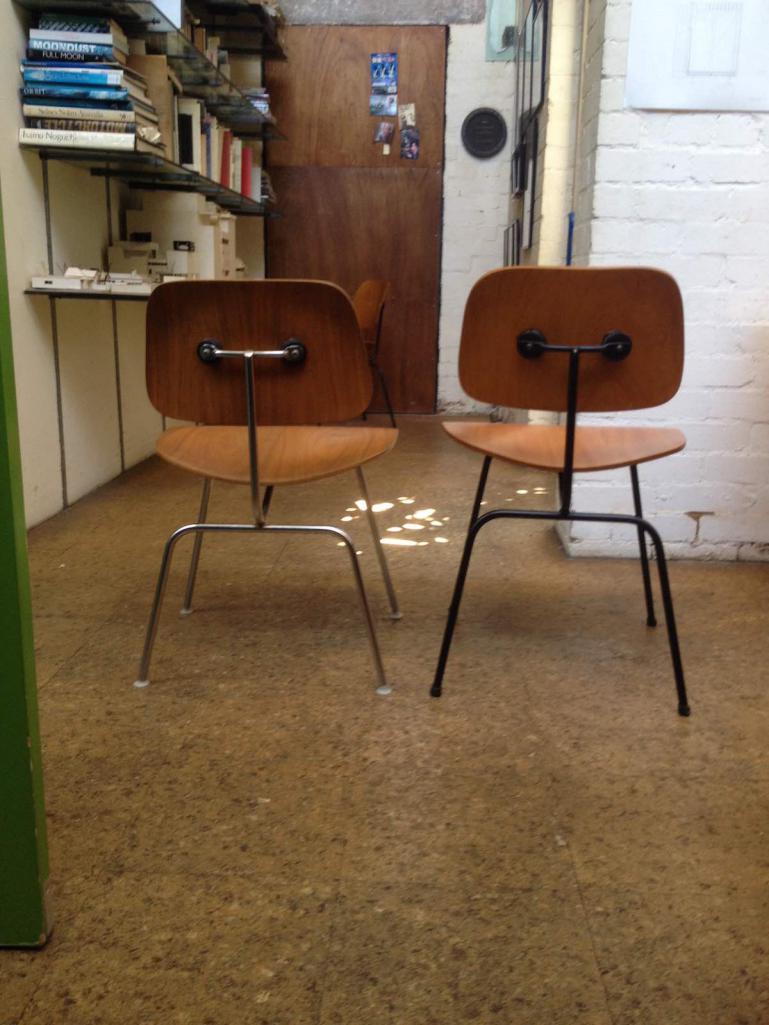

Posted by: Van B Dec 31 2022, 07:33 PM
Never knew the connection to proper skateboard decks, pretty cool!
Posted by: wonkipop Dec 31 2022, 07:58 PM
Never knew the connection to proper skateboard decks, pretty cool!
was all down to the currency exchange rate back then.
AUD had a fixed value pegged to the USD.
$1.50 AUD = $1.00 USD.
tony alva knew how to make a dollar.
cheaper than getting them made in the USA.
there was no question of quality.
australia had high standards = to USA manufacturing standards.
different world. china was still rice paddies and chairman mao.
but thats also why there are copies and licensing of all those things like chairs etc back in that era.
to import an eames chair from the USA direct would have made it unaffordable.
exchange rate to begin with - then hit with a 100% import duty and then a 50% sales tax on top of that. cumulative.
was still around when i bought my 914 in.
i avoided the customs duty - i had owned the car in the USA as a resident for more than 12 months. still got slugged the sales tax but i did a bit of invoicing magic on that one to reduce it slightly. still hurt the hip pocket to do it back then.
i have a special plate on the car rivetted on next to the VIN tag in the front trunk.
its a personal import plate. means the car is excempt from the australian design rules.
technically "non compliant" but permitted.
Posted by: Van B Jan 2 2023, 06:21 PM
Found some ugliness in the back edge of the trunk that needed to be cleaned up. So, I thought I’d show off how easy the steam power washer dispenses with ziebart by way of a little before and after shot: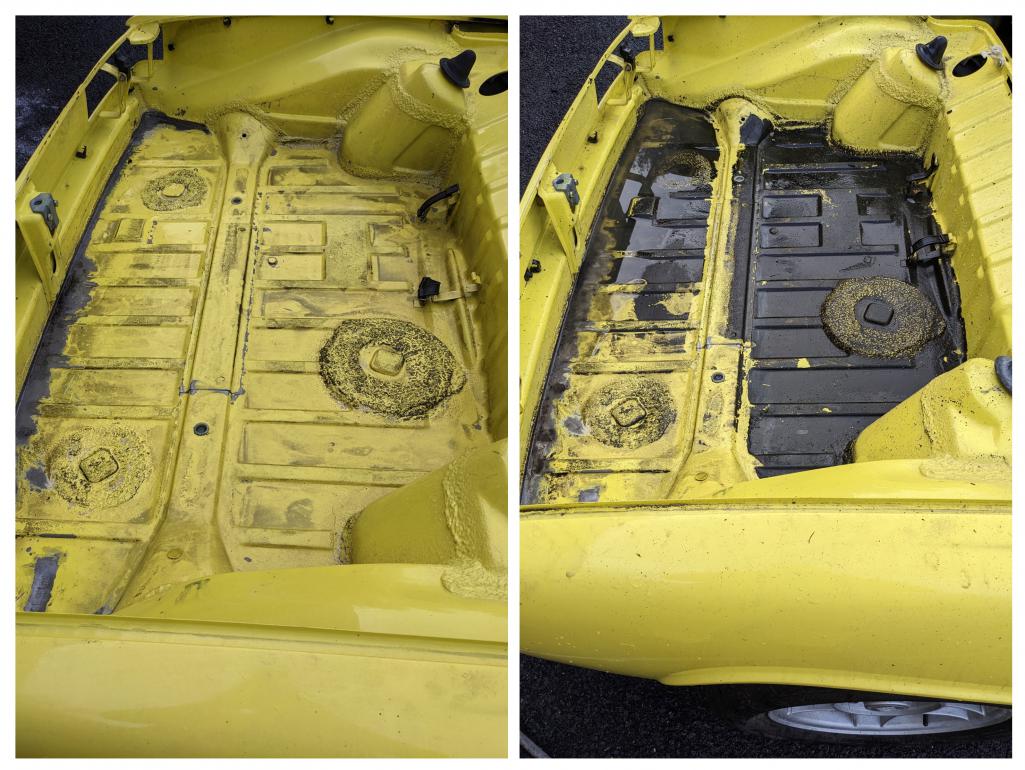
From there all you need is some acetone and a rag to remove the leftover residue.
Posted by: wonkipop Jan 3 2023, 12:01 AM
not too bad.
a little bit of that went on in my rear trunk.
i did a bit of touch up rust converting 30 years ago - seemed to paralyse it.
think foam pad under carpet traps condensation?
not a problem in aus in second half of cars existence - don't have cold enough conditions.
have never wanted to attack mine aggressively.
still got a cute little stamp and piece of half century old paper tag there.
good idea to rip into yours and get that zeibart off - kill it stone dead.
we have steam pressure washer at the workshop.
they come in handy.
though i have to be careful with it as it will actually tear paint off if you get it too close to the surface being cleaned.
Posted by: Van B Jan 3 2023, 09:58 AM
I think these issues were driven by tail light gaskets being 50yrs old and showing daylight between the housing and the panel.
Posted by: Van B Jan 7 2023, 05:45 PM
I’m starting to like this lead free tinning to fill in rust pits that don’t rise to the level of panel replacement: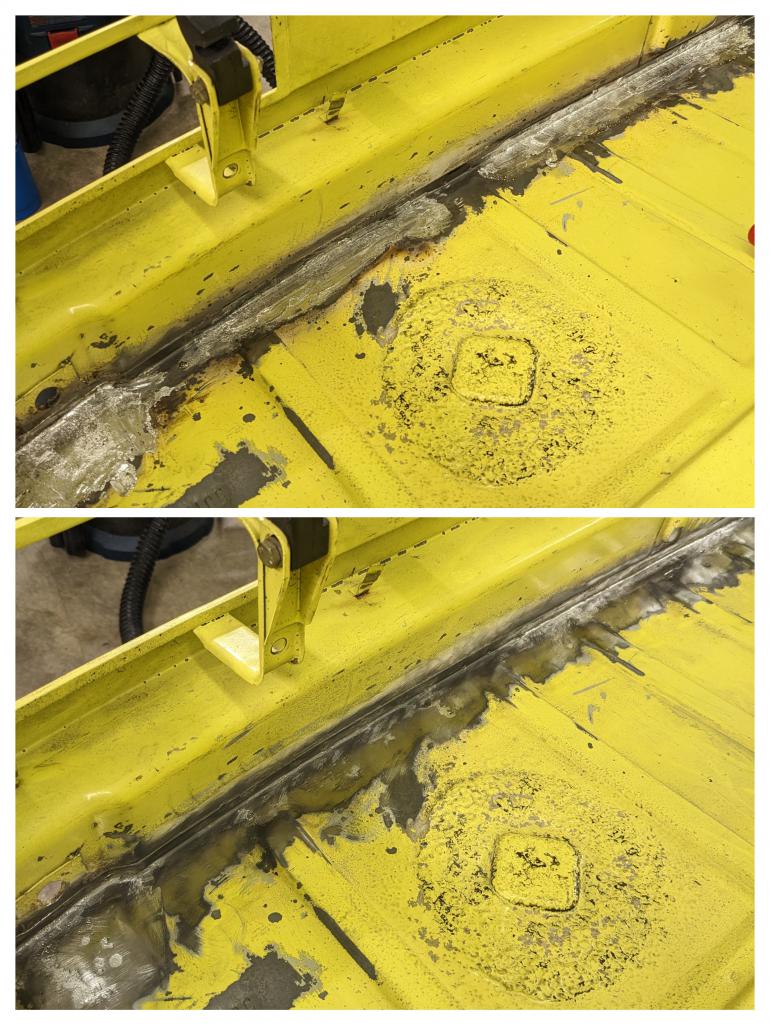
Posted by: Van B Jan 8 2023, 08:23 PM
Well Sh!t: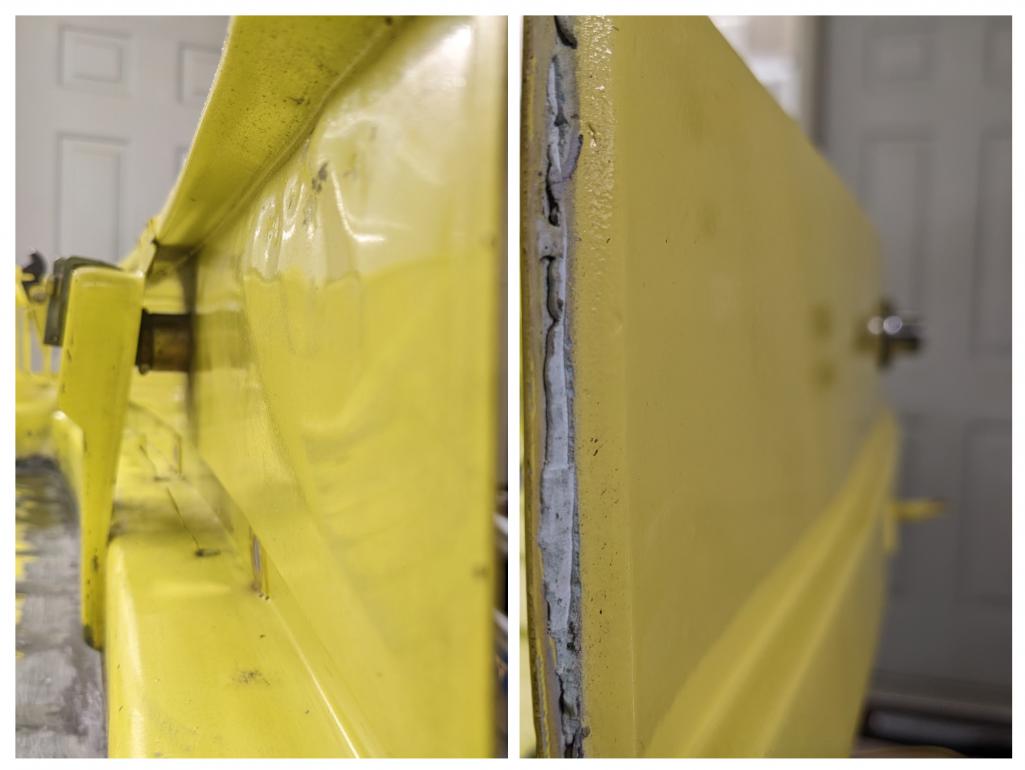
I saw a repair order in the records to “repair and repaint parking damage”. I guess I just found it.
Posted by: wonkipop Jan 9 2023, 03:36 PM
Well Sh!t:
I saw a repair order in the records to “repair and repaint parking damage”. I guess I just found it.
it is 50 years old! bound to collect some battle scars.
tricky one. do you fix now. the old expanding scenario problem.
faced similar dilemmas with falcon ute.
we did not want to "over-restore" since it was going to keep on being a work vehicle.
where do you draw the line. followed by wringing of wrists.
i guess you could tap it out a bit better and knock the bog out if its too deep.
and do a restricted repaint on that rear panel between the tail lights if you want to hit out at it now. otherwise its the slippery slope to a full strip and total repaint.
given your original intention is just to hit those inner areas and grab the rust by the neck now and then enjoy driving again, best thing to do is hold off for the full repaint whenever you schedule that down the track!?
Posted by: Van B Jan 9 2023, 11:34 PM
The color is off anyway, it’s missing that light green hue that you can see under certain light. So, I won’t bother with a localized repaint.
Basically I’m on the fence at the moment. I suppose I need to see how easily I could source some glasurit 22 line single stage paint.
Posted by: wonkipop Jan 10 2023, 02:19 AM
given you are a perfectionist.
(as proven by the cold start discussions)
you might need to hold back.
or otherwise you will have a bare body shell on jack stands.
could be good but will take a bit of time to plough through.
Posted by: Van B Jan 16 2023, 09:23 PM
Got a little more progress this weekend. Could’ve been more, but I didn’t like how the restoration design jack pads fit. They didn’t have enough curve and were slightly aft tilted. So I cut off the originals cleaned them up and fitted to the new plates.
Attached thumbnail(s)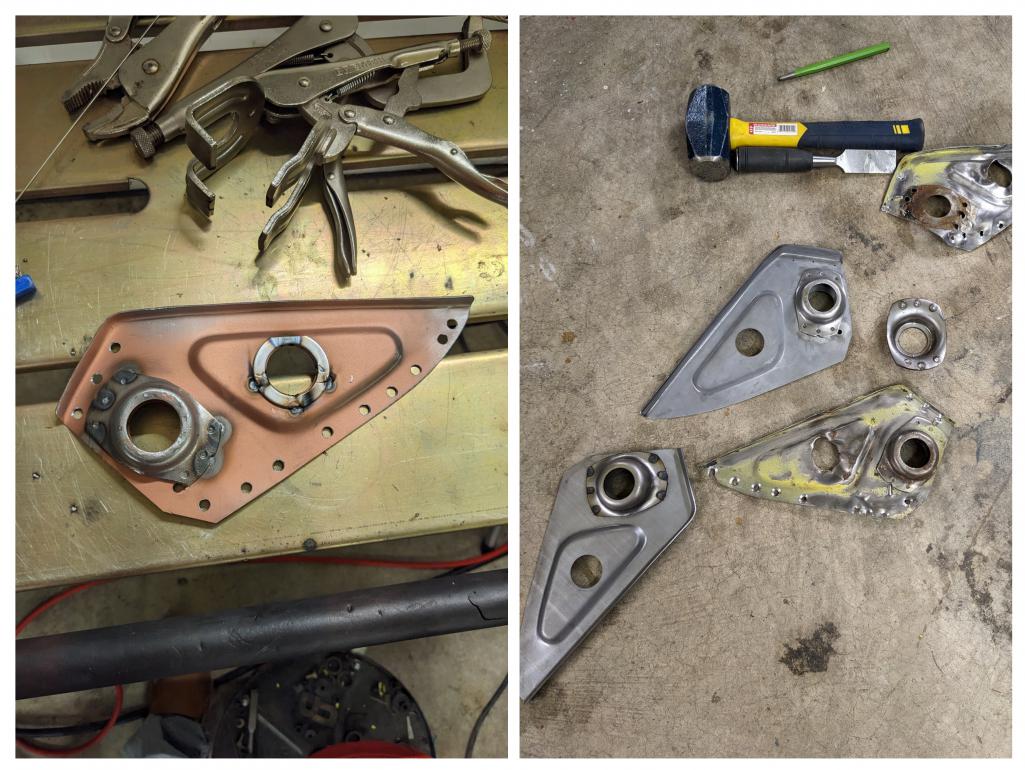
Posted by: Van B Jan 16 2023, 09:24 PM
I also decided to reinforce the eye since the old ones are clearly prone to tearing out if looked at with more than a stern glance lol.. i bought some bushings from tractor supply and welded them on each side to build up the thickness. I also tig welded the ground edge with some high tensile rod to make up for the lack of meat on that section. In all, I’m pleased with this improvement.
Attached thumbnail(s)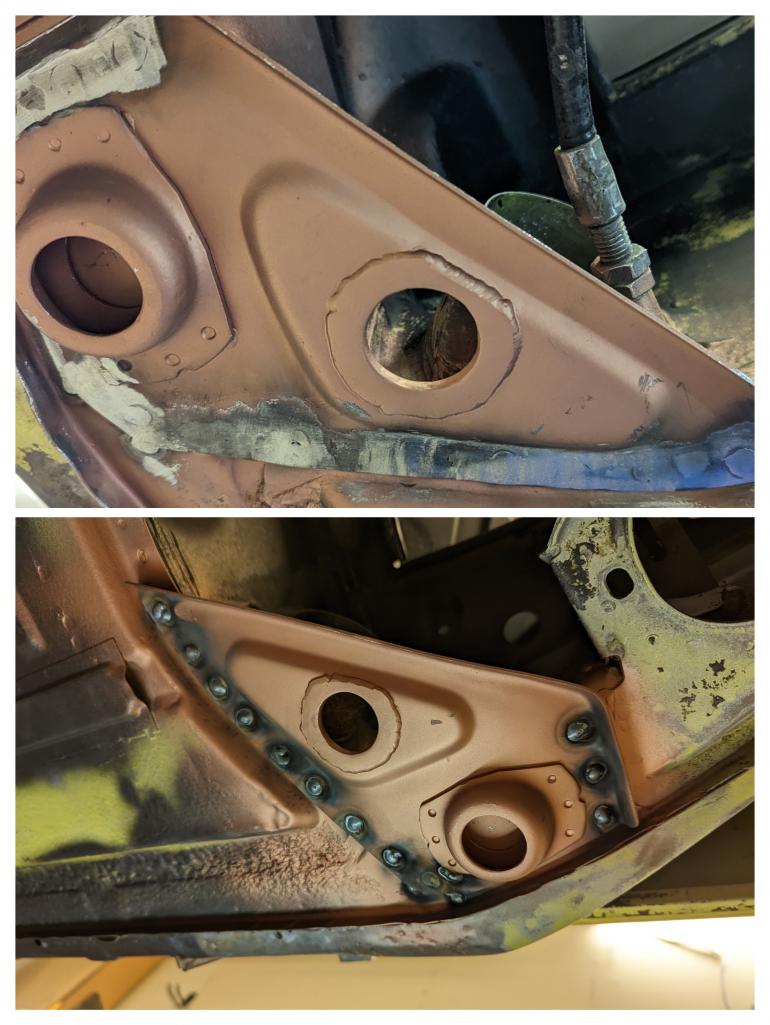
Posted by: wonkipop Jan 16 2023, 11:59 PM
I also decided to reinforce the eye since the old ones are clearly prone to tearing out if looked at with more than a stern glance lol.. i bought some bushings from tractor supply and welded them on each side to build up the thickness. I also tig welded the ground edge with some high tensile rode to make up for the lack of the meat on that section. In all, I’m pleased with this improvement.
might have to copy you.
i look at those so called jack donuts on mine with great suspicion.
what is the licensing fee for the update?
Posted by: Van B Jan 17 2023, 12:47 AM
Ha! A four pack of bushing washers cost me about $4 at the local farm supply store. You’ll at least be lucky enough to find them in metric!
Posted by: Van B Jan 17 2023, 10:05 PM
I know this is absolutely stupid, but I don’t care lol. I probably won’t ever use the jack points, but if I do, I will have total confidence. A little but of hammering, cutting, beveling, a mega difficult tig weld, and presto! Super strong jack points better than new!
@http://www.914world.com/bbs2/index.php?showuser=18995 thanks for the cautionary tale!
Attached thumbnail(s)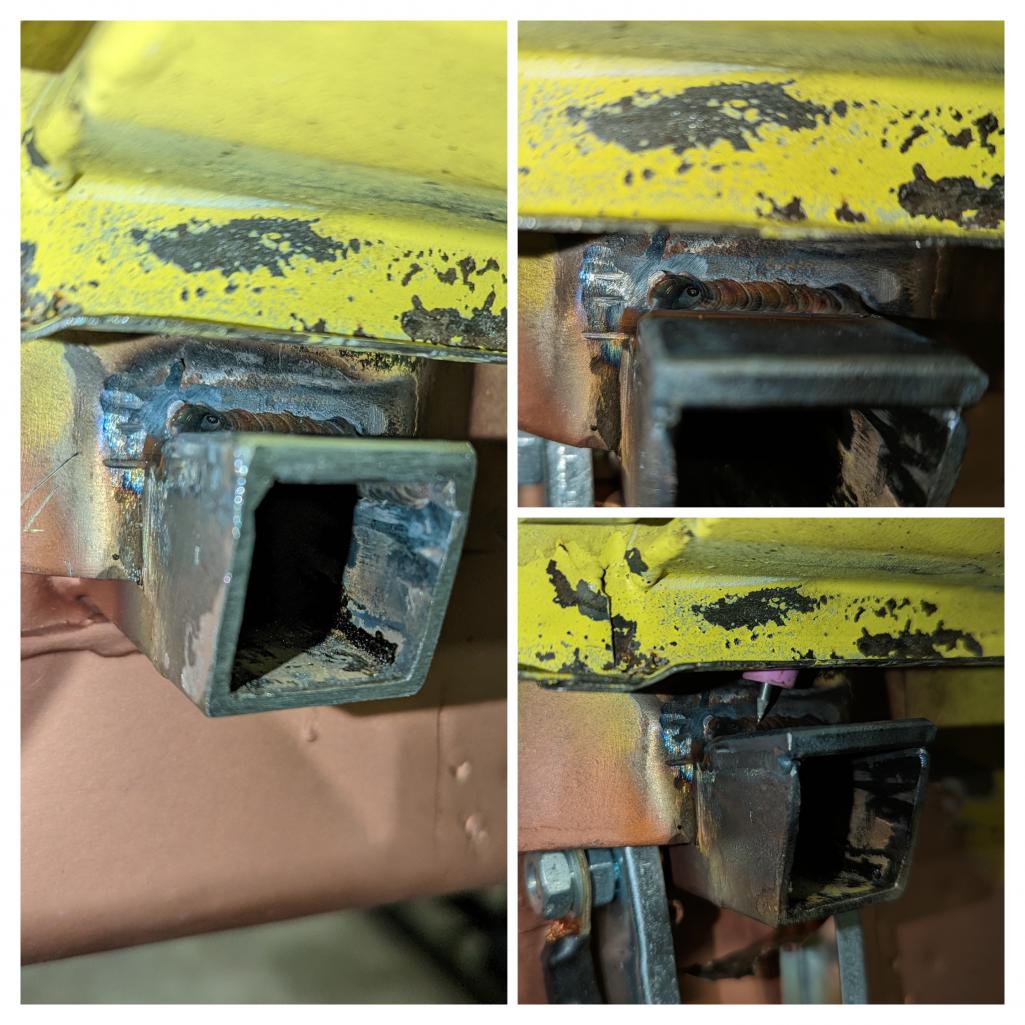
Posted by: Van B Jan 29 2023, 05:55 PM
Keeping this public journal going:
The jack points are finally sorted and extra beefy! Man when you add up the steps, it really hits home how involved some of these repairs are.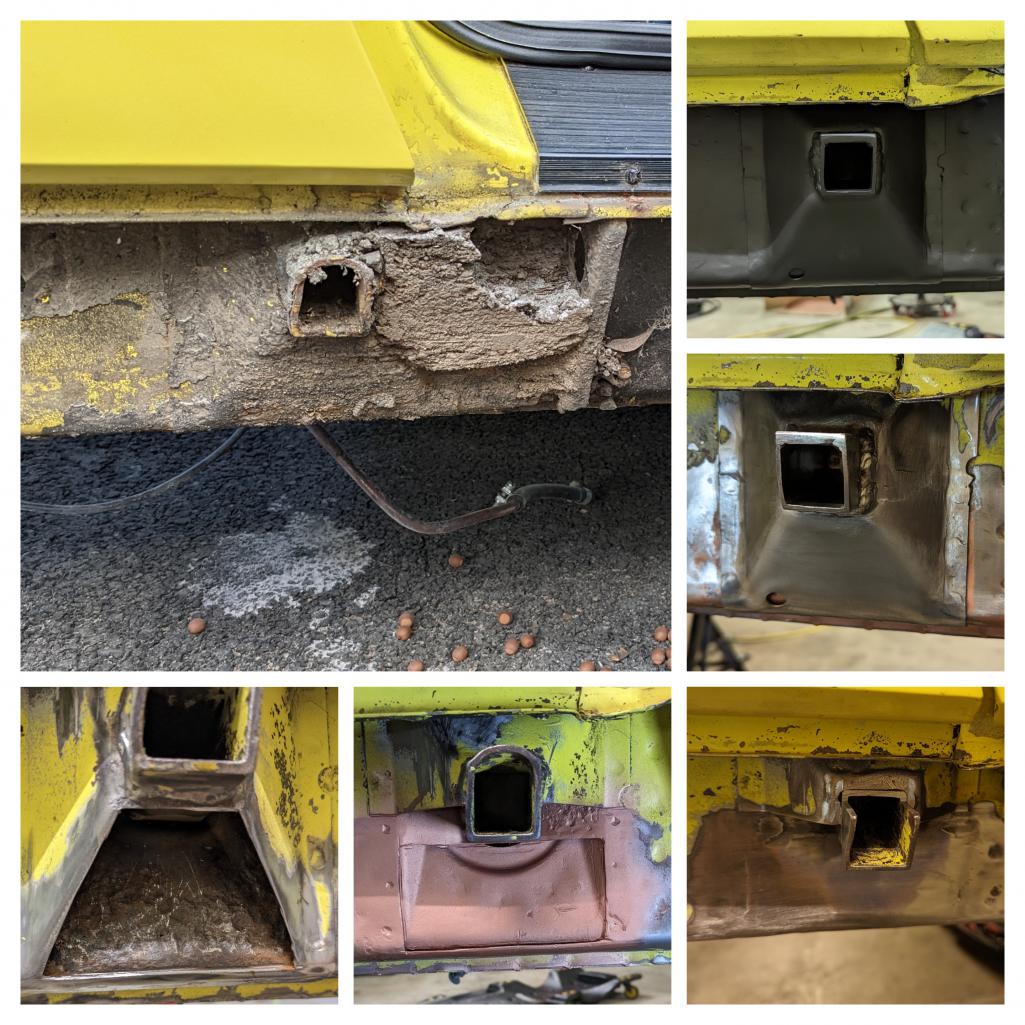
From there I moved on to the rear sway bar. The pre fab mounts that Chris was kind enough to throw in with the rear sway bar he sold me were a no go. Spacing was off on the bolts enough that the clamp wouldn’t mount. And the leg was too tall. So, new nuts and a wide leg stance were the chosen fix.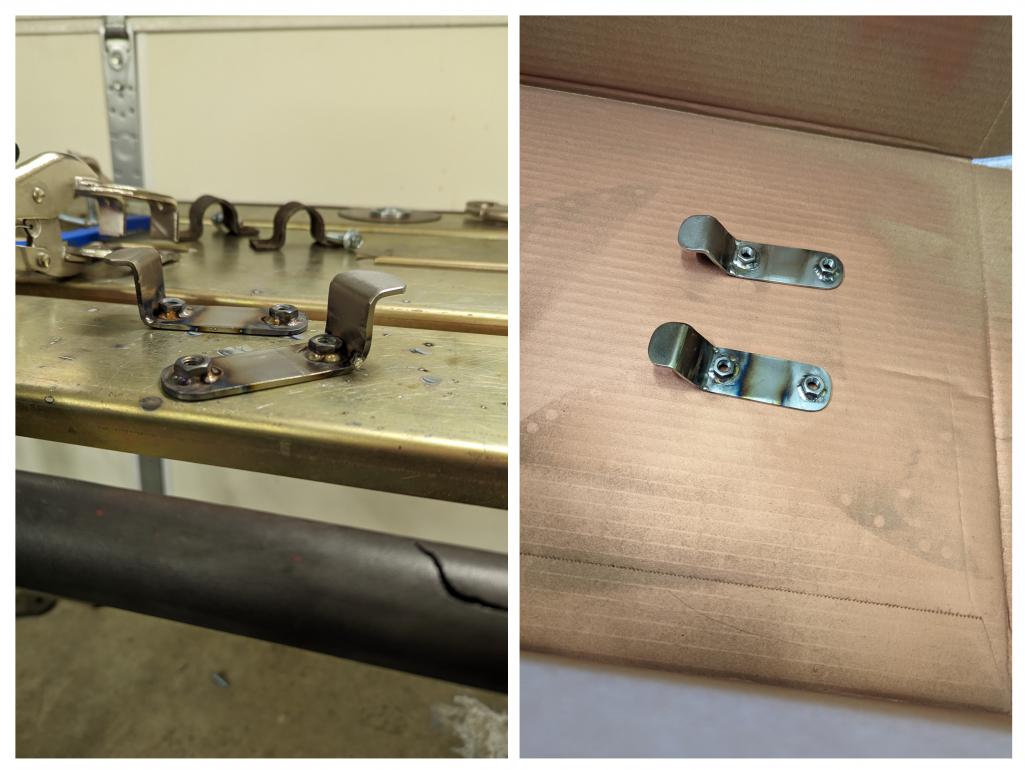
Posted by: Van B Jan 29 2023, 06:01 PM
Then it was just a matter of getting it all aligned and welded on… without too many sparks down the shirt!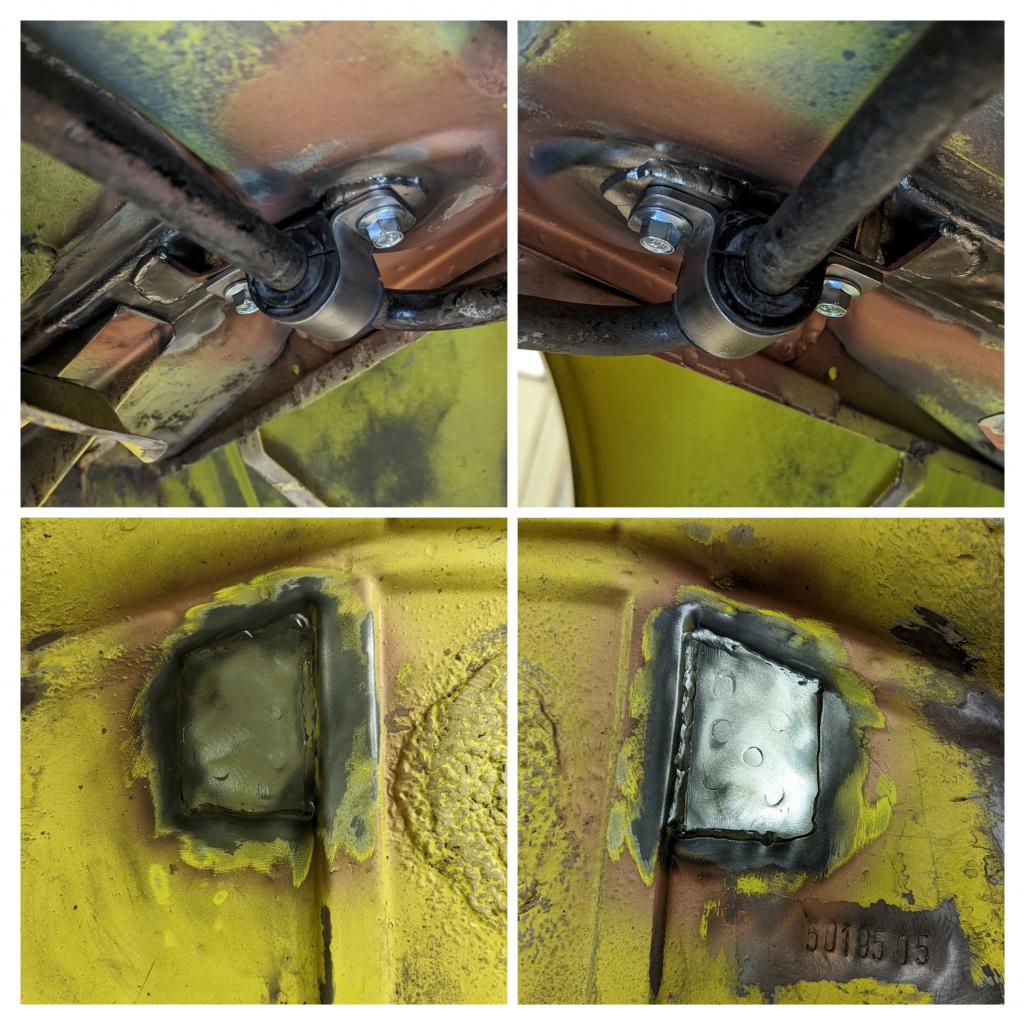
Very pleased overall. But some ziebart kept melting from inside that box section and tried to ruin my welds. Not that I was going for internet famous or anything, but I still wanted to be sure of good tie in and no porosity.
Posted by: Van B Feb 12 2023, 08:56 PM
Ok, so I’m working on adapting my stock 996 front sway bar to the 914. My reasons are varied, some rational, some sentimental, but mostly for the fun of it.
That said, I’d like some critical feedback from those of you who check in on this thread before I start welding.
To start off, here is how I have it mounted to the cross member supports: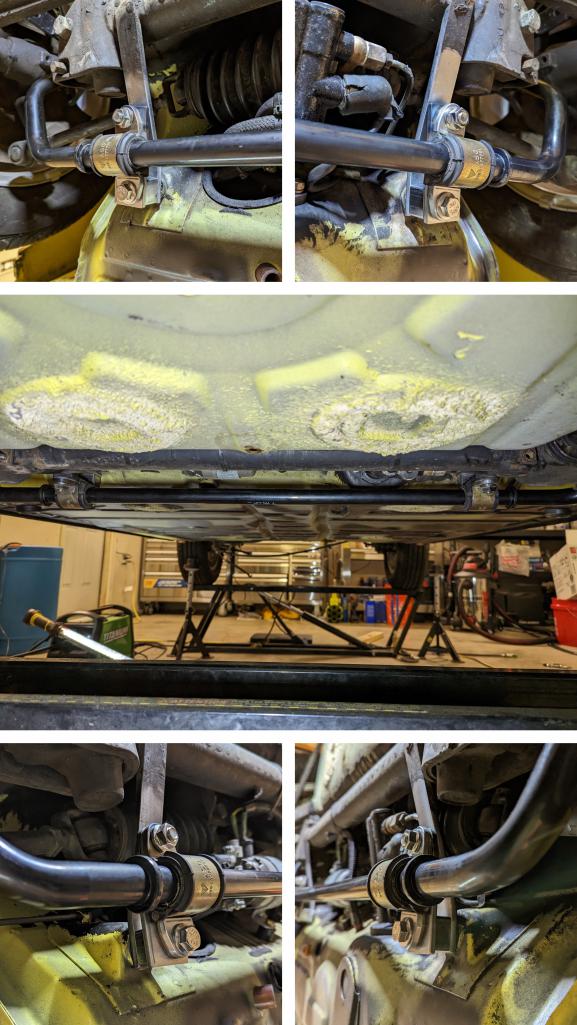
Many things to annotate here. First, I chose to use the support bolt location because it will give the greatest strength against any twisting on the support bar vs welding on an extension to get the original bracket position. On the 996, the mounts are on the outside of the collar, I also thought moving them inboard a bit might soften the bar up a little bit. But on the other hand, I’m not sure it won’t induce bowing on the sway bar and thus, binding.
Next, here’s a preview on the link mount arrangement:
These are volvo sway bar links, but fit great and will make for an easy mount tab on the far end of the control arm for maximum leverage.
While checking clearances, the one limit I’ve found is that when airborne, I will only get one full wheel turn left or right before the tie rod end hits the sway bar shoulder. So, as long as I have one of the front wheels on the ground, I should be good. And, I think it looks like the turbo tie rod ends are a little slimmer… not sure I’ll get full lock at full travel. But, alternatively, I can always avoid jumps!
@http://www.914world.com/bbs2/index.php?showuser=22428 @http://www.914world.com/bbs2/index.php?showuser=10753 @http://www.914world.com/bbs2/index.php?showuser=24231 @http://www.914world.com/bbs2/index.php?showuser=25740
Posted by: wonkipop Feb 12 2023, 09:44 PM
well well well.
thats quite a different approach.
i just have the schtandhardt faktory svay bar that goes through the fuel tank area.
with its absurdly long and small diam drop links!
i see yours will work quite a bit differently.
very short drop link.
i think i can understand the benefits of that but am not a suspension expert.
you would well outqualify me on that front.
i can see how the set up i have keeps me and the steering wheel out of trouble on that front, if the impossible ever happened and the 1.8 got enough suds up to lift off.
i can also fore see a situation where you would get airborne.
Posted by: Van B Feb 12 2023, 10:01 PM
I could swap the link to the inside of the sway bar end and be about the same place as the OE bar, but I want more leverage on this stiffer bar. I’m pretty sure sway bar links are mostly strained under tension which is why a 10mm rod is plenty.
Posted by: wonkipop Feb 13 2023, 12:03 AM
I could swap the link to the inside of the sway bar end and be about the same place as the OE bar, but I want more leverage on this stiffer bar. I’m pretty sure sway bar links are mostly strained under tension which is why a 10mm rod is plenty.
yes its always tricky trying to get my head around the physics of how the forces are working. (in relation to drop links). separating cause and effect in my brain. i always feel that compression must somehow be involved. but i guess it isn't. or the forces are axial and the rod is sufficient. i have been known to do very thin steel columns in some of my buildings and am always amazed at what my engineer will have the nerve to get down to, so long as the loads are purely axial (in either direction). the back links make a lot more sense to me. however your observation regarding air force short combat take offs and climb outs related to sway bar interference possibly highlights the porsche design a little better?
i understand if you go too far on stiffness of sway bar you can end up lifting the inside wheel. i'll leave that for the experts like @http://www.914world.com/bbs2/index.php?showuser=22428 !
i know my RS Clio (fwd) happily lifts its rear wheel all the time if you give it a bit of good cornering action.its got one hell of a sway bar across the rear (as well as the front). but its designed to lift that wheel and transfer all the weight to the outer wheel to stop lurid oversteer.
but i see that what you are after is a particular sort of feel and performance handling enhancement that is beyond the old showroom set up which was actually really an excuse to soften the spring rates for comfort and then dial back some anti-lean characteristics - at least when it came to the rear bar.
 thats probably downselling it a bit but......, its not particularly aggressive as a set up - the stock sway bars.
Posted by: Superhawk996 Feb 13 2023, 12:41 AM
Personally, I’d never accept the tie rod hitting the anti roll bar under any circumstance. Having a tie rod get hung up even momentarily could become catastrophic.
There will be dynamic deflections that haven’t been accounted for.
1) the bar walking side to side even with stopper collars in place at the bushings.
2) Deflection of the bar as it winds up with the outside wheel moving into compression and the inside wheel moving toward rebound.
3) Deflections imparted on the suspension from lateral load.
If a sanctioning body like SCCA were to find something like that interference during a tech inspection, I don’t think it would pass tech.
Posted by: wonkipop Feb 13 2023, 12:54 AM
Personally, I’d never accept the tie rod hitting the anti roll bar under any circumstance. Having a tie rod get hung up even momentarily could become catastrophic.
There will be dynamic deflections that haven’t been accounted for.
1) the bar walking side to side even with stopper collars in place at the bushings.
2) Deflection of the bar as it winds up with the outside wheel moving into compression and the inside wheel moving toward rebound.
3) Deflections imparted on the suspension from lateral load.
If a sanctioning body like SCCA were to find something like that interference during a tech inspection, I don’t think it would pass tech.
Posted by: Van B Feb 13 2023, 12:58 AM
Superhawk, thanks.
1.) Forgot to mention that collars are on order
2.) Compression doesn’t have a clearance issue, but I agree on full rebound.
- I’m lowering the bar mount and measuring the installed size of the turbo tie rod to see if that get me full clearance.
3.) The drop link joints will absorb those with no binding and no interference short of failure.
Basically, copy all on the need for full clearance even at the limit of movement. I’ll see what adjustments I can make.
Posted by: wonkipop Feb 13 2023, 01:17 AM
yeah, get rid of the steering interference.
i enjoy your posts and inquiring mind.
it would be a shame to have it fall victim to an ejector seat malfunction.
i don't know enough about suspension.
nor the theory. perhaps i should since i benefit from driving some good equipment.
however my RS Clio has a rock solid front end.
admittedly its front wheel drive.
but its all incredibly solid.
sub frame. sway bar with no drop links. and in the super duper versions it had a giant front strut external reservoir shock that was like a solid pole.
so impressive that harry of harry's garage and OCTANE fame was driving one as a camera car chasing ferraris and lambos up the alps and was surprised that he could glue himself to their arses. they got away from him on the straights but he was right there again in the corners. drivers of lambos etc were equally surprised they couldn't shake him.
he immediately bought the car. the camera car. and still has it.
so.....i'm not sure about what that means for mid engine cars.
but there might be something to what you are doing.
i'd have to process it.
Posted by: StarBear Feb 13 2023, 08:04 AM
Yep; way beyond my wheelhouse (pun intended).
I have the original setup on mine, but I never go over 60 and most often more around 35 touring around town.
Best wishes! 
Posted by: Superhawk996 Feb 13 2023, 08:24 AM
I know reading books has gone out of vogue but I’m always going to recommend the Fred Puhn “how to make your car handle” book. 
In keeping with the times - this is a pretty good website:
https://suspensionsecrets.co.uk/
Posted by: wonkipop Feb 13 2023, 11:28 PM
here are stock sway bar dimensions i think (?) you were after @http://www.914world.com/bbs2/index.php?showuser=26011
or best as i can measure here in the garage.
sway bar is under fuel tank so i can't do that one but its easy for you to get off your own car if the tank is out.
you can see in photos how the end of the sway bar is forged (or however its done) into a squared section of bar that the lever bar bolts to. 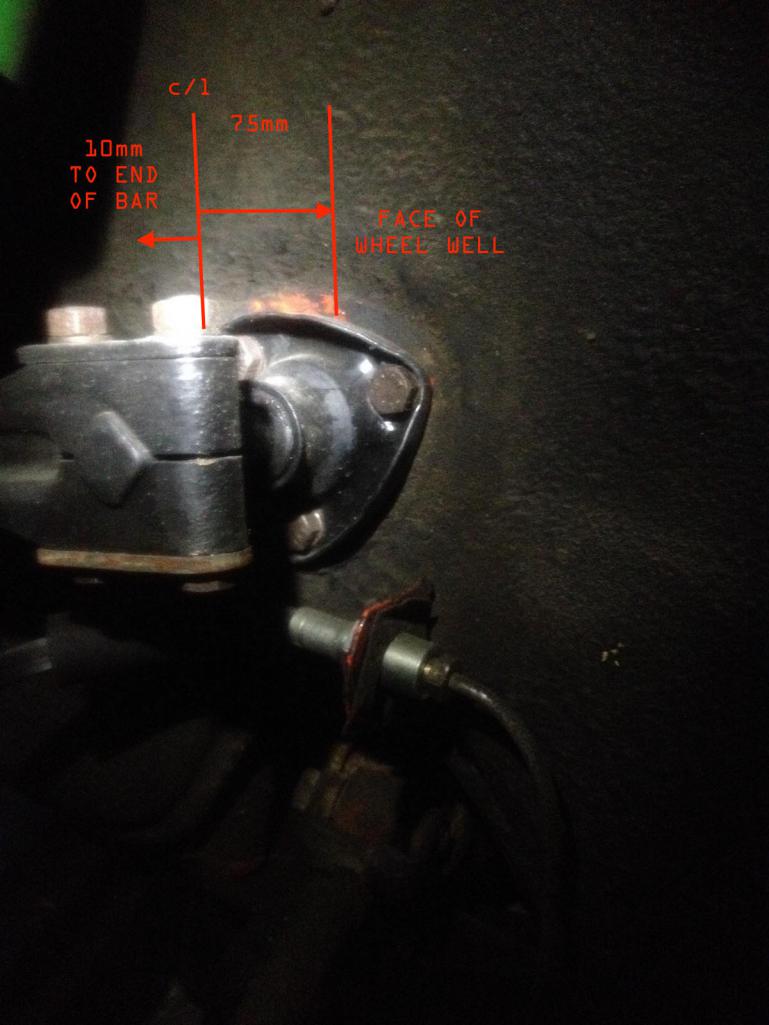
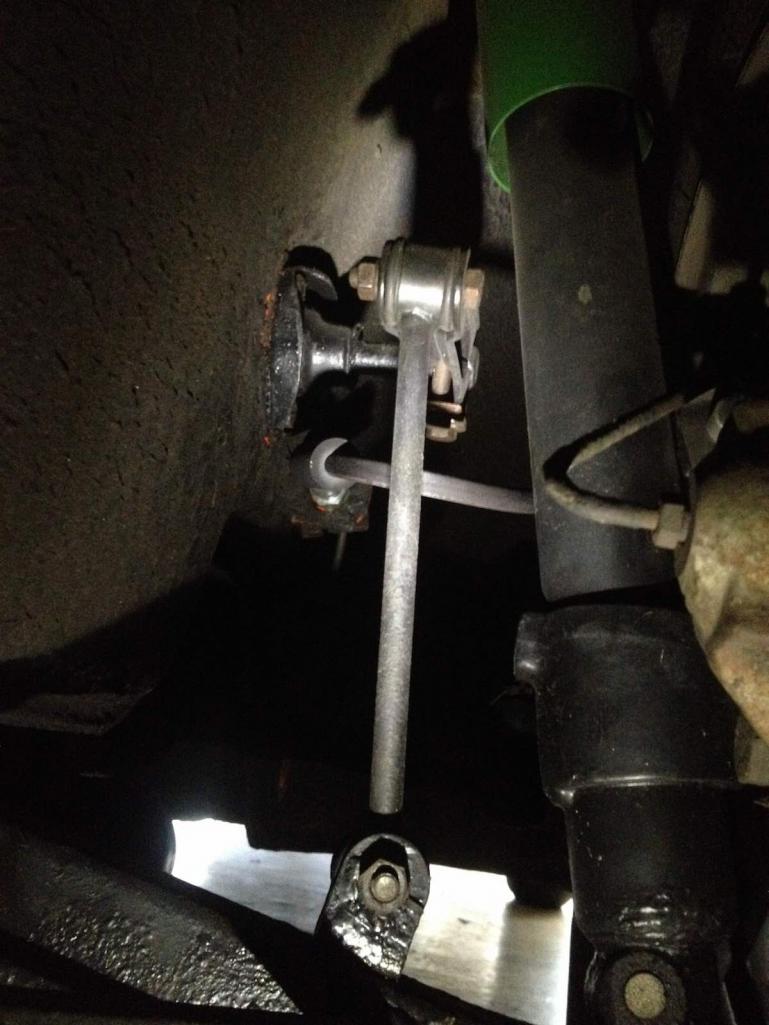
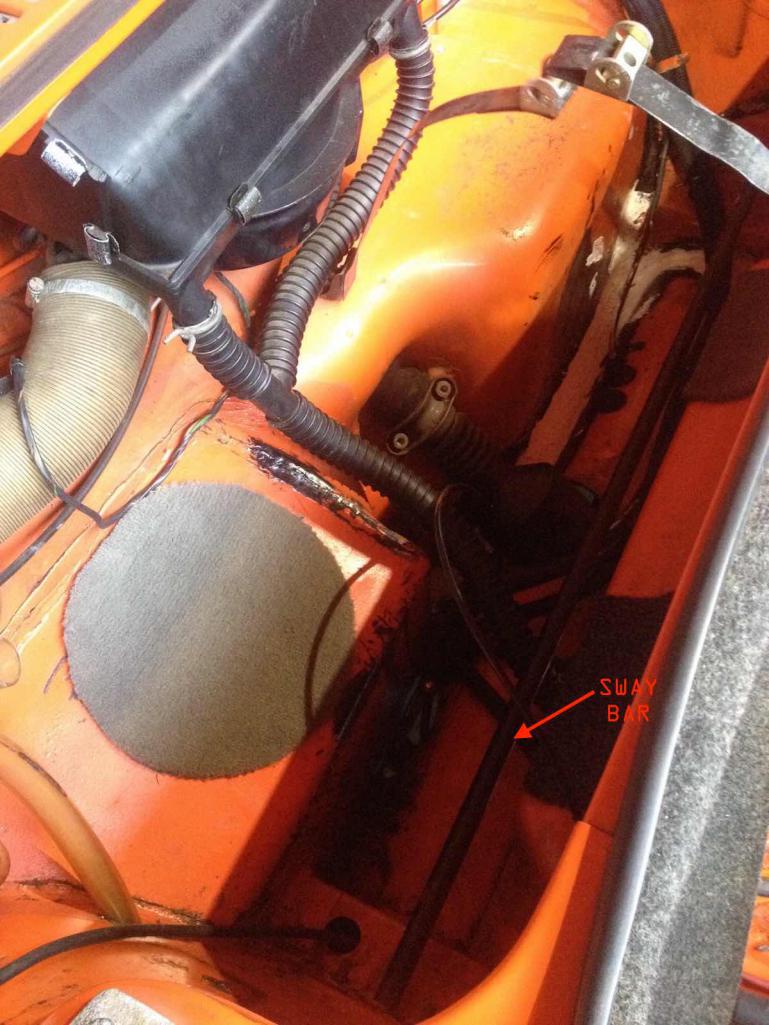
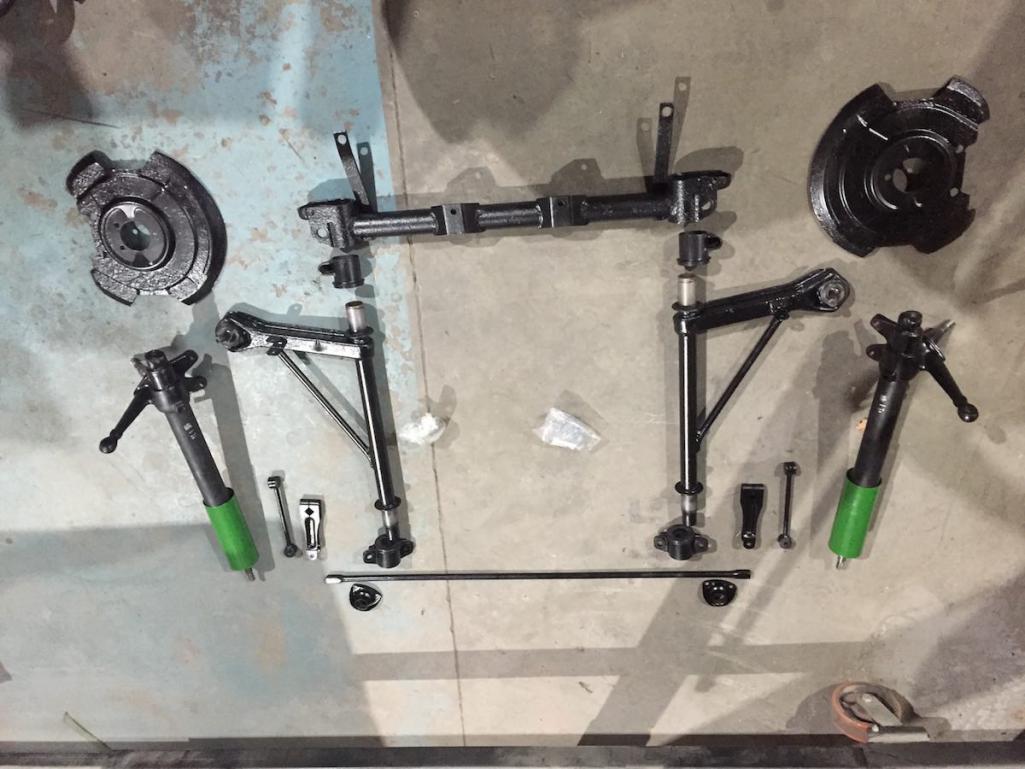
Posted by: Van B Feb 14 2023, 12:33 AM
@http://www.914world.com/bbs2/index.php?showuser=24231 thanks. I’m actually looking for the arm length eye to eye from the drop link to where it attaches to the sway bar itself. And the overall sway bar length as near as you can approximate. I know that might be tough to measure when installed. I’m trying to use the calculator superhawk provided to see torsion differences between what I’m attempting and the OE bar configuration.
Thanks for the help!
Posted by: wonkipop Feb 14 2023, 12:49 AM
the lever arm off the sway bar is 120mm eye to eye.
the eye at one end being the roll bar centre and the other end being the drop link centre.
i can only give you those dimensions above for the sway bar length itself.
it protrudes those dimensions either side of the wheel well. you need to be able to measure deeper down in the wheel well to get the interior length.
no can do with fuel tank installed. but you can and then add the 75mm each end.
i would call the square ends part of the sway bar. allow a small amount for inner wheel well thickness and you have the length of the sway bar.
i hope my photo above in post before makes sense. i am measuring the distance out from the wheel well to the cl of the lever arm. all in all the sway bar is 85mm long from the wheel well out. same other side. add interior dimension across the hole that swallows the fuel tank. but lower down than top. you can see where to make the measurement from my photo. can't access roll bar from below car even if i could get myself under it, which i can't. head is too big. bottom panel is in the way.
its fully interiorized man.
Posted by: wonkipop Feb 14 2023, 01:00 AM
realising maybe you are doing some calcs off site.
so here is a very approx dimension on interior dimension of roll bar length measure from top of fuel tank looking at edge of the cavity.
860mm.
maybe add 10mm to account for wheel well walls.
then 2 x75mm each end.
= 1020mm overall length.
good as 1000mm long give or take. the good old metre.
Posted by: Van B Feb 14 2023, 05:34 AM
@http://www.914world.com/bbs2/index.php?showuser=24231 thank you kind sir. I think I can use your outside the wheel well numbers to reconfirm your length estimate. And your lever arm numbers are exactly what I need.
Posted by: Van B Feb 17 2023, 09:35 AM
@http://www.914world.com/bbs2/index.php?showuser=24231 @http://www.914world.com/bbs2/index.php?showuser=22428
Thank you both for your help, looks like I’m definitely in the window for stiffness! First screenshot is the OE 914 setup, second is the 996 bar.
I think it’s likely the 914 is stiffer than predicted here. As Superhawk pointed out to me, the arms won’t flex like a single piece bar and are a clean 90 deg transition (no diff between x and z). For the 914 length, I measured the space under the tank, measured metal thickness at the pinch welds, and used wonkipop’s wheel well measurements.
Posted by: Van B Feb 17 2023, 09:37 AM
Now I’ll continue working clearances and post up for further face shots from the tribe here lol! 
Posted by: Superhawk996 Feb 17 2023, 04:27 PM
I like it! Good attempt at a baseline understanding of what the new proposed bar is in comparison to the stock bar.
In the on-line calculator change the z dimension to something small like 0.1 and it bumps the stiffness to about 169 so not a huge change there.
Just as the online estimator will underestimate the stock bar, it will probably slightly overestimate your 996 bar which I think has a pretty substantial hump in the arm to clear the LCA.
Overall looks pretty reasonable as a starting point. Better than what my first gut instinct thought!
Posted by: Van B Feb 17 2023, 05:03 PM
I may be at a dead end because of control arm clearance…
The pics http://www.914world.com/bbs2/index.php?s=&showtopic=361191&view=findpost&p=3057685 show a 20mm offset. But to clear the tie rod end at full droop and full lock requires 50mm! Which means the sway bar is the lowest thing on the car and couldn’t possibly be covered by a modified pan.
I’m trying to be pragmatic about this, but I’m also really bummed that it doesn’t seem like a reasonable mod at this point.
Posted by: Superhawk996 Feb 17 2023, 05:47 PM
Raise spindles to move the tie rod end up in Z? Raised spindles are generally a good thing to help with bump steer and the lowered front ride height stance that so many like.
Just a thought
Alternatively there are the Elephant Racing bump steer spacer thing-a-Mabob - let me find the link.
Nope I’m a dope - that is moving the tie rod end down instead of the spindle going up which effectively brings the rack and tie rod down. Doh! Both are in wrong direction to improve clearance you need. 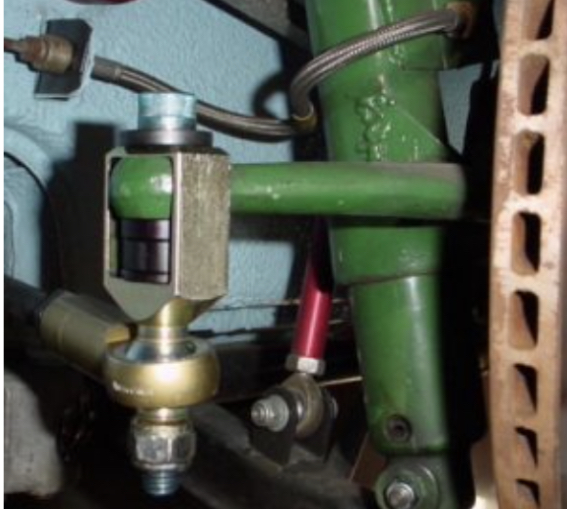
Wait what’s wrong with me trying to get you to keep that 996 bar over the elegant stock bar package. 

Posted by: Van B Feb 17 2023, 06:04 PM
Lol! Because the challenge is what it's all about! I'll post some pics when I get it mocked up with clearance.
Posted by: Van B Feb 19 2023, 05:58 PM
While I continue to waste money and time on this front sway bar idea, I thought I would make some progress in other areas.
Got my new fuel tank retrofitted and painted: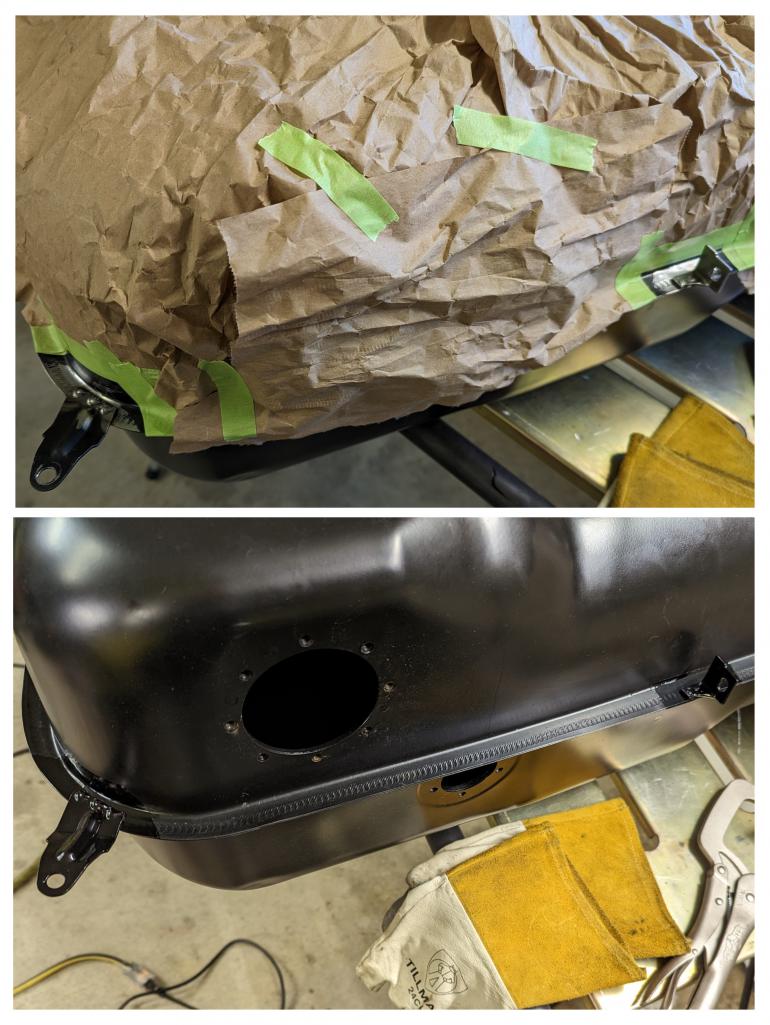
Posted by: Van B Feb 19 2023, 06:02 PM
Looking at the old tank, it faired very well for a 50yr old piece. It definitely spent some time sitting with a very low fuel level. And I think it’s interesting that the most aggressive corrosion is below the fuel line and not in the condensate region.
I’m thinking to borrow an idea from the marine (and aviation) world and add an anode to the new tank.
Attached thumbnail(s)
Posted by: Superhawk996 Feb 19 2023, 07:21 PM
You could do that …. But you’ll be long gone before anyone can appreciate it. It made it 50 years without one. I’ve seen Model T’s that still had the original tank! Don’t see why a properly cared for 914 tank won’t make it to 100 too!
Posted by: Van B Feb 19 2023, 08:25 PM
I know you’re right, but I can add it in for $20 and treat it as a 20yr experiment lol. $1/yr science sounds fun, right?
Posted by: Superhawk996 Feb 19 2023, 08:43 PM
I know you’re right, but I can add it in for $20 and treat it as a 20yr experiment lol. $1/yr science sounds fun, right?
Nah - you need this - get ahold of OP for this post and I’m sure the two of you can quickly come to terms for about $20
 now that’s the way you do a science experiment!
Posted by: wonkipop Feb 20 2023, 02:06 AM
Looking at the old tank, it faired very well for a 50yr old piece. It definitely spent some time sitting with a very low fuel level. And I think it’s interesting that the most aggressive corrosion is below the fuel line and not in the condensate region.
I’m thinking to borrow an idea from the marine (and aviation) world and add an anode to the new tank.
fuel tank explains the over-all good state of preservation of your car.
further evidence of a good catch.
it very evidently spent a good period of time holed up in a garage someplace.
its a strange thing all these 1.8s that for whatever reason seemed to get put away,
and have recently resurfaced. who would have thought that 30 years ago!
to encourage your sway bar experiment further.
in between prepping the sh$tbox 84 thunderbird rear trunk lid and back window area for repaint today (sanding sanding and more sanding, then masking masking masking) i helped mike do a caliper rebuild and replace with brake bleed on the workshop owner's old 80s merc station wagon. a totally tasteful, anonymous vehicle (gutless to boot - 4 cylinder). i couldn't help but notice the wacko sway bar, with drop link that is a psuedo strut etc. the sway bar goes through about mid ht somewhere in the double firewall behind the engine. thanks to you i find myself suddenly paying attention to sway bars and all the different ways the germans squeezed them in.
i conclude your ideas are nothing if not german!!!
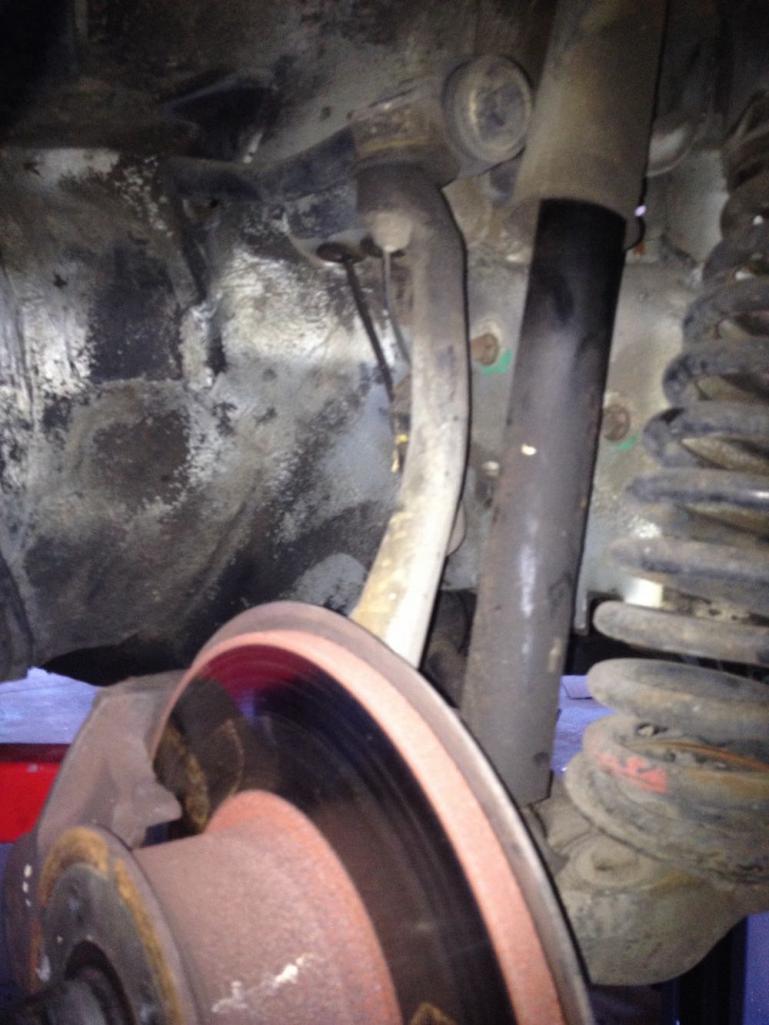
Posted by: Van B Feb 20 2023, 03:51 PM
Commitments have been made today. But, this also means I will need a new fuel tank if I ever decide to run the car on anhydrous methanol… that magnesium anode won’t like it one bit.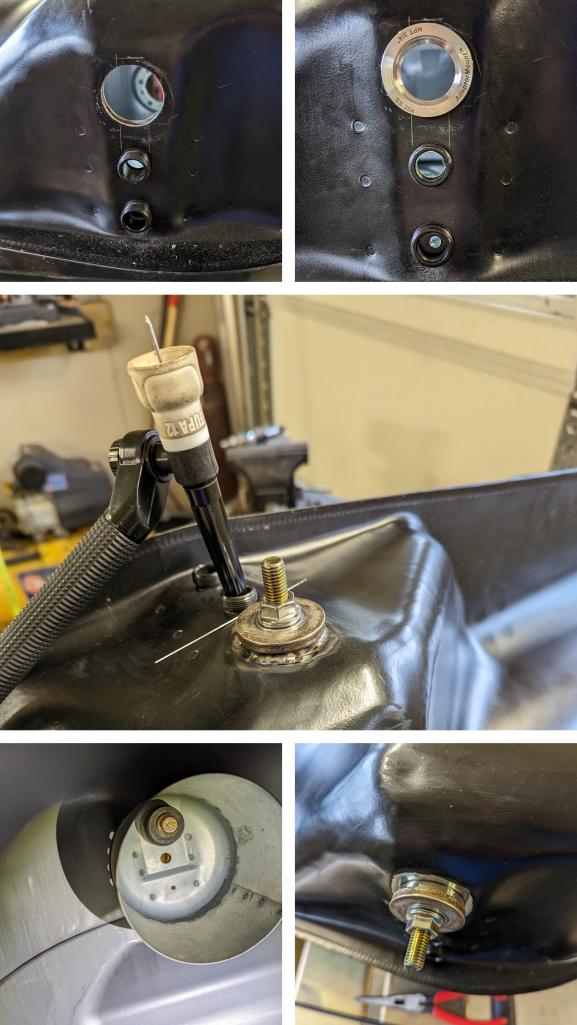
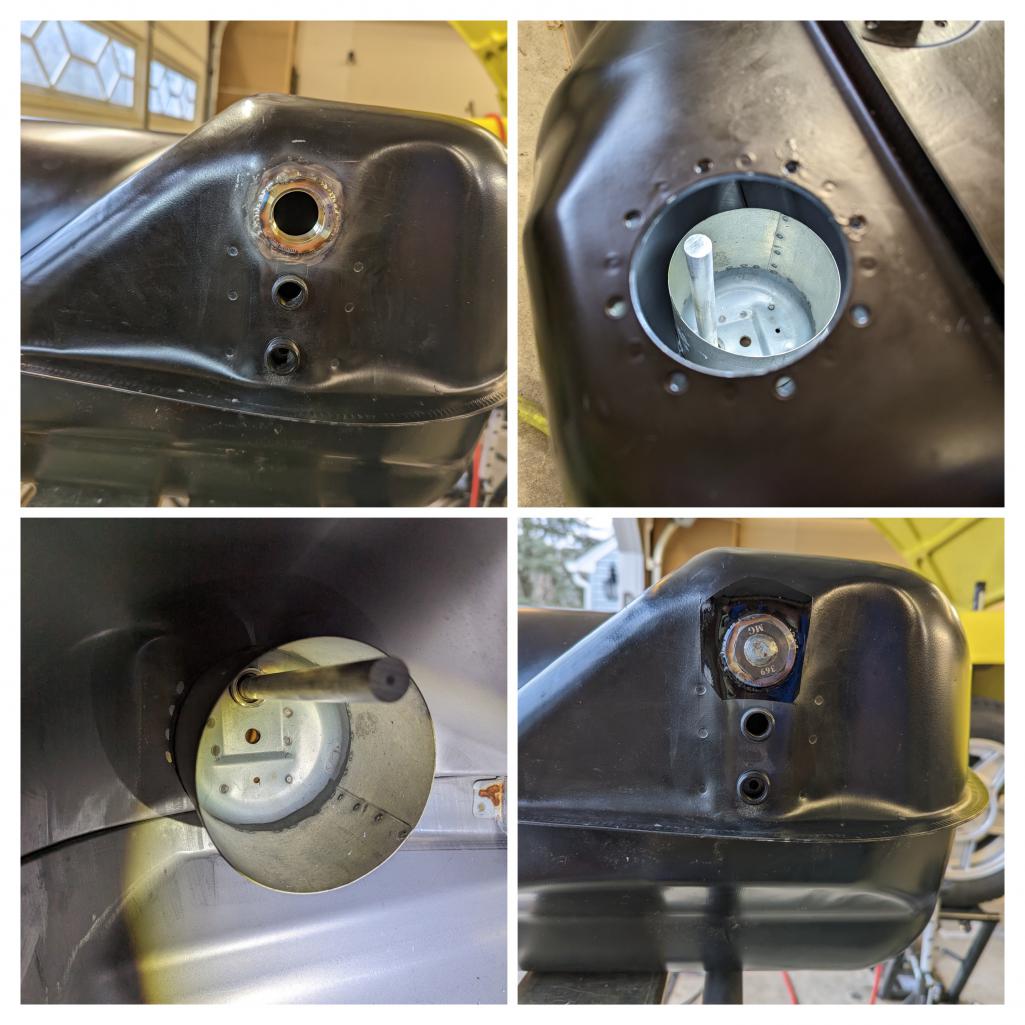
Posted by: Van B Feb 20 2023, 03:54 PM
BTW @http://www.914world.com/bbs2/index.php?showuser=22428 … I couldn’t even find that little device on Google anywhere… something tells me it never caught on lol!
@http://www.914world.com/bbs2/index.php?showuser=24231 , I’ve ordered a sway bar taken off an RS America… might be the closest I get to ever owning one if it works out lol!
Posted by: wonkipop Feb 20 2023, 05:28 PM
BTW @http://www.914world.com/bbs2/index.php?showuser=22428 … I couldn’t even find that little device on Google anywhere… something tells me it never caught on lol!
@http://www.914world.com/bbs2/index.php?showuser=24231 , I’ve ordered a sway bar taken off an RS America… might be the closest I get to ever owning one if it works out lol!
964?
america specific model the RS America?
i don't know much about 964s.
other than they love to blow up their AFMs.
and they are quite heavy cars.
apparently there was going to be a 914/924 level model that the 4 wheel drive system and rear engine 4 cylinder was developed for during the 80s but it never happened.
but the 4 wheel drive system ended up in the 964 but beefed up. porsche were committed to going 4 wheel drive. an interesting bit of thinking back then.
Posted by: Van B Feb 20 2023, 05:41 PM
Yeah, we didn’t get the carrera RS here so, they gave us the RS America. Lighter stripped down version with the M030 suspension setup. So, this will be a 22mm bar, but narrower at the hips than my 996 bar. The standard 964 bar is 20mm.
We’ll see how it goes next weekend.
Posted by: wonkipop Feb 20 2023, 06:27 PM
given your fiddling around in the fuel tank region and you have the fuel pump up front already have you picked up that subtlety about the fuel pump having slightly higher flow rate in the 75s after they moved the fuel pumps to front of car.
its in the fuel injection section of the factory manual right up towards the end of the section. they list the fuel pump specs.
i'm thinking previous owner of your car moved fuel pump but left it as a standard 74 fuel pump? not sure what you have got up the front there.
makes sense that the 75s would have run a slightly more powerful pump to get the length of hose up to pressure faster.
i imagine you are going to do the tunnel fuel lines with all this work you are doing.
i wouldn't be leaving the old plastic lines in. although mine were in remarkable condition except for about the last 4 inches or so near where they exit out through the engine bay firewall. from there on they were plastic about to go snappo.
Posted by: Van B Feb 20 2023, 06:42 PM
Affirm. Got some sweet tangerine racing 8mm lines and a two port Bosch. I’ve also modded a 996 fuel filter to use instead of the lawn mower filter the car would normally have.
Now I just have to figure out where to put it. No one seems to make the late model front cover + bracket, and I can’t find one used…
Posted by: Superhawk996 Feb 20 2023, 07:27 PM
BTW @http://www.914world.com/bbs2/index.php?showuser=22428 … I couldn’t even find that little device on Google anywhere… something tells me it never caught on lol!
@http://www.914world.com/bbs2/index.php?showuser=24231 , I’ve ordered a sway bar taken off an RS America… might be the closest I get to ever owning one if it works out lol!
They never caught on because they don’t work. Snake oil. And I hate to say it but putting an anode on the tank isn’t going to work very well either. Not sure how to make the science story short. I guess the best I can say is that without an electrolyte between the cathode and the anode, Cathodic Protection doesn’t work. Gasoline doesn’t conduct electricity and won’t function as an electrolytic cell.

You know . . . A stock bar fits mighty nice.
Posted by: Van B Feb 20 2023, 08:12 PM
No argument there. If it was, then a steel tank would never be an option. But electrons do move, water does get in the fuel, and now the atoms have a feed trough lol. It only needs to work a little bit.
And you act like front sway bars are all over the internet. Unless you are willing to buy seriously worn set up for $600 or a racing setup for $800, you may as well find another solution. Which suits me just fine for reasons previously discussed.
Posted by: Superhawk996 Feb 20 2023, 08:39 PM
Duplicate
Posted by: Superhawk996 Feb 20 2023, 08:40 PM
Don’t kid yourself on price. Used setups change hands regularly for $250-$350. One went recently with all new bushings included as part of the deal.
PMB has the full blown kit brand new at $725 with all new Dansk parts. What you really need is the Elephant Racing set up - I think that one is about $1500!
I fully get you’re in it for the challenge. Carry on.
Posted by: wonkipop Feb 21 2023, 04:08 AM
Don’t kid yourself on price. Used setups change hands regularly for $250-$350. One went recently with all new bushings included as part of the deal.
PMB has the full blown kit brand new at $725 with all new Dansk parts. What you really need is the Elephant Racing set up - I think that one is about $1500!
I fully get you’re in it for the challenge. Carry on.
yeah, you know he is going to do it @http://www.914world.com/bbs2/index.php?showuser=22428 .
and he will succeed.
i'm looking forward to the reports on improved handling.
momentary airborne characteristics.
controllability when the wheels hit the deck again etc.
you motorcycle guys! i've never had the guts to get on one and go fast.
but my business partner is one of you nutcases so i kind of get it.
Posted by: wonkipop Feb 21 2023, 04:23 AM
Affirm. Got some sweet tangerine racing 8mm lines and a two port Bosch. I’ve also modded a 996 fuel filter to use instead of the lawn mower filter the car would normally have.
Now I just have to figure out where to put it. No one seems to make the late model front cover + bracket, and I can’t find one used…
about 30 years ago a former boss of mine also had a 914 he bought in from california and converted to rhd. i still see that car as another guy in the 356 register has it.
ex policeman now retired. he likes it very much and drives it hard.
as i recall my old boss made a fuel pump cover out of an "orange cake baking tin".
sure enough when i saw it recently, there it was, still there.
these used to be commonly available in australian supermarkets for all the old ladies to use to bake orange cake loaves. he drilled a hole in the panel that blanks off the fuel tank from the trunk for the fuel lines to come through, fixed the fuel pump to the face of the panel on the trunk side and then screwed the orange cake baking tin over that.
easy access to fuel pump from trunk interior.
i copied him in my buildings to do VW inspired door handle receiver recesses so i could position doors hard into corners and let the door close flat agains the wall.
if you can find these in america you could adapt it as a fuel pump access cover?
in australia they were made by a company called "willow".
Posted by: Van B Mar 14 2023, 08:02 PM
I’m about to be back on the underside front sway bar adventure, but I took a diversion from my fuel pump relocation diversion to fix the brittle cracked drain tubes on my airbox. Some roughed up copper fittings, a little reaming in the drain stubs, some epoxy, and presto! Deionizing drains lol!!!
Attached thumbnail(s)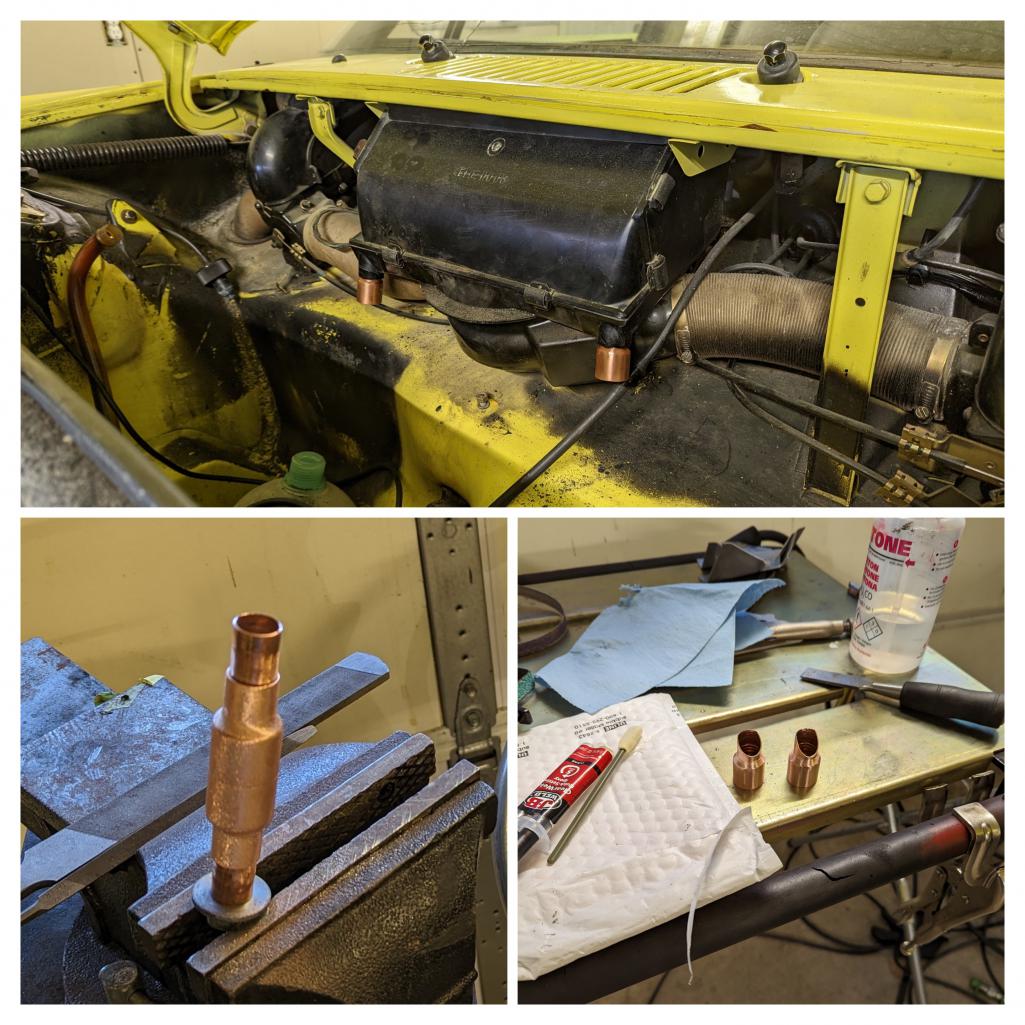
Posted by: Van B Mar 26 2023, 07:51 PM
Underbody front sway bar project is finally on a vector for success. I had to give up on the 996 bar. But an Addco bar proved to be a cost effective option and still allows me to use modern drop links. This one is a 19mm solid bar and specs out very close to what we calculated for the OE bar previously.
I’m going with the front mounted orientation as it is really the only way to avoid clearance issues… unless I want to develop a bar from scratch. But, I have talked with Addco and they are willing to make me a hollow bar if I want. So, I’m going to be thinking about it, of course.
The front trunk reinforcement turned out to be a good opportunity to deal with some rust spots too
Attached thumbnail(s)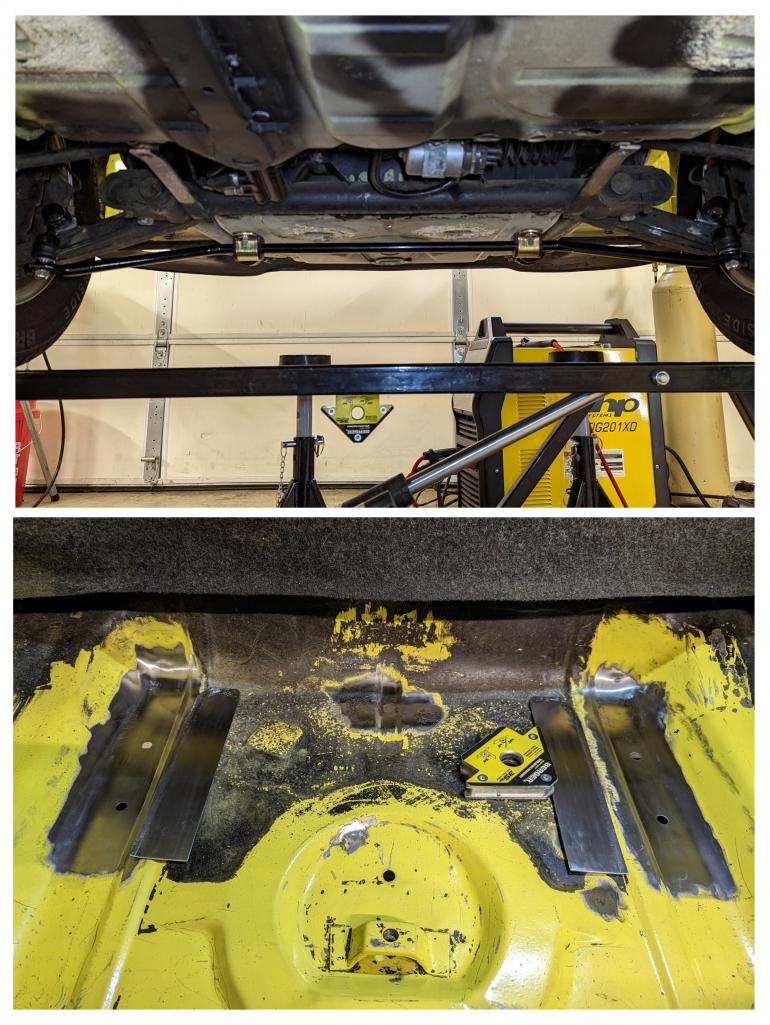
Posted by: wonkipop Mar 27 2023, 01:39 AM
noice, very noice.
------
guess who came into the workshop today?
the glasurit man. the one who gets the real stuff.
he was in to discuss paint strategy for a lancia fulvia.
interesting bloke. he is a pom. quite a character.
he reckons they have dropped manufacture of a whole lot of yellow tinters.
(not that yellow tinter is necessarily yellow paint in the end but......)
he reckons the ukraine war has upset things. apparently a number of the tints were sourced there. (eastern europe still is happy to deal in poisons which a lot of these old paint ingredients are). problems. dropping lines of colours left right and center.
he is relying on his own (now getting old) stock of tinters for some desperate folks. which he reckons are getting close to borderline to be able to mix up some classic colors.
it was an interesting conversation.
i did ask him about porsche 914 color - saturn yellow. told him it might be listed under VW and the year 1974. he said he would look into it and ring mike back if he could find out current info.
Posted by: Van B Mar 27 2023, 07:10 AM
POM = Redcoat, right?
Anyone who prints the queen on their money is suspect in my opinion lol!
I may have actually found a place in Dallas, TX that still sells and stocks 22 line. My initial conversation is promising.
We'll see if I start to gather momentum soon, but maybe this summer I can undertake that challenge. I've been so pleased with the performance of my "Doney Kong" copper manifold that I decided to pull the trigger on a proper 3M spray gun setup for both paint and undercoating.
Once I get this sway bar setup complete, it will finally be time for suspension tear down.
Posted by: wonkipop Mar 27 2023, 02:34 PM
POM = Redcoat, right?
Anyone who prints the queen on their money is suspect in my opinion lol!
affirmative to both.
though pom = all limeys and not restricted to 18th century military personnel.
the queen is dead, the punce is now on the lucre, even less trustworthy.
good news re 22 line potential in the former american colonies.
its definitely being turned off according to the p/l/rc.
Posted by: Van B Apr 23 2023, 11:43 PM
Work has been brutal (my real job) and my progress on the car was rapidly approaching zero, but Ive managed to finalize my underbody front sway bar. I know a few of you will just wonder why I didn’t go with the OEM setup, but you’ll have to add that to your list of unanswered questions lol…
Inside the trunk, I did a base layer reinforcement of 16ga steel; hammered the edges enough to follow the curve. I wanted to distribute pressure over the widest area I could… and maybe even transfer some load into compression of the vertical sides.
Attached thumbnail(s)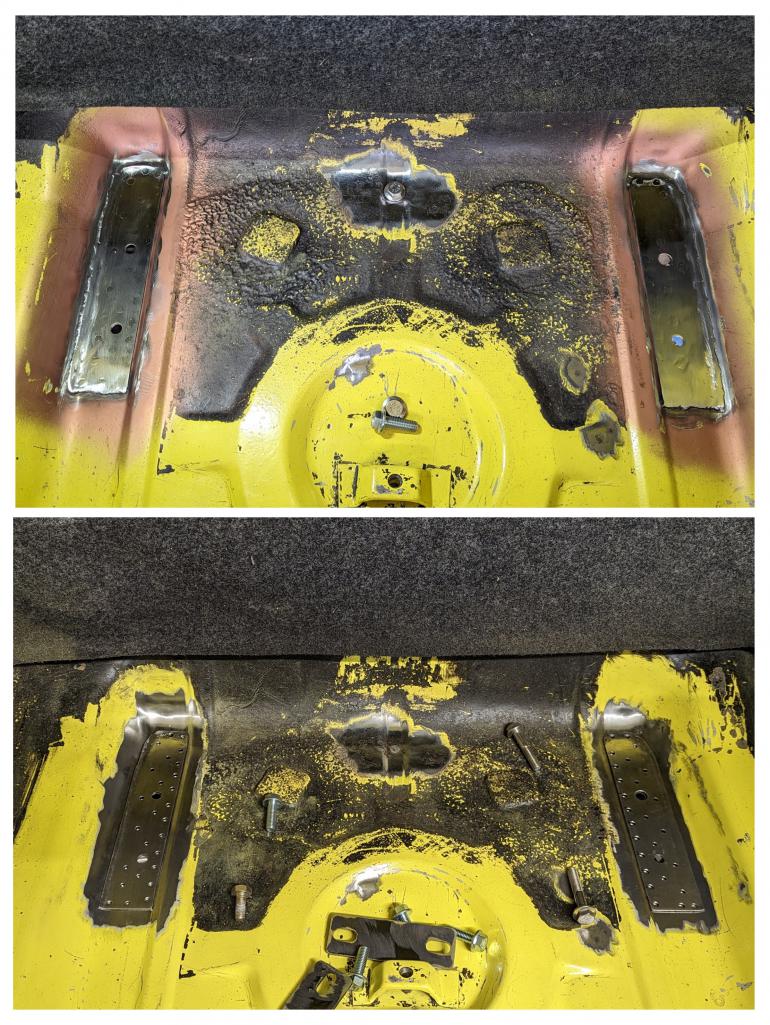
Posted by: Van B Apr 23 2023, 11:45 PM
Then I topped it with 1/4” plate to ensure I have no distortion or flex at the mounts. Stitch welding that much on a low heat setting took forever, and just couldn’t be made pretty like a single bead, but I did avoid warping.
After several dry fits, I was inspired the box wrench I strained to reach while I worked the ratchet underneath. Thus, I cut some sheet metal into a dog bone shape and welded the bolts into a handy removable single part. Made it low profile so it wouldn’t rub the spare tire.
Attached thumbnail(s)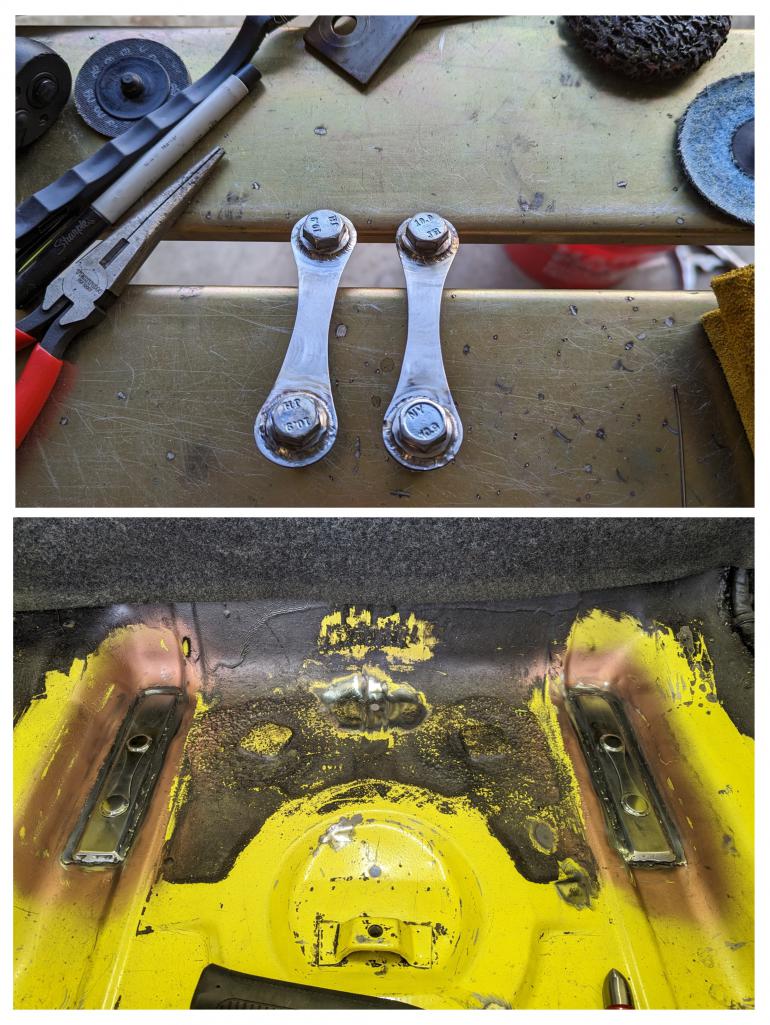
Posted by: Van B Apr 23 2023, 11:51 PM
And as a final touch, I got some CNC aluminum brackets. All in all, I’m pleased with the result. Modern drop links will ensure no binding and should give a long life. When I pull the control arms, I’ll finalize that mount and consider moving them out a bit more. I want to get at least 75% of the arm length to work the sway bar. If anyone knows the distance from centerline pivot, to the OE link mount, I would appreciate the reference.
Attached thumbnail(s)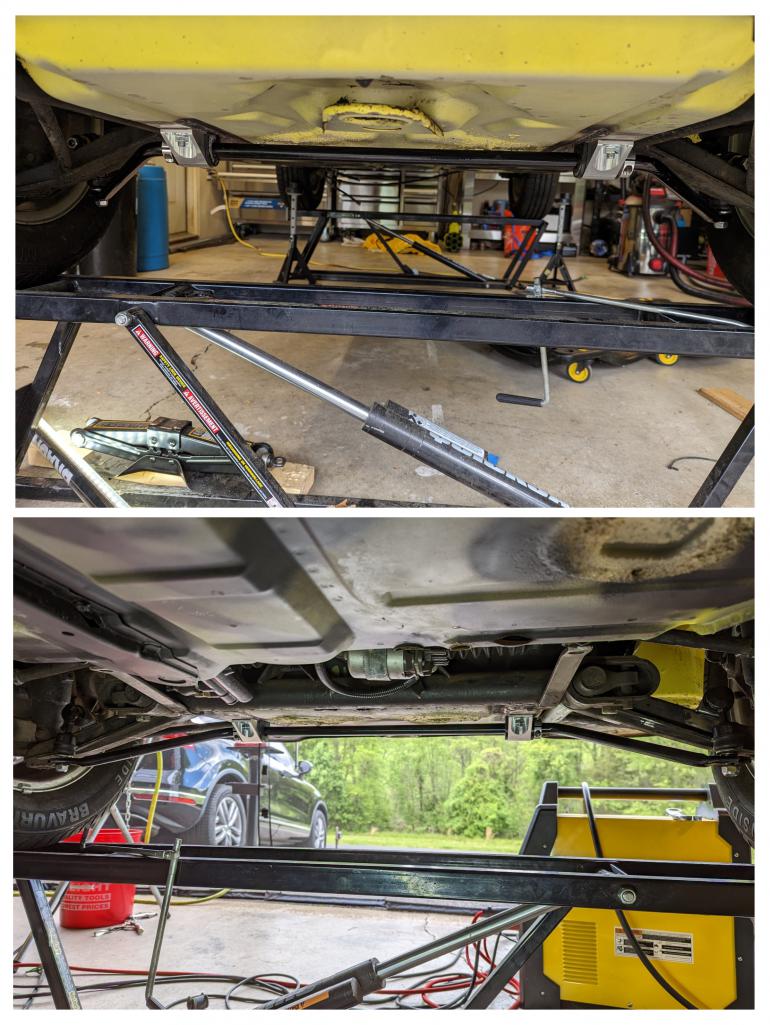
Posted by: wonkipop Apr 24 2023, 07:39 PM
175mm from c/l of torsion bar to c/l of drop link mount.
sway bar mounts look good.
be interesting to find out this works out when you are back on the road
Posted by: Van B Apr 24 2023, 09:02 PM
175mm from c/l of torsion bar to c/l of drop link mount.
sway bar mounts look good.
be interesting to find out this works out when you are back on the road
As always, thanks @http://www.914world.com/bbs2/index.php?showuser=24231 . I’m looking forward to that day. I’m sure it will be better than no sway bar, but the real test will be comparing it with OE sway bars like you and @http://www.914world.com/bbs2/index.php?showuser=10753
Posted by: Van B Jun 4 2023, 08:45 PM
I had hoped to post up the results of my fuel pump and filter project, but while working on it all, I discovered the dreaded tunnel rust
That leaking master cylinder I replaced last year apparently had been leaking bad for a while (DAPO) and the fluid worked its way through the tunnel.
Obviously I wasn’t expecting this and had to come up with a plan for what must be the most difficult rust repair known to the 914 world.
I decided to go full send.
I bought a chemical resistant garden sprayer… thanks COVID for making such products enter the marketplace lol…
Anyway after about a gallon of evaporust and a dozen iterations of spraying a pressure washer through the tunnel and catching the flood with a shop vac, I got a pretty impressive result!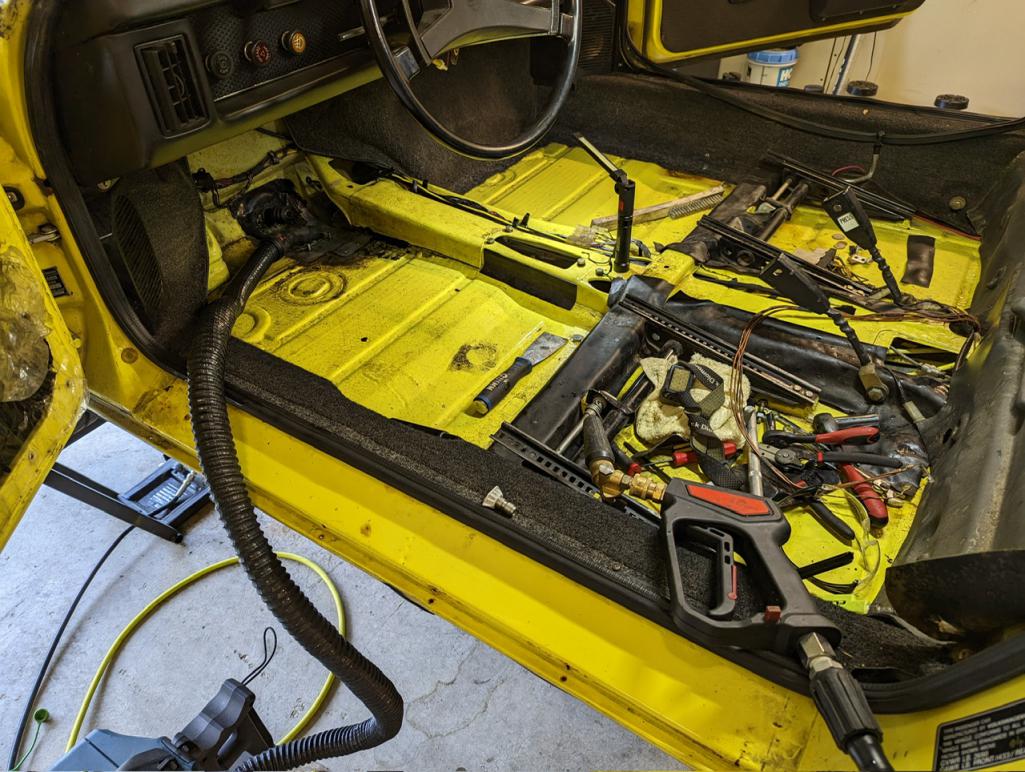
I forgot to take a before photo… mostly because of the sheer trauma and panic lol, but you can see on the right side of this pic what the whole tunnel looked like, and worse.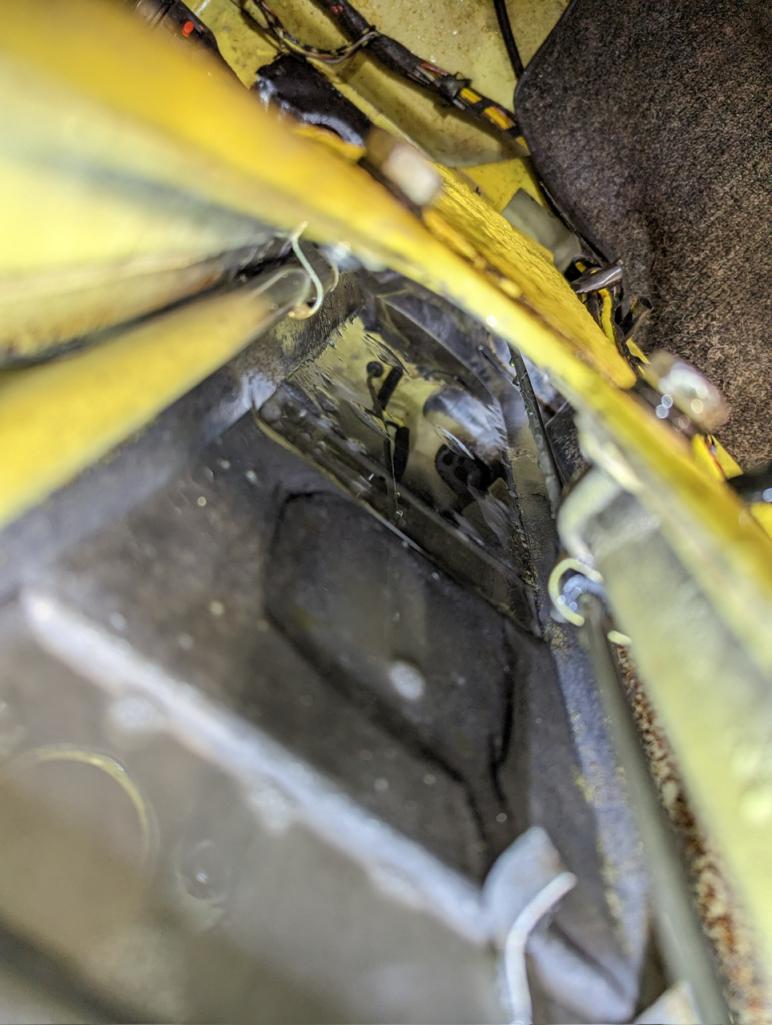
Finally I sprayed some phosphoric acid to convert what was left.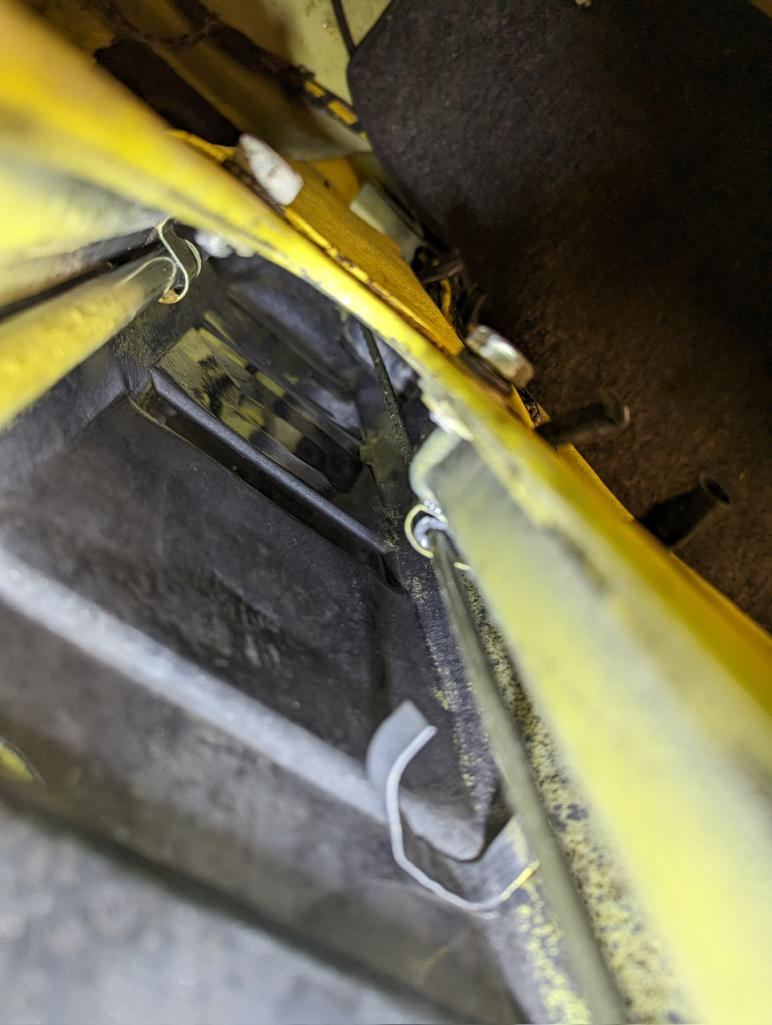
After it all dries, I’ll spray some phenolic resin and from eastwood and then some epoxy sealer just to be sure…
Posted by: wonkipop Jun 5 2023, 03:42 AM
well you might be suffering corrosion trauma (hey - it is a 914) but i am looking at above tunnel surfaces and observing a highly intact car. all those stuck on vinyl pieces on the floor just like they are supposed to be....are there. nice.
bonus - gorgeous green/yellow paint on the upper floor pan. original.
Posted by: Van B Jun 5 2023, 06:32 AM
Thanks wonki. That's an important reminder.
What's frustrating with all these trouble areas is that they're all preventable with proper maintenance and repairs. Overall, I've managed to catch everything before it went real bad.
Soon, I should be back on track. I'm real close to starting the chassis/suspension rebuild.
Posted by: wonkipop Jun 5 2023, 03:38 PM
if its any comfort i had to get stuck into mine a few years back during recommission when i had the tank out and suspension off. where we had done work on the firewall for RHD conversion 30 odd years ago was showing signs of corrosion initiation! nipped that in the bud.
i love por15 and seam sealer. (not).
its good stuff but jesus get any on your skin anywhere and you are wearing it, its not coming off.
luckily i did not have tunnel trauma syndrome. had a good look in there doing the fuel lines.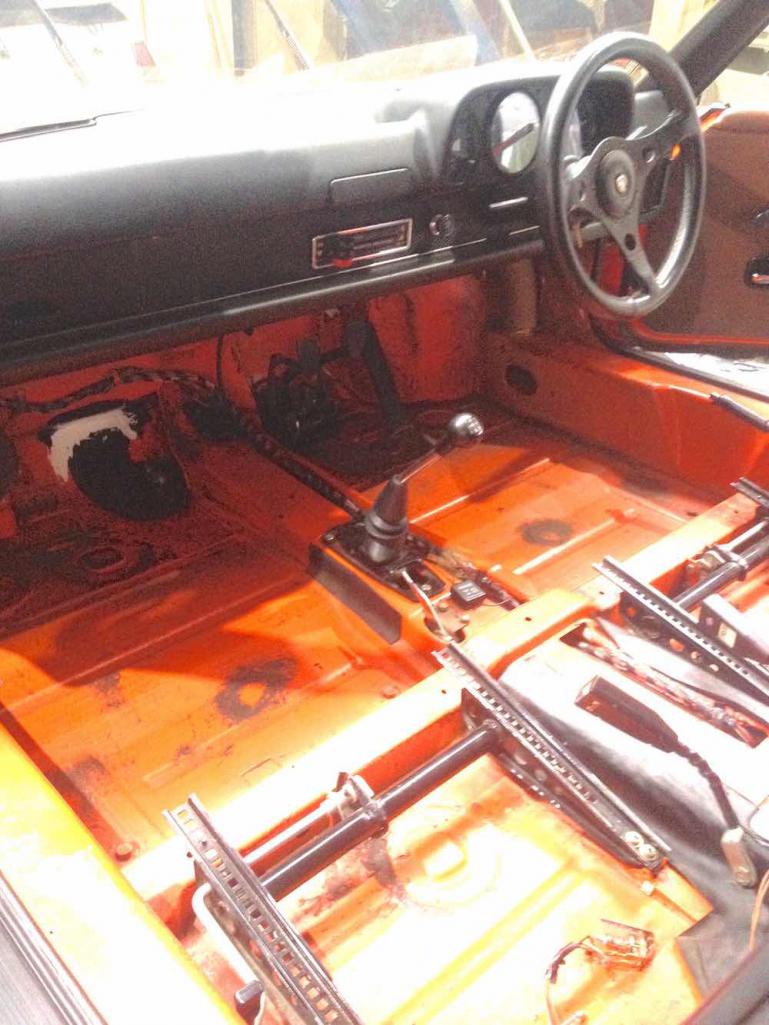
ps. as an aside i ran into the guy who did the conversion mod work on the firewall and pedals etc all those years ago a couple of months back. he is a respected mgb guy a few years older than me.
he is still alive. he was at a hillclimb event the mg club run. he asked me about the car and was very surprised and delighted i still had it. he has a mgb he bought as a twenty year old in the 1970s. getting on to 60 years of ownership.
back in the early 90s he was converting a lot of mgbs shipped out of california and then onselling to japan. a lot easier to convert an mgb than a 914.
Posted by: Van B Jun 16 2023, 10:17 PM
After dealing with the tunnel and some excursions looking at parts, charting the way ahead, I needed some results. A few weeks ago, I got fed up looking at the lumpy stitch mig welding on my underbody sway bar mounts, so I TIG’d it up with many many tiny welds. Then I steam pressure washed the old ziebart off. Today I did the acid phosphate etch and cracked open some of my fancy 3M underbody coating and pressurized spray gun.
This stuff is gonna be awesome, but I’m gonna need more. It’s a rubberized coating, but it dries pretty hard yet stays flexible… borderline plastic like.
Attached thumbnail(s)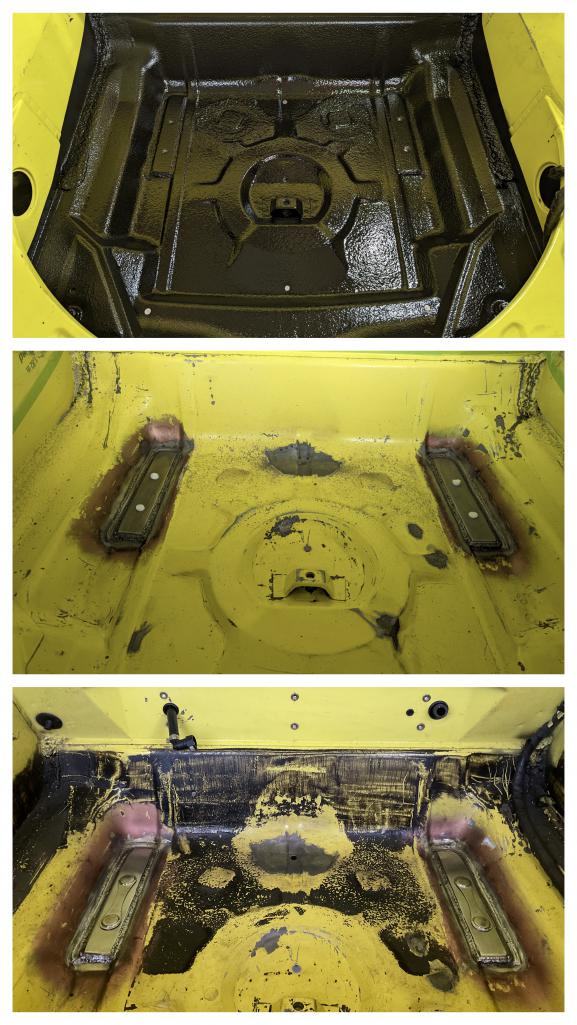
Posted by: Van B Jul 3 2023, 10:30 PM
For the one or two 914world friends I have still following my progress, here some more of what I’ve been up to.
3M seam sealer and rubberized coating on the back wall to seal it all up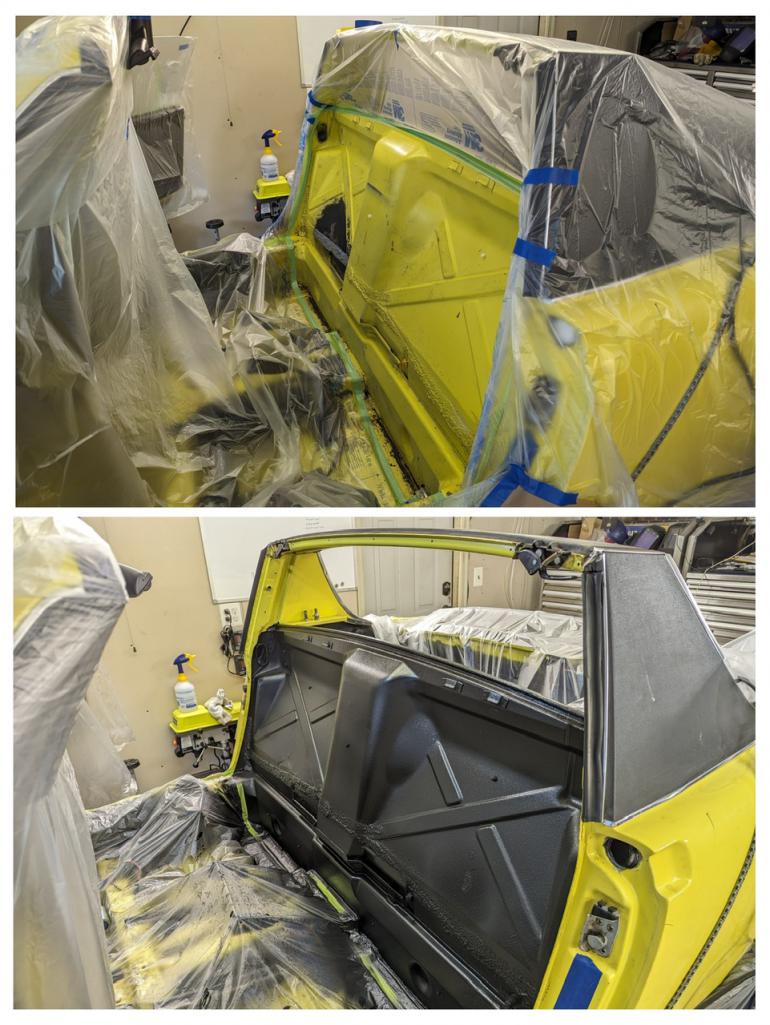
And a pretty hilarious late night find on Amazon… yes “Amazon Basics” butyl sound dampening mats. 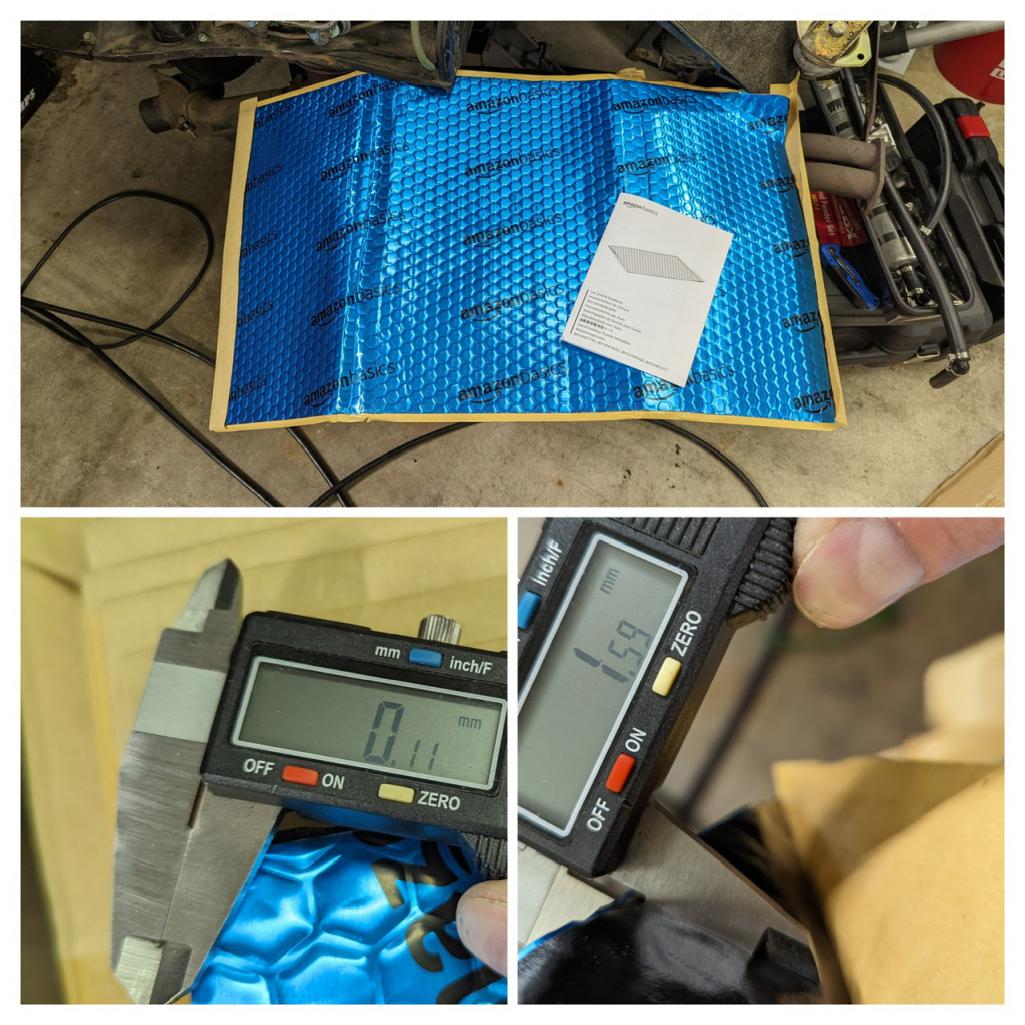
I bought it first because it was too funny to say that I have amazon sound dampening, but also because its crazy cheap. Lets face it, everything out there is private label manufacturers anyway. And this stuff specs out pretty well, right in the middle at 1.5mm butyl with .1mm foil. And it’s priced cheaper than the 1mm stuff
https://www.amazon.com/AmazonBasics-Car-Sound-Deadener-9-Piece/dp/B07XMF3KK5
Final top off is eastwood closed cell foam. All 3 layers together are lighter than the original back pad but far more effective, mostly due to the form factor and adhesion of the amazon butyl, but there is definitely a cumulative effect to cover more frequencies of vibration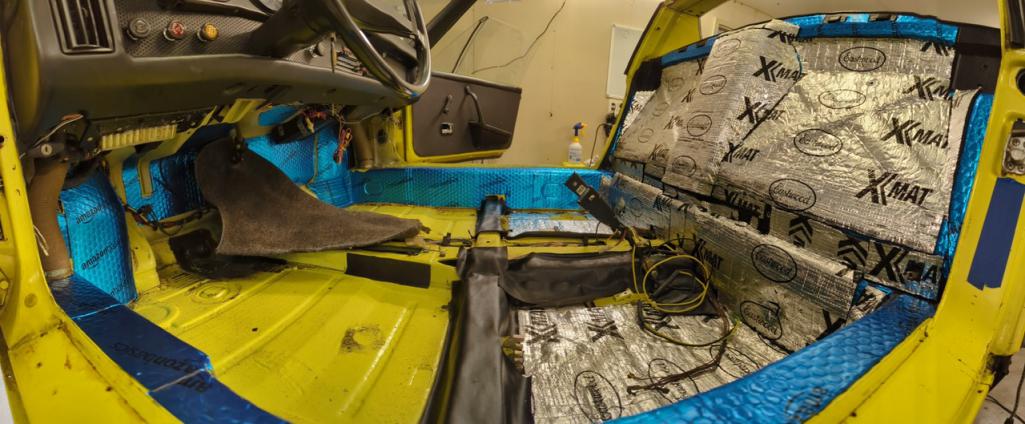
Posted by: wonkipop Jul 3 2023, 10:46 PM
For the one or two 914world friends I have still following my progress, here some more of what I’ve been up to.
3M seam sealer and rubberized coating on the back wall to seal it all up
And a pretty hilarious late night find on Amazon… yes “Amazon Basics” butyl sound dampening mats.
I bought it first because it was too funny to say that I have amazon sound dampening, but also because its crazy cheap. Lets face it, everything out there is private label manufacturers anyway. And this stuff specs out pretty well, right in the middle at 1.5mm butyl with .1mm foil. And it’s priced cheaper than the 1mm stuff
https://www.amazon.com/AmazonBasics-Car-Sound-Deadener-9-Piece/dp/B07XMF3KK5
Final top off is eastwood closed cell foam. All 3 layers together are lighter than the original back pad but far more effective, mostly due to the form factor and adhesion of the amazon butyl, but there is definitely a cumulative effect to cover more frequencies of vibration
might have to save my pennies and get on a plane for 28 hours when you get it back on the road.
i fancy a trip to the smithsonian so i could do a combat drop in for a reco mission.
would put me close to @http://www.914world.com/bbs2/index.php?showuser=10753 's boot camp.
its looking good.
you got me wondering why i have 50 year old rust inducing sound junk still in the jaffa.
Posted by: Van B Jul 3 2023, 11:00 PM
That would be really cool wonki!
I’ve got plenty of hilton honors points that I could contribute to that leg of the trip too!
Overall, I’m really pleased with the amazon stuff and I would recommend it. Get a roller though. 2mm butyl would be nice, but 1.5mm with the undercoat that will be on both sides is a superior solution IMO.
Butyl on foil doesn’t bridge well at all, obviously. So, I ended up doing a lot of cardboard templates.
Attached thumbnail(s)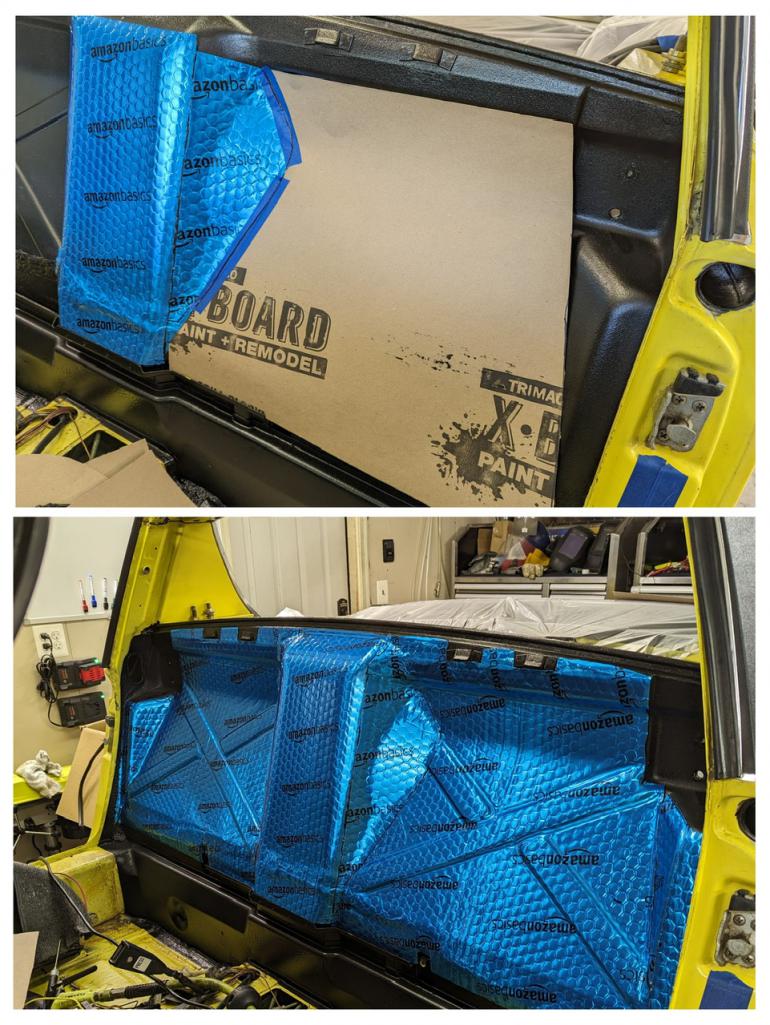
Posted by: StarBear Jul 4 2023, 06:22 AM
That would be really cool wonki!
I’ve got plenty of hilton honors points that I could contribute to that leg of the trip too!
Overall, I’m really pleased with the amazon stuff and I would recommend it. Get a roller though. 2mm butyl would be nice, but 1.5mm with the undercoat that will be on both sides is a superior solution IMO.
Butyl on foil doesn’t bridge well at all, obviously. So, I ended up doing a lot of cardboard templates.
If wonki’s trip happens, let me know! I’m not that far away (in NJ)!
Posted by: Cairo94507 Jul 4 2023, 07:18 AM
I am following your build.
Posted by: tygaboy Jul 4 2023, 07:38 AM
I'm a follower, too. Between @http://www.914world.com/bbs2/index.php?showuser=9712 Michael and me, you've got at least double what you thought you had. Now stop whining and get back on the project!
Posted by: Cairo94507 Jul 4 2023, 07:53 AM
Posted by: Van B Jul 4 2023, 02:10 PM
Oh man, now that I know I’m being supervised the pressure is on. But I guess since I haven’t gotten or responses from you guys, then my decisions are at least acceptable lol… or maybe just morbid curiosity to see if any of them turn into a cautionary tale 
Posted by: Van B Aug 13 2023, 06:33 PM
#dobetter
After laboring through the gummy nasty second layer of paint on the driver side rear quarter, a funny thing happened on the passenger side. I noticed a small section delaminating as I was working with my coating removal disc. So, I pulled on it a bit while it was still warm.
My instinct was correct, the paint was not at all bonded… anywhere.
So, I took a torch and chisel and stripped it like old house paint lol! Unfortunately, I found a terrible excuse for dent repair that was rusting away underneath. Because I have all the records for this car, I know exactly when and who did this “repair”. What I didn’t know until today, was the extent or quality.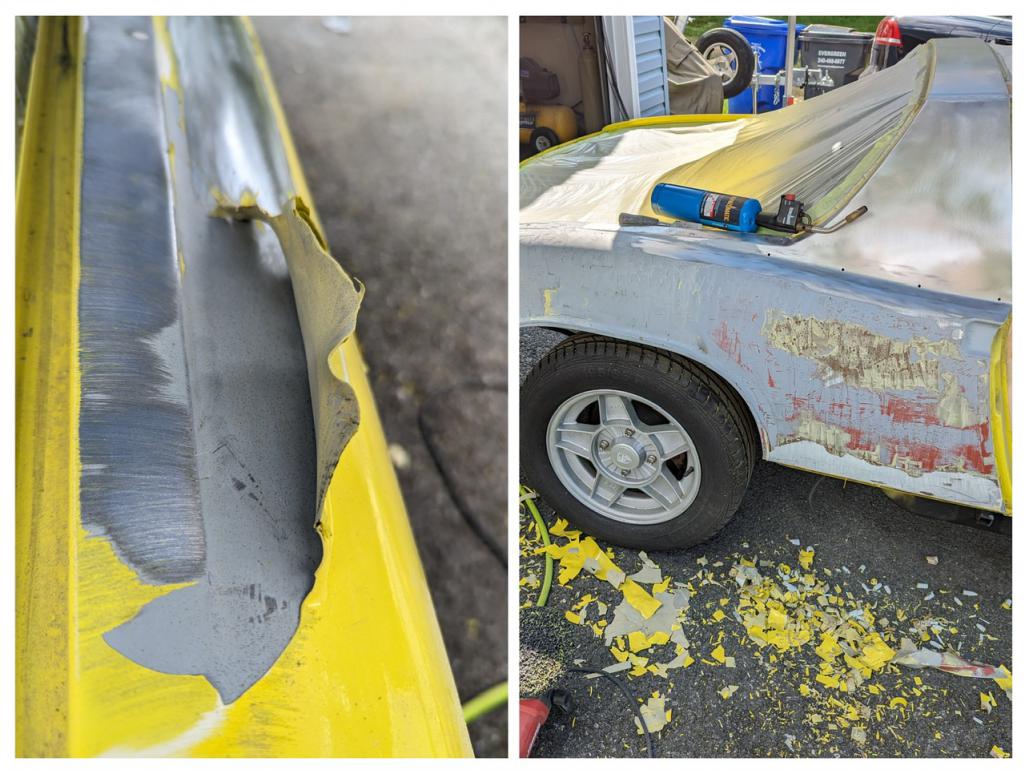
I suppose one silver lining is that this was the fastest I’ve ever stripped the paint off a car lol… and dust free!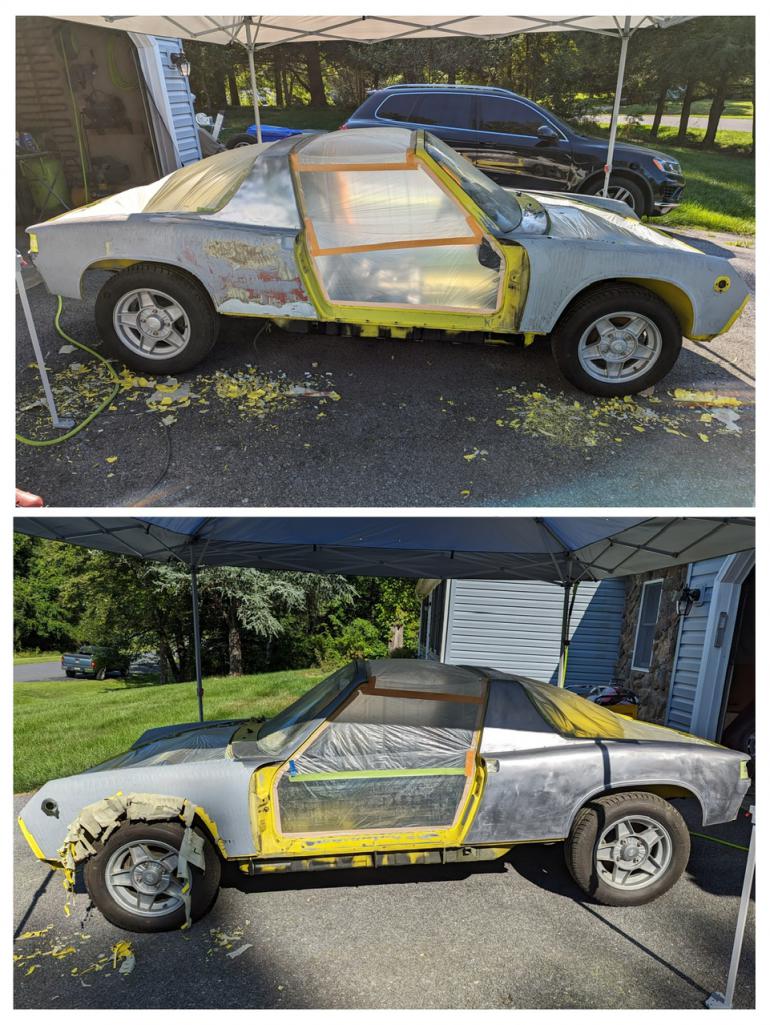
Posted by: wonkipop Aug 14 2023, 03:02 AM
at this rate when i touch down in dc to check out the lunar module in the smithsonian - i won't get a ride. (i'm really going to check out the plywood german flying wing from WW2! and the Bee five two if they have one? )
@http://www.914world.com/bbs2/index.php?showuser=10753 will have to come to the rescue with his bernardsville vicinity original so i can relive my wasted youth enjoying your fine country back in the late 80s.
i shoulda stayed, married the girl and become a citizen.
then i could drop in and help you rip the paint off.
keep going. it will be great.
esp if you can reproduce that fantastic undecideable yellow or is it green.
same as phoenix red or is it orange.
its still a good car despite the minor prang in its distant past of being
i'll be demanding an up close special clearance inspection of an F117 if i have to stand around your car on jack stands drinking a beer.
Posted by: wonkipop Aug 14 2023, 03:20 AM
ps
love the wheels. good look oh yes.
am almost ashamed of my star steelies, but you know.
got to go with the corny VW attempt at sportiness because i was born a nerd, much to my mother's despair.
Posted by: Van B Aug 14 2023, 05:19 AM
Wonki, I can't fathom how many surprises hide in the small, finite space that a 914 fills. But in my case, the answer is still more lol...
Posted by: Craigers17 Aug 14 2023, 05:22 AM
Nice progress......love the wheels!
Posted by: Van B Aug 14 2023, 05:27 AM
Nice progress......love the wheels!
Ha! Thanks buddy! No take backs though!
Posted by: Van B Aug 14 2023, 08:37 AM
keep going. it will be great.
esp if you can reproduce that fantastic undecideable yellow or is it green.
same as phoenix red or is it orange.
its still a good car despite the minor prang in its distant past of being
i'll be demanding an up close special clearance inspection of an F117 if i have to stand around your car on jack stands drinking a beer.
Wonki I noticed that the left and right side photos show the color change perfectly. Bright yellow in the infrared and yellow green in the UV shade. The blue light from the awning definitely helped it slow up on camera this time.
Oh and you'll have to venture westward for a sighting of the few of those still in the air as test mules
Posted by: 76-914 Aug 14 2023, 09:29 AM
Paint delaminating is what lead me to paint my '76 too! I was able to strip the lids and large areas in other spots with a scrapper and a couple of boxes of razor blades. In retrospect I'm glad it happened or I would have missed the  qtr panel repair. What is a coating removal disc Van? @http://www.914world.com/bbs2/index.php?showuser=24231 you might consider adding the Space and Air Museum in San Diego to your travel plans. https://www.sandiego.org/members/museums/san-diego-air-space-museum.aspx
Posted by: Van B Aug 14 2023, 04:17 PM
@http://www.914world.com/bbs2/index.php?showuser=9964 I use these bad boys in 7” diameter on my polisher.
https://www.3m.com/3M/en_US/p/d/b40071650/
Doesn’t gouge into the metal unless you get on the edge accidentally. And with a polisher you can slow it down to control the heat you put into the panel.
Posted by: Superhawk996 Aug 14 2023, 04:47 PM

The last time I looked at this thread you and Wonki were talking about furniture 
Now I check in and the car is torn to bits and missing paint. 
Posted by: Van B Aug 14 2023, 05:05 PM
The last time I looked at this thread you and Wonki were talking about furniture
Now I check in and the car is torn to bits and missing paint.
Do you even 914?
Posted by: Superhawk996 Aug 14 2023, 05:26 PM
The last time I looked at this thread you and Wonki were talking about furniture
Now I check in and the car is torn to bits and missing paint.
Do you even 914?
Sadly . . . No. Mine is buried in storage while it awaits its new home to be built. It’s even more buried than this once I got all my parts and shop equipment in there
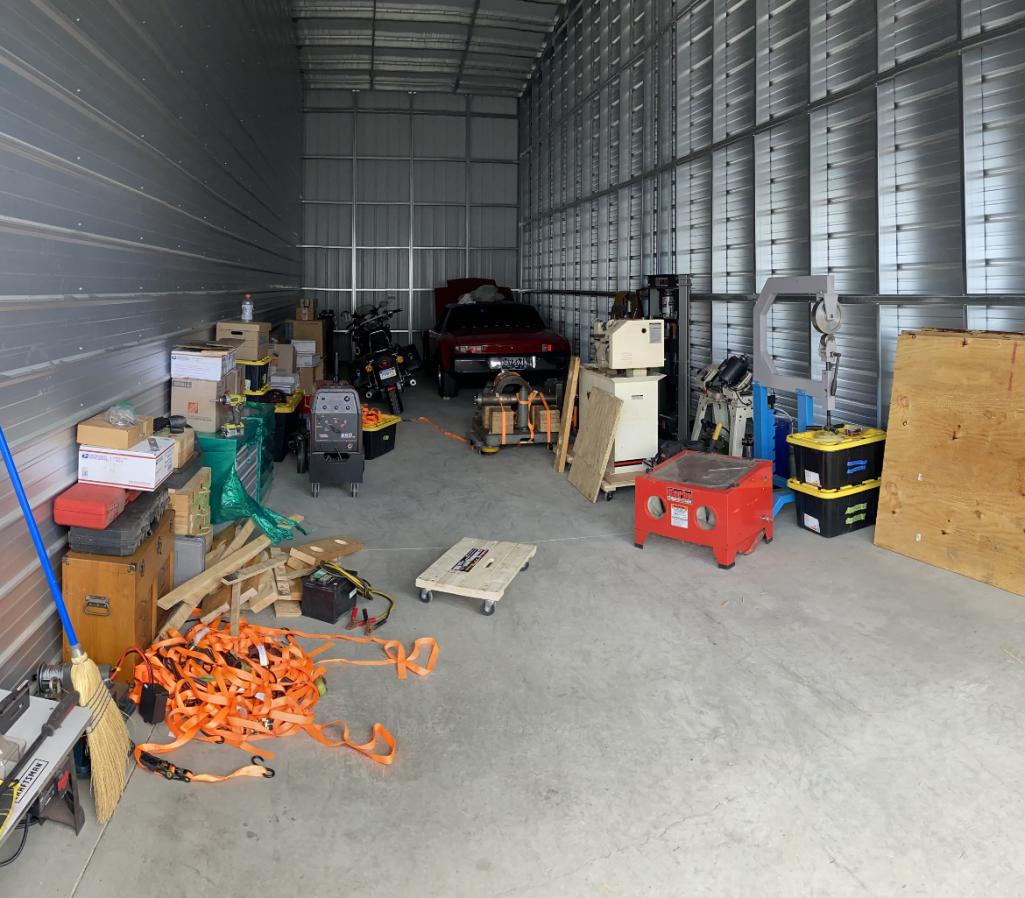
I’ll have to live vicariously though your project
.
Posted by: 76-914 Aug 14 2023, 10:14 PM
@http://www.914world.com/bbs2/index.php?showuser=9964 I use these bad boys in 7” diameter on my polisher.
https://www.3m.com/3M/en_US/p/d/b40071650/
Doesn’t gouge into the metal unless you get on the edge accidentally. And with a polisher you can slow it down to control the heat you put into the panel.
I got some of those but I didn't know the name and I don't have any that large. I've got some 4" ones that go on an angle grinder and 2" roloc style. I wish I'd known of the 7" that fit my polisher.
Posted by: wonkipop Aug 15 2023, 04:30 AM
The last time I looked at this thread you and Wonki were talking about furniture
Now I check in and the car is torn to bits and missing paint.
Do you even 914?
Sadly . . . No. Mine is buried in storage while it awaits its new home to be built. It’s even more buried than this once I got all my parts and shop equipment in there
I’ll have to live vicariously though your project
.quite a multi storey shed you got there mate.
you could really bury a 914 under a lot of sedimentary layers of "kipple".
i think that is the word phillip K dick used........for stuff or .......whatever.
its kind of like where i live.
no windows.
but i am top lit.
Posted by: wonkipop Aug 15 2023, 04:54 AM
keep going. it will be great.
esp if you can reproduce that fantastic undecideable yellow or is it green.
same as phoenix red or is it orange.
its still a good car despite the minor prang in its distant past of being
i'll be demanding an up close special clearance inspection of an F117 if i have to stand around your car on jack stands drinking a beer.
Wonki I noticed that the left and right side photos show the color change perfectly. Bright yellow in the infrared and yellow green in the UV shade. The blue light from the awning definitely helped it slow up on camera this time.
Oh and you'll have to venture westward for a sighting of the few of those still in the air as test mules
looks like i will be going to fresno?
wonder if i am up to skating a few empty swimming pools with steve alba.
not likely at my age and with my knees.
wrecked the left knee about 2006 bailing on a grind. in a steep aussie pool.
little stevie caballaro owned a 914 back in the 80s
Posted by: Van B Aug 15 2023, 05:12 AM
You’re on your own there wonki. I’ve never been on a skateboard in any real way. Where I grew up, roads were flat and rough and pools were above ground lol
Posted by: wonkipop Aug 16 2023, 03:38 AM
You’re on your own there wonki. I’ve never been on a skateboard in any real way. Where I grew up, roads were flat and rough and pools were above ground lol
we didnt have real above ground pools here where i grew up.
they were wading pools 6 inches deep for kiddies to cool off.
the only ceeement pond i desecrated back in the 70s was in an abandoned display pool showroom in an industrial suburb of melbourne. and it was a steep as all sh$5.
no one got above the scum line. the tiles were at the edge of the universe.
i think at this stage of life i will go nowhere near a pool again.
i did get a good run at some in the early 2000s while i was still sort of an approximation of my early form in terms of body structure. the surfing breaks here were getting unfriendly so i just went into find a pool with some mates and enjoy the hard crunch of a wipe out alternative.
i will just park myself at the end of the runway in fresno.
i got to see one of those things while they are still flying.
call me stoopid, but those planes are way weird. like a lunar module.
american thinking at its finest even if somewhat outdated by the stuff now being done.
F117 = L jet 914. numero uno? you can see my drift.
Posted by: Porschef Aug 16 2023, 04:28 AM
those planes are way weird. like a lunar module.
american thinking at its finest even if somewhat outdated by the stuff now being done.
On one of my solo cross country trips 30 years ago (in a 75 911, what a great car) just outside Vegas I saw a pair of them flying, pretty low, maybe a mile away. I remember being pretty excited about it. Wasn’t much I could do but watch, not like I was gonna whip out my phone and try to snag a couple pics, like most of us do today. Filing to the ever diminishing memory bank was my only option...
Posted by: Van B Sep 4 2023, 07:12 PM
Making problems, then solving them and declaring it an accomplishment lol…
Made a video detailing my method for preemptively solving door alignment issues.
https://www.youtube.com/watch?v=GhrzzHzztLE?si=Tt_KvG2v4HPywOqZ
https://youtu.be/GhrzzHzztLE?si=N4kM7ySNODyXjxqM
Don’t mind the red tape, I was paid a visit by my in resident auditor. I gave her the tape and said mark anything that doesn’t look right to you… she found a lot
Posted by: Van B Oct 9 2023, 06:52 PM
Work and weather stalled progress for s bit, but I got some things going again. I decided a while back that I would do my own replating and what better place to start than on parts that I will paint over!
I went with the caswell kit vs making my own solution. I have made my own brew before, and had good success with electropolishing, but plating never came out cosmetically the way I would like. Other than the easter egg chromate dip on the caswell kit, which I’m struggling with, everything else is great.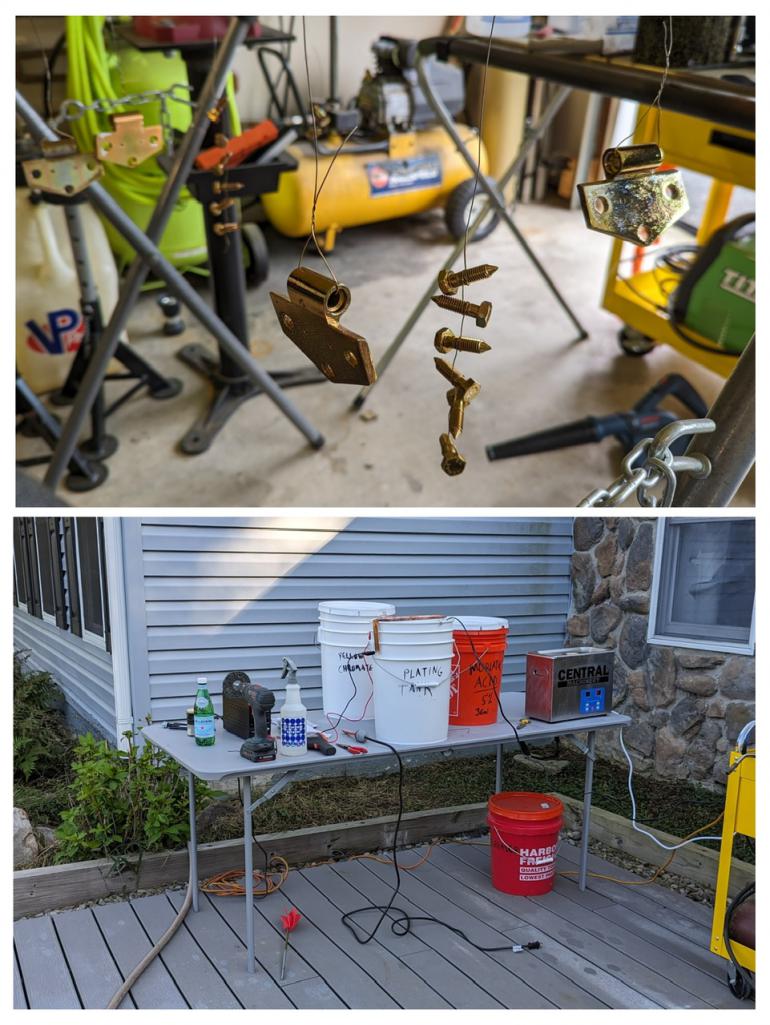
I also, refit the doors again after bolting the hinges back up, just to see it all work and those pins did exactly what I needed. What a relief that I won’t have to fight that down the road!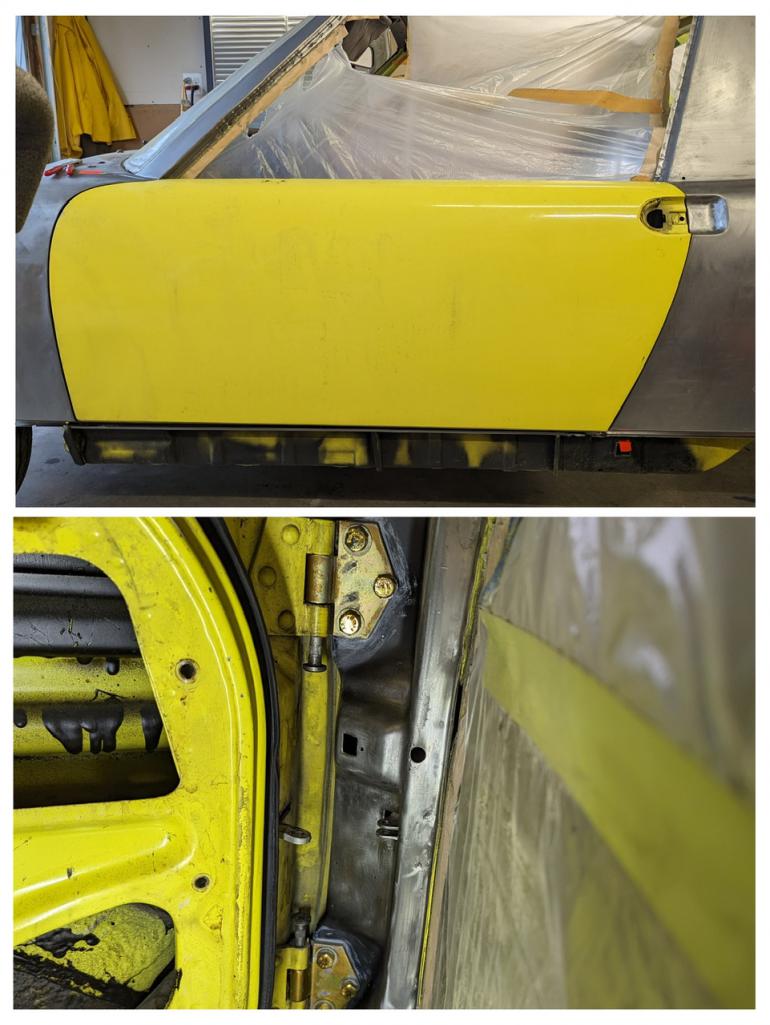
Posted by: 76-914 Oct 10 2023, 08:51 AM
Your plating turned out good. I may try that one day. Years back a body man told me to drill those door hinges. and trunk lid hinges with a 1/8" bit before removing them. When re-mounting the pieces insert the drill bits stub end first. It help[s to place a bevel on the stub ends. Fast forward to present day: A neighbor who was a body man years back came by to check out my work last year and gave me the business for drilling those holes. A couple of weeks ago he dropped by to lend a hand remounting the front lid. We loosened /tightened the hood several times before he sheepishly relented and let me do it my way. Now he is a believer. Can't wait to see your finished product.
Posted by: Van B Oct 10 2023, 03:26 PM
Your plating turned out good. I may try that one day. Years back a body man told me to drill those door hinges. and trunk lid hinges with a 1/8" bit before removing them. When re-mounting the pieces insert the drill bits stub end first. It help[s to place a bevel on the stub ends. Fast forward to present day: A neighbor who was a body man years back came by to check out my work last year and gave me the business for drilling those holes. A couple of weeks ago he dropped by to lend a hand remounting the front lid. We loosened /tightened the hood several times before he sheepishly relented and let me do it my way. Now he is a believer. Can't wait to see your finished product.
I knew there had to be similar approaches. I prefer the roll pin due to the interference fit i.e. really tight tolerance. I hammered the pins flush after torquing down the bolts, and with a little dab of epoxy or filler, you’ll never know they were there.
I appreciate the confidence vote… I’m definitely in that make or break moment where the finish line seems further than ever! Bizarre how a physical object as small as a 914 can begin to feel like an infinite black hole lol…
Posted by: 76-914 Oct 10 2023, 06:10 PM
Your plating turned out good. I may try that one day. Years back a body man told me to drill those door hinges. and trunk lid hinges with a 1/8" bit before removing them. When re-mounting the pieces insert the drill bits stub end first. It help[s to place a bevel on the stub ends. Fast forward to present day: A neighbor who was a body man years back came by to check out my work last year and gave me the business for drilling those holes. A couple of weeks ago he dropped by to lend a hand remounting the front lid. We loosened /tightened the hood several times before he sheepishly relented and let me do it my way. Now he is a believer. Can't wait to see your finished product.
I knew there had to be similar approaches. I prefer the roll pin due to the interference fit i.e. really tight tolerance. I hammered the pins flush after torquing down the bolts, and with a little dab of epoxy or filler, you’ll never know they were there.
I appreciate the confidence vote… I’m definitely in that make or break moment where the finish line seems further than ever! Bizarre how a physical object as small as a 914 can begin to feel like an infinite black hole lol…
I hear you. 90% done and 90% to go. I actually enjoyed the metal work but there is a lot of other items that were pure drudgery. You're car is going to look so good and you can now see the light a the end of the tunnel.
Posted by: wonkipop Oct 11 2023, 03:05 AM
Your plating turned out good. I may try that one day. Years back a body man told me to drill those door hinges. and trunk lid hinges with a 1/8" bit before removing them. When re-mounting the pieces insert the drill bits stub end first. It help[s to place a bevel on the stub ends. Fast forward to present day: A neighbor who was a body man years back came by to check out my work last year and gave me the business for drilling those holes. A couple of weeks ago he dropped by to lend a hand remounting the front lid. We loosened /tightened the hood several times before he sheepishly relented and let me do it my way. Now he is a believer. Can't wait to see your finished product.
I knew there had to be similar approaches. I prefer the roll pin due to the interference fit i.e. really tight tolerance. I hammered the pins flush after torquing down the bolts, and with a little dab of epoxy or filler, you’ll never know they were there.
I appreciate the confidence vote… I’m definitely in that make or break moment where the finish line seems further than ever! Bizarre how a physical object as small as a 914 can begin to feel like an infinite black hole lol…
yes i think light bends around a 914 altering time and space.
leaving you stuck on an event horizon never arriving and never leaving.
its such a 1970s car but then again it isn't.
it was kind of out of time and place when new and sort of remains that way.
all on its own in some kind of other design period all of its own?
probably explains both its appeal and its dislike and nothing in-between.
it is actually a definition for avante-garde? and its sort of stayed avante-garde.
no one has really copied it. since. so its just remained original and unique.
you will get there and you have the benefit of working from a very very good base.
wisely purchased.
....and then .......when done-------you can put us all to shame with our slightly malfunctioning L jet systems.
that plating looks great. top job. you are a bit of materials scientist i see.
Powered by Invision Power Board (http://www.invisionboard.com)
© Invision Power Services (http://www.invisionpower.com)