Printable Version of Topic
Click here to view this topic in its original format
914World.com _ 914World Garage _ new 914 with Gearbox Issues
Posted by: tonybolony Sep 17 2022, 09:11 AM
So new oener here , messing with my 1972 car , i have noticed that i dont seem to have 4/5 gear , i did mess and i ended up loosing Reverse , so am starting to lose the will to live lol, is there a guide on setting up linkages ? i also notice my shifter doent seem to go to the right much also, not sure if thats part of the problem ? but too travel left its got loads and its springs back also ?
confused i am lol
Posted by: emerygt350 Sep 17 2022, 09:19 AM
Are you playing around with the adjustments in the cab under the stick?
I would double check the cone screw and bushing health in the back before you mess with anything up front.
Posted by: rhodyguy Sep 17 2022, 11:20 AM
Failed roll pin in the assembly above the rear access plate of the trans? Replace every bushing in the linkage from the shifter to the roll pin. Buy a Haynes manual.
Posted by: PCH Sep 17 2022, 02:03 PM
Is your gearbox a rear shifter? Just got mine shifting really nicely.
Besides replacing all the bushings, check the metal parts also. My lock out plate was really worn as were metal parts of the shift linkage. The lock out plate is available new but the linkage is no longer available but it is repairable.
George Hussey's book 700 914 tips has a picture of the linkage wear points.
Posted by: rjames Sep 17 2022, 02:35 PM
How are you adjusting it?
If bushings are good, follow this:
http://www.914world.com/bbs2/index.php?showtopic=188120
Posted by: Shivers Sep 17 2022, 04:06 PM
My 72' is a tail shift. If yours is stock then get a good bushing kit and install. That is the first step adjusting the tail shifter. Second, the only other adjustment is at the tail end of the trans. The shifter rod is held in place at the far tail end by a bushing in a mount. The mount bolts to the trans through two holes, holes bigger than the fasteners. That way the mount can move Up and Down and Side to Side. and that is how I adjust my tail shifter.
Posted by: tonybolony Sep 18 2022, 03:18 AM
wow thank you for all the response , its all new to me , i originally opened up the acess panel and messed there , the bushing in the back on the trans is in place so the rod is solid and the shifts are nice, except i cant get 4/5
Posted by: emerygt350 Sep 18 2022, 04:35 AM
Try checking the cone screw where the rod enters the tunnel. If loose it will cause slipping on rotation, often causing you to lose 4/5.
Posted by: tonybolony Sep 18 2022, 05:21 AM

Try checking the cone screw where the rod enters the tunnel. If loose it will cause slipping on rotation, often causing you to lose 4/5.
is that where when under the car i see that section coming out from under the tunnel and it has a ball connection in it ? i am sure that section is a little loose ??
Posted by: ChrisFoley Sep 18 2022, 05:46 AM
There are two plastic balls in that location which should be replaced along with the other bushings along the linkage. There's also a cup bushing at the bottom of the shift lever and a shaft support bushing just aft of the lever, inside the tunnel.
Posted by: ChrisFoley Sep 18 2022, 05:47 AM
Try checking the cone screw where the rod enters the tunnel. If loose it will cause slipping on rotation, often causing you to lose 4/5.
Tailshift - no cone screws.
Posted by: emerygt350 Sep 18 2022, 07:36 AM
Try checking the cone screw where the rod enters the tunnel. If loose it will cause slipping on rotation, often causing you to lose 4/5.
Tailshift - no cone screws.
Really? Wow. I guess that's good, since they can't come loose, but bad on that it's such an easy fix...
Posted by: ChrisFoley Sep 18 2022, 08:44 AM
Try checking the cone screw where the rod enters the tunnel. If loose it will cause slipping on rotation, often causing you to lose 4/5.
Tailshift - no cone screws.
Really? Wow. I guess that's good, since they can't come loose, but bad on that it's such an easy fix...
Actually I was wrong, there is one at the base of the shift lever.
Posted by: rgalla9146 Sep 18 2022, 08:58 AM
Adjustment is done at the rear of the tunnel. Remove square black cover on top, single slotted screw.
Best to have a short 13mm socket on a 4" extension to reach in through the provided
hole in the drivers side of the tunnel.
Mark the adjustment parts first so that you have a starting refrence.
It is helpful to weld the nut to the tightening collar.....one less tool to hold while
manipulating the adjustment.
Make an appointment with a chiropractor before starting. 
My son in law is from Hull
Posted by: Shivers Sep 18 2022, 09:55 AM
Sorry about the dirt and grease. Been parked for a few years in the dirt. Luckily I have not pulled the engine yet. The adjustment is correct in this pic (yellow), was shifting fine. That is your up and down. The side to side will get the paddle at the end of the ball far enough to the left to reach 4-5th gear, paddle needs to push the cage over. But move it too much and say goodbye to 1st- R. I would loosten the fasteners on the mount so with a bump of a rubber mallot it would move but not so loose I'd lose the adjustment I had on up and down. Real small moves till you have it.
I hope this makes sense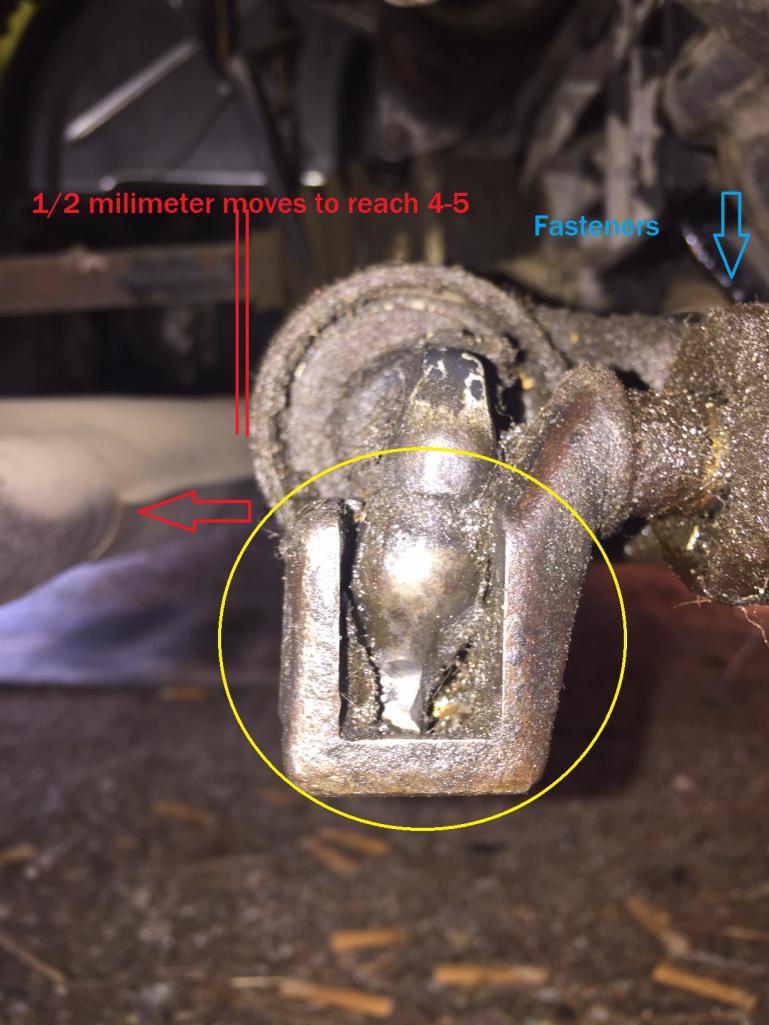
Posted by: Dave_Darling Sep 19 2022, 03:08 AM
You might also use a mirror and flashlight to check inside the center tunnel. When the front connection on the clutch tube lets go, the tube can move to the right and interfere with the bottom of the shift lever moving left--so the shift knob can't move right as far as it should.
I know this can be an issue for side-shift cars; I am less certain about tail-shift ones.
--DD
Powered by Invision Power Board (http://www.invisionboard.com)
© Invision Power Services (http://www.invisionpower.com)