Printable Version of Topic
Click here to view this topic in its original format
914World.com _ 914World Garage _ Engine Shroud Refurbishment
Posted by: DennisV Oct 1 2022, 07:54 AM
Does anyone have first-hand experience refurbishing their engine shroud that they can share? Best practices? Lessons learned?
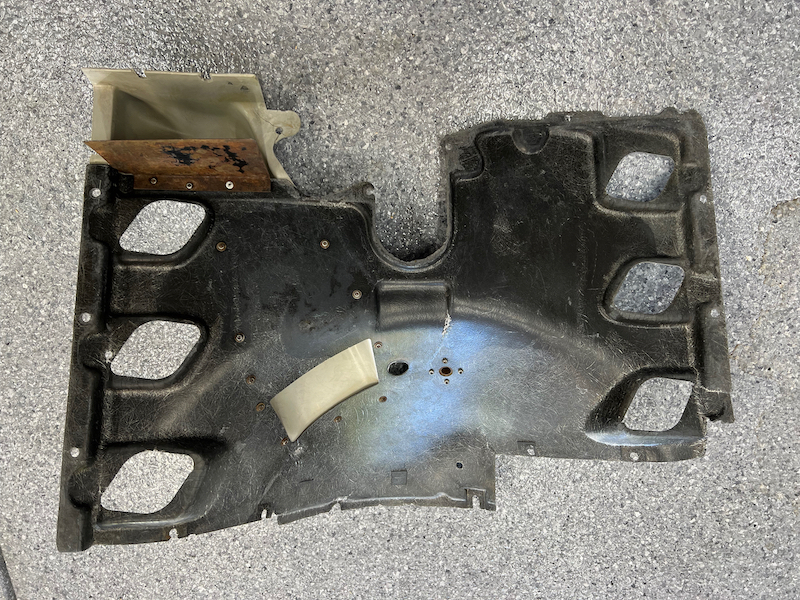
I bought the best (err only) original engine shroud that I could find that I think is correct for our engine. Thanks for the http://www.914world.com/bbs2/index.php?s=&showtopic=361694&view=findpost&p=3029644. It might work as is, but it could sure use some help. Faded. Cracks. Etc.
I've done some searching, but the best resources I've found so far are https://youtu.be/i9hfpOCnzEs.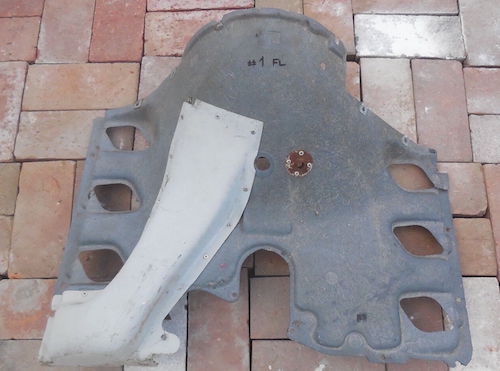
Posted by: Front yard mechanic Oct 1 2022, 10:43 AM
Easy and fun, best done outside and wear long sleeves + your favorite Covid mask
Posted by: porschetub Oct 1 2022, 03:43 PM

Does anyone have first-hand experience refurbishing their engine shroud that they can share? Best practices? Lessons learned?
I bought the best (err only) original engine shroud that I could find that I think is correct for our engine. Thanks for the http://www.914world.com/bbs2/index.php?s=&showtopic=361694&view=findpost&p=3029644. It might work as is, but it could sure use some help. Faded. Cracks. Etc.
I've done some searching, but the best resources I've found so far are https://youtu.be/i9hfpOCnzEs.
Ok having worked in most types of fiberglass for a fair while I suggest remove the broken cooler duct and repair it first,grind out the hole from the inside and remove all the fractured area's with a grinder,clean the part as much as possible then apply several layers of painters tape on the outside to get the shape back for your repair.
Them mix up polyester resin and apply to the inside with chopped strand matt layed into it,just a few layers to hold the shape,you can build it up later to get the original thickness,when thats done remove the tape and apply a thin layer of filler to correct the shape.
Leave the part off for the meanwhile as it makes the rest of the shroud repair and painting easier,apply the same process of repair to that part in area's that are damaged.
It is very important to clean these area's as oil can be present on these parts and will effect the quality of the repair and final painting.
I used acrylic enamel on my shroud and it has lasted well and provides a shine similar to the original gelcoat that was used when this part was molded.
You will need the following ;
small tin of 1k paint thinner/reducer for cleaning,
a small fiberglass boat repair kit with will usually include some chopped strand matt,the GP resin and hardener (MEKP) ,will be in that kit,
a small tin of acetone for cleaning parts ,brushes,hands etc,
drylube sand paper ,80 grit,220 ,320 the 400 for final sanding before primer,
1 x colour matched grey spray can for cooler ducting ,
1 x black spray can,
1 x spray can of Ik primer,
masking tape,
small tin of lightweight polyester filler,
pop-rivets and backing washers to refit ducting after painting,
throw away cloves and other consumables.
Make sure your working temp is suitable and the humidity is low,resin is generally 1-2 % dependent on temperature,take your time and you will get good results,mine came out really nice,good luck Dennis.
Posted by: Robarabian Oct 1 2022, 08:15 PM
Fiberglass can be messy. If you are not fiberglass savvy, look for a product in a can, called "Kitty Hair." It is sort of pre mixed fiberglass repair and could be used in an application like this, and you can do it in layers and build it up a bit. You will still do some sanding and shaping but I have found it is pretty easy to work with and is not a complete mess of epoxies and glass sheets etc....
Does anyone have first-hand experience refurbishing their engine shroud that they can share? Best practices? Lessons learned?
I bought the best (err only) original engine shroud that I could find that I think is correct for our engine. Thanks for the http://www.914world.com/bbs2/index.php?s=&showtopic=361694&view=findpost&p=3029644. It might work as is, but it could sure use some help. Faded. Cracks. Etc.
I've done some searching, but the best resources I've found so far are https://youtu.be/i9hfpOCnzEs.
Posted by: Olympic 914 Oct 2 2022, 06:38 AM
Does anyone have first-hand experience refurbishing their engine shroud that they can share? Best practices? Lessons learned?
I bought the best (err only) original engine shroud that I could find that I think is correct for our engine. Thanks for the http://www.914world.com/bbs2/index.php?s=&showtopic=361694&view=findpost&p=3029644. It might work as is, but it could sure use some help. Faded. Cracks. Etc.
I've done some searching, but the best resources I've found so far are https://youtu.be/i9hfpOCnzEs.
Ok having worked in most types of fiberglass for a fair while I suggest remove the broken cooler duct and repair it first,grind out the hole from the inside and remove all the fractured area's with a grinder,clean the part as much as possible then apply several layers of painters tape on the outside to get the shape back for your repair.
Them mix up polyester resin and apply to the inside with chopped strand matt layed into it,just a few layers to hold the shape,you can build it up later to get the original thickness,when thats done remove the tape and apply a thin layer of filler to correct the shape.
Leave the part off for the meanwhile as it makes the rest of the shroud repair and painting easier,apply the same process of repair to that part in area's that are damaged.
It is very important to clean these area's as oil can be present on these parts and will effect the quality of the repair and final painting.
I used acrylic enamel on my shroud and it has lasted well and provides a shine similar to the original gelcoat that was used when this part was molded.
You will need the following ;
small tin of 1k paint thinner/reducer for cleaning,
a small fiberglass boat repair kit with will usually include some chopped strand matt,the GP resin and hardener (MEKP) ,will be in that kit,
a small tin of acetone for cleaning parts ,brushes,hands etc,
drylube sand paper ,80 grit,220 ,320 the 400 for final sanding before primer,
1 x colour matched grey spray can for cooler ducting ,
1 x black spray can,
1 x spray can of Ik primer,
masking tape,
small tin of lightweight polyester filler,
pop-rivets and backing washers to refit ducting after painting,
throw away cloves and other consumables.
Make sure your working temp is suitable and the humidity is low,resin is generally 1-2 % dependent on temperature,take your time and you will get good results,mine came out really nice,good luck Dennis.

Having worked with fiberglass boats for a bit, this is the best way. Didn't use the body filler though, they have gelcoat repair to use. But that was on the boats, that would be constantly exposed to water.
Posted by: DennisV Oct 2 2022, 06:43 AM
Ok having worked in most types of fiberglass for a fair while I suggest remove the broken cooler duct and repair it first,grind out the hole from the inside and remove all the fractured area's with a grinder,clean the part as much as possible then apply several layers of painters tape on the outside to get the shape back for your repair.
Thank you for this detailed post. It is really helpful. A couple follow up questions:
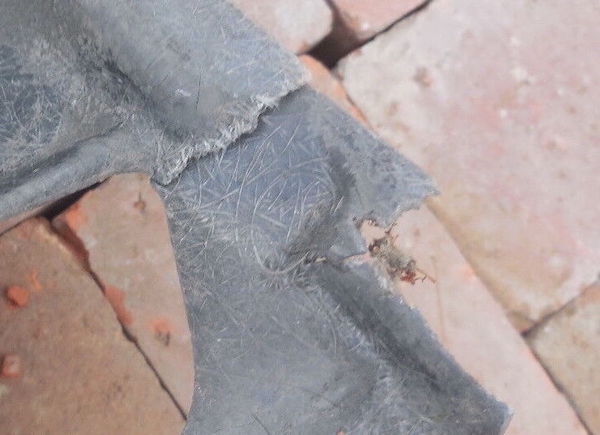
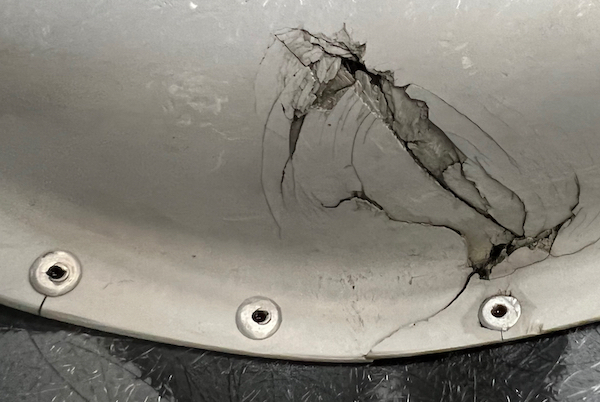
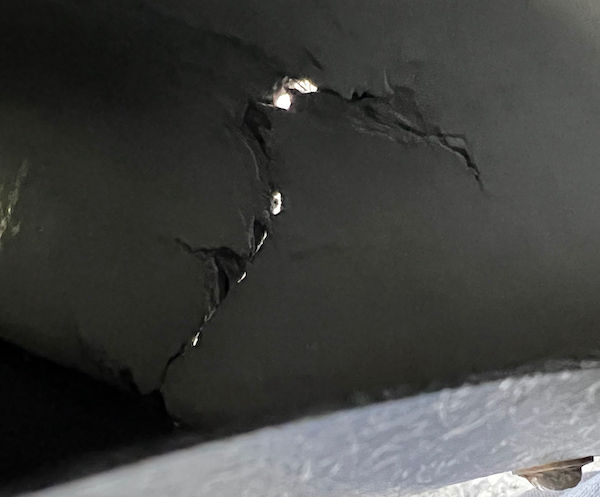
Is it normal to be able to see the fibers so prominently, or is this indicative of the material eroding?
I have never tried to rivet fiberglass before. Will I have trouble getting a tight fit without damaging it? It has been a long time time I had to rivet anything, but I seem to recall it wants to sandwich the material quite firmly before snapping off.
Why did you choose to paint rather than take the original gelcoat approach?
Thanks again.
Posted by: porschetub Oct 2 2022, 01:17 PM
Ok having worked in most types of fiberglass for a fair while I suggest remove the broken cooler duct and repair it first,grind out the hole from the inside and remove all the fractured area's with a grinder,clean the part as much as possible then apply several layers of painters tape on the outside to get the shape back for your repair.
Thank you for this detailed post. It is really helpful. A couple follow up questions:
Is it normal to be able to see the fibers so prominently, or is this indicative of the material eroding?
I have never tried to rivet fiberglass before. Will I have trouble getting a tight fit without damaging it? It has been a long time time I had to rivet anything, but I seem to recall it wants to sandwich the material quite firmly before snapping off.
Why did you choose to paint rather than take the original gelcoat approach?
Thanks again.
The fibres show up because the gelcoat has failed,mine had a few area's like this and,thats common as they are old and this area is subject to heat,the black ones are generally the worst.
Gelcoat repair is still possible but it would be expensive and gelcoat is difficult to spray when thinned as it is designed to be sprayed into a mold to achieve a nice shine.
My choice of paint was only because I had some I wanted to use up,you could improve things by using a 2k black spray can but not sure of it in this application.
The factory used pop-rivets so you should be fine,you could still leave the duct on but that will make repair more difficult just depends on if you can get to the damaged area to grind it out,maybe you could show a pic of the underside ..that would help.
Cheers.
Posted by: mlindner Oct 3 2022, 05:45 AM
Using the stranded glass is very easy to apply, three or so layers, all wet one at a time. Areas that are missing, use masking tape to build up a backer to lay the glass on. Its lot of fun, do it out doors. Regarding revets, use washer on the back side so it does not crack the glass. Best, Mark
Posted by: mlindner Oct 3 2022, 05:51 AM
Found a picture of mine. It had more problems than yours. After the glass repair I applied a gel-coat that just flows on....self leveling and painted. Best, Mark
Posted by: DennisV Oct 3 2022, 12:06 PM
Gelcoat repair is still possible but it would be expensive and gelcoat is difficult to spray when thinned as it is designed to be sprayed into a mold to achieve a nice shine.
This is good to know.
maybe you could show a pic of the underside ..that would help.
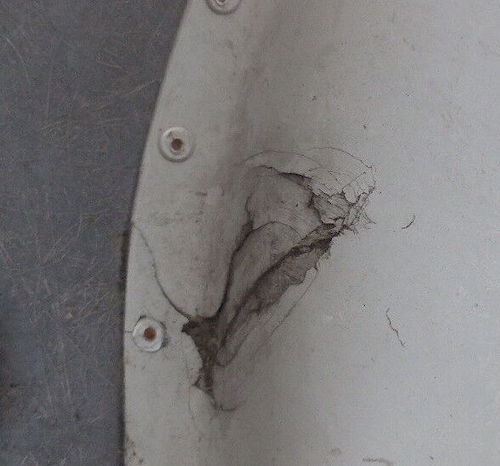
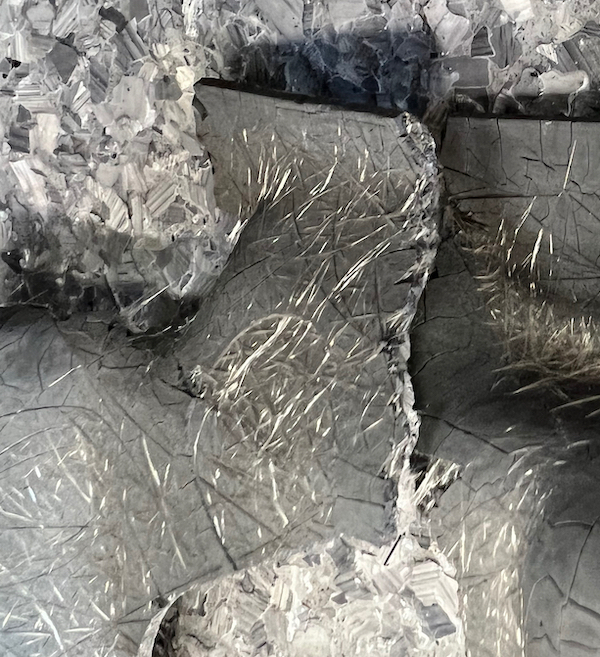
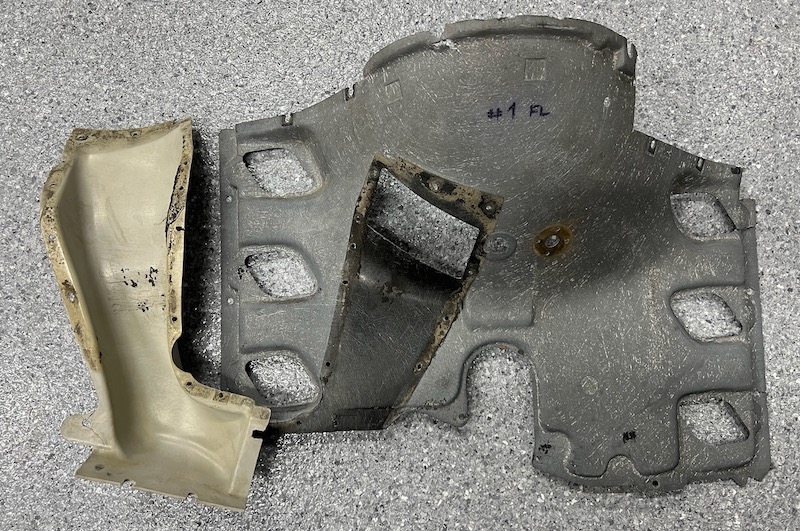
This is it after 2+ hours of degreasing. I knew this was going to take some effort, but it's turning into a real project. It's got several major cracks and some holes.
Thanks everyone for sharing their experience. I never imagined I'd be learning about fiberglass to work on a Porsche.

Posted by: DennisV Oct 3 2022, 12:08 PM
Found a picture of mine. It had more problems than yours. After the glass repair I applied a gel-coat that just flows on....self leveling and painted.
Looks nice. Now I want to see the before photo!
Can you share the name of that self-leveling gelcoat product? I thought part of the point of the gelcoat was that it was tinted. You still needed to paint after gelcoat?
Posted by: roundtwo Oct 3 2022, 12:27 PM
Great thread as very useful since I’m going through the same resto project.
Recommended paint that’s resistant to oil and gas?
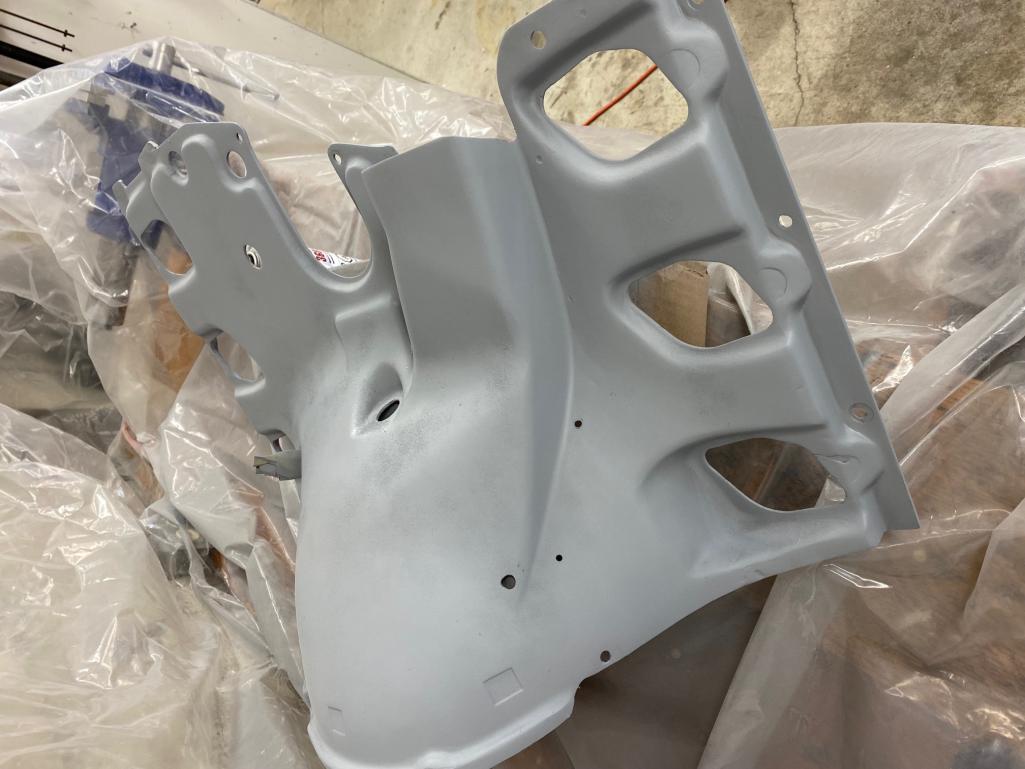
I used epoxy to repair a couple of small damaged areas were fasteners had torn out some material. If I had more extensive repairs I think the fiberglass recommendations in this thread were spot on .
Primed with 2 k high fill primer to eliminate micro cracks on the surface.
[attachmentid=853726] 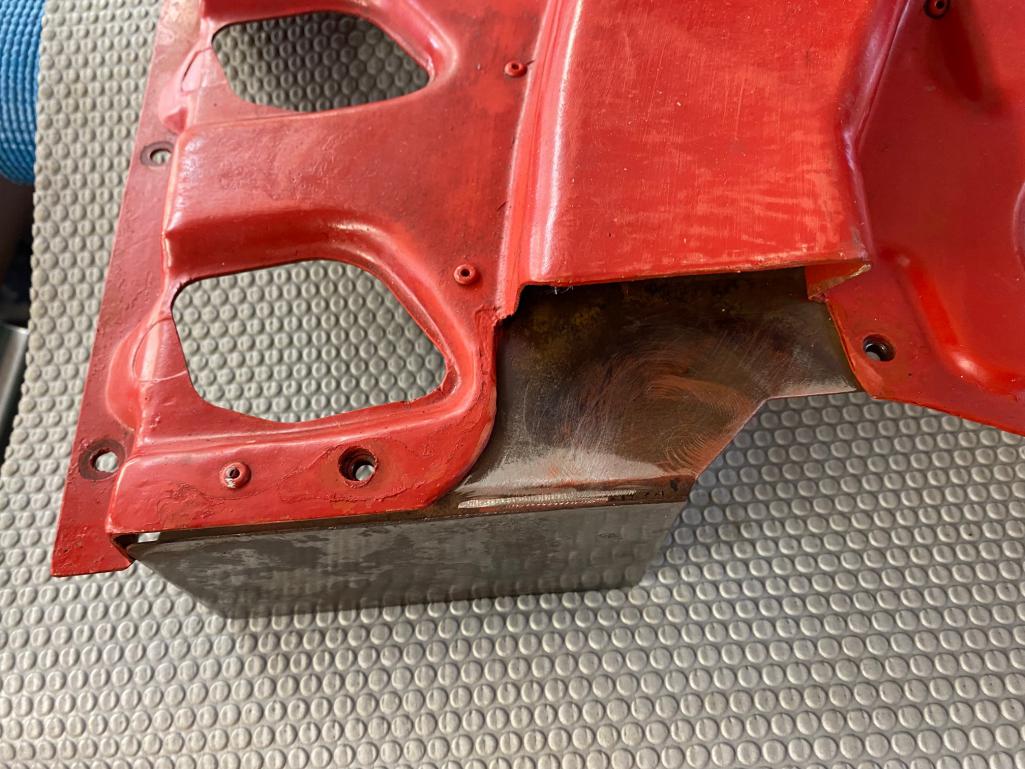
Attached thumbnail(s)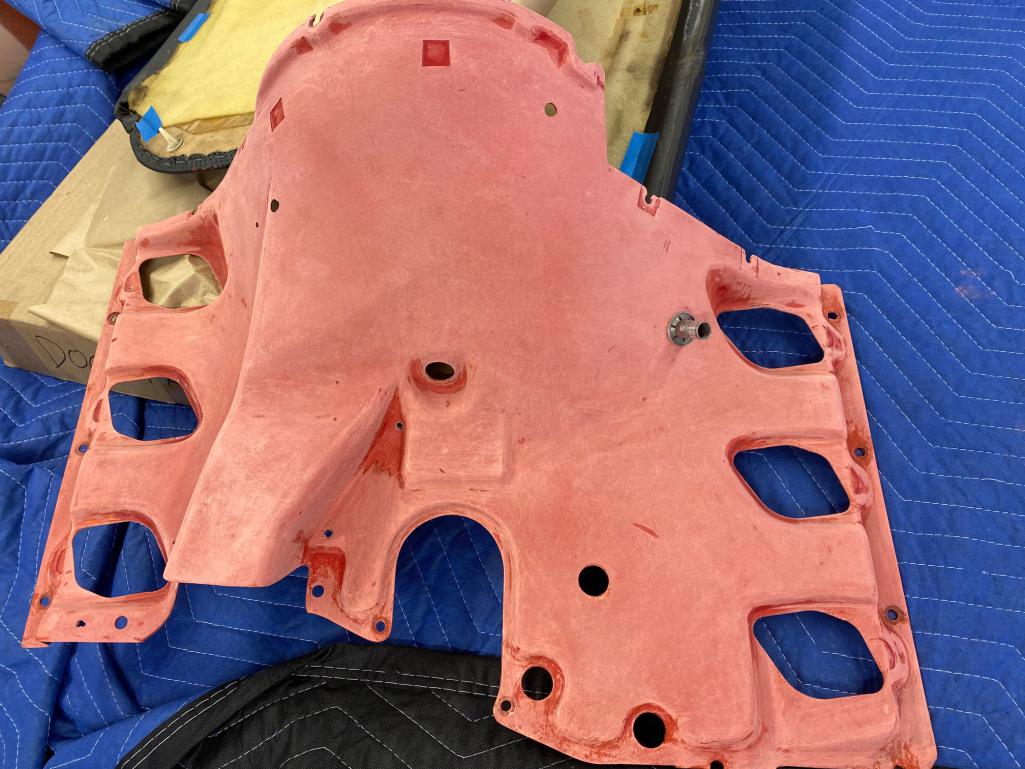
Posted by: DennisV Oct 3 2022, 01:16 PM
Great thread as very useful since I’m going through the same resto project.
Recommended paint that’s resistant to oil and gas?
I used epoxy to repair a couple of small damaged areas were fasteners had torn out some material. If I had more extensive repairs I think the fiberglass recommendations in this thread were spot on .
Primed with 2 k high fill primer to eliminate micro cracks on the surface.
Looks like you made some great progress.
Did you use a https://www.eastwood.com/eastwood-2k-aerospray-polyester-primer-surfacer.html?utm_source=youtube&utm_medium=annotation&utm_campaign=2018-07-18&utm_content=Polyester+Primer?
What's the best way to remove the rivets without damaging the fiberglass? I guess I could die grind off the top? Maybe this is my justification for getting an oscillating multi-tool?

Posted by: brant Oct 3 2022, 01:22 PM
Drill the rivets out
Posted by: mlindner Oct 3 2022, 01:27 PM
I did find one shot, most of the repairs are already done on the back side. I do remember most of the bolt holes broken out....FIX, rough up fiberglass over broken hole and epoxy on top a washer the correct size. Make sure to keep center hole clean while drying. Then glass a little on the back if needed. Make sure to sand/rough up old fiber glass surface and hit with Acetone before applying new resin and glass. You can see the washers in the original post. Regarding Gel coatings I know nothing.....Went to WestMarine and told them what I was doing (repair). They have a gel that is like syrup, brush on and let it run all over, moving up and down, side to side to level out. Then sanded and painted. And when glassing an open broken area, you can line the area with tin foil (will pull off easier).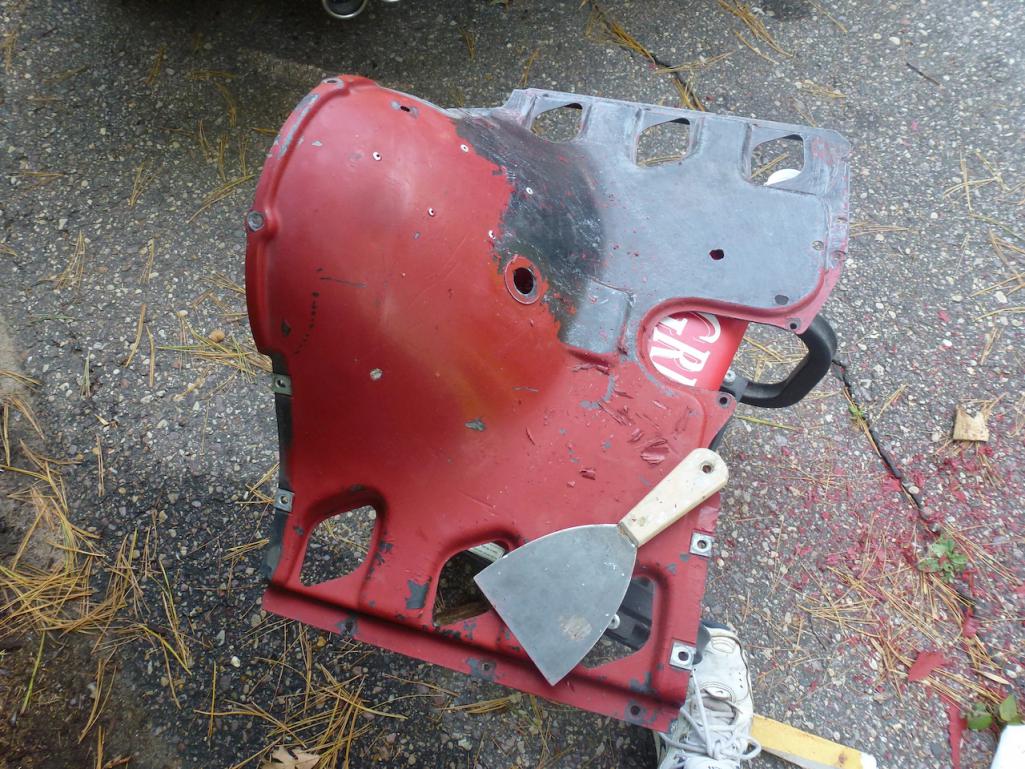
Posted by: mlindner Oct 3 2022, 01:36 PM
That looks great round two.
Posted by: porschetub Oct 3 2022, 04:16 PM
Great thread as very useful since I’m going through the same resto project.
Recommended paint that’s resistant to oil and gas?
I used epoxy to repair a couple of small damaged areas were fasteners had torn out some material. If I had more extensive repairs I think the fiberglass recommendations in this thread were spot on .
Primed with 2 k high fill primer to eliminate micro cracks on the surface.
Looks like you made some great progress.
Did you use a https://www.eastwood.com/eastwood-2k-aerospray-polyester-primer-surfacer.html?utm_source=youtube&utm_medium=annotation&utm_campaign=2018-07-18&utm_content=Polyester+Primer?
What's the best way to remove the rivets without damaging the fiberglass? I guess I could die grind off the top? Maybe this is my justification for getting an oscillating multi-tool?
Yes ,sorry I forgot to mention I used a 1k Valspar high build primer/surfacer before topcoat ,this helps the paint "key" to the fiberglass and builds up the surface area's where the gelcoat has failed.
If you have broken cracked sections remove the fractured stuff and clamp them together with small spring clamps then "tab" glass the area,let it cure and do the full repair after that ,things will be lined up better that way.
Your under side view certainly indicates the cooler duct needs to come for that repair,as mentioned about rivets just drill them out ,besides it makes painting easier too.
Mark makes a good point about using polyester to recover,its not really gelcoat but a flowcoat which has styrene wax in it and excellant self leveling properties,same stuff is used on surfboards (less pigment) and called "glosscoat".
Not a fan of epoxy in some applications and IMO not really suited here as these moldings were made of polyester, anyway I just hate the stuff also....very nasty
 .
.
Posted by: roundtwo Oct 3 2022, 05:40 PM
Great thread as very useful since I’m going through the same resto project.
Recommended paint that’s resistant to oil and gas?
I used epoxy to repair a couple of small damaged areas were fasteners had torn out some material. If I had more extensive repairs I think the fiberglass recommendations in this thread were spot on .
Primed with 2 k high fill primer to eliminate micro cracks on the surface.
Looks like you made some great progress.
Did you use a https://www.eastwood.com/eastwood-2k-aerospray-polyester-primer-surfacer.html?utm_source=youtube&utm_medium=annotation&utm_campaign=2018-07-18&utm_content=Polyester+Primer?
What's the best way to remove the rivets without damaging the fiberglass? I guess I could die grind off the top? Maybe this is my justification for getting an oscillating multi-tool?
I went with a 2k primer I purchased from a local Automotive paint store. I’ll have to check the brand.
For the rivets I drilled out the centers and they came out rather easily without damaging the surrounding fiberglass.
I was pretty leery about using a Chemical paint remover. I couldn’t seem to find one that was labeled to be fiberglass friendly. I ended up sanding off the gooey old finish which took an extraordinary amount of time I care not to ever repeat. All those difficult inside corners!!!
Posted by: roundtwo Oct 3 2022, 05:41 PM
I did find one shot, most of the repairs are already done on the back side. I do remember most of the bolt holes broken out....FIX, rough up fiberglass over broken hole and epoxy on top a washer the correct size. Make sure to keep center hole clean while drying. Then glass a little on the back if needed. Make sure to sand/rough up old fiber glass surface and hit with Acetone before applying new resin and glass. You can see the washers in the original post. Regarding Gel coatings I know nothing.....Went to WestMarine and told them what I was doing (repair). They have a gel that is like syrup, brush on and let it run all over, moving up and down, side to side to level out. Then sanded and painted. And when glassing an open broken area, you can line the area with tin foil (will pull off easier).
Great info and well done!
Posted by: roundtwo Oct 3 2022, 05:46 PM
Great thread as very useful since I’m going through the same resto project.
Recommended paint that’s resistant to oil and gas?
I used epoxy to repair a couple of small damaged areas were fasteners had torn out some material. If I had more extensive repairs I think the fiberglass recommendations in this thread were spot on .
Primed with 2 k high fill primer to eliminate micro cracks on the surface.
Looks like you made some great progress.
Did you use a https://www.eastwood.com/eastwood-2k-aerospray-polyester-primer-surfacer.html?utm_source=youtube&utm_medium=annotation&utm_campaign=2018-07-18&utm_content=Polyester+Primer?
What's the best way to remove the rivets without damaging the fiberglass? I guess I could die grind off the top? Maybe this is my justification for getting an oscillating multi-tool?
Yes ,sorry I forgot to mention I used a 1k Velspar high build primer/surfacer before topcoat ,this helps the paint "key" to the fiberglass and builds up the surface area's where the gelcoat has failed.
If you have broken cracked sections remove the fractured stuff and clamp them together with small spring clamps then "tab" glass the area,let it cure and do the full repair after that ,things will be lined up better that way.
Your under side view certainly indicates the cooler duct needs to come for that repair,as mentioned about rivets just drill them out ,besides it makes painting easier too.
Mark makes a good point about using polyester to recover,its not really gelcoat but a flowcoat which has styrene wax in it and excellant self leveling properties,same stuff is used on surfboards (less pigment) and called "glosscoat".
Not a fan of epoxy in some applications and IMO not really suited here as these moldings were made of polyester, anyway I just hate the stuff also....very nasty
.Agreed the epoxy wasn’t ideal and I wouldn’t go that route again. Fortunately only tiny little areas that needed patching. Fiberglass lessons learned.
The largest error I want to avoid is top coating it with the wrong paint. The previous owner refinished the cover and it was clear that some fuel ate through a bunch of areas turning the paint a big globby mess.
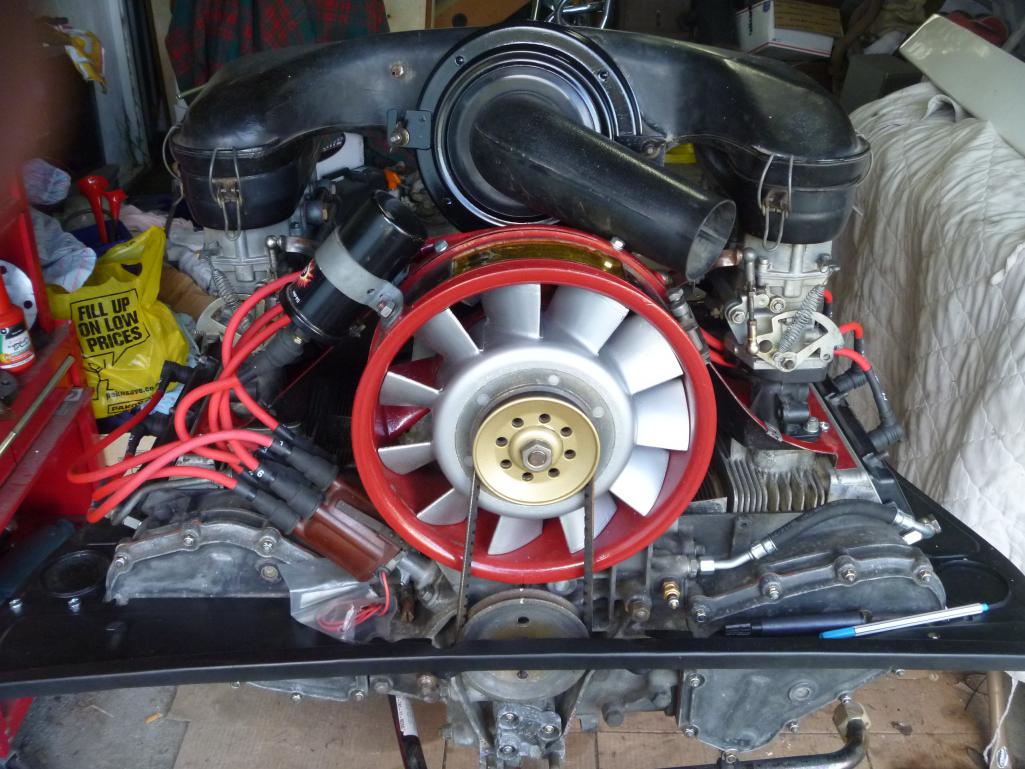
One issue I’m trying to figure out is what color to paint it. The engine is a 930/02 euro Carrera 3.0. Traditionally the shroud would be red however the color of my car is red as well. So do I paint the appropriate red for the engine That won’t match the color of my Bahia red car or do I go ahead and paint the shroud iBahia red? Or break Porsche tradition for this engine by painting the shroud black as it would look best with the red engine compartment?
Posted by: brant Oct 3 2022, 05:49 PM
I agree with the high build primer!!
I sanded in between coats
And had really good luck with 2 part epoxy on multiple motors
Posted by: Superhawk996 Oct 3 2022, 08:21 PM
Check into SprayMax 2k primer and it can also be had as custom color 2k product via a couple paint houses that do business on EBay. I’ve used the one out of Spokane WA with good results for custom color mix.
Posted by: porschetub Oct 3 2022, 09:57 PM
Check into SprayMax 2k primer and it can also be had as custom color 2k product via a couple paint houses that do business on EBay. I’ve used the one out of Spokane WA with good results for custom color mix.
End of the day lots of workable options for op,and with the stock air cleaner there isn't much of the shroud to see anyway ,as long it is fitting nicely and sealing on the mounting screws and around the cooler, function is more important in this respect.
End result is always worth it,unless you really cock it up
 .
.Posted by: DennisV Oct 4 2022, 07:18 AM
I do remember most of the bolt holes broken out....FIX, rough up fiberglass over broken hole and epoxy on top a washer the correct size. Make sure to keep center hole clean while drying. Then glass a little on the back if needed.
The washer is a clever idea. I have several that are broken off. A few were covered with speed nuts, which I suspect were not original.
I was inspired by the helpful ideas and great results shared here to spend some more time on it last night. Unfortunately, my rivet drilling skills proved to be sub par. As such, in the process of trying to improve my situation I ended up creating some more work for myself. Am I the only one this happens to?

Lots to repair. Guess I'll try to compile some photos of original black shrouds in good condition as a reference. I think mine has some extra holes...
Posted by: Retroracer Oct 4 2022, 01:16 PM
RE: "I have never tried to rivet fiberglass before. Will I have trouble getting a tight fit without damaging it? It has been a long time time I had to rivet anything, but I seem to recall it wants to sandwich the material quite firmly before snapping off."
McMaster Carr sell some rivets intended for fiberglass; I bought a pack and they work well. They are aluminum, and the "inside" end is quite deep and deforms in a more graceful way so as not to unduly stress the material being clamped. FWIW,
- Tony
Posted by: mlindner Oct 4 2022, 01:40 PM
use the correct size aluminum washer on the back and you will not crack the fiber glass. No need for steel rivets. Mark
Posted by: ValcoOscar Oct 4 2022, 01:46 PM
Great thread as very useful since I’m going through the same resto project.
Recommended paint that’s resistant to oil and gas?
I used epoxy to repair a couple of small damaged areas were fasteners had torn out some material. If I had more extensive repairs I think the fiberglass recommendations in this thread were spot on .
Primed with 2 k high fill primer to eliminate micro cracks on the surface.
[attachmentid=853726]
I bought a $50 broken shroud at a swap meet and repaired it.
I used epoxy and Evercoat (kitty hair), just used some standard safety red I had in stock.
O
Attached thumbnail(s)
Posted by: DennisV Apr 13 2023, 03:35 PM
End result...ran out of time / patience on the repair. Purchased a new reproduction from http://www.series900.com. I do not yet have the engine to try fitting it to, but I am pleasantly surprised with the quality. Here is a side-by-side photo with an original.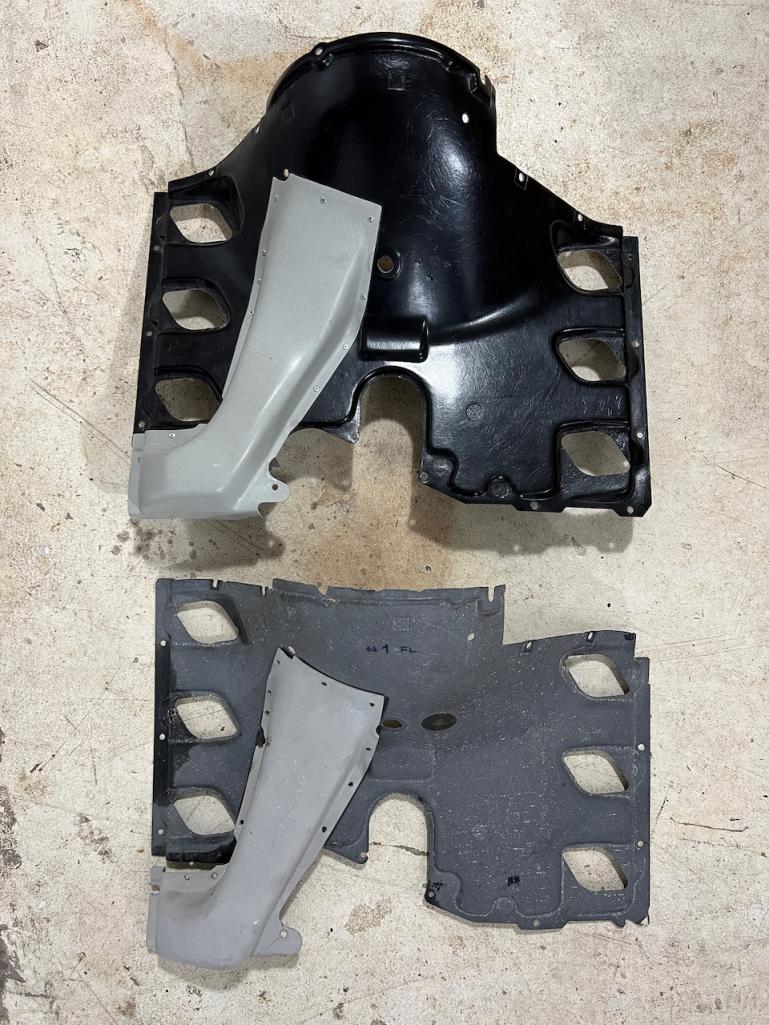
Posted by: tygaboy Apr 13 2023, 04:11 PM
Bring your damaged shroud down to The Red Barn sometime. I have all the composite repair supplies needed to fix it. Happy to work with you on it...
Posted by: technicalninja Apr 13 2023, 06:00 PM
If you don't mind answering...
What did the new shroud cost?
Powered by Invision Power Board (http://www.invisionboard.com)
© Invision Power Services (http://www.invisionpower.com)