Printable Version of Topic
Click here to view this topic in its original format
914World.com _ 914World Garage _ Safari 914 project
Posted by: East coaster Nov 4 2022, 08:04 PM
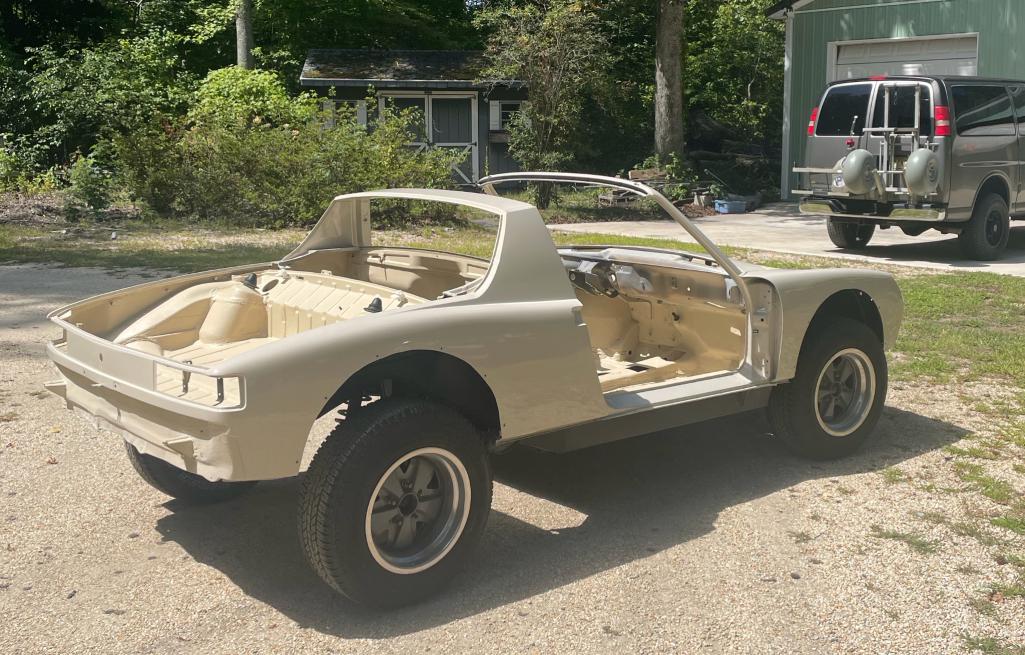
I’ve been out of the 914 game for quite some time. The last 914 I built was back in 2006 and was quite a build. I’ve had about a dozen 914s over the years and my 2006 build was to be my ultimate 914 (for me at least). It was a GT flared 3.6 six conversion and was a great car. I sold it in 2015 and moved to other things. I’ve been getting the itch to build another teener for a while, but to go in a different direction. I’ve seen a couple Safari builds and that seemed interesting.
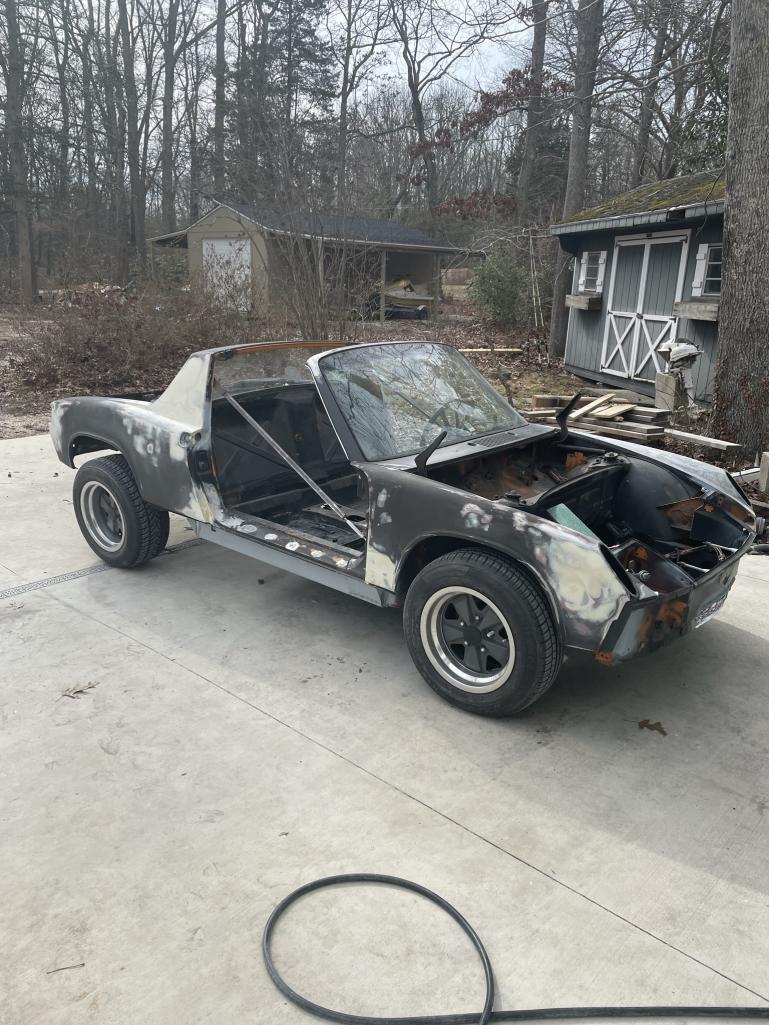
I picked up pretty well worn ‘72 914 for the base of my project. My plan is to build a budget conscious (it’s all relative) Subaru powered Safari mod. I plan to go with a normally aspirated 2.5 Subaru from a 1998 Forrester along with the Subaru tranny.
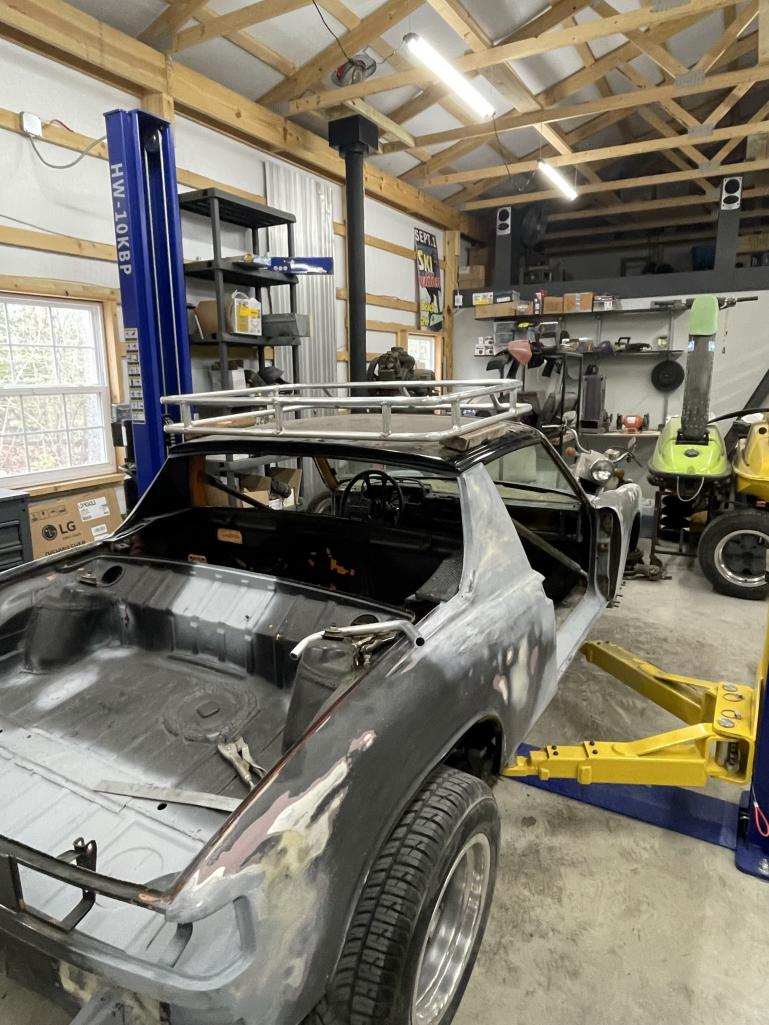
I’ve been working on removing rust and getting the tub suitable for my plans. This will by no means be a concours resto type build, but should prove interesting.
Here’s the base car being picked up for the project start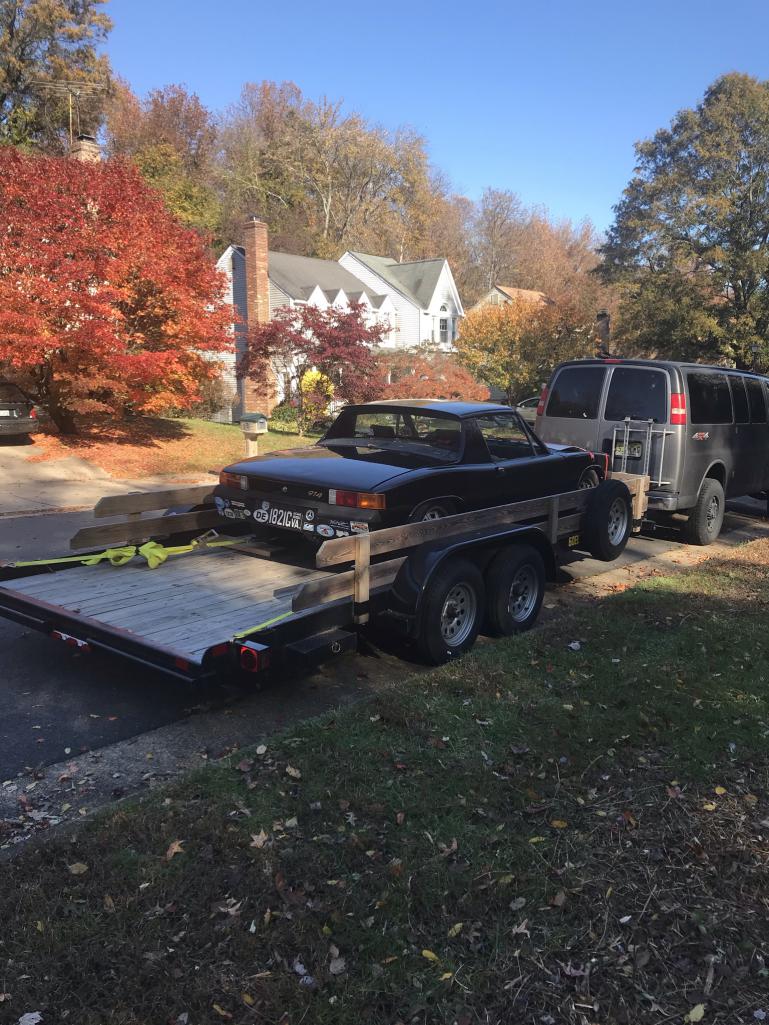
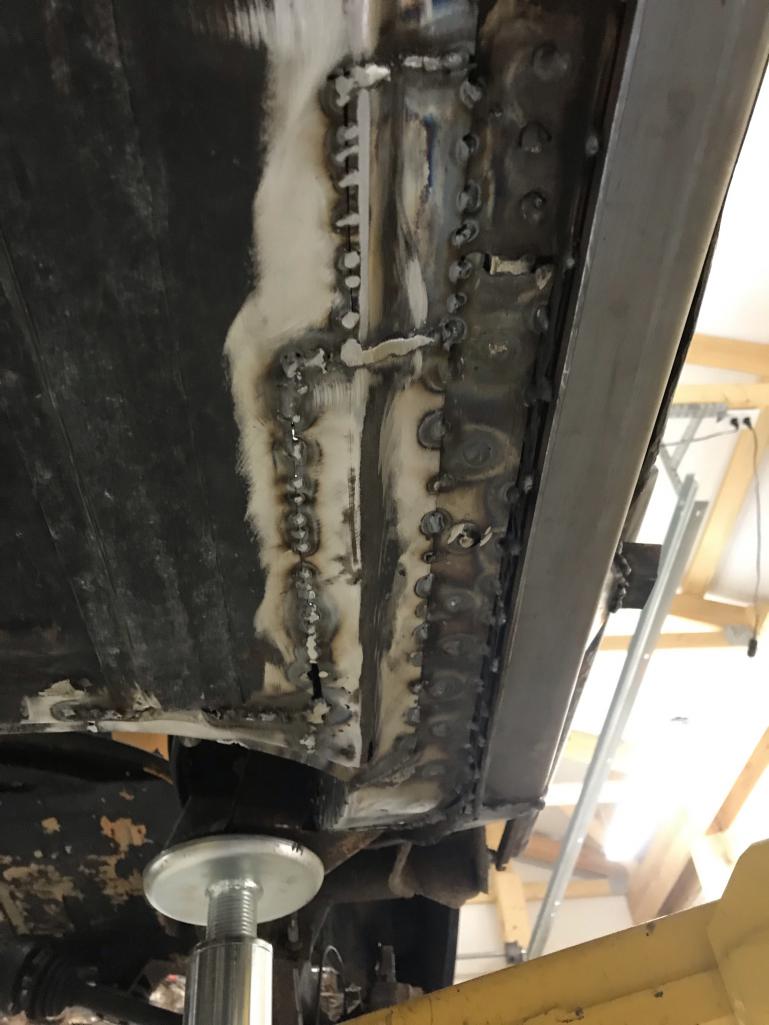
I stripped it down and sold the engine and tranny (it was a partially completed V8 conversion). Then started cutting out rusted areas a welding in new metal.
Some Radom rust repair pics in no special order….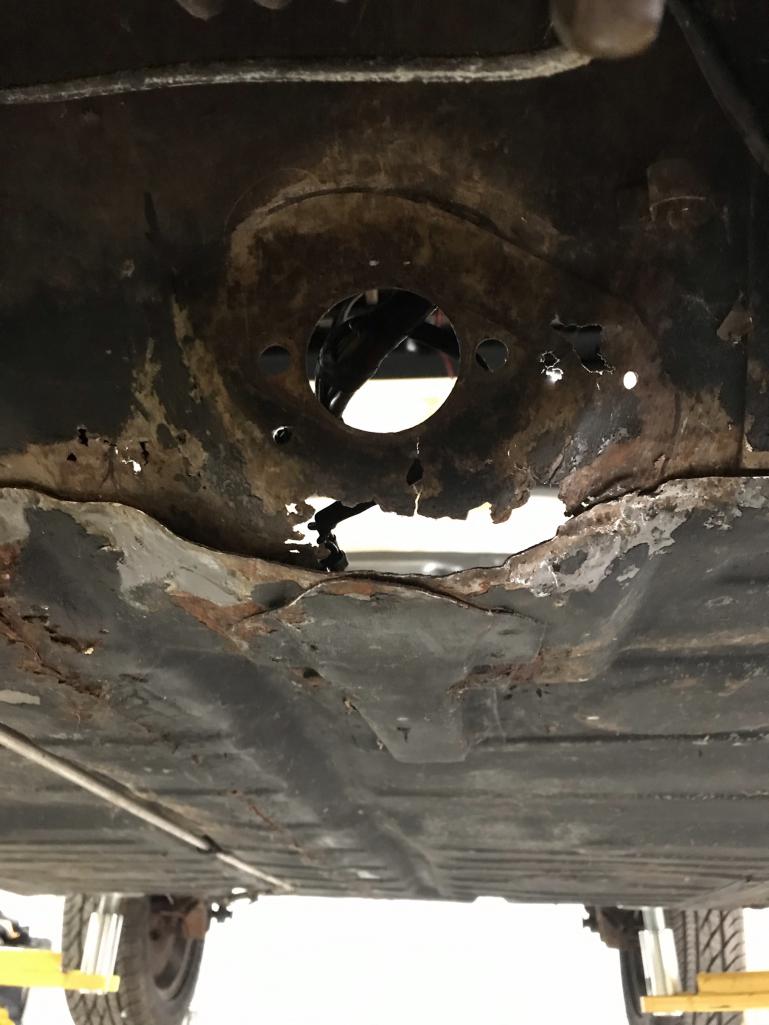
Attached thumbnail(s)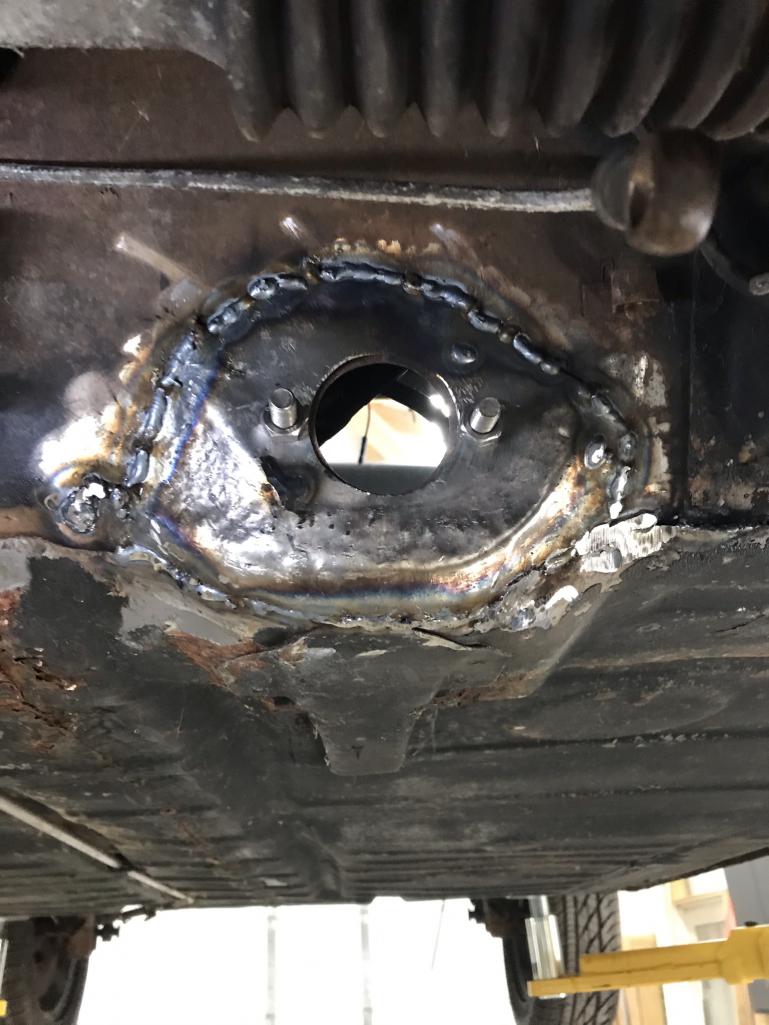
Posted by: East coaster Nov 4 2022, 08:08 PM
 [
[
Hell hole
attachmentid=856763]
Attached thumbnail(s)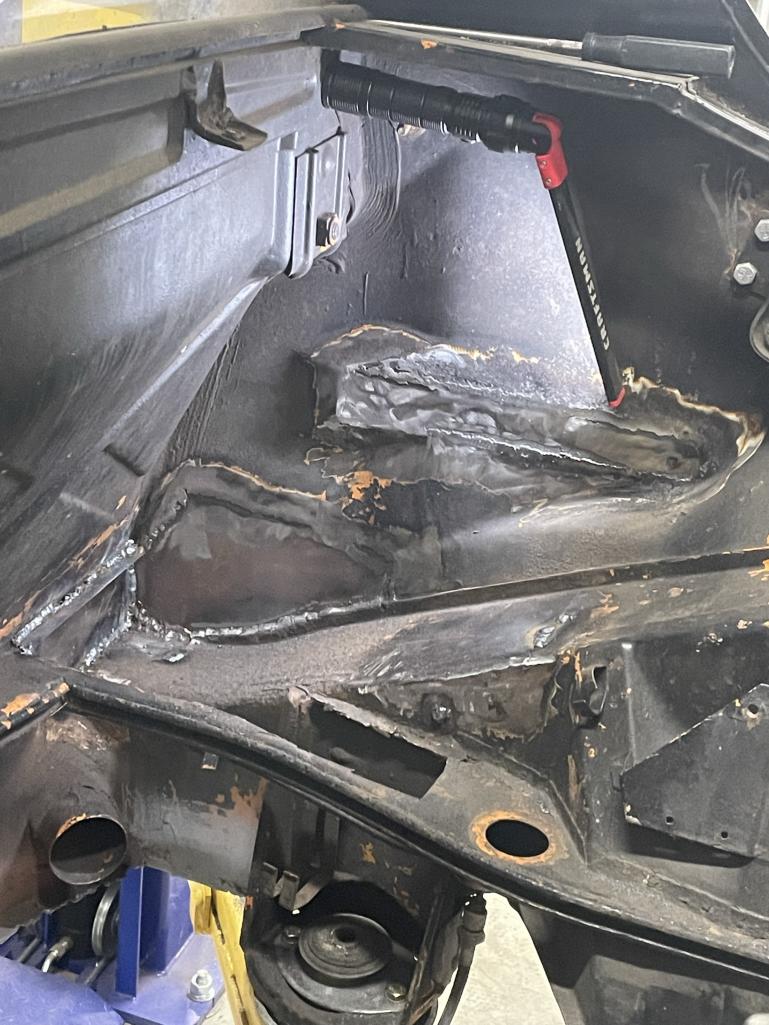
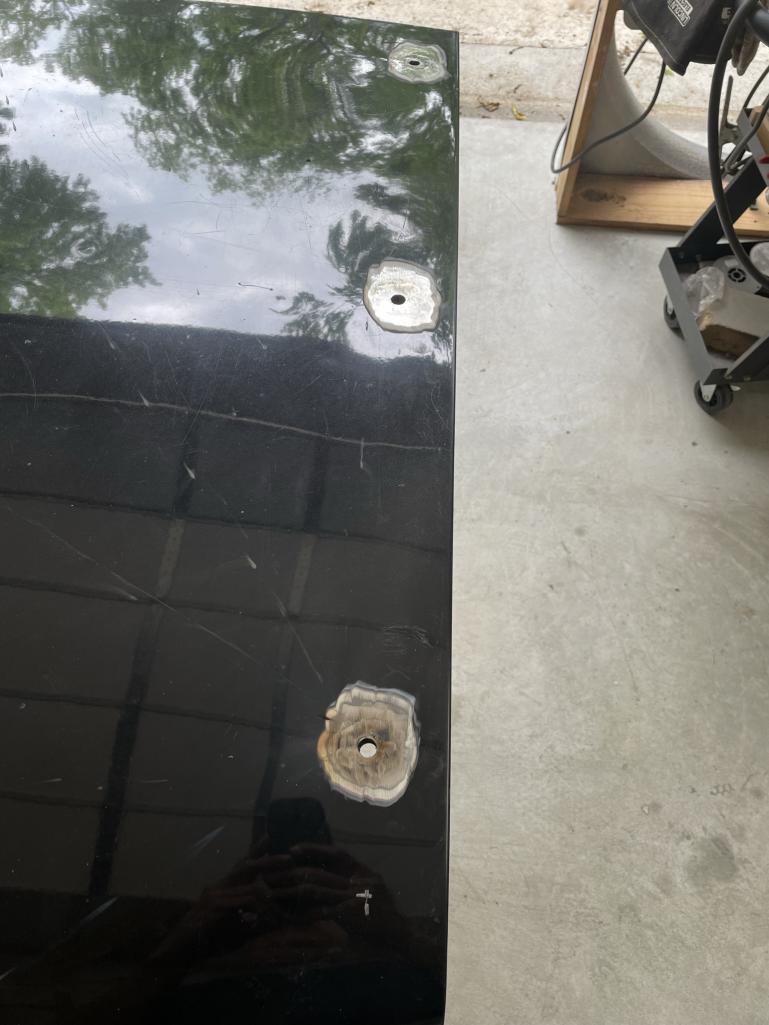
Posted by: East coaster Nov 4 2022, 08:11 PM
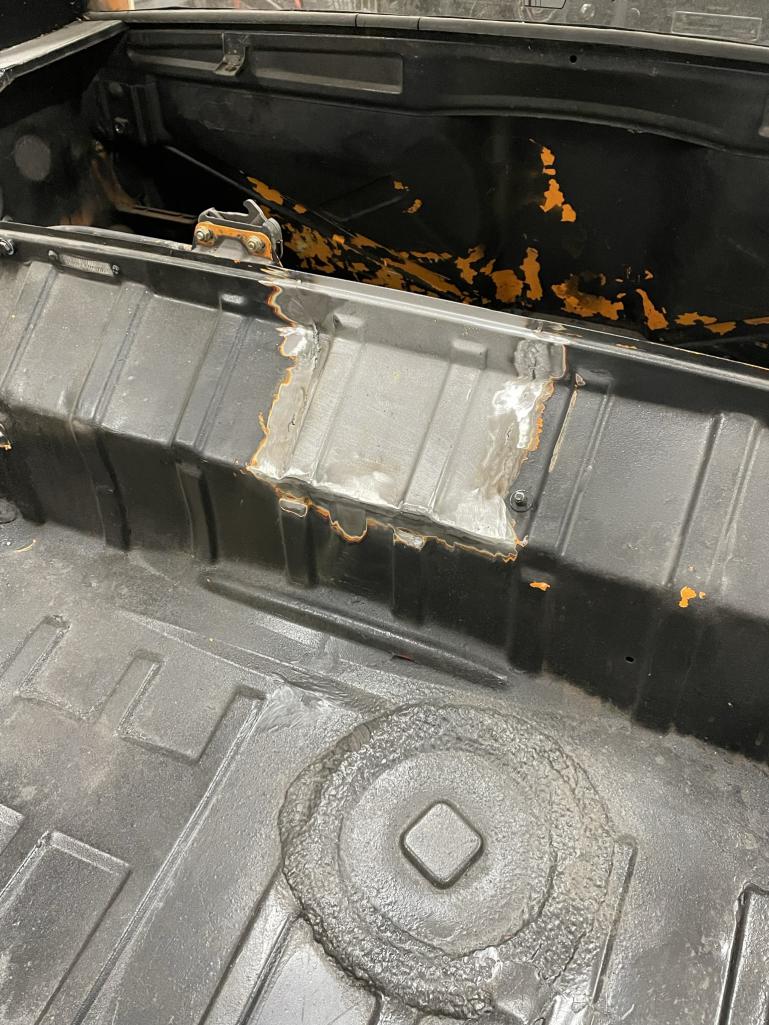
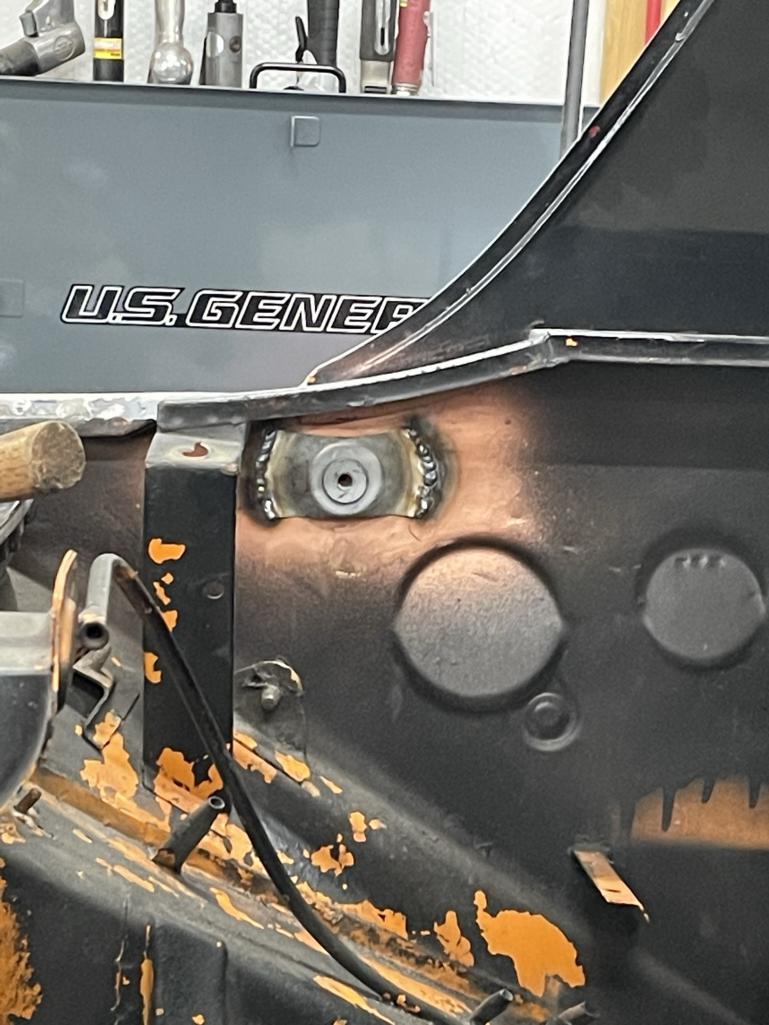
Closed up the tell tale V8 mod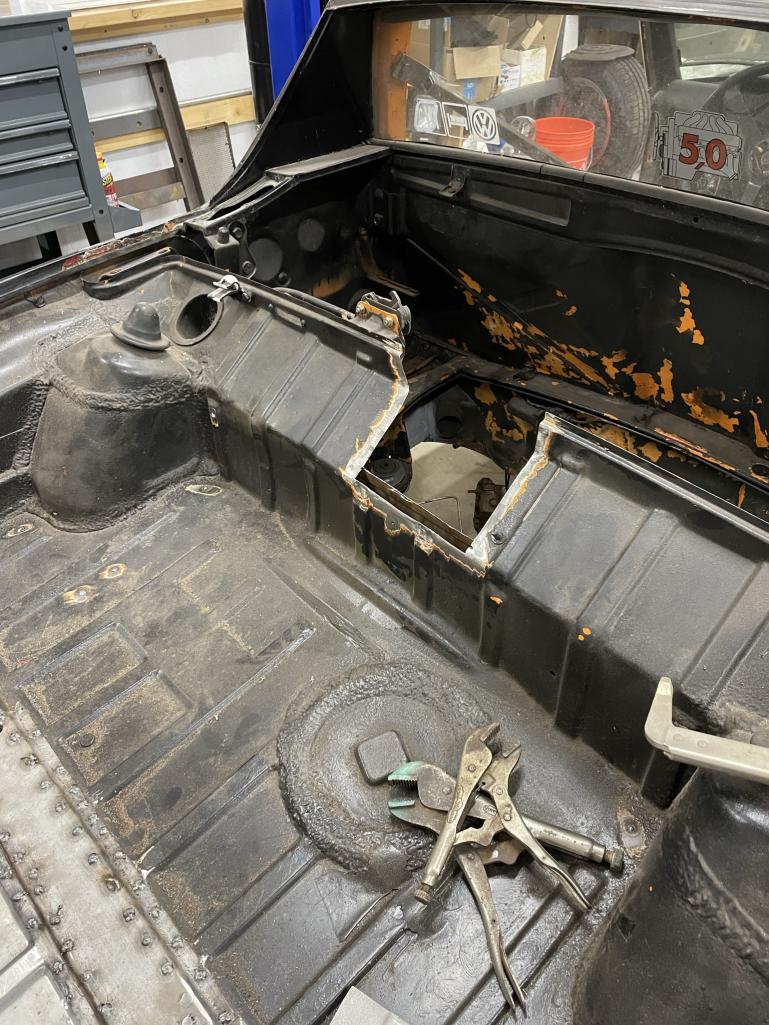
Posted by: East coaster Nov 4 2022, 08:15 PM
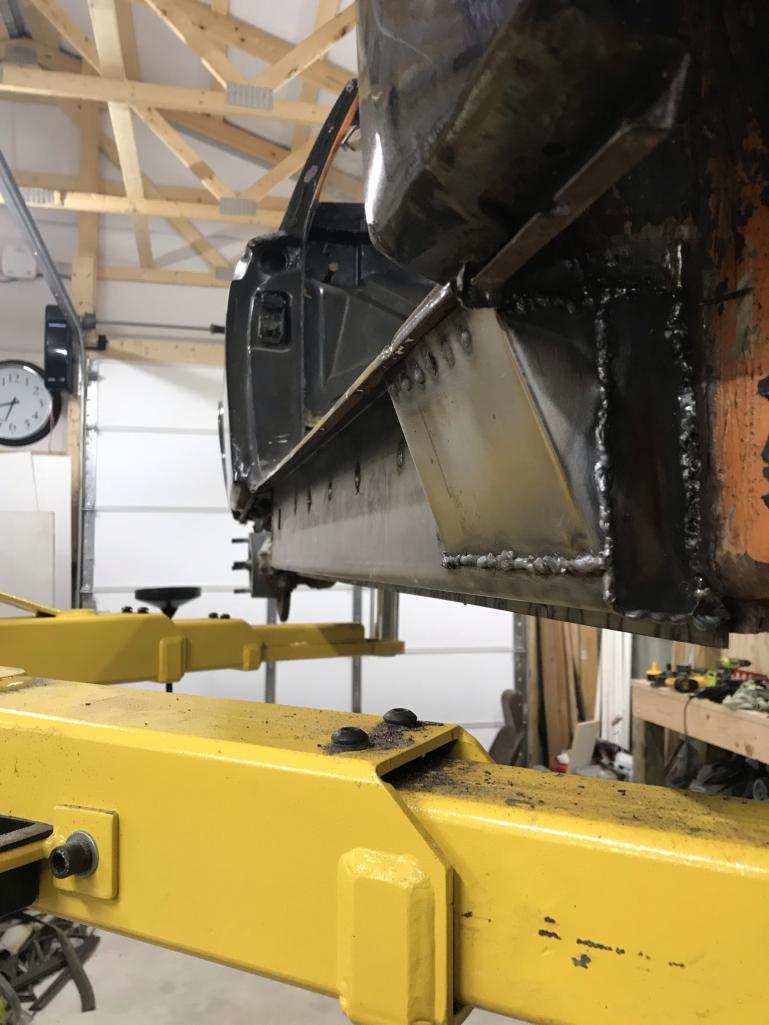
And moved on to some suspension fun……aka Safari lift
Raised the attach point on the rear trailing arms by 2”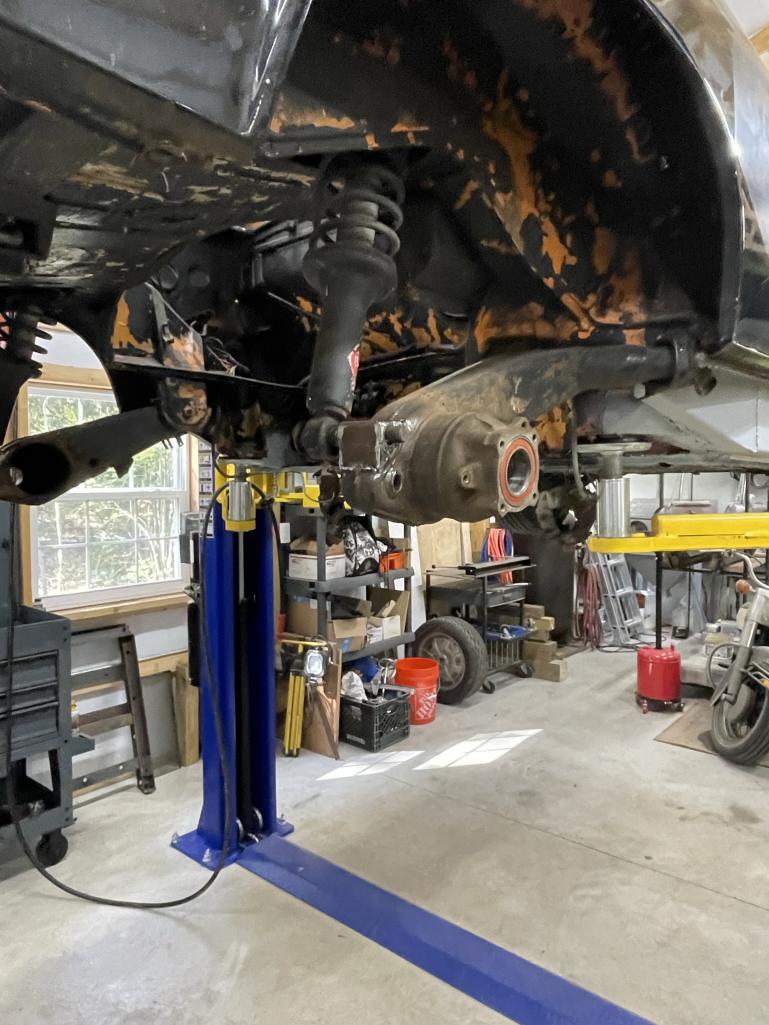
Then moved to fron struts and lowered the spindles to the max
Posted by: East coaster Nov 4 2022, 08:18 PM
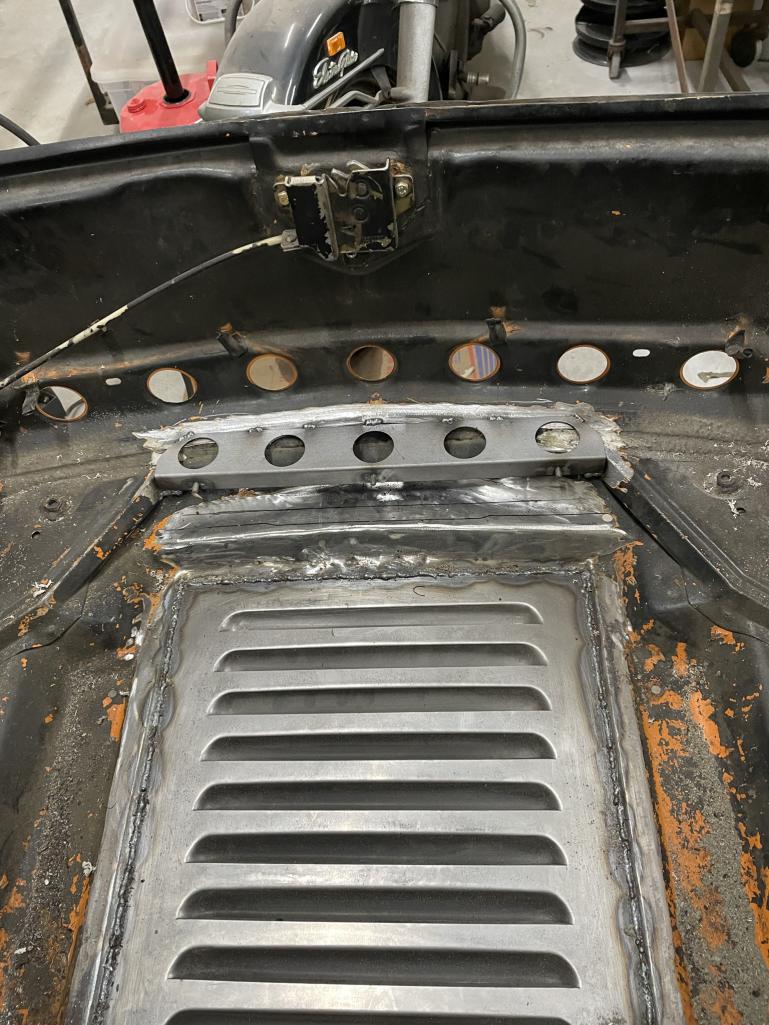
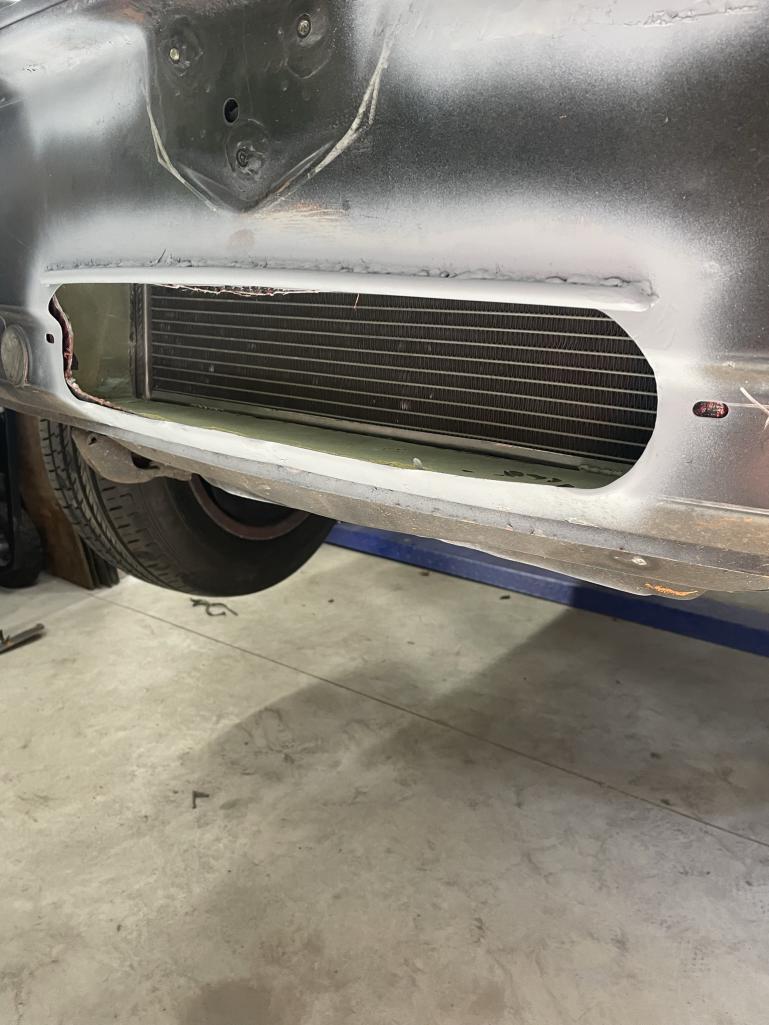
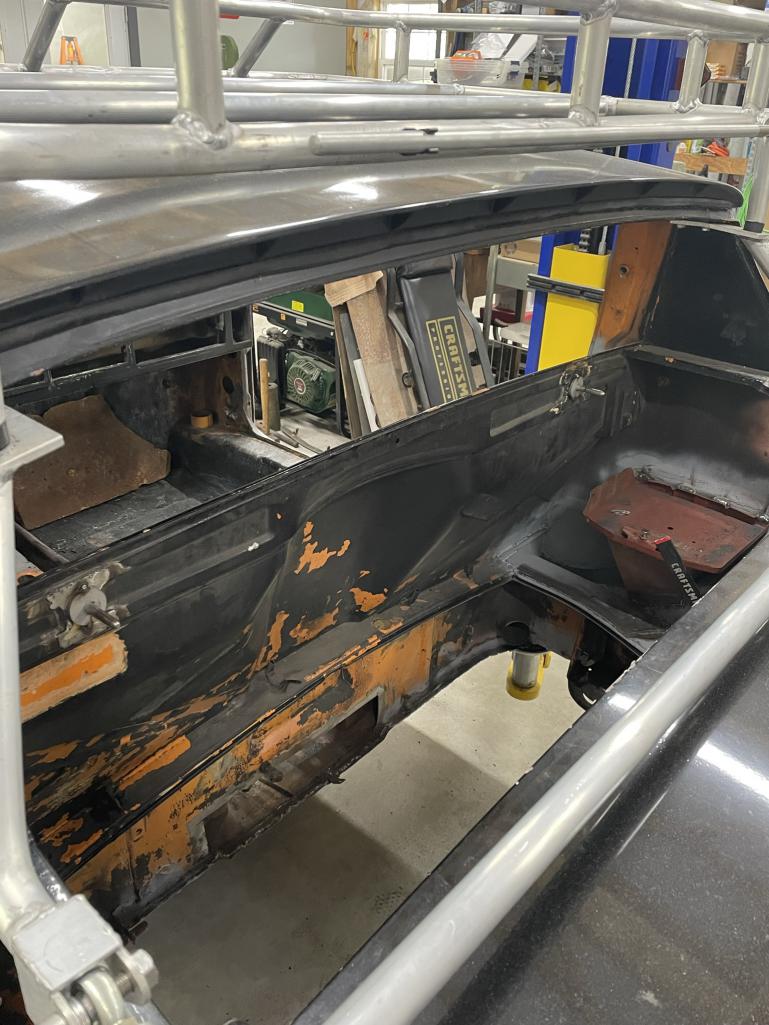
Working on the radiator install. I plan to vent out the bottom, but with the air ducted rearward. So I started by cutting a big hole….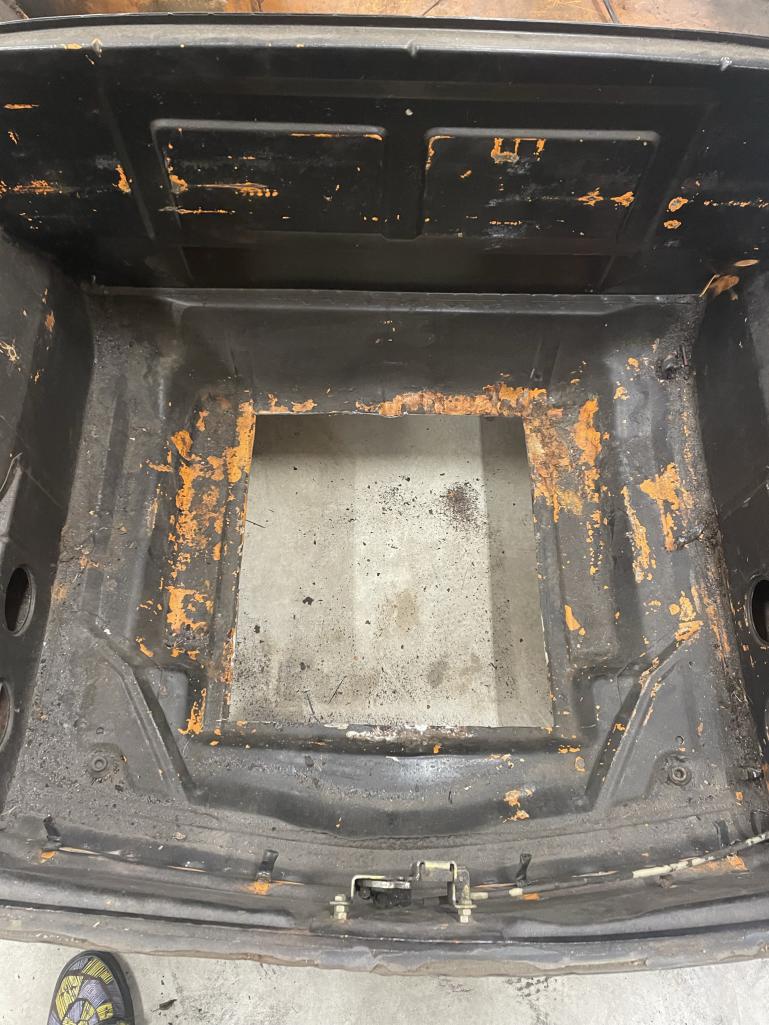
Then filled the big hole hole with a louvered panel from a VW Bus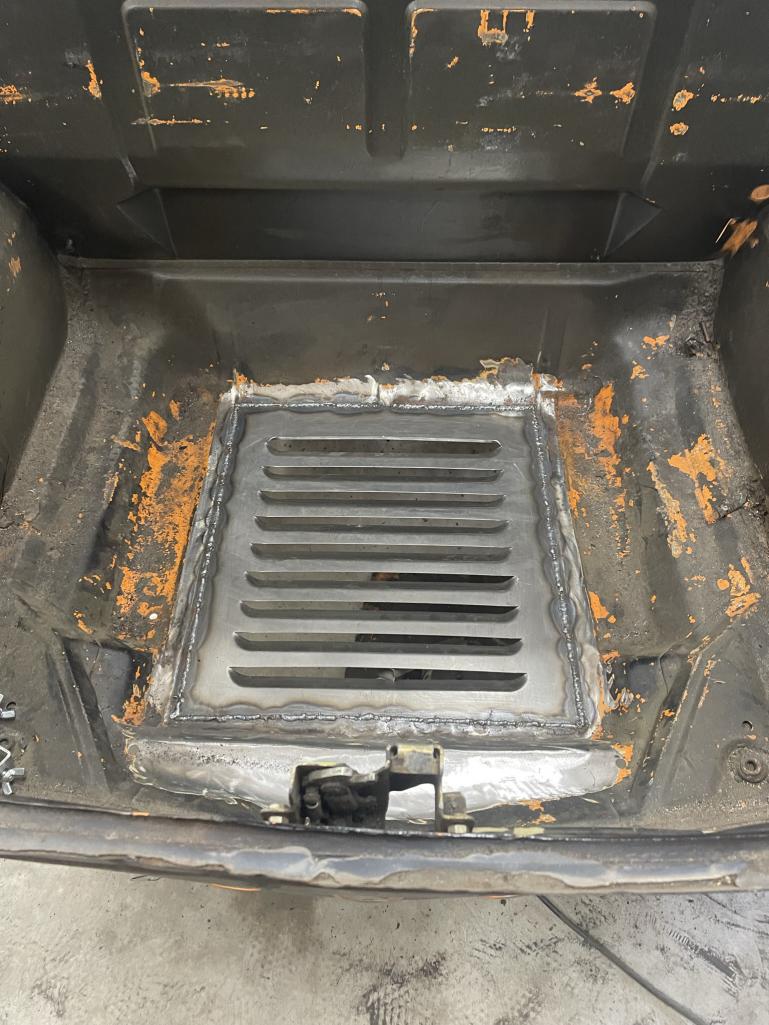
More pics to come……
Posted by: East coaster Nov 4 2022, 08:51 PM
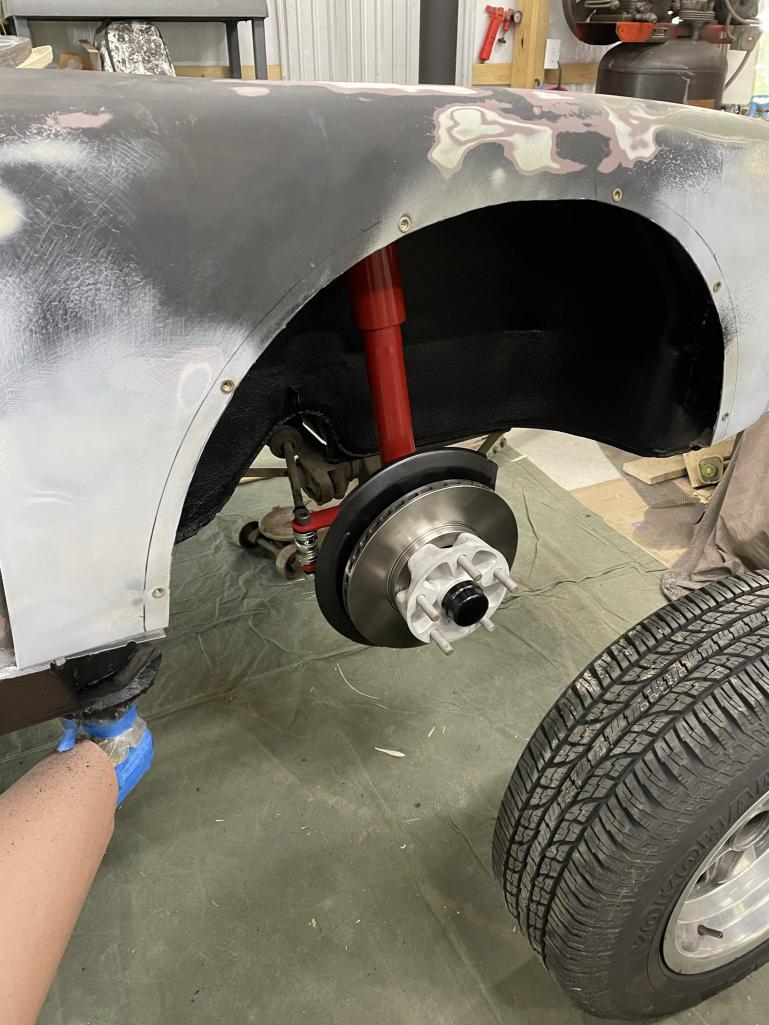
Machined rear hubs and rotors for 5 lug….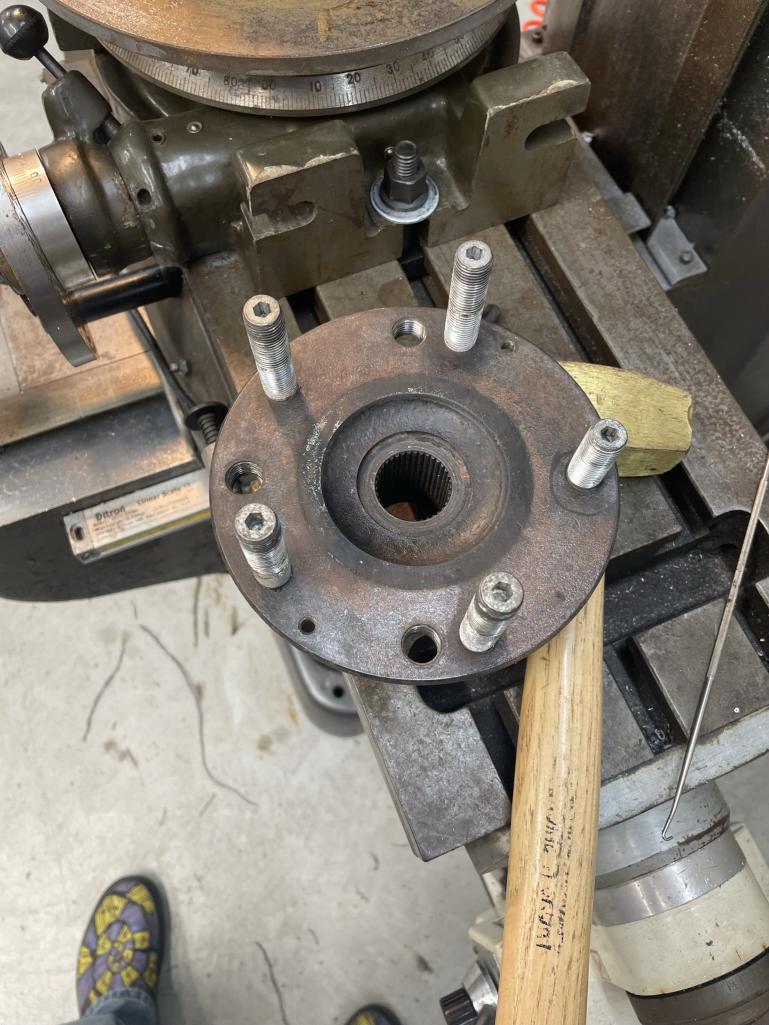
Rebuilt the pedal cluster….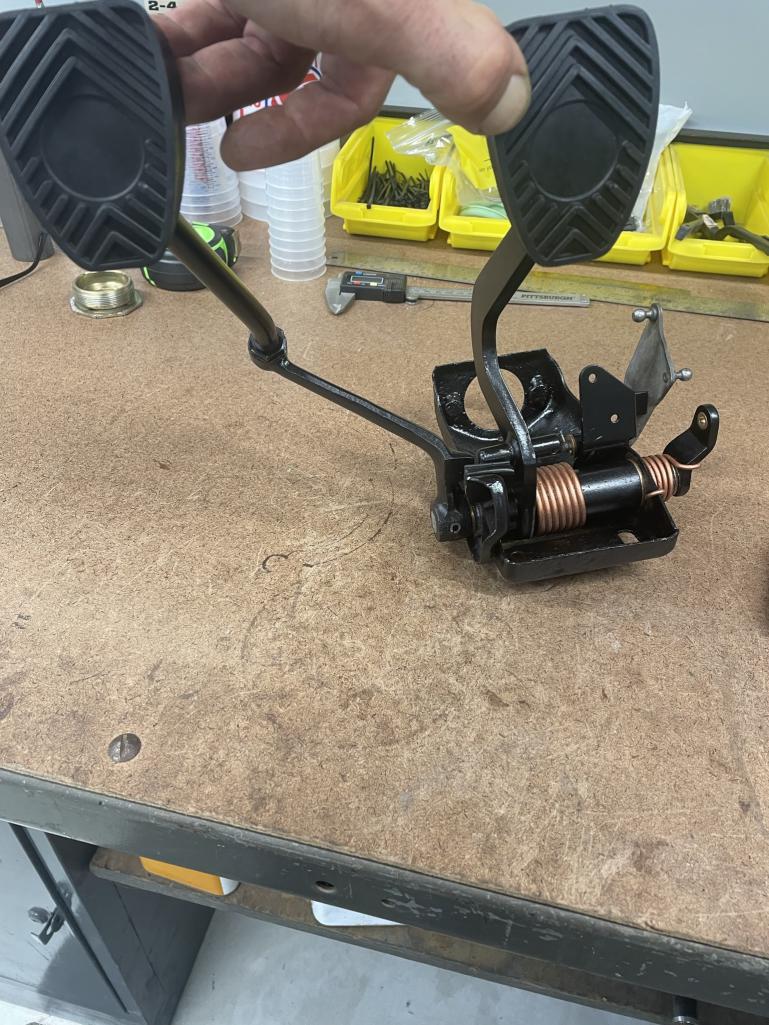
Posted by: Tjmrfe Nov 4 2022, 08:58 PM
Looks great. Looking forward to following your journey…good luck.
Posted by: mb911 Nov 5 2022, 08:32 AM
Will you finishing the welds on the floor pan? Looks like a good start but also some finding and blending in your future.
Posted by: jhynesrockmtn Nov 5 2022, 09:11 AM
I don't get the safari trend thing but your skills are impressive. Will be interested to see the project as it progresses.
Posted by: 914sgofast2 Nov 5 2022, 02:42 PM

I don't get the safari trend thing but your skills are impressive. Will be interested to see the project as it progresses.
I think the Safari trend has arisen because paved roads are getting too clogged up, so the only place you can let it rip are on dirt roads and forest fire trails, at least here in California.
Posted by: 914e Nov 5 2022, 03:08 PM
I don't get the safari trend thing but your skills are impressive. Will be interested to see the project as it progresses.
Trend? I have been watching Porsches race off road since the 70's.
Posted by: East coaster Nov 6 2022, 06:21 AM
Will you finishing the welds on the floor pan? Looks like a good start but also some finding and blending in your future.
Yes, these were just some random shots. The welds have been completed.
Posted by: infraredcalvin Nov 6 2022, 07:33 AM
Do you really want a hole on the bottom of the car when off roading? I’d think you would want to seal up the bottom tight to keep out dust, dirt, water, mud, snow…… just a thought…
BTW, love what you’re doing, I look forward to seeing your updates!
Posted by: waltonsm Nov 6 2022, 05:10 PM
And moved on to some suspension fun……aka Safari lift
Raised the attach point on the rear trailing arms by 2”
Then moved to fron struts and lowered the spindles to the max
Are you planning to cut and weld the trailing arm to add camber back? You could lower the inner suspension console/mounting point too. I considered making a reversible insert in the inner ear for my build. I still might do it if I find I don’t have the adjust range I need.
Posted by: East coaster Nov 7 2022, 06:42 AM
I guess I’ll see where I end up with camber. I saw the mod you did on your arms but didn’t know if it was to achieve extra camber or to be able to get to stock specs.
Posted by: East coaster Nov 8 2022, 07:57 PM
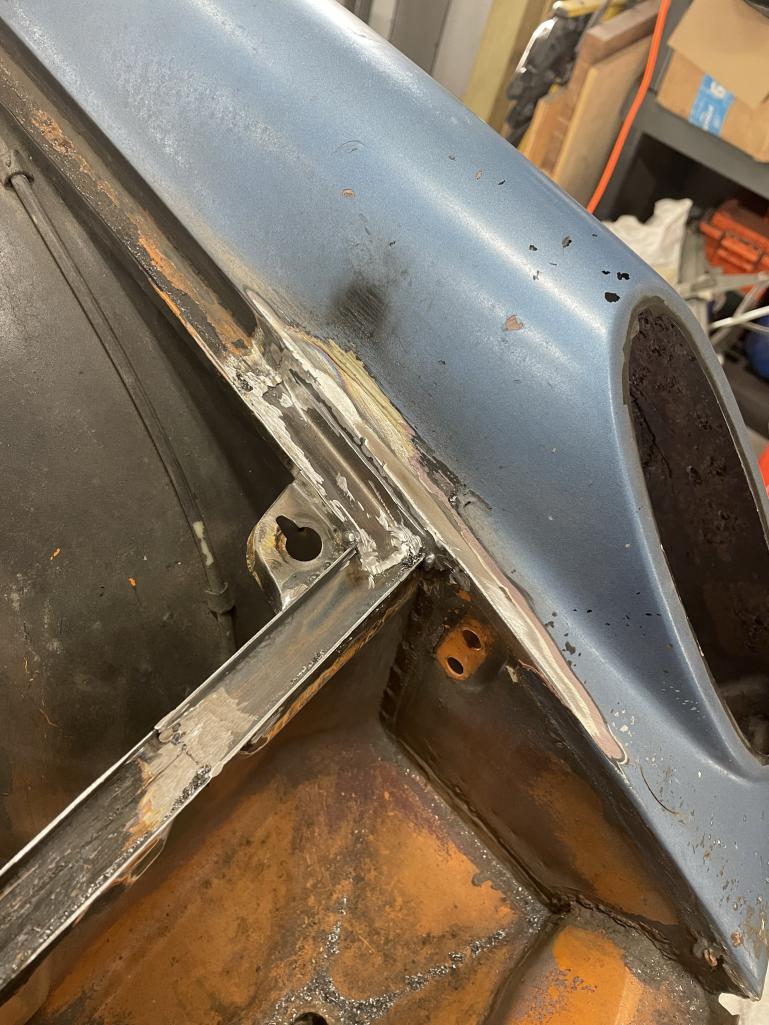
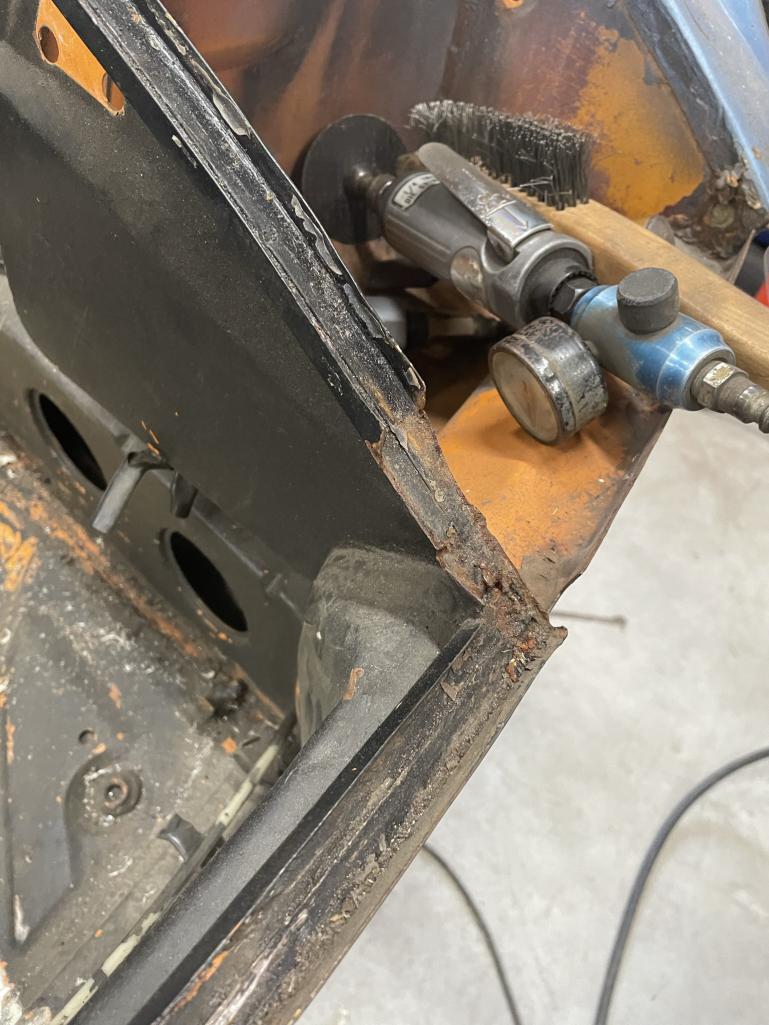
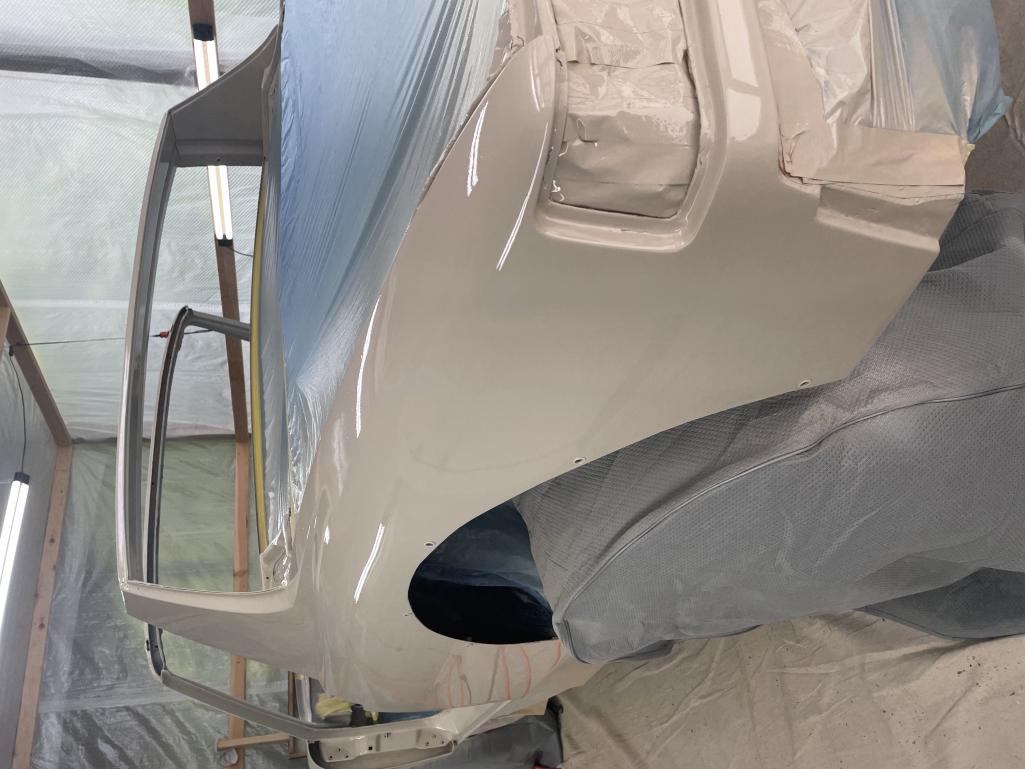
It was hood seal channel repair day. Bent some 18 gauge channel and went to work. Some before and afters……both sides were pretty much the same.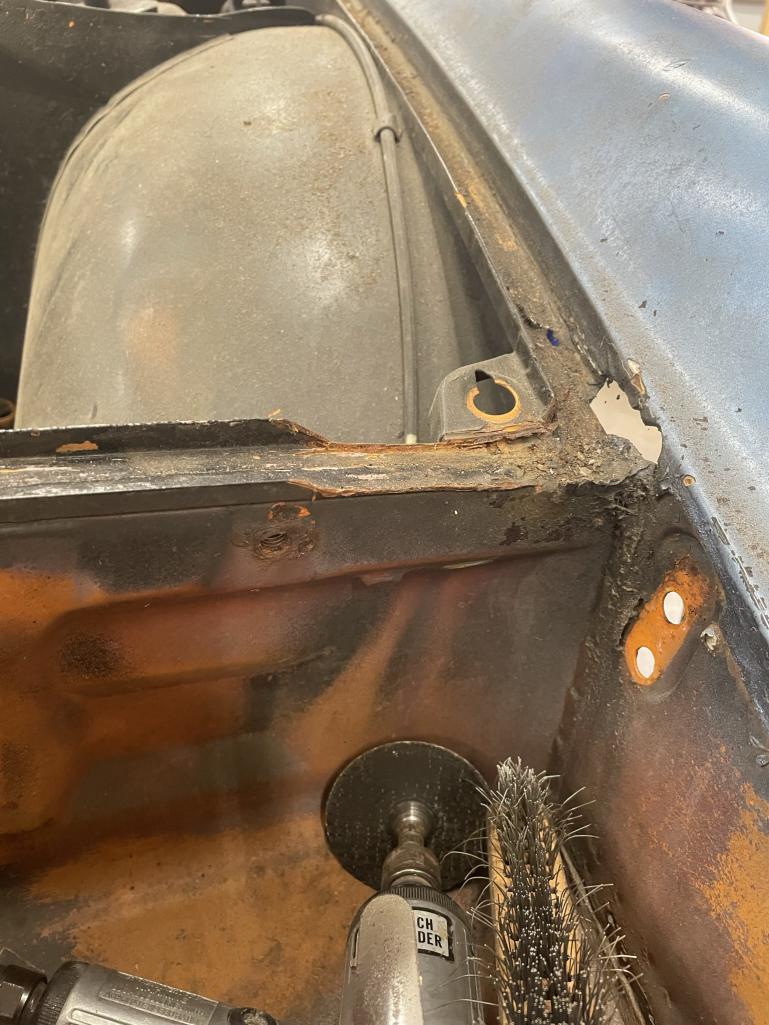
Posted by: bkrantz Nov 8 2022, 08:26 PM
Nice work! How high will the floor pan sit above the ground?
Posted by: r_towle Nov 9 2022, 08:06 AM
Good to see this one saved…it needed your skills!
Posted by: East coaster Nov 12 2022, 08:35 PM
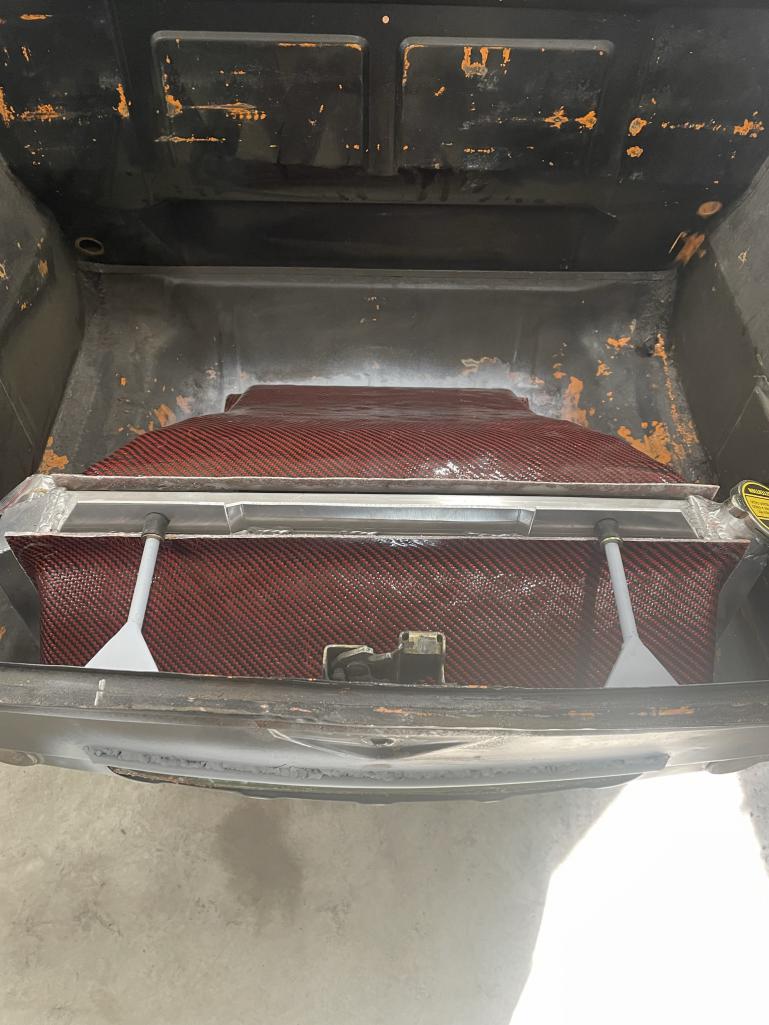
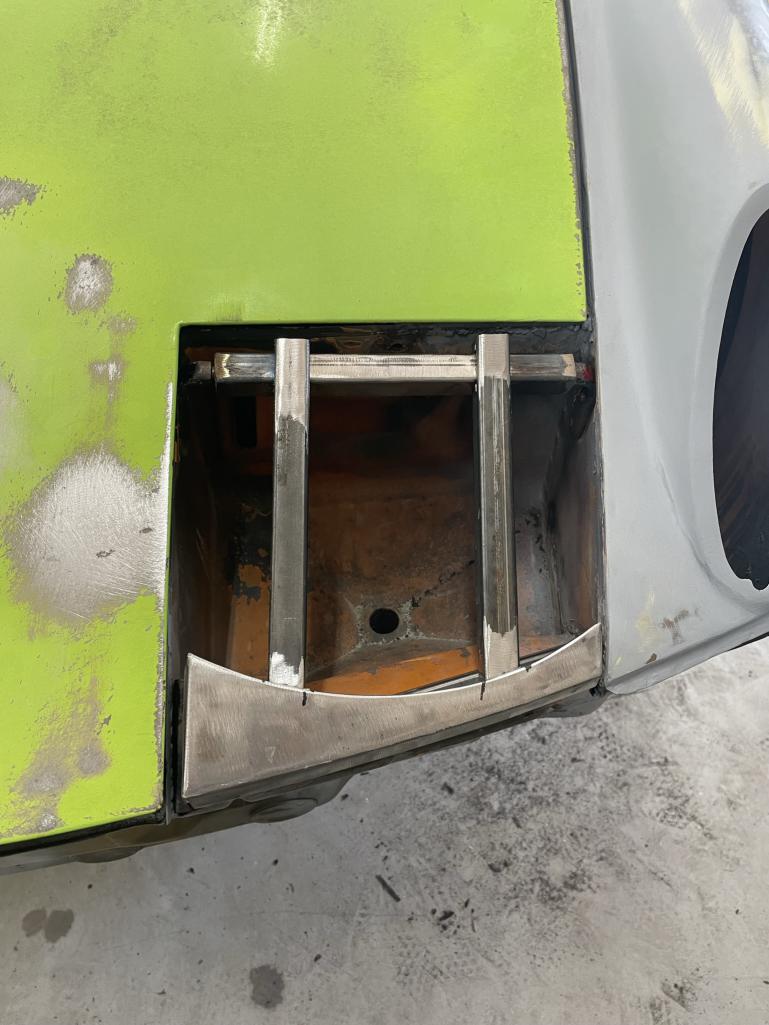
Radiator time…..made a mount for the bottom of the radiator and welded it into the front of the trunk. It has 3 rubber mounts at the bottom of the radiator that will support the majority of the weight and stresses.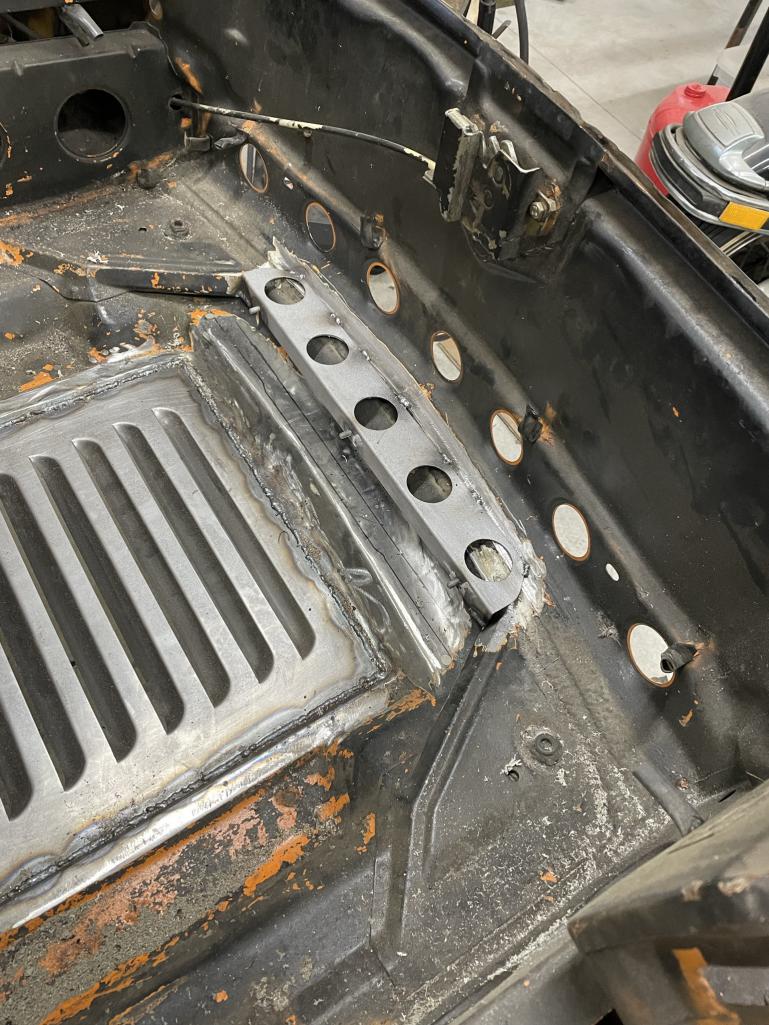
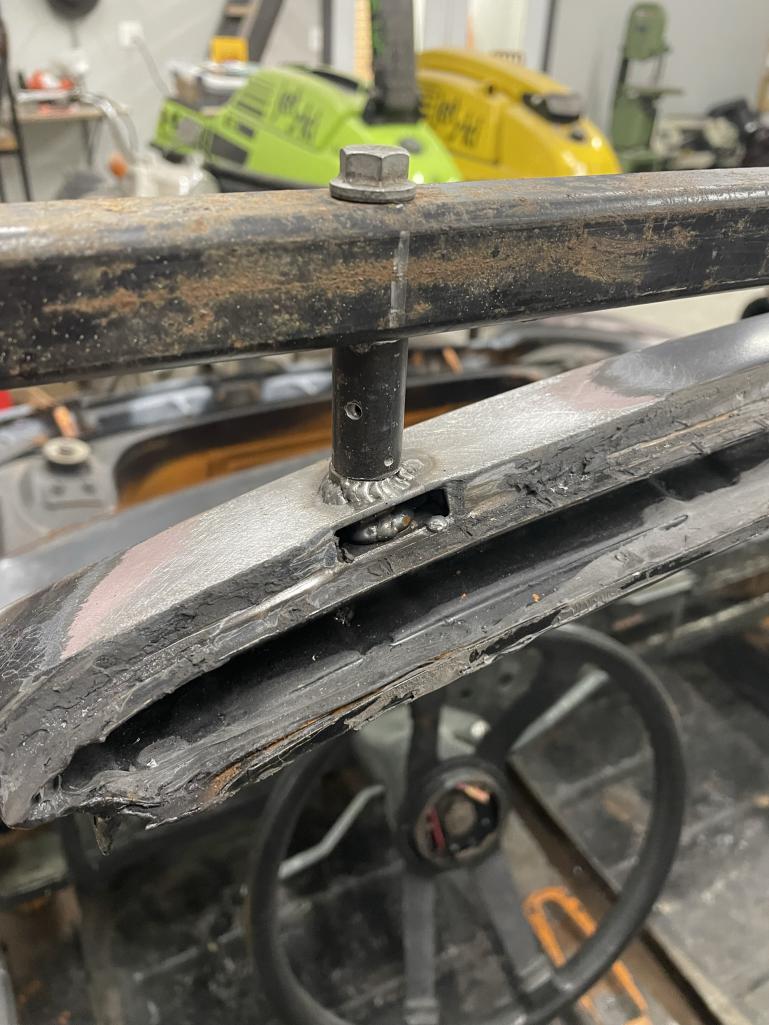
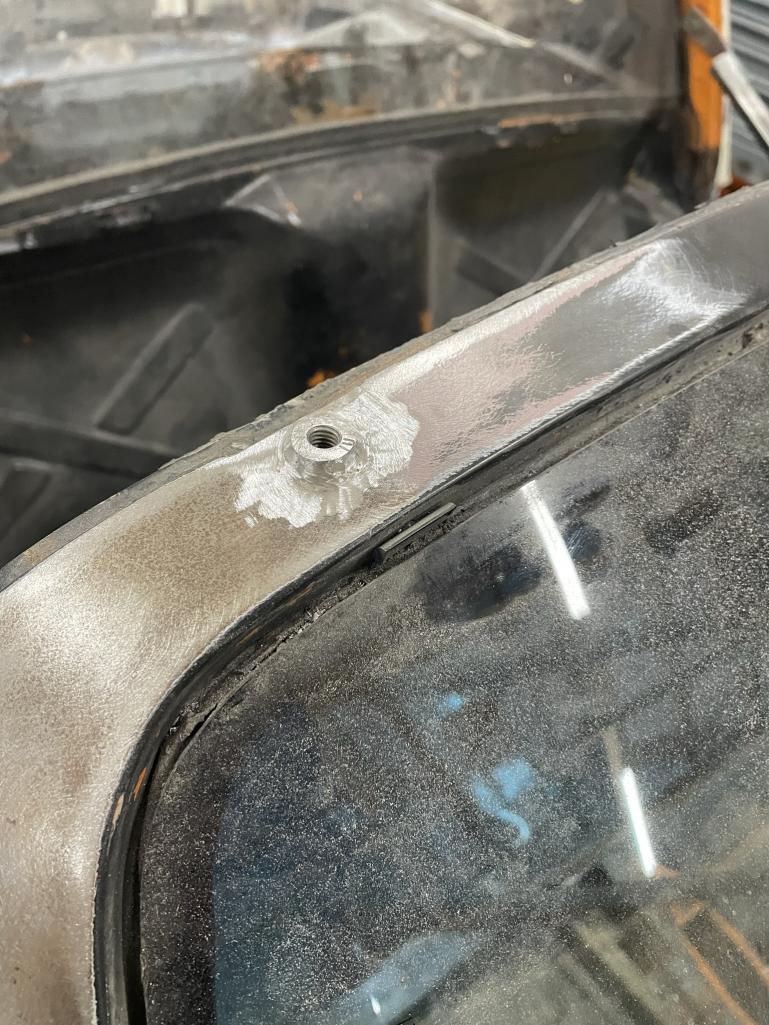
Posted by: East coaster Nov 12 2022, 08:36 PM
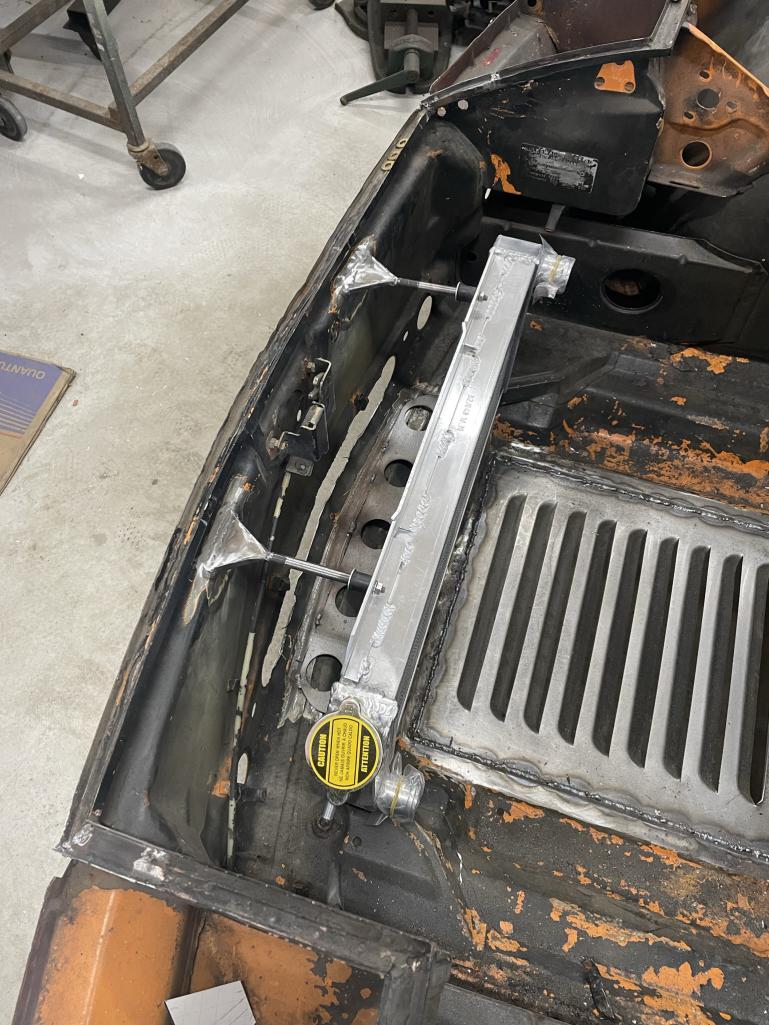
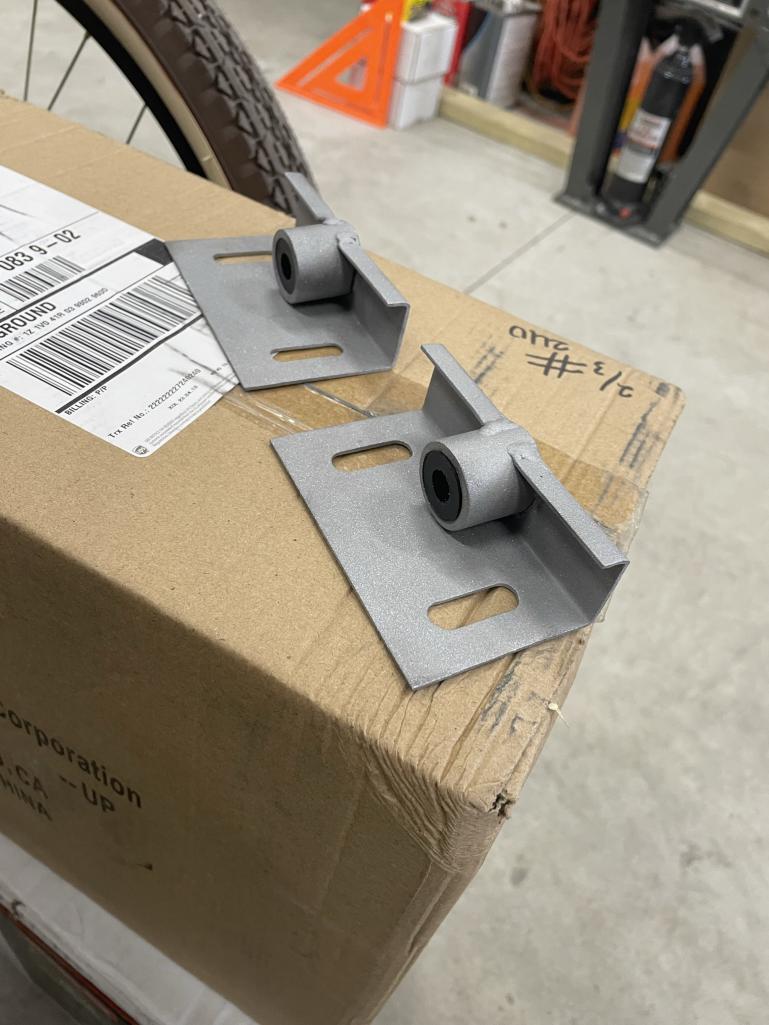
Then moved on to a means of mounting the top of the radiator. These mounts won’t have much stress but I wanted them to be strong, but minimal. I decide on two reinforced posts extending from the front wall of the trunk. These are 3/8” chrome-moly tubing passed through the chassis and plug welded on the outside, then braced with some simple flanges on the inside. Rosette welded some 6mm studs into the radiator end of the tubes that mount the rubber isolating moun.
Very light and simple, but very strong…...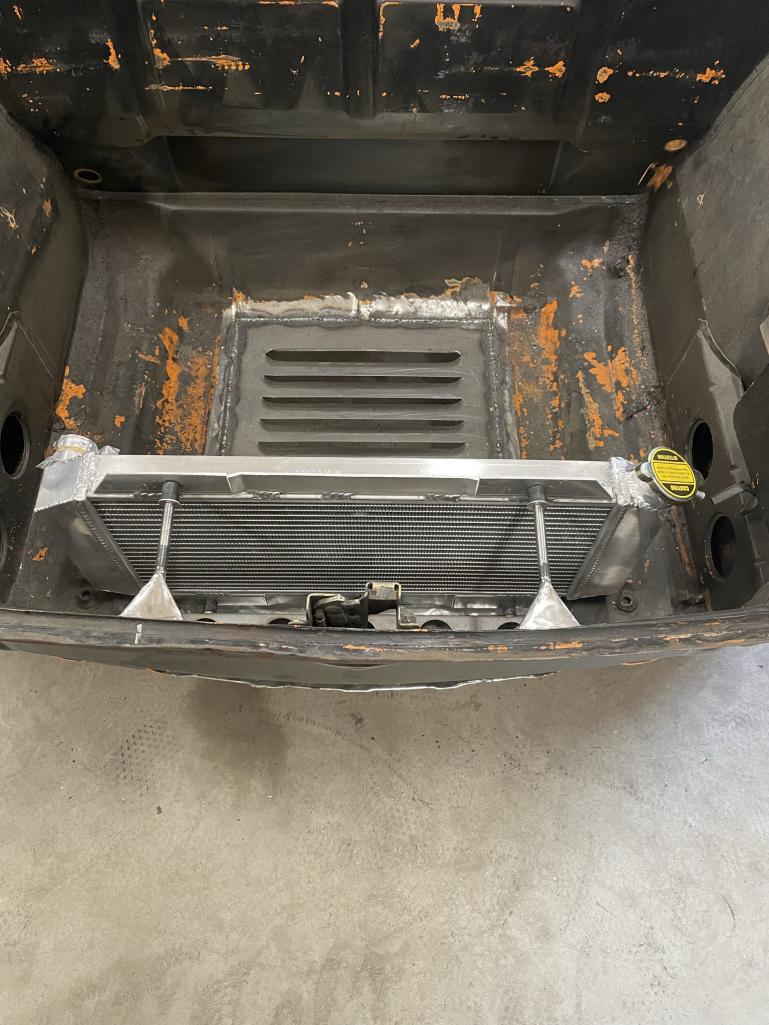
Posted by: East coaster Dec 4 2022, 07:39 AM
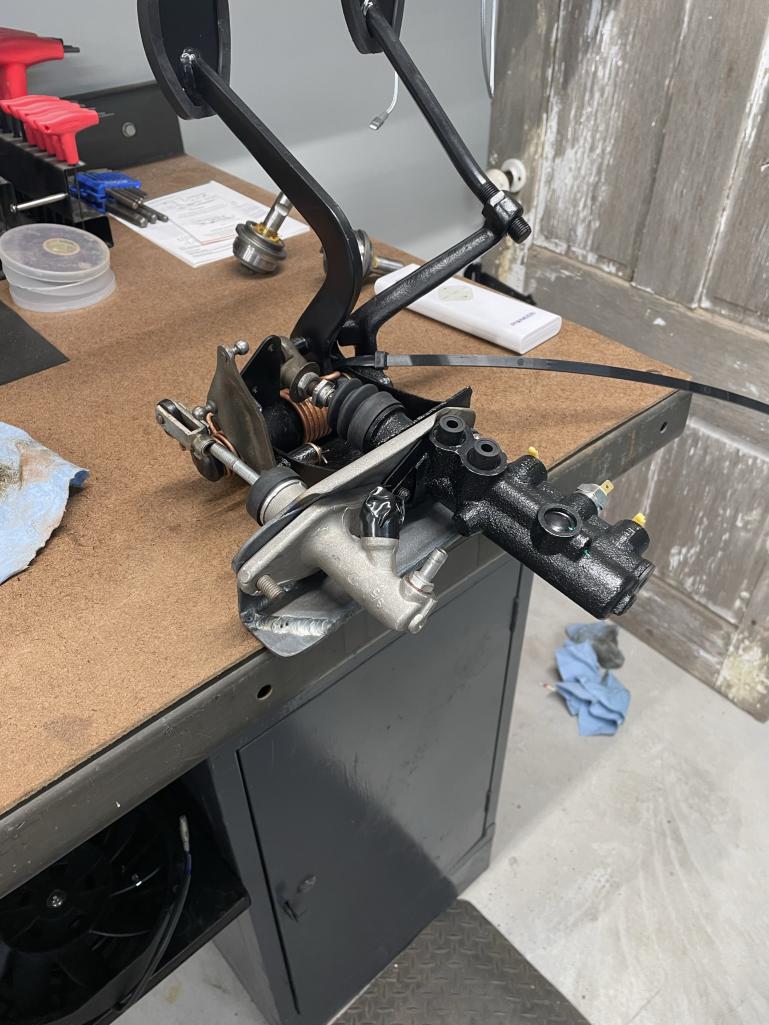
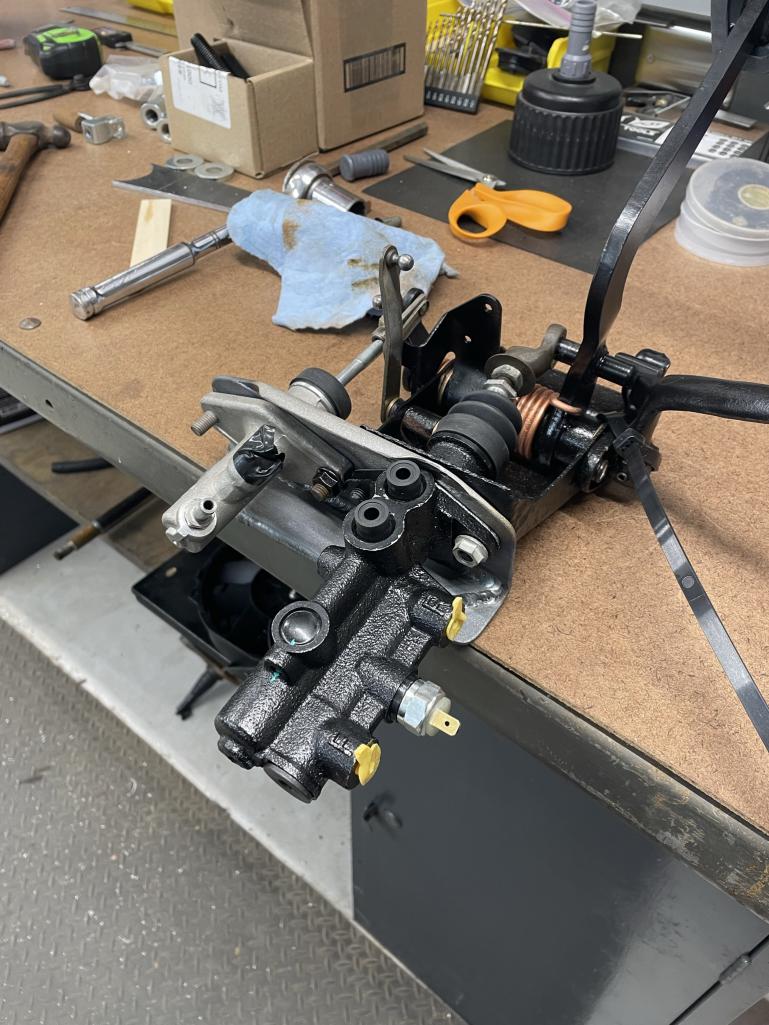
A small diversion project to allow me to work in the heated portion of my shop on a cold damp day. Fab’d up the bracket for the clutch master cylinder.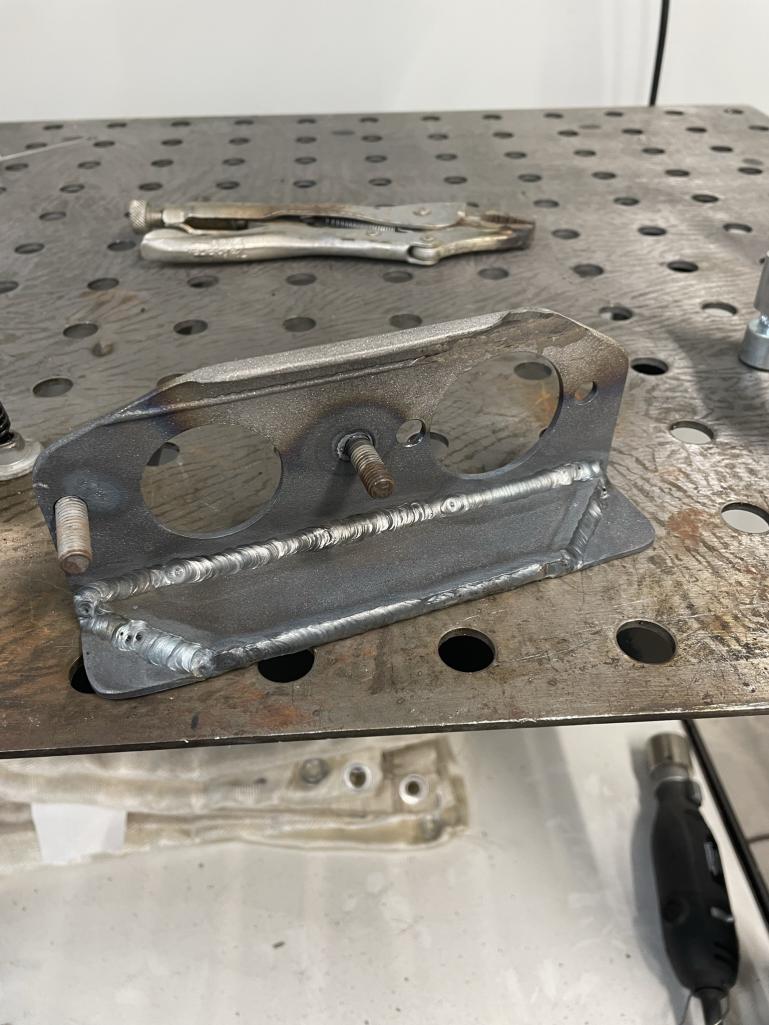
Posted by: East coaster Dec 7 2022, 07:08 AM
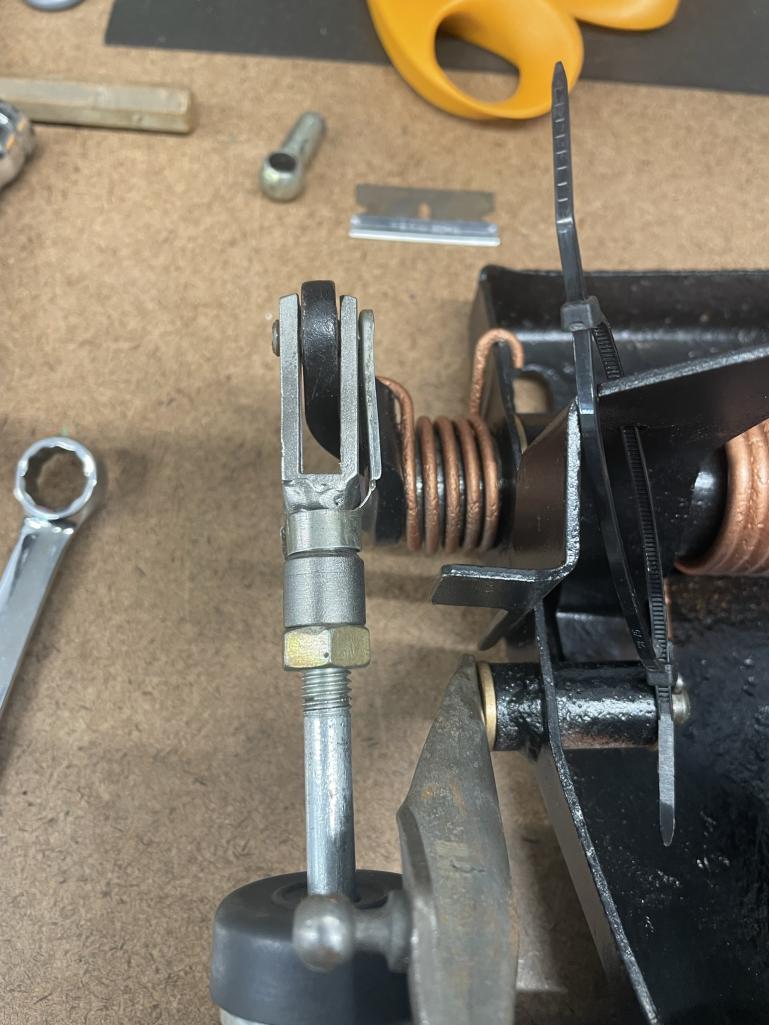
Machined a conversion part for the clutch clevis. Just turned a piece of 1/2” steel to make the clevis end the diameter of the stock clevis threaded area so the pin will still clip on, then a radius to the larger diameter to provide enough beef for the 8mm thread of the Honda master cylinder. Welded the new part to the stock clevis and all lines up and functions well.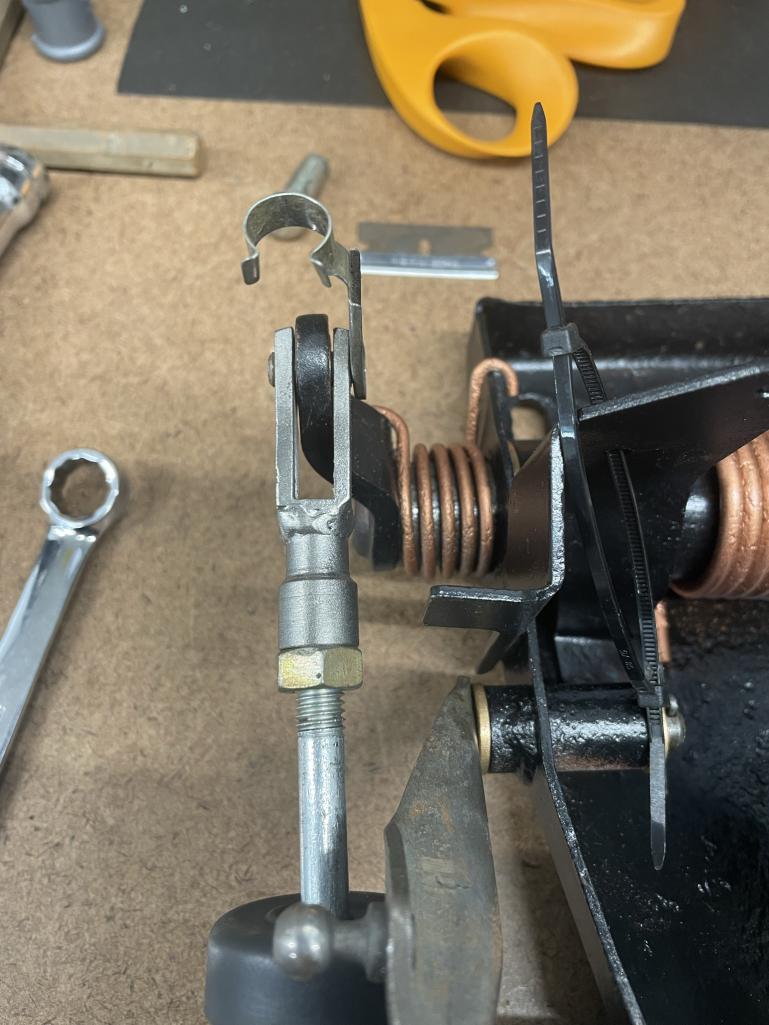
Posted by: East coaster Dec 15 2022, 07:36 PM
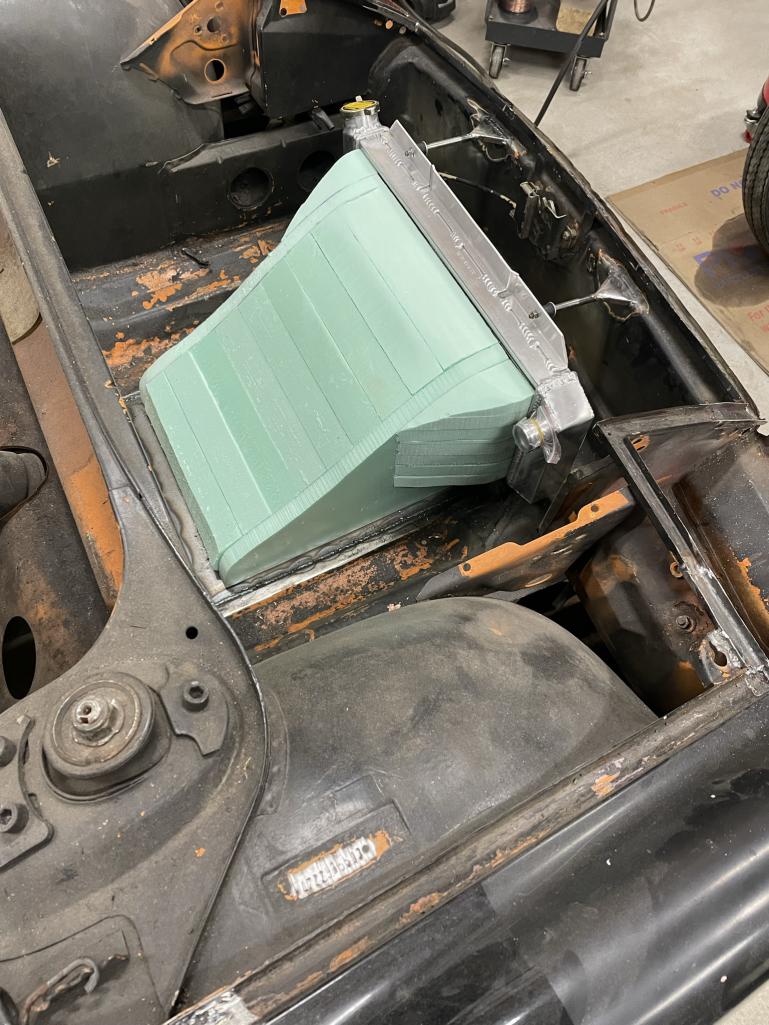
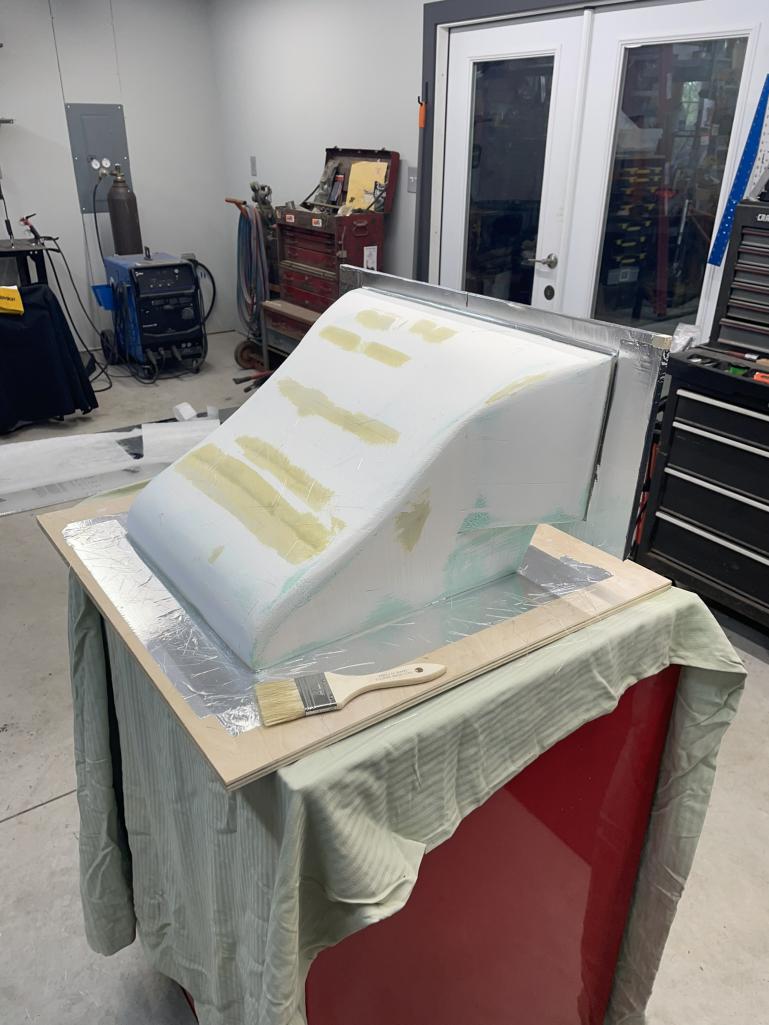
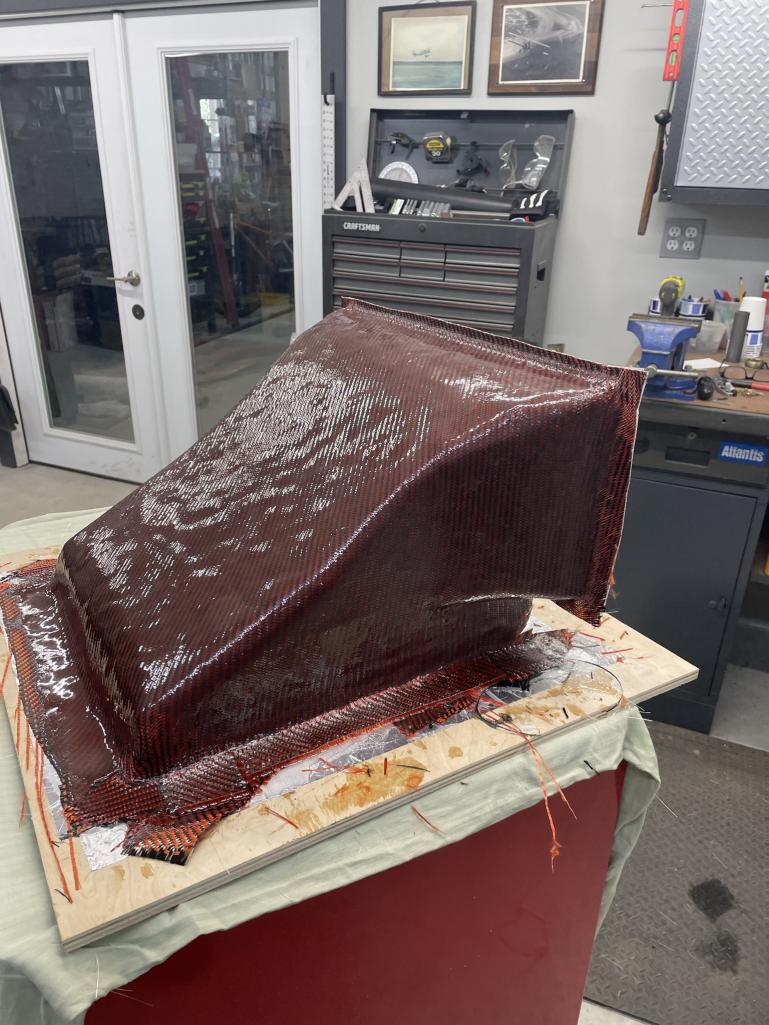
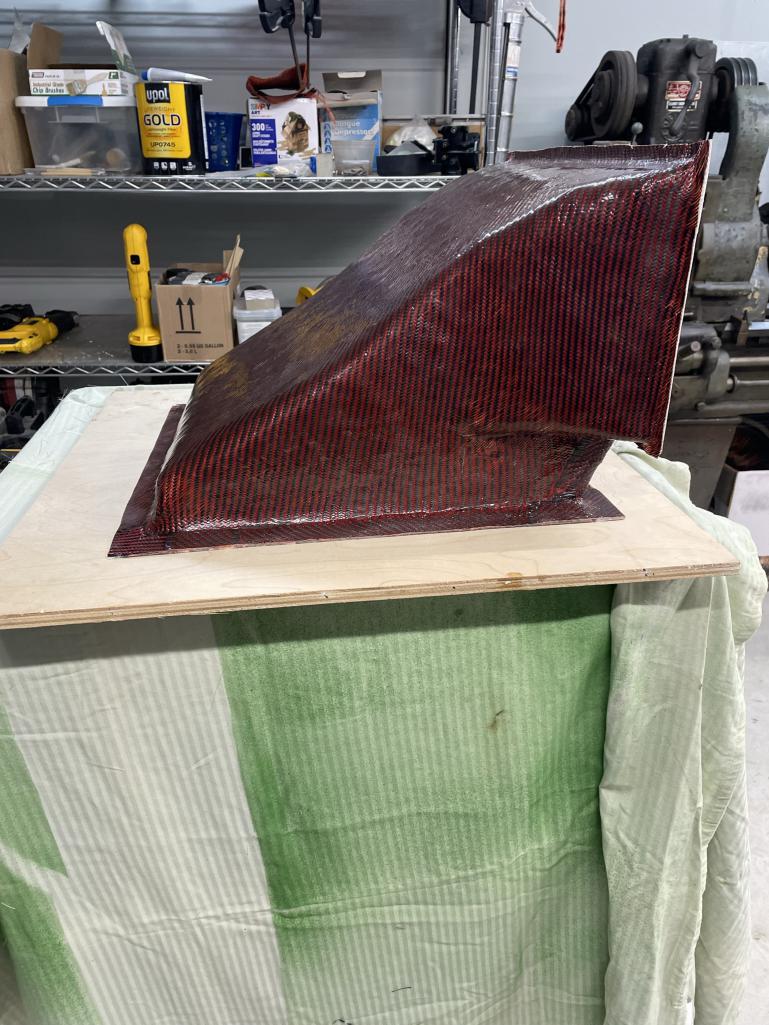
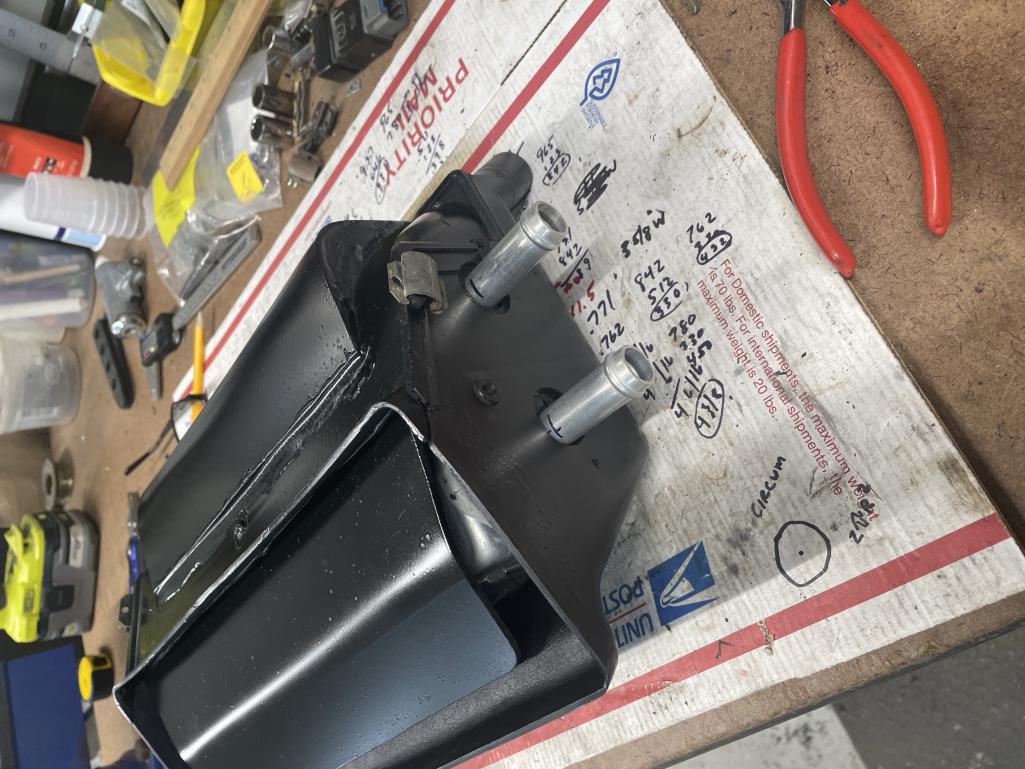
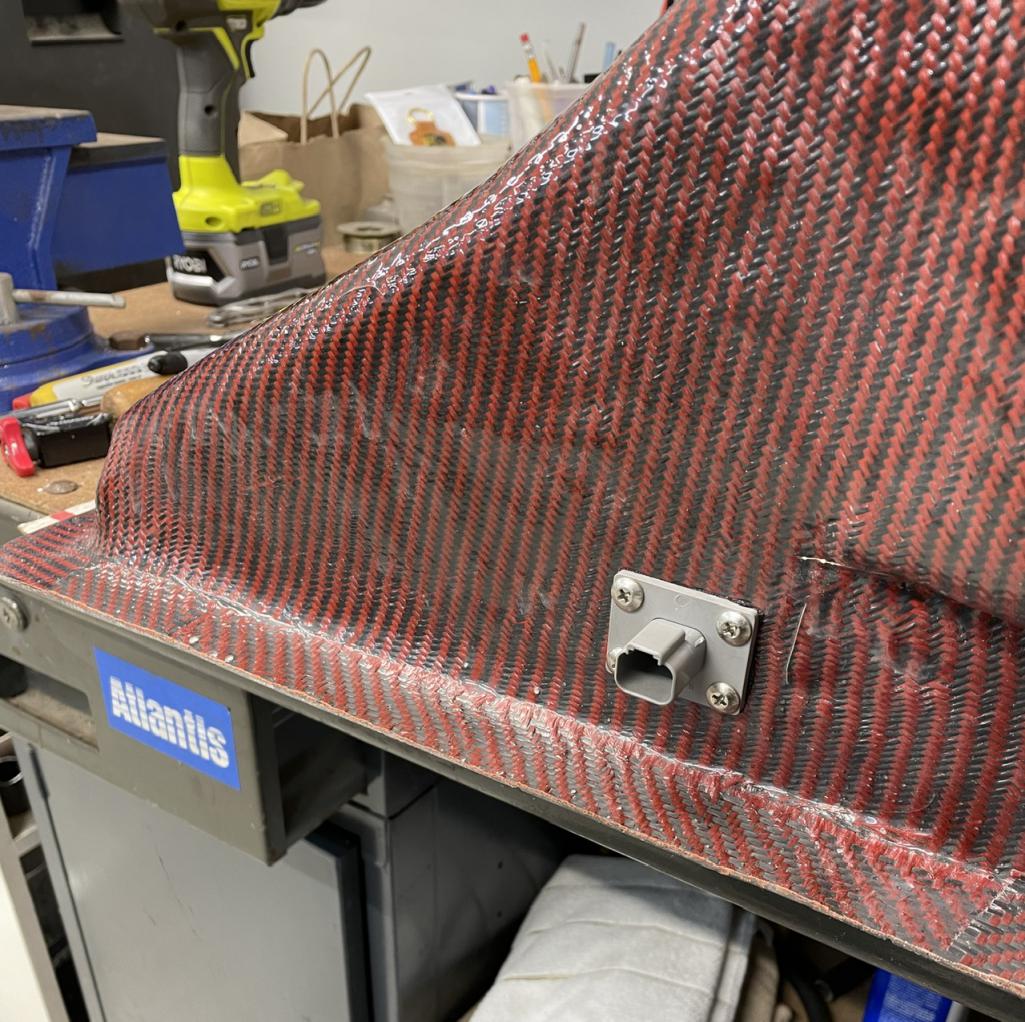
With radiator mount completed, it was on to the fabrication of the exit plenum. A little foam and filler to create a “buck”, then on to a little carbon/Kevlar layup. It came out well and I’m now laying up an entrance plenum to go between radiator and inlet opening. The plenums will have a thick rubber seal to isolate the plenum from the radiator and keep a tight seal.
Attached thumbnail(s)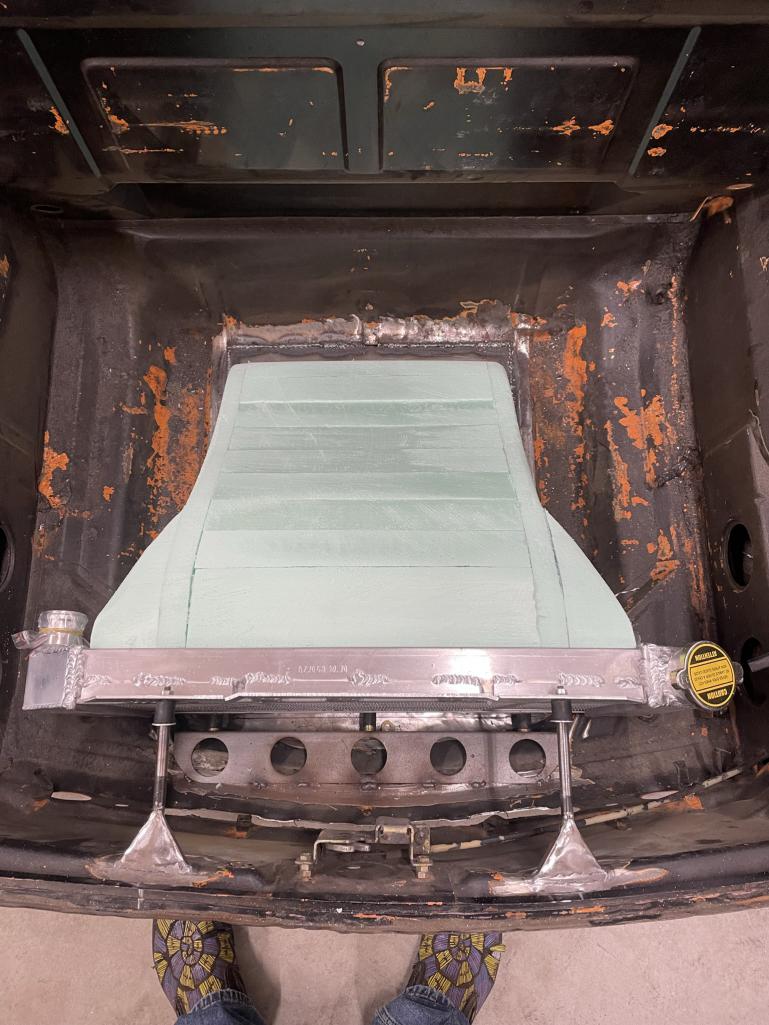
Posted by: East coaster Dec 15 2022, 07:38 PM
Posted by: East coaster Dec 15 2022, 07:39 PM
Purdy……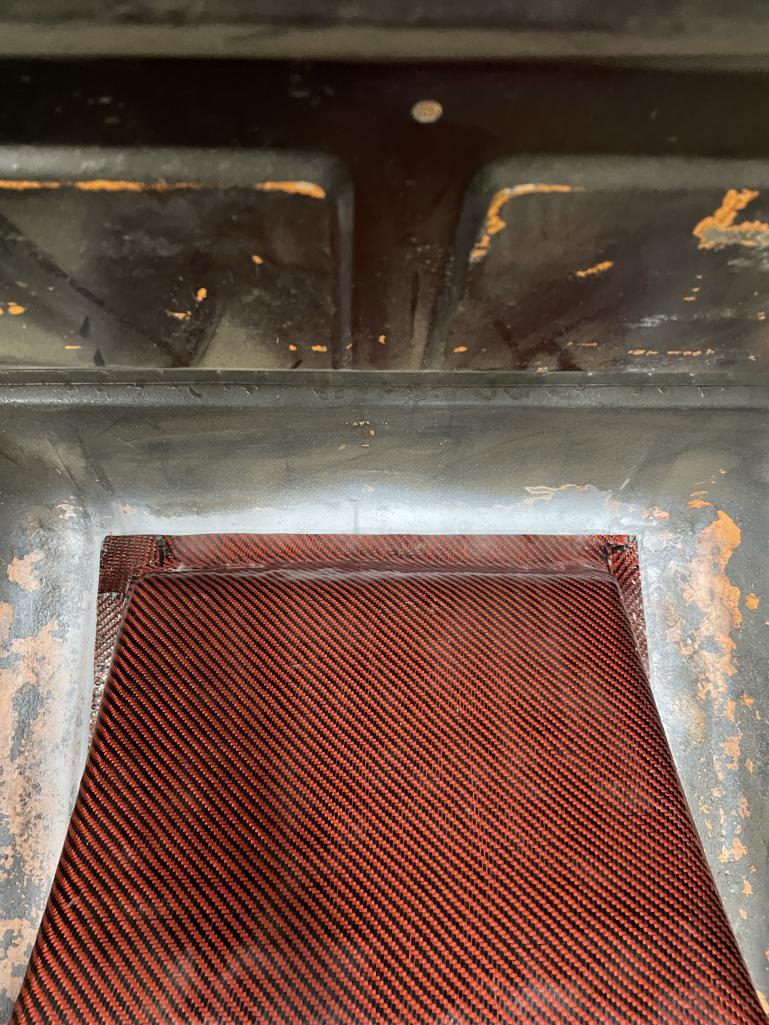
Posted by: Montreal914 Dec 15 2022, 09:33 PM
I am still in admiration with your fiberglass duct work on your silver six (avatar), but now, even more! 
A few questions:
What type of foam is this?
What type of adhesive are you using to bond the foam pieces?
What type of filler are you using?
Are you putting any protective layer on the filler prior to laying the CF over?
Are you using polyester resin with CF as you would for fiberglass?
Would all of this buck preparation process be the same for fiberglass?
I think this is such cool fabrication work! 
Sorry for all the question... 

Posted by: Blue6 Dec 15 2022, 09:49 PM
I am still in admiration with your fiberglass duct work on your silver six (avatar), but now, even more!
A few questions:
What type of foam is this?
What type of adhesive are you using to bond the foam pieces?
What type of filler are you using?
Are you putting any protective layer on the filler prior to laying the CF over?
Are you using polyester resin with CF as you would for fiberglass?
Would all of this buck preparation process be the same for fiberglass?
I think this is such cool fabrication work!
Sorry for all the question...
What he said….
Posted by: East coaster Dec 16 2022, 06:06 AM
I am still in admiration with your fiberglass duct work on your silver six (avatar), but now, even more!
A few questions:
What type of foam is this? (Just some foam board from Home Depot)
What type of adhesive are you using to bond the foam pieces? (Hot glue gun)
What type of filler are you using? (A coating of joint compound, then a little bondo where needed)
Are you putting any protective layer on the filler prior to laying the CF over? ( I usually do but didn’t here. The foam breaks out of the finished piece and it leaves a layer of joint compound which sands off very easily)
Are you using polyester resin with CF as you would for fiberglass? ( I used West System epoxy)
Would all of this buck preparation process be the same for fiberglass? (Same for glass. In fact, this has a single layer of fiberglass mat under the carbon. If you use polyester resin you would need to use different foam, as poly will eat this type of foam)
I think this is such cool fabrication work!
Sorry for all the question...
Posted by: slowrodent Dec 16 2022, 07:53 AM
Super metal fab work.. And that plenum is wondrous. I love that solution. And your choice of footwear... the list goes on and on.. 
Posted by: Retroracer Dec 16 2022, 10:35 AM
Another nod to the excellent footwear - but adding to the composite questions:
- who do use as a supplier for the carbon/kevlar?
- are you using dye in the gel coat to give it that red coloring?
Great thread BTW!
- Tony
Posted by: East coaster Dec 16 2022, 07:35 PM
Another nod to the excellent footwear - but adding to the composite questions:
- who do use as a supplier for the carbon/kevlar?
- are you using dye in the gel coat to give it that red coloring?
Great thread BTW!
- Tony
I got the carbon Kevlar material from US Composites. The red is actually orange Kevlar woven with the black carbon. It was a left over from one of my jetski projects.
Posted by: East coaster Dec 20 2022, 06:30 PM
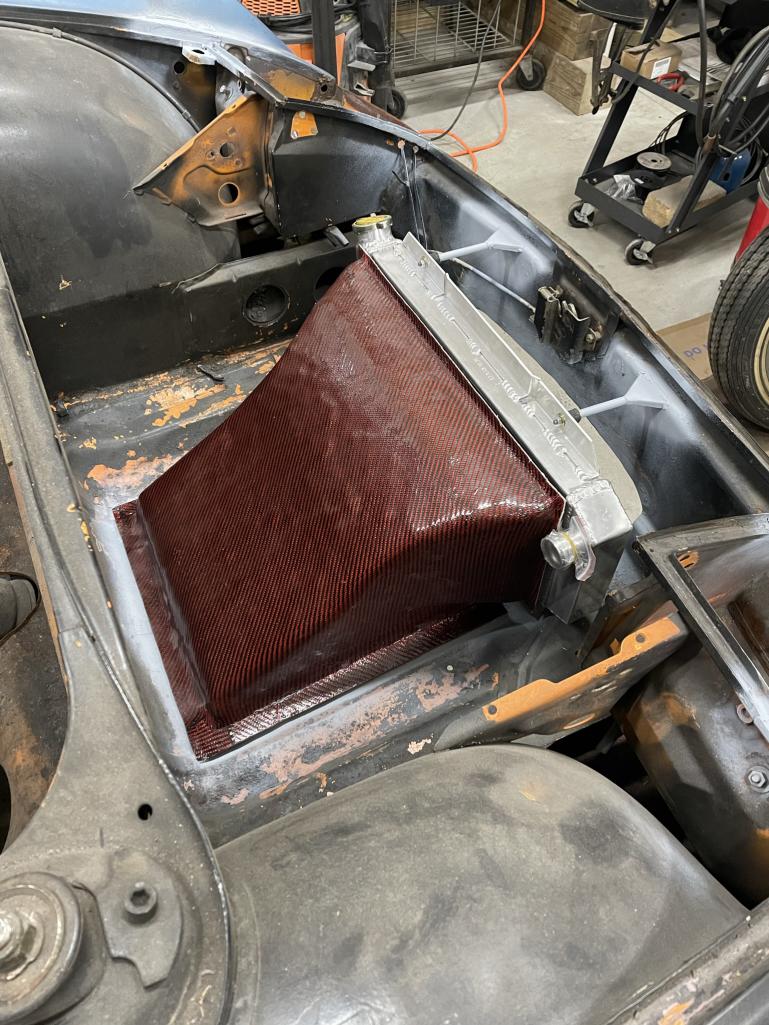
Finished up the entrance plenum. Final fitting/trimming will be held for final install, but it fits up pretty damn close now (leaving a little room for sealing). Now on to figuring out my cooling lines.
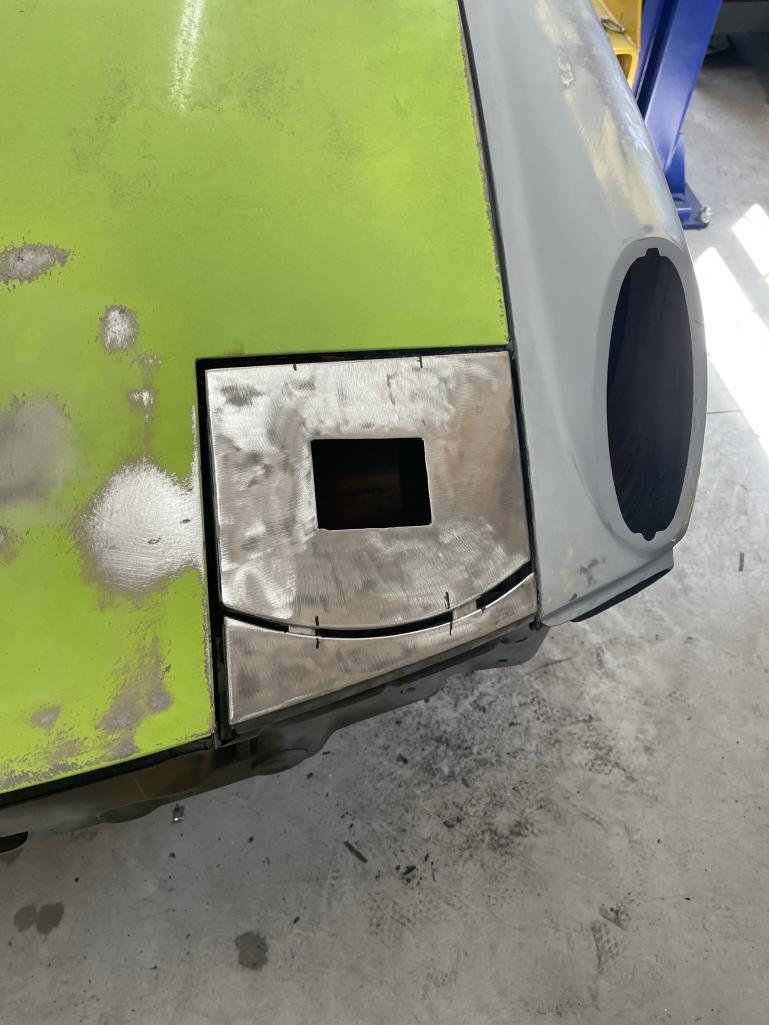
I added a piece of 1/4” chromoly tubing to the top of the radiator opening to stiffen things up a bit. It was pretty flexy at the top once the hole was cut.
Posted by: East coaster Jan 29 2023, 09:28 PM
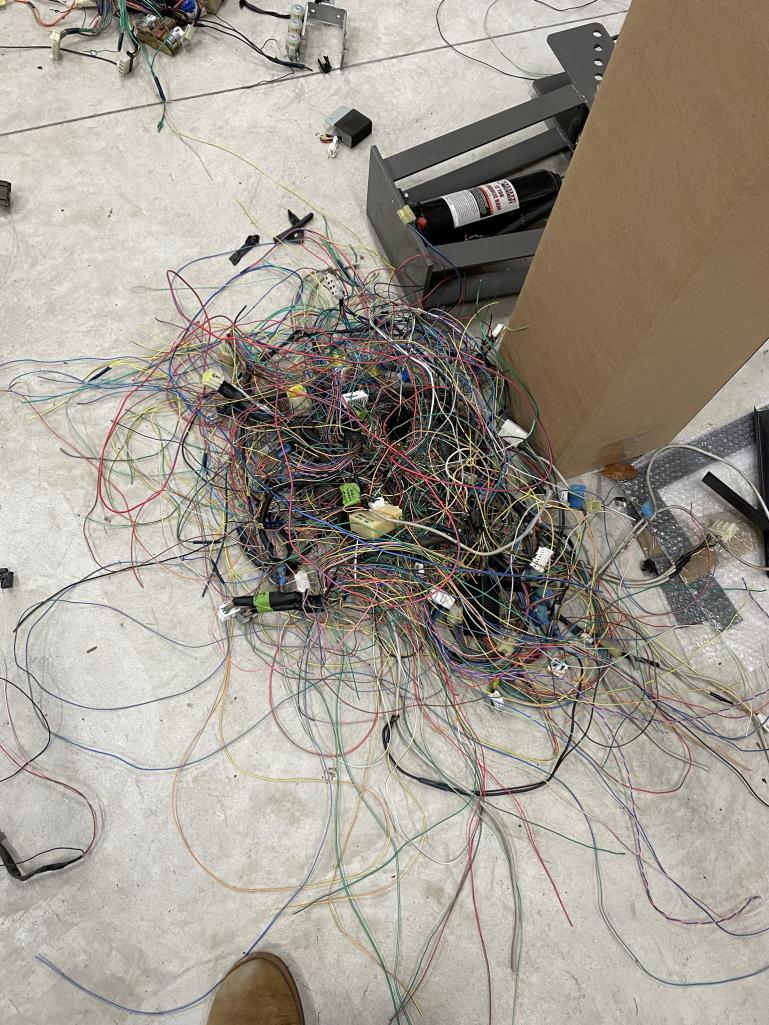
Surfing through a sea of wires………I plan to use the entire wiring harness from my donor Subaru. I’ve been paring it down to what’s needed in the 914. The large pile of wires is what’s been removed so far.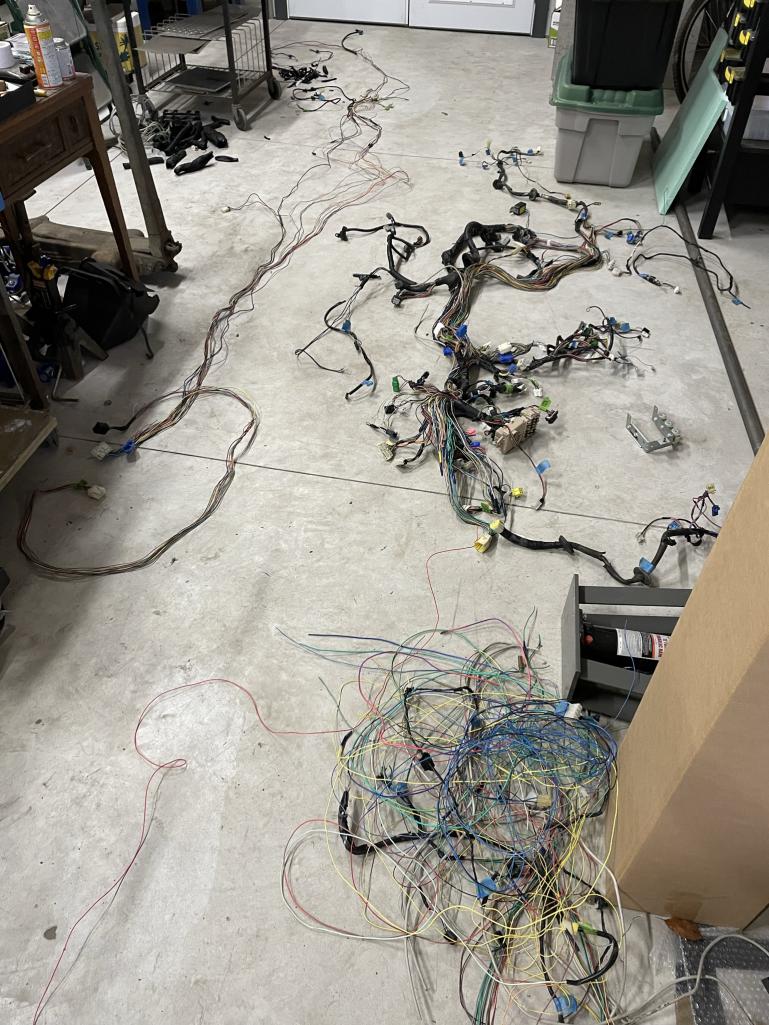
Posted by: East coaster Feb 7 2023, 07:08 PM
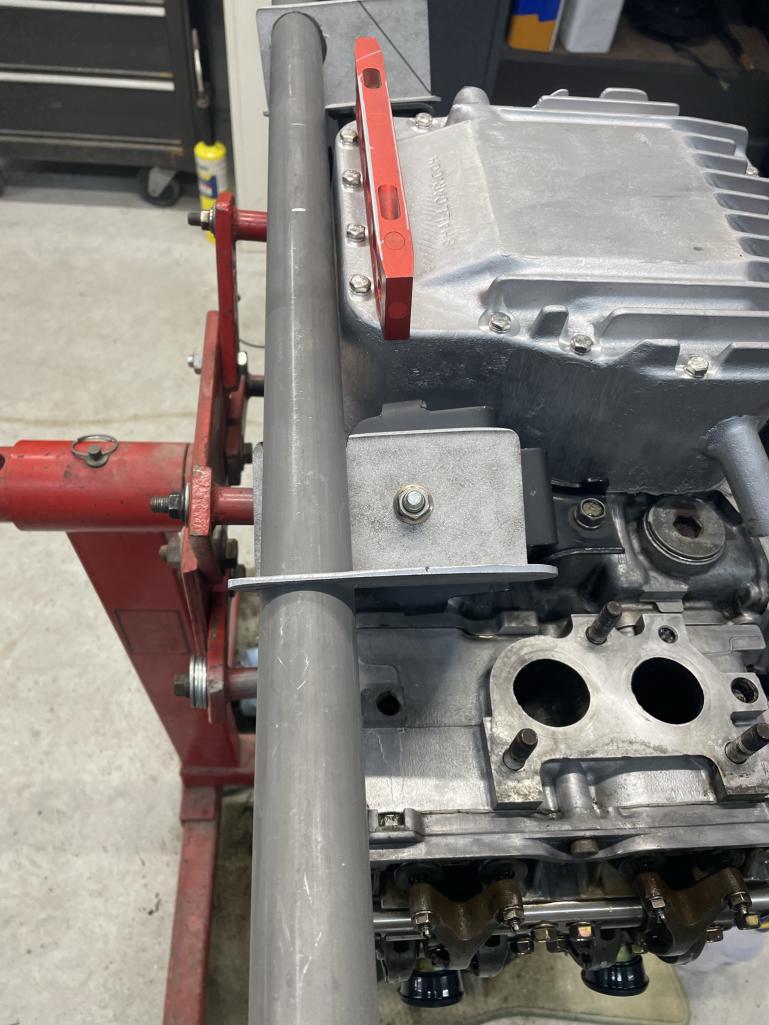
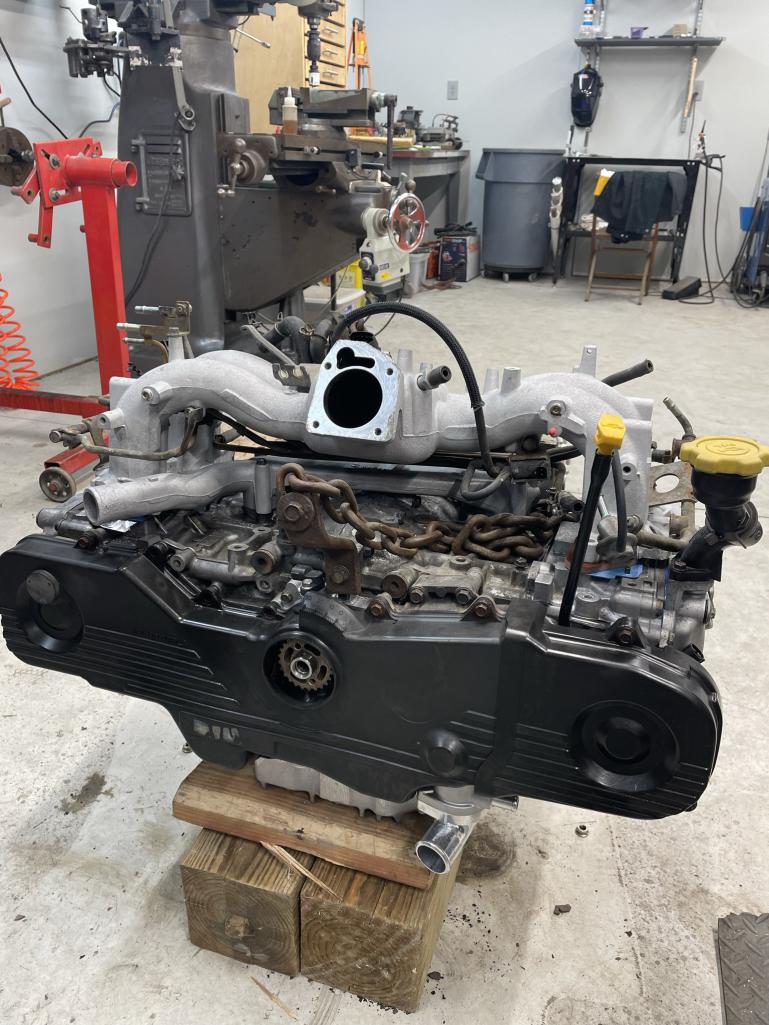
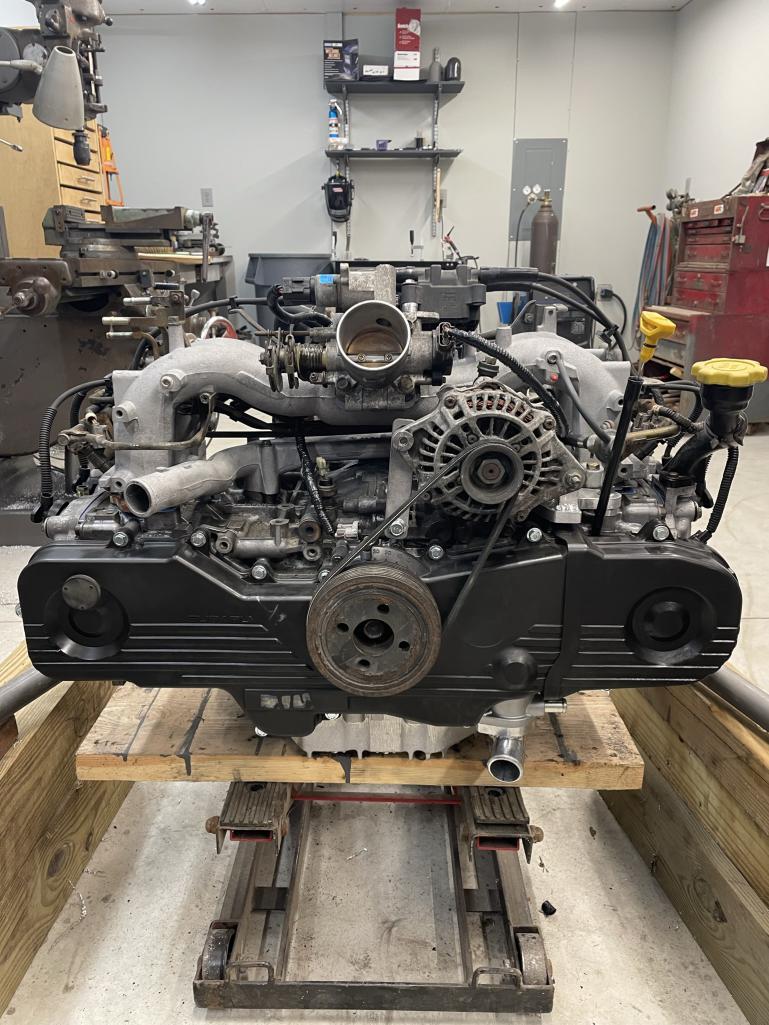
I tore down my donor Suby engine and replaced head gaskets, oil pump, water pump, and timing belt. I also installed an aluminum oil pan for additional clearance. I’ll be working on flipping my intake manifold shortly.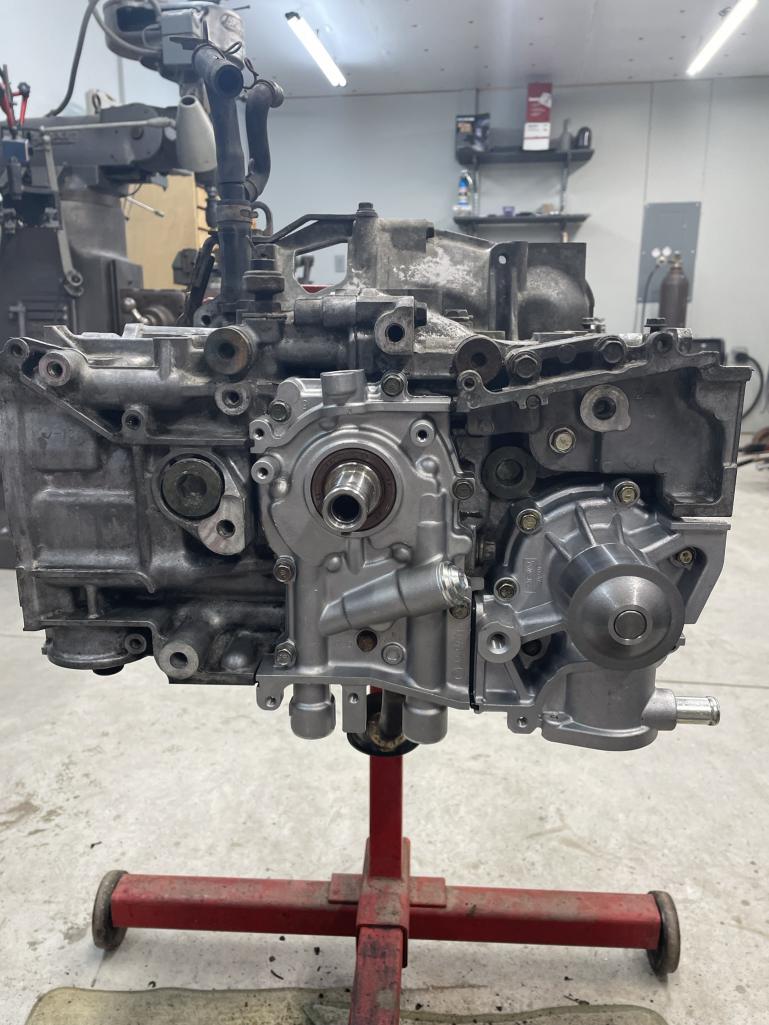
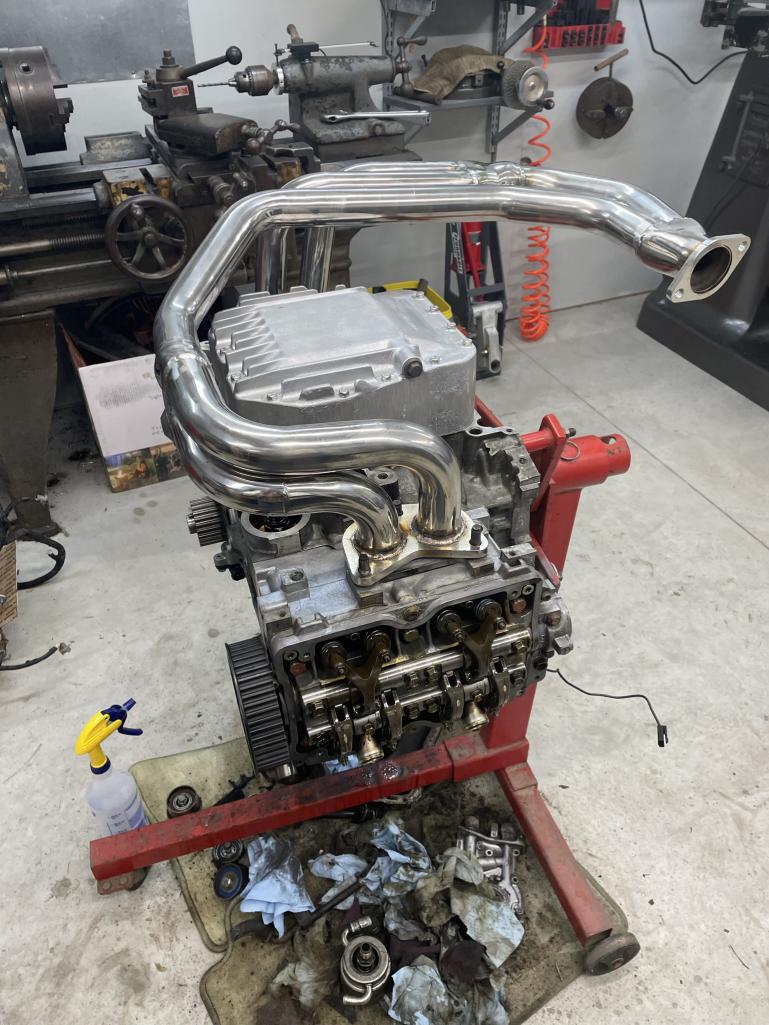
Posted by: East coaster Feb 7 2023, 07:14 PM
While the engine was upside down, I started fabricating the engine mount/cradle. Here’s the cross bar and motor mount plates coming together. I left the cross bar a little long until final fitting in the longitudinal cradle bars. 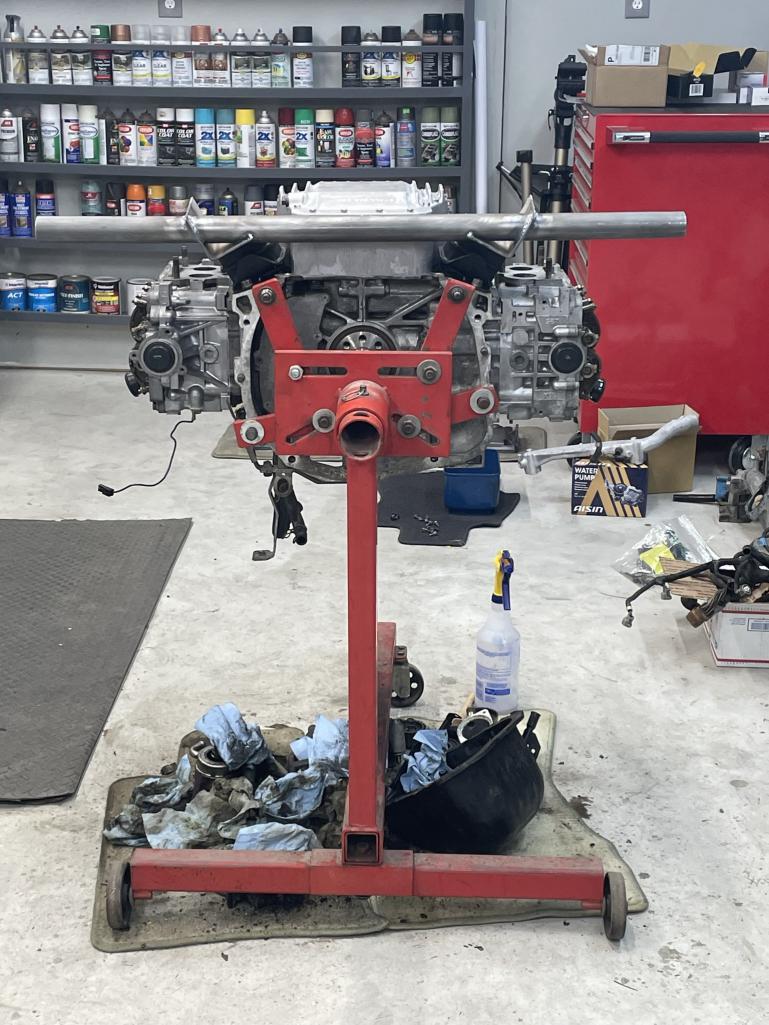
Posted by: East coaster Feb 7 2023, 07:15 PM
Couple more pics….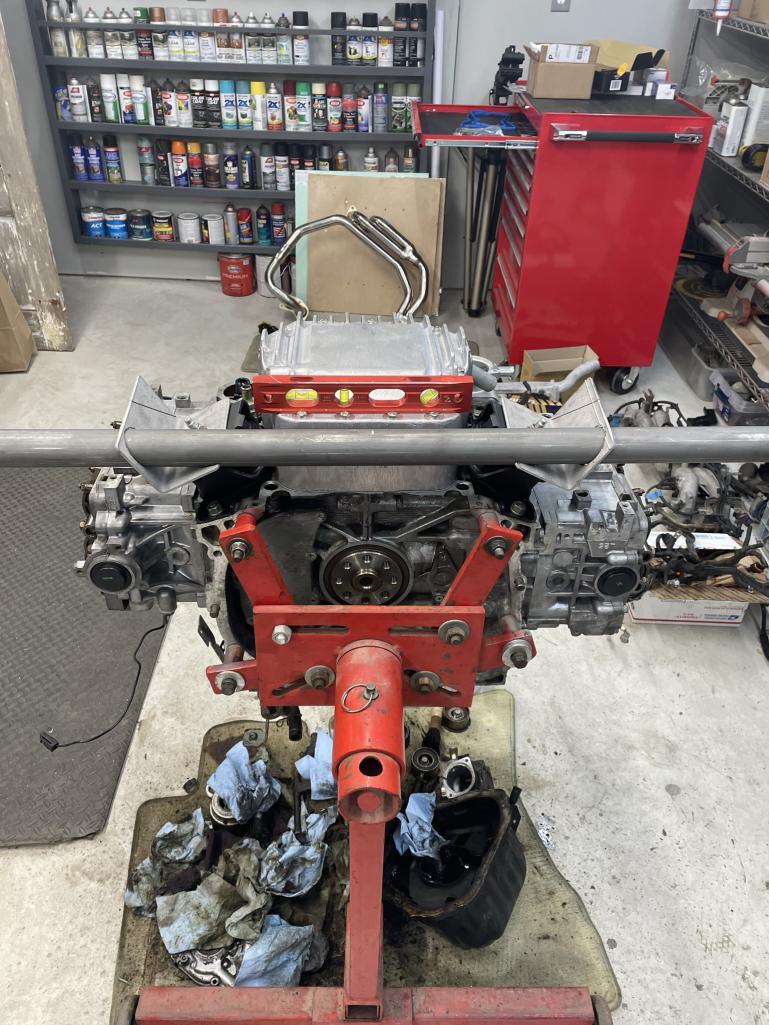
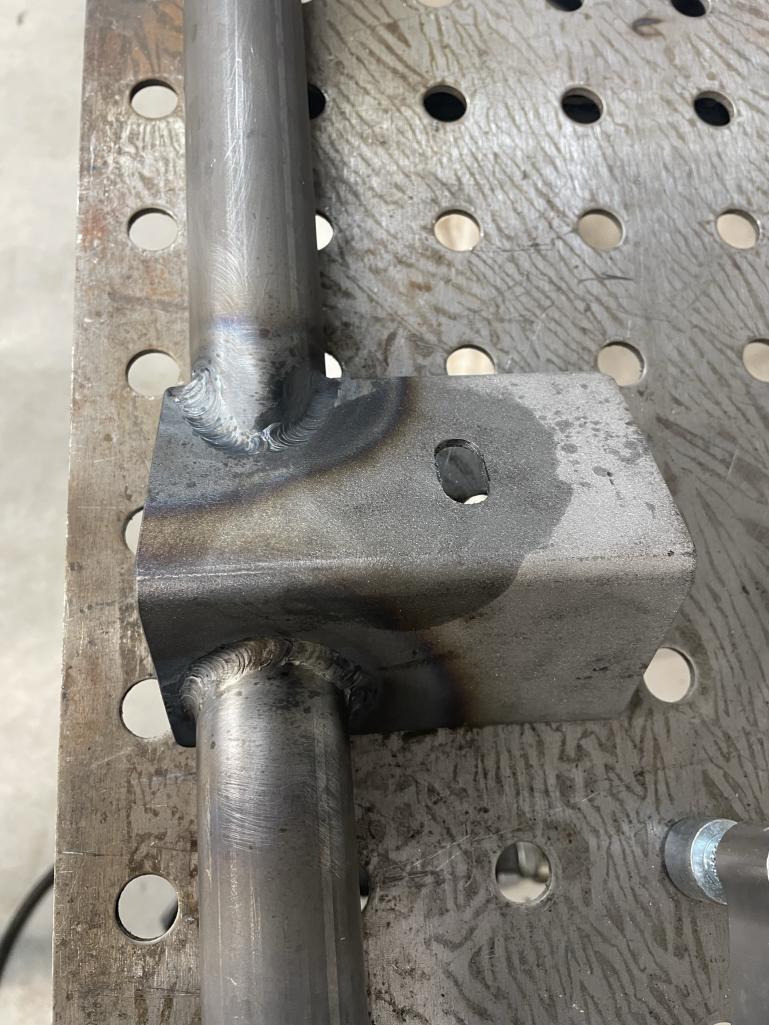
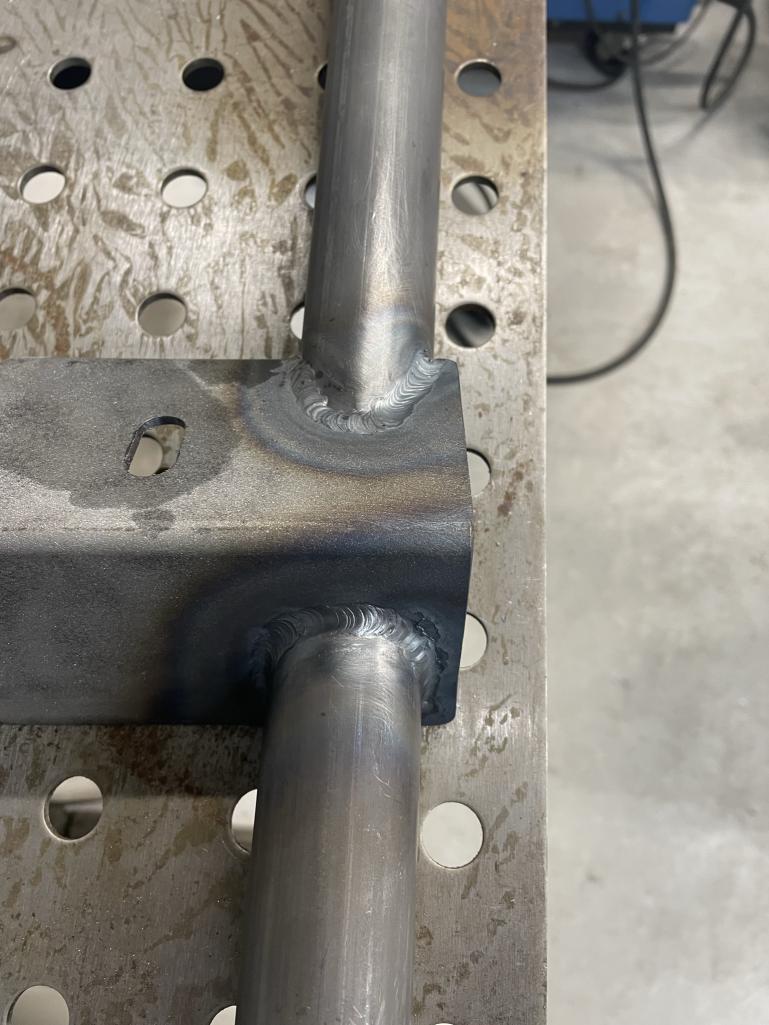
Posted by: East coaster Feb 10 2023, 07:58 PM
Got more done on the cradle today. Bent some 1-1/2” DOM for the longitudinal section and fabricated mount plates for the motor mount and trans mount body points. Got the longitudinals welded up and got the engine mount cross bar tacked for finish welding tomorrow. Next will be figuring out my trans mount to cradle interface.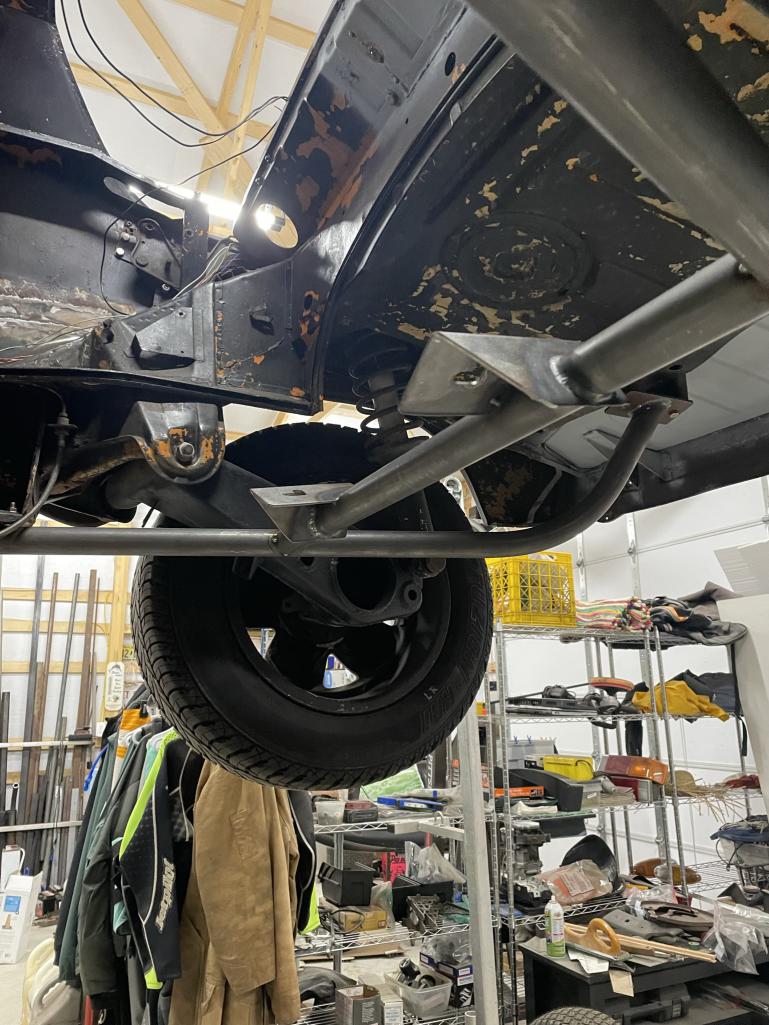

Posted by: East coaster Feb 13 2023, 08:16 PM
Fabricated the trans support and incorporated the mount into the cradle…..I’m callin’ the cradle done! (Well, except for some paint) Now on to the next challenge……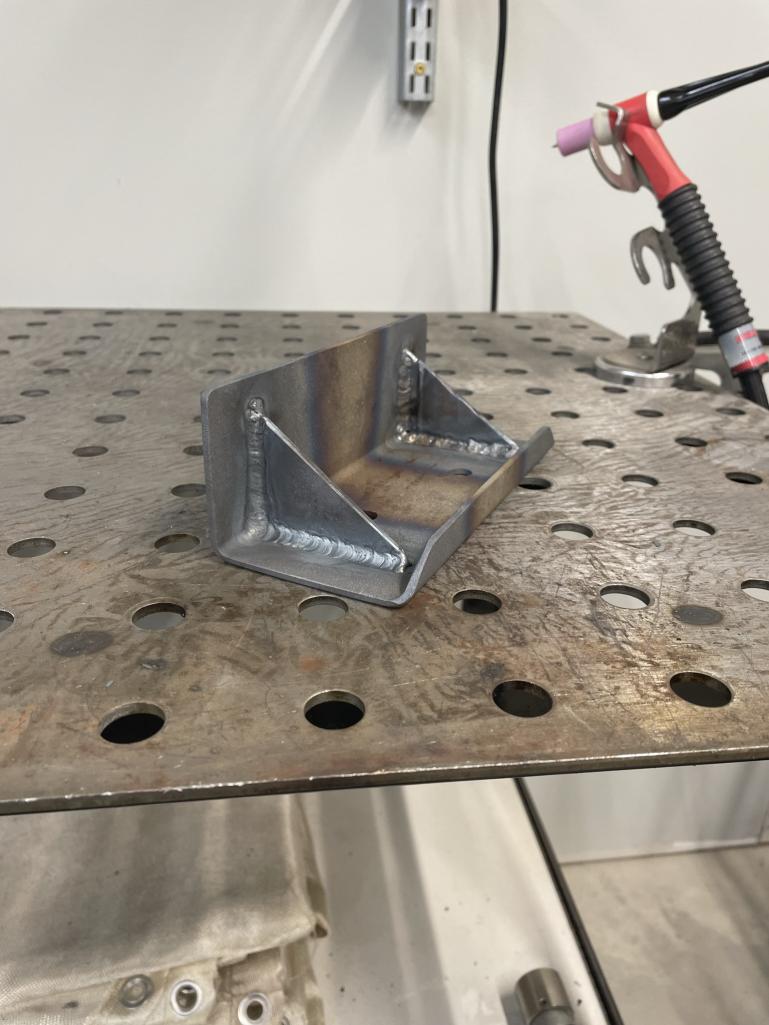
Posted by: East coaster Feb 17 2023, 06:39 PM
Took advantage of some unseasonable February weather and got a jump on the body work. It’s shaping up nicely after the metal work.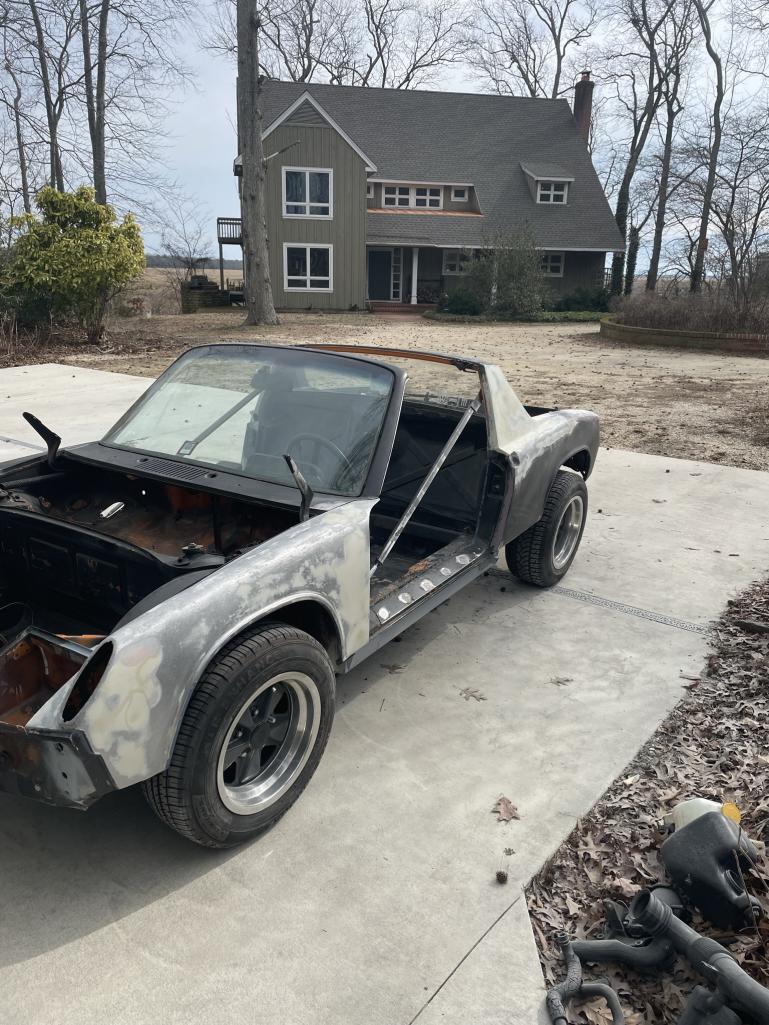
Posted by: East coaster Feb 19 2023, 07:44 PM
My focus on my project has been all over the map, mostly driven by our crazy Northeast weather. Today was an inside shop day and I started working my intake manifold flip. I stripped my intake and glass beaded the intake to clean it up. The flip is mechanically pretty straight forward, need just an 8mm spacer to raise the manifold enough to provide clearance for the fuel hard lines. The harder part will be re-wiring the harness a bit to account for the movement of the sensors, but even that shouldn’t be too difficult.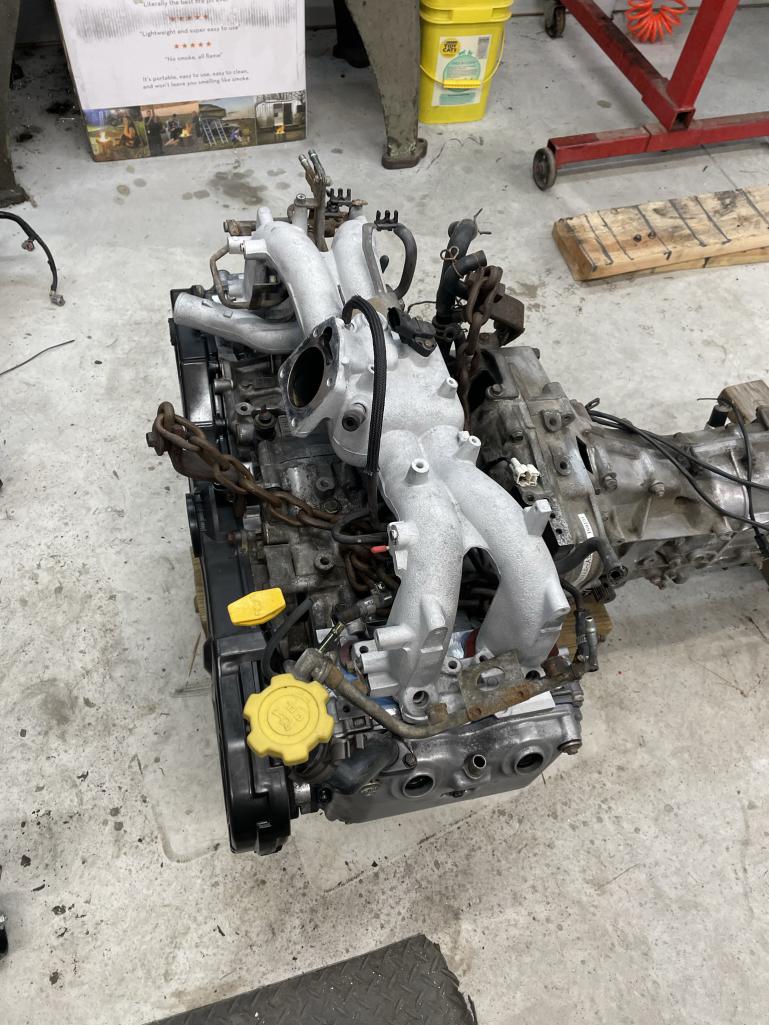
Posted by: raynekat Feb 19 2023, 11:20 PM
Nice welds there...you've definitely got some skills in this department.
I took an intro to welding class (MIG) this fall, and it's not easy by any stretch.
Posted by: euro911 Feb 20 2023, 06:45 PM
Cool 
Posted by: East coaster Feb 20 2023, 07:01 PM
[/quote]
Nice welds there...you've definitely got some skills in this department.
I took an intro to welding class (MIG) this fall, and it's not easy by any stretch.
[/quote]
Thank you…..I’m learning!
Posted by: rgalla9146 Feb 21 2023, 10:45 AM
You're in Brigantine, I'm in Paramus
We've never met. You're friends with Jim Foster ?
Years ago I saw a picture on this site of the oil cooler installation (pretty sure anyway)
you did on your silver car.
I fashioned my duct work in fiberglass similar to yours.
Great to see you're at it again.
Beautiful work.
Maybe we meet at the North East Gathering ?
Rory
Attached thumbnail(s)
Posted by: East coaster Feb 21 2023, 06:20 PM
You're in Brigantine, I'm in Paramus
We've never met. You're friends with Jim Foster ?
Years ago I saw a picture on this site of the oil cooler installation (pretty sure anyway)
you did on your silver car.
I fashioned my duct work in fiberglass similar to yours.
Great to see you're at it again.
Beautiful work.
Maybe we meet at the North East Gathering ?
Rory
Nice job! Yeah I did a similar setup on my silver 3.6 car.
Posted by: East coaster Feb 22 2023, 06:54 PM
Posted by: East coaster Feb 25 2023, 08:40 PM
Began fabricating my alternator bracket today. It’s pretty much done except for the tensioner, I’ll take that tomorrow.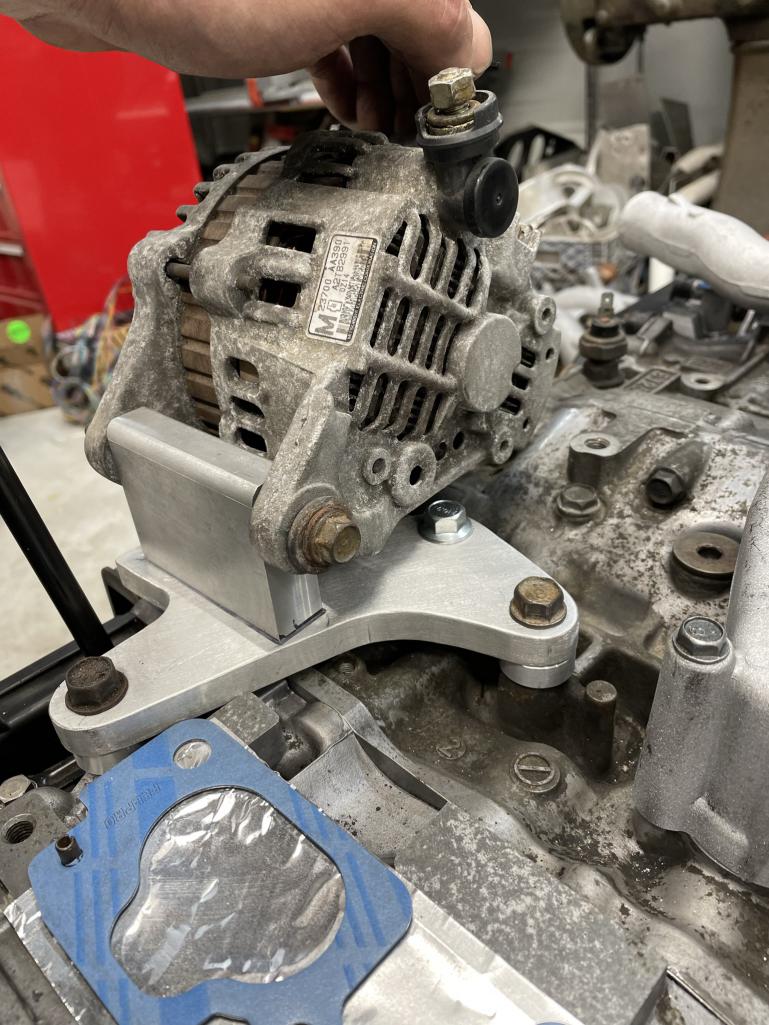


Posted by: East coaster Feb 26 2023, 06:29 PM
First test fit of the engine/trans. Everything fit up well. I was concerned about the starter and clutch slave cylinder but all cleared just fine. Looks like my cradle measuring/ guessing/cursing was spot on.
Attached thumbnail(s)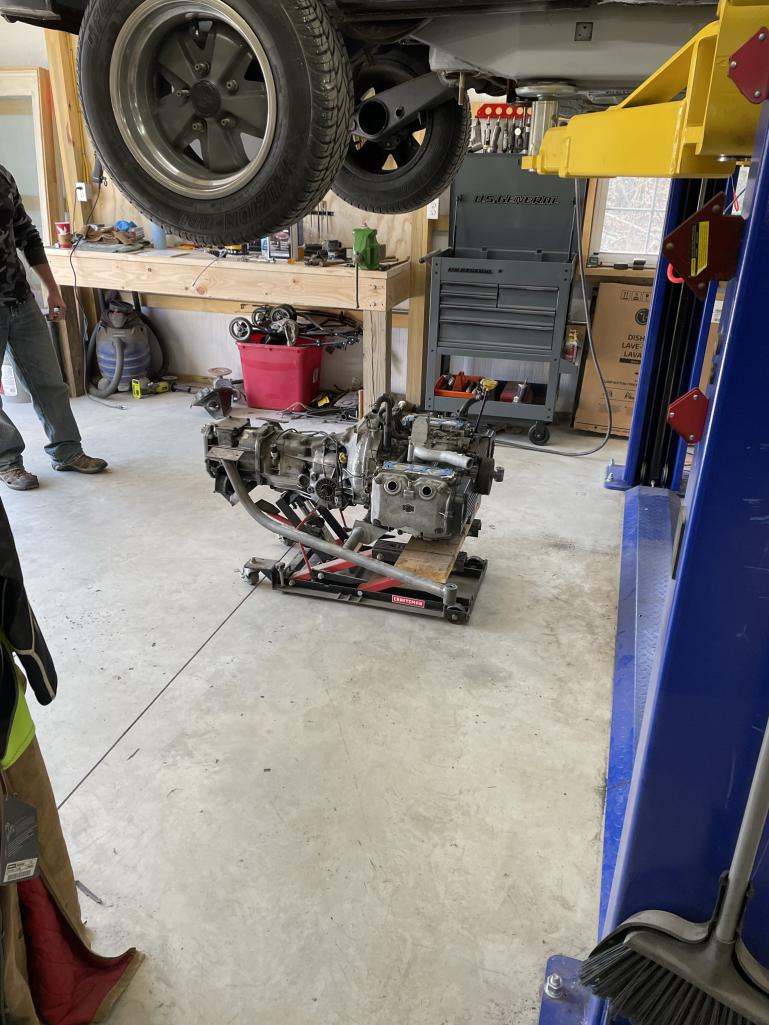
Posted by: East coaster Feb 28 2023, 07:23 PM
Finalized alignment of alternator bracket and finish welded it up.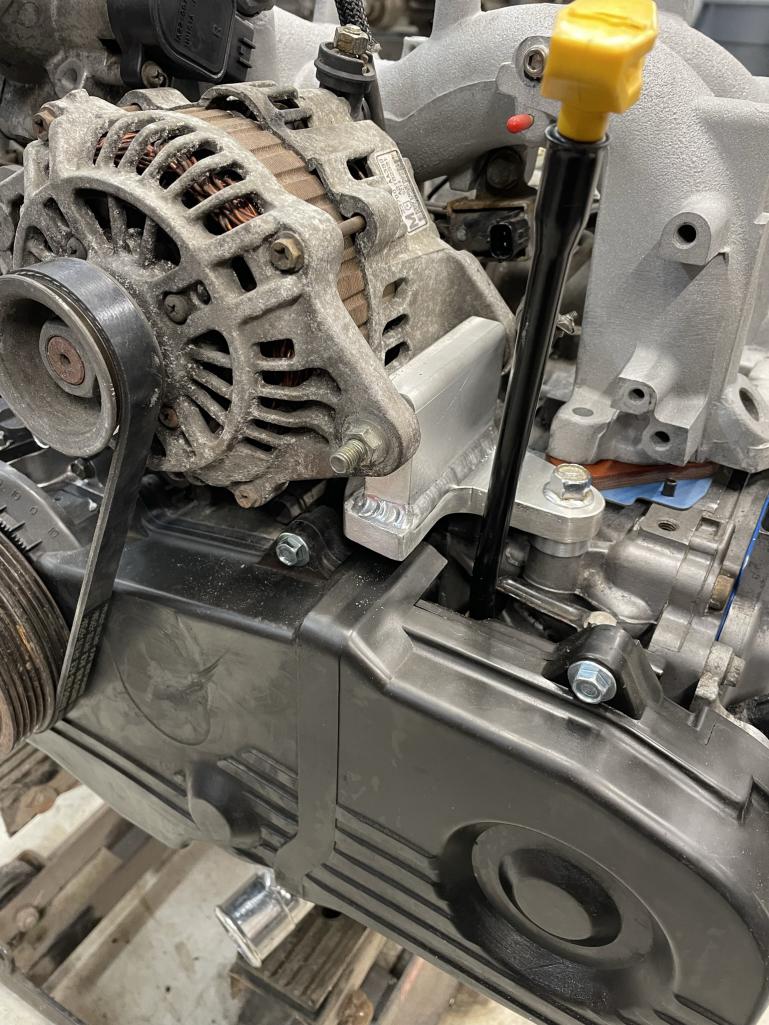
Posted by: East coaster Mar 2 2023, 08:29 PM
Worked out the engine harness today. I had to undress the harness and reconfigure it to account for the manifold flip. All wires reached the new locations except for the throttle position sensor. I extended the 3 wires to the TPS and redressed the harness. Everything all connected up and ready to go.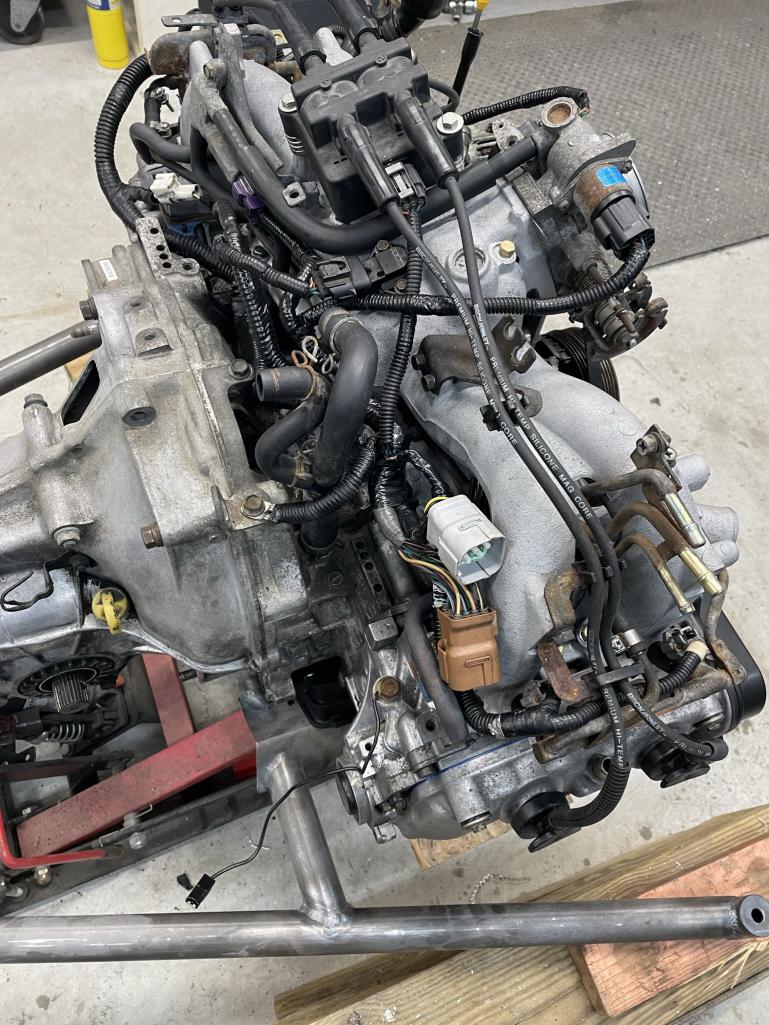
Posted by: East coaster Mar 5 2023, 07:58 PM
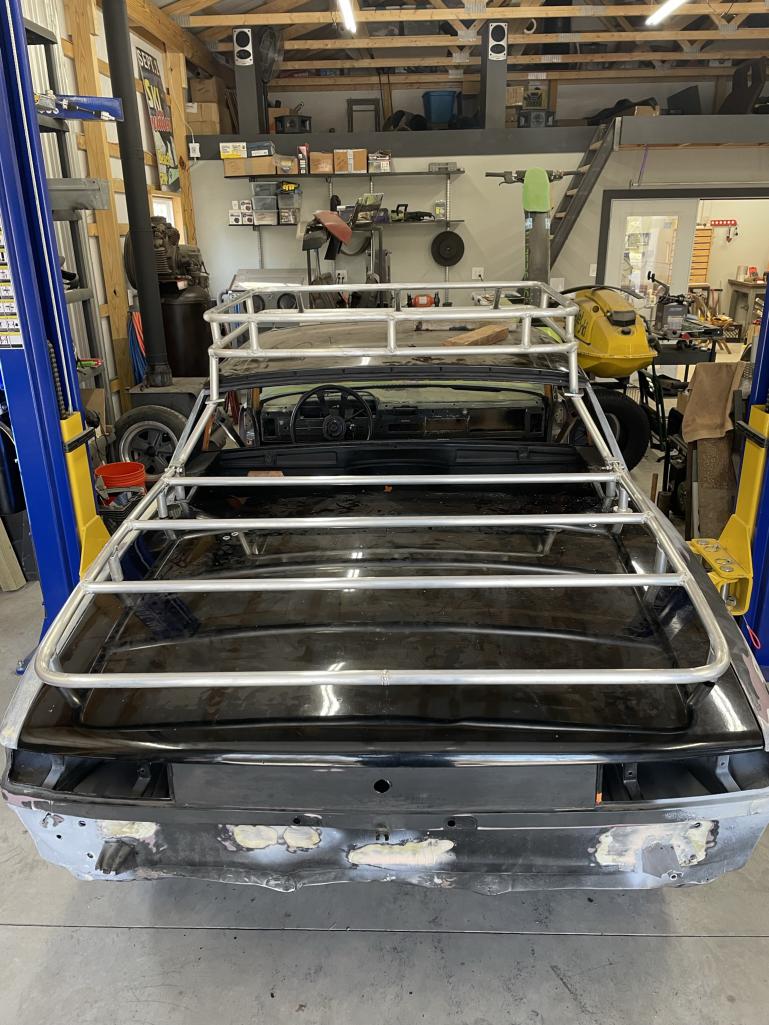
Started fabricating my safari rack (what’s a safari build without a rack??). I have some interesting ideas, we’ll see what transpires…..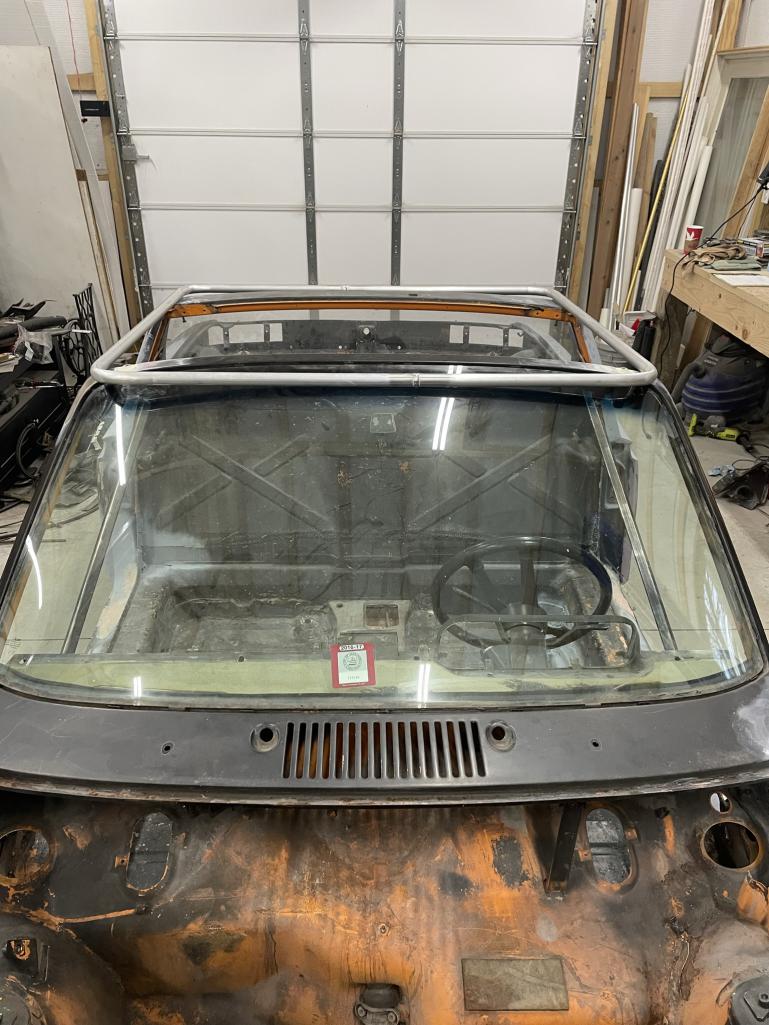
Posted by: East coaster Mar 9 2023, 08:27 PM
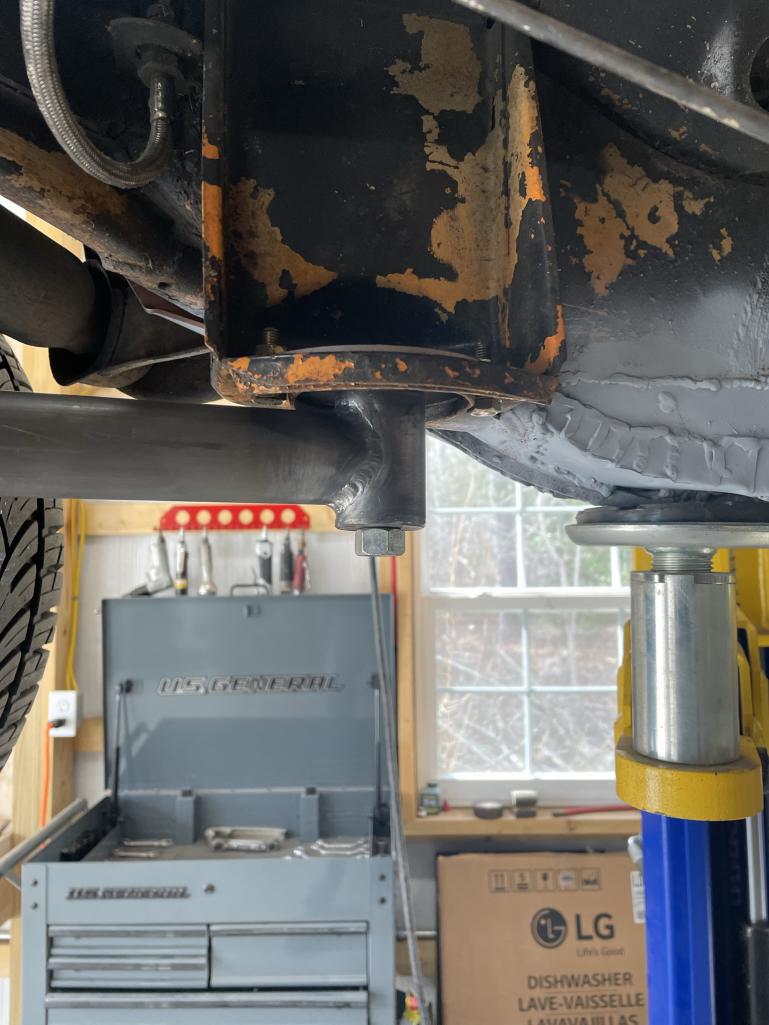
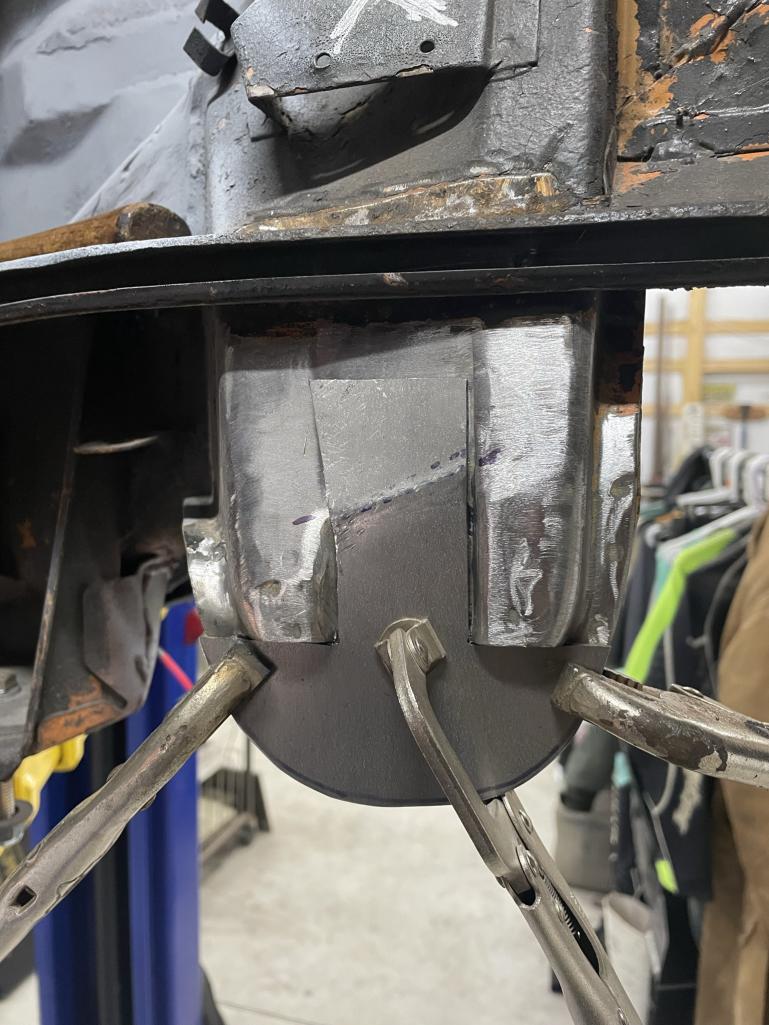
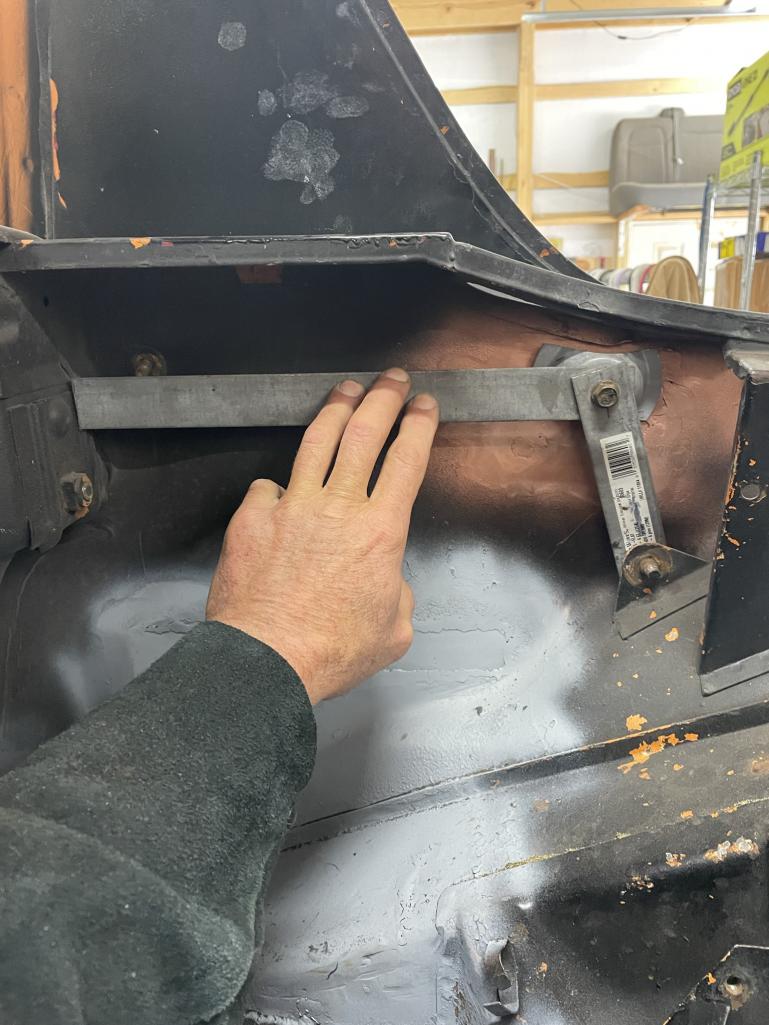
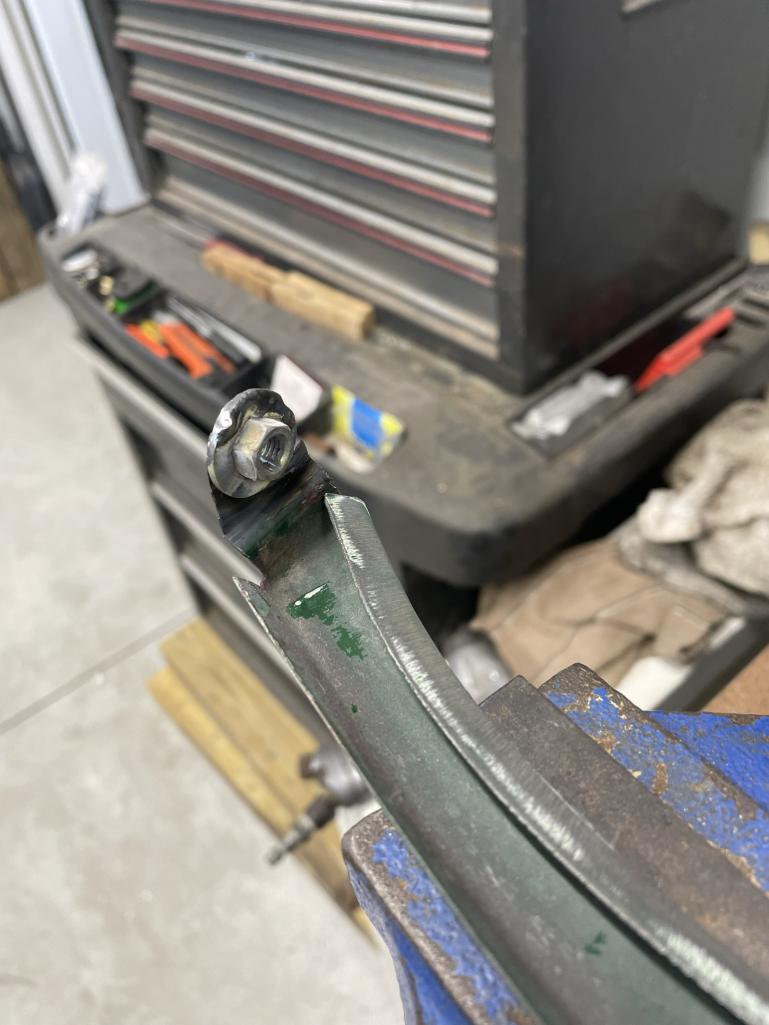
Decided to lower the rear control arm mounts to account for the 2” lift. This will help regain camber and help with trailing arm length (wheel center in wheel arch). To accomplish this I decide to lower the mounts 1” (compromise between complexity and strength of end product). I lengthened the the innner mounting ear and will be adding a 1” spacer to the outer mount point.
Started the process by cutting off the box section of the mount (saving for attachment later), then adding a section to the internals of the “ear” (not shown in pics). Then added a 16ga layer that ties to upper ear and extends 3/8 lower than existing end of ear.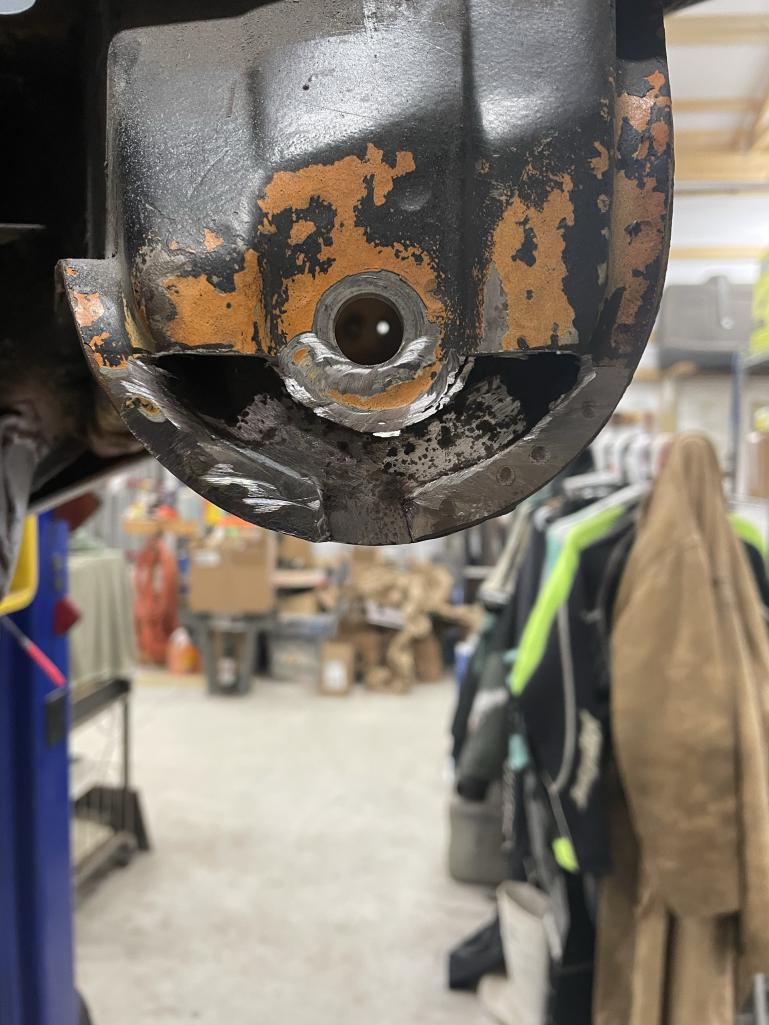
Posted by: East coaster Mar 9 2023, 08:31 PM
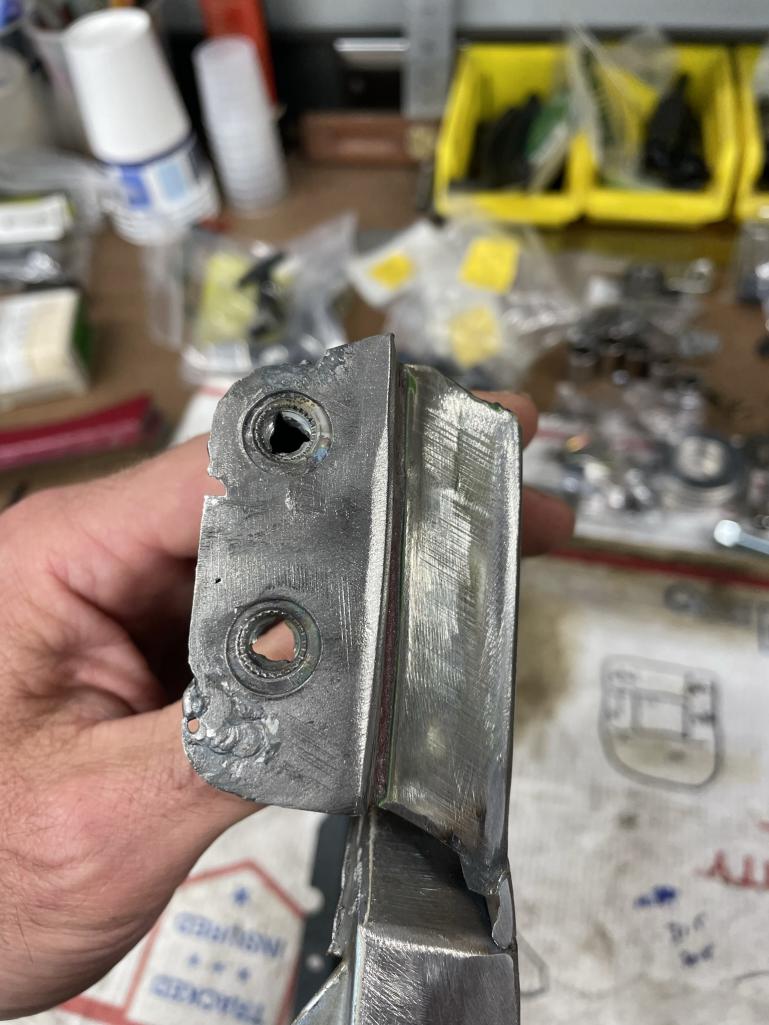
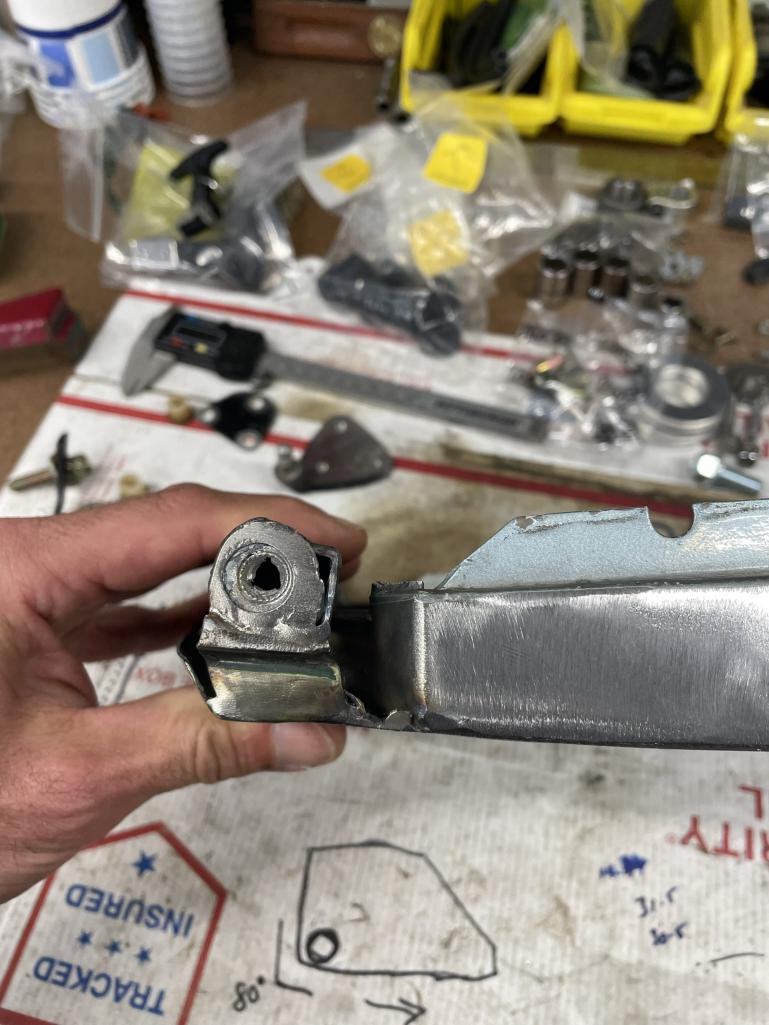
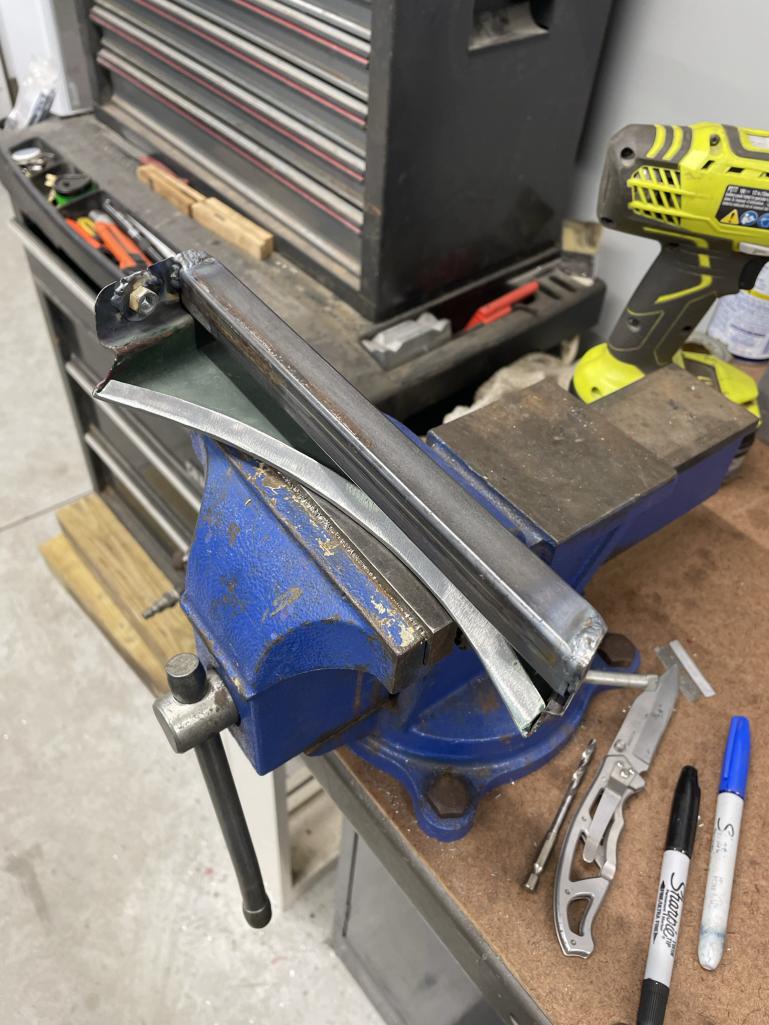
Then I re-attached the box section removed in 1st step and fabricated new sections to account for the lowering of the box section.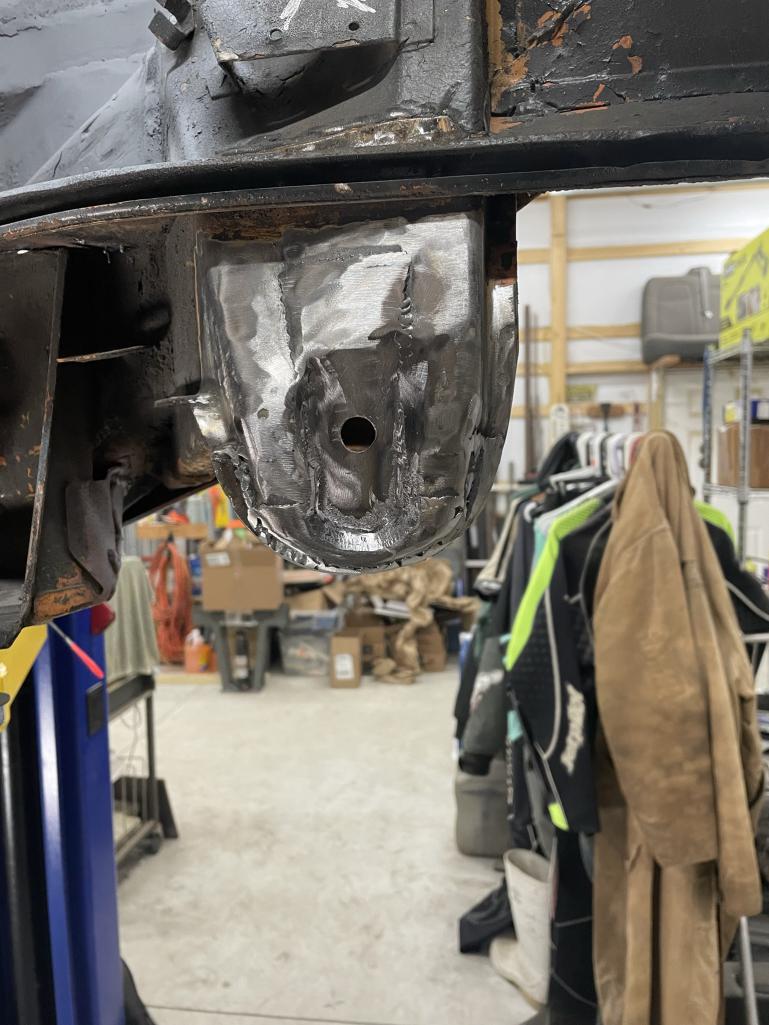
Then I added re-enforcement to the ear by adding sections to both side of the mount point, wrapping to the sides of the mount.
Attached thumbnail(s)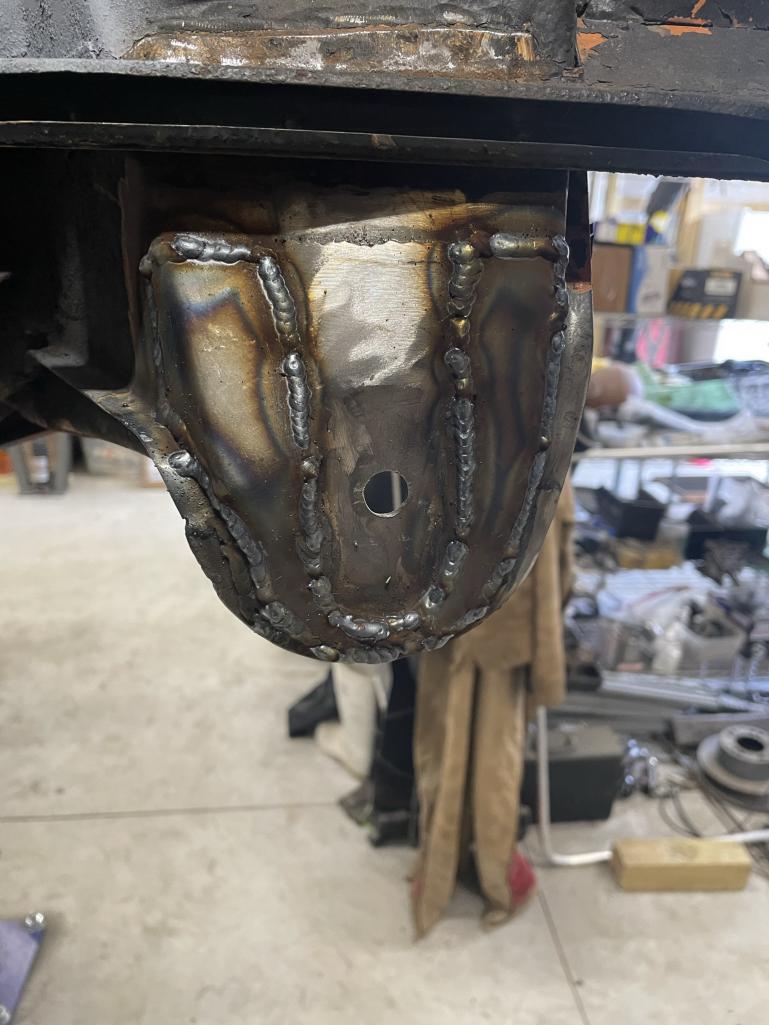
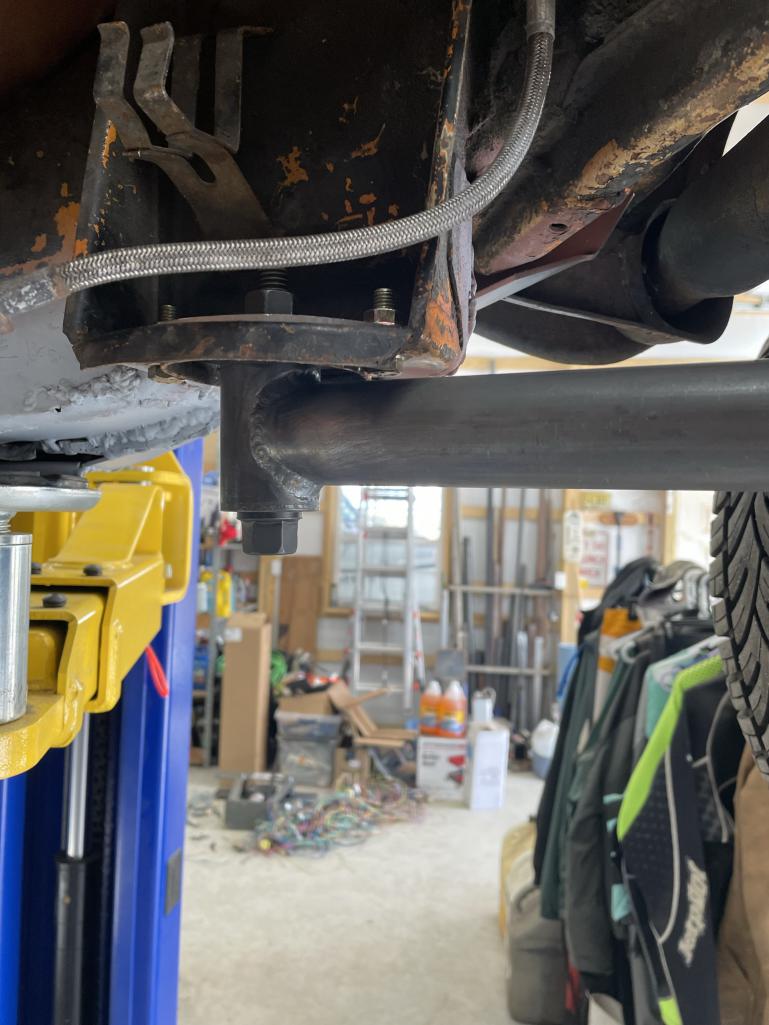
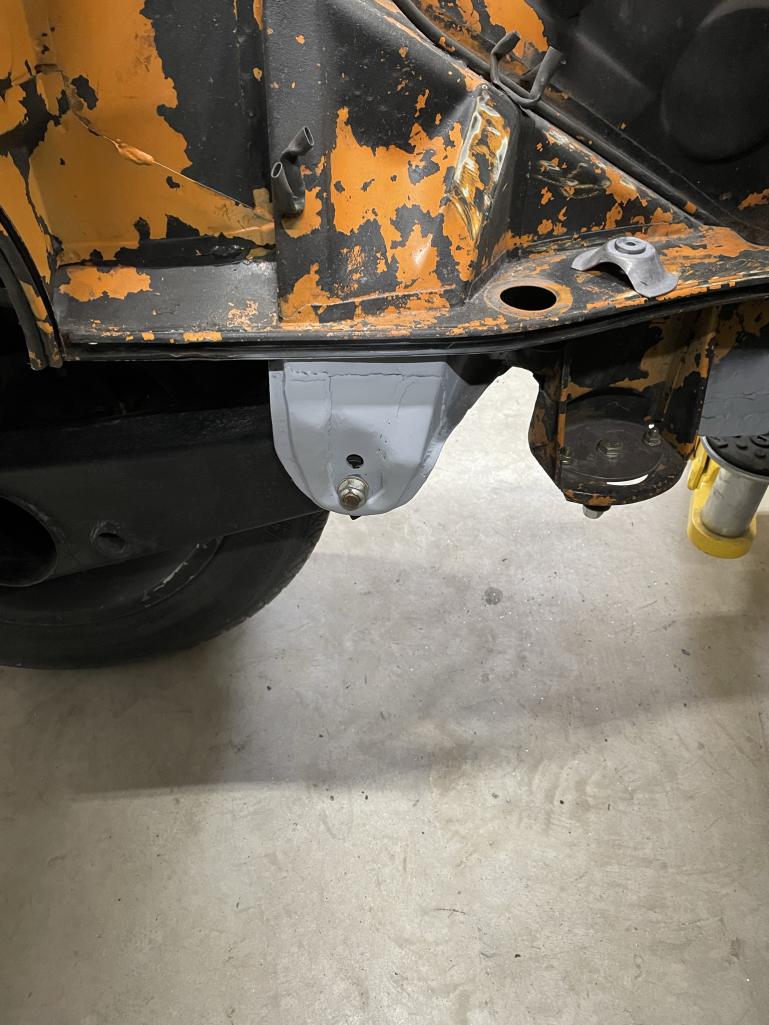
Posted by: East coaster Mar 9 2023, 08:35 PM
Then I cleaned up and drilled a new mounting hole 1” lower than the original. This mod will allow it to be returned to stock by simply moving the trailing arm back to original hole.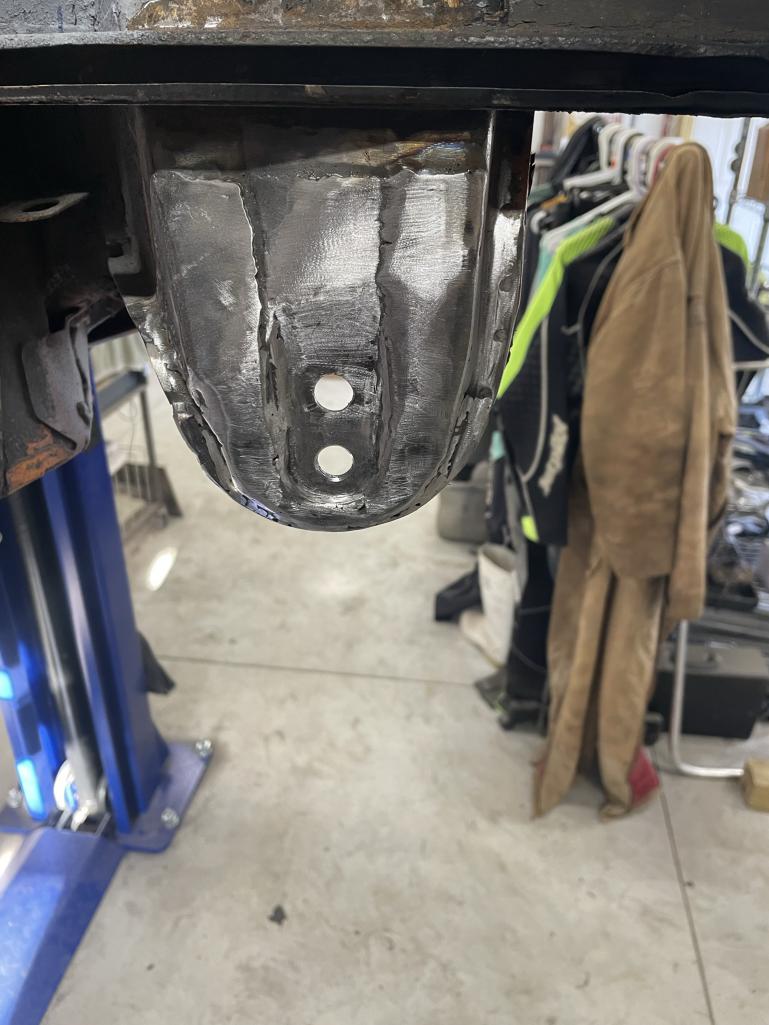
I’ll make the spacers for the outer mounts tomorrow and hopefully have it back on it feet by the end of the day.
Posted by: East coaster Mar 10 2023, 08:20 PM
The outer trailer trailing arms spacers are done….the rear suspension is ready for re-assembly. The spacers are made from 1” billet 6061-T6 aluminum.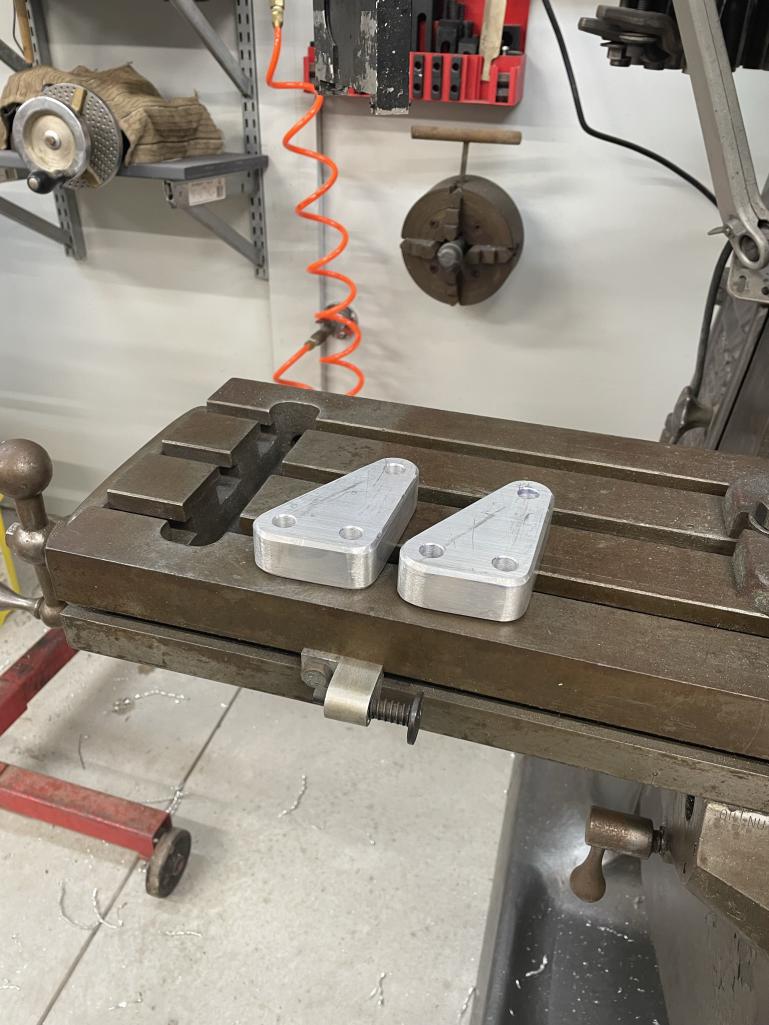
Attached thumbnail(s)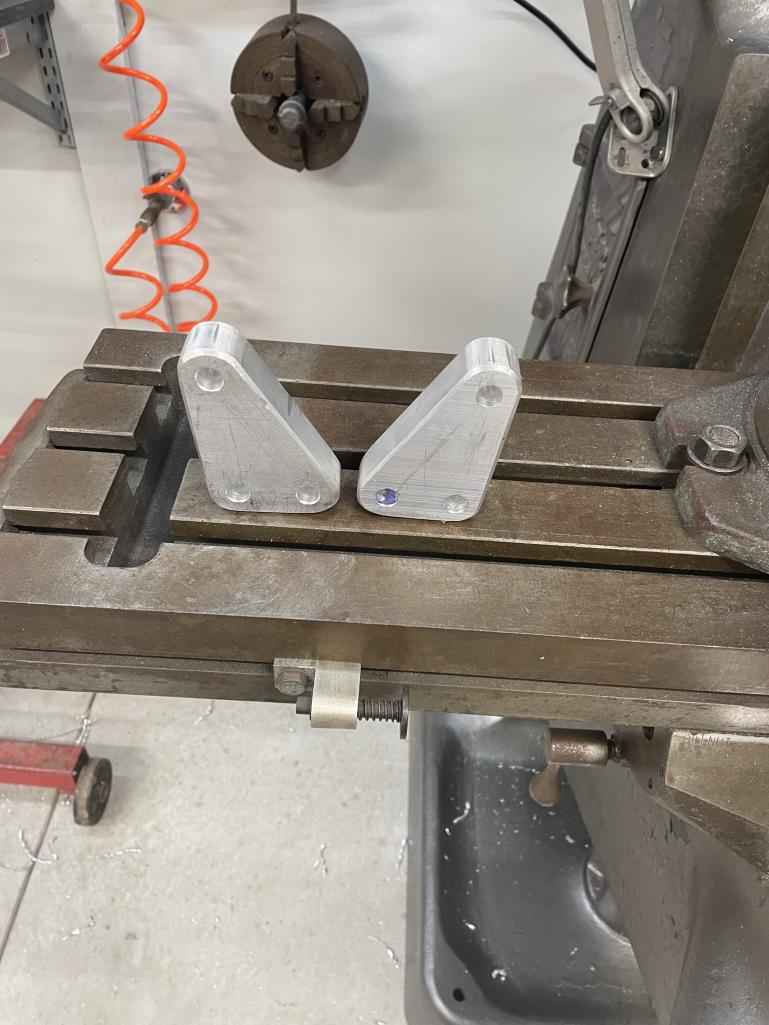
Posted by: Retroracer Mar 11 2023, 09:21 AM
Some great fabrication there. Rack design coming along, clearly you'll need to mount 2 spare tires up there at a minimum
I'm sure you've thought ahead for this; but one thing to check is that the driveshafts are still OK under full droop? No doubt you can account for the 2" lower arms in the trans cradle design/mounting...
- Tony
Posted by: East coaster Mar 11 2023, 09:04 PM
Some great fabrication there. Rack design coming along, clearly you'll need to mount 2 spare tires up there at a minimum
I'm sure you've thought ahead for this; but one thing to check is that the driveshafts are still OK under full droop? No doubt you can account for the 2" lower arms in the trans cradle design/mounting...
- Tony
Thanks! The axle clearance is a concern, but it seems others have tread down this path and I haven’t heard of an issue. That said, I won’t sleep easy until it’s all installed and proven. I’ve thought about what I’ll do if it’s an issue, but hoping it’s not.
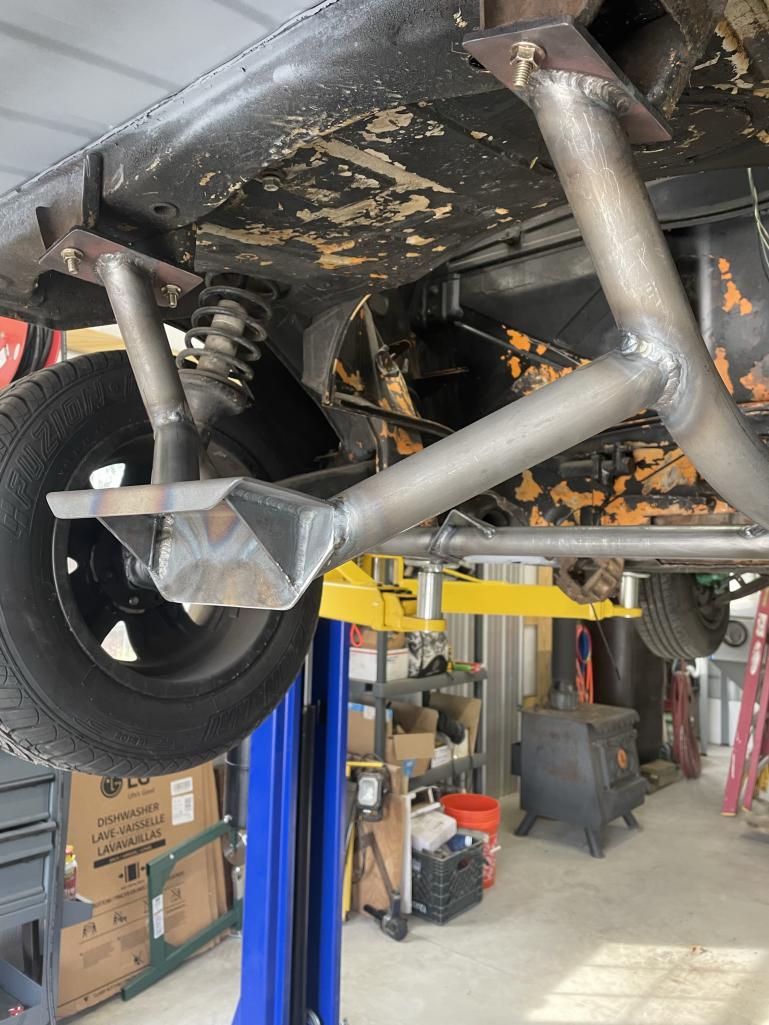
Posted by: East coaster Mar 11 2023, 09:07 PM
Trailing arms installed and its back on its feet…..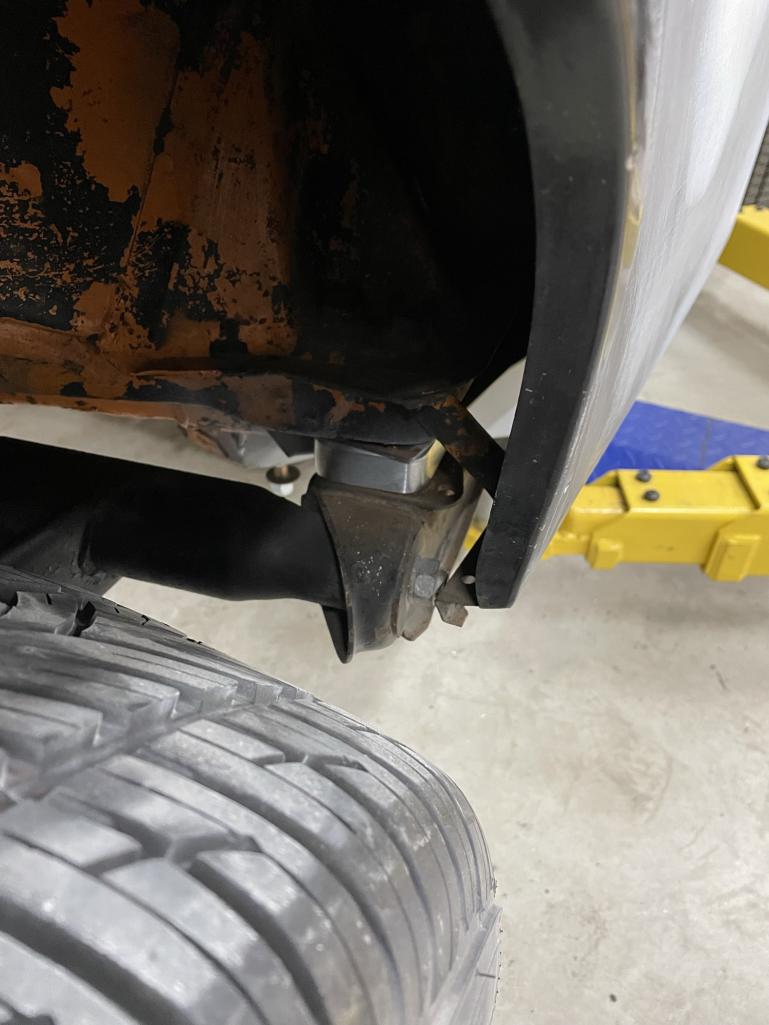
Posted by: East coaster Mar 14 2023, 07:09 PM
Somethin’ brewin’…….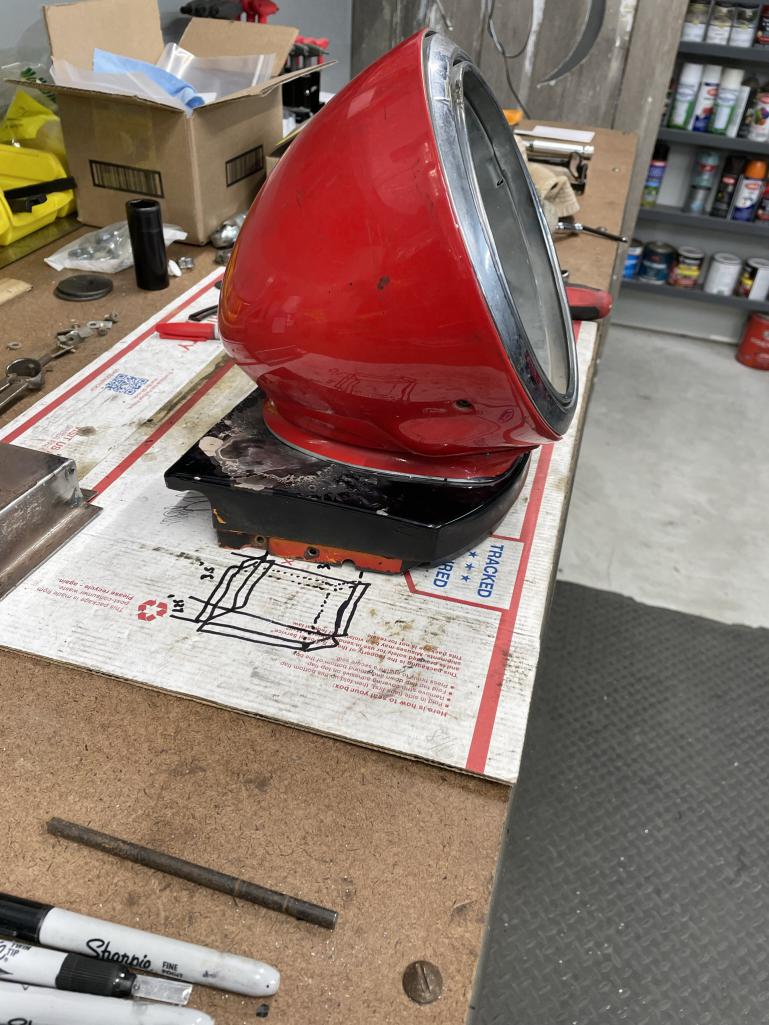
Posted by: East coaster Mar 15 2023, 07:54 PM
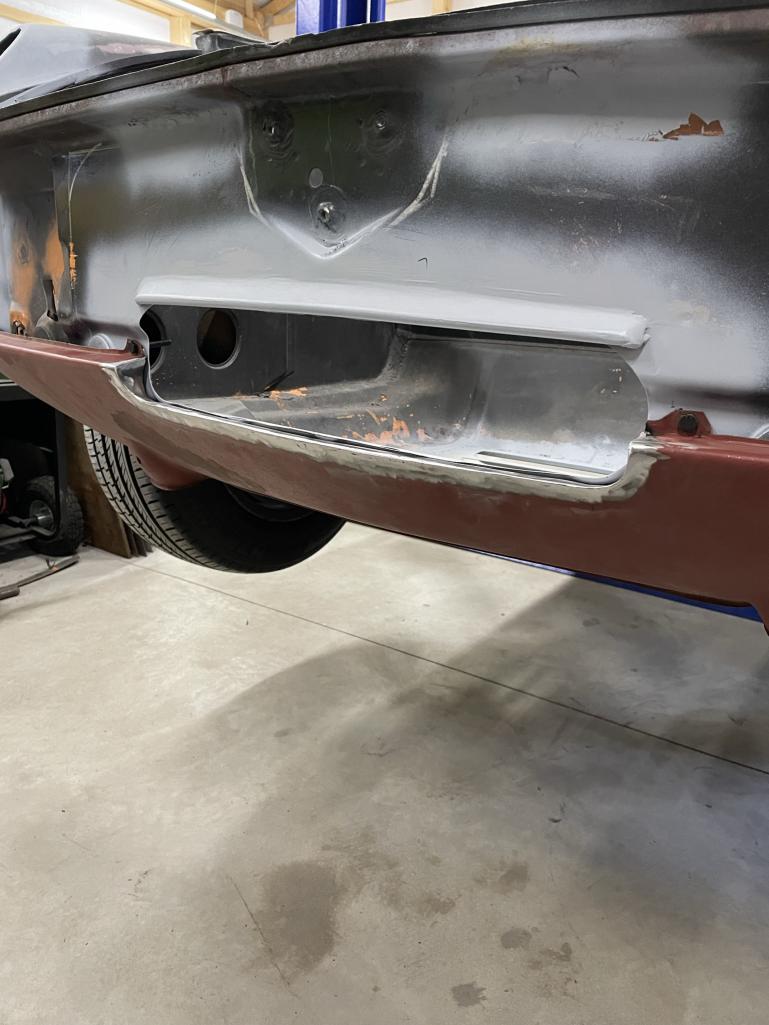
Picked up a stock front valance in nice shape and modified it for the radiator opening.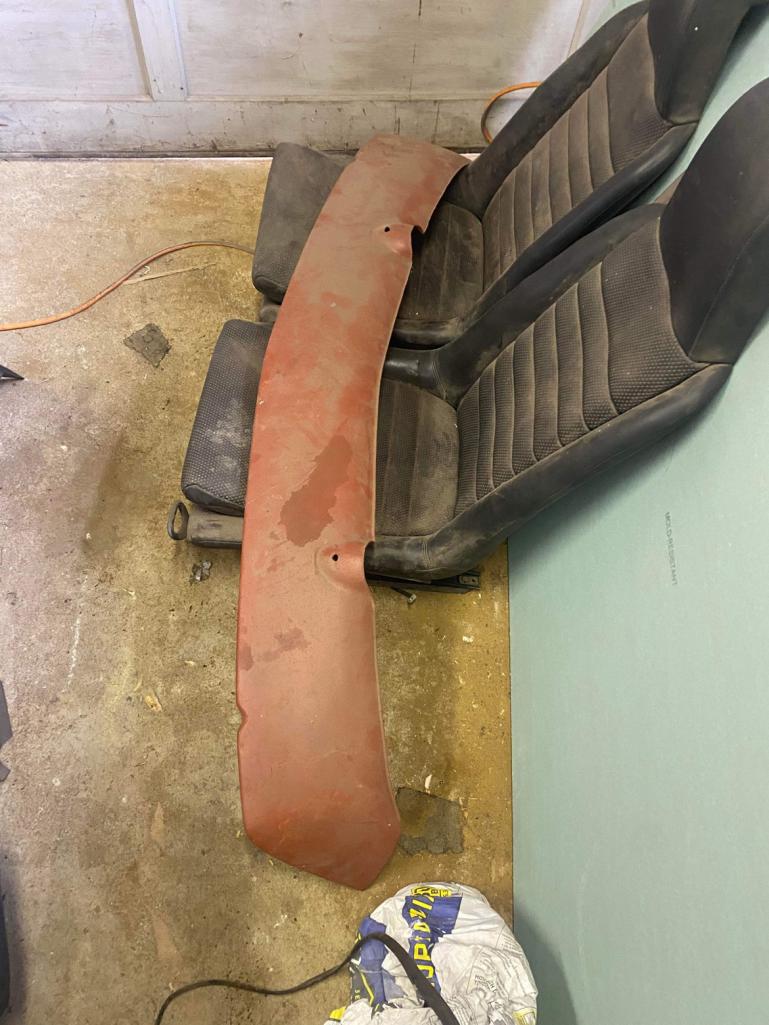

Posted by: East coaster Mar 23 2023, 07:52 AM
Did the same treatment to the bumper…….radiator inlet complete.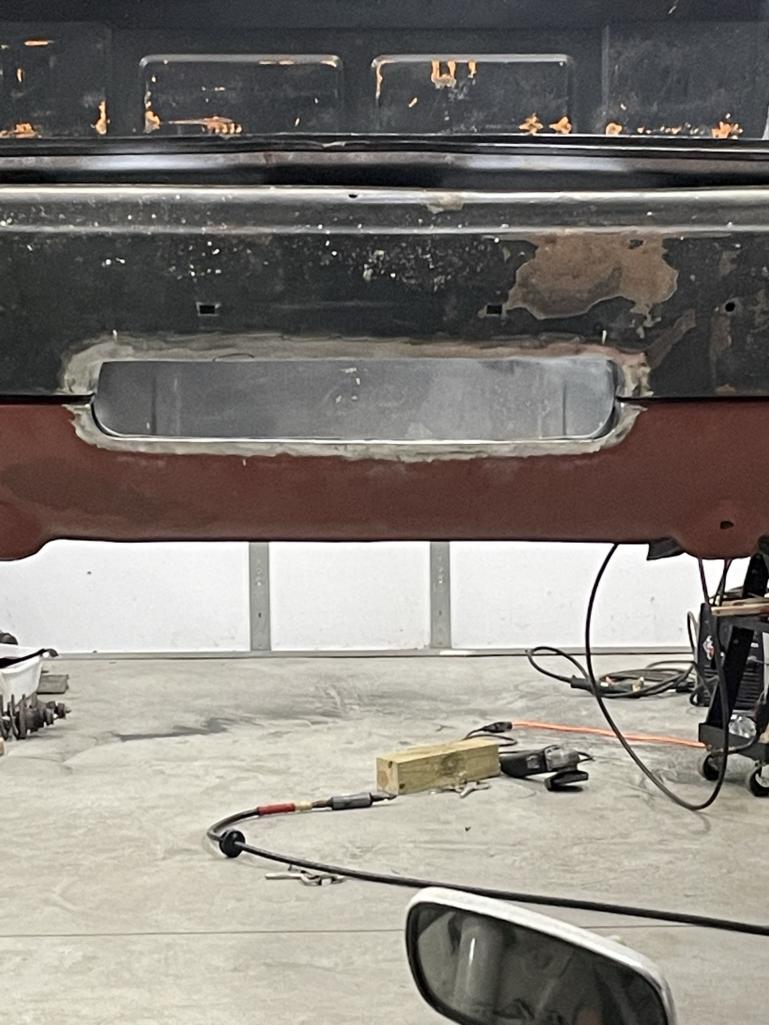
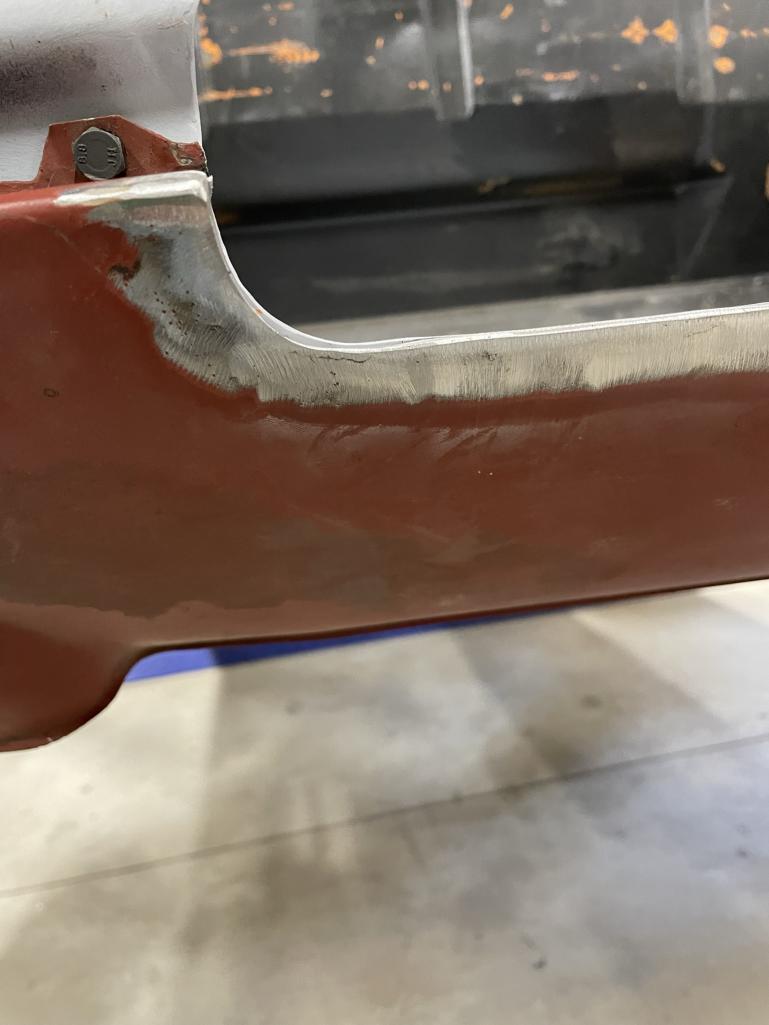
Posted by: East coaster Mar 23 2023, 06:47 PM
I saved the sh*ttiest task for last……had to repair some pretty bad rust at the front bumper mounting areas. There were sizable holes through to the headlight bucket area. Fabricated some patch panels and made it strong again. This area just sux because there’s no room to work it at all.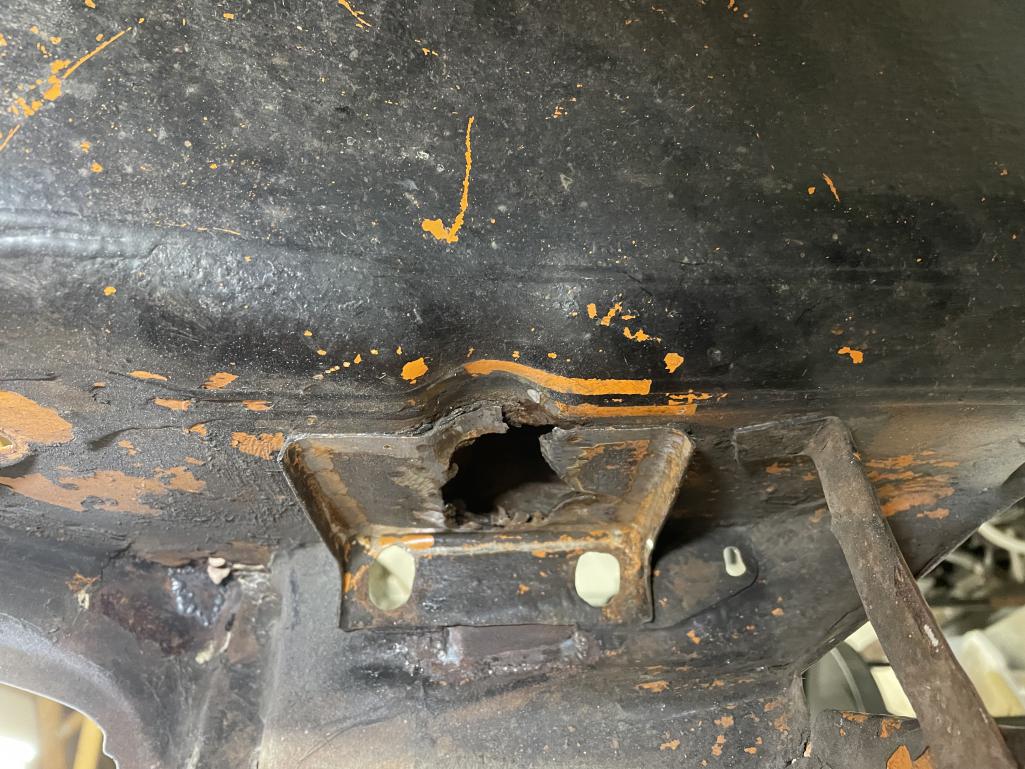
Posted by: East coaster Mar 23 2023, 06:50 PM
Patch welded in…..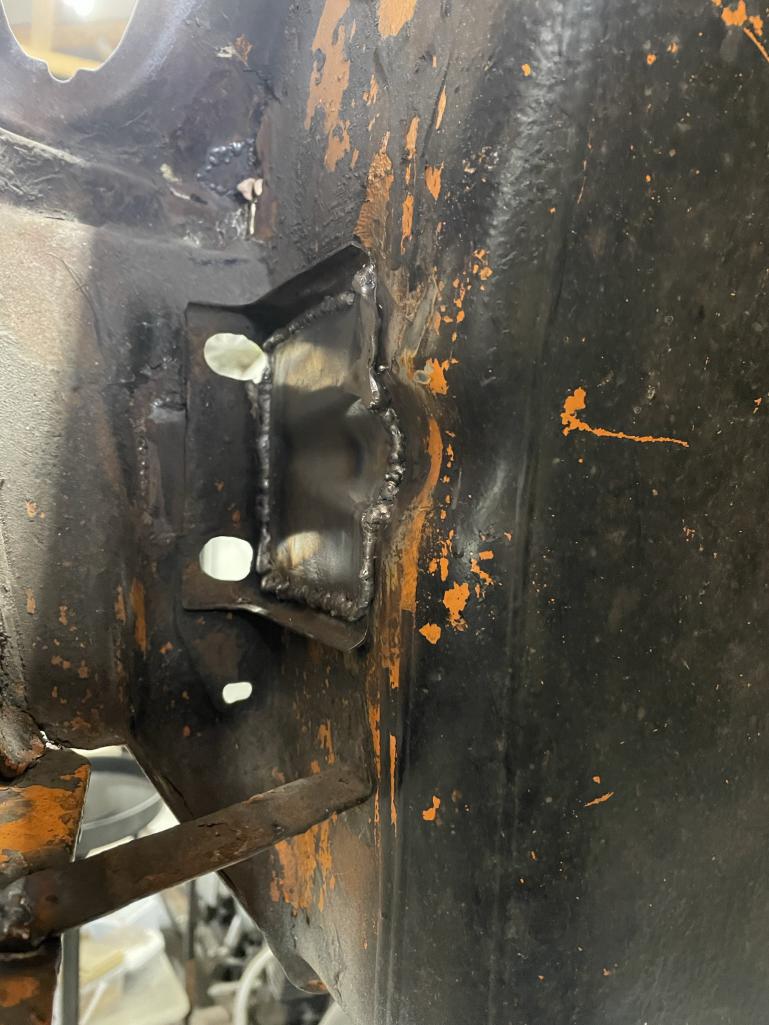
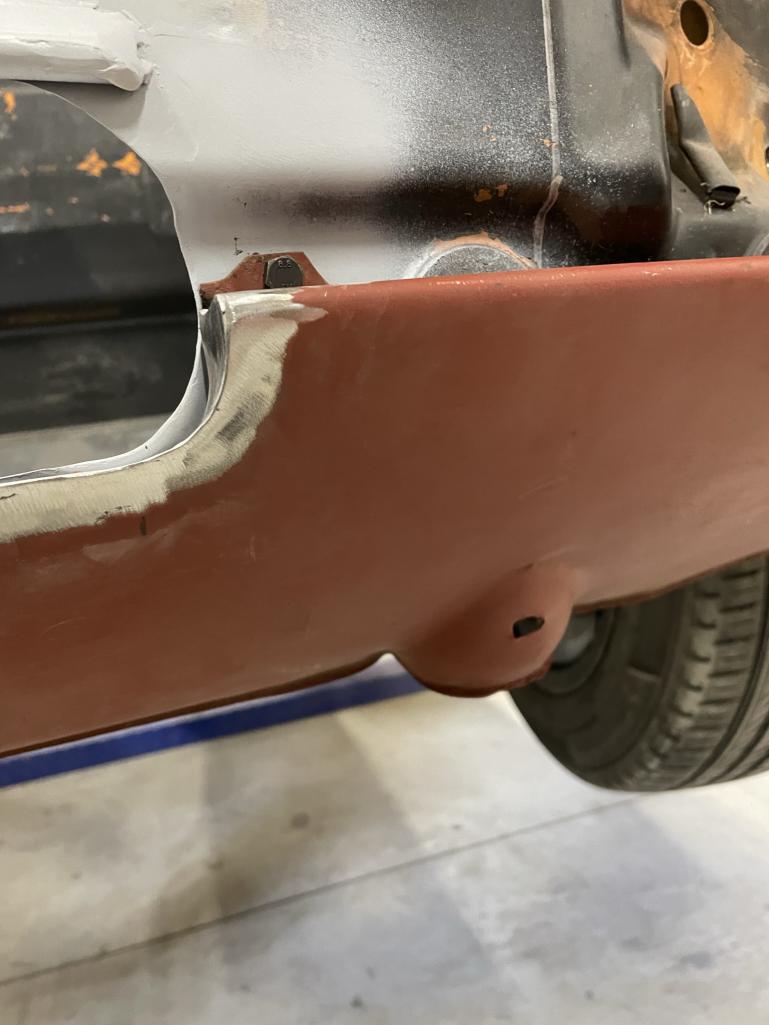
Posted by: East coaster Mar 23 2023, 06:51 PM
Passenger side was worse and required 2 patch pieces….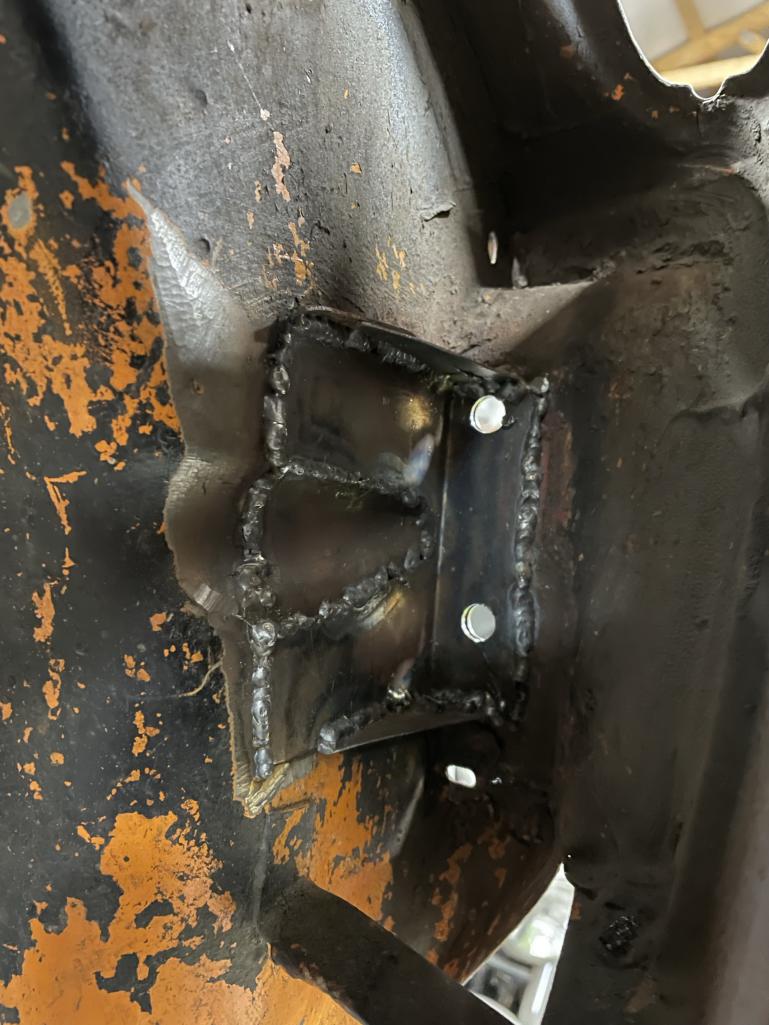
Posted by: East coaster Mar 23 2023, 06:58 PM
Then it was on to rear trunk hinge pivots. The drivers side was a mess of bubble gum welds holding a stock replacement pivot. I cut the off and got down to clean metal. The passenger side had an aftermarket heim joint setup (jwest?) and they had drilled multiple holes before they got it right. I welded up all the holes and got back to clean metal as a base.
I made a little jig for proper positioning the pivot, it works for either side.
Posted by: East coaster Mar 24 2023, 05:28 AM
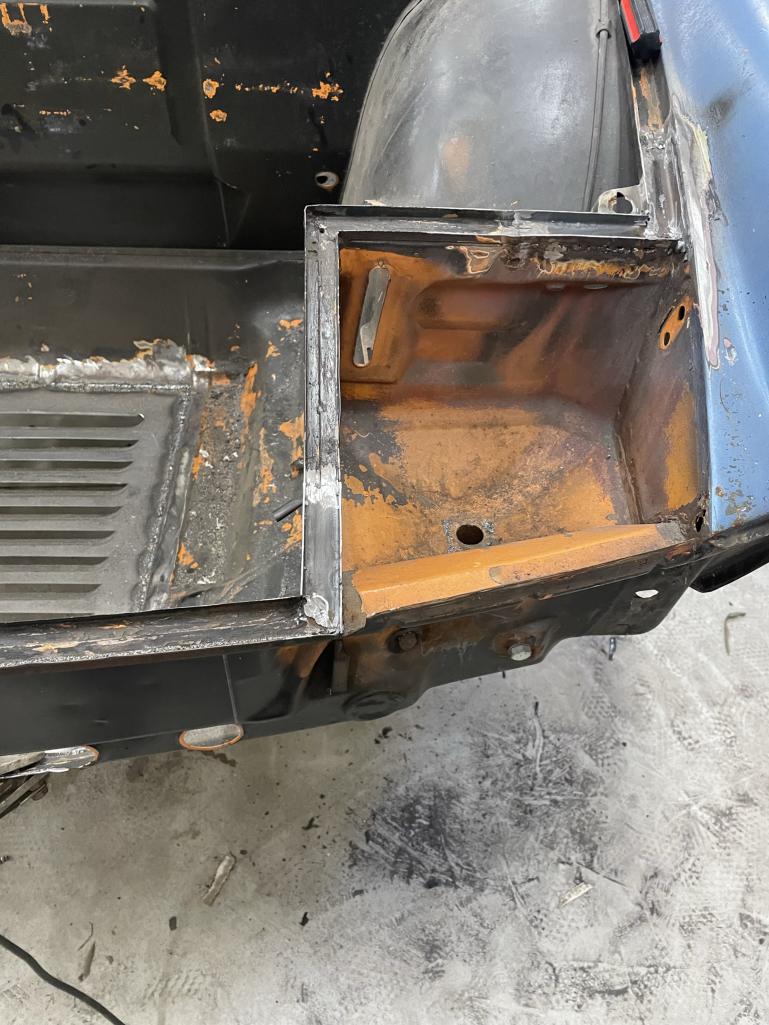
Tackled the battery tray next. Although I’m doing a Subaru conversion and most seem to relocate the battery, I couldn’t find any reason not to go with the stock location.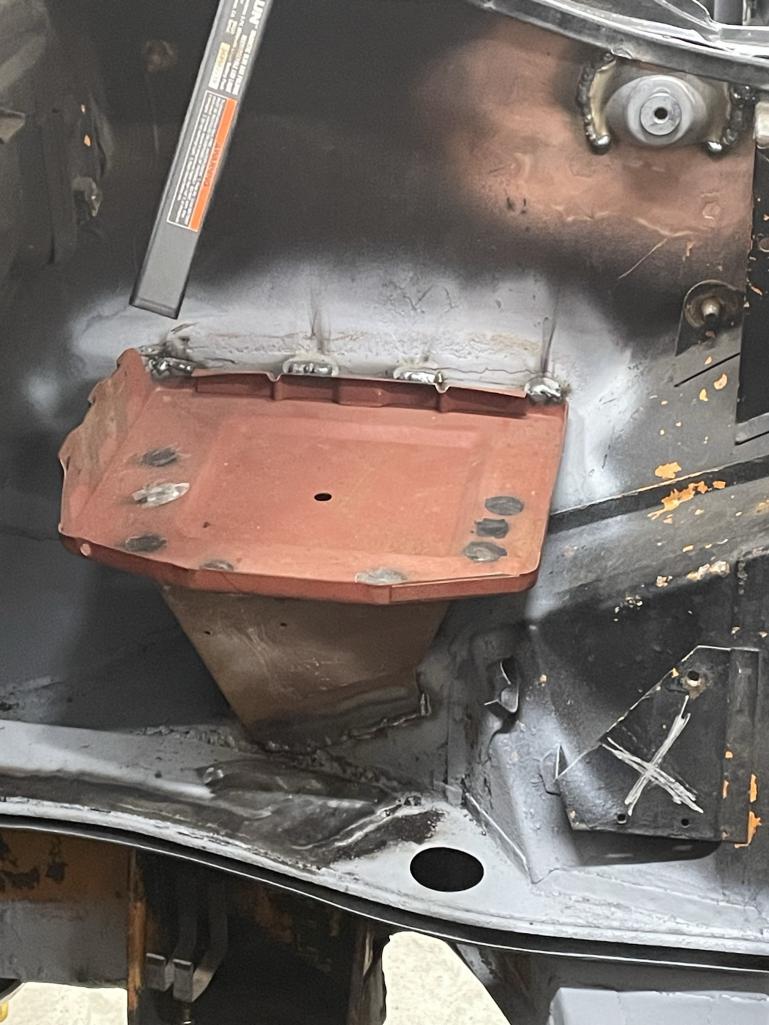
Posted by: East coaster Mar 24 2023, 07:51 PM
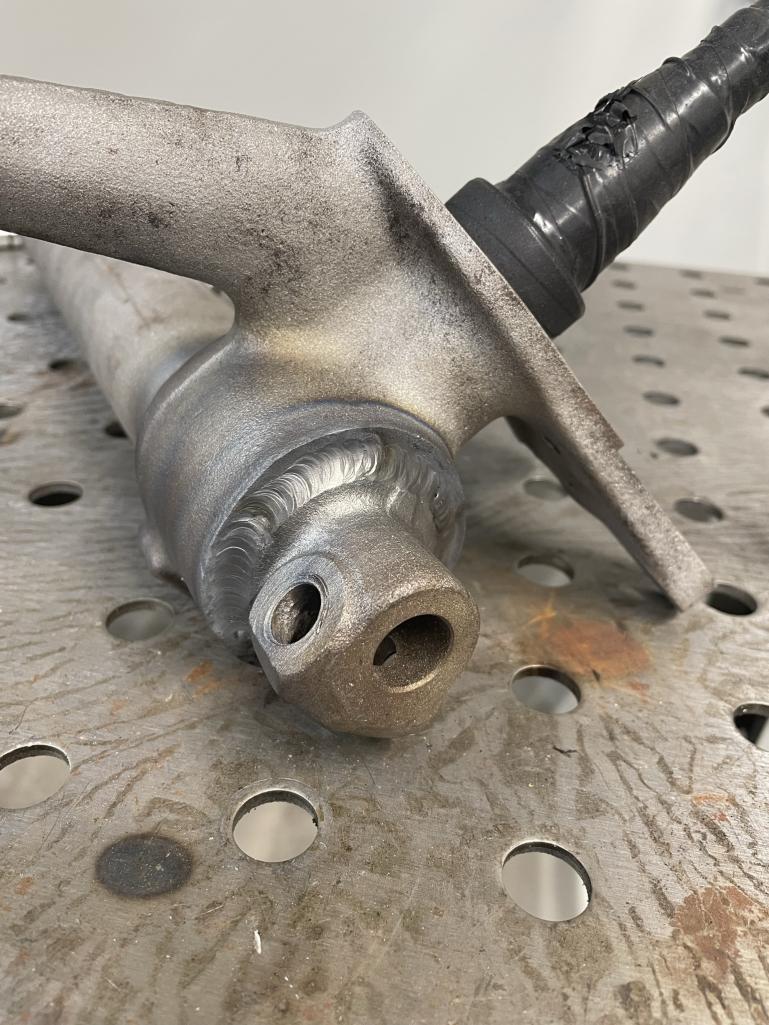
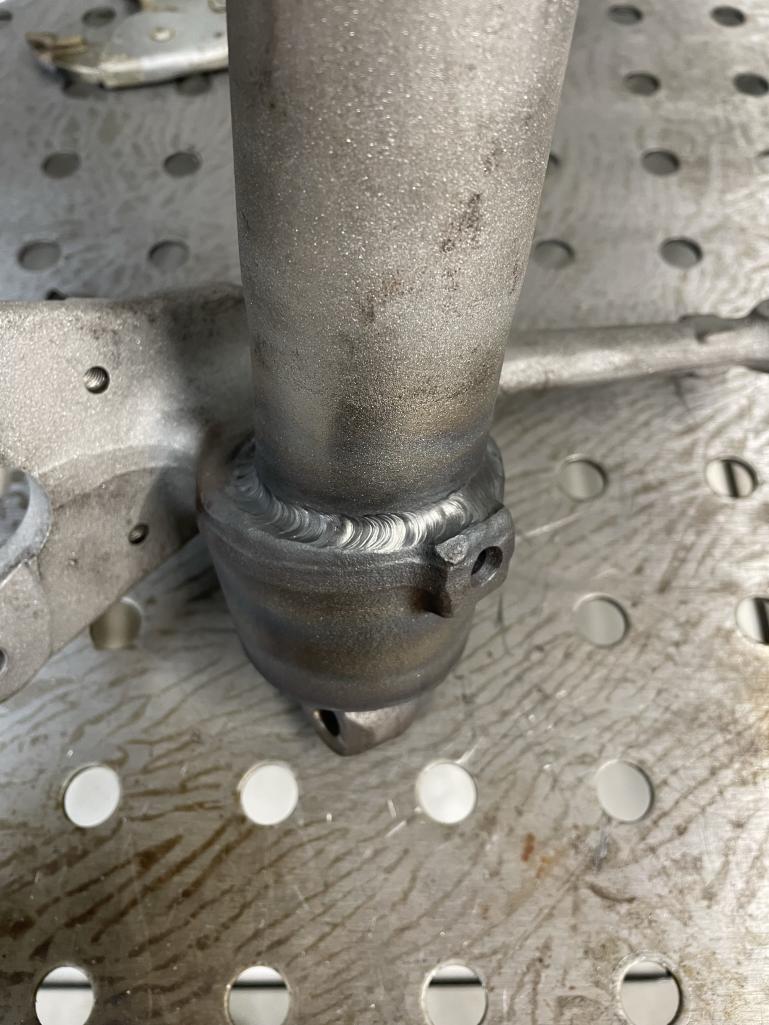
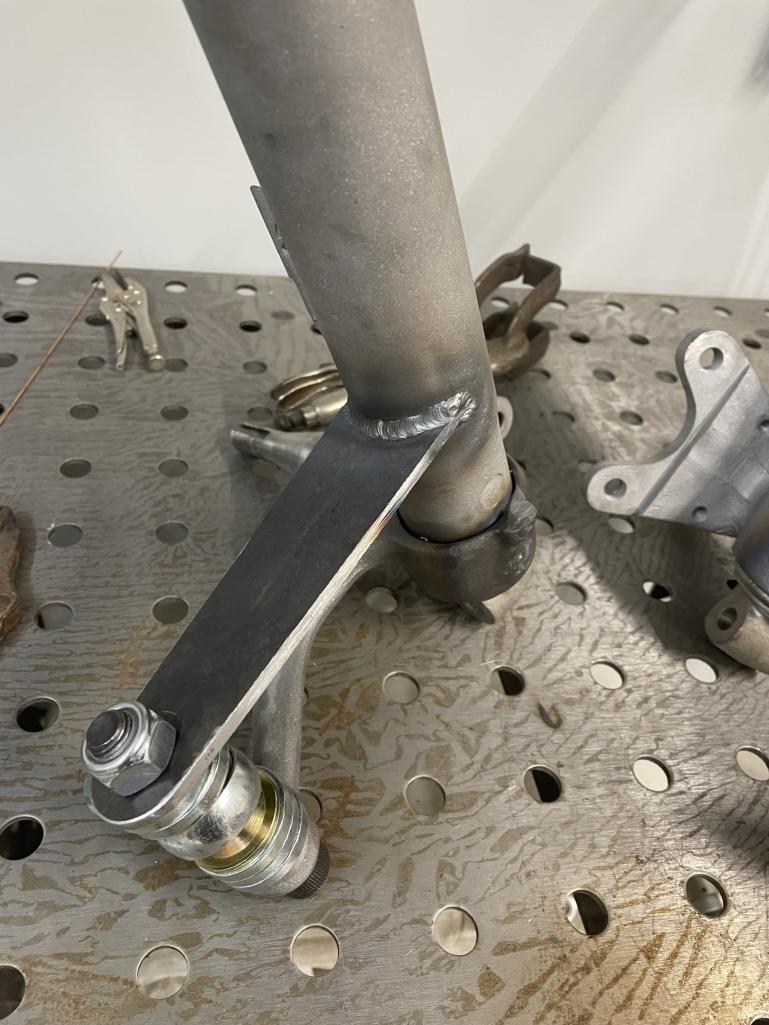
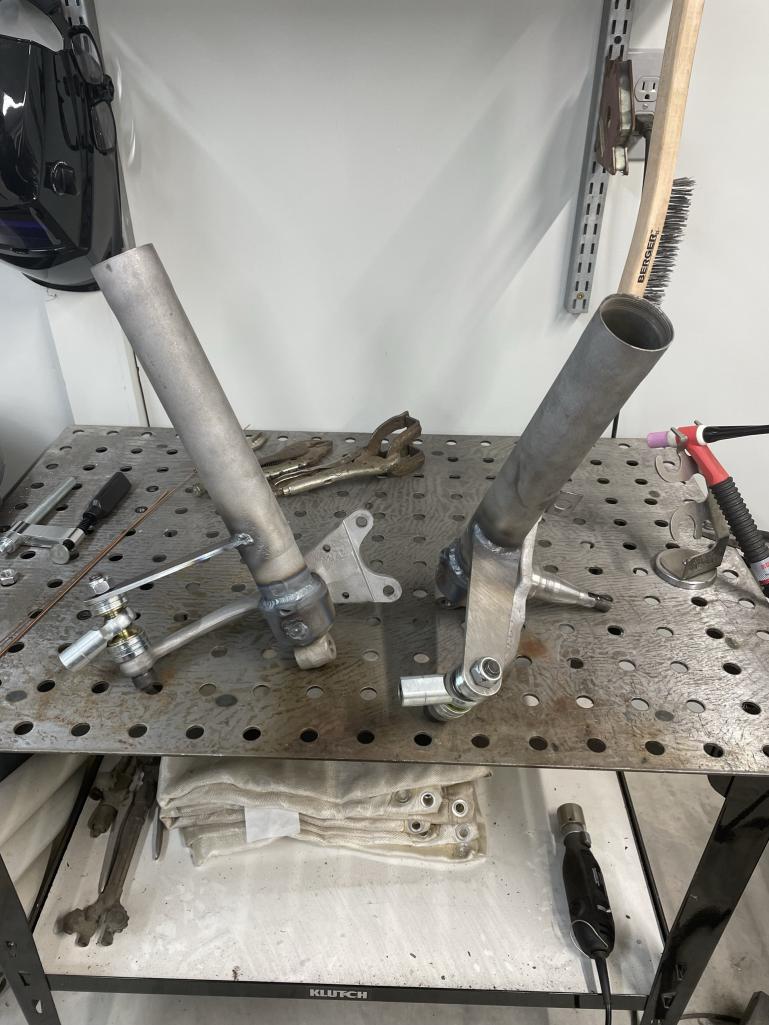
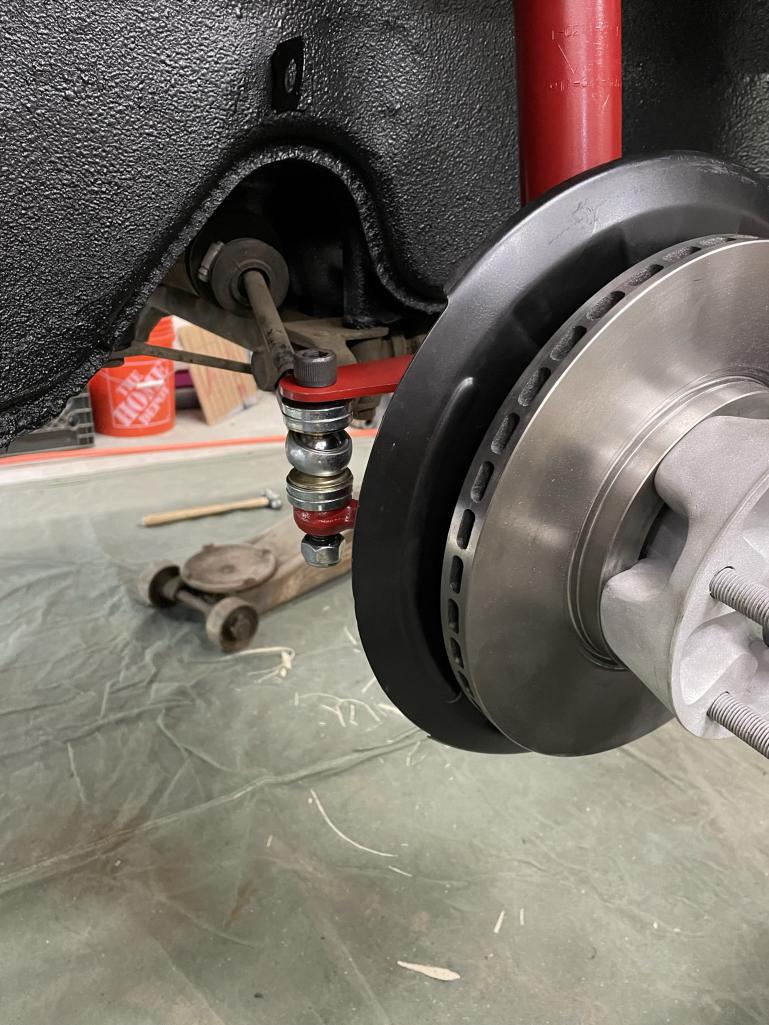
Decided a little while back to go with 911 struts. I was originally going to use my stock 4 bolt struts and convert the rotors to 5 lug and started modifying them for the Safari lift.
Fast forward…..thanks to @http://www.914world.com/bbs2/index.php?showuser=10825 , I have 911 struts to mod.
I lowered the axles 1.670” and added a steering arm brace to allow for heim joints (vs ball joints). Welded them up today and now they’re ready for prime and paint.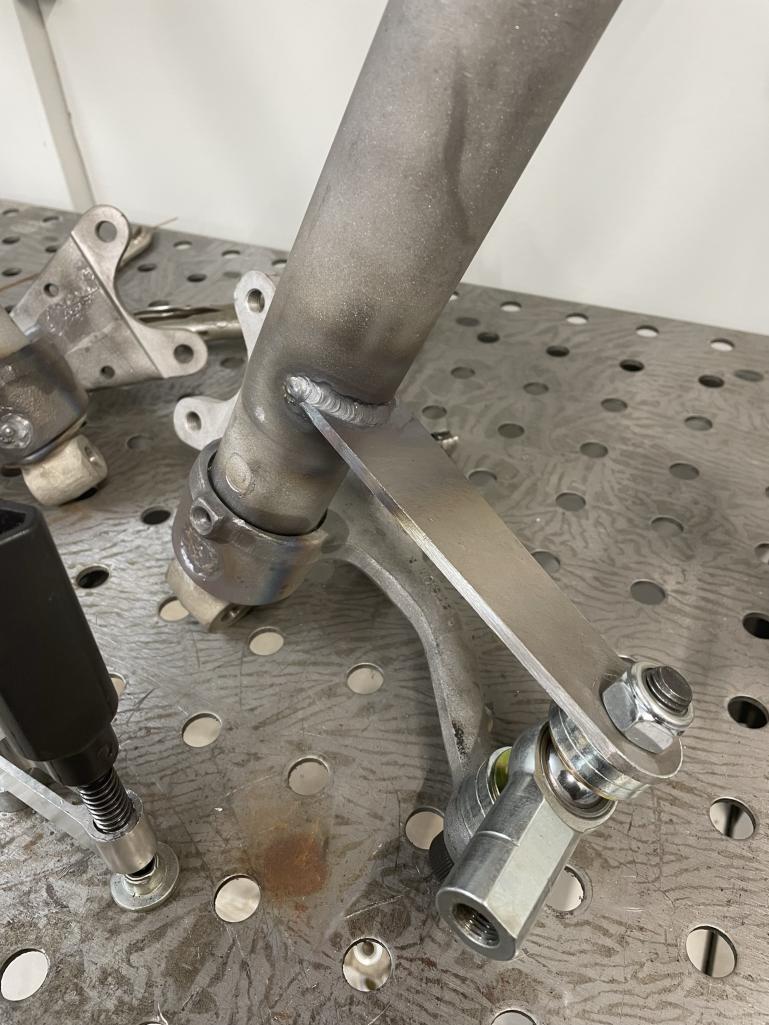
Posted by: East coaster Mar 27 2023, 08:08 PM
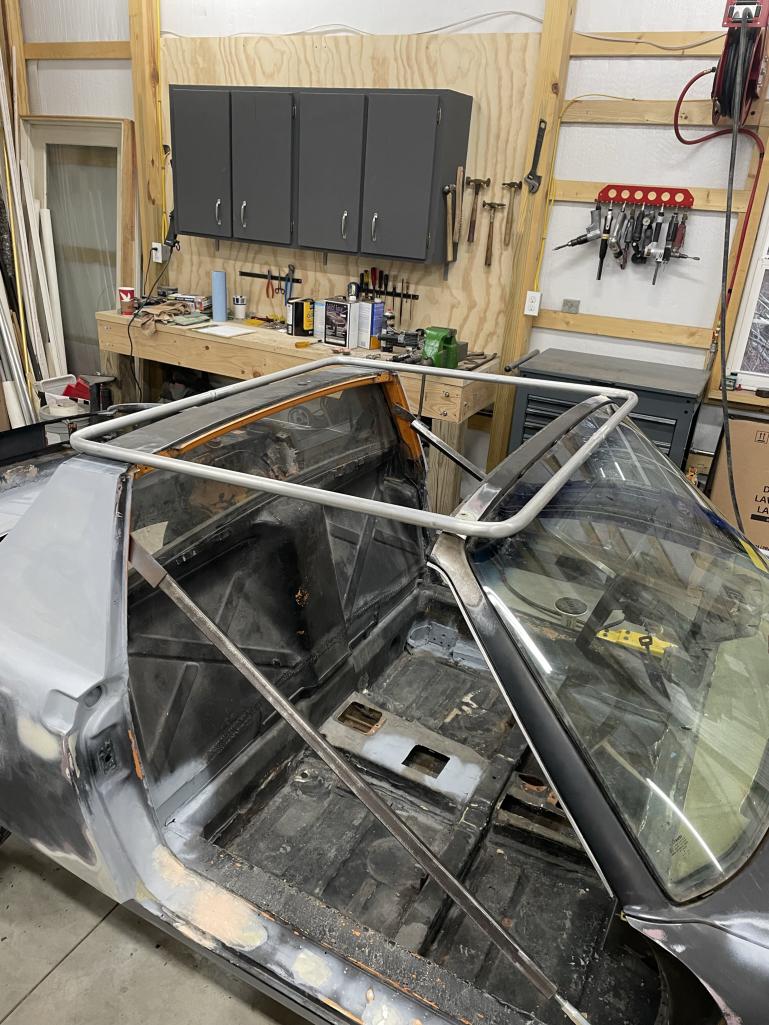
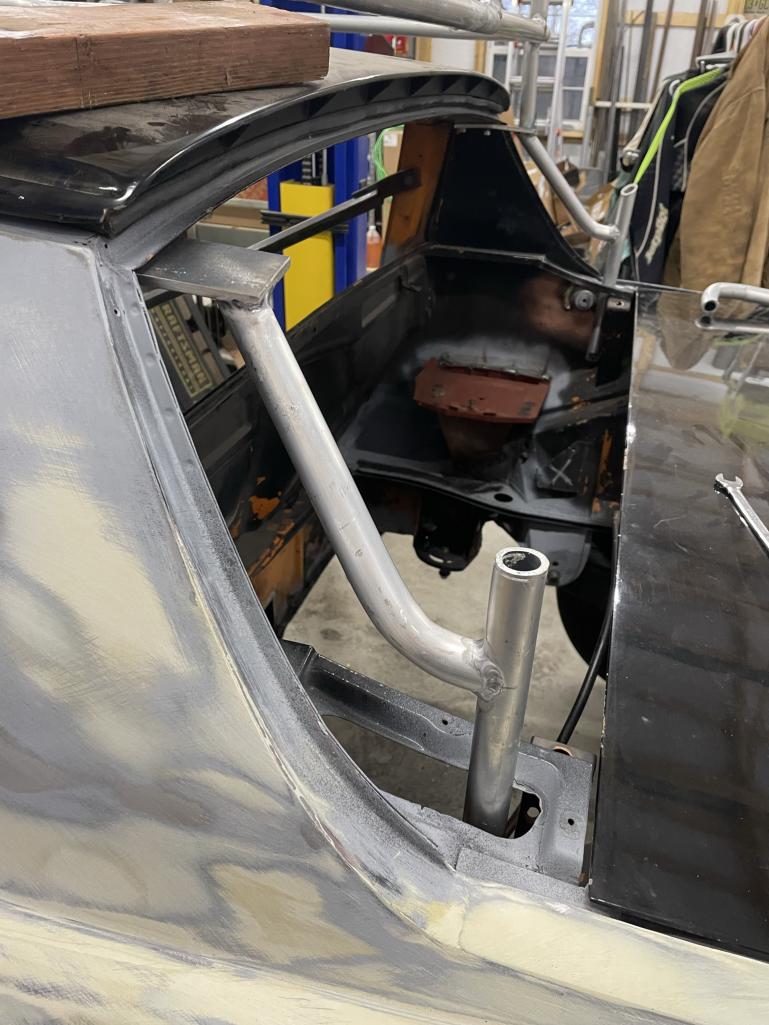
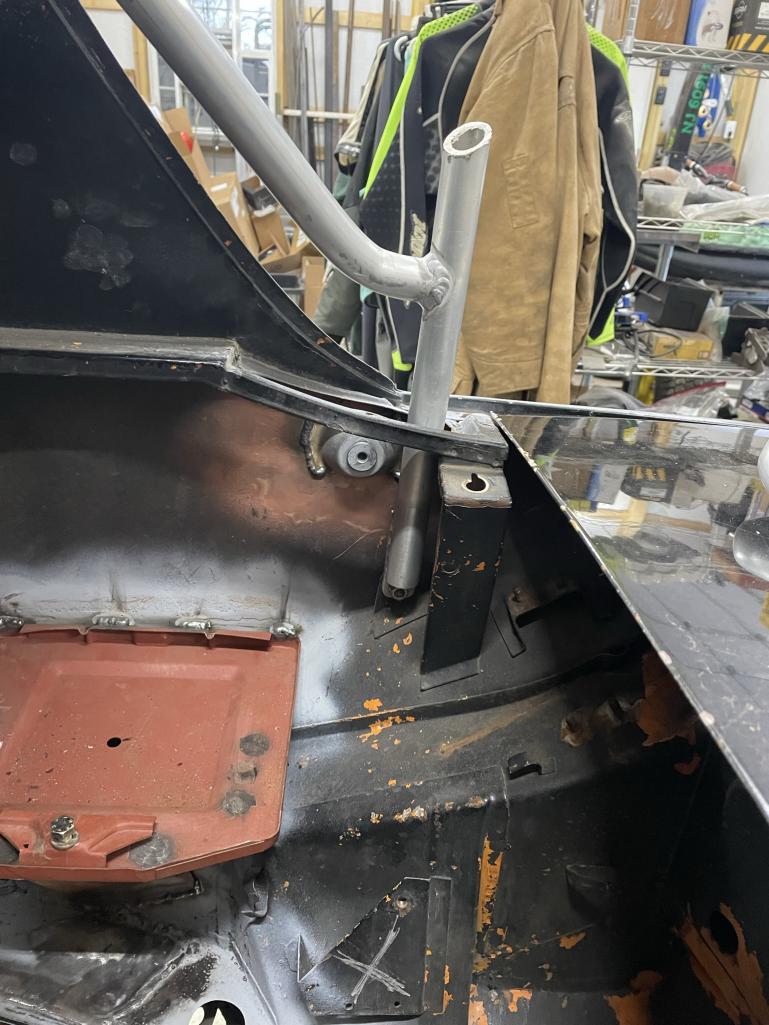
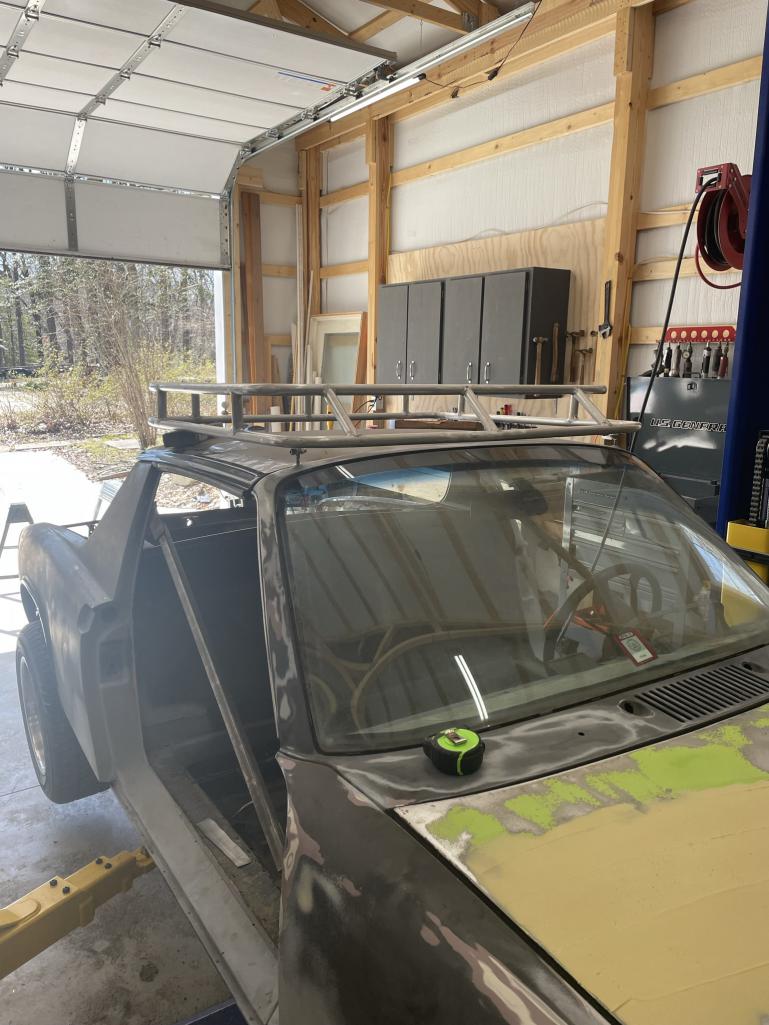
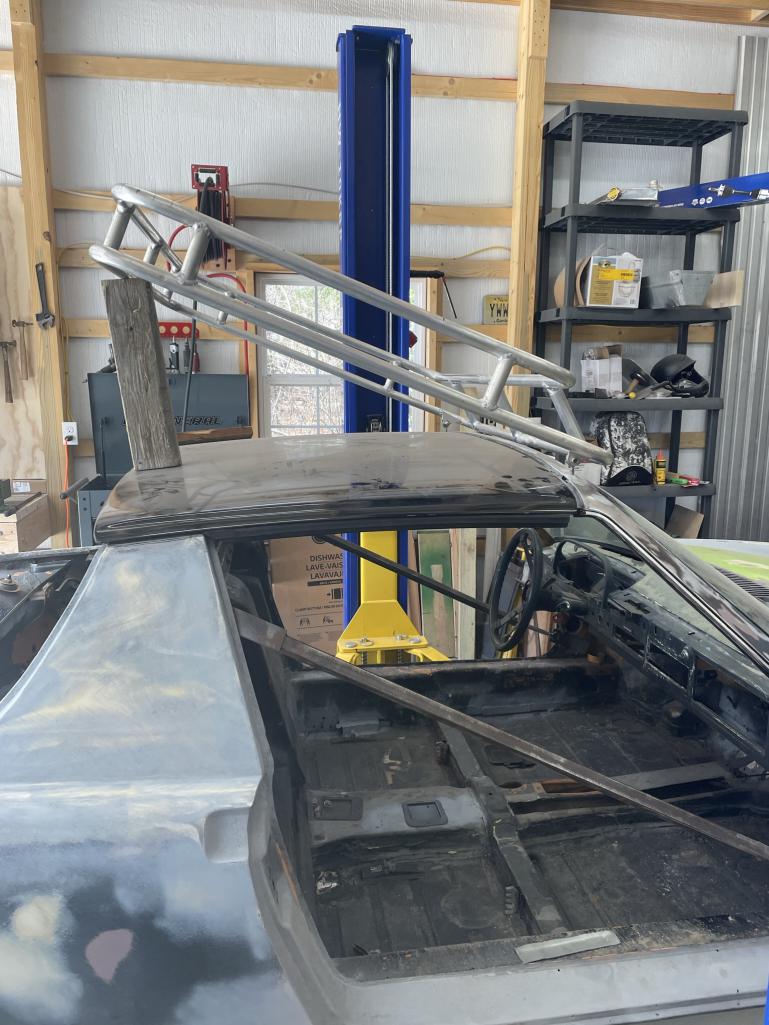
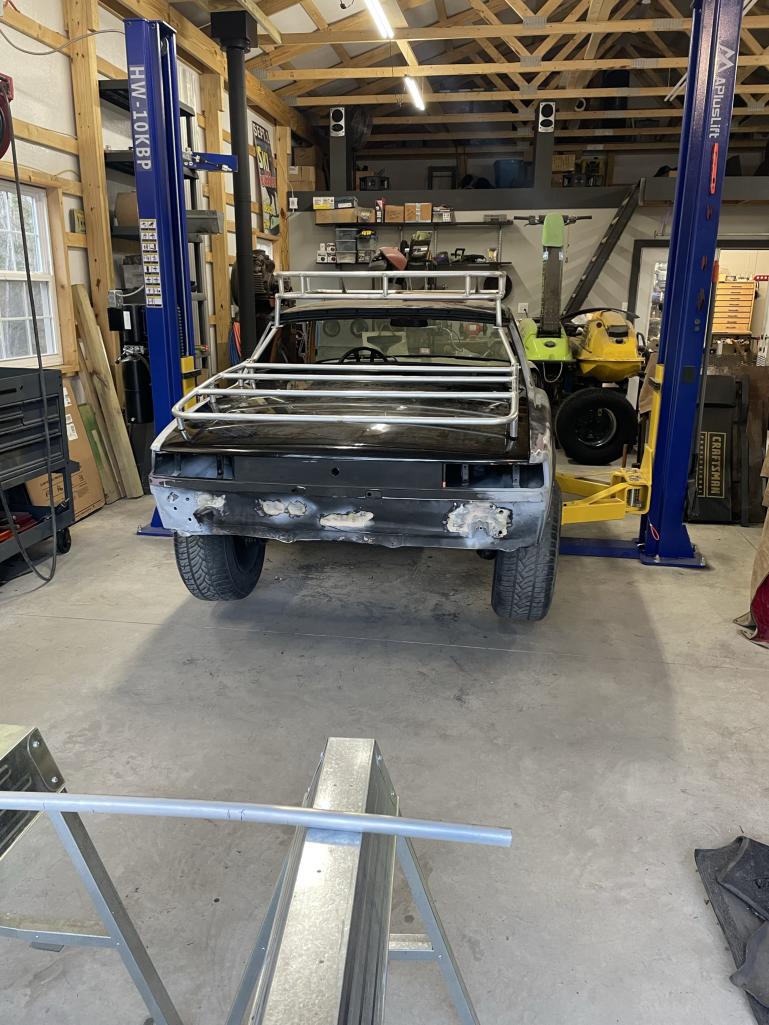
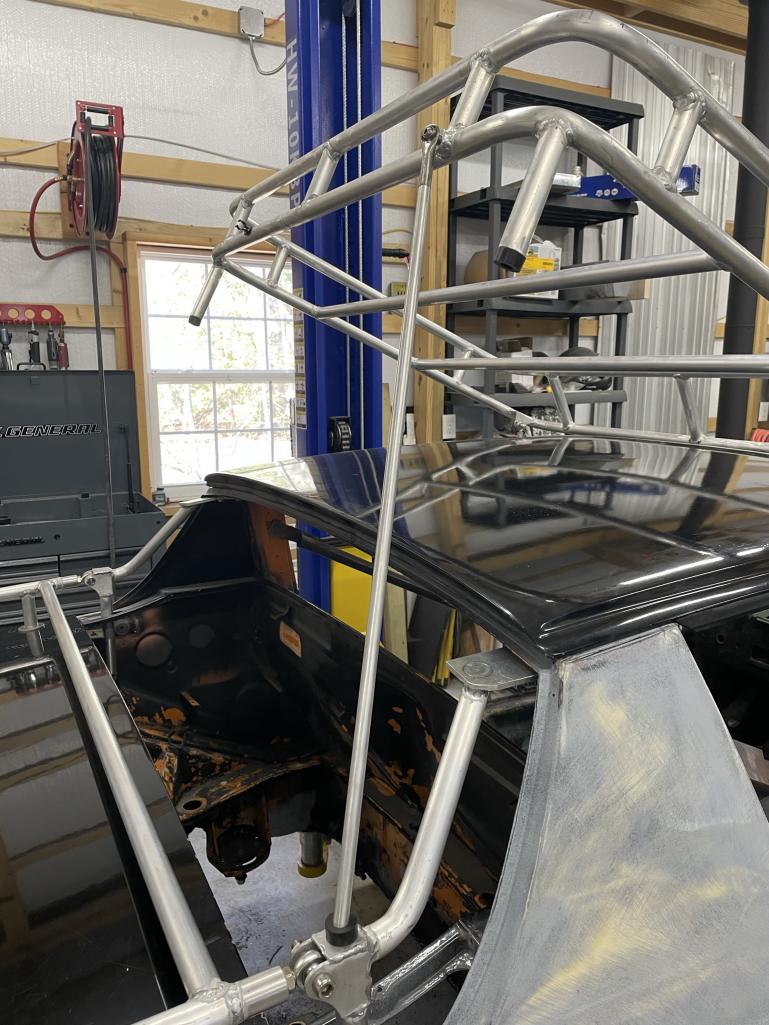
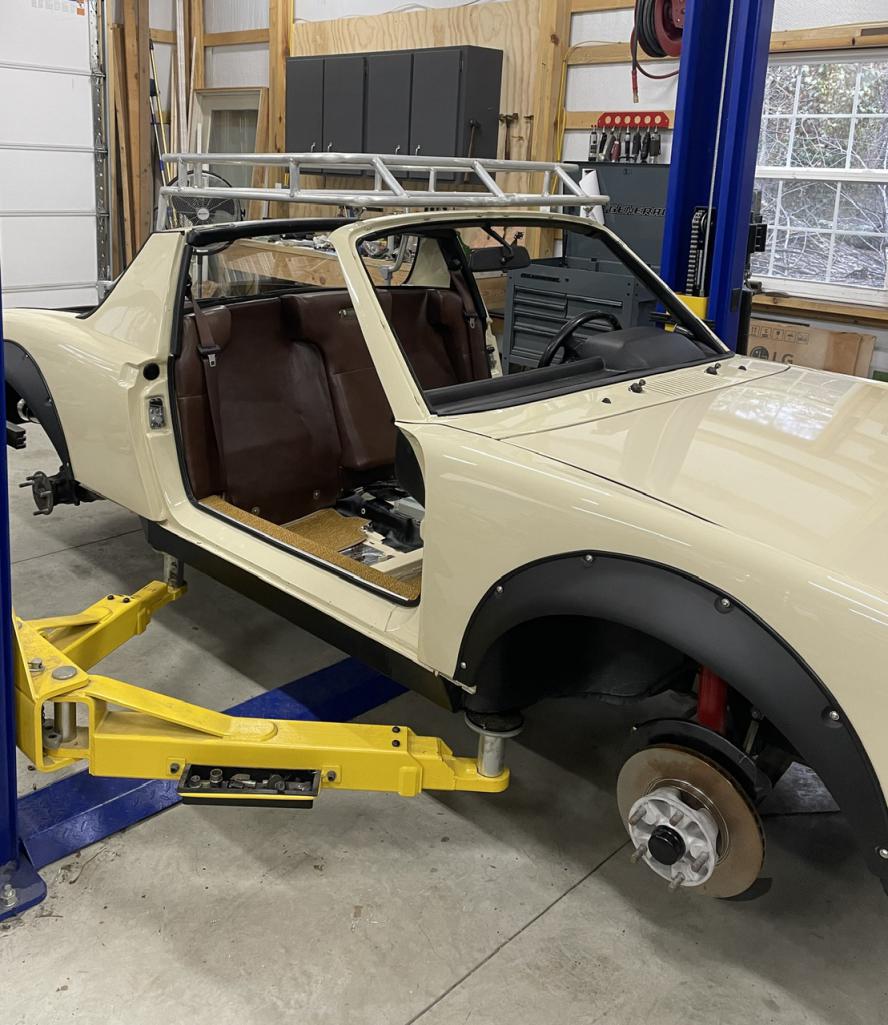
Safari stuff progress……still have to work the mounts. The front rake/angle matches the windshield.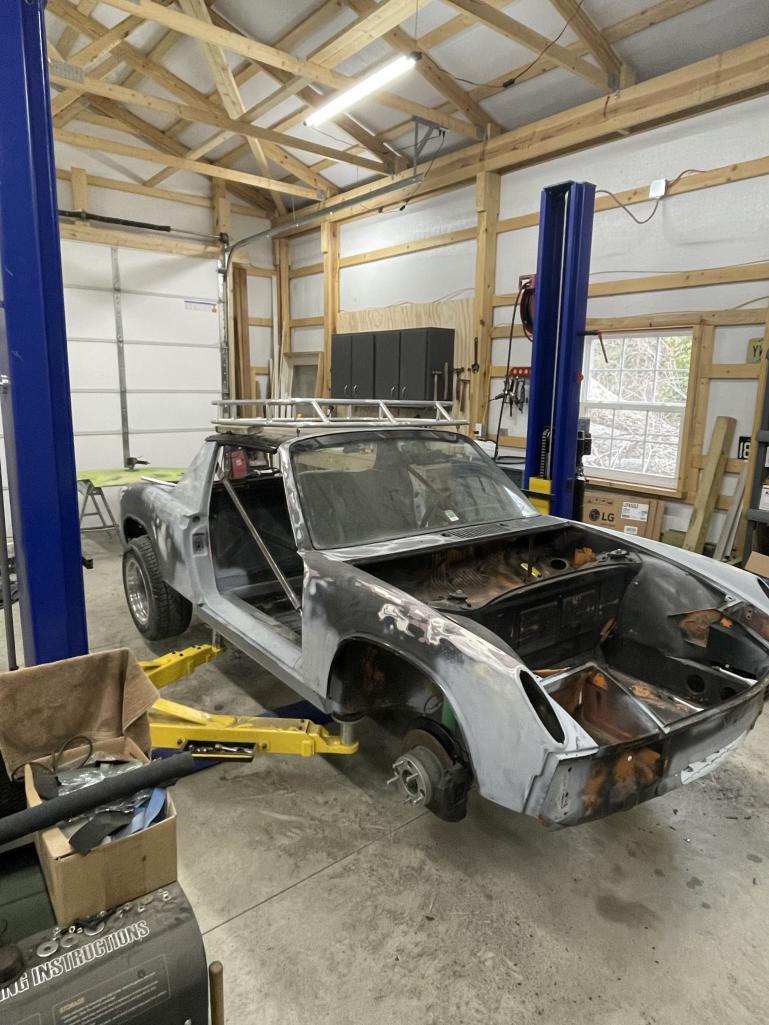
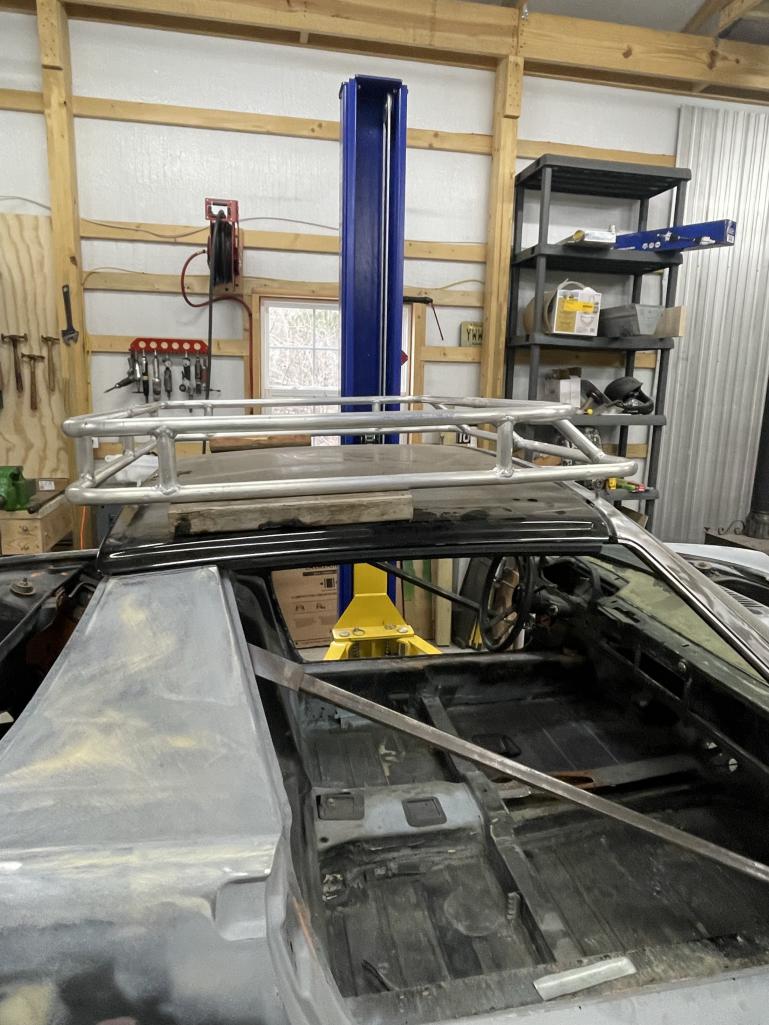
Posted by: East coaster Mar 31 2023, 06:58 PM
Miscellaneous tidbits…..
Posted by: East coaster Mar 31 2023, 07:01 PM

Posted by: Retroracer Apr 1 2023, 09:48 AM
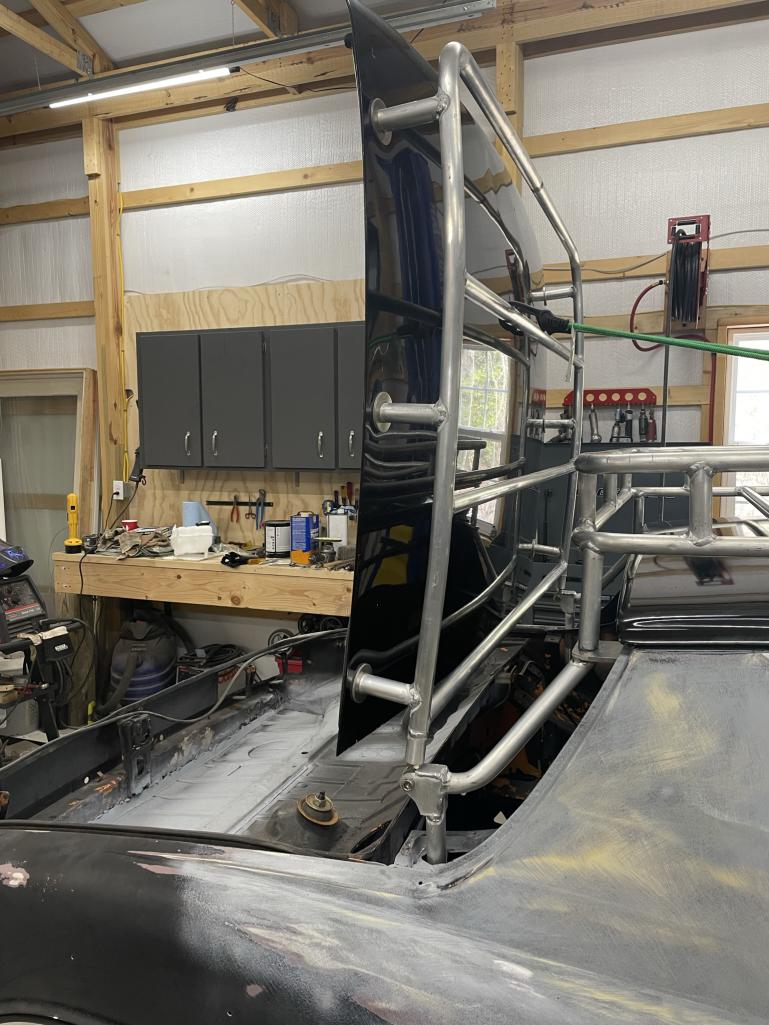
Hinged at the front so you can remove the targa roof? Nice touch...
- Tony
Posted by: East coaster Apr 1 2023, 07:10 PM
Hinged at the front so you can remove the targa roof? Nice touch...
- Tony
Yup, that was an absolute requirement!
Posted by: slowrodent Apr 2 2023, 01:01 PM
This is such a BOLD build . I really do love it. You're clearly a very skilled fellow, and the really varied nature of the tasks you've been taking on is impressive. Keep up the great work.
Posted by: sixnotfour Apr 2 2023, 01:01 PM
Better reinforce windshield frame..
https://pbase.com/9146gt/image/88567152
The Sunco 9146GT ..owner complained about flexing and broken windshields..
Posted by: East coaster Apr 2 2023, 06:12 PM
Better reinforce windshield frame..
https://pbase.com/9146gt/image/88567152
The Sunco 9146GT ..owner complained about flexing and broken windshields..
Thanks! I’ve considered that but I don’t plan on carrying too much on the roof rack except the front wheel of my mountain bike. I’m thinking I won’t be stressing it much more than the factory ski racks did…….I guess I’ll find out.
The rack is mounted on heim joints at the windshield so it can flex front to rear without stressing the windshield frame. Of course the main reason for the heim joints is to tilt the rack to remove the top.
Posted by: East coaster Apr 2 2023, 06:37 PM
My biggest challenge in this project thus far is deciding what color to paint it. It was originally Signal Orange (L20E). It came with a very nice brown interior, and I have to say I love Signal Orange but not with a brown interior. I’ll have to figure out a color in the next couple weeks.
Posted by: East coaster Apr 3 2023, 07:00 PM
Started work on the rear rack. Hope to get it welded up tomorrow…..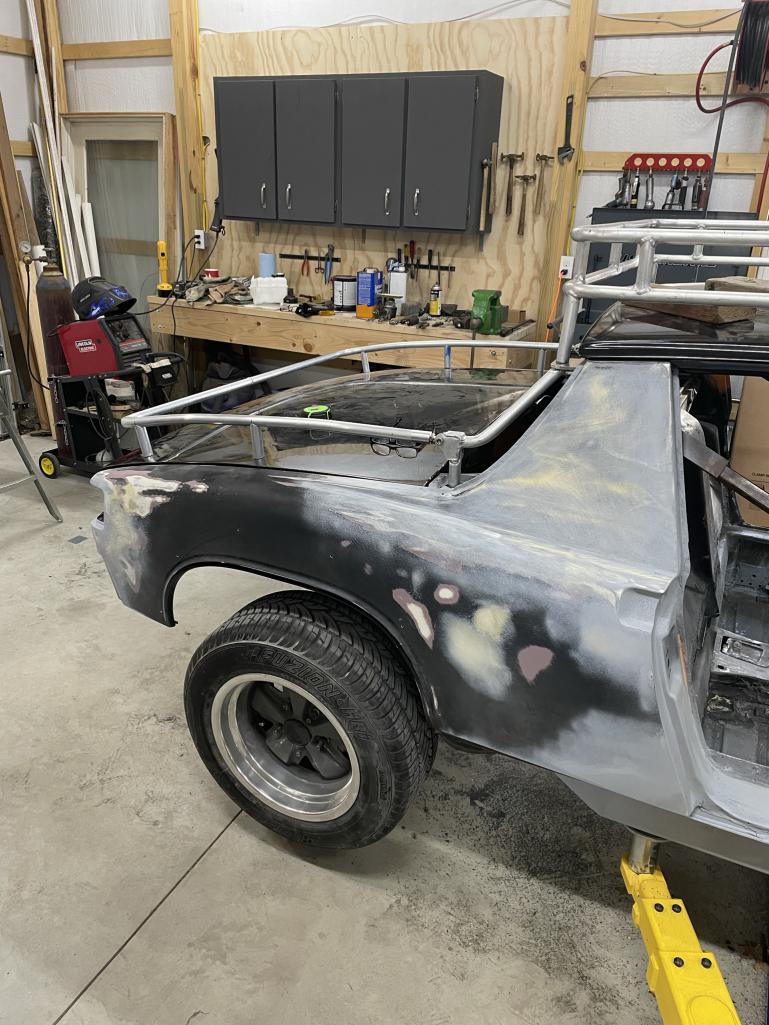
Posted by: Optimusglen Apr 3 2023, 07:22 PM
This is giving me ideas, love the build so much. It really REALLY makes me want to keep going on my safari-esque concept. 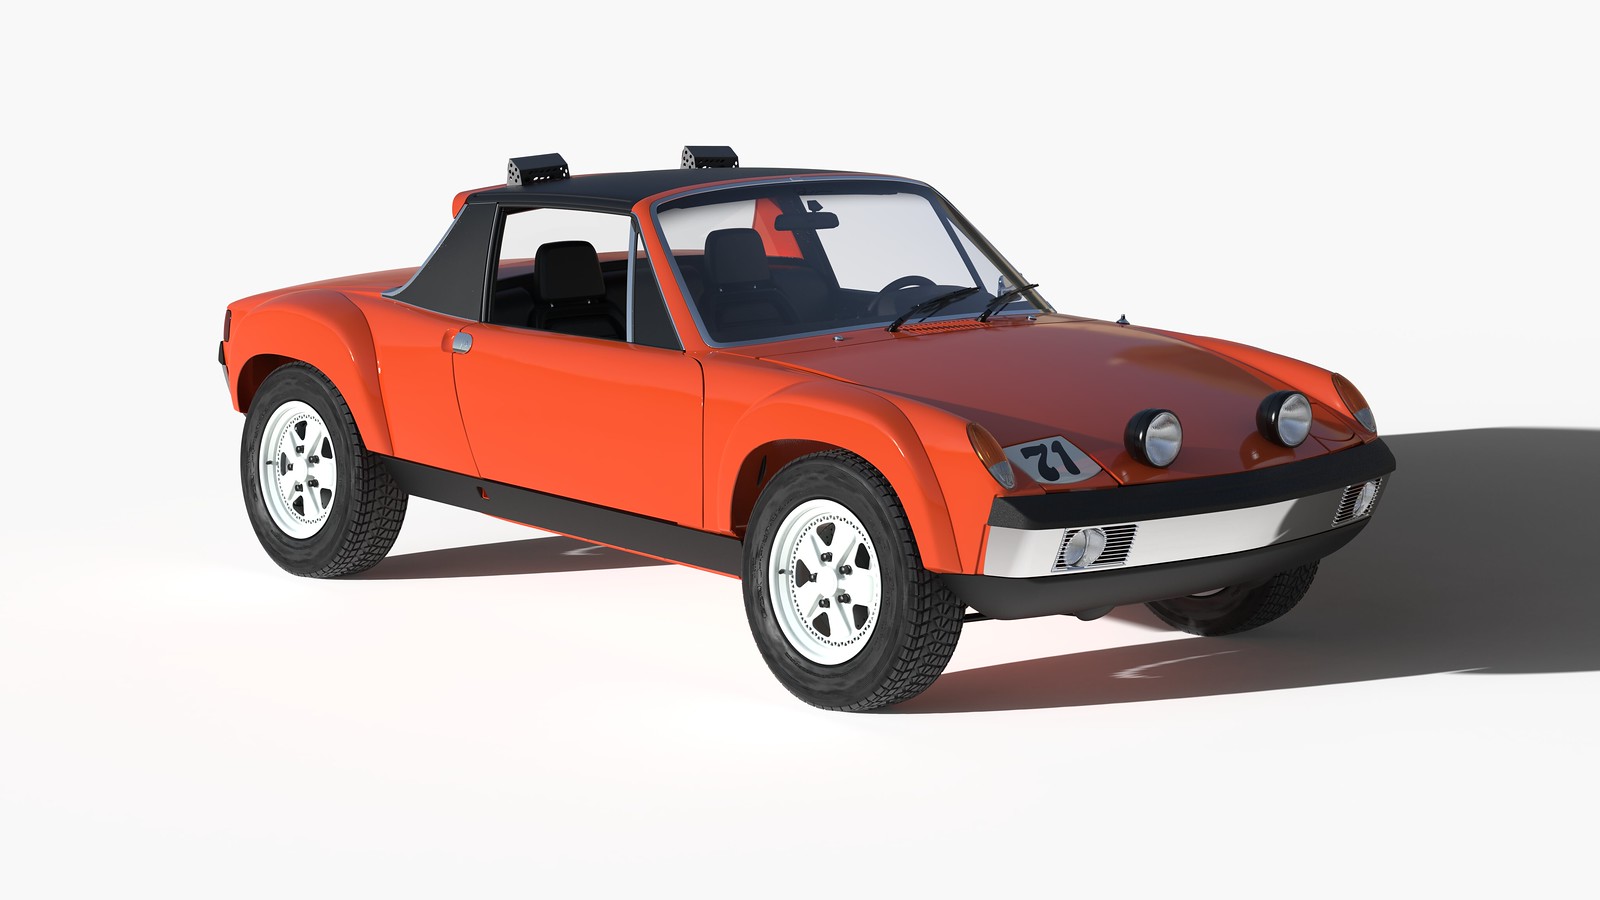
my CNC flare molds are in my garage waiting for warmer weather for the fiberglass lay up, I think my biggest hurdle is fabricating the inner ear extensions on the rear. Might just hash the flares and body out and then do suspension in the furture.
Posted by: East coaster Apr 4 2023, 05:18 AM
Looks very cool.
Posted by: altitude411 Apr 4 2023, 09:00 AM
* Subscribed... very cool build. Thank you for posting ![popcorn[1].gif](style_emoticons/default/popcorn[1].gif)
Posted by: Van914 Apr 4 2023, 04:37 PM
Saw this one in Indy a few years ago
Posted by: East coaster Apr 4 2023, 07:56 PM
Finished fabricating and welding the rear rack. Only thing left is welding the flanges where it meets the trunk.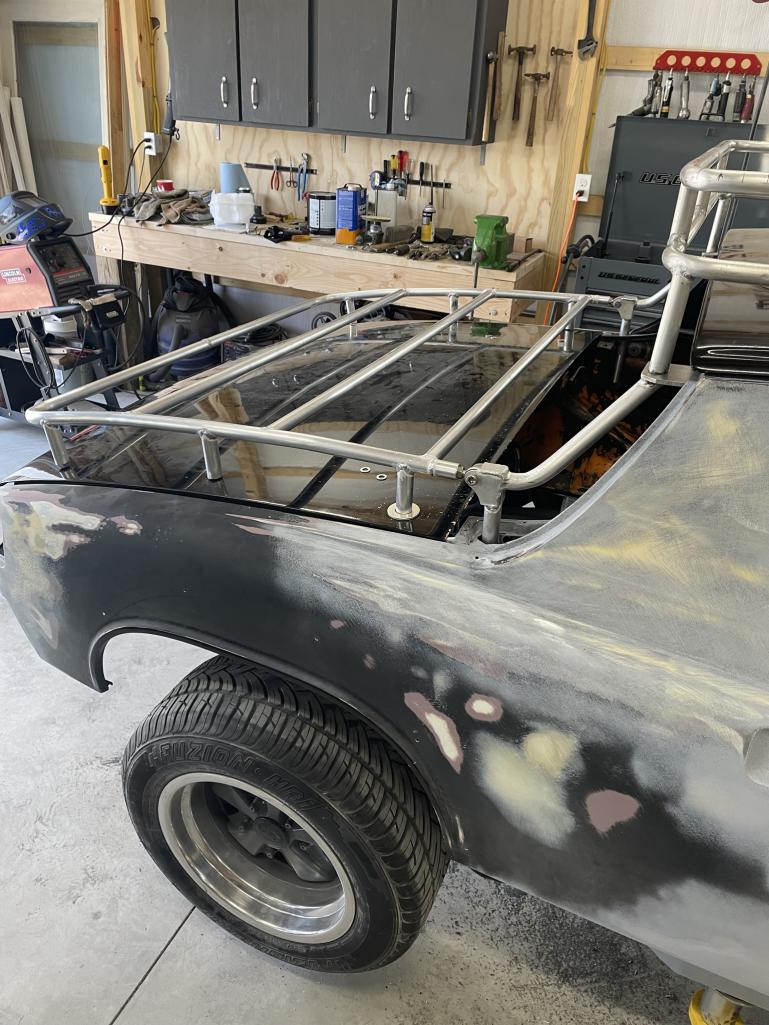
Posted by: East coaster Apr 6 2023, 08:08 PM
Finished the rear cargo rack and got it mounted to the trunk lid. I removed the factory hinges and the trunk lid now hinges off the rack. The trunk lid works perfectly and latches using the factory latch. Now onto the next part of the project….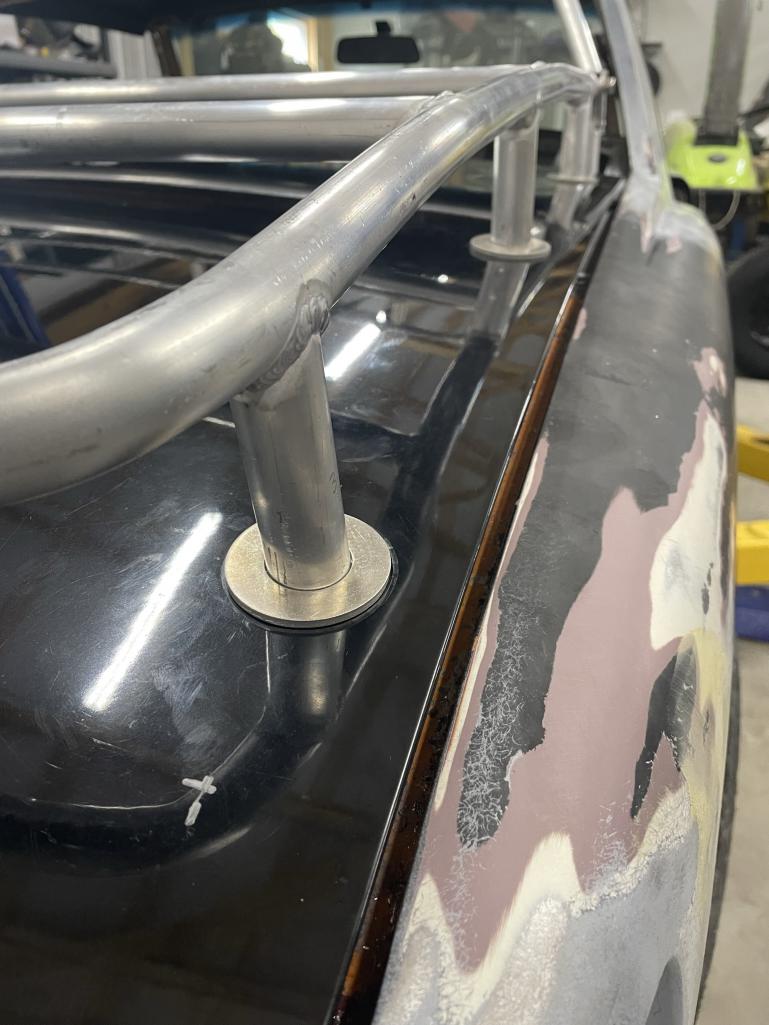

Posted by: East coaster Apr 6 2023, 08:09 PM
… trim.994E4729_F102_4323_9F7F_019DDD25424E.MOV ( 2.59mb )
Number of downloads: 92
trim.994E4729_F102_4323_9F7F_019DDD25424E.MOV ( 2.59mb )
Number of downloads: 92
Posted by: wonkipop Apr 6 2023, 08:44 PM
love the trunk lid hinging.
Posted by: Optimusglen Apr 7 2023, 08:10 AM
Do you need a winch to lift the rear trunk? 
kidding, really love the idea.
Posted by: Shivers Apr 7 2023, 09:10 AM
Well, this rocks (pun intended}. The rack sure makes this a great build in my head, the border here has seen the beginning of some great adventures in similar vehicles. Very cool dude
Posted by: East coaster Apr 7 2023, 07:27 PM
Do you need a winch to lift the rear trunk?
kidding, really love the idea.
Was worried about that, that’s why I made it all from 1” aluminum tube. It’s actually pretty light.
Posted by: Montreal914 Apr 7 2023, 08:27 PM
Very nice work!
Based on the quality of the craftmanship, clearly you have an idea as to how to hold it open, in order to easily set the roof in?
Posted by: East coaster Apr 8 2023, 07:15 PM
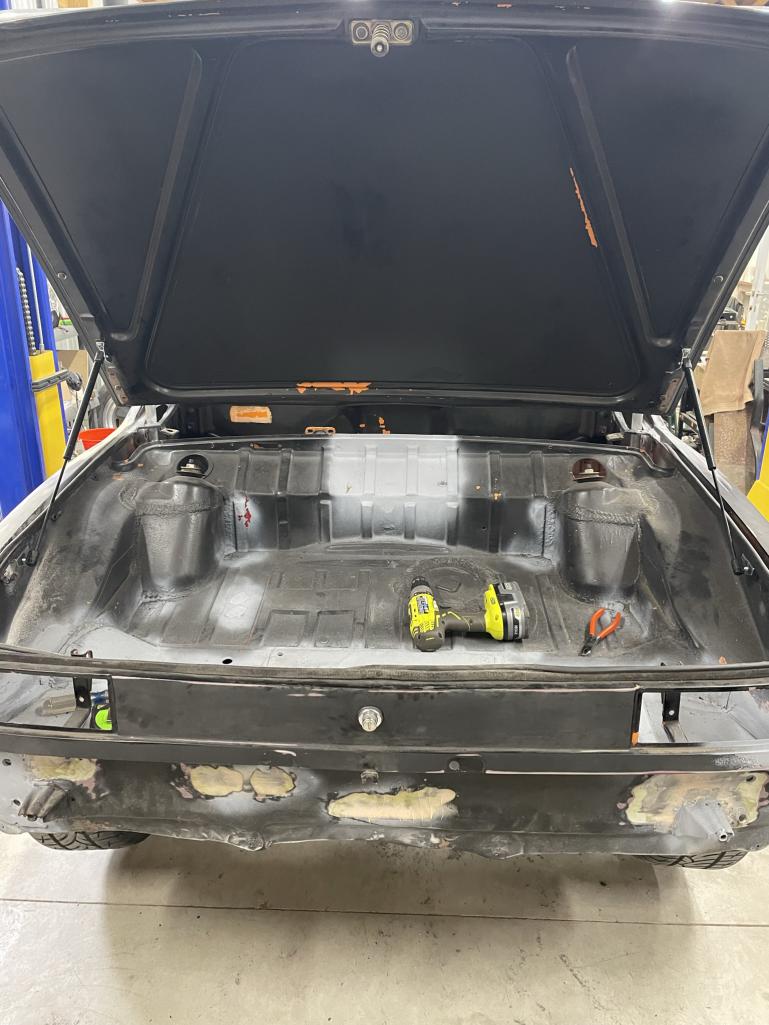
Installed gas struts for the rear trunk today. They lift the trunk lid and the rack just fine.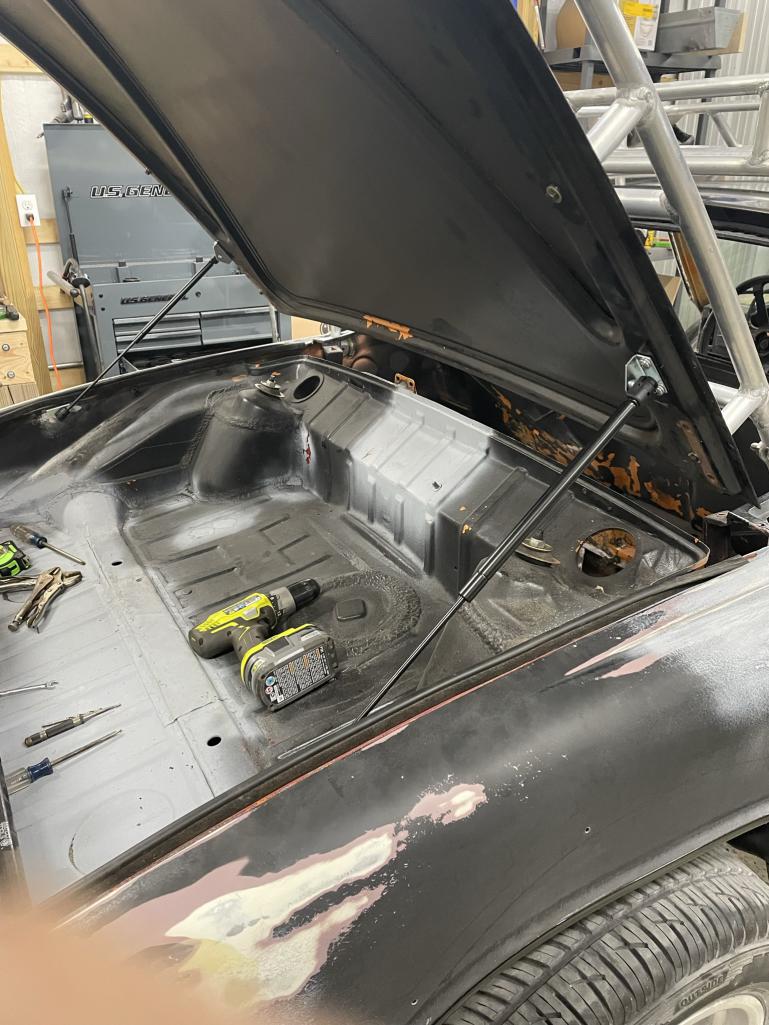
Posted by: East coaster Apr 10 2023, 07:41 PM
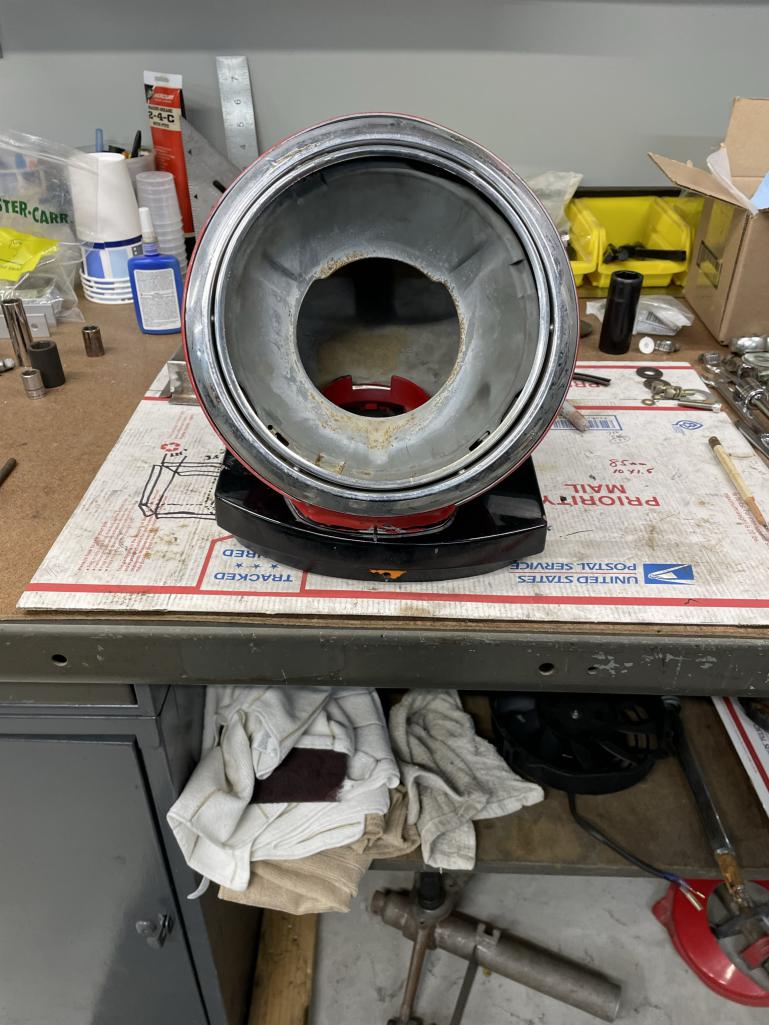
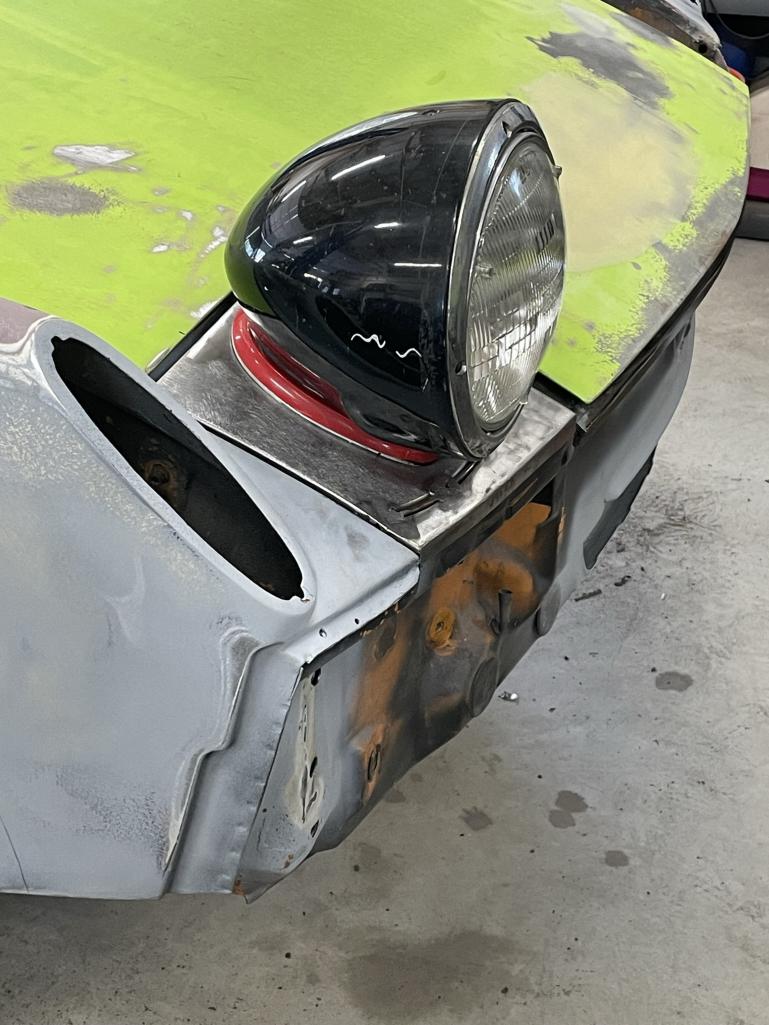
Decided to go with something different for my headlights. I’m using heavily modified 928 headlights in a fixed position. I made a support frame that goes below the 914 headlight doors and incorporated the eyebrow into the door. Still need to do a little finishing work, and the repeat for the passenger side, but I thought I’d share the progress…..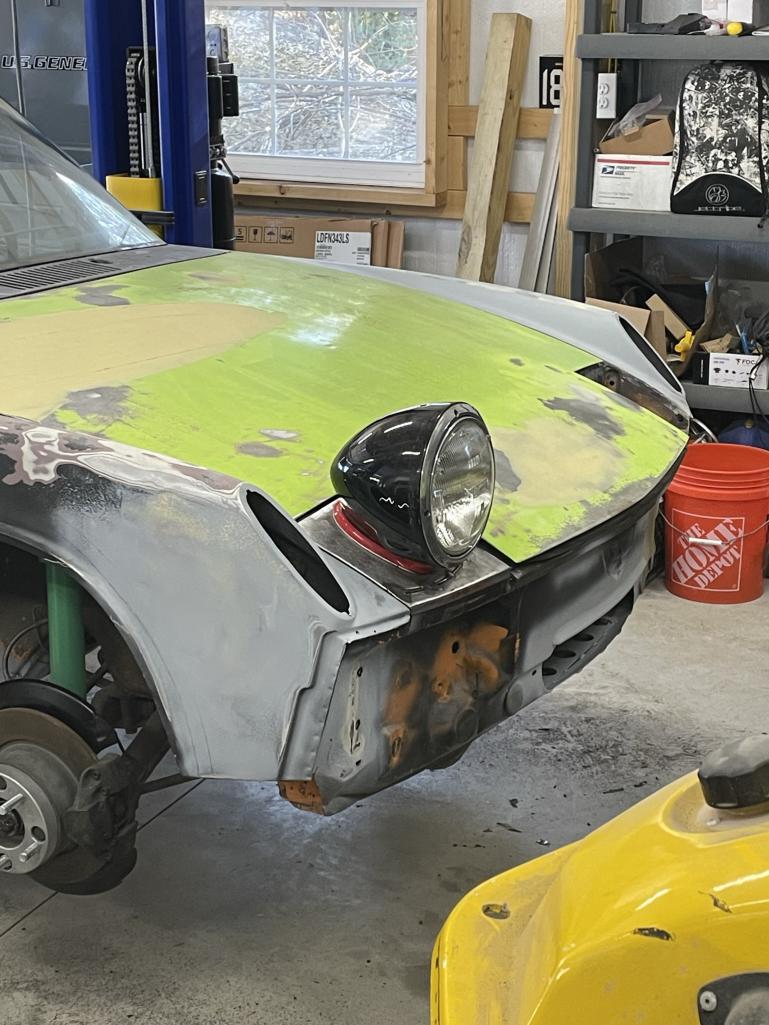

Posted by: brubou Apr 10 2023, 08:30 PM
Forget Cibie's!!! Mount a couple 928 headlights on the hood!!
Posted by: Retroracer Apr 11 2023, 08:43 AM
Cool idea with the fixed 928 headlight buckets. Can't wait to see the design for the front safari "animal & small tree" deflection bars....
And, presumably, more spotlights!
- Tony
Posted by: East coaster Apr 11 2023, 08:07 PM
A few detail pics of headlight framing…..
Attached thumbnail(s)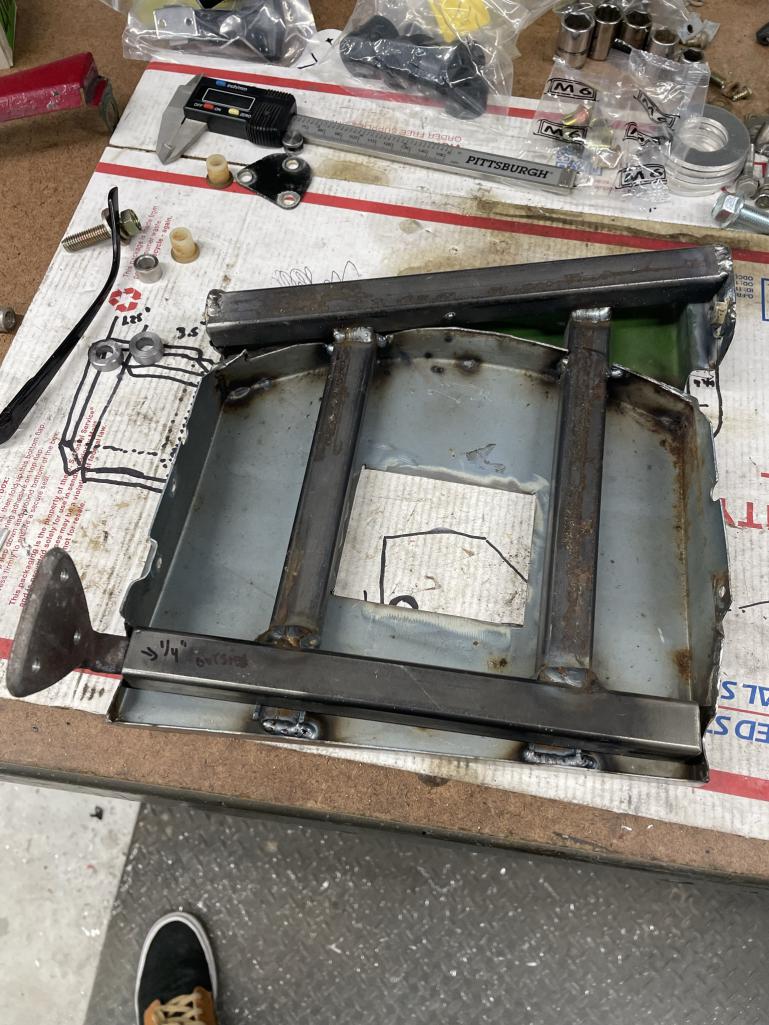
Posted by: East coaster Apr 11 2023, 08:08 PM
More….
Attached thumbnail(s)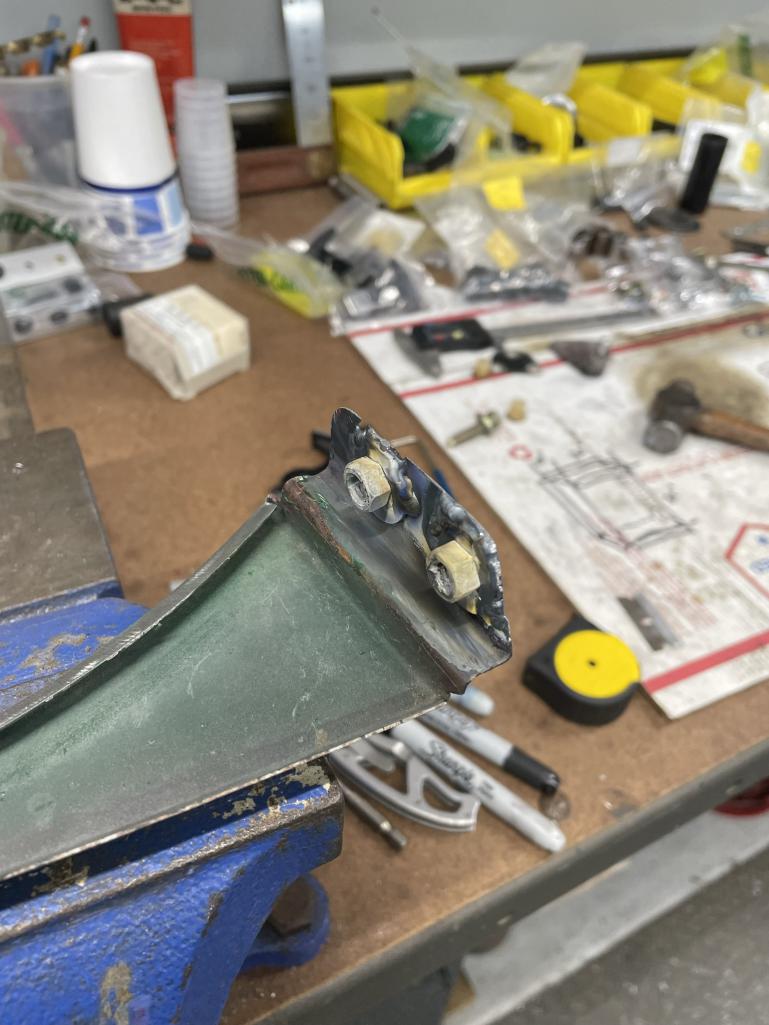
Posted by: East coaster Apr 11 2023, 08:09 PM
Posted by: Chris H. Apr 12 2023, 04:43 AM
Your fab skills are really next level. You're making exactly what you want which is awesome. Love the 928 lights and I literally copied your frunk floor venting idea. Just another day of grinding, welding pin holes, grinding, welding, grinding and then some paint and mine should be done .
Posted by: East coaster Apr 12 2023, 05:07 AM
Thanks for the kind words Chris. You’re one of the folks to blame when it came to choice of drivetrain 
This is a pretty far departure from most builds, but I’m actually trying to do the safari mods so that it could be fairly easily put back to stock. Most of my mods either use stock mounting points, or at least leave stock mounting points intact. I’m pretty sure I’m going to enjoy the safari mods, along with Subaru drivetrain, but if someday post my ownership someone wanted to revert to stock it shouldn’t be too difficult.
Posted by: Chris H. Apr 12 2023, 05:37 AM
Thanks for the kind words Chris. You’re one of the folks to blame when it came to choice of drivetrain
This is a pretty far departure from most builds, but I’m actually trying to do the safari mods so that it could be fairly easily put back to stock. Most of my mods either use stock mounting points, or at least leave stock mounting points intact. I’m pretty sure I’m going to enjoy the safari mods, along with Subaru drivetrain, but if someday post my ownership someone wanted to revert to stock it shouldn’t be too difficult.
Guilty as charged sir
. You'll like the Subaru drive train. The engine mounts for most of them are the same configuration so in the future you can update/swap as needed with very little effort. Seems like you saved that car, which had the usual fixable rusty areas and mods for a V8 swap. Enjoy it! Hope to see it someday. Posted by: East coaster Apr 13 2023, 07:32 PM
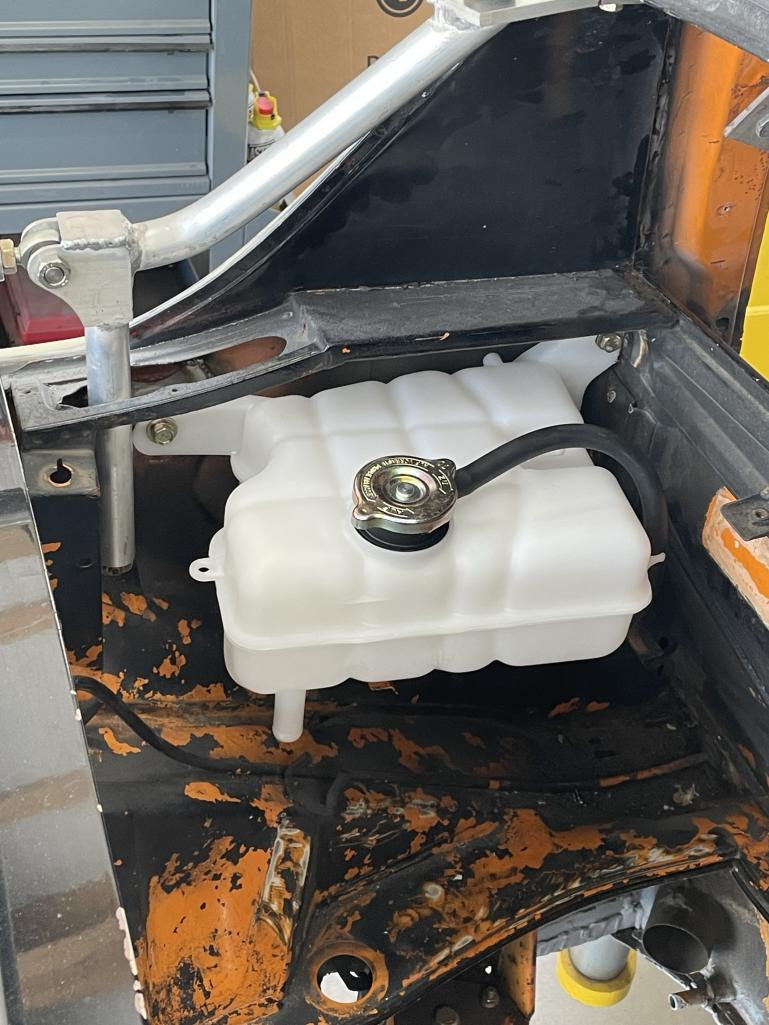
Got the mounts figured out for my coolant expansion/reservoir and test fit the tank…..looks like it belongs there. Unseen in the pics is a 3/8” post the tank slides onto at the bottom.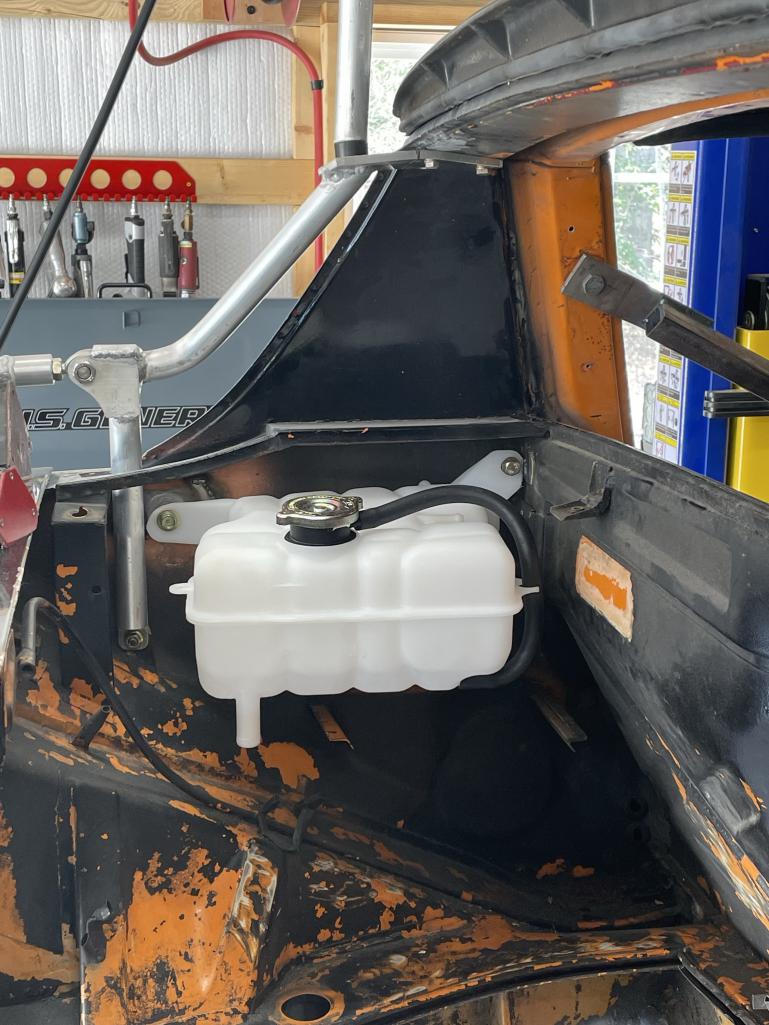
Posted by: East coaster Apr 18 2023, 03:50 AM
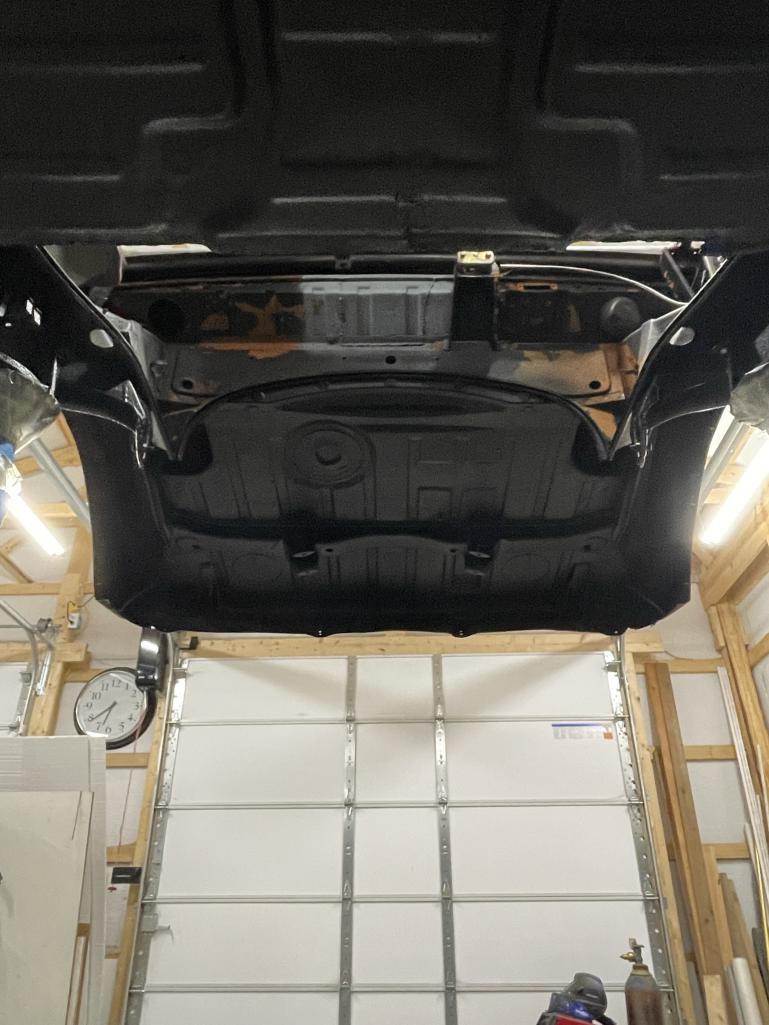
I wanted to make the engine cover removable for better access. I looked at a couple different options and decided on using horizontal pins mounted to the firewall with receivers mounted to the cover.
I made the receivers adjustable in height and alignment. First removed all hinge and torsion bar stuff, then welded plates with 6mm studs at each hinge location. Then I made the receiver parts with elongated slots for adjustment. Inside each part are delrin bushings I made with a female taper to help with pin engagement.
The cover slides onto the pins with ease and uses the stock rear latch to secure the cover.
Here’s a couple detail pics of the parts….
Posted by: East coaster Apr 18 2023, 03:54 AM
Pins welded to firewall after beefing up prior hinge location. Receivers mounted to cover showing the adjustment angle needed for alignment (engine cover ribs are not perpendicular to the cover).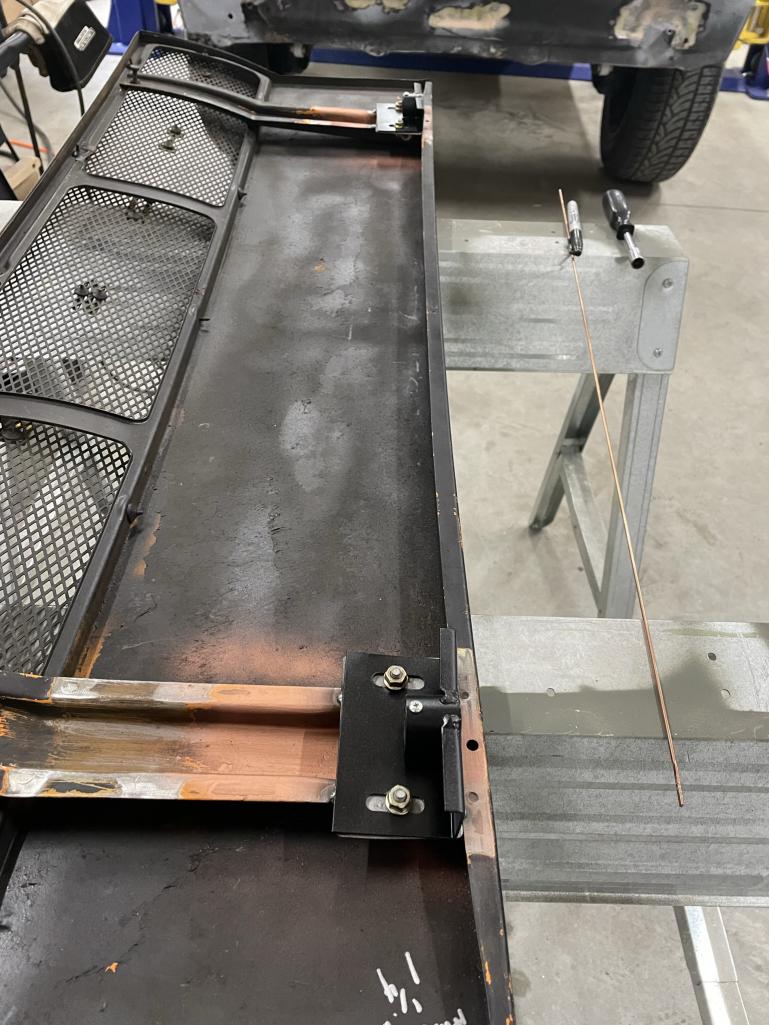

Posted by: East coaster Apr 18 2023, 03:56 AM
Here it sits on the pins with the rear latch engaged. This is prior to any adjustment of the latch, just a quick test fit.
Attached thumbnail(s)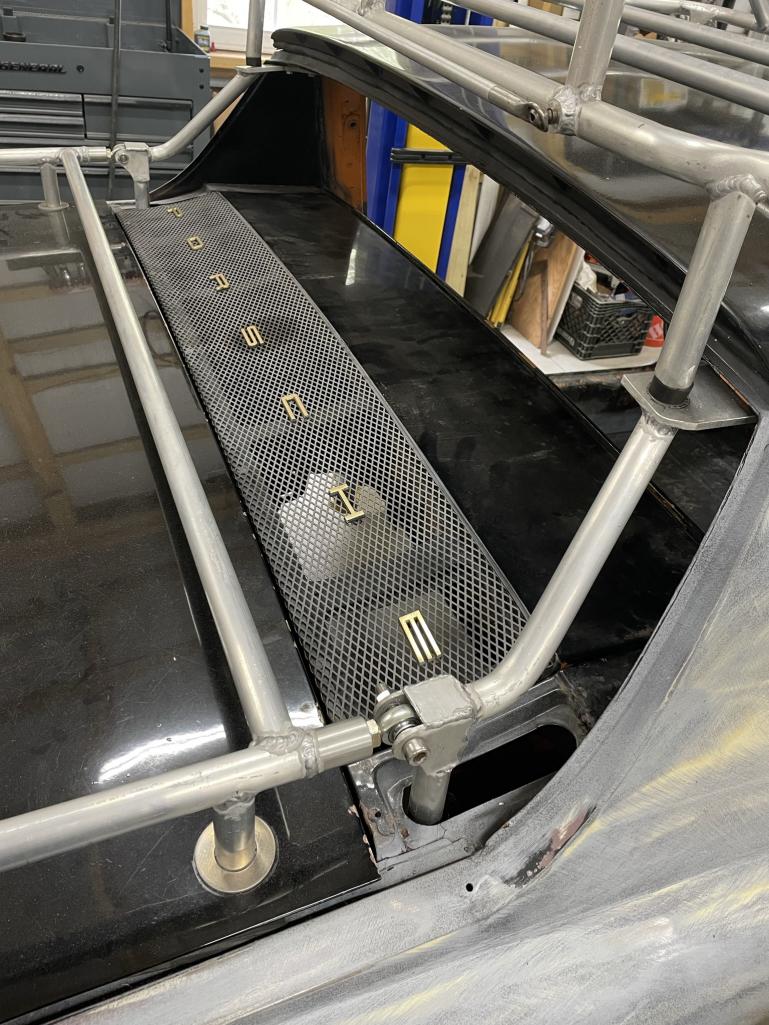
Posted by: tygaboy Apr 18 2023, 07:46 AM
Nice. I was thinking along those same lines for my catch on my reverse tilt trunk but there was too much angle and distance needed from pin engagement to seating. Do you have to have the trunk open to get the engine lid off?
Either way, I love watching your engineering of all these clever designs. Keep up the awesome work. 


Posted by: Retroracer Apr 18 2023, 10:09 AM
Looks like you added a prop for the rear of the tilting roof storage frame, as well as bumpers for the landing pads (on the sail underside)? Nice! Liking the pragmatic approach,
- Tony
Posted by: East coaster Apr 18 2023, 12:40 PM
Nice. I was thinking along those same lines for my catch on my reverse tilt trunk but there was too much angle and distance needed from pin engagement to seating. Do you have to have the trunk open to get the engine lid off?
Either way, I love watching your engineering of all these clever designs. Keep up the awesome work.
Thank you! I angled the pins on the firewall so it will come up as it slides back. I can remove/install without opening the trunk lid. It didn’t take much angle to allow me to clear the trunk lid. I thought this was going to be more of a problem and had already been thinking of pivoting receivers if this didn’t workout, but thankfully I was able to keep it simple.
I retired this year and I’m just having fun with the fab aspects of this project…..it’s nice to finally have time.
Posted by: East coaster Apr 19 2023, 05:26 AM
Looks like you added a prop for the rear of the tilting roof storage frame, as well as bumpers for the landing pads (on the sail underside)? Nice! Liking the pragmatic approach,
- Tony
Yup, I added a prop at the rear of the roof rack to hold it up for targa removal/install. I wanted to use gas shocks but the geometry just isn’t there, so I went old school and simple. The stainless heim joint at the end of the prop is a spare jetski part I mod’d to adapt to the alum prop rod.
Posted by: tygaboy Apr 19 2023, 08:03 AM
Super duper awesome. I want to move to your neighborhood and be your shop helper. Such a cool build.
Posted by: brant Apr 19 2023, 10:44 AM
nice job on the engine lid
we did something similar back a few years ago
shown fully in my vintage race car build thread in my signature.
we tried to minimize weight so tried to build it the lightest we could.
Attached thumbnail(s)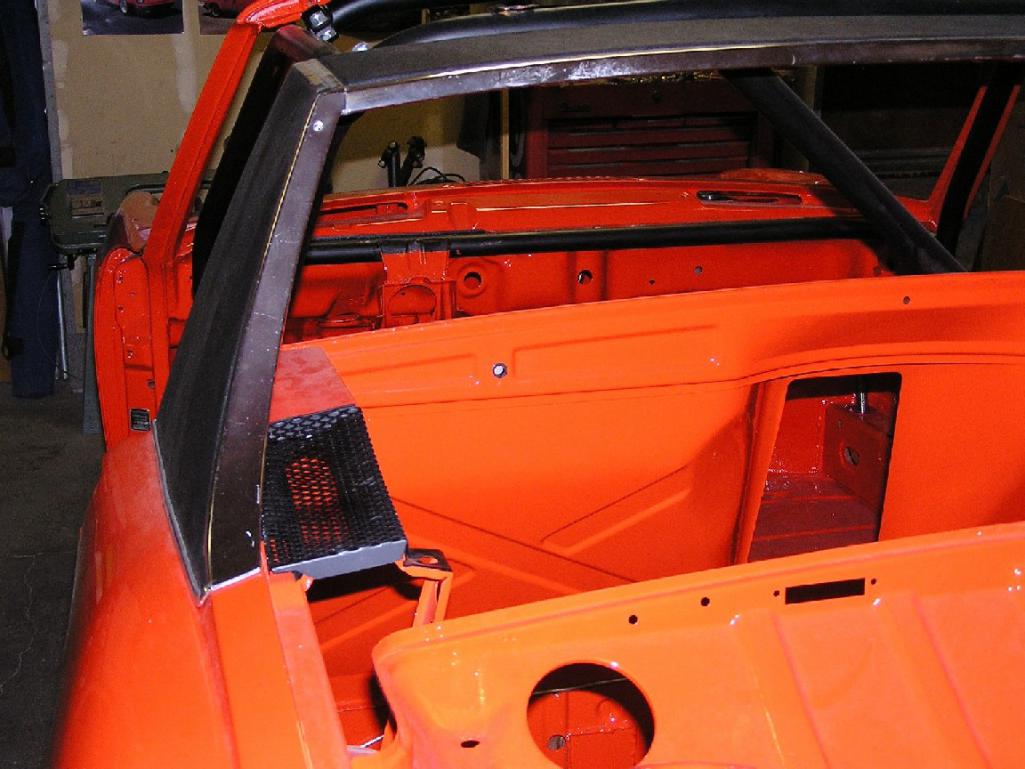
Attached image(s)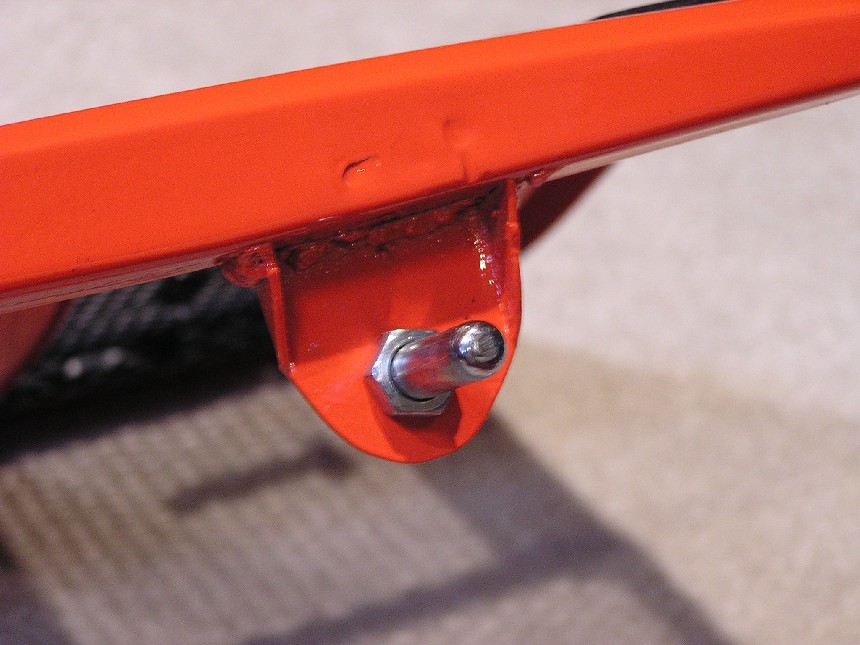
Posted by: East coaster Apr 19 2023, 06:18 PM
nice job on the engine lid
we did something similar back a few years ago
shown fully in my vintage race car build thread in my signature.
we tried to minimize weight so tried to build it the lightest we could.
Nicely done!
Posted by: East coaster Apr 20 2023, 07:05 PM
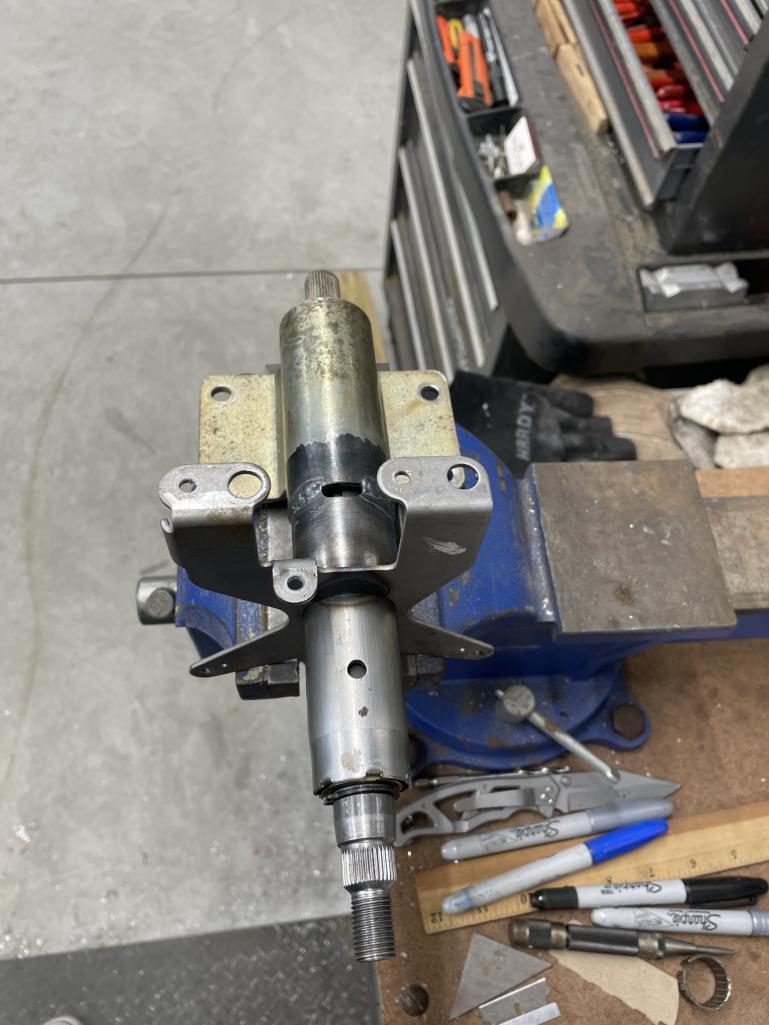
Decided to tackle my steering column today. Since I’m using the complete Subaru wiring harness I wanted to maintain all the stalk controls for wipers, lights, etc.
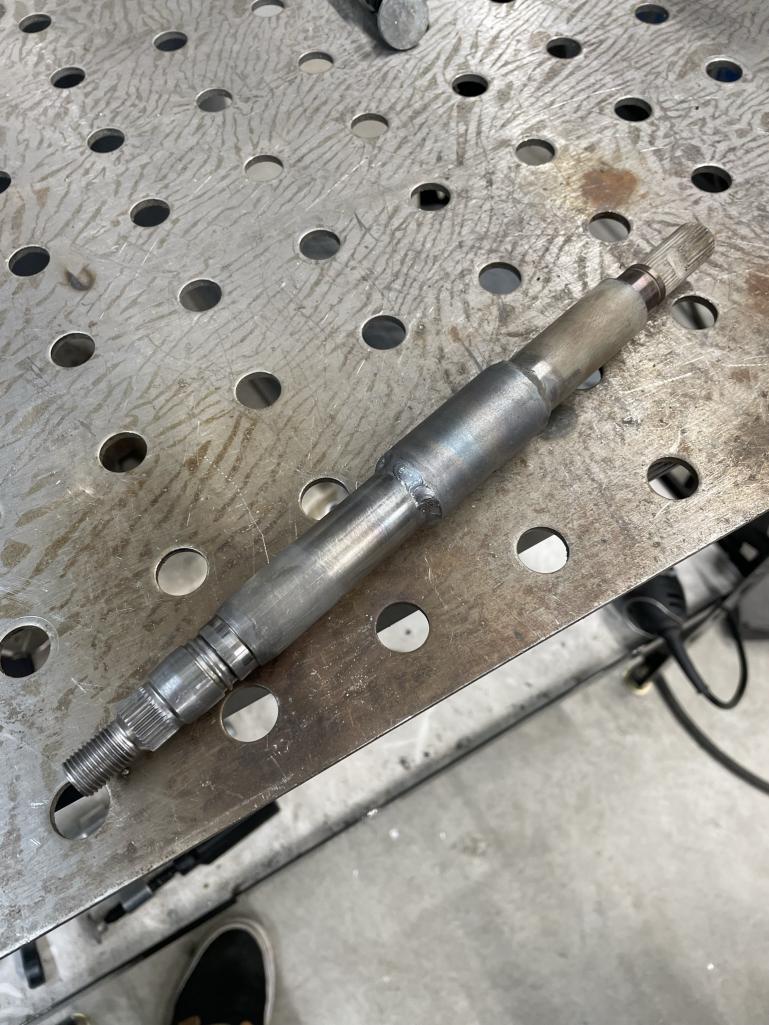
To support this I had to make a “Porsuaru” steering column. I used the outer portion of the Subaru column and the inner portion of the 914 column and, after determining the correct length, welded them together.
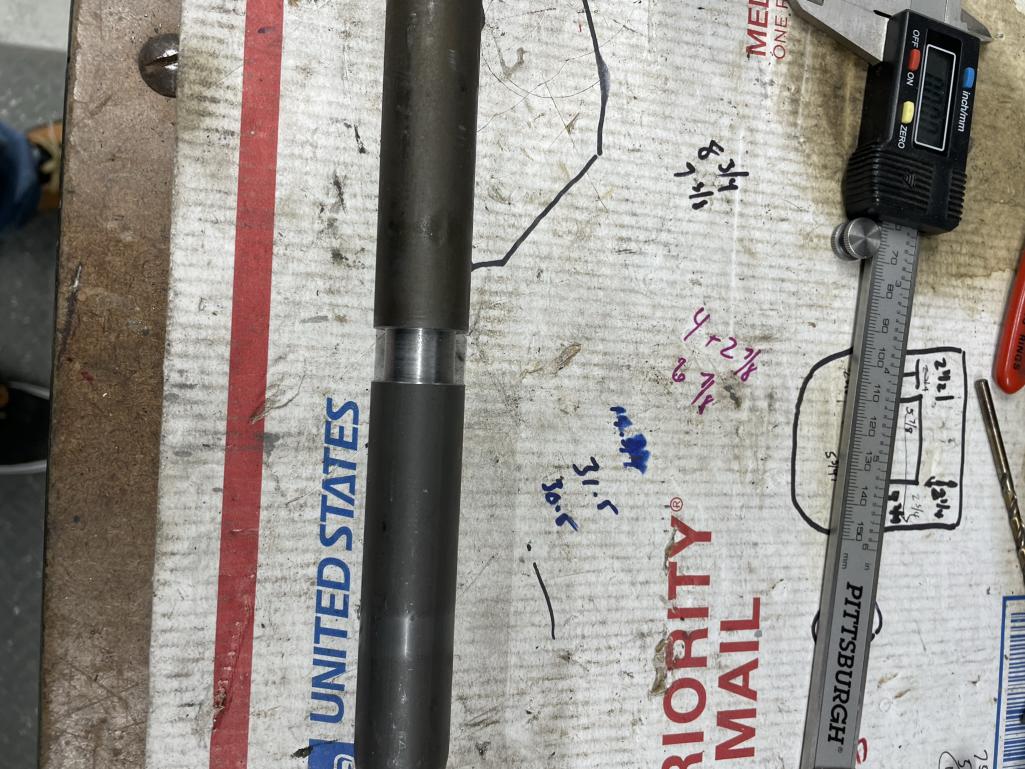
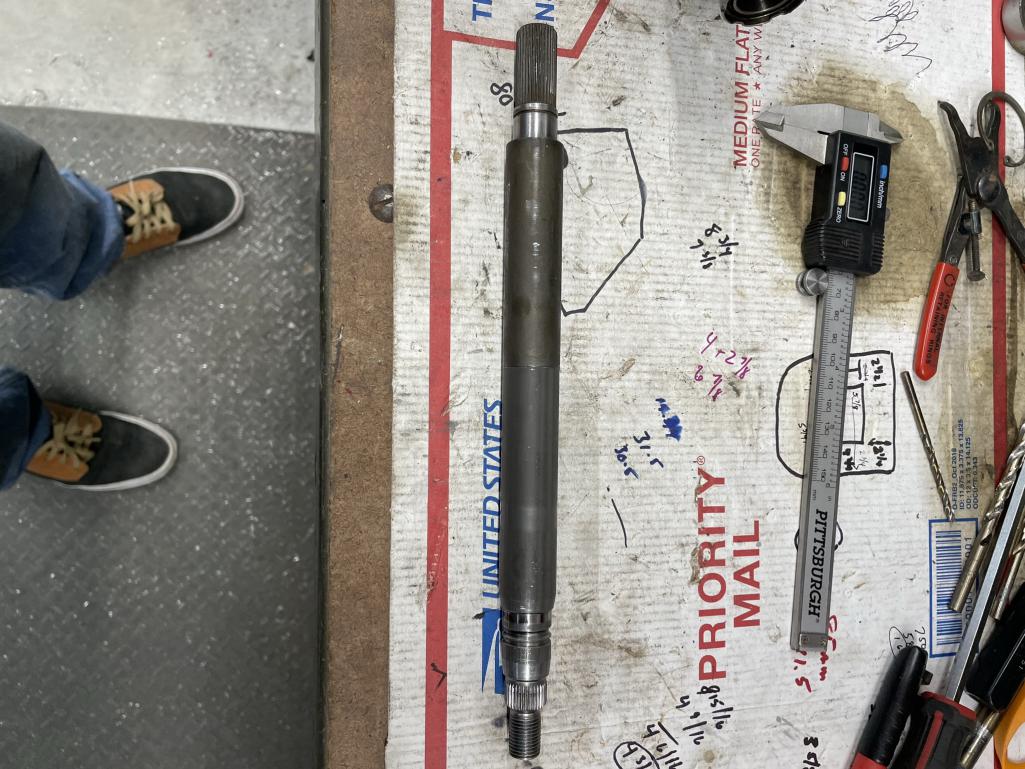
Next was making a Porsuaru steering shaft. Same concept, use the 914 bottom and Subaru top. The Suby shaft is hollow and the 914 solid. Once I determined the exact length I machined the 914 shaft to fit into the Suby shaft to ensue good alignment.
I welded the two shafts together, and for extra insurance, I welded a collar over the joint. The length is a little critical in that the shaft is encapsulated between snap rings at each end(since 914 snap ring is at bottom and Suby is at the top. So now there’s rings at each end).
Attached thumbnail(s)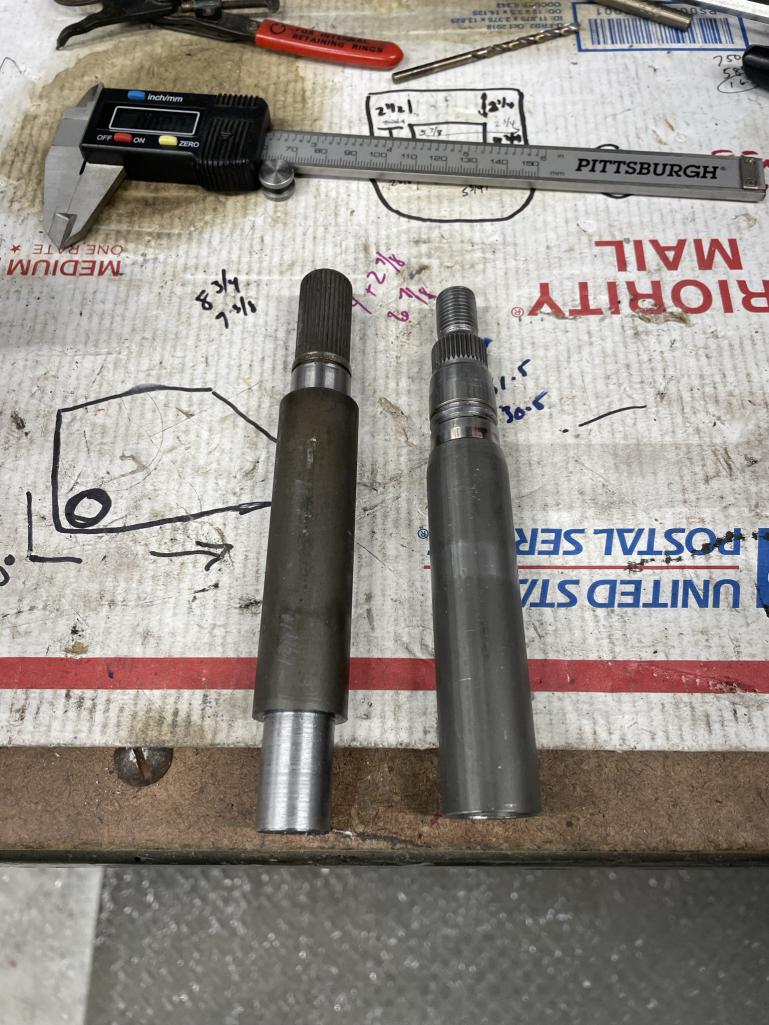
Posted by: East coaster Apr 20 2023, 07:07 PM
More….
Attached thumbnail(s)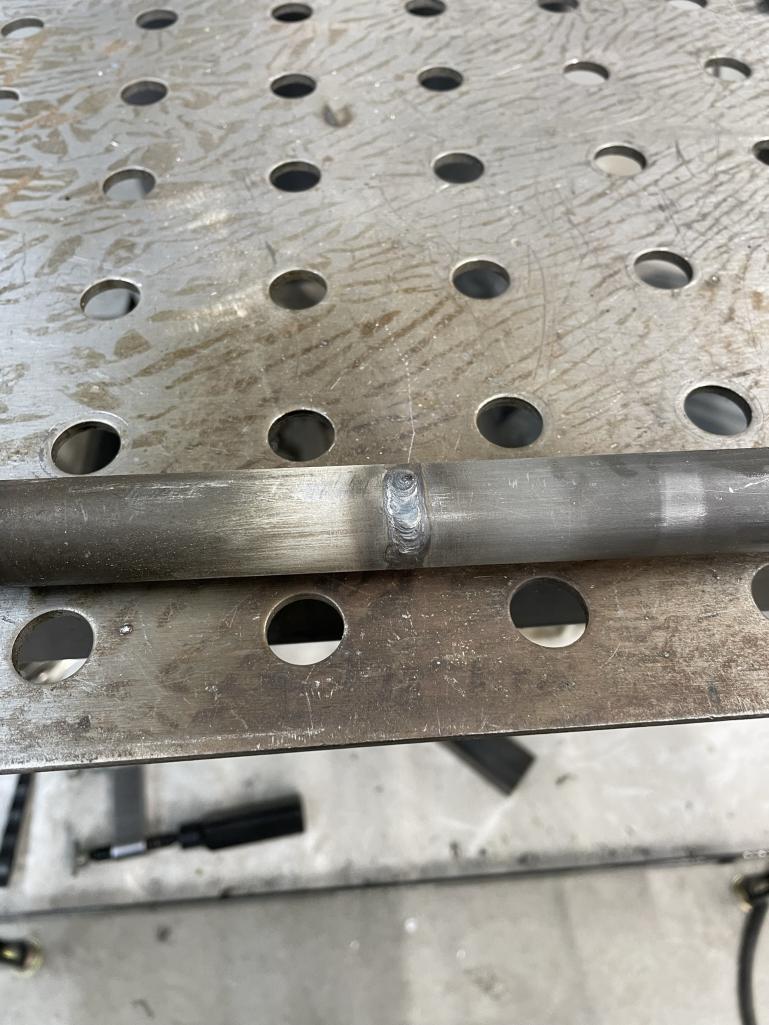
Posted by: East coaster Apr 20 2023, 07:08 PM
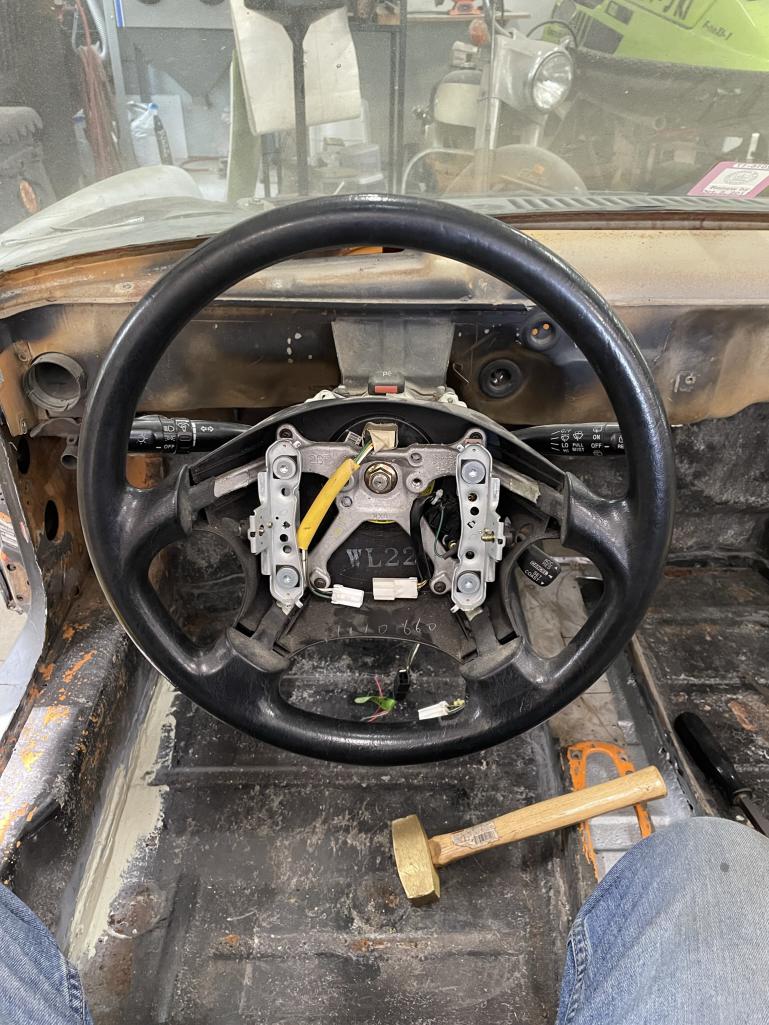
Test fit……works great.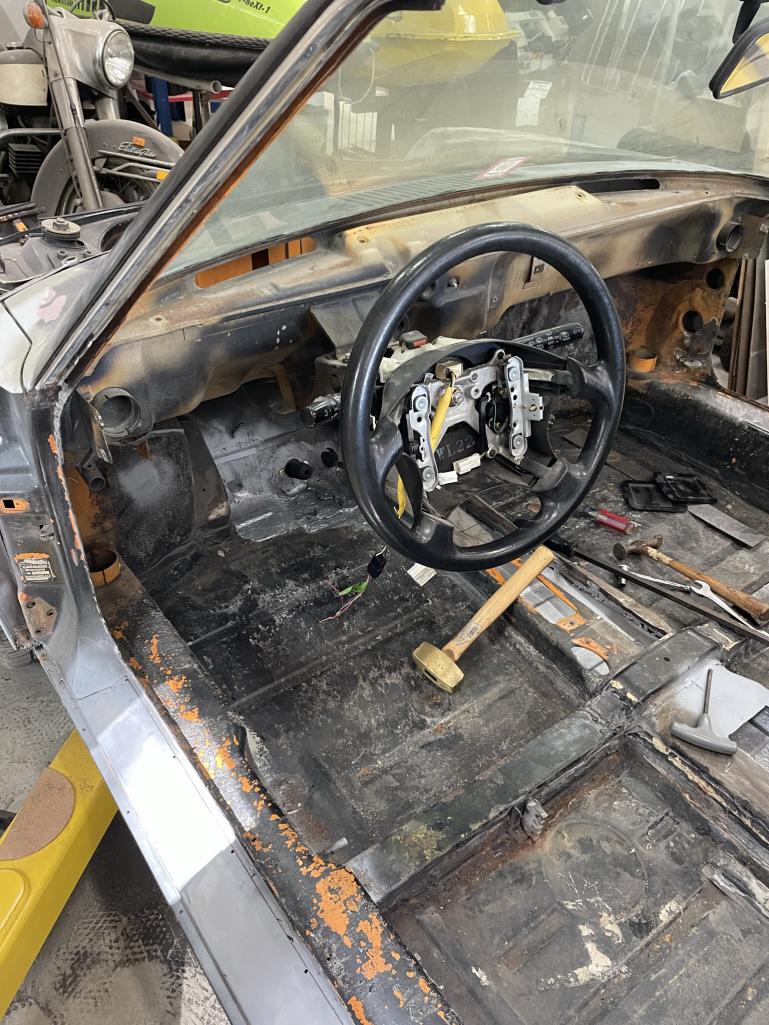
Posted by: East coaster Apr 23 2023, 06:46 PM
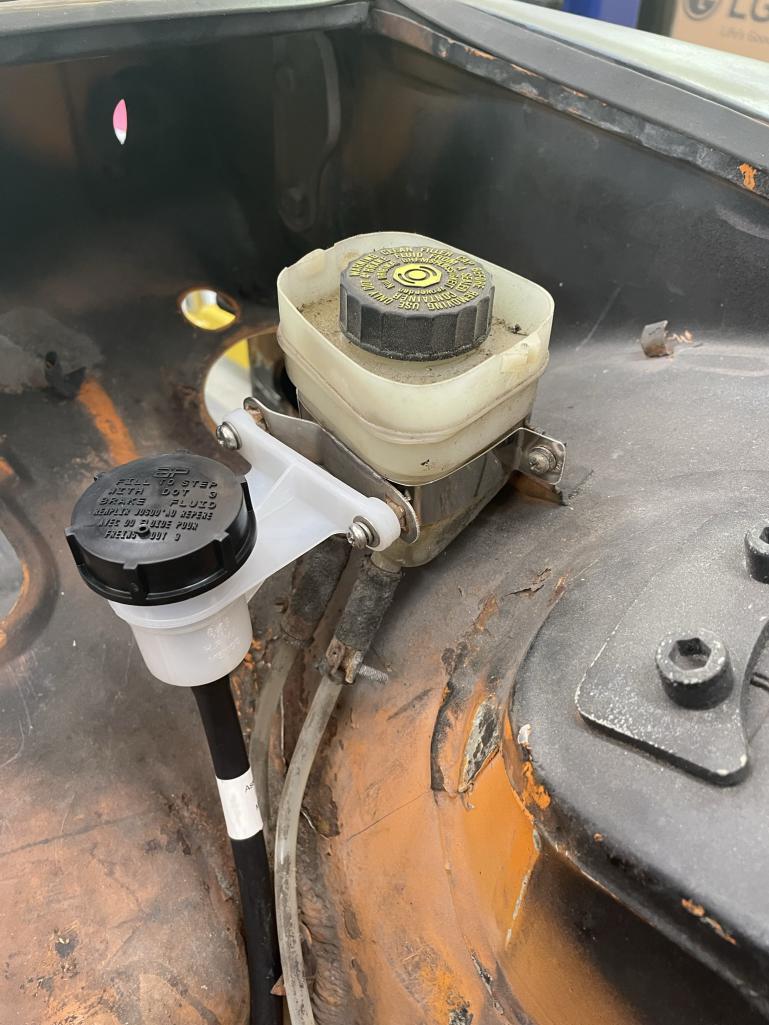
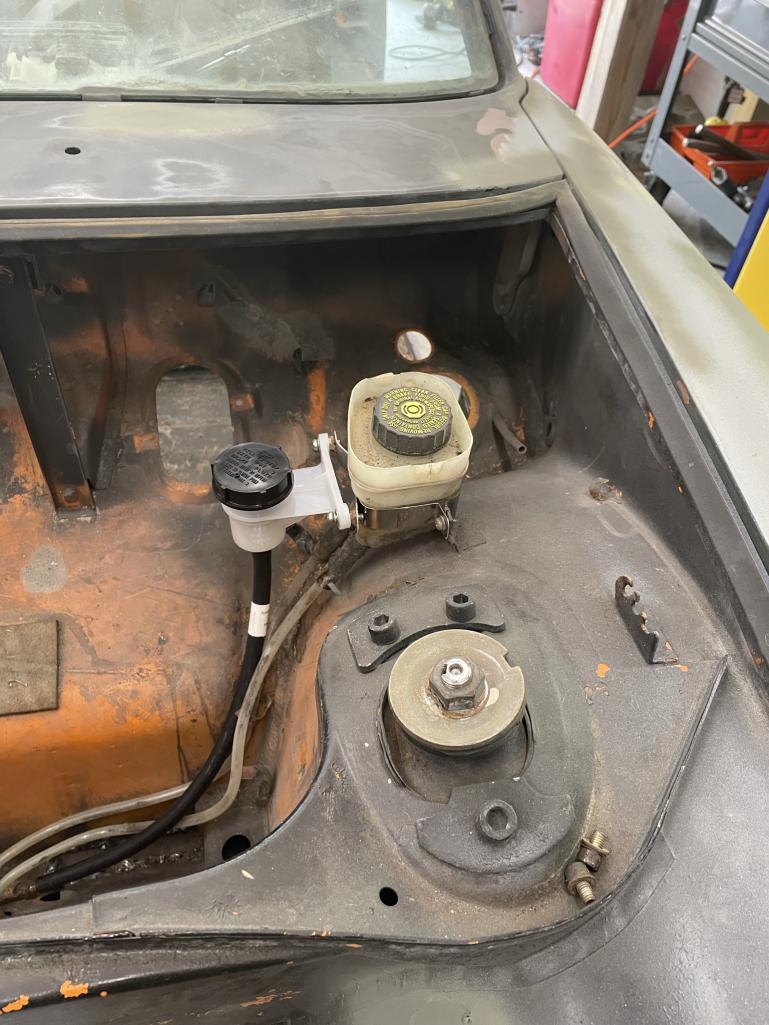
Some simple little updates today. Since I’m going with a hydraulic clutch I needed a place for a reservoir. The original bracket for my brake reservoir was a rusty POS, so I made a new stainless bracket. Then I fab’d a bracket for the clutch reservoir and welded them together……a small simple project with good results.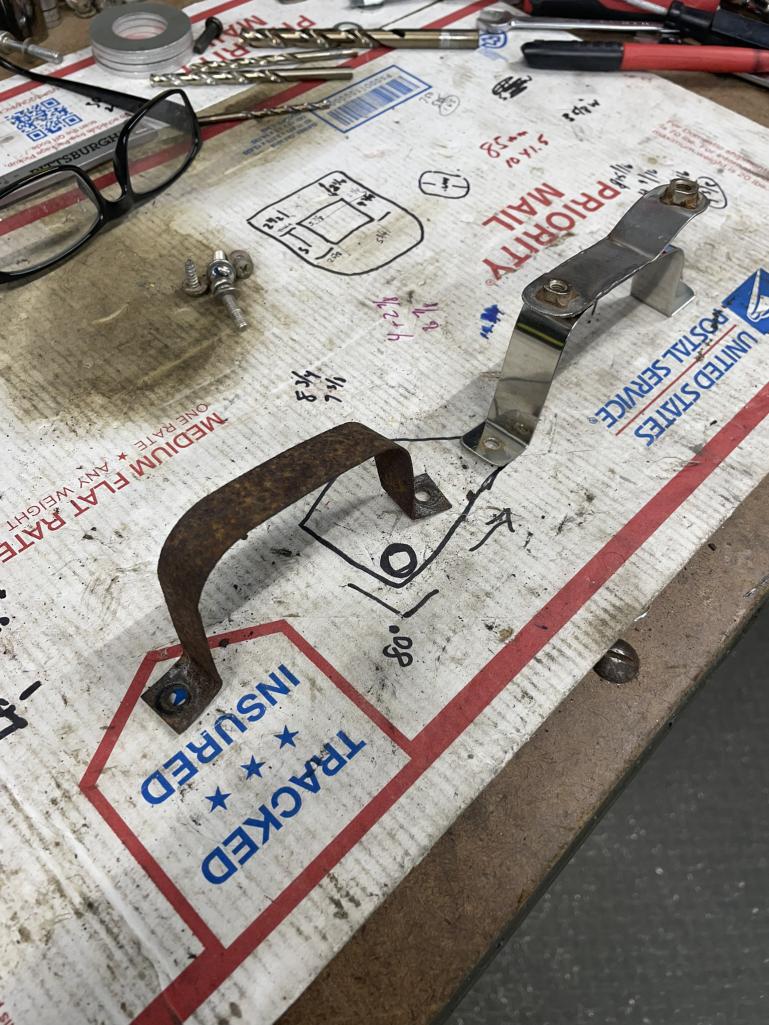
Posted by: East coaster Apr 23 2023, 06:49 PM
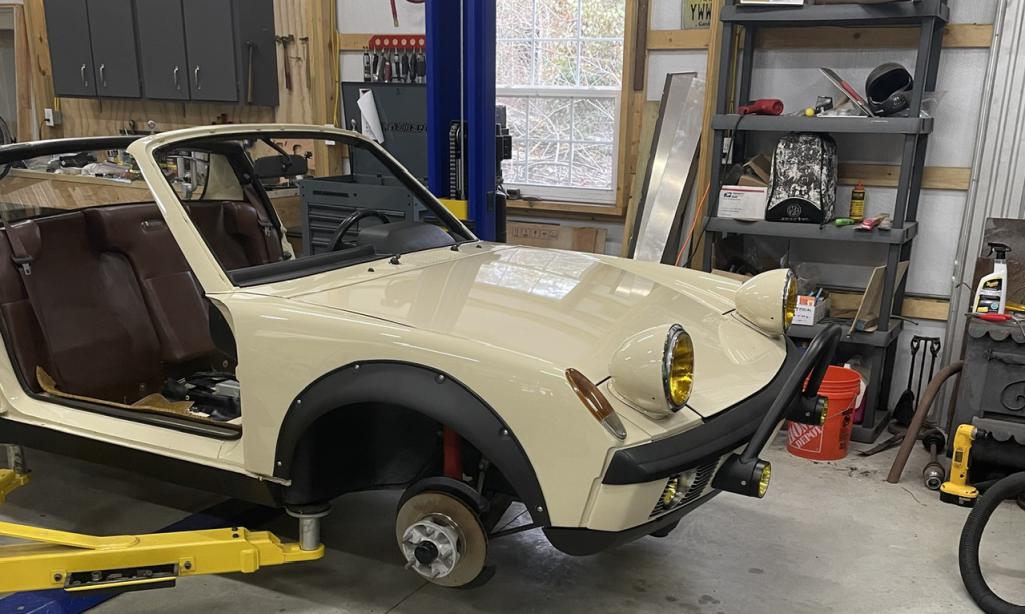
Also…..The beast got to see the light of day today, so I couldn’t resist a pic. I know the flares will be polarizing for some…….but hey, it’s my project
Attached thumbnail(s)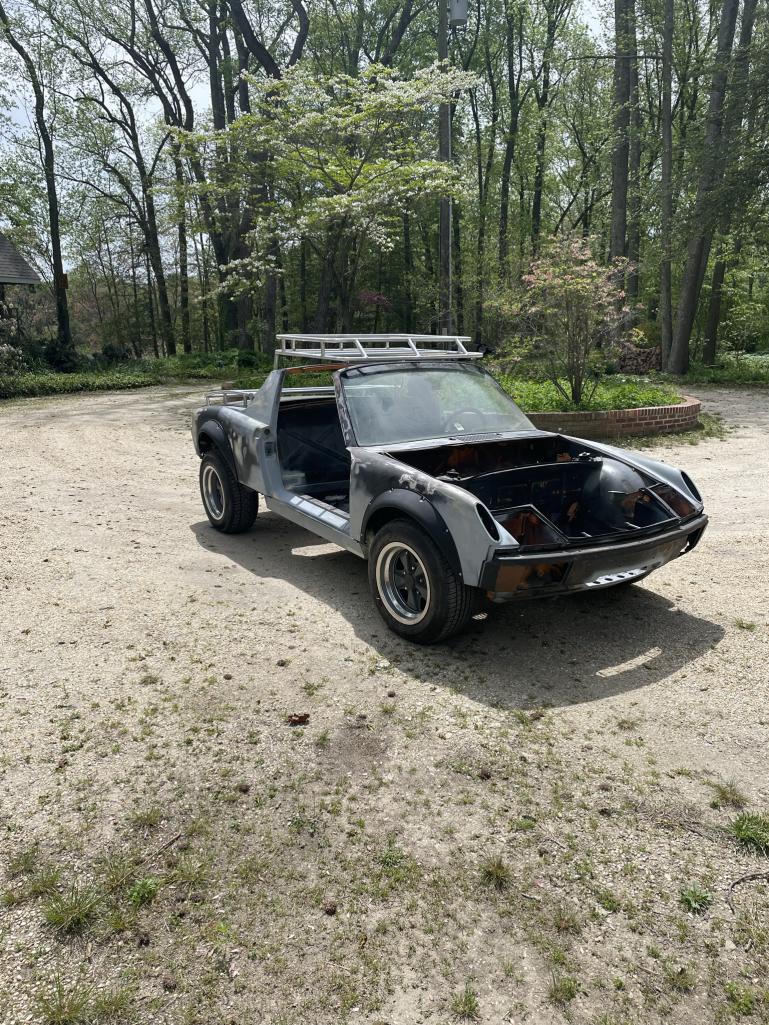
Posted by: East coaster Apr 30 2023, 06:33 PM
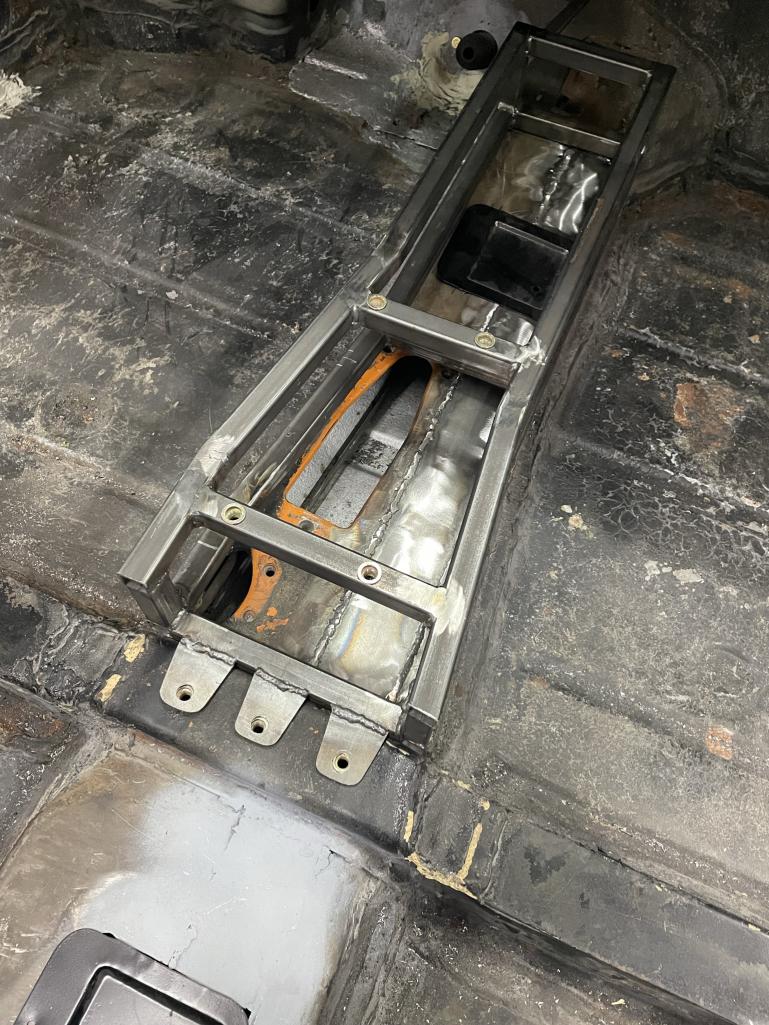
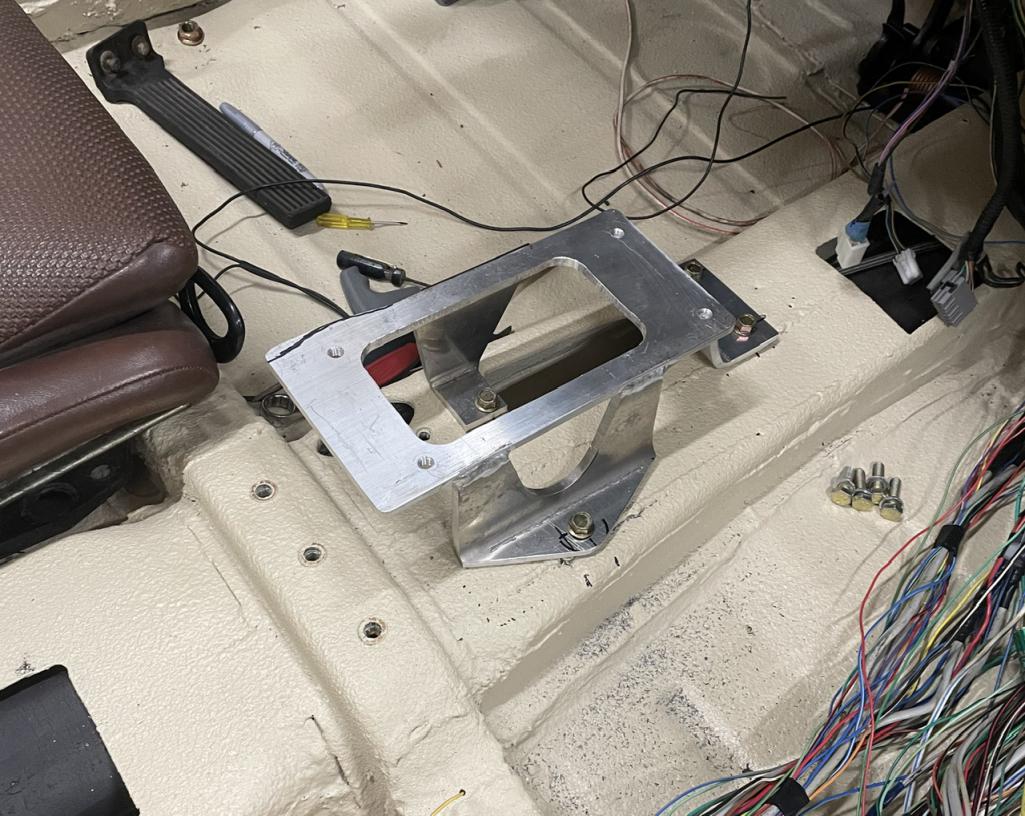
Been a busy week with life stuff and not much time for the project. I did manage to get a jump start on my shift console though. Cables should be here this week and then I can it finalized.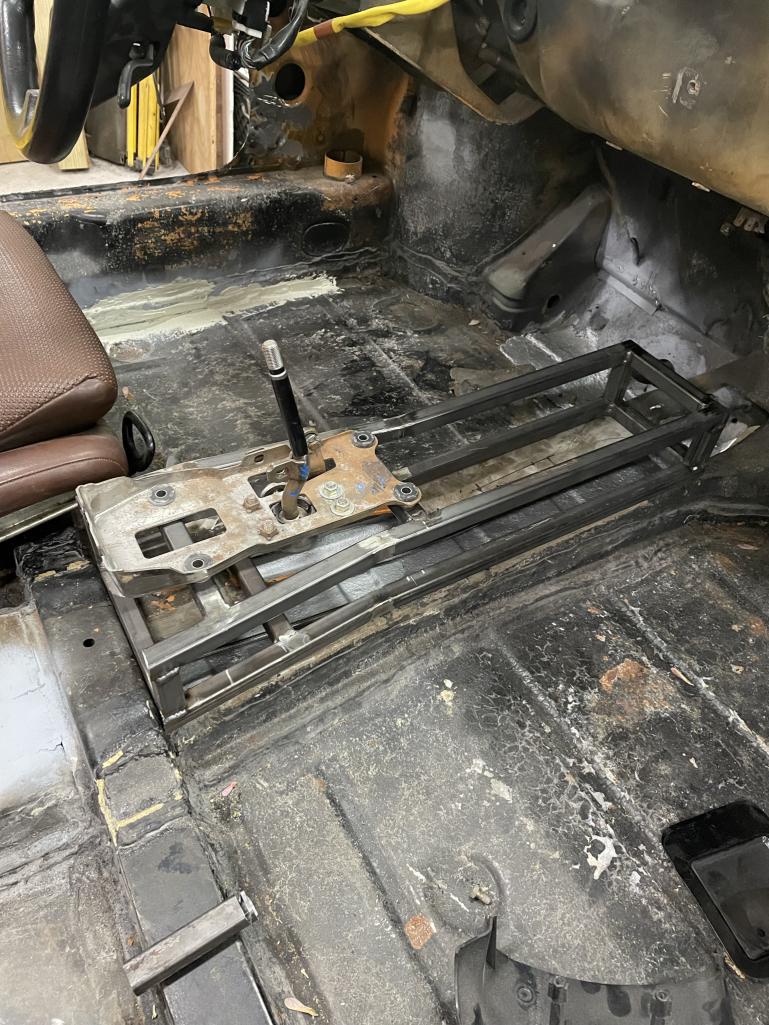
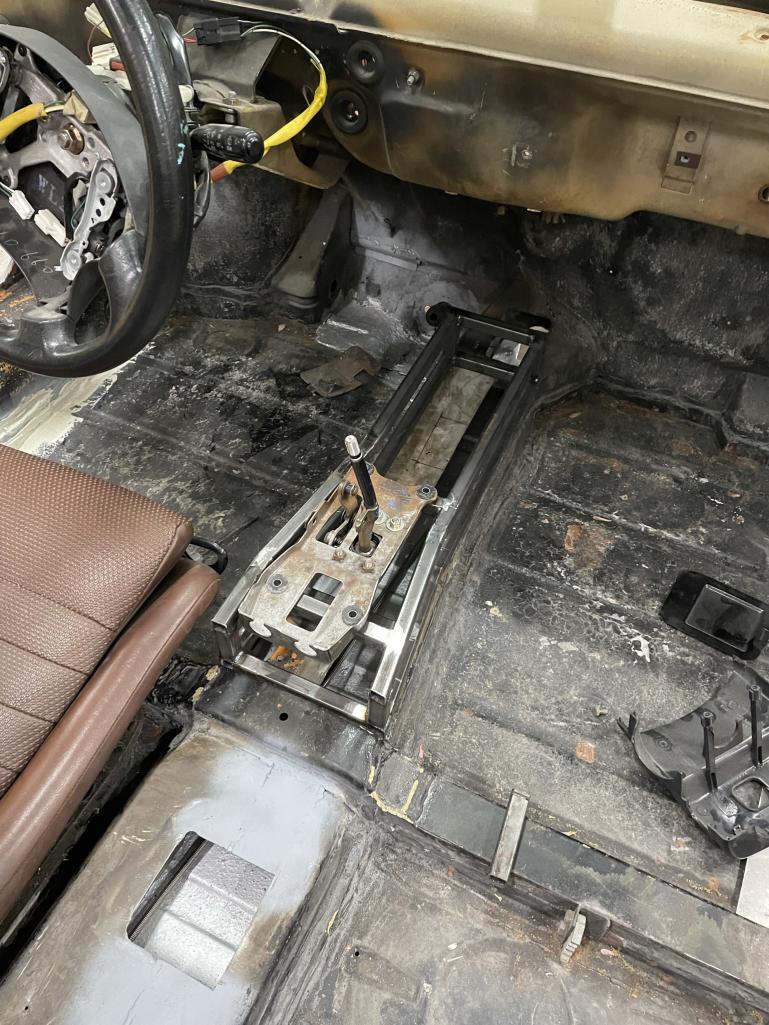
Posted by: East coaster May 4 2023, 07:48 PM
Finished welding up the stock center tunnel where I had removed material prior. I “think” I’m now done welding in the body. Also finished the shift structure and added the mounts for it. I added some additional access panels in the tunnel using stock rear access covers.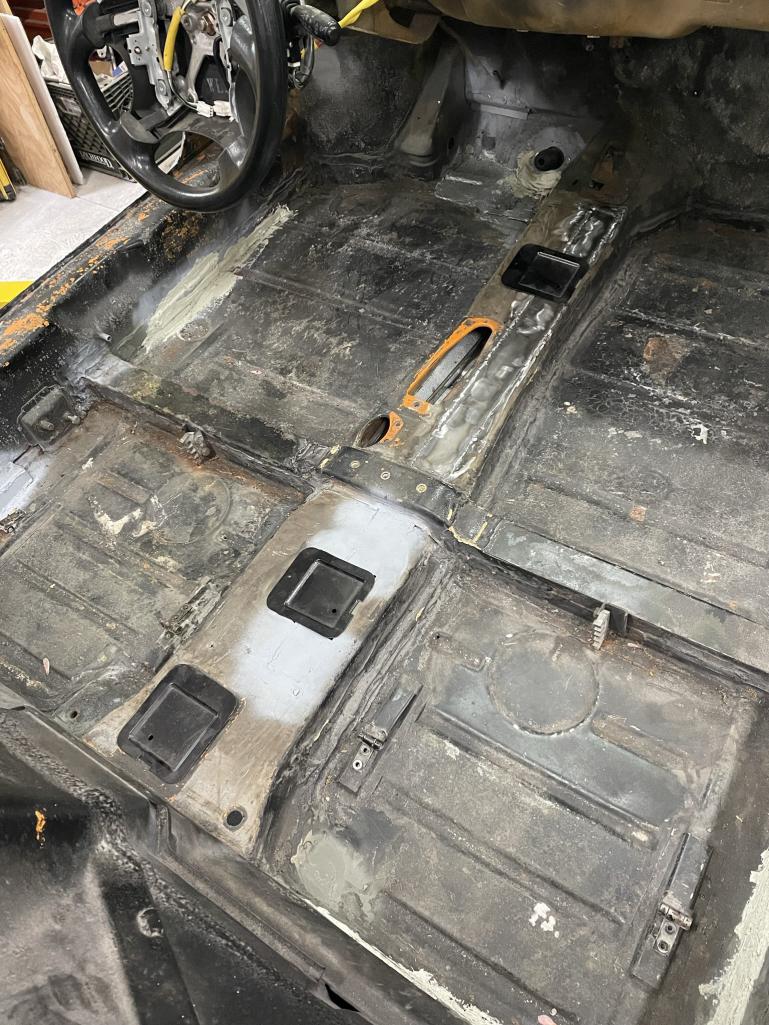
Posted by: Retroracer May 5 2023, 08:30 AM
Really enjoying the build, great progress. IMHO, the flares look great, really suits the Safari look - and as you point out: your car, your choices!
- Tony
Posted by: Chris H. May 5 2023, 09:31 AM
Nice console! The MR2 shift shaft is a little too short IMO so you have to either raise it up in some way or get an extender (which makes the shift throw longer). that should be the perfect height. Love the threaded mount for the base.
Posted by: East coaster May 6 2023, 06:42 PM
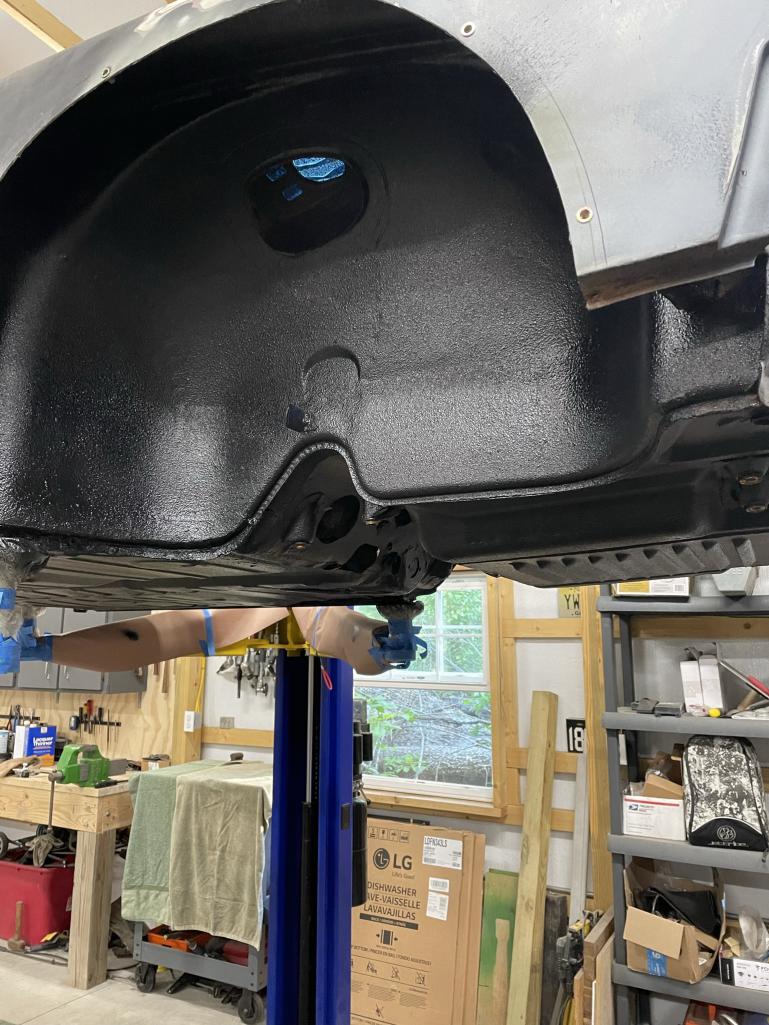
I’m not sure why after many hours of fabrication this feels like the biggest accomplishment so far………I got the under carriage covered in bedliner today. It’s so nice to see something head towards completion. I used a 2K urethane bedliner (like raptor liner) to protect the underside.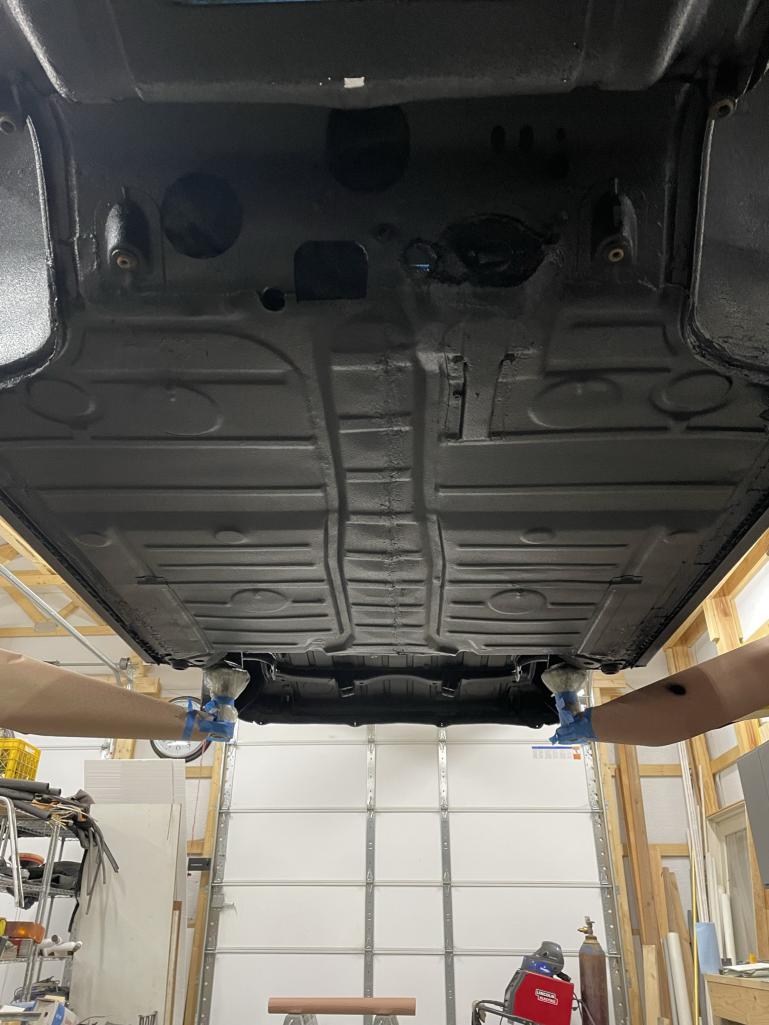
Posted by: East coaster May 14 2023, 05:56 AM
I’ve decided to dub this project “Sufari” (updated titled thread). Trying like hell to get this in paint before the hot weather hits.
Posted by: 76-914 May 14 2023, 07:54 AM
Don't know how I missed this thread earlier  . Great build thread and progressing very quickly.
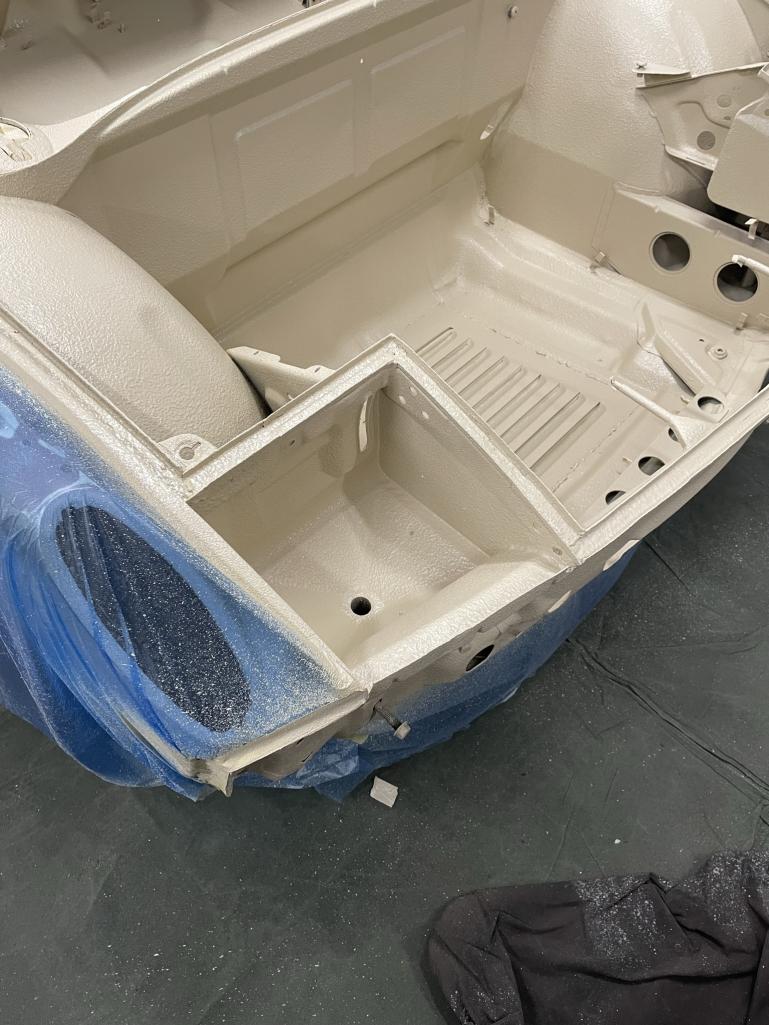
Posted by: East coaster May 19 2023, 06:13 PM
Finally got some color on its bones! I’m doing paint tint bedliner in the trunks, interior, and engine compartment. Front trunk done.
Posted by: East coaster May 19 2023, 06:15 PM
And a couple coats of black bedliner for sound deadening. It will get a couple coats of tinted bedliner next.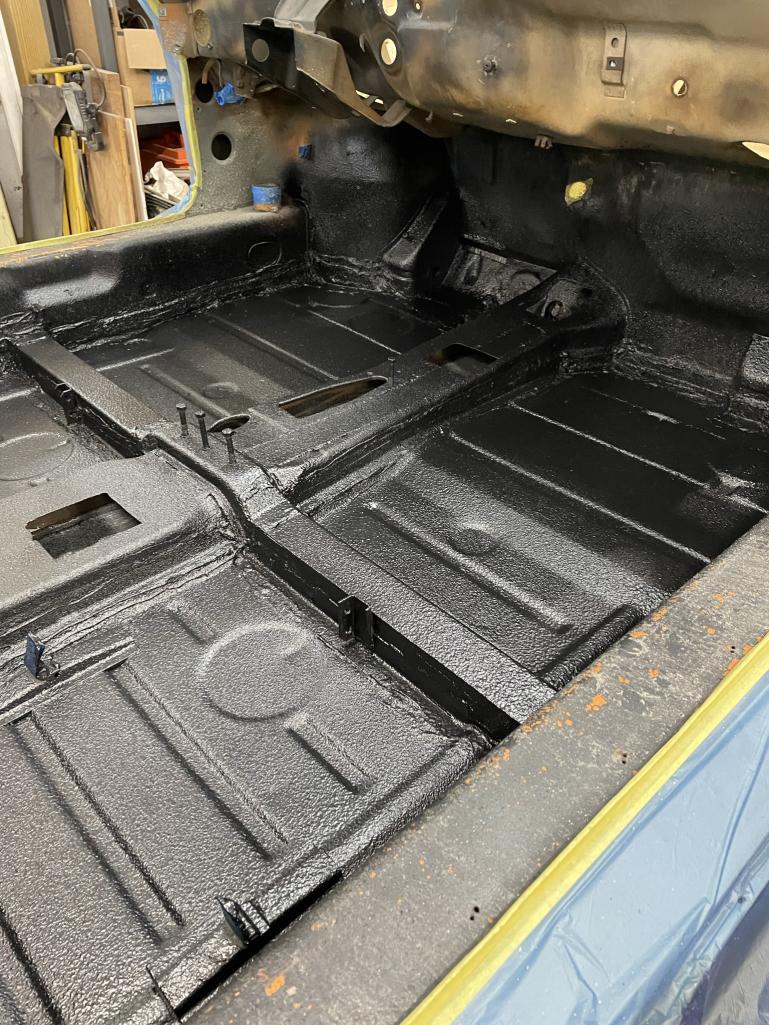
Posted by: East coaster May 19 2023, 06:17 PM
Endstate scheme…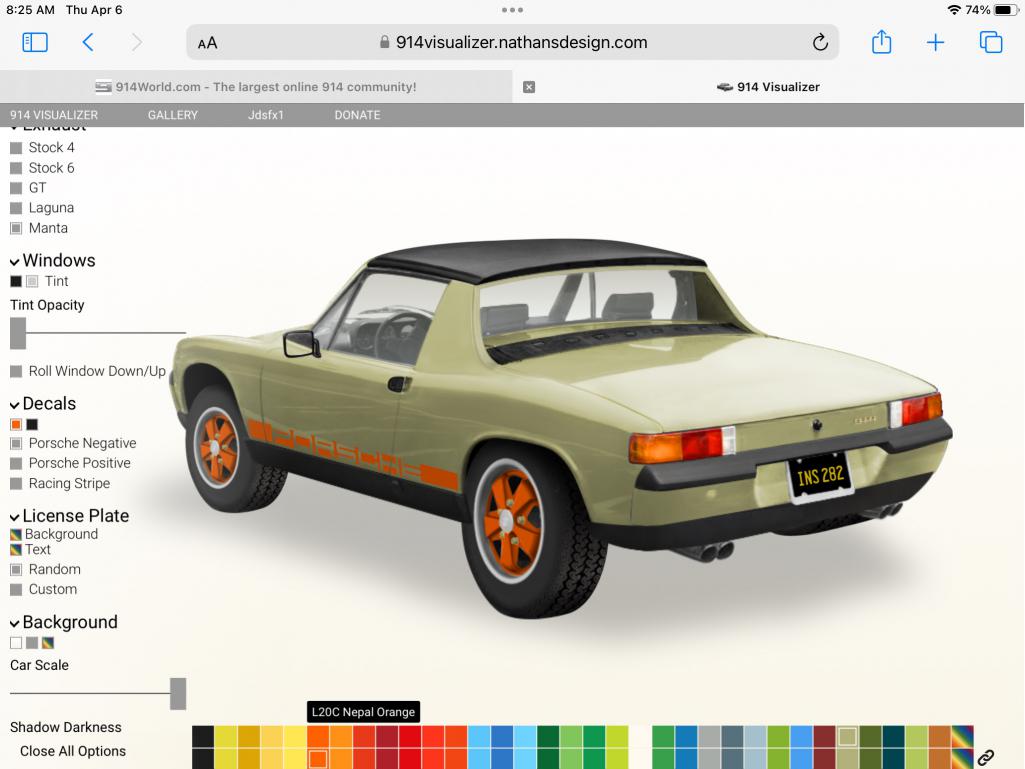
Posted by: East coaster May 22 2023, 05:06 AM
Got a little micro project done yesterday. Welded pass-thru tubes into the mounting holes for the Safari rack on the rear trunk lid. Without these the panel will distort when tightening the mounting bolts. The tubes are welded to the ribs on the bottom and surface at the top. Just another little thing checked off the list in prep for paint.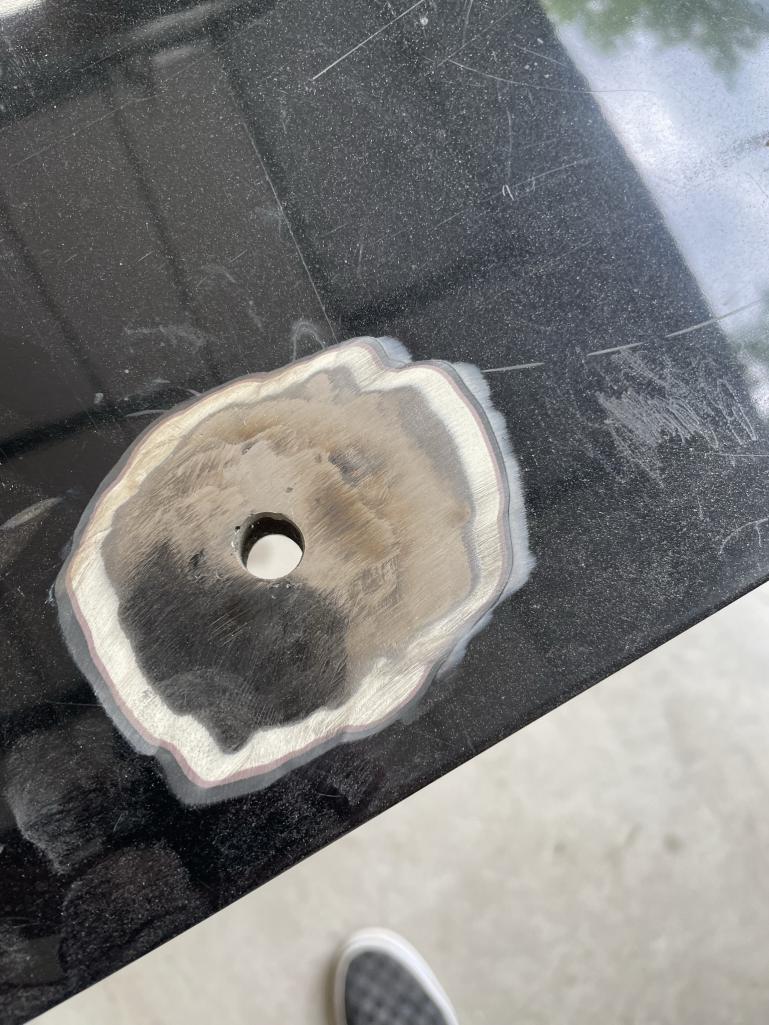
Posted by: r_towle May 22 2023, 09:07 AM
bigger tires!!!
Posted by: East coaster May 23 2023, 05:37 AM
bigger tires!!!
The tires pictured are just what came with the wheels when I bought them.
Just got the new tires mounted and I went with the largest I could fit without hacking up the wheel wells. I’ll be running 215/70/15 Yokohama Geolander all terrains. They finish out at about 27” diameter and to go larger would take some saw-zall magic.
Posted by: DRPHIL914 May 25 2023, 08:30 AM
looking good! i have a question, why not spray inside the headlight bucket area too while you are sealing it and painting/coating? just wondering why you left that.
Phil
Posted by: East coaster May 25 2023, 04:55 PM
looking good! i have a question, why not spray inside the headlight bucket area too while you are sealing it and painting/coating? just wondering why you left that.
Phil
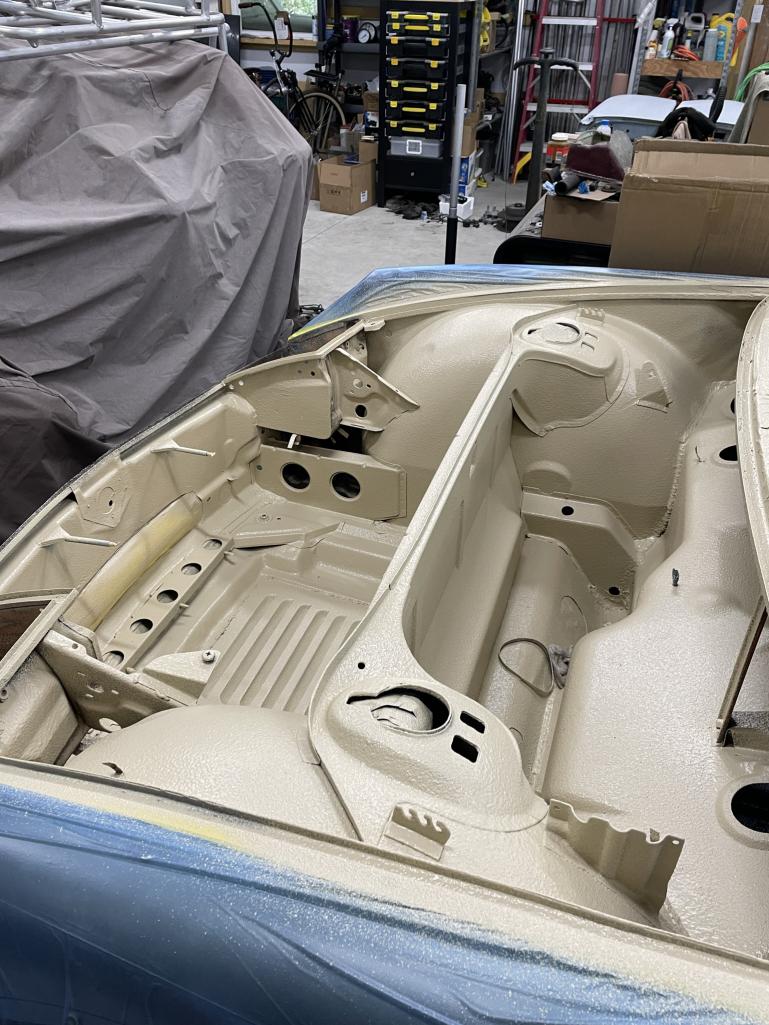
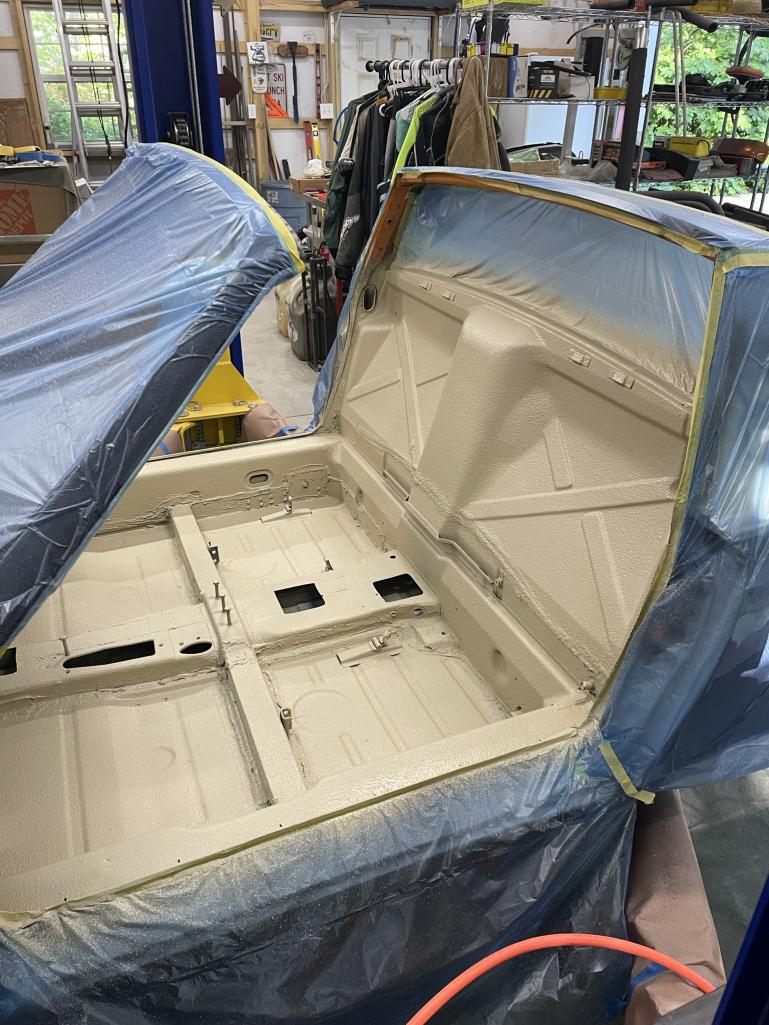
Is this better? I was waiting for supplies to finish it all up.
Posted by: East coaster May 25 2023, 04:58 PM
Finished the trunks, engine compartment, and interior today. I also did the areas behind the front and rear bumpers. Feeling some progress…..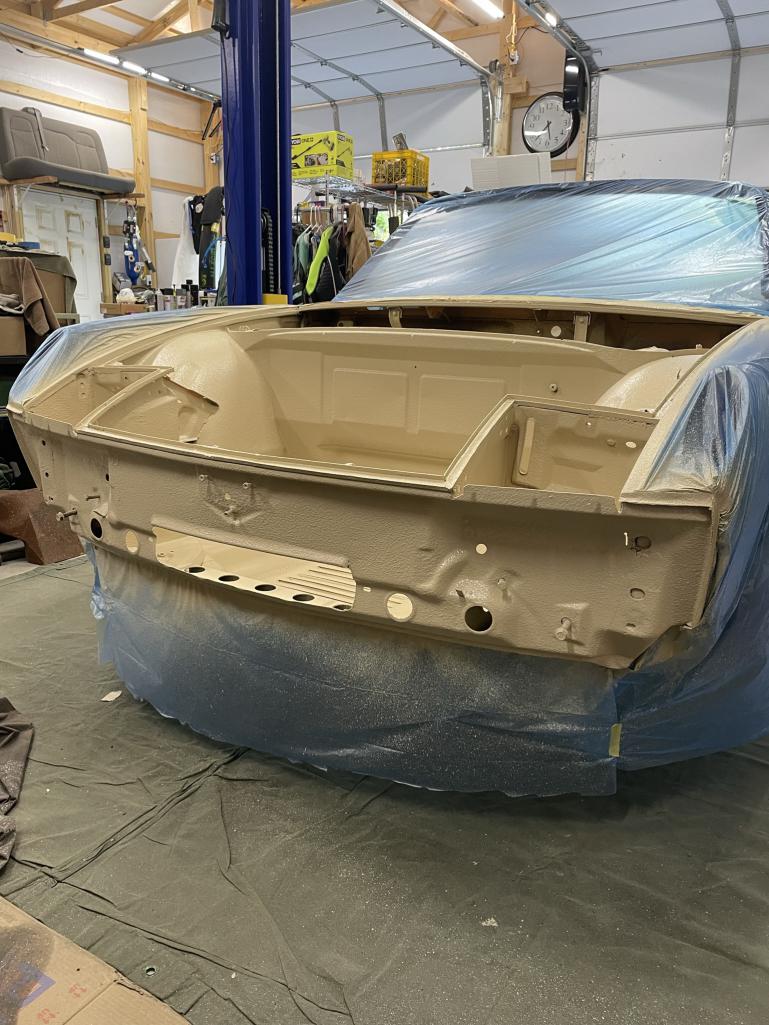
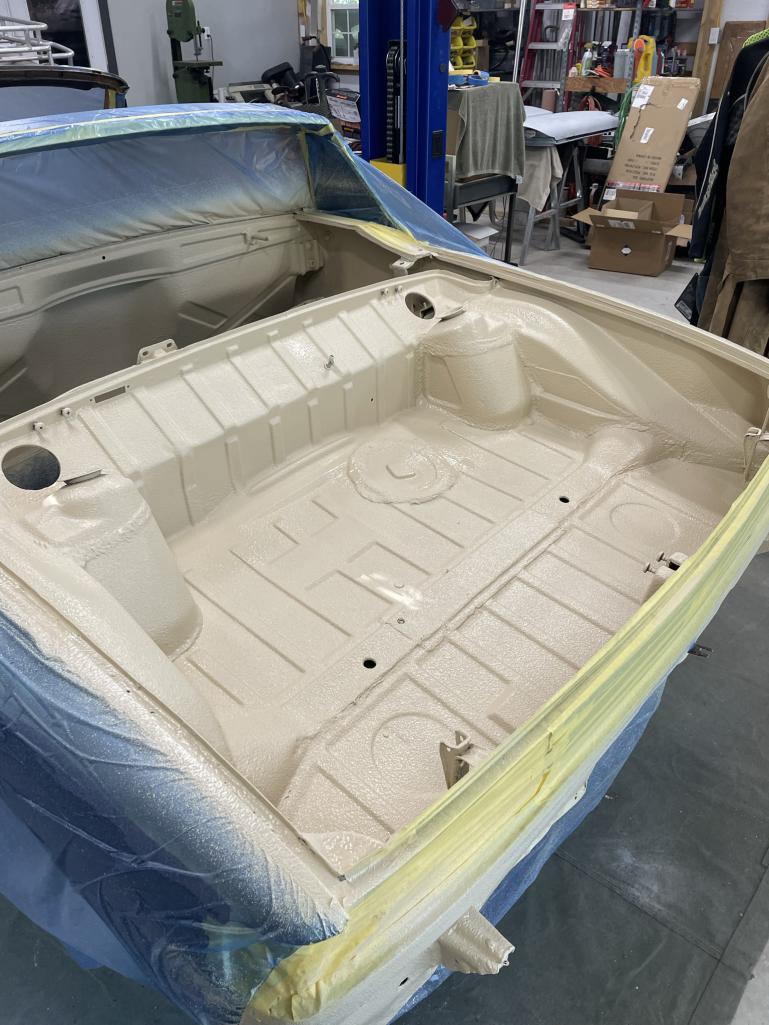
Posted by: East coaster May 25 2023, 04:59 PM
One more….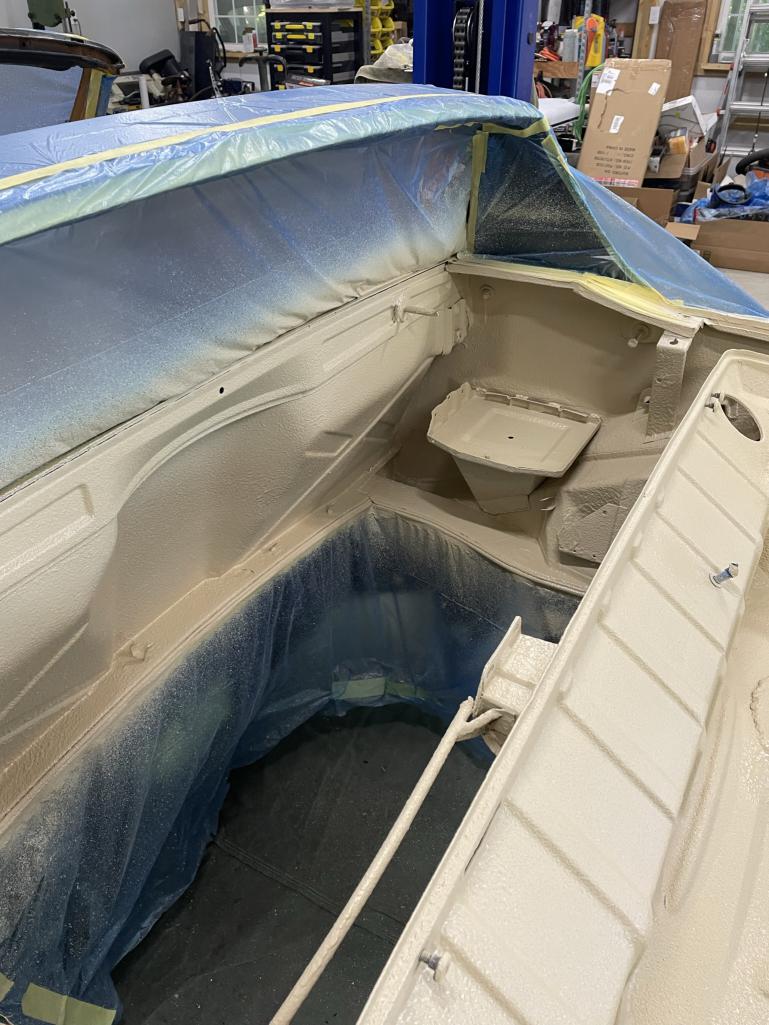
Posted by: East coaster May 26 2023, 07:00 PM
Got it back on its feet today. Put the front and rear suspension on and set it down on its new tires for the first time. Setup the heim joint tie rod ends and did a course adjustment so I can wheel it around…..good to see it back on its feet!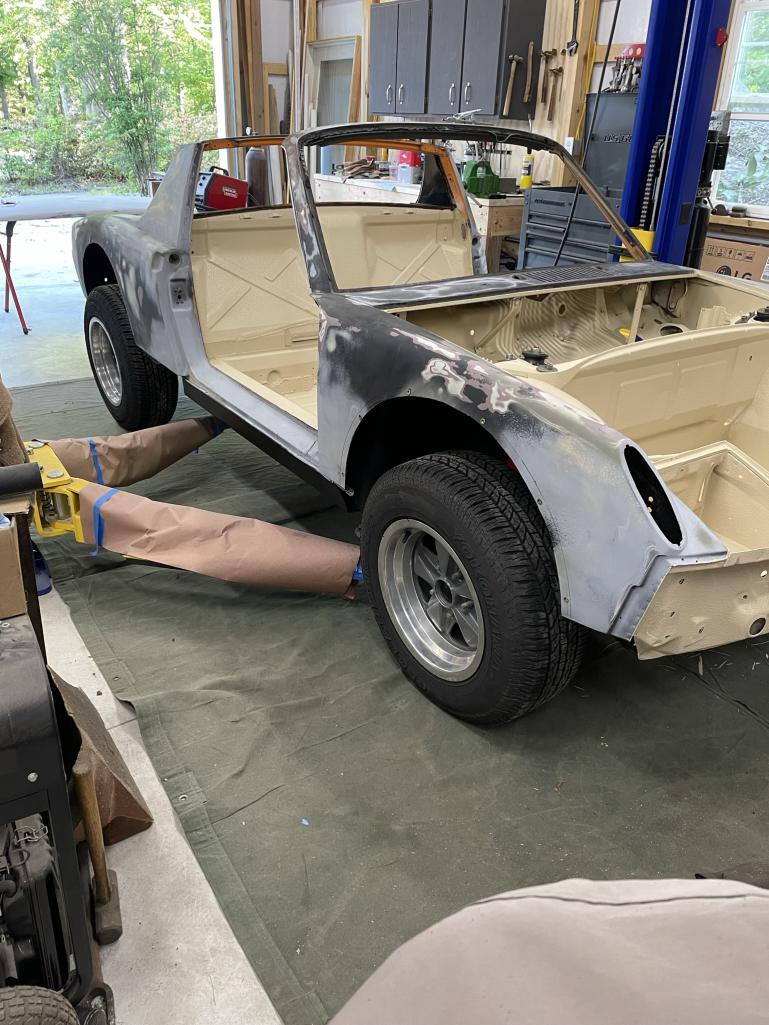
Posted by: East coaster Jun 5 2023, 06:47 PM
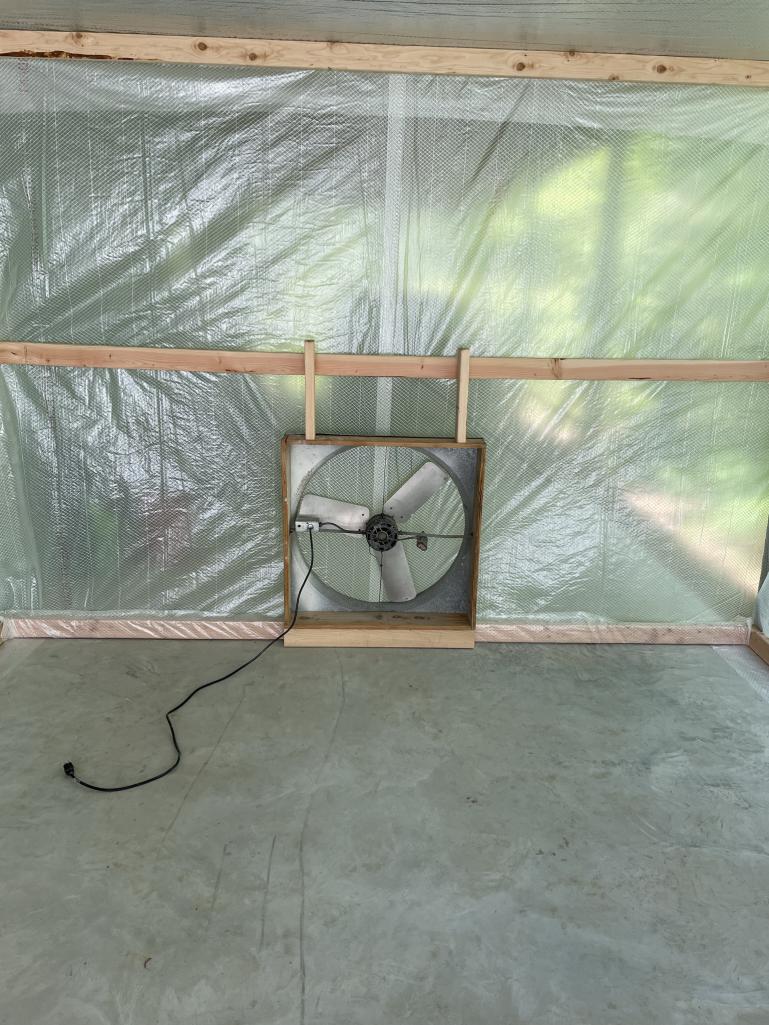
I’ve been quiet lately……..just doing body work to get ready for paint, and that’s kinda boring stuff.
Broke away from sanding for a day to erect a paint booth in the “lean-to” off the side of my shop. It’s 20’x12’, with filters at one end and exhaust fan at the other. It’s all sealed in a heavy gauge reinforced plastic.
Posted by: 914outlaw Jun 6 2023, 02:01 PM
This is a great build. Can't wait to see it completed. Did you consider a steel roof for rigidity?
Posted by: East coaster Jun 6 2023, 08:10 PM
This is a great build. Can't wait to see it completed. Did you consider a steel roof for rigidity?
I did consider it, but I love driving with roof off.
Posted by: East coaster Jun 8 2023, 07:31 PM
Well, it’s gray…..got it primed today, one step closer to paint…..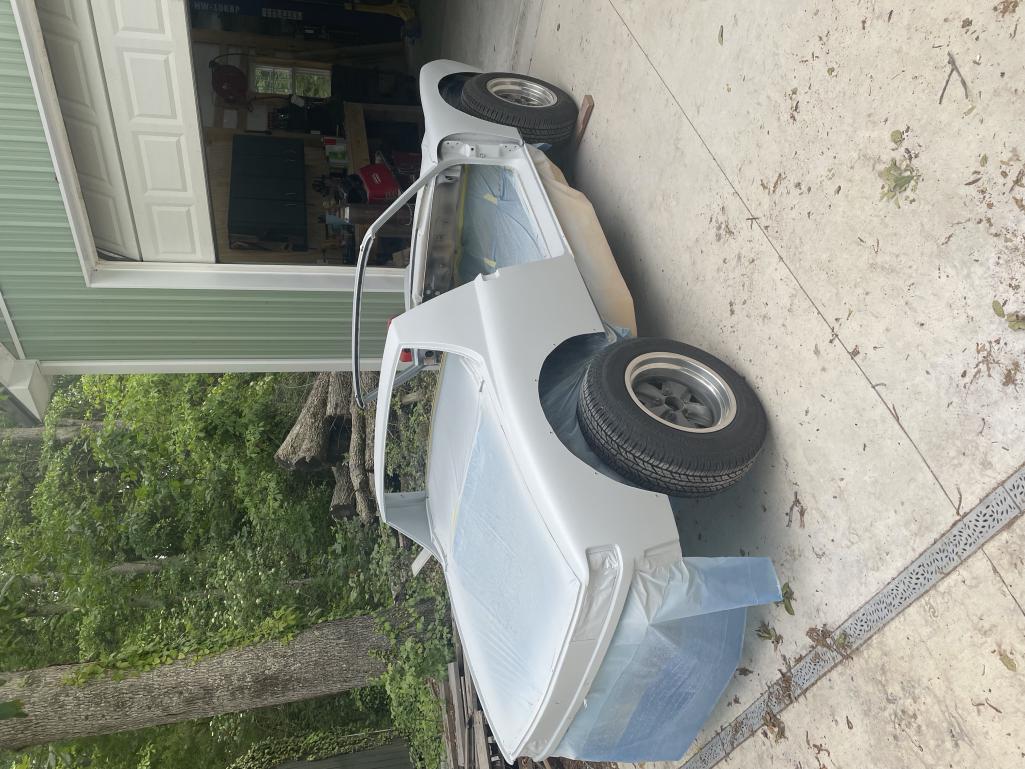
Posted by: East coaster Jun 9 2023, 04:53 AM
Not sure why pic came out sideways……oh well, here’s a different angle. Dang, this one’s sideways too…grrrr!
Posted by: DRPHIL914 Jun 9 2023, 08:57 AM
looking good! i have a question, why not spray inside the headlight bucket area too while you are sealing it and painting/coating? just wondering why you left that.
Phil
Is this better? I was waiting for supplies to finish it all up.
Not sure why pic came out sideways……oh well, here’s a different angle. Dang, this one’s sideways too…grrrr!
awesome!!! looking great! Lots of great protection against the elements, good for another 40 years, right??what is the final color selection?
one othe rquestion, did you install a bump steer kit? if so what type/brand?
Posted by: East coaster Jun 14 2023, 05:08 AM
awesome!!! looking great! Lots of great protection against the elements, good for another 40 years, right??
what is the final color selection?
one othe rquestion, did you install a bump steer kit? if so what type/brand?
Final color will be Shoreline Beige. It’s a non-stock color but I think it will work well here. I did a full color change, so it’s “factory like” and not too ratty.
As far as bump steer, I modified my struts with a support arm and am using heim joints instead of tie rod ends for the linkage. This lets me set the height f the tie rods, and hopefully eliminates bump steer issues. Here’s a pic of the setup: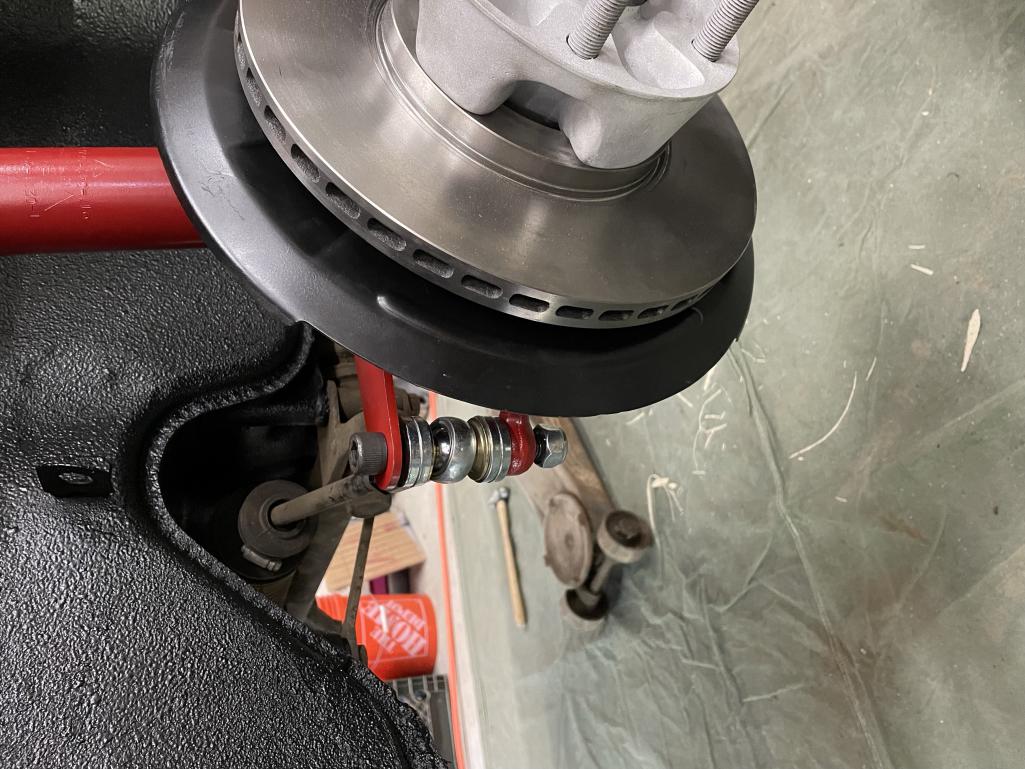
Posted by: East coaster Jun 14 2023, 05:12 AM
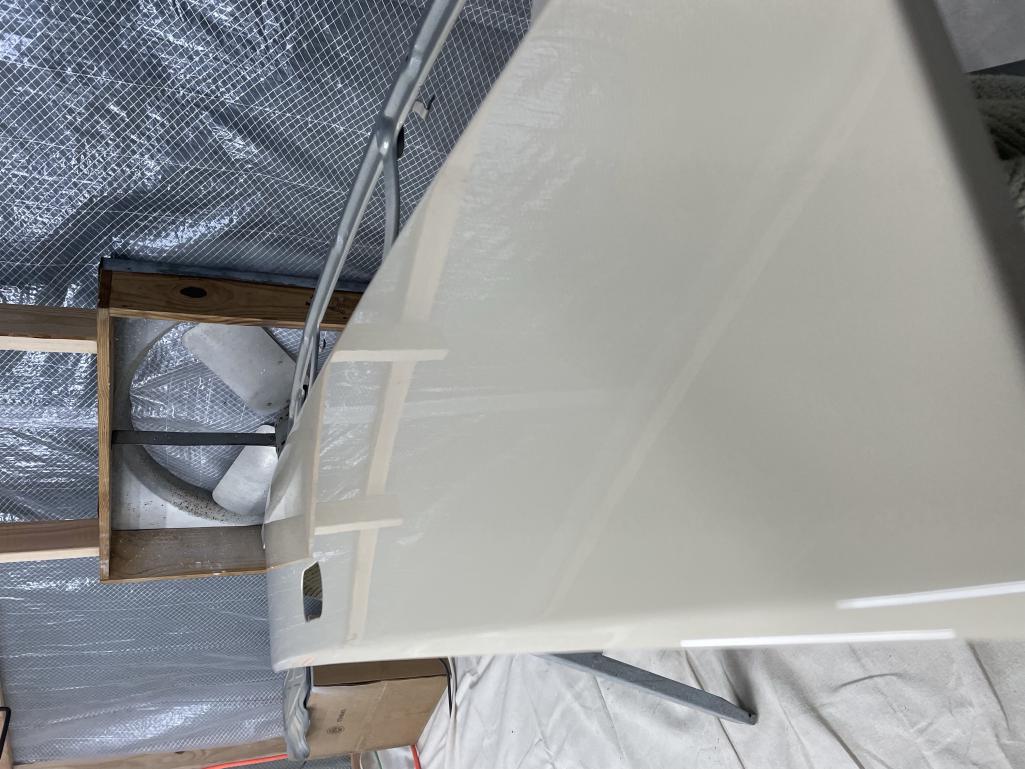
Got to try out the paint booth yesterday and it worked out great. I shot the underside of the hood, trunk, and engine cover in final paint.
Much Thanks to @http://www.914world.com/bbs2/index.php?showuser=10825 so I had a hood to shoot!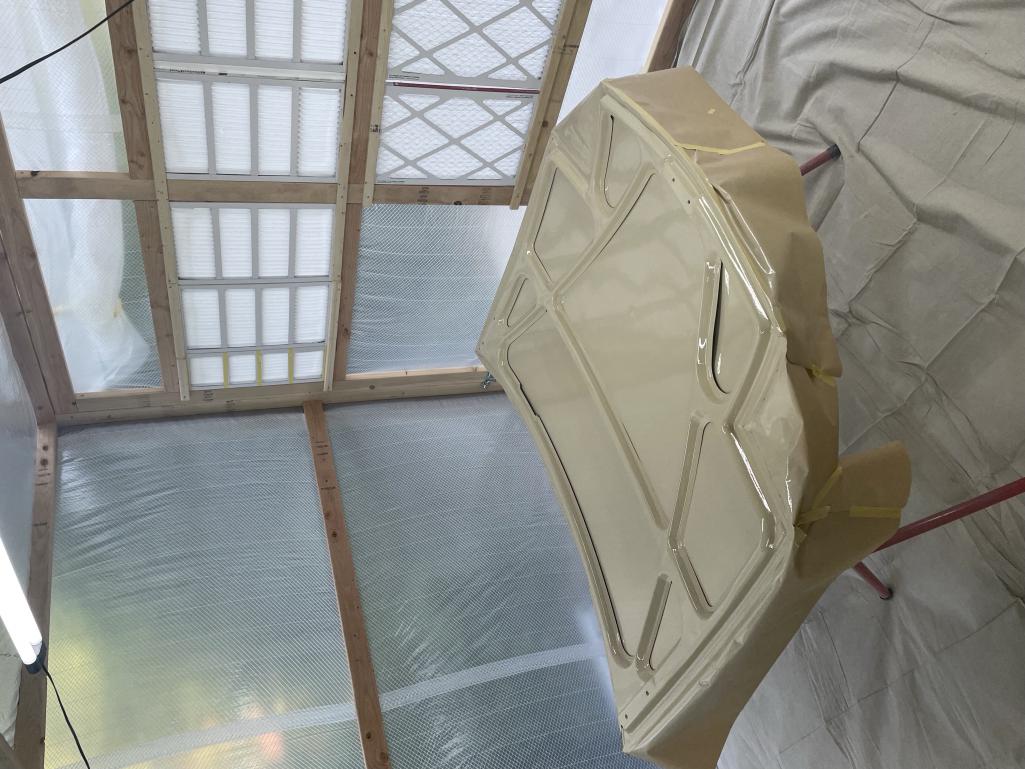
Posted by: East coaster Jun 14 2023, 05:13 AM
Looks like sideways pics are my new norm, not sure why, but here goes another…..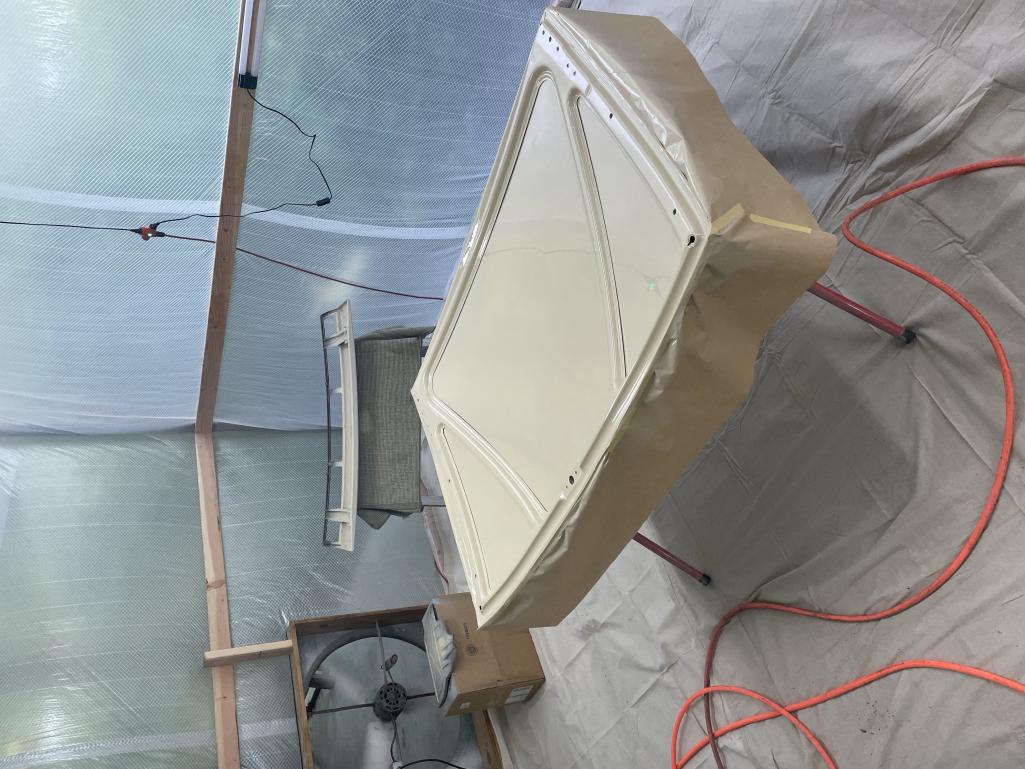
Posted by: mgarrison Jun 14 2023, 07:37 AM
Looks like sideways pics are my new norm, not sure why, but here goes another…..
If you hold your phone so that your thumb button is to the right, the pics should be rotated correctly. Andy explained it in a post here somewhere...
Posted by: East coaster Jun 15 2023, 08:25 PM
Got some more paint work done today, fresh paint looks so nice!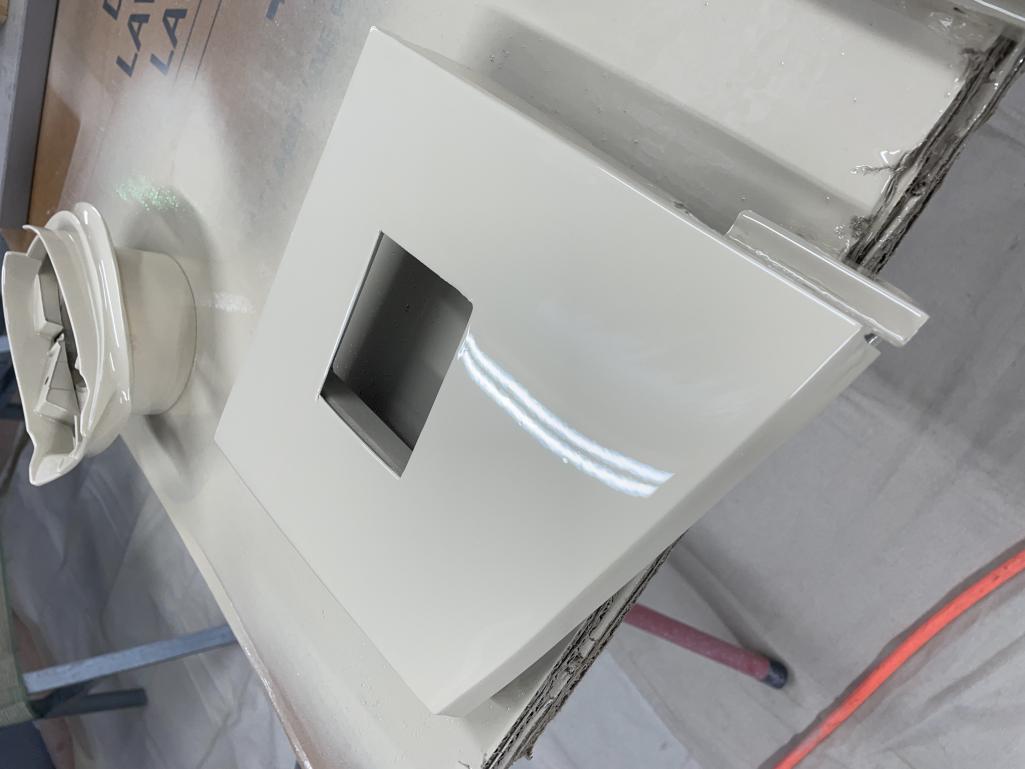
Posted by: East coaster Jun 15 2023, 08:27 PM
Posted by: East coaster Jun 15 2023, 08:29 PM
Posted by: East coaster Jun 15 2023, 08:29 PM
Posted by: East coaster Jun 23 2023, 07:32 PM
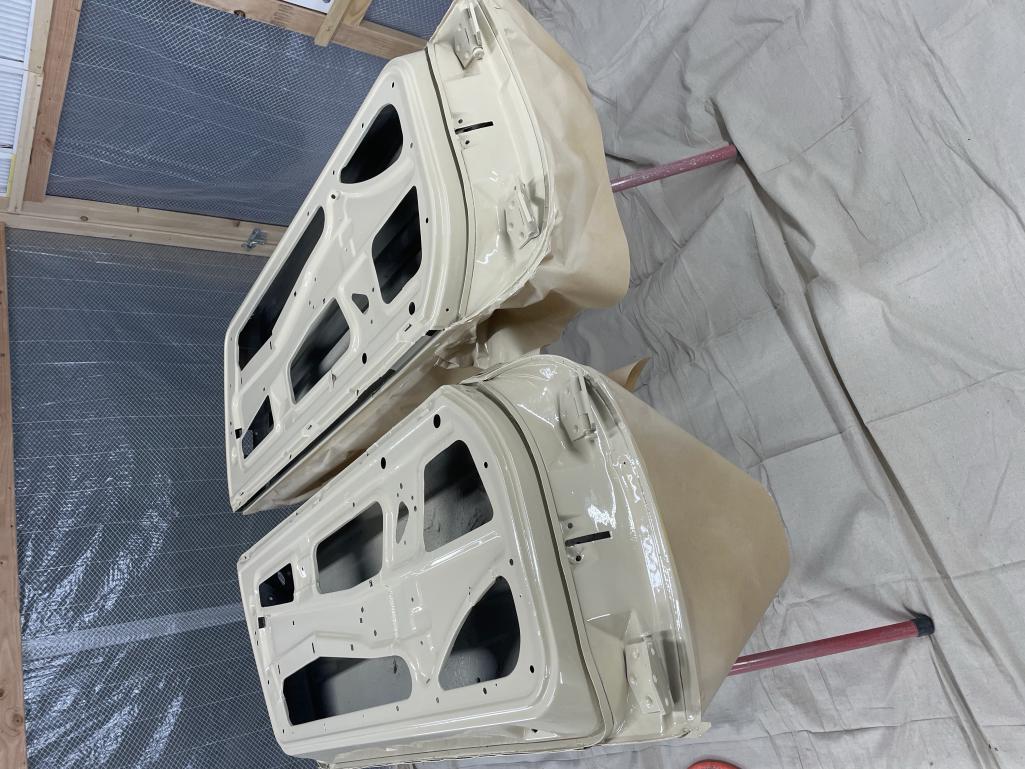
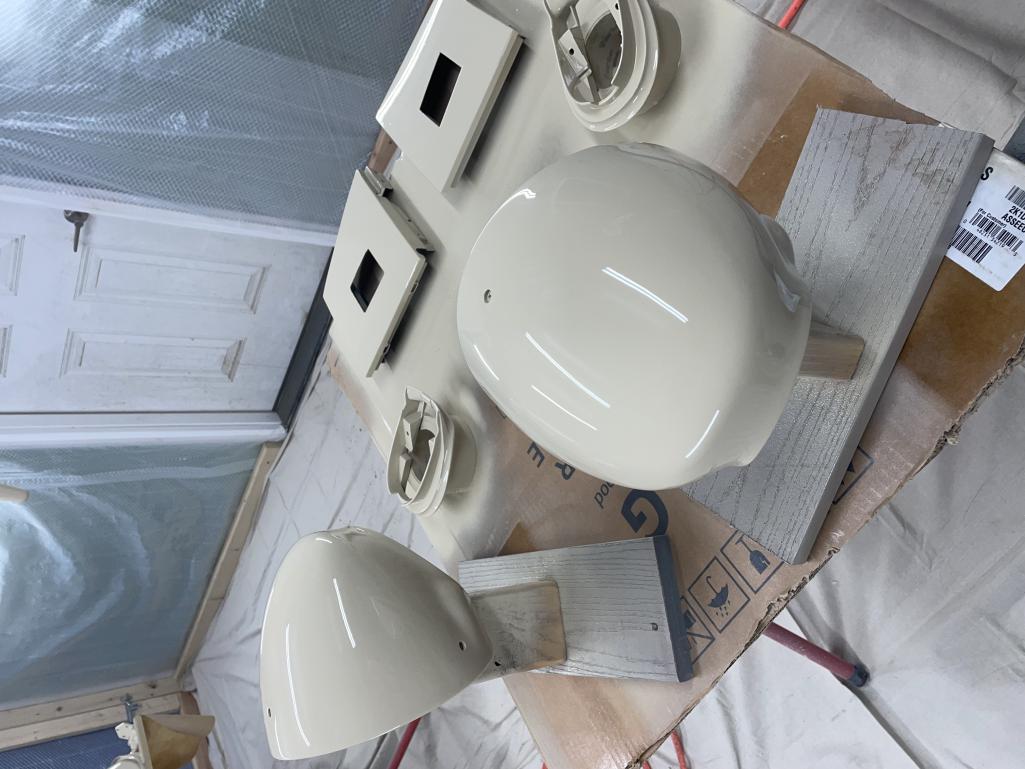
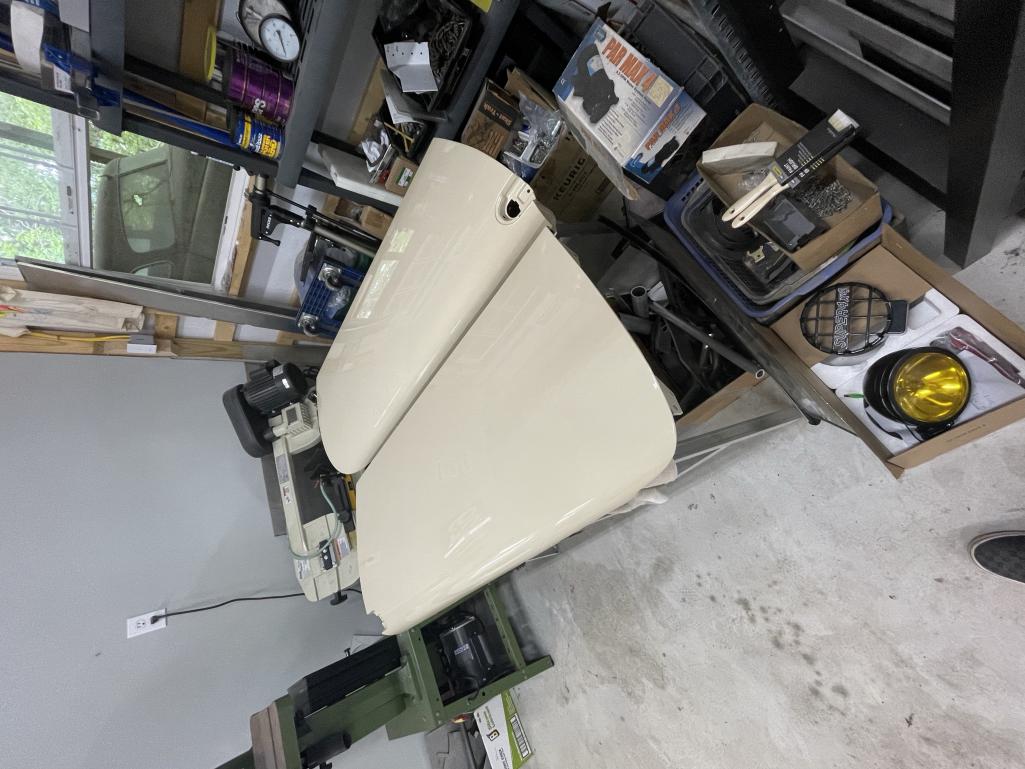
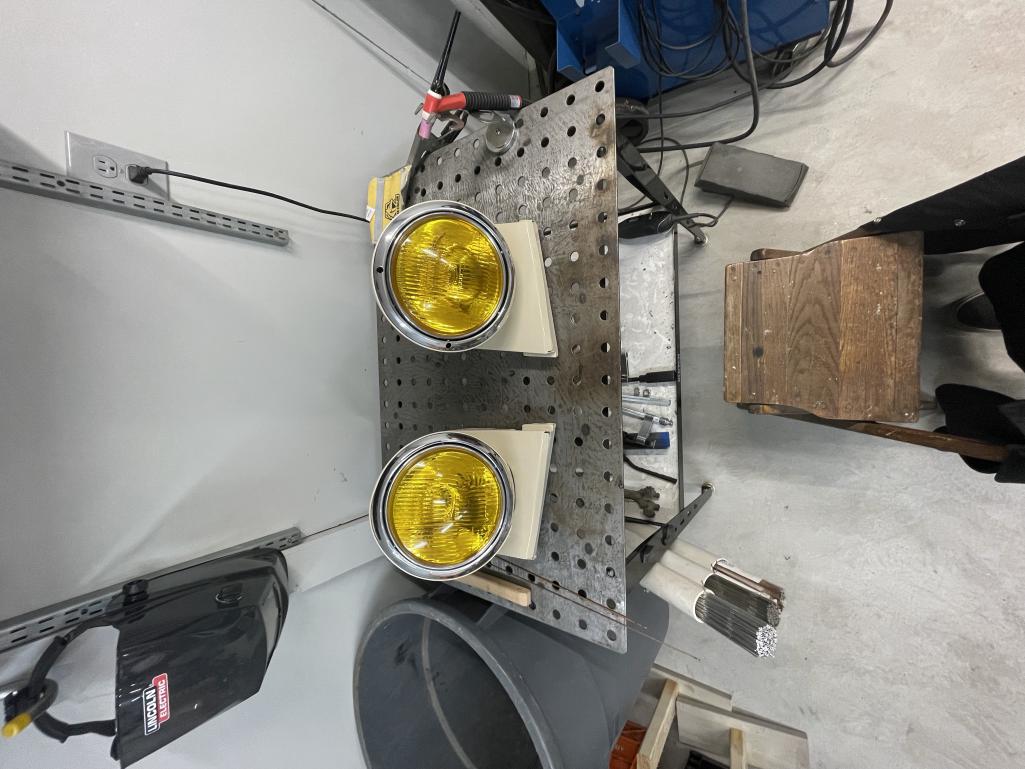
This weather is killing me……I want to finish my paint…..Grrr! I did get some progress though. I got the hood and doors painted just before our glut of crap weather. I also assembled the custom headlights for the project.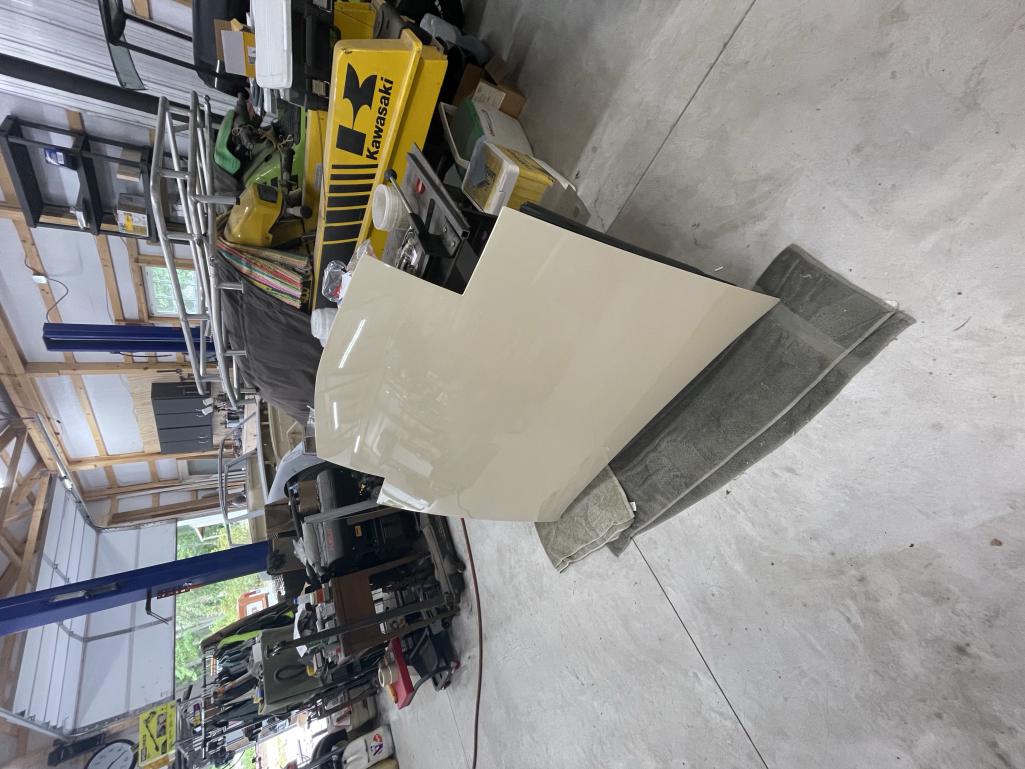
Posted by: East coaster Jun 23 2023, 07:33 PM
Posted by: East coaster Jun 23 2023, 07:33 PM
Posted by: East coaster Jun 23 2023, 07:34 PM

Posted by: rick 918-S Jun 24 2023, 05:39 AM

Posted by: East coaster Jun 29 2023, 01:01 PM
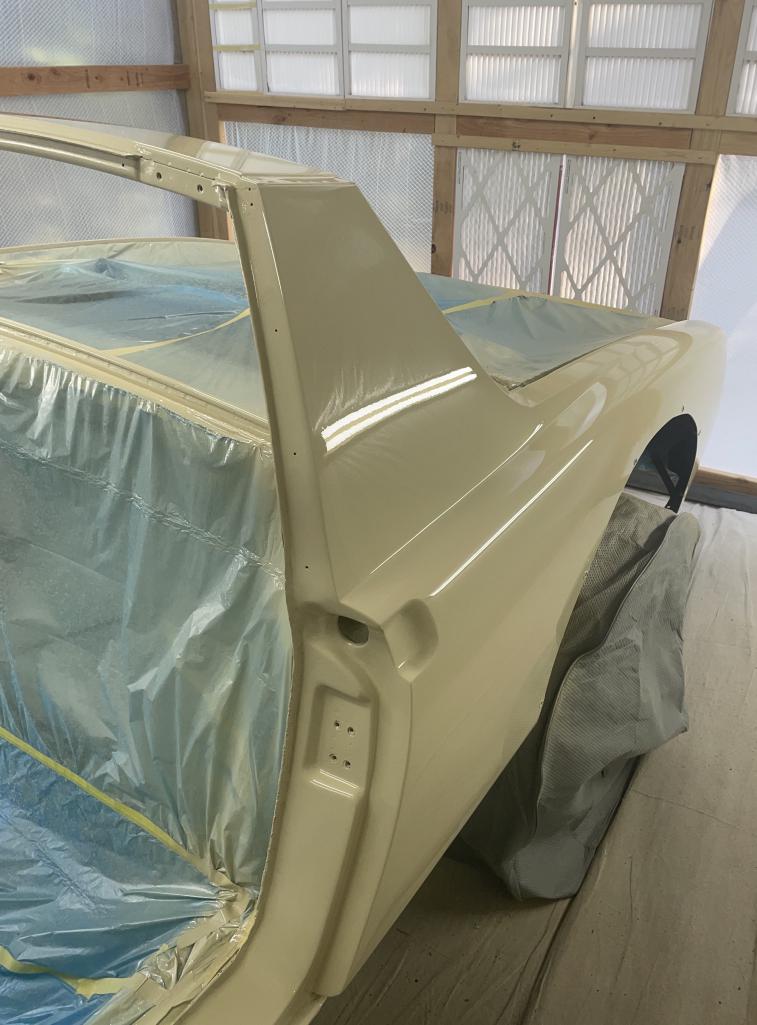
The weather finally cooperated and I got the tub painted. This completes the paint for the car, a milestone I’m glad to have behind me!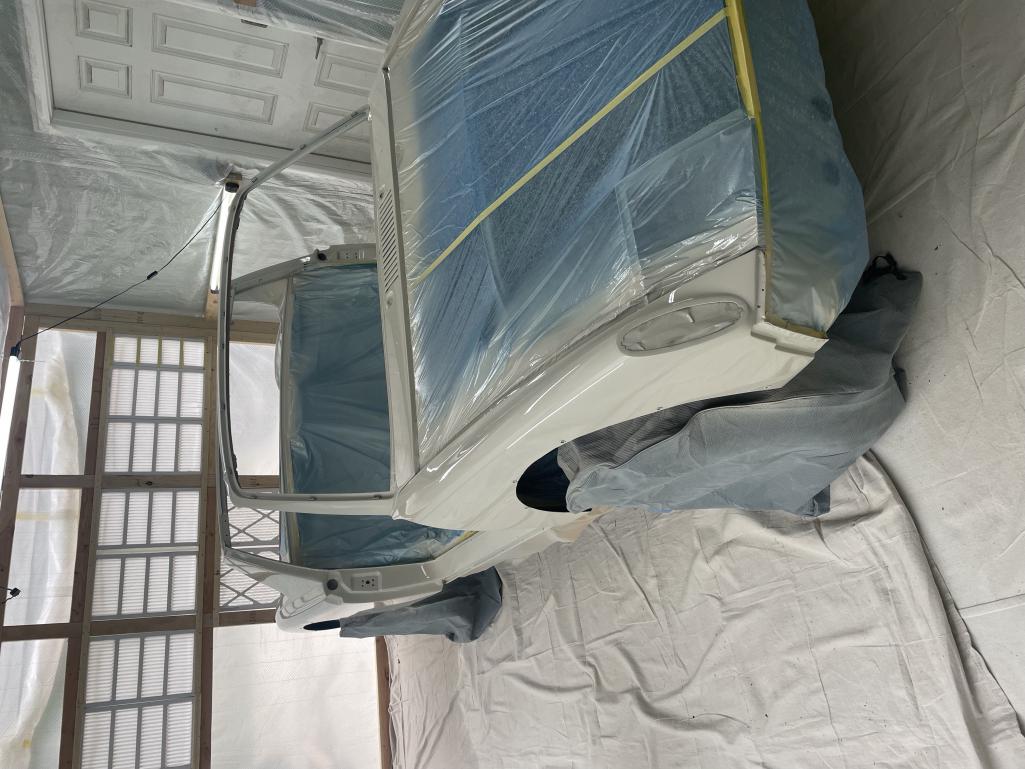
Posted by: East coaster Jun 29 2023, 01:02 PM
I’m lovin’ these sideways pictures….not!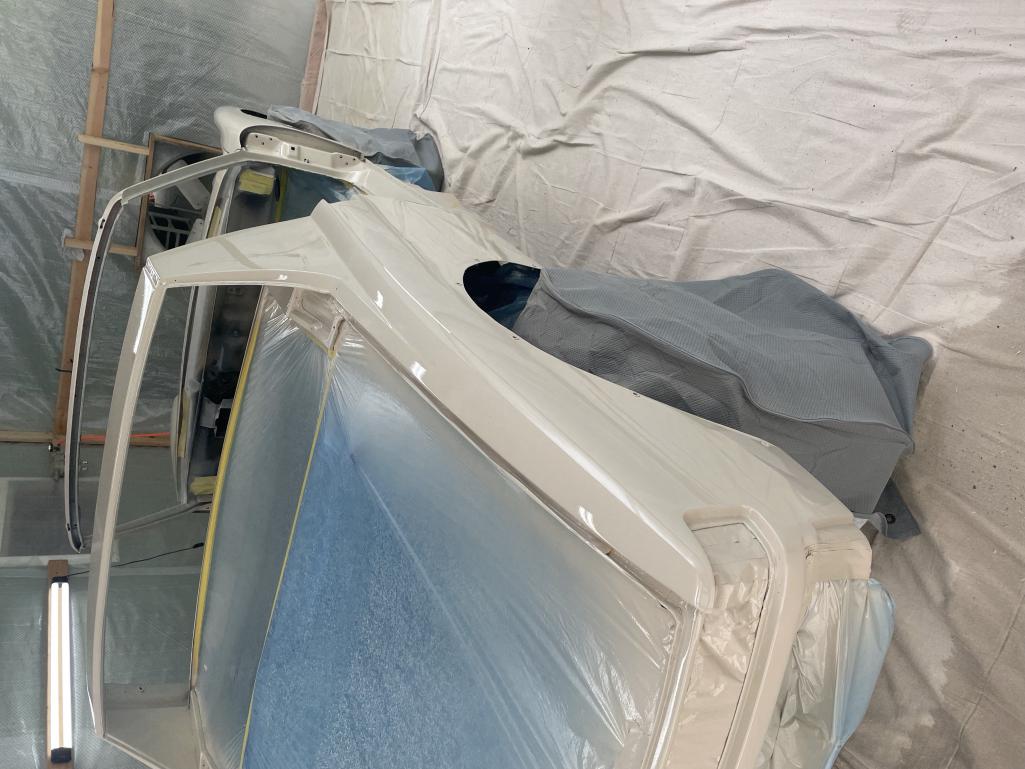
Posted by: East coaster Jun 29 2023, 01:03 PM
Posted by: East coaster Jul 5 2023, 03:58 PM
Ok, so this is demoralizing………the tub came out a completely different color than all the other parts. I purchased a gallon of paint (base) and knew I would be pushing it to get the tub done without running out. So, I ordered another quart to be sure and it seems they completely screwed up the mix. I even added the new quart to about a quart of the original paint just to minimize any slight variability that could occur. So here I sit with my tub painted with 2 coats of base and 3 coats of clear (and it came out beautifully except for the color).
My only option is to sand and paint again, but I’m waiting on a response from paint supplier before proceeding. I can’t imagine what the cost would be to correct this if this had been done by a shop. Unfortunately, the weather is so hot now I probably won’t be painting until early fall……oh well!
Here are some pics of the difference…..
Posted by: East coaster Jul 5 2023, 03:59 PM
Posted by: Root_Werks Jul 5 2023, 04:04 PM
Nice! Always such a good feeling when paint goes on a 914.
Posted by: tygaboy Jul 5 2023, 04:17 PM
Arggg. I can't imagine how frustrated you must be! Any chance you could add some graphic or something to either distract from it or, even better, make it look like you did it on purpose?
Just tossing out some ideas. Feel free to toss out what I just suggested.
Best of luck on a resolution.
Posted by: East coaster Jul 5 2023, 04:34 PM
Arggg. I can't imagine how frustrated you must be! Any chance you could add some graphic or something to either distract from it or, even better, make it look like you did it on purpose?
Just tossing out some ideas. Feel free to toss out what I just suggested.
Best of luck on a resolution.
Thanks for the sympathy and suggestions! After all I’ve done to make this thing straight I think I’m just going to bite the bullet and sand the tub and respray it. That said, it’s only an option if I can get paint to match the other pieces. I’m going to get new paint and spray a test piece first to make sure it matches. If it doesn’t, then I’m looking having to respray everything…….and that would really suck!
Posted by: rick 918-S Jul 6 2023, 08:01 PM
I hate when that happens. 2 3/4 gallons of paint on Juergen's car but I mixed it from one gallon to another before starting. Paint is so expensive now. 
Posted by: East coaster Jul 16 2023, 07:36 AM
Just posting to see if I can get a picture to come out right side up…..ok, it seems to work. I had to open the picture I took with my phone on my iPad and then screen shot it. I guess this will need to be the new process for posting to my build thread, still don’t understand why since I haven’t changed any settings on my phone and they posted correctly for the first 7 pages of my thread.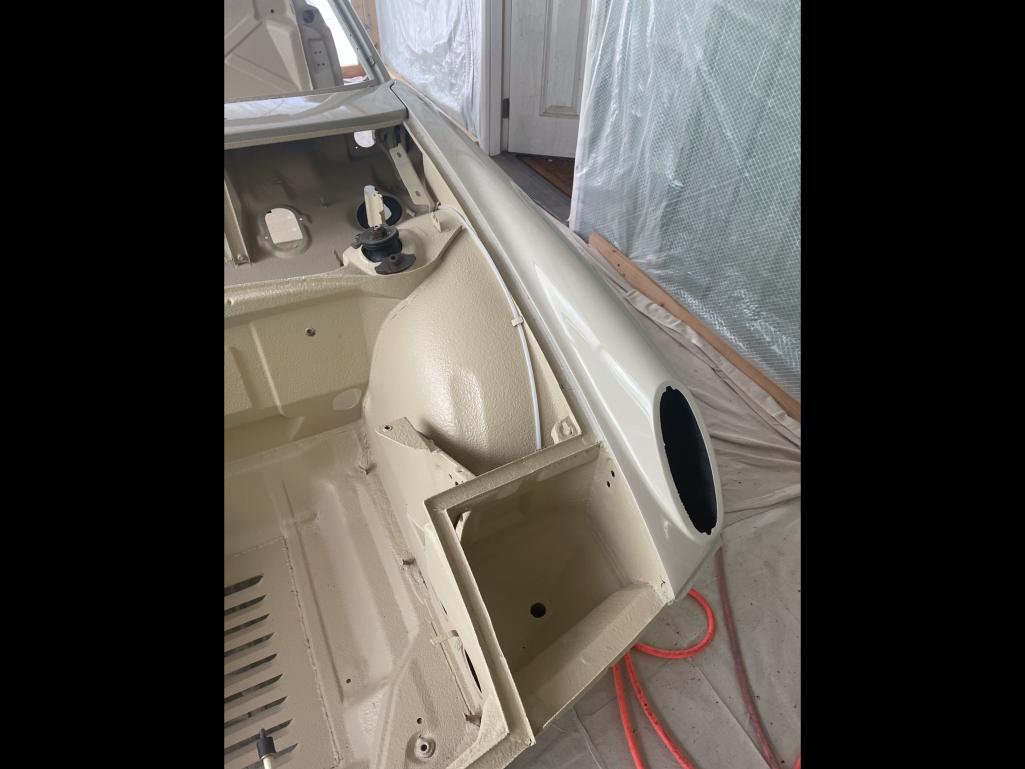
Posted by: East coaster Jul 19 2023, 04:54 AM
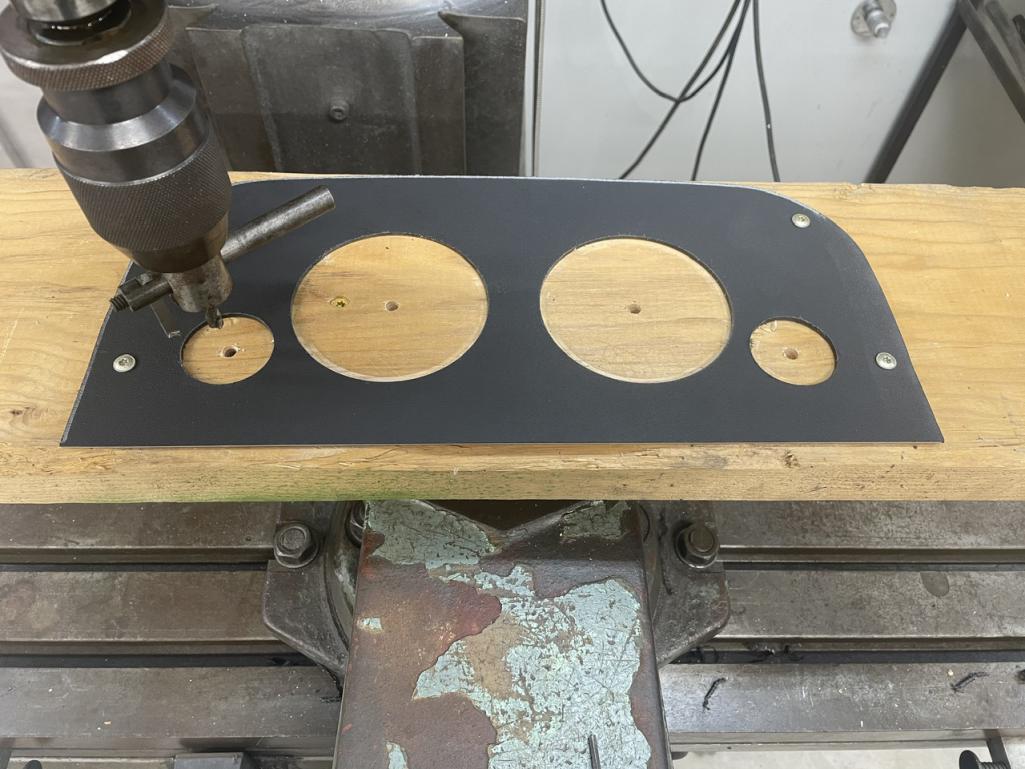
While waiting for cooler weather to repaint the tub I’ve been chipping away at smaller projects that can be done in the air conditioned portion of my shop. Since I’m running the complete Subaru wiring harness I wanted to use the Suby gauge pod as well. As anyone who’s tried this knows, the pod doesn’t fit in the 914 gauge area. I’ve seen some where they added height to the gauge “hump”, but I really wanted to keep the stock dash pad.
I was able to get the Suby gauge pod reduced in size by removing the connectors at the top of the pod and direct soldering the pigtail cable directly to the PCB. This saved me 1-1/2” to 2” that would’ve been needed at the top for cabling. I did have to cut the dash at the bottom of the pod area about 5/8” but the will not be an impact.
I reduced the Suby gauges down to the bare minimum and then made a new gauge bezel and glass that matches the Suby gauges but has the outer shape of the 914. I had to relocate the mounting tabs in the dash hoop to allow them to clear the Suby pod, but I’m pretty happy with the result.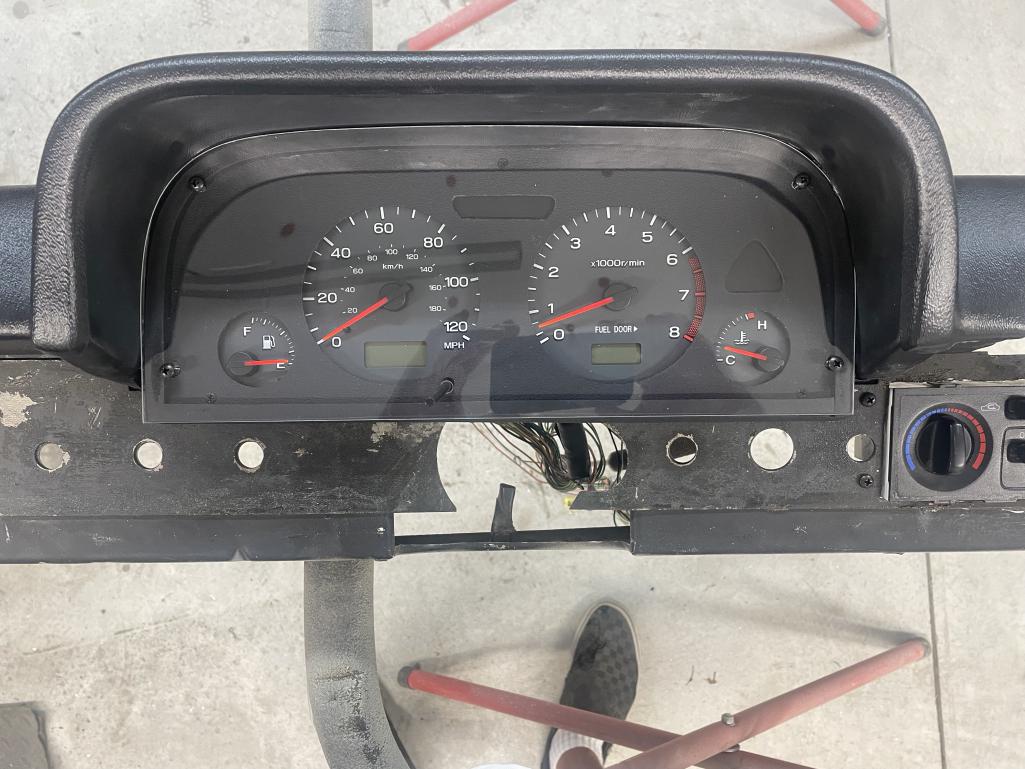
Posted by: East coaster Jul 19 2023, 04:56 AM
I’m also going with the Suby hvac controls and added those with a little tweaking of the factory hole.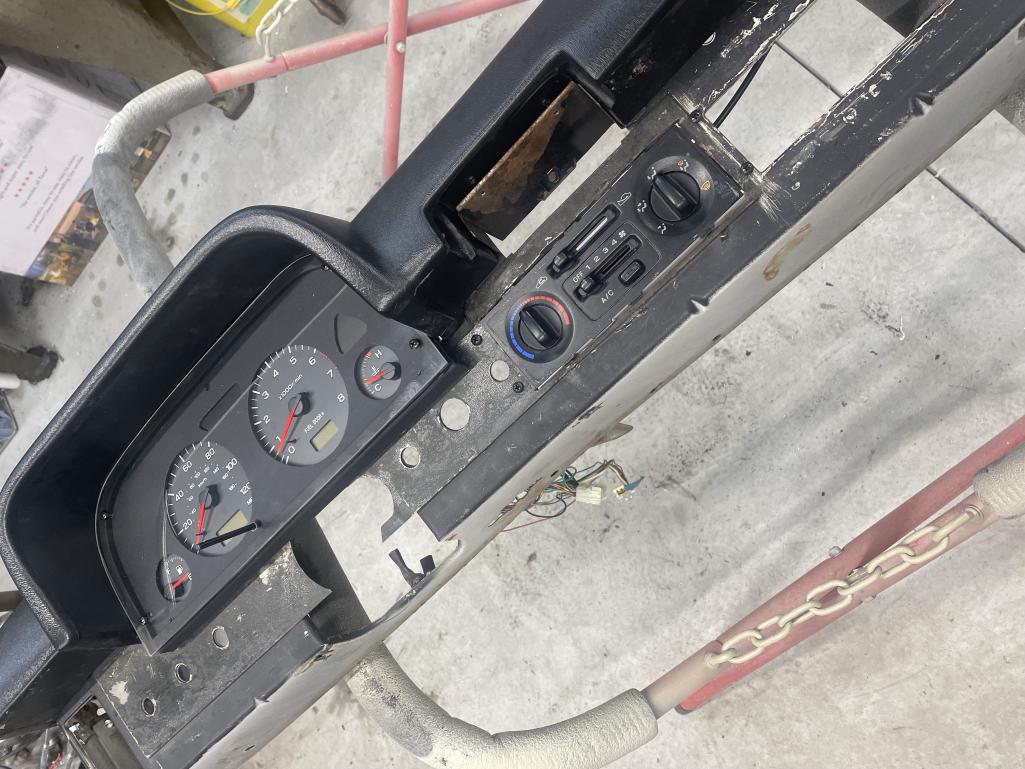
Posted by: East coaster Jul 19 2023, 04:57 AM
Mods to the “hoop”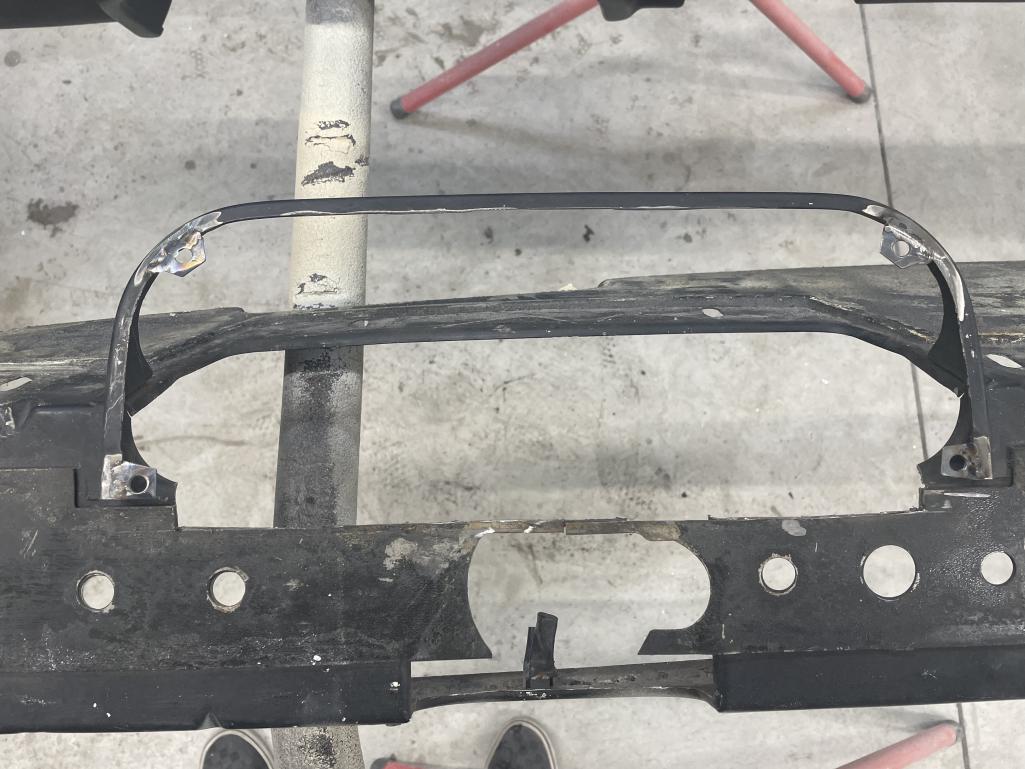
Posted by: East coaster Jul 19 2023, 05:10 AM
Making of bezel……I used a textured Kydex material.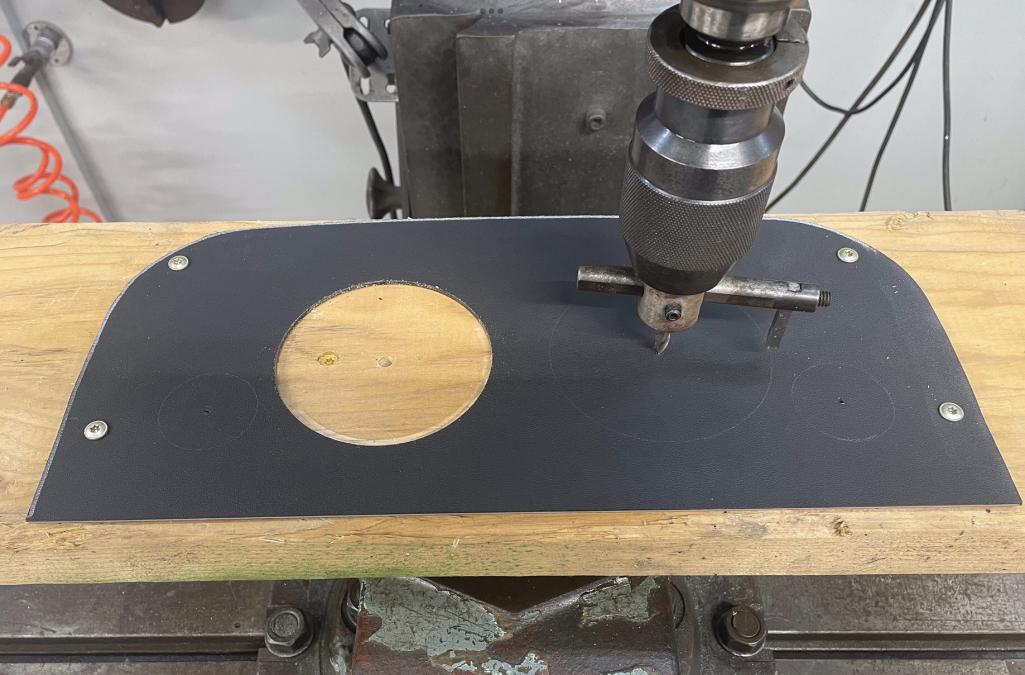
Posted by: East coaster Jul 19 2023, 05:16 AM
Hard to tell from the photos but I also removed the indicator “films” from the stock Suby faceplate and glued them behind the cuts above and to the right of the tach and Speedo. This will give me the indicator lights for turn signals, high beams, Alt, Oil, and check engine. They’re behind the little oval cutout and the guitar pick shaped cutout.
Posted by: sreyemj Jul 20 2023, 06:47 PM
Amazing project, love the color!
Posted by: East coaster Jul 20 2023, 07:00 PM
Amazing project, love the color!
Thank you! It’s certainly been a fun a challenging project so far.
Posted by: East coaster Jul 29 2023, 06:08 AM
Finished up the dash. Upholstered the top and the face of the dash with pieces from 914 Rubber. Finished the gauge pod by painting a black border on the inside of the glass. I think it looks more finished that way and it hides the mounting hardware pretty well.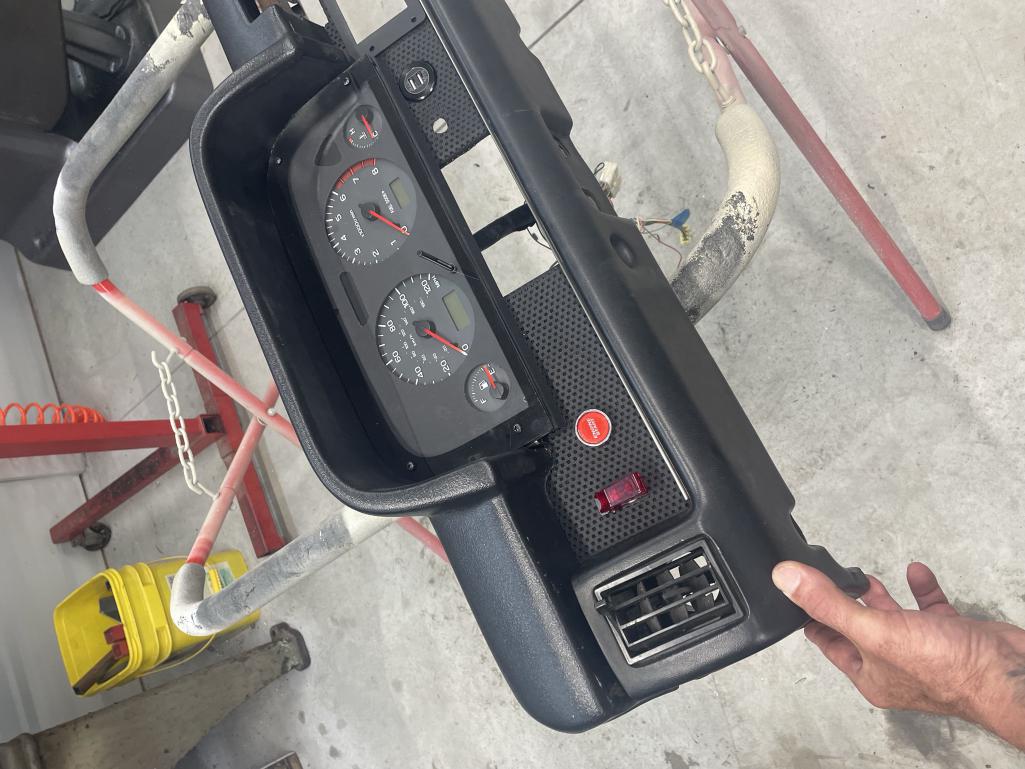
Posted by: East coaster Jul 29 2023, 06:09 AM
Dash top…..
Posted by: Porschef Jul 29 2023, 07:41 AM
Don’t know how I missed this either, but I’m blown away by your imagination/creativity skills that are matched by your fabrication abilities. Digging pretty much everything that’s been done.
Congratulations on your retirement, I was wondering how you found the time.
Great color choices (you can’t go wrong with a little Nepal orange ) and yeah, the paint problem sucks but not a dealbreaker for me if it’s consistent on the exterior.
Following, looking forward to seeing it on the beach
Posted by: Shivers Jul 29 2023, 01:20 PM
That came out super nice.
Posted by: East coaster Jul 31 2023, 07:00 PM
Started working on the heater core setup. I’m adding a heater core to the fresh air box for heat/defrost. I had to remove some material and then add some to the front of the box. I used ABS sheet from McMaster-Carr to make the addition. More to come, I’m just getting started…….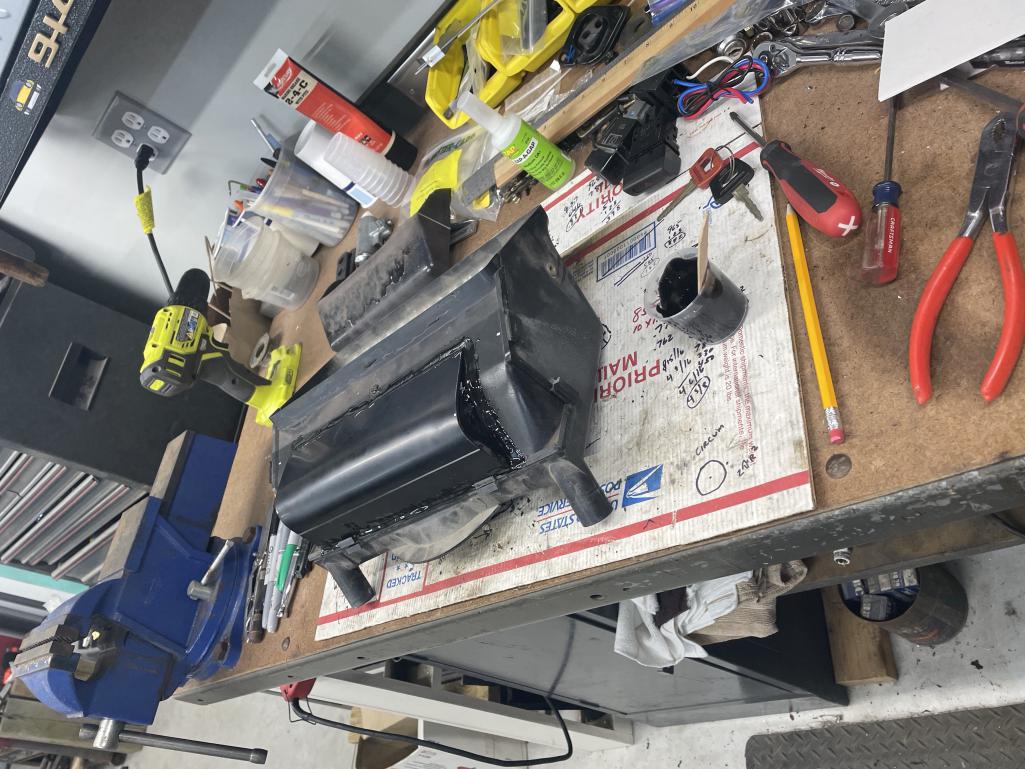
Posted by: East coaster Aug 2 2023, 07:17 PM
Heater core install wrapped up. I had to cut the box and add a section to the front, and had to make my own rain water diverted to go over the core.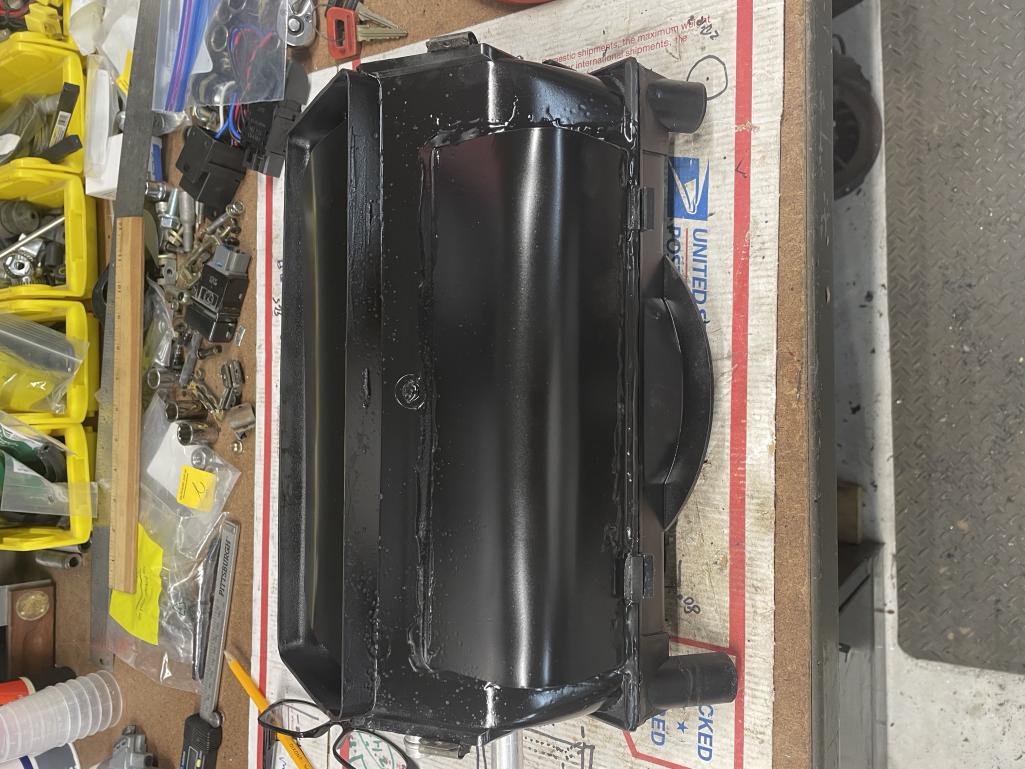
Posted by: East coaster Aug 2 2023, 07:19 PM
Another sideways pic…
.
Posted by: East coaster Aug 2 2023, 07:20 PM
Last….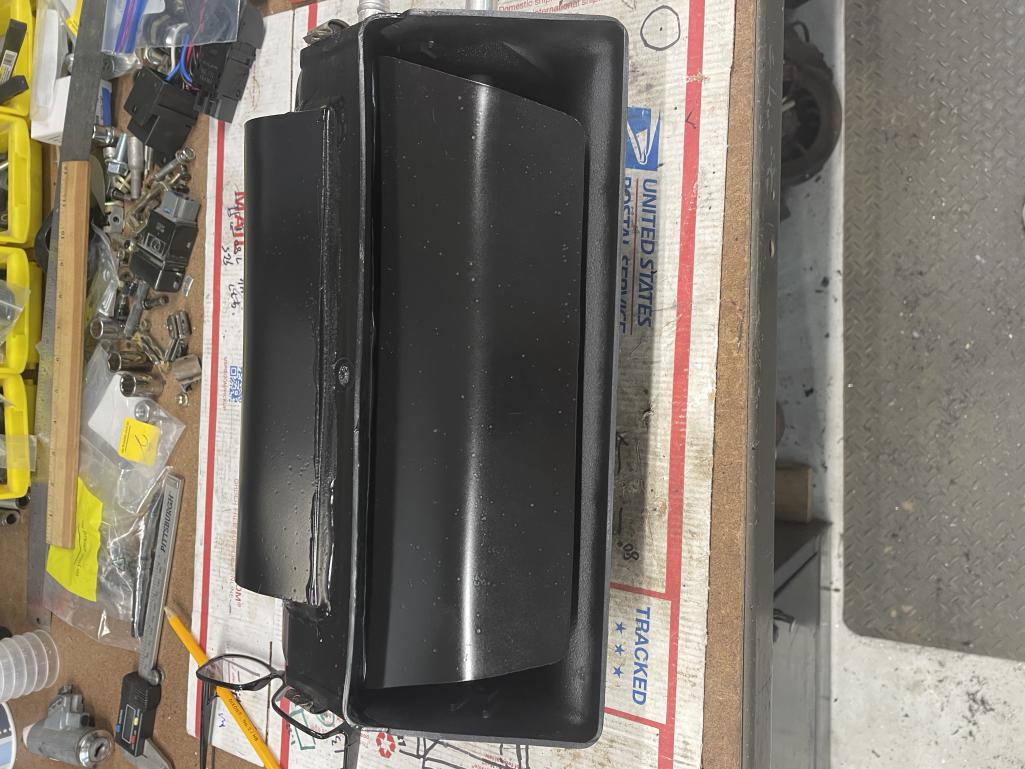
Posted by: East coaster Aug 7 2023, 04:32 PM
Started tinkering around with machining my axles for a Subaru spline at one end. I turned a piece of aluminum to the diameter of the Suby shaft so I could practice on softer metal until I nailed the process.
It came out well. I still need to adjust the tool depth out a little bit but I’m getting real close. I wanted to play with this before cutting on my real axle.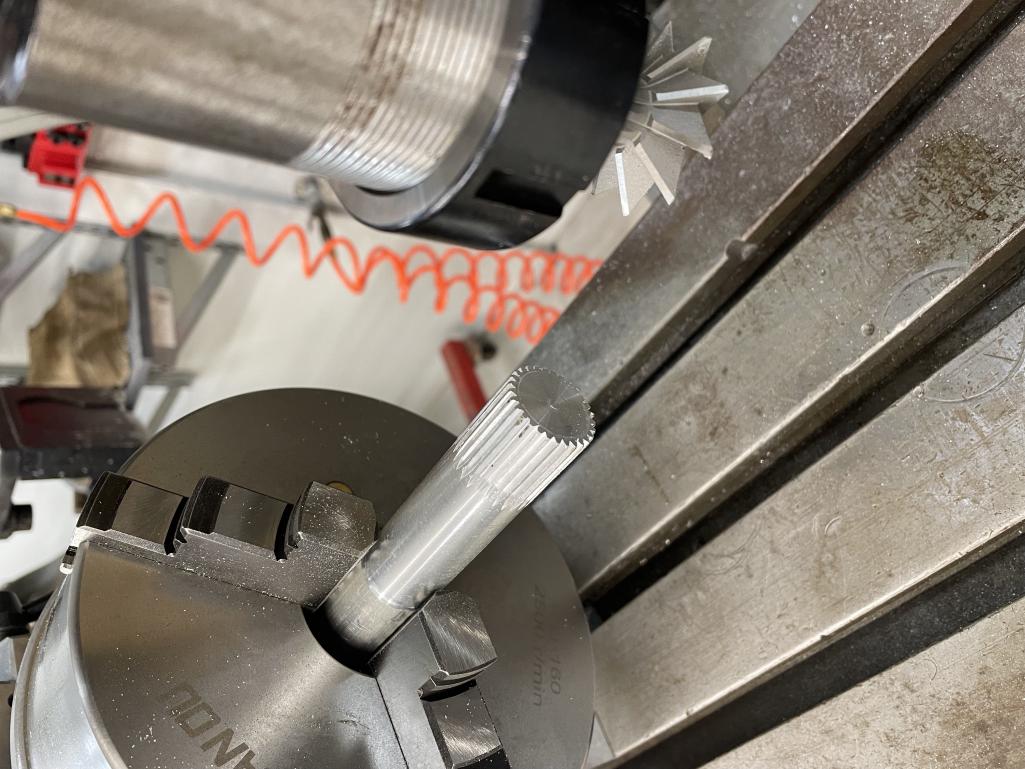
Posted by: East coaster Aug 7 2023, 04:33 PM
And with CV inner……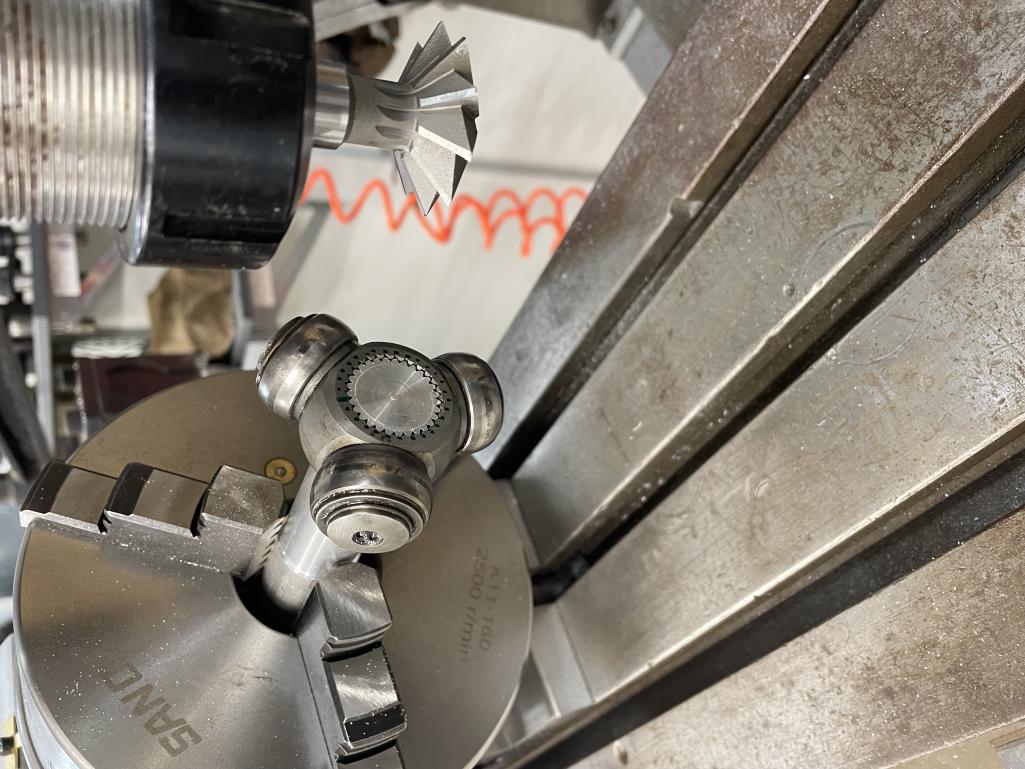
Posted by: Shivers Aug 7 2023, 04:44 PM
And with CV inner……
That is awesome
Posted by: jd74914 Aug 8 2023, 08:25 AM
Very cool!
What's the deal with the mill? Is that an automated 4th axis?
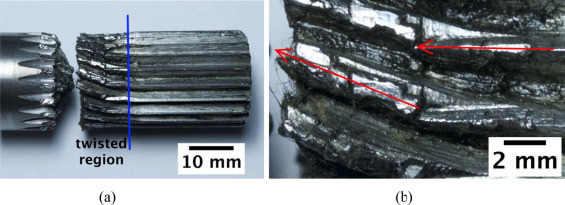
Unsolicited feedback: You might want to relieve on the back of the splines (cut down the axle and then fillet into the splines). I've done the same cutting you're showing and twisted then sheared at the stress concentration where the splines land in the main axle on two occasions and now always put a neck down like shown in the below image. 
Posted by: East coaster Aug 8 2023, 01:01 PM
Thanks for the feedback Jim. The mill is just an old Bridgeport that I put a DRO on. It’s awesome to have in the shop. I also have a 100 year old LeBlond lathe, and between the two of them you can make almost anything if you have the skills (I’m working on it).
The piece I machined was just a practice piece I was using to test out the process. I plan to mimic the Subaru shaft when I cut and spline the real shaft and I think the Subaru shaft has a relief like you mention.
Posted by: jd74914 Aug 8 2023, 08:58 PM
Cool! Sounds like a nice set! I love my Clausing lathe and can't wait to get a new [to me] mill.
You can get a lot of work done with just a DRO. And TBH full manual is probably a better starting point, at least from what I learned from the master machinists who taught me. It's nice to be able to be able to assess a cut by sight/sound/touch all at once while you're working the machine.
Sounds good on the half shafts. The car I twisted/spiral sheared almost exactly like the below picture and when we analyzed saw that the cracking actually started at the root of the spline.
In my case is was a 25mm diameter shaft on a 120ish hp car formula car which did launch so perhaps more load than you'll see, but still something you don't forget. 
Can't wait to see the final product! Your whole project is awesome BTW! 
Posted by: East coaster Aug 15 2023, 06:37 PM
Working on things I can do in the air conditioned portion of my shop. Decided to tackle my fuel tank. I’m using a complete Subaru fuel pump and sender so I fitted that to the tank. The pickup sits in the sump and I made a backing plate with studs to mount the unit. I also cleaned the tank with a vinegar soak for a few days, followed my baking soda and water. All that is left is giving it a coat of paint.
Posted by: East coaster Aug 15 2023, 06:38 PM
Backing plate….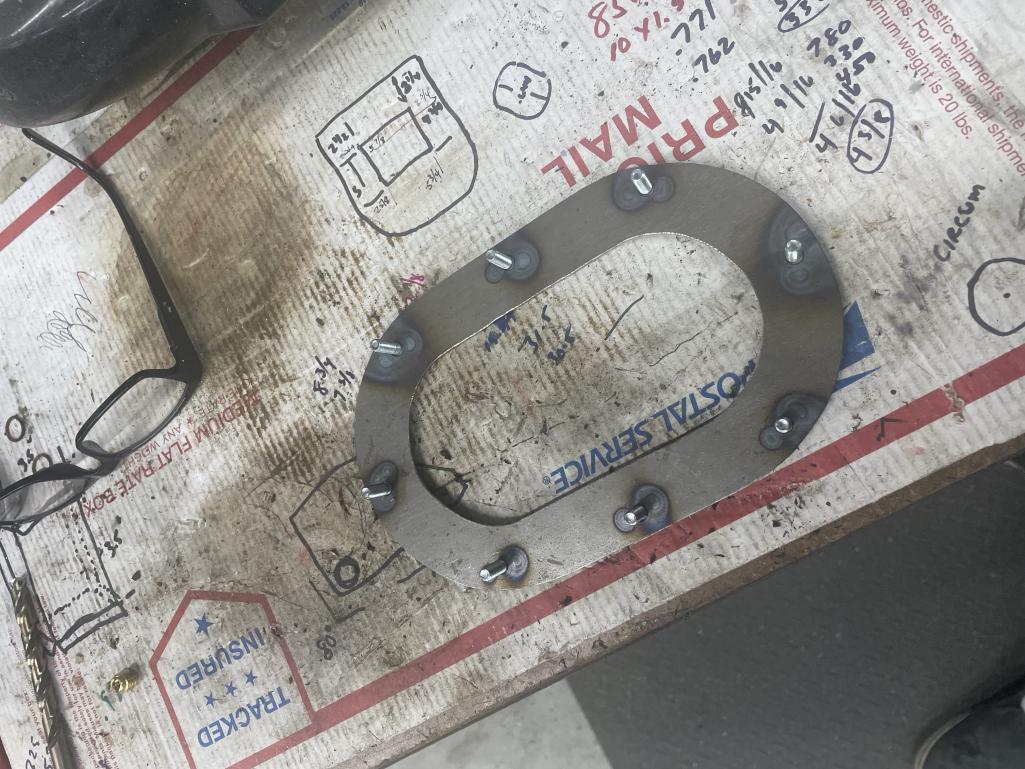
Posted by: East coaster Aug 15 2023, 06:39 PM
Backing plate welded to tank….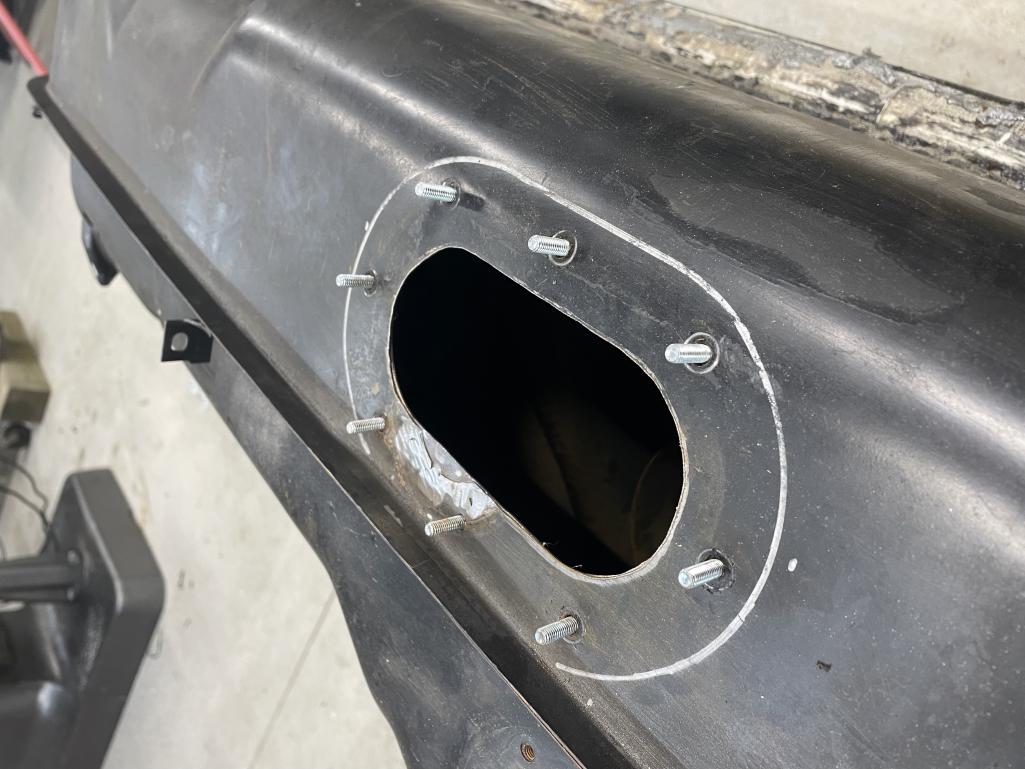
Posted by: East coaster Aug 15 2023, 06:41 PM
Pickup in sump…….I had to turn the sock filter around 180 degrees to have it fit in the sump.
Posted by: East coaster Aug 24 2023, 07:32 PM
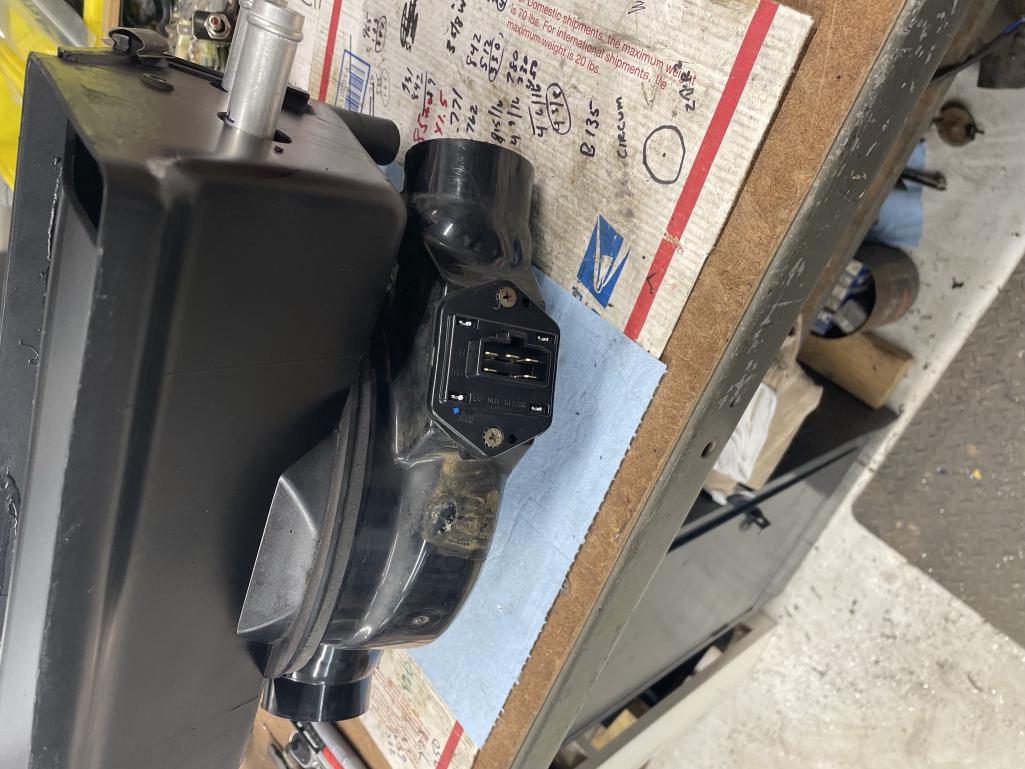
Wrapped up the fresh air box/heater today. All new seals from 914 Rubber, new fan and motor from URO, and mods to house the heater core and the Subaru resistor pack.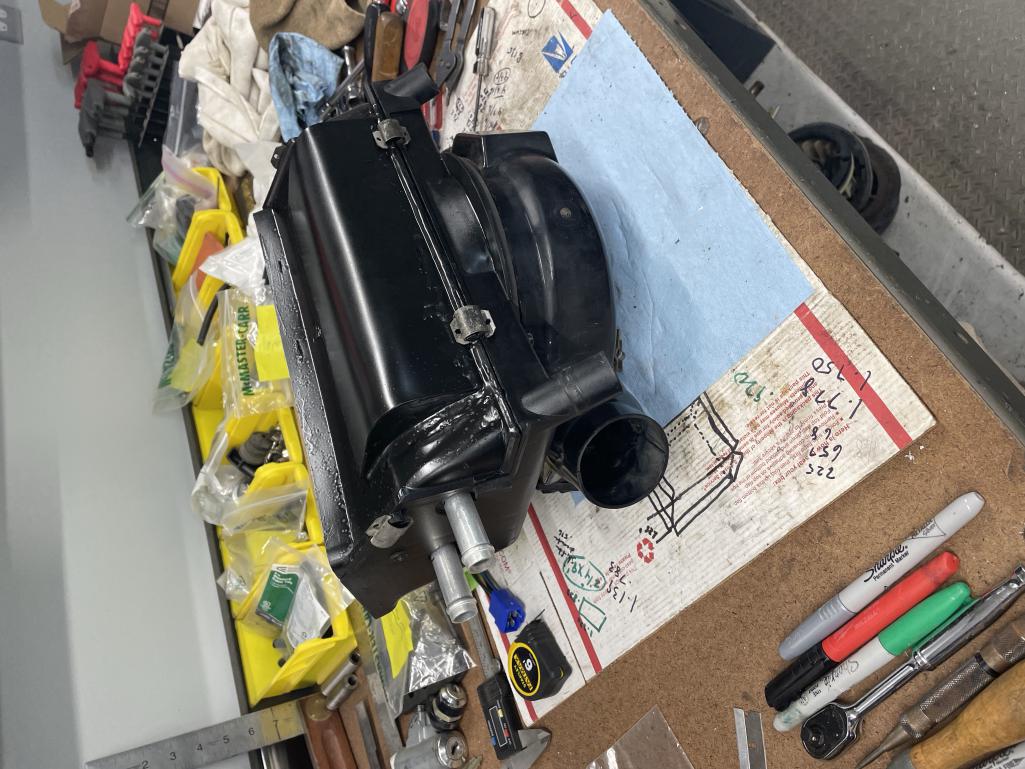
Posted by: East coaster Aug 24 2023, 07:32 PM
Posted by: East coaster Sep 2 2023, 01:58 PM
Rolled it out of the paint booth to began sanding off my perfect new paint job and repaint (in the correct color this time!). It’s been a while since I painted it and I was truly just waiting for cooler weather to tackle sanding and respray, but I think I needed this much time to get over the disappointment and frustration of being supplied with the wrong paint. I wished they had given me the wrong color and not just the wrong tone, at least I would’ve noticed before spraying.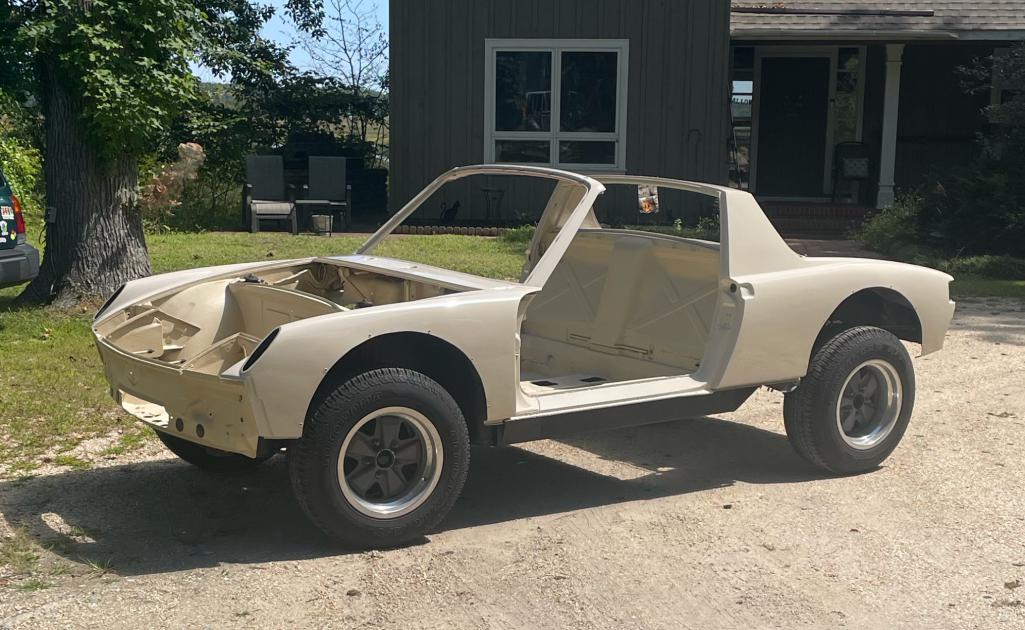
Posted by: East coaster Sep 2 2023, 01:59 PM
Posted by: East coaster Oct 3 2023, 04:35 PM
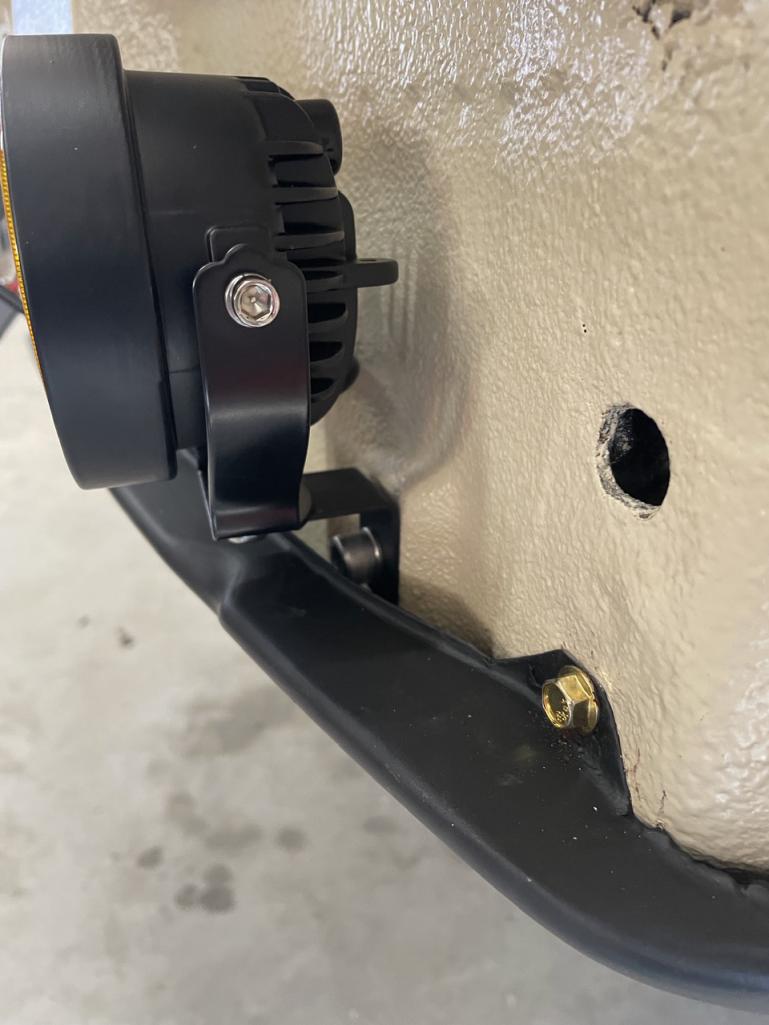
Got back from a two week trip and decided to get a little done on the car while I’m waiting for cooler weather for sanding and paint. I’ve bounced around numerous ideas on a front push bar and here’s what I came up with. It’s all aluminum and pretty darn light so it’s not adding much weight (I think it’s lighter than the bumper tits that it eliminated).
Here are mounts. They’re 4” alum tube shaped to fit the bumper with a 1/4” plate welded at the back for mounting.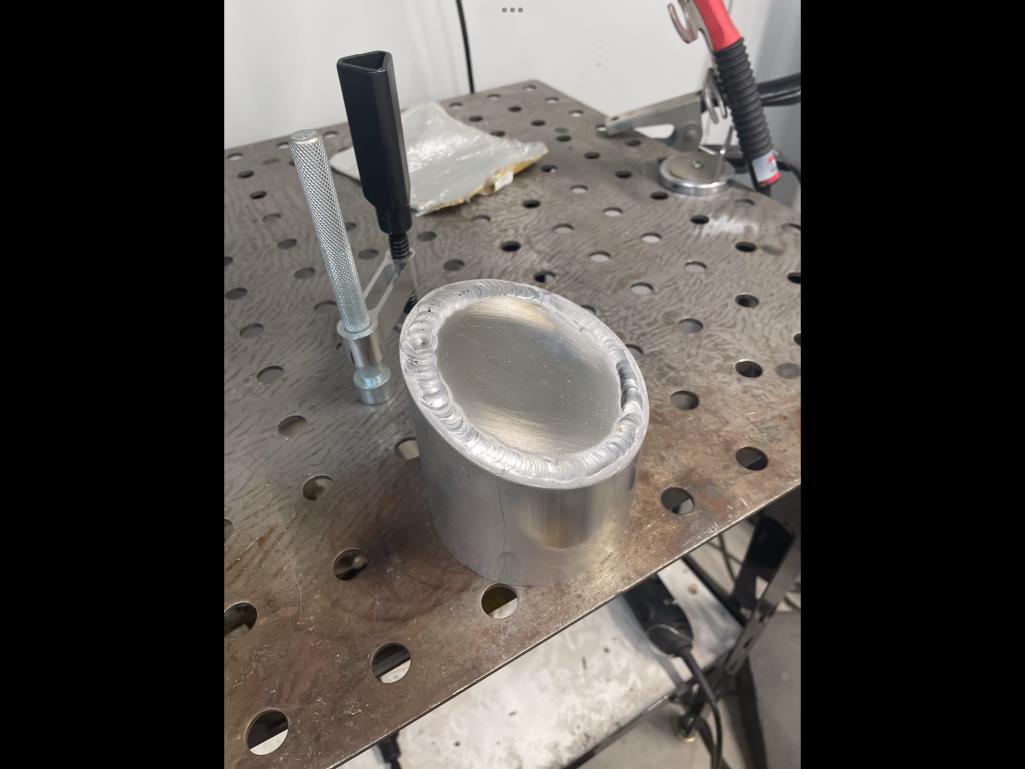
Posted by: East coaster Oct 3 2023, 04:36 PM
Posted by: East coaster Oct 3 2023, 04:36 PM
Posted by: East coaster Oct 3 2023, 04:38 PM
And welded up and mounted with 4” led fog lights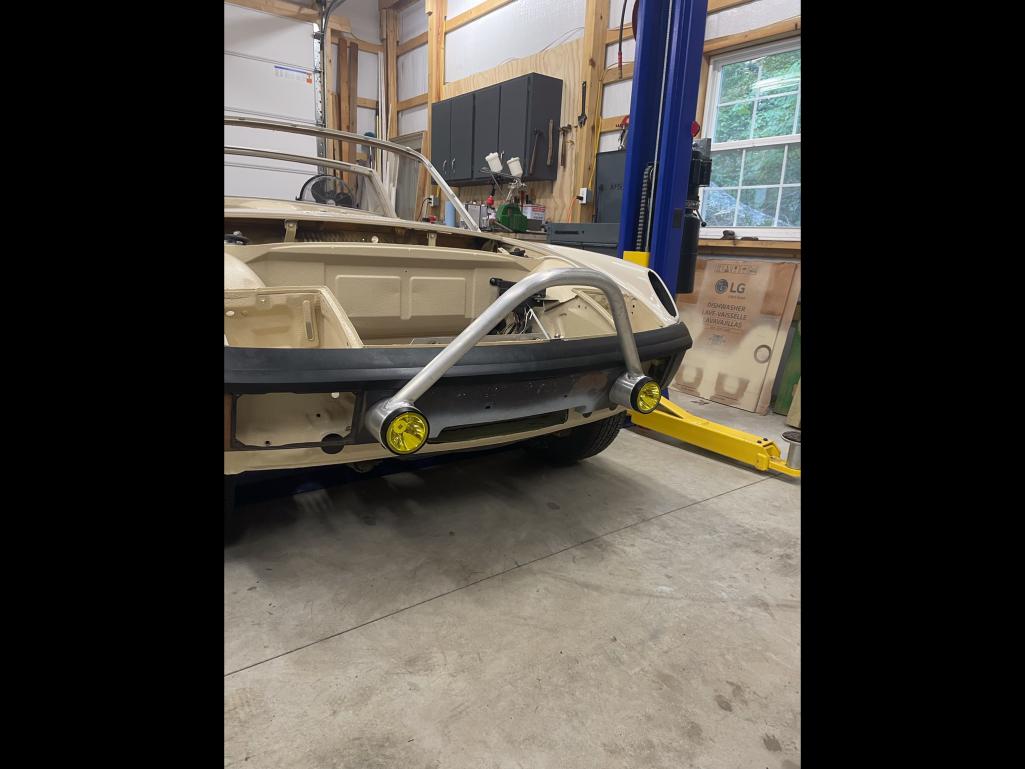
Posted by: East coaster Oct 3 2023, 04:38 PM
Nuther…..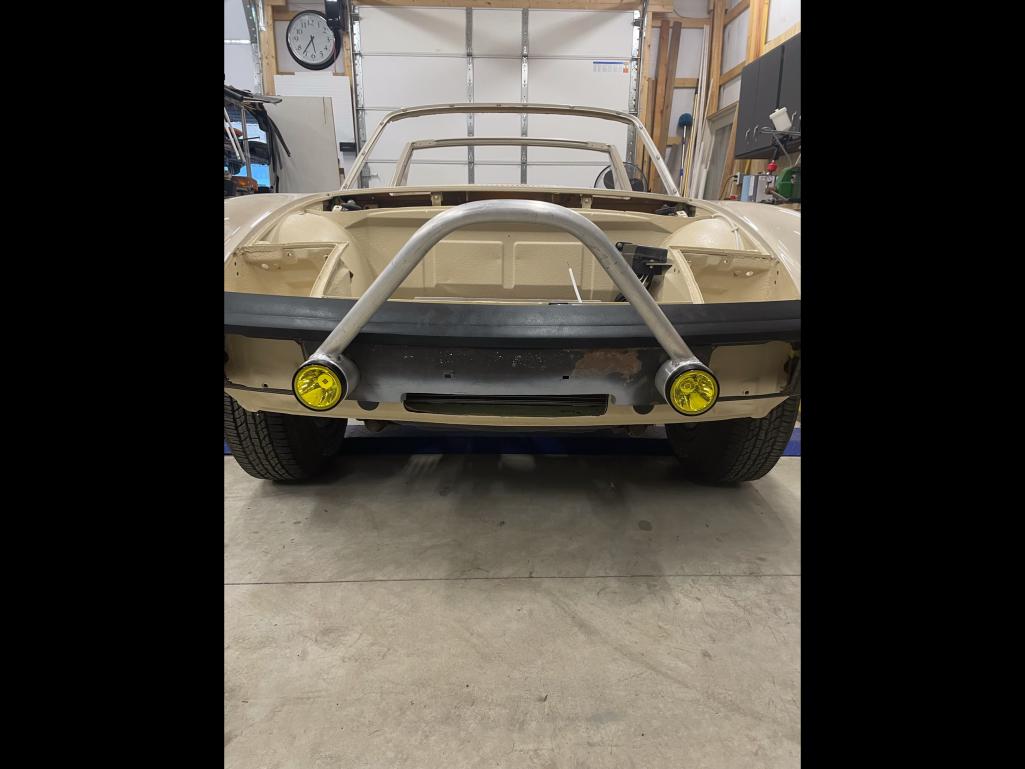
Posted by: East coaster Oct 3 2023, 04:42 PM
I may still add a cross bar towards the bottom, but that’s for another day.
Posted by: tygaboy Oct 3 2023, 06:02 PM
Love it. That looks great! 
Posted by: Shivers Oct 3 2023, 06:08 PM
Nuther…..
Awesome
Posted by: gereed75 Oct 4 2023, 09:01 AM
You are doing some incredible work on this car. Mastercraftmens level.
That heater box is just so trick, Wow.
Posted by: East coaster Oct 11 2023, 05:24 AM
Well, we finally got some cooler weather so it was sanding time. Sanded all my fresh paint with 400 in prep for respraying (in the right color this time….grrrr). Hopefully my next pics will be of it freshly painted and ready to move to assembly stage.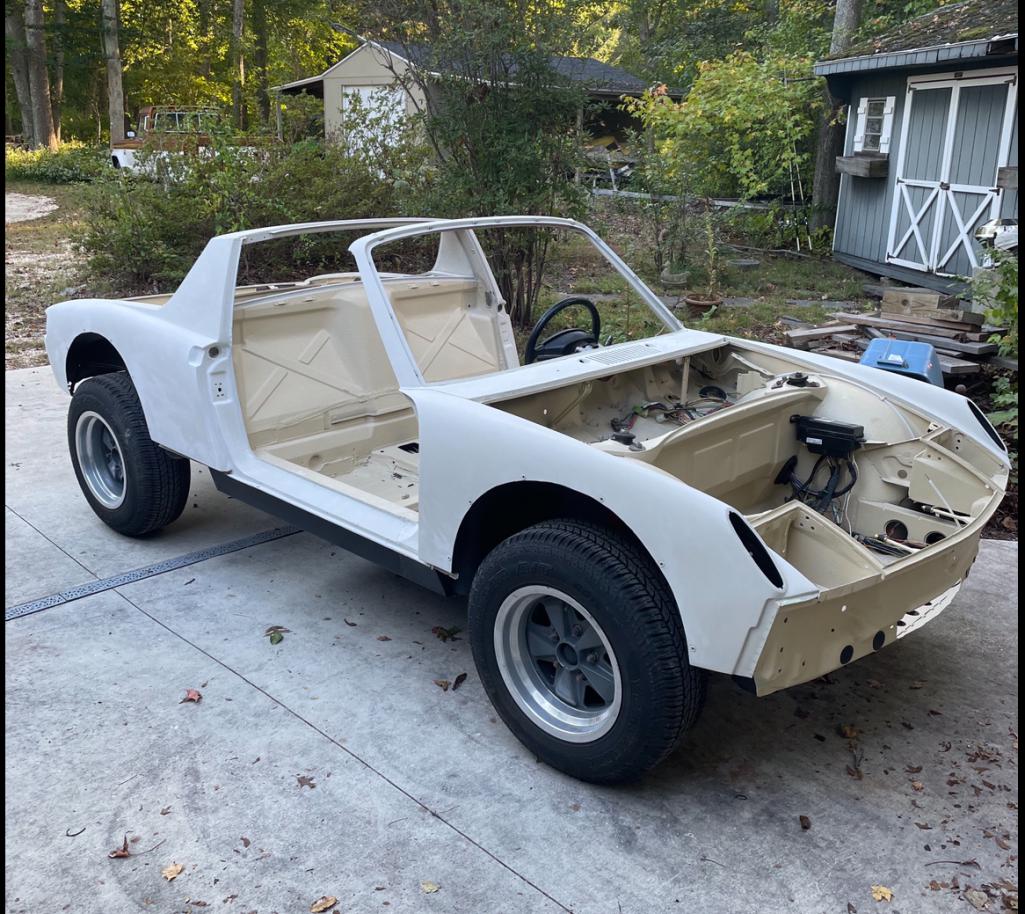
Posted by: Gint Oct 12 2023, 01:04 PM
Started working on the heater core setup. I’m adding a heater core to the fresh air box for heat/defrost. I had to remove some material and then add some to the front of the box. I used ABS sheet from McMaster-Carr to make the addition. More to come, I’m just getting started…….
Cool project!
What are you using to attach the additional ABS to the heater box?
Posted by: Hoppie944s2 Oct 12 2023, 02:02 PM
Well, we finally got some cooler weather so it was sanding time. Sanded all my fresh paint with 400 in prep for respraying (in the right color this time….grrrr). Hopefully my next pics will be of it freshly painted and ready to move to assembly stage.
nice wheels!
Posted by: East coaster Oct 12 2023, 06:29 PM
Nice weather this week. Got the tub repainted (the right color this time). I’m so glad to exit this phase and move on to assembly.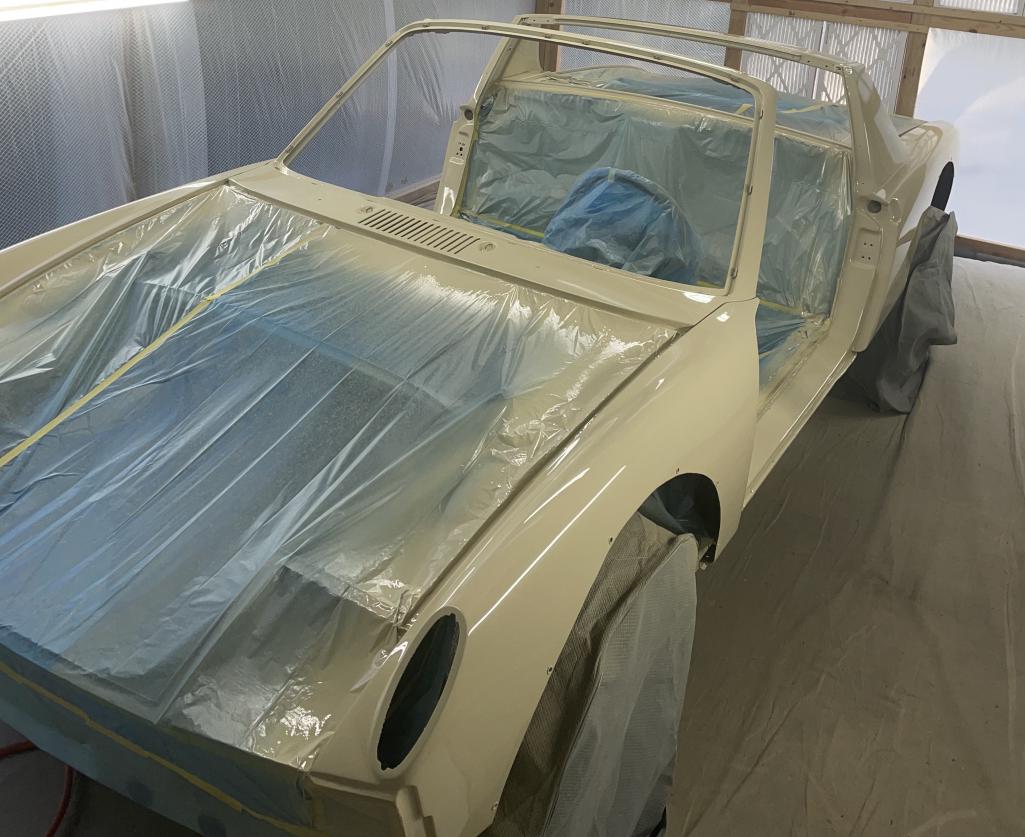
Posted by: East coaster Oct 12 2023, 06:29 PM
Posted by: East coaster Oct 12 2023, 08:02 PM
Cool project!
What are you using to attach the additional ABS to the heater box?
I used JB Weld (black) made for ABS
Posted by: East coaster Oct 13 2023, 05:08 PM
Now that paint is done, it’s time to move to more fun things. I’m going with orange negative side stripes and decided to paint the Fuchs to match. One down, three to go!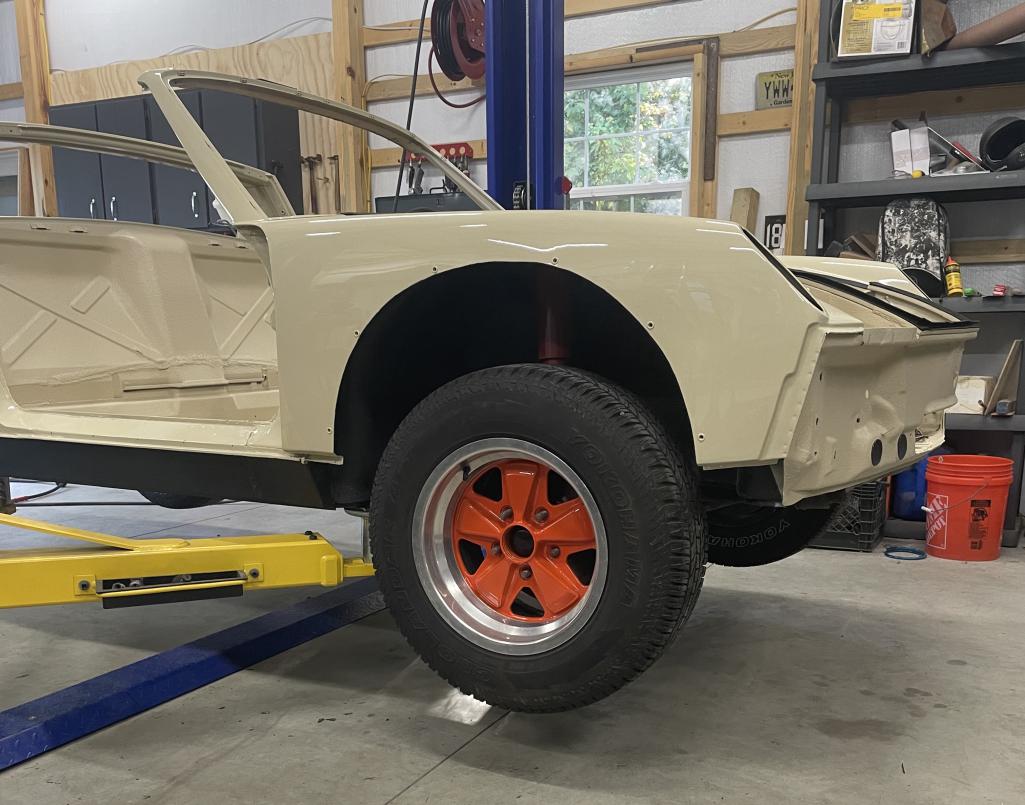
Posted by: East coaster Oct 19 2023, 07:37 PM
Put my cooling lines through the tunnel today. The lines are 1-1/4” aluminum with barbed ends. The tubes share an insulating layer of insulation to keep the heat out of the tunnel/interior. The tubes are sealed to the body at each end via 8mm high temp silicone seal with retaining plates.
Now I can drop my engine/trans in….progress now that paint is cured.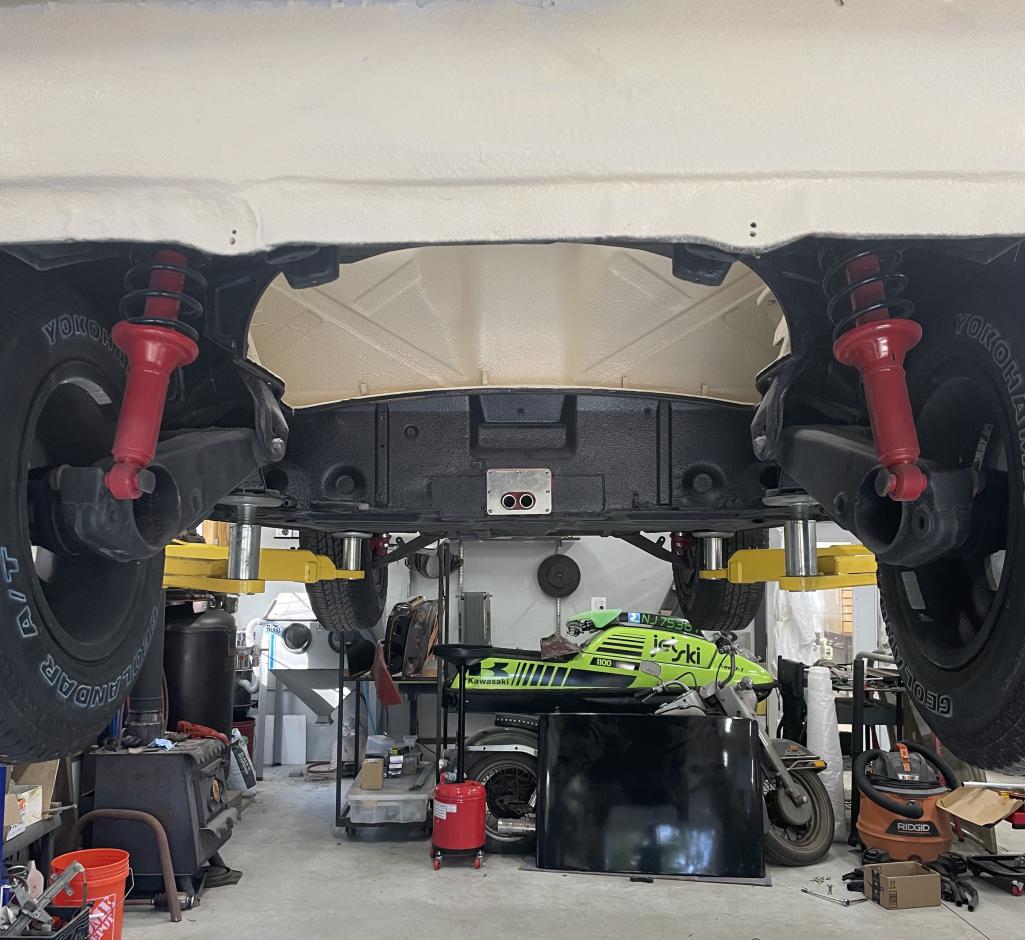
Posted by: East coaster Oct 19 2023, 07:38 PM
Posted by: East coaster Oct 19 2023, 07:38 PM
Posted by: East coaster Oct 21 2023, 06:18 PM
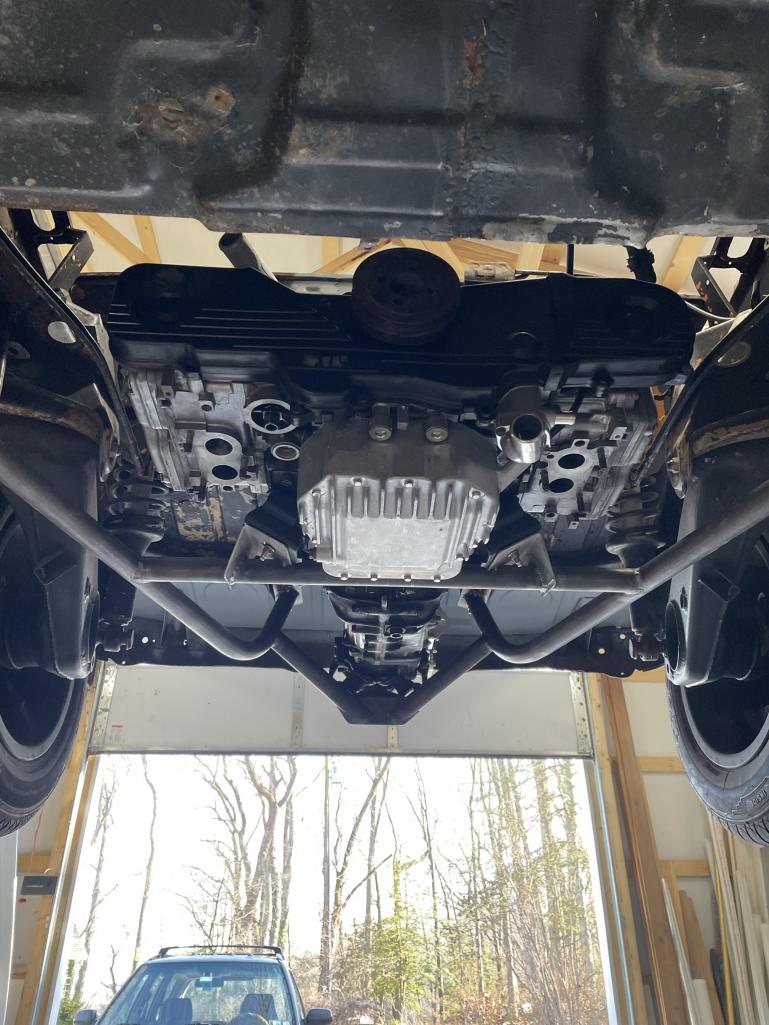
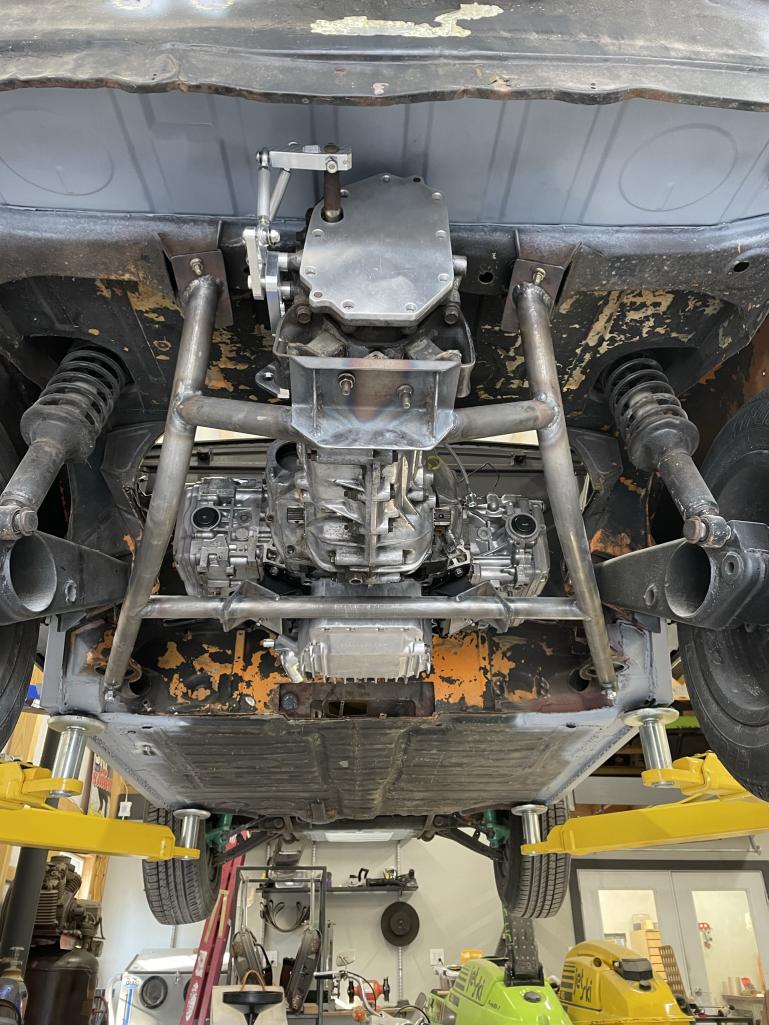
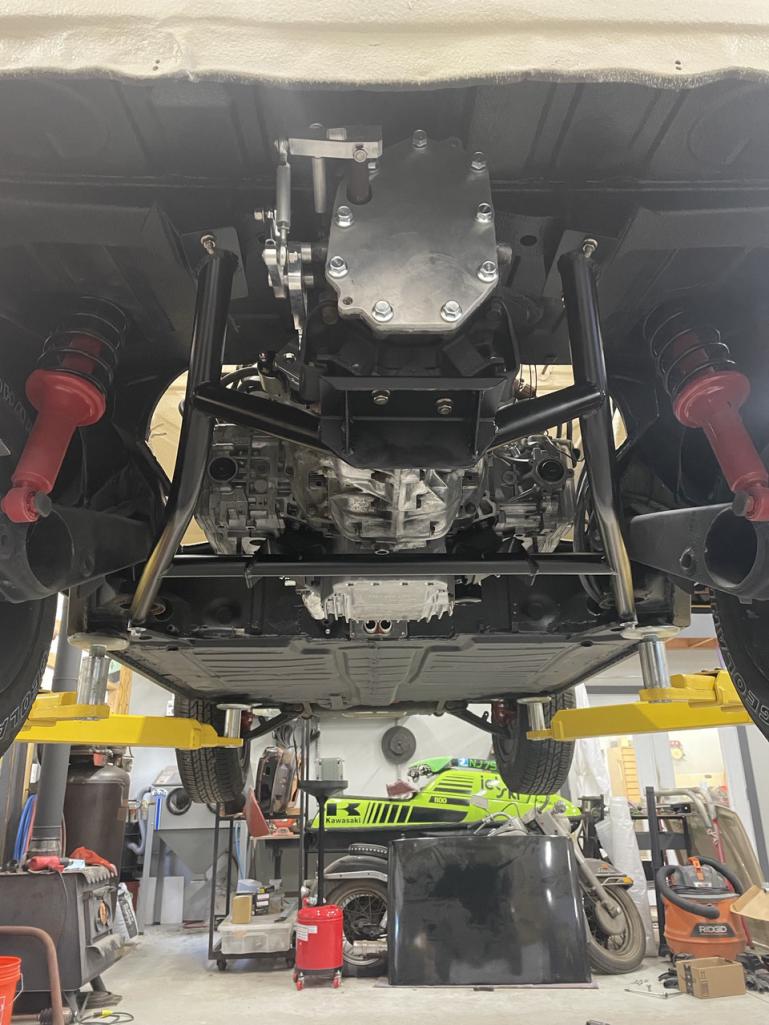
Mounted up the engine and trans today. The cradle lines up so nicely that I did it by myself in about 20 mins. I guess we’ll see how many times I have to take it back out before the project is through (hopefully none, but I’m a realist).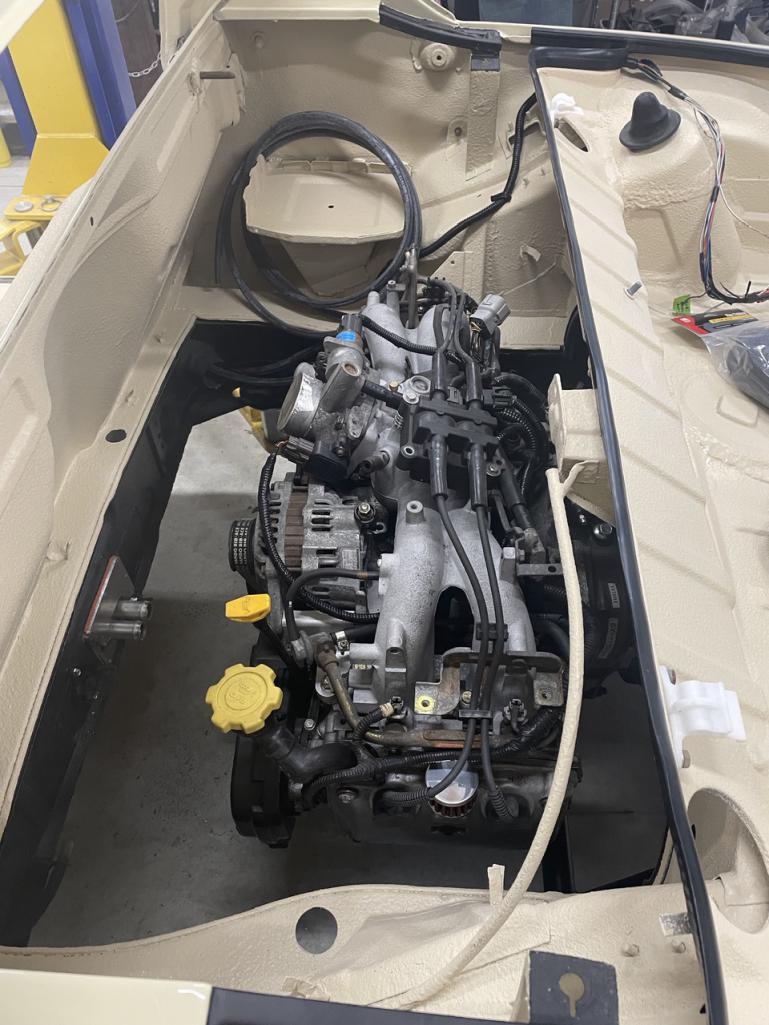
Posted by: East coaster Oct 25 2023, 07:56 PM
Getting bumpers ready for paint…..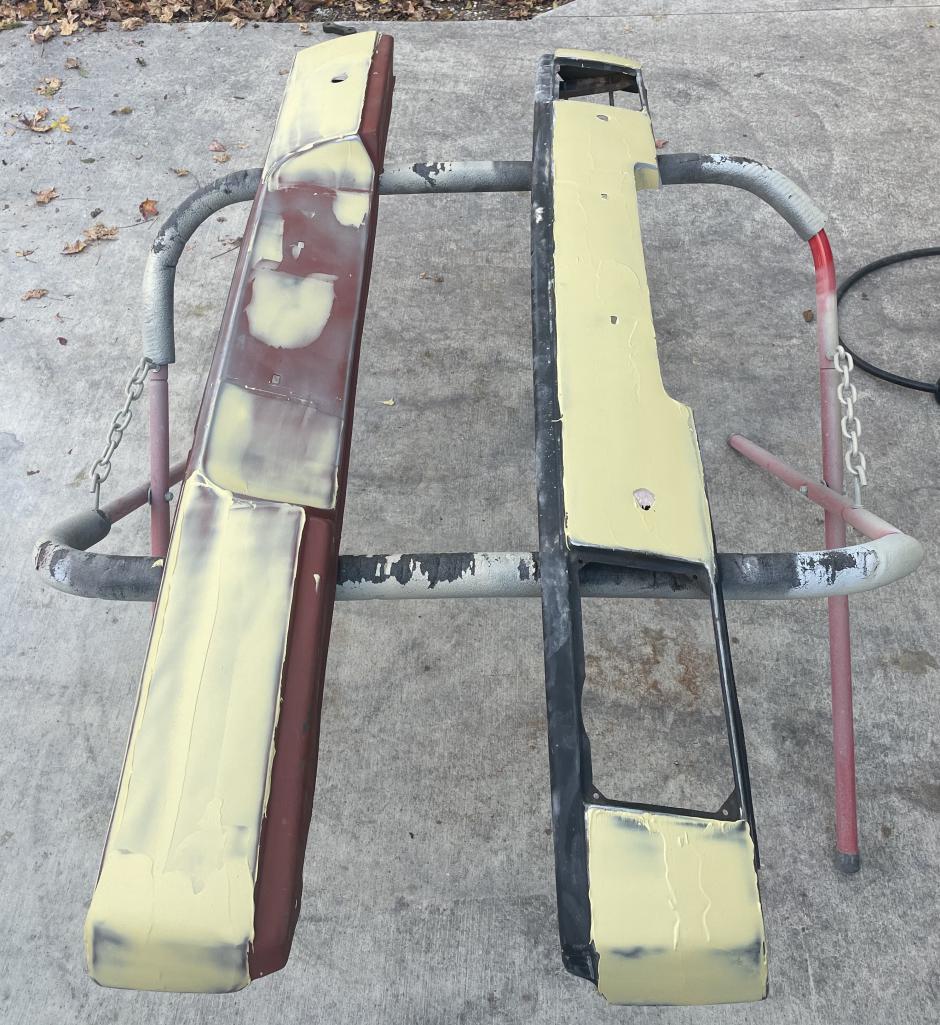
Posted by: East coaster Oct 25 2023, 07:59 PM
Ran clutch hydraulic line, throttle cable, shift cables, and worked on installing the full Subaru harness into the body, installed pedal cluster and brake master and clutch master……making progress…..pics to come
Posted by: Shivers Oct 25 2023, 10:07 PM
Ran clutch hydraulic line, throttle cable, shift cables, and worked on installing the full Subaru harness into the body, installed pedal cluster and brake master and clutch master……making progress…..pics to come
Great stuff. It should have a nice light front. Should be interesting to see how it floats on a washboard. Should have plenty of power to find out.
Posted by: Gint Oct 26 2023, 06:51 AM
Cool project!
What are you using to attach the additional ABS to the heater box?
I used JB Weld (black) made for ABS
Thanks!
Posted by: East coaster Oct 28 2023, 05:02 AM
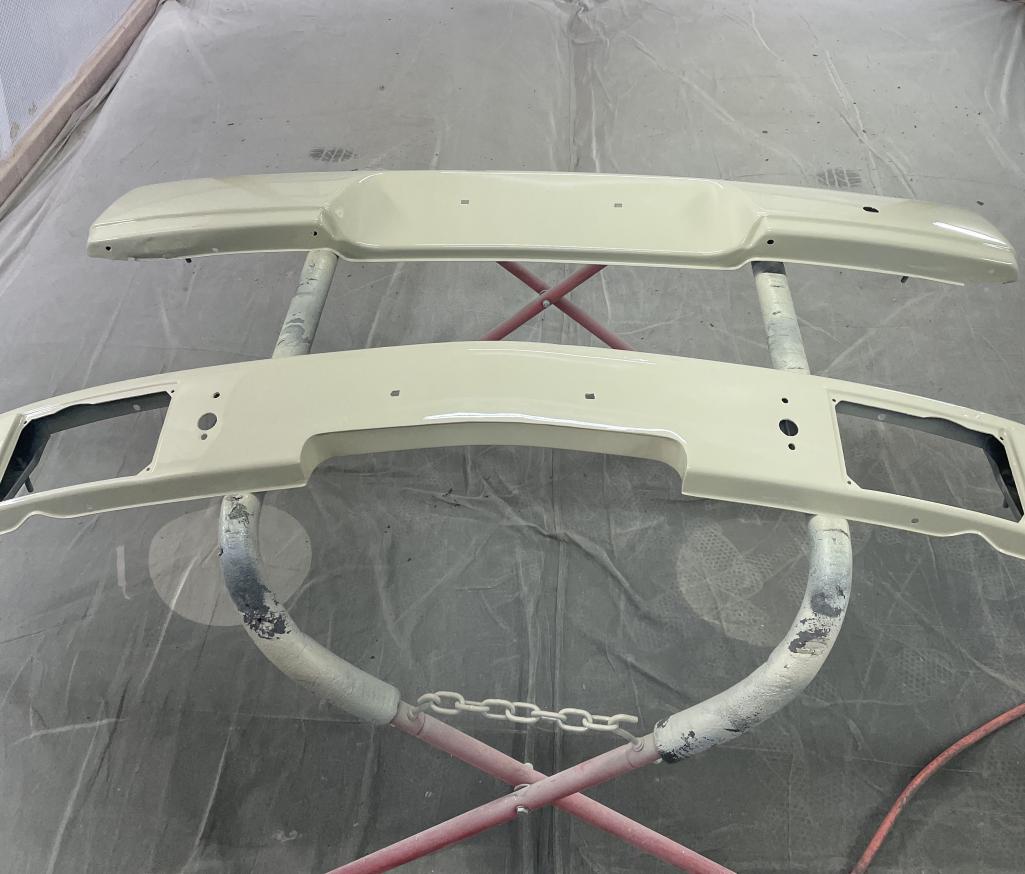
Bumpers painted and I’m officially declaring the paint phase complete! Of course I still need to paint rockers and valances but I don’t count things that get painted with a foo-bomb can.
I’ve got 2 fresh new bumper tops to put on these, hopefully they fit well. I’ve had 13 914’s and never had one with body color bumpers before. I think I’ll like it on this car.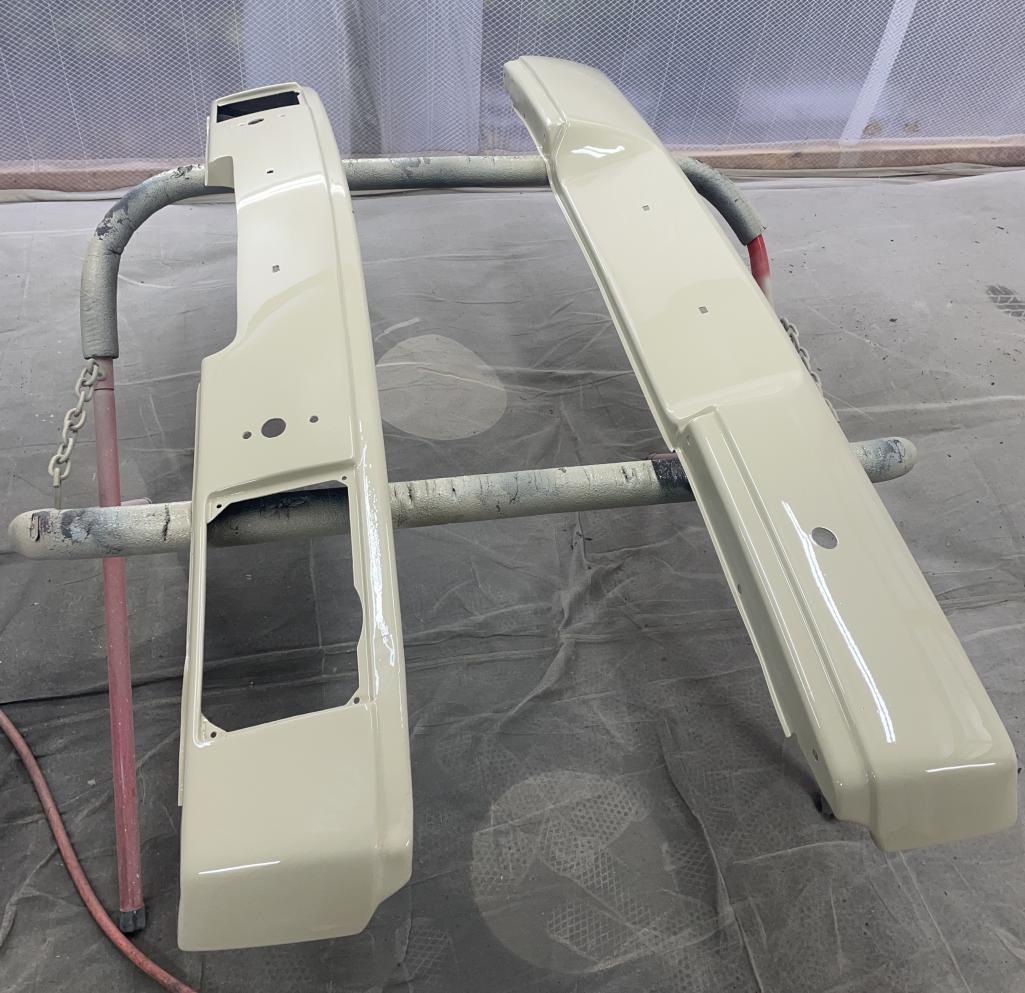
Posted by: East coaster Oct 28 2023, 05:02 AM
Posted by: East coaster Nov 1 2023, 04:48 AM
I’ve been working on the wiring on/off between other aspects of the project. I’m using the entire Subaru harness and adapting it to suit all the 914’s needs.
I was able to mount the Suby interior fuse panel in the stock 914 location. Also mounted several of the relays in the general area. I had to make an extension bracket for the right side of the fuse box but the left side mounted right up to the stock 914 mount.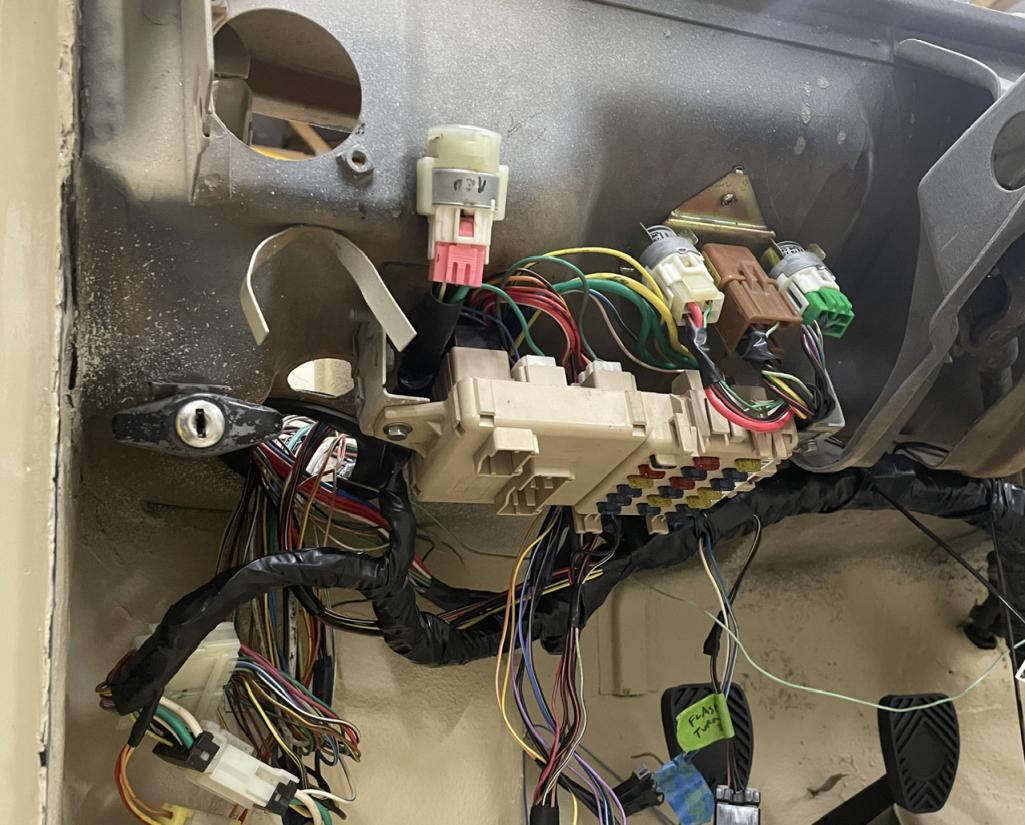
I had to extend the engine harness 85” to accommodate the engine being behind the seats instead of in front of the windshield. Hardest part there is properly extending the shielded wires (for various sensors) while maintaining proper shielding. I still need to dress out the cable with proper sheathing/protection, but at least it now reaches and connects the engine to electrical system.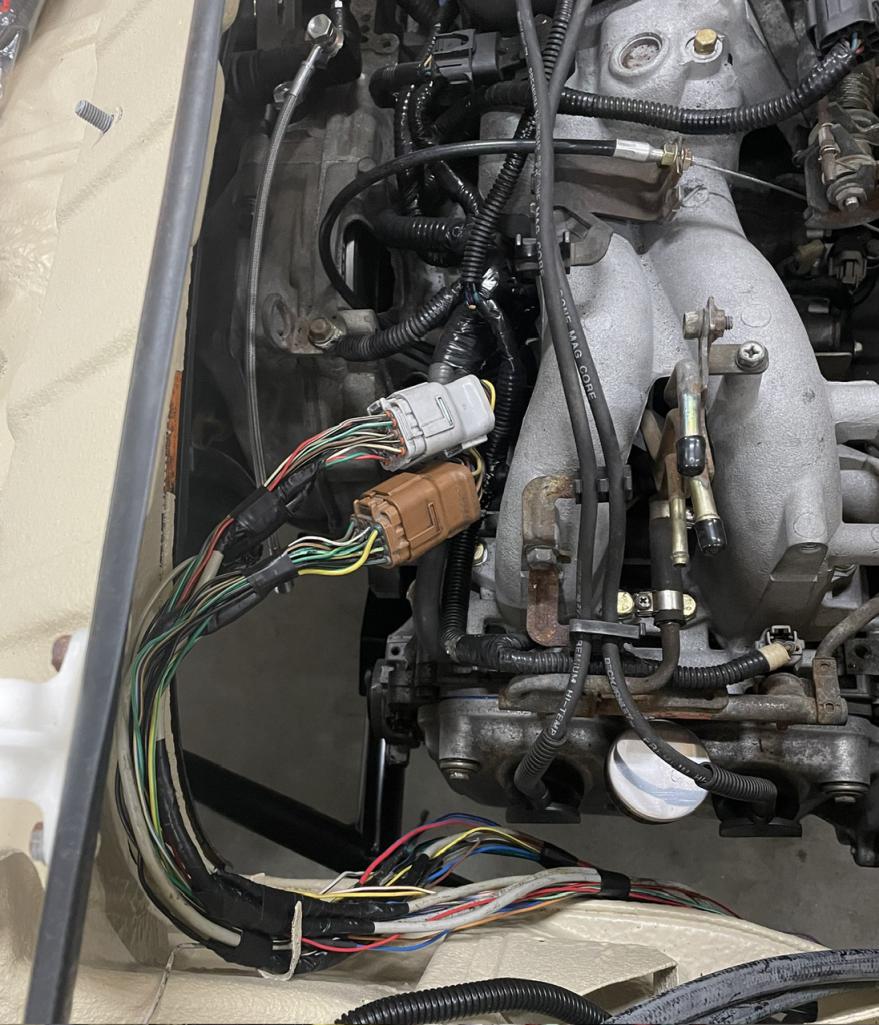
Posted by: Root_Werks Nov 1 2023, 12:34 PM
Looking good! I like your wiring is looking nice and clean. That always takes a lot of extra time to make it look nice.
Posted by: East coaster Nov 2 2023, 05:06 AM
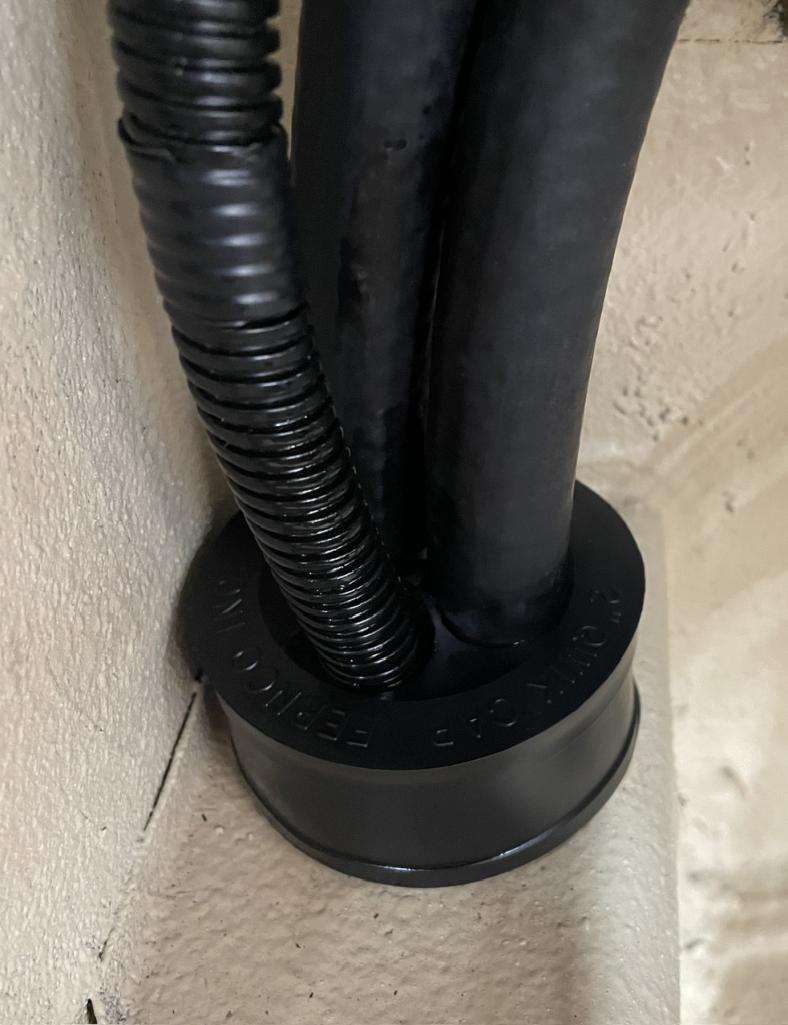
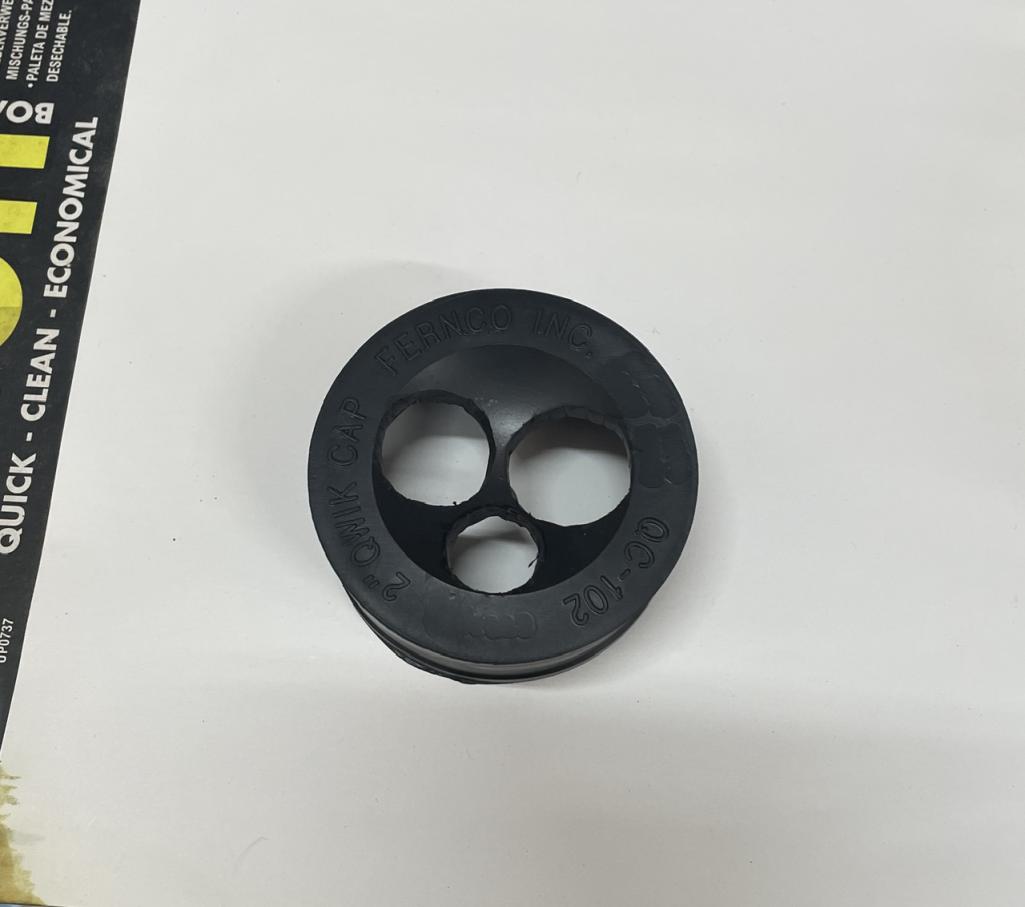
Ran my heater core lines and some 12v lines through my drivers side heater tube. To seal off the tubes and keep critters out I used 2” Fernco caps. I cut pass-thru holes and they make a nice tight seal. I put caps at each end of the heater tubes. I used these on my 3.6 build years ago for the oil cooler lines and they held up perfect.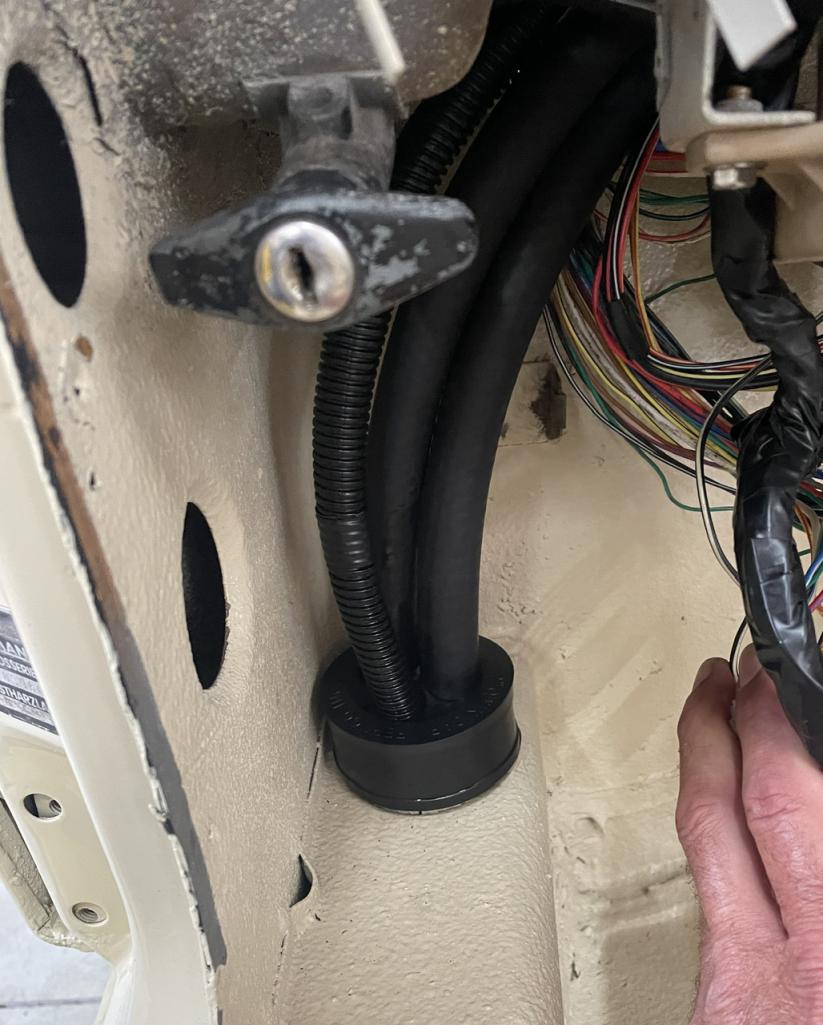
Posted by: Retroracer Nov 2 2023, 11:07 AM
Super nice work on the cooling pipe routing. Very clean solution!
- Tony
Posted by: East coaster Nov 2 2023, 07:23 PM
Got the Main fuse box dressed up and mounted today. I had fab’d and welded a mounting bracket prior to painting. Starting to see light at the end of the tunnel with the wiring, just another couple of days and it should be complete (if I don’t get distracted by something more fun).
Posted by: East coaster Nov 3 2023, 07:15 PM
Got the dash mounted today. I wanted to get this in so I can figure out my center console design.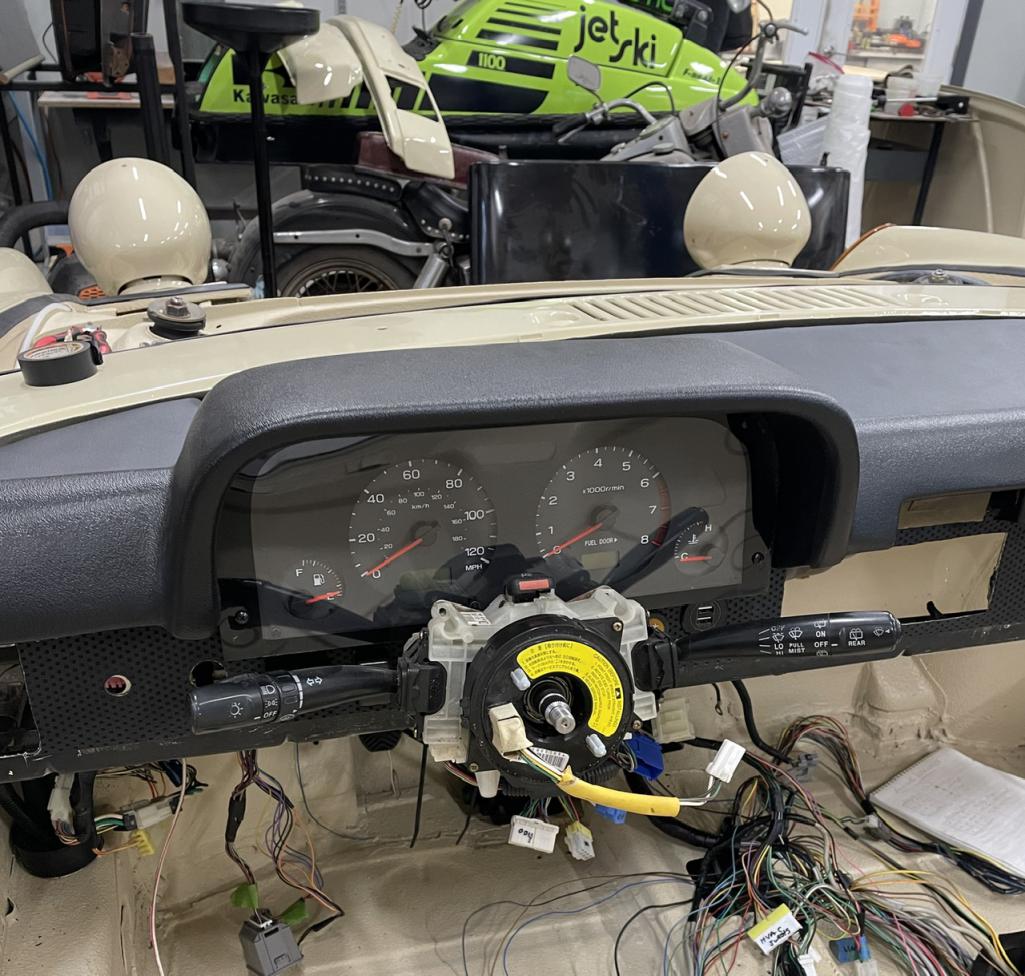
Posted by: East coaster Nov 7 2023, 07:43 PM
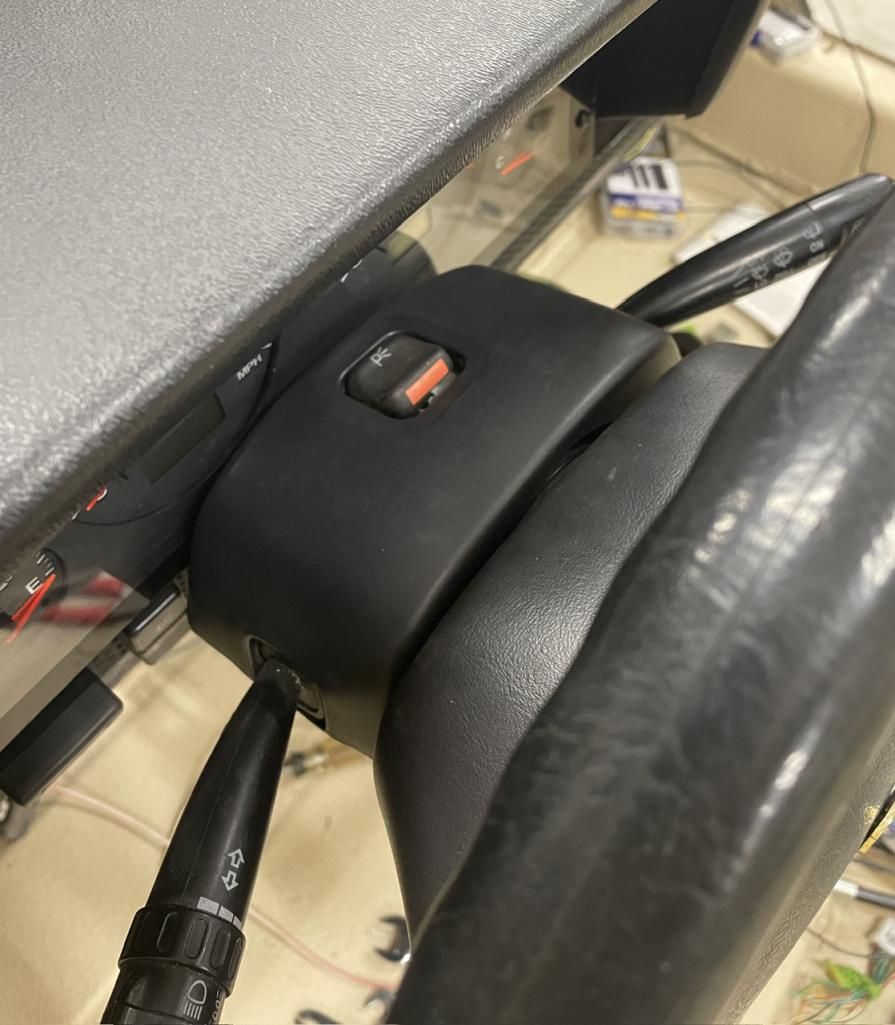
Worked on the steering column cover and dash wiring. I modified the Suby column cover to fit the 914 dash and it fits pretty well. There are some gaps on each side that I’ll address before I’m done. I also added a Porsche emblem to the modified Suby steering wheel to make it seem more at home.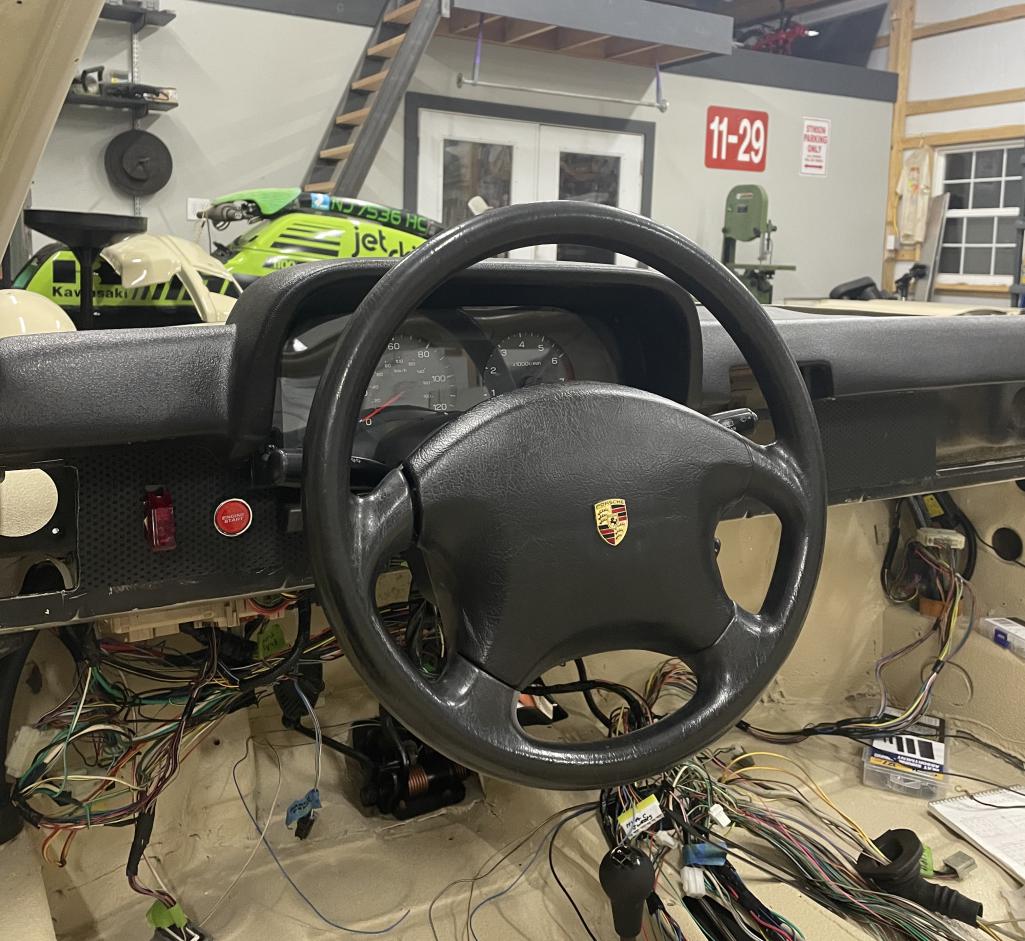
Posted by: East coaster Nov 10 2023, 06:30 AM
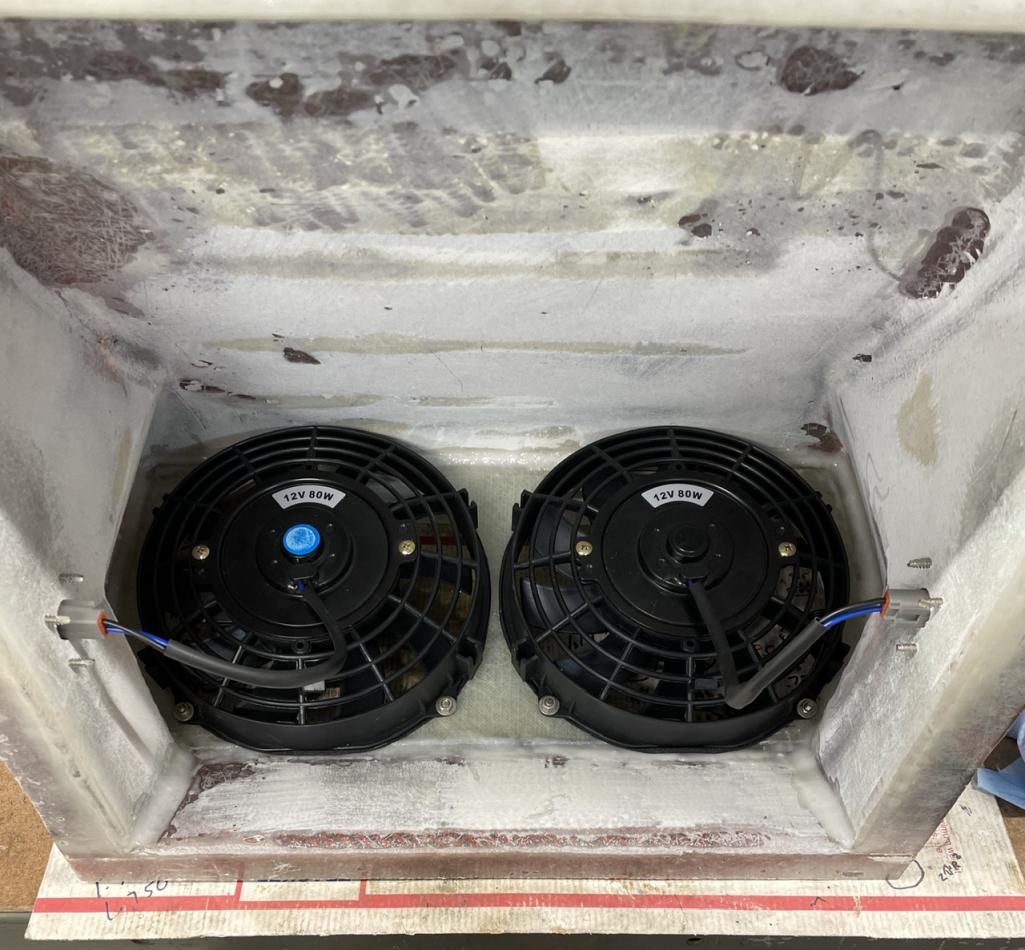
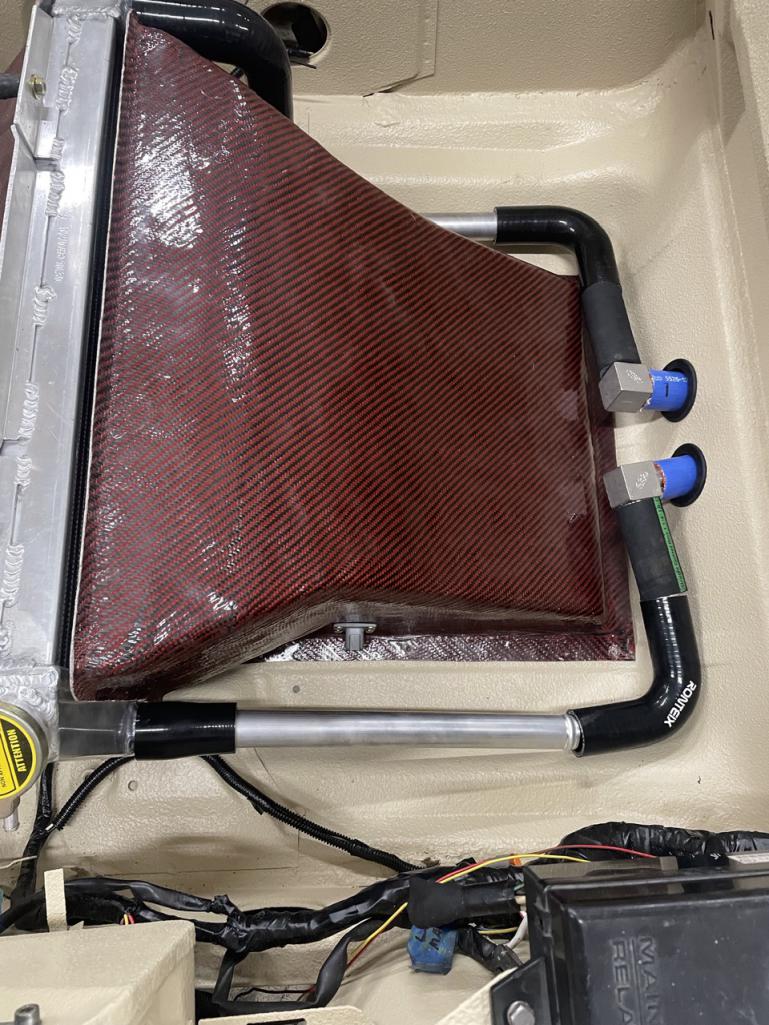
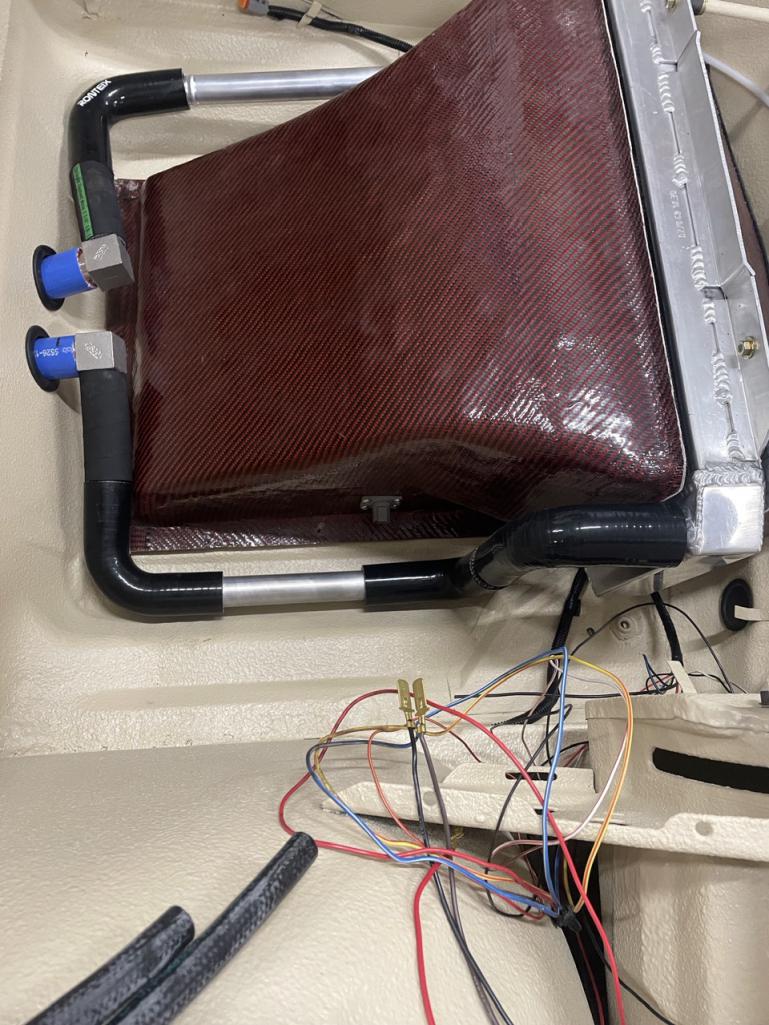
Working on finalizing the radiator install. I needed to mount my dual fans in the exit duct, so laid up a flat section of biaxial glass and cut the holes for the fans and outside dimensions. Then just bonded it in place with epoxy thickened with 404 and 406 fillers. The end result is very rigid and will support the fans well.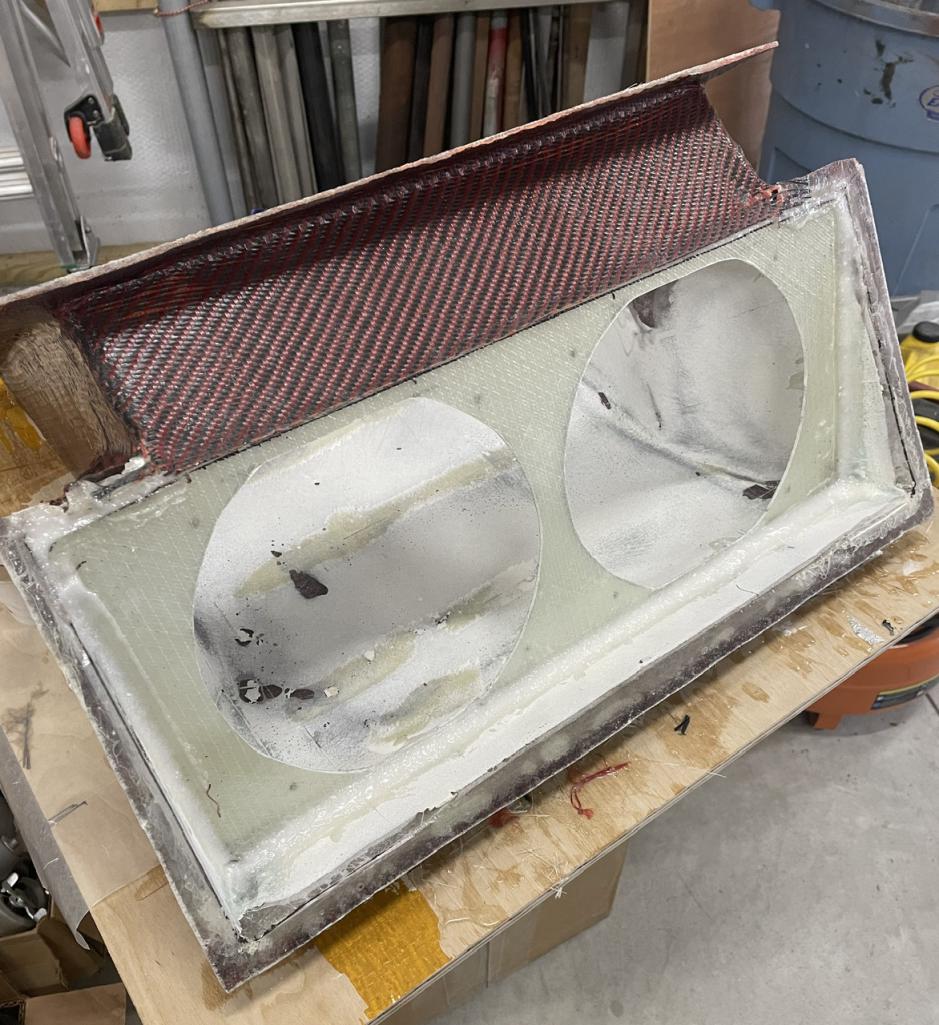
Posted by: East coaster Nov 11 2023, 06:03 PM
Finished up the radiator exit plenum, fans mounted and wired to Deutsch bulkhead connectors (one for each fan, one on each side of plenum). I wanted to be able to pull the plenum for cleaning/etc, so the connectors will make that easy. The factory Suby wiring harness and ECU will power/control the fans. It runs one fan until the second is needed.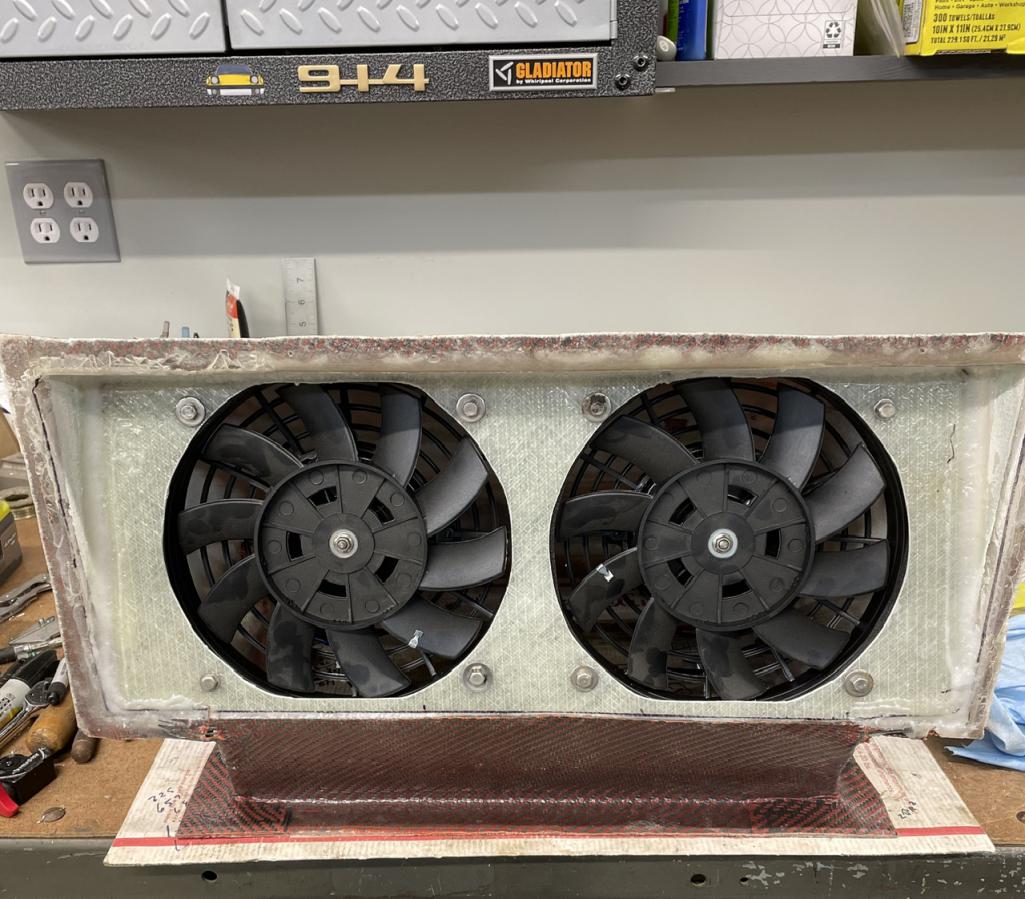
Posted by: davehg Nov 11 2023, 07:05 PM
If there were ever a reason to swap a Subaru motor into a 914 it would have to be this.
Fantastic build. An AWD safari 914 will be brilliant. Your skills are terrific. Can’t wait to see where this ends up.
A thought for interior. Seat inserts should be cotton with a print like a Mexican poncho. I saw this in a Meyers Manx and it was brilliant.
Posted by: East coaster Nov 11 2023, 08:13 PM
If there were ever a reason to swap a Subaru motor into a 914 it would have to be this.
Fantastic build. An AWD safari 914 will be brilliant. Your skills are terrific. Can’t wait to see where this ends up.
A thought for interior. Seat inserts should be cotton with a print like a Mexican poncho. I saw this in a Meyers Manx and it was brilliant.
Thank you! It’s been a fun project so far.
Posted by: East coaster Nov 14 2023, 07:23 PM
In the theme of trying to wrap up the wiring, I added a 3rd brake light today. The hardest part was running the wiring so it exits the body under the sail trim. There’s no exposed wiring with this setup.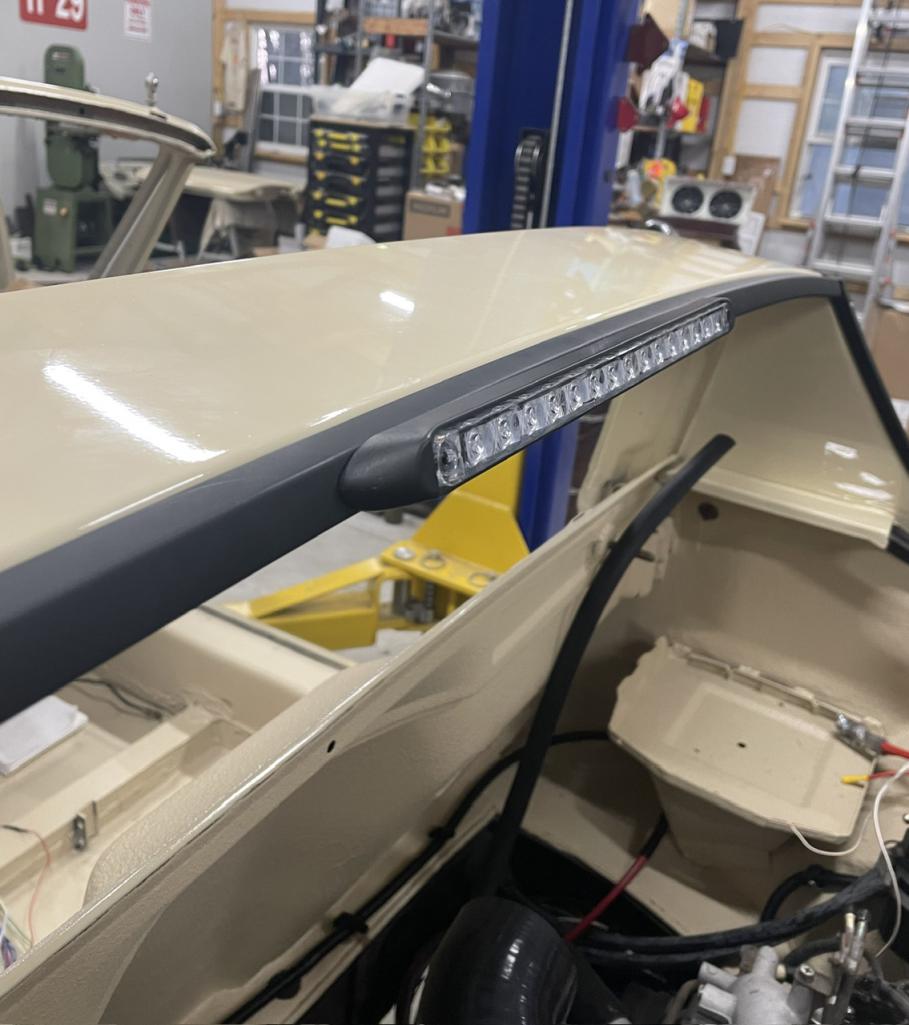
It’s pretty bright…..hopefully might prevent getting rear-ended.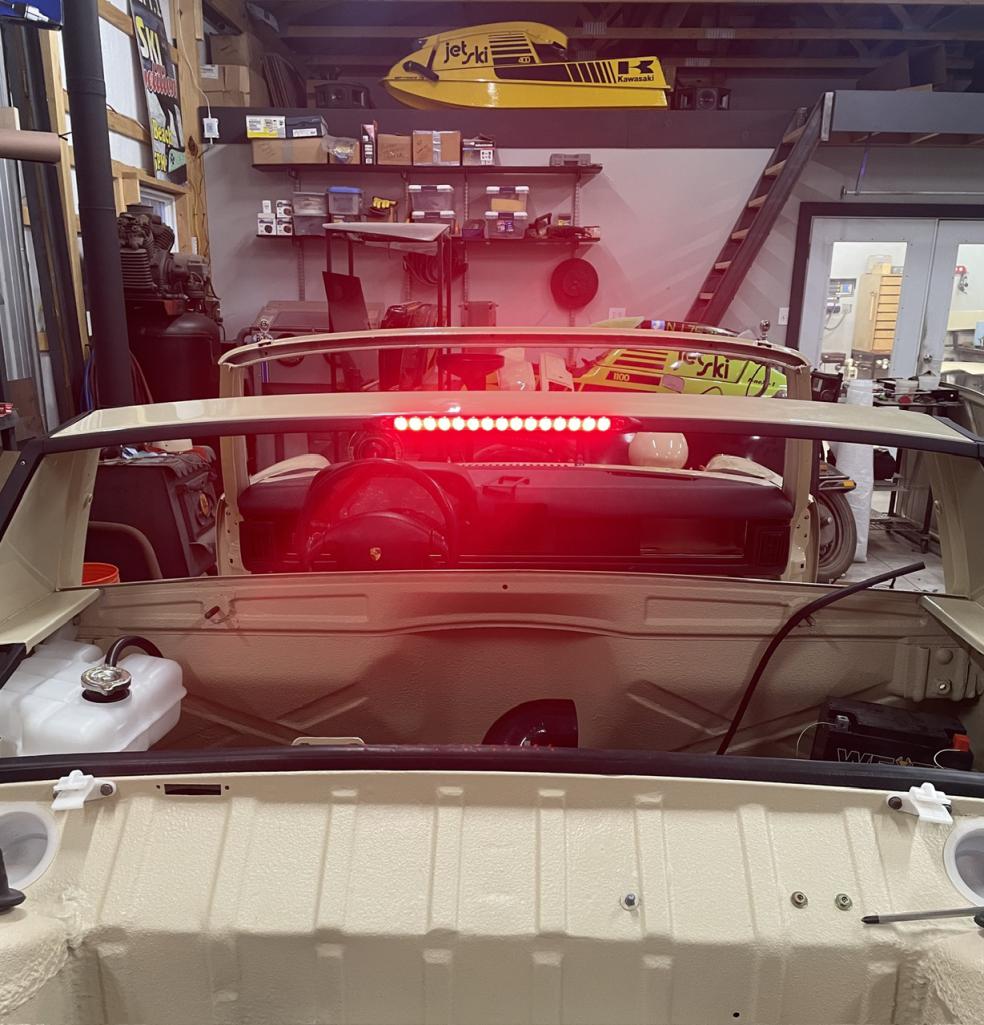
Posted by: East coaster Dec 1 2023, 07:08 PM
Took a break on the project to spend a week in Italy, which was pretty cool, but now back on the project. I’ve been doing many little things that aren’t picture worthy but necessary.
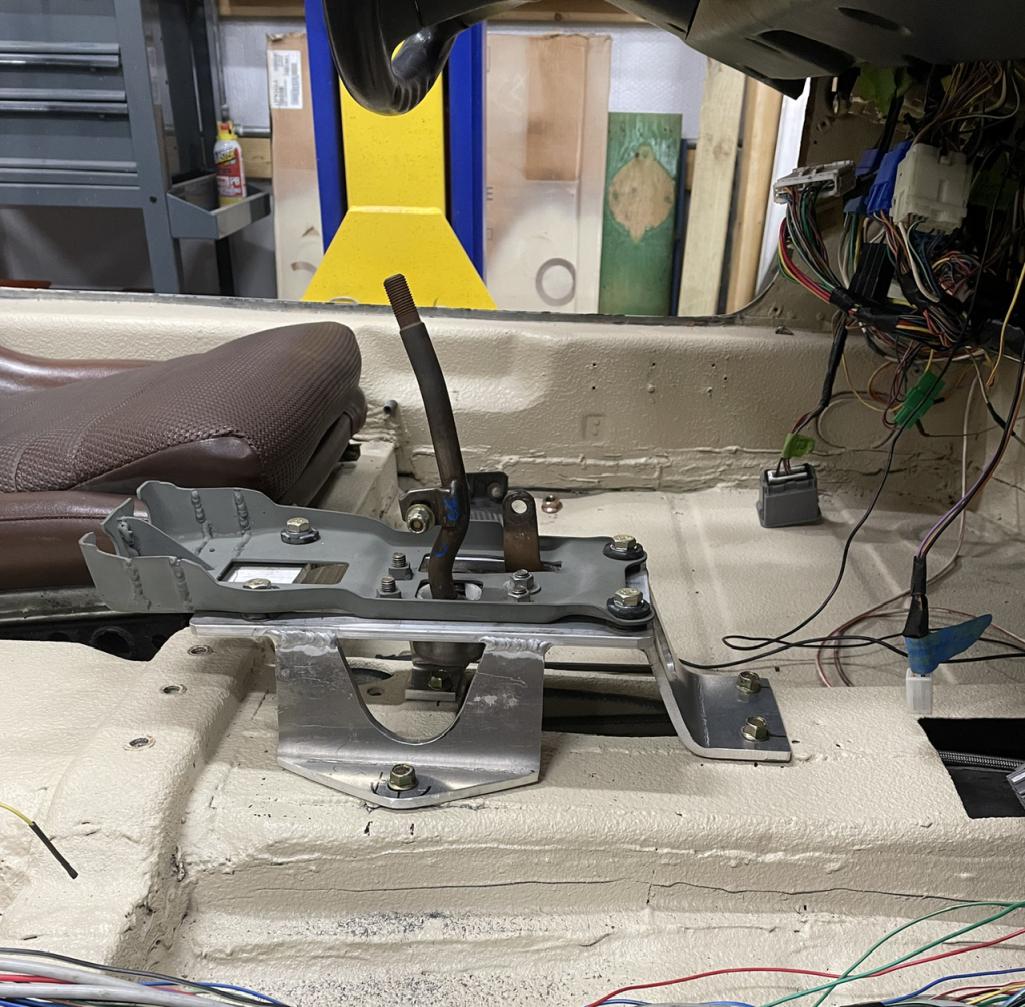
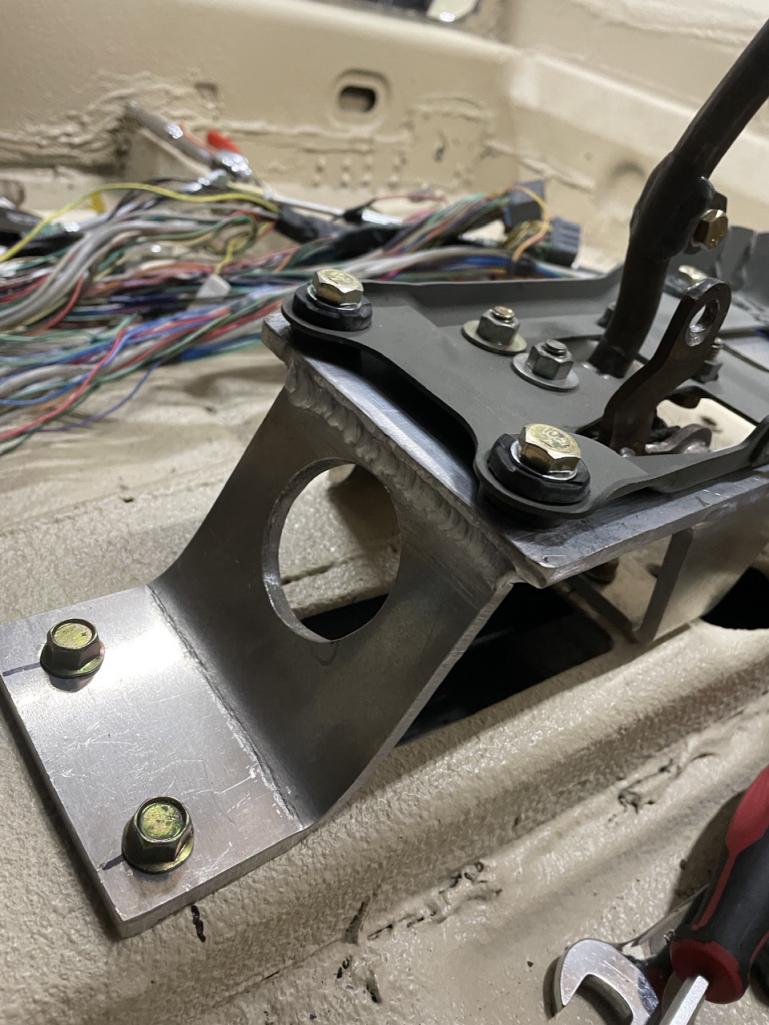
Today I decided to rework my shifter mount. The previous version was 3/4 steel tube, and frankly, overkill and heavy. I decided to scrap it and fab up an aluminum mount. The other issue with the previous version was that the harness would have to pass through it. If I ever needed to pull the mount I’d have to pull the harness back through it first. The aluminum version provides enough space to allow the harness to pass by on the outside of the mount.
I did clean up the mount a bit after these pics, but didn’t get too crazy making it look pretty because it will all be hidden in the center console when done.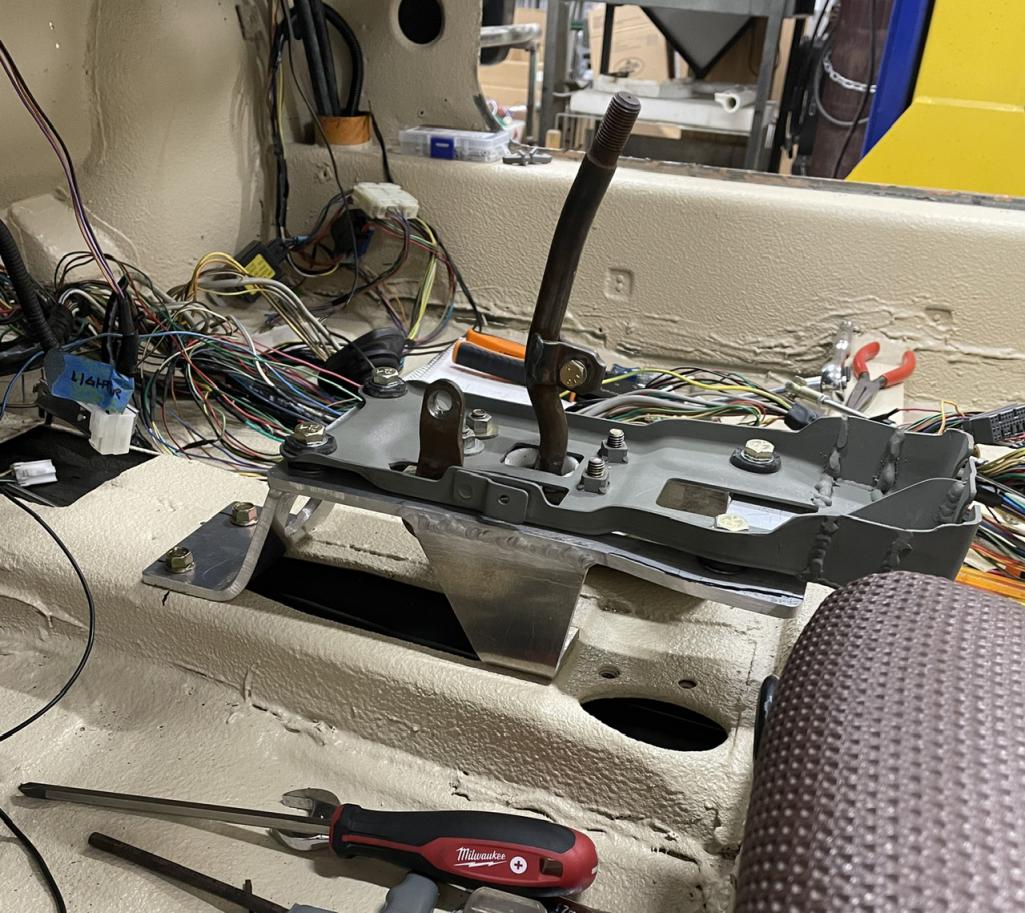
Posted by: East coaster Dec 7 2023, 06:00 PM
Decided to play with my radiator setup today (frankly, I was sick of wiring). I finished the final trimming/fitment of the radiator ducts and made the seals for the inlet and outlet ducts. The seals are a high temp silicone. I also put heat insulation inside the duct to help keep trunk temps down.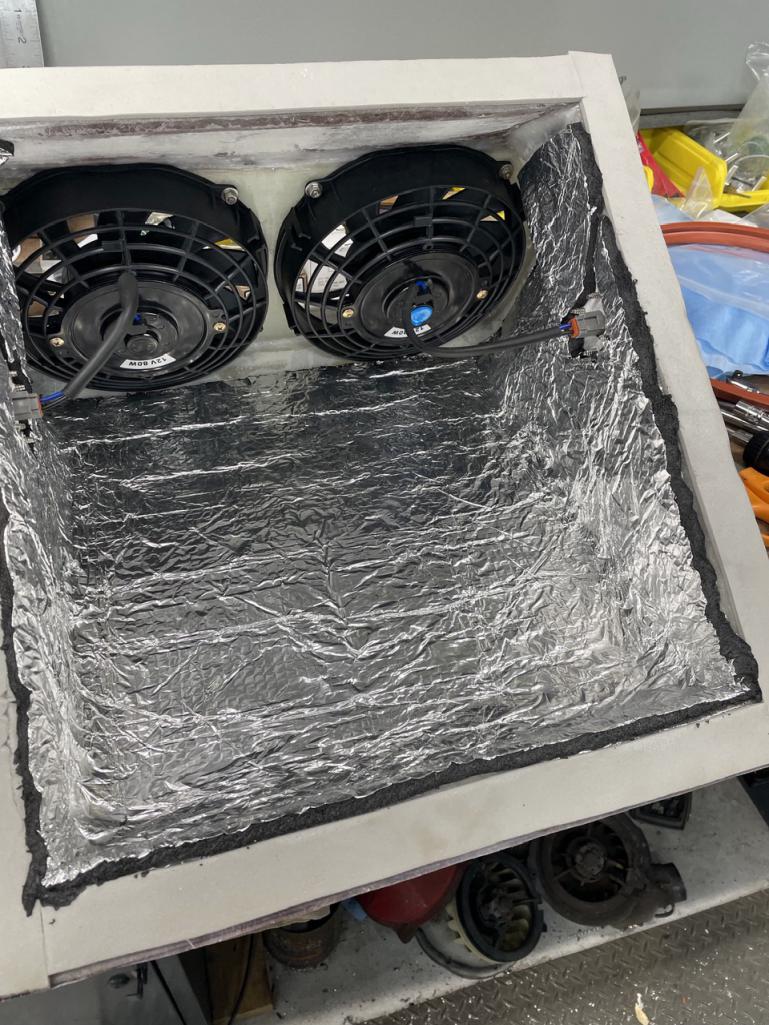
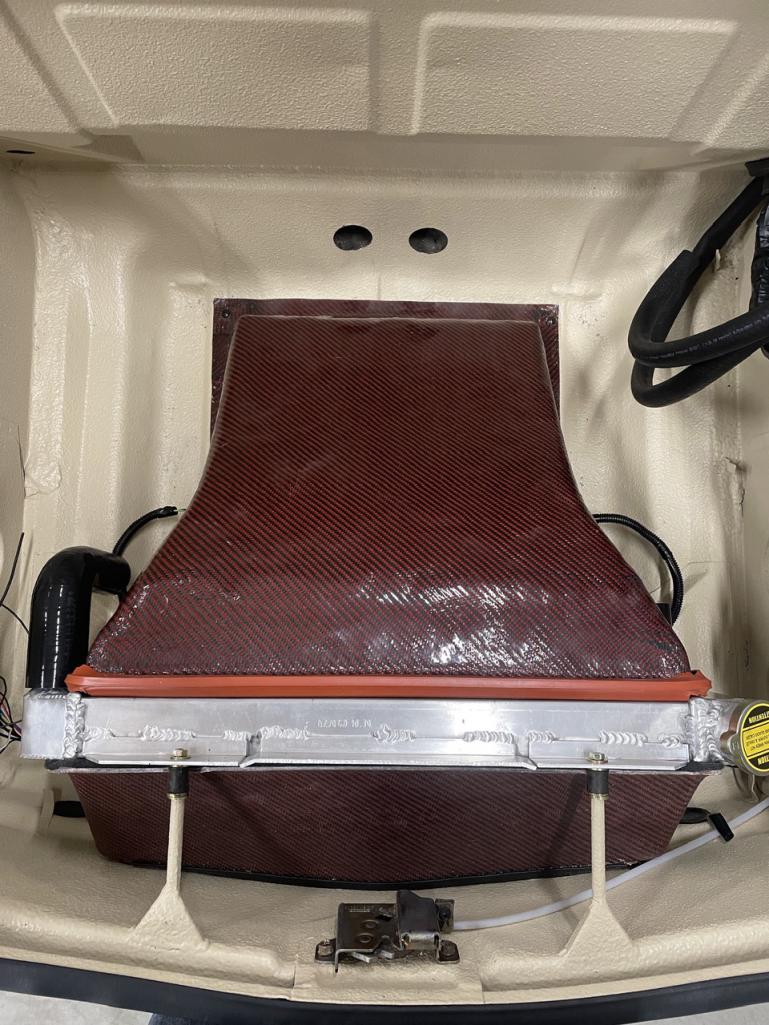
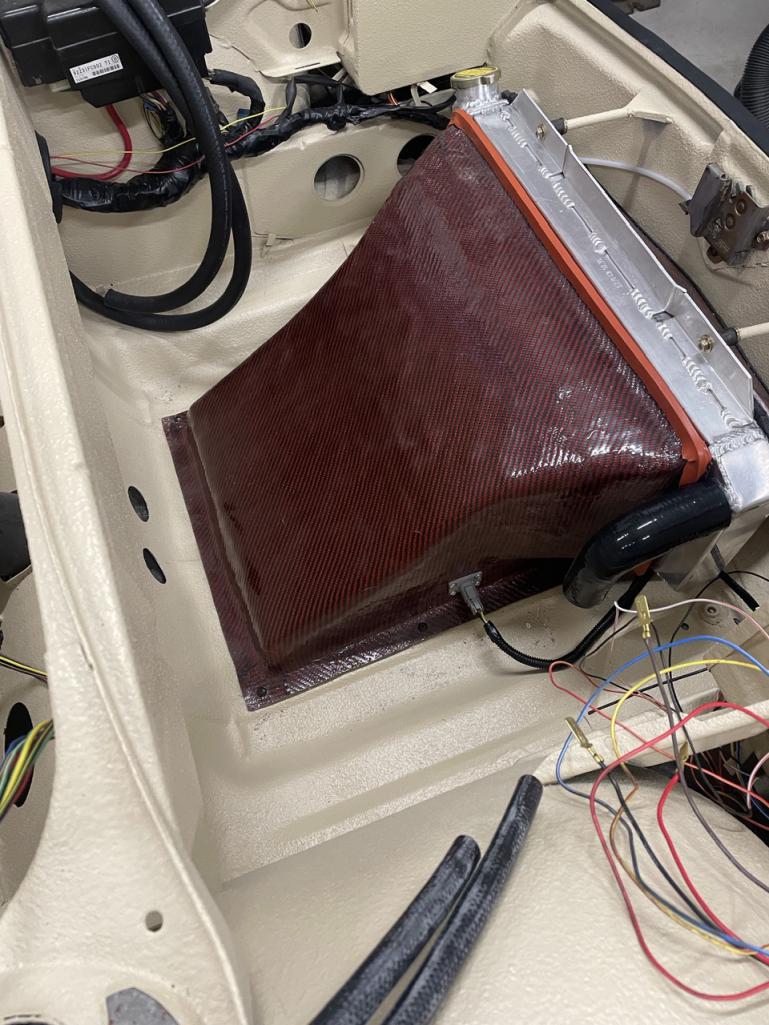
Posted by: East coaster Dec 7 2023, 06:05 PM
Then I played with my water lines and made the alum tubes to connect all the various silicone tube fittings. I think I’m going to take stock in a hose clamp company! It’s a little convoluted but I wanted to maintain as much trunk space as I can. The lines will be nice and symmetrical once I get it clamped up.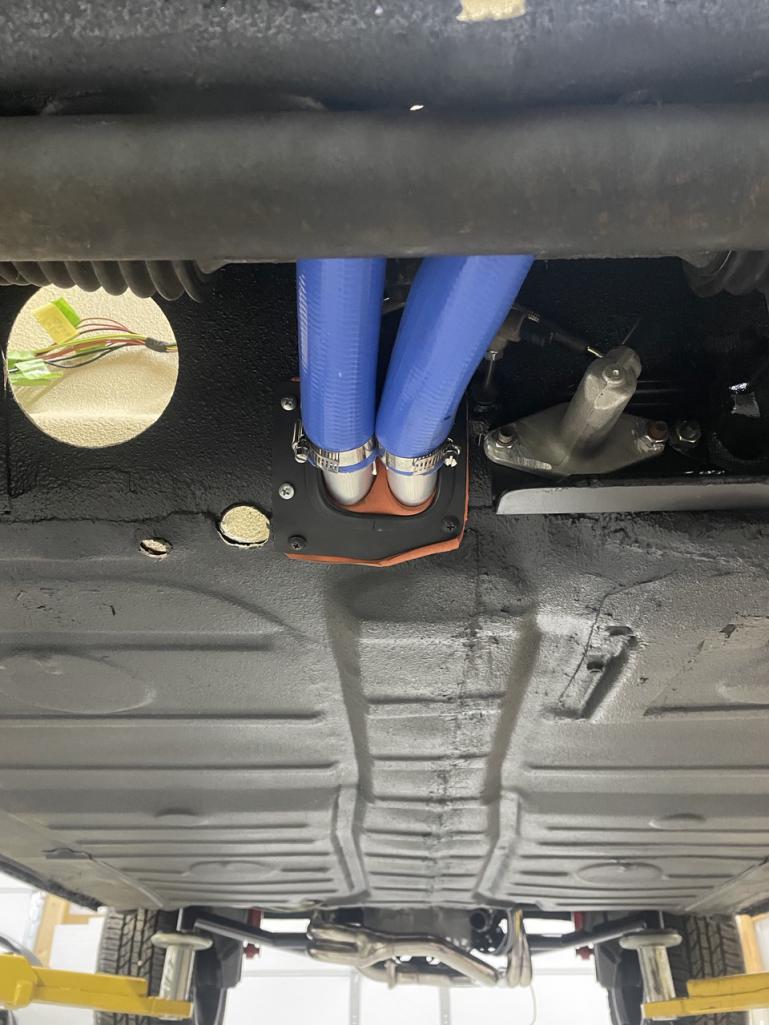
Posted by: Shivers Dec 7 2023, 06:06 PM
That is slick.
Posted by: East coaster Dec 12 2023, 07:21 PM
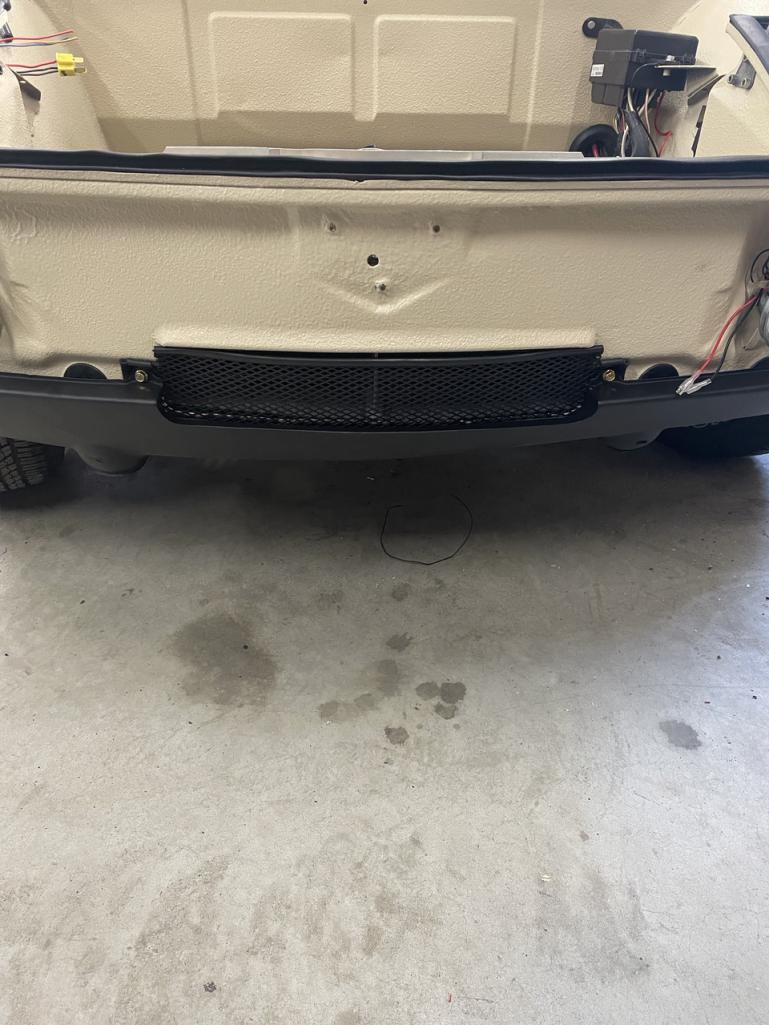
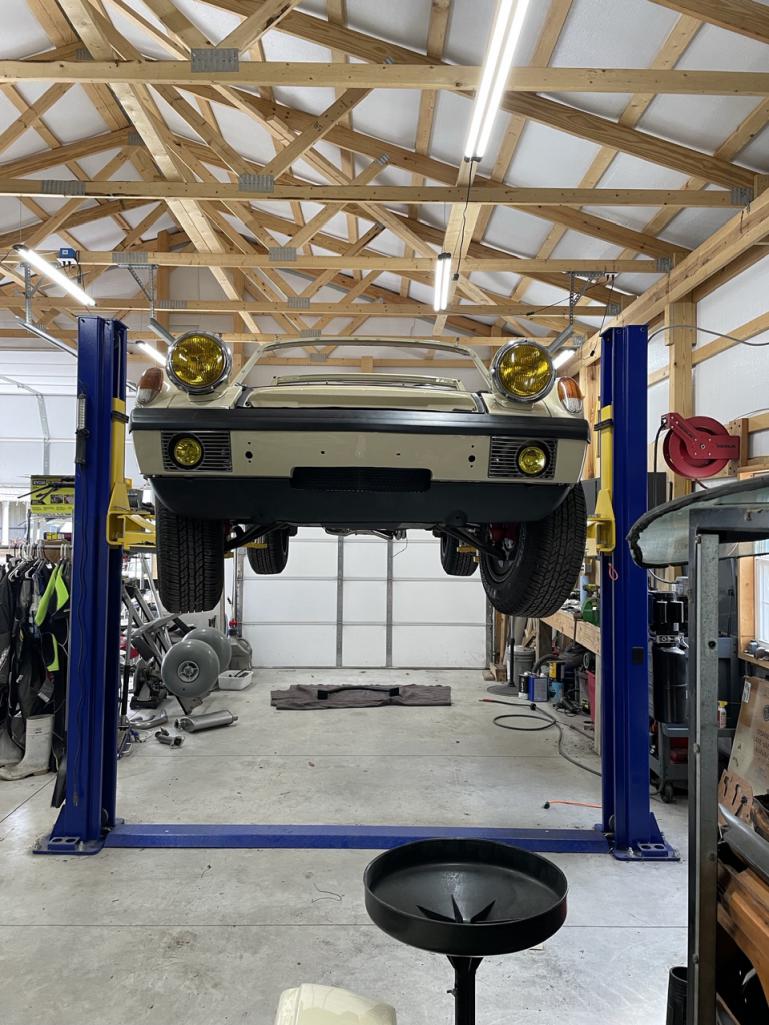
Put the front valance on today. I had to trim it back about an inch on each side for the larger wheel wells, then work a lip back into it to keep it stock looking and add strength. I also made a grill for the radiator intake using some extra engine lid grill material I had.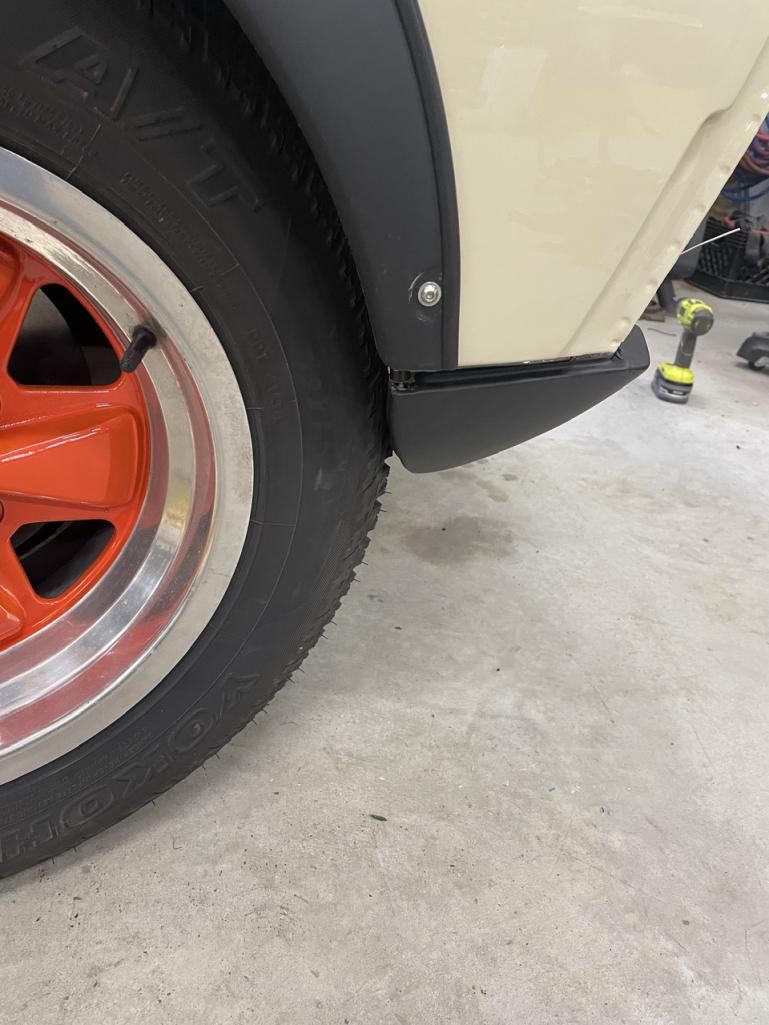
Posted by: Chris H. Dec 12 2023, 07:31 PM
Looking great! What size hoses did you go with?
Posted by: East coaster Dec 12 2023, 08:08 PM
Looking great! What size hoses did you go with?
It’s all 1-1/4” except where it connects to engine and radiator. I have 1-1/2” to 1-1.4” converters there.
Posted by: East coaster Dec 13 2023, 07:30 PM
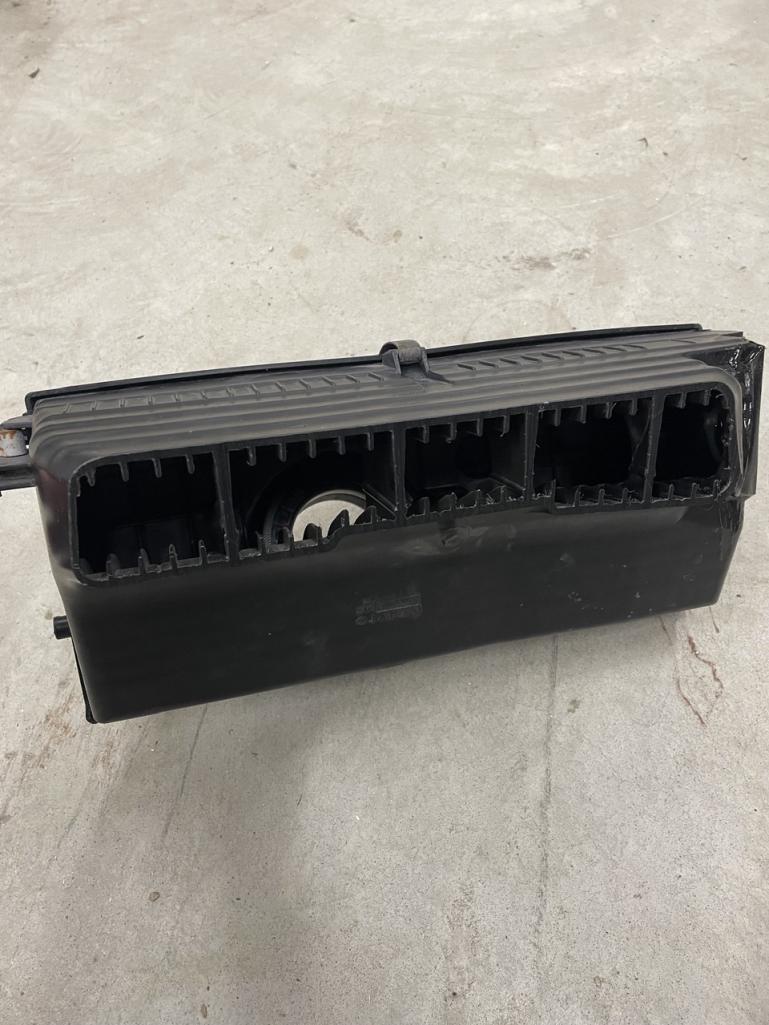
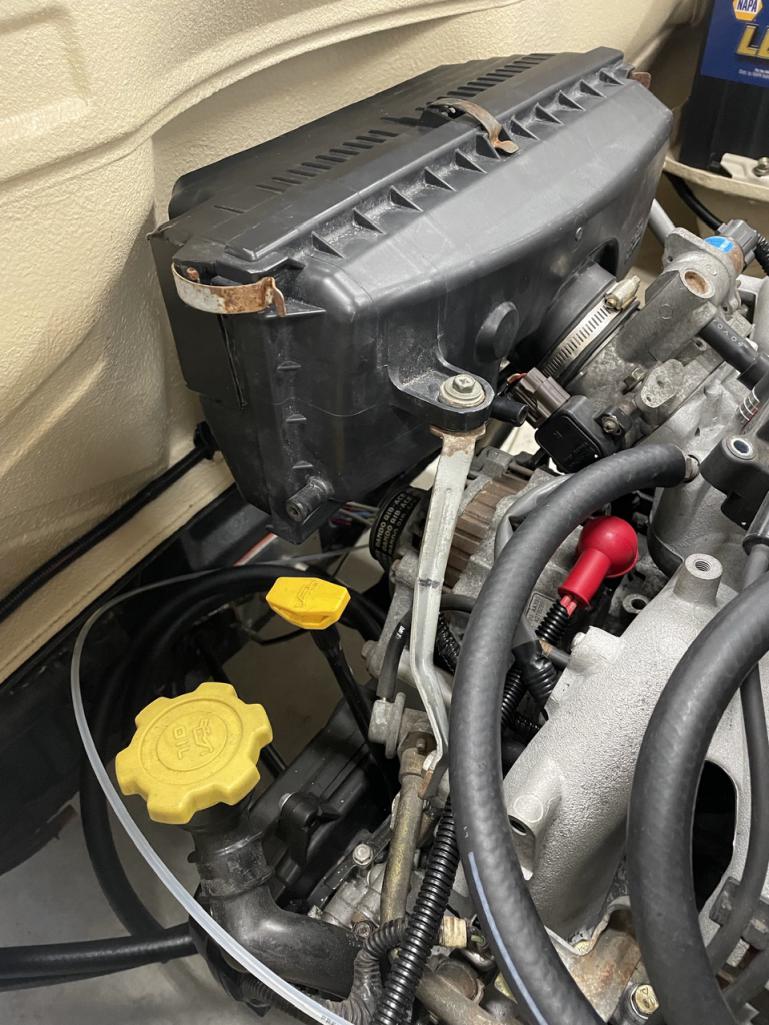
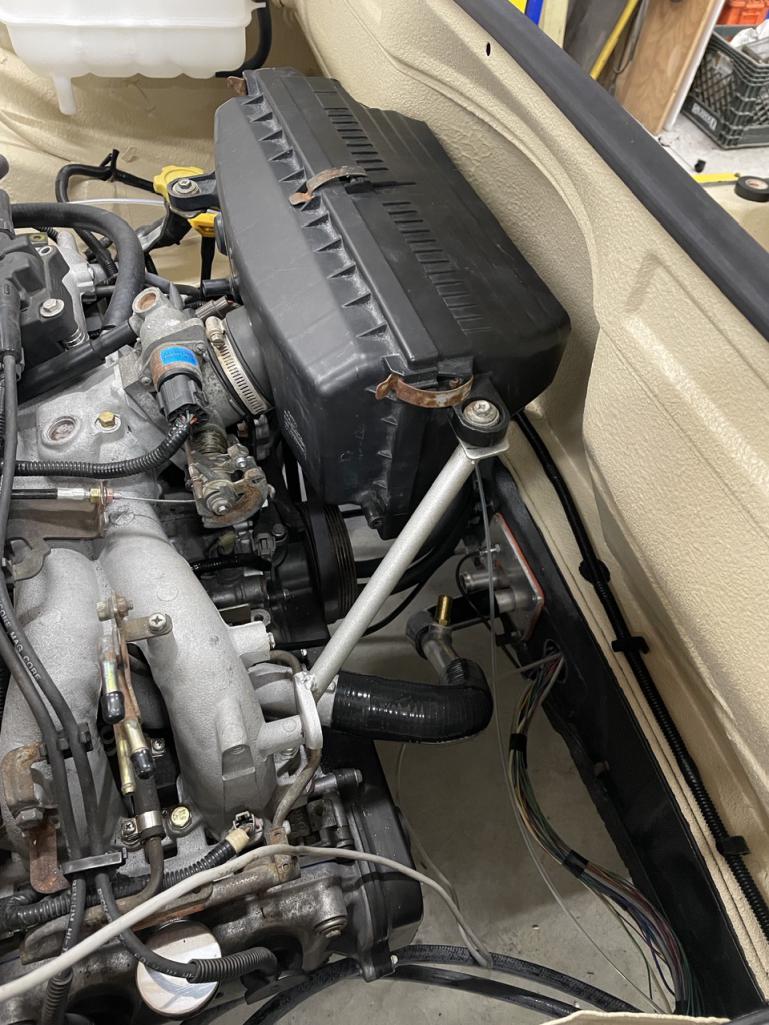
I decided to reuse/repurpose the stock Suby air filter box. I think it’s hard to beat a factory filter and I had it on hand, so……..I cut off the intake tube feeding the box and made an ABS block-off for it, then cut the front off the box to serve as the new intake. It provides lots of intake area and will breath from the very front of the engine bay in the recess for the 914-6 fan.
Then, because I flipped my intake manifold, I had to make some support brackets for the box. One side I was able to reshape the stock Suby bracket to fit, but the other side I had to fabricate.
All done and ready for a fresh filter…..
Posted by: East coaster Dec 19 2023, 06:51 AM
Worked on getting the front lighting completed. Installed and connected the parking lights/signals. This was as easy as putting brass spade connectors on the Suby harness ends and installing fresh rubber boots from 914rubber. I also wired the fogs and installed them. I’m using 4” led fogs in the bumper and same in the stinger bar. For the bumper fogs, I had to make some mounting brackets to position them correctly in the light grills.
Getting this done let me final mount my valance and bumper…..starting look like a car again.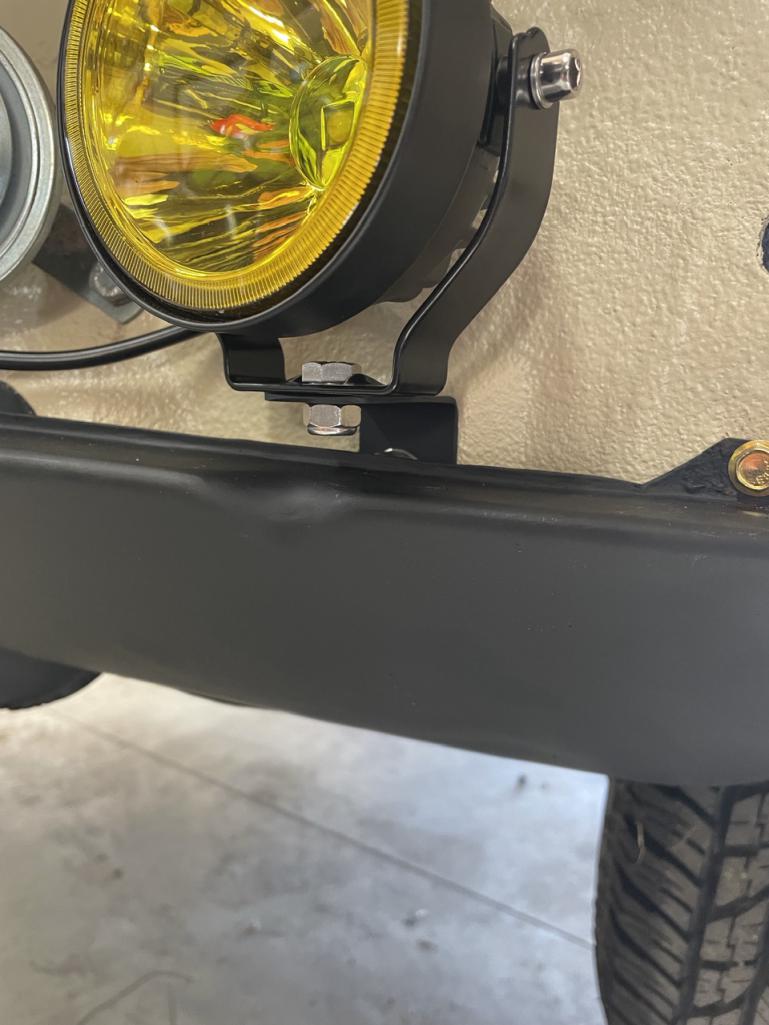
Posted by: East coaster Dec 19 2023, 07:59 PM
I’m exhausted 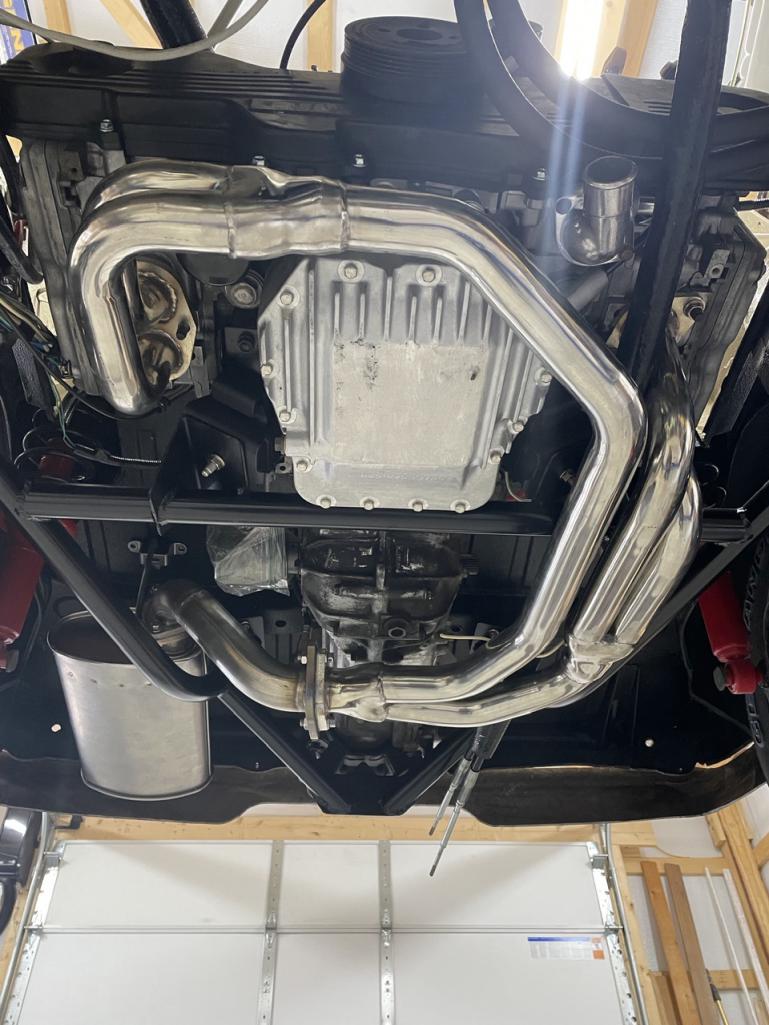
Posted by: East coaster Dec 20 2023, 05:48 AM
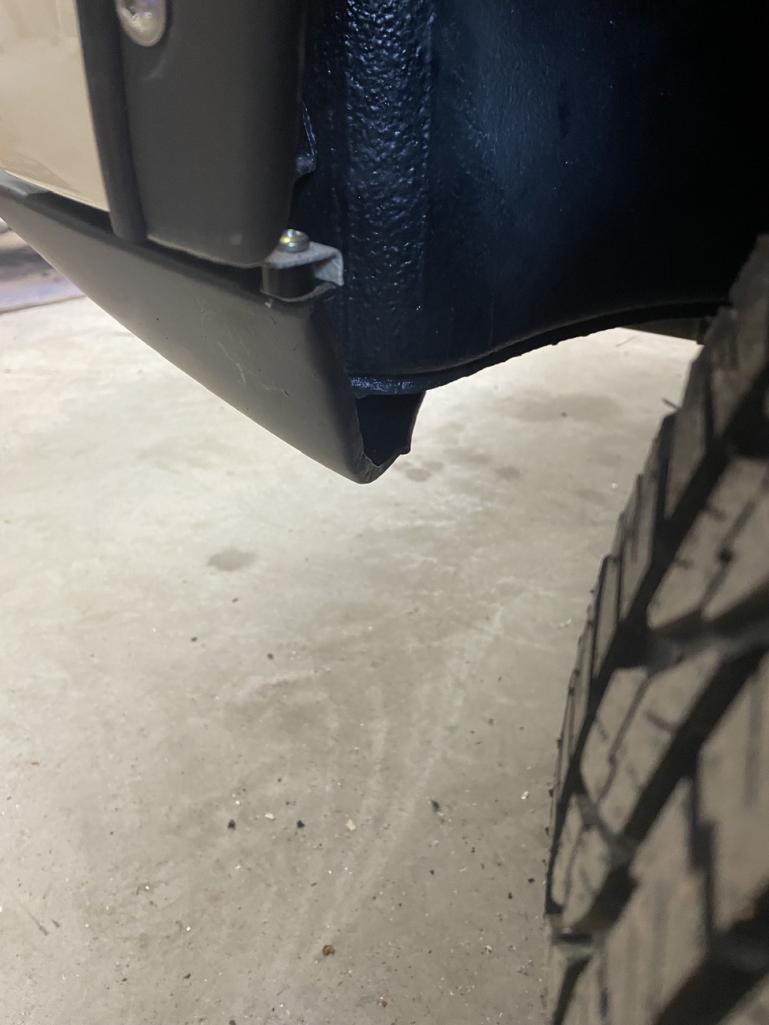
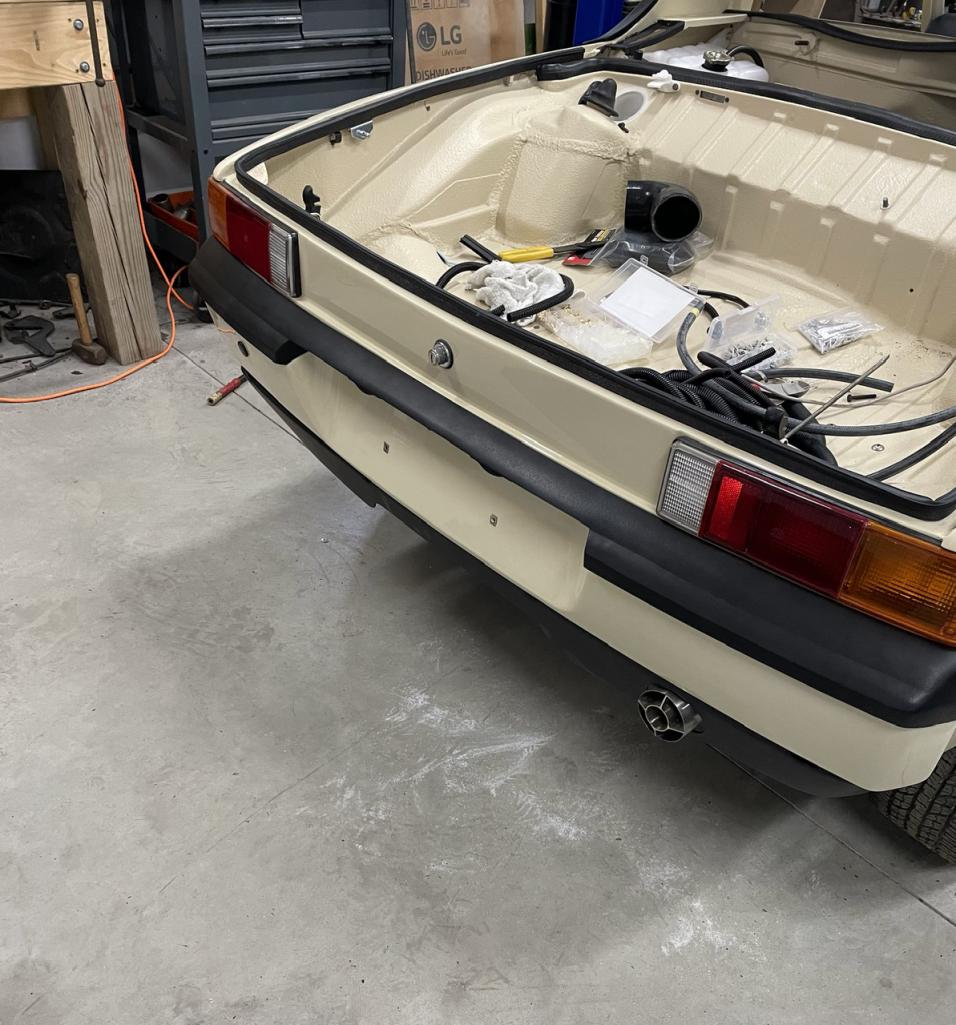
I had an early/deep rear valance (fiberglass repro) and I “tuned” it a little for my needs. I trimmed it down a few inches and added a gentle cutout in the middle to display the tail end of the Suby trans and add a little better airflow out of the underside.
Just need to punch my exhaust hole through it and give it a little paint.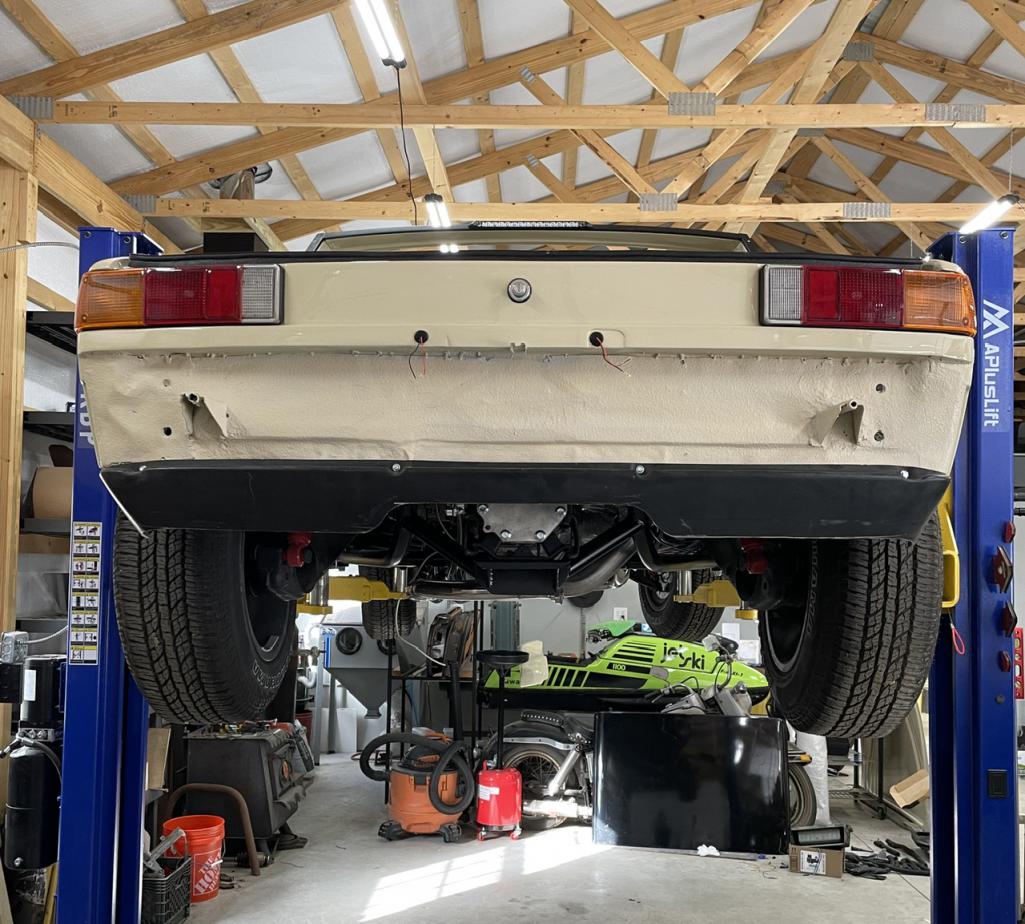
Posted by: East coaster Dec 23 2023, 08:43 PM
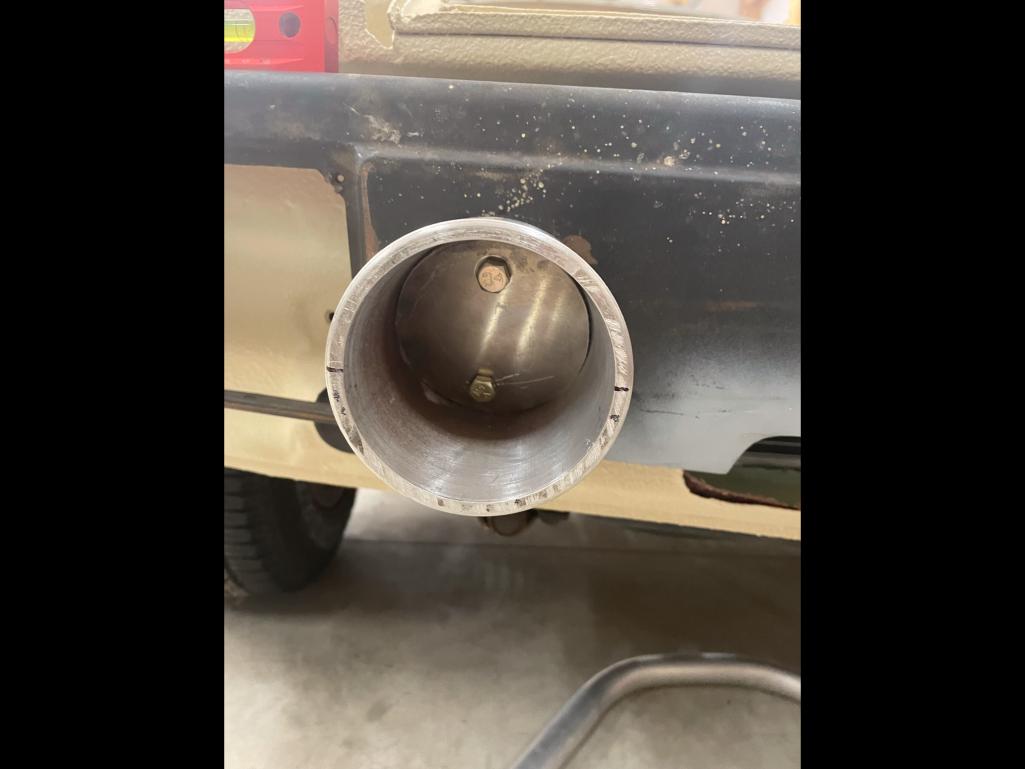
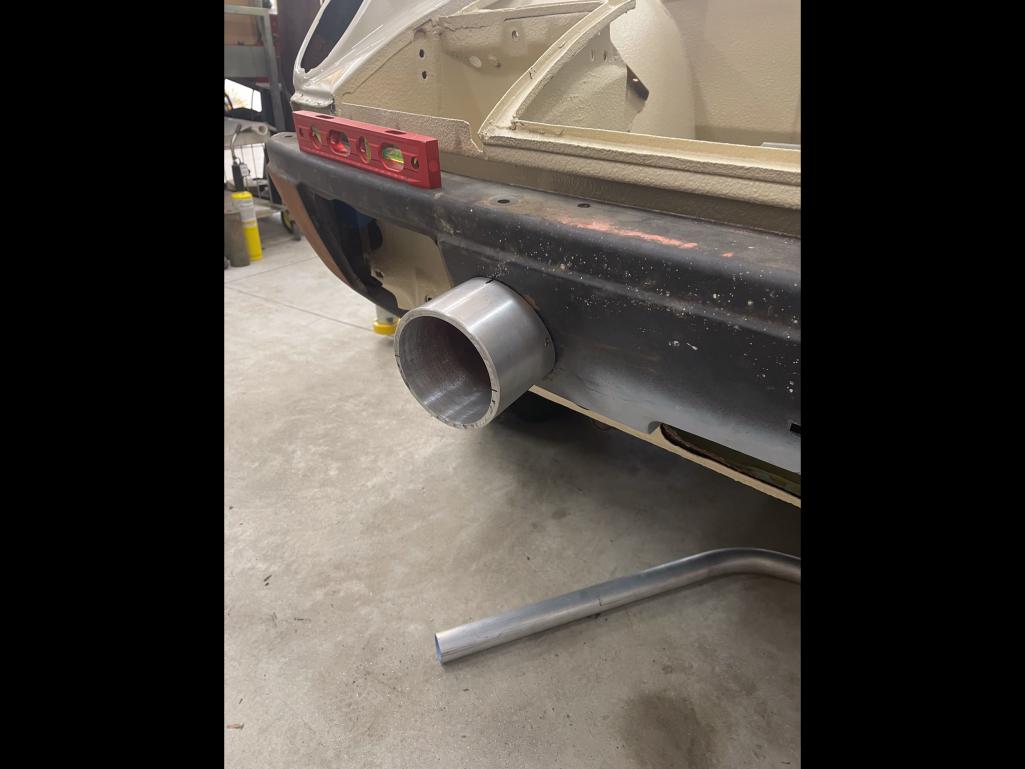
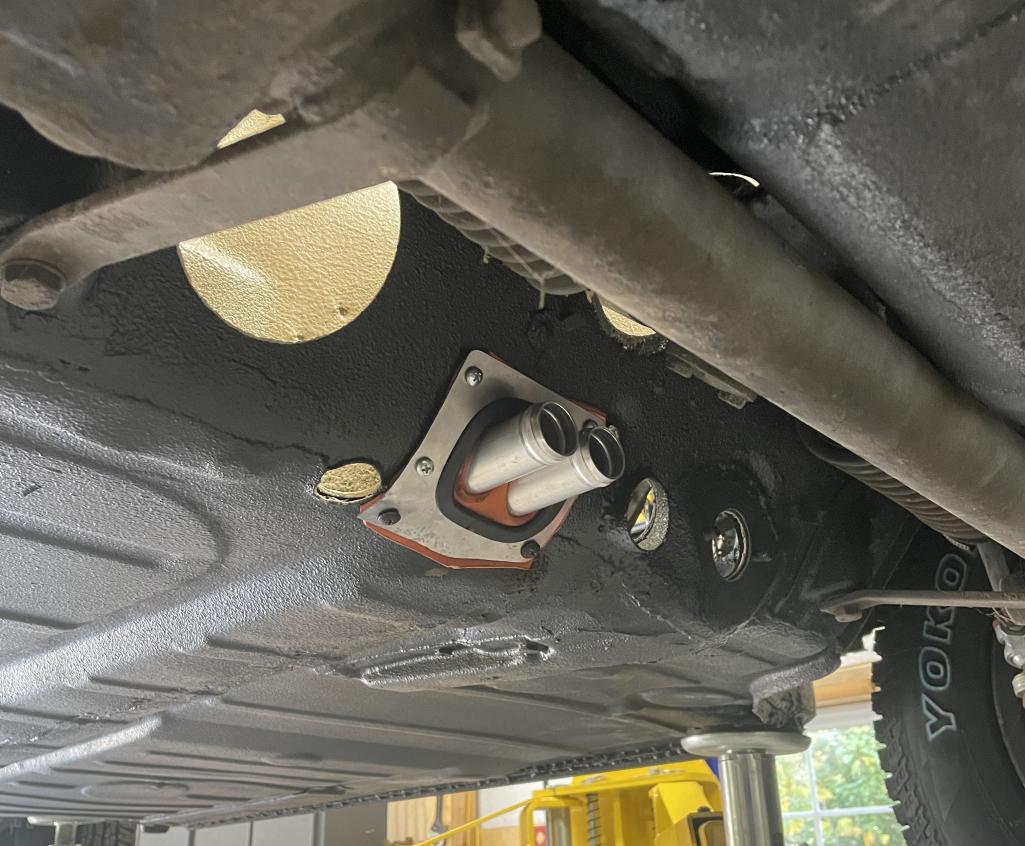
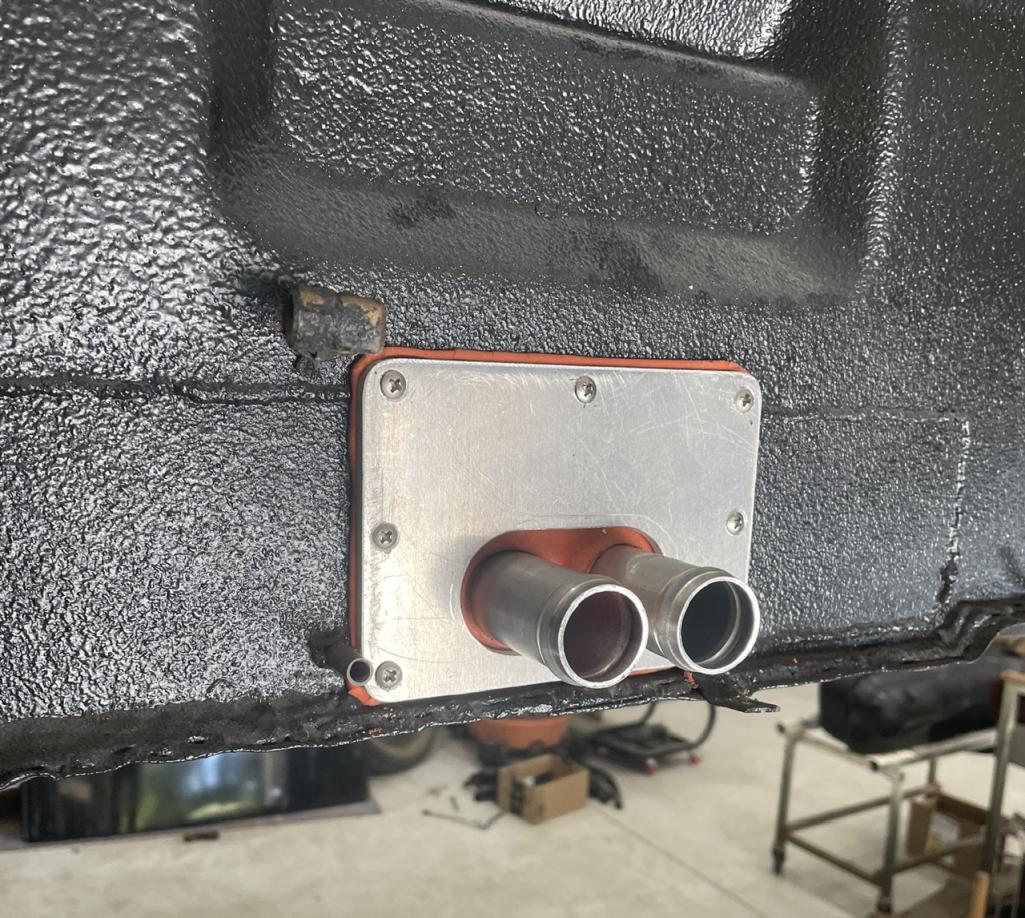
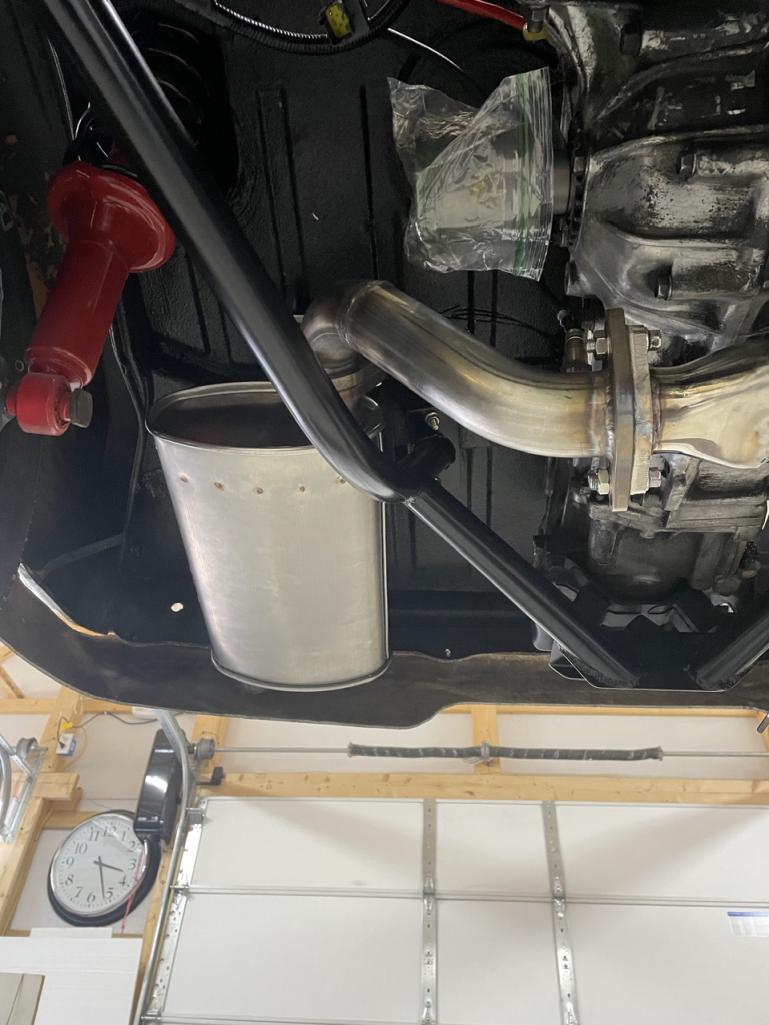
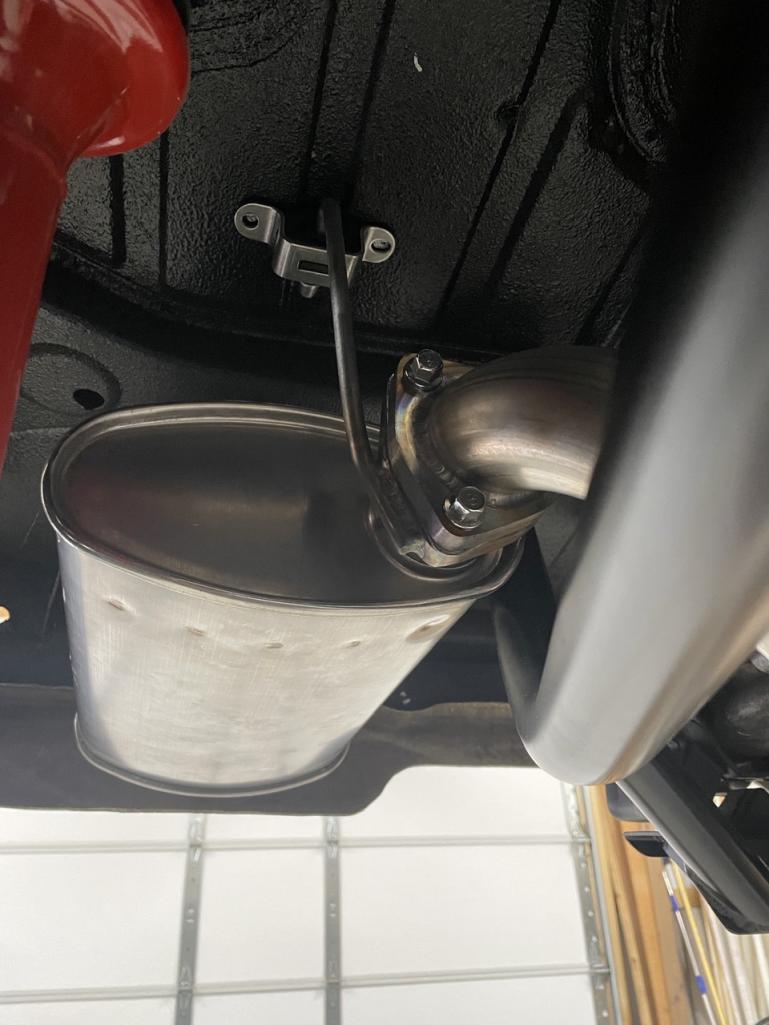
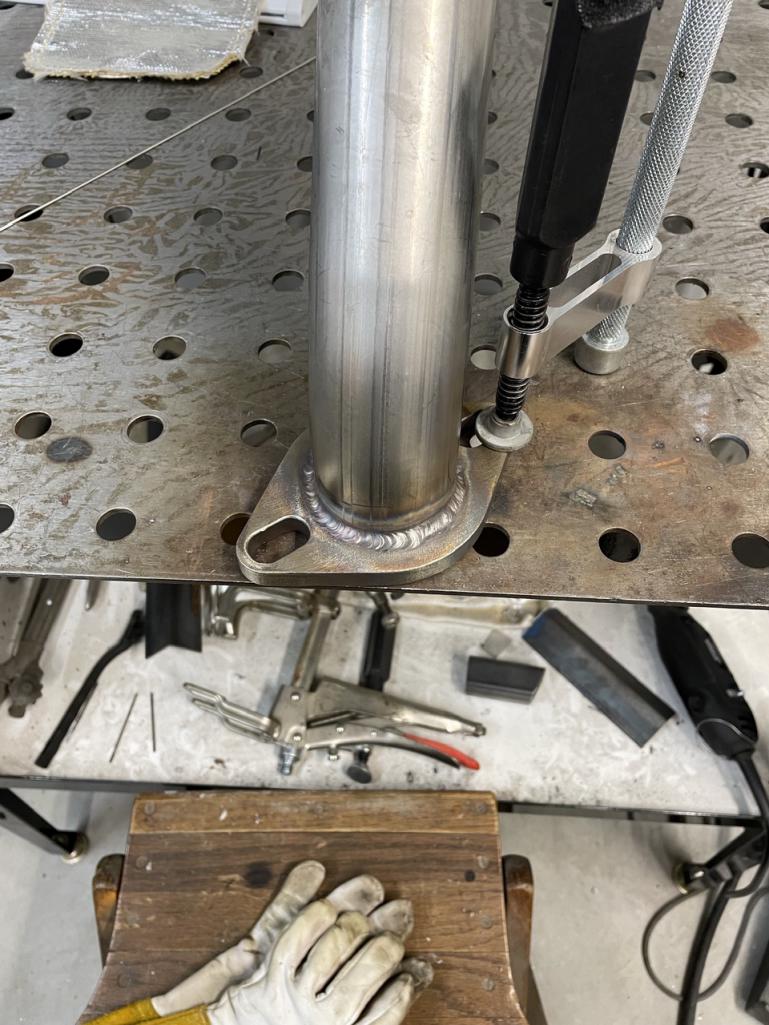
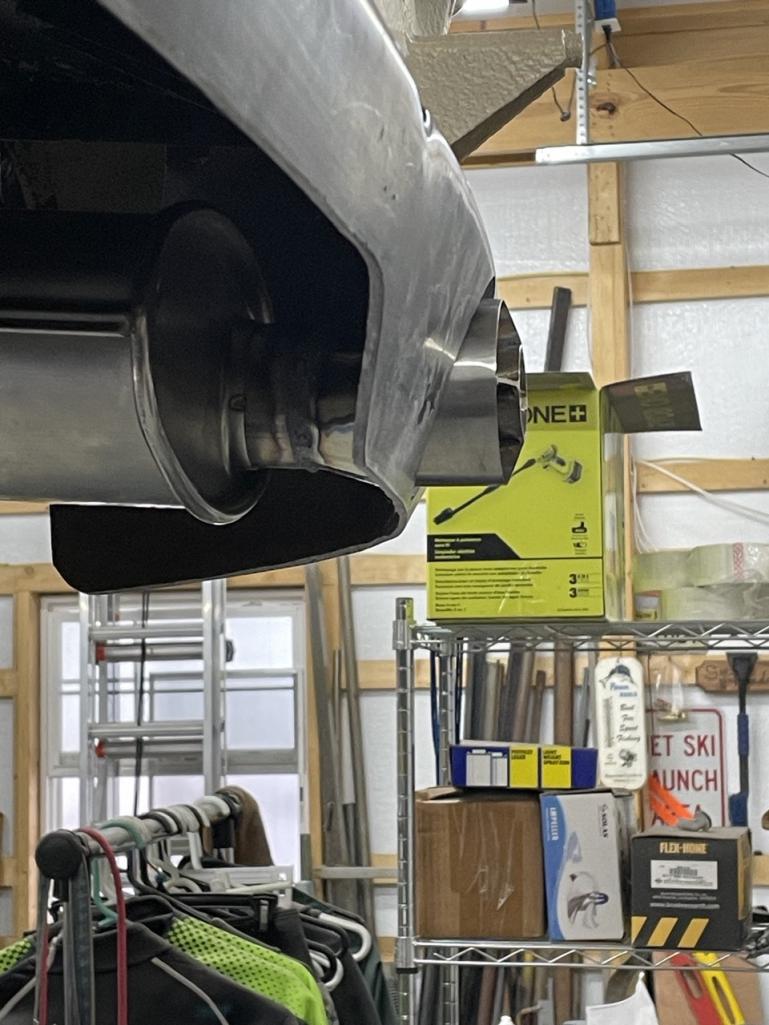
Ok, so……I finally finished the exhaust. I wanted an exhaust tip that was reminiscent of the vintage bomb sight megaphones, and I wanted to make a tip vs buy. I started with a flaired tube (2.25” to 3”) and put a 1.25” tube inside. It’s all stainless like rest of the exhaust.
Once it was welded on it was time to cut the valance.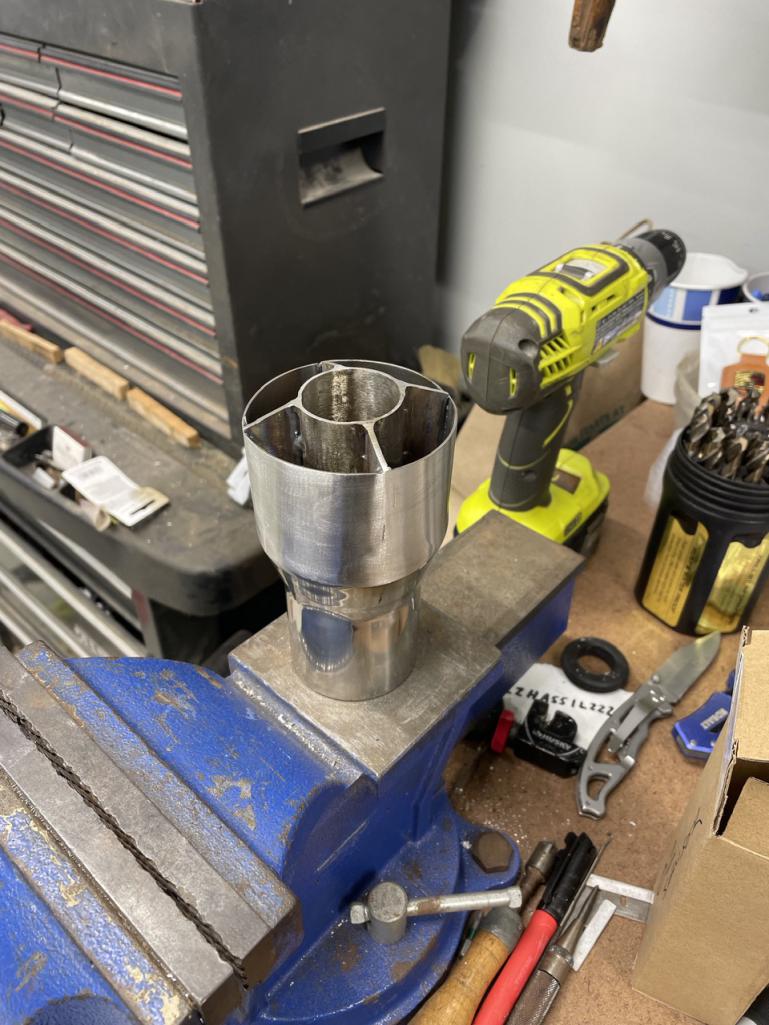
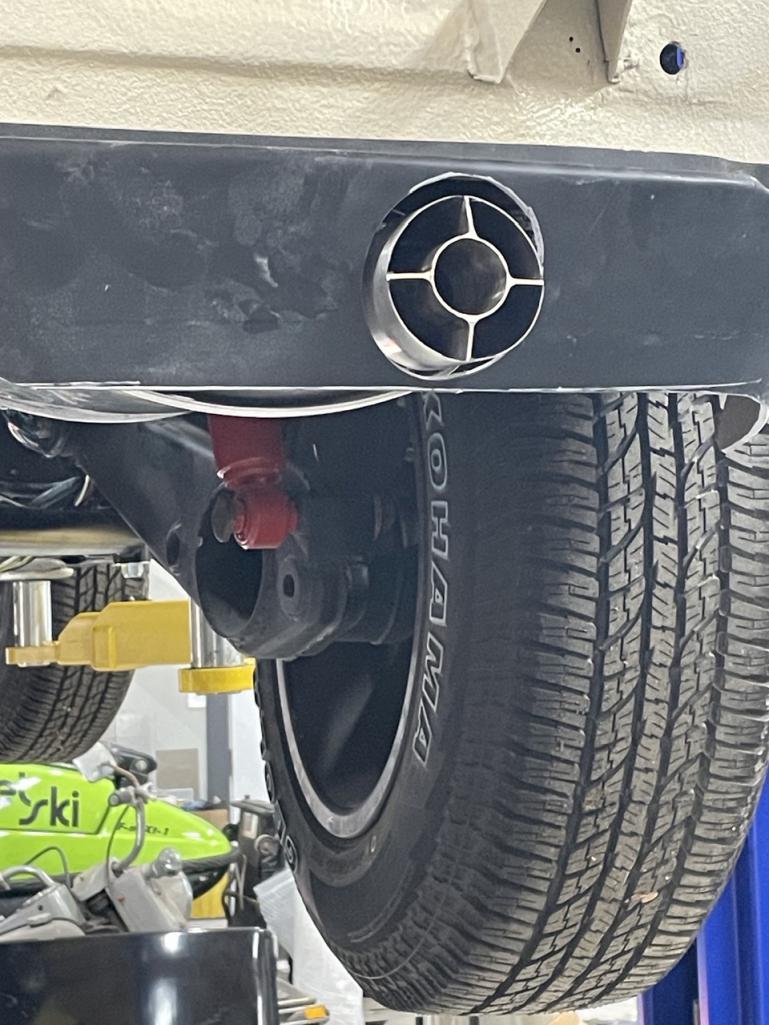
Posted by: East coaster Dec 23 2023, 08:48 PM
Also mounted my “stinger” and installed/connected the lights mounted in it.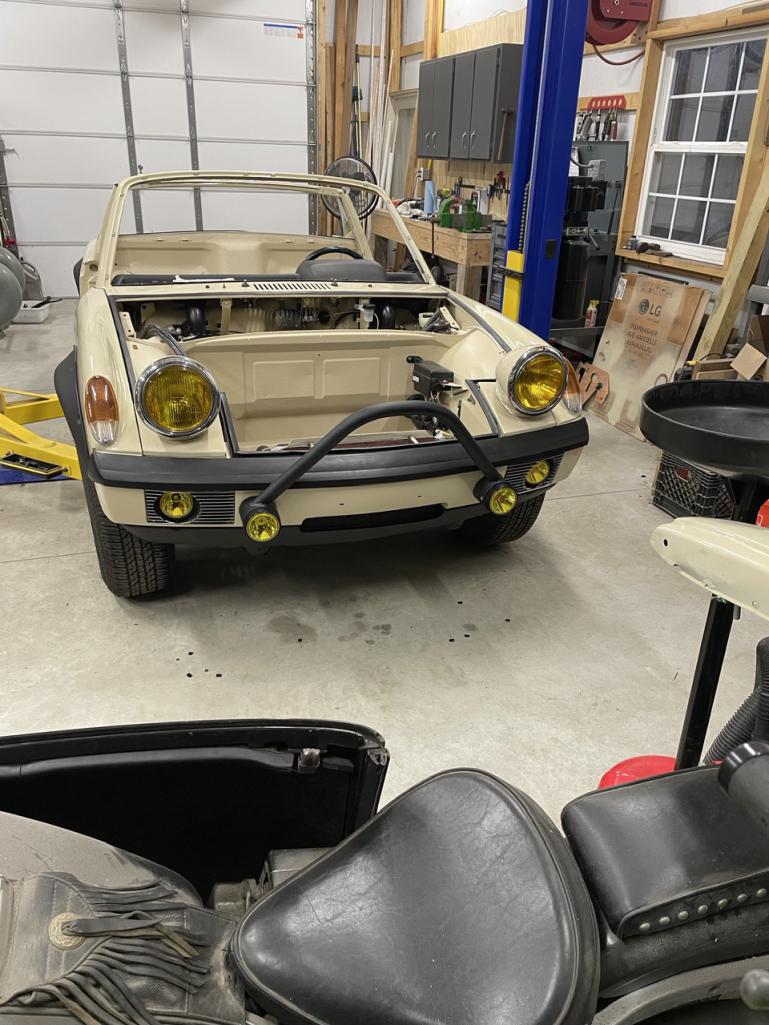

Posted by: Retroracer Dec 24 2023, 12:59 PM
The exhaust tip is a great retro "nod" to those early performance exhausts, as well as being basically a work of art by itself! The way its kept up high and peeking through the valance is in keeping with the offroad, "minimum overhang" vibe too.
Love the Design thinking and details on this build.
- Tony
Posted by: East coaster Dec 26 2023, 07:28 AM
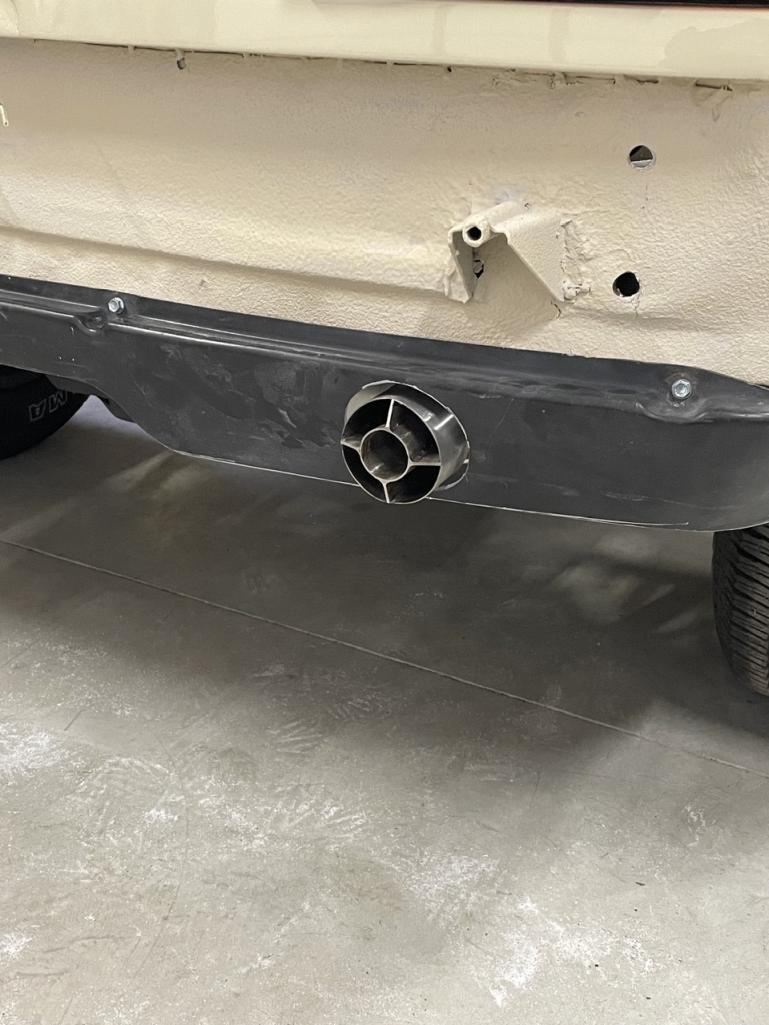
Got my rear valance painted and mounted, and mounted up the rear bumper. I’ve had numerous 914s over the years but never had body colored bumpers, I’m really liking it. I wired up the license plate lights and installed them, and with that, I’m calling the rear lighting done.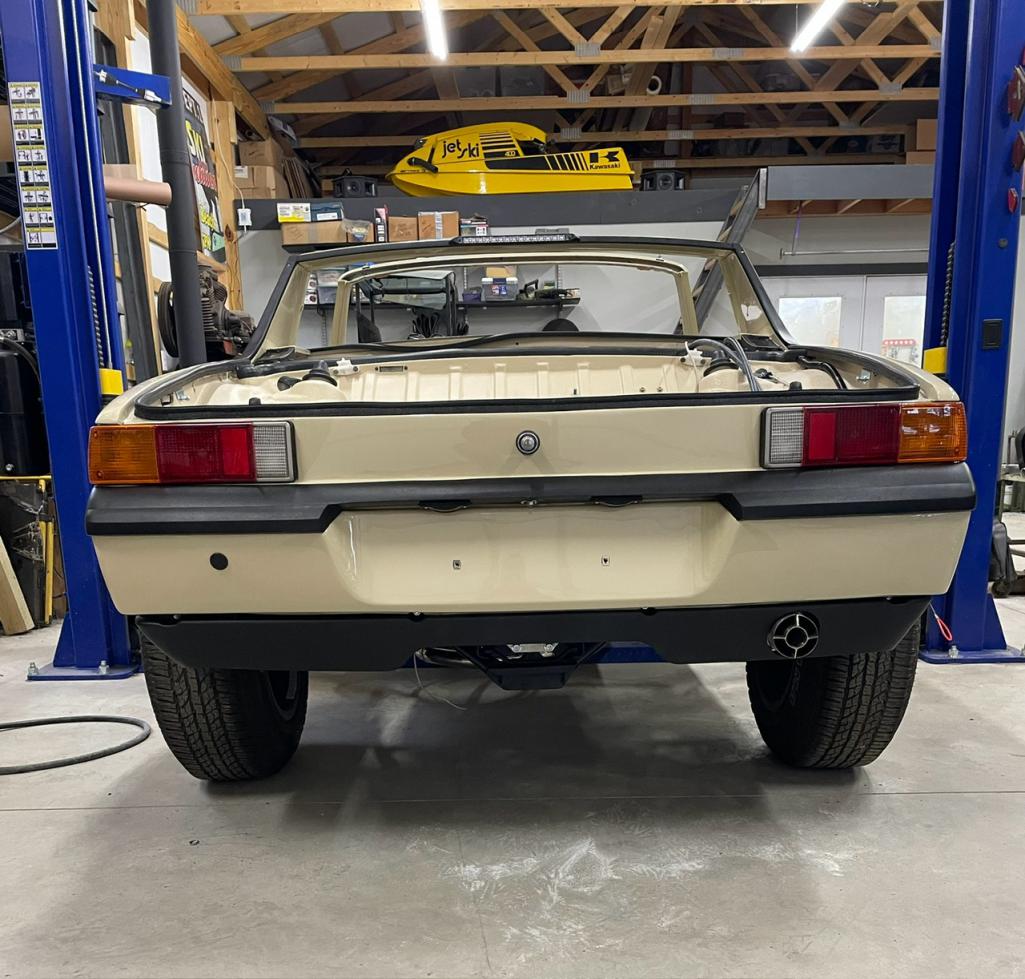
Posted by: East coaster Dec 27 2023, 06:33 PM
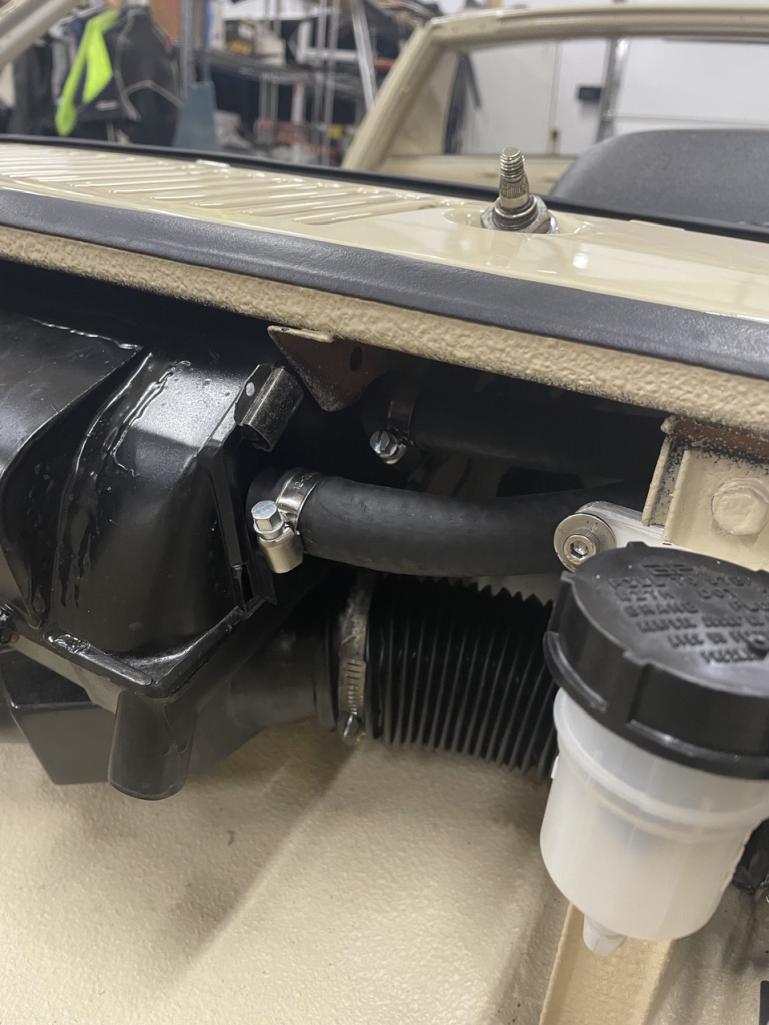
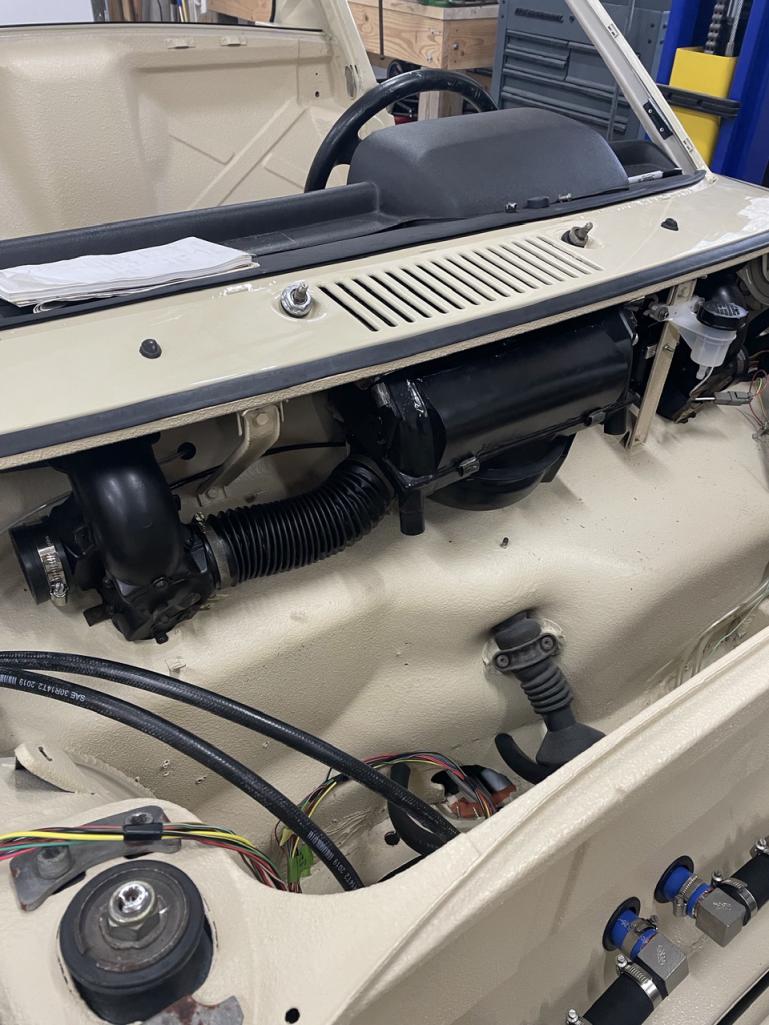
I tend to put off tasks that I know are going to suck. This was one of them…..I decided to tackle my fresh air box today. I’ve read the tips and tricks on getting the box installed and used some of this advice. In the end I used a couple of wire ties to keep the seal in place and a pry bar under the box to compress the seal once in place. I thought it would never raise enough to get the bolts started but after about 15 mins of expletives and sweat I got the bolts started and ran them in…….a moment of victory!
I connected up the air ducts, wiring, and heater core hoses. I also torqued down my wiper mounts so it’s officially done. Now I can move on to getting my tank installed once I get it cleaned out and painted.
A day of victory over my nemesis the air box!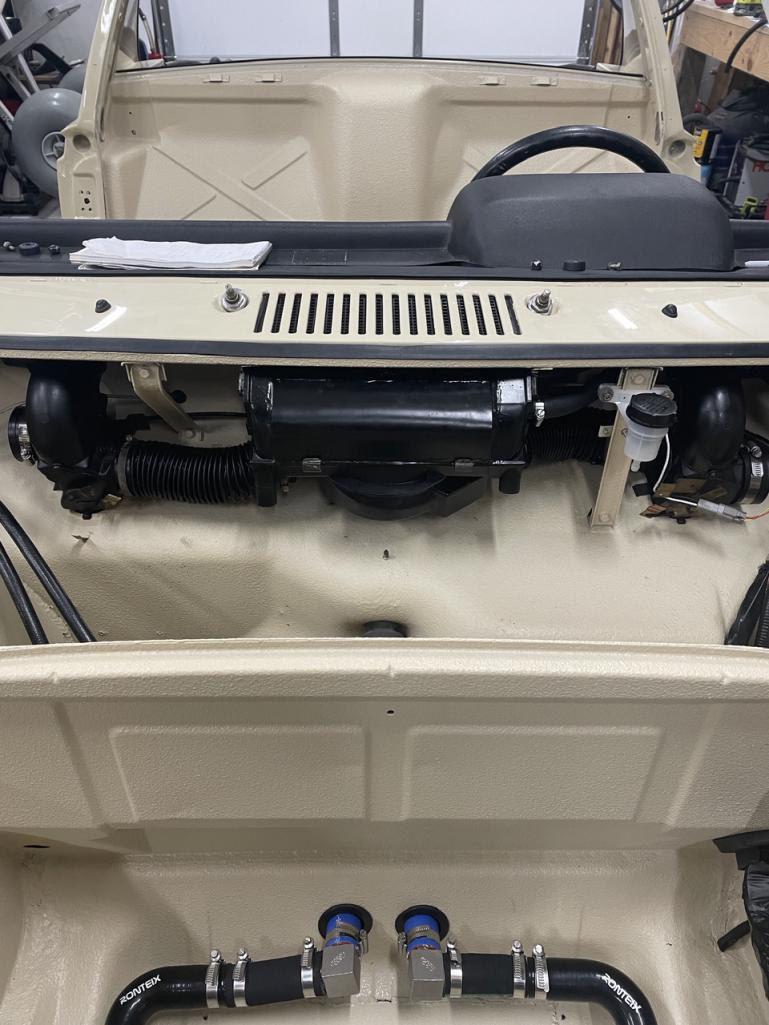
Posted by: East coaster Dec 28 2023, 05:17 PM
Got all my water lines plumbed up today, including the heater valve and control cable. This is controlled by the temp selector in the dash (I’m using the Suby hvac controls). It’s a long run for the cable but it seems to work great. It runs from dash through the heater tube in pass side long, then to valve.
Also got my rear window installed today…..progress!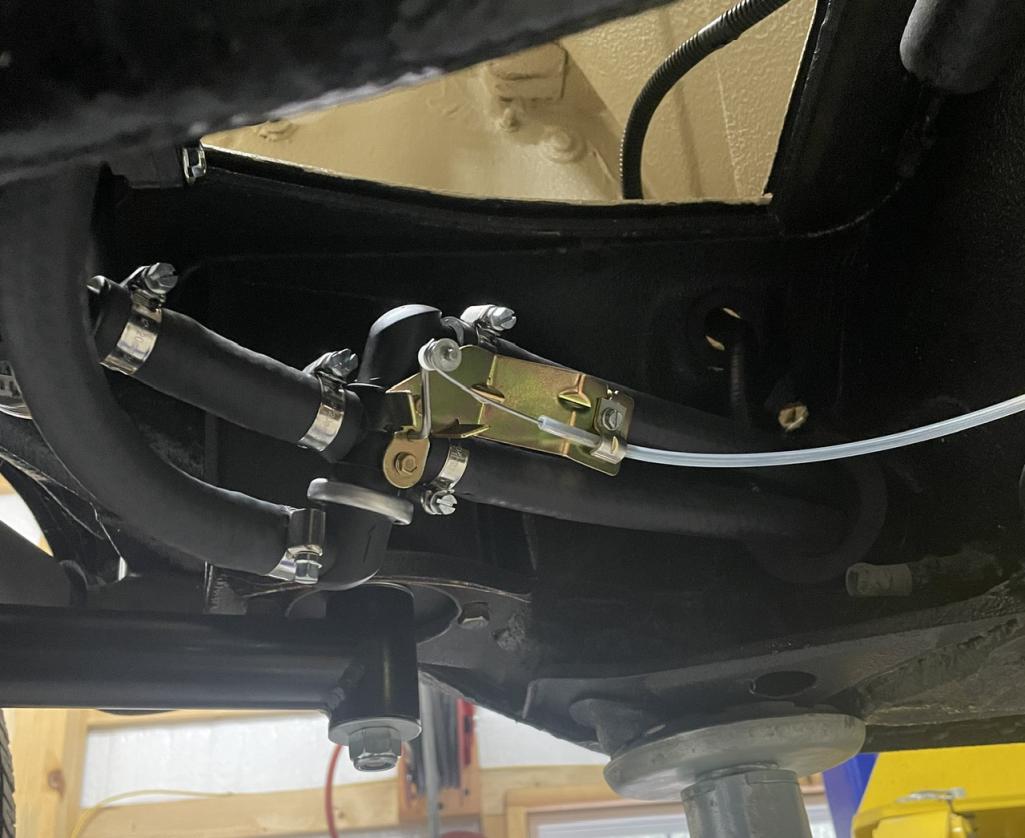
Posted by: tygaboy Dec 29 2023, 10:25 AM
Coolest build on 914 World.
Posted by: East coaster Dec 29 2023, 05:55 PM
Coolest build on 914 World.
Thanks, it’s hardly that, but it’s been fun and is keeping me out of trouble in my retirement
Posted by: East coaster Jan 4 2024, 07:55 PM
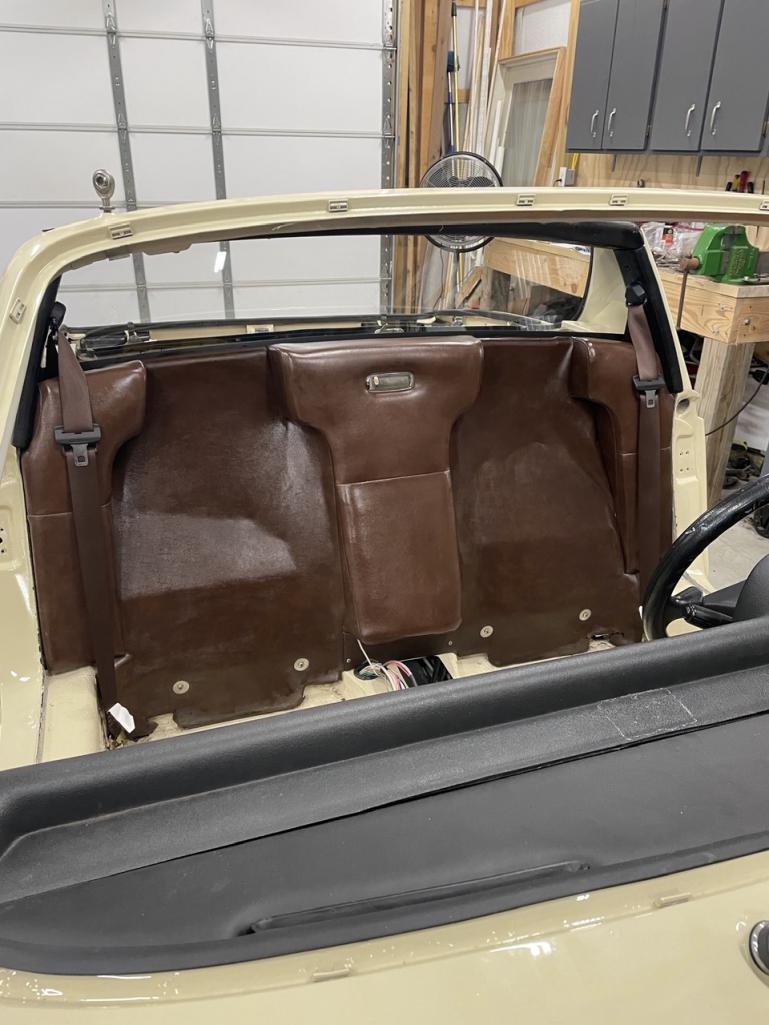
Had some interior fun today. Installed my rear window, new seat belts (seatbeltUSA), my targa trim, engine lid cable, and my back pad. I’m loving the color contrast ext to int.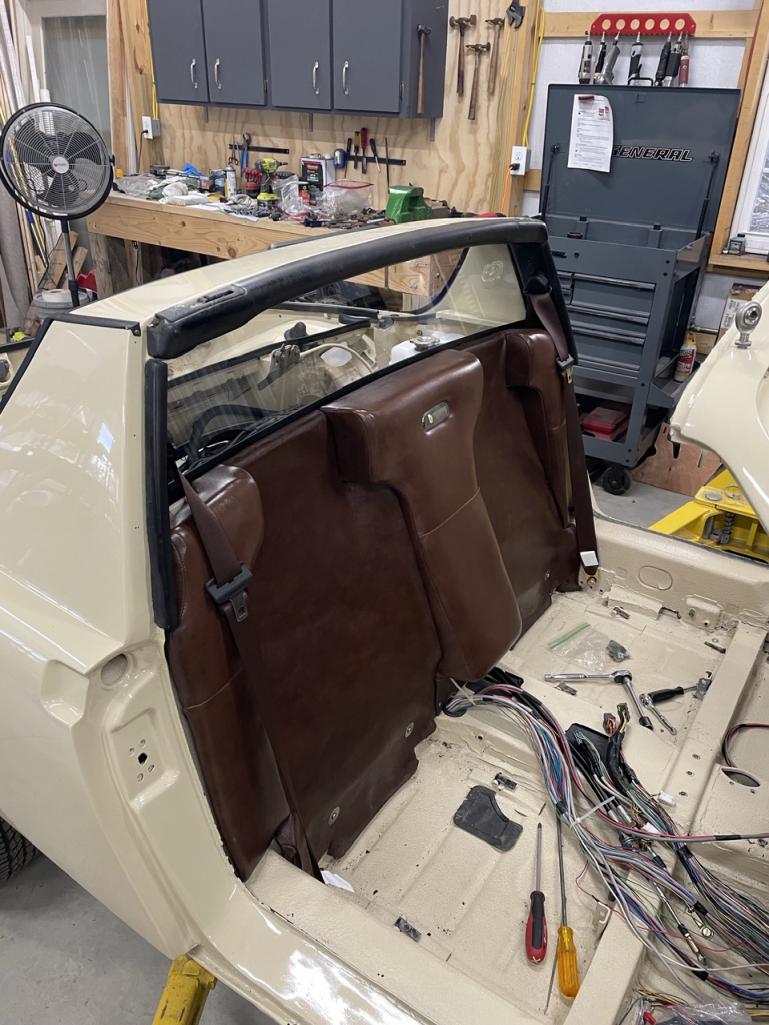
Posted by: tygaboy Jan 5 2024, 08:23 AM
Coolest build on 914 World.
Thanks, it’s hardly that, but it’s been fun and is keeping me out of trouble in my retirement
Dude. Don't argue with me. I'm an expert on what's coolest - and it's your work/your car.

Posted by: East coaster Jan 5 2024, 08:13 PM
So in between other little projects it was tank cleaning 101…….I made block off plates for the fuel fill and the Subaru fuel pump openings, then filled with 7 gals of vinegar and sealed it up. Rotated the tank for a couple days to get good coverage, then drained vinegar and filled with water/baking soda mix. Rotated a couple more days, then drained the mixture and put 1-1/2 gals of wd40 to treat the fresh metal.
Hopefully tank will go in soon after a couple coats of paint.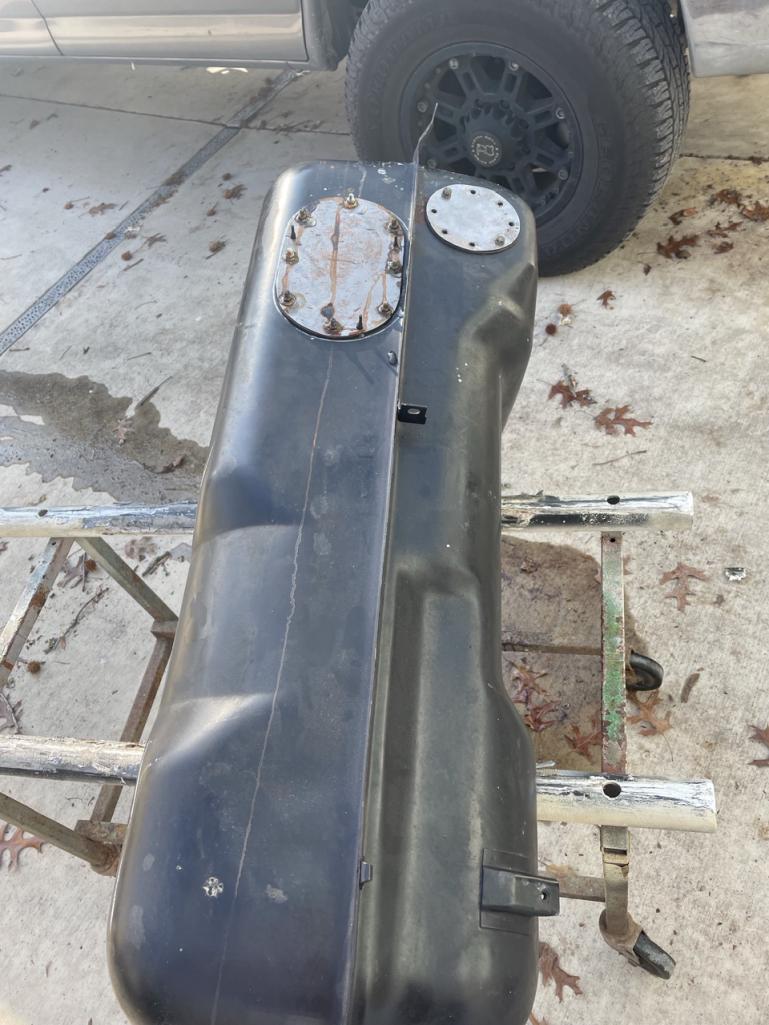
Posted by: Montreal914 Jan 5 2024, 09:51 PM
Had some interior fun today. Installed my rear window, new seat belts (seatbeltUSA), my targa trim, engine lid cable, and my back pad. I’m loving the color contrast ext to int.
Beautiful back pad!

Is this an original in nice shape or something reupholstered?
Really nice build!
Posted by: East coaster Jan 6 2024, 05:59 AM
[/quote]
Beautiful back pad!
Is this an original in nice shape or something reupholstered?
Really nice build!
[/quote]
It’s actually original. The bottom is a little rough but better than most I’ve seen and is still solid. The seats and door panels are in similar shape, so I didn’t have to deal with upholstery other than whatever I come up with for a center console.
Posted by: East coaster Jan 7 2024, 10:03 PM
So it was a milestone day for my project. After countless hours paring down the Subaru harness to fit the 914, modifying the gauge cluster and its wiring, extending the engine to ECU harness, and generally adapting the Suby harness to work with 914 lights, wipers, fan……….I connected the battery for the first time and no smoke or flames came out!
Along with no smoke or flames, everything works (all lighting, cold air blower via Suby controls, wipers, flashers, turn signals, brake lights, gauges, radiator fans, and even cranked over when I hit the start button…..yay!
I have to say I feel a great level of relief that it all works and nothing sizzled. That said, I still have to wire the fuel pump once the tank is in, so there’s still an opportunity to screw it up 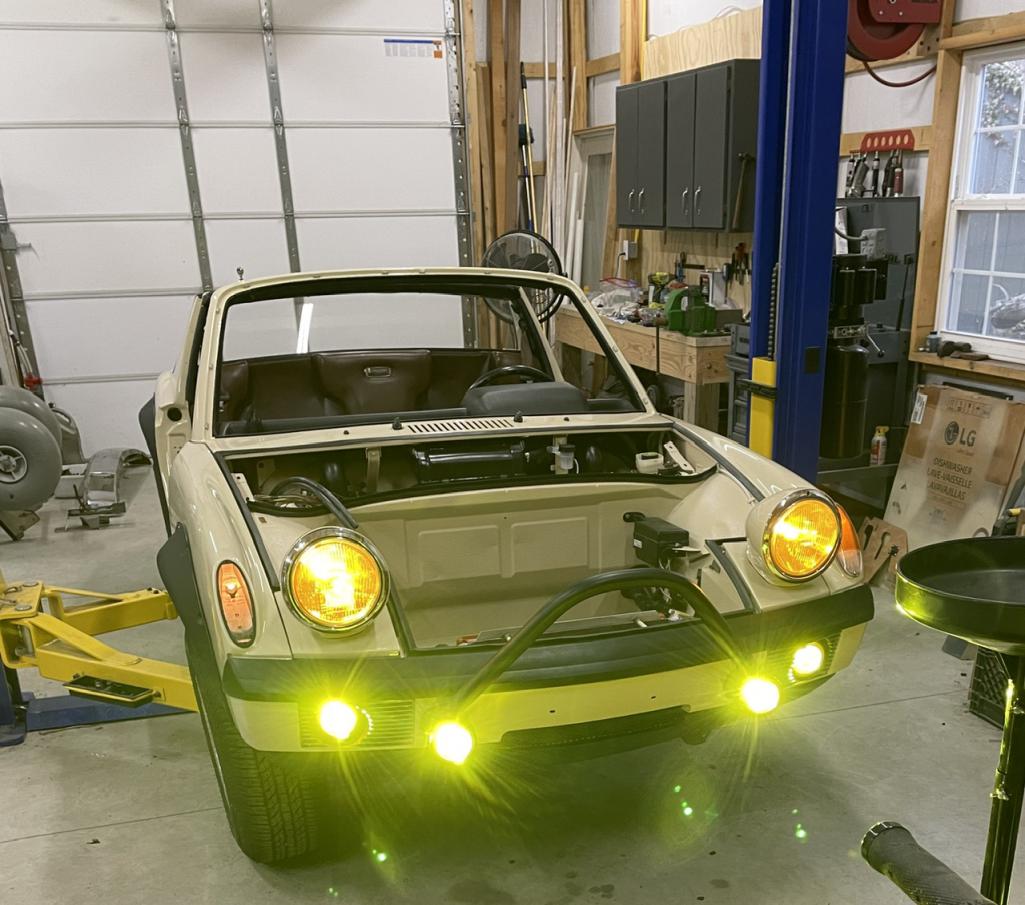

Posted by: East coaster Jan 11 2024, 07:51 PM
So……we just enjoyed a 30 hr power outage due to the kick ass storm that hit us. That delayed a little of my progress but picked it back up now that we have power back.
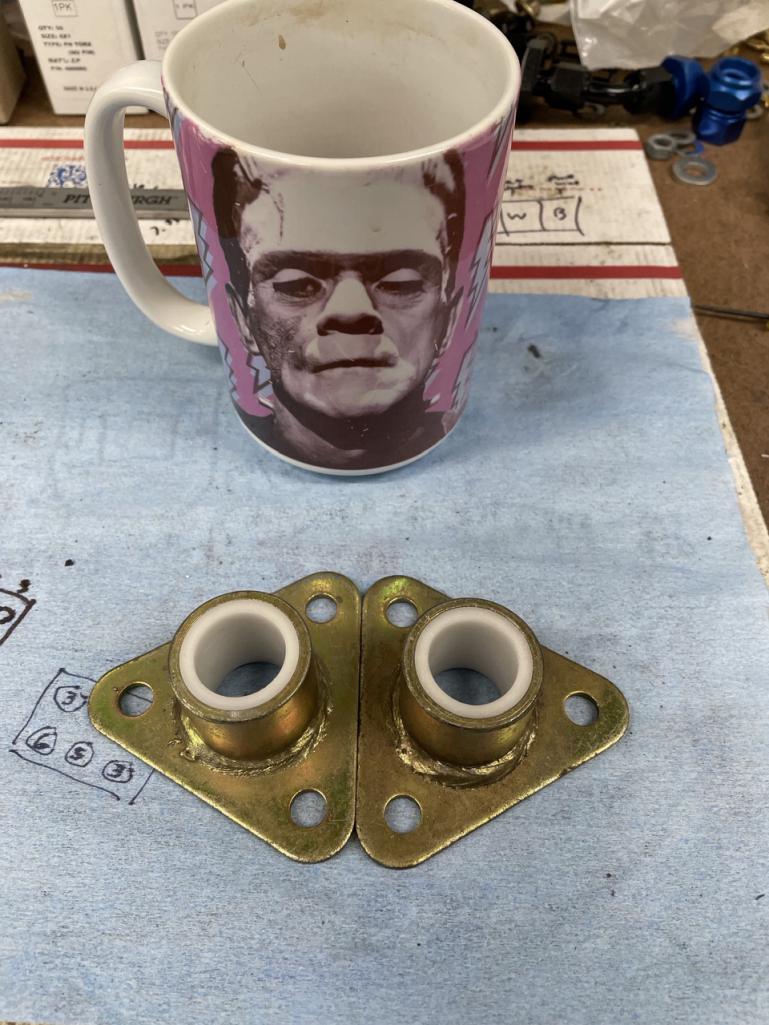
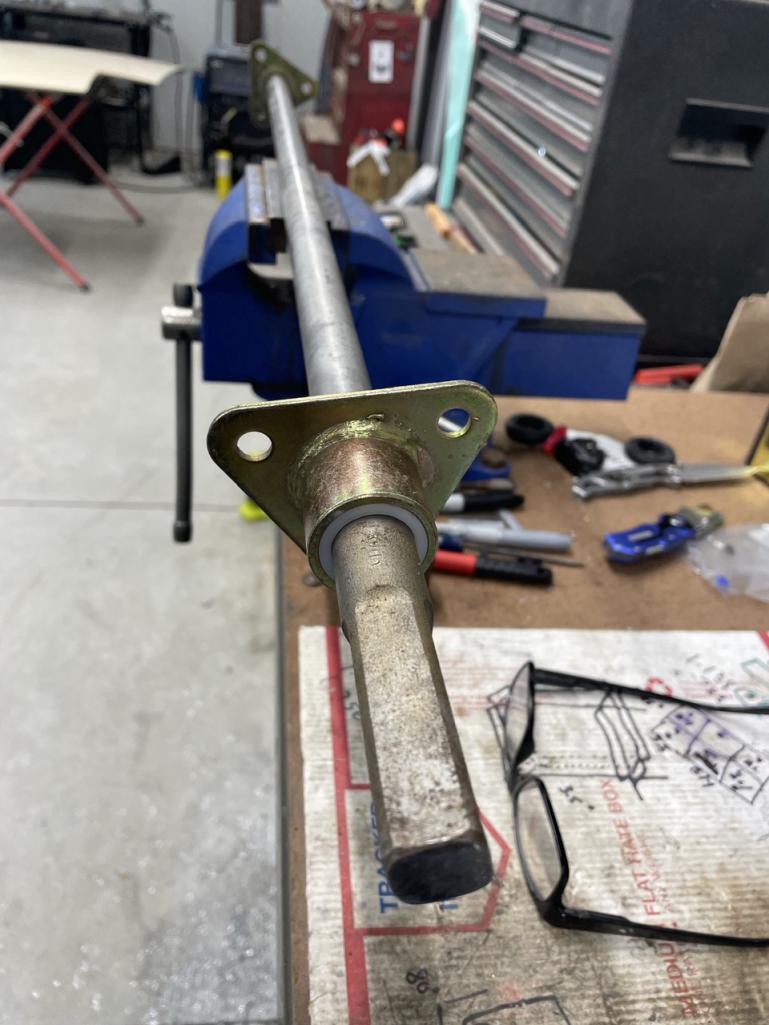
I have a Weltmeister sway bar that I bought for the project but it came with no bushings. I couldn’t seem to find any so I made some. I turned down some delrin to make the bushings where the bar passes through the mounting brackets. I got the bushings done about an hour before we lost power. Today we got power and internet back and I was able to get the sway bar installed. I used the 914 Limited sway bar install plates and they make the job easy (my car came without sway bars/mounts).
Here’s a couple pics of bushing making 101….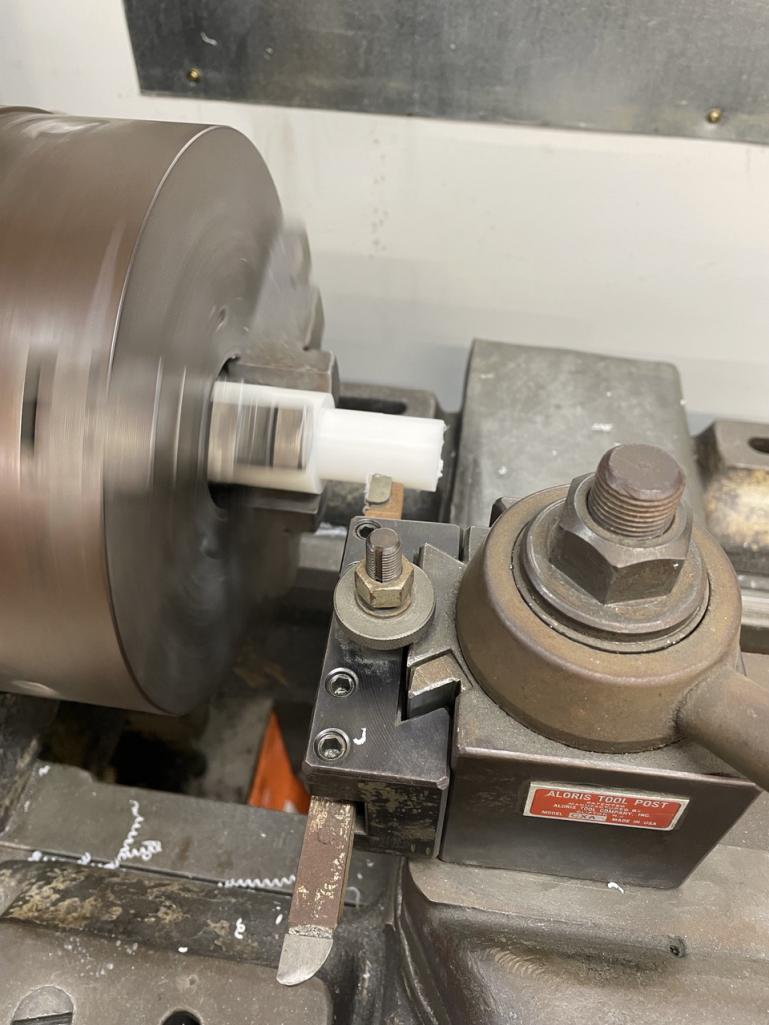
Posted by: Shivers Jan 11 2024, 08:16 PM
So it was a milestone day for my project. After countless hours paring down the Subaru harness to fit the 914, modifying the gauge cluster and its wiring, extending the engine to ECU harness, and generally adapting the Suby harness to work with 914 lights, wipers, fan……….I connected the battery for the first time and no smoke or flames came out!
Along with no smoke or flames, everything works (all lighting, cold air blower via Suby controls, wipers, flashers, turn signals, brake lights, gauges, radiator fans, and even cranked over when I hit the start button…..yay!
I have to say I feel a great level of relief that it all works and nothing sizzled. That said, I still have to wire the fuel pump once the tank is in, so there’s still an opportunity to screw it up
I find myself smiling after every installment. Lights look like they belong there.
Posted by: East coaster Jan 20 2024, 06:03 PM
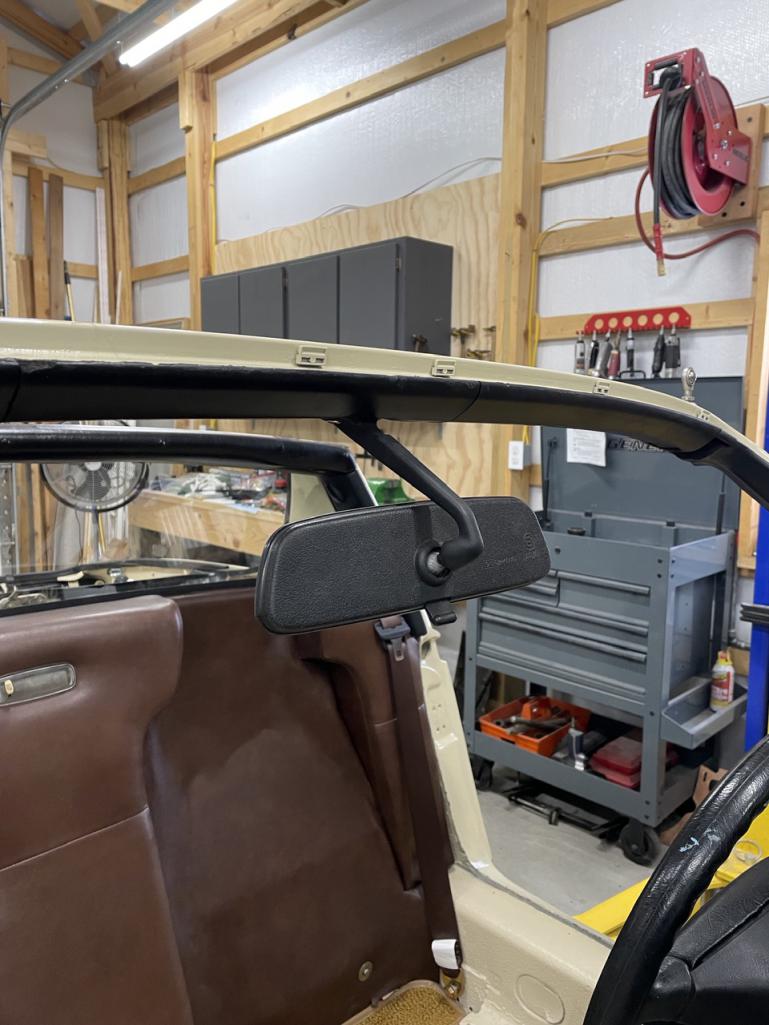
So, it’s like -125 out or something and I needed something to work on in the heated part of my shop. All I could think of was modifying the BMW mirror to fit the 914. I had one of these in my last 914 and really liked it. I didn’t add the visor pins yet as I’m not sure I’m going to install visors. If I do, I’ll add the pins when I install the visors.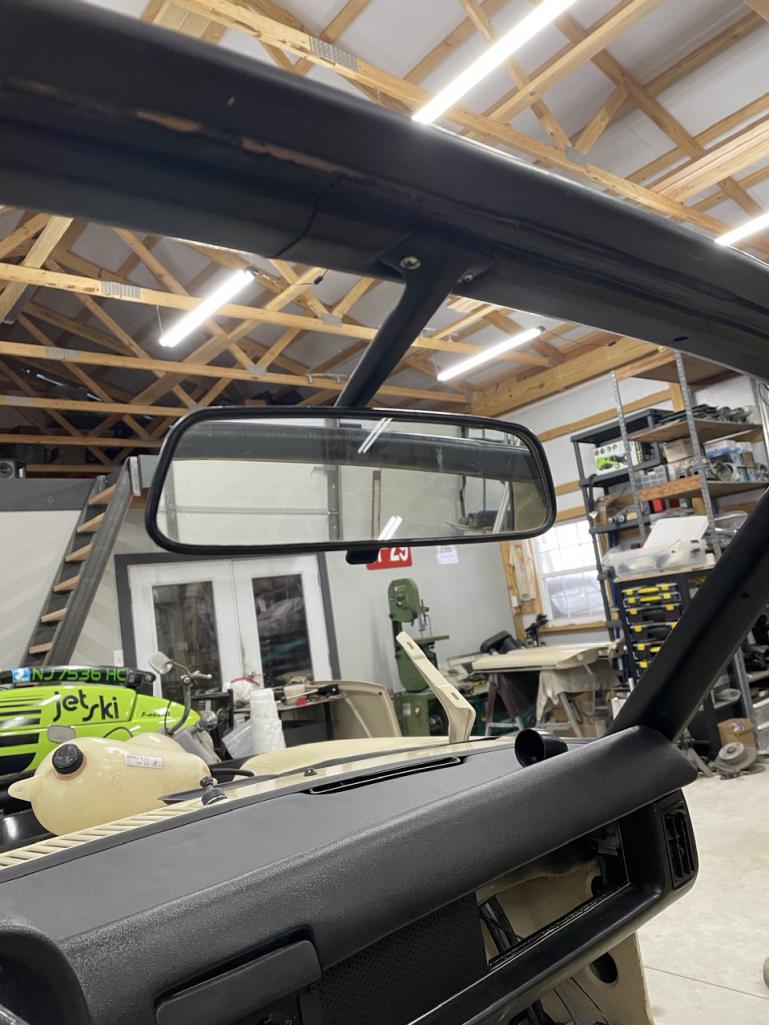
Posted by: East coaster Jan 22 2024, 08:14 PM
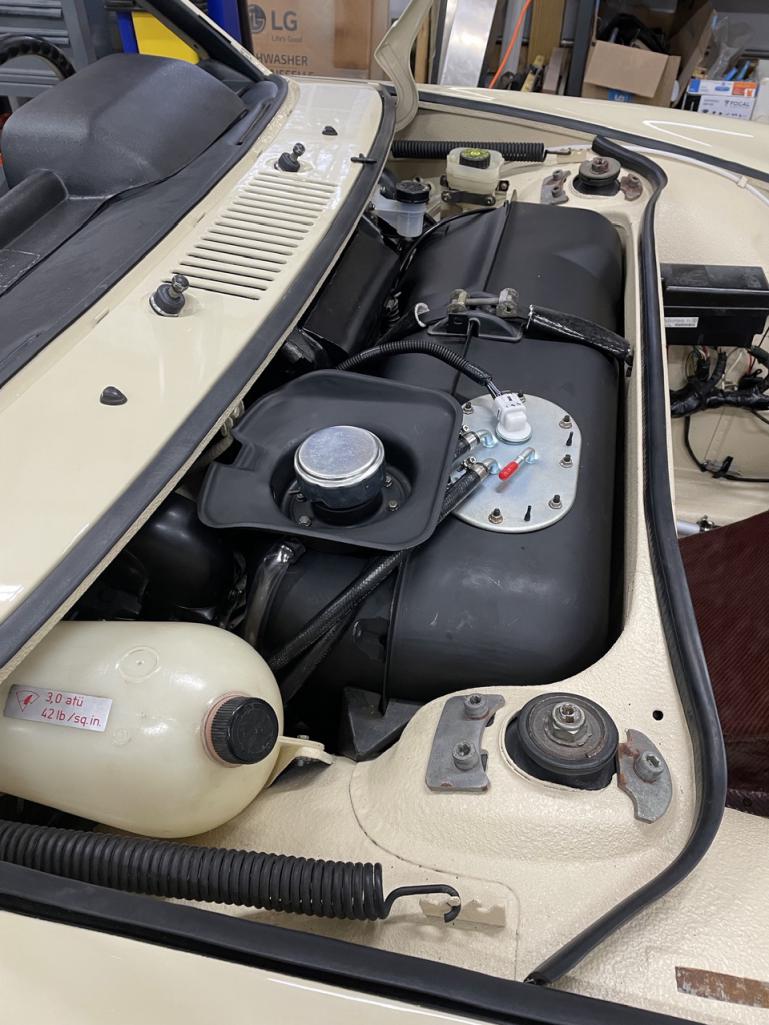
Got a couple things checked off the list today. I put the tank in place, plumbed fuel lines, and added a block off and a drain valve to the outlets on the bottom of the tank (since the Subaru pump feeds from the top). Also finished the wiring for the fuel pump and connected it up……..it’s ready for some fuel and an initial startup.

Posted by: tygaboy Jan 22 2024, 10:49 PM
All of that looks so good.
Posted by: Lof8 Jan 23 2024, 01:46 PM
what model BMW is the mirror from? I recently cracked my windhsield installing a mirror with the adhesive pad. Car look fantastic!
Posted by: East coaster Jan 23 2024, 07:29 PM
what model BMW is the mirror from? I recently cracked my windhsield installing a mirror with the adhesive pad. Car look fantastic!
This one is from an early 3 series, but a 2002 works the same.
Posted by: East coaster Jan 23 2024, 07:36 PM
Today was the day to see if it made noise. It fired right up and idled down nicely. It’s a happy day in project land!
It’s alive!!!……..in my best Dr Frankenstein voice
I have a video but can’t seem to get it to upload……I’ll keep trying
Posted by: strawman Jan 24 2024, 06:44 PM
As a fellow Suby conversion addict, all I can say is congrats! The first start is always the greatest feeling ever. I've been driving my turbo Suby-powered 914 since about 2012, and I have successfully campaigned it at PCA and Vapor Trail Vettes autocrosses for several years now.
I recently bought out an estate here on the CA Central Coast back in September that included a sorta running/driving EG33 swapped 914 and a mostly complete parts car, five T4 engines, six transaxles and two pallets of 914, 912 and 911 parts that I've been slowly selling to fund my next project. I've been toying with the idea of building the parts car into a Safari 914 to cruise the gravel mountain roads around here. After reading through your build, I don't think there any question... now I just gotta find a running manual-equipped Suby parts car.
Enjoy driving it!
Geoff
Posted by: East coaster Jan 25 2024, 06:21 AM
Here’s a pic of the ball valve I added to the stock fuel port. I figured it’s a lot better than siphoning the tank if I ever need to pull the tank and it happens to be full (which is very likely due to Murphy’s law). I was able to get fittings that convert the stock tank Port threads to AN threads. One port is capped and one has the drain valve. I’ll be safety wiring the ball valve lever to ensure it never drains accidentally.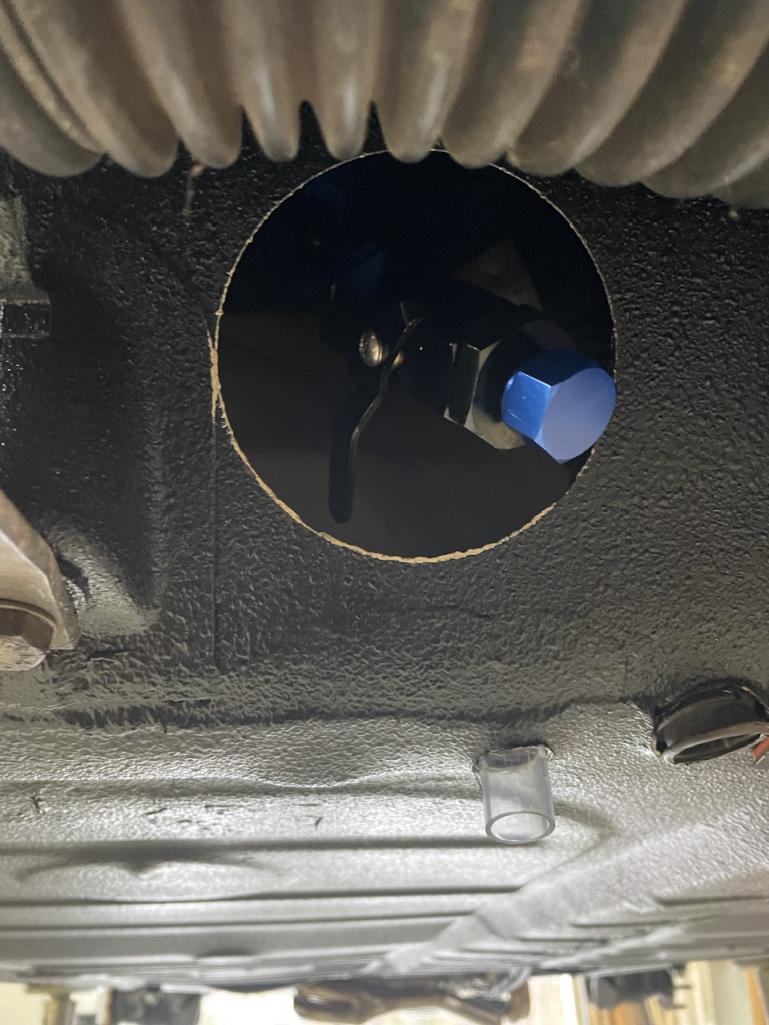
Posted by: pek771 Jan 25 2024, 06:32 AM
Nice having a lathe isn’t it?
Are you above stock ride height?
Posted by: East coaster Jan 25 2024, 09:31 AM
Nice having a lathe isn’t it?
Are you above stock ride height?
It’s awesome to have a lathe and mill. You can pretty much make anything. My lathe is over 100 years old and I can only imagine all the things it’s made over time.
I raised the suspension 2” with lowered spindles in the front and modified mount points in the rear.
Posted by: East coaster Jan 26 2024, 09:41 PM
Just some random pics of wrapping up the wiring harness (now that I know everything works), and playing with trying to get my carpet uncurled from packing. I also installed and final adjusted the shifter and cables.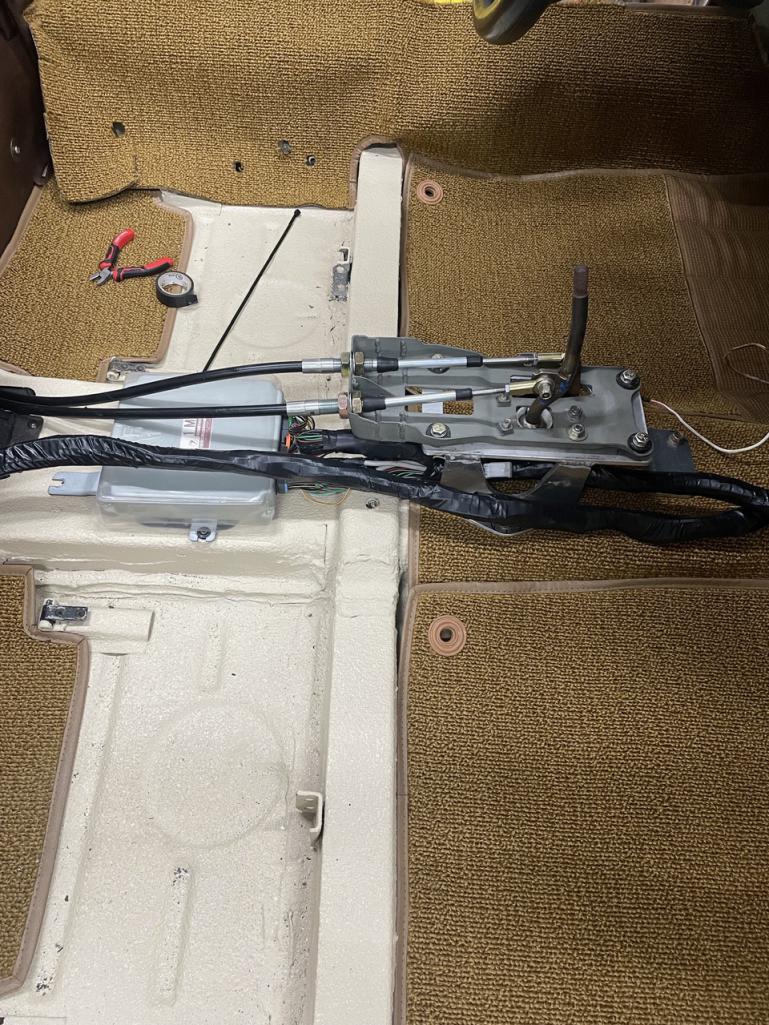

Posted by: East coaster Jan 29 2024, 07:48 PM
Managed to get the hood on by myself today. I used some blankets to protect the cowl and went for it. Looks much better with a hood
Also fitted up the roof rack for some final work on the latches at the rear.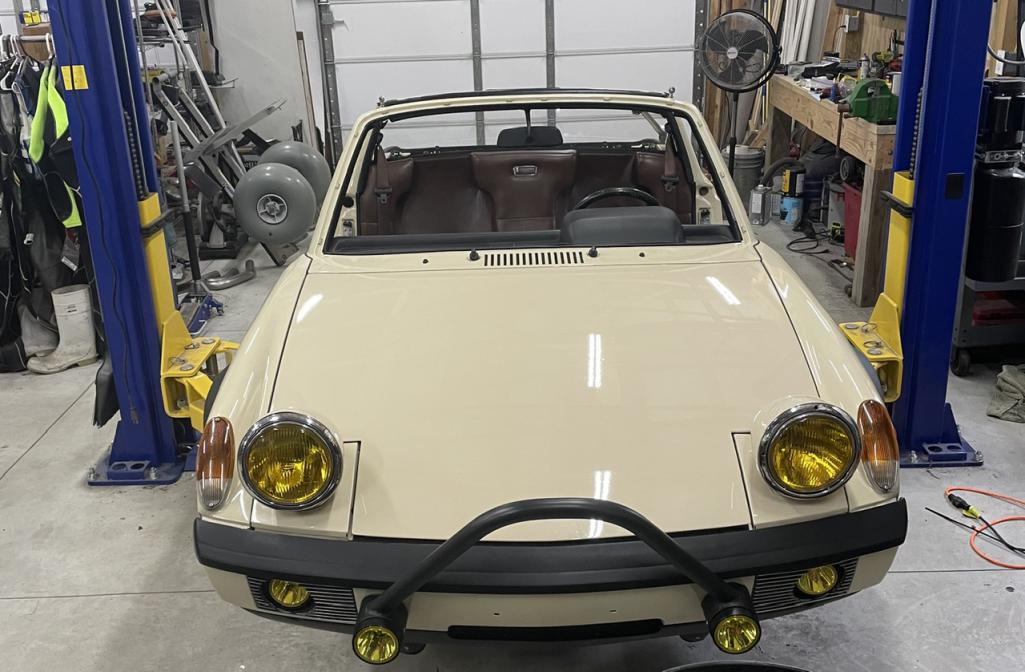
Posted by: maddog Jan 30 2024, 08:09 AM
I love this build! Cant wait to see it finished!
Posted by: Retroracer Jan 30 2024, 08:07 PM
Something to think about: How about coating the roof rack and brush bar a dark brown to match the backpad - gives the car a nice two tone contrast to the black targa top, bumper tops and flares? Little bit of a nuanced difference to the obvious "blackened" approach....
- Tony
PS. Still loving this build BTW. Nice job on the engine firing up!!
Posted by: East coaster Feb 1 2024, 07:53 PM
Worked on the final fitment of the roof rack today. It was pretty much finished a while ago except for a means of latching it down. I decided on a simple approach using some rubber rack straps.
I made some pins for the operating end of the straps and welded them to the support brackets. Then I welded mount points on the rack for the fixed end of the straps.
I’m calling it done (other than finishing and painting)!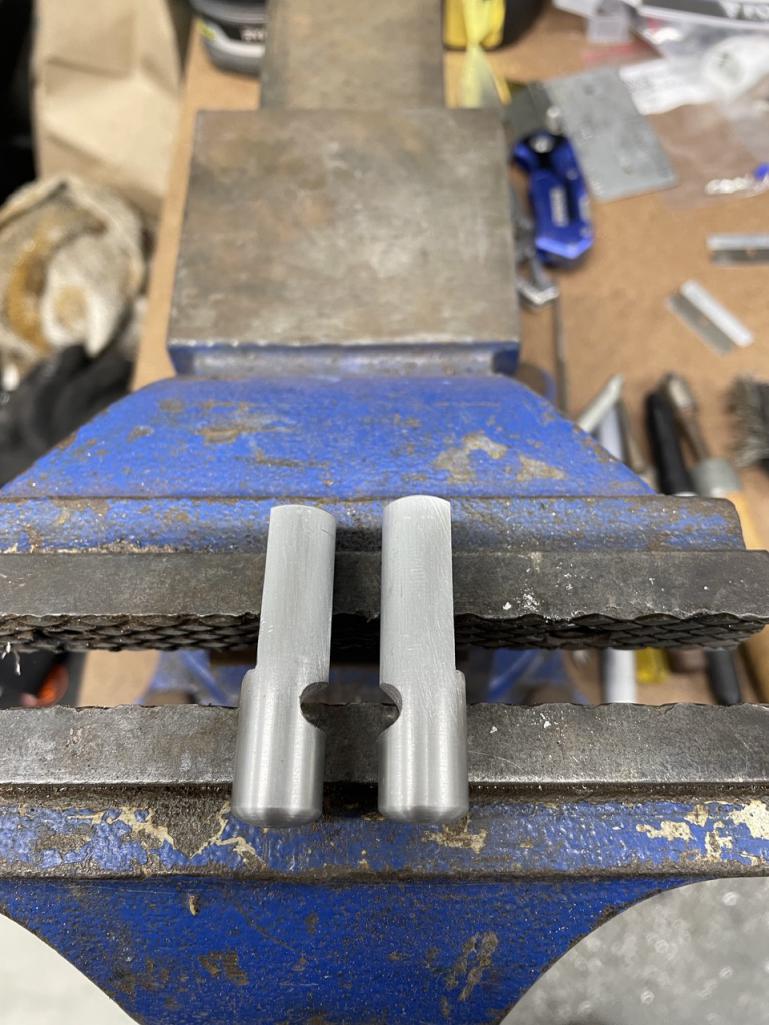
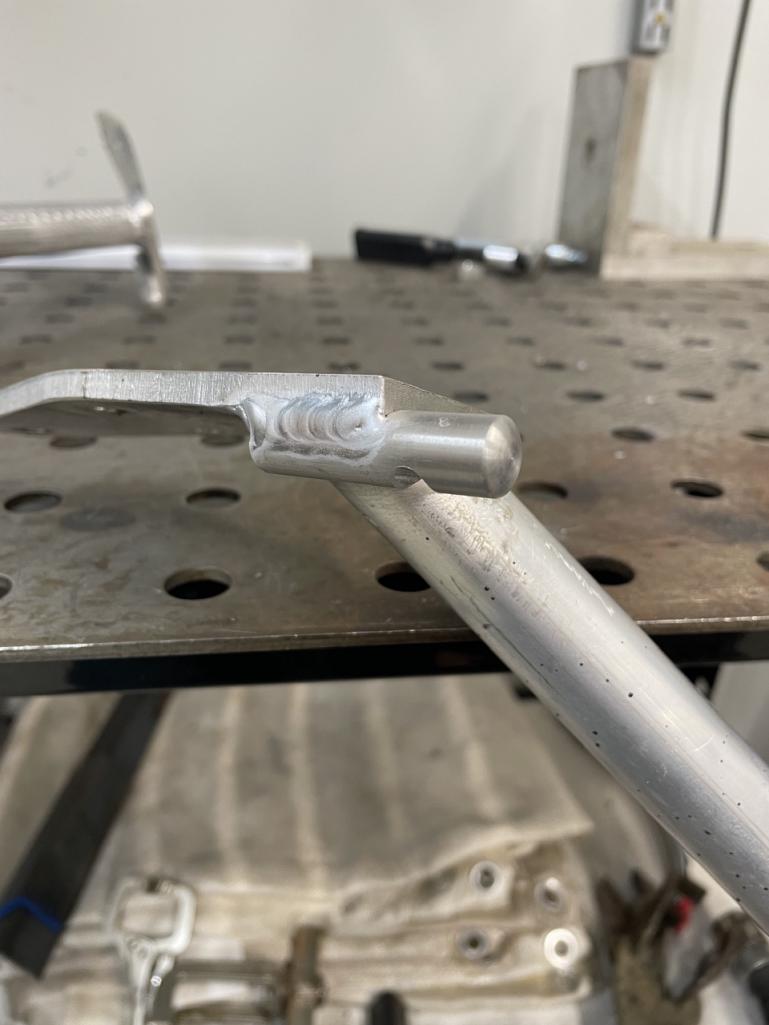
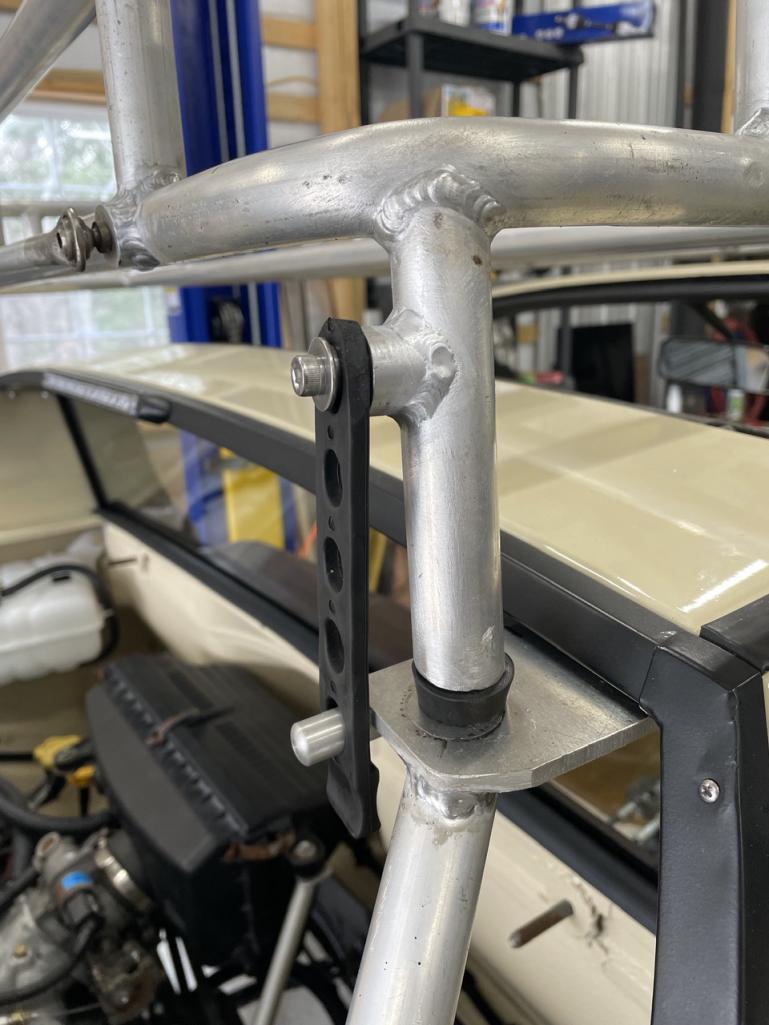

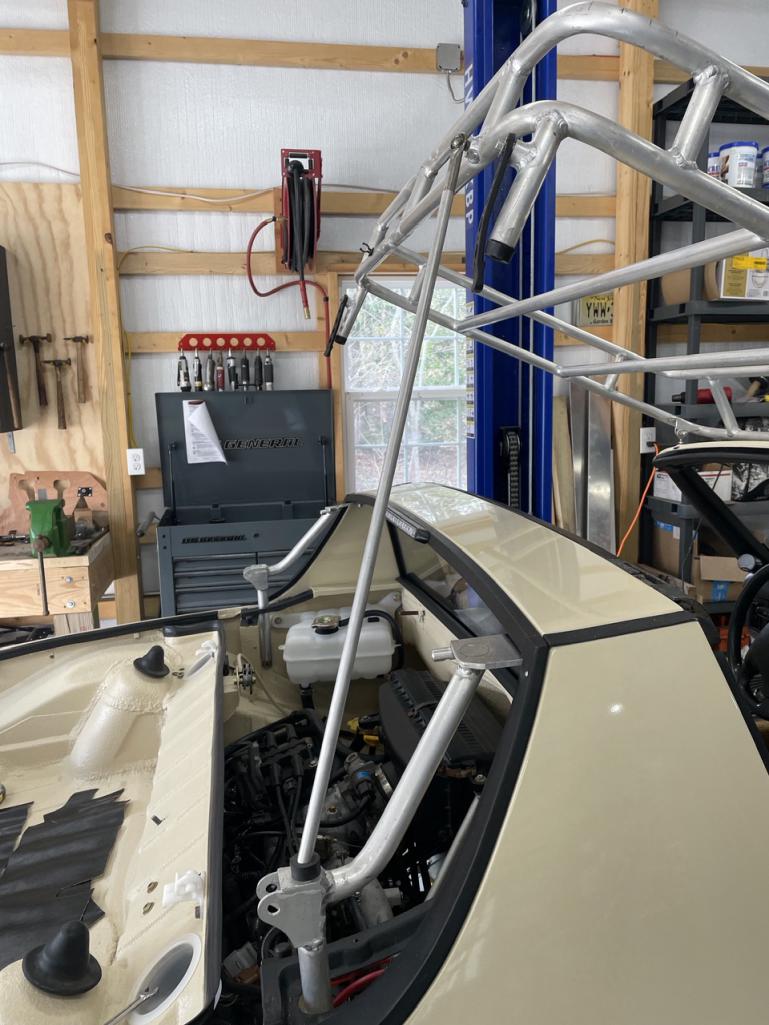
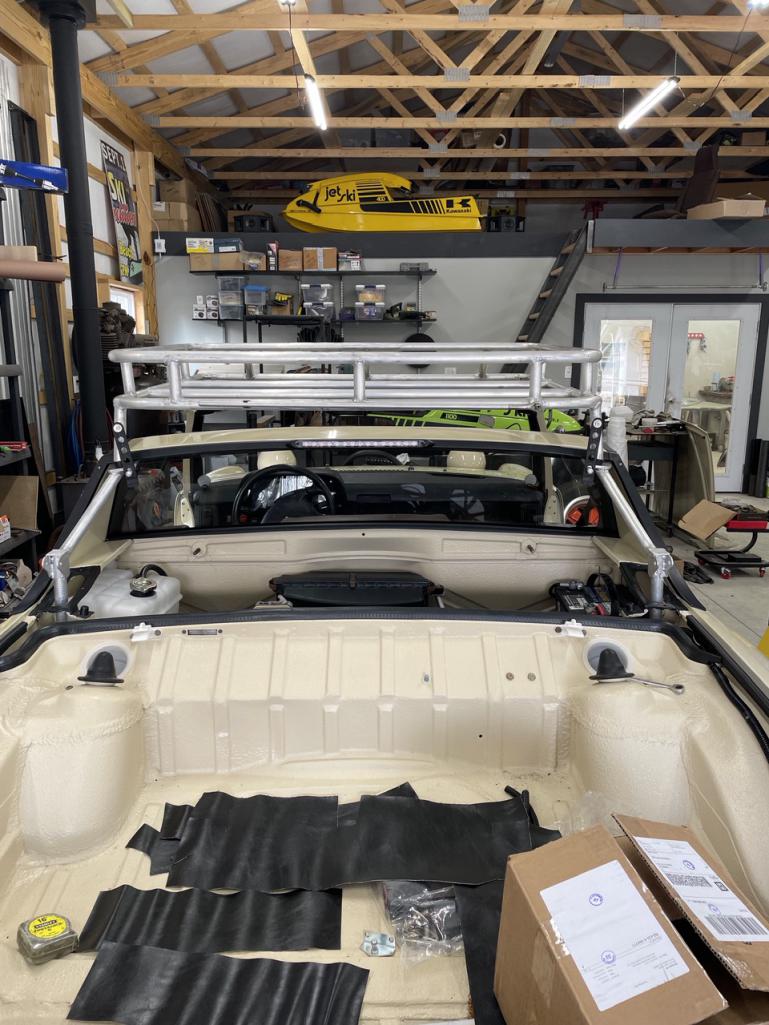
Posted by: East coaster Feb 2 2024, 06:39 AM
Something to think about: How about coating the roof rack and brush bar a dark brown to match the backpad - gives the car a nice two tone contrast to the black targa top, bumper tops and flares? Little bit of a nuanced difference to the obvious "blackened" approach....
- Tony
PS. Still loving this build BTW. Nice job on the engine firing up!!
That would look good. I’m going to stay with black for touch up reasons though. I have a feeling there will be spots to touch up on the regular and there’s nothing like the ease of flat black spray cans.
Posted by: rick 918-S Feb 2 2024, 07:21 AM
Like this build. Lots of detail. You will really enjoy the result.
Posted by: DRPHIL914 Feb 2 2024, 08:23 AM
i am curious about where you sourced the flare material and how you came up with that design/shape? I like it especially your unique safari build.
Phil
ps awesome work btw, enjoying your unique approach with this yet using a lot of stock stuff like heater box for heat and so on, i am interested to see if that will provide enough air flow across the core to give you enough hot air for the cabin.
Phil
PSS - and i love the rack, i would like you to make me one when you are finishe with this build !!!
Posted by: East coaster Feb 5 2024, 05:28 AM
i am curious about where you sourced the flare material and how you came up with that design/shape? I like it especially your unique safari build.
Phil
ps awesome work btw, enjoying your unique approach with this yet using a lot of stock stuff like heater box for heat and so on, i am interested to see if that will provide enough air flow across the core to give you enough hot air for the cabin.
Phil
PSS - and i love the rack, i would like you to make me one when you are finishe with this build !!!
Phil, The flares are just universal flares I picked up off eBay. I figured if I didn’t like them I could always GT flair it, but so far I think they’re right for the safari look.
I have let the car warm up and I seem to be getting good heat flow to the defrosters and floor vents. I put a new blower in the fresh air box and it really moves air. I’ll find out for sure when I start driving it in the cold.
Posted by: pek771 Feb 5 2024, 06:46 PM
How much do you think this weighs? And have you driven it yet?
Posted by: East coaster Feb 5 2024, 07:44 PM
How much do you think this weighs? And have you driven it yet?
No idea on the weight. I was pretty conscious of weight as I progressed though. All the roof rack and supporting parts are aluminum and really pretty light. The front “stinger” bar is also all aluminum and weights less than the stock bumper tits. It’s not ready to drive yet, but hopefully soon. The only major thing left is to make my driveshafts.
Posted by: East coaster Feb 9 2024, 08:05 PM
Made an air deflector for the Safari rack. Here’s fitting it up prior to final trimming/shaping/painting…..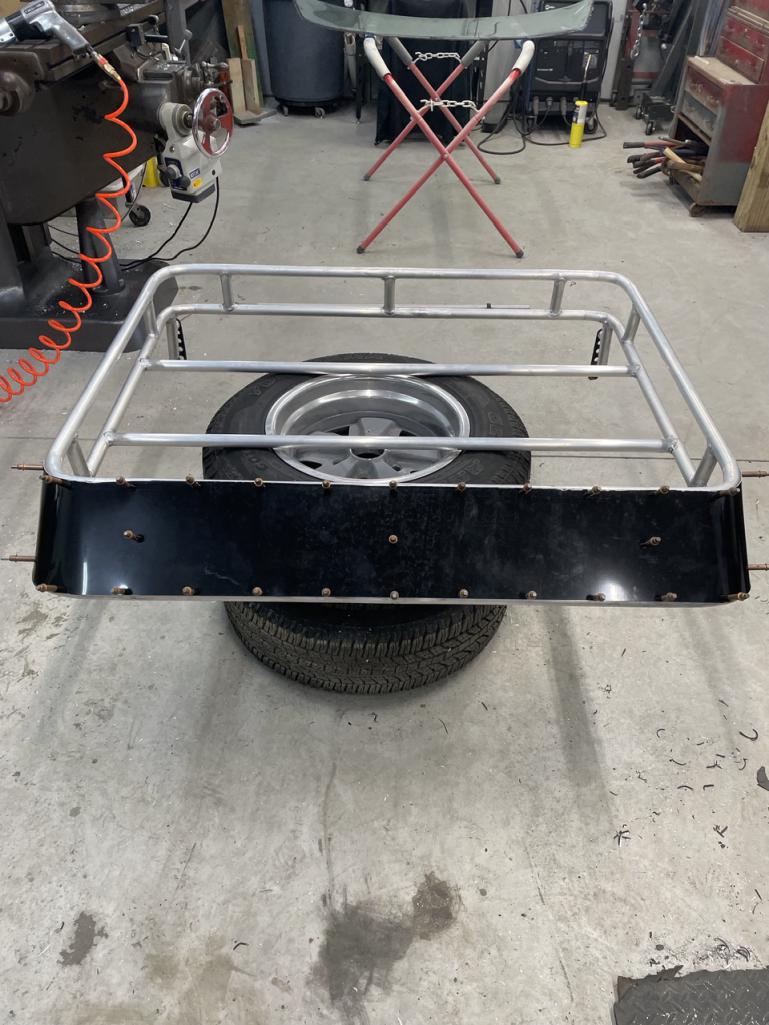
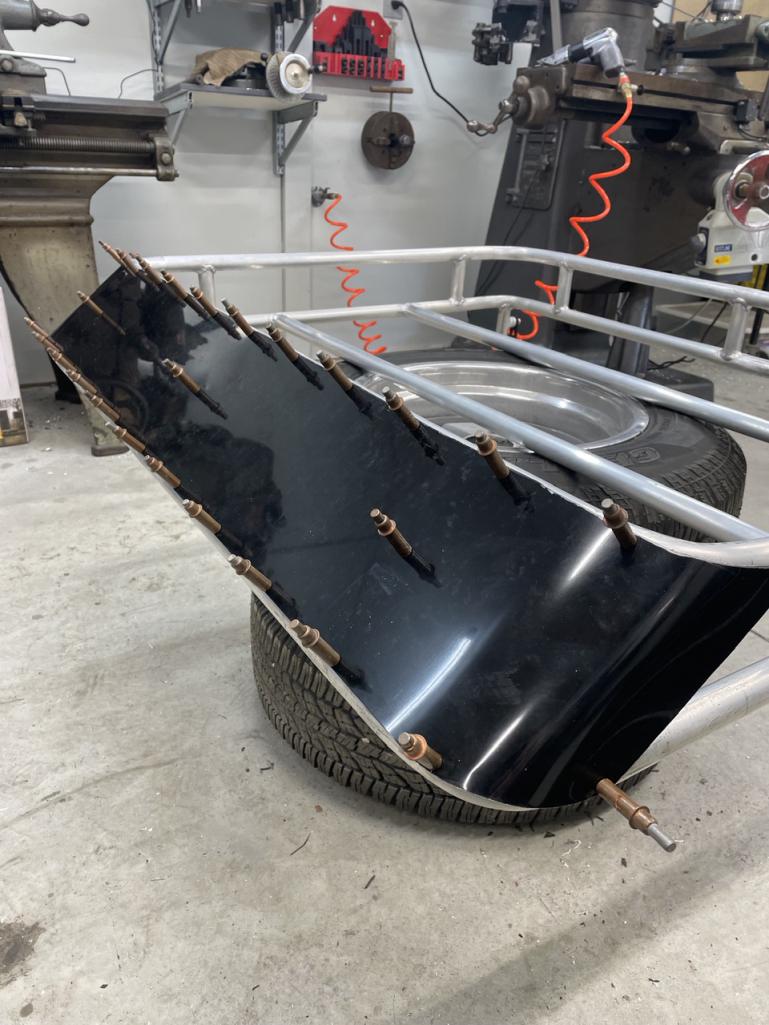
I also finished and painted the trunk hinge supports/rook rack mounts and got them installed. Getting them through the grills and O-rings was a challenge but it came out clean looking.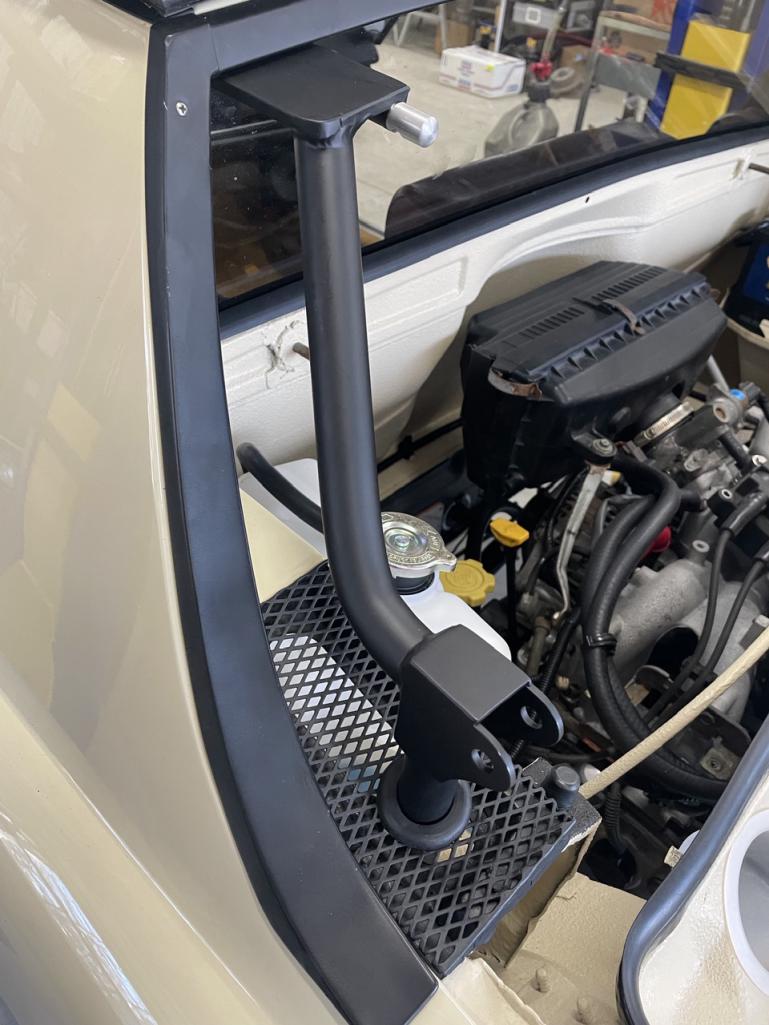
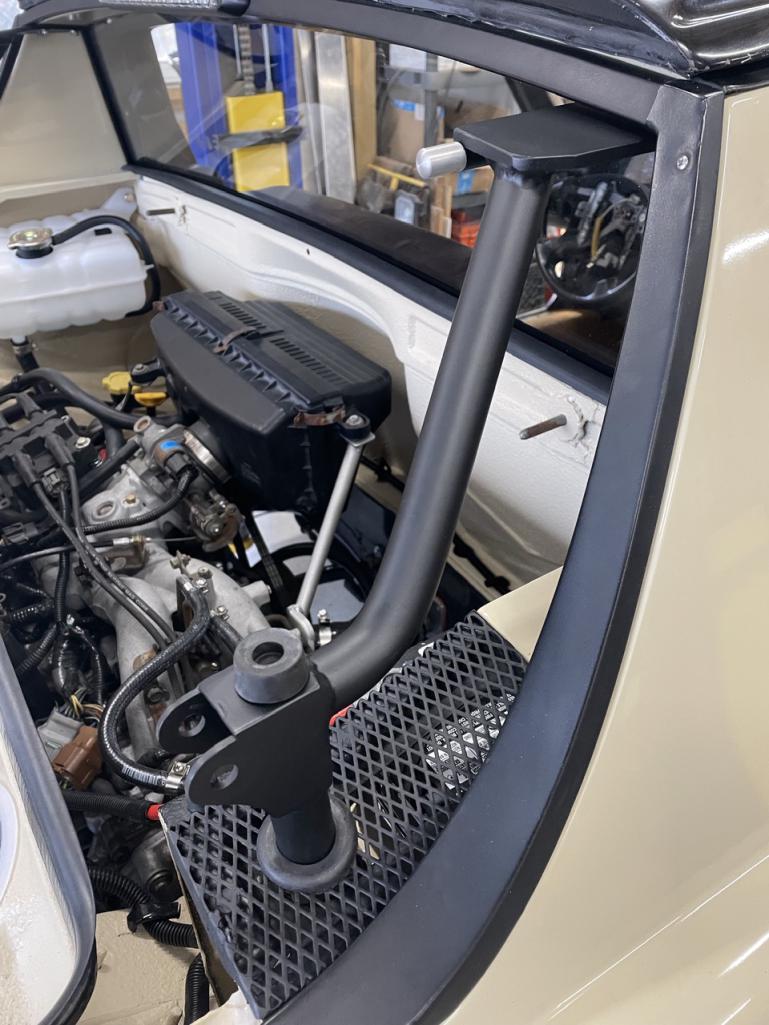
Posted by: tygaboy Feb 10 2024, 08:28 AM
Nice. Very tidy. To me, it's those little details that make all the difference.
Posted by: East coaster Feb 11 2024, 05:45 AM
Finished painting and installling the roof rack, looks so much better painted.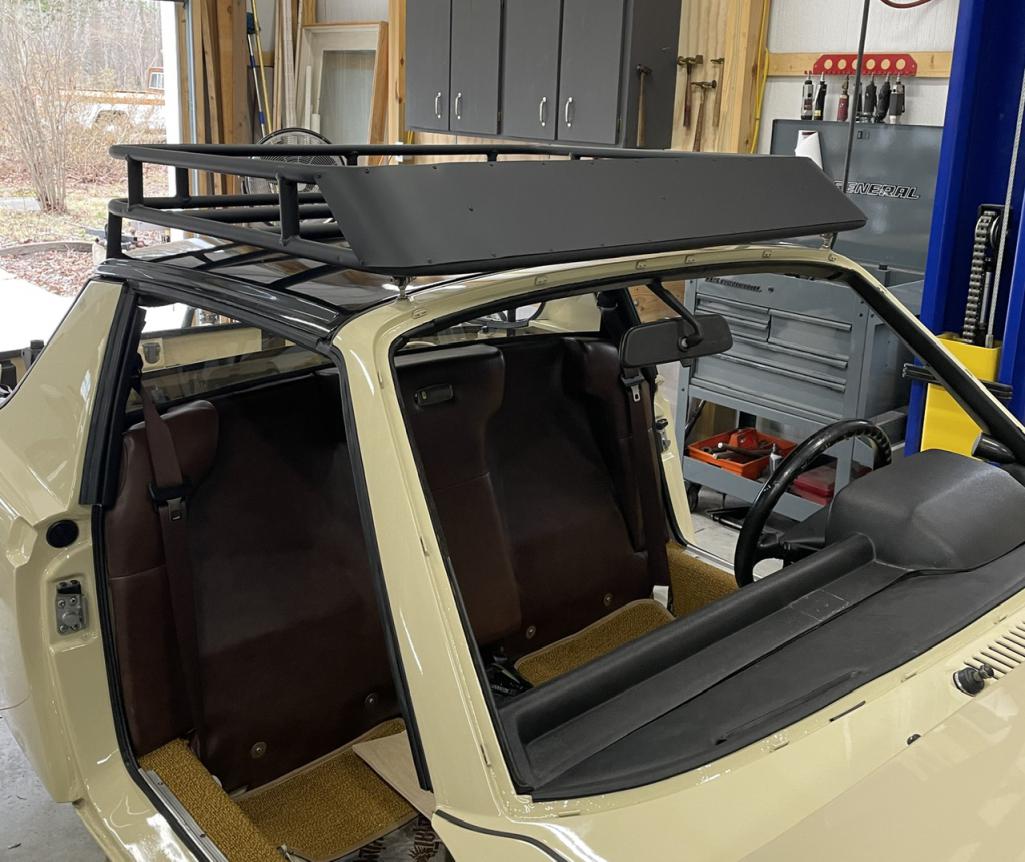
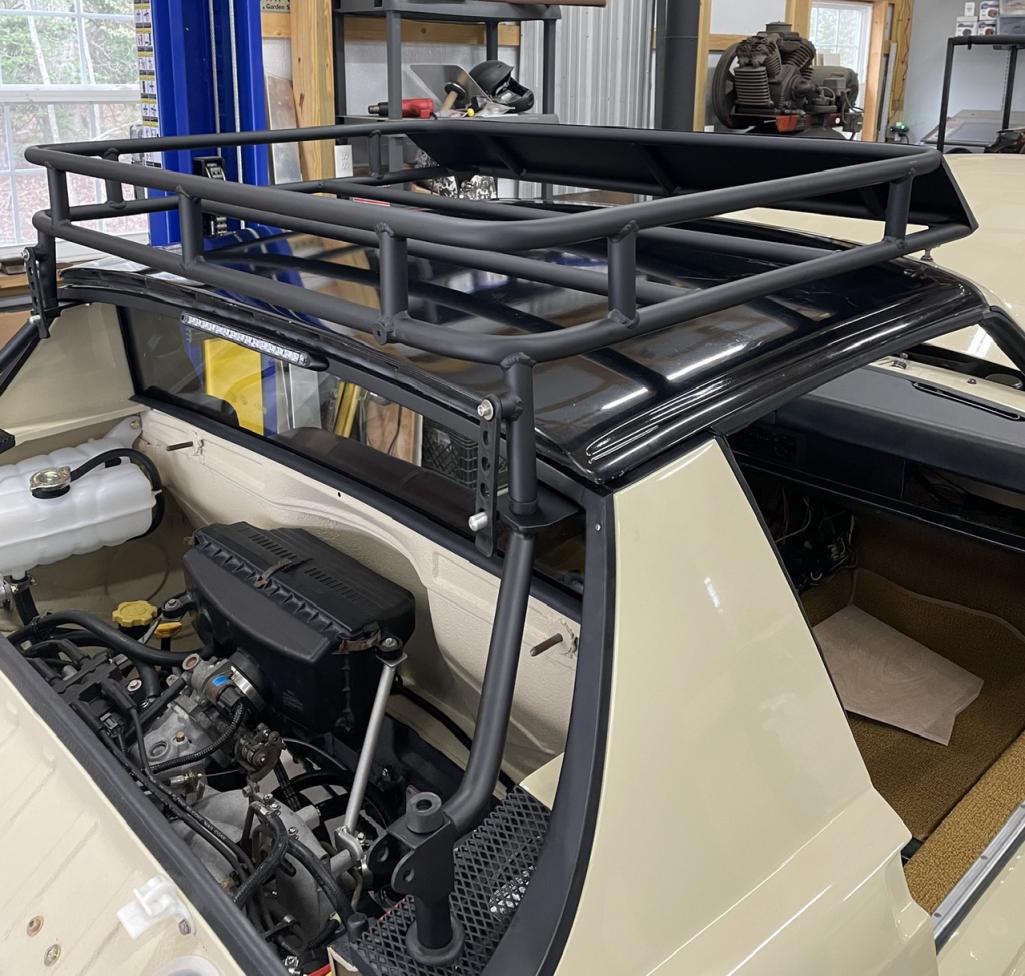
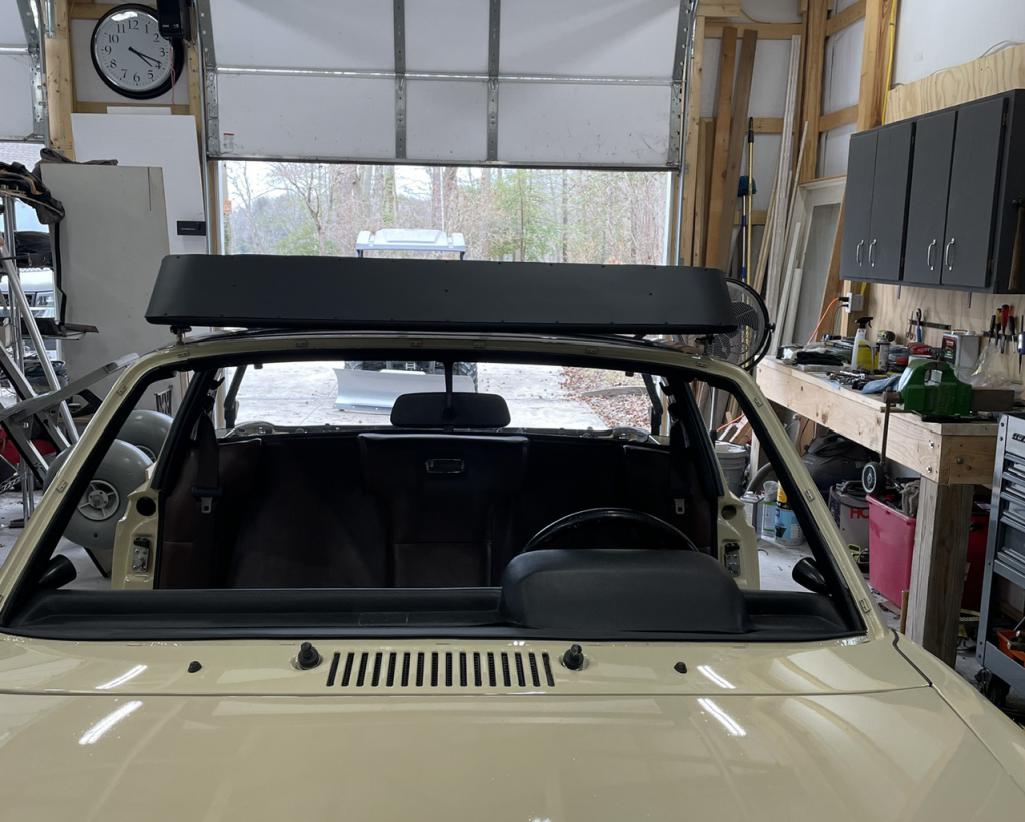
Posted by: Lilchopshop Feb 11 2024, 02:09 PM
@East coaster, I love your build. So many well-executed parts of the project. I can’t help wanting to copy a lot of it. Would you be willing to share the following? Sorry if I might have missed any of this in your postings.
Source/model for 3rd brake light
Model/year of Honda for clutch master cylinder
Source/model for radiator
Where is heater core from?
Source/model of fuel pump/ sending unit
Posted by: East coaster Feb 11 2024, 06:55 PM
@East coaster, I love your build. So many well-executed parts of the project. I can’t help wanting to copy a lot of it. Would you be willing to share the following? Sorry if I might have missed any of this in your postings.
Source/model for 3rd brake light——found it on eBay, there’s lots of options there
Model/year of Honda for clutch master cylinder—97-02 Honda Cvic
Source/model for radiator—Ford Fiesta MK1 (got on eBay for $250, with dual fans)
Where is heater core from?—Mazda 626
Source/model of fuel pump/ sending unit—96-98 Subaru Legacy
Answers above^^^
Posted by: East coaster Feb 12 2024, 05:17 PM
Got the trunk rack painted and mounted it up. This, combined with the roof rack supports, is how my trunk hinges. Trunk is supported by dual gas struts.
It’s so nice to start getting these panels on the car and out of my way in the shop. How I haven’t damaged a panel constantly working around them I’m not sure.
All that’s left is to mount the doors and the car will look complete and I’ll have all my shop real estate back. Unfortunately, I’m not going to mount the doors until all my interior work is done.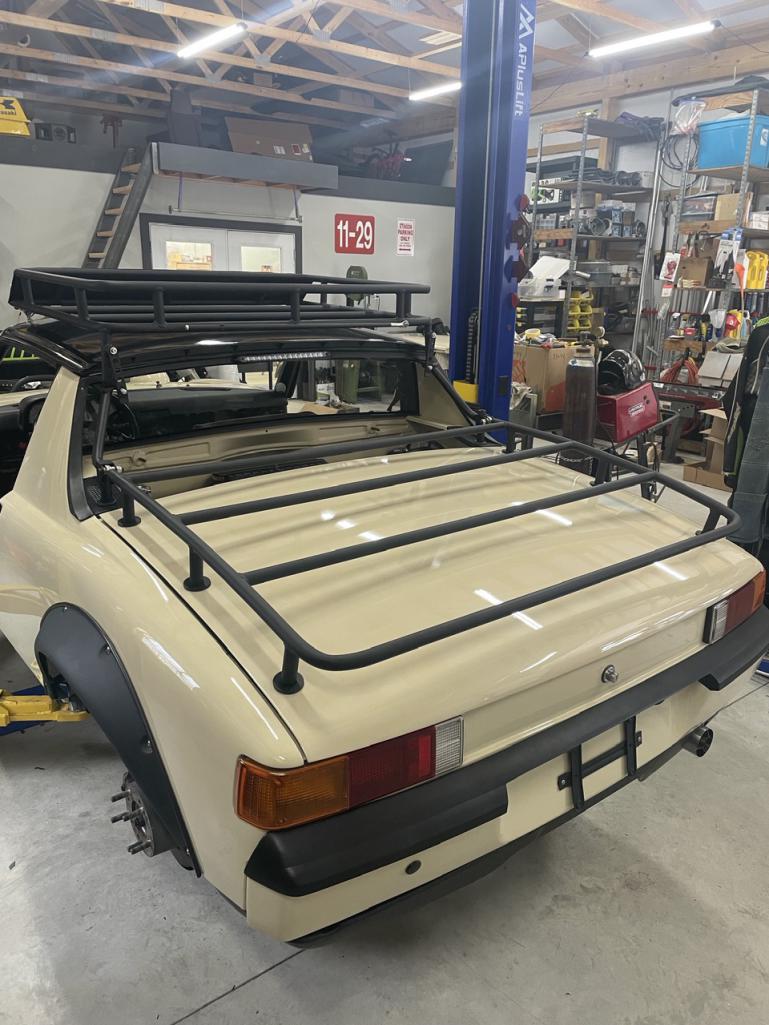
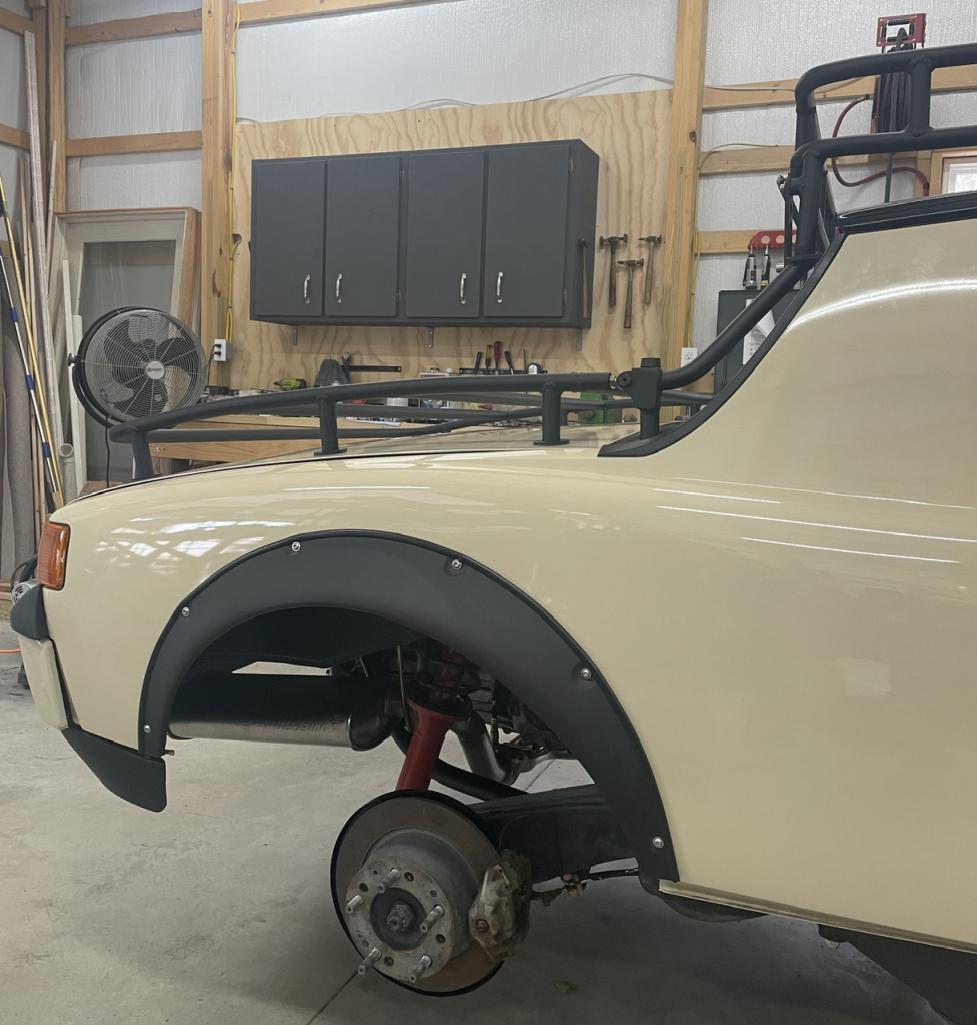
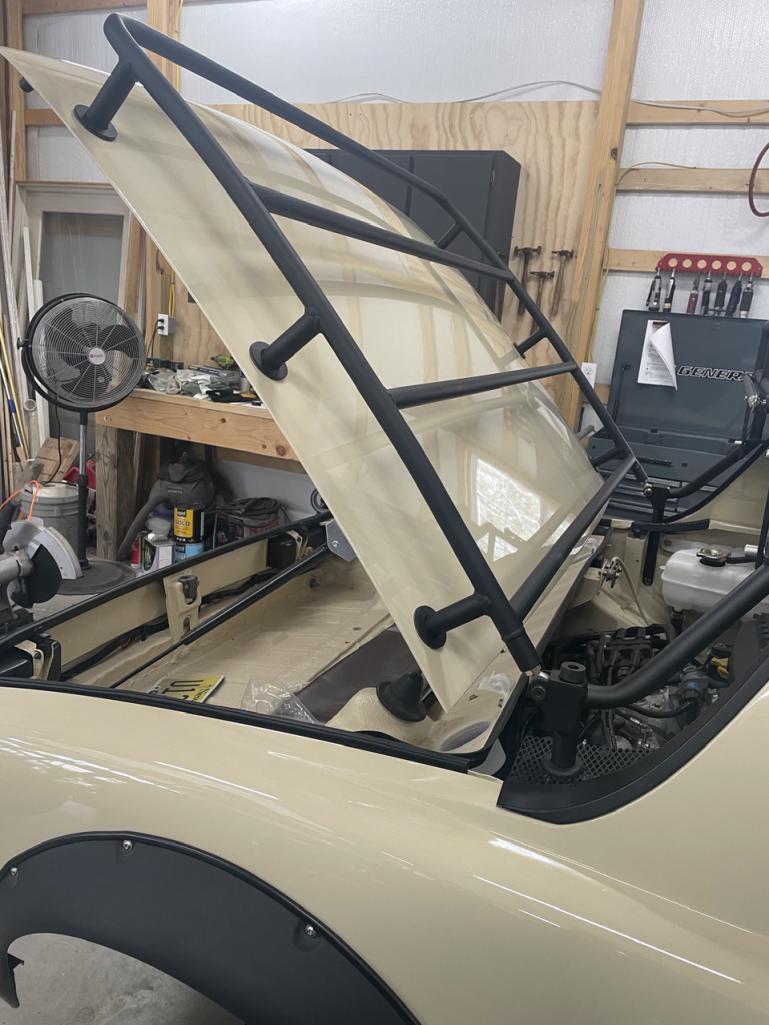
Posted by: kid914 Feb 14 2024, 03:25 PM
In the theme of trying to wrap up the wiring, I added a 3rd brake light today. The hardest part was running the wiring so it exits the body under the sail trim. There’s no exposed wiring with this setup.
It’s pretty bright…..hopefully might prevent getting rear-ended.
Werre was it sourced?
Posted by: East coaster Feb 14 2024, 07:11 PM
In the theme of trying to wrap up the wiring, I added a 3rd brake light today. The hardest part was running the wiring so it exits the body under the sail trim. There’s no exposed wiring with this setup.
It’s pretty bright…..hopefully might prevent getting rear-ended.
Werre was it sourced?
Found it on eBay
Posted by: simonjb Feb 14 2024, 07:42 PM
Just an unbelievable build - and Skills.
Posted by: East coaster Feb 29 2024, 06:17 PM
Ok, so I need a center console to conceal my shifter and the wiring harness and ECU. I hate working with wood, but it seemed the best medium for what I’m trying to do, maybe I’ll make another in fiberglass or carbon some day.
I also wanted to put my head unit in the console. This means the console has to flare out at the top to provide enough width for the unit. I’m using birch ply and I scored the backside (3 scores, 1/2” apart) where the it goes up to the dash to allow some flex to get the wedge shape I need. It’s coming along ok and will be ready for upholstery in another day. The rear height is just right for an armrest lined up with shifter, and it provides some good storage. The ECU is under the storage bin/armrest. The lid tilts from left to right and is padded with 1” high density foam (leftover from one of my jetski projects).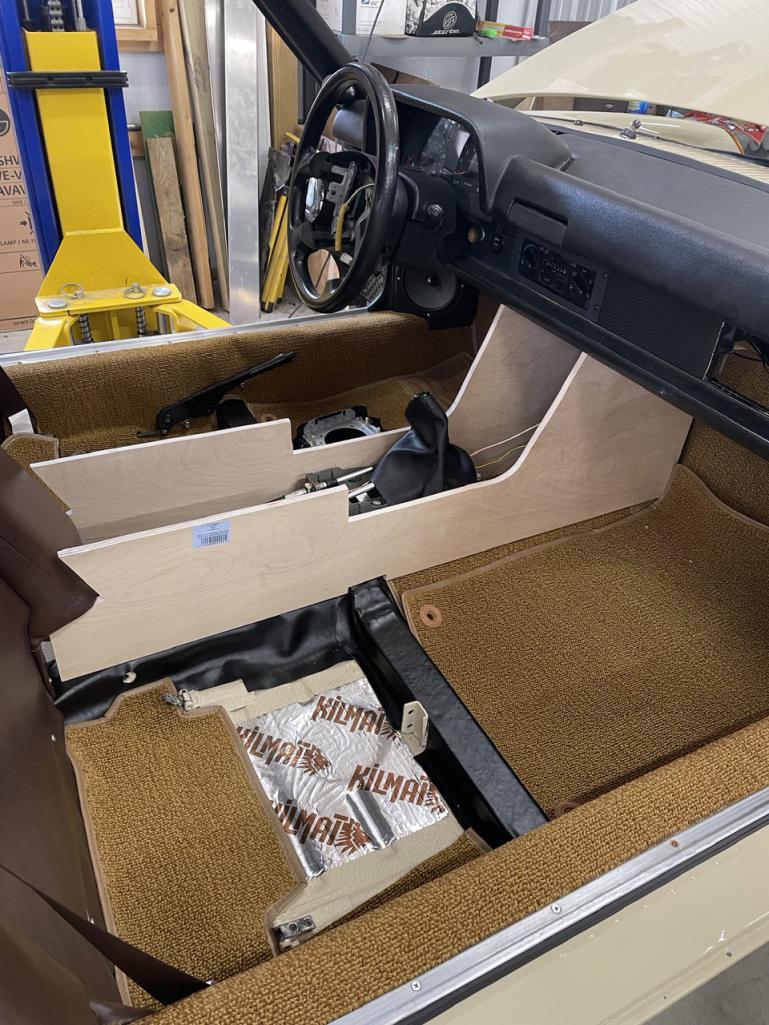
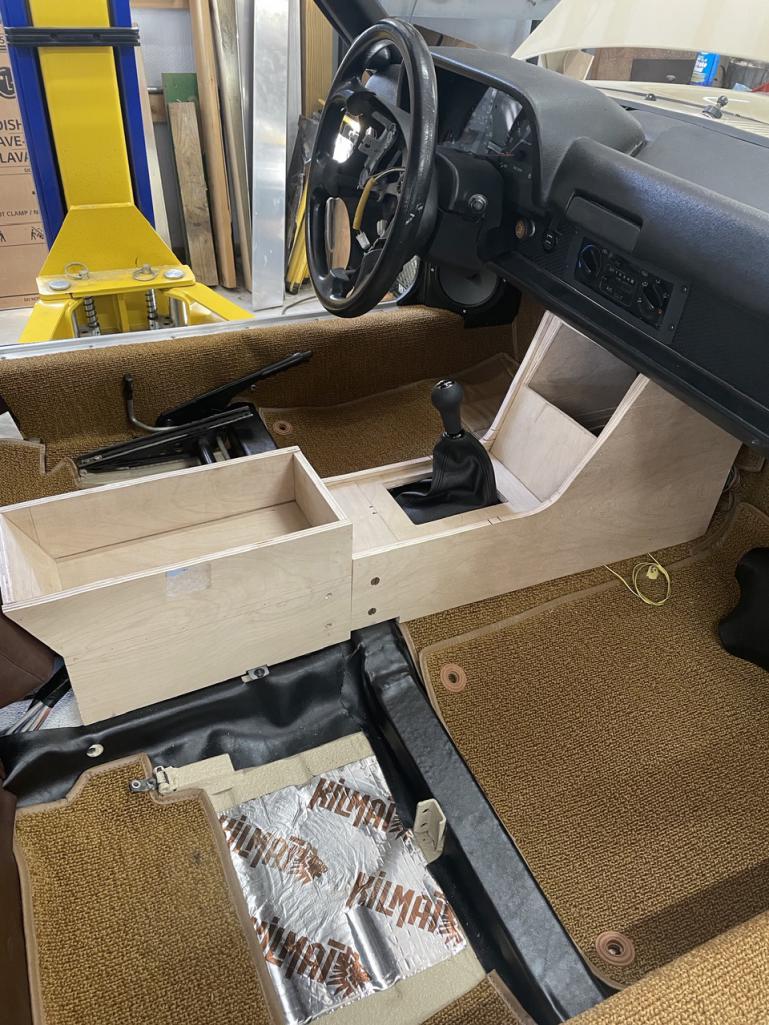
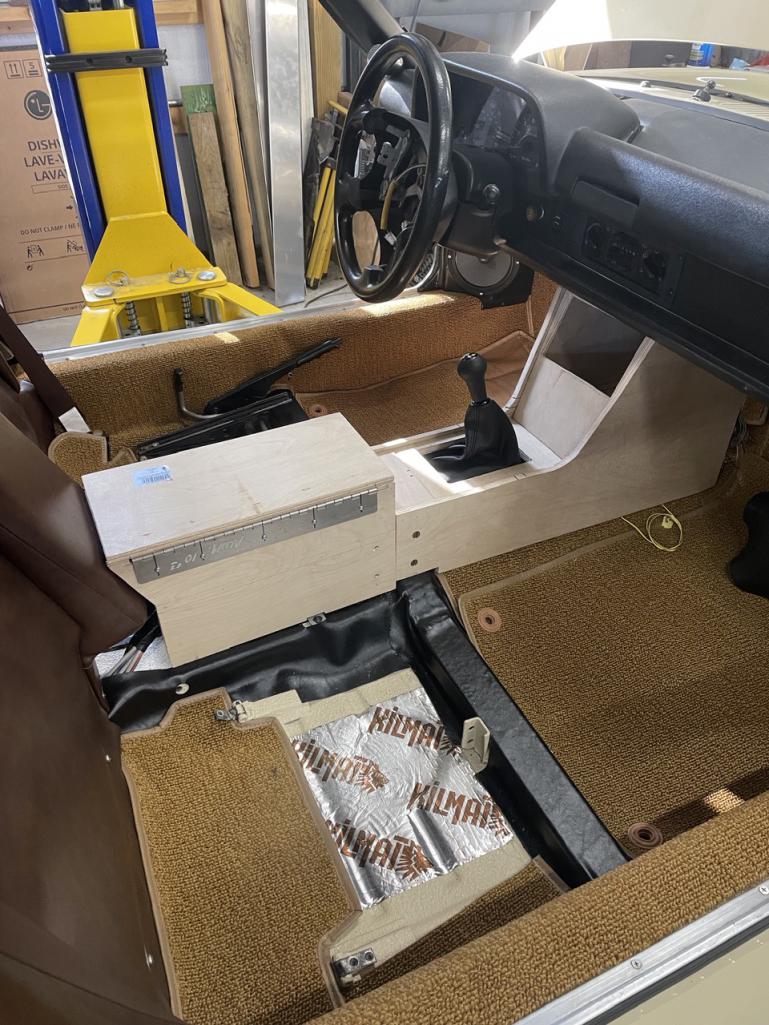
Posted by: 76-914 Feb 29 2024, 07:44 PM
That console looks good.
Posted by: Mitox Feb 29 2024, 10:31 PM
Really enjoying watching your build - awesome work
Posted by: East coaster Mar 11 2024, 08:16 PM
So after way too much time on my console, it’s finally done. I think one of the cool things about projects like this the varied tasks required to complete it. This one took woodworking, sewing, upholstery, and a little metal fab.
Getting everything to fit into the console and still be able to install/remove it was like working a Rubik’s cube. The console houses a subwoofer, head unit, cup holders, and conceals my shifter, ECU, and wire harness. It also provides some decent storage space.
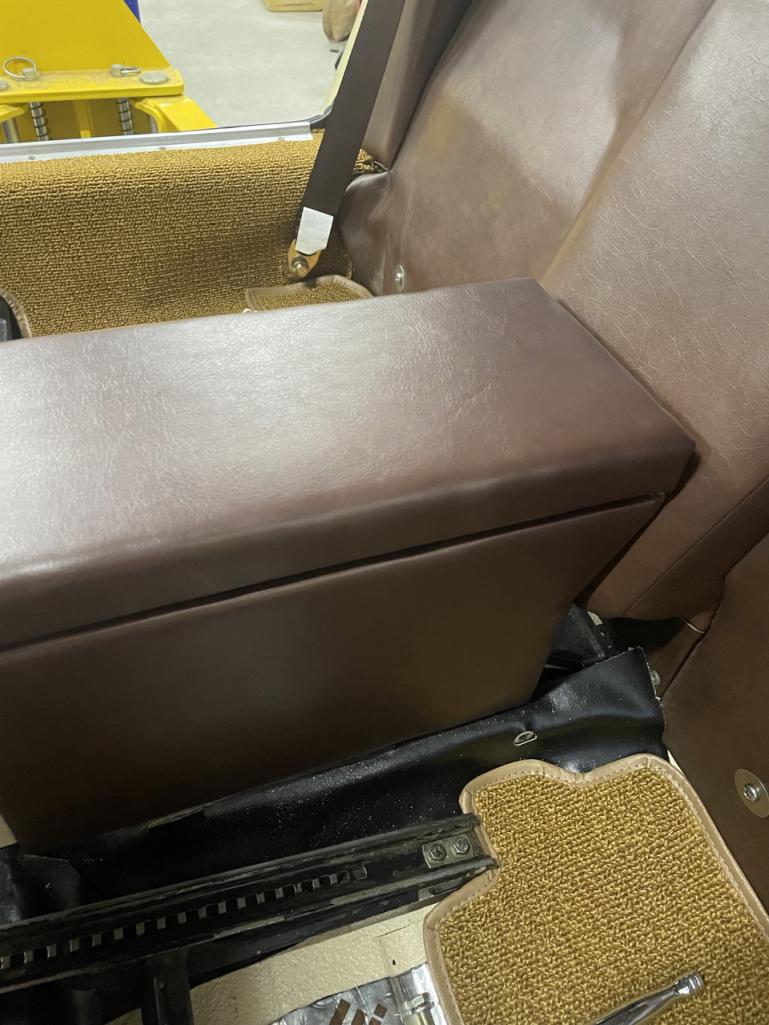
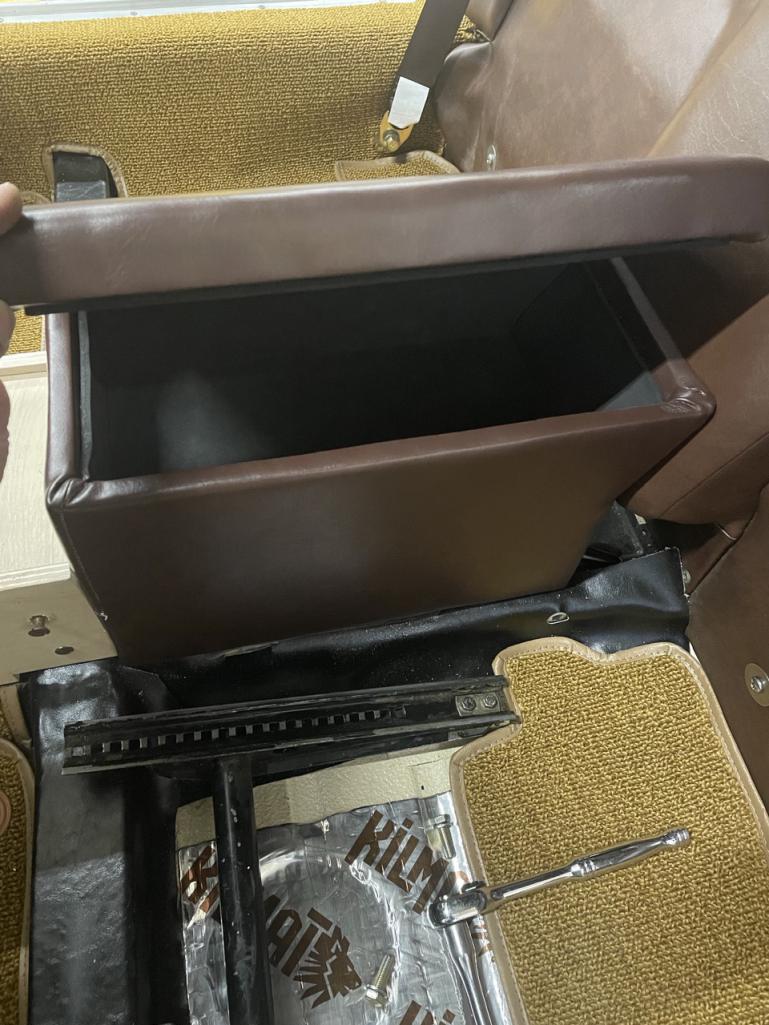
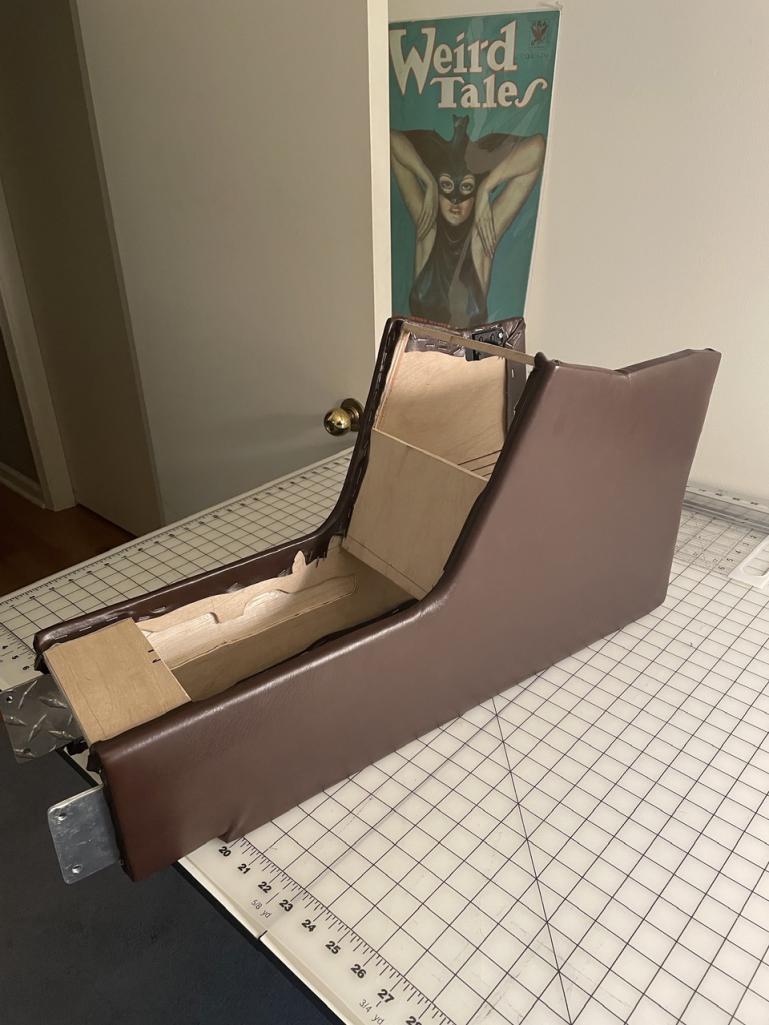
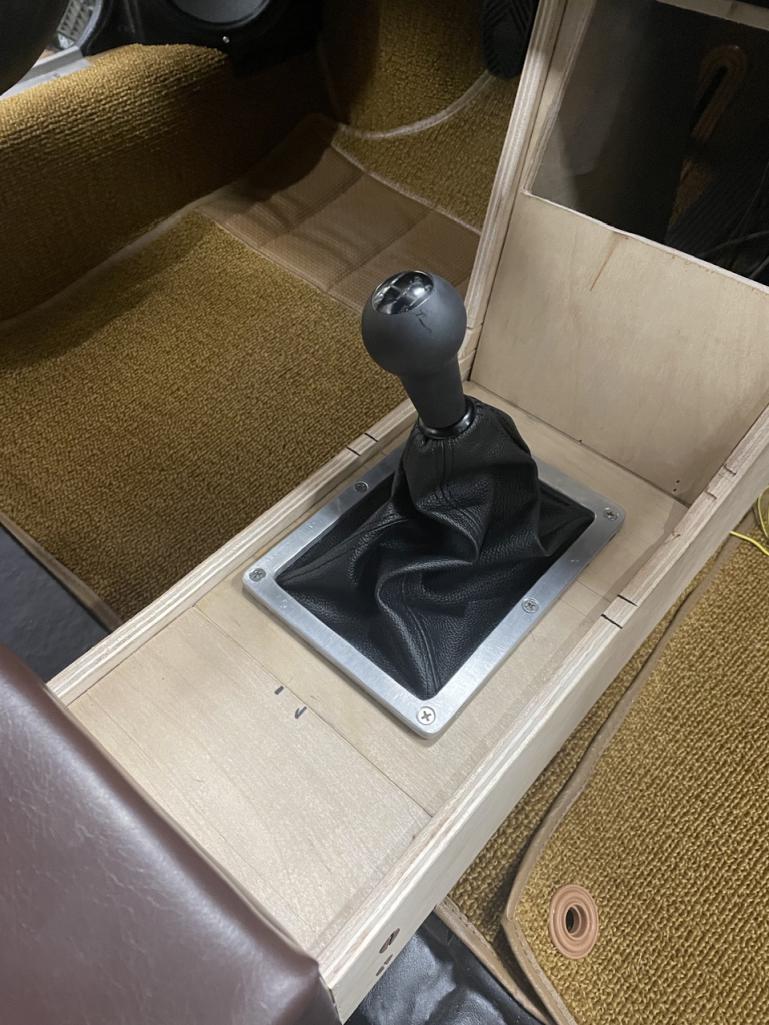
Posted by: East coaster Mar 11 2024, 08:21 PM
Here’s the Pioneer subwoofer installed. Added cup holders and did the inlay with black hydro turf (jetski padding).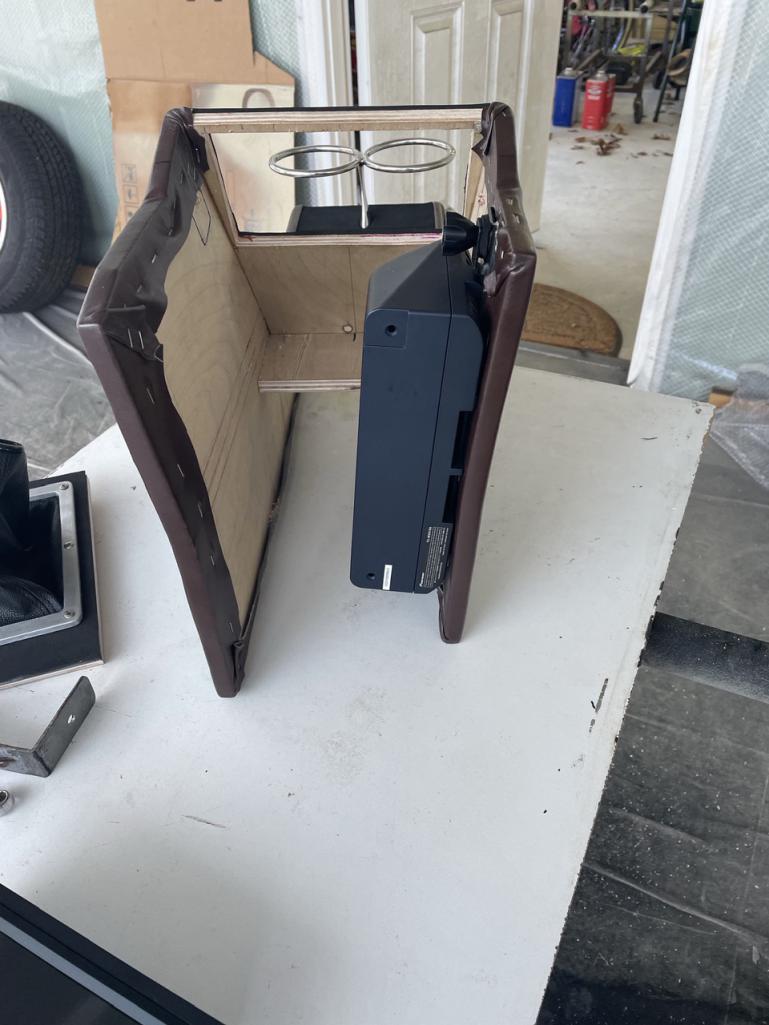
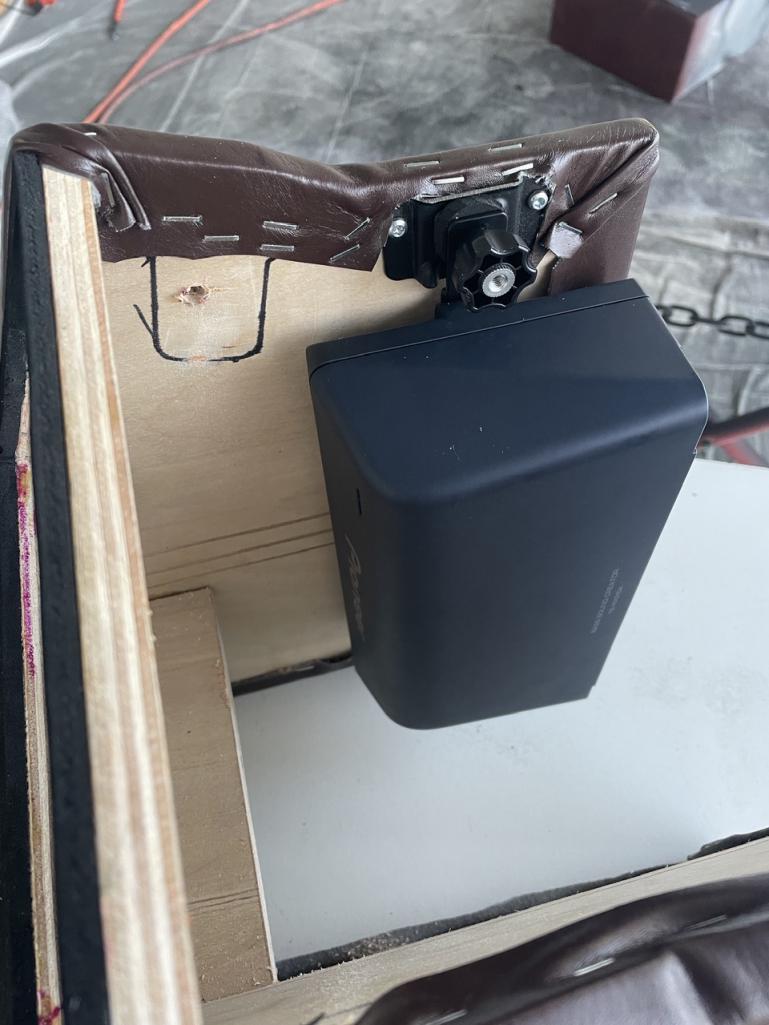
Attached thumbnail(s)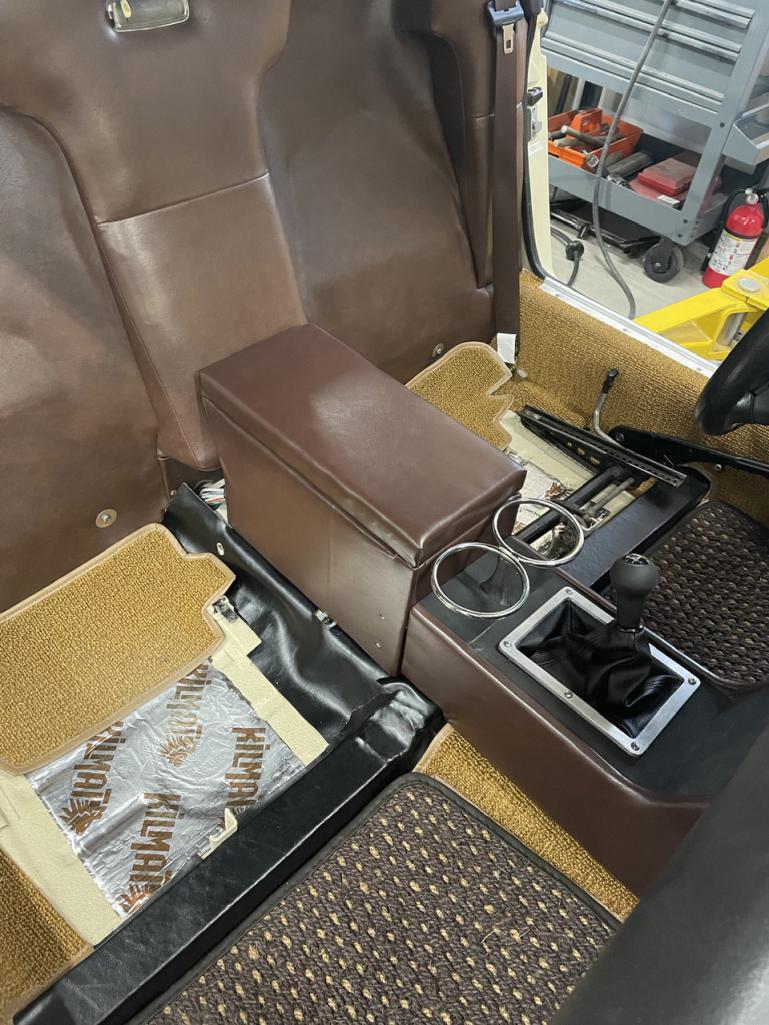
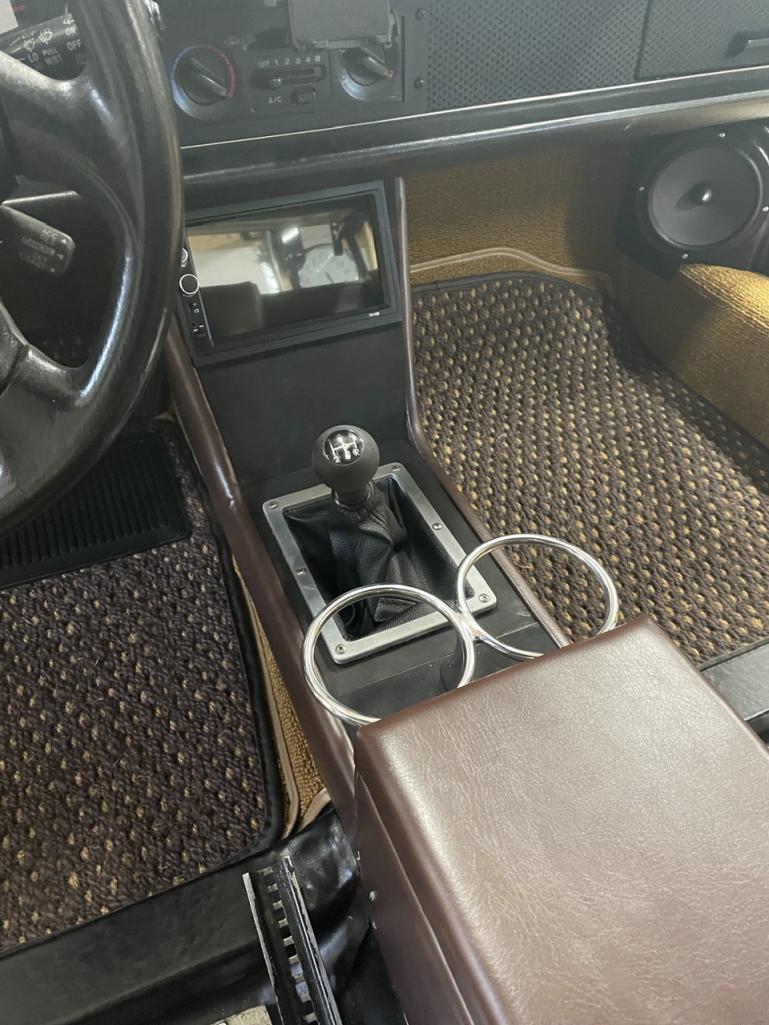
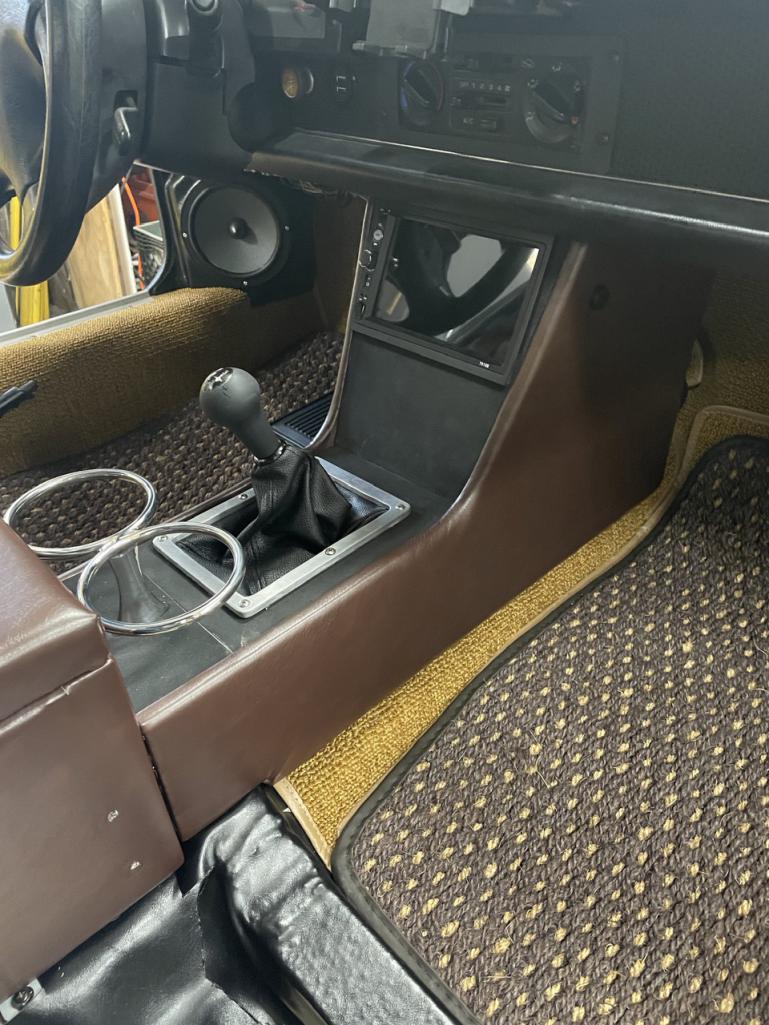
Posted by: East coaster Mar 11 2024, 08:24 PM
Also made a phone mount out of my ashtray…..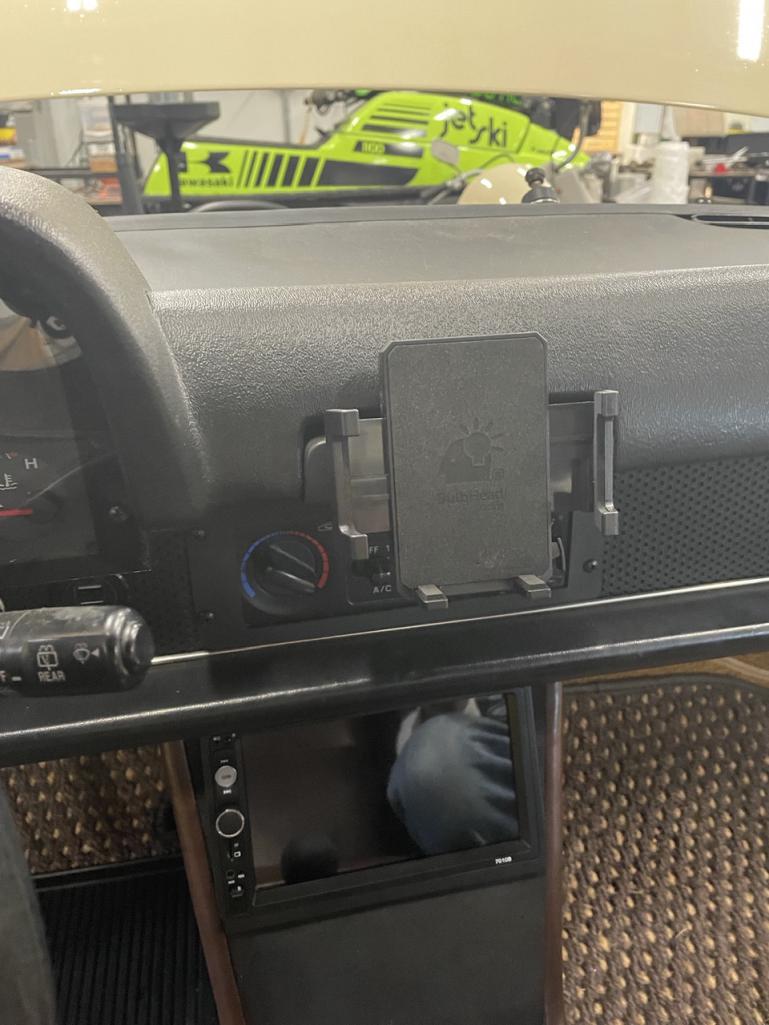
Posted by: DRPHIL914 Mar 12 2024, 07:42 AM
wow looking great, love the console!!
where did you source the cup holder from?
- oh and wondering what are you planning for seats? stock or something race/rally inspired?
Phil
Posted by: East coaster Mar 12 2024, 08:57 AM
wow looking great, love the console!!
where did you source the cup holder from?
- oh and wondering what are you planning for seats? stock or something race/rally inspired?
Phil
Cup holder is a marine piece. It’s stainless and worked for my setup. I didn’t have room to recess dual cup holders and I really wanted 2 (one for me and one for the Mrs). Seats will be stock. The interior was in nice shape when I bought the car so I’ll be using the stockers.
Posted by: East coaster Mar 12 2024, 03:50 PM
Got the seats in today, it’s starting to look like a car again 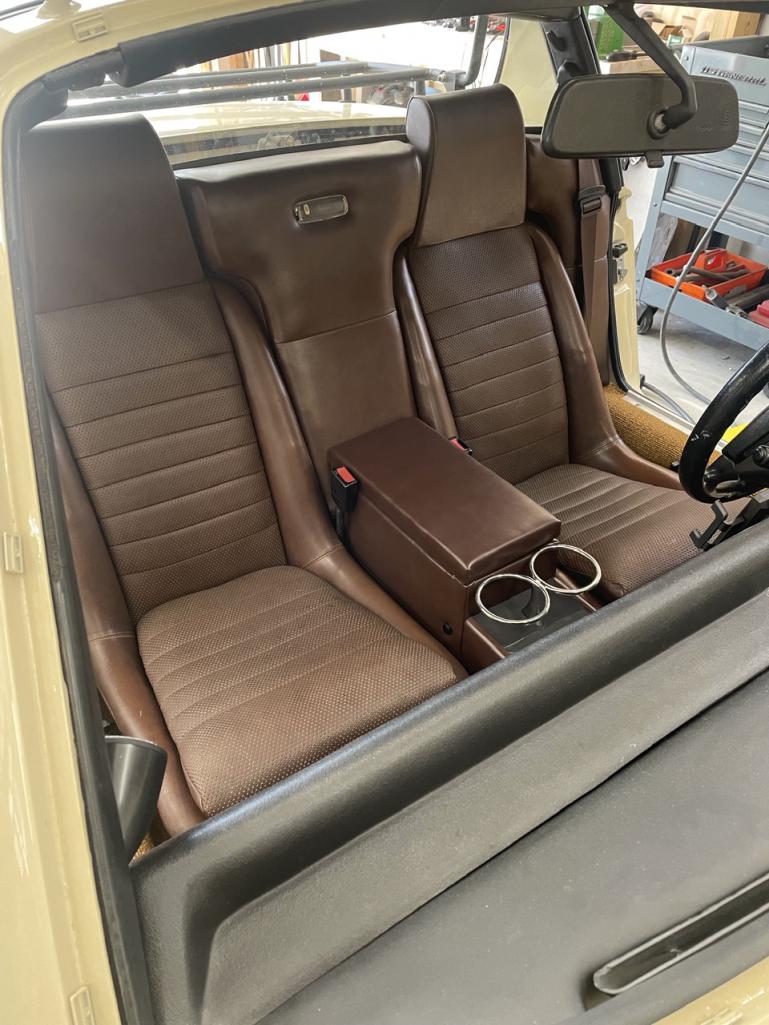
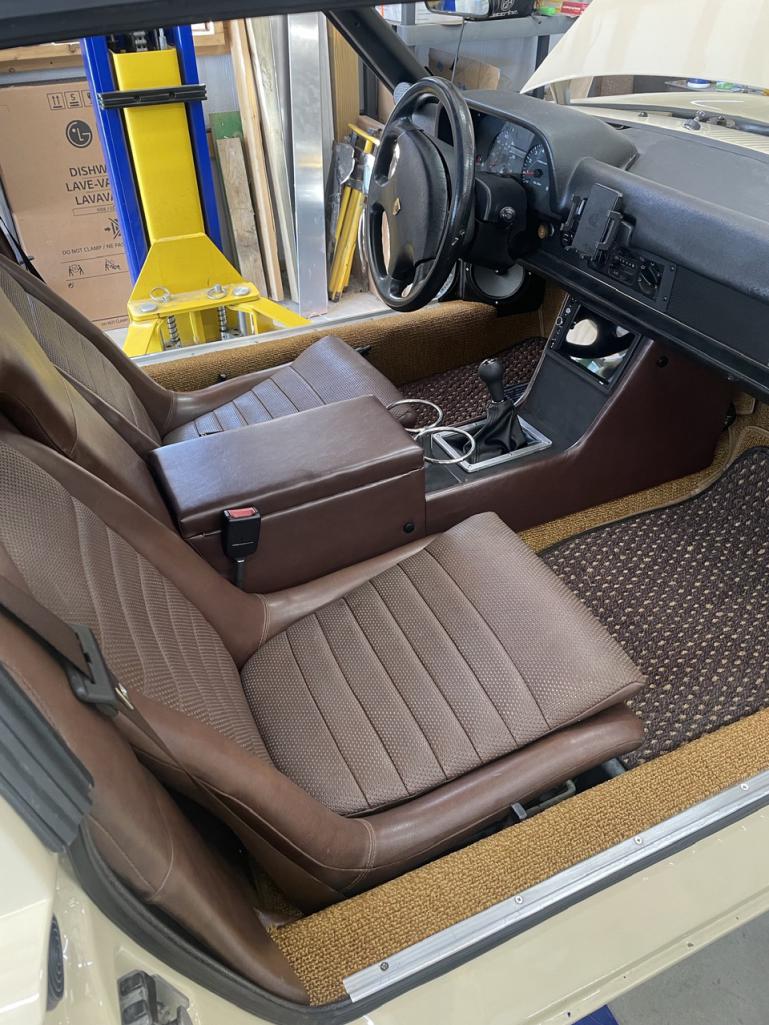
Posted by: DRPHIL914 Mar 13 2024, 06:03 AM
Got the seats in today, it’s starting to look like a car again
beautiful!! stock brown seats look awesome, i figured since you had a stock back pad in the car that you might be keeping the stock seats, those look like new. GTS classics has seats that fit into the back pad as well, if you wnated something with more lateral support, which you might need if you start doing some fun off road stuff with this car.

Posted by: East coaster Mar 13 2024, 06:29 AM
Got the seats in today, it’s starting to look like a car again
beautiful!! stock brown seats look awesome, i figured since you had a stock back pad in the car that you might be keeping the stock seats, those look like new. GTS classics has seats that fit into the back pad as well, if you wnated something with more lateral support, which you might need if you start doing some fun off road stuff with this car.
I had GTS seats in my last 914 and they were great.
Posted by: East coaster Mar 13 2024, 06:30 AM
[/quote]
beautiful!! stock brown seats look awesome, i figured since you had a stock back pad in the car that you might be keeping the stock seats, those look like new.
GTS classics has seats that fit into the back pad as well, if you wnated something with more lateral support, which you might need if you start doing some fun off road stuff with this car.
[/quote]
I had GTS seats in my last 914 and they were great.
Posted by: Bullethead Mar 14 2024, 07:39 AM
Nice!
Posted by: East coaster Mar 16 2024, 06:46 PM
Fitted up the rockers today. They’re an aluminum set I got through someone here in the World. I had to remove 3/4” from each end and reform the lips to account for the larger wheel openings. Just need to get them painted now and they can go on for real.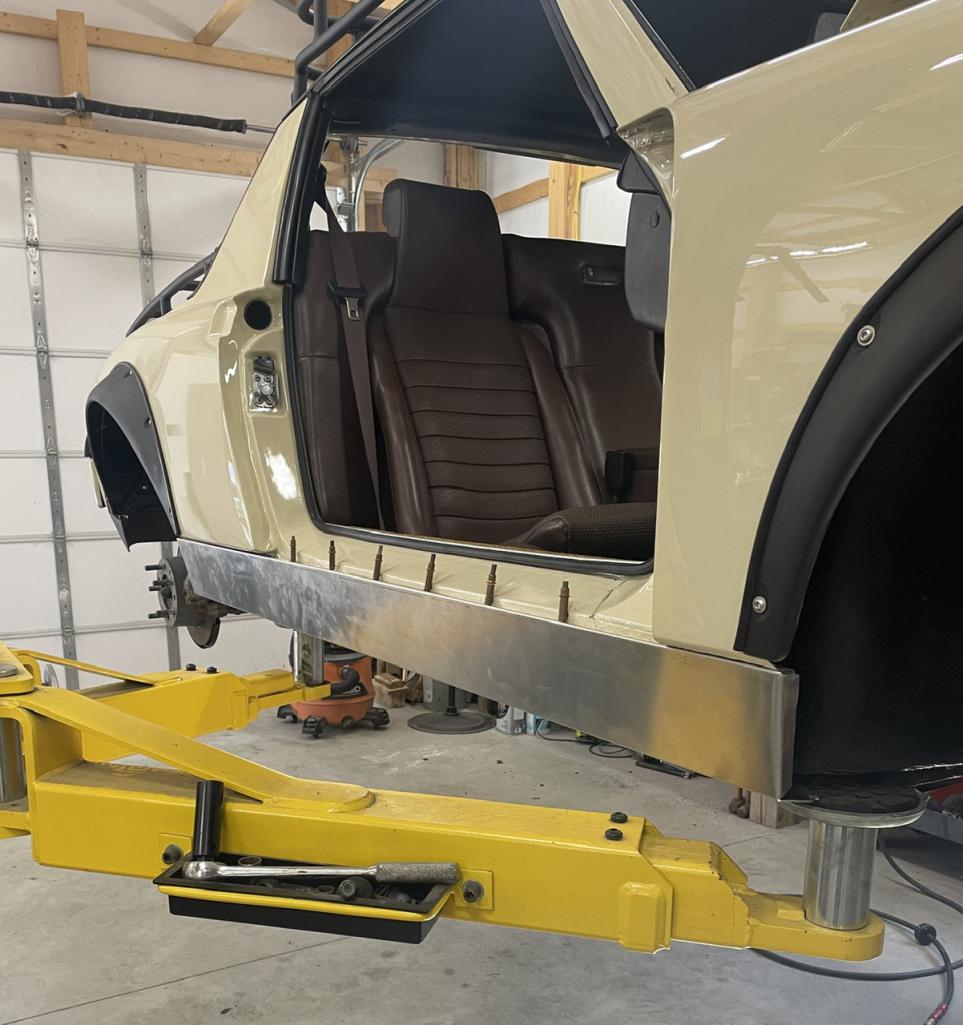
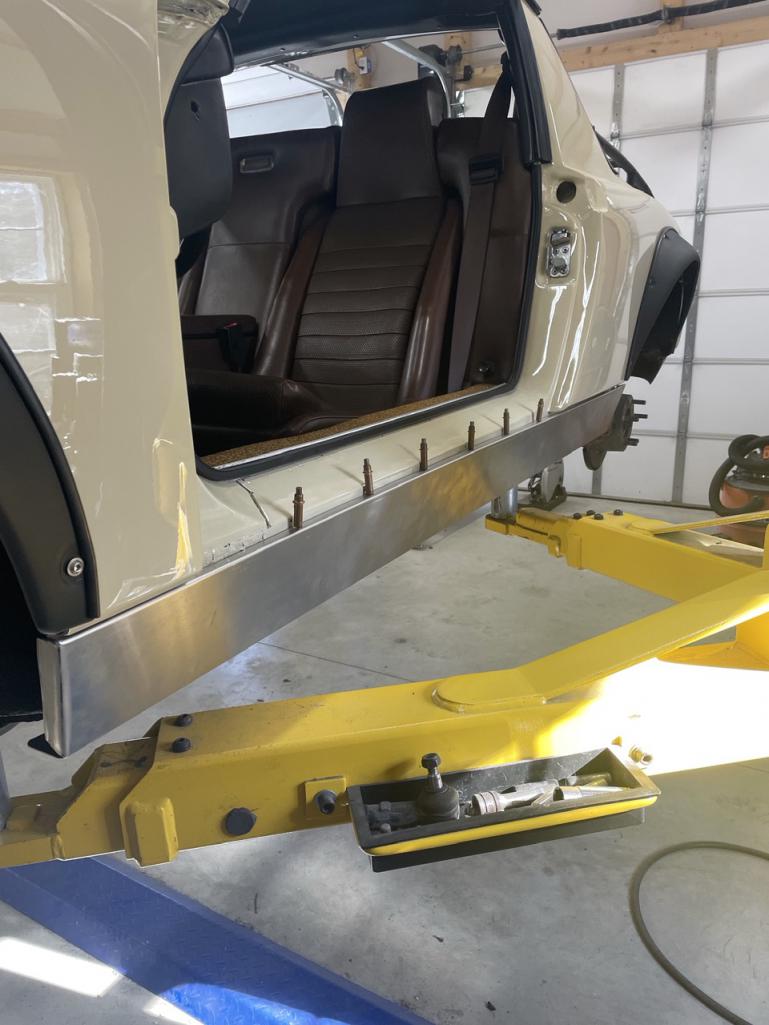
Posted by: East coaster Mar 16 2024, 06:50 PM
I also made a cover plate for the opening for the fuel tank. I have a drain valve that protrudes through the hole about 1” so I couldn’t use a flat plate/disk. I built a little box section to go over the opening and mounted it up.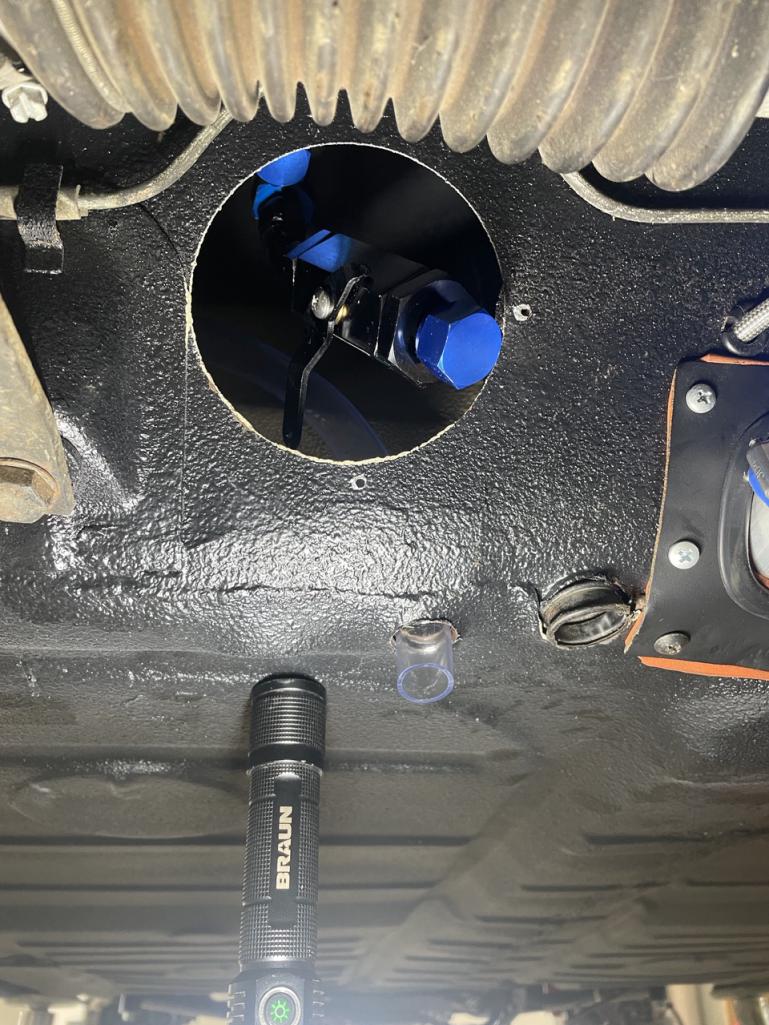
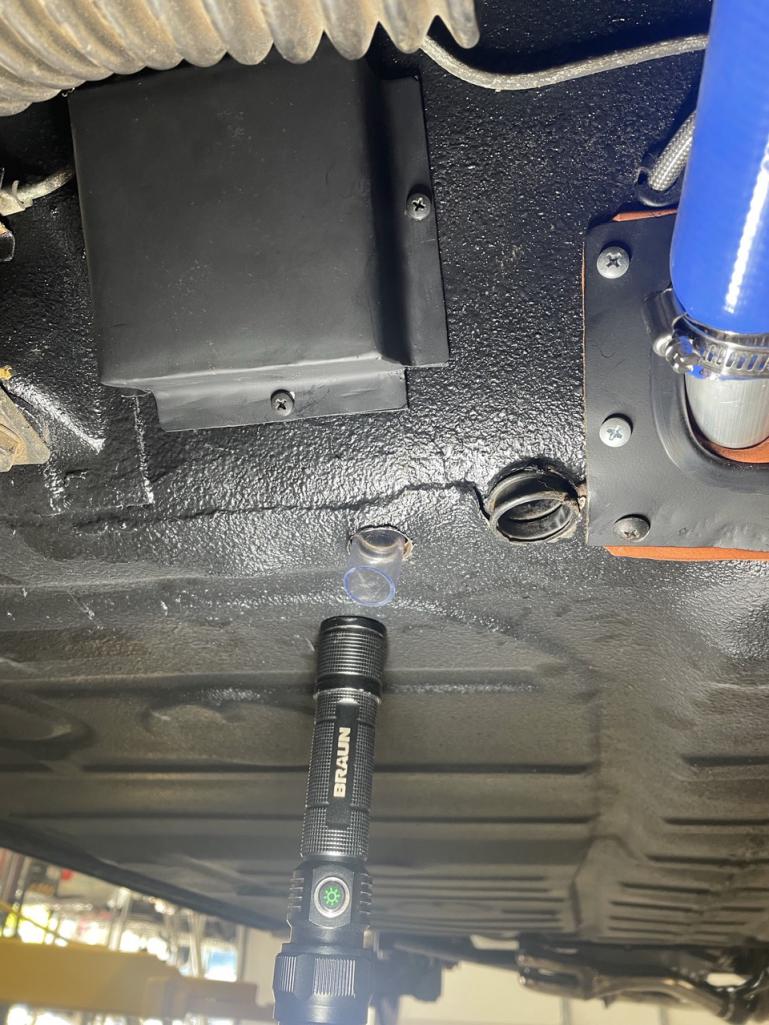
Posted by: 76-914 Mar 16 2024, 07:43 PM
Your interior came pout looking great man.
Posted by: East coaster Mar 22 2024, 03:52 PM
Gettin’ legit! It’s licensed and insured now.
I need to finish up a few things to be ready for a test drive but it’s getting close. I need to bleed brakes and clutch, and machine my axles and get them installed, then it’s test drive time…….oh yeah, I should probably put the doors on too!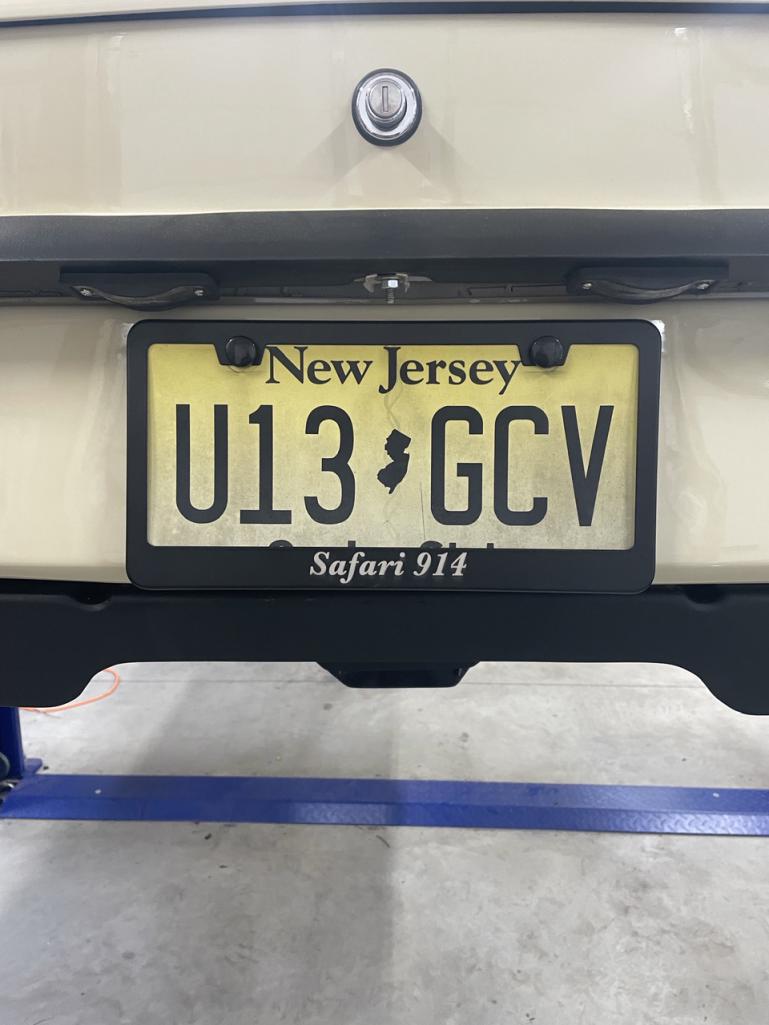
Posted by: waltonsm Mar 23 2024, 12:01 AM
Your interior came pout looking great man.
Yeah! Awesome! That is way better than my $5 bed bath and beyond center console towel!! Maybe I should use the pile of material I bought and do something useful with it.
Posted by: East coaster Mar 26 2024, 05:19 PM
Made my first driveshaft today. I used a couple shafts as “practice” pieces to workout tooling and the process, and this is the first finished piece (which will go on the car). It’s been an interesting process and something I hadn’t done before, but I’m super pleased with the results.
This is a stock 914 shaft shortened and resplined to the 29 tooth Subaru CV spline. I’ll be using stock 914 outer CVs, with stock Subaru inner CVs.
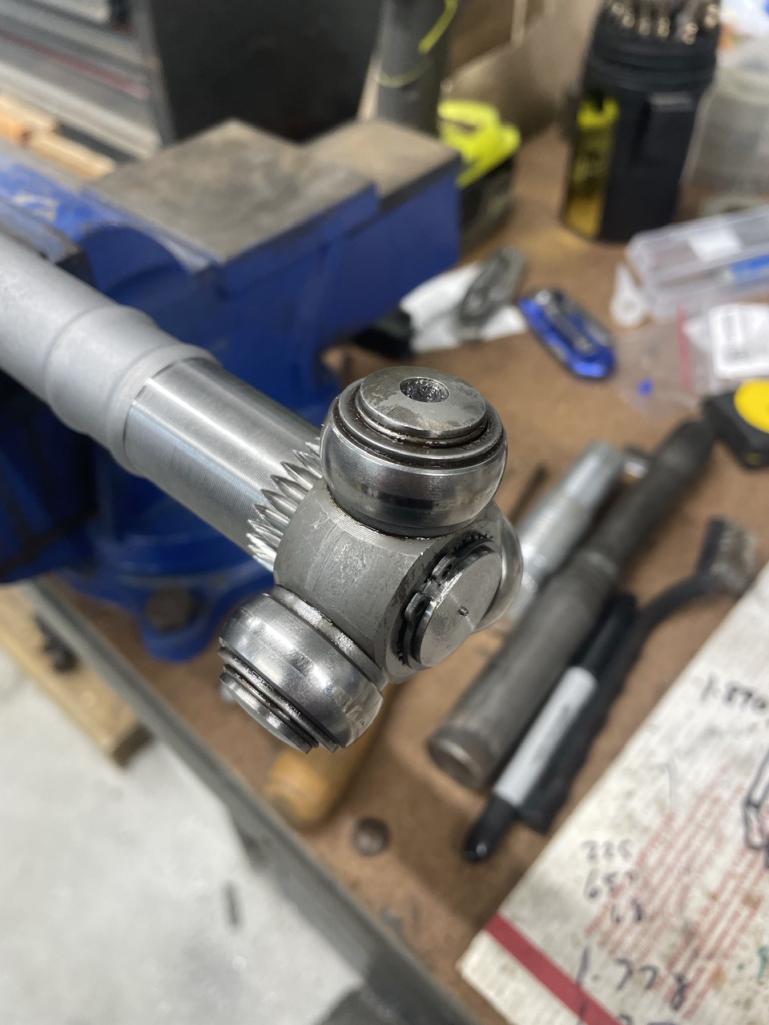
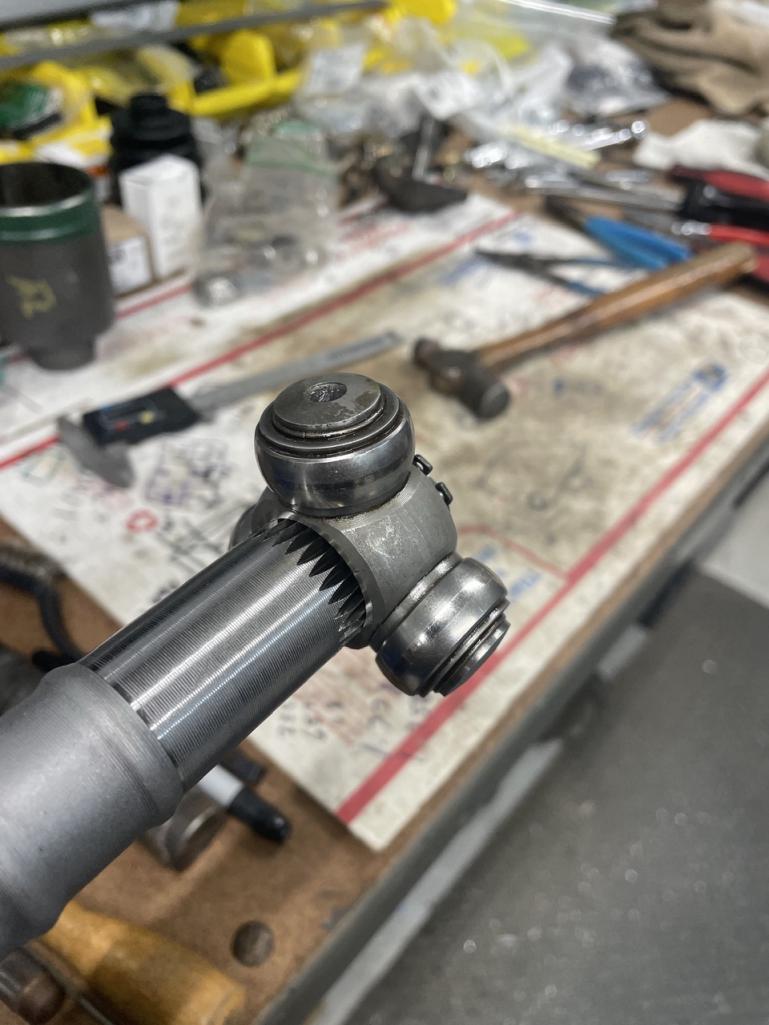
Posted by: 76-914 Mar 26 2024, 05:37 PM
Nice work. You must have a nice mill and indexing head. I forget which engine you're running but a Turbo or 6 will eat those CV's if you have fat tires and hammer it. I just changed to 5 lug but I put 27K on it before I blew a 914 CV. I didn't do burn outs (well maybe the first year of two ) or fat tires either.
Posted by: rick 918-S Mar 26 2024, 05:44 PM
Nice work. You must have a nice mill and indexing head. I forget which engine you're running but a Turbo or 6 will eat those CV's if you have fat tires and hammer it. I just changed to 5 lug but I put 27K on it before I blew a 914 CV. I didn't do burn outs (well maybe the first year of two
) or fat tires either.Geeze Kent I was kinda admiring those Suby ones. I was thinking they looked like you could get some articulation out of them. Well at least you can get them...
Posted by: Maltese Falcon Mar 26 2024, 06:08 PM
These Tri-Pod looking CV joints might be the ticket in high performance transaxles>>putting the power down; but don't know much about these mfg by Metalore inc. in El Segundo CA. Looks like their clients are major motorsports players 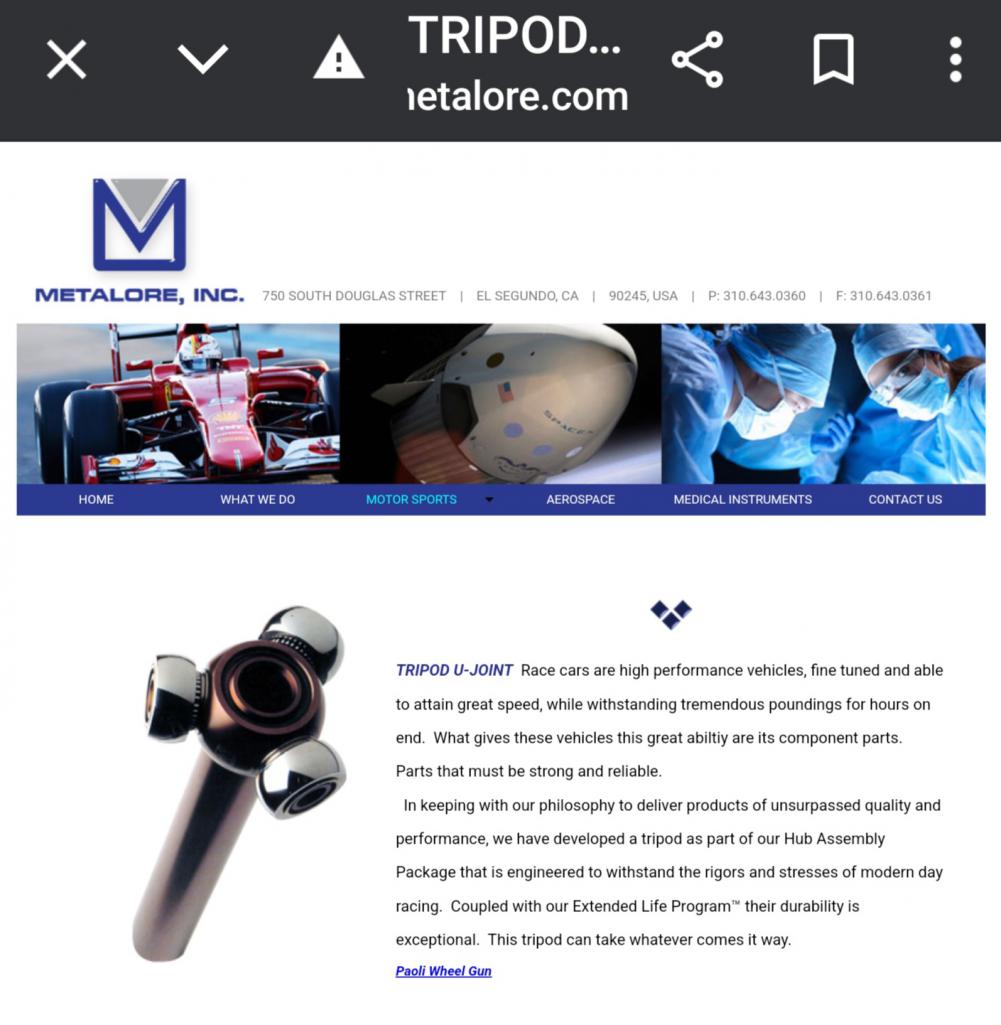
Posted by: East coaster Mar 26 2024, 07:38 PM
I’ll be running a NA 2.5 Suby engine so hopefully these will be fine, I guess I’ll find out. I figure the 914 end will be the weak link, but I ran those with my 3.6 6 conversion and only broke one in 9 years.
Posted by: East coaster Mar 27 2024, 07:36 AM
Many years ago my friends dubbed my shop “Frankenstein’s lab” because of the varied things I like to build and the approach taken. Probably like most here, I enjoy a lot of different things in the mechanical domain. I’ve built boats, airplanes, motorcycles, bicycles, and, of course, cars. A while back I embraced the Frankenstein theme and started tagging my projects with some form of Franky image. Here’s a couple of past projects and their tag, and my more subtle tagging of my Safari project. 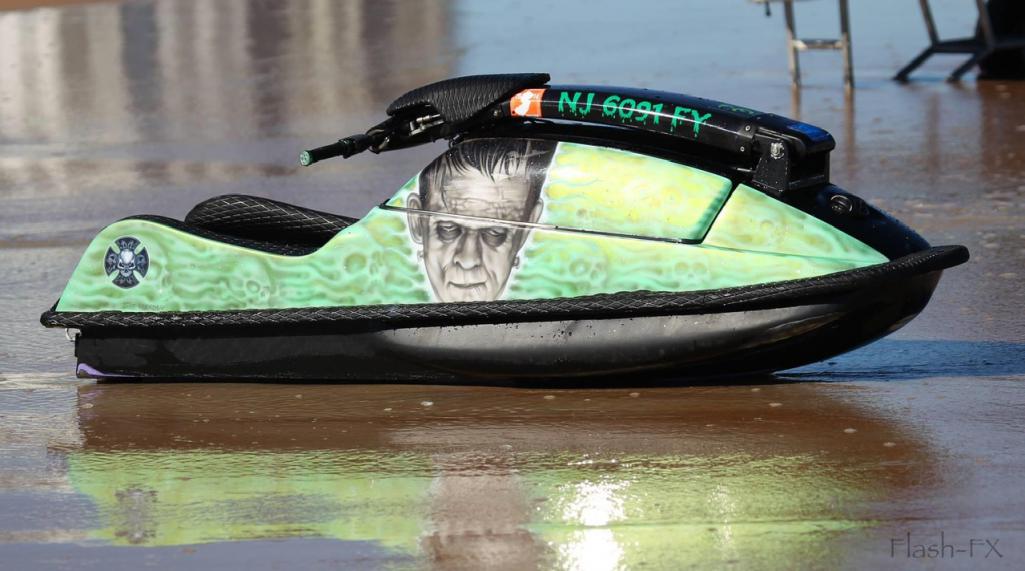
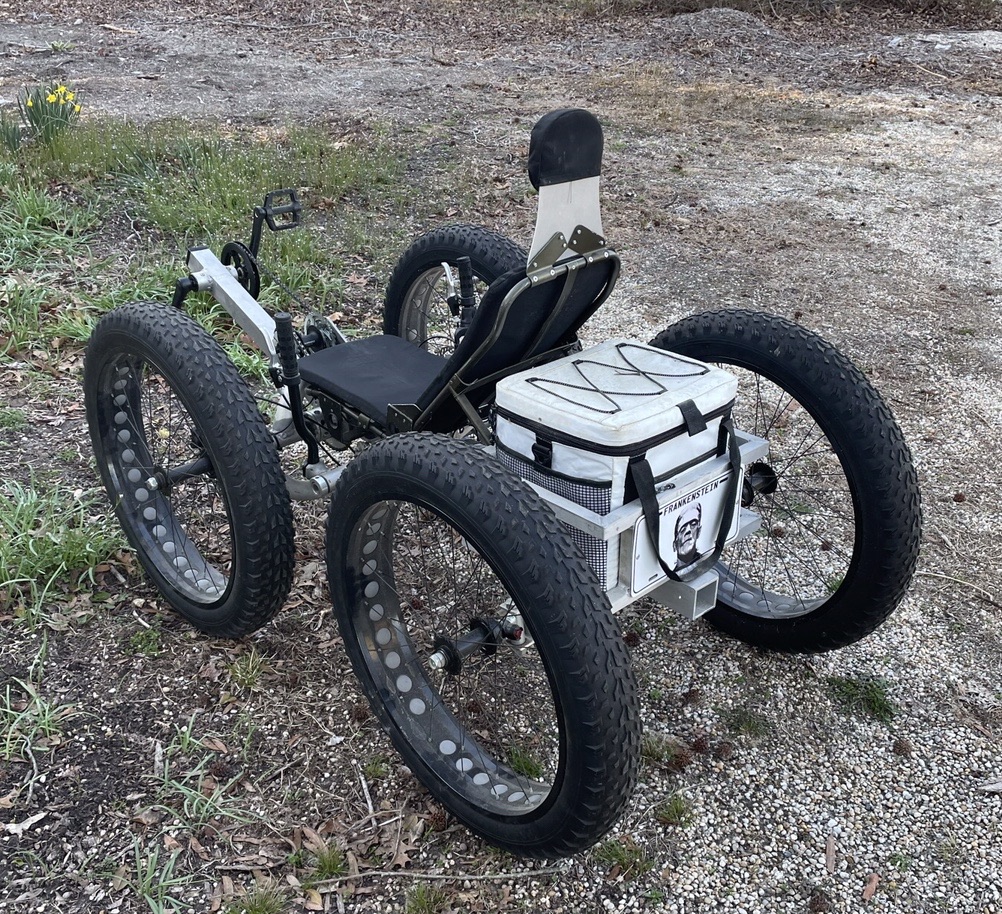
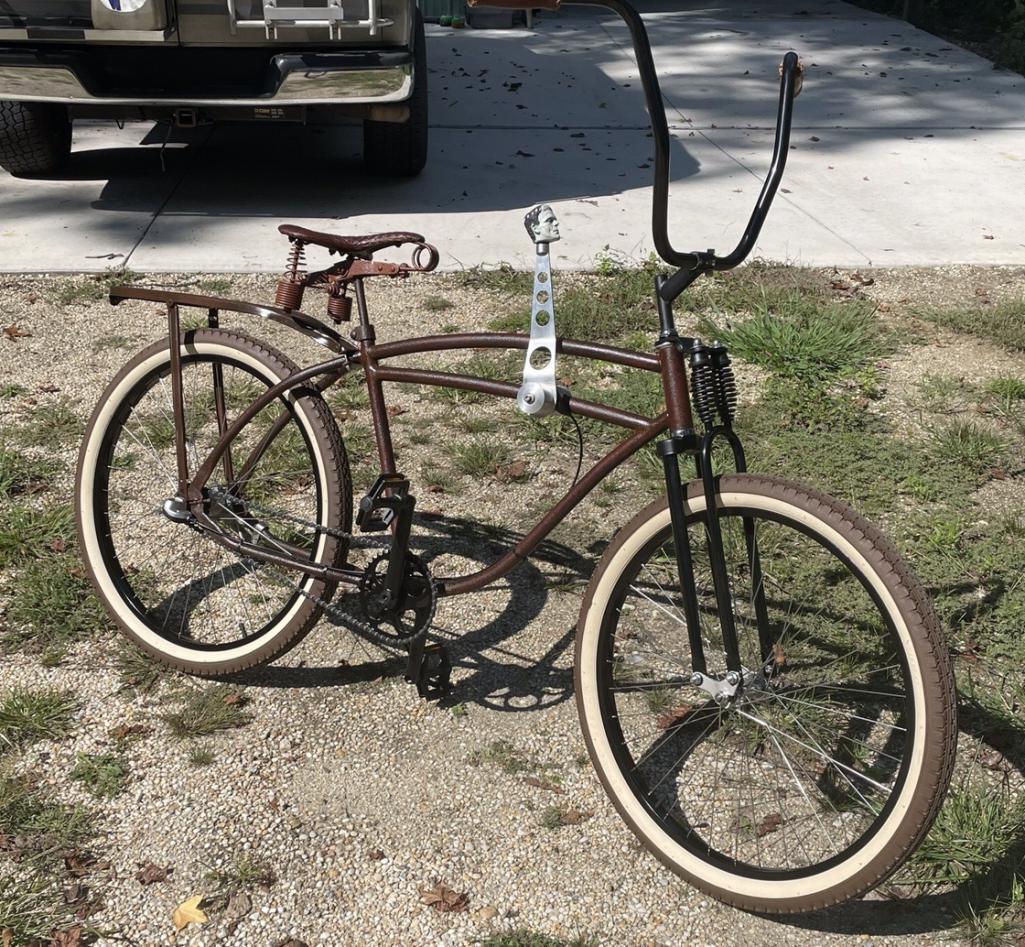
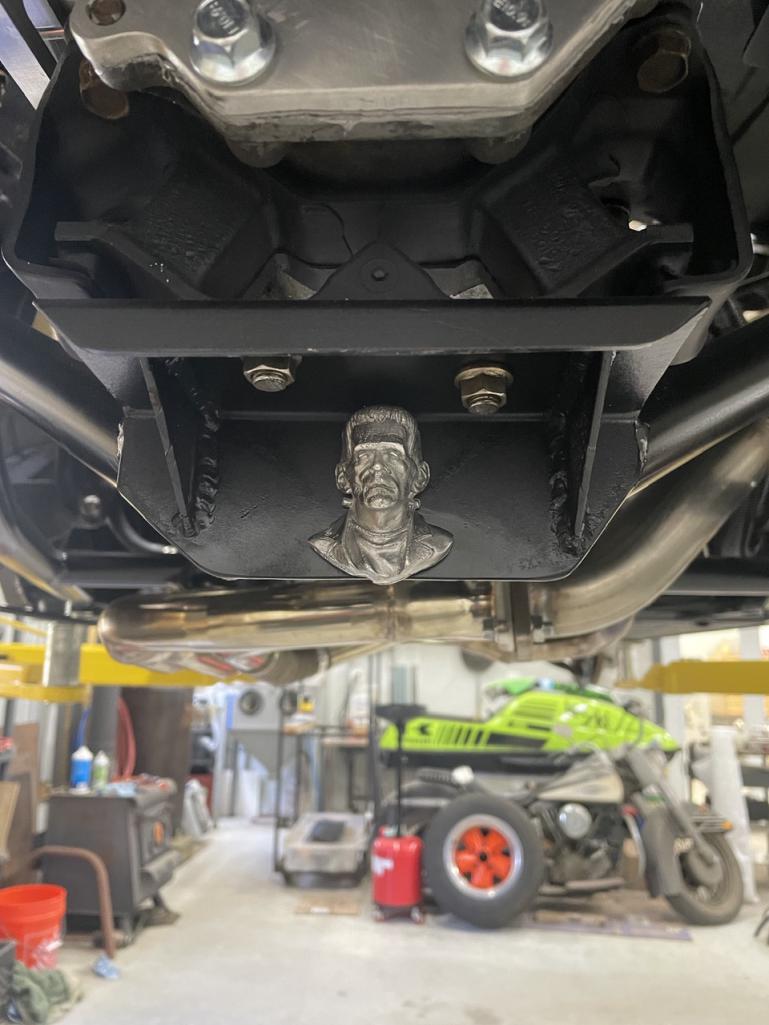
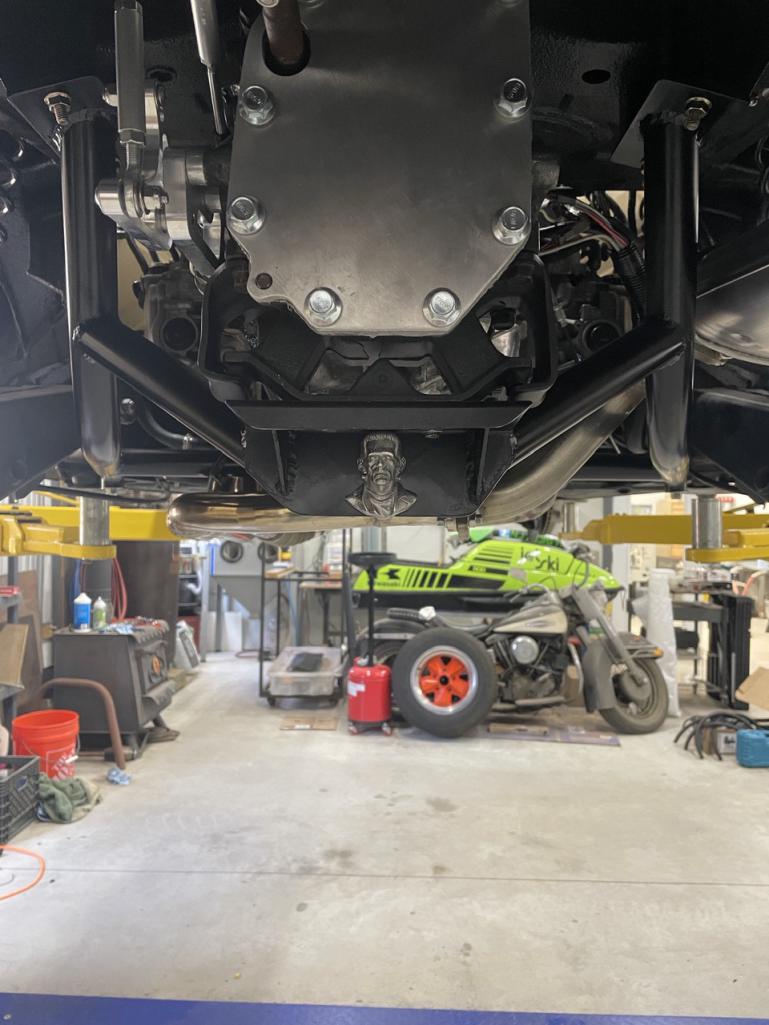
Posted by: Shivers Mar 27 2024, 08:37 AM
Made my first driveshaft today. I used a couple shafts as “practice” pieces to workout tooling and the process, and this is the first finished piece (which will go on the car). It’s been an interesting process and something I hadn’t done before, but I’m super pleased with the results.
This is a stock 914 shaft shortened and resplined to the 29 tooth Subaru CV spline. I’ll be sing stock 914 outer CVs, with stock Subaru inner CVs.
Very cool. Must be gratifying to be able to be that precise with your work. Mine are always close but I don't win many cigars.
Posted by: East coaster Mar 27 2024, 01:10 PM
And driveshaft #2 done, ready for a little paint and CV assembly.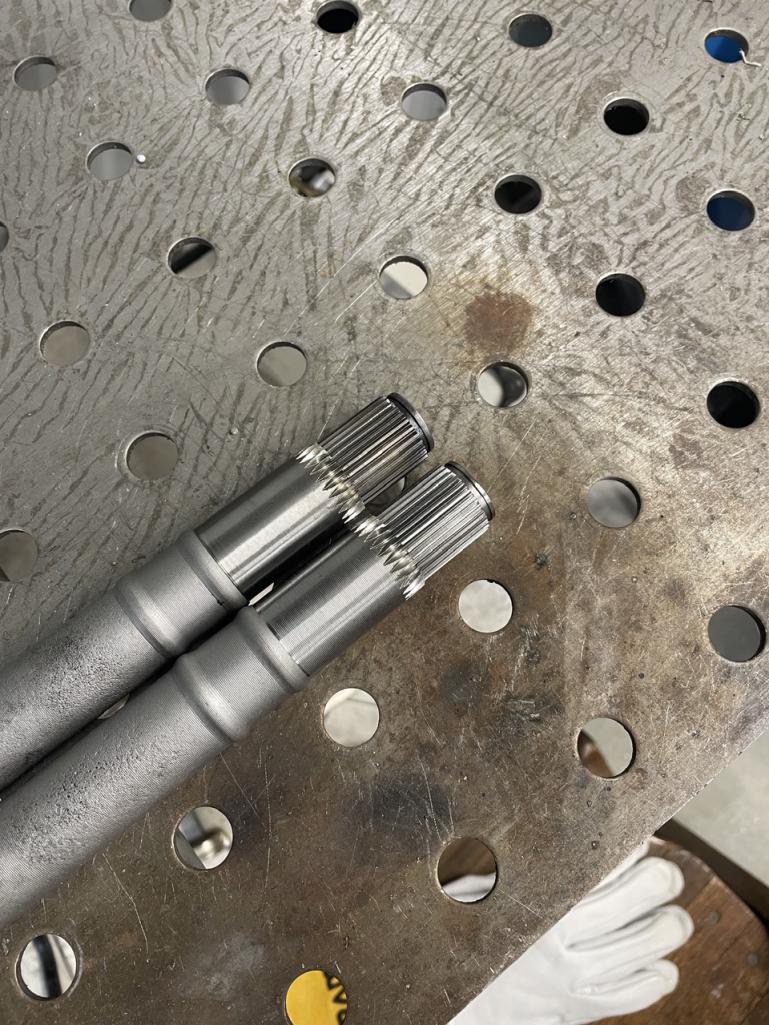
Posted by: rick 918-S Mar 28 2024, 06:15 AM

Posted by: East coaster Mar 30 2024, 05:08 PM
Since I’m running the Suby fuel pump I can’t use the factory expansion tank. I really want a proper evap system so I don’t get fuel smell/fumes. I made an expansion tank to reside where the factory charcoal canister used to go and I’ll be putting a canister in the engine compartment.
The tank is less volume than the factory tank but was the most I have room for. The inlet is at the bottom of the tank, with the exit at the top. I welded a baffle plate inside just below the top fitting to keep fuel from getting to the exit (I hope). I used a piece of 3” tube and flattened it to an oval shape.
The tank will get a bath in flat black to help it blend with the fuel tank and not be too obtrusive.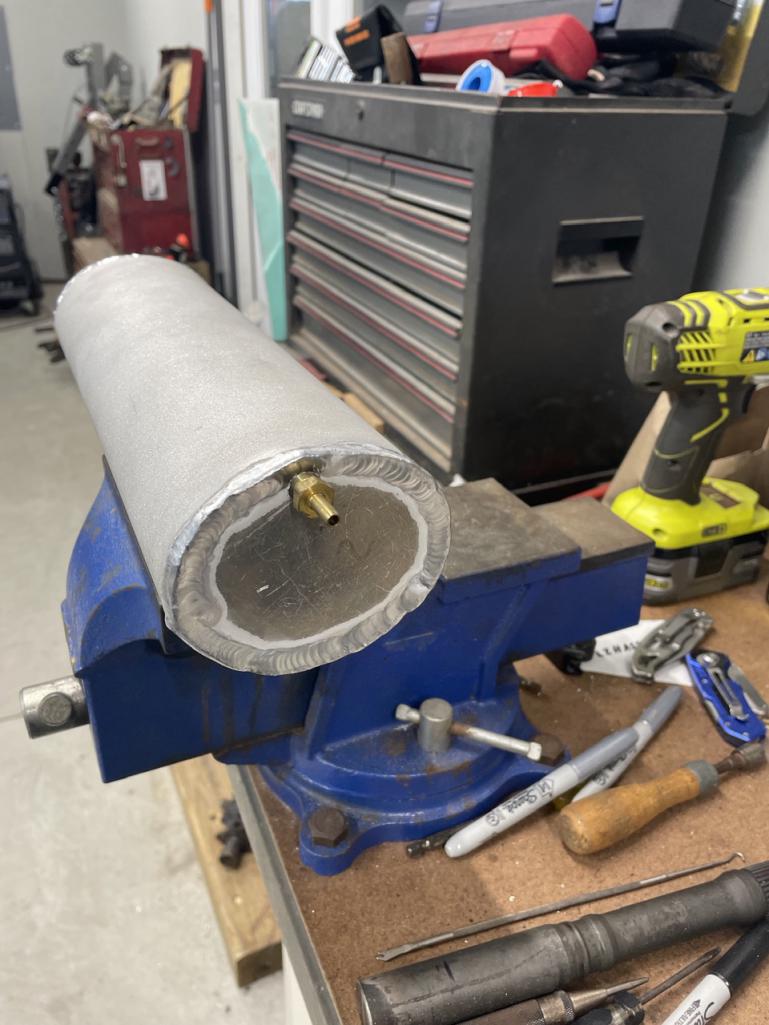
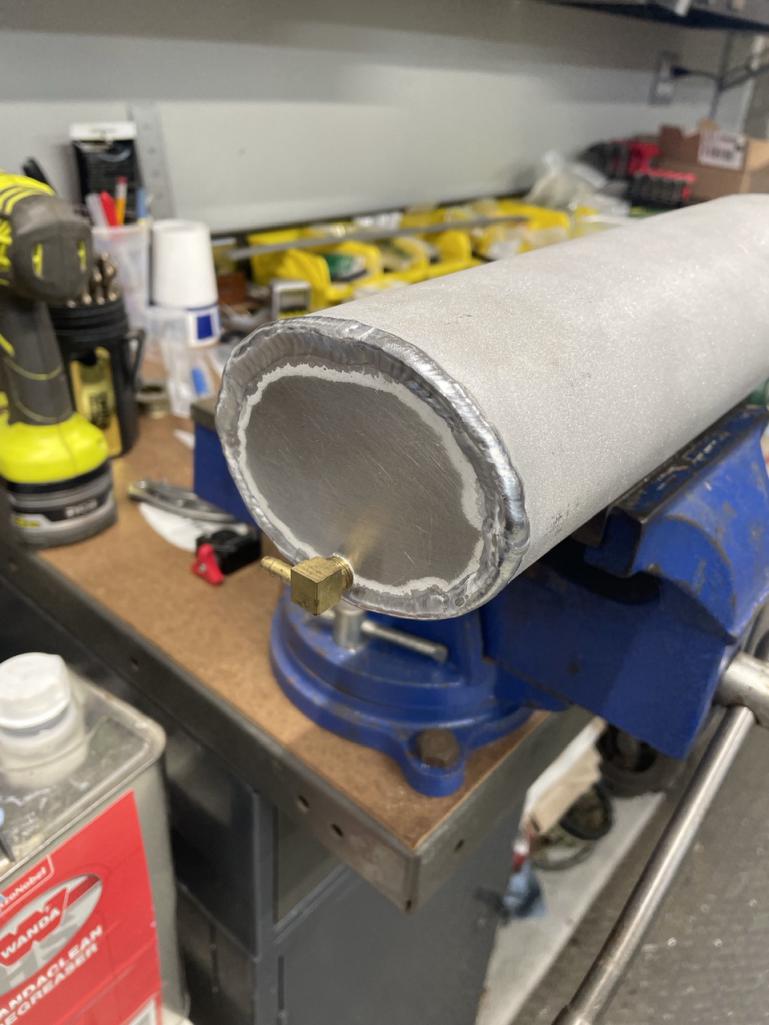
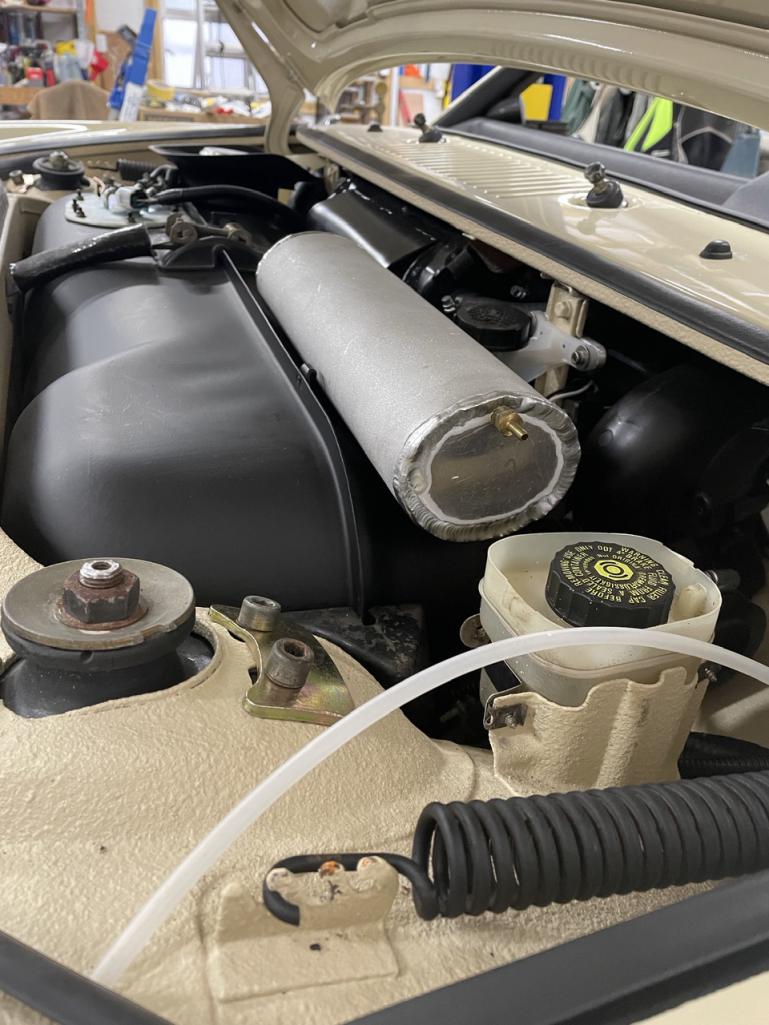
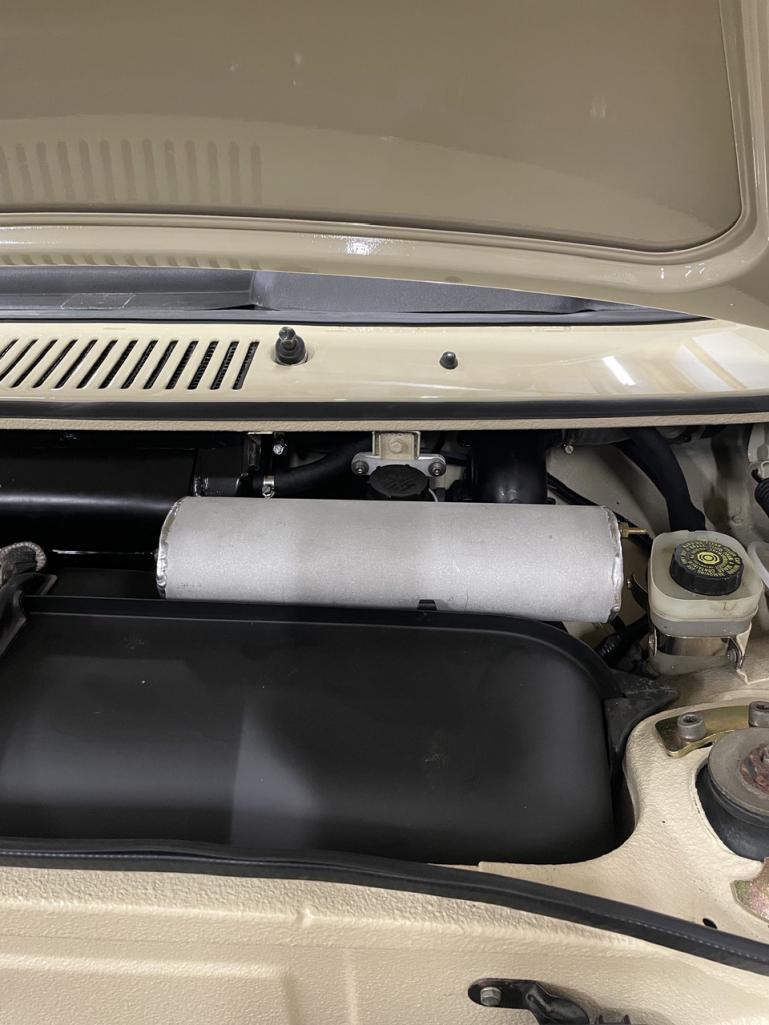
Posted by: East coaster Mar 31 2024, 07:44 PM
A little flat black does wonders…….expansion tank installed and plumbed, and waiting for the charcoal canister.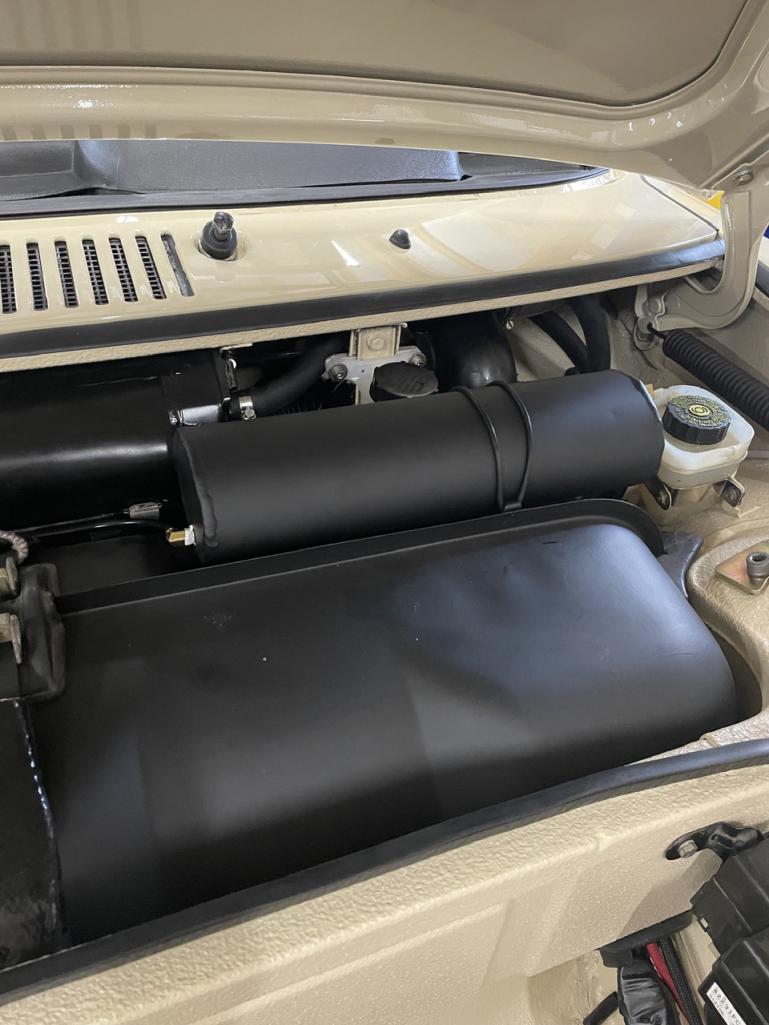
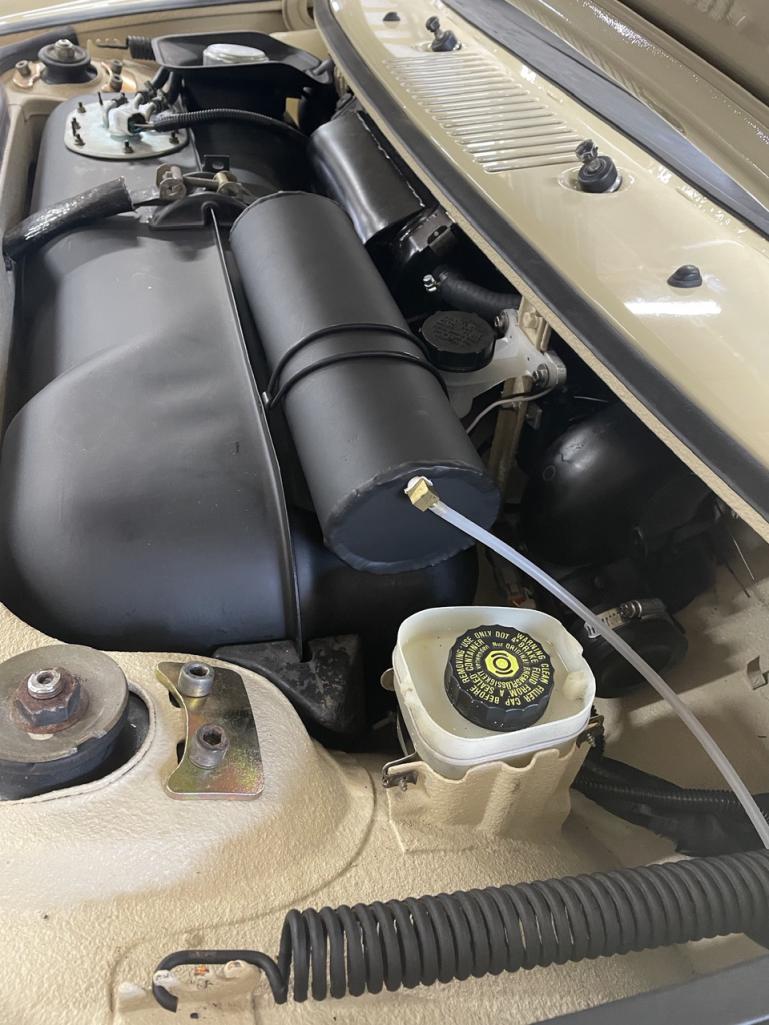
Posted by: East coaster Apr 1 2024, 05:08 PM
Wrapped up the evap system install today. I used a charcoal canister from a VW Jetta and installed it just under the coolant reservoir. It’s all plumbed up and ready to remove stink.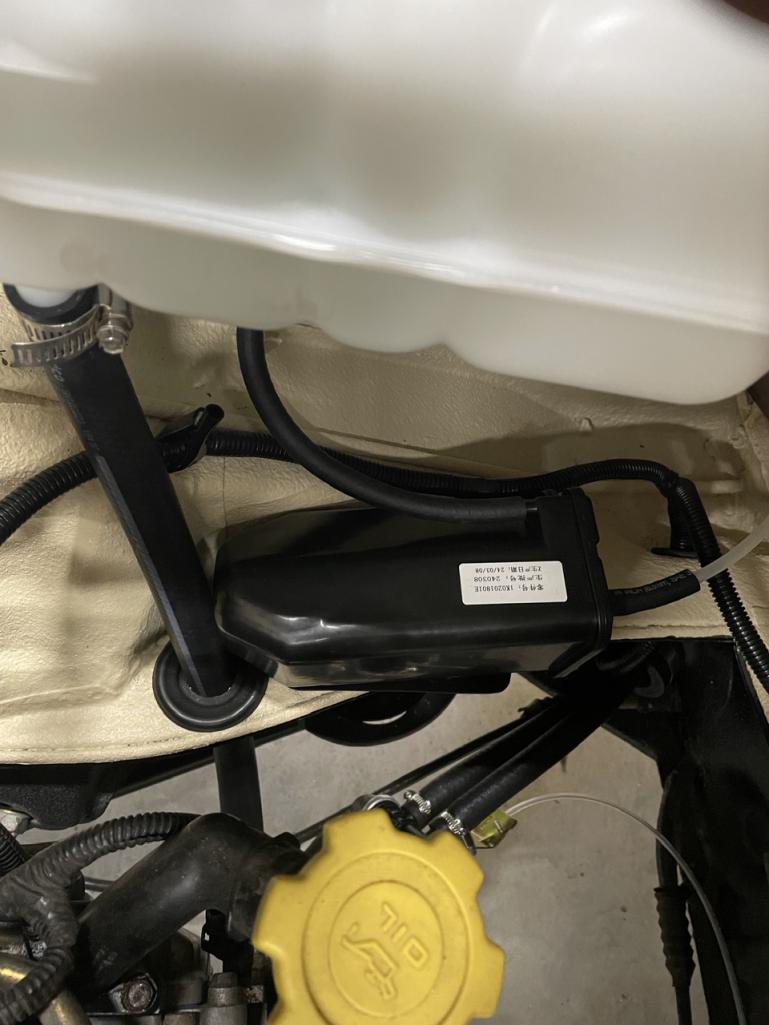
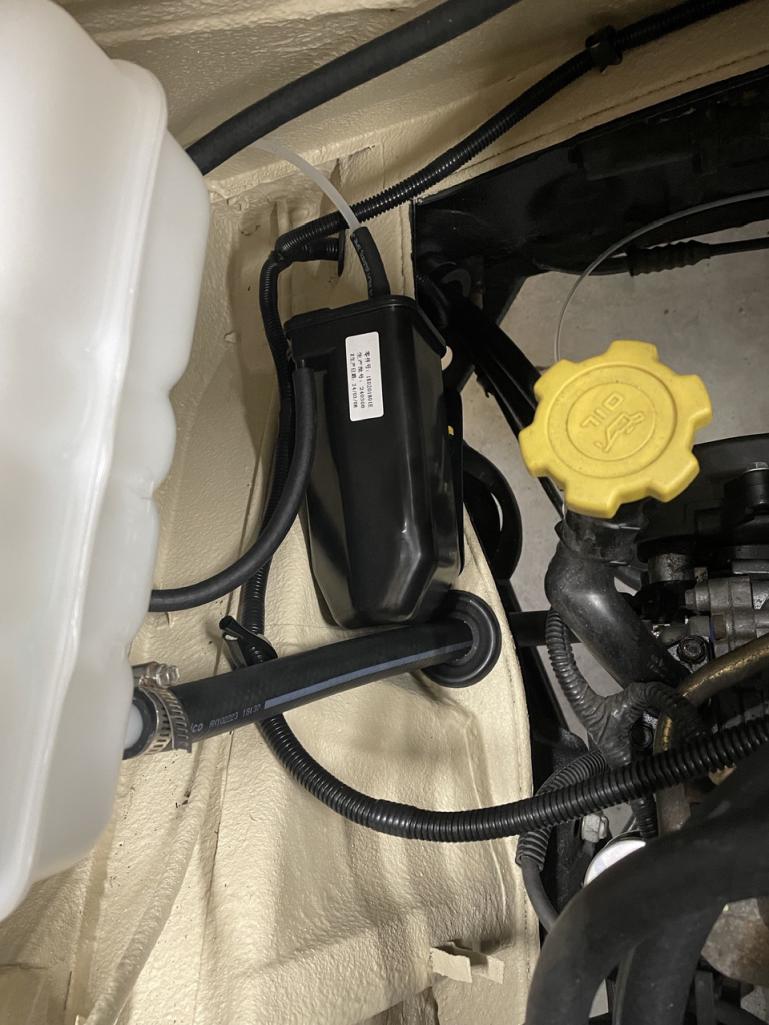
Posted by: East coaster Apr 3 2024, 05:52 AM
One axle built and installed, hopefully get the second one in today.
Just need to bleed brakes and clutch and maybe the first test drive this weekend….woohoo!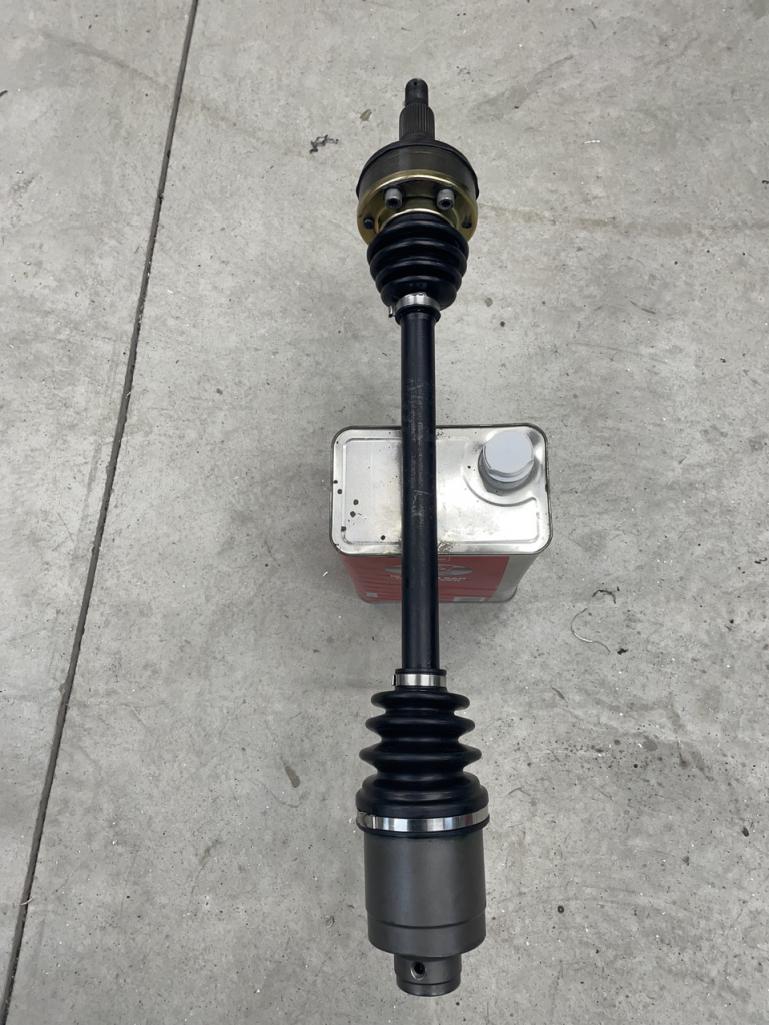
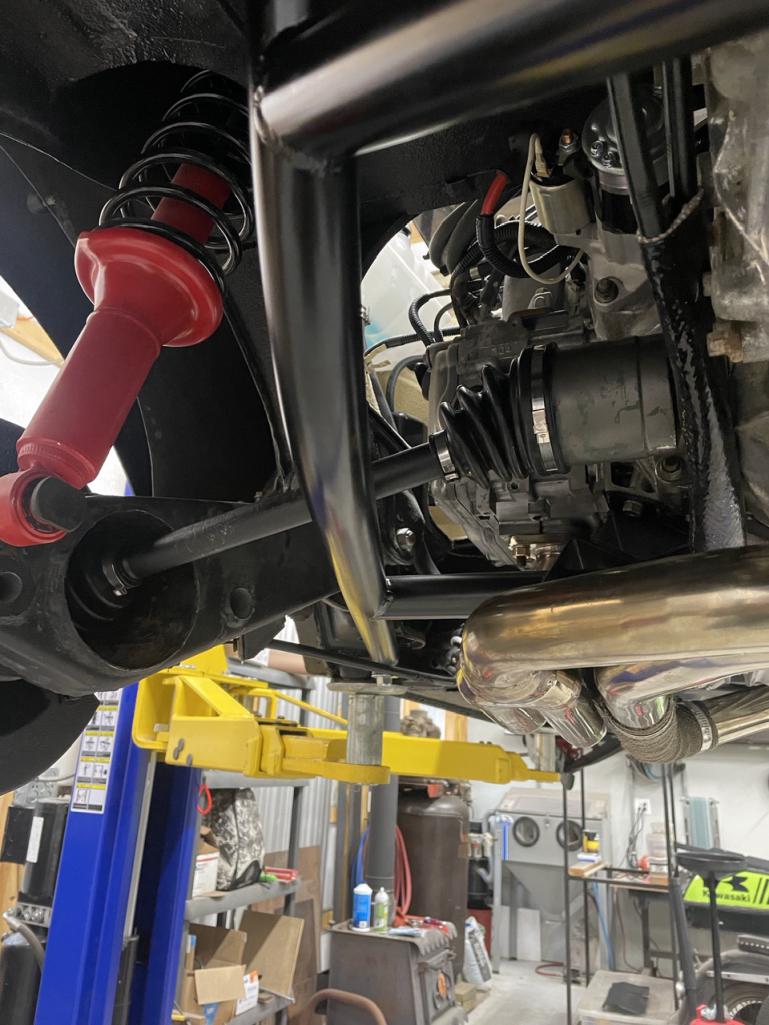
Posted by: East coaster Apr 3 2024, 04:16 PM
Built up other axle and got it installed…….just might be able to manage a rip around the property this weekend yet.
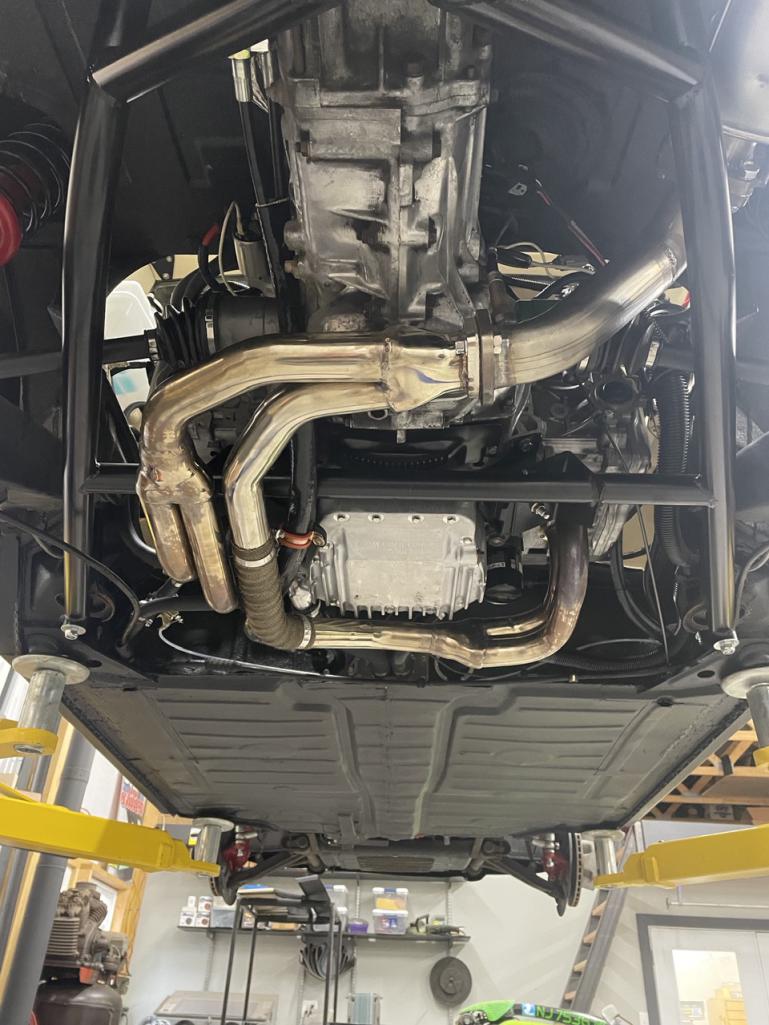
Posted by: Chris H. Apr 4 2024, 06:15 AM
Congrats ! Looks great, and most importantly you finished it! Or at least this version of it. You're fabrication skills are very impressive.
Posted by: East coaster Apr 6 2024, 04:42 AM
Made a master cylinder brace yesterday. I wanted something bolt-in rather than welded. This is a two piece bolt together solution that mounts between the master cylinder mount point (between nut and MC body) and the suspension cross member.
I found that a front strut tube is the exact diameter to fit the cross member tube. I had an old junk strut laying around and cut a piece of tube to make the brace. The long section is just a piece of steel angle cut to size and shape. I made a threaded attach point between the long section and the tube so it installs/removes easily.
Without the brace you could see the deflection in the floor and MC would bend downward on hard braking. With the brace it doesn’t deflect at all. The design transfers the load into the cross member, and the bottom of the steel angle keeps the MC from flexing downward.
Nothing earth shattering here, as many have made similar braces, but I thought I’d share my version. It just needs a shot of flat black and it will be installed for good today.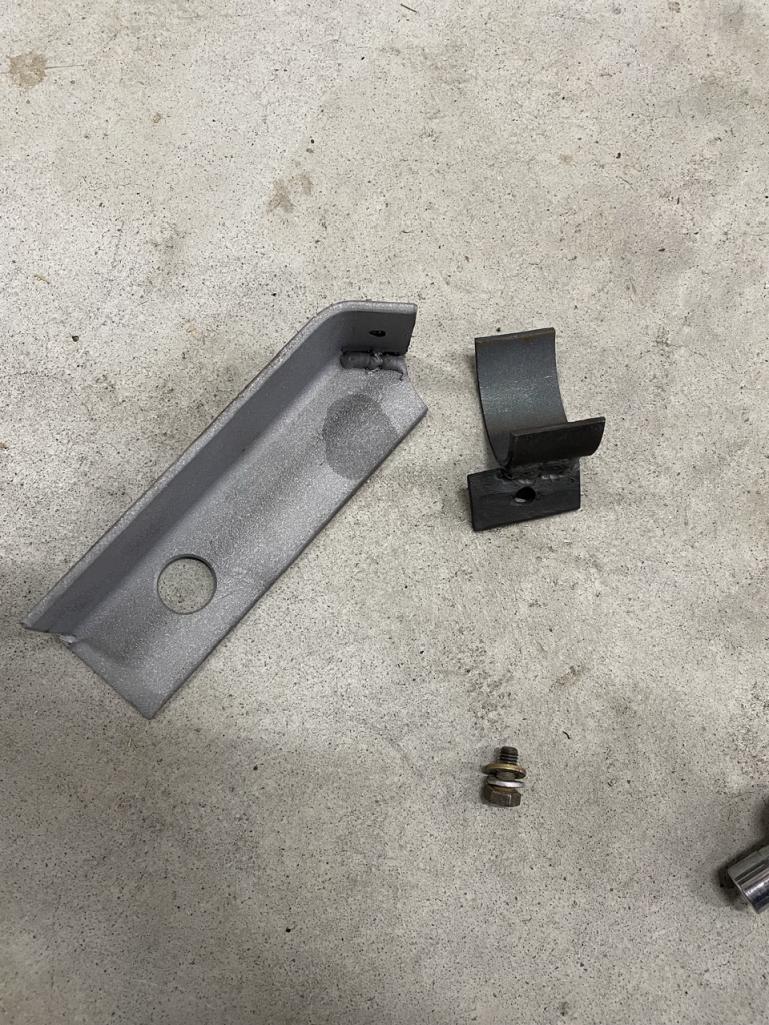
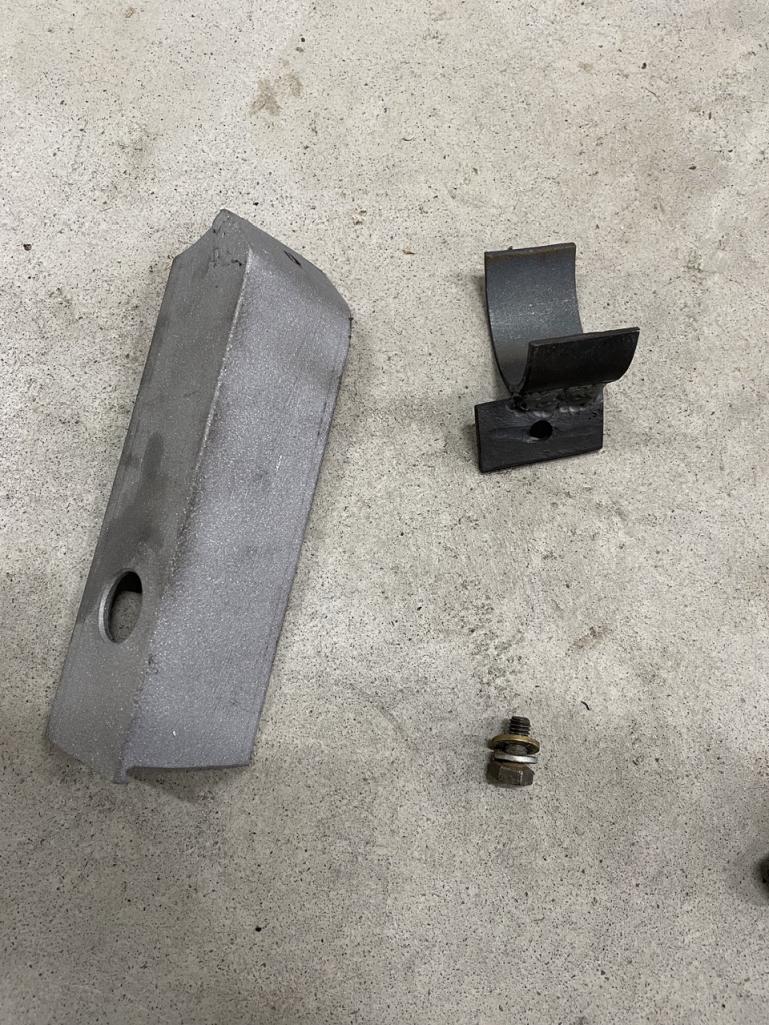
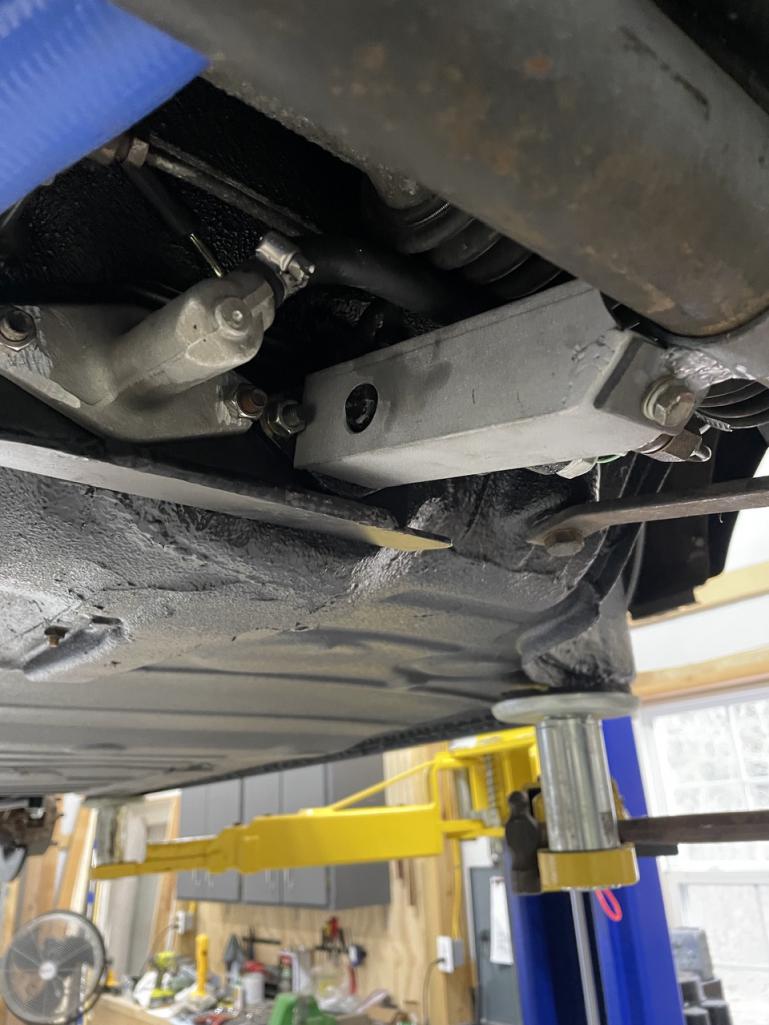
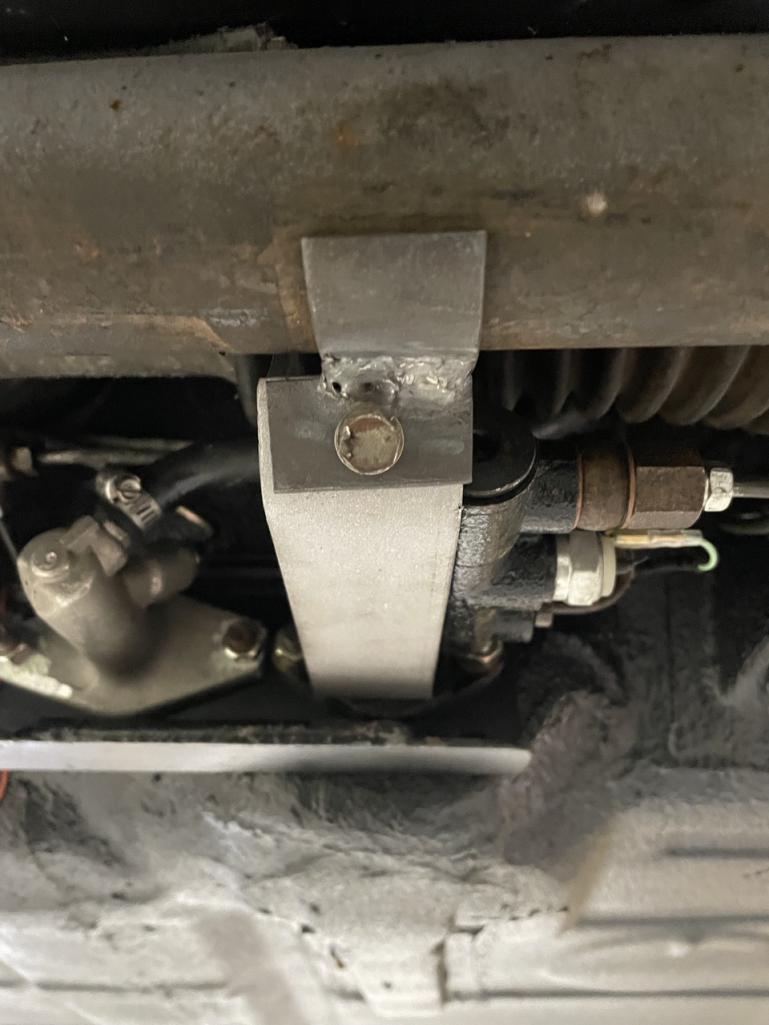

Posted by: East coaster Apr 9 2024, 04:49 AM
Got my wheels painted today (Phoenix red L21E), now I can get the car back on its feet and get a test drive as soon as I bleed brakes and clutch (I hate things I can’t do myself!)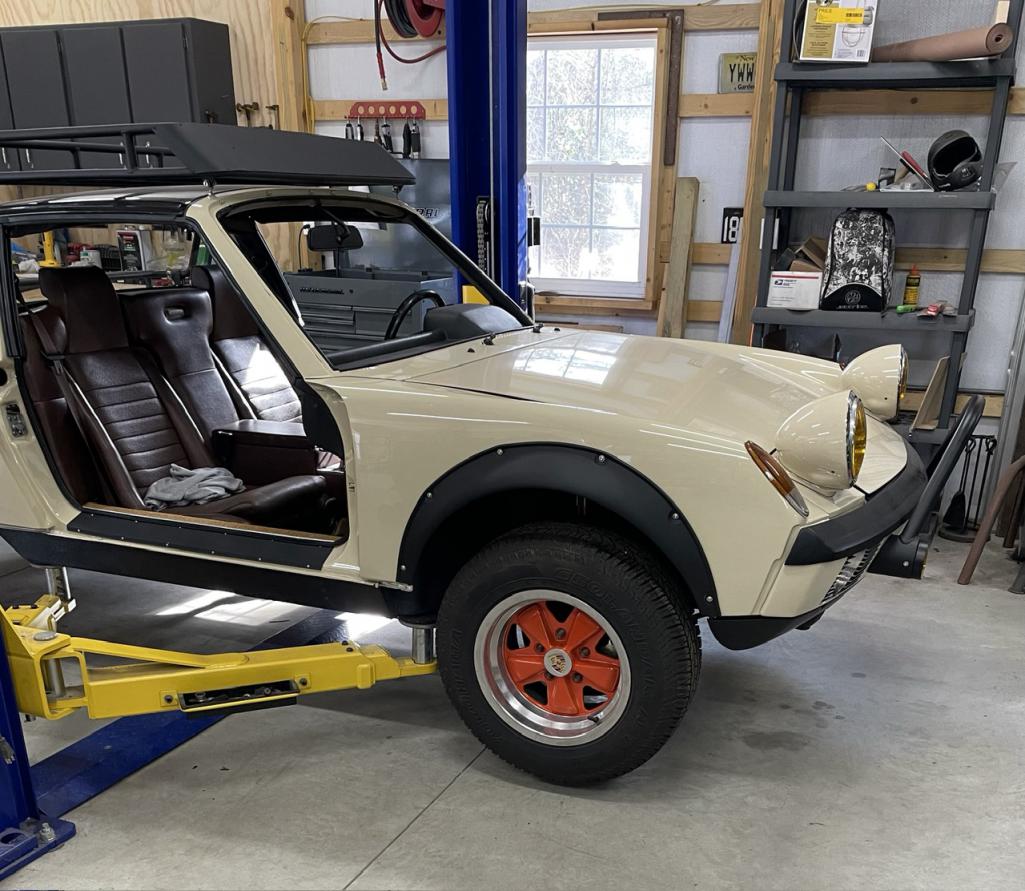
Posted by: slowrodent Apr 9 2024, 07:41 AM
Continues to be such a finely crafted and handsome project... Thanks for sharing.. You're not going to get that thing dirty are youi?! 
Posted by: East coaster Apr 11 2024, 07:29 PM
One door mounted, one to go…..
Posted by: rick 918-S Apr 12 2024, 07:33 AM
Fun Project!
Posted by: friethmiller Apr 12 2024, 10:29 AM
Lov'n this! Nice build!
Posted by: East coaster Apr 12 2024, 05:16 PM
Thanks!
It got to see the light of day before I installed the drivers door today. It hasn’t been on its wheels or out of the shop for a while now and it was good to see it out in the sun!
On the downside, looking at the pics makes me realize I need to layoff the project for a few days and clean up the yard around the shop. I thought when I retired I’d have all this free time….huh!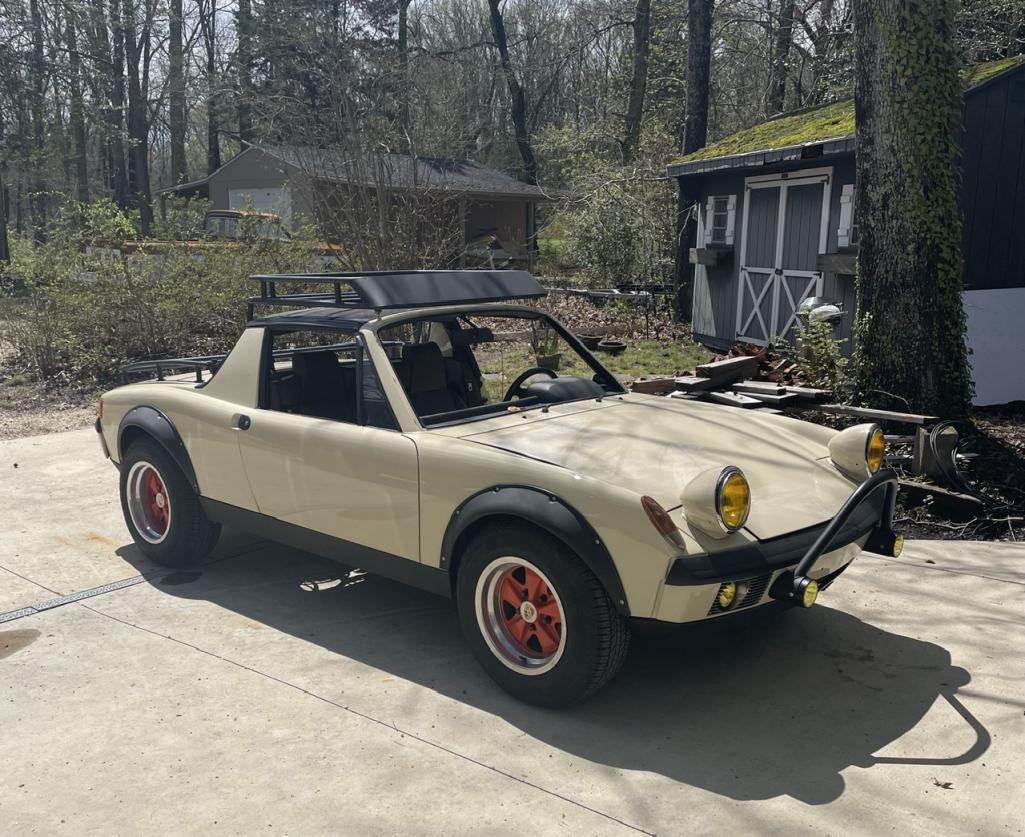
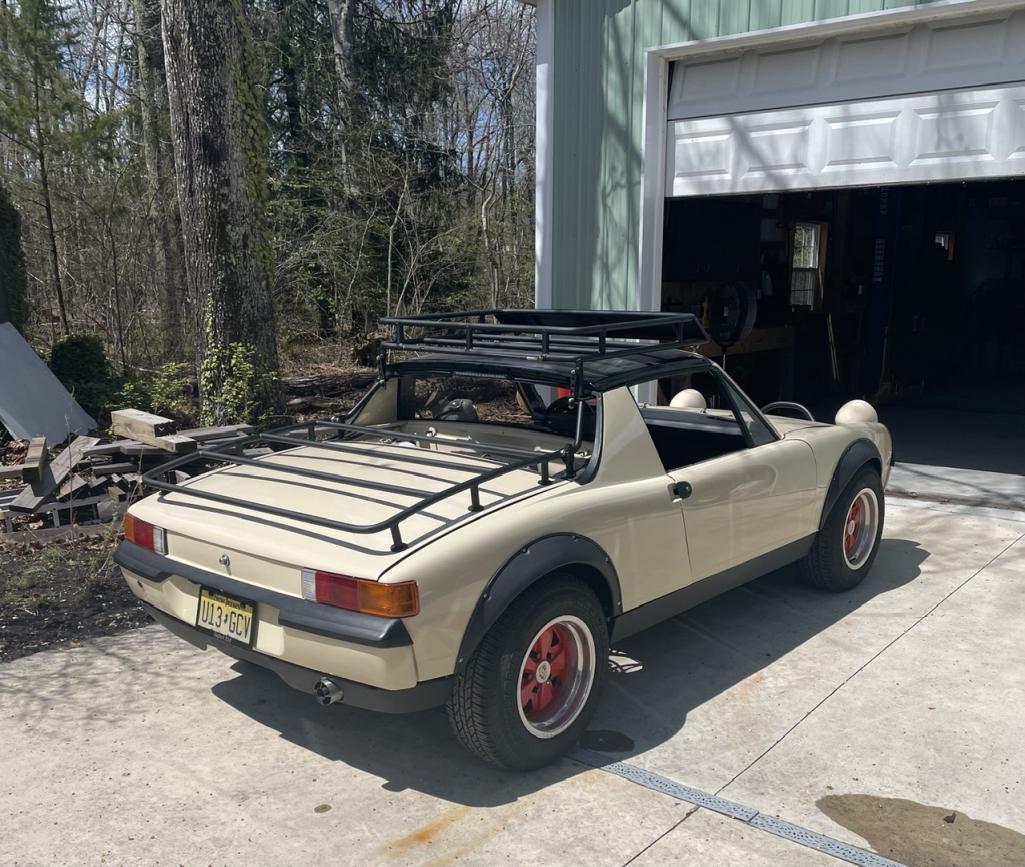
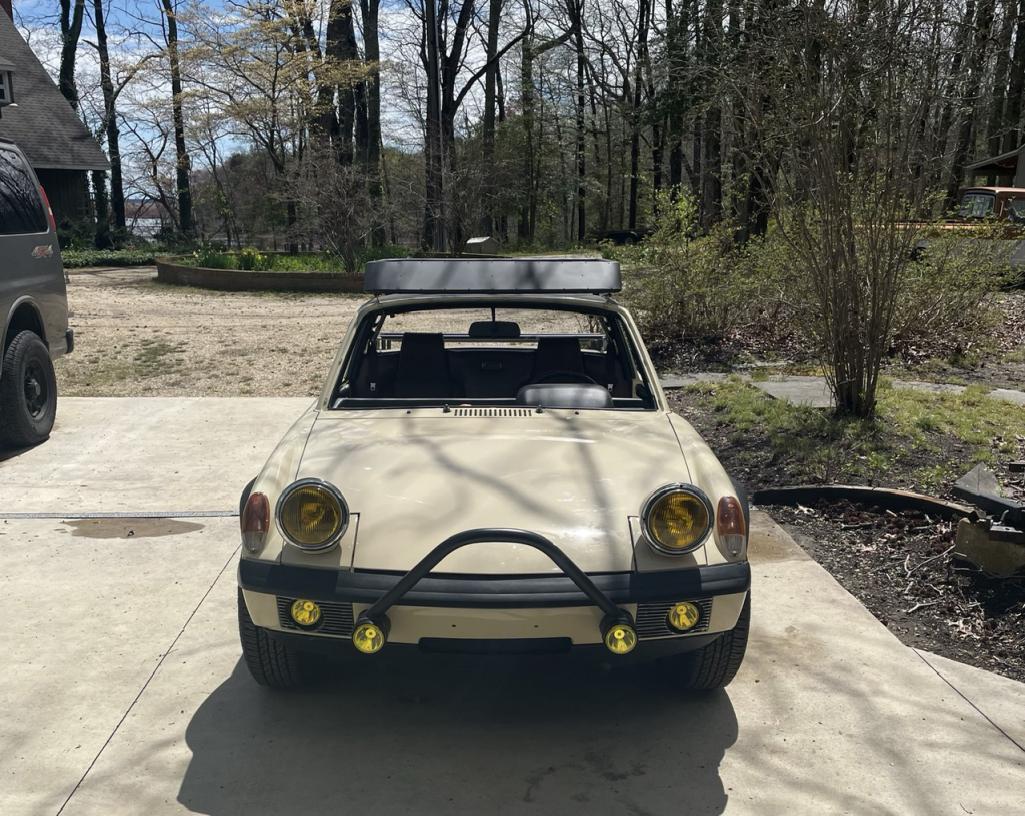
Drivers door installed…..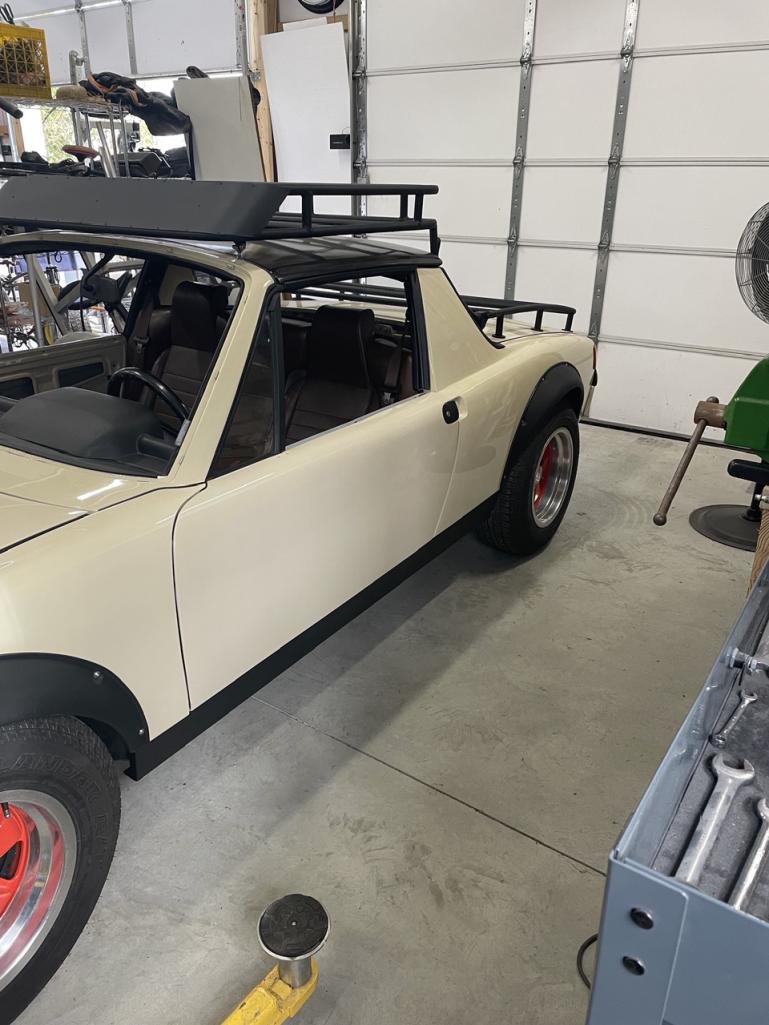
Posted by: KSCarrera Apr 13 2024, 10:38 AM
This is astounding work! Absolutely love it! 
Posted by: East coaster Apr 18 2024, 10:36 AM
Finalized the engine cover install. Decided to do the letters to match the wheels since gold just didn’t seem to work with everything else. As a refresh, the cover doesn’t have hinges, it slides onto pins on the firewall and still uses the stock latch at the rear.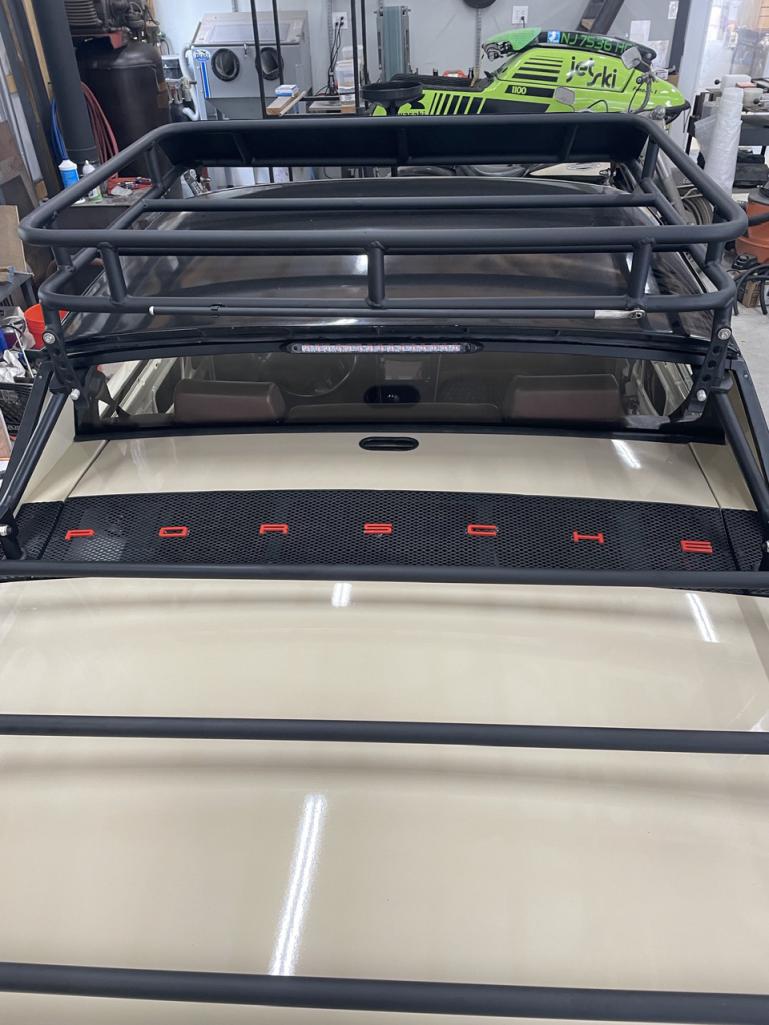
Posted by: BillJ Apr 18 2024, 10:59 AM
Love this project so much.
Posted by: 914sgofast2 Apr 18 2024, 12:54 PM
I love how those wheels and tires look on this Safari build with those "restrained" black fender flares. That's how fender flares should look on a 914 to fully expose the front and rear wheels and tires, at least in my opinion.
Posted by: 914werke Apr 18 2024, 01:03 PM
I too have enjoyed following your project and applaud your craftsmanship & attention to detail but, IMHO I think the wheels are the part that unfortunately depart from the off road/rally aesthetic.

Perhaps some OZ's or Speedlines in Phoenix red with white lettering ...?
Posted by: Shivers Apr 18 2024, 02:31 PM
I look forward to hearing how well it lands. Great work.
Posted by: East coaster Apr 18 2024, 05:43 PM
I too have enjoyed following your project and applaud your craftsmanship & attention to detail but, IMHO I think the wheels are the part that unfortunately depart from the off road/rally aesthetic.
Perhaps some OZ's or Speedlines in Phoenix red with white lettering ...?
My original plan was to stay 4 lug and go with wide Steelies, but I came across the Fuchs and figured I couldn’t go wrong with them.
Powered by Invision Power Board (http://www.invisionboard.com)
© Invision Power Services (http://www.invisionpower.com)