Printable Version of Topic
Click here to view this topic in its original format
914World.com _ 914World Garage _ Chemical dipping progress ...
Posted by: DaveB Dec 23 2022, 02:12 PM
I am providing some pictures and background on chemical dipping my 914.
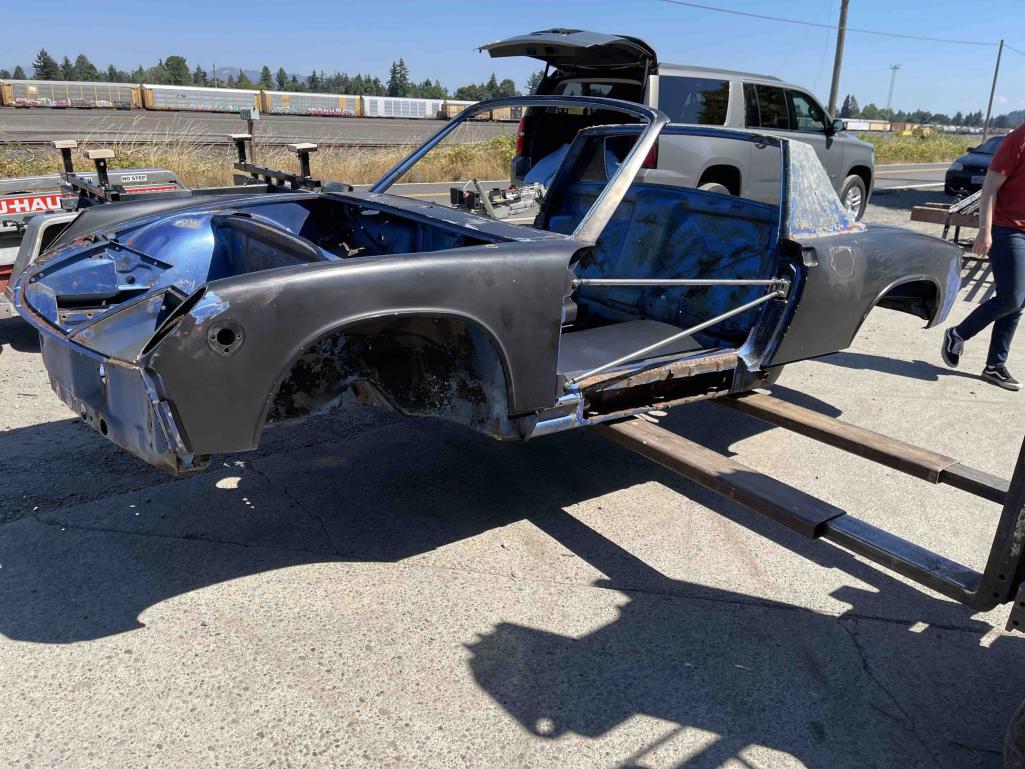
I dropped my 914 chassis at the chemical dipper in September. To get the chassis prepared, I stripped everything off the chassis. Anything aluminum, like tags, has to be removed. Rockers panels cut open so heat transfer tubes can be removed. All nuts and bolts gone. The drain plugs are removed. I scrape off as much sealant as I can. Strip the sail cover. I stripped and cleaned off the doors, frunk, trunk, headlight covers and a few other small body parts which also got dipped. I used the door braces from Tangerine because I can adjust the distance and remount to the inside later. I drilled a few small holes in bracing tubes for draining per a request from the dippers. 
After this was done, my daughter and I loaded it with a body cart onto a car trailer and took it for a drive. Once it gets to the chemical dippers, it gets lifted with a forklift and set in their lot to wait for its turn. 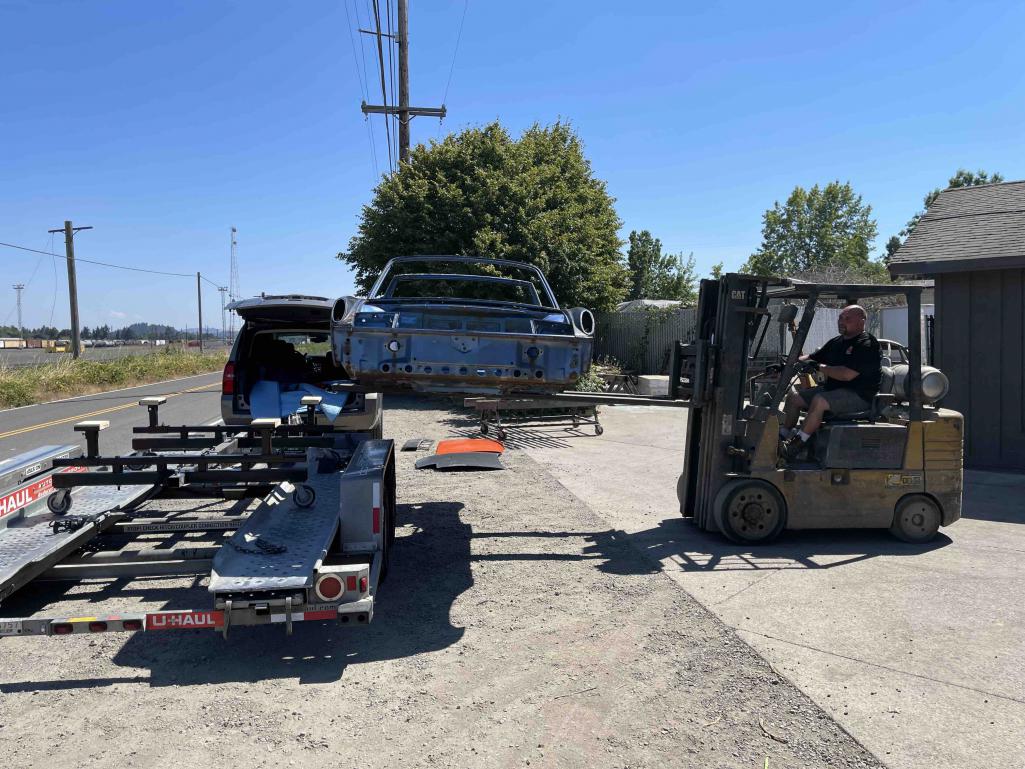
They started the chemical dip process this week. I got the first photos of the 914 chassis in a cage they built for a 914 they did a few months ago. 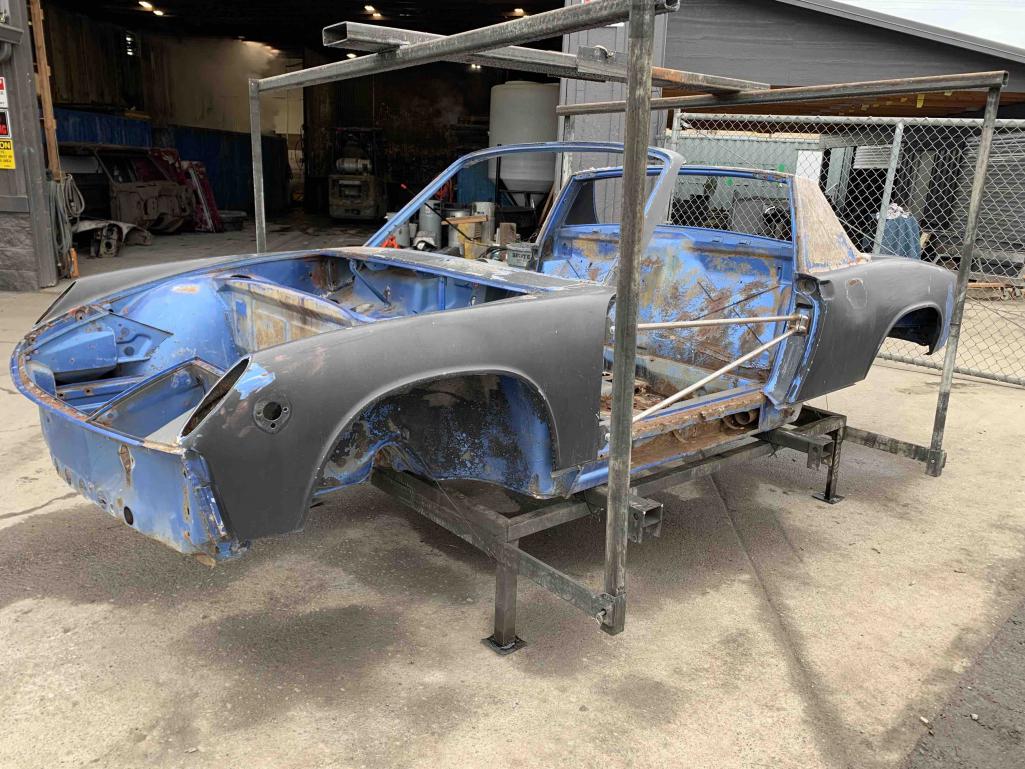
The chassis is pulled out of the hot caustic tank after 2 days. This is for paint and grease removal. This picture is right out of the tank before high pressure cleaning. I can see all the bondo and bodywork I have to address. 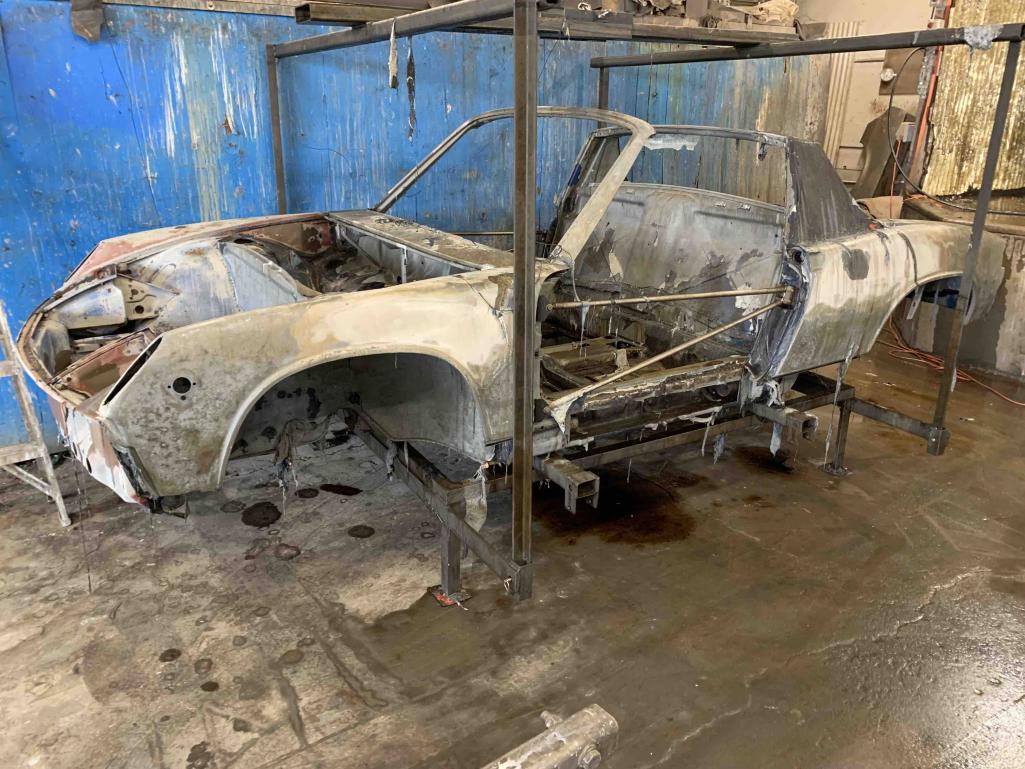
9 JANUARY UPDATE. They have finished the acid dip and high pressure washing. Bondo, adhesives from the vinyl top and factory Wurth sealant are all gone. Should be ready to deliver in a few days. 
DaveB
Posted by: NARP74 Dec 23 2022, 02:18 PM
That's a lot of work just too get to the dip process, I didn't realize some of those steps. It will save a bunch of time for you though. Keep the pics coming.
Posted by: rick 918-S Dec 23 2022, 02:46 PM
I had this done to a 280 SL I did. The car was cooked first @ 800 deg to cook off the paint, undercoating etc. that was left on the chassis after I completed the repairs. The acid dipped. washed and submerged in a vat of E-coat.
See post 61 on.
http://www.914world.com/bbs2/index.php?showtopic=107923&st=60
Posted by: Cairo94507 Dec 23 2022, 02:49 PM
Amazing. Looking forward to the next series of photos. 
Posted by: mepstein Dec 23 2022, 02:55 PM
Just did my 912. Chem dip and then e-coat. Picking it up in a couple days. I was lucky because 67 and earlier have metal heater tubes. I believe Porsche switched to paper in 69.
Attached thumbnail(s)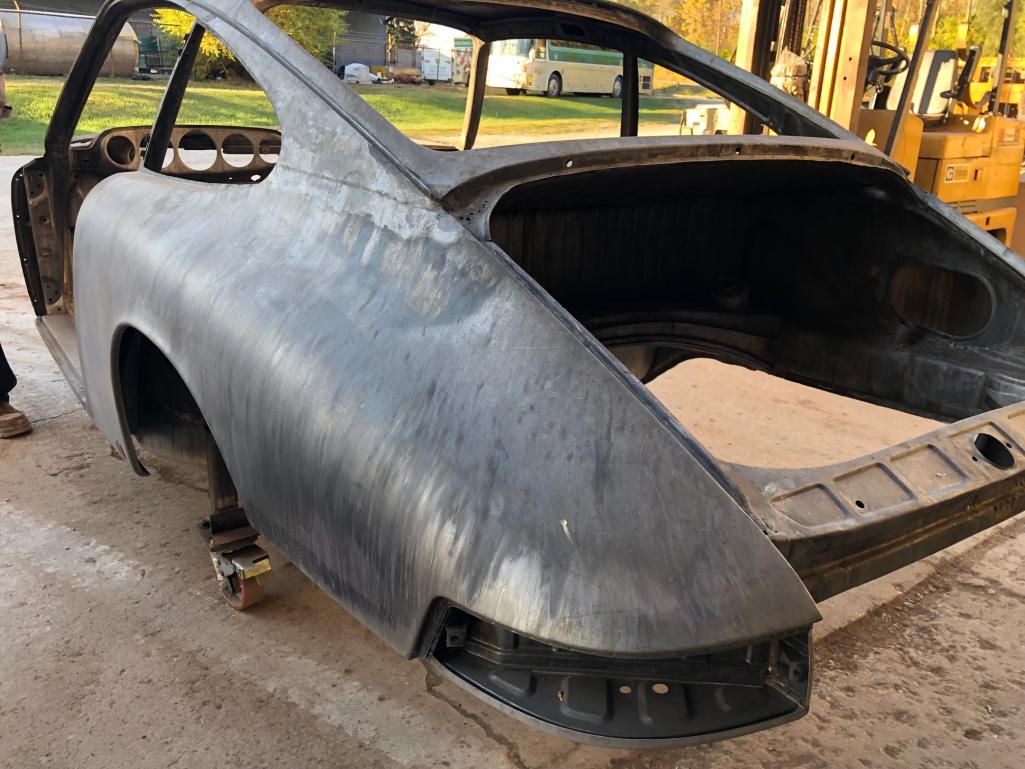
Attached image(s)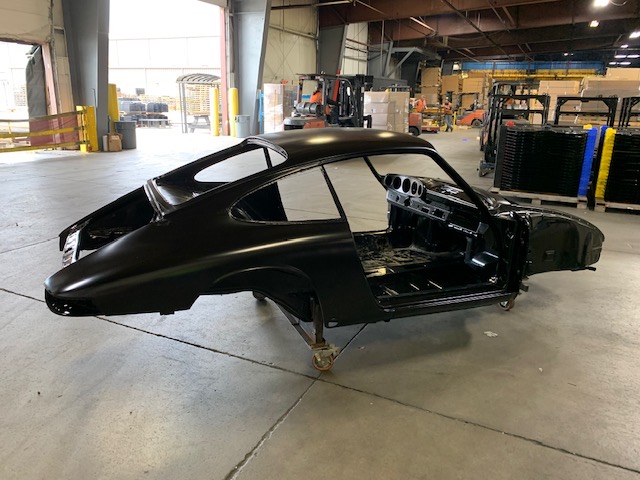
Posted by: BillC Dec 23 2022, 03:42 PM

Just did my 912. Chem dip and then e-coat. Picking it up in a couple days. I was lucky because 67 and earlier have metal heater tubes. I believe Porsche switched to paper in 69.
Mark -- where did you get your car dipped and e-coated? I'd love to do that to my 914, at some point in the future.
Thanks!
Posted by: Aerostatwv Dec 23 2022, 03:52 PM
I dipped my 914 in the early 80's. I would recommend drilling holes in areas that are sealed up and squirt some type of rustproofing in there. It will rust from the inside out. My right suspension console was solid and while performing a hard right corner, the right rear suspension console ripped out due to rusting from the inside out. Back then, the only sheet metal available was primarily OEM.
It was pretty difficult spraying paint in all of the tight areas, you've got your work cut out for you. Hope you go back with the original color.
Keep the pictures coming! It's a long, arduous process but you'll get it done!
Cheers,
Chris
Posted by: BeatNavy Dec 23 2022, 03:55 PM
I spoke to the Porsche resto shop in my town last week about possibly media blasting one or more of my cars. They won't blast. They are trying to talk me into the dip/e-coat process. I guess they ship it out in the midwest somewhere. Budgetary quote of $8K to $10K, but I don't know what's included (e.g., shipping, prep, etc.).
Posted by: Aerostatwv Dec 23 2022, 04:00 PM
I spoke to the Porsche resto shop in my town last week about possibly media blasting one or more of my cars. They won't blast. They are trying to talk me into the dip/e-coat process. I guess they ship it out in the midwest somewhere. Budgetary quote of $8K to $10K, but I don't know what's included (e.g., shipping, prep, etc.).
I wish e-coat had been an option back then, money well spent!
Posted by: mepstein Dec 23 2022, 04:21 PM
Just did my 912. Chem dip and then e-coat. Picking it up in a couple days. I was lucky because 67 and earlier have metal heater tubes. I believe Porsche switched to paper in 69.
Mark -- where did you get your car dipped and e-coated? I'd love to do that to my 914, at some point in the future.
Thanks!
Talk to Doug Graber. +1 (574) 202-4636
There are a lot of chemical dippers and a lot of e-coasters in the Midwest, especially Ohio and Indiana, but strangely enough, not many of them do both. There is one that does both in Louisiana but friends who have gone there have strongly recommended me away from them. Doug knows the business and can help you out. Be prepared to spend $7-10k (or more) by the time you are done.
Why so much? The places that do it spend money on chemicals, labor, machines and work space. It takes days or more to complete the process and there are many steps involved. Doug told me e-coat is actually a 13 step process. You can’t just drop it in the tank and call it done.
Then there’s travel. Drop off the car, for me about a 1k mile trip, then pick it up a couple weeks later, take it to the e-coater, then back again in a couple weeks to take it home. I hired it out because I would save very little by driving it myself.
The best way to do the process is to chem dip, do all your metalwork, then chem dip again to remove the flash rust that will occur, then e-coat. That’s about a $12-15k multi step process. I did my metalwork, dipped and e-coated, knowing that I will have some touch-ups to attend to when I get it home. It’s not much because we already did a ton of metalwork. Front fenders, rear quarters, front latch panel, front suspension pan, rockers, latch panels and rear parcel tray are all new, along with a bunch of patching in other spots. Front and rear lids and bumpers are glass. We found a bit of work needed on the doors but it’s minor.
The e-coat is really important if you are dipping the car. Blasting doesn’t remove paint between the spot welded seams so regular primer can be used. Chemical dipping removes everything and normal spray primer won’t work to coat in between the metal. That’s why you hear about acid dip cars having issues with acid (dripping from seams years later), but it’s not acid, it’s just corrosion from the raw unprotected metal. Primer, seam sealer and paint trap it for a while but eventually the car flexes at the seam and you notice the corrosion. E-coat is thin enough to flow into the spot welded seams.
Posted by: mepstein Dec 23 2022, 04:33 PM
I spoke to the Porsche resto shop in my town last week about possibly media blasting one or more of my cars. They won't blast. They are trying to talk me into the dip/e-coat process. I guess they ship it out in the midwest somewhere. Budgetary quote of $8K to $10K, but I don't know what's included (e.g., shipping, prep, etc.).
Rob - Talk to Doug and tell him I sent you. At least to compare quotes. The good thing about Doug is he used to work at the e-coat place that he takes the car to and overseas the process. So if it comes out wrong, he makes them fix it. It’s an expensive system that doesn’t always make sense in our cars but if you have a valuable car or one you plan to hold on to, it’s something to consider. Currently, a full car respray is expensive. Prep is still 95% of a paint job so all the base work before the paint goes on is as important as ever.
Posted by: Ishley Dec 23 2022, 09:53 PM
I didn’t do the tub but had my doors, trunk and engine lid dipped. I also had the guy e-coat and blast a few other parts that wouldn’t fit in my blast cabinet too. Everything came out perfect. Really so nice to do the final repairs (had a few surprises) then sand and prime to seal
everything up until I it ready for paint. On the trunk lids I will have to add a little panel glue back but I don’t anticipate any issues.
It took 6 weeks to get everything back. I had it done by Redi-Strip in Roselle Il. They do both hot tank and sand blasting.
Posted by: DaveB Dec 24 2022, 05:15 AM
@http://www.914world.com/bbs2/index.php?showuser=10825 That 912 came out great. With e-coat - my 914 is just not going to be that valuable. I'm not targeted this build for resale, so the level of dip I am getting meets what I need.
@http://www.914world.com/bbs2/index.php?showuser=8358 918-S. I enjoyed the thread on your build. Thanks for the link.
MetalWorks Paint and Rust Removal in Eugene is doing the dipping and they use a rust inhibitor, not an e-coat. I have a lot of metal work to do, so I prefer seeing it in white. My full price for the chemical dipping with the chassis, doors, frunk, trunk, engine cover, headlights and brackets was under $2800.
DaveB
Posted by: BeatNavy Dec 24 2022, 07:06 AM
I spoke to the Porsche resto shop in my town last week about possibly media blasting one or more of my cars. They won't blast. They are trying to talk me into the dip/e-coat process. I guess they ship it out in the midwest somewhere. Budgetary quote of $8K to $10K, but I don't know what's included (e.g., shipping, prep, etc.).
Rob - Talk to Doug and tell him I sent you. At least to compare quotes. The good thing about Doug is he used to work at the e-coat place that he takes the car to and overseas the process. So if it comes out wrong, he makes them fix it. It’s an expensive system that doesn’t always make sense in our cars but if you have a valuable car or one you plan to hold on to, it’s something to consider. Currently, a full car respray is expensive. Prep is still 95% of a paint job so all the base work before the paint goes on is as important as ever.
Great info, thanks Mark ( @http://www.914world.com/bbs2/index.php?showuser=10825 )

Posted by: barefoot Dec 24 2022, 09:59 AM
A video sometime ago re chem dipping Nissan 240 Z in England near the coast with salt air. They said after dip nothing comes back out 
Posted by: 930cabman Dec 24 2022, 11:29 AM
Not for me, I would be concerned with the solution penetrating every portion of a spot welded seam. But on the other hand, most of our cars have survived a 1/2 century of little/no TLC so does it really matter especially when many of us are in the fourth quarter anyway.
Posted by: mepstein Dec 24 2022, 12:34 PM
Not for me, I would be concerned with the solution penetrating every portion of a spot welded seam. But on the other hand, most of our cars have survived a 1/2 century of little/no TLC so does it really matter especially when many of us are in the fourth quarter anyway.
My former employer does it on most of their pre galvanized builds so they’ve seen quite a few cars come through. Pulling apart the spot welded seams, you can see the Ecoat really does penetrate almost everywhere. There does seem to be a bit of a faraday cage effect on some of the enclosed spaces. Not all the time but it’s there. Nothing is 100% for every situation but the dip/Ecoat seems to be the real deal and my 912 was at the point that normal blasting wouldn’t be enough.
Posted by: Root_Werks Dec 24 2022, 04:12 PM
Nice pictures from everyone on dipping a tub.
Last tub I had dipped was a 356, they had to drill some holes to ensure all the air pockets were gone. It was acid dipped, pressure washed, I think dipped again to neutralize and then pickled with a phosphate coating? It was a shop in Canada that did the work.
That was 5 years ago, and back then it was hard to find a place with tanks large enough for car tubs. Place I used also said they didn't like doing cars. To much work, they liked large construction projects (beams, trusses etc.)
Posted by: mepstein Dec 24 2022, 04:57 PM
Nice pictures from everyone on dipping a tub.
Last tub I had dipped was a 356, they had to drill some holes to ensure all the air pockets were gone. It was acid dipped, pressure washed, I think dipped again to neutralize and then pickled with a phosphate coating? It was a shop in Canada that did the work.
That was 5 years ago, and back then it was hard to find a place with tanks large enough for car tubs. Place I used also said they didn't like doing cars. To much work, they liked large construction projects (beams, trusses etc.)
Lots of places in Ohio and Indiana. They must have laws that make it easy. I hear Louisiana also allows it.
Posted by: DaveB Jan 9 2023, 01:59 PM
Added an update to my first post. The chassis has finished acid dipping and rust inhibitor. Air drying then it's ready!! 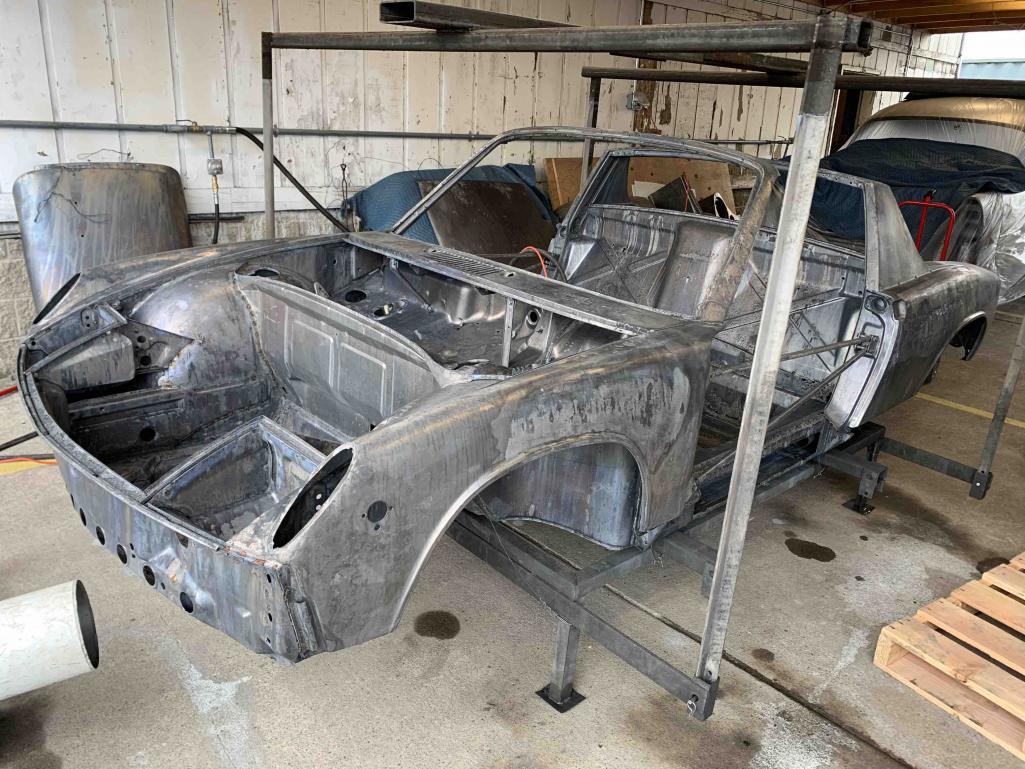
DaveB
Posted by: 930cabman Jan 9 2023, 02:05 PM
Looks very fresh, thanks for the update
Posted by: Root_Werks Jan 9 2023, 02:16 PM
Looks great! Get some primer on it next?
Posted by: Cairo94507 Jan 9 2023, 02:43 PM
Man, just as clean as they come. What a perfect canvas for building the car of your dreams.
Posted by: DaveB Jan 9 2023, 03:03 PM
Man, just as clean as they come. What a perfect canvas for building the car of your dreams.
FYI - This was done before mine. Owner spent > $1M and decided to do a full restoration.

DaveB
Posted by: Cairo94507 Jan 9 2023, 03:36 PM
One of my favorite cars. Beautiful. 
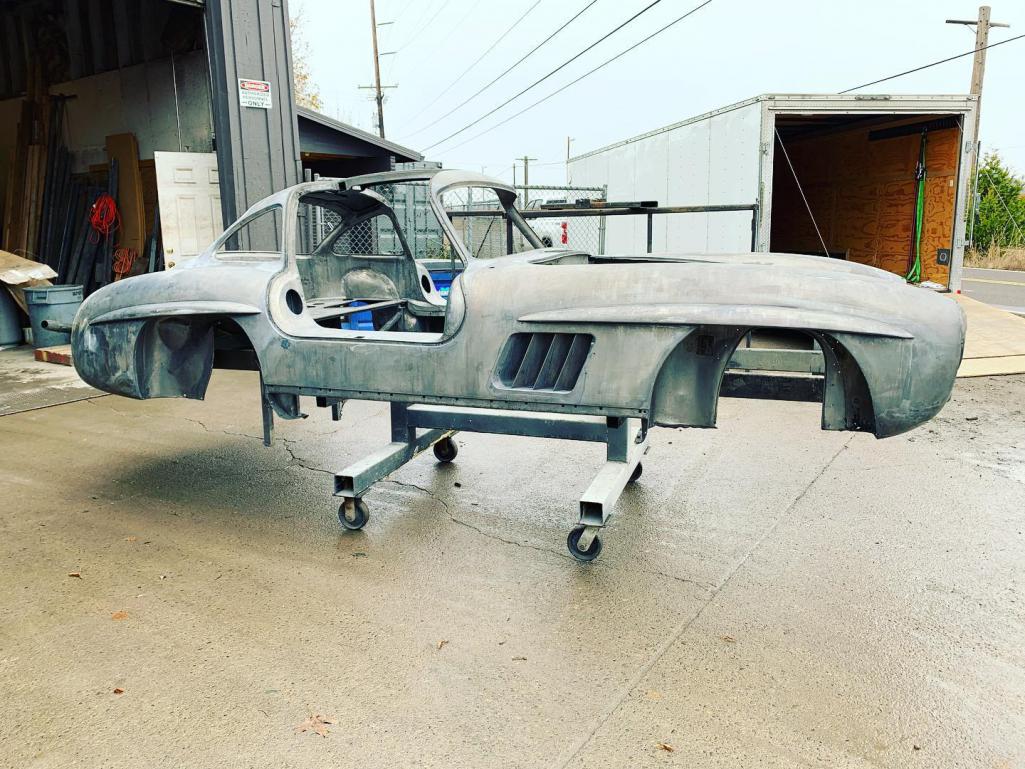
Posted by: DaveB Jan 9 2023, 04:39 PM
I wish I had known this was at the dippers when I dropped off my 914. Getting to see and photograph how the 300SL Coupe chassis was built in white is a rare opportunity.
DaveB
Posted by: DaveB Jan 11 2023, 08:01 PM
I have a question on the inner wheel well. This seems to be made of three layers. There is an inner sheet metal, what appears to be an inner material, like a stiffener and the outer sheet metal. The lower left are with the large rust spot in this rocker panel picture is what I am referring to:
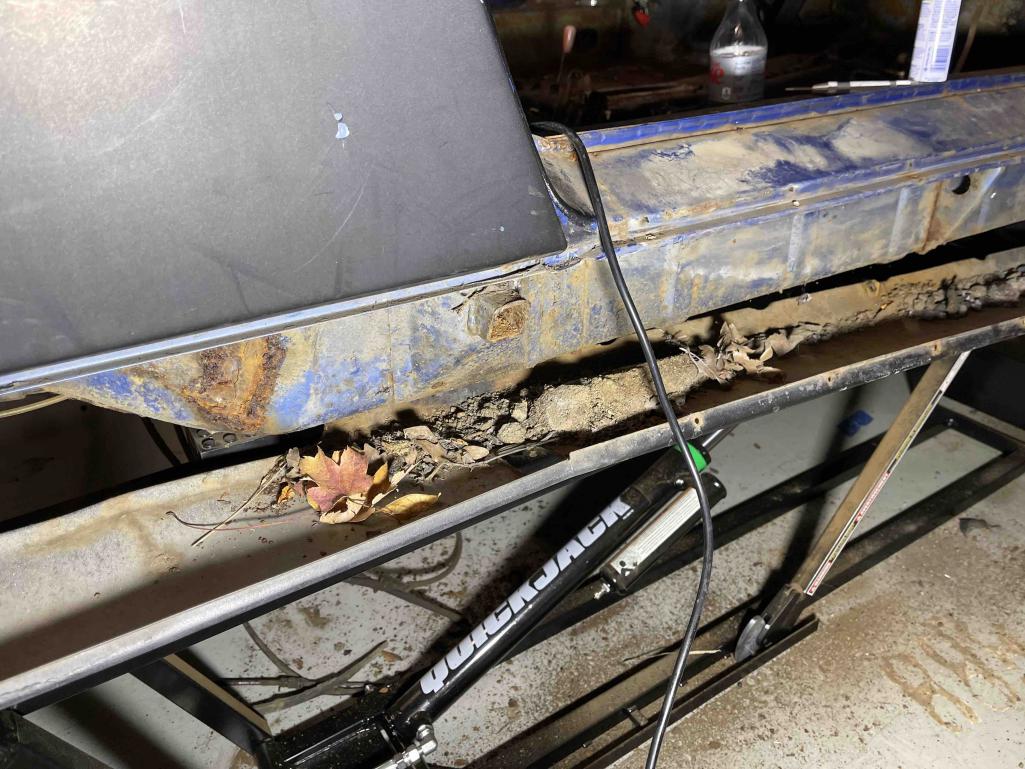
I ground down the edges and took this picture prior to the chemical dipping. You can see this inner material appears to be all rusted. 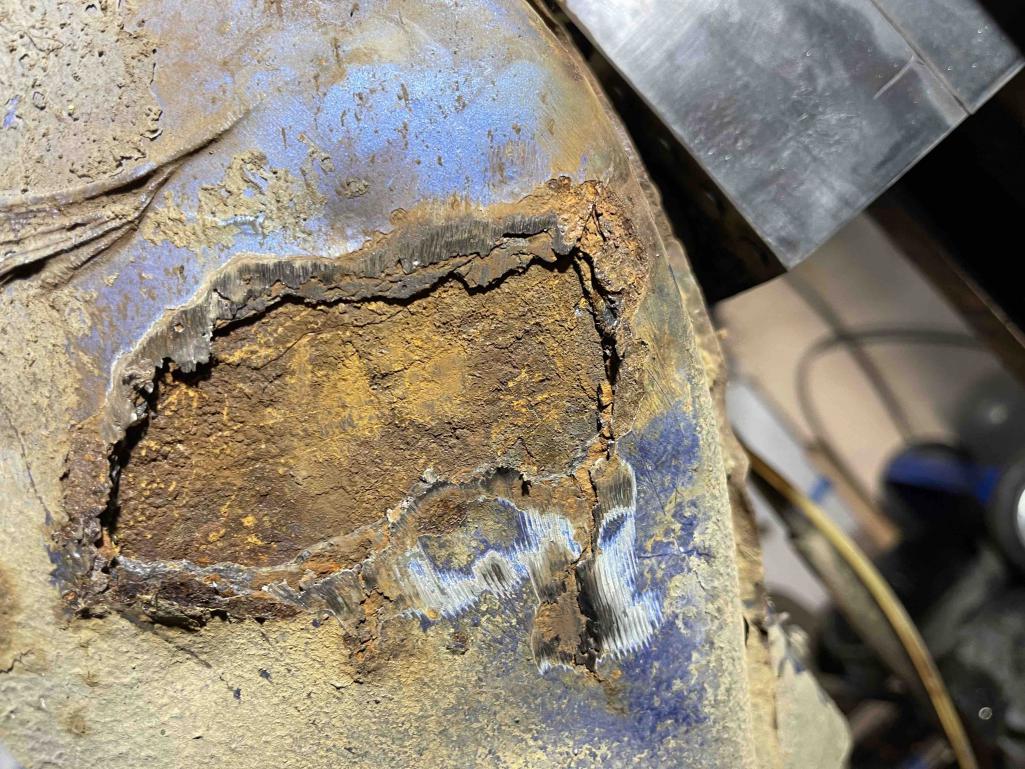
I got the car back in my garage yesterday. I now look into an open area and clearly see the three layers. Can anyone tell me about this inner material? I can look down the inside of the wheel well and see the inner and outer metal is good and this in-between material is gone in most areas. This stiffer is only located on the side of the wheel well, not the top or bottom. 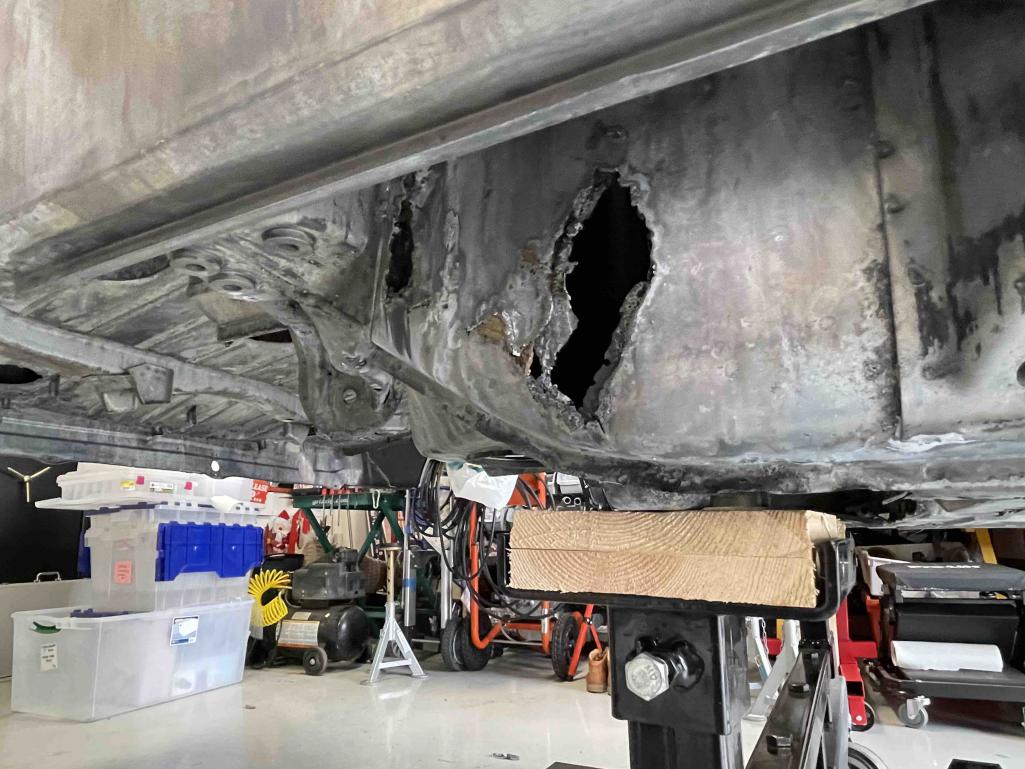
Thanks
DaveB
Powered by Invision Power Board (http://www.invisionboard.com)
© Invision Power Services (http://www.invisionpower.com)