Printable Version of Topic
Click here to view this topic in its original format
914World.com _ 914World Garage _ Karl's Project Update
Posted by: Qarl Jul 25 2003, 08:07 PM
Okay... I decided to start a Gint-like thread and just post progress instead of starting a new subject each time I do something neat.
Latest project.... Pedal cluster rebuild.
This is really VERY easy to do.
I had the pieces powder coated. Installed new bushings. Cleaned up everything and reassembled.
I'm also installing AJ billet pedals (I've got the billet gas pedal too).
Attached image(s)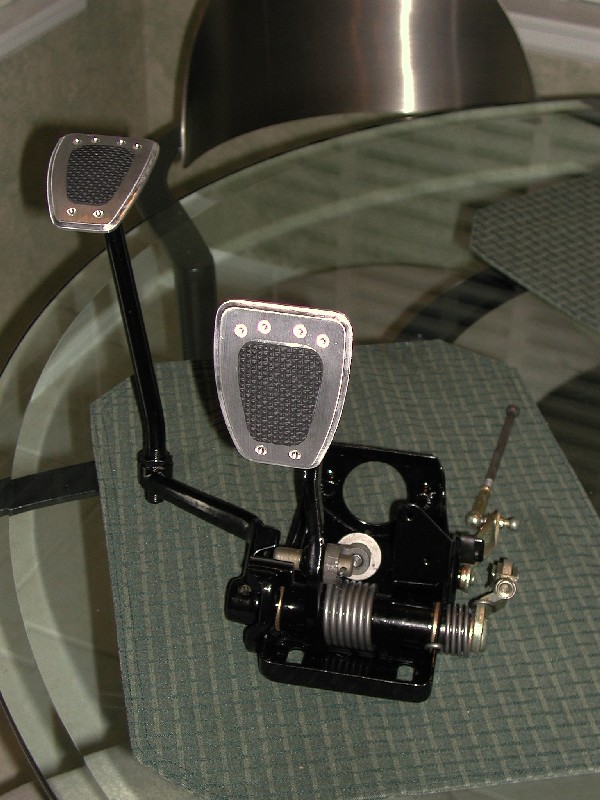
Posted by: tahoward Jul 25 2003, 08:09 PM
Mental note to self: Must have billet pedals! Very nice! Can't wait to see your car finished.
Posted by: Qarl Jul 25 2003, 08:09 PM
Also had the light buckets powder coated... although no one will see them but me.
Man these things were nasty before I bead blasted them.
NOW! Nice and shiny
Attached image(s)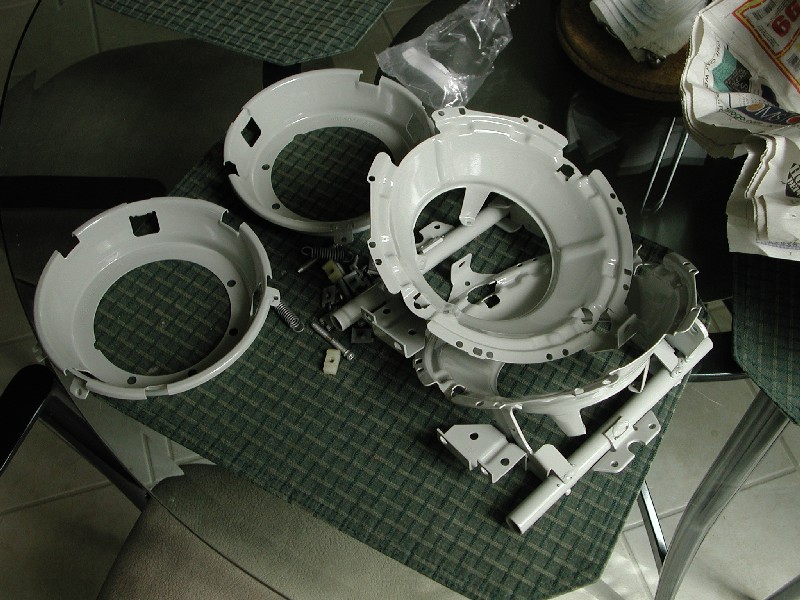
Posted by: ein 6er Jul 25 2003, 08:12 PM
did you plate the hardware on the cluster yourself?
Posted by: Qarl Jul 25 2003, 08:13 PM
Cluster hardware cleaned up very nice to look new. I lucked out.
I just garmed out all the black pieces for gloss powdercoast after I bead blasted them at home.
Same guy who did this...
Attached image(s)
Posted by: rhodyguy Jul 25 2003, 08:17 PM
nice karl. with the influx of parts i take it your car is on the road to being on the road. endevour to persevere.
kevin
Posted by: Qarl Jul 25 2003, 08:23 PM
Unfortunately... not much work on the body other than fitting flares. LOTS of rain here is making it hard to get body work done... humidity is high and it's so friggin hot.
That's okay... I'd rather the car get painted in a month or two after the rains start subsiding a little more...
I basically have just been refinishing/replating everything so that when I do get the body back... everything (for the most part) is ready to go back on clean and refreshed.
Carpet came in this week... Gauges are due in next week. Interior is all redyed (I do need to redo the door panels).
Tranny rebuild project is next...
901 - GT torsen differential, billet intermedate plate with new bearings, billet side cover, new synchros, 1st gear dog teath, seals, and regearing for the engine.
Posted by: vortrex Jul 25 2003, 08:33 PM
so when is your targeted completion date? it's nice to see someone dumping this kind of money into a 914! I really like what you're doing with the car.
Posted by: Brad Roberts Jul 25 2003, 08:46 PM
Do not let Karl fool you. Not all pedal assemblies come apart easily. 90% of them are a serious pain in the ass to get apart (like getting the roll pin out of the clutch arm).
Looks great.. I'm going thru the same pain on the 3.6 car soon.
B
Posted by: Qarl Jul 25 2003, 08:55 PM
Dumping money is right...  I am totally aware that I am stupidly dumping inordinate amounts of money into this car that I will NEVER recover.
But I am doing this once (I am building my dream 914 to last and keep). It will, for all intents and purposes, be basically a NEW 914. Almost everything is being replaced, upgraded, rebuild, replated, refinished, restored, etc.
This car has consumed me for many years (lots of dreaming). I have loved 914s since my first car when I was 16. I've spent countless hours searching through catalogs and magazines over the years for ideas. Luckily the internet has made my thought process easier over the past several years.
Groups like 914club and the Pelican Parts BB make the free exchange of knowledge and ideas so much easier. Thanks to Brad for making THIS board the best! Thanks to everyone else for contributing.
Working on this car is also my therapy and release for the stresses I deal with daily at work and the life my wife and I live.
Realistic completion date is the end of the year...
I figure another 6-8 weeks for body work (he's slow but good).... A month to reassemble (in my spare time).... And a month to install everything at the shop, troubleshoot, tweek, balance, etc.
Maybe it will make a nice Christmas present.
Posted by: Qarl Jul 25 2003, 08:58 PM
Oh yeah... the roll pin was a BITCH.
I drilled and drilled and cursed and swore. Took it to a machine shop to get pressed out. The guy placed it on a vice... took a hardned steel punch and a big f-ing hammer and WHAM it was out in 1 second. No charge. (Of course I was also picking up my lower valve covers for machining.).
If I can give any advice to someone restoring a car... two things.... Air compressor and bead blaster. It's made refinishing crap so much nice than dealing with a wire brush or chemicals.
Posted by: Curvie Roadlover Jul 25 2003, 09:05 PM
Karl, I have a question for you. Do you think that , when completed, you're car will be so nice that you'll be afraid to drive it? At least to some degree? You may need to get another one to use for a fun car. If your petal cluster is anything like how the rest of your car will be upon completion, you'll have to put it in a climate controlled showcase. 
Posted by: Qarl Jul 25 2003, 09:38 PM
This car will NOT be a daily driver, but a weekend, and fun car. Car shows, maybe a driver's ed event. Cruising for the weekend.
My wife probably WON"T like riding in it because it will be a very stiff car (although Mueller's needle bearings will help a little).
No.. .it won't be a garage queen, although I did meet with my builder today and he's going to add A/C to the garage... 
Here are the valve covers... they were painted with VHT wrinkle finish paint.
Attached image(s)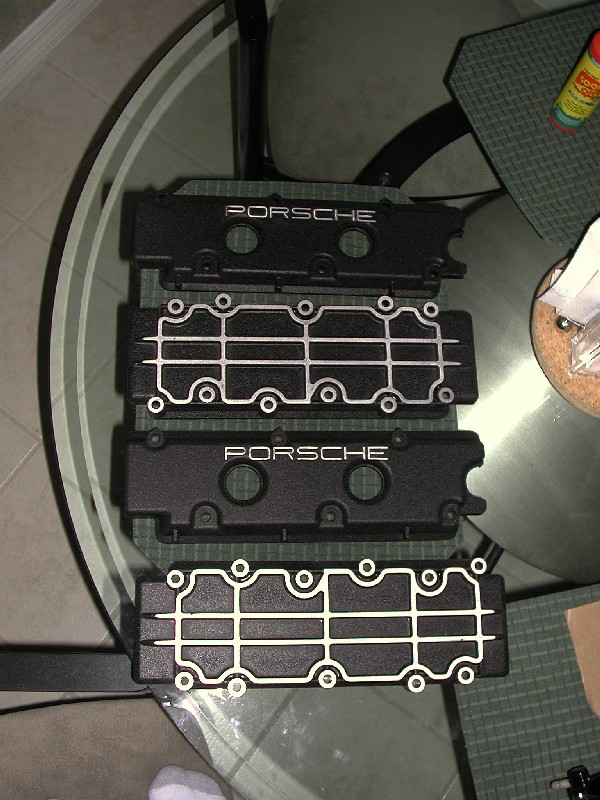
Posted by: Britain Smith Jul 25 2003, 09:50 PM
Nice work...I love it when people put the effort in to powder paint all the pieces.
I expecially like the fan housing...who did that for you? I am getting my fan housing in the mail soon and I haven't decided what I want to do to it. I like the idea of painting the housing black...that is powder painted also right? What kind of finish is on the actual fan? From what I understand, it is magnesium which can be difficult to make look good?
Let me know,
Britain
Posted by: Qarl Jul 25 2003, 10:01 PM
Housing was powdercoated in gloss black
Fan was blasted and coated in silver powder coat and then clearcoated.
DO NOT powdercoat the inside of the fan housing area that the alternator slides into. It is basically an interference fit and even the powdercoat layer will not allow you to install the alternator. Have it masked off... as well as any screw threads.
Same goes for the pedal cluster... cork off the through-tubes to allow the bushings to fit and tape off any screw threads.
Posted by: URY914 Jul 25 2003, 10:04 PM
Karl,
You need a CPM schedule of your project. I do them for work all the time. Make a list of the activities and the duration, than put them in order. When you find your longest string, you have the credical path and with a time scale you can figure out your completion date.
Paul
Posted by: Qarl Jul 25 2003, 10:13 PM
Thanks for the info Paul... this coming from someone who has taken 24 years to get his car where it is....
Just kidding.
If you look at my website and my progress page.. you will see large gaps in activity. This is due to lack of time, kid being sick, work taking too much time, me not feeling well.
http://www.my914-6.com/progress.htm
But you will also notice a lot of activity in the last few months that has been pretty consistent.
Of course I don't document EVERYTHING!
Posted by: Andyrew Jul 25 2003, 10:48 PM
Karl that is going to look soooo cool. I cant wait to see it all together, heck I cant wait to see my car all together!
Posted by: Mueller Jul 25 2003, 10:56 PM
Karl,
It's great to see progress like this
Not that I know what to look for, but are those valve covers modified for use in the 914 yet??
Posted by: Qarl Jul 25 2003, 10:59 PM
Mueller...
Yes the lower valve cover ribs were machined down to allow clearance on the rear trailing arms.
The ribs come up about 1/4" higher than the valve cover mounting bolt thru-holes. I had the ribs machined down to the level of the holes.
About $40 for the machining.
Posted by: shoguneagle Jul 26 2003, 02:21 AM
I have been watching your project with keen interest. You are realizing a dream and that vision is coming together as you have seen it. The money spent over the twenty four years is not waste since it contributes to a working hobby and when averaged out those years does not appear to be bad. Yes, the total appears to be very high and scary. Then you look at the project and the dreams becoming a reality. Yes, I would have spent the money anyway in some other activity, but I have been building a dream; not becoming a reality.
Very nice job and I will continue to watch with great interest. You are seting build standards of quality and excellence.
Thanks for letting us participate in watching you buildi your dream.
Steve Hurt
Posted by: URY914 Jul 26 2003, 04:43 AM
Steve,
Karl hasn't been working on his car for 24 years. He was just giving me $hit because I've owned mine for 24 years. Karl's bearly 24 years old himself.
Karl, so for our next get together, you're driving your car right? You better.
Paul
Posted by: Qarl Jul 26 2003, 09:33 AM
Yes... Paul's had his car for 24 years and it is getting lighter and lighter... not due to the usual brown rot... but due to Paul's "texas chainsaw massacre" style of bodywork....
I've had this car since last May!
I've had 3 other 914s in the past starting at age 16.
Today's project... clean out the fuel tank!
Posted by: Bleyseng Jul 26 2003, 11:03 AM
Karl, everything is lookin great!
On the tranny, if you are putting in new 1st gear dogteeth go for the 2nd gear ones too. They take a beating with all the downshifting along with 1st gear.
BTW- What do you do? (for a job)
Geoff
Posted by: Qarl Jul 31 2003, 07:29 PM
European Racing Headers came in today... They look VERY nice. Off to get ceramic coated tomorrow!
Attached image(s)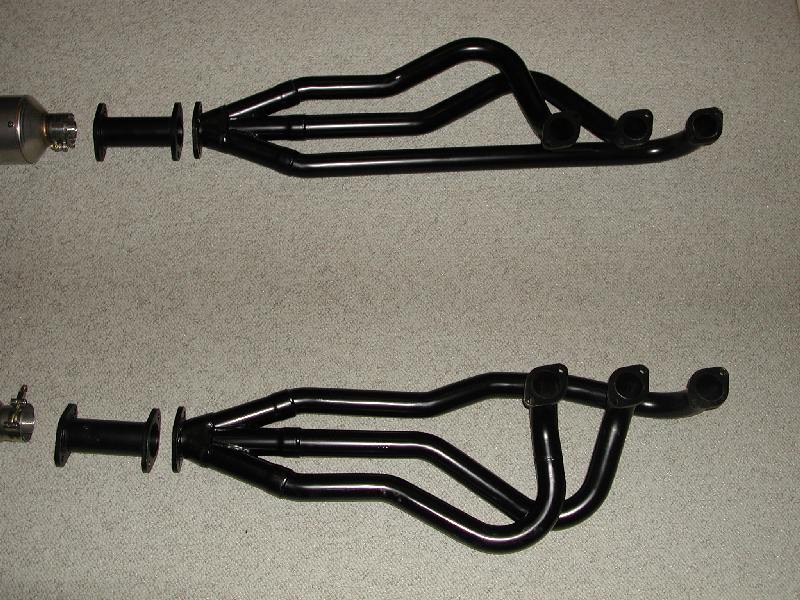
Posted by: Qarl Jul 31 2003, 07:30 PM
Hmmm... I think I'm gonna like this exhaust setup...
Attached image(s)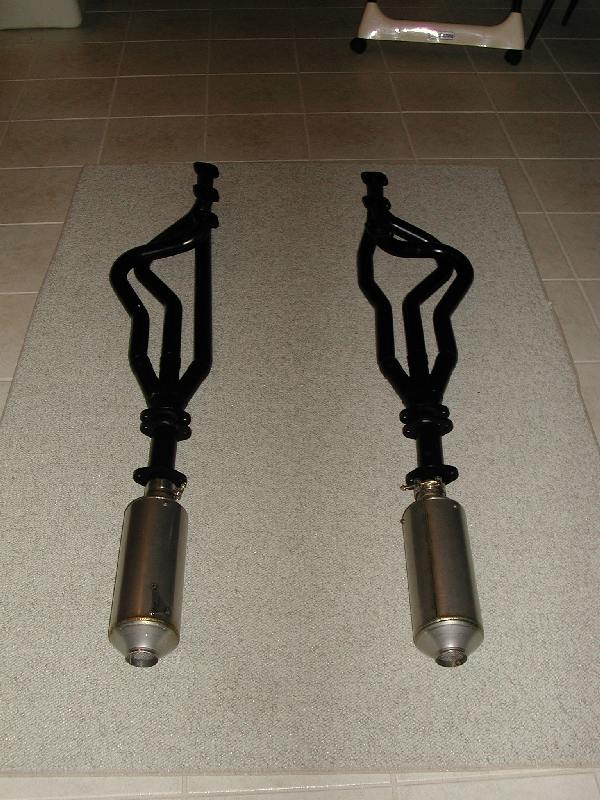
Posted by: Scott Carlberg Jul 31 2003, 11:07 PM
Karl,
what type of mufflers are those in the last pic?
Posted by: Qarl Jul 31 2003, 11:10 PM
Mufflers.... click here...
http://www.914world.com/bbs2/index.php?act=ST&f=2&t=3524&st=0#entry44661
Posted by: maf914 Aug 1 2003, 06:57 AM
Karl,
Everything is looking good!
Where are you having the ceramic coating applied? Do you have a place in the Southeast? Are you having the mufflers coated as well?
Thanks.
Mike
Posted by: Van914 Aug 1 2003, 07:39 AM
You can also get these wheels. They are 15 X 6.5 and fit in the fenders.
http://www.minilitewheels.com/
I have these on my 1974 914
Van
Posted by: Qarl Aug 1 2003, 08:26 AM
I like my wheels! I don't need minilites!
The mufflers are all stainless... so no coating needed.
Headers are going to Jet Hot for the Stirling ceramic coating.
Karl
Posted by: seanery Aug 1 2003, 08:29 AM
Karl,
You'll like the sterling finish. It looks very nice!
Posted by: Aaron Cox Aug 1 2003, 09:36 AM
mufflers look a little rice to me! jk man. nice project. how cheap is it to get stuff powder coated?
also....carl, can your car balance on two jackstands? didnt think so 
Posted by: Qarl Aug 2 2003, 01:57 PM
Engine Dressing...
Attached image(s)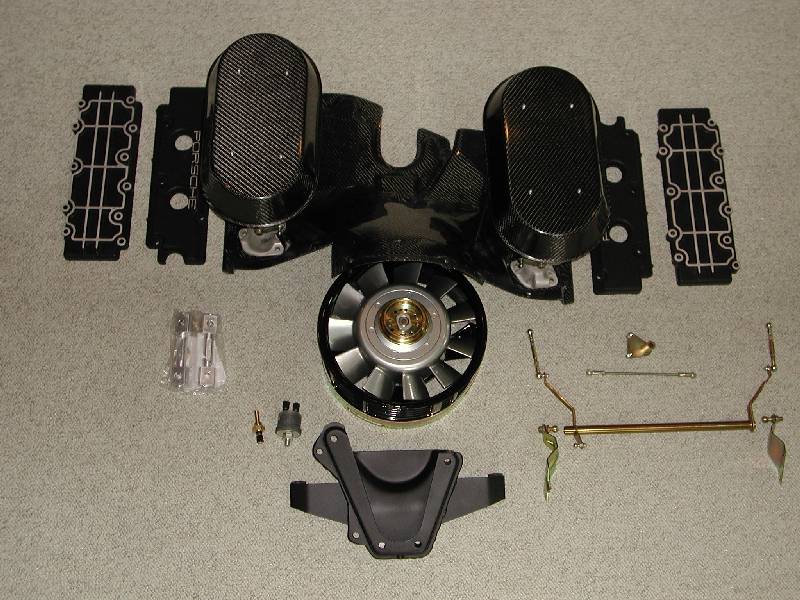
Posted by: URY914 Aug 2 2003, 06:09 PM
Paul,
Is this going to be a work of art or a car?
Very nice stuff-you're doing it right. 
Paul
Posted by: Curvie Roadlover Aug 2 2003, 08:43 PM
You're gonna need some velvet ropes to put around it when you're done, Karl.
Posted by: Qarl Aug 8 2003, 05:31 PM
Engine is 99% done... just need some pulley parts and the carb jetting pieces...
Attached image(s)
Posted by: Qarl Aug 8 2003, 05:32 PM
Gauges are done...
Attached image(s)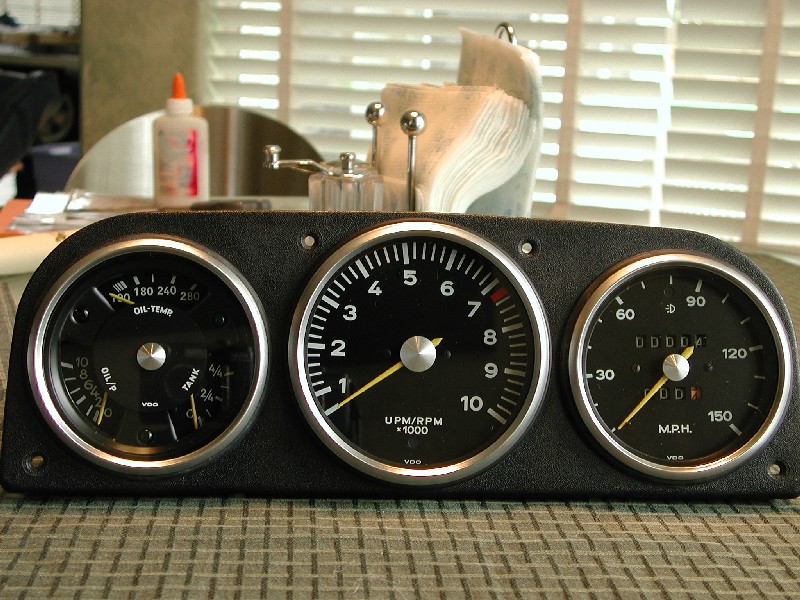
Posted by: seanery Aug 8 2003, 06:26 PM
great looking gauges!
Posted by: Mueller Aug 8 2003, 07:47 PM
Karl,
I think you'd have a few people interested in a calender with only your car in it once finished...maybe a few months could have pictures of the piece parts before it went together
Posted by: iansale Aug 8 2003, 07:57 PM
Karl,
Where did you get the bezels for your gauges?!?!? They look sweet!
Posted by: Qarl Aug 8 2003, 09:03 PM
Palo Alto Speedometer installed them...
http://www.914world.com/bbs2/index.php?act=ST&f=2&t=3948
Posted by: URY914 Aug 8 2003, 09:32 PM
Real pretty, Karl.
But they look heavy. 

Paul
Posted by: Qarl Aug 8 2003, 09:41 PM
Believe it or not, the triple gauge is the lightest of the three. The housing is an aluminum stamping instead of the pot metal.
Hey.. I've got them mounted in the plastic gauge panel from the '75 car to save some weight... ha!
I picked up a set of fiberglass front and rear GT hood replicas... the car is getting lighter and lighter...
Steel flares will add some weight....
Fiberglass bumpers, rockers, front and rear hood will save a bunch of weight.
I removed all of the tar, most of the seam sealer, the rear firewall insulation, and the engine firewall pad. Quite a bit of weight in total here.
What does a stocker 914 weigh? 2200 lbs or so? I'll probably come close to the original weight after it all evens out. Engine is heavier, flares are heavier, and bigger wheels and tires are slightly heavier.
Hoods, rockers, bumpers, and insulation reduce a lot.
Oops, I forgot about the chassis stiffening stuff... okay so I may be a little heavier!
Posted by: URY914 Aug 8 2003, 09:47 PM
From the list of things you've done, I would say it would be less weight than stock. Those hoods are heavy, as are the bumpers. That friggin' car is gonna fly!!
BTW, I just spent three hours in the garage with a new blade in my Sawzall. 
Guess what I cut out. I'll post pictures in the morning.
It's almost midnight, I'm going to bed.
Paul
Posted by: Qarl Aug 24 2003, 06:24 PM
finished replating the hardware for the front light buckets and reassembled...
Attached image(s)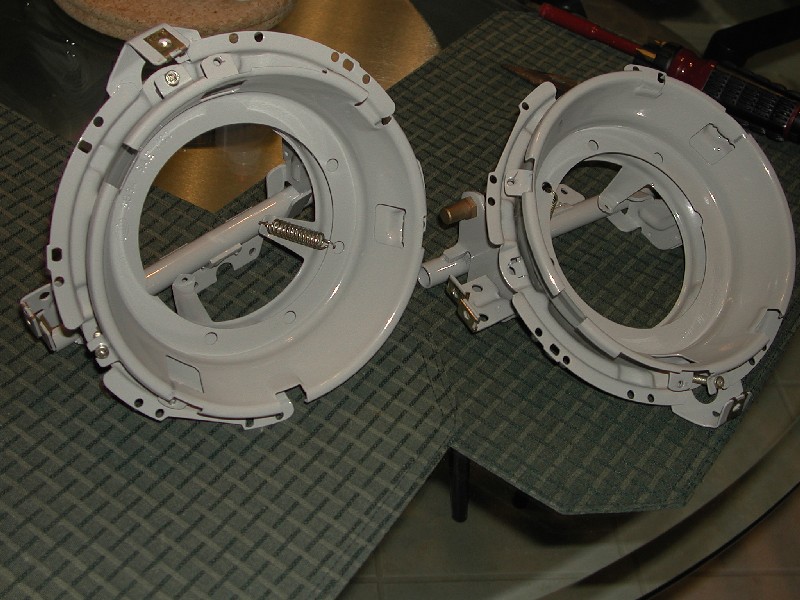
Posted by: Qarl Aug 24 2003, 06:24 PM
Gathered the rear suspension stuff...
Attached image(s)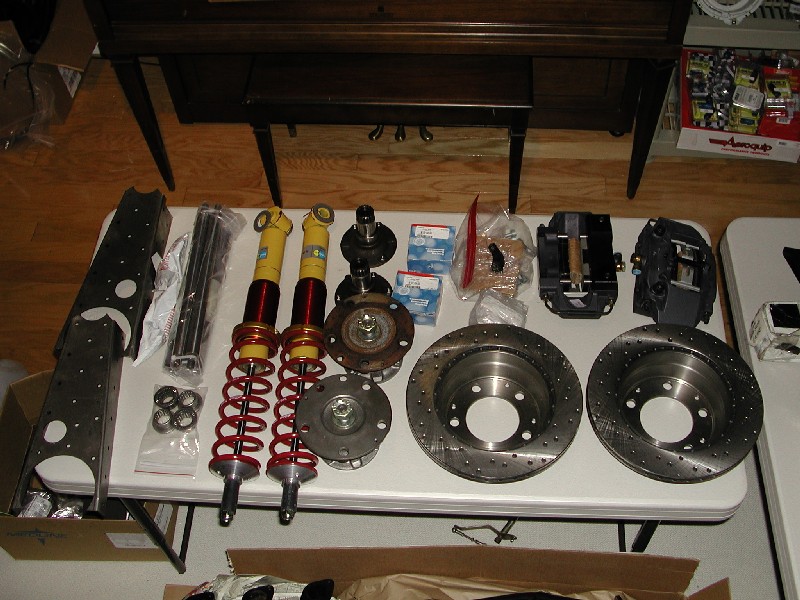
Posted by: Qarl Aug 24 2003, 06:25 PM
And the front...
Attached image(s)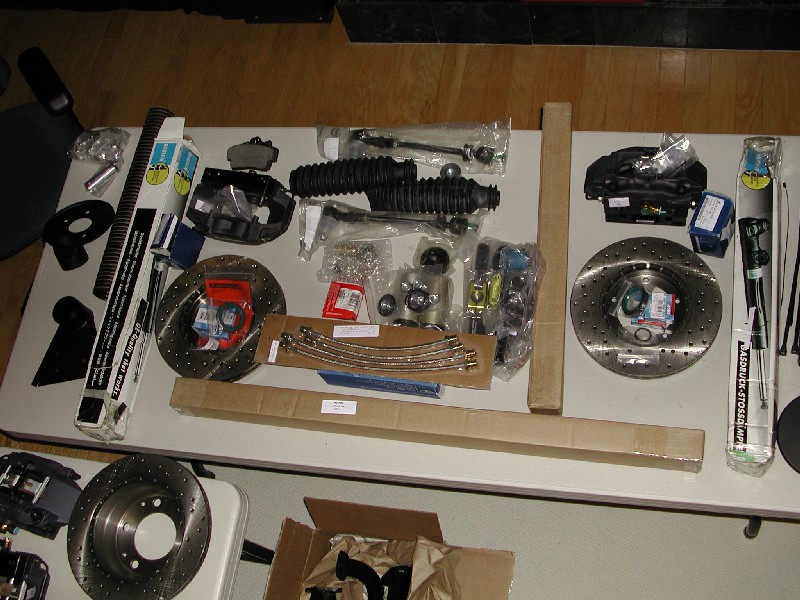
Posted by: Qarl Aug 24 2003, 06:26 PM
started stripping the rear trailing arms...
Attached image(s)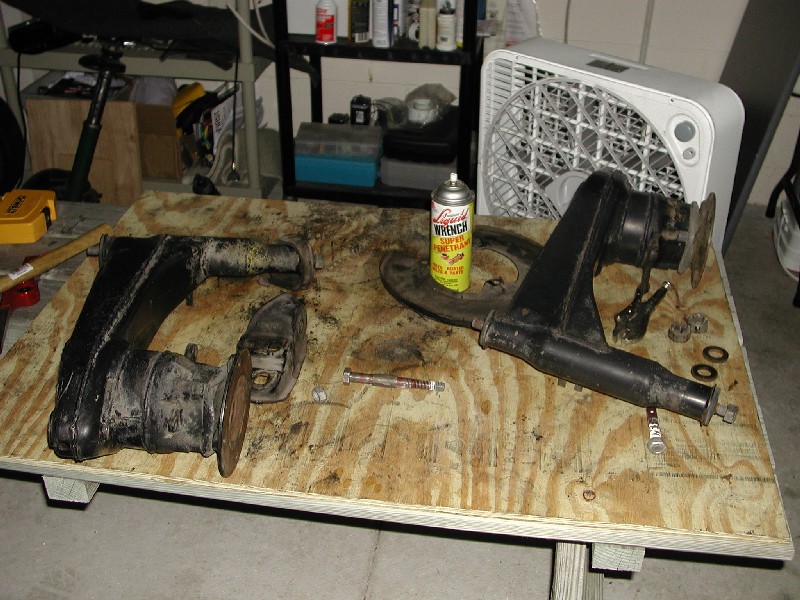
Posted by: Aaron Cox Aug 24 2003, 06:28 PM
bilsteins on the front? why not koni's?
Posted by: Qarl Aug 24 2003, 06:40 PM
Blisteins all round to go with these...
Attached image(s)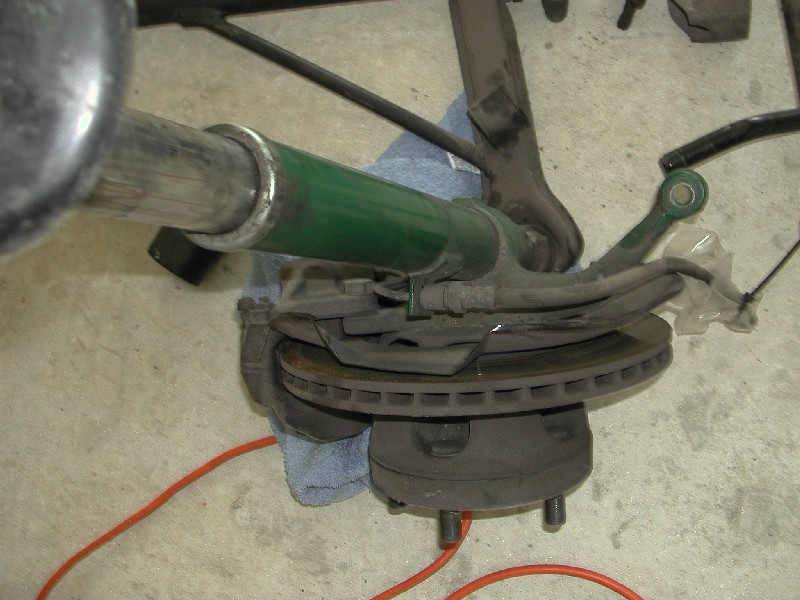
Posted by: ChrisReale Aug 24 2003, 07:03 PM
Pretty sweet karl. What Sway Bar are you gunna use? Tarett or Smart racing?
Posted by: Qarl Aug 24 2003, 07:05 PM
Smart Racing bar. I locate the through-holes for the swaybar tomorrow.
Should be fun.
Karl
Posted by: URY914 Aug 24 2003, 07:10 PM
So what's up with boxing the trailing arms? Are you going to do it? Against Brad's advice.
Paul
Posted by: ChrisReale Aug 24 2003, 07:11 PM
Cool, what size?
Posted by: Aaron Cox Aug 24 2003, 07:18 PM
cool, bilstein strut assembly's....  - im running bsteins in the rear- koni reds up front.... good combo.
Posted by: Qarl Aug 24 2003, 07:30 PM
I have the arm reinforcing kits. Still debating on the issue.
Front swaybar is 23mm Smart Racing Bar.
22mm solid torsions. Needle bearings. Turbo tie rods, Bilsteins (will raise strut spindle and revalve inserts), aluminum crossmember, new ball joint and bearings.
Rear is Bilsteins, 180 lb springs (may go to 200), adjustable height spring perch, needle bearings, early 911 hub, stub axle, and rear axle. new bearings, blah, blah.
Posted by: redshift Aug 24 2003, 07:35 PM
Karl, do you have an extra injected longblock?
weenie!

M
Posted by: Brad Roberts Aug 25 2003, 12:42 AM
Awesome Karl. Flat out awesome. I really get a kick out of seeing people do things RIGHT. NO holds barred.
Take note people. You can half ass it.. or do it right the first time.
I can see a WEVO 915 in your future Karl.. wait until you see the pics of the WEVO 915 for the black 3.6 car. Show car quality.
B
Posted by: Andyrew Aug 25 2003, 01:30 AM
Ya know Brad, some people just dont have the money to do it "right"...
If I did have the money, I would do it right.. But the two tables he has look like they have more $ in new parts than I have spent on my whole car (including the car).. Karl, I cant wait to see this car get done, I think it will be an amazing machine! (not to mention whip my car in anything..
)
Posted by: dbelleperc Aug 25 2003, 04:05 AM
Karl, very nice.  . Have you thought on what kind of lights you are going to use? H4's or for the bad a$$ car bad a$$ lights (Xenon's) like myself. And one more thing why can't you be in San Diego.
Posted by: Brad Roberts Aug 25 2003, 09:12 AM
Timo,
We purchase that kit from Clewitt engineering near Los Angeles Ca.
Richard Clewitt is the person who makes those parts.
B
Posted by: fiid Aug 25 2003, 09:57 AM
I second what Brad says about doing it right.
Doing it right, however, doesn't mean you can't stage your project into affordable chunks. I have found in real life as well as in Gran Tourismo - that it's better to save and get the stuff you really want rather than compomising because of cost. So if you want a 3.2l 6 - save for it and don't buy a 2 litre!
Fiid.
Posted by: Qarl Aug 25 2003, 12:15 PM
I've got a set of period NOS Cibie Z-beam headlights with Pia superwhites in there.
Stock fogs with 50w halogen inserts, new lenses, and rechromed reflectors.
That sensor is from Clewett Engineering. http://www.clewett.com/products/ignit.htm
Posted by: dbelleperc Aug 26 2003, 12:47 AM
Sorry when I was going to post the link is when the 914club surver went down but here is the link to the http://www.sylvania.com/xenarc/x60246054.htm And here is the link to the http://orderxenarc.sylvania.com/orderxenarc/productenlarged.asp?ProductId=141940&CId=%7BC463ACFF%2D9FD4%2D4961%2D94C0%2DCC5F3569A316%7D&NC=826200321924
Posted by: Qarl Sep 2 2003, 09:59 PM
Been busy...
Beed blasted the brake shields, A-arms caps, trailing arm link bearings...
I finally completely disassmbled and bead blasted the trailing arms
This reminds me of an old Far Side cartoon.... "Nature's way of saying... DO NOT TOUCH!"
Demon dog!!!!
Posted by: seanery Sep 2 2003, 10:05 PM
are you really gonna use the dust shields?
Posted by: scotty Sep 2 2003, 11:14 PM
Karl, your car is going to be too clean to drive! You're doing what'll take me another 10 years to do 
Posted by: Brad Roberts Sep 3 2003, 12:01 AM
Karl.. to reach great Anal heights you must use a 60 grit grinding disc and remove all welding flash and buzz down the seams on the control arms before powder coating.
I just did this Monday night to the arms going on the Black 3.6 car.
B
Posted by: rhodyguy Sep 3 2003, 05:30 AM
karl, scotty was reading my mind. better save some money for a bunch mirrors to place under the car. have you started a search for a trailer?
kevin
Posted by: maf914 Sep 3 2003, 08:15 AM
Karl and Brad,
Karl, I remember from a previous post that for your rear 5-bolt conversion you were using a combination of early 911 drive flanges, CV's, 911 axles and early 911 hubs. Is that correct?
Brad, I know you've discussed this on the PP forum in the past.
Could one of you please list the correct 911 pieces and years to make this work? Flanges, axles, CV's, bearings? Thanks.
Mike
Posted by: Qarl Sep 3 2003, 08:30 AM
Early 911 5-bolt hubs
Early 911 stub axles 4-bolt CV
Early '69 to '74 Axles
Sportomatic drive flange for tranny output. Course spline. This has a slightly deeper dish than the regular 901 output flanges and allows you to bolt the entire assembly up without having to use a spacer.
Early 911 wheel bearings for the rear.
Posted by: maf914 Sep 3 2003, 11:01 AM
Karl, Thanks. I wonder how hard it is to find Sportmatic flamges?
Mike
Posted by: Qarl Sep 3 2003, 11:26 AM
There are a couple of different variations on the sporto flanges. It's the '70 to '74??? range. The 915 tranny sporto used something similar which will also work.
I found mine by posting an ad on the Bird's 911 classifieds.
Here is what to look for... 4 bolt ( if your CVs are 4-bolt). Course splined, tranny out put flange, from 901 or early 915 transmission.
The large end of the flange that bolts to the axle is cupped. The desired sporto output flange has a deeper dish (about 1/4 to 3/8") or so. It is obvious when comparing the two. This is the desired one. It's this extra depth that allows you to use this combo without a spacer.
Posted by: Brad Roberts Sep 3 2003, 12:14 PM
You can run this setup with the regular 901/915 course spline. The .250 difference is split between two CV's which ends up being .125 on either end.The CV's have enough play that you can do this NO problem. We beat the piss out of them in race cars and V8 conversion cars with NO failures.
Dont sweat trying to find the sporto's. Its not worth it. If they fail on you (EVER) track me down. I'll replace both axles for you (sound confident enough for you ?)
B
Posted by: boxstr Sep 3 2003, 07:48 PM
Karl I was under the impression that the dust covers(brake rotor backing plates) will not fit on this conversion. True or false??
CCLINDUSTCOVERTOWN
Posted by: echocanyons Sep 3 2003, 09:29 PM
I have the same rear setup why are you using rear 911 bearings? I though that you could only use 914 bearings.
BTW
Great attention to detail!
Posted by: Qarl Sep 3 2003, 09:34 PM
The early 911 (69-71) hubs use the same wheel bearing as the 914-6 (and 914-4).
Posted by: Qarl Sep 3 2003, 09:42 PM
Umm... Craig... you're probably right. I didn't think that far ahead. Oh well... nice clean brake shields for my parts stash.
Posted by: Qarl Sep 3 2003, 09:46 PM
Okay... today's progress.
1:00 AM - couldn't sleep so I rough fitted the Smart Racing bar parts together...
This was MUCH easier than expected. Removed a-arms from ball joints, removed the torsion bars, torched off the bushing hosings and removed the rubber bushings, and finally cut off and ground down the Carrera underbody swaybar tabs.
Euro says woof! I can't wait for my ride!
Attached image(s)
Posted by: Bleyseng Sep 3 2003, 10:05 PM
Those A arms look like prime targets for blasting, Karl.
Geoff
Posted by: Qarl Sep 3 2003, 10:06 PM
Yes... blasting tomorrow night. Too f-ing humid tonight.
In fact it was raining outside when I did all this tonight. Even witha fan blowing in the garage it was like a steam bath.
I can't wait until Fall weather hits in another month or two.
Posted by: maf914 Sep 4 2003, 07:10 AM
Too humid in the garage? Gee, I thought you were doing all of your work in the dining room!
It's been a fairly mild summer as far as temperature goes here in Savannah, but the humidity has been a bitch, as usual. About one more month before things start to cool a bit.
Karl and Brad, Thanks for all the good info on the rear 5-stud combo.
Mike
Posted by: Qarl Sep 17 2003, 08:14 PM
Tank and parts came back from the powder coater today...
A-arm is below the tank in photo. The ends weren't coated to allow for installation of Mueller's needle bearings.
I replated the bearing retainer cover for the trailing arm. I'm waiting for the yellow zinc hardware to arrive to reassemble the rear assemblies. (Maybe this weekend or early next week.
Next to press all the sleeves in the a-arm mounts and the trailing arm for Mueller's bearings
I did everything in a 30% gloss (satin). I'm very happy with the results.
Attached image(s)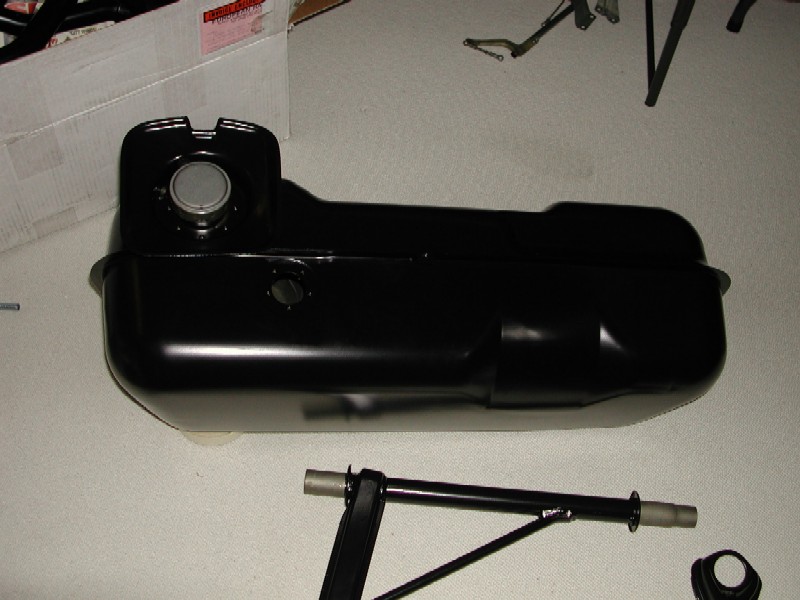
Posted by: Qarl Sep 17 2003, 08:14 PM
wysiwyg
Attached image(s)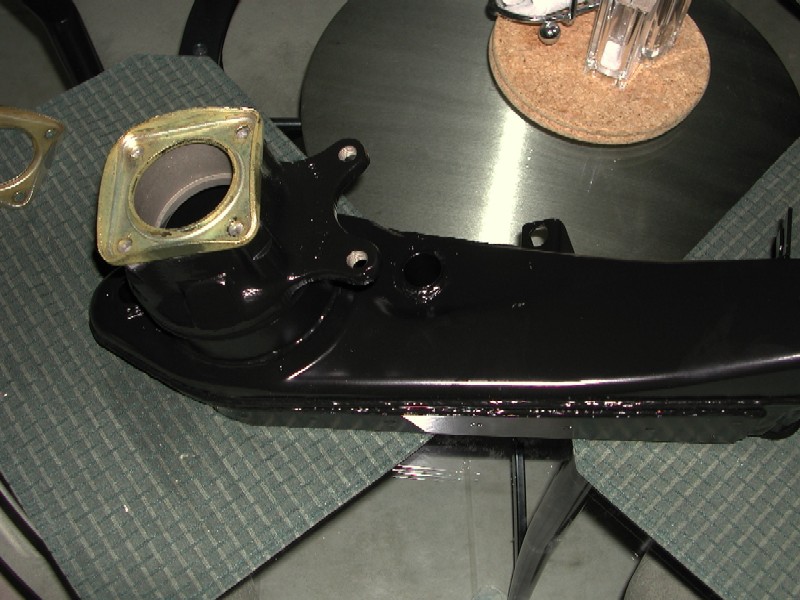
Posted by: seanery Sep 17 2003, 08:15 PM
nice karl!
Posted by: echocanyons Sep 17 2003, 08:18 PM
Nice work!
Theyre real purty!
Posted by: Eric Taylor Sep 17 2003, 10:09 PM
Very Nice Karl! Can't wait to see the finished product. Do you have any pic's of body ?
Eric
Posted by: Brad Roberts Sep 18 2003, 01:13 AM
Cool. Looks like we are traveling the same paths.. I should get everything back from the powder coater early next week for "Blackie".
B
Posted by: Qarl Sep 19 2003, 10:17 PM
Okay... spent about an hour stripping the front suspension down to the Bilstein struts. They will be sent off to have the spindles raised and the inserts revalved.
I disassmbled the hub in preparation for new bearings and shorter studs (there was a spacer and longer studs installed from the PO).
Attached image(s)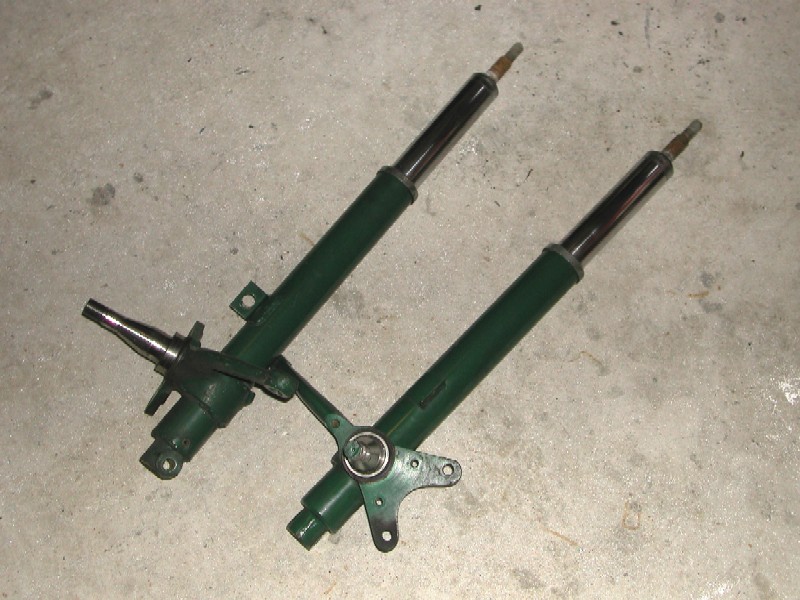
Posted by: Qarl Sep 19 2003, 10:18 PM
r434r
Attached image(s)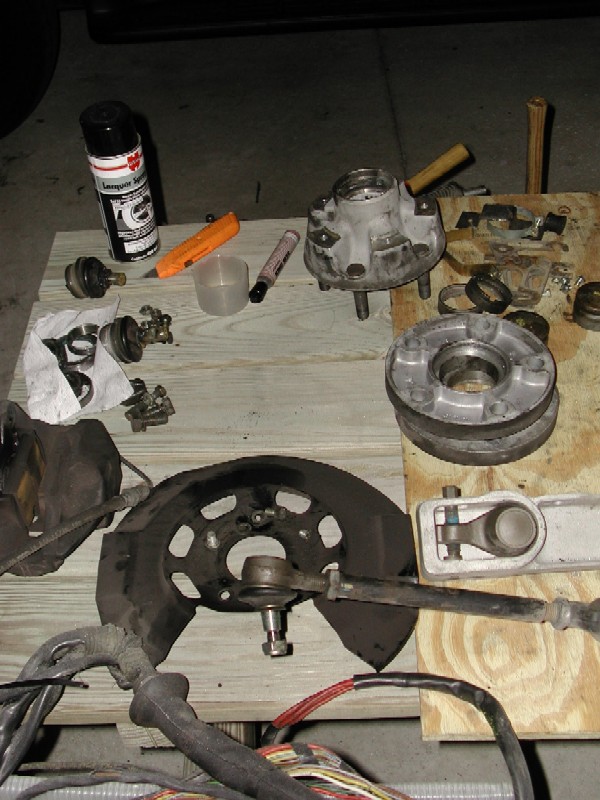
Posted by: Brad Roberts Sep 20 2003, 01:22 AM
I had my hubs beed blasted and EVERYTHING powder coated. It turned out SWEET. I didnt have my truck so I will pick everything up next week.
B
Posted by: redshift Sep 20 2003, 07:59 AM
Mike
Oh my God, in the a/c, you still sweat your ass off.
Hey maf, when you want me to terrorize your hood with my teener of mass destruction? I am thinking about the Oyster Bar for dinner or something around Wednesday.
Five stud combo sounds like a Club One thing.

M
Posted by: maf914 Sep 20 2003, 08:43 AM
Miles,
If you're going to be on Wilmington Island Wednesday, stop by and show me your "new" ride. And I'll show you my car on jackstands!
I ate at the Oyster Bar last weekend. Had my fried seafood fix for now.
Check your PM for directions.
Mike
Posted by: Qarl Sep 20 2003, 02:45 PM
Got Mueller's needle bearing installed on the right side a-arm. It required some sanding of the ends to get the sleeves to fit and then heating the sleeves in the oven to expand them.
22mm torsion bar from Smartracing (Sway-away power bar) is sitting there, as well as the new ball joint!
The driver's side is in progress and is turning out to be a little harder than the first side.
What fun!
Attached image(s)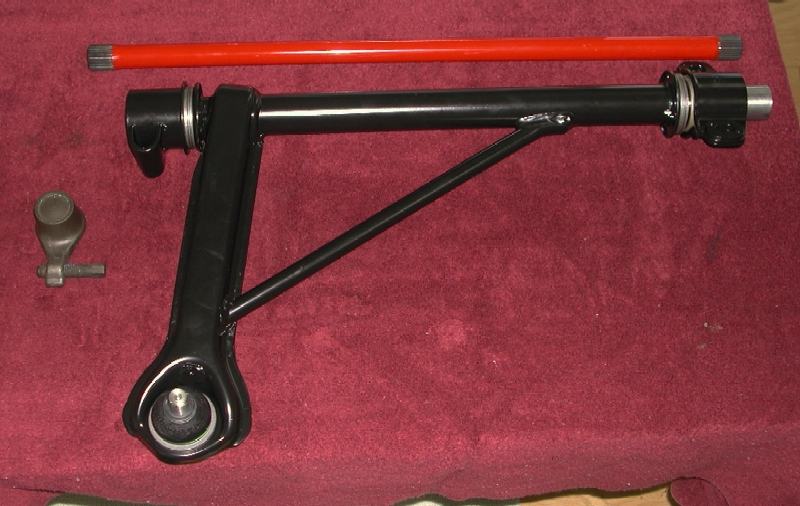
Posted by: Nemo914 Sep 20 2003, 03:22 PM
Karl,
Just spent the last 30 minutes reading through all the posts and looking at your progress pictures. It brought back a lot of memories as I did a complete resoration of my 72 914 1.7 10 years ago. I did a 35mm photo journal of the project, and a lot of the pictures look exactly the same! The biggest difference between our projects is that I returned mine to stock condition. When you are done, you will find the toughest part about your "new" car is watching go through its "second" deterioration process. Every rock ding just kills! But, you gotta drive it!
I will keep watching your progress. Best of luck. 
Rich
Posted by: Qarl Sep 20 2003, 11:44 PM
Busy day...
Finished installing the NOS Cibie headlights in the front bucket assemblies (had the headlight ring powdercoated).
Attached image(s)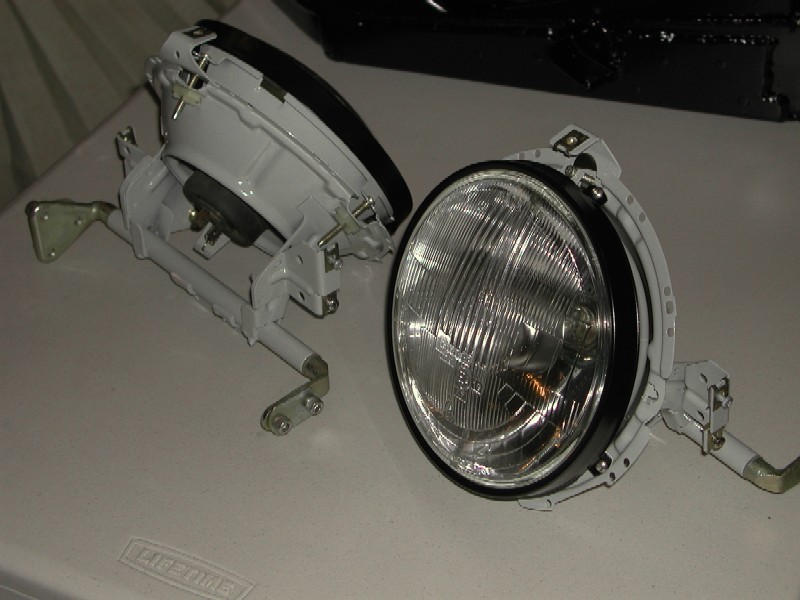
Posted by: Qarl Sep 20 2003, 11:45 PM
Installed the ERP bump steer kit on the tie rods.
Attached image(s)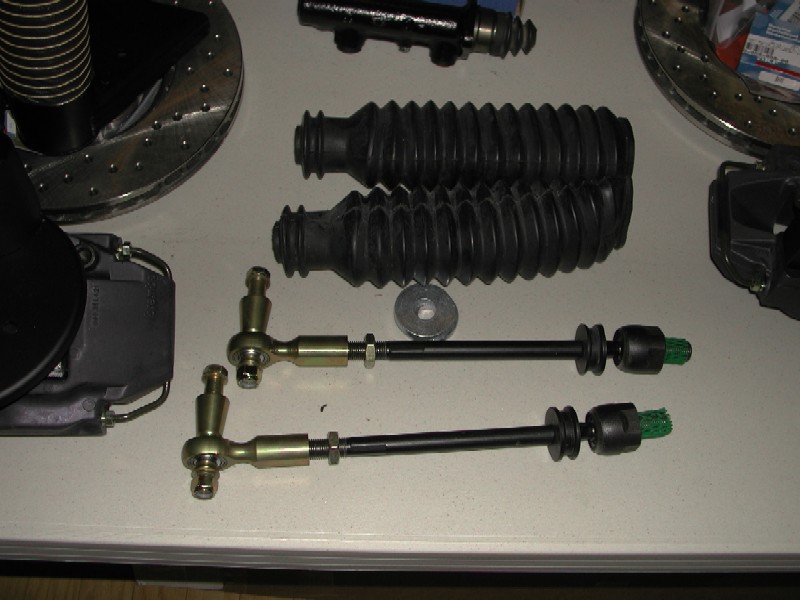
Posted by: Brad Roberts Sep 21 2003, 05:12 AM
You are going to hate yourself. You dont need that bumpsteer kit when you raise the spindles. I personally consider that WAY overkill for the street anyway. You will be replacing those heim joint ends every 6 months or so. They give a TON of feedback thru the steering wheel (great for racing... but pick up every nook and cranny in the road and transfers it to your hands/arms/shoulders) You should really think about those pieces. I know they are trick.. we run them on the race cars.
B
Posted by: Qarl Sep 21 2003, 09:14 AM
AAhhhh... what you are looking at is the result of the car evolving over a year of development, and receiving lots of mixed info along the way and not paying attention.
Had planned on using the existing struts and using the bump steer kit (which I purchased). Then I discussed raising the spindles.
Car's design purpose is changing as it evolves... Was originaly mostly a street car with slight track use.. not more 50/50.
So what would you recommend...
1. Keep existing strut housings, use stock inserts, and keep the bump steer kit or
2. Raise the spindles and revalve the strut inserts?
Posted by: Qarl Sep 23 2003, 09:38 PM
Nice clean hubs. I taped off the bearing surfaces before blasting. Shorter studs will be pressed in this weekend. They were set up for 1" spacers because of the Phonedials that were on the car before.
Aluminum cross member was blasted as well (after cleaning all the crud off first).
Attached image(s)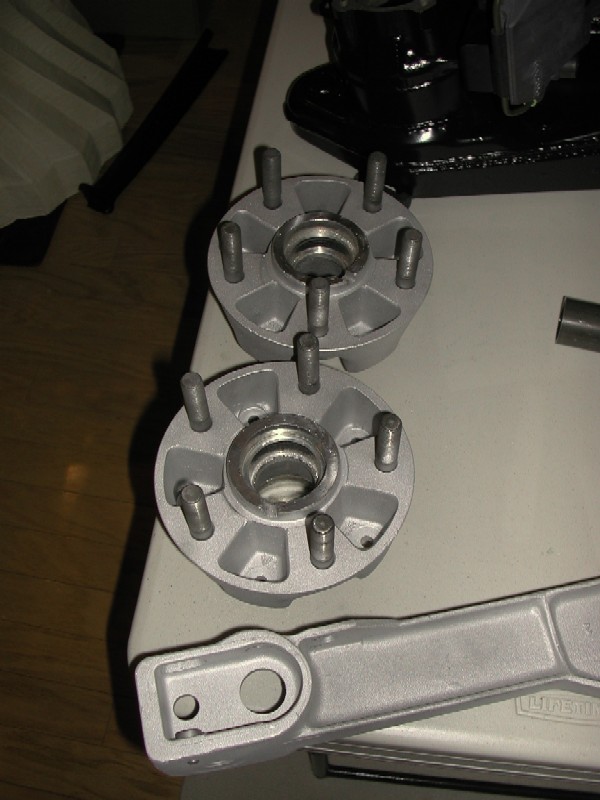
Posted by: Carl Sep 23 2003, 10:12 PM
Karl,
What an amazing project. You're patience and attention to detail is remarkable. Thanks for sharing your progress with us.
Carl
Posted by: Brad Roberts Sep 24 2003, 01:35 AM
My parts look better.. my parts look better.. Pics tomorrow evening.
Good job Carl. Everything looks nice and clean.
I mean K-a-r-l.
B
Posted by: Qarl Sep 24 2003, 07:56 AM
t-u-r-d
Posted by: Qarl Sep 25 2003, 09:40 PM
Fuel tank is done.
It was blasted, powdercoated, sealed with the POR tank sealing kit (you do this carefully AFTER the powdercoating), fuel line fittings redone, fuel sender refurbed, new gaskets, and new hardware.
Voila
Attached image(s)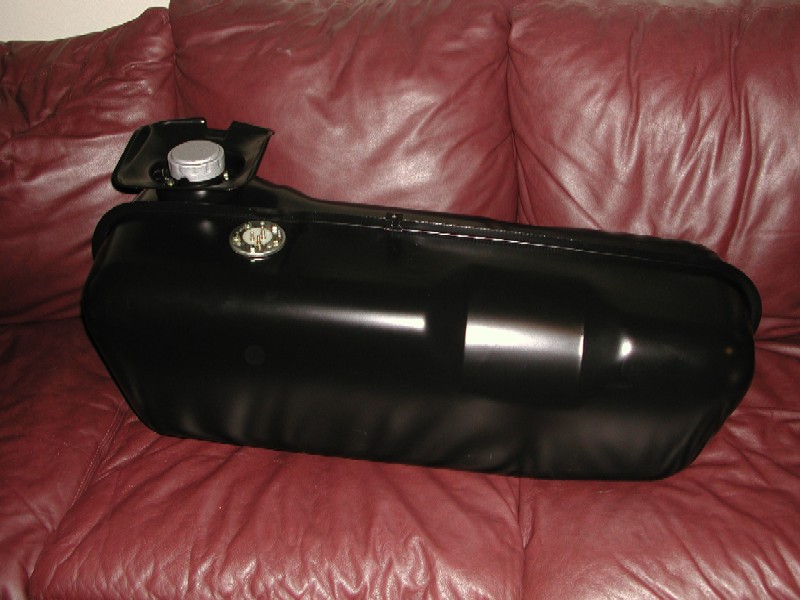
Posted by: Qarl Sep 26 2003, 04:49 PM
Okay, go here...
http://www.914world.com/bbs2/index.php?act=ST&f=2&t=5248
... for the name discussion.
Thanks! 
Posted by: Brad Roberts Sep 27 2003, 03:55 AM
Karl.. I split the topics. We have a ton of control over the BBS. We can split and move threads at will.
B
Posted by: Qarl Nov 5 2003, 11:25 PM
Finally did a rough assemble of the rear suspension..
From this...
to this...
I pick up the powder coated front struts tomorrow!
and other good news. Hunter is coming home tomorrow!!!! Yipee...
Posted by: swood Nov 5 2003, 11:37 PM
Very Very cool Qarl!
Posted by: rick 918-S Nov 6 2003, 12:45 AM
Nice work Karl. Hows your boy?
Swood Is that your car on your avatar? Coool color. 
Posted by: Curvie Roadlover Nov 6 2003, 05:04 AM
Karl, your car is going to be SO SWEET when you're done, that you're going to have to hire a bevy of supermodels to sprinkle rose pedals on the road ahead of you wherever you drive. You also may want to think about purchasing a set of velvet ropes to put around it when you're parked in public areas.
Posted by: Jeroen Nov 6 2003, 05:42 AM
Looking good!
And the fact that Hunter is coming home is even BETTER ! ! !
cheers,
Jeroen
Posted by: Eric Taylor Nov 6 2003, 08:16 PM
Oh man karl, This car is gona be the king kong of all 914's. What piece isn't powdercoated:)
Eric
Posted by: URY914 Nov 6 2003, 08:29 PM
I see you're not using the spacer.
Don't like living on the edge?
Paul
Posted by: TimT Nov 6 2003, 08:29 PM
Karl, what brakes are you using?
glad your boy is coming home
Posted by: Qarl Nov 6 2003, 08:47 PM
The "spacer" is actually a 4 to 5 bolt adapter from the PO. The new car will have 9x16 fuchs in the rear...
Posted by: d914 Nov 6 2003, 08:51 PM
aren't any of the parts actually in the garage. I more of your house than the garage.
Nice to see your son home...
Posted by: scotty Nov 6 2003, 08:52 PM
Since time = $$$, I think Karl's got the first $1,000,000 914!
Posted by: Qarl Nov 7 2003, 05:16 PM
Who says Bilstein front strut housings have to be Bilstein green? Why can't they be Bilstein Yellow? The powder coat color (signal yellow) is pretty darn close to Bilstein yellow.
They should come together this weekend!
Attached image(s)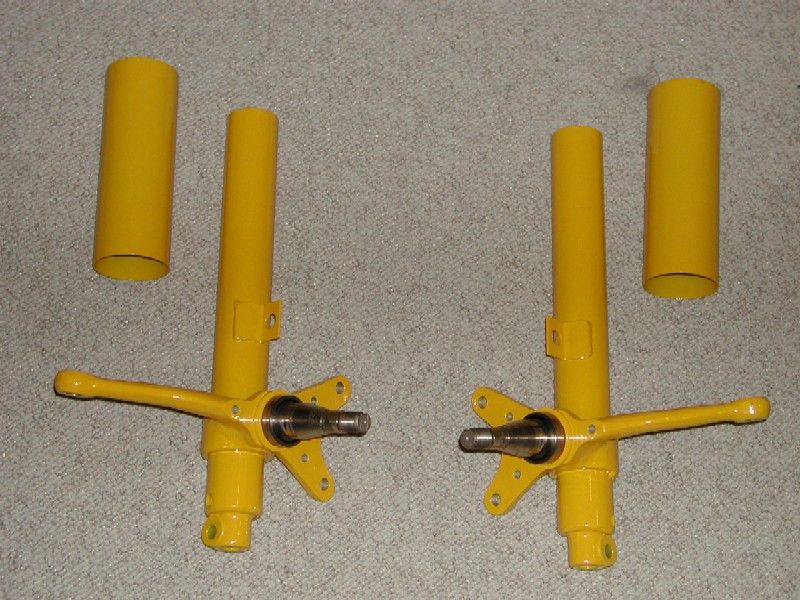
Posted by: redshift Nov 7 2003, 05:19 PM
This is going to be a very, very nice parts car!
Watch your back!
M
Posted by: Aaron Cox Nov 7 2003, 08:34 PM
schweet! is thing goin into a museum? ever gonna see a road?
Posted by: dsmeyer Nov 8 2003, 06:01 AM
You may want to consider painting parts of your brake rotors.
Otherwise they will start to rust the minute they see any water.
I masked off where the pads contact the rotors and then sprayed on a high temp gray paint.
Then I baked them in the oven per the intructions on the can.
I also masked the area where the hub and the rotor mate to keep the surfaces true.
This was done at least five years ago and it holds up fine for a street car.
Attached image(s)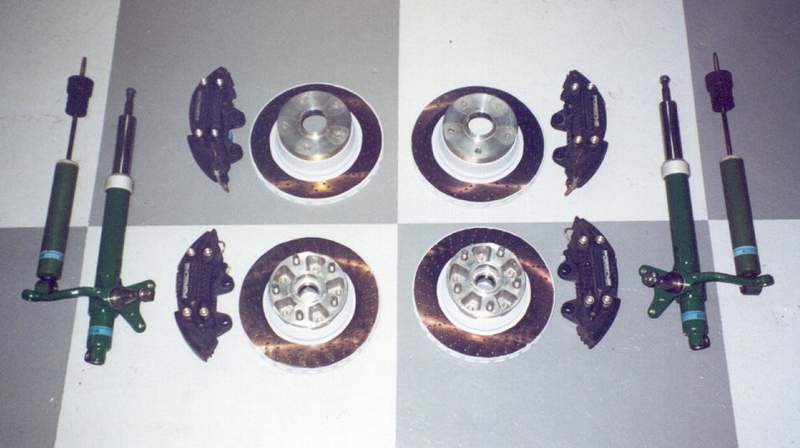
Posted by: dsmeyer Nov 8 2003, 06:11 AM
Another picture of the painted rotor.
The strut is a RSR style raised spindle for a 16" wheel.
(can be raised a little higher than for a 15" wheel)
Notice the reshaped steering arm and the gussets for reinforcement
where spindle welds to the shock tube.
Attached image(s)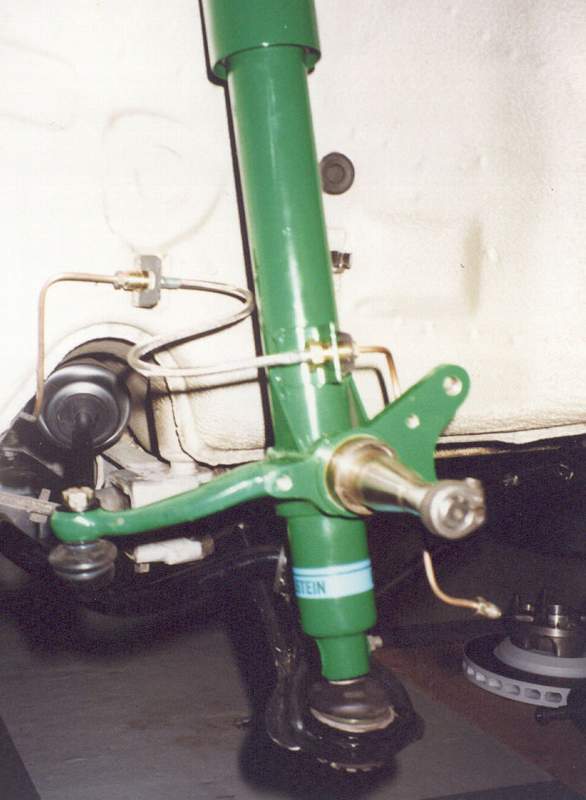
Posted by: Qarl Nov 8 2003, 09:40 AM
mmm... big ass brakes!
Posted by: dsmeyer Nov 8 2003, 10:12 AM
Just stock '86 930/Turbo Look brakes.
If I put brakes this heavy on my 914 it wouldn't go fast enough to need them...
Posted by: Qarl Nov 12 2003, 10:08 PM
Okay, my steering rack has been refurbished.
Bead blasted cross member
Repacked steering rack with new moly grease
Installed turbo tie rods
Installed Bump Steer Kit
Posted by: redshift Nov 12 2003, 10:28 PM
Your parts collection is nice!
You should build a car.
M
Posted by: Qarl Nov 12 2003, 10:32 PM
Thanks. I was thinking of doing that... maybe some day. 
Posted by: redshift Nov 12 2003, 10:35 PM
We have bets on if you finish or not.
M
Posted by: Andyrew Nov 12 2003, 10:39 PM
Nice rack!!!
(sorry, couldnt help myself )
Posted by: Qarl Nov 12 2003, 10:42 PM
Finish what? Collecting parts? I will never finish collecting them...
Posted by: redshift Nov 12 2003, 10:51 PM
lol Andrew!
Karl, you fail to see that you are under scrutiny by the central scrutinizer.
What's the time frame? Side bets!
M
Posted by: Qarl Nov 13 2003, 12:28 AM
Woohoo!!!! 

Posted by: redshift Nov 13 2003, 12:29 AM
lol
We are the only people who would have a kegger over a pile of wires like that..
WOOHOO!
M
Posted by: Jeroen Nov 13 2003, 12:32 AM
So, where did you find it?
cheers,
Jeroen
Posted by: Qarl Nov 13 2003, 12:34 AM
Miles,
I like how you sit in the shadows lurking... just waiting to reply to my posts...
Posted by: redshift Nov 13 2003, 12:36 AM
Don't make me pull out the big red G.
M
Posted by: Qarl Nov 13 2003, 12:42 AM
Long story on the harness...
I bought it about two years ago (before I even owned the current 914). Sold it about six months ago...  Recently re-acquired it!
This is my old picture.. but it will be back in my posession soon!
I still saved considerablly from what AA wanted for the only other one I could find!
Posted by: ArtechnikA Nov 13 2003, 07:34 AM
you may not need the bumpsteer kit with the reshaped steering arms on the RSR struts; they're both correcting for the same geometry/placement factor. my guess is the steering arm change will get you into the ballpark and you'll need at most a teeny shim under the rack to make it perfect. unless you're also relocating the rack in the tub, in which case i donno ...
i'll contact you offlist about pricing and sourcing - i want those struts (possibly the 15" versions) on my 911 this winter ...
BTW - fog light seals arrived just fine, thx.
Posted by: Qarl Nov 13 2003, 08:43 AM
Those RSR struts aren't mine. They belong to another dsmeyer!!! I have regular Bilstein struts.
Posted by: dsmeyer Nov 13 2003, 02:10 PM
Those were standard Bilstein struts, before the spindles were raised,
rewelded and gusseted. The steering arm was reshaped and then
the whole strut was powder coated green.
That's why I called them RSR "style" struts.
Posted by: Qarl Nov 20 2003, 07:15 PM
It lives... I actually DO have a car body to put all those purdy parts on to.
Car is primered. Flares are getting smoothed out. There are very few dimples in the body to be repaired. The body guy is amazed how straight this car is.


Posted by: JmuRiz Nov 20 2003, 07:23 PM
Wow, all those seams look GREAT w/o all the goop from the factory. I forget, did you remove that, or did your body guy? I hear it's a B to remove, but boy does it look good w/o it.
Posted by: redshift Nov 20 2003, 07:25 PM
I am going to cry.
M
Posted by: Qarl Nov 20 2003, 11:37 PM
Fu__ed a bearing up. Another one is on the way. Thanks Mueller!
Attached image(s)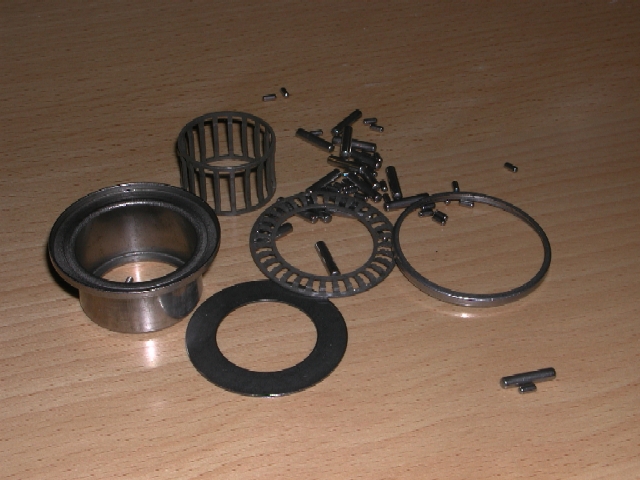
Posted by: swood Nov 21 2003, 12:14 AM
Way too many parts man! You'll never get that all back together. I'm sure you'll end up like me,with a box full of "extra" parts.
So cool you're doing it right! Can't wait to see it done. Are you going to hermetically seal it when you're done?
Posted by: Qarl Nov 21 2003, 12:21 AM
I'm thinking more along the lines of a giant "Space Bag" or the Food Sealer 2000!
Posted by: Brad Roberts Nov 21 2003, 02:12 AM
Karl,
we are neck and neck.. I dropped "blackie" off last week to the body shop and they kicked ass on it all week. The tubs look identical at this point...LOL
Thanks for the pics.
B
Posted by: Qarl Nov 21 2003, 09:55 AM
How about a "blackie" update!
Posted by: Brad Roberts Nov 21 2003, 02:49 PM
I need to merge all the threads I have started with the different pieces of the car. Update wil happen soon. The body shop has several digital camera's so I may have them shoot something for me (they are over an hour away from me with no traffic).
B
Posted by: Qarl Jan 30 2004, 10:14 PM
Long time... no motiviation... no update.
After meeting with iamchappy (Dave Chapman) today, I finished "assembling" the bits and pieces of the front suspension and did a mock setup in the climate cooled garage (i.e., kitchen)
Old suspension - stock '89 911 Carrera front end, Carrera brakes, stock Bilstein inserts, stock 19mm torsion bars, stock tierods, stock bushings, stock camber plates, dirty
NEW front suspension...
Monoblock Brembo brakes, new rotors, bearings, Bilstein spprt stut inserts, Turbo tierods with ERP bump steer ends, 22mm torsion bars, needle bearing bushings, Weltmeister adjustable camber plates, rotor cooling brake ducts and block-off plates, rebuilt steering rack, everthing powdercoated, new hardware.
Posted by: redshift Jan 30 2004, 11:23 PM
It's legs are spread.... it wants me!!!
M
Posted by: watsonrx13 Jan 31 2004, 09:25 AM
Karl, I know you can't wait to get the car back. Any idea when you'll get it back? The Nov pic looks great with the primer.
Posted by: rick 918-S Jan 31 2004, 09:29 AM
I think I'm leaking testosterone again..Wwooo 
Powered by Invision Power Board (http://www.invisionboard.com)
© Invision Power Services (http://www.invisionpower.com)