Printable Version of Topic
Click here to view this topic in its original format
914World.com _ 914World Garage _ Need an idiots guide to tailshift Gearbox setup
Posted by: tonybolony May 16 2023, 10:26 AM
so i been messing and i can now no longer get reverse or 1st , and i dont even know what gears i do have, is there a guide to start from scratch at all please as i am scratching my head, reverse be a start then i can get it out of my garage :-)
Posted by: Shivers May 16 2023, 11:49 AM
Put up a picture of the end of the rod and cage at the tail of the trans. I put up a pic and suggestions in your last thread. If you lost first & R and did move the bracket towards the left you may have gone too far. Small moves Sparks.
On the end of the rod is a ball and a paddle attached to it. The paddle is at the bottom. Make the paddle flush with the bottom of the cage by lifting or lowering the bracket. Then move the bracket side to side (1/2 mm moves or less) to achieve 1st thru 5th. The shift rod inside the tunnel and from the fire wall back have no adjustment. If the paddle is worn and will not get R - 1st and 4th - 5th, I have heard of people welding on metal to the paddle and getting the correct shape. Sorry you're too far for me to visit
Posted by: Optimusglen May 16 2023, 01:47 PM
This is what I did when I had my tail shifter. Works great.
http://www.914world.com/bbs2/index.php?showtopic=312436&hl=
Posted by: tonybolony May 16 2023, 02:02 PM
this is my car at tailshift end , its currently in neutral
thank you in advance
Posted by: rhodyguy May 16 2023, 07:33 PM
Is the shift lever centered between the 2/3 and 4/5 planes in those photos? There is a ball cup bushing on the bottom of the shift lever. You have to pull the lever assembly to replace it. Perfect opportunity to clean and inspect the components underneath. Pretty good chance the detent plate is spent and springs loaded with gunk. Plan on replacing every bushing. Buy a Haynes manual. Clean your work spots on the car. Cheap carb cleaner works swell. It’s more fun.
Posted by: tonybolony May 16 2023, 08:52 PM
all the bushing i have changed , its basically sat in nuetral in the shifter in car, the spring system on the shifter works, i had it off and cleaned it and replaced that cup bushing also
Posted by: Dr Evil May 17 2023, 06:51 AM
Hey mate,
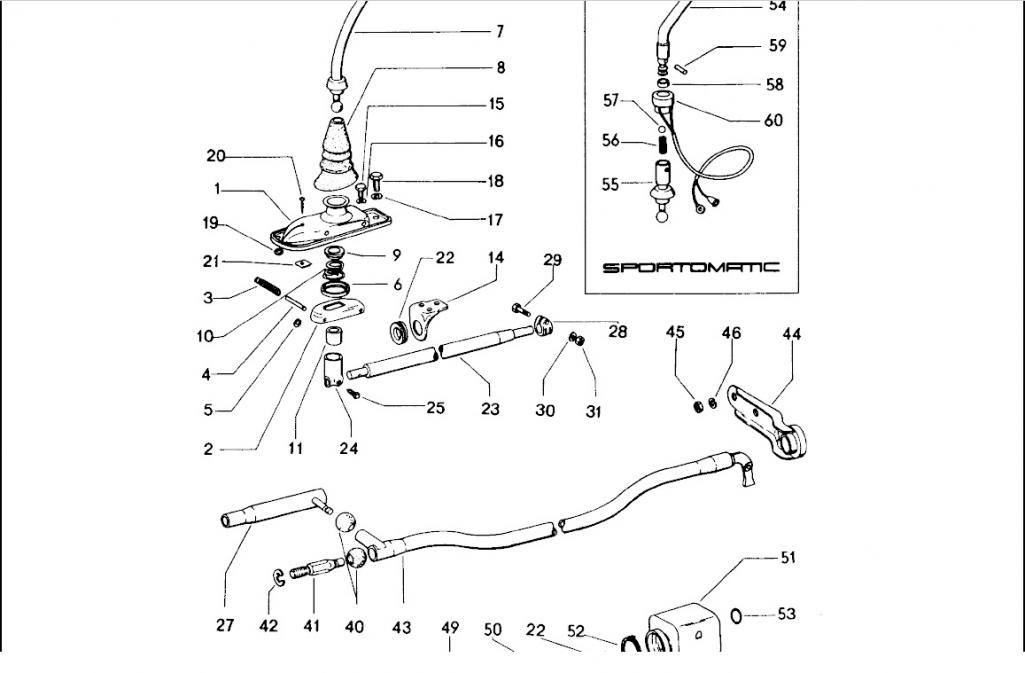
Lets start at the beginning and assure all bushings are replaced. I would advise we list all that are and have added the Porsche diagram to best assist as many times when people say they replaced ALL they actually replaced ALL that they knew about.
You have 4 major ones to replace:
2 ball type at the fire wall intersection, numbered 40 in the pic
1 firewall where the rod comes out (not in this pic)
1 cup type at the base of the shifter, number 11 in this pic.
In the shifter there are a few placed that can cause issues like wear on the bushing inside the shifter, numbers 6 and 9, and the spring plate that can wallow out making shifting worse, number 2. These are many of the usual wear items that least to suboptimal shifting.
Also, check the ball at the end of the shift rod as it can wear and need metal welded on to make it more robust again and to restore command in your shifting inputs.
Once all of that has been verified as in good keep, you can then wrestle with shifting adjustment.
You have lost R/R which are the ones on the far left shift plane. At the transmission this is reversed, so they are the ones where your ball end is rotated anticlockwise and pushes the shifter rod in the tail cone all of the way IN.
If you move the cabin shifter all of the way to the left and cannot move it fore and aft to select gears then you have to adjust the coupler, 28 in the pic, further anticlockwise as seen from looking at the firewall. What this does is change your shift rods stop point in its anticlockwise travel to further anticlockwise thus putting it into the 1/R gate.
You can try adjusting this at the rear per the pics posted previously with moving the collar bu loosening the two nuts, and sliding the collar medially and re-tightening the nuts. This moves the ball end closer to the tail cone and thus makes it easier for you to move the rod completely inward placing it into the 1/R gate. I assume you already tried this due to your posting. If I am wrong, try this first as it is less frustrating and much easier. However, you may lose 4/5 if this is not the issue that is out of alignment.
To set the shifter from a good start point, I recommend shifting into 2 or 3rd at the tail cone (in between all of the way in and all of the way out, forward is 2nd, rearward is 3rd). You can then go into the cabin and adjust the stick shifter to just rest along the spring plate with no tension in the shifter. Adjust the aforementioned adjust points to set the stick exactly where it should be and you should be all good.
Posted by: tonybolony May 17 2023, 07:21 AM
this info is brilliant and thank you to all that have helped
Posted by: tonybolony May 17 2023, 01:19 PM
well its been a year long build has this car with tears involved and a lot of swearing, the gearbox was almost the final nail in the coffin lol , however its now done, or at least R / 1 /2 /3 not got to 4 & 5 yet as only went down the street
i used all the info at hand , and the idea with the sheet metal grips was brilliant, that works lovely
now its just silly niggly bits like a wheel bearing , leaky tank ( that's just a pipe)
Again Thank you all 

Powered by Invision Power Board (http://www.invisionboard.com)
© Invision Power Services (http://www.invisionpower.com)