Printable Version of Topic
Click here to view this topic in its original format
914World.com _ 914World Garage _ Adventures of an old 914-6
Posted by: vintage914racer Aug 1 2023, 01:01 PM
As a regular lurker, and occasional forum participant (primarily when I find myself in a pickle and need to "phone a friend") I've always enjoyed ongoing build and "keeping them on the road and running" threads. So in an effort to do the same for myself, and perhaps prevent haphazardly ad hoc and disjointed threads for projects and updates, I figured I'd try to pull things together into my own, ongoing thread.
This thread is about "Speedy," my 1970 factory 914-6. The car has spent more time off the road than on, but as of late I've proclaimed it's the year of Speedy and started tackling a long list of updates. Before we get into those details, here's a bit about Speedy...
My memories with Speedy go back the the mid-80's when I was a pudgy four or five year old. Back when safety was more of a suggestion than a requirement, I'd often tag along in the front seat between my mom and dad on backroad blasts and the occasional trip up to Brainerd International Raceway when IMSA used to run up there.
Why the name "Speedy?" Well I suppose because as a kid I saw the 180mph speedy, felt my dad's right foot initiate some speedy acceleration, and perhaps because I distinctly remember my mom, in the passenger seat look up from what she was reading, glance at the speedo and shriek upon the realization that we were doing 120mph. By 1980s perspective, particularly that of a 6 year old, the car was Speedy. By today's standards? I'm not sure. But it sure is fun. And for the record, I'm not typically one to name a car, but apparently I was as a youth. And its stuck.
Here's she is, for reference...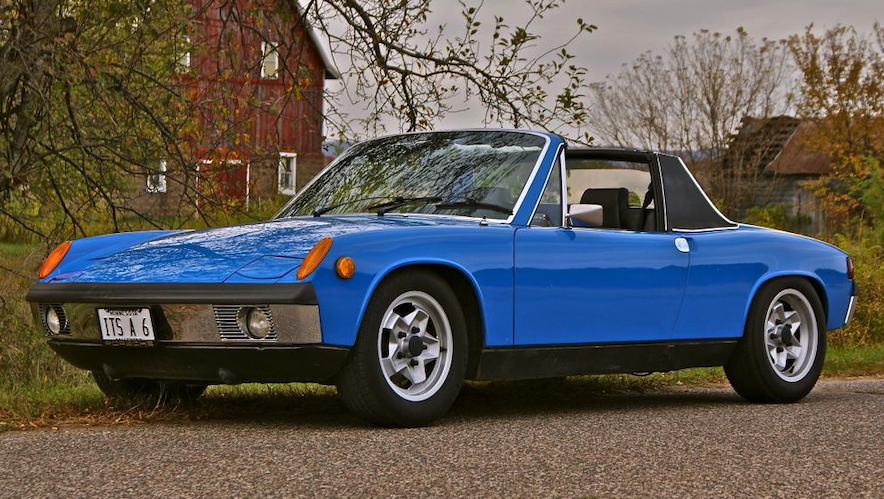
It's worth noting that my Dad bought Speedy after he overcame a horrible battle with blood cancer (where they initially gave him 60 days to live). After paying off some truly excessive hospital bills that piled up during his better part of a year spent in the hospital, Speedy was his "I kicked Cancer's ass" celebratory purchase. He bought it at Carousel Porsche Audi in Golden Valley, MN, and perhaps not by coincidence, when I was a teenager I kicked off 10 years of employment at that very same dealership.
Stay tuned for more about our early years with Speedy and my journey as caretaker...
Posted by: vintage914racer Aug 1 2023, 01:17 PM
I don't remember the particulars at all, given dad's no longer around, but Speedy wasn't his first Porsche. Sometime before I was born, and until I was a few years old, he had a lovely (from I can tell from pictures) Gemini blue early-seventies 911. Presumably he sold it to pay some hospital bills.
Regardless, the 914 was the German car of the household for my early-elementary years. Then dad's financial advisor planted a crazy seed in his head. He suggested that since my dad would likely never qualify for life insurance (he had overcome three difference cancers...I left a few details out for brevity), that perhaps he invest in his car passion and serve as assets that could be old to raise funds should anything happen in the future. So that's just what he did. And thus accelerate my interest in German, aircooled cars.
Now I've quickly learned that more than one car project is one too many, but it was not a deterrent for my dad. He was very successful at what he did and fortunate enough to be able to pay others to fix his cars. The thought of being able to pay someone else to bust their knuckles on 70's era non-galvanized sheetmetal is truly joyous. As this thread will soon illustrate, though, I am not in that boat. Hence I've slowly amassed some rarely-admired, and oft obscenity inducing, mechanical skills. But I digress. The point is, soon Speedy wasn't the only horse in the shed. And she wasn't driven nearly as much as she probably should've.
Fast forward a dozen or so years. Dad passed away unexpectedly, at just 46, and in very abbreviated terms, I became the new caretaker of the car.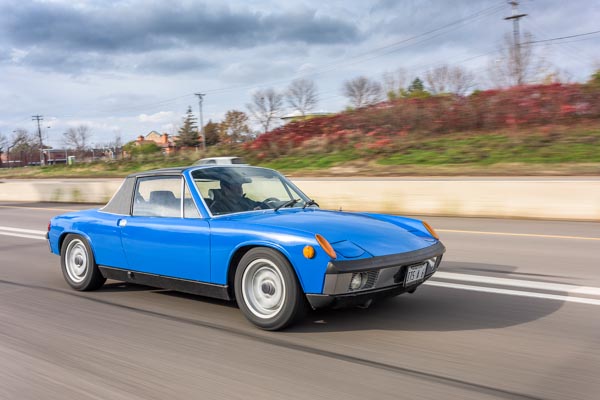
For 10-15 years I didn't spend a lot of time driving the car. A lot of it was due to me being young, navigating college and the early years of becoming a responsible young adult. And of course I didn't have the money to maintain the car, although working at the local Porsche dealership did have its benefits.
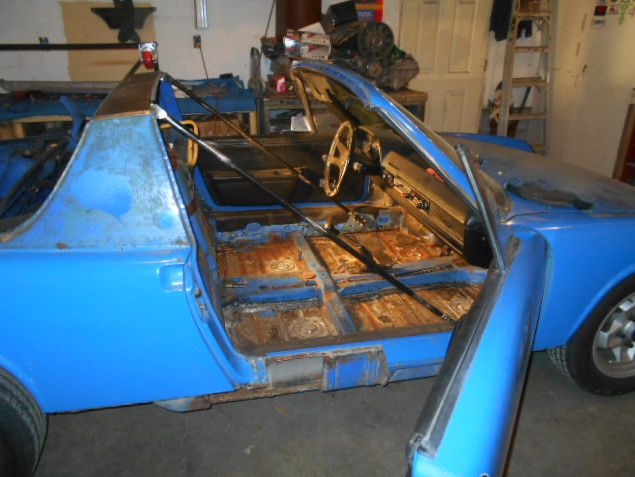
As I moved about through career life, entered married life and kicked off life with small kids, I found myself in a place where I could start getting Speedy back on the road. There was a few year run where I probably put 2-3k miles on the car per year, which is a lot considering Minneapolis is covered in snow half of the year. Following a few good years of 914 adventures I learned that my car was not immune to tinworm. And my chassis was in far worse shape than I thought...
Posted by: vintage914racer Aug 1 2023, 01:51 PM
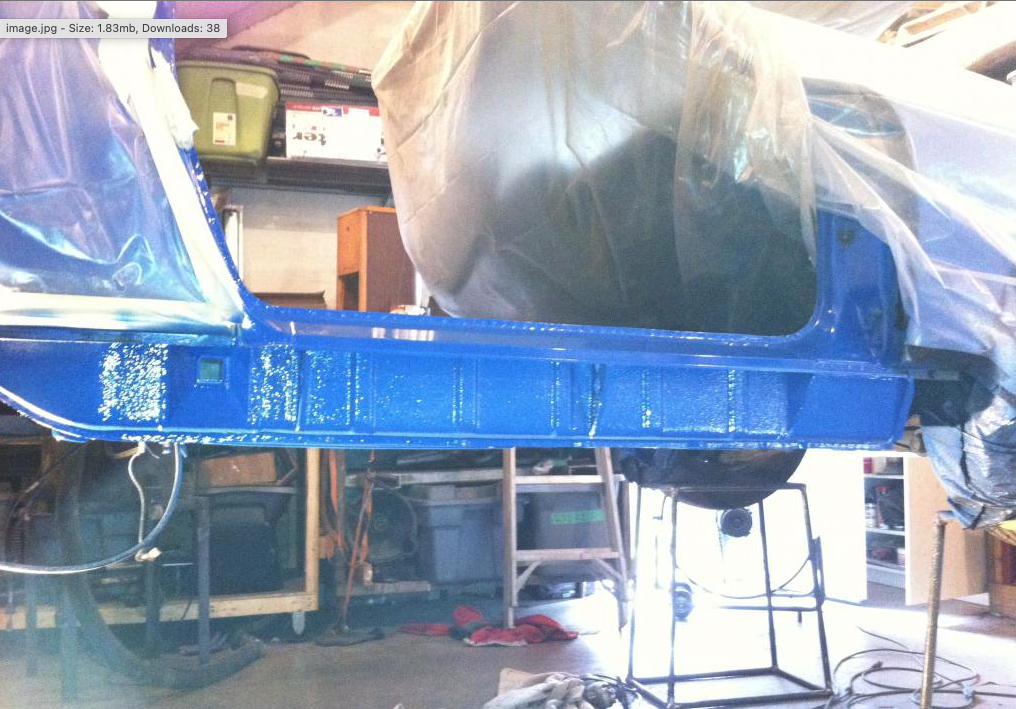
As eluded to in my last post, the rust was strong in the longs, hellhole, part of the floor pan and firewall. Fortunately there are amazing folks like Rick (Rick918-S) who are a wealth of knowledge and equally skilled. Off the car went to northern MN (on the coldest day I ever remember experiencing) and he got to work making the chassis as good as new.
You can checkout the entire long/pan/hellhole/etc rust elimination work on the thread below. I've included a few mugshot and glamour shots below as teasers.
http://www.914world.com/bbs2/index.php?showtopic=226585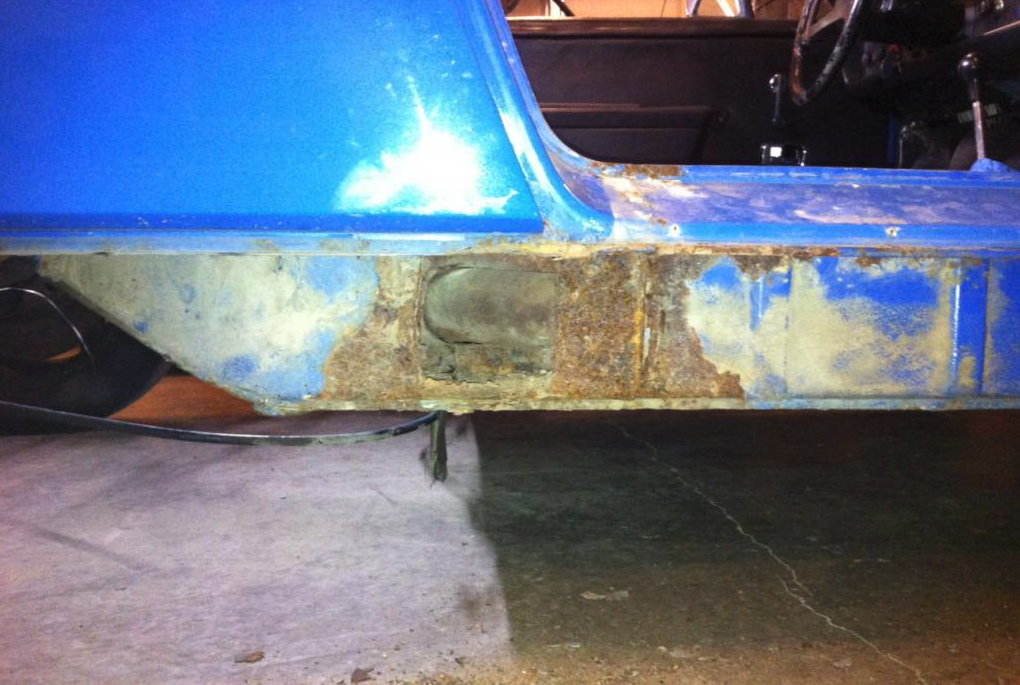
Posted by: Cairo94507 Aug 1 2023, 02:03 PM
![popcorn[1].gif](style_emoticons/default/popcorn[1].gif)
 We love build threads- I am sure your father is smiling as he looks down at your care of his 914-6.
Posted by: vintage914racer Aug 1 2023, 02:10 PM
With 99.72% of the car's structural integrity restored I could enjoy the cars. And I did. Sometimes. But not nearly and much as I should have.
Adult life, kids and other distractions (including my other, temperamental four wheeled German mistresses) kept my but from the seat. Probably the biggest detractor was the fact that I had young kids and, despite my parents three across the seat approach, I couldn't enjoy the car with my family. The kid also love the van. So that got a fair amount of drive time, except when the engine went kaput. Twice. At least VW parts are still cheap. And that's exactly why I always say more than one vintage car project is one too many.
My other German mistresses...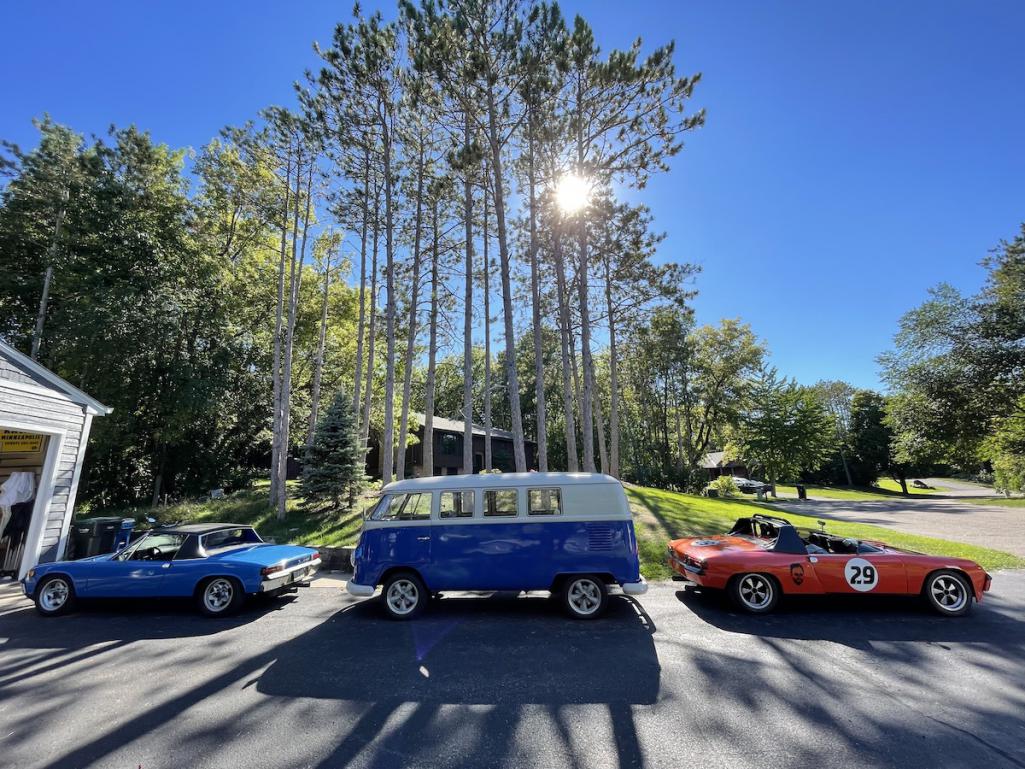
Fortunately now my kids are old enough to ride in the front seat of Speedy and schedules are such as there's marginally more time to get out for drives when the sun is shining.
So, this past January, with great fanfare and enthusiasm, I declared 2023 the year of Speedy. Trumpets blared. Confetti shot from the sky. Banners proclaimed, "It's a 914!"
I had amassed a long list of repairs, spanning the necessary, nagging and good to do while I'm in there. Then I set about checking the repairs off my list with a target of getting Speedy back on the road in July.
The list of 2023 maintenance items included:
-Replace all three rubber oil lines that run from the oil tank. Each was seeping or more
-Update to 930 valve covers and gaskets. Again to tackle another set of leaks
-Replace the rear main seal. There's a common theme here. Yep, you guessed right, more oil leaks.
-Replace the clutch, pressure plate and flywheel. There was a bit of collateral damage, and slipping clutch, from years, if not decades, of oil penetration
-Replace the master cylinder. Yep, that was leaking too. And unfortunately spewed a bunch of fluid in the driver's floor pan. Say goodbye to the beautifully painted floor pans.
-Replace a rear wheel bearing. Or two.
-Replace the speedo cable.
-Replace the rear window seal that apparently wasn't sealing despite replacement a few years back. Water seeped in, mixed with the aforementioned brake fluid and created some nice flash rust.
-Plus anything else I found while I was in there. And a bunch I'm probably forgetting and will remember when I go through my photo updates.
Posted by: mlindner Aug 1 2023, 02:31 PM
That's very cool, both your story and Speedy. Keep it coming. Mark
Posted by: vintage914racer Aug 2 2023, 08:18 AM

That's very cool, both your story and Speedy. Keep it coming. Mark
Thanks, the initial list of projects is nearly done. I even managed to add ~50 miles to the odd on the maiden voyage last weekend, but I'm getting ahead of myself.
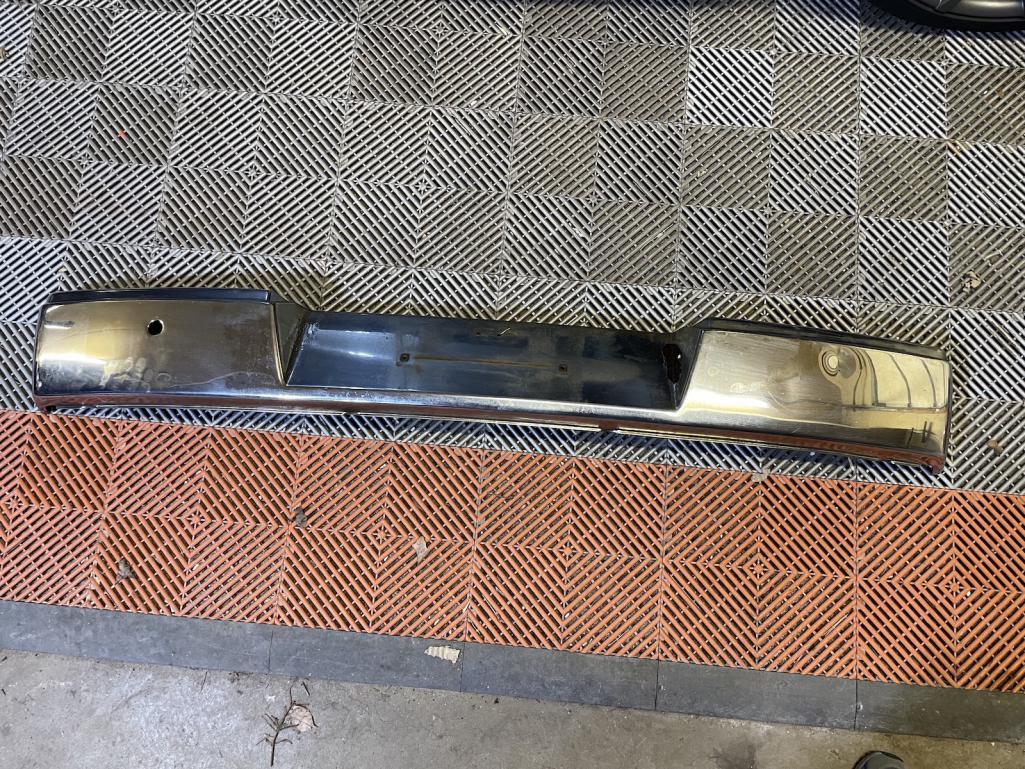
On of the first items of business was to remove the rear bump and send it off for chrome. I know this process can take a long time and I wanted to get ahead of it. For as long as I can remember the chrome was flaking off to the right of the license plate and it was the first thing I saw every time I looked at the rear profile.
So off came the bumper and I shipped it off to beautiful sunny CA so ValcoOscar on these boards could work his magic.
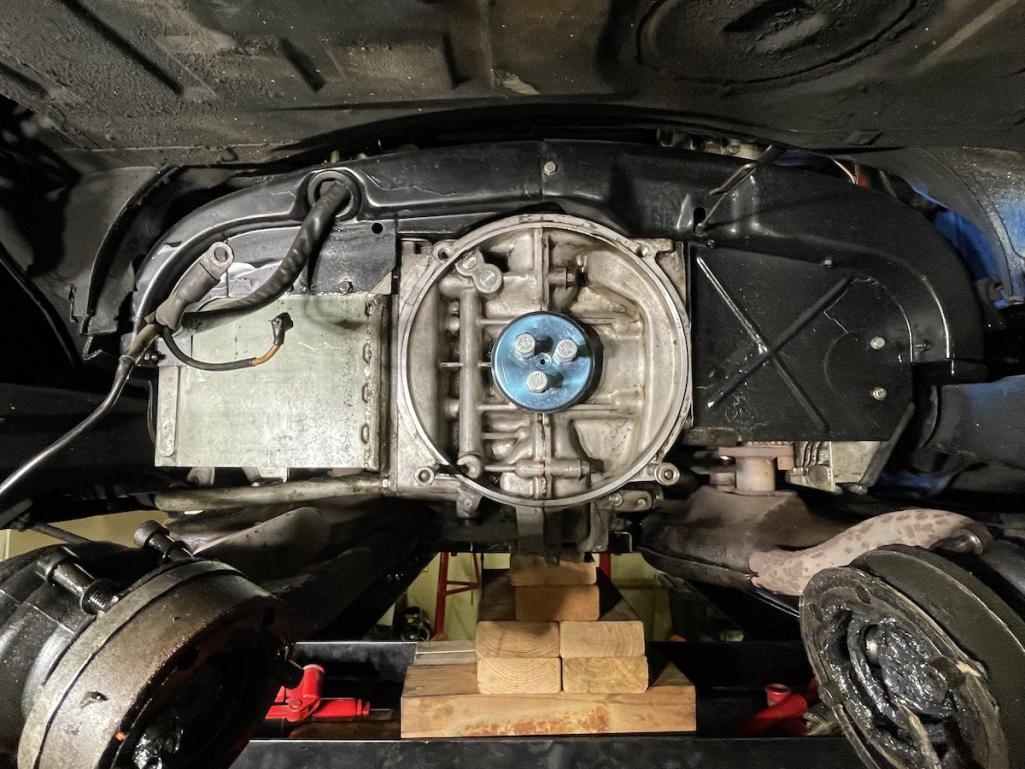
The next order of business was to tackle what I assumed was a very leaky RMS bearing. The clutch had recently been slipping and I was pretty sure an unexpected hot oil bath was the culprit.
So I drained the oil, dropped the tranny, removed the PP, clutch and flywheel. And would you believe it, the RMS looked decades old, bungled up, and clearly leaking oil all over the clutch and adjacent parts.
Here's a picture after I cleaned up decades of caked on oil - at least most of it.
The old seal came out quite easily. Getting the new one in wasn't as simple. The countless threads and videos I referenced online showed folks gently tapping it in with a rubber mallet and a block of wood. That wasn't working here, and believe me, I was using the finest piece of leftover scrap wood I could find in my garage

I learned online for a mere few hundred dollars I could purchase the "official" RMS installation tool. I'm all for buying new tools, but not one I'm going to use once this decade. So, I made a trip to Lowe's and scavenged the aisles to see what I could repurpose to build my own tool. I crossed my fingers that an employee didn't ask me what I was looking for, as 9 times out of 10 they don't understand what I'm trying to do or why I'd use a (insert unrelated product) to work on an old car. After 10 minutes searching the aisles I struck gold. In the electrical section I believe.
Armed with my makeshift install tool, the seal went in relatively easy.
From here I reminded myself that the clutch was heavily oil soaked and needed replacement. The pressure plate wasn't looking great either. It also appeared that the flywheel had been penetrated with oil and was pretty worn. Out came the CC and I placed an order for parts. A week or so later they arrived and I made quick work of installing them.
In went the flywheel.

Then the clutch.
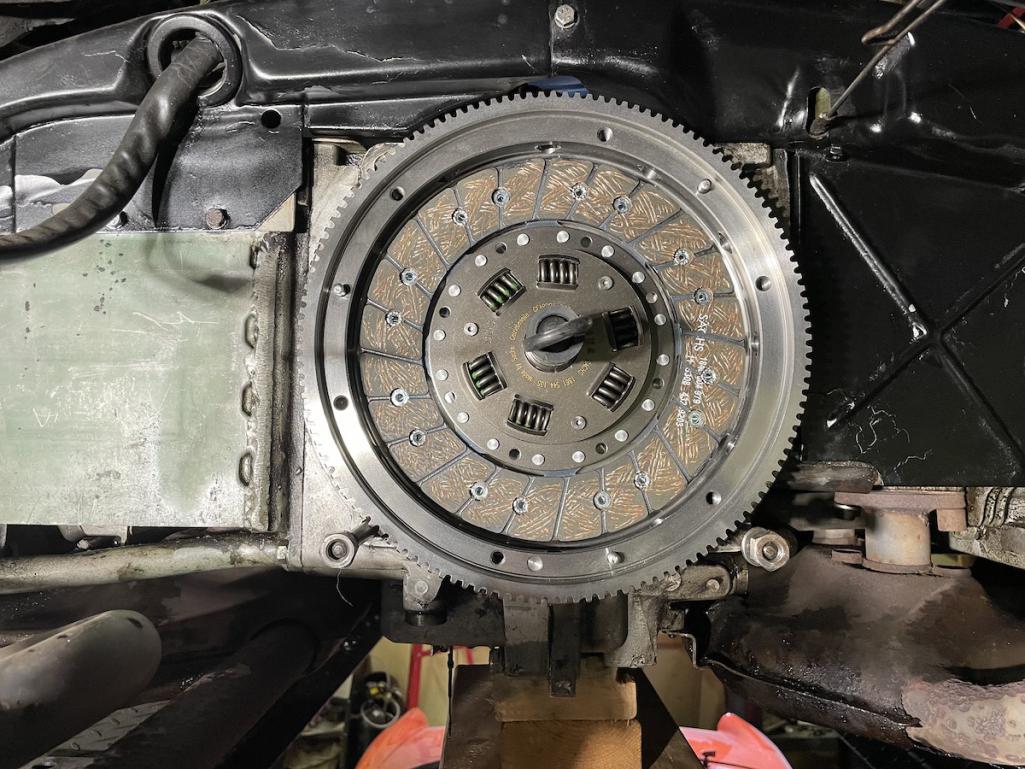
Then the pressure plate.
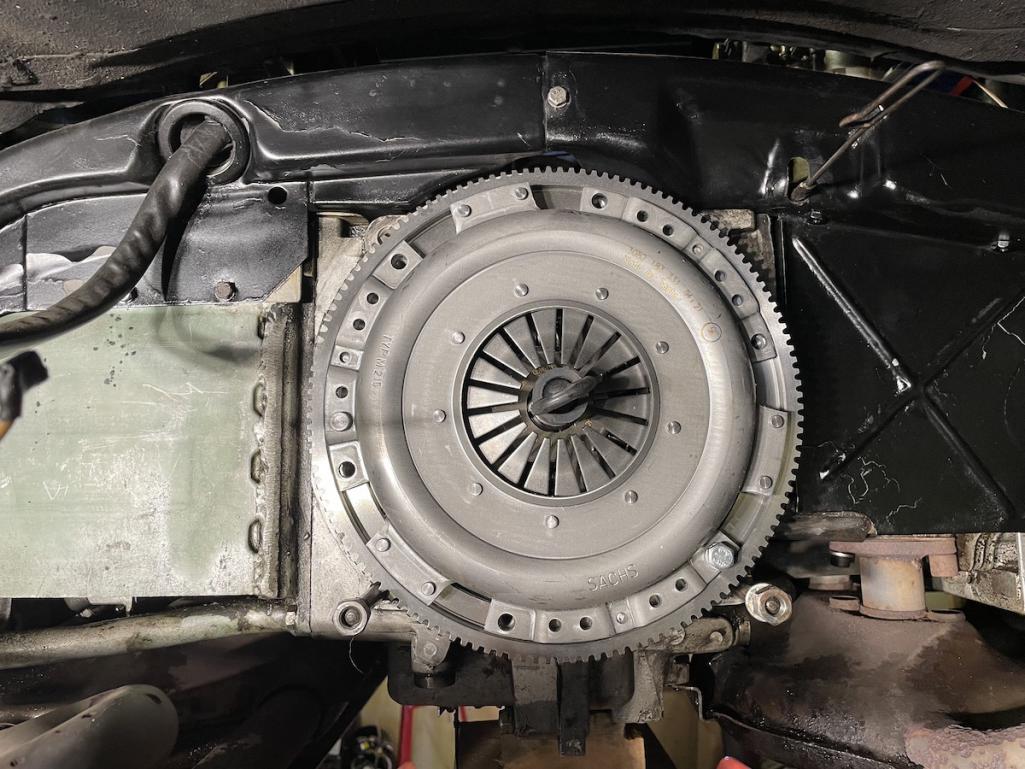
I reinstalled the transmission and checked the first block of work off of my list. Only 47 other projects to go....
Posted by: vintage914racer Aug 2 2023, 09:28 AM
We love build threads- I am sure your father is smiling as he looks down at your care of his 914-6.Thanks, Michael. I strangely like process of writing and documenting my work. Maybe it’s therapy for the busted knuckles and broken spirit from spending 3 hours on a job that should take 1 hour. On the other hand, it is very fulfilling, at least for me, stepping back and taking pride in a job well done.
Posted by: vintage914racer Aug 3 2023, 03:29 PM
So, picking up where I left off...
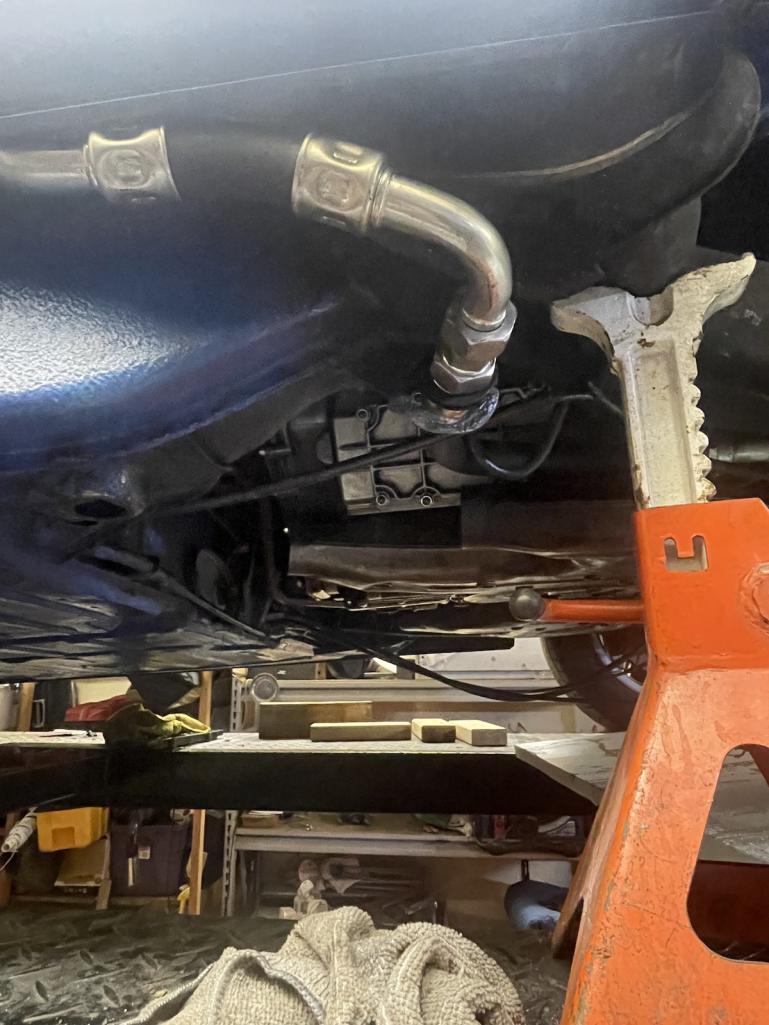
With the RMS replaced, and new flywheel, clutch and pressure plate swapped in it was time to move on to my next project - oil tank oil line replacement. My old lines appeared original and had a healthy weep going at each hose connection. Fortunately, Patrick Motorsports was offering a pretty good sale price on the three lines I needed, so I whipped out the AMEX and waited a few days for them to arrive. I then put off the job for a good three weeks or so.
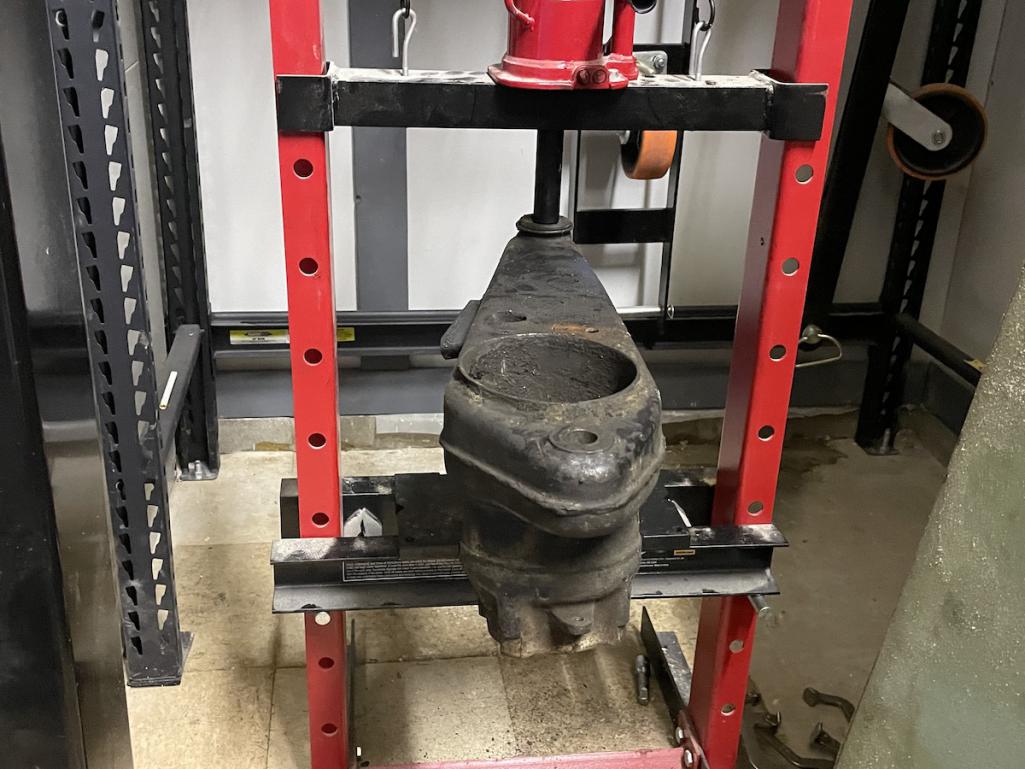
At some point during my procrastination window I fell into "get the 914 vintage race car ready for Road America mode" and quickly learned that I had some pretty serious chassis issues on the other 914 in my stable. Fortunately Rick (Rick918-S) came to the rescue there. You read all about that adventure here via this link:
http://www.914world.com/bbs2/index.php?showtopic=366018&hl=
And here's a teaser photo of the work...
...and an on-track shot confirming Rick's repairs did the trick. See that vinyl face on the site of the car? No, that's not me, I'm not that vain, rather it's a tribute to my Dad. He raced this car long before I took it over. For better or worse as I've progressed into my 40s I look more and more like him. 
But back to repairs on Speedy, as that's what this thread is all about. Not the orange race car (that hasn't been named to my children's dismay)
To do the job right I had to remove the oil tank. I'd done it before prior to shipping the car up to Rick in Duluth for the longitudinal/pan repairs, but it had been years. I remembered there was a trick to doing it, but that's all I remembered. So, after removing the LR wheel, rocker cover and other miscellany, I spent an hours or so wrestling the oil tank trying to get it out. It wasn't happening.
In my frustration I didn't snap any photos, but in a nutshell, when I installed the tank last time I had the lower line attached in such a way that it could sneak the tank in, however the fitting would not clear the chassis coming back out. After some thinking I broke out the dremel and cut the the darn hose fitting off. I somehow managed to do so without damaging the tank or the adjacent chassis area. I'd call that a win. Then, with the finesse of a freshman at his first homecoming dance, I spun the tank around and out of the darkest confines of the inner fender.
I reveled in my win, got distract with other life things, maybe s squirrel in the yard, or perhaps a combination for the next week or two until I resumed work on oil tank. I made quick work of installing the new lines and wrangling the tank back into it's home.
Here's a few upshots to prove I'd done my job. 
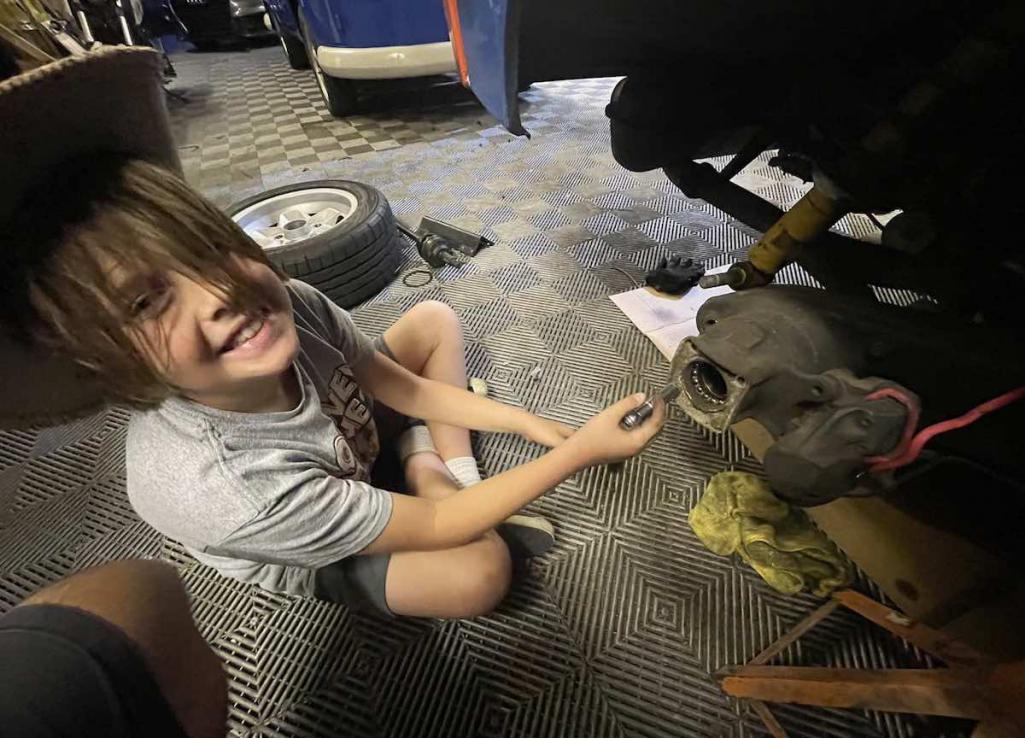
And going through my photos I ran across this one I forgot to share leading up to the RMS repair. Here you'll see I'm not afraid to employ child labor, you know, in the spirit of teaching them a thing or two about auto mechanics.
Posted by: vintage914racer Aug 3 2023, 03:34 PM
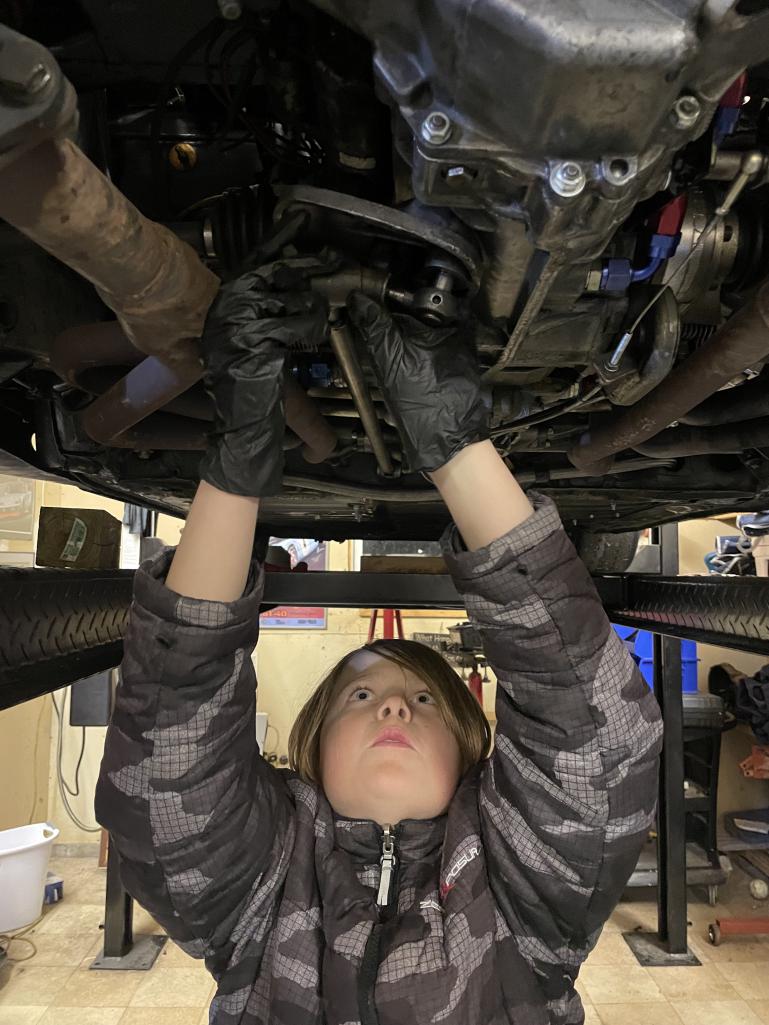
But now as I look at the image, I've realized this is the orange car, not the blue one. At any rate, occasionally my kids can be convinced to help me. At least for a few minutes before they get bored.
Posted by: Dion Aug 3 2023, 05:42 PM
Loving this!
Posted by: vintage914racer Aug 3 2023, 10:38 PM
Loving this!
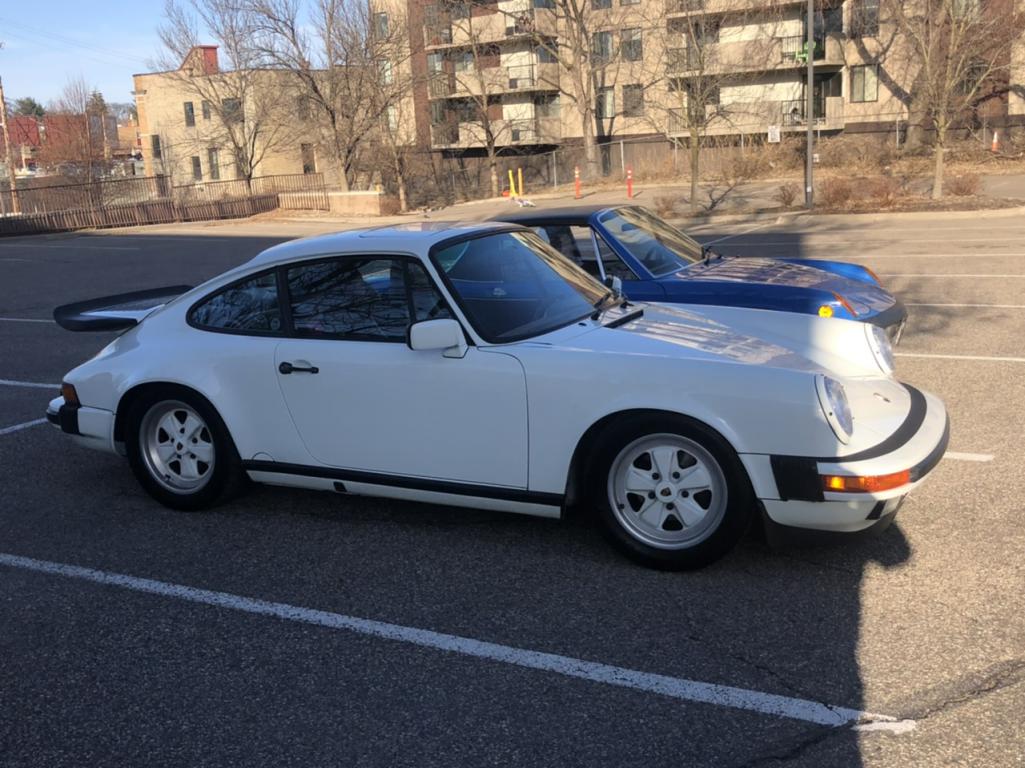
Thanks. More to come, but not until I return home from a trip to Road America for IMSA races there this weekend. I’ll be riding shotgun out in my buddy’s 1987 911 Carrera. Inevitably I’ll post a few pictures of our adventures…because his 911 is a gem and Road America is Motorsports Nirvana.
Here’s a sneak peek of the 911 a few years ago when we had our cars out for a nice late summer cruise.
Posted by: TRS63 Aug 4 2023, 12:00 AM
What a cool car and so great it being a family car since new !
Thanks for sharing,
Antoine
Posted by: vintage914racer Aug 9 2023, 03:16 PM
Following the replacement of the RMS, and associated components replaced "when I was in there," the next project to check off the list was the LR wheel bearing.
First order of business was removing the axle nut cotter pin...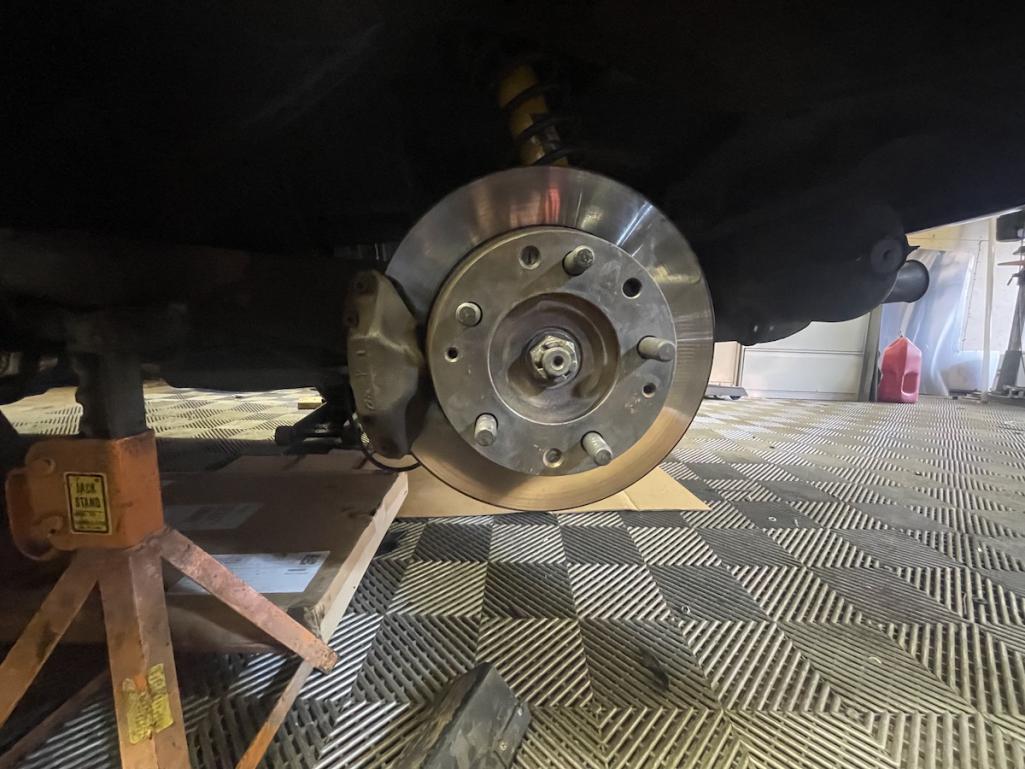
Then remove the brake disc and move the caliber out of the way...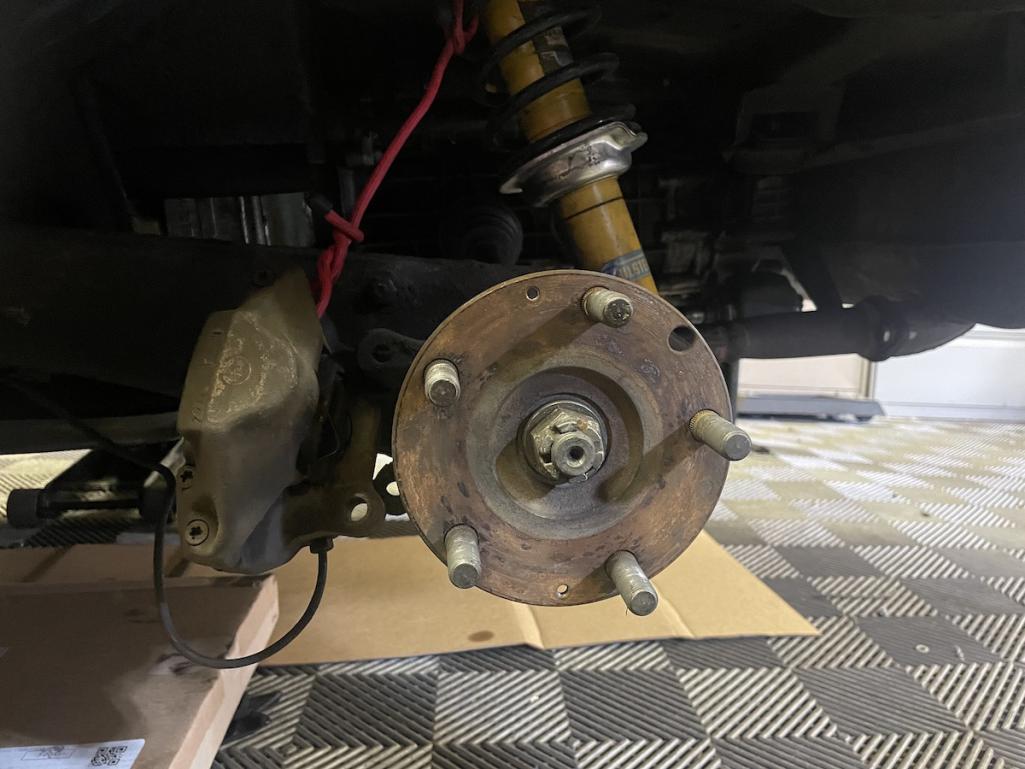
I proceeded to get the hub, bearing cover plate and wheel bearing removed in short order. Based on my investigation, the wheel bearing didn't look too bad. I knew, however, it had been a long time since they had been replaced so I planned on replacing both. (TEASER: when I removed the passenger side bearing last night it became evident immediately that this was the one making noise, but more on that later).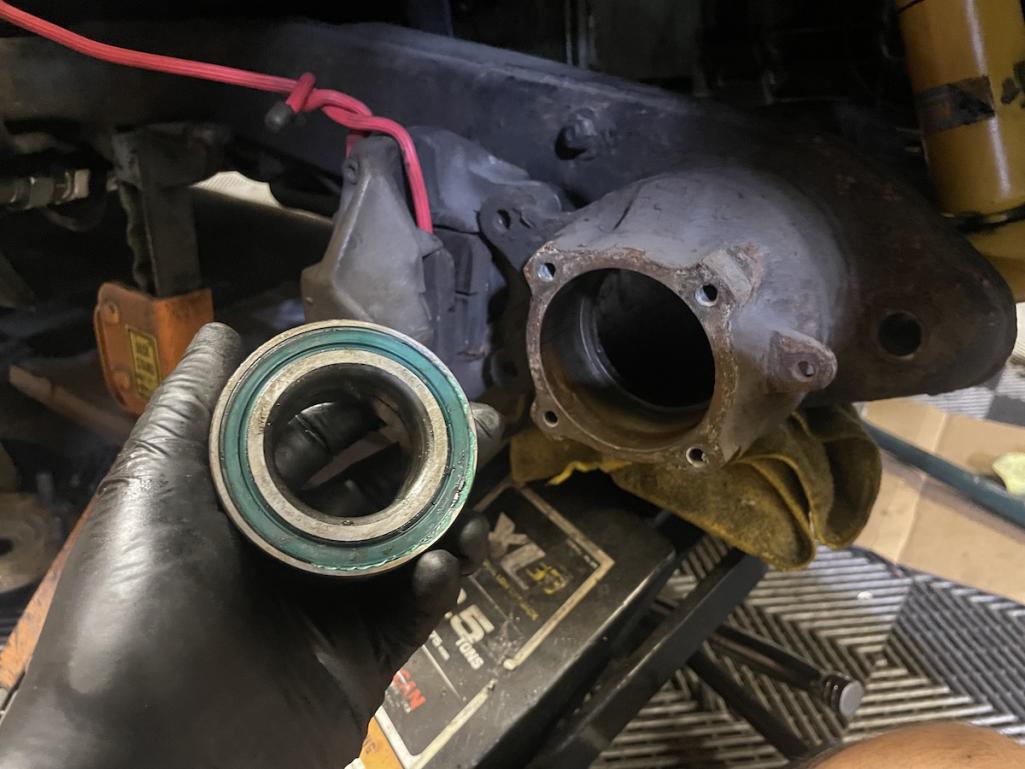
After cleaning the hub a bit, and giving the bearing plate a refurb (In black opposed to gold...the horror) I scavenged in the freezer to find the last of my bearing stash that I put in there at least 18-months ago...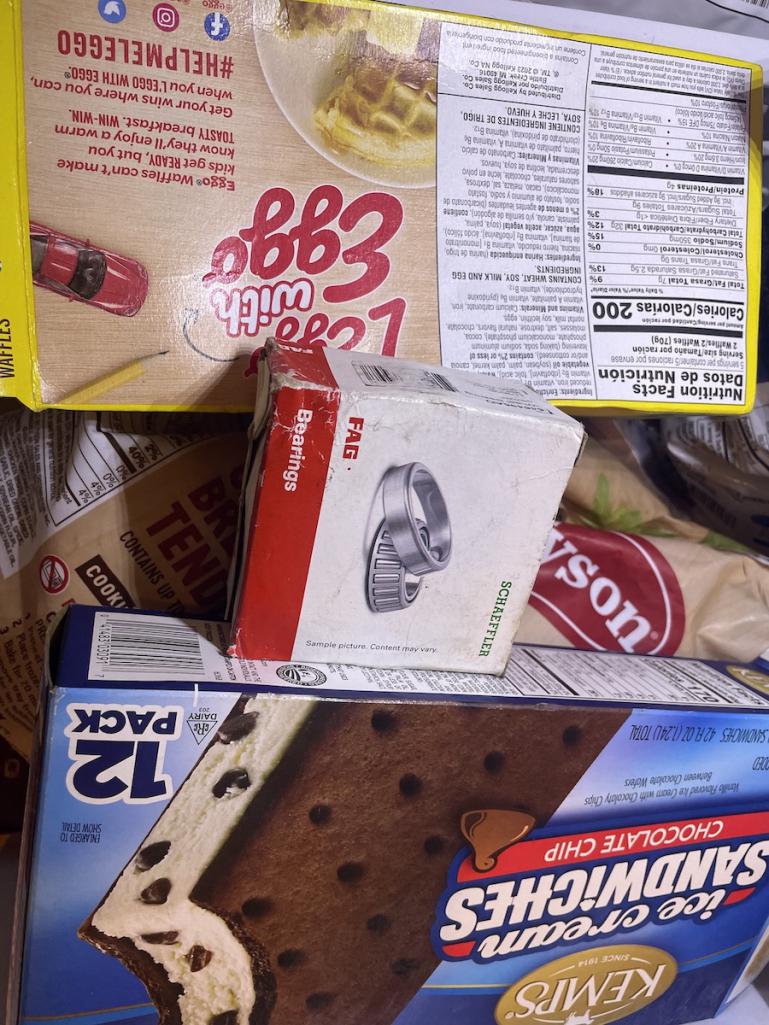
I'll have you know, I did not grab an ice cream sandwich, even though I really wanted to. I proceeded to pop the new bearing in and install the bearing cover plate.
Posted by: vintage914racer Aug 9 2023, 03:39 PM
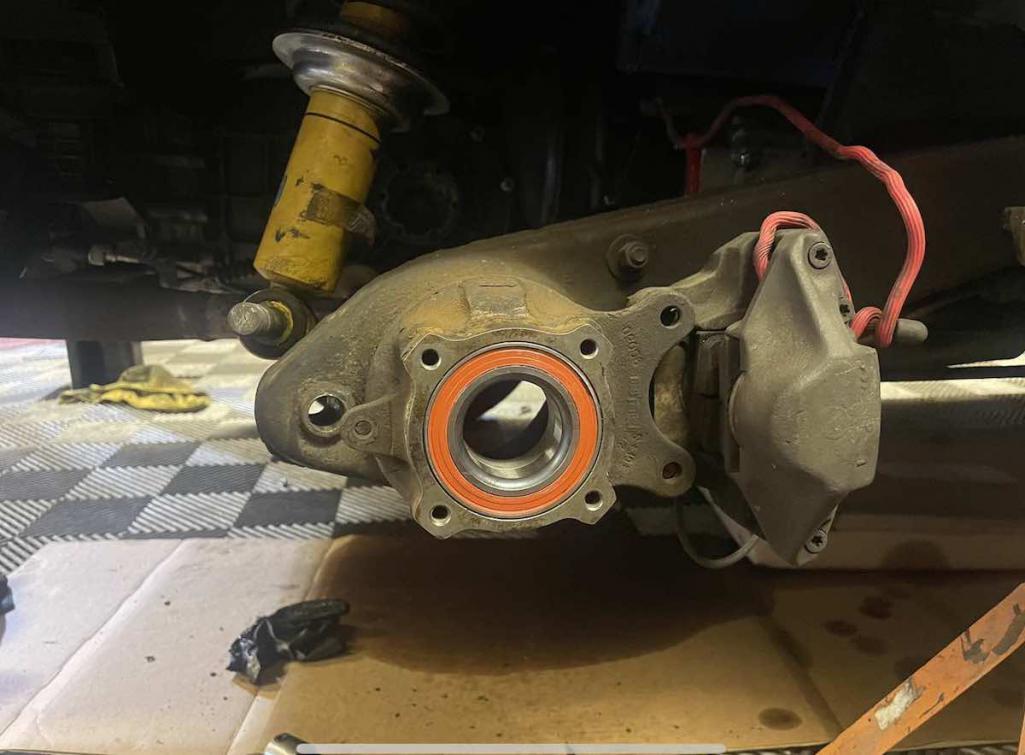
The gasket on the outboard axle flange looked a bit gnarly, so I replaced it with a new one while I had it out. 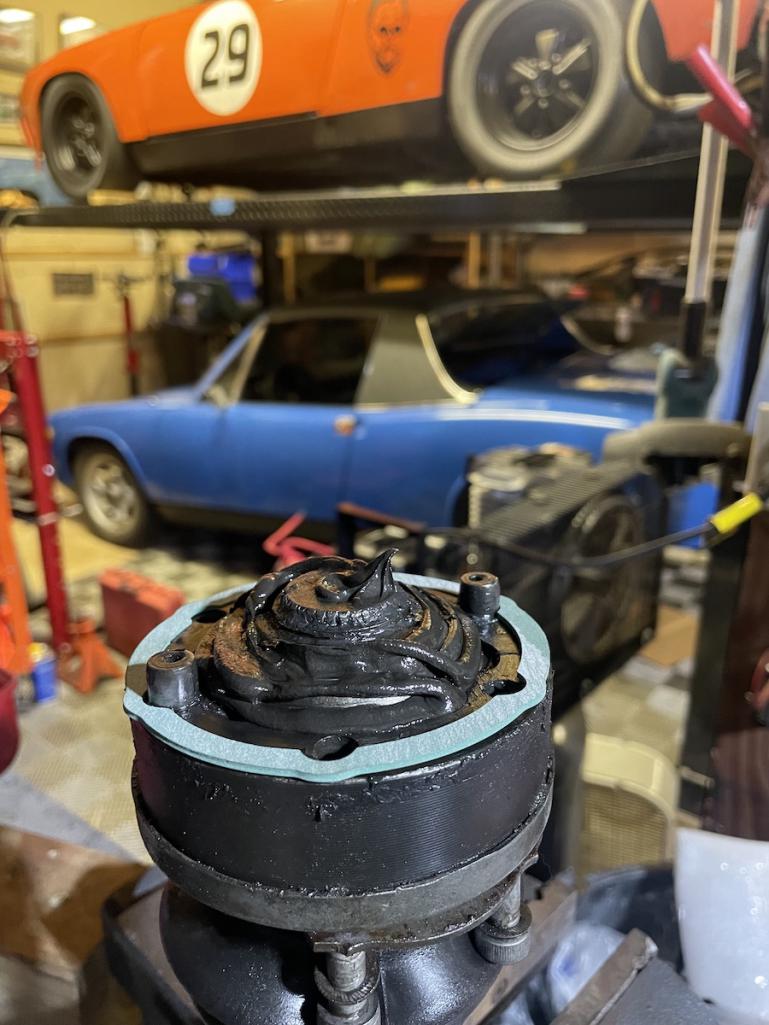
I pressed in the hub and then struggled to get the axle back in place. I've done this job many times without issue, but it seems that the effects of working in my sweat lodge of a garage (It was low to mid-nineties and very humid at the time, and surely a lot hotter in my garage) I failed to get the hub pressed in completely. As such the splines wouldn't slide in appropriately and a lot of cursing ensued.
I even removed the output shaft from the transmission to give myself more room and angle to work with, but it was fruitless. Alas, once I realized the hub needed to go in a bit further everything went together quickly.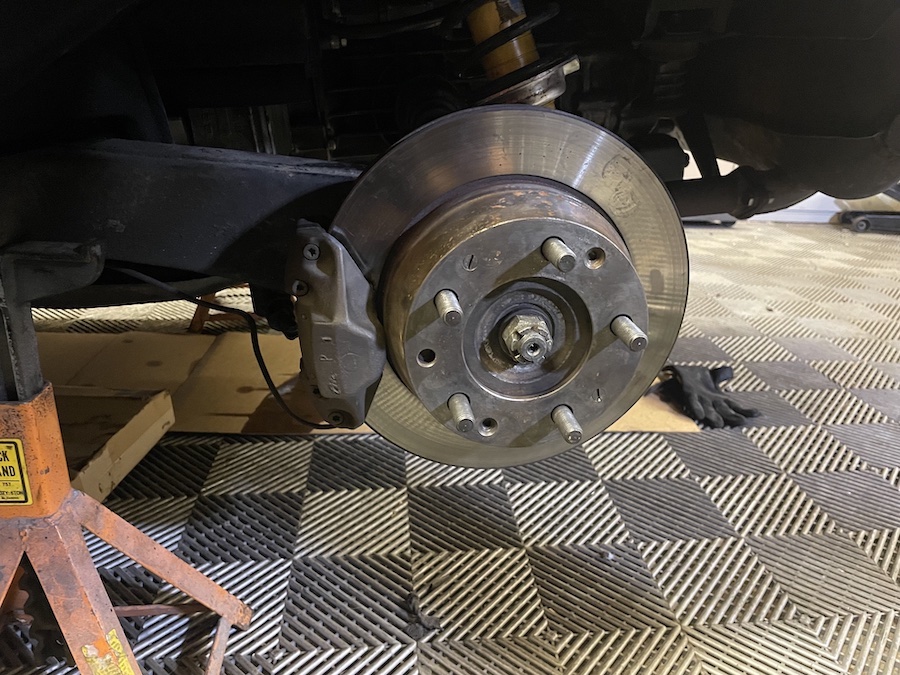
I broke out my handy dandy five foot cheater bar, tightened the axle bolt to good and tight, installed a new cotter pin and dropped the car back on the ground.
Up next, adventures in master cylinder replacement and, with the help of my 11 year old shop apprentice, I tackle the RR wheel bearing (which after removing clearly needed replacing).
Posted by: Cairo94507 Aug 10 2023, 11:41 AM
Posted by: vintage914racer Aug 11 2023, 10:08 AM
Bad news. I failed to get pictures of the new master cylinder installation. Good news. It went a lot easier than I expected.
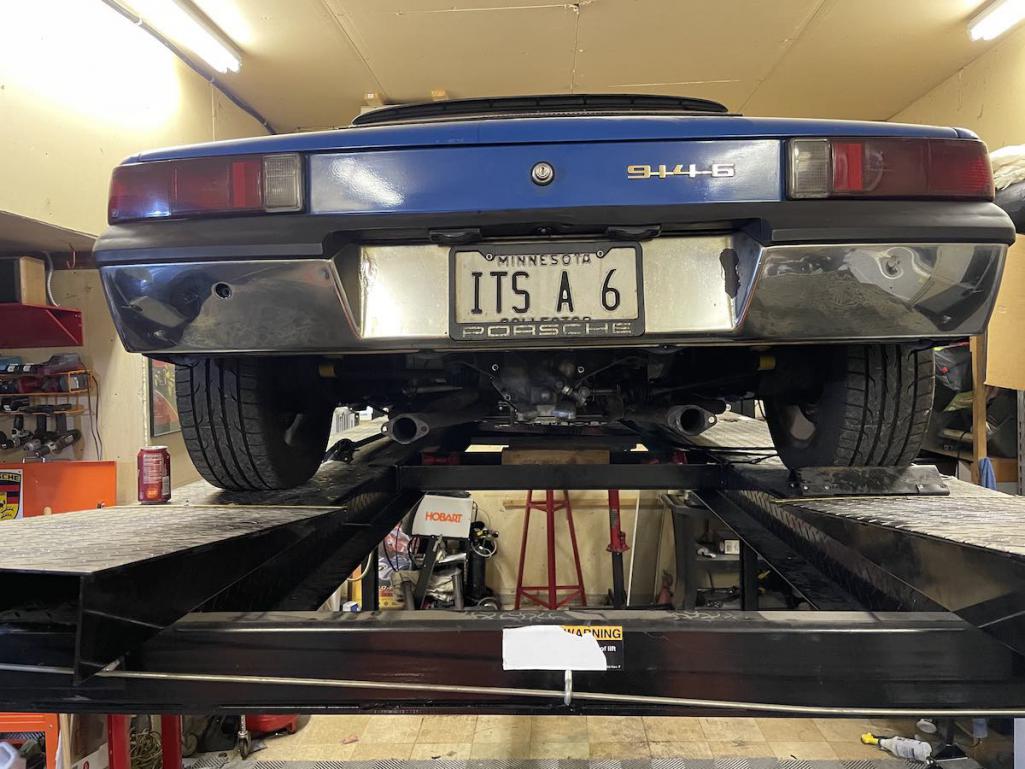
I replaced the master cylinder once before on this car, a good twenty years ago. On my back, on the dirty floor of the storage garage where I kept the car. This time around I replaced it in relative luxury with the car perched in the top bunk of my 914 bunk bed (aka my lift). 
I made quick work of removing the old master cylinder (MC). Prior to lifting the car I loosened the gas tank, unmounted the brake fluid reservoir and dropped the fluid lines down. This provided enough slack to pop the pesky lines into the top of the MC. By some miracle I had everything buttoned up in 15 minutes. Maybe less.
The hardest part of the job? Sourcing the copper washers for the MC banjo bolt. For some reason I was missing one and the three FLAPS near me had nothing close. I was able to source some and get them in a couple of days.
Then it was on to brake bleeding circuit training. I went around the car bleeding the brakes so many times that I might've gotten dizzy. Or maybe it was from the brake fluid vapor. At any rate, I got the system bled, dropped the car to the ground, and took it for a good 40 minute spin.
Posted by: rick 918-S Aug 12 2023, 09:29 AM
Had to bump this one. Great story of family and cars. Don't forget to add the bus story.
Posted by: vintage914racer Aug 16 2023, 04:38 PM
Had to bump this one. Great story of family and cars. Don't forget to add the bus story.
Thanks for the bump, Rick. Just saw your update to your thread for Jeurgen's car. Amazing work!
As for my blue 914, I've knocked a couple more projects off the list and even took it for a 25-mile spin last night. Update post to follow. For better or worse as soon as I check a proejct off the list, another item gets added to the list.
Posted by: Luke M Aug 16 2023, 06:27 PM
You may want to check your shock spring cups. They are upside down.
Attached image(s)
Posted by: vintage914racer Aug 16 2023, 08:15 PM
You may want to check your shock spring cups. They are upside down.
Thanks for pointing that out. For better or worse new rear shocks are on the list. I suppose I can bump that project up and flip the cups while I'm in there.
Posted by: Freezin 914 Aug 16 2023, 08:50 PM
Not sure how I missed this thread until tonight, but a great story!
Posted by: vintage914racer Aug 16 2023, 09:27 PM
Not sure how I missed this thread until tonight, but a great story!
Thanks! Glad you found it.
So, when we last left off I had got the LR wheel bearing replaced and everything buttoned up. Since I had so much fun replacing the bearing, I figured I'd continue the fun and tackle the wheel bearing on the RR corner. But I decided to postpone it for a couple of days.
When I finally stopped procrastinating I convinced my apprentice to endure a few minutes in the garage and just maybe learn a little something about mechanics. Also busted knuckles and perhaps broken automotive dreams. If you're wondering what the deal is with the straw hat, don't ask me. It somehow arrived on a shelf in the garage years ago only to be found by my son. Some people have thinking caps...I suppose this is his garage hat.
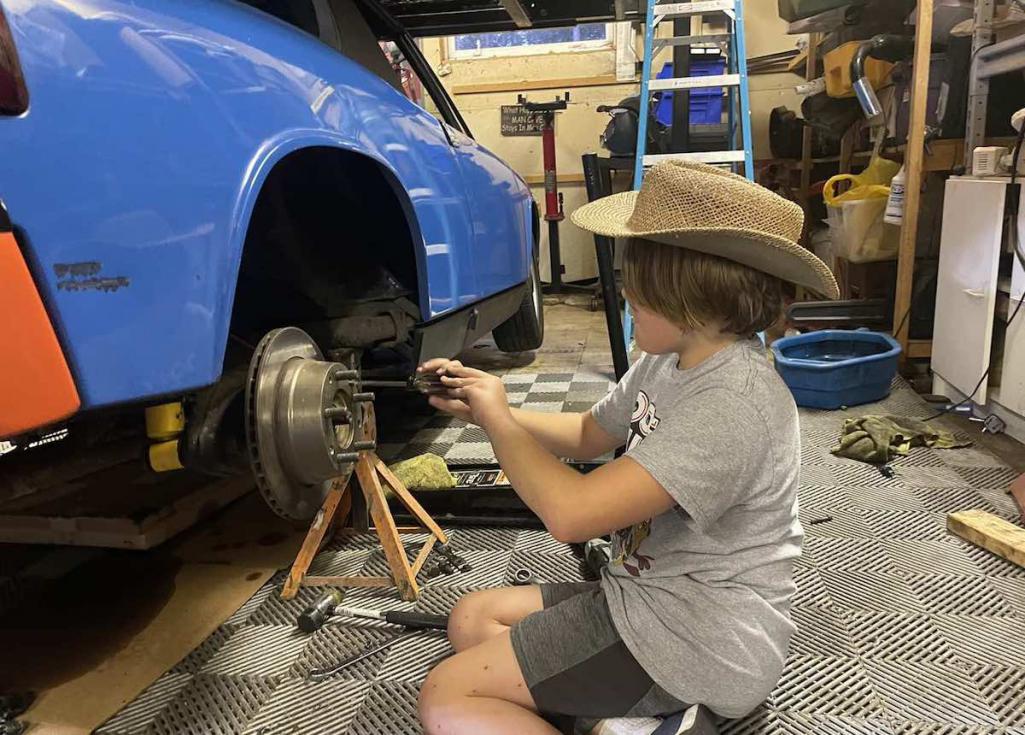
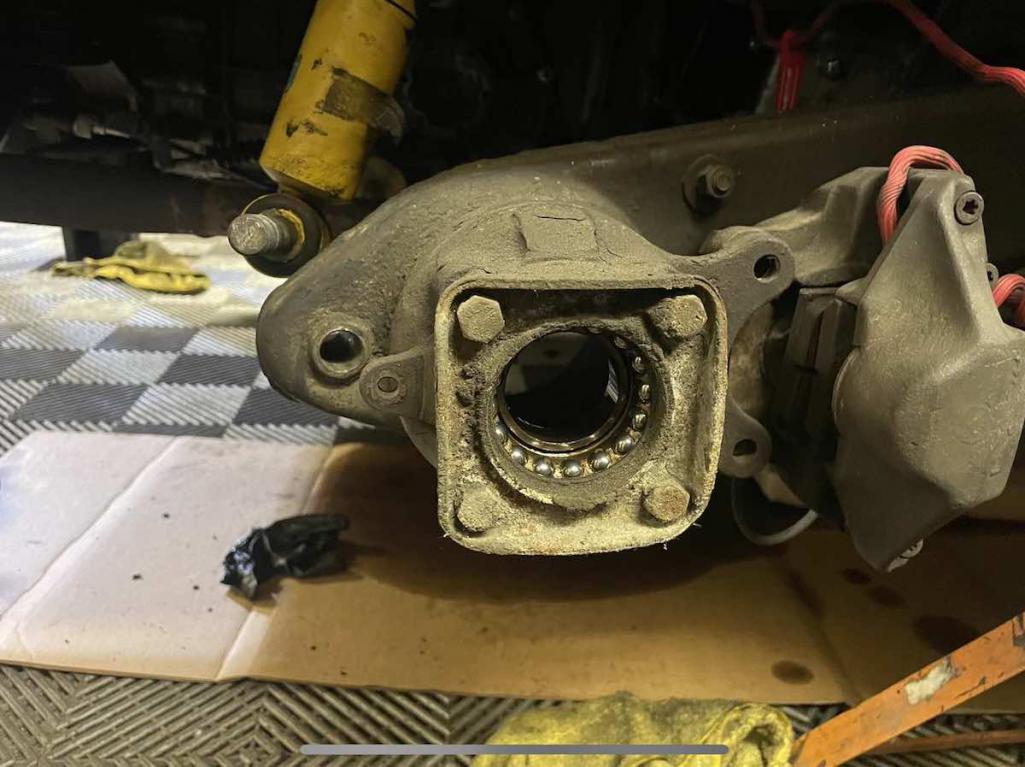
As we dug in further it became apparent that this bearing hadn't been touched in a while and clearly needed replacing.
I managed to keep my apprentice interest long enough to help remove the bearing retaining plate, then he darted back inside to the comfort of the air conditioning.
Check out that filth and grime...
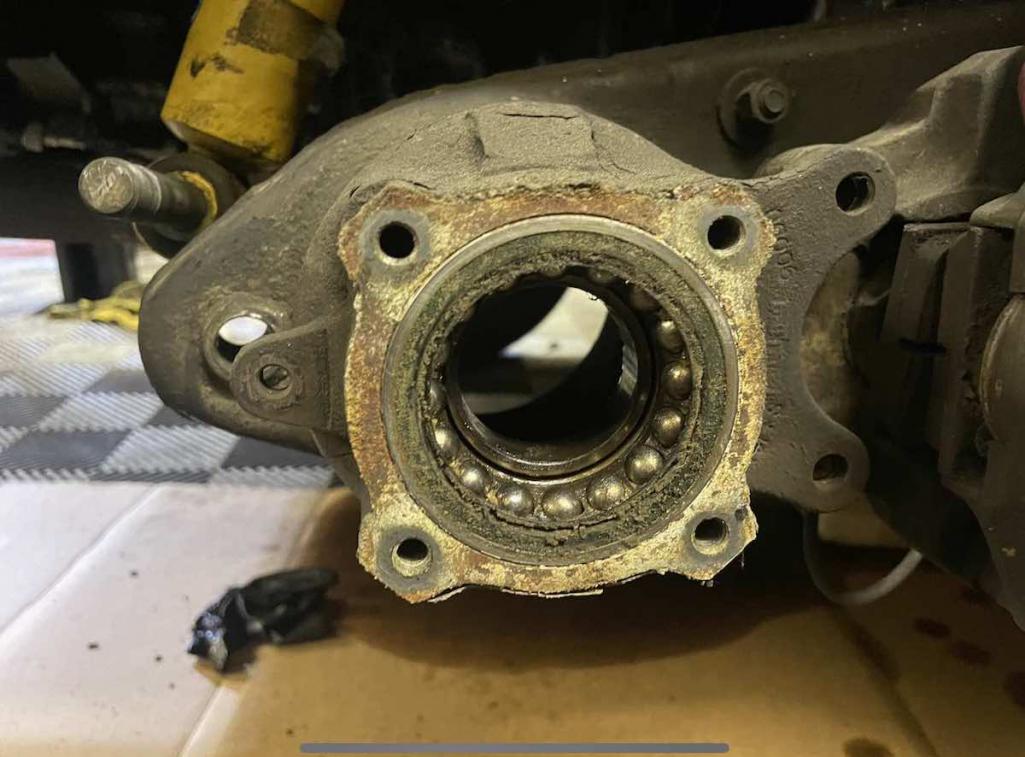
Not sure how long this bearing has been in there, but it wouldn't surprise me if it dated back to 1970.
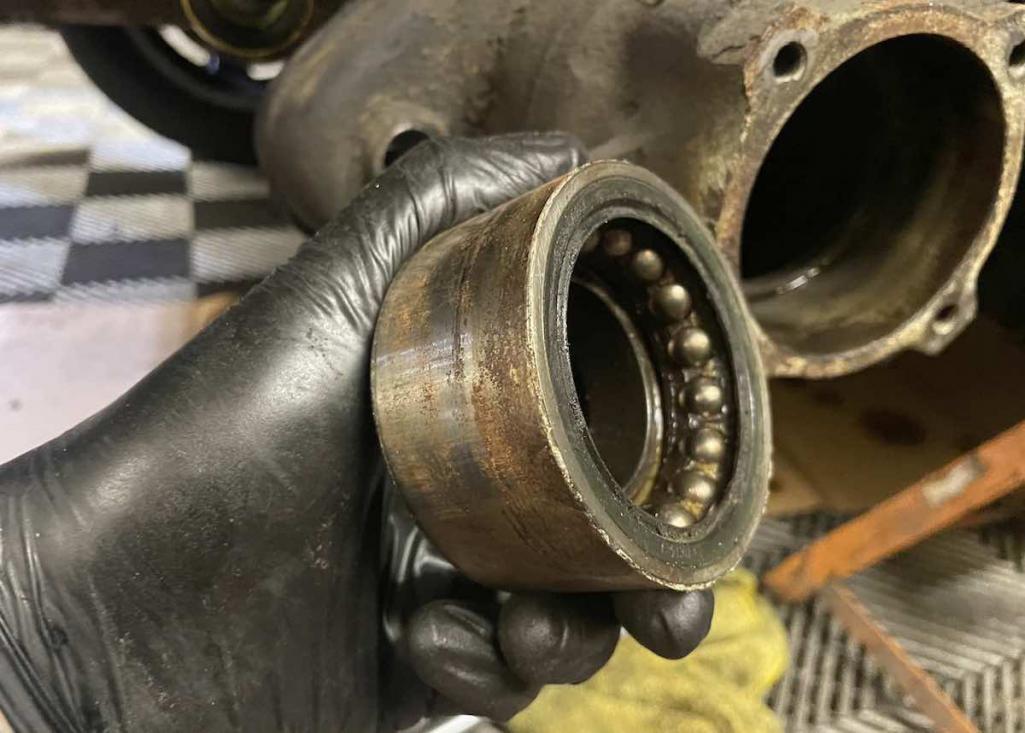
After spending a couple of nights nestled between some frozen chicken breasts and what was left of the ice cream sandwiches, I rescued the new bearing from the freezer and popped it into the cleaned-up bearing housing.
You'll have to use your imagination to visualize how everything else went back together. Rest assured it all went back together with relative ease.
I had to wait until the next day to give the new bearings a maiden voyage. My neighbor pals love to comedically post on Nextdoor about my loud car if I leave after dark, and I didn't want to dare let their potential posts interfere with the latest "is it a coyote, fox or wolf" post from the unofficial Nextdoor neighborhood watch committee.
Posted by: Rogerz33 Aug 17 2023, 12:49 AM
A totally cool project! Way to go
Posted by: vintage914racer Aug 17 2023, 09:21 AM
A totally cool project! Way to go
Thanks, Roger. It's been fun tinkering on it and knocking things off of the list. My wife and I went for a drive Tuesday night. I think the last time we both rode in it had to be 3 or 4 years ago. Many more to come.
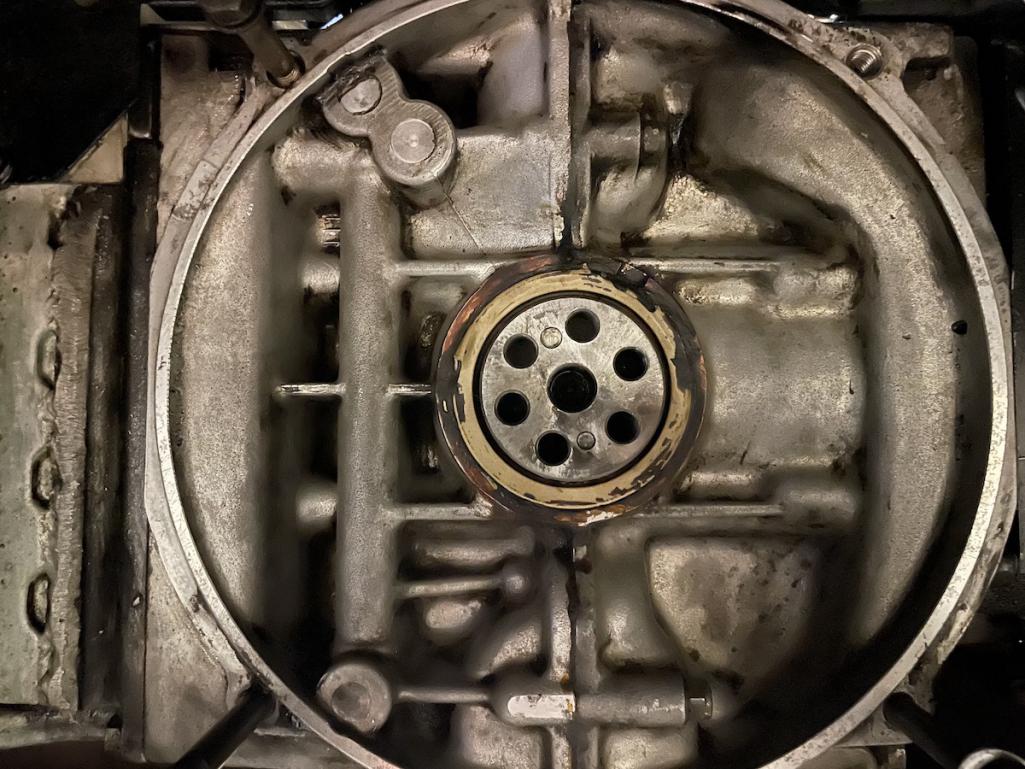
Up next - addressing the triangle of death by installing a new breather gasket, oil pressure switch and thermostat o-ring.
Posted by: vintage914racer Aug 18 2023, 11:41 AM
On to the next project on my list, the "triangle of death." It's such an ominous name, but rest assured I successfully took on the triangle and came out completely unscathed.
Here is the triangle pre-repairs. Most probably know, but it consists of well the triangle formed between the oil breather housing, the thermostat and the oil pressure switch. Some if not all tend to leak oil at some point so I figured I'd tackle them all. 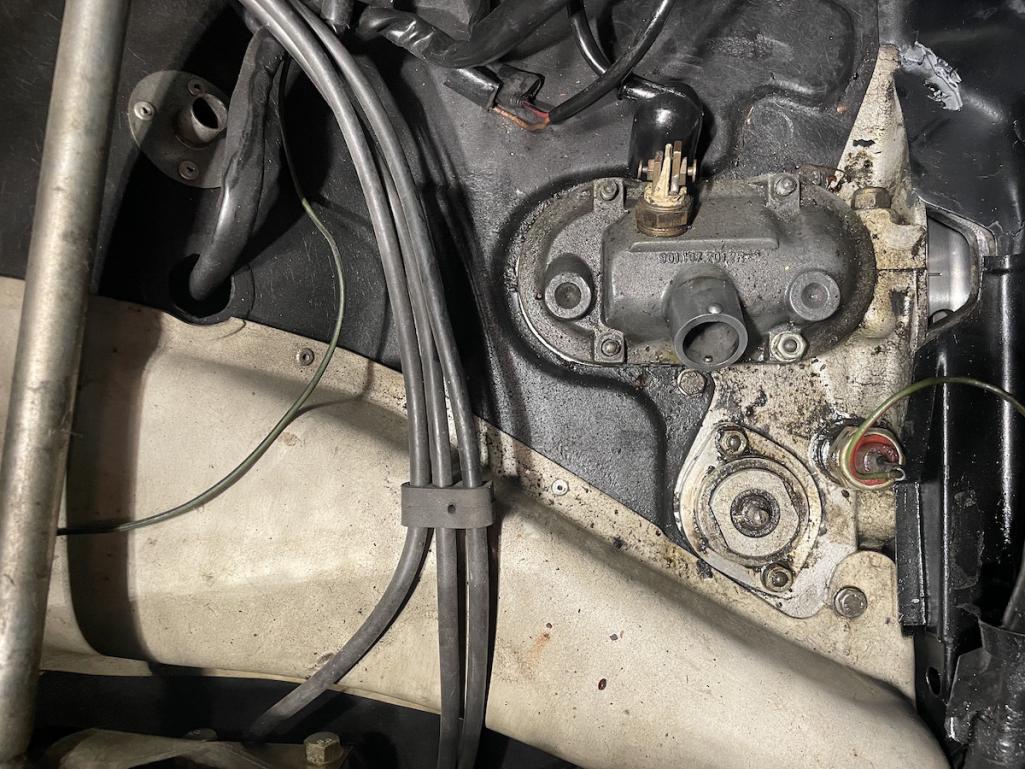
The breather housing was first on my list. 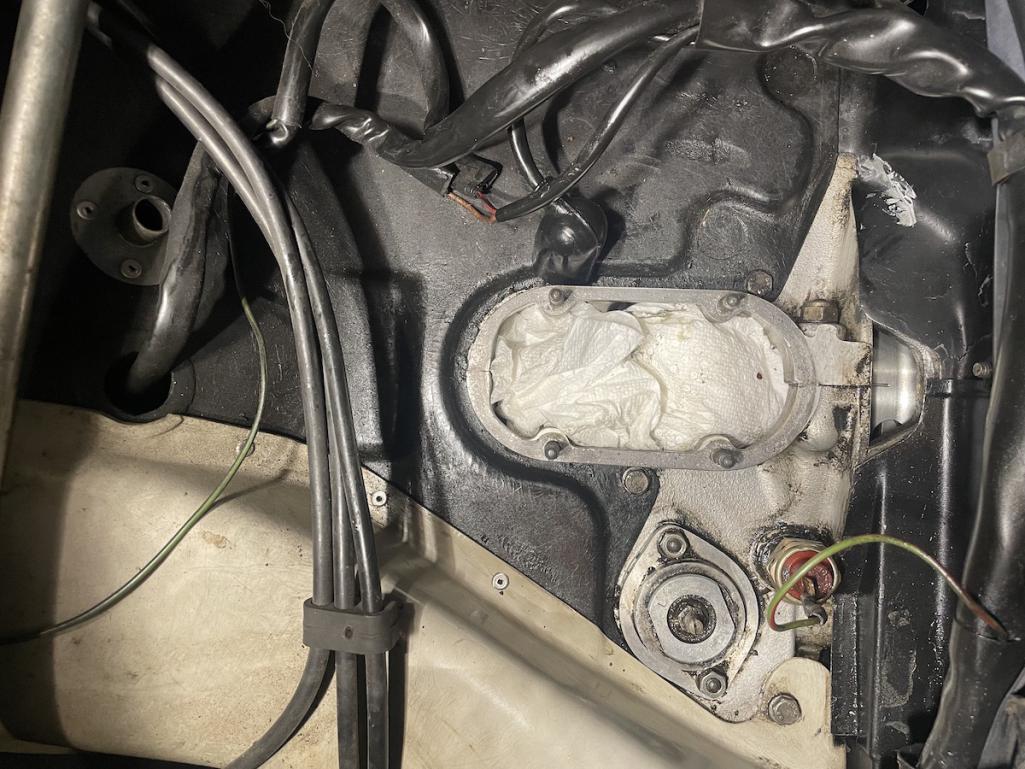
It, like the two other corners of the triangle, was seeping a bit. I'm sure having two gaskets hidden under the cover didn't help. I'm trying to figure out who the prior guy was who slapped one gasket over the top of another? Oh yeah, that was me. Probably a good 12 years ago. To my (dis)credit, the gasket under the green one was silver and properly affixed to the engine case.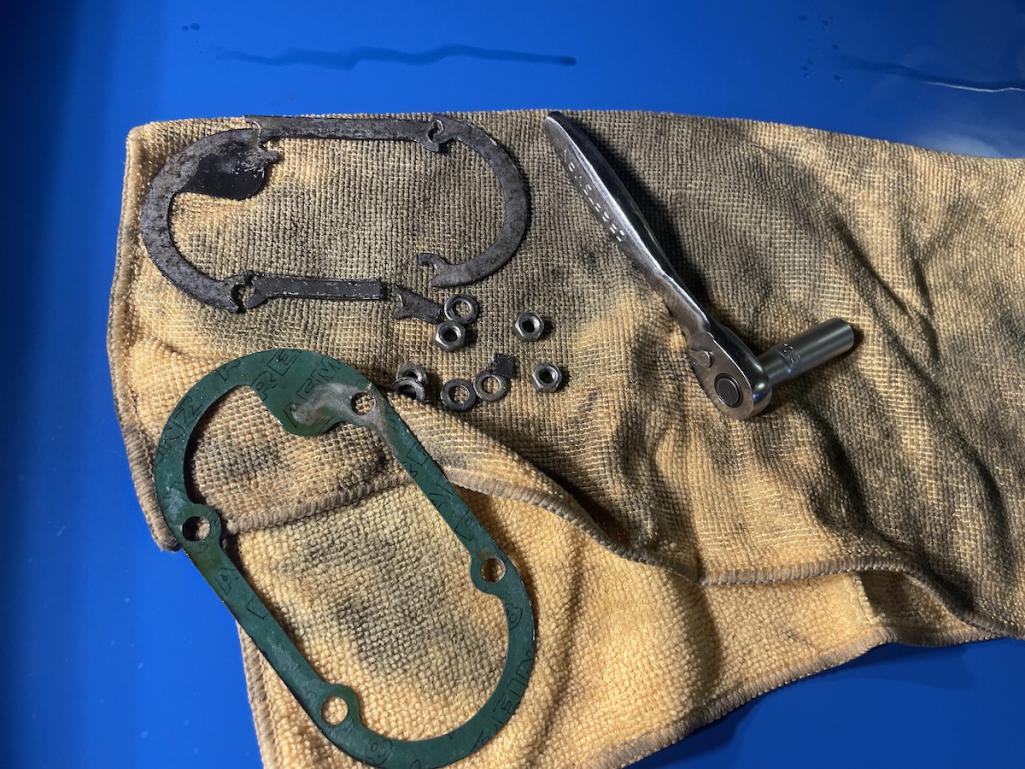
With the mating surfaces cleaned up, new gasket affixed and breather cover re-fastneed I moved on to my next project...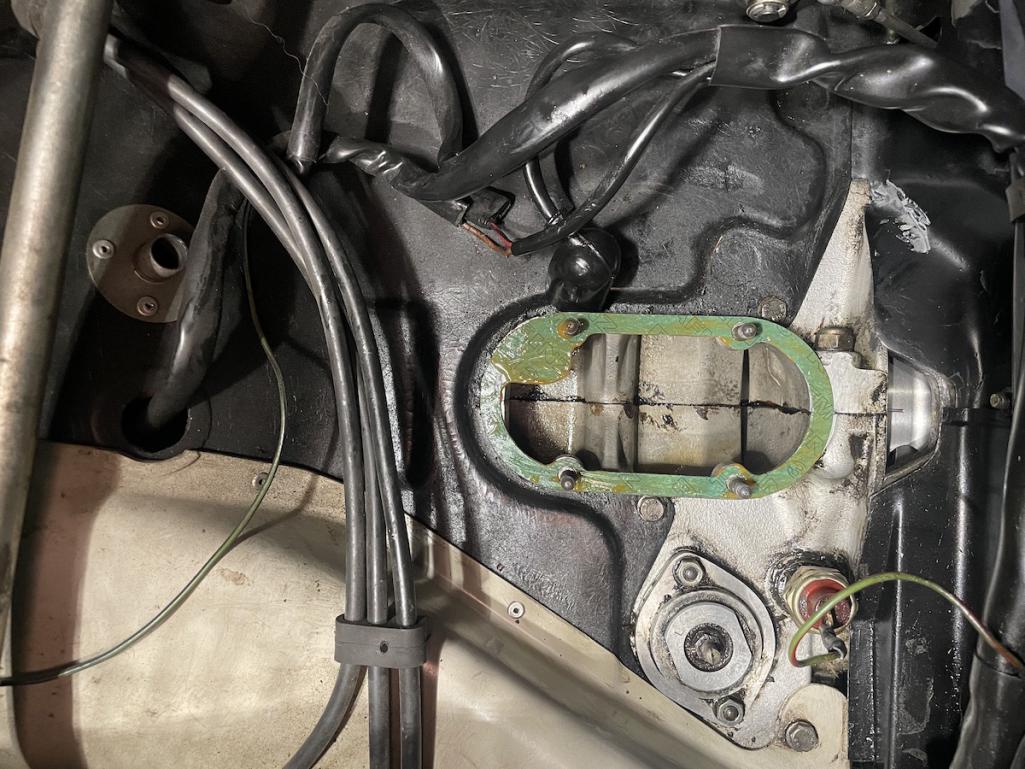
...grilling dinner. A guy has to eat, right?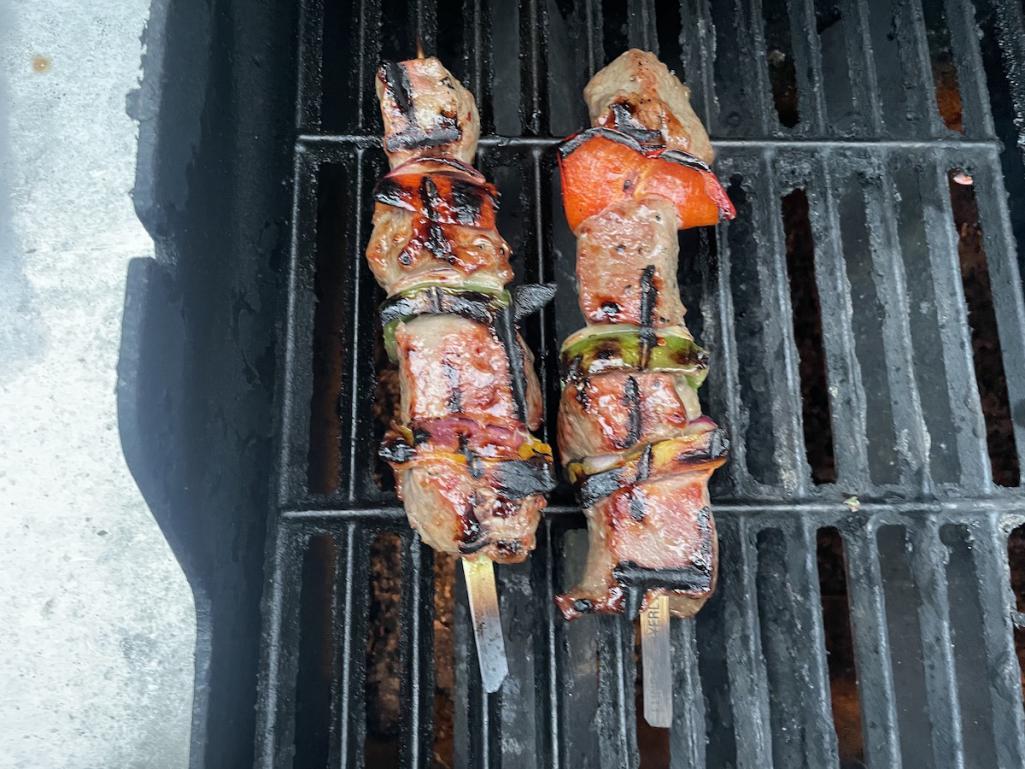
I then moved on to replacing the oil pressure switch. It was a quick fix, however finding the correct aluminum washer that mounts between the switch adapter fitting and the case was a bit of a scavenger hunt. Following visits to the local hardware store and two auto parts stores, I had what I needed and checked the pressure switch off of my list.
I'm continually amused when I walk into my FLAPS and they ask what I'm looking for. My usual response is, "It doesn't matter, you're not going to have it." Lately it's been trips like this for crush washers and other hardware. Every now and then I find a helpful parts rep who saves the day. I found that guy this time around. That's a win in my book.
The final corner of the triangle was the thermostat o-ring. This was another easy job. Out comes the t-stat.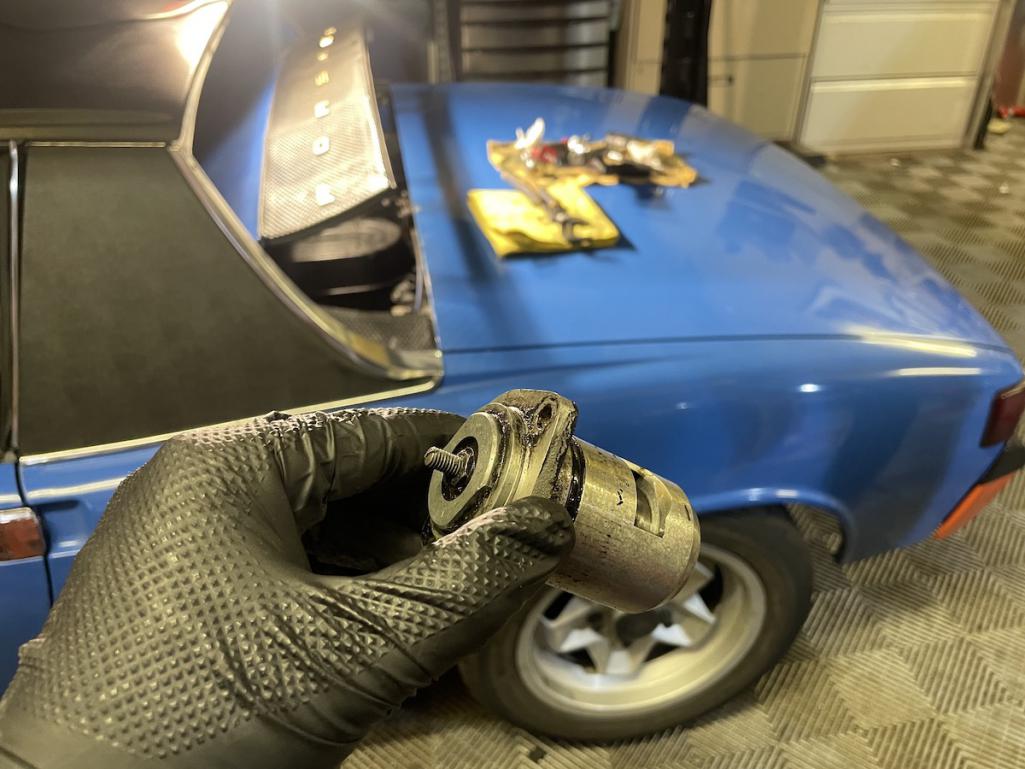
Off with the old seal and on with the new one.
I reinstalled the thermostat then got the triangle of death cleaned up nice and pretty. I've filed paperwork to rename the area the triangle of cleanliness, but I know the clock is ticking until it again gets dirty.
The next day I treated myself to a drive to work in the 914 and took the long way home. 
All told I added a good 50 miles to the odometer. The good news? No more triangle of death leaks. The bad news? I found more leaks.
While I replaced my lower valve covers with 930 covers and new gaskets (and failed to document it here), I didn't replace the uppers. Would you believe that they too seem to be leaking? Let just say I was a bit surprised at the leaks. But that's what happens when you clean up a mess. You quickly notice when a new mess is made.
Posted by: BillJ Aug 18 2023, 11:48 AM
Love this thread and the family connection. My 6 is the same way.
Posted by: vintage914racer Aug 18 2023, 12:55 PM
Now, I need the wisdom of the group....
Now that I've been driving the car a bit I'm more conscious of a low speed whine that comes from the rear of the car at low speeds, sometimes when going in a straight line and sometimes when turning. The noise goes away when I apply light brake pressure. It does not speed up or slow down based on vehicle speed/revolutions.
Prior to replacing both rear wheel bearings I thought it might be bearing noise, but I've ruled that out with the bearing replacement. The fact that the noise goes away with light brake pressure makes be think that maybe it's brake related?
The e-brake is disconnected so I can rule that out. Could the rubber brake lines be collapsed just enough to cause the brakes to drag? Maybe a caliper is biting just enough to make noise? I'd expect more of a pad drag noise versus a medium toned whine. It doesn't seem like pad resonance. And I would think cv joints would click more.
I'd like to try to get to the bottom of it without throwing more parts at it unnecessarily. I'll likely dig in more tomorrow, but any wisdom would be greatly appreciated.
Posted by: ClayPerrine Aug 18 2023, 01:27 PM
Now, I need the wisdom of the group....
Now that I've been driving the car a bit I'm more conscious of a low speed whine that comes from the rear of the car at low speeds, sometimes when going in a straight line and sometimes when turning. The noise goes away when I apply light brake pressure. It does not speed up or slow down based on vehicle speed/revolutions.
Prior to replacing both rear wheel bearings I thought it might be bearing noise, but I've ruled that out with the bearing replacement. The fact that the noise goes away with light brake pressure makes be think that maybe it's brake related?
The e-brake is disconnected so I can rule that out. Could the rubber brake lines be collapsed just enough to cause the brakes to drag? Maybe a caliper is biting just enough to make noise? I'd expect more of a pad drag noise versus a medium toned whine. It doesn't seem like pad resonance. And I would think cv joints would click more.
I'd like to try to get to the bottom of it without throwing more parts at it unnecessarily. I'll likely dig in more tomorrow, but any wisdom would be greatly appreciated.
I would look into the differential lash/transmission internal bearings. When you are driving, the differential lash is loaded in the forward way. When you brake, you unload everything and reload it in a different way. You may have a carrier bearing failing, or the gears are whining from old age. We all whine more as we get older.

Maybe Dr Evil will chime in on this?
Posted by: vintage914racer Aug 18 2023, 01:58 PM
Now, I need the wisdom of the group....
Now that I've been driving the car a bit I'm more conscious of a low speed whine that comes from the rear of the car at low speeds, sometimes when going in a straight line and sometimes when turning. The noise goes away when I apply light brake pressure. It does not speed up or slow down based on vehicle speed/revolutions.
Prior to replacing both rear wheel bearings I thought it might be bearing noise, but I've ruled that out with the bearing replacement. The fact that the noise goes away with light brake pressure makes be think that maybe it's brake related?
The e-brake is disconnected so I can rule that out. Could the rubber brake lines be collapsed just enough to cause the brakes to drag? Maybe a caliper is biting just enough to make noise? I'd expect more of a pad drag noise versus a medium toned whine. It doesn't seem like pad resonance. And I would think cv joints would click more.
I'd like to try to get to the bottom of it without throwing more parts at it unnecessarily. I'll likely dig in more tomorrow, but any wisdom would be greatly appreciated.
I would look into the differential lash/transmission internal bearings. When you are driving, the differential lash is loaded in the forward way. When you brake, you unload everything and reload it in a different way. You may have a carrier bearing failing, or the gears are whining from old age. We all whine more as we get older.
Maybe Dr Evil will chime in on this?
Thanks for the input. Dr. Evil tears into the the tranny for my track car every other winter or so. I was already planning on sending him this tranny over the winter. I’m guessing no one has been in it since new.
Posted by: porschetub Aug 18 2023, 02:53 PM
On to the next project on my list, the "triangle of death." It's such an ominous name, but rest assured I successfully took on the triangle and came out completely unscathed.
Here is the triangle pre-repairs. Most probably know, but it consists of well the triangle formed between the oil breather housing, the thermostat and the oil pressure switch. Some if not all tend to leak oil at some point so I figured I'd tackle them all.
The breather housing was first on my list.
It, like the two other corners of the triangle, was seeping a bit. I'm sure having two gaskets hidden under the cover didn't help. I'm trying to figure out who the prior guy was who slapped one gasket over the top of another? Oh yeah, that was me. Probably a good 12 years ago. To my (dis)credit, the gasket under the green one was silver and properly affixed to the engine case.
With the mating surfaces cleaned up, new gasket affixed and breather cover re-fastneed I moved on to my next project...
...grilling dinner. A guy has to eat, right?
I then moved on to replacing the oil pressure switch. It was a quick fix, however finding the correct aluminum washer that mounts between the switch adapter fitting and the case was a bit of a scavenger hunt. Following visits to the local hardware store and two auto parts stores, I had what I needed and checked the pressure switch off of my list.
I'm continually amused when I walk into my FLAPS and they ask what I'm looking for. My usual response is, "It doesn't matter, you're not going to have it." Lately it's been trips like this for crush washers and other hardware. Every now and then I find a helpful parts rep who saves the day. I found that guy this time around. That's a win in my book.
The final corner of the triangle was the thermostat o-ring. This was another easy job. Out comes the t-stat.
Off with the old seal and on with the new one.
I reinstalled the thermostat then got the triangle of death cleaned up nice and pretty. I've filed paperwork to rename the area the triangle of cleanliness, but I know the clock is ticking until it again gets dirty.
The next day I treated myself to a drive to work in the 914 and took the long way home.
All told I added a good 50 miles to the odometer. The good news? No more triangle of death leaks. The bad news? I found more leaks.
While I replaced my lower valve covers with 930 covers and new gaskets (and failed to document it here), I didn't replace the uppers. Would you believe that they too seem to be leaking? Let just say I was a bit surprised at the leaks. But that's what happens when you clean up a mess. You quickly notice when a new mess is made.
I had a leak @ the breather cover for similar reason,when I removed it the gasket was way too thick compared to the VR replacement and was way over tightened,I had a section of sheet glass I had used to reface my valve covers and ran the cover over on that....it was twisted and took a bit to get right.
I have a leak @ my oil pressure sensor that i'am going to attend to ,its only small but enough to piss me off .
Leak chasing and repair IMO is part of the came with these engines.
Keep up the good work,cheers.
Posted by: vintage914racer Aug 18 2023, 03:00 PM
[/quote]
I had a leak @ the breather cover for similar reason,when I removed it the gasket was way too thick compared to the VR replacement and was way over tightened,I had a section of sheet glass I had used to reface my valve covers and ran the cover over on that....it was twisted and took a bit to get right.
I have a leak @ my oil pressure sensor that i'am going to attend to ,its only small but enough to piss me off .
Leak chasing and repair IMO is part of the came with these engines.
Keep up the good work,cheers.
[/quote]
You’re right, it seems like there’s always another leak to chase. The good news is the number of drops from on the garage floor are noticeably fewer in number.
Posted by: vintage914racer Nov 4 2023, 11:34 AM
In chasing down the "low speed whine" noted above, I figured I would replace the rear brake flex lines. I don't remember the last time (or if) I replaced them and I though maybe, just maybe, one or both had shrunk and were causing the rear brakes to drag.
Upon further inspection, the lines did indeed look old, but upon removal and dissecting them I didn't see any shrinkage (and it was pretty cold in the garage). Oh well, a new set of flex lines won't hurt and will last me until the next time I forget whether I've replaced them or not. I also replaced one of the hard lines as it didn't cooperate during the job.
I don't have any pictures of the brake line job, but I do have pictures of my next distraction...a trip to Rennsport Reunion VII with my 9-year-old daughter.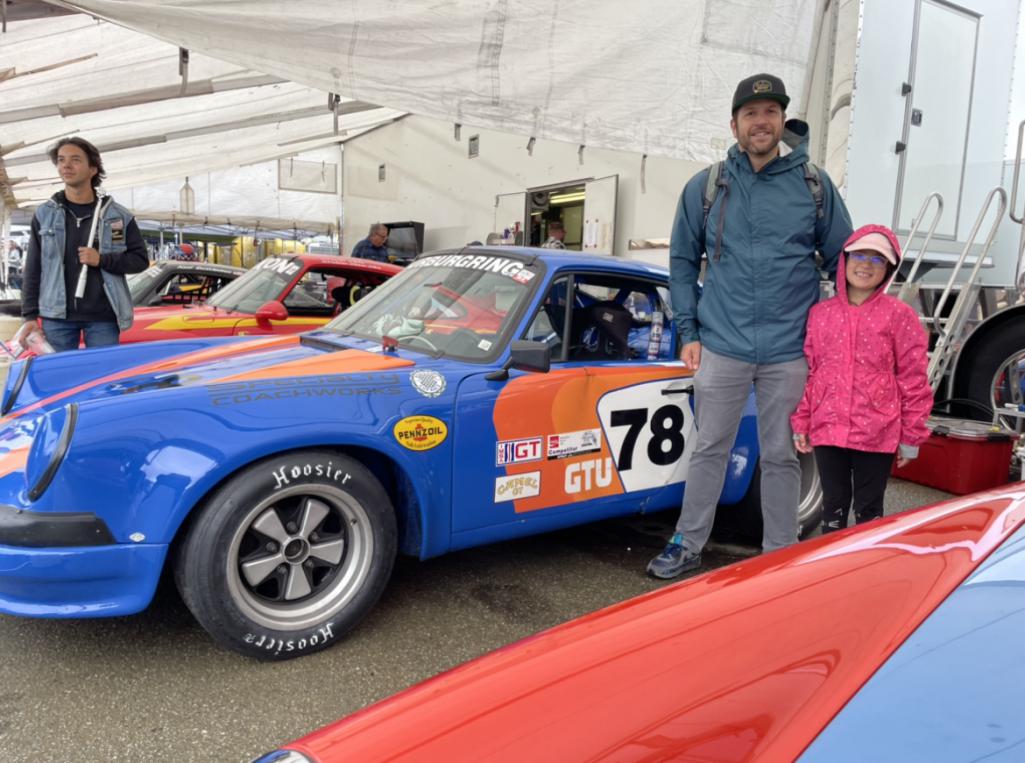

The blue car was actually a project car my dad owned many years ago that never got completed when he was around. We ended up selling it maybe 15 years ago and it was subsequently restored to the livery it ran at the Sebring 12 hours in the early eighties. I hadn't seen it since it was restored and it was fun catching up with the current owner. The car was built by group of local MN privateers, back when a few guys could build a car and bring it to the big show.
There were also a few other nice cars there....but ya'll have seen plenty of Rennsport pictures already I'm sure.
Posted by: vintage914racer Nov 4 2023, 11:41 AM
Back home from Rennsport, I tackled rebuilding the rear calipers. It was my first time doing so on a 914, but I'd rebuilt them for other cars so figured it wouldn't be that tough. And guess what? It wasn't tough. As an added bonus my "rear end whine" went away after the rebuild. It seems a dragging caliper was causing a bit of low-speed resonance noise. 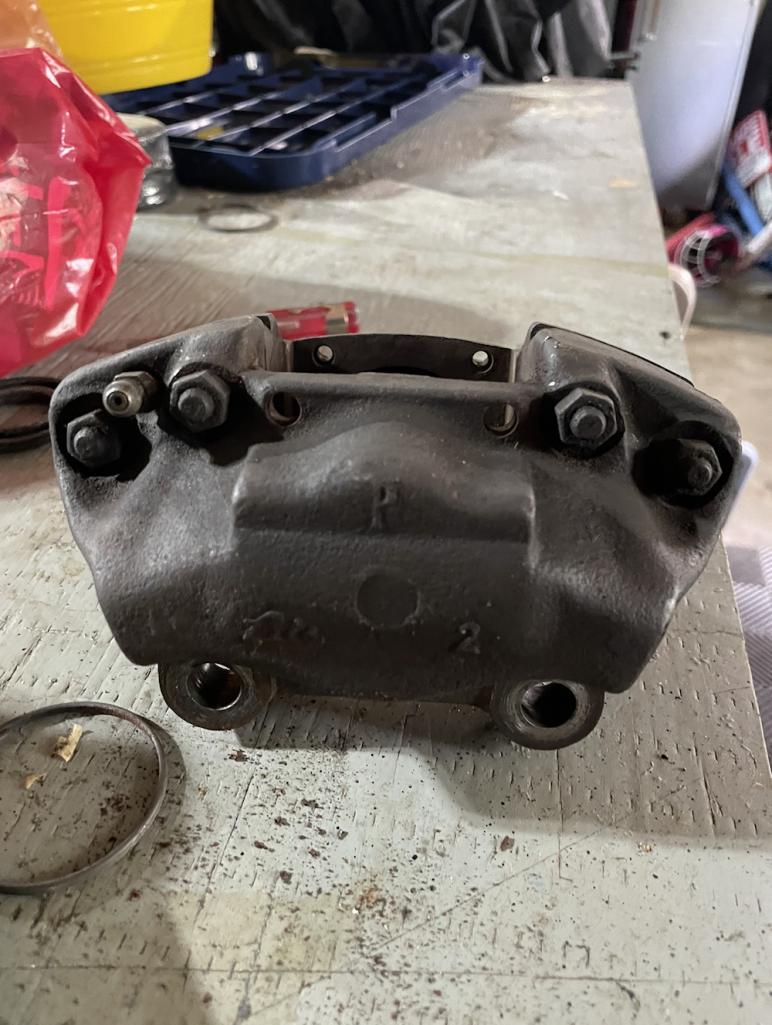
Posted by: vintage914racer Nov 4 2023, 11:51 AM
The next order of business then was to drive the car and enjoy it a bit, which I did. The driving season is short in MN, so I enjoyed a few fall drives and errands where I took the long way home.
This takes us up to now. We had our first snowfall of about 3 inches. It melted pretty quickly, but the end is near. The car is more or less tucked away for the winter. But that didn't stop me from completing one more project - installing the beautifully re-chromed bumper that arrived in the mail this past Wednesday. ValcoOscar did amazing work, and while it took a bit longer than expected, it was worth the wait. Now the bumper suddenly makes the rest of the car look a little less shiny.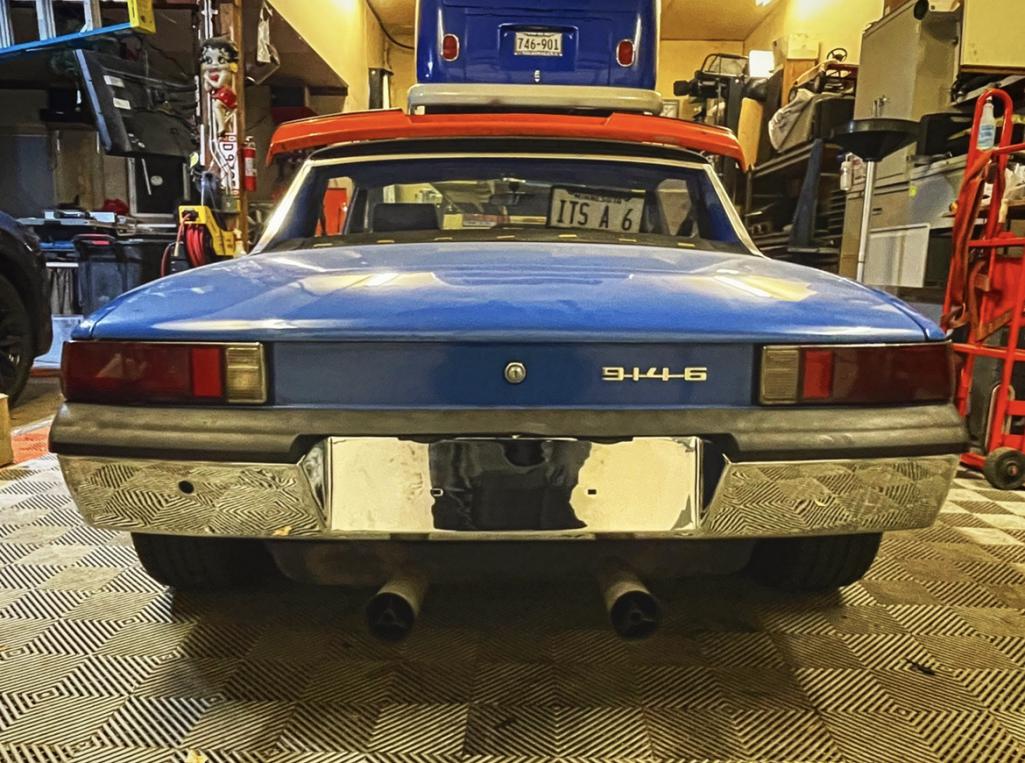
Posted by: rick 918-S Nov 4 2023, 12:14 PM
Really great to see your daughter was interested enough to go to the event with you. That bumper looks nice!
Posted by: vintage914racer Nov 4 2023, 01:41 PM
Really great to see your daughter was interested enough to go to the event with you. That bumper looks nice!
Thanks, Rick. Yeah she had a pretty good time.
The bumper turned out really nice.
Posted by: Cairo94507 Nov 4 2023, 01:54 PM
Very cool.
Posted by: vintage914racer Dec 18 2024, 02:58 PM
It seems I've done a poor job updating this post over the last year.
For the most part I've done very little to the car in the last 12 months other than drive it. I managed to put close to 1,000 miles on it over the fair weather months here.
Here are a few snapshots I found on my phone from the summer months here in MN...
First, one of a few trips to the local Ben and Jarry's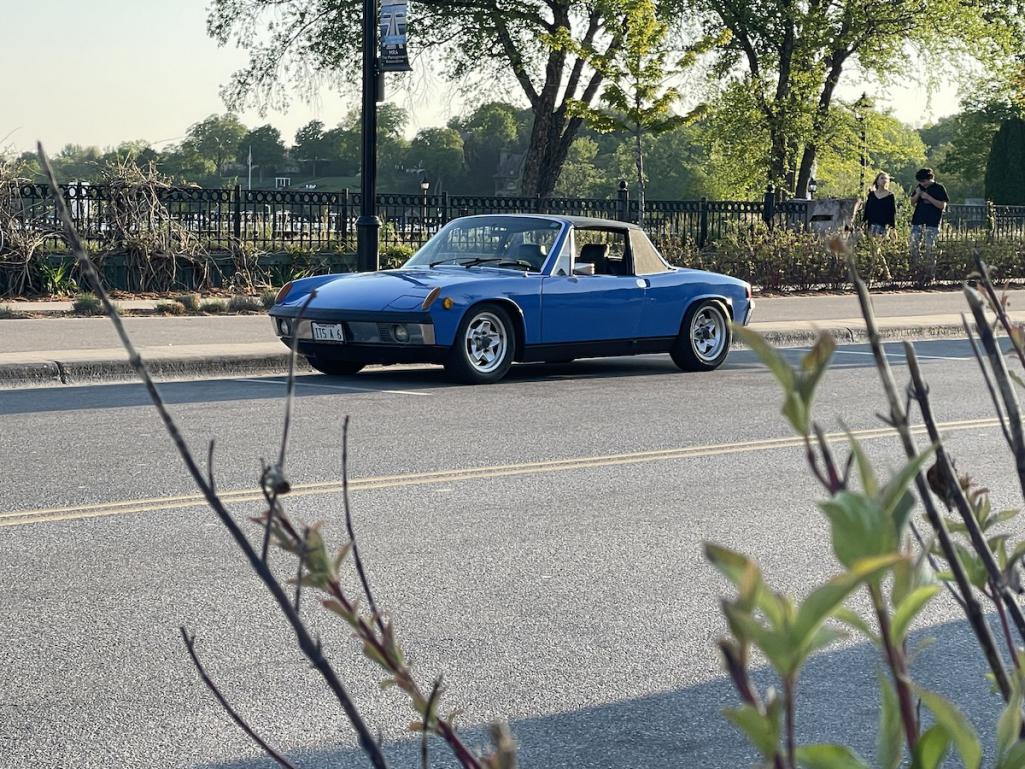
And a quick shot in front of the Minneapolis mural adjacent to my office. For a good week or two, before it got too hot here, I drove the 914 to work.
And another shot with my daughter during a trip to the local mini golf spot.
And finally, a shot at home on the lift. I was able to source this vintage license plate frame from Carousel Porsche/Audi. I find the frame cool for two reasons. First, my dad bough the 914 at this dealership in the mid-eighties and this is the frame that they probably would've put on the car at the time (or maybe a bit earlier). It's also cool for me as I spent 10 years working at this dealership, starting when I was 15 years old. 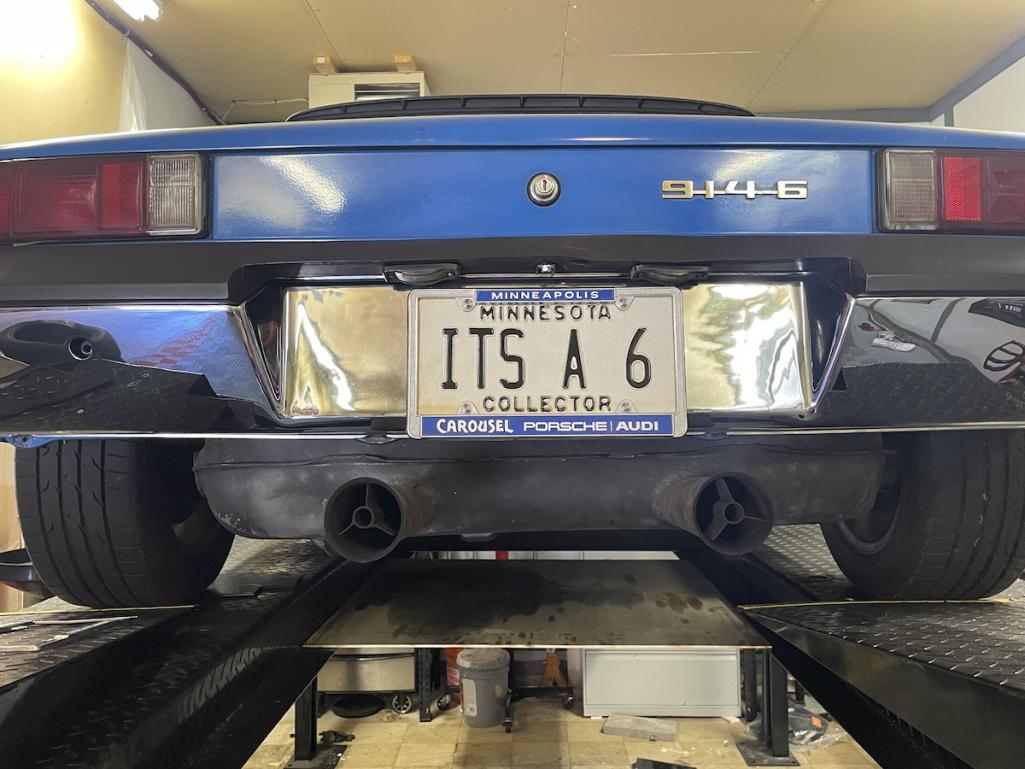
Now with winter among us here in MN, I'm thinking ahead to next spring and running through the things I'd like to do to the car. First and foremost, I need to track down a couple of more oil leaks. Despite fixing a bunch of them, the car still does a very good job of marking its spot. I think the oil return tubes are the biggest offenders for now. Given I don't want to pull the heads, I'll probably try the collapsible spring versions.
Another order of business is replacing the muffler with something more pleasant for longer highway drives. I've been eyeing an achtungkraft muffler with button adjustable flaps, although I have a bit of sticker shock. The ability to choose between a muffled, or more rowdy exhaust note is quite intriguing.
I'm pondering long term plans for the car. I'd like to rebuild the engine at some point. Currently powered by a 1968 aluminum case 911s engine, it has a bit more scoot than stock, but also the engine is tired. I've threatened to tackle the project myself. I have some good phone a friend resources at my disposal, and I think I'm reasonably mechanical.
The other thing on my mind is some of the body rust, namely behind the door handles near the sail panel and on the front windshield cowl. Rust repair is Pandoras box, and while http://www.914world.com/bbs2/index.php?showuser=43 tackled all of the structural rust 10 or so years ago, I'm worried about sidelining the car and budget for more cosmetic rust repair. Naturally I'd like the car to be fresh and shiny (and adorned with GT flares) - I just need to figure out when and how to pull the trigger.
Big picture, another thought continues to cross my mind -- will I be able to sustain keeping two 914s in tip-top shape and be able to appropriately enjoy both? With buckets of cash and time, sure, but I'm not sure that's the best deployment of my resources. Both cars are expensive to keep up, and despite being able to do a lot myself, there are some things I'm probably best not doing. The race car sees the track three or four weekends out of the year, and absorbs probably requires 2-3 times that many weekends of me prepping it throughout the year. And with its tired, twisted, always been a race car chassis, I see it needing constant mending (when it probably really should be re-tubbed). On the other side of the garage, the blue 914-6 "Speedy" gets driven a bit, but not enough as I'd like. I'd really like to get it in great cosmetic shape and refresh the motor so I can simply enjoy it. So, my hair brained idea that gets tossed around in my head at least once or twice per year is to retire the orange chassis, repurpose its fun drivetrain bits into and fix the blue car up as a shiny, 9146 GT inspired dual sport ripper. Am I nuts?
Posted by: mb911 Dec 18 2024, 04:59 PM
I run that very muffler. I am local to Bryan and do some work for him. If you seriously interested I can sell you one at a great price.
Posted by: vintage914racer Dec 18 2024, 05:58 PM
I run that very muffler. I am local to Bryan and do some work for him. If you seriously interested I can sell you one at a great price.
I am indeed interested and hoping to get one between now and spring driving season. I have a local friend with a G body who is also interested for his car. I’ll be sure get in touch when we’re ready to pull the trigger.
Posted by: mb911 Dec 18 2024, 06:12 PM
I run that very muffler. I am local to Bryan and do some work for him. If you seriously interested I can sell you one at a great price.
I am indeed interested and hoping to get one between now and spring driving season. I have a local friend with a G body who is also interested for his car. I’ll be sure get in touch when we’re ready to pull the trigger.
Ok sounds good. I don’t have them listed on my website but we can make a deal.
Posted by: vintage914racer Dec 18 2024, 07:58 PM
I run that very muffler. I am local to Bryan and do some work for him. If you seriously interested I can sell you one at a great price.
I am indeed interested and hoping to get one between now and spring driving season. I have a local friend with a G body who is also interested for his car. I’ll be sure get in touch when we’re ready to pull the trigger.
Ok sounds good. I don’t have them listed on my website but we can make a deal.
Sounds great. Stay tuned.
Posted by: Lof8 Dec 19 2024, 09:00 AM
Beautiful car and great story! I love it!
Posted by: Root_Werks Dec 19 2024, 03:42 PM
You've had some really fun projects on this 914. Very cool your daughter shares such an interest as well.
And you actually drive it, yay! Most just sit in the garage (like mine  )
)

Posted by: vintage914racer Dec 19 2024, 04:23 PM
You've had some really fun projects on this 914. Very cool your daughter shares such an interest as well.
And you actually drive it, yay! Most just sit in the garage (like mine
)It’s been fun. And a little frustrating as all garage projects can be. I definitely would like to drive it more than I do. Hopefully next year….
Posted by: sixnotfour Dec 19 2024, 07:23 PM
what engine is in it ??,, looks like an ealier Sandcast case ...
Posted by: vintage914racer Dec 19 2024, 10:45 PM
what engine is in it ??,, looks like an ealier Sandcast case ...
It is indeed an aluminum case 68s engine.
Posted by: vintage914racer Jan 10 2025, 08:47 PM
The holidays have passed and despite fooling myself into thinking I'd have some project time in the garage, alas I was wrong. Now in our first week of January, I've finally found time to jump back into the car.
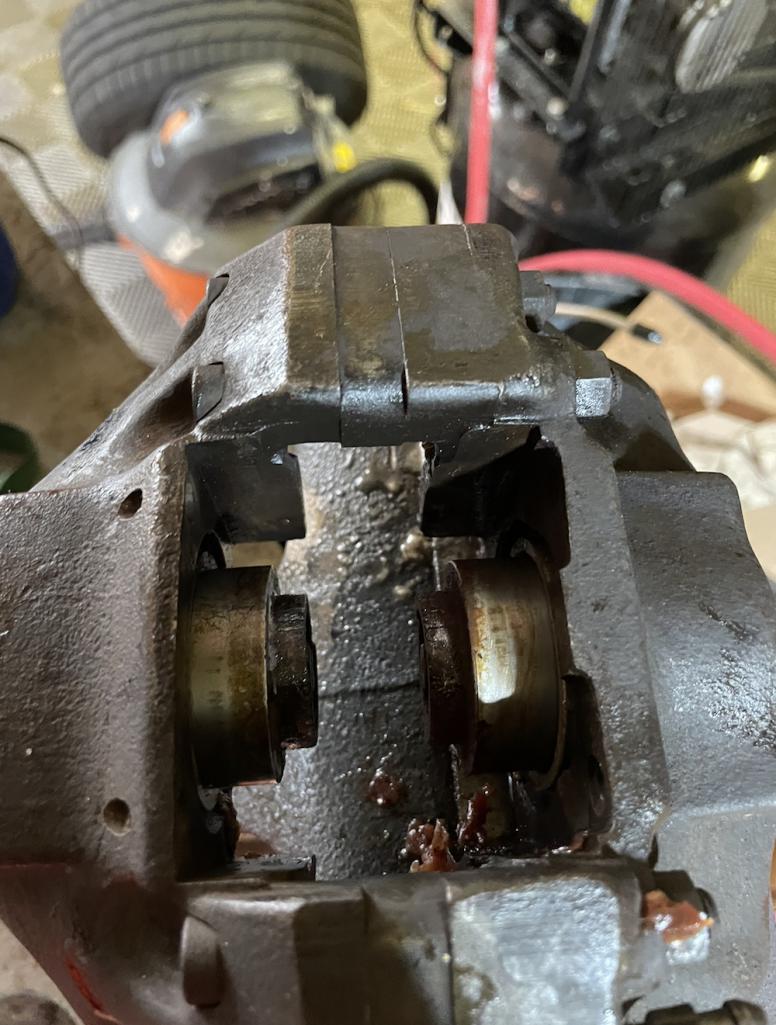
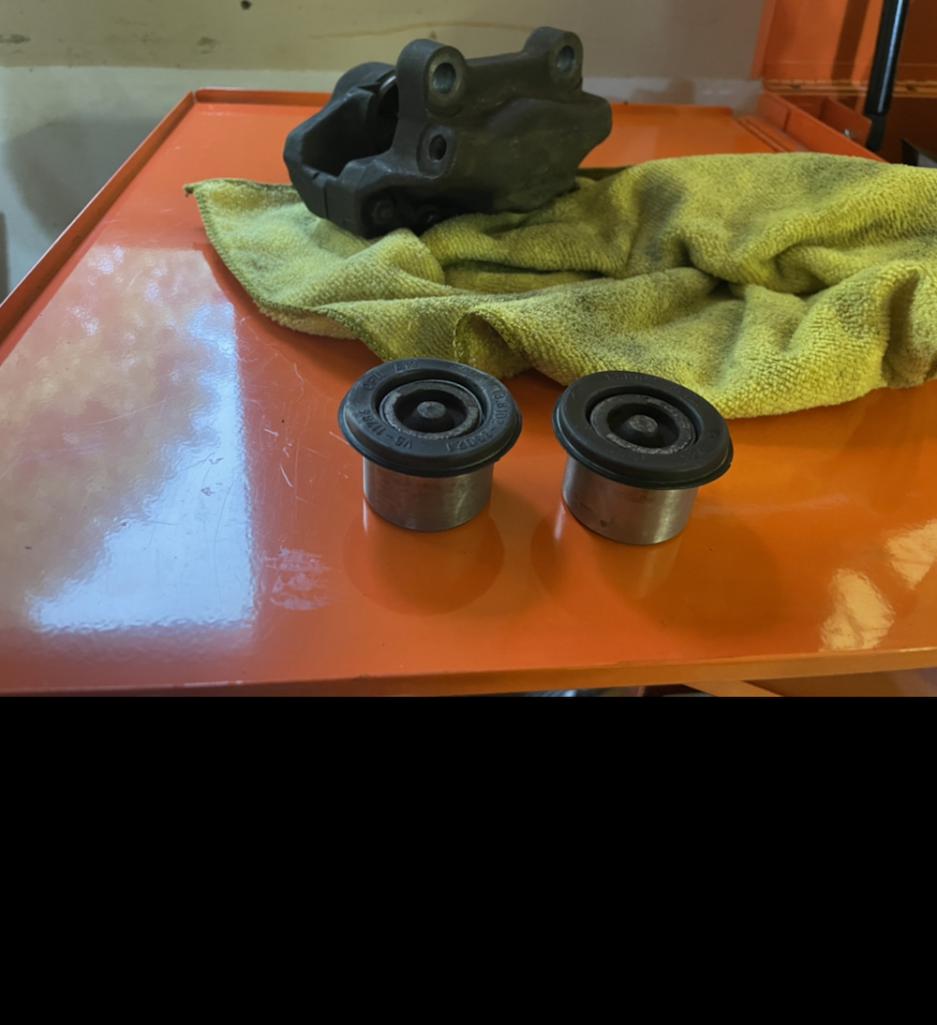
The rear shocks are reaching the end of their life, so I ordered up a set of replacements. Preparing to get them installed I got a case of while-you're-in-there and decided it was a good time to replace the trailing arm bushings. I didn't see any record of them being replaced in my pretty extensive records for the car, so I figured there wasn't a better time than now.
So off came the trailing arms...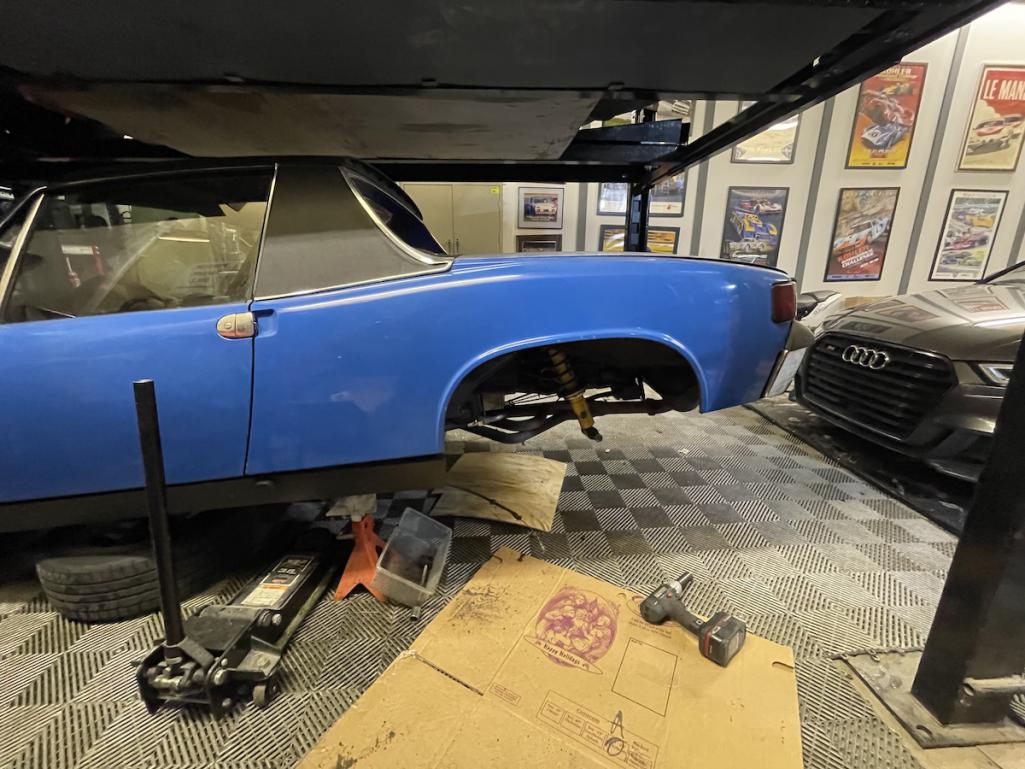
Once removed from the car I couldn't get over how dirty and nasty the trailing arms were. Now if you've followed this thread you may remember I replaced both rear wheel bearings lately, a task I now regret given I plan to blast and refinish the trailing arms. 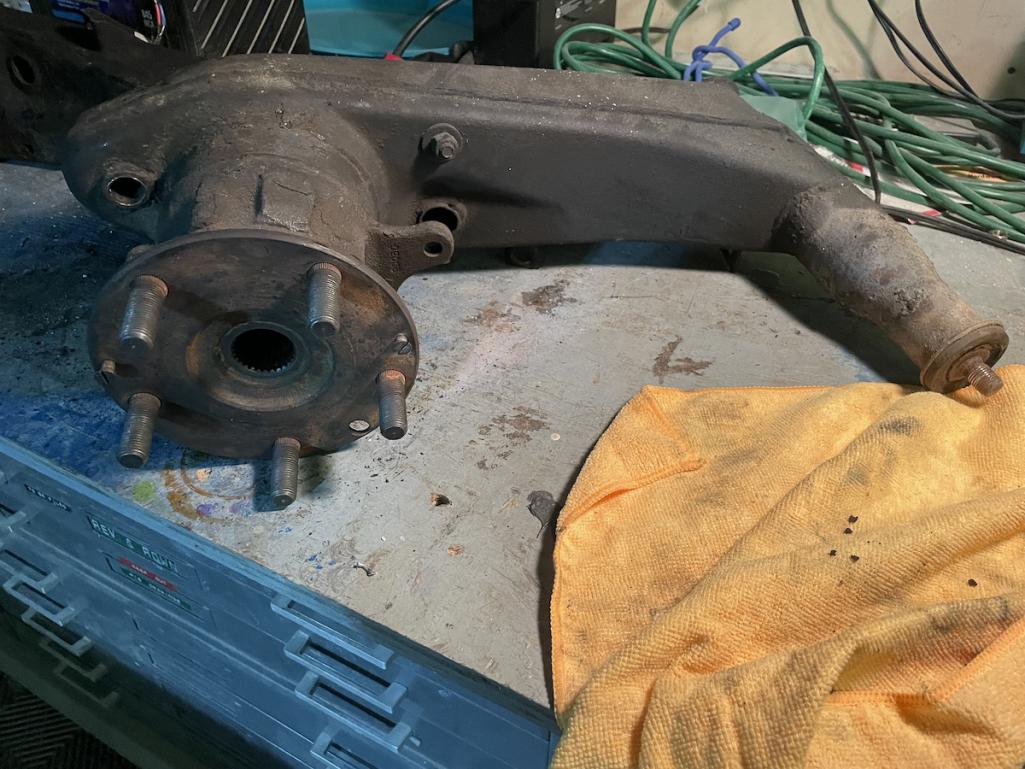
So out came the hubs...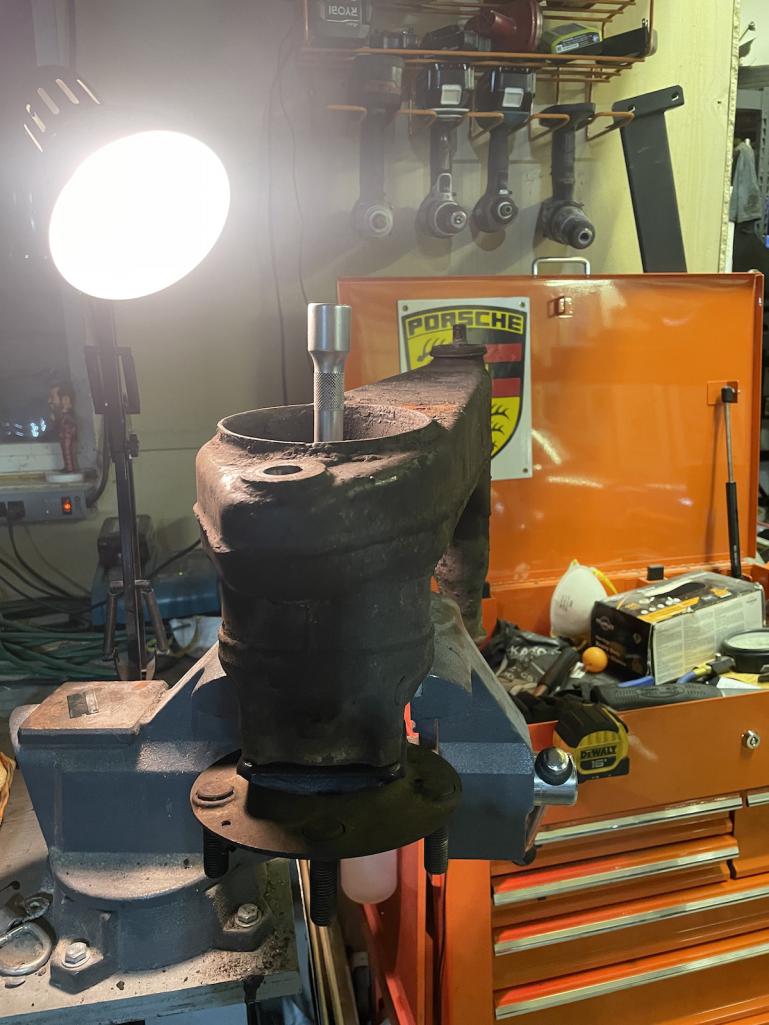
...and then the bearings. Fortunately I've essentially doubled the value in the Harbor Freight press I convinced myself I needed a few years ago for some other project.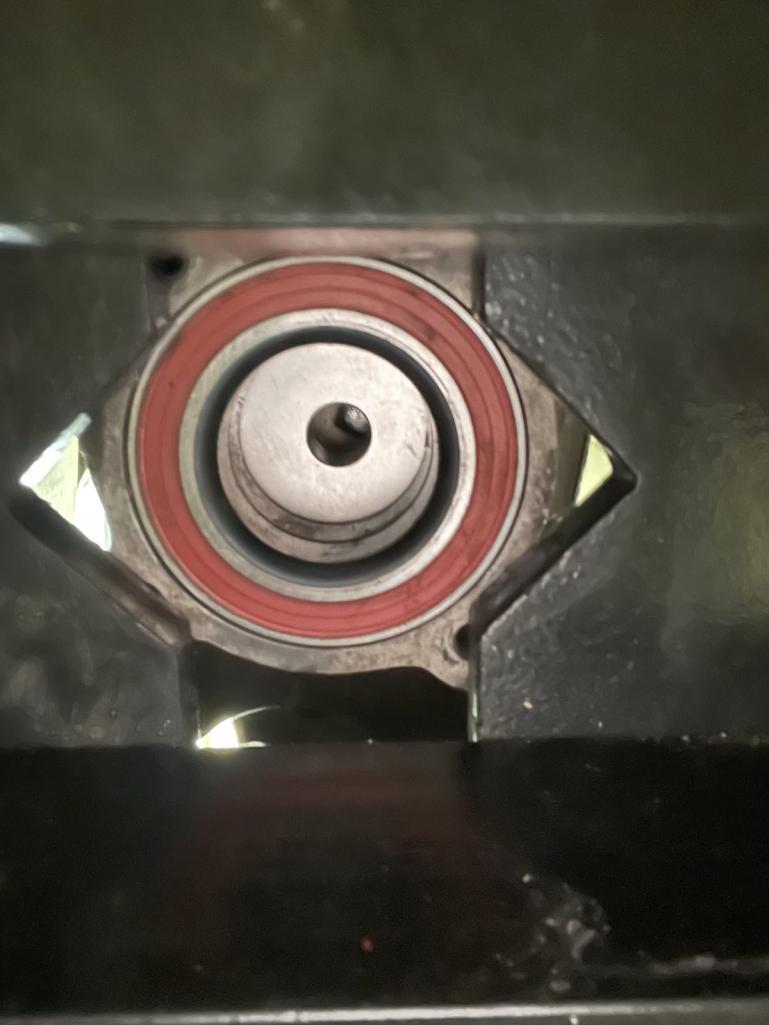
Finally, I proceeded to remove the trailing arm shafts. I was whistling the whole time, knowing I had now tripled the value of my investment in my hydraulic press. 
Now, over the years, I remember seeing many threads of people lamenting the removal of their old rubber factory bushings, involving blow torches, anxious anticipation of a puff of black smoke (as if they were awaiting the arrival of a new pope), and a bunch of jerking around. But as if the wrenching gods were looking down on me, I was spared. Or perhaps I just had the right tools for the job.
And with what only took a few minutes to recap in this thread, but in reality was a few nights of expletives and busted knuckles, I managed to have two hulks of greasy, grimy 914 trailing arms on my bench.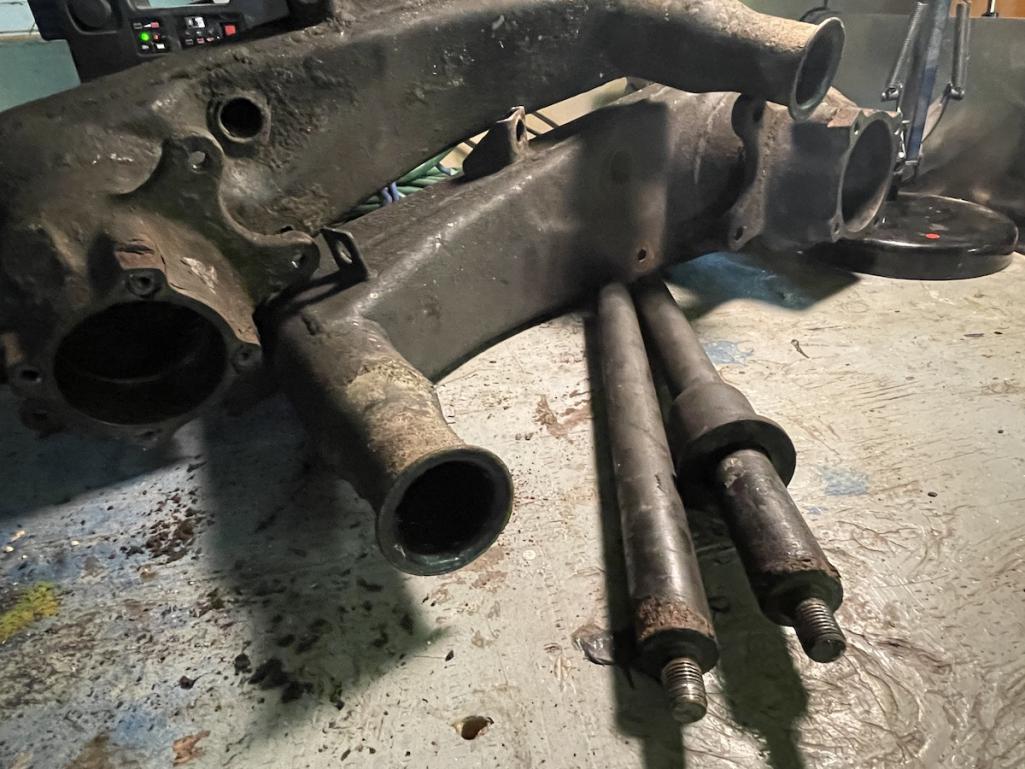
So now, two questions on how I proceed from here:
1) My trailing arm shafts are pretty corrodded, and its my intentinon to replace them. Should I replace them with PMB's fancy stainless shafts and stick to rubber bushings, or should I go the Elephant Racing Polybronze route? I have the latter on my track car and they're great, but I'm not sure I really need them on the street car.
2) The rear springs are a bit soft for my likings, and given I've never achieved a low BMI score, i'd like to up the spring rate. My leaning is towards threaded Ground Control collars (I have them on the other car) and either 150 or 175lb springs. All my forum research suggests I should err on the softer side.
Up next, deep cleaning inner fenders that appear that they've never been scrubbed.
Posted by: technicalninja Jan 10 2025, 09:10 PM
Most of the solid SS shafts don't have the ridges in the ends that dig into the suspension ears.
Rebel racings versions (which are also hollow) show this feature.
https://www.rsrproducts.com/product-page/914-hollow-pivot-shafts-for-rear-bushings
I like those!
Now, the guy who runs Rebel has a bit of a bad rap. Sounds like he is a good guy, just overwhelmed by life.
A recent thread regarding this.
http://www.914world.com/bbs2/index.php?showtopic=372961
Personally, I'd call and see if he had any in stock, ready to ship.
Both he and Elephant have upgraded rear trailing arm bushings. Many here like the Rebel product.
Streetcar will be most "user friendly" on rubber.
Elephant seems to have the best rubber ones, but they are MORE expensive than the poly-bronze which seems backwards to me.
Posted by: Cairo94507 Jan 11 2025, 09:28 AM
Great work; love the press. I have Elephant Racing rubber bushings in my car. I also have 140 pound rear springs. I am running Bilsteins all around with stock (later) F&R sway bars. I had the poly-bronze type bushings in my last 6 and hated them on the street. I think I may switch to the coil-over setup on my current 6...at least it's on the list. That way I can corner balance it and set the rear height exactly where I want it. Let's face it, they are really never done. 
Posted by: vintage914racer Jan 11 2025, 10:19 AM
Most of the solid SS shafts don't have the ridges in the ends that dig into the suspension ears.
Rebel racings versions (which are also hollow) show this feature.
https://www.rsrproducts.com/product-page/914-hollow-pivot-shafts-for-rear-bushings
I like those!
Now, the guy who runs Rebel has a bit of a bad rap. Sounds like he is a good guy, just overwhelmed by life.
A recent thread regarding this.
http://www.914world.com/bbs2/index.php?showtopic=372961
Personally, I'd call and see if he had any in stock, ready to ship.
Both he and Elephant have upgraded rear trailing arm bushings. Many here like the Rebel product.
Streetcar will be most "user friendly" on rubber.
Elephant seems to have the best rubber ones, but they are MORE expensive than the poly-bronze which seems backwards to me.
I'm leaning towards rubber bushings. I have purchased parts from Clint at Rebel Racing in the past and didn't have any issues. I always grab my popcorn when I see the thread that pops up quarterly here or on the Pelican forums wondering if Clint is still in business, alive, etc. More recently I've ordered his stuff through Tarett for peace of mind that it will arrive.
Posted by: vintage914racer Jan 11 2025, 10:20 AM
Great work; love the press. I have Elephant Racing rubber bushings in my car. I also have 140 pound rear springs. I am running Bilsteins all around with stock (later) F&R sway bars. I had the poly-bronze type bushings in my last 6 and hated them on the street. I think I may switch to the coil-over setup on my current 6...at least it's on the list. That way I can corner balance it and set the rear height exactly where I want it. Let's face it, they are really never done.
Thanks for the insights on the PB bushings on the street. I think I'll go rubber.
Posted by: vintage914racer Jan 17 2025, 10:42 AM
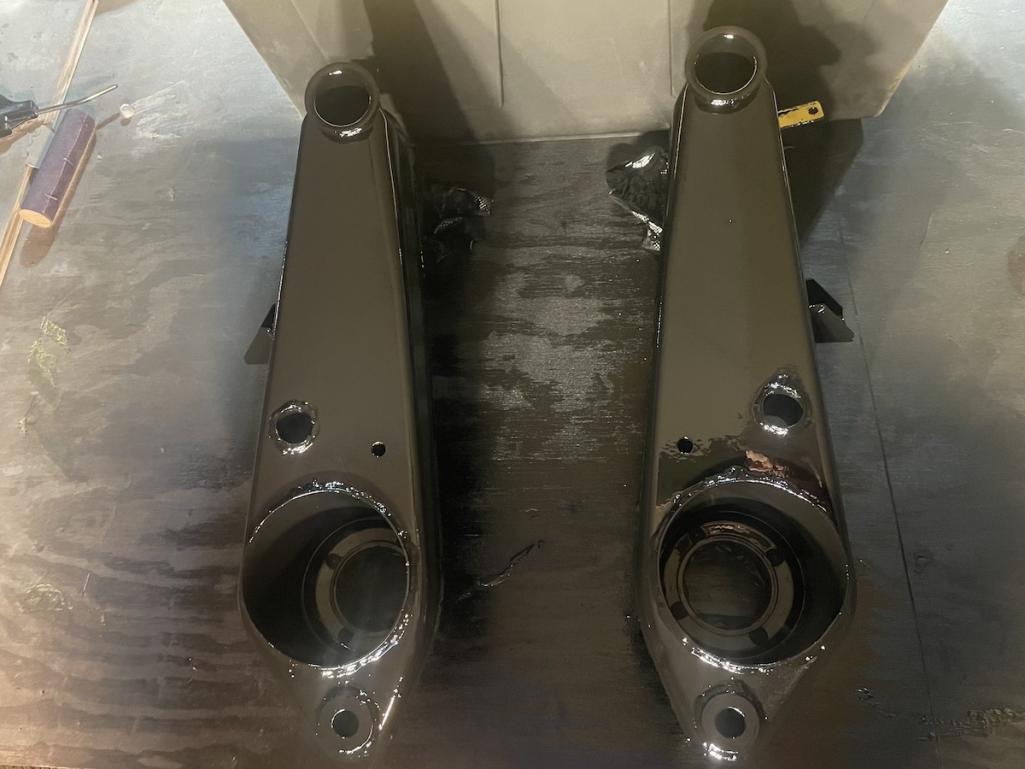
I ended up ordering a set of elephant racing rubber bushings and shafts for the trailing arms. While waiting for parts to arrive from the west coast I spent my time cleaning up and refinishing the trailing arms. With limited timely powder coating options in my area, and some impatience, I ended up stripping the arms down to clean shiny metal and spraying them with Eastwood chassis coat primer, and then their extreme chassis coat paint. They went from thoroughly nasty to looking good. 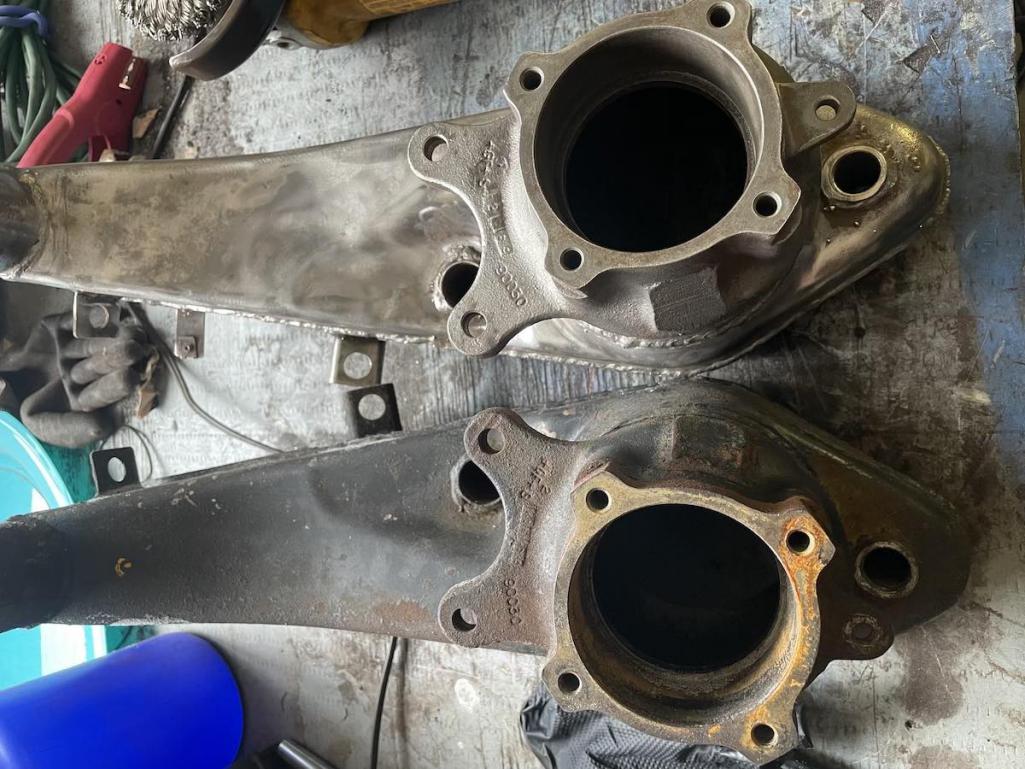
Random question, there was an angle bracket attached to each on the inside vertical edge (not pictured). What is the purpose of that bracket? Is there any reason to replace it?
This weekend I’ll get the bushings and bearings installed, then start cleaning up and refinishing the outer mount brackets while I wait for my threaded rear coilover kit to arrive.
Posted by: vintage914racer Jan 19 2025, 08:04 PM
I managed to get a bit done this weekend, although the garage heater had its work cut out for it offsetting the frigid temps outside. Last winter I reinsulated the garage and added a massive reversible ceiling fan that's done wonders for keeping the garage comfortable enough even on the coldest days.
With my trailing arms freshly painted, it was time get them out of the dining room and put them back together. The rarely used shop press got a bit more use pressing the new shafts in. 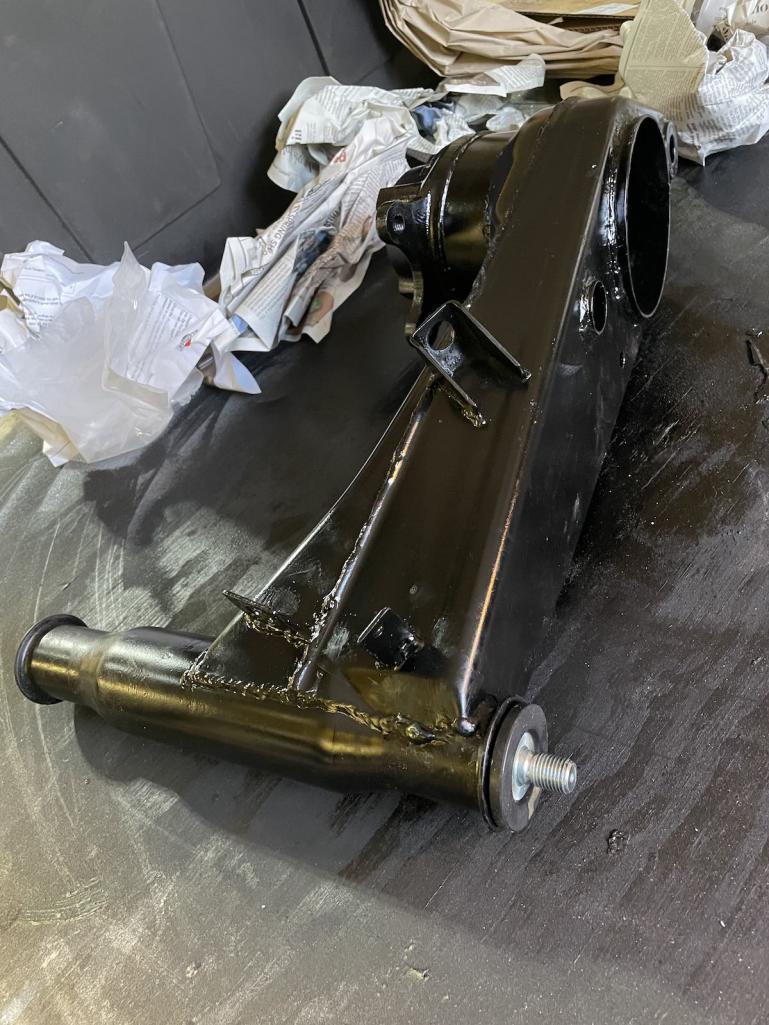
From there I got the wheel bearings installed. 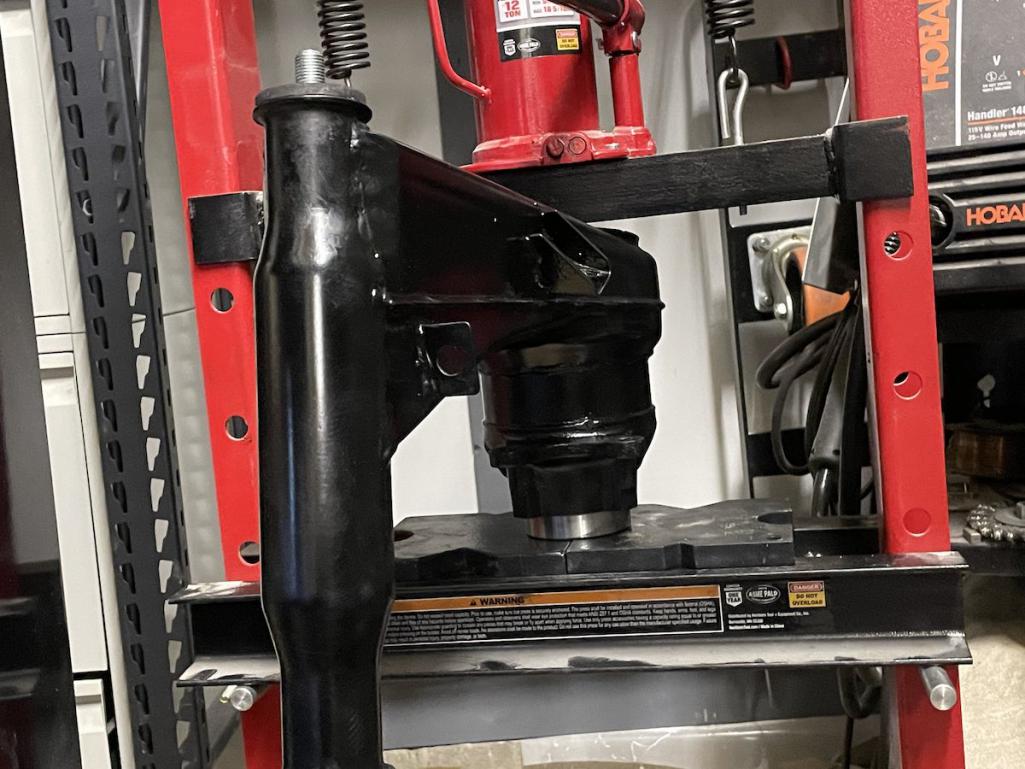
I made quick work of getting the bearing retainer plates back on and pulled the hubs back into place. 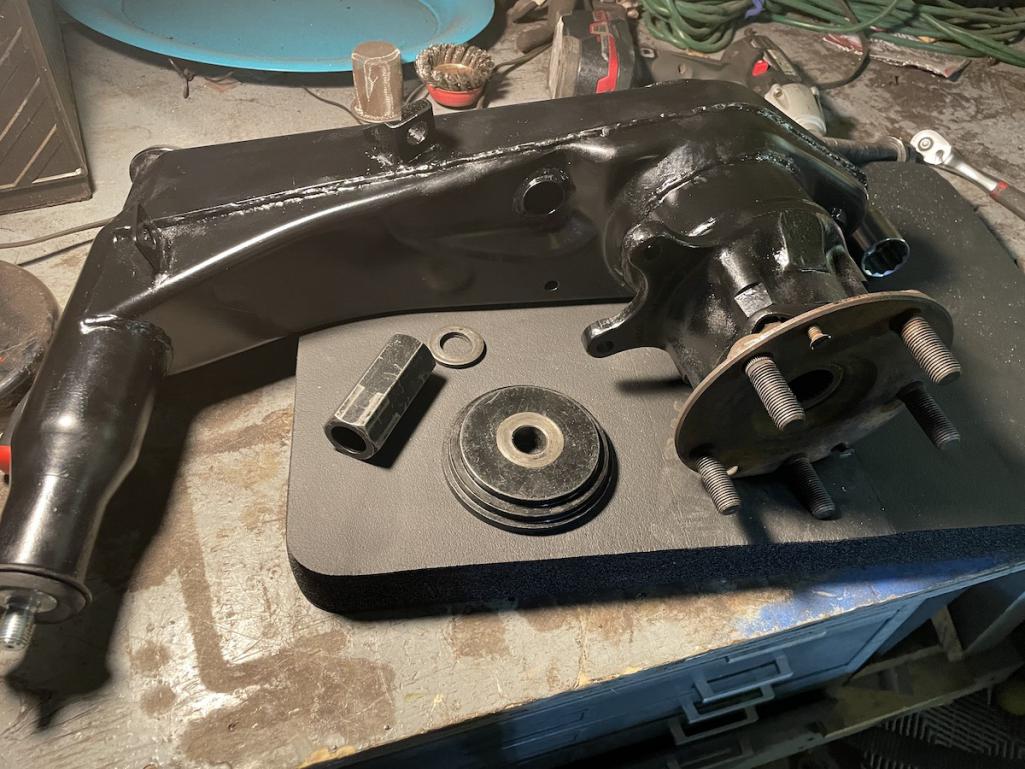
I also got the rear shock assemblies removed in anticipation of threaded coilover collars arriving in the mail sometime this week. I intended to use Rebel Racing threaded collars, but Tarett was out of stock. Despite having had good service actually working through client at Rebel Racing in the past, I figured I wouldn't push my luck and hence trying to order through Tarett. Being unsuccessful, I ended up ordering collars from Ground Control. That's what I have on my track car, so I know they'll work as intended on the street car.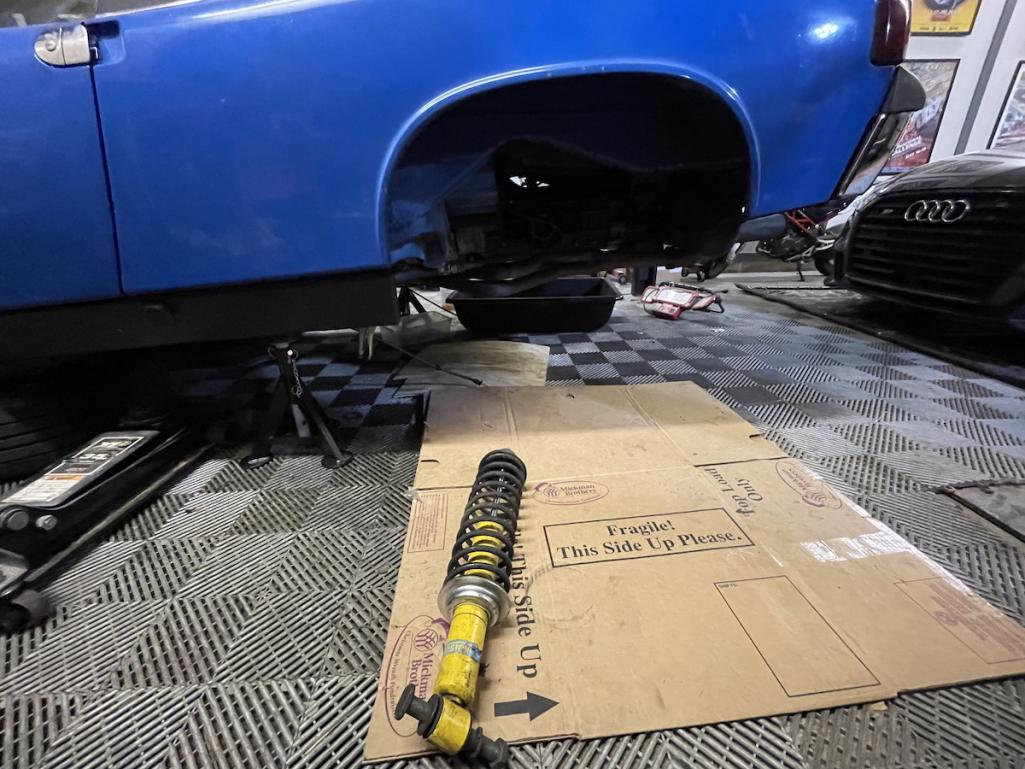
Next up....reinstalling the trailing arms.
Posted by: rick 918-S Jan 20 2025, 05:46 AM
Glad to see the progress. -16 here yesterday but managed to get some badly needed garage cleaning done.
Powered by Invision Power Board (http://www.invisionboard.com)
© Invision Power Services (http://www.invisionpower.com)