Printable Version of Topic
Click here to view this topic in its original format
914World.com _ 914World Garage _ Stabilizer Bar Rear
Posted by: DennisV Aug 12 2023, 08:30 PM
I was attempting to replace the bushings for the rear stabilizer bar on our 1970 914-6 today and ran into a real head scratcher.
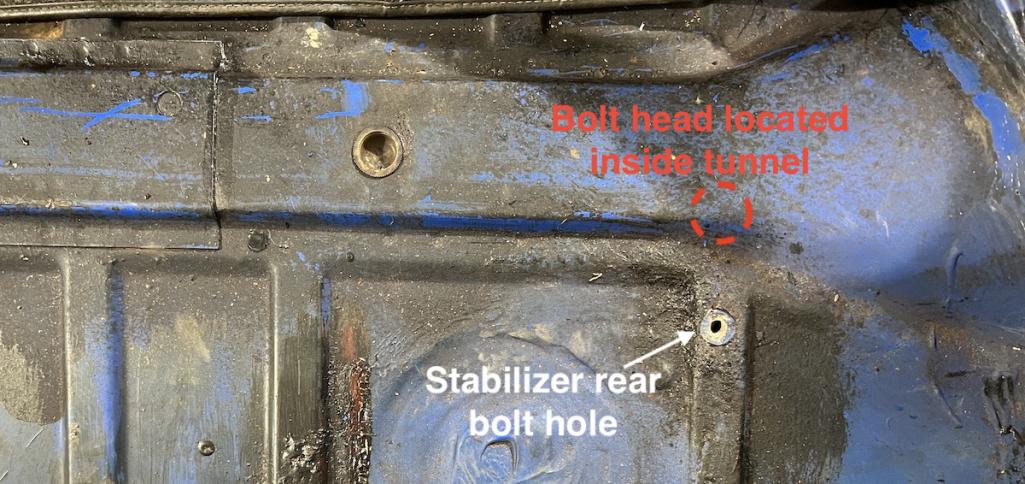
The bolt towards the front was installed top down with the head inside a tunnel. The nut visible underneath the car. Turning the nut also turns the bolt. Same on both sides. There is no hole, or tells of a former hole, in the trunk. I can't tell how the bolt was inserted. Nor can I find a way to secure the bolt to remove the nut, never mind think about getting the bolt out.

Underneath, the only access I can find is a nearby hole about the size of a quarter. I can barely get an index finger in there to feel the edge of the bolt head. A box or open end wrench is a no go. Too big and not able to get necessary angle.
The rear bolt came out easily. Bolt head was accessible in the trunk. Nut unscrewed underneath and along came about 12 washers used as spacer.
I could cut off the nut, but the bolt remains. Otherwise I can only imagine taking a hole saw and cutting an access opening above it. I really don't want to cut what appears to be good original metal.
Other ideas?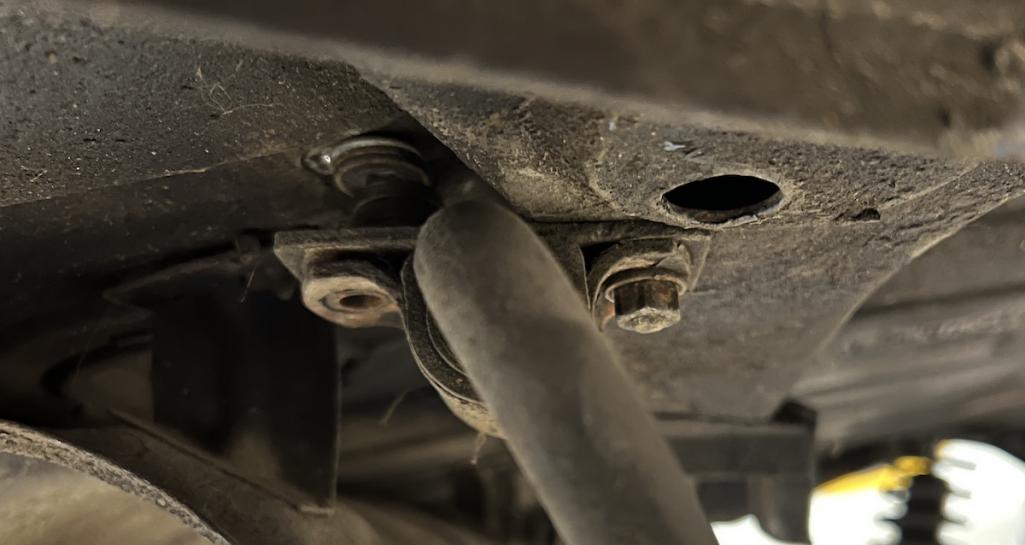
Posted by: Superhawk996 Aug 12 2023, 09:02 PM
Bolt had to have been inserted through the hole circled.
I’d buy an El-cheapo wrench that fits the hex and bend it into a 90 degree or Z shape with an acetylene torch to fit in the hole and hold the bolt. Grind wrench thinner if needed to fit through the hole. They must have held it with a wrench to tighten it.
Alternately cut it then fish the hex head out of that tunnel with a flex grabber or magnet via that hole.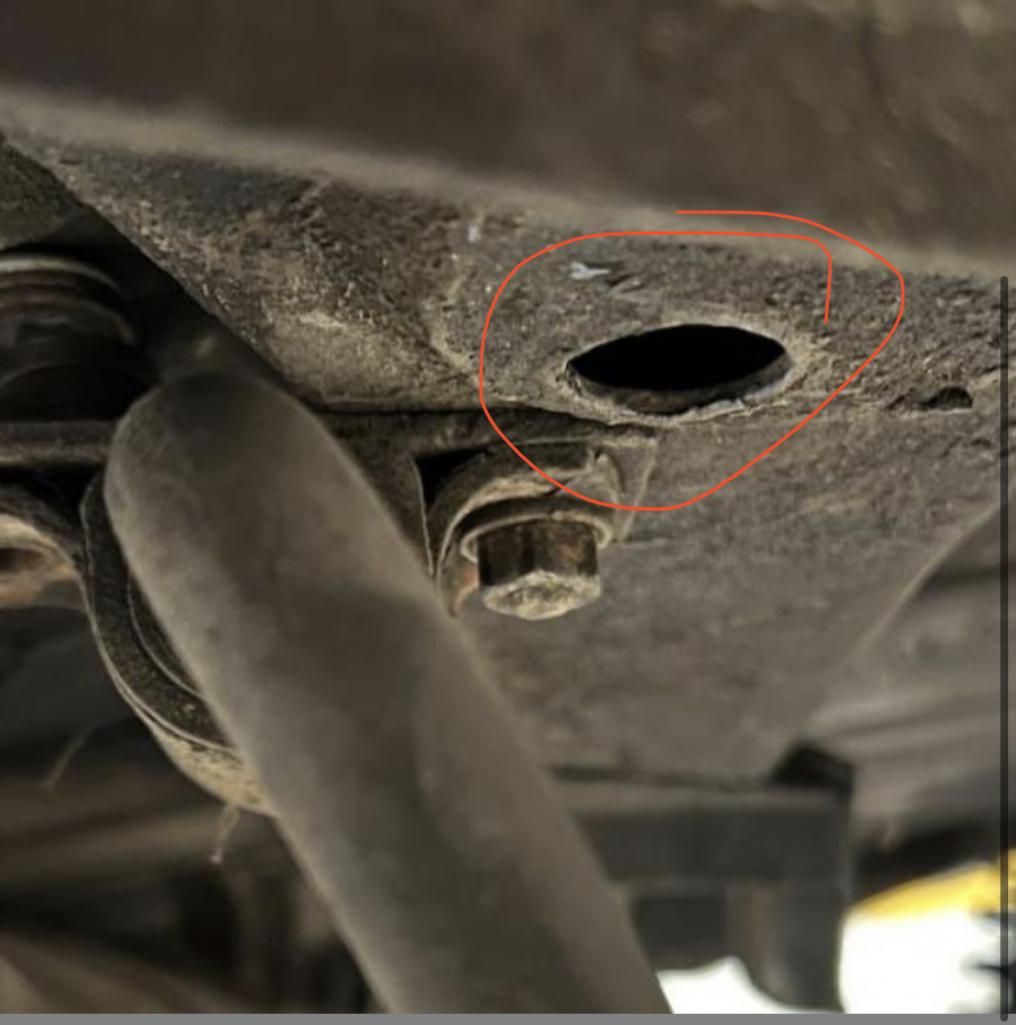
The joys of unwinding DAPO workmanship 
Posted by: DennisV Aug 13 2023, 06:20 AM

Bolt had to have been inserted through the hole circled.
I agree that the nearby hole seems like the only entry point. Though I don't see how in the heck would they have stood the bolt up and positioned it for the bracket?
 I guess where there's a will, there's a way. Seems super tedious. Particularly when they just drilled a hole through the trunk for the rearward hole.
Thanks for the removal suggestions. I was hoping I had overlooked something obvious.

Posted by: JeffBowlsby Aug 13 2023, 08:52 AM
I am not understanding what your mounting bracket is or how it is attached. Here is a standard mount which is welded in place. It has capture nuts welded to the bracket. It also has reinforcement plates in the trunk, which your car does not have.
Is it possibly an early factory installation specific to the /6, or perhaps a later PO installation?
Attached image(s)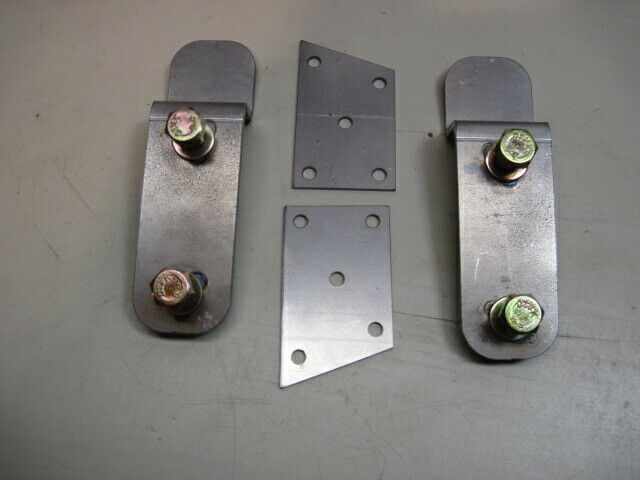
Posted by: Craigers17 Aug 13 2023, 09:00 AM
Bolt had to have been inserted through the hole circled.
I agree that the nearby hole seems like the only entry point. Though I don't see how in the heck would they have stood the bolt up and positioned it for the bracket?
I guess where there's a will, there's a way. Seems super tedious. Particularly when they just drilled a hole through the trunk for the rearward hole.Thanks for the removal suggestions. I was hoping I had overlooked something obvious.
Is it possible that it's NOT a bolt, but a piece of all-thread that they threaded up through the bottom and then put a nut on it from the top side (using that access hole)?
Posted by: sixnotfour Aug 13 2023, 09:39 AM
I am not understanding what your mounting bracket is or how it is attached. Here is a standard mount which is welded in place. It has capture nuts welded to the bracket. It also has reinforcement plates in the trunk, which your car does not have.
Is it possibly an early factory installation specific to the /6, or perhaps a later PO installation?
Cut that wierd PO installed mess.. Install the correct mounts..
Posted by: ClayPerrine Aug 13 2023, 10:48 AM
To me it looks like an aftermarket bar.
I agree with the "get the correct factory mounts and use them" comment.
Posted by: DennisV Aug 13 2023, 06:47 PM
Is it possible that it's NOT a bolt, but a piece of all-thread that they threaded up through the bottom and then put a nut on it from the top side (using that access hole)?
It was a bolt. Cut them off with a Dremel and fished them out the nearby hole.
I think the bar itself is factory. It has "16" on it.
Am I correct in understanding that 914-6 did not come with stabilizer bar standard or even as an option from the factory?
Posted by: Superhawk996 Aug 13 2023, 07:02 PM

Posted by: porschetub Aug 14 2023, 02:33 PM
Is it possible that it's NOT a bolt, but a piece of all-thread that they threaded up through the bottom and then put a nut on it from the top side (using that access hole)?
It was a bolt. Cut them off with a Dremel and fished them out the nearby hole.
I think the bar itself is factory. It has "16" on it.
Am I correct in understanding that 914-6 did not come with stabilizer bar standard or even as an option from the factory?
Pretty certain they never came with sway bar from the factory,I have one in my "6" conversion that the PO added and seem to remember it is 16mm cheers.
Powered by Invision Power Board (http://www.invisionboard.com)
© Invision Power Services (http://www.invisionpower.com)