Printable Version of Topic
Click here to view this topic in its original format
914World.com _ 914World Garage _ Dizzy timing workaround?
Posted by: torakki Mar 14 2024, 07:32 PM
I'm trying to adjust timing on my 2.0L and ran into an issue. The bolt you loosen, to rotate the dizzy, is underneath the vacuum can. I can't seem to find a tool to get under there to loosen or tighten. I've had the dizzy out and removed the vacuum advance and it's no problem getting to it. Is there something way off with my distributor?
Thanks for telling me the secret.
Posted by: worn Mar 14 2024, 08:01 PM

I'm trying to adjust timing on my 2.0L and ran into an issue. The bolt you loosen, to rotate the dizzy, is underneath the vacuum can. I can't seem to find a tool to get under there to loosen or tighten. I've had the dizzy out and removed the vacuum advance and it's no problem getting to it. Is there something way off with my distributor?
Thanks for telling me the secret.
Are you at #1 TDC?
Posted by: Dave_Darling Mar 14 2024, 08:16 PM
That looks about right. You should be able to sneak a stubby 10mm wrench onto it from one angle or another.
It is a bit of a pain, but it's possible.
--DD
Posted by: emerygt350 Mar 15 2024, 04:16 AM
That looks a hair too advanced as well. That would place the can even more over the bolt.
I use a racheting 10mm.
A 123ignition dizzy would solve that....
Posted by: barefoot Mar 15 2024, 05:31 AM
Can you invert that clamp which would put the screw on the opposite side ???
Posted by: FlacaProductions Mar 15 2024, 09:36 AM
That looks rotated way too counter-clockwise to me. Does it run with the distributor in that general orientation? Are we sure it's the right distributor?
Granted, i'm the guy who can't get my 123 installed/set up correctly but I've spent a lot of time in there recently and have had no issue with the ratcheting 10mm. Either way, don't overtighten that clamp - you can pull the bolt thru. It doesn't take much to clamp the distributor in place.
Here's mine before I started on the 123. Ran well like this but the vac can was no longer holding vac.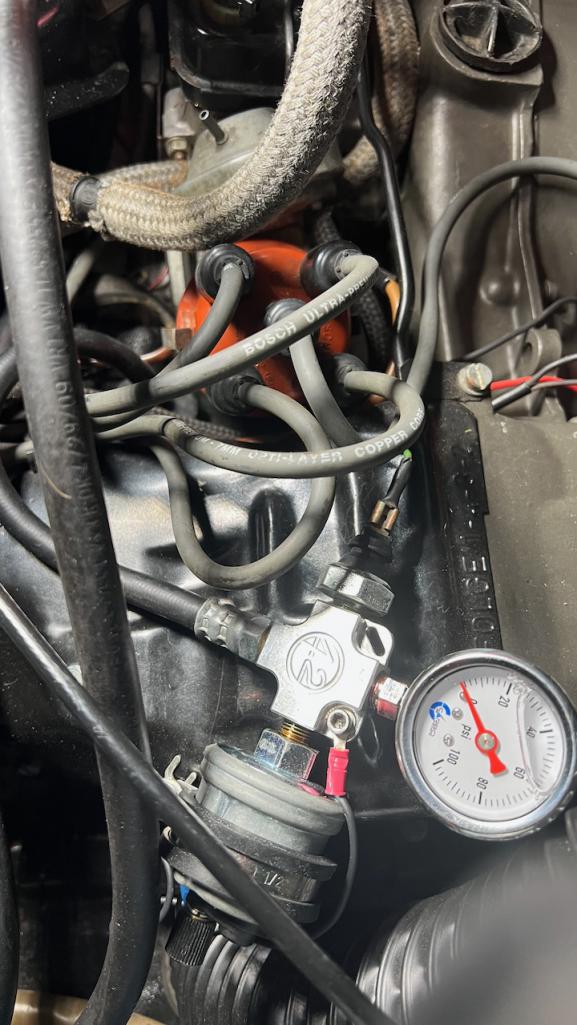
Posted by: rjames Mar 15 2024, 01:12 PM
I always found it easiest to use a box wrench in there.
Posted by: sportlicherFahrer Mar 15 2024, 03:00 PM
Are you at #1 TDC?
Think you're onto something here. Rotor looks closer to where #2 should be. #1 rotor position should be closer to pointing forward/center of car.
Posted by: ClayPerrine Mar 15 2024, 03:11 PM
There is a small line on the distributor where the cap mounts. With the motor on top dead center, the rotor should point at the line. So I would say that you have the distributor drive gear installed incorrectly in the case. That puts the distributor off by one wire tower. If the distributor drive gear is installed correctly, then the vacuum can will point roughly at the bail that holds the oil filler onto the case.
Posted by: torakki Mar 15 2024, 04:43 PM
Ok, some good info. Let me try and address the comments.
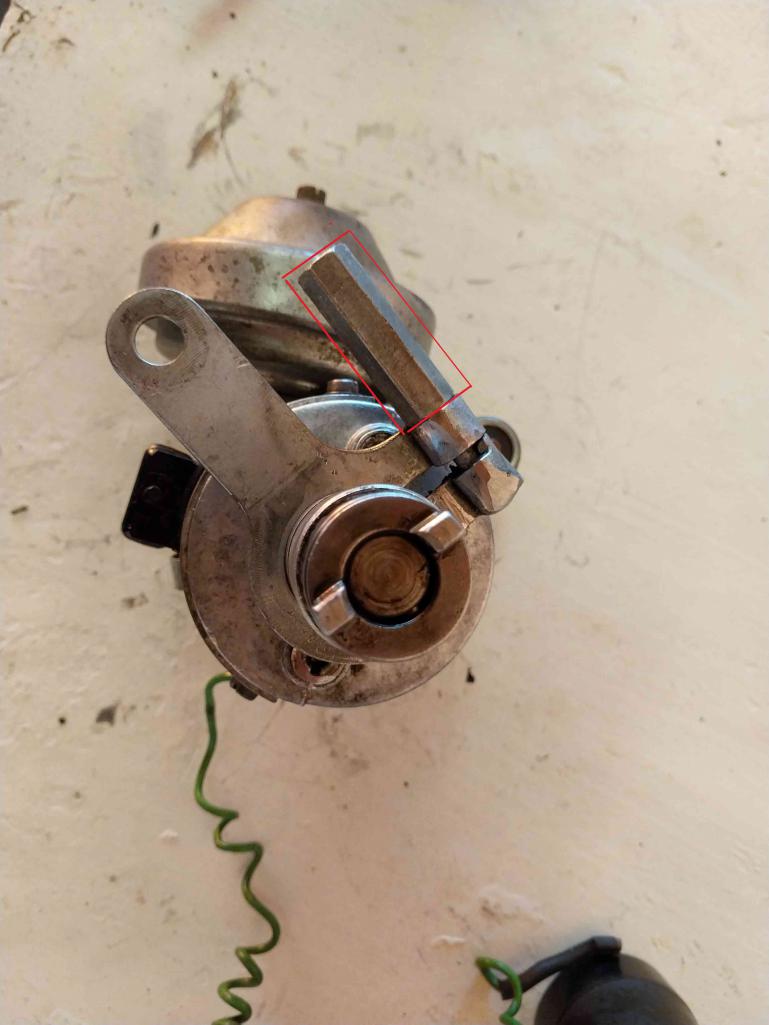
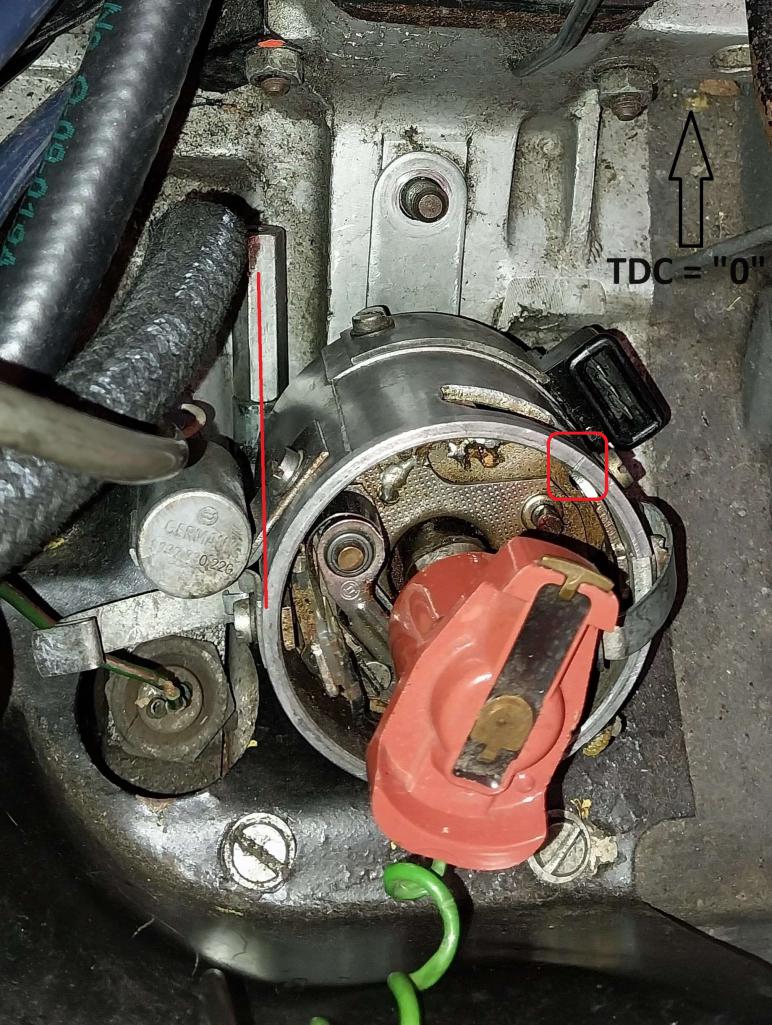
It was not at top dead center, just random, wherever it landed. I've had it at TDC for my starting point. I removed the vacuum can so I could get at the adjusting bolt. Then set to aprox 8 degrees. Ran ok but bobbled a little at first acceleration. Put the can back on with same timing but I could see the advance diaphragm rod changed the timing. It did run but now loud pops. So, as Brian's photo shows, I took the dizzy out, to loosen the bolt and re-oriented it closer to that photo. Now, does not start. Clay, you have me thinking. There is no drive gear but is a notch that goes into a slot inside the case, (top photo). It's slightly off center so you can't get it wrong. But, I'm wondering if I can rotate the dizzy one plug wire over, and move the wires one over on the cap, which would solve the access to the bolt issue. I did get a ratcheting wrench on it after rotating the can clockwise, but, like I said, won't start now. Rotating back, can hits the wrench and then it won't move. Barefoot, great idea, but I though of that too. Problem, the bolt is off center and the dizzy wont seat down far enough to engage the dizzy notch at the bottom. (photo).
I'll start from scratch and ponder the comments and get it back to TDC and rotor pointing at the line. But, not today. I've been trying for years to get this running right. Got close but not there yet. Getting burned out on it.
Thanks for all the responses. I'll follow up next time I get a chance to frustrate myself. 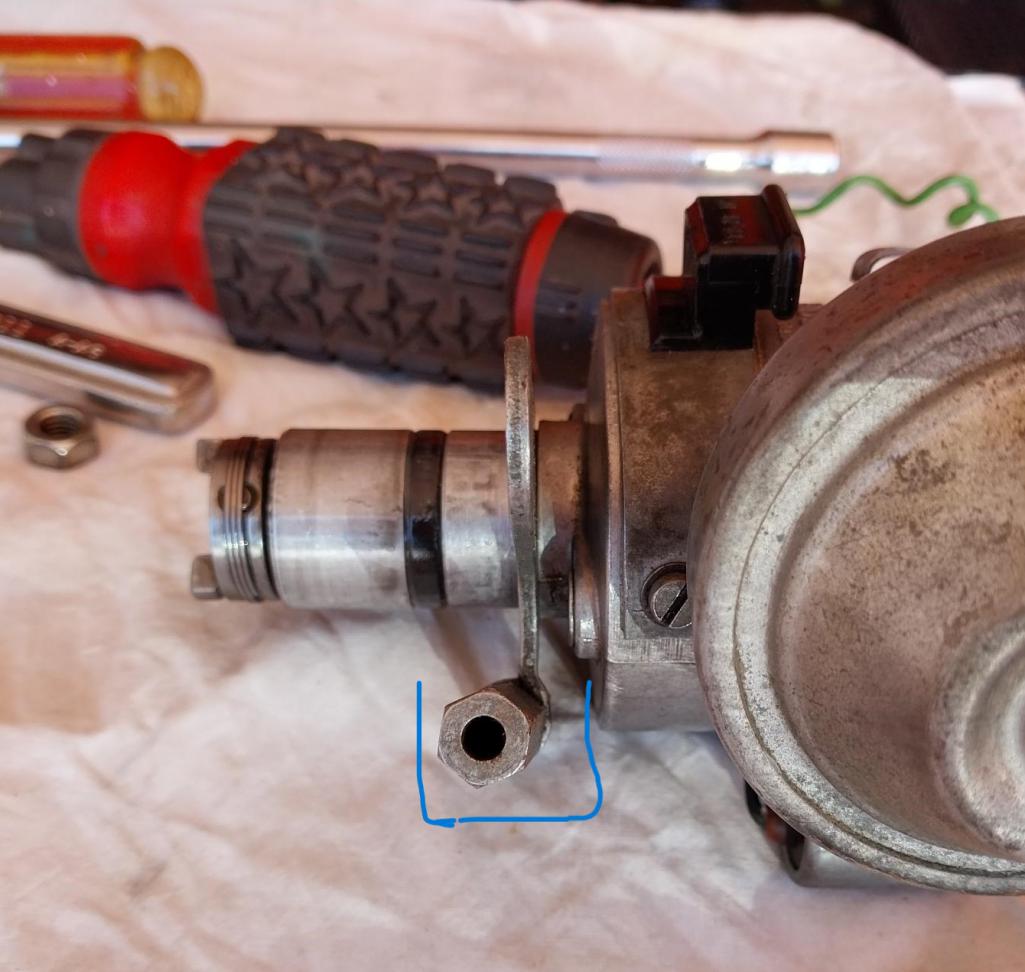
Posted by: emerygt350 Mar 15 2024, 06:56 PM
You have many 914 gurus nearish to you....
Posted by: ClayPerrine Mar 16 2024, 04:10 AM
Ok, some good info. Let me try and address the comments.
It was not at top dead center, just random, wherever it landed. I've had it at TDC for my starting point. I removed the vacuum can so I could get at the adjusting bolt. Then set to aprox 8 degrees. Ran ok but bobbled a little at first acceleration. Put the can back on with same timing but I could see the advance diaphragm rod changed the timing. It did run but now loud pops. So, as Brian's photo shows, I took the dizzy out, to loosen the bolt and re-oriented it closer to that photo. Now, does not start. Clay, you have me thinking. There is no drive gear but is a notch that goes into a slot inside the case, (top photo). It's slightly off center so you can't get it wrong. But, I'm wondering if I can rotate the dizzy one plug wire over, and move the wires one over on the cap, which would solve the access to the bolt issue. I did get a ratcheting wrench on it after rotating the can clockwise, but, like I said, won't start now. Rotating back, can hits the wrench and then it won't move. Barefoot, great idea, but I though of that too. Problem, the bolt is off center and the dizzy wont seat down far enough to engage the dizzy notch at the bottom. (photo).
I'll start from scratch and ponder the comments and get it back to TDC and rotor pointing at the line. But, not today. I've been trying for years to get this running right. Got close but not there yet. Getting burned out on it.
Thanks for all the responses. I'll follow up next time I get a chance to frustrate myself.
There is a drive gear, but it is not attached to the distributor. If you have a Haynes manual, there is a picture in there of how the slot in the top of the drive gear is supposed to be positioned when the motor is at TDC.
Posted by: emerygt350 Mar 16 2024, 09:08 AM
The more I look at that distributor the more I suspect the plug wires were one to the left.
Posted by: fiacra Mar 16 2024, 10:50 AM
The more I look at that distributor the more I suspect the plug wires were one to the left.
I was thinking the same thing... I once looked at a Beetle that the owner was selling because they never could get to run right and the problem the whole time was that they had put the plug wires back on the cap incorrectly. To check turn the rotor so that it is aligned with the notch in the distributor, put the cap back on and make sure that the rotor is now aligned with the plug wire that goes to cyl #1. If not, there's your problem. As Clay said the drive gear could also be off. The distributor shaft end is eccentric and will only mate with the drive gear one way. I once got a distributor back from the rebuilder with this installed 180 degrees off, but in that case your car will never run. If the drive gear was installed incorrectly you've got a bigger job ahead of you, but it is doable. Start with the simple thing that often is done wrong, which is the order that the plug wires were put on the distributor. The firing order is 1-4-3-2. Good luck! Taking breaks and getting a good nights rest often helps with the frustration....
Posted by: Superhawk996 Mar 16 2024, 11:19 AM
There is no drive gear but is a notch that goes into a slot inside the case, (top photo). It's slightly off center so you can't get it wrong.
Oldest mythology about T4 dizzy
It can go in 180 off but won’t seat fully but will rotate the dizzy (but engine won’t run - not your issue). And as stated above the drive tang to the shaft can be installed improperly if the dizzy itself has ever been disassembled.
Likewise, the dizzy drive is geared on the bottom of the dizzy drive shaft (12 teeth) and it’s not impossible to have that drive gear installed a tooth off (30 degrees). Even if you haven’t touched the dizzy drive, it’s not impossible that a prior owner screwed it up. As mentioned - Haynes manual and factory manual have install procedure and photos of how it’s supposed to be oriented.
Agree with checking all the simple stuff 1st (wires, rotor orientation to distributor body at #1 TDC). The notch in the distributor cap is what establishes the #1 wire in the cap with respect to #1 TDC orientation of the rotor to the distributor body.
Posted by: fiacra Mar 17 2024, 01:39 PM
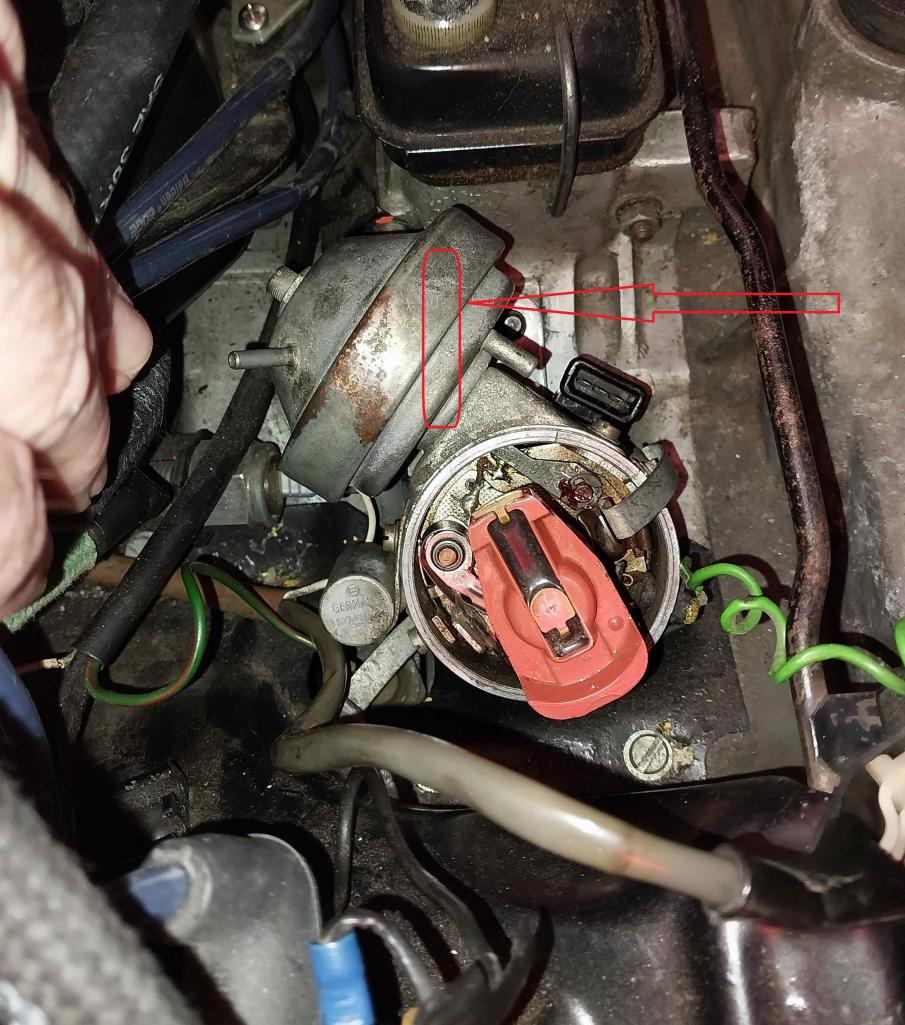
Here's a picture of the position of my distributor and the clamp nut on a 1973 2.0. It's properly timed, or at least very close, and the clamp nut is "easily" accessible and not under the vacuum can. I'm curious to see what you find once you check the plug wire position as well as the distributor gear position. Looks like something is off......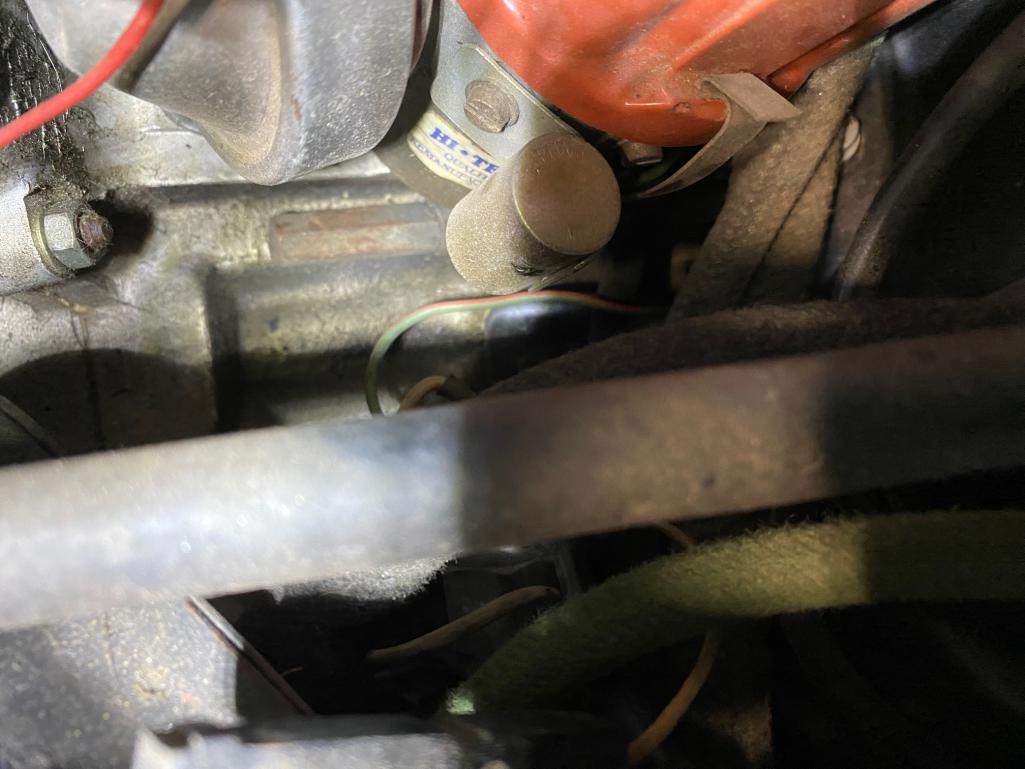
Posted by: torakki Mar 17 2024, 05:22 PM
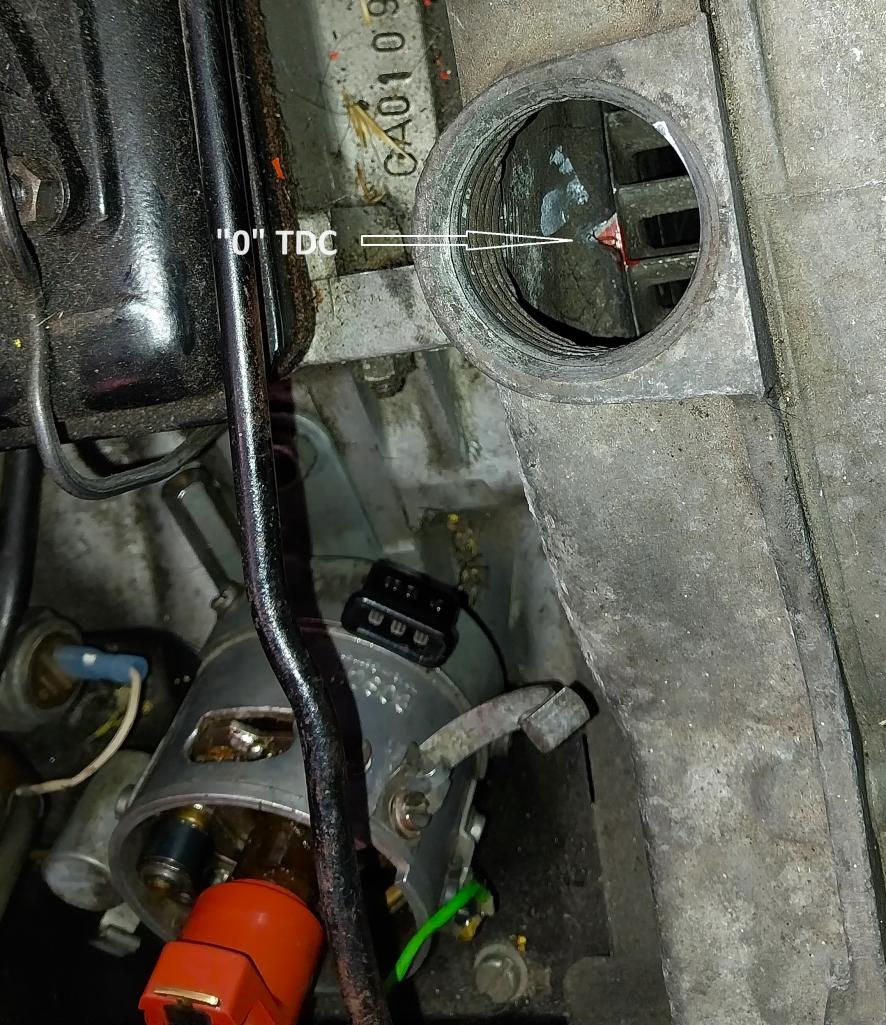
Well, I reset everything from scratch. "O" at TDC, rotor at the line on the dizzy and it started for a second but popping load so timing must be way off. So, what Superhawk996 said about the dizzy not seating right but still rotating the rotor. I found an old photo where the rotor, at TDC is pointing more left. Compared to the photo I took yesterday. I think the dizzy is not sitting in the slot. The car did run very good other than fast idle when cold and slow idle when warm. I discovered the aux air valve was not getting 12V, so when that was resolved, I had slow idle. That's when my timing issues started. And Fiacra shows a great photo of what it "should" look like. Not what mine looks like.
I'll try in the next few days to remove it (again) and re-seat it. Photos with markings are from yesterday. The other is from a few years ago.
Thanks for the great tips. 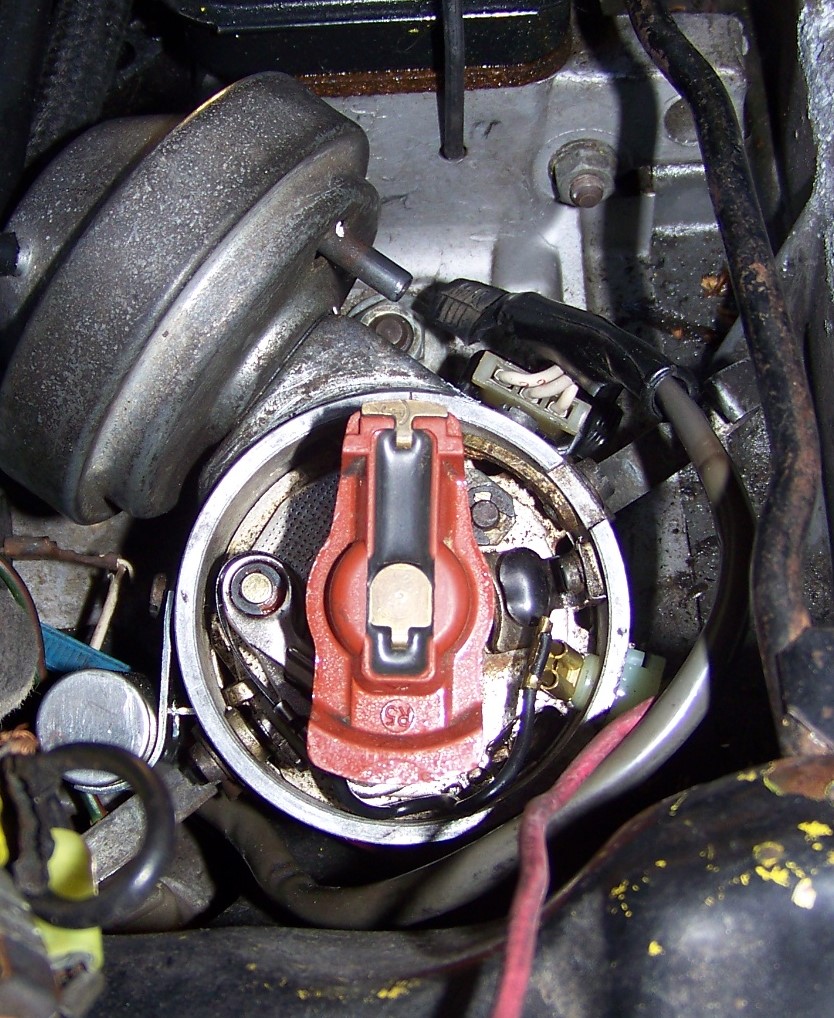


Posted by: cgnj Mar 17 2024, 05:43 PM
The amount of time you have spend noodling around to save time is sunk cost. Do it right and know that it is right forever.
Make sure you're at TDC compression stroke. Pull the valve cove and confirm that both valves are slack.
Here is a pic to help you. I've posted this screenshot at least 5 times in the last 2 years. I should use it as my avatar.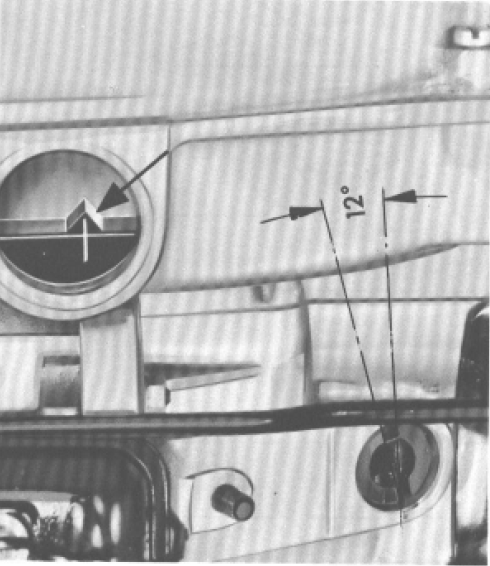
Posted by: emerygt350 Mar 17 2024, 06:06 PM
Or just use a chopstick to feel when when 1 is at tdc. Put the car in 5th and push it.
Posted by: ejm Mar 17 2024, 06:32 PM
Or just use a chopstick to feel when when 1 is at tdc. Put the car in 5th and push it.
Details on using a chopstick to locate TDC are in http://www.914world.com/bbs2/index.php?showtopic=22782

Posted by: r_towle Mar 17 2024, 06:53 PM
If you look at the picture from Flaca back about 10 posts take note of the location of the vacuum canister in relationship to the oil breather housing.
As stated, it’s not possible to mount the distributor 180 degrees of because the male key on the bottom of the distributor is off center and will never align with the female groove in the drive gear.
I would suggest you pause.
Set motor to TDC.
Use marks on flywheel, but don’t trust them.
Remove the valve cover and verify the valves are closed on cylinder 1
Remove spark plug and verify tdc on number one.
Remove distributor and get a clear picture of the drive gear in the hole.
It’s not super hard to correct this, but you need to ensure you are indeed starting at TDC.
Posted by: Superhawk996 Mar 17 2024, 06:53 PM
Or just use a chopstick to feel when when 1 is at tdc. Put the car in 5th and push it.
Be careful with just saying #1 TDC.
Each piston is at TDC twice on a 4 stroke. Needs to be at #1 TDC on the compression stroke.
Keep in mind there are folks out there that don’t know this or don’t connect the dots.
Posted by: fiacra Mar 17 2024, 08:25 PM
Or just use a chopstick to feel when when 1 is at tdc. Put the car in 5th and push it.
Details on using a chopstick to locate TDC are in http://www.914world.com/bbs2/index.php?showtopic=22782
Just don't break the chopstick.... Don't use a cheap single use one. I pull a valve cover, put the car in neutral and use a remote starter to turn the engine and watch to see what is rocking. Using a chopstick saves you the hassle of pulling a valve cover. You can do the same by turning the key in the ignition, just a lot more jumping in and out to do. Be sure to d/c the coil so you don't actually start the car (or in your case the distributor will be out). If you don't want to do either of those an alternative to pushing the car is to put the rear up in the air, put it in fifth gear, and hand turn one of the rear wheels. The other wheel has to be blocked so that it can't turn.
As superhawk pointed out if the tang on the end of the distributor shaft is in strong enough direct contact with the drive gear it can turn the distributor without it actually being properly mated. In my experience you'll know when the tang slips into the drive gear as you'll feel it do so. Firm pressure down on the distributor while you turn the rotor and you should feel it pop into place. If the O rings are new it can be hard to seat the distributor but you can use a little oil to make it easier. Much easier to tell on a type I if the distributor is properly seated as you can see the base of the distributor directly, but you can use an inspection mirror to get a decent look at the base of the distributor on this engine.
A few random thoughts that may not apply -- with all this work going on just make sure that the rotor is properly seated, that all the plug wires are firmly seated, that no wires have been pulled loose, and that the cap hasn't gotten cracked. My last step before moving forward is always to inspect all wiring in the area I've been working and physically push on all connectors to make sure they are seated. A visual inspection can fool you.
Finally, there are a lot of experienced people in the Northern California area. Not sure where you are specifically located, but a posting asking for someone to come help is not unreasonable and most people are willing to share their time and expertise. In fact, really hard to stop them from doing that
 . It's a common joke to say that if you put two experts in a room you'll get three different opinions, but at least having a second pair of eyes and hands, as well as someone to help brainstorm, can be valuable. The connections I've made on workshop days, or going to help others with their projects, have been invaluable in my quest to keep my cars on the road.
Posted by: emerygt350 Mar 18 2024, 05:49 AM
Or just use a chopstick to feel when when 1 is at tdc. Put the car in 5th and push it.
Details on using a chopstick to locate TDC are in http://www.914world.com/bbs2/index.php?showtopic=22782
I can tell you how to do it, but I can't do anything about a person's stupidity. Hopefully we all know these are 4-stroke motors. Although reading the above link makes me wonder.
Back to this issue:
If you roll the car in 5th till the tang in the drive gear shaft is where it is supposed to be in that image, and your fly wheel mark lines up, and you drop the dizzy, the rotor should be pointing kinda towards the timing mark hole and your vacuum can should be more to the right than it was. If you do those things, and any of that doesn't work out, I would then verify the dizzy is in the slot and then verify TDC. I would just use a chopstick, others suggest pulling valve covers and watching valve timing events. Your call. Just don't break the chopstick (only roll the car, don't shove the chopstick into the cylinder, just little way in the spark plug hole is all that is necessary to feel the piston when it is near the top). And it's a 4 stroke, so if you are 180 out, you are on the exhaust stroke.
Posted by: VaccaRabite Mar 18 2024, 07:46 AM
When confirming TDC, I've always found it best to get the car up in the air with one rear wheel on a ramp and the other rear wheel dangling. (be smart, and support the side dangling with a jack stand, but you need the wheel free to turn.)
With the car in 5th gear, you can now turn the dangling wheel by hand and it will rotate the motor without having to roll the entire car. You KNOW you are at TDC when the mark lines up on the fan AND the valves are BOTH closed on Cylinder 1. The smart guy takes a moment to mark the flywheel under the car with a paint pen through the inspection hole.
I will usually pull the spark plugs when I do this so that I am not fighting compression, but this is optional.
The bonus is that when I'm doing valves I can lay under the car and watch the valves while turning the motor with my foot (using my foot to turn the dangling wheel). I use the Krusty method (DRAMA!) but if you mark the flywheel with a paint pen for each cylinder TDC you can do it traditional and still not have to get out from under the car. Yes yes, this is OT for this thread, but its related!
Zach
Posted by: emerygt350 Mar 18 2024, 10:02 AM
When confirming TDC, I've always found it best to get the car up in the air with one rear wheel on a ramp and the other rear wheel dangling. (be smart, and support the side dangling with a jack stand, but you need the wheel free to turn.)
With the car in 5th gear, you can now turn the dangling wheel by hand and it will rotate the motor without having to roll the entire car. You KNOW you are at TDC when the mark lines up on the fan AND the valves are BOTH closed on Cylinder 1. The smart guy takes a moment to mark the flywheel under the car with a paint pen through the inspection hole.
I will usually pull the spark plugs when I do this so that I am not fighting compression, but this is optional.
The bonus is that when I'm doing valves I can lay under the car and watch the valves while turning the motor with my foot (using my foot to turn the dangling wheel). I use the Krusty method (DRAMA!) but if you mark the flywheel with a paint pen for each cylinder TDC you can do it traditional and still not have to get out from under the car. Yes yes, this is OT for this thread, but its related!
Zach
Not to get off topic but...
I like the Krusty method too, you leave the wheels on? I should try that... I didn't think there was enough room for me to get in there with the wheels on.
Posted by: torakki Mar 20 2024, 07:16 PM
Haven't had a chance to look at it for a few days but today, start from scratch. Flywheel at TDC "0" mark. Rear wheel raised, put in 5th gear, rotate stub axle with large socket and torque wrench. Chop stick confirms, piston at top. Tongs on bottom of dizzy match with notches and rotor points to line on edge of dizzy. Looks a little different from CGNJ's photo but close, (hard to tell the angle). Matched my orientation to Flacas' photo as close as I could tell. Car starts and pops like it's firing with an intake valve open, then dies. Timing's not even close.
I do have a friend that's a 914 expert but he's one of those guys that has multiple car projects going on, no parking space and two teenagers with activities. But I'll see him next month at a Caras & Coffee, so I'll run it past him.
I've been timing cars for 50 years. There's gotta be something hidden, that I'm not seeing. Something not related to timing. This car ran great other than slow idle after warm. I found the aux air valve had no power, fixed it and started to adjust timing for better idle.
I'll mess with it tomorrow and see if I find anything new. I appreciate all the responses and good advice. Updates soon. Thank you!! 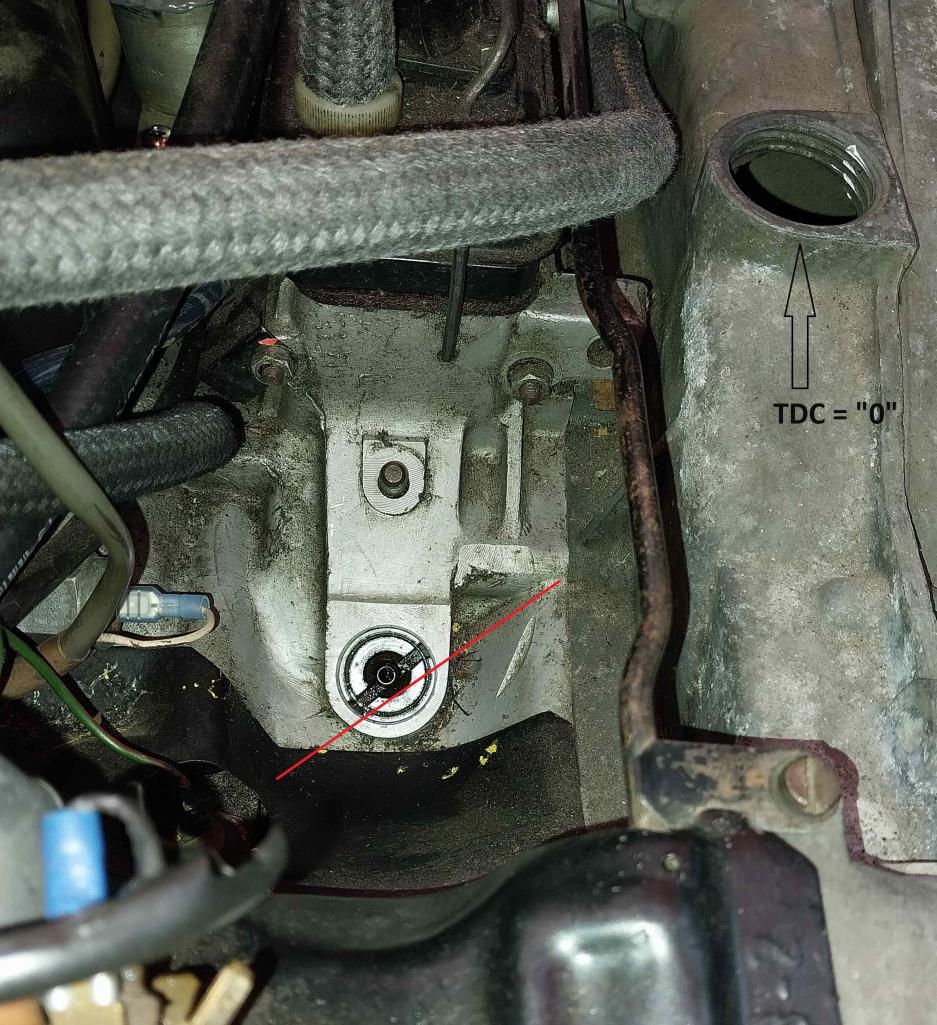
Posted by: r_towle Mar 20 2024, 08:03 PM
How is that ground wire inside the distributor?
Do you have a dwell meter?
Is the dwell constant?
Rich
Posted by: r_towle Mar 20 2024, 08:05 PM
The pointer to the fan would not be my choice for tdc mark.
The flywheel hole to view it is at the back.
But…if it’s running and popping….FI time
Posted by: FlacaProductions Mar 20 2024, 08:05 PM
Rats!
Following closely because it truly sounds like you and I are in a similar boat.
I'm doing a similar install but with a 123 which results in the same sort of "running" - and mine ran great before the 123 attempt.
I can't see what's incorrect here...but it's obviously something.
Posted by: Superhawk996 Mar 20 2024, 08:17 PM
I would disagree with your assessment that the dizzy drive is in the correct position.
I believe it is off by a tooth
Yours: 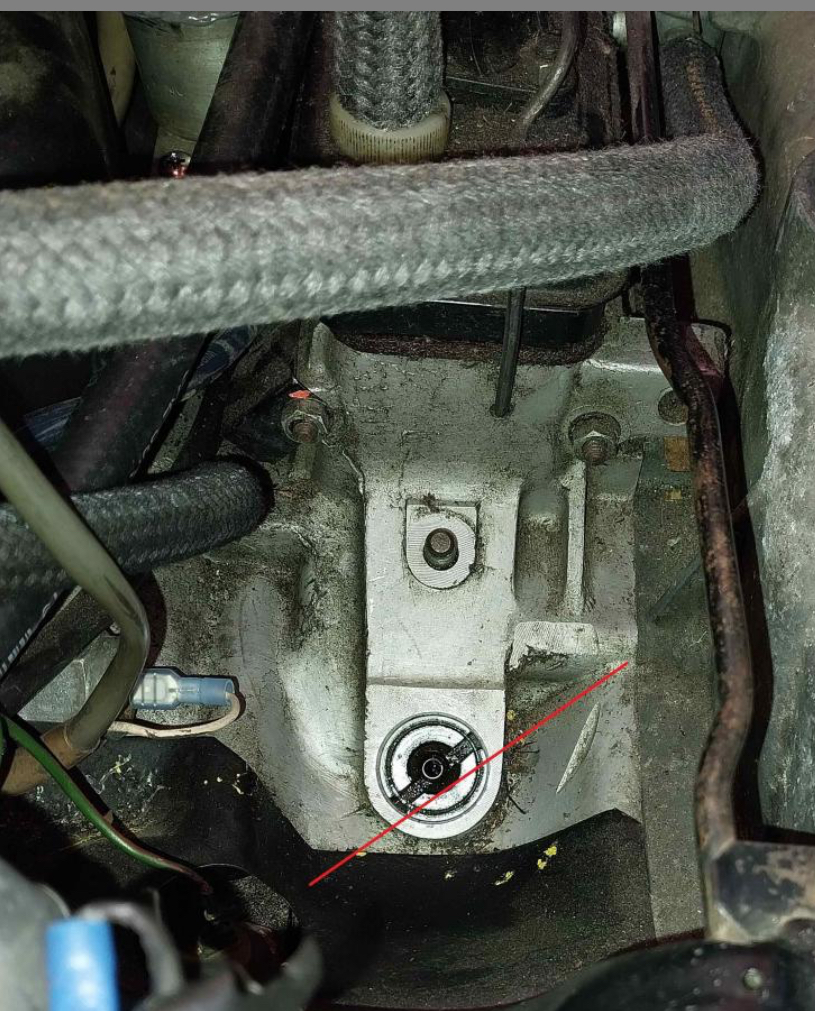
Correct example 1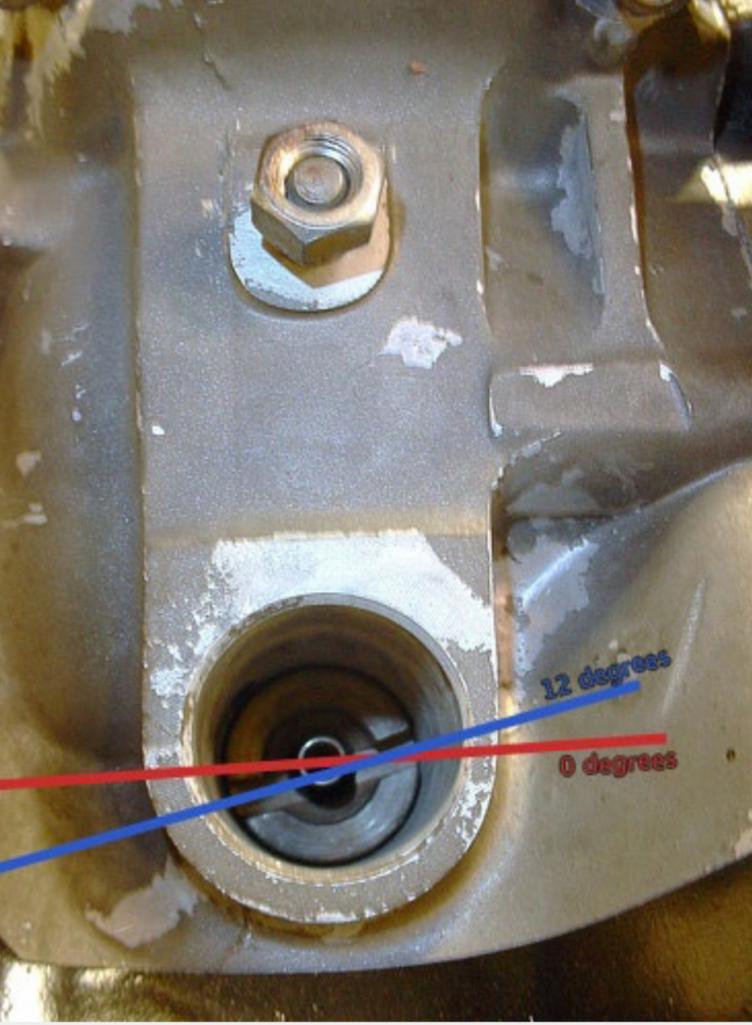
Correct example 2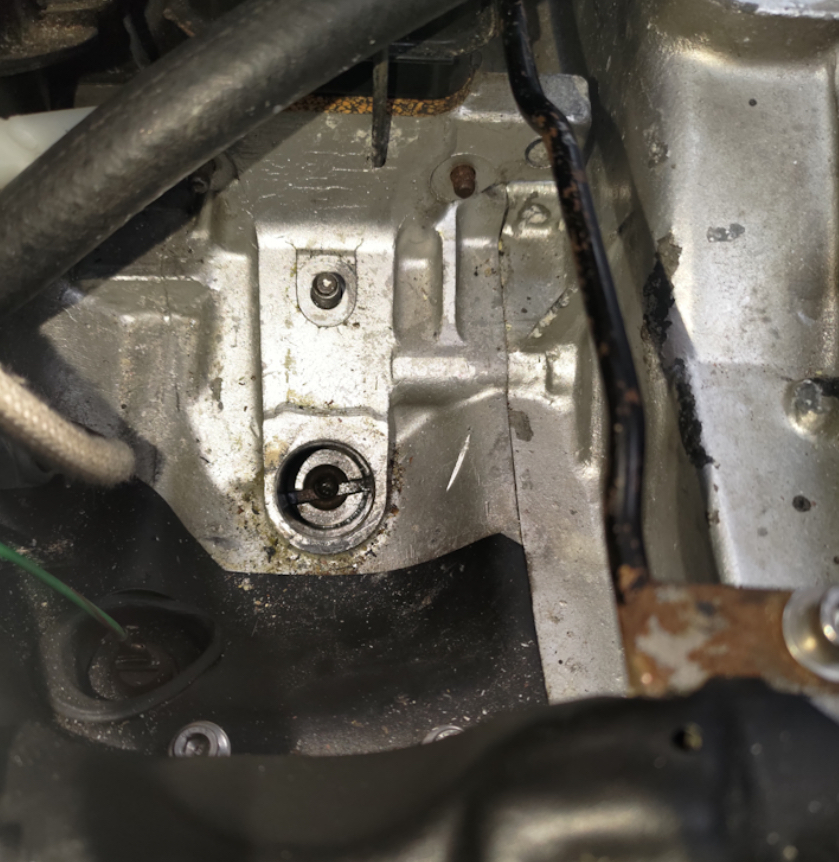
Factory manual photo reoriented closer to views above 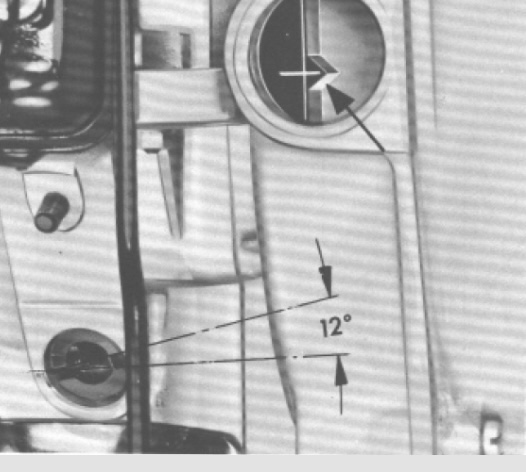
Posted by: ClayPerrine Mar 21 2024, 05:35 AM
I would disagree with your assessment that the dizzy drive is in the correct position.
I believe it is off by a tooth
Yours:
Correct example 1
Correct example 2
Factory manual photo reoriented closer to views above

You beat me to it. Pull the distributor drive and set it like the picture. Then reinstall the distributor and see what it is doing after that.
Also, make sure you are on TDC. Some fans didn't have the TDC mark, just the 27 degree mark.
Posted by: rgalla9146 Mar 21 2024, 05:50 AM
The amount of time you have spend noodling around to save time is sunk cost. Do it right and know that it is right forever.
Make sure you're at TDC compression stroke. Pull the valve cove and confirm that both valves are slack.
Here is a pic to help you. I've posted this screenshot at least 5 times in the last 2 years. I should use it as my avatar.
Finally !
Posted by: emerygt350 Mar 21 2024, 08:06 AM
Not to beat a dead horse here but also make absolutely sure the plug wires are going where they are supposed to be going. Hopefully it is just that 'off a tooth' problem.
Posted by: 914_teener Mar 21 2024, 02:32 PM
Before any horse gets beaten....why don't you tell us what the history of the car is and the dizzy that's in it before everyone here starts to jump in a rabbit hole or beat a dead horse.
Pray tell what is that on the vac cannister? Pray tell what is the dizzy number?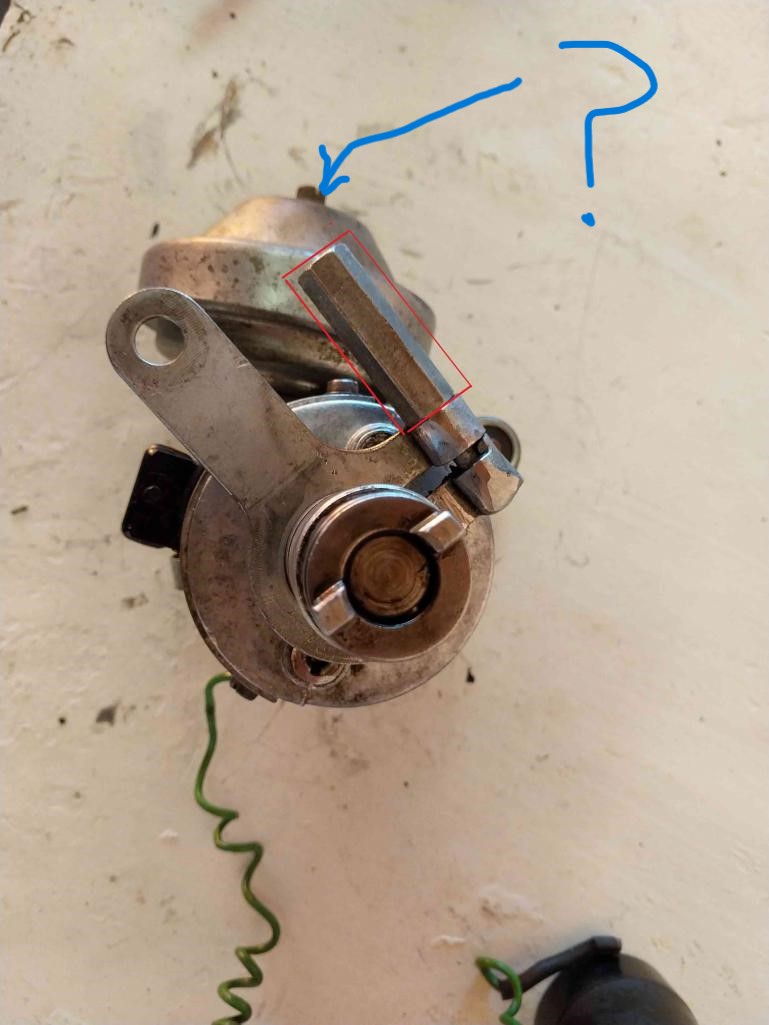
Posted by: emerygt350 Mar 21 2024, 03:12 PM
interesting.
Posted by: FlacaProductions Mar 21 2024, 04:33 PM
I asked this in post #6.
I forget - has it previously run with this distributor?
Posted by: 914_teener Mar 21 2024, 06:22 PM
I asked this in post #6.
I forget - has it previously run with this distributor?
Yea...he said it was running ok. Slow to warm up. The moment he messed with the jury rigging he assumed it's the timing.
Details:
What is the history of the engine?
Is it D-jet and are all the spec components working?
Is the harness in good shape? I see strained spade connectors and for sure somebodies been into that dizzy.
I'd get help as suggested. That dizzy's been altered or fixed and I seriously doubt if the car is running stock d-jet that it is the correct dizzy or someone at some time has messed with it.
That's just a quess....but probably the case.
Posted by: torakki Mar 22 2024, 04:27 PM
OK, more corrections. I pulled out the drive gear and turned it, (I believe) one tooth. I was feeling confident since it now matches the photos provided. Put it all back together. Starts up, but still a loud popping. I decided to record it, since it maybe something more serious, (youtube video). I checked all the exhaust ports and all around the intake, took the plugs out. Can't find anything that would cause this noise. Broken valve?
The car had this dizzy when I got it. Car ran great other than idle issue. Smooth and snappy acceleration. I had the dizzy apart some years back, cleaned the FI bits and lubed everything. Soldiered one wire (looks sloppy) but works. New cap, rotor, ign. wires, plugs, points. Plug wires have not been moved. I read '73 and '74 had the "0" for TDC. That's where I set it with rotor pointing at # "1". I have been told to change the harness. Trying to recall all the comments and addressing them.
https://www.youtube.com/watch?v=R1t7uhs9eGw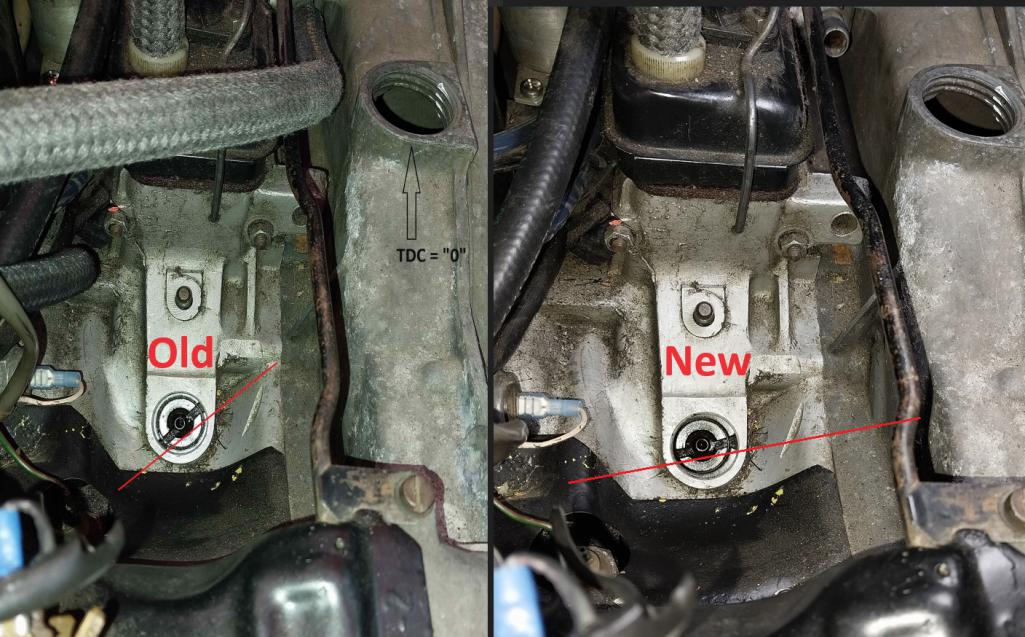
Posted by: emerygt350 Mar 22 2024, 05:08 PM
Can you compensate for it when you advance or retard? That sounds like a spark plug is out. Cross threaded plug? If it's a valve, ouch.
Posted by: Jack Standz Mar 22 2024, 06:15 PM
OK, so you took the distributor out and worked on the vacuum advance parts, right? Now the car doesn't work right?
First suggestion is to put a timing light on it (preferably a dial-back one). Then report back to us exactly where the spark is firing when you turn the motor over. Make sure the light is on the #1 ignition wire and be 100% sure you've marked TDC for #1 on its compression stroke on the flywheel. Do not just go by an existing mark.
Not sure what was done to the vacuum advance mechanism. But, that would be another area to check closely after you're sure you have the initial timing as close as you can.
And, a final guess. Maybe you've created a problem with the injection wiring, contacts, or CS valve?
Posted by: cgnj Mar 22 2024, 06:30 PM
Clearly you chose to disregard my advice and set TDC on compression by observing your valve train.
You don't know if you were at TDC compression stoke when you reindexed the distributor gear. Explain to me again why I should continue to offer alive to get your problem resolved if you chose to selectively implement it?
Posted by: Superhawk996 Mar 22 2024, 09:03 PM
After resetting the dizzy drive; static timing should be set about 8 degrees before TDC in order to start and run well enough to actually set the timing. Engine will not run well at all firing exactly at top dead center.
I listened to the video. Is that noise the sound of it firing? Sounds very odd and is too short to tell much. It also looks like you’re having to move the throttle to get that sputter?
Agree with previous comment to make sure you have haven’t disturbed other connections (mps, trigger points, etc.).
Posted by: technicalninja Mar 22 2024, 11:05 PM
The video "did" it for me.
Sounds minor advanced to me during cranking.
Fire up sounds MECHANICAL to me big time!
I'd "base line" that!
Compression test FIRST!
I think you will "find" it there.
That sounds like valvetrain damage or a significant loss of compression backwards through the intake valves or escaping between the cylinder head and jug.
Tiny chance crossed SP wires could make that noise too. Check firing order carefully.
All of the other suggestions regarding distributor indexing have been fine.
One thing that no one has suggested is using the compression pulse to verify if you're at TDC compression or TDC exhaust.
Most engines are a PIA to remove the valve cover to check, the type 4 is easy.
I NEVER remove the valve cover...
You can remove the check valve from the compression tester hose and screw it in the spark plug hole. You now have nothing more than a tube into the cylinder.
On everything except a completely destroyed motor you can rotate the engine by hand (or tire-that's easier on a type4) putting your thumb over the open tube and when you reach the compression stroke you can feel the pressure. Even slow rotation speed will end up blowing your thumb off the tube. It will be obvious!
Rotate up to TDC and you're TDC compression.
I'd check compression first, if fine leave all the plugs out and verify TDC compression using either my method or @http://www.914world.com/bbs2/index.php?showuser=403 . His is fine too-his will verify TDC compression on a trashed motor where mine will not.
As I would employ a "bump starter lead" mine can be done very quickly.
His requires removing a valve cover.
Adjusting the valves is a common maintenance item that I'd want to do anyway.
I just wouldn't want to do it to a motor that requires removal for repair.
Setting dwell with a dwell meter is a requirement, not an option. You can see dwell on a meter during cranking alone, engine doesn't have to be running.
No-ones suggested checking spark intensity. I'd hold the coil wire 1/4-1/2" away from the case. Personally, I'd kill fuel during this. Have someone turn key to start while watching spark intensity. Should be little blue lightning bolts, sharp electrical crackling noise.
Should look and sound a bit like a stun gun...
I suggest insulated pliers.
Hope this helps!
I'd do a compression test first. 
Posted by: 914_teener Mar 22 2024, 11:23 PM
Guy writes a post about trying to time a mismatched distributor in a TIV air cooled engine and ends up tearing the engine apart.
Yea...I agree...you should pull it and start over. Not.
Check the Brad Anders site....read it three times...check your parts and do all the test there and check back.
Posted by: emerygt350 Mar 23 2024, 05:22 AM
I agree with ninja and the others, that sounds makes me think a compression test is the next step, and settle down people, it's just troubleshooting a car, nobody owes anyone anything. (Besides patience etc)
Posted by: ClayPerrine Mar 23 2024, 06:04 AM
Run a compression check on the motor.
Posted by: technicalninja Mar 23 2024, 09:25 AM
I listened to the video a couple of more times.
My money is on something mechanical making that noise.
Probably not compression leaks.
Sounds like you have a spoon in a garbage disposer!
After comp test (which is a 30-minute process max) I WOULD remove both valve covers and check out the rocker arms/valve train crap that I could get to in chassis.
These are bad about pulling the rocker arm studs from the head castings.
Might be repairable in chassis, especially if they are simply loose.
I'd be screaming "TURN IT OFF! Kill it NOW!" if I had that much noise on start-up.
I DON"T EVER recommend removing an engine from the chassis for rebuild without a proper diagnosis.
You need further diag at this time, not an automatic rebuild...
Posted by: Jack Standz Mar 23 2024, 01:01 PM
Really?
If the story told is accurate, the car ran well (enough) before messing with the distributor by pulling it out and removing the vacuum cannister. After everything that's been done to "fix" the problems, my guess is the timing is actually off still, especially after removing the distributor drive and re-clocking it "one tooth".
Putting an inductive dial-back timing light on it will tell you if you're getting a spark and when (if you actually have an accurate TDC mark on #1 compression stroke, the last motor we checked TDC on, we used a $15 bore scope to watch the piston as we turned the motor over slowly by hand).
A wild guess is that there's spark, but the points gap could be wrong and the timing off. Eliminating points is one reason to go to electronic ignition, but that's another rabbit hole for another day.
If the car was running well before the start of this rabbit hole adventure, don't see how the motor lost compression or got destroyed by the things done to it as describedby the OP.
Posted by: emerygt350 Mar 23 2024, 01:55 PM
Did you listen to the video?
Posted by: technicalninja Mar 23 2024, 02:01 PM
I was just absorbing what everyone else was saying regarding this problem until I watched the 8 second video.
I wasn't planning on posting at all...
The noise in the vid changed it for me.
Usually, noises are muted via video and most times it's difficult to even hear what the poster is complaining of...
He WASN"T complaining of hideous noises!
Maybe the exact opposite happened in his video and the noises were amplified.
It could be possible.
I may be wrong, I've been wrong before.
Doesn't happen often...
To my ears that video sounds like "the Grim Reaper is knocking on the front door"
and I would not fire that again until I better understood where the noise was coming from.
That noise "deadlines" that for starting in my book.
Compression test and valve train inspection would be first on my list.
These only cost time (maybe VC gaskets) and if a problem is found will save hours of head scratching from frustrating diagnostic results.
I am in perfect agreement regarding the use of an inductive timing light and a dwell meter early on. I just don't think the problem merely ignition related at this point.
Hell yes! I would put both to work during the diagnosis, but I would start with a comp test first on this one.
Possible noise makers: foreign object in cylinder, broken valve spring, rocker arm looseness, miss wired plugs, loose tin or other items bolted to engine.
Loose balancer/hub, loose flywheel/clutch bolts.
The first four could have happened during the ignition work.
These are 50 years old...
914 teener brought up another biggie that I would research early on.
Is the distributor correct of the engine/D-jet FI?
He thinks it's wrong.
I'd bet he is correct!
I'd still do the comp test, valve train inspection before anything else.
Edit: The saddest thing is that it would taken me less time to do the diag than it has taken to post suggestions....
Posted by: torakki Mar 23 2024, 04:02 PM
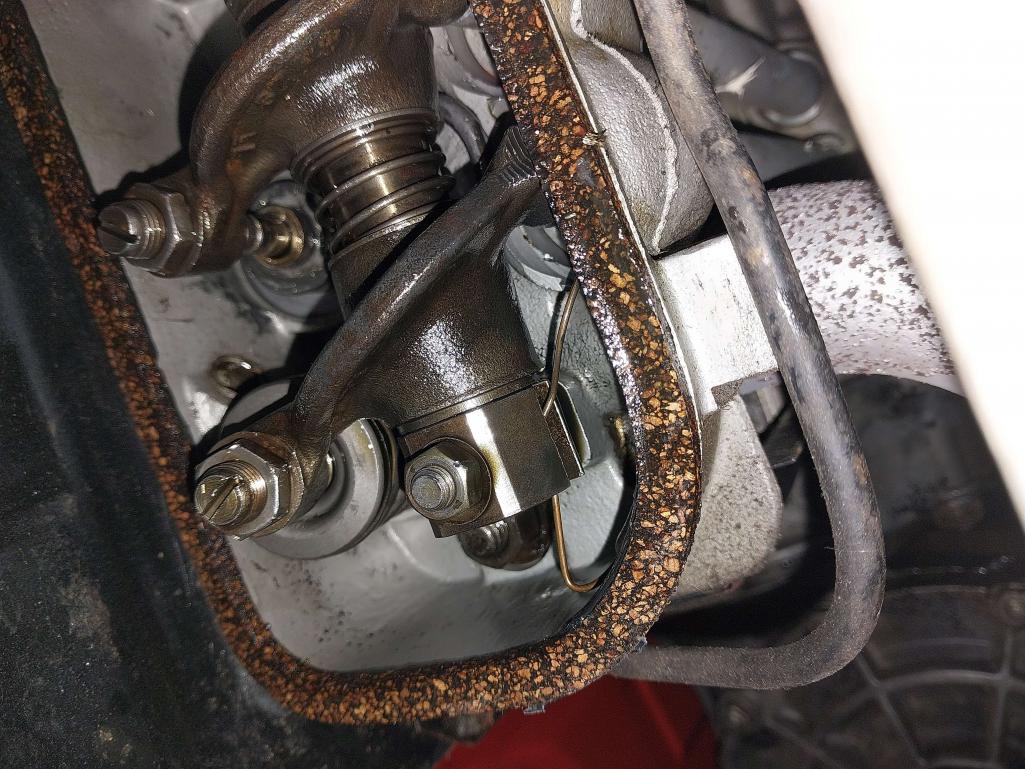
OK, the result is in: I didn't want to tweak cgng anymore, so I started to remove the valve cover. Then, I thought I'd check more comments first and saw a few saying, compression test first, which makes sense since I was thinking a broken valve. All were in the 85 to 105 range, (cold engine, battery not at full), except one. #3 was 0 PSI compression. I removed the valve cover on that side and found a broken spring. I'm hoping the valves not bent but it probably is since the piston was closing it. If it's not bent, I heard you can pressurize the cylinder with air to hold the valve closed to install the spring and retainer. I've rebuilt air cooled 911 engines before but never too deep into a 914. It seems like you can remove the heads without taking the engine out of the chassis. I was planning on changing some leaky pushrod tube seals, so I guess, now is the time.
I want to thank all the commentors with mountains of tips and places to look and comments that showed a lot of research, thinking and knowledge. This started out to be a simple timing issue and went sideways in a hurry, making diagnosing more difficult. Tomorrow, (maybe) I'll start removing exhaust and clearing the way. I'm 65 and it's hard to get up off the garage floor so not looking forward to it.
Thanks again, Bob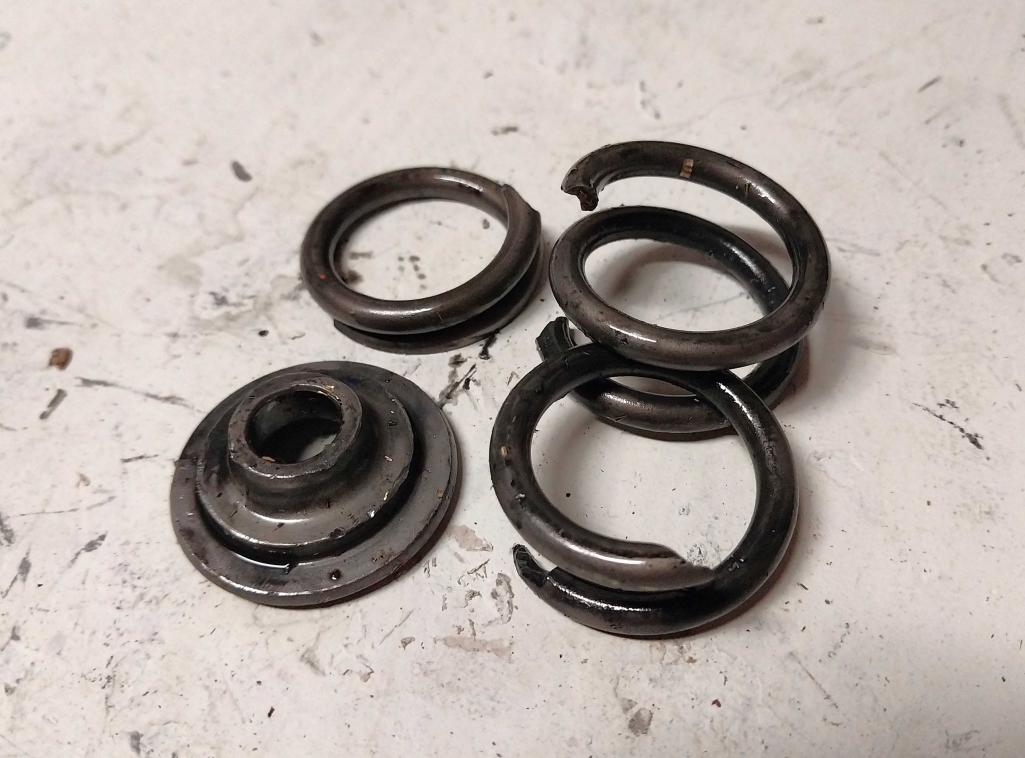
Posted by: emerygt350 Mar 23 2024, 04:13 PM
Well, thank goodness you found it and it isn't something really terrible. If I were you I would pull it. Easy and if that spring broke, I wouldn't be trusting the others. I replaced all of mine last summer (along with some other bits) and it was cheap and easy. These type 4s really are the easiest things to work on. Outside the car.
Posted by: technicalninja Mar 23 2024, 04:49 PM
You can check that valve via TDC compression on that cylinder and holding the valve closed by hand as a helper connects air pressure to the compression tester tube (with check valve removed) and if the valve is concentric the pressure will force it closed better than you can hold it closed. You won't hear hissing through the intake.
If it's bent/damaged, you will have audible flow through the intake.
I agree with emerygt350...
Even if the valve is straight, I'd do all the springs and I'd remove the engine.
Out of the car, T4s are GRAVY to work on...
Important tip. If the rocker arms are off and the valves are not part of the equation, you don't have to worry about which TDC you are at.
You really don't have to worry about TDC at all. Off TDC the air pressure will rapidly push the piston to BDC and as the valves aren't involved you can do "leak down" test at the bottom as well.
It's best to get the piston either dead ass on TDC or close to BDC and add the air pressure slowly as just hooking up 100psi to a piston 10% down the bore will SLAM it BDC with violence. You CAN bend/break stuff this way.
Every single engine I build is tested for leak down at both TDC and BDC before the valve operation is added in.
Ring sealing is equally important at both ends of the travel...
I test this immediately after cylinder head installation before I put a bunch of other stuff together.
Posted by: fiacra Mar 23 2024, 06:26 PM
Not sure where you are at but if you are close by and you decide to pull the engine to work on it I'd be happy to lend you my Tangerine Racing engine lift plate. I'm in Richmond. I also travel to Berkeley and San Francisco on a regular basis. PM me if you want to borrow it.
Posted by: Superhawk996 Mar 23 2024, 07:22 PM
Well that escalated quickly 
Clearly was more to the story than just the inaccessibility of the dizzy hold down.
Agree with others. Pull engine - it makes zero sense to try to do major engine work with the engine in the chassis.
Posted by: Jack Standz Mar 24 2024, 10:01 AM
+1
Yes, pull the motor and have someone fix it right.
Very happy for you that, at least, you've found the main problem.
"Car ran great other than idle issue. Smooth and snappy acceleration." Clearly, not the case.
Posted by: emerygt350 Mar 24 2024, 10:38 AM
It probably ran that way till the spring broke. Perhaps there was a misfire that put extra strain on the valve spring.
Posted by: Superhawk996 Mar 24 2024, 11:00 AM
Perhaps there was a misfire that put extra strain on the valve spring.
A broken or cracking valve spring can certainly cause a misfire but a misfire will not break a valve spring.
Posted by: technicalninja Mar 24 2024, 01:58 PM
If I was pulling a 914 engine out I'd inspect before making any plans
Everything off the short block.
Inspect everything.
Make plans/set desires.
Ask questions of other members.
I know little about D-jet. This is why I didn't post until the video.
I was LEARNING...
When I heard the Reaper, I thought I SHOULD BITCH!
I'd research the folks on here that are D-jet Gurus...
I'd want to know what can realistically be run with D-jet.
I believe I've seen snippets that say something like 150+ has already been accomplished.
150hp 914 would be a freaking Hoot!
There's probably an easier to hit target...
One build that I might try would be KB stroker flat tops on long H-beams,
Quench BELOW .040 maybe .035.
Biggest cam and compression the Gurus on here suggest.
I'd cheat compression high as I believe the quench above will allow it.
Appropriate valve train upgrades.
Mild port/chamber work. "profiling" is what I call it, not making big changes, port matching intake/exhaust)
SSI exhaust.
Ceramics on crown, chamber and exhaust port.
Appropriate gauges: WBO2 - knock - CHT.
15-30% improvements over stock power and much quicker to accelerate would be my expectations.
The pistons and rods DROP almost 4 lbs  of weight this way!
Edit: the initial beastie that originally started this post I'd TRASH (maybe saving it for NO) and replace with a 123 set up for D-jet. The Bluetooth one...
Posted by: emerygt350 Mar 24 2024, 02:57 PM
Perhaps there was a misfire that put extra strain on the valve spring.
A broken or cracking valve spring can certainly cause a misfire but a misfire will not break a valve spring.
Yeah, now that I think about it I don't see how that would work either.
Posted by: torakki Mar 24 2024, 07:20 PM
Not sure where you are at but if you are close by and you decide to pull the engine to work on it I'd be happy to lend you my Tangerine Racing engine lift plate. I'm in Richmond. I also travel to Berkeley and San Francisco on a regular basis. PM me if you want to borrow it.
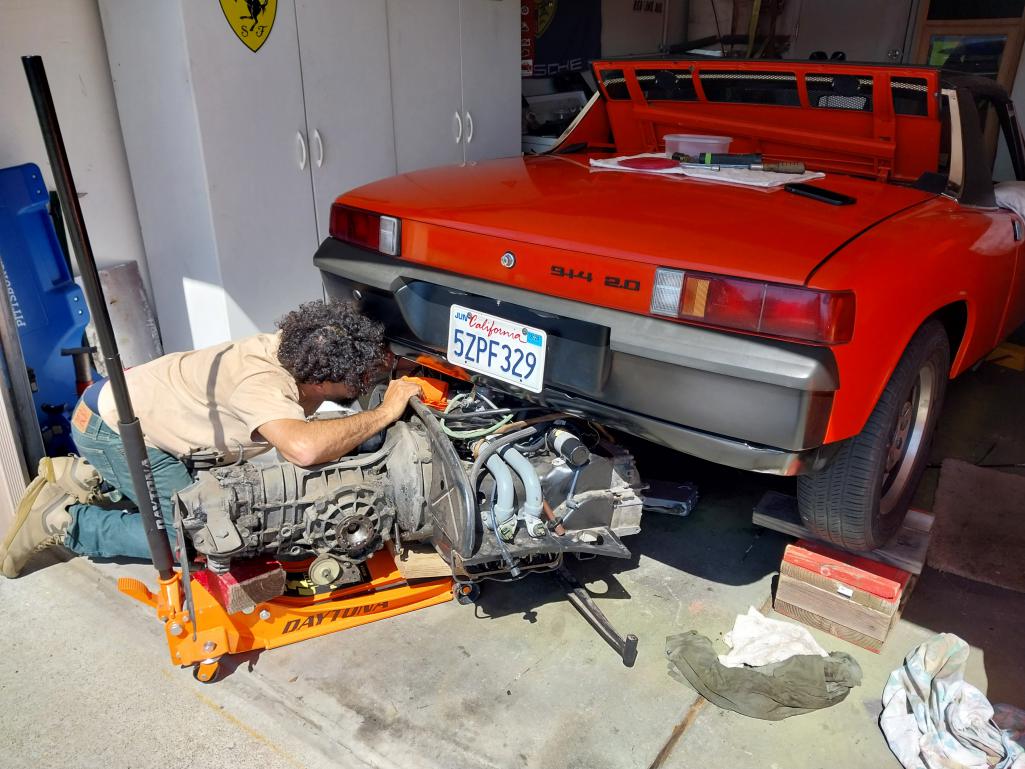
Yes, after I posted yesterday, I started thinking. I should pull the lump out. Then did a little research. I'd feel more comfortable when it's finally back together that I did it the right way and looked over anything suspect. fiacra, wow, that's very nice of you. I do have a low profile, extended reach floor jack so I should be OK. You're not too far, I'm up in Fairfield.
When I was younger, this would be ok. Now, old knees, old back and tired arms so it may take a while to finish all this. technicalninja, interesting knowledge on pressurizing the cylinder. I would think it would need huge air to push the piston down, turn the crank and components. I'd love to have 150hp in a 914 but most of what you talked about was over my head. All the 911 rebuilds I've done were from stock to stock. Easy stuff.
So, I started the disassembly today. Got must of the underneath stuff undone. I hope to get all disconnected by Tuesday when a friend will stop by to help drop the motor. My younger years, once a 911 was jacked up with oil out, I could have it out in around 1 hour. Maybe 2 if I keep having the wrong tools under the car with me.
Thanks again for all your comments and advice. Much appreciated. Bob
Posted by: technicalninja Mar 24 2024, 07:34 PM
You have to be damn careful doing leak downs and make SURE the wrench/breaker bar you are turning the engine over with is NOT on the front crank pully when you apply air.
If it is and you're not at PERFECT TDC it will throw the tool, with a VENGANCE, across the shop.
"Tomahawk" is a good description of how it flies...
Yep, I've done that before, thankfully it didn't hit anything important!
Posted by: r_towle Mar 24 2024, 08:11 PM
Buy new shifter bushings.
Check clutch and accel cables…easier to replace now.
Two new front rubber motor mounts.
New rear main seal
New gear oil
Check cv joints
New muffler gaskets at engine and at muffler joints
New valve cover gaskets
New push rod tube seals
New oil cooler seals
Dizzy and oil temp oring and washer
As far as getting the spring on….go order the proper clamp, remove the head and do it properly so you can look inside.
Posted by: r_towle Mar 24 2024, 08:12 PM
Remove the heat exchangers and muffler now, before dropping the engine.
It’s way easier.
Posted by: emerygt350 Mar 25 2024, 05:03 AM
And that tangerine racing engine lift plate makes everything better, I would borrow it if you can.
Posted by: VaccaRabite Mar 25 2024, 07:03 AM
I'd research the folks on here that are D-jet Gurus...
I'd want to know what can realistically be run with D-jet.
I believe I've seen snippets that say something like 150+ has already been accomplished.
150hp 914 would be a freaking Hoot!
Edit: the initial beastie that originally started this post I'd TRASH (maybe saving it for NO) and replace with a 123 set up for D-jet. The Bluetooth one...
Djet needs then engine to be near stock to run. Djet cam. Even just changing the displacement from 94 to 96mm needs a modified sensor (which can be bought from Tangerine). Everything needs to be at or near stock, including cam profile and compression for Djet to work right. Its best not to think of Djet as a tune-able system, though you can. But, there are good reasons why 2056 guys running Djet are happy with 120hp. Go beyond that, and you are requiring carbs or modern EFI.
My old 2056 was a bit more then 120 - but I was slightly more compression, Microsquirt, and a different cam.
Zach
Posted by: technicalninja Mar 25 2024, 08:46 AM
I'd research the folks on here that are D-jet Gurus...
I'd want to know what can realistically be run with D-jet.
I believe I've seen snippets that say something like 150+ has already been accomplished.
150hp 914 would be a freaking Hoot!
Edit: the initial beastie that originally started this post I'd TRASH (maybe saving it for NO) and replace with a 123 set up for D-jet. The Bluetooth one...
Djet needs then engine to be near stock to run. Djet cam. Even just changing the displacement from 94 to 96mm needs a modified sensor (which can be bought from Tangerine). Everything needs to be at or near stock, including cam profile and compression for Djet to work right. Its best not to think of Djet as a tune-able system, though you can. But, there are good reasons why 2056 guys running Djet are happy with 120hp. Go beyond that, and you are requiring carbs or modern EFI.
My old 2056 was a bit more then 120 - but I was slightly more compression, Microsquirt, and a different cam.
Zach
I stand corrected!
See, I really am not proficient with D-jet!
Stay wimpy, it's safer!
I too am a HUGE believer in modern digital FI!
I haven't worked with analog shit in decades...
It definitely is a step BACKWARDS!
Now, J-jet and K-jet I have lots of experience with.
Still like the new junk better!
Posted by: Eric_Ciampa Mar 25 2024, 02:13 PM
I have the Tangerine lift plate and I work in Sacramento. I would be happy to meet you in Sac if I’m closest.
Posted by: emerygt350 Mar 25 2024, 03:39 PM
I'd research the folks on here that are D-jet Gurus...
I'd want to know what can realistically be run with D-jet.
I believe I've seen snippets that say something like 150+ has already been accomplished.
150hp 914 would be a freaking Hoot!
Edit: the initial beastie that originally started this post I'd TRASH (maybe saving it for NO) and replace with a 123 set up for D-jet. The Bluetooth one...
Djet needs then engine to be near stock to run. Djet cam. Even just changing the displacement from 94 to 96mm needs a modified sensor (which can be bought from Tangerine). Everything needs to be at or near stock, including cam profile and compression for Djet to work right. Its best not to think of Djet as a tune-able system, though you can. But, there are good reasons why 2056 guys running Djet are happy with 120hp. Go beyond that, and you are requiring carbs or modern EFI.
My old 2056 was a bit more then 120 - but I was slightly more compression, Microsquirt, and a different cam.
Zach
Ask me how I know Zach speaks the truth!
Posted by: torakki Mar 26 2024, 06:45 PM
I have the Tangerine lift plate and I work in Sacramento. I would be happy to meet you in Sac if I’m closest.
Another big thanks to Eric. I've been working on the car the last few days, couple hours each day and got the engine out. A big floor jack and a Porsche loving friend made it very easy. Maybe 2 hours of disconnecting things and maybe one + hours to do the final drop. r_towle - Lots of great tips. Things to think about. The car only has about 40 miles on it since the resto job. It kept getting put aside for other projects. I was buying auction cars with damage and doing repairs to flip. So, many years have gone buy but many things are still new, like shift bushings, exhaust gaskets. CV joints still look like new grease, etc... I do have a valve spring compressor that has worked on 911 heads.
VaccaRabite - Wow, getting complicated. I'd love to have that kinda HP in this little tike but as one poster said, "stay wimpy". I have a couple other "Godzilla" cars. BTW - you must know Dominic.
I'd be interested to see a tool fly across the landscape just from compression. As long as it didn't hit a car, (or person). Thanks for the additional input on the top end rebuild. Bob
Powered by Invision Power Board (http://www.invisionboard.com)
© Invision Power Services (http://www.invisionpower.com)