Printable Version of Topic
Click here to view this topic in its original format
914World.com _ 914World Garage _ 2270 Valvetrain Geometry
Posted by: vjb206 Mar 19 2024, 07:57 AM
Hey Folks!
I’m in the process of a 2270 build (I’m a bit of a n00b, but using this as a great learning experience) and have some questions I was hoping the collective wisdom of the board could help me out with…
Dual springs
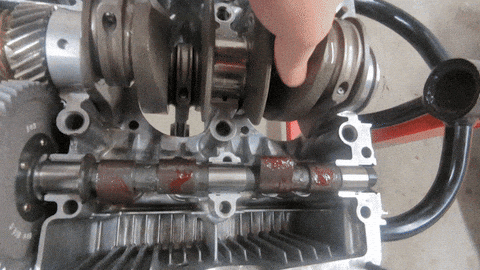
I’m running a WebCam #163/86b. This cam calls for dual springs which I had my machinist install. Of course I read the Jake Raby Valvetrain Geometry article after my 1st trial-run of test-fitting the adjustable pushrod to gauge lift. The springs are –so tight– that I bent the pushrod. He warned us, so I can’t complain. My question is - will I do damage to the cam test-fitting like this? I can deal with a slightly bent adjustable pushrod here and there, but I don’t want to damage the internals. Thoughts?
Rocker assembly
Do I need a shim on either side of the rockers? Or can the rocker make contact with hexagonal support/blocks directly? I’m getting .004 on the feeler with just a solid spacer, 2 shims, 2 rockers, and the 2 support/blocks. This means that I have only 1 shim per rocker, leaving one side un-shimmed, and abutting up against either the support/block, or the solid center spacer. Is that problematic?
As usual, thanks in advance!
vb
Posted by: Jack Standz Mar 19 2024, 12:14 PM
Dual Springs
Are you sure the pushrod was seated in the cup of the lifter? If it is riding on the edge of the lifter, you can end up with zero lash and bend the PR.
Is the adjustable PR installed and adjusted correctly? If it's too tight, you can end up with zero lash or negative clearance and bend the PR.
Rockers
Clearance the spacers (make them thinner) as needed and use different thickness of shims to have the rocker approximately centered on the valve stem with a good wiping motion. It's an iterative process until you get it right. Start with multiple shims of varying thicknesses
Posted by: Jack Standz Mar 19 2024, 12:40 PM
The above assumes the cam/gear was installed correctly. All bets are off if it isn't.
Posted by: VaccaRabite Mar 20 2024, 05:05 AM
As long as you used a good assembly lube you will not damage the cam or solid lifters.
Did you already do the math the show what your max lift, range of acceptable lift, and exact mid lift should be? Do you know the approximate starting length of your adjustable pushrod?
I'm assuming that you are building your rocker arms with the soild bushing kit EMW and TIV store sells? If so, that kit is sold oversized and is intended that you mill down the spacers until everything fits. When I did it, I used 400 grit sand paper on a pane of glass and cutting oil.
I'd suggest taking pics and posting them up of what you are attempting. And talk to the vendor of the rocker bushing kit and get instructions on how its supposed to fit. Its been a while since I did it (like 15 years) so the kit may have changed...
Zach
Posted by: vjb206 Mar 20 2024, 07:06 AM
Thank you @http://www.914world.com/bbs2/index.php?showuser=4366 Standz, and @http://www.914world.com/bbs2/index.php?showuser=1435
- Definitely possible the cap wasn't seated correctly in the cup. This is only my 2nd build and 1st with this kind of valvetrain work.
- I'm fairly certain the cam is installed correctly... you can see it right before I closed it up. I had the lobes pointed in the right direction relative to the dot on the gear and all that...
- Re: Maths... no. I actually don't know how to do the math ahead of time. I have my cam card and I know what lift I'm looking for. But my approach (following Jake's valvetrain post) was to set the adjustable PR to 27.1 and then fiddle... Little more here, little less there. I quickly came to the conclusion that I needed boss shims to get the rocker assembly sitting higher to help with my angles, so I just temporarily fit washers. I've ordered boss shims of varying sizes, and intend to play more this weekend. Good to know that I'm not damaging anything by keeping the dual springs in there. I realize that right now with temp washers in the head boss, and my deck height still in flux (more waiting on shims) all I'm doing is just getting a feel for how to do this measurement, and I have no actual measurements yet. That's fine, as I'm using this phase of the build to learn and get a feel for how this works.
- Glad to hear that taking down the blocks can be a home-garage-type-thing. I've been learning I need 3 shims to the right of the rocker to prevent binding, so the hexagonal block will definitely need to be taken down as well as the spacer. I'll do the 400 grit sand paper on a pane of glass and cutting oil-thing as well!
- Dumb-question alert: Are rocker shaft shims of varying sized (typical products offered from JBugs, AA, etc.) for non-type 4s interchangeable? I don't see any sets of varying thickness specifically sold for Porsche 914, but tons for Type 1/2/3...
I'm going to find time this weekend for more fiddling and will follow up with pics/GIFs (and likely more questions!).
Thanks all!
Posted by: Jack Standz Mar 20 2024, 10:17 AM
Didn't you mention that you're having Tabari (from the Samba) machine your rockers for swivel feet? If so, why not have him machine them for setting up the spacers?
Posted by: vjb206 Mar 20 2024, 11:30 AM

Didn't you mention that you're having Tabari (from the Samba) machine your rockers for swivel feet? If so, why not have him machine them for setting up the spacers?
He just sold me the swivel feet, he's not doing shims / blocks AFAIK. I've asked him and if he says yes, obvi I'll pull the trigger.
Posted by: GBX0073 Mar 20 2024, 04:39 PM
Tabari
Will sell you cut down blocks and Shims you will be loading up on shims with the cut down blocks
Powered by Invision Power Board (http://www.invisionboard.com)
© Invision Power Services (http://www.invisionpower.com)