Printable Version of Topic
Click here to view this topic in its original format
914World.com _ 914World Garage _ 1.7 Rebuild First Start Up Advice
Posted by: Robroe Jul 4 2024, 05:15 PM
Have 73 1.7 bought in pieces. Engine has been rebuilt and ‘souped up’ however I don’t know what internals were installed. New crank, cam, pistons, rods and heads. but I don’t know which ones. Weber 44 idf carbs. Never had oil in it and been stored unstarted for 10 yrs in climate control. I’ve added oil by slow dripping 2 quarts through the oil pressure sensor hole. Oil dripped out of the rockers so I’m pretty sure it got some oil as pre lube. It’s on a home built test stand with the transmission mounted with the starter.
I’m trying to turn the engine over by hand with the plugs out. Have squirted oil in each plug hole. I’m able to turn the engine by hand about 45 degrees and it gets harder to spin so can’t go any further. Would it be a good idea to pull the rocker arms to see if the builder installed some wild cam without checking valve/piston clearance? It doesn’t feel like internals are hitting each other but who knows? Would hate to pull the heads if I don’t have to. Any thoughts before I break something?
Rob Roe
Newbie
Posted by: Montreal914 Jul 4 2024, 05:23 PM
Cheap Amazon emdoscope connected to you phone should allow you to see what is happening in the chaber via the spark plug hole I would think. Mine has a 45 degree mirror attachment to view on the side.
Posted by: Superhawk996 Jul 4 2024, 05:27 PM
With what you just described, I can’t see any scenario where I wouldn’t be taking it apart.
Posted by: emerygt350 Jul 4 2024, 06:00 PM
When you say 'by hand', what do you mean? A breaker bar or pulling on the fan?
Posted by: 930cabman Jul 4 2024, 08:18 PM

Have 73 1.7 bought in pieces. Engine has been rebuilt and ‘souped up’ however I don’t know what internals were installed. New crank, cam, pistons, rods and heads. but I don’t know which ones. Weber 44 idf carbs. Never had oil in it and been stored unstarted for 10 yrs in climate control. I’ve added oil by slow dripping 2 quarts through the oil pressure sensor hole. Oil dripped out of the rockers so I’m pretty sure it got some oil as pre lube. It’s on a home built test stand with the transmission mounted with the starter.
I’m trying to turn the engine over by hand with the plugs out. Have squirted oil in each plug hole. I’m able to turn the engine by hand about 45 degrees and it gets harder to spin so can’t go any further. Would it be a good idea to pull the rocker arms to see if the builder installed some wild cam without checking valve/piston clearance? It doesn’t feel like internals are hitting each other but who knows? Would hate to pull the heads if I don’t have to. Any thoughts before I break something?
Rob Roe
Newbie

If you are unable to get a full rotation of the crank somewhat easily, start dis assembling her. Or try the starter to spin it over. If you are able to get her to spin, connect an oil pressure gauge and see if she will pump up some oil pressure.
Might get lucky

Posted by: bkrantz Jul 4 2024, 08:29 PM
With what you just described, I can’t see any scenario where I wouldn’t be taking it apart.
Yup. At leat pull the heads and check piston to valve clearance.
Posted by: Superhawk996 Jul 4 2024, 09:38 PM
. . . Or try the starter to spin it over. If you are able to get her to spin, connect an oil pressure gauge and see if she will pump up some oil pressure.
Might get lucky
I would strongly advise against this. You will not get lucky. The starter exerts a lot of torque on the crankshaft. The starter is fully capable of bending valves. I don’t know the gear ratio between starter and ring gear off the top of my head but it’s probably about a 10:1 mechanical advantage.
If you already have an interference that isn’t allowing you to rotate the crank - more mechanical advantage will only serve to break or bend things.
Without spark plugs the crank should rotate freely by hand, no exceptions.
Oil pressure has nothing to do with not being able to freely rotate the crank at this stage in the game. If the original builder didn’t apply assembly lube to the main bearings and the cam lobes, the damage would be done before the engine ever builds oil pressure by rotating it. And if that sort of negligence was causing a lack of hand rotation (I’ll guarantee it isn’t), that would be all the more reason to tear it down, find out what was done, and reassemble it correctly.
Posted by: Superhawk996 Jul 4 2024, 09:52 PM
If you are unable to get a full rotation of the crank somewhat easily, start dis assembling her.

Posted by: Superhawk996 Jul 4 2024, 09:55 PM
Without spark plugs the crank should rotate freely by hand, no exceptions.
[edit] - I guess the exception would be if the transmission is in gear. Make sure the trans is in neutral and that you’re not trying to rotate the whole gear cluster and differential as you’re rotating the engine by hand
Posted by: emerygt350 Jul 5 2024, 05:01 AM
You could remove the rockers and give it a go, if it turns freely you know that either your hitting or you have some crazy powerful springs ...
Posted by: Robroe Jul 6 2024, 12:02 AM
You could remove the rockers and give it a go, if it turns freely you know that either your hitting or you have some crazy powerful springs ...
Removed the rockers and push rods. Could turn the engine by hand by gripping the fan. I’m considering cranking the starter with the rockers and push rods removed to see if it builds enough oil pressure to turn off the oil warning light. If I get that far, then was considering reinstalling the push rods and rockers and adjust the valve clearance very loose and try to turn it over again by hand. With luck, there will be no valve/piston interference and I can turn the crank by hand. Not sure what valve springs I have. They are doubles but that’s all I know. I assume the springs can be heavy enough to make it harder to turn by hand. But sounds like it should be turntable by hand unless there is clearance issue. Going very slow and cautious. Thanks for your thoughts. Please keep your suggestions coming! I might just get an endoscope camera to look inside. I can see numbers on the pistons through the spark plug holes but can’t read the numbers.
Posted by: emerygt350 Jul 6 2024, 05:10 AM
I wouldn't worry about oil pressure yet but it couldn't hurt with the rockers off.
The springs are a little worrisome to me. I know they are used but I wonder if that means there is some radical cam in there. Do you have a micrometer? Measuring the lift on the cam might be interesting. You should be able to ballpark it with the pushrod travel.
To determine if it's the valve springs you could put them back on one intake valve and try turning it by hand. If that works add another and keep going. If it gets progressively more difficult but the engine keeps turning...
Posted by: emerygt350 Jul 6 2024, 06:15 AM
And it just occurred to me... Check top dead center on 1 and verify the correct timing of the valve events. If they did just 'throw it back together' the cam might be off. I doubt that's the case, but it would be good to know.
Posted by: technicalninja Jul 6 2024, 07:15 AM
With what you just described, I can’t see any scenario where I wouldn’t be taking it apart.
It's already OUT!
With the plugs and the rockers off it should spin completely free.
You should be able to turn the flywheel/front pully with a single finger and no effort.
"Gripping" should not be required.
You should tear down.
IMO doing anything else is a waste of time. you should be able to get that down to a "short block" with the rods hanging out of the case fairly quickly.
The most likely culprit IMO is a ring that got damaged during installation.
Using a friend supporting the rods that should "free wheel" with zero drag.
During the tear down you should verify both bore and stroke. The 44s it came with should be on a BIG motor, not a small one.
Posted by: Robroe Jul 7 2024, 12:19 AM
With what you just described, I can’t see any scenario where I wouldn’t be taking it apart.
It's already OUT!
With the plugs and the rockers off it should spin completely free.
You should be able to turn the flywheel/front pully with a single finger and no effort.
"Gripping" should not be required.
You should tear down.
IMO doing anything else is a waste of time. you should be able to get that down to a "short block" with the rods hanging out of the case fairly quickly.
The most likely culprit IMO is a ring that got damaged during installation.
Using a friend supporting the rods that should "free wheel" with zero drag.
During the tear down you should verify both bore and stroke. The 44s it came with should be on a BIG motor, not a small one.
Ordered borescope today to look inside cylinders through spark plug holes. Hope to learn more about which pistons were installed (part numbers from tops) and better idea of valves and heads. From there I hope to decide whether to pull the heads for a better look. I”ll probably try to measure piston travel and valve lift too. Would be nice to know a bit more about what I’ve got before trying to start.
The fan is very close to the case. Seems like it might be touching a little as I spin the motor by hand. It’s so pretty with the tin and case powder coated. Hope I don’t have to tear it down too far if at all.
Will post what I find with the scope. Might even figure out how to take pictures.
Posted by: 930cabman Jul 7 2024, 08:20 AM
With what you just described, I can’t see any scenario where I wouldn’t be taking it apart.
It's already OUT!
With the plugs and the rockers off it should spin completely free.
You should be able to turn the flywheel/front pully with a single finger and no effort.
"Gripping" should not be required.
You should tear down.
IMO doing anything else is a waste of time. you should be able to get that down to a "short block" with the rods hanging out of the case fairly quickly.
The most likely culprit IMO is a ring that got damaged during installation.
Using a friend supporting the rods that should "free wheel" with zero drag.
During the tear down you should verify both bore and stroke. The 44s it came with should be on a BIG motor, not a small one.
Ordered borescope today to look inside cylinders through spark plug holes. Hope to learn more about which pistons were installed (part numbers from tops) and better idea of valves and heads. From there I hope to decide whether to pull the heads for a better look. I”ll probably try to measure piston travel and valve lift too. Would be nice to know a bit more about what I’ve got before trying to start.
The fan is very close to the case. Seems like it might be touching a little as I spin the motor by hand. It’s so pretty with the tin and case powder coated. Hope I don’t have to tear it down too far if at all.
Will post what I find with the scope. Might even figure out how to take pictures.
Are you able to get her to spin reasonably easy? if so, you might be on your way. Fan will be close to the housing, perhaps a special washer was not installed.
Posted by: Robroe Jul 7 2024, 03:47 PM
With what you just described, I can’t see any scenario where I wouldn’t be taking it apart.
It's already OUT!
With the plugs and the rockers off it should spin completely free.
You should be able to turn the flywheel/front pully with a single finger and no effort.
"Gripping" should not be required.
You should tear down.
IMO doing anything else is a waste of time. you should be able to get that down to a "short block" with the rods hanging out of the case fairly quickly.
The most likely culprit IMO is a ring that got damaged during installation.
Using a friend supporting the rods that should "free wheel" with zero drag.
During the tear down you should verify both bore and stroke. The 44s it came with should be on a BIG motor, not a small one.
Ordered borescope today to look inside cylinders through spark plug holes. Hope to learn more about which pistons were installed (part numbers from tops) and better idea of valves and heads. From there I hope to decide whether to pull the heads for a better look. I”ll probably try to measure piston travel and valve lift too. Would be nice to know a bit more about what I’ve got before trying to start.
The fan is very close to the case. Seems like it might be touching a little as I spin the motor by hand. It’s so pretty with the tin and case powder coated. Hope I don’t have to tear it down too far if at all.
Will post what I find with the scope. Might even figure out how to take pictures.
Are you able to get her to spin reasonably easy? if so, you might be on your way. Fan will be close to the housing, perhaps a special washer was not installed.
Yes it spins fairly easy by pushing the fan by hand. Just remembered Jake Raby advice on loosening the oil filter when cranking the engine to purge air out of the oil passages so oil pressure can be established. Might give that a try while waiting for the boroscope to arrive. If valve/piston clearance looks ok with boroscope I will likely put the push rods and rockers back on. And check with boroscope with valves opening. Then loosen tappets to reset valve clearance and measure cam lobe height by measuring push rod travel from valve closed to valve open. Will also measure piston travel to learn what crank I have. And check compression. Anything questionable and I’ll tear it down to inspect. The motor was built over 10 yrs ago by a supposed “race engine guy” but no records. It looks nice and turns over well by hand and with starter without the rockers installed.
Posted by: 930cabman Jul 7 2024, 03:54 PM
With what you just described, I can’t see any scenario where I wouldn’t be taking it apart.
It's already OUT!
With the plugs and the rockers off it should spin completely free.
You should be able to turn the flywheel/front pully with a single finger and no effort.
"Gripping" should not be required.
You should tear down.
IMO doing anything else is a waste of time. you should be able to get that down to a "short block" with the rods hanging out of the case fairly quickly.
The most likely culprit IMO is a ring that got damaged during installation.
Using a friend supporting the rods that should "free wheel" with zero drag.
During the tear down you should verify both bore and stroke. The 44s it came with should be on a BIG motor, not a small one.
Ordered borescope today to look inside cylinders through spark plug holes. Hope to learn more about which pistons were installed (part numbers from tops) and better idea of valves and heads. From there I hope to decide whether to pull the heads for a better look. I”ll probably try to measure piston travel and valve lift too. Would be nice to know a bit more about what I’ve got before trying to start.
The fan is very close to the case. Seems like it might be touching a little as I spin the motor by hand. It’s so pretty with the tin and case powder coated. Hope I don’t have to tear it down too far if at all.
Will post what I find with the scope. Might even figure out how to take pictures.
Are you able to get her to spin reasonably easy? if so, you might be on your way. Fan will be close to the housing, perhaps a special washer was not installed.
Yes it spins fairly easy by pushing the fan by hand. Just remembered Jake Raby advice on loosening the oil filter when cranking the engine to purge air out of the oil passages so oil pressure can be established. Might give that a try while waiting for the boroscope to arrive. If valve/piston clearance looks ok with boroscope I will likely put the push rods and rockers back on. And check with boroscope with valves opening. Then loosen tappets to reset valve clearance and measure cam lobe height by measuring push rod travel from valve closed to valve open. Will also measure piston travel to learn what crank I have. And check compression. Anything questionable and I’ll tear it down to inspect. The motor was built over 10 yrs ago by a supposed “race engine guy” but no records. It looks nice and turns over well by hand and with starter without the rockers installed.
All good news, you may have a winner. Always good to check things out, but it's possible to assemble the beast and she will run. FI or carbs?
Posted by: Robroe Jul 7 2024, 05:20 PM
With what you just described, I can’t see any scenario where I wouldn’t be taking it apart.
It's already OUT!
With the plugs and the rockers off it should spin completely free.
You should be able to turn the flywheel/front pully with a single finger and no effort.
"Gripping" should not be required.
You should tear down.
IMO doing anything else is a waste of time. you should be able to get that down to a "short block" with the rods hanging out of the case fairly quickly.
The most likely culprit IMO is a ring that got damaged during installation.
Using a friend supporting the rods that should "free wheel" with zero drag.
During the tear down you should verify both bore and stroke. The 44s it came with should be on a BIG motor, not a small one.
Ordered borescope today to look inside cylinders through spark plug holes. Hope to learn more about which pistons were installed (part numbers from tops) and better idea of valves and heads. From there I hope to decide whether to pull the heads for a better look. I”ll probably try to measure piston travel and valve lift too. Would be nice to know a bit more about what I’ve got before trying to start.
The fan is very close to the case. Seems like it might be touching a little as I spin the motor by hand. It’s so pretty with the tin and case powder coated. Hope I don’t have to tear it down too far if at all.
Will post what I find with the scope. Might even figure out how to take pictures.
Are you able to get her to spin reasonably easy? if so, you might be on your way. Fan will be close to the housing, perhaps a special washer was not installed.
Yes it spins fairly easy by pushing the fan by hand. Just remembered Jake Raby advice on loosening the oil filter when cranking the engine to purge air out of the oil passages so oil pressure can be established. Might give that a try while waiting for the boroscope to arrive. If valve/piston clearance looks ok with boroscope I will likely put the push rods and rockers back on. And check with boroscope with valves opening. Then loosen tappets to reset valve clearance and measure cam lobe height by measuring push rod travel from valve closed to valve open. Will also measure piston travel to learn what crank I have. And check compression. Anything questionable and I’ll tear it down to inspect. The motor was built over 10 yrs ago by a supposed “race engine guy” but no records. It looks nice and turns over well by hand and with starter without the rockers installed.
All good news, you may have a winner. Always good to check things out, but it's possible to assemble the beast and she will run. FI or carbs?
Weber 44s. I have all the FI stuff from 73 and a complete 74 1.8 parts car. Will see if the webers are fun and tunable.
Posted by: emerygt350 Jul 7 2024, 05:26 PM
Hopefully it was just crazy compression and stiff springs....
Posted by: 930cabman Jul 7 2024, 05:46 PM
With what you just described, I can’t see any scenario where I wouldn’t be taking it apart.
It's already OUT!
With the plugs and the rockers off it should spin completely free.
You should be able to turn the flywheel/front pully with a single finger and no effort.
"Gripping" should not be required.
You should tear down.
IMO doing anything else is a waste of time. you should be able to get that down to a "short block" with the rods hanging out of the case fairly quickly.
The most likely culprit IMO is a ring that got damaged during installation.
Using a friend supporting the rods that should "free wheel" with zero drag.
During the tear down you should verify both bore and stroke. The 44s it came with should be on a BIG motor, not a small one.
Ordered borescope today to look inside cylinders through spark plug holes. Hope to learn more about which pistons were installed (part numbers from tops) and better idea of valves and heads. From there I hope to decide whether to pull the heads for a better look. I”ll probably try to measure piston travel and valve lift too. Would be nice to know a bit more about what I’ve got before trying to start.
The fan is very close to the case. Seems like it might be touching a little as I spin the motor by hand. It’s so pretty with the tin and case powder coated. Hope I don’t have to tear it down too far if at all.
Will post what I find with the scope. Might even figure out how to take pictures.
Are you able to get her to spin reasonably easy? if so, you might be on your way. Fan will be close to the housing, perhaps a special washer was not installed.
Yes it spins fairly easy by pushing the fan by hand. Just remembered Jake Raby advice on loosening the oil filter when cranking the engine to purge air out of the oil passages so oil pressure can be established. Might give that a try while waiting for the boroscope to arrive. If valve/piston clearance looks ok with boroscope I will likely put the push rods and rockers back on. And check with boroscope with valves opening. Then loosen tappets to reset valve clearance and measure cam lobe height by measuring push rod travel from valve closed to valve open. Will also measure piston travel to learn what crank I have. And check compression. Anything questionable and I’ll tear it down to inspect. The motor was built over 10 yrs ago by a supposed “race engine guy” but no records. It looks nice and turns over well by hand and with starter without the rockers installed.
All good news, you may have a winner. Always good to check things out, but it's possible to assemble the beast and she will run. FI or carbs?
Weber 44s. I have all the FI stuff from 73 and a complete 74 1.8 parts car. Will see if the webers are fun and tunable.
44's might be a bit big, depending on cc's, CR, cam, .... I tried 44's on a 2056 build and I was unable to get a good vacuum signal. Wound up with 40's and couldn't be happier
Posted by: Robroe Jul 8 2024, 02:40 PM
Hopefully it was just crazy compression and stiff springs....
Just measured stroke by inserting a rubber hose in the plug hole and turning engine by hand from bottom of piston stroke to top. It measured 3.95 inches stroke. That seems big compared to stock published stroke at 2.66 inches stroke. Is 3.95” stroke possible with a non stock crank? This is supposed to be a hot engine but adding 1.3” to stroke seems like a lot.
Turns easy by hand now so loosening up.
Posted by: emerygt350 Jul 8 2024, 02:59 PM
Wow, if that is right it is a monster. If you have 96mm pistons and your number is correct for stroke you would have a 2.8 liter. I suspect it would eat itself. With 93s it's still a 2.7
And those 44s make sense with that.
Posted by: 930cabman Jul 8 2024, 03:27 PM
Hopefully it was just crazy compression and stiff springs....
Just measured stroke by inserting a rubber hose in the plug hole and turning engine by hand from bottom of piston stroke to top. It measured 3.95 inches stroke. That seems big compared to stock published stroke at 2.66 inches stroke. Is 3.95” stroke possible with a non stock crank? This is supposed to be a hot engine but adding 1.3” to stroke seems like a lot.
Turns easy by hand now so loosening up.
Could be a beast

Assuming the heads are still bolted in place and spinning freely, is it an option to put fire in those combustion chambers?
Posted by: Robroe Jul 8 2024, 03:44 PM
Just remeasured stroke using plastic straw. 3.8” which is 96mm. Haven’t seen cranks for sale bigger than 86mm stroke. So not sure what I’ve got. Looking forward to boroscope viewing to see if I can read part numbers on to of pistons. Might be able to tell if the are 96mm or 94 mm and even see the valves without dismantling it. The heads are supposed to be special, but we shall see.
Posted by: Robroe Jul 8 2024, 04:16 PM
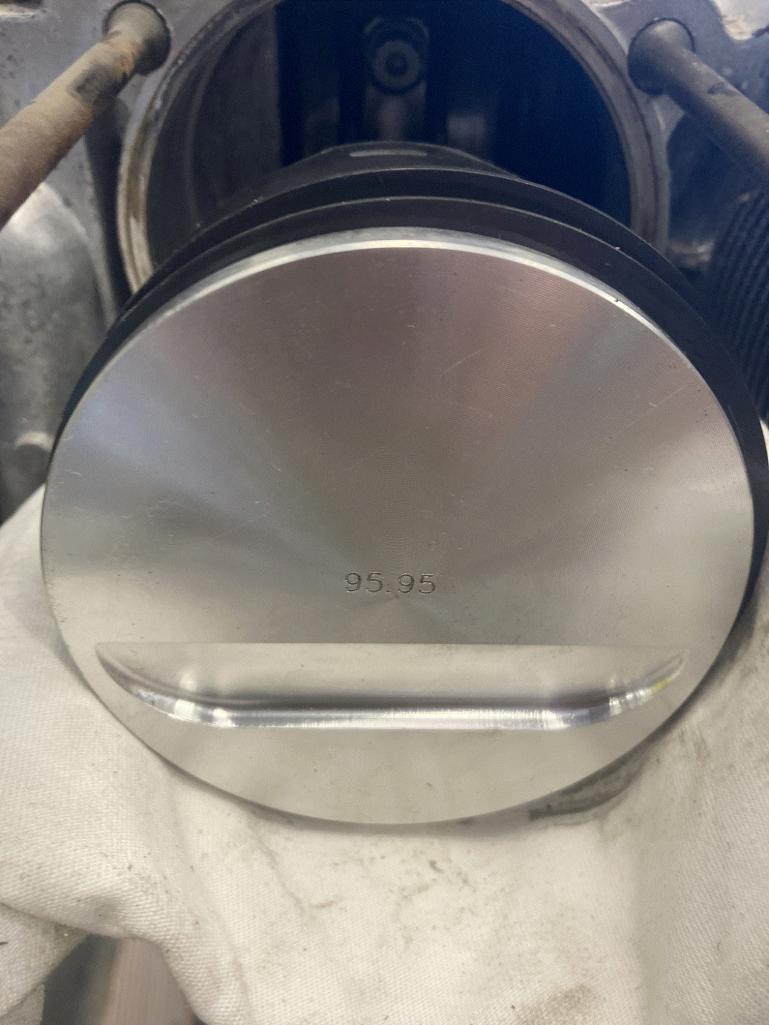
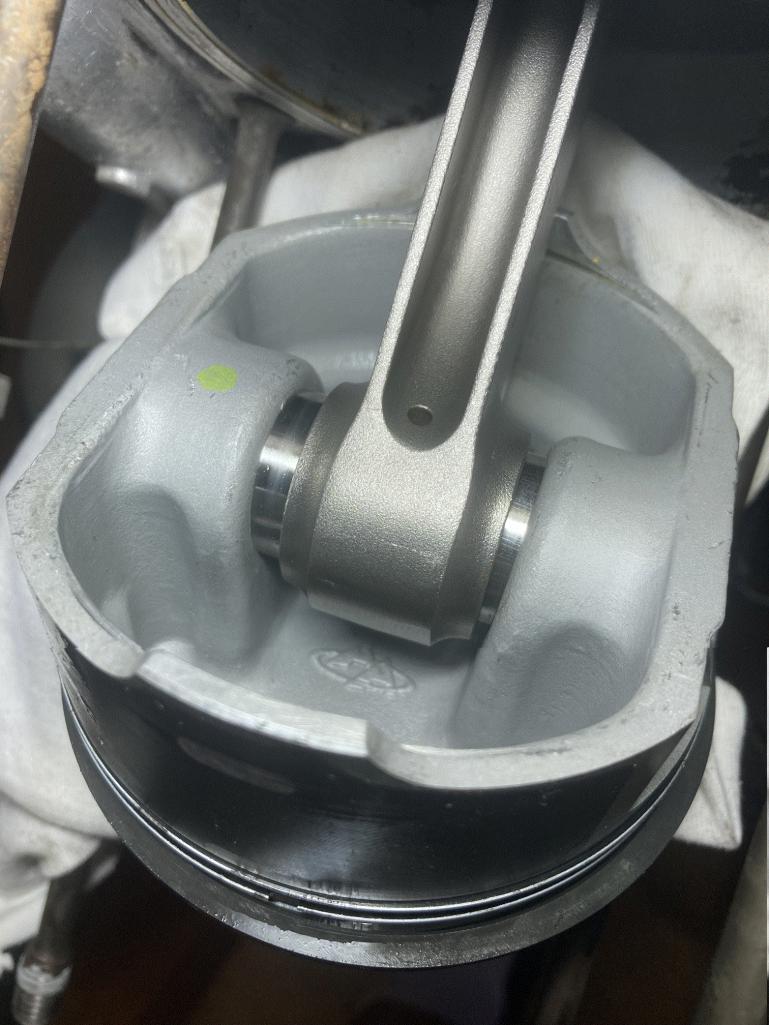
Boroscope just showed up. Pistons are marked 95.95 on top. They are flat with valve relief cuts. Any idea what pistons these are?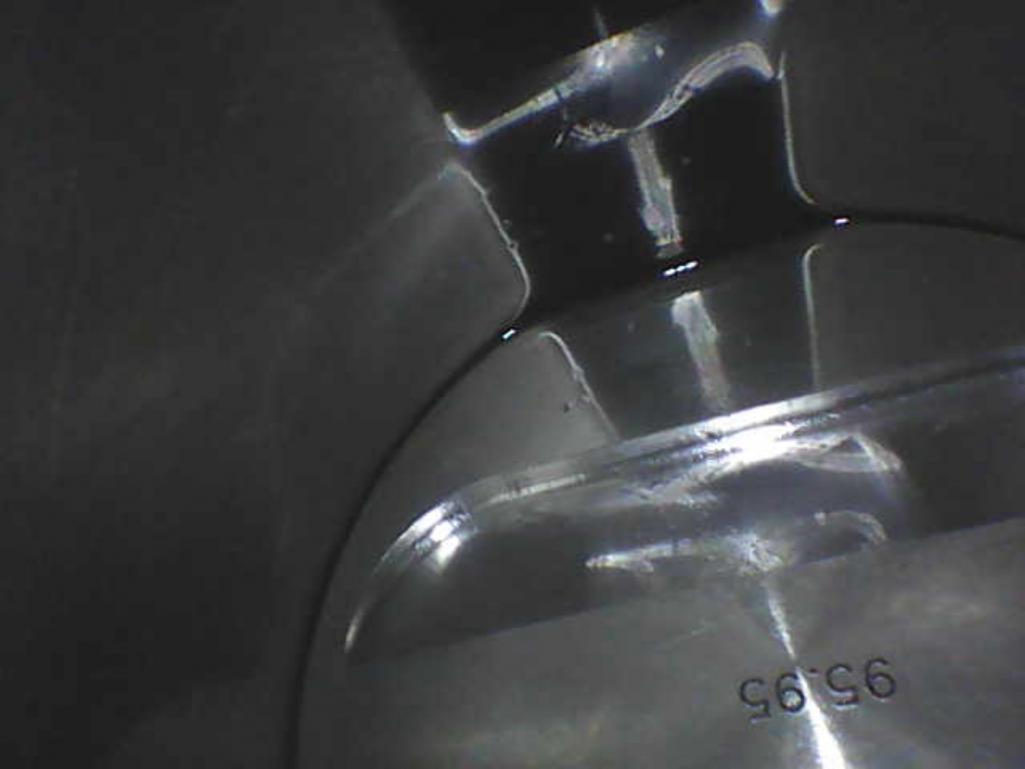
Posted by: emerygt350 Jul 8 2024, 04:19 PM
They look like my 96mm pistons. If that thing is as big as it seems I hope they are forged....
Posted by: Superhawk996 Jul 8 2024, 06:01 PM
With respect to stroke - you’re neglecting that the spark plug isn’t perpendicular to the piston. What you’re measuring isn’t 1:1
Given that none of this is stock 1.7L I’d be taking that apart to figure out exactly what is in there and how it was built.
There are plenty of stroker cranks that require clearance work be done to the case.
Likewise those relief cuts in pistons may not be clearing valves properly.
Posted by: emerygt350 Jul 8 2024, 07:23 PM
As long as the tip of the probe isn't sliding the distance will not be altered if it isn't perfectly perpendicular.
I think it's worth pulling the heads at this point just to figure out what the compression is. If this is a 2.7 you are going to have to be careful. If the bottom end is rotating freely I wouldn't go deeper. But that's me.
Posted by: Superhawk996 Jul 8 2024, 08:47 PM
Dude not even close to perpendicular to the dome of the piston. Especially on 1.7L heads. I don’t have a set of heads in front of me to measure but probably almost 45 degrees on 1.7L heads.
Geometry matters.
Posted by: Robroe Jul 8 2024, 08:55 PM
As long as the tip of the probe isn't sliding the distance will not be altered if it isn't perfectly perpendicular.
I think it's worth pulling the heads at this point just to figure out what the compression is. If this is a 2.7 you are going to have to be careful. If the bottom end is rotating freely I wouldn't go deeper. But that's me.
Ok. Pulling the heads is recommended. What am I looking for/measuring when I pull them? Should I install any new gaskets? It never run so all new inside but been sitting for 10 years without oil in climate control. Anything I need to do when pulling heads?
Posted by: Superhawk996 Jul 8 2024, 09:56 PM
And this DVD available from LNengineering.com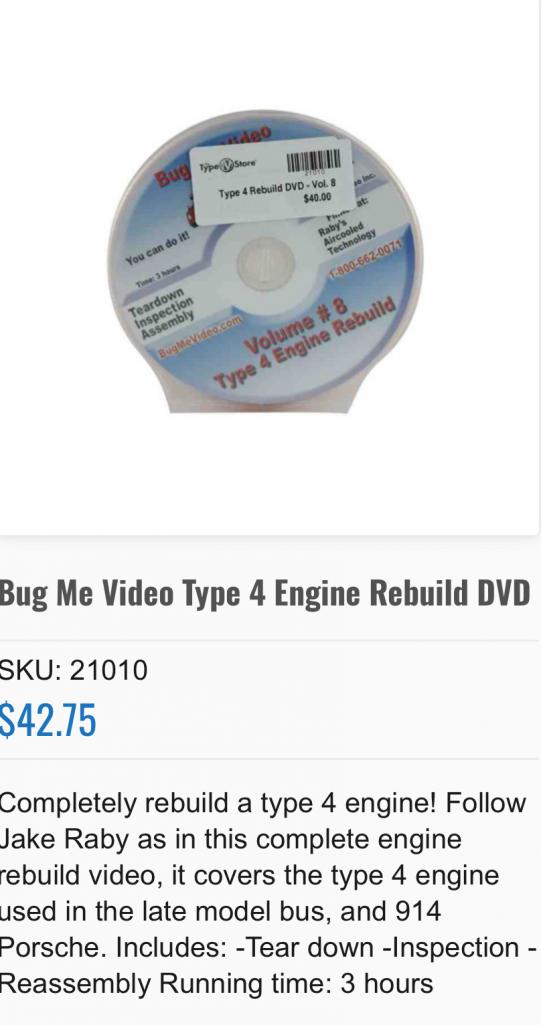
Posted by: Superhawk996 Jul 8 2024, 10:05 PM
You need to know the stroke, then you can determine displacement.
You need to know the compression ratio.
You need to know the deck height.
Since it won’t turn over by hand with the rockers on it you need to determine what valve lifts you’re dealing with and whether you have adequate valve clearance to the piston. The pocketed pistons are a whole other story. Who’s pistons? How much material is left in the piston dome?
You need to figure out if it was put together with head gaskets and get rid of them if it was. Pay particular attention to Jake Raby’s posts to this link. I know this link refers to 2.0L but it pertains to all displacements.
http://www.914world.com/bbs2/index.php?showtopic=370781&st=40
Be aware that rubber ages and hardens regardless of whether it was in climate control or not.
You should be checking crank end play.
There are literally dozens of things that should be verified rather than just hoping it was put together properly and won’t grenade when you run it.
Posted by: 930cabman Jul 9 2024, 04:49 AM
There are literally dozens of things that should be verified rather than just hoping it was put together properly and won’t grenade when you run it.
probably best to open her up all the way and confirm exactly what you have instead of risking damage of new parts
Posted by: emerygt350 Jul 9 2024, 04:58 AM
Or you could continue to determine if in fact you do have contact (I am personally doubting it) first. Send us pics of the heads, I doubt they are 1.7 heads, but they could be. Do the plugs come in from the top of the motor? Are there 3 or four bolts holding the intakes on?
If it is not valve contact but instead spring strength, it's your call. I would pull a head to determine compression and measure valve diameter. If they were building a beast I would hope they put big valves in it.
As superhawk mentioned, no gaskets to worry about, however there may be shims under the jug. Nice thing is you will be able to verify how much distance you have between the piston and valves and set your own compression.
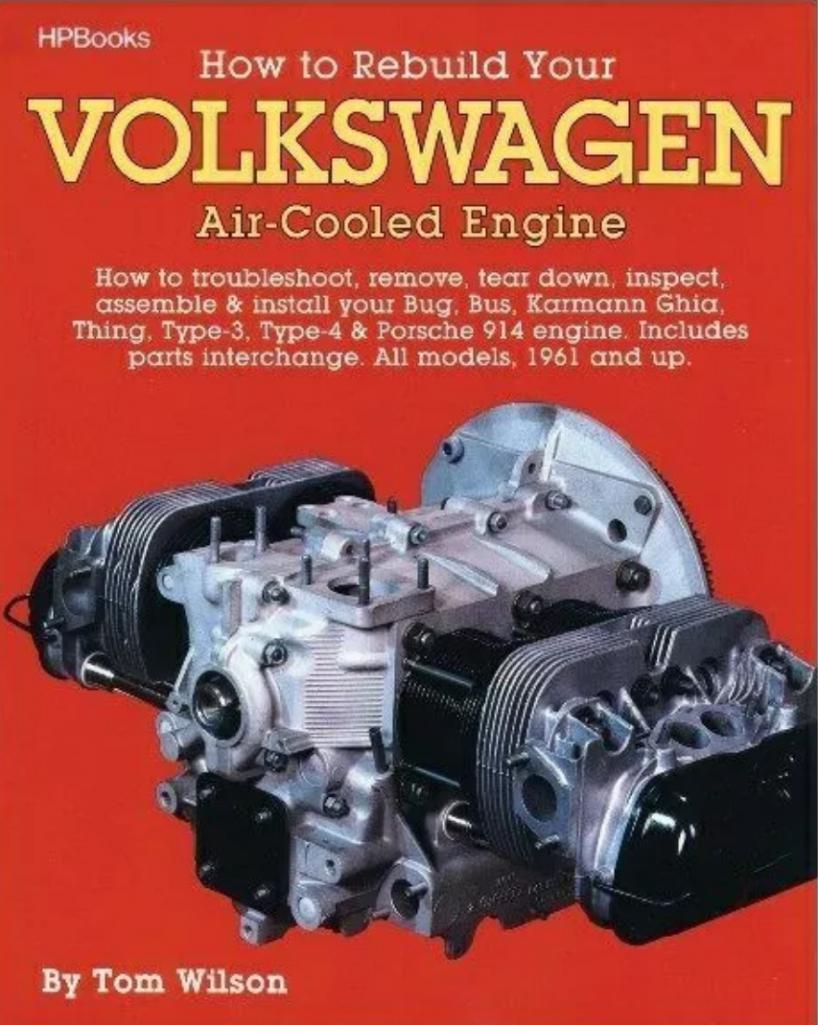
That book is a good one and worth having on the shelf. And raby is raby of course.
Posted by: technicalninja Jul 9 2024, 07:09 AM
I DON"T like the raised 95.95.
I want the tops of my pistons smooth as a "baby's ass"
The valve reliefs look rough too.
Look like inexpensive forged to me.
I'd fully tear down.
Remove heads, lock jugs in case with crossbars (you can use wood here, just trying to lock jugs to case) check deck heights and stroke.
Now you know how big it is...
If it's a stroker (more than 71) I'd fully tear down because of it.
Strokers REQUIRE special tricks for clearance of the crank/rods/camshaft and are a significant increase in complexity for the builder.
If it comes out stock 2.0l (71) I might check "feel" of the assembly and re-assemble.
If you have a stroker there you hit the jackpot!
I'd LOVE to "find" a 78mm stroke with flat tops at 96mm bore. That is a 2255 and is a VERY GOOD combo to have.
Take pictures and post on here. You will get opinions, lots of opinions...
Posted by: technicalninja Jul 9 2024, 07:24 AM
Tear down tip!
Keep everything in its originally installed position.
I even watch the hardware for placement and direction/clocking.
All the crap should be "indexed".
If the lifters have ever run, they HAVE to stay on their respective cam lobes!
When you're taking the dash out of a Prius (I know you're not doing this) the placement of every single screw is important. Put a long one where a short one should have gone and you can pierce an ECU.
I once saw a 300ZX twin turbo PCM destroyed by a screw the owner put in the wrong place. $1800 mistake in 1998!
Fastner placement can be CRITICAL
I'll often use egg containers, biscuit pans to keep track of hardware.
Posted by: Jack Standz Jul 9 2024, 09:48 AM
U can tell it's a stroker if you can see spacers under the cylinders. Maybe take a look with that scope/camera through the sparkplug hole in the tin? My guess is that you're looking at a 2056 (possibly a 1911).
Yes, check everything. Although not likely, make sure the valve reliefs on the pistons (probably cast) aren't upside-down, because that would be a bummer. Measure and write down all the speciations because you will not remember. Things like bore, stroke, valve sizes, intake and exhaust lift or cam number if there is one, blueprint the oil pump, plug the oil gallerys with tapered threaded plugs, etc., etc.
While you have it apart, lubricate it properly and get ready for startup, especiallythe special lube on the cam lobes. We also had a 2056 project motor that was stalled and sat for over 10 years. When we got back to the project, the molly-lube turned into a grey stiff gunk. Cleaned things up and started again with new bearings, etc.
BTW you can turn the motor over with a 23mm(?) wrench on the alternator pulley fastener if the alternator belt isn't too loose (you can squeeze the belt with your hand while turning the bolt to help stop any slipping). Just don't force anything if you feel resistance.
Best wishes for a successful startup!
Posted by: Robroe Jul 9 2024, 11:20 AM
And this DVD available from LNengineering.com
Thanks! Have ordered book and Jake’s DVD.
Posted by: Robroe Jul 9 2024, 11:35 AM
If I’m going to tear this engine down to inspect, a proper engine stand would probably easier than the home made test start stand it’s on now. What engine stands do y’all prefer?
Posted by: 930cabman Jul 9 2024, 01:09 PM
If I’m going to tear this engine down to inspect, a proper engine stand would probably easier than the home made test start stand it’s on now. What engine stands do y’all prefer?
HF will have something decent for not alot of $$, but you will need a yoke, can't remember where I found mine?
Posted by: Robroe Jul 9 2024, 03:57 PM
I DON"T like the raised 95.95.
I want the tops of my pistons smooth as a "baby's ass"
The valve reliefs look rough too.
Look like inexpensive forged to me.
I'd fully tear down.
Remove heads, lock jugs in case with crossbars (you can use wood here, just trying to lock jugs to case) check deck heights and stroke.
Now you know how big it is...
If it's a stroker (more than 71) I'd fully tear down because of it.
Strokers REQUIRE special tricks for clearance of the crank/rods/camshaft and are a significant increase in complexity for the builder.
If it comes out stock 2.0l (71) I might check "feel" of the assembly and re-assemble.
If you have a stroker there you hit the jackpot!
I'd LOVE to "find" a 78mm stroke with flat tops at 96mm bore. That is a 2255 and is a VERY GOOD combo to have.
Take pictures and post on here. You will get opinions, lots of opinions...
Posted by: Robroe Jul 9 2024, 04:00 PM
I DON"T like the raised 95.95.
I want the tops of my pistons smooth as a "baby's ass"
The valve reliefs look rough too.
Look like inexpensive forged to me.
I'd fully tear down.
Remove heads, lock jugs in case with crossbars (you can use wood here, just trying to lock jugs to case) check deck heights and stroke.
Now you know how big it is...
If it's a stroker (more than 71) I'd fully tear down because of it.
Strokers REQUIRE special tricks for clearance of the crank/rods/camshaft and are a significant increase in complexity for the builder.
If it comes out stock 2.0l (71) I might check "feel" of the assembly and re-assemble.
If you have a stroker there you hit the jackpot!
I'd LOVE to "find" a 78mm stroke with flat tops at 96mm bore. That is a 2255 and is a VERY GOOD combo to have.
Take pictures and post on here. You will get opinions, lots of opinions...
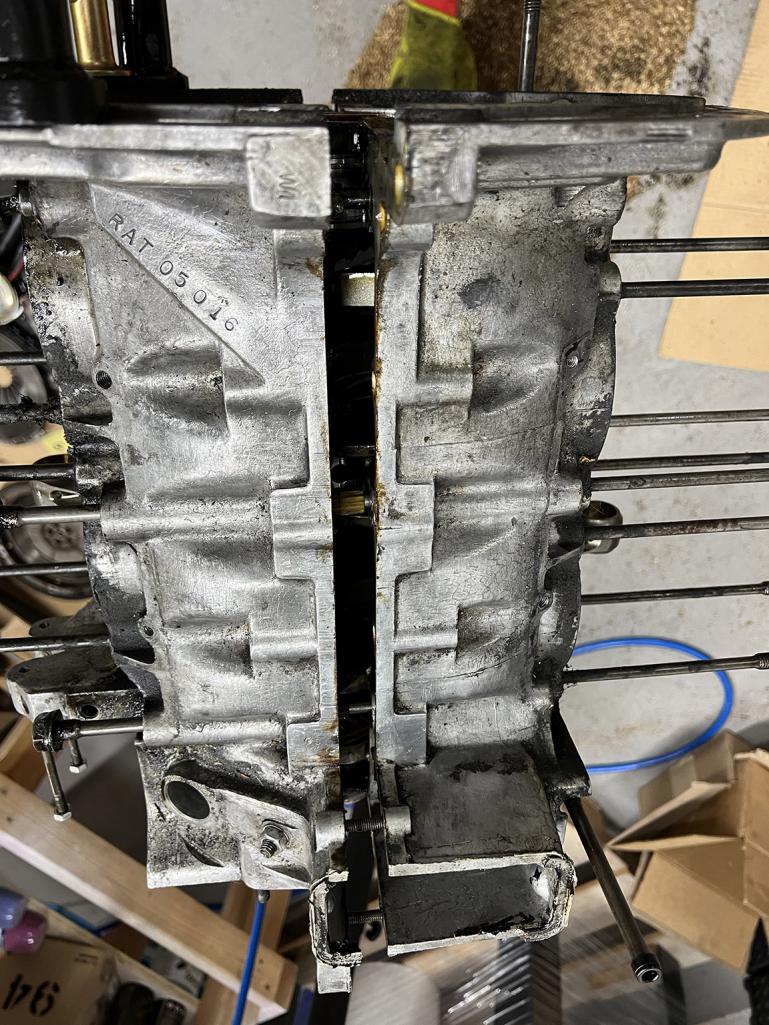
[attachmentid=916273] [attachmentid=916273]
Posted by: Robroe Jul 9 2024, 04:01 PM
I DON"T like the raised 95.95.
I want the tops of my pistons smooth as a "baby's ass"
The valve reliefs look rough too.
Look like inexpensive forged to me.
I'd fully tear down.
Remove heads, lock jugs in case with crossbars (you can use wood here, just trying to lock jugs to case) check deck heights and stroke.
Now you know how big it is...
If it's a stroker (more than 71) I'd fully tear down because of it.
Strokers REQUIRE special tricks for clearance of the crank/rods/camshaft and are a significant increase in complexity for the builder.
If it comes out stock 2.0l (71) I might check "feel" of the assembly and re-assemble.
If you have a stroker there you hit the jackpot!
I'd LOVE to "find" a 78mm stroke with flat tops at 96mm bore. That is a 2255 and is a VERY GOOD combo to have.
Take pictures and post on here. You will get opinions, lots of opinions...
[attachmentid=916273] [attachmentid=916273]
Posted by: Robroe Jul 9 2024, 04:03 PM
I DON"T like the raised 95.95.
I want the tops of my pistons smooth as a "baby's ass"
The valve reliefs look rough too.
Look like inexpensive forged to me.
I'd fully tear down.
Remove heads, lock jugs in case with crossbars (you can use wood here, just trying to lock jugs to case) check deck heights and stroke.
Now you know how big it is...
If it's a stroker (more than 71) I'd fully tear down because of it.
Strokers REQUIRE special tricks for clearance of the crank/rods/camshaft and are a significant increase in complexity for the builder.
If it comes out stock 2.0l (71) I might check "feel" of the assembly and re-assemble.
If you have a stroker there you hit the jackpot!
I'd LOVE to "find" a 78mm stroke with flat tops at 96mm bore. That is a 2255 and is a VERY GOOD combo to have.
Take pictures and post on here. You will get opinions, lots of opinions...
[attachmentid=916273] [attachmentid=916273]
Sorry about the multiple posts of the same photo. Learning how to use the site.
Posted by: technicalninja Jul 9 2024, 04:29 PM
THAT LOOKS PROMISING!
You might have hit a home run...
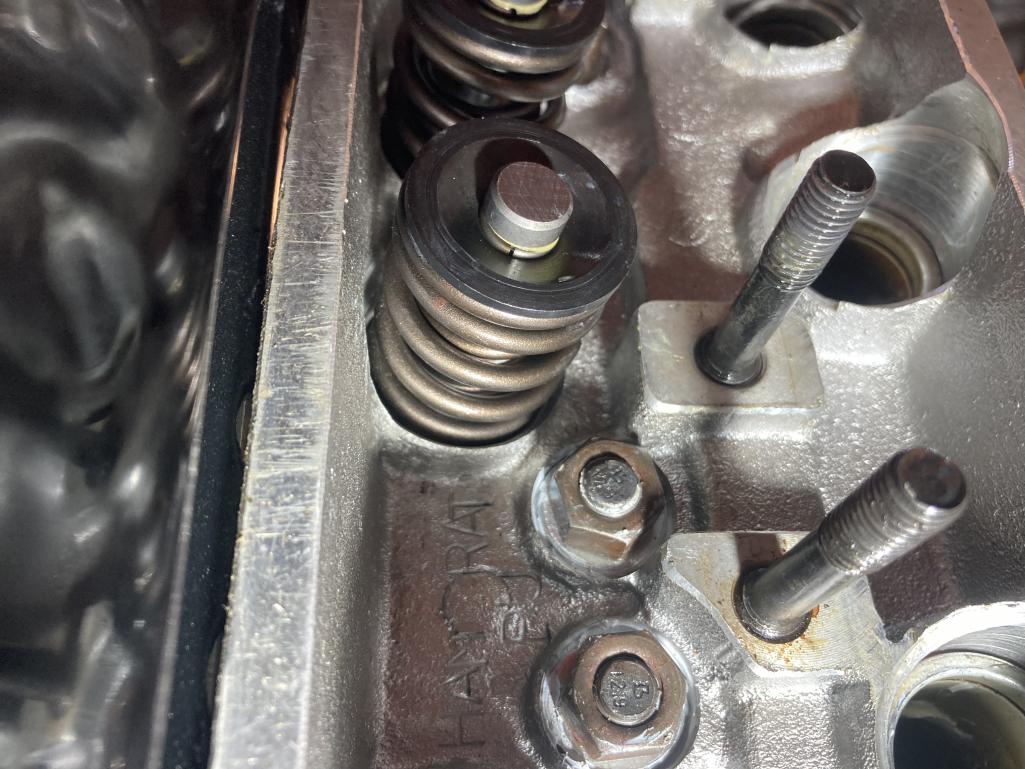
Fancy retainers/springs, RAT etched in.
Show MORE!
Posted by: Superhawk996 Jul 9 2024, 05:09 PM
For OP
RAT = Raby Aircooled Technology
HAM = Hoffman Automotive Machine
Those are nice heads - this is why it’s important to disassemble & understand if anything is not clearanced properly.
Those are expensive heads - you don’t want to damage them
Posted by: technicalninja Jul 9 2024, 06:28 PM
You couldn't have any better markings than that!!!!!
The 44s are probably correct.
If it's what I think it is it's MORE than 30K today.
You should ALSO have a "Billy Bad Ass" exhaust with it.
If it measures anything over 71 on stroke you NEED one!
There's a pretty good one in the classifieds right now that might pair well with that motor.
http://www.914world.com/bbs2/index.php?showtopic=370909
Looks like it's pending right now.
It's the nicest 4-cylinder exhaust that has been in the classifieds in 18months...
You have what I WANT to find. A hidden Raby motor (maybe)!
You might have hit a "Grand Slam!"
Be STUPID careful with the lifters. There is a chance they are ceramic or roller...
Posted by: technicalninja Jul 9 2024, 06:33 PM
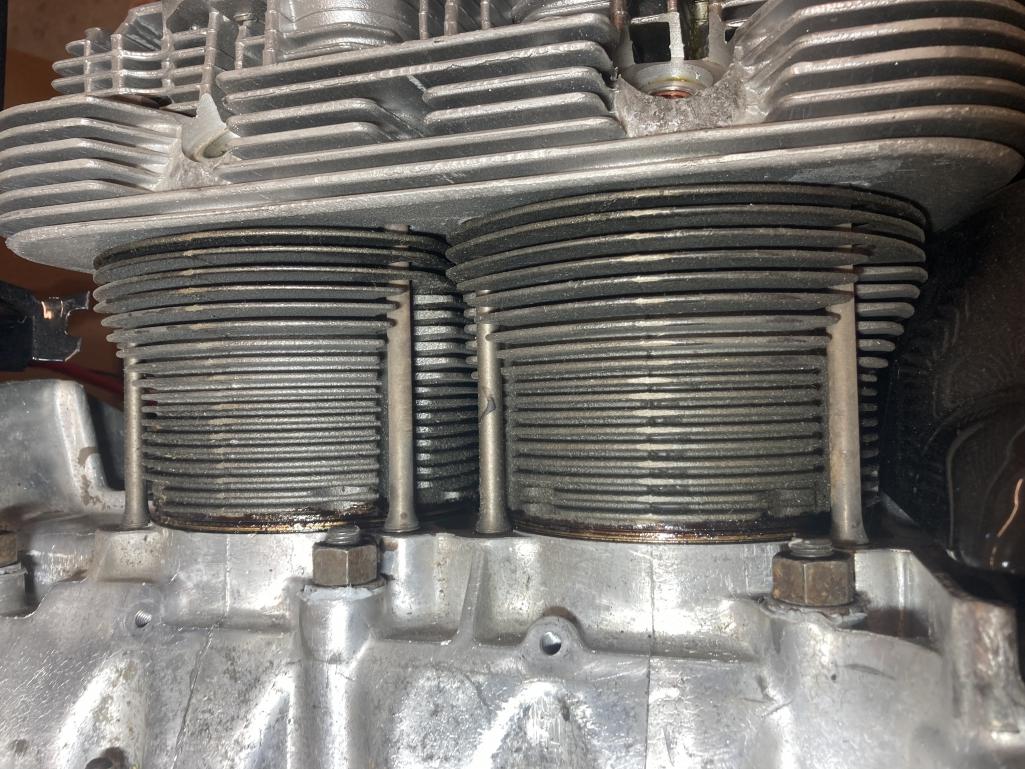
Pull the tins FIRST!!!!
You want to look at the jugs. If they are "Nickies" you hit the home run.
They will look 911 "like". not VW finned. Aluminum with denser machined fins.
Posted by: Superhawk996 Jul 9 2024, 07:00 PM
Pull the tins FIRST!!!!
You want to look at the jugs. If they are "Nickies" you hit the home run.
They will look 911 "like". not VW finned. Aluminum with denser machined fins.
Can see the cylinders without pulling the tin but as stated previously I’d be going through the whole engine anyway.
Raby serializes his engines so unless case has RAT serial number it’s probably not a whole Raby built engine . . . But you never know. If I recall Raby / HAM developed heads were sold on Type 4 Store years ago. Not exactly sure how those were stamped.
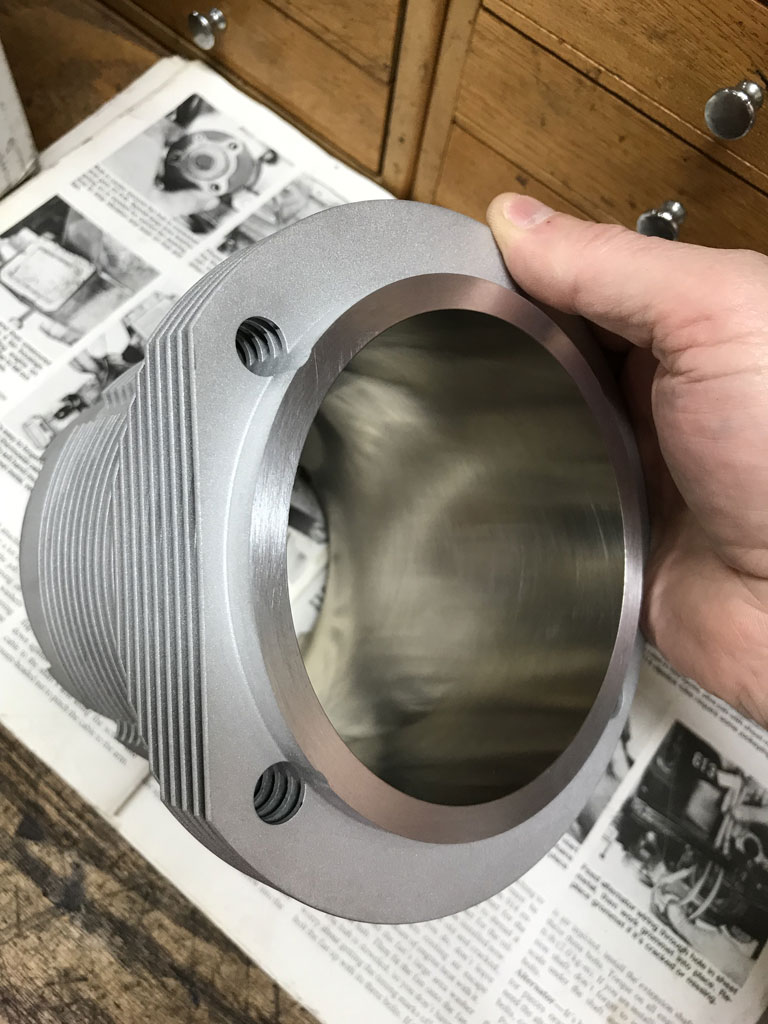
For OP - Nickies cyclinders are billet aluminum - very distinctive. Here’s a set of 100mm cylinders I have slated for a build as example of what they look like
Posted by: technicalninja Jul 9 2024, 07:53 PM
@http://www.914world.com/bbs2/index.php?showuser=22428 
Those are NICE!
Look at how thick the walls are!
You're going to have far less trouble sealing to the head with those.
Nice FAT sealing surface!
What stroke are you pairing those with?
Posted by: Jack Standz Jul 9 2024, 11:43 PM
That is some very good news for you. Those heads represent many many hours of development by Len Hoffman and Jake Raby.
When setup right with proper valvetrain geometry and then the right tuning (ignition timing too), you should be in for some serious HP, but with cool running and longevity too. They come with really good parts too, like springs, valves, guides, retainers, and calling them "ported" doesn't do them justice to the development and time invested to get them to flow just right. And they are expensive.
You might have Nickies too. Maybe the rest of the motor is by RAT, but since it wasn't started, it's more likely a kit. But, that's still good news because RAT used very good parts. Parts that were matched to the motor and the intended purpose. So, since a 914 owner had it, it's unlikely a "camper" (bus) motor. All good news. Definitely want to make sure she's put together 100% right before you start her up.
Good luck! And, go out and buy a lottery ticket, OK.
Posted by: emerygt350 Jul 10 2024, 06:49 AM
Man, I would hate to tear that down if it was professionally assembled.
Posted by: Superhawk996 Jul 10 2024, 06:55 AM
Man, I would hate to tear that down if it was professionally assembled.
I’d hate to start it if it were not.
Posted by: 930cabman Jul 10 2024, 07:15 AM
For OP
RAT = Raby Aircooled Technology
HAM = Hoffman Automotive Machine
Those are nice heads - this is why it’s important to disassemble & understand if anything is not clearanced properly.
Those are expensive heads - you don’t want to damage them
It's worth the small $ to invest and find out exactly what lies within
Posted by: Robroe Jul 10 2024, 06:00 PM
For OP
RAT = Raby Aircooled Technology
HAM = Hoffman Automotive Machine
Those are nice heads - this is why it’s important to disassemble & understand if anything is not clearanced properly.
Those are expensive heads - you don’t want to damage them
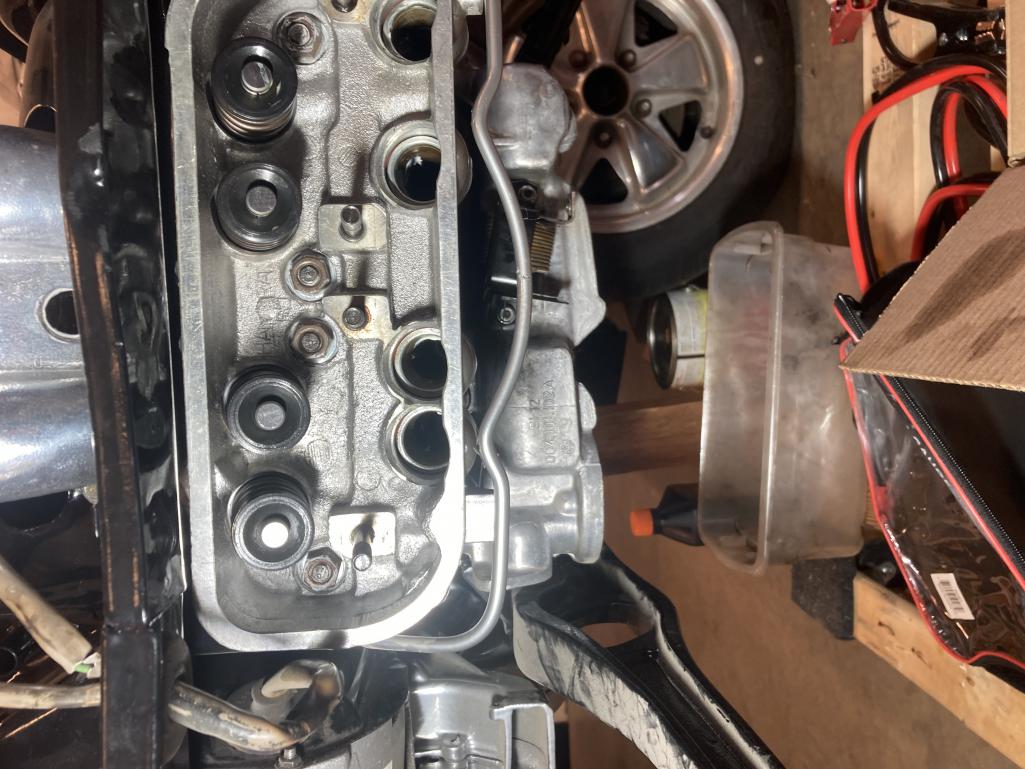
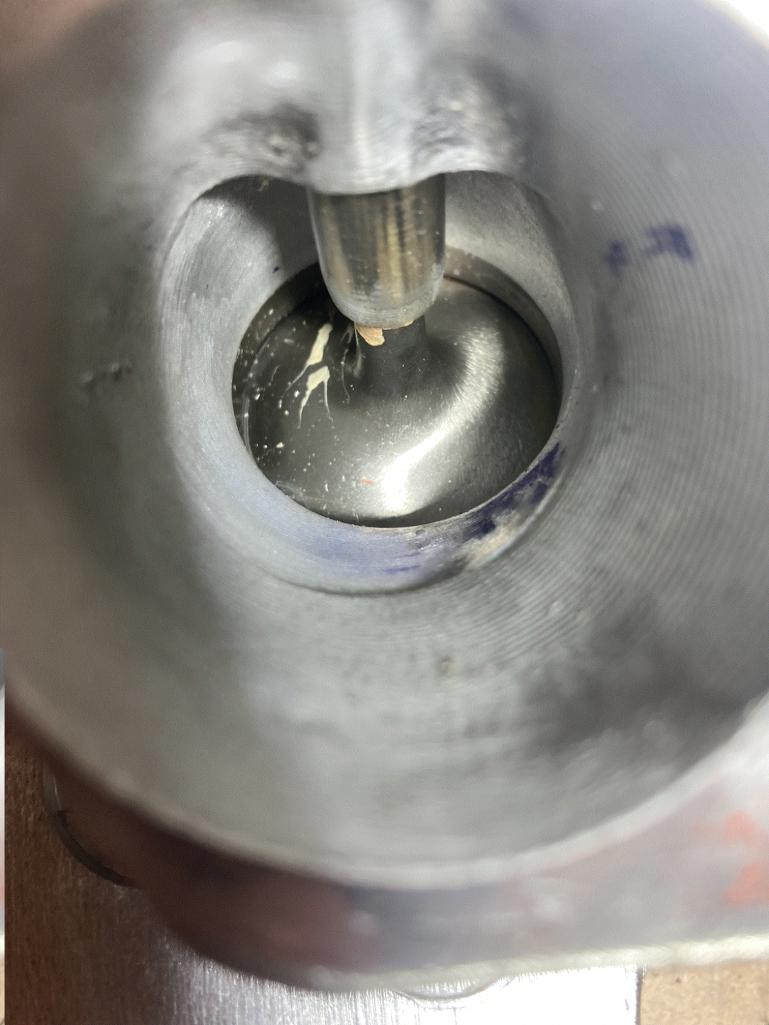
It's worth the small $ to invest and find out exactly what lies withinPict of cylinder. Any idea what it is? I'm hoping to take one head off in a day or two and measure cylinder.
Posted by: emerygt350 Jul 10 2024, 06:56 PM
First of all, looks like 2.0 heads to me. Cylinders look like iron but I could be wrong. The spacers under them are legion. I think you need to pull a head at this point just to know the valve size and deck height, but if I were you, I wouldn't crack the case. I know all the old fuddy duddies are going to tie their underwear in knots over that but if everything looks good up top, you can verify plenty of valve clearance (which you can do by pulling the head) and you can get a measure of the compression, I would have to ask myself if I could do better job than the last guy on the bottom end. Would I take it right out onto the track? No, I would carefully get it going and build up confidence in the previous person's build.
If you see everything looking like quality, I would go for it. But that is me.
Posted by: Robroe Jul 10 2024, 07:15 PM
First of all, looks like 2.0 heads to me. Cylinders look like iron but I could be wrong. The spacers under them are legion. I think you need to pull a head at this point just to know the valve size and deck height, but if I were you, I wouldn't crack the case. I know all the old fuddy duddies are going to tie their underwear in knots over that but if everything looks good up top, you can verify plenty of valve clearance (which you can do by pulling the head) and you can get a measure of the compression, I would have to ask myself if I could do better job than the last guy on the bottom end. Would I take it right out onto the track? No, I would carefully get it going and build up confidence in the previous person's build.
If you see everything looking like quality, I would go for it. But that is me.
Magnet sticks to cylinders so definitely not aluminum.
Posted by: Robroe Jul 10 2024, 07:17 PM
First of all, looks like 2.0 heads to me. Cylinders look like iron but I could be wrong. The spacers under them are legion. I think you need to pull a head at this point just to know the valve size and deck height, but if I were you, I wouldn't crack the case. I know all the old fuddy duddies are going to tie their underwear in knots over that but if everything looks good up top, you can verify plenty of valve clearance (which you can do by pulling the head) and you can get a measure of the compression, I would have to ask myself if I could do better job than the last guy on the bottom end. Would I take it right out onto the track? No, I would carefully get it going and build up confidence in the previous person's build.
If you see everything looking like quality, I would go for it. But that is me.
Magnet sticks to cylinders so definitely not aluminum.
What is a legion spacer?
Posted by: Superhawk996 Jul 10 2024, 07:19 PM
I know all the old fuddy duddies are going to tie their underwear in knots over that but if everything looks good up top, you can verify plenty of valve clearance (which you can do by pulling the head) and you can get a measure of the compression, I would have to ask myself if I could do better job than the last guy on the bottom end.
If you see everything looking like quality, I would go for it. But that is me.
While you have it apart, lubricate it properly and get ready for startup, especiallythe special lube on the cam lobes. We also had a 2056 project motor that was stalled and sat for over 10 years. When we got back to the project, the molly-lube turned into a grey stiff gunk. Cleaned things up and started again with new bearings, etc.
I guess I’ll wear the old fuddy duddie title with honor.

There is no rocket science to putting a bottom end together but there are a lot of details that matter.
Without some decent lube on the cam, it’s not impossible to wipe out a cam in the first 20 minutes of initial break-in run time. The more aggressive the cam, the more I want assembly lube not just coincidental oil splash.
Don’t know about you but I’d like to be sure there is some assembly lube on all the bearings rather than depending on cranking the engine with ignition disabled to build oil pressure. Did the oil pump get coated with some light grease so that it builds oil pressure quickly or will it take extended cranking to build oil pressure?
What are the bearing clearances? What do you do if it starts up and has low oil pressure - then what? Yeah, disassemble and look at & measure bearing clearances.
Did the cam get a single thrust bearing or was it done Raby style with a double thrust bearing? For that matter what cam is in there?
Were the rods torqued properly? What rods are in it, stock or maybe H-beam or I-beam. So many details that matter. Especially if this is truly a hot-rod build looking to be spun up (otherwise why bother with double valve springs).
I’ll grant you that whoever paid for RAT / HAM heads probably wasn’t his 1st rodeo but there is no guarantee this wasn’t quickly assembled by someone else just to get it sold and moved along down the road.
Posted by: Superhawk996 Jul 10 2024, 07:24 PM
What is a legion spacer?
looks like multiple spacers stacked. Sign of amateur build.
A pro build would only use one spacer.
Multiple spacers are multiple leak paths.
Likewise multiple spacers can be less rigid than a single spacer unless flatness of each is perfect. This affects head bolt torque.
Posted by: technicalninja Jul 10 2024, 07:26 PM
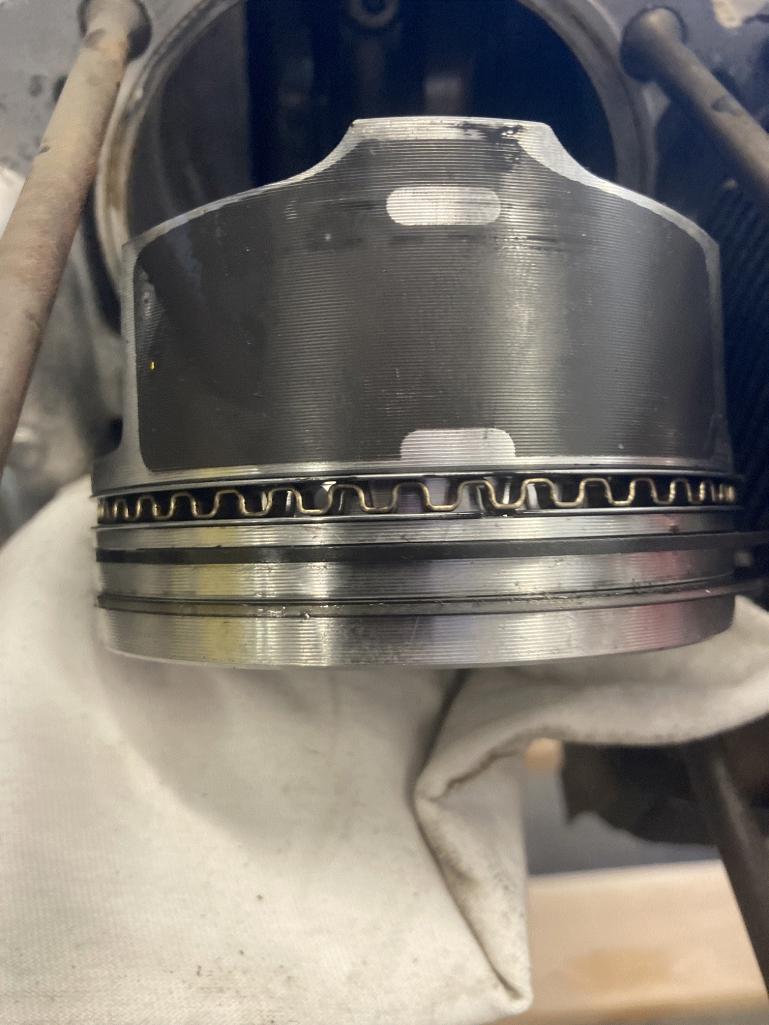
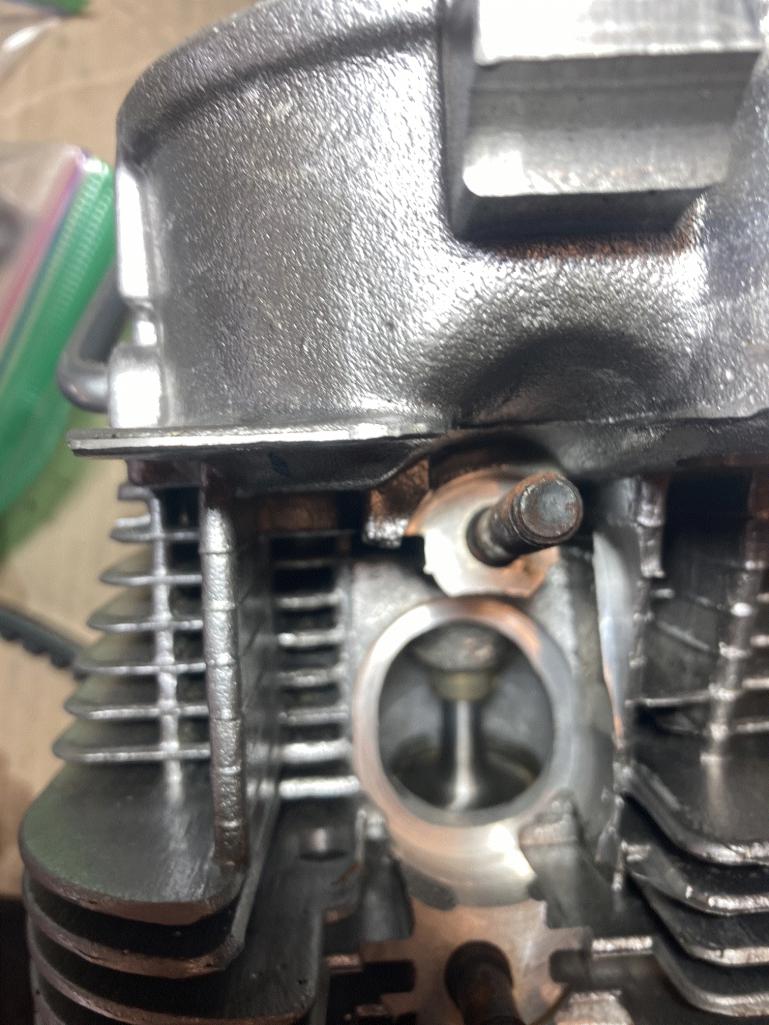
Positives:
Heads- look like Raby heads with welding around the spark plug wells (Raby did this).
Proper retainers/springs.
Look like oversize rocker arm studs.
Negatives:
Raised numbers on piston crowns. I believe those would have been machined off if built by someone knowledgeable. I'd have removed them.
And then I'd have ceramic coated the tops...
I've NEVER seen raised numbers in forged stuff. The forging process would destroy them.
Someone else said "cast" and I'm prone to agree due to those numbers and the rough valve depressions.
Cast iron jugs.
Stock head studs and re-used head nuts.
Grey RTV on case studs.
If they used grey RTV, a master would use a x-acto knife during curing to trim the excess.
Possibility of internal clips in the lifters.
The value of the heads FAR exceeds the posibility of destroying said heads without a full tear down.
I'd take lots of pictures and check a bunch of stuff during the tear down but that would get reduced to individual componets before I'd put fire to it.
It's looking more like a kit build with RAT heads.
Still a KILLER deal IMO!
Posted by: emerygt350 Jul 11 2024, 05:53 AM
I think the raised numbers are just an optical illusion but I could be mistaken. The multiple spacers is concerning.
Posted by: technicalninja Jul 11 2024, 07:26 AM
95.95mm in a 96mm bore equals .05mm PTW clearance or .002".
This is a clearance for cast pistons...
It's a TIGHT clearance for cast pistons in an air-cooled application!
Posted by: Superhawk996 Jul 11 2024, 08:10 AM
95.95mm in a 96mm bore equals .05mm PTW clearance or .002".
This is a clearance for cast pistons...
It's a TIGHT clearance for cast pistons in an air-cooled application!
Not really. 0.03 mm was initial clearance when 914 engines were built. Per the Tech bulletin for the Bus engines the clearance was later opened to 0.05mm
Here are OEM 914 shallow dish pistons for a 2.0L 94mm - marked 93.97
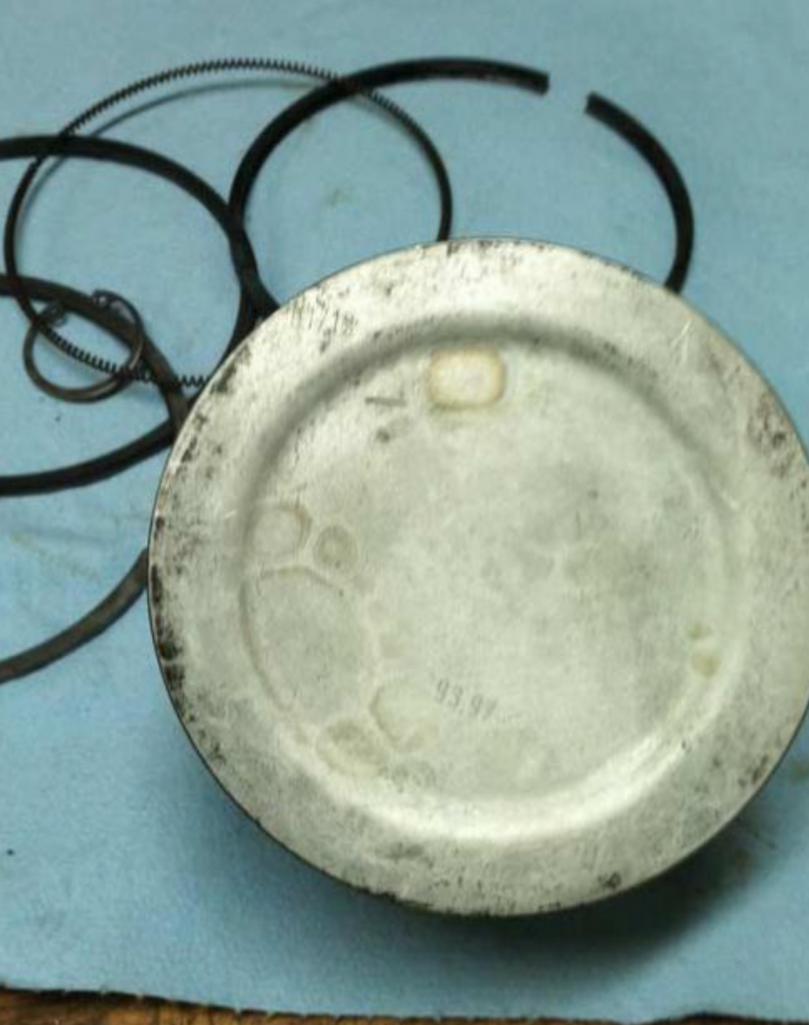
Here’s is the excerpt from the bus bulletin that has later been applied genetically by the aftermarket to Type 4 pistons and cylinders
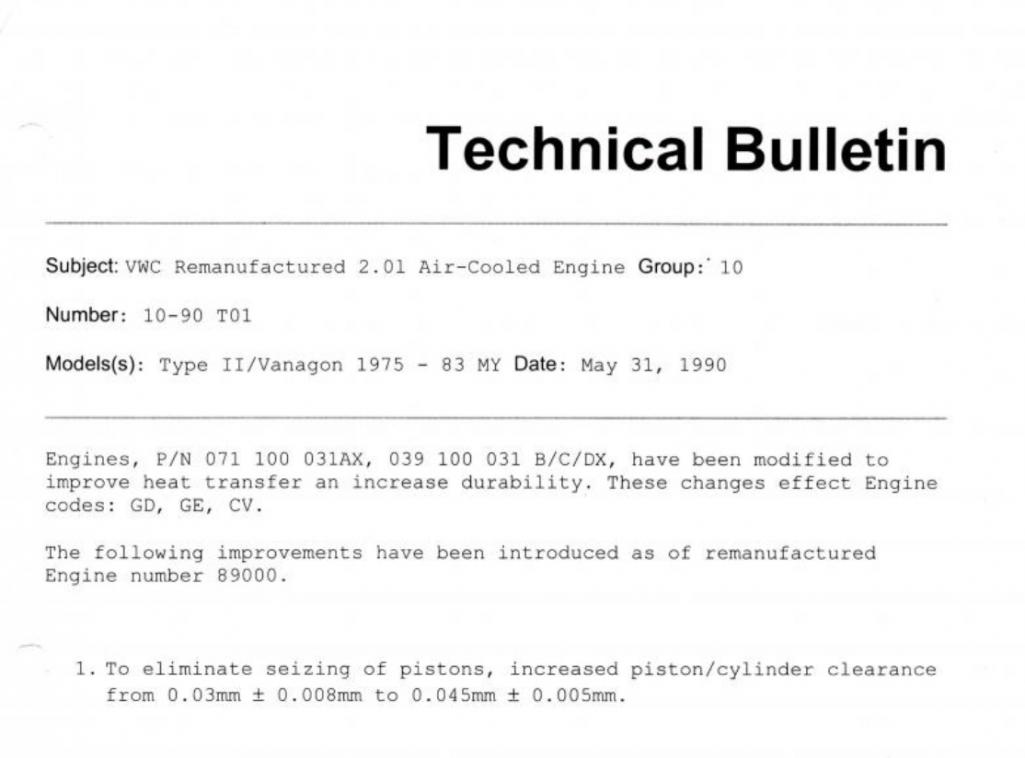
Bus would have had more susceptibility to seizing due to the brick in the wind aerodynamic loads plus the cargo loads that are way, way higher than the load imposed on a 914. So 0.05mm of clearance is more than adequate for a 914.
I believe Raby has run Nickies with as low as .00075” (0.019mm) piston to cylinder clearance somewhere along the line. I can’t find the source for that so take it as unverified. That of course would be possible because the piston is running in an aluminum cylinder that is expanding as fast as the piston as it heats up.
Side topic @http://www.914world.com/bbs2/index.php?showuser=27135
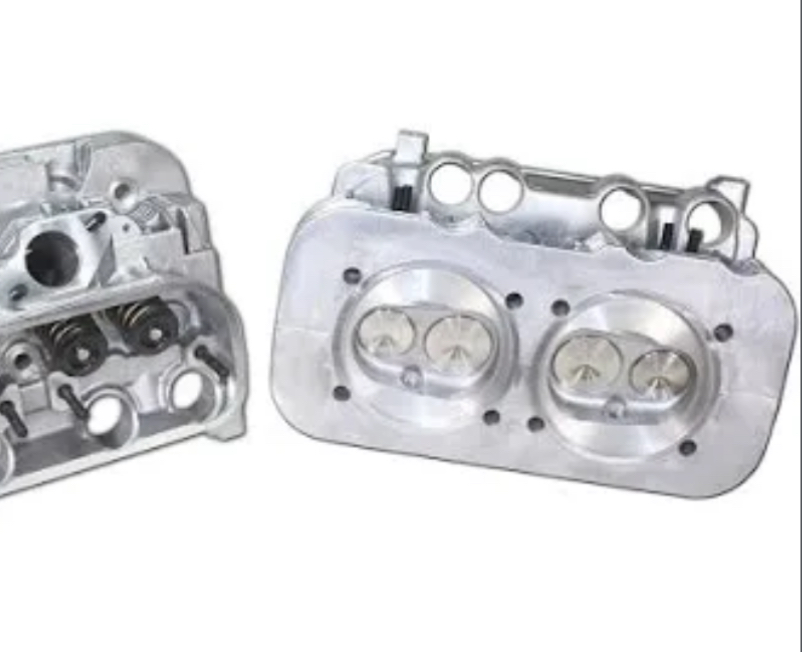
Comparison of HAM head to OEM (2.0L)

Posted by: Jack Standz Jul 11 2024, 08:48 AM
I guess I’ll wear the old fuddy duddie title with honor.
Did the cam get a single thrust bearing or was it done Raby style with a double thrust bearing? For that matter what cam is in there?
Yes. Forgot about the double cam thrust bearing (actually just an extra thrust bearing taken from another regular cam bearing set). When we mocked up the motor, we had some binding with a double thrust bearing set from the type 4 store. Required some clearancing. Pretty sure the RAT motor kits had them. Would want to check that before start-up.
As you wish, we can grant you the title of "Old Fuddy Duddy".
RAT/HAM heads welded around the spark plug holes to relocate them to the more favorable 2 liter position.
Posted by: technicalninja Jul 11 2024, 11:25 AM
95.95mm in a 96mm bore equals .05mm PTW clearance or .002".
This is a clearance for cast pistons...
It's a TIGHT clearance for cast pistons in an air-cooled application!
Not really. 0.03 mm was initial clearance when 914 engines were built. Per the Tech bulletin for the Bus engines the clearance was later opened to 0.05mm
Here are OEM 914 shallow dish pistons for a 2.0L 94mm - marked 93.97
Here’s is the excerpt from the bus bulletin that has later been applied genetically by the aftermarket to Type 4 pistons and cylinders
Bus would have had more susceptibility to seizing due to the brick in the wind aerodynamic loads plus the cargo loads that are way, way higher than the load imposed on a 914. So 0.05mm of clearance is more than adequate for a 914.
I believe Raby has run Nickies with as low as .00075” (0.019mm) piston to cylinder clearance somewhere along the line. I can’t find the source for that so take it as unverified. That of course would be possible because the piston is running in an aluminum cylinder that is expanding as fast as the piston as it heats up.
Side topic @http://www.914world.com/bbs2/index.php?showuser=27135
Comparison of HAM head to OEM (2.0L)
Thanks for the pics SH!
Answered some questions I had.
That has minimal chamber re-shaping.
I'm betting your Nickies will not fit in your HAM heads as is...
You're going to have to have those fly cut to the larger diameter and then re-ceramic coated due to the loss of coatings on the flat sections.
Got the heads BEFORE the Nickies did you?
That would piss me off!
Posted by: Robroe Jul 11 2024, 11:33 AM
95.95mm in a 96mm bore equals .05mm PTW clearance or .002".
This is a clearance for cast pistons...
It's a TIGHT clearance for cast pistons in an air-cooled application!
Sorry to be such a newbie….what is “PTW” clearance? How would I measure that?
Posted by: technicalninja Jul 11 2024, 11:48 AM
Piston to wall
Bore clearance. You measure the bore with an inside micrometer and the piston skirt with an outside micrometer and the difference is the PTW clearance.
The point you measure the piston is CRITICAL. Most manufactures have a specific spot, normally about halfway down the skirt below the pin bore as the measuring spot.
Pistons ARE NOT perfectly cylindrical. They are shaped like a barrel (a little tint bit) and measuring diameter of the crown or skirt will give you different readings...
Posted by: 930cabman Jul 11 2024, 12:14 PM
Piston to wall
Bore clearance. You measure the bore with an inside micrometer and the piston skirt with an outside micrometer and the difference is the PTW clearance.
The point you measure the piston is CRITICAL. Most manufactures have a specific spot, normally about halfway down the skirt below the pin bore as the measuring spot.
Pistons ARE NOT perfectly cylindrical. They are shaped like a barrel (a little tint bit) and measuring diameter of the crown or skirt will give you different readings...
I have used a feeler gauge, will get you close. maybe not close enough for a race application, but for the street I think it's fine. Generally at 90 degrees to the pin
Posted by: Robroe Jul 11 2024, 06:49 PM
Piston to wall
Bore clearance. You measure the bore with an inside micrometer and the piston skirt with an outside micrometer and the difference is the PTW clearance.
The point you measure the piston is CRITICAL. Most manufactures have a specific spot, normally about halfway down the skirt below the pin bore as the measuring spot.
Pistons ARE NOT perfectly cylindrical. They are shaped like a barrel (a little tint bit) and measuring diameter of the crown or skirt will give you different readings...
I have used a feeler gauge, will get you close. maybe not close enough for a race application, but for the street I think it's fine. Generally at 90 degrees to the pin
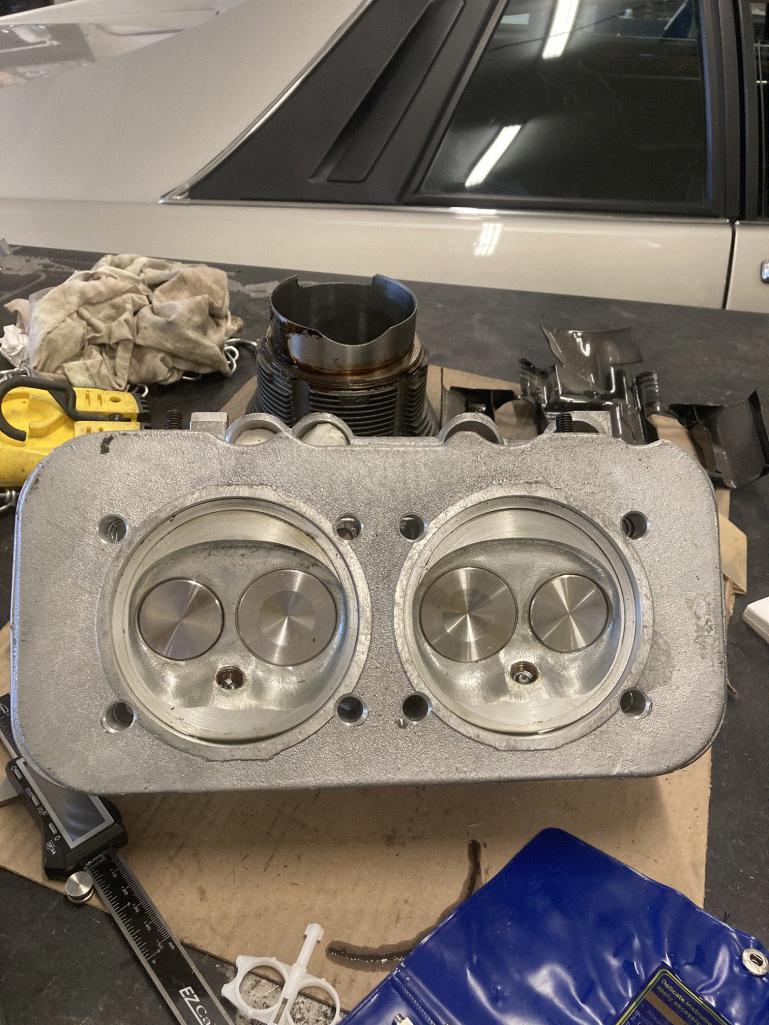
Cylinders are 96mm bore. Intake valves are 44.06 or so. Exhaust valves are 35.95 mm or so. Will measure pistons and deck height next.
Posted by: Robroe Jul 11 2024, 07:00 PM
Piston to wall
Bore clearance. You measure the bore with an inside micrometer and the piston skirt with an outside micrometer and the difference is the PTW clearance.
The point you measure the piston is CRITICAL. Most manufactures have a specific spot, normally about halfway down the skirt below the pin bore as the measuring spot.
Pistons ARE NOT perfectly cylindrical. They are shaped like a barrel (a little tint bit) and measuring diameter of the crown or skirt will give you different readings...
I have used a feeler gauge, will get you close. maybe not close enough for a race application, but for the street I think it's fine. Generally at 90 degrees to the pin
pistons appear to be from AA. Are these cast and not forged?
Cylinders are 96mm bore. Intake valves are 44.06 or so. Exhaust valves are 35.95 mm or so. Will measure pistons and deck height next.
Posted by: technicalninja Jul 11 2024, 07:22 PM
Those have had the chambers worked far more than SuperHawks!
I LIKE your heads!
Please take pictures of the intake and exhaust ports.
I'd REALLY, REALLY like pictures of the ports directly below the valves.
You would have to take the valves out which, if you've not done that before, you shouldn't "learn how" on those heads.
I can't have everything I want...
Now, if it was me, I'd rip those apart to change the valve stem seals (or O-rings) and hand lap ALL of the valves.
If those have been sitting for years hand lapping should be done.
Yes, go ahead and take them apart! 
I will walk you through a hand lapping if you desire it.
A quick test to test valve sealing is to fill up the intake and exhaust port with a liquid and watch if the liquid seeps by the valve into the chamber.
I normally use mineral spirits as I'm planning tear down anyway.
A safer fluid (for using the heads without tear down if sealing is good) would be liquid WD40. You can buy this stuff in gallons.
https://www.homedepot.com/p/WD-40-1-Gal-Multi-Purpose-Lubricant-for-Heavy-Duty-Use-49011/204777421?source=shoppingads&locale=en-US&pla&mtc=SHOPPING-BF-CDP-GGL-D25S-025_031_GARAGE_AUTO-NA-Multi-NA-PMAX-NA-NA-NA-NA-NBR-NA-NA-NA-Automotive&cm_mmc=SHOPPING-BF-CDP-GGL-D25S-025_031_GARAGE_AUTO-NA-Multi-NA-PMAX-NA-NA-NA-NA-NBR-NA-NA-NA-Automotive-71700000117332062--&gad_source=1&gclid=EAIaIQobChMI1bD_06ighwMVcTYIBR1ORgP4EAQYBiABEgKIyvD_BwE&gclsrc=aw.ds
Wouldn't bother me at all to test heads with WD, drain, blow them out, and then run without pulling them down.
Stand the heads so the port face is horizontal at the top and fill the port up. Wait 5-10 minutes and see if the level has dropped.
A TINY amount of leakage may occur through the valve stem.
You will see that around the springs.
Active dripping will require attention.
Water or Mineral spirits I'd want to tear down to fully remove.
Tearing down is easy with the proper tools. You need a valve spring depressor.
You slightly compress each valve spring, remove the keepers, release the compressor and remove the springs and retainer.
Keep everything in order and mark the parts to allow replacement in the same port.
I could easily pull the valves in less than 5 minutes per head.
Posted by: Superhawk996 Jul 11 2024, 07:27 PM
So lighter than OEM con rods. Looking good.
Pistons and cylinders from AA Performance Products. Budget oriented parts vs the big names but nothing wrong with their stuff at all - lots of folks using them. Mahle style slipper coating on the skirts is a nice touch.
Decent amateur build based on what we’ve seen.
Did you measure stroke?
Posted by: technicalninja Jul 11 2024, 07:28 PM
Did you check the stroke during disassembly?
You measure the depth of the piston at BDC versus the deck height at TDC.
Did you check deck height during tear down?
You measure how far down the bore the piston is at TDC. This is done with feeler gauges or dial indicator
Have you checked crankshaft endplay yet?
This is done with a dial indicator.
If you don't know
BDC = bottom dead center
TDC = top dead center
Those are ends of the stroke.
Posted by: technicalninja Jul 11 2024, 07:32 PM
The cast pistons, which I agree are FINE, need cleaning bigtime!
You can probably re-use the rings, but you need to clean the piss out of them and their respective groves in the pistons.
Those appear to have never been run...
Posted by: Superhawk996 Jul 11 2024, 07:35 PM
Those have had the chambers worked far more than SuperHawks!
I LIKE your heads!
My heads are the AA 2.0L china casting but valves, seats, springs reworked by HAM.
IIRC the RAT / HAM are the AMC 1.8L casting (better quality history) but then welded and reworked to mimic the 2.0L generally.
I’m going to go with Emery here - if valves are sealing properly (they will be) - I wouldn’t tear down the heads. RAT & HAM are top notch and I don’t see that their work needs to be double checked or re-done.
I guess maybe I’m not so fuddy duddie after all.

Posted by: technicalninja Jul 11 2024, 07:46 PM
Those have had the chambers worked far more than SuperHawks!
I LIKE your heads!
My heads are the AA 2.0L china casting but valves, seats, springs reworked by HAM.
IIRC the RAT / HAM are the AMC 1.8L casting (better quality history) but then welded and reworked to mimic the 2.0L generally.
I’m going to go with Emery here - if valves are sealing properly (they will be) - I wouldn’t tear down the heads. RAT & HAM are top notch and I don’t see that their work needs to be double checked or re-done.
I guess maybe I’m not so fuddy duddie after all.
I'm actually in agreement with you. I did say "don't learn how on these heads" and provided a method of verification that did not require tear down.
I STILL want to see the ports however!
Badly!
Posted by: Superhawk996 Jul 11 2024, 07:51 PM
I'm actually in agreement with you. I did say "don't learn how on these heads" and provided a method of verification that did not require tear down.
My bad. For some reason I read it the opposite; ie now is the time to learn.

Posted by: technicalninja Jul 11 2024, 07:55 PM
SuperHawk, how would you test to see if the valves were seating properly?
The statement of "not needing to be double checked" IS the ROOT of ALL mechanical failures in my book.
You insult Mr. Murphy by stating that.
Mr. Murphy likes kicking you in the nuts...
I double and triple check everything ALWAYS!
I caught WAY TOO much shit to ever stop.
The only other way to test valve sealing is with a dedicated valve seat vacuum tester and that is something even I don't have...
Posted by: Superhawk996 Jul 11 2024, 07:59 PM
I’m going to reiterate what Ninja said earlier
Be sure you are indexing the flywheel to the crank and keeping all parts indexed and identified so they can go back to the EXACT same location.
Not sure if this Flywheel, crank, rods, fan assembly was dynamically balanced as an assembly. Probably not with amateur build but if it was you want things in the same spot.
A tell on dynamic balancing is if you find what seem to be drilled or ground spots where minor amounts of weight are removed to balance the assembly.
The book / DVD will have details.
If I couldn’t find evidence of dynamic balance work having done, I’d seriously consider doing it if you intend to really spin this motor up beyond factory redline. Should be able to outsource to a local performance shop - maybe Seattle or Tacoma area if necessary.
Posted by: Superhawk996 Jul 11 2024, 08:06 PM
SuperHawk, how would you test to see if the valves were seating properly?
What you’ve proposed is perfectly fine. Low viscosity, low surface tension fluid.
Posted by: Front yard mechanic Jul 11 2024, 08:12 PM
We should change the name of this forum from 914 world to supper ninja technical hawk
Posted by: technicalninja Jul 11 2024, 08:15 PM
I’m going to reiterate what Ninja said earlier
Be sure you are indexing the flywheel to the crank and keeping all parts indexed and identified so they can go back to the EXACT same location.
Not sure if this Flywheel, crank, rods, fan assembly was dynamically balanced as an assembly. Probably not with amateur build but if it was you want things in the same spot.
A tell on dynamic balancing is if you find what seem to be drilled or ground spots where minor amounts of weight are removed to balance the assembly.
The book / DVD will have details.
If I couldn’t find evidence of dynamic balance work having done, I’d seriously consider doing it if you intend to really spin this motor up beyond factory redline. Should be able to outsource to a local performance shop - maybe Seattle or Tacoma area if necessary.
100%!
If they put those nice rods in and DIDN'T balance, I'd FIRE THEM!!!
Posted by: Superhawk996 Jul 11 2024, 08:21 PM
We should change the name of this forum from 914 world to supper ninja technical hawk
Point taken
Posted by: technicalninja Jul 11 2024, 09:03 PM
We should change the name of this forum from 914 world to supper ninja technical hawk
OK!
Should we NOT have discussions regarding builds?
Would the other members prefer to not have SuperHawks and my input?
Posted by: burton73 Jul 11 2024, 10:29 PM
Positives:
Heads- look like Raby heads with welding around the spark plug wells (Raby did this).
Proper retainers/springs.
Look like oversize rocker arm studs.
Negatives:
Raised numbers on piston crowns. I believe those would have been machined off if built by someone knowledgeable. I'd have removed them.
And then I'd have ceramic coated the tops...
I've NEVER seen raised numbers in forged stuff. The forging process would destroy them.
Someone else said "cast" and I'm prone to agree due to those numbers and the rough valve depressions.
Cast iron jugs.
Stock head studs and re-used head nuts.
Grey RTV on case studs.
If they used grey RTV, a master would use a x-acto knife during curing to trim the excess.
Possibility of internal clips in the lifters.
The value of the heads FAR exceeds the posibility of destroying said heads without a full tear down.
I'd take lots of pictures and check a bunch of stuff during the tear down but that would get reduced to individual componets before I'd put fire to it.
It's looking more like a kit build with RAT heads.
Still a KILLER deal IMO!
@http://www.914world.com/bbs2/index.php?showuser=27135
Picture of RAT case with Serial number
Just so all can see what one of these RAT cases done my Jake looks like
Best Bob B
Posted by: Jack Standz Jul 11 2024, 11:59 PM
+1 on the suggestions to dynamically balance the motor if you don't see evidence of balancing or drill marks on the pressure plate/flywheel, etc. Dynamic balancing, not static "balancing."
Take all the reciprocating parts to the balancer. Crank, Rods, pistons, flywheel, clutch/pressure plate, etc. One of the signs of a RAT built motor (not a kit) is the fasteners were indexed to the location on the clutch/flywheel.
Posted by: Robroe Jul 12 2024, 04:51 PM
Here are measurements so far. I still need cam lift.
Stroke 78mm
Cylinder Diameter 96mm
Deck Height .052 in 1.32 mm
Intake Valve 44.06 mm
Exhaust Valve 35.95 mm
Posted by: technicalninja Jul 12 2024, 05:08 PM
Good looking numbers!
I'd pick a single shim to reduce deck height to .040.
I've always balanced my pistons and rods myself.
The machine shop won't invest the time that I am willing to, and they are never as accurate.
If you have a V configuration engine the machine shop needs the pistons/rods/rings/pins/clips to calculate "bob" weight.
I still don't let them do the balancing of the above.
If you're an inline or a boxer they machine shop does not need the above to balance the crank and I'm a HUGE believer in sending the absolute minimum parts to the machine shop.
It's hard for them to lose stuff that you keep in your shop...
Now, they DO NEED EVERYTHING that attaches to the crank.
If they are doing a proper job, they will balance the crank first by itself and then add an item and rebalance (doing the metal reduction to the new addition only), add another part, and so on. This is time consuming.
The quick and dirty way is to assemble it all and just balance it once...
Both ways will give you the same result but the long way will allow you to replace a single part and effect the total out of balance the least amount.
You also have the option to balance just that item and be near perfect.
SO two ways to balance...
One is the old school proper way
One is the new "Get-er-done" varity that is far more common now
Posted by: Robroe Jul 12 2024, 06:25 PM
Good looking numbers!
I'd pick a single shim to reduce deck height to .040.
I've always balanced my pistons and rods myself.
The machine shop won't invest the time that I am willing to, and they are never as accurate.
If you have a V configuration engine the machine shop needs the pistons/rods/rings/pins/clips to calculate "bob" weight.
I still don't let them do the balancing of the above.
If you're an inline or a boxer they machine shop does not need the above to balance the crank and I'm a HUGE believer in sending the absolute minimum parts to the machine shop.
It's hard for them to lose stuff that you keep in your shop...
Now, they DO NEED EVERYTHING that attaches to the crank.
If they are doing a proper job, they will balance the crank first by itself and then add an item and rebalance (doing the metal reduction to the new addition only), add another part, and so on. This is time consuming.
The quick and dirty way is to assemble it all and just balance it once...
Both ways will give you the same result but the long way will allow you to replace a single part and effect the total out of balance the least amount.
You also have the option to balance just that item and be near perfect.
SO two ways to balance...
One is the old school proper way
One is the new "Get-er-done" varity that is far more common now
I need an engine stand yoke for my build. My welding table would be a fine bench mount. What engine stand combination due you use? Hate to spend $400 for a one time use.
Posted by: 930cabman Jul 12 2024, 06:25 PM
We should change the name of this forum from 914 world to supper ninja technical hawk
I am glad to have top notch guys here to share their experiences, generally invaluable information.
Thanks all contributors
Posted by: Superhawk996 Jul 12 2024, 08:23 PM
I need an engine stand yoke for my build. My welding table would be a fine bench mount. What engine stand combination due you use? Hate to spend $400 for a one time use.
I use a Harbor Freight rolling base and a nice 3 arm yoke that I got off Thesamba.com.
Unfortunately I tried to get a link for you and it looks like the guy that used to build them (very affordable ~$120) has passed away and is no longer found in classifieds over at Samba.
You might post a WTB here and and see if someone has one they might sell but isn’t using. They were well made and capable of holding a six cylinder engine fully dressed.
The two arm yoke would work in a pinch for a /4 but the 3, 4, or 5 arm yokes are way stronger but get more expensive too. The 3 arm was a good compromise that works for me.
Posted by: technicalninja Jul 12 2024, 08:45 PM
I bought a cheap ass one as I was NOT planning on building a six.
Mine has two arms and came with a bracket that could be mounted on a bench.
Mine fits in a normal cheap ass engine stand of which I have 10-15.
Way too many!
It's like they BREED when I'm not looking...
I make 3/4" plywood bases on the engine stands and I'll add wheel/tire until I'm close
to have a second safety.
The 2-arm stand has worked fine with 2 complete 2.0l on it now.
I had to "fab" mounting hardware as its not perfect.
If you can get 3 or 4 arm used inexpensively that's probably money well spent.
You should always be able to get what you paid for it from another member down the road.
You MIGHT get an offer to borrow one from another member in the next few posts.
This happens far more often than you would think on this forum!
Should this happen, you should buy the beer! 
Posted by: technicalninja Jul 12 2024, 08:48 PM
https://aapistons.com/products/bench-mount-engine-stand?variant=30413920579¤cy=USD&utm_medium=product_sync&utm_source=google&utm_content=sag_organic&utm_campaign=sag_organic&cmp_id=204697570&adg_id=16306239610&kwd=&device=c&gad_source=1&gclid=EAIaIQobChMI7uzAioCjhwMVCTIIBR1NxAMLEAQYAiABEgIgNPD_BwE
That's the one I bought!
$50!
Your engine is too nice to use a cheapy.
But, that will actually work...
EDIT: The thread title needs to be changed!
It should read "Killer find 2256 Raby headed engine thrash" or something similar.
Posted by: technicalninja Jul 13 2024, 10:26 AM
On balancing...
Pistons/rods I will balance to +/- 0.5 grams
But the entire assembly I will accept +/- 2 grams.
Doesn't have to be super close!
When an engine runs it ends up with oil entrained on all of the parts and this oil "ropes" differently on different parts.
Due to the amount of oil hanging on the parts the engine will NEVER be in "perfect balance".
It CANNOT happen unless you get rid of the oil!
Dry sump has less of this happening but it's still significant.
When someone tells me the entire assembly is +/- some tiny amount it just means that they don't understand what is happening inside an engine while it's running...
When a good machine shop calculates "bob weights" for a V engine they should ALWAYS include 5 grams for this entrained oil in each bob weight.
Posted by: Robroe Jul 13 2024, 02:11 PM
On balancing...
Pistons/rods I will balance to +/- 0.5 grams
But the entire assembly I will accept +/- 2 grams.
Doesn't have to be super close!
When an engine runs it ends up with oil entrained on all of the parts and this oil "ropes" differently on different parts.
Due to the amount of oil hanging on the parts the engine will NEVER be in "perfect balance".
It CANNOT happen unless you get rid of the oil!
Dry sump has less of this happening but it's still significant.
When someone tells me the entire assembly is +/- some tiny amount it just means that they don't understand what is happening inside an engine while it's running...
When a good machine shop calculates "bob weights" for a V engine they should ALWAYS include 5 grams for this entrained oil in each bob weight.
Head porting photos. Just ordered AA 2 arm bench mount yoke. Looks pretty solid but will weld additional material if it looks questionable.
Posted by: technicalninja Jul 13 2024, 02:29 PM
Thanks for the pics!
Those ridges in the port say "CNC" ported.
It ALMOST looks like the port is undercut just beyond the valve seat.
That "flies in the face" of normal porting techniques...
Most ports work best with throats at 85% of the seat diameter.
Those throats look bigger than the seat! 
Maybe it's a "Type4" type of thing...
I'd love different angles and better shots of the exhaust port which I believe is the "Achilles Heel" of Type 4 head flow.
The 2.0l heads I've messed with had pretty decent intakes and the VERY WORST exhaust ports I've seen.
It didn't look like there was a decent way to "fix" the exhaust port IMO.
Posted by: 930cabman Jul 13 2024, 05:51 PM
On balancing...
Pistons/rods I will balance to +/- 0.5 grams
But the entire assembly I will accept +/- 2 grams.
Doesn't have to be super close!
When an engine runs it ends up with oil entrained on all of the parts and this oil "ropes" differently on different parts.
Due to the amount of oil hanging on the parts the engine will NEVER be in "perfect balance".
It CANNOT happen unless you get rid of the oil!
Dry sump has less of this happening but it's still significant.
When someone tells me the entire assembly is +/- some tiny amount it just means that they don't understand what is happening inside an engine while it's running...
When a good machine shop calculates "bob weights" for a V engine they should ALWAYS include 5 grams for this entrained oil in each bob weight.
Head porting photos. Just ordered AA 2 arm bench mount yoke. Looks pretty solid but will weld additional material if it looks questionable.
Looks like you might have a rockin /4 engine. Take you time with the assembly and keep us posted with your results
Posted by: emerygt350 Jul 14 2024, 04:46 AM
It looks like a ton of work for a little old 4, tell you what, why don't I just take that off your hands? I have a old bus engine fully assembled that I could give you instead.
Posted by: Superhawk996 Jul 14 2024, 12:14 PM
It looks like a ton of work for a little old 4, tell you what, why don't I just take that off your hands? I have a old bus engine fully assembled that I could give you instead.
Oh. . . So now you want to build a motor.

Posted by: emerygt350 Jul 14 2024, 04:44 PM
It looks like a ton of work for a little old 4, tell you what, why don't I just take that off your hands? I have a old bus engine fully assembled that I could give you instead.
Oh. . . So now you want to build a motor.
Well, I think I would be doing a guy a favor!

Posted by: technicalninja Jul 15 2024, 07:25 AM
Support mods that I think are important for this level of motor.
Big exhaust! You have DOUBLED the heat output; you need a serious exhaust to not "back up the sewer" with heat.
Raby himself suggests 4 into one with short collectors for his stuff.
@http://www.914world.com/bbs2/index.php?showuser=7222 has a nice set of short collector 4/1 set up that I'm hoping he will post a pic of.
Then there's the Tangerine stuff...
https://tangerineracing.com/shop/ols/products/tangerine-evo-914-4-street-system-1-58
His systems are what is referred to as tri-y and have two distinct collectors 2-1 than 2-1 again. There are good reasons to do it this way. You end up with two negative pulses at the exhaust port exit this way at different rpm ranges.
Pricy but very nice! I'd go Tangerine is cost wasn't an object.
That used set up was a good deal!
There is a BUNCH of good stuff out there! You CAN use the normal SSI heat exchangers, but they will be a bottleneck at high flow rates.
Because of doubling the heat output, you also need good temperature tracking.
Oil temp is important. Don't trust the original gauges. An accurate temp gauge is a requirement long before ANY oil cooler is warranted. You MIGHT need the cooler as well; the gauge will let you know if you do.
More important is cylinder head temp. Best to have sensor around #3 spark plug.
Lots of threads on here, many different was to go. I actually bought a 4-channel gauge from a member on here as I'm prone to gather WAY MORE data than I really need.
Then there is wide band O2 sensors. If you're not using these, you are back in the stone age of reading plugs for tuning data. Wideband is PARAMOUNT in any build IMO.
Oil mods, your oil pump can be a weak point. I'm an absolute bitch about "sucking air" which is possible with a stock oil pump. Pumps are made with dedicated O-rings that stop that shit. Lots of threads about pumps as well.
Then there's the oil pick up. A "tuna can" is the minimum IMO. Lots of threads again...
Fuel supply, you need to be able to deliver at least 200hp worth of fuel at all times.
At this level of engine, I'd be running a 7-8psi pump under the tank and a fuel pressure regulator to reduce this to 3 psi right before the carbs.
Overkill, but if you run lean EVER it will GO BANG and you will be sad.
Ignition: No points for this, modern electronic distributor. Many are available but the current "King of the hill" is the 123 blue tooth model.
I'm actually a fan of full-on stand-alone modern EFI with sequential injection and sequential coil on plug but you already have the proper sized carbs, and this jump is every bit as big a jump as the 1.7 to 2.255 jump you lucked into.
Even I would fire what you have on carbs first.
Talking about that...
I'm using the lowest of the low induction system for initial run in/cam bedding.
My 75 came with a brand new progressive 2bb. This is a single carb in the center over a plenum that feeds all 4 cylinders. This thing is SUCK CITY for performance but it is beyond easy for initial set up.
I'd use the baby single Weber to get the engine through the first CRITICAL run in period. I'd bed the cam and make sure the thing is proper before trying to add ITBs.
The ITBs can have initial teething issues and I don't want to be jacking around with that type of shit while the cam is bedding in.
Baby Weber for an hour and then the REAL carbs...
You shouldn't have to purchase this puppy, lots of us have one and most would be willing to let you use them for a short period of time as the ONLY time we use them is for run in as I have just described.
They REALLY do SUCK but they are drop dead easy to make work!
Enough for now...
Posted by: emerygt350 Jul 15 2024, 12:42 PM
I have an old progressive solex in the basement. The opel gt community had shot put contests with them back in the 80s....
Posted by: Robroe Jul 15 2024, 07:45 PM
On balancing...
Pistons/rods I will balance to +/- 0.5 grams
But the entire assembly I will accept +/- 2 grams.
Doesn't have to be super close!
When an engine runs it ends up with oil entrained on all of the parts and this oil "ropes" differently on different parts.
Due to the amount of oil hanging on the parts the engine will NEVER be in "perfect balance".
It CANNOT happen unless you get rid of the oil!
Dry sump has less of this happening but it's still significant.
When someone tells me the entire assembly is +/- some tiny amount it just means that they don't understand what is happening inside an engine while it's running...
When a good machine shop calculates "bob weights" for a V engine they should ALWAYS include 5 grams for this entrained oil in each bob weight.
Head porting photos. Just ordered AA 2 arm bench mount yoke. Looks pretty solid but will weld additional material if it looks questionable.
Facet fuel pump mounted under fuel tank in Frunk and Exhaust. 2.0 stainless heat exchangers
Posted by: Robroe Jul 18 2024, 01:56 AM
On balancing...
Pistons/rods I will balance to +/- 0.5 grams
But the entire assembly I will accept +/- 2 grams.
Doesn't have to be super close!
When an engine runs it ends up with oil entrained on all of the parts and this oil "ropes" differently on different parts.
Due to the amount of oil hanging on the parts the engine will NEVER be in "perfect balance".
It CANNOT happen unless you get rid of the oil!
Dry sump has less of this happening but it's still significant.
When someone tells me the entire assembly is +/- some tiny amount it just means that they don't understand what is happening inside an engine while it's running...
When a good machine shop calculates "bob weights" for a V engine they should ALWAYS include 5 grams for this entrained oil in each bob weight.
Head porting photos. Just ordered AA 2 arm bench mount yoke. Looks pretty solid but will weld additional material if it looks questionable.
Facet fuel pump mounted under fuel tank in Frunk and Exhaust. 2.0 stainless heat exchangers
Cylinder shims. Trying to use just one instead of the 4 stacked that the engine builder used. The shims added up to .150”. Closest single shim I can find is .160” from type 4 store. This will add .010” to my deck height bringing it from .052” to .062”. This brings compression to just around 8.0. Rim o used to do custom shim thickness but looks like they are out of business. Any sources for shims at .150”?
This will be a fun weekend car and probably not going to the track.
Posted by: Superhawk996 Jul 18 2024, 04:55 AM
Food for thought:
Shims - call Type 4 store / LN Engineering about what shim you need made. Shims are Blanchard ground for precise thickness and uniformity. A 0.160” shim can be ground down to exactly what you want. If Type 4 store can’t do it, find a local machine shop with a Blanchard Grinder and have it done there.
Stroker with cast iron cylinders and higher compression ratio is going to generate more heat - what is the plan to keep the engine cool? Is this engine set up for external oil cooler?
What oil pump is being used? Be aware that if a Type 1 oil pump has been substituted, you need to carefully measure the pump OD vs the engine case pump bore ID. Type 1 pumps are often grossly undersized allowing internal oil pressure leakage between pump outlet and case inlet. Likewise this can lead to sucking in air into the oil. Both of these will lead to low oil pressure especially when the engine is hot. Finally, Type 1 oil pump inlet / outlet location are slightly misaligned to the type 4 case - may need some custom port alignment to get things matched up properly.
Was the case machined with the Raby style rear main seal drainback to help reduce RMS leaks? Probably want to look into that while engine is apart.
Stock or SSI heat exchanger is going to limit your HP as Ninja already pointed out. Inability to quickly & efficiently move hot exhaust gasses out of the engine will lead to increased engine temperature as well.
Posted by: Jack Standz Jul 18 2024, 07:25 AM
Pretty sure the Type IV Store can make you some custom spacers for your cylinders. It just takes a little longer.
You can get an o-ringed type 1 pump from Gene Berg Enterprises in normal or full flow versions with either 26mm or 30mm gears.
Posted by: technicalninja Jul 18 2024, 07:37 AM
On balancing...
Pistons/rods I will balance to +/- 0.5 grams
But the entire assembly I will accept +/- 2 grams.
Doesn't have to be super close!
When an engine runs it ends up with oil entrained on all of the parts and this oil "ropes" differently on different parts.
Due to the amount of oil hanging on the parts the engine will NEVER be in "perfect balance".
It CANNOT happen unless you get rid of the oil!
Dry sump has less of this happening but it's still significant.
When someone tells me the entire assembly is +/- some tiny amount it just means that they don't understand what is happening inside an engine while it's running...
When a good machine shop calculates "bob weights" for a V engine they should ALWAYS include 5 grams for this entrained oil in each bob weight.
Head porting photos. Just ordered AA 2 arm bench mount yoke. Looks pretty solid but will weld additional material if it looks questionable.
Facet fuel pump mounted under fuel tank in Frunk and Exhaust. 2.0 stainless heat exchangers
Cylinder shims. Trying to use just one instead of the 4 stacked that the engine builder used. The shims added up to .150”. Closest single shim I can find is .160” from type 4 store. This will add .010” to my deck height bringing it from .052” to .062”. This brings compression to just around 8.0. Rim o used to do custom shim thickness but looks like they are out of business. Any sources for shims at .150”?
This will be a fun weekend car and probably not going to the track.
Better check your math...
Flat top 2255s run 9+ on compression ratio. I bet you forgot to add the 1
You'll be at 9 not 8
Swept volume divided by clearance volume + 1
Or (swept volume+ clearance volume) divided by clearance volume.
Both equal same numbers...
2255 strokers are usually ABOVE 9.0-1
I LIKE it there! I'd be hunting 9.5-1 but I'd also be doing full on EFI and running E/85 which most of the members on here would "Burn me at the stake" for.

Powered by Invision Power Board (http://www.invisionboard.com)
© Invision Power Services (http://www.invisionpower.com)