Printable Version of Topic
Click here to view this topic in its original format
914World.com _ 914World Garage _ I need help with rear trunk torsion bar
Posted by: Doug Leggins Oct 4 2005, 08:55 PM
The teener kicked my ass tonight! I simply wore myself out trying to get the rear trunk torsion bar behind the trunk roller.
I searched for as much info as I cold find before beginning this task. I modified my 12" adjustable wrench as mentioned on other threads on this topic. This tool proved to be a very good lever for pushing the torsion bar back. I could get the torsion bar pushed/twisted back well enough but I could not get it around the hinge roller/pin. I tried several times but could not find a way to get the roller behind the pin on the hinge.
I tried to remove the hinge then hold the torsion bar back as far as I could and then reinstall the hinge -This is the task the wore me out! No matter how or what I tried I could not find a way to get the bar behind the roller.
Anyone know the secret/technique to get the torsion bar in place?
Here is a pic of the wrench with a notch cut out on the end.
Attached image(s)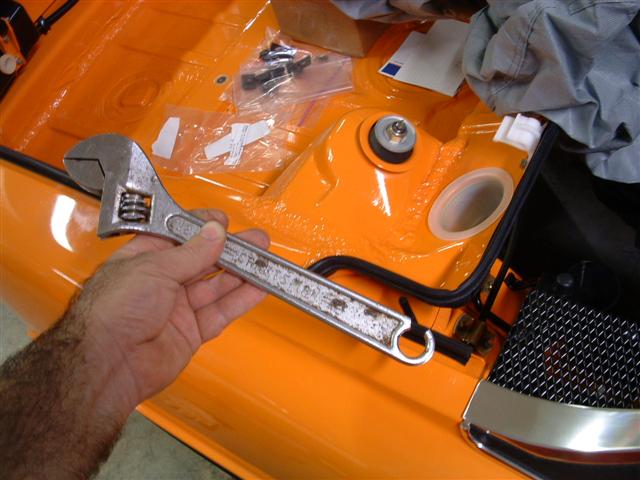
Posted by: Doug Leggins Oct 4 2005, 09:03 PM
Trying to bet the black torsion bar behind the brass roller. -Help!!!
Attached image(s)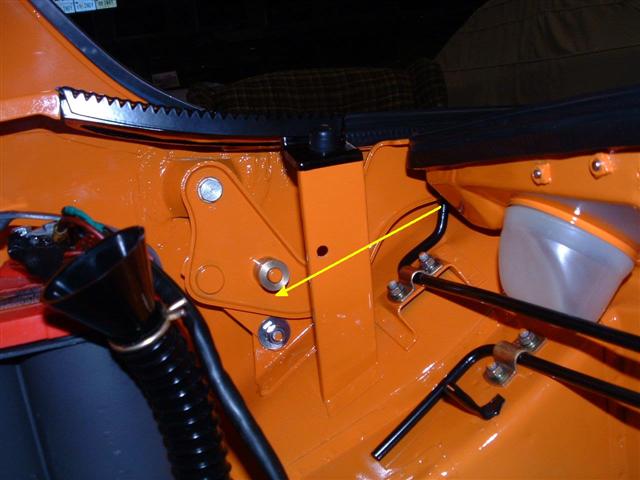
Posted by: Rand Oct 4 2005, 09:07 PM
Taking mine OUT was a careful process... putting one back IN? Ouch - I don't envy your job.
Personally, I like the shock kits better.
Are you intentionally wanting to keep the stock parts? If not, Craig can hook you up with a great alternative (www.camp914.com).
If so, I can understand after looking at your car pics.  Nice work!
Posted by: Joe Sharp Oct 4 2005, 10:06 PM
Doug: I take my 1/4 screw driver extention and a deep 5/16 socket for leverage, it seems to work for me.
:PERMAGRIN: Joe
Posted by: Air_Cooled_Nut Oct 4 2005, 10:19 PM
Though I can't help, this topic is perfect because I'm going to change out the plastic ones for the brass ones left over from my last 914. Oh, and I am quite envious with your car  Orange cars rock
  (see my VW on my web site
  )
)
Posted by: olav Oct 4 2005, 10:51 PM
To get that puppy on you need to:
Preload torsion bar spring with a box wrench until the crescent wrench with the notch can be positioned behind the upper bend.
Once the crescent wrench is in position push it forward toward the roller.
Set the spring on the roller with a screw driver.
So, you essentially attack the problem from the trunk side.
Posted by: Doug Leggins Oct 4 2005, 10:53 PM
I thought about the shock kits, even had it on the long list of things to buy. But, for some reason i have been compelled to use the stock set up on the rear trunk  . The engineering mind set just kinda wants to see how well this set up works when in good condition and properly maintained. This set up is kind of intriguing to me. Although much less so now that I have tried to install it
  .
.
Joe - Do you use the extension and socket to maneuver the bar around the roller and pin?
Air_Cooled_Nut - The modified 12" adjustable wrench works very well to move the torsion bar forward and back. I think that it would work very well to relieve the tension enough to slide off the plastic roller and then slide on the brass roller.
Anyone else with a good idea on a way to get the torsion bar behind the roller?
Thanks
Posted by: olav Oct 4 2005, 10:59 PM
There's a "special" tool to do this with and the adjustable wrench mimicks the tool.
Posted by: Doug Leggins Oct 4 2005, 11:08 PM
| QUOTE |
| To get that puppy on you need to: Preload torsion bar spring with a box wrench until the crescent wrench with the notch can be positioned behind the upper bend. Once the crescent wrench is in position push it forward toward the roller. Set the spring on the roller with a screw driver. So, you essentially attack the problem from the trunk side. |
These are the steps that i tried, except for setting the spring on the roller with a screw driver. I thought about trying this but didn't have the right helpers to attempt it. My wife and my son were trying their best but just not the skill level that I needed on this task to attempt prying the torsion bar around the pin and roller.
Toby - nice squareback!
Posted by: hmeeder Oct 4 2005, 11:14 PM
I used this method once upon a time when my hinge pin cup separated from the sidewall. Respect those damn torsion bars, they have no respect for you. Werd
http://forums.pelicanparts.com/showthread.php?s=&threadid=68181&highlight=hinge
PS. Love the color fo your car too. OPAFer!
Posted by: plas76targa Oct 5 2005, 06:00 AM
Doug,
To replace a broken plastic roller with an aluminum roller, I used the spark plug wrench out of my 911's tool kit. I'd guess it performed the same function as the 5/16 deep socket described in Herb's procedure. My advantage was the torsion spring was already in place so I didn't have to move it far. That tool easily fits one's hand as well as over the bar. I did have a helper though.
I don't envy you trying to pry that thing 90 degrees - as you photo shows. If you can borrow the spark plug tool from anyone local, that might work. Anyone close by to help? Sure looks like you'd need six hands a some divine guidance too!
Posted by: ClayPerrine Oct 5 2005, 08:50 AM
As was said previously, use a box end wrench to move the torsion bar until you can get the mocified cresent wrench hooked over the bar below the first bend.
Remove the roller from the pin, and use a big screwdriver as a wedge to allow the bar to slide past the pin and below it.
Once the bar is laying against the bottom of the pin, use the cresent wrench to pry it down, and slip the roller in place.
Hope that helps.
Posted by: aircooledboy Oct 5 2005, 10:58 AM
I have had to do this 3 times to repair my pivot hinge, and I used a deepwell socket kinda like joe described.
1) box end wrench to get the bar end pointing up to vertical
2) slip smallest that will it over the bar deepwell socket with 12" extension over the end of the bar
3) move bar into place with extension
4) As bar gets into position near roller, slide socket back off bar enough so it isn't going to interfere with the roller, let bar up into grove.
Posted by: flesburg Oct 5 2005, 02:52 PM
Guys !!!!!!!!! This question comes up every 6 months or so.
There is a special tool for this. I bought mine from either Tweeks (now mid-america motorsports) or Automotion (now Performance Products) maybe 20-25 years ago.
It slips over the end of the torsion bar, rotates, and holds onto the torsion bar. It has a socket fitting on it so you can use a ½ or ¾ inch breaker bar to apply tension to the torsion bar. It works like a charm. No danger of a broken bone. When you see how easy it is you will be pissed off at yourself for not thinking of it and making one for yourself.
If you will give me a little time ( I will not be where the tool is to take its picture until the 15th of October) I will take a picture and post it. Maybe one of you might want to make some….
Or, I will loan it to you. If you will pay for shipping both ways (and let me hold title to your first born, or you 914, or something) until you return it to me. I do not normally EVER loan tools, because it makes enemies out of friends when they break them or loose them or forget them or whatever. Seriously, I would loan it. I live near Kansas City, MO.
I do not want to sell it because I might need it someday and do not know where to get another one…
Dale Flesburg
Send me a PM
Posted by: ClayPerrine Oct 5 2005, 03:46 PM
Dale,
The cresent wrench modification mentioned in this thread was invented by a Porsche mechanic (Wes Hildreth) who has worked on these cars since they were new. He has the special wrench you describe, and he considers it an expensive paperweight. 
If it works for you, great.
Posted by: Joe Sharp Oct 5 2005, 04:20 PM
Doug: I takt the 5/16th deep well and slip it on a 1/4 screw driver extention and slip that over the bar. Work it around the grill parts and under the piviot pen. It takes some effort, but thats just the way I get it done.
:PERMAGRIN: Joe
Attached image(s)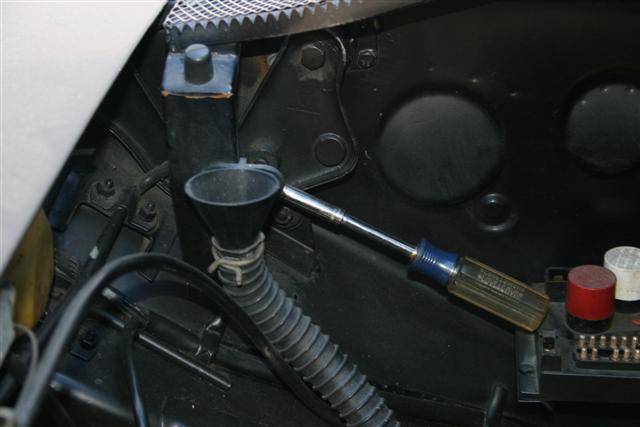
Posted by: Headrage Oct 5 2005, 05:10 PM
Excellent solution Joe.
Posted by: Joe Sharp Oct 5 2005, 06:19 PM
Thanks Allan. But its not mine, I read it on the board somewhere.
:PERMAGRIN: Joe
Posted by: jsteele22 Oct 5 2005, 06:42 PM
Car looks sweet, BTW (I'm thinking of converting to signal orange if I ever get around to painting.)
I repaired a hinge on my car when I got it, and was gonna get the metal rollers (one of the plastic ones was cracked.) When I looked at how it worked and how hard it was to install, I decided it just wasn't a very good design compared to a shock (really shock + spring) kit. To keep the trunk lid up, the force required is inversely proportional to the distance from the pivot. If you want your force applied 10 times closer than it would be with a shock/spring system, you've gotta apply 10 times more force. Hmm. it would seem that a force that large could over time prove harmful to the hinges. Anyone ever heard of hinge problems on a 914 ? How about any car w/ the shock/spring setup ?
I understand the aesthetic of not having those shocks there, and also the desire to keep a car as stock looking as possible, but in my case neither of these apply. So I bought a shock kit, which I still have in its original packaging. When I need to keep the trunk lid open, I use my head.
Posted by: Doug Leggins Oct 5 2005, 08:30 PM
SUCCESS!!!!
Both torsion bars are in place!
Thanks to all of you that helped! I also called Michael at Brad Mayeur's shop and got very similar advice. 
My wife and I got the passenger side on fairly easy tonight using the 1/4" screwdriver extension and screwdriver as a prybar method.
It went well enough that I was confident that the driver's side would be relatively easy so I recruited my son to take some "action" shots.
Here are some pics of the driver's side install.
Using the 1/4" nutdriver extension in my left hand to pull the torsion rod as far forward as I could, stopping when it touched the small grill.
Attached image(s)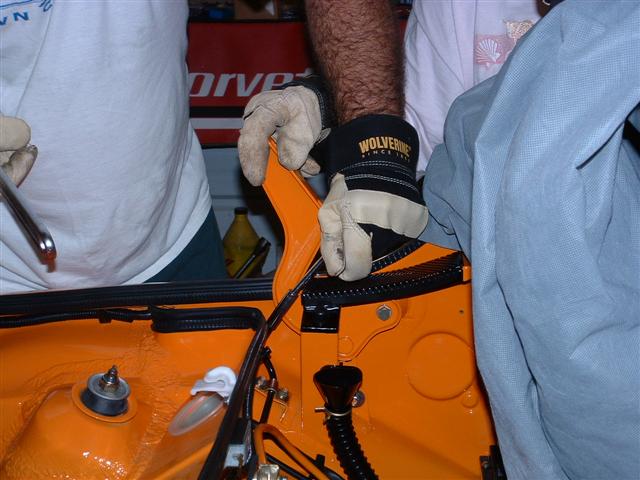
Posted by: Doug Leggins Oct 5 2005, 08:32 PM
transitioning from the 1/4" extension to the notched adjustable wrench in my right hand. Susan was holding the hinge up out of the way for me.
Attached image(s)
Posted by: Doug Leggins Oct 5 2005, 08:36 PM
Using the notched wrench to push the torsion bar forward. Fair amount of effort required here. This wrench works really well for this task -provides good control.
Attached image(s)
Posted by: Doug Leggins Oct 5 2005, 08:37 PM
Reaching in from the engine bay with a large screwdriver to use to wedge the torsion bar around the roller pin.
Attached image(s)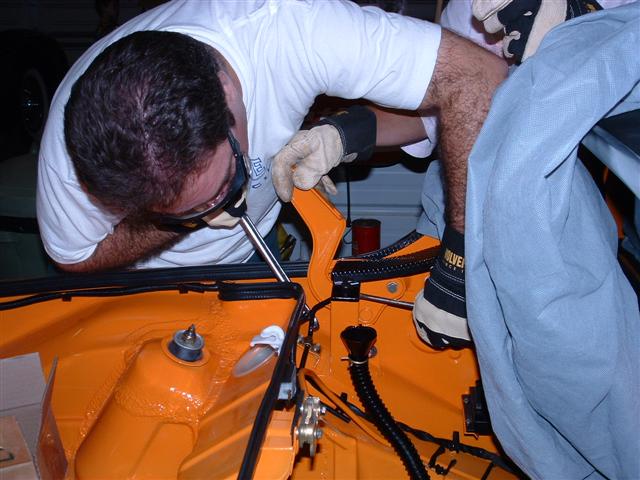
Posted by: Doug Leggins Oct 5 2005, 08:40 PM
Screwdriver used to pry the bar around the end of the roller pin. This is the trick that I was missing last night.
Attached image(s)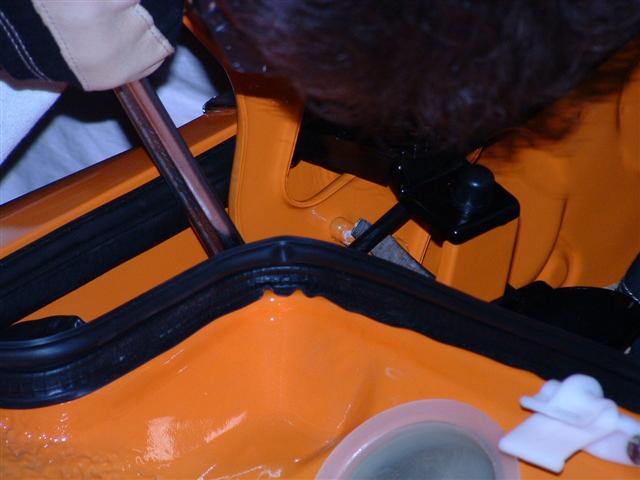
Posted by: Doug Leggins Oct 5 2005, 08:41 PM
Torsion bar on the back side of the roller pin!
Attached image(s)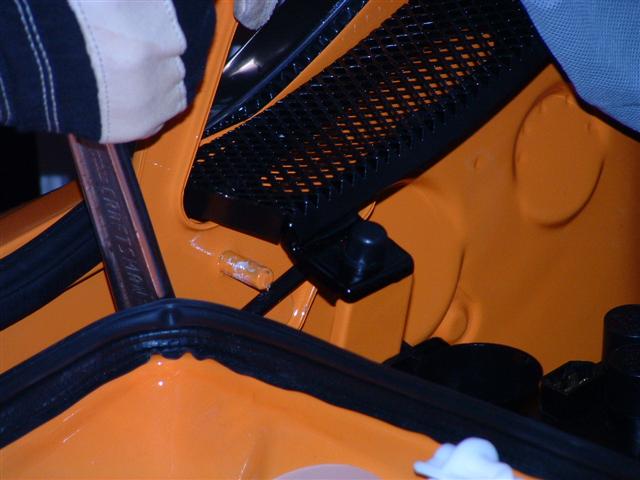
Posted by: Doug Leggins Oct 5 2005, 08:45 PM
Slipped the roller on the pin, cautiously eased up on the tension applied by the notched wrench and success!!!
Attached image(s)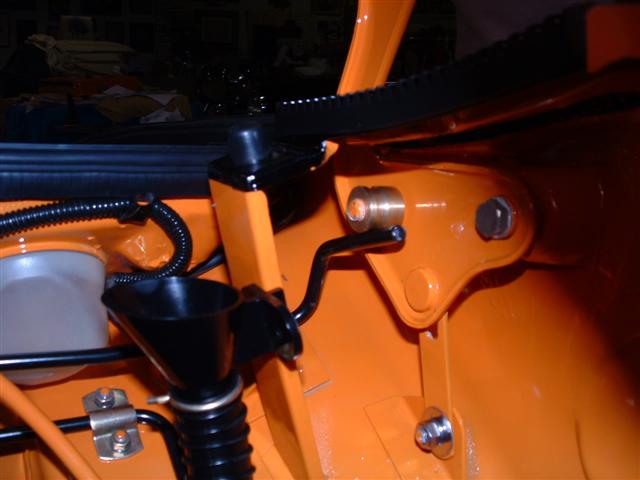
Posted by: Lou W Oct 5 2005, 09:00 PM
This belongs in the Classic Thread Section.
Posted by: seanery Oct 5 2005, 09:01 PM
wow! 
Any paint problems?
Hey, I got part of your message tonite, but couldn't tell what you were saying, had to check my caller id and saw it was an 812 cell, so I assume that was you
Posted by: jsteele22 Oct 5 2005, 09:20 PM
Wow, is there anything in your car that isn't brand new ?
Great pictures. Why couldn't the folks at Haynes do so well ?
I agree, put this thread in the classics !
Posted by: seanery Oct 6 2005, 12:07 AM
| QUOTE (jsteele22 @ Oct 5 2005, 10:20 PM) |
| Wow, is there anything in your car that isn't brand new ? Great pictures. Why couldn't the folks at Haynes do so well ? I agree, put this thread in the classics ! |
There are new things on Doug's car, but you've got to understand, most of the items have been R&R'd...and most by him!

Posted by: ClayPerrine Oct 6 2005, 10:10 AM
This is a nice picture representation of the procedure I described. The only difference in how I do it is I put the screwdriver in from the top, and hold it and the hinge with one hand.
 How about a metal or nylon wedge that can be slipped over the pin. Then just pull the torsion bar up and it would pop into place by itself.
Posted by: Mikey914 Nov 28 2017, 12:05 PM
No need to make the tool, this looks like the technique. 
Posted by: JOEPROPER Apr 14 2020, 07:46 AM
![]() Just bumping this thread because it's really useful, and I'm about to attempt it.
Just bumping this thread because it's really useful, and I'm about to attempt it. ![]()
Posted by: JOEPROPER Apr 14 2020, 08:05 AM
This helped. ALOT. 5 minutes or less with no help and a smushed left thumb.
Attached thumbnail(s)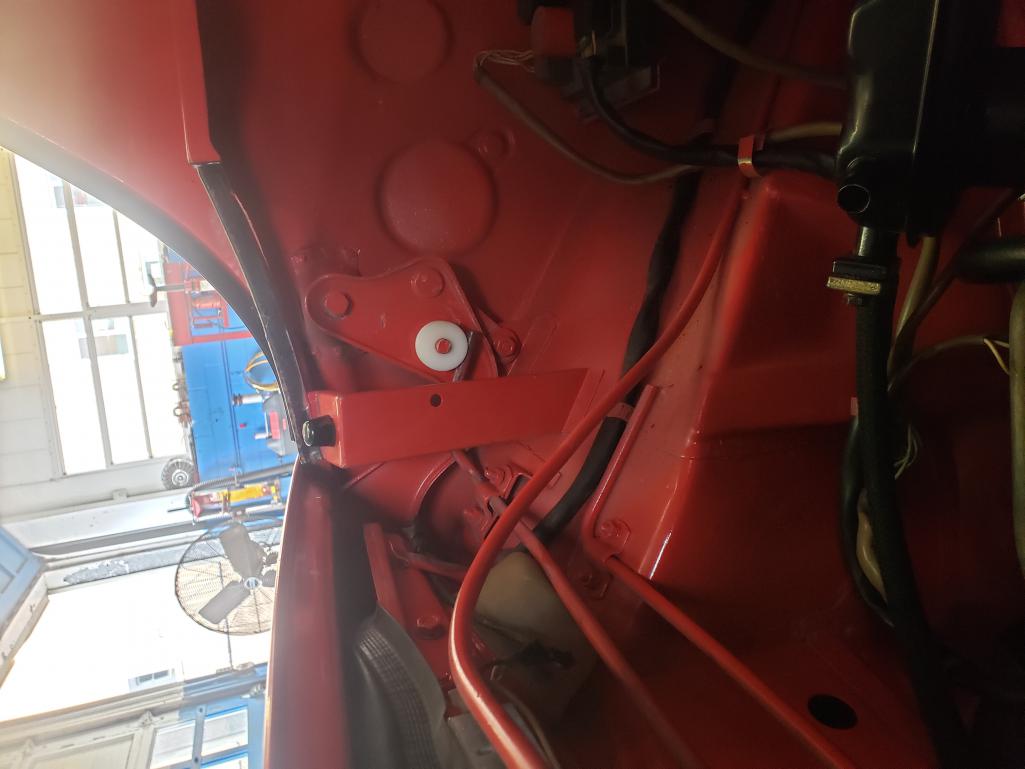
Posted by: AZBanks Apr 14 2020, 09:10 AM
Great thread. I am going to need it because I have to fix/repair/replace the hinge bracket on both sides.
Posted by: JOEPROPER Apr 14 2020, 10:16 AM

Great thread. I am going to need it because I have to fix/repair/replace the hinge bracket on both sides.
Be carefu! Those skinny little torsion springs are TOUGH. Looks are deceiving.
Posted by: Jakester1 May 5 2020, 09:44 AM
DOUG, thank you for the great pic's of installing the trunk springs, again THANKS, I'll go out and try installing the springs with a little insight in how to do the job without knocking out all my teeth.
Posted by: dt4 May 31 2020, 01:51 PM
tomorrows job
is it done with the trunk lid on the hinges?
Posted by: IronHillRestorations May 31 2020, 04:20 PM
tomorrows job
is it done with the trunk lid on the hinges?
It may be possible, but probably adds a lot of difficulty. I've never done it that way. I got the tool from @http://www.914world.com/bbs2/index.php?showuser=419 Original Customs, worth every penny
Posted by: BeatNavy May 31 2020, 06:05 PM
It can be done with trunk on the hinges. Be careful, and it is very advisable to have a helper (one to hold the rod, one to slip the rollers on). Be careful 
Posted by: rhodyguy Jun 1 2020, 09:17 AM
Prop the trunk fully, FULLY, open for a lid on roller install.
Posted by: dt4 Jun 1 2020, 11:27 AM
defeated me today, it took plenty of effort just to get the bars installed mainly due to the threads on the studs being painted up
I gave it a bit of a go to see how to approach it and will get it done when I am re-energised 
Posted by: Mikey914 Jun 1 2020, 11:55 AM
We just brought on McMark's tool for doing these. If anyone needs one I will have them at $29.99 a pop
http://www.914world.com/bbs2/index.php?showtopic=329569&hl=tool+spring+tension
Attached image(s)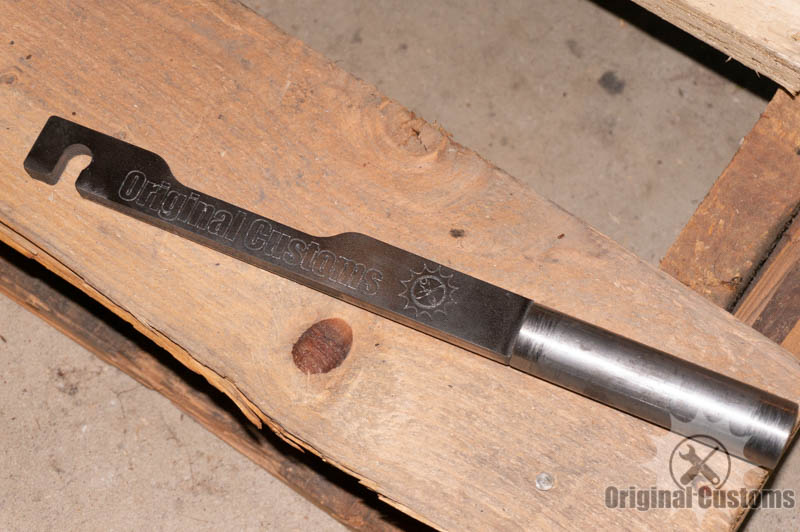
Posted by: Arno914 Aug 27 2020, 06:25 AM
Place some thick cushioning on the area where the torsion spring might impact in case it slips off the socket while you try to pry it over the roller pin. Otherwise it will leave a big ding on your bodyshell! 
These springs are nothing for kids... 
Posted by: Garland Sep 13 2020, 02:33 PM
Great tool, glad these are still available, got mine last week, it was finally time. Clean install, still have 10 fingers. 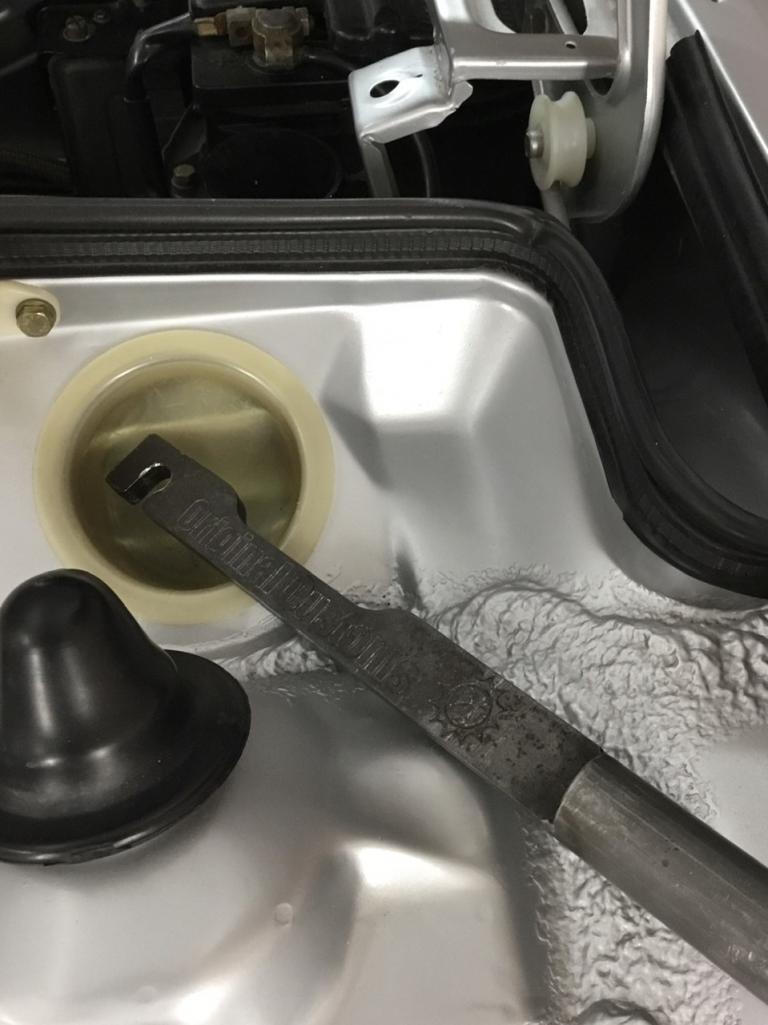
Posted by: Mikey914 Sep 13 2020, 06:02 PM
Link
https://914rubber.com/rear-trunk-spring-pressure-relieving-tool
Attached image(s)
Posted by: jrmdir Aug 10 2021, 08:57 AM
Older thread but Doug still deserves kudos for the write up and photos of the sectioned crescent wrench technique. I tried all day Saturday (and busted my a##) with a set up that I thought would work using 1/2" square steel tubing for leverage but couldn't figure out how to hold the spring up in order to get another "bite" on the end. On Sunday, a $9 Harbor Freight wrench and about 7 Dremel disks later and I was able to finish the job in about 5 min. Fantastic!
Thanks again Doug!
Ron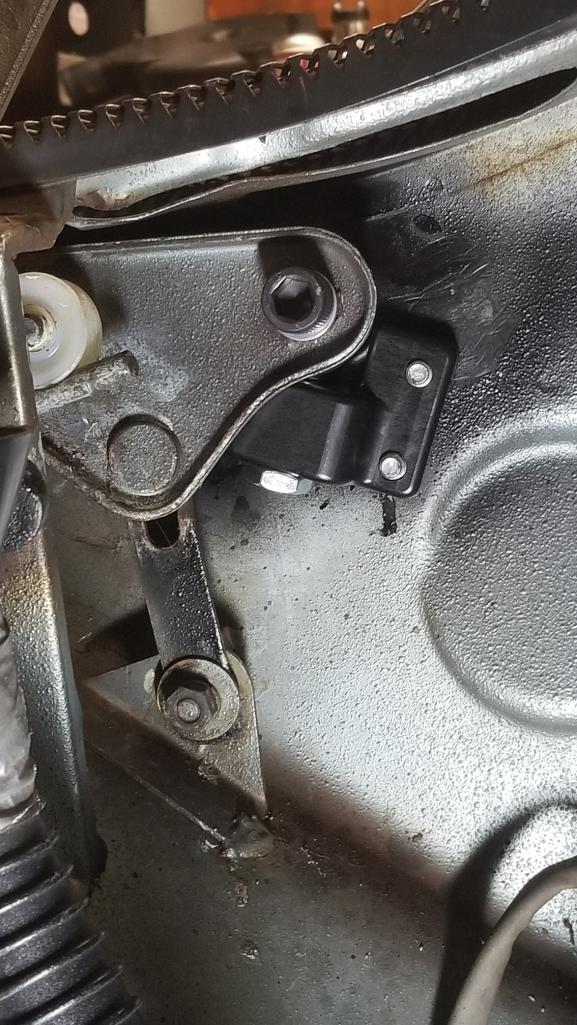
Posted by: tomh Aug 10 2021, 09:43 AM
I notched an old flat crow bar
It worked great.
Posted by: NARP74 Aug 10 2021, 09:58 AM
Older thread but Doug still deserves kudos for the write up and photos of the sectioned crescent wrench technique. I tried all day Saturday (and busted my a##) with a set up that I thought would work using 1/2" square steel tubing for leverage but couldn't figure out how to hold the spring up in order to get another "bite" on the end. On Sunday, a $9 Harbor Freight wrench and about 7 Dremel disks later and I was able to finish the job in about 5 min. Fantastic!
Thanks again Doug!
Ron
How did you determine the location of the JWest brackets? I have them and the tool to do this job. Was the engine installed when you did it?
Posted by: jrmdir Aug 10 2021, 11:19 AM
[/quote]
How did you determine the location of the JWest brackets? I have them and the tool to do this job. Was the engine installed when you did it?
[/quote]
Yes the engine is in and I removed the trunk lid. The kit is great but the instructions about locating the right spot for the holes didn't sound easy to me: Put the lid back on and do the trial and error thing!
So I figured the best thing would be to try to make sure the center of the new bolt lined up with where the prior center of the welded bracket had been. So before I ground off the spot welds, I spent some time re-forming the broken off bracket until it fit back where it was - with the broken edges lined up with the metal still on the car. Then I screwed the old mounting bolt most of the way through (see photo) put a dab of white grease on the end and set it back in place so the grease transferred to the body. Probably overkill bc there was a definite dimple stamped into the body right were the grease ended up. Not sure if this was a a factory guide point but it seemed so. I only had to to one side so I don't know if they're all like that.
Next I drilled a 5/16 hole at that center point. (start with a 1/8" drill and work up because there is a 2nd layer of metal partially behind that will cause a larger drill to walk off center. AMHIK!) Finally, I found a suitable bushing to allow me to put a longer 5/16 bolt through the large rod end hole, added a thin washer and stuck it through the new hole in the body with a nut and washer on the wheel well side.
So, with the pivot point theoretically right where it used to be, I was able to rotate the new bracket around to find the best clearance for the four bolts and scribe for the bolt holes.
So after all this verbiage, the big disclaimer is that I've yet to reinstall the lid - but will do that today. However since I drilled larger mounting holes as suggested - for adjustment - I'm pretty confident it will work out just fine.
Ron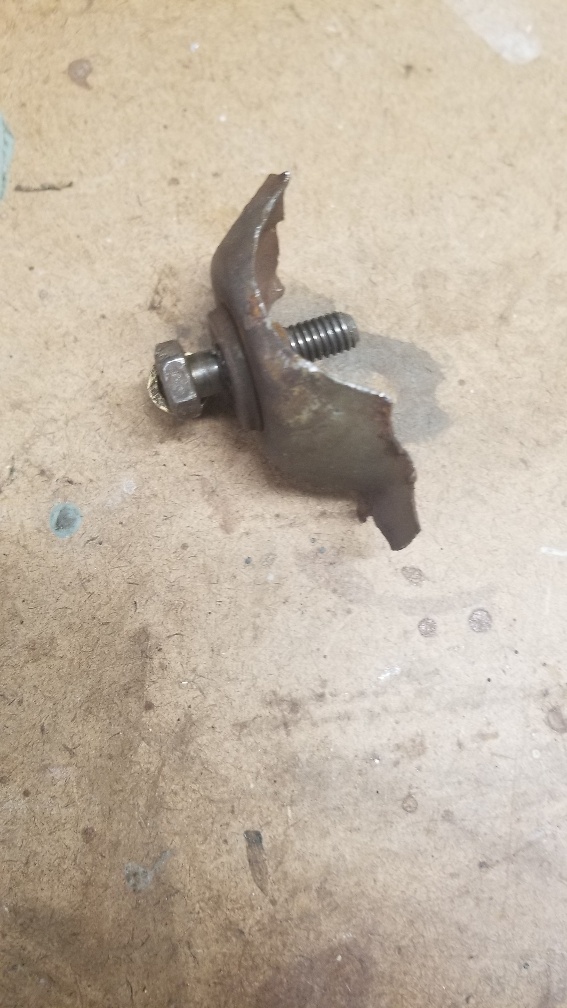
Posted by: ClayPerrine Aug 10 2021, 01:21 PM
How did you determine the location of the JWest brackets? I have them and the tool to do this job. Was the engine installed when you did it?
I bolt them to the hinges, and put the lid on the car. Then I mark where the brackets are on the walls. Then I take the lid back off, and line up the hinges with the marks I made.
Once they are on the body, I can adjust them up and down to make the decklid fit perfect.
Clay
Posted by: jrmdir Aug 10 2021, 02:32 PM
Success!
I've owned this car for over 2 months and until today have never seen it without the left side of the trunk sticking up an inch and a half! Nice Butt!
Ron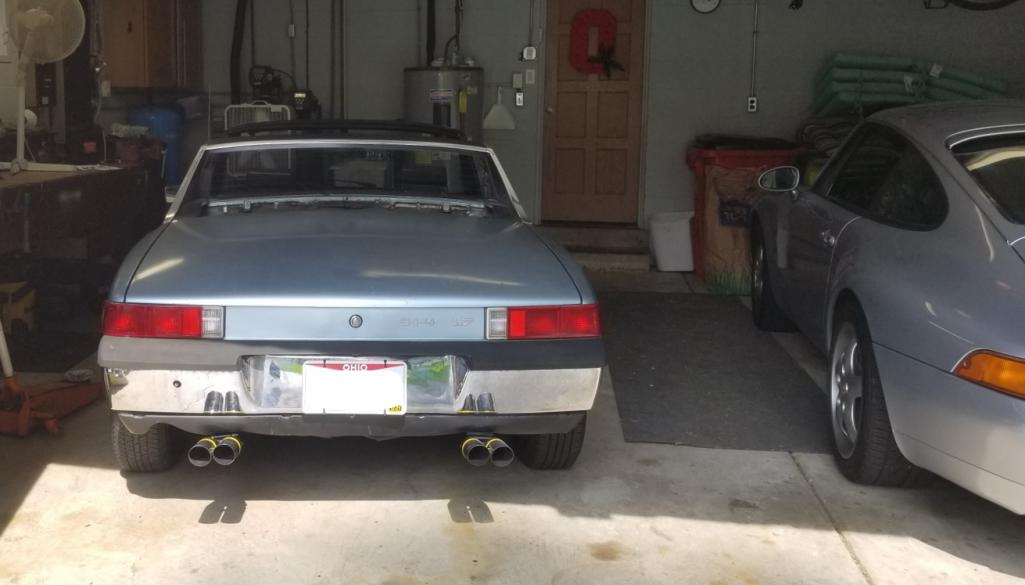
Powered by Invision Power Board (http://www.invisionboard.com)
© Invision Power Services (http://www.invisionpower.com)