Printable Version of Topic
Click here to view this topic in its original format
914World.com _ 914World Garage _ Marv's 3.6 GT project thread
Posted by: Marv's3.6six Nov 17 2005, 12:08 AM
I have always loved the 914/6 GT's and will be converting this orig 6 (below) to an updated GT plus try to build a TTOD capable AX’r. 
It will be pretty much be a straight up racer, no heat, no radio, no nuthin, almost a full GT car but with no roll cage. To get to TTOD I felt that I needed a few things I did not already have, such as more rubber beneath me, more low end torque, closer gear ratios, LS diff, more tuneable suspension, body stiffening, yadda yadda, you get the drift.
This first pic is when I bought her in August 02, she's a factory six with a 3.2 and 915 trans, 911s suspension, was PCASDR 99 & 2000 AX champ for class HI.
Attached thumbnail(s)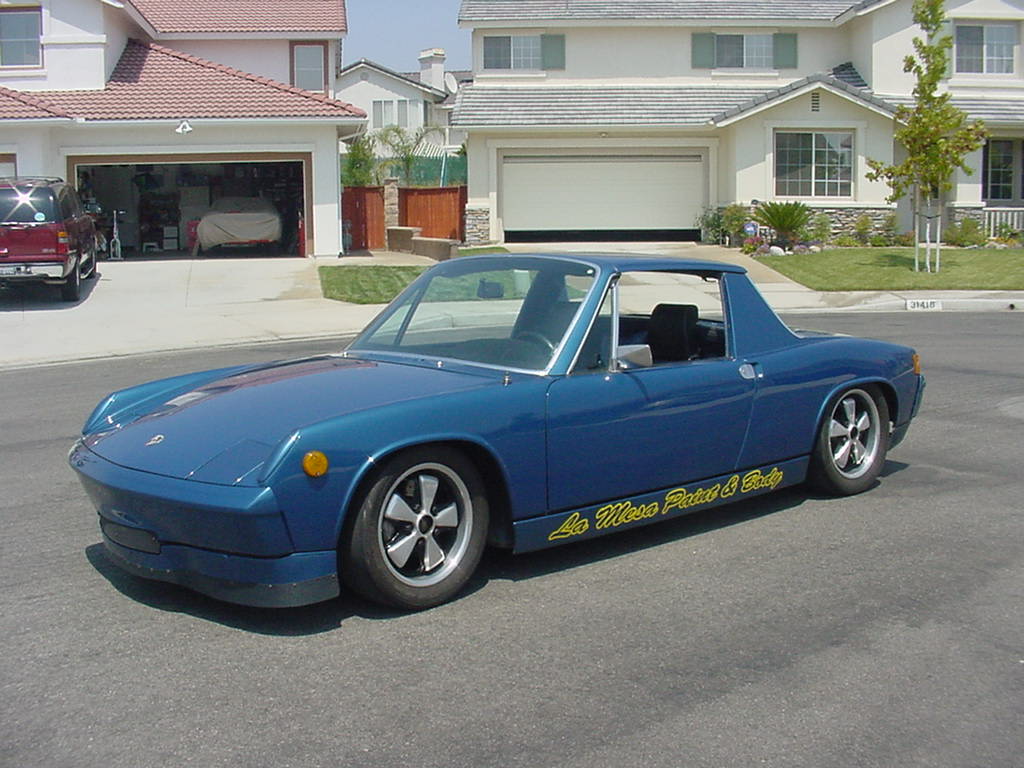
Posted by: Andyrew Nov 17 2005, 02:37 AM
Ya need slicks for TTOD....
buuut...
Cool stuff!!!
Same thing im doing... cept I got a lowly v8... and I KNOW that I cant get TTOD with the 50k 911's and 914's running around...
Posted by: DrifterJay Nov 17 2005, 05:29 PM
Marv! A teener guy in Murrieta!! Cool shit man! I will be home in a couple of weeks, definately would love to stop by and check out your project and shoot the shit!
-Jared
Posted by: Rand Nov 17 2005, 05:35 PM
| QUOTE (Marv's3.6six @ Nov 16 2005, 10:08 PM) |
| straight up racer, no heat, no radio, no nuthin, almost a full GT car but with no roll cage.... I bought her in August 02, she's a factory six with a 3.2 and 915 trans, 911s suspension, was PCASDR 99 & 2000 AX champ for class HI. |
Great starting point!! I like your style and am looking forward to watching your progress!

Posted by: effutuo101 Nov 17 2005, 08:07 PM
Very nice!
Posted by: J P Stein Nov 17 2005, 08:29 PM
My car came close to TTOD SCCA locally with a street legal car....and a damn good driver(not to be confused with me). 
Your car is too damn pretty to do what I did in my continuing attemtps for TTOD. It would also be very uncomfortable to drive anywhere. You prolly don't have enuff fender to get the tire you need.....that's just a guess.
You risk breaking up your chassis without the stiffness required by monster tires.
Having said that, if you have a small enuff pond, it can be done with a street car, me thinks. Trekkor has done it...no offense, Trek.
Posted by: Marv's3.6six Nov 17 2005, 11:20 PM
March 2005, Car is stripped except for wheels & steering wheel. Going to the sandblast booth here. We found that this car had 7 paint layers, mucho bondo, and a couple of really hack body repairs. We estmate that we removed over 100 lbs in paint, the paint was 3/16" thick! (Go back to the first post for a clue as to who did this custom (HACK) paint work.
Attached image(s)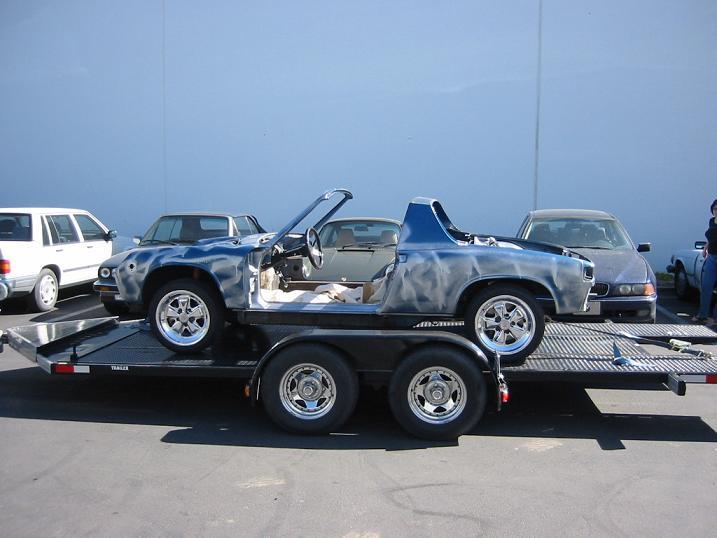
Posted by: brp914 Nov 18 2005, 12:06 AM
my .02: black adds needed detail and makes a nice contrast to the silver you've chosen - hence black sail panel trim, rockers, and valences. Also, black between the fuchs spokes. Agree? Otherwise it reminds me of this crappy apt when I was in school. Between tenants they would shoot another layer of paint. But they wouldn't mask anything. Everything got coated with the same cheap shiny paint - walls, doors, trim, light switches, cat and dog...
Posted by: Marv's3.6six Nov 20 2005, 10:18 AM
March 2005, Here 99% of paint has been sandblasted off. Metal work to start. Guy in pic is Brian from Temecula Rod & Custom, he is a master metal worker, claim to fame is he appeared on early Monster Garage episodes. 
Attached image(s)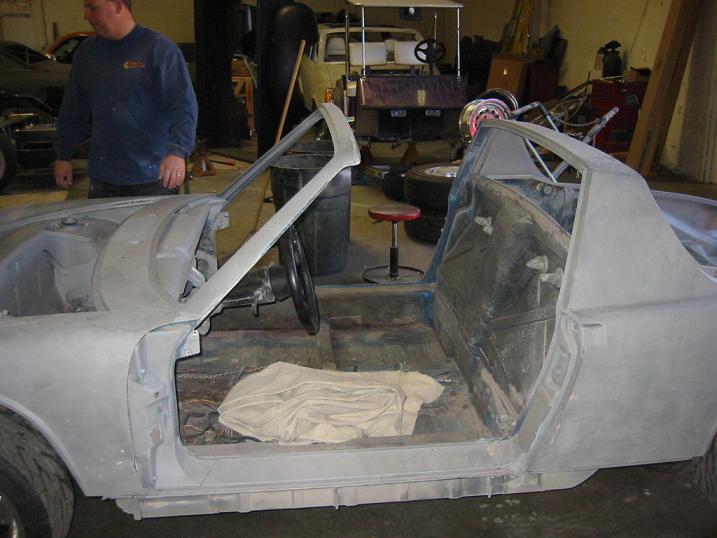
Posted by: Marv's3.6six Nov 22 2005, 05:16 PM
May 2005 Some of the metal work completed. Note how the steel front spoiler is custom flared at the end to match the GT flares.
Attached image(s)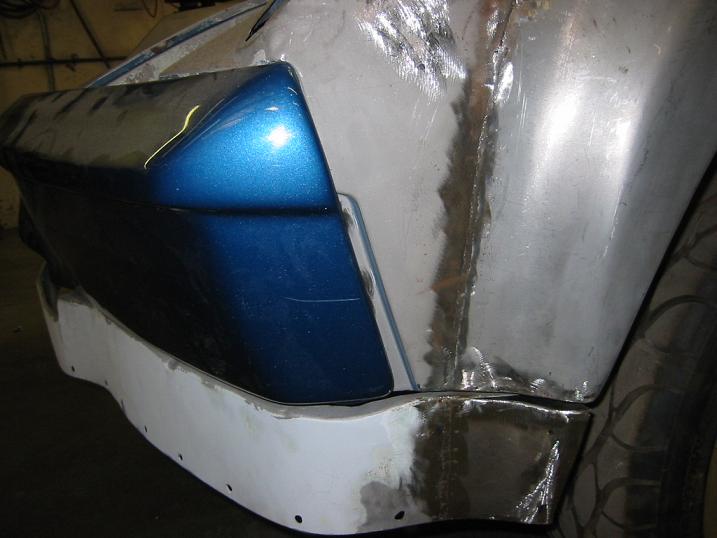
Posted by: Marv's3.6six Nov 22 2005, 05:17 PM
Pic: Rocker panels custom flared to match GT flare, extra structural bracing added to fight cone damage at AX's.
Attached image(s)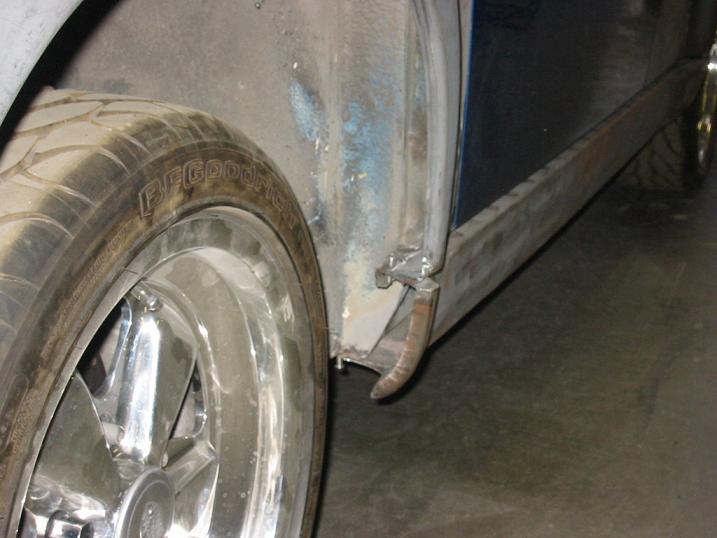
Posted by: Marv's3.6six Nov 22 2005, 05:24 PM
July 2005 Finished metal work, tub on rotissere with some body filler & being prepped for paint.
Attached image(s)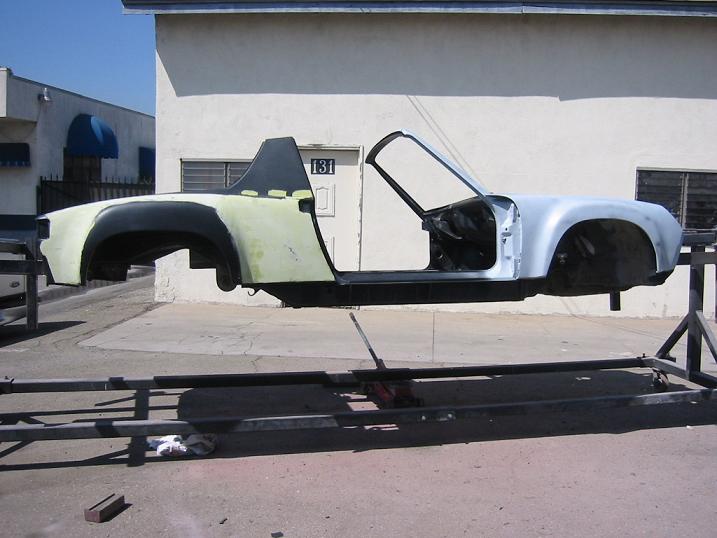
Posted by: Marv's3.6six Nov 22 2005, 05:28 PM
11/22/2005 Paint on tub finished, Carrera GT Silver. Tub to go on lift this Friday, assembly starting yay! 
Attached thumbnail(s)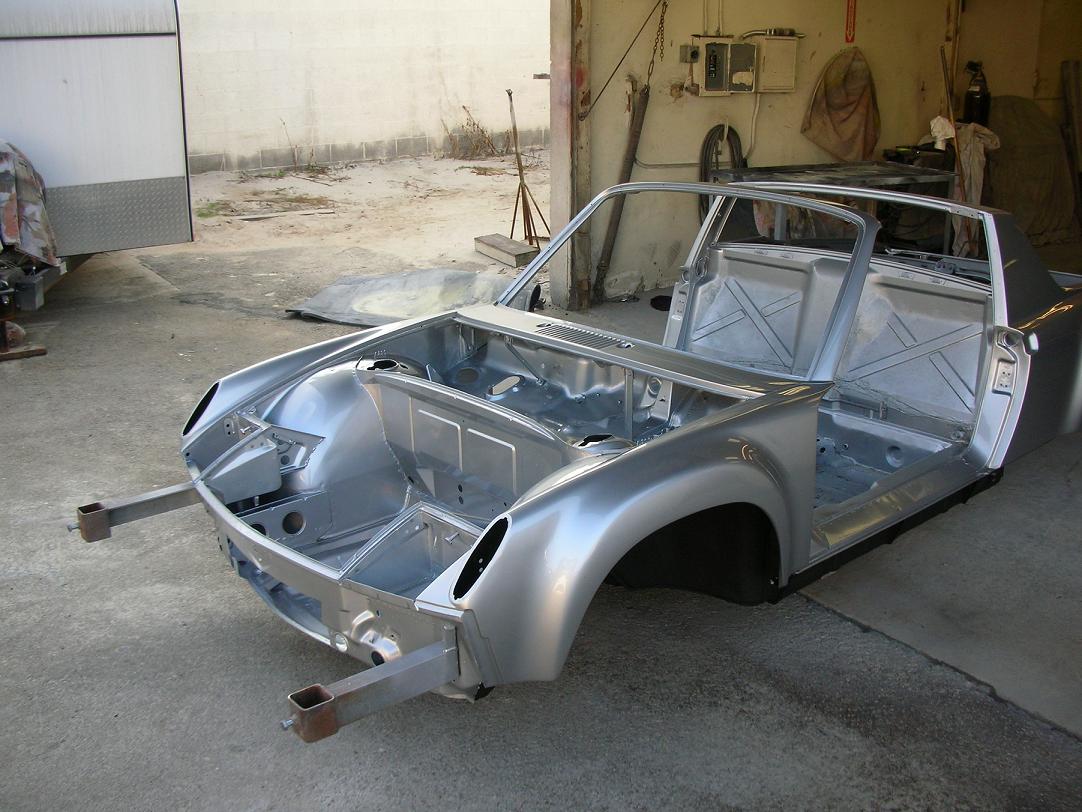
Posted by: MrKona Nov 22 2005, 10:02 PM
Looks beautiful. Love the color! 
Posted by: Verruckt Nov 22 2005, 10:26 PM
I was wanting the same silver (w/ flares even), looks awesome!
How well did they get in the area under the headlight buckets? That looks like it would be a total PITA. 
Posted by: Marv's3.6six Nov 22 2005, 10:36 PM
Andrew (the paint meister) is an artist, for hard to get areas I think he used a wand tip, kinda like a garden sprayer, plus he could turn the tub upside down purty easily.
Next pic: full shot of painted tub, on rotissere.
Attached image(s)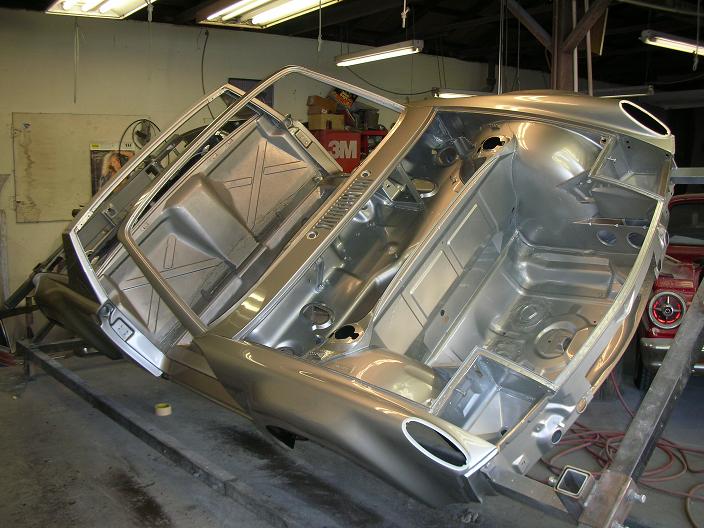
Posted by: Marv's3.6six Nov 22 2005, 10:39 PM
Pic: shot of rear suspension seam welding.
Attached image(s)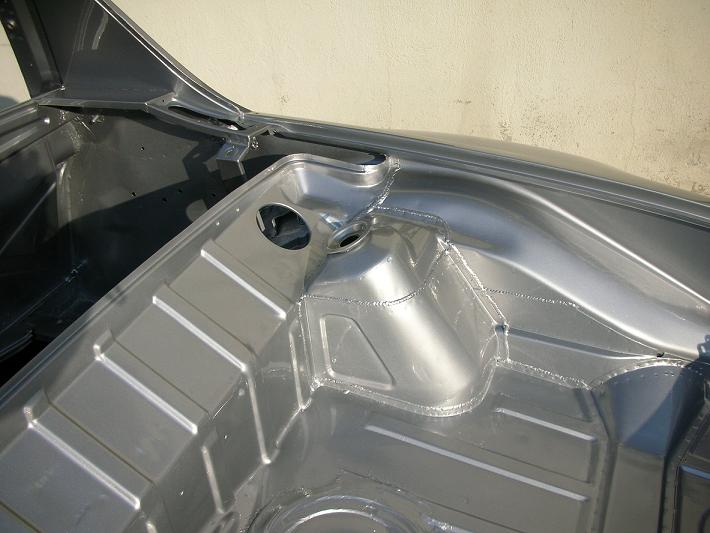
Posted by: Marv's3.6six Nov 22 2005, 10:45 PM
Brake porn: Brembo GTP lightweights, 12.3" full floating rotors.
Attached image(s)
Posted by: 0396 Nov 23 2005, 07:20 AM
Can't wait to see this at the track.
Love to have those Brembos as a spare set 
Posted by: soupbone Nov 23 2005, 11:09 AM
How much coin for the body work and paint if I may ask?
Posted by: Marv's3.6six Nov 23 2005, 11:28 AM
I would rather not say, but I probably could of bought a pretty nice original 6 for the amount spent, just on paint & body work alone. 
Posted by: Marv's3.6six Nov 23 2005, 11:31 AM
Heres the wheels I'm gonna run, HRE311 17X9 & 17X8, custom offset/backspace for early 911, should fit perfect, I hope. These will goto Al Reed for a repaint and makeover after fit up checks out.
Attached image(s)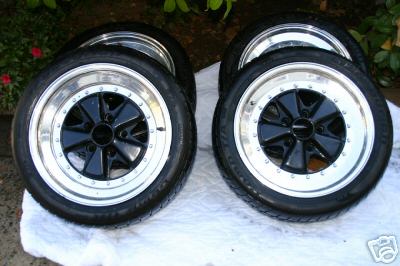
Posted by: soupbone Nov 23 2005, 11:31 AM
Thanks I have a guesstimate now which does indeed help. How long did it take to get it back to a roller?
Posted by: Marv's3.6six Nov 23 2005, 11:38 AM
I'm just bringing y'all up to speed right now.
Its kinda a roller so to speek right now, she's on a "rolling cart" and will go up on a lift at my buddys shop this Friday for final assembly to begin.
Posted by: Marv's3.6six Dec 13 2005, 10:02 PM
After a few weeks wait she is finally on four wheels.
Attached image(s)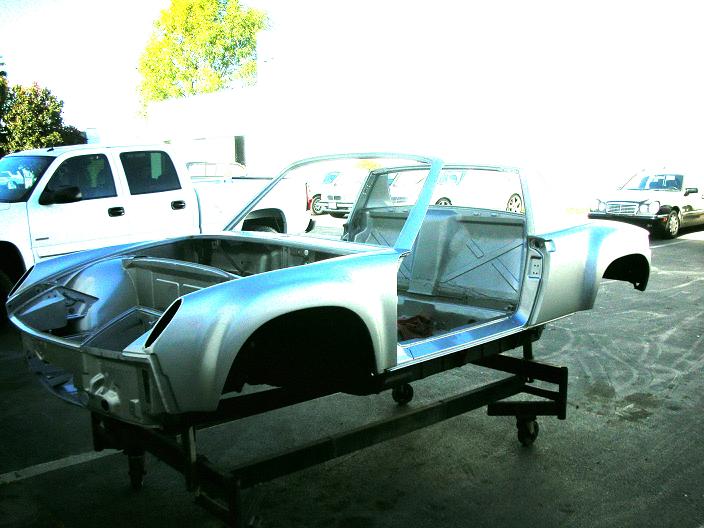
Posted by: Marv's3.6six Dec 13 2005, 10:04 PM
Work has started , removed tar for new undercoat/linex type coating. Checkout the welding on the engman long kit install.
Attached image(s)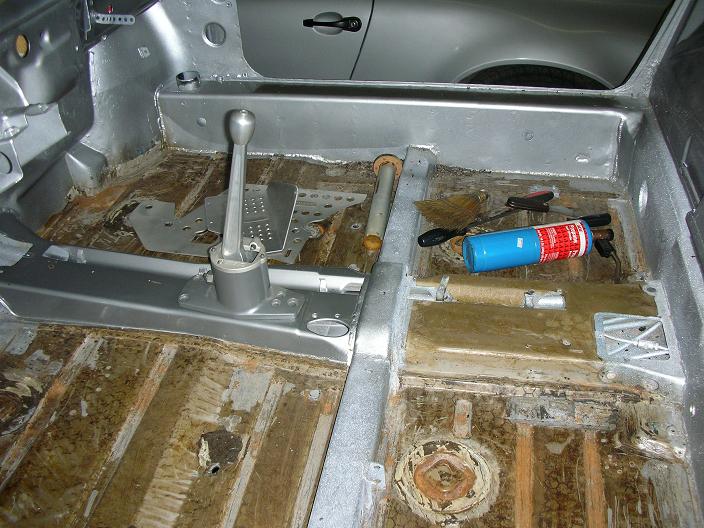
Posted by: Marv's3.6six Dec 13 2005, 10:07 PM
Starting on setrab front oil cooler install.
Attached image(s)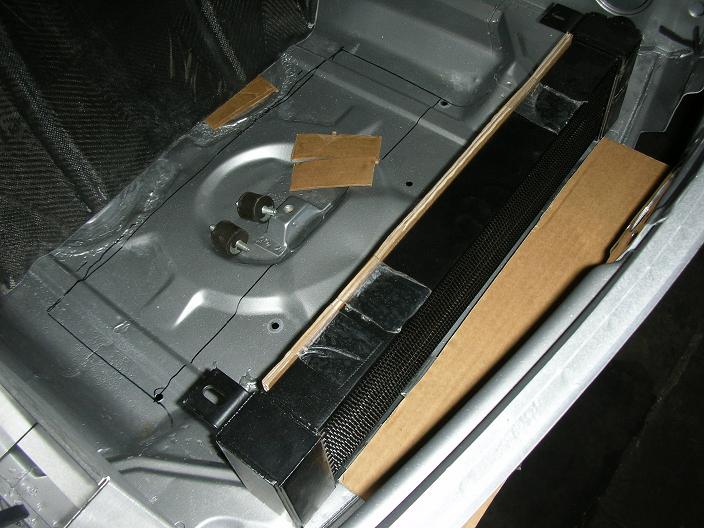
Posted by: Marv's3.6six Dec 22 2005, 09:27 PM
Update, wiring loom modified & installed. 12/21
Attached image(s)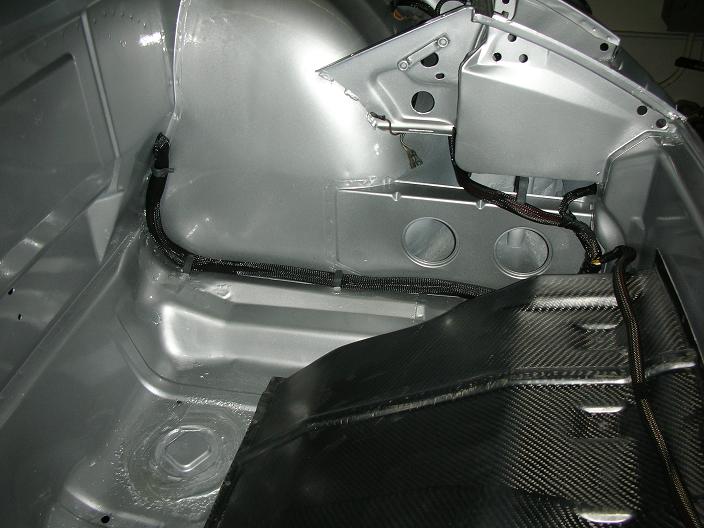
Posted by: Marv's3.6six Dec 22 2005, 09:29 PM
Undercoating as floor sealer. 12/21
Attached image(s)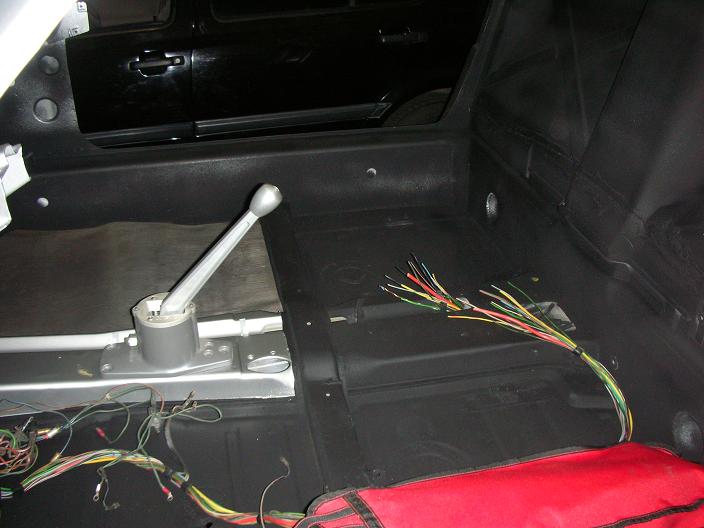
Posted by: Jeroen Dec 22 2005, 09:37 PM
lookin' good!!!!
Posted by: Aaron Cox Dec 22 2005, 09:38 PM
youre insane 
Posted by: Rob Ways Dec 22 2005, 10:35 PM

Posted by: Eddie Williams Dec 22 2005, 10:42 PM
Very Nice.
Posted by: trekkor Dec 22 2005, 11:45 PM
I love seeing a project coming together.
Way to move on this
KT
Posted by: Lou W Dec 23 2005, 12:08 AM
Looks Great.
What is the brand of the undercoating that you used on the interior, how was it applied, and how thick is it? Is it for sound deadining?
Posted by: Marv's3.6six Dec 23 2005, 08:09 PM
Sound deadning for undercoat. Forgot to look at brand name.
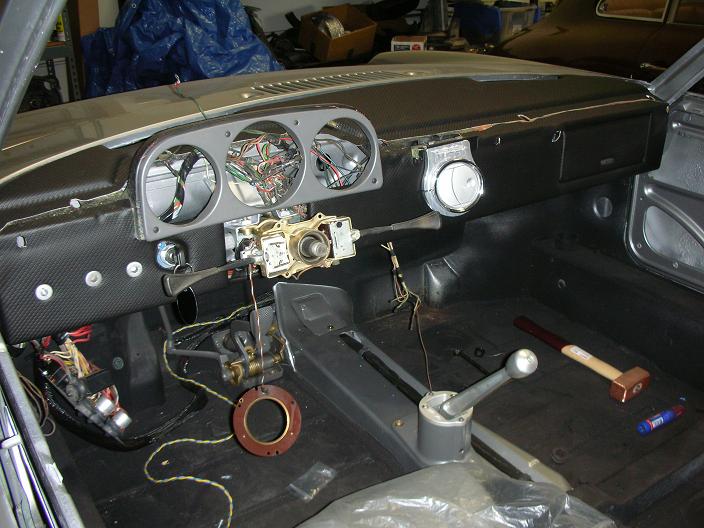
12/23 Installed Engman fuse panel, back side pic.
Attached image(s)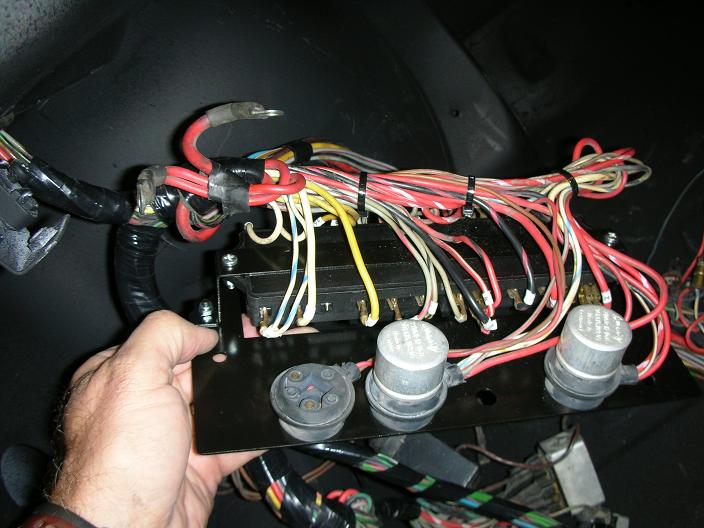
Posted by: Marv's3.6six Dec 23 2005, 08:10 PM
12/23 Center tunnel wiring loom finished. Tunnel painted to match outside of car, will remain exposed like shown.
Attached image(s)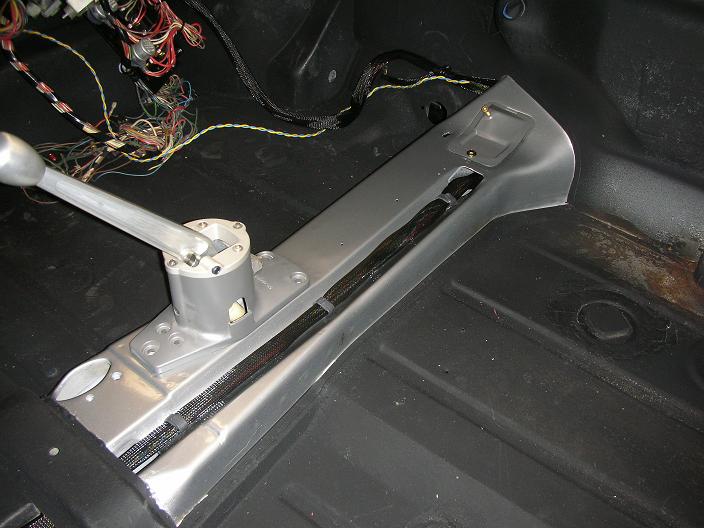
Posted by: Aaron Cox Dec 23 2005, 08:52 PM
marv - title changed 
Posted by: jim912928 Dec 23 2005, 08:56 PM
You are doing one unbelievable job!
Posted by: Marv's3.6six Dec 23 2005, 09:07 PM
| QUOTE |
| marv - title changed |
| QUOTE |
| You are doing one unbelievable job! |
Posted by: Markeydoo Dec 24 2005, 02:52 PM
Marv That looks GREAT. When will it be complete??
Mark
Posted by: Marv's3.6six Dec 24 2005, 03:55 PM
| QUOTE |
| Marv That looks GREAT. When will it be complete?? Mark |
Good question. I'd guestimate a few more months
Its at my good friends Tom's shop in Temecula, so its not like I can jus' walk out to the garage an work on it.
Fortunatley though his shop is across the street from my business so I can walk over & work on it. Tom and I work on it in the evenings & some week ends. He's also a master P car mechanic and has every cool tool known to man, so its a bit easier than a at home garage build.
Posted by: Markeydoo Dec 30 2005, 10:37 PM
Cool
The pictures look GREAT. Once I get a few more miles on my car and the weather is nicer we will have to come down.
Have a good New Year
Mark
Posted by: Marv's3.6six Jan 1 2006, 02:15 PM
12/31/2005 Got some good work done, cut several holes in the car for oil lines, modified fuel cell & rubber mounts, finished fabricating rubber mount oil cooler bracket plate.
Pedals assembled, they look wicked! BTW anybody know what those two bracket pieces are on the right? I had them powder coated for some reason, now I don't remember where they go.
Happy New Year all.
Attached image(s)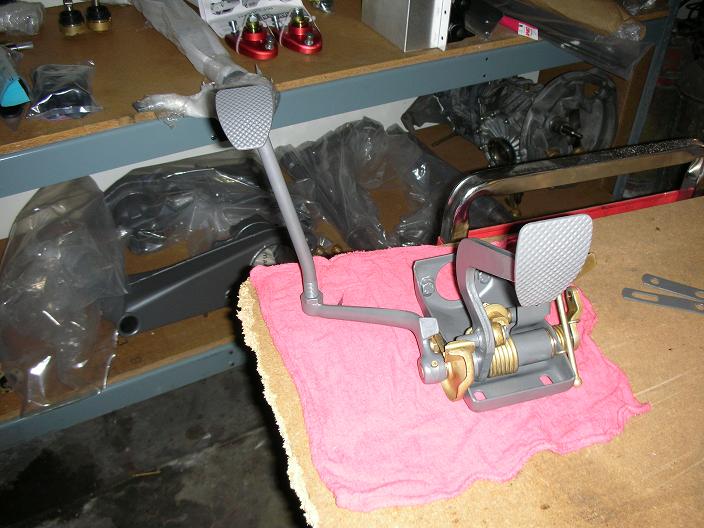
Posted by: Aaron Cox Jan 1 2006, 02:20 PM
the bracket things look like the ones on the rear trunk hinge pivots/rollers....
Posted by: Marv's3.6six Jan 8 2006, 08:44 AM
1/7/06 Bulkhead fittings and -12 45AN fittings test fit. I decided to run the oil lines thru here instead of inside the cab. these will snake down next to the wiring harness by the fuel cell in a heat sleeve.
Attached image(s)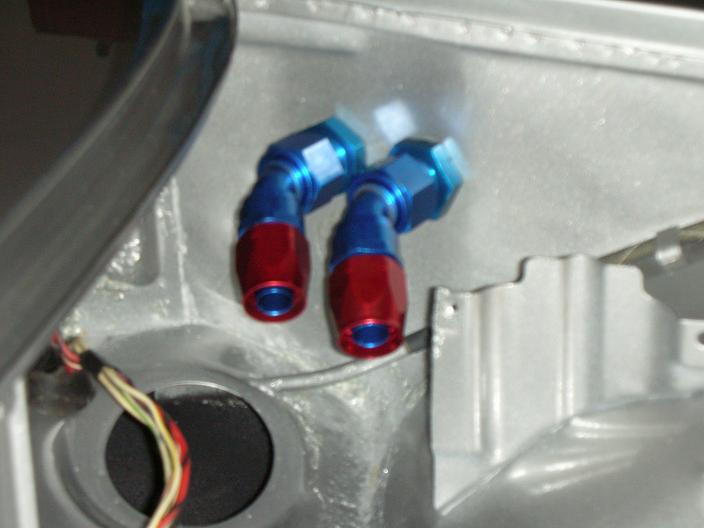
Posted by: Marv's3.6six Jan 8 2006, 08:46 AM
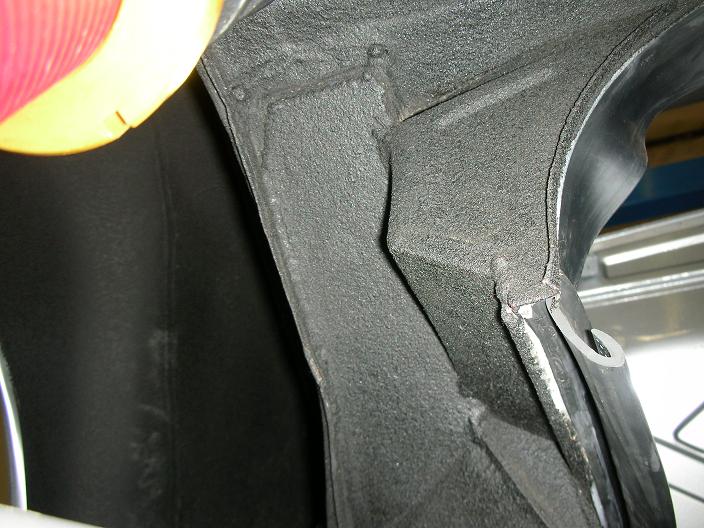
1/7/06 Inside wheel well. -12 bulkheads and AN 90's Small hole is radio antennae wire hole.
Attached image(s)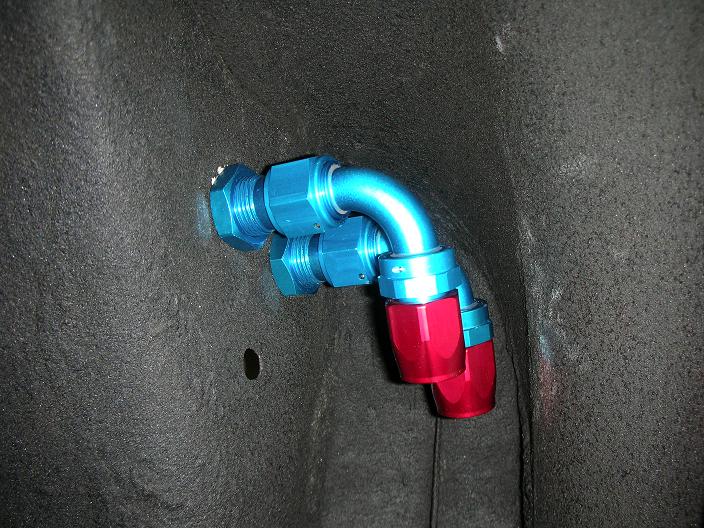
Posted by: Marv's3.6six Jan 8 2006, 08:47 AM
1/7/06 Time to make a big hole.
Attached image(s)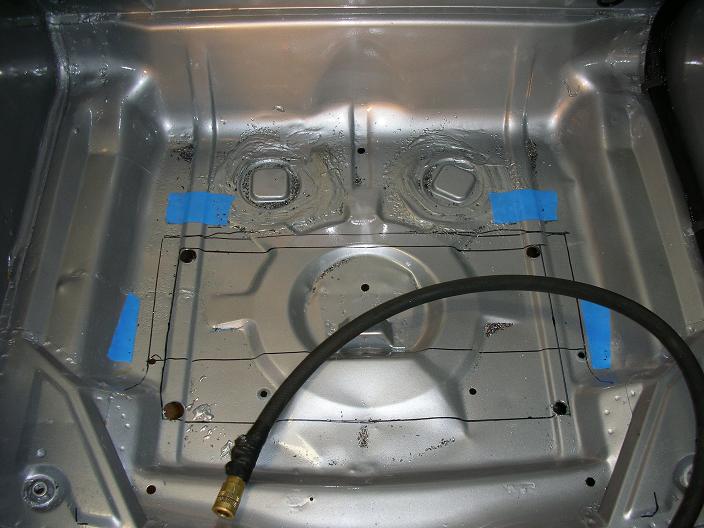
Posted by: Marv's3.6six Jan 8 2006, 08:50 AM
1/7/06 The biggest cut I have done on a teener 9X18" hole. This exit hole is 20% larger than the entrance hole in the front of the tub, for mo better flow baby.
Attached image(s)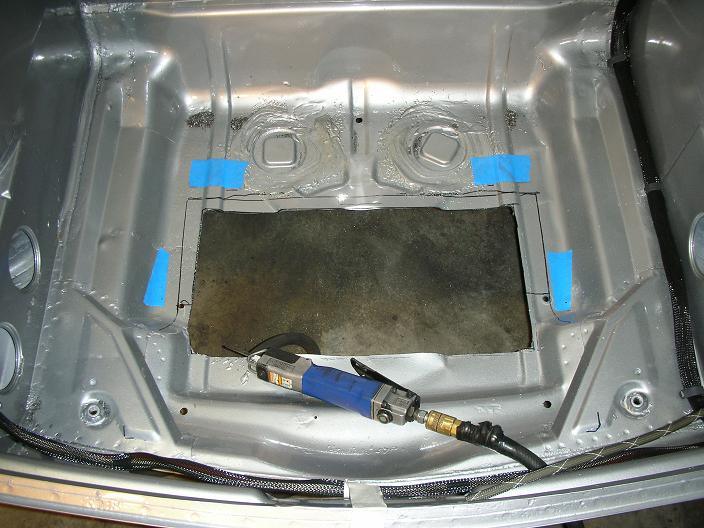
Posted by: Marv's3.6six Jan 8 2006, 08:54 AM
1/7/06 Mount oil cooler to custom fab rubber mount base plate and installed thermostat.
Attached image(s)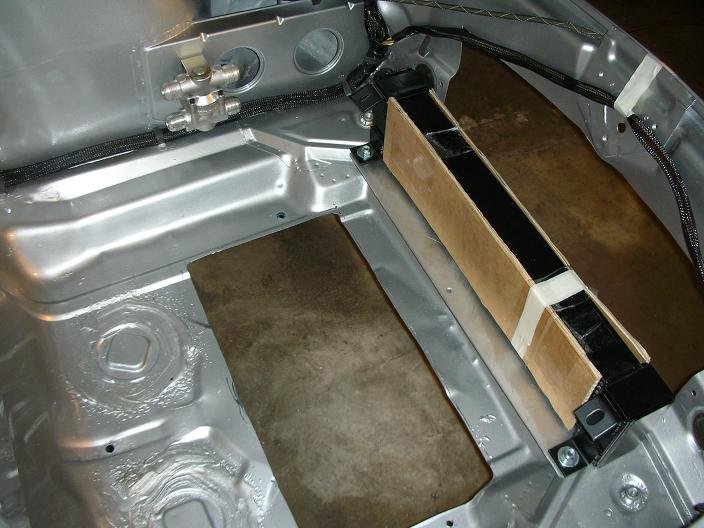
Posted by: Marv's3.6six Jan 8 2006, 08:57 AM
1/7/06 fab custom -12AN lines from oil cooler to Tstat. You can see the rubber isolator mount for the oil cooler base plate on the right.
Attached image(s)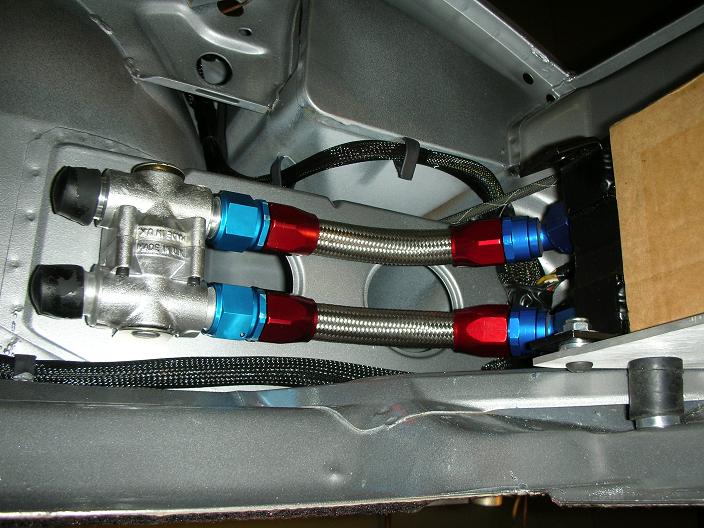
Posted by: Marv's3.6six Jan 8 2006, 08:59 AM
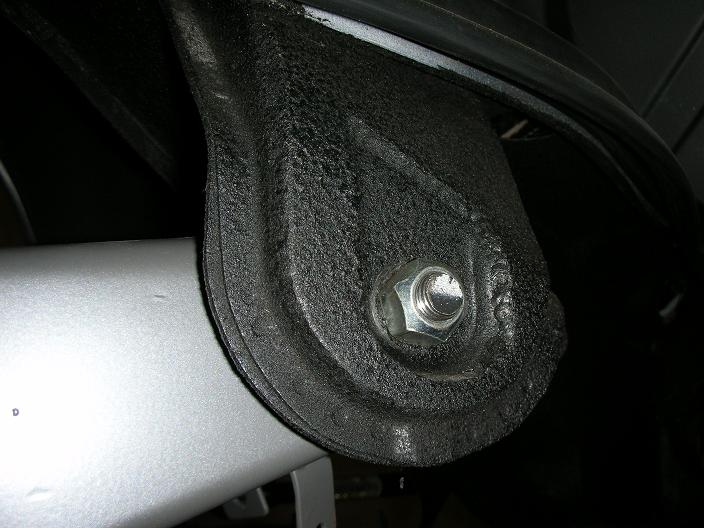
1/07/06 Passenger side mono ball.
Attached image(s)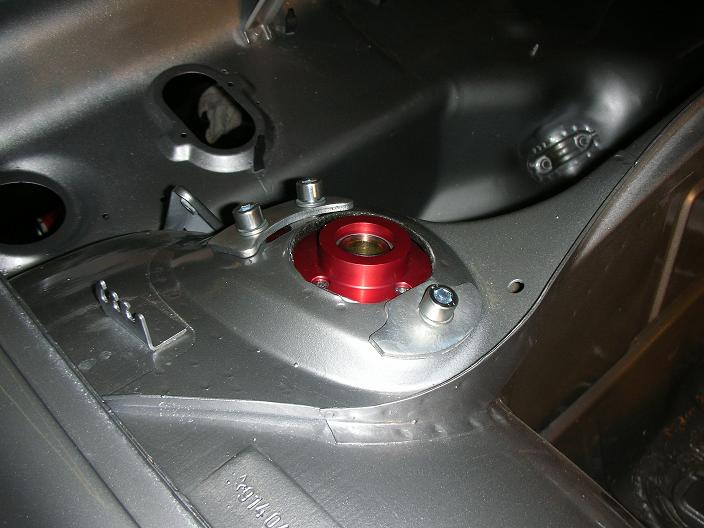
Posted by: Marv's3.6six Jan 8 2006, 09:03 AM
1/7/06 Bilstein RSR drop spindle strut mounted to elephant racing decambered ball joint.
Attached image(s)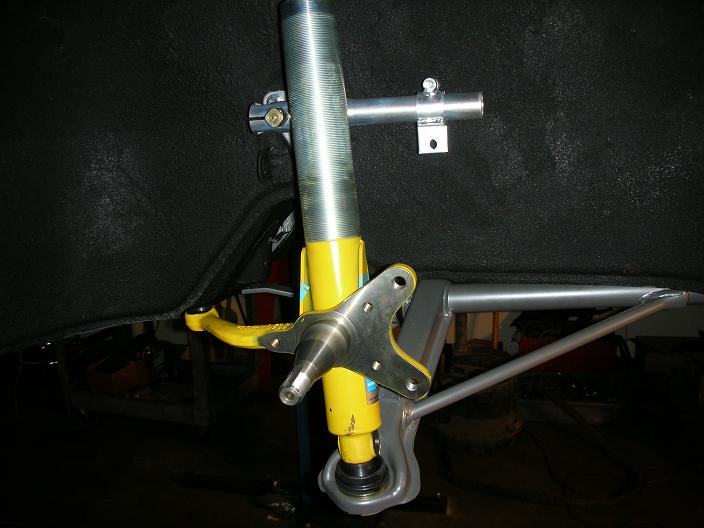
Posted by: Marv's3.6six Jan 8 2006, 09:04 AM
1/7/06 Tom's thumb
Attached image(s)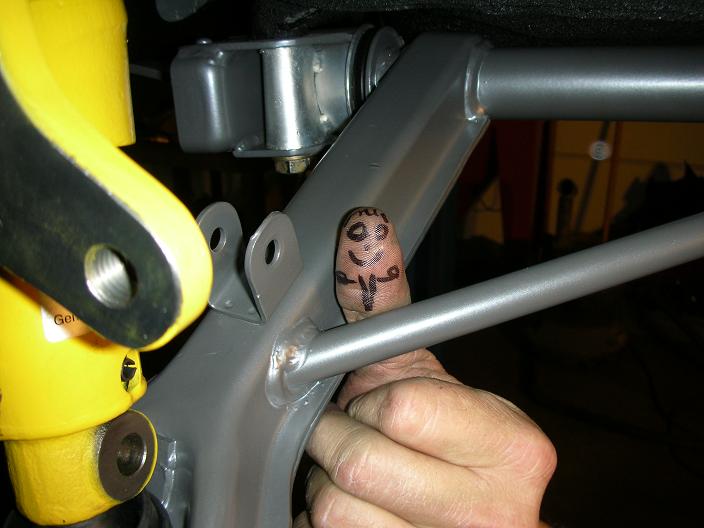
Posted by: Marv's3.6six Jan 8 2006, 09:06 AM
1/7/06 Carbon fiber air deflector test fit.
It does not look like much was done today but we got about 20 hours worth of labor done, lots of stuff not seen like the shift linkage, misc bracketry, clearencing on the tub for oil lines, etc. etc. a very good day!!!!!!!! Its moving along.
Attached image(s)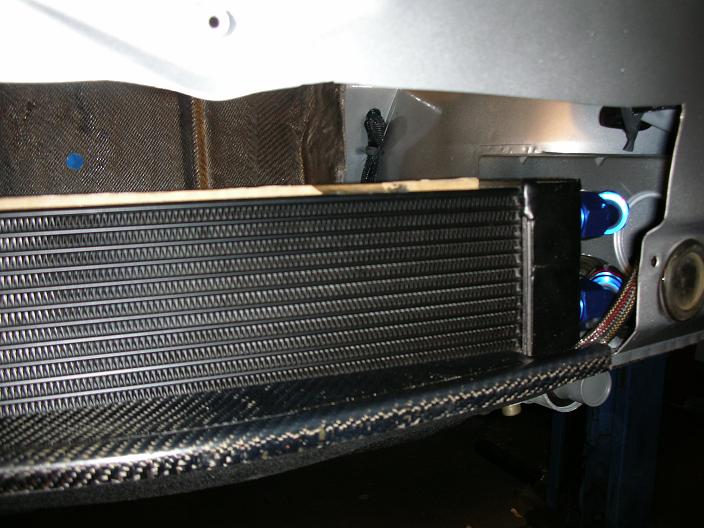
Posted by: East coaster Jan 8 2006, 09:24 AM
Marv........Looks killer!
Are you running your oil lines through the tunnel?? I haven't decided where to run mine yet and I'm still thinking there has to be a cleaner way than most of what I've seen.
Posted by: Marv's3.6six Jan 8 2006, 09:31 AM
No not thru the tunnel. Running along the outside GT style, but where most peeps go in the cab & around the pedals I did not want the lines inside. So I went up and inside the left front wheel well then thru the bulkhead panel where the radio antennae wire goes in, then down by the fuel cell, following the wiring harness.
Posted by: Luke M Jan 8 2006, 11:58 AM
Keep up the good work Marv.
Keep us posted on the cooler install, as many of us are doing the same.
I also do not want to run the oil lines inside the cab.
MMMM more pics of the routing please?
Luke
Posted by: hars914 Jan 9 2006, 02:13 PM
I ran my lines the same way. It was way better than running them inside. It
also helps with the cooling.
Posted by: Lou W Jan 9 2006, 02:42 PM
Sure is looking good, keep the pictures coming. insert: smiley face with camera
Posted by: Luke M Jan 9 2006, 10:03 PM
Hey, Marv
Question on your wire harness. Is it new or did you make one up.
My wire harness is shot and need a new one.
Luke
Posted by: Markeydoo Jan 9 2006, 10:13 PM
Looks Good Marv. Is the fuel cell going where the old tank was or in the front?
Mark
Posted by: Marv's3.6six Jan 9 2006, 11:56 PM
| QUOTE |
| Question on your wire harness. Is it new or did you make one up. |
Nope not new, cleaned up the old one & installed a braided sleeve.
| QUOTE |
| Is the fuel cell going where the old tank was or in the front? |
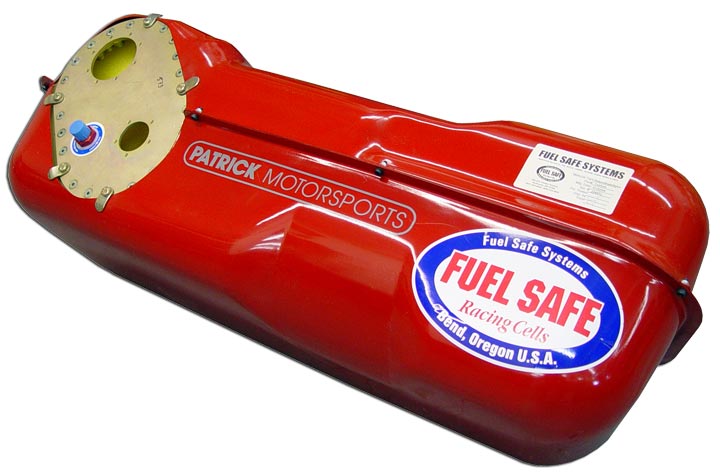
Yeppers, PMS fuel cell go's in the stock location. Although did have to give it a little love on the bottom with a baseball bat to clearence for the oil lines to pass by it.

Attached image(s)
Posted by: Marv's3.6six Jan 12 2006, 08:09 AM
1/11/06 Oil lines finished in front trunk, top view.
Attached image(s)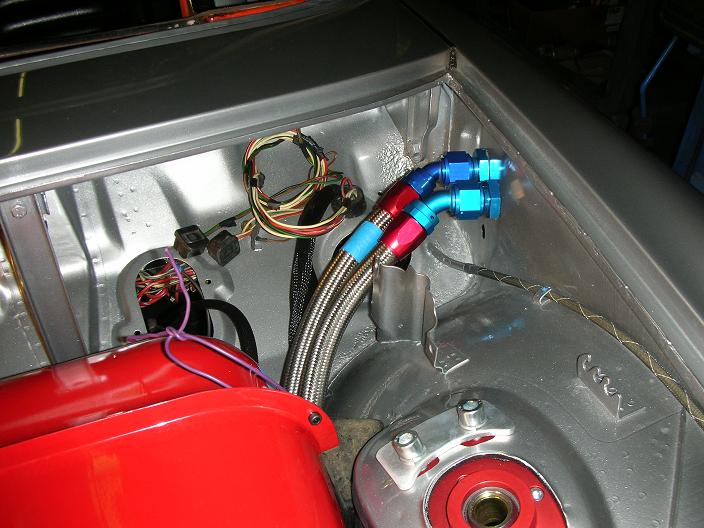
Posted by: Marv's3.6six Jan 12 2006, 08:10 AM
01/11/06 Oil lines lower view, to Tstat.
Attached image(s)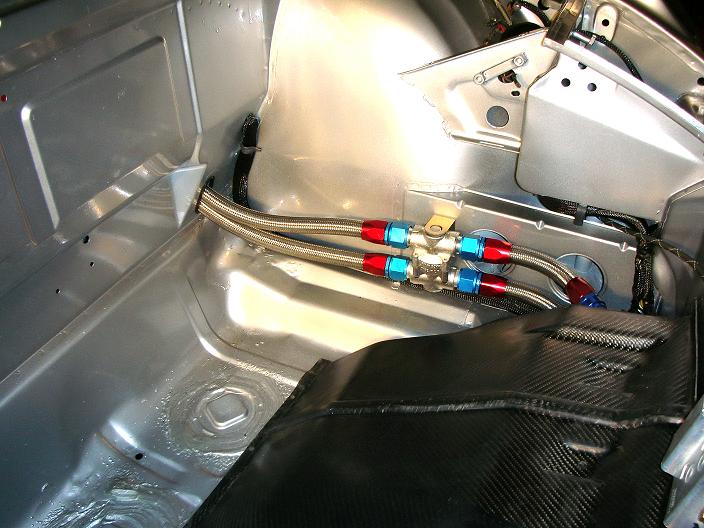
Posted by: Marv's3.6six Jan 12 2006, 08:11 AM
01/11/06 23mm Brake master cylinder install.
Attached image(s)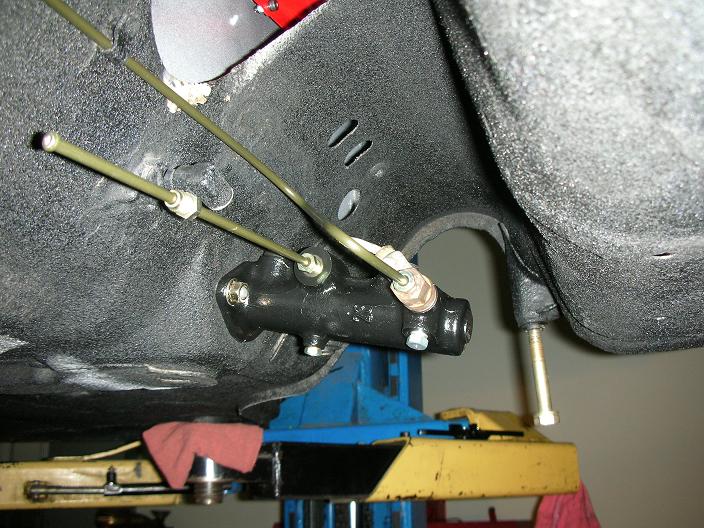
Posted by: Eric Taylor Jan 12 2006, 11:54 AM
God this project is sexy, I love reading the thread and looking at the pictures. keep it coming man! That's top notch work.
Eric
Posted by: Aaron Cox Jan 12 2006, 12:00 PM
marv,
any worries about the hot oil lines running next to your brake fluid resevoir?
AA
Posted by: Marv's3.6six Jan 12 2006, 02:44 PM
| QUOTE |
| any worries about the hot oil lines running next to your brake fluid resevoir? |
No cuz I am using an aftermarket reservoir from Patrick Motorsports that mounts on the cross member wall. Also using a heat sleeve that will wrap the oil lines by the fuel cell & wire harness.
| QUOTE |
| God this project is sexy, I love reading the thread and looking at the pictures. keep it coming man! That's top notch work. |
Hey Thanx for the props Eric, I am happy to do so. This is such a great community and a wealth of information, Club members have helped me more than they'll ever know.
Posted by: Aaron Cox Jan 12 2006, 03:14 PM
| QUOTE (Marv's3.6six @ Jan 12 2006, 01:44 PM) | ||
No cuz I am using an aftermarket reservoir from Patrick Motorsports that mounts on the cross member wall. Also using a heat sleeve that will wrap the oil lines by the fuel cell & wire harness. |
where did you get this stuff? i need some heat shielding sleave to protect clutch and speedo cables from melting on the header.....
Posted by: xitspd Jan 12 2006, 03:57 PM
Marv,
Looking good! I am very happy with my PatrickMotorSports fuel cell. Do you know how much fuel it will hold? I have only put in about 10 gallons at a time.
Dan
Posted by: Marv's3.6six Jan 29 2006, 09:39 AM
1/21/06 Battery mount
Attached image(s)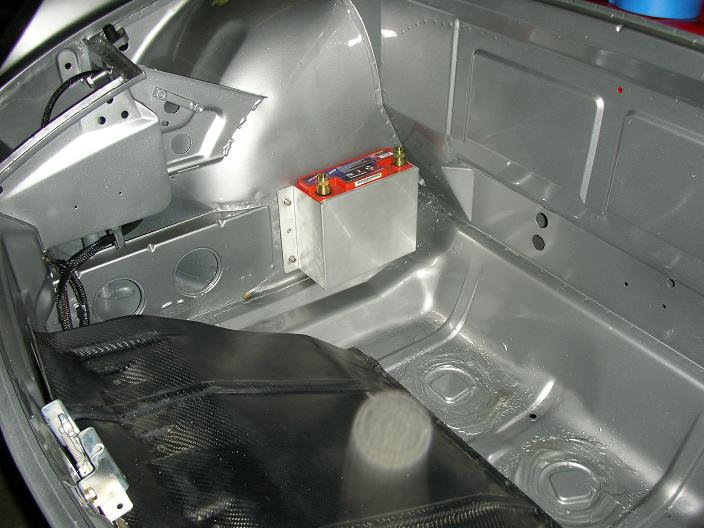
Posted by: Marv's3.6six Jan 29 2006, 09:41 AM
1/21/06 Changed my mind and decided to mount the rese in the stock location. Fabricated a brake fluid resevoir mount to go in factory location
Attached image(s)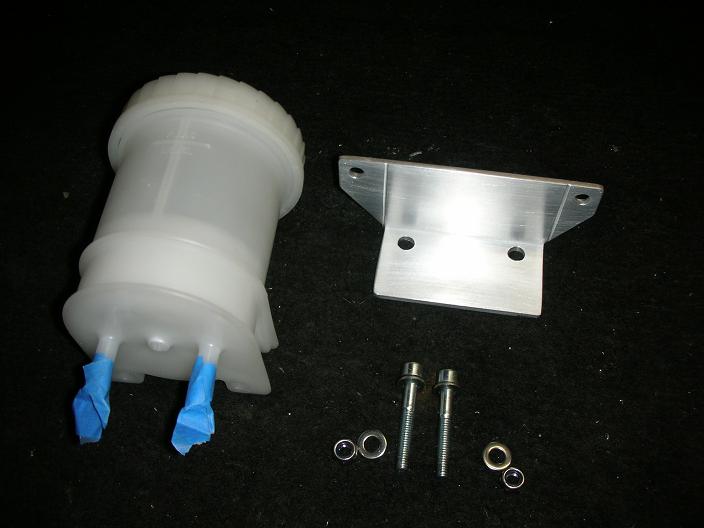
Posted by: Marv's3.6six Jan 29 2006, 09:43 AM
1/21/06 Grinded out existing holes for oil lines to run under rocker panels.
Attached image(s)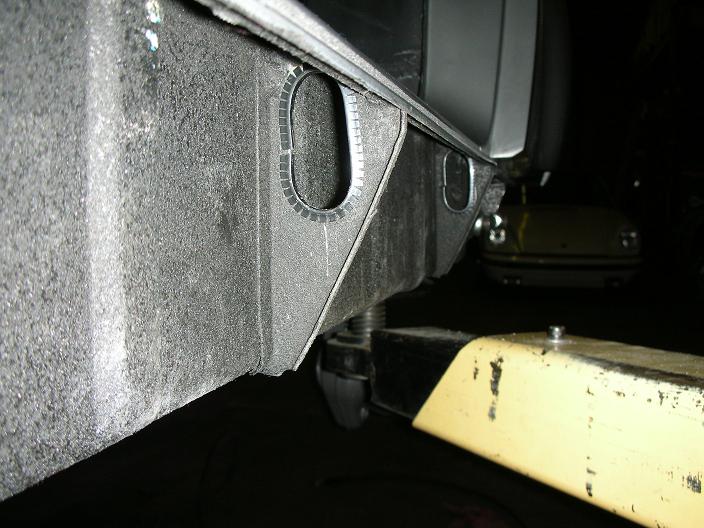
Posted by: Marv's3.6six Jan 29 2006, 11:04 AM
1/25/06 Brake fluid rese mounted, hood hinges mounted.
Attached image(s)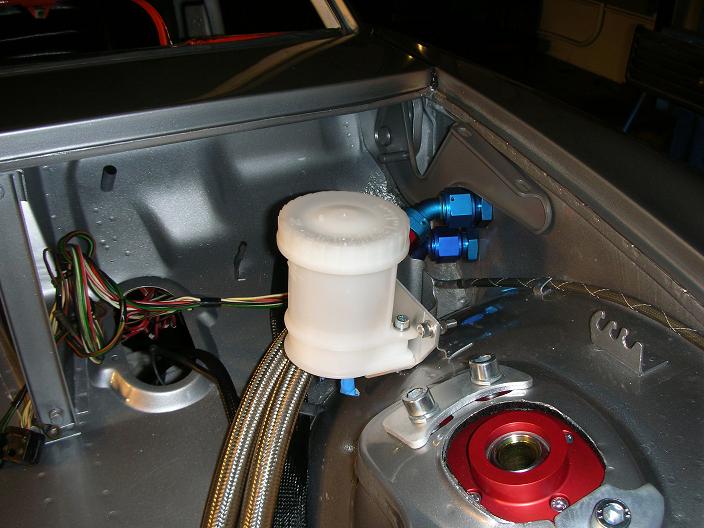
Posted by: Marv's3.6six Jan 29 2006, 11:08 AM
1/25/06 rear wheel test fit. Gonna have them refinnished, have to decide, whether to make them black, or Iron glimmer (the darker gray you see on the suspension arm) or red? Hmmm 
Attached image(s)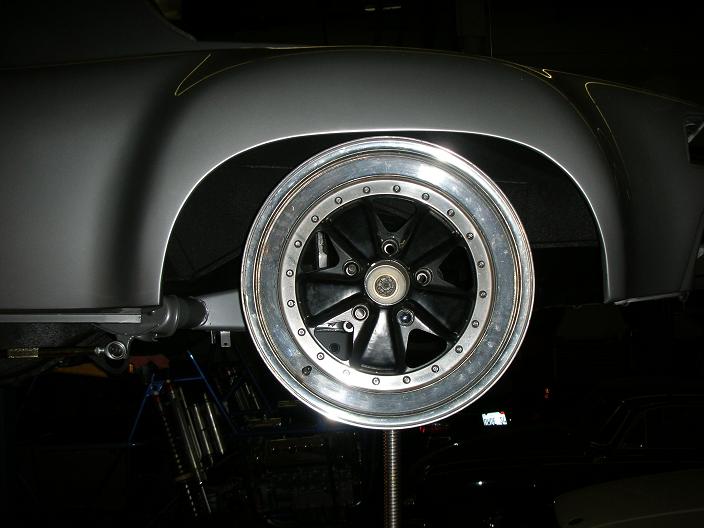
Posted by: jim912928 Jan 29 2006, 11:10 AM
the rims...have them match the exterior paint scheme..that would look very stealthy!
Posted by: Marv's3.6six Jan 29 2006, 11:13 AM
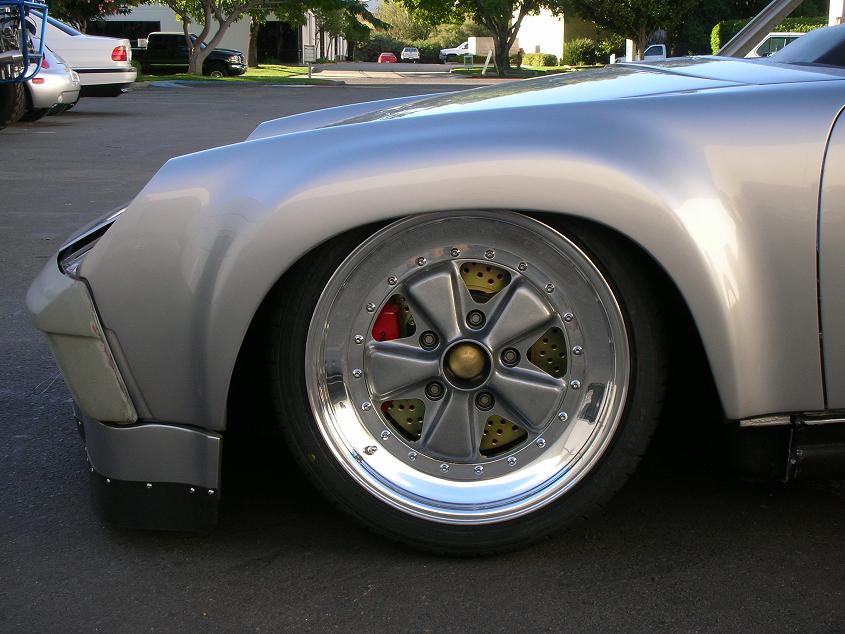
1/28/06 Front wheel test fit. The wheel looks pretty mean in black! hmmm, the car looks crazy in person, I'm getting excited.
Attached image(s)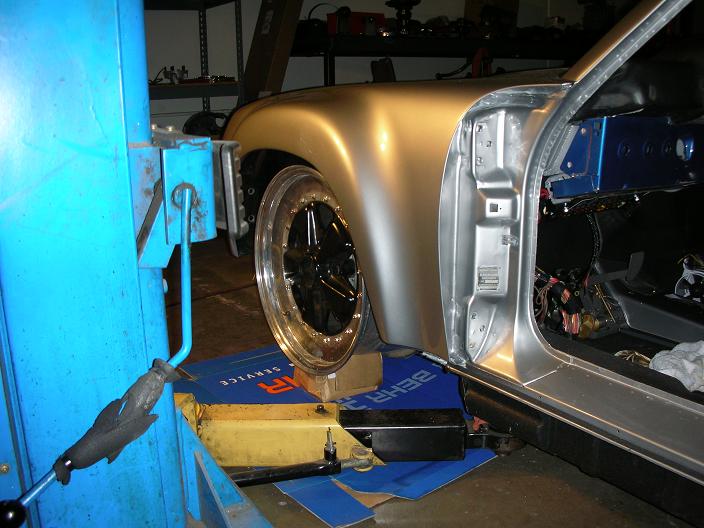
Posted by: Marv's3.6six Jan 29 2006, 11:15 AM
1/28/06 suspension installed, brake hard lines installed, the hard lines are a pia to bend correctly.
Attached image(s)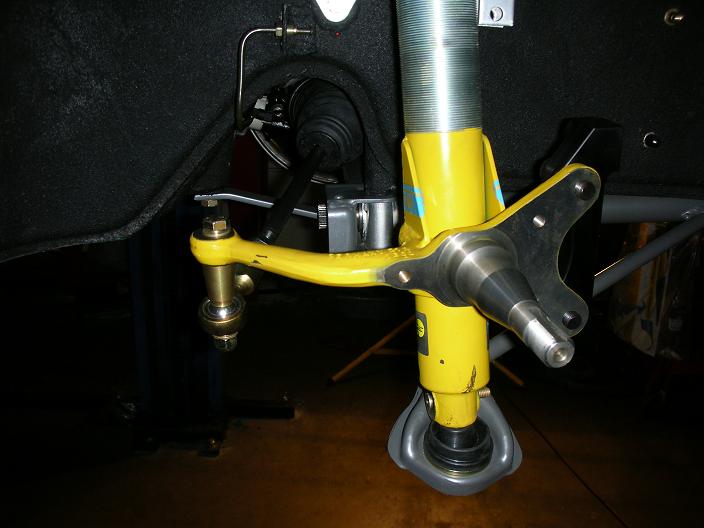
Posted by: Marv's3.6six Jan 29 2006, 11:34 AM
1/28/06 Brake bias valve installed.
Attached image(s)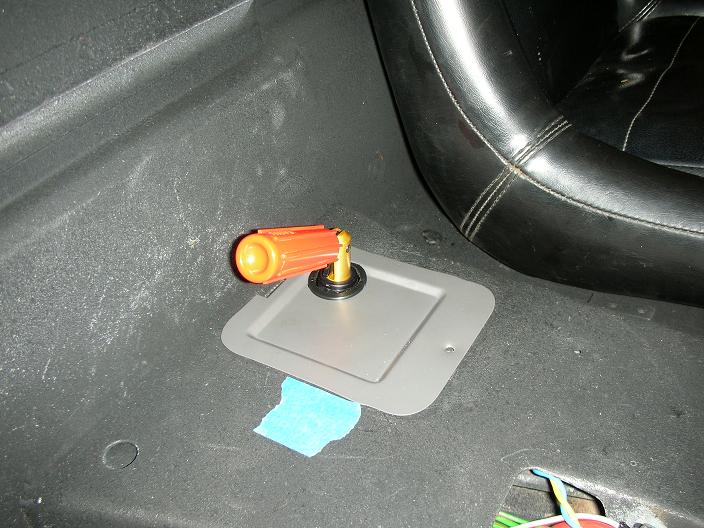
Posted by: fiid Jan 29 2006, 12:44 PM
I think this is the cleanest project I've ever seen. Wayyy nice. Good Job Marv!
Posted by: brp914 Jan 29 2006, 02:03 PM
seems like an odd place for the thermostat. the pump, ergo your engine, has to work pretty hard to shove cold oil all the way up to the front, only to find its not hot enough yet, and goin' all the way back. what if the safety valve in the case didn't work right? rank speculation on my part, but I'd wait til it was warmed up before driving it.
re: the wheel color: imho, red would divert attention from the beautiful body work, especially with a neutral color like silver.
Attached image(s)
Posted by: J P Stein Jan 29 2006, 05:25 PM
| QUOTE (brp914 @ Jan 29 2006, 12:03 PM) |
| seems like an odd place for the thermostat. the pump, ergo your engine, has to work pretty hard to shove cold oil all the way up to the front, only to find its not hot enough yet, and goin' all the way back. what if the safety valve in the case didn't work right? rank speculation on my part, but I'd wait til it was warmed up before driving it. |
Careful, now, you're thinkin' too much. Conventional wisdom & indepentent thinking seldom coexist peacefully.
BTW, there is no saftey valve on the scavenge side of the engine. Nor is there in that thermostsat.
Posted by: trekkor Jan 29 2006, 06:19 PM
Here's mine. I've seen one mounted behind the front bumper, visible through the fog light grill.
I've never heard of any actual problems with this set up.
Only speculation and debate. 
The oil goes into the tank from this circuit which already has 8 or more qts, depending on the tank you will use.
Starvation is a non-issue.
KT
Attached image(s)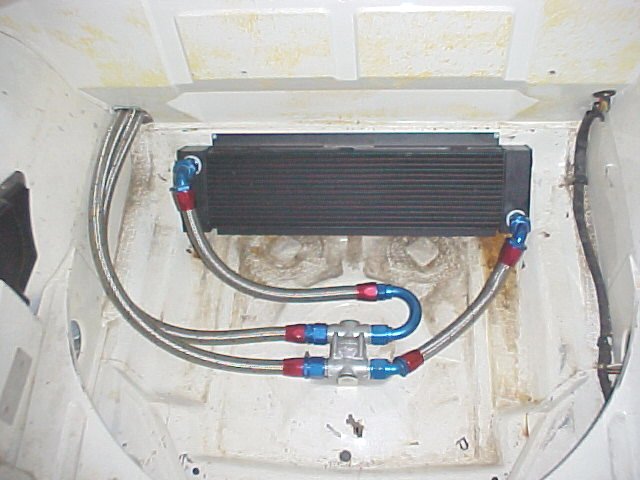
Posted by: grasshopper Jan 29 2006, 06:21 PM
wow!!! your car is looking great!!!
Posted by: Marv's3.6six Jan 29 2006, 08:16 PM
1/29/06 Fabricating lower valence, ABS spoiler.
Attached image(s)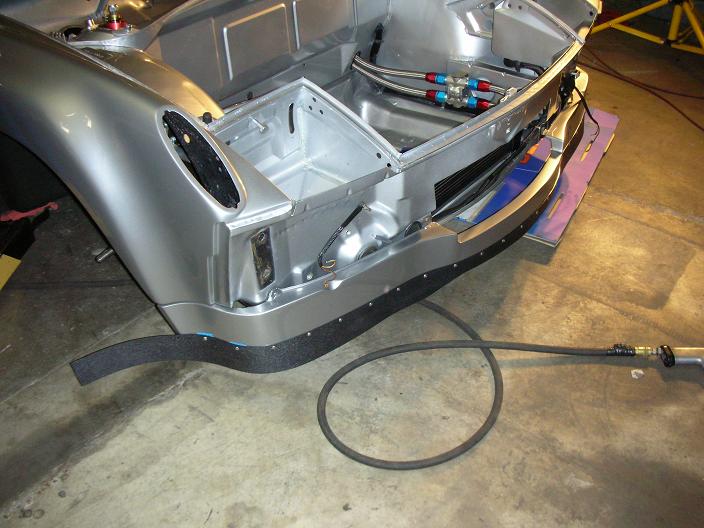
Posted by: Marv's3.6six Jan 29 2006, 08:18 PM
1/29/06 Lower valence with spoiler, front view.
Attached image(s)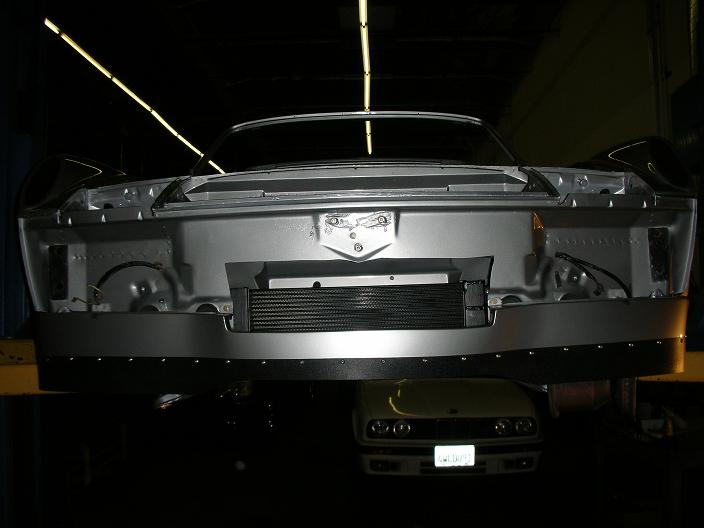
Posted by: Marv's3.6six Jan 29 2006, 08:20 PM
1/29/06 Side view. Turned out wicked looking!
Attached image(s)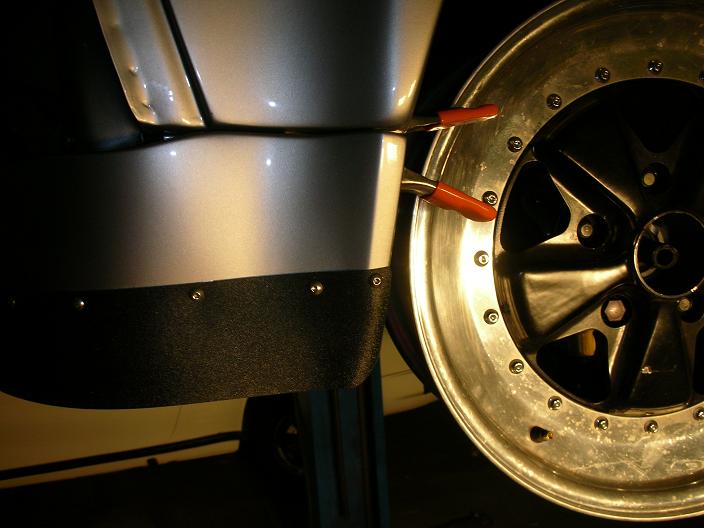
Posted by: nein14 Jan 29 2006, 08:25 PM
Looks Great!!!!! close attention to detail! keep the pics coming
Posted by: Jeroen Jan 29 2006, 11:08 PM
nice!
Is that a regular GT front valence? Or some kind of spoiler?
Where did you get it?
Posted by: Marv's3.6six Jan 30 2006, 12:07 AM
| QUOTE |
| Jeroen: Is that a regular GT front valence? Or some kind of spoiler? Where did you get it? |
| QUOTE |
| nein14: Looks Great!!!!! close attention to detail! keep the pics coming |
| QUOTE |
| brp914:seems like an odd place for the thermostat. the pump, ergo |
| QUOTE |
| fiid: I think this is the cleanest project I've ever seen. Wayyy nice. Good Job Marv! |
Thanx guys for all the support! The club has saved my ass a few times on this project.
Posted by: markb Jan 30 2006, 01:06 AM
Absolutely beautiful.
Posted by: Van914 Jan 30 2006, 05:54 AM
Marv,
Love the front valance and spoiler. Too bad someone can't take a mold and reproduce. I need one like that.
Van914
Posted by: Racing916 Jan 30 2006, 06:52 AM
Marv any thought of fabricating front valances and bumpers like that I would be interested if the $$$ was right.
Steve
The car looks great by the way, love the the silver!!!
Posted by: Gint Jan 30 2006, 08:38 AM
Beauty! Hey, what are you putting along the bottom of that spoiler? Rubber? Source, etc...?
Posted by: Lou W Jan 30 2006, 08:59 AM
That will be one gorgeous car
Posted by: Marv's3.6six Jan 30 2006, 09:35 PM
1/30/06 Front baloney skin test fit, perfecto!!!! no spacers needed
Attached image(s)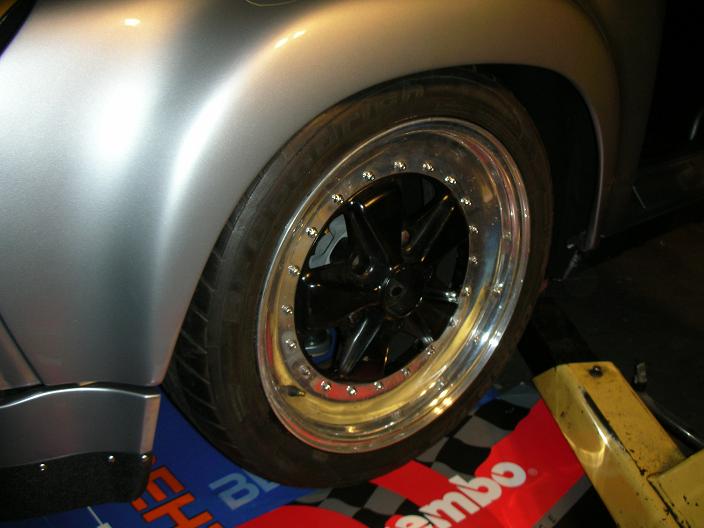
Posted by: Marv's3.6six Jan 30 2006, 09:37 PM
01/30/06 Rear tire test fit, 1/4 or 3/8 spacer needed!! Car looks tuff with tires. Time to send the wheels off to Al Reed for a little love.
Attached image(s)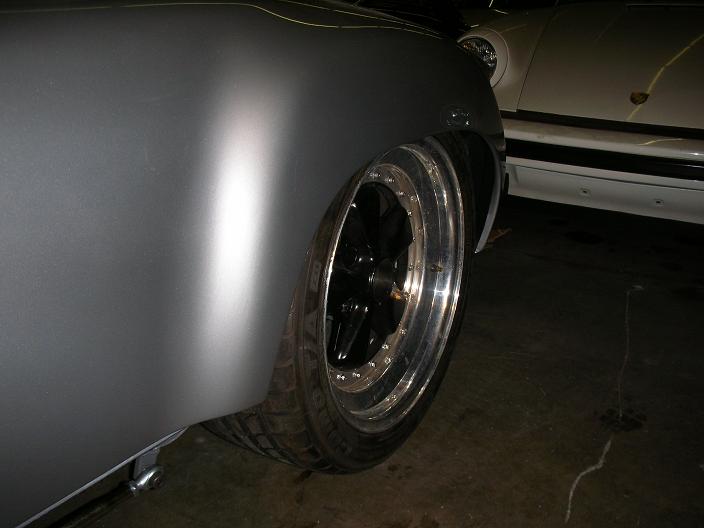
Posted by: Eric_Shea Jan 30 2006, 10:37 PM
Where did you get the braided covering for the wire loom?
Posted by: Marv's3.6six Jan 30 2006, 11:39 PM
| QUOTE |
| Where did you get the braided covering for the wire loom? |
| QUOTE |
| Beauty! Hey, what are you putting along the bottom of that spoiler? Rubber? Source, etc...? |
| QUOTE |
| Marv any thought of fabricating front valances and bumpers like that I would be interested if the $$$ was right. |
Posted by: Eddie Williams Jan 31 2006, 07:30 AM
| QUOTE (Marv's3.6six @ Jan 30 2006, 11:39 PM) | ||
|
They have it in German Flag tri-color as well!

Posted by: Marv's3.6six Feb 4 2006, 11:59 PM
02/04/06 New custom fiberglass bumper test fit.
Attached image(s)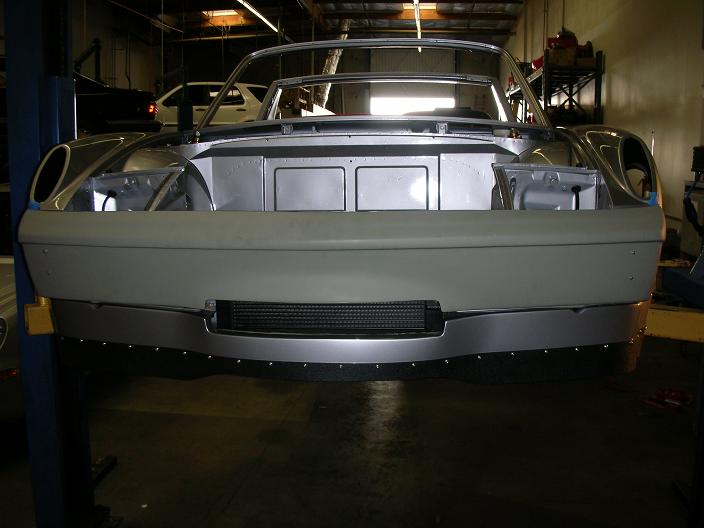
Posted by: Marv's3.6six Feb 5 2006, 12:03 AM
02/04/06 23mm master cylinder installed.
Attached image(s)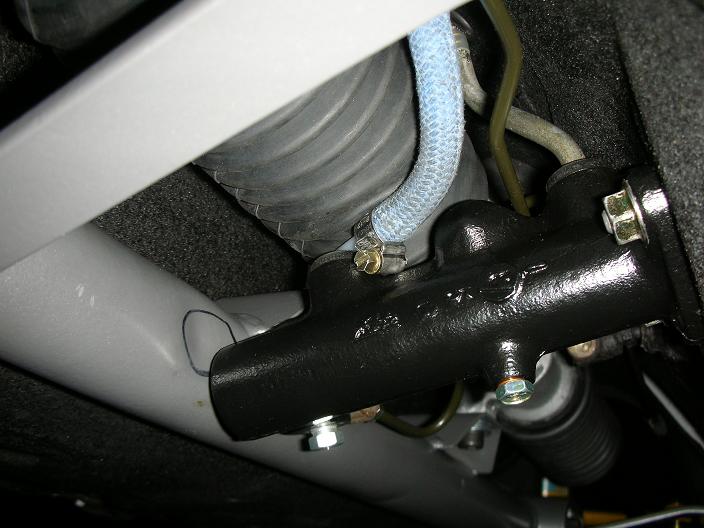
Posted by: Marv's3.6six Feb 5 2006, 12:06 AM
02/04/06 Brake fluid resevoir finished.
Attached image(s)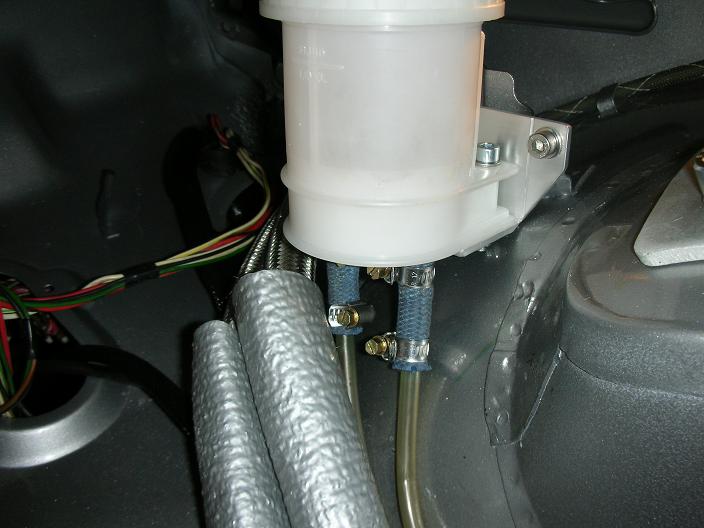
Posted by: michel richard Feb 5 2006, 07:38 AM
| QUOTE (Marv's3.6six @ Jan 30 2006, 07:35 PM) |
| 1/30/06 Front baloney skin test fit, perfecto!!!! no spacers needed |
I may have missed it, but can you say exactly what you haver for wheels (backspacing etc . . .) and flares, to get such a nice fit ?
TIA
Posted by: Marv's3.6six Feb 5 2006, 09:59 AM
Yesterdays work included a final test fit for the wheels. I find that things are different then when I first test fitted the wheels, because the Brembo calipers are pretty big and necessitate a 3/8" spacer up front. However the rear wheels are a perfect fit, the brake hat adds about 1/4" spacer.
The wheels really are just about perfect with over 9" of rubber on the front and 10.2" on the rear at "full bottom" out nothing touches anywhere and there is plenty of clearence, even the front fit turning lock to lock bottom out great.
To answer your question Michel the wheels are HRE311 and were custom made for early 911, and the flares are GT replicas from AA.
Posted by: Eric_Shea Feb 5 2006, 10:04 AM
What size cable organizer stuff? I'm getting ready to order. Thanks for the link.
How much did you need? I could get a roll of someone else wants some...
Posted by: Marv's3.6six Feb 5 2006, 10:18 AM
Eric I will have to look at the sizes Tom purchased, he really bought it to use on his Northstar V8 dune buggy, he has several different sizes and also used various sizes of shrink tube to end the sleeves on the 914.
Posted by: Eric_Shea Feb 5 2006, 10:21 AM
That's what I was thinking... might be a couple sizes. And, ditto the shrink tubing... that looked like the clean route.
Thanks for going out of the way... YOUR PROJECT'S SCREAMIN!
E.
Posted by: Lou W Feb 5 2006, 10:23 AM
| QUOTE |
| Marv's3.6six Posted on Feb 5 2006, 09:18 AM -------------------------------------------------------------------------------- Eric I will have to look at the sizes Tom purchased, he really bought it to use on his Northstar V8 dune buggy, he has several different sizes and also used various sizes of shrink tube to end the sleeves on the 914. Eric_Shea Posted on Feb 5 2006, 09:04 AM -------------------------------------------------------------------------------- What size cable organizer stuff? I'm getting ready to order. Thanks for the link. How much did you need? I could get a roll of someone else wants some... |
I pm'd Marv yesterday asking the same question about sizes and lengths, also wanted to know about the front trunk cable release cover too. Eric, I may need to buy the same stuff that you're looking at too.
Posted by: Marv's3.6six Feb 19 2006, 10:14 AM
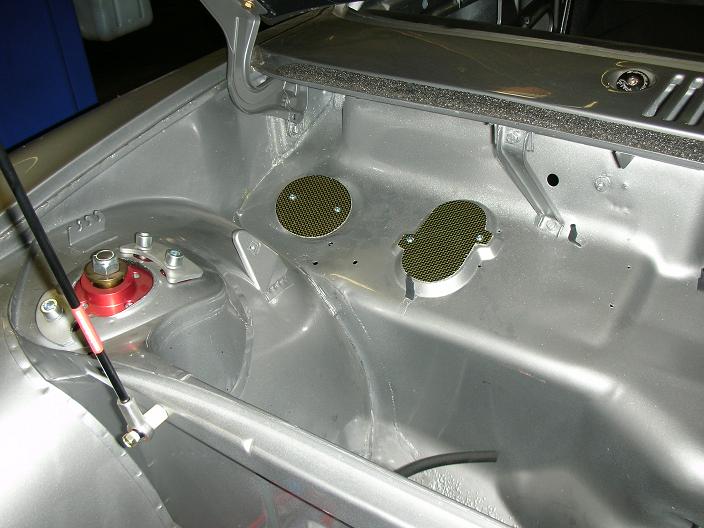
While you So Cal guys were BBQ'n at Joe Sharps I was doin this. Fuel pump install above shot.
Attached image(s)
Posted by: Marv's3.6six Feb 19 2006, 10:15 AM
Fuel pump install below shot
Attached image(s)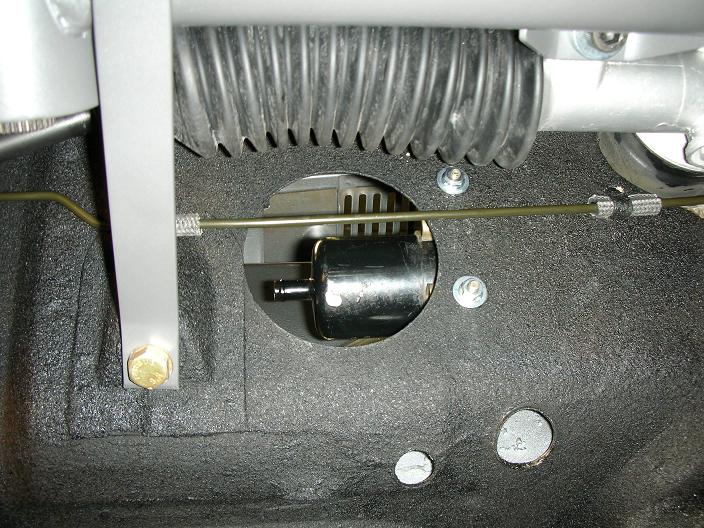
Posted by: Marv's3.6six Feb 19 2006, 10:21 AM
Rear suspension final installation, bearings, hubs, brakes etc. Safety wireb brake brackets.
Attached image(s)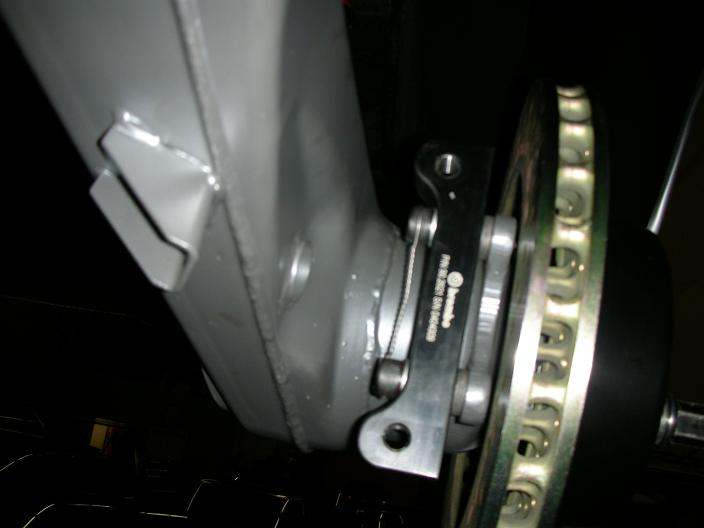
Posted by: Marv's3.6six Feb 19 2006, 10:23 AM
Front brake bracket install.
Attached image(s)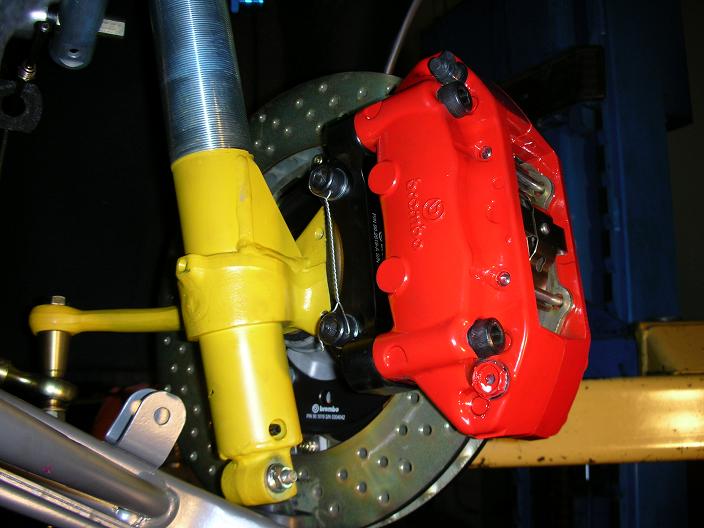
Posted by: Marv's3.6six Feb 19 2006, 10:28 AM
Right front corner complete (xcept sway bar) brake rotor to hub, bearings packed & installed all bolted up tight n good. Not shown, I forgot to take pic is I had to remove the RSR struts & chop 1/2 inch of thread off the top, the struts were way too long & would of poked thru the hood! Per Jim at PMS a common issue using 911 struts for 914's.
Attached image(s)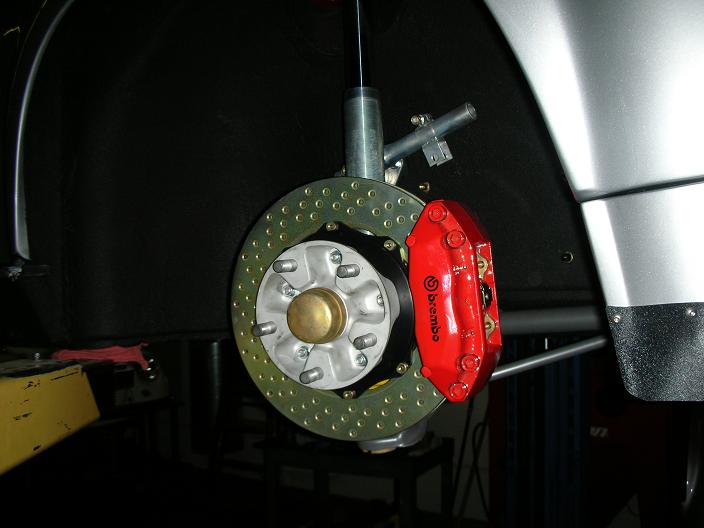
Posted by: Marv's3.6six Feb 19 2006, 10:29 AM
Right rear corner complete
Attached image(s)
Posted by: Marv's3.6six Feb 19 2006, 10:30 AM
Left rear corner complete
Attached image(s)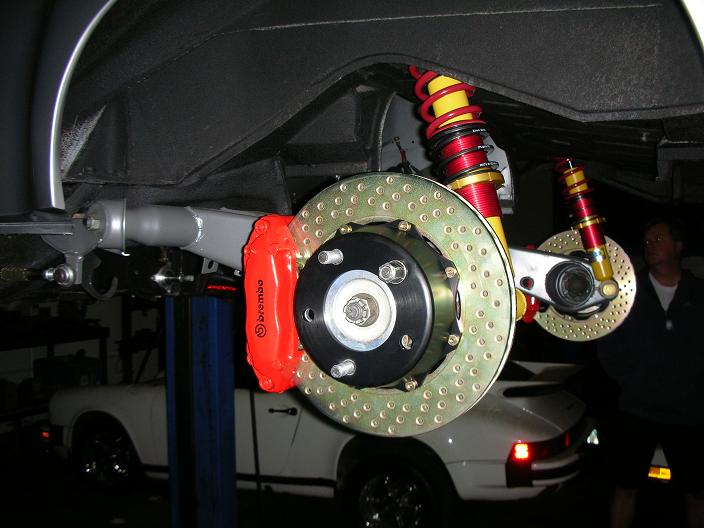
Posted by: Marv's3.6six Feb 19 2006, 10:32 AM
Left front corner complete All in all a very productive day. 
Attached image(s)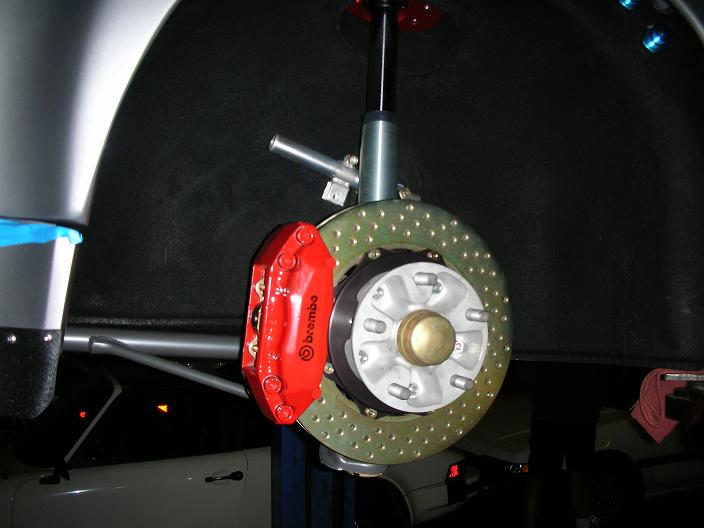
Posted by: Lou W Feb 19 2006, 10:56 AM
Marv,
Thanks for the tour last week, your car is absolutly gorgeous at the rate you're going, you should have the car on the road soon. 
Posted by: boxstr Feb 19 2006, 11:35 AM
Marv, very nice, everything is looking great. One question. Is the fuel tank going in and over the fuel pump?? I would think you would want it out in the front trunk area where it would be easier to access if there were a problem with pump?
CCLINHYPERLINK
Posted by: messix Feb 19 2006, 12:10 PM
| QUOTE (Marv's3.6six @ Feb 19 2006, 09:23 AM) |
| Front brake bracket install. |
is this pict. flipped? looks like the saftey wire isn't on rotation tension. righty tighty-lefty loosey.
Posted by: brp914 Feb 19 2006, 12:54 PM
hey Marv,
beautiful work. coupla ?'s:
1. there was a thread recently re: threaded collars for rear suspension. There was concern that the collars fit too loosely on the shock and potentially allowing the collar to skip over the retainer - not fun. Did you encounter this? If not, mind telling your source?
2. looks like bils front, koni rear. any problem matching characteristics?
3. will this car be street legal?
thanks
Posted by: Marv's3.6six Feb 19 2006, 01:38 PM
| QUOTE |
| Lou W: Thanks for the tour last week......... |
| QUOTE |
| boxstr: fuel tank going in and over the fuel pump?? |
| QUOTE |
| messix: is this pict. flipped? looks like the saftey wire isn't on rotation tension. righty tighty-lefty loosey. |
| QUOTE |
| brp914: 1. there was a thread recently re: threaded collars for rear suspension. There was concern that the collars fit too loosely on the shock and potentially allowing the collar to skip over the retainer - not fun. Did you encounter this? If not, mind telling your source? 2. looks like bils front, koni rear. any problem matching characteristics? 3. will this car be street legal? |
1. I did a search and could not find that thread? what actually happened? My source is PMS, I will talk to Jim Patrick about this concern.
2. Runnin bils front and rear.
3. Well not really but yeah I will run it on the street kinda sort of.
Posted by: brp914 Feb 19 2006, 01:49 PM
http://www.914world.com/bbs2/index.php?act=ST&f=2&t=44758&hl=coleman
never posted link before - hope it works
Posted by: Marv's3.6six Feb 23 2006, 05:37 PM
2/22/06 No pics. Installed engine bay seals, a surprisingly easy job when using silicone lubricant and the correct tools!
R&R the steering column, bunch o grit & sand from sandblasting,.....clean & lubed, ready to install............Need to find new upper & lower clamshell plastics for steering column for 914-6, will put add on parts forum.
Worked on modifying dash panel, R installing a boat bilge blower as an air delivery vent system that will blow cool air towards my face. Early teeners suck for air flow & ventilation. 
Posted by: Eric_Shea Feb 23 2006, 05:39 PM
| QUOTE |
| 2/22/06 No pics |

Posted by: byndbad914 Feb 23 2006, 10:44 PM
Impressive! Love the color as well.
Posted by: db9146 Feb 24 2006, 08:48 AM
Marv,
I'm enjoying the show....keep it up!!!
The rear brake adapter look like it says "Brembo" on it. Where did you source the adapters? Are the calipers Big Reds, 928S4, etc.?
Also, what MM torsion bars are you running in the front since you're not running coil-overs? Do you know the spring rates you're using for the front and rear?
Thanks
Posted by: Marv's3.6six Feb 24 2006, 09:04 PM
| QUOTE |
| The rear brake adapter look like it says "Brembo" on it. Where did you source the adapters? Are the calipers Big Reds, 928S4, etc.? |
| QUOTE |
| Also, what MM torsion bars are you running in the front since you're not running coil-overs? Do you know the spring rates you're using for the front and rear? |
Front torsion bars are hollow 22mm, rear springs are 200lb mains and 150lb tenders.
Posted by: Marv's3.6six Mar 1 2006, 10:48 AM
Last friday 2/24 cleaned 3.6 long block, looks purty good in front of a 993 huh?
Attached image(s)
Posted by: Marv's3.6six Mar 1 2006, 10:52 AM
02/24/06 Under side of engine, gone is 60k km of cosmoline mixed with canadian dirt and gunk, she's clean as a whistle.
Attached image(s)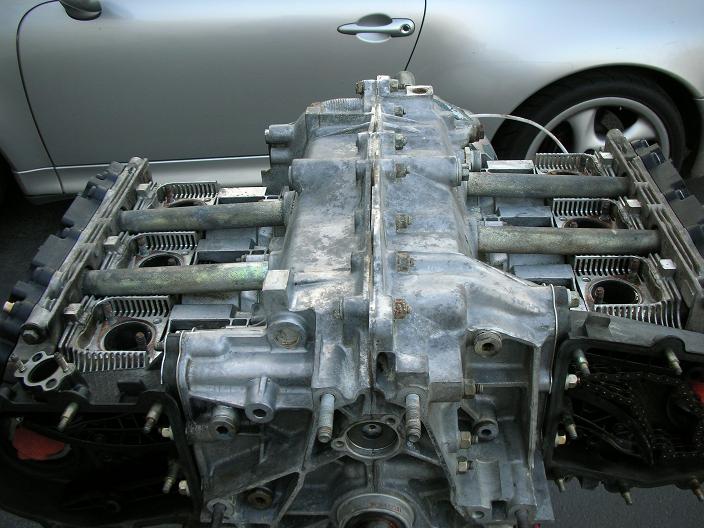
Posted by: jfort Mar 1 2006, 11:11 AM
don't know when I have enjoyed a thread this much. appreciate the effort to show us what you are doing on top of all the work on the car.
Posted by: Eric Taylor Mar 1 2006, 11:29 AM
 One of my favoriate threads !. Are you changing the cams out? Looks like your at least replacing them? How much power is this sucker gona have?
Eric
Posted by: drewvw Mar 1 2006, 11:45 AM
that is one sweet looking power plant....the 993 behind ain't too shabby either.
Posted by: ken914 Mar 1 2006, 11:54 AM
Incredible work! You have me thinking of stipping my /6 down and redoing everything. Now I just have to find about 1500 spare hours....
Posted by: Marv's3.6six Mar 1 2006, 12:56 PM
| QUOTE |
| Are you changing the cams out? |
.............Other engine mods are light flywheel, match flowed injectors, 1 3/4" headers, B&B 2 in, with 2- 3" out muff.I will post some pics soon on the work we did last night, we installed some of the body panels: front & rear CF hoods, rear bumper & custom steel valence with flare to match GT flare, the rear looks just plain sick!!!!!!!! kinda looks like a 930 a$s end.
Posted by: Marv's3.6six Mar 4 2006, 12:33 AM
02/28/06 front & rear CF decklids installed. Rear bumper & lower valence installed. Rear end shot, do these flares make my butt look big?
Attached image(s)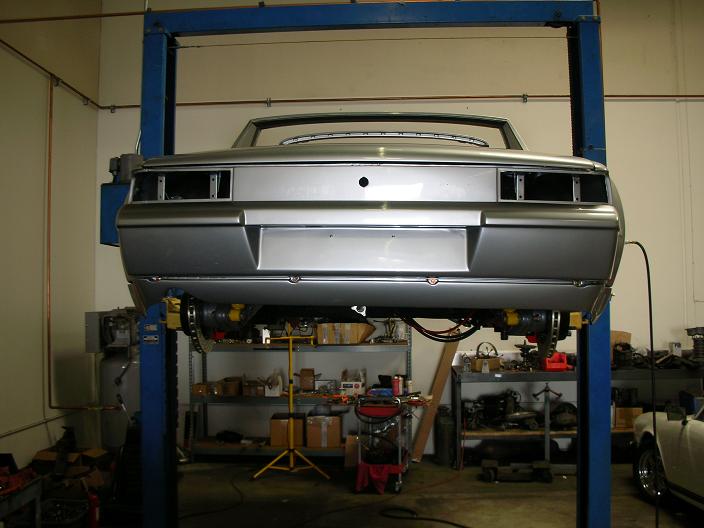
Posted by: Marv's3.6six Mar 4 2006, 12:36 AM
02/28/06 right rear quarter panel shot of new flared wide a$s steel valence install
Attached image(s)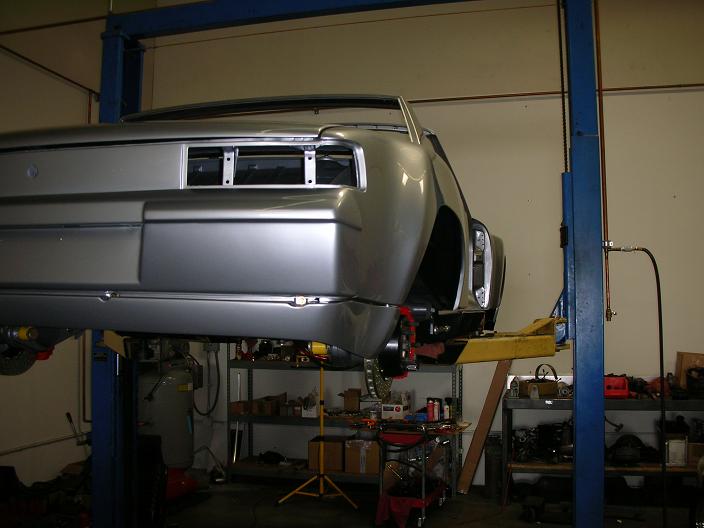
Posted by: Marv's3.6six Mar 4 2006, 12:40 AM
Close up of GT flare to lower valence metal work, it turned out great Just wait til U see the rocker panels installed It really looks like a 930 and 914 mated.
Attached image(s)
Posted by: maf914 Mar 4 2006, 09:21 AM
Man, that looks good!
Keep up the good work! Thanks for posting all of your photos.
Posted by: tdgray Mar 4 2006, 09:37 AM
Fantastic work Marv.
Can't believe I did not see this thread before. You 're amazing dude. 
Posted by: Sideways Mar 4 2006, 09:40 AM
| QUOTE (Marv's3.6six @ Mar 3 2006, 11:36 PM) |
| 02/28/06 right rear quarter panel shot of new flared wide a$s steel valence install |
Your butt looks great, and the flares on the car look good too
Posted by: Marv's3.6six Mar 4 2006, 12:22 PM
| QUOTE |
| Your butt looks great |
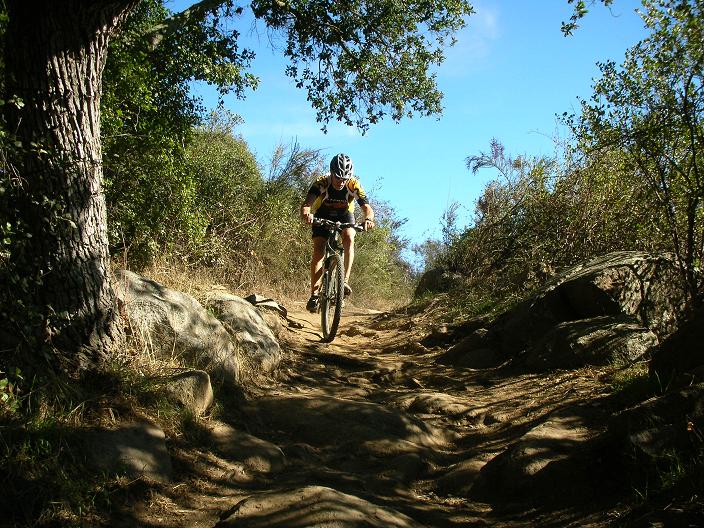
Here's what I do to keep the butt the correct size to fit the lil Recaro seat. Believe it or not part of my day job is to ride prototype bikes, this is me on a 29" wheeled full suspension mountain bike.
Attached image(s)
Posted by: Headrage Mar 4 2006, 12:25 PM
That is really, really nice. Can't wait to see it finished...
Posted by: Eric Taylor Mar 4 2006, 12:47 PM
| QUOTE (Marv's3.6six @ Mar 4 2006, 11:22 AM) | ||
Here's what I do to keep the butt the correct size to fit the lil Recaro seat. Believe it or not part of my day job is to ride prototype bikes, this one is a 29" wheeled full suspension mountain bike. |
Awesome ! You ride? That's so cool! I'm right now going to hit the road with the team at school, but come this summer it's going to be mountain
 .
. How do you like that 29 inch mtn bike? I've really wondered about those, seems like a cool idea. Just a guess but do you work for gary fisher?
Awesome thread, awesome pic! keep it coming
Eric
Posted by: turboman808 Mar 4 2006, 12:48 PM
| QUOTE (Marv's3.6six @ Mar 4 2006, 10:22 AM) |
| Here's what I do to keep the butt the correct size to fit the lil Recaro seat. Believe it or not part of my day job is to ride prototype bikes, this one is a 29" wheeled full suspension mountain bike. |
Now just how in the hell do I get a job like that. I ride 21 miles one way to go to work each day and don't get paid nothing for it
I have a custom vintage steel roadie being finished right now. Frame just got finished painting and I figure I will let the shop put the whole thing back together. Really wanted it in time for my club ride the morning before Paris Roubaix.
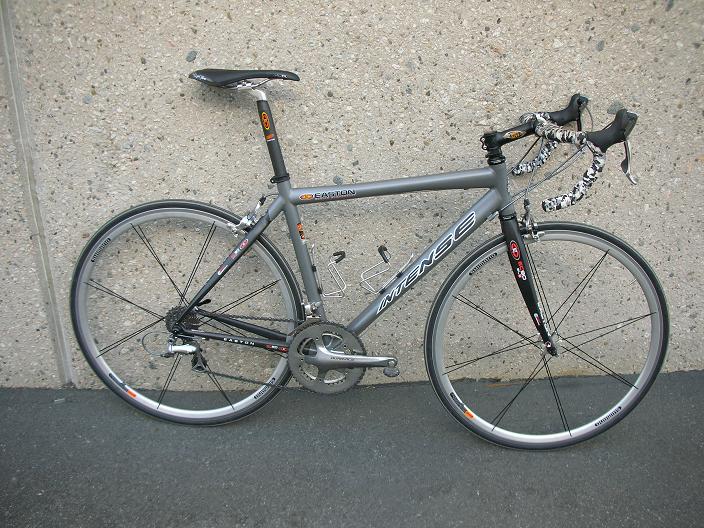
Posted by: Marv's3.6six Mar 4 2006, 01:53 PM
| QUOTE |
| How do you like that 29 inch mtn bike? & do you work for gary fisher? |
Attached image(s)
Posted by: Marv's3.6six Mar 9 2006, 08:35 AM
03/08/06 Received the finished fiberglass work on the front bumper, with installed brackets and reworked the glass on wrap around end edge, on the right.
Attached image(s)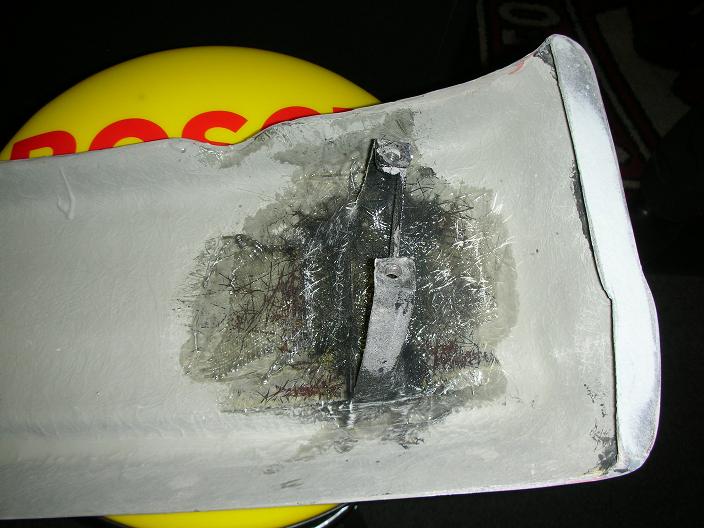
Posted by: Marv's3.6six Mar 9 2006, 08:39 AM
03/08/06 Test fit front bumper for gaps, lots of sanding work done to get gaps right, gaps are looking really good especially since this is a carbon fiber hood, more sanding/fitting work to be done, want gaps perfect. Right side headlight cover test fit, ..............................look ma no eyebrows
Attached image(s)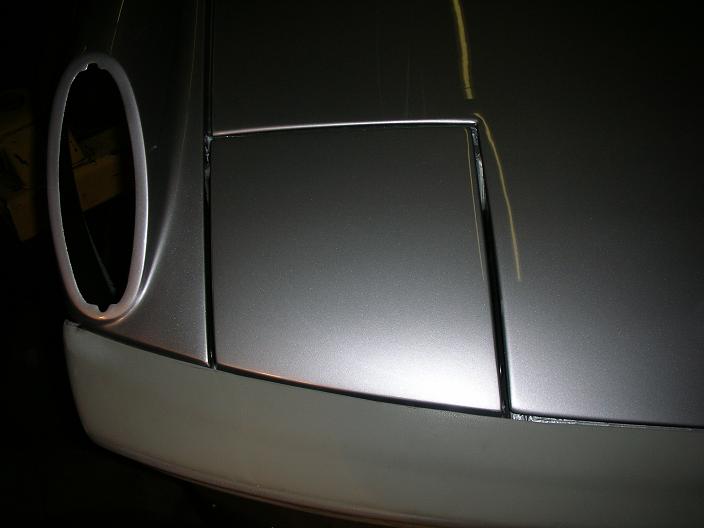
Posted by: maf914 Mar 9 2006, 08:43 AM
What are you using for a bracket in your bumper photo?
Also, who's bumpers are these and did they fit?
Thanks.
Posted by: Marv's3.6six Mar 9 2006, 08:43 AM
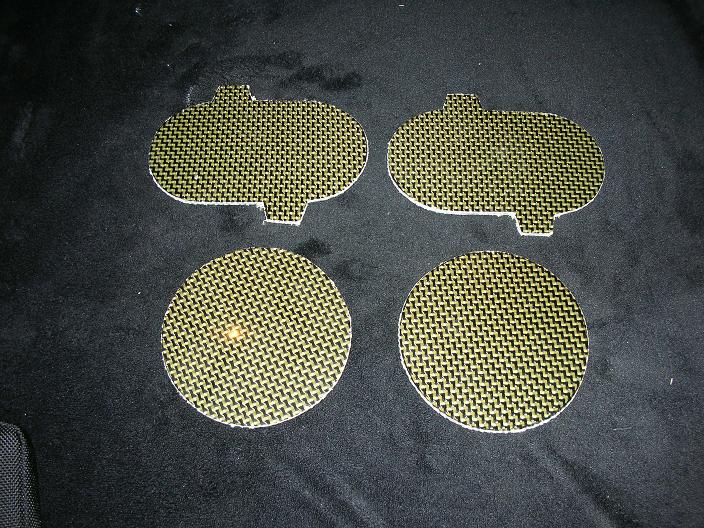
03/08/06 Testing carbon kevlar cover plates..............what do you think? Yes...no...
Attached image(s)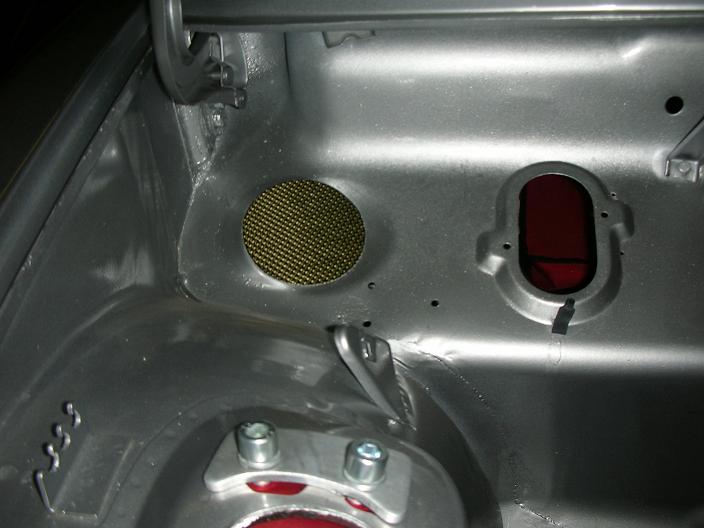
Posted by: Marv's3.6six Mar 9 2006, 08:47 AM
03/08/06 Modified fuel cell, upsized fittings from -6 to -8 on supply side to pump, and return size from -4 to -6.
Attached image(s)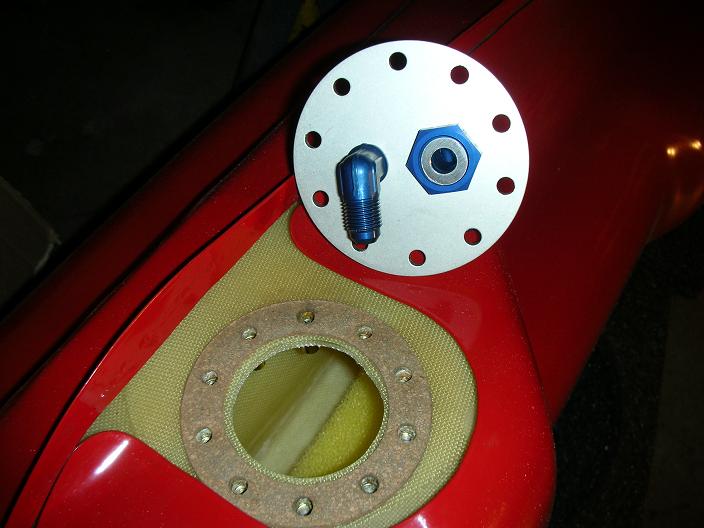
Posted by: Marv's3.6six Mar 9 2006, 08:49 AM
03/08/06 Installed mod plate in fuel cell.
Attached image(s)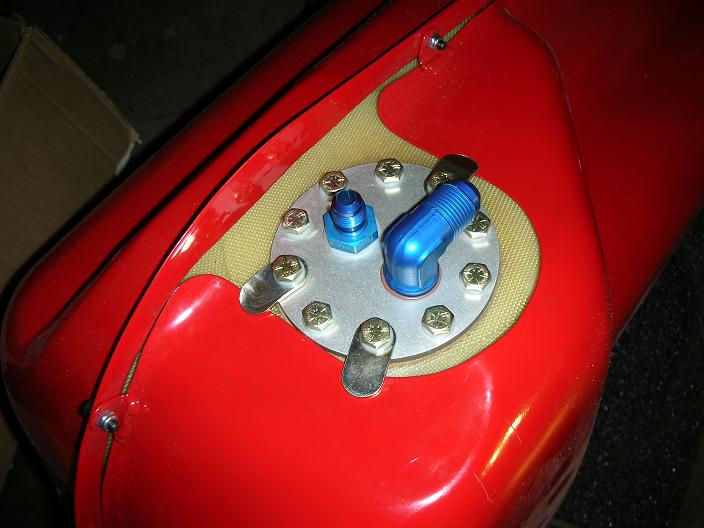
Posted by: Marv's3.6six Mar 9 2006, 09:11 AM
| QUOTE |
| What are you using for a bracket in your bumper photo? Also, who's bumpers are these and did they fit? |
Bracket is mild steel, and the bumper is a one off. Go back to the very first post of this thread & you will see the bumper. The custom shape, done by the PO, while it looks great its actually a foam filler sanded to shape, then a thin layer of bondo, then painted. Well it turned out like caca when painted a lighter color, cuz the bondo cracks like mad. I had a local carbon fiber specialist make a mold of the bumper and then duplicated it in fiberglass, its been a e$$pencive process, and I prolly would not do it again. People have asked if I would be interested in selling them...........I dunno?.
Posted by: byndbad914 Mar 10 2006, 06:19 PM
been following this thread for a bit - your car is awesome! The no-eyebrow idea looks pretty slick in the closed position - I like it since those pieces just never seem to line up nicely on the seams with those rubber mounts. I bolted mine in so I could get them to line up and stay. Look forward to seeing the finished product!
Posted by: Marv's3.6six Mar 13 2006, 10:58 AM
03/12/06 Test fit install of front toe eye, will powder coat it red.
Attached image(s)
Posted by: Marv's3.6six Apr 1 2006, 09:23 PM
04/01/06 First time workin on the car for three weeks. 
Front tow eye finished, ready to install.
Attached image(s)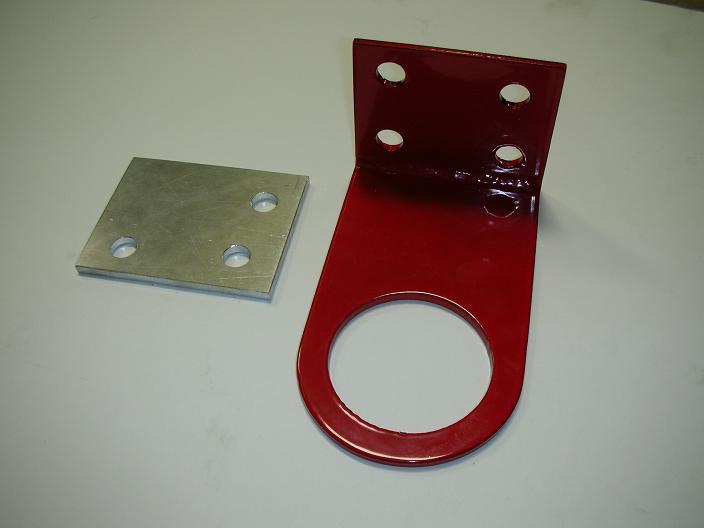
Posted by: Marv's3.6six Apr 1 2006, 09:26 PM
Bracket installed.
Attached image(s)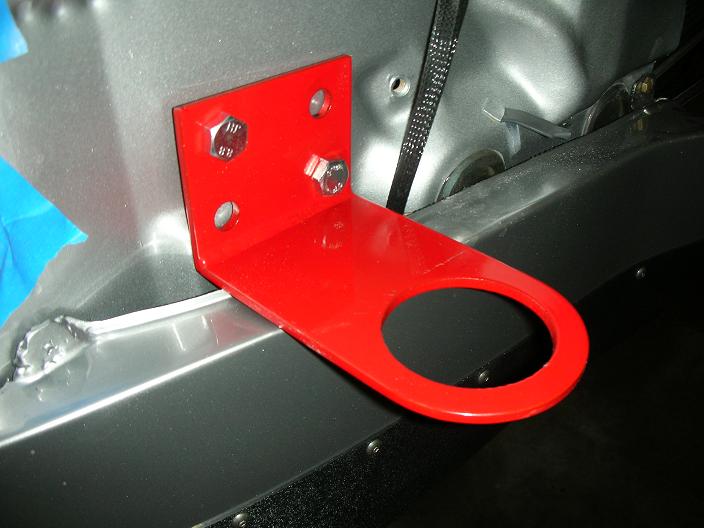
Posted by: Marv's3.6six Apr 1 2006, 09:28 PM
Carbon fiber hood prop installed for carbon fiber hood.
Attached image(s)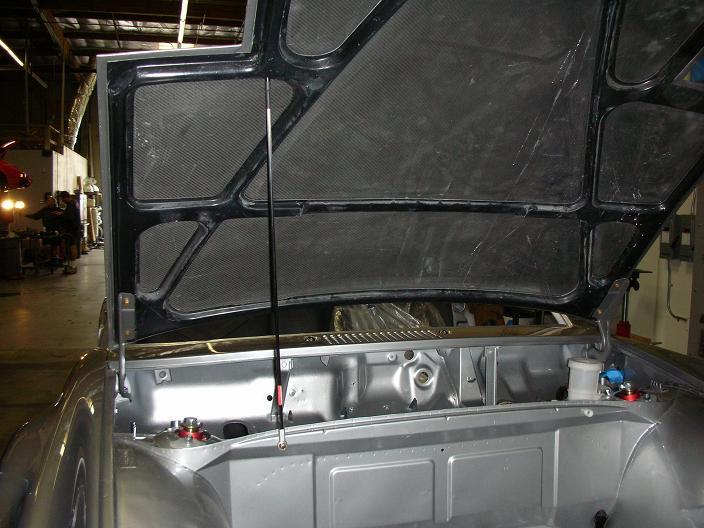
Posted by: Marv's3.6six Apr 1 2006, 09:29 PM
04/01/06 front grill test fit.
Attached image(s)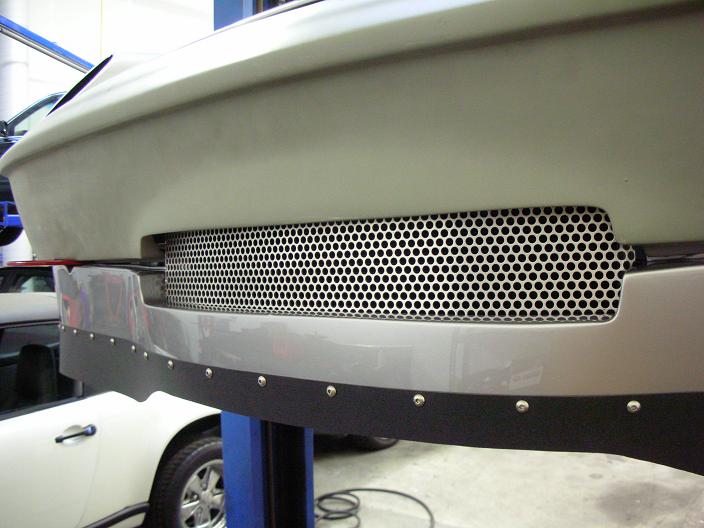
Posted by: Aaron Cox Apr 1 2006, 09:31 PM
got a pic with the headlights up?
looks great marv!!
Posted by: bernbomb914 Apr 1 2006, 10:53 PM
I stopped by last week to look. Very nice it will be one of nicest cars around.
Bernie
Posted by: Marv's3.6six Apr 14 2006, 07:55 AM
04/13/06 got some little things done, bead blasted and painted & installed headlight buckets.
Attached image(s)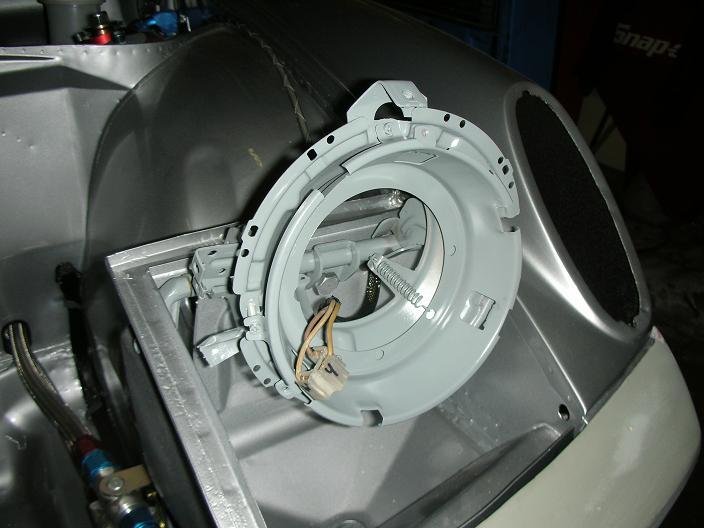
Posted by: Marv's3.6six Apr 14 2006, 07:59 AM
04/13/06 Installed exhaust heat sheild, it has a special high temp powder coat thats a really cool looking finish, I am thinking about using it on a few other parts. 
Attached image(s)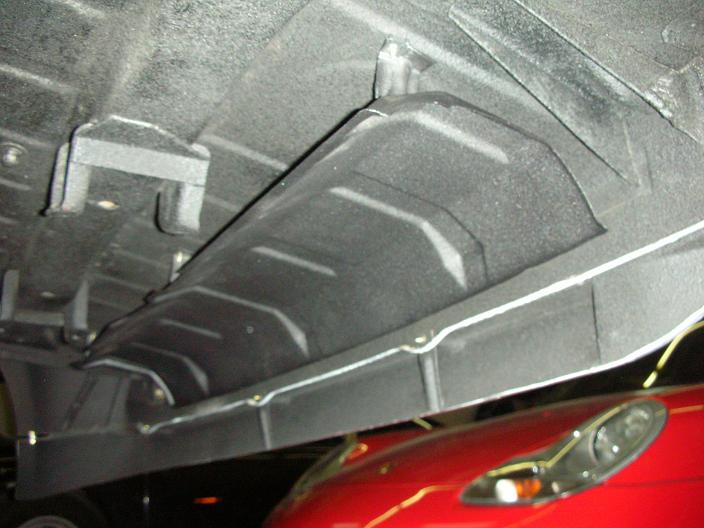
Posted by: Marv's3.6six Apr 14 2006, 08:03 AM
04/13/06 Finish install of brake/clutch pedal assembly. Had to wait for a special plunger for the 23mm MC.
Attached image(s)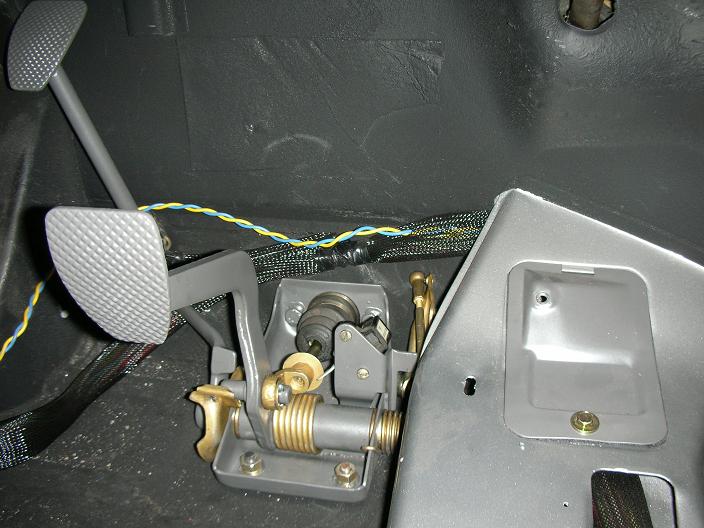
Posted by: Marv's3.6six Apr 14 2006, 08:05 AM
04/13/06 Installed rear trunk latch assembly. Actually keyed it to match the ignition key!
Attached image(s)
Posted by: Marv's3.6six Apr 14 2006, 08:09 AM
04/13/06 Off the subject of the GT I just sealed the deal on a new daily driver today.... AND.... its a P car!
(hint) Its a pepper under pressure. I am so so stoked. 
Posted by: Lou W Apr 14 2006, 08:10 AM
Perfect timing, thanks for posting the picture of your headlights, I was trying to figure out how to put mine back together. 
That pedal assembly is awesome, was that done by Eric? your car sure looks good, your're doing a great job on it. 
Posted by: East coaster Apr 15 2006, 07:51 AM
Marv, Where did you bring your DME harness through to the passenger compartment? Did you incorporate it into the stock 914 harness? I didn't see any large new holes in your firewall, just curious?? I haven't figured out where/how to bring mine in yet.
Posted by: Marv's3.6six Apr 15 2006, 12:10 PM

Marv, Where did you bring your DME harness through to the passenger compartment? Did you incorporate it into the stock 914 harness? I didn't see any large new holes in your firewall, just curious?? I haven't figured out where/how to bring mine in yet.
DME not going in cab. Goin in rear trunk on panel behind engine next to right shock tower. Had it there when it was a 3.2, never had a problem with heat or otherwise.
Posted by: Britain Smith Apr 15 2006, 01:06 PM
That pedel cluster turned out exactly like mine...sweet!
-Britain
Posted by: 914forme Apr 16 2006, 08:05 AM
Marv great project I noticed something studin' the pictures. You have a rear toe plate stiffener like Brant runsruns, you got some details of this better pictures etc...
Thanks, Stephen
Posted by: Marv's3.6six Apr 18 2006, 09:21 PM
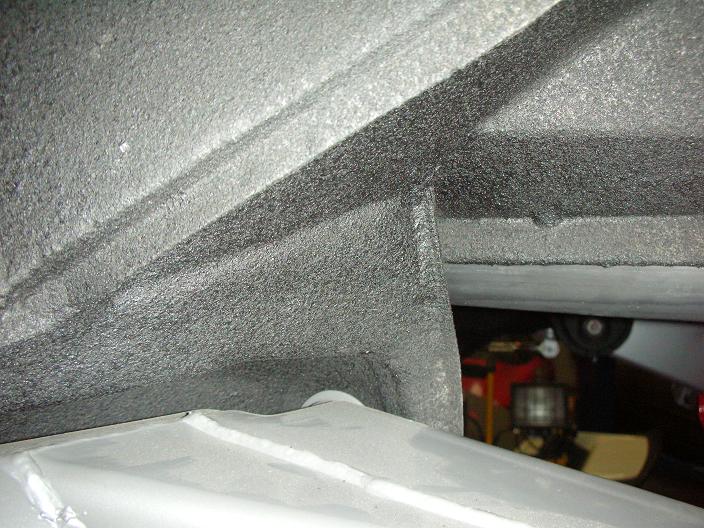
pic 1 Inside shot of toe bracing, 3/16" steel
pic 2 Upper plate bracket, 1/8" steel
pic 3 Outside bracketing, 1/8" steel
Attached image(s)
Posted by: So.Cal.914 Apr 19 2006, 02:19 AM
Your car is one Bad Mo Fo. The attn. to detail is staggering, it's almost better than sex. Nice Job! 
Posted by: Marv's3.6six Aug 2 2006, 10:57 PM
08/02/2006 Finally some new progress, have not worked on car since April (been very busy at work) just rec'd HRE311 wheel centers that have been powder coated a luscious "cosmic grey metallic" pics don't begin to show how good they look. 
Attached image(s)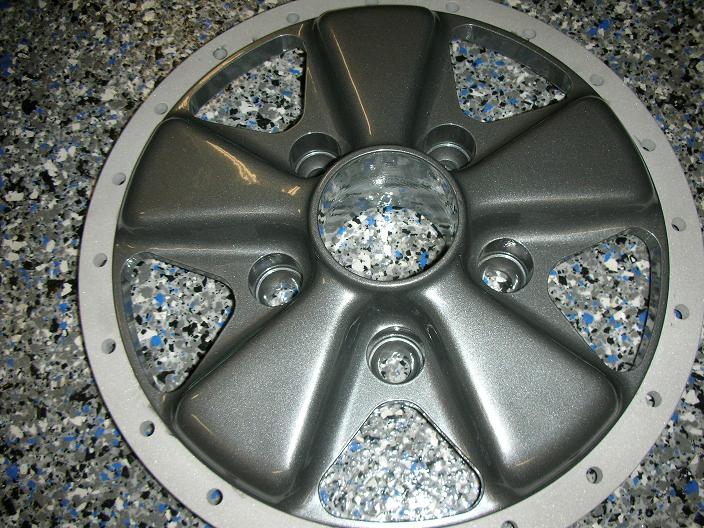
Posted by: Marv's3.6six Aug 2 2006, 11:06 PM
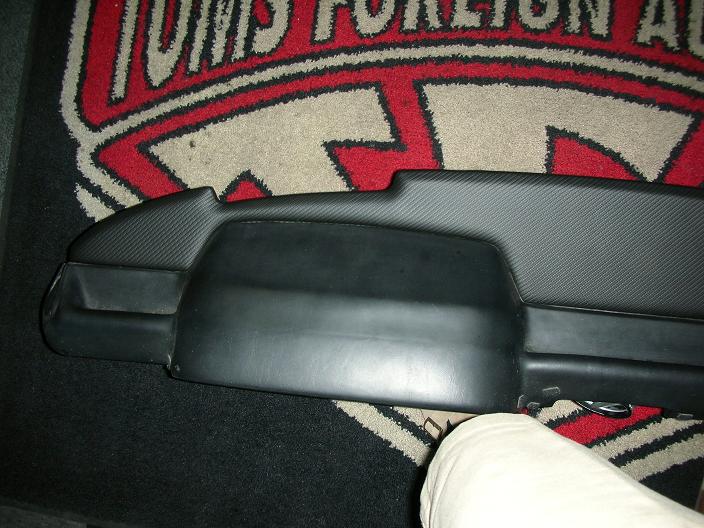
08/02/2006 Dash has been reworked, radio & vent controls removed. Have new vent where the ash tray was made from a 03 ford f150 truck vent angled toward the driver. This will be powered by a 12v boat bilge blower that will be mounted under the dash.
The dash vinyl has a carbon fiber weave effect.
Attached image(s)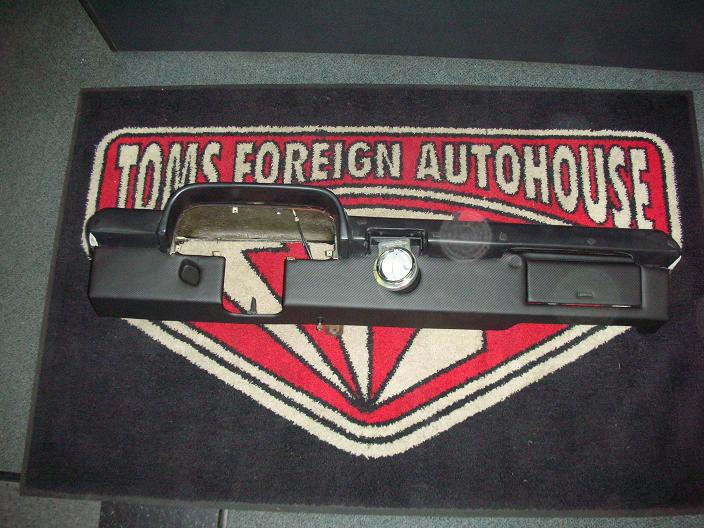
Posted by: pete-stevers Aug 3 2006, 12:00 AM
marv...you're nuts
and absolutely insane
this has got to be one of the neatest, cleanest, no holds barred,projects i have ever seen!!!
Posted by: Marv's3.6six Sep 14 2006, 09:03 PM
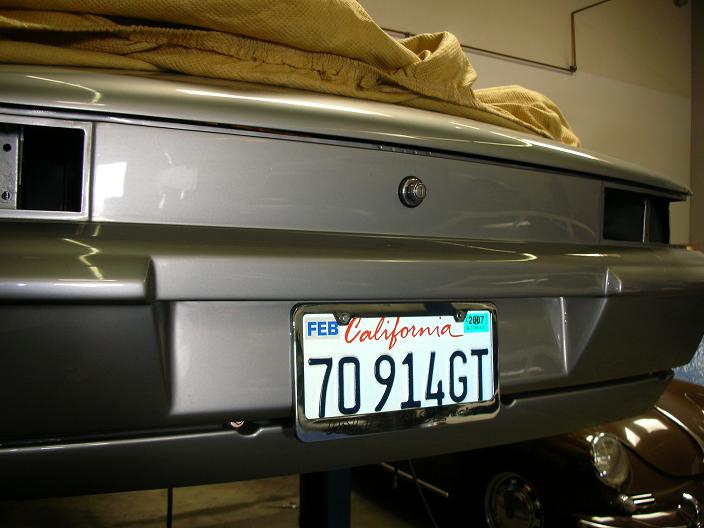
pic 1 Me in the cockpit, taken 9/14/6. (with harness on for broken collarbone) 
pic 2 New lic plate.
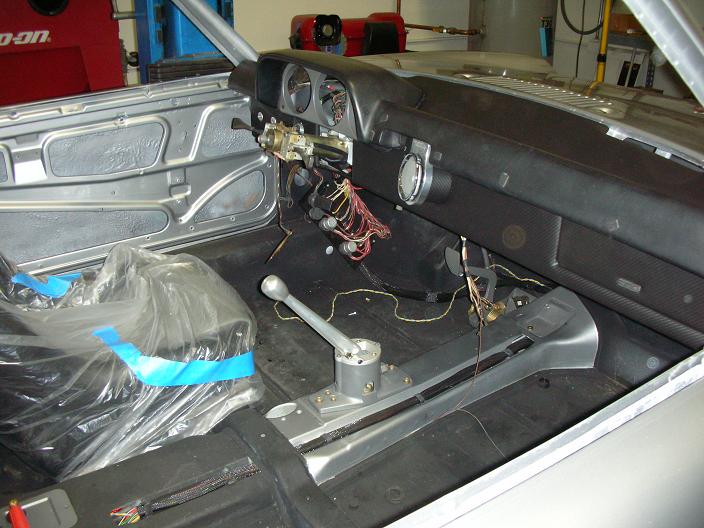
pic 3 dash installed.
Attached image(s)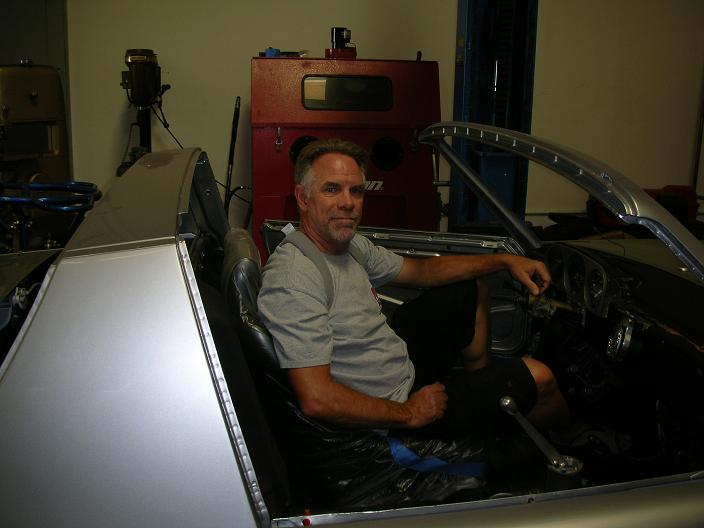
Posted by: Marv's3.6six Sep 14 2006, 09:12 PM
pic 1 brake line installed
pic 2 dash complete
pic 3 doors installed, major bummer here door gaps are shiite. the car seems to have moved while installing engman inner long kit. both doors will have to reworked and repainted to get gaps right.
Attached image(s)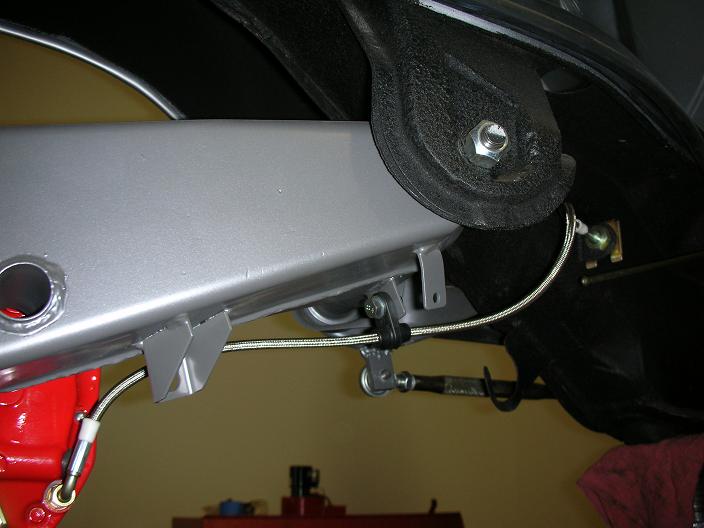
Posted by: jgara962 Sep 14 2006, 09:13 PM
I've been wondering what happened to this project 
Can't wait to see it completed!
Posted by: Lou W Sep 14 2006, 10:45 PM
Sure is looking good  ...
...
So what about the collarbone? Biking accident?
Posted by: Marv's3.6six Sep 15 2006, 06:33 AM

Posted by: AZ914 Sep 15 2006, 08:11 AM
I did the same exact thing a few years back. Got to wear that cupless-bra as well
. Sucks...Car is looking great!

Posted by: Eric_Shea Sep 15 2006, 09:49 AM
Bummer about the doors Marv.
Looks great. Can you give me a run down on the CF hood prop? This is exactly what I've been looking for.
Posted by: Marv's3.6six Sep 15 2006, 11:25 AM
http://www.seinesystems.com/Ult-Strut-Home.htm
Posted by: siverson Sep 15 2006, 11:43 AM
Looks great!
-Steve
Posted by: xitspd Sep 15 2006, 02:48 PM
Marv,
Intense! Beautiful and done right. I look forward to seeing the finished product. Your attention to detail is outstanding. I live off the Palms to Pines 74 in Valle Vista, let's do it!
Dan
Posted by: Eric_Shea Sep 15 2006, 05:01 PM
That's what I thought... did you have to modify it in any way (shorten?)
Posted by: Marv's3.6six Sep 15 2006, 05:14 PM
Posted by: xitspd Sep 15 2006, 08:47 PM
Marv
We sponsored (3) ten man corporate teams at the 24 Hours of Adrenalin race starting tomorrow Valle Vista Boyz , at Hurkey Creek I will only be there for a few hours. We have a good showing of Intense bikes in our pits. If you get a chance stop by our tent and enjoy a warm caterered meal. Intoduce yourself to Larry Minor or Howard Rosenthal as my friend. I was at Hurkey today, lot of your product there.
Dan
Posted by: Marv's3.6six Sep 15 2006, 11:08 PM

Posted by: xitspd Sep 16 2006, 09:19 AM
Yeah! Attached is a picture of my 3:00 AM ride last year that left me sitting with an ice bag for about 2 hours! So much dust on the downhill two HID's did not work. I will email you some pics of our camp amd your bikes.
Dan
Attached image(s)
Posted by: Eric_Shea Sep 16 2006, 09:24 AM
Strut on order. Thanks
Posted by: andys Sep 18 2006, 02:33 PM
Marv,
I know this is going back into your thread a bit, but what is the source/application of the master cylinder reservoir you used for your car?
Great work, BTW!!
Andys
Posted by: Marv's3.6six Sep 18 2006, 04:50 PM
source/application of the master cylinder reservoir you used for your car?
Source would be Patrick Motorsports.
Posted by: ferlutt Oct 1 2006, 12:38 PM
1/7/06 Time to make a big hole.
Hey sorry to bother, but did the guys from Patrick Motorsports send u a patter or any instructions to install the GT oil cooler??? Cuz i bought one and got nothing and i dont want to try and do it without any instructions.
Could you give me some feedback on how to install this thing or scan the instructions for me??? i have been trying to get this guys from PM to send me some instructions and some bolts for my flywheel but no luck....
Its just not good cuz i cannot put my engine and tranny together and i cannot do any progress on my car, thats sh...ty
Anyways, any help would be greatly appreciated!!
Fernando
Posted by: Maltese Falcon Oct 1 2006, 04:25 PM
Fernando...stop stuttering (DBL post).
When I received the last 3 fr coolers from them there were NO instructions in the boxes. I install the coolers with the in/ out ends on the right (pass side) for T4 eng...and the left (driver) for a six. Then cover it up with a GT (aftermarket) shroud- or fab one.
I need to put up some more pics on my 2.0 build, but Trekkor should have this jpeg on his build history--check archives .
EZ job !
Marty
Posted by: Marv's3.6six Oct 2 2006, 08:27 PM
Here ya go, I knew I had this at work. It is self explanatary. 
Attached thumbnail(s)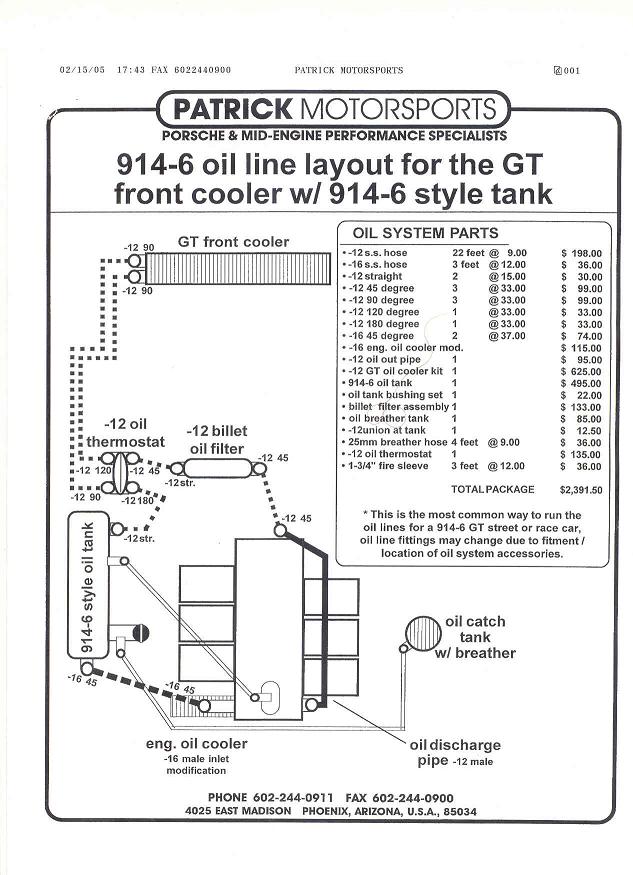
Posted by: PRS914-6 Oct 2 2006, 08:44 PM
The diagram may or may not be accurate for his installation. For instance, why add another filter? On a 95 3.6, that would give you 3 filters. I ran my lines down the right, not the left and installed the thermostat very close to the scavenge side of the pump on the right side of the motor mount. Very clean that way
Posted by: Marv's3.6six Oct 2 2006, 11:38 PM
The diagram may or may not be accurate for his installation. For instance, why add another filter? On a 95 3.6, that would give you 3 filters. I ran my lines down the right, not the left and installed the thermostat very close to the scavenge side of the pump on the right side of the motor mount. Very clean that way
Posted by: PRS914-6 Oct 3 2006, 08:09 AM
Yep, I agree with the use of a extra filter with a race car. Not too many 6's blow on the street though. The oil comes out of the engine on the right side and depending on your cooler, your lines may exit on the right side as well. Personally, I like the thermostat as close to the engine discharge point as possible to quickly respond to engine temps, so I mounted the thermostat there. I just feel it responds better there. Maybe I worry too much.
Mounting it up front works for a race car since they rarely do stop and go driving and are open most of the time. It is for sure easier to mount the thermostat up front and avoid additional plumbing in the back.
Bottom line is there are 50 different ways to plumb them depending on the use and the hardware used. I only suggest considering the application and hardware before using a generic picture. The picture gives a great overview of the theory. There is nothing wrong with the pic, but there just might be better alternatives depending on the application and was the point I was trying to make.......
Posted by: Marv's3.6six Oct 7 2006, 12:02 AM
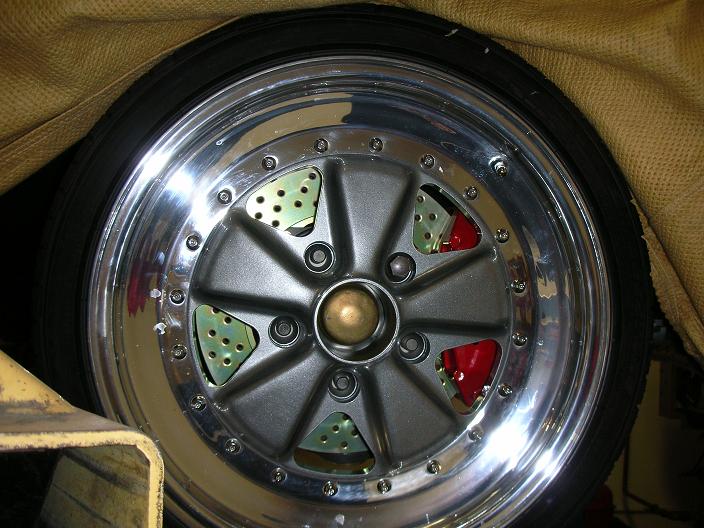
Buh-ling Bling! Wheels are done, Thanks Al Reed. HRE311's centers powdercoated cosmic grey & lips polished! Looks wicked!
Attached image(s)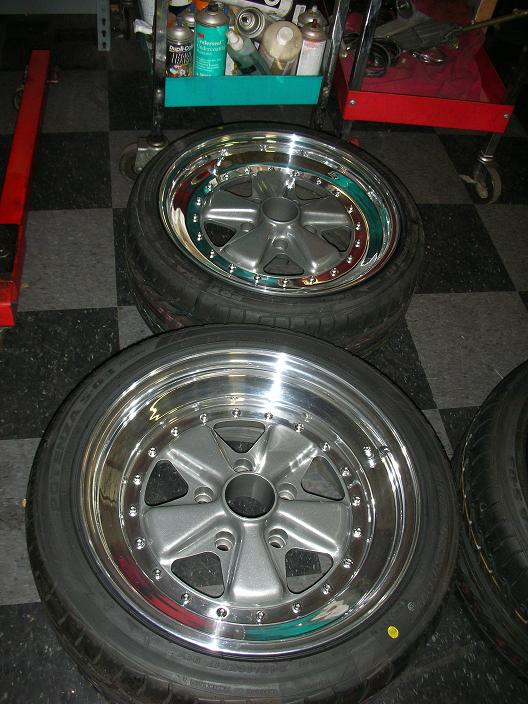
Posted by: Lou W Oct 7 2006, 12:22 AM
OOOOOHHHHH, Those are beautiful 
Posted by: Marv's3.6six Oct 7 2006, 09:44 AM
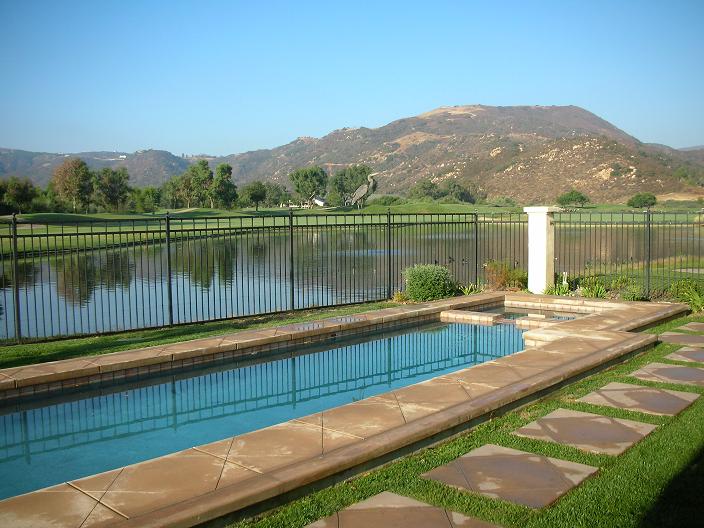
Hey check this out, I woke up to find my neighbor, a 3' tall Heron, standing on my back fence!
Attached image(s)
Posted by: jgara962 Oct 7 2006, 02:17 PM
Hey check this out, I woke up to find my neighbor, a 3' tall Heron, standing on my back fence!
Lucky you. Every once in a while I look out my window to see a heron standing on the edge of my pond...watching my koi.
Haven't seen it in a while though. I think something may have happened to him


Posted by: Marv's3.6six Oct 19 2006, 09:15 PM
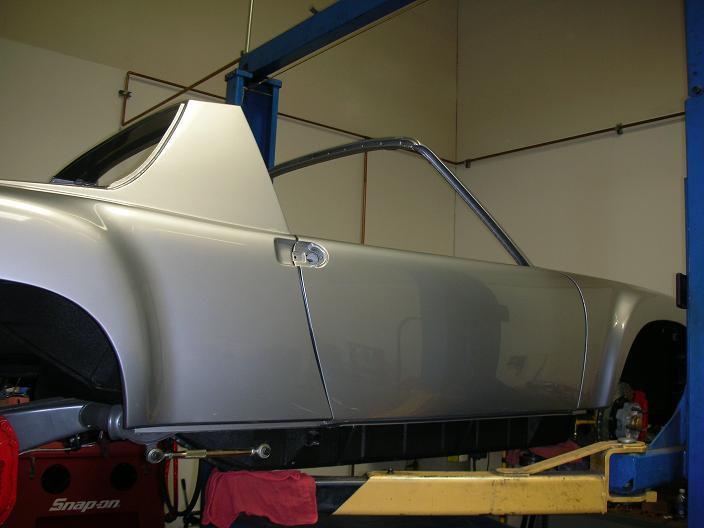
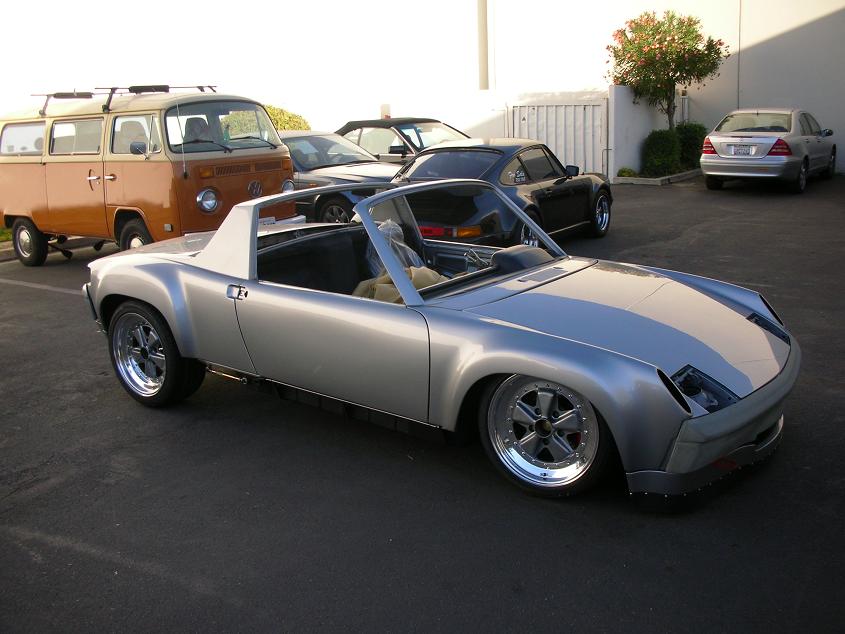
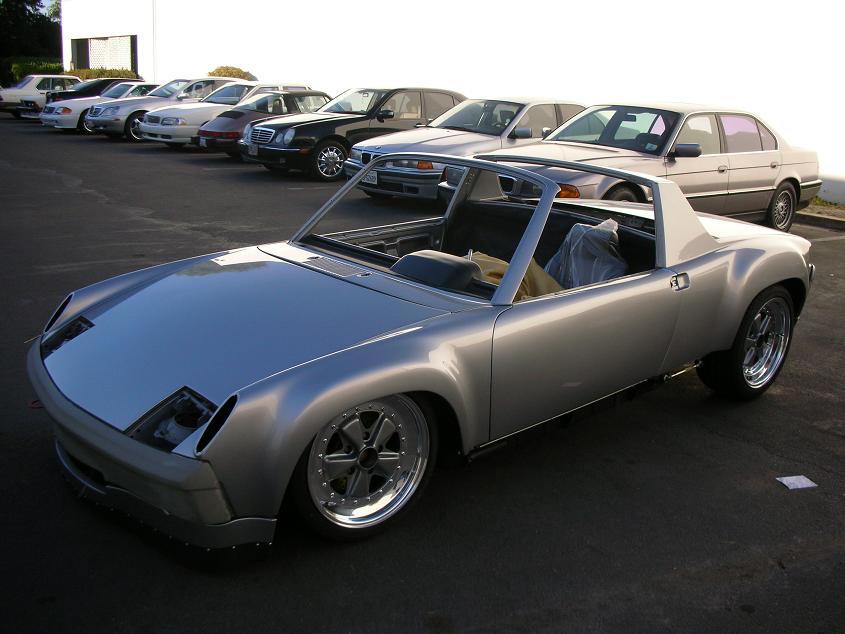
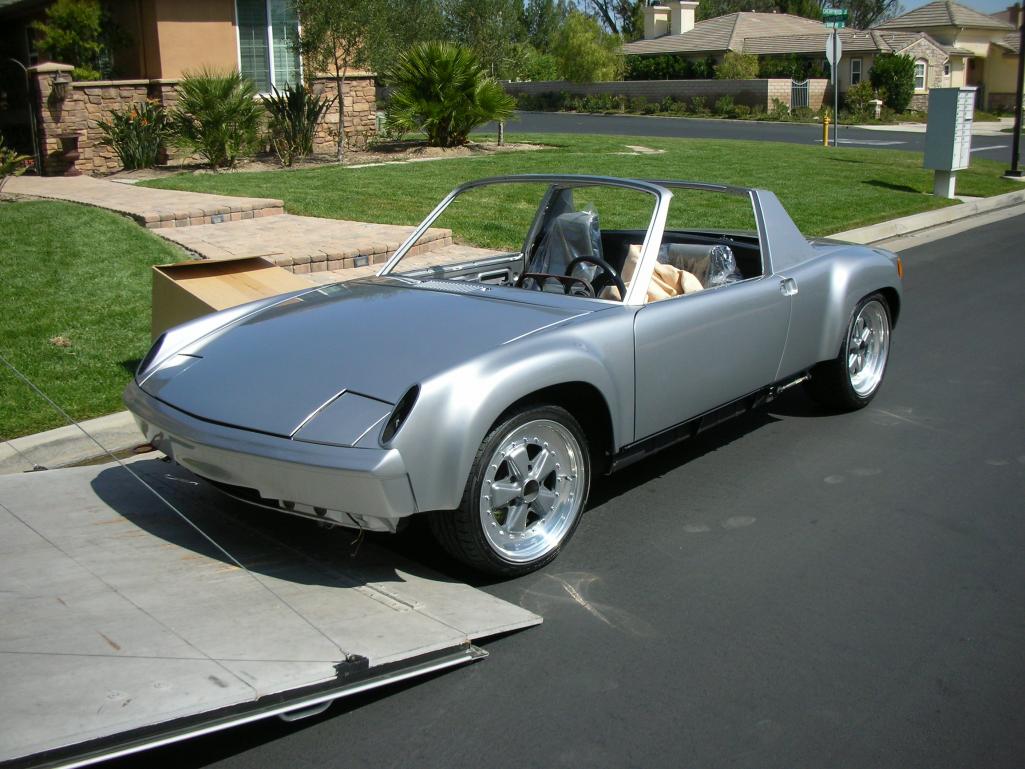
 She's a roller, kindof.......what you guys think? Still a long way 2 go.
Attached thumbnail(s)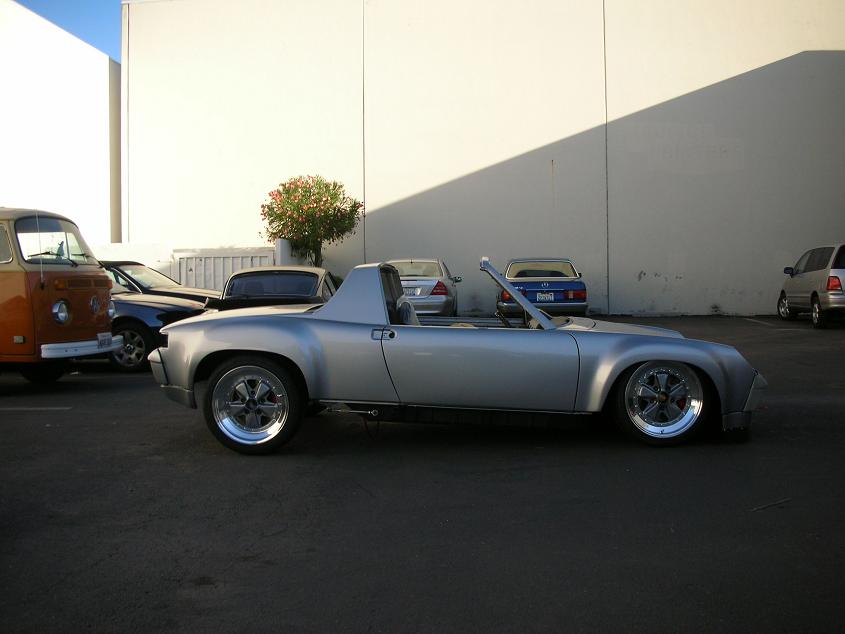
Posted by: jim912928 Oct 19 2006, 09:18 PM
way cool!
Posted by: Travis Neff Oct 19 2006, 09:20 PM
That is looking great Marv!
Posted by: So.Cal.914 Oct 20 2006, 12:29 AM
It's going to sit sooo nice. Really coming out great.
Who did you get your fuel cell from?
Posted by: Marv's3.6six Oct 20 2006, 08:19 AM
It's going to sit sooo nice. Really coming out great.
Who did you get your fuel cell from?
Posted by: Eric_Shea Oct 20 2006, 08:50 AM
OK, OK... we all officially hate you
Your car sucks and so does your view. I'll bet you married a troll as well

Marv, all in jest of course. Looking great.
I can't wait until this thing is fired up.
Posted by: db9146 Oct 20 2006, 11:00 AM
Really cool....just add some wheelie bars!!! 
just kidding....really looks nice. Wow.
Posted by: maf914 Oct 20 2006, 11:45 AM
The photo above of the front wheel reminds me of a funny car front end, the body is so low over the tire.
I think your car looks great. This thread has been really enjoyable. More photos, please.
Posted by: bernbomb914 Oct 20 2006, 05:51 PM
marv that view looks to be from Bear Creek. very nice place the car looks very nice.
Bernie
Posted by: JPB Oct 20 2006, 06:11 PM
Sweet rid Clid. Please post it on jackstands just to simmer down the envy factor please?

Posted by: Marv's3.6six Oct 22 2006, 08:51 PM
but really there are no torsen bars in the front suspension right now. I am probably gonna run it pretty low.Posted by: lybones Oct 31 2006, 01:42 PM
She's a roller, kindof.......what you guys think? Still a long way 2 go.Great work and progress!! I'm loving it.

Posted by: ferlutt Nov 2 2006, 11:16 AM
Hey what size of brakes do you have?? i was looking to upgrade mine with some nice brembos but i dont know what size will fit, i have 15 inch fuchs, what size are yours and how big are the discs??
Nice car by the way!!! its looking great
Hey check this out, I woke up to find my neighbor, a 3' tall Heron, standing on my back fence!
Lucky you. Every once in a while I look out my window to see a heron standing on the edge of my pond...watching my koi.
Haven't seen it in a while though. I think something may have happened to him
Posted by: Marv's3.6six Nov 2 2006, 01:17 PM
Posted by: iamchappy Nov 2 2006, 06:13 PM
What size are your rims and tires and there offset.
Posted by: Marv's3.6six Nov 3 2006, 02:24 PM
Rims are front 8X17 don't recall offset/backspace, Rear 9X17 15.4mm backspace. These were made for early 911 so offset/backspace should be similar to Kinesis or BBS for early car. Tires are Bridgstone front S-03 215/45/YR17 rear 245/40/YR17 These wheels are NLA as the hoops were discontinued a couple years ago. The cool thing is they are direct bolt up no spacers needed!
Posted by: iamchappy Nov 3 2006, 02:45 PM
Thanks, I will keep my eyes open for simular. The Linsey or Mirage fuch wheels are another option Im looking at.
Posted by: Marv's3.6six Oct 27 2007, 01:16 AM
First work on the project in quite a while. I got recharged after Ron & Glens windy swapmeet last Sunday. There are so many cool people in this (914)world, I am stoked to be a part of this community.
Two almost perfect turn sig housings made into one perfect one, thanks Hershel.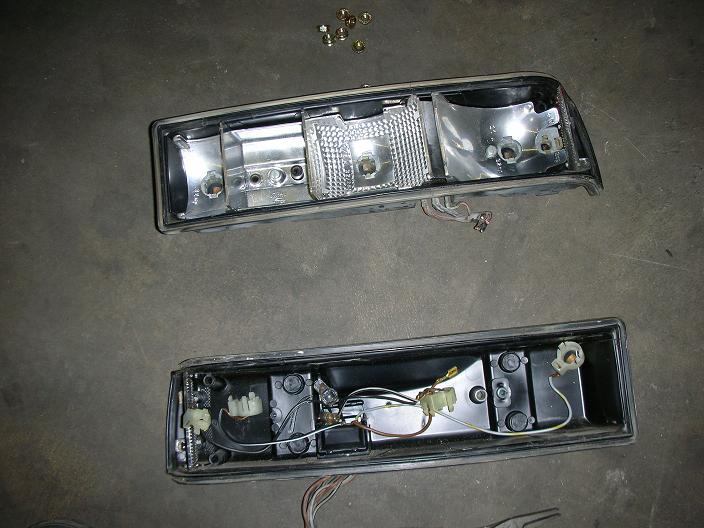
Attached image(s)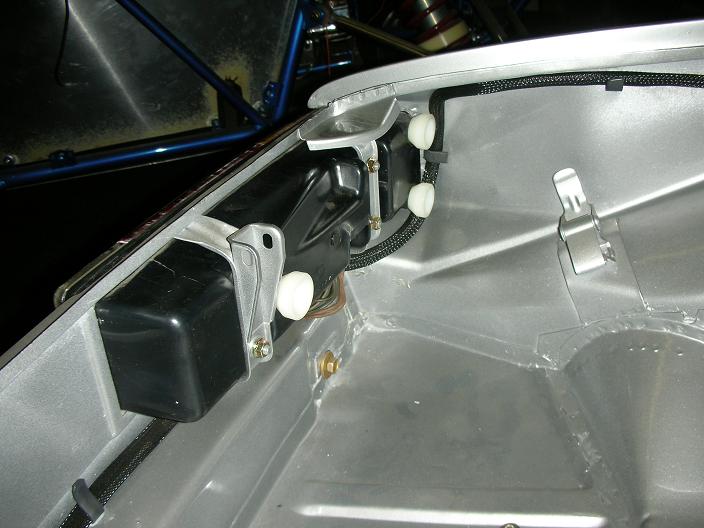
Posted by: Marv's3.6six Oct 27 2007, 01:19 AM
Finished rear turn sigs complete & installed.
Attached image(s)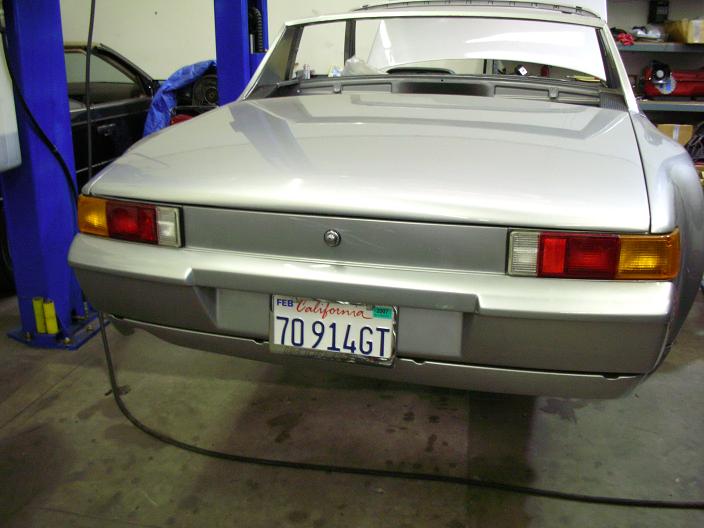
Posted by: sendjonathanmail Oct 27 2007, 08:06 AM
keep the pics coming!
Posted by: Lou W Oct 27 2007, 10:04 AM
Hi Marv, glad to see that you are back at it. Keep the pictures coming.
Posted by: Aaron Cox Oct 27 2007, 11:53 AM
haha marv! yeah buddy! get on that car!!!
Good seein you again man.
Now finish your damn car!
Posted by: Eric_Ciampa Oct 27 2007, 03:02 PM
Where did you pick up those bumpers? I believe you said that they were FG? I was looking for the source the other day but turned up nothing.
Posted by: Marv's3.6six Oct 27 2007, 11:56 PM
Thanks for the comments guys. Lou you missed a good time at R&G swapmeet.
Eric...r/e bumpers: the rear one was on the car when I bought it I donot know from where it came. The front one is my own, I have (own) the mold for it. No plans to make them commercially.
Here is something you don't see every day..............a real GT headlight kit, Armando Serrano and I got together and bought them from Germany earlier this year. I plan to be installing soon.
Attached image(s)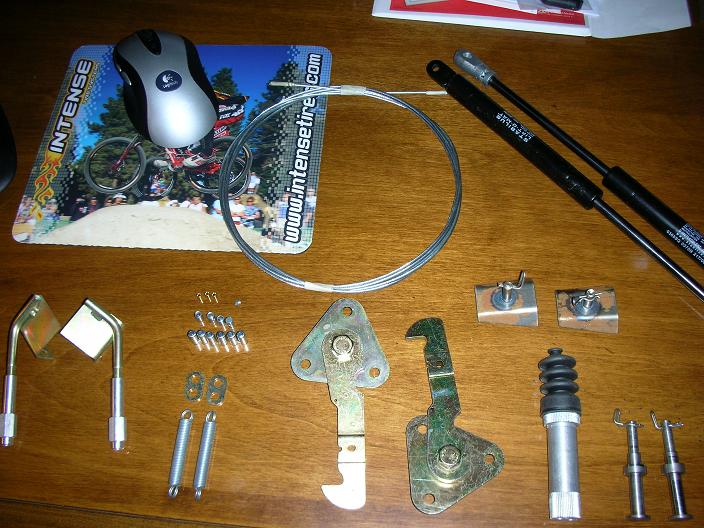
Posted by: Aaron Cox Oct 27 2007, 11:59 PM
that is quite... INTENSE marv
Posted by: Marv's3.6six Oct 28 2007, 12:07 AM
Here is some fabrication from earlier this week. Modified oil cooler mounting bracket, orig bracket was hack. Fabricated some more block offs from carbon/kevlar sheet. a good week for my teener.
Attached image(s)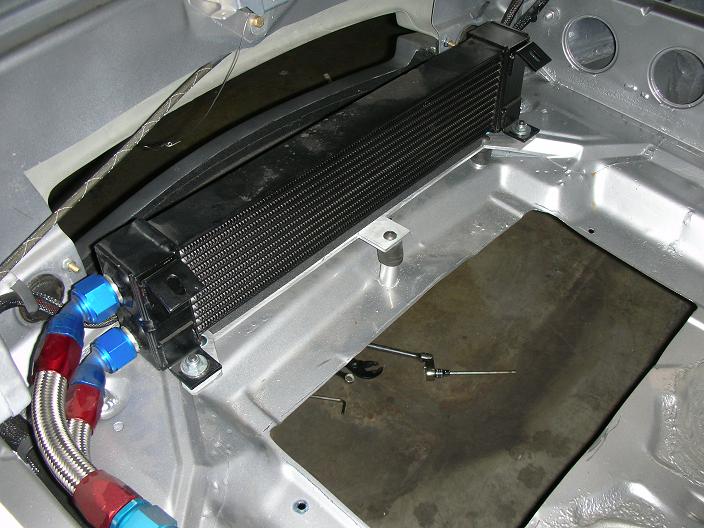
Posted by: Eric_Ciampa Oct 28 2007, 12:32 AM
Thanks for the info. Keep on updating your thread. I (and I am sure many others) are living vicariously through your project b/c I know I will never have the time (or $) to go through my 914 the way you are. At this point this thread is more like art than anything else.
Posted by: rfuerst911sc Oct 28 2007, 08:24 AM
Beautiful work. Are there any pics of the oil lines transitioning from the rear of the long into the engine bay? I'm assuming this takes place in front of the oil tank? I'm doing a /6 conversion and I'm having trouble visualizing this transition and a pic or two would be great.
Posted by: Martin Baker Nov 1 2007, 08:54 PM
Marv, Here are your signals. I have the gasket you needed, I cleaned an extra up, looks like new. I've sent an e-mail your way as well.
Martin
Attached image(s)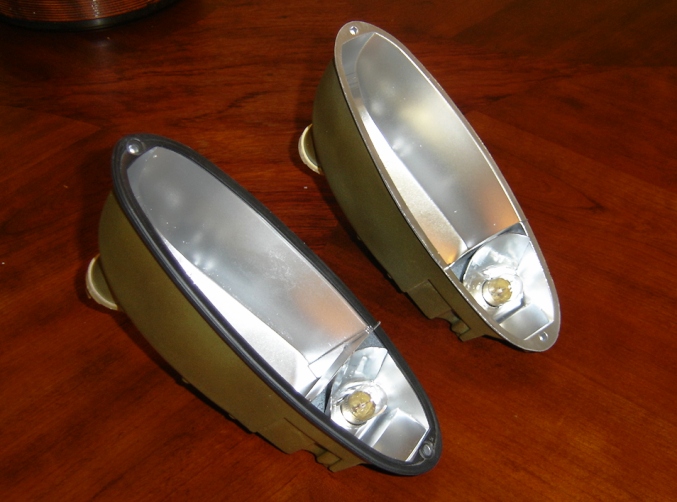
Posted by: So.Cal.914 Nov 1 2007, 10:09 PM
Glad to see you back at it, your build thread was one I could not put down.
Posted by: Marv's3.6six Nov 3 2007, 09:36 PM
pic 1 Todays fabrication. Aluminum grill for oil cooler exit air flow, this was more complicated than than it looks.
pic 2 Carbon kevlar block offs installed.
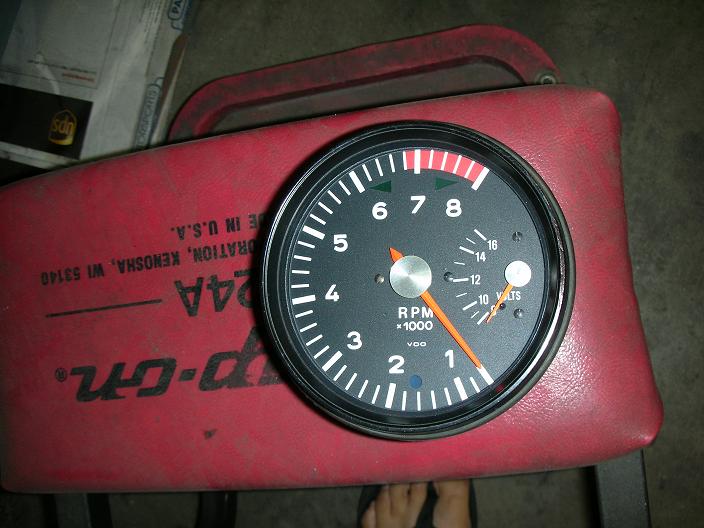
pic 3 NHS (North Hollywood Speedo) beautiful art work. The thought behind this was to have the needle straight up and down when at red line . Looks sick! They also made me a great combo gauge with oil temp, oil pressure, and fuel
Attached image(s)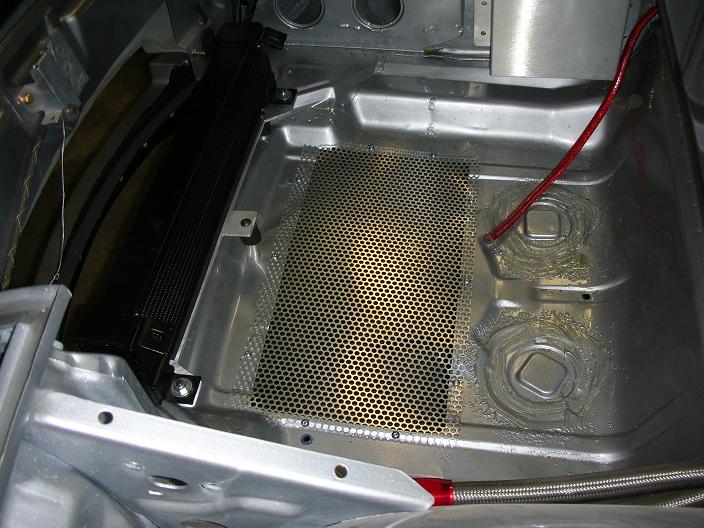
Posted by: iamchappy Nov 3 2007, 11:03 PM
Very Cool!
Posted by: Root_Werks Nov 3 2007, 11:19 PM
Sweet! It's been a while since I have checked up on this thread. The car is looking great!
Posted by: Lou W Nov 6 2007, 10:18 PM
Very nice. 
Posted by: Marv's3.6six Dec 17 2007, 10:11 AM
Back to paint shop Saturday 12/15. Been waiting since the last summer for an opening. Doors get completely re-worked gaps get addressed. New front FG bumper gets paint. Some new touch up for welded brackets for 914 GT headlight openers.
Attached image(s)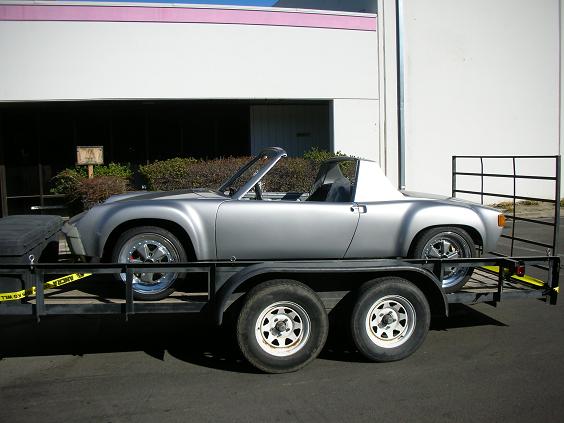
Posted by: Ferg May 20 2008, 11:47 AM
![]()
Ferg
Posted by: neo914-6 Jul 28 2008, 05:27 PM
Ferg
 what Ferg said!
Posted by: 6freak Jul 31 2008, 09:37 AM
Ferg
what Ferg said!Nice work ..nice color ..nice car ..
Posted by: Aaron Cox Jul 31 2008, 07:05 PM
marv,
keep on it You know your gonna love it in the end!
Posted by: Rod Sep 13 2009, 05:08 PM
Just spent a really enjoyable hour reading through this thread. Wow, what amazing work! Very impressive, surely progress has beenn made in the last year or so Such a shame it stopped so abruptly....
That will so be worth it. 
Posted by: Solo914 Dec 2 2009, 12:33 PM
![]() For one of my favorite threads
For one of my favorite threads
Can't wait to see this car done
Posted by: db9146 Mar 3 2010, 11:07 PM
Anyone know what happened to Marv?
Posted by: carr914 Mar 4 2010, 08:22 AM
I just went through this thread for the first time ( a lot of good pointers for me), but no Happy Ending
T.C.
Posted by: Marv's3.6six Apr 30 2010, 04:24 PM
I just went through this thread for the first time ( a lot of good pointers for me), but no Happy Ending
T.C.
Not ending yet! Ok.. Got my fires stoked to get back on this. I have no time to do this project, but have been talking recently to Jim Patrick about PMS finishing the car for me. I am sure that he could finish this in his sleep, its so close. I just got to get everything boxed up and moving towards AZ, got to find a car hauler that will move a roller and pallets of shit. Wish me luck.
Posted by: effutuo101 Apr 30 2010, 04:47 PM
Very nice Marv! I can't wait to see some video!
Posted by: MoveQik Apr 30 2010, 04:56 PM
Not ending yet! Ok.. Got my fires stoked to get back on this. I have no time to do this project, but have been talking recently to Jim Patrick about PMS finishing the car for me. I am sure that he could finish this in his sleep, its so close. I just got to get everything boxed up and moving towards AZ, got to find a car hauler that will move a roller and pallets of shit. Wish me luck.
You should let Jim finish it for you. I'll even offer to pick it and store it for you until you can come get it. Or maybe I could just drive back for you.

Posted by: Elliot Cannon Apr 30 2010, 07:58 PM
Hi Marv. Missed you at the G&R. I think you should buy this one and save yourself some trouble. 
Attached image(s)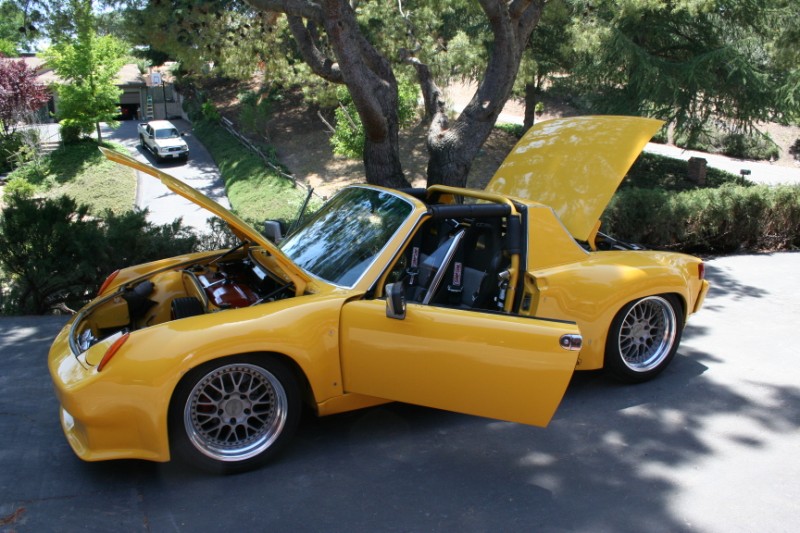
Posted by: Ferg Apr 30 2010, 08:41 PM
I would have finished it for nothing, but I take a year and 5,000 miles just to make sure I have all the bugs worked out 
Posted by: EdArango Aug 8 2010, 01:47 PM
So what is the latest on this rebuild???
Posted by: Marv's3.6six Feb 24 2011, 10:44 PM
So what is the latest on this rebuild???
The latest is nothing new, do you guys have any suggestions on how to motivate a mechanic that will not work on my car or prepare a final invoice for work done?
Posted by: Lou W Feb 24 2011, 11:03 PM
So what is the latest on this rebuild???
The latest is nothing new, do you guys have any suggestions on how to motivate a mechanic that will not work on my car or prepare a final invoice for work done?
Ya, show up with a trailer.
Posted by: gothspeed Feb 25 2011, 04:32 PM
Awesome !!!
Posted by: db9146 Feb 25 2011, 06:16 PM
Nevermind.................... 
Posted by: mepstein Feb 25 2011, 06:23 PM
reading his thread, I don't think it's at PMS.
Posted by: Twise Feb 25 2011, 06:53 PM
http://www.autorepair.ca.gov/
The California - Bureau Of Automotive Repair can usually get the results you are looking for. Am I to understand that you do not have a signed repair order for the work done so far? Is it still in Temecula?
Jim put my motor in, and I was very happy with the work done. He also called me everytime there was an additional charge required.
Posted by: laflaur Feb 25 2011, 06:53 PM
yeah, explain how bad publicity affects business!
Posted by: Series9 Feb 25 2011, 09:08 PM
I will pay for shipping to Series 9 so that I may complete this beautiful car.
I have 3.6 experience.
Give me the address of the "mechanic" and I'll send the carrier.
Posted by: MoveQik Feb 25 2011, 10:46 PM
I will pay for shipping to Series 9 so that I may complete this beautiful car.
I have 3.6 experience.
Give me the address of the "mechanic" and I'll send the carrier.
God that's a sweet offer. Hell, I would send mine there to have you upgrade the 3.2 you did for me!
Posted by: nsr-jamie Feb 26 2011, 10:31 AM
Marvelous Marv!! Love this thread. It was great to read all the pages with progress day by day in 2006, now it 2011...I hope you get re-inspired and are able to get some work done on the car. Honestly it looks pretty much close to completion, just a little more work and I think you are done. Everybody is looking forward to seeing you complete the car. I hope you are able to do it and wish you all the best
Posted by: Marv's3.6six Feb 26 2011, 10:49 AM
I will pay for shipping to Series 9 so that I may complete this beautiful car.
I have 3.6 experience.
Give me the address of the "mechanic" and I'll send the carrier.
Jeez Joe thats a great offer. I remember watching your 3.6 build when you were still in CO. Your work is very nice. My issue is that the car is in pieces all over this guys shop, I can't just pick it up. This guy is a master mechanic but is also somewhat a non finisher he has several projectcars of his own that are all about 50% complete.... in fact he is lovingly called 50% T*m. My car was supposed to be a project we worked on on evenings and weekends, it started out like that but he lost interest at various points in time, you can see this by all the starts and stops on this thread. I will also take some blame for this as I have been busy with my business. But I have asked him several times over the last couple years to prepare an invoice for his work. Originally I was going to trade a high end mountain bike for his services but that is no longer. The custom trans that was built by Jim Patrick was a bike deal like that. I would just like to get the car out of there but donot want to have bad blood as he is somewhat of a friend.
Posted by: DrifterJay Feb 26 2011, 12:48 PM
Screw bad blood, how long has the car been there? Half a decade? What a fucking joke, think about it. Threaten to move the car; schedule a uhaul trailer and truck for all the parts. If that doesn't light a fire under his ass, then pull your car out. 
Posted by: Series9 Feb 26 2011, 02:58 PM
I will pay for shipping to Series 9.
Jeez Joe thats a great offer.
It's a standing offer. I'll pay shipping to Florida and charge you a fair price to take the project to completion.
You can fly out, and we can take the two 3.6s out to the track at Daytona and watch some racing.
If you're the adventurous type, drive it home to CA. Otherwise, fly home and ship the car.
I'm known for my ability to get things done. No BS.
Posted by: mepstein Feb 26 2011, 04:41 PM
Reading through the thread, it looks like the longs are bowed due to a reinforcement that was overdone. Maybe that is what is holding up the build.
Posted by: Rand Feb 26 2011, 04:56 PM
I would just like to get the car out of there but donot want to have bad blood as he is somewhat of a friend.
You are a man of amazing patience. After over five years, I'd say it's time to move it on and he has no right to feel bad blood over you wanting to take it somewhere else to get it finished. You certainly can't just leave it with him because you fear upsetting him. It's way past that point.
Posted by: socalstuttgart Feb 27 2011, 12:53 AM
I'll I have to say is don't give up and contact me if you need some encouragement.
Posted by: gothspeed Feb 27 2011, 05:05 PM
I had a problem like that but it only took 6 months of non work, for me to start picking up the stray parts 'first' so that nothing gets left behind ........... then went over there and had triple A to tow the car outa there. We are still friends after all that but now he gets my work done quicker  .
.
So go over there and start segregating parts that you know are yours and putting them in totes ....... and bring them home ...... if anyone asks why you are taking your parts ....... tell them they are yours and need to be worked on .......
5 years is waaaaaaaaaaaaay tooooooo long for anyone to get 'upset' at you ............... pay what ever you legitimately owe and get your teener outa there ......... if anyone gives you any serious problems ........ bring the title to the car and the cops ............. 
Posted by: Solo914 Oct 3 2011, 09:20 PM
![]()
Alright Marv,
I guess I will give my favorite thread its yearly bump. I hope you eventually find a way to motivate your mechanic or atleast get it out of there. This car is to awesome to not see finished. 2012 is only 3 months away!!!!
Kyle
Posted by: Marv's3.6six Oct 3 2011, 11:28 PM
Alright Marv,
I guess I will give my favorite thread its yearly bump. I hope you eventually find a way to motivate your mechanic or atleast get it out of there. This car is to awesome to not see finished. 2012 is only 3 months away!!!!
Kyle
So Kyle thanks for the bump. As it is now I do have the car and it cost me a fair sum of money plus attorneys were involved (need I say more)......but alas the car is not complete, nor do I have the money now to finish it. Maybe 2012.
Posted by: Elliot Cannon Oct 3 2011, 11:30 PM
Come to the G&R Marv. Be good to see you again.
Cheers, Elliot
Posted by: Solo914 Oct 4 2011, 09:18 AM
Marv,
Its good to hear that you atleast have it again. What's left on the to-do list? From the pictures the car looks close to being ready to assemble. California build party?
Kyle
Posted by: Marv's3.6six Feb 16 2012, 08:56 PM
Well folks it has certainly been a while since there was work done... I am glad to announce I finally have forward progress. yay.
After a lot of searching I found who I consider one of the best in my region to finish my car. Don Kravig of Precision Motion Porsche. Don is a master porsche mechanic has decades of aircooled flat six AND much 914 race car building experience. Don has had my 993 engine for several weeks and has been prepping it for the car. Upon inspection of the exhaust valve guides it was decided to pull the heads and have at it. While we are in there we will add some performance mods.... I will post up some pics soon of the trick ass work being done.
Posted by: SirAndy Feb 16 2012, 09:31 PM

Posted by: MDG Feb 16 2012, 09:31 PM
Excellent news! I can't wait to see the progress. Congrats on the restart of this project.
Posted by: RiqueMar Feb 16 2012, 09:37 PM
Great news!
This is probably the progress thread that I always wanted to see finished!
![popcorn[1].gif](style_emoticons/default/popcorn[1].gif)
Posted by: db9146 Feb 17 2012, 08:44 AM
Glad to see you moving on it again Marv......its going to be a beautiful -6!!!!
Posted by: Joe Sharp Feb 17 2012, 10:31 AM
This is Soooo good to hear!!!!
Posted by: Marv's3.6six Feb 17 2012, 11:50 PM
95 3.6 with heads removed. Inspection of cylinders, ring gap, big end of rods....check, check, check all good, all seals good, engine appears to be as advertised a low mileage 993 engine in excellent shape.
Attached thumbnail(s)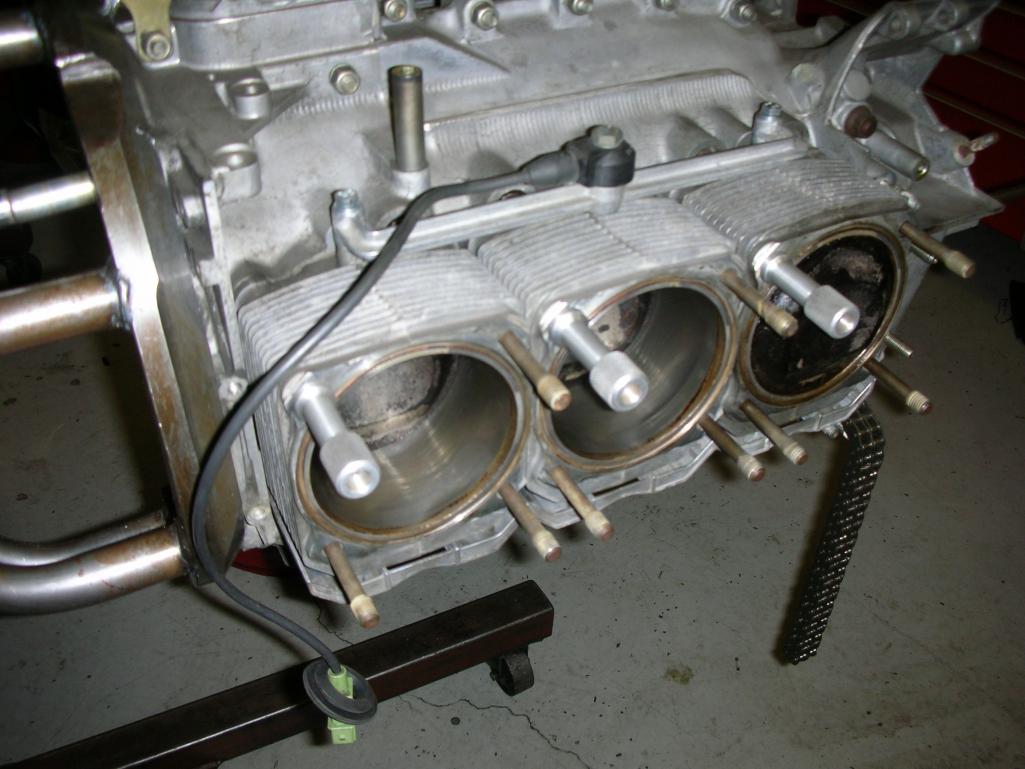
Posted by: Marv's3.6six Feb 17 2012, 11:56 PM
New goodies. freshening up gaskets n seals.
Attached thumbnail(s)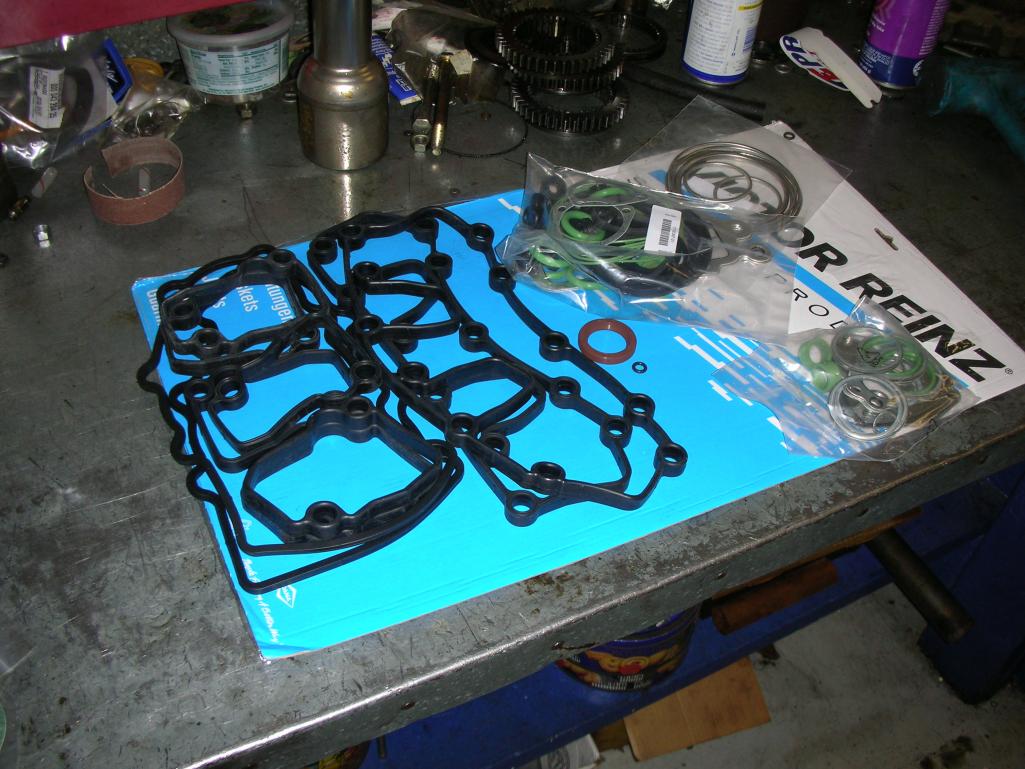
Posted by: Marv's3.6six Feb 18 2012, 12:00 AM
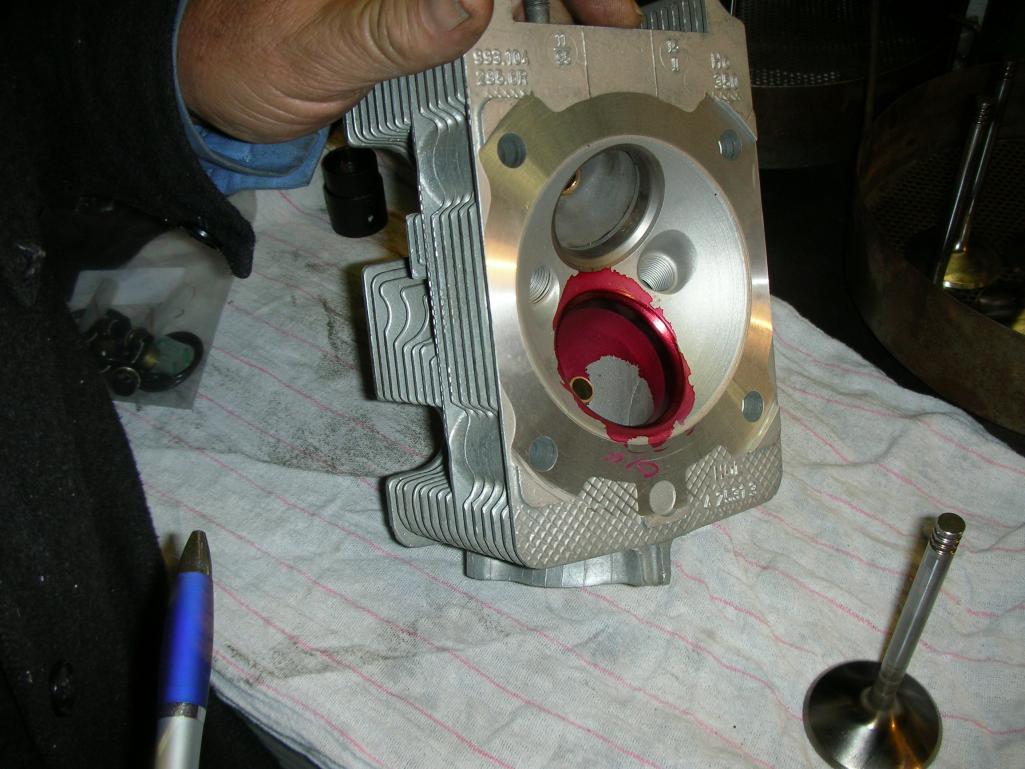
New exhaust valve guides, 3 angle racing cut valve job, cylinder head milled a few thou to increase compression.... all good stuff.
Attached thumbnail(s)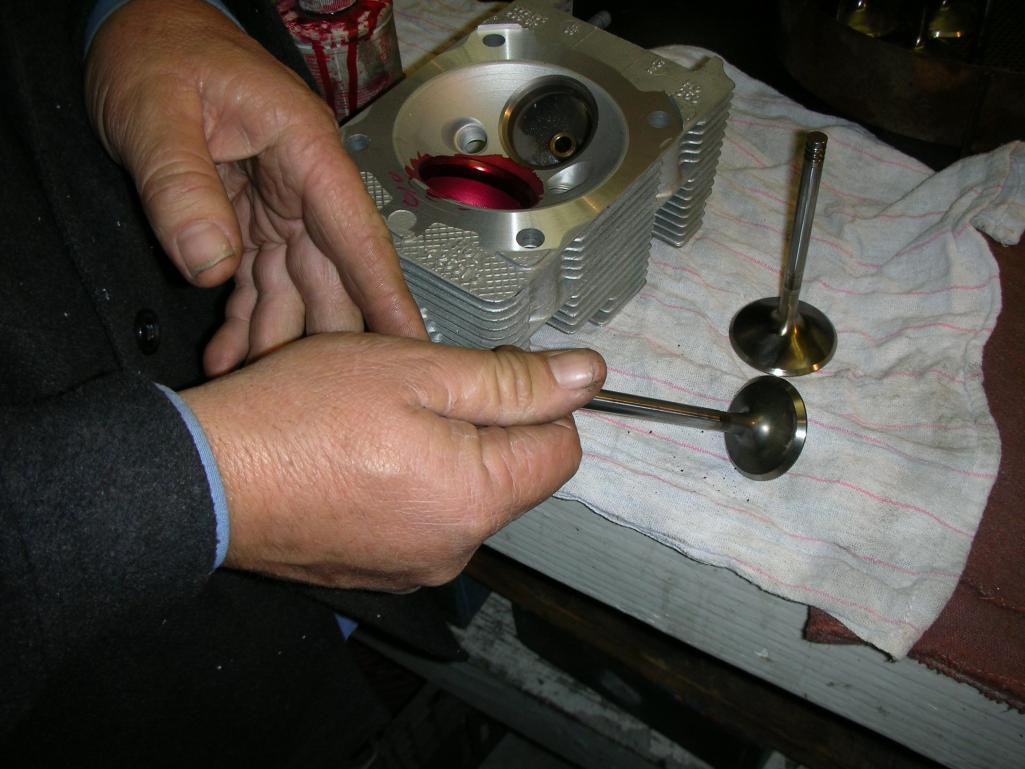
Posted by: Ferg Feb 18 2012, 09:00 AM
Sooo happy to see this thread again
Posted by: Marv's3.6six Feb 18 2012, 02:19 PM
3 angle valve grind and head work up close.
Attached thumbnail(s)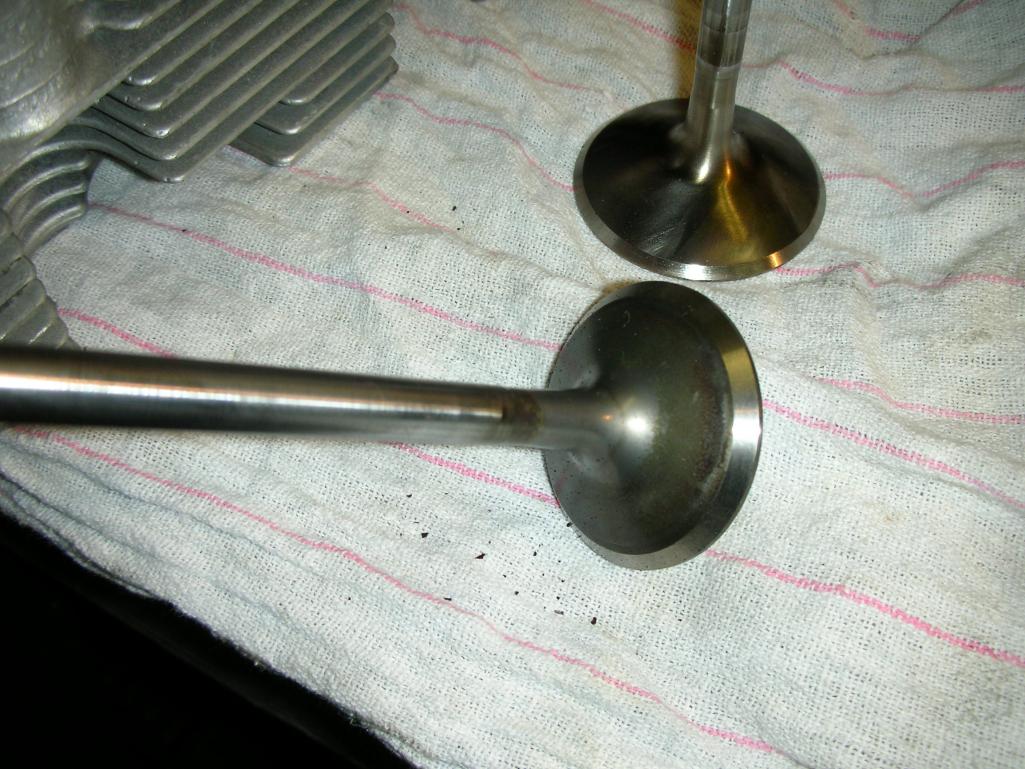
Posted by: Marv's3.6six Feb 18 2012, 02:23 PM
Awesome looking head, you can see that .010 has been shaved off to increase compression ratio.
Attached thumbnail(s)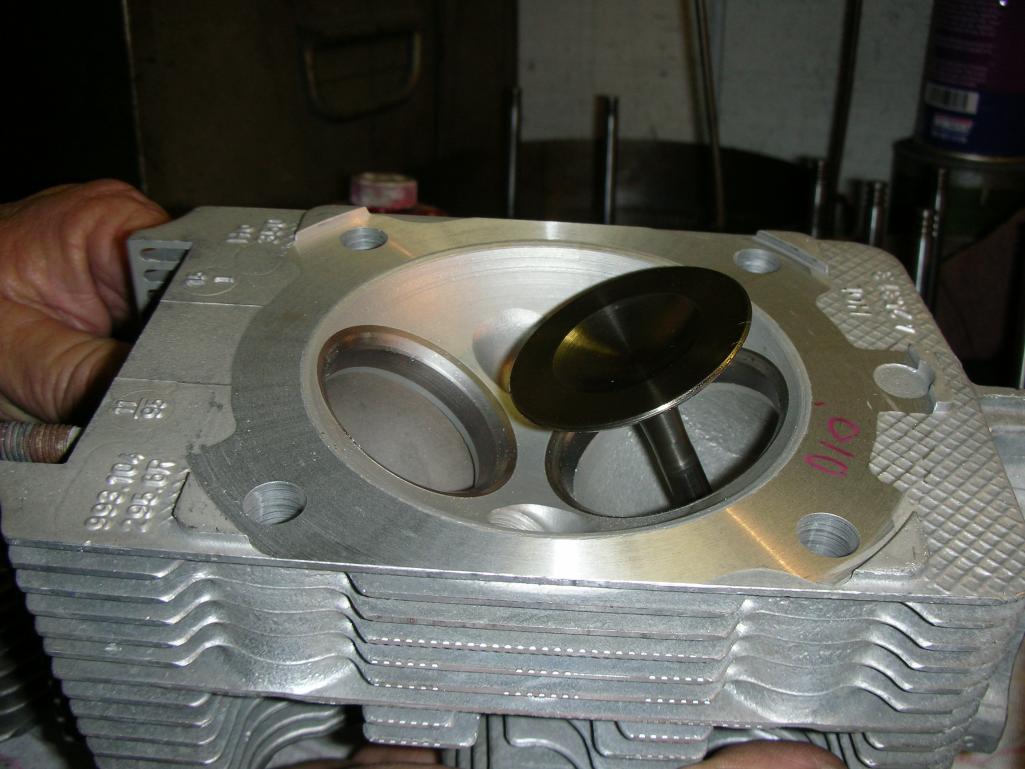
Posted by: Marv's3.6six Feb 18 2012, 02:26 PM
Incredible 904 replica at Precision Motion Porsche.
Attached thumbnail(s)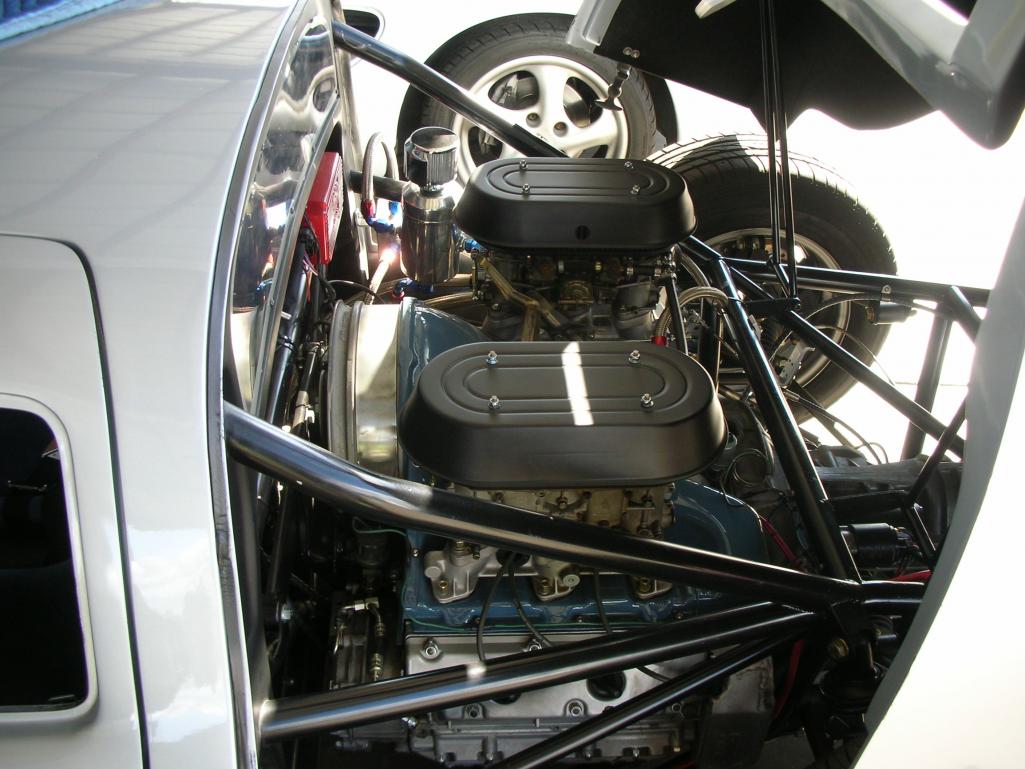
Posted by: Marv's3.6six Feb 18 2012, 02:32 PM
This SC is a car that Don from PMP built some time ago..... 2400lbs with a 97 Varioram engine, RS cams.... with a G50 and coil overs all around.... I was given a ride in this baby.... Holy Schnikes it is insanely quick and very well sorted.
Attached thumbnail(s)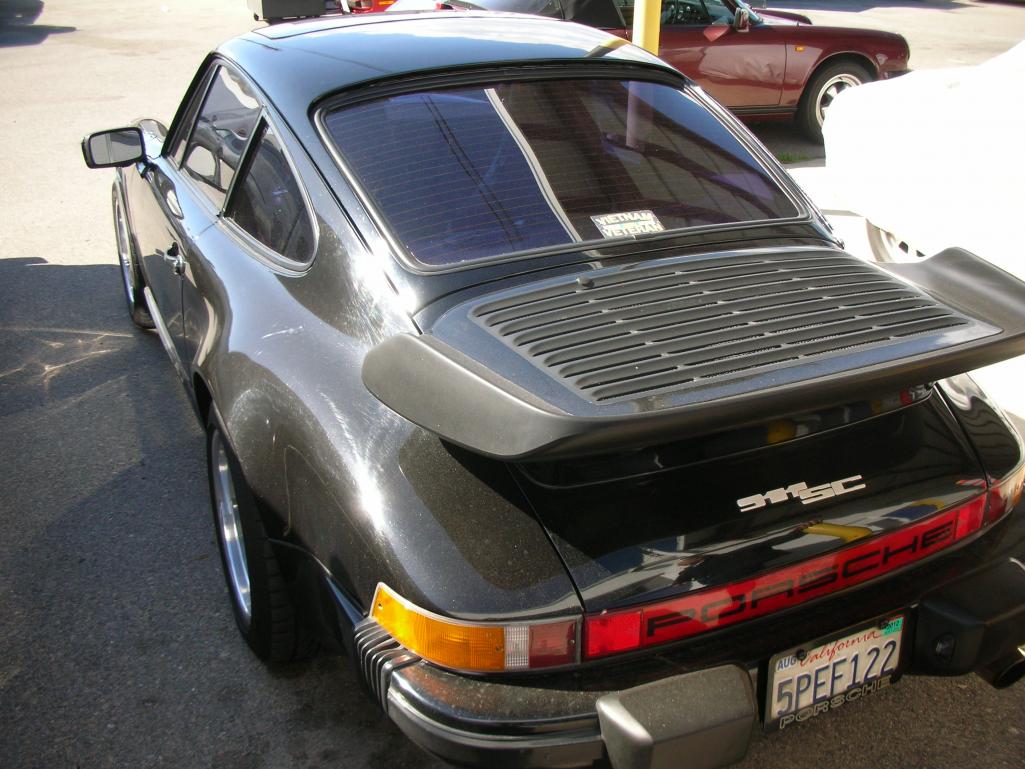
Posted by: Madswede Feb 18 2012, 04:40 PM
Those engine pics are effin' gorgeous!
Congrats on restarting the build (again)!
Posted by: Marv's3.6six Feb 25 2012, 07:52 AM
More progress. Completed heads being assembled on to cylinders.
Attached image(s)
Posted by: 396 Feb 25 2012, 09:14 AM
Congrats on the forward momentum
Posted by: Marv's3.6six Feb 27 2012, 10:49 PM
Today the new RS cams were installed and timed. Intake and fuel injection system assembly began. sorry no pics.
Posted by: Marv's3.6six Mar 4 2012, 11:23 PM
Gave her a little bath today, first time I have washed it since 2005. If all go's well the engine and trans install will begin in the next couple weeks.
Attached thumbnail(s)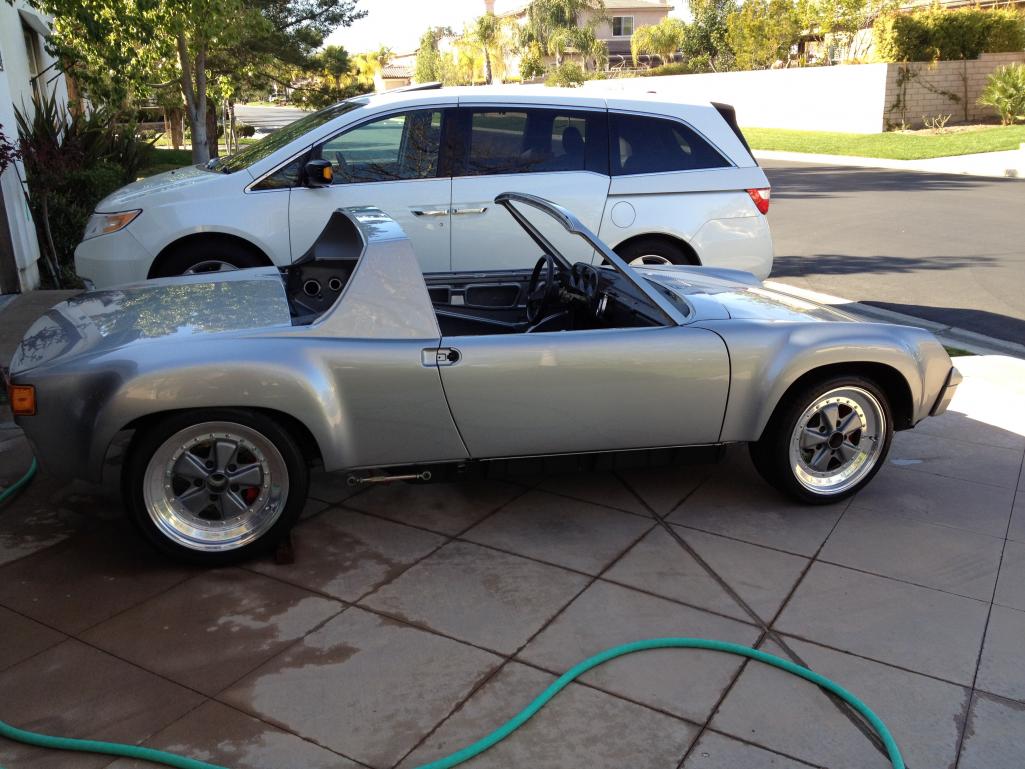
Posted by: stuttgart46 Mar 5 2012, 07:34 AM
Congrats.
That is a great looking car you got there.
Posted by: Ferg Mar 5 2012, 09:26 AM

Posted by: rnellums Mar 5 2012, 10:12 AM
Gave her a little bath today, first time I have washed it since 2005. If all go's well the engine and trans install will begin in the next couple weeks.
Someday....

Posted by: polo classic Mar 5 2012, 02:47 PM
Lovely car
Posted by: Aaron Cox Mar 5 2012, 03:35 PM
She's looking better than ever Marv.
SOON!
Posted by: RickS Mar 5 2012, 03:40 PM
Simply unbelievable!
Posted by: Marv's3.6six Mar 14 2012, 11:17 PM
My baby on her way to Precision Motion for the fun to begin. Engine and trans fitment to body begins next. I have waited so so long for this.
Attached thumbnail(s)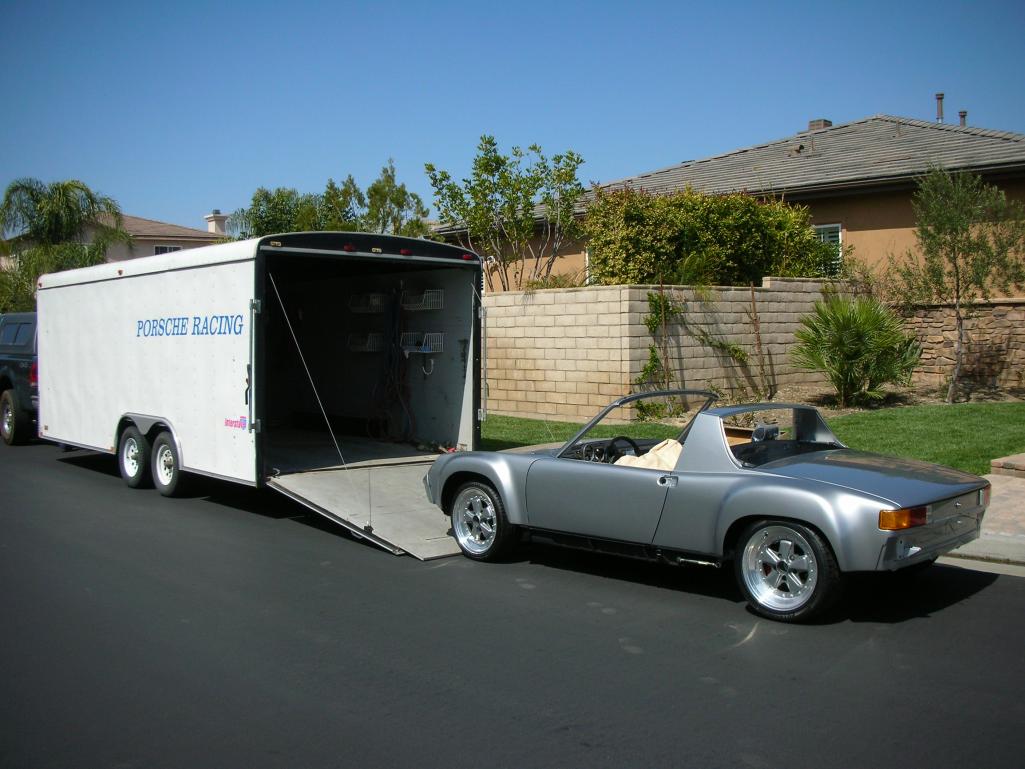
Posted by: stuttgart46 Mar 15 2012, 06:33 AM
I don't think I could sleep until I got it back.
Such a great looking car.
Posted by: Travis Neff Mar 15 2012, 09:36 AM
SO HAVE WE!
I have waited so so long for this.
Posted by: Marv's3.6six Mar 15 2012, 04:37 PM
I spent quite a while yesterday with Don from PMP. We discussed many aspects of the car.
One thing I am considering is running some beautiful 16" 930 Fuchs I have had for a long time instead of the 17" HRE that are on the car. I am thinking the 16's will look more period correct to the car with 50 and 55 series sidewall versus the super skinny on the car now??
Posted by: Marv's3.6six Apr 14 2012, 09:14 AM
I spent quite a while yesterday with Don from PMP. We discussed many aspects of the car.
One thing I am considering is running some beautiful 16" 930 Fuchs I have had for a long time instead of the 17" HRE that are on the car. I am thinking the 16's will look more period correct to the car with 50 and 55 series sidewall versus the super skinny on the car now??
Ok I have found out the offset on 930 fuchs are a no go, the wheels do not fit under the rear flares... time to ebay the fuchs.
Posted by: Marv's3.6six Apr 14 2012, 09:19 AM
Progress...... Patrick Motorsports front engine mount being welded in. The stock 6 front mount would be tortured with all the torque from the 3.6, ....had to go for the big guns.
Attached thumbnail(s)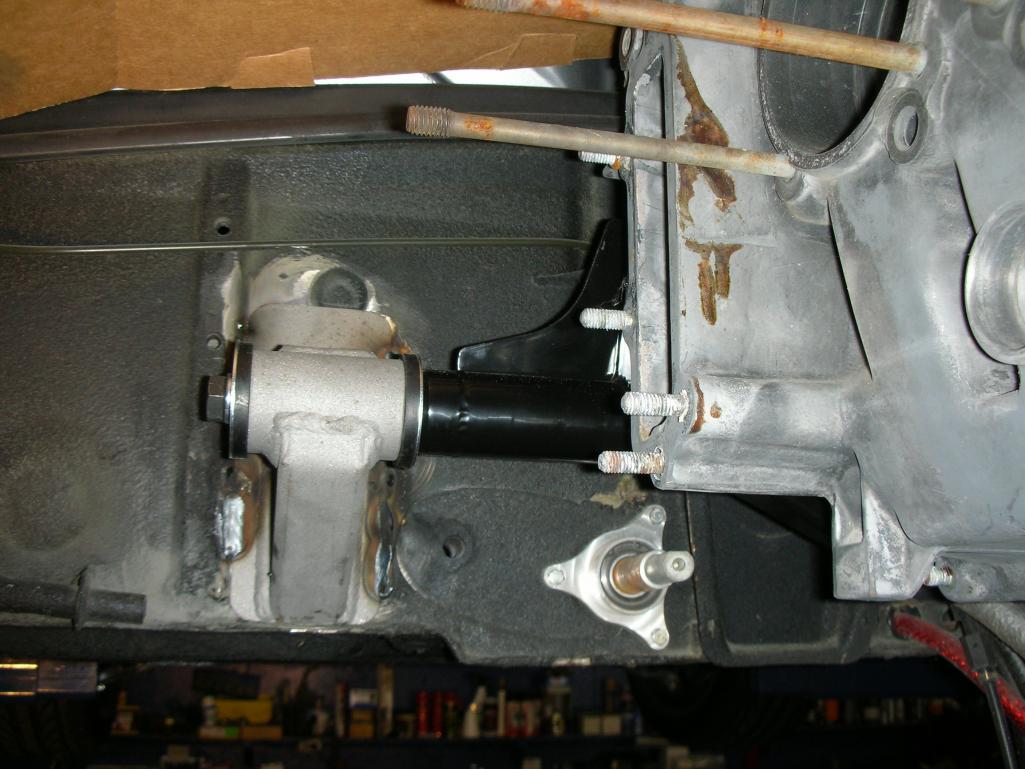
Posted by: PRS914-6 Apr 14 2012, 09:23 AM
I have the 9" 930 wheels on mine and they fit fine. What if you trimmed or rolled the lip on the flare? You could gain 1/2 inch or so.
Posted by: Marv's3.6six Apr 14 2012, 09:33 AM
Wevo semi solid rear mounts.
Attached thumbnail(s)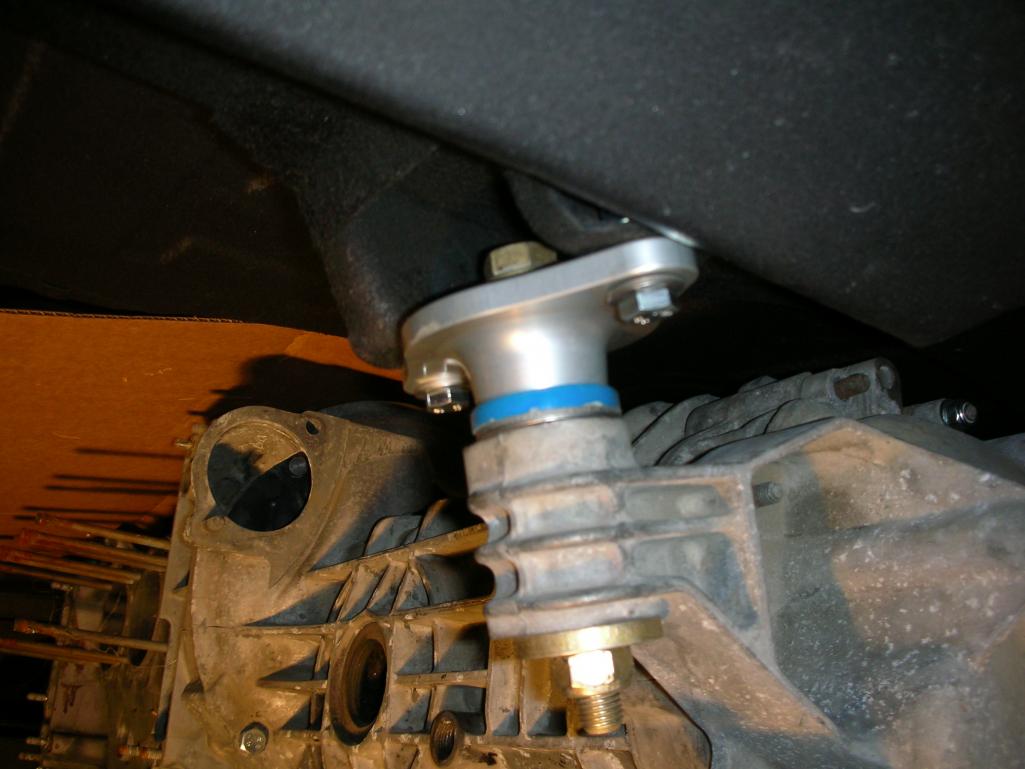
Posted by: Marv's3.6six Apr 14 2012, 09:40 AM
I have the 9" 930 wheels on mine and they fit fine. What if you trimmed or rolled the lip on the flare? You could gain 1/2 inch or so.
Lips are rolled but would require some more work. At this point the 17's will be the way I will go, much more tire choices anyway... and the gear ratios I worked out with Jim Patrick on the trans are matched to my tire choice. And lastly I don't have the extra coin as it is being consumed on the project.
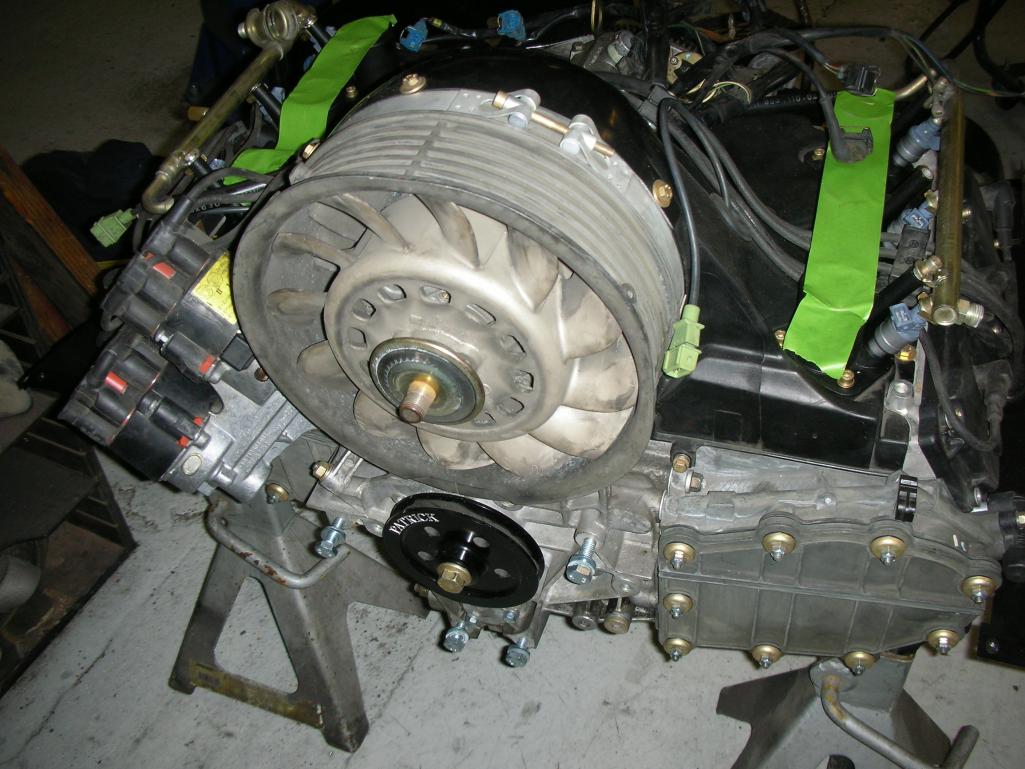
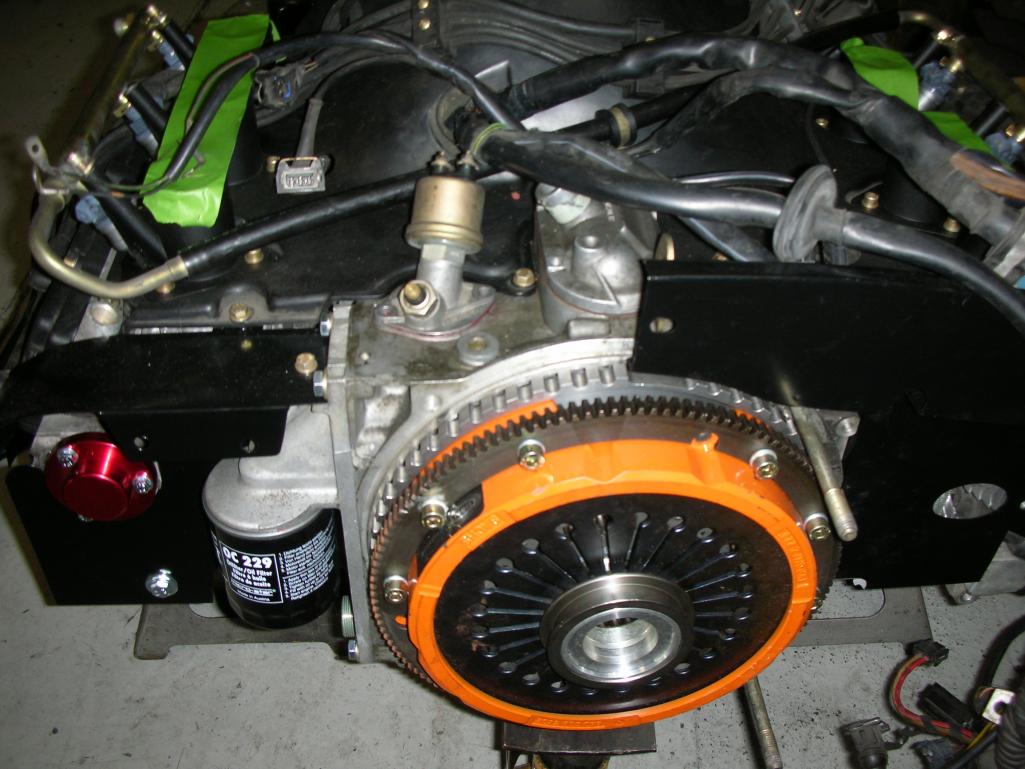
Posted by: Marv's3.6six Apr 14 2012, 10:14 AM
And here she is fresh as a daisy ready to go. She is a ROW 993 3.6 with RS cams, Patrick lightweight flywheel, RS Eng. match flowed fuel injectors, new valve guides, new racing valve job, new fly cut heads...... all ready to run the snot out of. Can't wait. 
Attached thumbnail(s)
Posted by: Marv's3.6six Apr 14 2012, 10:34 AM
Last photo of the day. Here is my front valence/spoiler... On the left side is new 5mm alum black ano button head screws on the right the stainless hardware... the black ano looks sooooo much better.
Attached thumbnail(s)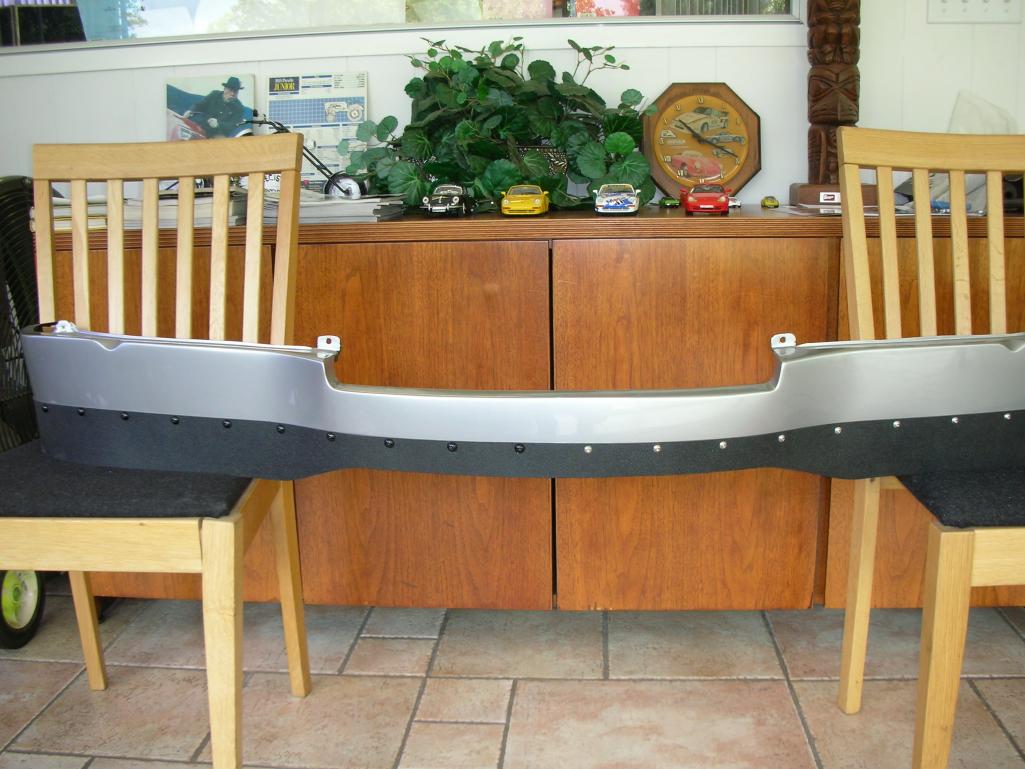
Posted by: 396 Apr 14 2012, 01:06 PM
And here she is fresh as a daisy ready to go. She is a ROW 993 3.6 with RS cams, Patrick lightweight flywheel, RS Eng. match flowed fuel injectors, new valve guides, new racing valve job, new fly cut heads...... all ready to run the snot out of. Can't wait.
Motor looks 'clean'.. congrats on your progress

Posted by: jim dorociak Apr 14 2012, 09:16 PM
Your wheels might look much more time period correct if only the outer rims were clear anodized instead of high polish. Here is a picture of the last set of 3 piece 17" fuchs I restored. jdorociak@gmail.com Jim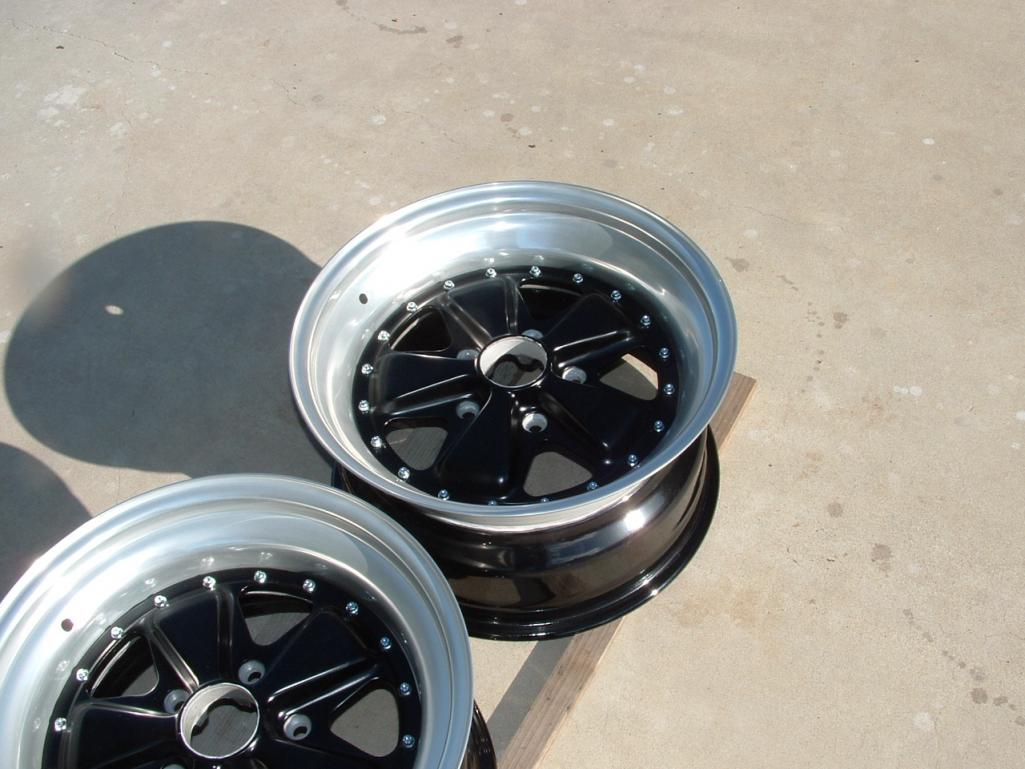
Posted by: jim dorociak Apr 14 2012, 09:18 PM
If I were to restore a set again I would use black bolts so they would disappear. jim
Posted by: PRS914-6 Apr 14 2012, 10:26 PM
Just an FYI.....I started off with a Patrick crank pulley. It was the only single 993 pulley I was aware of at the time of my build and I didn't like it's smaller diameter and resulting slower fan and alternator speed. I later learned that the 993 RS had a single pulley system and the diameter was the right size. As you already know, every 3.6 needs a valve job and I believe it is because of the high heat generated by these engines and the smaller pulley is just an invitation to aggravate valve guide wear for little HP gain.
I have just installed the RS pulley in preparation of this summer.
Anyway, I only mention this in case you weren't aware of the availability of the larger Porsche pulley.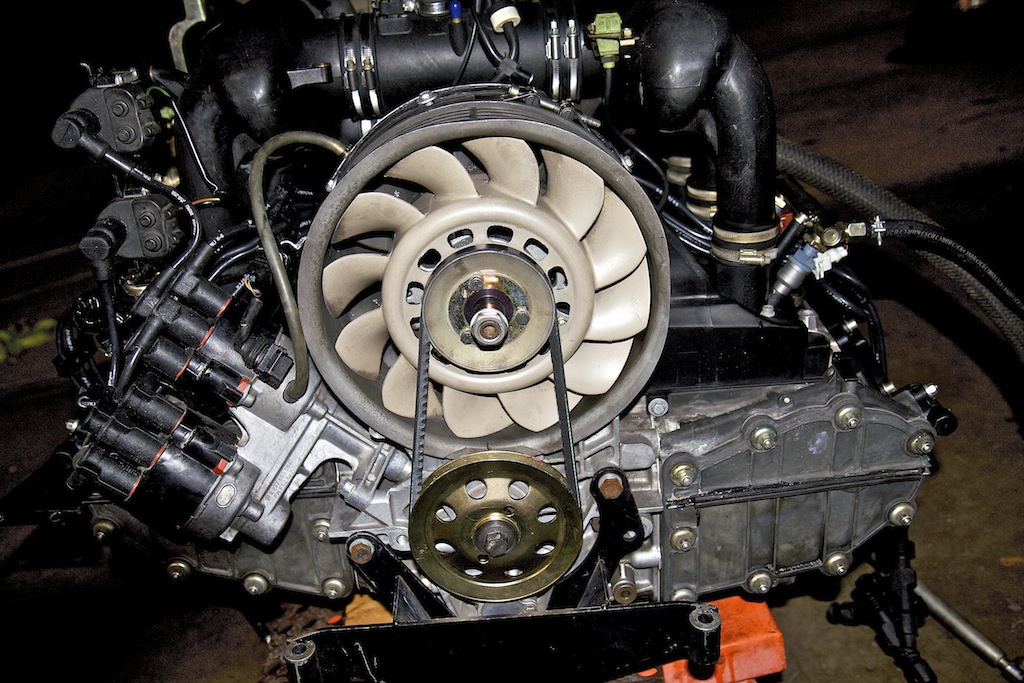
Posted by: 396 Apr 15 2012, 08:09 AM
Just an FYI.....I started off with a Patrick crank pulley. It was the only single 993 pulley I was aware of at the time of my build and I didn't like it's smaller diameter and resulting slower fan and alternator speed. I later learned that the 993 RS had a single pulley system and the diameter was the right size. As you already know, every 3.6 needs a valve job and I believe it is because of the high heat generated by these engines and the smaller pulley is just an invitation to aggravate valve guide wear for little HP gain.
I have just installed the RS pulley in preparation of this summer.
Anyway, I only mention this in case you weren't aware of the availability of the larger Porsche pulley.
Great info... where would one source this?
Thanks
Posted by: PRS914-6 Apr 15 2012, 08:18 AM
Anyway, I only mention this in case you weren't aware of the availability of the larger Porsche pulley.
Great info... where would one source this?
Thanks
Porsche dealer. I bought mine 2 years ago for the same price as a Patrick pulley (now for sale) but the price has gone up some. You won't want to pay retail. Sunset Imports (Excellence readers discount) or similar can get it for you.
Posted by: 396 Apr 15 2012, 08:23 AM
Anyway, I only mention this in case you weren't aware of the availability of the larger Porsche pulley.
Great info... where would one source this?
Thanks
Porsche dealer. I bought mine 2 years ago for the same price as a Patrick pulley (now for sale) but the price has gone up some. You won't want to pay retail. Sunset Imports (Excellence readers discount) or similar can get it for you.
Thanks for the fast reply / info
Posted by: Marv's3.6six Apr 15 2012, 09:02 AM
Anyway, I only mention this in case you weren't aware of the availability of the larger Porsche pulley.
Great info... where would one source this?
Thanks
Porsche dealer. I bought mine 2 years ago for the same price as a Patrick pulley (now for sale) but the price has gone up some. You won't want to pay retail. Sunset Imports (Excellence readers discount) or similar can get it for you.
Thanks for the fast reply / info
Interesting info I will check into it. But here is my uneducated thoughts on the issue. The valve guide issue with 993 is well documented and IMO is primarily because of soft valve guide material. Under driving the fan and alternator is probably not an issue on our cars as the cooling is most likely sufficient because most 914's do not have another 1000lbs of mass to push around, do not have air conditioning plus other parasitic devices and creature comforts all of which the 993 has. Additionally the alternator in a 914 application does not have to power all the electronic gizmos the 993 has, so it is less critical to spin the alternator at a higher speeds to keep the voltage and amperage high.
Posted by: Marv's3.6six May 19 2012, 09:05 AM
Front suspension completed and tight. check.
Brake work done. Hard lines, T's, Braided lines all finished. Brembo GTPLW brake system completed and ready to roll. check.
Attached thumbnail(s)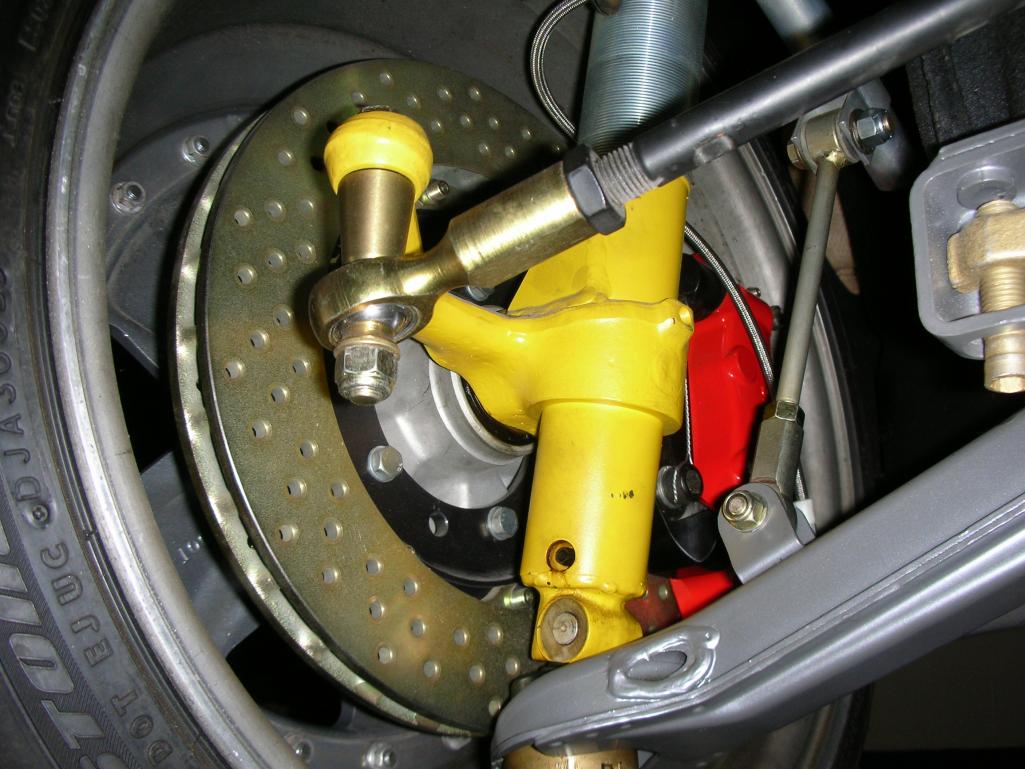
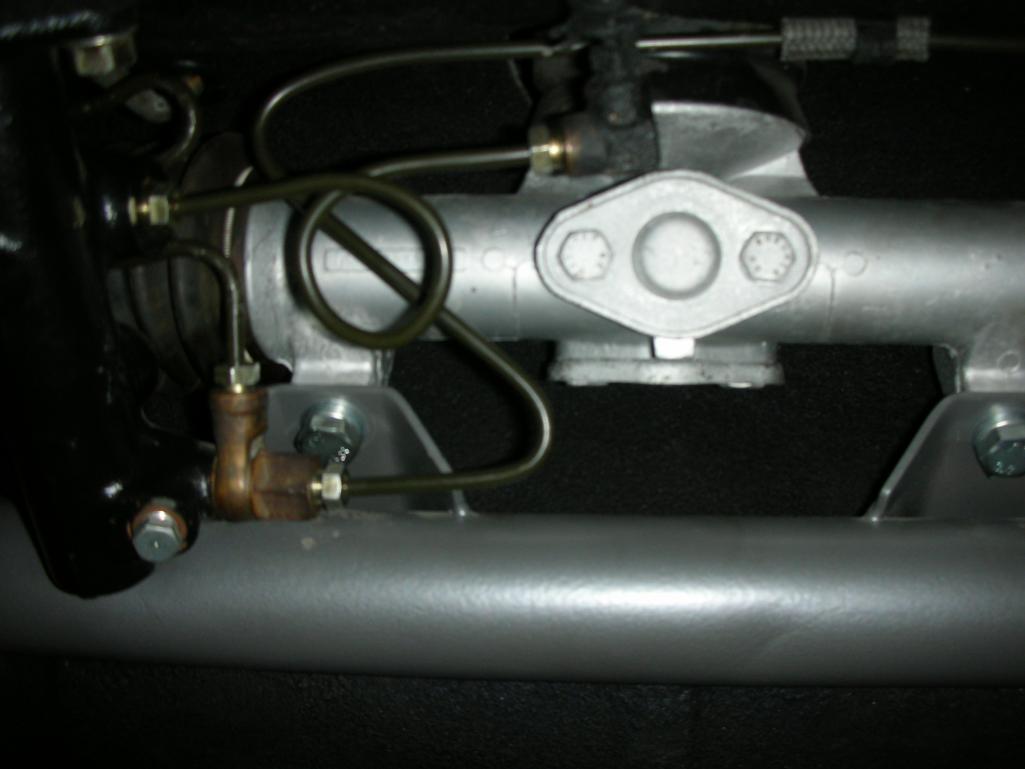
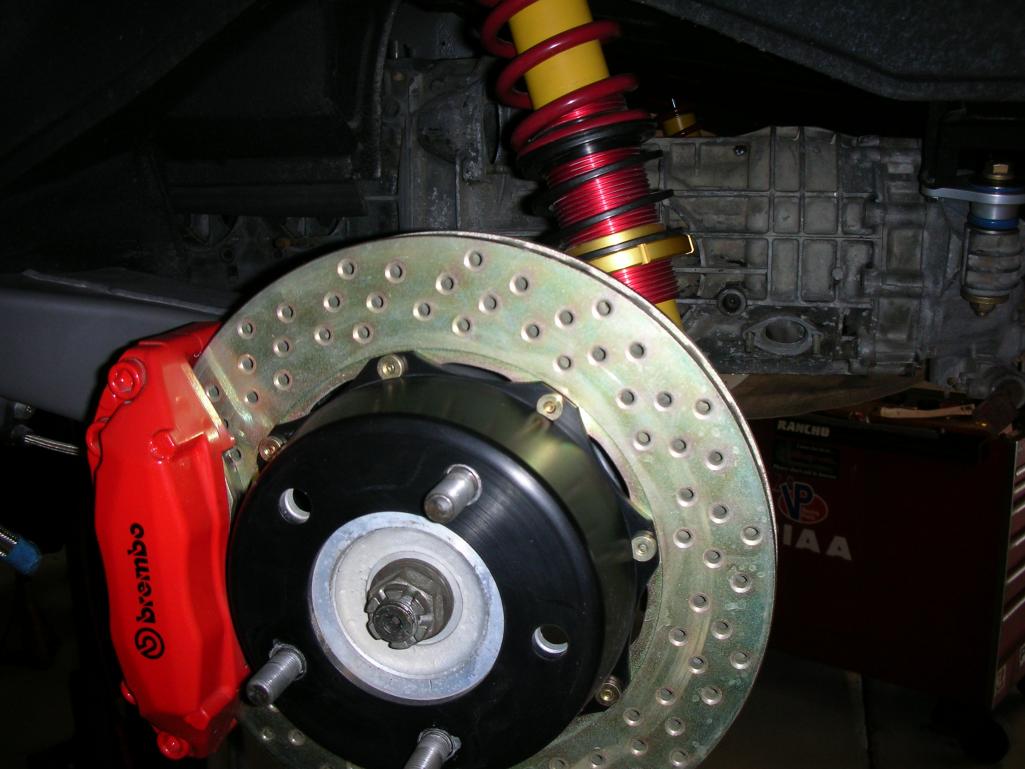
Posted by: Marv's3.6six May 19 2012, 09:18 AM
Engine and trans test fit. Looks good. Fit good. Getting closer. There is much more work to be done. Install throttle cable assembly etc. Fab a false bulkhead for the battery and 993 ECU wiring loom. I also did not like how the painted intakes turned out so I am redoing those.
Attached thumbnail(s)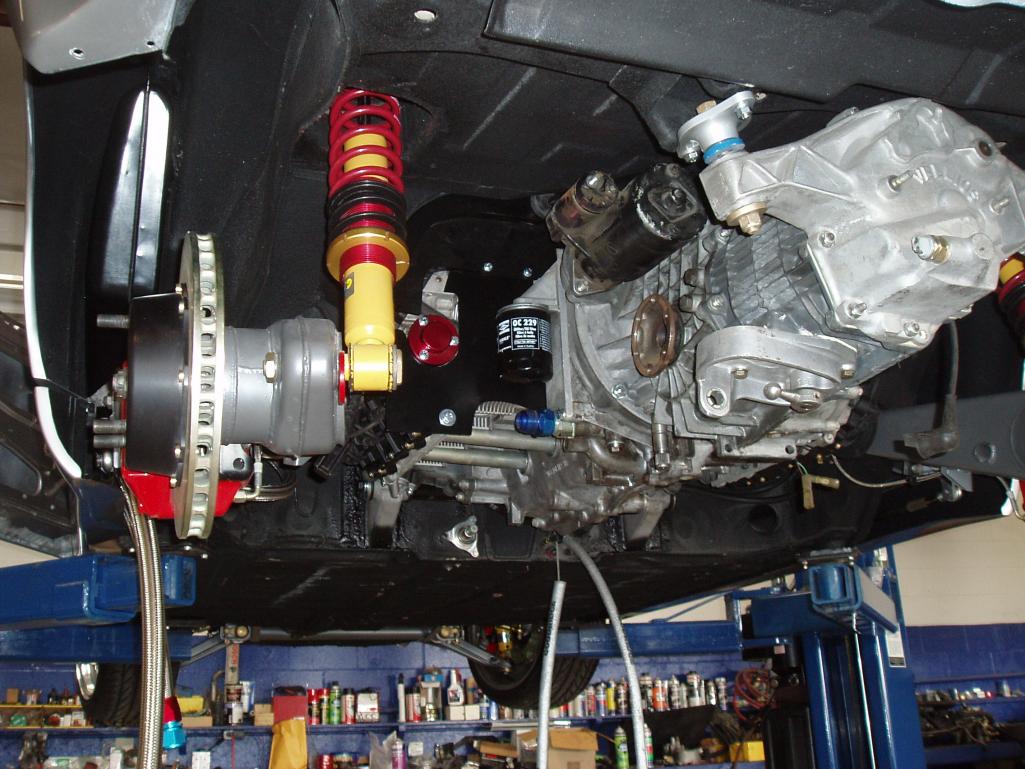

Posted by: Marv's3.6six May 19 2012, 09:24 AM
Customized Porsche gauges installed. North Hollywood Speedo makes incredible stuff. check.
Attached thumbnail(s)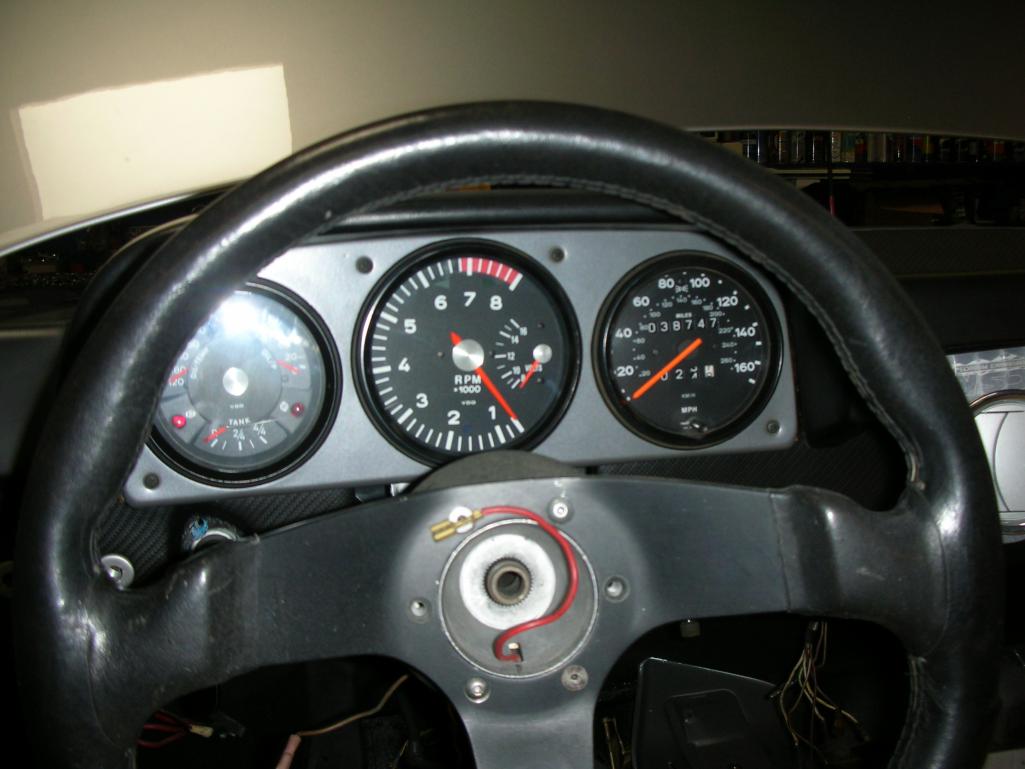
Posted by: Elliot Cannon May 19 2012, 04:32 PM
That's a really great car Marv. Whos is it?
Posted by: Marv's3.6six May 20 2012, 11:54 AM
That's a really great car Marv. Whos is it?
Posted by: Marv's3.6six May 20 2012, 12:06 PM
New windshield installed. check.
This is the second windhield I have bought for this project. The first one was purchased in 2005 by my (not any more) friend Tom, we wrapped it up in blankets and stored it for future installation. Well Don from PMP went to install it and he discovered that it was a mercedes windshield! Tom f***ed me again! Anyway new windshield yay.
Attached thumbnail(s)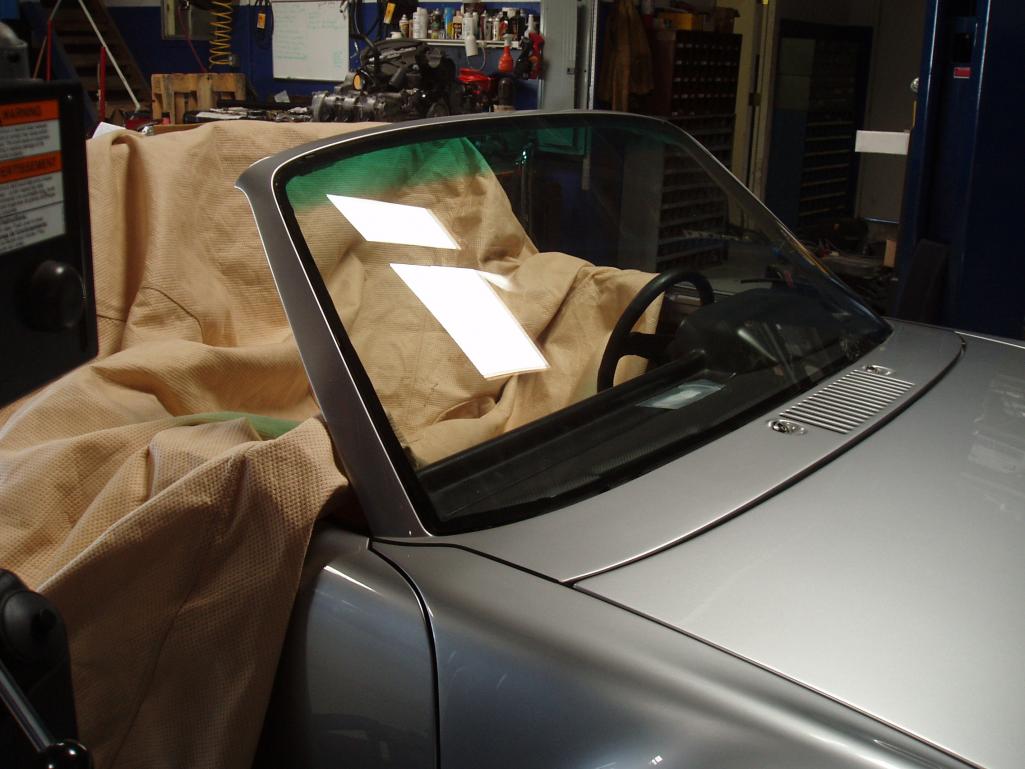
Posted by: euro911 May 20 2012, 12:20 PM
Looking good. Interesting oil tank ... who makes those?
Posted by: Krieger May 20 2012, 04:12 PM
WOW
Posted by: Marv's3.6six May 20 2012, 07:48 PM
Looking good. Interesting oil tank ... who makes those?
It's an original 6 all factory parts.
Posted by: Qarl May 20 2012, 07:58 PM
Looking good!
Posted by: Cairo94507 May 20 2012, 08:13 PM
I am loving this car....except for the wheels thus far (sorry). That aside, this is a terrific build and car.
Posted by: euro911 May 20 2012, 08:49 PM
Maybe it's the angle, lighting or shadowing in the shot - it looked like an external tank sitting in the engine bay ... Just my old eyes playing tricks on me
Posted by: Marv's3.6six May 20 2012, 11:02 PM
I am loving this car....except for the wheels thus far (sorry). That aside, this is a terrific build and car.
The wheels look much better in person. But yeah I kind of agree and have been thinking about refinishing the "polished" look to an "RSR" finish. My brother thinks they look great as is but I am considering change. I also have a beautiful set of 16" 930 fuchs, but have been recently told they won't fit over the brembo's.
The new 17" fuchs look wheels (Rota Fox) are beautiful but I also hear they are quite heavy. Decisions.
Posted by: Cairo94507 May 21 2012, 06:55 AM
RSR finish......love it.
Posted by: Mr.242 May 21 2012, 07:58 AM
Maybe it's the angle, lighting or shadowing in the shot - it looked like an external tank sitting in the engine bay
... Just my old eyes playing tricks on me I thought the same too. It because the relay board isn't mounted and in the way
GREAT CAR!
Posted by: tavoman27 May 21 2012, 10:38 AM
I am loving this car....except for the wheels thus far (sorry). That aside, this is a terrific build and car.
The wheels look much better in person. But yeah I kind of agree and have been thinking about refinishing the "polished" look to an "RSR" finish. My brother thinks they look great as is but I am considering change. I also have a beautiful set of 16" 930 fuchs, but have been recently told they won't fit over the brembo's.
The new 17" fuchs look wheels (Rota Fox) are beautiful but I also hear they are quite heavy. Decisions. Hi Marv... my 914 just got back from upholstery and its all new with the rs door panels you wanted to see... Car is at PMP and I will be working on it today.
Gus
Posted by: Marv's3.6six Aug 10 2012, 07:47 PM
8/10 The car as it looks today. Is all covered up for fabrication of custom roll bar.
Roll bar is a quasi replica of the factory 914-6 GT roll bar. Note that the bar is recessed back into the body and is well out of the way from a collision with my nugget. Roll bar fab by Don from PMP. very nice work, very.
Attached thumbnail(s)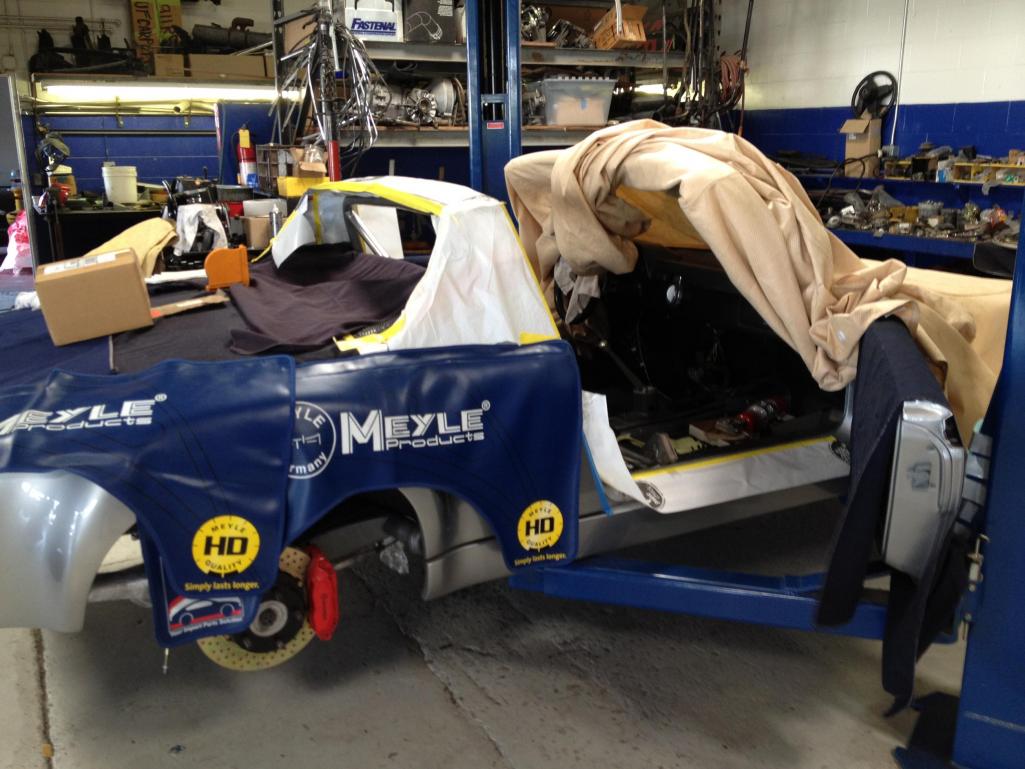
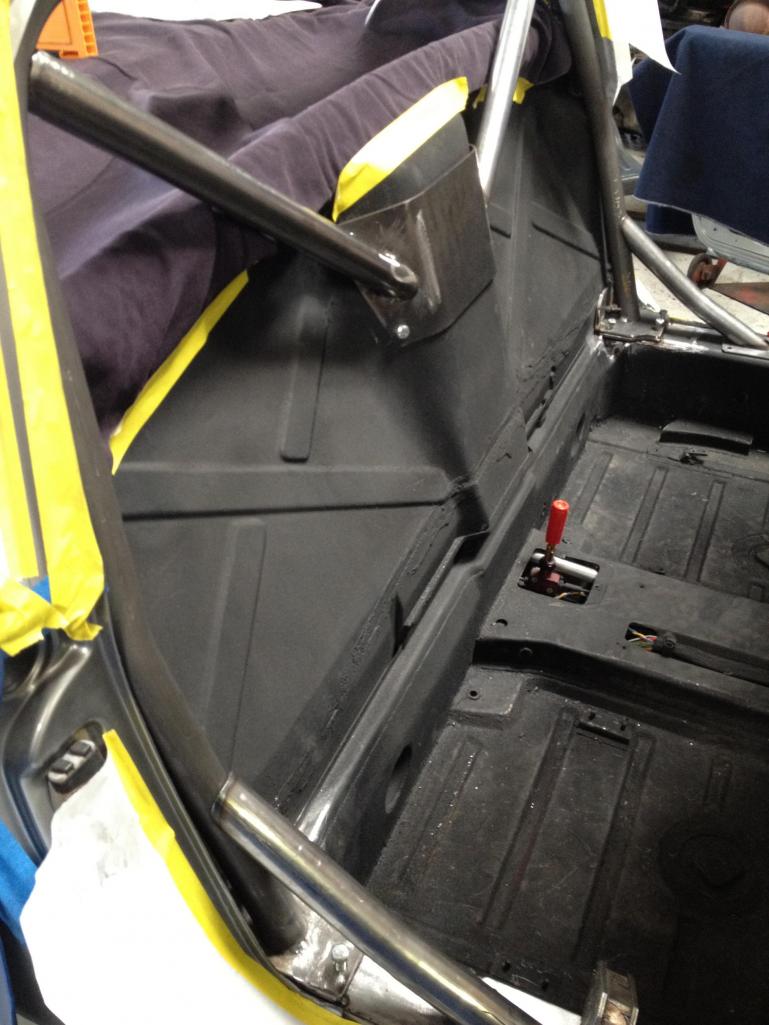
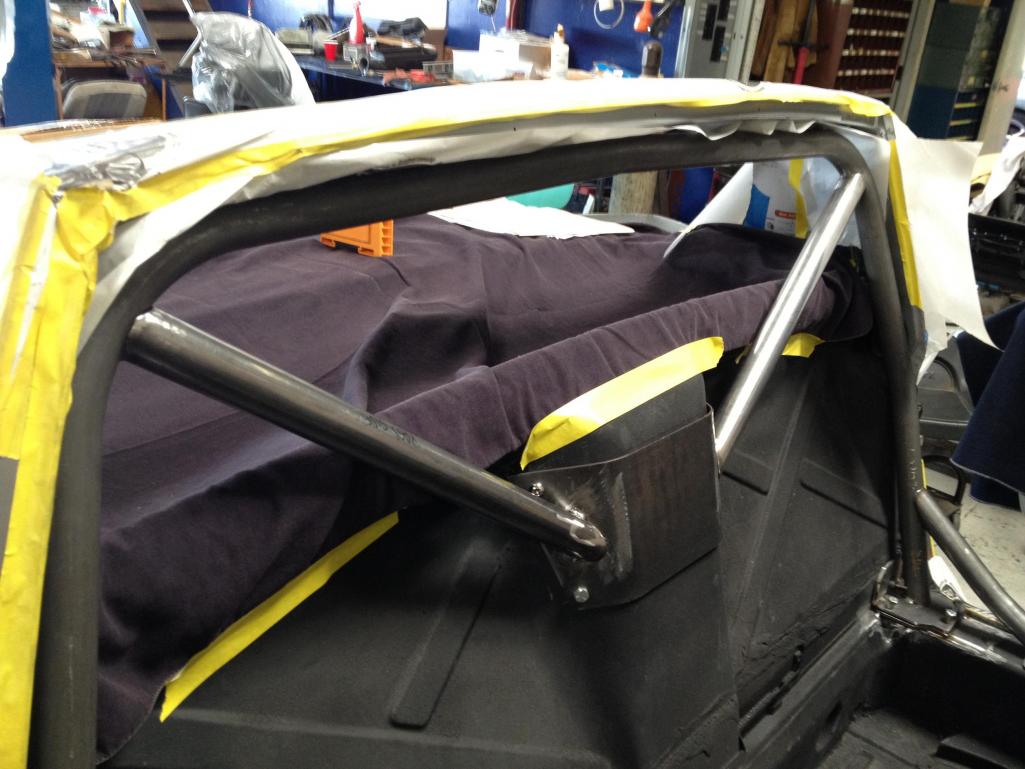
Posted by: Marv's3.6six Aug 11 2012, 07:33 AM
Up close shot of roll bar a tight fit.
Attached thumbnail(s)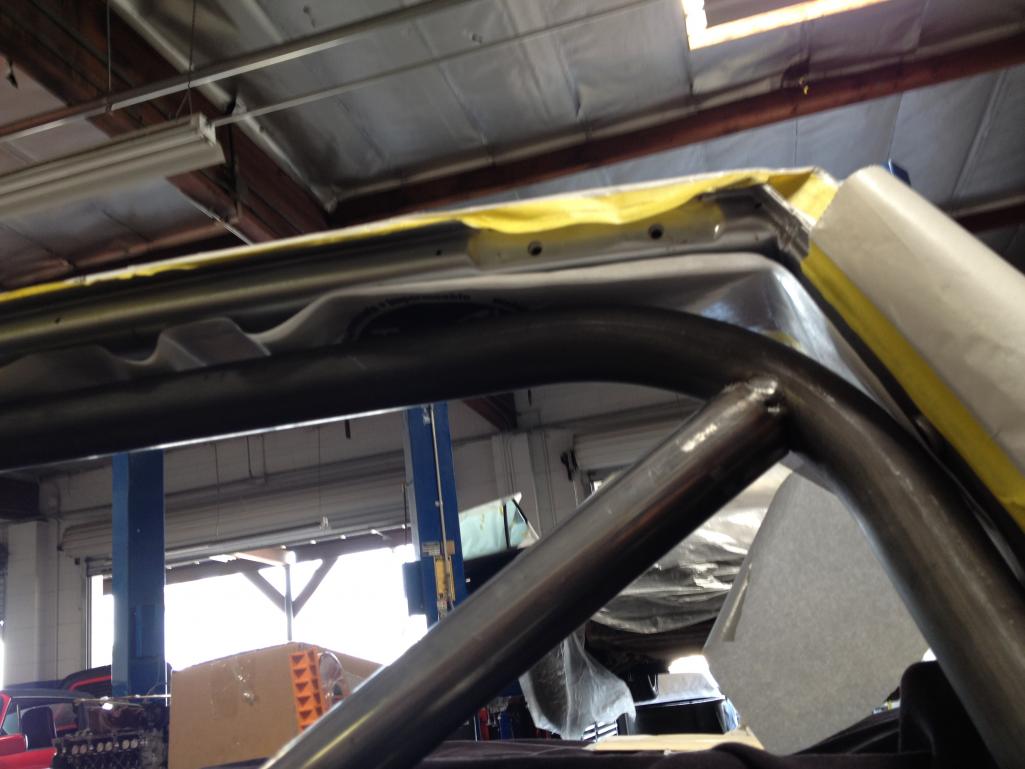
Posted by: Marv's3.6six Aug 11 2012, 07:37 AM
Battery now mounted next to the engine near factory location.
Attached thumbnail(s)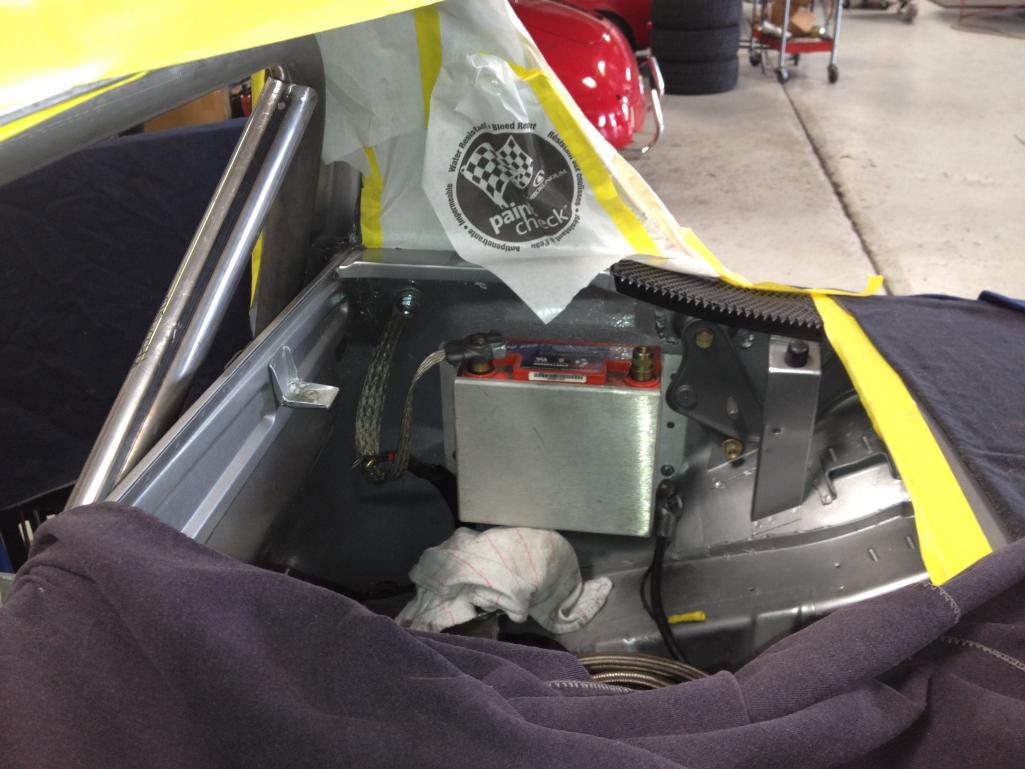
Posted by: Marv's3.6six Aug 11 2012, 07:40 AM
New braided stainless fuel lines.
Attached thumbnail(s)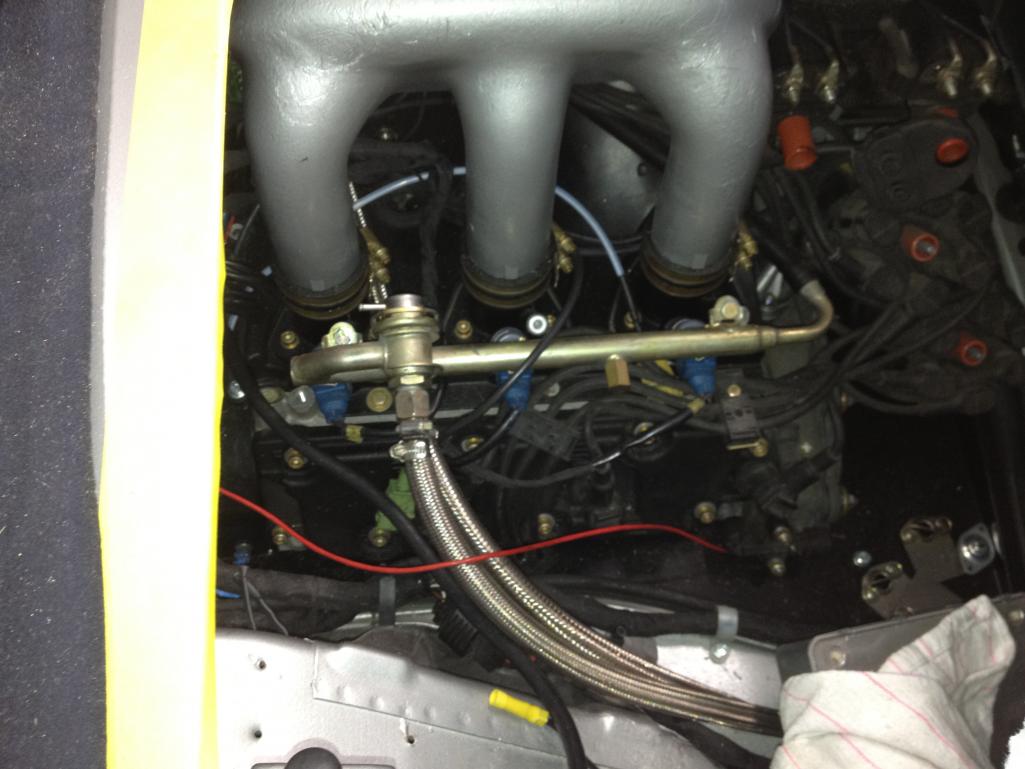
Posted by: kg6dxn Aug 11 2012, 08:41 AM
Make sure you can get the back glass in. Looks like a PITA with butyl rubber...
Posted by: mepstein Aug 11 2012, 11:17 AM
Make sure you can get the back glass in. Looks like a PITA with butyl rubber...
Looks like a bolt in bar.
Posted by: nine9three Jan 28 2013, 03:29 PM
![]()
Posted by: Marv's3.6six Feb 9 2013, 12:35 AM
OK its time to post up recent work on my GT... I know its been a while so here are some pics.
1) New custom made (by Don) long wheel studs
2) Front suspension near completion
3) New high torque starter and with rebuilt CV's and freshly painted axles.
4) Beauty shot of headers & valve covers
5) pic of installed muffler & 2 beautiful 356's (The black one has a six stuffed in it)
Attached image(s)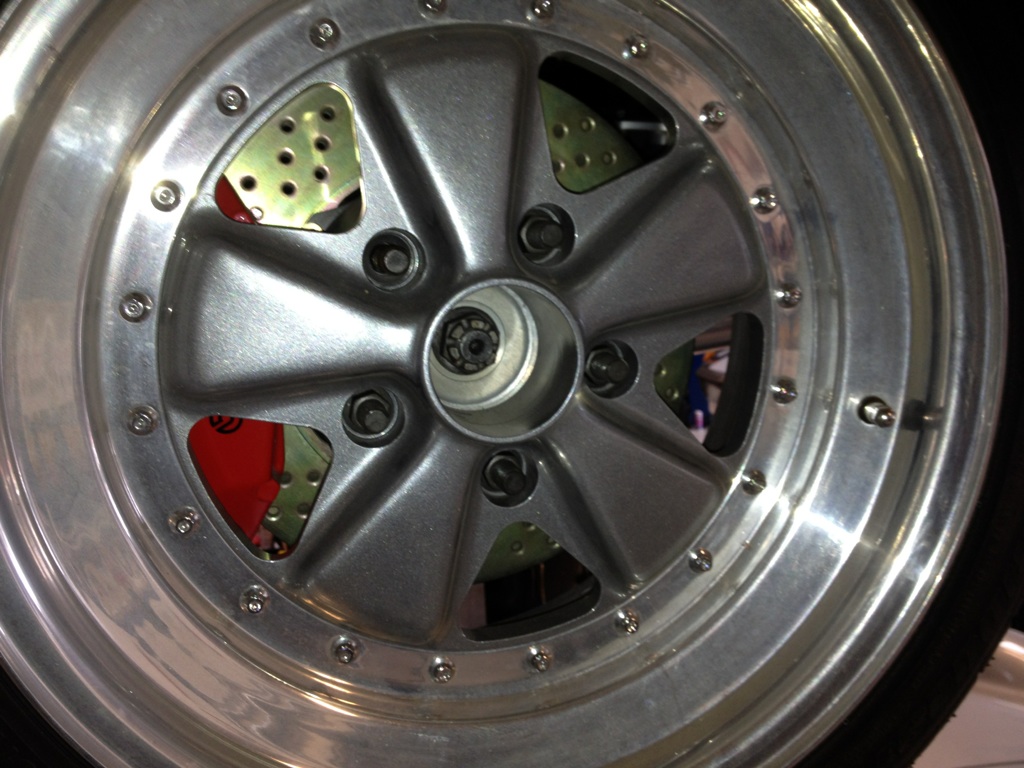
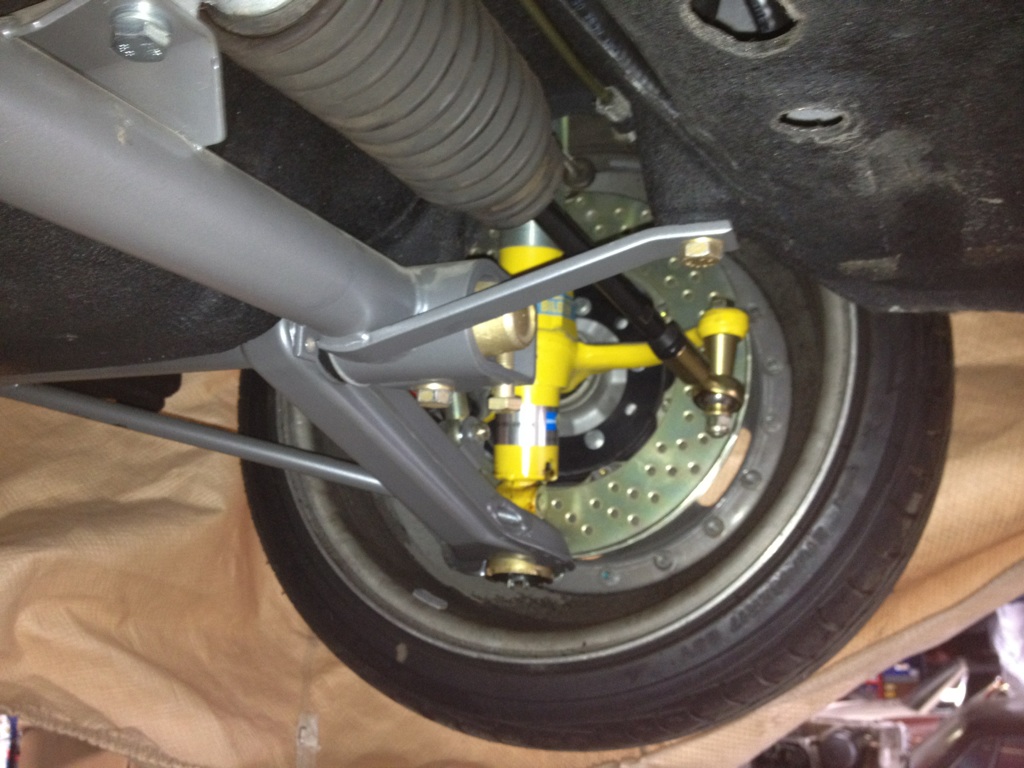
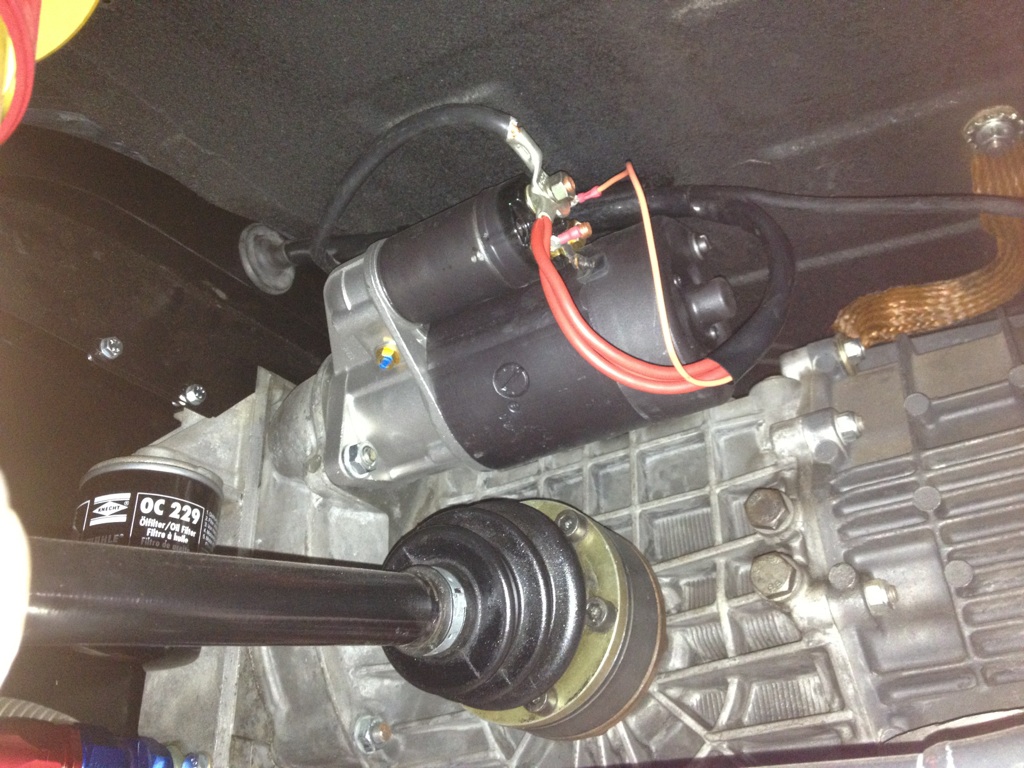
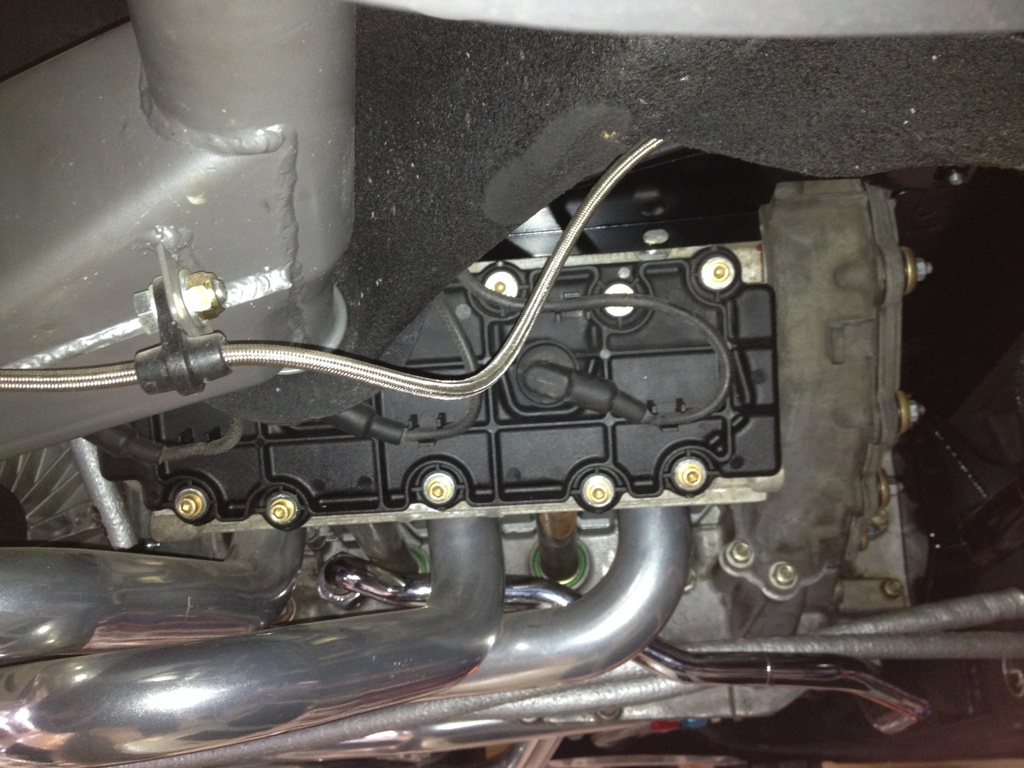
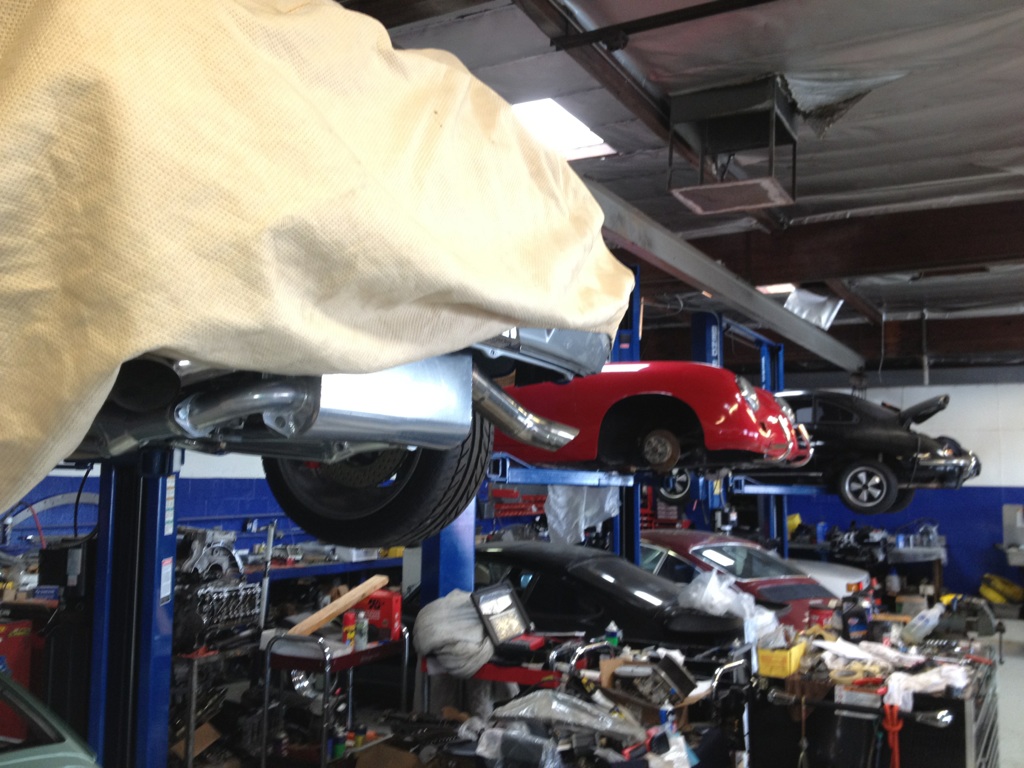
Posted by: Marv's3.6six Feb 9 2013, 12:50 AM
Pics
1) Front suspension with sway bar completed. Drop spindle struts with decambered ball joints turbo tie rods bump steer kit. Sexy looking.
2) Another view of the muffler customized bracketry work and ceramic coated
3) Lower baffle for oil cooler
4) Pedal cluster installed and fine tuned.
5) Baffle shot
Attached image(s)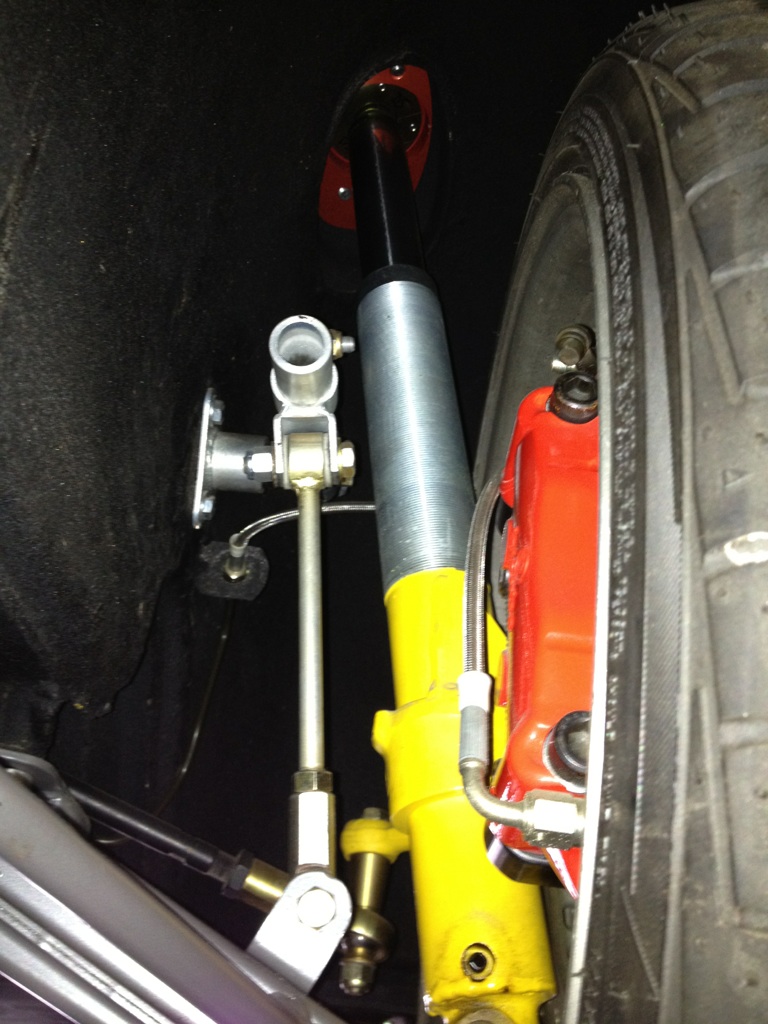
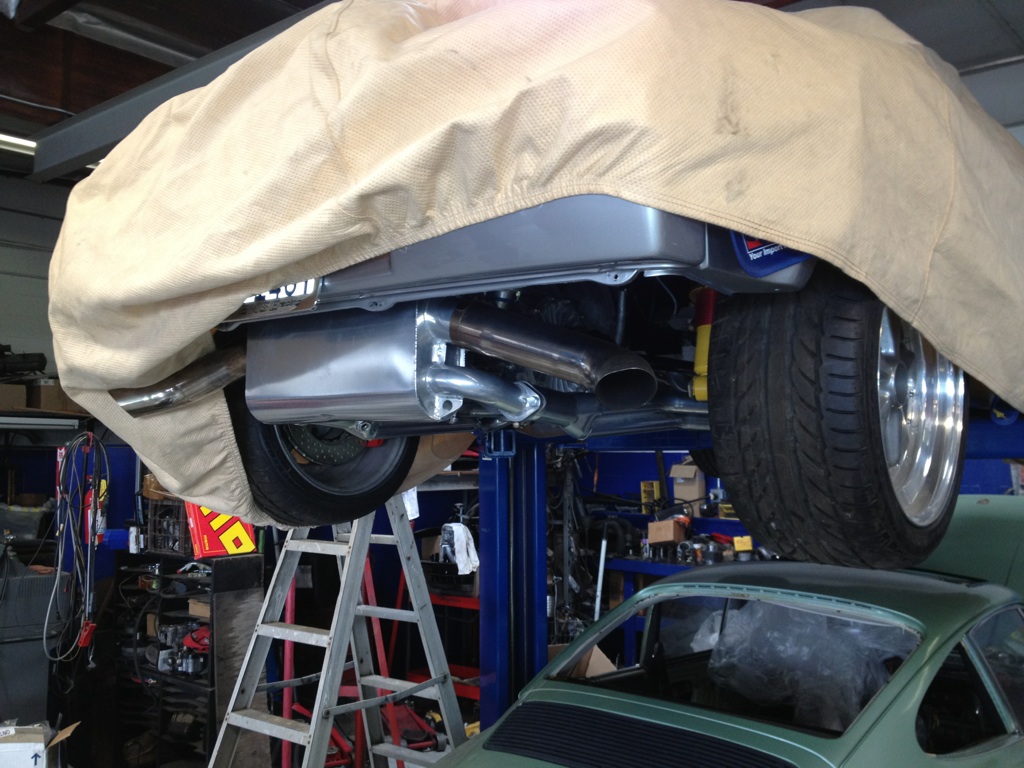
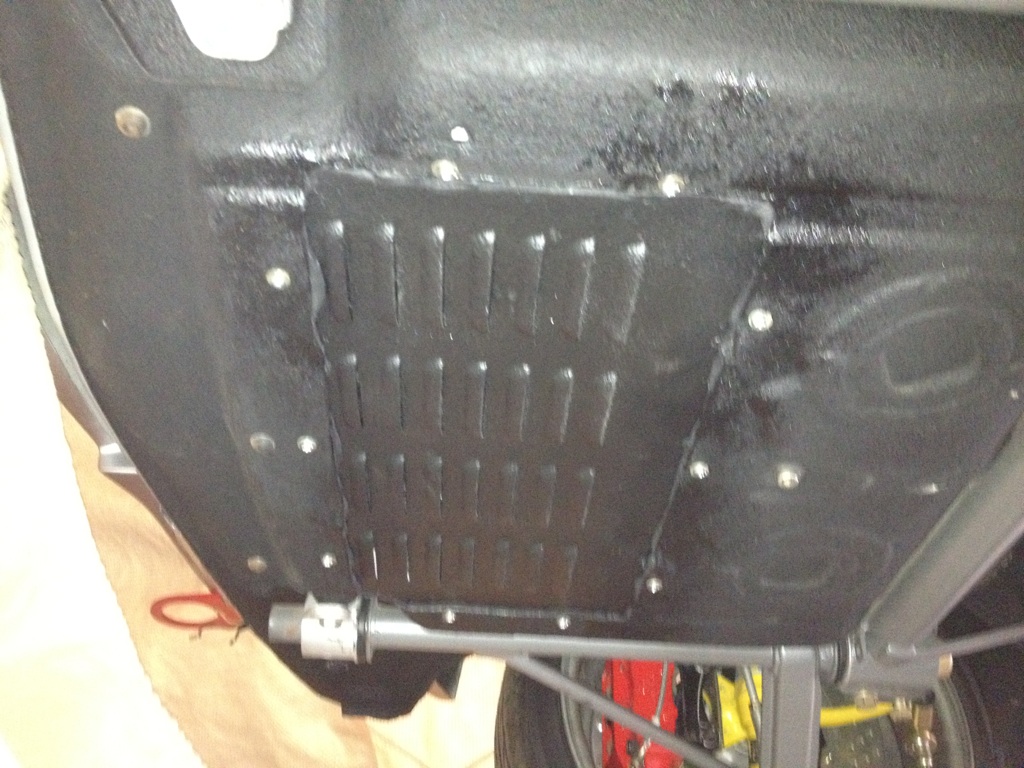
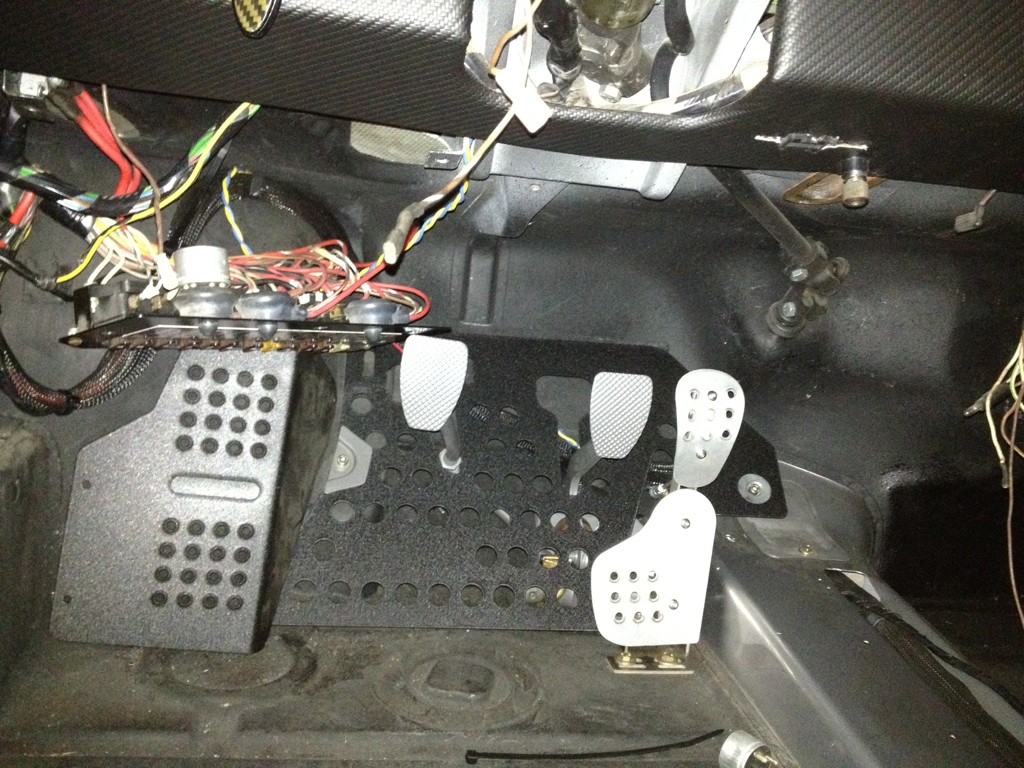
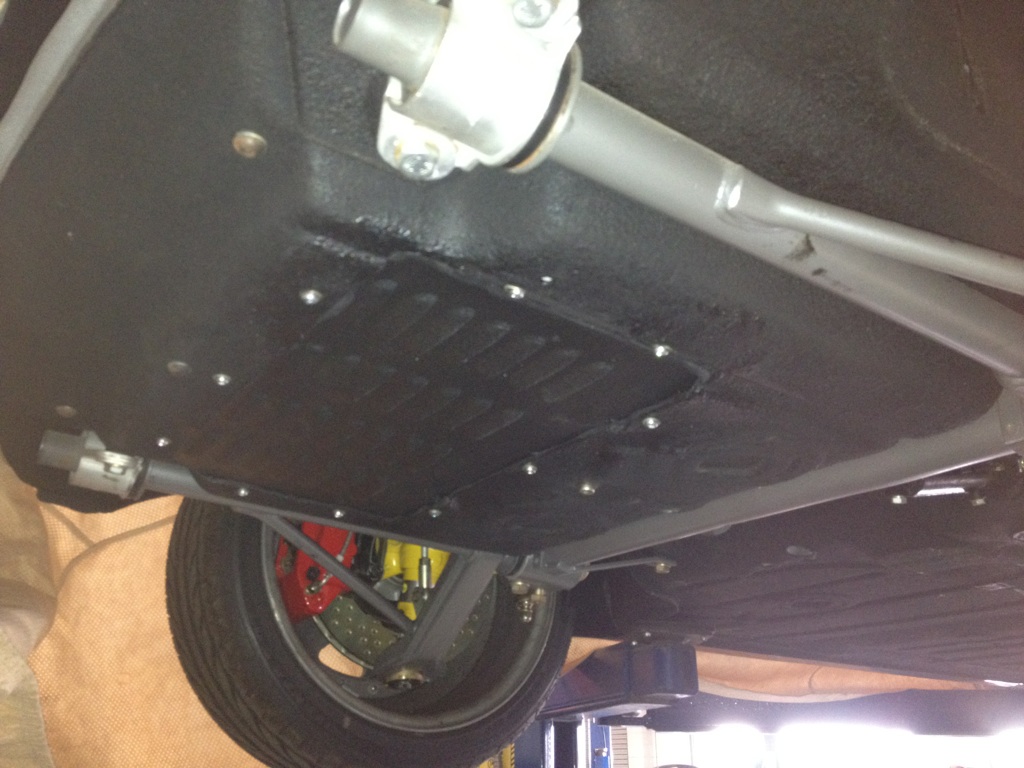
Posted by: Marv's3.6six Feb 9 2013, 01:08 AM
1) Recaro drivers seat installed. Lower rear seat mounting brackets modified rewelded to tub and seat lowered.
2) 930 steering rack completed
3) Porsche factory fuel filter installed
4) Patrick motorsports super beefy front engine mount completed
5) Clutch cable system installed and tuned
6) Oil lines completed and pressure tested
Attached image(s)
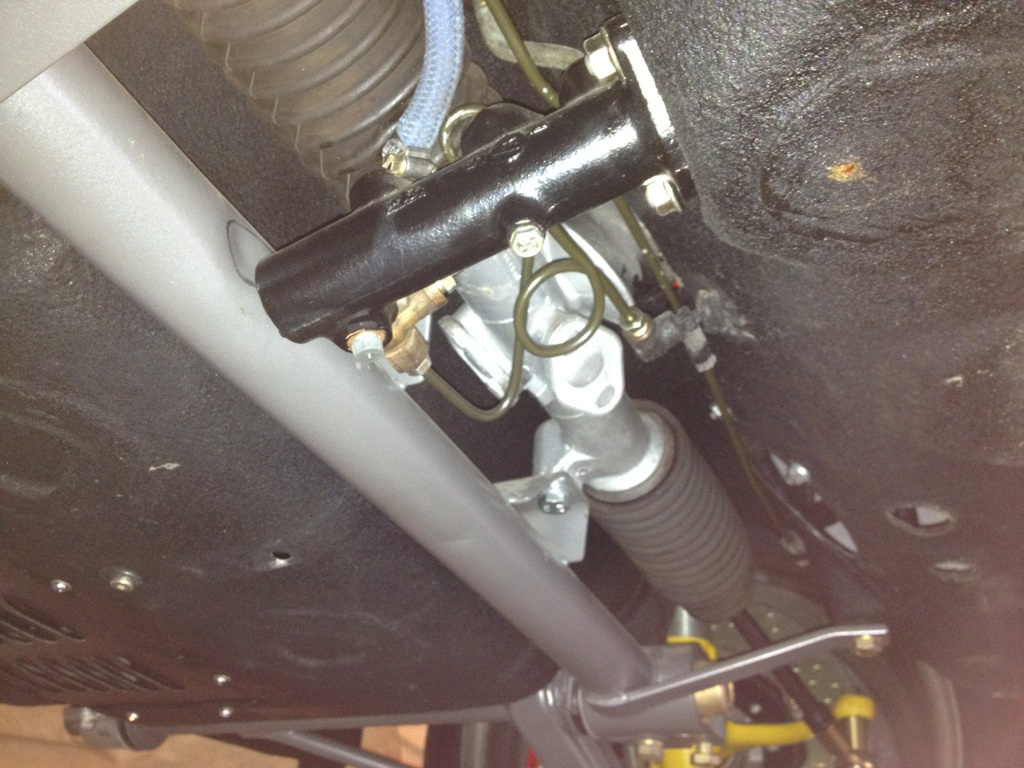
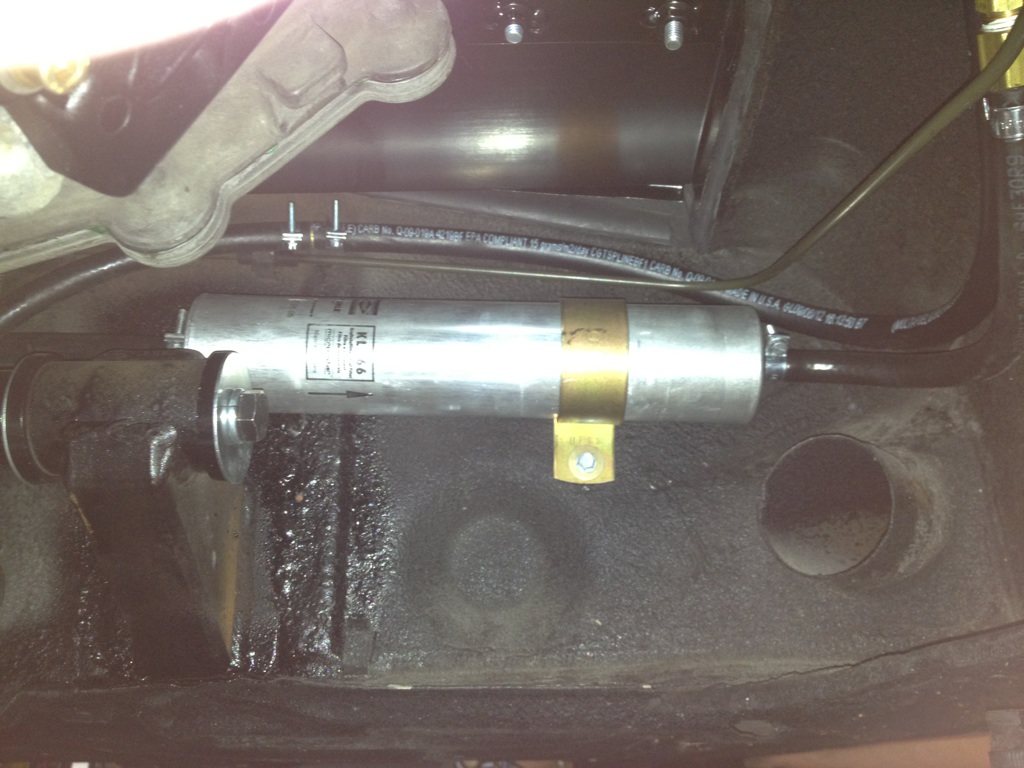
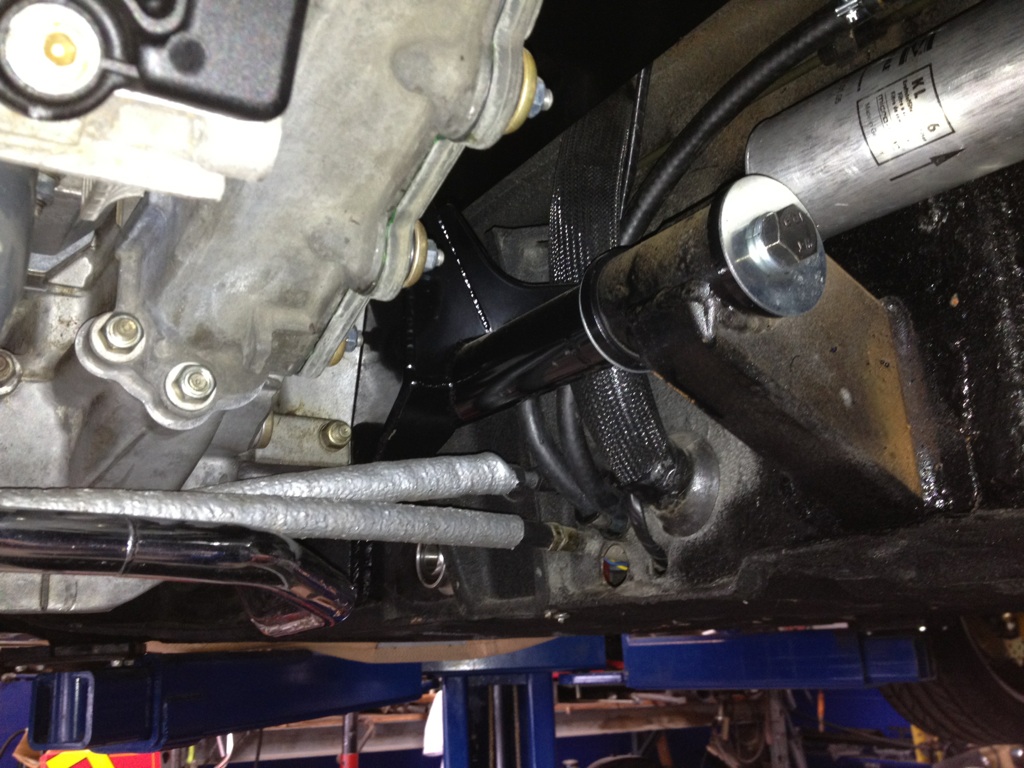
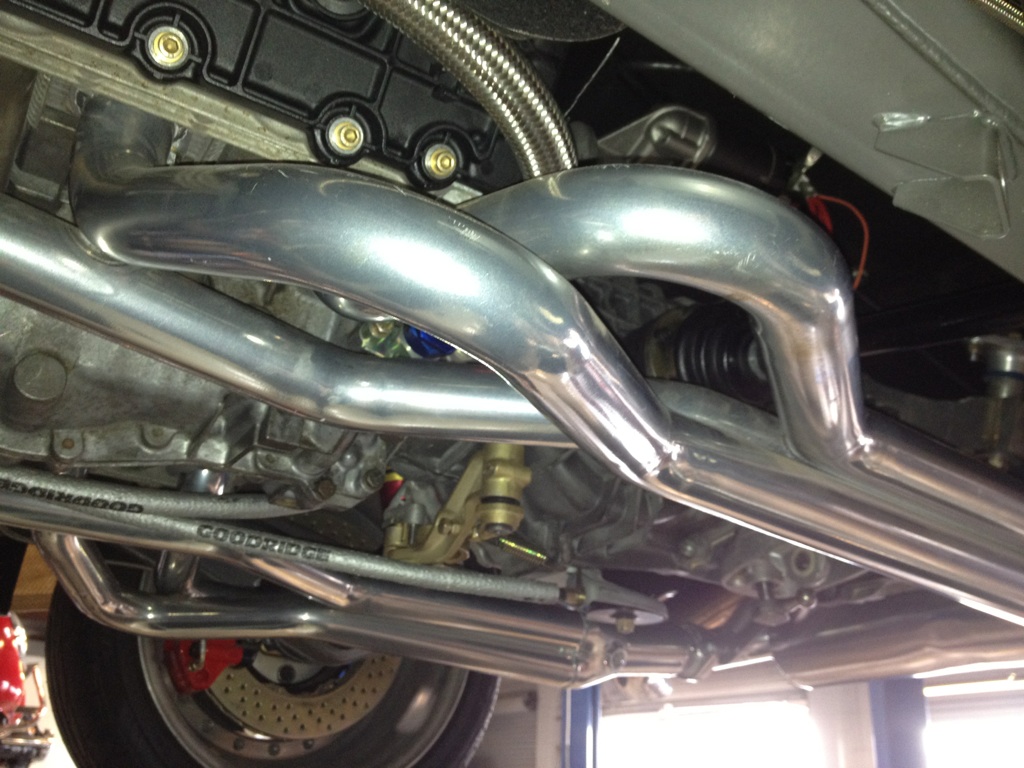

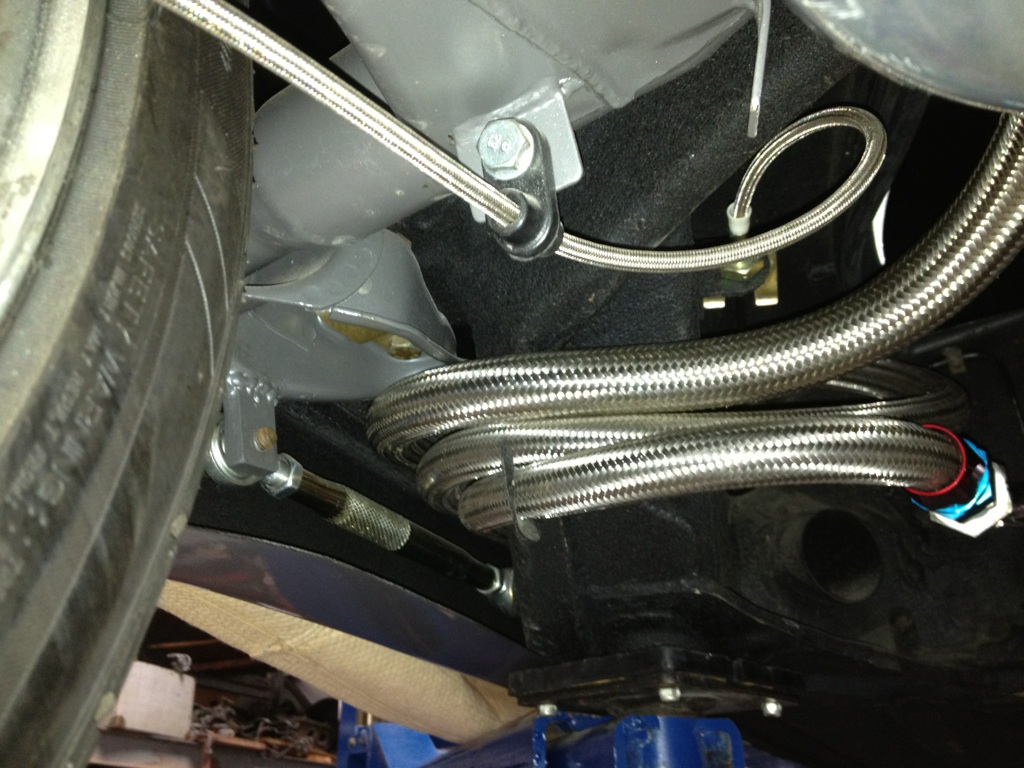
Posted by: Cairo94507 Feb 9 2013, 07:40 AM
Now that is the way I like to start my day. Your car is looking beautiful. Very nice work
Posted by: Elliot Cannon Feb 9 2013, 06:57 PM
I think we all know that isn't Marvs car.  Nice try Marv.
Posted by: euro911 Feb 9 2013, 08:13 PM
Nice looking stuff
Posted by: Marv's3.6six Feb 9 2013, 08:53 PM
I think we all know that isn't Marvs car.
Nice try Marv. Photoshop virtual car.
L E OT
Posted by: Krieger Feb 9 2013, 08:59 PM
Very nice! Are you going to put it on the track?
Posted by: KELTY360 Feb 9 2013, 11:37 PM
Are you going to the moon with that thing?
Posted by: rick 918-S Feb 10 2013, 12:42 AM
Posted by: Marv's3.6six Feb 10 2013, 06:28 PM
Very nice! Are you going to put it on the track?
Are you going to the moon with that thing?Track no... maybe DE. But autocross yes that was the original idea when I started this project in 2005 yikes it's been a long time.. Maybe I will go to the moon.
The car has been since the beginning an autocross car.. most all the work has been to get the car balanced and setup to handle great even the trans is setup with close ratio 2,3,4 gears. lightweight and balance should be really fun.
Posted by: mepstein Feb 10 2013, 08:16 PM
Marv - Love the build. Glad to see it's getting finished. What did you do to fix the door gap?
Posted by: jdlmodelt Feb 10 2013, 09:06 PM
Marv - Love the build. Glad to see it's getting finished. What did you do to fix the door gap?
I was wondering the same thing...what did you do to fix the door gap?
Posted by: siverson Feb 18 2013, 09:21 AM
Sweet. Looks like you are getting close.
-Steve
Posted by: Luke M Feb 27 2013, 12:04 PM
Someday my 6 will look this nice.
More updates please....
Posted by: Marv's3.6six Feb 27 2013, 05:05 PM
Someday my 6 will look this nice.
More updates please....
Thank You.
Update: waiting for ECU to be returned it is out for modification... found out the ECU is a 96 model and is unable to accept a custom chip without some type of mod.
Posted by: R8CERX Jun 6 2013, 12:14 AM
Marv-any more updates?
I just found your thread and what a history--
I got a 914-6 similar to yours...well... minus the full steroids/hormones that your car is on.. looks awesome...
Live here near your work and home... would love to connect!
Posted by: Marv's3.6six Jun 6 2013, 08:16 AM
Would love to meet up with you guys....but I want a running car first.
There has been work, but has been slow going. Have the ECU sorted and installed. Have turned over the engine with the tiny battery and I am impressed with the juice that little guy has, really cranks. Oil pressure comes up good while cranking (with zero leaks) a really good sign. Have not yet started the engine.
Purchased some additional Patrick 3.6 modified parts to make the intake system fit and look like a porsche factory installation.
Have invested in some serious seat belts Schroth Racing PROFI II 4 point with ASM technology. These are one of the only street legal DOT approved systems available.
The project has had a delay due to Don having to move his shop a few blocks, he lost his lease. I think the building was sold. He had to be out by June 1 so worked stopped some time ago and should resume in a few more weeks.
I am hoping to be complete by late summer.
Posted by: rick 918-S Jun 6 2013, 10:36 AM
Very nice Marv!
Posted by: Maltese Falcon Jun 7 2013, 12:44 AM
Nice metallic / Ceramic exhaust headers.
Did I say Nice color match to the silver car as well?
Excellent build Marv !
Marty
Posted by: Marv's3.6six Jun 10 2013, 06:55 PM
Nice metallic / Ceramic exhaust headers.
Did I say Nice color match to the silver car as well?
Excellent build Marv !
Marty
Thanks Marty. I agree YOUR headers are beautiful in ceramic.
BTW did you ever develop that spot caliper we talked about (in August 2006)?
Posted by: Maltese Falcon Jun 10 2013, 10:00 PM
Thanks Marty. I agree YOUR headers are beautiful in ceramic.
BTW did you ever develop that spot caliper we talked about (in August 2006)?
Marv now I need to build three of these kits for the big reds.
Yours , SIXX. and a set for our 914-8 gtt. (see separate thread ).
Just need some prototype time !
Marty
Posted by: Marv's3.6six Jun 10 2013, 11:44 PM
Thanks Marty. I agree YOUR headers are beautiful in ceramic.
BTW did you ever develop that spot caliper we talked about (in August 2006)?
Marv now I need to build three of these kits for the big reds.
Yours , SIXX. and a set for our 914-8 gtt. (see separate thread ).
Just need some prototype time !
Marty
Just need protoype time? Not a problem... Let's see I took my car apart in 2005, car is not finished yet..... I can wait a little longer.
Posted by: Marv's3.6six Jun 11 2013, 12:08 AM
Come on guys 10 more views and we are @ 50000.
Posted by: Joe Sharp Jun 11 2013, 05:47 AM
12 more and it's 5100.
Posted by: bulitt Jul 31 2013, 05:55 PM
Extraordinary Car, and you win the award for patience and perseverance
Posted by: Elliot Cannon Jul 31 2013, 09:31 PM
Marvs' car? Three words. Cee, gee, eye.
Posted by: Socalandy Jul 31 2013, 10:36 PM
waiting for more pictures
Posted by: Marv's3.6six Jul 31 2013, 11:24 PM
waiting
for more pictures Couple of pics sent to me this week by Nik @ Precision Motion.
1) My GT finally back on a lift at the new PM shop.
2) ECU mounted in its proper (final) location and wiring loom being finished up.
Attached thumbnail(s)
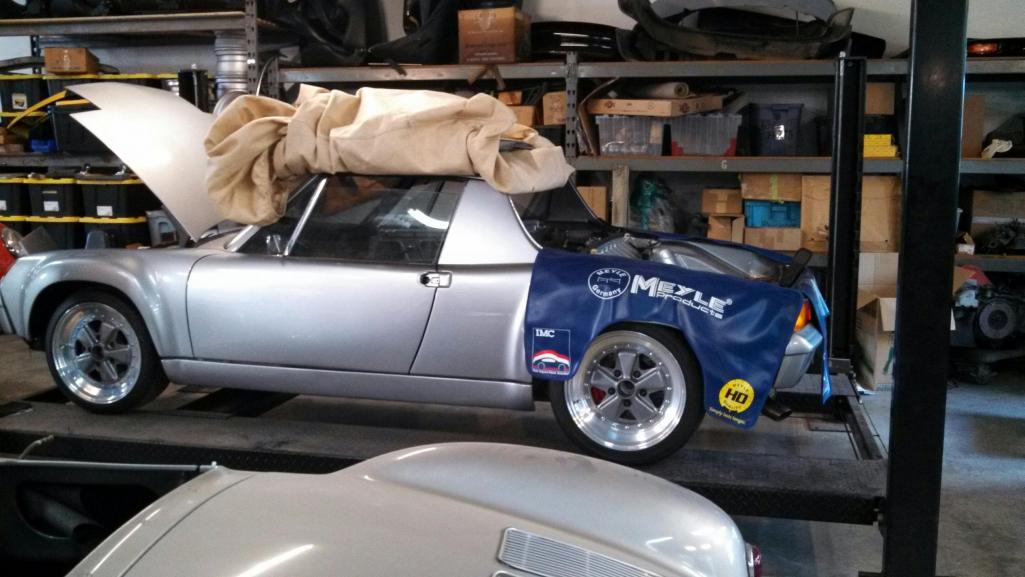
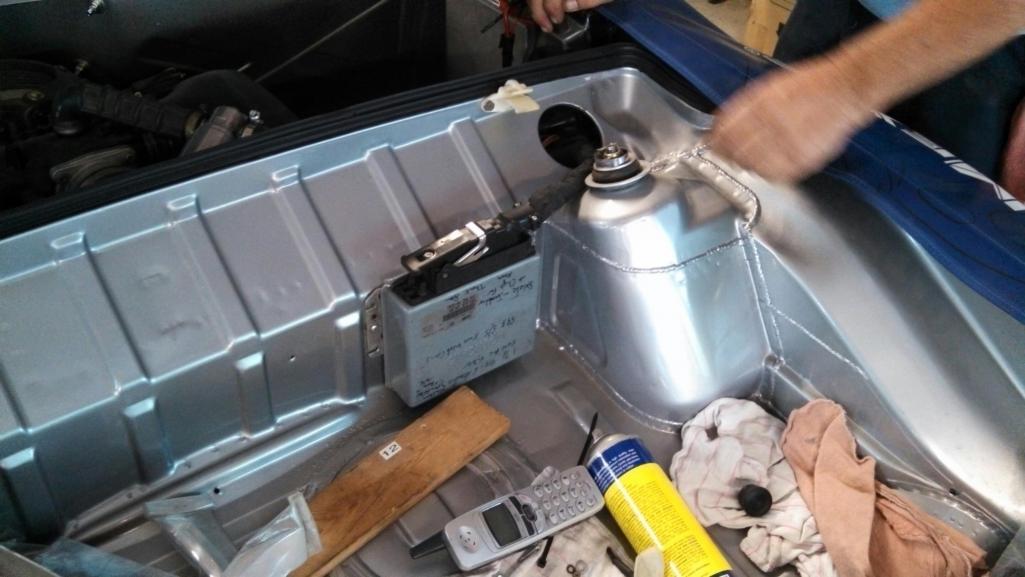
Posted by: Marv's3.6six Aug 22 2013, 06:44 AM
Here we go first startup documented. This baby sounds wicked, the big six sounds angry and also sounds like an early 911 S motor. A big milestone and 8 years in the making. Enjoy.
https://www.youtube.com/watch?v=RIBAqCObSiw
Posted by: Cairo94507 Aug 22 2013, 07:16 AM
Congratulations! Sounded nice and of course looks nice too.
Posted by: Ferg Aug 22 2013, 08:03 AM
Awesome!
Posted by: 396 Aug 22 2013, 08:50 AM
Very nice...congrats!
Posted by: Rod Aug 22 2013, 09:36 AM
Nice work!!!! Can't wait to see this thing moving
Posted by: puffinator Aug 23 2013, 07:26 AM
Where did you get the exhaust system or did you have the exhaust system custom made? Sounds great and I am looking for an exhaust system for my -6
Posted by: Marv's3.6six Aug 23 2013, 09:06 AM
Where did you get the exhaust system or did you have the exhaust system custom made? Sounds great and I am looking for an exhaust system for my -6
The exhaust system is an older system based on a Magnaflo type muffler. 2 in 2 out for early 911. I purchased it used about 10 years ago off the Bird Board, it is loud earplugs are necessary.
Posted by: uncle smokey Aug 23 2013, 11:48 AM
Just read the whole thing again. Fantastic car and glad you got it done.
Posted by: 914Timo Aug 23 2013, 01:03 PM
waiting
for more pictures Yes, please !! More pics !! That is very nice and sounds good. Congratulations about the first start !! Love the wheels
Posted by: Marv's3.6six Aug 23 2013, 04:27 PM
Just read the whole thing again. Fantastic car and glad you got it done.
Not quite done. Have a sizeable punch list to complete. First drive will (hopefully) be next Friday the 30th. Can't wait!!!!!!!!!!!!!!!!!!!!!!!!!!!!!
Posted by: Marv's3.6six Nov 16 2013, 10:58 AM
5 days before G&R last week my car was being corner balanced, then on to an allignment, had a full detail.... It was time for the first test drive by Don.
Oh Schnit the car will only go into 2nd and 4th gears. Don tries all his tricks, no luck. Don involves Jim Patrick together they try all their tricks... no luck.
Schnit again another G&R without my car. I knew showing up at G&R without my car again I would incur the ribbing of Elliot about my imaginary car. Off I went without the car and my tail between my legs. Surprisingly Elliot was nice about it, I can only assume he was on his meds that day.
Friday before G&R Don removed my trans and was off to the river, with a side trip to Patrick Motorsport. Don had arranged with Jim Patrick to come to his shop this week and diagnose the problem on the spot. I received a text Friday from Don that the "problem solved."
Big Props to Don at PMP to go out of his way (about 200 miles and a full day) and to Jim Patrick for agreeing to meet Don and fixing the Vellios shifting issue on the spot.
Hopefully I will be driving soon.
Posted by: siverson Nov 16 2013, 12:16 PM
Nice! I'm getting closer on getting my car back together as well...
Posted by: brp986s Nov 16 2013, 01:17 PM
Hey Marv, I bought your 3.2 back in ahem..mumble mumble...2006? I had my own setbacks, including a 2 year 915 Wevo conversion at a well known shop in Burbank! Just the box, nevermind the axles, linkage, and assorted other confusing nonsense that I had to figure out myself. Well, good to hear that your project has come to fruition and I hope to see it one day.
Posted by: SLITS Nov 16 2013, 01:47 PM
Hopefully I will be driving soon.
And I believe in Santa Claus, The Tooth Fairy, The Easter Bunny, magic, the small of a woman's back and long wet kisses.
Posted by: DBCooper Nov 16 2013, 03:06 PM
And I believe in Santa Claus, The Tooth Fairy, The Easter Bunny, magic, the small of a woman's back and long wet kisses.
Cool, I believe in those things too!
Posted by: AZ914 Nov 16 2013, 06:53 PM
Marv,
Most excellent! looking forward to your first drive report!
Posted by: gothspeed Nov 16 2013, 08:33 PM
Marv, if I can ask, what is the paint brand and color code for the Carrera GT Silver you used?
Posted by: Marv's3.6six Dec 21 2013, 01:38 PM
Posted by: bulitt Dec 21 2013, 06:30 PM
....Dude!.........
Posted by: Elliot Cannon Dec 21 2013, 06:34 PM
See! I told ya it would run some day. Fantastic Marv. Will we see it at the G&R finally?
Posted by: RobW Dec 21 2013, 06:56 PM
Congrats! Now drive over to Best Buy and get an new video camera!
Posted by: Ferg Dec 21 2013, 07:47 PM
Posted by: ben*james Dec 21 2013, 10:19 PM
Congrats! Now drive over to Best Buy and get an new video camera!
Posted by: Chris H. Dec 22 2013, 08:38 AM
Looks like it's moving pretty good Marv!
Posted by: Marv's3.6six Dec 23 2013, 09:47 AM
Yes it moves. I have been waiting to see this since 2006. Kris from Precision shot the video from his phone I can only hope that he was so excited that he was shaking. I hope to go out and see the car and drive it for the first time, maybe today.
Posted by: 2mAn Dec 23 2013, 02:52 PM
Just went through the whole thread. Congrats!
Posted by: Cairo94507 Dec 23 2013, 05:36 PM
How exciting - I hope you take some good video and photos to share with all of us.
Posted by: Marv's3.6six Dec 29 2013, 11:46 AM
First shakedown drive yesterday 12/28/2013. Initial thoughts OMG this is going to be fun. There some issues to work out with the brakes but the car feels remarkably balanced at low to moderate speeds, there has been zero suspension setup yet. The tranny needs some braking in as it shifts a little stiff. Also the close ratio gears and LS diff in the trans are new to me. It will take some getting used to. First drive in the car since about 2005. yay.
Attached thumbnail(s)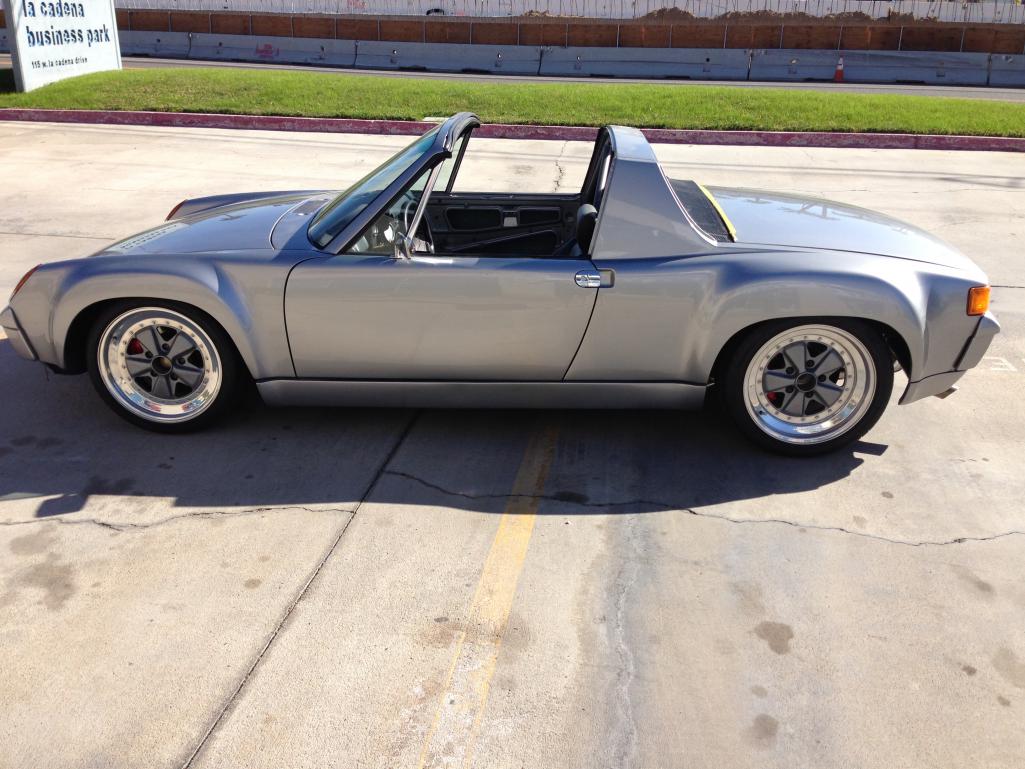
Posted by: Marv's3.6six Dec 29 2013, 11:51 AM
Butt shot of the hot rod. It looks the business.
Attached thumbnail(s)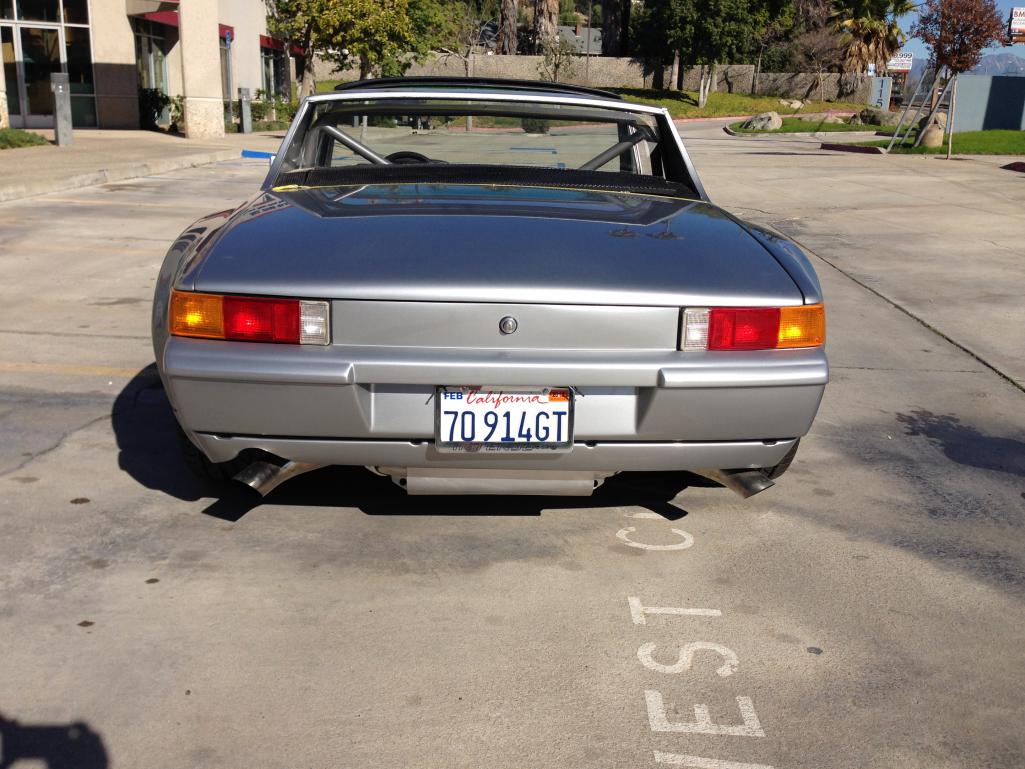
Posted by: Marv's3.6six Dec 29 2013, 11:55 AM
Interior shot. Love the Recaro seat. Still a bunch of work to do but a significant milestone to drive her. I will be back next Saturday to put more miles on, maybe some twisty roads.
Attached thumbnail(s)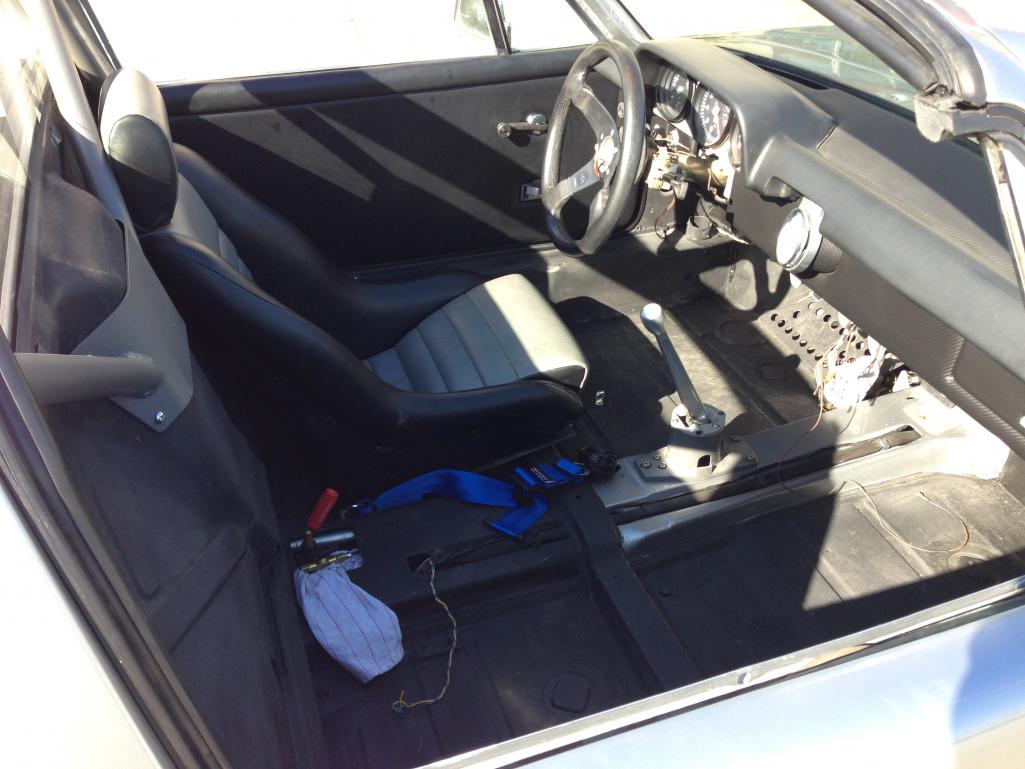
Posted by: Marv's3.6six Dec 29 2013, 12:04 PM
First drive video 12/28/2013. Please excuse the quality... hand held iphone and I got a call at the end. Enjoy.
https://www.youtube.com/watch?v=JNfbnc8FFxw
Posted by: 396 Dec 29 2013, 06:55 PM
Congrats! It's almost finished.
Enjoy in good health
Posted by: Cairo94507 Dec 30 2013, 08:51 AM
How exciting to be able to drive it finally. This is a great looking car and done correctly. The only thing that threw me off for a second was the rear valance. With the opening only on one side it made it look unbalanced until I realized there was exhaust pipes on both sides and an opening only on the driver's side. Regardless, that is a serious machine. Can't wait to hear more as you work out the final issues and get to enjoy the car. 
Posted by: R8CERX Jan 5 2014, 02:27 AM
Marv--wow!
I can't wait to have you bring your car out for a cruise!
Glad we connected today at COSI's!
Murrieta will be well represented with your rocket ship!
Posted by: Marv's3.6six Jan 5 2014, 10:32 AM
Marv--wow!
I can't wait to have you bring your car out for a cruise!
Glad we connected today at COSI's!
Murrieta will be well represented with your rocket ship!
Thanks Felix, nice meeting you yesterday. I was quite surprised at the turn out of all the different makes and type of cars. I will be coming to COSI in the future.
Posted by: Marv's3.6six Jan 5 2014, 12:52 PM
Saturday 1/4/2014 Drove another 30 or so miles shakedown. Results are 1 sore neck from cornering forces. 2 ran out of gas. 3 the linkage for the 915 gear box needs work. After many many shifts to brake in the tranny, rowing thru the gears over and over it became difficult to find gears, sometimes first gear was hard to find sometimes it would not go into third, after an hour or so most gear were sloppy to find and fourth gear would not work at all and it would pop out of first.
I think the issue is the shift rods are rotating slightly in the "universal apex joint" I believe the solution will be to drill and pin the clamps.
Don at PMP has said this will be the best solution. Next week more shakedown runs. I hope to have the linkage issue fixed and so far none of the gauges are working. I have no idea how many revs I have been pulling. I can't wait to wing her out to red line.
Attached image(s)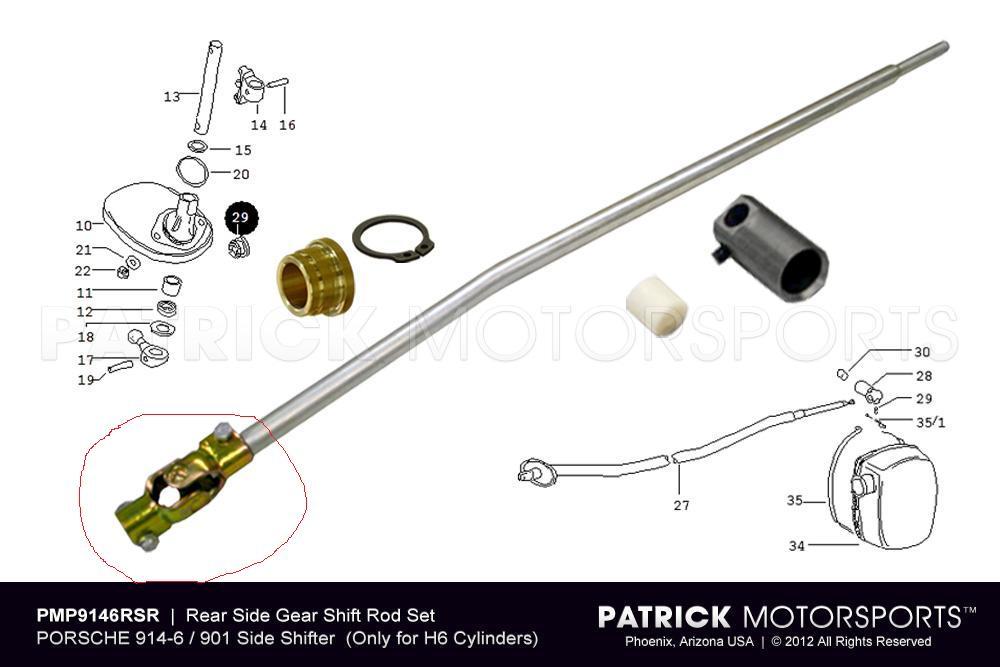
Posted by: mrbubblehead Jan 12 2014, 01:56 AM
i cant beleive i just found this thread. omg marv that car is beautiful. i had the same shifting problem in a baja i built. i pinned my linkage also. and i took a cut off wheel and grinded two slots 90 degrees of the pin holes. it helped to pinch the coupling to the shaft.
i wanna be part of the first major drive too. i live fairly close to you guys, just down the street from herschal. maybe we could get a drive in up to idylwild while the weather is still nice.
Posted by: ConeDodger Jan 12 2014, 11:05 AM
After a long read and meetings with Cheif Fraud Investigator E. Cannon, we will be seeking an indictment for false project thread.
Either that or an Academy Award for best effects in a fantasy film....
Seriously Marv, this is one bad ass build with a great (frustration) story attached.
Posted by: brp986s Jan 12 2014, 11:11 AM
The Patrick linkage is unmitigated garbage - with a high price. Well, atleast a few years back it was. You have a velios as I recall, and I have a wevo 915, but the kits share parts. Here's how I fixed it:
http://www.914world.com/bbs2/index.php?showtopic=101397&hl=
This was a fairly challenging job for a diy'er due to the exacting dimensions. Shifting in the neutral plane from 1-2 to 5-R amounts to 5mm of rotation as measured on ther input shaft to the box. And you need to allow for slop. So, if off by 1mm the 1-2 plane may become unreachable. At the same time you need to enter the 5-R lockout properly. I had to cut and reweld the shaft a couple times before I got it spot on.
Posted by: Marv's3.6six Jul 15 2014, 06:19 PM
On July 4 the car was delivered to me, yay I was a happy boy. I now had the time to look at the car and admire her for her fineness. All was good in my world....except, as I had time to enjoy a few brews and look closely....almost everywhere I looked there was something not quite right. The list of strange work is long. There are issues with electrical, brakes, trans, steering and worst of all the suspension is totally wack.
Well guys what you see here is the car being loaded up for a trip to Phoenix. I am biting the bullet here and sending her to Jim Patrick @ Patrick Motorsports because I simply do not trust how the car runs drives and brakes. Jim has offered to go thru the car and make it right. Who knows what else Jim he will find that is screwy....I know this will co$t but WTF I am in too deep anyway.
Attached thumbnail(s)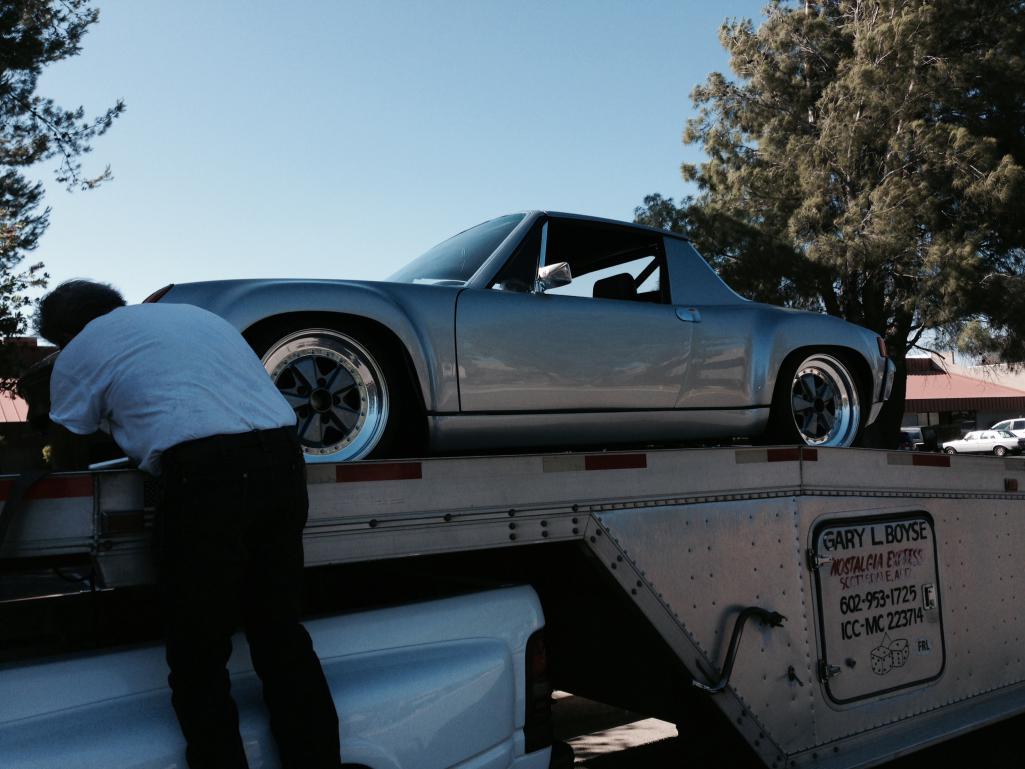
Posted by: mepstein Jul 15 2014, 07:27 PM
Too nice a car not to have at 100%
How did you ever fix the door gaps?
Posted by: Marv's3.6six Jul 15 2014, 07:47 PM
Too nice a car not to have at 100%
How did you ever fix the door gaps?
The door hinge mount area on the body was given some healthy lovin with a blunt object.
Posted by: Marv's3.6six Jul 15 2014, 07:56 PM
In regards to the professional work done on the car. Even though nothing was said directly both Slits and Glen Sager gave me funny looks when I told them who was working on my car.... now I understand the funny looks. 
Posted by: Steve Jul 15 2014, 08:11 PM
On July 4 the car was delivered to me, yay I was a happy boy. I now had the time to look at the car and admire her for her fineness. All was good in my world....except, as I had time to enjoy a few brews and look closely....almost everywhere I looked there was something not quite right. The list of strange work is long. There are issues with electrical, brakes, trans, steering and worst of all the suspension is totally wack.
Well guys what you see here is the car being loaded up for a trip to Phoenix. I am biting the bullet here and sending her to Jim Patrick @ Patrick Motorsports because I simply do not trust how the car runs drives and brakes. Jim has offered to go thru the car and make it right. Who knows what else Jim he will find that is screwy....I know this will co$t but WTF I am in too deep anyway.
You should be in good hands with Patrick Motorsports. He has turned out more killer 3.6 914's than anyone. I used to live in AZ and my favorite past time was drooling over the awesome 914's in his shop.
Posted by: Marv's3.6six Jul 15 2014, 10:33 PM
You should be in good hands with Patrick Motorsports. He has turned out more killer 3.6 914's than anyone. I used to live in AZ and my favorite past time was drooling over the awesome 914's in his shop.
Posted by: Marv's3.6six Oct 8 2014, 08:33 AM
Back in my garage after a stay at Patrick Motorsports. JP sorted out many issues with the car. Now need to get new tires as the Bridgestones are 10 years old, have maybe 200 miles on them and hard as a rock. Thinking Toyo Proxes R888.
Attached thumbnail(s)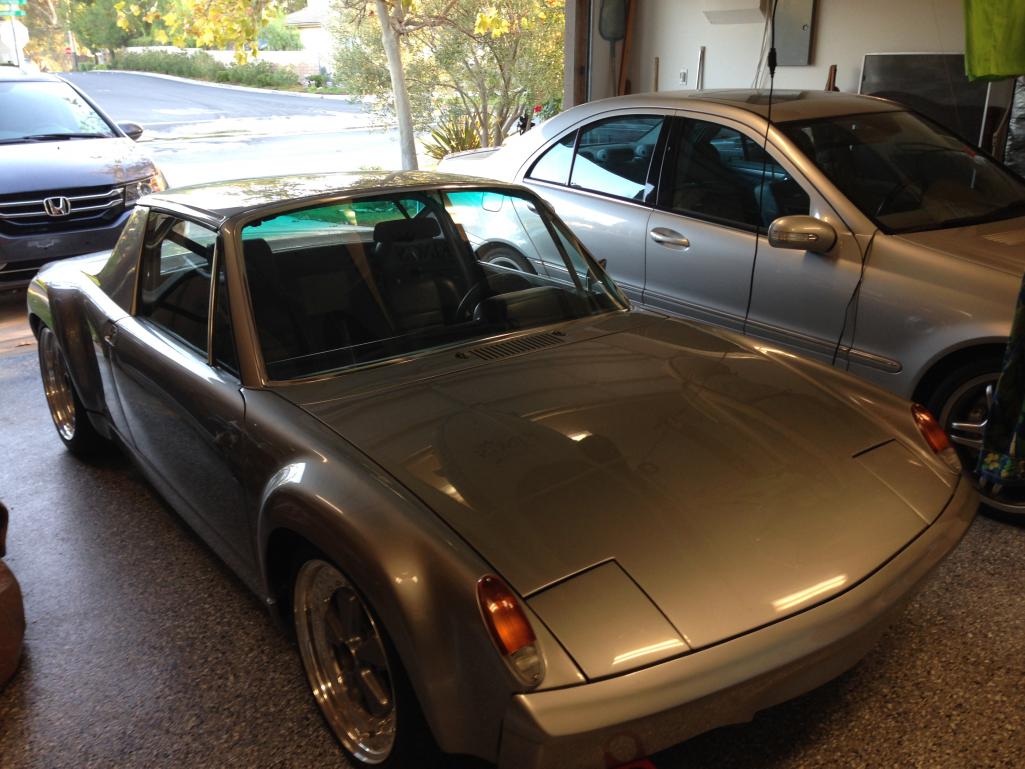
Posted by: Elliot Cannon Oct 8 2014, 10:33 AM
Will it be ready for the G&R?
Posted by: 914six Oct 30 2014, 10:15 PM
Hi Marv,
Great to see you and your car last Sunday at G&R... i think you should re read
post # 410 on fixing your shifting problem. Good Luck.. i believe the problem
is in the shift rods ... needs adjustment ..and hopefully not in the trans.
Cheers,
Harry
Posted by: Marv's3.6six Oct 31 2014, 07:29 AM
Hey Harry good to see you to. I am hopeful that I may have found something that will make a significant improvement in shifting. It has been ten years since I took the car apart and I am finding that I pretty much have to relearn how to use the Wevo shifter properly. I have just rediscovered a few things I forgot about shifting the Wevo. The car maybe has 100 new miles on it so at this point I hope most of the problem lies with the nut that connects the drivers seat to the steering wheel. Time and miles will tell.
Posted by: Marv's3.6six Mar 22 2015, 08:29 AM
Here are a few projects slash updates on the hot rod. This is a pic of the front valence. I have fabricated a bug screen for the front air inlet opening to the oil cooler. It turned out nice, one of the mount brackets I will have to redo as it is slightly out of straight.
Also have replaced the black button head fasteners on the the spoiler lip with stainless button heads. You should be able to see in previous posts on this thread those were black not silver. This change makes the car look a tad bit racy-er I think.
Attached thumbnail(s)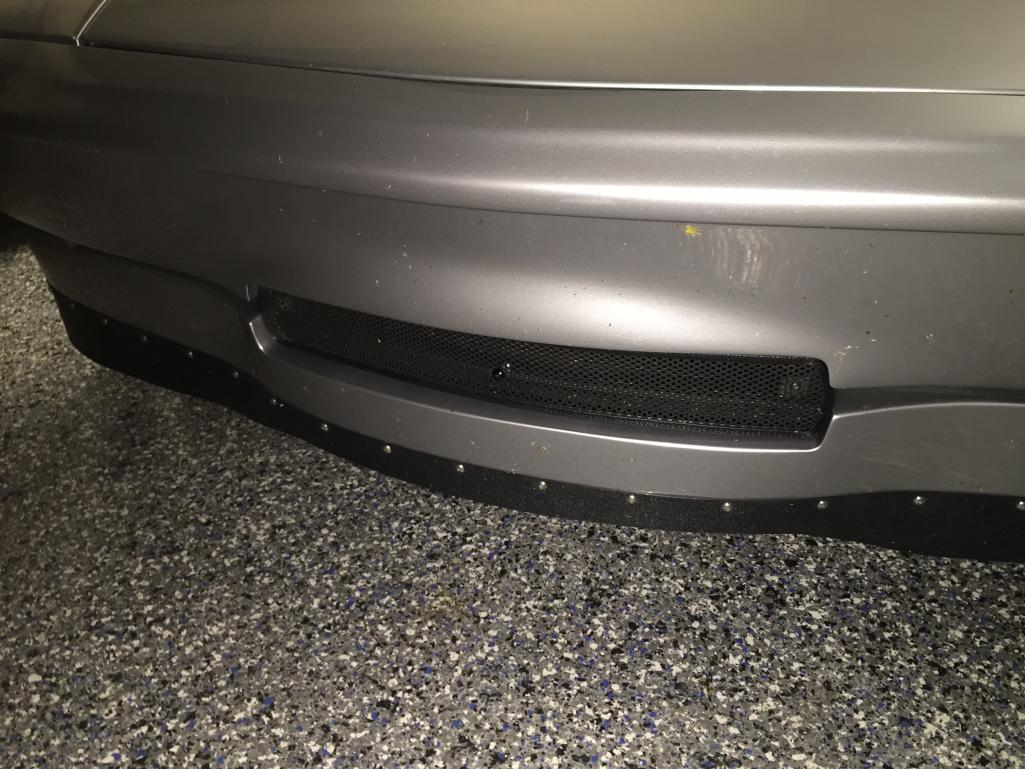
Posted by: Marv's3.6six Mar 22 2015, 08:38 AM
Here is a cool change. What you see is an in tank fuel pump installation. The tunnel lines were replaced with a single stainless line with a regulator mounted up front. The fuel is pulled up thru the top of the tank.
My car had BMW fuel hose running thru the tub. This hose was showing signs of "chafing" so when the stock carerra 3.2 pump died it was time to make a change and remove the fire hazard line and update to in tank.
Attached thumbnail(s)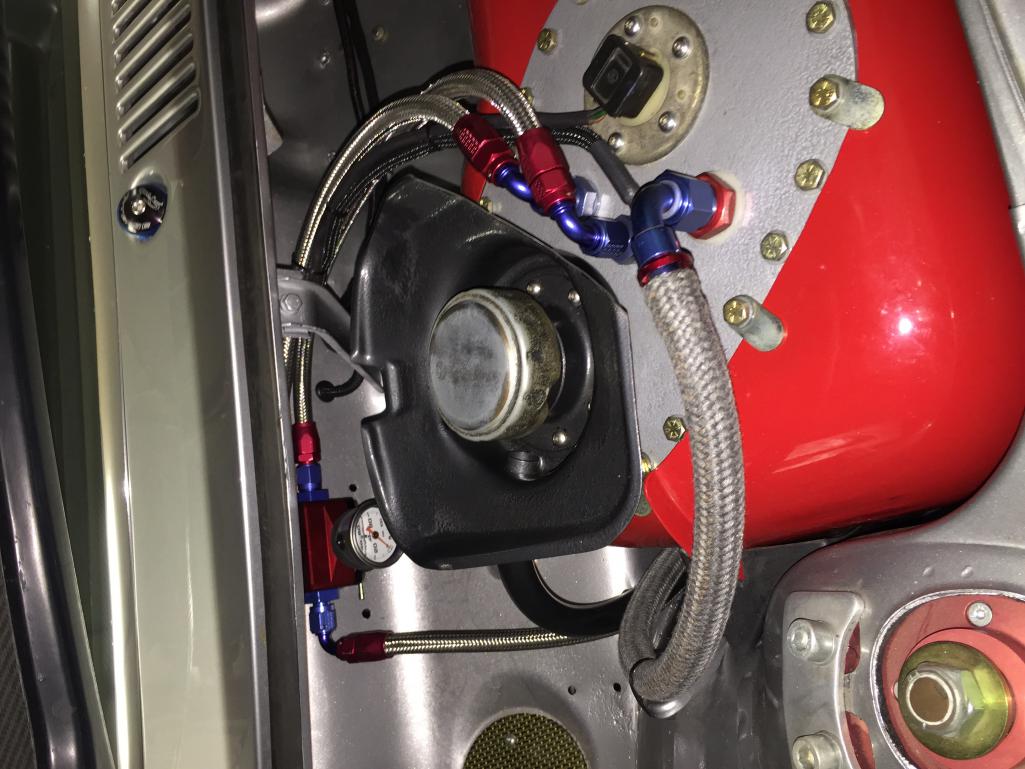
Posted by: Marv's3.6six Mar 22 2015, 08:43 AM
Here is a cool little bauble. This is a new shift knob it's a Wevo SL knob. This knob is CNC'd from 6061 T6 billet and is very light weight.
Attached thumbnail(s)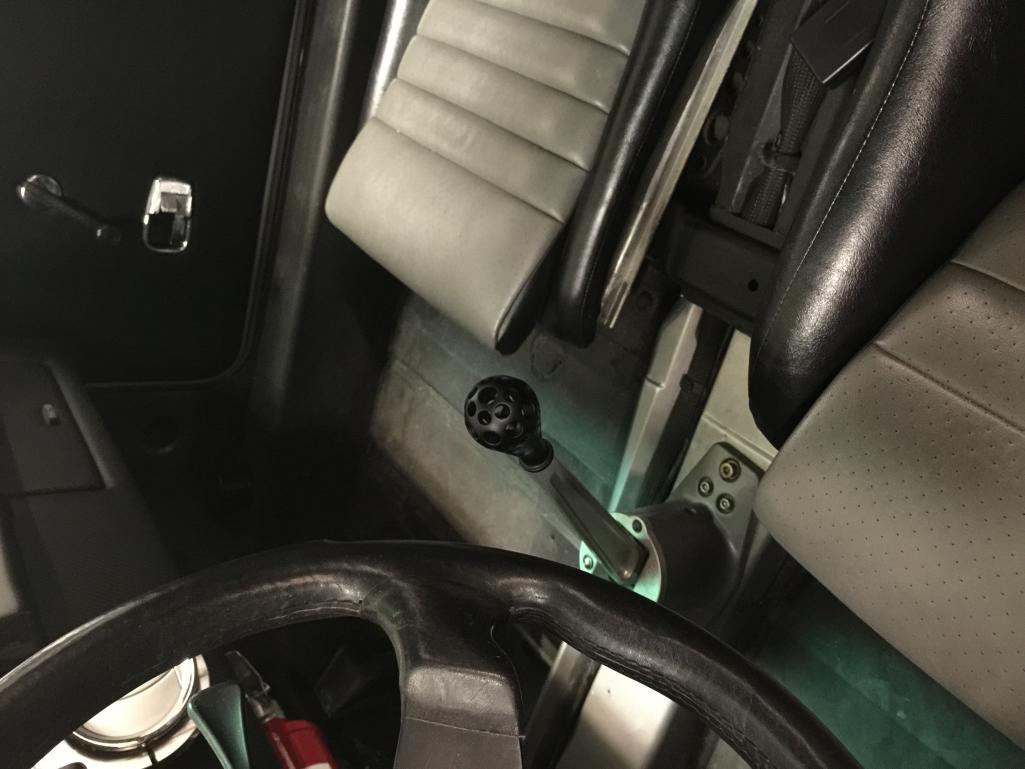
Posted by: Marv's3.6six Mar 22 2015, 08:49 AM
Last item of the day. I have been tired of the lap belts and wanted something more up to date. Because the roll bar blocks the stock mounting locations I had seat belts plus make me some new belts. I found these cool billet clamps for a Polaris quad and went about making some mods and installing new belts. Works just like stock. 
Attached thumbnail(s)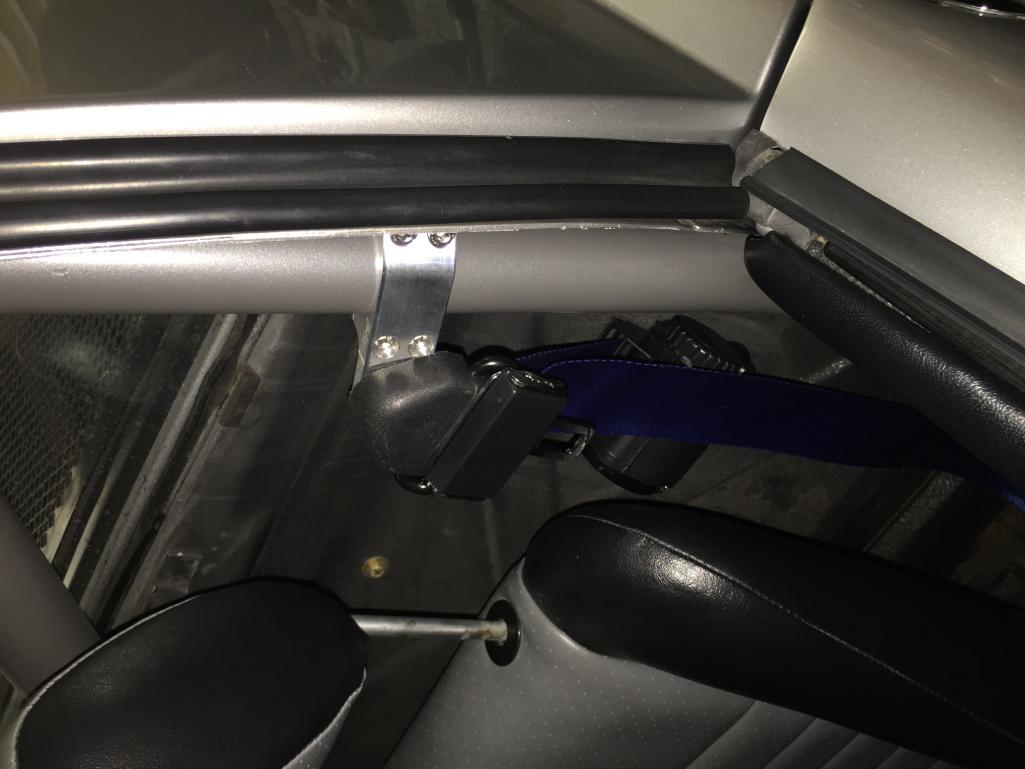
Posted by: Marv's3.6six Mar 22 2015, 08:57 AM
Ok one more. Here is a beauty shot on one of my favorite loops. There are a some fun roads up in La Cresta behind Murrieta Ca.
Attached thumbnail(s)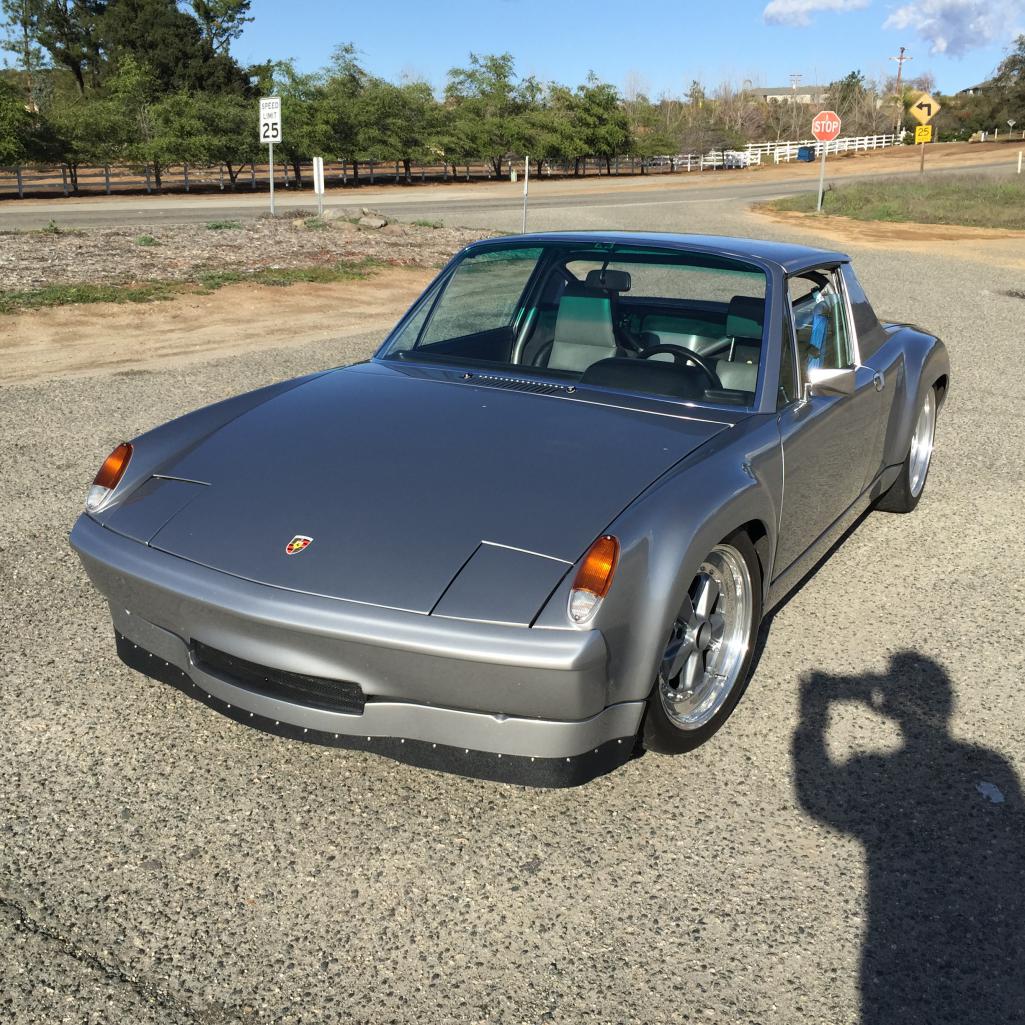
Posted by: Shadowfax Mar 22 2015, 09:14 AM
Ok one more. Here is a beauty shot on one of my favorite loops. There are a some fun roads up in La Cresta behind Murrieta Ca.
Man, what a beautiful car. Gonna go back and read the whole thread now.
Posted by: Cairo94507 Mar 22 2015, 10:25 AM
Terrific build and beautiful car.
Posted by: Harpo Mar 22 2015, 11:07 AM
I love the idea of a modern fuel pump in the tank. Can you give us some of the details?
Thanks
David
Here is a cool change. What you see is an in tank fuel pump installation. The tunnel lines were replaced with a single stainless line with a regulator mounted up front. The fuel is pulled up thru the top of the tank.
My car had BMW fuel hose running thru the tub. This hose was showing signs of "chafing" so when the stock carerra 3.2 pump died it was time to make a change and remove the fire hazard line and update to in tank.
Posted by: Elliot Cannon Mar 22 2015, 11:39 AM
Lookin' good Marv. See you in Palm Springs?
Posted by: mgp4591 Mar 22 2015, 12:11 PM
Lookin' good Marv. See you in Palm Springs?
Or seeing you at WCR?
Posted by: Krieger Mar 22 2015, 12:21 PM
Dang nice looking car! I don't think I've ever seen that front bumper or spoiler before. Who made them?
edit: I looked back to p. 1 of thread. La Mesa Body?
Posted by: veekry9 Mar 22 2015, 12:38 PM
I like it.
A subtle curvature of the valance and bumper,likely as a measure for room,not merely as a stylistic exercise.
Very nice work.
Posted by: Maltese Falcon Mar 22 2015, 01:12 PM
Even more awesome to see in person !
Good meeting you and this car at last year's G+R
You should come out to our next Hollywood cruise in.
Marty
Posted by: Marv's3.6six Apr 7 2015, 01:07 PM
There have been a couple of requests for information regarding installing an in tank fuel pump. The information I looked into I was able to find on Youtube. Most of the project parts are available in a kit form.
My particular install is unique due to the fact I am running a Patrick Motorsport 914 Fuel Safe fuel cell. This is an advantage due to the fact that the top of the tank by the filler literally unbolts and comes off easily and allows access to install the pump thru the top, also that the fuel cell is already using AN fittings makes it easy peasy.
Hope this helps.
Posted by: Marv's3.6six Apr 7 2015, 01:22 PM
Dang nice looking car! I don't think I've ever seen that front bumper or spoiler before. Who made them?
edit: I looked back to p. 1 of thread. La Mesa Body?
Yes La Mesa Body. However the bumper La Mesa made.... the curvature was made almost completely out of bondo...so I had to have a custom fiber glass mold made by a local fabricator. The chin spoiler is made out of steel BUT flexed badly so it needed to be reworked and reinforced significantly.
Lastly the chin edging is made from ABS plastic and is available from a NSX aftermarket vendor. I have over the years replaced that piece more than a few times due to scraping on driveways. I scrape it good every 6 months at G&R
The look is unique and would be quite hard and expensive to duplicate. (I am not interested in selling copies of the bumper)
Posted by: Maltese Falcon Apr 7 2015, 01:38 PM
Even more awesome to see in person !
Good meeting you and this car at last year's G+R
You should come out to our next Hollywood cruise in.
Marty
Marv...save the date: Sunday, April 26, 2015, see the thread here in the Garage section. There will be Porsche factory rep (Kerry) at the cruise-in, he is a big 914 and aircooled gearhead.
Hope to see you there !
Marty
Posted by: Marv's3.6six Apr 7 2015, 01:53 PM
Lookin' good Marv. See you in Palm Springs?
Or seeing you at WCR?
Hey Elliot. I will be at G&R and then going to Marty's Hollywood cruise. You going also? how bout a caravan
Posted by: FourBlades Apr 7 2015, 06:21 PM
Love the eyebrow delete.
Subtle but cleans it up a lot.
John
Posted by: mgp4591 Apr 7 2015, 07:58 PM
Love the eyebrow delete.
Subtle but cleans it up a lot.
John
What does it look like with the headlights on- extra sailing area?
Posted by: Marv's3.6six Aug 22 2016, 09:24 AM
On another thread someone was wondering if this car was ever finished. This car is done, finished and on the road. It is everything I thought it would be. This car with this power is easy to drive, you can just lug her around town or wring her neck. I have torque from about 2k revs on up to red line. She is incredibly quick even just short shifting at 3500 thru 1st 2cd and 3rd.
This 3.6 has been a wonderful engine so far. The light flywheel the RS cams. she has a mild lope when at idle, which I love. Now that it is all sorted there is virtually nothing to do except check the oil.
The 915 trans is working very well, after some initial shifter issues things are now working just fine. These transmissions can still be a little balky at times but most of the time it is a thing of beauty to row thru the gears.
The last and final big mod I did to the car was to add the 4 small fans on the front mounted oil cooler, after some initial fusing problems, and a slight redesign on the power circuit it has been perfect. She has a thermostatic switch and operates as per design, I have not seen any high oil temps since the install.
The next item to complete is a full corner balance alignment. I am curious to know what her final weight will be, she should be pretty damn light.
Is this car done, are these cars ever really done... they are a hobby and we will always find something new to work on. Love my hotrod 3.6
Posted by: Marv's3.6six Apr 12 2017, 09:00 AM
Added new side stripes recently.....
Attached thumbnail(s)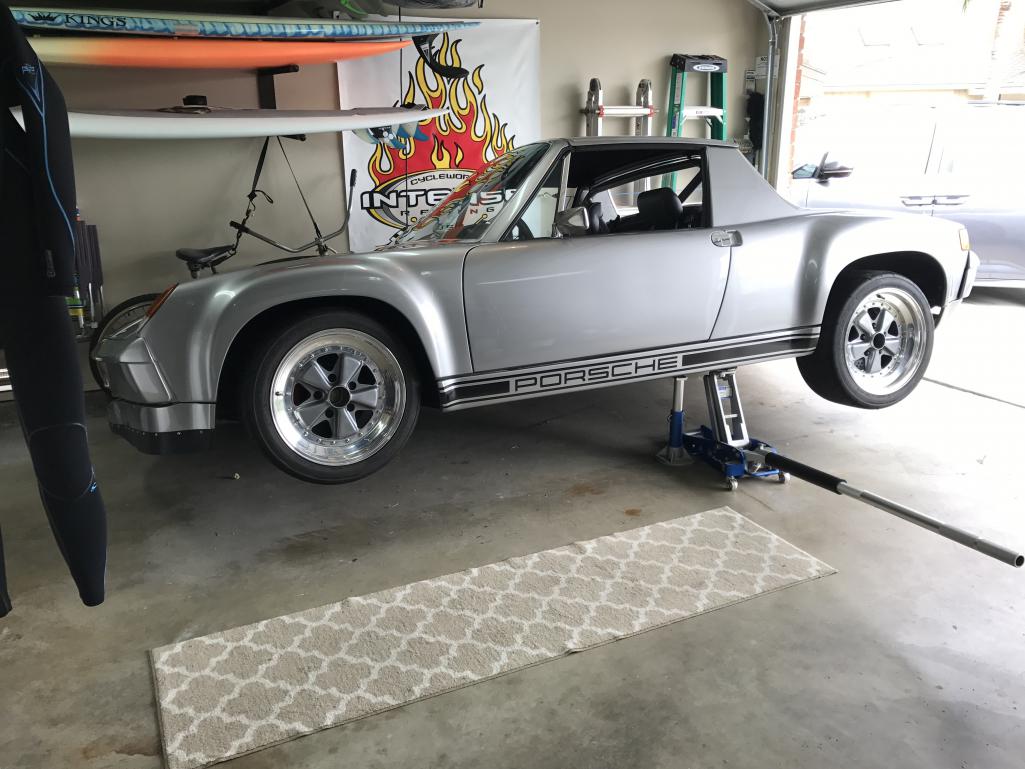
Posted by: Marv's3.6six Apr 12 2017, 09:20 AM
Oh and COTM Thanks Guys!!!
Attached thumbnail(s)
Posted by: AZ914 Apr 12 2017, 11:26 AM
Posted by: forrestkhaag Apr 12 2017, 01:43 PM
Very cool car.
Posted by: Coondog Apr 12 2017, 01:47 PM
First time reader of this thread, going to have to talk with JP about your fuel cell install.
Posted by: SO.O.C914er Apr 12 2017, 08:38 PM
Beyond cool. Not enough said for this car of the month. Saw Marv's 914 at the Riverside swap meet this past weekend this was the third time I've walked around this car maybe the best 914 I've seen. You hear this car arrive sounds extremely nasty turn and look and you know you need to walk over and look a little closer.
Posted by: KELTY360 Apr 12 2017, 10:46 PM
Nice! I prefer the stripes on the rockers to the door bottoms.
Posted by: Marv's3.6six Apr 13 2017, 08:52 AM
First time reader of this thread, going to have to talk with JP about your fuel cell install.
JP did not do the "in tank" fuel pump install, don't know if he does those.
Posted by: Coondog Apr 13 2017, 11:44 AM
First time reader of this thread, going to have to talk with JP about your fuel cell install.
JP did not do the "in tank" fuel pump install, don't know if he does those.
PMS does this and sales the tank but to much $$$$$ to justify this mod.
Posted by: porschetub Apr 13 2017, 03:49 PM
Wow nice car,great selection off surfboards what more could a man want .
Posted by: ndfrigi Apr 13 2017, 05:19 PM
Added new side stripes recently.....
I'm sure sir those ladders by the wall has something that hold it standing/kneeling against the wall, right? Especially that aluminum extendable is quite heavy even it is an aluminum. With that beautiful car (which was infront of my car last Sept. Seal Beach 914 Featured) you don't want it to get any body dent.
Again, super nice and clean car you have there!
Posted by: Marv's3.6six Apr 13 2017, 06:03 PM
Added new side stripes recently.....
I'm sure sir those ladders by the wall has something that hold it standing/kneeling against the wall, right? Especially that aluminum extendable is quite heavy even it is an aluminum. With that beautiful car (which was infront of my car last Sept. Seal Beach 914 Featured) you don't want it to get any body dent.
Again, super nice and clean car you have there!
Yes ladders are secured, if you look thru the windows of the car you can see the rope (blue) that is used to hold the ladders. Thanks for the kind words.
Posted by: Marv's3.6six Apr 13 2017, 06:07 PM
Wow nice car,great selection off surfboards what more could a man want
.Thanks for the props,.... also I am fully retired and I play with the car, the surfboards and my mountain bikes almost every day. he he.
Posted by: NS914 Feb 10 2022, 07:37 PM
Hey Marv,
I can't thank you enough for your persistence and ultimately a build of the first order!
Like many builds here, I have learned a ton!
Grant
Posted by: Marv's3.6six May 9 2022, 11:59 AM
Hey y'all long time no post. I miss a lot of you guys. Bottom line is I don't drive my car much at all any more... So I am in process of listing my baby on BaT.
At one point in time there were peeps here on the World that had said, if you were ever interested in selling let me know, here is the notice.
Love my car, just don't use it, the wife calls it my garage ornament.
This car (for those that don't know it) was a complete over the top restomod GT on an original six chassis with the best of everything available at the time. 3.6 993 eng, 915 close radio trans, Brembos, HRE forged wheels, rotisserie done steel GT car with lots and lots of custom work.
PM me if interested, it will not be cheap.
Marv
Posted by: Cairo94507 May 9 2022, 12:15 PM
Good luck Marv - Sorry to see you selling, but I get it. You have one beautiful car with all the right stuff for sure. If my wife would not dig a hole and throw me in it, I would be very interested.
Oh no ... she must have seen my post - I found a large hole on our property . . 9' deep!
Posted by: drem914 May 9 2022, 01:07 PM
PM me if interested.
@http://www.914world.com/bbs2/index.php?showuser=3165 PM sent
Posted by: sb914 May 9 2022, 01:34 PM
Hi Marv,
Sad to see it go !
Definitely one of my all time favorites !
Posted by: Steve May 10 2022, 09:14 AM
Always loved and admired your car Marv!! I know you went through many trials & tribulations to get that thing done. We will miss you at the local events. Don't be a stranger, show up anyway and say hi!!
Posted by: Maltese Falcon May 10 2022, 06:44 PM
One of the best 914s on the Planet @http://www.914world.com/bbs2/index.php?showuser=3165
Posted by: Ferg May 11 2022, 06:23 PM
I was one of those guys not sure I’m in the right position to make you a fair offer will be watching and bidding on bat
Posted by: Shivers May 11 2022, 06:33 PM
You're one of the OG members, sorry to see you two part. If the next car is half as cool as this one, I'm sure you'll have fun in it too.
Powered by Invision Power Board (http://www.invisionboard.com)
© Invision Power Services (http://www.invisionpower.com)