Printable Version of Topic
Click here to view this topic in its original format
914World.com _ 914World Garage _ Can you tighten a factory side mirror?
Posted by: MW 914 Dec 6 2005, 11:53 AM
Every time I get off the freeway, I have to adjust my side mirror as the wind pushes it up, down, in...everywhere. Is there a way to tighten the thing up?
Posted by: Joe Ricard Dec 6 2005, 11:56 AM
Yea take it off and flip it upside down. you will see a nut with a spring under the nut. just tighten the nut and whala.
Posted by: Aaron Cox Dec 6 2005, 11:56 AM
| QUOTE (Joe Ricard @ Dec 6 2005, 10:56 AM) |
| Yea take it off and flip it upside down. you will see a nut with a spring under the nut. just tighten the nut and whala. |
and "voila"

Posted by: ss6 Dec 6 2005, 11:57 AM
Unscrew it from the body. There is a 10 mm nut in the throat you can tighten.
Posted by: MW 914 Dec 6 2005, 12:08 PM
Great. Thanks guys. On to my next question...
Which engine is better, a stock 2.0 six or a big four? JUST KIDDING! 
Posted by: Mark Henry Dec 6 2005, 12:09 PM
Most times you need to take a cheap 10mm socket and grind the OD down to fit in the mirror nut hole. Nows a good time to take it apart and lube it.
Posted by: TROJANMAN Dec 6 2005, 12:11 PM
Which engine is better, a stock 2.0 six or a big four? JUST KIDDING!

your wimpy ass 1.8

Posted by: michel richard Dec 6 2005, 12:14 PM
and "voila"

euh, voilà . . .
Posted by: MW 914 Dec 6 2005, 12:15 PM
Well shit, nothing is ever easy. I pop the mirror off and tighten the nut up. It won't budge front to back but it did absolutely nothing for the up and down slop. What next?
Posted by: Mark Henry Dec 6 2005, 12:21 PM
euh, voilà . . . Michel got it right...helps that he's French Canadian 
I "think" that one may need mirror removal...never done that one.
Done others and they were just 2 sided tape, heating it a heat gun softened the tape.
Posted by: Joe Ricard Dec 6 2005, 12:36 PM
Oh the other nut. Yea that one is a real PITA
The mirror glass has to come out. To do this usually means destroying the brittle rubber glass surround when removing it. once the glass is out then the same "tighten the nut" procedure.
Posted by: McMark Dec 6 2005, 12:52 PM
How convenient, I just did one of these on Sunday. Full disassembly and lube. Here's the trick that I used.
You need:
- two razor blades
- 2 small bladed flat screwdrivers
- patience
You have to pry out the black plastic "ring" that holds the glass in. If you stick a screw driver under it, you'll crack up the mirror. So starting at the center of one of the wide sections carefully work the razor blade (sharp side) between the black plastic and the glass. You may have to use the screwdrivers a bit to help gain access. Once the razor blade is in, you can slide the screwdriver between the razor blade and the black plastic and twist the screwdriver to pry up the plastic. The razor blade will spread the load and protect the mirror glass. Work your way a little closer to one corner.
Once you get one screwdriver securely underneath the plastic, insert the second razor blade/screwdriver combo right next to the first and work it towards the other corner. To pop the corners out takes a little more "oomf", but if you're slow and careful it should come out without braking. Once you get one corner out it's just a matter of going around and prying it all out. Keep using the razor blade to protect the glass.
Underneath the glass there is a clear plastic spacer. I've seen some that disintegrate once you take the glass out. I this is the case, you'll have to devise some otherway to keep the glass away from the metal side and tight against the black plastic. Perhaps duct tape behind the glass?

Lube and tighten the nut as necessary with an 8 mm wrench.
If you're clear plastic piece was okay, insert it first and then place the glass on top of it. There is a small lip that must be visible around the border of the glass. It make take a few tries and a little pick work to make it seat right. If this isn't clear, test assemble the glass and clear plastic in your hand. You'll see how the glass goes "inside" the clear plastic piece. Once those two are in, slowly and carefully push the black plastic in. Plan ahead so that the first corner you put in and the last corner you put in have a long space between them.
Posted by: MW 914 Dec 6 2005, 01:13 PM
Thanks Mark. I printed this and I'm off to the garage. Update to follow....
Posted by: MW 914 Dec 6 2005, 03:21 PM
Ok, someone post Mark's method in a "How-to" forum. This worked great and everything is nice and tight now. No broken glass or screwed up gaskets.
Thanks again Mark.
Posted by: McMark Dec 6 2005, 04:22 PM
No problem. Glad it worked out for you! 
Posted by: Dave_Darling Dec 6 2005, 06:38 PM
I'd love it if someone took some pics.
Regardless, this should go in the "Classics" section!
--DD
Posted by: SLITS Dec 6 2005, 06:43 PM
Interesting.....I've been able to tighten the one behind the glass..no problem, but the stand nut has always been frozen and breaks off...bummer
Posted by: GTeener Dec 6 2005, 06:43 PM
Full disassembly and lube. Here's the trick that I used.You need:
- two razor blades
- 2 small bladed flat screwdrivers
- patience
Once you get one screwdriver securely underneath the plastic, insert the second razor blade/screwdriver combo right next to the first and work it towards the other corner. To pop the corners out takes a little more "oomf", but if you're slow and careful it should come out without braking. Once you get one corner out it's just a matter of going around and prying it all out. Keep using the razor blade to protect the glass.
Underneath the glass there is a clear plastic spacer. I've seen some that disintegrate once you take the glass out. I this is the case, you'll have to devise some otherway to keep the glass away from the metal side and tight against the black plastic. Perhaps duct tape behind the glass?

Lube and tighten the nut as necessary with an 8 mm wrench.
If you're clear plastic piece was okay, insert it first and then place the glass on top of it. There is a small lip that must be visible around the border of the glass. It make take a few tries and a little pick work to make it seat right. If this isn't clear, test assemble the glass and clear plastic in your hand. You'll see how the glass goes "inside" the clear plastic piece. Once those two are in, slowly and carefully push the black plastic in. Plan ahead so that the first corner you put in and the last corner you put in have a long space between them.
Thanks Mark!
Posted by: GTeener Dec 6 2005, 06:45 PM
Regardless, this should go in the "Classics" section!
--DD
Wayne Cowie (type47fan) told me he had pictures of this process and was going to send them to me, but I guess he forgot....
Posted by: STL914 Dec 6 2005, 09:10 PM
I just tried Marks method to remove the glass, and aside from breaking both razor blades in the process, it worked fine. 
I needed to switch the mirror from a driver side position to passenger side position, but the body will not rotate. It's now sitting in the garage after an application of Liquid Wrench.
Thanks Mark
Posted by: smooth_eddy Dec 6 2005, 10:07 PM
| QUOTE |
| Regardless, this should go in the "Classics" section! |

Anyone else? Eddy
Posted by: SirAndy Dec 6 2005, 10:28 PM

Posted by: johannes Jan 28 2006, 01:38 PM
Thank you for the tips. I just have done the job today. I had a broken mirror.
I decided to replace it and in the meantime wanted to bring my painted side mirrors back to polished finish.
Here are a few pictures showing what has been described in the previous messages.
Here you can see the first ajusting nut.
Attached image(s)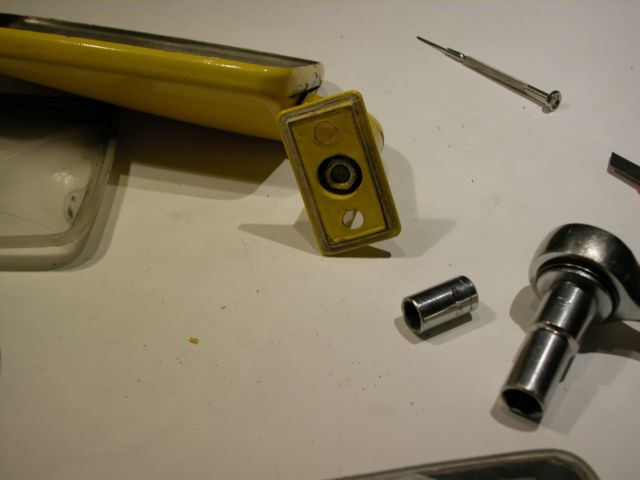
Posted by: johannes Jan 28 2006, 01:40 PM
Here you can see the transparent spacer and the plastic sealing.
You can see the second ajusting nut that is behind the (broken) mirror and the transparent spacer.
Attached image(s)
Posted by: johannes Jan 28 2006, 01:43 PM
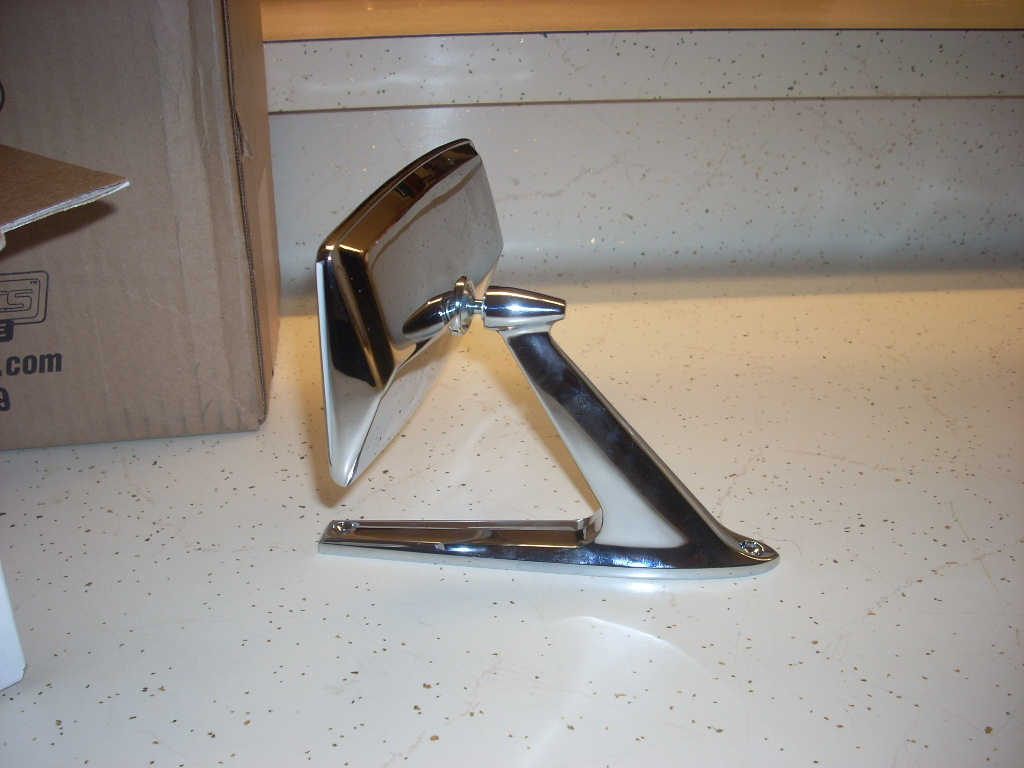
A friend of mine kindly polished all the parts ... Not so bad looking for a 30 years old side mirror
Attached image(s)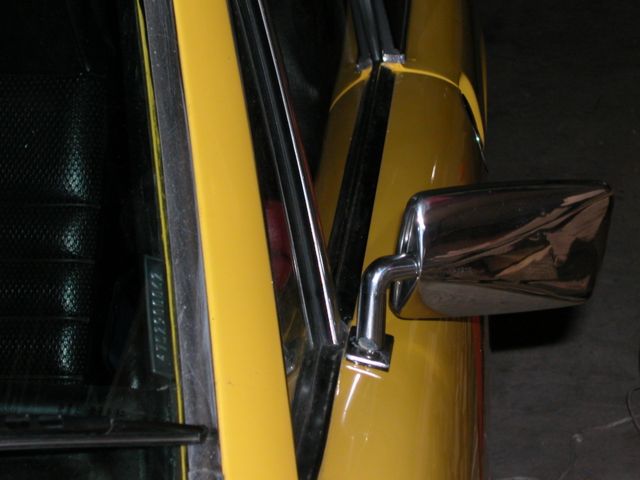
Posted by: alpha434 Jan 28 2006, 07:33 PM
Just throw away the stock mirror and get a Wink mirror for the inside. Best idea I've ever heard. Ok, ok. I've got that problem with mine flopping around too. Thanks all. I'll fix it the same way.
Posted by: STL914 Jan 28 2006, 09:51 PM
Hey, throw those stock mirrors my way please.
Posted by: type47fan Jan 29 2006, 12:30 AM
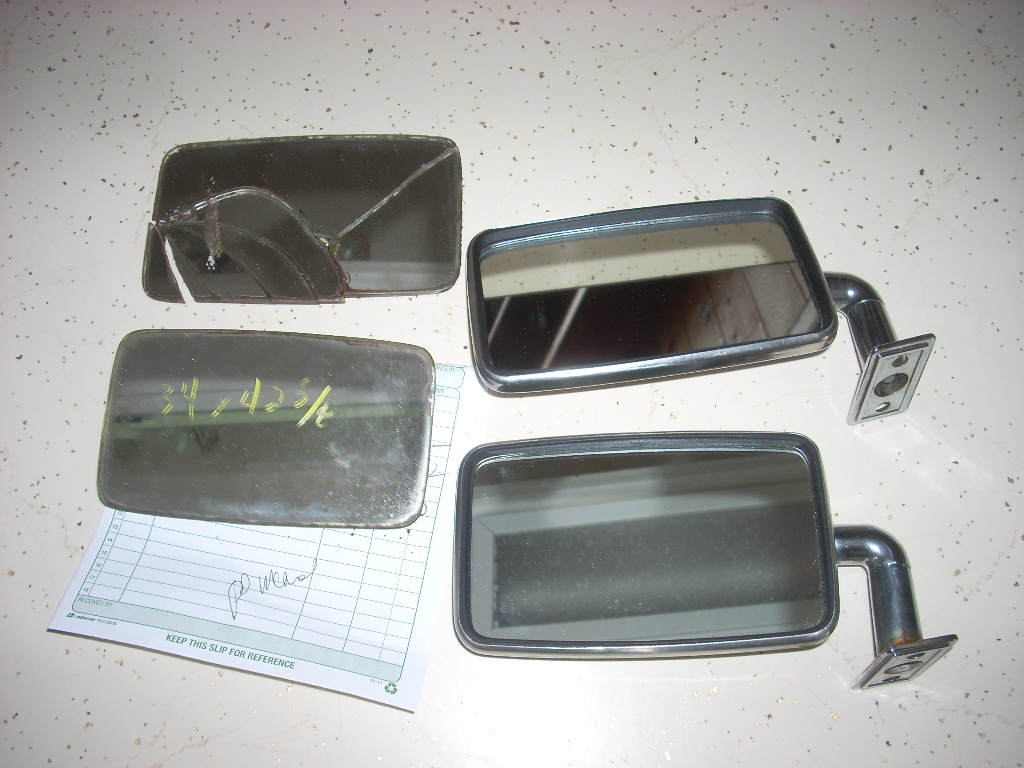
Gwen, I did send the pictures to you. . . here they are again, without narrative, which has been so eloquently described above . . . .
Attached image(s)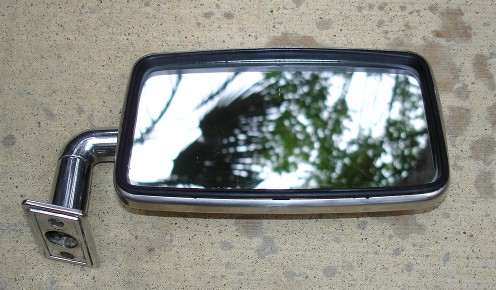
Posted by: type47fan Jan 29 2006, 12:32 AM
#2
Attached image(s)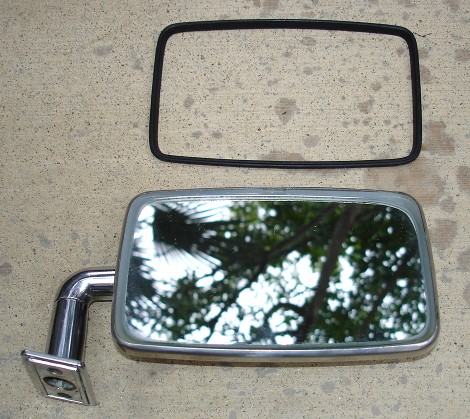
Posted by: type47fan Jan 29 2006, 12:32 AM
#3
Attached image(s)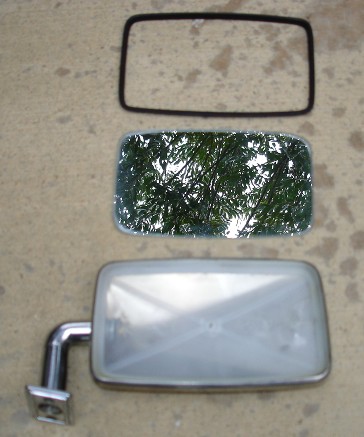
Posted by: type47fan Jan 29 2006, 12:32 AM
#4
Attached image(s)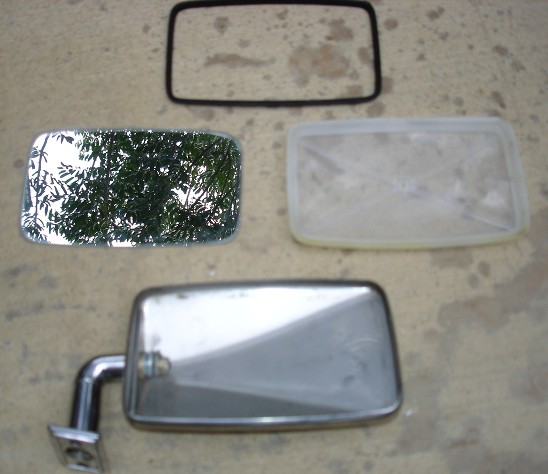
Posted by: type47fan Jan 29 2006, 12:33 AM
#5
Attached image(s)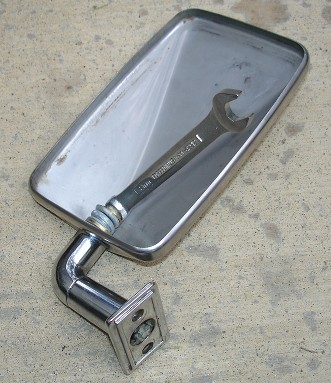
Posted by: johannes Feb 1 2006, 11:24 AM
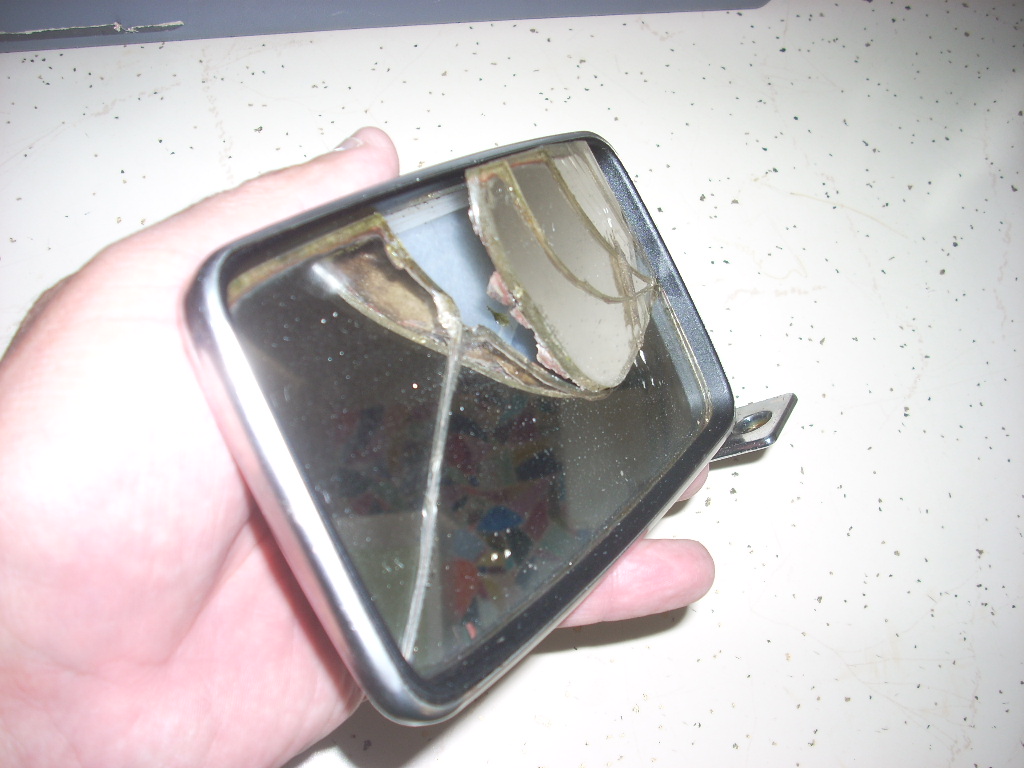
AAARRRHHHH , Just began to restore my second mirror ... and found out that the transparent plastic is broken in 3 pieces ... so is unusable ...
Does someone have this part available for me ? ... I can pay of course
The piece I need is the one shown on the picture bellow
HELP !!!!
Attached image(s)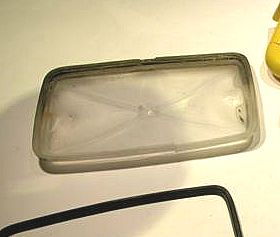
Posted by: McMark Feb 1 2006, 11:45 PM
I've never done it, but I expect you could get away with some foam tape, maybe 1/4" thick. Just put it around the outer edge of the steel piece. 
Posted by: type47fan Feb 2 2006, 12:51 AM
Good luck,
AAARRRHHHH , Just began to restore my second mirror ... and found out that the transparent plastic is broken in 3 pieces ... so is unusable ...
Does someone have this part available for me ? ... I can pay of course
The piece I need is the one shown on the picture bellow
HELP !!!!

My USD.02, see above
Posted by: johannes Feb 2 2006, 02:15 AM
Thank you, I'll try that ...
Posted by: Cuda911 Nov 20 2017, 02:06 AM

Oh the other nut. Yea that one is a real PITA
The mirror glass has to come out. To do this usually means destroying the brittle rubber glass surround when removing it. once the glass is out then the same "tighten the nut" procedure.
Rather than destroying the rubber, if the rubber ring doesn't pop out, just break the glass out and get some new glass cut. Cheap and easy. Worked for me.
Of course, you can also just order some '73 Mustang mirrors as replacements. My understanding is that most here prefer them to the stock mirror.
Attached image(s)
Posted by: Coondog Nov 20 2017, 07:13 AM
[i][quote name='Cuda911' date='Nov 20 2017, 12:06 AM' post='2549981']
[quote name='Joe Ricard' post='552482' date='Dec 6 2005, 10:36 AM']
Of course, you can also just order some '73 Mustang mirrors as replacements. My understanding is that most here prefer them to the stock mirror.
[/quote]
April fools day is in April not November............
Posted by: Valy Nov 20 2017, 09:50 AM
Oh the other nut. Yea that one is a real PITA
The mirror glass has to come out. To do this usually means destroying the brittle rubber glass surround when removing it. once the glass is out then the same "tighten the nut" procedure.
Rather than destroying the rubber, if the rubber ring doesn't pop out, just break the glass out and get some new glass cut. Cheap and easy. Worked for me.
Of course, you can also just order some '73 Mustang mirrors as replacements. My understanding is that most here prefer them to the stock mirror.
Can you please post the specific pattern to brake the mirror?

Posted by: Larmo63 Nov 20 2017, 10:17 AM
Double post.
Posted by: Larmo63 Nov 20 2017, 10:18 AM
If you read McMark's 'how-to,' getting the glass out of the mirror is not that hard with a little patience. He nails the procedure. I've done a few, it can be done.
By the way, the early mirror is shorter, but seems wider. It also has a different arm.Both early and late mirrors use the same base, and the black plastic gasket
has a slight "cant" to it. If your side mirrors look like they sag, you might have the black thing in backwards.
Posted by: StratPlayer Nov 20 2017, 02:46 PM
Wow digging up an old thread here.
Posted by: raynekat Nov 20 2017, 07:14 PM
Have to admit.....Mustang mirrors look
pretty bad to me. 
The shape just doesn't fit the 914 correctly.
Posted by: Edward Blume Nov 20 2017, 07:47 PM
what kind of hammer? 
i'm 
Posted by: Cuda911 Nov 20 2017, 08:02 PM
Have to admit.....Mustang mirrors look
pretty bad to me.
The shape just doesn't fit the 914 correctly.
It's just what you're used to. It echos the shape of the front corner windows perfectly.

Last I heard, Larmo was trying to scare up a set for his ride.
Attached thumbnail(s)
Posted by: Larmo63 Nov 21 2017, 01:01 AM
Those look embarrassingly awful.
Posted by: Cuda911 Nov 21 2017, 02:30 AM
Those look embarrassingly awful.
Thanks for the compliment!
Posted by: MoveQik Nov 21 2017, 01:33 PM
Wow...blast from the past! Project update: 12 years later and my mirror is still nice and tight.
Posted by: Cairo94507 Jun 22 2022, 08:12 AM
Cool - I have to do both of my mirrors before WCR. My driver's side mirror is loose but I figure I may as well do both. This was a cool thread to find for that.
As a follow up, the 914Rubber parts made the job easy-peasy. Both mirrors are now nice and tight- no vibration at speed.
I was curious about the comment made above about the black base gasket being different if your mirror sags a bit. My driver's mirror looks as if it could be raised up a bit to eliminate that sag.... Any solutions?
Posted by: Cairo94507 Dec 4 2022, 10:50 AM
Bump.
Powered by Invision Power Board (http://www.invisionboard.com)
© Invision Power Services (http://www.invisionpower.com)