Printable Version of Topic
Click here to view this topic in its original format
914World.com _ 914World Garage _ GT oil system
Posted by: michel richard Dec 27 2005, 11:45 AM
As part of my GT look alike project, I spent quite a bit of time on the oil system. Here's the link to the overall project thread:
http://www.914world.com/bbs2/index.php?act=ST&f=2&t=34896
There's several good threads on the site about coolers. I started one, soliciting opinions about a possible oil cooler to use. I must say I had not done a search before starting that thread. If I had, I would have found a lot of the information I was looking for. see:
http://www.914world.com/bbs2/index.php?act=ST&f=2&t=40719&st=0&#entry529632
I've decided to move away from the solution I was exploring there, which involved Porsche 928 transmission oil coolers and instead to use an Rx7 cooler that I will modify and then have ultrasound cleaned. Actually, all the parts below will need a super-thorough cleaning before the engine starts, to avoid contamination. There's a place in town that does ultrasound cleaning, and that appears to be the best route.
I have also started a thread on the hard oil lines, and tub modifications to make room for those. See:
http://www.914world.com/bbs2/index.php?act=ST&f=2&t=40719&st=0&#entry529632
I have'nt sourced the hard oil lines yet.
In any event, I've done a lot of work on assembling a GT style oil system for my car. Here's an overall view of the part of the system in the engine compartment:
Posted by: michel richard Dec 27 2005, 11:47 AM
1st picture did not upload. Here it is:
Attached image(s)
Posted by: michel richard Dec 27 2005, 11:47 AM
Detail of the console area:
The threaded hole on the console that faces towards the middle of the engine compartment, just above where the oil filter goes, is not used and will be plugged.
Attached image(s)
Posted by: michel richard Dec 27 2005, 11:49 AM
The spacer can barely be made out in the preceeding picture, between the black console and the oil tank.
Here's a closer view of the console. Spacer cannot be seen here, hosever:
Attached image(s)
Posted by: michel richard Dec 27 2005, 11:50 AM
On the underside of the car, the oil lines that will attach to the hard oil lines, and the one (furthest) wich is the oil return line, from the engine:
Attached image(s)
Posted by: michel richard Dec 27 2005, 11:51 AM
I had to drill a couple of 1 and 3/8 inch holes in the driver side shelf to let oil lines through. (the hole furthest away is on all cars):
Attached image(s)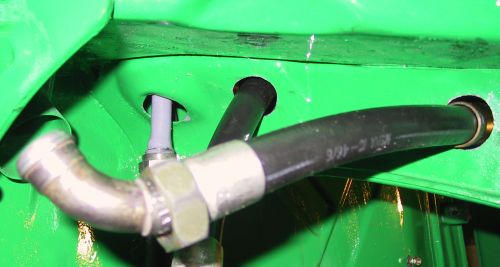
Posted by: michel richard Dec 27 2005, 11:53 AM
Finally, I fabricated the pop-off valve that attaches to the oil fill neck. Here's a few pictures.
Attached image(s)
Posted by: michel richard Dec 27 2005, 11:53 AM
again:
Attached image(s)
Posted by: michel richard Dec 27 2005, 11:56 AM
Finally: I have yet to test the pressure at which it opens, it should be around 80 psi. If I'm off a little, I can adjust it. I used the fittings from a junk engine case that still had them.
Attached image(s)
Posted by: Eric_Shea Dec 27 2005, 05:22 PM
Is that a 72 911S console?
Posted by: michel richard Dec 27 2005, 08:08 PM
| QUOTE (Eric_Shea @ Dec 27 2005, 03:22 PM) |
| Is that a 72 911S console? |
It's a '69 S console. I think that the '72 part is completely different, that was the year the 911 had the tank in front of the right rear wheel. The part I have is actually magnesium, very, very light.
Posted by: thesey914 Dec 28 2005, 04:06 AM
I can't quite see the route oil takes...does it pass through filter and then through thermostat?
Why is the oil return line connected to filler?
Posted by: michel richard Feb 18 2006, 02:22 PM
I ran a test to see at which pressure the pop-off valve would open, and it was too high (above 100 psi). So I figured out a way to make the valve adjustable. A longer lollow end screw, and a jam nut:
Attached image(s)
Posted by: michel richard Feb 18 2006, 02:22 PM
and assembled:
Attached image(s)
Powered by Invision Power Board (http://www.invisionboard.com)
© Invision Power Services (http://www.invisionpower.com)