Printable Version of Topic
Click here to view this topic in its original format
914World.com _ 914World Garage _ V8 Conversion Completed
Posted by: nick mironov Jan 15 2006, 12:58 PM
My conversion took approximately 5 months of work to get the engine in and get the car on the road. Another 18 months for further work and improvements. Thanks very much to the 914 Club Forum and those who posted their conversion information and to those who responded to my questions, and special thanks to the club members who attended the V8 conversion meeting in Pleasanton in September 05 and shared their valuable knowledge with me.
If anyone is interested in seeing the car, I live in the Richmond District of San Francisco.
Project Specs:
1975 1.8L 914
Renegade conversion kit
Chevy 283
Vortec heads
Compcam 260H
New cam bearings
0.060 cylinder overbore
New rods and pistons (9.5:1 compression ratio)
New main and rod bearings
Replaced all gaskets and freeze plugs
New high volume oil pump
MSD Billet HEI distributor
Holley 4 barrel carburetor
Treated miscl rust with OSPHO and Por 15 paint
Herculiner truck bed liner in front and engine compartments
911 19mm master brake cylinder upgrade
BMW 320i front caliper upgrade to start with,
M-caliper upgrade using hubs by http://www.914world.com/bbs2/index.php?showuser=87
Stainless steel flex brake hose upgrade
Replaced rear brake proportioning valve with TEE.
Rebuilt rear brake calipers
Pedal cluster bushings upgrade to brass (from existing plastic)
Replaced transmission shifter bushings
Replaced transmission seals
Weltmeister short-shifter
WEVO transmission mounts
9” Kevlar clutch
New Bilstein rear shocks and bellows/boots.
Electric fuel pump – Carter CRT-P4070 5 psi, 72 gph
New / custom throttle cable
HP mini-starter
2-gauge wire to starter
Ron Davis Radiator with two 13”diameter SPAL fans (Renegade set-up)
http://www.914world.com/bbs2/index.php?showtopic=106800
VDO Water temperature gauge
VDO Oil pressure gauge
VDO Oil temperature gauge (original)
Tachometer upgrade by http://www.914world.com/bbs2/index.php?showtopic=70968
Oil Cooler
Center console
Rear trunk strut conversion kit – http://www.camp914.com/
Magnaflow dual-in dual-out muffler
Body work and re-paint
Power mirrors from Honda del Sol
Rear wing from Toyota MR-2
http://www.914world.com/bbs2/index.php?act=ST&f=2&t=71844&st=0#entry900766 by http://www.autosintl.com/
Carpets by http://www.914world.com/bbs2/index.php?showuser=1389
Thttp://www.davidclee.com/Towbarinstructions.htm for flat towing with integral wiring harness
16" 4-lug http://www.914world.com/bbs2/index.php?showtopic=61708&hl= from http://www.packracingproducts.com/
BF Goodrich G-Force Sport 205/55/16.
The dyno tests were done this 8/24/2008 at the Thunderhill dyno. At max rpm of about 6,250 the dynamometer showed a speed of 153 mph. On the track we got it up to about 125 mph. However, it threw a water pump belt a couple of times. I think that there is too much flex in the Renegade water pump mount, so I need to reinforce it.
At rear wheels: 263 ft-lb torque, 241 hp.
Engine: Assuming a 15% loss through the transmission, the engine would have about: 302 ft-lb torque, 277 hp.
Maybe more if the test was done on a motor dyno stand without water pump, alternator, and muffler.
Without air filter: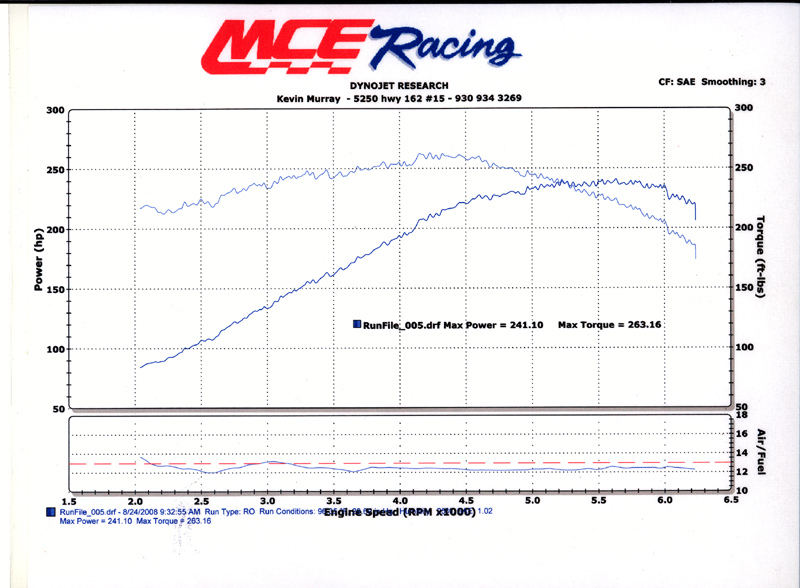
With and without air filter: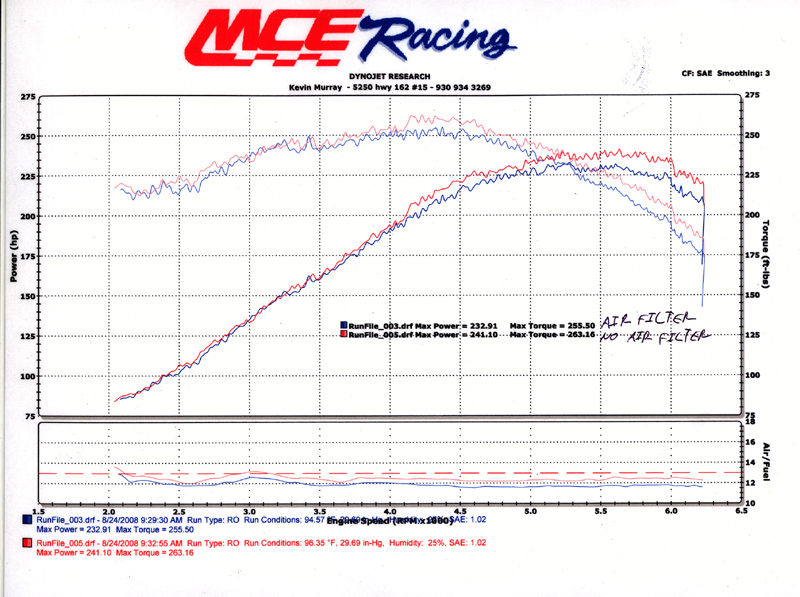
Posted by: nick mironov Jan 15 2006, 12:59 PM
I bought the car in June 05, ordered and collected enough parts to start, and removed the engine at the end of August.
Attached image(s)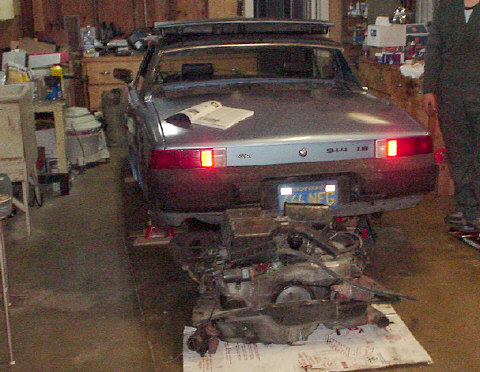
Posted by: nick mironov Jan 15 2006, 01:00 PM
Started on the radiator first:
Attached image(s)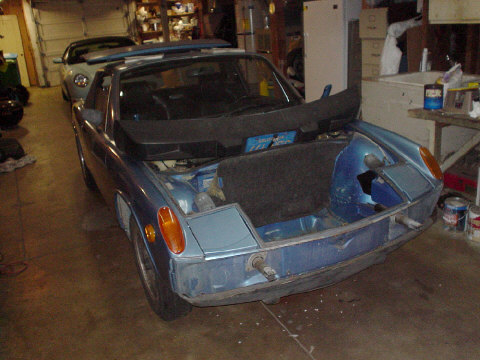
Posted by: nick mironov Jan 15 2006, 01:01 PM
Cut the front and isntalled the radiator and shroud:
Attached image(s)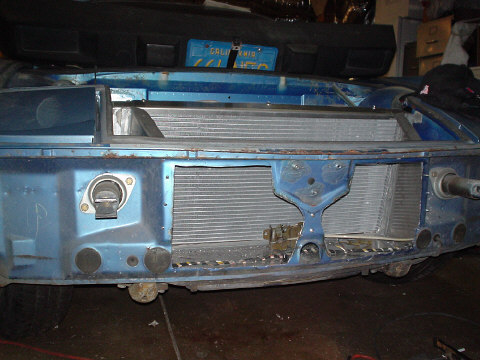
Posted by: neo914-6 Jan 15 2006, 01:02 PM
Nick,
Great job, another Bay Area conversion! 

FYI, We have another "member" who bought Renegades flagship "Peal". A conversion meet this summer will be huge!
Posted by: nick mironov Jan 15 2006, 01:03 PM
Another view of the radiator:
Attached image(s)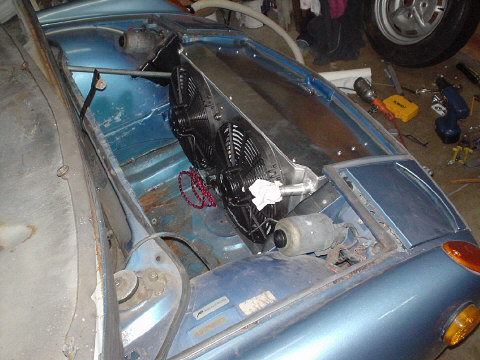
Posted by: nick mironov Jan 15 2006, 01:03 PM
Cut the bumper:
Attached image(s)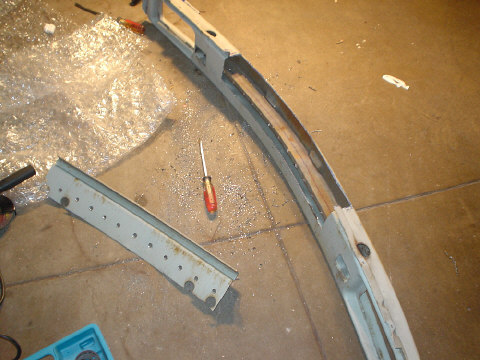
Posted by: nick mironov Jan 15 2006, 01:04 PM
Finished front:
Attached image(s)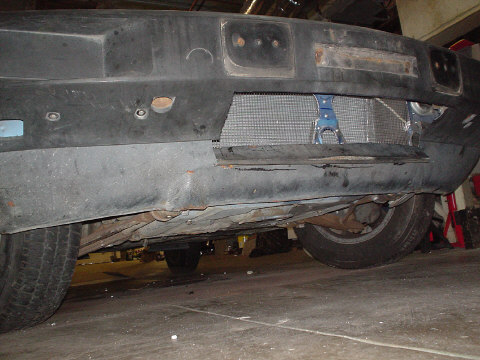
Posted by: nick mironov Jan 15 2006, 01:05 PM
Removed gas tank and cleaned up the rust within the compartment:
Attached image(s)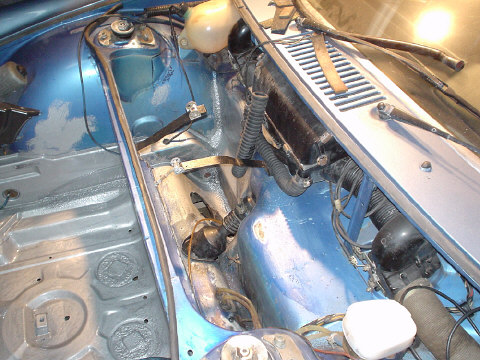
Posted by: nick mironov Jan 15 2006, 01:06 PM
Cleaned out and painted the gas tank:
Attached image(s)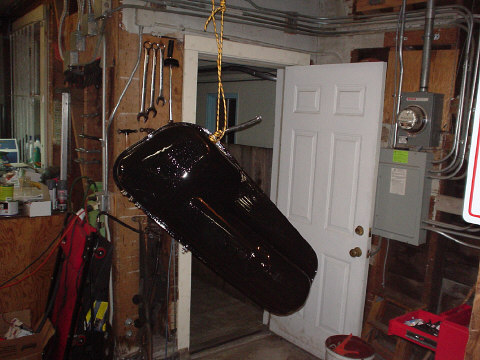
Posted by: nick mironov Jan 15 2006, 01:07 PM
Cleaned out rust from front compartment, painted with POR15, primered, and final-coated with Heruliner truck bed liner:
Attached image(s)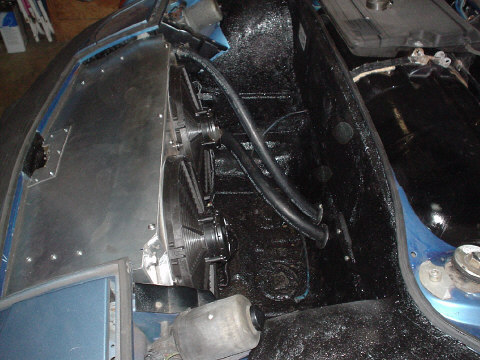
Posted by: nick mironov Jan 15 2006, 01:10 PM
At this time, I have not committed to cutting the vents in the wheel wells. I am going to experiment with various hood ventings - perforated plates, louvers etc. I have three hoods to work with. If none of that works properly, I will then cut the vents in the wheel wells:
Attached image(s)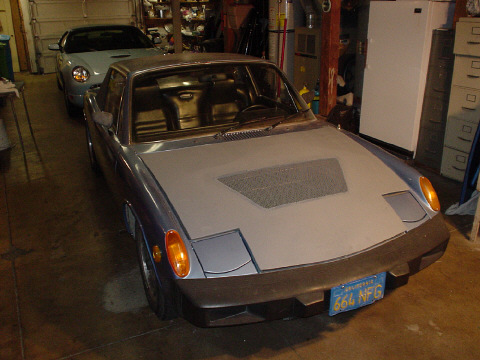
Posted by: nick mironov Jan 15 2006, 01:12 PM
Engine compartment was also cleaned out of rust, painted with POR 15 paint, primered, and final-coated with Herculiner truck bed liner. This is the compartment after engine removal and initial placement of the coolant components:
Attached image(s)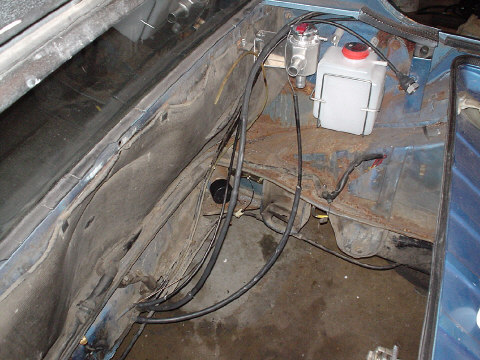
Posted by: nick mironov Jan 15 2006, 01:13 PM
Primer over POR 15 paint - ready for Heculiner:
Attached image(s)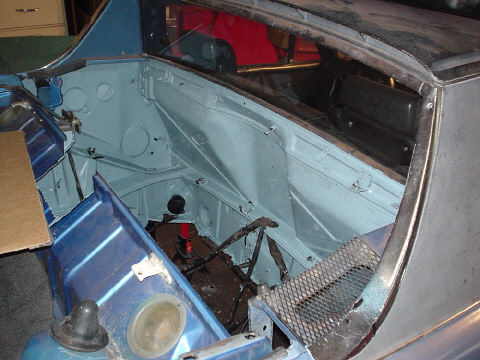
Posted by: nick mironov Jan 15 2006, 01:15 PM
Trunk was de-rusted and treated with POR 15 paint. You can see the Herculiner in the engine compartment, the distributor cutout, the relocated battery, and the strut-type trunk lid springs:
Attached image(s)
Posted by: nick mironov Jan 15 2006, 01:16 PM
Engine rebuild:
Attached image(s)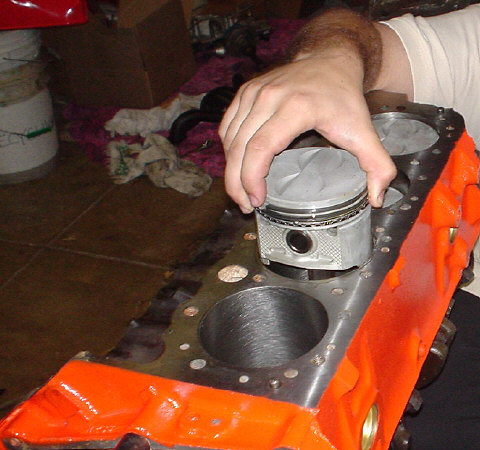
Posted by: nick mironov Jan 15 2006, 01:16 PM
Engine rebuild:
Attached image(s)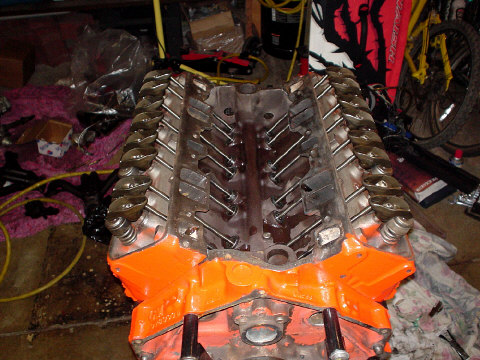
Posted by: nick mironov Jan 15 2006, 01:17 PM
Mostly compete engine:
Attached image(s)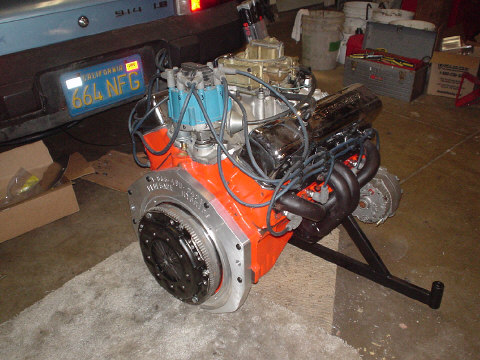
Posted by: nick mironov Jan 15 2006, 01:19 PM
Transaxle was thoroughly cleaned. All of it was as black as the inside of the bell housing in this picture. All seals were replaced:
Attached image(s)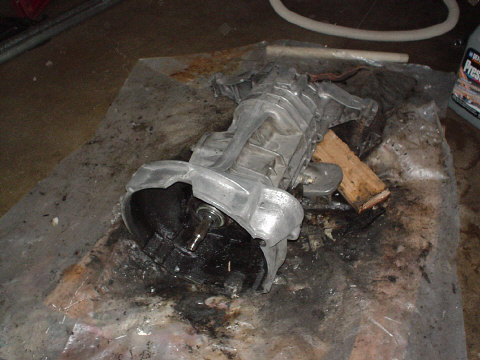
Posted by: nick mironov Jan 15 2006, 01:20 PM
Engine amd transaxle are mated and ready to be installed:
Attached image(s)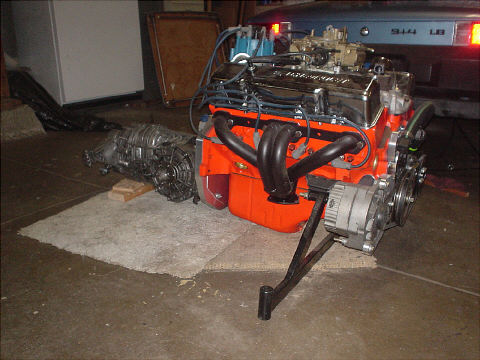
Posted by: nick mironov Jan 15 2006, 01:21 PM
Going in:
Attached image(s)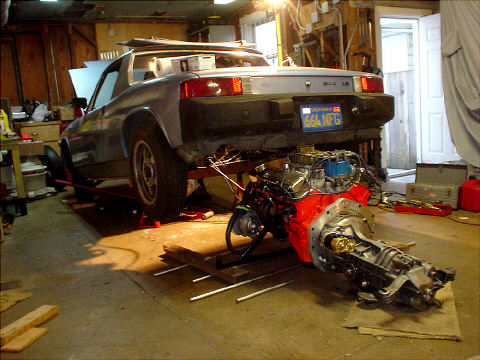
Posted by: nick mironov Jan 15 2006, 01:23 PM
Going in...
I actually did the install by myself - since I could not find anyone to help at the moment I decided to do it.
Attached image(s)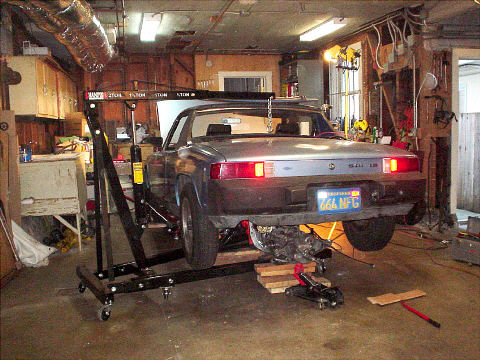
Posted by: nick mironov Jan 15 2006, 01:26 PM
Installed. Right side before exhaust installation. Note the black cable/tube that loops right in front of the CV joint - that is a new throttle cable made longer than the original to attach to the carburetor from the rear:
Attached image(s)
Posted by: nick mironov Jan 15 2006, 01:28 PM
Installed. Left side after exhaut installation. Note the rubber bellows at the shifter linkage cover - that is a perfect-fit bellows I picked up at Home Depot for a flexible sink drain:
Attached image(s)
Posted by: nick mironov Jan 15 2006, 01:28 PM
Rear view:
Attached image(s)
Posted by: nick mironov Jan 15 2006, 01:29 PM
Coolant accessories:
Attached image(s)
Posted by: nick mironov Jan 15 2006, 01:31 PM
Carter electric fuel pump (noisy). The heater tubes are capped with 2" ABS pipe caps - perfect fit:
Attached image(s)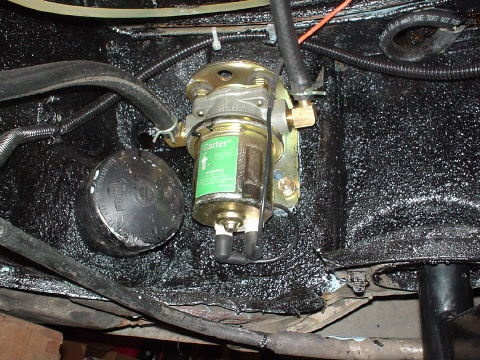
Posted by: nick mironov Jan 15 2006, 01:32 PM
Rebuilt pedal cluster:
Attached image(s)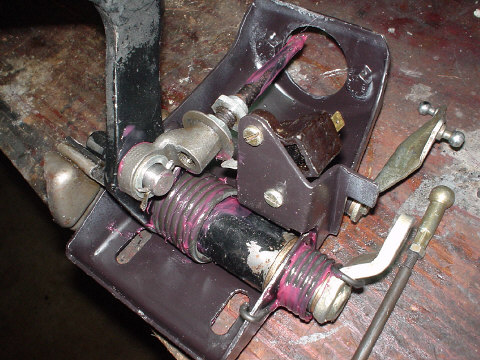
Posted by: nick mironov Jan 15 2006, 01:36 PM
Custom throttle cable. I drilled and tapped the ball joint and installed 2 set screws. The cable is 1/16". (I tried a 3/32", but it had a little trouble in the motorcycle cable tube that I used in the engine compartment to replace the existing cable tube. I replaced the plastic tube in the tunnel with a new nylon tube - aircraft quality cable guide.
Attached image(s)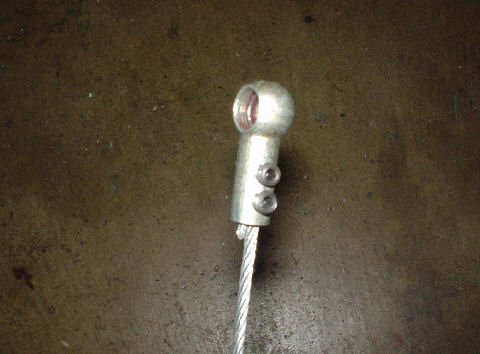
Posted by: nick mironov Jan 15 2006, 01:38 PM
Throttle cable setup at the carburetor:
Attached image(s)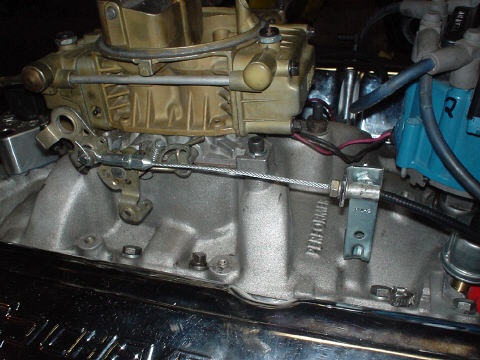
Posted by: dmenche914 Jan 15 2006, 01:38 PM
Nice!!! So the radiator air exit is thru the hood? Did you do that to keep the metal solid in the wheel wells for strength, or other reason? i wonder about the common method of cutting the wheel well, if it hurts stiffness much or not.
PS 'Got a photo of the muffler(s) to post?
Posted by: nick mironov Jan 15 2006, 01:39 PM
Muffler - sure is loud without one:
Attached image(s)
Posted by: nick mironov Jan 15 2006, 01:39 PM
Magnaflow #12468
Attached image(s)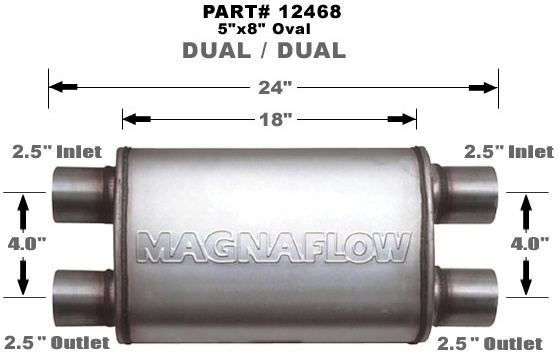
Posted by: dmenche914 Jan 15 2006, 01:43 PM
I like that muffler, i have a flowmaster mounted something like that on my Buick V6 914. It however exits out the rear of the muffler (rather than the side like yours) and has four pipes out the rear. It is loud. (i think I need ear plugs sometimes in it!)
Posted by: Crazyhippy Jan 15 2006, 02:22 PM
Very nicely done. My only concerns are:
1: The cuts made for the radiator have 90* corners. Keep an eye on them, as the metal will usually begin to tear one direction or the other from there. A smooth corner (holesaw) would have eliminated this concern.
2: Venting through the hood... I have yet to see it work well enough for me to try it, and the car looks stock externally (sleeper!!!) other than that.
Once again, very well done!!
BJH
Posted by: r_towle Jan 15 2006, 02:35 PM
Awesome job, really nice work.
Did you modify the tranny....removal of first gear...
What are your 0-60 times??? any idea?
Rich
Posted by: Dr. Roger Jan 15 2006, 02:46 PM
you can reduce the sound made by the fuel pump by isolating it with a rubber mount instead of solid mounted to the body.
i have mine "hung" by the thickest zip ties i could find and mine is absolutely quiet. looks kinda' strange but i had to please myself.
great job and yours went faster than mine. even better 

Posted by: nick mironov Jan 15 2006, 03:34 PM
As I mentioned, I have three hoods that I will be testing for venting options. if none of them work out, I will then vent through the wheel wells. I prefer to avoid cutting the wheel wells for structural integrity reduction concerns. I have some equipment available to test air flows for each configuration - under static conditions. I will am not able to test under dynamic (car moving) conditions. Once I get results, I will post them.
I don't know the performance of the car at this time. I have at least 500 miles of break-in ahead of me. Also, I just experienced an ignition system problem, which I have not yet had time to solve, so the car is not running today.
The transmission is stock and is in good shape. (I think that the car had only 60,000 original miles on it). Later this year I plan modify the transmission to taller gears.
Thanks for the info on hanging the fuel pump. Mine is already on rubber mounts, but obviously it needs better isolation. You can't really hear it as you drive, but it is annoying if you need to simply turn the ingnition to the run position. I am thinking of changing the basic fuel pump single relay to a double-interlock relay so that it engages only after the ignition switch has been in the start position.
Posted by: messix Jan 15 2006, 03:49 PM
fuel pump: it looks like the pump to bracket is isolated with rubber washers. you could also use the same type of washers to isolate the braket to body mount.
you have ignition problem? do you have constant 12v to the hei?[with ingintion turned to on]
if yes then it might be the module uder the cap below the rotor. its a good idea to have a spare to carry in the car. these can be intermitant good-bad.
Posted by: Andyrew Jan 15 2006, 03:56 PM
Hood venting will work fine only if you put a little air block/ lip at the front. Bout 1/2 to 1in tall. It lifts the air over the hole and actually creates a suction from the radiator.
Rest of the car is looking good.
Andrew
Posted by: dmenche914 Jan 15 2006, 04:16 PM
Might be worth a try taping some ribbons on the hood near vent, and see how much they move under your static test, then take it for a drive and see what they do, if they stay the same direction when you speed up, then you'r probably still flowing the right way. Frankly with your inner ducting, i don't see why the hood exhaust method wont work .
What do you have as the cover (screen?) on the outlet, can't tell form the computer. Like to see a closer up photo of how you did the hood outlet if you have one
On my car the wheel wells are cut, Last poster comment on square holes is right, rounded corners will really reduce the possibility of fatigue cracking. A square hole on the British Comet (first passenger jet, beat Boeing and the 707 into service) The squared off window on the fuselauge caused a crack too start there do to fatigue from the compression / decompression cycles. That killed a bunch of folks in several crashes until the Coments were grounded. By the time they figured it out, and rounded the windows, Boeing had taken lead with the 707, and the Comet dispite redesign, never regained the lead and sales were almost nill. A crack from a square window stopped British passenger jets form beating Boeing. Notice how all the windows on jets are rounded these days, no sharp corners.
you could round yours with a fat rattail (round) file in each corner, a 1/4 radius or so radius will help prevent cracking, it doesn't take much. and rounding is better than a sharp corner. larger radiuses are best, but would reuire the air intake hole to be made a bit wider and taller to add. (or leave size and have bulbus corners, nothing wrong with that.) I had to cut the corners round on my car, prior owner had made some square, and a crack about an inch long had started. Them again i think there is less stress int eh area you cut, the front panel is likely under a lot less stress than the wheel well section is.
Anyway neat to see someone experimenting with the hood. The cut outs in the wheel wells look like they would weaken the car. Mine are a bit big. Maybe a better idea for air exit than a big hole in the well is to drill lots of say 1/2 inch holes,a nd make a perferated panel? To late on my car, but something you could give a go if you decide to . Anyone done that?
Who did your exhaust pipes from the headers back? you or a local shop? (i got to get a quieter muffler!)
Anyway real nice conversion.
Posted by: Andyrew Jan 15 2006, 04:43 PM
Nick, I'd leave the fuel pump alone...
You want to be able to know if the fuel pump is running....
I will be doing both as far as the hood thing goes.
I'll cut the wheel well, and rivit it back in durring the summer months, and durring the rainy season I'll open the wheel wells, and put a closed hood on.
Thats MY current plan.
btw, i bet your exhast isnt that quiet one single magnaflow? ha!
bet it sounds pretty darn good though...
Posted by: twistedstang Jan 15 2006, 06:02 PM
Nice looking conversion. Looks really clean 
Posted by: nick mironov Jan 15 2006, 08:50 PM
I got the car running. Turns out that it was not an electrical problem. There was no fuel delivery. Tracked it down to a pinched fuel line under the fuel tank. I went to the gas station the other day to fill it up for the first time and the weight of the fuel in the first-time full tank dropped the tank and it pinched the fuel line. Freed it and now the fuel is flowing and the car runs great.
The hood vent screen that I am presently using consists of a perforated metal panel with 1/8" holes on 3/16" staggered centers with about 50% free area. It does not seem to restrict flow very much, but I have not yet tested it. Right now it is simply screwed on to the top of the hood. If I decide to use this approach, I will either drill the pattern in the hood I plan to use or have a friend of mine use his automated plasma cutter make the holes (if we can make it do that).
I agree, that there should be a small lip at the front to help creat a low pressure region over the hood. If I end up with louvers, they will protrude about a 1/2' to get that effect.
If I end up cutting the wheel wells, I will probably do it with multiple 1-1/2" holes (or similar) drilled with a hole saw in a staggered pattern. In any case, the compartment is well waterproofed with the POR 15 paint and Herculiner truck bed liner.
The single muffler is actually fairly quiet. You can easily talk in the car. (You can hear the he fuel pump over the engine sound). It seems to have the most resonance at idle. It is very quiet under constant speed and has a nice sound under acceleration. Overall it is very nice sound. The exhaust work was done by Tom at the Exaust Outlet in Daly City. I need to take it back to him - he placed the left exhaust pipe too close to the shifter rod and it interferes with third gear. He said that it is an easy tweak for him to correct this condition.
I don't think that cracking at the air inlet corners is going to be a potential problem, since there is no load in that area. However, taking the time to round the corners would be an easy precaution.
Posted by: Andyrew Jan 16 2006, 02:52 AM
Funny.. Mines livable and solid under idle. semi loud at cruze and if a cop hears me under full throttle... im toast. wakes up anyone near by...
I'll be designing louvers over the next couple months.. I'll post them when I get the design done... I know what I want... just cant see it.. lol
Posted by: jd74914 Jan 16 2006, 12:48 PM
louvers? like these?
Attached image(s)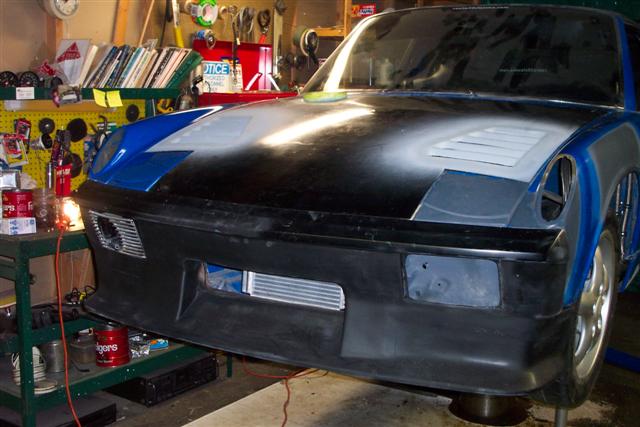
Posted by: andys Jan 16 2006, 12:56 PM
| QUOTE (jd74914 @ Jan 16 2006, 10:48 AM) |
| louvers? like these? |
jd74914,
Not to hijack, but who makes that spoiler that's on the blue car??
Andys
Posted by: jd74914 Jan 16 2006, 01:26 PM
Andy, I have no idea, the car isn't mine, but heres some more pictures. I know that its a bumper and spoiler molded into each other.
Attached thumbnail(s)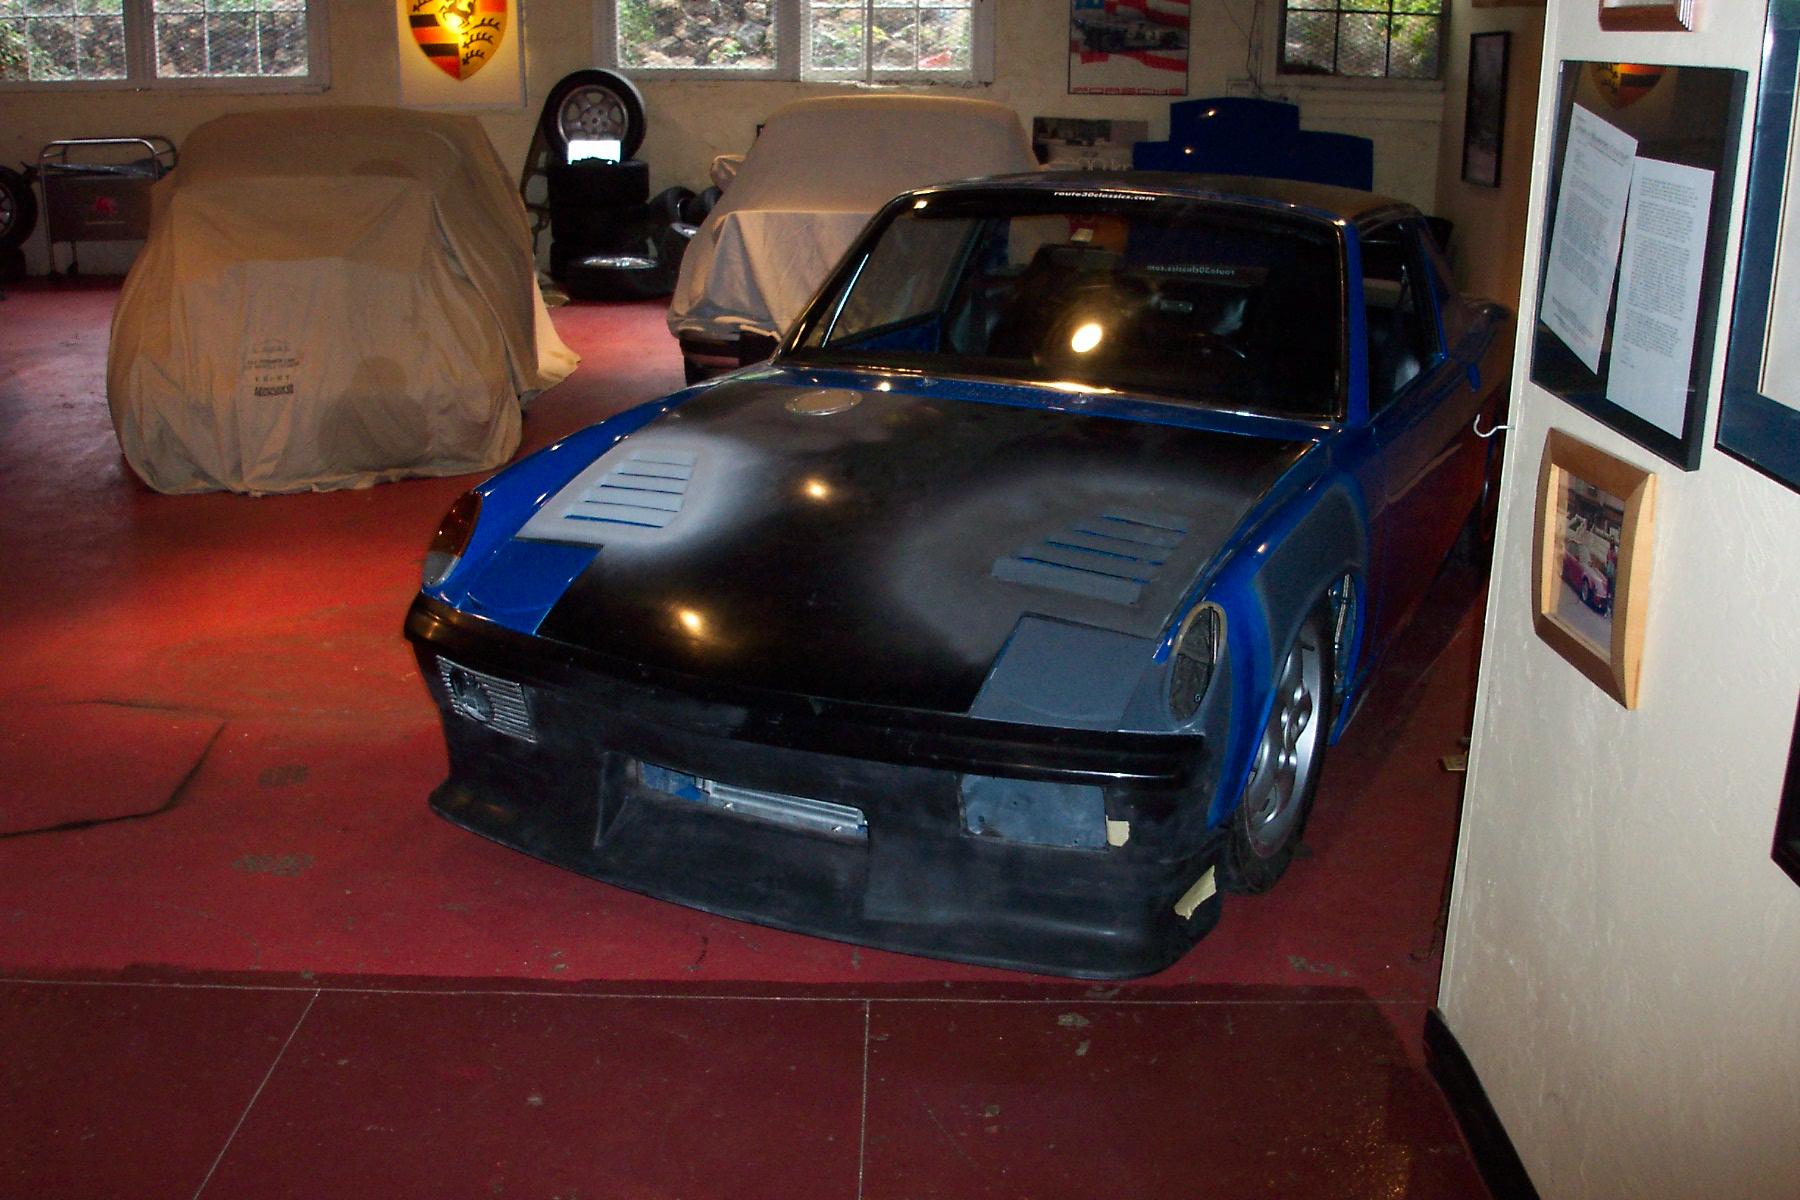
Posted by: jd74914 Jan 16 2006, 01:27 PM
And the bonding,
kinda looks like this spoiler, molded into a bumper http://www.automotion.com/productpage.aspx?pid=106450&name=914+Performance+Spoiler
sorry, hyjack over. 
Attached image(s)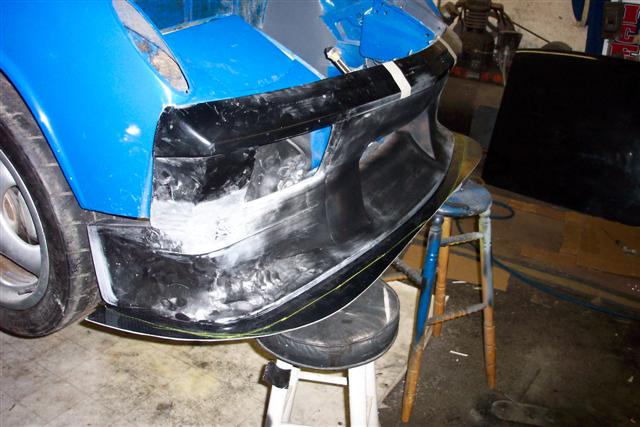
Posted by: nick mironov May 4 2007, 08:18 PM
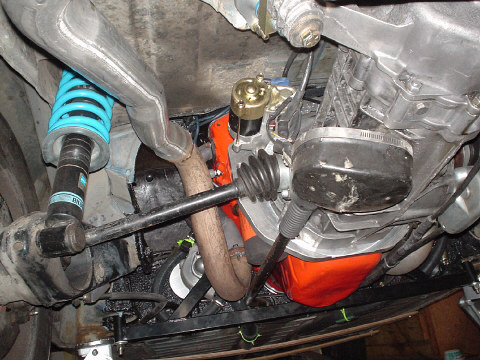
Upgraded the BMW 320i brakes to M-Calipers using Muller's hubs and 911 ventilated rotors:
Attached image(s)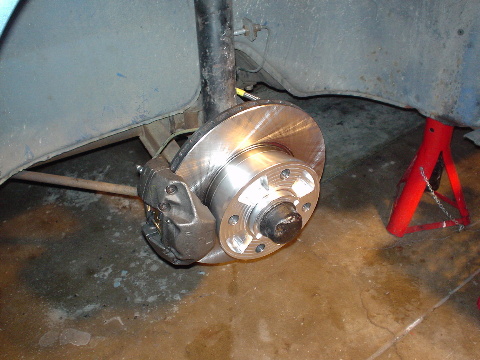
Posted by: nick mironov May 4 2007, 08:21 PM
The hood vent experiment worked, but the heat flowed back into the cabin through the front ventilation inlet. I gave up on it and vented the interior fender wells - using a hole saw:
Attached image(s)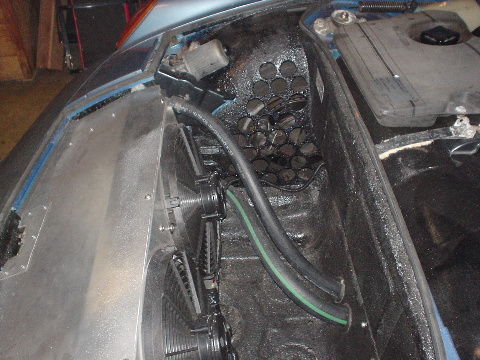
Posted by: nick mironov May 4 2007, 08:22 PM
Added an oil cooler to the engine. I mounted it horizontally on the engine support crossbar and added a scoop to direct the air flow up through it and out the top engine compartment grille:
Attached image(s)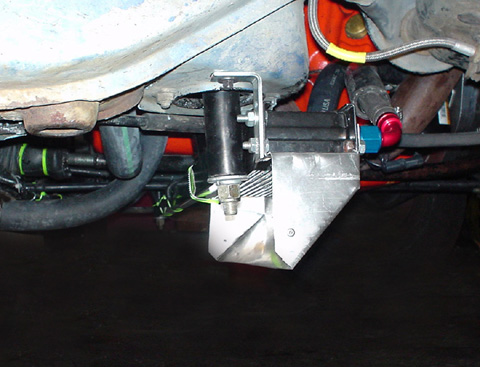
Posted by: nick mironov May 4 2007, 08:24 PM
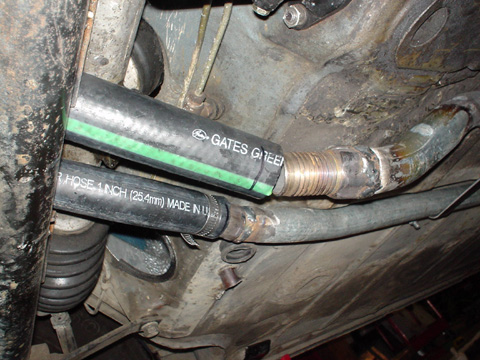
I changed the Renegade provided rubber hoses for steel pipes, custom bent to the contour of the bottom of the car, and welded hose nozzles on the ends. The return pipe and hoses are 1-1/4" and the supply pipe and hoses are 1" - Renegade recommended sizes:
Attached image(s)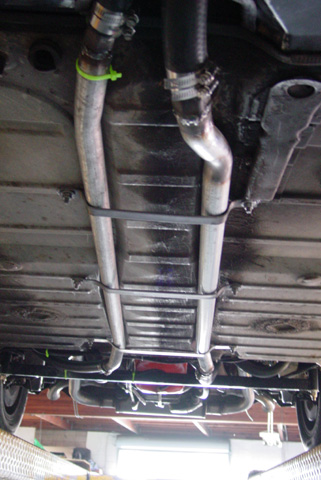
Posted by: nick mironov May 4 2007, 08:29 PM
After lots of body work, and a spray-can prime to stop rust, its off to the painter:
Attached image(s)
Posted by: nick mironov May 4 2007, 08:30 PM
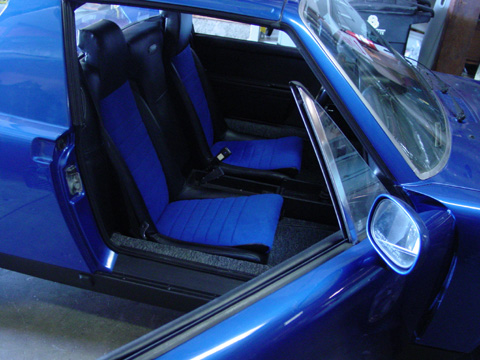
Back from the painter and finally re-assembled:
Paint color is Chrysler PT Cruiser 2005 Electric Blue Pearlcoat
http://www.914world.com/bbs2/index.php?act=ST&f=2&t=71844&st=0#entry900766
Attached image(s)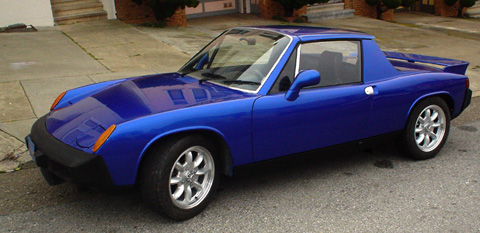

Posted by: jimkelly May 4 2007, 09:02 PM
shit - beautiful paint : )
I took my car today for it's first real tets drive - 202 miles - all seems good.
I can not hear radiator fans too good - would like a light on dash for them.
I wonder if your intake is adequate - not sure if i have seen anyone stick with the 1975/76 front bumper for a v8 conversion ??
Anyway - good luck.
I need to put in a better fuel pump and my hi torque starter when i get a chance.
fwiw - 5th gear at about 28/2900 is 65 mph for me - and i like it - my trans is stock.
under normal driving - i cruse at 3000 rpm - shift at 3500.
2nd gear is good for 0 - 40 but i shift into third before that generally : )
jim
Posted by: DSM May 4 2007, 09:23 PM
I'd imagine that short stroke 283 twist up pretty quick...huh?
Posted by: wbergtho May 4 2007, 09:23 PM
Looks like another nicely done conversion. Good show mate!
Posted by: Crazyhippy May 4 2007, 10:11 PM
The front bumper inlet is perfectly fine.
I really like the hole saw radiator exhaust... Very creative and the best of all worlds.
Great color too... I really like your car.
BJH
Posted by: Dr Evil May 4 2007, 10:30 PM
Wow, man. Just WOW. Very nice! 
Posted by: Gint May 9 2007, 08:25 PM
Found it....
That looks great Nick. More pics!
Posted by: nick mironov May 10 2007, 12:48 PM
There will be more pictures in a few weeks. http://www.914world.com/bbs2/index.php?act=ST&f=2&t=71844&st=0#entry900766 (using Autos International kits). I am taking the car to Thunderhill for a NASA event on June 2-3. Hope it doesn't break...
Already been to one PCA AX - the car is a handlful. Needs front sway bar, lowering, etc...
Nick
Attached image(s)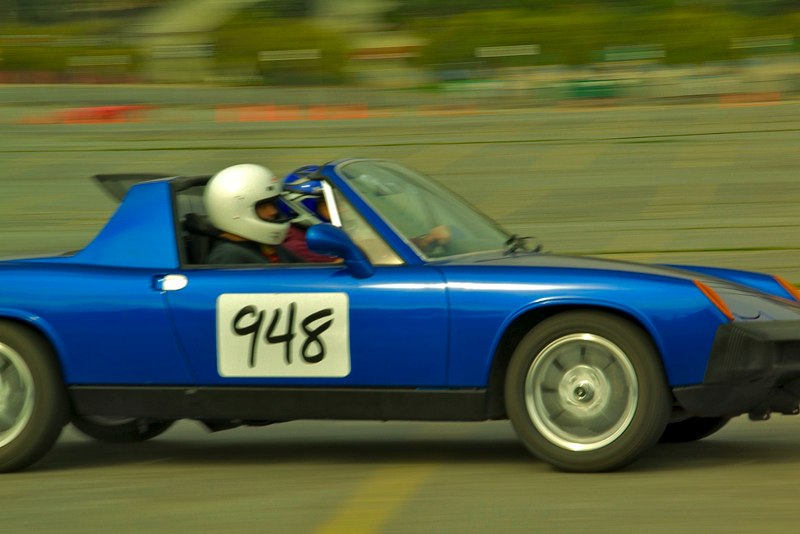
Posted by: Justinp71 May 10 2007, 01:38 PM
Looks nice... Maybe a 911 front suspension clip would help you out... 
Does anyone know the weight of a 914-v8, with the radiator and all that jazz???
Posted by: Boxer_Twins Jul 20 2008, 07:28 AM

Installed. Left side after exhaut installation. Note the rubber bellows at the shifter linkage cover - that is a perfect-fit bellows I picked up at Home Depot for a flexible sink drain:
I went to Home Depot yesterday and couldn't find this bellows. Does anybody have any specific product info on this item like an SKU or stock number or alternate source?
Posted by: michaelt55 Jul 31 2008, 06:58 PM
Installed. Left side after exhaut installation. Note the rubber bellows at the shifter linkage cover - that is a perfect-fit bellows I picked up at Home Depot for a flexible sink drain:
I went to Home Depot yesterday and couldn't find this bellows. Does anybody have any specific product info on this item like an SKU or stock number or alternate source?
Guess I will look tomorrow...
Posted by: Root_Werks Aug 1 2008, 09:31 AM
 Nice! Can't believe I haven't seen this thread before. Well done conversion.
Posted by: Wanna9146 Aug 1 2008, 10:09 AM
I know it's too late, but my Pantera has two (relatively small) hood vents that were added after the radiator was upgraded. Original Panteras did not even have these (don't ask me where the hot air went  ). The front trunk area is sealed off from the rest of the car with a thick rubber seal (kinda like our rear trunks). You can purchase these grill kits from some of the Pantera aftermarket companies (they ain't cheap, though):
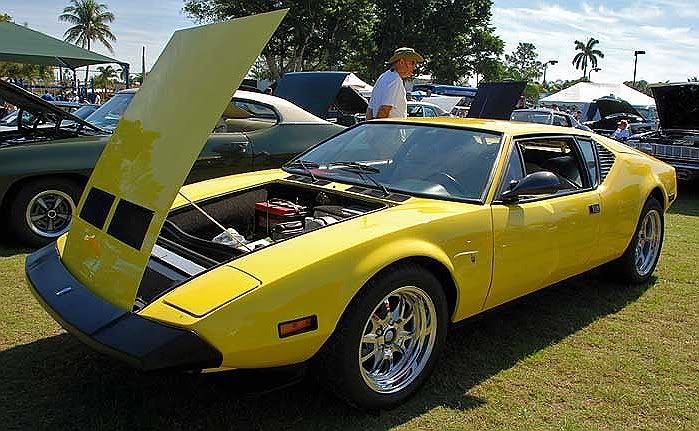
Another view (from another car):
Posted by: jt914-6 Aug 1 2008, 12:05 PM
What he was talking about with the heat getting into the passnger cabin was the hot air coming out of the louvers flowing toward the windshield and entering the fresh air vent in the middle of the windshield.
Posted by: Wanna9146 Aug 1 2008, 12:19 PM
What he was talking about with the heat getting into the passnger cabin was the hot air coming out of the louvers flowing toward the windshield and entering the fresh air vent in the middle of the windshield.
That intake should close when the A/C is running, right?
The heat inside the Pantera cabin was un-bearable, even with the A/C full blast.
Posted by: jt914-6 Aug 1 2008, 04:17 PM
As far as I know, fresh air always comes in from there. You can slide the top/air control knob all the way left and close it as much possible. When you slide the red bottom knob to the right air from the heat exchangers is let in. I would say that all 914's with AC was dealer installed and hung under the dash. As said, when using the AC you should have the top knob to the left and the red know to the left too to keep out as much hot air as possible.
Posted by: 3d914 Aug 1 2008, 05:49 PM
IIRC you also have to close the two side vents, as I remember that mine would let warm outside air in even with the controls set for closed venting.
I don't remember ever using the outside air venting. If I wanted outside air I took the top off. For warm/hot air of course one needs the venting from the heat exchangers. I think in my SHO project I'll delete this front outside vent by blocking it off.
Nice project and very well done conversion. 
Posted by: nick mironov Aug 28 2008, 05:34 PM
See dyno tests added to page 1.
Nick
Posted by: computers4kids Aug 29 2008, 08:29 AM
See dyno tests added to page 1.
Nick
Thanks for posting the dyno shots...pretty interesting. It's nice to see what you feel under the pedal in black and white. I am very interested how to go about getting a car on a dyno. Sorry, newbie in this area. As soon as my motor gets broken in I would like to dyno mine as well. First I have to figure out how to find one close to me. Couple quick questions...what does something like this normally cost? How does one know where do you stop for a max rpm...is it a judgement call what you think is a safe max rpm from experience?
Nice ride!
Mark
PS Thanks for the BMW calipers...combined with the performance pads you recommended work great!!
Posted by: So.Cal.914 Aug 29 2008, 09:22 AM
I googled So Cal Dyno testing...http://www.socaldiablo.com/Intro.html
You will know your redline when you have it dyno'd.
Posted by: 6freak Aug 29 2008, 09:26 AM
Back from the painter and finally re-assembled:
Paint color is Chrysler PT Cruiser 2005 Electric Blue Pearlcoat
http://www.914world.com/bbs2/index.php?act=ST&f=2&t=71844&st=0#entry900766
....
NICE COLOR ..NICE WORK
Posted by: fiacra Mar 28 2024, 05:16 PM
Looks like this car is now up for sale on SF Craigslist...
https://sfbay.craigslist.org/sfc/cto/d/san-francisco-porsche-914-v8/7730947828.html
Posted by: burton73 Mar 28 2024, 06:58 PM
Looks like this car is now up for sale on SF Craigslist...
https://sfbay.craigslist.org/sfc/cto/d/san-francisco-porsche-914-v8/7730947828.html
This should get moved to the Cars For sale our brothers may want to buy it for $24,000
very old postings
Best Bob B
Posted by: Root_Werks Mar 29 2024, 10:45 AM
Nice to see all these years later the 914 is still on the road being enjoyed.
Posted by: Steve Mar 29 2024, 11:33 AM
Nice car!! Good price if their is no body rot.
Powered by Invision Power Board (http://www.invisionboard.com)
© Invision Power Services (http://www.invisionpower.com)