Printable Version of Topic
Click here to view this topic in its original format
914World.com _ 914World Garage _ 86-89 Carrera steering wheel fit a 914?
Posted by: 914-8 Jan 31 2006, 01:38 AM
Anyone know how that can be made to work?
I think I've seen it done before, not sure how they did it.
The splines seem the same, but it's not just a simple bolt on. At least the spare Carrera wheel I have won't bolt into the 914, the spacing is wrong (the wheel won't seat all the way).
Posted by: Twystd1 Jan 31 2006, 05:23 AM
I have seen several iterations of the same setup..
I believe Scott Kline did the conversion with a large Sledge Hammer
and 2 pints of Tequila whilst being dressed up as a cheer leader at the last
D&G swap meet and cross dressing Ho Down....
Then again... Thats what Slits said... I wasn't there.......
MattR.....
Posted by: Rockaria Jan 31 2006, 09:12 AM
You betcha it'll work. With some slight mods to parts of it.
I cut down the crush tube a bit and retrofitted the 914 turn signal/Horn thingy so the wheel was closer to the dash so everything worked and had no gaps. If you just put it on, it will fit and bolt on with no problems. But there will be a 1 inch gap between the wheel and the sterring column. As well the horn and turn signal cancel things won't work. And the wheel will be relly far away from the dash.
But with a little work... Its worth it.


Posted by: jim912928 Jan 31 2006, 10:00 AM
I also did this, what I did is cut out, per the gap, the end piece on my 914 steering wheel. I then, with longer bolts, attached the cut 914 end onto the 911 end. Slide it on and you are up and running. This does take some precise measuring!
Posted by: 914-8 Jan 31 2006, 11:19 AM
That looks great!
But how do you secure the 914 end piece to the cut Carrera wheel?
Posted by: Root_Werks Jan 31 2006, 12:08 PM
Done it a few times. Take the 911 wheel and 914 wheel apart and shorten the 911 "web" circle cage thingy by 7/8" I think, weld on 914 splines, turn signal cancel thingy. Done it I think 3 times. Each time looking better than the last. Takes a little practice, but looks factory when your done and everything works.
Key is you need both wheels to make one. 
Posted by: 914-8 Feb 1 2006, 12:19 PM
I spent some time looking at the Carrera wheel and some other stuff that I had laying around and figured out the trick way to do this.
Remove the Carrera horn pad. You will see that there are 4 aluminum rivets holding the wheel to the stem/crush cage.
Grind off those rivets. The wheel can them be removed from the cage. What you have now is basically a wheel formatted like an aftermarket Momo! Just a flat wheel with no mounting on it.
Now, remove the rubber covering from the crush cage (that's the trim piece behind the stock carrera wheel). You will see that it has some ribs in it. Cut those ribs back (effectively opening up the diameter).
This now fits perfectly over a Momo or other standard aftermarket adapter!
Slide it on over the adapter.
Now you just bolt up the carrera wheel to the Momo adapter.
There is a slot on the Carrera wheel at the top, which just so happens to fit into the Momo adapter perfectly. Bolt those two in, and it ends up being centered perfectly. The other 4 holes need to be drilled into the carrera wheel to line up with the Momo holes in the adapter. No biggie. Put the horn pad back on and everything is covered up.
This whole process takes about an hour. No welding. No measuring and everything lines up perfectly.
When you are done, cosmetically, it looks EXACTLY like you simply bolted on a stock, unmodified Carrera wheel. And everything functions perfectly.
Posted by: ewdysar Feb 6 2006, 06:56 PM
914-8, Is this the kind of adaptor that you used?
Eric
Attached image(s)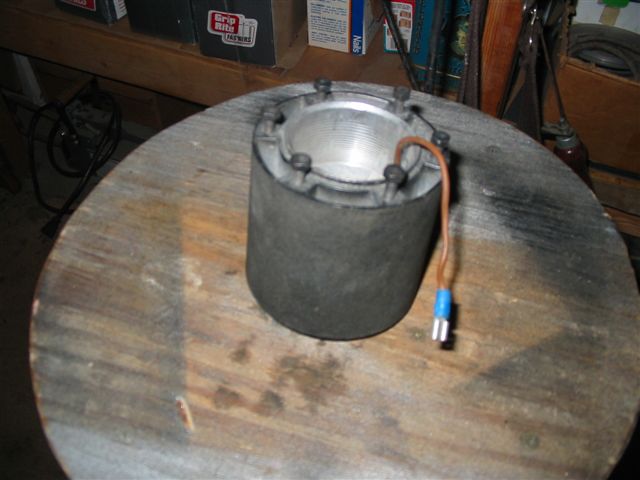
Posted by: ewdysar Feb 6 2006, 06:57 PM
Other end...
Attached image(s)
Posted by: 914-8 Feb 6 2006, 09:58 PM
Yup, that's it.
Powered by Invision Power Board (http://www.invisionboard.com)
© Invision Power Services (http://www.invisionpower.com)