Printable Version of Topic
Click here to view this topic in its original format
914World.com _ 914World Garage _ Rust repair Questions
Posted by: rjames Feb 18 2006, 05:56 PM
Rust treating, killing, etc, and just want to get some input before I get to crazy with the MIG.
Here are some questions:
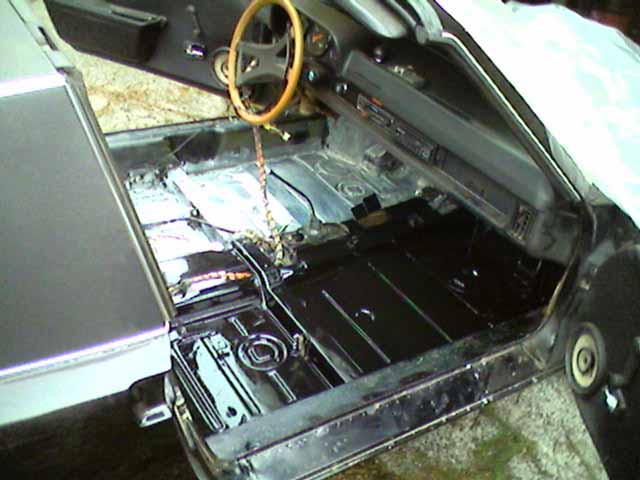
I have some floor pan issues. Are the holes too big just to try and fill? The following photo is from the driverside, under the seat after the tar has been removed, and I've grinded down to bare metal. Should I advertise for someone who's cutting up a car to cut this pieces out for me, or should I just go buy some sheet metal and make a patch knowing it won't really match, but can at least be made to 'line up'?
Attached image(s)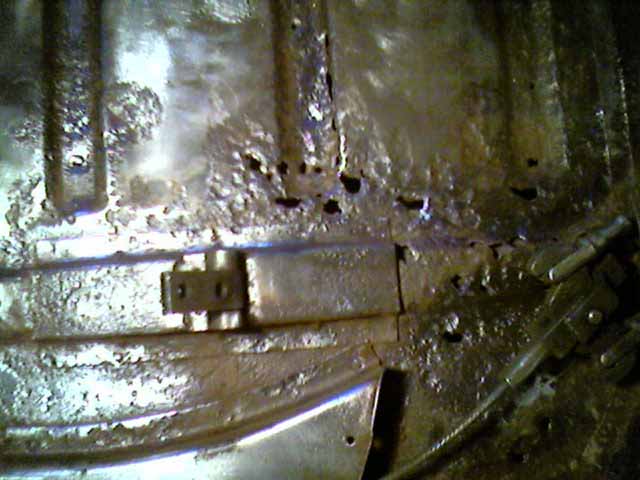
Posted by: Hammy Feb 18 2006, 06:01 PM
You can buy new replacement floor pans.
Also any car that's in the "parts" car condition probably won't have floor pans any better than yours. 
Posted by: scotty b Feb 18 2006, 06:02 PM
do yourself a favor and get a new pan section. That piece is pretty eaten up and if you try to weld up the holes you'll just burn through the surrounding areas. Gaurantee!
Posted by: rjames Feb 18 2006, 06:05 PM
Next set of questions:
Do I just cut the jack plate out? And leave the rocker as is except for using Metal Ready on it?
There are a few holes in the inner rocker panel as you can see in the photo, but can I just cut these out and weld a new patch in? Or should I really cut into the whole thing with the idea that there might be rust (might, that's a laugh) on the inside that will need to be treatd as well?
How do I cut the plate off? Just use a Sazall and/or snips, or do I use the welder to 'melt' the existing welds so I can pull it off?
There is also rust at the top of the inner rocker along the length of the driver side where it meets the door threshold (I think this is the correct name.) The door threshold all but covers it up in the photo- Do I just apply metal ready to this area?
Attached image(s)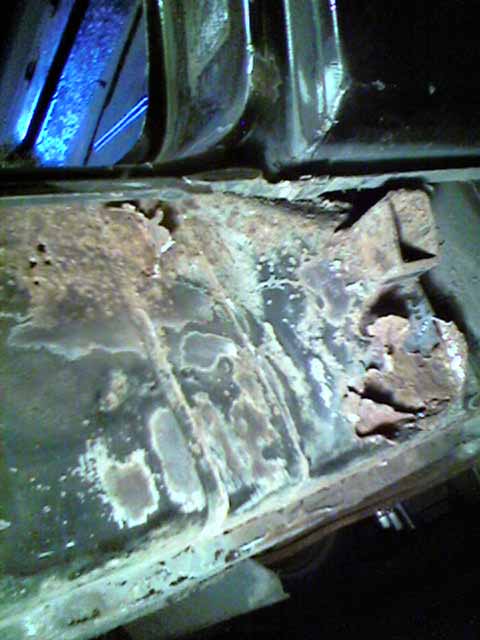
Posted by: scotty b Feb 18 2006, 06:11 PM
Cut it out, treat inside and replace with a new piece of metal. If the inside isn't eaten up, you could simply bend a pice of 18 gauge to the outside shape and weld it on. Jack post doesn't need to be there but the metal under it does.Spend the $25.00 and buy OSPHO for the inside, it is a helluva lot better than the cheaper stuff but it will f-up you senses if you take a good wiff of it so wear a mask!! Give it ample time to dry before enclosing it and make sure the edges of the metal don't have any on them.
Posted by: scotty b Feb 18 2006, 06:16 PM
you need to do something with the upper left portion of that pic as well, looks like you've got some serious issues building up in that rocker  when you get the section cut out, put a blow chuck up at the front vent hole of the rocker (inside the car by your left foot) and blow towards the rear of the car to clear out any rust or debris that may be in there, and if possible spray some of the OSPHO into the whole rocker.
Posted by: rjames Feb 18 2006, 06:23 PM
| QUOTE |
| you need to do something with the upper left portion of that pic as well, looks like you've got some serious issues building up in that rocker when you get the section cut out, put a blow chuck up at the front vent hole of the rocker (inside the car by your left foot) and blow towards the rear of the car to clear out any rust or debris that may be in there, and if possible spray some of the OSPHO into the whole rocker. |
Sounds good, but is the tube that's inside the rocker all metal, or is it some
kind of foam hose or something. I don't want to mess it up, and I've seen pictures
that seem to show some kind of material other then metal that's used for the heater
hose in there.
Scotty b, thanks for the info, and more questions if yer up for 'em:
The rust at the top runs along the entire rocker towards the front of the car. I wasn't able to punch holes in it with a screw driver, so my hope is that the rust is all on the outside. However, I can't get to it with the grinder either because it's tucked in under the door sill, so I would love to just be able to treat the outside of the majority of the long with something. Is OSPHO like Metal Ready? Or does it work differently/better?
Posted by: rjames Feb 18 2006, 06:35 PM
| QUOTE |
| Cut it out, treat inside and replace with a new piece of metal. If the inside isn't eaten up, you could simply bend a pice of 18 gauge to the outside shape and weld it on. |
So many questions....
18gauge? Cool. Can someone tell me what guage the inner wheel well metal is? I have to cut a new piece to replace the metal where the battery tray is (was) welded to. Thanks, and I know I'm going to have more questions... This board ROCKS.
 I would have never even attempted any of this without reading all of the other posts on here of people who have already done this making it seem doable.
Posted by: sk8kat1 Feb 18 2006, 06:39 PM
OSPHO?
Posted by: elocke Feb 18 2006, 06:57 PM
I just measured a piece that I trimmed off a Restoration Design upper wheelhouse panel at roughly .04". I've done most of the work that you're facing and you've got some good advice. Welding pitted metal is not fun, especially if you're learning to MIG.
Here's a pic of my right long after I cut out all the crap.
Ed
Attached image(s)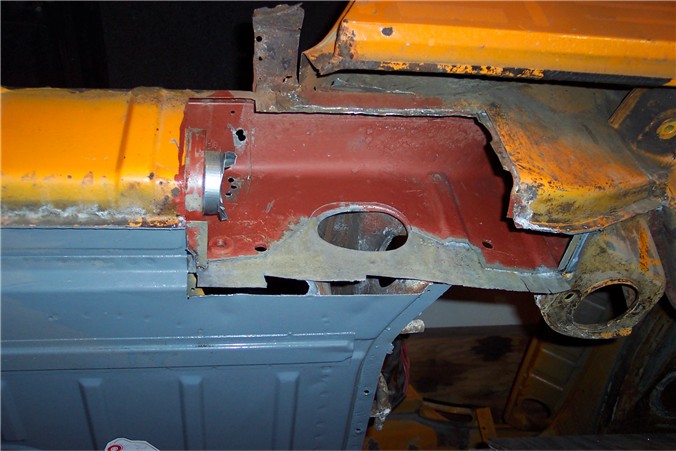
Posted by: rjames Feb 18 2006, 06:58 PM
I was looking at the floor plan that restoration design sells, and looks like there isn't a place to weld the part that the seat attaches to, or am I missing something?
Attached image(s)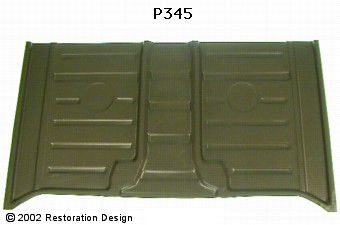
Posted by: Bartlett 914 Feb 18 2006, 07:03 PM
The seat mounts are extra. They are not on the site but resto carry them. There is also 2 reinforcment strips mounted underneath. Restro carrys them also. Ask and they wild spot welt them in for you.
Posted by: rjames Feb 18 2006, 07:28 PM
| QUOTE |
| just measured a piece that I trimmed off a Restoration Design upper wheelhouse panel at roughly .04". I've done most of the work that you're facing and you've got some good advice. Welding pitted metal is not fun, especially if you're learning to MIG. Here's a pic of my right long after I cut out all the crap. Ed |
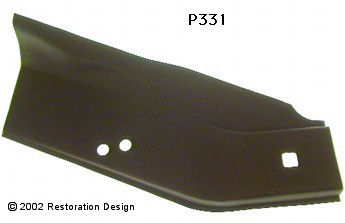
Ed, that piece that you're going to have to weld in (the part of your longs) is it this part from Restoration Design?
Attached image(s)
Posted by: scotty b Feb 19 2006, 07:13 AM
Sorry about the delay, I had a dinner date last night (moms birthday) If you don't want to completely remove and replace the outer rocker (I'm sure you don't) you really should get someone to sandblast that upper edge to get the metal perfectly clean. Then you can very carefully weld up those small holes, but like I said before, be prepard to burn through alot! Take your time and don't let the metal heat up to much. OSPHO ia a phosphoric acid that attacks and neutralizes the rust, it also forms a barrier to prevent it from restarting. Been used in restoration shops for years. About $25.00 per gallon, and is water consitency so it can be sprayed through a cheap paint gun. First and foremost cut out the section around the jack post and look in the tunnel VERY well with a light to make sure the inner rocker isn't rusted through as well. If it is car is proably not werth fixing.As for the lines running inside the tunnel it is a cardboard(esque) tube and you need to be careful when cutting through the outer skin not to hit it. Most of the structural metal on these cars is 18 gauge whiile the body metal is 20 gauge (I think)ONe other thing on the OSPHO, if it is in an area you can easily access you would be best off to let it dry for a day, come back with a brush and some water to clean it with, this will neutralize the acid in it, and then paint over it with your etching primer to ensure a good repair.
Ospho link:
http://www.ospho.com/directions.htm
Posted by: elocke Feb 19 2006, 09:14 AM
Hey; that was my 100th post 
That's pic is the lower wheelhouse. Here's a pic of the upper being installed.
Ed
Attached image(s)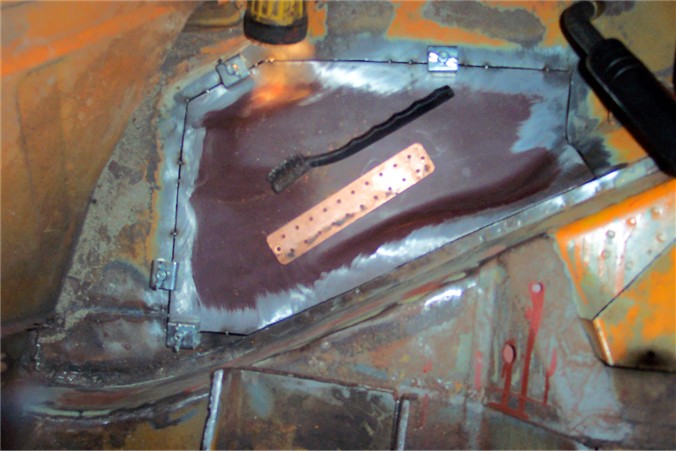
Posted by: rmital Feb 19 2006, 10:08 AM
| QUOTE (rjames @ Feb 18 2006, 03:56 PM) |
| Rust treating, killing, etc, and just want to get some input before I get to crazy with the MIG. |
Very timely post for me...I should be doing similar work to the rocker area in the next week or so. Post your progress if you could. Pics would be great.
Thanks to all the info.....
Ray
Posted by: vesnyder Feb 19 2006, 10:23 AM
I bought my drivers side floor pan from Stoddards's - and it came with the floor latches. I am local to Stoddard's, which made it easier - but it was the cheapest I could find!
Posted by: abearauto Feb 19 2006, 10:59 AM
 JUST A LITTLE TIP ON WELDING HOLES WITH A MIG, GET A PIECE OF COPPER PLATE, AND PUT BEHIND THE HOLES WHEN YOU MIG THEM, THE MIG WONT STICK TO THE COPPER AND LESS LIKLY TO MAKE THE HOLES BIGGER, CAN ALSO ADJUST THE WIRE FEED ON THE MIG TO PUT OUT MORE THIS IS BETTER TO FILL WITH, SEE IF YOU CAN FIND A PIECE TO PRACTICE ON TO GET THE MIG ADJUSTED RIGHT, GOOD LUK STEVE
Posted by: elocke Feb 19 2006, 01:08 PM
Woops...I just reread this and realized I misread the question. I didn't use a RD piece to fix the left (not right as I mis-indicated) long. I formed pieces to resemble the factory "layers". I didn't want to rip into the area under the front of the fender because I think to install the RD piece properly it seems you need to cut some of the fender off. I took lots of pics of this work so here are a few. If you need more let me know.
Ed
Attached image(s)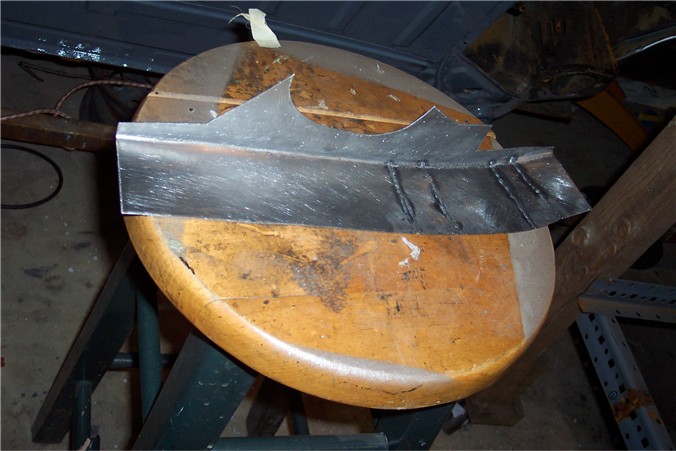
Posted by: elocke Feb 19 2006, 01:10 PM
Here's that 1st layer installed.
Attached image(s)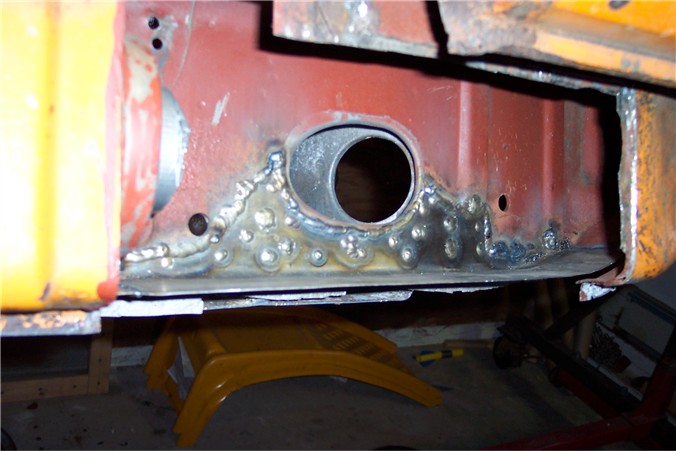
Posted by: elocke Feb 19 2006, 01:12 PM
Then the bottom layer with flange to meet the outer rocker.
Attached image(s)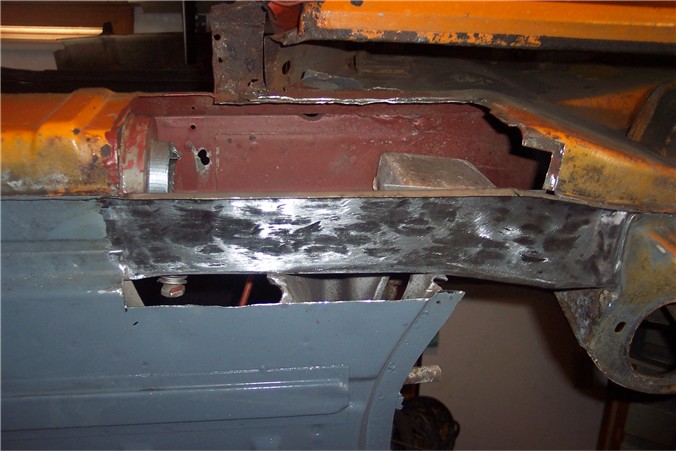
Posted by: elocke Feb 19 2006, 01:16 PM
This piece is the end of the outer rocker, shaped like the original and with a flange to overlap with the lower wheelhouse piece. I almost forgot to put the heater tube back in; duh
Ed
Attached image(s)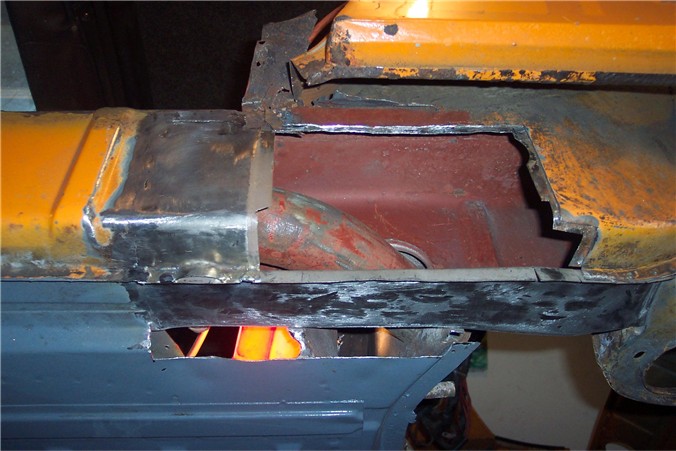
Posted by: elocke Feb 19 2006, 01:22 PM
This piece overlaps the outer rocker, as will the next, which yields an area of 3 layers. I left a small sill on the edge of the piece to sit the final lower wheelhouse-type piece in after grinding.
Attached image(s)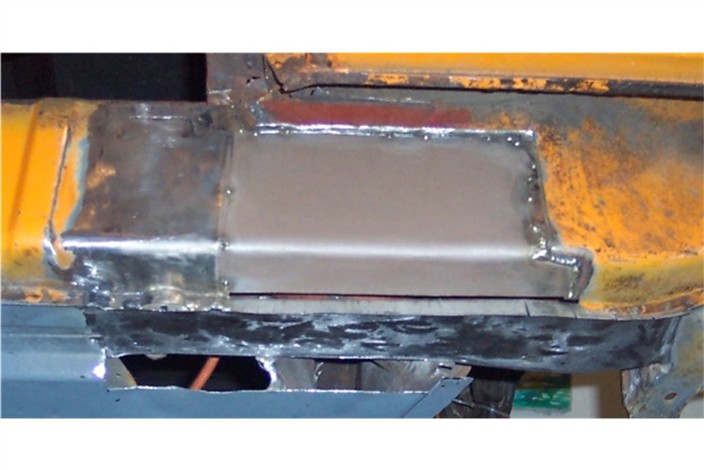
Posted by: elocke Feb 19 2006, 01:23 PM
Outer layer installation.
Attached image(s)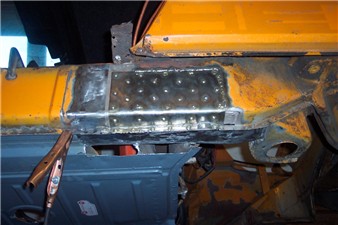
Posted by: elocke Feb 19 2006, 01:27 PM
I didn't make the parts with the dents for the jack tube on purpose. Now I wish I had...oh well. The thought was to make it at least as strong as factory.
Attached image(s)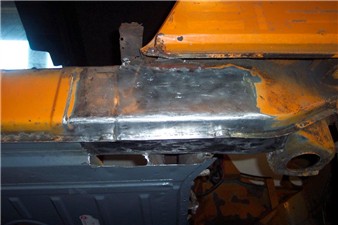
Posted by: rjames Feb 20 2006, 12:15 AM
Ed- Fantastic job you're doing!!
How did you cut out the layer of metal without disturbing the layer behind it? (see below pick).
Are you using 18 gauge metal for this?
Also I'd be interested in knowing what you (or others) are using to cut the sheet metal pieces. I bought some metal snips today, and it seems like it would be very difficult to actually cut any long pieces of metal with them.
Attached image(s)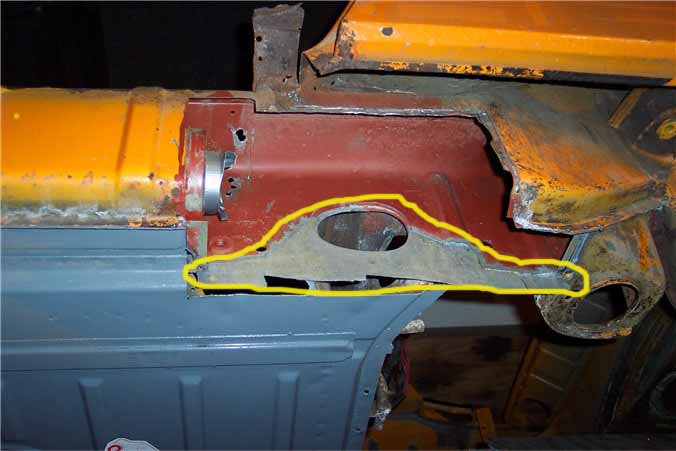
Posted by: rjames Feb 20 2006, 12:37 AM
Figured I'd attach a couple of pictures of the shiny parts of the floor pans. I haven't treated them yet, and I got them down to the bare metal just using a 1/4" drill and a lot of different attachments. I was going to use the metal ready, but seeing as the OSPHO is getting rave reviews, I went and picked up some. The stuff was only 13 bucks for a 1/2 gallon. Pretty cheap. I plan to coat it with black cololred POR15 afterwards.
Attached image(s)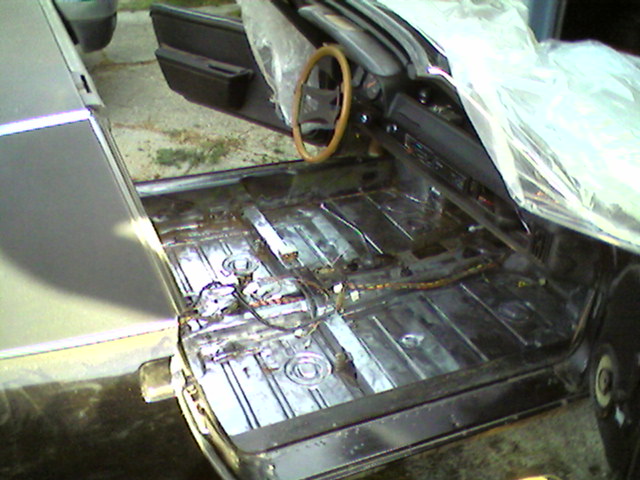
Posted by: rjames Feb 20 2006, 12:39 AM
'nother. Stupid camera phone isn't the best for taking pictures...
Really the only issues are with the driver's side, rear area. The rest of the pan is good all around, with hardly any rust pitting if any, at all.
Attached image(s)
Posted by: elocke Feb 20 2006, 09:25 AM
Thanks...this was the pinnacle of the rust repair work. I think I used 20 gauge (.036). I cut the outer layer using a dremmel w/cutoff wheel (lots of 'em), drill for spot welds, snips to cut the new pieces and roughly cut old pieces out, hand-held hacksaw blades. I hardly ever used my 41/2" cutoff tool...too jumpy. I used a vise and ball peen to make bends. Cuts and welds for more complex shapes. I had looked into building my own bending brake and buying a bead roller but never did. I treated the pieces with Metal Ready and primed the weldable edges with weld-thru primer. This was before I tried Ospho. The red in there is Eastwoods rust encapsulator, which I sprayed into both rockers before I found (or started looking for) rust. I've got tons more pics of other rust repairs...under the gas tank, front of both rockers, f & r trunk, front bumper mounts, hell-holel, door sills, lower door jamb. Let me know if you need more.
Ed
Posted by: turbo914v8 Feb 20 2006, 11:50 AM
I have these parts put together as one. I purchased it new and ended up not using it. It’s up for sale $100.00 US plus shipping. PM me if you need it and your interested.

Posted by: rjames Feb 21 2006, 01:19 AM
| QUOTE |
| This piece overlaps the outer rocker, as will the next, which yields an area of 3 layers. |
Ed, why 3 layers? Did you feel this was necessary for added strength in this area?
I really appreciate all the info.
Tomorrow I will start cutting out the bad stuff. I lucked out and found a sheet metal place that was willing to give me scraps in trade for beer and/or dougnuts. Not a bad deal!
One question on the weld-through primer, it's only used on places where 2 pieces of metal are overlapping, or 'sandwiched' together, right? Is it only applied only exactly where welds are going to happen? Does it also protect from rusting?
I'll post pics as the process continues tomorrow.
..and Turbo- thanks for the offer. It looks as though you have the sheet metal for the passenger side. At the moment it looks as though I've only got mild surface rust in that area, nothing that would require any cutting out of metal. However, if this changes I'll keep you in mind! Thanks!
Posted by: elocke Feb 21 2006, 09:04 AM
I basically copied the factory layout. When I cut out the rusty stuff, I observed what the pieces looked like and how they connected and did it that way. This results in 3 layers at the interface of the back edge of the outer rocker, the inner layer, and the lower wheelhouse front edge.
I could have just slapped a thick piece over the rusted area or the long repair kit from RD but I was paranoid that I'd still rust from the inside out.
Here are some methods I used as far as metal treatment goes. This could be the wrong way and I'm sure there are better ways. THere are several metal treatment products, all with their own +'s and -'s. At first I was spraying the entire repair piece with weld-thru primer. I'd strip as best I could the surface on the car that I was welding to and apply metal ready. Then I'd mask off the weld area, apply the primer, and weld. Then I decided to treat the entire patch piece with metal ready, mask off the weld area, apply weld primer, and weld. Weld thru primer is a pain to weld. It seems to me (right or wrong) that have to turn up the heat or weld for longer. So basically my thought was to use the weld primer at the weld joints and metal ready for the rest. My intension was then to spray the insides again with either POR15 or Eastwoods rust encapsulator, which I haven't done yet. I have a great Pelican article on drilling holes in the longs and spraying the insides with a wand.
I'd love to hear some feedback on rust protection on repairs because I still have some doubts as to how I did it.
Ed
Posted by: lotus_65 Feb 21 2006, 10:13 AM
assuming the following:
repairs have been *reasonably* well done,
rust inhibator used where *reasonably* possible,
the car only sees water from car washing and an occasional rainstorm,
how much more is it going to rust? i guess i'm just getting a little freaked by this dialog...
Posted by: rjames Feb 21 2006, 01:00 PM
My guesses:
If there is rust still present, then that area is going to keep on rusting unless fully 'encapsulated'. Bare untreated metal will rust eventually as moisture gets to it (regardless of whether you are the one splashing the water on it) due to humidity in the air.
Posted by: rjames Feb 26 2006, 03:27 PM
| QUOTE |
| I treated the pieces with Metal Ready and primed the weldable edges with weld-thru primer. |
More pictures of the progress: I metal readied the floor pans, and then Applied black POR15 over all but the rear driver's side pan which pretty much needs to be completely cut out:
Attached image(s)
Posted by: rjames Feb 26 2006, 03:28 PM
'nother
Attached image(s)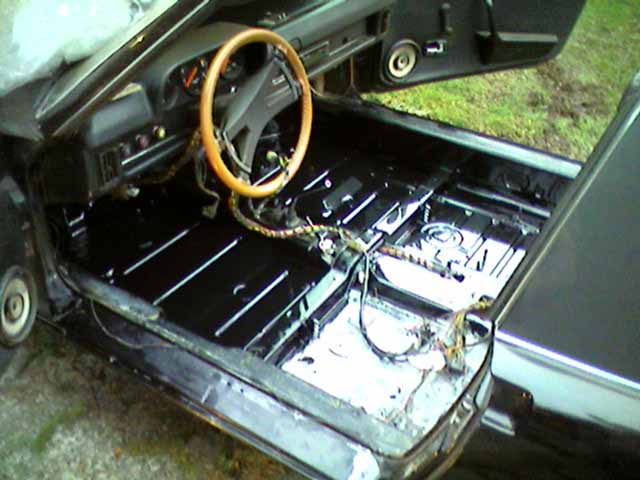
Posted by: rjames Feb 26 2006, 03:28 PM
..
Attached image(s)
Posted by: rjames Feb 26 2006, 03:30 PM
I need to cut this piece out due to too many holes. Anyone cutting up a car? I'll probably need to order from RD.
Attached image(s)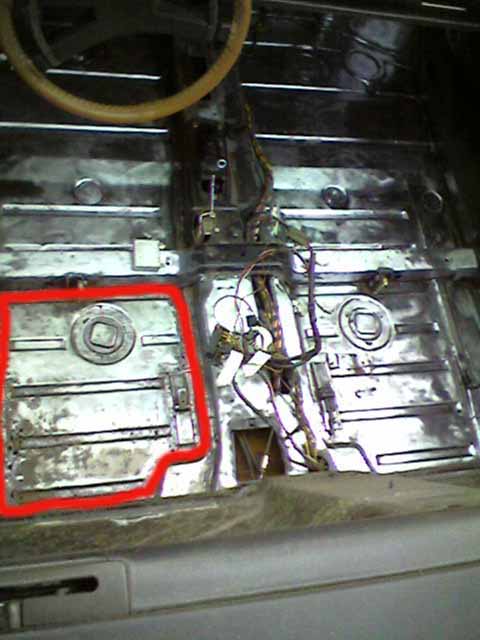
Posted by: rjames Feb 26 2006, 03:36 PM
Also a couple of more questions for anyone and everyone:
1) In order to remove a section of the door sill to cut/reweld part of the longs,
do I just drill out the spot welds and then make the cut above the section I need?
And if so, how do I put it back in when there will then be holes drilled through where
the welds were? Do I have to fill all of the holes on the part of the sill I cut out so
I can then have something to weld to? (I'm probably not explaining my question very well..)
2) if using metal ready, do I really need to use weld-thru primer also?
3) According to the POR15 directions, I am supposed to apply at least 2 coatings of the stuff. Is this really necessary on the floor pans? It also says to apply additional coats 3 hours after applying the previous coat, when it's still slightly tacky. If I do need to apply another coat, the previous coat has been drying for 24 hours now. Is it too late to apply a second coat?
that stuff is no fun to work with btw. However seeing shiny black on my floor boards when the stuff was wet makes me want to repaint the entire car.... 
Posted by: scotty b Feb 26 2006, 05:57 PM
drill out the spot welds with a good spot weld cutter, thenremove the panel. You will more then likely need a chisel and hammer to cut the outer portions of each spot weld loose since the cutter won't get it all. Hole saw type spot weld cutters will do the job but not nicely, they want to walk around and will eventually break a tooth (teeth) making it useless. Most body shops carry a nice bit that is about 20.00, but it will last and is a traditional style bit. After applying the metal ready and welding, simply apply another coat over the weld and inbetween the panels if you can, then cover it with a suitable sealer coat.You will have to watch when you break throught the outer piece of metal and stop in order to not go through the inner section. This will allow you to re-weld the sill  t
t
Posted by: rjames Feb 27 2006, 01:46 AM
[/QUOTE] drill out the spot welds with a good spot weld cutter, thenremove the panel. You will have to watch when you break throught the outer piece of metal and stop in order to not go through the inner section. [/QUOTE]
Thanks Scotty-
ahhh so obvious I should have figured that out. My brain must be working at only 1/2 speed- maybe that's from breathing in the POR15 stuff the other day. 
I got the hell hole cleaned up. I had to remove the battery tray as I found some holes in the sheet metal where the tray is welded to the sidewall. I will cut and fab new metal to weld soon. Happily though, that seems to be the only major problem in this area, no holes down below to the longs or to the passenger side firewall! Sweet!
Attached image(s)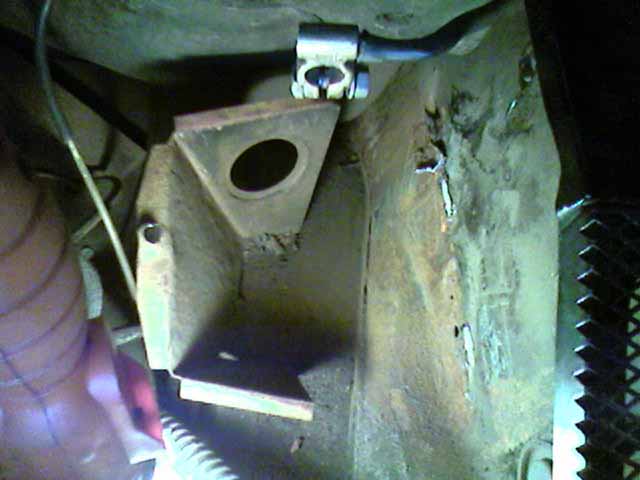
Posted by: rjames Feb 27 2006, 01:46 AM
Pretty clean!
Attached image(s)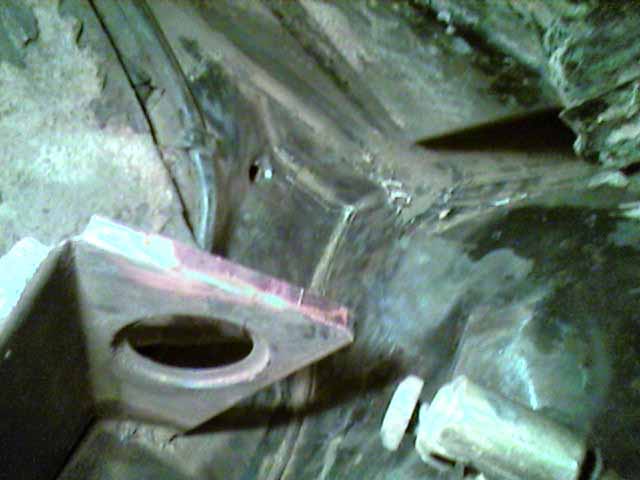
Posted by: rjames Feb 27 2006, 01:47 AM
hell holes to be repaired...
Attached image(s)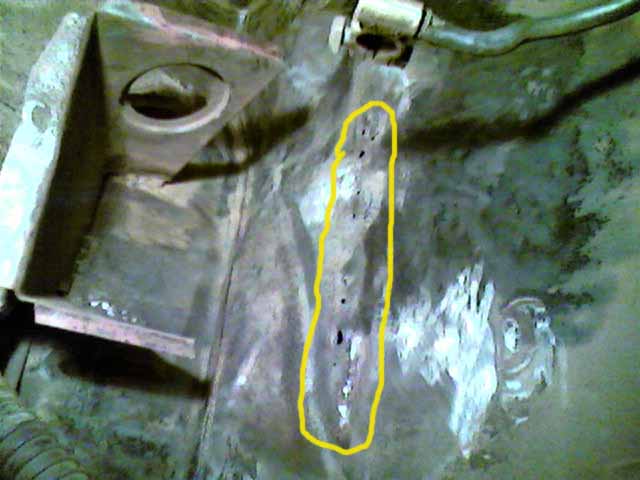
Posted by: porsha916 Feb 27 2006, 07:31 PM
Thats quite a project, building your own rust free 914!! If I get down your way I will give you a call and stop by! How much longer will take before the 914 is driveable again?
Take Care
Bill
Posted by: rjames Feb 27 2006, 10:12 PM
Yeah, I got inspired by looking at all of the other posts on here, took a welding class, sold some stuff so I could afford a welder...and here I am. Who knows I might be able to pull it off, too?
Of course 'rust free' it will never be, but I'll do what I can- I at least want to make sure it's not going to break in two 
Hoping to have the car drivable within a month or so. Who knows, maybe I'll be able it up to Everett for the races after all!
Call anytime Bill, it'd be great to have an opportunity to return the hospitality!
Powered by Invision Power Board (http://www.invisionboard.com)
© Invision Power Services (http://www.invisionpower.com)