Printable Version of Topic
Click here to view this topic in its original format
914World.com _ 914World Garage _ 914 power windows
Posted by: Dr Evil Mar 20 2006, 08:55 PM
Hey all,
I just recieved my power window kit today and figured that I would post pics of my install/trial so you all could make up your mind if you wanted to get the inexpensive universal kits from ebay. If this install and action is successful I will have one kit available for sale with everything you need, but lets see how it works first. 
(I am not at my home computer so I can not post the pics yet...I will post one of the install tonight when I get home)
Posted by: jim_hoyland Mar 20 2006, 09:10 PM
Good idea.
Posted by: 736conver Mar 20 2006, 09:32 PM
I saw a cool idea in a hot rod magazine last night. They used the window crank as the switch for the electric window. Nice stock look and you still get power windows with no obvious switches.
Posted by: Dr Evil Mar 20 2006, 09:51 PM
The handle activated would be neat.
Here is a pick of the motor assembly:
Attached image(s)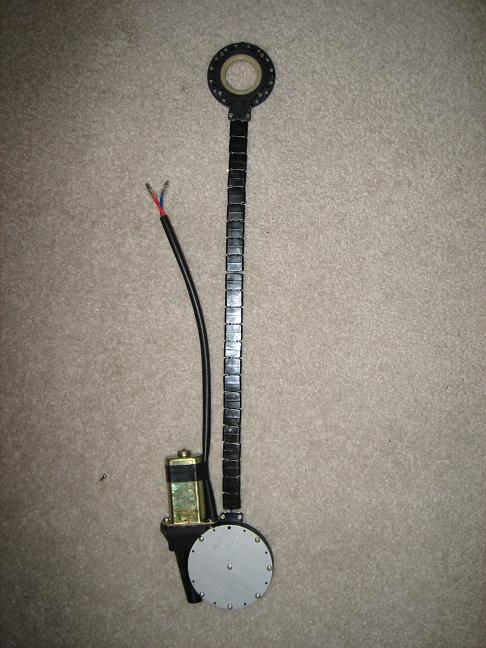
Posted by: Dr Evil Mar 20 2006, 09:52 PM
Here is one of the illuminated switches that comes with it:
Attached image(s)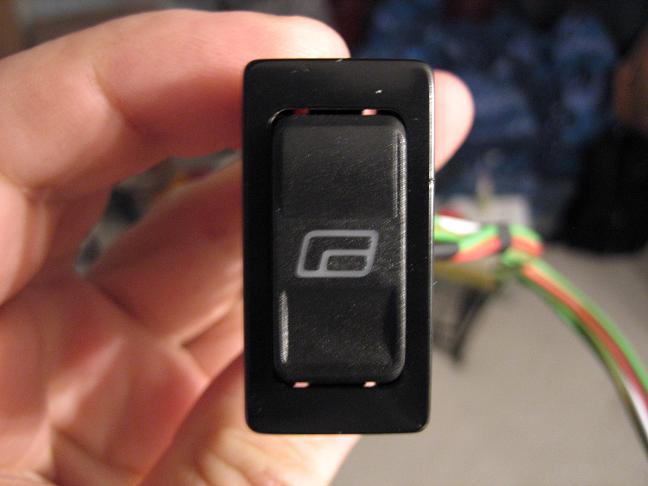
Posted by: Dr Evil Mar 20 2006, 09:54 PM
Here is the unit almost all of the way installed. Note- I will be trimming mounting tabs at the red lines and may need to cut the door at the green lines to keep the profile down. I will see about the last part when I trial fit my new door panels.
Attached image(s)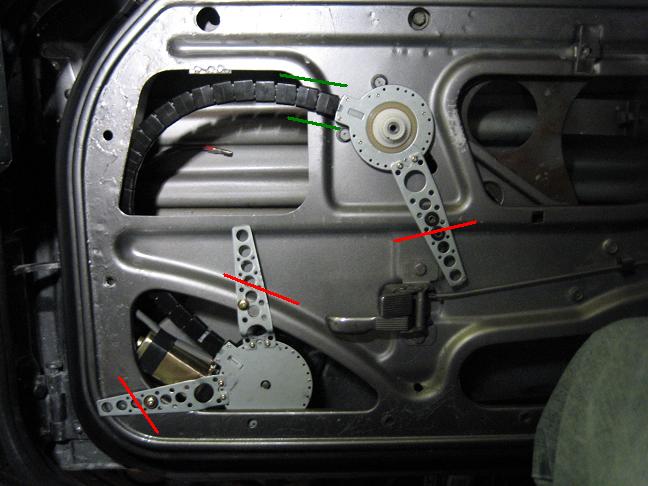
Posted by: Dr Evil Mar 20 2006, 10:04 PM
If there is anything in particular you want to know, want close ups of, etc post your questions here. I will be happy to accomodate. 
I am going to bed now, early day tomarrow.
Posted by: Grimstead Mar 20 2006, 10:10 PM
Thanks for posting this Mike. I’ve wanted to add power windows to my 914 for many years.
My main concern (and I’m sure you’ll be able to answer this when they’re done) is that I hear most of these kits wind the windows pretty s..l..o..w..l..y.
PS, post Lots–O-Pics!
![popcorn[1].gif](http://www.914world.com/bbs2/html/emoticons/popcorn[1].gif)
Posted by: tyler Mar 21 2006, 09:37 AM
The other issue is ho easy do the windows have to operate manually to be able to be powered. I know mine are really hard to roll up even after cleaning and greasing. Do you think the motor will power through the range?
Posted by: Dr Evil Mar 21 2006, 09:48 AM
Tyler,
that is a good question. You can also adjust your vent window channel to help ease your window movement. There are many adjustments to do to get it nice and smooth. Look into it as your window should not be hard to roll up and leaving it that way will cause premature fatigue of your parts.
Posted by: 914fan Mar 21 2006, 10:48 AM
how does this interface with the crank gear? Is there a picture of what is not needed from the original set up? Does this just go over there the crank handle goes? I guess I want to know hoe it works overall.
Will this work for later doors or earlier doors or both?
Posted by: Dr Evil Mar 21 2006, 11:02 AM
Theoretically it should work on old as well, but I have no proof as of yet.
I will take some pics of the interface tonight to give you more clarity.
Posted by: Dr Evil Mar 21 2006, 11:29 AM
I thought that I would add some contrast in kits and prices. All ofthe universal kits come with the same adaptors and such. the main difference is the design adn in some kits the possibly the power.
If you do a search for SPAL kits on the net or ebay you will get many hits with varried prices and extras like switches and such.
Here is one with two motor options and without switches:
http://www.commandoalarms.com/itmidx3.htm
And another of the same variety:
http://www.autodax.com/products/powerwindow/spal-2.htm
These are by no means the cheapest suppliers of these kits as I have seen them for less. Just to let you know that they are out there.
Other brands may go for less (like the one I bought). SPAL is the name brand in power window conversion kits so they are usually more. I have heard no complaints about the SPAL, but lets see what the competition has to offer
Posted by: Flat VW Mar 21 2006, 01:10 PM
Wow, pretty simple looking, sweet parts.
I did not look at the links, Mike, but how much added weight?
It can't be much.
John
Posted by: Dr Evil Mar 21 2006, 01:20 PM
Hey John,
I don't know exact added weight, but i woudl. assume 10-20# to be a good range. I am being generous in my guess as weight was not an issue to me. I may be able to weigh it when I get home if I can find my scale 
Posted by: Dr Evil Mar 21 2006, 03:44 PM
Time for some answers:
John,
I was wayyy off with the weight thing. I am not good at guessing weight. I weighed one assembly and switch and it was a little over 1 lb. So figure 3 lbs.
914fan,
If you look at the above pic you will see how the unit fits onto the crank. For your question I took some pics of the pieces for clarification, though.
This first one is a close up of the end of the drive unit. Notice the toothed inside:
Attached image(s)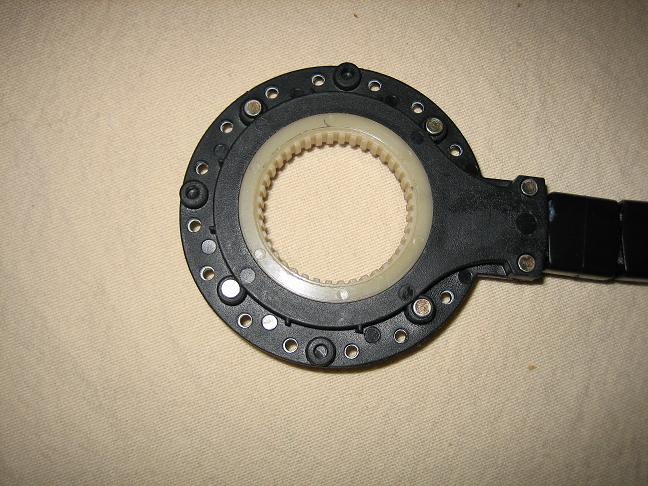
Posted by: Dr Evil Mar 21 2006, 03:46 PM
The toothed interior piece fits over the adaptor pictured here:
Attached image(s)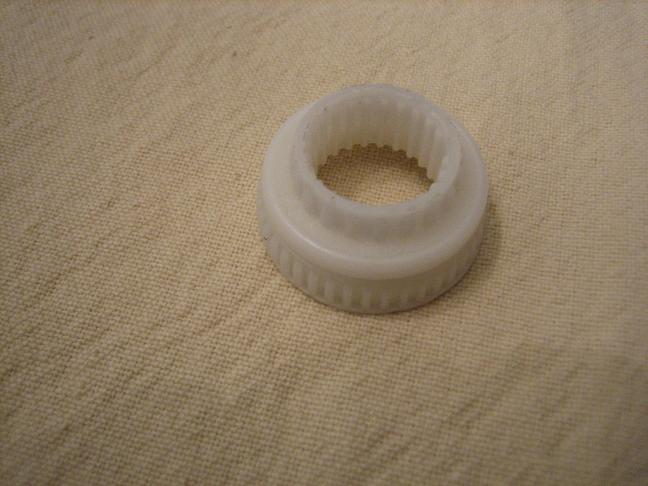
Posted by: Dr Evil Mar 21 2006, 03:47 PM
The toothed inside of the adaptor fits onto the toothed out side of the crank adaptor. The insode of the crank adaptor fits onto the crank:
Attached image(s)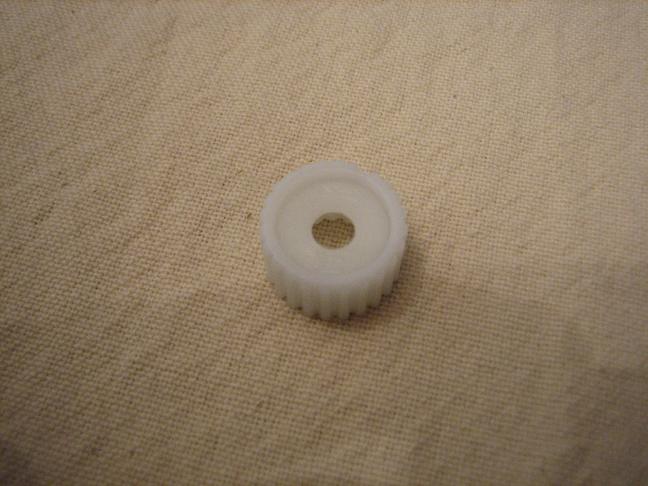
Posted by: Dr Evil Mar 21 2006, 03:48 PM
This thread may take a while since I am back in school, but I will be including wiring info as well.
Posted by: bmunday Mar 21 2006, 03:56 PM
Mike,
I assume that the toothed adapter, mounts to the teeth on manual crank handle. Any thoughts on the life of the plastic teeth? ANy stress on those teeth and it looks as though they could crack. I wonder how hard if yould be to find them machined..? I bet a bit more cash.. Just a thought..
Posted by: Dr Evil Mar 21 2006, 03:59 PM
All of the kits that I have seen use this very hard type of plastic. If you look at late model windows you will see the gears are all made of this material. Not worth machining IMHO.
Posted by: Dr Evil Mar 21 2006, 04:00 PM
Oh, and there is more than one adaptor that will fit the window crank (just incase).
Posted by: airsix Mar 21 2006, 04:20 PM
The good thing about the adaptor being made from plastic is that if the works get jammed up one day you know that the cheapest and easiest piece to replace is the piece that will break.
-Ben M.
Posted by: jim_hoyland Mar 21 2006, 10:03 PM
Mike,
Nice close up of the installation. Can you picture the motor being installed aft of the crank ? I mounted speakers behind the front door panel.
What gauge of wire did you install to the motors ?
Posted by: skline Mar 21 2006, 11:53 PM
Hey Mike, Just an idea, I used to install the Spal power window kits a lot back in the day and you may want to experiment with moving your crank assembly back inside the door a little using spacers. It will let your door panel sit closer tot he door.
I will order a set for mine and install them and take pictures as I go so you can see how they go in. They are similar to what you have but I have found them to be the best of the cheap kits. The kit you are using is the Colibri kit.
There is another company out there that makes OEM style power window kits called Electric Life They used to be over in Wilmington off Sepulveda, now they are in Chicago. They make the whole kit with the regulator just like the factory would have done. They were expensive though as I recall. About $500 for a two door kit. They dont make one for the 914 but they have some pretty trick universal kits that could be made to work in our little cars.
http://www.electric-life.com/main.asp
Posted by: Brian Mifsud Mar 22 2006, 12:55 PM
| QUOTE (Dr Evil @ Mar 20 2006, 07:54 PM) |
| Here is the unit almost all of the way installed. Note- I will be trimming mounting tabs at the red lines and may need to cut the door at the green lines to keep the profile down. I will see about the last part when I trial fit my new door panels. |
wow.. nice UNCUT doors.. I've nevers seen a "virgin" one, mine were butchered by some guy with a hammer and crowbar to fit crappy speakers.
Nice to know the drives are only a little over a pound each. How much current do they draw and where are you tapping in for power?
Posted by: Dr Evil Mar 23 2006, 03:44 PM
| QUOTE (skline @ Mar 22 2006, 01:53 AM) |
| Hey Mike, Just an idea, I used to install the Spal power window kits a lot back in the day and you may want to experiment with moving your crank assembly back inside the door a little using spacers. It will let your door panel sit closer tot he door. I will order a set for mine and install them and take pictures as I go so you can see how they go in. They are similar to what you have but I have found them to be the best of the cheap kits. The kit you are using is the Colibri kit. There is another company out there that makes OEM style power window kits called Electric Life They used to be over in Wilmington off Sepulveda, now they are in Chicago. They make the whole kit with the regulator just like the factory would have done. They were expensive though as I recall. About $500 for a two door kit. They dont make one for the 914 but they have some pretty trick universal kits that could be made to work in our little cars. http://www.electric-life.com/main.asp |
Hey Scott,
Thanks for the tip on the spacing. I was wondering if there was the possibility of swapping door mechanisms so the crank side would be facing into the door. Spacers would be easier. Do you have any opinion on the brand that I decided to go with? I am very pleased with the kit so far. It came with everything from pluggs to wires to switches. I wish I oculd just drive over and install it at your place. No that I need help, just that I miss hanging out with ya.
Jim,
I would guess that the supplied wiring is 12-18 gauge. Plenty thick. As for reverse mounting, I would hae to put screw holes in my door to show you. The little metal tabs come with the kit and let you mount the regulator where ever. If I can get someone to hold it in place I will take a pic.
Brian,
I will likely tap power from my cigarette lighter wires as I have removed my lighter (I only smoke when I am on fire
)I do not knw how much current these will draw, but I have a /6 so it will likely not be of consequence to me.
Posted by: jim_hoyland Mar 23 2006, 11:12 PM
This may seem crazy; but here goes..........................how about replacing the existing turn signal and wiper switch (s) with a multi-tasking switch that could allow contol of the windows. My Volvo has extra stuff crammed into the two stalks; the volvo rear wiper could be a PW onleft/off/onright and the blinker could be up/down when the wiper in is onleft or onright
Is it even doable ?
Posted by: Dr Evil Mar 24 2006, 09:00 AM
 Doable? Sure, but it would probably take a bunch of time and none of the current parts would be adequate for conversion.
You sure have an imagination
Posted by: jim_hoyland Mar 24 2006, 09:06 AM
This would tak it to the next level, albeit some electrical challenges are out there. I'll bet there's someone else who has thought about this and has worked out the solutions......let's see.
Posted by: Aaron Cox Mar 24 2006, 01:49 PM
Jim,
just be happy with the power windows 
Posted by: Dr Evil Mar 25 2006, 10:28 PM
So I took Scott's advise and shimmed my assembly. It made everything so shallow that I had to notch my door to make the assembly fit flush. Of course I took pics for ya'll.
Attached image(s)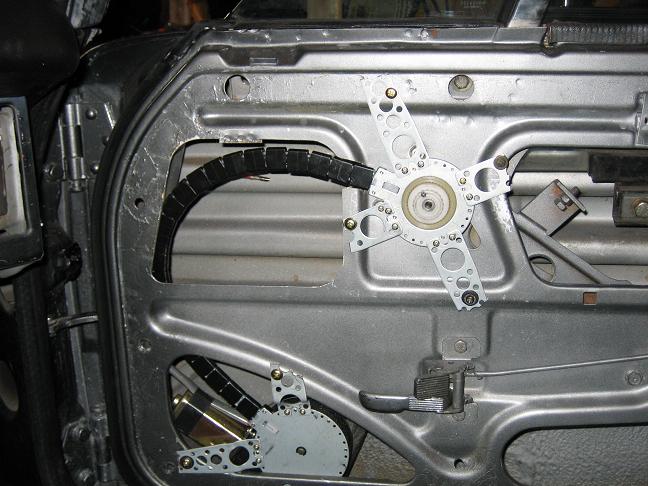
Posted by: Dr Evil Mar 25 2006, 10:29 PM
Close up (a little blurry). I kinda over did it on the reinforcement, but it looks nice
Attached image(s)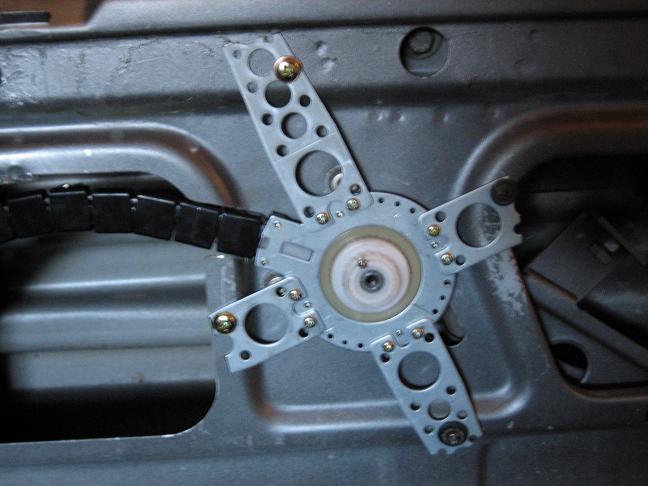
Posted by: Aaron Cox Mar 25 2006, 10:33 PM
"scalpal - check!
sawzall - check!
dremel - check!"
Posted by: Dr Evil Mar 25 2006, 10:36 PM
Great news and enlightening finds today. I jumpered the motor on the pass side and it worked perfectly. It was just as fast as it should be. The fascinating thing was that when I tested the drivers side it moved much slower (due to it being mounted a bit differently which will be addressed later). I can take video of the window working, but I have no place to host it (and no interest in starting such). If some one want so to host it, I can shoot it maybe tomarrow.
Posted by: Aaron Cox Mar 25 2006, 10:37 PM
| QUOTE (Dr Evil @ Mar 25 2006, 09:36 PM) |
| Great news and enlightening finds today. I jumpered the motor on the pass side and it worked perfectly. It was just as fast as it should be. The fascinating thing was that when I tested the drivers side it moved much slower (due to it being mounted a bit differently which will be addressed later). I can take video of the window working, but I have no place to host it (and no interest in starting such). If some one want so to host it, I can shoot it maybe tomarrow. |
email it to me and i can host it here on 914club...
acox914 at comcast dot net
Posted by: Dr Evil Mar 25 2006, 10:40 PM
Alright man, if I can talk the woman into filming it while I jumper it I will send it to you. 
Posted by: Dr Evil Apr 1 2006, 08:54 PM
I got it filmed, now I gotta figure out how to email a 54Mb video. 
Posted by: cbenitah Apr 1 2006, 08:59 PM
| QUOTE (Dr Evil @ Apr 1 2006, 06:54 PM) |
| I got it filmed, now I gotta figure out how to email a 54Mb video. |
AIM...
Posted by: Dr Evil Apr 1 2006, 09:05 PM
I am kinda anti AIM. AOL products have spyware and such. I had a roomie put it on my computer and it was a pain to get rid of.
What about yahoo messenger?
Posted by: Aaron Cox Apr 1 2006, 09:08 PM
| QUOTE (Dr Evil @ Apr 1 2006, 08:05 PM) |
| I am kinda anti AIM. AOL products have spyware and such. I had a roomie put it on my computer and it was a pain to get rid of. What about yahoo messenger? |
54 megs!?!?!?!?!
go to putfile.com or yousendit.com and temp host it there...
you know how to FTP stuff?? - i
Posted by: Dr Evil Apr 1 2006, 09:14 PM
Como? No pienso que puedo.
I do not know how to adjust my file size or anything. i have never used a digi vid cam before. It is only 33sec. Any ideas? It should be easy. 
Posted by: Aaron Cox Apr 1 2006, 09:40 PM
upload it to:
A ) yousendit.com
B ) putfile.com
C ) google video
D ) the other site i cant remember the name of
Posted by: Dr Evil Apr 1 2006, 10:54 PM
Like I didn't have enough crap to learn. I have uploaded it and it is being "verrified" so who knows when it will be ready for viewing.
Stay tuned!......................watch the banana 
Posted by: cbenitah Apr 1 2006, 11:02 PM
| QUOTE (Dr Evil @ Apr 1 2006, 08:54 PM) |
| Like I didn't have enough crap to learn. I have uploaded it and it is being "verrified" so who knows when it will be ready for viewing. Stay tuned!......................watch the banana |
it will take 24h or less (may be more the larger the file is) mine 20mb file took 30h..
Posted by: Dr Evil Apr 1 2006, 11:11 PM
| QUOTE (cbenitah @ Apr 2 2006, 01:02 AM) | ||
it will take 24h or less (may be more the larger the file is) mine 20mb file took 30h.. |
Ok, for 59Mb I guess you will need more bananas

Posted by: gonflyn Apr 2 2006, 01:30 AM
Hey, here's one of those quick or dumb questions  ...anybody know if there is a way of converting the REAR window into a slider like on a pickup truckor tail gate that will disapear behind the seats? Allways thought that might be pretty neat...but allways sold my cars before having a chance to really look into it? I don't know if there would be any real advantage or aerodynamic gain or loss with having the rear window down or out? But, it might be a good look with just the roll bar?
Posted by: erikstoll Apr 2 2006, 10:08 AM
after the power window motor crapped out in my mitsubishi (insert jokes here) im convinced that power windows are evil as hell
Posted by: Dr Evil Apr 5 2006, 07:48 PM
Well, lets see if this worked. It should play as soon as you open the window (no pun intended). It was faster, but I had been running the window up and down for about 30 min on the same battery so it was a little slower by the time I videoed it.
http://video.google.com/videoplay?docid=5806587071548248795
Posted by: Dr Evil Apr 5 2006, 07:51 PM
Oh ya, I have a set with two lit switches, some wiring, and two actuators with all of the mountng hardware that I will be selling. I will include instructions, too. 

Posted by: ChrisNPDrider Apr 5 2006, 07:52 PM
worked for me. not too slow - well then again I'm used to slow

Posted by: Dr Evil Apr 5 2006, 08:03 PM
Actually, the host service sped it up to where it was when the battery was charged Go figure. It looks good to me too. I must admit that our mechanisms are a bit of a PITA. My 75 Benz would probably move too quick with these kits....I am gonna find out eventually on that one.
Posted by: Headrage Apr 5 2006, 08:05 PM
That is so cool Mike.
I want one...
Posted by: Dr Evil Apr 5 2006, 08:13 PM
PM me Allan. I told you I have one. And you know me, it will be low $$ cause I love the teeners and want them to be happy
Posted by: jd74914 Apr 5 2006, 08:17 PM
Looks good. Billy Joel fan? 
Posted by: jim_hoyland Apr 5 2006, 08:20 PM
Very nice Mike. what gauge wire did you run out to the motors ?
Posted by: Dr Evil Apr 5 2006, 08:22 PM
Jim, 18AWG.
Billy Joel is OK by me, but it was all that was on the radio.  Radio here SUCKS!
Posted by: Headrage Apr 5 2006, 08:45 PM
How does it look with the door panels on?
Posted by: Dr Evil Apr 5 2006, 08:48 PM
Mine will be different as I have them completely covered. I also shimmed the mechanism like Scott suggested to make the profile as low as possible. Fo rme you will not be ablt to tell they are there. If you want to take the more common way out, then the kit comes with cups to install over the mechanism that clean up the hole where the handle would attach. I am in the process of wiring in my power mirrors so I havent mounted the panels yet. I'll see about taking a few pics in a couple of days time providing.
Posted by: Headrage Apr 5 2006, 09:39 PM
I'd like to have it look smooth with the switches in a center console.
Posted by: Dr Evil Apr 5 2006, 09:44 PM
For smooth you will have to recover your door panels to hide the hole where the gear pushed through for the handle. No kit will make it absoleutly smooth with out extra work. If you recover your panels then all you have to do is not fill in the hole in the back part, shim the gear mechanism and you will be golden. Markydoo's looks like this. I have my switches in the center console. I like it that way, but I do have switch pods for anyone wanting to mount the switches in the door.
If you notice the door metal you will see it has its own protrusions. The installed kit does not exceed the doors natural set up by more thatn a couple of 1/32".
I get it, you need pics
Posted by: sj914 Apr 6 2006, 02:12 AM
Great job 
Only 15 years ago I asked about these kits and people said that it couldn't be done.
ps. Now you need to work on some power door locks.
Posted by: Dr Evil Apr 6 2006, 07:09 AM
Power door locks are cheap and easy. I am not gonna do these on this car as I do not usually unlock my doors while I am driving (but do wish to opperate my windows). If I didn't have the power mirrors and windows I would probably do it, but I have too many wires
Posted by: Engman Apr 6 2006, 07:29 AM
Nice video - now I want one.
Great job Dr.
You need to see me at Hershey on these - I might have some connections we could use.
Again - Nice!
M
Posted by: Dr Evil Apr 6 2006, 09:26 AM
Engman,
Thanks for the complement. I am looking for suppliers currently, any leads would be greatly appreciated. I would like to sell a whole kit for no more than $100 including switches, instructions, mounting hardware, and most of the wiring. Some of the kits out there are crazy expensive with the switches costing upwards of $30 alone. The cost will depend on how much I can get them for and what type. If it is gonna be SPAL then it will be $100 because they are not the least expensive. If it is gonna be the brand and type I already have then it will be around $75 I hope. Time will tell.
I'll definetly see you at Hershey
Posted by: Grimstead Apr 6 2006, 09:28 AM
Are you going to start selling these? And if so, how much?
(Never mind, too slow to the submit button)
How long till you start selling them?
Posted by: Dr Evil Apr 6 2006, 12:06 PM
| QUOTE (Grimstead @ Apr 6 2006, 11:28 AM) |
| Are you going to start selling these? And if so, how much? (Never mind, too slow to the submit button) How long till you start selling them? |
Who knows when I will be able to start. I have my feelers out to some vendors. I have sold the other kit that I currently have. Mainly it is price that I am working on. I wont sell it if you can get it for the same price somewhere else. The instructions will remain here with me answering questions for free. I will eventually post some wiring diagrams as well so the DIYers can install any kit they want and do not have to go to me.
Posted by: Dr Evil Apr 6 2006, 12:08 PM
Oh ya, I may also sell a new fuse block kit to those customers that wish to have an extra designated position for the windows. I'll have to see. I am not gonna sell the blocks separate as there are already two vendors doing them and they are good quality at an affordable price.
.......stay tuned for more innovations!
Posted by: Engman Apr 6 2006, 12:09 PM
Just to clarify - The Dr. is your man - I may have a lead for him on the kit - but he is the guy.
M
Posted by: Dr Evil Apr 6 2006, 06:35 PM
Alright folks,
I have a line on 4 kits for $70+ shipping. Is this a resonable price for ya'll? If anyone wants to order one of these I will take the first 4 emails and put the rest on a list if I can get more.
I am looking for feed back as to what price is best and how many people are interested.
Posted by: Dr Evil Apr 6 2006, 07:43 PM
3 left
Posted by: Dr Evil Apr 6 2006, 07:50 PM
2 left
Posted by: Dr Evil Apr 6 2006, 08:05 PM
ONE LEFT 
Posted by: SGB Apr 6 2006, 08:05 PM
PM sent!
Posted by: Dr Evil Apr 6 2006, 08:28 PM
I got ya, man. Yer #3.
Still one left for a lucky person
I am suprised at how fast these sold
I hope to sell the next one by tomarrow when the East coast awakens from its slumber. I am actually still working the guy to see if I can get a better deal. I would like to end up with a final price shipped for $75...lets see.
Now watch the dancing monkey 
Posted by: jim_hoyland Apr 6 2006, 08:54 PM
pm sent
Posted by: Dr Evil Apr 6 2006, 08:56 PM
No deal on getting a lower price from the guy. He is kinda thick in the head..too bad his prices are the lowest. I got four, though
Posted by: Dr Evil Apr 6 2006, 09:08 PM
I still have one left!!!!!!!!
I have J.D., Scott, Jim
Someone emailed me, PMed me, and IMed me and screwed up my count
Any takers
Posted by: Dr Evil Apr 7 2006, 09:36 AM
Kits are on order!
I still have ONE left if someone wants it.
Posted by: Gint Apr 7 2006, 09:54 AM
| QUOTE (Dr Evil @ Apr 7 2006, 09:36 AM) |
| Kits are on order! I still have ONE left if someone wants it. |
I'll take it Mike. I'll send PM.
Posted by: Dr Evil Apr 7 2006, 05:18 PM
And then there were none..... I am not to confident that I will be getting any more inthe near future either sooo youguys can consider your selves lucky I will be posting wiring and stuff as time permits.
Posted by: firstknight13 Apr 7 2006, 08:54 PM
OK now i NEED one too!!!! DOC i need a fix 
Posted by: Dr Evil Apr 7 2006, 09:22 PM
Sorry Dude,
I don't know when/if I will get any more. I will be keeping an eye out, though. I kinda dont want to deal with the guy that I bought these from. He is a bit of a jerk. These first 4 were to test market. If I get enough interest I will actively seek out more kits with the full intention of keeping the cost low.
Posted by: Dr Evil Apr 19 2006, 07:46 AM
All of the orders shipped yesterday (except for the ones that are being picked up).
FYI, the video that I took WAS with a basically dead battery. I charged it yesterday and it was almost empty. Just food for thought.
Posted by: Dr Evil Apr 23 2006, 08:49 PM
Alrighty, here are the wiring instructions in free hand. The switch does not care if you hook it up one way or another since it is symetrical  Any questions, just post here and I will get to them.
Attached thumbnail(s)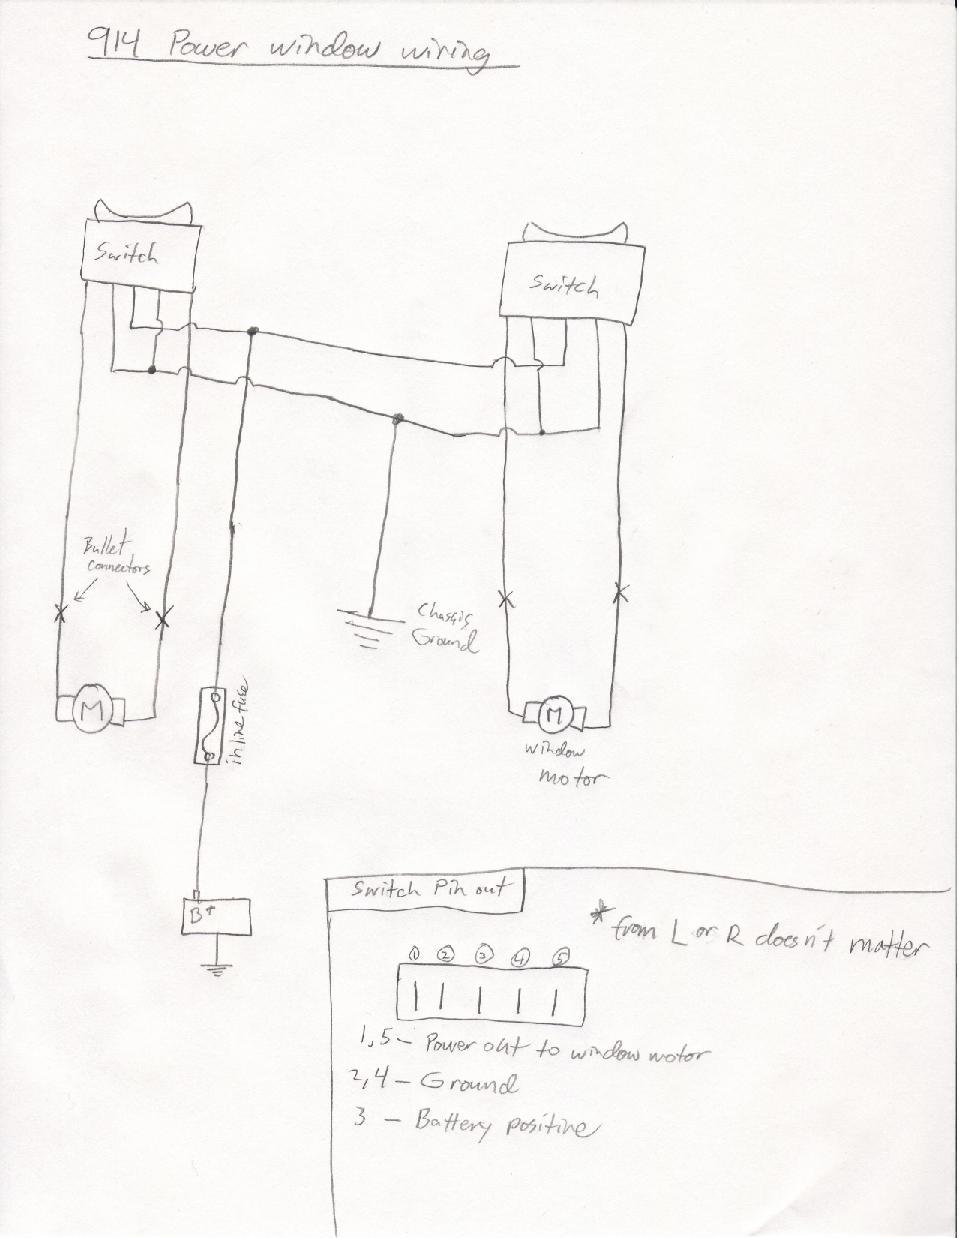
Posted by: jim_hoyland May 2 2006, 10:29 PM
Mike,
Is the diagram pretty much the same as the wiring and connectors are already layed out. Just looked at the wiring briefly today, and it seemed pretty straight forward.
Posted by: Dr Evil May 3 2006, 09:50 AM
Yup, the diagram is based on if you want ot run two switches instead of the three. Color of wire is largely unimportant, location on the switch is.
I PMed you a response also, but please do aks as many questions as you may have here so all can benefit.
Posted by: jim_hoyland May 6 2006, 06:25 PM
Mike,
Installed the switches today, found some really nice holders at West Marine. Pic..
Check this site out: http://www.julianos.com/ they have some nice swithch plates and have a look at the e-brake set up they sell....
Attached thumbnail(s)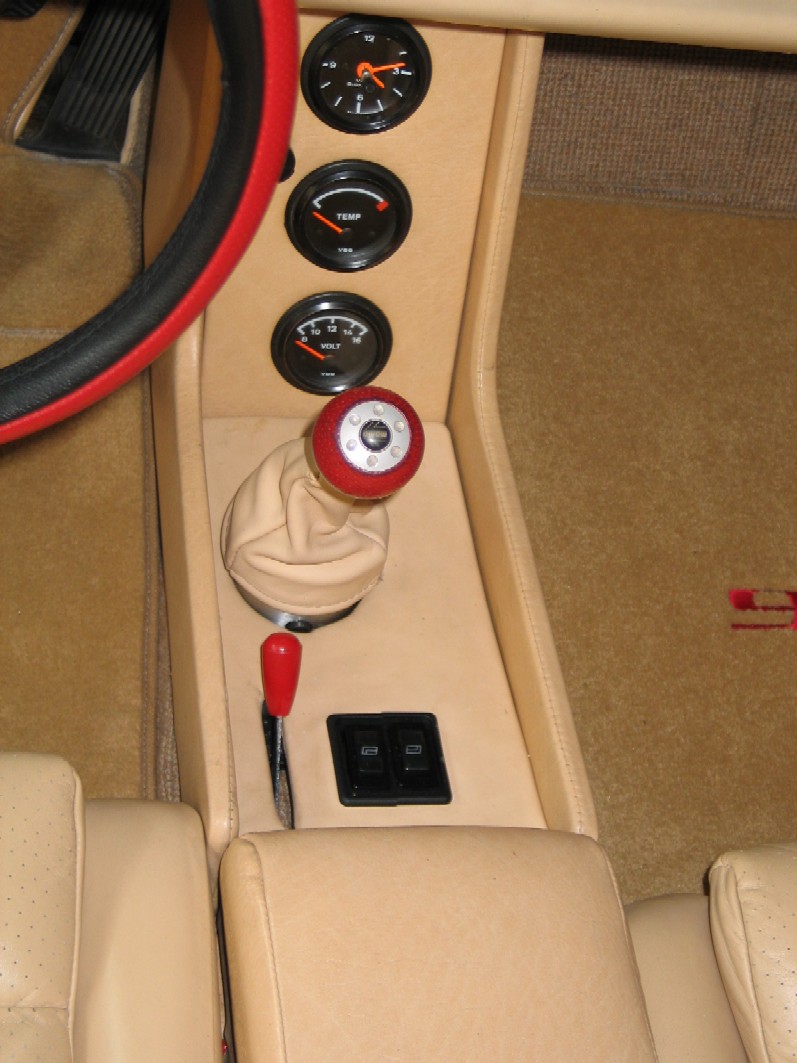
Posted by: Stieve May 6 2006, 11:13 PM

Mike,
Installed the switches today, found some really nice holders at West Marine. Pic..
Check this site out: http://www.julianos.com/ they have some nice swithch plates and have a look at the e-brake set up they sell....
I am also interested, is there a brand name?
Posted by: jim_hoyland May 7 2006, 07:14 AM
I already tosssed the boxes--Cole Hersee is the brand name. They are sold as inner and outer units. They lock together. I bought two ends and locked them together. They have inside singles, 2's and 3's. Very nice set up. All the West Marine stores must carry them; I have seen them in 2 stores. If you need more info, their is a West MArine down the street from me
Posted by: ptravnic May 7 2006, 10:34 AM
Very clean! Well Done!! 
I already tosssed the boxes--Cole Hersee is the brand name. They are sold as inner and outer units. They lock together. I bought two ends and locked them together. They have inside singles, 2's and 3's. Very nice set up. All the West Marine stores must carry them; I have seen them in 2 stores. If you need more info, their is a West MArine down the street from me
Posted by: jim_hoyland May 7 2006, 10:48 AM
There isn't much room under the center pad. I had to ditch the white plastic connectors nthat plug into the bottom of each switch and use small 90 degree female connectors. These are pretty sweetl. Soldered to the 90's and then covered the connectors with liquid connector goop. This stuff acts like the plastic covers and will keep the 90's from touching one another. Made a short loom for the two sides, ground, and power that terminates just short of the panel with the gauges for quick disconnect. Used the plastic six wire connectors that came with the package.
Posted by: Dr Evil May 7 2006, 11:07 AM
 I knew that you would do them right.
Just wait until next weekend when I take some pictures of my glorious set up. 
My drivers side is a bit bound up and I need to reposition the motor so it is less of an angle on the drive line. The passenger side is perfect. Our doors are a real PITA to get clean and lubed and set right. I bet your car will be the best.
Posted by: jim_hoyland May 7 2006, 01:39 PM
I havn't installed the motors yet; starting at the switches and working outward. You know I have speakers mounted behind the door panels; do you think I will be able to install anyway ? or will I have to get creative ?
And, heard you say you are working on a small auxillary fuse pane.. I'm in real need of one.
Posted by: Dr Evil May 7 2006, 03:06 PM
As for a small aux panel, I have pretty much given up on the idea as I have seen, touched, coveted, and admired Engman's kit and would not be able to make anything that would do what his kit did not already do. And the price is rediculously low (this is not a paid endorsement, but it could be  )
)
I would contact him about makbe getting one of his 5 gang fuse panels in the raw so you can install it somewhere. He could probably hook you up with a set up worthy of the polished nature of your car.
Now that you have the motor sets you can decide how you want to install them. It was hard for me to do (especially alone). There are several options, but the main idea is to not bend the cable too much. The straighter the cable, the more tourque and the better the operation. All I could think of was that you may need to notch your door all the way across to place the cable track in it, but this may be prohibitive. You may be able to get away with it behind the speaker. Gonna need pics to help brain storm.
I know Scott Kline has a lot of experience with doing kits like this. You should shoot him a PM and see if he can help you out with the install. You are lucky because he lives near you.
Posted by: jim_hoyland Sep 17 2006, 08:42 PM
Anyone do the full install after Dr. Evils oiginal post ? I'm still at the "install the motor stage".Was wondering if anyone discovered a way to install the motor with speakers still in the door ? Probably not possible, but wanted to check.
Posted by: Dr Evil Sep 17 2006, 08:47 PM
Hey Jim,
Taking a break from cardio at teh moment and was thinking that maybe you could mount a bracket in the door that puts the motor at a slight angle, but next to the speaker. Hard to describe, but the main idea is you want to maintain the largest radius possible. If you put the bracket pointing into the door and make it so it sits right next to the speaker you should have enough room for both. Should, but I havent looked at mine in a while and I may be off in my mental calculations. 
Back to the grind...
Posted by: jim_hoyland Sep 18 2006, 07:26 PM
Interesting idea. WIll I need to attach working end to the winder shaft, wire it up and see if it works at that angle ???
Posted by: Dr Evil Sep 18 2006, 07:30 PM
That would be a good test to do. It took me a loooooong time to get the darn windows adjusted jsut right so that they worked well. So many adjustments. That and I lubed everything....maybe too much in some spots, but it works...wish the car did.
Posted by: jim_hoyland Sep 18 2006, 07:38 PM
I don't suppose you are coming out to the left coast are you; I sense this project really requires the expertise of someone who has "been there". I'm not in a rush, so if you do plan a trip in the next year, I can hold it....
Hope you Med School is working out; we need some doctors with a healthy sense of humor.
That would be a good test to do. It took me a loooooong time to get the darn windows adjusted jsut right so that they worked well. So many adjustments. That and I lubed everything....maybe too much in some spots, but it works...wish the car did.
Posted by: bd1308 Sep 18 2006, 07:54 PM
wouldnt the motor put off some kind of intereference?
J/w
Posted by: Dr Evil Sep 18 2006, 08:45 PM
I'm flattered, Jim It is possible. I know I will be out in San Joses in Oct 07 if everything goes allright for my wedding. Other than that, I am not sure when I will be uot. Try to find Skline, he used to do these installs for a living and he has been MIA lately so wee need someone to do a drive by
Posted by: jim_hoyland Nov 25 2006, 11:25 AM
Mike,
Got a question on shimming the assembly; Do you put washers behand all the bolts holding the assembly to the door or just the ones by the crank ? I tried shimming the two M7s by the crank handle and it became difficult to turn.
And, did you replace the two M7 near the crank with a flat head ? I am finding the bolts heads are kinda in the way.
Pictures to come later....
Thanks,
Jim
Posted by: Dr Evil Nov 25 2006, 11:57 AM
Jim,
I shimmed everything (not the tracks necessarily unless they bind with the new angle) as per Sklines instructions. This keeps the geometry of the window mechanism the same while moving it into the door a slight bit. I do not recall replacing any bolts, but if they are in the way I see no problem with replacing them with a more suitable fastener. For shims I made my own out of some of the spare window adapters. Any nylon stock should work.
Posted by: jim_hoyland Nov 25 2006, 01:56 PM
Thanks Mike,
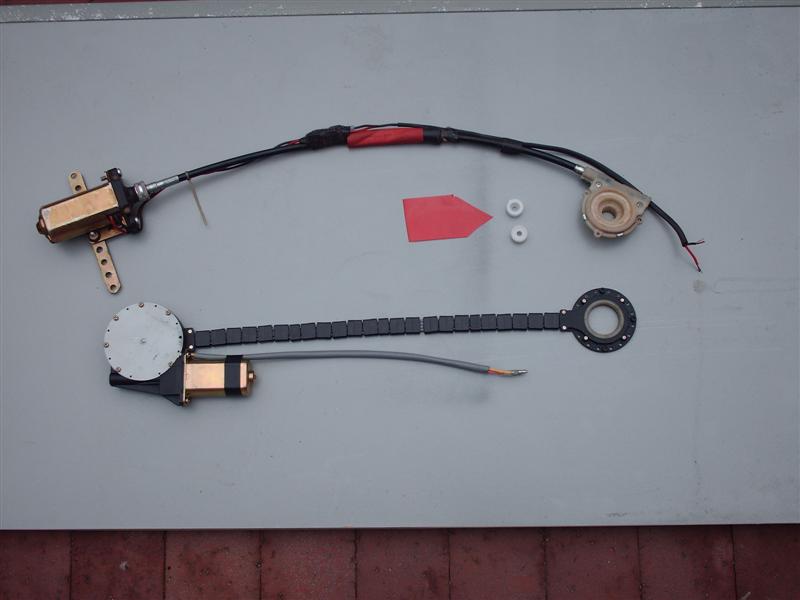
I'l post a picture of the set up; I had to go with a different motor/cable set up because of the conflict with the speakers. I think they are AuotoBac. There is no name on the set up but it allowed me to mount the motor at the rear of the door and have a straight run to the winder. I'll shoot a pict of that later today.
Here'a a pict of the two set ups side by side. The only problem I have is the adapter was missing and I'm checking to see if PO may kept it. The adapters from your kit are a hare to big and if I file them down, all the splines are lost. If I can't locate the original adapter, I may JB Weld the adapter to the setup. I believe there will be plently of holding power. Any suggestions will be appreciated.
Jim,
I shimmed everything (not the tracks necessarily unless they bind with the new angle) as per Sklines instructions. This keeps the geometry of the window mechanism the same while moving it into the door a slight bit. I do not recall replacing any bolts, but if they are in the way I see no problem with replacing them with a more suitable fastener. For shims I made my own out of some of the spare window adapters. Any nylon stock should work.
Attached image(s)
Posted by: jim_hoyland Nov 30 2006, 09:38 PM
Mike,
I found a pair of these motors and they really fit good. The only problem is they didn't come with the adapters for the window crak shaft; the ones from your kit are to big. I tried filing one down to make it fit. but by the time it fit, there were no splines left.
Robert21 has a Spall kit, we are going to see if those adapters will work; the seller is also looking for the origs.
My bak up plan is to JB Weld the filed down adapters into the mechanism. Seems like there the splines on the outer ring will provide a place for the JB to bond.
Any suggestions on replacement adapters or back up plan ?
Thanks, Jim
Attached image(s)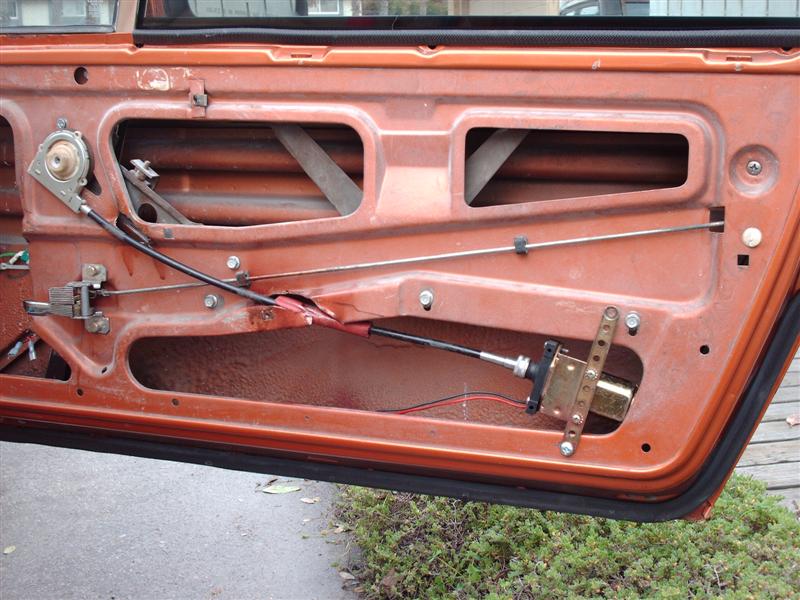
Posted by: Dr Evil Nov 30 2006, 10:05 PM
Maybe Quick steel putty will serve you better. I have no more adaptors and do not know where exactly to get more (if possible). I only had enough for the kits I sold. the only problem with the putty or the weld is that is will not want to come off of the actuator in the future. Tough call. Maybe lubing the actuator with teflon first, or plastic wrap woudl allow you to make a removable part. I have vrafted some amazing stuff out of Quicksteel.
Sorry I can't be more of a help 
Posted by: horizontally-opposed Oct 24 2020, 10:11 AM
Mike,
I found a pair of these motors and they really fit good. The only problem is they didn't come with the adapters for the window crak shaft; the ones from your kit are to big. I tried filing one down to make it fit. but by the time it fit, there were no splines left.
Robert21 has a Spall kit, we are going to see if those adapters will work; the seller is also looking for the origs.
My bak up plan is to JB Weld the filed down adapters into the mechanism. Seems like there the splines on the outer ring will provide a place for the JB to bond.
Any suggestions on replacement adapters or back up plan ?
Thanks, Jim
^ A single image that provides an answer to my first reservation with adding a motor to the door after seeing the first page of this thread: Where do you mount the motor if you already have door speakers? Yours is a really nice setup.
Thanks for this, Jim. Next questions: How long have you (and any others!) been living with power windows, and how has it been?
Posted by: IronHillRestorations Oct 24 2020, 02:08 PM
Pretty sure the guy I got the kit from (car got wrecked) had the motor mounted with springs in the top rear inner door frame
Powered by Invision Power Board (http://www.invisionboard.com)
© Invision Power Services (http://www.invisionpower.com)