Printable Version of Topic
Click here to view this topic in its original format
914World.com _ 914World Garage _ seam welding and rear suspension strengthening
Posted by: Andyrew Mar 22 2006, 01:55 AM
So my project for a stronger chassis has begun.
Heres were Im at right now. Took the suspension out today.
I'll go do some welding and prep tonight, hit the bed, see what you guys say, and do some more welding tomorrow.
Picture of some buckling of the suspension. Other side has a raised area, but is generally flat, this side has raised and concave area's. I'll be adding something here for strenthening, a tube? A flat piece of metal? A triangle? 


Here is some area's im going to weld, any two pieces joined together I will stitch weld.
Posted by: Andyrew Mar 22 2006, 01:55 AM


fiberglass.. random pic.
engine mount lower right.
Some of the engine mount metal will be welded as well, possibly some reinforcement as well.
Posted by: Andyrew Mar 22 2006, 01:55 AM

Picture of what I believe to be ovaled ear hole.
Will post another thread on that... That bolt always comes loose, after just a short drive..


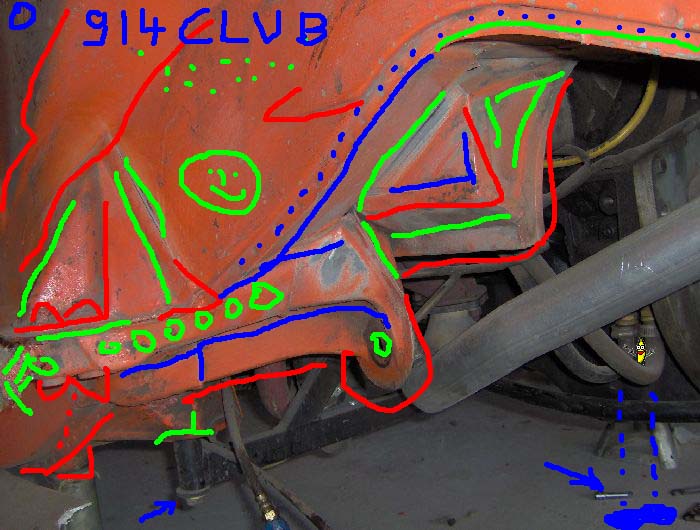
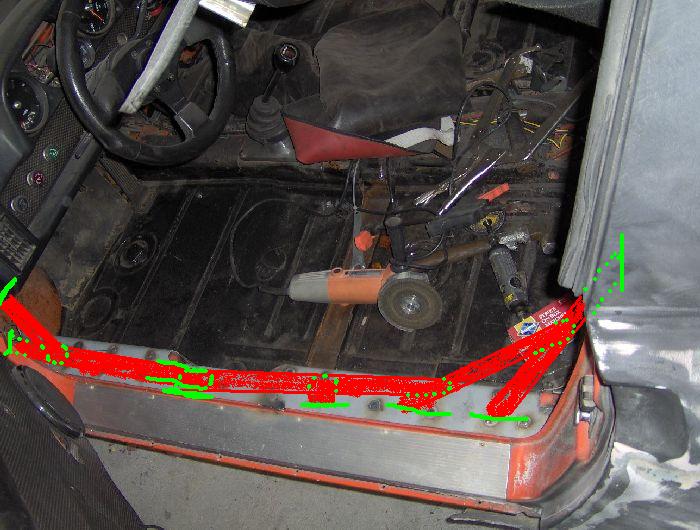
Big picture.. Please, Someone (brad?) give me a green line where to seam weld, a red box where to add metal, a blue line where to tube...
rear susp setup. ignore blue paint and spacers..
Car as it looked bout noon. 255's up front, fit guud.


Gettin the body lines right..
More body lines
Posted by: Andyrew Mar 22 2006, 01:56 AM

And more..
The welder... (tim allen grunt) Lincoln 135 made the cart myself.
Start of the engman kit. left side DONE
rear
Ass bigger than my gi nevermind.
dont tell me im beautiful. 
Front susp... DONE, OUT
YES
Few K's into suspension and brakes doesnt hurt a v8..
 time.. (A&W)
Posted by: Andyrew Mar 22 2006, 01:58 AM
Oh ya, it takes,
11mm 13mmx2 15mm 17mm 19mm 3/4 sockets 7/8's socket
Impact wrench 8mm allen (I think) 6mm star allen (cv) pliers, and a couple screwdrivers to take it all out.
Posted by: SirAndy Mar 22 2006, 03:29 AM
| QUOTE (Andyrew @ Mar 21 2006, 11:55 PM) |
| Please, Someone (brad?) give me a green line where to seam weld, a red box where to add metal, a blue line where to tube... |
here you go ...
 Andy
Andy
Attached image(s)
Posted by: reddog Mar 22 2006, 03:34 AM
![]()
Posted by: Racer Chris Mar 22 2006, 06:45 AM
Andrew,
The "buckling" you noted is nothing but a little wrinkling from the metal stamping process when the parts were originally manufactured. It isn't from any stress during operation of the vehicle. I wish I had a chassis as nice as yours.
Posted by: riverman Mar 22 2006, 06:48 AM
| QUOTE (SirAndy @ Mar 22 2006, 04:29 AM) | ||
here you go ... Andy |

Posted by: MattR Mar 22 2006, 09:21 AM
no need to weld, just use bondo
Posted by: drewvw Mar 22 2006, 09:46 AM
so the buckling of the suspension, is that a common thing? Only with bigger engines in there?
please educate me, I am paranoid about old cars and failing suspensions
Posted by: mike_the_man Mar 22 2006, 09:53 AM
Andrew,
Sorry for the hijack, but when did you switch to the fiberglass fenders? All that panel beating was wasted?  Can you give me some specifics on the panels you used, or a link to an old thread?
It's looking good! Decided on a colour yet? Will it be ready for WCC06? I'm hoping for another ride.
Posted by: McMark Mar 22 2006, 11:23 AM
| QUOTE (Racer Chris @ Mar 22 2006, 04:45 AM) |
| Andrew, The "buckling" you noted is nothing but a little wrinkling from the metal stamping process when the parts were originally manufactured. It isn't from any stress during operation of the vehicle. I wish I had a chassis as nice as yours. |

Looks like forming wrinkles. Same stuff people are seeing on AA flares.
And your hole doesn't look oval. Could be oversize, but I doubt it. It looks too round. BUT, I can't explain why it's coming loose.
 Maybe you just need to work out?
Posted by: mrdezyne Mar 22 2006, 11:45 AM
| QUOTE (mike_the_man @ Mar 22 2006, 07:53 AM) |
| Andrew, Sorry for the hijack, but when did you switch to the fiberglass fenders? All that panel beating was wasted? Can you give me some specifics on the panels you used, or a link to an old thread?It's looking good! Decided on a colour yet? Will it be ready for WCC06? I'm hoping for another ride. |
I emailed and asked the same question. They look like Bontempi flares but not sure. They look sweet regardless...
Posted by: Aaron Cox Mar 22 2006, 12:15 PM
| QUOTE (riverman @ Mar 22 2006, 05:48 AM) | ||||
|
rofl ahndy.....
Posted by: Sparky Mar 22 2006, 12:53 PM
| QUOTE (Andyrew @ Mar 22 2006, 02:55 AM) |
| Picture of what I believe to be ovaled ear hole. Will post another thread on that... That bolt always comes loose, after just a short drive.. |
Tighten up your http://www.mypleasure.com/education/sexed/kegels_for_better_sexual_health.asp.
Posted by: Scott Carlberg Mar 22 2006, 01:27 PM
I would like to Nominate Andy's post/Drawing as the Post of the YEAR, if not the Decade!!!


Oh and Andrew, 
Posted by: Andyrew Mar 22 2006, 01:27 PM
Geez andy, I had metal all rolled, tubes formed, and was ready to start welding when I saw the mueba
I'll take it as a joke... lol
Chris, Thanks! Chassis is rust free on that side, hell holl had a little problem which I fixed a long time ago. Poorly, but I fixed it... I'll take it as it came from the factory like that, but I think I might strenthen it anyways...
Drewvw, buckling is not common, Chassis cracking only happens when you start putting bigger sticky tires, and more hp through the car and big rate springs..
I had in my possetion my f/g flares before the wcc 05. I knew I would never get my flares to be wide enough or perfect enough to paint. Currently they need to house 285 35 18's on the back.. No way my hand made flares could do that. The flares are Rich Bontempi HPH flares front and rear. I do like them alot.
Sparky, lets not go there.
Posted by: Andyrew Mar 22 2006, 07:28 PM
Heres a possibility.
Attached image(s)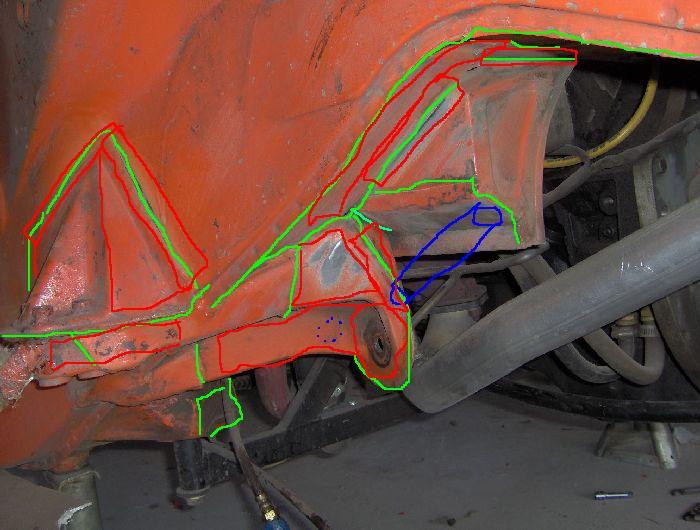
Posted by: Racer Chris Mar 22 2006, 07:30 PM
Here's what I worked out for the outer console reinforcement.
Attached image(s)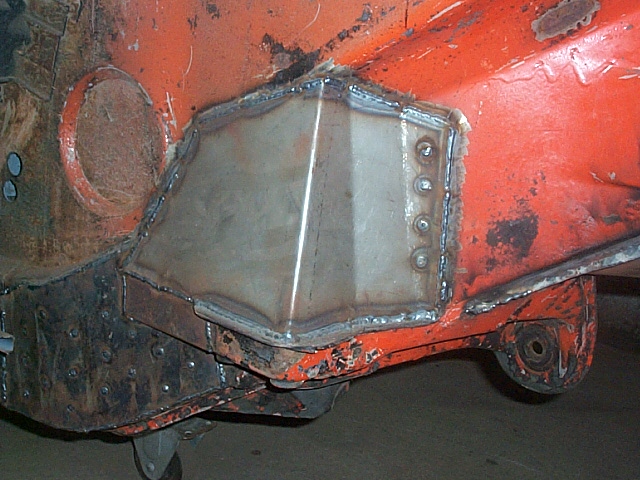
Posted by: Andyrew Mar 22 2006, 07:31 PM
Thanks Chris!
I'll do that.. looks strong to me.
What guage metal did you use?
Posted by: Racer Chris Mar 22 2006, 07:32 PM
I have one set of these parts in stock.
Add a tubular brace from the inner console to the firewall and you won't ever have cracking problems with the rear suspension pickups.
Attached image(s)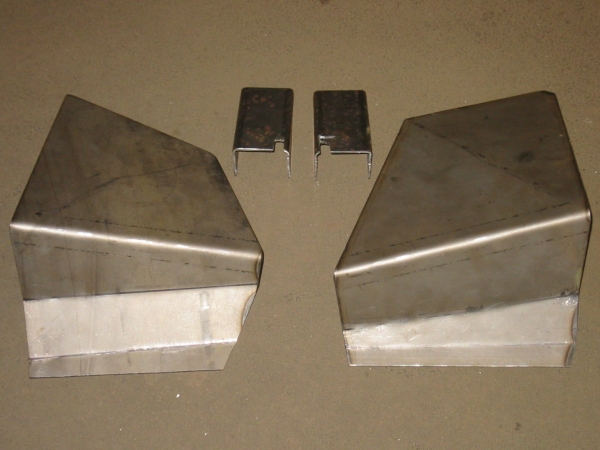
Posted by: Andyrew Mar 22 2006, 07:39 PM
Checked your site, Didnt see a price.
I dont have oogles of bucks... lots more things to buy ( my list of things to buy takes me to a -3000 left in the bank )
Whats your price?
I know your very knowlegable when it comes to this, what do you think about my plan there? Not a whole lot of metal added.. less than the GT kit.. 2 tubes (one like you said, and one behind it.. locking in the ear)
Im worried because im currently at 275lb springs, will be running true slicks sometime in the future (10's and 11's) and I dont want to go with a cage because I will drive it on the street.
Andrew
Posted by: Racer Chris Mar 22 2006, 08:03 PM
Cracking in this area is primarily due to repeated flexing of the panels which loosens up the pinch welds and/or starts cracks at highly stressed areas of panels. I think what I designed eliminates the flex issue by spreading the loads out to otherwise unstressed areas, therefore stops cracking and spot weld loosening.
I've never been a big fan of seam welds. While it tightens things up it also causes shrinkage/warpage. I like to design things that minimize the total amount of welding required, and use the least amount of added metal to accomplish the goal.
Note the additional 14ga. piece along the rocker in front of the outer console. It isn't essential but provides reinforcement to the area between the console and the jack post. I think the GT kits had a similar piece in that location.
Regarding the tubular reinforcement of the inner console, I don't think the rearward tube is nearly as valuable as the forward one since the highest loads are on the outer wheel in cornering and the forces push the console in and up. The upward force is well resisted by the existing structure IMO.
Here's an example of the tubular brace I like.
Attached image(s)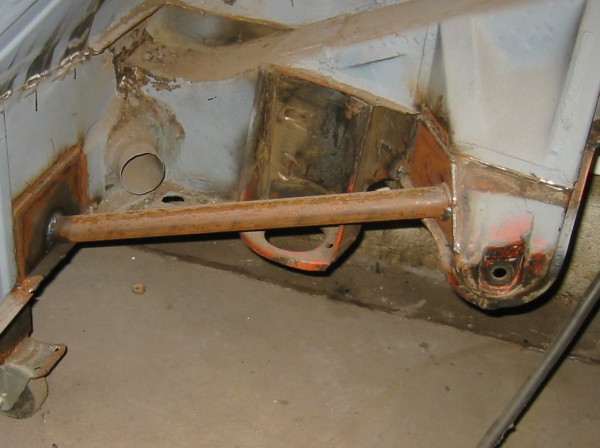
Posted by: Jeroen Mar 22 2006, 08:07 PM
Andyrew,
The blue tube in your sketch won't do anything
The part you are connecting it to isn't structural...
another area to put some thought in is were the framerail ends at the rear shock mount
with the firewall in place it's gonna be hard to weld the vertical part of it, but you can seem weld the top/horizontal part of framerail to the firewall and on the other side of the firewall, seem weld the shock tower
stichwelding the rest of the shock tower isn't a bad idea either
check brant's build thread, you'll find some good pics there (including how he managed to weld the vertical part of the framerail by cutting a section out of the firewall)
re: the rear susp bolts coming loose
maybe your the shoulders of your bushings are are too "high"
the trailing arm shaft should be slightly wider than the bushings to get a secure mount
Posted by: Andyrew Mar 22 2006, 08:08 PM
Thanks Chris,
That helps!
That is exactly what I was going to do for the bar up front.
Posted by: jonwatts Mar 23 2006, 12:24 AM
| QUOTE (Jeroen @ Mar 22 2006, 06:07 PM) |
| Andyrew, The blue tube in your sketch won't do anything The part you are connecting it to isn't structural... |
Aww ya beat me to it.
Posted by: Andyrew Mar 23 2006, 12:53 AM
Jeroen, Sorry didnt see your post...
I didnt know if that piece was structural or not, but I figured seam welding things to it would help it be used as a pivot point..
I will stitch weld the whole shock tower, is there any portion that would benifit from adding metal to it? I have 275 lb springs, I remember brad saying the max he's used without having problems was 250, so i figure stitch welding the rest of the are would help.
The welding the vertical part of the framewell, are you refering to were the shock tower meets the longitudnal? I was planning on welding it, I will check Brants build and save any pictures I see of chassis stiffening.
I have new bushings for the rear arm, I do not know if they have been done before on this arm. I have another set of arms which I did not have a problem with untill I changed the arms for the 5 lug.. Could you explain the "shoulder of the bushing being to high" portion? maybe a picture would help.
Thanks again!
Posted by: Andyrew Mar 23 2006, 01:06 AM
Heres a pic of what im planning for the interior.
Its just a tad bit of help for structure, wont hurt my seating, and maybe help if I get T boned, I know, wont do a bunch.. but I think it may help the chassis.
Attached image(s)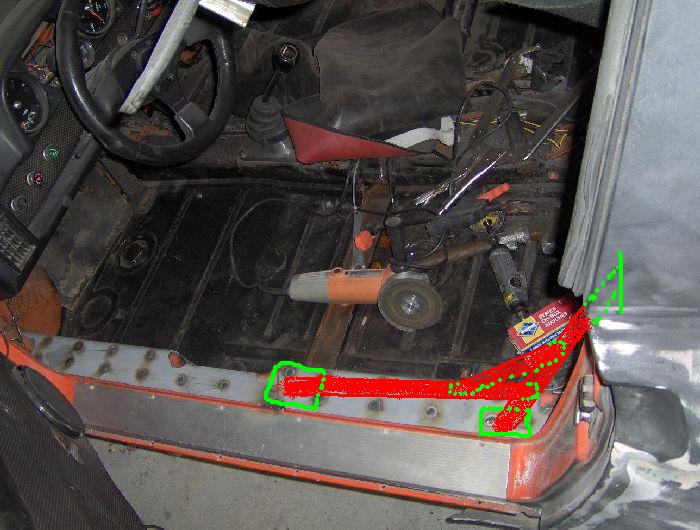
Posted by: Porcharu Mar 23 2006, 02:15 AM
[QUOTE=Here's an example of the tubular brace I like. [/QUOTE]
What happens in a wreck - say a bad one where the rear of the car gets all wadded up. Looks like that bar might end up in your back.
I like the idea of the tube for stiffening, but I have been thinking about this potential proplem for a while.
Posted by: dan10101 Mar 23 2006, 03:00 AM
That tube brace will fold just as quickly as the surrounding metal.. besides the angle at which it is at will put it 5 inches behind the rear seat if it continued in its path of motion.
An accident that bad would kill both driver and passenger anyways, seatbelt's wouldnt hold that much strain and the collision would probably give enough whiplash to kill them as well..
You drive a car like this, You take a risk like that...
Anyways, Sway bar is out. New one next to it.
Old sway bar goes to Kenny (orange914)
New one is a  weapon.. looks to short? 32inches is the firewall to firewall, bar is 37.5 2.25 on each side of play room..
Hardest part will be fabbing mounts for the bushings.
Posted by: dan10101 Mar 23 2006, 03:03 AM
pic
Attached image(s)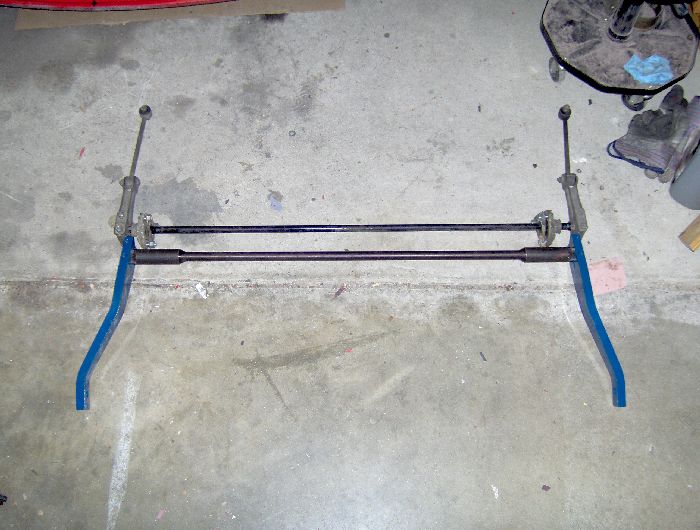
Posted by: dan10101 Mar 23 2006, 03:03 AM
pic of car
Attached image(s)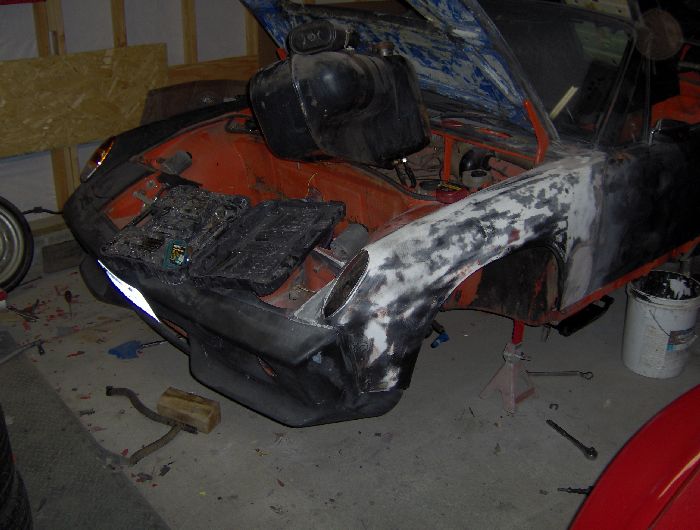
Posted by: dan10101 Mar 23 2006, 03:04 AM
sway bar hole a tad small. Need to enlargen and reinforce.. 

Attached image(s)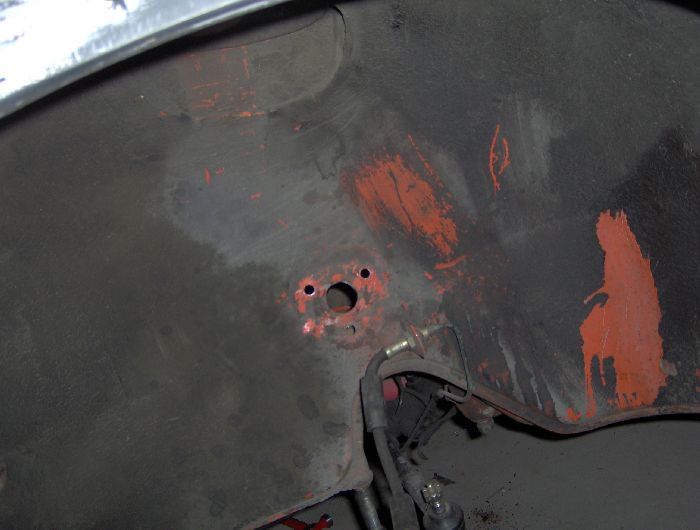
Posted by: Racer Chris Mar 23 2006, 06:12 AM
| QUOTE (Porcharu @ Mar 23 2006, 03:15 AM) |
| [QUOTE=Here's an example of the tubular brace I like. [/QUOTE] What happens in a wreck - say a bad one where the rear of the car gets all wadded up. Looks like that bar might end up in your back. I like the idea of the tube for stiffening, but I have been thinking about this potential proplem for a while. |
I whacked the left rear corner of my race car at 100mph against an armco barrier. I never lifted.
The pickup ear folded around the end of the tube reinforcement. The firewall is quite strong along the bottom edge where it is welded to the floorpan and there is a second layer a couple inches forther forward. There's no danger of injury from that tube.
Attached image(s)

Posted by: Jeroen Mar 23 2006, 08:37 AM
andyrew,
the pic below shows 2 situations
in the top one, you will see that the shaft is slightly protruding beyond the shoulder of the bushing
the bottom one, the bushing sticks out farther that the shaft
this is not good
the shaft should mate to the suspension pickup on the chassis to prevent it from rotating (and loosening the bolt)
if this happens, you need to remove some material from the bushing so the shaft "sticks out" a bit
re: doorbar design
remember that the middle of the long is it's weekest point taking stress away from other parts of the chassis and focusing it to the middle of the long (as in your sketch) might not be a good idea
Attached image(s)
Posted by: maf914 Mar 23 2006, 10:28 AM
Andyrew,
You might want to go back and check out the 914RS build thread and look at the reinforcing tube work Joe did in the cockpit. If I recall correctly, he built a partial tube cage that extended from the rear firewall to the forward part of the longitudinal. Not a complete cage but a reinforcement that ran low from the firewall forward. Your idea looks similar.
Posted by: Andyrew Mar 23 2006, 11:05 AM
| QUOTE (Jeroen @ Mar 23 2006, 07:37 AM) |
| andyrew, the pic below shows 2 situations in the top one, you will see that the shaft is slightly protruding beyond the shoulder of the bushing the bottom one, the bushing sticks out farther that the shaft this is not good the shaft should mate to the suspension pickup on the chassis to prevent it from rotating (and loosening the bolt) if this happens, you need to remove some material from the bushing so the shaft "sticks out" a bit re: doorbar design remember that the middle of the long is it's weekest point taking stress away from other parts of the chassis and focusing it to the middle of the long (as in your sketch) might not be a good idea |
Thanks, That helps a bunch!
Also I'll move the pickup points further.
How bout this?
Attached image(s)
Posted by: Aaron Cox Mar 23 2006, 11:11 AM
stop pussyfooting and do a real doorbar 
Posted by: J P Stein Mar 23 2006, 11:23 AM
I seam welded everything from the after firewall back.
Nuthin' has broke in 4 years of Axing on a rough venue.....(insert fingercrosssing smilie here). I saw no noticable warpage.
I've seen uni-body prep articles & vids for racin'. The first thing these race shops did was seam weld everything in sight. I dunno if it has done any gud on my car, but it didn't hurt.
Posted by: SirAndy Mar 23 2006, 11:27 AM
| QUOTE (Aaron Cox @ Mar 23 2006, 09:11 AM) |
| stop pussyfooting and do a real doorbar |
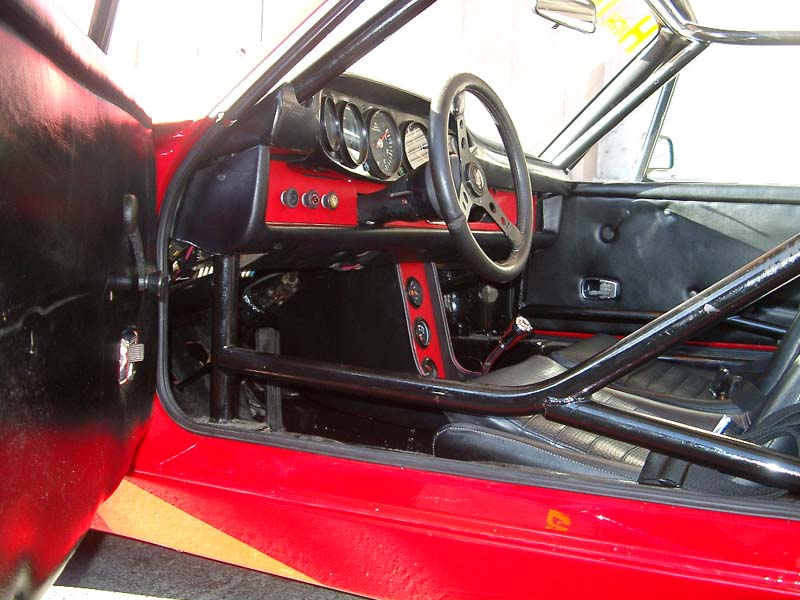
if you come to the breakfast on sat. i'll let you test-sit my car. the door-brace actually makes it EASIER to get in/out of the car ... Andy
AndyAttached image(s)
Posted by: Andyrew Mar 23 2006, 11:41 AM
Im sorry, but I will not make a full bar. I want the bar to be somewhat hidden, and I want the old man who drives and rides this car to be able to get in and out of it with ease. I know about sliding on the bar, thats how I get in and out of the turbo race car. I slide on the seat.
Sat im prom tux shopping.
Andrew
Posted by: Andyrew Mar 23 2006, 11:54 AM
measured the sway bars with a dial caliper.
Stock is 6/10 of an inch, Nascar is 7.5/10 of an inch. I would have to say that I think the nascar bar is made of a stronger material than the stock one and which it should be stiffer.
At any rate, stiffness also depends on how far the droplinks are from the actual shaft. Which is why im going to drill a hole every 1.5 inches towards the bar on the arm. Should give me quite a bit of adjustability with adjustable droplinks.
PS my door brace will be simular to Andy's... just about 2in lower
Posted by: neo914-6 Mar 23 2006, 12:04 PM
Andrew,
Scott told me "Peal" had unique and hidden bracing. Maybe BJ can attest to this. This car is now owned by someone near me who also has a 215 914 V8.
Posted by: SirAndy Mar 23 2006, 12:20 PM
| QUOTE (Andyrew @ Mar 23 2006, 09:41 AM) |
| I know about sliding on the bar, thats how I get in and out of the turbo race car. I slide on the seat. |
sliding? how does "sliding" help you getting out of the car ????
*i* was talking about leverage ...
Andy
Posted by: Andyrew Mar 23 2006, 12:23 PM
Helps getting in andy.
Getting out is just a matter of practice and tecnique (sp?)
Felix, I would be interested if the owner could send me some pics, or if you could send me some pics. Thanks
Posted by: JOHNMAN Mar 23 2006, 12:30 PM
| QUOTE |
| I seam welded everything from the after firewall back. Nuthin' has broke in 4 years of Axing on a rough venue.....(insert fingercrosssing smilie here). I saw no noticable warpage. I've seen uni-body prep articles & vids for racin'. The first thing these race shops did was seam weld everything in sight. I dunno if it has done any gud on my car, but it didn't hurt. biggrin.gif |
Pics please.
Posted by: SirAndy Mar 23 2006, 12:36 PM
| QUOTE (Andyrew @ Mar 23 2006, 10:23 AM) |
| Getting out is just a matter of practice and tecnique (sp?) |
alright, then let me say this one more time ...
with a bar like mine, it is actually "easier to get in and out of the car" ...
no sliding required ...
Andy
Posted by: JOHNMAN Mar 23 2006, 12:36 PM
When you guys refer to seam welding, I become rather confused.
When one "seam" welds sheet metal that was spot welded together, does one run a heavy weld at the break (bend) or does one simply weld a bead past the spot welds at the end of the bent "flange".
Also when 2 "flanges" meet (along the bottom or top) of the longs, how are these "seam" welded?
I am assuming that MIG welders are being used.
Typically, when I think of seam welding sheet metal boxes, I think of how the gas tanks were welded (continuous spot welding between two rollers).
I need some pics of the "seam" welding.
Thanks for some pictorial explanations.
Posted by: Andyrew Mar 23 2006, 12:39 PM
OK then andy...
When I get home from work, I'll draw you up what I want to do in your angle, and we'll see the difference. There is not much.
Posted by: Porcharu Mar 23 2006, 01:26 PM
| QUOTE (Racer Chris @ Mar 23 2006, 04:12 AM) |
| [QUOTE=Porcharu,Mar 23 2006, 03:15 AM] [QUOTE=Here's an example of the tubular brace I like. [/QUOTE] What happens in a wreck - say a bad one where the rear of the car gets all wadded up. Looks like that bar might end up in your back. I like the idea of the tube for stiffening, but I have been thinking about this potential proplem for a while. [/QUOTE] I whacked the left rear corner of my race car at 100mph against an armco barrier. I never lifted. The pickup ear folded around the end of the tube reinforcement. The firewall is quite strong along the bottom edge where it is welded to the floorpan and there is a second layer a couple inches forther forward. There's no danger of injury from that tube. |
That's good to hear. Not good that you crashed tho.
Posted by: lapuwali Mar 23 2006, 02:04 PM
Seam welding is "welding the seams" (between the spot welds). This may help a tad in some highly stressed areas, but only if the original engineering was really bad. It's really popular in the Civic crowd, but I think it's mostly way too much work for way too little gain.
Posted by: andys Mar 23 2006, 03:46 PM
| QUOTE (SirAndy @ Mar 23 2006, 09:27 AM) |
| if you come to the breakfast on sat. i'll let you test-sit my car. the door-brace actually makes it EASIER to get in/out of the car ... Andy |
Sir Andy,
When you install a cage like the one in your photo, does it not obstruct both the engine lid release knob and the front truck release knob? Pic's? How do you get around this issue?
Thanks,
Andys
Posted by: SirAndy Mar 23 2006, 05:29 PM
| QUOTE (andys @ Mar 23 2006, 01:46 PM) |
| When you install a cage like the one in your photo, does it not obstruct both the engine lid release knob and the front truck release knob? Pic's? How do you get around this issue? |
engine lid knob is fine, it clears the cage ...
front hood knob has to be turned 90 deg. and shaved on top. no big deal really ...
Andy
Posted by: J P Stein Mar 23 2006, 06:47 PM
I don't have any good pictures of the welding done on my car.....this one is prolly best. The factory welding(to use the term loosly) in this area is gawd awful. I had to spend hours grinding out the cold lap & porosity....amongst other flaws.
I also welded around the perimiter of the ear & ground it shooth. The same with the arch at the wheel well.....after grinding the ends of the lap even....then ground that smooth. On both of these areas, there were spot welds that blew out the edge of the material. IIRC, most of the rest was more seal welding than anything that would add much strengh.....tho I could be wrong.
Unibodies are designed to be assembled using the quickest method that *will suffice*. As to wheather this is the strongest method is for you to decide. This thing sure as hell wasn't designed to cope with what I'm doing to it.
Attached thumbnail(s)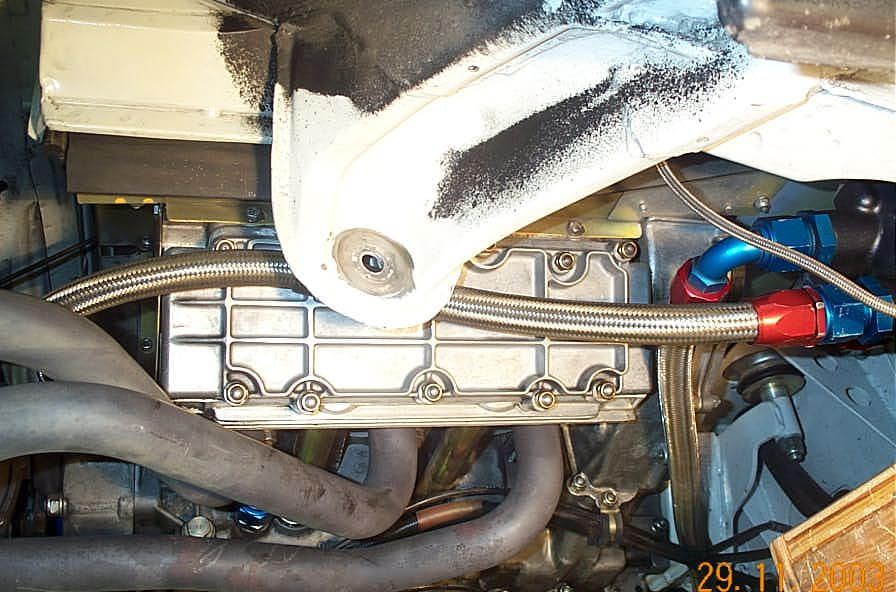
Posted by: TimT Mar 23 2006, 07:50 PM
| QUOTE |
| I think it's mostly way too much work for way too little gain. |
Not sure I can agree with that. Porsche factory racecars have come seam welded for years. From the 72RS lightweight to the 2003 GT3RS that we own have welded seams. I havent seen a 997 GT3 yet so I cant comment on them, but i tend to think that Porsche will continue this practice.
Posted by: andys Mar 23 2006, 10:22 PM
| QUOTE (SirAndy @ Mar 23 2006, 03:29 PM) | ||
engine lid knob is fine, it clears the cage ... front hood knob has to be turned 90 deg. and shaved on top. no big deal really ... Andy |
Doesn't the roll bar sit directly in front of the engine lid release? Can you explain? I'm probably going to mock up a cage with PVC pipe, but don't see how I'll be able to pull the knob.
Andys
Posted by: Andyrew Mar 23 2006, 10:24 PM
Just drill another hole and weld another bong 1 inch over...
No biggie.
Posted by: Racer Chris Mar 24 2006, 05:51 AM
| QUOTE (andys @ Mar 23 2006, 11:22 PM) |
| Doesn't the roll bar sit directly in front of the engine lid release? Can you explain? I'm probably going to mock up a cage with PVC pipe, but don't see how I'll be able to pull the knob. Andys |
Andy,
If you are careful positioning the tube where it welds to the rocker there is room for the handle to be pulled. The roll cage tube should be outboard of the lid release centerline. It may be necessary to shorten the handle 1/4" or so and tap the hole a little deeper. It's close.
Posted by: Pistachio Mar 24 2006, 09:15 AM
Re: the dog-ear tube braces
What's the "desired" OD of the tubing? Wall thickness? (.120 or .095)
Guess it sort of depends on how much stress you think is going on there, but I've run across pics of guys doing semi-tube frames that looks like they're using 1.75" OD, & the pic on this thread looks ...1"(?)
Curious to the consensus of what's "needed" & what's overkill.
Posted by: brant Mar 24 2006, 09:31 AM
Sorry...
I tried to bite my tongue but couldn't make it...
so jumping in here.
I think seam welding IS a Ton of work, yes for only small gain... but come on.. in racing gain is gain.
- How much money do people spend on 5 hp in racing?
- How much money do people spend on weight in racing?
every little thing helps!
I'm sure tube framing every weak point would produce bigger gain, but its heavier and not always legal.
We spent 2 years prepping our chassis
and then 6 months assembling it.
my thread shows all of the assembly, but doesn't show the 2 years of seam welding and chassis work that went into it......
We seam welded a bunch of it.
here are a few shots:
Attached image(s)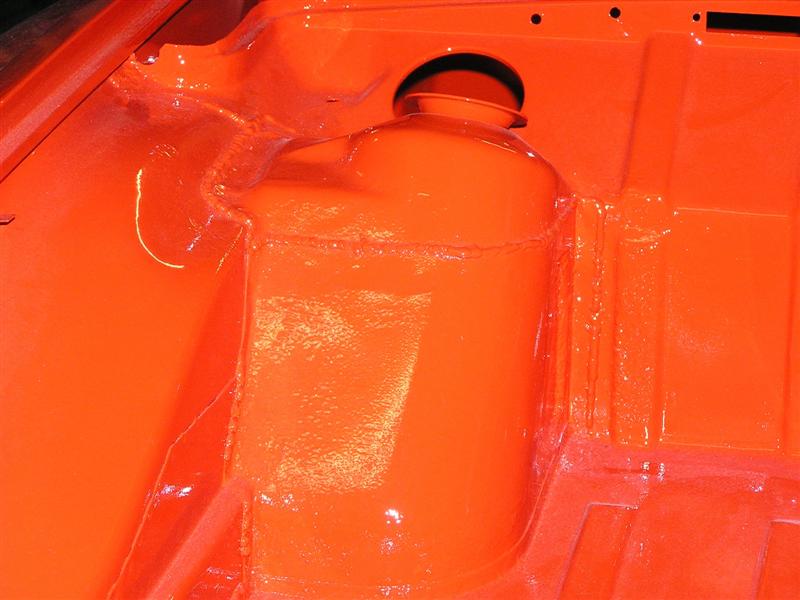
Posted by: brant Mar 24 2006, 09:32 AM
Inside of the same:
Attached image(s)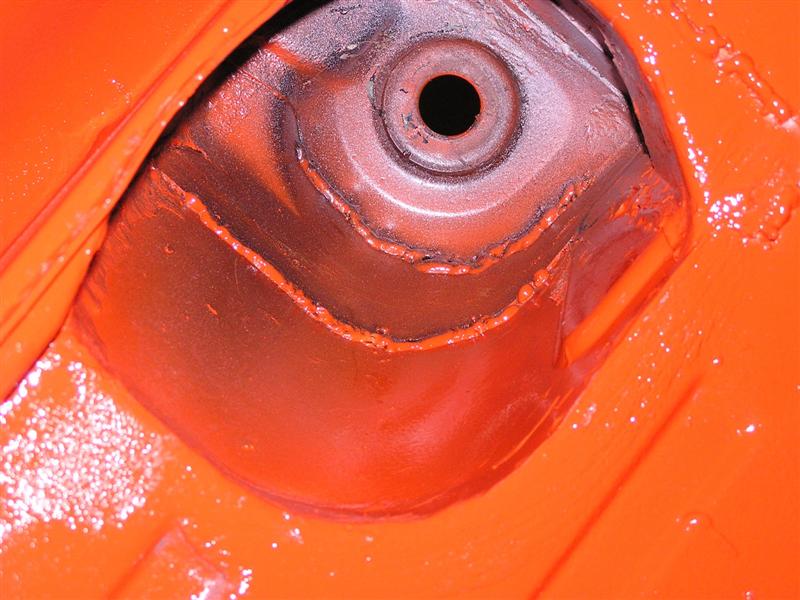
Posted by: Andyrew Mar 24 2006, 11:28 AM
Brant, Thanks! I was working on that area last night..
PITA to weld... I couldnt get my welder configured right..
Andrew
Posted by: MattR Mar 24 2006, 02:59 PM
| QUOTE (TimT @ Mar 23 2006, 05:50 PM) | ||
Not sure I can agree with that. Porsche factory racecars have come seam welded for years. From the 72RS lightweight to the 2003 GT3RS that we own have welded seams. I havent seen a 997 GT3 yet so I cant comment on them, but i tend to think that Porsche will continue this practice. |
you better believe it.
the 997gt3 is a piece of art and is seamwelded throughout.
Posted by: MattR Mar 24 2006, 03:01 PM
| QUOTE (Andyrew @ Mar 24 2006, 09:28 AM) |
| Brant, Thanks! I was working on that area last night.. PITA to weld... I couldnt get my welder configured right.. Andrew |
something tells me if you are having trouble "configuring" your welder, you're not the person to be seam welding that car.
go find a professional. if you cant afford it a) get a job, B ) learn to weld, c) give up the advantage.
Posted by: J P Stein Mar 24 2006, 04:08 PM
Do it , Andrew.
Some of your passes are gonna look like hammered shit initially.....but that's why they make grinders. Just concentrate on your puddle & the movement required to tie the metal together.....setting the heat & feed takes some fooling around, but once you're close, you'll see it.
You're gonna have to do some overhead and that's where it gets tough. Make sure you have some leathers to keep the hot stuff off your pink body.....most of the time. The smell of burning hair and sound of sizzling flesh is all just part of the fun......a couple months later, you'll laugh about it. 
Posted by: Andyrew Mar 24 2006, 04:44 PM
| QUOTE (MattR @ Mar 24 2006, 02:01 PM) | ||
something tells me if you are having trouble "configuring" your welder, you're not the person to be seam welding that car. go find a professional. if you cant afford it a) get a job, B ) learn to weld, c) give up the advantage. |
Thanks mister!
I think I'll stick with JP's advice.
Here, let me post some pics of some of my welds..
Its a new welder, and I just got more gas, its possible they gave me the wrong stuff. I had a tough time getting it setup right for some of my other stuff, only had the welder a little bit.
I can weld just fine thank you matt. Given that the welder is setup propperly...
My problem was dirty surface area and the fact that welding on 1/4 inch of metal, upside down, trying to set the temp and speed of the welder is a little difficult.
Andrew
Posted by: Andyrew Mar 24 2006, 05:25 PM
Heres some shots of my crappy welding.
Back of the rear fender.. Not as structural as ahead of it. Figured it was a good place to test.
Attached image(s)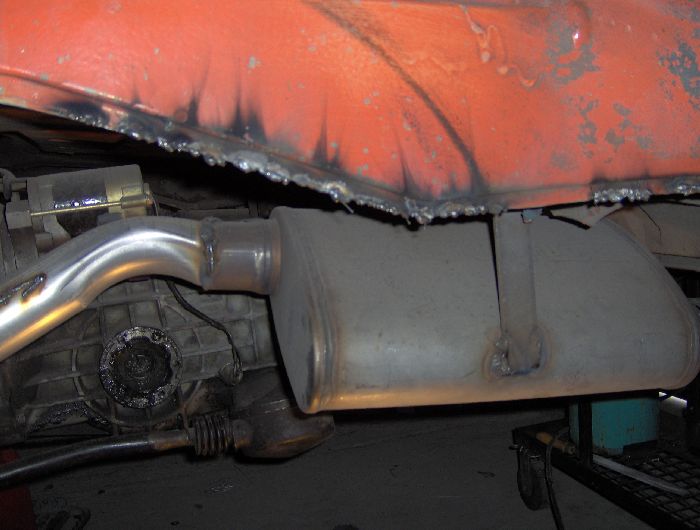
Posted by: Aaron Cox Mar 24 2006, 05:27 PM
 yummy! goober welds!
man, you got MattR'd!
have some fun. a grinder is all you need.....
Posted by: Andyrew Mar 24 2006, 05:27 PM
more
Attached image(s)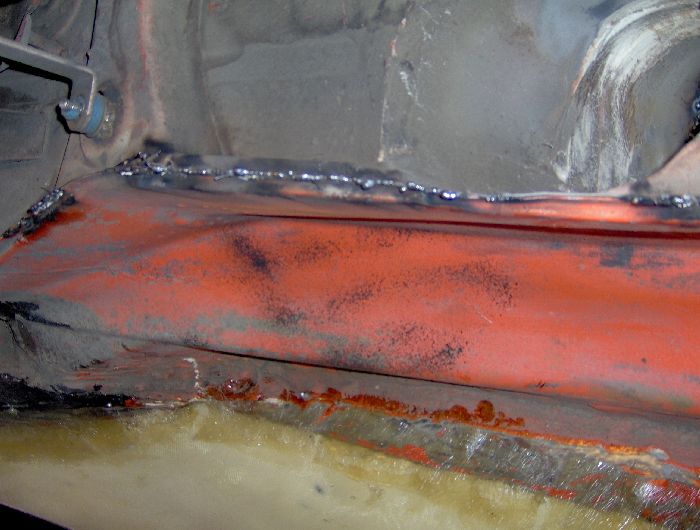
Posted by: Andyrew Mar 24 2006, 05:28 PM
Get it dialed in a little... and figure I'll try a little piece.
Attached image(s)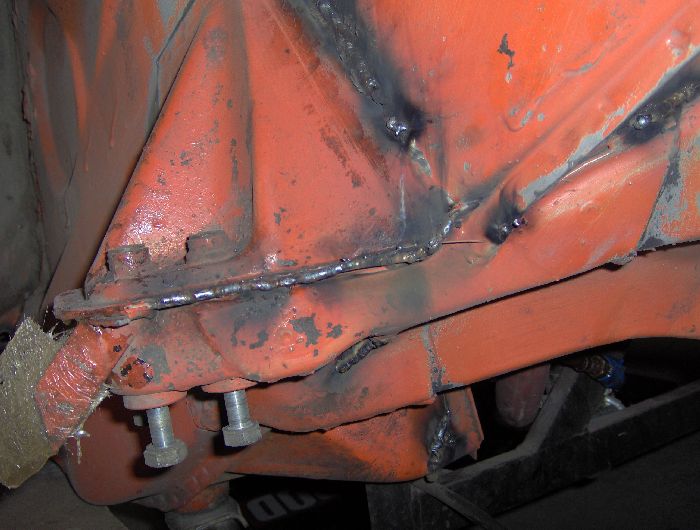
Posted by: Andyrew Mar 24 2006, 05:29 PM
Smore
Attached image(s)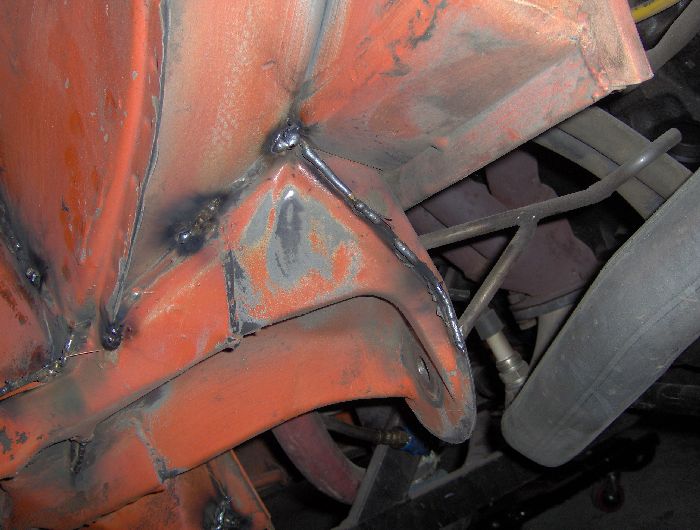
Posted by: Andyrew Mar 24 2006, 05:31 PM
Close up of my only line I did.
Rest were done by tacks so I could grind them off if I wanted.
Attached image(s)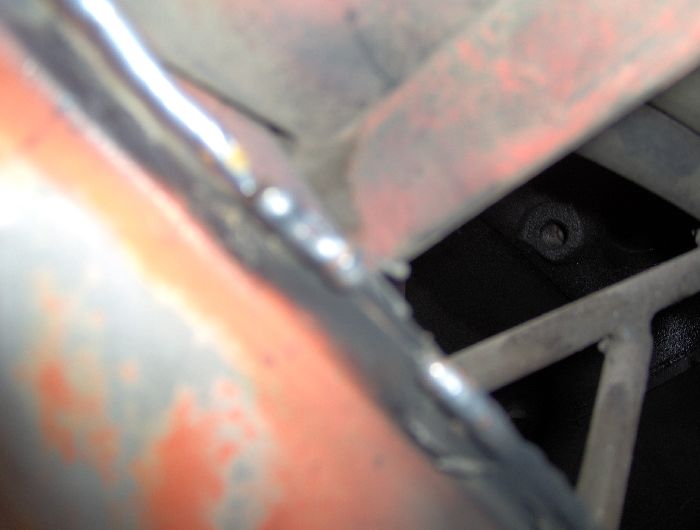
Posted by: Andyrew Mar 24 2006, 05:32 PM
more welds
Attached image(s)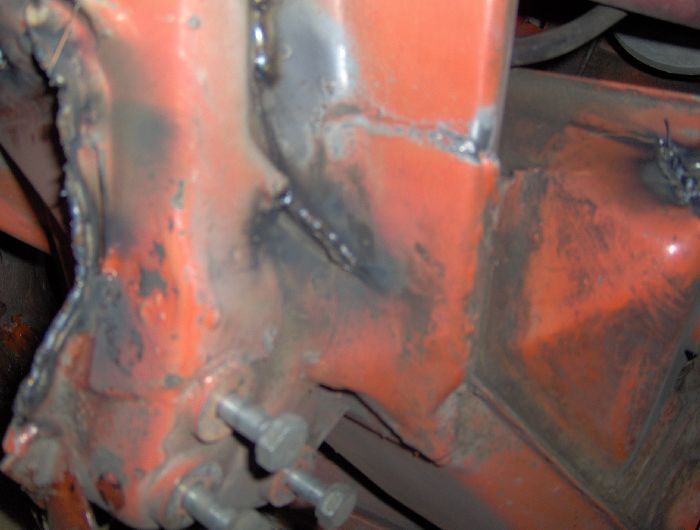
Posted by: Andyrew Mar 24 2006, 05:35 PM
My trouble area..
Couldnt get a clean weld, burnted a little through, played with the settings, Metal felt a lot thinner than the rest.. Sparks would rest on my glove and burn my hand, and hit my shirt, and splatter over my mask... Upside down.. arm fully extended.. Gave up... lol
Attached image(s)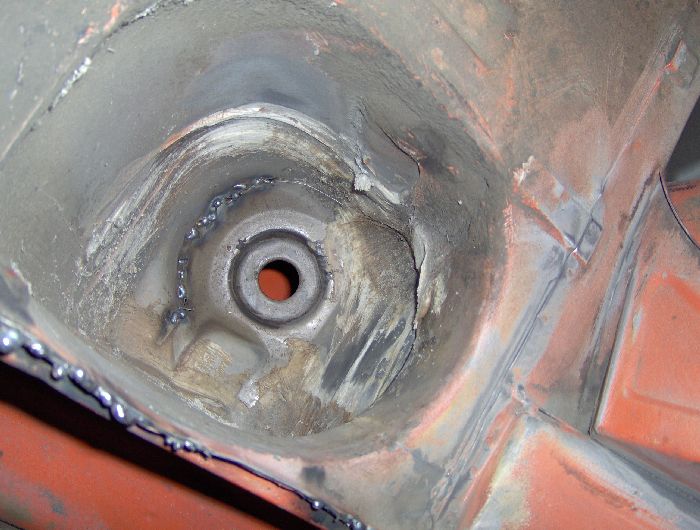
Posted by: Aaron Cox Mar 24 2006, 05:35 PM
have you thought about grinding the area you wish to weld first? 
Posted by: Andyrew Mar 24 2006, 05:37 PM
Yes.. I used a wire wheel.
heres my long kit welds.
Attached image(s)
Posted by: Andyrew Mar 24 2006, 05:38 PM
Finally my setup.
Attached image(s)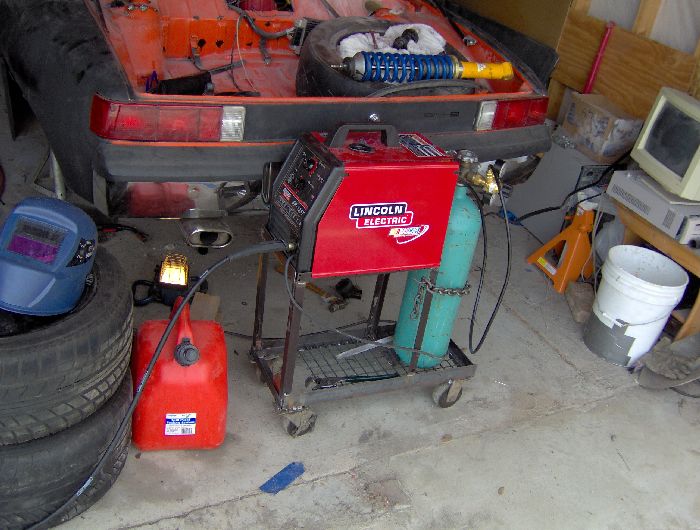
Posted by: brant Mar 24 2006, 05:48 PM
sometimes I use a MAP torch or propane torch to burn off the paint before I weld...
then a stiff wire hand brush to clean up the area.
followed by primer after the weld.
(In fact I did ever single seam with POR-15 on the orange car)
brant
Posted by: MattR Mar 24 2006, 05:52 PM
| QUOTE (Andyrew @ Mar 24 2006, 03:37 PM) |
| Yes.. I used a wire wheel. heres my long kit welds. |
Were those done with a spot welding machine?
Posted by: Andyrew Mar 24 2006, 05:57 PM
Matt, no... I did them myself with the same mig pictured.
Brant, Good tip. I know doing the longs I would have to use a screwdriver to scratch up the paint with, then it would take a second to burn the paint and then I was good..
I'll use that for the rest of my work. The wire wheel couldnt get all the paint, and it took forever.
How did you take the seam sealer off? wire wheel or burned it?
Wire wheel took forever on the tower pictured.
Posted by: MattR Mar 24 2006, 05:57 PM
| QUOTE (Andyrew @ Mar 24 2006, 02:44 PM) |
| I can weld just fine thank you matt. Given that the welder is setup propperly... |
A little modesty goes a long way.
I see why you an alpha clash so often... its like watching two positive poles of a magnet being throw at eachother really fast. At first you repel but one of you will eventually flip and you'll be inseperable (except one of you will be face down).
Posted by: Andyrew Mar 24 2006, 06:02 PM
I never said I was GOOD at welding, I just said I could do it..
Geez matt, You PMSing today? cus all I hear is bitch bitch bitch... 
| QUOTE |
| eventually flip and you'll be inseperable |
Just like you and aaron? Aw, how cute.. But im taken.. sorry
Posted by: Sideways Mar 24 2006, 06:10 PM
| QUOTE (Andyrew @ Mar 24 2006, 04:38 PM) |
| Finally my setup. |
Which Lincoln are you using?
Posted by: Andyrew Mar 24 2006, 06:12 PM
135
one's on ebay..
http://cgi.ebay.com/LINCOLN-SP-135T-sp-135-t-MIG-WELDER-NEW-120V-K1873-1_W0QQitemZ7602722235QQcategoryZ113743QQssPageNameZWDVWQQrdZ1QQcmdZViewItem
If I were to do it again, I'd get the plus. my school has the plus, makes a much better connection.. Makes me think mine is setup wrong..
Posted by: Aaron Cox Mar 24 2006, 06:24 PM
| QUOTE (Andyrew @ Mar 24 2006, 05:02 PM) | ||
Just like you and aaron? Aw, how cute.. But im taken.. sorry |
hey! i got no dog in this fight.....
leave me outta this...
i think its cool youre going for chassis rigidity.
have you given any thought to warpage? ala... weld and then move on to a different area. ive read people have warped their chassis' by laying continous bead after bead.....

Posted by: Andyrew Mar 24 2006, 06:33 PM
Yup, My mind is all on shrinkage...
Thats why I only laid one bead.. and I generally moved from one side, back to another.. let it cool down a bit. "stitch" welding... one stitch at a time
Posted by: J P Stein Mar 24 2006, 08:20 PM
You want the surfaces *clean*....no paint or other guck
in the weld area....real clean. On that overhead, grind the pinch seam down so both sections of metal are the same height & CLEAN. You gotta get your face up close to that joint to keep right on that parting line & I ran it down hand.
I never found shrinkage to be an issue....just laid it on.
This was a similar seam, but 3 sections of metal & almost flat.
Attached thumbnail(s)
Posted by: J P Stein Mar 24 2006, 08:22 PM
Grinders are gud.
Attached thumbnail(s)
Posted by: J P Stein Mar 24 2006, 08:24 PM
But bondo is better.
Attached thumbnail(s)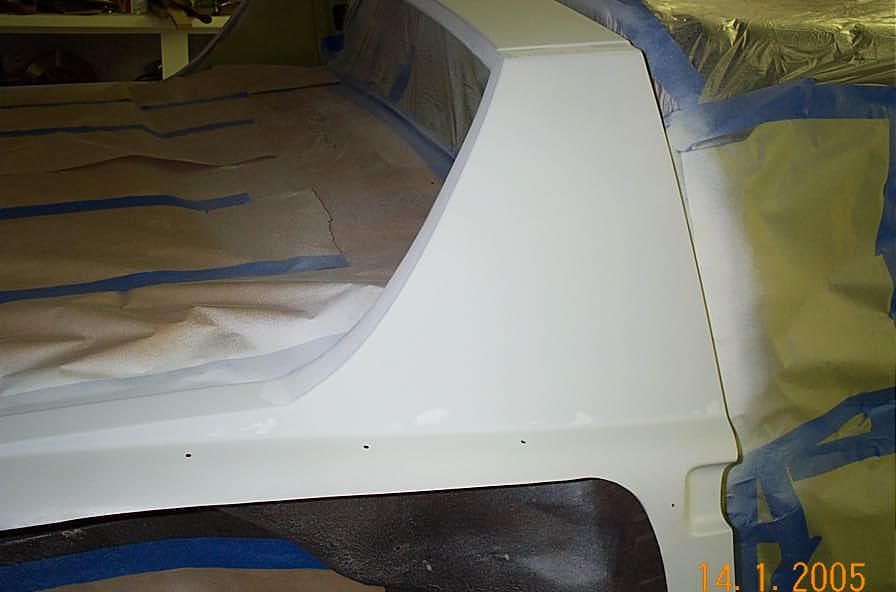
Posted by: Andyrew Mar 24 2006, 08:29 PM
Did you have trouble keeping the wire on the seam as well?
You seam welded, ground it down, and welded it again? Explain to me what you did with that sail pannel.. Thats my next weld project..
Posted by: J P Stein Mar 24 2006, 08:50 PM
As I said, there are 3 layers of sheet metal there.
I had to do about 3-5 inches at a time as the spotwelds holding it together are.....disappeared.
After the "fin" is ground down just a bit proud of the flat surface, you're faced with metal, gap, metal, gap, metal.
Naturally when you have a deal like that , blow thrus are a problem.....but just keep doing a wash pass and seal em' up.
On that lower pinch seam, I ground as described, welded, (Yes, a hell of a time keeping on the parting line.....get close. & brace on your other hand....even when it's on fire) then came back and smoothed things out with various grinding instruments. An angle grinder for the big globs, then a sanding disc and/or rice cake on a die grinder to make things pretty (kinda). You don't wanna leave sharp edges or joggles....stress points crack....or start em'. Smooth is gud.
IMO, that arch is a high stress area on the car.
Posted by: Brando Mar 24 2006, 10:15 PM
another idea would be to take your grinder (you should have one for a welding job like this) and grind at an angle on the flange that sticks out where the two pieces are laid together. In metal shop this is a trick we used for flange welds.
Posted by: Brando Mar 24 2006, 10:17 PM
This is how the body is normally "welded" together. Spots welds on a flange that's painted over. Very little surface area to weld on, you're going to get gobs of weld material where it rolls down, cools and puddles into large globs. More difficult than it has to be, plus you have a small target to aim for to keep the 2 pieces together.
Attached image(s)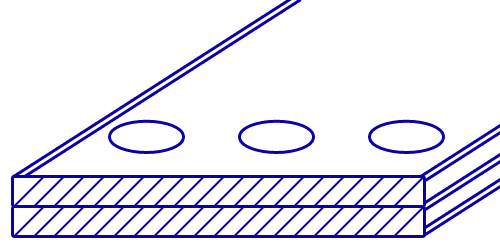
Posted by: J P Stein Mar 24 2006, 10:18 PM
Hummm.....gud idea. Where were ya when I was doing this?
Posted by: Jeroen Mar 24 2006, 10:19 PM
I'm not much of a welder (varying results) but cleaning to bare metal, like JP mentioned is a MUST
If you don't your results will suck no matter what...
The paint and other crap that's still there will contaminate your weld. Your weld will sputter like mad and you get lousy penetration ( = bad weld)
Wirebrush on an electric drill works perfectly fine, but yes, you'll have to put some elbow grease into it... no pain, no gain
seam sealer comes off best with the wirewheel too
if your weld sucks, just grind it down and have at it again...
Posted by: Brando Mar 24 2006, 10:19 PM
But if you use your angle grinder and do about a 60º angle going through both pieces, you can get more surface area to weld on. Afterwards you're going to grind it to the appropriate shape so this will not matter. You are achieving the same goal (seam welding) but doing it cleaner to begin with. Just don't be a doof and cut yourself on your freshly-made lap weld area.
PS: It's always easier to lap weld two pieces together than flange weld...
Attached image(s)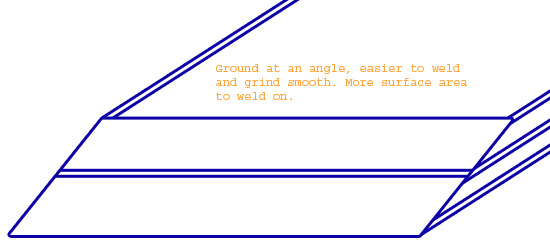
Posted by: J P Stein Mar 24 2006, 10:48 PM
Nice sketch, but I visualized it.
The long side opposite your gun would prolly be consumed....a gud thing.....but you don't have to go overhead...just kinda angle the gun upward some......which I really like. Some fussing would be in order.....isn't there always?
Posted by: Brando Mar 25 2006, 04:28 AM
I drew pictures because not everyone can clearly visualize what I was saying
Posted by: Andyrew Mar 25 2006, 05:33 AM
Thanks a ton bondo!!!
That really helps. I will hence forth do this.
And prep my area better..
Posted by: Brando Mar 25 2006, 02:08 PM
Bondo? 


Posted by: Aaron Cox Mar 25 2006, 02:12 PM
| QUOTE (Brando @ Mar 25 2006, 01:08 PM) |
| Bondo? |
was that a "i cant read brando's username"? or "Bondo saves the day!"
Posted by: J P Stein Mar 25 2006, 02:31 PM
Brado, bondo.....what's the difference?
Posted by: Andyrew Mar 25 2006, 02:45 PM
I was up till 7am... worked till 330am... Gimme some slack
Sorry brando..
Powered by Invision Power Board (http://www.invisionboard.com)
© Invision Power Services (http://www.invisionpower.com)