Printable Version of Topic
Click here to view this topic in its original format
914World.com _ 914World Garage _ Project MBT-8 914 (warning - big pics for dial-up)
Posted by: byndbad914 Apr 17 2006, 05:07 PM
So, I was updating my website and came up with a name for my car... though it is really more sarcastic than I would have wished for.
Project MBT-8 914 stands for (in military voice) Main Battle Tank 8 nine one four - or resembling the fact it is a V8 914 that is quickly becoming an M1 Abrams. It will be interesting to see what this puppy weighs when I am all said and done - I expect that the 2305lbs it went in at has been on a steady diet of burritos. I put a lot of cage in it for safety, so I am okay with that, but now that I am adding weight with a dry sump tank (not the tank, but the extra oil weight and hoses), a wing that feels pretty heavy, and door panels, etc (every little thing adds up of course) I am going to have to go to fiberglass decklids and lexan windshields to get back near that weight.
Let's see, how can I lie to myself... oh yeah, hey it will be more stable. Yeah, that's the ticket.
But, if you are going to war, bring a tank right? Lame metaphor for racing of course, but... well... whatever.
AJ made a bunch of progress again, from the rear iso it is starting to look like a 914 again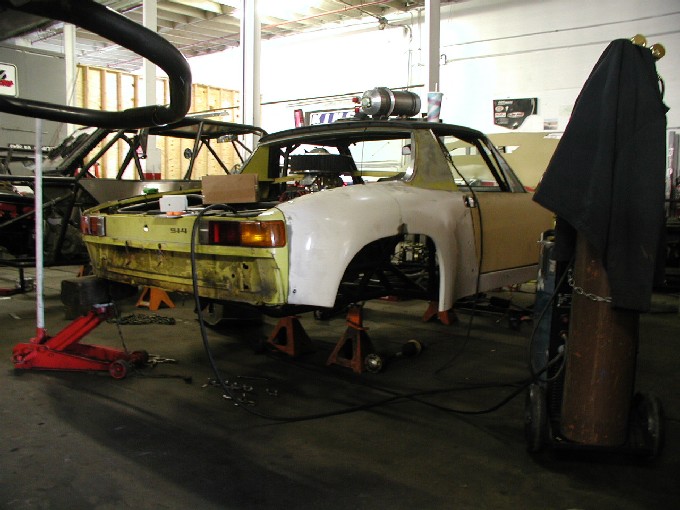
YEAH, we can preview pics finally!! And do multiples in one post!! Nice job to the admins!!
here you can see the upper pad set in place - notice the cut to get it in. Once it is screwed down, the seam will be noticeable but not bad.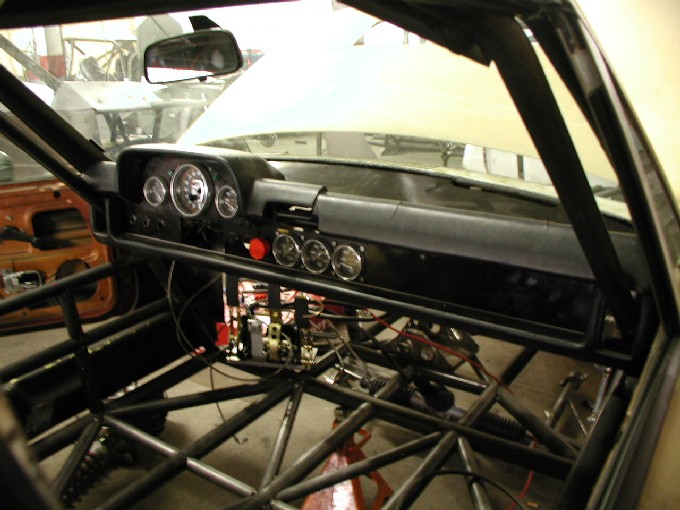
the front will need rework to fit, but tacked into place for now until the front fiberglass is put on this week.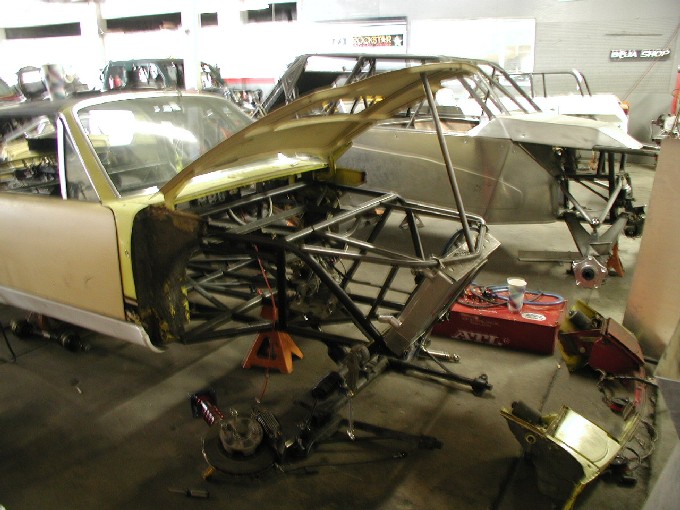
Also added in some midpoint mounts to the adapter plate for additional support - that 930 transaxle mounting setup is scary to me so this should take some of the load off of that area.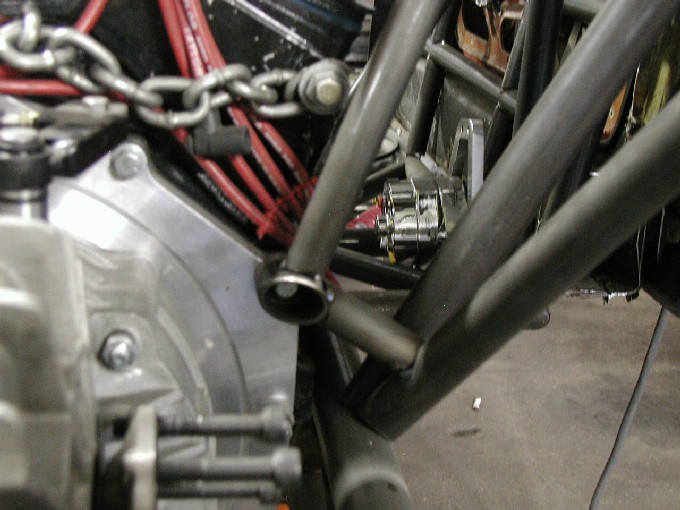
BTW, if you saw this link for the first time, here is the original link from the start
http://www.914world.com/bbs2/index.php?showtopic=46192&hl=byndbad914
got messed up a little by the "great virus of 06" fiasco, so I started another here.
Posted by: 914_1.8t Apr 18 2006, 03:19 PM
Looking great 
Please do keep updating with newer pics...I'm in the process of doing something similar and your pics are very helpful.
Posted by: Aaron Cox Apr 18 2006, 04:24 PM
nuts!
Posted by: byndbad914 Apr 18 2006, 05:33 PM
not just nuts, deeez nutz!
sorry, couldn't help myself.
1.8t - are you building a tube car as well? If so, you can mimic my "floor" if you are worried about side impact stability, but if you worry about weight, the average sane car builder will use way less tubing and you will probably be fine. I am "ascared" of getting hurt, so that is why the cockpit area is so gnarly. I have what is known as the Anderson Luck Factor...
Of course, hopefully I don't "call it" here, but watch me go off the track and have something come in the window and hit me in the throat anyway. The car will be in perfect shape without a scratch. That would be what is known amongst my friends as the "Anderson Luck Factor" - the low probably of the craziest/worst thing happening is multiplied by 10 if I am involved. 
Yeah, they think that is funny... 
Posted by: pokey1168 Apr 18 2006, 06:14 PM
WOW!!!!!!!! 
I think I am having tube envy!!!!
GREAT work
Posted by: 914_1.8t Apr 18 2006, 06:29 PM

not just nuts, deeez nutz!
sorry, couldn't help myself.
1.8t - are you building a tube car as well? If so, you can mimic my "floor" if you are worried about side impact stability, but if you worry about weight, the average sane car builder will use way less tubing and you will probably be fine. I am "ascared" of getting hurt, so that is why the cockpit area is so gnarly. I have what is known as the Anderson Luck Factor...
Of course, hopefully I don't "call it" here, but watch me go off the track and have something come in the window and hit me in the throat anyway. The car will be in perfect shape without a scratch. That would be what is known amongst my friends as the "Anderson Luck Factor" - the low probably of the craziest/worst thing happening is multiplied by 10 if I am involved.
Yeah, they think that is funny...
Yup, I had a rought idea of what I wanted to do but looking at yours gave me a clear plan on how to do things. Thanks again for posting the pics.
Not really worried about weight...I just want to it be less than 2400lbs and i'm good...but even then I dont think i'm going to use as much tubing as yours. I may pick up some 1"x.120 tubing to reinforce selected areas.
Posted by: byndbad914 Apr 18 2006, 07:06 PM
pokey - I think I am having avatar envy!
1.8t - a couple suggestions to help minimize the tubing but stay rigid...
I have the outer perimeter (the "square" that frames out the interior area) at 2" diameter - 1-3/4" would be fine for most folks. The lower forward tubes, the rear tubes that mount the engine, and the tubes that tie the front to rear are 1-3/4" - I would stick with that. The reinforcement in the interior is a mix of 1-1/2" and 1-1/4" - you could make the "diamond" under the seats and other "tie-in" tubing out of 1-1/2" and leave out a lot of the cross tubing (the stuff running parallel to the windshields that I added for side impact stability).
that said, if you use chromoly like I did (DOM will be 30% heavier), my whole tube frame section is probably only 300-400lbs. I haven't done a weight analysis in a while, but the lower "frame area" front to rear with no hoop or NASCAR bars was about 175lbs, so if that doubled it would only be 350lbs, and I don't think I added twice as much tubing yet. DOM would only add roughly 115lbs to the whole car in that case.
If you stay with a 4cyl and 901 trans, you will be lighter than me by a couple hundred pounds as well. So I am guessing I will be around 2400lbs, maybe higher as I add more stuff to it (trans coolers, trans pump, oil coolers, wing, fire suppression system, so forth), so you should stay within 2400lbs.
Roger Sheridan has a really light 914 tube car - I have a ton of pix of that car.
a thread from the bird board http://forums.pelicanparts.com/showthread.php?s=&threadid=253609
He had mostly 1-3/4" and 1-1/2" bar, with 1" stuff in less structural areas, firewalls weren't welded in place (mine will be = more rigidity but more weight). He has a 3" diameter tube that runs across the rear of the car at the lower firewall area and built off of that - his designer found it necessary to have that huge tube at that point to help react the rear loads IIRC. His whole car with a -6 and 901 trans was just over 1800lbs. He recently went to a 915 so guesses it is about 1850lbs now. Carbon fiber seat, etc. helps of course. 
Posted by: 914_1.8t Apr 18 2006, 09:09 PM
Thanks for the suggestions, I will be picking up some 2x2"'s for the floor area like you suggested. I'm using DOM tubing so I guess mine will be a little heavier. Currently I've got 100ft of 1.5" DOM, I'll also pick up some 1" .120 to use for reinforcements.
My plan is to leave the exterior of the car alone and gut everything else, including front rear firewall as you did....only keeping the longs. I don't plan to take the fenders/quarters apart...just leave the body whole with reinforments and build around (on inside) of that.
After being inspired by your thread (really ) I went into the garage and did some chopping and bending. I managed to make the main hoop/roll bar. I'm planning on making the cage off of the longs first and then chopping and doing the floor and building up as on yours.
Anyways, I don't mean to hijak your thread...I'll start another one for my project in case someone would like to see it...thanks again for your suggestions.
Posted by: byndbad914 Apr 19 2006, 06:20 PM
Thanks for the suggestions, I will be picking up some 2x2"'s for the floor area like you suggested. I'm using DOM tubing so I guess mine will be a little heavier. Currently I've got 100ft of 1.5" DOM, I'll also pick up some 1" .120 to use for reinforcements.
My plan is to leave the exterior of the car alone and gut everything else, including front rear firewall as you did....only keeping the longs. I don't plan to take the fenders/quarters apart...just leave the body whole with reinforments and build around (on inside) of that.
After being inspired by your thread (really
) I went into the garage and did some chopping and bending. I managed to make the main hoop/roll bar. I'm planning on making the cage off of the longs first and then chopping and doing the floor and building up as on yours.Anyways, I don't mean to hijak your thread...I'll start another one for my project in case someone would like to see it...thanks again for your suggestions.
Just to clarify the first sentence - I have 2" diameter round bar, not 2x2 square bar. If you want to go with a "boxed" section car, use 2x3, with the 3" as the vertical dimension.
Oh boy, see now you went and got me all excited... I started out to build a rectangular "frame" car but couldn't get 2x3 in chromoly...
And then reread what I just wrote - build a frame car. THAT would be cool, not weigh a ton, and the longs would be in place simply to hold the body structure, not carry loads. With my car, I kept the longs below the doors to have some rigidity regarding the fact I am using stock, heavy doors. The rear section that is still left (the sail panel and the small bit of fender to Dzus the fiberglass) is VERY weak right now. I can grab the little piece of fender and move the sail around a bit. Won't matter as the reinforcements added in my first pics in this post will hold all that in place.
For you, you could run 2x3 box front to rear firewall as a parallel frame (with the correct width to match the mounting locations for the front suspension), then box out the car to the longs, and back and forth at the front nad rear where you want the new firewalls. Then weld the 2x3 along the longs on the inside - making the new frame structure integral to the longs. Now the body is "along for the ride". Add in a roll cage just like mine (tie into the frame, NOT the longs!!), a couple tubes to the front for strut perch mounting and such (similar to mine). Then the rear you could lay out with a mix of round bar and box sections to mount your engine and such. You will be fairly different from mine if you run trailing arms. Watch my link over the next couple weeks - AJ should be starting the five-link rear setup shortly which will be waaaayy easier and slicker to work with than trailing arms and easy to build (you'll already have the 1" diam tubing). Front end will be tubular as well with struts that would also be good to copy if you plan to use struts and not SLA ("double A"). The lower arms, fully adjustable strut perches and spherical "ball joint adapter" pieces were all bought from Kanna Motorsports and I expect them to work fine... we'll see soon enough.
Make sure to add some small strutural tubing like I have to tie into the fenders, rear panel and such to support the body, THEN cut out all of the inner body stuff and rearward longitinals (cut rear part of longs down to the firewall like I did AFTER you lock the body in place - will take a lot less measuring than AJ is doing right now to get the body back into place).
If you are going to stick with the flat Pcar engines, you would need to work at keeping everything removeable from the bottom since they are so wide. Otherwise, the narrow V8 makes the upward removal doable, and the caging of the car much easier. If you could come from the top, you could frame front to rear.
fingers are wearing out...
The reason I support building a "frame" car so much is that any overhead structure is not as necessary for rigidity - though of course helps with torsional loads for sure - notice I say not as necessary. You could have less internal cage structure and such for a very rigid car making it more streetable.
Think American g-machine cars and you will get what I mean. Solid frames, solid suspensions, minimal overhead structure, very streetable and comfortable with loads of power and cornering on hand. THAT is what I originally intended to build, then went 141mph, car was scary acting, etc etc, full tube crazy car.
My future 70 Mustang fastback project will be diff'ernt - build more for the street with a 500HP engine, but from a 430-ish cube engine, so "milder" running and such. Then I won't want all the cage structure at all. That will be 2x4 DOM framed out with a NASCAR front clip and 3-link rear if that means anything to you. Our 914s are lighter so 2x3 DOM would be fine for you.
Here is a good Nova g-machine project that illustrates the rectangular tubing as a frame with minimal cage structure.
http://www.iimuchfabrication.com/
Posted by: 914_1.8t Apr 20 2006, 03:18 AM
I'm planning on doing something very similar to what you recommended. However, I'm building the cage into the longs and also tying it into the floor and rest of the chassis. Basically, the longs and body will be going for a ride with the chassis and won't really be responsible for any kind of load, it'll be just hanging on as you said.
As for my project:
Using a Audi S4 (2.7tt, but single larger turbo) engine + 6spd trans. HP goals is about 550ish. Uneven lenght A-arms with QA1 or Koni coilovers with Willwood 4 piston calipers/brakes front and rear, riding on custom spindles using porsche hubs and bearings. I'll be modding some trailing arms to make the spindles (at least thats the plan for now).
And as far as G-machines...I love em. Check out Lateral-g.net if you havn't already...I got my motivated to build the 914 this style from checking out that stuff. My next car will be a 69' camaro (which will be my daily driver)...after I finish the 914.
-Sonu
Posted by: byndbad914 Apr 20 2006, 01:37 PM
As for my project:
Using a Audi S4 (2.7tt, but single larger turbo) engine + 6spd trans. HP goals is about 550ish.
So the 250cube V8 dual overhead cam engine... definitely build a frame car to the rear suspension points, and pick the engine up from below. Then make the motor/trans remove from above. You'll see how easy it is on my car in the next couple of weeks. Besides, those heads make the engine so wide (now I know why you want to remove the rear firewall!!) you will have to come in from the top. With a framed rear, you will need very little tubing above it for support (just enough to tie in some shock mounts basically), which will make R&R that much easier as well.
BTW, since you follow the 'merican car stuff, why not something cheap and simple like a dual overhead cam 4.6L Ford? I am also considering building a daily driver 914 with one of these and a re-geared 901 (instead of the Mustang). Kennedy may even have an adapter plate for Ford to Audi transaxles by now if you wnat that 6spd. Could put a couple of junkyard Garretts on there and make 550 no problem on boost, and there are TONS of aftermarket parts for it. I was measuring the 5.4L supercharged engine in my Lightning too

Uneven lenght A-arms with QA1 or Koni coilovers with Willwood 4 piston calipers/brakes front and rear, riding on custom spindles using porsche hubs and bearings. I'll be modding some trailing arms to make the spindles (at least thats the plan for now).
Are you hell-bent to have stock Porsche bolt pattern or something? I would highly, highly suggest just getting NASCAR front suspension pieces with the Wilwood calipers and rotors as a package. Would be 5 on 5 pattern which means a ton more wheel selection, especially if you want to use racing wheels. Buy adjustable coil-overs for NASCAR as well - cheap and easy to work with. 86 all that Porsche crap, it just becomes a PITA sooner or later. For the rear, you could cut down the trailing arm to just the hub, build uprights from there, and redrill stock hubs to 5 on 5, and adapter the Wilwoods to the rear. OR, there is a ton of already fabbed up rear hub stuff out there for purchase. Not cheap, but easier in the end and easy to fab to.
All that QA1 stuff and such I really am not sure how it has gotten so popular, other than they make bolt-on kits for Camaros and such. Building from scratch, use the NASCAR stuff like Carrera 67-series shocks and such. Here is a link to give you an idea of pricing and such - click on the SW Tour Front Suspension link - you would just get uppers and lowers, hubs and such - maybe those calipers if you like (remember, those are enough to stop a SW Tour car!), use the stock rack for correct width and such, set the hubs to the right track width and weld away. Easy to adapt turbo tie rods to work with these hubs.
http://www.strcars.com/products.htm
If I had it to do over again... before I spent all that money on struts and shit trying to build a tub car instead of a tube car...
And as far as G-machines...I love em. Check out Lateral-g.net if you havn't already...I got my motivated to build the 914 this style from checking out that stuff. My next car will be a 69' camaro (which will be my daily driver)...after I finish the 914.
Nice, Lateral-g is in my "favorites". Check out this Mustang - this is what I was going to do to the one I had years ago, then got the idea for the 914...
http://www.lateral-g.net/members/libbymustang/
Holy crap - it is done!! I have been watching that link for over a year and it hasn't changed until sometime in the last week, he went from fab to "finished" pics.
Posted by: 914_1.8t Apr 20 2006, 03:05 PM
So the 250cube V8 dual overhead cam engine... definitely build a frame car to the rear suspension points, and pick the engine up from below. Then make the motor/trans remove from above. You'll see how easy it is on my car in the next couple of weeks. Besides, those heads make the engine so wide (now I know why you want to remove the rear firewall!!) you will have to come in from the top. With a framed rear, you will need very little tubing above it for support (just enough to tie in some shock mounts basically), which will make R&R that much easier as well.
BTW, since you follow the 'merican car stuff, why not something cheap and simple like a dual overhead cam 4.6L Ford? I am also considering building a daily driver 914 with one of these and a re-geared 901 (instead of the Mustang). Kennedy may even have an adapter plate for Ford to Audi transaxles by now if you wnat that 6spd. Could put a couple of junkyard Garretts on there and make 550 no problem on boost, and there are TONS of aftermarket parts for it. I was measuring the 5.4L supercharged engine in my Lightning too
I was looking into the LS1's and Lightning stuff also...but decided to go Audi. Plus I got a killer deal on the engine/trans and am very familiar with Audi motors. A single GT35r should get me there with the S4 motor and it's stong enough stock to hold that kind of power.
Are you hell-bent to have stock Porsche bolt pattern or something? I would highly, highly suggest just getting NASCAR front suspension pieces with the Wilwood calipers and rotors as a package. Would be 5 on 5 pattern which means a ton more wheel selection, especially if you want to use racing wheels. Buy adjustable coil-overs for NASCAR as well - cheap and easy to work with. 86 all that Porsche crap, it just becomes a PITA sooner or later. For the rear, you could cut down the trailing arm to just the hub, build uprights from there, and redrill stock hubs to 5 on 5, and adapter the Wilwoods to the rear. OR, there is a ton of already fabbed up rear hub stuff out there for purchase. Not cheap, but easier in the end and easy to fab to.
Actually, not really looking to keep porsche bolt patter necessarily...just thought I could use the stuff I already have (like extra trailing arms) to make the spindles. The wheels I want to really use are 5x112 bolt pattern. I'm looking into a few other choices also (cheaper ones) and will decide by tomorrow which way to go.
Nice, Lateral-g is in my "favorites". Check out this Mustang - this is what I was going to do to the one I had years ago, then got the idea for the 914...
http://www.lateral-g.net/members/libbymustang/
Holy crap - it is done!! I have been watching that link for over a year and it hasn't changed until sometime in the last week, he went from fab to "finished" pics.
Yeah...I've been following that mustang for quite some time now. Basically what I want to do with the teener...but still not sure if I will really need to do a boxed 2x3 or round tubing for the bottom since the teener is so much lighter. If I get a camaro I'll be doing like that.
I'll post some pics next week of progress...and my final decision on how to do the frame/suspension. I'm having a cousin come by and to compare ideas and then we will build whatever we decide on.
Any updates on your car?
Posted by: byndbad914 Apr 20 2006, 03:59 PM
Plus I got a killer deal on the engine/trans and am very familiar with Audi motors. A single GT35r should get me there with the S4 motor and it's stong enough stock to hold that kind of power.
Makes sense - kinda what I figured. Those Audi motors are nice, just parts can be expensive when needed. My good friend (is building a turbo'd Volvo) has an Audi A4 and was telling me an O2 sensor was almost $200!! He is really resourceful and determined a VW one would be an exact replacement (had to change the wiring connector) for $48.
Actually, not really looking to keep porsche bolt patter necessarily...just thought I could use the stuff I already have (like extra trailing arms) to make the spindles. The wheels I want to really use are 5x112 bolt pattern. I'm looking into a few other choices also (cheaper ones) and will decide by tomorrow which way to go.
So are those wheels "dished" at all or have a bunch of backspace? I ask because you could set the track width to run a nice race wheel (which tend to have less backspace, or more "dish") and then make adapters that bolt to the 5 on 5 and match whatever flavor of wheel you want. The additional backspace can make up for the 1" adapter. Just a thought, and exactly what I am doing with mine.
Yeah...I've been following that mustang for quite some time now. Basically what I want to do with the teener...but still not sure if I will really need to do a boxed 2x3 or round tubing for the bottom since the teener is so much lighter. If I get a camaro I'll be doing like that.
Camaro would be 2x4. 2x3 would be about right for a light 914. IMHO, a simple 2x3 structure would be the easiest way to go and build SLA front and rear suspension from. You could have a sweet street/track car with minimum tubing that way. In fact, with a 2x3 frame you really wouldn't need any additional tubing at all. So a 4pt cage would be nice for safety, but not as necessary for stiffness. Down tubes at the front suspension from the roll bar would simply be there to have somewhere to mount the shocks. Rear suspension would be the same story - there just to tie in shock mounts. It could be supported by a couple tubes running down through the firewall to the rear of the frame. Really slick and easy. Just my opinion of course...
Any updates on your car?
With gas at $3.19/gal (just filled up at lunch
 ) I am only going to see AJ once a week on Saturdays. This Sat I may start trying to get some wiring started - I have a Painless (more like PITA) 12 circuit race car fuse block I am going to convert the car over to. Will be slick in the end though a tough job to do. I have spent the last 3 days studying how they wired that fuse block and laying out how I am going to integrate it into the 914. 914s tend to have an unfused positive feed, though not always, and then fuse the output (like the headlights for instance, the switch is unfused hot, and the wires that go to the headlights run thru the fuse). The flashers have a fused hot on 914. This panel is set up to fuse the positive input on everything - not a difficult change but I have to dig through the wiring diagrams to determine the best way to wire into the stock 914 components.
Posted by: byndbad914 Apr 24 2006, 12:57 PM
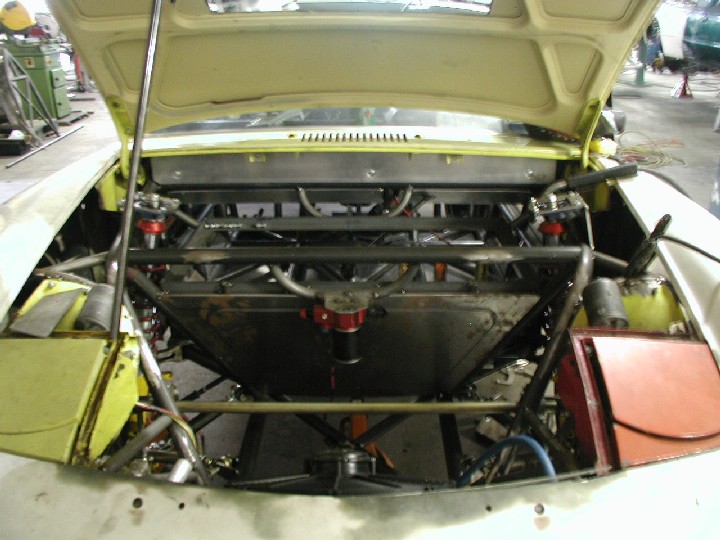
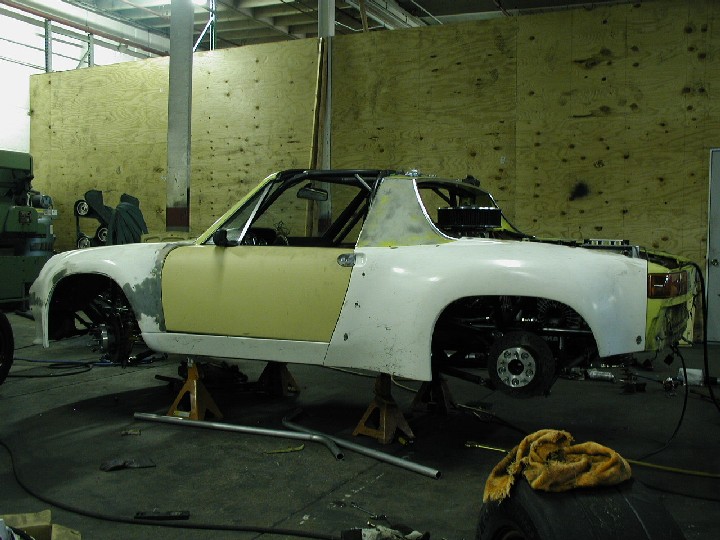
AJ continues to cruise along on the car... here are some pix from Saturday. More will be on my website when I update it -probably tomorrow.
Starting to look like its old self again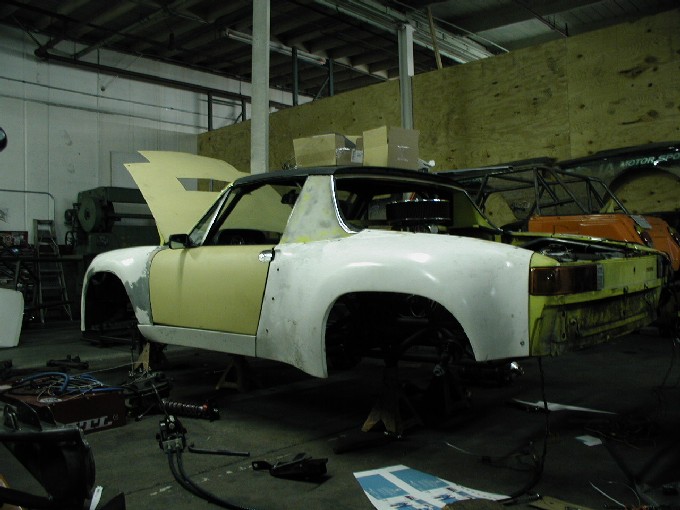
Here is the front trunk area - radiator is tucked in nice and tight to the fiberglass, but a little too tight. AJ needs to drop the nose another 3/8" roughly to get the fiberglass back to original position - notice the broken lip area - he is brutal with my fiberglass!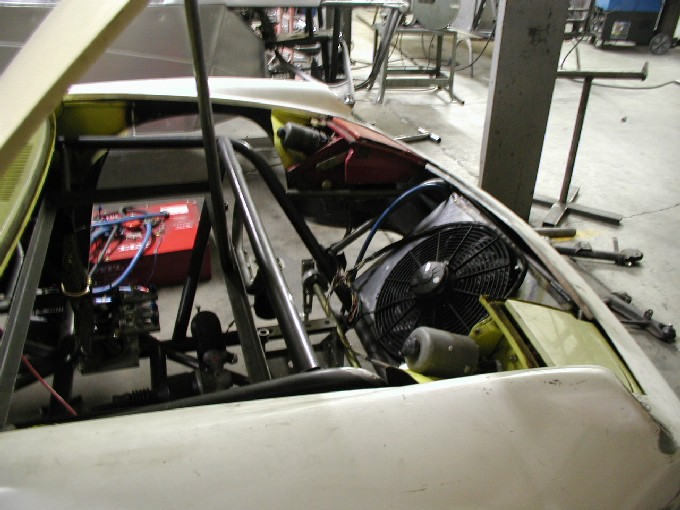
Here is a tray I made for the rear to hold the ignition and trans pump. There will be a couple bars ran from the mid-mounts to rear mounts for this tray to ride on. Then when I want to remove the engine and trans, that can come right along with it (notice the flanges have been added so engine/trans can R&R from above)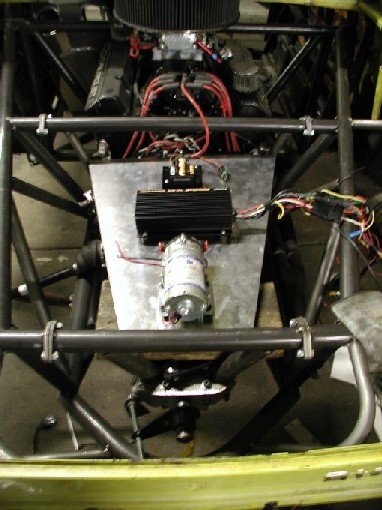
This shows the rough placement of the seat - even though the firewall will be much further forward than before, you can see that the seat is roughly where I would have had it anyway. By rough placement I mean there are no brackets welded in place yet... I will be using the stock rails and mounting scheme to have adjustability to get it just perfect. My right rotator in my shoulder was blown out a few years back so it gets "twitchy" after a bit of use, so I have to move the seat around every once in awhile to change my position to the wheel.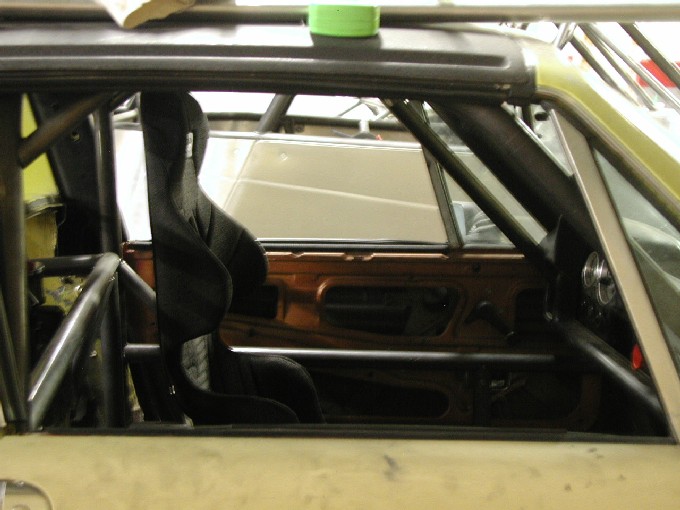
Posted by: turbo914v8 Apr 24 2006, 04:08 PM
AJ continues to cruise along on the car... here are some pix from Saturday. More will be on my website when I update it -probably tomorrow.
Starting to look like its old self again
Here is the front trunk area - radiator is tucked in nice and tight to the fiberglass, but a little too tight. AJ needs to drop the nose another 3/8" roughly to get the fiberglass back to original position - notice the broken lip area - he is brutal with my fiberglass!
Here is a tray I made for the rear to hold the ignition and trans pump. There will be a couple bars ran from the mid-mounts to rear mounts for this tray to ride on. Then when I want to remove the engine and trans, that can come right along with it (notice the flanges have been added so engine/trans can R&R from above)
This shows the rough placement of the seat - even though the firewall will be much further forward than before, you can see that the seat is roughly where I would have had it anyway. By rough placement I mean there are no brackets welded in place yet... I will be using the stock rails and mounting scheme to have adjustability to get it just perfect. My right rotator in my shoulder was blown out a few years back so it gets "twitchy" after a bit of use, so I have to move the seat around every once in awhile to change my position to the wheel.
AHHHHH finally got my fix, great pictures. Still looking for the pictures of the wing?
Posted by: byndbad914 Apr 24 2006, 04:16 PM
Hey Paul - I know what you mean. I too am jonesing to see what the wing is going to look like on the car, and I pestered AJ again Saturday asking when we could work on it He needs to finish up some more stuff in the rear before we start welding in mounting plates for the wing, so maybe a week or two more 
Posted by: byndbad914 May 30 2006, 04:05 PM
Alright, after a 5-week fuch up dealing with machinists, I finally have the car moving along again. Long story short, I had designed some custom wheel adapters for the new racing wheels, which should take one day to make. THREE WEEKS into the ordeal, I finally told the first shop to pound sand after not starting them (they told me 2 days btw when I gave them the dimensions). Then the next shop took a week to do them WRONG (even with a fully dimensioned ProE drawing!!!!), then after I taught them how to read a print, made them close but not quite right again the next week. Close enough to work though, so the car sat 5 weeks waiting for a 1-day project. I shoulda just bought a rotary table and done them myself at this point...
So, anyway, AJ is finally able to get back on it and start doing the suspension. After the suspension is all in place, we can install the firewalls, mount seats, wire, plumb and all that good stuff. Hopefully that is all "downhill" and rolls along, but the car won't be done to bring up to the WCC, which I REALLY wanted to be able to do. I was on schedule 5 weeks ago 
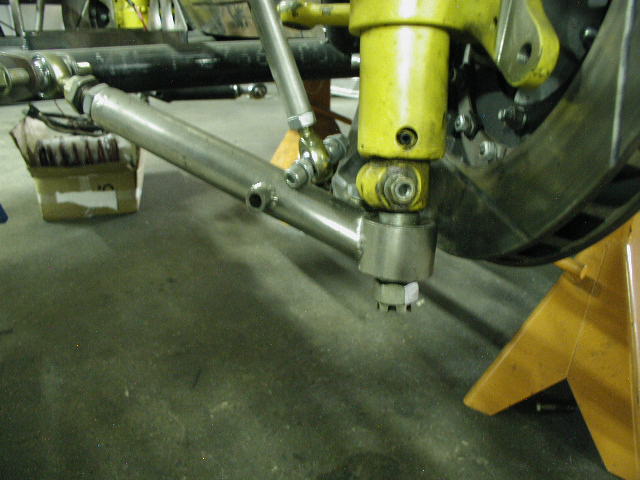
Front suspension - forward link is really a 935 link from Kanna Motorsports - AJ is making a lower A-arm for strength v. one forward link and one lateral link.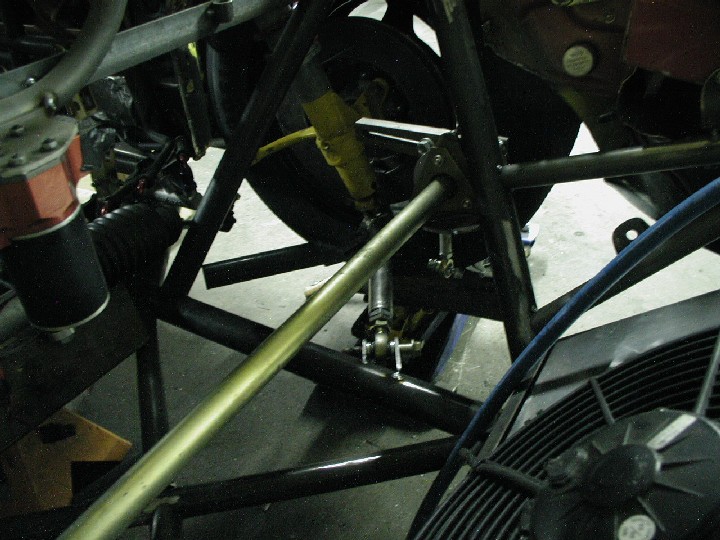
Iso shot with the wing and new spill plates (the other ones I fabbed looked lame once the wing was installed)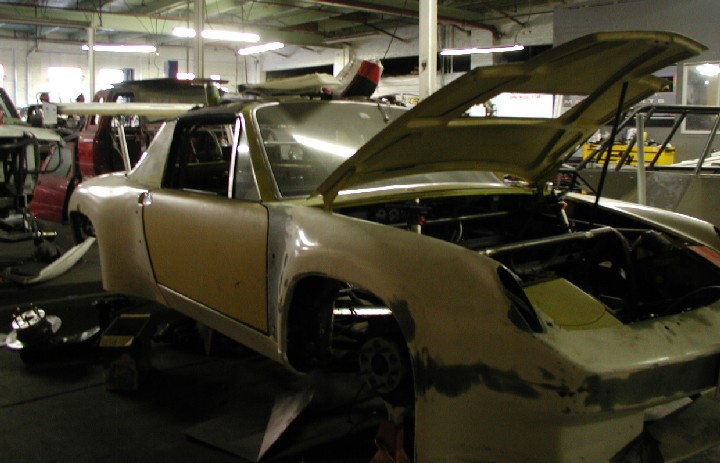
From the rear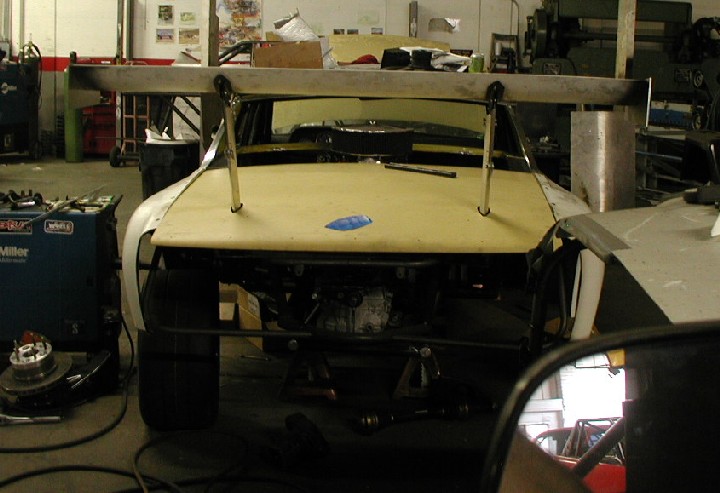
Posted by: byndbad914 May 30 2006, 04:17 PM
Details of the wing mounting for those that have wondered how I was going to do it - I more or less copied the idea from Roger Sheridan, except how he designed his lower mounting to the car. The aluminum uprights had flat sections inside that matched .75x1.5" tubing perfectly (I think Roger used the chromoly steel which doesn't have that feature and was why I chose aluminum instead).
The adjusting hardware on the uprights is all purchased from McMaster Carr and is simply a 6" adjuster with rod ends. The tabs will be welded into place later.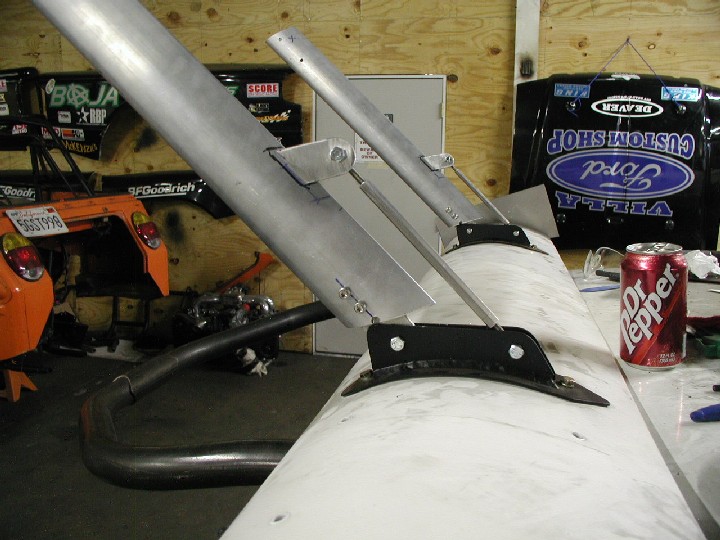
Lower mount has two sets of holes - lower pair puts the wing about roof high, then I have an inch higher set in case I need cleaner air. Starts looking a bit lame if the wing gets really high though... the angle is 25 degrees - I would like more "visually" but I was afraid of the moment loads at the weld with more and more angle.
At the top, I have aluminum plate cut to fit the upper wing mount welded to thicker plate cut to match the .75"x1.5" inside dim of the tubing.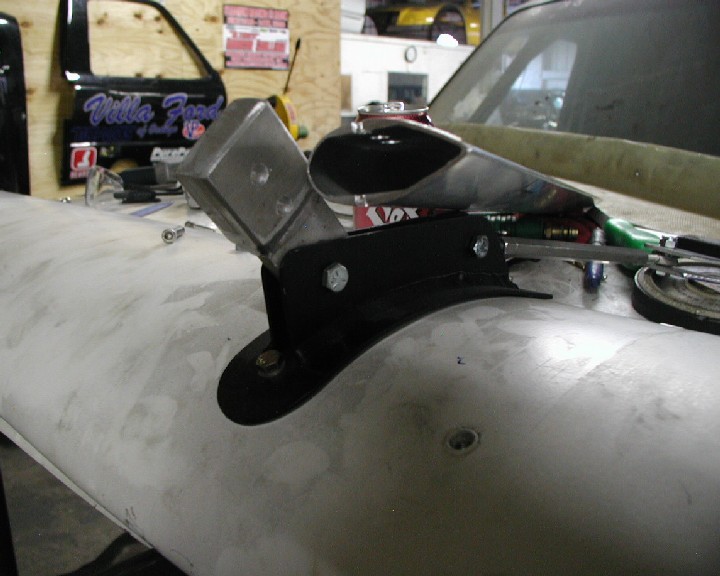
There are more shots on my website, but beware, geocities sucks and wants to shut it down apparently if a bunch of people access it but feel more than welcome to click away...
Posted by: turbo914v8 May 30 2006, 09:30 PM
Ahhh, you know that this is just what I have been waiting for. 
Why did you not put the wing uprights closer together like RS car?
Can you post the part number of the uprights again?
Great progress.
Posted by: byndbad914 May 31 2006, 02:07 PM
Why did you not put the wing uprights closer together like RS car?
I was going to put them closer together, but Roger said he has some "rocking" in his wing with the mounts close together. Having them further apart will help combat that. However, the narrower spacing would look much cooler... just make sure you custom order the wing to have the internal support where you plan to mount it. I had to custom order the 33" width - standard is something like a 42" and 52" width. Roger Sheridan has his at 18" width btw
Can you post the part number of the uprights again?
Here is a link to Aircraft Spruce - the tubing is one size only in aluminum and comes in 6ft lengths (one piece is more than long enough for 2 uprights and WAYYY cheaper than the chromoly. Cost of one exact length upright in chromoly would be as much if not more than the whole 6ft piece of aluminum).
http://www.aircraftspruce.com/catalog/mepages/struttube.php
Great progress.
Thanks
Posted by: turbo914v8 May 31 2006, 05:53 PM
That’s what I am talking about.  Thanks for the being so up front with information. Hope you don’t mind but thanks to you I have a real good idea how to duplicate a similar set up for my self. Hope you don’t mind if I copy you. Your ideas are first rate.
Posted by: byndbad914 Jun 1 2006, 03:05 PM
Hope you don’t mind if I copy you.
Your ideas are first rate.Heheh, the wing ideas are copied from Roger Sheridan, so feel free to steal the stolen
 If you are seriously tracking the car, go with wider spaced uprights like mine. If you are "sorta" tracking but also care about it looking cool, go with the 18" spacing on the uprights - it looks much better that way.
I had heavily considered going to the 18" center and running a couple small guide wires from the spill plates to the back of the roof (no I am not kidding
 ). At the track if I had rocking I could hook up the wires to stop the rocking, then off the track I could just remove the wires and it would look good all the time. This is starting to sound like a bad Zoolander pun... "the car would be really gud looking"
Posted by: Brad Roberts Jun 1 2006, 03:54 PM
My question is:
What are you going to do in the front to balance the car? That wing has a 3degree angle of attack @ zero setting on the uprights!!! You are going to need a BIG splittler for the front..LOL
I have always admired the tube work of a offroad guy. He could have used a lot less in the construction of the car. Every single cage/car build I have seen from the offroad guy's is WAY overkill. You make references to Roger's car.. Roger's car has 1/4 of the tubes in it compared to yours. You will have NO issues with being able to jump it off of 30ft cliffs!!
Dont take the above as negative. It is just an observation. I'm happy you have progress on a project 
B
Posted by: Aaron Cox Jun 1 2006, 03:56 PM
he has the power to over come the extra weight 
Posted by: byndbad914 Jun 1 2006, 04:37 PM
My question is:
What are you going to do in the front to balance the car? That wing has a 3degree angle of attack @ zero setting on the uprights!!! You are going to need a BIG splittler for the front..LOL
I have always admired the tube work of a offroad guy. He could have used a lot less in the construction of the car. Every single cage/car build I have seen from the offroad guy's is WAY overkill. You make references to Roger's car.. Roger's car has 1/4 of the tubes in it compared to yours. You will have NO issues with being able to jump it off of 30ft cliffs!!
Dont take the above as negative. It is just an observation. I'm happy you have progress on a project
B
Brad - no offense taken!! I am going to be running a front splitter - I just have yet to fab it. It will probably stick out about 2-3" in front of the spoiler area once it is done.
As for the tubes, all those tubes in the center of the car are actually my idea - not AJs. Even AJ thought I was way overkill! So I have the baja guys thinking I am overkill
I just wanted the center cockpit area of that car to be very rigid since it is so compact - recently rally guys were being killed by side impacts where the car crumpled in and took them out. All that tubing is there to hopefully keep the car out of my ribcage As for Roger's car - you are correct that he has way less tubing, but that just doesn't seem safe to me should something really go wrong at 150mph.And torsionally it will better handle the 438 lb-ft of torque the V8 is making.
His car is very light, which is great for speed, but not necessarily safety. Mine probably gained 150-200lbs just in floor tubing, but in the long run I think I will be happier carrying that 200lbs of safety around the track. And fortunately all of that extra weight will only be 4-5" off of the ground.
Of course, the way my luck works, I will have a side impact and the car won't budge an inch, but I will have died from some f'd up internal injury due to lack of impact absorbsion

Posted by: byndbad914 Jun 12 2006, 03:07 PM
mo' updating after the weekend. I went down Friday to check up on things. Normally I would work on it on Saturday, but went out to Willow for the POC races instead (need to get my priorities straight, right?!) It was good to go out there as I have a whole bunch more ideas of things to do and there was a huge turnout of cars.
I saw the turbo 996 car that clicked off a 1:18 a month or two ago out there, and that was something to see. I gather he wasn't that much quicker through the corners from what I could see, but through the T7-T8 sweeper and the straight he would just mow down cars like they were standing still! I only took pics of the rear suspension as my camera ran out of room before getting an overall shot of it. 
Anyway, back to MBT. AJ is finishing up the front suspension by building the upper strut mounts as of Friday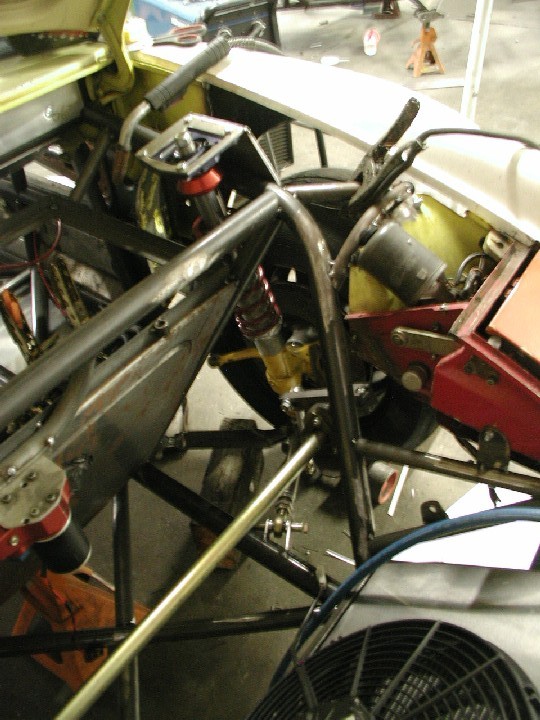
and started making the skin for the underside of the car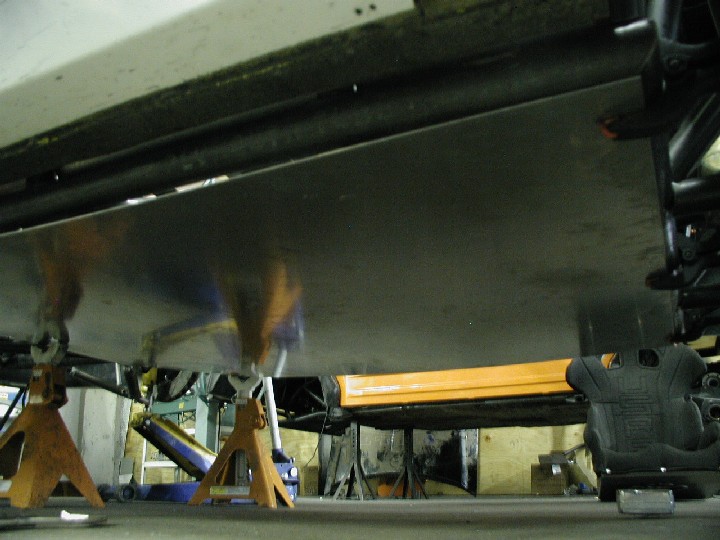
from inside
Posted by: byndbad914 Jun 12 2006, 03:09 PM
he skinned out the dash and some other areas too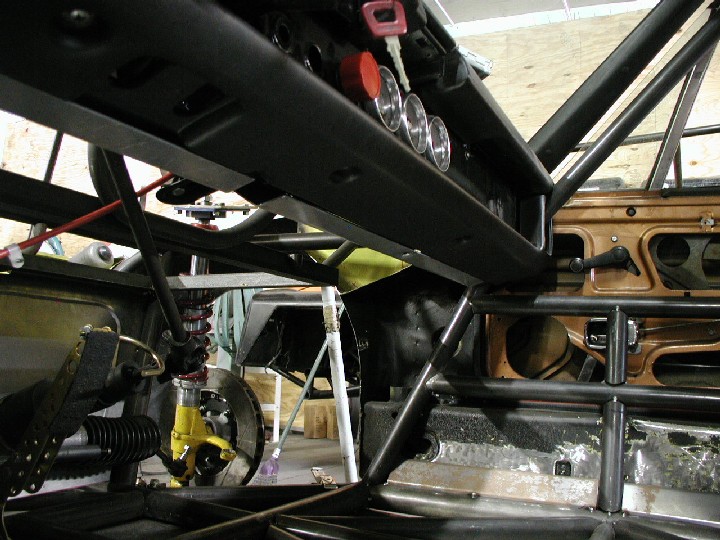
Posted by: 914_1.8t Jun 12 2006, 03:13 PM
What gauge sheet are you using for the fllorpan/underside?
Posted by: byndbad914 Jun 12 2006, 03:30 PM
What gauge sheet are you using for the fllorpan/underside?
good question... I am not sure about gauge sizes, but I think it is .090" IIRC. I will have to ask to be sure. He used the .060" stuff on the backside of the dash, but I am pretty sure the bottom is thicker. I don't think it was 1/8".
Posted by: Brad Roberts Jun 12 2006, 05:04 PM
Little Tidbit about the Turbo cars you were watching.. they rarely finish the race. Something *always* breaks for some odd reason.
It is fun watching them come to a stop for the corners
HUmm. I'm wondering if you should have went with Rogers "wide" version. The biggest tires I could get under the narrow body (with stock suspension) are 11's.
B
Posted by: Andyrew Jun 12 2006, 05:47 PM
Brad, same for the HPH flares? I've got 10's on now, and see another inch of livable space.. more if I cut the reinforcement.. (but I wont do that..)
Posted by: byndbad914 Jun 12 2006, 06:22 PM
Little Tidbit about the Turbo cars you were watching.. they rarely finish the race. Something *always* breaks for some odd reason.
It is fun watching them come to a stop for the corners
HUmm. I'm wondering if you should have went with Rogers "wide" version. The biggest tires I could get under the narrow body (with stock suspension) are 11's.
B
When I bought the kit, I actually planned on more of a streeter V8. Times they are a changin'. Even so, I won't have any of the inner body in the way now. I will be limited by only what the 5-link suspension won't hit for the most part, which will be interesting to see what that will be. I may be able to get a 12 or 13 under there in the end, but hard to predict at this point. I am going to talk to AJ pretty seriously later tonight about maybe building A-arm stuff similar to the 996 I shot all the suspension photos of as opposed to long links (which I prefer because you get little to no change through travel with those), which will make more room for tires.
As for those turbo cars breaking - I heard he has something like 700 rwhp, which seems like a ton from such a small motor, so I am guessing that would be a "highly stressed" engine
He didn't break from what I saw, but he threw money at the car in a manner not often witnessed and never experienced by a guy like me. Rumor is his dad owns all the Sport Chalet stores, they have about $500K-$600K in the car. He was changing tires in between every session (18" x huge" sets of Yokos aren't exactly cheap).Sense the jealousy yet
His dad owns the Sport Chalets, my dad owned a garbage route. And a septic tank pumper at one point to round out the strange smells of our driveway. Born "whiskey tango" and it has been an uphill battle ever since, that many would insist I am losing I suspect 

Posted by: byndbad914 Jun 19 2006, 05:50 PM
more updates... he has started laying out the rear suspension. It is looking good so far, but still early phase. The uprights may prove to be a bit of a pain but doable - AJ is mocking up with the whole arm, then will cut it down to where it needs to be for all 5 links to work correctly. He already determined it was easier to work with the arm upside down 
Sorry for the fuzzy pics, turns out my batteries were almost dead an my camera focus goes to crap when that happens...
Here is a jpeg from SusProg3D software's website. I didn't use the software (I used graph paper and compasses cuz I am a CSOB) but lifted this pic from their site to show AJ what I want.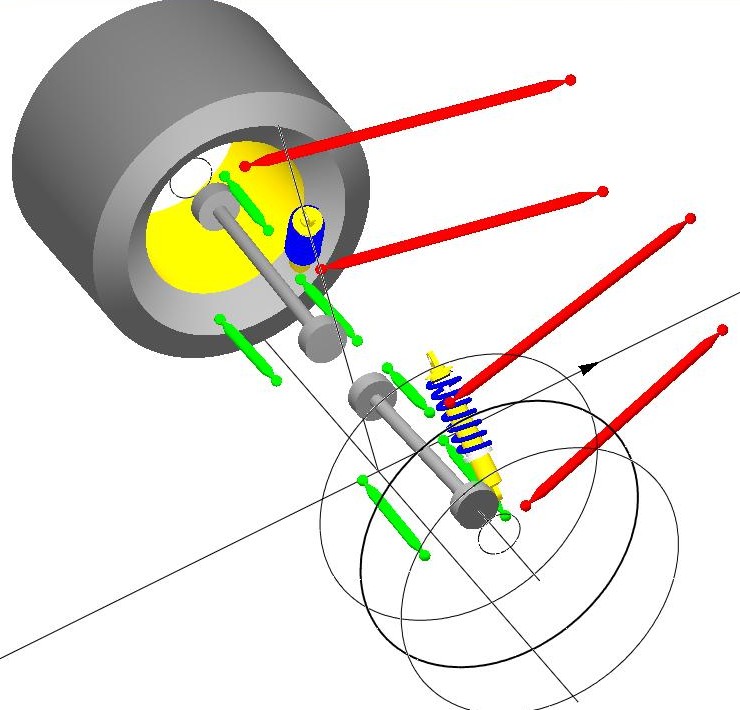
And the progress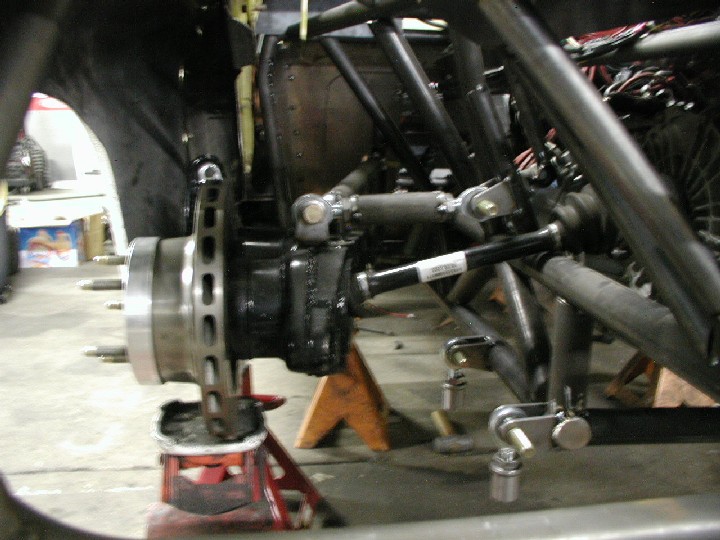
Note that the top link isn't declined - but it isn't at ride height, just resting on the jack. The end geom should have lowers parallel to ground and nominal ride height with a decline in the top link to give about 1deg of camber gain on 2" of bump. The shock will mount in the stock location again.
Posted by: byndbad914 Jun 19 2006, 05:54 PM
And then we had a seriously heated debate about his firewall. He thinks it is nice and simple and works well. I hated how it looks and how intrusive it was. He was pretty on fire after that conversation, but everything is smoothed over after the weekend and I gave him some sketches of what I would like to see and he will make it happen.
Here is what he had - what do you guys think? I am a really picking bastard, so maybe I am just taking it too far, but I just didn't like how "big" it looked. My sketch follows the back of the cage inboard to the engine mounting tubes, then has a "doghouse" that is removeable at the center (think like a van but at the rear, or a Pantera for those that know what those are like).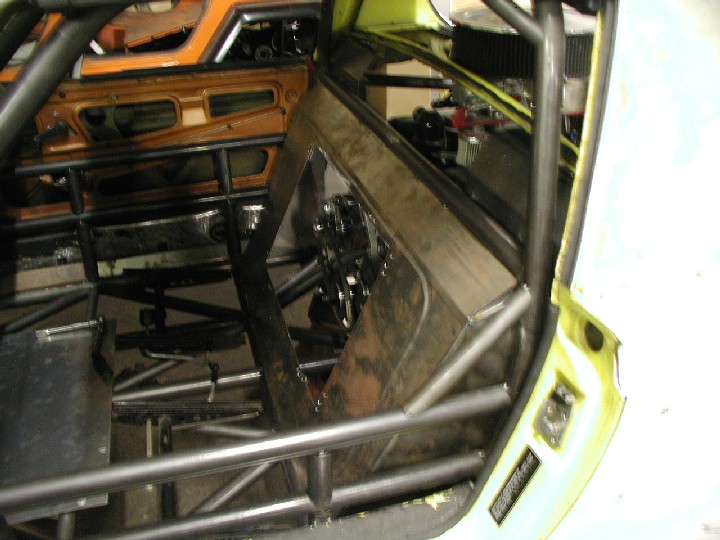
And then a shot of the wheel adapters I had made FYI. Adapts 911 130mm pattern to 5-on-5 race wheel pattern.
Posted by: byndbad914 Jun 26 2006, 02:52 PM
too lazy again this week to get a set of batteries, so camera is still a little fuzzy...
AJ fixed the firewall to a sketch I provided... IMO look about 1000% better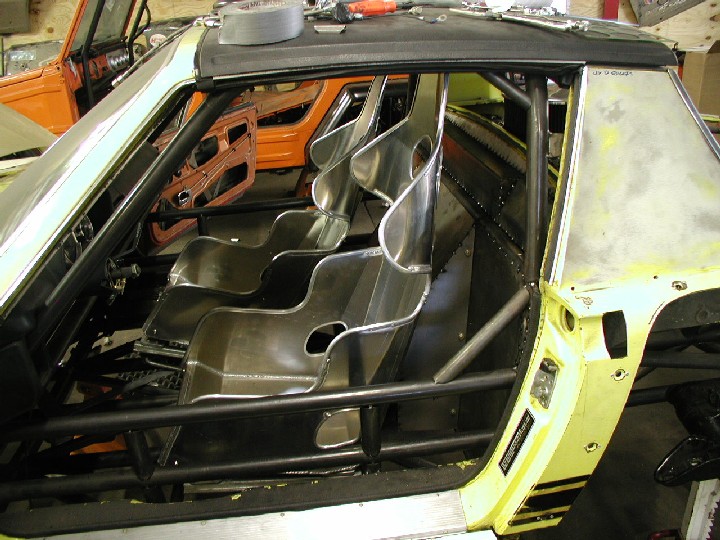
Another shot - you can kinda see the pieces up by the window that I bent up for them to install. The square area gives plenty of clearance to the water neck and throttle linkage, while the bent pieces attached on each side follow the stock pillar pads almost perfectly to give it a "custom, but factory fit" look. I think it was worth the extra effort to make it match the car's lines. He had just a 90deg bend like the center all the way out just sort of "running into" the pads and thought it was lame to try to work to an interior pad... some guys just don't get what I am trying to do.
Oil tank is mounted more or less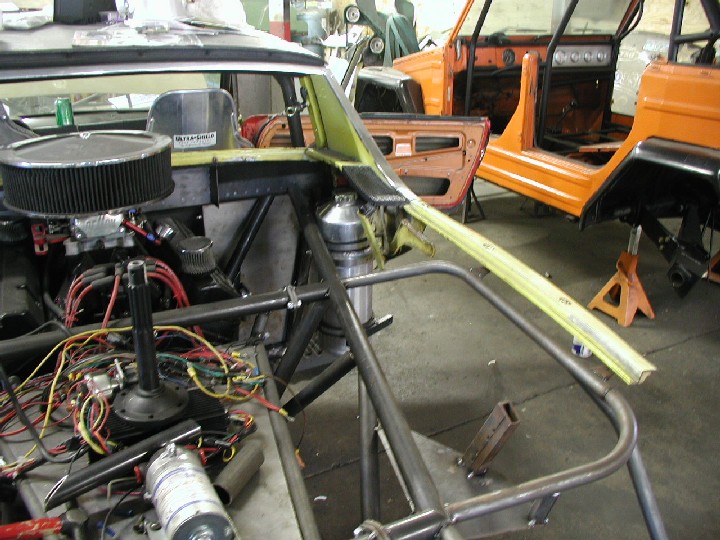
Seats will be mounted next while the suspension gets finished up (hopefully) and a few more items to mount (shifter, cooling system, fluid coolers, and such). So a couple more weeks I should be able to trailer this home to start a custom wiring harness, run all the brake and fuel lines and plumb the dry sump system. I am hopeful I am only a month away from getting this thing started again. It is a long shot, but if AJ can wrap up in a couple of weeks, I may take a week off of work (I need the break) and just hammer away at this thing.
Posted by: Aaron Cox Jun 26 2006, 02:58 PM
lookin good!
Posted by: turbo914v8 Jun 26 2006, 05:14 PM
Excellent progress. It looks like your almost finished. I don’t what I am going to do when you’re all done and your updates end?????? Maybe watch more T.V. Maybe I will start working on my ride. Now there’s a though. I have a question for you. In your previous picture of the oilcan, standing on end is what appears to be your rear stub axel. Can you provide details regarding that part? What car is it from? Part number? I know that you have the 930 CV's and I am wondering what parts you used to connected the 930 CV's through the stock 914-swing arm with no adaptors.
Posted by: 914-8 Jun 26 2006, 05:42 PM
Very cool!
You definately were right about the firewall!
Posted by: Brett W Jun 26 2006, 05:51 PM
TIm you need to watch your toe change on the rear suspension. With the link going towards the firewall you will see an unusually high amount of toe change in bump droop and roll. You have compounded the movement of the wheel by adding that link.
I looked at doing something similar on my car in the early stages because it is easiy to package. You will also see a jerky rate of camber gain with such a short upper arm. It would be better if you could mount it somewhere over or near the tranny.
I know you are concerned with safety, but using .090+ for the floor pans is insane. Look at the thickness of the factory sheetmetal. I would go a little thinner as you are just using it to keep the dirt out. The tubing is providing the real protection.
Posted by: byndbad914 Jun 26 2006, 06:05 PM
In your previous picture of the oilcan, standing on end is what appears to be your rear stub axel. Can you provide details regarding that part? What car is it from? Part number? I know that you have the 930 CV's and I am wondering what parts you used to connected the 930 CV's through the stock 914-swing arm with no adaptors.
I thought someone may wonder what that was... actually that isn't off of my car
They were working on the Thing next to mine and I think one of the guys picked it up off the ground and thought it was mine. I just left it there As for my setup specifically, I have Turbo Carrera axles and hubs. Talk to Jim at Patrick Motorsports for all the specifics, but he sells some simple spacers that go in the mix to make the longer Carrera stub axles and hubs work with the narrower, stock 914 wheel bearings. Works really slick. The axles can be bought new with the stub axles as an integral part. Then you just need Carrera hubs, his spacers and it all goes together. And the Carrera CVs bolt directly to the 930. He gave me a matching price on the parts (to Pelican's prices which were cheaper when I bought my stuff - don't know about now) when I bought the flanges and spacers from him.
Brett - The toe change shouldn't be too bad over a couple inches of bump - but that is left to be seen. All the links are adjustable, and I have to mess with the caster angle of the rear to tune it out. It shouldn't be anywhere near as bad as the trailing arms were. Also, camber gain is relative between the length of the upper and lower - so it is a short upper, but somewhat short lowers. I calculate 1 degree gain at 2" of bump and 1.5deg at 3" of bump. After that I drag the car on the ground, so gain becomes irrelevant. Remember, any suspension design will work if you stop it from moving

But good eye as it looks to be really short, but the tube diam and rod ends can be deceiving - it is around 8-3/8" long and the bottoms are like 9 - 9-1/2" long IIRC.
Posted by: grantsfo Jun 26 2006, 06:23 PM
Dang that is too cool!!! I do have to ask how much will that thing weigh once its finnished? Theres a whole lotta steel there! I think you should see if Porsche wants to take a run at NASCAR!
Posted by: turbo914v8 Jun 26 2006, 09:02 PM
In your previous picture of the oilcan, standing on end is what appears to be your rear stub axel. Can you provide details regarding that part? What car is it from? Part number? I know that you have the 930 CV's and I am wondering what parts you used to connected the 930 CV's through the stock 914-swing arm with no adaptors.
I thought someone may wonder what that was... actually that isn't off of my car
They were working on the Thing next to mine and I think one of the guys picked it up off the ground and thought it was mine. I just left it there As for my setup specifically, I have Turbo Carrera axles and hubs. Talk to Jim at Patrick Motorsports for all the specifics, but he sells some simple spacers that go in the mix to make the longer Carrera stub axles and hubs work with the narrower, stock 914 wheel bearings. Works really slick. The axles can be bought new with the stub axles as an integral part. Then you just need Carrera hubs, his spacers and it all goes together. And the Carrera CVs bolt directly to the 930. He gave me a matching price on the parts (to Pelican's prices which were cheaper when I bought my stuff - don't know about now) when I bought the flanges and spacers from him.
Brett - The toe change shouldn't be too bad over a couple inches of bump - but that is left to be seen. All the links are adjustable, and I have to mess with the caster angle of the rear to tune it out. It shouldn't be anywhere near as bad as the trailing arms were. Also, camber gain is relative between the length of the upper and lower - so it is a short upper, but somewhat short lowers. I calculate 1 degree gain at 2" of bump and 1.5deg at 3" of bump. After that I drag the car on the ground, so gain becomes irrelevant. Remember, any suspension design will work if you stop it from moving
But good eye as it looks to be really short, but the tube diam and rod ends can be deceiving - it is around 8-3/8" long and the bottoms are like 9 - 9-1/2" long IIRC.
Thanks again for the great information. Man your smart.
Posted by: byndbad914 Jun 26 2006, 09:25 PM
Thanks again for the great information. Man your smart.
Heh, thanks for the compliment. Probably more resourceful than smart - when I need to figure out how to make something work, I get the phone and start harassing all the usual suspects in the Porsche world.

I think Jim Patrick gets a lot of
 on the various forums, but he has been a good guy to talk to (at least for me) in the past few years. He was somewhat of a dick a few years back the first couple of times I tried to call his shop and order stuff and always went elsewhere. But maybe he had a change of heart a couple years ago Maybe he was reading the forums and unlike George at AA, actually took the bad-mouthing seriously and made a change. In any event, he is NOT cheap (typically his prices are higher than other places for the exact same stuff) but anytime he has helped me out I bought the stuff from him as my "consultation fee" so to say.
And when suppliers are cool to me I give 'em props, so I always promote Pelican, Otto's and Patrick for parts and help. That is my main resources. There are others I have not bought from yet that are quite popular, but for now Pelican is 5 blocks from my house, Otto's is about 10 miles and otherwise it is Patrick.
Posted by: Brett W Jun 26 2006, 09:50 PM
Brett - The toe change shouldn't be too bad over a couple inches of bump - but that is left to be seen. All the links are adjustable, and I have to mess with the caster angle of the rear to tune it out. It shouldn't be anywhere near as bad as the trailing arms were. Also, camber gain is relative between the length of the upper and lower - so it is a short upper, but somewhat short lowers. I calculate 1 degree gain at 2" of bump and 1.5deg at 3" of bump. After that I drag the car on the ground, so gain becomes irrelevant. Remember, any suspension design will work if you stop it from moving laugh.gif
But good eye as it looks to be really short, but the tube diam and rod ends can be deceiving - it is around 8-3/8" long and the bottoms are like 9 - 9-1/2" long IIRC.
Actually I thought about it some more and you may have a decent design for a hybrid car. If you set it up so that the front links will toe the suspension in on braking and bump you can help stabilize the chassis. This will make the car much easier to drive for a non-professional driver.
You are right the less the suspension moves the more all suspensions become the same. That was something else that I studied with my design. In a race car with very limited suspension travel for instance, struts and dual a-arms have similar characteristics.
What does your roll center do in bump and roll? Where is it in location to the front? How is it in relation to the CG height in the rear?
Car is looking good. You plan on painting or powder coating the chassis when your are done?
Posted by: byndbad914 Jun 27 2006, 01:03 PM
Actually I thought about it some more and you may have a decent design for a hybrid car. If you set it up so that the front links will toe the suspension in on braking and bump you can help stabilize the chassis. This will make the car much easier to drive for a non-professional driver.
You are right the less the suspension moves the more all suspensions become the same. That was something else that I studied with my design. In a race car with very limited suspension travel for instance, struts and dual a-arms have similar characteristics.
What does your roll center do in bump and roll? Where is it in location to the front? How is it in relation to the CG height in the rear?
Car is looking good. You plan on painting or powder coating the chassis when your are done?
Brett - yous a smart kid and catching on to how I am setting the car up. The car will have toe change (AFAIK all indep suspensions have slight toe change through motion, it is all about minimizing it and choosing if you want over or understeer). I am going for slight toe-in to force understeer, which as you wisely mention, is easier to drive. The key of course is to not have it change from in to out or vice-versa - then the car is a mess to drive.
And you are mucho correct on the "non-professional" part of my driving

Roll center on the front moves down (struts) and same with the rear on bump <both move up on rebound>. I have the RC set higher in the rear (not exactly calculated frankly, but drawn out on paper it is slightly higher and should roughly stay higher all the time at static settings) - again to force understeer. But that value will move around anyway as I set the car to the track (camber changes move the RC - the front will be more affected than the rear tho'). If I have to run a bunch of camber in the rear and none in the front to get tire temps correct, then maybe the rear RC would be lower than the front for instance. I don't expect that scenario of course, but the RC is a moving target; at static settings with same front and rear camber, rear is higher.
As for relevance to cg - I has no ideas unfortunately. This car has never been built, so there is no way of knowing where the weight lies until it is done - then I can weigh it and tip it if I feel so inclined (pun intended) and figure that out.
Why all the understeer tuning? Bcuz it oversteered like a mofo before at any speed. And it is the only car I have ever spun
 And in terms of trying to get all the RCs and ICs right - there will always be compromise and for a 914, it is space. I have 10lbs of in a 3lb - not even 5lb - bag.
So basically what I get is what I get and I will tune the suspension so it can be all it can be, not all it might have been if you catch my drift. I am not going for the track record with the car anyway, I just wanted to be as safe as possible because I love going really fast v. tons of corners (why I like Willow Springs), and if we could improve some things, then improve them.
BTW, I should check your blog... how is your car coming?
Posted by: Brett W Jun 28 2006, 02:23 AM
Unfortunately my car is staring forlornely at me, watching me work on everyone else car or project. Gotta make some bank to play with my own projects. Hopefully I will get to do something on it next month.
I want to get back on the chassis and engine adapter.
Posted by: byndbad914 Jul 16 2006, 06:25 PM
updated shots of the car after this last weekend. First, the rear suspension is all tacked into place and looking good. I can grab the hub off the jackstand and move it up 4" before any visible toe change (at which point I have ripped the frame off the car to do that in reality with only 3-3.5" ground clearance) and camber gain looks slight. Of course once everything is all done and I am corner-balanced, set at height and running thru the alignment steps will I know exactly what I have. Looks really good tho'
rear close-up roughly near ride-height (jackstands aren't exactly precision for photos )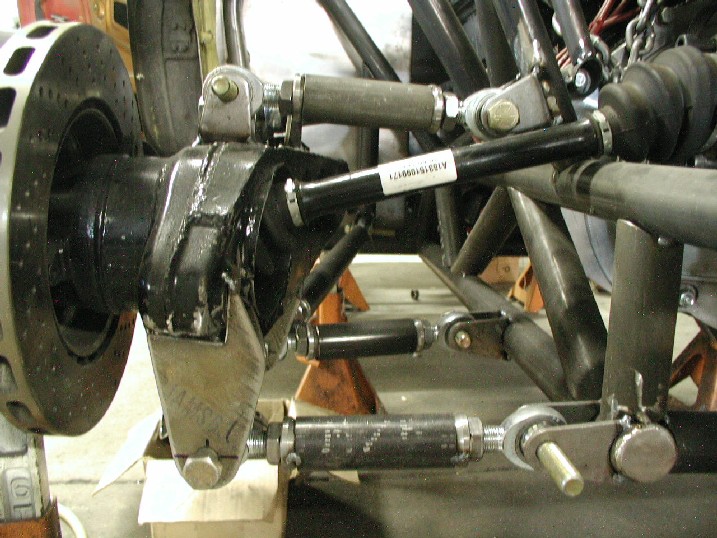
a more overall shot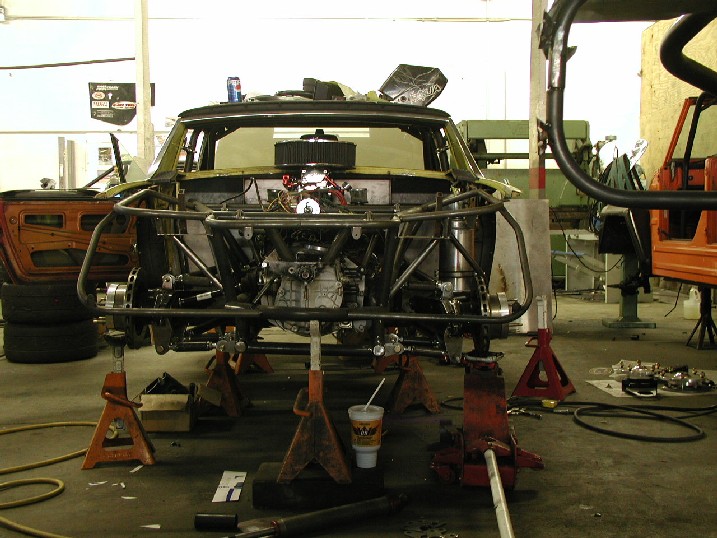
Posted by: byndbad914 Jul 16 2006, 06:27 PM
front splitter I have been working on. I will final mount it when it is on the ground and the body panels all lined up and such. You can see the coolant reservoir added as well.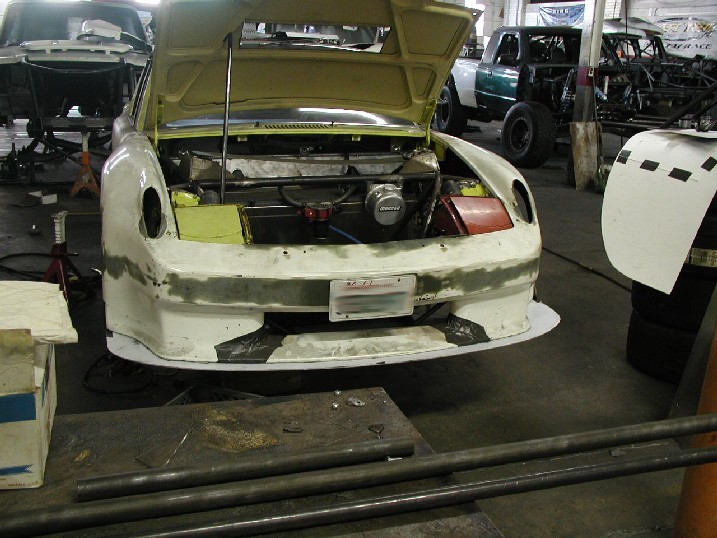
with relief cut for the tires on both sides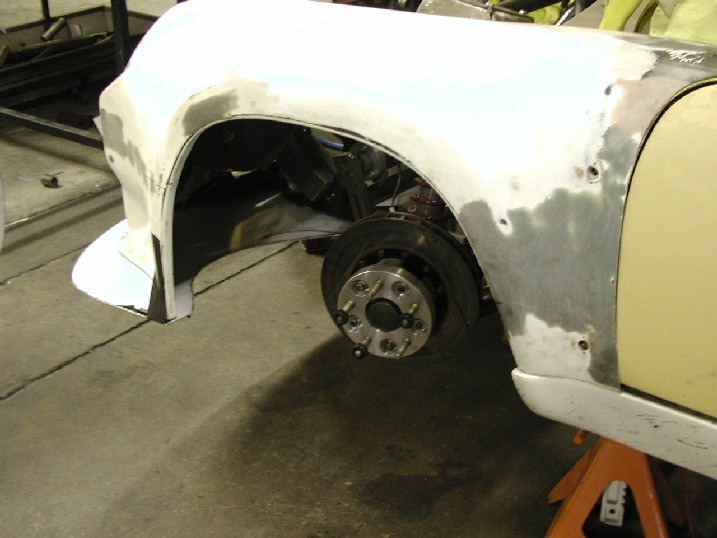
And the oil tank mounting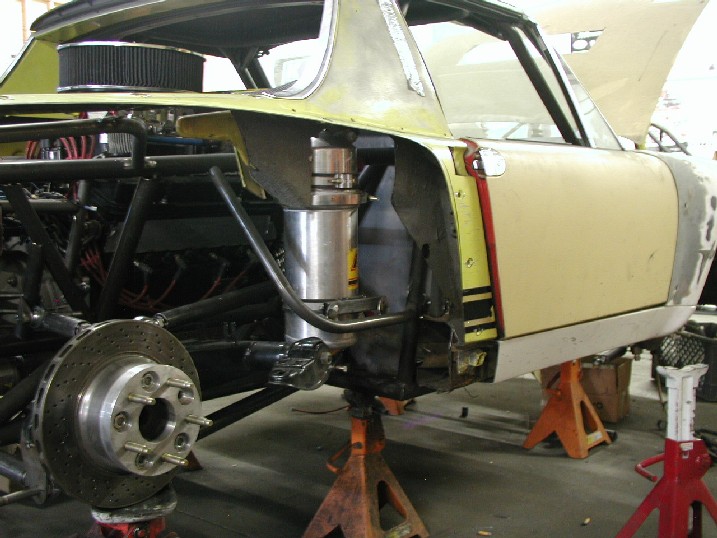
Posted by: byndbad914 Jul 16 2006, 06:29 PM
and a shot to show the firewall better (new batteries in the camera finally) and the shifter is mounted.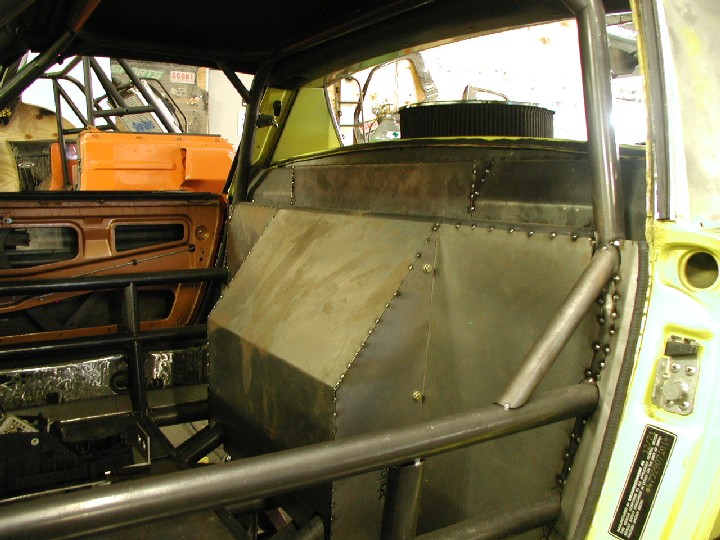
shifter is hard to see, but maybe you get the idea. It is up about 4" from the floor for better accessibility while racing.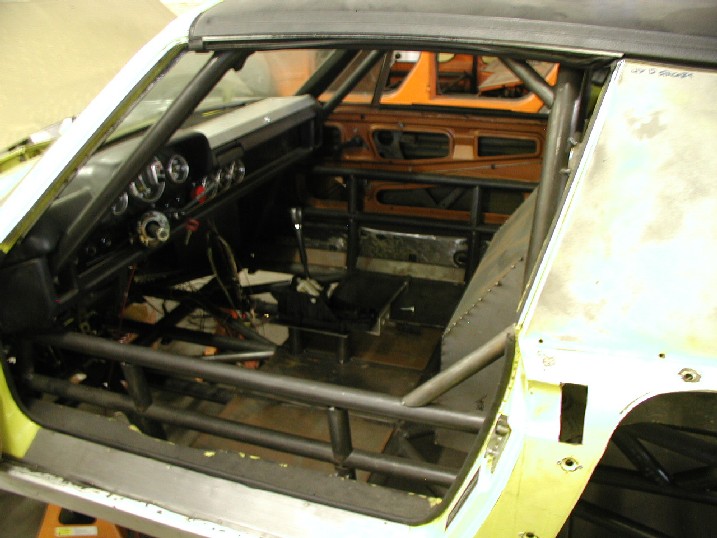
Posted by: Aaron Cox Jul 16 2006, 06:43 PM
sick man... totally over the top super cool sickness goin on....
Posted by: Andyrew Jul 16 2006, 06:55 PM
I agree with aaron!!
Im lovin it!
Posted by: drive-ability Jul 16 2006, 08:37 PM
"byndbad914"
You know I love the hole car but especially the scale of the material, I like the big tubes, heim joints / everything is built up to be over kill. It might be heaver than some but I like it that way....
Posted by: Sammy Jul 16 2006, 09:14 PM
Wow, very impressive car, that is soooo much work. But,..... it aint a 914.
It has 914 doors, a 914 roof, windshield, and dash but that is about it.
You should name it after yourself. It's more your car that a Porsche
Posted by: turbo914v8 Jul 17 2006, 06:43 AM
Great update. This is what a 914 was meant to be. Living up to its full potential. My .02 worth. Love the suspension. 
Posted by: byndbad914 Jul 17 2006, 12:19 PM
thanks for all the comments guys. Sammy - I like to think of this car as a 914 the same way a NASCAR Nextel Cup car is a "stock" car. I need to get me a new Ford Fusion with the 358 cube V8 option so I can add heads and a cam to and go racin'
I have a short-track 353cube V8 and apparently I might be in the NASCAR weight classes anyway  Anybody see the Excellence spoof on the Porsche NASCAR? I may have beat them to the punchline!
Posted by: Brad Roberts Jul 17 2006, 05:10 PM
That is the best use of a 914 control arm I have ever seen..LOL
Cant wait to see you drive it.
B
Posted by: byndbad914 Jul 24 2006, 08:52 PM
not much happened last week unfortunately But, I had some requests for clearer front suspension shots, so here are a couple.
The plated arm (running fore in the A) is from Kanna Motorsports, as well as the "ball joint" machined replacement to work with the spherical joints. From their 935 front suspension stuff - they were cool about selling piece parts since I don't have a 911 setup I am trying to bolt into.
and a shot of the upper mounting. This will be changing a fair amount as they didn't leave room for the fuel cell  Gotta have that... so the mount will be lowering 1" meaning I have to take the struts to Bilstein and they "quoted" (over the phone - hopefully it won't change when the time comes) $125-150 each to cut them down a couple inches so I can get some travel back out of them. The camber plates were custom-made by Kanna also to match the 18mm strut diameter. They used a 3/4" spherical bearing and machined a spacer to 18mm that slips into it (thin but works).
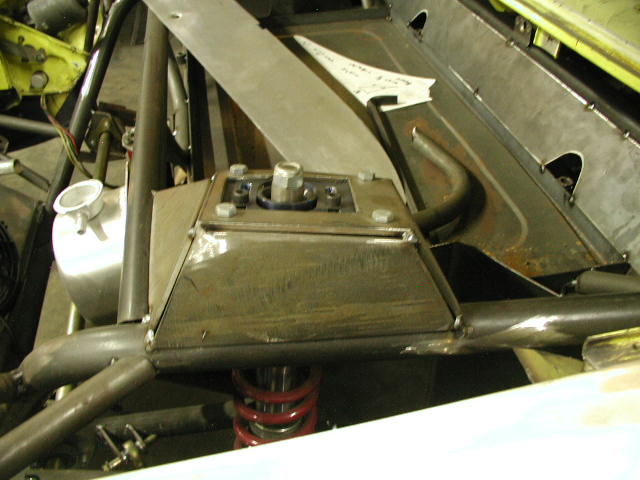
Sorry, not detailed shots of the machined ball joint replacement or shim at the top. Gonna have to wait on that until I tear it apart again
Posted by: byndbad914 Aug 10 2006, 03:02 PM
slow moving the past 2 weeks as AJ had a race in Vegas that kept him busy on his own truck. Now he is back on the car and welding has began. The center is mostly done and the rear is done. He is going to button up the front next week. Most of the welds are absolutely amazing. A couple you can tell were near the end of the day when fatigue was setting in 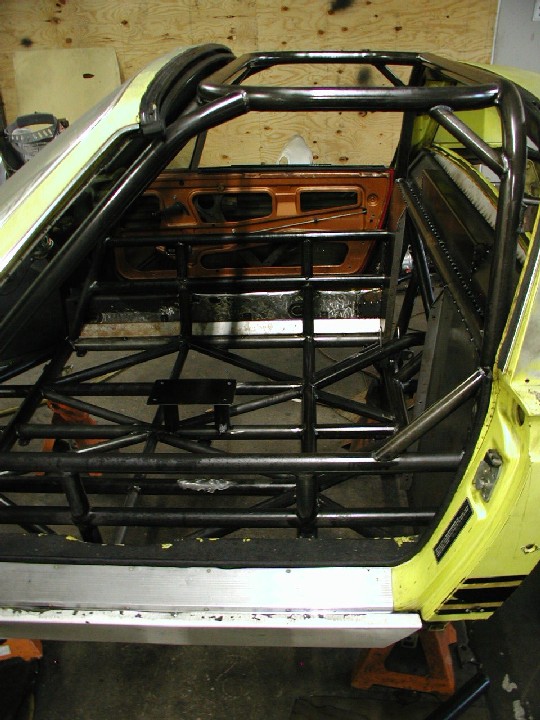
cloudy closeup but you can more or less tell how even the beads are on this car
And the firewall area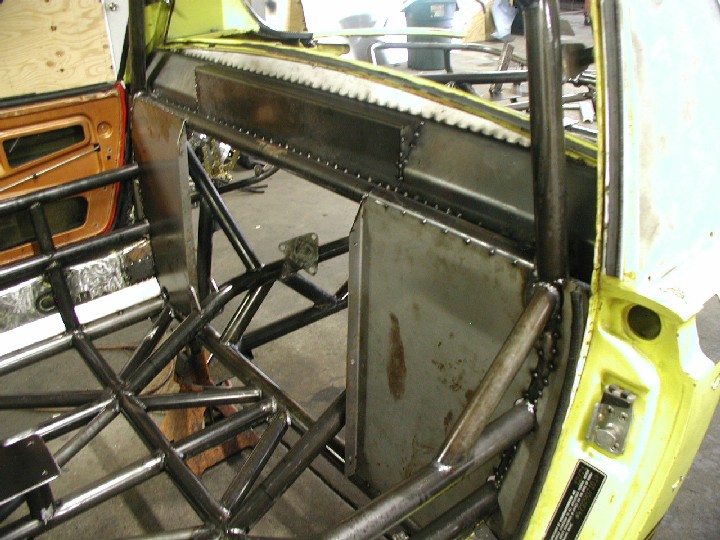
some more to come next...
Posted by: byndbad914 Aug 10 2006, 03:04 PM
rear area closeup
front still needs welding and the strut mounts lowered/modified to fit the fuel cell, but here is an iso from the front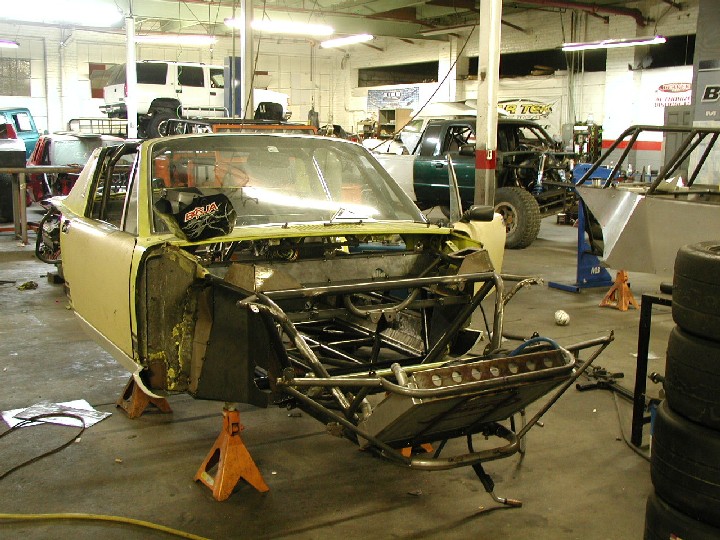
Posted by: byndbad914 Aug 10 2006, 03:05 PM
and all the stuff I get to put back on when the welding is all done and the suspension is bolted into place. Hopefully by end of next week I can start that process!
Posted by: neo914-6 Aug 10 2006, 03:39 PM
Tim,
That's fantastic work! 
I can forward pics from Elmer's 914 V8 w/NASCAR SB2 motor if you'd like. He's finally got it reliable enough to finish races at TH.
Posted by: byndbad914 Aug 10 2006, 06:54 PM
Tim,
That's fantastic work!
I can forward pics from Elmer's 914 V8 w/NASCAR SB2 motor if you'd like. He's finally got it reliable enough to finish races at TH.
thanks Felix - please do send me those pics. Just feel free to PM away

I am trying to convince my old boss to get us tix to the SEMA show (we have gone every year the past few, but he hasn't ordered them yet!
 ) so I hope to meet you and see your car out there. Probably roll out near the end of the week to spend Friday walking until my hips hurt, then Friday night away the pain and taking in some of the "talented" entertainment off the strip, and Saturday getting rid of my remaining dollar bills at the casinos and
  back to SoCal
Sunday tends to be a lot of
![yellowsleep[1].gif](style_emoticons/default/yellowsleep[1].gif) on the couch trying to recoup
on the couch trying to recoup I think I got enough smileys in this post!
and the all-important 
Posted by: neo914-6 Aug 10 2006, 08:29 PM
Tim,
That's fantastic work!
I can forward pics from Elmer's 914 V8 w/NASCAR SB2 motor if you'd like. He's finally got it reliable enough to finish races at TH.
thanks Felix - please do send me those pics. Just feel free to PM away
I am trying to convince my old boss to get us tix to the SEMA show (we have gone every year the past few, but he hasn't ordered them yet!
) so I hope to meet you and see your car out there. Probably roll out near the end of the week to spend Friday walking until my hips hurt, then Friday night away the pain and taking in some of the "talented" entertainment off the strip, and Saturday getting rid of my remaining dollar bills at the casinos and back to SoCal Sunday tends to be a lot of
on the couch trying to recoup I think I got enough smileys in this post!
and the all-important Tim,
I've only gone for 2 days for each of the last two years so this time I'm taking a week off work. Besides I have to deliver it Sunday and pick it up Saturday. After this crazy schedule of working on the car, I will probably sleep through the show
As the show gets closer, I'll organize a meet since there may be alot of people in the club attending. The car will be in area accessible to those without badges
Posted by: byndbad914 Aug 15 2006, 07:44 PM
Just got off the phone with AJ - looks like I will be taking Friday off to have Friday and Sat to start reassembly of the car at his shop (enough to get it all back on the trailer)!! After I get some of it back together he has some odds and ends to mount, but I may be able to get the thing back next week and start the fun of plumbing it and wiring it
Just happy at this point - it has been a long time coming so I hope I really get it back next week and then I can lay into it. Probably take some PTO I have been saving and just spend a week or two straight cranking at it.
Posted by: byndbad914 Aug 26 2006, 12:43 PM
busting some tail the last couple weekends - here is where I am at (almost ready to take it out of AJ's!!)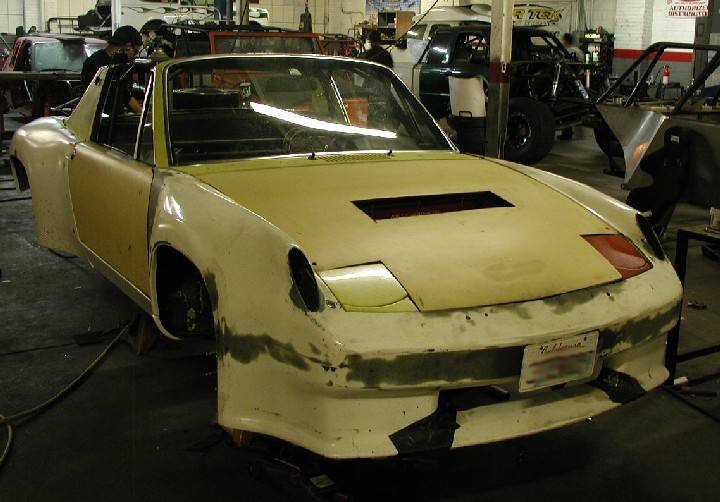
and a fuzzy shot of the rear
Posted by: byndbad914 Aug 26 2006, 12:48 PM
s'more
stock dash all fitted in and steering column welded exactly where I want it to be - feels good and I can actually see the whole tach now (imagine that in a 914!!)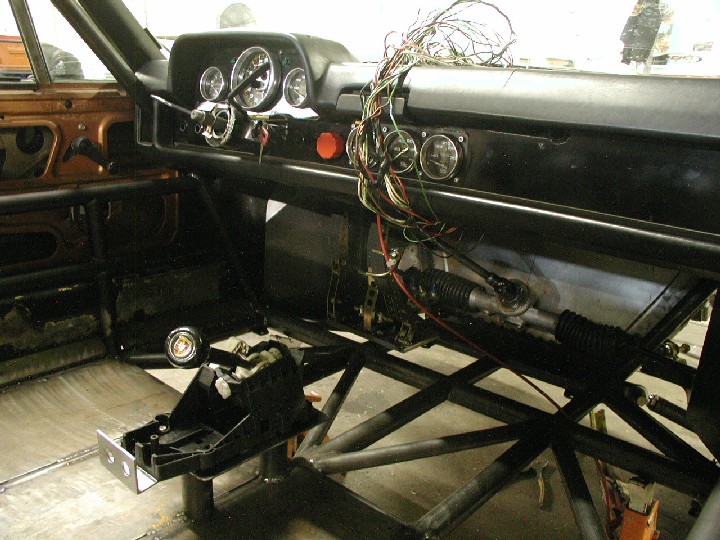
the rear without engine and cradle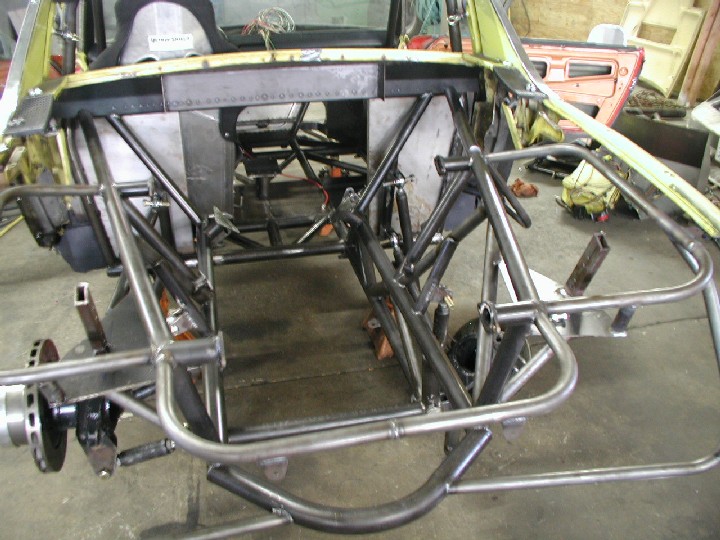
Posted by: byndbad914 Aug 26 2006, 12:53 PM
and...
fitting 10lbs of sh!t in a 5lb bag - front trunk (I know the cell is high, but where else could I have but it? Nowhere, just too damn big but need 17gals just to make a decent session without running out!) The car will just plow a little more as the front gets "stiffer" (car lightens up with fuel loss on the nose).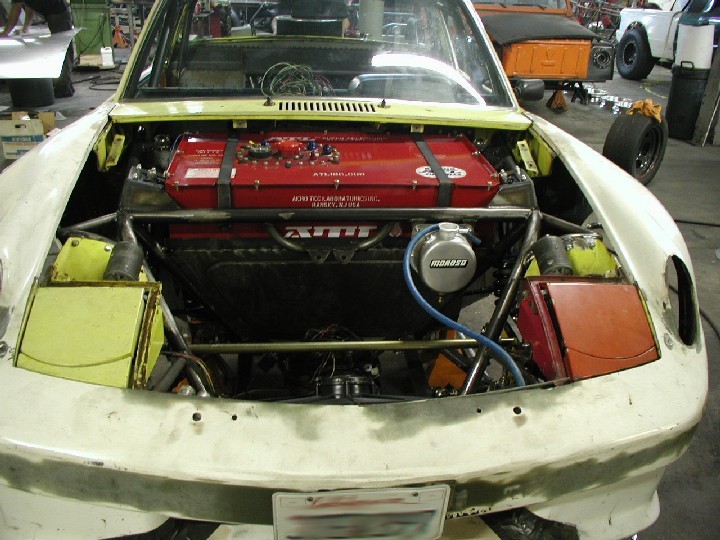
engine and cradle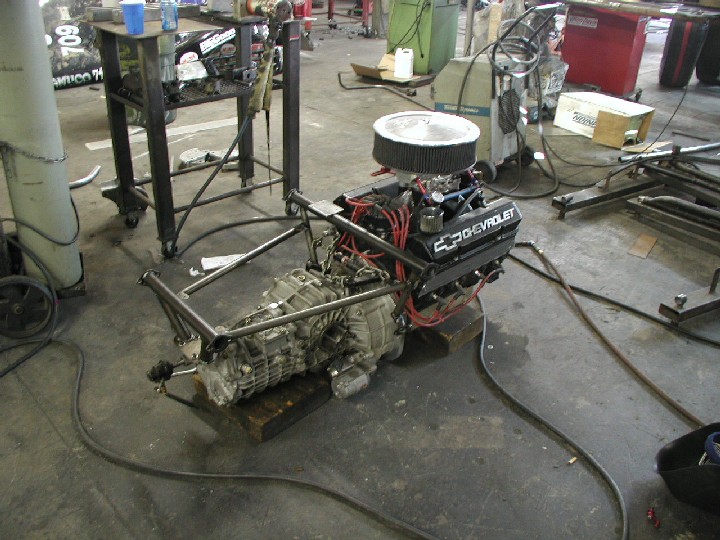
had to hack the sheot out of the upper perches - a little camber adj left, but basically all of my adjustments will be done with the bottom links When I win the lottery, I can buy a $2200 custom cell and redo the perches and such 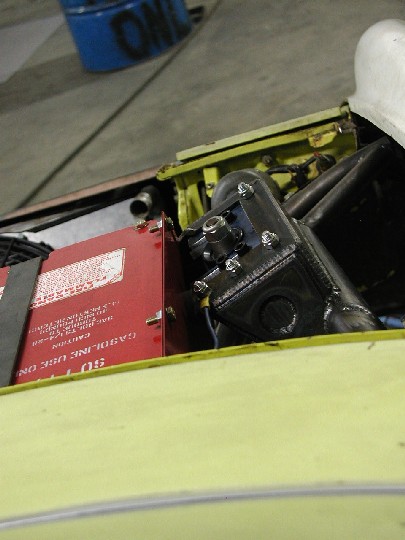
Posted by: Britain Smith Aug 26 2006, 05:57 PM
I can't believe that all the panel fit back on and it look like a 914 again...awesome work.
-Britain
Posted by: JPB Aug 26 2006, 07:11 PM
Very good work and all them tubes are awsome. This thing can be jack up and Bajaed if ya wanted, no pun intended. The diaphragm bracing on the floor is excessive but solid as hell. You can extend your suspension arms and you can jack this thing up like a Chenoweth! It will sit well on the track with the weight but I don't think you have any HP restrictions for that space frame.
Posted by: Aaron Cox Aug 26 2006, 09:03 PM
Tim. you are nuts. and i respect that LOL
whatcha gonna use for the rest of the floor?
any reasons you didnt go center seat driver car?
AA
Posted by: MecGen Aug 26 2006, 09:48 PM
Cool... 
This so seroiusly car porn...Sweet ass work. I think if you mounted the fuel cell on the roof it would still be deadly fast.
Gotta love it
+Karma
Later
Posted by: byndbad914 Aug 27 2006, 05:08 PM
Tim. you are nuts. and i respect that LOL
dat boy crazy... crazy? more like crazy insane. That whole joke about car addiction making heroin look like a desire for something salty (or however it goes) is so hard to explain to "others". I like you guys You're all nuts Aluminum skin. I was going to say leave it open in case I need to flintstone some extra brake before going into turn 1.
fiancee. 'nuf said right! She didn't understand the heroin comment either until I gave her a ride. Then she said "I see how this can be addicting" <giggle giggle>
 she gets it... tho' she still thinks I am nuts.
That and I really wanted it to be like a 914 tho' that is the loosest interpretation of a 914 most have seen. I like the stock dash and door panels and all that stuff on the cars - center seat would void that whole thing. If I were truly trying to build an uber-fast race car with awesome weight distribution and such, that is the right idea, and the cage would be way different too, but I just wanted it to feel like a 914 powered by cases of dynomite and safe in case I decide to take an off-track excursion that goes bad.
Posted by: Mr.C Aug 28 2006, 06:28 PM
Is this thing still going to be tagged for the street? I would love to see it at a get together in the future.
Posted by: byndbad914 Aug 28 2006, 06:36 PM
Is this thing still going to be tagged for the street? I would love to see it at a get together in the future.
yeah, that is why I had to wedge the wiper assembly back in there and put the headlights on and so forth. I could slide it through registration without them in theory (we don't have state inspections here) but can't get insurance without it being "road worthy", so technically if you don't have insurance, you can't re-register.
It is WAY too loud to drive around without expecting to get a noise violation ticket, but hopefully if I am on my way to a burger-joint cruise night the cop would be cool if he stopped me. It would be a fix-it ticket I couldn't fix

Posted by: Brando Sep 1 2006, 11:25 AM
Hot damn that's looking badass
Question though... It looks like you had the chassis built around the engine and trans. Like, wrapped around. How do you do an engine and trans drop if it's all caged in there like that?
Posted by: Aaron Cox Sep 1 2006, 11:27 AM
Hot damn that's looking badass
Question though... It looks like you had the chassis built around the engine and trans. Like, wrapped around. How do you do an engine and trans drop if it's all caged in there like that?
silly rabbit! look at the pics. it comes out from the top.

Posted by: Brando Sep 1 2006, 12:18 PM
Pictures wouldn't load  wierd...
It's a porsche, it's supposed to drop out the bottom
Posted by: byndbad914 Sep 14 2006, 05:05 PM
So I just responed to an email from a fellow non-clubber, and I kinda get similar questions a lot, so thought I would put my response here for others to see. Well, I answered his questions specifically and this was the last one that generally I hear
I modified the trailing arms since it was the absolute cheapest way to go. There are some expensive uprights out there (917 kit cars for instance - but way, way too expensive to buy their uprights separately) and I think there are some GT40 kits and such with uprights. You might check that out but it won't be cheap.
As for the Corvette stuff, I looked at it briefly AFTER I started my project. I would recommend this - figure out a way to adapt the whole dual A corvette rear with the corvette uprights. Adapt the front as well. Then you have a well designed dual A setup, same bolt pattern front and rear and so forth. At most you might need custom axles to match the CV at the hub with a different CV at the trans to match the Porsche stuff.
IF I HAD IT TO DO ALL OVER AGAIN, I WOULD HAVE DONE THIS. It would have saved me a lot of headache and money in the long run. ONLY DOWNSIDE is that there aren't any spherical bearing items yet (that I know of), so it would have had a bushing "give", but those cars are heavier than ours and pull over 1G all the time. I think it would look expensive to buy a Corvette front and rear suspension up front, but in the long run I believe it might be cheaper. Also, lots of brake upgrades (tho' no need to on our little cars!) and so forth, so really a good choice I feel. Also, down the road when more $ is back in the budget, building custom links with spherical ends to replace the actual A would be easy.
THAT SAID, I MADE NO MEASUREMENTS and am ASSUMING that it would fit. I would recommend finding a wrecked C5 or a friend's C5 and measure the arms, make templates and place in the car and see if you can make it work. I would bet it would considering how narrow the transaxles are on these cars.
Good luck and hopefully that helped a little. If you have some 914 trailing arms and room for the links, the 5-link is a simple setup too and I can help you with that if you chose to do that. I just think overall the Corvette has some well-designed pieces that you can buy off the shelf if you muck one up later.
Tim
So hopefully if anyone out there is starting from scratch and thinking about a serious tube chassis car, maybe consider my statement about using the C5 (or C6 tho' can't be too many wrecked yet) suspension front and rear. I think it would be an awesome doube-A setup. In previous posts, I have mentioned I intend to do that exact setup to a 70 Mustang as my next project a few years/cash replenishment down the road. The trans will be rear mounted and awesome, tho' not a C5/C6 setup, but even mo' better (tho' don't want to give all my sweet ideas away
)
Posted by: turbo914v8 Sep 15 2006, 11:29 AM
I love this thread.
Posted by: Brett W Sep 15 2006, 05:21 PM
I already looked at the C4 stuff and it won't work at all. There is no way to compensate for axle travel. They use a drive shaft. Now I have already pulled the wheels off my dad's bradn new ZO6 to measure and analyze the C6 stuff. There is potential there. The new stuff uses a CV joint on both ends.
The nice thing with the vette is the availability of a hub and bearing setup. This will allow you to construct a faily simple upright around it. Same thing goes for the rears. The bolt pattern is pretty common so big wheels are easy to come by
Looking good Tim, maybe i can get back on mine one day. If I could get a space on customer work.
Posted by: byndbad914 Sep 18 2006, 04:02 PM
I already looked at the C4 stuff and it won't work at all. There is no way to compensate for axle travel. They use a drive shaft.
yeah, I knew there was no way I would want to use C4 stuff. teh C5 and on has the rear transaxle, dual CV stuff so it looks alot like a 914 back there with the bonus of dual As
Your dad has a new Z06? Nice! That is my new favorite car. I never thought I would like a GM product enough to buy it, but I would have one of those if I didn't need the pickup for towing.
Posted by: byndbad914 Sep 19 2006, 02:38 PM
Here are some update shots I took over the weekend. As of last night, the car was on the ground and I am picking it up this afternoon!! Will have "final shots" of the chassis build probably tomorrow. In the meantime....
Bummed, but ended up running the cooling lines inside. Will have to ceramic coat them down the road to reduce the temps. I will also move the water pump to the passenger side too and get rid of the cross-over. For now, this is the band-aid for lack of planning 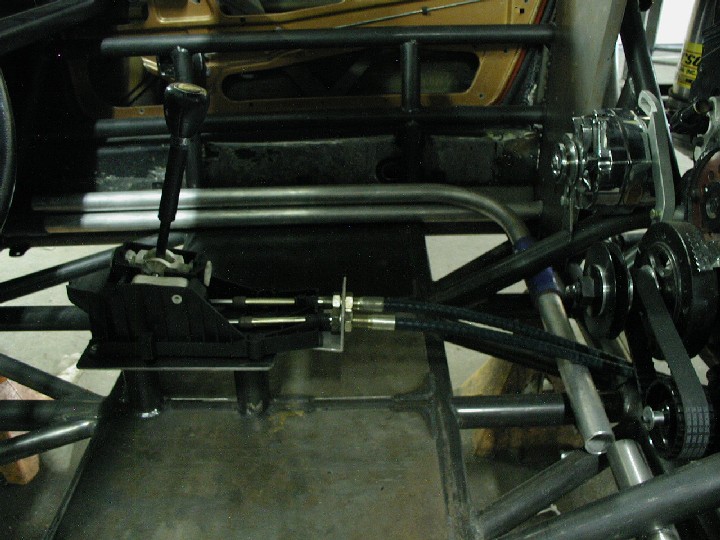
The front area with the fuel pump, filter, fill tank and overflow all mounted. Notice the center mounted battery too.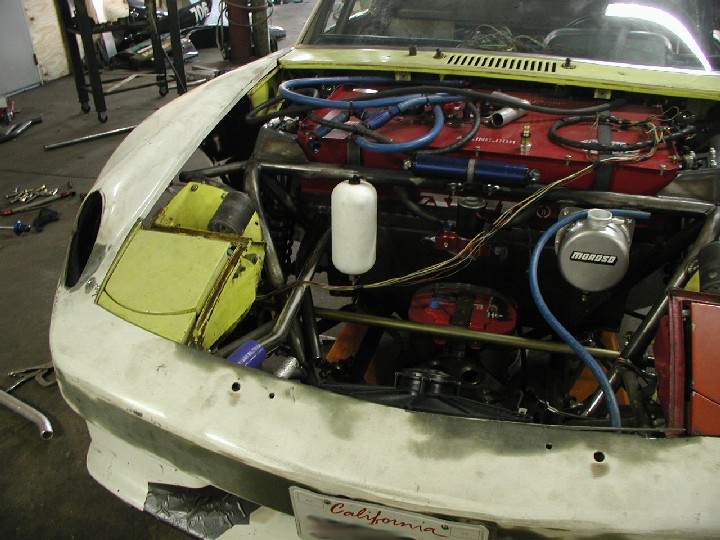
water pump (Meziere WP337 for those that will ask ) and monster HP6 oil filter.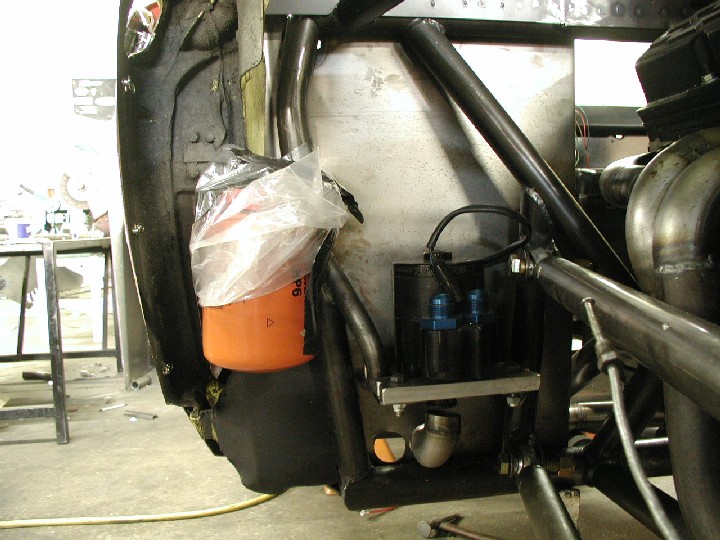
Posted by: byndbad914 Sep 19 2006, 02:40 PM
rear shot with the coolers all mounted (one for oil, one for trans)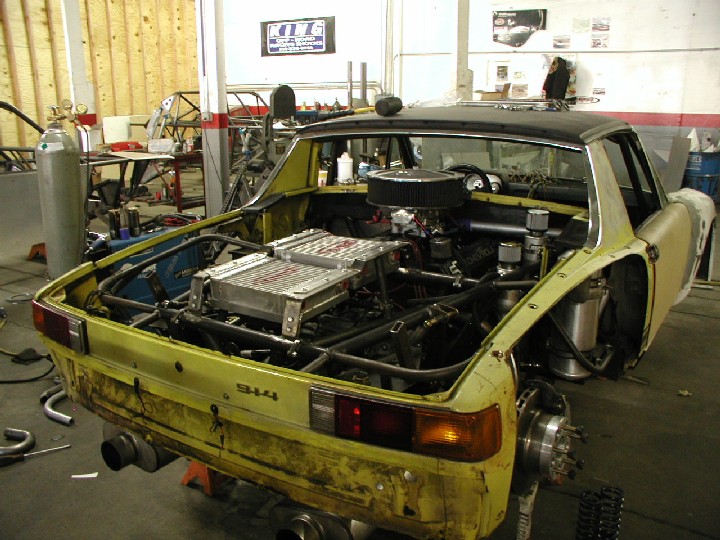
the rear "upright" finalized.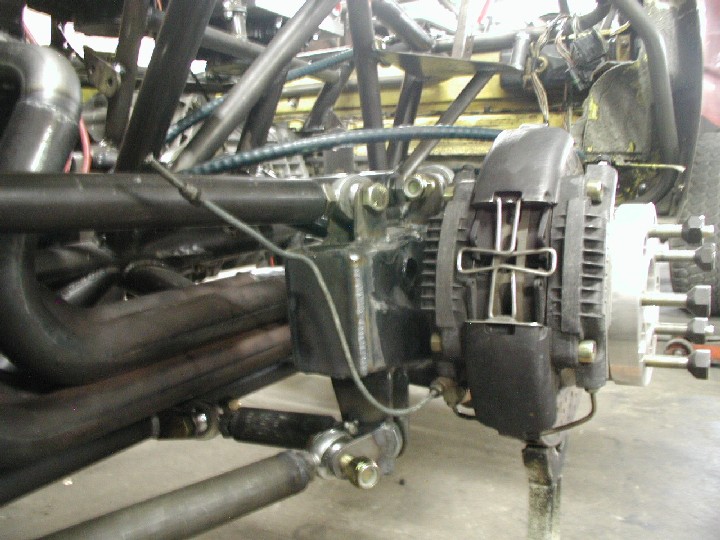
the trans pump mounted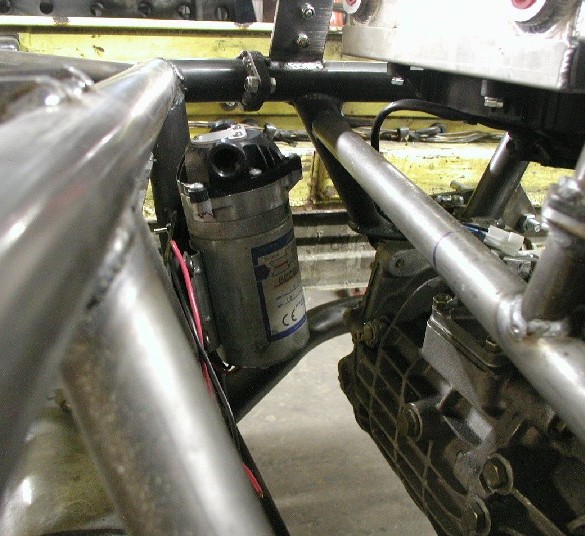
Posted by: byndbad914 Sep 19 2006, 02:43 PM
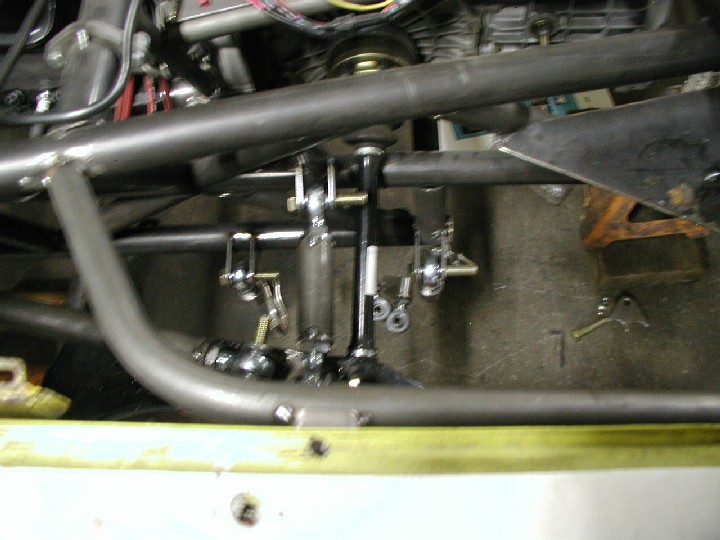
and for the shift linkage - I thought having a nice bearing in there would be bitchin, but turns out the bearing has a lot of play so it makes shifting feel a little sloppy. I will either machine a whole new bracket, or just press-in a plug, drill a 5/16" hole exact, and use a stud for the pivot to remove that play... but notice the adjustable slot for ratio and so forth.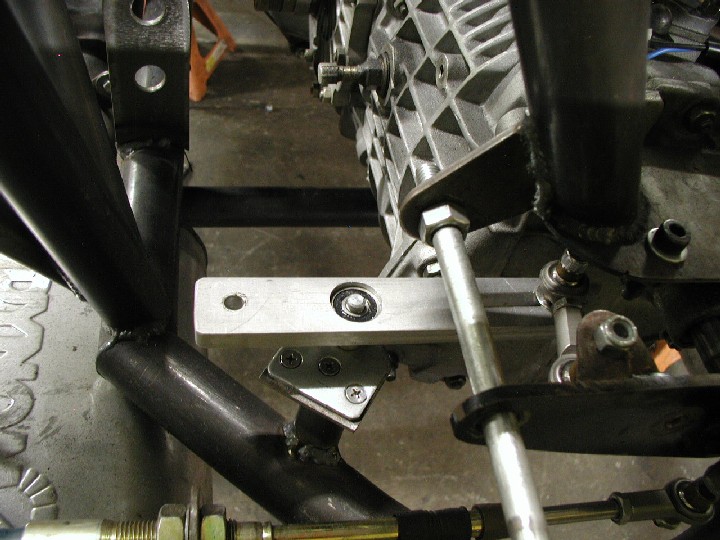
and the cross cable setup for the side to side selection. Again, adjustable by shimming the heim up or down.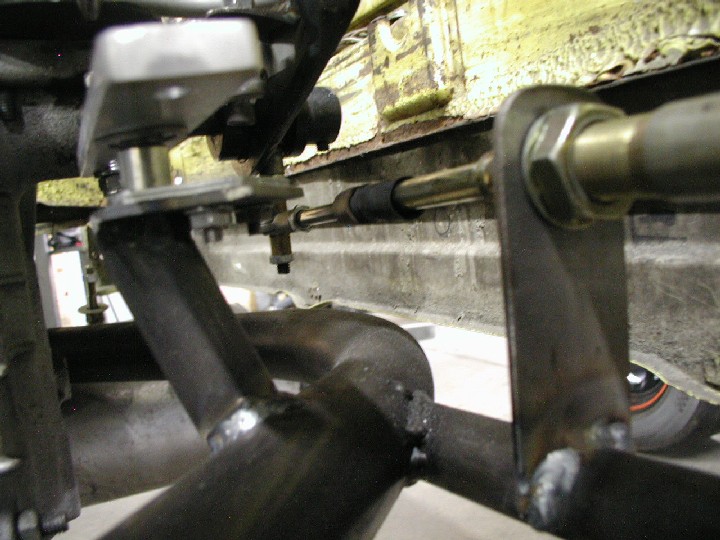
Posted by: Travis Neff Sep 19 2006, 02:55 PM
This is a wicked transformation, can't wait to see it on the ground!
Posted by: Aaron Cox Sep 19 2006, 03:00 PM
more progress! nicely done man
Posted by: turbo914v8 Sep 19 2006, 07:11 PM
Beauty to my eyes. I am drunk with envy.
Posted by: So.Cal.914 Sep 19 2006, 08:24 PM
Eyegasm's! I have been following your build and I have seen some very cleaver
answers to some difficult questions. It's going to be EVIL, WICKED, MEAN &
NASTY, I like it. With all that steel under even extreme conditions you should be
safe. Nice job.
Posted by: Brett W Sep 19 2006, 10:16 PM
Yeah my old man picked it up in Feb and it only has 1300 or 1800 miles. I think it has probably seen redline once maybe.
Car looks good. Time for some paint.
Posted by: byndbad914 Sep 20 2006, 03:21 PM
thanks to all for the kind words and votes of confidence! Here are some final shots. As for paint, paint don' help it go faster, so unnecessary Actually, I want to get it running, sort it out a bit, then believe it or not, tear it completely back down again.
Future plans over the next 6mo-1yr:
Get running
Race around Willow and sort the suspension, make sure everything is all where I want it, fix/weld whatever and get a "final" version sorted.
Tear down to ground again
Acid dip what is left
Send to heat treat (this will remove the stresses in the welds - very important on chromoly - and burn out the remaining acid)
Powdercoat the chassis
Paint the car
Maiden voyage - chip the shit outta the paint/powdercoat on the road course
Left these images a little big for clarity... here we go:
took this shot to show there will be no shortage of camber adjustment in the rear (car just "slapped" together here, no susp alignment at all). Then noticed a cool effect - look how low the car is v. the truck in the rear. That truck is lifted a fair amount, but gives you all a relative idea.
A rear shot - I am standing next to the red truck (I am 5'9"), so you see where the rear fender is in relation to me, and notice I am shooting DOWN at the car The car will actually be another 1" to 1-1/2" lower too - I left a little high to get it on the trailer...
Rear bumper will go on (at home at the time of these pix) and I will have to chop the rear valence for the exhaust, but will have a complete rear down the road.
Notice I chopped the spills way down - this is very form over function! The bigger spills woulda been better, but looked like  IMO and I hated the wing on the car. Chopped them way down and it really cleaned the look up. So, proof I care more about looks than hitting 160mph I guess. All the true racers are thinking
  right about now
Posted by: byndbad914 Sep 20 2006, 03:54 PM
couple more shots before it went on the trailer to come home last night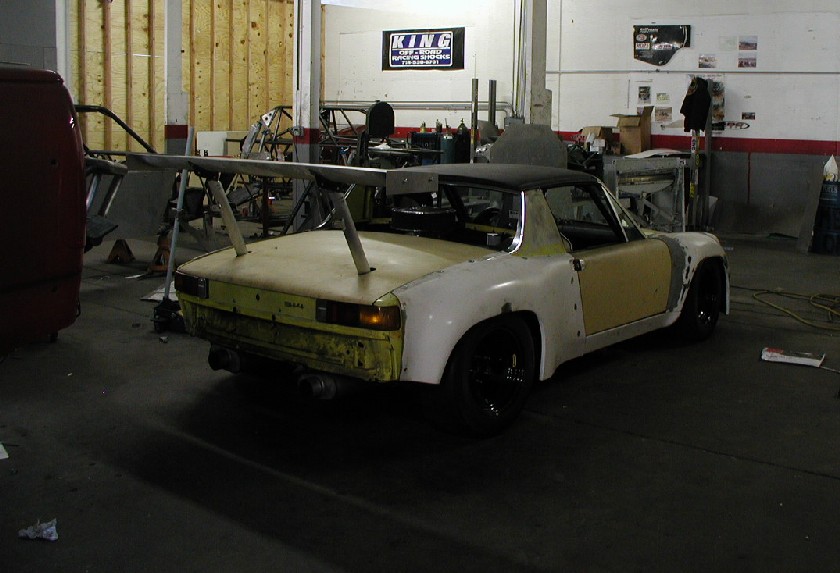
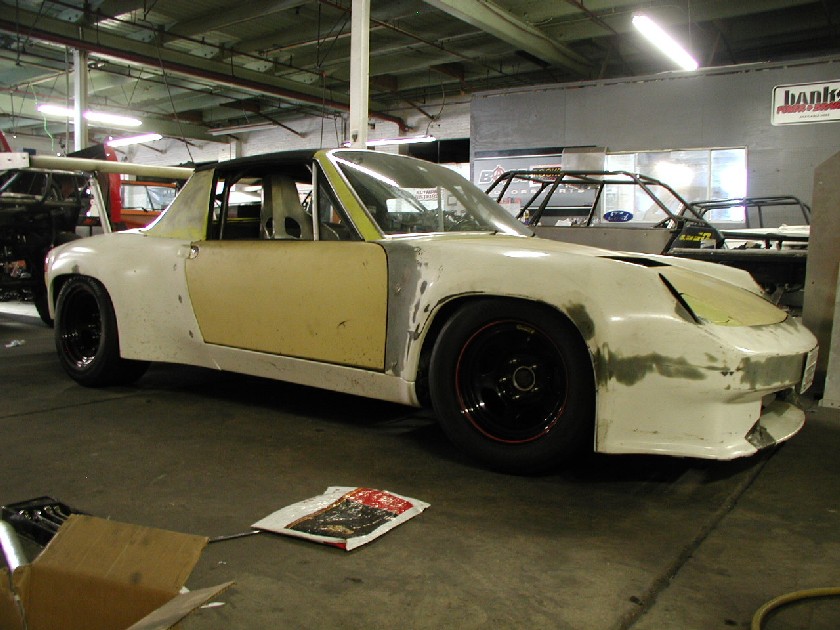
Posted by: RS22b Sep 20 2006, 04:08 PM
wow! congrats on all the hard work and reward.
Posted by: byndbad914 Sep 20 2006, 06:16 PM
apparently I am not too far off of cramming C5 stuff in a little car - a fellow member sent me this link, thought I would share with all. Shows stock stuff on the front and simple custom tubes on the rear as I suggested... whooda thunk I am not the only crazy bastard out there I don't like that he used square tube to build the front (torsional stability sucks) and shoulda used round tube like the rest of the car IMO, but he has the right idea overall!
http://www.germanlook.com/Forums/showthread.php?t=6197&page=6
scroll down for his pix.
Posted by: turbo914v8 Sep 21 2006, 09:28 AM
Well let me be the first to thank you for taking us all along on this very cool journey. Best of luck with the rest of the build and don’t forget we would be glad to look at any pictures of your progress, no matter how small.
Posted by: grantsfo Sep 21 2006, 09:47 AM
How much does this weigh?
Posted by: byndbad914 Sep 21 2006, 12:40 PM
How much does this weigh?
We got it on the ground for the first time Monday night - AT 11:00PM! (shows AJs willingness to work with me, right!) - and when I got down there Tuesday afternoon to pick it up, we were all excited and BSing and so forth... guess who forgot to weigh it before he put it on the trailer!
So I am working on borrowing AJs scales. He might race this weekend and if so, I won't be able to get them until later. If not, I will probably be down there on Sat and borrow them to take home. I will post what I find out when I get the info. I am expecting/bracing myself that it will be heavy by 914 standards (but still light by other car standards of course).
PS - thanks Paul!
Posted by: MJHanna Sep 21 2006, 01:30 PM
I bet you can't wait to fire it up for the first time and cruise around the block.
Posted by: Dr. Roger Sep 21 2006, 01:59 PM
"oh shit! . honey call the kids inside!" LOL
Posted by: byndbad914 Sep 21 2006, 03:03 PM
"oh shit! . honey call the kids inside!" LOL
Funny you say that - the first iteration of this car was fired up in my garage for the first time last October on a nice, sunny SoCal afternoon. Across the street and just a few houses down is a park with a kiddie pool. It was noisy and kids were screaching and laughing, so forth. I fired it up, ran it a couple of minutes and shut it off.
The park was dead silent! A couple of car alarms were going off in the street, but the park was silent
I walked out to the sidewalk to look down at the park and a block away a lady came out of her house and started looking around I live right near LAX - probably thought a plane crashed over her house. A neighbor over 2 blocks away came walking up a few minutes later and said he was wandering around looking for what made all the racket and checked the car out for a while.I ordered mufflers for the sprint headers shortly thereafter
I miss that sound soooo much right now it is killing me.
Posted by: byndbad914 Sep 25 2006, 01:12 PM
borrowed AJ's scales over the weekend and here is what I have so far... the car without any fluids, but everything I could find in the garage to throw on top of it was 2500lbs. I said I would be happy with 2600lbs, and I need to stick to it. Once I add oil, coolant and 1/2 tank of fuel, she will vault the 2600lb mark for sure, but that is okay.
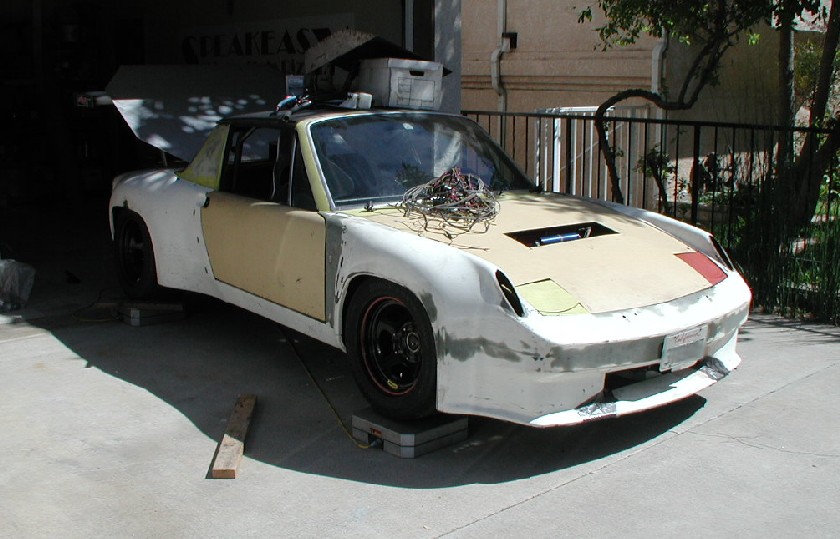
Corner weights aren't real as the car ride height wasn't set, crap laying in and on the car where ever it would rest and so forth - I just wanted the overall number.
For the future I am going to get fiberglass lids front and rear anyway, copy Felix's HID-style headlight setup that mounts in the turn signal buckets to save weight, and I have the original 72 doors off the car that I will gut completely for the track. I can trim away 200lbs I think with time and effort.
Took me the whole rest of the afternoon messing with it to get the ride height set level and correct to the suspension geometry - here is a final "level" look. Down the road cross-weighting will affect it of course, but level and low is this (excuse the blurry image, the batteries had been flashing "dead" the whole weekend and this was the last shot I got out of 'em)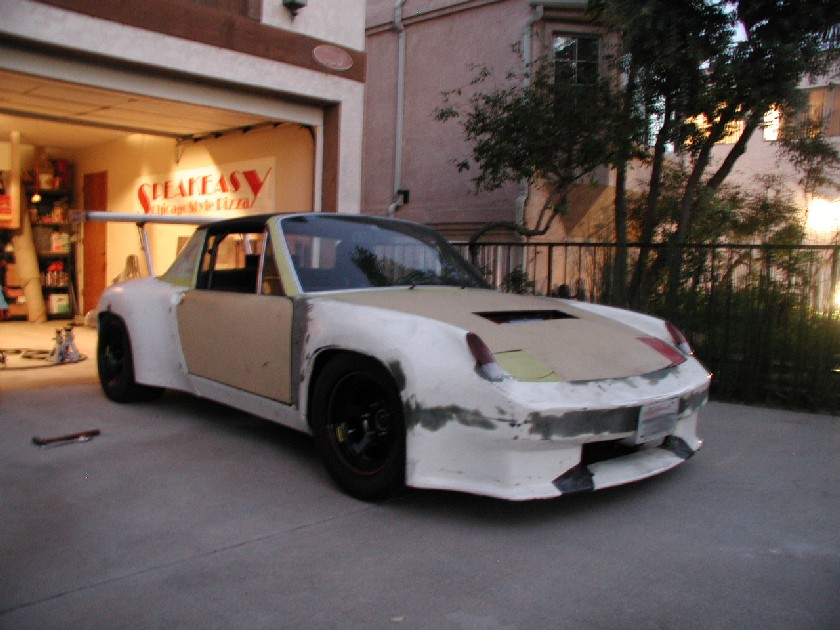
Posted by: Aaron Cox Sep 25 2006, 01:39 PM
rattle can it one color (flat black) for a nice semi completed effect
Posted by: Mueller Sep 25 2006, 02:31 PM
2600 lbs is not too bad....I was expecting Nascar figures of 3500+
Posted by: byndbad914 Sep 25 2006, 02:42 PM
rattle can it one color (flat black) for a nice semi completed effect
Actually I am going to start a thread asking about rattle can paint - I want to do exactly what you said - rattle it matte black - but I am not sure how that affects body work later (in other words, do I have to sand all that shit back off of the fiberglass and such or can it be left on and worked over without penalty like final paint falling off or peeling later).
2600 lbs is not too bad....I was expecting Nascar figures of 3500+
 yeah, picked the car up Tues night and swung by my friend Troy's house to show him. He was actually talking to my other friend Scott that is going to help me set the car up (NASCAR guy) and he told Troy the car probably weighed 1,000lbs more than it should
  If I can change out the lids, doors (for the track only - I am going to install guide "pins" in the hinges of the good doors for easy removal/reassmble when I want to take it to a cruise night), windshield for polycarbonate, so forth and get it down to 2,400lbs I would be really happy at that.
Actually Scott wasn't far off tho' if you consider Roger Sheridan's tube/fiberglass body 914-6 is 1,850lbs - I am almost 1K more than his... but I will feel pretty safe in this puppy above 150mph.
Posted by: ChrisNPDrider Sep 25 2006, 07:01 PM
AWESOME car, thread, progress!
My 0.02 = if you're gonna dip the car in a year and do final paint then, you can do whatever for paint now. The only problem I see is that if you leave the car in sun with cheap @$$ black paint from a spray can, it might all flake off at 140+ mph.
Also, rear valence? I see tons of photos of track 914s that are actually gutted in the rear. Perhaps you have an aero plan in mind, to seal up the bottom flush with the rear valence. Otherwise, a rear valence might just be a big drag parachute. Covering the bottom rear should be OK for a water cooled car, I don't think blocking some air flow would cause much trouble. At 160 mph the air wont have time to do anything but the path of least resistance. Keep the photos coming!
Posted by: byndbad914 Sep 26 2006, 12:57 PM
AWESOME car, thread, progress!
My 0.02 = if you're gonna dip the car in a year and do final paint then, you can do whatever for paint now. The only problem I see is that if you leave the car in sun with cheap @$$ black paint from a spray can, it might all flake off at 140+ mph.
Also, rear valence? I see tons of photos of track 914s that are actually gutted in the rear. Perhaps you have an aero plan in mind, to seal up the bottom flush with the rear valence. Otherwise, a rear valence might just be a big drag parachute. Covering the bottom rear should be OK for a water cooled car, I don't think blocking some air flow would cause much trouble. At 160 mph the air wont have time to do anything but the path of least resistance. Keep the photos coming!
Thanks!
On the paint issue, I agree won't matter for the steel parts if I am dipping, just worried about the fiberglass pieces. They need a lot of sanding, so
 might just have at it anyway Got some good info from my paint thread question too.
As for rear valence and bumper, you are right on for asking. It isn't on the car because I am contemplating what I want to do. The bumper from AIR fits like
so I may buy a Getty one for the "street", then hack the center out of the AIR one (I have seen many a track car like that). On the track, run no rear valence (the car is skinned between the rear rails btw as you mention all the way back to the mufflers) and the hacked bumper up a bit for airflow out the rear. Then on the street put the nice bumper and valence on.I dunno, I am having a really hard time determining what I want to do back there. Because I skinned it all the way back to almost the valance, I should be able to run the bumper and valence and not have issues. But then hacking the back out would give all the hot air from the engine/trans/coolers somewhere to go.
Another issue that I have absolutely no idea of the effect is rear airflow differences between the two concepts v. wing performance. Wings at the rear bumper of the car are heavily influenced by how the air comes out from under/behind the car too. I may f it up having a bunch of airflow out the back v. low-level/high velocity airflow under the valance. Or completely the opposite.
So I will probably base it all on how it will look in the end like some silly ricer with his pants hanging low (form over function)
First iteration will be full bumper and valence - if the car feels "not fast enough for my pucker factor" I will dig deeper. I have an idea I am just going to scare the outta myself with this thing as is ![shocked[1].gif](style_emoticons/default/shocked[1].gif) It was pretty fast before, now if it handles a lot better and I can really blow thru T8 of Willow above 145-150mph, that will be plenty for my comfort factor. Even all f'd up before it was the fastest car I have ever driven.
It was pretty fast before, now if it handles a lot better and I can really blow thru T8 of Willow above 145-150mph, that will be plenty for my comfort factor. Even all f'd up before it was the fastest car I have ever driven.
Posted by: byndbad914 Oct 24 2006, 10:55 PM
hey all - 'bout time for an update. Progress has been slow the last couple weeks as I had to prepare and fly out to Denver area for a job interview last week. Got my fingers crossed for that one!
Anyway, I had the wiring more or less done before that all came about, but finalized a few things tonight. All that is left is to get a new battery-to-kill-switch cable made (mine old one is about 2ft too short now) and wire the positive to the ignition box behind the drivers seat (it is all wired minus that input).
Not too often you see a tube chassis car with 525HP V8 and a wing and - WTF - wipers! They work tho' I dont have blades for the arms right now Got some fun shots with the lights on - ever seen those pictures in the mall of old street scenes and the cars have lights that light up?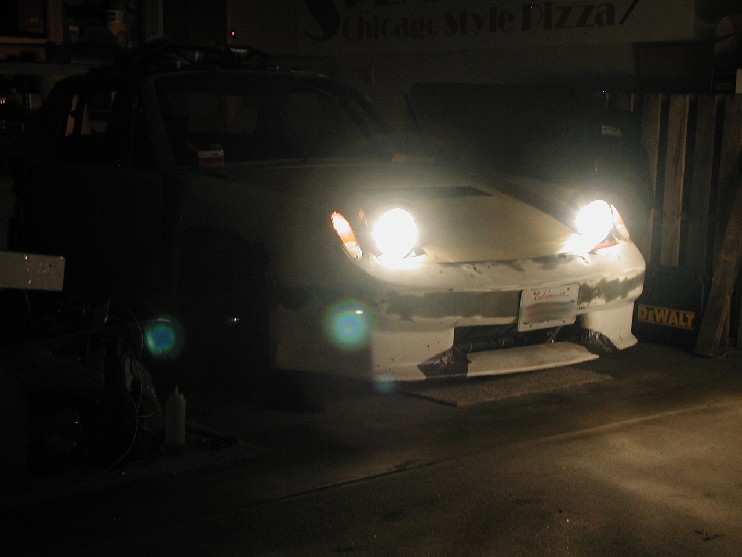
The rear lights complete with reverse lights on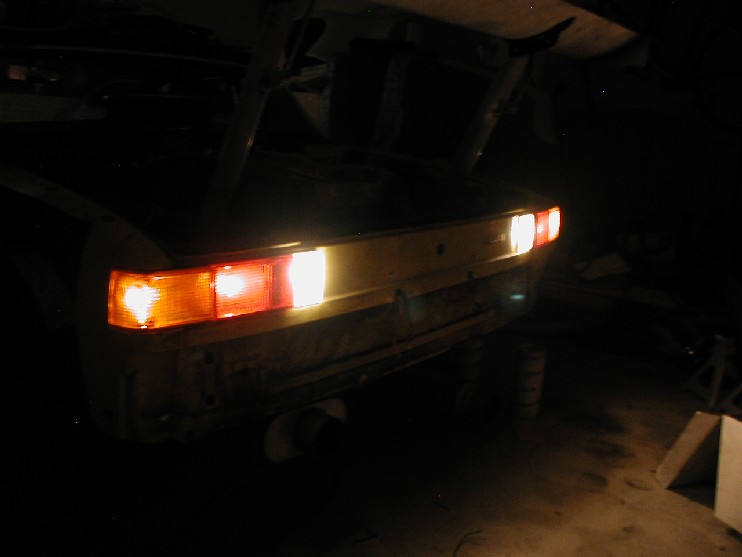
I like the red dash lights with the carbon fiber gauges - kinda poser but I think it looks really cool and when the car is all satin black, the red should match really well
I did all I could to hide the wiring and burnt through over 150 zip ties (on my 4th package of 50) Will probably go back and redo the ones along the NASCAR bars to clean up as I found myself running a few extra wires I forgot about. I am really autistic about this stuff and damn near tick when I am running those wires trying to get everything nice and evenly spaced and straight and tight and.... ugh. Anyway, here is an idea of how I ran the wires trying to hide them from direct view (obviously I didn't run in the frame as I didn't want to drill holes anywhere in it - a chopper motorcycle is different)
outside which view will be blocked by the door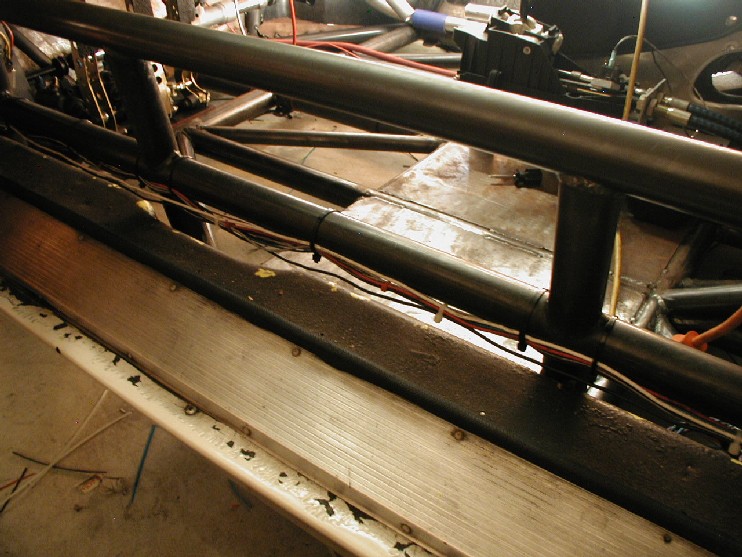
Posted by: byndbad914 Oct 24 2006, 11:02 PM
and from the passenger side - can't see it looking through the windows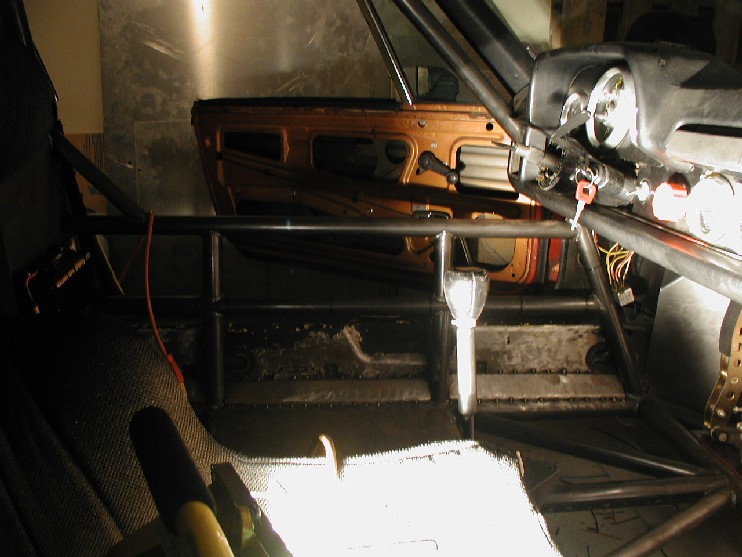
The rear area, I pulled hot from the starter pole (direct to battery through the kill switch) and ran inline fuses for the rear fans/trans pump/distributor. I chose not to tax the fuse box too much and also those would be long runs from the front firewall back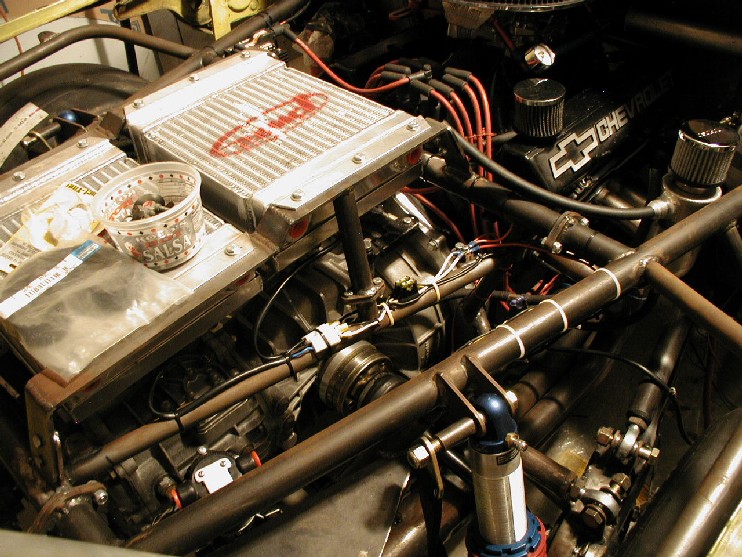
I just realized I forgot to get a shot of the new fuse block from Painless - I will try to remember to do that.
Posted by: byndbad914 Oct 24 2006, 11:17 PM
Probably starting to notice that by now I just basically pieced the stock harness back together for now. The front loom is a bit short and kinda spans the width a bit funky for now, but I didn't want to waste time redoing that since SEMA is next week and I look forward to checking out Felix's headlight setup in the turn buckets. If that looks good 'nuf for me, all that wiring will get pitched and new, simpler wiring will be ran for those units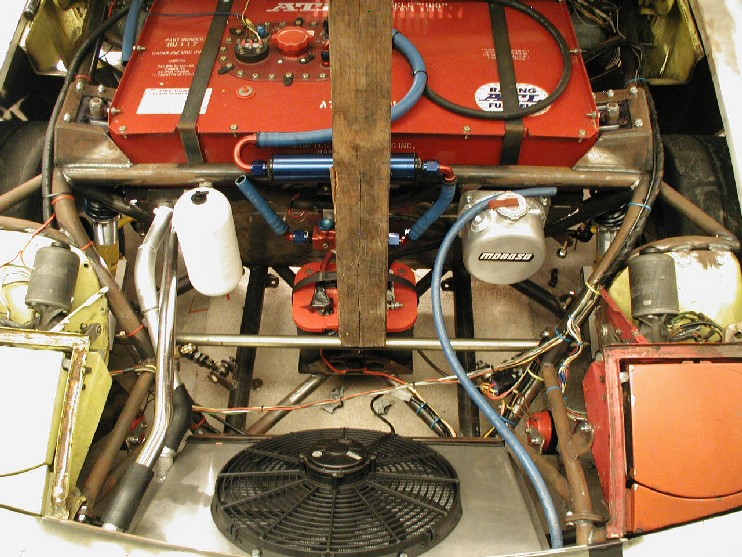
For the switched items I added (3 cooling fans/H2O pump/fuel pump/trans pump) I fused the hot and switched the ground. This makes it clean as only one wire goes into the box per item (the other side of the ground is internal to the mounting screws) instead of running one hot in from the fuse and then back out to the item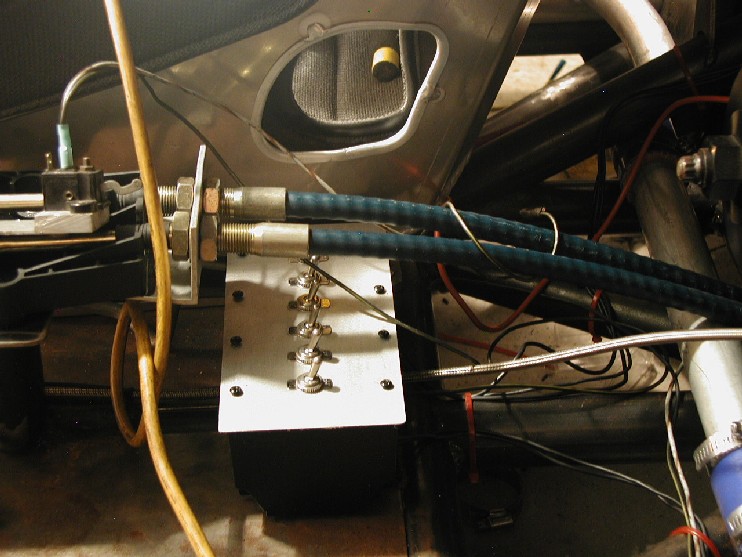
Posted by: Mike T Oct 25 2006, 01:04 PM
I understand the paint to use for the Blackout look is John Deere Blitz Black. Seems to be the paint of choice for the Rat Rod crowd. It's cheap too at $26.00/gallon.
Never used it myself but a friend of mine is preparing to use it on a Ratrod beetle he's building.
http://crankshaftcoalition.com/wiki/John_Deere_Blitz_Black_paint
Some info and examples.
Mike T
Posted by: ss6 Oct 25 2006, 03:46 PM
Been following your progress (mostly via the pix), awesome job!
Saw the discussion on using Corvette suspension, was wondering if you had any thoughts about Boxster guts being a suspension candidate?
Been daydreaming about doing a tube frame teener ever since my sheet metal wonder slid into a tirewall last summer, but figured I'd try to leverage all that high priced Porsche engineering talent by using entire late model front and rear suspension assemblies rather than trying to engineer my own (not enough time / confidence). Would also stick with Porsche engine / tranny since my local PCA wouldn't let me on the track without 'em.
The Boxster suspensions are delivered to the factory as bolt-in assemblies from subcontractors, so I'm thinking they should be relatively easy to design mounts for, and there should be plenty of twisted Boxster parts donors out there.
Any comments / opinions?
Posted by: byndbad914 Oct 25 2006, 03:56 PM
I understand the paint to use for the Blackout look is John Deere Blitz Black. Seems to be the paint of choice for the Rat Rod crowd. It's cheap to at $26.00/gallon.
Thanks Mike - you are right on about that. I have been asking around to see if anyone knew where to get JDBB - my cousin is doing a ratrod squareback actually with an angle chop and so forth and I heard about it through some sites he pointed me to. Should be pretty cool. Thanks for posting that tho'
Does anyone know where I could get about a case of the JDBB in rattle cans? I don't have a gun and just want to go for it with cans... I have strayed away from the rustoleum idea for fear of ever wanting to do a better paint job (I heard all that Rustoleum will have to come completely back off if I use it).
Here is a shot of the fuse block from Painless tucked into the passenger side of the footwell. Feet are about 1.5ft away from this, so not worried about it getting stomped on. Gotta get in there with the new bag of zip ties and clean it up some more
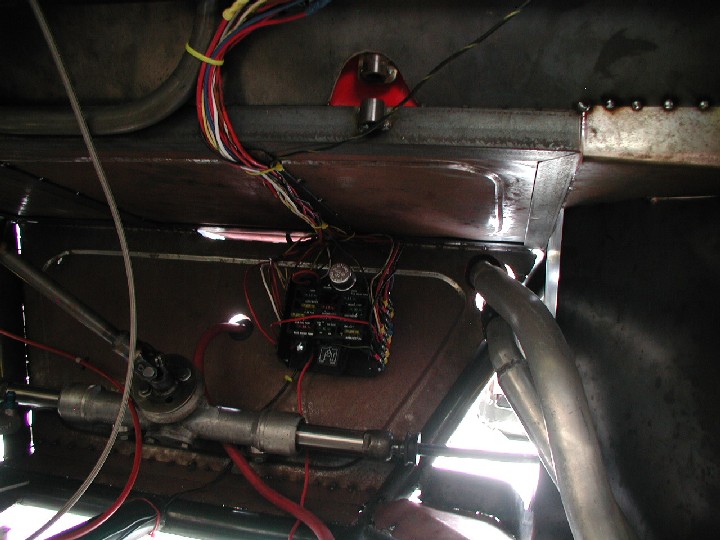
You are kinda looking up, so you see the underside of the fuel cell area and the cooling lines to the right. You can't even see the wires when sitting in the passenger seat or looking in from outside. All of that is up behind the dash, minus the fuse block - that you can see in the passenger seat.
Here is another sorta cloudy shot of the rear fuses (camera was too close to really focus) to see how I fused the primary side of the cooler fans and trans pump, so forth. They are $2ea at AutoZone and will help remove too much load through the fuse block at the front.
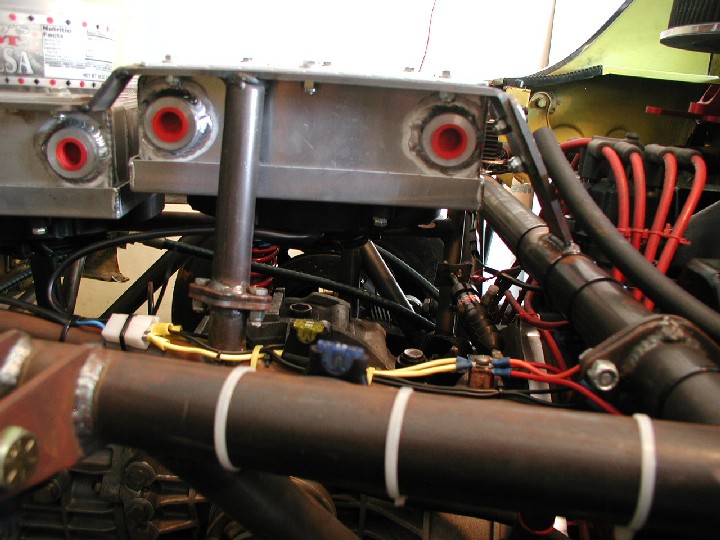
Lastly, the ignition box is mounted behind the driver's seat to keep heat away. Also, it is mounted right between the NASCAR bars so I can just pop open the door, take a little screw driver and change my rev limiter and see the diagnostic light.
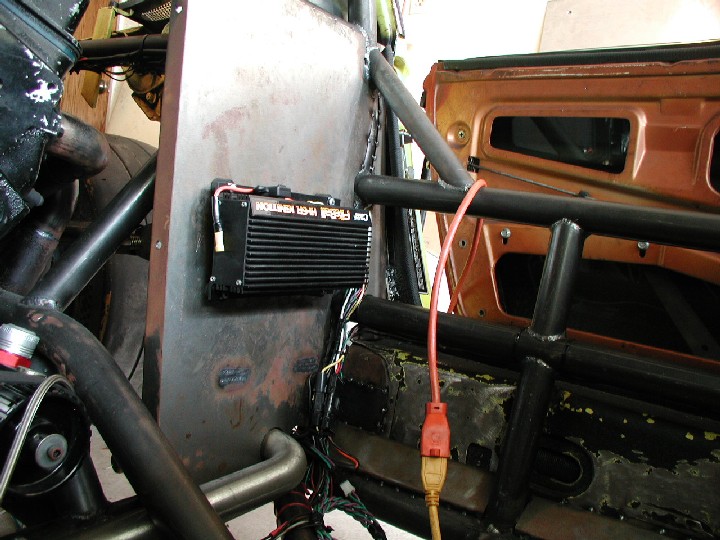
Posted by: byndbad914 Oct 25 2006, 04:08 PM
Saw the discussion on using Corvette suspension, was wondering if you had any thoughts about Boxster guts being a suspension candidate?
Been daydreaming about doing a tube frame teener ever since my sheet metal wonder slid into a tirewall last summer, but figured I'd try to leverage all that high priced Porsche engineering talent by using entire late model front and rear suspension assemblies rather than trying to engineer my own (not enough time / confidence). Would also stick with Porsche engine / tranny since my local PCA wouldn't let me on the track without 'em.
The Boxster suspensions are delivered to the factory as bolt-in assemblies from subcontractors, so I'm thinking they should be relatively easy to design mounts for, and there should be plenty of twisted Boxster parts donors out there.
Any comments / opinions?
Sucks that you wrecked your car - that is not a good feeling to count those pennies in your head when you get out and look at it.
Well, it is basically opinion so take it FWIW... I don't know much about the Boxster suspension frankly, but I can rip off Chapman with this - any suspension works with little motion (typical race car setups have maybe 1" of compression and 2" expansion during body roll). That is on the high side - many higher spring rate cars and big sway bar cars may see less than 1" on both. So, that means there is little motion to cause detrimental effects of good v. bad designs.
So, I would base my suspension selection on this criteria:
1. If limited travel, then most suspension designs will probably work
2. Which one has dimensions that will fit inside of the body/track width I am using? The Boxster is a narrow car, so I bet it could be worked to fit just fine. Also, see Felix's Neo-914 setup - IIRC he has a boxster trans (tho' don't quote me there - if not him, it has been done). So you could have a pretty slick setup using all Boxster components and just mate that trans to whatever engine you chose. Also you would have a slick cable shifter setup to modify to fit your car as well. I basically have a Boxster shifter in mine and aftermarket cables for my 930 trans.
3. Availability of good performance parts - this is why I like the Corvette stuff. That is THE hot ticket in rodding these days, so there are some cool parts out there to upgrade them and there will be even more. That said, if you are okay with the stock arms and so forth of the Boxster, then that won't be a concern. Also, I would have fabbed custom tubular arms based directly off of jigging the stock C6 stuff to have spherical bearings and so forth - I would do the same with the Boxster stuff as a performance upgrade I suspect.
Long winded opinion, but hopefully that helps you when deciding. I just like the C5 and later stuff - that LS7 Z06 is THE car IMHO right now and that suspension DEFINITELY handles as I have ridden in C5 Z06s and was absolutely blown away what a stock car with good tires can do. That said, I bet the Boxster stuff would be easier to adapt since it is all metric and about the same width as the 914...
Posted by: Jeroen Oct 27 2006, 11:26 AM
the boxster rears are mcPhersons, basically the same as the fronts
check the "boxster build" thread in the paddock, there's pics of the susp.
if you're going tubeframe, you could use the 993 or later rearsuspension
Posted by: byndbad914 Oct 27 2006, 01:10 PM
if you're going tubeframe, you could use the 993 or later rear suspension
Here is a set of photos a fellow nonclubber had on here awhile back trying to find out who owned it - apparently used late model stuff front and rear. My concern is look how far through the hood the front struts would be...
I had a bunch of money wrapped up in struts and shocks and brakes and so forth for the stock tub, so I kinda made the mistake of not seeing that as a "sunk cost" as clearly the parts were nearly new and useable. Had I not had so much money wrapped up in 930 Turbo brakes, RSR front struts and so forth, I WOULD NOT USE STRUT SUSPENSION. I would have used either Corvette dual-A stuff or some form of NASCAR front clip and custom-made rear. We went 5-link rear on mine as it was easy with the V8 and so forth. Corvette A's would have worked too I suspect.
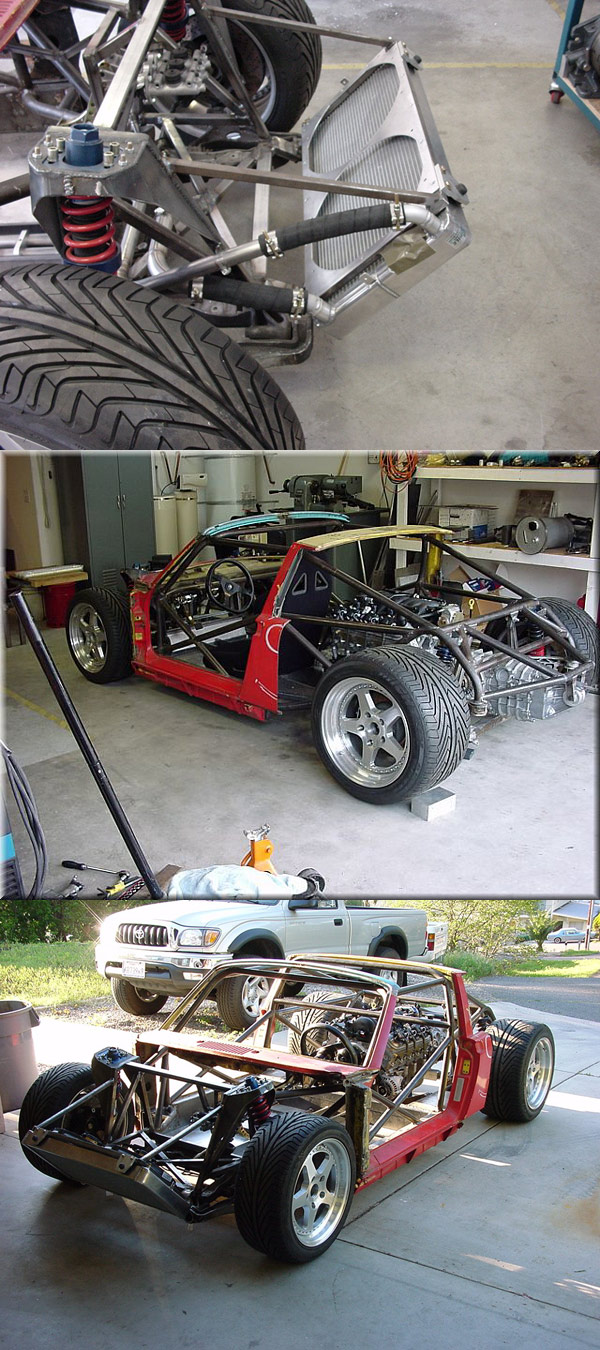
edit - to see the picture in full size, click on the link, then click on the pic again where it pops up to get full size
Posted by: Bigbohr Oct 27 2006, 01:49 PM
if you're going tubeframe, you could use the 993 or later rearsuspension
This may not be what you meant, but just wanted to point out that unless you can accept near zero suspension travel I don't think you can use the 993 suspension sub-frame. The half-axles on the 993 point out backwards, while they have to point forwards on a 914. The 993 subframe doesn't allow you to do that (interference). So you would have to fabricate a frame and control arm brackets. The 996 subframe may not have that problem, I don't know.
The other problem with the 993 and probably also 996 suspension is that the forward links go quite far inward towards the car centerline - otherwise said the spacing between the pivots is quite narrow. Not sure whether a flat 6 will fit in between. The V8 being much narrower on the bottom shouldn't have that problem. Exhaust routing may still be a bit of a challenge though.
byndbad914, your car is awesome! Very nice work ...
Posted by: Brad Roberts Oct 27 2006, 02:52 PM
Crazy
You are one of the first people (outside of myself) that I have seen use this method. People look at me funny when I run one wire to their fans in the front of a V8 car. Porsche liked to do this a lot in the past.The car you posted pics of with the Boxster stuff: He used Boxster rear upper mounts in the front. I'm trying to figure out why he did this? Can you point me to his thread somewhere?
996 rear suspension in a 914.. YES. It appears easier to us the 996 than the Boxster rear setup.
B
Posted by: Brad Roberts Oct 27 2006, 03:03 PM
I see what he did now. That is all 993 FRONT suspension in the front of the car. Not Boxster. Boxster uses the same style strut mounts as the 993, but they use them in the rear. I looked closer and saw 993 lower control arms.
My bad..
B
Posted by: byndbad914 Oct 27 2006, 03:21 PM
Crazy
You are one of the first people (outside of myself) that I have seen use this method. People look at me funny when I run one wire to their fans in the front of a V8 car. Posted by: byndbad914 Nov 27 2006, 02:15 PM
just a little update for those who are following along - I fired the latest iteration yesterday. It is sooo weird how the dry sump makes the engine act so much better. Fired right up, warmed right up and idled within just a couple seconds of running and that NEVER happened before. The only change is the dry sump so maybe somehow that more efficient pump (I can prime it to 60psi for 2 minutes with my Dewalt electric drill, so that is definitely no drag) puts "less enough" load on the motor that it idles nice even cold.
Anyway, I am just happy it fired up and didn't leak all over the place. My Barry Grant fuel pump is leaking however, so I either need to tear into it and replace a seal or send it back.
Ordered a custom throttle cable this morning (my friends came over to hear it run and were laughing watching me sit on the NASCAR bar with my left hand turning the key and my right through the back window operating the carb). Then I need to get the seats all welded in and seat belt mounts, make a new doghouse for it now that all the wiring and so forth is ran, then align it, then tear up some track. I am shooting for an open track day at Willow Dec 22nd. I would like to make the 8th but doubt I can pull all of that off. Maybe. I am going to Florida for the PRI show 3rd week of Dec and accepting a job in Colorado so probably moving and starting by Jan 15th, so it is going to be an insane month!!!!!!!
Posted by: andys Nov 29 2006, 04:16 PM
I am shooting for an open track day at Willow Dec 22nd. I would like to make the 8th but doubt I can pull all of that off. Maybe. I am going to Florida for the PRI show 3rd week of Dec and accepting a job in Colorado so probably moving and starting by Jan 15th, so it is going to be an insane month!!!!!!!
I may be able to make it out to Willow Springs on one of those track days along with another 914V8.........Drop me a PM.
Andys
Posted by: byndbad914 Nov 29 2006, 04:46 PM
some update pix...
I am a dork for sure and here is proof - but I thought it looked cool and was a good way to use the screen out of the engine lid that no longer fits I have 3 lids, so I will be using that screen elsewhere too like the front radiator opening and some gills I want to cut in the front fenders....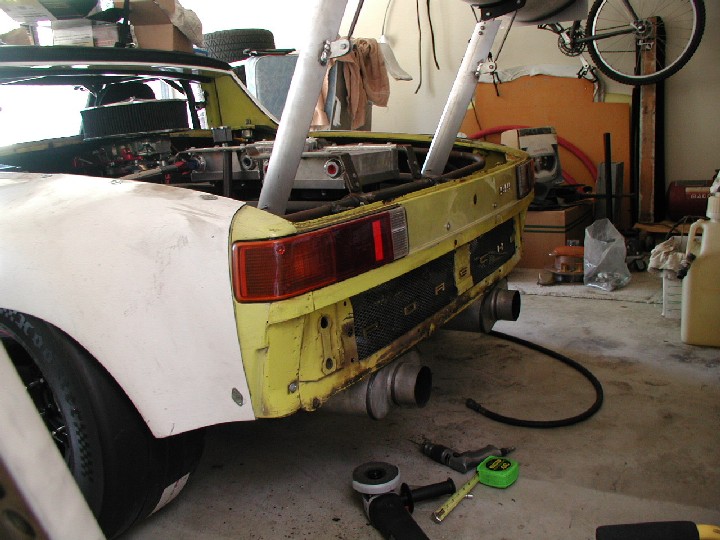
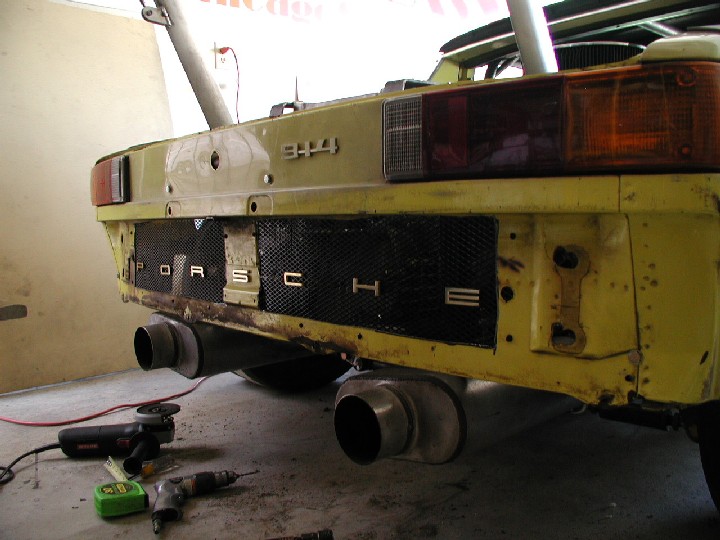
I put the screen in there to relieve any pressures that might build up while the car is running and also give all the heat a place to go... that bumper area is essentially a wall to the undercar airflow. On the street I will pull the license plate light wires back through and add the bumper and rear valence to be street legal (attaching the valence is why I kept the 1" strip on the bottom). Don't laugh too hard at my inability to cut a straight line Once it is all painted semi-flat black, you will hardly notice it
Overall shot of the engine compartment with the oil lines and water all plumbed
Andy - when I am rolling to Willow I will let you know.
Posted by: byndbad914 Nov 29 2006, 04:50 PM
more... the front of the engine and ignition box. Pass seat is waiting to be welded in.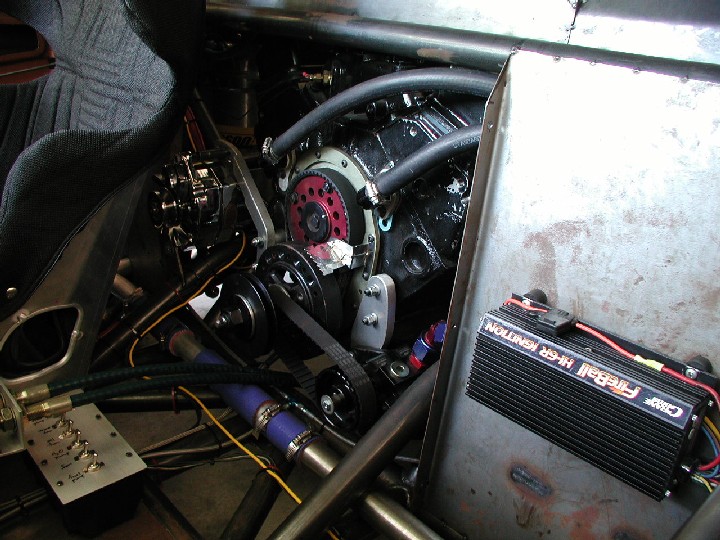
mounted the reservoirs inside so I can see if I have fluid or not going into turn 1 at 160mph... good to know! If I accidentally cut a line or get a leak, that isn't something to find out the hard way at that speed. I need to weld the mount in place (zip-tied for now so I could bleed everything).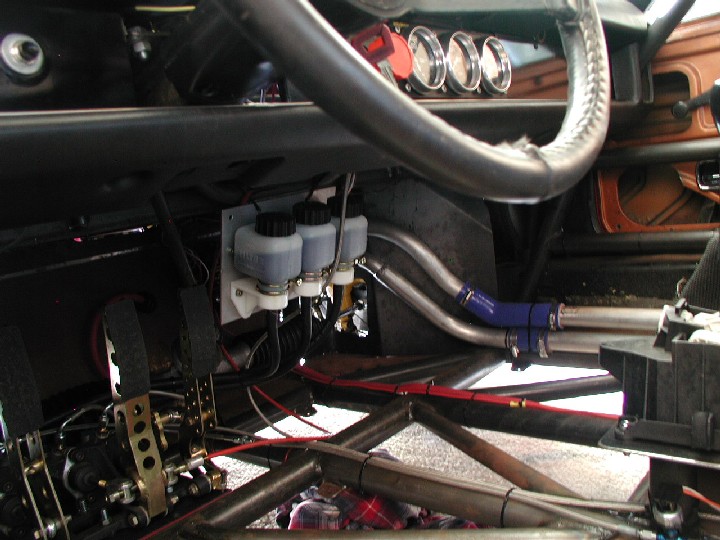
and the dash. The little black button is the horn now - then I can make a removable steering wheel setup much easier.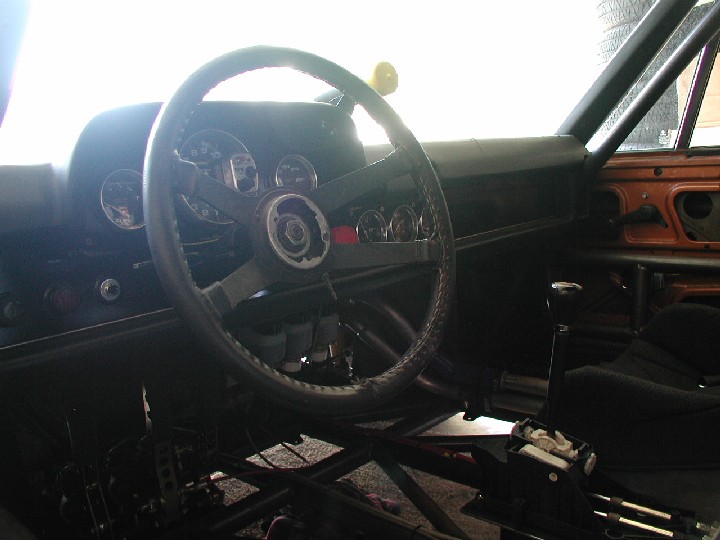
Posted by: byndbad914 Nov 29 2006, 04:53 PM
My latest iteration of the shift linkage and the cables. Works really precisely with this simplified bracket and still adjustable with the slot feature.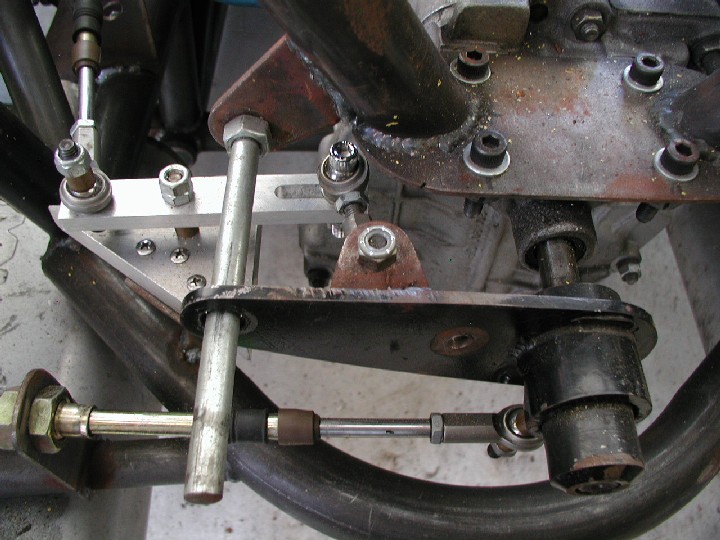
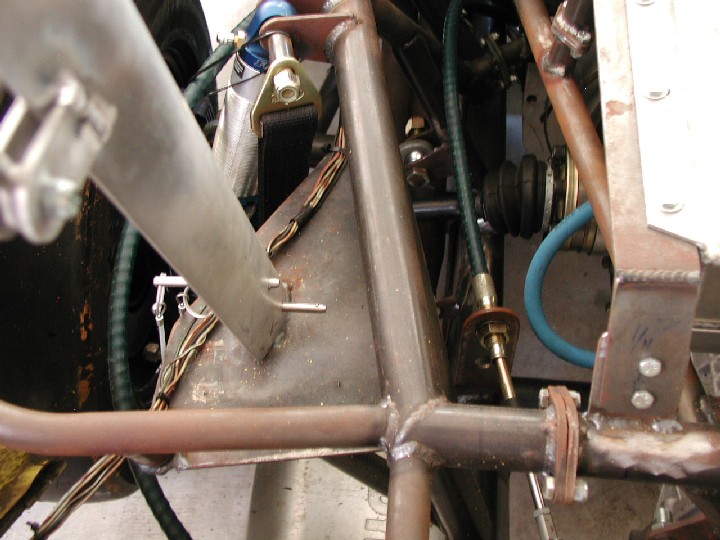
And the front trunk - can't wait until Felix and Tony get that HID in the signal buckets setup all worked out so I can lose those pop-up light assemblies!!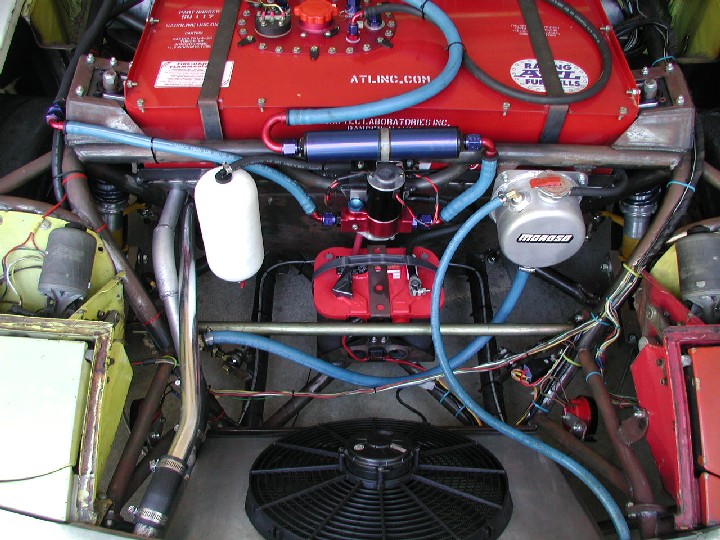
Posted by: Brad Roberts Nov 29 2006, 05:10 PM
Looks great (as usual)
I havent figured out the exact mechanical advantage, but the Boxster's/996's and GT3's all use a form of "counterweight" on the shift linkage. I'm not positive on the effects, but I would imagine it helps lesson the amount of effort to make the shift.
Thoughts on this?
B
Posted by: andys Nov 29 2006, 05:25 PM
Looks great (as usual)
I havent figured out the exact mechanical advantage, but the Boxster's/996's and GT3's all use a form of "counterweight" on the shift linkage. I'm not positive on the effects, but I would imagine it helps lesson the amount of effort to make the shift.
Thoughts on this?
B
Brad,
The counerweight on my 01E 6 speed is used to counter the weight of the linkage so that when the car hits a bump in the road, it helps to prevent it from jumping out of gear.
Andys
Attached image(s)
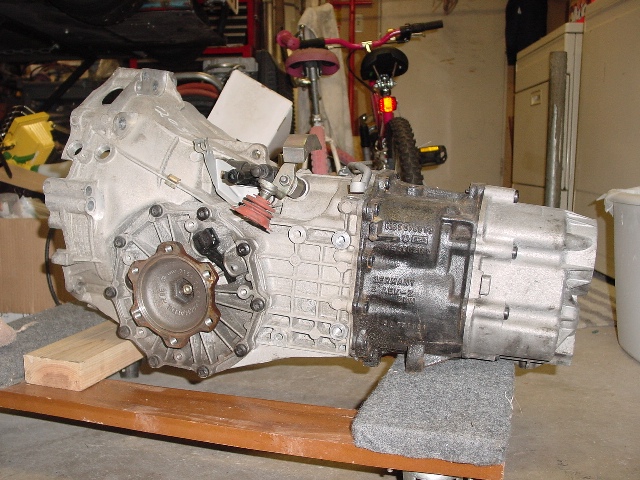
Posted by: byndbad914 Nov 29 2006, 05:28 PM
Looks great (as usual)
I havent figured out the exact mechanical advantage, but the Boxster's/996's and GT3's all use a form of "counterweight" on the shift linkage. I'm not positive on the effects, but I would imagine it helps lesson the amount of effort to make the shift.
Thoughts on this?
B
It would be interesting to see the counterweight setup as it seems to me if you counterweight to help shifting, that would only work one way if you know what I mean by that (weighted to help with the pull would fight the push motion for instance).
nevermind - Andy beat me to it with a better answer even!
Posted by: turbo914v8 Nov 29 2006, 08:22 PM
Great progress, the highlight of my day.
Posted by: Brett W Nov 30 2006, 01:42 AM
Many other cars have a counterweight on the shifter, rod or both. I think it may have to do with dampening vibration from the engine or help to get in gear. Once it is moving it will help force the syncros together.
Looks good Tim. I have a set of Boxster shift cables as well. They look like every other production cable. Big spongy rubber ends. Helps cut vibration and make the shifter feel bad. My Boxster tranny didn't come with any kind of counter wieght.
Posted by: byndbad914 Apr 26 2007, 12:53 AM
Been awhile since I posted any updates about the car... I hit the rattlecans pretty hard and at least it is close to one color now. Semi-flat looked great, then after buffing it out a bit it is a bit glossy, but at least it is smooth for the most part.
Didn't paint the hood as I have a perfect hood I need to cut the bracing out of around the strut mounts to put on this car and will paint it (no need for hole in the hood now).
Actually I put a few coats on the car with sanding in between every 2 or 3, but then I just plain got lazy at the end in terms of buffing it out so it looks like ass up close. If I bought a buffing wheel (my shoulders just can't take it) and the right buffing compound the rattlecan job would probably even out really well and look good actually. Some spots before the elbow grease wore off and my joints started to squeal look pretty good!
Be fun to see who catches my bonehead mistake...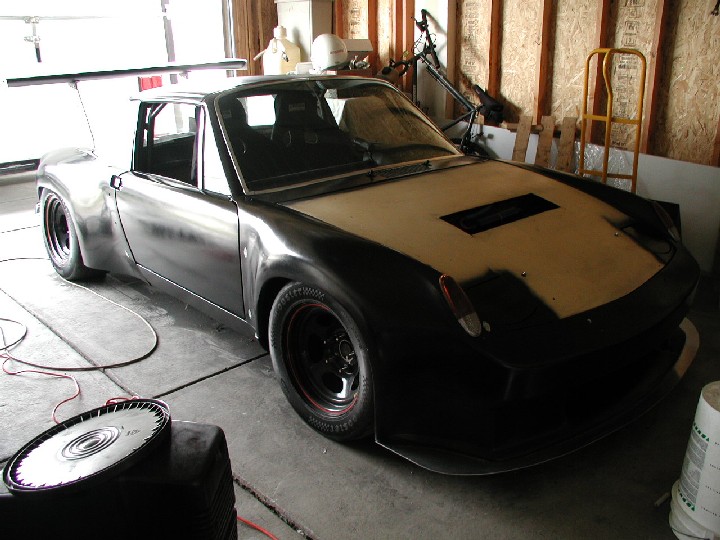
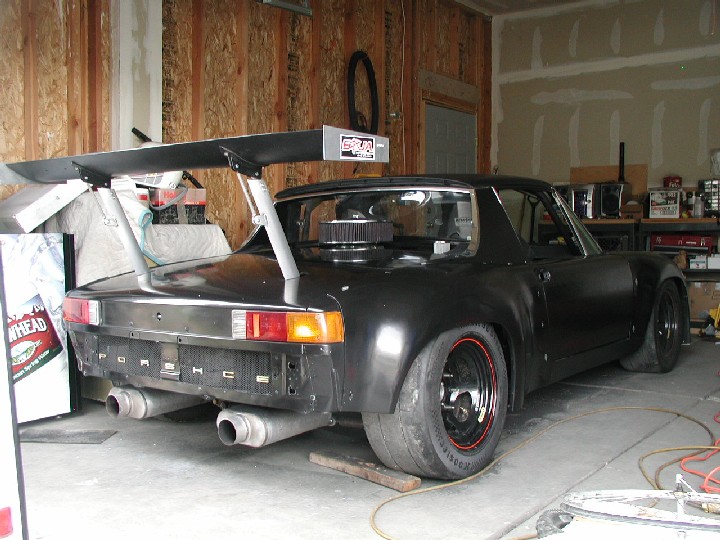

Posted by: byndbad914 Apr 26 2007, 12:56 AM
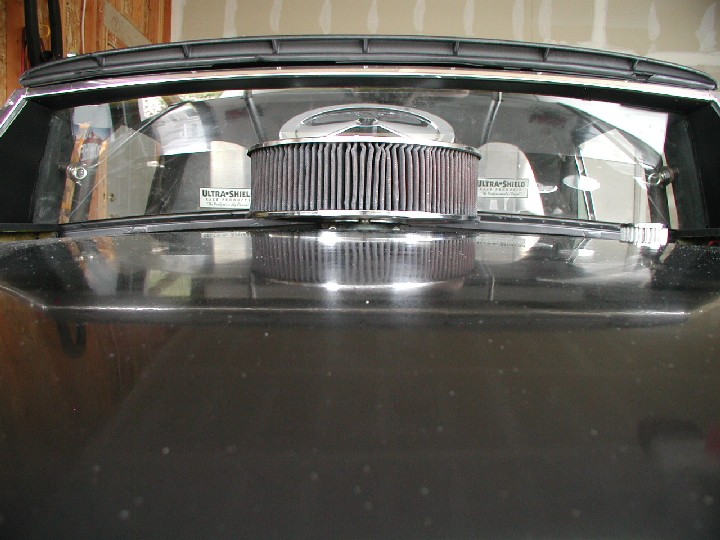
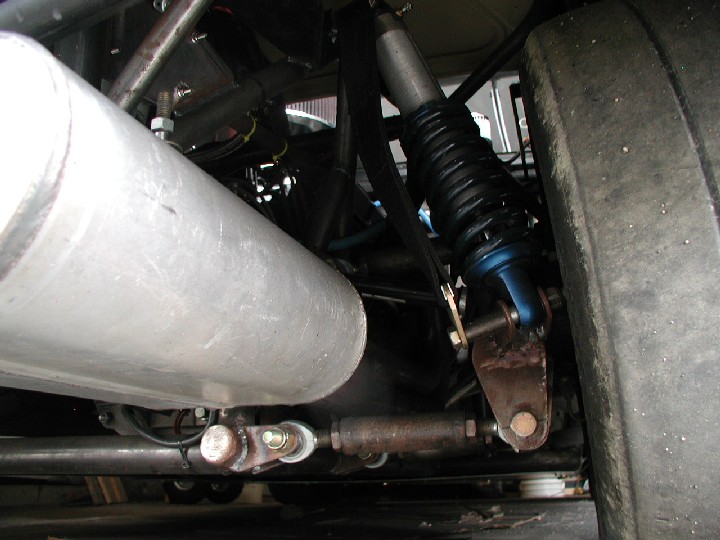
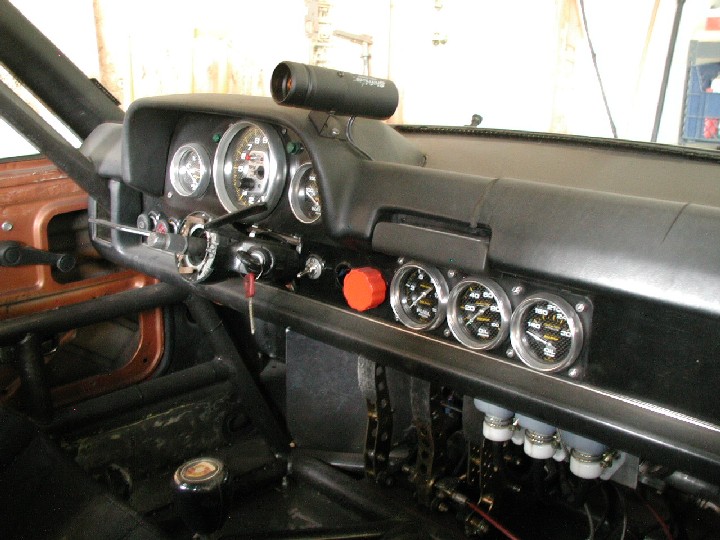
Posted by: Dan (Almaden Valley) Apr 26 2007, 12:59 AM
PORSHCE pronounced Porsh-cee?
Posted by: grantsfo Apr 26 2007, 01:03 AM
PORSHCE pronounced Porsh-cee?
LOL! Thought I was only one to catch that.
Posted by: byndbad914 Apr 26 2007, 01:15 AM
so I guess that "other" thread was right... conversion cars really aren't Porshkuhs, or whatever that name is
Posted by: drive-ability Apr 26 2007, 10:11 PM
so I guess that "other" thread was right... conversion cars really aren't Porshkuhs, or whatever that name is
Hey,
I've noticed if I put a little pressure on the shifter in the direction I'm shifting the transmission jumps out of gear (in a good way) and in to the next much essayer. Say your in first and just about to depress the clutch to go to second, I have found applying a little pressure on the shifter in the out of gear direction will get it to jump out and fall in the next gear much quicker. I don't do it much because I just don't hammer it much at all, well maybe a little. I'm no 930 expert, and thats another reason, because I don't know if that's good for the trans.. It certainly doesn't feel as if its hurting the trans, to tell the truth it feels better as it just seems things are moving quick and smooth with no gear noise or feel at all in the linkage.
Posted by: byndbad914 Apr 26 2007, 10:21 PM
Hey,
I've noticed if I put a little pressure on the shifter in the direction I'm shifting the transmission jumps out of gear (in a good way) and in to the next much essayer. Say your in first and just about to depress the clutch to go to second, I have found applying a little pressure on the shifter in the out of gear direction will get it to jump out and fall in the next gear much quicker. I don't do it much because I just don't hammer it much at all, well maybe a little. I'm no 930 expert, and thats another reason, because I don't know if that's good for the trans.. It certainly doesn't feel as if its hurting the trans, to tell the truth it feels better as it just seems things are moving quick and smooth with no gear noise or feel at all in the linkage.
That isn't just a 930 thing, all sticks will do that.. if you more or less hold rpm constant you should be able to completely pull it out of gear without the clutch at all. That said, that is because of the synchros more than anything and that is rather rough on them. You will wear the synchros out quicker doing what your talking about.
Old trucker thing so to say even without synchros (tho' the gears were cut differently and easier to do this with) but I have driven the 914 home one night when the press plate failed late at night... run the car up thru your first gear, hold rpm constant and you can slip the car out of gear, lower the rpm to whatever it would be in the next gear up (roughly 1500-2000 rpm less) and slip it into the next gear - you never have to use the clutch for anything but take off. I drove almost 30 miles on back roads of Orange County from school in Santa Ana to Lake Forest one night with no clutch.
Learned that trick from my dad back in Iowa - he had this old truck the clutch was messed up in so we would just synchro-shift it. TOB would just howl when you had to take off but the truck was worth less than a new clutch
Posted by: byndbad914 Apr 29 2008, 09:14 PM
Bring out yer dead! (But I'm not dead) He says he's not dead... so forth.
Just had to dig up my old thread to find a picture of my fuel cell since I am ordering some parts... funny as the thread seems dead, but the project insists the spending/updating isn't dead yet so a couple years later I am still iterating this thing. It will never end of course
So thought I would drop some shots after some more work last weekend. I had some threads of changes along the way, but just to tie it all into this one... since the last pics I have
1. added louvers to a different, very light-weighted stock hood and to the roof
2. remounted the wing
3. changed the wheels and tires yet again
4. added the sway bar back into the car with custom steering stops
5. upgraded to a suede wheel and QD for easy ingress/exit
6. shortened the dog house to get more leg room and head room
7. added a wickerbill and larger end plates (can't find a spill plate look that I like with the car, so just went with best aero shape and will leave it at that)
8. gutted the original early doors and need to finish bodywork on the passenger side, driver door is already mounted
9. came up with a paint scheme I intend to rattle can on this summer.
It would be nice if there were more room to put more than one or two images per post... so here comes a few posts.
The paint scheme
Posted by: byndbad914 Apr 29 2008, 09:15 PM
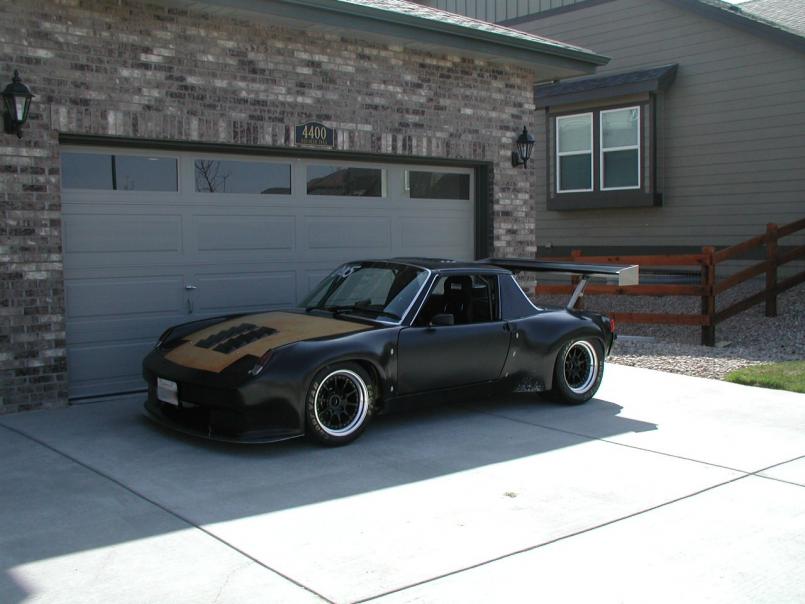
Posted by: byndbad914 Apr 29 2008, 09:16 PM
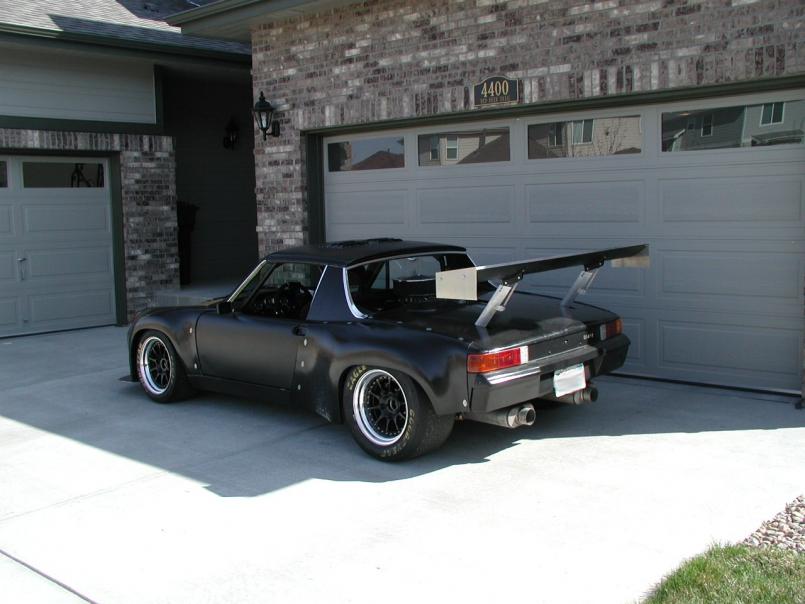
Posted by: byndbad914 Apr 29 2008, 09:16 PM
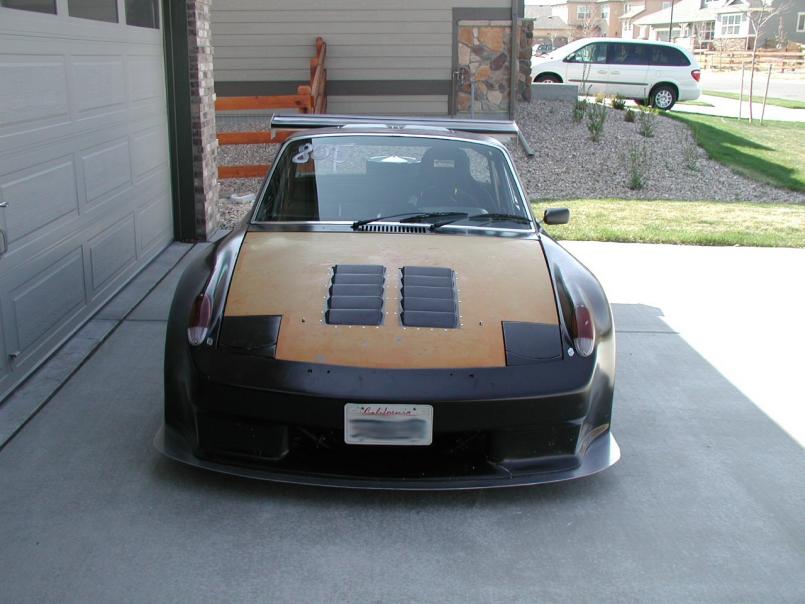
Posted by: byndbad914 Apr 29 2008, 09:17 PM
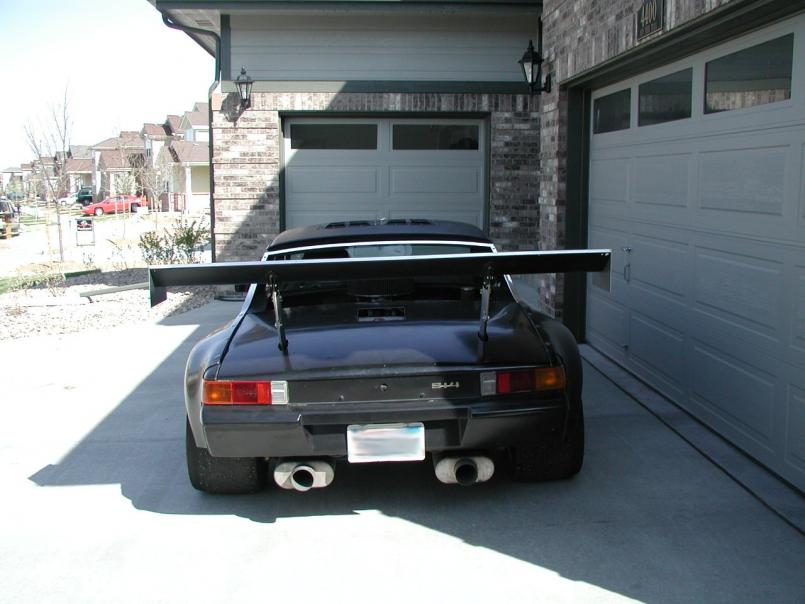
Posted by: byndbad914 Apr 29 2008, 09:20 PM
Took it drag racing a couple weeks ago to opening weekend at Bandimere. Fun shot cuz the car is SO tiny compared to typical vehicles. I am behind the Honda on an uphill slope and the car is still small looking Perty cool IMO.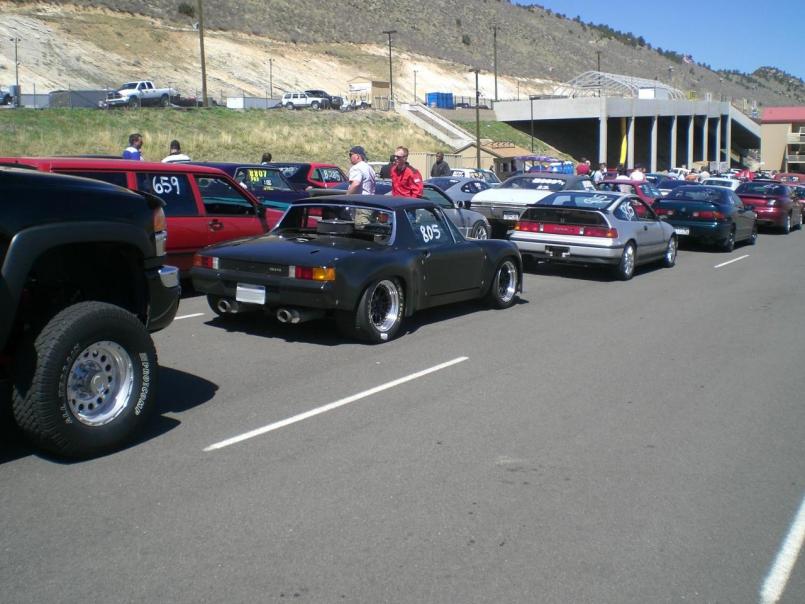
Posted by: byndbad914 Apr 29 2008, 09:22 PM
you can see in the pics above I haven't buffed out the driver's door since I just did it a couple weeks ago. Letting the paint have plenty of time to cure.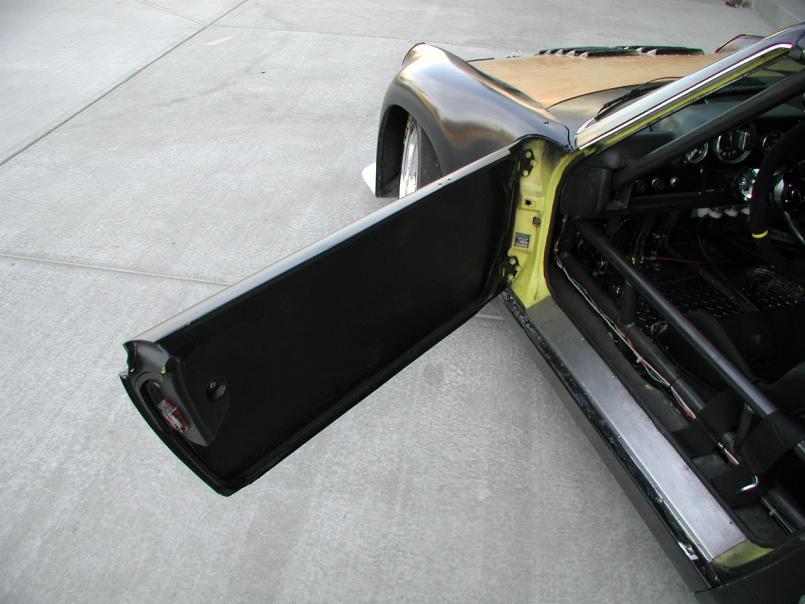
Posted by: byndbad914 Apr 29 2008, 09:24 PM
the wheel and QD setup, diamond plate thin alum floor skin.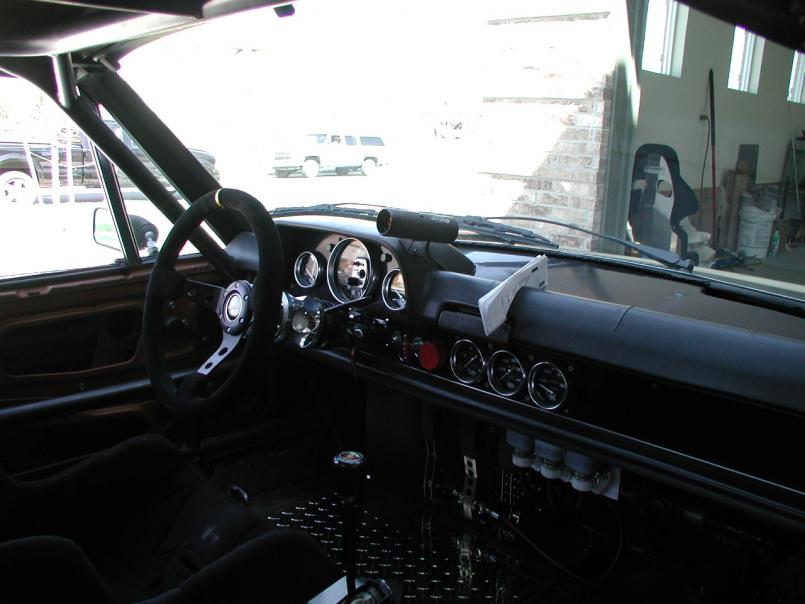
Posted by: byndbad914 Apr 29 2008, 09:25 PM
and a sample of the camo green to black color contrast I expect.
Posted by: LvSteveH Apr 29 2008, 09:36 PM
How did it do in the quarter mile? I'd think it should be capable of high 10's, but that's probably stretching it at your altitude.
Posted by: byndbad914 Apr 29 2008, 10:19 PM
wow, good call Steve.
It was horrible times due to numerous things, like no weight transfer and lack of traction period, but I ran a 12.88 at 113mph, 13.4 at 113mph , and a 12.90 a 114.7 mph which was the run the clutch smell became very obvious
An AWD 997TT ran right behind me - 11.97 at 113mph! And that time really matches the mph, so I think my car is good for 118mph with a new clutch. That would be around 11.6 equivalent at a mile high and 10.8 equiv or so at sea level.
I have suspected my clutch has been slipping for a while now, but that really confirmed it. I think it is because I draw so long on one gear (2nd) from 60mph to 100mph, then third is 100 to 140mph, so the mechanical advantage in the gear isn't there and it must really work the clutch.
So I need to go to a Kevlar disk apparently. Explains the mph drop I have been noticing after the front stretch at Pueblo (the front stretch is a 1/4 mile track BTW and I started out hitting 135mph and have been as low as only hitting 125 or so last track day.
edit - talk about your size comparisons Look how big that turbo is!
Posted by: Andyrew Apr 29 2008, 10:54 PM
That is extremely suprizing, I would expect your MPH to be much faster!
Posted by: byndbad914 Apr 29 2008, 11:43 PM
keep in mind this is at a mile high, not sea level. I hit the scale on the way back after the first run and was 2800lbs exactly with me in the car, and probably 420 peak HP at this altitude and the fact the car is not light by 914 standards all add up.
Take the car to sea level and the peak 525HP comes back and the mph would match something in the 120s for sure.
So, running an 11.97 at 2800lbs equates to 323 whp. But keep in mind, I make more peak whp and that is where people make mistakes in their calcs - they put the peak whp they measured at a chassis dyno in the calc and think they will go 130mph.
The calc is AVERAGE whp during the run, and I can believe over the quarter my average HP at altitude is roughly 323. Really after thinking about it I expect the car to run more like 116mph based on a bunch of math assumptions of course which would be 340 whp average.
assuming 20% increase to sea level of 408 whp average, then I would run 124mph around 11.07 if the car hooked, etc. Now, go back to the original tub setup, no cage etc and it was 2305lbs + 205-ish for me clothed and jacketed and the ET drops to 10.38! But that is a VERY UNSAFE car so I carry ~300lbs of "save my ass" with the new tube chassis car.
Posted by: Sleepin Apr 29 2008, 11:58 PM
That's insane! I wanna ride! That is faster than my Blown '72 Nova ran at our altitude! Sounds like a fun one! ..and a little
Posted by: So.Cal.914 Apr 30 2008, 12:33 AM
talk about your size comparisons Look how big that turbo is!
Compaired to your car it looks like the turbo should have dolphins leaping in front of its Bow.
I had followed your build with great anticipation. Nice to see her get the final
touches. When I did that work for you on the paint I am ashamed to say I did not
realize it was the same car. What can I say...All the good stuff is hidden under
sheet metal and composite's.
Posted by: byndbad914 Apr 30 2008, 01:57 AM
hahaha, yep Paul, that was the intent actually. I wanted to look like a simple 914 with a body kit and bolt-ons. It is fun to see folks walk up, realize it has a Chevy and start making comments... then they stutter and the eyes widen when they look passed that and realize the whole car is a tube chassis with a skin of a 914. I get a lot of comments on having kept the stock dash and steering column for instance because it makes it easy to overlook the fact the floor of the car isn't really much of a floor I intended to run stock doors with door panels to keep the eyes away from the tube floor, but it just isn't worth the extra weight in the long run.
If you know much about G-machines or the coolest Camaro ever, Gottlieb's Big Red Camaro, I fell in love with that car as a senior in HS and always wanted to build a tube chassis, big HP road race car that really doesn't look like much more than a modded stocker at first. Big Red started a whole phenomenon single handedly.
http://www.hotrod.com/featuredvehicles/113_0504_1969_chevrolet_camaro/index.html
Funny, not sure if I ever really mentioned the inspiration for my car... funnier that it was a Camaro and not some sort of Euro race car.
Sleepin' - post a pic of the Nova if you have it! I love those early 70s Novas. You're right about the altitude and what it takes to run well. My friend had a twin turbo (junkyard turbos of old Tbirds) 377 stroked Windsor I build in his 91 Mustang LX that would run high 11s and at that time (mid 90s) that was a fast ass car at Bandimere that he drove to and from the track in. Now with the turbo technology and all the AWD cars these days, it was amazing what some cars would run. Then you would see a hopped up muscle car on slicks run in the 12s at best.
Posted by: Sleepin Apr 30 2008, 02:25 AM
Wasn't much to look at in primer. The engine was a perfectly setup from (what I gather) an "old school" builder 355 and fun as hell in it's own right. I put the mini blower and had the heads redone with 2.02/1.60's...with the flat top pistons it became pretty fun to drive, but almost worthless for any tires I could fit under it. I just did not want to be the one to  the trunk on such a solid car. I sold it in November (to buy the 75 914) to a friend of a friend in South Dakota and I hear it is hitting low 11's at that altitude.
I miss it, but not as much as I miss being able to run on the interstate at 85mph and still getting 20++ mpg (4:11's suck on the Interstate), and being able to go around corners. 

Posted by: byndbad914 Apr 30 2008, 02:38 AM
primer is clearly fine by my standards
My 70 Mustang fastback I sold to pay for college (the better investment but I MISS that car on a regular basis) had a 302 I built up that would run 13.70s spinning most of the track on BFGs at 104mph hahahaha. Same story too... drive it home screaming along at 65mph with 4.11s! And handling in that car was whether you could stomach a 4 wheel drift thru a bend in the road.
But man oh man the memories with that car. I don't have any pix scanned to post but it was orange with black trim and big arse tires (265/50/15s on the front with rolled fenders and they still rubbed) and 295/50/15s stuck on the rear with air shocks to get a little extra clearance Old school deep dish slot wheels I bought for $200 out of the Recycler and so forth - good times.
Posted by: Sleepin Apr 30 2008, 02:49 AM
Yeah, I drove it from Brighton to Grand Junction with 4:11's! . . .5 1/2 hrs.... slowly! Gotta Love the rumble of a nice V8 too!
I think at this point I am leaning towards the WRX engine in my 1.8. I miss playing with turbo's
I bet you kick yourself for selling that '70 302! I have a few cars that I lie awake at night and wonder what happened to them....and what I was thinking when selling them.
I will have to swing up to Bandi one of these days you are going to be up there! I'd love to see it in person!
Posted by: byndbad914 Apr 30 2008, 03:05 AM
I miss the car, but don't kick myself for getting my BSME with the money. That said, I will own a 70 fastback again someday. At some point I will certainly sell this car an move on (I always do).
Why not go with the bigger scooby 4? I think I have heard of those 2.5L with a bit of extra boost clearing 300HP. Or, cooler, would be to put the boxer 6 in the car and single turbo that up to around 400HP.
I like those scooby conversions - it is a "natural" progression to more modern boxer technology IMO. When the Baja Shop was doing my car I noticed nearly every new sand rail they built was a turbo'd Suby, not a VW.
But the rumble of the V8 can't be beat. At altitude tho' I am already starting to think single turbo on my car and broader lobe center cam. Won't happen but fun to talk about nonetheless.
I will post if I am heading out to Bandimere again in the future if I get notice... the Volvo wagon next to me in line is my buddy and he basically told me on Wed of that week he might go to Bandimere on Sat, then after the car wasn't together in time ended up texting me at 2AM Sunday morning to confirm we would leave for the track at 8AM so that is the notice I am used to having to work with hahahaha.
Posted by: Sleepin Apr 30 2008, 03:11 AM
Oh believe me, I have thought about the bigger motors! (I would like to have seen my Nova engine in a 914!) I think the most economical rout would have to be the 2.5 out of a Forester or Legacy. Fine to have stock for a year, save up some cash...then get the turbo. ahh one of these days
Posted by: turbo914v8 Apr 30 2008, 09:18 PM
I simply love looking at your 914. Thanks for posting more great pic's
Posted by: Gint Apr 30 2008, 10:02 PM
The Camaro kid across the street and his Firebird buddy came home a couple of weeks ago from Bandimere telling me of the "car like yours with a V8." I'm guessing that was you Tim.
Posted by: byndbad914 Apr 30 2008, 11:43 PM
The Camaro kid across the street and his Firebird buddy came home a couple of weeks ago from Bandimere telling me of the "car like yours with a V8." I'm guessing that was you Tim.
how funny. I am guessing had to be as I was the only 914 out there
turbo - I am finally getting to where I like how it looks too. The pic at the top of the page I think is a great angle and with the flares it looks pretty slick. I need to figure out a way to get air in the car efficiently without having that monster air cleaner screwing up the lines of the car...
Posted by: erwan914 Dec 14 2017, 02:47 AM
hello
what is the model of seats
Erwan
Posted by: Porcharu Dec 16 2017, 06:49 PM
I miss the car, but don't kick myself for getting my BSME with the money. That said, I will own a 70 fastback again someday. At some point I will certainly sell this car an move on (I always do).
Why not go with the bigger scooby 4? I think I have heard of those 2.5L with a bit of extra boost clearing 300HP. Or, cooler, would be to put the boxer 6 in the car and single turbo that up to around 400HP.
I like those scooby conversions - it is a "natural" progression to more modern boxer technology IMO. When the Baja Shop was doing my car I noticed nearly every new sand rail they built was a turbo'd Suby, not a VW.
But the rumble of the V8 can't be beat. At altitude tho' I am already starting to think single turbo on my car
and broader lobe center cam. Won't happen but fun to talk about nonetheless.I will post if I am heading out to Bandimere again in the future if I get notice... the Volvo wagon next to me in line is my buddy and he basically told me on Wed of that week he might go to Bandimere on Sat, then after the car wasn't together in time ended up texting me at 2AM Sunday morning to confirm we would leave for the track at 8AM
so that is the notice I am used to having to work with hahahaha.Thats funny I still have dreams of my 67' fastback weekly. I haven't driving the car in anger since about 92'. I gave the care to my dad for putting me thru college but I get first dibs before he sells it. I hope he is just going to give it back as all it does is take up space in his shop and he is getting old now. I hope I get it along with his FE 427 - that would be a sweet swap as the car is setup for canyon racing with a built 351 and 5 speed. The one time I took it to the strip it ran a fairly pitiful 13:20 and then a 12:80 at I think 118. Totally wrong trans with the close ratio toploader at 2.32 first gear. Probably like a 930 trans.
Powered by Invision Power Board (http://www.invisionboard.com)
© Invision Power Services (http://www.invisionpower.com)