Printable Version of Topic
Click here to view this topic in its original format
914World.com _ 914World Garage _ The tub is home !
Posted by: michel richard Jun 11 2006, 07:09 AM
Got the tub back on Friday, minus hoods. Body shop man apparently worked till 23:00 on Thursday to make sure I would have it for the weekend.
Weather has been awful, and this morning was the first time it stopped raining long enough to pull the car out of the garage.
Attached image(s)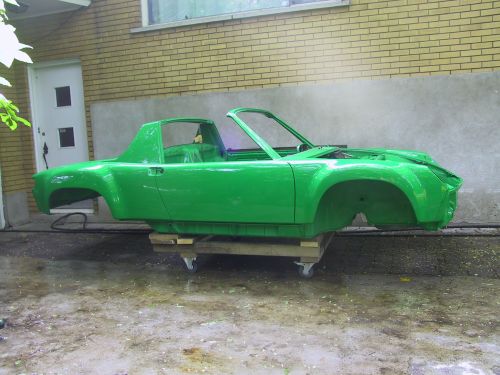
Posted by: michel richard Jun 11 2006, 07:10 AM
Front passenger quarter:
Note that I did have time yesterday (Saturday) to start assembly. I put the wiper motor in and got started on the fresh-air ventilation system.
Attached image(s)
Posted by: michel richard Jun 11 2006, 07:10 AM
Right rear quarter
Attached image(s)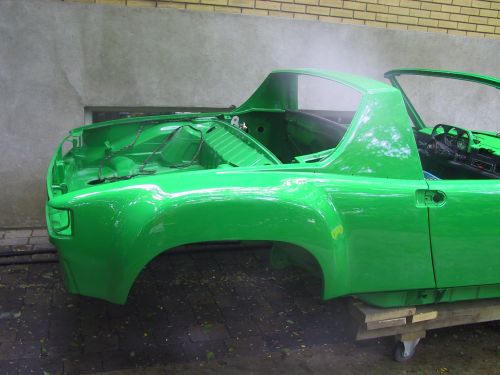
Posted by: michel richard Jun 11 2006, 07:11 AM
Door gaps are better in person than in the pictures.
Overall view:
Attached image(s)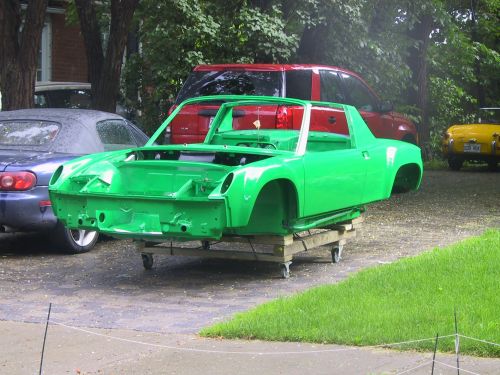
Posted by: michel richard Jun 11 2006, 07:12 AM
Driver side:
Attached image(s)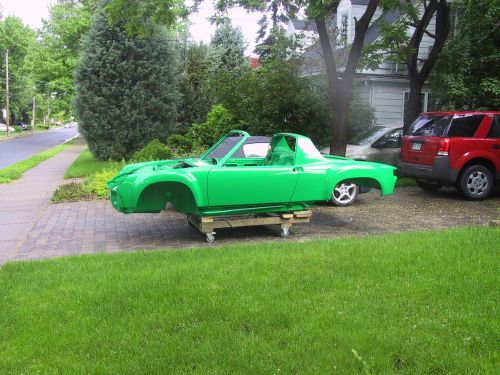
Posted by: michel richard Jun 11 2006, 07:13 AM
Engine bay left
Attached image(s)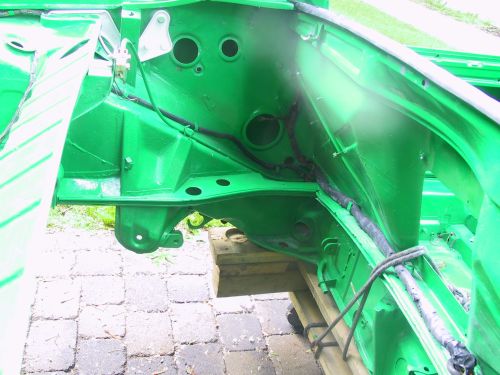
Posted by: michel richard Jun 11 2006, 07:14 AM
engine bay right.
I did weld in some anchor points for the dog-ear reinforcement, as per another thread:
Attached image(s)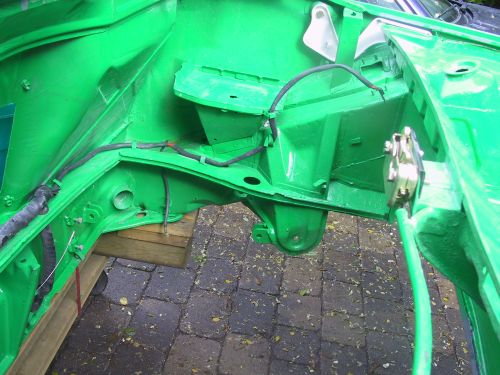
Posted by: michel richard Jun 11 2006, 07:15 AM
And a preview of a future thread: home-made GT-style head light mechanism:
Attached image(s)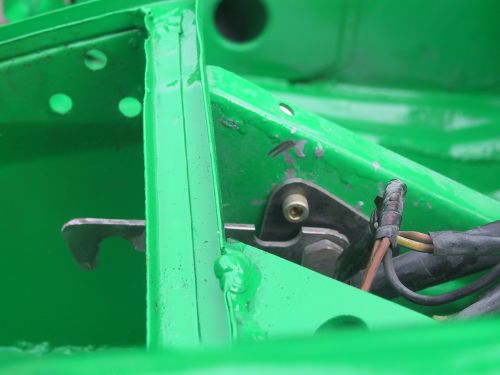
Posted by: boboli914@att.net Jun 11 2006, 07:27 AM
Sweet! I can't wait ot see this one come together. I love that color. 
Posted by: rhodyguy Jun 11 2006, 07:35 AM
beauty, eh?
k
Posted by: rick 918-S Jun 11 2006, 07:37 AM

Posted by: markb Jun 11 2006, 07:45 AM
Nice! 
Posted by: ken914 Jun 11 2006, 07:50 AM
Looking great!
Welcome to the flared 1970 /6 club!
Now about that 2.2, wouldn't you rather have a 3.2 ...
Posted by: So.Cal.914 Jun 11 2006, 07:55 AM
How bad is that . Nice job
Posted by: Porsche Rescue Jun 11 2006, 09:02 AM
Wonder if Jon Lowe is following your effort? Hope he is enjoying as much as I.
Posted by: Headrage Jun 11 2006, 09:45 AM
Really nice!!!
Love the color.
Posted by: swl Jun 11 2006, 09:47 AM
Lookin' good Michel! Keep the assembly reports comming.
Posted by: Mark Henry Jun 11 2006, 09:56 AM

Posted by: Jeroen Jun 11 2006, 10:06 AM
really sweeeeeeet!!! 
looking forward to your GT-headlight post
Posted by: michel richard Jun 11 2006, 10:10 AM

Looking great!
Welcome to the flared 1970 /6 club!
Now about that 2.2, wouldn't you rather have a 3.2 ...
Actually, the engine that is going in is a high compression, twin plug, 8,000 rpm, short stroke 2.5. Built on a late 7R case. 40 mm PMO carbs.
Should make between 225 and 250 hp, and be plenty of fun.
Michel
Posted by: 914-8 Jun 11 2006, 10:11 AM
AWESOME!
That color is the best. I was very close to going Viper Green on mine.
Posted by: Lou W Jun 11 2006, 10:57 AM
Looks fantastic, keep up the good work and keep the pictures coming.
Posted by: michel richard Jun 11 2006, 11:05 AM
Thanks guys.
I will keep updating the thread.
Michel
Posted by: michel richard Jun 11 2006, 01:51 PM
Got most of the fresh air system installed this afternoon. Had to take it apart a couple of times, because I initially put it together wrong. Then I saw there's a couple of drawings near the end in the Haynes that shows the connections.
Does anybody have a real close-up of the vent controls, on the dash, of an early car. I can't seem to get the controls to fit right. There's a gap around the little chrome piece and the basket-weave material.
Michel
Attached image(s)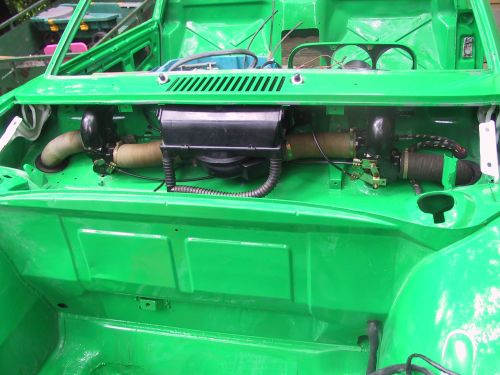
Posted by: michel richard Jun 11 2006, 07:09 PM
like so:
Attached image(s)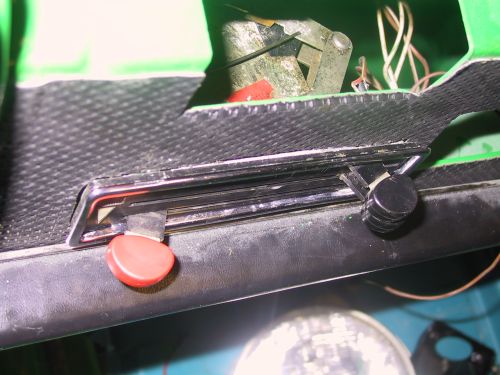
Posted by: cantley914 Jun 11 2006, 07:43 PM
Michel,
I have the 8 volumes factory repair manuals covering both the 914/4 and 914/6
I can look if you want and scan the sheet showing the set-up if you want.
LMK
Steph
Posted by: michel richard Jun 11 2006, 07:56 PM
Michel,
I have the 8 volumes factory repair manuals covering both the 914/4 and 914/6
I can look if you want and scan the sheet showing the set-up if you want.
LMK
Steph
I am sure that would be helpful.
Merci.
Michel
Posted by: sixnotfour Jun 11 2006, 08:19 PM
the dash facia material is glued to sheet metal that goes over the black steel . the chrome piece then snaps over.
since you glued the basket weave to the dash , thats how it will look
Posted by: Krieger914 Jun 11 2006, 09:00 PM
 Absofrickinunbelievablygorgeous. Enjoy it.
Posted by: Dave_Darling Jun 11 2006, 09:58 PM
Michel, check your PM's.
--DD
Posted by: Lawrence Jun 12 2006, 02:45 AM
Damn, that's a great color.
Are those glass or steel flares?
-Rusty 
Posted by: Gint Jun 12 2006, 05:37 AM
Very nice Michel!
Posted by: Quebecer Jun 12 2006, 06:34 AM
Absolutely beautiful !
Is it the car's original color?
If you need an extra set of hands to re-assemble the car, I'd be glad to lend my pair. Let me know...
Dan
Posted by: Travis Neff Jun 12 2006, 10:57 AM
Looks great Michael, that color really screams!
Posted by: michel richard Jun 12 2006, 01:26 PM
Damn, that's a great color.
Are those glass or steel flares?
-Rusty
Aftermarket steel. Butt welded.
Posted by: Brad Roberts Jun 12 2006, 01:33 PM
That GREEN is awesome. Cool project!!
Good job
B
Posted by: Eric_Shea Jun 12 2006, 01:43 PM
Posted by: horizontally-opposed Jun 12 2006, 02:06 PM
Absoloooootely stunning!!!!
Hmmnnn, 15x7s and 9s in RSR finishes, old-school racing tires, GT bumpers with painted silver lower sections, vinyl sails, Euro lenses, black lower rockers etc., GT interior...
Oh wait, it's YOUR car. I can't wait to see what YOU will do with the most amazing blank canvas I've seen in a while.
pete
Posted by: Eric_Shea Jun 12 2006, 02:32 PM
knowing Michel... that's not too far off 
Posted by: michel richard Jun 18 2006, 06:05 PM
Got quite a bit of stuff done over the weekend:
I assembled the brake system, from the fluid reservoir to the hoses at each corner.
Here's the master cylinder. Jon Lowe sold the car to me with factory-bent brake lines, which really makes for a neat look:
Attached image(s)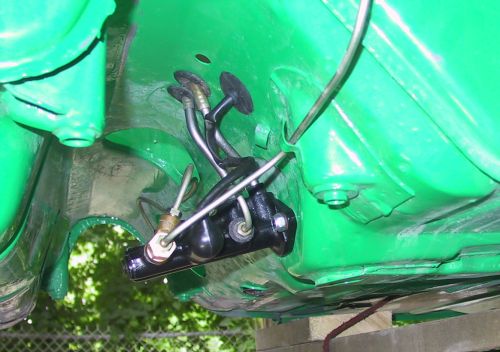
Posted by: michel richard Jun 18 2006, 06:05 PM
and:
Attached image(s)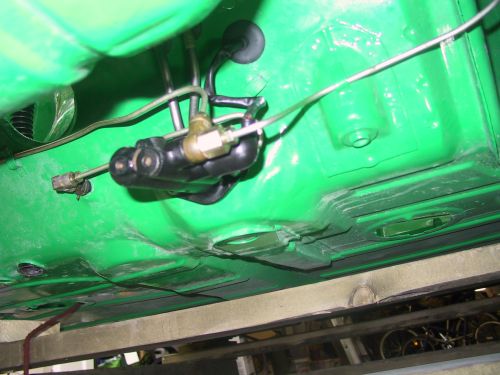
Posted by: michel richard Jun 18 2006, 06:07 PM
I then installed the steering gear. It's now done from the steering wheel to the tie rods. I'm using an alloy crossmember.
Attached image(s)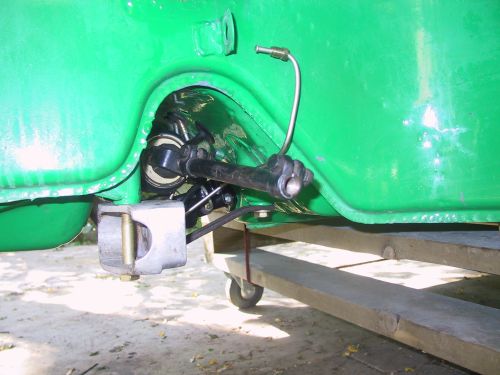
Posted by: michel richard Jun 18 2006, 06:09 PM
and: (Ok, can't see much here)
Attached image(s)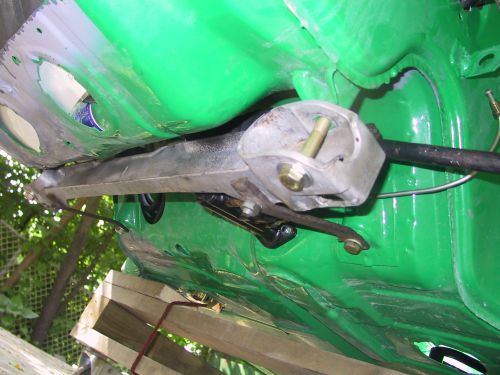
Posted by: michel richard Jun 18 2006, 06:12 PM
From above:
The other thing that I did is install fuel lines. I'm using steel all the way through the cabin. I'll post other pictures later, from within the engine compartment. I'll also be using twin fuel pumps.
In any event, the front looks like this, at this point. Once the sway bar is done, I believe the gas tank will be ready to go in.
Attached image(s)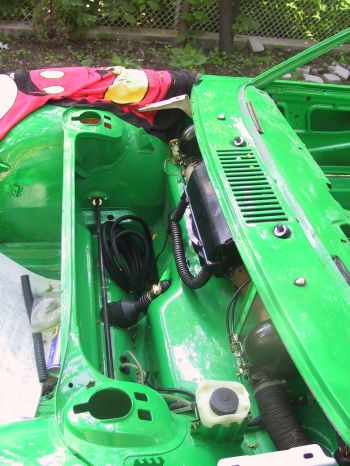
Posted by: michel richard Jun 18 2006, 06:14 PM
Moving on.
The trim around the roll-bar has to be installed before the oil tank, on a /6' because there's one trim nut that sits above the tank. So I got started on said trim.
Driver's side so far:
Attached image(s)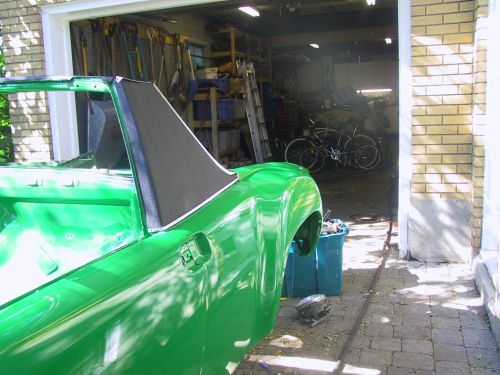
Posted by: michel richard Jun 18 2006, 06:15 PM
And passenger side. There's still some fine-tuning to do.
Attached image(s)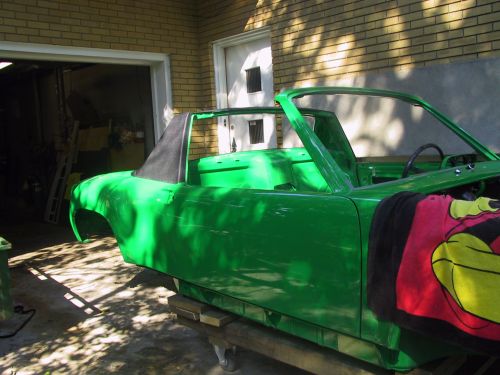
Posted by: michel richard Jun 18 2006, 06:16 PM
I must say, I'm pretty happy with the weekend's progress.
Michel
Posted by: Sparky Jun 18 2006, 10:58 PM
Michel awesome job!! So is that the beaut you will be driving to the Ramble? Hope to see you soon! 
My best,
Mike D.
Posted by: redshift Jun 18 2006, 11:18 PM
wow! Nice!
What color is that, face ripping green? 
M
Posted by: michel richard Jul 21 2006, 06:55 PM
Okay, a lot of progress since the last update.
I lost my camera, and had to buy a new one, hence the silent period.
In any event, the car now sits on its wheels. Most of the suspension and brakes are done. I have to change the ball joint on the passenger side from an early one to a late one, because of the struts I am using. I also need to do a little more work on the rear brake discs.
This is what the rear set-up looks like today.
Attached image(s)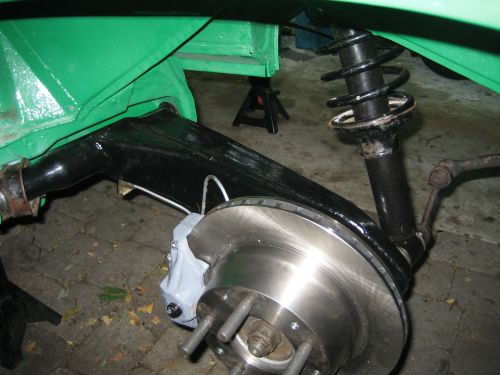
Posted by: michel richard Jul 21 2006, 06:57 PM
That's a 914/6 caliper, with a 911 spacer, and a ventilated rear disk, which results in the 914/6 GT setup.
Posted by: michel richard Jul 21 2006, 06:59 PM
I also did a lot of work on the cabin. Here is what it looks like now. The instruments are not connected yet. I have not decided if I will use the triple gauge or the regular 911 gauge, with a gas gauge in the ashtray spot. I would love that latter.
I decided to go with a fairly complete interior, but I am using a set of lightweight carpets that Jon Lowe included with the sale.
Attached image(s)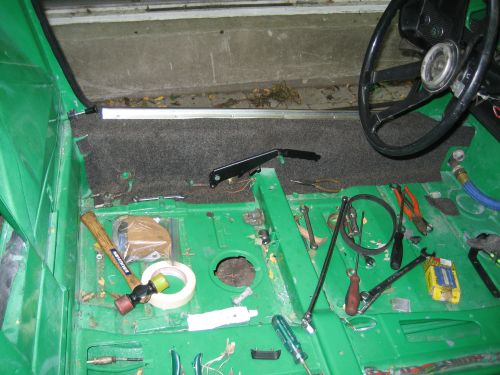
Posted by: michel richard Jul 21 2006, 07:00 PM
More:
Attached image(s)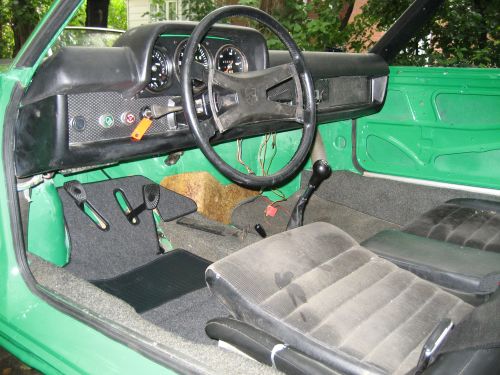
Posted by: michel richard Jul 21 2006, 07:04 PM
The doors obviously need to be done, some carpeting is missing, the seats need work, the glass needs to be installed.
The whole dash, steering column and hand controls, pedal assembly (except the gas pedal itself) are pretty much done.
A lot of work goes into the dash and steering column !
Posted by: michel richard Jul 21 2006, 07:10 PM
forgot to attach the picture
Attached image(s)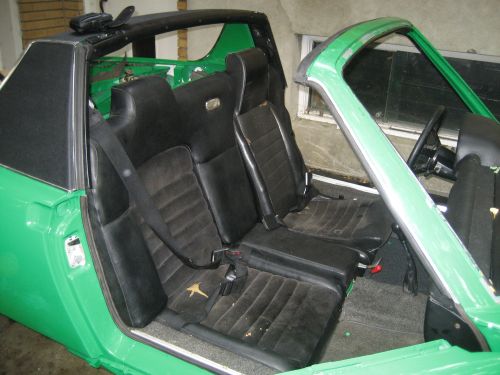
Posted by: michel richard Jul 21 2006, 07:11 PM
The dash:
Attached image(s)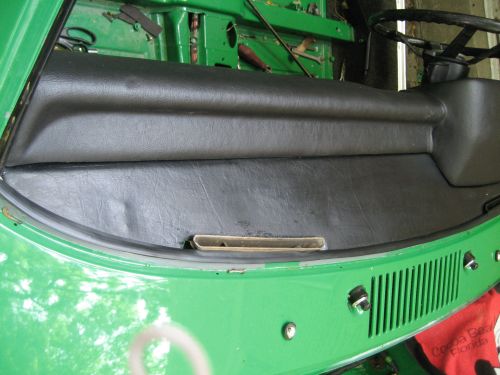
Posted by: michel richard Jul 21 2006, 07:12 PM
again
Attached image(s)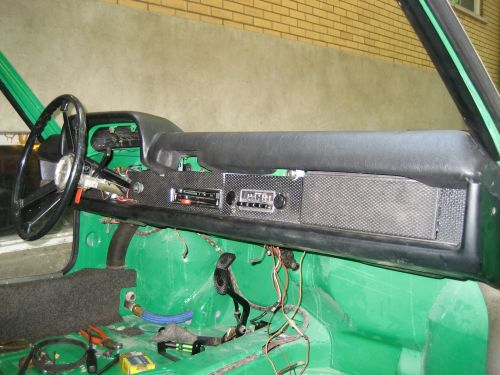
Posted by: michel richard Jul 21 2006, 07:13 PM
OK,
I have first row season tickets to the Montreal Alouettes football stadium. There are some benefits:
Attached image(s)
Posted by: michel richard Jul 21 2006, 07:14 PM
There was a game last night (July 20, 2006)
Attached image(s)
Posted by: michel richard Jul 21 2006, 07:15 PM
Girl in the first picture is Joëlle.
Posted by: Eric_Shea Jul 21 2006, 09:57 PM
Turbo Tie Rods. Paint those front shock towers black. Looks awesome
Posted by: michel richard Jul 23 2006, 03:10 PM
I put the fuel tank in, and ran the oil lines through to the front truink area. The latter was a real pain: the lines are AN-20 (at least I think that's what's they're called, they're 1.25 inch OD). I will need to figure something out to keep them from chafing where they go throught he bulkhead. They are armored, though.
I spent all morning trying to get some 90 degree fittings on the end of the lines, to no avail. I'll need to get new ones, I guess.
Attached image(s)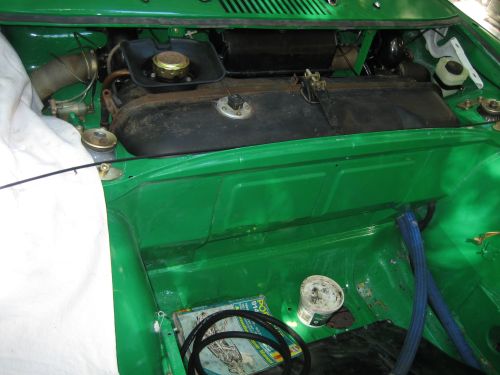
Posted by: michel richard Jul 23 2006, 03:11 PM
I also moved back to the engine compartment, where I began the installation of the twin fuel pumps.
Attached image(s)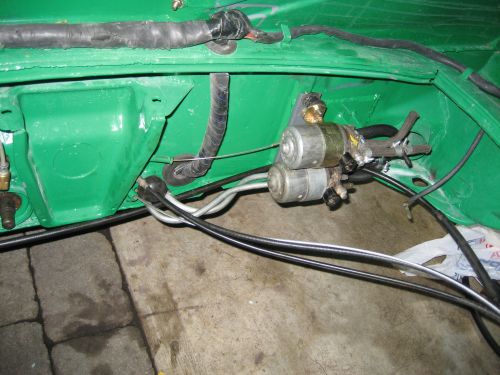
Posted by: swl Jul 24 2006, 07:54 AM
the lines are AN-20 (at least I think that's what's they're called, they're 1.25 inch OD). I will need to figure something out to keep them from chafing where they go throught he bulkhead.
I think I read somewhere that the numbers in the AN system are 1/16ths. So AN20 is 20/16=1.25.
Have you thought about using a piece of small diameter rubber hose for your chaffing guard? Cut the length to the circumference and then split it down the length so you can fit it over the edge of the hole.
Posted by: michel richard Jul 24 2006, 09:30 AM
Steve,
Thanks for the suggestion, but there's no room for a rubber chafing guard. I will need to make a guard out of thin gauge sheet steel. I'm pretty sure I can make everything round and smooth so there won't be a problem. It's just a matter of doing it.
Eric,
I know about the shock towers being black on the /6, but I don't like that look, and I don't think all GT cars were like that. I think I'll stick with what I have there. As for tie rods, maybe later.
Does anybody have a spare thingy that goes at the back of the slot in the doors for the window ? I need the early style.
Michel
Posted by: Eric_Shea Jul 24 2006, 10:35 AM
Michel,
If you're GTing it... why not move the pumps up front? I had serious vapor lock situations with my -6 with a stock 2.0 and the pumps in that location (sort of in that location).
Just a heads up from real world experience.
Posted by: Aaron Cox Jul 24 2006, 10:47 AM
why twin pumps to begin with?
Posted by: mihai914 Jul 24 2006, 12:54 PM
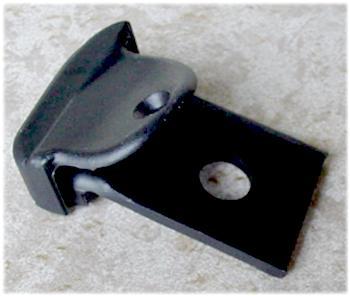
Does anybody have a spare thingy that goes at the back of the slot in the doors for the window ? I need the early style.
Michel
Hi Michel, if you're referring to this part but early style, I have some laying around.
Attached image(s)
Posted by: swl Jul 24 2006, 01:30 PM
I will need to make a guard out of thin gauge sheet steel. I'm pretty sure I can make everything round and smooth so there won't be a problem. It's just a matter of doing it.
That would be more your style anyway. You do great fabrication work.
Posted by: michel richard Jul 24 2006, 01:34 PM
Eric,
I did'nt think that location would cause vaporloc problems. You may get hotter weather than we do. Then again, moving the pumps to the front may be a good idea. I had'nt really considered it, but maybe I should.
Aaron,
Theoretically, because the fuel pump is one of those single components that can immobilize the car. In reality, because I have a few and it's cool. i.e. very favourable cost to coolness ratio.
Mihai.
It is that part, except the early style, you are correct. Can I come to your house to pick one up ? Do you want to come see the project ?
Cheers.
Michel
Posted by: michel richard Jul 24 2006, 01:35 PM
I will need to make a guard out of thin gauge sheet steel. I'm pretty sure I can make everything round and smooth so there won't be a problem. It's just a matter of doing it.
That would be more your style anyway. You do great fabrication work.
Steve, thank you. I don't think my fabrication work is that good, but thanks.
Posted by: mihai914 Jul 24 2006, 08:29 PM
Mihai.
It is that part, except the early style, you are correct. Can I come to your house to pick one up ? Do you want to come see the project ?
Cheers.
Michel
Michel, I'd come down and have a look when you are free. If it's a time sensitive thing you are more than welcome to drop buy after work or something. I'll go find those things right now.
Posted by: michel richard Jul 28 2006, 07:08 PM
Finally got my new engine. Details are here:
http://www.914world.com/bbs2/index.php?showtopic=57462
Posted by: michel richard Jul 30 2006, 06:30 PM
More progress,
Mihai came by and delivered three (!) of the early window guids I was looking for. Have'nt worked on the passenger door yet, but thanks ! Mihai, would you have a spare early handbrake lever ?
Did a lot of work on the front cooler and lines. Went to a hydraulics shop and the gentleman had a bit of time, so we resolved a lot of things. Does'nt quite work yet, but it's getting there.
I did the final securing of the cooler and its shroud, as well as final (or nearly so) intallation of the hard lines under the rockers. Here's the hard oil lines. The finish is POR 15.
Attached image(s)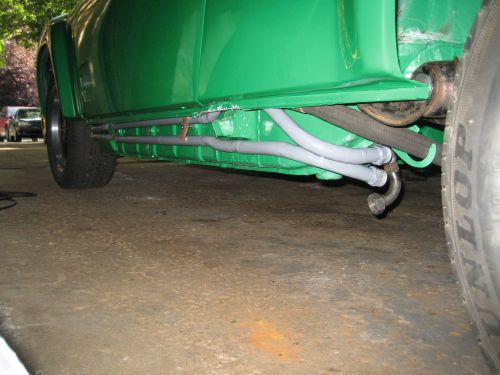
Posted by: michel richard Jul 30 2006, 06:38 PM
And here's how the connection will be made in the footwell. The hose is acutally armored, so I'm not really concerned about getting oil on my legs in an accident. I may still build a shroud over the hose.
Attached image(s)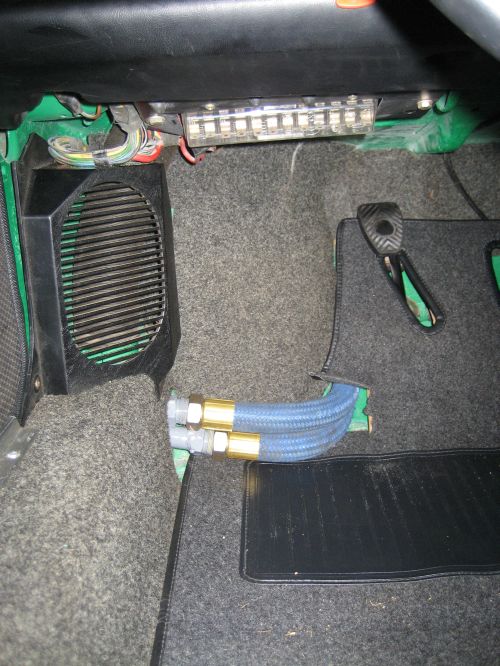
Posted by: michel richard Jul 30 2006, 06:39 PM
Spent the rest of the weekend working on the headlights, and the oil system in the engine compartment. More on that later.,
Michel
Posted by: Brad Roberts Jul 30 2006, 06:48 PM
B
Posted by: Brad Roberts Jul 30 2006, 06:49 PM
That was "speachless"
I love the color. I love the look you are going after!!
Great job.
Wish I was there to help.
B
Posted by: michel richard Jul 30 2006, 06:53 PM
Brad,
It means a lot coming from you.
Michel
Posted by: Brad Roberts Jul 30 2006, 06:59 PM
I recognize quality. I recognize hard work and dedication.
I see all of that + more in your project.
Make sure you take HIGH quality pics of the progress.
They need to be shot in hi-res for magazine use 
Most casual users of this site dont know that we have several magazine guy's here and several 914 specific book writers on the site daily.
Restore/rebuild something nicely and some print work may be in your future if you so choose!
B
Posted by: Eric_Shea Jul 30 2006, 07:01 PM
It was about 75-80 in CO that day and I was scooting along around 100-120mph to the Steamboat parade on I-40. That was with a stock 2.0. The one in the GT I'm building is going up front. Nearly all the originals had them there.
Hey... we have the same engine! Absolutely P-E-R-F-E-C-T GT motor IMHO.
Posted by: michel richard Jul 30 2006, 07:04 PM
I recognize quality. I recognize hard work and dedication.
Make sure you take HIGH quality pics of the progress.
Most casual users of this site dont know that we have several magazine guy's here and several 914 specific book writers on the site daily.
B
Brad,
All the pictures I have posted were shot in hi-resolution, then tuned-down for the site. Plus I have a ton more that were not posted.
I did not know about magazine guys and the site . . . I guess it would be fun to have something published, but the priority is to get the car done.
Michel
Posted by: Brad Roberts Jul 30 2006, 07:08 PM
Stay focused!
Just make sure you keep taking good pics!!
You are doing fine
B
Posted by: michel richard Jul 30 2006, 07:09 PM
It was about 75-80 in CO that day and I was scooting along around 100-120mph to the Steamboat parade on I-40. That was with a stock 2.0. The one in the GT I'm building is going up front. Nearly all the originals had them there.
Hey... we have the same engine! Absolutely P-E-R-F-E-C-T GT motor IMHO.
Eric,
I have not really had vaporloc problems with the stock pump location, but the temperatures you mention certainly occur here. The incident you mention, was that with the stock location, or one closer to what I'm doing ? I guess the main reason I might try to keep the pumps in the back, for now, is that I'm beginning to smell the oats, and I'm anxious to get the project done. Very good feedback, though, thank you.
Is your engine running ?
Posted by: sixnotfour Jul 30 2006, 08:05 PM
It was about 75-80 in CO that day and I was scooting along around 100-120mph to the Steamboat parade on I-40. That was with a stock 2.0. The one in the GT I'm building is going up front. Nearly all the originals had them there.
Hey... we have the same engine! Absolutely P-E-R-F-E-C-T GT motor IMHO.
Eric,
I have not really had vaporloc problems with the stock pump location, but the temperatures you mention certainly occur here. The incident you mention, was that with the stock location, or one closer to what I'm doing ? I guess the main reason I might try to keep the pumps in the back, for now, is that I'm beginning to smell the oats, and I'm anxious to get the project done. Very good feedback, though, thank you.
as long as you dont have the factory heater boxes blasting hot air at the pumps they will be fine, here is some backup:
http://www.pbase.com/9146gt/image/23962455
Posted by: michel richard Jul 30 2006, 08:21 PM
[/quote]as long as you dont have the factory heater boxes blasting hot air at the pumps they will be fine, here is some backup:
http://www.pbase.com/9146gt/image/23962455
[/quote]
Jeff, very good point. Had not thought of that one. Thanks.
Michel
Posted by: Brad Roberts Jul 30 2006, 08:45 PM
BINGO. Same issue in the 4 cyl 914's. Reroute the hot air from the "bell" on the flapper box and the problem goes away.
B
Posted by: mihai914 Jul 31 2006, 07:10 PM
Mihai, would you have a spare early handbrake lever ?
Sorry Michel, none of those, remember you'll be due for inspection some time soon so you'll need a working one.
Can you give me the part # of the headlight surround you're looking for, I have a white one with light overspray on one side that may be usefull to you.
Posted by: Eric_Shea Jul 31 2006, 10:14 PM
Ahhhhhh indeed. That was a bone stock car.
It is now... I dropped it in the 911 to keep it running while I:
a ) finished the 914 tub and/or (take your pick)
b ) finished the 3.0 MFI motor for the 911
I need to borrow a dizzy while mine's being rebuilt. Anybody got an early S-dizzy they want to loan me?

Posted by: sixnotfour Jul 31 2006, 11:35 PM
yup.
Michel,your progress is fantastic
its taken me a year to get this far; put the motor in.
Attached image(s)
Posted by: michel richard Aug 2 2006, 07:57 AM
Thank you.
I posted a question in a separate thread. I'm trying to make sense of some of the wiring on my engine.
http://www.914world.com/bbs2/index.php?showtopic=57772
Eric, an easy question for you: how do you like the 2.5 engine ?
Cheers.
Posted by: Eric_Shea Aug 2 2006, 09:57 AM
I'll let you know when I get a dizzy on it.
Posted by: michel richard Aug 6 2006, 06:35 PM
Target today was to get the engine bolted up to the tub.
Mihai had volunteered his precious help, and he showed up as promised.
Posted by: michel richard Aug 6 2006, 06:35 PM
Oops
Attached image(s)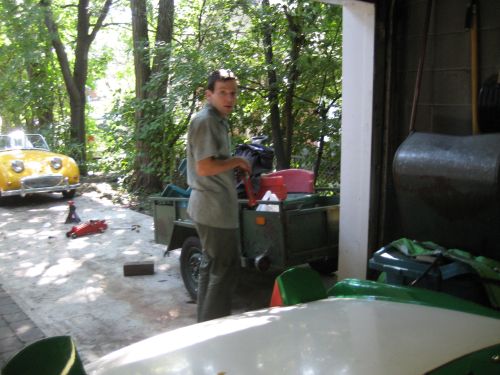
Posted by: michel richard Aug 6 2006, 06:36 PM
Just so that I won't be left out in the cold, Mihai shot a picture of me, fidling with the ignition.
Attached image(s)
Posted by: michel richard Aug 6 2006, 06:38 PM
This is what I was doing: getting the ignition pickup for the Electromotive HPV1 to fit. Things are tight ! and the manual gives some pretty tight tolerances that one has to live with.
Attached image(s)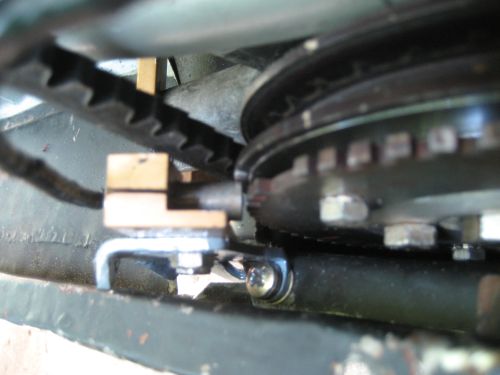
Posted by: michel richard Aug 6 2006, 06:39 PM
Once all the last minute stuff was done, we slipped the engine under the car:
Attached image(s)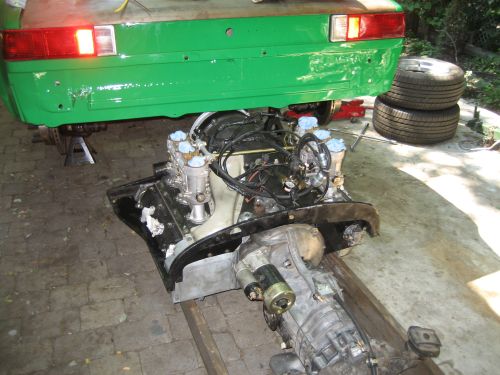
Posted by: michel richard Aug 6 2006, 06:43 PM
And proceeded to bolt it up. We had a bit of trouble bolting the front stock /6 engine mount, but some perseverence paid off. Mihai's help was invaluable.
He took some pictures of my acrobatics.
Attached image(s)
Posted by: michel richard Aug 6 2006, 06:44 PM
But the engine finally assumed the position:
Attached image(s)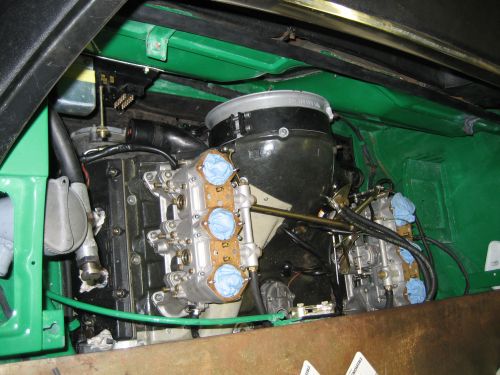
Posted by: michel richard Aug 6 2006, 06:46 PM
We also had an issue in the back, where some of the custom self-built transmission oil cooling stuff fouled the tub. I'll have to figure something out in that regard.
More on that later.
Michel
Posted by: michel richard Aug 8 2006, 06:36 PM
The issue in the back was solved with the creative use of a BFH. (on a part that does'nt show, of course)
Back to the front, I did the final installation of the front cooler, this evening (August 8, 2006)
Here's a shot from above. A number of the fittings were custom made by a local hydraulics shop. Nice silver soldering of certain parts. Expensive, but appears to be worth it.
Attached image(s)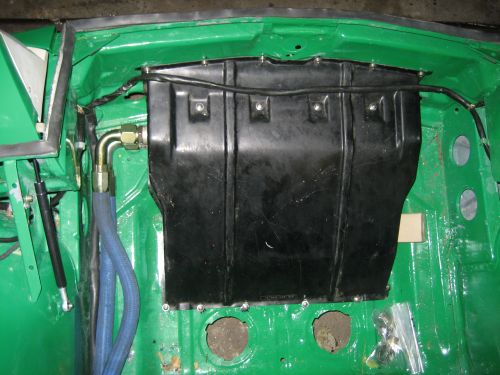
Posted by: michel richard Aug 8 2006, 06:37 PM
And from the front:
Attached image(s)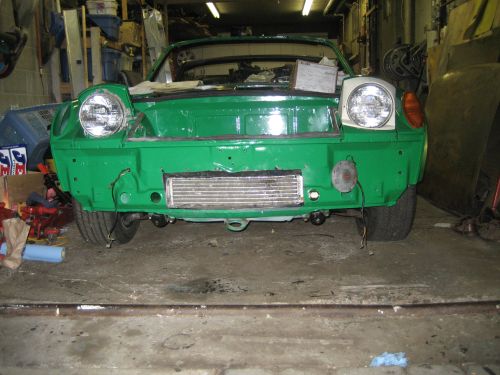
Posted by: boboli914@att.net Aug 9 2006, 03:55 PM
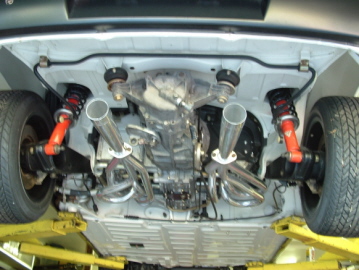
What is this? Some sorta radical air intake? 
Attached image(s)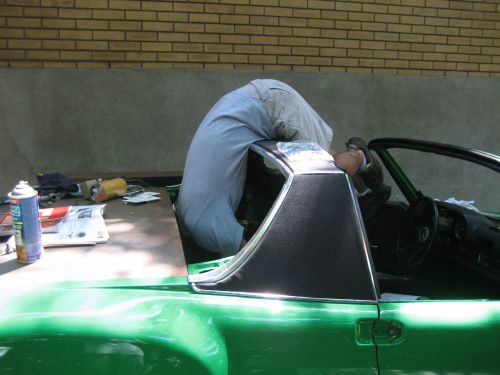
Posted by: swl Aug 9 2006, 06:03 PM
What is this? Some sorta radical air intake?
looks more like air exhaust to me
Posted by: michel richard Aug 9 2006, 07:35 PM

I did have it coming.
Posted by: Sparky Aug 9 2006, 10:44 PM
Offer to let them feel your nuts
The car looks great, I hope to see it (and you) soon!
My best,
Mike D.
Posted by: michel richard Aug 10 2006, 07:55 AM
Trying to make it to the ECR. A lot of things would need to be lined up, but I might be able to start the engine this weekend.
Michel
Posted by: michel richard Aug 12 2006, 04:21 PM
Finally finished all the oil plumbing.
Here is the front trunk:
Attached image(s)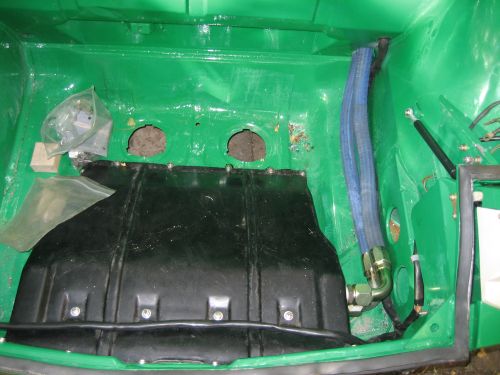
Posted by: michel richard Aug 12 2006, 04:21 PM
The oil lines come out in the driver footwell:
Attached image(s)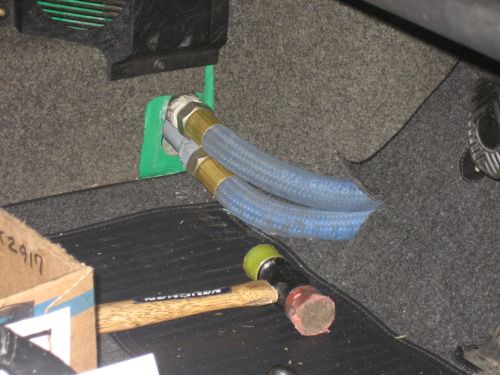
Posted by: michel richard Aug 12 2006, 04:23 PM
Across the left side longitudinal, and down the side of the car. I'll have to make a block-off plate to minimize water ingress where the hard lines go through the long.:
:
Attached image(s)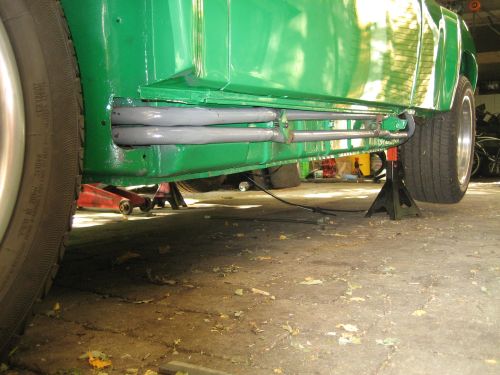
Posted by: michel richard Aug 12 2006, 04:24 PM
The hard lines tuck under the longitudinal, at the back, and connect to hoses. The hose with the cloth covering is the feed from the oil tank to the engine mounted oil cooler.
Attached image(s)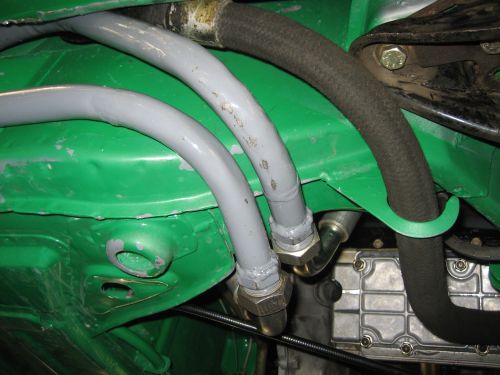
Posted by: michel richard Aug 12 2006, 04:26 PM
Once inboard of the longitudinal, the hoses go up throught the engine shelf.
Attached image(s)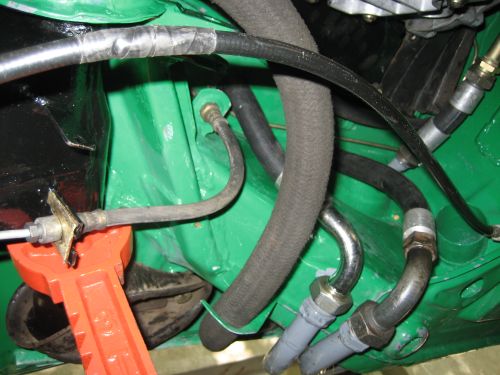
Posted by: michel richard Aug 12 2006, 04:27 PM
And reach the thermostat and oil console.
Attached image(s)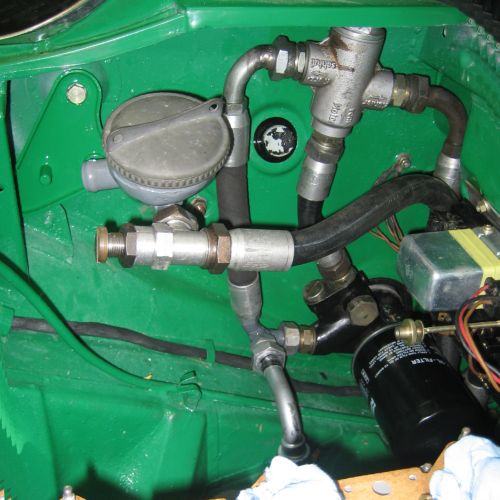
Posted by: michel richard Aug 12 2006, 04:30 PM
There's a lot of details that needed attention, and the whole thing turned out to be more involved and more complicated to execute than I had anticipated. Luckily there's a good hydraulics supply shop not too far from my house, and they were willing to work with me. They ended machining several custom fittings (ouch). I just hope nothing leaks !
I'll work on the ignition tomorrow, and on the oil system for the tranny.
Right now, it's beer time.
Posted by: michel richard Aug 13 2006, 04:29 PM
Got a lot of work done on the Electromotive HPV ignition system, today.
Did most of the wiring upstream of the coils. The manual says to use a high quality relay to switch the power to the ignition. I hacked a spare 914 wiring harness and used a base for the ubiquitous (nice word, eh?) round relays that we have, plus one of those relays, of course. I assumed the current rating was high enough.
It's pretty tight, but it looks like it all fits.
I have not finished the high voltage portion of the system: I have yet to connect the spark plug connectors to the high voltage wires. In any event, I think I'll eventually get pre-made MSD wires.
So, here is what it looks like:
Attached image(s)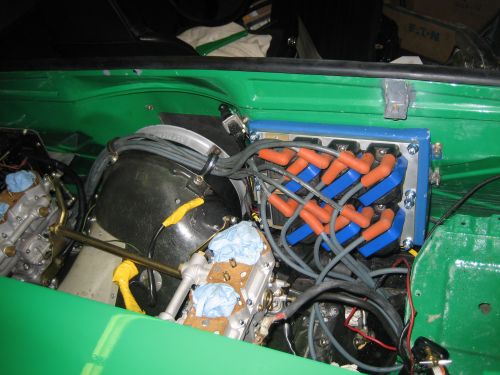
Posted by: So.Cal.914 Aug 13 2006, 05:48 PM
What is this? Some sorta radical air intake?
Cup holder.
Posted by: michel richard Aug 13 2006, 06:41 PM
Went back out after dinner. Got the rear brakes finalized and adjusted the clearance. I now have a parking brake !
All that's left to do on the brakes is to fill and bleed the system. I feel like I'm getting close to a first ride.
Posted by: michel richard Aug 17 2006, 06:27 PM
Got a couple of hours of work in, this evening.
I almost finished plumbing the tranny oil circulation stuff. This is how it looks like now. I decided I would forego the tranny oil cooler at this stage, because I want to "get her done".
Attached image(s)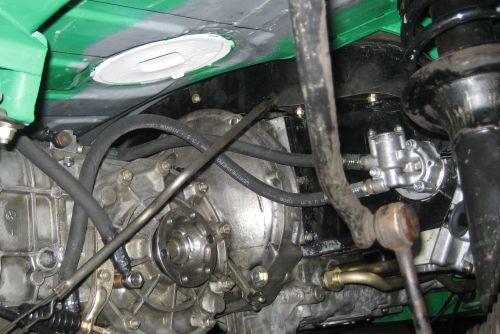
Posted by: michel richard Aug 17 2006, 06:28 PM
I also did more work on plumbing the twin fuel pumps, but I ran out of hose clamps so I had to stop.
Attached image(s)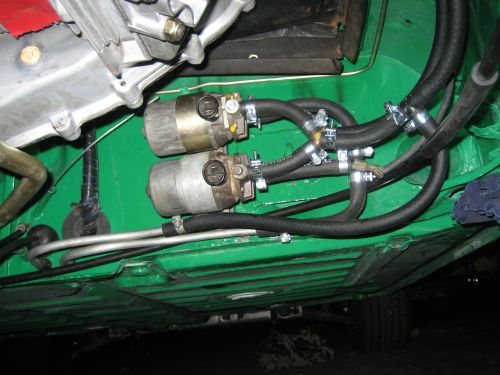
Posted by: michel richard Aug 26 2006, 05:30 PM
I spent the day doing a lot of little things in preparation for engine start-up. I still don't have functional ignition wires.
1) I wired the twin fuel pumps.
2) I finished the fuel system, installing the fuel pressure regulator and gauge that PMO sells. It's not GT looking, but it's pretty effective. Longer term, I would like to go back to MFI (I still have my full system, from the 2.2 E).
3) I bolted the exhaust system on. I did weld a 18 x 1.5 mm nut to each heat exchanger, so that I will be able to use the Innovate O2 sensing system to help in tuning. I believe that the stock system will be plenty big for the 2.5 engine, espelcially since this is primarily a street car.
4) I installed the shift linkage.
The heat exchangers take up a lot more room than headers do, and things are now pretty tight under the engine.
Here's the modification to the heat-exchangers (ok, the welding is a little chunky):
Attached image(s)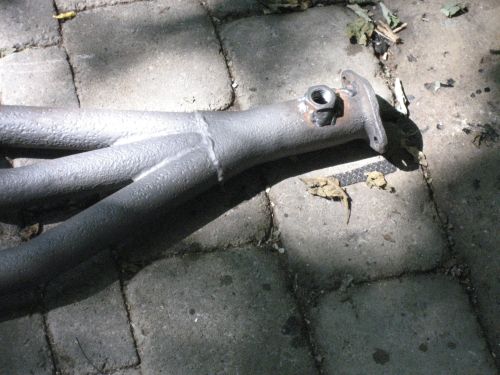
Posted by: michel richard Aug 26 2006, 05:34 PM
And the fuel pressure regulator. It is bolted to the support for the engine compartment cover. The battery tray is just to the left of it, in the picture.
Tomorrow, the plan is to install a battery, do a smoke test (i.e. no major short circuits), crank the engine over to get fuel and oil pressure, test for spark, then turn everything off. Can't wait for those ignition wires !
Michel
Attached image(s)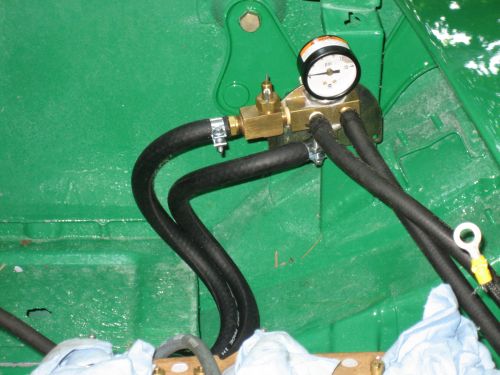
Posted by: JPB Aug 26 2006, 05:48 PM
Hei Micheal, on vas t'apeller Rocket Richard avec s'ta wogaine las!!!
 From one Quebequer to another ans. J'vien d'Levis stie.
Posted by: mihai914 Aug 26 2006, 07:01 PM
J'vien d'Levis stie.
That explains lots of things
Posted by: michel richard Aug 26 2006, 07:09 PM
Mihai,
I got the stuff needed to install the windshield. You busy tomorrow ?
Michel
Posted by: JPB Aug 26 2006, 07:29 PM
Une petite froide soulage toute les problemes de la vie. I can't spell worth the schmit.LOL I do have a little Jesus Juice but it's vin rouge. Won't add weight to my already heavy car.LOL
Laurentide, c'est toujour bon!
Posted by: si2t3m Aug 27 2006, 10:52 AM
I'm turn my head for a couple of minutes (ok years!) and what's this!!!
Wow Michel !!!
Can't wait to see it !!!
Shoot me a call if you need help (but looks like you can do pretty good on your own!)
Hey JPB, j'suis de l'autre côté du St-Laurent. PM moi.
Posted by: mihai914 Aug 27 2006, 03:36 PM
An update on Michel's project, today the rear glass and windshield were put in. The rear window went fine. The windshield was a bit messier to put in. Michel will have to do some urethane cleaning, the good news is that there will surely be no leaks.
Marc-André, it's good to hear from you, I hope you still have your blue beauty, you should see Michel's car in person, the flares are nice, hint, hint
Posted by: JPB Aug 27 2006, 04:34 PM
Hell ya brothers!! If I go to visit my dad in Levis, we need to get together for some Laurentide!!!
Dans la belle Province estifi!!
Posted by: cantley914 Aug 28 2006, 05:40 PM
Hell ya brothers!! If I go to visit my dad in Levis, we need to get together for some Laurentide!!!
Dans la belle Province estifi!!JP make sure you drop me an e-mail when you cross the border.
I`m in for a cold one.(or two).
Steph
Posted by: michel richard Aug 28 2006, 06:41 PM
Short update.
I did some cleaning-up of the goop around the windshield, and am now pretty sure it will come out ok. It is a bit more work than expected, though.
Marc-André, nice to hear from you. Stop by to see the project the next time you're in town.
Michel
p.s. anybody who's on the board is welcome to stop by.
Posted by: JPB Aug 31 2006, 03:54 PM
Hell ya brothers!! If I go to visit my dad in Levis, we need to get together for some Laurentide!!!
Dans la belle Province estifi!!JP make sure you drop me an e-mail when you cross the border.
I`m in for a cold one.(or two).
Steph
Ah oui Steph, absolument! All the chick stuff has been deleted.LOL
Posted by: michel richard Sep 4 2006, 11:23 AM
The engine has started !
That's the good news. Saturday in the afternoon, after connecting the ignition wires, and spending quite a bit of time figuring out why I was'nt getting fuel at the carbs (I had inverted the feed tube and the return tube upstream of the fuel pump) it started on the first pull. Woohooo !
Bad news is that I'm getting a pretty massive oil leak in one of the external oil lines. It's one that I made myself, and it looks like I did not get enough penetration on some of the welds. Oh well. I now have the line out of the car, and I'll take it to my friendly hydraulics shop to have another one made, but by a real welder.
So, the engine has run maybe a minute so far. Still, it's quite a step.
I have yet to install the halfshafts, and that has been today's project. Here's the two of them, all apart.
Attached image(s)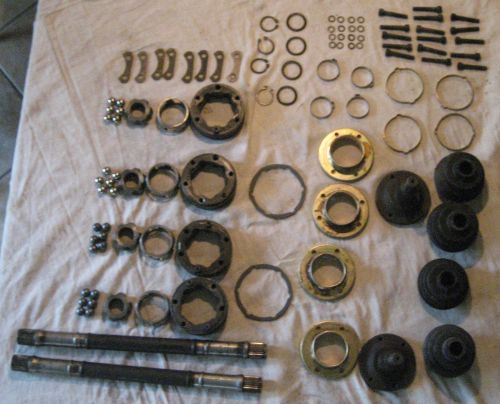
Posted by: michel richard Sep 4 2006, 11:30 AM
One of the original /6 CV joints is bad, with significant grooving of the outer race, if that's the word. So I will use an early 911 CV joint instead. The differences are simply the abscense of a shallow groove on the outside of the outer race, in which the gasket rests and the lack of the drive pins.
I figured that I could drill a the holes for the pins with a letter "W" bit, but I wore out the only one that I have before even finishing the first hole. Those races certainly are hard steel. I'll need to get a cobalt bit to finish.
As for the gasket, it'll simply be a matter of having to endure a little bit more hastle when assembling.
Otherwise, life is good. My stepdaughter is in the hospital delivering a boy, as I type this. Can't wait to get the call to go see it. (gives new meaning to "labor day" !)
Posted by: JPB Sep 4 2006, 01:30 PM
Nice work bro and gald to hear the good news about the little one on the way. Sounds like you are almost there and gonna be ready to burn some rubber!!!!
Ca y vas a planche!!!
Posted by: michel richard Sep 4 2006, 04:43 PM
Healthy, normal, 7.5 pound baby boy, at 15h30 this afternoon. Mom is well.
Life is good.
Posted by: mikelsr Sep 4 2006, 05:06 PM
Healthy, normal, 7.5 pound baby boy, at 15h30 this afternoon. Mom is well.
Life is good.
Congrats on the baby boy!
Also before anyone else says it:
 We have to see pictures of your son!
and tell your son

I hope your wife recovers very quickly.
Mike
Posted by: michel richard Sep 4 2006, 05:50 PM
Healthy, normal, 7.5 pound baby boy, at 15h30 this afternoon. Mom is well.
Life is good.
Congrats on the baby boy!
Also before anyone else says it:
We have to see pictures of your son!and tell your son
I hope your wife recovers very quickly.
Mike
Mike,
Thanks, but he's my grandson !
Pics will come.
Michel
Posted by: mikelsr Sep 4 2006, 06:07 PM
Mike,
Thanks, but he's my grandson !
Pics will come.
Michel
Sorry about that. Tell your Grandson (someday we will have one - we hope) Happy Birthday!
Mike
Posted by: michel richard Sep 4 2006, 06:12 PM
Tell your Grandson (someday we will have one - we hope) Happy Birthday!
Mike
I will.
Michel
Posted by: Jeroen Sep 4 2006, 07:42 PM
Congrats grandpa!!!
Posted by: michel richard Nov 28 2006, 01:36 PM
The story continues on a separate thread:
http://www.914world.com/bbs2/index.php?showtopic=61313&st=0&gopid=782158&#entry782158
Michel
Posted by: sixaddict Mar 28 2010, 08:42 AM
Michel
Your car is fantastic and if i wasn't loaded with green monsters i would be calling>
I have conversion with oil lines in cockpit like yours....any pics of shrouding to keep them concealed......need to do that as basically a street car.
Thanks
Terry
Powered by Invision Power Board (http://www.invisionboard.com)
© Invision Power Services (http://www.invisionpower.com)