Printable Version of Topic
Click here to view this topic in its original format
914World.com _ 914World Garage _ My SDS install
Posted by: ottox914 Jun 12 2006, 06:58 AM
I've taken the plunge, sent $$$ to Mark, and ordered SDS for my 914. I expect with mail delays to the great white north, for delivery to be 3-4 weeks out, but thats O.K. I'll be updating this thread with photos and comentary about the install. Here's the starters-
Motor is a mostly stock 2.0, euro pistons and cyls, and a little head shaving to up the c/r. Motor was built by Brad Mayeur about 50K ago. Stock cam, valves. Now for the good stuff. I purchased from Jake some TWM ITB's, manifolds, air cleaners. The car was running a Kerry Hunter exhaust and super trapp exhaust.
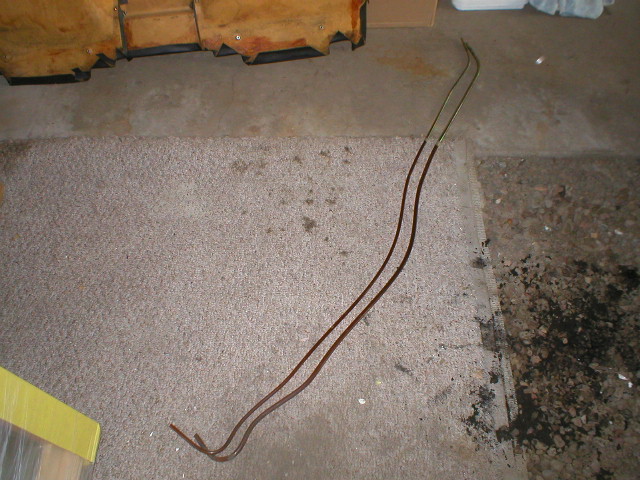
The SDS system will be a fuel and ignition/coil pac system, so I'll be dropping the motor to more easily axcess the front for the hall sensor install. Along the way I'll be replacing the engine shelf to engine tin rubber seals, and ordering/installing some of Chris Foley's replacement fuel lines.
Last night I prepped the motor for the drop, and found some additional things to fix. Theres a big suprize. NOT. While the firewall and shift rod guide bushings were fine, no more than 1/16 play between the rod and bushing, the ball cup bushing was, well, GONE! There was the bottom half of the bushing still in the cup, but where the ball on the shift linkage would contact the nylon, it was worn/broken off into pieces. No wonder it ground a little... and there was a torn motor mount, and I had a couple head studs stick in their EZ outs, and the whole mess backed out of the head, rather than the nut coming off the stud, or the stud coming out of the EZ out...
I won't bore you with photos of the drop, we've all done that a hundred times, but here are some photos of the mock up of the ITB's and a spair coil pac floating around the shop, done to get more accurate measurements for the harness to be constructed/supplied by SDS. The wires for the injectors and sensors will run across the back trunk firewall, under all the new fuel lines, and attach to the back firewall with some neat "tree" style zip ties I found, where the plastic "tree" will go into 2 holes in the back trunk firewall, and tuck the wires up and out of the way.
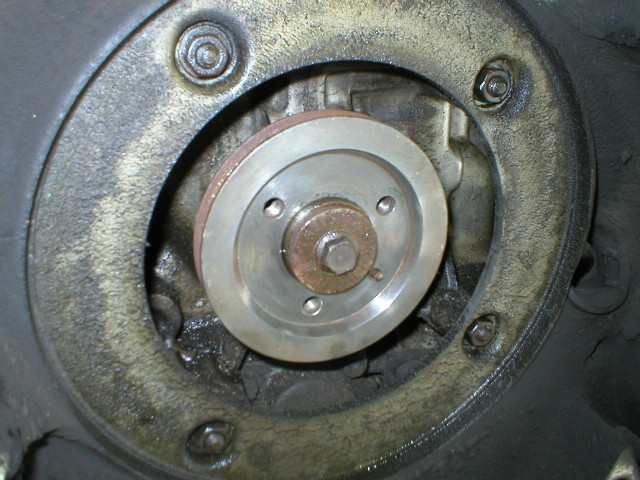
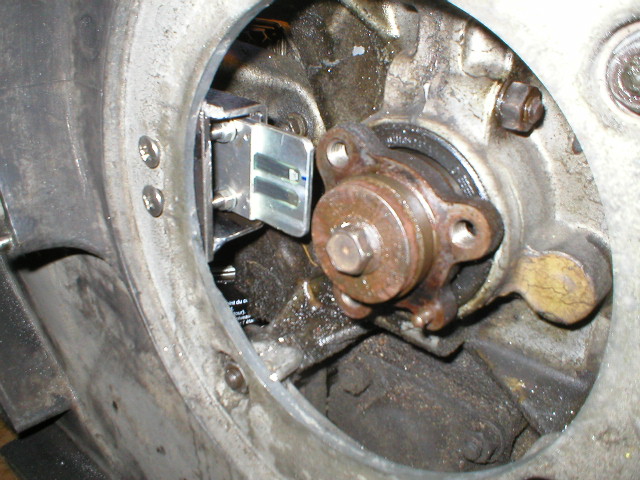
For the crank sensor, I've got a pully coming from a 914 A/C car to test fit. I may use that, or I may have a machinist friend make an aluminum disc to mount the trigger mags to. I'll have to get it appart and see what it all looks like, and what will work best.
Now, some photos-
Attached thumbnail(s)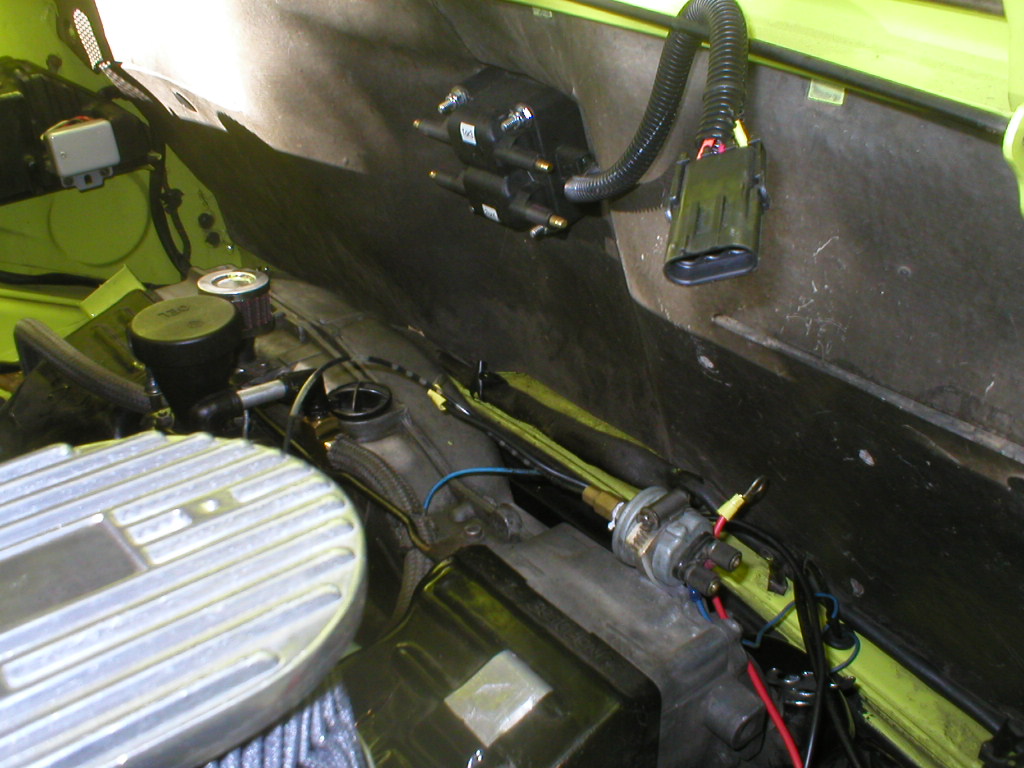
Posted by: ottox914 Jun 12 2006, 06:59 AM
ITB left
Attached thumbnail(s)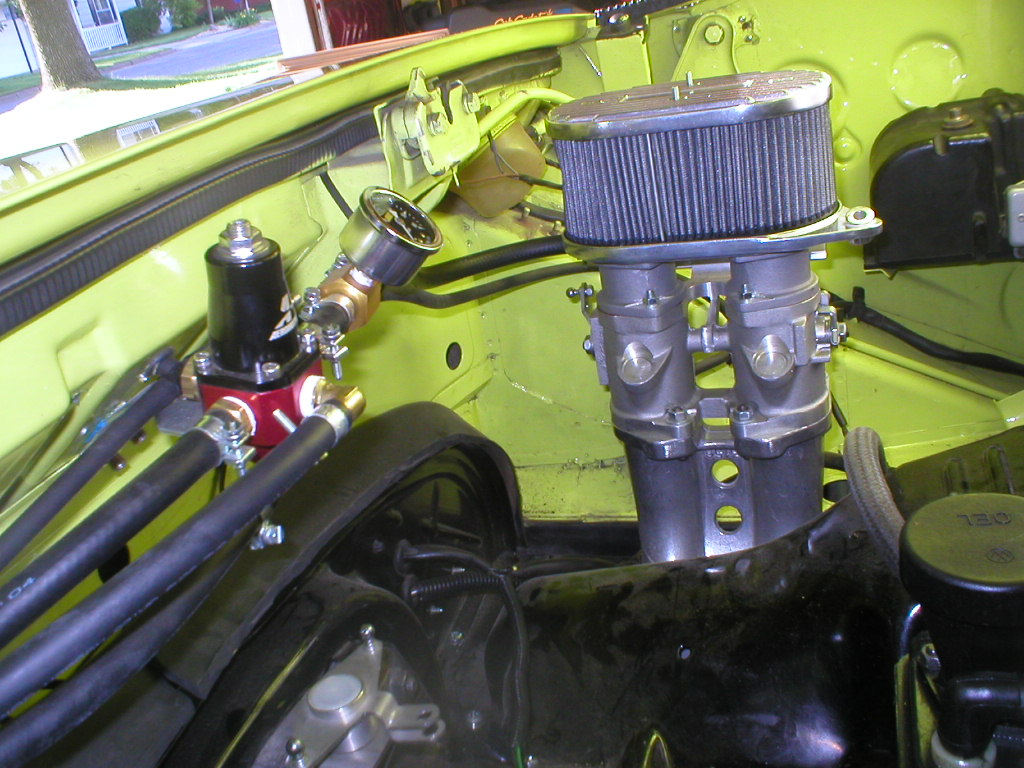
Posted by: ottox914 Jun 12 2006, 07:00 AM
ITB right
Attached thumbnail(s)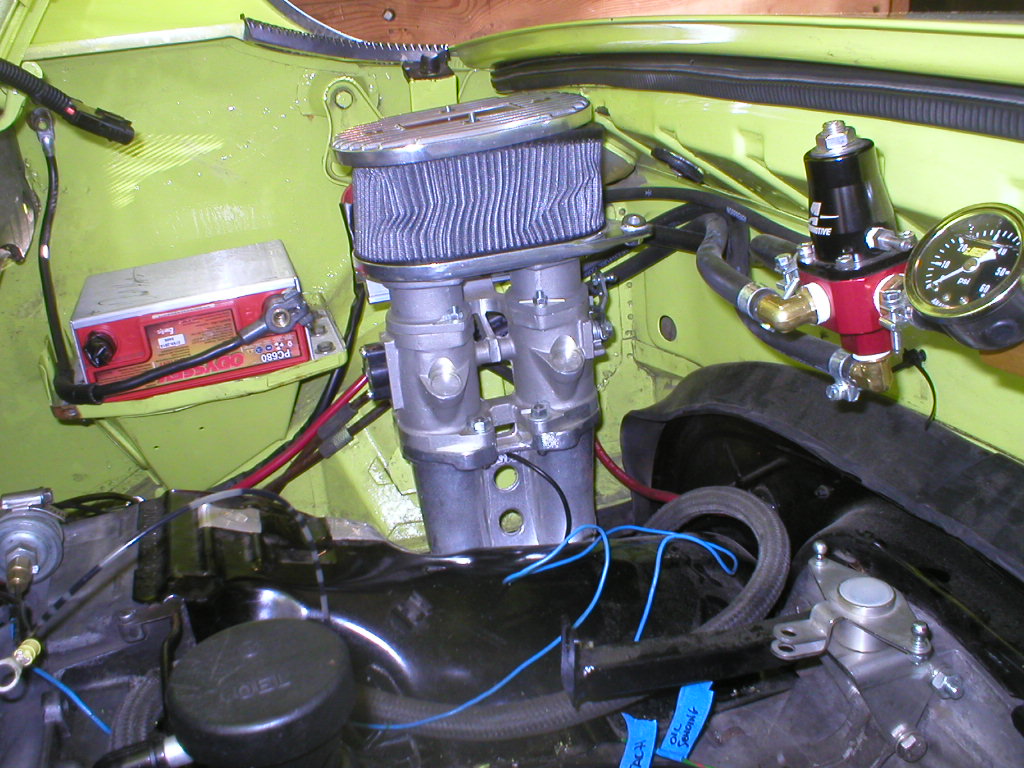
Posted by: Mark Henry Jun 12 2006, 07:23 AM
I forget how long my injector harness is, but the plug in is dead center so I'll measure it and we will make it a hair longer. Then it should go agaist the back firewall nicely.
Also see if you can find a crappy old ashtray and copy my mount for the programmer, it works perfectly.
Here's the link to my install so you have it handy
http://www.914world.com/bbs2/index.php?act=ST&f=2&t=5396
Posted by: Mark Henry Jun 12 2006, 07:26 AM
BTW your aircleaner is crushing because you're cranking it down to tight, use a bit of the weak loctite and leave them a little loose.
Posted by: ottox914 Jun 12 2006, 07:33 AM
Good guess on the aircleaner, but in reality, it was due to un-supervised nephews loose in the garage... generally, you'll NOT find toys on the workbench... thanks guys. I'll be giving you a call tonight to discuss the harness lengths and some other details. Any sign of the $$$ yet?
Posted by: Gint Jun 12 2006, 07:34 AM

ooohhhhhwwww!!!!!!!!!
What did the "TWM ITB's, manifolds, air cleaners" $et you back? And for that matter, the SDS setup from Mark?
Looking forward to the pics of the install. I may be heading that direction myself before too long.
Posted by: blitZ Jun 12 2006, 07:39 AM
Do the ITBs include new injectors or do you use your stock injectors? Also, will the ITBs you purchased work as well if you increase your displacement? Looks like a nice setup, anxious to see the results.
Posted by: Mark Henry Jun 12 2006, 08:32 AM
I'd make the injector harness around 43" to 44" if you want it to run along the rear firewall. This is to the longest wire, 3" spacing.
You will also need:
1- 1 to 5 amp in-line fuse to the ECU
1- 10 amp in-line fuse to the injector harness.
2- 15 amp in-line fuses to the pump and coil pack
I also have a 10 amp in-line fuse to the pump relay, but I don't think it's really needed.
He's using 30cc/min Ford redtops (bosch) I believe for injectors.
Posted by: Aaron Cox Jun 12 2006, 09:20 AM
why'd you choose TWM over Jenveys?
just curious if quality on one is better...
Posted by: ottox914 Jun 12 2006, 09:23 AM
Not to be all mystical about the whole thing, but you can talk to Jake and Mark and make your best deal...
The injectors are indeed the 30# ford "redtops". I sourced them from EBAY, from a seller of injectors. They are a flow matched set. Injectors were availible from Jake, but not part of the "package" of stuff I ordered from him. And no, I don't recall the cost. Do any of us really keep track of that anymore?
I had Jake size the ITB's for up to a 2316. Nice number, huh? They will probably be a little large for the 2.0, but the long term plans are: Get the SDS up and running. Learn the tuneing. Don't blow up the motor. (notice how the ITB's at the sides, the coil pack in the front, and all the fuel system/injection harness lines across the back firewall leave a really big open area in the middle of the engine bay?) Add a turbo (and I know, I KNOW, you can't turbo a 914) and subaru WRX intercooler in a season or 2, then see of the motor blows. The WRX intercooler has one inlet and 2 outlets for the charge air path. Should work out pretty well with ITB's, and give some snappy throttle response. If it blows up, maybe a 2316? If not, it'll be a pretty cool little auto x car. And yes, for you SCCA types, I also know a turbo'd 914 will be underweight for SM2, and way under prepared for XP, but I'm building the car for me, not the SCCA, and if I want a world beater for SCCA, I'll drive my friends car, which I'm helping him develop. A fat performance 3.0 4 cyl, 1675# or so WITH driver... attaching a photo below of me driving HIS car-
Attached thumbnail(s)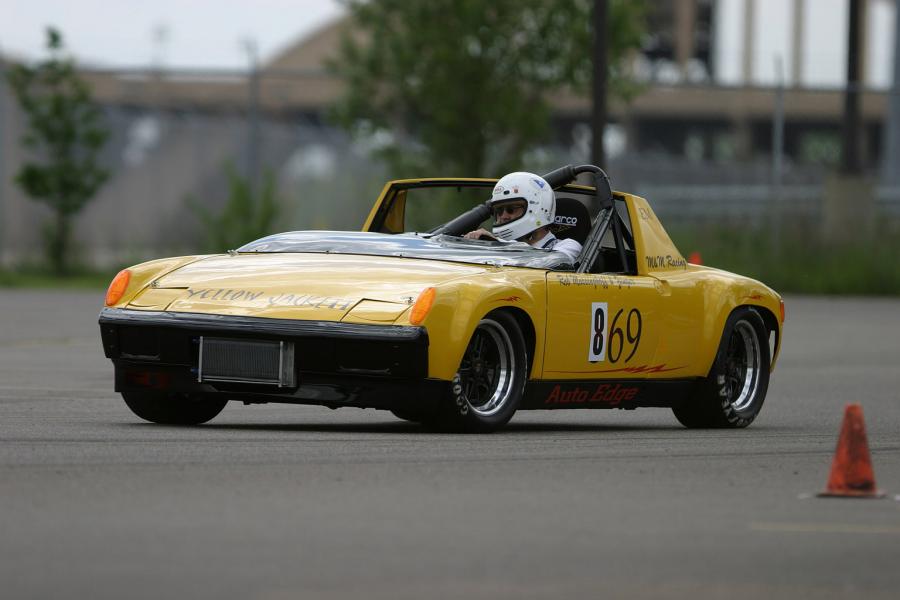
Posted by: ottox914 Jun 12 2006, 09:31 AM
why'd you choose TWM over Jenveys?
just curious if quality on one is better...
1) $$$$ less
2) Its what Jake was selling that day, he beat any other $$$ on the TWM's I could find, and its good to support those who support us.
3) I liked the way the injector supply rail was set up to connect to the TB.
Posted by: Mark Henry Jun 12 2006, 02:02 PM
David I got your PM and I'll look it over tonight. The cheque is still in the mail, I'll let you know as soon as it gets here, mid-week most likely.
If you don't have an old ashtray for your programmer mount, I think I have one.
Posted by: Mark Henry Jun 13 2006, 09:33 AM
Daaaaavid! I have mail!
Figure out the final on your harness..... 
Posted by: ottox914 Jun 13 2006, 09:32 PM
Email sent.
Posted by: Gint Jun 13 2006, 10:25 PM
Not to be all mystical about the whole thing, but you can talk to Jake and Mark and make your best deal...
Oy...
Please, then just tell me how much you think this might cost you to get the whole mess installed and the 914 running. Please, I don't want to know anyone's pricing secrets or anything so dastardly. I just want to know how long I have to save my duckets to do something like that.
Posted by: ottox914 Jun 14 2006, 06:26 PM
I don't know what the exchange rate is dollars to duckets these days, but as best as I can recall, here's the damage: bought the ITB's, manifolds, air cleaners from Jake around a year ago with a small windfall from work that Mrs Me did not get her hands on. I think the total was around $750. Injectors off EvilBay were maybe $100. Add another $100 or so for the linkage from some place in CA, I could dig it up if anyone wants it once I get the install photos up and you all can see it. SDS can run you anywhere from around $900 shipped for fuel only, to maybe $1400 shipped for the crank fire/coil pac version. Add more for optional relays. Add more for a wideband to better tune it and not blow up your motor. My SDS bill was around $1700. Add lots of labor and beer to help pay off your fabricator, and more $$$ for all the other little "while I'm in here" things to fix, new plugs and wires, fuel pressure regulator, fuel lines, clamps, filter, dyno time after you've got it 80-90% tuned, etc, and theres your total.
So in round numbers, not including pending fabrication and the "while I'm in there" stuff, I'm at $2650. I expect when it hits the streets the total will be closer to 3k. Will it be worth it? We'll see, looking at it this way its awful expensive HP at this point. But. If a 2316 comes to pass, all I need is the long block. If a turbo happens, I mount it on the end of the kerry hunter collector, source a scavange pump for the oil return, add an EvilBay subi intercooler, and for maybe $500 more I've got the turbo thing going. Safely, as the tuneing will be totally adjustable with great MFG support. $2650 is not the end of this project, just the beginning.
Posted by: Gint Jun 14 2006, 09:51 PM
Thank You!
Posted by: Mark Henry Jun 15 2006, 07:54 AM
System ordered
Posted by: ottox914 Jun 18 2006, 10:24 PM
Weekend update: Slow progress with relatives in town. Got my brother in law to help with the engine drop, so thats done. Discovered BOTH motor mounts were sheared. And who says 914's got no power? Started taking tin off the engine to scope out the hall sensor mounting options. Got the new engine room rubber seals in. Was thinking of trying this with the motor in, but since it had to come out, no better time than now. I would think it COULD be done with the engine in, but I wouldn' t want to be the guy to try... Ordered some of C.F.'s fuel lines, he's a week or 2 out on those.
If someone can school me on how to load multiple photos on one posting, please do.
Now, some photos.
Attached thumbnail(s)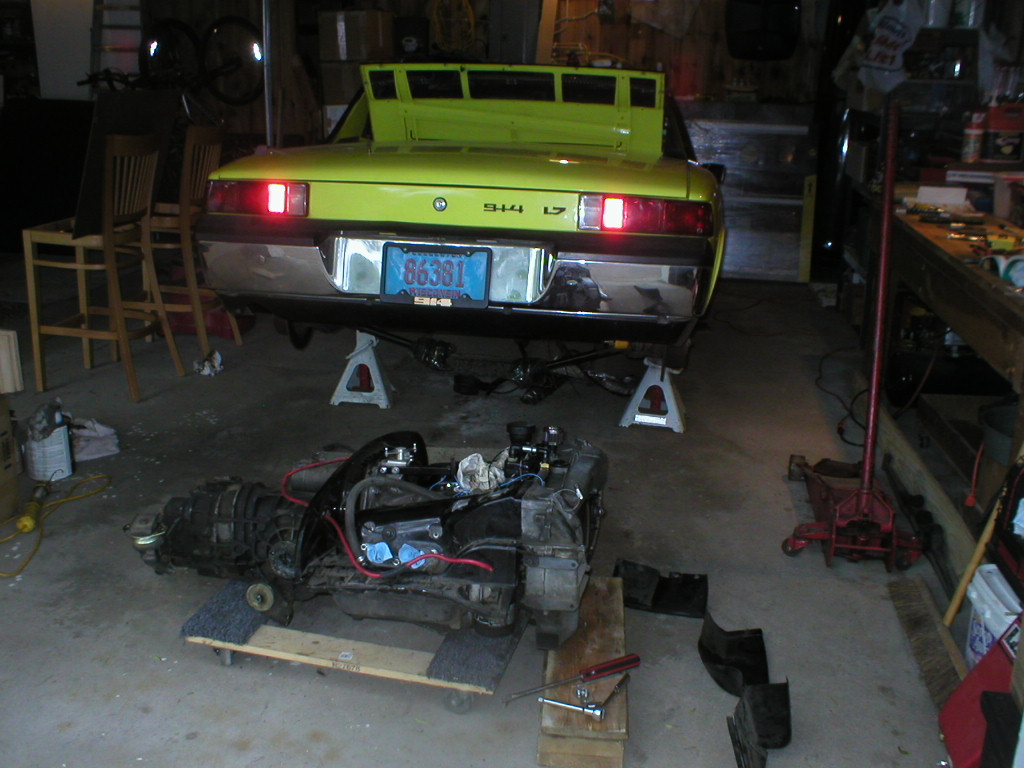
Posted by: ottox914 Jun 18 2006, 10:25 PM
Dork brother in law messing around with motor mounts.
Attached thumbnail(s)
Posted by: ottox914 Jun 18 2006, 10:26 PM
new engine rubber is in.
Attached thumbnail(s)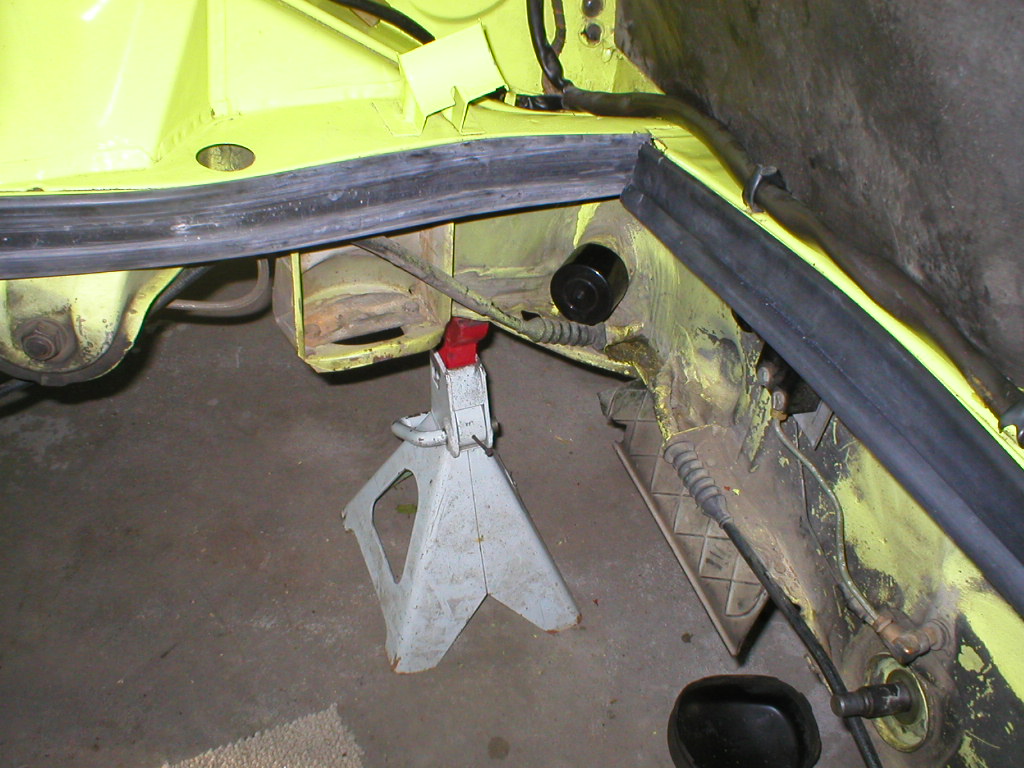
Posted by: ottox914 Jun 18 2006, 10:29 PM
got some parts... these are pulley's from a/c cars, there are 2 different designs, one a bit larger, lighter, but the "edge" of the pulley where magnets would have to mount is angled, the other pulley is a bit smaller, a heavier cast piece, but has a nice flat edge for drilling/mounting the magnets. There is also a "shorty" distrubuter plug that Dave-O made and sent. Thanks!
Attached thumbnail(s)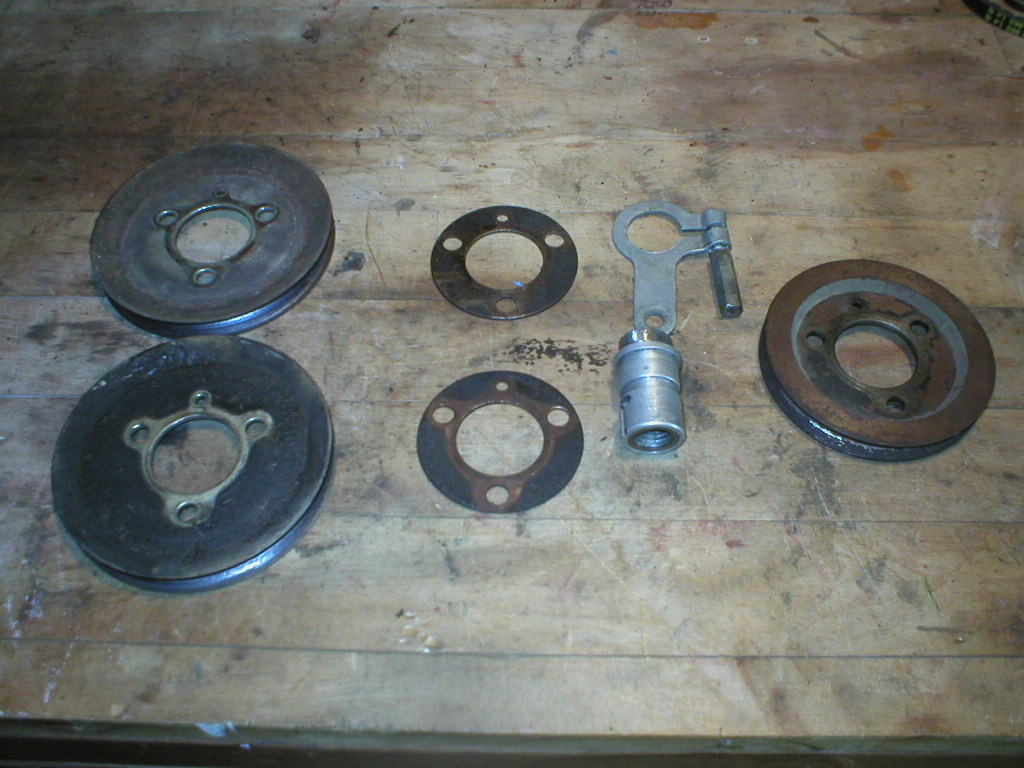
Posted by: ottox914 Jun 18 2006, 10:32 PM
close up of the pulleys and their differences. I'm going to start looking things over with an eye to useing the pulley with the flat magnet mounting surfaces, for obvious reasons. If I need a larger diameter pulley to get the magnets closer to where the hall sensor will end up, I may just use the larger ones as templates, and have an aluminum disc made up. I'll post more when I know more.
Attached thumbnail(s)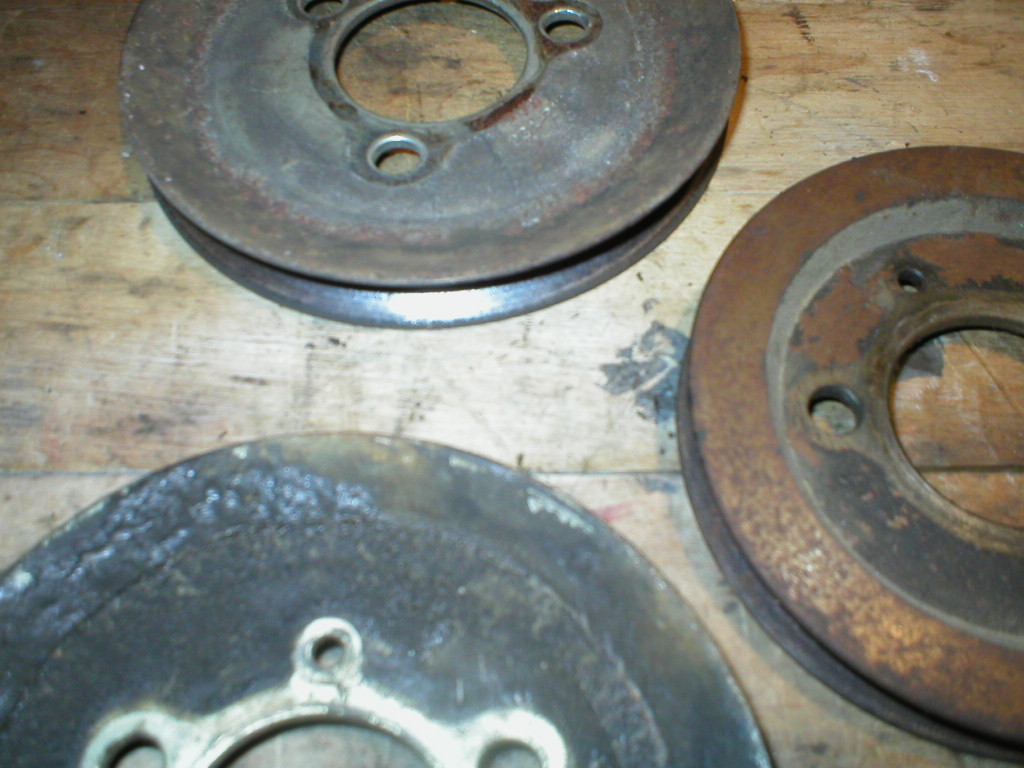
Posted by: Mark Henry Jun 23 2006, 12:21 PM
System shipped yesterday, it should be in my hands on Monday.
FYI I ordered the system last friday and they are busy as hell right now, pretty good turn around (for a custom wire system) I'd say.
BTW if you mount the trigger wheel about the same as mine those pulley's should work just fine. Size doesn't matter (to a point) but you have to install the magnets spot-on.

Posted by: ottox914 Jul 13 2006, 09:16 PM
Goodies have arrived!!! Bad news is that I'll be away from home and projects for the next 3 weeks with work, weddings, auto cross events in borrowed cars, family reunions..... this is gonna drive me nuts!
Here are the bits and pieces-
Attached thumbnail(s)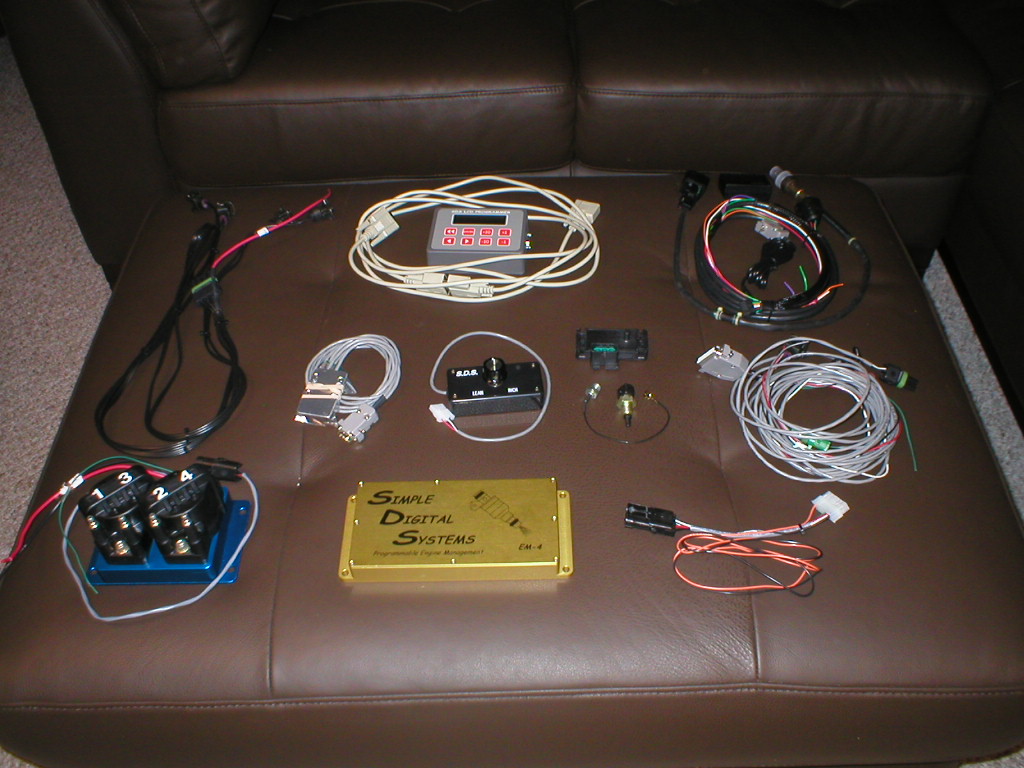
Posted by: Mark Henry Jul 14 2006, 07:17 AM

Posted by: ottox914 Jul 28 2006, 10:06 PM
Took the last 2 days off work, yesterday was slow, as I was bushed from 3 weeks on the road, but today significant progress was made...
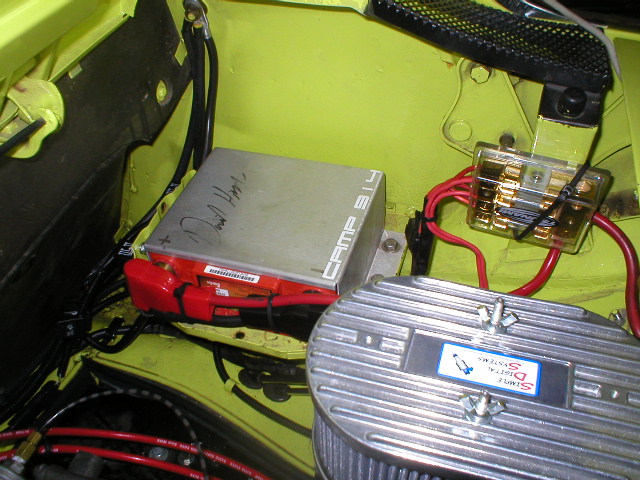
The main SDS ecu has been mounted, all wires run. Coil pac mounted and connected.
Attached image(s)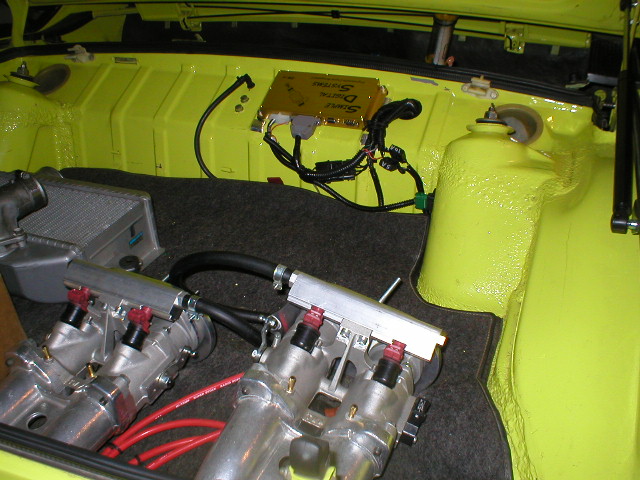
Posted by: ottox914 Jul 28 2006, 10:08 PM
A couple more views of the ECU install.
Attached image(s)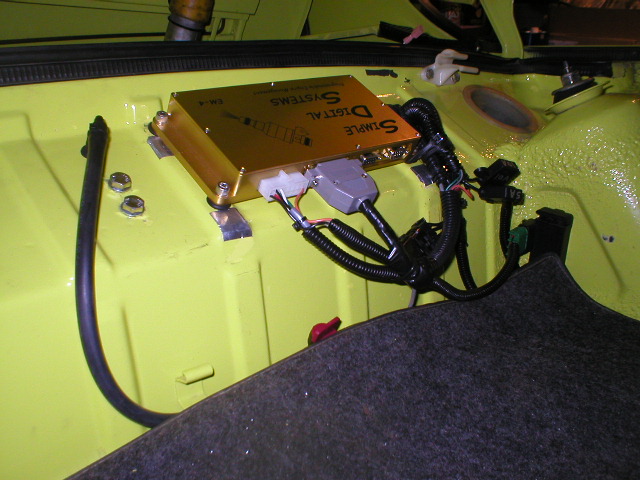

Posted by: ottox914 Jul 28 2006, 10:11 PM
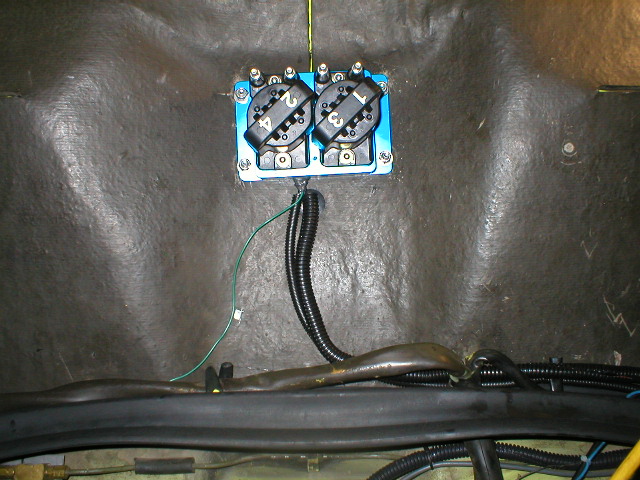
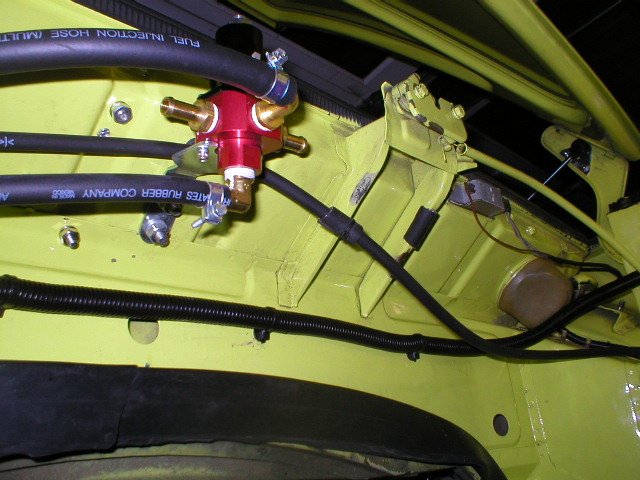
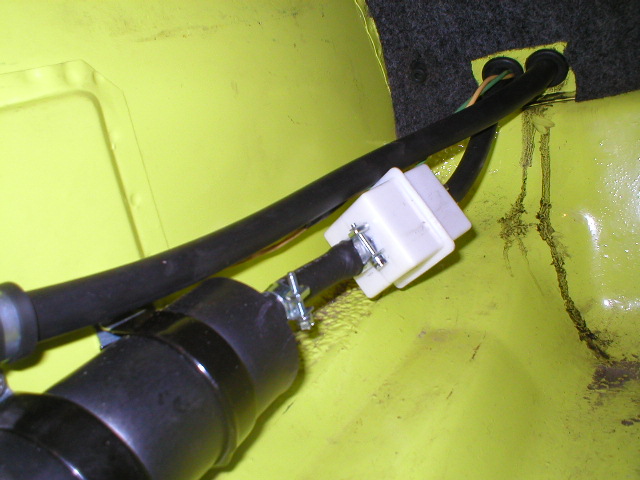
Here is a bunch of wireing, relays, distribution block... the relays and fuses have long enough leads to be pulled up over the battery to make them easier to work with if a fuse or relay goes bad and needs replacement when the engine is NOT out, and axcess is not this easy.
Attached image(s)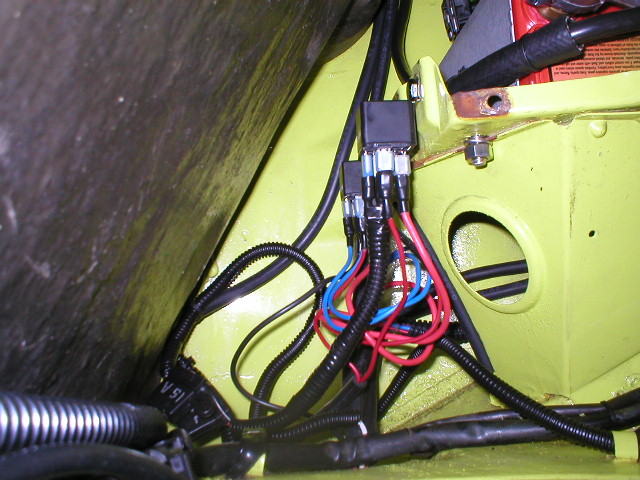
Posted by: ottox914 Jul 28 2006, 10:22 PM
Just a few more for tonight. After this was all done, I turned the key. Not much happened, as there is no motor, but the SDS fired up, the display worked, the sending units sent, and the ecu responded. Engine temp, air temp, TPS all registered and were reactive, as was the control knob. The hall sensor was not installed on the engine, but I did plug it in and run the magnets across it, and it showed "magnet seen" on the screen, another good sign.
Still lots to do- tomorrow's goals will be to get the wires run for the WMS wideband, running from the dash display to the wideband O2 sensor, and connecting into the SDS system along the way. Also drilling a hole in the dash and finishing up the wireing for the VDO cyl. head temp gauge. If energy continues, I've got the rest of Chris Foley's fuel lines to install and a new, bigger fuel pump. If I can get all that off the list, that'll be a good day. Still remaining: pushrod tube seals, of course check and set the valves after taking the rockers off, and tear off the fan to mount the pulley from the prior photos, and mount the hall sensor. I'll check the clutch while the tranny is off, new shift bushings and motor mounts, install that lightweight starter I bought last december... and so it goes.
Attached image(s)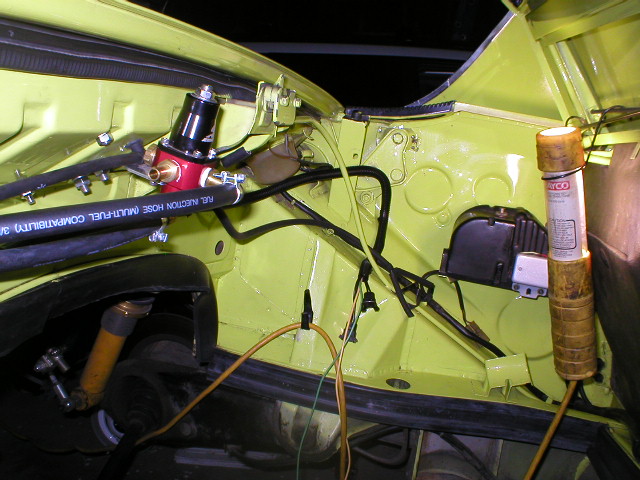
Posted by: ottox914 Jul 29 2006, 07:42 PM
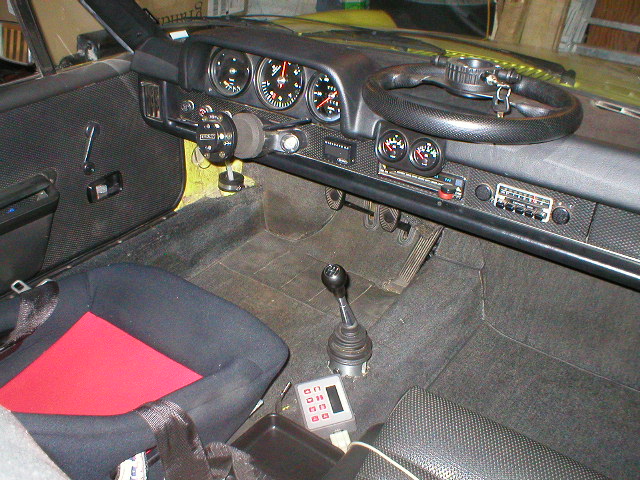
TheWMS wideband is in and tested. I only need to hook up the actual wideband sensor once engine/trans/exhaust system is back in. Put some battery to the dash mount display, and all the right lights and test codes ran.
Installed it where the cig lighter goes. The first photo shows the display pressure fit into the cig lighter, just to see how it looks. Second photo, I have pulled out the lighter and used a Dremel tool with a metal cutting bit to square off the bottom of the cig lighter hole, so I can better center the display on the dash. Makes some nice shiney metal bits that go everywhere.
Attached image(s)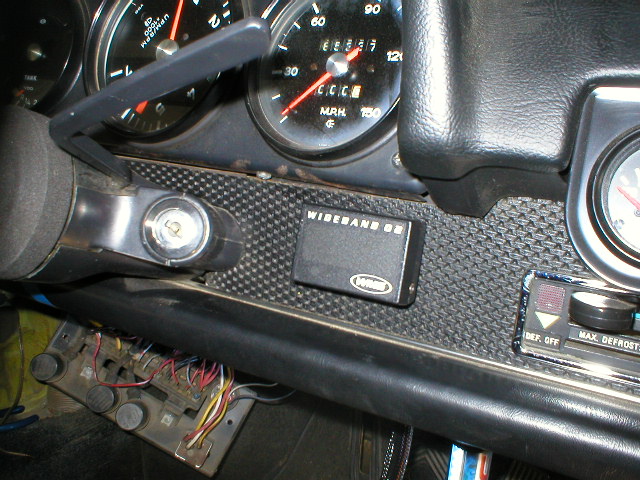
Posted by: ottox914 Jul 29 2006, 07:46 PM
Ran the wires back to the engine by way of the driver side heat duct. The WMS bundle looked to be well protected, but there were 2 wires from the SDS ecu that needed to be attached to the wideband, so I ran those thru some 3/8 plastic tubing, then stuck the whole mess up the heater tunnel. At the ends are my 2.99 fernco plumbing caps, rubber, with a hole drilled thru them. Once the motor is in, and all final lengths set up, I'll add some black rtv at the back to prevent any water getting in at the hole. I'll also squirt some in the end of the plastic tube to seal it as well. I plan to leave an inch or 2 of plastic tube coming out into the engine area, and if I need to send any other wires up front, I can cut off the bit with the rtv in it to open the tube up again.
Attached image(s)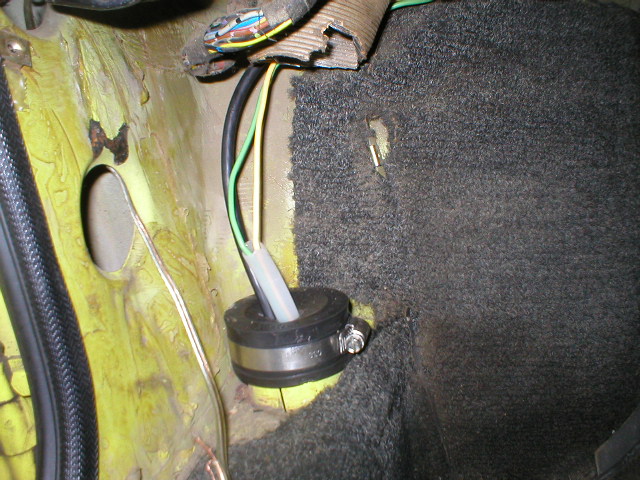
Posted by: ottox914 Jul 29 2006, 07:51 PM
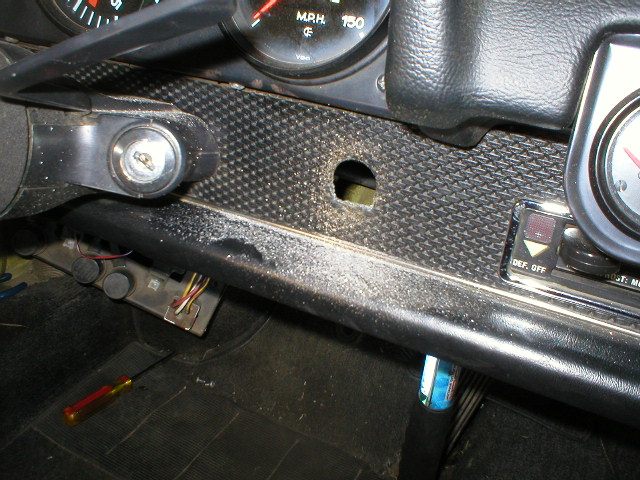
Finished install. Looks good to me. Was really a snap in some ways, as the cig lighter provided switched power and ground right in the area I needed for the WMS wideband. 3M double sided foam tape secured the display to the dash. Just needed a couple make spade connectors. Also got the wires for the cyl head temp gauge strung from the engine area up the tunnel, using another grommet from some addl wires that came up front for oil sending/pressure gauges installed a couple yrs ago. Tomorrow will be the cutting of a big hole in the dash on the other side of the steering wheel for the cyl head temp gauge. And there is still those fuel lines if I get done quickly on the gauge install.
Attached image(s)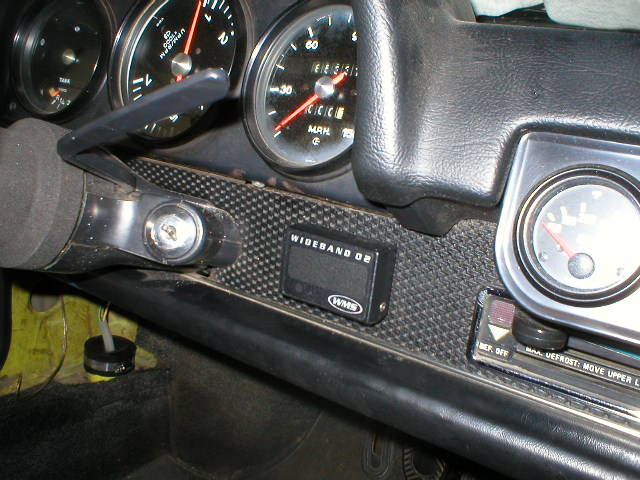
Posted by: Dave-O Jul 29 2006, 08:06 PM
Looks good Dave! I'm a bit jealous of all your fancy new gadgets. I'm going to take my 914 with an AFI system (archaic fuel injection) and beat up on some punk kids in Appleton tomorrow.
Have you dug into the fan housing yet?
Posted by: ottox914 Jul 29 2006, 09:15 PM
Dave-O, have not gotten in there yet. I wanted to get all with wiring done first, and save some of the fab work for... you? I know you like that kind of stuff- whatcha doing next weekend? Actually, I wanted to get all the wiring done with the engine out, and the fuel lines, as once the pushrod tube seals and sensor mount are done, I'm gonna REALLY want to get it all back togather, and having to put time in on that other stuff would drive me mad with the engine done, but now, all that other stuff is still kinda fun and part of the process.
I did power up the SDS ecu last night- everything looks good. The controller scrolled thru all the screens in the correct order, I hooked up the ET (engine temp) and AT (air temp) as well as the TPS, and all registered correct values. The TPS value changed as the throttle body was open/shut. I was pretty stoked after that little test run. I wanted to stay up all night and just play with the controller, just to get the hang of it.
You ran great last weekend- that 41 with me in your STS2 car was fun. That chick in the Mazdaspeed Miata was a cutie- to bad she: 1) drives a miata, 2) has a boyfriend with an Elise, and 3) I happen to be very married. Would mine, with the SDS and Keizer/710's been in the 40's? 39's? Who knows. It really made me want mine back on the road/track again. Go and pick on some ricers, and give me a call with the results. FTD? Top 5? Top 10?
Don't be to jealous, yours runs. And runs well. You've got many runs that I owe you in mine for the help you've been.
Posted by: ottox914 Aug 1 2006, 09:05 PM
More progress, slow but, well, sure? Got the cylinder head temp gauge mounted in the dash. Still need to get the wires hooked up, but the lines from the engine to the dash are run, just need to connect to the gauge, and need to run a ground and dimmer switched power to the light. Here's some pics- first one is the location, second is the big hole saw for the big hole. I first located center for the hole, and traced onto the vinyl the hole saw size opening. I then used a sharp knife to cut the vinyl out of the hole. Center punched the metal, drilled a starter hole, and had at it with the hole saw. I drilled the hole out with the saw in reverse. Didn't want to risk the sharp edge of the teeth snagging some vinyl, and also wanted some control of the hole and how quickly it broke thru- didn't want to twist the wires behind the hole into a rats nest of problems.
Attached image(s)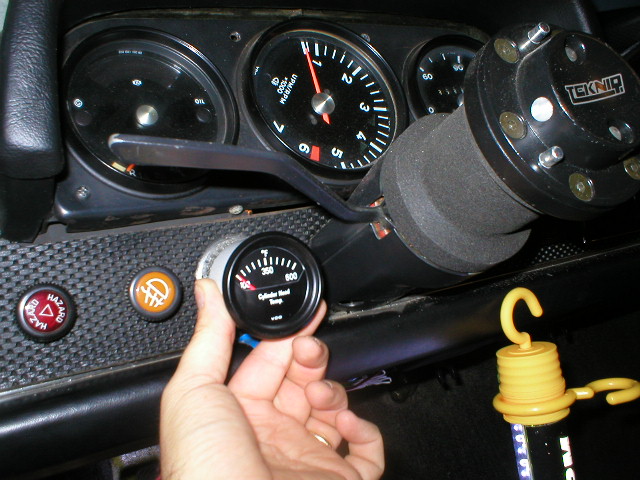
Posted by: ottox914 Aug 1 2006, 09:09 PM
Once the basic hole was done, I used the dremel and metal cutting bit to smooth out the rough edges, and open the hole a little, as the hole saw was 2", the gauge 2 1/16. Grind a little off, test fit, grind a little more for the perfect fricton fit. First pic is the finished hole, next one is the view of the gauge with the wheel on, from my eye level perspective. Off to the right is the WMS wideband display.
Attached image(s)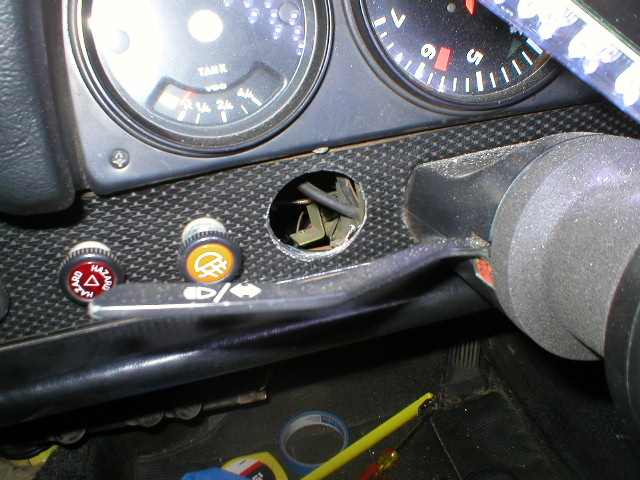
Posted by: ottox914 Aug 1 2006, 09:14 PM
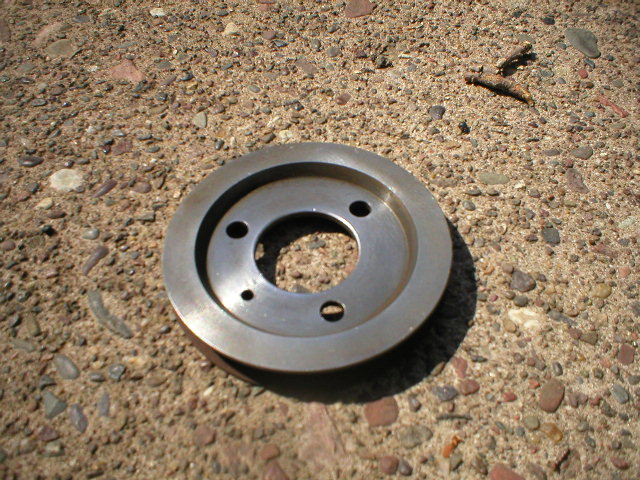
I also took a lunch break and put the wire wheel on the drill, and shined up the a/c pulley that will hold the magnets for the crank fire ignition. Just a bit nicer to work with clean parts. Below are before and after photos.
Dave-O, coming off a 4th place pax finish in his STS2 car, is possibly coming over this weekend to get the last of the fabrication work done, and hopefully turn the key... I think between the 2 of us its do-able in 2 days. We'll find out.
Attached image(s)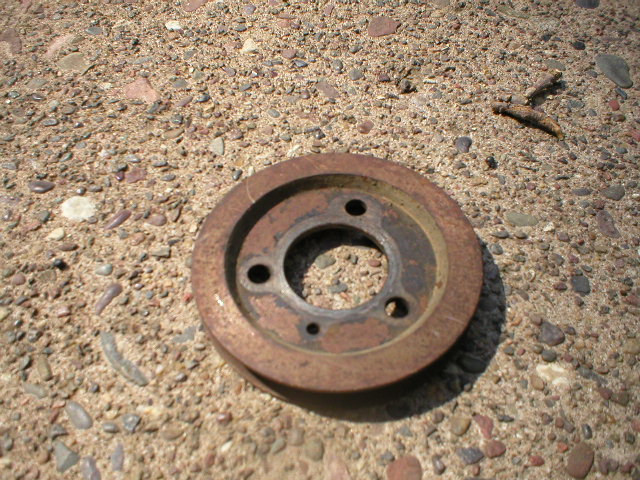
Posted by: ottox914 Aug 1 2006, 09:17 PM
Sorry, couldn't resist, a close up of the gauge.
Attached image(s)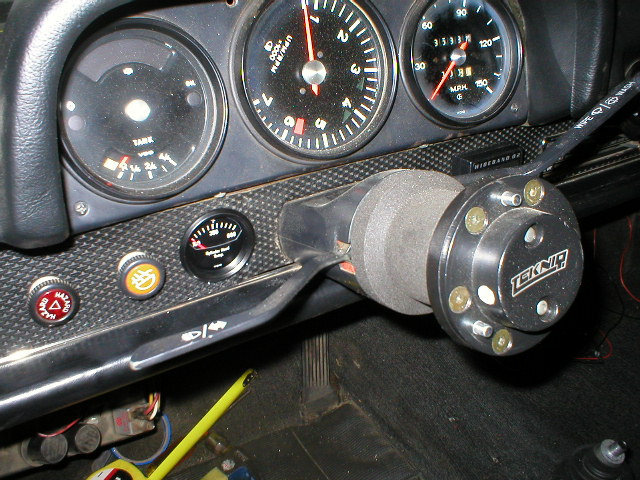
Posted by: ottox914 Aug 4 2006, 10:14 PM
Lots of progress today- the fearless fabricator arrives, bringing big tools. not sure about the legality of transporting tanks of gas inside a passinger vehicle, but it was buckled up.
Attached image(s)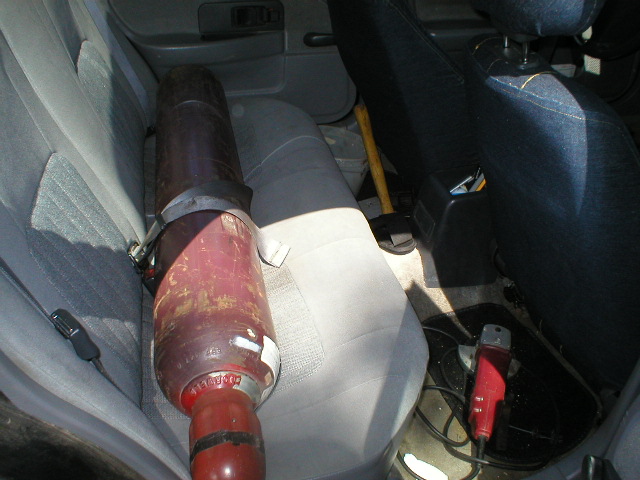
Posted by: ottox914 Aug 4 2006, 10:15 PM
we hulked the motor onto the workbench for new push rod tubes, seals, and a valve adjustment.
Attached image(s)
Posted by: ottox914 Aug 4 2006, 10:17 PM
and then moved on to test fitting the pulley that will receive the trigger magnets.
Attached image(s)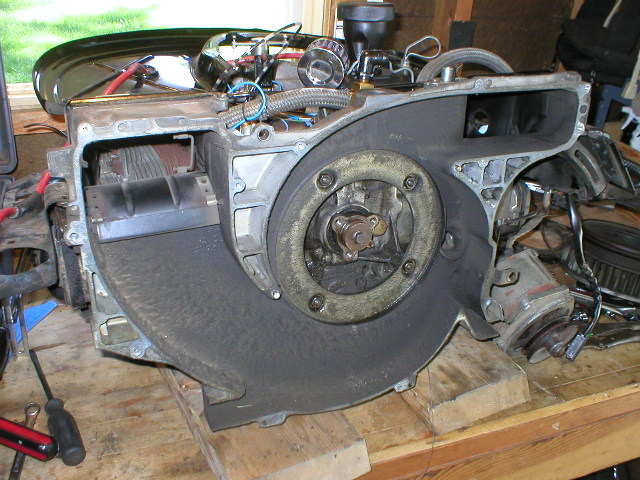
Posted by: ottox914 Aug 4 2006, 10:19 PM
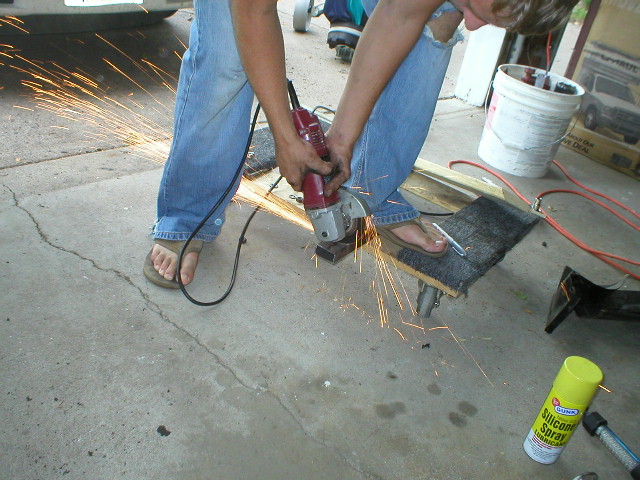
fabrication time-
Attached image(s)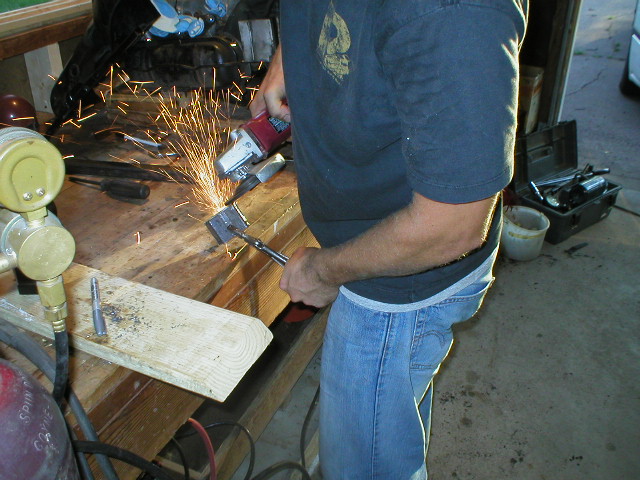
Posted by: ottox914 Aug 4 2006, 10:20 PM
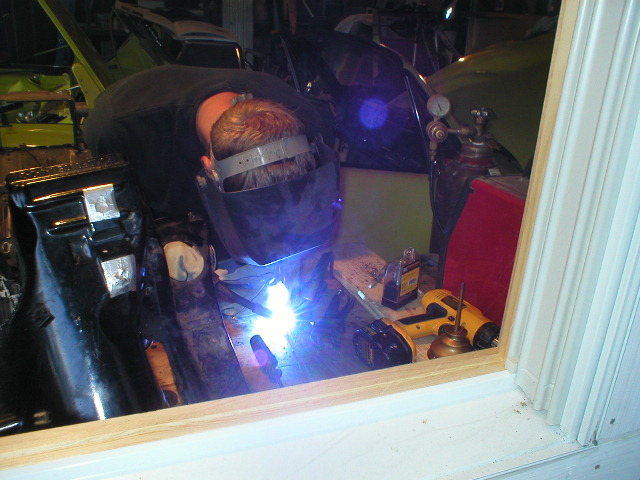
Lets weld!
Attached image(s)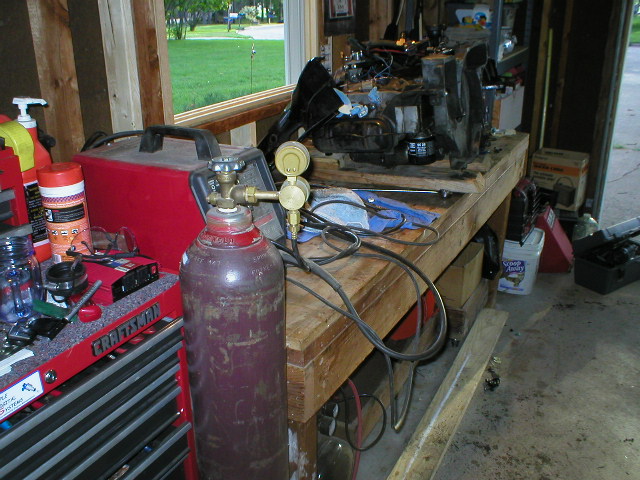
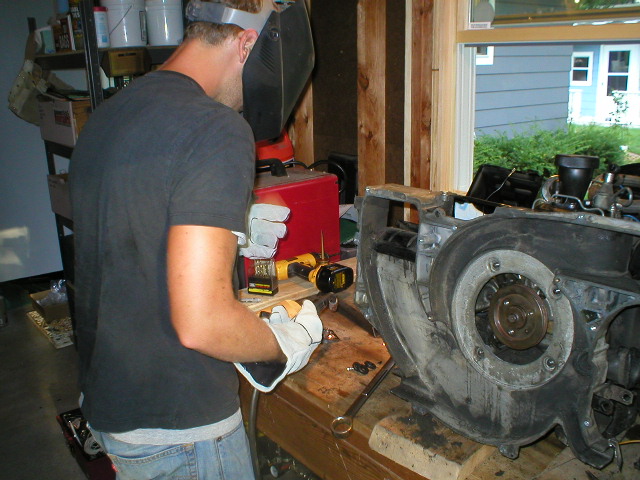
Posted by: ottox914 Aug 4 2006, 10:24 PM
making the sensor mount- we first tried some 2" x 1" rectangle stock, but it didn't give enough set back between the sensor and the pulley. Solutions included having a flat disc machined to match the mounting holes for the pulley, or make a welded box section that would give the proper clearances for the sensor and magnets, once mounted on the pulley. Having welding equipment, but no lathe, we chose option "B".
Attached image(s)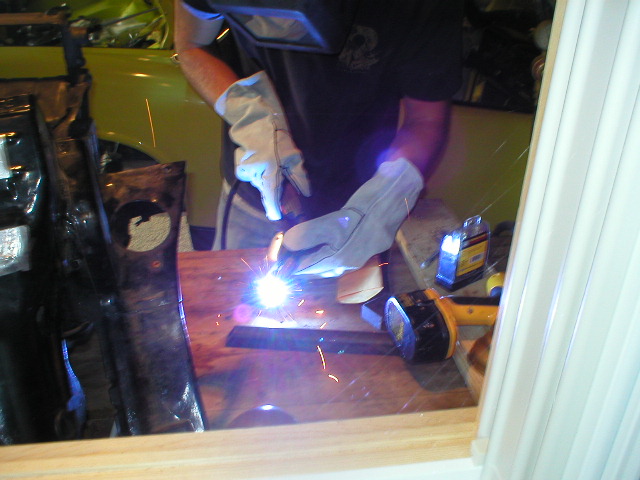
Posted by: ottox914 Aug 4 2006, 10:25 PM
test fitting our creation...
Attached image(s)
Posted by: ottox914 Aug 4 2006, 10:28 PM
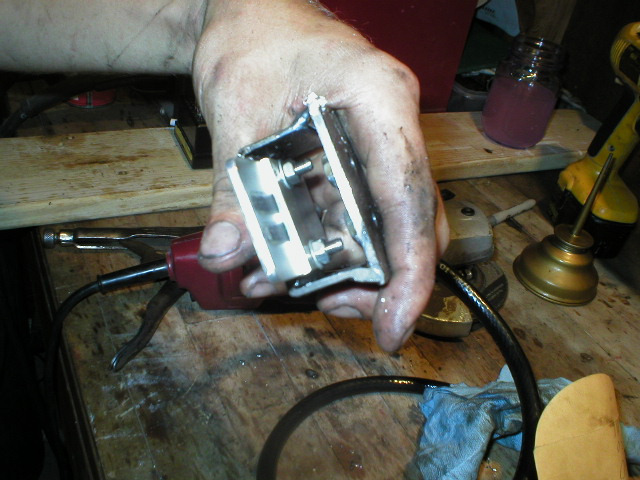
close ups of the sensor mount. It has nuts welded on the inside for the mounting to the fan shroud screws, which still need to be counter sunk a little.
Attached image(s)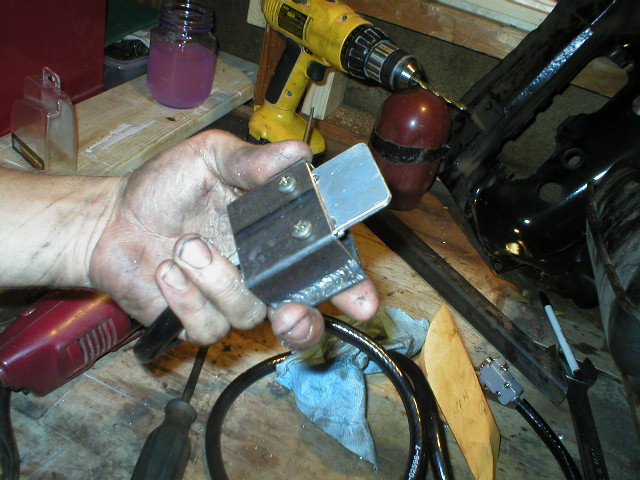
Posted by: ottox914 Aug 4 2006, 10:33 PM
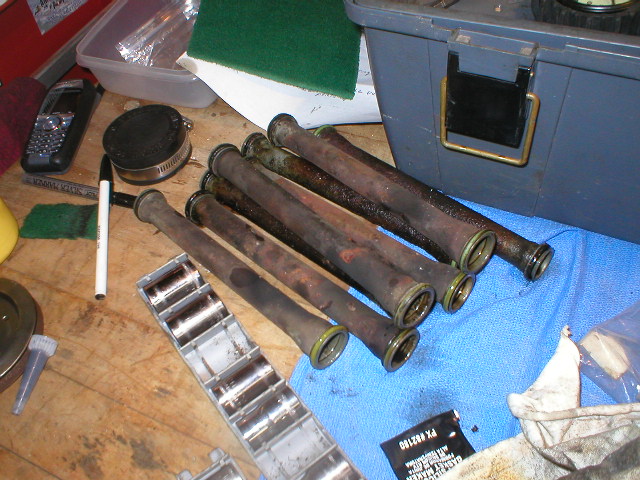
In addition to the push rod tubes/seals, valve adjustments, sensor mounting, we got Chris Foley's fuel lines in. This was just too easy. With the motor out, I'd bet once we got the tank pulled, it took us less than 1/2 an hour. We pulled the plastic out, stuffed the metal in. We ended up with one guy in back pushing the lines in, a sesond guy in the car getting them lined up with the grommet at the front firewall. Again, what a product. Went in super easy, looks great. Thanks Chris. Anyone wanna buy some slightly used plastic lines? (just kidding)
Attached image(s)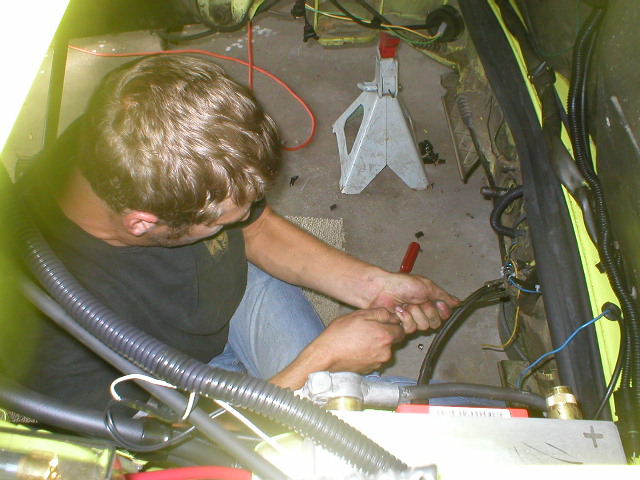
Posted by: ottox914 Aug 4 2006, 10:34 PM
And here are the new lines in place.
Attached image(s)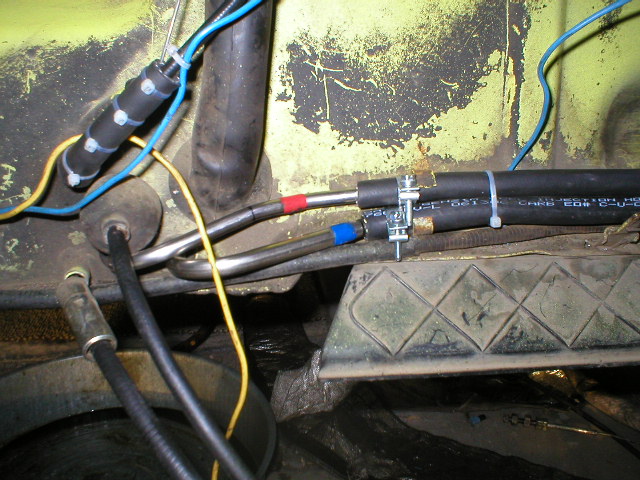
Posted by: ottox914 Aug 4 2006, 10:38 PM
Whats left? PLENTY!!! Tomorrow we countersink and finalize the sensor mounts to the fan housing. Mount the cyl. head temp sensor. Replace the fuel pump and filter. Drill and mount the magnets on the crank pulley. put the engine and tin back togather. New thermostat cable. Marry the engine to the trans, and re-install. Plus a hundred and one other things that will need to be done along the way. I hope to drive it to dinner tomorrow night. We'll see whats up about 6pm.
Posted by: Boojum Aug 4 2006, 11:31 PM
Fearless fabricator, indeed! I'd be more weary of playing footsie with an angle grinder, but maybe that's just me.
Posted by: grasshopper Aug 4 2006, 11:51 PM
 lol...I would be afraid I would cut my foot off...I have already tried slowing one down with my thumb
Posted by: ottox914 Aug 6 2006, 11:18 AM
August 5 has come and gone. Happy birthday to me... but no running 914, the best present a guy could get...
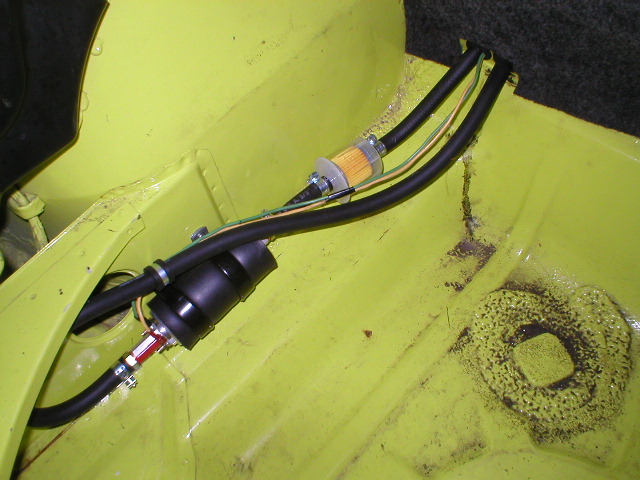
Progress was slow, as even with the fearless fabricator, the detail work slowed us down. We decided to divide and conquer, so not many pics from yesterday. One part of the project was to upgrade to a walbro 255 fuel pump. I came to discover that thing is L O N G, and makes packaging up front a challenge. Couldn't get it all to fit in the gas tank area. The pump and filter sorta fit under the gravel guard, but I was a little concerned about lines being a little to close to the moving bits of the steering rack for my comfort. And again, the length of the pump limited the location of the pump/filter down there, and pinched lines were about a 50/50 thing, they may be fine, they may not.
So I/we went with option 3, front trunk. I'll be having another friend who works in sheetmetal make an aluminim cover for the pump/filter/lines that will still allow full use of the front trunk, room to stash the spair, and not be in the way for any future front oil cooler that may come along.
Attached image(s)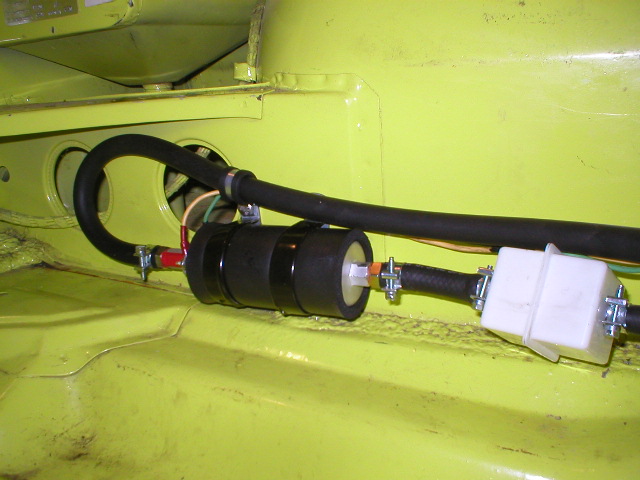
Posted by: ottox914 Aug 6 2006, 11:21 AM
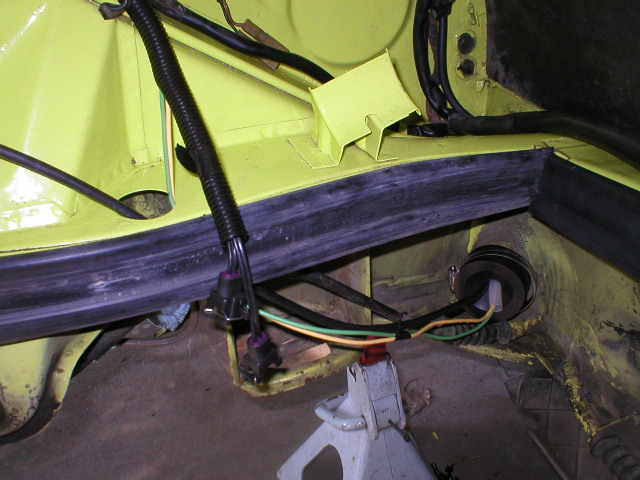
Here are the lines into the fuel tank area, and the lines and wireing to the fuel pump as they were run up the tunnel, thru the tank area, and into the front trunk. The power for the fuel pump is fused, 40amp relay switched, and uses none of the old factory wiring. Just above the lines into the fuel tank area can be seen the sway bar, so I'm confident I'll have no pinching issues.
Attached image(s)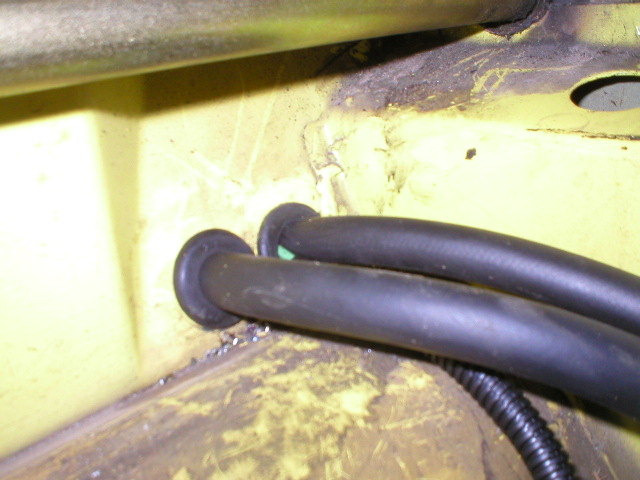
Posted by: ottox914 Aug 6 2006, 11:37 AM
The motor is back togather, and attached to the trans. Not seen on this blury photo is the Ebay light weight gear drive starter. New factory engine mounts are installed. BOTH of the mounts were fully destroyed when the motor came out. I'm amazed I didn't rock and roll that motor enough to crack a tranny mounting ear. No wonder it didn't shift so well... Dave-O was putting the motor back togather all day yesterday, while I was puzzleing out and running all over town looking for bits and pieces for the fuel pump project, so I didn't get much for photos. The mounting of the magnets in the pulley went as easily as the SDS instructions indicated it would. We mounted the sensor on the opposite side of the motor from the alternator to keep it away from that source of electrons. I added some 1/4" fuel hose, cut down the length of the hose, around the hall sensor wires to keep them safe coming back out of the cooling housing and thru the engine tin. We had the motor up on the workbench, and were able to extend the wires from the sensor to the SDS ecu, and use the test function on the ECU to be sure the magnets were "seen" before buttoning it all up.
Today will be a lazy day- picking up the garage, seeing who took whose tools home, doing some more prep work the engine install. I'd like to get the fuel tank back in, and maybe test it. I'll just run a hose from the 2 out ports of the fuel pressure regulator to make a fuel loop, and power the fuel pump directly from the battery, and after dumping a gallon or 2 of fuel in the tank, let it circulate to check for leaks. I could also get the interior back togather, back pad back in, seat in, vac that up a little. Next week for work is probably 60 hrs and 1000+ miles on the road, so monday night will be my only option to make more progress after today. Maybe next saturday I can get a couple friends over to get the motor in, and we'll have some tuning adventures to report on.
Attached image(s)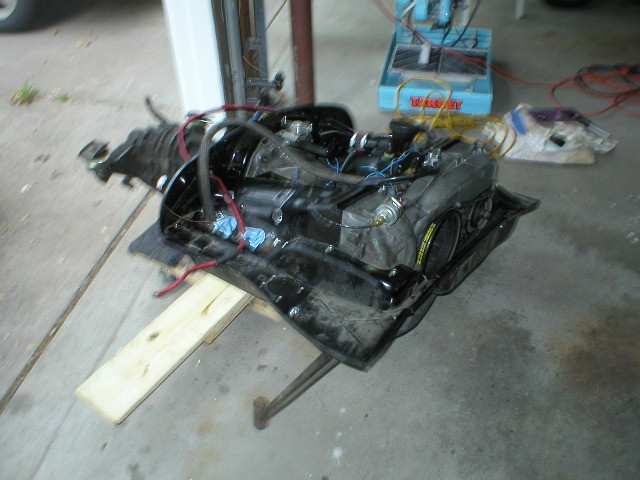
Posted by: ottox914 Aug 7 2006, 06:27 AM
Slow progress on sunday. Slept in. Dad came by, we had a beer on the deck. . Some friends called up for golf and dinner. I got some metal patches painted and installed on the engine tin, re-did the fuel pump instal- again. I wasn't happy with the filter, it was for a 75-76 car, and the inlet/outlet were not the right sizes for the 3/8 line I was using from the tank to the filter, and from filter to pump. A "purolator F21111 has the right size inlet/outlet, so finally tracked that down, changed some more fuel lines, and the tank is almost in. Rinced the it out, and test fit the tank again, the fuel outlets need just a little twist to line up perfectly with the new hose runs.
Attached image(s)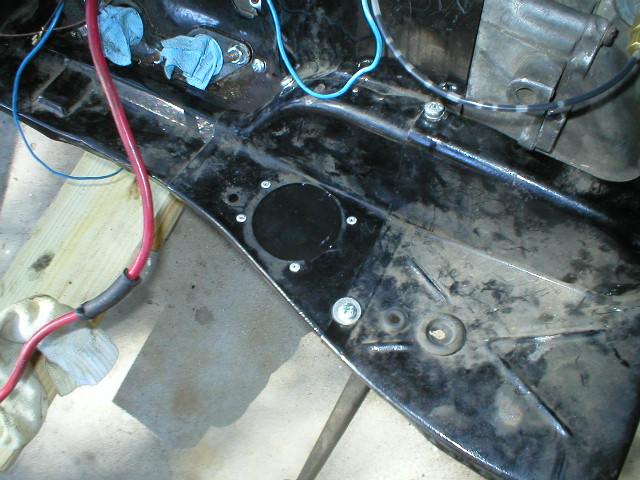
Posted by: ottox914 Aug 7 2006, 06:33 AM
Here's a shot of the new mini starter- looks good if you ask me!
The to-do list is still a long one- finish up the final checks and wire runs on the engine itself. Pull the front fan housing, alternator, fan and re-allign the sensor. Do the final adjustments to the fuel lines and install tank, test the fuel system for leaks. Stuff the motor/trans in, do CV's, exhaust, install all the intake manifolds, ITB's, linkage, fuel lines, wideband sensor and wireing, and hit the key!
Monday is my only night to work on it this week, we'll see what the weekend holds.
Attached image(s)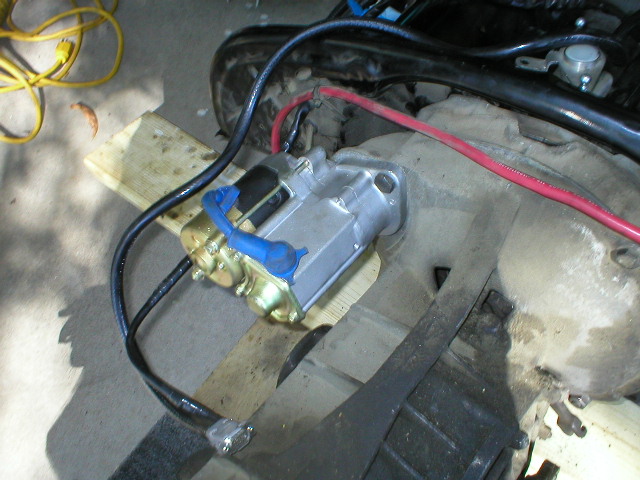
Posted by: ottox914 Aug 7 2006, 09:22 PM
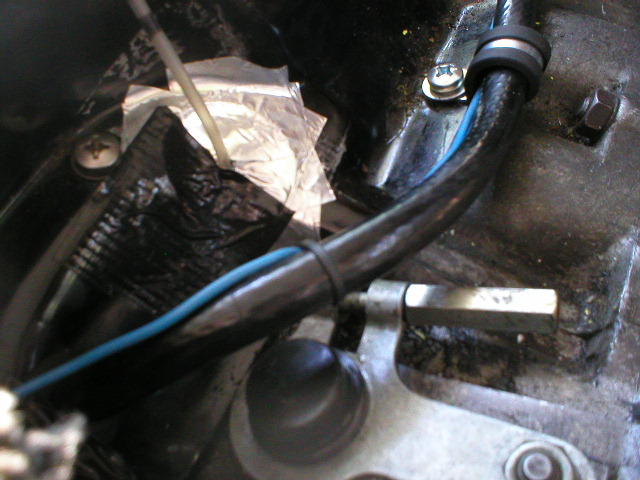
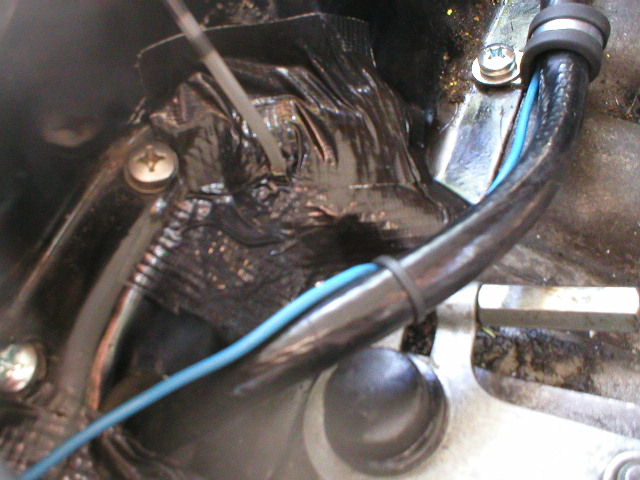
Long day driving a desk, but I did make it to the garage for a bit. Confirmed that the magnets are all "seen". They are seen by the sensor for just a couple degrees of crank movement, and when I was testing them last night, with the plugs in, the compression was enough to cause the motor to spin past the point of recognition, and it seemed as though the sync magnet was not registering. I pulled the plugs this pm and tried the test again, and with the ability to more smoothly, slowly turn the engine over, all magnets registered just fine. Also did a little detail work, routing and securing the hall sensor wire, and taping up the oil pressure hole.
There is a big, odd factory grommet to go here, mine had long since rotted away. So, I put several layers of aluminim tape over the hole, one on top of the other. This is the tape used in the HVAC industry to seal ducts after the install. After about 3-4 layers of this, I topped it off with some black racer tape. Looks kinda bad close up, but once the engine is in the car, bending over the fender to look inside, it'll look just fine for now.
First photo is initial layers of aluminum tape.
Second photo is start of black tape.
Third photo is finished job.
To the right can be seen the plug for the dizzy that the fearless fabricator came up with to seal the hole. I took it out and shot it black to keep it from rusting a little, as it was bare metal when he got done with it.
Attached image(s)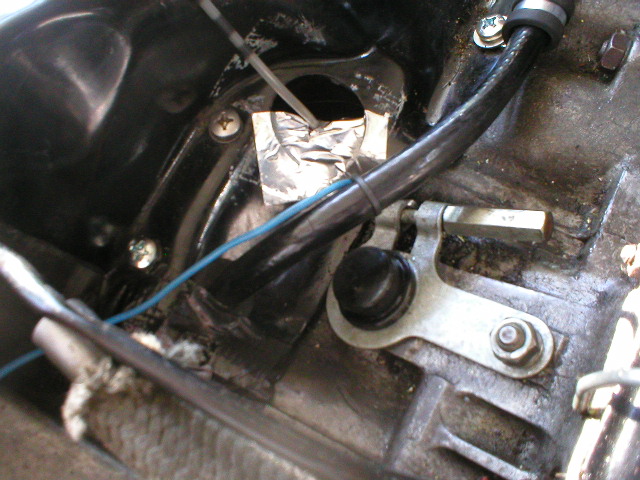
Posted by: ottox914 Aug 17 2006, 07:12 AM
More progress but no sparky just yet. The engine is in the car, and the bottom side work is all done. Kerry Hunter is installed, wideband installed, clutch/speedo, ground strap installed. Started work on the top side, and the drivers side ITB is in, all wireing on that side is done. Working now on the middle of the motor wireing, and have still the passinger side ITB to mount and wireing on that side to finalize. Need to make some plug wires, the ones in the photos are for show/test fitting/routing.
So, on to some pics-
first photo is the underside, ceramic coated KH system, I wrapped it also to keep the heat down. wideband sensor installed
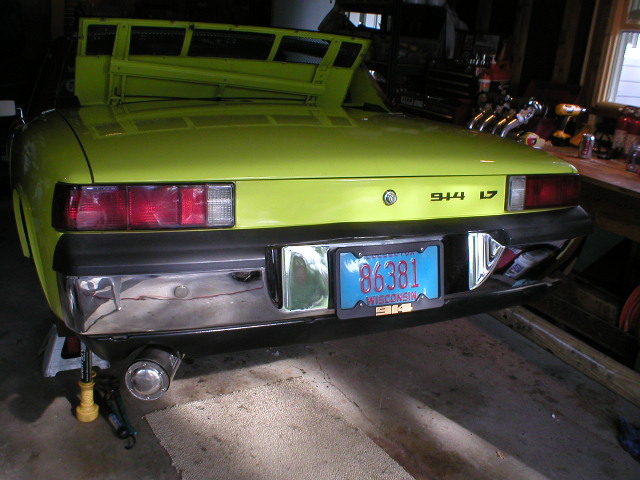
second photo- I couldn't stand it anymore, I dusted off the trunk lid, shined up the bumper, polished the supertrapp a little, and had to take a shot- its looking like a nice 914 again, rather than a pile of parts.
Attached image(s)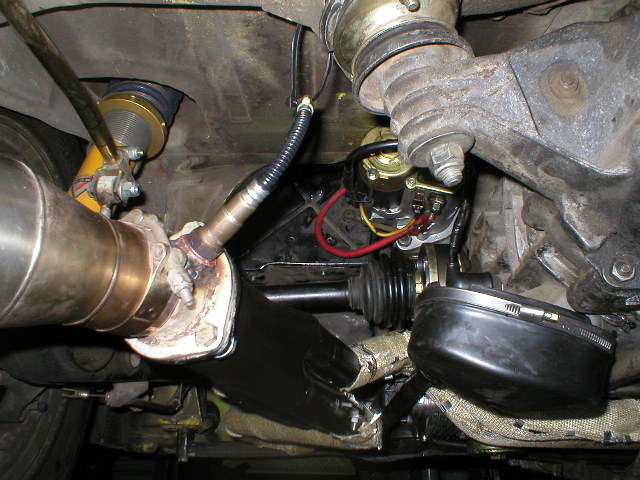
Posted by: ottox914 Aug 17 2006, 07:16 AM
more pics-
first is the drivers side ITB, I made new, longer threaded rod sections so I can add a small spacer and some rain hats from one of our 914 club vendors...
second is the interior, I cleaned that up a bit and got it all back togather. From the same good 914 club vender, there are 2 of the cool speaker enclosures, both in raw FG, needing to be finished and installed- that will be a nice lazy weekend project once the car is back on the road.
Attached image(s)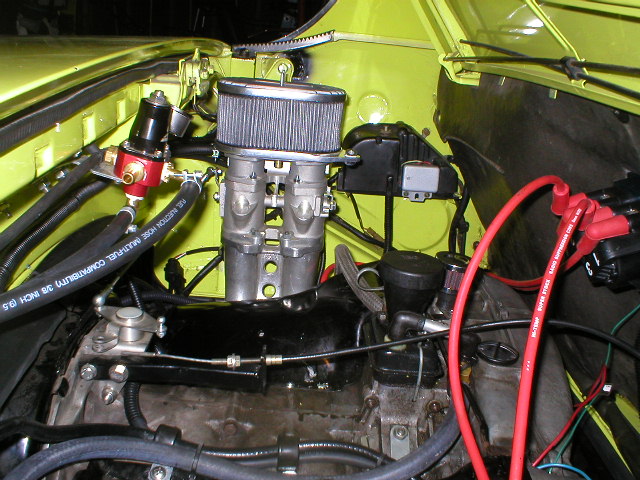
Posted by: ottox914 Aug 17 2006, 07:19 AM
Whats left? A little wireing in the middle of the motor, install the passinger side ITB and connect all the sensors over there, connect fuel lines, route to the ecu and connect the crank sensor, 2x and 3x check everything, add some fuses, and crank it over- see what happens!
I'm thinking saturday will be THE day. She goes or she blows.
Posted by: crash914 Aug 17 2006, 10:14 AM
Can you share some more information on a couple of items?
The fuel pressure regulator that you are using, is it a rising rate type?
The throttle linkage. That looks trick. I like the cable fit and mount.
thanks,,,,
Posted by: Mark Henry Aug 17 2006, 12:28 PM
The old trigger mount thing done quick bit didn't happen? 
I knew as soon as you ripped out that engine a bit of DWD would set in...get that puppy off those jack stands as fast as you can or else.
Looking good!
Posted by: Dave-O Aug 17 2006, 01:09 PM
Looks good Dave!
Make sure to call me when it pops (in a good way). I've been stuck working on the Saturn as of late...struts and a bunch of other stuff.
Are you driving the Jackett on Sunday? If you need a seat I've got one open.
I'll give you a call tonight.
Posted by: ottox914 Aug 17 2006, 08:22 PM
Throttle linkage came from here:
http://www.classicandspeedparts.com/s/
Its the same one Jake sells, although modified by him, to work on his DTM systems for the 914.
The cable bracket is the fine work of the mad mechanic, and fearless fabricator, our own Dave-O (Hildebrandt)
The FPR is indeed a rising rate, its an aeromotive #13301, summit or jegs can set you up with one. I liked the way it would mount in my application, and I liked the pressure rates- the stock spring is 3-20 psi, the optional spring, (which is included in the kit, you just need to install it) is 20-65 psi. I'm running 30 right now, which is what Jake recomended for the injectors I'm using. I liked that this one had a lower range than others. If the FPR has a range of 30-80 lets say, and you want 30, what if you really end up needing 28? This one had a good range for the intended install.
I'll keep us all posted, and keep your ears open for a powerfull vvvrrrrooooooom! Or great weaping and sadness...
Dave-O, the jackett is scheduled for its first runs of the year. It wasn't out last weekend due to wet conditions. Not that it would rust with all the FG on that car...
Mark, with your little beer swilling smilie, are you intending to come way down south to Wisconsin and buy me a cold one?
Posted by: ottox914 Aug 21 2006, 06:48 AM
IT LIVES!!!!!!!
I'll post some photos and description of the first start, and thoughts on the project later today or tomorrow when I have more time....
IT LIVES- IT LIVES- IT LIVES- IT LIVES!!!!!!!!!!!!!!!!!!!!!!!!!!!!!!!!!!!!!!!!!!!!!!!!!!!!!!!!
Posted by: ottox914 Aug 22 2006, 08:49 PM
This could get long.....
Got it all togather the 21st, and hit the key... nothing. again. nothing. again. nothing. It would just crank and spin. Cranked pretty good with the new starter, but no "pop". Kept telling myself it was air in the fuel lines. 4th try. POP, VVVrrrroooommmm, a nice, even 1000 rpm idle.
whoa.
Didn't really expect THAT so soon. I haven't even messed with, well, anything. I sit in the drivers seat, amazed and happy. Next thing is to set the base timing. Turn off the key. Pull it out. Motor is still running..... pulled the 12v line from the factory relay board to the power-to-the-system relays I added, and it dies, as it should. Several days of trouble shooting, and I think its a bad ignition switch, as when I power the new system relays direct off the battery, the same problem occurs, making me think the problem is in the switch or factory relay board, rather than my work.
So, sometimes the key shuts things off, sometimes is doesn't. So tonight, when I got the clutch tightened up, I stayed pretty close to home.
It runs good. Real good.
It was getting dark, so I didn't want to get out in to deer country, and the non-backlit SDS controller was getting hard to read, but I did do a little seat of the pants tuneing, and as they advertise, it is simple. I ran thru the gears a couple times, glancing at the WMS wideband, noting that the suggested factory fuel settings were giving me about 9-10:1 AFR. I left it pretty rich at idle, but above 1750 started leaning things out. Another quick spin, we're around 10-11:1. Pull over, pull a little more fuel from 2k rpms up, and have a look again. Now we're at 11-12:1, and its dark. Not bad progress for 15 min of driving. Sadly enough I have 2 long days ahead of me, so probably no tuning wed/thur, but I could have a short day friday...
Can't wait to use the data logging feature. Basically, warm the motor up. Find a deserted, deer free road, start at 2k rpm or so in 3rd gear, plant the throttle to about 75%, and run to redline. The SDS will record the AFR every 250 rpm and save it for you to look at on the controller. Compare that with what you want at each rpm range, change the fuel value at that rpm range to reflect the same % difference of the AFR you got, and AFR you want. Lock down the controller, take another run, and adjust again if needed. How easy will THAT be.
Before all that, I need to borrow a timing light that works, as mine seems to be fubar'd. I'll set the base timing, which involves just looking at the timing marks with the timing light, and adjusting a value on the controller to "set" the timing to 10btdc. This way the ecu has a reference to what 10 degrees is in the real world, as compaired to whatever the exact timing ended up being based on the magnet installation. You're just fine tuneing the accuracy of the magnets to real world for the ecu.
Got alot of people to thank:
-My wife for her patience, and not asking how much this was all costing.
-Mark Henry, for the hook up on the goods.
-Ross and Barry, the owners of SDS, who are nearly always availible on the phone, and were very helpful in working out harness lengths and routing. Nothing was impossible for these guys, the answer was always: sure, we can do that. How cool is it to actually get one of the principals of a business on the phone?
-Our own Dave-O Hildebrandt, the mad mechanic, AKA fearless fabricator. His relentless push toward progress is nicely balanced by my "Monk" like tendencies to the details, and we work well togather. Not that he does sloppy work, but he pushes me along and I keep an eye on the finer points of the project.
-Lee Frisvold, friend and president of our auto cross club, as well as electronic guru. He teaches automotive electronics, specifically control systems, and in addition to being a positive sounding board of support for the project, what a mind to have on the team.
-Brad Mayeur. If you don't know him, you should. 914LTD is his business, and he likely has forgotten more about 914's than most all of us think we know. A great source of odd bits and pieces for odd 30+ yr old cars. His passion for the 914 is matched only by his depth of knowledge. Between Lee with modern EFI training, and Brad knowing the fine details of the 914's, these were 2 gotta haves on the team. (Brad can be reached at: P914ltd@yahoo.com or at: 309-694-1797)
-Others who had a hand in the madness: Steve Kramschuester, Brandon Hatfield, and the Great Nate. Thanks to you all.
So whats next? Set the timing, get the cyl head temp gauge working, get the new ignition switch from Brad, adjust the shift linkage, and whatever else needs doing. Now some more photos to get current:
Not that its a Porsche, but is a 2 seater, our new to us slightly used tandem
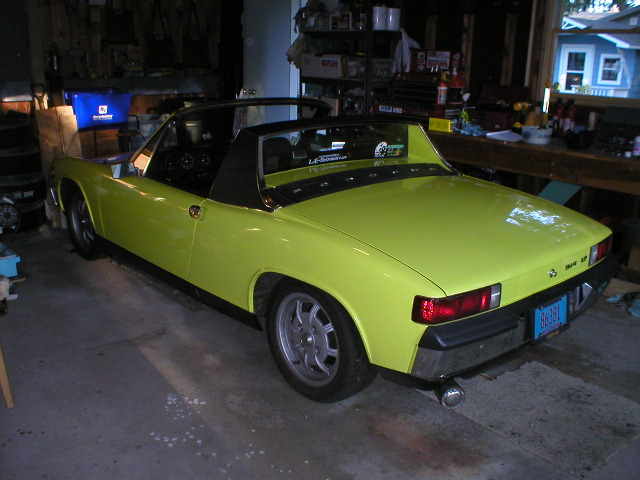
The yellow car.
Attached image(s)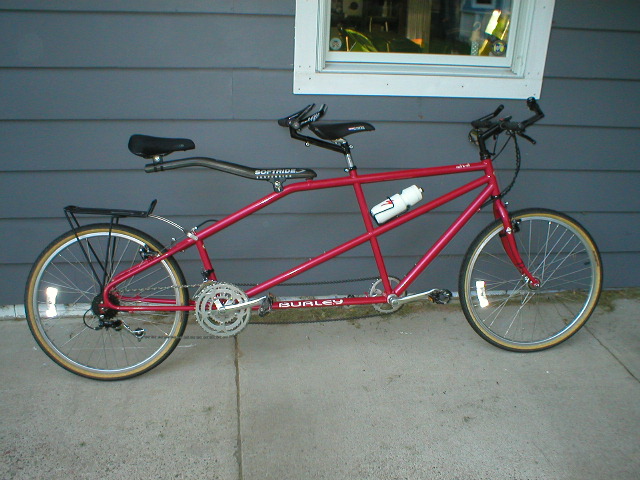
Posted by: ottox914 Aug 22 2006, 08:56 PM
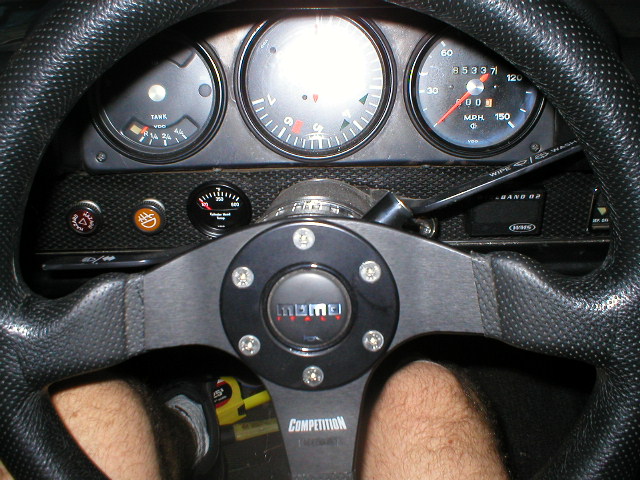
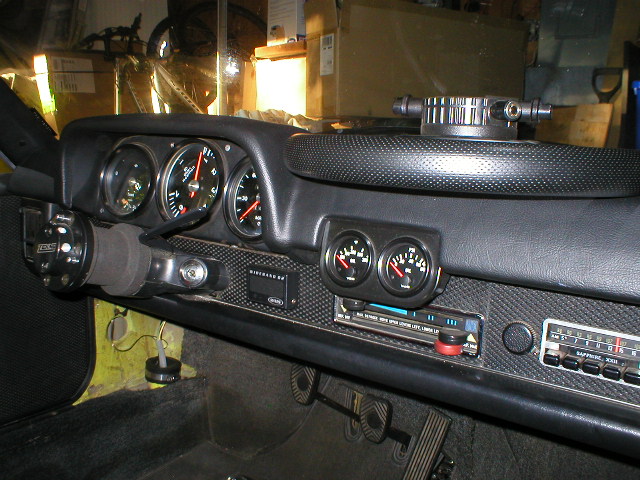
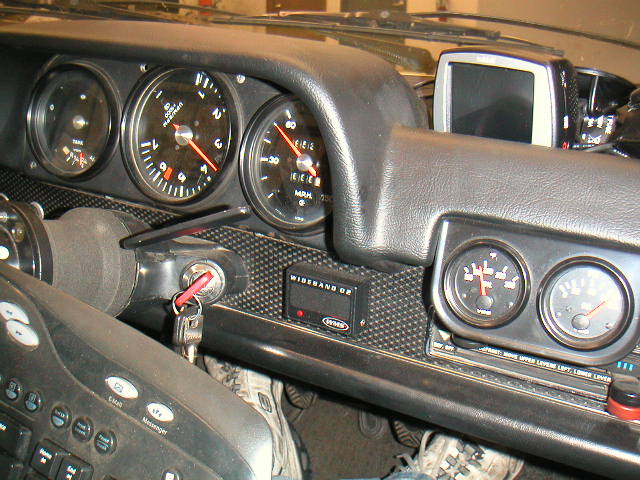
cyl head temp gauge that is backlit, but not showing a reading. Hmmmmm.
wms wideband. I like it. Installs easy, looks cool, works great.
Attached image(s)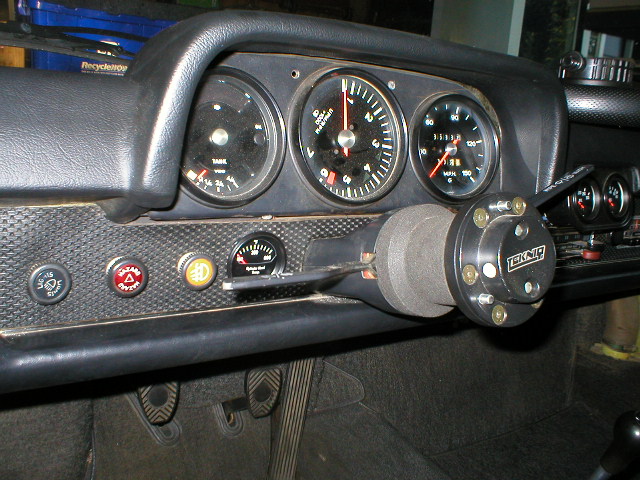
Posted by: ottox914 Aug 22 2006, 08:58 PM
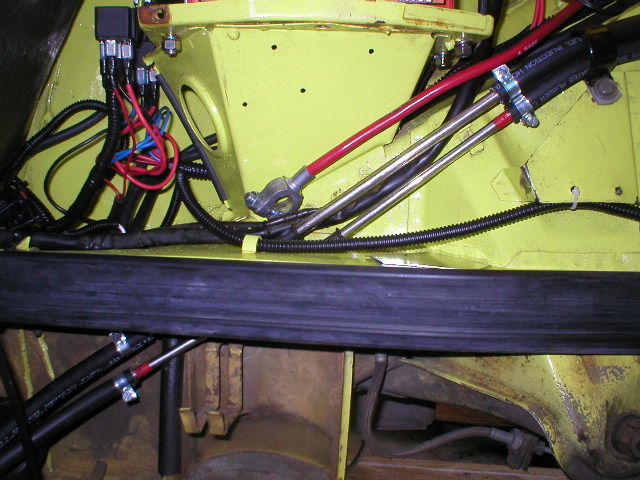
coil pac mounting.
throttle linkage.
Attached image(s)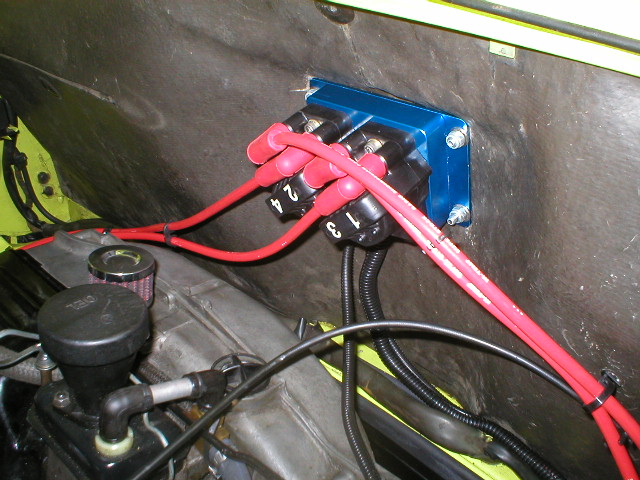
Posted by: ottox914 Aug 22 2006, 09:00 PM
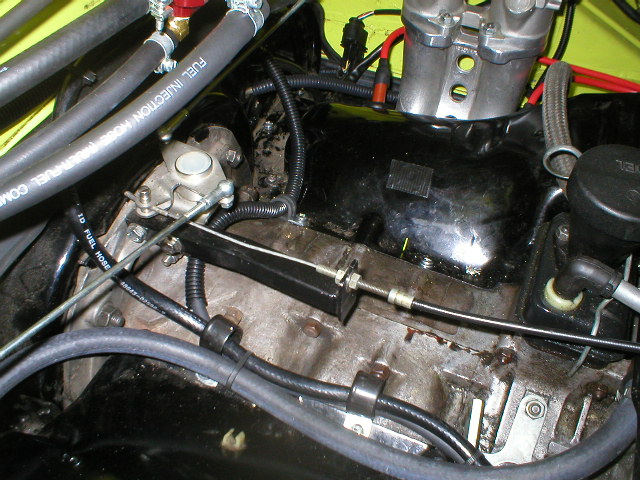
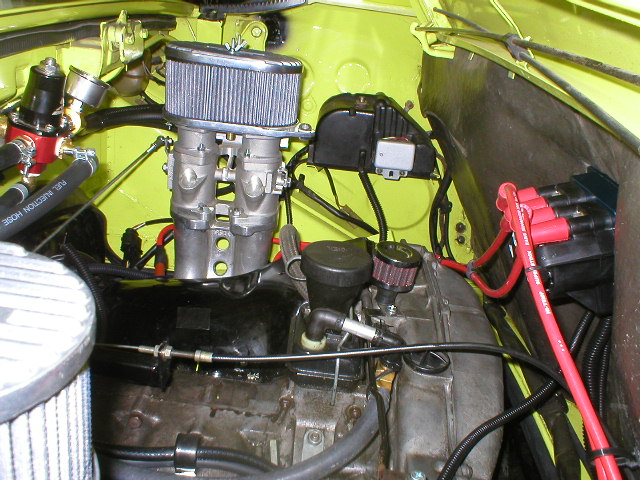
left and right ITB's.
Attached image(s)
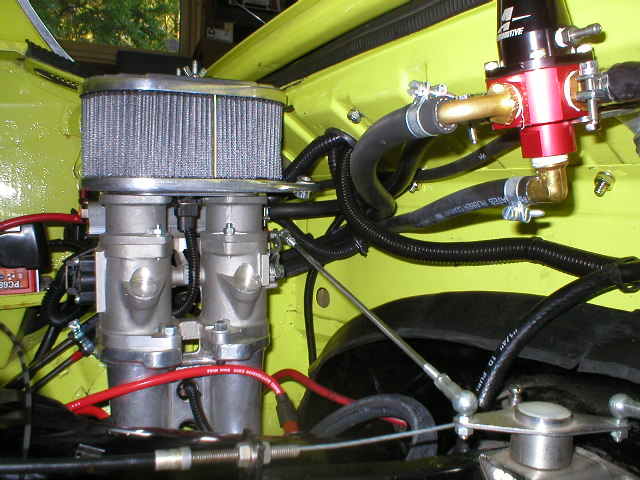
Posted by: ottox914 Aug 22 2006, 09:02 PM
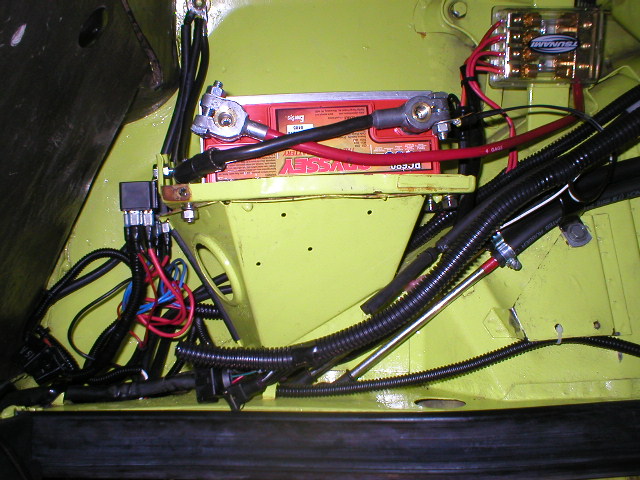
battery area and relays/distrubution block.
Attached image(s)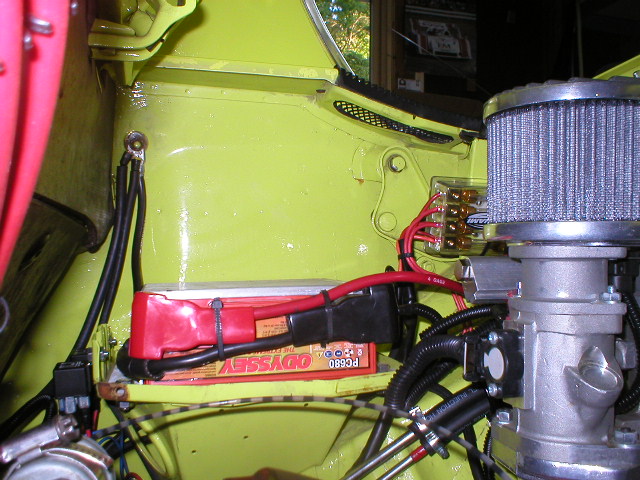
Posted by: ottox914 Aug 22 2006, 09:04 PM
ITB's from above
Attached image(s)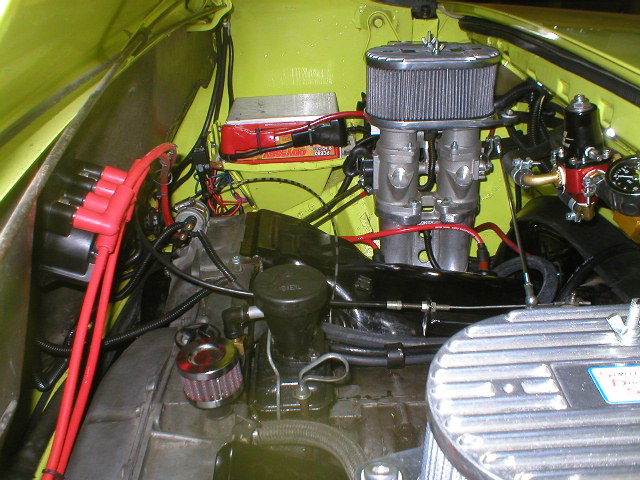
Posted by: ottox914 Nov 17 2006, 07:25 AM
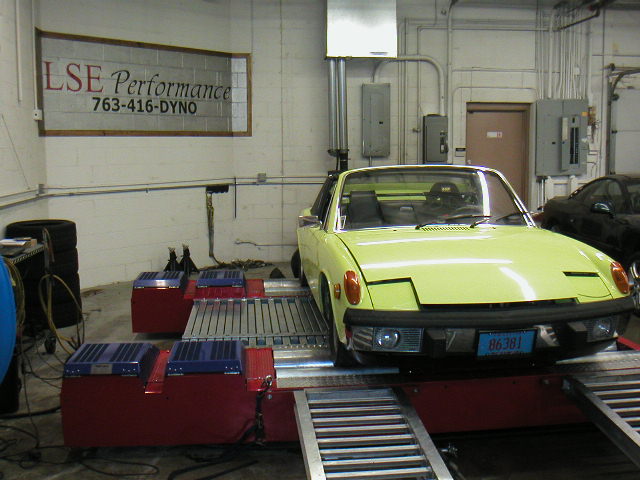
Its 20 min. after 7. Its 28 degrees out. I have a 2.5 hr drive to the dyno. And headers. No heat.
Does this sound like a trip a rational, sane sports car owner would take?
If you answered "yes", you must be a 914 owner.
If you answered "no", sell your 914 and buy a miata.
I don't have a scanner to post the sheets, but I'll add some photos and comentary on the fine tuning of the SDS on 45mm twm's. Changes since the last post have been minimal- I swapped the 1bar map sensor for a 2bar, in anticipation of the turbo going on this winter. That will change the n/a tune a little, but not much, mainly due to the number of cells availilble to adjust the tune. If the system has around 60 cells for values, evenly spaced by vaccume amounts, then all 60 are availible for n/a running with a 1bar sensor. With a 2bar, 30 cells are availible for n/a tuneing, 30 for boosted tuneing. So by running a 2bar sensor on a n/a car, I now have 1/2 the resolution for n/a tuneing, but on the other hand, when the turbo goes on, 1/2 the tuneing will be done!
Posted by: ottox914 Nov 18 2006, 02:49 AM
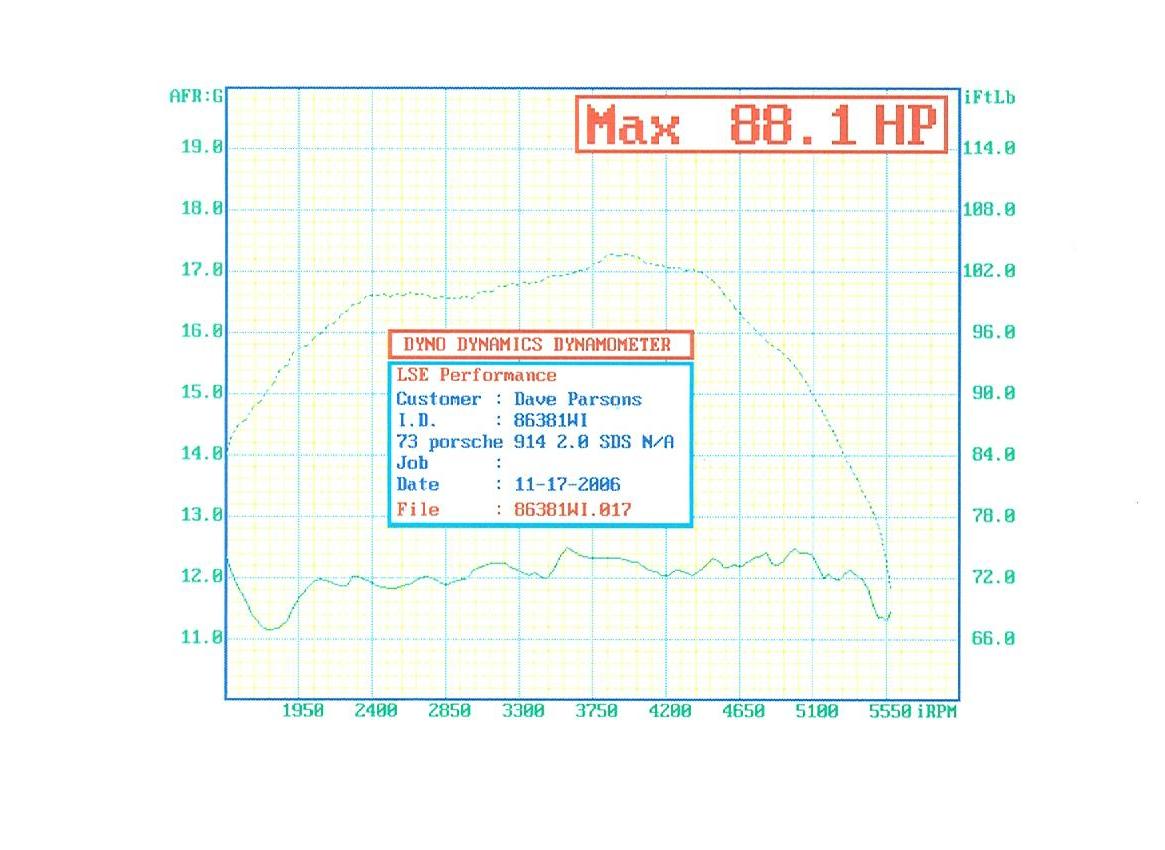
Well, here is the news. I tried to go into this without any real expectations, just a better running 914. And thats exactally what I got. It starts with about 1/2 a revolution of the starter, and settles into a 750 rpm idle, no stumbles, around 14:1 afr. Max HP was 88.1, TQ was 103.6. If this seems low, know that this was obtained on a Dyno Dynamics system, which generally runs 10% lower than a dynojet or mustang. So 88 hp is closer to 96 at the wheels. Add another 10% for driveline losses, and we're at around 105 at the crank. The engine is stock cam, heads, crank, just has kerry hunter exhaust, TWM's and SDS.
The TQ curve, well not curve so much as straight line is impressive. At 2250 rpm, the TQ is 98 pound feet, and while it rises to a max of 103.6 at 4000 rpm, it stays above 98 till 4750 rpm. Of course its all over by 5k rpm, but what fun on the way there. If we use the same conversions, 103 plus 10% + 10% puts the TQ at the engine at around 125. I was amazed and pleased with the flatness of the curve. I was concerned about losing some TQ with the ITB's, but this does not seem to be the case. It pulls like crazy from 2500 or so right up to where the cam takes a crap on the party and it all goes south at around 5k rpm. At 5250, where HP and TQ meet, I'm making 84 hp/tq.
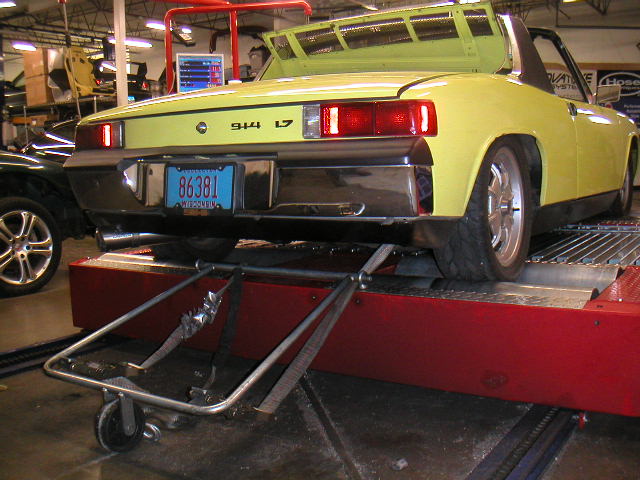
Here are a couple snaps of the day.
Attached image(s)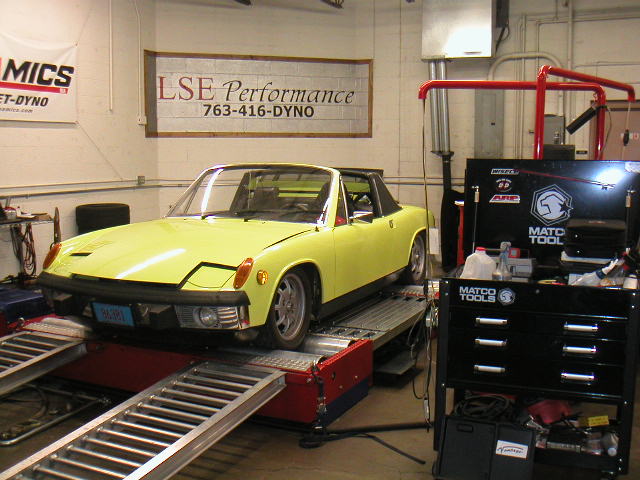
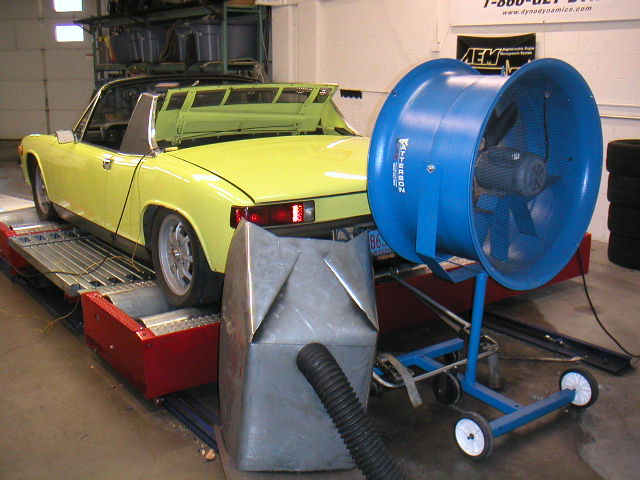
Posted by: ottox914 Nov 18 2006, 03:00 AM
These guys are a big turbo/drag shop, with the owners mitzu 3000gt putting down 720 HP, and is street driven, full interior, and will light up all 4 tires in 3rd gear on the highway if you ask it to. They did a great job on the car, and had some good turbo info for me for the planned upgrades to my car this winter.
Here are a few more pics-
Attached image(s)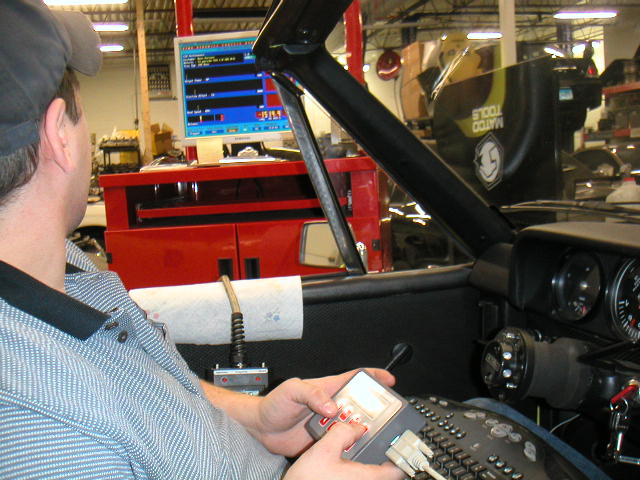
Posted by: ottox914 Nov 25 2006, 04:24 PM
Here are the charts-
Attached thumbnail(s)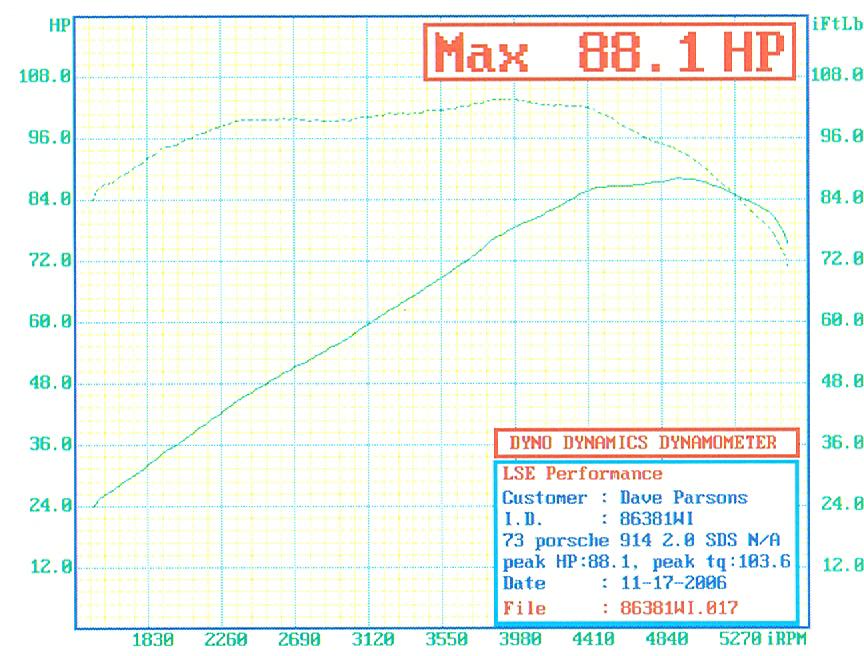
Posted by: Eric Taylor Nov 25 2006, 05:01 PM
Cool project! That's going to make for a nice reliable car. That burley is a cool ride as well. The softride on the back must be plush. They always made nice bikes, to bad they tanked.
Posted by: Joe Ricard Nov 26 2006, 06:57 AM
Nice. I guess hoser power per dollar is tough to eat huh? that better be one sweet running engine.
Posted by: ottox914 Nov 27 2006, 08:27 AM
Eric- both Burley and Softride are still making bikes- google them and see, they're just not making bikes togather anymore.
Joe- Idles at 1000 rpm as well as any honda, pulls like a freight train idle to redline. Don't forget, this is only about 1/2 way into the project. Next is the turbo. The stock EFI can't handle that as well as the SDS, and I think your carbs would have a tough time with a little un-natural aspiration as well. You are building your car for the SCCA, I'm building mine for me. Its cool both ways, we're both still ripping it up in 914's.
Powered by Invision Power Board (http://www.invisionboard.com)
© Invision Power Services (http://www.invisionpower.com)