Printable Version of Topic
Click here to view this topic in its original format
914World.com _ 914World Garage _ The Official JLO V8 Conversion Thread
Posted by: nine14cats Jul 17 2006, 12:13 AM
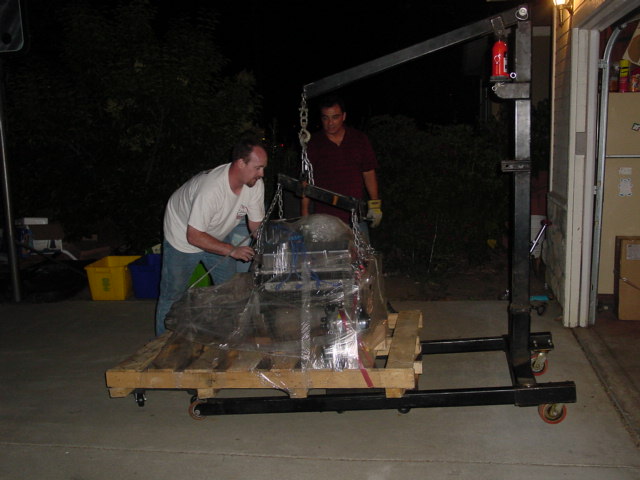
I am using this thread to document our Renegade V8 conversion of a 1975 914 that I purchased from Craig Laughlin at Camp 914. The car has 11 inch wide steel GT flares on the back and along with GT flares on the front. 17 inch rims all around.
The start of the project was Craig delivering JLO to our front door. You gottal love the great service from Camp 914!
Bill P.
Attached image(s)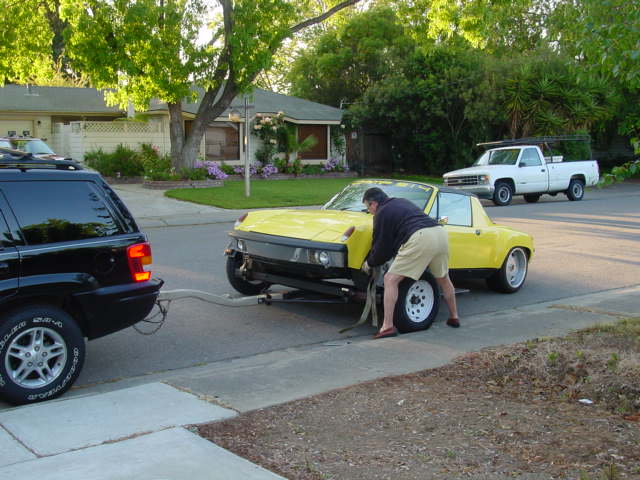
Posted by: nine14cats Jul 17 2006, 12:14 AM
A few shots of the "virgin" JLO before the V8 project starts....
Attached image(s)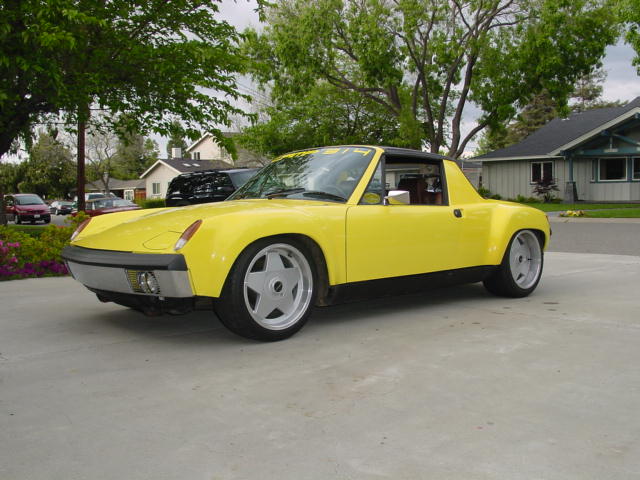
Posted by: nine14cats Jul 17 2006, 12:15 AM
The other side....
Attached image(s)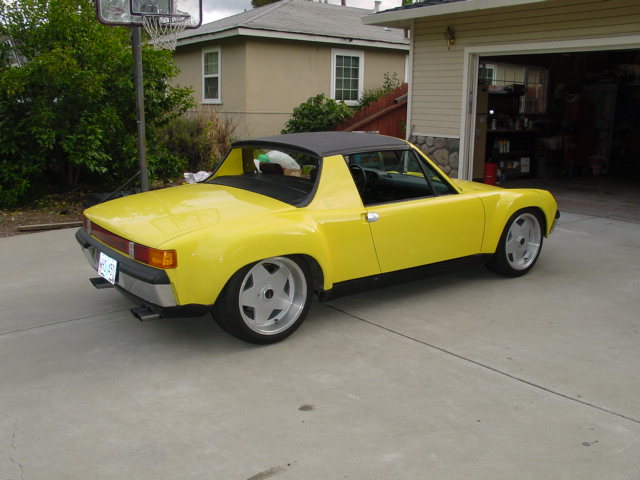
Posted by: nine14cats Jul 17 2006, 12:19 AM
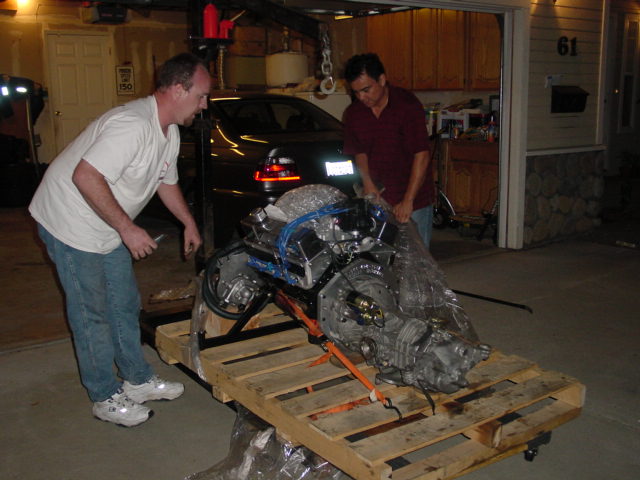
Part of the purchase of JLO from Camp 914 included a great deal on a Renegade Hybrids conversion kit. As I didn't need the 2.2 liter 4 cylinder and sideshift transaxle residing in JLO, James (Lapuwali) graciously offered to purchase the drive train from me. So out with the drive train....
Attached image(s)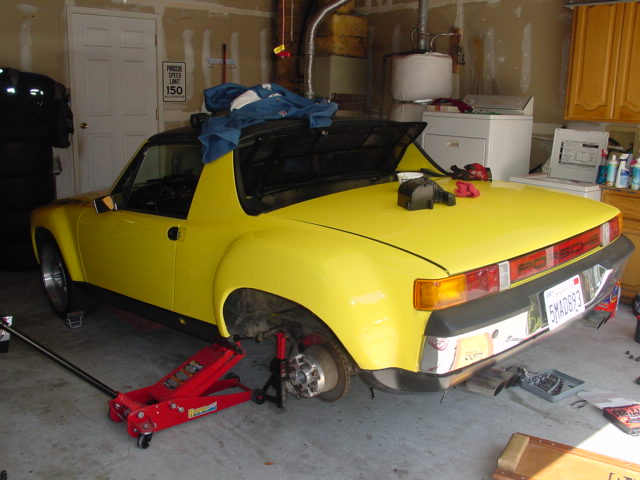
Posted by: nine14cats Jul 17 2006, 12:22 AM
And the engine goes over to James for a transplant into his car....
Attached image(s)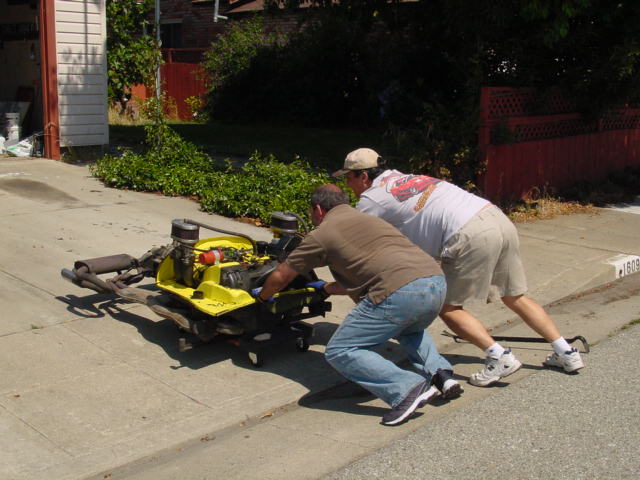

Posted by: nine14cats Jul 17 2006, 12:26 AM
Time to start cutting into JLO for the radiator cuts...so off comes her clothes!... 
Attached image(s)
Posted by: nine14cats Jul 17 2006, 12:28 AM
Here's the Renegade Hybrids template. It cuts through the reinforcement on the lower part of the fenderwell....
Attached image(s)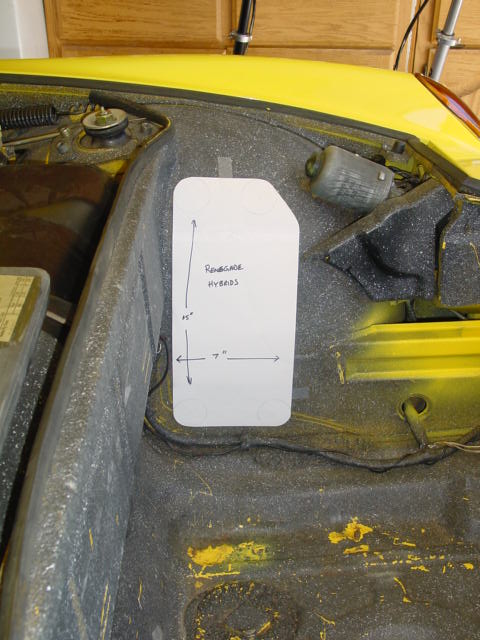
Posted by: nine14cats Jul 17 2006, 12:30 AM
I PM'd Guy Thompson (914GT) about his radiator outlet cuts on his beautiful V8 conversion that he is running in Tuscon, Arizona. He has a slightly different cut out and I ended up using it for my conversion. If I need more exhaust opening for the hot air, I can cut down like the RH template.
Attached image(s)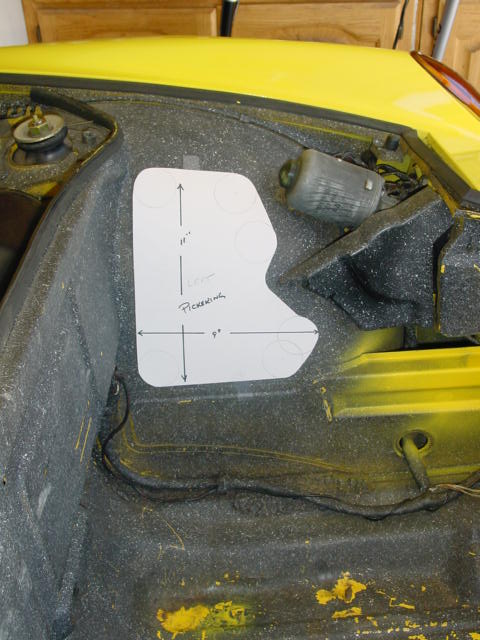
Posted by: nine14cats Jul 17 2006, 12:32 AM
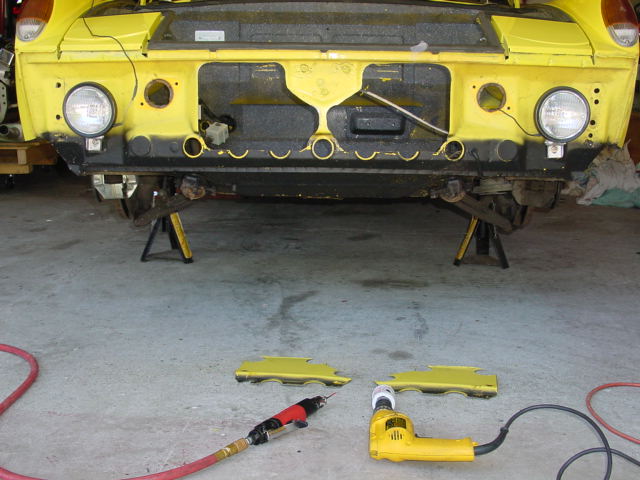
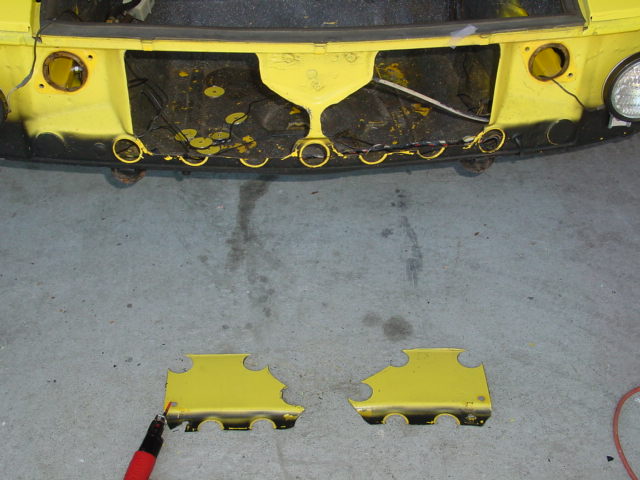
Now for the moment of truth...cutting into a perfectly solid, rust free 914! 
First we go to the front.
Attached image(s)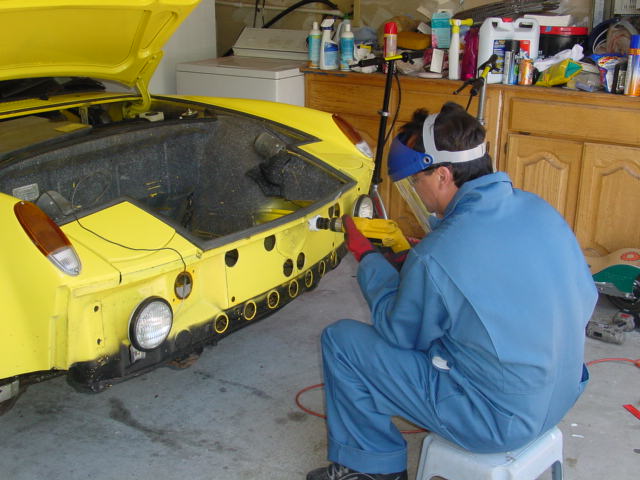
Posted by: neo914-6 Jul 17 2006, 12:35 AM
 Bill, feel free to check mine for comparison. I'm rechecking my electricals for first start...
Attached image(s)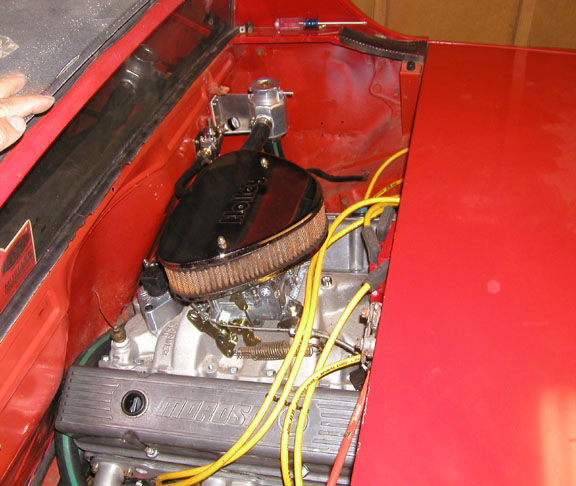
Posted by: nine14cats Jul 17 2006, 12:36 AM
Now to move into the front trunk to work on the wheel wells. First a hole saw for a nice radius edge and then my trusty air tools to slice through the metal "like butter!"
Attached image(s)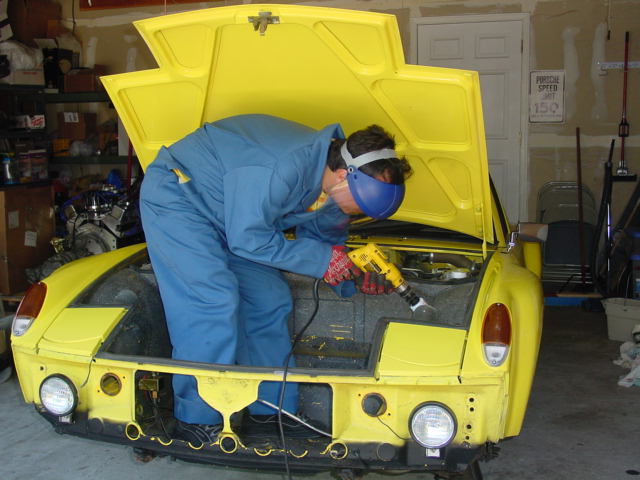
Posted by: nine14cats Jul 17 2006, 12:39 AM
 Bill, feel free to check mine for comparison. I'm rechecking my electricals for first start...
Hi Felix!
I definitely will check your car! This has taken a little longer than I hoped due to family and work diversions, but I'm making good progress now.
Bill P.
Posted by: nine14cats Jul 17 2006, 12:43 AM
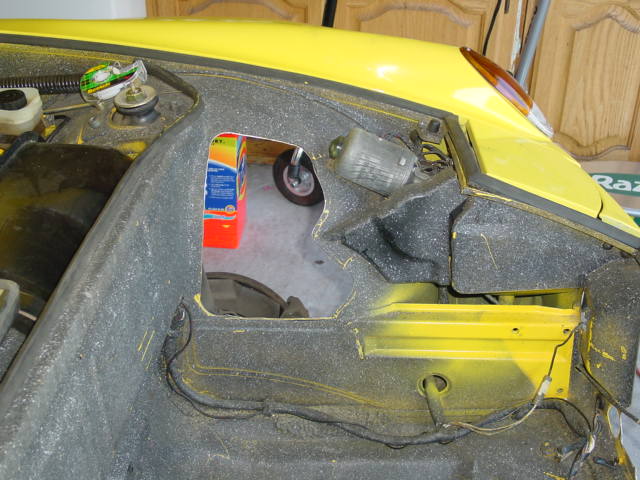
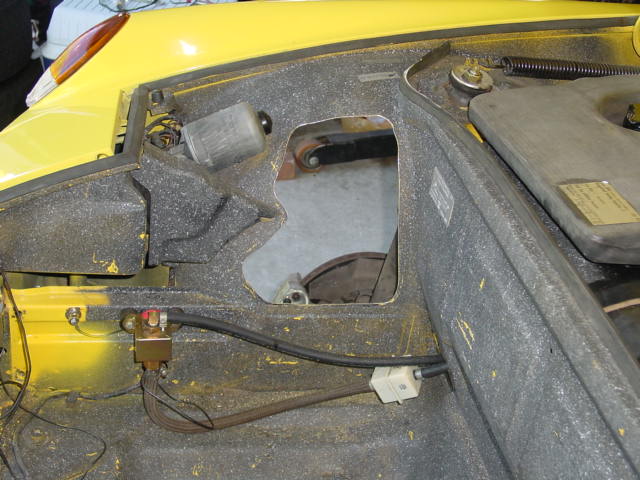
As you can see from this picture, a previous owner had sprayed GM bedliner spray all over the front and rear trunks, including ventilation system and gas tank. 
This bothered me...so I decided to take out the ventilation system and gas tank to survey the situation.
Attached image(s)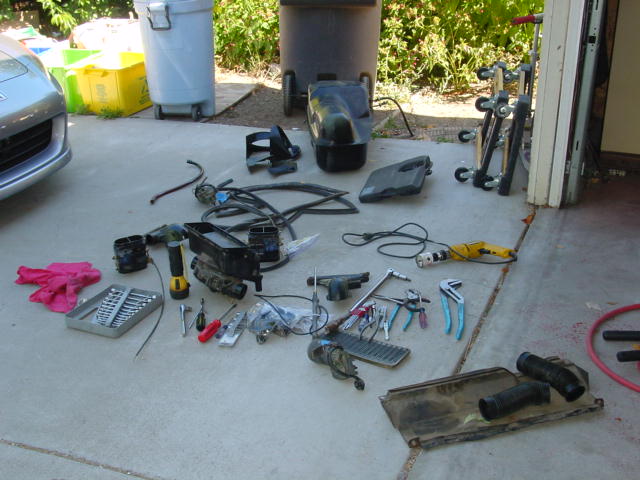
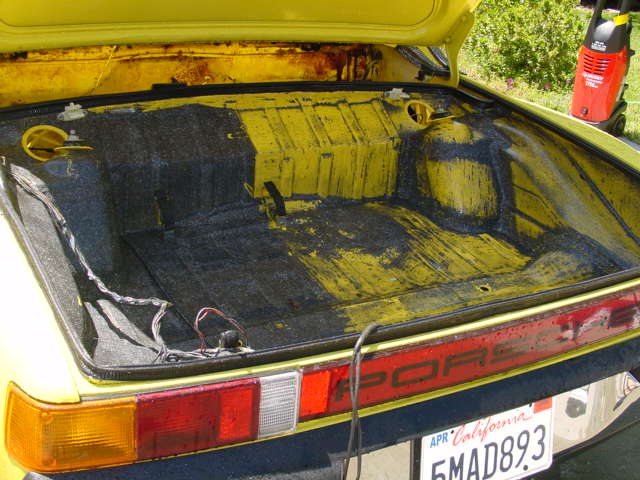
Posted by: nine14cats Jul 17 2006, 12:44 AM
Pretty ugly in there...lots of work to do...
Attached image(s)
Posted by: nine14cats Jul 17 2006, 12:46 AM
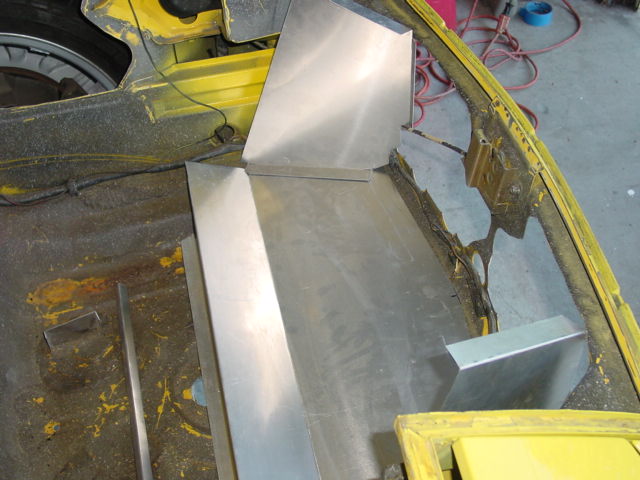
I played around with the Renegade radiator sheet metal for fun.... 
Attached image(s)
Posted by: nine14cats Jul 17 2006, 12:48 AM
Time to pressure wash as much of that bedliner as I can...first the front...
Attached image(s)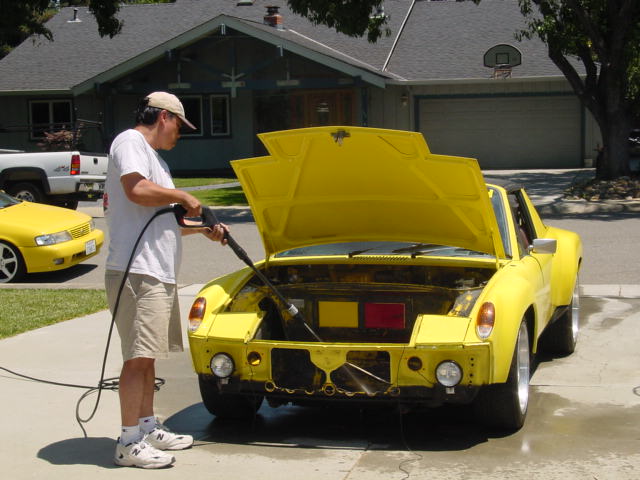
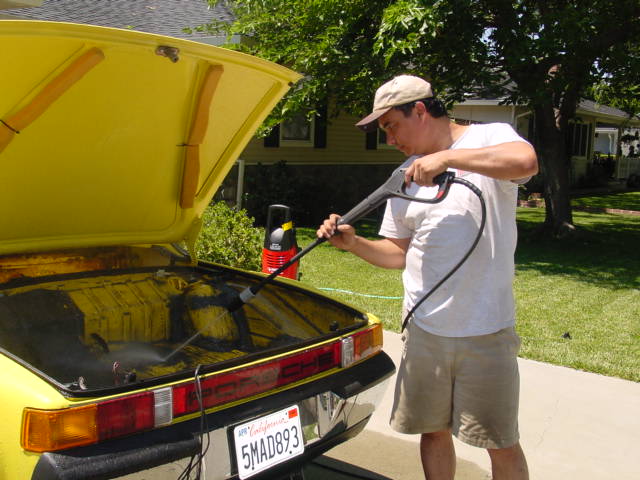
Posted by: nine14cats Jul 17 2006, 12:50 AM
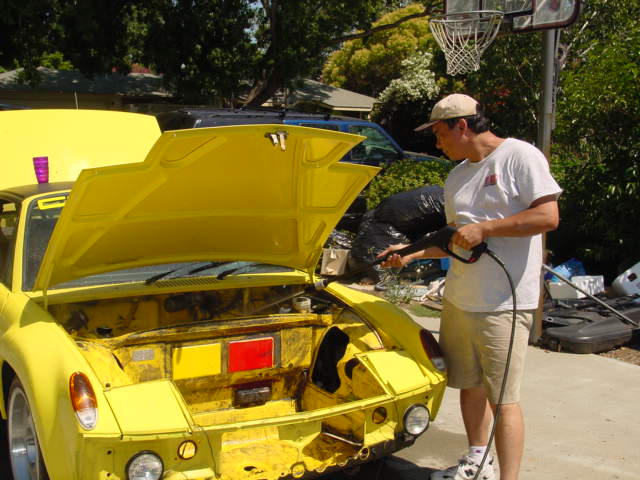
Now to wash JLO's backside! 
Attached image(s)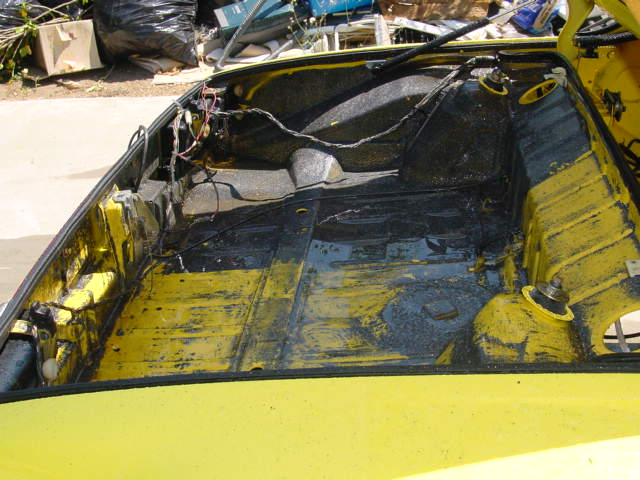
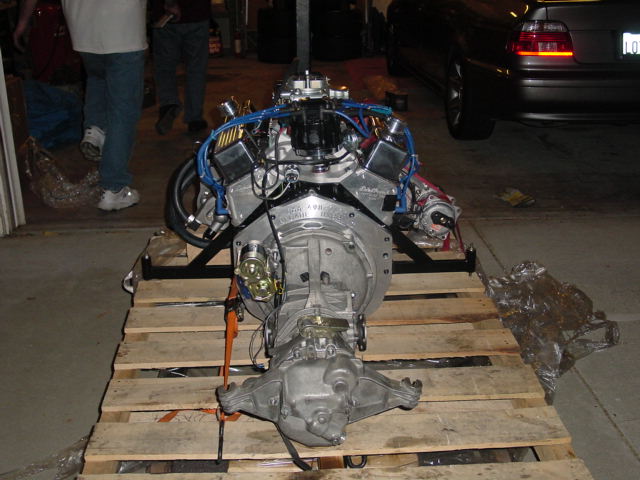
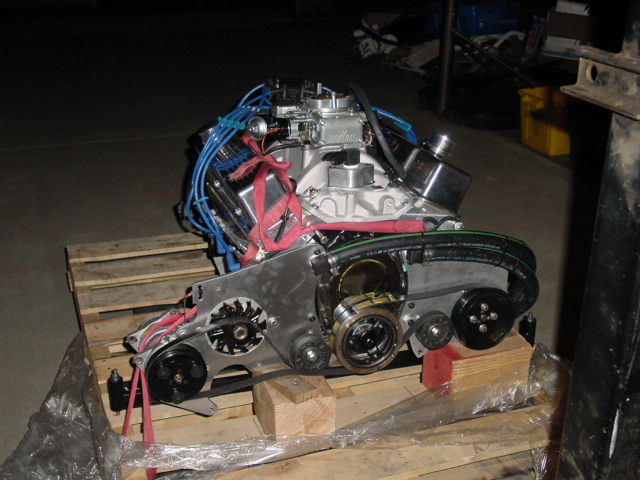
Posted by: nine14cats Jul 17 2006, 01:04 AM
For JLO's V8 heart transplant I wanted something that could spin. I toyed with the idea of a 283 with Rod Simpson's nice camshafts but decided to stick with a 350.
I decided to order a Stage II motor from Renegade's engine builder, Wild Bill's Machine Shop.
I ordered:
350 SBC, 9.5: 1 compression with Demon 650 carb (electric choke)
Serpentine system with A/C
Edelbrock Aluminum Heads and Intake
4 speed RH "tall" gear 901
As there was another thread detailing Wild Bill's issues on one of our fellow members cars here in the club, I brought this to both Renegade and Wild Bill's attention and specified no used anything other than the block and crank.
I had a few "goodies" inside the engine installed as well (roller rockers, ARP everything, etc.) to help the motor spin freely.
The motor should be good for 380HP and just a tad shy of 300 ft/lbs of torque...(trying to make the 901 last as long as possible).
Mike of Renegade personally delivered my motor to my door.
Attached image(s)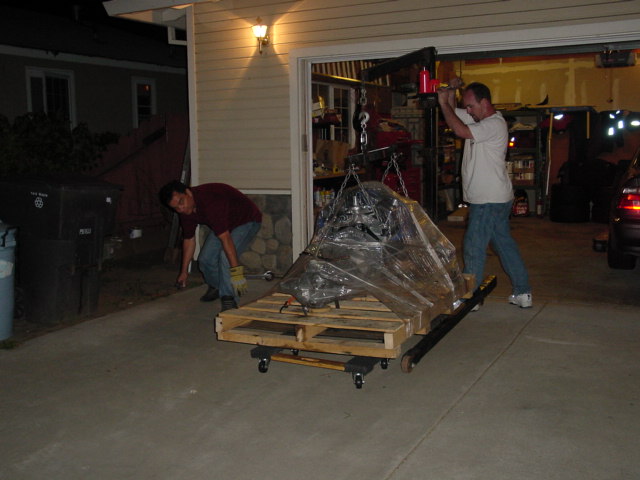
Posted by: nine14cats Jul 17 2006, 01:05 AM
A few more shots of the motor with the serpentine system... 
Attached image(s)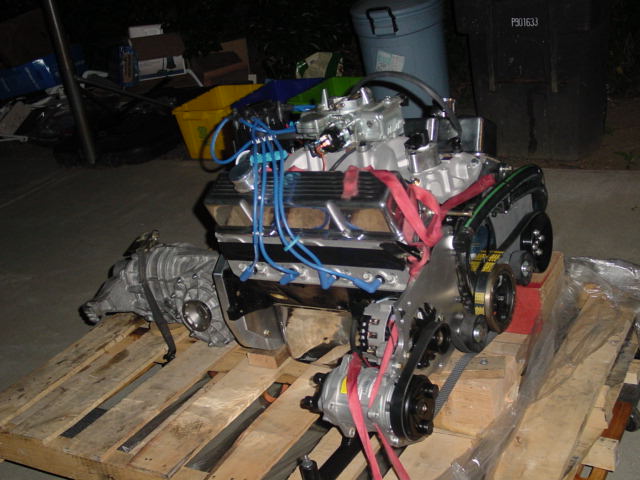
Posted by: nine14cats Jul 17 2006, 01:23 AM
We've been sanding and painting the trunks and engine bays...
Here's the front trunk, before ....
Attached image(s)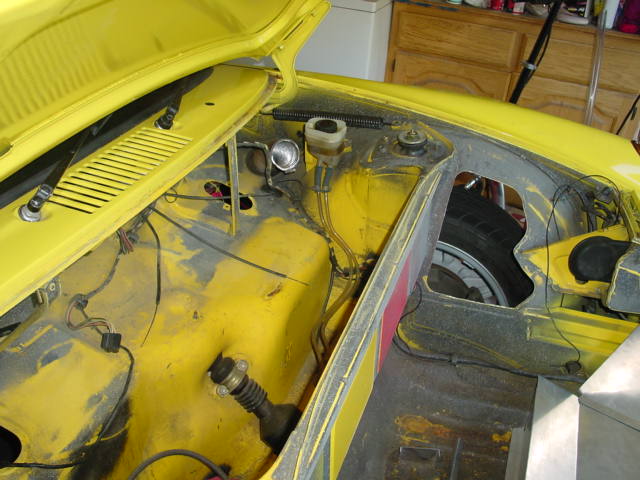
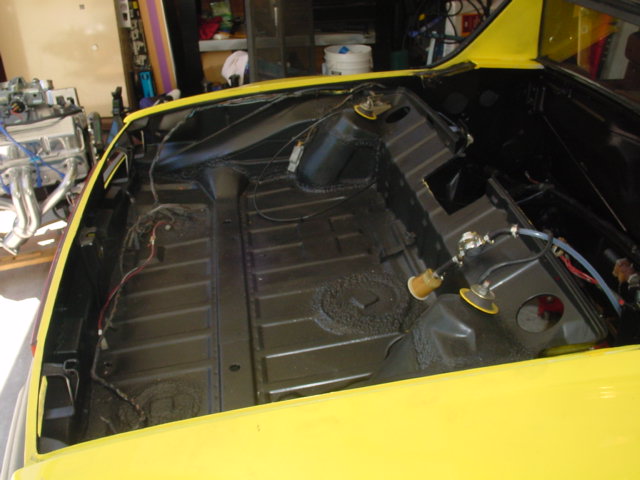
Posted by: nine14cats Jul 17 2006, 01:25 AM
And the front trunk after some elbow grease.... 
Attached image(s)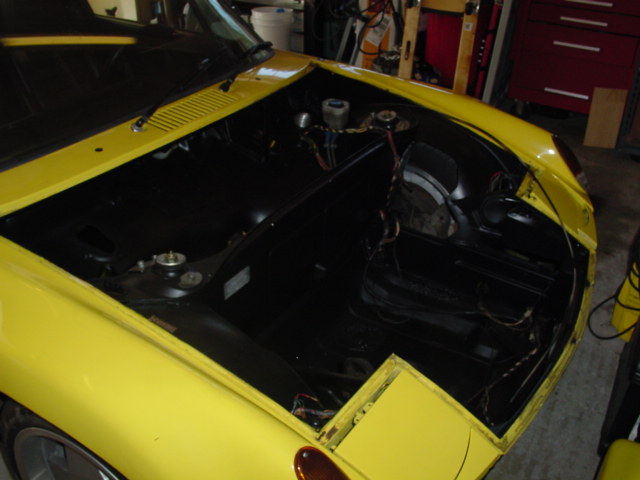
Posted by: nine14cats Jul 17 2006, 01:27 AM
And the rear trunk before and after.....
Attached image(s)
Posted by: nine14cats Jul 17 2006, 01:32 AM
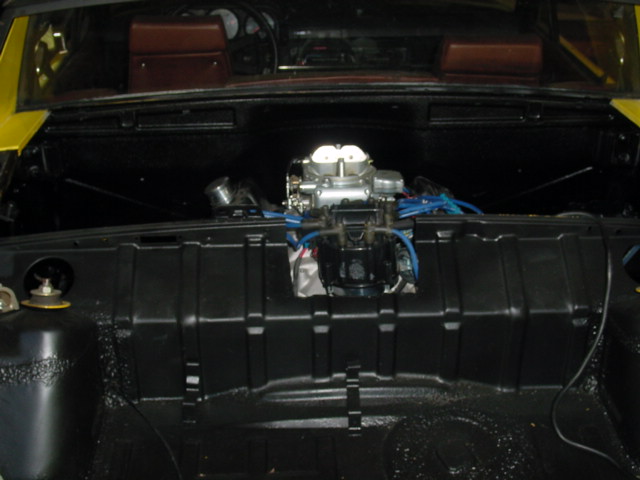
Engine bay....
Attached image(s)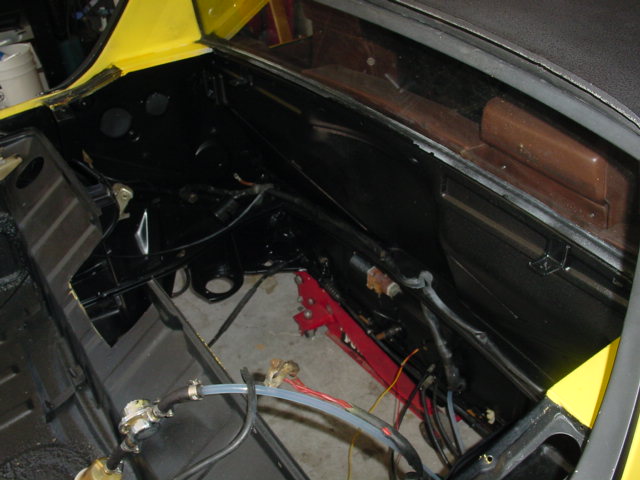
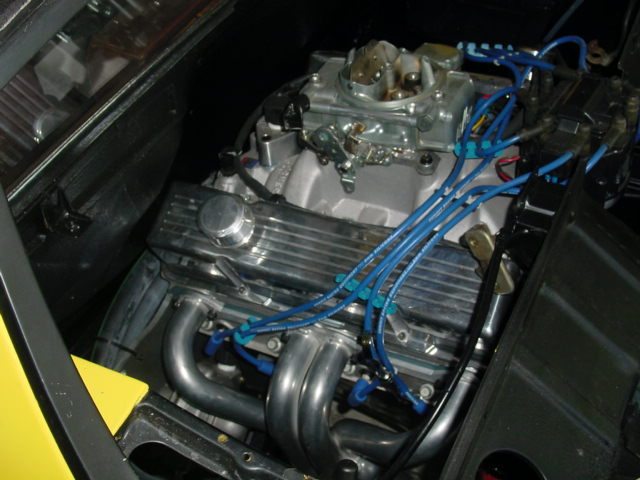
Posted by: nine14cats Jul 17 2006, 01:34 AM
Now to put in the motor...first up is to install the headers....
Done....
Attached image(s)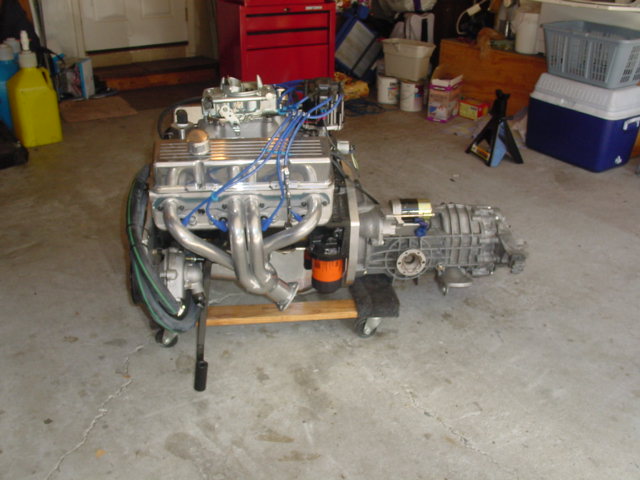
Posted by: nine14cats Jul 17 2006, 01:35 AM
Now for JLO to assume the position....
Attached image(s)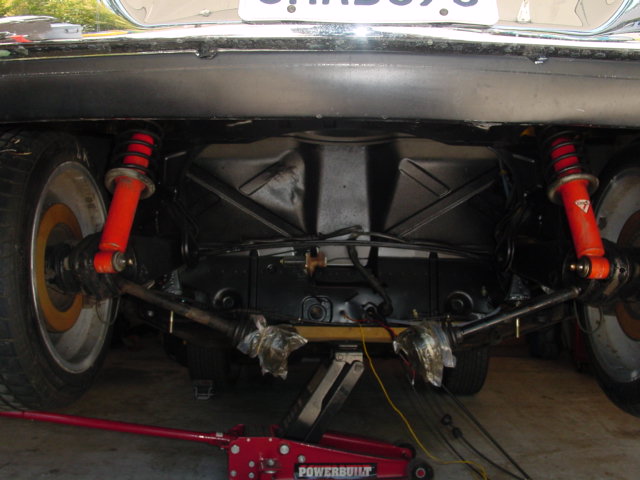
Posted by: nine14cats Jul 17 2006, 01:38 AM
A little shot of the rear transaxle mounts.....and some of the hardware detail....
Chrome
Black
Red
Blue
Nice contrasting colors!
Attached image(s)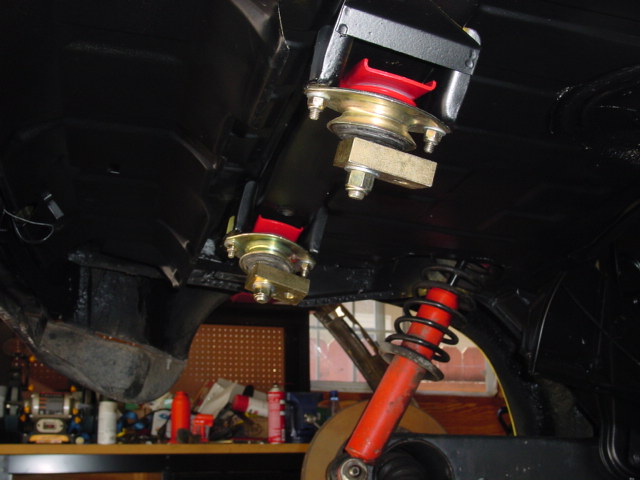
Posted by: nine14cats Jul 17 2006, 01:40 AM
The RH kit bolted right up, no problems with fit and clearances....
Attached image(s)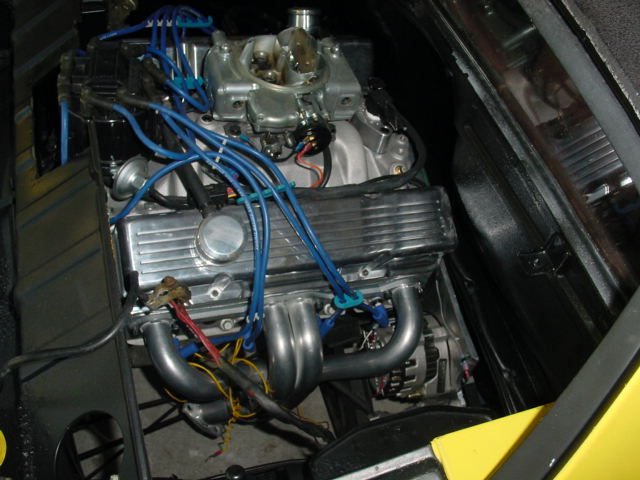
Posted by: nine14cats Jul 17 2006, 01:40 AM
A shot of the water pump....
Attached image(s)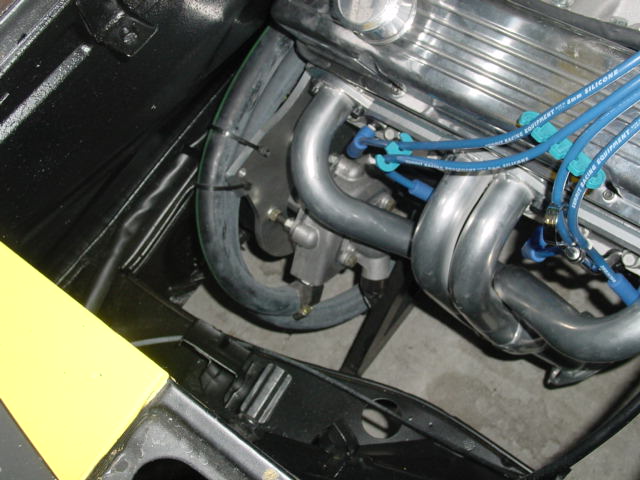
Posted by: nine14cats Jul 17 2006, 01:41 AM
A shot of the AC compressor....
Attached image(s)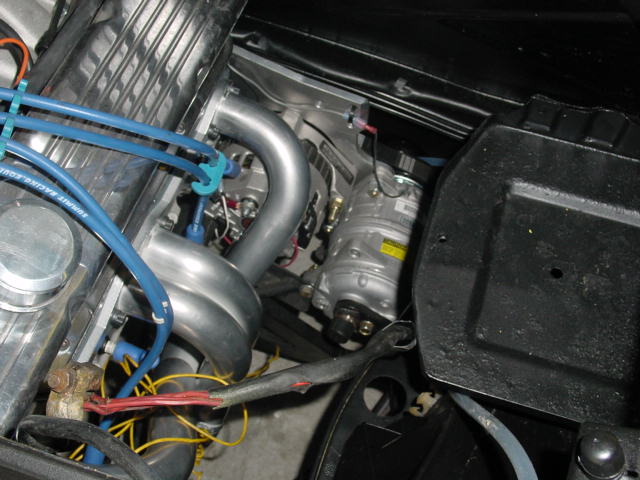
Posted by: nine14cats Jul 17 2006, 01:43 AM
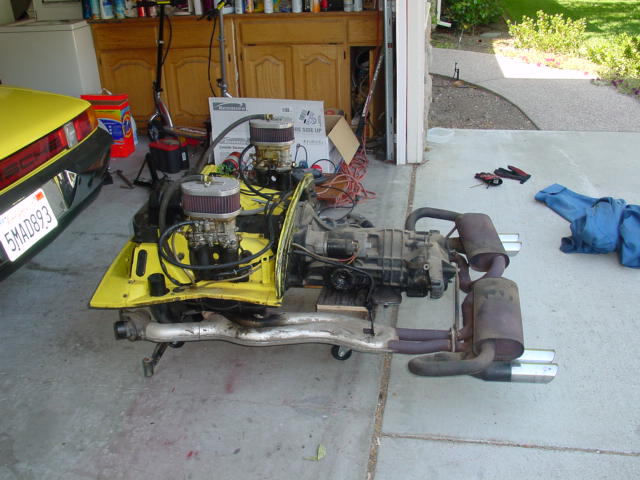
A shot of the drive train installed. 
The axles shown are the old axles. I will leave them on while I play with the exhaust routing. I have new Renegade Hybrids super beefy axles....in a bright red color!
Attached image(s)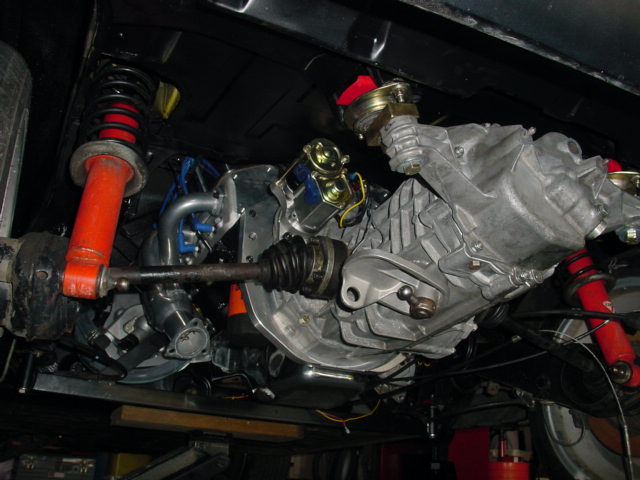
Posted by: nine14cats Jul 17 2006, 01:45 AM
A close up of the starter....some folks have to dimple the trunk pan to make the clearance fit....I was lucky....no clearance issues...
Attached image(s)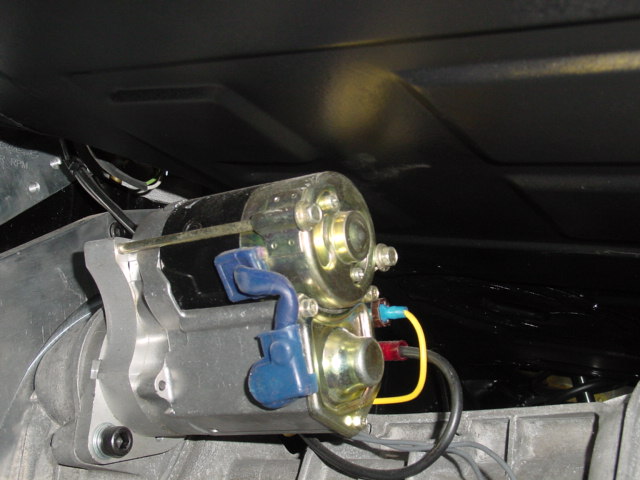
Posted by: nine14cats Jul 17 2006, 01:47 AM
Next up is playing with the radiator sheet metal and mounting the radiator.
After that comes figuring out the AC lines.
Quite a bit to do, but we're getting there!
Bill P.
Posted by: Brad Roberts Jul 17 2006, 01:49 AM

Some of us undo the allen screws that hold it to the adapter and re-clock it.
Looks great Bill. You have done a really nice job cleaning everything up and using high quality replacement pieces.
B
Posted by: nine14cats Jul 17 2006, 02:02 AM
Some of us undo the allen screws that hold it to the adapter and re-clock it.
Looks great Bill. You have done a really nice job cleaning everything up and using high quality replacement pieces.
B
Thanks B,
We're trying to do a good job since there is no time constaint. My son and I are having a great time, one of the better things we've done together. When it's enjoyable, work....even hard work....is fine (except for that crappy bedliner...
, what a mess.)The next decision is deciding to put the ventilation system back in or not. I have Engman's block off kit, and I have the RH under dash AC / Heat unit. Or I may put in the fresh air blower. But the plastic of most of the ventilation plastic has the bedliner all over it, which means sanding and painting. Also, one of the diverter boxes has a crack in it, so I'll need to get another box. And all that work to put in a fresh air source for the defroster.
I'm leaning towards leaving it out...but it leaves the cowl area with a slightly unfinished "kit car / race car look" I kinda want it to look like a custom factory car...
And then this leads to having the fresh air gill vent in the cowl welded shut by Scott. And then repainting the cowl. And since I repainted the cowl, I should do JLO justice and repaint the the entire car. A can of worms for sure!
Once we start looking at the plastic, I'm sure we'll leave it out...or do the work and restore the ventilation system....
Bill P.
Posted by: John G Jul 17 2006, 10:41 AM
Bill,
She looks AWESOME! Keep me posted on how things are going!
I'll bet you can't wait to start her up and cruise around a bit.
John
Posted by: GTeener Jul 17 2006, 10:58 AM
Looking good Bill Can't wait to see her drive to the next breakfast
Posted by: Randal Jul 17 2006, 11:05 AM
Now for the moment of truth...cutting into a perfectly solid, rust free 914!
First we go to the front.
As usual Bill you are doing a great job' always organized and prepared.
But MAN those overalls are way to CLEAN. Are you trying for the:
"The Cleanest 914 Mechanic 2006"
Award?
Posted by: Root_Werks Jul 17 2006, 11:52 AM
I was wondering what happened to JLO after you sold the engine. Cool! Can't wait to see the finshed product! 
Posted by: Dan (Almaden Valley) Jul 17 2006, 11:56 AM
The 3.6 engine Bill sold to Andy was from his Beast track car project....which I believe the chassis is now owned by Randal
JLO was a V8 conversion car from the beginning,,,it has just been awhile since Bill has had time to work on it and make any headway. 
Posted by: lapuwali Jul 17 2006, 12:20 PM
And the 2.2 Type 4 Bill sold to me is obviously doomed to be a transient. It's coming out of my car for a 2.7 Six soonish, and at least a couple of clubbers have expressed interest in it.
Posted by: nine14cats Jul 17 2006, 12:23 PM
And the 2.2 Type 4 Bill sold to me is obviously doomed to be a transient. It's coming out of my car for a 2.7 Six soonish, and at least a couple of clubbers have expressed interest in it.
Don't you just love it! These cars are the ultimate "Frankencars" with parts going from chassis to chassis....
Bill P.
Posted by: nine14cats Jul 17 2006, 12:31 PM
The 3.6 engine Bill sold to Andy was from his Beast track car project....which I believe the chassis is now owned by Randal
JLO was a V8 conversion car from the beginning,,,it has just been awhile since Bill has had time to work on it and make any headway.
Latest iteration of "The Beast™" is a joint development car for Randal and I. I'm still the owner and am still working with Scott and Brad to finish the car. Most likely "The Beast™" will get a 3.6 and WEVO box. I've already sent a new rear swaybar to Yeaman Autobody last week. Randal and I will be down there Wednesday to pick colors for the chassis powdercoat and for the body colors as well.
I will have pictures and will be starting an official "The Beast™ build up thread" soon.
Too many things going on right now.....

Bill P.
Posted by: Brad Roberts Jul 17 2006, 12:42 PM
I look forward to getting it together (finally)
B
Posted by: GTeener Jul 17 2006, 01:00 PM
The 3.6 engine Bill sold to Andy was from his Beast track car project....which I believe the chassis is now owned by Randal
JLO was a V8 conversion car from the beginning,,,it has just been awhile since Bill has had time to work on it and make any headway.
Latest iteration of "The Beast™" is a joint development car for Randal and I. I'm still the owner and am still working with Scott and Brad to finish the car. Most likely "The Beast™" will get a 3.6 and WEVO box. I've already sent a new rear swaybar to Yeaman Autobody last week. Randal and I will be down there Wednesday to pick colors for the chassis powdercoat and for the body colors as well.
I will have pictures and will be starting an official "The Beast™ build up thread" soon.
Too many things going on right now.....
Bill P.
"The Beast" has taken how many years to complete now?
Dude, you win the patience award

Posted by: nine14cats Aug 2 2006, 10:44 PM
Tonight I played with JLO and mocked up the radiator assembly and sheet metal. Here's a few pics of tonight's progress.
First the sheet metal base and sides....
Bill P.
Attached image(s)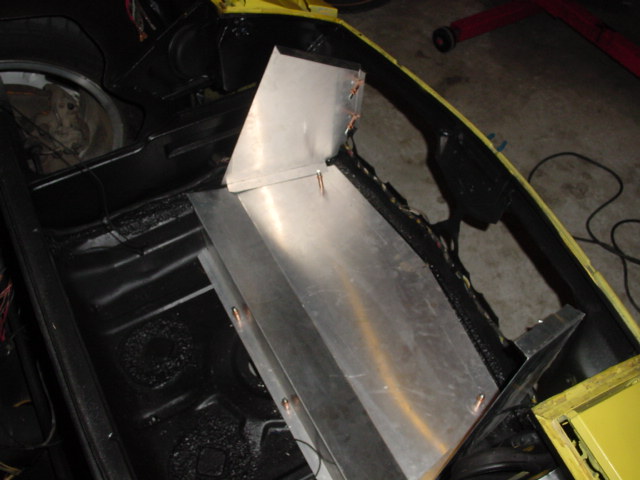
Posted by: nine14cats Aug 2 2006, 10:45 PM
Next the RH radiator is set into position....
Attached image(s)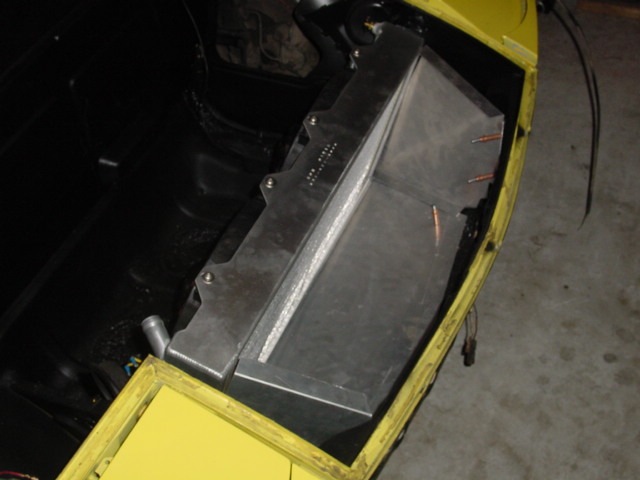
Posted by: nine14cats Aug 2 2006, 10:46 PM
Radiator cowling goes on....
Attached image(s)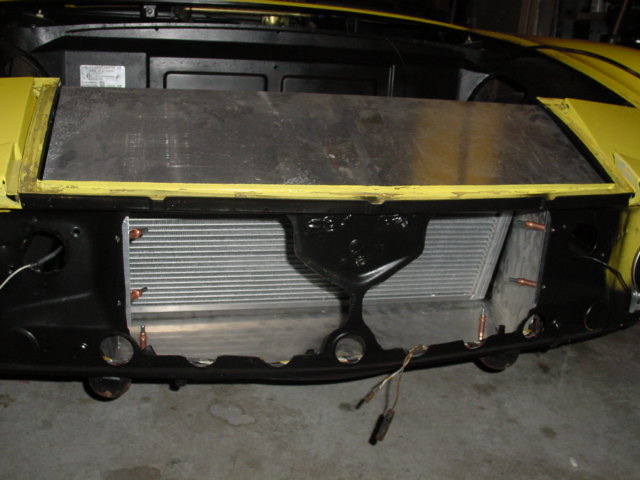
Posted by: nine14cats Aug 2 2006, 10:48 PM
Assembled look from the fan side.....
Attached image(s)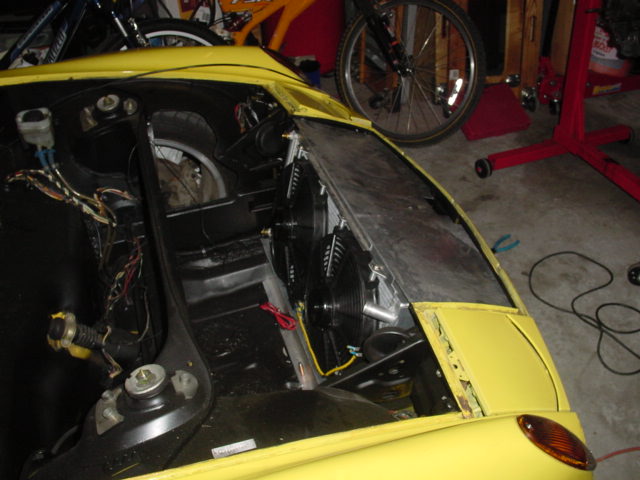
Posted by: nine14cats Aug 2 2006, 10:50 PM
And here is an aluminum L channel that I have no clue as to where it goes. I'll call Renegade tomorrow, unless someone knows where it goes..... 
Bill P.
Attached image(s)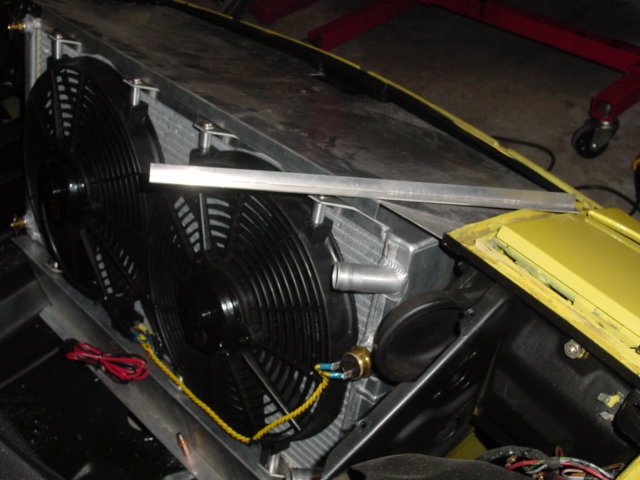
Posted by: nine14cats Aug 2 2006, 10:50 PM
Maybe the L channel goes here?
Bill P.
Attached image(s)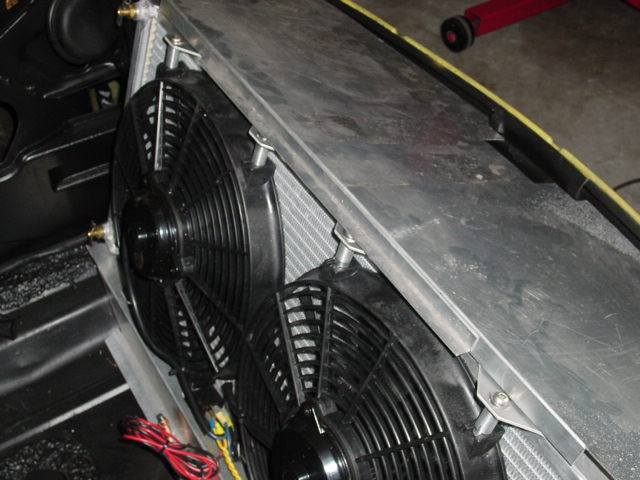
Posted by: nine14cats Aug 2 2006, 10:53 PM
Here's an interesting shot of the radiator cowling on top of the radiator. It doesn't look like this is how it would fit on the radiator, but supposedly I shouldn't have to notch the cowling to fit over the fan brackets.
Anyone have an idea about this? I've got this on my list as well for my Renegade call.
Bill P.
Attached image(s)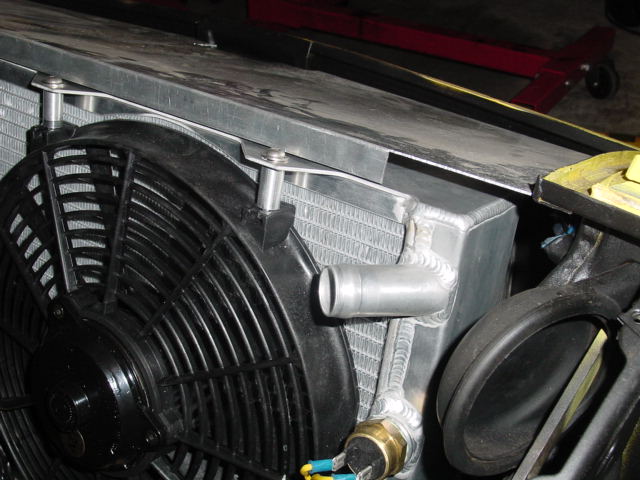
Posted by: Bruce Allert Aug 2 2006, 11:17 PM
Bill, I don't know anything about these V8 conv. radiators and just to show my ignorance...
Where is the fill cap? If it's on top like a regular radiator your cowl would cover it. It looks like the back face of the cowl should be bracing the front of the radiator or (another way of saying it) the radiator would butt up against the rear face of the cowl.
I dunno...  just a thought.
I'll trade ya a mini horse for JLO when yer done 
...b
Posted by: nine14cats Aug 2 2006, 11:40 PM
Bill, I don't know anything about these V8 conv. radiators and just to show my ignorance...
Where is the fill cap? If it's on top like a regular radiator your cowl would cover it. It looks like the back face of the cowl should be bracing the front of the radiator or (another way of saying it) the radiator would butt up against the rear face of the cowl.
I dunno...
just a thought.I'll trade ya a mini horse for JLO when yer done
...b
Hi Bruce,
Believe it or not, the radiator fill is at the highest point of the coolant system....in the engine bay! The way the cowling goes on the radiator and the instructions from Renegade say that the cowling goes over the top of the radiator.
It's interesting that Renegade makes a nice kit (most everything bolts right up) and gives customers like myself access to a internal web page that gives pictures and instructions for their kit assembly. But in reality, their instructions are very poor in my opinion. RH says a picture is worth a thousand words, but they only have a handful of pictures. If I were them, I'd take digital pics step by step of their assembly process and provide it.
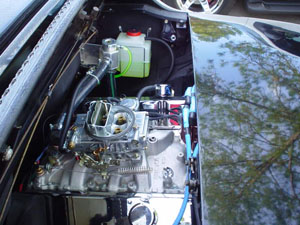
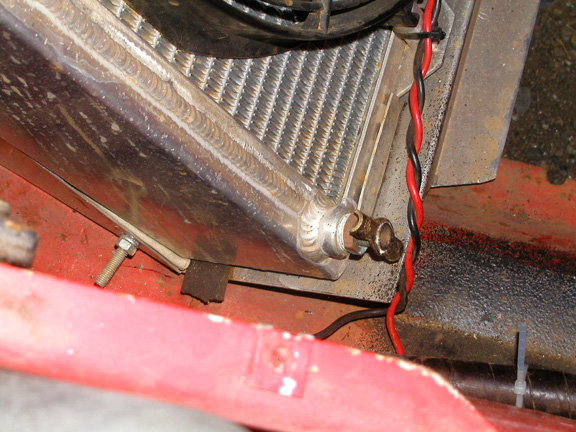
Here's a pic of aircooledboy's RH ride. You can see the radiator fill stand and overflow bottle in the engine bay.
Thanks,
Bill P.
Attached image(s)
Posted by: GS Guy Aug 3 2006, 05:42 AM
Bill,
Any chance the cowl piece is upside down? Looks like it should fit flush on top of the rad. maybe with the piece of angle connecting the flange (now sticking up) with the upper fan mounting bolts?
BTW, I've decided the JLO car is pretty much exactly how I want my next project to be - a GT flared car, properly reinforced, with V8 power. Got to get a few current projects out of the way first though - maybe in another year or so.....
Jeff
Posted by: Bruce Allert Aug 3 2006, 07:36 AM
Bill, looking at the Renegade photo of their radiator assembly on their site, yours looks a wee bit different.
http://www.renegadehybrids.com/914/914rad.html
....b
Posted by: dakotaewing Aug 3 2006, 08:26 AM
Bill -
Run this by the others here on this board, but I am pretty sure that you do not want ANY metal touching the radiator, but have all contact isolated by rubber...
If you have metal to metal contact, you will "ground the radiator" which will cause electrolisis (sp) which will destroy the radiator over a period of time - A good example is to look at any modern car, and you will find the the radiator rests on rubber and has rubber in the securing areas...
Thom
Posted by: GTeener Aug 3 2006, 09:10 AM
Bill, I don't know anything about these V8 conv. radiators and just to show my ignorance...
Where is the fill cap? If it's on top like a regular radiator your cowl would cover it. It looks like the back face of the cowl should be bracing the front of the radiator or (another way of saying it) the radiator would butt up against the rear face of the cowl.
I dunno...
just a thought.I'll trade ya a mini horse for JLO when yer done
...b

Bruce,
You have a miniature horse? Do you breed them? How are they as pets?

Posted by: GTeener Aug 3 2006, 09:12 AM
Bill,
Keep up the good work and thanks for sharing the progress!
Posted by: neo914-6 Aug 3 2006, 11:07 PM
Bill,
I don't see that part on mine (circa 03) unless it's inside lower front of the radiator. You are missing notches.  on the lack of instructions...
Looking good!
Attached image(s)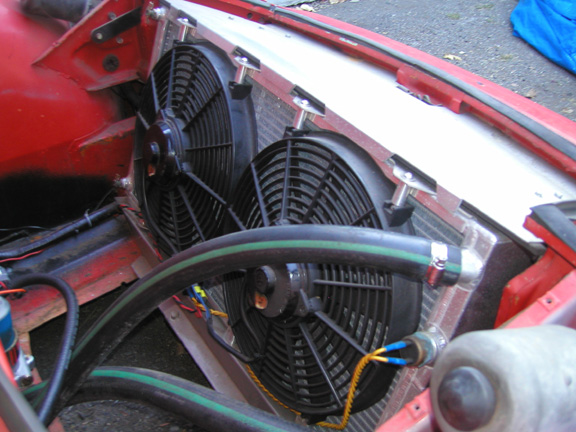
Posted by: nine14cats Aug 4 2006, 12:17 AM
Bill,
I don't see that part on mine (circa 03) unless it's inside lower front of the radiator. You are missing notches.
on the lack of instructions...Looking good!
Hi Felix,
I talked with Scott at RH today. From your picture, I have the same radiator as you. As Bruce pointed out from RH's site, their current design is different. Their new radiator is slightly deeper and the sheetmetal layout is different.
Scott says to toss the "L" channel. As you suspected, it's there to keep the front of the radiator from moving. But he says the "C" channel does that. He said I would have to notch the cowling by hand as yours is.
I also asked Scott the question that Thom mentioned -- keeping the radiator from touching the sheet metal. Scott said that they use upholstery edging on the side "wings" that the front vertical part of the radiator touches and that RH uses single sided RV adhesive foam on the top and bottom of the radiator. They attach the adhesive side directly to the top and bottom of the radiator and then make a compression fit into the "C" channel at the bottom and use the top cowling with the lip to hold the radiator in place. No other anchoring is desired. RH wants the radiator to float in the assembly given the flex of the 914's front end sheetmetal.
How is your assembly clearanced? Does is have foam in between the bottom and top of the radiator?
And what is "RV adhesive foam"? and where do I find it?
Bill P.
Posted by: neo914-6 Aug 4 2006, 01:52 AM
Bill,
I don't see that part on mine (circa 03) unless it's inside lower front of the radiator. You are missing notches.
on the lack of instructions...Looking good!
Hi Felix,
I talked with Scott at RH today. From your picture, I have the same radiator as you. As Bruce pointed out from RH's site, their current design is different. Their new radiator is slightly deeper and the sheetmetal layout is different.
Scott says to toss the "L" channel. As you suspected, it's there to keep the front of the radiator from moving. But he says the "C" channel does that. He said I would have to notch the cowling by hand as yours is.
I also asked Scott the question that Thom mentioned -- keeping the radiator from touching the sheet metal. Scott said that they use upholstery edging on the side "wings" that the front vertical part of the radiator touches and that RH uses single sided RV adhesive foam on the top and bottom of the radiator. They attach the adhesive side directly to the top and bottom of the radiator and then make a compression fit into the "C" channel at the bottom and use the top cowling with the lip to hold the radiator in place. No other anchoring is desired. RH wants the radiator to float in the assembly given the flex of the 914's front end sheetmetal.
How is your assembly clearanced? Does is have foam in between the bottom and top of the radiator?
And what is "RV adhesive foam"? and where do I find it?
Bill P.
I'll take a closer look tomorrow at the gaps, but I do have the "RV" foam on the sides and bottom except on the top. I'm sure it's just thick foam you can get at OSH or Home Depot.
I'd drive it by but still need to get the shifter to clear the rad belt and adjusted. Can't get reverse right now...

Powered by Invision Power Board (http://www.invisionboard.com)
© Invision Power Services (http://www.invisionpower.com)