Printable Version of Topic
Click here to view this topic in its original format
914World.com _ 914World Garage _ How do you replace the two shift coupler bushings?
Posted by: neo914-6 Jul 20 2006, 03:15 AM
can't see what's holding it in...
Attached image(s)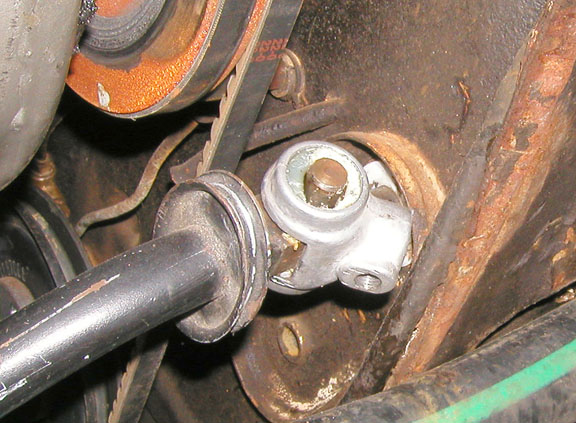
Posted by: jr91472 Jul 20 2006, 06:45 AM
This first thing is to remove the shift rod from the car. Once out of the car and on your bench, then attack the shift bushing.
It looks like you have already removed the cone screw...correct? Now remove the cone screw at the rear of the car (by the tranny). Once both are out, the rod should pull away from the tranny and the firewall. You should then have the shift rod out with the coupler attached.
Now that that is out, you will need a vice and/or press and an assortment of wrench sockets (deep sockets work best).
Place the coupler (still attached to the rod) in the vice. Use a small socket and place against the "large horizontal pin". Use a second larger socket and place on the oppisite side of the coupler. This second socket should be big enough that the "pin" will push through it once you start turning the vice. But it must also be small enough so that it fits inside the coupler. I.E. its diameter should roughly match the plastic bushing - bigger than the pin, but smaller that the coupler body. The idea is that the vice will push the pin through the bushing. BUT, BE CAREFUL. The actual coupler is not that strong. That is why the size of the sockets that you use is so important. The coupler should "float" in the vice because all the stress will be on the "pin" on one side and the bushing on the other. If done wrong, the coupler will break.
Sorry I don't have any pics. Once you figure it out, it is actually quite easy.
good luck.
Posted by: Joe Sharp Jul 20 2006, 07:01 AM
Felix: I take a piece of something like 1/8 plate and put it in the vice and put the square part of the shaft on it to keep from putting pressure on the cast parts. I have read of people breaking them. The pin is pressed in and can be driven out with a punch. There are sirations on the shaft that help to keep it in place. When I replace the bushings, I use a cold chisel the refreshen them.
:PERMAGRIN: Joe
Posted by: maf914 Jul 20 2006, 07:03 AM
If you have a bench vise that's the way to go. My method was a little more basic.
I removed the shift rod with coupler attached and sprayed it with penetrating oil. I took a block of wood (actually a piece of landscaping timber) and drilled a hole a little larger in diameter than the pin in the coupler and deeper tham the length of the pin. I placed the coupler on this block with the pin centered on the hole and gently tapped the pin into the hole using a hammer and punch. Gently, because as stated above the coupler is somewhat fragile. It looks like cast aluminum or pot metal and is probably brittle. In my case the pin came out with relative little force from the hammer. 
Remove the old bushings and replace with new from the inside of the coupler. Reposition on the shift rod and tap the pin back in.
Be patient and don't force it. Replacement couplers aren't cheap! 
Posted by: solex Jul 20 2006, 07:28 AM
I just did this and had a hell of a time trying to get the pin out.
I used a vise and two sockets, one to support the rod (size it so it fits inside the cage and supports the rod (it must not support the cage) and the other socket should fit on top of the pin.
I soaked mine in penetrating oil for a few days but that did not really help. I had to apply a bit of heat to the rod where it surrounds the pin and only after I was able to get the pin out.
Dan
Posted by: Aaron Cox Jul 20 2006, 07:41 AM
i did a quickee write up on this...
PITA....
Posted by: URY914 Jul 20 2006, 08:02 AM
A few tips:
A little heat should help things along.
Go slow when your pressing it out.
Be careful not to screw up the pin.
Posted by: neo914-6 Jul 21 2006, 01:53 AM
All Good advice, I used my small vise and the pin came out surprisingly easy (with a pipe on the vise handle).
1. As recommended I used a smaller than pin size socket with hardened washers on the opposite side to hold the bushing to the housing.
2. Once the pin was protruding I used a socket larger than the pin to get it 3/4 out.
Attached image(s)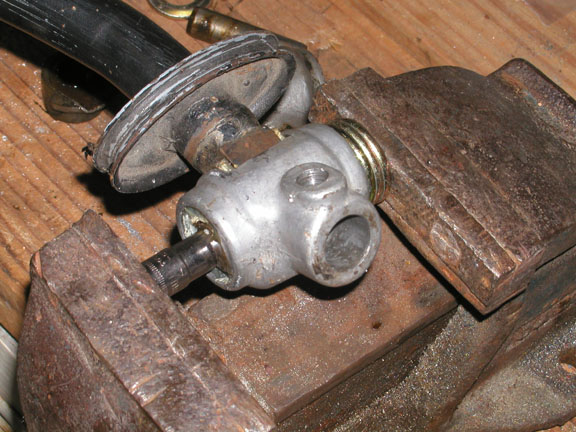

Posted by: neo914-6 Jul 21 2006, 01:55 AM
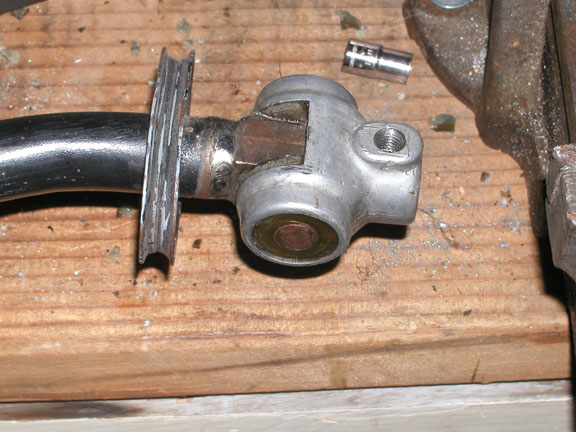
3. I then pulled the pin out with pliers and a rag to protect it. The pin has 3 or 4 serrations. This must enough to secure it in the square rod's hole.
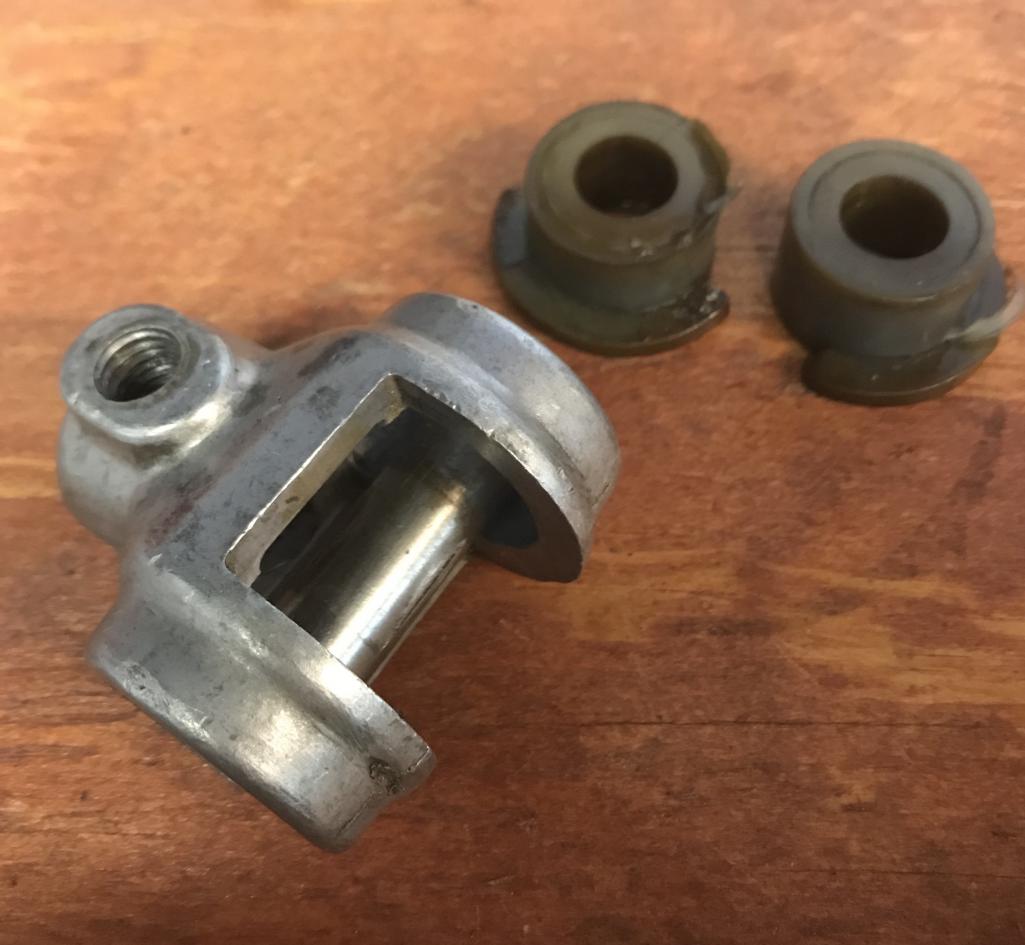
4. To install the bushings I used a long socket with washer on opposite side and drove the first one in with the vise. The half flanged bushings install from the inside of the coupler. The flange keeps them in. I had to work and guide the edges of the bushing in the coupler housing.
Attached image(s)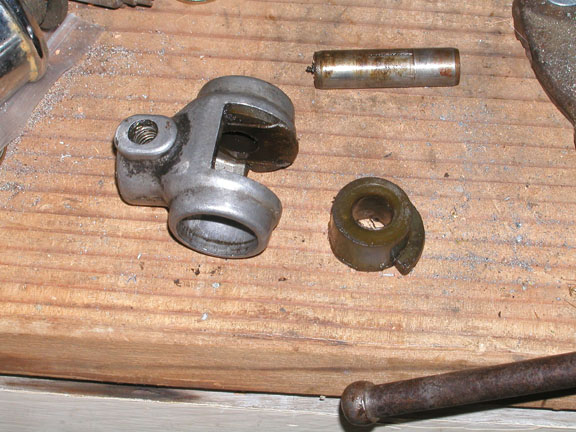
Posted by: neo914-6 Jul 21 2006, 01:56 AM
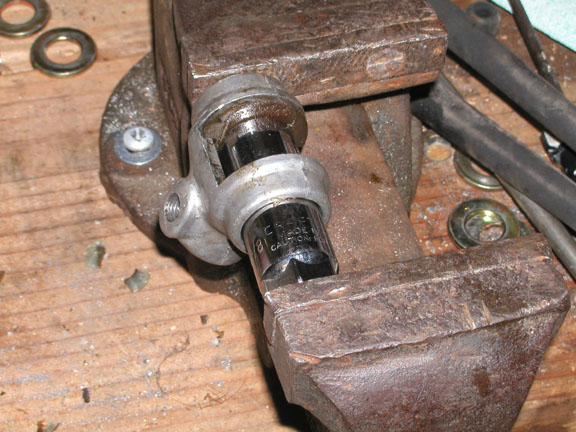
5. To get the second bushing in I used the pin and a flat piece of aluminum in the vise of course.
6. Once they were in I removed the pin and inserted the square part of the shift rod. Be carefull not to install it upside down as the set screws should be in the same down orientation.
7. I then drove the pin in with a washer on the opposite side. The bushing where the pin was driving wants to recess into the gap between the coupler and square rod. Get it flush with the bushings and you're ready to install the shifter.
Attached image(s)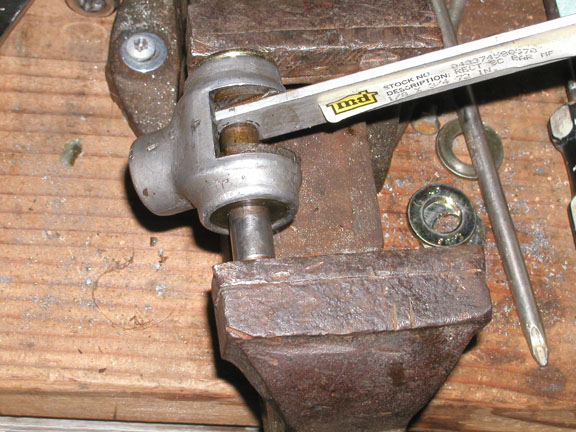
Posted by: McMark Jul 21 2006, 02:17 AM
Nice writeup Felix. 
Posted by: jr91472 Jul 21 2006, 07:46 AM
YO Admins!!
Can this go in the Classics? It is way too complicated to explain and Neo914-6's pics say it all. Good job man 
Posted by: elwood-914 Jul 21 2006, 07:55 AM
I was just looking at my bushing kit and wondering where those went. Very timely. Thanks Felix for the good write up. 
Posted by: jonwatts Jul 21 2006, 08:40 AM
I rarely think to take the time to document when I do stuff, and I know you are burning the midnight oil to get this done. Nice writeup and nice way to give back to the community.

Posted by: neo914-6 Jul 21 2006, 09:21 AM

I rarely think to take the time to document when I do stuff, and I know you are burning the midnight oil to get this done. Nice writeup and nice way to give back to the community.
Thanks, I thought I'd document it since I may have to do this in another 20 years

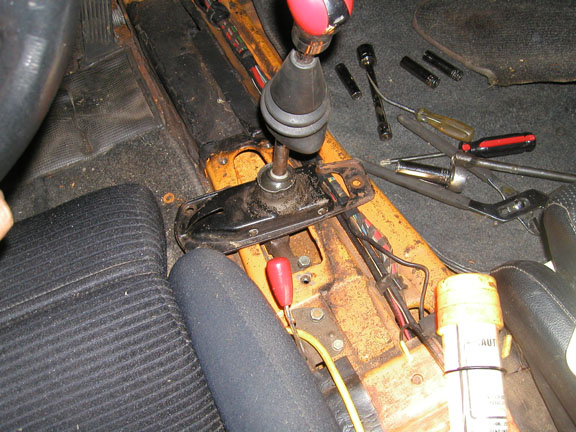
One more thing, while reconnecting the shifter in the car I found rotating the base made it easier to join the rods and tighten the bolt:
Attached image(s)
Posted by: KaptKaos Jul 21 2006, 09:28 AM
Make sure that you connect the coupling so that the set screw faces down.
Ask me how I know this 
Posted by: Aaron Cox Jul 21 2006, 09:34 AM
ROFL.. i did it too Joe!
Posted by: neo914-6 Jul 21 2006, 11:34 AM
Make sure that you connect the coupling so that the set screw faces down.
Ask me how I know this
Posted by: racerx9146 Jul 21 2006, 03:29 PM
Gonna throw my 2 cents in here only because the this is far from a stock 914. I assume this is in the Neo 914 concept.
When i put my 6 in with a side shifter i made a straight shift rod with the factory coupler mentioned in this thread. I guess i had something off kilter because my shifting was very stiff. Put a slight bend in the bar and it was a littler better but not great. Anyhow i got tired of messing with it replaced the coupler with a Wevo coupler to give me a full 360 degree pivot and all is better now. I know most folks dont seem to have my problem but with all the stuff going in this 914 not sure he will wind up with things in the original location.
John
Posted by: jkeyzer Jul 21 2006, 03:35 PM
With a good socket set a bench vise becomes a very versatile press!
Posted by: neo914-6 Jul 21 2006, 05:59 PM
Gonna throw my 2 cents in here only because the this is far from a stock 914. I assume this is in the Neo 914 concept.
When i put my 6 in with a side shifter i made a straight shift rod with the factory coupler mentioned in this thread. I guess i had something off kilter because my shifting was very stiff. Put a slight bend in the bar and it was a littler better but not great. Anyhow i got tired of messing with it replaced the coupler with a Wevo coupler to give me a full 360 degree pivot and all is better now. I know most folks dont seem to have my problem but with all the stuff going in this 914 not sure he will wind up with things in the original location.
John
John,
This is on my V8 car, the neo914 has a Boxster cable shift. My unique problem is the 70 chassis has a higher exit at the firewall and the couping in the bar interferes with the w/p belt. Most know the WEVO is a well developed shift linkage for the 915.
The coupling bushing replacement, however, is universal to any post 73 914s or those who converted to side shift.
Yep Jeff the vise is a very useful tool. I could have gone to Jasons and used his press but this worked just fine.
Posted by: eg914 Jul 21 2006, 11:42 PM
I just did this a couple weeks ago, as one of the bushings in the coupler had disintigrated (only 2nd & 3rd gears), and the pin was falling out. With the new bushings installed I was able to put the pin back in by hand. Is this too loose? Is it possible for the pin to wear to the point that the diameter is too small?
Should I panic now or later? 
Posted by: neo914-6 Jul 22 2006, 02:51 AM
I just did this a couple weeks ago, as one of the bushings in the coupler had disintigrated (only 2nd & 3rd gears), and the pin was falling out. With the new bushings installed I was able to put the pin back in by hand. Is this too loose? Is it possible for the pin to wear to the point that the diameter is too small?
Should I panic now or later?
The pin only had three of four scored lines or serrations. If those aren't holding the pin in I would replace it or somehow rescore it. That joint turns and gets alot of vibration.
Posted by: McMark Jul 22 2006, 03:06 AM
Replacement pins are available. 
Posted by: SA-914 Jul 14 2014, 07:32 PM
You fixed it the hard way...
Check out what the previous owner did to mine. Got the 914 last week and was fixing sloppynest in the shifting...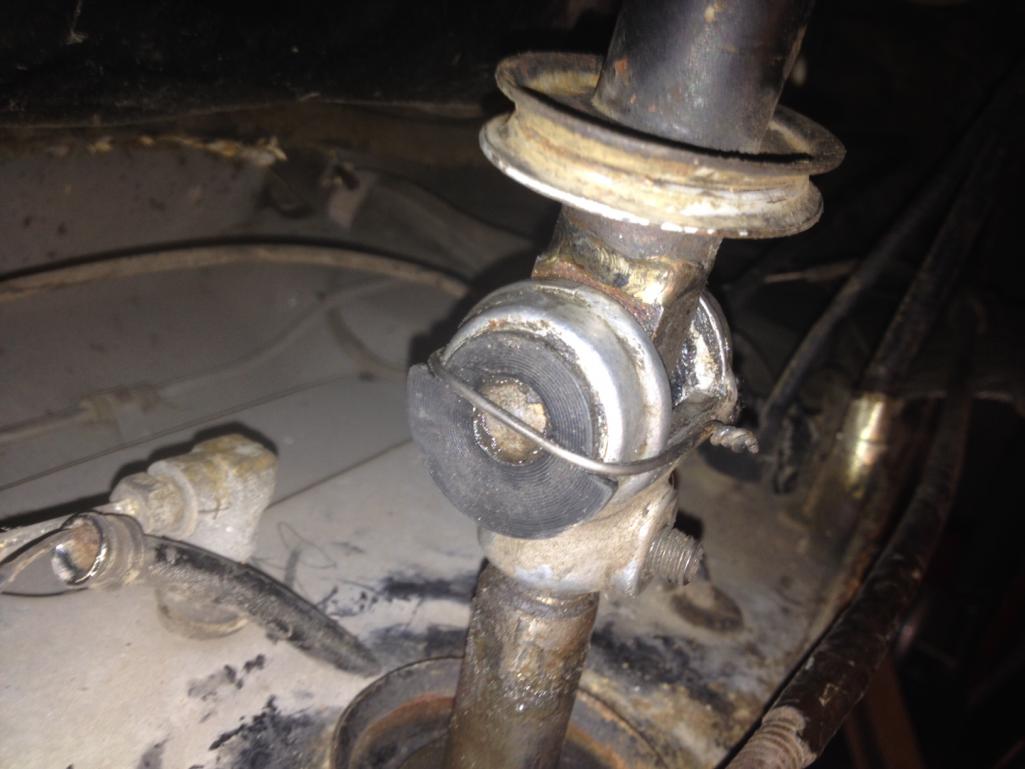
Posted by: ChristopherB Jun 15 2016, 06:47 PM
Getting that pin to break free is no easy task. I had to use heat and the vise to get it to break free. Thanks to this thread, I had all the info I needed to get it done. The picture of the bushings mounted externally with the wire holding it together would make a nice kit to keep in the car. Mine totally fell apart with no warning. You could just pop in the bushings and wire them in place, and be on your way.
Posted by: BeatNavy Jun 15 2016, 06:56 PM
Getting that pin to break free is no easy task. I had to use heat and the vise to get it to break free.
 My bushing disintegrated after taking it to state inspection. I think the "tech" had trouble figuring out the shifting and "man-handled it" to the point when I got it home it was completely gone. And yes, getting that pin out was a real chore. I also used a vice, lots of PB, a lot of heat, and a major cheater bar on the vice handle. I'm glad I've got the bronze one in there now.
Posted by: r_towle Jun 15 2016, 07:15 PM
I had this same bushing setup disintegrate on a 356 many miles from home.
I found lots of small twigs and jammed them in all around the pin on both sides and wrapped the whole thing in electrical tape......piece of caked
Posted by: BeatNavy Jun 15 2016, 07:21 PM
I had this same bushing setup disintegrate on a 356 many miles from home.
I found lots of small twigs and jammed them in all around the pin on both sides and wrapped the whole thing in electrical tape......piece of caked
Do it once, do it right, eh Rich?

But when you're miles from home you do what you gotta do. In Army maintenance that's called BDAR - "Battle Damage Assessment and Repair"
Posted by: ChristopherB Jun 15 2016, 07:31 PM
[ My bushing disintegrated after taking it to state inspection. I think the "tech" had trouble figuring out the shifting and "man-handled it" to the point when I got it home it was completely gone. And yes, getting that pin out was a real chore. I also used a vice, lots of PB, a lot of heat, and a major cheater bar on the vice handle. I'm glad I've got the bronze one in there now.
[/quote]
Did you do a Maryland state inspection on your 914? I have historic tags and an inspection wasn't required.
Posted by: BeatNavy Jun 15 2016, 07:49 PM
Did you do a Maryland state inspection on your 914? I have historic tags and an inspection wasn't required.
Nope, full Virginia state safety inspection - it's my daily driver, so I couldn't have any restrictions. It's been since the 90's last I registered a car in Maryland, but I know their inspection is a bit more, er, "robust" than VA.
Posted by: r_towle Jun 15 2016, 08:20 PM
I had this same bushing setup disintegrate on a 356 many miles from home.
I found lots of small twigs and jammed them in all around the pin on both sides and wrapped the whole thing in electrical tape......piece of caked
Do it once, do it right, eh Rich?
But when you're miles from home you do what you gotta do. In Army maintenance that's called BDAR - "Battle Damage Assessment and Repair"
Fun book on this
Attached thumbnail(s)
Posted by: bdstone914 Jun 15 2016, 08:27 PM
I had this same bushing setup disintegrate on a 356 many miles from home.
I found lots of small twigs and jammed them in all around the pin on both sides and wrapped the whole thing in electrical tape......piece of caked
Do it once, do it right, eh Rich?
But when you're miles from home you do what you gotta do. In Army maintenance that's called BDAR - "Battle Damage Assessment and Repair"
I was taught that was a field expedaite repair. More commonly referred to by a politically incorrect term.
Army Engineer 69th Batalion, 1969
Crap I'm old.
Posted by: ThunderbirdDrive Sep 8 2016, 01:54 PM
Thanks so much for this write up!
The step by step pictures take out all of the guess work for me.
Now to order some new bushings and get that pin out!
Posted by: Mikey914 Sep 12 2016, 11:20 AM
<!-- quoteo(post=733956:date=Jul 21 2006, 07:40 AM:name=jonwatts) --><div class='quotetop'>QUOTE(jonwatts @ Jul 21 2006, 07:40 AM)
</div><div class='quotemain'><!-- quotec -->I rarely think to take the time to document when I do stuff, and I know you are burning the midnight oil to get this done. Nice writeup and nice way to give back to the community.
<!-- QuoteEnd --></div><!-- QuoteEEnd -->
Thanks, I thought I'd document it since I may have to do this in another 20 years
One more thing, while reconnecting the shifter in the car I found rotating the base made it easier to join the rods and tighten the bolt:
Dam, so easy. I'll give this a shot next time.A+ for technique
Posted by: capitolatim Oct 13 2017, 05:01 PM
Thanks for the great post. Using the vice and sockets worked great. I should have tried that before beating the pin and torching it.
Shifts great now. 
Posted by: Dion Feb 17 2018, 10:22 AM
This thread was very helpful. Thanks to all those that contributed.
Just did this morn’.
For me a 7/32 and a 21/32 socket was used. Needed a
little oomph on the vice. As I think these have been in the car since day one!
Waiting for the new brass ones to arrive from Pelican.
Attached thumbnail(s)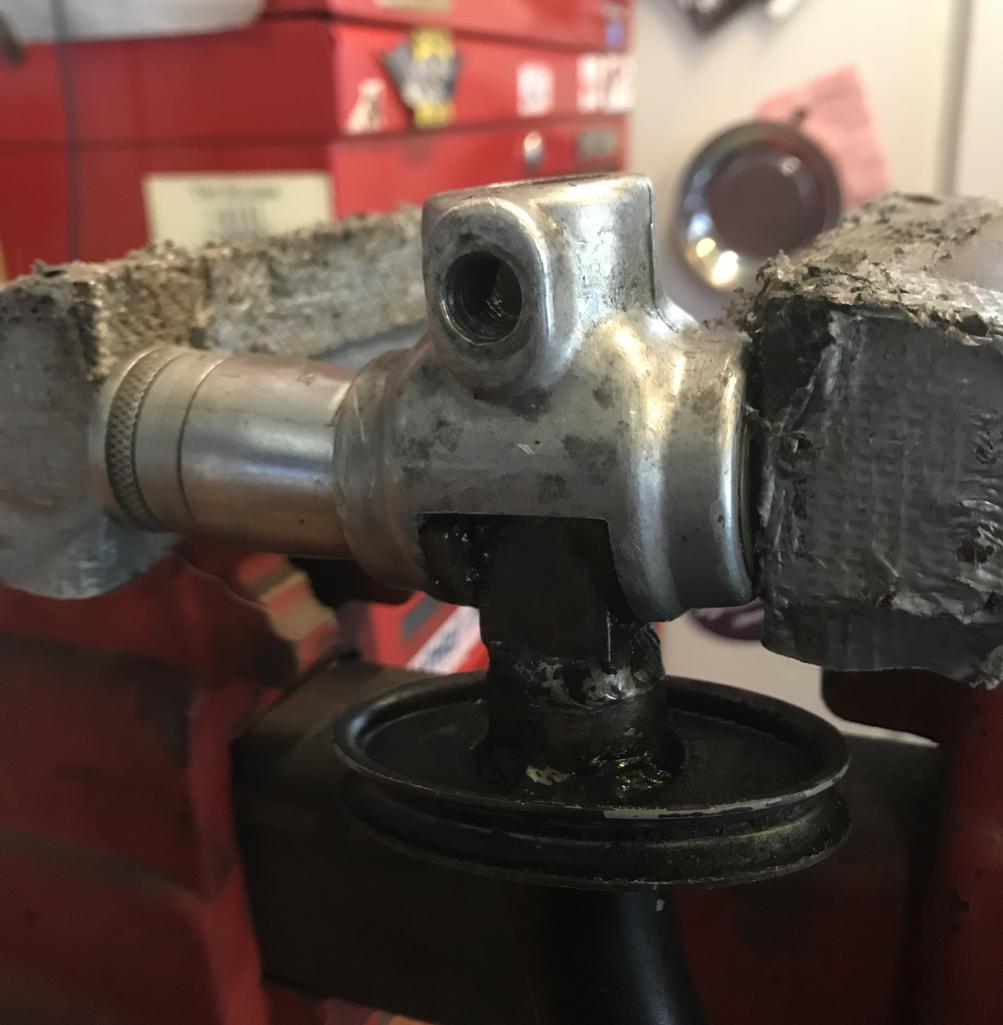

Posted by: Dion Feb 17 2018, 10:23 AM
Prompted to do this since the shifter bar needs altering for the six engine conversion.
Attached thumbnail(s)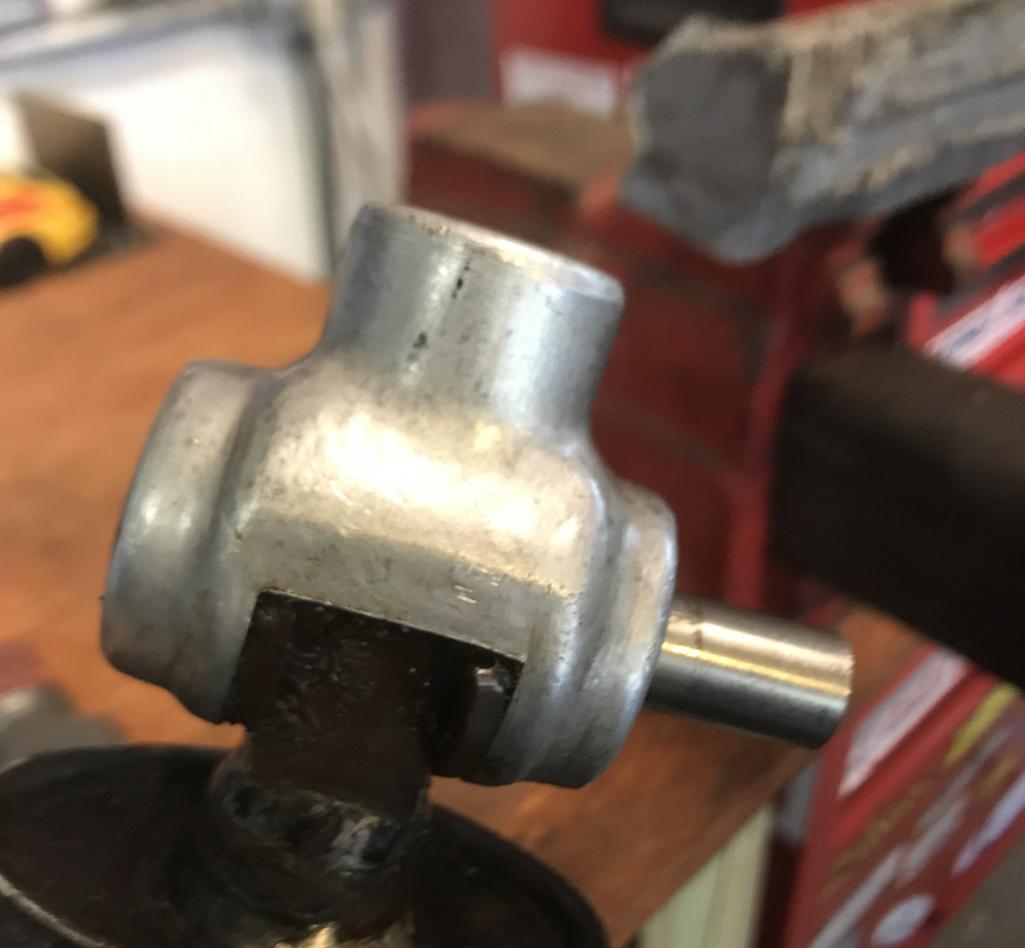
Posted by: 930cabman Aug 14 2021, 02:54 PM
I had this same bushing setup disintegrate on a 356 many miles from home.
I found lots of small twigs and jammed them in all around the pin on both sides and wrapped the whole thing in electrical tape......piece of caked
Do it once, do it right, eh Rich?
But when you're miles from home you do what you gotta do. In Army maintenance that's called BDAR - "Battle Damage Assessment and Repair"
I was taught that was a field expedaite repair. More commonly referred to by a politically incorrect term.
Army Engineer 69th Batalion, 1969
Crap I'm old.
Researching fitting new shift bushings and came upon an OLD guy, if this is from 2016, what does that make him today?? Thanks bd for all your insight and sharing of your experience.
Posted by: bdstone914 Aug 14 2021, 03:38 PM
I had this same bushing setup disintegrate on a 356 many miles from home.
I found lots of small twigs and jammed them in all around the pin on both sides and wrapped the whole thing in electrical tape......piece of caked
Do it once, do it right, eh Rich?
But when you're miles from home you do what you gotta do. In Army maintenance that's called BDAR - "Battle Damage Assessment and Repair"
I was taught that was a field expedaite repair. More commonly referred to by a politically incorrect term.
Army Engineer 69th Batalion, 1969
Crap I'm old.
Researching fitting new shift bushings and came upon an OLD guy, if this is from 2016, what does that make him today?? Thanks bd for all your insight and sharing of your experience.
It makes
 me 72.
Posted by: 930cabman Aug 14 2021, 07:42 PM
I had this same bushing setup disintegrate on a 356 many miles from home.
I found lots of small twigs and jammed them in all around the pin on both sides and wrapped the whole thing in electrical tape......piece of caked
Do it once, do it right, eh Rich?
But when you're miles from home you do what you gotta do. In Army maintenance that's called BDAR - "Battle Damage Assessment and Repair"
I was taught that was a field expedaite repair. More commonly referred to by a politically incorrect term.
Army Engineer 69th Batalion, 1969
Crap I'm old.
Researching fitting new shift bushings and came upon an OLD guy, if this is from 2016, what does that make him today?? Thanks bd for all your insight and sharing of your experience.
It makes
me 72.And no signs of slowing down. Many of us are boomers and share the same "hobby"
Posted by: 930cabman Aug 15 2021, 05:43 PM
I was invited to a P car outdoor event today and was looking forward to bringing my new to me 1975 1.8 example. However last night the shift coupler bushings decided to break down. This morning as I was opening up the rubber boot a bunch of "dust like debris" came out. Thankfully I have a decent inventory of parts, I managed to locate a decent rear shift rod complete with decent bushings. I made the event and had a great time meeting and sharing stories with several other enthusiasts.
I saw somewhere some guys fabricate new shift coupler bushings (with greater precision than those commercially available) from Delrin or some similar material. Just for fun I asked a fellow 914 guy to test drive my new example to get his take on the feel of the shift linkage and the brakes. He came back and gave it a passing grade. I guess the 914 cannot compare to a G50 for shift feel.
Posted by: SKL1 Sep 27 2021, 01:16 PM
Glad to find this thread with the search function- just pushed the pin out and also recommend heat to "melt" the old bushings. Makes it much easier to use the sockets to push the pin out. Used my small vise with an extended handle to get more torque.
Now just waiting for the brass bushings from pelican...
Posted by: jim-c Dec 14 2021, 01:10 PM
I used this thread today. New bushings needed. I heated the pin with MAP gas. It wouldn't budge with just the vice and socket method. Heated up the pin and drove it out with a punch. It went easy.
Powered by Invision Power Board (http://www.invisionboard.com)
© Invision Power Services (http://www.invisionpower.com)