Printable Version of Topic
Click here to view this topic in its original format
914World.com _ 914World Garage _ Fuel System Thread
Posted by: billd Sep 13 2006, 06:56 PM
I finally got some time over the long weekend a few weeks ago to plumb the fuel system for my /6. I'd appreciate any comments experienced club members may have.
When I did my /4 I used 5/16 stainless tube and just clamped rubber hose to the tube. For my /6, I decided to be a bit more professional. I ran 3/8 steel tube and used AN-6 fittings throughout the high-pressure section - from the pump output to the return tube. I used hard line wherever possible. There are just three sections of Aeroquip socketless hose (I like this better than braided stainless): to the engine fuel rails, from the engine fuel rails, and from the pump to the line through the tunnel.
The lines for the tunnel start under the tank as shown in this photo. The supply line is flared and connected to socketless hose with AN connectors. The return line has a 5/16 rubber hose clamped to it. The other end clamps to the return tube on the tank.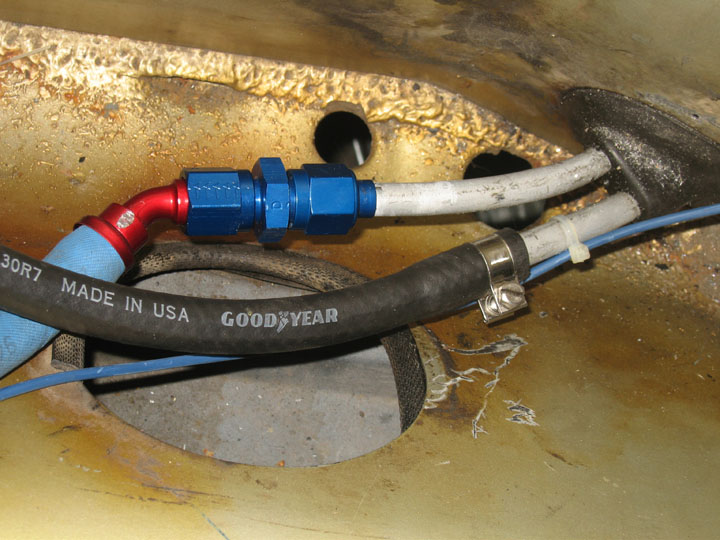
The other end of the tunnel lines are bent around the /6 engine mount and connected via AN-6 unions to hard line that runs to bulkhead fittings in the sheet metal on the edge of the engine compartment.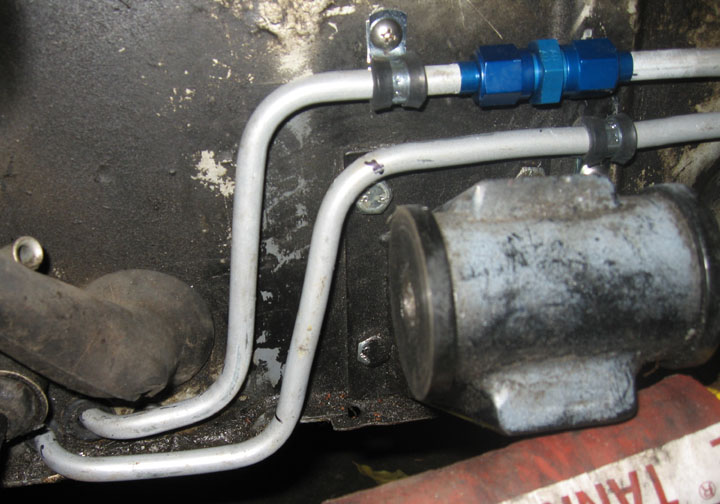
The supply line runs up through the sheet metal near the firewall to a second fuel filter (third if you count the sock in the tank) mounted on the fire wall.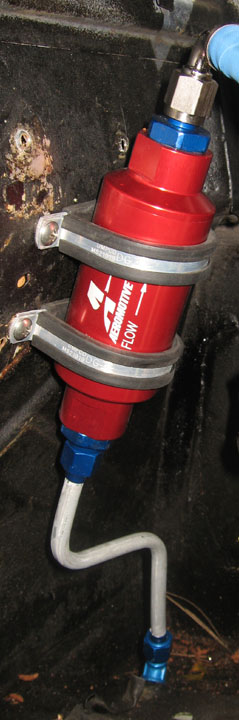
Posted by: billd Sep 13 2006, 07:03 PM
The return line runs up through the sheet metal under the battery tray to a pressure regulator mounted behind the battery tray. There is a pressure gauge mounted directly to the regulator.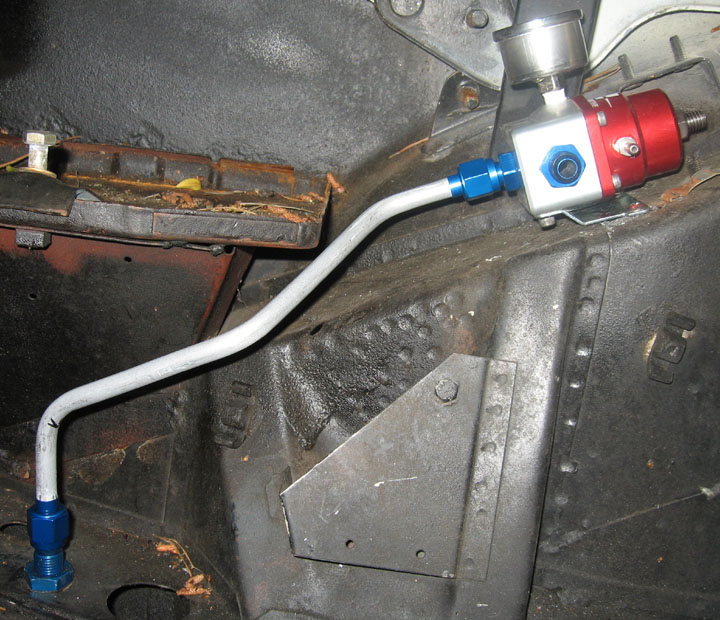
Here is the pressure regulator and gauge shown from above.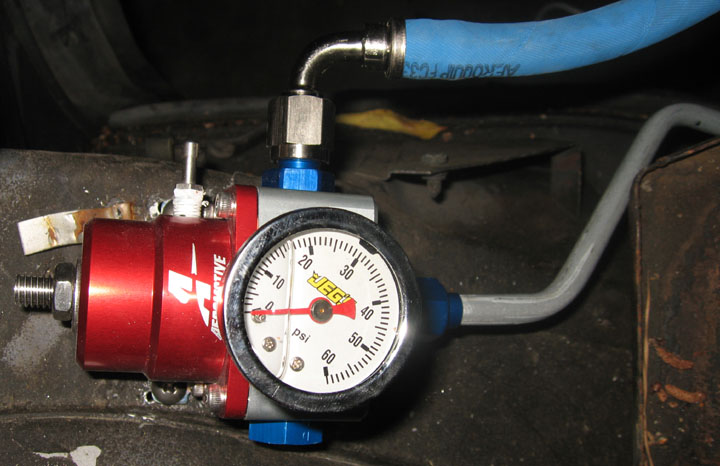
And here's some more detail of the lines under the sheet metal.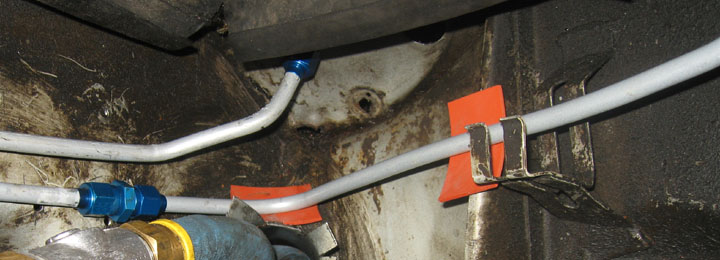
Posted by: billd Sep 13 2006, 07:08 PM
Finally, here's the mounting of the fuel pump to the bulkhead directly in front of the tank. The pump is for a mid-80s 911 (don't ask) with suitable adapters to convert the output to AN-6. The pump is shock mounted using a bracket made from aluminum sheet. On the inlet side is a standard 75-76 914 fuel filter with 11mm line to the pump and 9mm line to the supply tube on the tank. (Yes, I know the clamps on the 11mm line are bad, but I didn't have any good clamps this size.)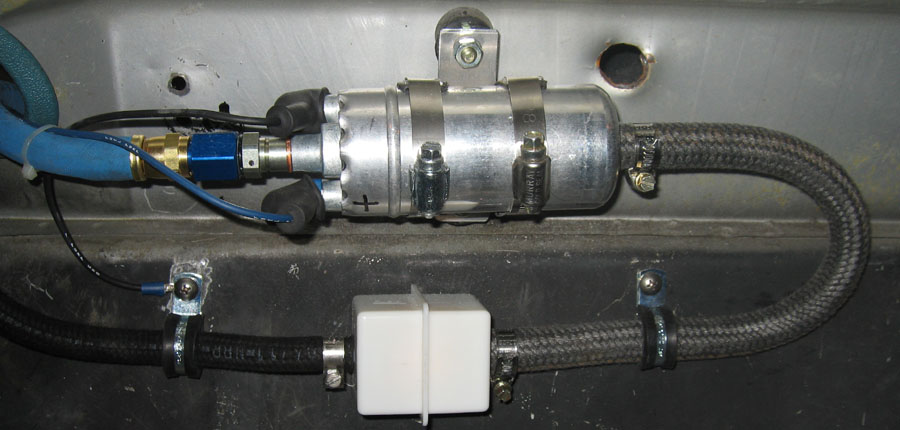
After plumbing all of this, I'm not sure I like this location. The pump may be a bit high and so may have trouble getting started with a nearly empty tank. I need to test this and may relocate the pump to the right side wall of the front trunk if this is a problem. The tradeoff is that the side location is lower, but also more vulnerable to an impact on the passenger side of the car.
Posted by: billd Sep 13 2006, 07:16 PM
So what were the lessons learned from this project:
First what's good about this system:
1. Use AN hardware. This stuff is the right way to plumb any kind of fluid handling system in a car - fuel, oil, brakes. It is reliable and can be disassembled and reassembled many times with no loss of integrity.
2. Use socketless hose. This hose is great. It is every bit as reliable as braided stainless and doesn't act as a file rubbing a hole in everything it comes up against.
3. Pipe routing and component locations. I can't think of a better place to put things other than perhaps moving the fuel pump as described above.
OK, so what would I do differently were I to do it again?
1. Use 5/16 line. The 3/8 line isn't needed to handle the fuel flow to my 3.2 and its significantly harder to work with than 5/16. On my /4 I plumbed a single piece of 5/16 through the tunnel and up through the sheet metal with the engine in the car. With 3/8 I couldn't even get to the bulkhead connectors with one piece with the engine out of the car.
2. Perhaps use more hose and less hard line. Its a pain making up all those little pieces of hard line and getting the length and angles of the ends exactly right.
3. Use an Aeromotion fuel pump with AN fittings. I acquired the 911 pump early in the project, but I don't like using adapters - another joint to leak.
4. Perhaps move the fuel pump to a lower location.
Posted by: Aaron Cox Sep 13 2006, 07:19 PM
looks good!
Are you gonna weld in the motor mount?
Posted by: billd Sep 13 2006, 07:23 PM

looks good!
Are you gonna weld in the motor mount?
I wasn't planning to. It seems plenty sturdy just bolted in - with doublers on the other side of the firewall.
If I was going to weld, I should have done that *before* plumbing the fuel lines right by the top of the mount.
Posted by: Aaron Cox Sep 13 2006, 07:24 PM
looks good!
Are you gonna weld in the motor mount?
I wasn't planning to. It seems plenty sturdy just bolted in - with doublers on the other side of the firewall.
If I was going to weld, I should have done that *before* plumbing the fuel lines right by the top of the mount.
a 3.6 is going in there... you *may* want to reconsider... at least run a bead along the sides you can get to....
Posted by: billd Sep 13 2006, 07:42 PM
a 3.6 is going in there... you *may* want to reconsider... at least run a bead along the sides you can get to....
The engine is a 3.2 short-stroke - a 76 Carerra 3.0 motor with 95mm P/Cs.
I'll think about welding. You've got me worried about bolt holes getting elongated now. However this car ran just fine with a 2.0L 6. The 3.0 isn't that much heavier.
Posted by: turboman808 Sep 13 2006, 09:05 PM
I think I need to redo mine over the winter. I'm pretty sure it's braided steel hoses from the front to the rear. I kinda get a gas smell. Should use hard lines thru the tunnel instead.
Posted by: grantsfo Sep 14 2006, 11:12 AM
Great work Bill. I'm really looking forward to seeing this car! Another well driven zoomie 914 will be a welcomed addition to our local AX scene.
Posted by: billd Sep 14 2006, 11:43 AM
Great work Bill. I'm really looking forward to seeing this car! Another well driven zoomie 914 will be a welcomed addition to our local AX scene.
Thanks for the kind words Grant. There is a downside, however, to having all of this horsepower. It eliminates all excuses for not getting TTOD. Today I can whine about only having 85hp at the flywheel (perhaps 75 at the rear wheels). With 200+ hp, if I don't win, the only explanation is that the driver isn't good enough. Or perhaps I can argue that the blue smurfmobile is probably 800lbs lighter than my car.
Posted by: andys Sep 14 2006, 11:59 AM
What kind/brand tubing bender and flaring tool did you use? 3/8" stainless is quite a bit more difficult to work with. Where did you buy the tubing?
Andys
Posted by: billd Sep 14 2006, 12:13 PM
What kind/brand tubing bender and flaring tool did you use? 3/8" stainless is quite a bit more difficult to work with. Where did you buy the tubing?
Andys
I bought the tubing from Jegs - their Galvanized Zinc Fuel Line Coil Kit - they sell 5/16 as well - get that, not the 3/8. I threw away the double-flare fittings that came with the kit.
I have had the bender and 37 degree flaring tool for ages. I probably got them from Aircraft Spruce back when I was doing a lot of work on airplanes. Make sure you get a 37 degree flaring tool and not a 45 degree tool - which is used for double flares on brake lines.
I think Jegs sells all the tools too, so you can get everything from one source (including the AN fittings).
Posted by: smdubovsky Sep 20 2006, 12:23 PM
Excellent work Bill. Dont know how I missed this thread last week. I plan to do the same thing eventually. A few Q/comments if you dont mind:
1) Why not run aluminum fuel line? Jegs carries several brands of it too. Lighter and easier to bend. Could easily run 3/8" both directions then? (Yes, I understand it can workharden, but so do all metals, and its not a problem if supported correctly.)
2) You really liked the socketless hose, eh? I dont know anyone whos used it yet (other than you), but it looks FAR simpler to put together (and lighter). I've always wanted to give it a try.
3) For the flares, did you use a AN tube nut and sleeve? I've never fabricated hard lines for AN and dont know the exact procedure. Slip nut and sleeve over line, flare, and voila?
FWIW, Using mallorys "rule of thumb" - 5/16" minimum for <300hp, 3/8" for <500hp, etc.
Best,
SMD
Posted by: billd Sep 21 2006, 08:25 AM
Excellent work Bill. Dont know how I missed this thread last week. I plan to do the same thing eventually. A few Q/comments if you dont mind:
1) Why not run aluminum fuel line? Jegs carries several brands of it too. Lighter and easier to bend. Could easily run 3/8" both directions then? (Yes, I understand it can workharden, but so do all metals, and its not a problem if supported correctly.)
I thought about aluminum but picked steel both because of concerns about work hardening and because I was concerned that any rubbing of an Al fuel line against a steel component in the tunnel might wear a hole.
2) You really liked the socketless hose, eh? I dont know anyone whos used it yet (other than you), but it looks FAR simpler to put together (and lighter). I've always wanted to give it a try.
I like it so far, but haven't yet seen how well it does over time. Its much easier to work with than stainless braided hose.
3) For the flares, did you use a AN tube nut and sleeve? I've never fabricated hard lines for AN and dont know the exact procedure. Slip nut and sleeve over line, flare, and voila?
The procedure is pretty simple. Cut the line, debur it, slide the nut and then the sleeve over the end, put it in the flare tool with about 3/16 showing and flare it. The most important thing is to make sure both the inside and outside are deburred before flaring or you might get a leaky fitting or a slow crack.
Posted by: smdubovsky Sep 21 2006, 02:14 PM
Deburr, got it. Any easy way, or just go at the inside lightly w/ a counter sink/tapered ream and a file for the outside? Wouldn't a tubing cutter leave the outside burr-free?
What flaring tool do you use? Searching the aircraft forums, they seem to like the "rol-air". And at ~$80 its far less than most others ($300+)
FWIW, I hear you cant pull a socketless hose off the fitting (well, not w/o assistance) - it has to be cut off. So, sounds like the buggars are designed to stay put...
Tnx,
SMD
Posted by: GS Guy Sep 22 2006, 06:07 AM
Hey Billd,
Use any "tricks" to get the hose onto the fittings? I recently did up a breather/PCV system with some 1/2 size fittings and hose - had a heck of a time getting the fittings fully seated into the hose! It sure as heck doesn't just "push on"! A real PITA.
I saw the "tool" that was available to supposedly make this easy - but it only works for the straight fittings, not elbows - so didn't think it was worth getting.
Jeff
Posted by: billd Sep 22 2006, 09:54 AM
Deburr, got it. Any easy way, or just go at the inside lightly w/ a counter sink/tapered ream and a file for the outside? Wouldn't a tubing cutter leave the outside burr-free?
I use a file on the outside and the stone from a die grinder on the inside. A tapered reamer would work fine too.
What flaring tool do you use? Searching the aircraft forums, they seem to like the "rol-air". And at ~$80 its far less than most others ($300+)
Check Jegs and Summit Racing. I would bet that both will have a 37 degree flaring tool for less than $40.
Posted by: billd Sep 22 2006, 09:58 AM
Hey Billd,
Use any "tricks" to get the hose onto the fittings? I recently did up a breather/PCV system with some 1/2 size fittings and hose - had a heck of a time getting the fittings fully seated into the hose! It sure as heck doesn't just "push on"! A real PITA.
I saw the "tool" that was available to supposedly make this easy - but it only works for the straight fittings, not elbows - so didn't think it was worth getting.
Jeff
It was a bit of a pain getting the hose on the fittings. What I found useful was to
1. Lubricate the hose with some silicone grease (this made a big difference)
2. Put the fitting in a vise
3. Clamp the hose in a tool that gives you something to push on
4. Push the hose onto the fitting while rocking it slightly from side to side
I was able to assemble all of my hoses this way. I have used the special tool on straight fittings and it works great. I've consdered making a tool that would do the same thing on other fittings - they all have a little collar that would be easy to grab.
Posted by: GS Guy Sep 23 2006, 06:22 AM
3. Clamp the hose in a tool that gives you something to push on
Ahhh - any pics of said tool? That's what I found, I could hold the fitting easy enough, but couldn't hold the hose secure enough (with anything that wouldn't possibly damage it) to put enough force on it to slip over the barbs.
Ended up cobbling together a set-up on my hydraulic press to get 'em together, but only worked because I was doing fairly short hoses - I literally "pressed" the hose onto the fitting.
Jeff
Posted by: billd Sep 23 2006, 10:52 AM
3. Clamp the hose in a tool that gives you something to push on
Ahhh - any pics of said tool? That's what I found, I could hold the fitting easy enough, but couldn't hold the hose secure enough (with anything that wouldn't possibly damage it) to put enough force on it to slip over the barbs.
Ended up cobbling together a set-up on my hydraulic press to get 'em together, but only worked because I was doing fairly short hoses - I literally "pressed" the hose onto the fitting.
Jeff
You can either use the tool for assembling with straight fittings - one end of it clamps the hose, or use a set of vice-grips with some silicone baffling wrapped around the hose to protect it.
Powered by Invision Power Board (http://www.invisionboard.com)
© Invision Power Services (http://www.invisionpower.com)