Printable Version of Topic
Click here to view this topic in its original format
914World.com _ 914World Garage _ How to Build a GT Lid (in almost a day)
Posted by: Eric_Shea Nov 1 2003, 05:50 PM
Damn this site is good...
I started the morning by searching the archives for "GT Lid". I found a great how to that took me to Dave's post on the PP BBS. Great job Dave. I was inspired. Off to the garage.
In building my GT replica I wanted my lid to match as closely as possible. I wanted the two screens to mate together down the middle. This is how my project differs from what I saw on other sites. I left the extra metal (not covered by an additional, original grill) at the back of the lid.
I actually only spent about 2.5 hours on this to get it to what you'll see below. The only thing left to do is to bend the final lip(s) down on the backside of the lid and prep for finishing.
Here's what you need if you care to brave the wilds of creating a GT lid.
* An extra 914 grill.
* Cut-off wheel.
* Tin Snips.
* Sabre saw with a metal blade.
* Die Grinder
* Vise
* Drill
* Body hammer
* Dollie
* Flanging pliers (or something... haven't gotten to that step yet. I'll keep ya posted)
Step 1:
I think this is a fairly easy way to get a GT lid started. I simply used an extra 914 grill but used it in the opposite direction. No "major" bending of metal (at this point). All you'll need to do is cut the mounting tabs off the long side where the two grills will meet. These tabs would get in the way of the tabs on the original grill. By cutting them off and using a "V" notch, the original tabs will be able to mount in their original holes (novel concept). I've also left as many of the (other) original mounting tabs as possible on the grill. More about that later. I used a small cut-off wheel to do the job.
Attached image(s)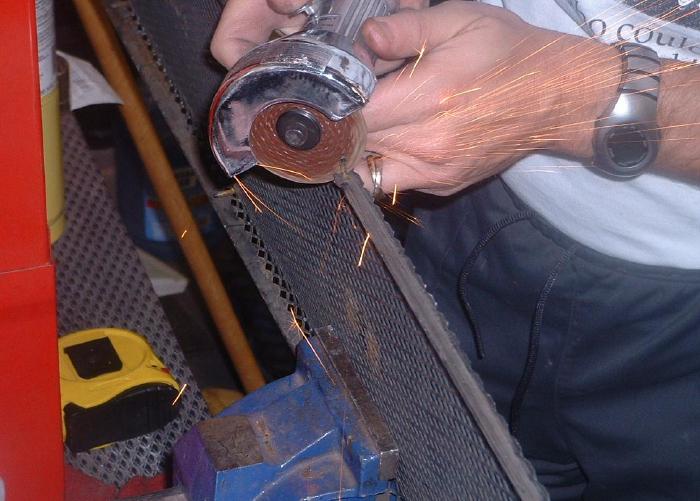
Posted by: Eric_Shea Nov 1 2003, 05:57 PM
Step 2:
The tabs are cut out. The picture below shows the notch made by the cut-off wheel.
This is where some bending comes in. The grill mates to the front edge of the lid on the "ends" and stands off by about 1/4 inch in the middle. This is because the ends of the grill are bent in a rather precarious manner. The picture shows the bend on the grill. Notice how you can see more of the "diamonds" on the right side and less on the left. The trick is to flatten the grill out on the ends and "re-bend" in a straight line. The "thick" part of the grill (at the bottom) is molded in that straight line. You need to secure it in a vise along the "thick" edge and bend it back in a straight line using a body hammer.
Attached image(s)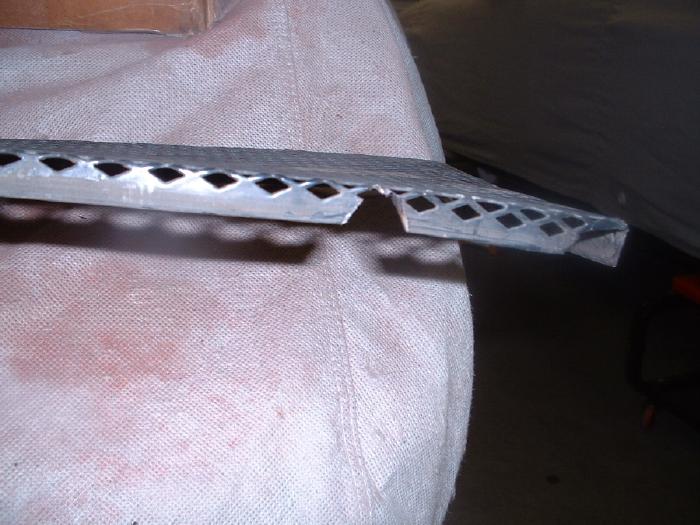
Posted by: Eric_Shea Nov 1 2003, 05:59 PM
Step 3:
Next I laid the screen on the lid for a test fit. I used a scribe to mark the locations of the remaining stock mounting tabs. I marked the lid and drilled the holes... pretty simple so far.
Posted by: Eric_Shea Nov 1 2003, 06:00 PM
(ooops... photo would be nice) 
Attached image(s)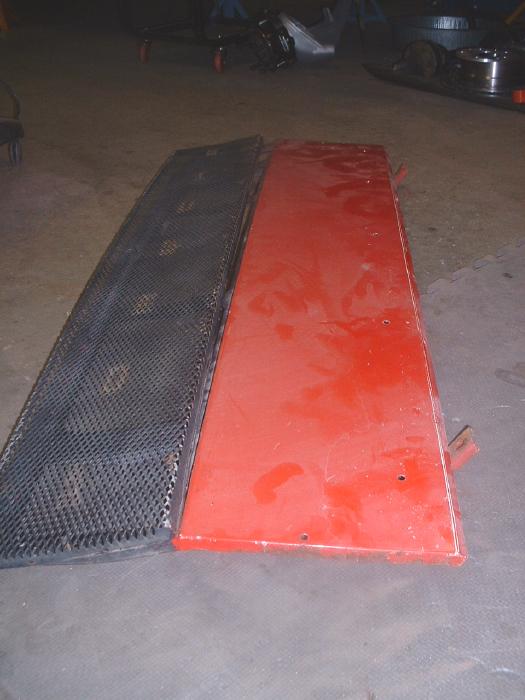
Posted by: Eric_Shea Nov 1 2003, 06:06 PM
Step 4:
I used a drill and drilled out the spot welds on the cross brace. I also used a cut-off wheel and cut the center spring mount down about 1/2" past the mount itself. I didn't use a special "spot weld bit", instead I drill completely through saving an extra .000012542nd of a pound in weight! (lighter = faster). Actually I've seen actualy GT lids and they're nothing to write home about so I wasn't too picky here... this took a whoppin 5 minutes.
Attached image(s)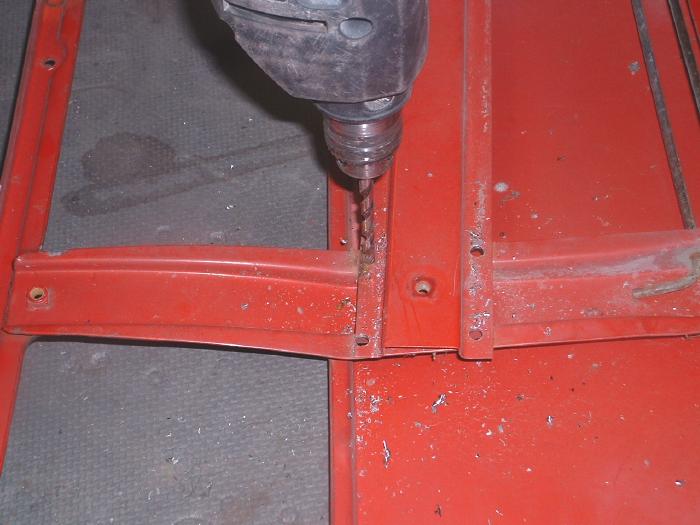
Posted by: Eric_Shea Nov 1 2003, 06:10 PM
Step 5:
Building the Template. I used the front section of the lid with the existing mounting surface as my original template. Seeing as how my grill would simply be turned around, this was a logical place to get a "factory look" type template from. I laid a piece of masking tape over the front surface and used the side of a pencil to trace the outline. I then lifted the tape and using my center hole as a guide, I laid the tape down on the back section of the lid.
Attached image(s)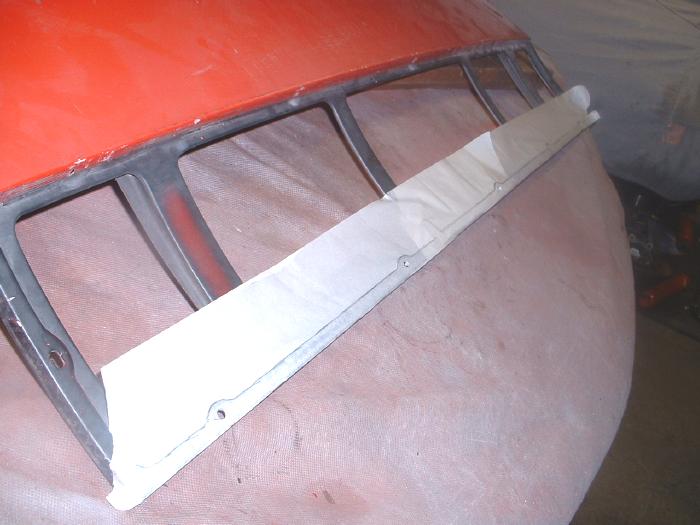
Posted by: Eric_Shea Nov 1 2003, 06:13 PM
Step 6:
Completing the template. I used masking tape and completed taping off the lid. Using measurements similar to the front half of the lid I drafted the new opening on the back half. All over except the "commitment" part (snip, snip).
Attached image(s)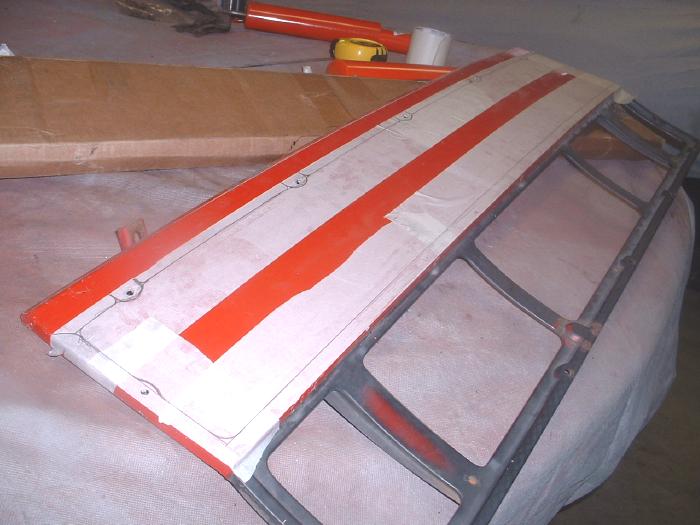
Posted by: Eric_Shea Nov 1 2003, 06:23 PM
Step 7:
You can see by the template above that I plan to simply fold down the back. The 45 deg. lines in the corners will give you an idea. Also, the lines around the tab mounting holes in the rear show the direction. Step 7 is "Get cutting."
I drilled a couple of holes to get my sabre saw blade started and away I went. The areas to be careful around when cutting are the mounting braces. I once again used the cut-off wheel to get at these areas. Be "very" careful with the cut-off wheel up toward the front of the lid. Here the sheetmetal virtually rests on the brace. You'll need to have a steady hand to just cut through the sheetmetal and not the brace. In the middle of the lid the brace slopes down so as not to be a mjor issue. Here's the new breather hole!
Attached image(s)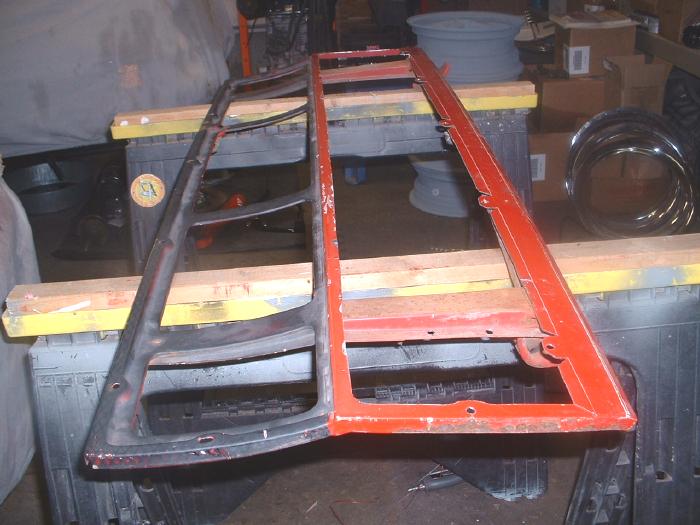
Posted by: Eric_Shea Nov 1 2003, 06:29 PM
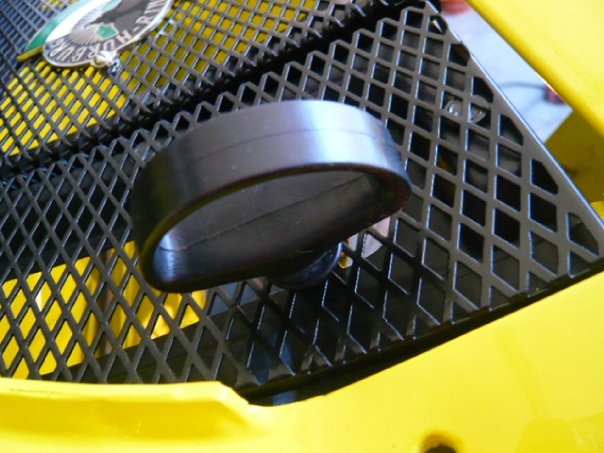
Next I'll need to find either some flanging pliers or... something that one of our fine 914club members would recommend for bending down the back lip. Once that is done the grill will need some slight cutting and modifying around those areas for final fit. I also kept the rubber beading that came on this grill and I plan to use it to "clean up" that back edge. Here's the lid with the grill trial fit, before the lip has been bent...
Film at 11:00! 
Attached image(s)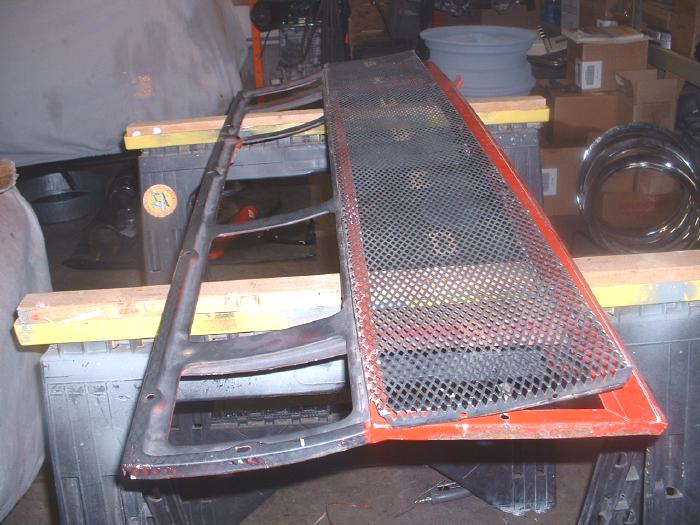
Posted by: McMark Nov 1 2003, 06:55 PM
Very nice! I'm looking forward to the finished product.
Posted by: Aaron Cox Nov 1 2003, 07:10 PM
schweet! 
Posted by: Eric_Shea Nov 1 2003, 07:11 PM
Thanks Mark... say, is that a venison burger? How's the car?
Posted by: ! Nov 1 2003, 07:46 PM
That's how I did mine......I used barbeque paint to finish it off....
Posted by: Lawrence Nov 2 2003, 09:05 AM
Fantastic job!
When this thread is finished, I'll move it to the Classics.
Posted by: djm914-6 Nov 2 2003, 10:24 AM
I'm glad to have inspired someone to do their own project. I never did finish mine, but someone at Hershey got a great deal.
Good luck on yours!
Here's the PP thread/ article... http://forums.pelicanparts.com/showthread.php?s=&threadid=86528&highlight=engine
Posted by: Eric_Shea Nov 2 2003, 03:28 PM
Did a few little things today. Dug out the original grill and test fit both together on the lid.
Also, used the MAP torch (why don't you have one yet?) and toned down the springs a bit. I held each sping in the vise and bent the end in about 1/2 way from where it was. I'm hoping this will duplicate the lighter 914-6 spring without going to the effort of finding a pair.
Attached image(s)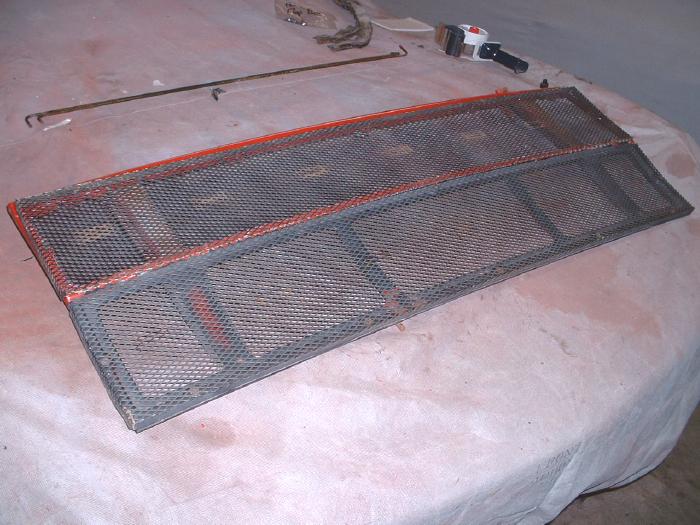
Posted by: Eric_Shea Nov 5 2003, 10:23 PM
Guess who?
OK... The answer to the missing tool from the first post is; A pair of Vise-Grip sheetmetal bending pliers. With those and a dollie and body hammer the final bend was completed.
Attached image(s)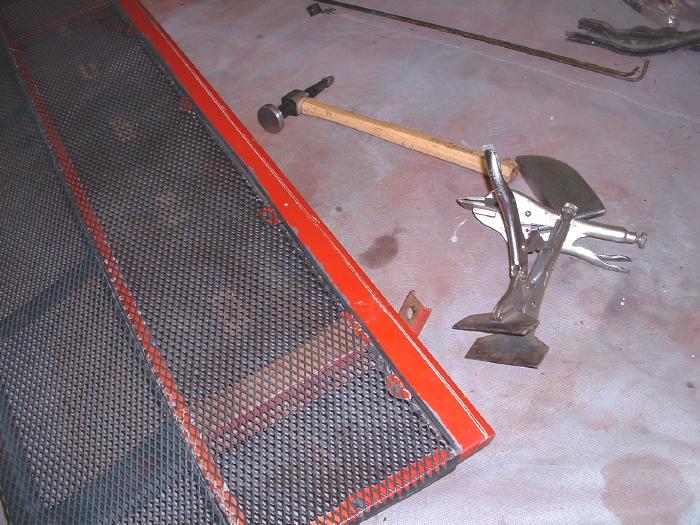
Posted by: Eric_Shea Nov 5 2003, 10:27 PM
I also took the time to trim the extra piece of rubber trim so it would fit along that back edge. Next, the entire lid and grill assembly gets taken off to the sand blaster to have it all cleaned up. Then it gets primed and painted with semi-gloss black and re-assembled.
Attached image(s)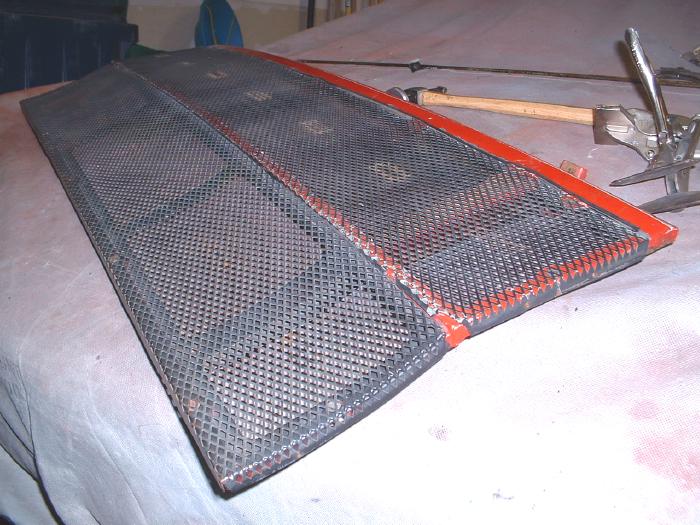
Posted by: redshift Nov 5 2003, 10:39 PM
That came out really nice.
Does Mike eat venison with barbeque paint?
M
Posted by: Eric_Shea Nov 7 2003, 11:09 PM
Back from the sandblaster today. I finished up the bend at the rear of the lid and, once again, test fit the grills. I also test fit the springs again.
Attached image(s)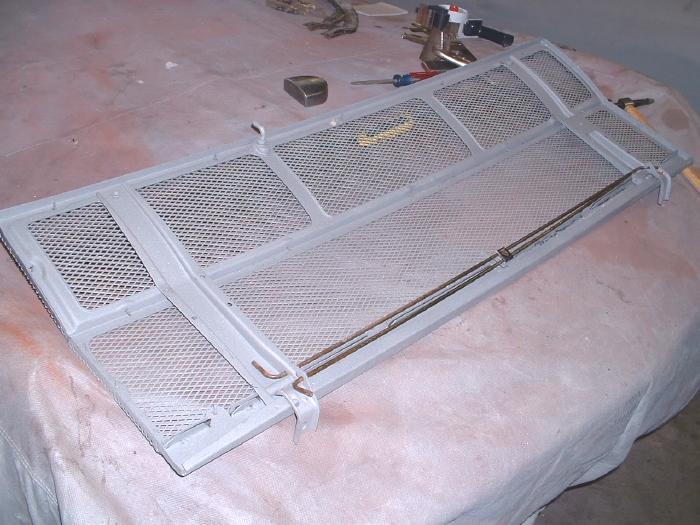
Posted by: Eric_Shea Nov 7 2003, 11:12 PM
After this photo was taken I dismantled the lid and put a small amount of filler on the edge that was bent down and hammered on with the body hammer. Tomorrow I'll finish that off and prime the grills and lid. If it's nice enough I might be able to put a finish coat on as well...
Attached image(s)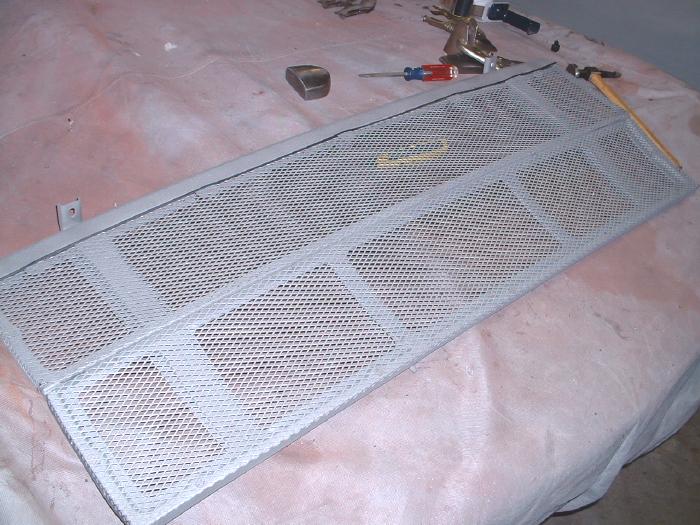
Posted by: Qarl Nov 7 2003, 11:36 PM
Nice job!!! 
Posted by: markb Nov 8 2003, 01:03 AM

Posted by: thesey914 Nov 8 2003, 04:00 AM
Eric, has the lid become really flexible now from lack of structural integrity?
I was wondering if its possible to use just one torsion spring to lift the lid now it weighs less? I'll admit I haven't been out to see if one spring is even is feasible
Great looking job.
Posted by: SirAndy Nov 8 2003, 04:28 AM
I was wondering if its possible to use just one torsion spring to lift the lid now it weighs less? I'll admit I haven't been out to see if one spring is even is feasible
Great looking job.
i have one with the stock torsion springs. no problem.
the frame is what gives it the strength ...
Andy
Posted by: Eric_Shea Nov 8 2003, 08:24 AM
Hey J,
Yes... it's become a bit more flexible without the brace but I don't see that as an issue for this car (or any car really...) It's either going to be up or down and I can't think of a time when the flex would effect anything. It will also tighten back up a bit when the grills are firmly mounted (Me thinks).
The spring issue is a pisser... with the amount of flex "one" stock spring makes the lid twist. That's why I originally thought about toning down both stock springs. With the trial fit last night I think the bending of the springs worked however I'm not sure if the lid will go up to the heigth needed. It "may" be that we're left with two choices.
a ) stock springs that will send the lid-a-flyin when you pull the latch, or
b ) 914-6 springs
(for those wondering about the spring differences, 6's don't have a rain catch which made the lid much lighter hence the factory used lighter springs to do the same job)
***Anybody have a pair of bump stops?***
Posted by: mikester Nov 8 2003, 08:34 AM
Will you be using a rain catch? If so...what about the newly exposed grill area? I know it's kind of coverd by the top...but I don't know if that is good enough.
Posted by: Eric_Shea Nov 8 2003, 08:40 AM
No rain catch... K&N Watershed air-filter housings and probably won't be driving it much in the rain.
Posted by: SirAndy Nov 8 2003, 01:36 PM
here's the easy fix for that:
a) put your HAND on the lid when you pull the release knob ...
geeeze, some people,
Andy

Posted by: Eric_Shea Nov 8 2003, 02:00 PM
Today's status:
Finished off the filler on the rear strip. I also went out and got some black primer and black semi gloss paint. Here's a look at the filler...
Attached image(s)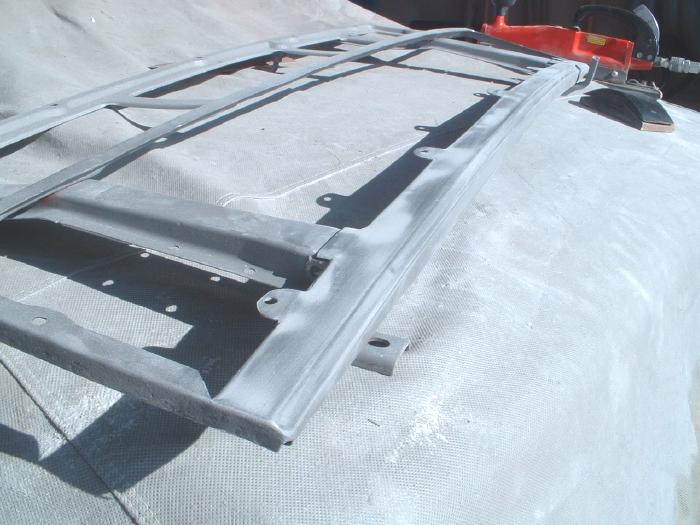
Posted by: Eric_Shea Nov 8 2003, 02:02 PM
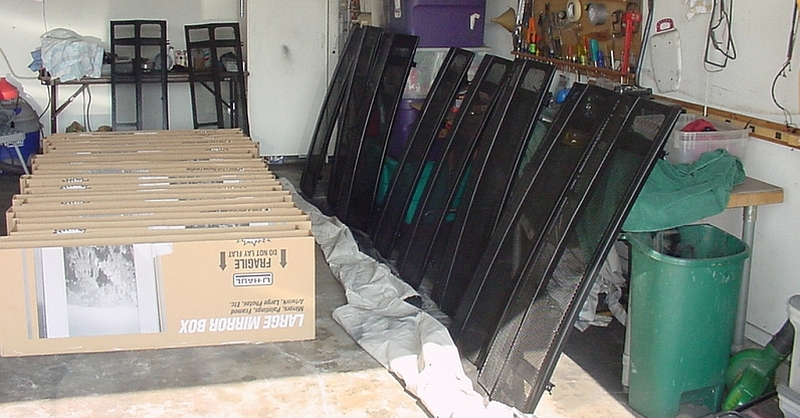
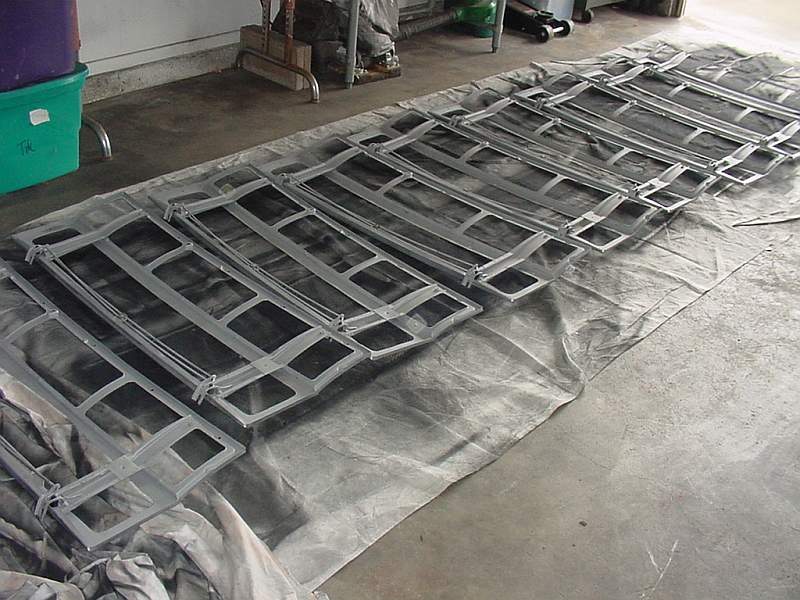
Here's the parts hanging in the sun... I'll fit it together later today and snap a final picture.
Film at 11:00! 
Attached image(s)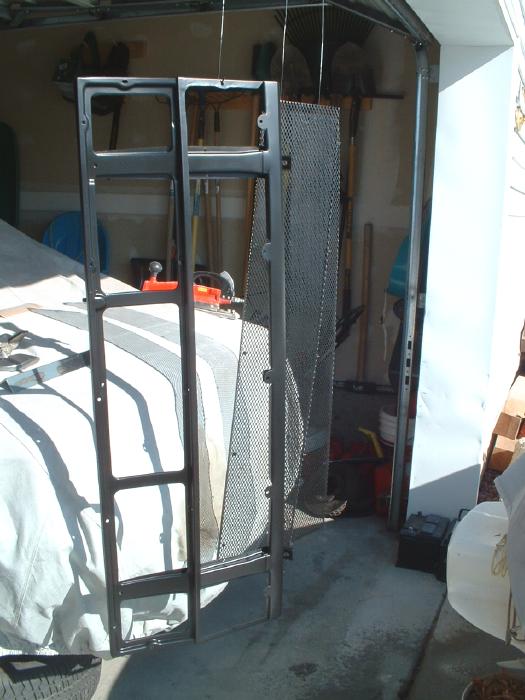
Posted by: djm914-6 Nov 8 2003, 02:08 PM
SCHWEET!
That looks much nicer that what I had done.  Great Job!
Posted by: Eric_Shea Nov 8 2003, 02:39 PM
Thanks Dave and all...
Done, fineato, pronto, finished, outta here, thread to bed. It was fun and I dig the look of the GT lid. Now all I need is GT to bolt it to (it's coming slowly but surely).
I'm about to pull the engine from the 911 and get started on that end of the project. Looking to put 90mm P&C's on a short stroker and have my rod ends rebushed for higher compression. S-cams and Webers. Should be a fun 220hp I'm hoping... Here's the pics of the finished lid:
Attached image(s)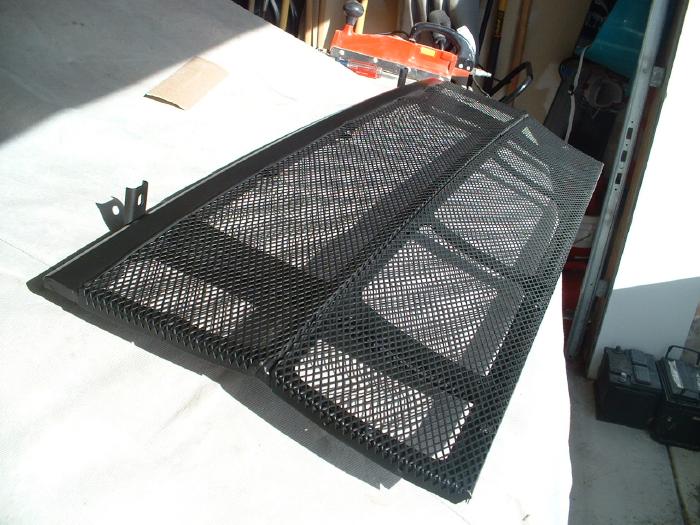
Posted by: Eric_Shea Nov 8 2003, 02:40 PM
Last one...
Attached image(s)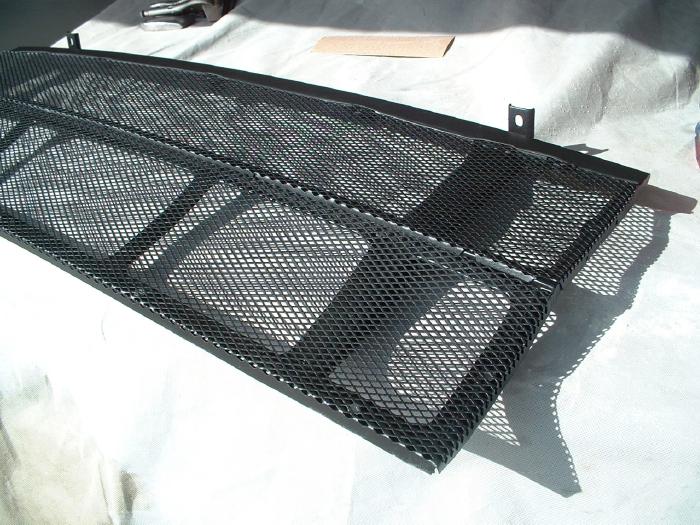
Posted by: thesey914 Nov 8 2003, 04:09 PM
Done, fineato, pronto, finished, outta here, thread to bed.
Not quite Eric.....we want to see it on the car.
Posted by: scotty Nov 8 2003, 04:10 PM
O-M-G!
Posted by: Eric_Shea Nov 8 2003, 04:33 PM
It is on the car... sitt'n right on the rear trunk lid
Posted by: TROJANMAN May 21 2010, 01:44 PM
This should be easier to find. Can we please move it to "the Classics"
Thanks
Posted by: MDG May 21 2010, 03:12 PM

This should be easier to find. Can we please move it to "the Classics"
Thanks

It already was in the Classics . . . at least that's were I found it a year ago when I used it as reference to make mine.
edit: yep - just checked; it's now in there twice. It's good though so why not
Posted by: TROJANMAN May 21 2010, 03:14 PM
 When I did my search, it came up in the garage.
Posted by: SirAndy May 21 2010, 03:24 PM
When I did my search, it came up in the garage.Which is CORRECT!!!
The "Classic Thread" forum as well as the new "Restoration and Build Threads" forum now only contain links to the actual threads while the threads were moved back into the garage to allow them to be included in your searches.
In your case, it worked perfectly ...
 Andy
Andy
Posted by: TROJANMAN May 21 2010, 03:27 PM
brilliant 
Posted by: carr914 May 21 2010, 08:12 PM
I've got a Couple of replica lids that I have done that are pretty nice. I have been offered a Lid off a real GT, but quite frankly the craftsmanship, while Real, looks kindergarden level.
T.C.
Posted by: ChicagoPete May 22 2010, 08:42 AM
I've got a Couple of replica lids that I have done that are pretty nice. I have been offered a Lid off a real GT, but quite frankly the craftsmanship, while Real, looks kindergarden level.
T.C.
Perhaps this has already been discussed T.C. But have you ever compared the mesh of the REAL lid to the mesh off a non GT lid???
What are the differences? I seem to remember the mesh on the GT lid is a little bit finer?? I mean the wire to make the mesh?
Any thoughts?
Peter
Posted by: PRS914-6 May 22 2010, 10:06 AM
Eric, nice job on the grill.....I originally tried to do a GT grill on my car and could never quite get the "wrinkle" out of the front side since it's not quite the same shape as the original and the "U" shape in the grill just wouldn't lay quite right. Probably anyone but me would be happy but I just couldn't get it perfect. (you know how anal I am  ).
).
So, the question is did you get that out or is there a bubble or bow in the screen when you sight down it? If it laid down right did you have to massage it to get it right or did it just seem to fit? Perhaps sounds stupid but I spent hours trying to get that out and gave up. Never tried a different screen though. The flatter paints tend to hide that though.
Posted by: computers4kids May 22 2010, 12:14 PM
So, the question is did you get that out or is there a bubble or bow in the screen when you sight down it? If it laid down right did you have to massage it to get it right or did it just seem to fit? Perhaps sounds stupid but I spent hours trying to get that out and gave up. Never tried a different screen though. The flatter paints tend to hide that though.
Paul, If you flip the grill 180 and then re-bend the fold on the last 6 inches (both corners nearest the center welting), the grill lays down beautifully.
It's easy to underestimate how much time goes into making one of these grills...nice ones. There is a whole wide range out there from the crappy chicken wire ones they made in the day, true GT, to ones carefully crafted out of OEM parts. I've made 20 of them so far and each time I swear I 'm not going to do any more--Then time passes and my 914 bank is empty and I do another batch.
Posted by: Eric_Shea Jun 2 2010, 09:10 PM
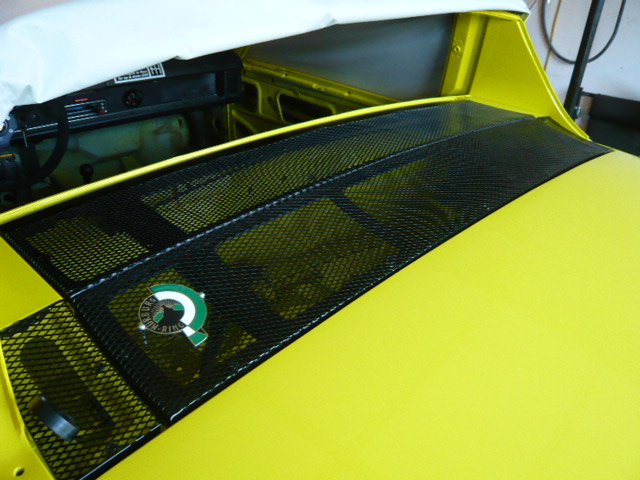
I have nothing to add but a picture of the lid now on the car! 
Posted by: SirAndy Jun 2 2010, 09:17 PM
I have nothing to add but a picture of the lid now on the car!
Do what the factory did and paint the body black underneath the little side grille thing-a-ma-jiggers. Having the body color shine through looks odd ...
 Andy
Andy
Posted by: Eric_Shea Jun 2 2010, 10:04 PM
That was an early shot when I was test fitting bits and pieces...
How's this?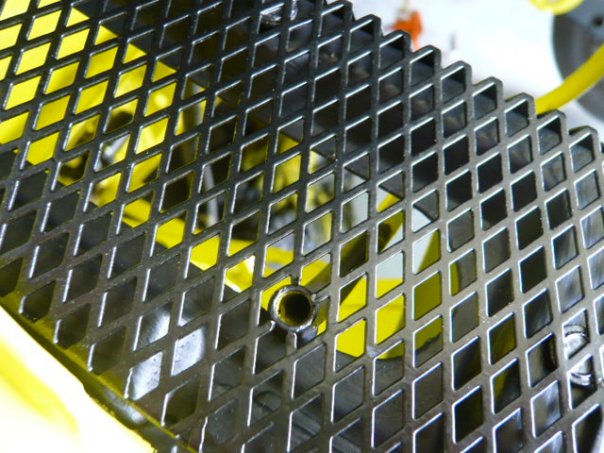
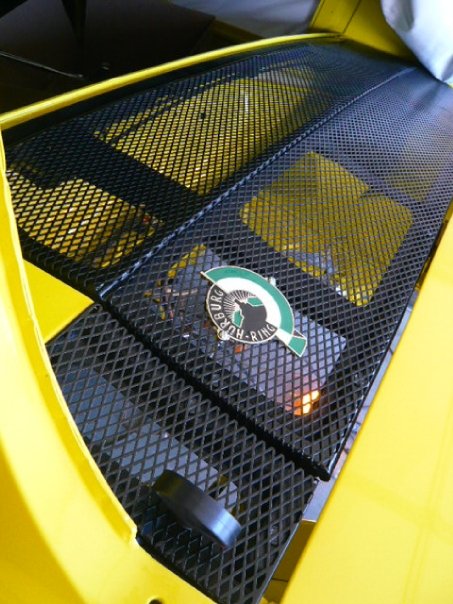
Now with the vinyl: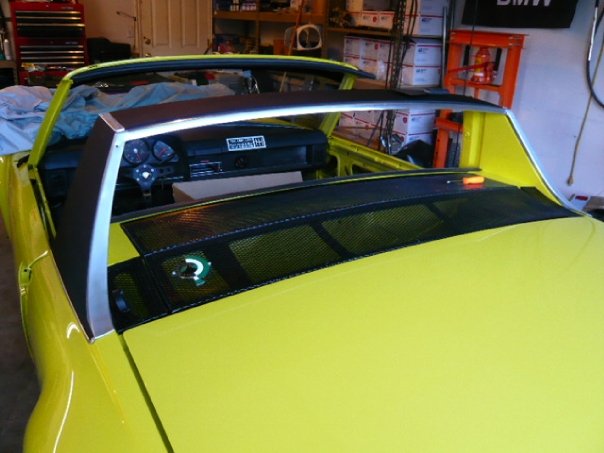
Posted by: Eric_Shea Jun 2 2010, 10:10 PM
Paul and Peter, I saw many GT lids and each was a tad bit different. Some were basic hack jobs. Some had stock 914 screen and some had a smaller mesh.
In the spirit, I think this came out really well. I didn't notice any weird lumps or humps in the screen but, honestly, I wasn't looking for them.
Posted by: SirAndy Jun 2 2010, 11:09 PM
How's this?

Posted by: JmuRiz Jun 3 2010, 09:18 AM
How's this?
Double
Looks awesome
Posted by: RobW Jun 3 2010, 10:15 AM
Great instructions!
I did one for my race car... it was fun, cost me about $45 mainly for a local kid to weld the second grate down because I couldn't get it to fit right.... now it works!
Posted by: mlindner Nov 25 2019, 06:29 AM
Thanks Eric for the post. My buddy came up to Wisconsin from Florida in March to help me build one. Had lots of fun and it turned out great. Mark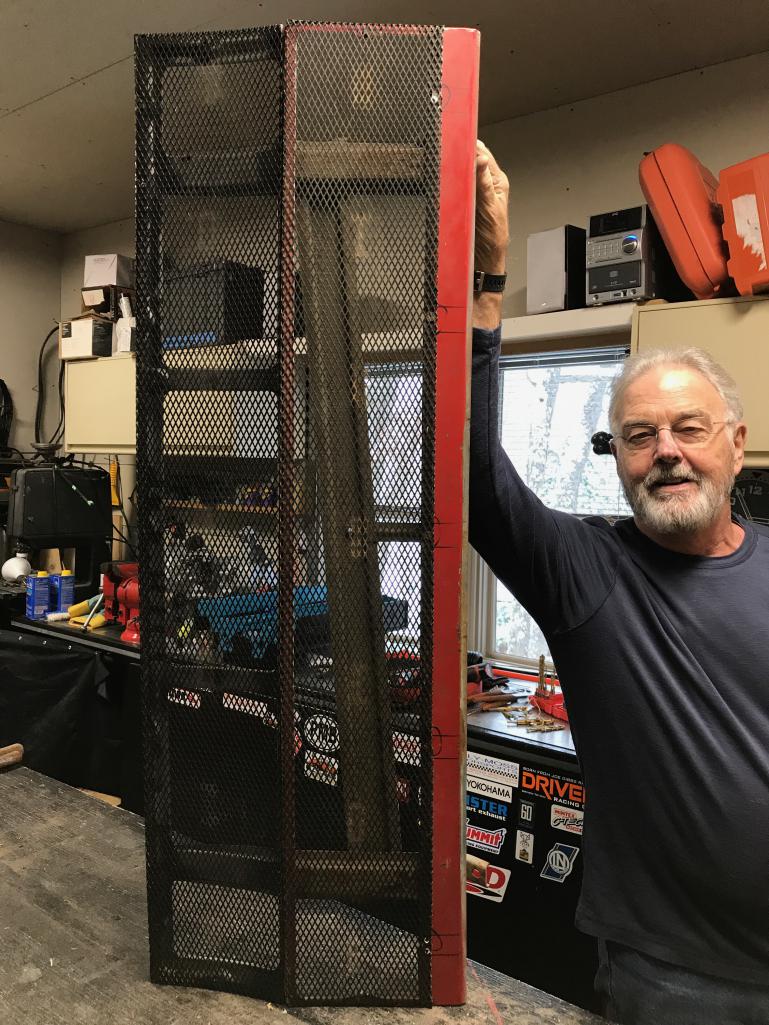
Posted by: mlindner May 23 2020, 05:05 AM
Final product just great. Mark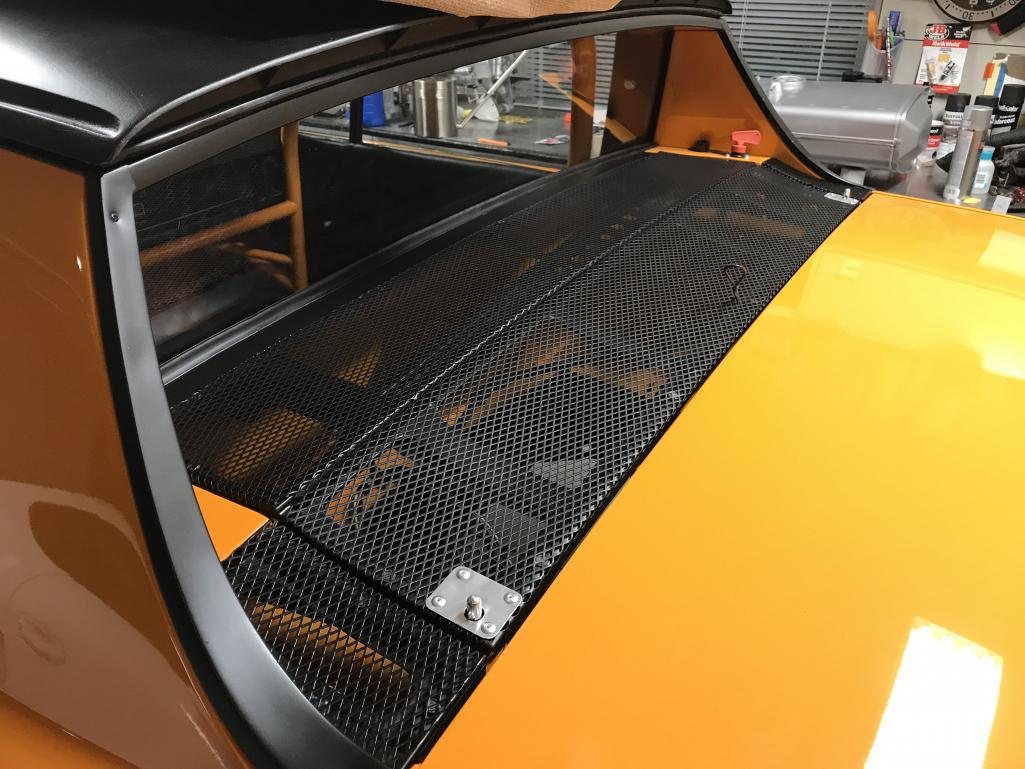
Posted by: Eric_Shea May 27 2020, 03:14 PM
Great job guys!
Posted by: windforfun May 27 2020, 05:12 PM
A true artista!
Posted by: SO.O.C914er May 27 2020, 07:07 PM
Nice work!  If someone has one ready to bolt on they would like to sale PM me please?.......Thanks Paul.
Posted by: dangrouche May 28 2020, 09:54 PM
Nice work!
If someone has one ready to bolt on they would like to sale PM me please?.......Thanks Paul.contact PCA7GGR (Sergio) on this board; he sells them for a shipped price of $400
Posted by: mlindner May 29 2020, 10:39 AM
Nice work!
If someone has one ready to bolt on they would like to sale PM me please?.......Thanks Paul.contact PCA7GGR (Sergio) on this board; he sells them for a shipped price of $400
+1, Sergio's are first class.
Posted by: ValcoOscar May 29 2020, 11:38 AM
Nice work!
If someone has one ready to bolt on they would like to sale PM me please?.......Thanks Paul.contact PCA7GGR (Sergio) on this board; he sells them for a shipped price of $400
+1, Sergio's are first class.
@http://www.914world.com/bbs2/index.php?showuser=20199 (Paul)
@http://www.914world.com/bbs2/index.php?showuser=1219 (Sergio)
I've bought a few of his
Oscar
Powered by Invision Power Board (http://www.invisionboard.com)
© Invision Power Services (http://www.invisionpower.com)