Printable Version of Topic
Click here to view this topic in its original format
914World.com _ 914World Garage _ Progress made on rust repair
Posted by: DNHunt Nov 5 2003, 08:47 PM
Fit the panels to repair the inner wheel well. Feels good to be starting to put things back together. Still have more clean up and more pieces to make. Here's the surgery on the drivers side
Attached image(s)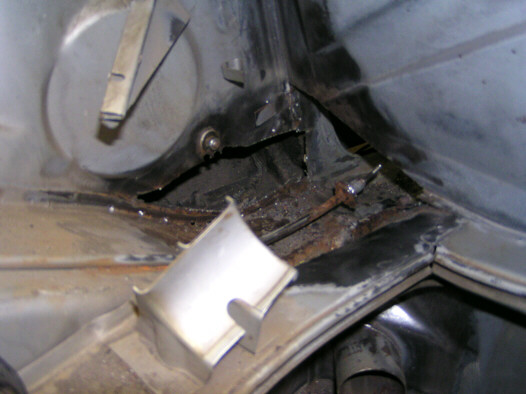
Posted by: DNHunt Nov 5 2003, 08:48 PM
Here's the patch fitted to the hole
Attached image(s)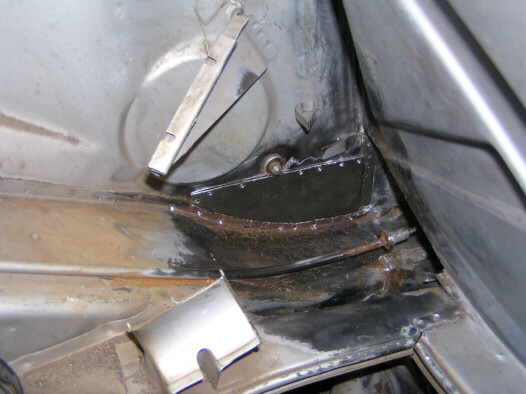
Posted by: DNHunt Nov 5 2003, 08:51 PM
Here's the hole on the passenger side. I kinda freaked over this but the panel from Restoration Designs fit very well. It needed a little massage but not much
Attached image(s)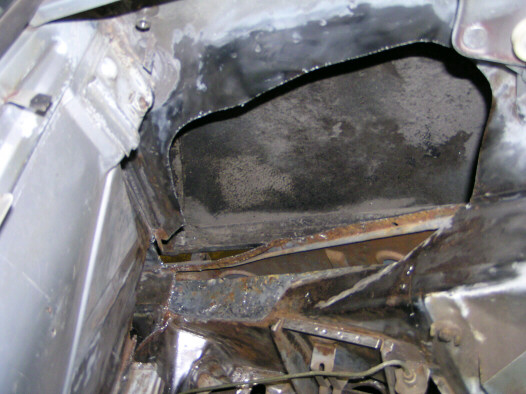
Posted by: DNHunt Nov 5 2003, 08:53 PM
Here's patch passively fit. Great product.
Dave
Attached image(s)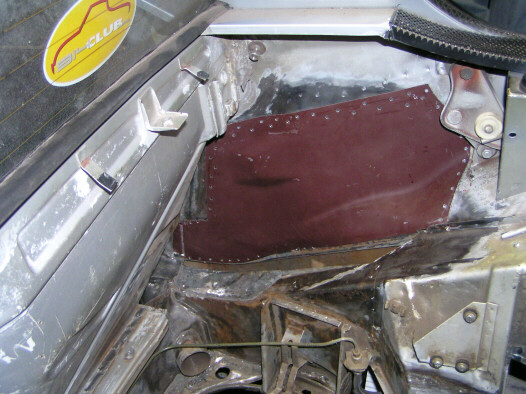
Posted by: Brad Roberts Nov 6 2003, 03:56 AM
Look at that... 
The 914club sticker is "watching" over your work.
Another quality piece from Restoration design.
B
Posted by: Racer Chris Nov 6 2003, 06:18 AM
You are making great progress. Way to go!  (we need a welding smilie)
Posted by: DNHunt Nov 6 2003, 09:06 PM
Fit a cardboard template to the missing part of the frame rail.
Dave
Attached image(s)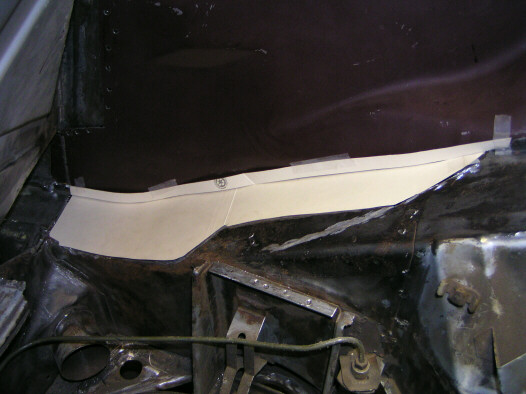
Posted by: MarkV Nov 6 2003, 09:26 PM
I have to do that same repair. 
Attached image(s)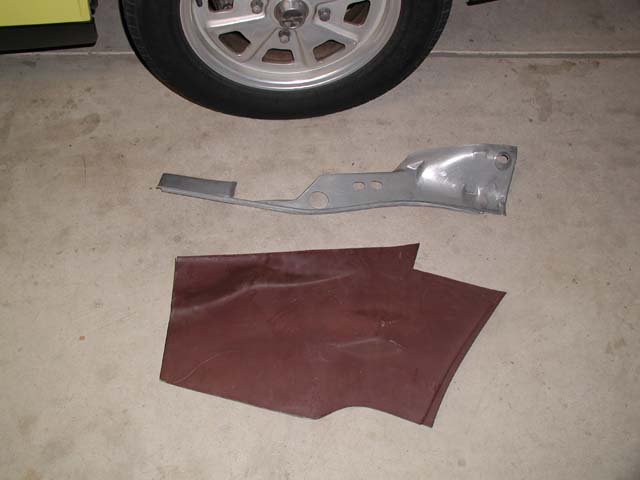
Posted by: MarkV Nov 6 2003, 09:29 PM
Bought this flange tool for the job at Harbor Freight.
Attached image(s)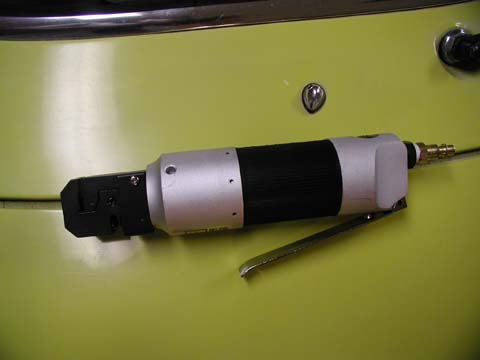
Posted by: MarkV Nov 6 2003, 09:30 PM
One side of the die makes a flange & the other side punches a 3/16" hole.
Attached image(s)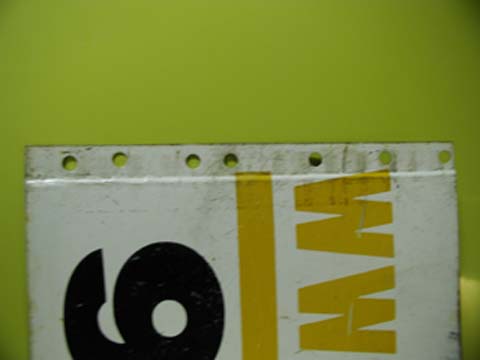
Posted by: Brad Roberts Nov 6 2003, 11:30 PM
Holy Toldeo Batman. (I mean Mark)
That is cool. I knew what task the tool performed but I had NO idea that it punched the hole also.
Damn.. it is now on the "must have list".
B
Posted by: MarkV Nov 7 2003, 01:15 AM
Brad,
Send me that orange front trunk that is collecting dust in your shop and I will send you a flange tool.
Posted by: rhaas Nov 7 2003, 11:01 AM
here is the link for the flange tool. I got one a while back, but have not had a chance to use it on the teener. I did test it out on some scrap it works real good.
http://www.harborfreight.com/cpi/ctaf/Displayitem.taf?itemnumber=41696
They are having a special on a body saw. This works good for tight spaces. Mine zips through the sheet metal without any trouble.
http://www.harborfreight.com/cpi/ctaf/displayitem.taf?Itemnumber=113
Posted by: DNHunt Nov 7 2003, 07:11 PM
Passively fit the top portion of the frame rail. Making a template really helped. Tomorrow I'll get the firewall pieces done.
Dave
Attached image(s)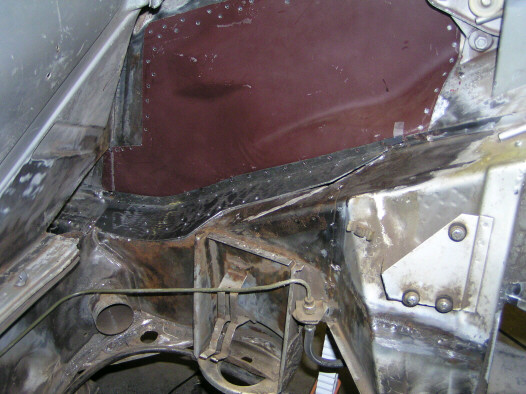
Posted by: ChrisReale Nov 7 2003, 07:16 PM
Cool D. Wanna come do mine? 
Posted by: DNHunt Nov 7 2003, 07:20 PM
Chris
I DON'T THINK SO, but by the time I'm through I should be well qualified to watch and give advice.
Dave
Posted by: DNHunt Nov 8 2003, 08:00 AM
Cut and fit template for firewall on driver's side
Attached image(s)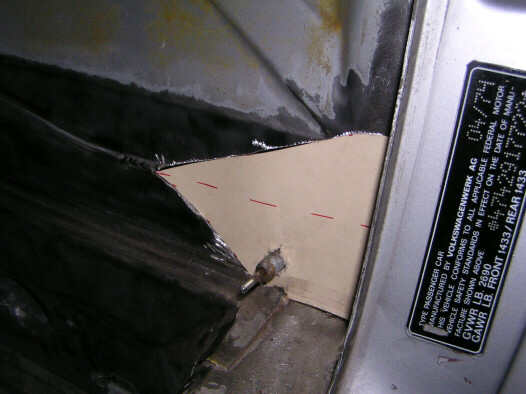
Posted by: DNHunt Nov 8 2003, 08:02 AM
Cut and fit template for passenger's firewall. Both of these areas are actually 2 pieces (upper firewall and lower inside firewall). Time to go cut and bend some metal.
I've become consumed working on this. I get up early and work on it before I go to the office and after i come home. The wife is getting so desperate to do something together she wants to help do the winter clean up in the vegetable garden. I'm gonna have to get a real life soon., but maybe I can stretch one more day of working on the car.
Dave
Attached image(s)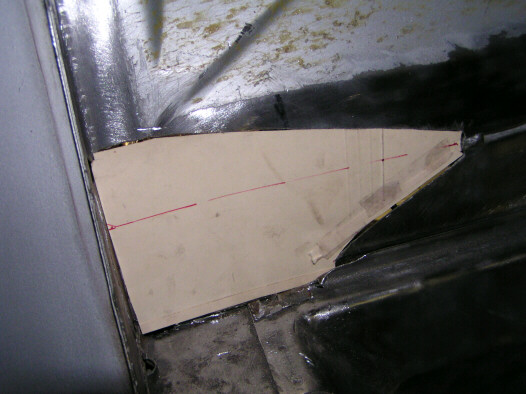
Posted by: rhodyguy Nov 8 2003, 08:17 AM
morning dave, if you're still at the computer. have the kids pull the pig weed, throw the left over squash in the black berries, and till the whole shebang under. let it rot!!! your brother in labor/time intensive yard work.
kevin
Posted by: DNHunt Nov 8 2003, 08:22 AM
Ya Kevin I'll do you one better. I'll put the 4' wide rottiller behind the JD tractor and let Gerry till the whole thing under. Betsy and I can get our together time watching the kid work. (Might work once until Gerry finds out how boring it is to drive the tractor at a whooping .5 MPH.)
Dave
Posted by: rhodyguy Nov 8 2003, 08:37 AM
no dave, gotta pull the pig weed. unless that's what you want to make your salads out of next year . thoses seeds are a menace.
kevin
"roundup is my second best friend"
Posted by: DNHunt Nov 8 2003, 05:20 PM
Finished cuuting out and fitting all of the pieces. Here's a picture of the passenger side firewall.
Attached image(s)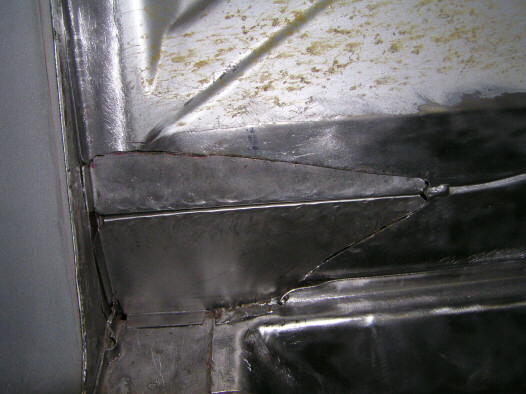
Posted by: DNHunt Nov 8 2003, 05:22 PM
Driver side firewall
Attached image(s)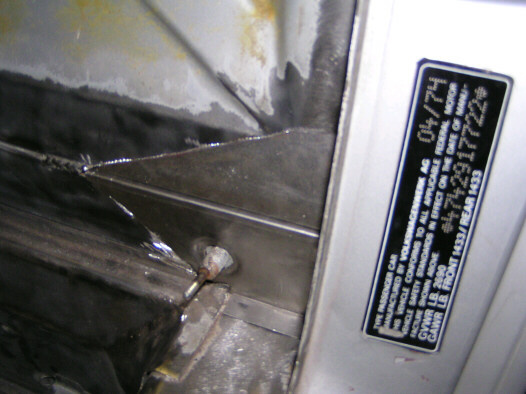
Posted by: DNHunt Nov 8 2003, 05:27 PM
Driverside engine shelf. Not pretty but functional. It's the best I could do with a ball peen hammer. Time for a beer. Hare's Ear Hefeweisen from the Metolius Brewing company (very good).
Dave 
Attached image(s)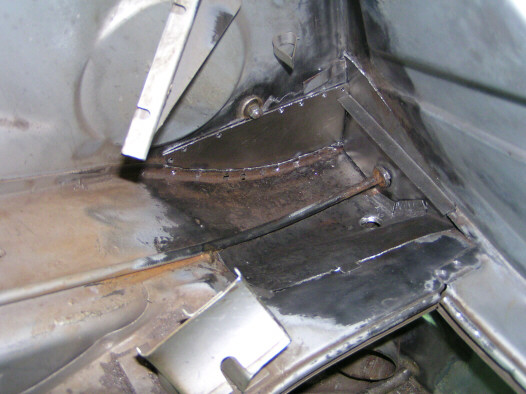
Posted by: Qarl Nov 8 2003, 05:48 PM
Really nice work Dave! I guess you're treating it like fixing a cavity...
Meticulous work and it shows!
Posted by: rhodyguy Nov 8 2003, 08:06 PM
very nice work dave. where did you go for the metal other than resto design pieces? jesus karl, i just lost 10 minutes out of my life "reading" your avatar.
kevin
Posted by: markb Nov 8 2003, 10:25 PM


Posted by: DNHunt Nov 9 2003, 05:34 AM
What's wrong with you guys, taking the time to read that. Just sit back and enjoy.
Kevin
Got some scrap from Tacoma Steel Supply. $5 in their coffee fund and I got plenty of steel with a whole bunch left over
Dave
Posted by: DNHunt Nov 9 2003, 08:30 PM
Welded in passenger inner wheel well. ain't pretty but it's stuck.
Dave
Attached image(s)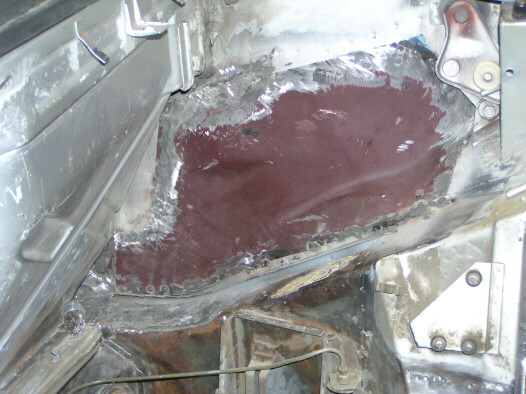
Posted by: trojanhorsepower Nov 9 2003, 08:44 PM
Dave,
Did you seem weld that after you spot welded it or did you do just the spot welds?
Nice job
-Pete
Posted by: DNHunt Nov 10 2003, 07:34 AM
Pete
I seam welded from the opposite side. That why I say it's a mess. Globs of metal in the wheel well.
Dave
Posted by: 2-OH! Nov 10 2003, 08:18 AM
Hey Dave:
What type of grinding tool did you use to get down in the very corner...I have the same exact repair to do on the passenger side but the driver side is OK, I think.. I just can't get in there to grind the rust out of the corner...
It appears by jabing with a screw driver that it's only surface and I think I'll be able to save it , if I could just get the rust out and treat it...
The other side (under the battery tray) is gone though...
Taking the rocker panel off yields good news...no rust at all...inside, outside or under the long looks great and soild, but the top is gone...
Is the Long a box and the engine compartment a second skin, so I should expect to repair the top of the Long and the engine compartment skin as well ???
2-OH!
Posted by: DNHunt Nov 10 2003, 08:37 AM
2-OH!
I used a couple of wood chisels to get most of the seam sealer off. Then I used a combination of various wire brushes including smaller ones with the bristles out the end (go to the hardware store, you will see a bunch of different ones). I also used some 3M pads that are used to remove paint.
One thing that helped me was one of those extensions for electric drills. It allows me to get the body of the power tool back and away from the firewall and wheel wells. Finally I just scaped and sanded.
When you go buy wire wheels, abrasive disks and sand paper take your plastic. You're gonna need a lot. The project kinda grows.
Dave
Whe
Posted by: 2-OH! Nov 10 2003, 10:01 AM
Dave:
Are there two thicknesses of metal, one for the Long and one for the engine compartment cowling ???
2-OH!
Posted by: DNHunt Nov 10 2003, 10:57 AM
Well sort of. There is an inside portion of the frame rail which you see at the surface. This wraps over the top ans spot welded to the innerwheel well. This is what you see rusted. Under that is a second piece that goes from the inner frame rail to about 1/2 of the way across the top. The first piece is spot welded to the underneathe piece. On the outside there is a piece under the inner wheel well that just curls over the top.
Hard to explain, I'll try to get a picture tonight
Dave
Posted by: 2-OH! Nov 10 2003, 11:06 AM
My problem is that the drain hole area is rusted to about (at least) the size of a half dollar...Got to get in there with something small and grind away until I find parent metal...I also have a rust hole IN both the firewall and down)in the very corner of the three pieces, firewall, inner wheel well and engine pan...That makes me think it has rusted through the Long...
2-OH!
Posted by: DNHunt Nov 10 2003, 11:23 AM
Take a look around but you won't see it all until you take out the engine remove the tons of seam sealer and start cleaning up with a wire wheel or abrasive.
I started with a 50 cent piece sized hole in the engine shelf. Clean up revealed a few small holes in the top of the long and lots of pitting. After I cut the piece out and turned it over I was really glad I removed. Would have been swiss cheese soon.
Dave
Posted by: 2-OH! Nov 10 2003, 02:06 PM
Thanks Dave...I've got the motor out so it's just a task of getting in there with the grinder and start cuttin' away the bad and see whats left...
2-OH!
Posted by: DNHunt Nov 10 2003, 09:31 PM
2-OH!
Here's the picture of the framr rail
Attached image(s)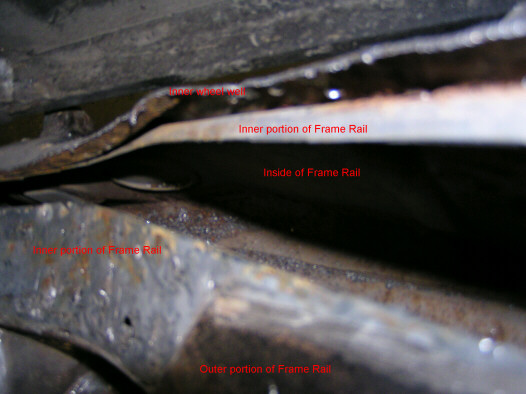
Posted by: 2-OH! Nov 11 2003, 08:06 AM
Thanks Dave, I'm off to the grinding wheel store on Friday...Ain't nothin to but to do it...
2-OH!
Posted by: DNHunt Nov 11 2003, 08:12 AM
Cleaning up the welds in here was a bitch. Couldn't sleep (damn prostate, had to pee) so I thought I would get something done this morning. 2hrs of grinding. My hands are practically tingling. I ought to have a great touch this morning.
Inside passenger wheel well
Attached image(s)
Posted by: DNHunt Nov 11 2003, 08:14 AM
Started cleaning up the patch in pergatory
Dave
Attached image(s)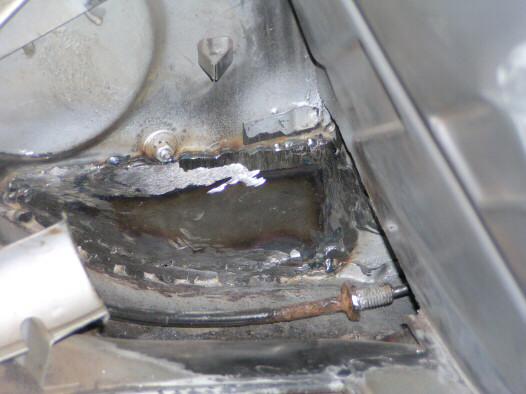
Posted by: rhodyguy Nov 11 2003, 08:18 AM
dave, i completely understand the frequency issue. get a nightlight for the john, leave the overhead off, sit down.
kevin
Posted by: mr914 Nov 12 2003, 09:50 AM
I have a 1/5 hp flex shaft dremel that I use to get in the tight areas. It's about $220. A pine cone carbide bit does wonders.
Posted by: 2-OH! Nov 12 2003, 10:09 AM
Yep, bought one last nite with the cone bit and flex shaft...
My concern was that the Dremel tool was to liteweight and might burn out...But I think it is the best way to go...
Thanks,
2-OH!
Posted by: DNHunt Nov 12 2003, 11:25 AM
I have the same flex shaft. Great tool but it takes time to do much with it.
Gonna cut a little more out of the top of the framerail. Just a small window so I can get access to the inside. Since i already have the top layer off I decided that the small amount of work needed would be more than made up for by having good access to inspect and treat the inside. Also, the nut under jack point that holds the rocker panel twisted off when I removed the stove bolt. I suspect red cancer. So, as long as I've come this far I better be sure and take care of it. Also I can weld on a new nut. Now that the inner wheel well is solid I'm not worried about the car bending
Dave
Posted by: Bleyseng Nov 12 2003, 06:46 PM
Looks good Dave!! Its a bitch grinding in those tight areas but just take your time and take a break now and then so you hands don't tingle.
I have either tea or a beer for a break.
Geoff 
Posted by: DNHunt Nov 12 2003, 08:54 PM
Opened up the framerail a little more. Already had the top layer off so I took a little of the second layer out. I needed to replace the nut below the jack point as it came off when I removed the rocker panel. I was fearing the worst (more red cancer) and I knew it would bug me if I came this far and didn't check. So out came the sawsall and I had a look
Not as bad as I feared. I already rewelded the nut for the rocker and sprayed Metal Ready. Tomorrow I'll give it a coat of Por 15 and close it up. Hope it never sees the light of day again.
Here's a pic before welding and Metal Ready.
Dave
Attached image(s)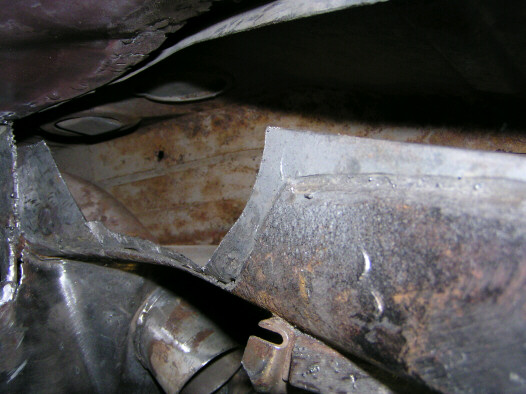
Posted by: DNHunt Nov 12 2003, 08:57 PM
Here's a close up. Awful looking hole but it's not full of rust
Attached image(s)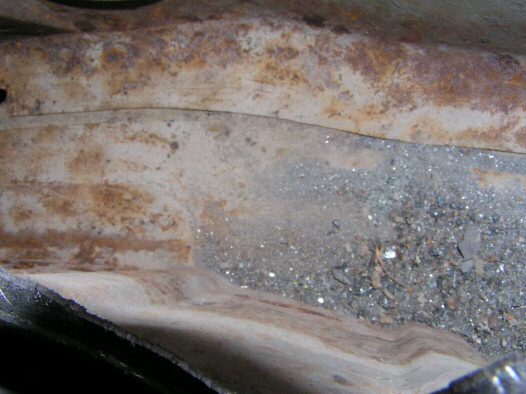
Posted by: DNHunt Nov 13 2003, 09:10 AM
Driver's side firewall patch welded and ground down. I've been using 3/4" separating disks in a flex tool for the tight spots. Separating disks are thin carborundum disks we use in the dental lab for roughing out castings like crowns and partial denture frameworks. They are made to cut nickel chromium so the cut welds pretty well. Each disk lasts me about 30 seconds so I waste a lot of time changing the little things. Still they work well for tight places. I'm off to the dental supply house to pick up a bunch.
Attached image(s)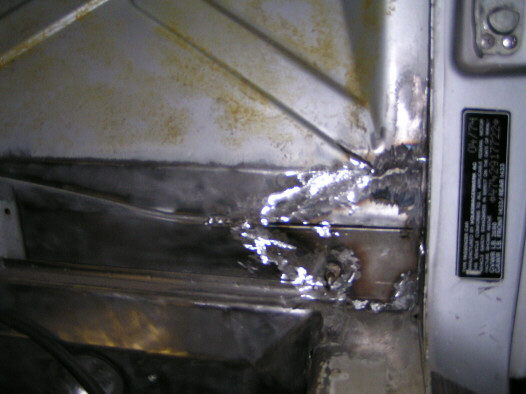
Posted by: DNHunt Nov 15 2003, 08:05 AM
Here is the inside of the passenger framerail after it was treated with metal ready
Attached image(s)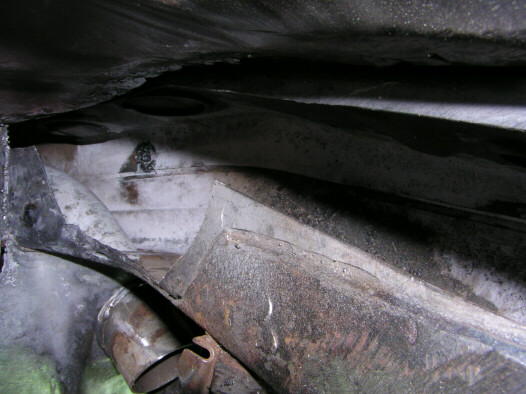
Posted by: DNHunt Nov 15 2003, 08:07 AM
Hereit is after putting Por 15 in the opening
Attached image(s)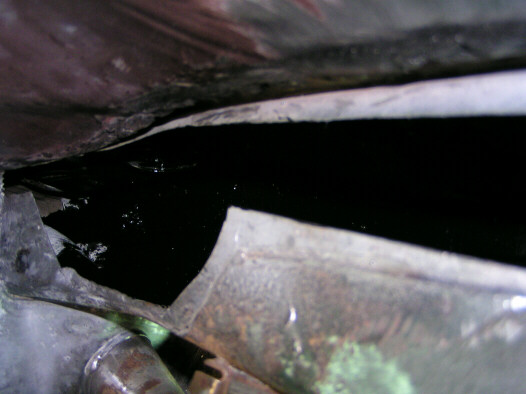
Posted by: DNHunt Nov 15 2003, 08:11 AM
FINISHED welding and grinding drivers aide inner wheel well, firewall and engine shelf. I know my welding is not pretty but its stuck good so I'mm happy. I think it's gonna be fine
Dave
Attached image(s)
Posted by: John Kelly Nov 15 2003, 08:50 AM
Hi Dave,
Nice job!
John www.ghiaspecialties.com
Posted by: DNHunt Nov 19 2003, 08:24 PM
Getting ready to start painting this weekend. First Metal Ready then Por 15 on bare metal. Finished lightly sanding engine bay paint for to recieve primer later. Tidied up weld seams. Pasenger side
Attached image(s)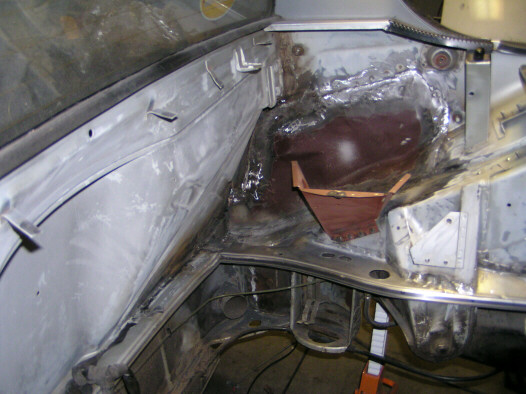
Posted by: DNHunt Nov 19 2003, 08:25 PM
Driver's side No fun getting all the old grime off. Since I plan to paint the engine bay I used laquer thinner which cut it pretty well.Took a lot of the gloss off too.
Attached image(s)
Posted by: Aaron Cox Nov 19 2003, 08:28 PM
way to go! 

Posted by: kafermeister Nov 19 2003, 08:40 PM
NICE!
Posted by: 2-OH! Nov 20 2003, 12:27 PM
Dave:
Did you take the Wiring Harness out or are you going to just tape off around it.
I still have to get the final horse hair off the firewall..Did the Laquer Thinner work on that old glue ???
2-OH!
Posted by: DNHunt Nov 20 2003, 12:35 PM
I left the wiring harness in and I'm working around it. Pain in the butt but, I'm lazy.
Lacquer thinner and elbow grease in equal parts.
Dave
Posted by: DNHunt Nov 22 2003, 04:20 PM
MORE RUST FOUND.
Pasenger door down low
Attached image(s)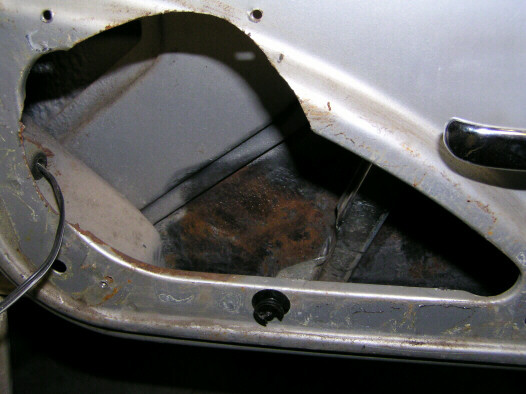
Posted by: DNHunt Nov 22 2003, 04:23 PM
Trunk. By the way my pad under the carpet was sopping wet. I hope it was from the stean cleaning about a month ago
Attached image(s)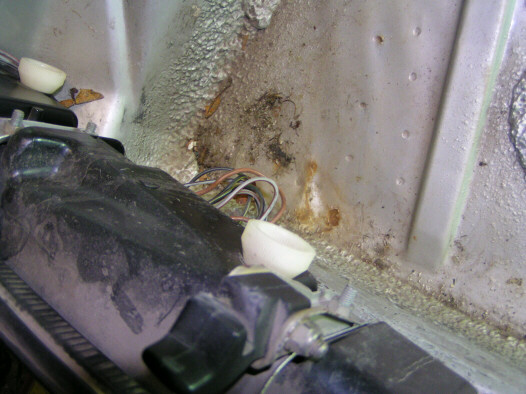
Posted by: DNHunt Nov 22 2003, 04:24 PM
Driver's door in the seal channel
Attached image(s)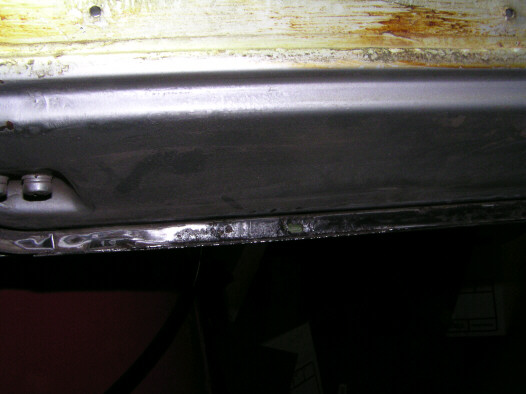
Posted by: DNHunt Nov 22 2003, 04:26 PM
Trunk prepared for Por 15
Attached image(s)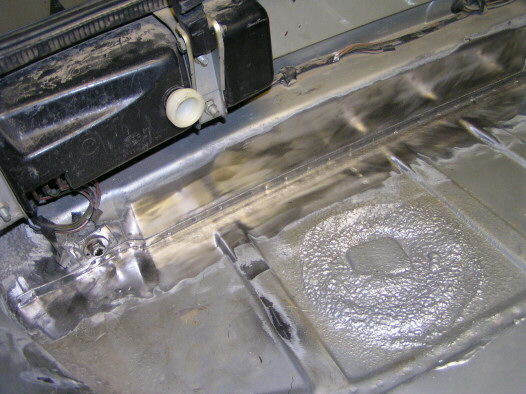
Posted by: redshift Nov 22 2003, 04:26 PM
Pad under carpet in trunk....
Hey Dave, if you care at all about your car, remove the padding under the carpet in the trunk, and the carpet over the padding in the trunk.
Take all that out.
M
Posted by: DNHunt Nov 22 2003, 04:27 PM
Another view of the trunk
Attached image(s)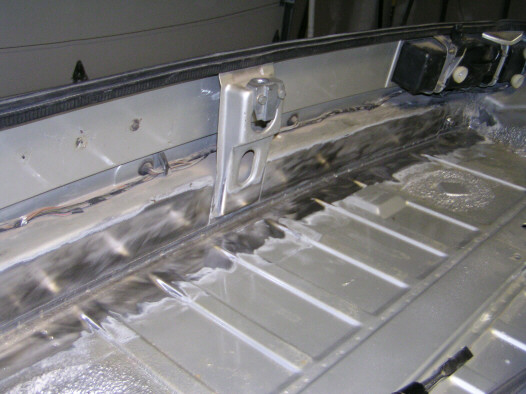
Posted by: DNHunt Nov 22 2003, 04:28 PM
Gotcha Miles
Thanks
Dave
Posted by: DNHunt Nov 22 2003, 04:30 PM
Cut out the rust in the channel in the driver's door
Attached image(s)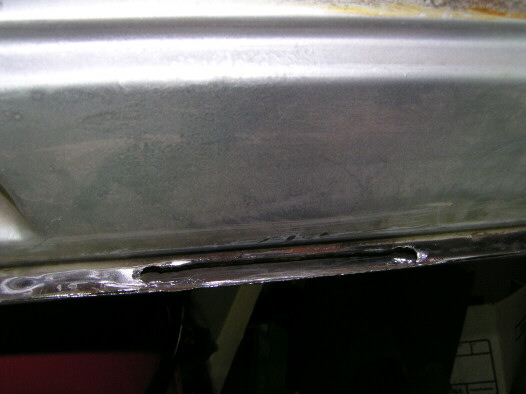
Posted by: DNHunt Nov 22 2003, 04:31 PM
Patch welded in
Attached image(s)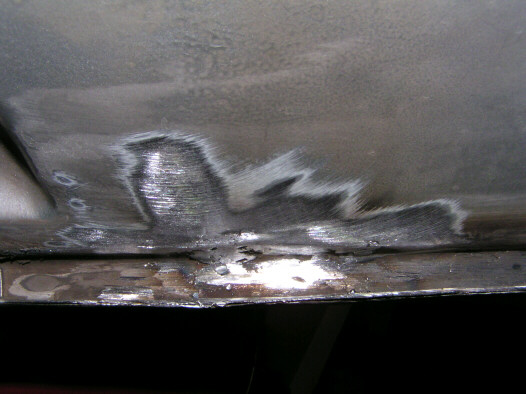
Posted by: rhodyguy Nov 22 2003, 06:46 PM
you're getting really good dave!!! welds are looking nice. you must have been expecting the worst til' you got the seam seal off in the trunk. where are you going from this point? still on the "hunt" or getting ready to start buttoning things up? you going to do the suspension while it's up in the air?
kevin
Posted by: DNHunt Nov 22 2003, 10:11 PM
Kevin
I wish I could say the welds are looking nice. They are a little better but, the grinding is getting really good.
I won't commit to being done with the hunt. Every time I think I've found the last of the rust I find more.
I did kinda jumped the gun on the trunk. But, I couldn't foresee that there wouldn't be rust under the seam sealer. Everywhere else it has hidden some. At least it was easy to get to. Only took about an hour to clean up.
Vacuumed really well this afternoon and wiped all the affected areas with tack cloth. Gonna start treating the bare metal tomorrow
Dave
Posted by: Brad Roberts Nov 23 2003, 05:51 AM
I throw away customers' SPONGES. They ask me "where did my pad go" and I point to the dumpster.
Dave everything is turning out REAL nice. Good job.
b
Posted by: DNHunt Nov 23 2003, 12:14 PM
Treated all the bare areas with Metal Ready. Stuff smells nasty. It turned all the areas with any rust black as advertised. Headed out to do a lot of rinsing.
Dave
Attached image(s)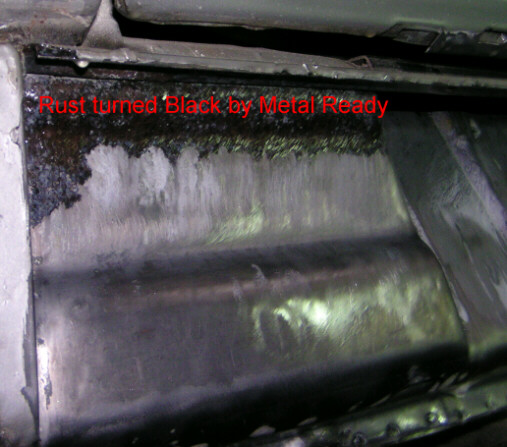
Posted by: DNHunt Nov 23 2003, 08:18 PM
Metal etched and ready for Por 15.
Attached image(s)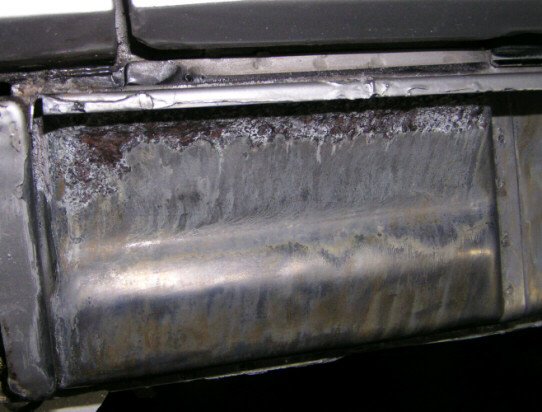
Posted by: DNHunt Nov 25 2003, 07:07 AM
Painted the center tunnel with Por 15. Used Metal Ready to prep it. The car is on jack stands with the nose down a couple of degrees. Poured about 1/4 cup of Por 15 in the aft inspestion port then used the air compressor and gravity to flow the paint down the tunnel. Worked really well. I used the excess to paint around the petal cluster.
Attached image(s)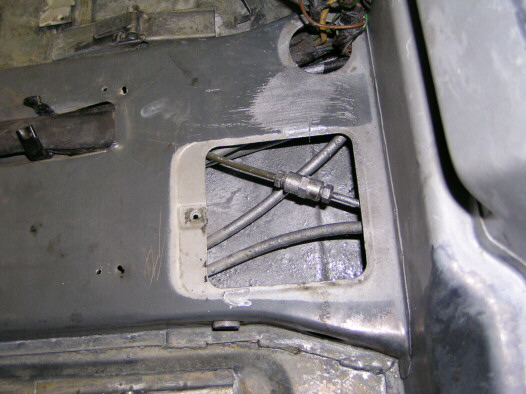
Posted by: DNHunt Nov 25 2003, 07:09 AM
Great way to paint. Quick and dirty
Dave
Attached image(s)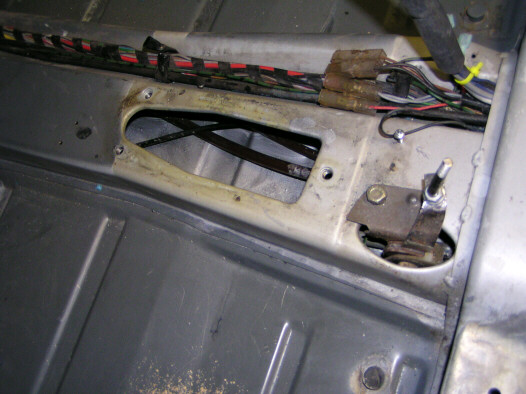
Posted by: redshift Nov 25 2003, 07:19 AM
Hey Doc, my car is next!
Good job, how's that eye doing?
M
Posted by: DNHunt Nov 25 2003, 07:25 AM
Miles
Only one problem. I hope I never have to do this again. (I know they never stop rusting) You'll have to do your own.
Eyes great. Thanks for your concern
Dave
Posted by: redshift Nov 25 2003, 07:32 AM
It's everyone's dream to have the perfect machine.
It's my dream to have Ed McMahon drive it here from somewhere else, so I don't have to take 3 years of crap off of JP when I start spraying primer.
M
Posted by: DNHunt Nov 25 2003, 09:47 PM
Hit on an idea to get Por 15 between the inner and outer lower firewall. I injected about 50cc's of Por 15 through the tubing into the space. Then I blew the hell out of it with the compressor to spead it around. If it works anything like it did for the center tunnel it should do a pretty good job.
Dave
Attached image(s)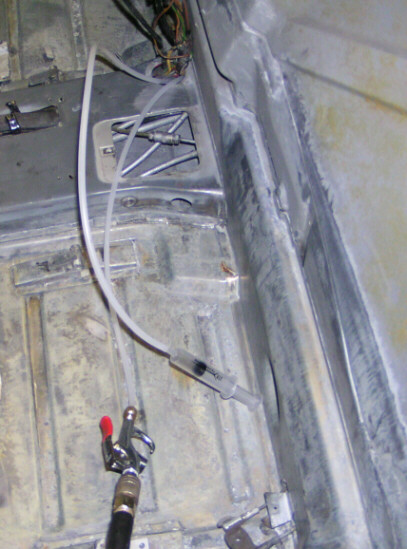
Posted by: DNHunt Nov 26 2003, 01:24 PM
Nice to see an end in sight. Brushed on Por 15 in the front trunk. I think it looks pretty darn good
Dave
Attached image(s)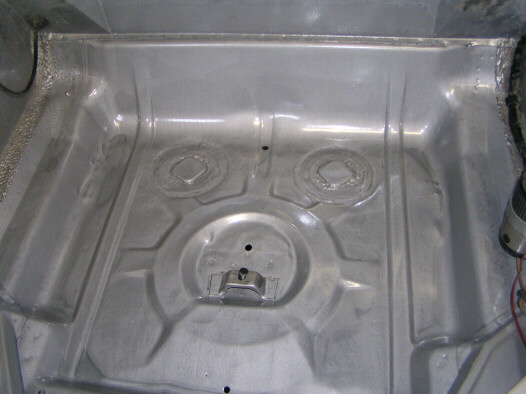
Posted by: SirAndy Nov 26 2003, 01:49 PM
should have used the metal ready for the forced injection
looking good!
Andy
Powered by Invision Power Board (http://www.invisionboard.com)
© Invision Power Services (http://www.invisionpower.com)