Printable Version of Topic
Click here to view this topic in its original format
914World.com _ 914World Garage _ Windshield frame to targa top seal removal.
Posted by: Headrage Nov 19 2006, 04:37 PM
Can it be done without turning it into junk? 
If so, any tricks...
Posted by: SirAndy Nov 19 2006, 04:41 PM

Can it be done without turning it into junk?
If so, any tricks...
i'll be the first to ask as we had that exact same confusion a week ago or so ...
do you mean the TARGA seal that goes between the windshield frame and the top or are you refering to another seal?
 Andy
Andy
Posted by: Headrage Nov 19 2006, 04:43 PM
I'm talking about the wrap around seal that goes across the top of the windshield frame and down both sides of the pillars. 
The unobtainium one...
Posted by: SirAndy Nov 19 2006, 04:46 PM
I'm talking about the wrap around seal that goes across the top of the windshield frame and down both sides of the pillars.
The unobtainium one...
ok, good.

easy to remove, just don't miss the *tiny* setscrews on each side in the top corners that hold it to the top of the a-pillar trim!
if it's in decent shape it can be easily removed in one piece. just be careful. done it many times ...
 Andy
Andy
Posted by: Headrage Nov 19 2006, 06:09 PM
if it's in decent shape it can be easily removed in one piece. just be careful. done it many times ...
AndyWhat exactly do you consider decent shape?
It's a 32 year old seal and has cracks at the corners.
Other than that it's all there.
Posted by: Richard Casto Nov 19 2006, 06:57 PM
I removed mine about a month ago and took a bunch of photos. I was intending to do a write up. I wouldn't consider it "easy", but it is doable. The unexpected problem I ran into was that the aluminum channels that the seal slide in on the side of the windshield had been "staked". It looks like it was done to prevent the seal from sliding up and out of the channel. I don't know if this was done at the factory or by a previous owner. I wouldn't be suprised if this was the original seal.
When I say "staked", I mean that they had take a punch (or screwdriver) and a hammer and punched in part of the groove in the channel to deform it. It was on the inside (you have to remove the inside windshield trim to get at it. Once I did that, I could bend back the channel, apply some soapy water to get it moving and then it came out. There is much more that it than just that, but that was the tricky part IMHO.
Hopefully in the next month or so I will do a writeup (with photos) on my website.
Posted by: SirAndy Nov 19 2006, 07:13 PM
When I say "staked", I mean that they had take a punch (or screwdriver) and a hammer and punched in part of the groove in the channel to deform it.
factory. they all were done like that ...
 Andy
Andy
Posted by: Headrage Nov 19 2006, 07:44 PM
Andy,
Please share the techniques you use to R&R the seal...
I just don't want to end up with the car sitting in the garage for the next 6 years looking for a replacement.
Posted by: mikez Nov 19 2006, 07:47 PM
Andy,
Please share the techniques you use to R&R the seal...
I just don't want to end up with the car sitting in the garage for the next 6 years looking for a replacement.
I used glycerin to help soften and lubricate the sliding out of the channels. I've had some over the years that tear where channel sits.
Why are you removing one? Paint?
Posted by: firstknight13 Nov 19 2006, 11:09 PM
be very carefull grasshopper pull from the bottom and work your way up to the top. this is the hard part there is a metal piece that the seal sits in and that is the weak spot. hold the top and side and pull out towards the back to release the seal . then go to the other side and repeat. after its out of that metal your set. replacement is much easyier. oh i did rip mine when i replaced the channel with a powder coated one. it was brand new!!! then 275 now the sky is the limit.... good luck 
Posted by: Richard Casto Nov 20 2006, 06:46 AM
be very carefull grasshopper pull from the bottom and work your way up to the top.Its a bit like pushing a chain, but pulling from the bottom is the key. You need to snake it up a bit at a time and do not pull AT ALL at the joint between the horizontal and vertical parts. Its one of those things that is scary the first time, but once you do it and see how it's done, I think the second time would be relatively straight forward.
Posted by: Headrage Nov 20 2006, 08:18 AM
Good info so far.
What holds it on across the top?
Posted by: Headrage Nov 20 2006, 08:18 AM
Why are you removing one? Paint?
Yep...
Posted by: Richard Casto Nov 20 2006, 12:38 PM
Good info so far.
What holds it on across the top?
All along the top there is an embedded metal clip. On the windshield frame there is a knife edge that the seal covers and the clip slides over and grips. I used both a small screw driver (putty knife might work better) on the top (between the frame and the seal) and sliping a finger behind the bottom of the seal. Alternate between the top and bottom to seperate the seal from the frame. Wiggle, go slow and don't force anything. Once you get a small section loose, you should see the clip and how it works. And once you get a section loose, the rest should be easy. I found the top easy and the sides hard. I did the top first and then the sides. If you have the sides loose and sliding in the channel already, it might make the top easier. But I think it is easier to get the top loose so that way you can slide the sides out. Either way, the sides will not slide all the way out unless you have already broken the top free.
I think Aaron mentioned that there are some screws through the seal near the corners (edges of the horizontal part). A PO had tried to cure a leak by adding some rubber sealant in that area and had covered up the screws. If I hadn't dug out the added sealant, I wouldn't have seen the screws.
Can't promise I will get it done, but I am going to try to do a write up with photos tonight. I just need to download the photos from my camera. I have the write up about 80% done already.
Posted by: Headrage Nov 20 2006, 01:29 PM
Good info so far.
What holds it on across the top?
All along the top there is an embedded metal clip. On the windshield frame there is a knife edge that the seal covers and the clip slides over and grips. I used both a small screw driver (putty knife might work better) on the top (between the frame and the seal) and sliping a finger behind the bottom of the seal. Alternate between the top and bottom to seperate the seal from the frame. Wiggle, go slow and don't force anything. Once you get a small section loose, you should see the clip and how it works. And once you get a section loose, the rest should be easy. I found the top easy and the sides hard. I did the top first and then the sides. If you have the sides loose and sliding in the channel already, it might make the top easier. But I think it is easier to get the top loose so that way you can slide the sides out. Either way, the sides will not slide all the way out unless you have already broken the top free.
I think Aaron mentioned that there are some screws through the seal near the corners (edges of the horizontal part). A PO had tried to cure a leak by adding some rubber sealant in that area and had covered up the screws. If I hadn't dug out the added sealant, I wouldn't have seen the screws.
Can't promise I will get it done, but I am going to try to do a write up with photos tonight. I just need to download the photos from my camera. I have the write up about 80% done already.
EXCELLENT!!!!!

Posted by: Richard Casto Nov 20 2006, 09:51 PM
Can't promise I will get it done, but I am going to try to do a write up with photos tonight. I just need to download the photos from my camera. I have the write up about 80% done already.
Ok, I put it together. It's my own little "how to" with photos. Someone else who has done this, let me know if I have an factual errors and I can fix the page...
http://motorsport.zyyz.com/project_914_13.htm
I hope this helps someone.
Oh, by the way, the busted up thumb in the photos has healed up nicely thank you!

Posted by: Headrage Nov 20 2006, 10:07 PM
Outstanding!!!
This has got to be added to the classic threads....
Posted by: Richard Casto Nov 20 2006, 10:21 PM
Outstanding!!!
This has got to be added to the classic threads....
If the admins think this is worthy of classic status, one of them can PM me and I can create a post with attached photos just like on my blog. I can't always guarantee my web server will be up as hosting that page as much as I would like.
Posted by: swood Nov 23 2006, 01:26 PM
Since I'm not hosting T-day this year, I spent some time on the car. I thought I'd add a few pics pertaining to the windshield seal removal, and how it's attached.
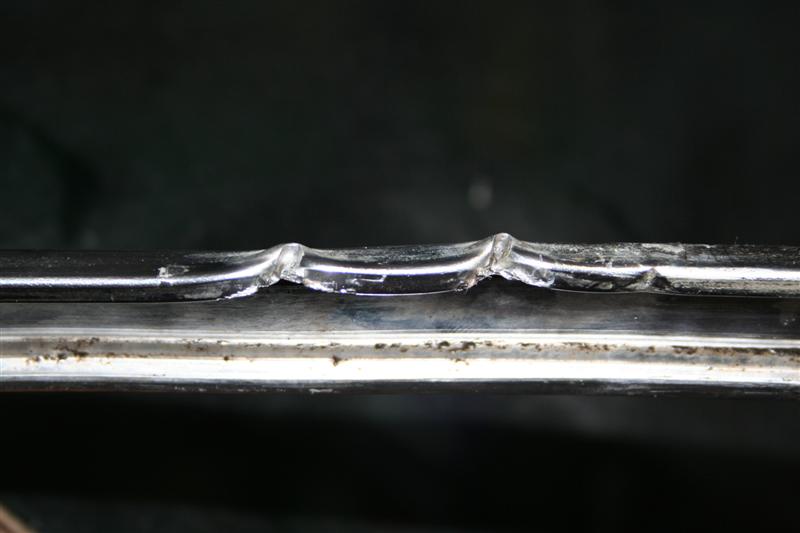
First pic shows the contour of the seal and of the channel that holds it. My channel only had two "stakes" (really just punched with a chisel or something) to hold the seal at the bottom. My seal was relatively plyable so I could just pull it out away from the channel rather than sliding it through. The latter is probably still the best way to go FWIW.
Oh yeah, it seems the channel has a factory bead of butyl to seal it all the way up to the top corner. Gotta remember to use it when putting it back.
Attached thumbnail(s)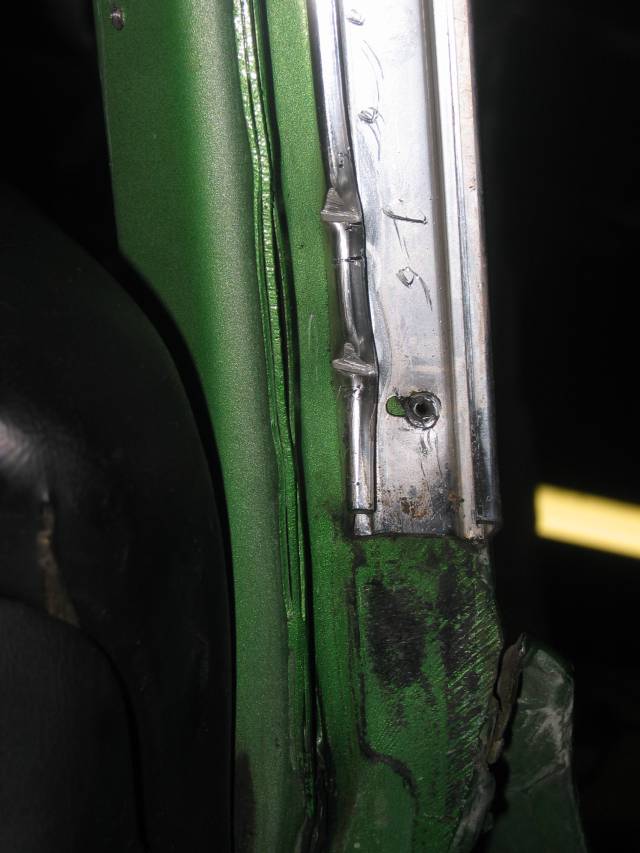
Attached image(s)
Posted by: swood Nov 23 2006, 01:32 PM
And just as an aside, if you ever have an opportunity to pick up an architectural flat file, do so. I've got 3 and I have almost a whole car stored in it.
You can see the winshield seal now coated in glycerine safely stored next to the outer trim and rear glass, safe and sound.
Attached image(s)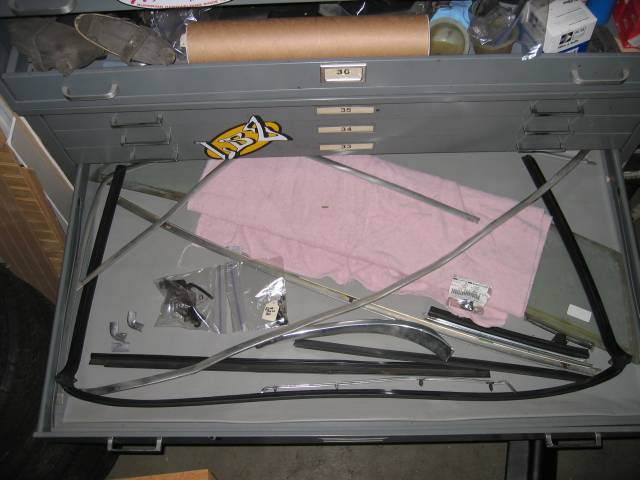
Posted by: Gint Nov 27 2006, 06:33 PM
Outstanding!!!
This has got to be added to the classic threads....
If the admins think this is worthy of classic status, one of them can PM me and I can create a post with attached photos just like on my blog. I can't always guarantee my web server will be up as hosting that page as much as I would like.
The link isn't working now...
Please post the pics and write up here and I will move it to the classics forum. I'll send a PM. And I'll also change the title of this thread.
Posted by: Headrage Nov 27 2006, 07:04 PM
I don't know how Mike.
Tutorial perhaps?
Remember, I hang out with Slits and Aaron on the board....
Posted by: Gint Nov 27 2006, 07:25 PM
I don't know how Mike.
Tutorial perhaps?
Remember, I hang out with Slits and Aaron on the board....
My previous post was directed to Richard...
Posted by: Headrage Nov 27 2006, 07:29 PM
My previous post was directed to Richard...
Gotcha...

Posted by: Richard Casto Nov 28 2006, 02:28 PM
As Gint noticed, my web server is not reliable  , so this is probably a better home for this. He also said he is going to move this into the classics section. So over the next few posts, I am going to replicate the info from here...
http://motorsport.zyyz.com/project_914_13.htm
Removal of the Front Targa Seal
Ok, it's time to tackle the windshield seal. This is the one that runs along the top and down the sides. Along the top it acts as a seal between the Targa top and the windshield frame. Along the sides, between the frame and the doors. The issue here is that this part is no longer available from Porsche. There is at least one reproduction that is available, but I believe there are supply and quality issues with that seal. NOS seals go for quite a bit on eBay. So if you need to remove your seal (as I do), you want to try to not tear it up.
Ok, before we go much further I have to admit that I did break the seal into two pieces (passenger side) during the removal process. However, I do feel that after figuring out how to do this, now would be able to remove it without breaking or tearing it. I was able to get the driver side OK after I learned how to do it on the passenger side. Hopefully these instructions will help you successfully remove yours without destroying it.
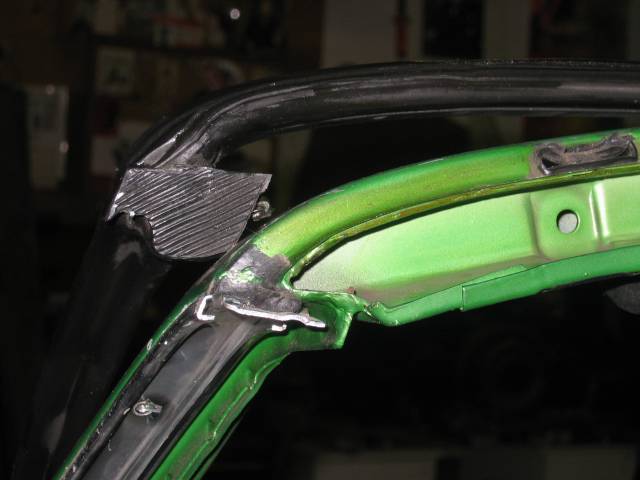
Ok, now to get down to business, first I didn't realize that there are actually two seals around the windshield. There is a lower seal that removes pretty easily. It only runs the length of the top of the windshield frame. The upper seal runs both the length of the top as well as down both side of the windshield frame.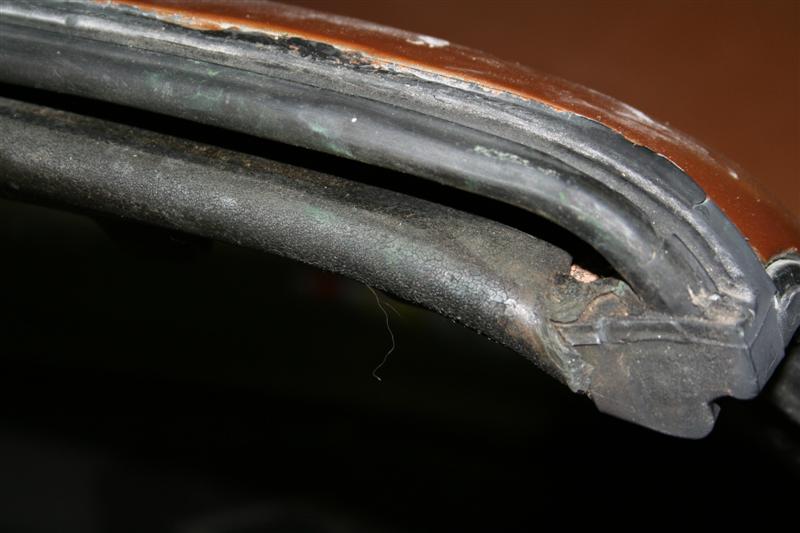
Hard to see in this photo, but there are two different seals here.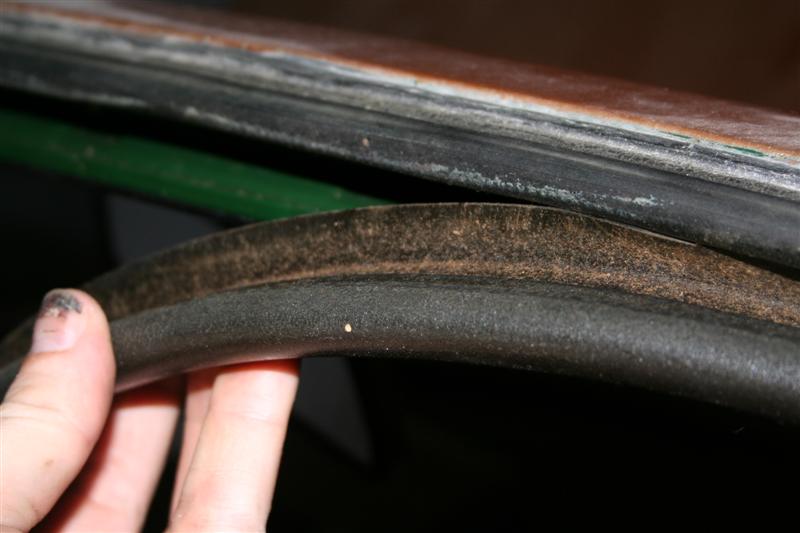
Here you can see me removing the lower seal. It only runs along the bottom of the top part of the main Targa seal.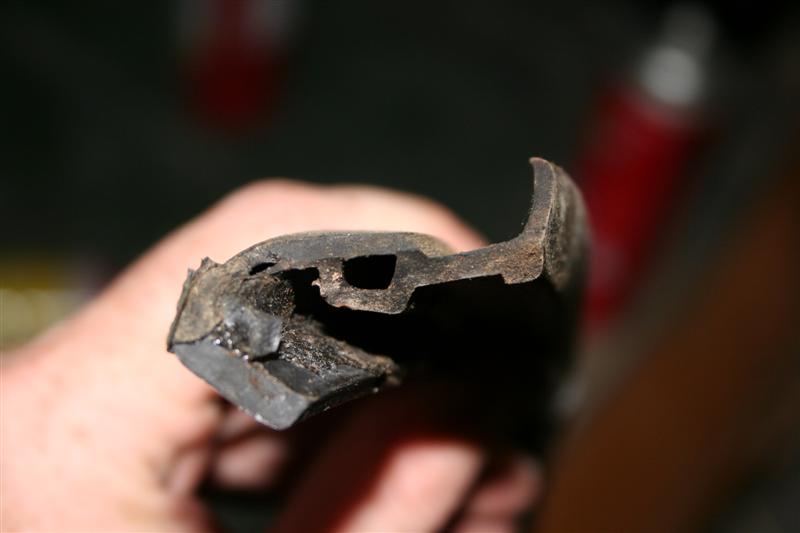
Note the profile. It sort of slips up under (I believe) the bottom part of the upper seal. It is easy to remove.
Posted by: Richard Casto Nov 28 2006, 02:41 PM
Before I started, I had no real idea on how the upper seal was shaped and attached to the body. The upper seal looks to have an embedded metal part that both reinforces the seal as well as acts as a clamp. It connects to the windshield frame in a tongue and groove fashion. The seal (and metal clamp) act as the groove and the windshield frame as the tongue. As far as I can tell, there are no adhesives used to attach the seal to the car (either on the top or side)
I started out by experimenting and found that I could insert a thin screwdriver between the seal and the frame along the top. I suspect that a thin putty knife would work better, but my screwdriver was working well for me, so I kept at it. By doing this, I was able to increase the gap. Do this slowly and a little at a time. You may also want to just use your hand periodically and wiggle the seal top and down a bit to help break it free from the frame.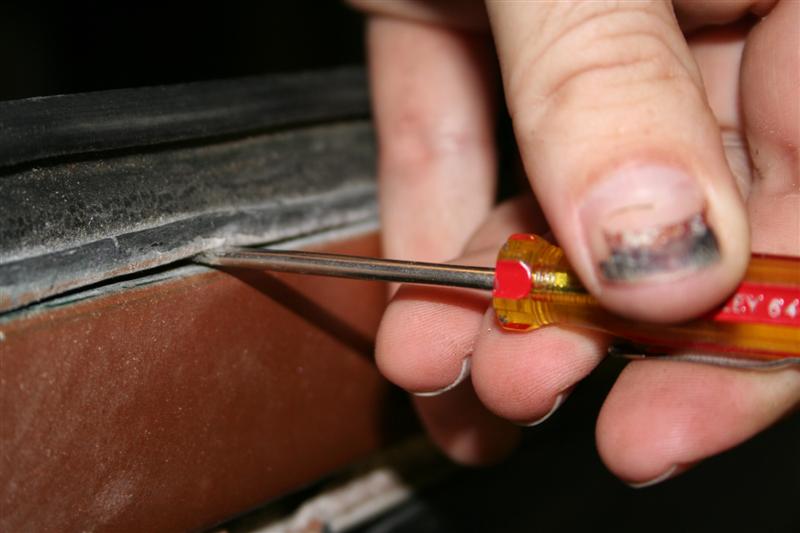
Screw driver going in at this point. I was nervous as I had no idea how it was put together at this point.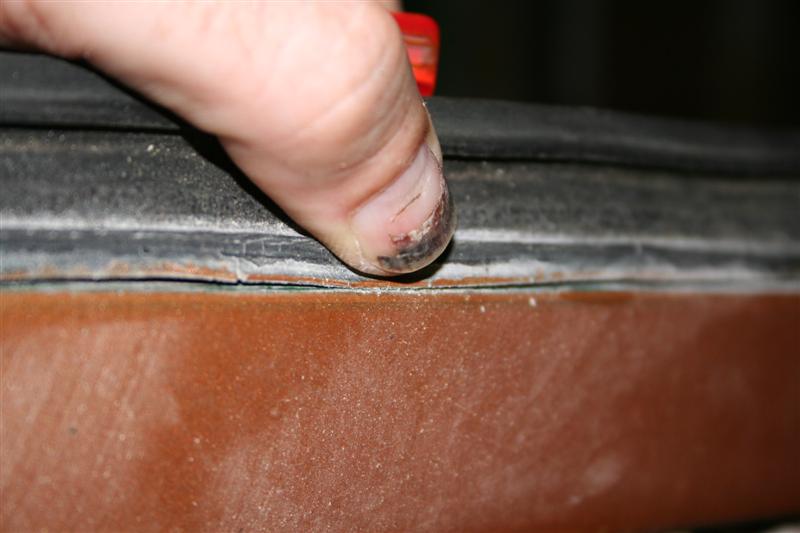
But it did seem to be working.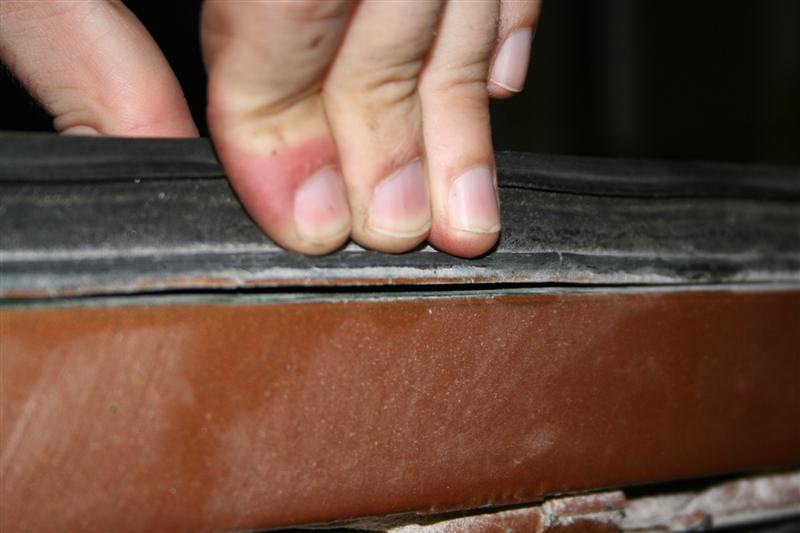
And I was able to pull it away from the frame a bit.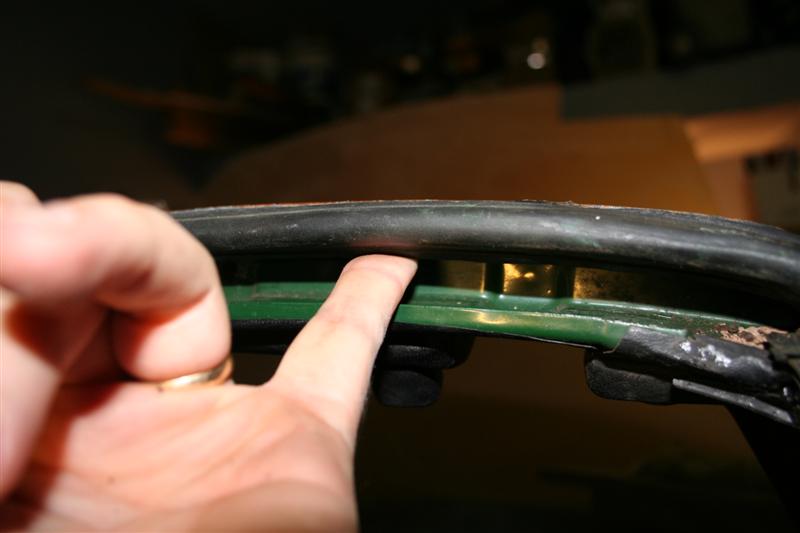
I also tried to insert my finger and pull the lower part of the seal as well. The idea here is to pull the seal straight out, but do it by applying the pressure from the inside out vs. trying to just pull directly on the exterior of the seal. Go slow, take your time, don't force anything if you are doing it right, you should hear the seal clamp loosen and break away from the frame section by section.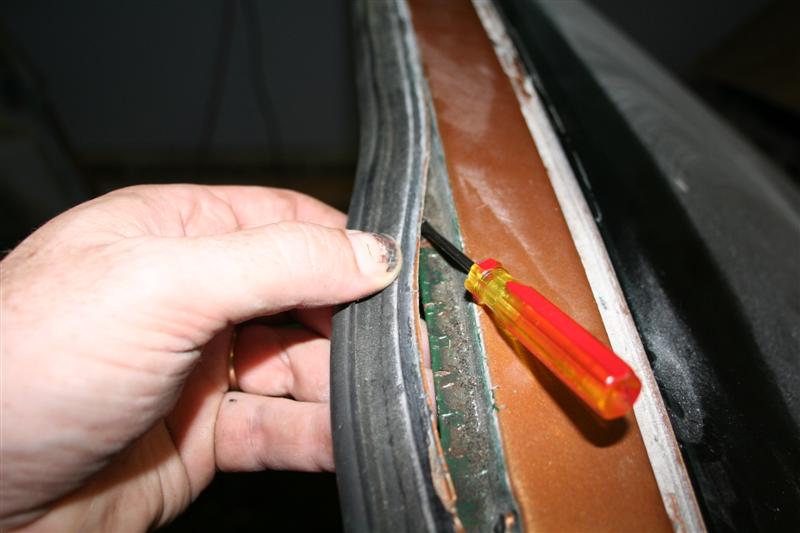
Eventually you will get a section to separate totally from the frame. One this happens, you should be able to work the rest of the top away from the frame pretty easily. Work you way right up to the intersection between the top and side parts of the seal on each side.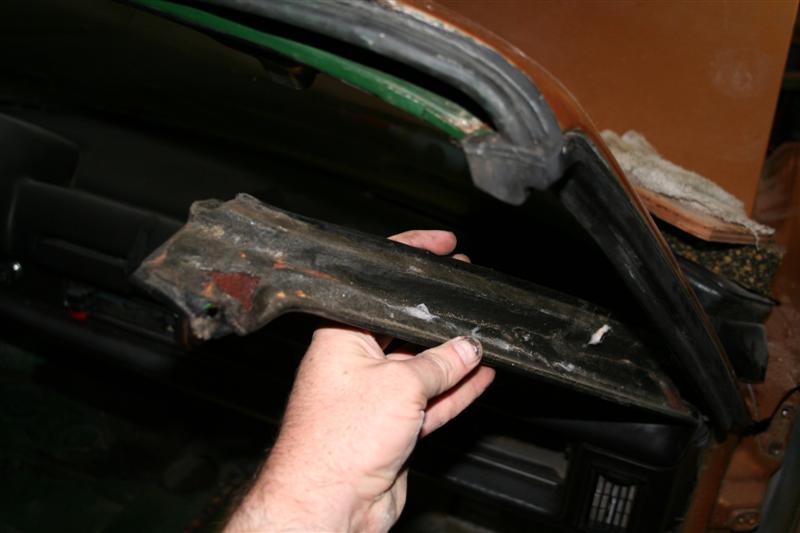
At this point you need to remove the upright trim on the inside of the windshield frame. On my 1972 model, there were three plastic caps that hid three #2 Phillips screws. There is also a small #1 Philips screw right at the intersection of the top and side parts of the seal. The small #1 is easy to miss. A PO for my car had tried to solve a leak I this area by applying some rubber sealant. The screws were buried under all of this.
Posted by: Richard Casto Nov 28 2006, 02:45 PM
Once this is done, you should be able to see both the inside and outside part of the aluminum C shaped channel that holds this part of the seal. Ok, now for the hard part. You will have two issues here. First, the seal may not want to budge due to general friction and the fact that it has to slide through a tight curve near the top. The other (which I think is the real reason it is hard to remove this seal) is that when the seal is installed at the factory, the C channel is "staked" on the inside in a few places to prevent the seal from sliding after it has been installed.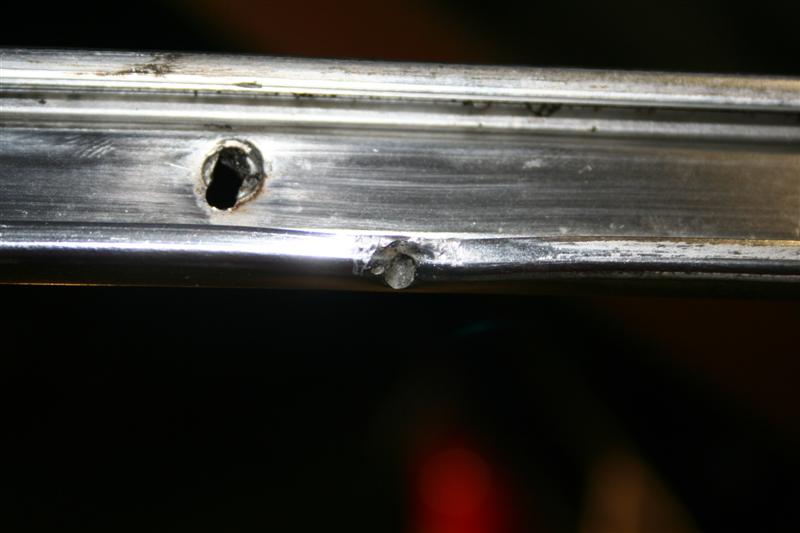
These photos where taken AFTER this was all done, but it shows you what the "stakes" in the channel look like. Mine have already been bent out so that the seal would slide out.
Posted by: Richard Casto Nov 28 2006, 02:51 PM
You will need to pull back the seal with your fingers enough to inspect the entire length of it on the interior side of the seal and find where it has been staked. I had three stakes on one side (spread out along the length) and two on the other (both near the end of the seal). So I assume they can be anywhere and have a indeterminate number of them. You will need to undo the staking enough so that the seal will be able to slide along the C channel. I don't have any photos of this part, but I took a wide blade screw driver and inserted it into the channel and dug and pried enough to allow the seal to slide. You may really have to dig in there to get enough of a bite to undo the staking. While my seal is of average shape, the inside part of this seemed to be the most flexible and sturdy part of the entire seal and I was able to really dig around at the channel without damaging the seal. I suspect this is because this part of the seal is typically hidden away from damaging UV light, etc. by the interior trim.
I don't know how cheap or easily available a replacement is for this aluminum channel. If it is cheap, I would not worry about what you do to it to get it to the point that the seal will freely slide. I haven't tried it yet, but I suspect that if you don't mangle it much, that you can bend it back and reused it. The part you bend should be hidden by the trim once reinstalled.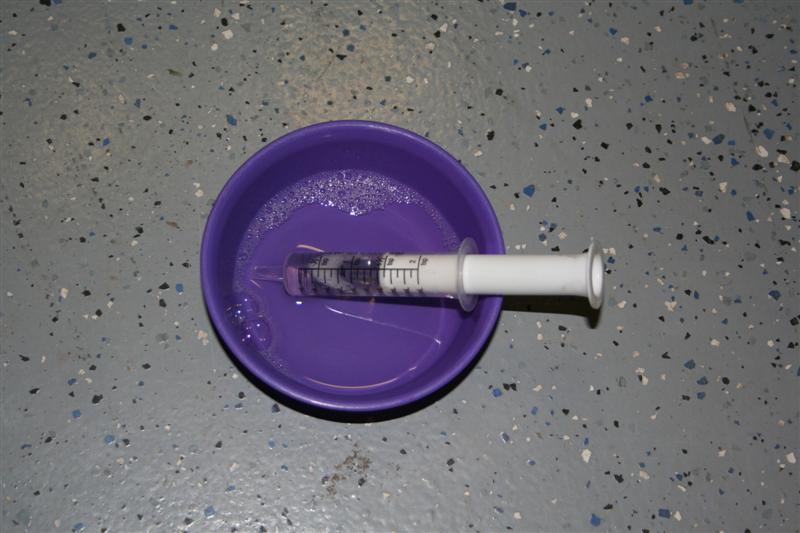
To help get the seal to slide, you will to lubricate it. I used a child's medicine syringe (available at a pharmacy or grocery store) and soapy water. I used regular glycerin dish soap and just a small bit of water. Whatever lubricant you use, it should be water based and not petroleum based (such as mineral oil).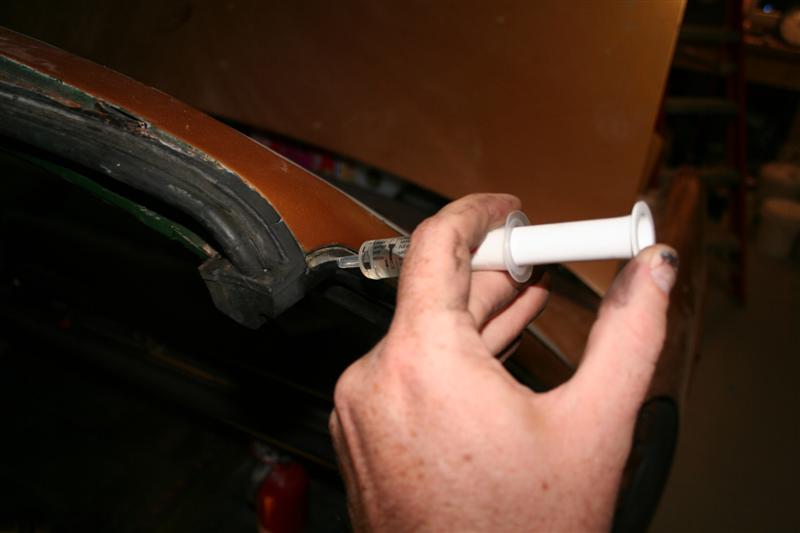
You should see if you can wiggle the seal a bit in and out (perpendicular to the channel) to see if you can loosen it up a bit where it might be stuck to the channel. Then you can try to use the syringe to squirt the soapy water in. If you get it in just the right place up near the top, you should be able to get a stream to run the entire length of the seal and drain out the bottom. Keep at it until you feel you have the soapy water between the seal and the channel along the entire length. It should run freely once it is loosed up.
After you have it lubricated, you may need to wiggle the intersection area between the top and side a bit to break it free from the frame as well. Be very careful as this is a very fragile area on the entire seal. At this point, you can start to try to slide the seal.
There are a few key things to remember at this point...
(1) Do not whatsoever try to pull the seal by grabbing a hold of the area around the intersection of the top and side piece. These pieces have been extruded and/or molded separately and then connected during the manufacturing process. They are weak where they have been joined together.
(2) Start pushing from the bottom, but then work your way up along the entire length by applying pressure on the seal in the direction that you want it to move. Wiggle as you go and apply additional lubrication as needed. Keep repeating this motion and if all is good, it should start to move.
(3) If it is not sliding something is wrong. Check to make sure you have undone the "staking" enough and that you can wiggle the seal along its length. If it is lubricated enough and has broken free, you should hear and see the soapy water squish out of the channel all along its length.
Posted by: Richard Casto Nov 28 2006, 02:58 PM
I started on my passenger side first. With much effort, I was able to get the seal to start to move. I should have realized that something was wrong as I was REALLY having to push hard from the bottom and was tempted to pull from the top.
I then made the mistake of trying to pull from the top. I was trying to not apply much pressure, but I ended up causing the seal to separate at the joint. Don't do what I did. It was a tough way to learn that lesson. DON'T PULL ON THAT JOINT.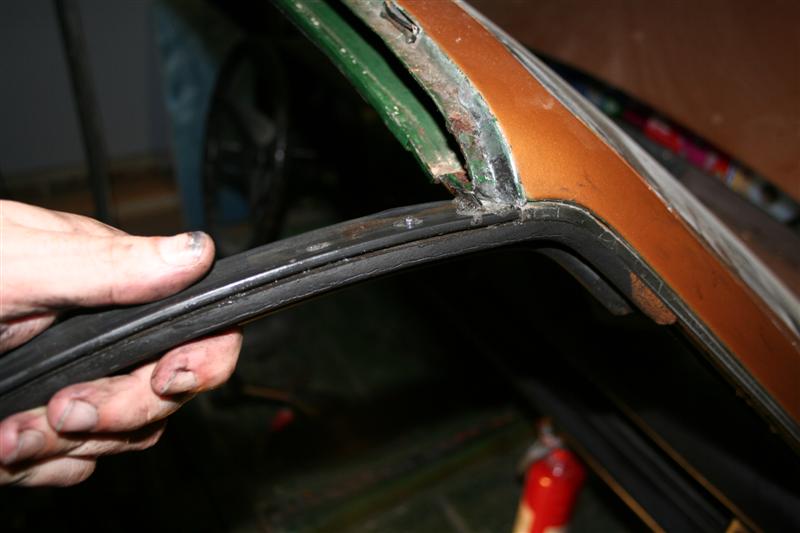
At this point I felt I was pushing harder than I should need. I realized that I had not undone the "staking" enough, so I fixed that and added more lubricant. The seal then slid out much easier and without any pulling needed to get it to move. Once I was able to get about three inches of the seal out of the top, I felt I was able to safely pull a bit from the top as well as push from the bottom to speed up the process. Bottom line, if it doesn't slide out, then something is wrong. Don't force it.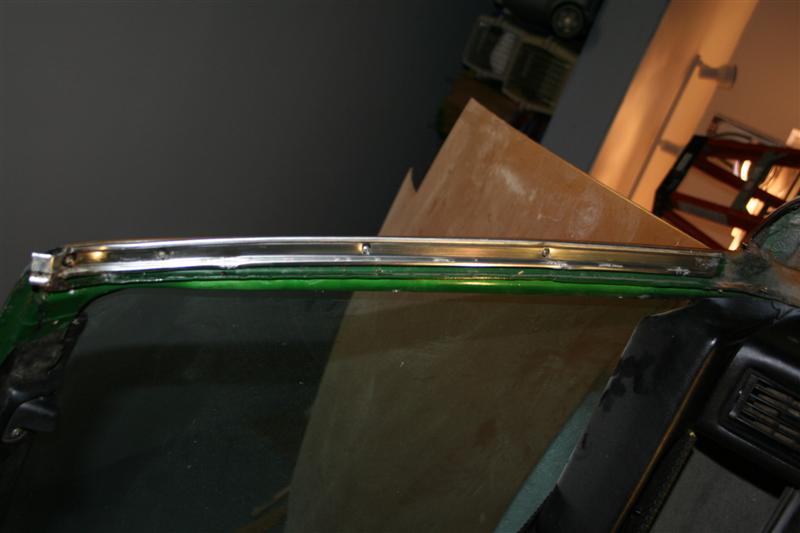
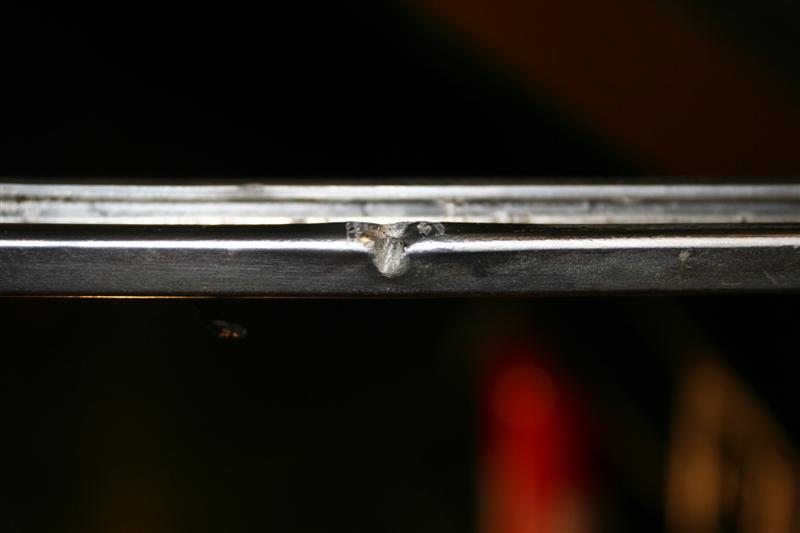
The aluminum channel is held in with a few #1 Phillips screws. I removed mine and here are some of the stakes in the channel.
After I realized that my impatience was the reason I broke the seal and that once the staking had been properly undone and the channel lubricated it slid out without having to pull at the top, I decided to take it a bit easier on the driver side of the seal. With the experience of the passenger side, I was able to repeat the process on the driver side, but without breaking the seal on this side. If I was to do it all over again, I am positive that I could have remove the seal without breaking it.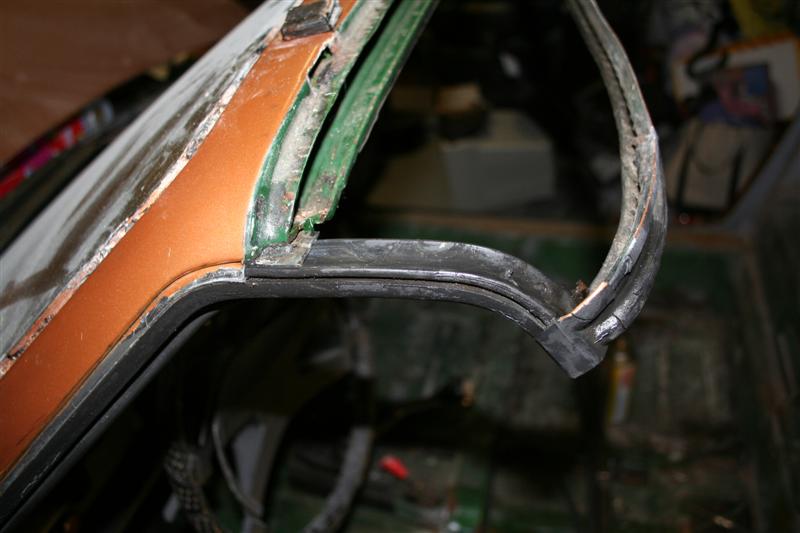
The keys are to go slow, take your time and don't force anything.
Thats it! Enjoy.
Posted by: JOHNMAN Nov 28 2006, 03:35 PM
I have never removed one by sliding it out of the channel.
I make sure the two corner screws are out, then I work the bottom of each side out of the channel and it will "zip" right out of the channel with little effort/force.
Be sure to get the seal loose past the crimped area before pulling.
They come out much better/easier when nobody has painted it in place.
Once the sides are loose, the top removes easily. Be very careful in the corners. I haven't broken one yet and I have removed some pretty crusty ones.
When it is time to reinstall, you must slide it down the channels, but on removal, I believe you stand a larger chance of ripping the seal if you try sliding it without lubrication.
I use P-80 rubber lubricant to install them and it works very well.
just my $0.02
Posted by: Gint Nov 28 2006, 03:43 PM
You mean this stuff?
http://www.ipcol.com/prod-p80.htm
Posted by: Richard Casto Nov 28 2006, 03:51 PM
John, I think I know what you are saying. I guess it depends upon how flexiable the rubber it. It would be interesting to have those who have done this a number of times respond to see if they slide it out, or pop it loose from the channel like you did.
I think you would absolutely tear it up if you didn't lubricate it. You have to remove the staking and lubricate. Once that was done it slides right out with pressure from the bottom and along the length of it seal. I didn't bend back the staking enough on my first attempt and that is how I broke the one side. As with most things, the second time is so much easier!
Posted by: JOHNMAN Nov 28 2006, 04:05 PM
You mean this stuff?
http://www.ipcol.com/prod-p80.htm
That is the stuff. It works great. I found it by accident at work while the shop was trying to slide 2 1/2" ID water discharge hose onto 2 1/2" OD rollers. It went MUCH better with the lubricant.
Posted by: dinomium Nov 28 2006, 04:39 PM
cool thread, now if we could just find a source for some new seals!!
Posted by: markb Nov 28 2006, 06:34 PM
I also have used the "zip" method on 2 or 3 that I have removed. Worked fine, no rips.
Posted by: Gint Dec 6 2006, 11:19 PM
Off to the Classic Threads Forum!
Powered by Invision Power Board (http://www.invisionboard.com)
© Invision Power Services (http://www.invisionpower.com)