Printable Version of Topic
Click here to view this topic in its original format
914World.com _ 914World Garage _ The Nando Build - Tear down thru First Start
Posted by: jwalters Dec 6 2006, 07:02 PM
 Hello all!
Welcome to the "NANDO BUILD"!
From this first page onward the saga of one mans quest for Uber reliable power will unfold..
My good friend Nando (martinef1963 - club member here) has experienced engine power problems. He has made the decision to rebuild for two primary purposes:
1 - Must be stone reliable and all things working (heat)
2 - Must make more power than stock.
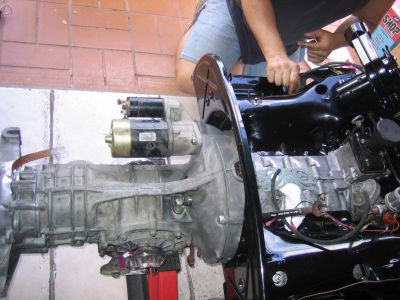
I went down to his house which is about 45 minutes away and helped him pull the engine. We then loaded the engine is his beast and brought it back to my skunk works: "Exhaustive Solutions".
And thus began the teardown -
But let me back up for a moment. Nando was unsure of just where to go with his motor. Size wise, power wise, money wise, etc, etc.
So I took him for a ride in Black Sabbath - Here is what comprises my motor build:
1.7 liters
Original 1971 90mm pistons and cylinders (almost worn out, I just did not have the money for upgrade when building, which is what many of you, are in the same predicament) These have a fair amount of blowby, and are probably affecting my overall compression ratio by -2 points by guessing..so prolly around 7.1:1 at least.
A SCAT C20 cam -
Weber 40mm IDF's with stock vents, 120 mains and 45 idles with F7 tubes.
Short manifolds
2 liter headpipes with monza manta exhaust
009 with crane optical
Now I am the first to admit, my motor is not "new", nor is it at full power levels had I had the money to do it the way I wanted....
I'll just let Nando tell you all what HE thought-----
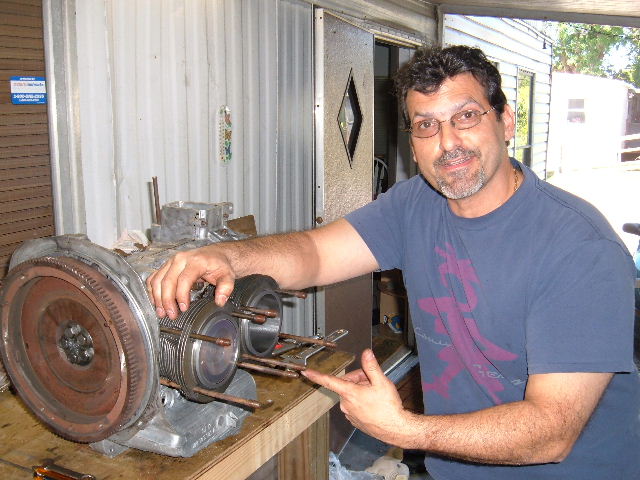
Back to the motor: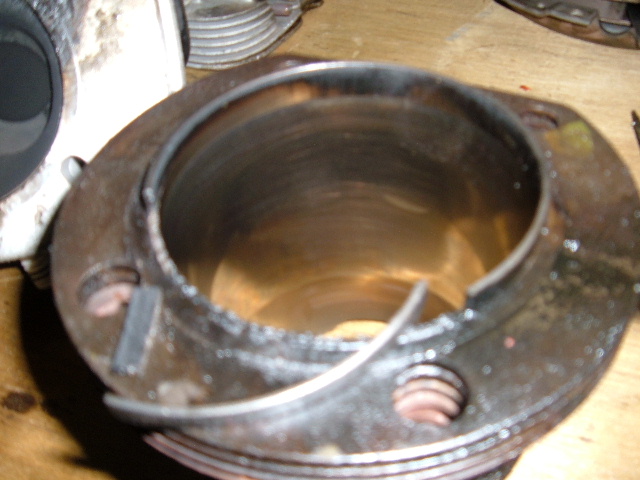 This is one reason why low power----
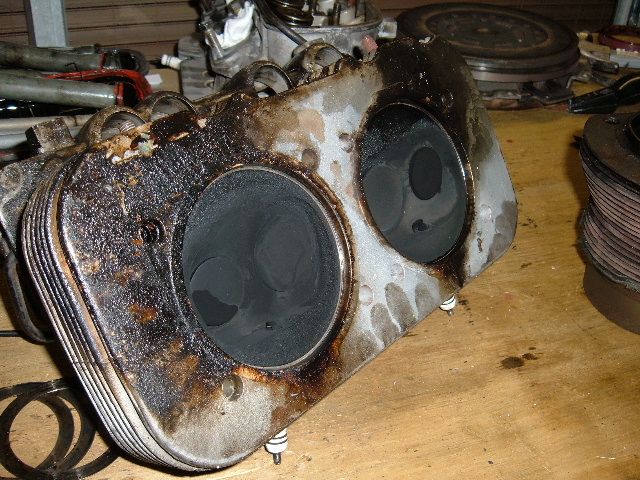
These are the really small valve 1.8/2.0 heads. W/o cleaning thay look to be pretty good, will know more when cleaned ---
I have some bolt-on power mods I have been working on for quite some time now, and a few will be incorporated into Nando's engine. I am using Black Sabbath as my on-road test bed. Everything I do is backed up by road tests and chassis dyno tests.......Stay tuned for info and pics. 
Posted by: jwalters Dec 6 2006, 07:14 PM
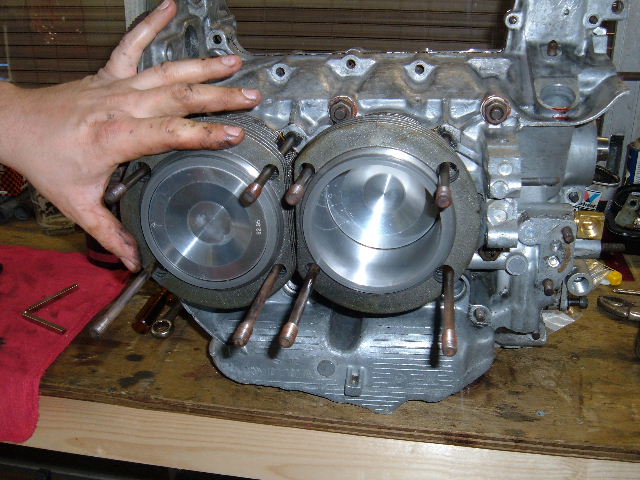
Here better pics of Nando's bored out 96mm cylinders ----
Not enough material there for my personal tastes.............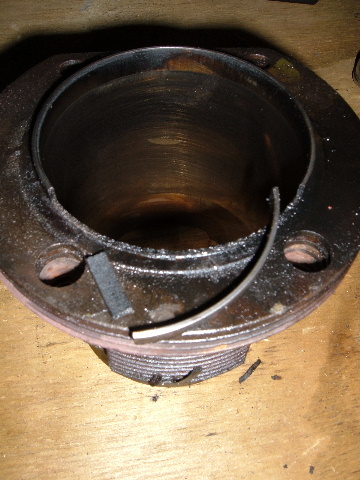
'nuther shot --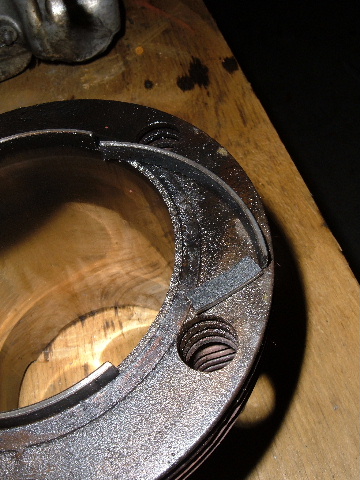
Posted by: martinef1963 Dec 7 2006, 07:36 AM
1st would like thank JWalters for his help and savy on this project.
I did give him a brief history, or what I know of the engine. It is a California engine that my old mechanic (Domonic - on the board) procured for me back in 1997-1998. I drove the car from Vacaville CA to Atlanta and it stayed there for a year while I was off doing some contract work in BumFuckiStan (one of the Stans).
I had some body work done on it, paint etc., but really just kept up w/ the oil changes, tune-ups, etc (nothing major). Bout two months ago it started to smoke real bad and died one day- later to find out that a plug or two were soaking in some oil. And here begins the Nando Build.
I will also be doing some rust work in the hell hole - not bad. I will be posting some pictures today and of progress. Could kick myself in the arse for not taking some pictures of the before, but none the less the top side of the engine was a very basic 1.7 FI set up.
Getting back to the ride I took/drove in Black Sabbath - WOW! The ride was unbelievable - I thought my car had it going on (NOT). The car had plenty of power w/ awsome response and it cornered incredibly! I can't wait to get my girl on the road.
I will be posting some pictures of the work that I will be doing to her while the engine is pulled. Hood, and engine compartment.
I did get a good mix of responses on my Powder Coat/Ceramic question/concerns and have decided to leave the SS alone (polish them), powder coat all of the heat related tin, engine compartment tin, and some other items.
mz
Posted by: jwalters Dec 7 2006, 09:01 AM
Whuts up dude?
Did you jump on that piston / cylinder combo??
I have the heads soaking in degreaser - going to run down to work and get my valve spring compresser - - I think they are going to clean up really nicely!
Posted by: jwalters Dec 7 2006, 05:45 PM
 The only two pushrods form the entire assembly with damage -
Also from the same cylinder - #3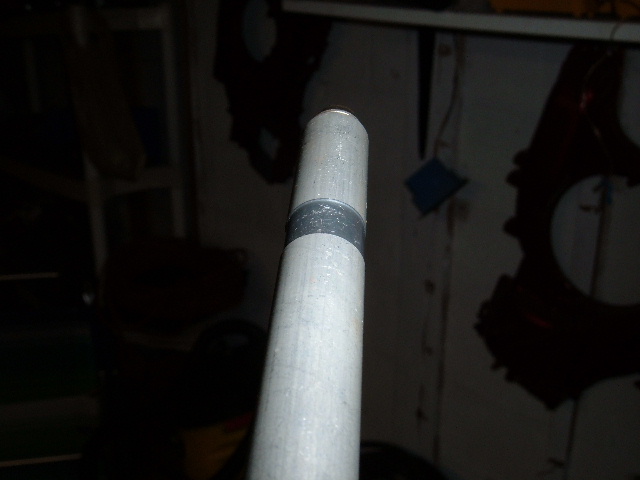
Posted by: martinef1963 Dec 8 2006, 08:05 PM
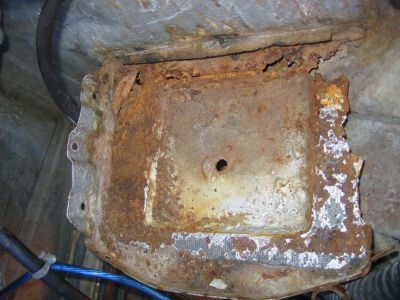
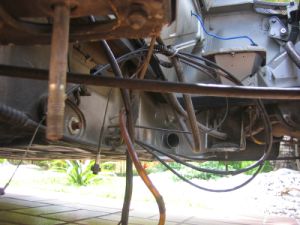
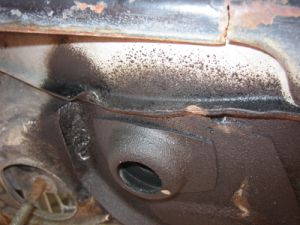
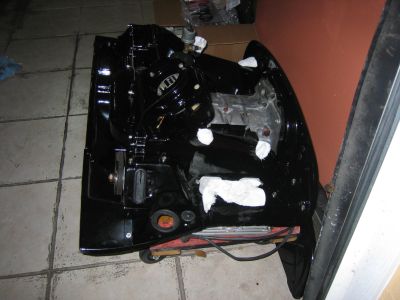
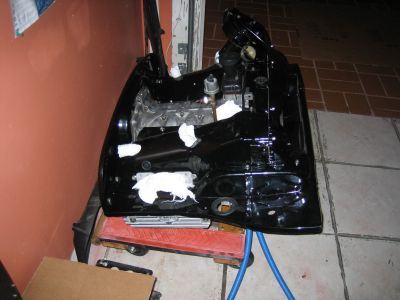
Here are some pictures of the progress of the engine compartment. JWalters has the engine at his place and we are waiting for parts to start the rebuild. While the engine is out I will get the rust out of the hell hole - not bad at all. Ordered a battery tray and support from AA - in the mail.
Attached image(s)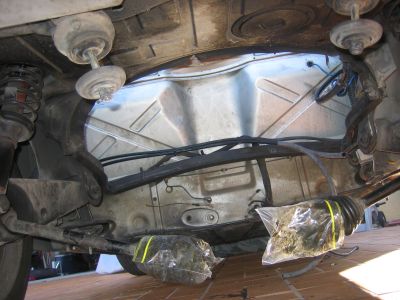
Posted by: jwalters Dec 11 2006, 06:40 PM
 Man, today has been rough - had company x-mas party last night. All day today I have been -

 .........think someone forgot to wash after wiping...........
Ok, so now it is late in the day and feeling a little better -
So I go out to the skunk works to try and get something accomplished.
On another thread there was a little discussion about "oil sludge".
This is what sludge is: 
and the following is what sludge will do for you...............
Basically, sludge is formed from byproducts of combustion, not being lifted, carried out of, and filtered by the engine system. Two things:
1. Poor choice of chosen oil - quaker state aquired a very bad rap for causing so much sludge buildup and engine failure that: I almost "AVOID" at all costs to not even look at a bottle while in my favorite FLAPS --
I personally use an oil designed for air-cooled piston aircraft. EXXON multi-grade ashless dispersant - this stuff is made from the word go for high heat aircooled engines. No problems with seals being ate up or anything else for over a year of use now. But I change it very, very frequently. This oil will scrub the engine very much so and quickly dirty up the filter. I go about 2K max and change it -
But everybody has their favorite oils to use - this is just mine-
anyway:
2. high heat producing engines. In particular aircooled engines. Because of so much thermal expansion and cooling contracting, tolerances easily open up to the point of the part or system is compromised - allowing non-full performance of designed part and allowing too much seepage of cumbustion products into the crankcase.
Posted by: jwalters Dec 11 2006, 06:43 PM
Quite the wear pattern, eh?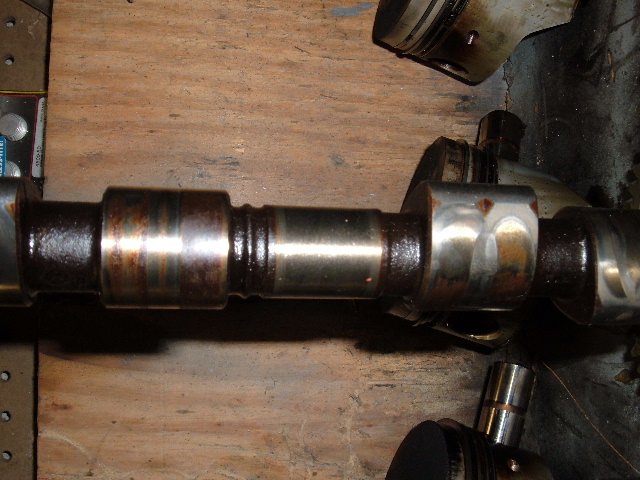
Posted by: jwalters Dec 11 2006, 06:44 PM
Nuther shot: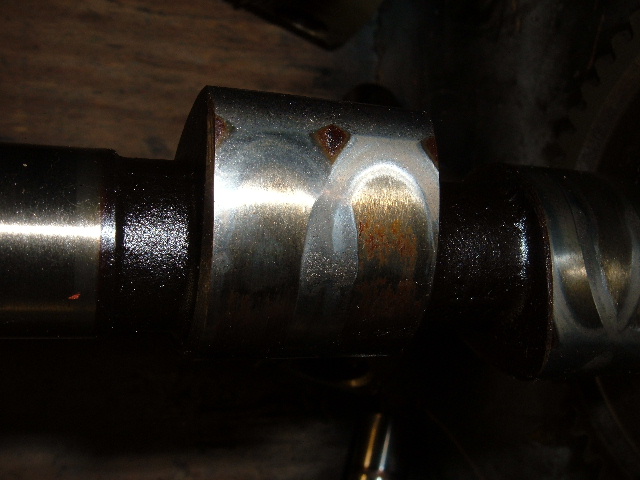
Posted by: jwalters Dec 12 2006, 06:13 PM
 Well, glad to be back on the club site! GREAT JOB Andy!!!!
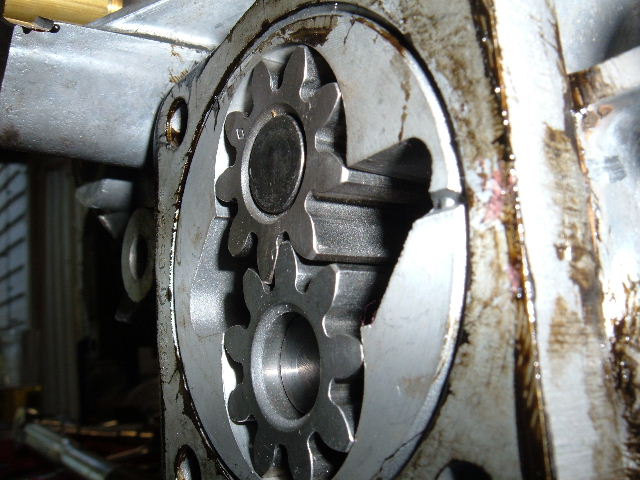
A very funny wear pattern on the dizzy drive gear - I have been into allot of aircooled engines and the markings here almost mystify - - Something is outta whack - everything I have seen so far points to excessive heat soak, wayyyy rich burning, and frankly, the "rebuild" has me puzzled..
Nando told me he has all of 6K on this motor ---hmmm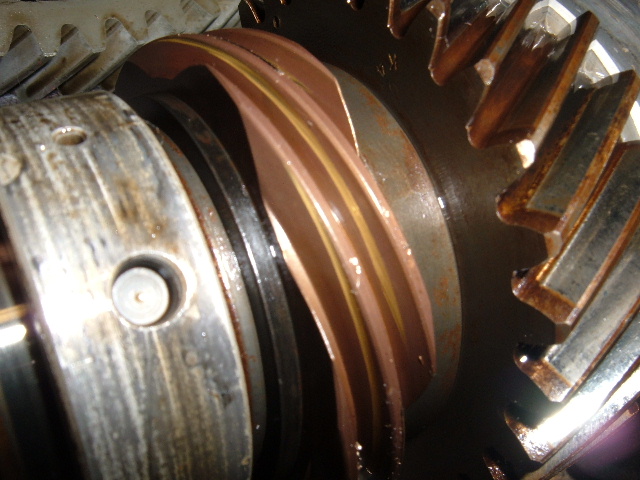
Posted by: jwalters Dec 12 2006, 06:16 PM
These heads have an unbelievable amount of build-up on them - about .060 in some places ... Soon you will see close-ups of the valves themselves..
Nando - you are in someones good graces because frankly, I do not see how you have not grenaded this motor completely....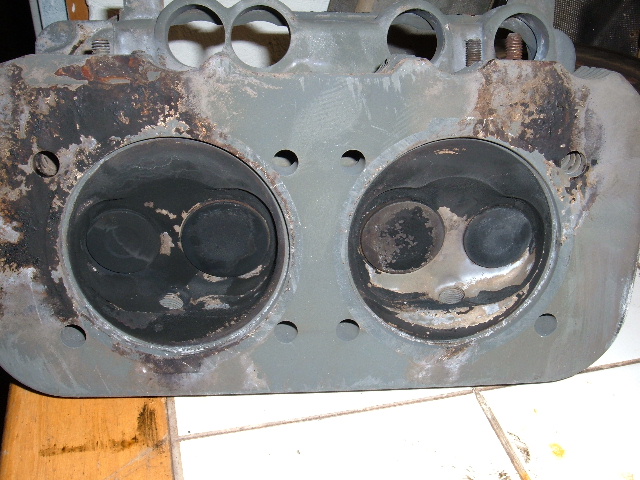
Posted by: jwalters Dec 12 2006, 06:17 PM
Possibly some free metal and most likely improper deburring resulted in this main bearing scoring and gougeing....
Posted by: jwalters Dec 12 2006, 06:18 PM
#1 rod cap bearing ---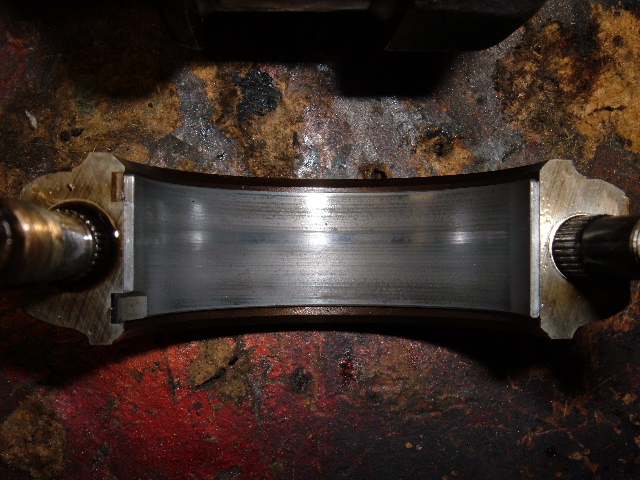
Posted by: jwalters Dec 12 2006, 06:19 PM
And the small end.............of same rod..............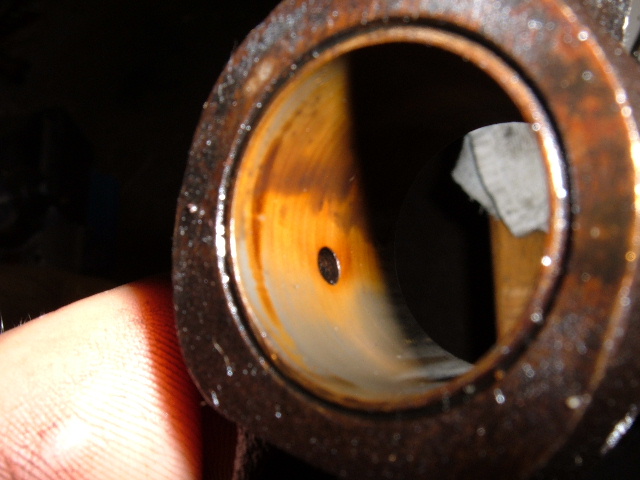
Now off back into the skunk works to pull some valvage...............
Posted by: jwalters Dec 12 2006, 07:01 PM
OK, NOW to some nittie - grittey --
The heads are a hodgepodge of parts - some sodium valves, some not - some new intakes, some not - a few guides new, a couple very worn (due to oil?? not replaced?? I can only speculate- )
Here is the first intake I cleaned and discovered: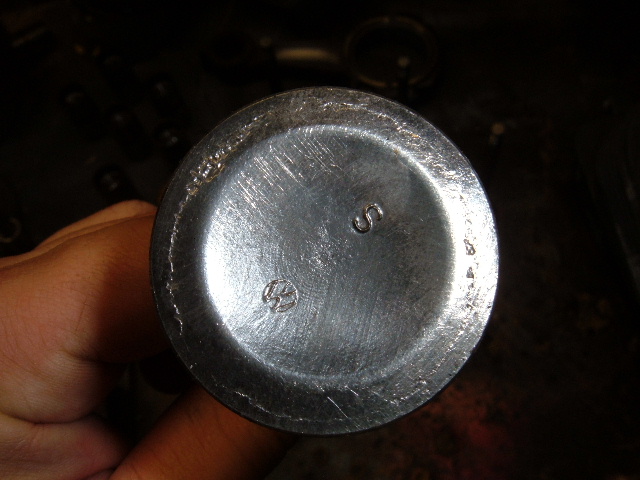 Wouldn't it be cool if the picture was to full scale??
Not just corroded, but corroded and fractured in an almost perfect circumference corresponding to the seat face !!!!!!!!!!!!!!!!! I got my 45power magnifying glass out and if only I could take a picture of that view!!!!
Holy crap...........It is in a way, sorta beautiful.....in a cheating death kind of way...
Posted by: jwalters Dec 12 2006, 07:03 PM
Nuther shot....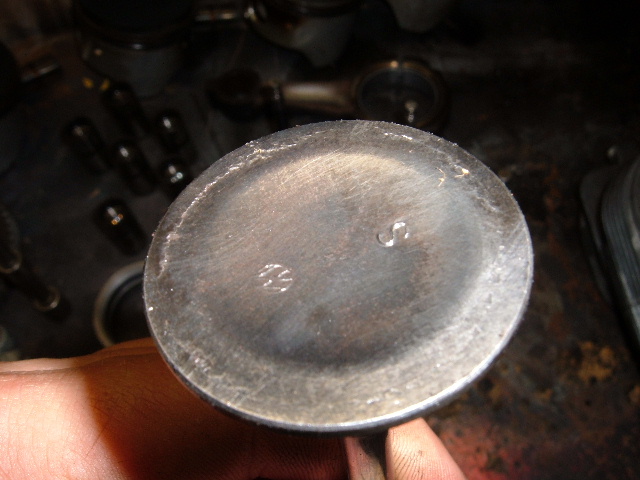
Posted by: jwalters Dec 12 2006, 07:06 PM
OK, whuts next??
Exhaust valve from same side of head - if you look very, very closely you can see on the outside shoulder area on the middle rim of the valve head,,,
You might be able to make out where the metal has pounded so violently it is actually "curled over" --- if you think you see deposits - those are not deposits - it is valve material folded and squeezed to a ridge...........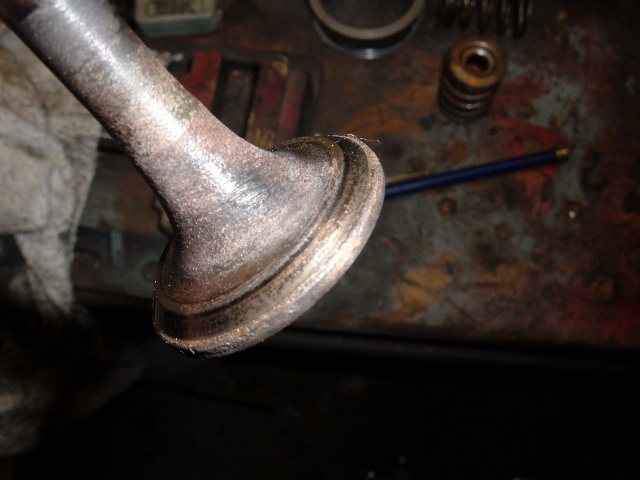
Posted by: jwalters Dec 12 2006, 07:08 PM
'Nuther shot...........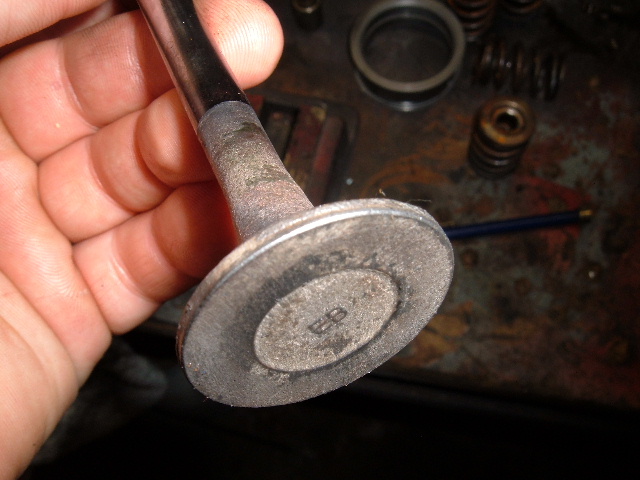
quick edit: How about that corrosion?!?!?!?! All facing material corroded off to about 120 grit surface.................
Posted by: jwalters Dec 12 2006, 07:10 PM
'Nuther shot --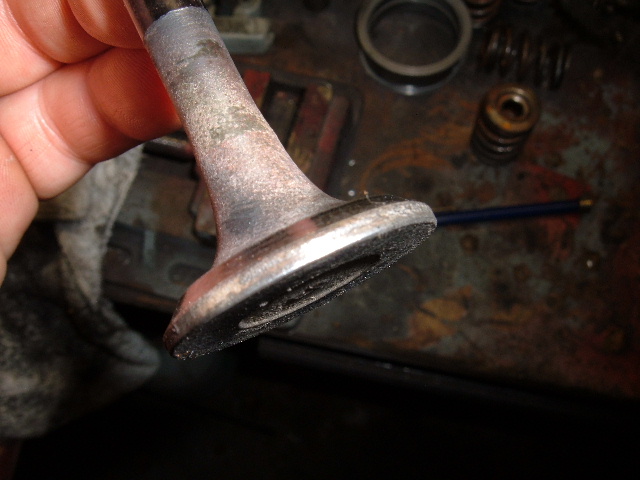
Posted by: jwalters Dec 12 2006, 07:14 PM
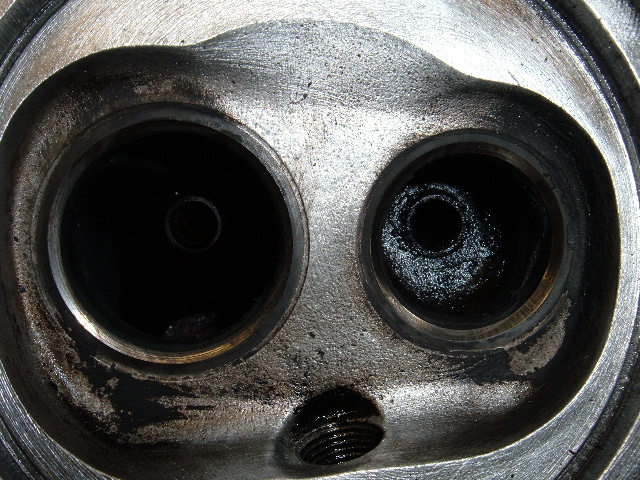
OK- Here are the seats --- notice the build-up of carbon in the exhaust port - choking prolly about 30% of total port size in an already choked down exhaust...
Nando, by what I have seen so far - if the wear was much better, and all that carbon build-up was not there, my man you would have known the difference in power output!! Also, curious as to what brand and type of oil you use? - and, has it been used for the duration of ownership? - this is good stuff dude, probably help a person or two by this thread -
This pup is going to scream again one day soon!! Ready to spend more money???? 
Posted by: jwalters Dec 12 2006, 07:15 PM
The heads are where it is all at....................jammin good heads = jamming time while cruising the strip.......................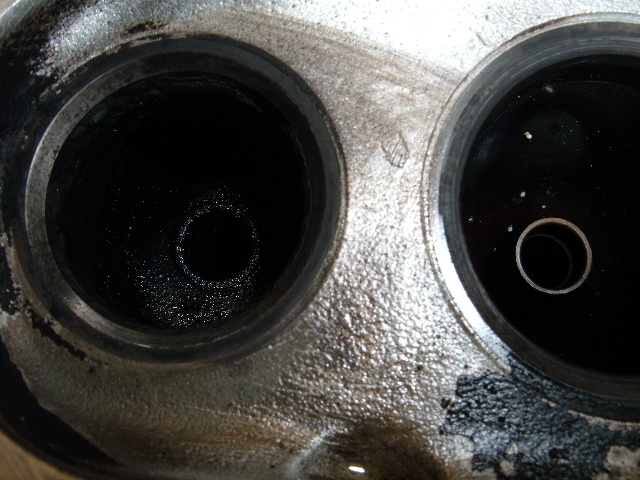
Posted by: jwalters Dec 12 2006, 07:16 PM
All things considered - this is where you never want to take a chance - the heads are where it is at.........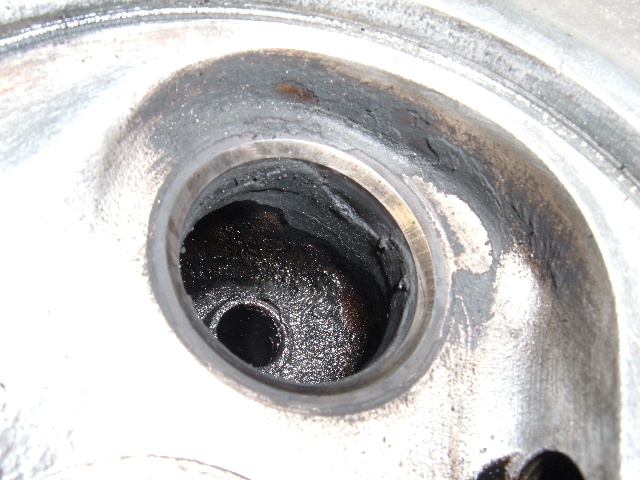
Posted by: martinef1963 Dec 12 2006, 10:24 PM
More MONEY? If my wife only knew how much this was costing already I would have to make new residence in Harley's (dog) house!
As to your question about the oil - I have always used Castrol - ran it in my MG & MGB - had no probelms.
I'll give you a call tomorrow to see what happens next - I haven't recieved anything in the mail (yet).
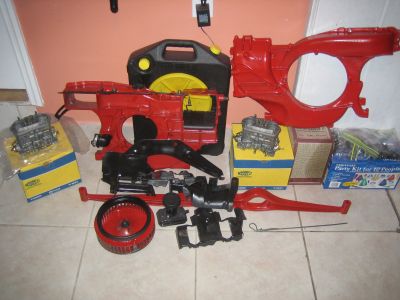
I've attached two pixs of what I've done to the air shroud, heat tin around the cylinder heads, engine mount bar, etc...
I'm having the car delivered for the hood, quarter panel work sometime tomorrow.
Will let you sleep in til 0500...  Thanks for the update.
Hey want to paint that engine before you put it back together - we'll talk in the AM.
Attached image(s)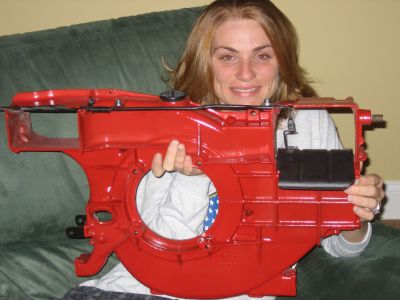
Posted by: jwalters Dec 12 2006, 10:56 PM
Bro - you call me that freaking early and we are going to have some issues........................
They just might have to shut the place down again.................
Excellent work on the go-fast goodies! You got them powdercoated? Right?
oh, and the money its just another 5 grand or so is all...........................

Posted by: martinef1963 Dec 12 2006, 11:05 PM

Bro - you call me that freaking early and we are going to have some issues........................
They just might have to shut the place down again.................
Excellent work on the go-fast goodies! You got them powdercoated? Right?
oh, and the money its just another 5 grand or so is all...........................
Negatory brother - spit & polish like the AF taught me! Degreased them, degreased them some more, broke out the wire brush drill attachment and went to work.
The black paint is 1200 degress, the red is 500 degrees. I want to work on the trany, but am concerned about corrossion. I have bagged off the cv joint connections butt (pun intended) is open to a bunch of debris, etc.
Any suggestions/recommendations?
Posted by: jwalters Dec 12 2006, 11:11 PM
Yea, just unbolt them and pull them out....it is a good time to do it anyways - those tranny seals are only a few bucks. Mine were 4 bucks each at aircooled. And the stub shafts just pull right out...
Then just tape over the holes - you were gonna drain and refill the tranny anyways, right??
Posted by: jwalters Dec 12 2006, 11:17 PM
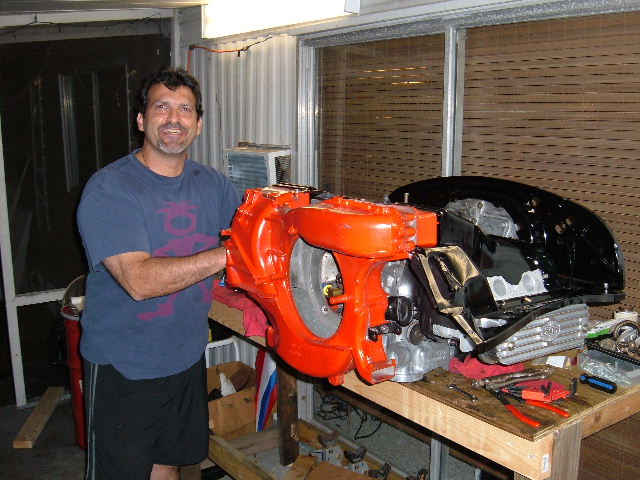
You know Nando - I just realized something - Trinket looks very happy to be holding that fan shroud...
Based on what I know about how she feels about the teener..... 
She is either getting enthused at the idea of remaking your car - - or - -
(And this is the one I am leaning to.............)
She is thinking " HA! Your car is in pieces ......I win!"


Posted by: jwalters Mar 11 2007, 05:09 PM
 Time for an update! Over the months we have been awaiting machine work, and the occasional part and widget to arrive via snail mail ---
To once again pick up where left off:
Nando working diligently to tap full flow fittings into the case...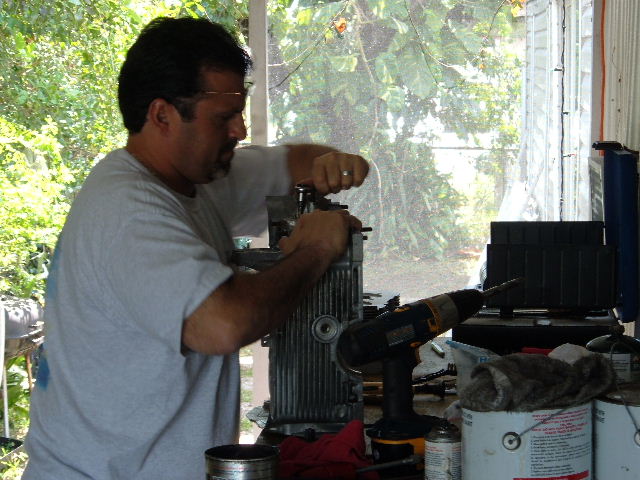
Went well..............
Posted by: jwalters Mar 11 2007, 05:13 PM
Getting set-up to begin lapping in the valves and barrels. To re-iterate, this thread is primarily for the benefit of those who would like to know / does not already know, the internal workings and going-on of our engines--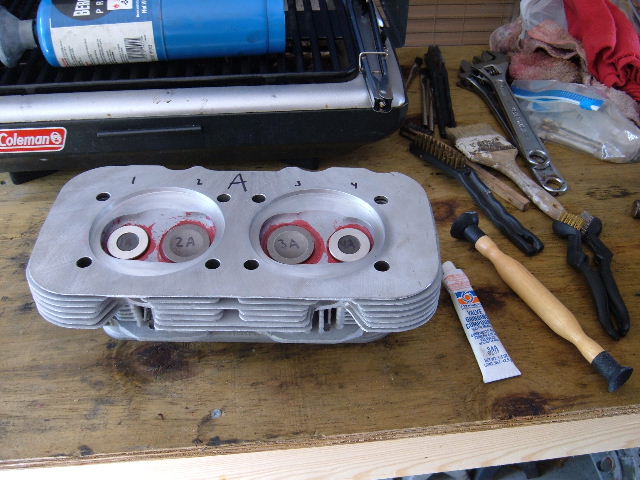
OK - Two heads. Each respective valve will be lapped into its seat and each barrel will be done the same. This is head "A" and the valves are marked 1A, 2A, etc with the respective corresponding marking on the head itself. During a build things will get moved and possibly fall off the bench, etc. This will ensure each part goes back to where it needs.
Posted by: jwalters Mar 11 2007, 05:25 PM
OK -this is the start - notice the valve lapping (grinding) compound in the tube and the wood dowel with suction cup on the end..these are instrumental to fitting a valve to its seat..
Operation is very simple - I put four dabs of liquid sandpaper (grinding compound) at four equal spaces on the valve seat and then insert the valve into the head. Then choosing the appropriate suction cup (both items available at any FLAPS) I suction cup the dowel to the valve and begin to work the valve back in forth with very little downward force. Pretend like you are playing with play-doh, or, imagine how scotty b pleasures himself.. After about 5-10 good rubs...  I then purposefully rotate the valve 90 degreees and do it all again. And again through to a full 360 degrees, 90 degrees at a time. This is the result:
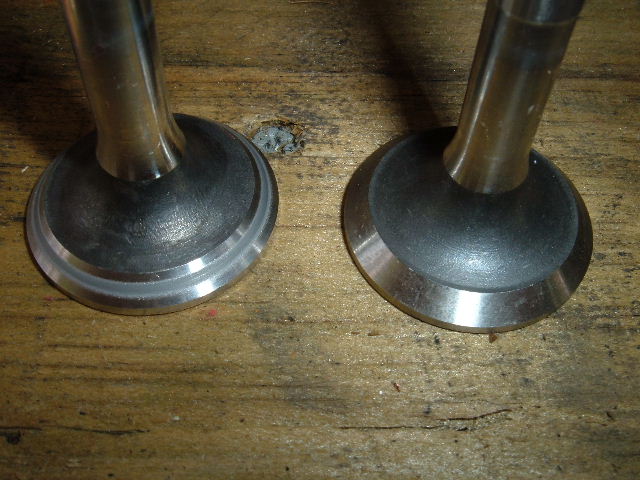
This is best case scenario with very old heads. These seat are in very good shape and were not over-ground at the machine shop. This is evident by the discolored line in the middle of the seat. A good solid and equal grind line at midpoint is very, very good, this is telling you the builder that this valve will seal very well. It does not take a lot of pressure and it also does not take long when you have good parts to begin with. (these valves are brand new)
Posted by: jwalters Mar 11 2007, 05:28 PM
And this is what the corresponding seat will look like--
The red stuff is just dykem - a machinists dye. This helps you visually very well..The seat on the left has been lapped - the seat on the right has only been ground at the machine shop and is not yet fitted to the valve face --
Posted by: scotty b Mar 11 2007, 05:30 PM
' things will move and possibly fall off of the bench" ??? Oh brother here we go.....
"well after falling off of the bench it seems that the majority of cooling fins have "dislodged themselves" so now we are trying to locate a suitable replacement head" 
I don't know about this whole thread it's starting to remind me of one of those late night cheesy info -mercials 
Posted by: jwalters Mar 11 2007, 05:46 PM
Ok, so now off to lapping in a barrel now that I am done with the valves on this side. What I am not showing now, which I will show soon, is how no matter how highly you trust your machinist, or how good they really are, you NEED to lap the barrels to the heads. Future pics will show in detail why ---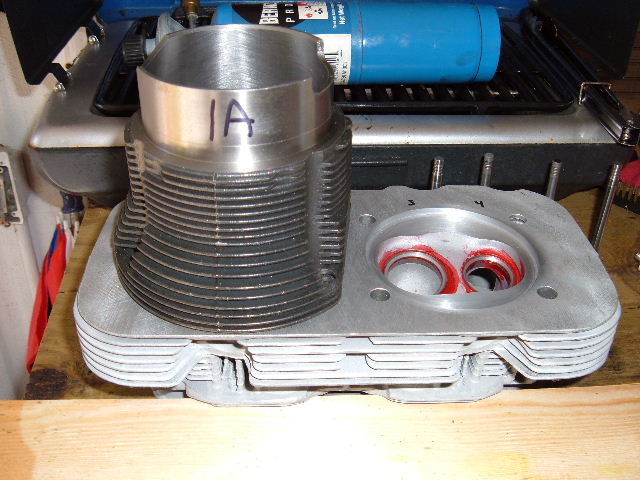
The same rule for the valves apply here - four good sized dabs of liquid sandpaper, let the weight of the barrel be the downward pressure - and 5-10 good strong rubs.. Rotate 90 degrees, repeat, repeat. Keep doing it a little at a time unitl a "uniform" discoloration and width are evident. And then stop. When done with care, a minimal amount of material is lost.
Posted by: jwalters Mar 11 2007, 05:49 PM
Here is a very good visual of the barrel to head sealing interface: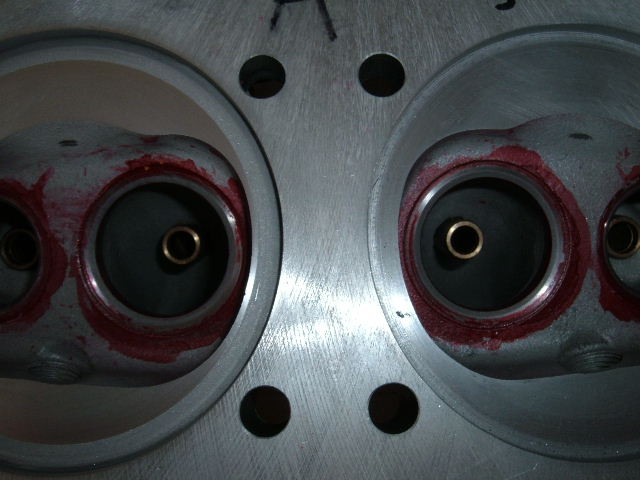
Once again, the left side is lapped, the right is not, yet anyway....
Posted by: jwalters Mar 11 2007, 05:50 PM
'nuther shot...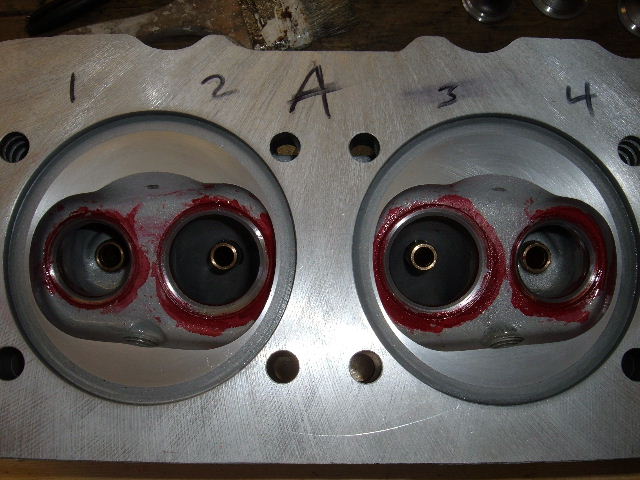
Posted by: jwalters Mar 11 2007, 05:53 PM
One more shot for posterity..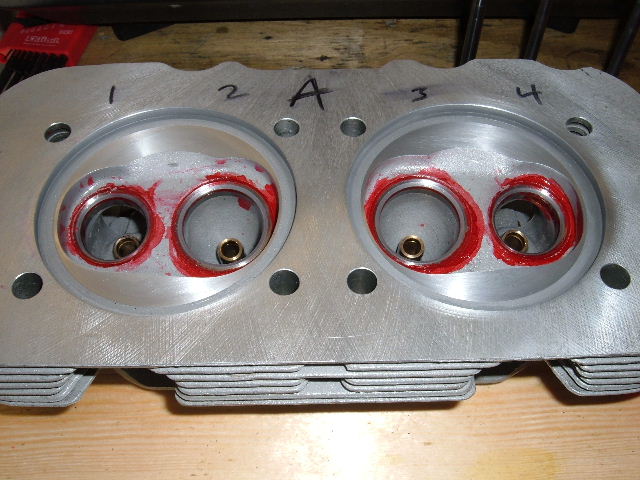
The key with THIS operation is TAKE YOUR TIME AND GO EASY WITH THE WHOLE PROCEDURE!!
Nobody wants to do things twice----the second time being after the engine is in the car and running and leaking combustion everywhere---
Posted by: jwalters Mar 11 2007, 05:56 PM
' things will move and possibly fall off of the bench" ??? Oh brother here we go.....
"well after falling off of the bench it seems that the majority of cooling fins have "dislodged themselves" so now we are trying to locate a suitable replacement head"
Yea right biatch - like you have "never" done or had that happen to you......
When you gonna be in Florida??
I don't know about this whole thread it's starting to remind me of one of those late night cheesy info -mercials
You would know, wouldn't you, you loser......
Posted by: jwalters Mar 20 2007, 08:13 PM
Ok - back at it. Finished the basic build-up the other day and am now in recuperation mode. Nando and I ran a marathon day of building, getting last minute things, eating and drinking somewhat heavily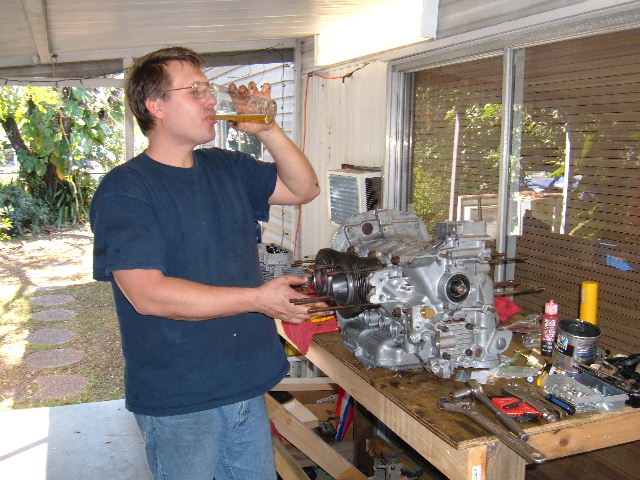
It was really nice to get this build done - this was the engine I wanted to do for BlackSabbath, but , just was not able to do it---
Posted by: jwalters Mar 20 2007, 08:20 PM
A good friend of mine made a post, back a little, poking fun at how things "might" fall off a table---- if the mayhem in the last picture is any indication - it could happen!
But, knocking on wood, I, being the pre-immenent master constructor - made a table/workbench of such sturdy stature, that only another Spartan such as myself could accomplish....... 

What made this build ever more the merrier is that it seems only a scant year ago,,,,,in a galaxy far, far away --- I  Nanado for not tightening his sparkplugs enough.....
And now here he is building the beast for one of the very few-known-to-exist teeners in SoFl ----
Posted by: jwalters Mar 20 2007, 08:32 PM
Ok, more info now for those of you who would really like to build their own, but are a little timid ---
Nando, chime in here bud, I know you 'thought' this project to be overwhelming,,,but,,,,,,,,,,,,,,,,,,,,,,,,,,,,,,,
Ok, back to the 'lapping' in the heads to barrels interface...
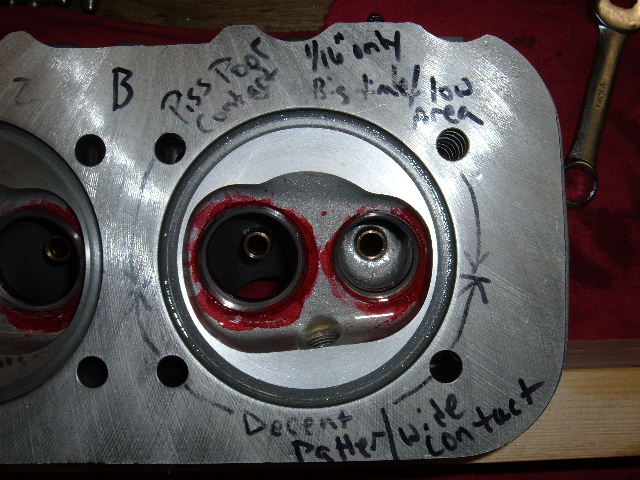
This picture I hope shows the high and low spots of the sealing area.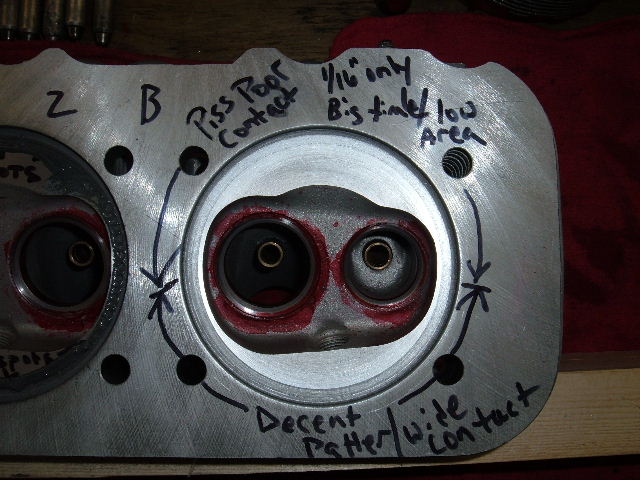
What you see here is the actual sealing area with only four complete turns of the barrel with lapping compund. Point to note is that there IS contact area around the entire circumference. It is just that at the bottom of the pic, the contact width is the full width of the barrel ~7.5mm and the top area is only ~ .75mm.
When the head is torqued this small measurement will increase a modicum - but keep in mindthis: the traditional auto engine head is torqued anywhere from 95-200 lbft depending on if USA designed or elsewhere, and not the fraction lbft of the T4 engine.......
Posted by: jwalters Mar 20 2007, 08:36 PM
This is the dead simple operation of lapping in the barrels with grinding compound - these heads were rebuilt with new guides and a three angle valve job, and all new valves.
this is a very important operation and goes along the same lines of lapping in the valves - you are ensuring complete sealing = longevity
Posted by: jwalters Mar 20 2007, 08:40 PM
This is what you are looking for when mating the camshaft gear and crank gear - this camshaft is the venerable web 86A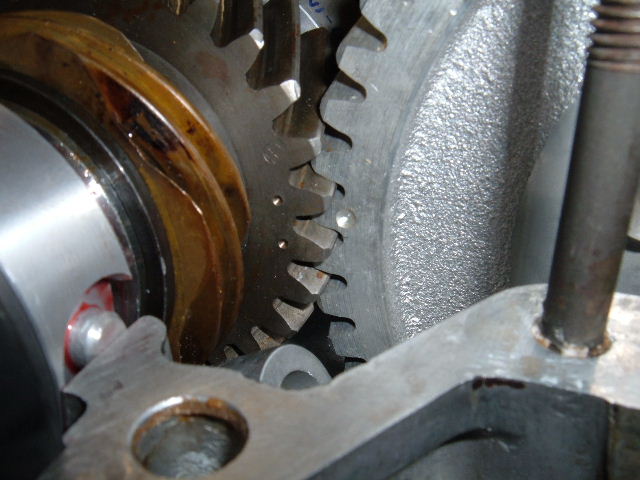
quick edit - I use my toaster over to heat the crank gear and dizzy drive gear to 400 degrees F - the dark stuff on the gear that looks like it was not cleaned enough, well, that is only left over pizza sauce ....
Posted by: jwalters Mar 20 2007, 08:45 PM
here is the same head after some judicious lapping and stroking -
This one about used up my patience - I had to lap the other side a little more to keep the heights the same - it is still not quite a full contact, but I cannot go anymore due to an uneven height relationship between the two sides - however, it is more than serviceable, and still has to be torqued and go through a full heat cycle. I have no worries here.
Posted by: jwalters Mar 20 2007, 08:49 PM
A quick shot of the internals---this case is a very early "W" one. It has no provisions for a windage tray---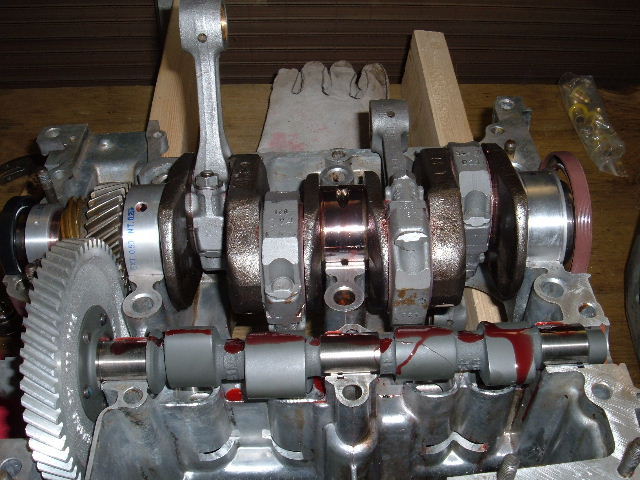
Posted by: jwalters Mar 20 2007, 08:53 PM
I have torn open quite a many of these engines and almost always find these missing - they are stabilizers, or, harmonic dampers for the case thru-bolts. A good idea to always use these. I have seen these bolts snap from the vibes frazzling them inside the case. Very long bolts with no support at all in those holes..I, and Nando, had to special order these. I do not think they come in any of the standard gasket paks...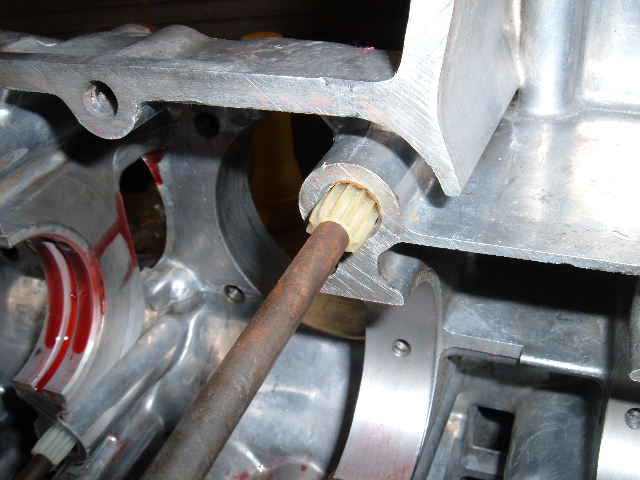
Posted by: jwalters Mar 20 2007, 08:57 PM
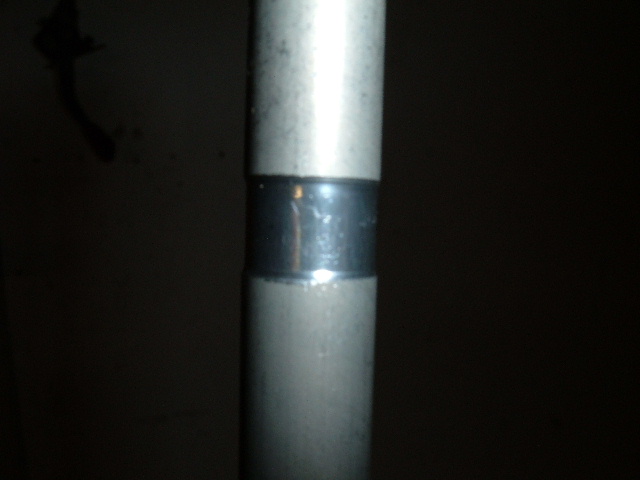
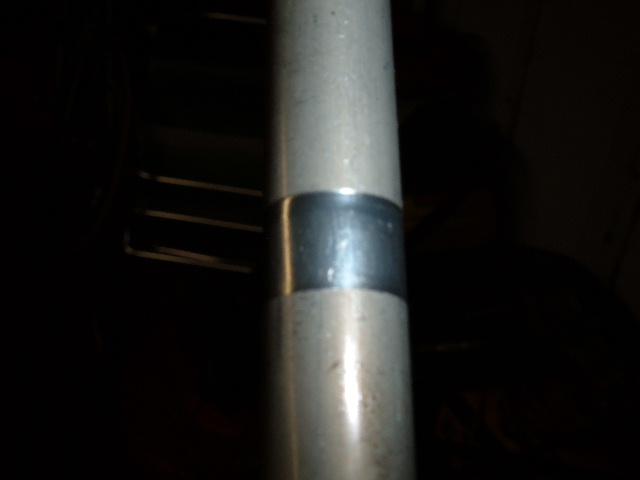
OK, here is a highly coveted secret I will now pass on to all. Do not use any type of hardening silicone on pushrod tubes!!! When an engine like the T4 goes from full cold to full hot in can grow upwards of 10mm!!!!
The secret: Toyota transaxle packing compund - AKA 'red stuff' --- it is non hardening and will move with the tubes as the flex --highly viscous, it pulls and fills in voids --
Do not use for case halves tho!!!!!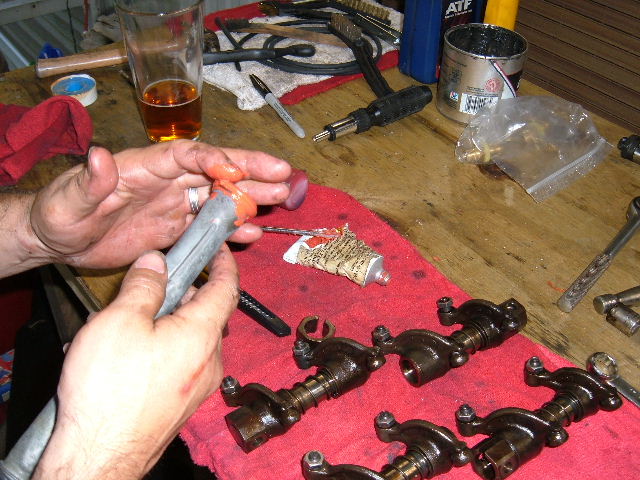
Posted by: jwalters Mar 20 2007, 09:01 PM
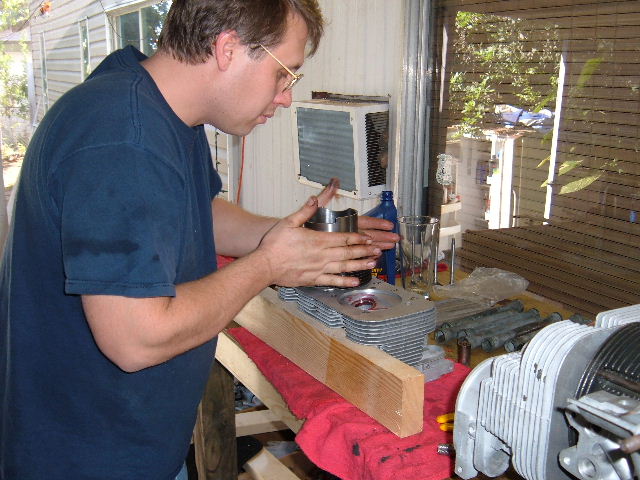
Yours truly demonstrating how to assemble a piston/cylinder assy on a rod..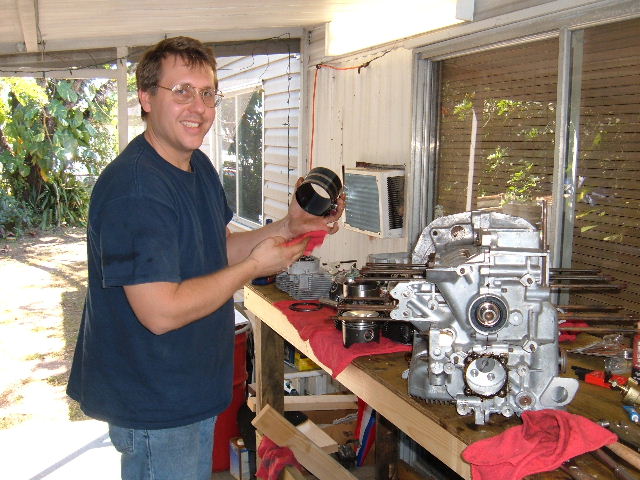
I must say I am pleasently surprised with these AA Products piston/cyl assemblies. The machining marks were of excellent quality, the pistons are stunning, and when pistons removed for the lap process, the rings were installed on the pistons perfectly!! very impressed..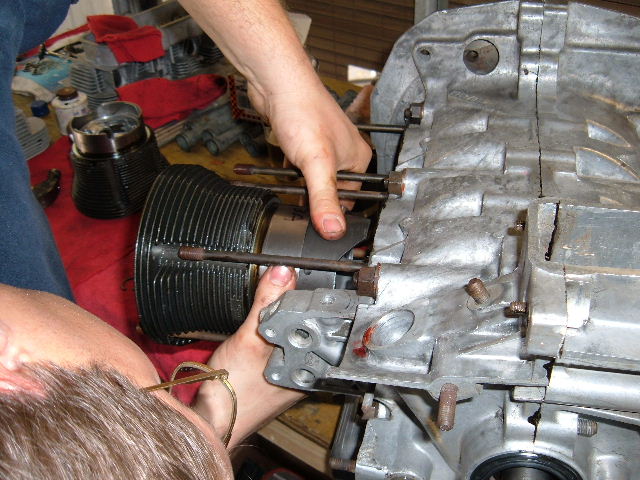
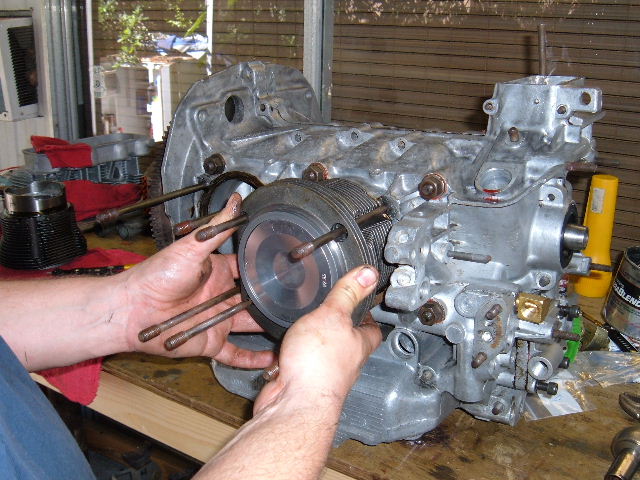
Posted by: jwalters Mar 20 2007, 09:05 PM
Very nice...
Posted by: jwalters Mar 20 2007, 09:08 PM
Nando doing the other side...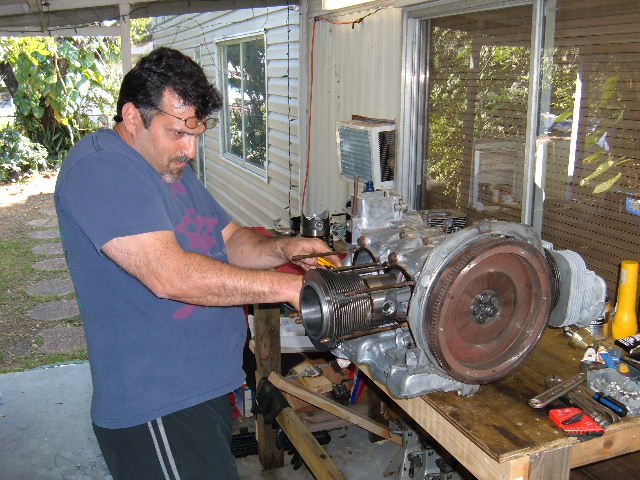
And assembling the other head - -this stuff is really, really simple and not the way some would have you believe -- just have your machine work done by a very reputable place and check it - -trust but verify!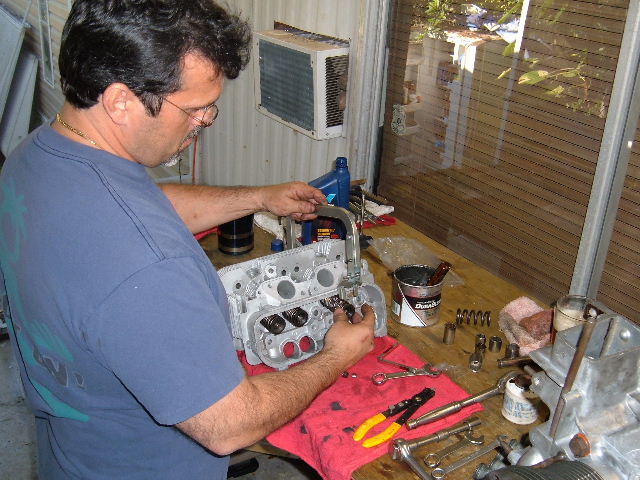
Posted by: jwalters Mar 20 2007, 09:10 PM
This is a rarity for me - second time in 15 years -- the oil pump drive gear was not pressed fully home on its shaft - - this is a shadeck unit - before and after 'fixing' the problem...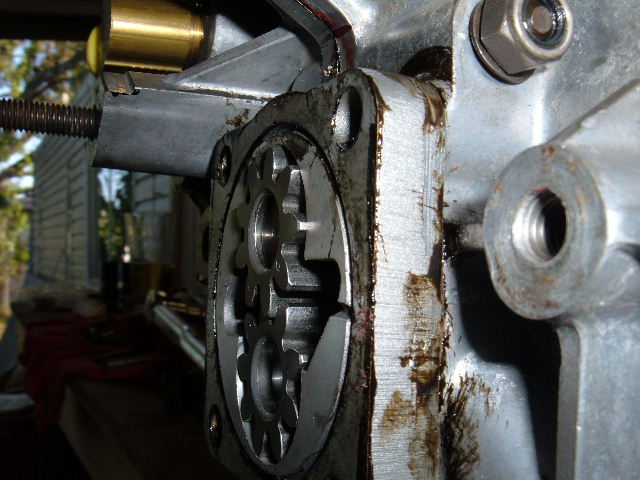
Posted by: jwalters Mar 20 2007, 09:13 PM
Done for now - now to wait for Nando's teener to return from paint and body to finish her off....
Nando, got a name for your car yet???
Posted by: elwood-914 Mar 20 2007, 10:20 PM
Hey guys, great job! Thanks for taking the time to take pictures and posting. 
Posted by: martinef1963 Mar 21 2007, 04:12 AM
"The Money Pit!"
This project went well over my projected budget. What I'll do in the near future is give a break down of cost for people that have never and are thinking about rebuilding a T-4 engine.
I believe the incidentals are what really add up.
Thanks Jay for taking the time to and lending your home for this rebuild. I have to go get ready for my driving.
I'll be getting the beast back late PM today or early AM tomorrow - will post pics.
regards. 
Done for now - now to wait for Nando's teener to return from paint and body to finish her off....
Nando, got a name for your car yet???
Posted by: jwalters Mar 21 2007, 08:29 PM
Hey, I got your messege, yes it is ok to pull the pump cover - leave it off, I have two more unused gaskets to replace it with. Cover up all your open holes with plastic or a wad paper towels into all the holes --
I have inventoried all the remaining items and we are good to go for the final countdown.
I found a dyno shop in Opa Locka so we can measure your new engines actual output -
If we can get it done before you go over the road great, if not, well, guess just have to wait...........
Posted by: jwalters Mar 21 2007, 08:31 PM
[quote name='martinef1963' date='Mar 21 2007, 06:12 AM' post='877551']
"The Money Pit!"
Do not believe him - He has a better car than I, and I have spent more beans....
(he had a better car to start with tho.. )
Posted by: martinef1963 Mar 22 2007, 06:10 AM
Money Pit was delivered from the body shop yesterday afternoon. I took some pictures of hell hole. I didn't have time to really inspect the floor pan triangle that R & R. From the top side it looks good, but from the bottom, duno.
The hood and passanger side were worked on also - they did a good job on matching the paint.
Looks like I will have to add several replies to get the pictures uploaded.
Fernando
Attached File(s) Hell_Hole_001.bmp ( 197.81k )
Number of downloads: 50
Hell_Hole_001.bmp ( 197.81k )
Number of downloads: 50
Posted by: martinef1963 Mar 22 2007, 06:16 AM
Here are some more pixs
Attached image(s)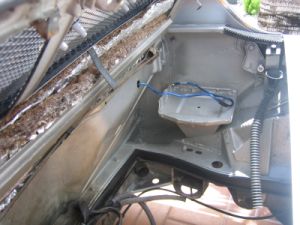
Posted by: martinef1963 Mar 22 2007, 01:08 PM
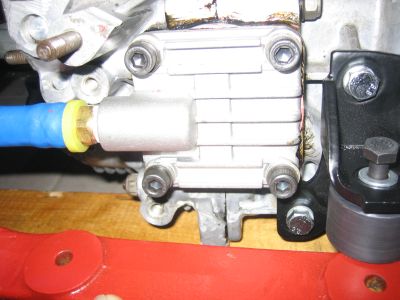
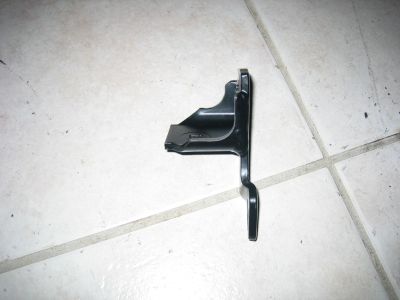
I was going to wash the engine bay area and prep for sound/heat pad installation, but the weather here in Miami today has been non stop raining. So I thought I would attach the engine mount brackets to the engine case and found that the left bracket can not be installed without modification. The full flow oil pump doesn't allow room for install. Aside from grinding the right side of the bracket down, are there other bracket applications that would allow for normal installation?
Here are some pictures:
Attached image(s)

Posted by: Aaron Cox Mar 22 2007, 01:33 PM
where did ya get the 'elbow' for the full flow?
Posted by: martinef1963 Mar 22 2007, 01:52 PM
Hi AA - I didn't get it, J picked it up. He would be the source.
regards - Nando
where did ya get the 'elbow' for the full flow?
Posted by: jwalters Mar 22 2007, 05:29 PM
Hi AA - I didn't get it, J picked it up. He would be the source.
regards - Nando
where did ya get the 'elbow' for the full flow?
Got it at advance auto parts - on the specialty rack...2.95 can be yours..
Posted by: jwalters Mar 22 2007, 05:35 PM
Damn Nando -- --- --- Ain't gonna do this  for at least a week.....oh man.
Work was brutal today -I do not know how I made it through....
Just grind the one side of the mount - there is plenty of steel left over to hold things in place...
Take some photos of the body due - post them, I want to see how it turned out...
Note: I am re-reading all we talked about this am .....
Man I was some kind of 'tight' last nite.............
Note to self: Never drink gin mixed with coke ever again.....
Posted by: martinef1963 Mar 23 2007, 07:47 PM
Gin & Coke -  One thing for sure you will learn...
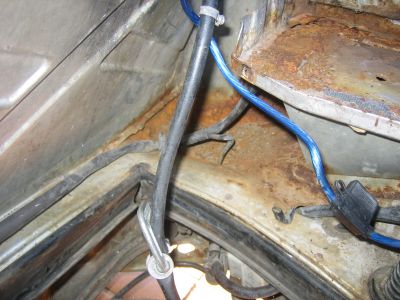
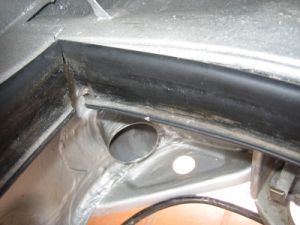
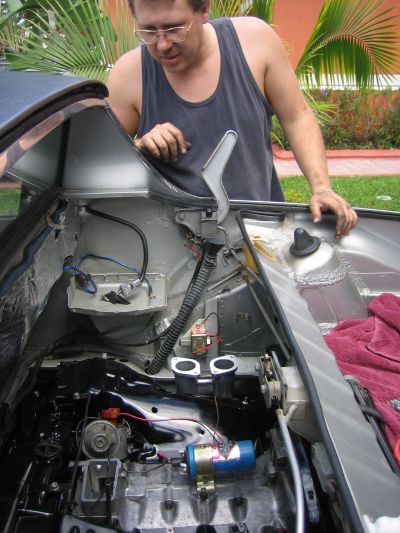
So today the sun was out and I got to some engine bay cleaning. I pulled the brittle engine bay rubber off and used POR 15 Marine product to get all the caked up crap from down under.
I rinsed twice, pat dried, and used my Black & Decker garden leaf blower to get all the moisture out.
Here is what it looks like this PM:
Attached image(s)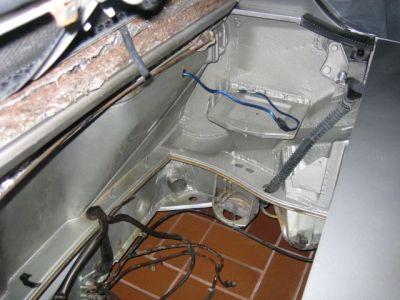
Posted by: rhodyguy Mar 23 2007, 07:55 PM
that came out super nice!!!
k
Posted by: jwalters Mar 23 2007, 08:05 PM
that came out super nice!!!
k
Yea, if it were not for me not[i] being gay...I would have penis envy...
Posted by: martinef1963 Mar 23 2007, 08:08 PM
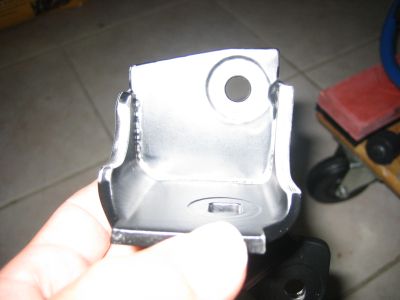
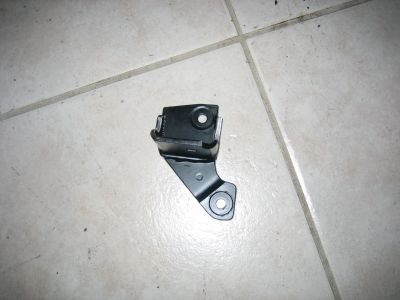
Here are the machined down motor mount. We had to in order to have it work with the full flow oil pump plate. It is a very snug fit though, think I will take it back and have them shave it down just a #$%^ hair - should work.
Here are the pictures: 
Attached image(s)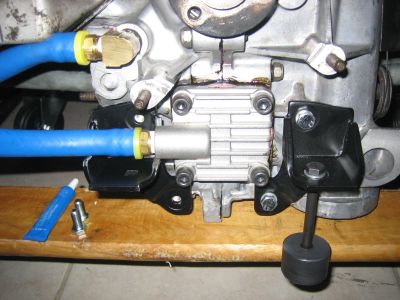

Posted by: jwalters Mar 23 2007, 08:11 PM
Is it snug on the nipple or the hose
Posted by: martinef1963 Mar 23 2007, 08:13 PM
I looked like that Peanut guy w/ the dust hanging around him all day long. It was messy, but the end result was well worth it.
POR 15 Marine - is incredible. Once I sprayed it on I could see the stuff working on the grease & grim. It took me no more than about 1 and half hour to get it looking like it does.
 I'm working on some Samual Adams tonight - I deserve it.
that came out super nice!!!
k
Posted by: martinef1963 Mar 23 2007, 08:17 PM
The "NIPPLE"  on the hose side it is perfect - I think just a little more, not much should be fine. I think if we leave it like that it will be pushing on the nipple/plate too much.
Your thoughts on that?
Is it snug on the nipple
or the hose Posted by: jwalters Mar 23 2007, 08:36 PM
The "NIPPLE"
on the hose side it is perfect - I think just a little more, not much should be fine. I think if we leave it like that it will be pushing on the nipple/plate too much.Your thoughts on that?
Is it snug on the nipple
or the hose If it is not touching it now - it never will - you are good to go!
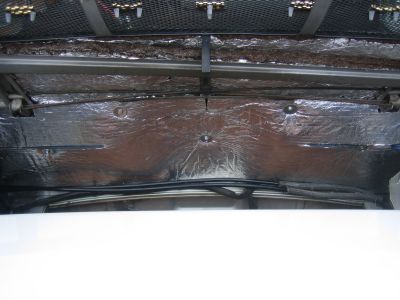
Posted by: rhodyguy Mar 24 2007, 10:15 AM
what's all the weird crap shown in the lip of the engine lid? wax on, wax off.
NOT!!!
k
Posted by: martinef1963 Mar 24 2007, 10:48 AM
It's the heat shielding material - the "foily" material on the edge is a bit rusted.
what's all the weird crap shown in the lip of the engine lid? wax on, wax off.
NOT!!!
k
Posted by: martinef1963 Mar 24 2007, 01:13 PM
Thank God the wife doesn't want to do anything today, but read a book. I woke up today wanting to install the heat shield/sound pad on the firewall. Sooo.......
Attached image(s)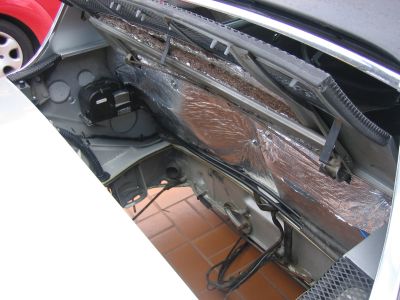
Attached File(s)
Hell_Hole_001.bmp ( 197.81k )
Number of downloads: 25
Posted by: martinef1963 Mar 24 2007, 01:17 PM
This one looks beter:
Attached image(s)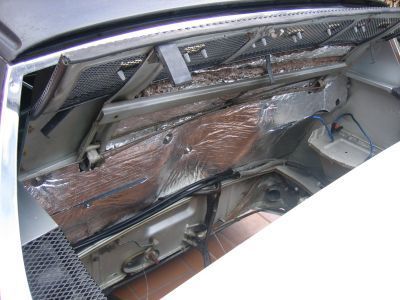
Posted by: jwalters Mar 24 2007, 06:28 PM
This one looks beter:
FARFENNUGENN ! hOORAY, i AM OFF OFF OF wORK -- - -
Posted by: jwalters Mar 24 2007, 06:56 PM
Hey dude, I set all your stuff (Gaskets and oil cooler) out on the workbench for you to grab while on your way...
Man these Sam Adams White Lagers are going down smoooooooooooooooooooooooooooooooooooooooooooooooooooooooth......
Posted by: martinef1963 Mar 24 2007, 07:18 PM
thanks - hey do I need to take the clutch, pressure plate too, or will you bring that down?
I bought & rcvd in the mail today a flywheel holder, so you don't have to bring that down for the final put together.
Don't mix that Samual Adams w/ Gin & Coke or you will surely
Hey dude, I set all your stuff (Gaskets and oil cooler) out on the workbench for you to grab while on your way... Man these Sam Adams White Lagers are going down smoooooooooooooooooooooooooooooooooooooooooooooooooooooooth......
Posted by: jwalters Mar 24 2007, 07:25 PM
thanks - hey do I need to take the clutch, pressure plate too, or will you bring that down?
I bought & rcvd in the mail today a flywheel holder, so you don't have to bring that down for the final put together.
Don't mix that Samual Adams w/ Gin & Coke or you will surely
Hey dude, I set all your stuff (Gaskets and oil cooler) out on the workbench for you to grab while on your way... Man these Sam Adams White Lagers are going down smoooooooooooooooooooooooooooooooooooooooooooooooooooooooth......
Yea, no, only worry about the gaskets and cooler - I will bring everything else down
Posted by: 914Tom Mar 26 2007, 02:14 PM
the revision on my 2.0 hast still to come, so is soak this thread up like nothing.
but one question.
are the pictures in post #24 only on my computer not avial.
space is reserved, but no picture
TOM
Posted by: jwalters Mar 26 2007, 06:44 PM
the revision on my 2.0 hast still to come, so is soak this thread up like nothing.
but one question.
are the pictures in post #24 only on my computer not avial.
space is reserved, but no picture
TOM
Hi Tom!

Welcome to the world which changes all ..................
n that post, no, no pictures. I was just faking out a friend is all. There are many, many knowledgeable people here who share very freely. Have no restraint in asking a question, make posts and join the fun.
And remember, WE have seen it all
>>>>>>> NO question could ever be presumed as stupid,,, anymore, oh we have seen it all. What I am saying is, don'y hold back!
Posted by: Gint Mar 26 2007, 07:00 PM
Great work. And thread too. That engine bay came out really nice.
Posted by: Aaron Cox Mar 26 2007, 09:10 PM
just noticed something....
why didnt you use longer studs on the oil pump, vs using cap screws ?
and - what size hose are you ladies using?  , like my oil cooler up front, ill be running AN -10 (5/8 ID) hose.... blah blah over kill.
btw - the fittings on your remote filter adapter are 3/8 npt correct? (got a pic?)
Posted by: addwestern Mar 27 2007, 02:43 AM
Nando- Looking very good as you said she would. My compliments to the chef.
Posted by: martinef1963 Mar 27 2007, 09:46 AM
Thanks Mike,
The heat/sound pad from Performance Parts wasa bit pricy, but it really worked out well. I used an avionic epoxy to get it to stick w/ out worrying down the line about failure.
She's coming along nicely.
regards,
Nando
Great work. And thread too. That engine bay came out really nice.
Posted by: martinef1963 Mar 27 2007, 09:55 AM
Aaron - we went looking for longer studs, but couldn't find any on a Sunday. We noticed that the studs were shorter than what we needed that day - as I've learned during this rebuild there is always some surprise, piece missing, wrong thinga ma jig, etc...
Because of Jay's work schedule we only get to work on Sundays - you can imagine my frustration - my teener has been down for a while.....
I believe the house is the same (Jay chime in if I'm wrong here), and yes the filter adapter are 3/8 npc.
thanks,
Fernando
just noticed something....
why didnt you use longer studs on the oil pump, vs using cap screws
?and - what size hose are you ladies using?
, like my oil cooler up front, ill be running AN -10 (5/8 ID) hose.... blah blah over kill.btw - the fittings on your remote filter adapter are 3/8 npt correct? (got a pic?)
Posted by: martinef1963 Mar 27 2007, 09:02 PM
 I just rcvd my Cylinder Head Temp Gauge and I am wondering if I was missing something???
  OR NOT?
I've attached a picture to see if someone could esplain to me.. Were is the sensor portion of this kit???
 Could it be that loop looking thing???
Posted by: Brian_Boss Mar 27 2007, 09:08 PM
That thing that looks like a ring terminal is the sender.
Posted by: martinef1963 Mar 27 2007, 09:14 PM
Brian - is it #2 or #3 spark plug hole?
That thing that looks like a ring terminal is the sender.
Posted by: type11969 Mar 27 2007, 09:17 PM
While you have your engine apart, I suggest notching the spark plug boss where you intend to install that sender . . . it prevents the sender from getting chewed up everytime you pull and replace your sparkplugs. Not a whole lot of room down in that spark plug bore.
Apologies if you already planned on doing that!
-Chris
Posted by: Brian_Boss Mar 27 2007, 11:04 PM
You want to put it on the hottest cylinder. I believe that is #3.
Brian - is it #2 or #3 spark plug hole?
That thing that looks like a ring terminal is the sender.
Posted by: Aaron Cox Mar 27 2007, 11:07 PM
^^^^  cyl #3.
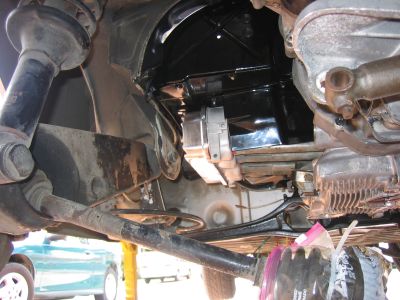
BTW - can you take a pic of the clearance behind the fan shroud to the elbow? i am wondering if i can put a smooth AN 90 there on a 3/8 npt - AN 10 adapter....
jwalters said something like 2" ?
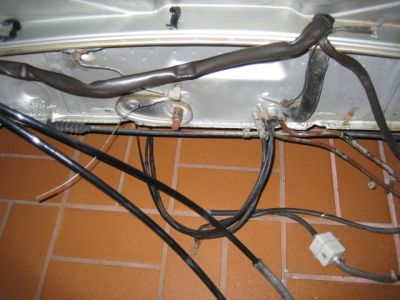
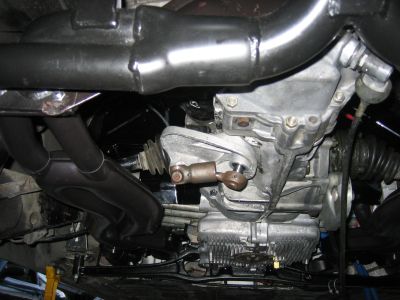
Posted by: martinef1963 Mar 28 2007, 09:04 PM
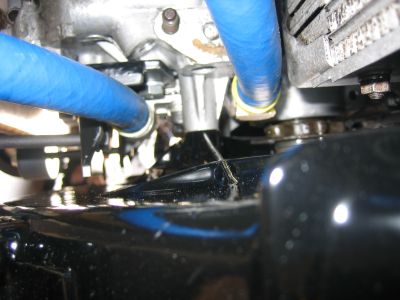
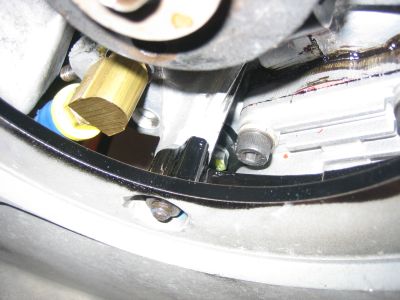
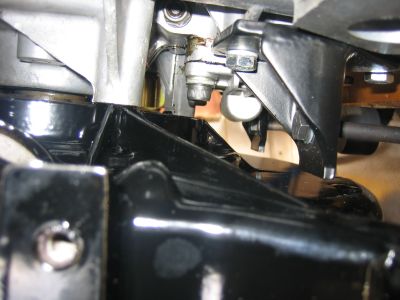
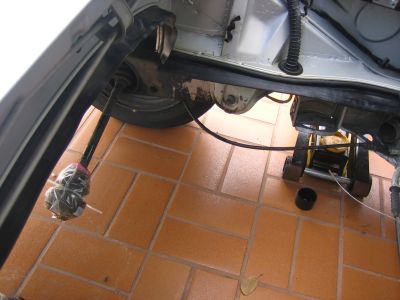
Okay AA - got rid of my kids today and got to work here are the pictures you requested:
^^^^
cyl #3.BTW - can you take a pic of the clearance behind the fan shroud to the elbow? i am wondering if i can put a smooth AN 90 there on a 3/8 npt - AN 10 adapter....
jwalters said something like 2" ?
Attached image(s)
Posted by: Aaron Cox Mar 28 2007, 09:07 PM
wicked. thanks for that pic!
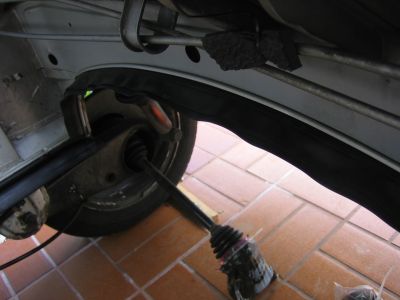
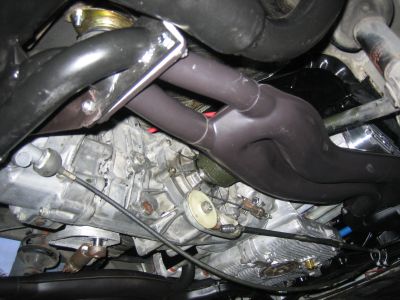
Posted by: martinef1963 Mar 28 2007, 09:09 PM
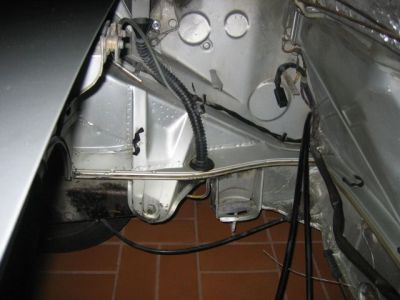
Sorry bout that AA but they look like they are sideways - here is another. If you want I will PM you the pictures.
Attached image(s)
Posted by: Aaron Cox Mar 28 2007, 09:12 PM
those were great. thanks!
Posted by: martinef1963 Mar 28 2007, 09:15 PM
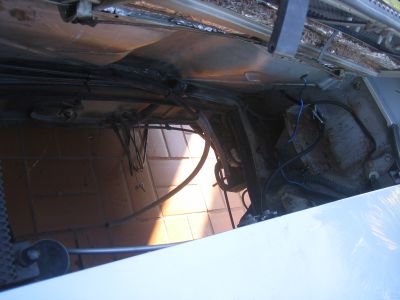
I also managed to do some engine bay work and added new rubber. SWEEEEETTTTTT.... 
Attached image(s)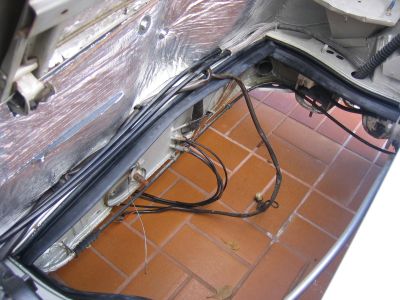
Posted by: martinef1963 Mar 28 2007, 09:18 PM
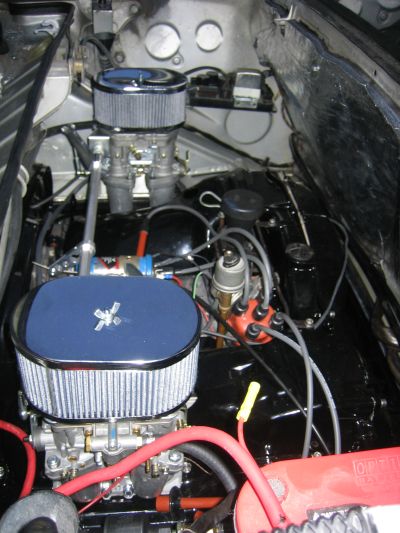
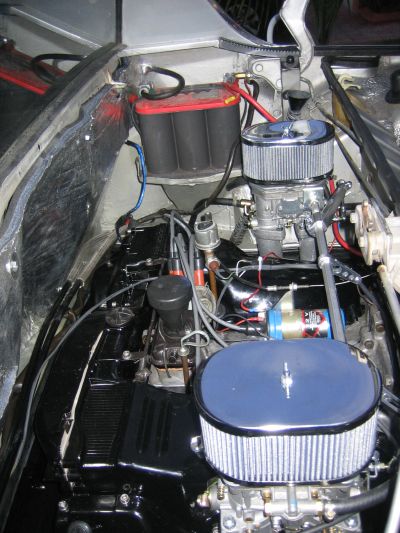
Today I really was on a roll w/ out the kids around.. I got to put Money Pit together for this Sunday's finally:
Attached image(s)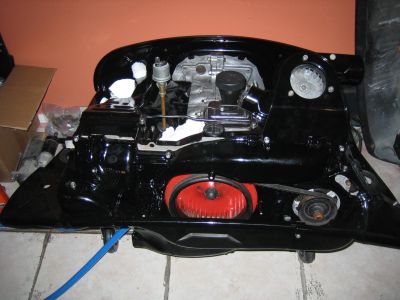
Posted by: jwalters Mar 28 2007, 09:18 PM
OK Dude - do you have EVERYTHING together for sunday ??????
Have you checked everything twice and then thrice ??????????????
Got the fuel pump in???? anything else ordered in ????
ARE you missing anything ?????
THINK!!!
Do you have a gas can ??? Filled????
Got the exhaust ready to go in ????
Only a few days left - do as much as you can on your side to ready it - -if you feel froggy go ahead and mount the intake manifolds - and, well, hell, the carbs and anything else - Distributor??? Put motor "straight up" with the timing marks I showed you - the dizzy slot will be.........maybe you should wait for me.
Have a beer on me - - - and should I bring some...............
Posted by: jwalters Mar 28 2007, 09:21 PM
Today I really was on a roll w/ out the kids around.. I got to put Money Pit together for this Sunday's finally:
You know, looking at the top pic in this post - even your engine is "happy" - I see it is standing to attention!!!
Posted by: jwalters Mar 28 2007, 09:25 PM
Looking good dude - Now that I think about it - IF you had your clutch and pressure plate you could mate the motor and tranny - of well, that will not take long...........
Posted by: martinef1963 Mar 28 2007, 09:29 PM
Jay - I'm waiting for the fuel pump. I went to ALL my local FLAPS and they have no Bosch items or Castrol break in oil.
I need you to, if you can, get those stuff from up north and bring w/ you. Let me know if that is a problem.
I don't know bro about the carbs - that is your department - it will be OJT.
I have the 911 motor mounts for the tranny. One of the CV joints fell apart in the plastic bag - do I need anything? There is gas in the tank.
I need from you, which I don't have, Transmission bolts - I don't have them???? If you don't have them I will have to get from ACE or this special place I know of.
What else do we need????? I'm stocked bro - it's only been like 5 or 6 months...
OK Dude - do you have EVERYTHING together for sunday ??????Have you checked everything twice and then thrice ??????????????
Got the fuel pump in???? anything else ordered in ????
ARE you missing anything ?????
THINK!!!
Do you have a gas can ??? Filled????
Got the exhaust ready to go in ????
Only a few days left - do as much as you can on your side to ready it - -if you feel froggy go ahead and mount the intake manifolds - and, well, hell, the carbs and anything else - Distributor??? Put motor "straight up" with the timing marks I showed you - the dizzy slot will be.........maybe you should wait for me.
Have a beer on me - - - and should I bring some...............
Posted by: jwalters Mar 28 2007, 09:35 PM
Jay - I'm waiting for the fuel pump. I went to ALL my local FLAPS and they have no Bosch items or Castrol break in oil.
I need you to, if you can, get those stuff from up north and bring w/ you. Let me know if that is a problem.
I don't know bro about the carbs - that is your department - it will be OJT.
I have the 911 motor mounts for the tranny. One of the CV joints fell apart in the plastic bag - do I need anything? There is gas in the tank.
I need from you, which I don't have, Transmission bolts - I don't have them???? If you don't have them I will have to get from ACE or this special place I know of.
What else do we need????? I'm stocked bro - it's only been like 5 or 6 months...
OK Dude - do you have EVERYTHING together for sunday ??????Have you checked everything twice and then thrice ??????????????
Got the fuel pump in???? anything else ordered in ????
ARE you missing anything ?????
THINK!!!
Do you have a gas can ??? Filled????
Got the exhaust ready to go in ????
Only a few days left - do as much as you can on your side to ready it - -if you feel froggy go ahead and mount the intake manifolds - and, well, hell, the carbs and anything else - Distributor??? Put motor "straight up" with the timing marks I showed you - the dizzy slot will be.........maybe you should wait for me.
Have a beer on me - - - and should I bring some...............
OK, I will bring OIL!!! Did you get new plug wires yet ??? If not, you had better overnight the F!@kers !!! I ganked some really cool copper over/under size nuts for the exhaust flanges - These have the 8mm thread, but are in an 11mm nut size!!! I know you might not have a clue to what I am talking about but, these should make getting you exhaust on a little bit easier ---
What about the remote oil filter??? Got it in yet??
Posted by: Aaron Cox Mar 28 2007, 09:39 PM
hold that train! you have an 8" piece of pipe to mount the oil pressure sender on???
you are gonna snap that sooo fast! its 1/8" npt, just grab a hydraulic grease gun hose and mount it on that.
cracked tube or cracked case block would suck.
Posted by: jwalters Mar 28 2007, 09:39 PM
Yea, and do not forget that there is alot of hardware and stuff on the tray I am bringing with me -- Go to the H/W store and get 13mm nuts with the locking plastic on them - You will need those pups for the intake set-up - get a bunch - 30 if you can - they are by far the most utilized nut on the car ... 
Clean the ground strap on the tranny real good and when you bolt it to the trans, take some paint and paint all over it to seal it in. That strap is of paramount to making sure you have good ground for the starter...
Posted by: martinef1963 Mar 28 2007, 09:39 PM
You're right - not a clue. About the plugs and wires - don't have them here - do any of your FLAPS carry them?
I overnighted the remote oil filter thinga ma jig from AirCooled.net. I think they tried to deliver today, but I was out this morning.
I will call again on the fuel pump for sure.
Jay - I'm waiting for the fuel pump. I went to ALL my local FLAPS and they have no Bosch items or Castrol break in oil.
I need you to, if you can, get those stuff from up north and bring w/ you. Let me know if that is a problem.
I don't know bro about the carbs - that is your department - it will be OJT.
I have the 911 motor mounts for the tranny. One of the CV joints fell apart in the plastic bag - do I need anything? There is gas in the tank.
I need from you, which I don't have, Transmission bolts - I don't have them???? If you don't have them I will have to get from ACE or this special place I know of.
What else do we need????? I'm stocked bro - it's only been like 5 or 6 months...
OK Dude - do you have EVERYTHING together for sunday ??????Have you checked everything twice and then thrice ??????????????
Got the fuel pump in???? anything else ordered in ????
ARE you missing anything ?????
THINK!!!
Do you have a gas can ??? Filled????
Got the exhaust ready to go in ????
Only a few days left - do as much as you can on your side to ready it - -if you feel froggy go ahead and mount the intake manifolds - and, well, hell, the carbs and anything else - Distributor??? Put motor "straight up" with the timing marks I showed you - the dizzy slot will be.........maybe you should wait for me.
Have a beer on me - - - and should I bring some...............
OK, I will bring OIL!!! Did you get new plug wires yet ??? If not, you had better overnight the F!@kers !!! I ganked some really cool copper over/under size nuts for the exhaust flanges - These have the 8mm thread, but are in an 11mm nut size!!! I know you might not have a clue to what I am talking about but, these should make getting you exhaust on a little bit easier ---
What about the remote oil filter??? Got it in yet??
Posted by: jwalters Mar 28 2007, 09:41 PM
Do you have feeler gauges?? I'mma thinkin ya doooooooooo
Posted by: jwalters Mar 28 2007, 09:44 PM
You're right - not a clue. About the plugs and wires - don't have them here - do any of your FLAPS carry them?
I overnighted the remote oil filter thinga ma jig from AirCooled.net. I think they tried to deliver today, but I was out this morning.
I will call again on the fuel pump for sure.
Jay - I'm waiting for the fuel pump. I went to ALL my local FLAPS and they have no Bosch items or Castrol break in oil.
I need you to, if you can, get those stuff from up north and bring w/ you. Let me know if that is a problem.
I don't know bro about the carbs - that is your department - it will be OJT.
I have the 911 motor mounts for the tranny. One of the CV joints fell apart in the plastic bag - do I need anything? There is gas in the tank.
I need from you, which I don't have, Transmission bolts - I don't have them???? If you don't have them I will have to get from ACE or this special place I know of.
What else do we need????? I'm stocked bro - it's only been like 5 or 6 months...
OK Dude - do you have EVERYTHING together for sunday ??????Have you checked everything twice and then thrice ??????????????
Got the fuel pump in???? anything else ordered in ????
ARE you missing anything ?????
THINK!!!
Do you have a gas can ??? Filled????
Got the exhaust ready to go in ????
Only a few days left - do as much as you can on your side to ready it - -if you feel froggy go ahead and mount the intake manifolds - and, well, hell, the carbs and anything else - Distributor??? Put motor "straight up" with the timing marks I showed you - the dizzy slot will be.........maybe you should wait for me.
Have a beer on me - - - and should I bring some...............
OK, I will bring OIL!!! Did you get new plug wires yet ??? If not, you had better overnight the F!@kers !!! I ganked some really cool copper over/under size nuts for the exhaust flanges - These have the 8mm thread, but are in an 11mm nut size!!! I know you might not have a clue to what I am talking about but, these should make getting you exhaust on a little bit easier ---
What about the remote oil filter??? Got it in yet??
I TOLD you to order wires!!!!! You need them!!!!! No, these are T-4 wires and are specific - - street and sand don't not carry them........ I know you are screwing with me, right???Hehe, hehe
QUICK EDIT: Let me know, and will rape BlackSabbath and bring hers so we can get er running ...
Posted by: martinef1963 Mar 28 2007, 09:53 PM
Okay - here is the deal. I went to all my FLAPS and because people down here think they live in a different country than the US - they just don't care much about BOSCH.
I tried all of them. Now, I can overnight them or two day them to get them here NLT Saturday.
Here is my confussion: BOSCH +4 Spark Plugs for a 79 911 3.0L engine, what about the wire set - 911 or for a 1972 914??? I know, I'm clueless about these things, but I'm work in progress...
Bring the oil, pan tray full of my bolts & nuts, and I'll make sure to go to ACE tomorrow and pic up thd 13MM w/ plastic thing a ma jig in them..... 
It's getting late, my head hurts, and there is only one Leffe Blonde in my fridge - try and have your cell phone on you tomorrow in the event that I have to call you (please).
thanks Nando
Posted by: jwalters Mar 28 2007, 09:57 PM
Okay - here is the deal. I went to all my FLAPS and because people down here think they live in a different country than the US - they just don't care much about BOSCH.
I tried all of them. Now, I can overnight them or two day them to get them here NLT Saturday.
Here is my confussion: BOSCH +4 Spark Plugs for a 79 911 3.0L engine, what about the wire set - 911 or for a 1972 914??? I know, I'm clueless about these things, but I'm work in progress...
Bring the oil, pan tray full of my bolts & nuts, and I'll make sure to go to ACE tomorrow and pic up thd 13MM w/ plastic thing a ma jig in them.....
It's getting late, my head hurts, and there is only one Leffe Blonde in my fridge - try and have your cell phone on you tomorrow in the event that I have to call you (please).
thanks Nando
OK - I will get he oil AND the plugs here - - if you can get the wires here NLT sat. then great - if not I will bring the ones off my car. And yes, seeing as you own a 914 -
- the wires you would need would be .................. Posted by: r_towle Mar 28 2007, 10:02 PM
Leira's Service Station
2101 Ludlam Rd
Miami, FL
(305) 261-0173
seems to have been doing VW's since 1971 in Miami...sure to have parts.
I also found this while trying to see if I could find a web site for Leira's for you...
I had to include this cause it seems to fit into the mood of the thread..
Top 5 list - worst places i've woken up
Current mood: exanimate
5.) Awoken by hotel security for sleeping in the hallway in front of my the door to my room. Apparently I was too drunk to operate the room key properly. It took a while to remember, then communicate that I was a hotel guest and not some vagrant that wandered in.
4.) On a couch in the living room of a house in IUP during homecoming, which turned out not to be my buddy Jason's house, but rather, that of a surprisingly understanding elderly couple. They even gave me a glass of OJ before I left. I think they thought I was on my deathbed.
3.) Chained to the floor in the (then) new California Police station. Immediately followed by a conversation about and vague recollections of a disagreement with a train.
2.) The only sober entry on the top 5; Behind the wheel of a car traveling about 100mph down the highway in the middle of the desert. Apparently it's a bad idea to try to drive straight through from Pittsburgh to San Diego. Somewhere between new mexico and arizona, the adrenaline wears off and the exhaustion sets in. There is absolutely nothing out there, no hills, no turns, no trees, nothing, except (thankfully) the widest set of rumble strips along the shoulder of the road.
1.) On a plane as it touches down, wih absolutely zero reollection of how I got there or where this plane might be landing. I've never before or since listened to the pilots announcement so closely. Turned out to be Chicago, where I luckily had friends, but it was February and I had no idea if or what I might have packed. Apparently, there is no such thing as too drunk to fly.
Posted by: r_towle Mar 28 2007, 10:10 PM
I will make a quick list here.
http://www.farrautoparts.com/ (german car parts in Miami)
Prestige Imports (dealer)
14800 Biscayne Blvd
North Miami Beach, FL 33181
Ph. 888-860-5210
Fx. 305-949-0927
another Dealer
Bird Road & Ponce de Leon Blvd.
Coral Gables, FL 33146
(305) 444-5555
Certified Pre-Owned:
US1 & Ponce de Leon Blvd.
Coral Gables, FL 33146
(305) 444-9999
1-800-252-4827 www.thecollection.com
Funny thing is, Porsche dealers do have parts for these cars...
in a pinch...alot of the little parts are at a dealer, on the shelf. nuts, bolts etc, oil, filters, even plug wires...
Rich
Posted by: Aaron Cox Mar 28 2007, 10:22 PM
lose the oil pressure sender 'pole'.....
Posted by: martinef1963 Apr 2 2007, 08:35 AM
Aaron - we put the car back together - I bought a smaller adapter, but did not get a chance to put it on.
I will be posting pictures sometime today - it was a long day yesterday.
regards,
Nando
lose the oil pressure sender 'pole'.....
Posted by: martinef1963 Apr 2 2007, 09:17 AM
I'd like to start off by stating, "if Jay would have had a good helper the Money Pit would have been running!" Jay really did the bulk of the work and I did try to stay lock step w/ him, but my inexperienced showed immensely. So thanks to Jay for taking his day off and helping me w/ this immense project.
Well here goes, Jay arrived at 730AM and I hadd three motorcycles to get out of the garage & two cars to rearrange before we could get started. In addition, one of the bikes was sitting on top of the motorcycle jack that we wanted to use to facilitate the engine install.
Jay started working on the clutch & pressure plate to get the engine & tranny joined while I went to the local ACE to get some replacement bolts & nuts that grew legs.....
Attached image(s)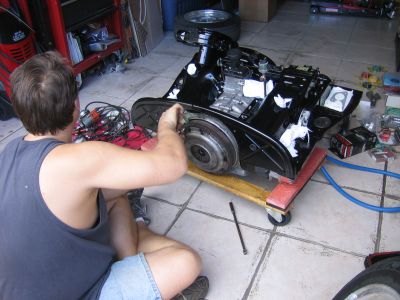
Posted by: martinef1963 Apr 2 2007, 09:28 AM
After joining the engine & tranny Jay began to look over the carbs, parts, etc.. As usual there were mising bolts that, again, took away from PROGRESS. So off I went off to the my local ACE store. After returning, it was time to get the Money Pit into the shell.
I'd like to say that using the motorcyle stand made the install very easy, HOWEVER, the week before I had R & R the engine rubber and in the process installed them in backwards.
For those that have never R & R this rubber. If you look at your engine bay rubber it has a bend at the bottom that hooks up with the engine tin for air flow efficiency.
So, with the engine out, but still located under the bay I R & R the rubber, while Jay started to build the carbs.
After the rubber R & R, we installed the engine.
Attached image(s)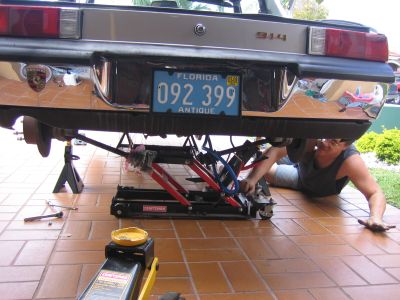

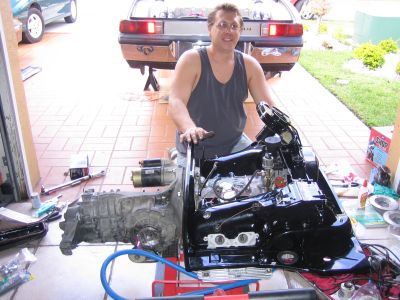
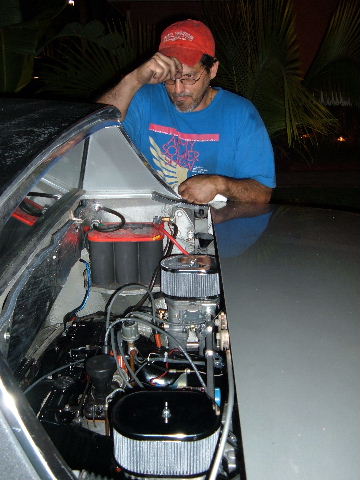
Posted by: martinef1963 Apr 2 2007, 09:41 AM
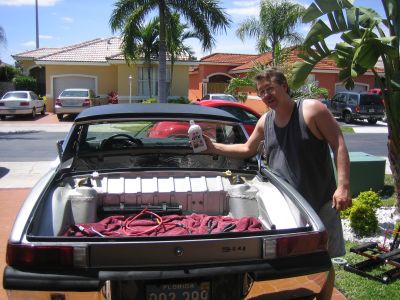 Adding the oil to the VIRGIN Money Pit
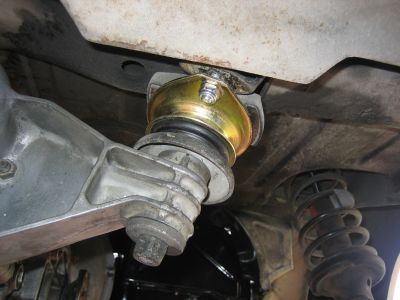 Before the engine/tranny was installed I R&R the tranny mounts with a new pair of 911 mounts.
Did I mention that the engine cross bar bolts were misplaced?????  you know - I did my thing AGAIN
We managed to get everything in place and the nuts were tightened down. The engine/tranny settled in and Jay worked on the top side while I worked on the bottom.
Jay tackled the carbs & wiring while I took care of the oil relief valves, oil strainer, taco plate.
Two other problems we encountered after the actual engine install. I purchased a fuel pump that came with no nipple, and were would we mount the oil filter mount.
This time Jay ran to the local FLAPS - did I mention twice? The THIRD time I flew w/ him to a Pep Boys that was out of the way and finally had to buy another fuel pump that came w/ nipples/accessories, etc.....
Jay got to working on the top side again, and I returned to the exhaust system - not too much fun here. Though the mufler was a PITA to get lined up (MANTA).
Posted by: martinef1963 Apr 2 2007, 09:51 AM
My mind is still fuzzy on the details and sequence of events, but you guys & gals should get the jist of this progress.
I know that there is no specific checklist that can be used for a project like this because people do different things, have a stash of extra stuff, etc.. - but hey maybe some does.
We ran out of day light, it turned out to be a 12 hour day. It was one of the most frustrating days that I can recall.
Regardless, there was major progress. If there is some advise that this rookie can give other rookies out there is - HAVE YOUR I's DOTTED and your T's CROSSED before undertaking such a project.
Ultimately, it's not the big things that kill you, it's the SMALL stuff!!! I'm sure Jay will add some pixs/verbiage here to fill in the holes.
Attached image(s)
Posted by: rhodyguy Apr 2 2007, 10:34 AM
next time try the CV bolt Schnorr (sp) washers and common nuts for the intake studs instead of the nyloc nuts. great progress!! which pump did you use? self regulated?
k
Posted by: Joe Ricard Apr 2 2007, 01:08 PM
You are going to have problems synching your carbs up with the VERY high angle of the lever arm.
Good luck.
Posted by: Kargeek Apr 2 2007, 03:18 PM
Joe's correct. The arms of the carb linkage should be level. My offset cable bracket mounted on the right carb works just fine- it you don't have any slop in the linkage.
DH
Attached thumbnail(s)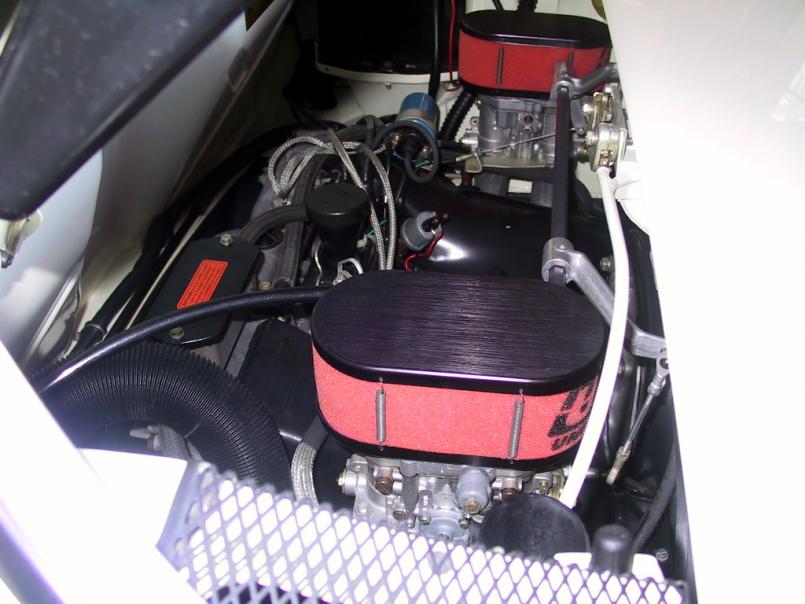
Posted by: rhodyguy Apr 19 2007, 09:42 AM
what's the update on this one? progress?
k
Posted by: jimkelly Apr 19 2007, 10:26 AM
i may have missed it ...
i know aa performance products 96 mm big bore kit
but
what distributor ??
what cam ??
what carbs and set up ??
thanks
jim
Posted by: jimkelly Apr 26 2007, 02:25 PM
is it better to tap case ot to use something like this and why.
http://www.kerryhunterenterprise.com/new_page_5.htm
jim
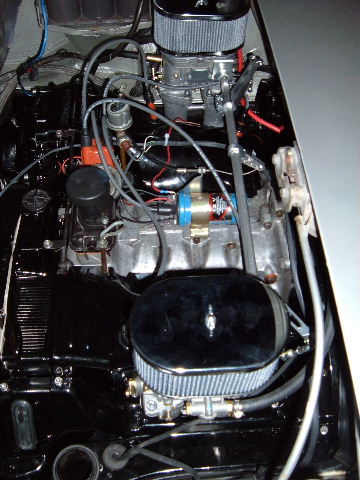
Posted by: jwalters Aug 2 2007, 07:45 PM
Da nando -
Attached image(s)
Posted by: Racer Chris Aug 3 2007, 07:00 AM
That looks very nice!
My compliments on your workmanship.
Posted by: rhodyguy Aug 3 2007, 07:58 AM
is that a dist for Ljet? does it work well with the vac canister unhooked? clean engine bay!
k
Posted by: justme May 28 2008, 11:52 AM
OK, here is a highly coveted secret I will now pass on to all. Do not use any type of hardening silicone on pushrod tubes!!! When an engine like the T4 goes from full cold to full hot in can grow upwards of 10mm!!!!
The secret: Toyota transaxle packing compund - AKA 'red stuff' --- it is non hardening and will move with the tubes as the flex --highly viscous, it pulls and fills in voids --
Do not use for case halves tho!!!!!
Do you have a part # on "the red" stuff?
Thanks
Powered by Invision Power Board (http://www.invisionboard.com)
© Invision Power Services (http://www.invisionpower.com)