Printable Version of Topic
Click here to view this topic in its original format
914World.com _ 914World Garage _ Project Turbo 914 begins...
Posted by: ottox914 Dec 24 2006, 01:44 PM
Just a little teaser on this winters project. Last winter I dug into this little update:
http://www.914world.com/bbs2/index.php?showtopic=53733&hl=
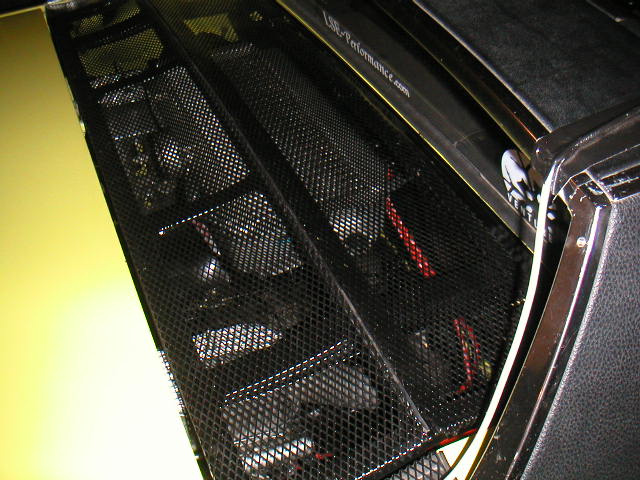
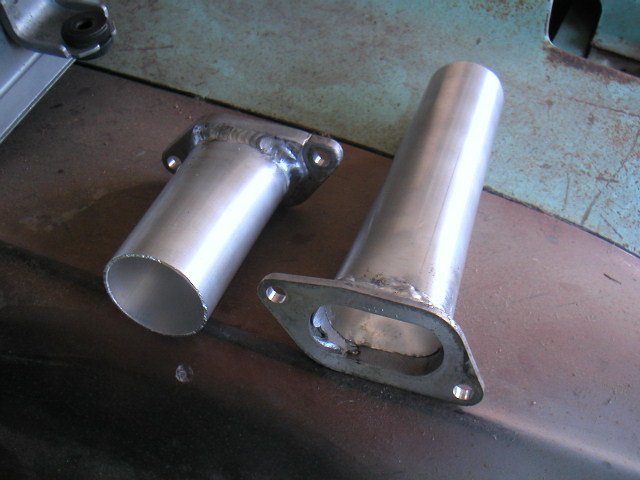
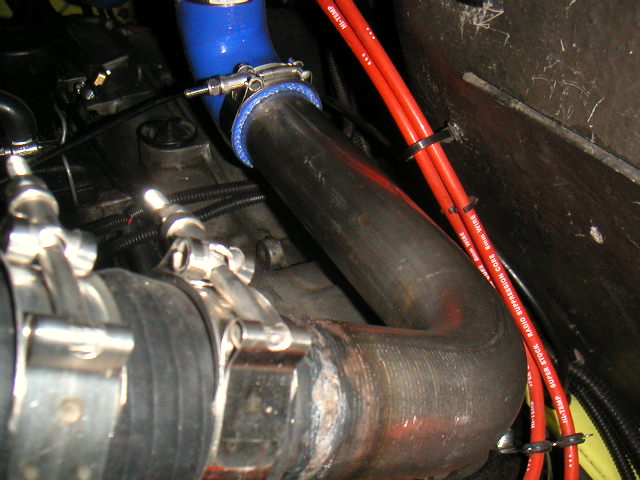
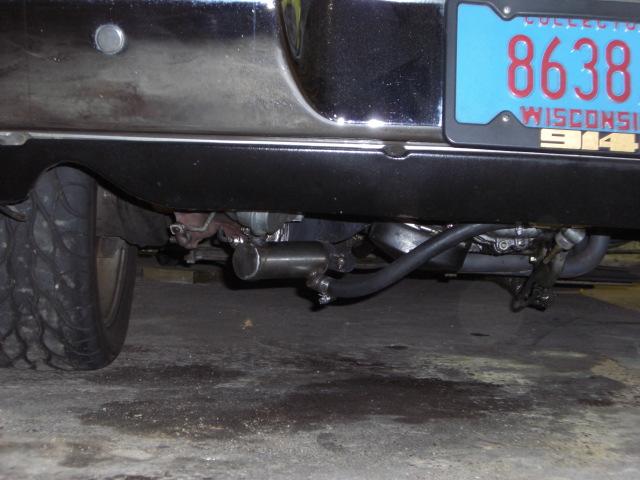
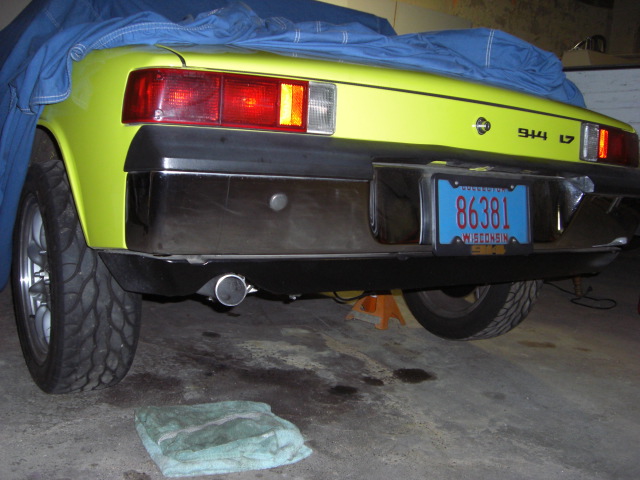
This winter will be phase 2. This photo will show some of the goodies under the tree, which will soon be under/on the car. The WRX intercooler has one round inlet on the back, and 2 smaller oval outlets under the opposite end tank. These will each exit and attach to some CB performance turbo "hats" for the ITB's that have 2" tubes welded to them. Some silicone elbows, and we're good. The intercooler will mount on braces running across the engine bay to support the intercooler as close to the GT lid as possible. I'll see how it goes, and probably do some yarn tuft testing to see about airflow in and around that lid, but I could always use the SDS computer to switch on either a puller or pusher fan below the intercooler based on boost, if needed. The turbo will mount on a custom flange/adaptor to be built to connect the turbo to the collector of the Kerry Hunter exhaust system. The turbo is a small Garrett VNT. The compressor map looks like a good match for this motor. I'm expecting the VNT turbo to give good low rpm thorttle response. Starting out at 5-6 psi, I'd be happy to see 10 when I'm done, but will tune to run safely on 93 pump gas and see where we end up. Off the back of the transmission, where the factory exhaust hanger mounted, I'll mount a similar hanger to support the turbo and exhaust system. A Tildon differential pump will return the oil to a willing valve cover. Oil will be taken from a "T" at the pressure sending unit on the case. There is a blow off valve to be added to the intercooler, and a mocal thermostat/sandwitch plate adaptor for the oil cooler, which has a thermostat controlled fan. I'll be adding an ignition switched relay for power to the fan and scavenge pump, so both will have power when the key is on. The pump will run continously, the fan when the thermo switch tells it to. Add some pressure side stainless or aluminum tubing from the turbo, thru the back engine tin, into the round inlet on the intercooler and we're done. Except for another trip to the LSE dyno, for some additional tuning. I'll keep posting as progress would warrent.
Attached image(s)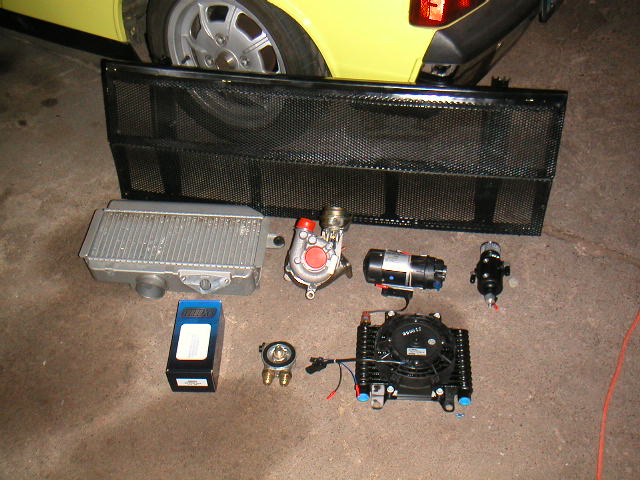
Posted by: ChrisNPDrider Dec 25 2006, 04:23 PM
Sweet! I like the the header collector mount/interface and that you don't plan to cut anywhere other than the tin. Maybe even use the J tube hole in the tin? Not really the best location though...Good luck!
Posted by: ottox914 Jan 8 2007, 02:19 PM
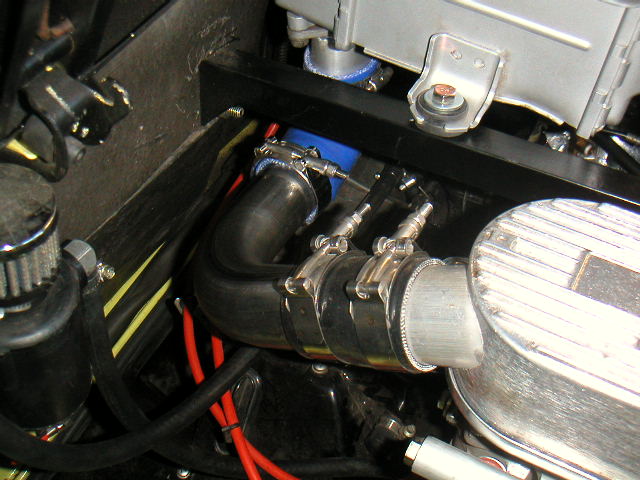
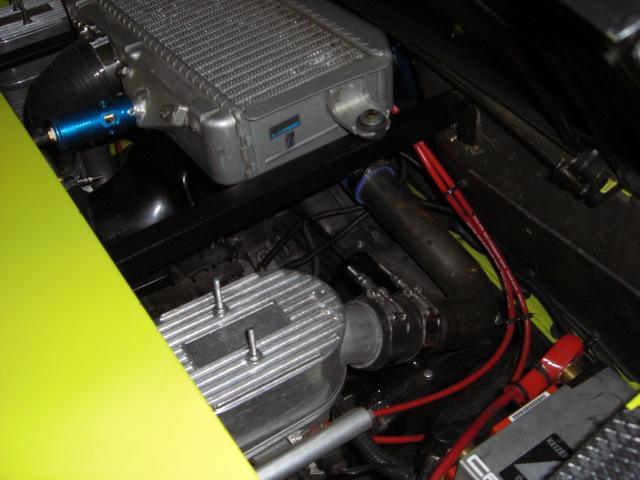
Now that the holidays have come and gone, and my real job is a bit slower, more time is availible to hang out in the shop. Here are a few mock up photos of the ITB hats, intercooler location, and boost gauge. The angle of the charge lines coming off the hats looks a bit extreme, but some of that is the perspective of the photo. The WRX intercooler has 2 outlets on the underside of the end tank, one will go left, one to the right, and these will drop down an inch or so from the IC, so they will end up lining up fairly well with the ITB hats. Next monday I have a couple friends coming over, and I'm taking the day off to make some time on this project. Look for more photos and progress reports then-
Photos were too big- will re-shoot and add them later tonight.
Posted by: Mark Henry Jan 8 2007, 03:20 PM
Very cool David. We're thinking along the same lines...
I'm thinking about a DTM set-up for more clearance, with the SDS and 94mm Nickies with cima b pistons.
We should compare notes and maps as we go.
Post some pics of the intercooler outlets please.
Take a look at iamchappy's turbo /6 for some ideas on how to plumb the rear end turbo oil return...I think he had to make a small catch tank.
What's the Garrett VNT off of? how much?
Posted by: GS Guy Jan 8 2007, 04:23 PM
Cool project David!
You do know the two openings on the one side of the intercooler are inlets right? The large 2-3/4" round opening the outlet? I don't know if it makes any difference to run it backwards?? Maybe have to reposition the blow off valve to the inlet side? Normally, the WRX runs a couple of cast elbost that bolt up to the 2 openings, which connect to a Y pipe and then to the turbo outlet.
I like the project though! DO IT!
Jeff
Posted by: Mueller Jan 8 2007, 04:24 PM

Now that the holidays have come and gone, and my real job is a bit slower, more time is availible to hang out in the shop. Here are a few mock up photos of the ITB hats, intercooler location, and boost gauge. The angle of the charge lines coming off the hats looks a bit extreme, but some of that is the perspective of the photo. The WRX intercooler has 2 outlets on the underside of the end tank, one will go left, one to the right, and these will drop down an inch or so from the IC, so they will end up lining up fairly well with the ITB hats. Next monday I have a couple friends coming over, and I'm taking the day off to make some time on this project. Look for more photos and progress reports then-
Photos were too big- will re-shoot and add them later tonight.
no need to re-shoot, "google" Irfanview, it is a free and simple photoeditor..
Posted by: ottox914 Jan 8 2007, 06:45 PM
Here come some pics- being only slightly more computer literate that a rock, I didn't realize I had a re-size function availible with what was already on the laptop. Oh well, live and learn. Maybe this is a good advertisement for SDS. So easy I can do it!
So far as progress, spent the afternoon finishing up on cleaning and lubing up the door locks and internal door mechanisms. Had one of the plastic odd shaped thingies give way on the driver door, so it seemed a good time to go thru both doors. Got the ITB "hats" placed, and have the intercooler perched on some boxes to find a good location. Tomorrow is a big road day for me, but wednesday should be a soft day at the real job, my wife is out of town that PM, so I should be able to work on the car, eat pizza, and toss back a few beers, all with great success, so expect more pics late wed.
I've included some photos of the L and R sides with the ITB hats and intercooler. The perspective of the photo makes the 2" inlet to the hats look like its angled way down and away. In reality, when you figure the drop off the intercooler for the new charge pipes, things should line up pretty well for a dual hump 90 degree elbow, 2 of which are on order.
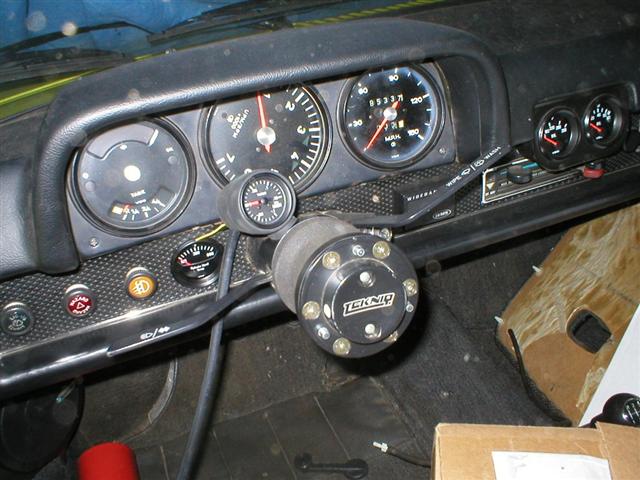
The boost gauge is from... a subaru. Why I haven't just done the whole subie swap is beyond me- the reason for this gauge is its small size, and its case is rubber, so I can trim the back of the gauge off 1/4 inch or so, and it'll fit the short space avalible between the dash and top of the steering collum, with out overhanging and getting in the way of the steering wheel.
Attached image(s)

Posted by: ottox914 Jan 8 2007, 06:47 PM
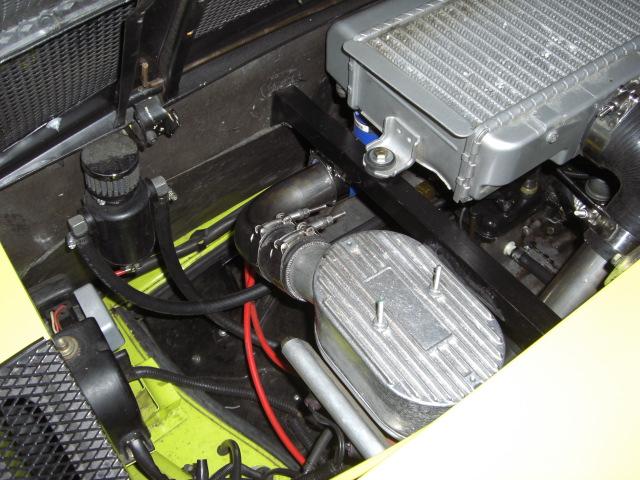
Here's a couple of the GT lid with the goodies underneath it. I'll post more answers to ?'s after dinner- Mrs Me has called up, its ready, so, gotta go-
Attached image(s)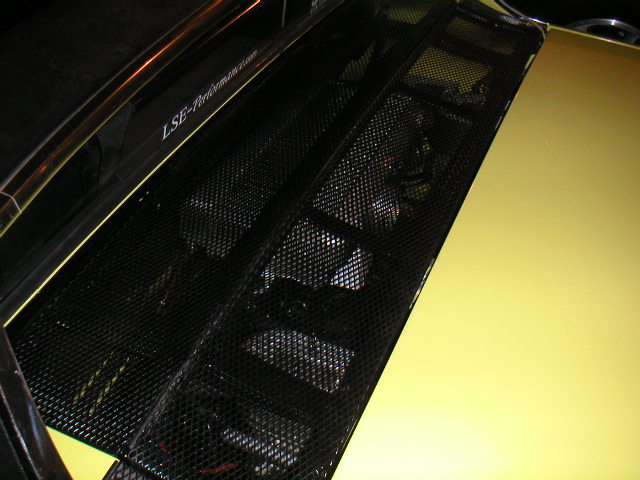
Posted by: Crazyhippy Jan 8 2007, 07:36 PM
Sweet! I like the the header collector mount/interface and that you don't plan to cut anywhere other than the tin. Maybe even use the J tube hole in the tin? Not really the best location though...Good luck!
Now that is a Neat thought.... Spin the intercooler 180* from where you have it now, and move it back 4" or so. Make the outlets from the intercooler go due left and right and into the sides of the ITBs.
I'm interested in the results you get.
BJH
Posted by: ottox914 Jan 8 2007, 10:54 PM
Mark Henry- Why DTM, besides your selling Jakes parts in Canada? Won't that be a higher profile, in terms of the overall engine? It would give you some more room up in front of the engine if you were thinking of some header/turbo mount up there. I had some thoughts in that direction, a flat fan over the engine, either electric or crank driven, intercooler mounted on top of that, ITB's, and a turbo mounted in front of the motor, just never got around to getting serious about that wild plan.
We can probably share some SDS notes, but depending on your cam, and turbo, this may or may not be helpful at all.
I'll shoot and post some intercooler shots tomorrow night.
I've talked to Chappy a bit, and done some research of my own. The catch can is more to have a spot for the remaining oil in the lines to the turbo to go, once you shut down, as the turbo spins down, there will be some residual pressure in those lines, and when the scavenge pump shuts off, there is no where for that oil to go, as the turbo spins down, so it can seep past the seals and give you a "puff" at start up, and possibly shorten the seal life. Longer lines between the turbo outlet and scavenge pump will allow more volume for this oil to fill, so long as it doesn't have to go up hill. I plan to add a small sump to my system anyway.
I had an Aerocharger brand (no longer in business) VNT turbo on a ford focus, and was spoiled with the response. I researched availible VNT's and found the VW TDI's to use one of 2 different models, the VNT-15 and VNT-17. The compressor map of the -15 was better suited to what I wanted to do, so I found a NIB turbo on evil bay a couple yrs ago, snatched it up, and kept it on the shelf till I was ready to do this. Don't recall the $$$ exactally, as its been several yrs. 3-400 seems to ring a bell though.
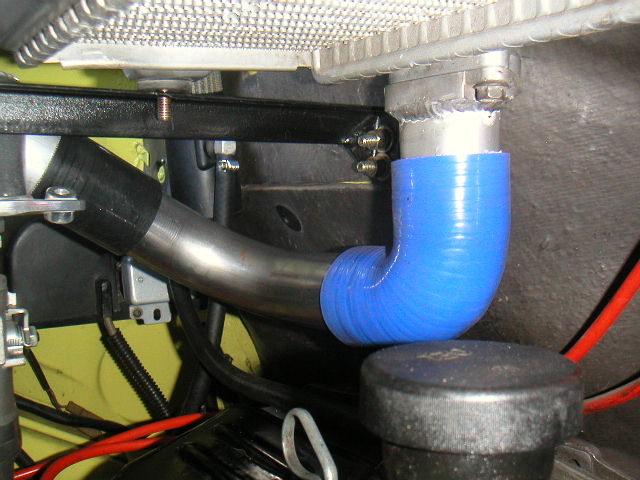
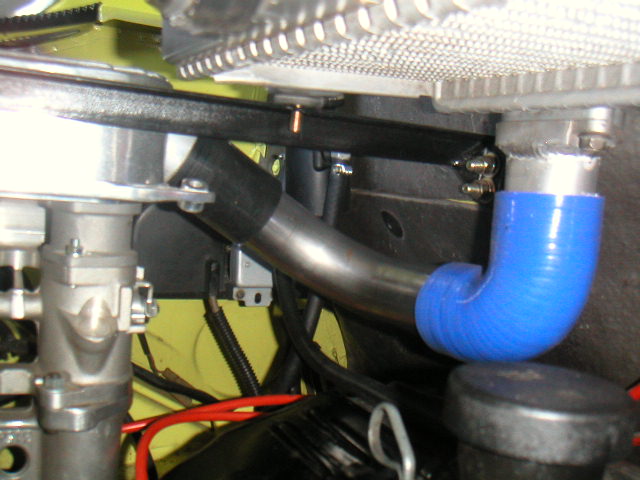
GS guy- yes, I an using the IC "backwards", but airflow is airflow. If you snoop around the turbo topic, and specifically air to water intercoolers, you'll find guys taking ford Tbird IC's, jacketing them, and turning them into air to water systems. With all this going on, reversing the air flow doesn't scare me off of the utility and packaging of this IC with 3 holes in it. As I'm going to try to mount the IC as close to the GT lid as possible, I'll be making a block off plate for the subi blow off valve mount, and adding it in line between the turbo and IC. It could still mount on the IC if I wanted it to, or I could buy 2 BOV's and mount one in each ITB hat. That might be cool, but why buy 2 when 1 will do? This is not a bling-mobile honda we're talking about here...
Mr CrazyHippy- Using the hole in the engine tin for the "J" tube passed thru my mind also, but with the ITB's more to the rear of the engine bay, the packaging of the parts I had, things just worked out better this way. The charge air from the turbo will come up under the trunk, and thru the back verticle engine tin, where a 90 degree elbow will bring it up towards the IC at about a 45 degree angle, and another 90 degree elbow will take it into the back of the IC. I'm not the most visual person in the world, so if that was not explained well enough, the photos will make more sense once I get that far.
This is sort of the inspiration for this little adventure: www.ststurbo.com. I will be adding a pressure switch after the scavenge pump, and running that to the parking brake light on the dash. I put the BMW 320 front calipers on my car, and moved my fronts to the back, and as such, have no parking brake anyway, might as well use that big light for something.
Posted by: Crazyhippy Jan 8 2007, 11:00 PM
That is a perfectly fine description. Looks like fun...
BJH
Posted by: Mark Henry Jan 10 2007, 08:23 AM
Mark Henry- Why DTM, besides your selling Jakes parts in Canada? Won't that be a higher profile, in terms of the overall engine? It would give you some more room up in front of the engine if you were thinking of some header/turbo mount up there. I had some thoughts in that direction, a flat fan over the engine, either electric or crank driven, intercooler mounted on top of that, ITB's, and a turbo mounted in front of the motor, just never got around to getting serious about that wild plan.
We can probably share some SDS notes, but depending on your cam, and turbo, this may or may not be helpful at all.
I have the DTM mocked up in the car now, the amount of room in front of the engine is huge!
I should be able to mount the turbo in front high enough to drain into the sump, while building the tin so that it is still technically under the car...I may even have enough room to do the same with the intercooler. I'd have to feed it via a scoop under the car.
Our fuel maps will be different but other points in the map may be the same.
Posted by: ottox914 Jan 10 2007, 10:53 PM
Not alot of turbo specific progress today, but some photos. Work kept getting in the way, and the shop was freezing cold- I could see my breath inside! Oh well, the owner is letting my car spend the winter there for free, and if he has no work for a day in the shop and cuts the heat, who am I to complain?
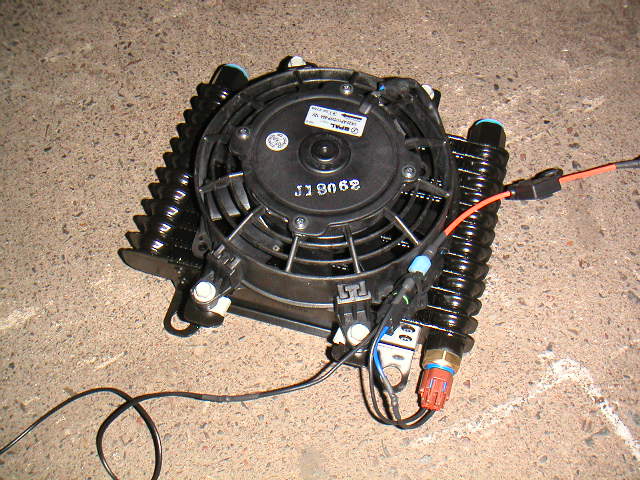
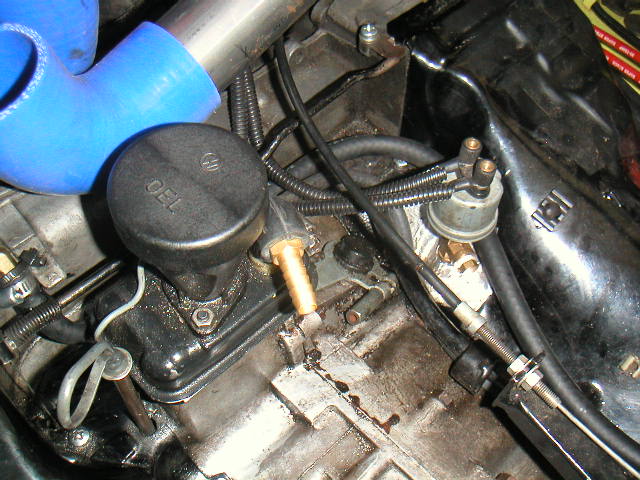
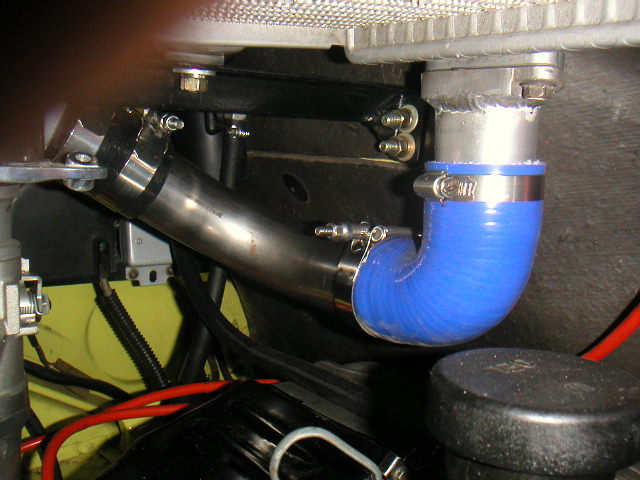
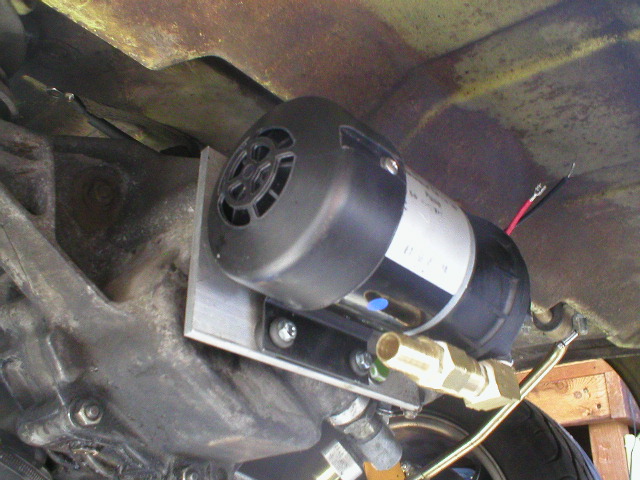
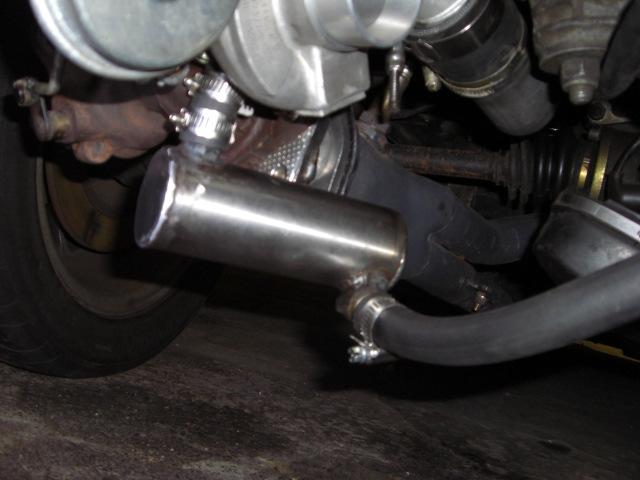
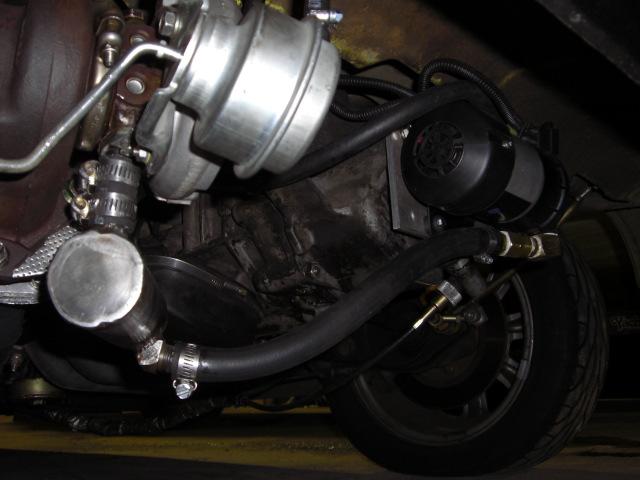
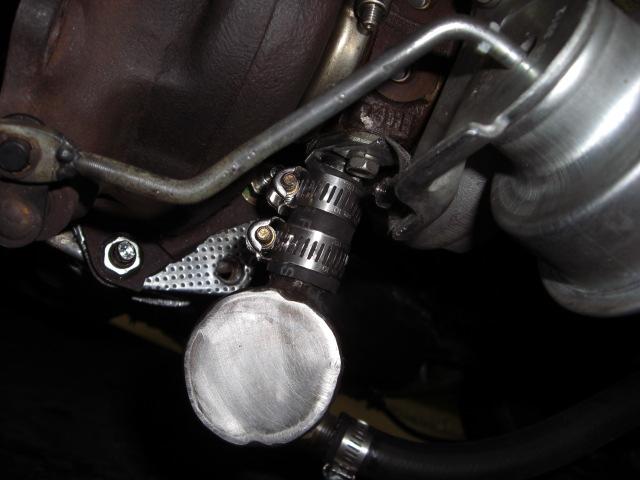
Today I picked up some aluminum stock to mount the intercooler, and got the thermostat/sandwich plate adaptor installed, so I can mount and run lines to the oil cooler.
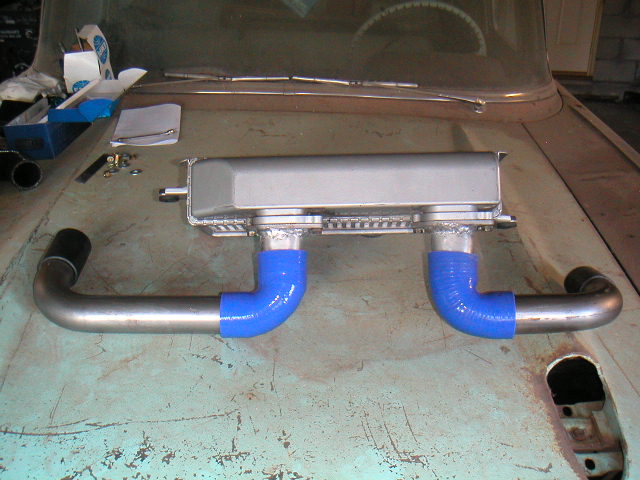
Below is a photo of the underside of the WRX intercooler, showing the 2 outlets.
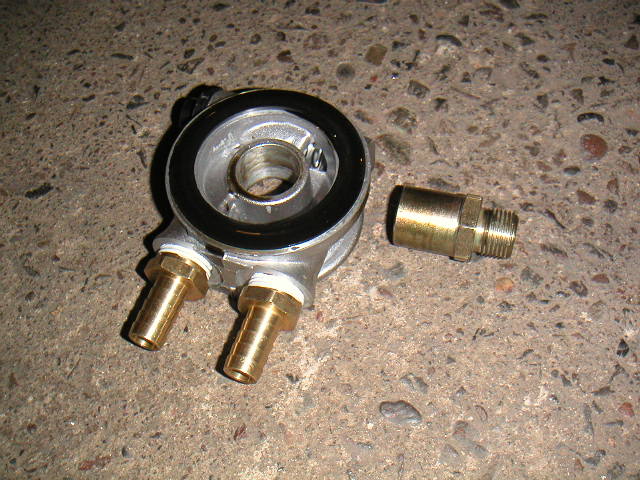
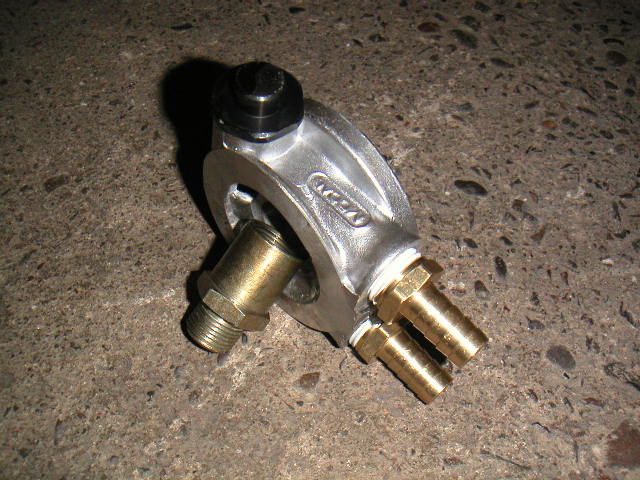
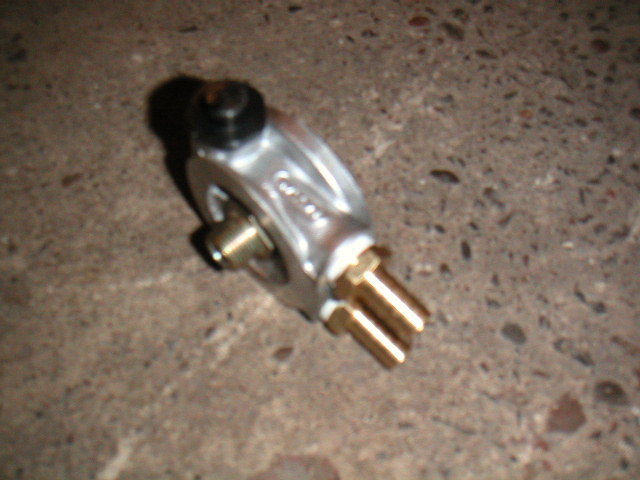
Next are a couple of photos of the thermostat/sandwich plate adaptor. Yes, doing one of Jakes full flow systems would be better, and yes, doing AN fittings and hose would be cooler, but this is only phase 2, remember? The $$$ I save by not dropping the engine and doing Jakes full flow, or not doing the braided/AN stuff will go along ways towards some of the special fabrication I can't do myself.
Attached image(s)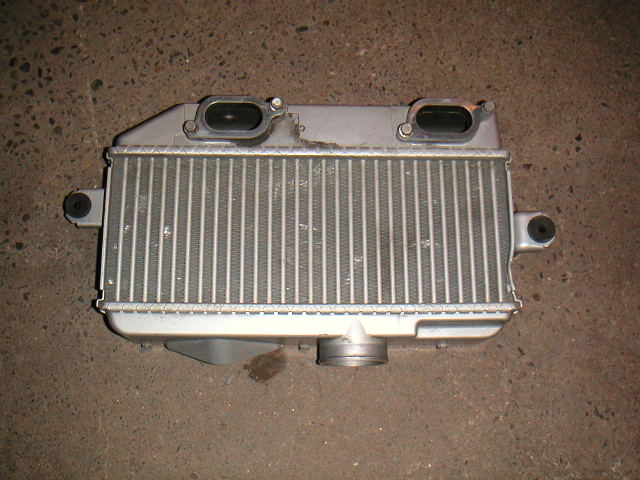
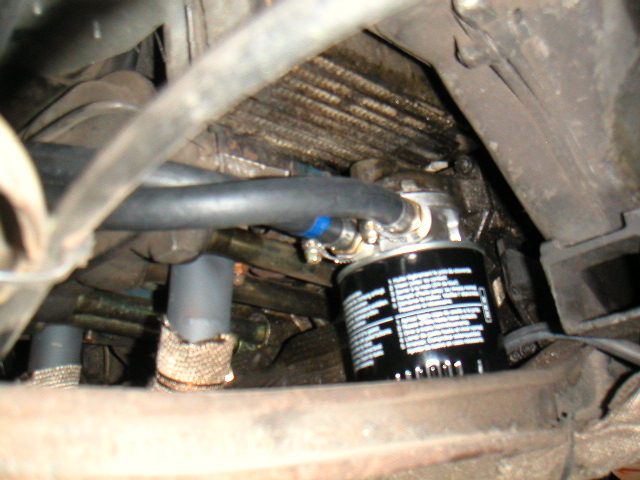
Posted by: ottox914 Jan 10 2007, 10:58 PM
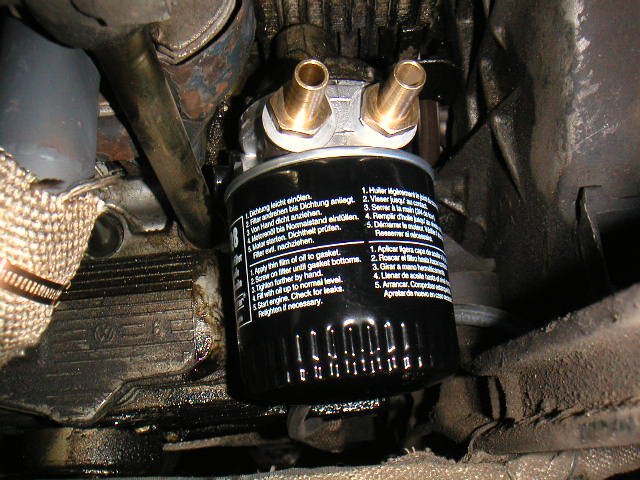
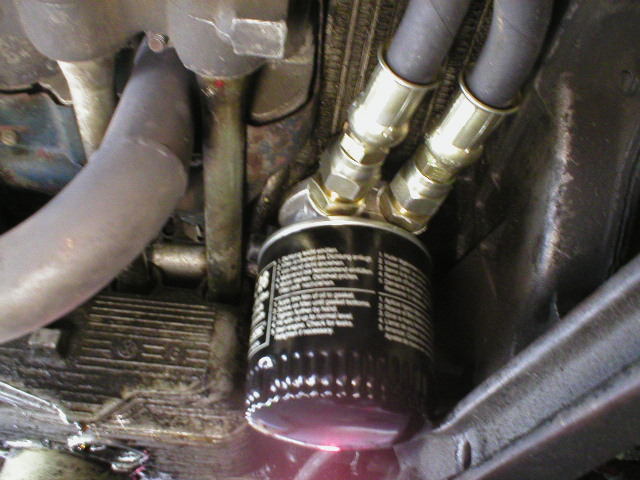
After removing the old filter and draining the oil, I pre-lubed the new filter, oiled the rubber gasket in the adaptor, slid it over the center piece, and using a 1" socket, tightened the center piece to the existing oil filter location on the block. After adding a new Mahle filter, you'll see it doesn't even extend below the engine mounting bar. The thermostat adaptor came from: BAT in Florida. Here's the rest of the photos-
And- anyone using this thermostat/adaptor know which is the line out, and line in for the oil flow? There were no directions in the box. Does it matter? The instructions for the cooler I'll be using note a specific in and out for that part, I just wanted to be sure to match everything up correctly. On to the photos-
Attached image(s)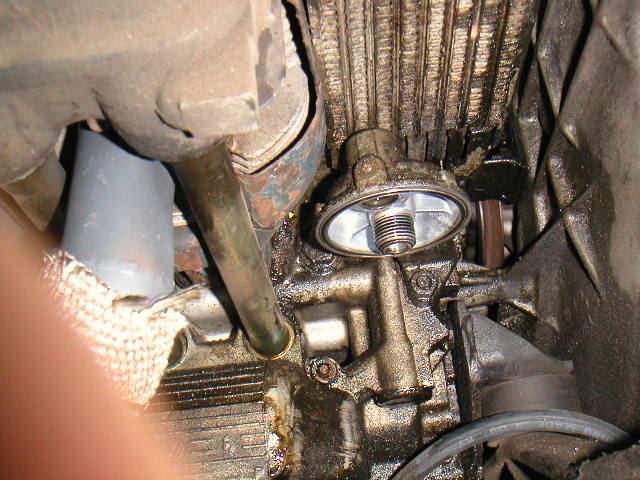
Posted by: ottox914 Jan 13 2007, 08:36 PM
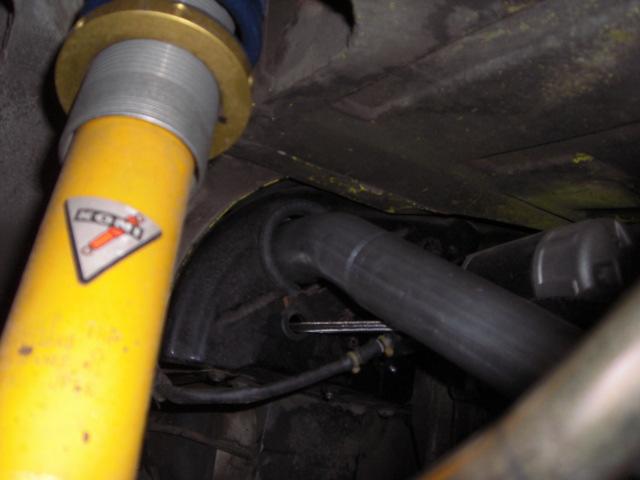
1-16-07 updates- got the oil cooler installed- sort of. I'll be taking it out to add the fittings and connect the hoses, but here's how it went:
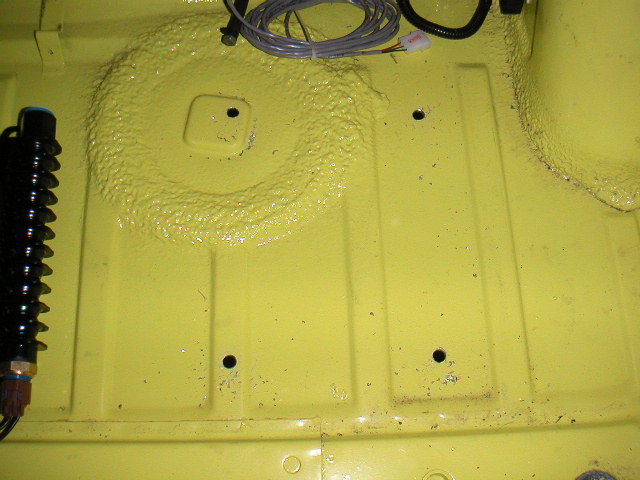
first photo is a hard to cut up trunk, but then again, I put holes in it for the rear sway bar, so whats the deal with 4 more?
second photo is 4 perfectly sized holes, courtesy of photo three, the unibit!
*I went back and forth from under the car to in the trunk at least a half a dozen times to decide where to drill. I then laid the cooler out in the trunk, marked for holes, drilled 2 sizes of pilot hole, then had at it with the unibit. In retrospect, I should have moved things to the outside of the car 1/2 an inch or so, the "bumps" in the trunk carpet would have been less if I had put all the nuts in the low spots of the trunk. Oh well, whats done is done, and with the rubber insulation mat and carpet in, you don't really notice the bumps that much.
photo 4 is the cooler, wired up. you need to attach a wire from the thermostat to the fan motor, attach the other wire to the thermostat to a (+) with 15 amp fuse, and attach the other wire from the fan motor to ground. The ground will be going back by the transmission, and attaching at the braded ground strap. the (+) will be going to the back of the verticle engine tin, where I will be installing a relay to power the fan and scavenge pump. I'll be moving my "hot start" relay to that location as well, so there will be 2 side by side.
Attached image(s)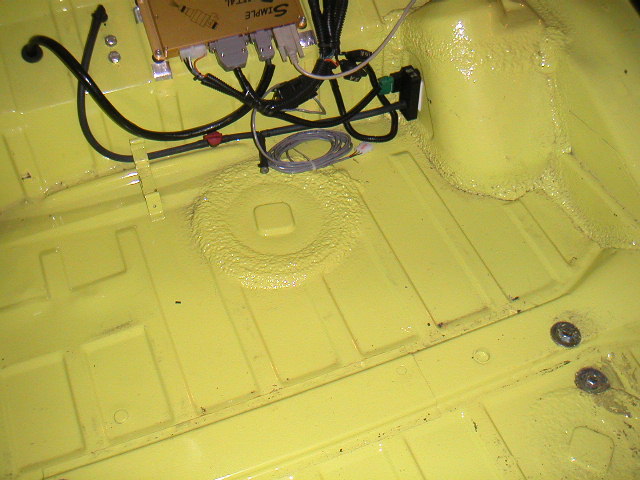
Posted by: ottox914 Jan 13 2007, 08:38 PM
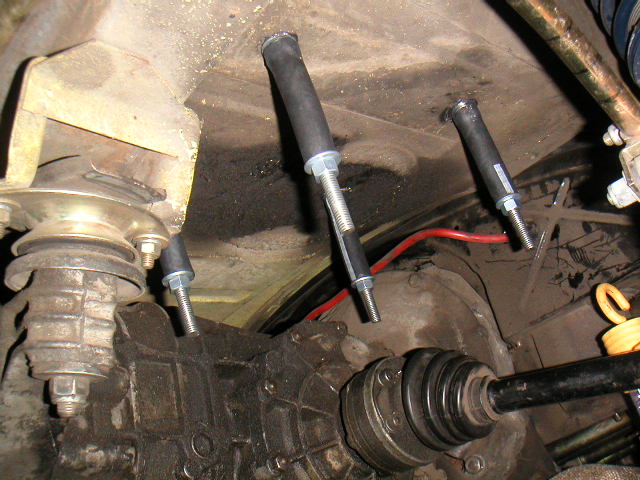
Mounting the cooler. The threaded rod went thru the trunk, with a nut, lock washer, and flat washer inside the trunk. I put a flat, lock, and nut up the rod under the trunk, and tightened it all up. Those new ratcheting wrenches sure made this easy.
In the second photo, I have added some cheep hose over the threaded rod and nut, hiding it all, cleaning up the look a little, and getting ready for photo 3.
In photo 3, I have added a washer and nut, to tighten up the hose. I tightened the nut so that each rod has the same length of threads showing. I then added 1/2 inch of hose over the nut. I then added the cooler, 1/2 inch more hose, and a washer and nut to finsh it off.
Photo 4 shows the cooler mounted. I'm hoping that due to the cooler holes being much bigger than the threaded rod, and that the mounts are sandwiched between 1/2 inch of rubber hose on each side, that this will allow for a sort of shock mounting to allow a little flexability in the mounts, should the need for some flex arrise, thus preventing the cooler itself from flexing and cracking/leaking.
I still have to remove the cooler to attach the power/fuse to the temp sensor, attach the barbed hose fitings, connect the lines, and I have some lock nuts to put on after the last bit of hose and washer, to try to keep everything togather with out having to really crank it down- I couldn't see how I could keep my shock mounting and tighten/compress everything enough to use a lock washer on the bottom, as I did on the top.
Monday I have my friends Lee and Dave-o, the fearless fabricator coming over for the day. Hopefully I'll have photos of the intercooler mounted, boost gauge mounted and hooked up, and maybe some intercooler piping started if we're lucky. We'll see how it goes and report back tuesday.
Attached image(s)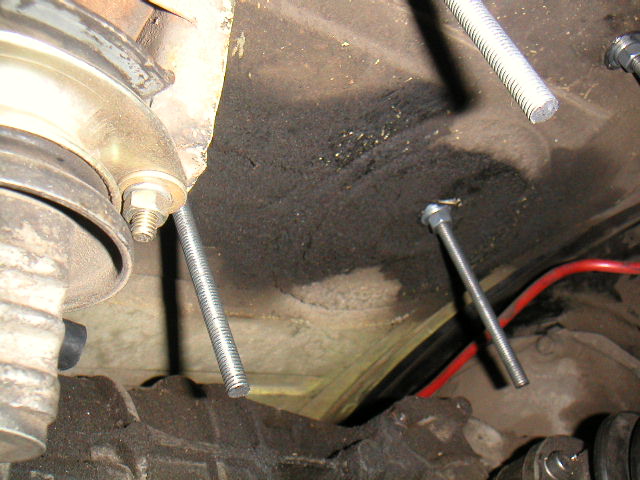
Posted by: Andyrew Jan 13 2007, 09:29 PM
those are really long threads...
Get 1in long one's.. not 5!!!
The rest of it looks good!
Posted by: Crazyhippy Jan 14 2007, 12:52 AM
have to space the cooler away from the floor for airflow....
Nicely done.
BJH
Posted by: ottox914 Jan 14 2007, 07:44 AM
have to space the cooler away from the floor for airflow....
Nicely done.
BJH
I was looking at the picture last night thinking the same thing. When I take it appart to add the hose fittings, I'll cut some 1" hose "spacers" and put them in place of the first 1/2" bit of hose thats on there now. I'll get a thin rubber grommit to lay over the bottom washer, then add the nylock nuts, and I'll buy a little depth that way, and still hopefully keep a little of my shock mounting. That was my plan from the start- being able to adjust the depth of the fan as I go, since I didn't really know how it'd all fit togather. The fan is designed as a "puller", but still it should have more air space than it does.
Posted by: Dave-O Jan 14 2007, 10:20 AM
Looks good Dave! What kind of stock did you get to mount the intercooler, 1"x1" square? We'll be sure to spend some time in the McMaster Carr catalog for prettier studs.
See you tomorrow,
Posted by: Andyrew Jan 14 2007, 11:43 AM
Oh, I thought that you were going to cut the trunk.. I see.
Then I would put it at an angle... (bend the tabs to be flat to the trunk) so when the fan is on the air is pushed towards the back, Just a slight angle would induce a whole lot more airflow over that cooler...
Just a thought. But I get your idea!
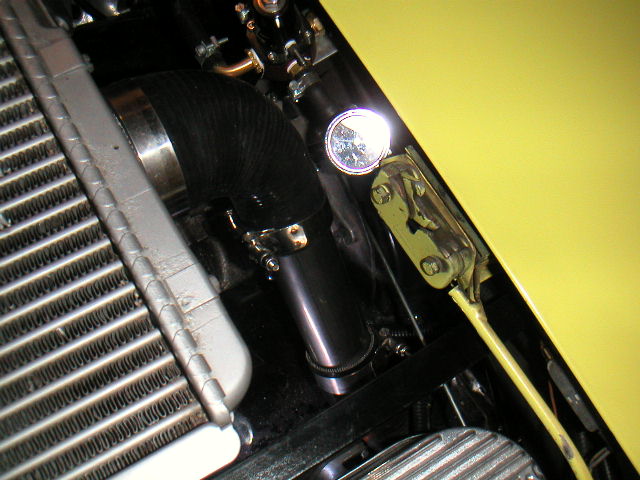
Posted by: ottox914 Jan 15 2007, 09:24 PM
Lee and Dave-o came over for the day. We played some guitar, messed with the yellow car, made some good progress. Did some electrical upgrades, re-did the oil cooler, its much better now, got it connected, test fired, no leaks, tore out the back pad, and got the intercooler mounts made. Forgot to bring a camera. Will try to get back to the shop tuesday afternoon for some snapshots, and will post more then.
The to-do list remains long. I need to get the boost gauge mounted, wired, plumbed. Need to get vacuume lines run to the RR fuel pressure regulator, blow off valve, and turbo. Need to move the cold start solinoid, and add another one to power the scavenge pump and the oil cooler fan. Need to make some intercooler piping. Need to run oil lines to the turbo, mount the scavenge pump, pressure switch, and return line.
Then get it off to LSE for fabrication of the intercooler to the ITB hat lines, and the turbo mount.
Then figure out how to post a movie to this site...
Posted by: Andyrew Jan 16 2007, 12:02 AM
post it on youtube, and link here.
Posted by: ottox914 Jan 26 2007, 09:35 PM
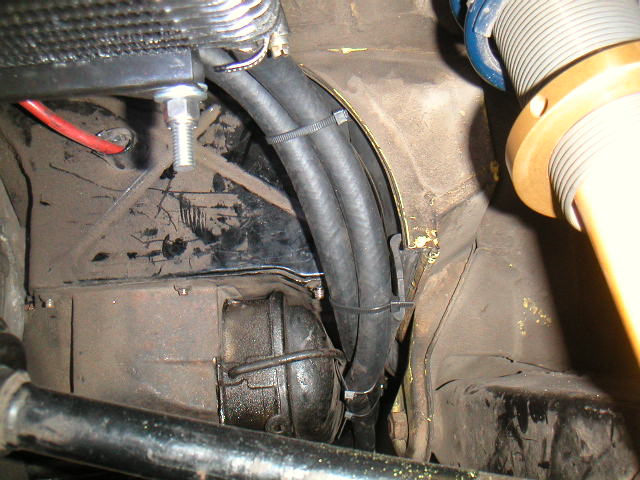
Some progress from today and tonight. re-did the oil cooler, I didn't like how tight it was to the underside of the trunk. Didn't come out quite as well as I had hoped, but its pretty good overall.
Since these photos the threaded rod has been cut off closer to the nuts, and some protection had been added to the hoses where they run across the edge of the engine metal. The black ground wire has been run under the trunk and now grounds with the transmission ground strap. I need to get a relay installed, and connect the power for the fan, and this part of the project is done.
Attached image(s)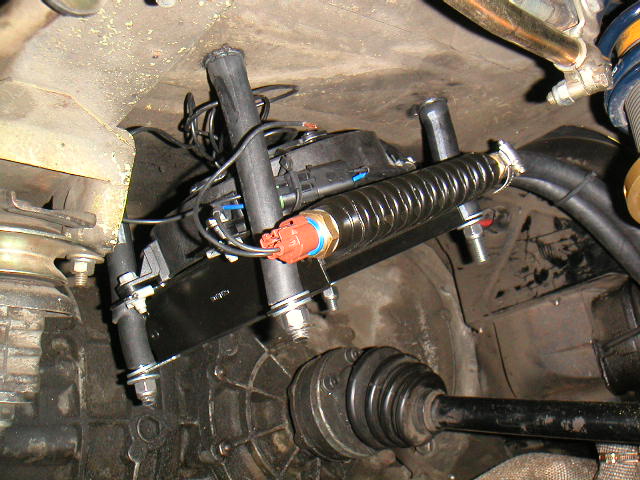
Posted by: ottox914 Jan 26 2007, 09:42 PM
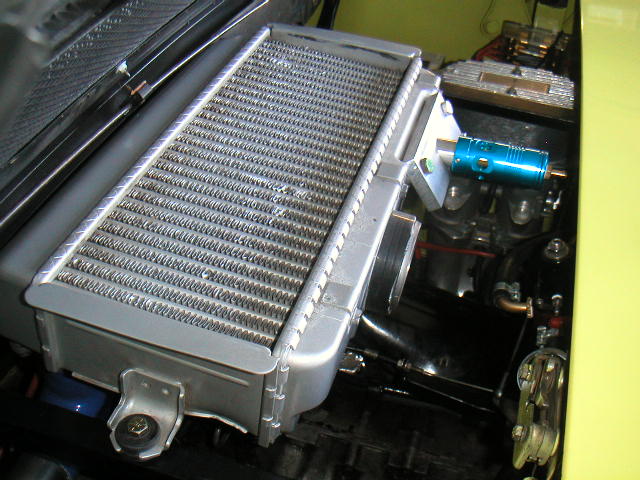
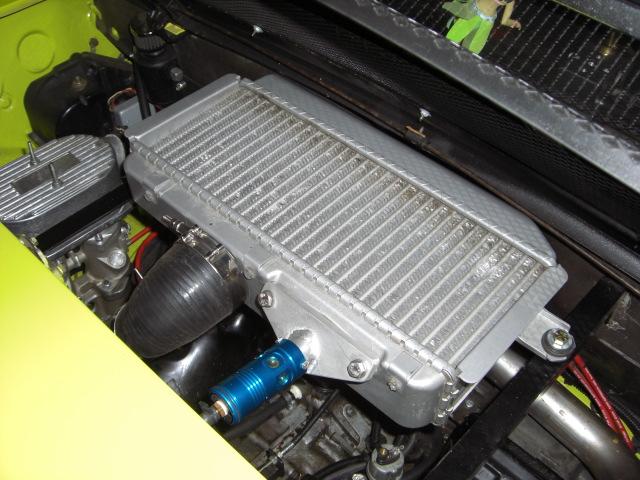
Also got the fancy intercooler mounts, made by our own fearless fabricator, Dave-O, painted with several coats, installed, and intercooler mounted. I expect the IC to come out for other work to be done, but its kinda cool to see it mounted up, ready for piping.
Attached image(s)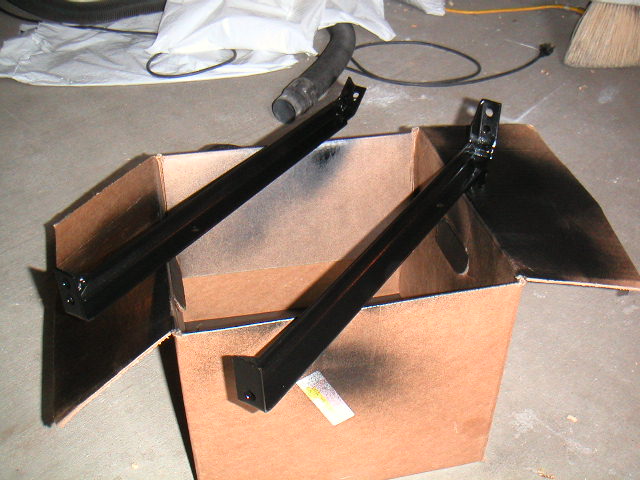

Posted by: Andyrew Jan 26 2007, 11:44 PM
Thats lookin much betta!!!
Everything is looking really good!!
Posted by: Dave-O Jan 27 2007, 11:39 AM
Looks good Dave! I can't wait to see the turbo plumbing done.
Posted by: Brando Jan 27 2007, 03:23 PM
Do like on 930s and force most of the engine cooling air through the intercooler. 
Posted by: ottox914 Apr 1 2007, 07:18 PM
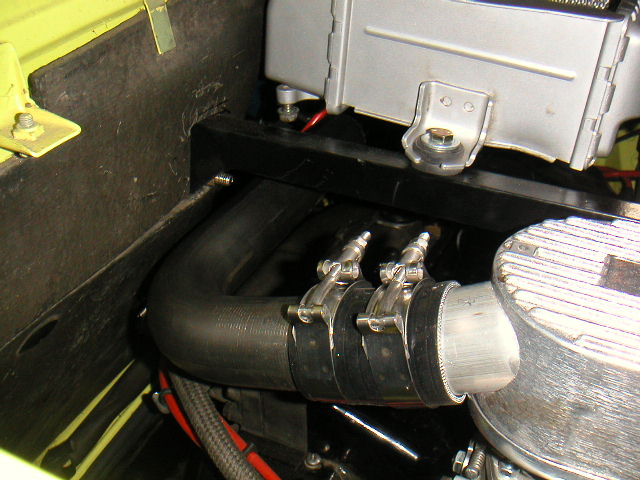
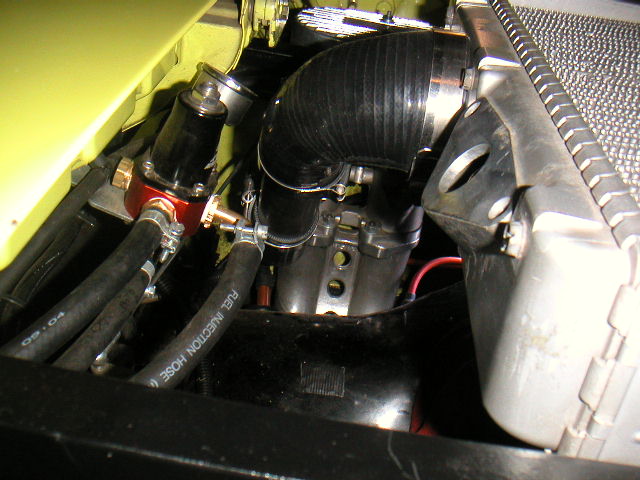
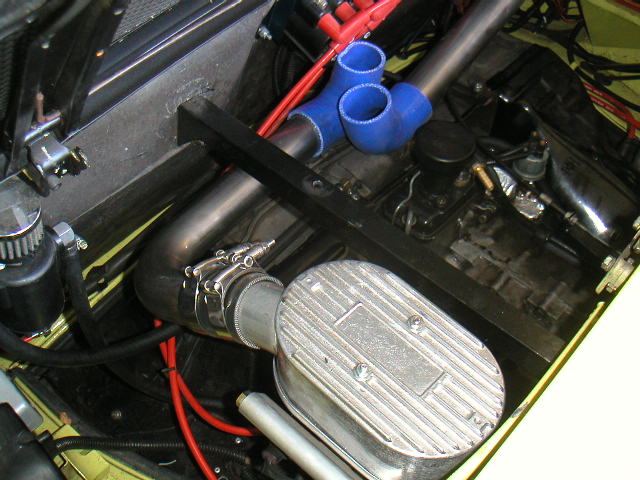
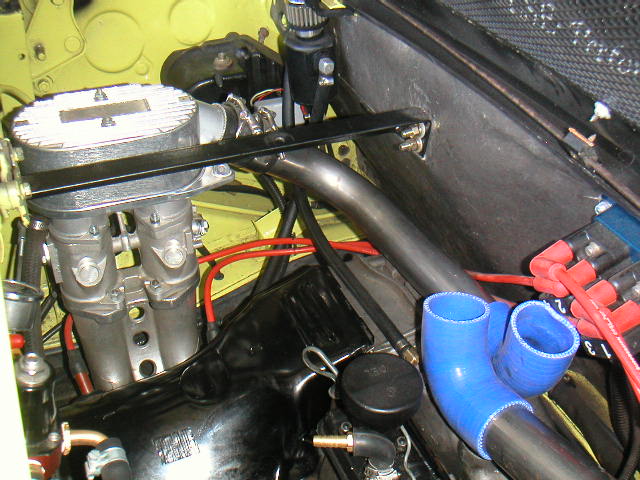
Finally some progress. With work, Christmas, New Years, teaching snowboarding, our end of the season snoboard safari to the mountains, progress has been slow. Got back in the shop for a couple hours this afternoon and got the topside charge piping done. There will need to be an adaptor made to go from the WRX intercooler to the charge lines to the ITB's, so the final position of those pipes may change slightly. I just cut off the 90 degree bends to about the right length for now.
Crunch time, as this friday I load the car up, and saturday it is delivered to LSE Peformance for the final fabrication of the adaptors for the intercooler and turbo to the collector, then some dyno time, and April 21-22 is our club novice school, I plan to have it ready for that to scare some newbies during the lunch time, when we allow the instructors to take their own cars out and give rides to the students.
On with the photos: these are of the left side ITB plumbing. The angle of the "hat" for the ITB, which was purchased from CB performance, was just about right with a straight section of silicone.
Attached image(s)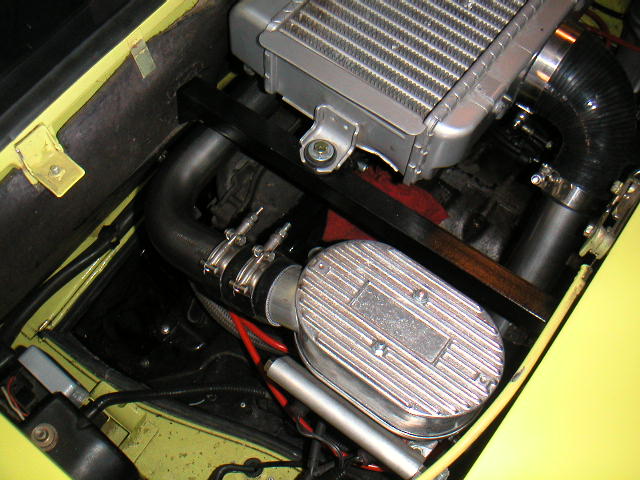
Posted by: ottox914 Apr 1 2007, 07:21 PM
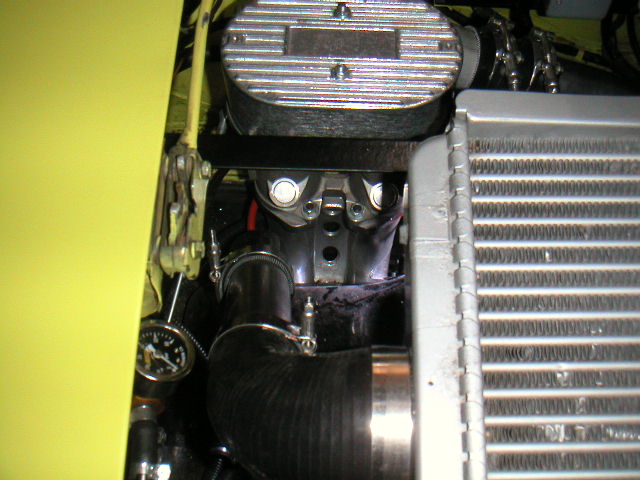
Here are some shots of the back of the intercooler, and the line to take in the boost from the turbo. I found a place for silicone that made a 3" to 2" 90 degree elbow, which was exactally what I needed. I still need to run the line thru the engine back metal to connect to this line off the intercooler.
Attached image(s)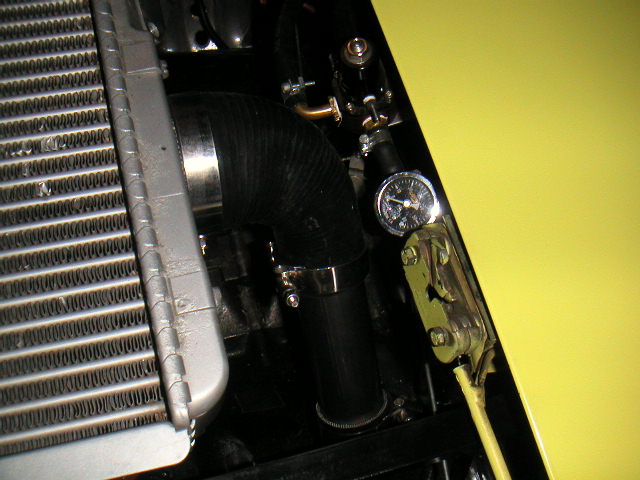
Posted by: ottox914 Apr 1 2007, 07:24 PM
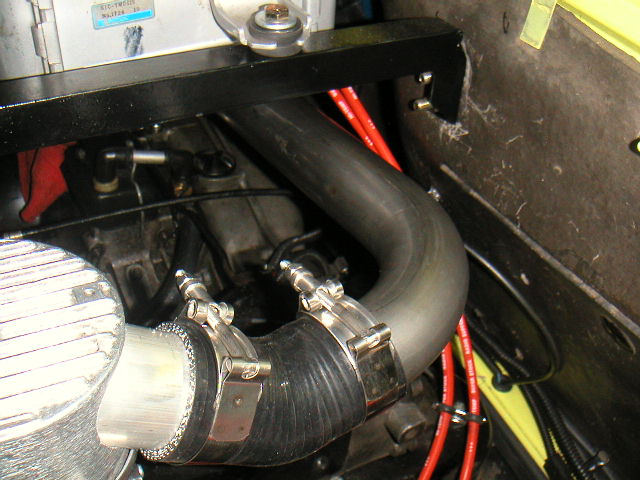
Here are the connections for the right side ITB. I needed to use a 45 degree silicone elbow to make this side line up a little bettter. As noted, once the final adaptors are made for the connection to the intercooler, the allignment may change a little, but this is basically how it will go.
Attached image(s)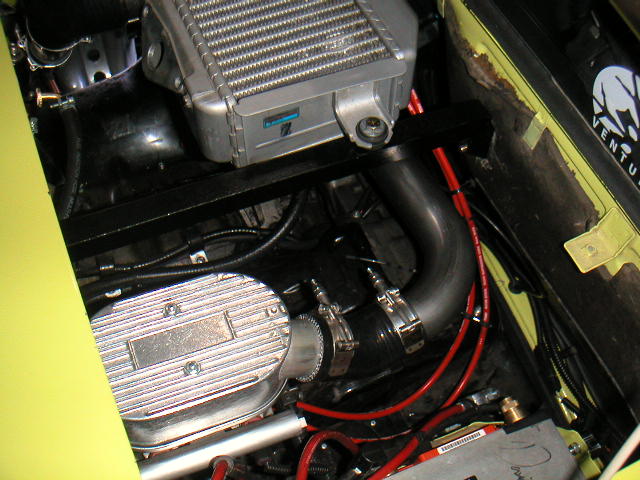
Posted by: ottox914 Apr 1 2007, 07:28 PM
Plenty of work yet to be done. Need to mount and connect the lines to the puke tank for the heads and case breather lines. Need to run vaccume lines to the blow off valve, rising rate fuel pressure regulater, and runs lines to the dash for the boost gauge, and mount that. Need to finish the charge line thru the back engine tin. Need to run oil lines from the pressure sensor area to the turbo, turbo to the scavenge pump, pump back to the block/heads. Need to finish bracket for turbo and scavenge pump, and the wireing to the pump, cold start solinoid, and oil cooler fan. In other words, alot of late nights to have this thing ready to tow 200 miles to LSE. Expect plenty of updates over the coming week.
Posted by: iamchappy Apr 1 2007, 07:41 PM
Looking good, it looks like you've got it well on it's way, turbo brother...
Posted by: Dave-O Apr 1 2007, 07:55 PM
I like that plumbing a lot! I wish I either lived closer or was less busy so I could help you get it ready. We'll have to swap drives sometime...I'm sure I could get you a little time in a certain red BMW 
Posted by: JPB Apr 1 2007, 08:14 PM
Nice work and looks killer clean mister 
Posted by: pankopp Apr 6 2007, 12:22 AM
waiting for an update! .... show us.... please
oh yeah, what brand oil cooler and oil adapter are you using, just wondering...
Thanks!
Posted by: ottox914 Apr 6 2007, 07:29 AM
I've had way to much of my real job to deal with so far this week. Tonight the trailer comes to haul the car to the dyno for final fabrication and tuneing. Last night, got the puke tank installed, interior put back togather and cleaned up, and routed most of the vac lines for the rising rate FPR, blow off valve, and to the turbo for the boost controler. Need a few "T" and 90 degree fittings I couldn't get from the hardware store at 11pm. So, alot of work done, but not alot of photo progress. I'm going to try to get to the car by 1-2 today, switch into mad mechanic mode, call in a little help, and try to get things as done as they need to be by 9-10pm tonight. I'll shoot photos and load them over the weekend.
The thermostat/sandwich plate adaptor is a mocal, purchased from BAT in Florida. It mounts between the oil filter and case. When using the good quality OEM filters, the filter does not extend below the engine mounting bar, so no worries there on a lowered car. The combination oil cooler/thermostatically controlled fan came straight out of the summit racing web site. Its a B&M part # 70298 in the cooling section of the catalog, if you have one. It comes with the cooler, fan, and thermostat to control it all. Just add key switched power and ground, and you're in business. No mounting hardware was included, you have to come up with that on your own.
Posted by: iamchappy Apr 6 2007, 09:08 AM
I've been looking into an temp adjustable fan switch for my intercooler , came across the Davis Craig stuff I could have the fans kick in at 90º or over.
( http://www.hrpworld.com/index.cfm?form_prod_id=835,52,363_3853&action=product
I am also considering a boost activated switch with a delay shut of relay to allow it to run on for a few minutes after it is activated. Right now I have it wired to a manual switch. I have a 4lb pressure switch plumbed in already to activate something..
Posted by: ottox914 Apr 6 2007, 12:24 PM
The SDS on my car will do a single ground switched item, either rpm based, or boost based. If I need an intercooler fan, I'll hook up the extra wire to the SDS, and have it switch on the intercooler fan using the boost based switch. I'll need to figure out some sort of delay also. I'm thinking of a manual ground switch for use when auto crossing. I can leave the fan on all the time.
I may have a gizmo to help you. Its a probe style thermostatically controlled relay. You stick the probe in the fins of the IC, and can set the relay to activate at a certain temp. This does not provide the delay you are looking for, but would provide a temp referenced switch. Let me know if you're interested.
I've been looking into an temp adjustable fan switch for my intercooler , came across the Davis Craig stuff I could have the fans kick in at 90º or over.
( http://www.hrpworld.com/index.cfm?form_prod_id=835,52,363_3853&action=product
I am also considering a boost activated switch with a delay shut of relay to allow it to run on for a few minutes after it is activated. Right now I have it wired to a manual switch. I have a 4lb pressure switch plumbed in already to activate something..
Posted by: iamchappy Apr 6 2007, 01:09 PM
The probe like you mention i found was the Davis Craig one that used a similar probe and was adjustable from 90º up most others I've seen were adjustable from 180º up.
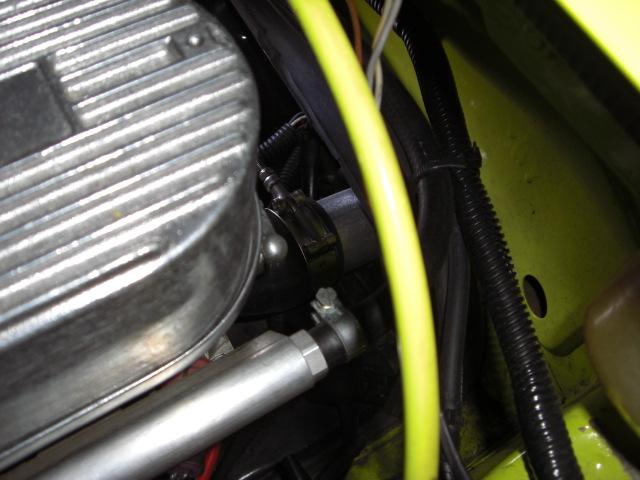
Posted by: ottox914 Apr 10 2007, 07:51 PM
More updates but still not done. Progress is moving at the speed of your average sundial these days- work is a B#@$*& lately. I obviously did not make my dead line to get the car dyno ready by last weekend. My current hope is to have it N/A ready this weekend, because next weekend is the first of 2 weeekends of novice school driver training, and the only thing better than riding with the newbies in their cars getting them to go faster is scaring the piss out of them in your own car...
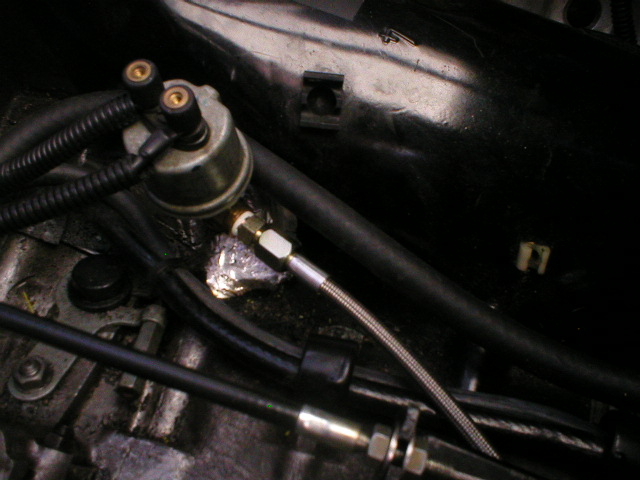
On to the photos. Worked on more intercooler piping, have the section done from the intercooler back down thru the back engine tin. Came up with a couple good ideas for mounting the turbo and getting the exhaust to turbo section fab'd. Re-mounted the oil sending unit, adding a "T" for the supply line to the turbo. Used 2" of copper. Before you all jump on me for that, let me say Brad Mayeur built the motor, used the same thing, and had no fears of failure. Good enough for Brad, good enough for me.
To be done: its still a long list. Ready for novice school: fix pulled exhaust stud, get wireing done to the hot start relay, extend some wires for the oil sender, swap out the turbo ITB hats for the air cleaners, put sway bars back togather, she should be good. Ready for dyno time: finish intercooler piping, get turbo mount and adaptor figured out/built, build some flange adaptors for the I/C pipes to the ITB hats, run the oil supply and return lines, mount boost gauge and run lines to that, and whatever else comes to mind.
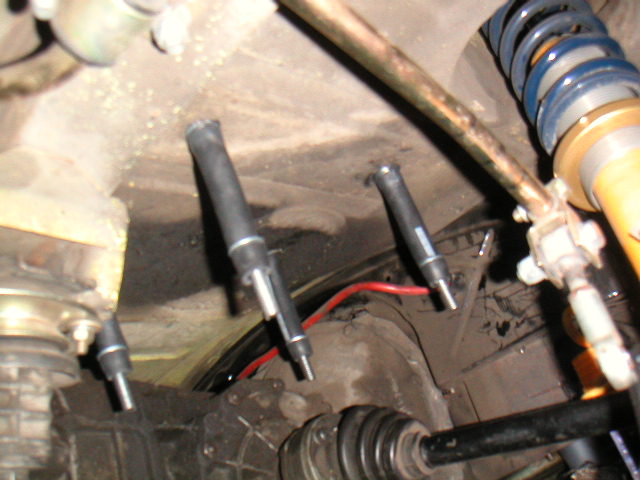
These photos are of the puke tank for the case and head venting, left and right ITB's and piping w/out the intercooler in the way, and the sending unit. I'll block off the air space around the oil sending unit with some silver aluminum tape, like is used in HVAC work, then cover that with black duct tape. Looking under the hood down in the depths of the engine you'll never know.
Attached image(s)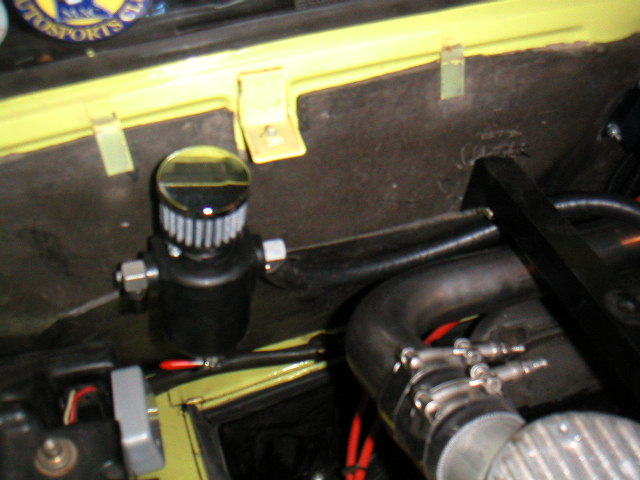
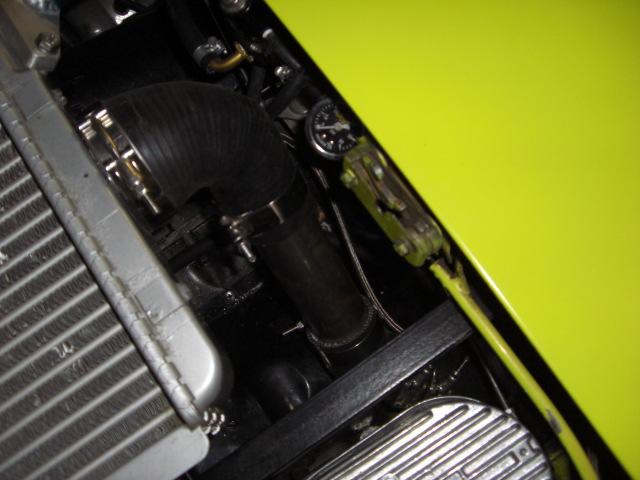
Posted by: ottox914 Apr 10 2007, 07:54 PM
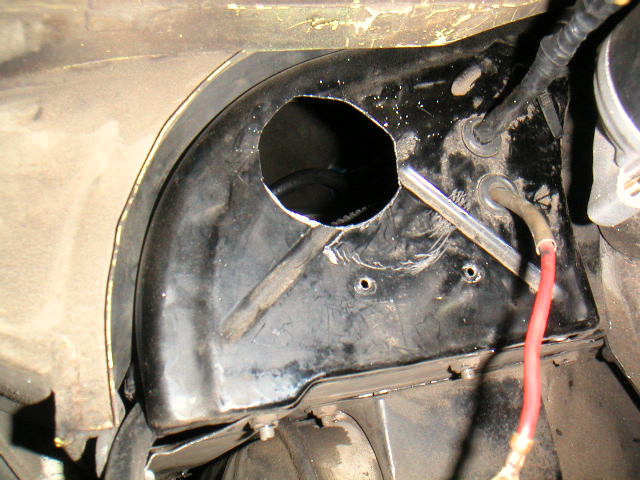
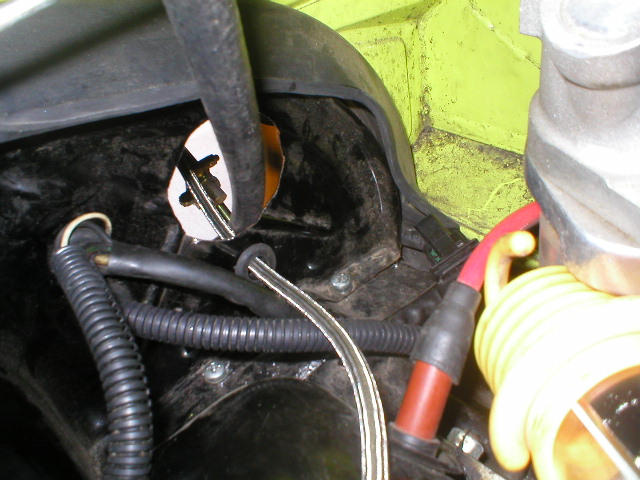
Next photos are of the pipeing from the intercooler to the back engine tin, the pipeing on the intercooler, and the hole in the back tin. This hole is big enough that I'll add some small hose split down the length to cover that sharp edge, and add a 2" section of silicone coupler around the charge pipe as it passes thru the hole to snug things up and allow some movement w/out rattling and squeeking me to death. The 2 smaller holes below the bigger one were for the hot start solinoid, which I'll be moving to the other side of the tin, and extending the wires to reach it.
The sad thing about all this is that I'm already thinking of NEXT winter, when I might try to take it all appart again and clean/detail/paint everything and cherry it out a little more...
Attached image(s)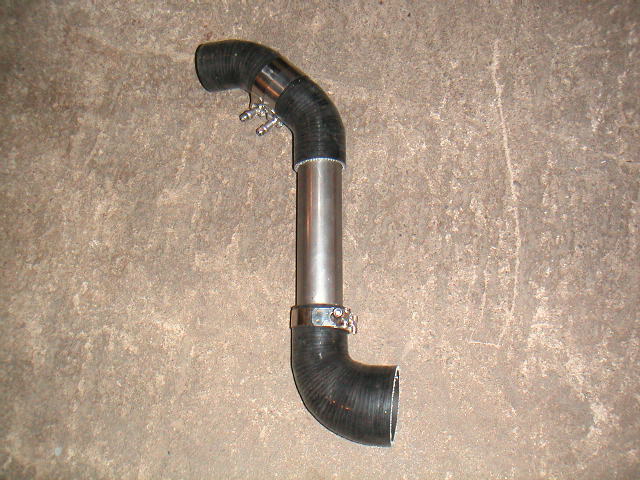
Posted by: Crazyhippy Apr 10 2007, 08:30 PM
Keeping the intercooler fan on is a good idea. The only time the fan (w/ a temp/boost based switch and delay) will ever shut off is cruising on the highway, and possibly momentarily in stop and go traffic... Wire it to the ignition switch and know the intercooler is as taken care of as possible.
I'm going to be adding a fan(s) to my intercooler too, I see intake temps in the 120-130 range pretty often. They are lower on the freeway (below 75ish, no boost, and lotsa air) and short term stop and go traffic (before heatsoak gets it)
A HUGE fan on the dyno was good for 13hp.
BJH
Posted by: Krieger914 Apr 10 2007, 09:43 PM
Get it to work really well, then paint/detail it. You never quite know about these odd unforseen gremlins that may cause you to take it apart a few more times and scratch/chip it in the process. Get-r-done!
Posted by: Tobra Apr 17 2007, 12:54 AM
You could put some misters over the IC and hook it to a windshield washer pump.
Water evaporating takes a lot of heat with it.
Posted by: ottox914 Apr 18 2007, 08:46 AM
Good things come to those who wait... well, I've been working on this project way to long to sit back and wait for it to finish itself. If I'm lucky, I get a couple hours a week, one night a week, so its been slow going...
As our novice driving school is this weekend, I have focused the last couple weeks on getting it n/a ready, and doing it RIGHT the first time, rather than slapping it togather and haveing to re-do a bunch of stuff.
So, not alot of turbo ready photos this time around, but getting some of the bits and pieces in place.
A friend of mine, (not dave h, the fearless fabricator) who is a welding genius (how many of you have welded stainless left handed up inside a 2' round tube about as far as you can reach while looking into a mirror to see what you're doing?) is retiring end of this month, and welcomed the small projects I had, such as the turbo to exhaust adaptor, I/C adaptors, and a few other odds and ends. Much cheeper rates that the shop the car was going to, plus I get to have a hand in the project, which will stay much closer to home. The car WILL go to LSE performance for the dyno tune once all systems are up and operating.
Current status pics- one is wireing to the starter, had to extend some lines and of course shrink tube and shield the lines, next is another view of the starter install. The next is the hot start kit. I know, lots of you say you don't need this, and with the mini gear reduction starter I probably don't need it, but with the added heat of the turbo down there, I thought it couldn't hurt, and besides, I have used one for years with no problems. Last is the power to the oil cooler fan, adding a fused connector, and taking power from the jumper to the hot start solinoid.
I've got a few vacuume lines to buttton up, need to attach the rear sway bar again, get it on the ground and give it a bath, and I should be ready to go for the weekend. Not bringing the sticky rubber, why waste it on the newbies, they'll have a thrill ride enough on a short, twisty course in a 30+ yr old car that keeps up with the new stuff, and beats up on a fair number of those newfangled water cooled cars.
I'm expecting, with my work, house projects, welding time, dyno time for this project to extend to mid summer. Bummer.
Attached image(s)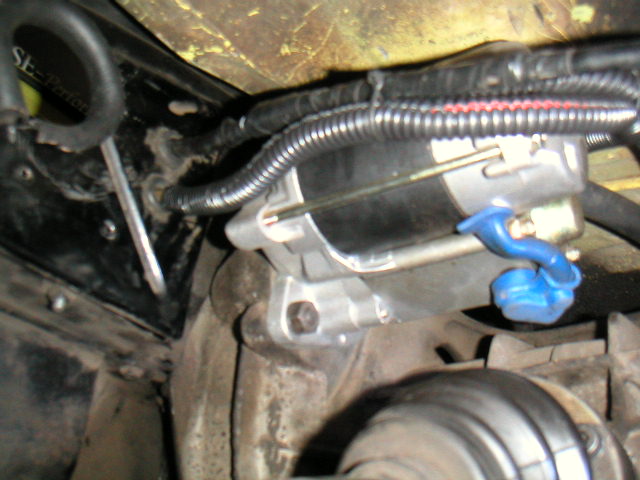
Posted by: Scott-thundercat May 8 2007, 11:39 PM
any updates?
Posted by: Nor.Cal.914 Jun 10 2007, 04:02 AM
How's your progress coming along with this? I'd like to see how you're doing on it! Thanks
-Chris
Posted by: Scott-thundercat Jul 8 2007, 09:01 PM
any new info?
Posted by: ottox914 Jul 8 2007, 10:40 PM
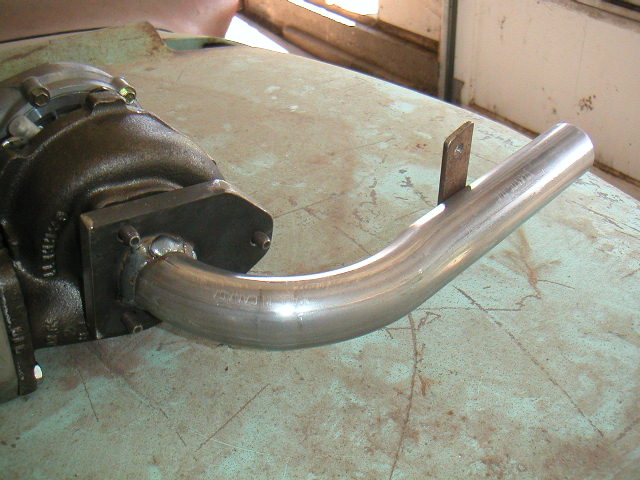
Really nothing much new to report. My local mega-fabricator is out of town for the month, so it may be into August before we get the header-collector to turbo adaptor made, the oval intercooler to round I/C piping done, and the shorty tail pipe from the turbo out the back done.
Around the house, we've been working on a bathroom re-model, up to about 10K in materials and counting. This has soaked up much of my time, as the plumbing, electrical, HVAC in this area have all been changed. This is ending up to be not your average slap some paint on it, "flip this house" sort of deal. Lots of natural stone and tile work, cherry wood work, Kohler everything. We do all the labor ourselves.
Back to the car, I've ordered a turbo-tach from one of our members, bigmark. I'll see if I can attach the photo. It should be on the way, and installed next weekend. I've got a couple pulled exhaust studs to be dealing with then too, to tighten up the exhaust to get ready for they turbo. I'll be puttering around with small projects on the car waiting for my fabricator to return home.
I almost find myself second guessing this turbo thing- at our last auto cross, I finished 9th out of 100 cars. How much more power do I really need?
AS MUCH AS IT TAKES!!!
Here's the tach pics.
Attached image(s)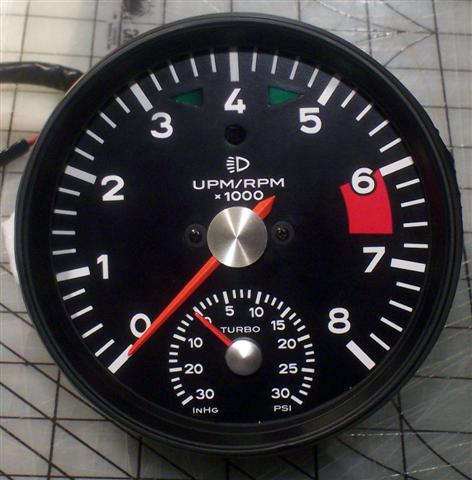
Posted by: ottox914 Sep 1 2007, 10:48 PM
Finally some more progress!!! Got bigmark's turbo tach installed, had some problems with the tach working right. He stepped right up to the plate and sent another one out asap. Will be getting that installed this coming week. I'll start another thread with step by step photos.
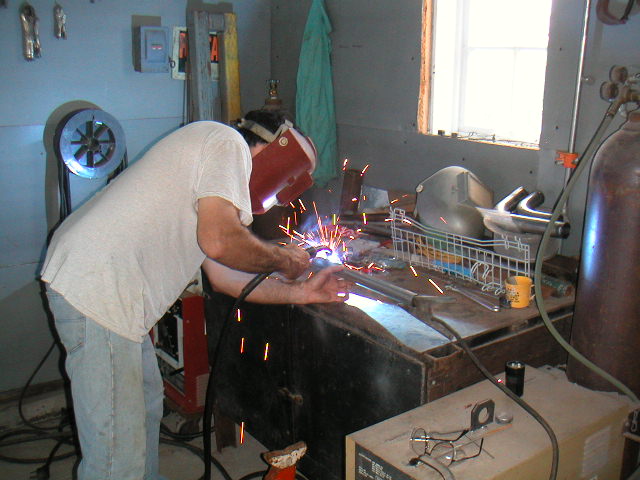
The tach is all well and good, but how about the turbo? Spent the day today with my friend Ron the metal master. He spent the day working on the flanges for the exhaust side of the turbo. The day. On 2 parts. Never ask a machinest to make a part for you, unless you have the patience of a saint. I must say, the pieces he made aren't fancy, but they will do the job, and are perfectly sized and cut.
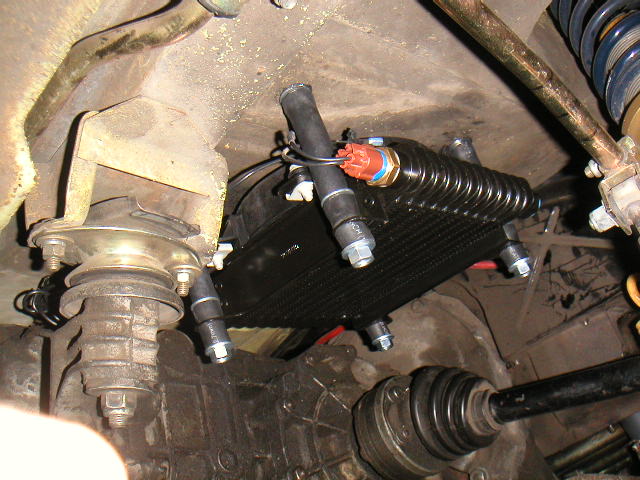
While he was working on that, I was working on intercooler piping. I re-installed the hats on the ITB's, and did alot of measure 2x cut 1x to get the round to oval down pipes Ron made cut to length, and the ITB to intercooler down pipes cut and set up.
Here are a couple pics of the initial test fitting from the ITB's, and the intercooler round to oval pipes Ron made.
Attached image(s)


Posted by: ottox914 Sep 1 2007, 10:54 PM
I also revised the lines to the puke tank, running 1 line from each head to the tank.
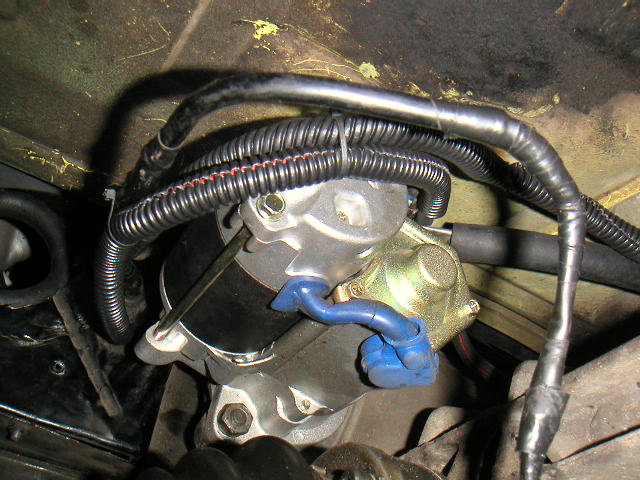
The next photo shows the oiling system for the turbo. To the left is the oil sending unit, and when I installed it, I added a "T" and a plug. I'll just need a 1/4" male fitting on the line to have oil to the turbo. From the Turbo, it will go to a scavenge pump, them back up and into the engine at the oil fill, where there is a fitting installed to receive the return oil line.
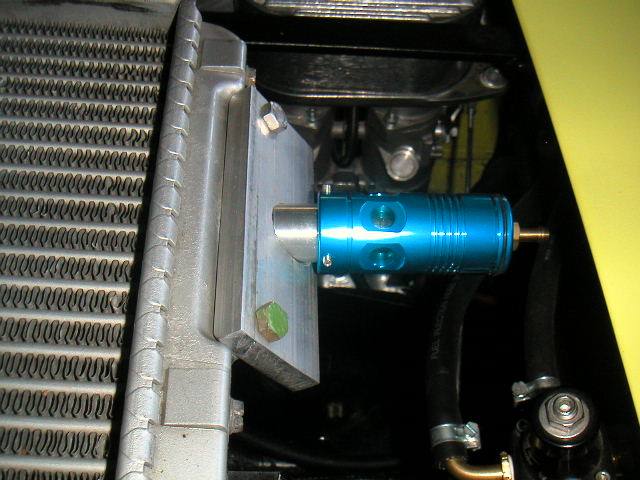
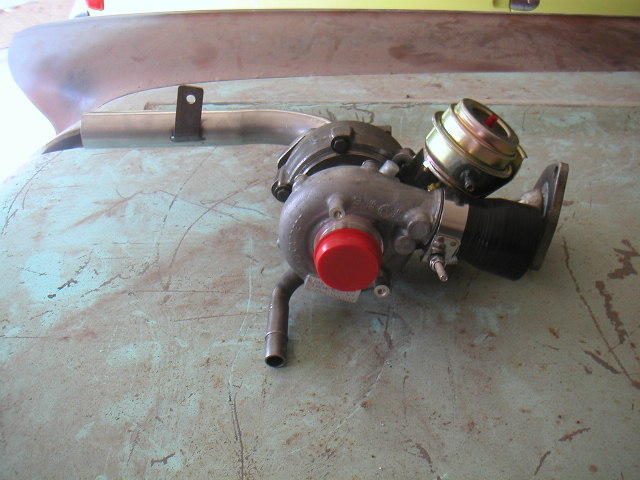
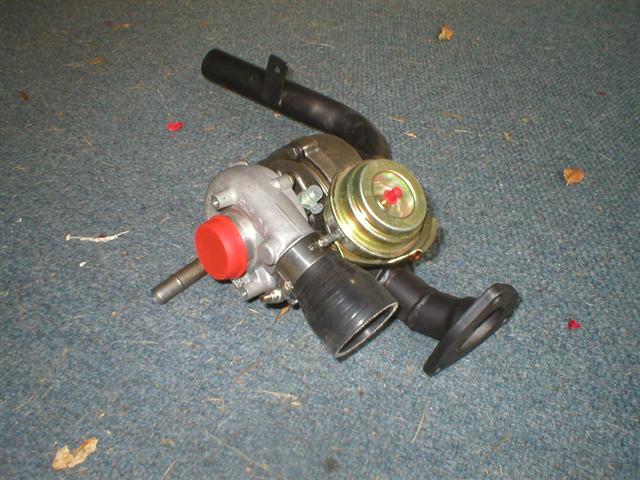
We also made an aluminum plate to mount on the intercooler for the blow of valve. With a VNT turbo, I'll probably not need it, but I decided to add one anyway. The subie BOV mounts up at an angle, making it impossible to close the engine lid. This plate with an angled hole drilled, will allow the BOV to mount horizontal, and the lid to close.
Attached image(s)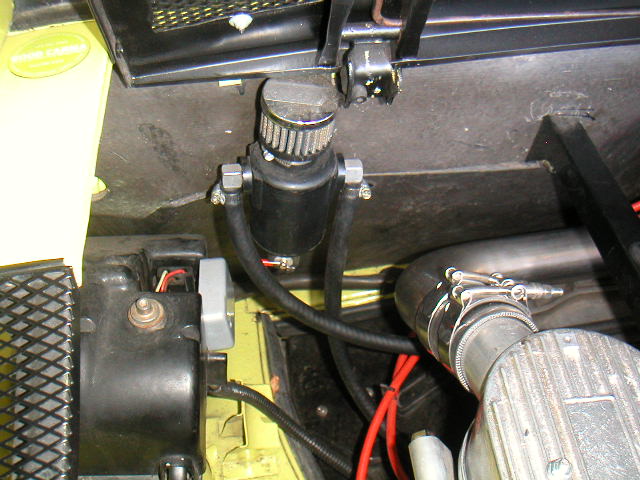

Posted by: ottox914 Sep 1 2007, 11:04 PM
Now for some good stuff. Got all the piping roughed in for the left ITB. It just needs some beads added to the ends to keep the hose on, and its done. The rt side needs an extention welded onto the "J" shapped piece, as the piece is about an inch to short on the short end of the "J". Ron will be heli-arcing that tomorrow with stainless, so the joint should be pretty invisible. This winter it all comes appart for powder coating anyway.
The last pic is the intercooler and piping. Keep in mind we need to add a little length to the pipe on the left as it turns back to the ITB, add beads, and bolt it all togather for good.
I also spent some time checking the turbo and actuator, to make sure the vanes were working as expected. All checked out good, and I got it adjusted to work for this application.
To be done: finish the turbo exhaust flanges, make the header collector adaptor, mount the scavenge pump, wire it, add oil in/out, make a short exhaust pipe, lengthen the wide band wired to get the sensor further back, add a bung for the Os sensor in the exhaust pipe, add piping from the turbo to the intercooler, install the turbo tach.
Attached image(s)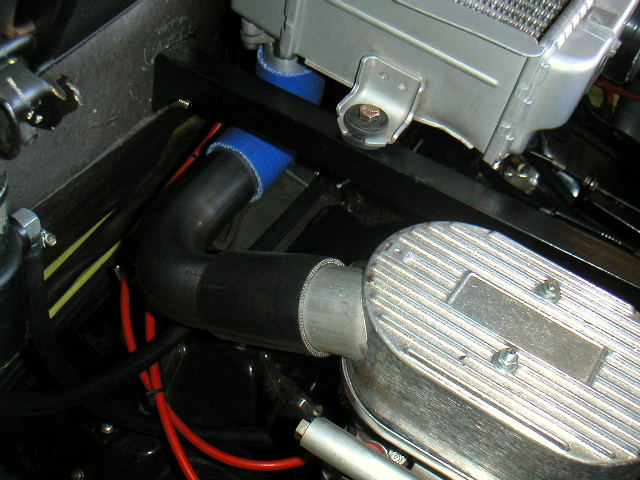
Posted by: ottox914 Sep 1 2007, 11:10 PM
Thats pretty much for the updates for now. Last week I ballasted the car and corner balanced it, got to within 4 lbs of matching cross weights. It was interesting to re-connect the sway bars, and see the difference in how you needed to set the drop links side to side when setting them with weight in the drivers seat. I made some adjustable double heim jointed links for the front and back of the car so I can set the bars for ZERO weight bearing when the car is static and ballasted.
The rest of this weekend is devoted to Mrs me, so probably not much more to add till tue/wed of next wk. My goal is to have the turbo up and running by the weekend, as there is a car show saturday and family reunion sunday I'd like to take it to. Blown, but not blown up.
Posted by: marks914 Sep 2 2007, 10:11 AM
Hey David,
Did you get a chance to try out that 2nd tach?
Mark
Posted by: JPB Sep 2 2007, 07:19 PM
Everyone knows you can't turbo a T4, should of went with a T1. 
Posted by: ottox914 Sep 3 2007, 09:34 PM
Mark, only had saturday to get to the car, family ruled for sunday/monday. Hope to get it installed tomorrow night and see how it goes. It looks great, and your customer service has been beyond great.
JPB- you best stay hidden behind that couch lest the mighty 914T smack you down!
(although I really DID think of T1 power, lets see, lighter, alot more been there/done that to fall back on, re-build it monthly when you hit it with the boost... hmmm.. nope)
This brings up an interesting thought- patience or money, which do you have more of? When I turbo'd my ford focus, I bought a kit, it was all there, to the last nut and bolt. Got it done and on the road in one long evening after work. No kidding. This project has taken FOREVER, although I will admit to being sidetracked with auto cross, gutting to the studs and re-doing our master bathroom, (10K in materials and still counting the labor...) golf, family, summer, but still, when it takes a day just to machine up 2 flanges for the exhaust in/out, and all the thinking, ordering, fabricating, re-fitting, re-doing when a better solution presents itself, well, I can really appreciate the one box solutions offered for other cars when it comes to turbos, and actually am quite amazed that the kits offered are as cheep as they are, in the 3-5k range, when I think of all that has gone into this project.
Time for bed. Gotta get an early start to the day to make an early appearance in the garage, for more progress and pics.
Posted by: 914-gt Sep 3 2007, 11:46 PM
Hi David, thats a nice set up!
Does anyone know what happened to the 76 914-6 with the turbo?
I was told that car was a mule car but have never found any actual info on the car.
That sure would be a neat car to document.
Posted by: ottox914 Sep 13 2007, 09:45 PM
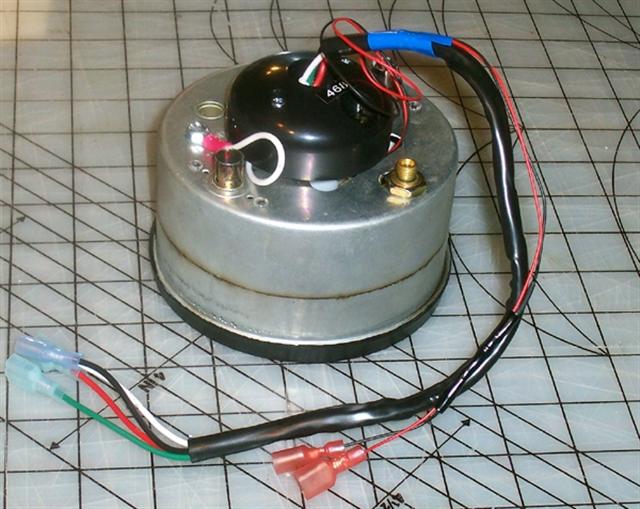
All kinds of updates: her is a link to the "bigmark" turbo tach install-
http://www.914world.com/bbs2/index.php?showtopic=76184
and a pic of the finished product.
Attached image(s)
Posted by: ottox914 Sep 13 2007, 09:55 PM
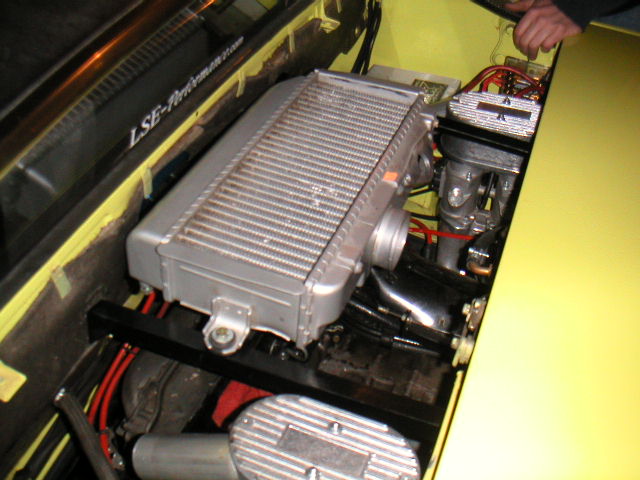
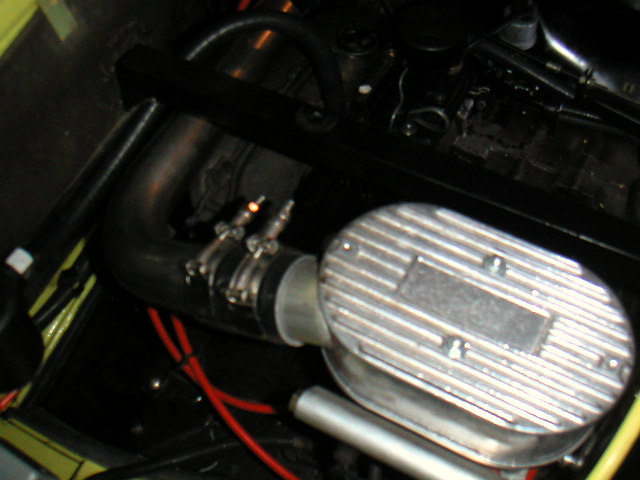
... now on to the good stuff. All this took place last week, thursday and friday, but I have had no time to update since then. We'll start out with the intercooler. Here are some pics of the final fitting of the pipes for the intercooler to ITB section of the system.
pic 1- test fitting right side
pic 2- test fitting right side
pic 3- test fitting left side
pic 4- test fitting left side
Attached image(s)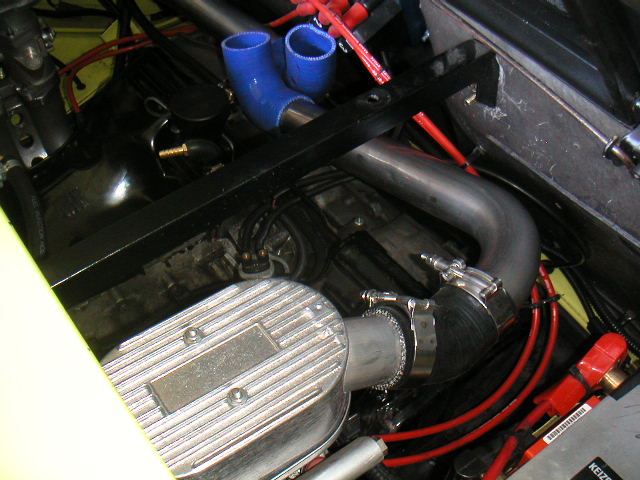

Posted by: ottox914 Sep 13 2007, 10:00 PM
Moving on to other work, I re-plumbed the puke tank to have an individual line from each head into it, with the lines going up from each head, no low spots to have anything condense. I also added an elbow and fitting for the oil return from the scavenge pump. The oil supply was already stubbed in when the oil pressure sender was installed. Next is a pic of the oval to round adaptors to get from the 2" round that the ITB hats need, to the oval of the subi intercooler.
Attached image(s)
Posted by: ottox914 Sep 13 2007, 10:09 PM
Final cuts of tubing, and the masked welder in action, adding beads to the aluminum ITB hats, intercooler adaptors, and to the mild steel IC piping. Good to have friends with skills... and now, just needs clamps.
914 Joke of the week. My friend Ron, the welder, goes into town to hunt down a flange to use to mount the turbo to the kerry hunter header collector. He stops at the one muffler shop in town, and runs into a guy who used to be on his fastpitch team, Steve. They catch up a little bit, and Steve asks Ron what he's looking for. Ron says he needs a flange to match a collector, shows him the collector, they find one thats close, just needs the mounting holes hogged out a little. Steve asks whats it for? Ron says "I'm putting a turbo on a 914 Porsche" Steve says "No, really, whats it for?"
Moral of the story: even in a town of 8000 with one muffler shop, a guy with a shaggy beard and no teeth knows you can't turbo a 914...
... what am I thinking?
Attached image(s)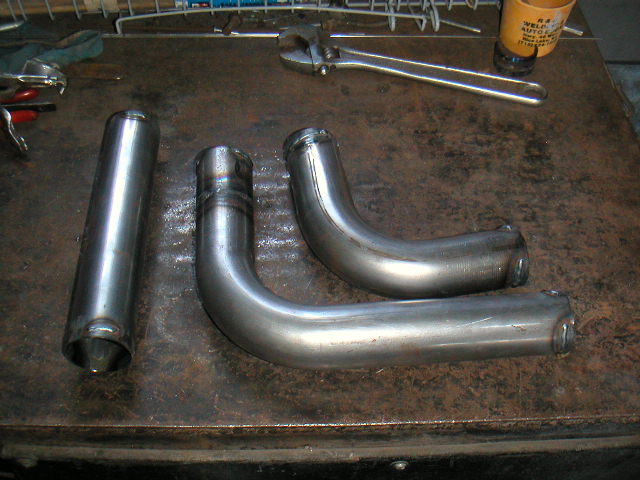

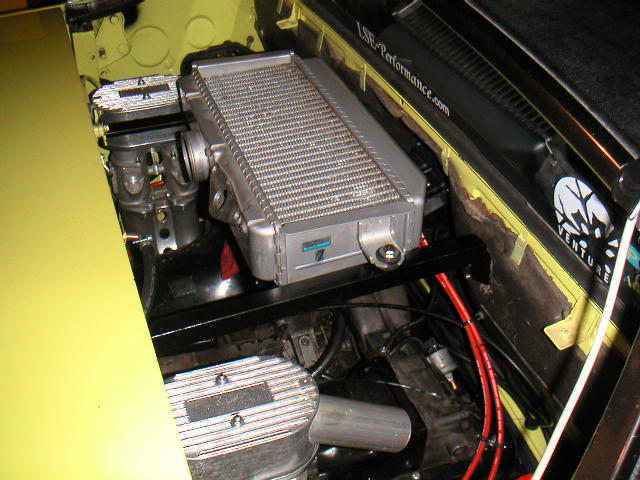
Posted by: ottox914 Sep 13 2007, 10:13 PM
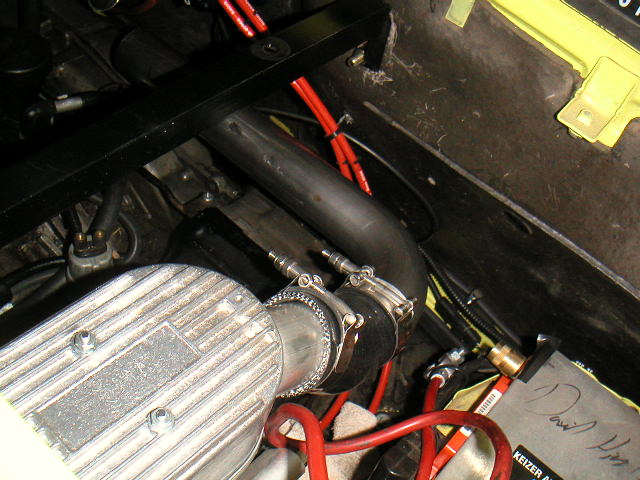
Right and left sides completed!
Attached image(s)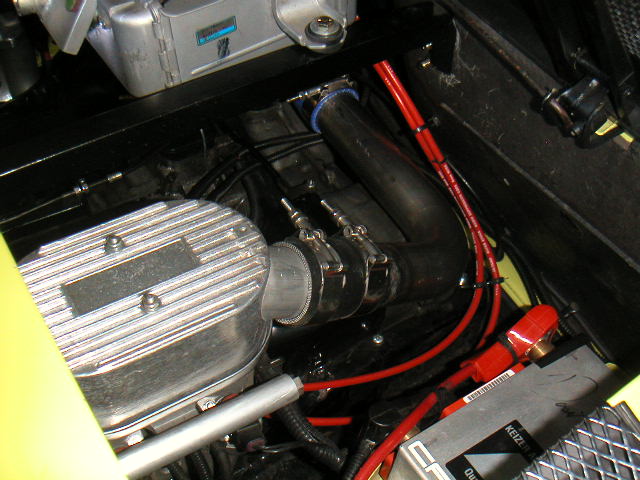
Posted by: ottox914 Sep 13 2007, 10:23 PM
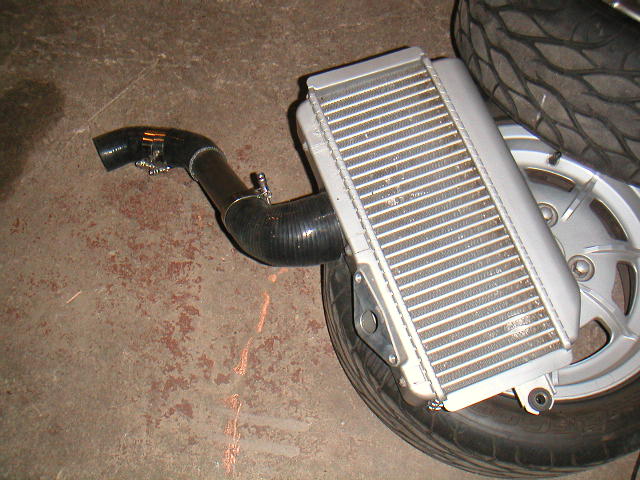
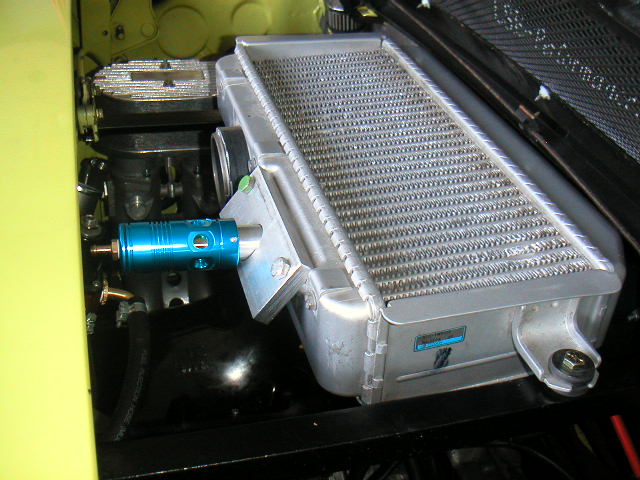
Intercooler mounted and connected to the round to oval adaptors, connected to the ITB hats. With a VNT turbo I shouldn't really need a blow of valve, , but there was a hole in the IC for the factory valve, so now was as good a time as any to make a plate and just put a hole in it for the BOV. I have since trimmed off the plate and finished it off a little better, added some stainless bolts to class it up a little, rather than the parts box bolts in the pictures.
Attached image(s)
Posted by: ottox914 Sep 13 2007, 10:30 PM
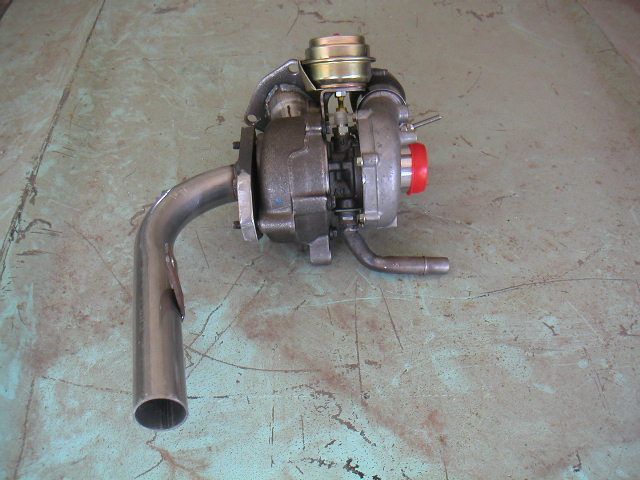
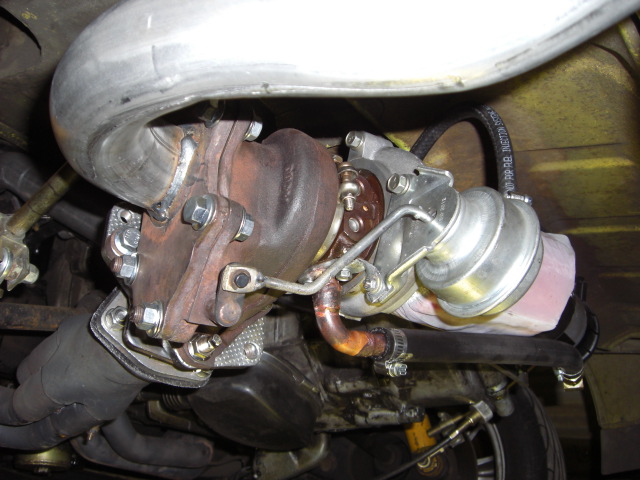
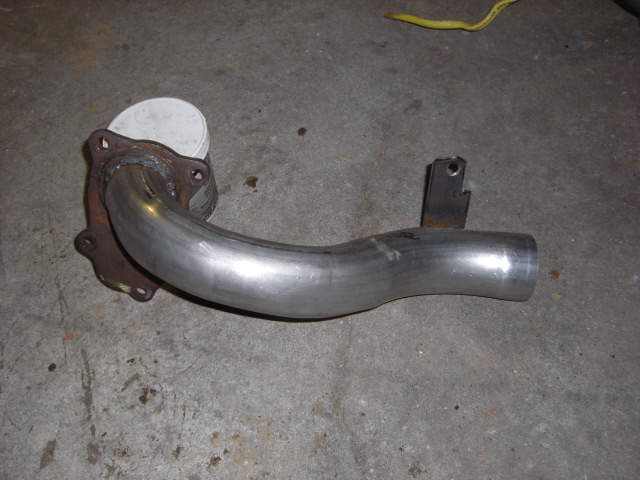
On to the good stuff. Think we'll have to trim off that exhaust just a bit. It should look pretty stealthy when its done. We went thru several versions of the adaptor from the turbo to the header collector. The first one kept the oil in/out of the turbo verticle, for good drainage, but the angles did not favor us, as the turbo ended up 4" off the ground. Before attaching the drain. Not good. We cut, tacked, test fit, and did it again till we had the drain no lower than the engine mounting bar. The oil comes into the turbo at a little bit of an angle, but after consulting with Corky Bell a bit, as the oil drain will be "sucked" dry by the Tildon differential pump I'll be using as a scavenge pump, being off verticle will hopefully be no big deal. Due to the nature of the center section and VNT mechanicals, clocking options for this turbo are limited.
Attached image(s)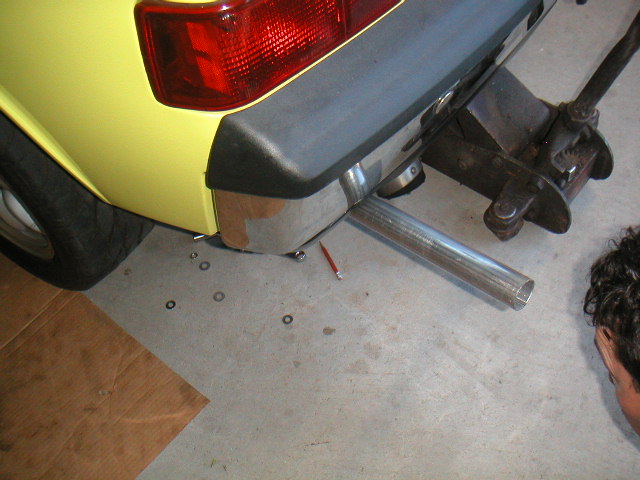
Posted by: ottox914 Sep 13 2007, 10:33 PM
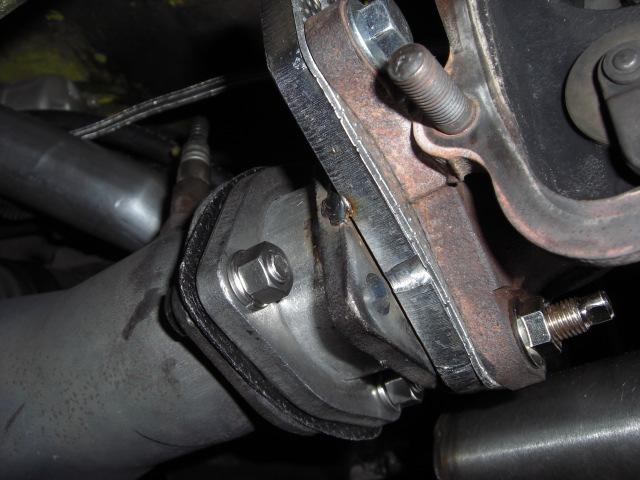
Some close ups of the flanges we had to make, and the final product, which is designed to bolt right in where the supertrapp now resides.
Attached image(s)
Posted by: ottox914 Sep 13 2007, 10:37 PM
Last installment for tonight- I took and hosed down the bare metal with some black grille paint to finish it off a bit.
to do list: fix oil leak at sandwich plate adaptor to oil cooler, mount the tildon pump, wire it, plumb the pump to the engine, get the hose made to go from the engine to the turbo, get more 2" tubing to make the boost line from the turbo to the intercooler, and "T" a vaccume line to the turbo to control the VNT. Per usual, its all worked out and done in my head, just gotta get in the garage and make it happen.
Attached image(s)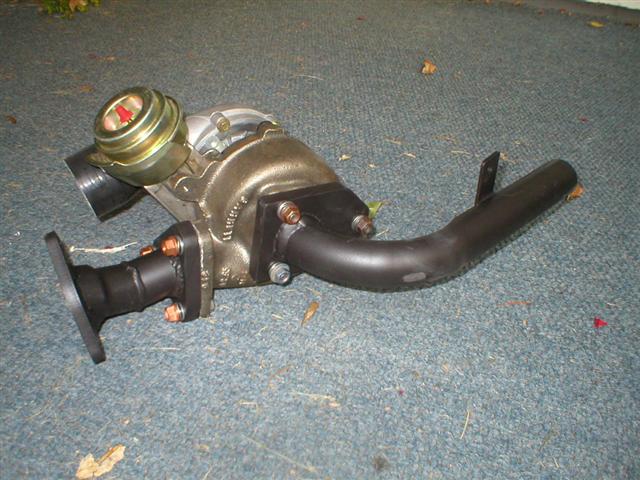

Posted by: ottox914 Sep 13 2007, 10:43 PM
I just re-read the thread and see that I 2x posted some pics and info- good thing I'm not in the garage tonight... enjoy and more info as it gets done.
Posted by: ottox914 Sep 26 2007, 08:40 AM
A few more updates- over the weekend, I swapped out the oil lines to the cooler. I just couldn't stop the leaking. Oddly enough, it was not where the fittings threaded into the sandwich plate adaptor, it was at the hose to hose barb connection. I tried several different types/brands of hose, one big clamp, 2 narrower clamps, 2 big clamps, different NPT/barb fittings, still leaked. So I got some -AN fittings for the sandwich plate end of the lines, and went to the local auto parts store for some REAL hose, with NPT on one end to connect to the oil cooler, and -AN on the other to go to the sandwich plate.
Attached image(s)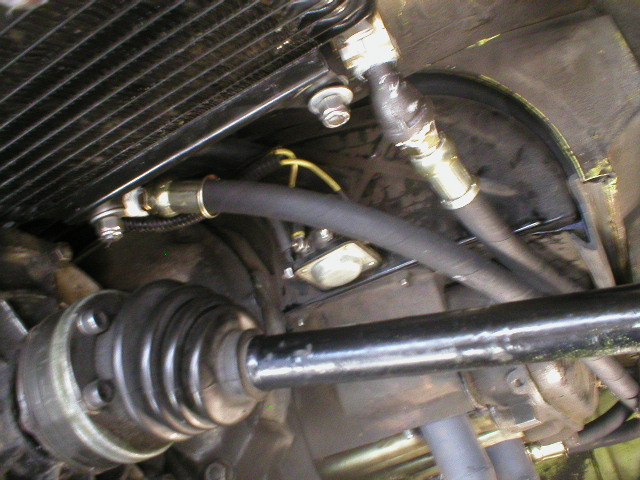
Posted by: ottox914 Sep 26 2007, 08:46 AM
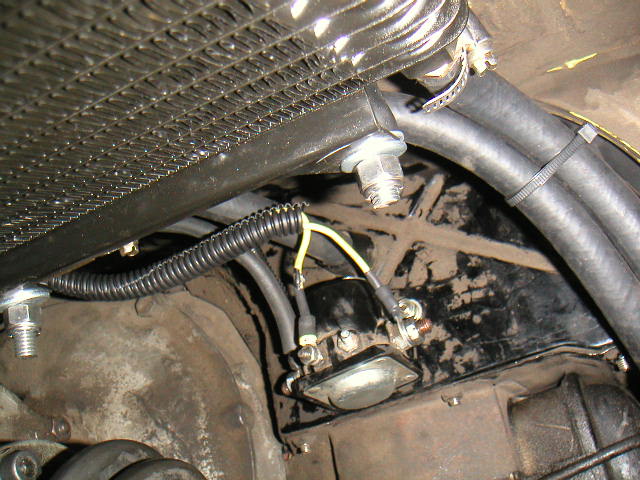
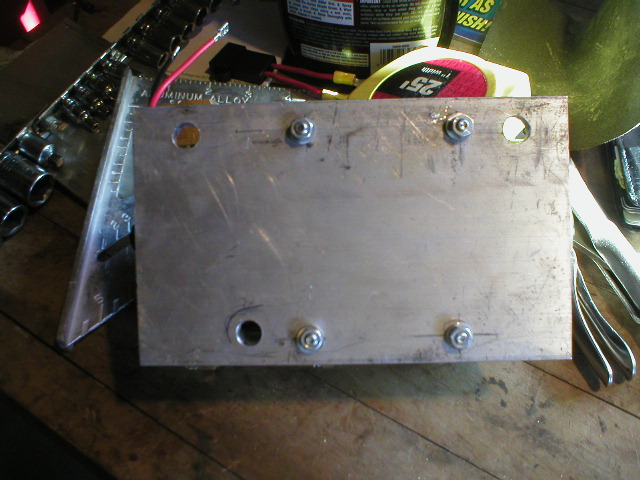
I also got the tildon differential pump (now scavenge pump) mounted. Made the bracket out of a piece of aluminum plate, drilled holes, and done. Well, 1/2 a day later done. I mounted it on the back of the trans where the brace for the factory muffler system would go. I also mounted the bracket thru the pinch bolt for the speedo angle drive, so I had 3 mounting points for the plate. I took another bolt from the box of old 914 bolts, and ground down the end to match the factory bolt, but be longer to accomidate the thickness of the plate. 4 bolts mount the pump to the plate, but be careful where you drill them, as the back of the plate contacts the back of the trans in several spots, and there is no room for the bolt/nut if your hole is in one of these spots.
Attached image(s)
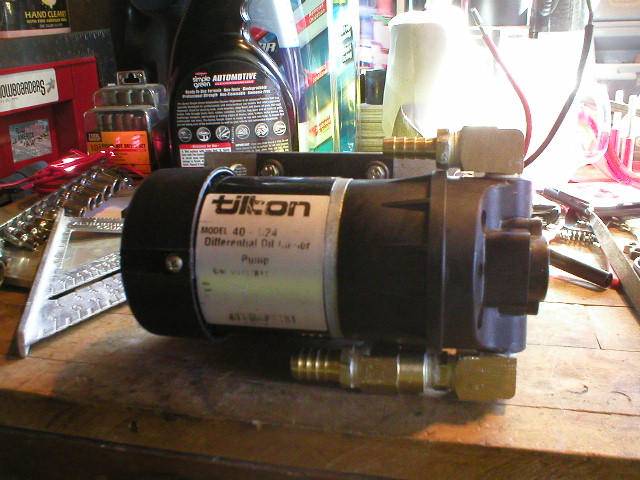
Posted by: ottox914 Sep 26 2007, 08:50 AM
Here are some pics of the pump on the car. I found key switched power in the factory harness. There is a group of 4 wires, 1 black, 1 larger black, 1 white/blue (I think) and one black/purple (tach). The larger black was the coil wire, and after testing with a meter, was found to be hot when the key was on, so I added a 20amp fuse in line, and connected to this location for power.
Attached image(s)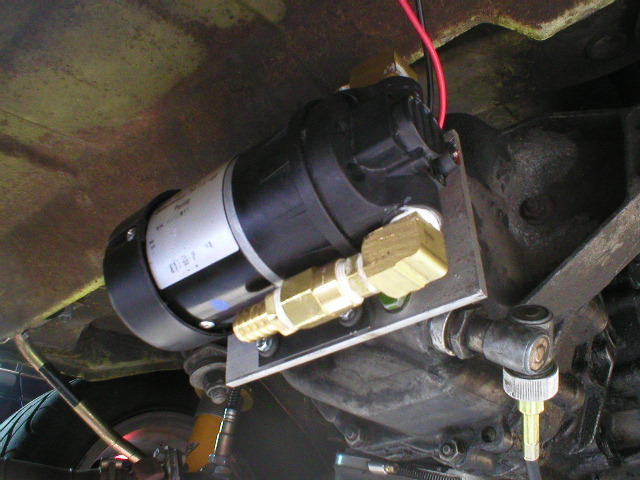
Posted by: ottox914 Sep 26 2007, 08:58 AM
Couldn't fit all the pics on that last post, here is the back of the plate, showing the need to be tidy with the mounting bolts to keep it all fitting well. The ground for the pump went up to the trans ground strap bolt.
Last night I mounted the turbo, and ran the drain line from the turbo to the pump, roughed in the lines from the pump to the engine, and the oil supply to the turbo. Will add some more pics tonight. I took thursday/friday off to get this thing DONE and on the road.
Side note- shop hard for parts! I was looking for an NPT to -AN adaptor for the turbo oil line, and a 4' section of braded hose, pre built, with -AN on each end. Some of the usual big auto parts superstores (you know who they are) had such things, in the sport compact section, as nitrous bits and pieces. Would have run me 70 bucks or so, and the adaptor would have been a blingy anodized aluminim bit. At my local dirt track store, (there are plenty of dirt/clay ovals in my area) a good solid brass adaptor and 4' section of brake line with correct fittings at each end ran me, oh, $17 bucks.
Attached image(s)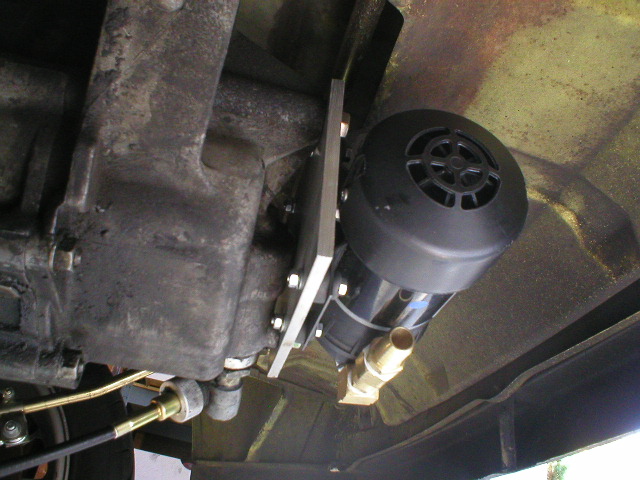
Posted by: Brian Mifsud Sep 26 2007, 11:32 AM
Dave,
Is your turbo oil circuit seperate from the engine's oil? You say you are using the scavenge pump to PULL oil out of the turbo. I don't know much about these systems, so the "obvious" question for me is why not "PUSH" the oil through? Does that cause oil leakage into the pressure side of the compressor?
Posted by: iamchappy Sep 26 2007, 12:36 PM
It would be best to have a small sump under the turbo to catch the drain oil. oil can back up into the pump and sit after shut down you can run the pump before starting and after shut down but the little sump is helpful in de-foaming the oil coming out of the pump and helping the priming circuit for the pump.
I have and extra one I made with 8an fittings on it if you need it.
Posted by: ottox914 Sep 26 2007, 02:24 PM
Brian- the engine oil is pressurized, and I am tapping into that to supply the top of the turbo bearings w/oil. As these are bearings, and not a pump, gravity is the only force trying to move the oil out the bottom of the turbo once the initial pressure supplied by the engine is "used up" getting the oil into the turbo. So you're mostly right. The engine pumps the oil to the top side of the turbo, gravity drops it out the bottom, and now my scavenge pump sucks it out and sends it back to the engine. Thats why you want the oil in/out to be as close to verticle as possible, and to mount the turbo higher than the oil pan if possible. I chose this mounting system mainly to save the $$$ and effort of a custom exhaust.
Which brings me to chappy.
I have been talking with Corky Bell, author of "Maximum Boost", and he suggested a line directly to the pump, although his book shows some low mount turbos with a small sump as you suggest. His reasoning was that if with the VNT feature of the turbo, I couldn't get a verticle oil drain, the draw of the pump may be more important to keep the turbo bearings flowing well, and this design concern may overrule the conventional set up of a small sump. He noted the main purpose of the sump was to allow a drain for the oil in the line to the turbo, and in the turbo, after shut down, and that the de-foaming of the oil in the sump was a happy side benefit. I'll be trying things as they are, and I can always turn the key to "on" and let the scavenge pump run a second or 2 prior to starting the car, to suck the lines clear, and also leave the key "on" a second or 2 after shutting the motor off, again to clear the lines and allow some room for draining. Supposidly the pump is self priming, and has some crazy verticle draw, but the thought of having the de-foamed drain oil ready to enter the pump can only make is last longer, rather than to start out dry each time the car is run. I still may contact you for that little sump you made if the godfather of turbos isn't 100% correct on this one.
The wonders of a one off install never cease to amaze and confound me.
Posted by: iamchappy Sep 26 2007, 06:28 PM
I had problems scavenging fast enough with the Tilton pump, but part of that was the Rayjay turbo I was using, after i switched to the cam driven 930 pump i didn't have any more problems.
I use the Tilton pump for my transmission cooler now.
Just let me know if you want the sump.
Posted by: ottox914 Sep 27 2007, 10:39 AM
chappy- pm sent.
Posted by: Aaron Cox Sep 27 2007, 11:02 AM
looks great!
so how do you put oil in it?
Posted by: ottox914 Sep 27 2007, 10:27 PM
More updates- I'm so close now I can feel the boost- Took today and tomorrow off to get this project DONE, but have a horrible cold, so work and mental processing are progressing at about 50% efficency...
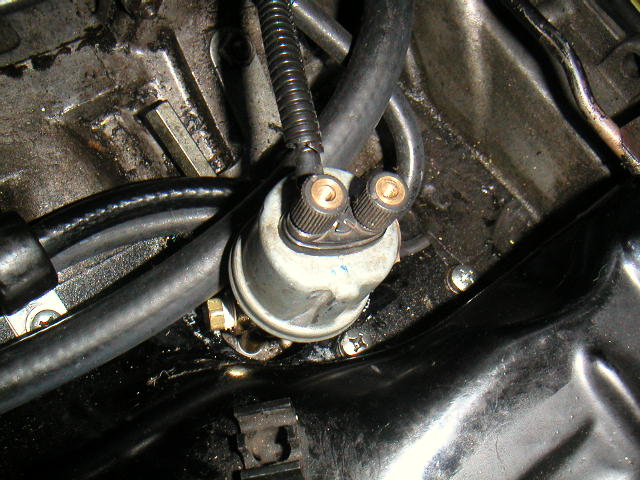
Today got alot of small things buttoned up. Here are some pics of oil lines being installed from the oil sending unit to the turbo.
When I had the motor out for the SDS install, I added a short nipple and "T" fitting to the oil pressure/temp sender, with a plug in the "T" for future use with the turbo.
Next is the line connected.
Next is the line going thru the back engine tin, and back to the turbo. There will be hose zip tied around the braded line where it touches anything to protect the hose and whatever it touches. The vaccume line to the VNT actuator will end up sharing the same hole and grommet, so I zip tied the hoses togather in front and in back of the grommet, to prevent any in/out motion.
Attached image(s)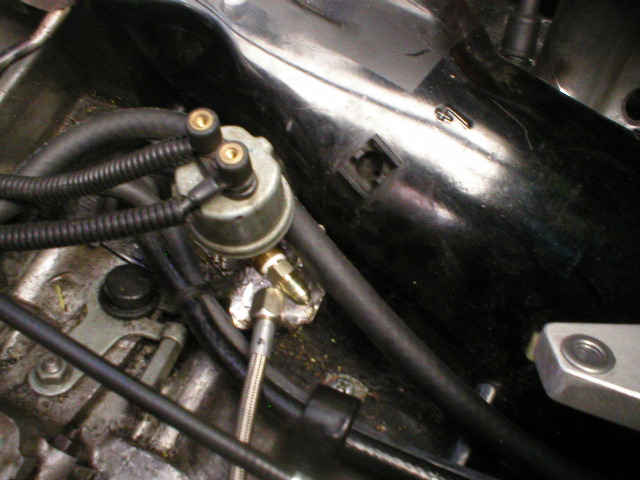
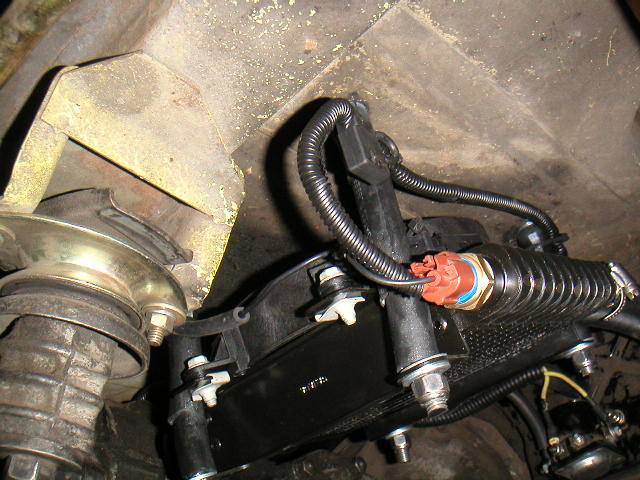
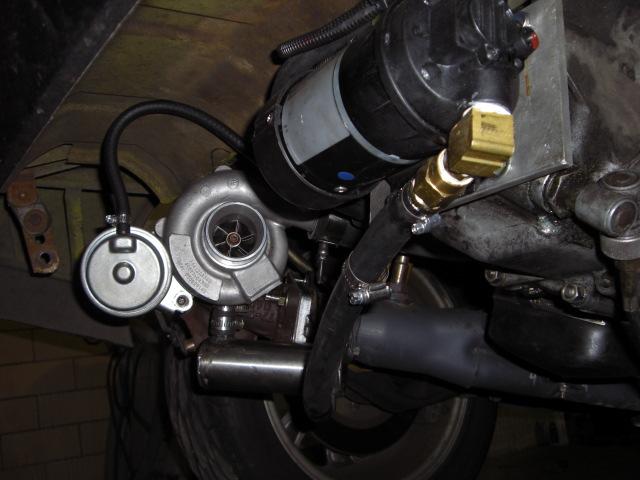
Posted by: ottox914 Sep 27 2007, 10:30 PM
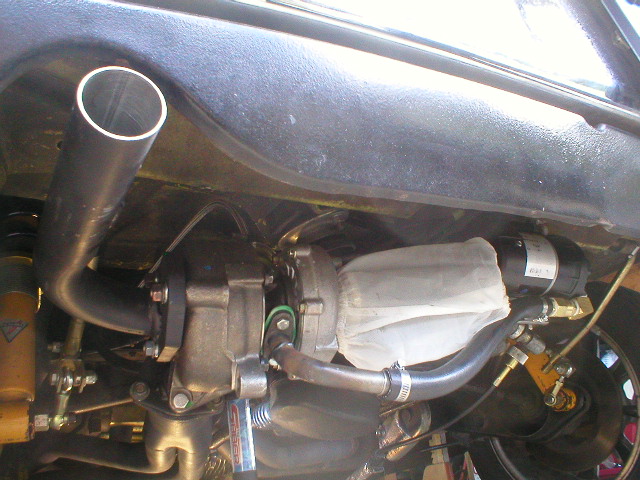
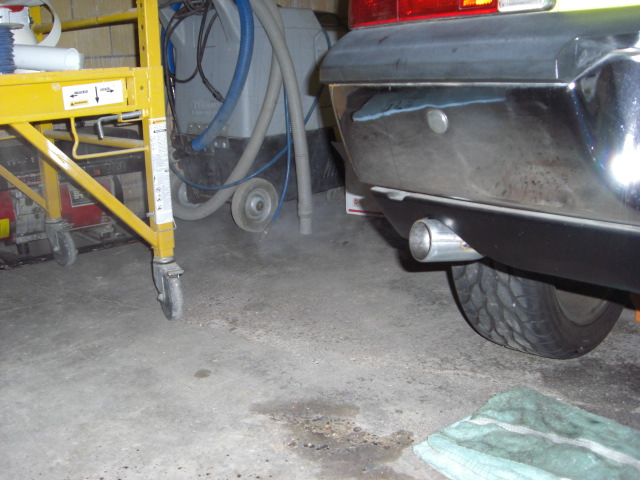
Here's a couple money shots for you- turbo, air cleaner, and tildon pump all installed and ready to go. I suspect I'll be re-doing the turbo drain, as it looks a little lame, but it is no lower than the engine mounting bar. I expect when the car is on the ground, you'll never see anything, except a factory looking little pea shooter exhaust.
Attached image(s)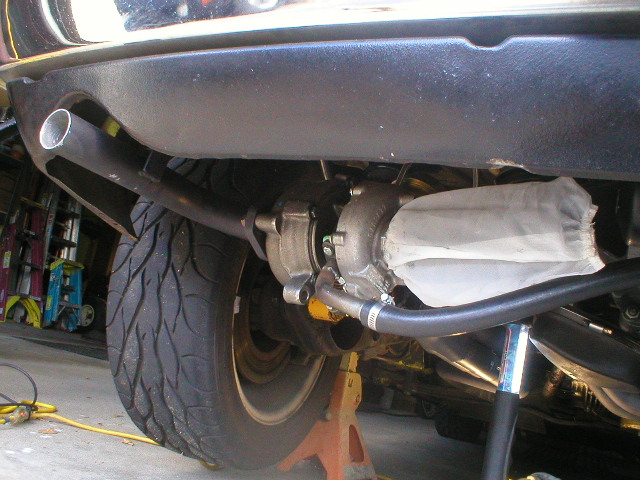
Posted by: ottox914 Sep 27 2007, 10:32 PM
One more of the install. I plan to build a 1/2 round shield for the air cleaner. There are a couple of threaded inserts on the turbo, and the shield will just need a couple tabs to easily mount and protect the air cleaner a bit more.
Attached image(s)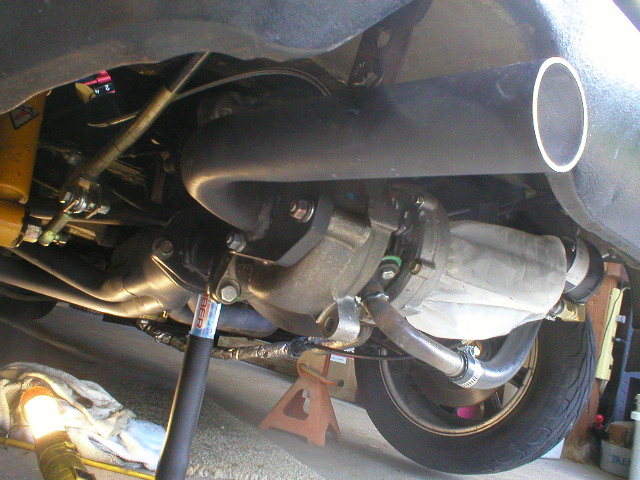
Posted by: ottox914 Sep 27 2007, 10:40 PM
A few more install shots, working on the oil lines.
First shot shows the oil supply and vaccume lines to the left, the oil return to the right. Before drilling and putting the line in, I ran a temp line to the oil fill tower, and fired her up! After a the longest 60 seconds ever, oil started flowing! I check under the car, no leaks, so it seems I have a system to the turbo and back. Tomorrow I will be tapping a 3/8 barbed fitting into the oil fill tower, and will use this as the location for the return oil. And yes, I will be careful NOT to get any shavings into the oil system.
When I finished for the day, pic 3 was showing in our back yard. Surely a good sign.
Tomorrow- need plugs 1 heat range cooler, make template for final boost line, from turbo to engine area, tap and install the oil return line, new dipstick, re-install intercooler, hook up the SDS, and go for a ride.
Attached image(s)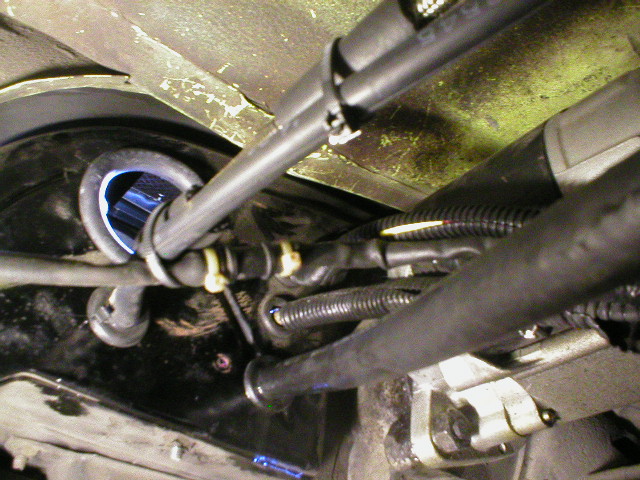

Posted by: ChrisNPDrider Sep 27 2007, 11:00 PM
Beautiful! 
Minimal cutting, fits great, I want one. So this is a kit, right? You're gonna hook us all up for cheap with a group buy, right? 

I agree the oil drain looks less than ideal, and a fatter exhaust pipe out back would increase coolness.
Posted by: ottox914 Oct 4 2007, 09:50 PM
Turbo update. Nothing but hurt. Will post more pics later.
http://forum.mnautox.com/forums/showthread.php?t=7777
Posted by: GS Guy Oct 5 2007, 06:51 AM
That stinks, I'd check the turbo over really well before deciding it's toast. Look for blades scraping the housings and any internal contact. ANY bearing noises or not perfectly smooth spots while turning would be highly suspect!
I'd also pressure test both intake and exhaust systems for ANY leaks - plug up the ends and use some soapy water or Snoop on the joints - like looking for leaks in a tire. You should be able to spot any leaks right away.
OTOH, TD04's are plentiful and cheap. Many guys upgrading their WRX's to bigger units sell their stock ones cheap.
Flanges are also easy to come by - Outback (who for some reason just changed their name to "Outfront") has inexpensive bare steel flanges for inlet and outlet sides:
http://www.outfrontmotorsports.com/homepage.htm
And these guys make a trick discharge flange for better wastegate and exhaust flow (shown in the attached pic):
http://www.ztspeedandfab.com/index.htm
Attached image(s)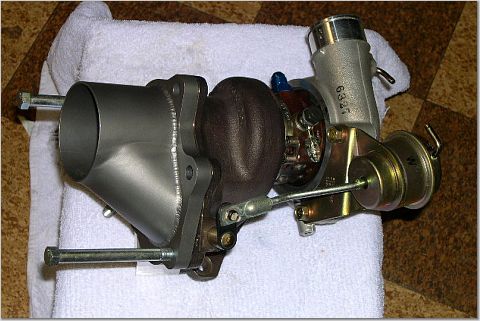
Posted by: arvcube Nov 30 2007, 10:26 PM
oil out the exhaust usually means that the seals in the turbo are bad. You mentioned that your initial cold oil pressure is about 60psi, with about 45psi as normal running...way too much for the turbo seals. you should think about adding a reducer to your oil feed line just before the turbo...
great project! i'll be slappin a turbo on mine one day. still working on the MS.
Posted by: ottox914 Jan 4 2008, 10:48 PM
TURBO 914 LIVES!!!
Round 2 with a wrx turbo is a success so far. Got it installed this afternoon/evening, and test fired in the garage. No spewing oil, no odd noises. To bad its cold and snowing in WI or there'd be a road test ot report on.
Will add pics and more details sunday pm.
Posted by: Sleepin Jan 4 2008, 11:57 PM
 That rocks! You are going to have to post some video!!!!
Posted by: GS Guy Jan 5 2008, 07:52 AM
That's great news David! 
Looking at an earlier post up the page a bit, it was mentioned about having too much oil going to the turbo. In the FWIW dept. I noted that on my WRX/TD04 and VF10 turbos the oil input banjo bolt has very small feed holes coming out the sides of the bolt - looks like it would certainly restrict oil flow to the turbo a bit (but not pressure). I switched to all AN fittings on my turbo but kept that special banjo bolt for the restricted orifice.
I'd like to see a pic of how your oil drain is plumbed. I've got to come up with something different thatn the OEM drain for that and haven't come across any aftermarket alternatives.
Jeff
Posted by: jimkelly Jan 5 2008, 08:23 AM
i am on a hunger strike until we get some video : )
that is some nice work!
Posted by: nsr-jamie Jan 5 2008, 08:23 AM
Wow, this is a cool post. I just noticed it now, I read it all the way through from page 1 to here and I am glad you got the problems figured out and am really looking forward to seeing some video footage (with sound) and see how the car works and performs, this is cool! Congrats!! Please show us more, very cool thread, thanks!
Jamie
Posted by: ottox914 Jan 6 2008, 08:06 PM
This may take a while, so get comfy.
Recap: Ever since I turbo'd my Ford Focus I wanted to do the 914. Phase one was to get some ITB's (from Jake) and SDS fuel injection (direct from the SDS guys in Canada) and get that all working. I sizes the ITB's for a 2316 as I thought I might like to build one some day, so they're a little big for my current 2.0. The 2.0 is a slightly warmed over motor built by Brad Mayeur, with euro P/C's, and a little head shaving to up the CR, stock cam and valve sizes. Kerry Hunter exhaust.
I picked up a VNT turbo from a VW TDI. The turbo I put on the Focus was a VNT, but by a company called "Aerocharger" which has gone out of business. The new turbo was a Garrett. My thinking was, the TDI is a 1.8, mine is a 2.0. The TDI revs to around 4500, the stock cam'd 914 dies off at around 5-5200. After picking up the ebay gem of a turbo, I finally found a compressor map for it. Not the best match for the pressure ratios I would be running, but it was paid for, and maybe the VNT features would broaden the operating range of the turbo, and it would work out all right.
Early October 2007 I got it all set up, custom making flanges, piping, mounts. I had thought about pre-lubing the bearings, pulling the fuel pump fuse, turning the motor over w/the starter to prime everything, but in all the research I did, I never once saw anyone make a big deal of pre-lubing. After years of research, planning, I was at my moment of victory! Rather than wait another 5 minutes, I turned the key, let it idle a while, and took a test drive. After a short bit the turbo was screaming, sounding more like a mad dremel tool than a turbo. There was oil out the tail pipe. There was virtually no boost, no matter how I set the vane controller for the VNT system.
I think I fried the seals/bearings.
I put the supertrapp back on, and finished the auto cross season. A crushing blow, enough was enough.
For the month of November I searched and researched turbos, and even picked up a junk turbo off a late 80's subie, (for free) but it was so rusted togather I couldn't get the hot and cold side housings off the center section to clock it to work for me. Studying compressor maps, I decided the stock WRX turbo, a TD04-13G would be a good match, so I joined some subie boards and looked for a low mileage take off. Turbo secured, I went ebay shopping for flanges and other bits needed.
Now we're up to the present, and on to the pictures-
First is a photo of the turbo, after clocking the center section. This is a process by which you basically take both compressor housings, exhaust and cold side, off the turbo, rotate the center section as you need it to be for oil flow in /out of the bearings, and put it all back togather. Except that in an orientation other than the OEM, the waste gate actuator will not line up with the waste gate. Hmmmm.... I found that the SRT Neon had a wastegate actuator that would start to open at 5psi, and be fully open by 7psi. The stock WRX actuator worked at higher pressures, and I wanted to start out small with psi. As a bonus, the SRT actuator had an odd bend in it, that just might work for me. Well, it did, thanks to Ebay.
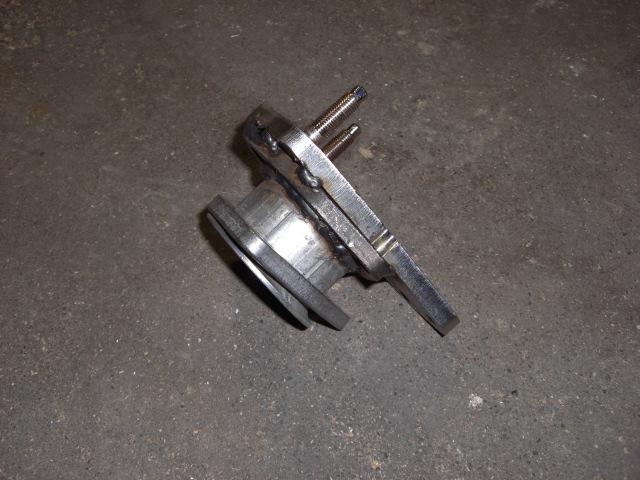
The next pic is the adaptor to join the turbo and the exhaust header. Initially I thought I could just weld the header flange, a triangle shape, to the turbo flange, an odd trapizoid shape, and bolt things up. Looked like it would work. Didn't. There was all kinds of turbo housing/collector issues that prevented getting the right bolts thru. We were going to have to do alot work to tap and stud the flanges to make it all work. And to top it all off, I didn't get the flanges lined up right before welding, so the whole turbo was slanted when we tried to test fit it. Hmmmm... back to the muffler shop to look for more ideas. We thought an extention of 1 1/2" would move the turbo back under the factory exhaust heat shield. Steve at the muffler shop suggested a flaired end to the extention, then we could rotate the turbo any which way we needed. Genuis. Thus was born the flange adaptor.
Next pic is the adaptor installed.
Next pic is the turbo, looking at the exhaust side. I still need to make the exhaust pipe, which will be an "L" shape, with a tab to mount it where the super trapp was mounted to the chassis on a slightly flexable mount. This will help support the turbo, so all the weight of the turbo is not on the head bolts.
Next pic is the turbo from below, and the last pic of this section is the turbo and tildon scavenge pump, viewing from the cold side of the turbo. I still need to get an air cleaner over the compressor inlet.
Attached image(s)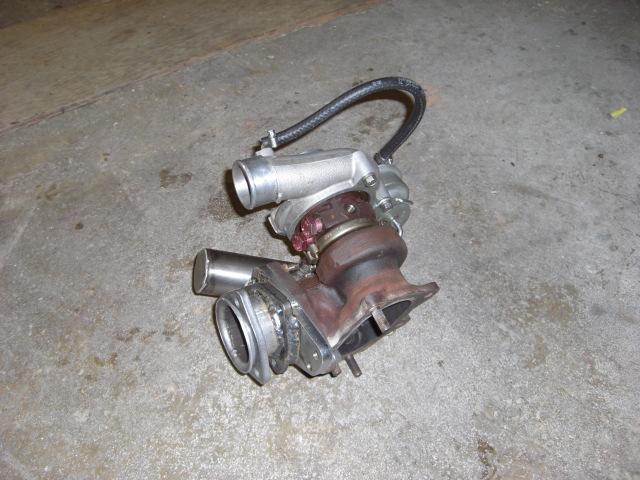


Posted by: iamchappy Jan 6 2008, 08:20 PM
David, it's nice to see you are using the oil sump i made... I love your Zork tube, i picked up a flange and some pipe so i can build one for when i want to shake up the town....
This week i plan on bringing my car up to the shop for them to check out the leaks, then i can start tearing it apart again....
Posted by: ottox914 Jan 6 2008, 08:21 PM
More pics- here are some of the oiling system, there have been plenty of questions about that. I have been consulting with Corky Bell of the Bell engineering group, Inc. He seemed to think the oil pressure of the system was not a problem with this "old school" turbo, but that if I were going with a newer style ball bearing turbo we might need to be a little more careful. Good enough for Corky, good enough for me.
The current configuration, which will be changing, uses a catch can supplied by one of our members who has built a monster turbo'd orange 6cyl. Wonder who that is... The catch can hangs to low. In reality, its no lower than the engine bar, but is hangs below the valance, and the oil return line is low also. Not that I go 4 wheeling with this car, but if I went off at an auto cross, or plugged a cone just the wrong way, I could rip it appart.
Mr. Bell to the rescue again. He seemed to think the catch can would not be needed on a smaller turbo at lower rpms (its not like the stock motor will spin to 7k rpms or anything) such as this one, and advised me that going direct from the turbo oil outlet to the scavenge pump should work fine. So I will be revising the oiling system to do just that, with a very short drain off the turbo, a 90 degree turn right under the turbo, and then attach a line straight to the scavenge pump.
On to the pics-
First is the back of the car, and what you can see, and not see relative to the turbo system. My hopes are to tuck it all up under the car, so all you see is a slightly larger exhaust pipe.
Next is a close up of the back of the car. The current oiling return system is a little low.
Pic of the catch can, which will be going away.
Here is the catch can and pump.
Close up of the drain from the turbo. I'll unclamp the catch can, remove the hose, and braze on a 90 degree fitting to get the oil line tucked up under the car a little better. Better for looks as well as safety- keeping it all attached should I go farming with the car at an auto cross.
Attached image(s)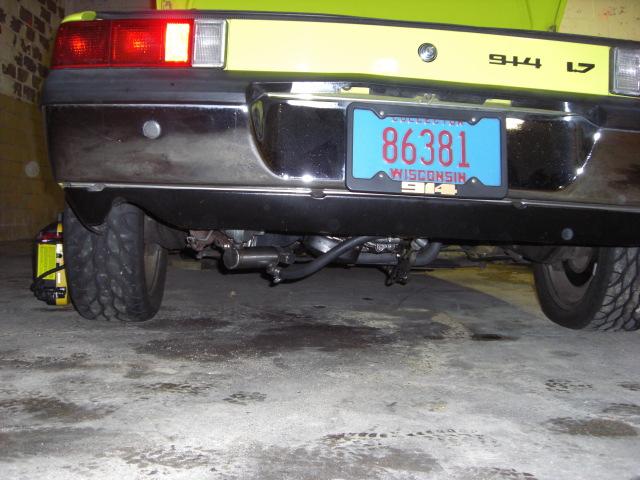
Posted by: ottox914 Jan 6 2008, 08:31 PM
Where does the air go after it enters the turbo? Here's the route:
out of the turbo, up past the starter
thru the back engine tin
into the engine area
up to the intercooler
to the left and right ITB's.
There is a puller style fan coming that will be mounted to the back of the intercooler, and can be turned on/off by the SDS system based on boost present in the system. I plan to also wire in an "always on" switch for auto cross.
Attached image(s)
Posted by: ottox914 Jan 6 2008, 08:40 PM
Remaining to be done?
Lots.
Add the puller fan to the intercooler. Re-do oil return system. Fabricate exhaust pipe. Plus whatever else I come across to improve.
***** BLING QUESTION*****
Should I take the intercooler piping in the engine area out, and:
rattle can it black
rattle can it silver
powder coat it black
powder coat it silver
leave it metal and spray a clear coat to prevent rust
Now just a few more pics of the beast-
(the back end looks high as it has been in the air alot, and not driven to settle the springs back down)
Lastly for tonight- there have been requestd for a video- I'm not going to take this car out into the salt bath that is Wisconsin roads in the winter. I did shoot a 15 sec or so vid of the turbo spining, around 12mb, (forgot to switch camera to "you tube" mode), but I have no idea how to post it. If some one can handle this, PM me your email addy, and I'll try to send you a copy.
Attached image(s)
Posted by: iamchappy Jan 6 2008, 09:01 PM
I agree that oil can is to low, ditch it. The reason i ran my intake through the trunk was so i could get my turbo up high so it would drain and had clearance.
I do like the fact you still have your trunk. Nice work.....
Posted by: Sleepin Jan 6 2008, 10:48 PM
Dave, All looks good. I would say your oil return setup is your weak point if you have one. My oil return on my Civic was the area I had problems with. When I originally tapped the line I wasn't thinking and ended up tapping in to the pan beneath the oil level and it ended up scaring me into a new pan that I tapped above the oil level. I see you have had a little help from the boys at H-T.com....I have been a member there for years and I can attest....there is a lot of knowledge to be had there. If you get frustrated with your oil setup, I would suggest getting ahold of the guys at http://ststurbo.com/. They have a lot of experience dealing with low mounted turbo's and are hella nice guys to deal with! They are probably going to hook me up with a turbo for my Sequoia in the future! (....errr hopefully!!!! ) I think from the looks of things, once you get it going, you can ditch the catch can and rubber line with hose clamps and go with some SS braided lines and AN fittings. Then you should be able to flog the crap out of it without worrying about them lines. High pressure or low pressure, most rubber return lines end up leaking and cracking.
As far as the tubes go, that is personal preference...although they would look cool body color! I have never really agreed with coating the intercooler with anything...so I hope you leave that bare!
I really hope for the best with this setup! Turbocharged engines are near and dear to my heart.....if they were closer to my wallet, I would be happier...
Crazy cool!!!!!
Posted by: nein14 Jan 7 2008, 04:58 PM
![popcorn[1].gif](style_emoticons/default/popcorn[1].gif)
Posted by: niterydr Jan 8 2008, 10:15 PM

This will be fun to tune
Posted by: ottox914 Jan 10 2008, 06:12 PM
This will be fun to tune
The tune should be easier that you might think- I have the n/a maps of the SDS about 95% of where I want them. Adding the turbo mean adjusting just 2 maps- adding some lines to the fuel table for operating conditions when there is + manifold pressure, and adding some lines to the timing table to pull some timing when boost is present.
I really don't expect it to be THAT simple, but who knows, could be...
Posted by: nein14 Feb 9 2008, 07:56 AM
Is it running yet?
Posted by: rick 918-S Feb 9 2008, 08:40 AM
Posted by: ottox914 Feb 22 2008, 11:14 PM
IT LIVES!!!!!!!!!!!!!!!!!!!!!!!!!!!!!!!!!!!!!!!!!!!!!!!!!!!!!!!!!!!!!!!!!!!!!!!!!!!!!!!!!!!!!!!!!!!!!!!!!
Got the turbo and lines done last weekend, got the tail pipe made, modified, and mounted. Hit the key. Nothing. It would crank but not even sputter. Had a couple of gun-shoot back fires though. Battery seemed kinda low.
This week. Charged battery, tried to start. Same deal, lots of cranking, not even a sputter, letting off the key results in a huge **KA-BOOM**.
Today. Put a small electric fan/heater under the back trunk, let it run for 2-3 hrs to warm up the belly of the beast. Called SDS for some ideas on what to check. They as usual answered the phone promptly and were very helpful. In english. During normal hours when I was needing them. Nice. So we went thru some ideas of how to check the coil pac, thinking maybe that was it. I go back to the garage, look at the intercooler and piping to be removed to get to the coil.
OK, maybe I'll give it one more try before doing all that work. 2-3 seconds of crank, and it lights right off, no drama, no fuss. It was a little louder than I expected, but remember its in a large garage that will echo and amplify a bit. Shut it off, take a deep breath, and try again. Pops right off. Bad gas? Fowled plugs? To darn cold? Don't know, but I plan to haul in some fresh gas to add to whats in the tank, and will be checking the plugs also.
Whats left? Per usual, plenty. Get it to the dyno. Build a shroud and mount a puller fan below the intercooler. Take it all appart and get the I/C piped powder coated. High temp coat the exhaust. Add an O2 bung to the exhaust before getting to the dyno. And whatever else comes to mind.
Now the pics:
Attached image(s)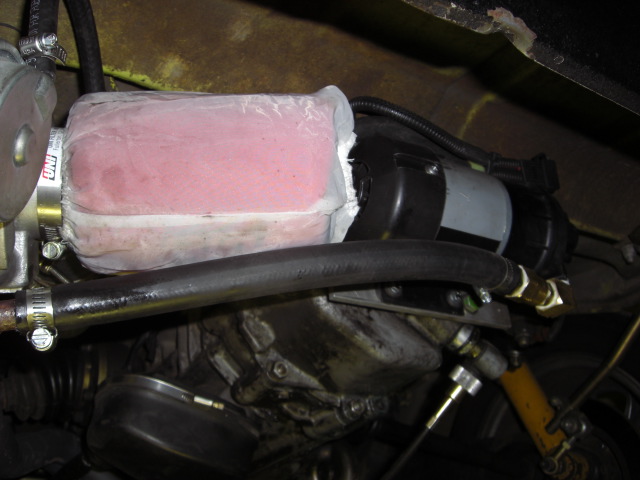
Posted by: ottox914 Feb 22 2008, 11:16 PM
A couple more pics:
Just need things to warm up and melt off for a proper test drive!
I'll add more after the dyno day, whenever that comes to pass. Hopefully winter will be over and done with sometime before july up here.
Attached image(s)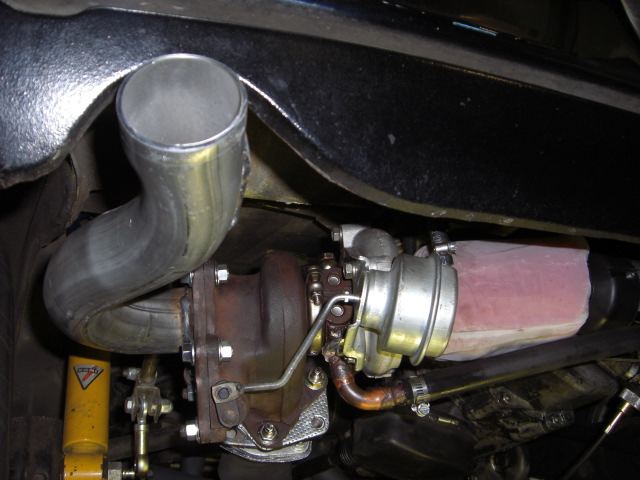
Posted by: iamchappy Feb 22 2008, 11:18 PM
NICE ZORK!!!!!!!
Posted by: ottox914 Feb 24 2008, 10:47 PM
Added a couple more pics I took this weekend. Just had to get into the garage and start it again, just to listen to it... One of the design goals was to keep it as stealthy as possible. Here are a couple shots showing how little you really can see from the back.
Attached image(s)
Posted by: ottox914 Feb 24 2008, 10:49 PM
Couple more pics- I believe the clutch and speedo cables hang lower than any of the turbo related stuff. If you look closely at the wheel on the carpet cleaner being stored on the back wall, you can kind of see a little puff of smoke from the cold temps in the garage and the hot exhaust. IT LIVES !!!!!!!!!!!!!!!!!!!!!!!!!!!!!!!!!!!!!!!!!!!!!!
Attached image(s)
Posted by: ottox914 Apr 9 2008, 11:21 PM
On the road with 914T.... I have been driving it for a couple weeks when the days are warm enough not to freeze at night in the car- with no heat. Initial results were promising but under-whelming. Boost gauge was showing 4 psi or so, and only at WOT in the upper rpms. BS'ing with some turbo guys, we thought it might be: a boost leak in the plumbing, or maybe the waste gate was opening a little early and the gauge was reading a little light, and everything was working as it should, I just needed some stones to crank up the boost a little.
I ordered and installed today one of these: www.boostvalve.com. I also moved the boost line to read pressure after the throttle plates, rather than at the turbo compressor outlet. This would serve to make the turbo spin a little harder to make the amount of boost requested, as if there were any leaks or pressure drops thru the intercooler, the turbo would have to boost beyond these things to make the desired pressure after the throttle plates.
BOOST!!!!! A solid 8psi. I'm still working on the tune. My plan to take the n/a tune and just tweek the high end- out the window. Tried that, but it just didn't work. I think hte turbo, even if its not making boost, is moving air enough to mess up the tune I thought I had nailed w/out the turbo. So I have started from scratch. I have wideband AFR's of around 14-15 at WOT, not as rich as I would want, but good enough to tip into the boost a bit and enjoy 3 yrs of planning and work.
The weather up here is supposed to suck for the next 4-5 days, so probably will not have any more fun rides. I'll try to get some pics of the last of the install tomorrow and add them to the thread. When we can get back on the road, I'll do a little video, and see if I can figure out how to post or host it or whatever.
Once I get the AFR's under control, its off to the dyno, and I'll be sure to post the before and after charts also. It's pretty weird to think that the rest of the work is to drive the darn thing, push buttons, and not to wait for some odd part then freeze in the shop to install it.
Posted by: iamchappy Apr 9 2008, 11:39 PM
David, you need to richen that thing up to around 12.5 while your boosting.
Posted by: ottox914 Apr 9 2008, 11:43 PM
Thats about where I was n/a, pre-turbo, and that is what I'm shooting for now. AFR's varry between 12 and 14/15, so its not running lean across the whole rpm or boost range, just in a couple spots. I've got plenty of timing pulled to keep it all save while I get the AFR's in line, and look at how long this has all taken... I'm being cautious in getting into the boost during the testing/tuneing phase. Just need more warm weather and another tank of gas.
Posted by: Walter Jun 26 2008, 03:49 PM
Any updates on how its running and maybe a dyno run yet?
I am curieus as now I know you can turbo an otherwise stock 914 2.0 to more than double its original power at 14,5 psi. Cool inlet temps is mandatory though.
Posted by: ottox914 Jun 26 2008, 05:38 PM
Much has gone on since the last update- intercooler and sucker fan, smaller turbo from a Mitzu 3000 GT, and now chasing boost leaks.
Short story- with the subi turbo, as seen in the pics so far, the boost started around 3k, got to 5psi somewhere between 3500 and 4k, topped out at 7 psi or so from there to redline. From 4k up, it was alot of fun. I thought the late boosting was due to the subie turbo being to big- yup, it came from a 2.0 motor, and thats what I had, but the subie is a motor that will spin to 7k and has 2x as many valves. So I re-did it all with a much smaller, 9B turbo from the 3000 GT. Performance was about the same. Huh? The smaller turbo should be boosting like crazy. Made an adapter to connect my compressor to the turbo inlet and pressurize the system. Found several boost leaks, and am chasing down a few more. I guess thats part of the fun of building you own system, rather than use a plug and play system with the bugs worked out of it.
So far as intake temps, with the subie and the 3000 GT turbo, with the cooling fan ON for the intercooler, I was seeing only a 15 degree rise from ambiant temps, and this with the turbos both boosting like crazy to show 7psi on the gauge with all the boost leaks.
In retrospect, doing this thru the factory plenum and throttle body would have been loads easier- no need to re-engineer the linkage and cable, much less intercooler piping, so less leaks, but hey, I had the ITB's on the car, and using them made room for the center mount intercooler, so, I guess like Edison and his quest for the electric light bulb, I need to just keep on thinking things thru and trying things out till its all good.
Work has been insane this summer. 50-60 hrs every week since october 07, not alot of time to put into the car. I have tomorrow off, and hope to track down the last of the boost leaks and add a bunch more pics and details to the thread.
Posted by: Walter Jun 28 2008, 01:44 AM
Thanks for the update!
I used a suby turbo too (IHI VF34 from a WRX) and that started about as late (as of 3000 rpm) too, but I have 7psi at 3500 and 14.5 psi at 4000 and above (ecu controls boost). Must confess its in a bug, but engine block is totally stock 914 2.0 apart from the Scat single T1 valve springs and Ti retainers.
It put out 222 hp and 225 ft.lbs of torque on the dyno...so its IS possible!
Just trying to give you some motivation to carry on
Posted by: ottox914 Jul 8 2008, 06:36 AM
http://www.youtube.com/watch?v=yTBMd6qFEek
http://www.youtube.com/watch?v=4_zCQhXJ-YI
Hope these links work. The first one should be a walk around of the car and project, the 2nd one is a little road trip. I'll see if I can get some more detail pics up to the thread later this week. If the links are bad, just surf utube for "914 turbo" and the 2 vids should come up for you. My user name there since I couldn't combine letters and #'s and use ottox914 is "minefourteen".
The tune is still a little rough, and as of yet I have not made it to the dyno, so I don't have any real #'s yet on what it puts out for HP and TQ. I could be a month or more before I can find/make the time for the 3 hr each way trip to a dyno, but I try to get out every night for a little bit to enjoy the car and work the SDS a little.
To drive the car is, ah, fun... The boost still starts later than I'd hoped for, don't know if any of the dyno guys will have a clue how to move that up a little, but because of that, it drives around town like any other NA 914, but mat the gas and it is just a smooth pull all the way to redline, not alot of noise and a huge push in the back just before you have to shift, like the little honda guys with turbos that are way to big... The tune right now is around 12-11 afr from 0 to 7psi or so, and 11-10 from there to max boost, which is around 10 psi. I've got alot of timing pulled to be sure not to melt anything, so to fine tune up the afr's across the boost range and put back some timing may sharpen up the throttle response as well. Not that the car is a dog right now, but always looking to make it better...
Posted by: arvcube Jul 8 2008, 11:02 PM
http://www.youtube.com/watch?v=yTBMd6qFEek
http://www.youtube.com/watch?v=4_zCQhXJ-YI
Hope these links work. The first one should be a walk around of the car and project, the 2nd one is a little road trip. I'll see if I can get some more detail pics up to the thread later this week. If the links are bad, just surf utube for "914 turbo" and the 2 vids should come up for you. My user name there since I couldn't combine letters and #'s and use ottox914 is "minefourteen".
The tune is still a little rough, and as of yet I have not made it to the dyno, so I don't have any real #'s yet on what it puts out for HP and TQ. I could be a month or more before I can find/make the time for the 3 hr each way trip to a dyno, but I try to get out every night for a little bit to enjoy the car and work the SDS a little.
To drive the car is, ah, fun... The boost still starts later than I'd hoped for, don't know if any of the dyno guys will have a clue how to move that up a little, but because of that, it drives around town like any other NA 914, but mat the gas and it is just a smooth pull all the way to redline, not alot of noise and a huge push in the back just before you have to shift, like the little honda guys with turbos that are way to big... The tune right now is around 12-11 afr from 0 to 7psi or so, and 11-10 from there to max boost, which is around 10 psi. I've got alot of timing pulled to be sure not to melt anything, so to fine tune up the afr's across the boost range and put back some timing may sharpen up the throttle response as well. Not that the car is a dog right now, but always looking to make it better...
Nice setup David. The engine sounds really solid when it revs. Looks like you've got plenty of fuel as depicted by your afr's. I'm thinking your retarded timing is contributing to the lag. I would also think that the header setup (long tubes) would as well.
Posted by: rick 918-S Jul 9 2008, 08:10 AM
Nice work!
Posted by: ottox914 Oct 21 2008, 09:14 AM
Long time w/no updates- busy summer- sorry guys.
Intercooler. There are pics of the IC installed, but here are a few of the fan. I found a fan that has a microscopic draw, I think it was like 2-3 amps, and moved 1000 cfm of air. My friend Steve the HVAC guy helped me make a plenum for under the IC to make things more efficient. The most temp rise I have seen during the heat of the day with around 98 degree air temps was a 30 degree rise in the intake temp. Now if you drive the car for a couple hrs, it will heat soak and rise a little more, but for the intended purpose, auto cross, I can expect to see 15-30 degree temp rise, thats not to bad considering the poor air flow of this location.
Attached image(s)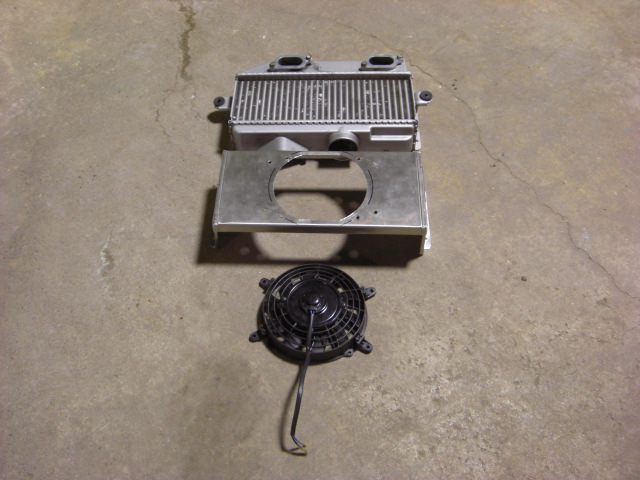
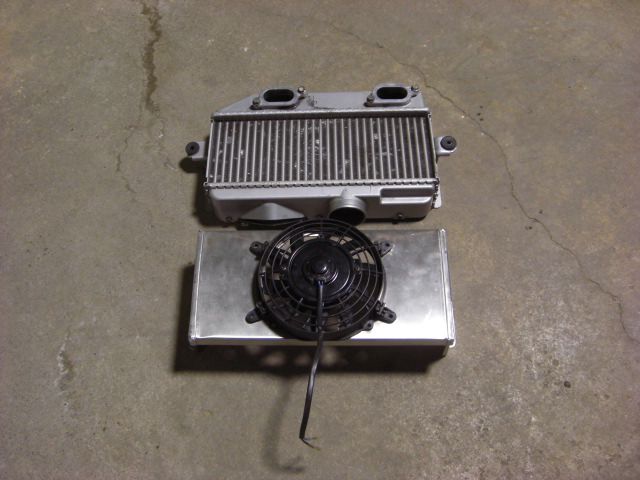
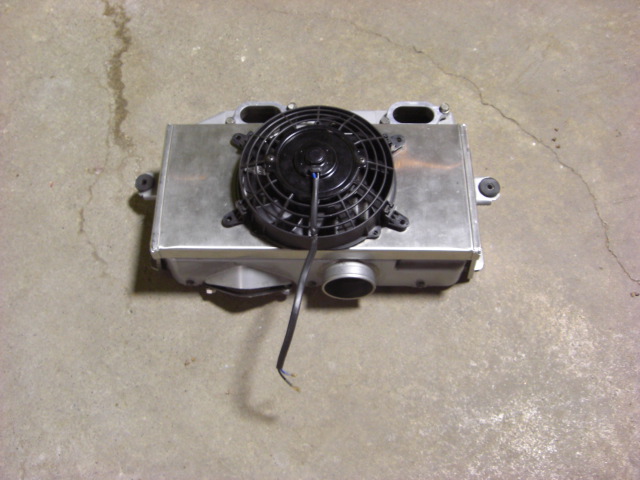
Posted by: ottox914 Oct 21 2008, 09:18 AM
Turbo- I noted that I had changed from the WRX 13G to a 3000GT 9B turbo. I guess 35 yr old 2 valve pushrod technology really doesn't flow as well as the 4 valve DOHC stuff we have in the newer cars. What I really needed to do was know exactally the flow rate of the heads of the 914 so I could compensate the formulas to determine the correct turbo sizing. Here are some pics of the difference in size of the WRX and 3000GT front turbo:
Attached thumbnail(s)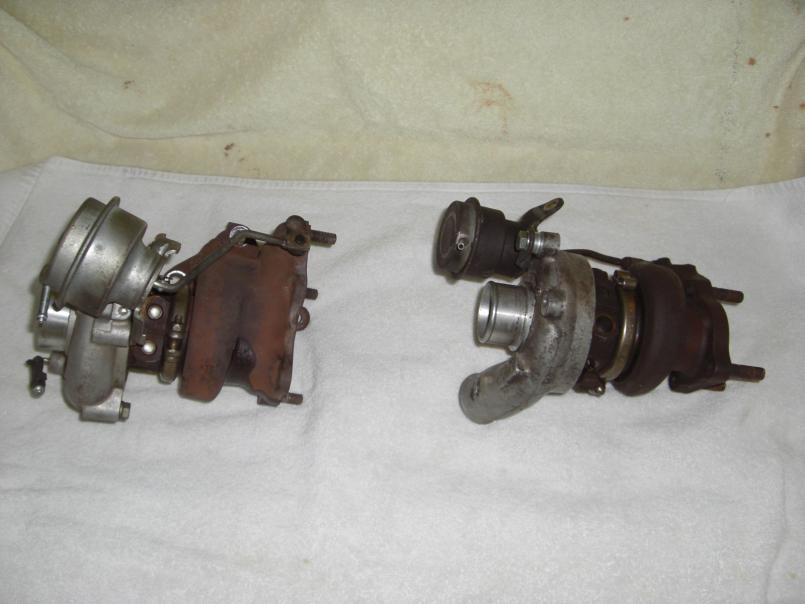
Posted by: ottox914 Oct 21 2008, 09:24 AM
Note the size difference of the turbo exhaust inlets and the compressor inlet:
Attached image(s)
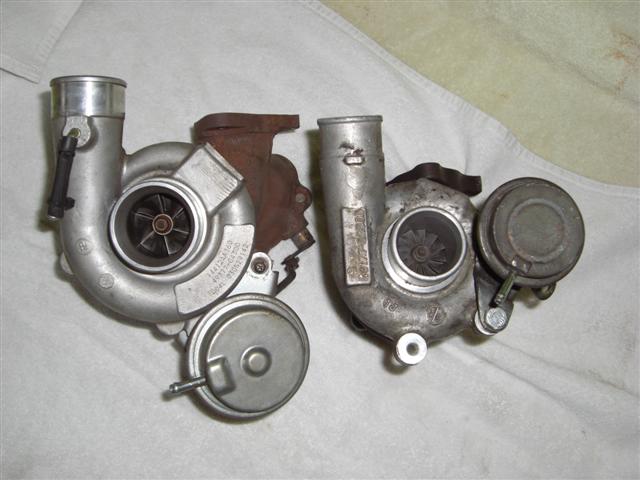
Posted by: ottox914 Oct 21 2008, 09:28 AM
Turbo install: the 9B installed the same way as the WRX turbo, just needed to re-do the header collector adaptor, (which will be re-done this winter to smooth the flow in) and do a new tail pipe:
Attached image(s)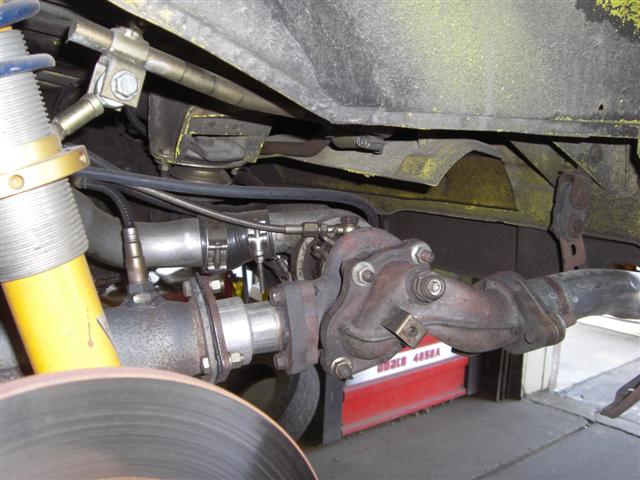
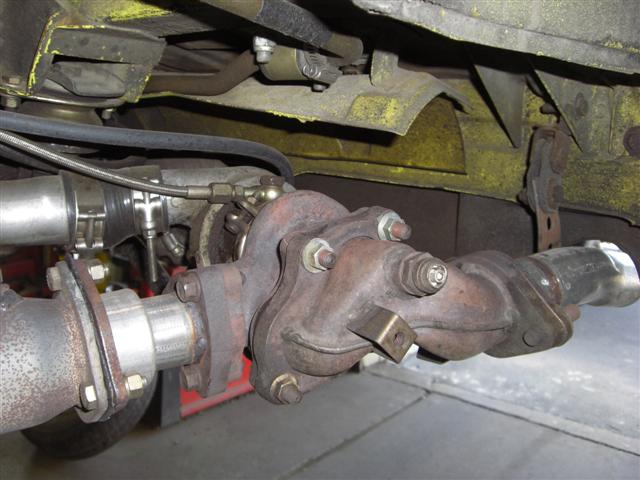
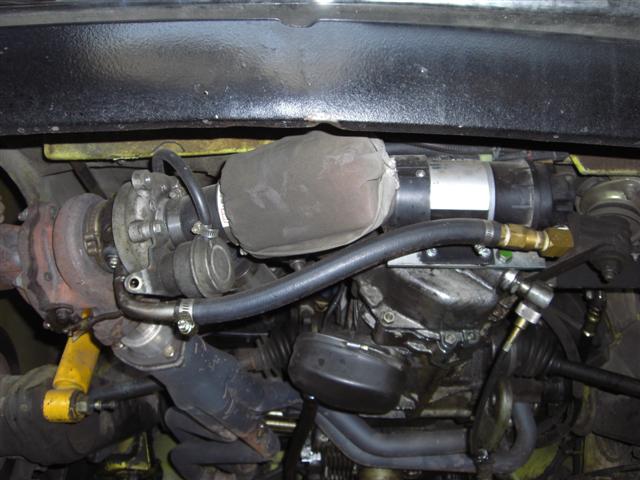
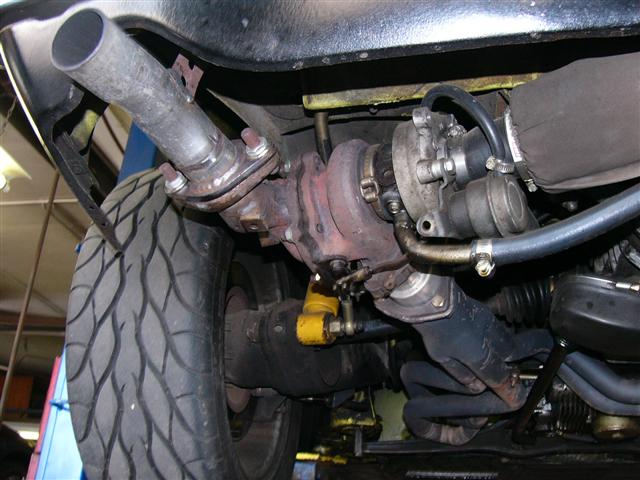
Posted by: ottox914 Oct 21 2008, 09:41 AM
Results? I now see 8 psi at WOT in 1st gear, boost building from 2500 or so in 2nd, and 10-11 from 3500 or so in 2nd gear to redline. AFR's are tuned with the SDS and wideband to be between 11-12 at WOT. The last half of the auto cross season, even on 4 yr old 710's has been a blast. In 2 events I had the 3rd fastest raw time, and was in the top 20 in the last 3. The 3rd place raw times were in grids of approx 120 cars, the top 20's were in 150+ car grids, with 8-10 national trophy winners and a couple of those wearing jackets as well.
Next? Still haven't made it to a dyno to see what it really makes, and what it can make. As our last event of the sesaon was last weekend, its now time to rest up a alittle, and get busy in the garage. Borrowed the equipment to do a compression and leak down test, need to put that to good use in the next couple weeks. Planning a new header adaptor to smooth the flow into the turbo, and water injection to keep head temps down, (the SDS can control this) and maybe add some more boost. The motor is still 100% stock. I think I'll pull the trans and do the flipped 5th gear to get a lower 3rd for the slightly longer tracks we set, and while the clutch is holding fine, might as well replace it while its all appart.
Wish list: better flowing heads and a cam with more exhaust duration from the Type IV store to push more air thru that turbo and spin it up sooner.
Lastly, a pic of the car at our last auto cross, which I was the course designer and EM. It was a theme auto cross, the theme being: Austin Powers, baby!
Attached image(s)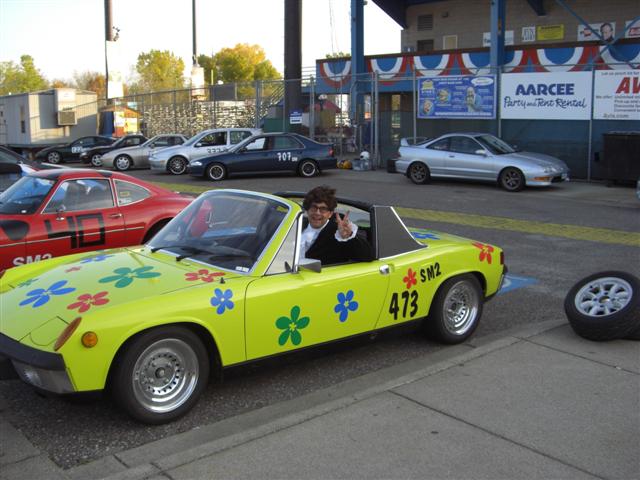
Posted by: rick 918-S Oct 21 2008, 09:54 AM
Ya BABY! You shagged that thing rotten! Very cool project.
Posted by: iamchappy Oct 21 2008, 09:57 AM
Looking good David, next year lets turbo together.
Posted by: biggy72 Oct 21 2008, 08:54 PM
If you want nice transitions go to spdexhaust.com They are really good and not too expensive, at least for most parts.
They are who I used last year making this turbo setup.
Attached image(s)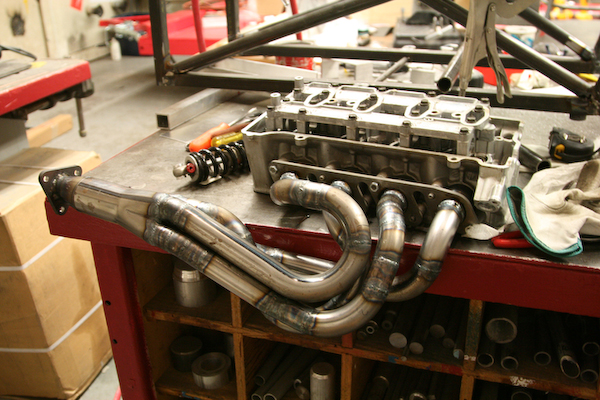
Posted by: ottox914 Oct 24 2008, 08:01 AM
Added a video of our last event. Working an a short compolation of several runs with a little music, hope to have time to finish it and get it loaded in a week or 2.
https://www.youtube.com/watch?v=LG7iIFa5AVU
Posted by: nola914 Oct 27 2008, 11:06 PM
David: Your project looks great. What fuel pump and pressure regulator are you using? And can the pump keep up with the flow required at top end? I'm curious about if you see any lean-out because of insufficent fuel flow.
Posted by: ottox914 Oct 29 2008, 07:39 AM
David: Your project looks great. What fuel pump and pressure regulator are you using? And can the pump keep up with the flow required at top end? I'm curious about if you see any lean-out because of insufficent fuel flow.
Go to my sig and click on the link to the SDS install thread. There are pictures and details on the pump and FPR there also. The pump is the often used walbro 255, and it has NO problems keeping up with the needs of the car. The FPR is an aeromotive unit that has a working pressure range of 20-60 psi, from summit racing. It is currently set at 40 psi fuel line pressure. The injectors are a matched set of 4 ford racing red tops, 30lb rated. At WOT and full boost my injector duty cycle is around 70%.
Posted by: Mark Henry Oct 29 2008, 08:46 AM
Looking good David!
About the only thing that I'd say may become an issue is the little strap on the tailpipe. Every time I've seen that done it ends up failing, as it will stress the entire exhaust system right back to the heads. A better mounting would be to modify the stock hanger (or a new stout unit) so that it provides proper support for the weight of the turbo and tailpipe.
Posted by: RJMII Oct 29 2008, 06:30 PM
Nice muffler. =o) you got a video or a sound clip of your car running? I bet it's got a nice sound to it.
EDIT: just saw the link. I was so busy drooling over the pictures that I completely missed it. lol Looks good!
Post video Edit: And it sounds sweet!
Posted by: ottox914 Oct 30 2008, 08:26 AM
Looking good David!
About the only thing that I'd say may become an issue is the little strap on the tailpipe. Every time I've seen that done it ends up failing, as it will stress the entire exhaust system right back to the heads. A better mounting would be to modify the stock hanger (or a new stout unit) so that it provides proper support for the weight of the turbo and tailpipe.
Hey Mark, I was going back and forth about that for awhile. If I made it a solid mount to the trans, if there was any extra-ordinary expansion from the additional heat of the turbo, would I have cracking and tension in the system? If I had a flexable mount at the pipe, would there be enough support for the turbo? Would it move and wiggle and crack something? I flipped a mental coin and went with a tab off the tail pipe to a firm rubber coupling to the car. The system is pretty rigid, there is hardly any motion to it at all side to side. I'm hoping there is not to much stress on the heads/header connection. No problems so far, but still not sure which was the right choice. I totally see your point, and may re-think a brace or support from the turbo to the trans when I re-do the header collector to turbo adaptor this winter.
Posted by: Mark Henry Oct 30 2008, 09:45 AM
I've done/seen many systems T1 and T4, every time a strap has been done in this fashion it has resulted in a failure of some type.
The sidewinder header I built for a T4 356 kit was too heavy and started to loosen the bolts at the collector, the owner had these straps added at a local shop (without my knowledge), ended up pulling out most of the exhaust studs.
A solid mount was made and mounted direct to the engine, so far no issues
I've used 2 A1 (brand) T4 to bug conversion headers, while no straps were used they (IMHO) are too heavy for just the exhaust studs. Damage was again done to 1 of the heads within 6 weeks, solid mount to engine was made (for both engines) and and both have been running without issue for 3 years.
T1 engines with these straps did not break at the exhaust studs but would fail somewhere at the tubing or muffler.
BTW When I say "solid mount" to the engine the system is still isolated from the chassis via the motor/trans mounts as in the 914 stock exhaust system.
Also I'd say there is not a whole lot of expansion stress from the stock type mounting because even a stock system would have a fair bit of expansion.
Posted by: arvcube Oct 30 2008, 01:52 PM
Makes alot of sense considering most other engine turbo setups use turbo braces that fasten to the engine block, and some of the exhaust flex is made through a flex pipe somewhere on the down pipe connecting the turbo to the exhaust. granted the turbo manifold/header is alot shorter in those cases, yet you would think that the turbo support to the engine would be even more crucial considering the length of the turbo manifold/header used in T4 applications. I see it as...if the engine moves, the turbo should move the exact same way as if it were bolted directly to the block..in this case...case!
Posted by: GS Guy Oct 30 2008, 04:04 PM
I'd also have a concern about system "growth" when fully hot and rigid mounts at the turbo? I have a similar dilemma with turbo out beside the trans and a good ways from the engine exhaust ports. No flex pipes, full rigid system. I'm sure it will put too much strain on the headpipes to support the whole thing, especially with the heavy turbo cantilevered way out back. Needs some kind of bracing, and to effectively support the turbo seems like it need to be trianglated off the trans (tail cone and side plate studs). But then this tries to prevent any growth movement - definitely a catch-22 situation! Maybe a heat dissapating aluminum "transition" mount off the turbo flange, through rubber standoff type mounts, to a triangulated tube mount off the trans? Seems kin'a rube goldberg, but at the same time would seem to solve the issues. Still thinking about this one...... 
Jeff
Posted by: degreeoff Oct 30 2008, 07:09 PM
love the vid! car goes like stink! I love it....sounds GREAT! Not to mention the attn to detail...looks very nice.
josh
Posted by: ottox914 Oct 31 2008, 07:17 AM
I've done/seen many systems T1 and T4, every time a strap has been done in this fashion it has resulted in a failure of some type.
The sidewinder header I built for a T4 356 kit was too heavy and started to loosen the bolts at the collector, the owner had these straps added at a local shop (without my knowledge), ended up pulling out most of the exhaust studs.
A solid mount was made and mounted direct to the engine, so far no issues
I've used 2 A1 (brand) T4 to bug conversion headers, while no straps were used they (IMHO) are too heavy for just the exhaust studs. Damage was again done to 1 of the heads within 6 weeks, solid mount to engine was made (for both engines) and and both have been running without issue for 3 years.
T1 engines with these straps did not break at the exhaust studs but would fail somewhere at the tubing or muffler.
BTW When I say "solid mount" to the engine the system is still isolated from the chassis via the motor/trans mounts as in the 914 stock exhaust system.
Also I'd say there is not a whole lot of expansion stress from the stock type mounting because even a stock system would have a fair bit of expansion.
Hard to argue with the voice of experience. Guess I'll add more/better turbo bracing to the winter to do list of updates/upgrades.
Posted by: ottox914 Nov 3 2008, 10:58 AM
New video added of our last auto cross of the season. I had inititally added some backing music, by a certain guitar player named Jimi, a certain song with the word "fire" in the title, thinking he's been OD'd, dead and gone for so long, who'd care, its not like I'm selling copies or charging to see it- well you tube did, and would not post it with the music, so I had to delete it. If you were to figure out the song and start it at the same time as the video, you'd get the full effect.
To many things on the "honey do" list over this past warm weekend, did not get the compression or leak down done on the 914. Today should be one of the last mid 60's days in WI, I better get to it...
https://www.youtube.com/watch?v=RzrvC2Wfzso
Posted by: ottox914 Nov 20 2008, 12:29 AM
Project 914 turbo gets some press!
http://www.sdsefi.com/project.html
Haven't been keeping this thread updated much lately, sorry. Perhaps over thanksgiving I'll be able to put a little time into updates and get everyone current.
Posted by: Root_Werks Nov 20 2008, 08:34 AM
Nice pictures of your 914 David. Clean install. Oh yeah, YOU CAN'T TURBO A 914!
Posted by: Solo914 Nov 20 2008, 10:23 AM
Project 914 turbo gets some press!
http://www.sdsefi.com/project.html
Haven't been keeping this thread updated much lately, sorry. Perhaps over thanksgiving I'll be able to put a little time into updates and get everyone current.
Very cool stuff.. So, when do you hit the dyno

Posted by: nola914 Nov 20 2008, 11:05 PM
David:
About your intercooler. I took a look around on the net, and a lot of Suby owners change out their stock units for the aftermarket TMIC's to get better efficiency and HP. But the aftermarket units are much thicker. I'm wondering about the fit and whether the thick units would have enough room to get proper flow through out of the bottom.
Is your IC a stock model or one of the thicker upgrades? If its stock, do you think that a thicker aftermarket unit would fit and function properly in the same location?
Posted by: ottox914 Dec 1 2008, 09:56 PM
Updates: Dyno is a no-go. Winter just came up to fast. Its highs in the low teens around here lately, and a 2 1/2 hr drive each way in a car with no heat to spend $75 bucks for 3 pulls then turn around and drive back for some odd reason did not appeal to me at all. Plus I have better things to spend my $75 on these days... The butt dyno says around 150 hp at the wheels, but I have no real idea, no other teeners in the area with other HP to compare the ride to. Our auto cross club president has a 1.8 miata with 6psi of supercharged boost, making around 160 whp. His feels stronger down low, no suprize with his M62 blower, but once I get to 3500 or so, mine really takes off right up to redline.
WRX intercooler. Its a stock factory WRX unit, not from an STI, not a thicker aftermarket unit. I think the thicker ones would probably work, but my support braces were set up for the factory sized unit, and I got one cheep enough from a club member, so thats what I went with. I think the sucker fan, and more importantly, the sealed plenum below the IC make the real difference. I don't know if a bigger, thicker unit would have helped that much. As for clearance, check the following pics.
Posted by: ottox914 Dec 1 2008, 10:31 PM
Updates: I checked the thread to see what I had added and what not- and we are up to date on the turbo, with the swap to the 9B. I had some issues with oil blow by, ? if this was from the rings/valves/guides, or some of all of the above. My oil separator and catch can were home made from what I could find in the shop- a bike bottle and some 3M type scrubbing pads stuffed in it to slow down the air if there was a pressure difference from inside the bottle to outside. Seemed to work fine, but after a day at a longer track at a larger event site, I had lots of blow by out of the bottle and out of one head at the valve cover. So after a weekend of research, I ordered the CFR oil separator. Not cheep, but well worth what I paid. It works perfectly. I had Chris add some fuel cell foam to the interior of the can to further aid in oil separation. Here's a few pics: The first 2 are the goodies prior to install, the next 4 are the install. Note the 3rd install photo, shows a line from the oil fill to the CFR can. If I was using a thicker intercooler, I don't know if I'd have enough space for a decent curve in the line with out a kink, as a thicker IC would force a tighter bend in the hose.
Attached image(s)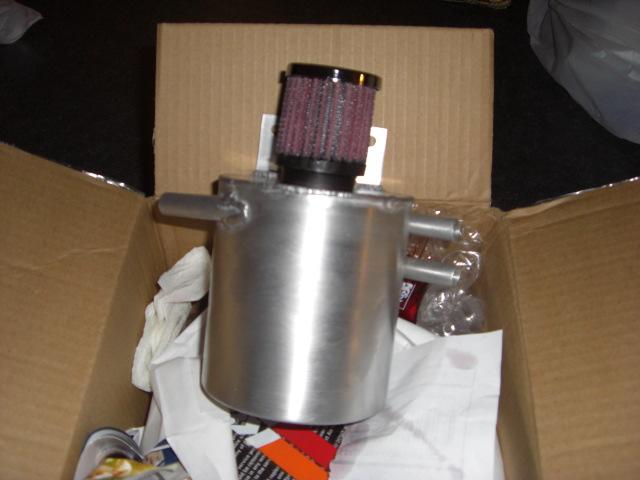
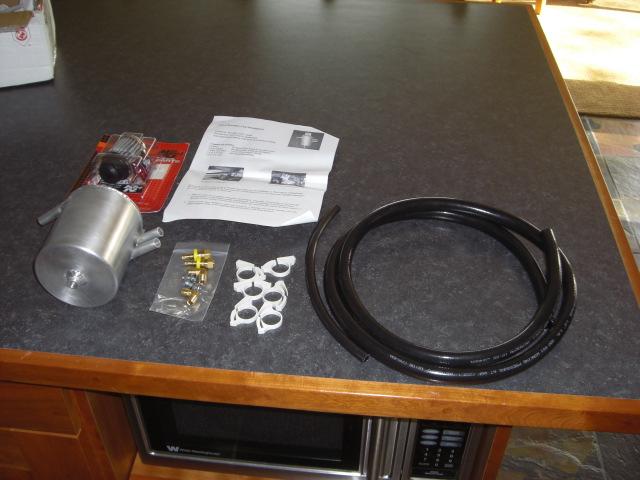

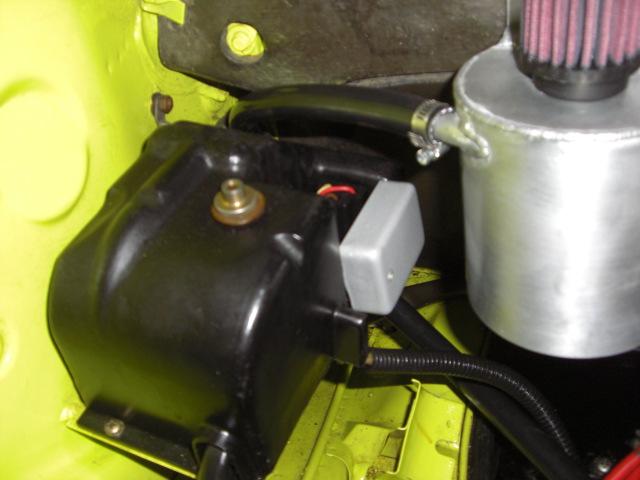
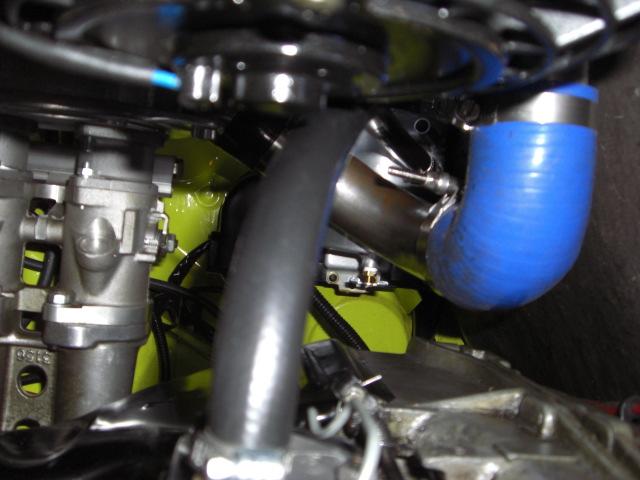
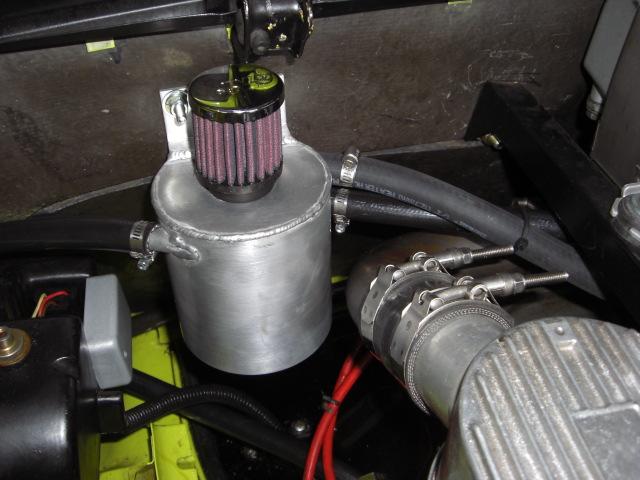
Posted by: Gint Dec 2 2008, 07:52 AM
David, WHat did you use to attach the breather tank to the firewall? Does is go all the way through the firewall? I'm considering riv nuts...
Posted by: ottox914 Dec 2 2008, 08:38 AM
David, WHat did you use to attach the breather tank to the firewall? Does is go all the way through the firewall? I'm considering riv nuts...
I pulled the back panel out of the interior and drilled right thru- held the tank up where it would go, (pulled the filter off the top for better axcess to the mounting holes), marked, drilled pilot holes, drilled full size holes, dug around the workbench for some bolts, finding 2 that were maybe a bit long, but would work, and presto! One done project.
The instructions for the kit have a drain line from the bottom of the tank back to the breather tower on the block. With the intercooler in place I didn't have that option, the oil would have had to flow uphill from the tank to the block. I went to the local hardware store and got a 1/8" valve that fit the threads perfectly in the bottom of the tank, and now I just check the valve, drain out what little is in there, and do this as part of my pre-race prep on the car when checking the engine oil level prior to an event.
It was hard for me to spend the $$$ on the part- its not cheep, but to get one in your hands, the quality is superb, and it does exactly what it needs to, and does it much better than my home-made bike bottle/green pad shade tree solution. Some things are worth spending money on if they're the right solution to the problem, and this was the right solution.
Looks cool too.
Attached image(s)
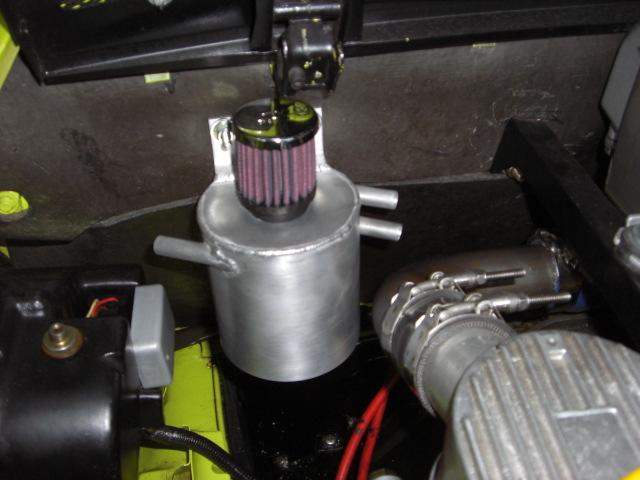
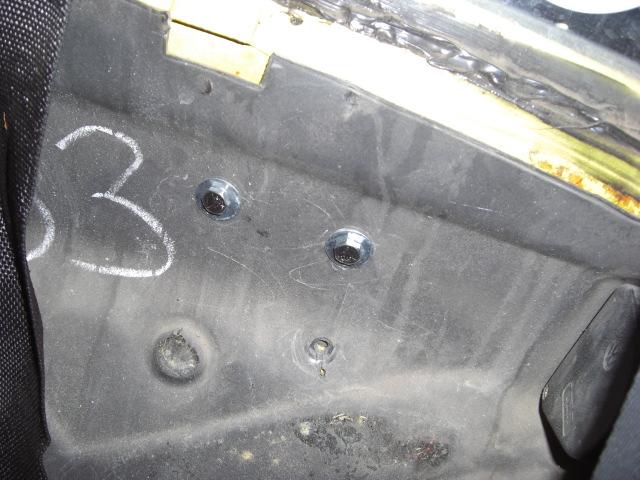
Posted by: maf914 Dec 4 2008, 03:43 PM
The engine lid hinge appears to be very close to the breather can filter. Does it interfere when closing the lid?
Also, does much oil vapor pass exit the can through the filter? I am considering ordering one of Chris's breathers and am curious about that.
Thanks. And thanks for all of the build photos and discriptions.
Posted by: ottox914 Dec 7 2008, 10:18 PM
The engine lid hinge appears to be very close to the breather can filter. Does it interfere when closing the lid?
Also, does much oil vapor pass exit the can through the filter? I am considering ordering one of Chris's breathers and am curious about that.
Thanks. And thanks for all of the build photos and discriptions.
Hinge is not a problem, looks closer in the pics than in the real world. Lid opens and closes no problem, but it is close. I suppose I could have moved the tank 1/2 an inch this way or that, but with the space remaining with the intercooler and other turbo goodies back there, this was the only space left, so being interested in how well it all looks as well as how it works, I centered the can in the space that remained as best as I could.
Vapor? hardly any, as in none. The instructions for the filter have you squirt some purple pre-oil stuff on it. The instructions have you saturate the filter with the pre-oil oil. The first time I used it there was a little run off of this onto the top of the can, easily wiped up. No mist or fog coming from the vent during normal, or not so normal (turbo charged auto cross runs) use. Much better than my old system of a bike water bottle with holes drilled in the top, and 3M scouring pad stuffed inside. That system worked OK for awhile, but on a longer track with extended boost, I had noticable blow by.
Posted by: 904svo Dec 7 2008, 10:38 PM
Dave, try this ,put a pressure gauge on the crankcase. I am willing to bet you
have over 10 lbs of pressure when you but your foot in it. You do not have a large
enought hoses to relieve the crankcase pressure. You may have to add extra relief port on each valve cover and run it to a larger overflow catch can.
Most drag cars have the same problem they solve the problem by using a vacuum pump to relieve the crankcase pressure
Posted by: nein14 Dec 8 2008, 06:42 AM
Dave, try this ,put a pressure gauge on the crankcase. I am willing to bet you
have over 10 lbs of pressure when you but your foot in it. You do not have a large
enought hoses to relieve the crankcase pressure. You may have to add extra relief port on each valve cover and run it to a larger overflow catch can.
Most drag cars have the same problem they solve the problem by using a vacuum pump to relieve the crankcase pressure
904sov is correct, the vent hose that comes out of the crank case cover on my motor is 1" in diameter and the tank is 1 liter in volume.
Also both valve covers have return lines.
Posted by: ottox914 Dec 9 2008, 05:59 PM
904sov is correct, the vent hose that comes out of the crank case cover on my motor is 1" in diameter and the tank is 1 liter in volume.
Also both valve covers have return lines.
As noted, since the new breather package from CFR I have had no blow by issues, but I'd be interested to see your set up- got any pics to share?
Posted by: nein14 Dec 10 2008, 06:26 AM
904sov is correct, the vent hose that comes out of the crank case cover on my motor is 1" in diameter and the tank is 1 liter in volume.
Also both valve covers have return lines.
As noted, since the new breather package from CFR I have had no blow by issues, but I'd be interested to see your set up- got any pics to share?
how many miles and for how long time wise have you driven the car, also how much boost are you running for street use?
these all have an effect on weither you will se it come back, base my experience your tank looks good but INHO your crankcase breather hose is too small.
Posted by: ottox914 Dec 12 2008, 02:22 PM
these all have an effect on weither you will se it come back, base my experience your tank looks good but INHO your crankcase breather hose is too small.
Since adding the new breather/catch can, have driven only 400 miles or so. No problems so far. Don't know if its just good luck, or haven't found right (or wrong) combination of twisting auto cross track and boost to really stress the new parts, or what.
Posted by: ottox914 Dec 13 2008, 07:33 AM
BREAKING NEWS!!! NEXT EVOLUTION OF PROJECT 914 TURBO!!!
I'd been having some smoke and blow by issues with project 914 turbo. I don't directly pin these problems to the turbo, as the motor was re-built by Brad Mayeur some 15 yrs ago or so, and has served me faithfully for that time, being beaten nearly to death auto crossing for the last 10 yrs. It doesn't owe me anything, I've more than gotten my moneys worth out of it.
I do believe the addition of forced induction has served to magnify the condition time has placed on the little motor that could, and any worn parts were just made that much more obvious. Nothing is broken, but its time for a re-build.
And so I have contacted Jake, and we have an interesting plan to make the most of my dollar, using a mix of 1.7 and 2.0 parts to build a turbo specific motor. Heads are already on their way to Len. I need next week to get the motor dropped so parts of the 2.0 can go to Jake for checking and re-building.
http://forums.aircooledtechnology.com/showthread.php?t=2819
(link to the discussion and planning of the new motor)
Needless to say, I'm looking foreword to next season, and hunting down that darn 350+ whp Comptech supercharged S2K that beat me 2x last year by a just tenths of a second.
Posted by: ottox914 Jan 11 2009, 03:25 PM
HEAD PORN!
hey, Hey, HEY, get your minds back on cars you guys!
Len sent a pic of the head- not much done beyond a good clean up and inspection. Sharp eyes will note the plug location has been changed. Len thought the heads would be moving along in the next couple weeks, so I'll post more of the magic as I get updates.
Gotta get going, the garage is calling, got the top side of the motor un-buttoned a couple weeks ago, still need to drop the motor and tear down the 2.0, getting some parts to Jake for inspection/machining.
Attached thumbnail(s)
Posted by: RJMII Jan 15 2009, 10:59 PM
Dave,
How did you plumb the turbo for cooling? what size of lines? what type of fittings to tap in where you did? Is it in the same loop of cooling line as the oil cooler?
Posted by: ottox914 Jan 16 2009, 09:31 PM
Dave,
How did you plumb the turbo for cooling? what size of lines? what type of fittings to tap in where you did? Is it in the same loop of cooling line as the oil cooler?
The 9B turbo I'm currently using came from a mitzu 3000 GT, its the front turbo off that twin turbo motor. In its native application, it has oil lube and water cooling. In my car, I plugged the water fittings, not like I needed to, but it looked a little better and kept road grime out of there, and am using just oil to lube/cool the turbo.
The oil cooler is running off a sandwich plate adapter with a thermostat built into it. The lines from the adapter to the cooler and back to not share any function with the turbo oiling. As the turbo needs oil from start up, I couldn't tap into the supply to the cooler, as if the thermostat on the sandwich plate had not reached operating temperature, there'd be no oil for the turbo, and thats no good. The oil coming from the turbo leaves the turbo by gravity, so plumbing that into the return to the motor from the cooler would not work either, as there would be a back pressure from the cooler return line to the drain line of the turbo. Again, no good.
Go to pg 4, comment 79, the photos attached there show the "T" fitting I added at the base of the oil sending unit. This got a braided stainless brake line attached to it to supply oil to the turbo. The brake line was, l think, under $10 bucks from the local dirt track supply store. Cheeper than anything summit or jegs had to offer. Pays to shop. The oil goes to the turbo, then drains out and into a tildon differential pump, now being used as a scavenge pump, to get the engine oil back to the motor. Seems I forgot to post the return trip pics for the oil. It goes from the turbo to the Tildon, and from there back thru the engine tin, where it attaches to a fitting I drilled and tapped into the lower area of the oil fill tower. Here are the pics of adding that fitting: First are the tools needed, 2nd is drilling pilot hole, 3 and 4 are tapping the hole. I used lots of oil on the tap. To catch shavings, I stuck several old socks in the oil fill, saturated them in oil, and took frequent stops to feel for any shavings coming off the back of the tap. Any I missed or couldn't feel were caught in the oil/socks. I'm pretty sure none got thru. Last photo shows the braided supply line from the oil sending unit, and the black return line from the tildon pump, attached to the oil tower. I chose to drain the oil back up there, rather than in a valve cover as others have done, because at an auto cross, with extended G loading of a long sweeper, I didn't want to risk filling a valve cover, and having the tildon try to fight to hard to evacuate the turbo oil into a full valve cover.
Don't know if this answered your question, but there it is.
Attached image(s)
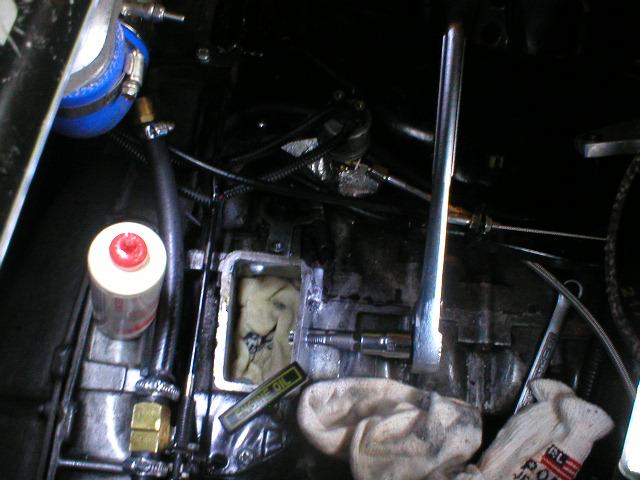
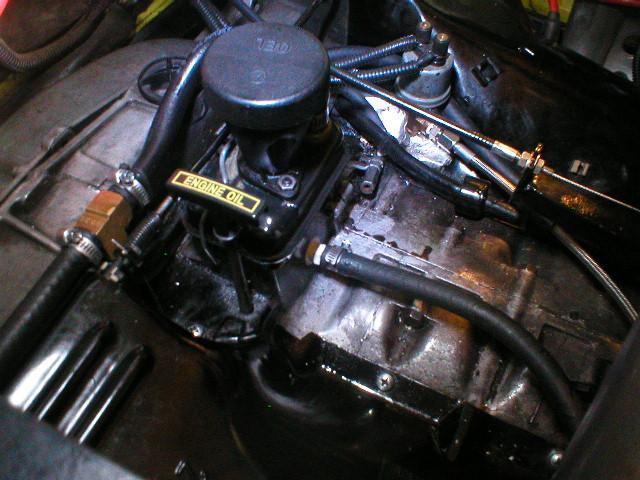
Posted by: ottox914 Jan 16 2009, 09:45 PM
Below is a copy/paste from a comment I made on another turbo thread on our forums. I wanted to add it to this thread because I don't want people to think:
1- You need a ton of money to do this. I'm spending a lot of cash, over alot of years, but this is my hobby. I don't drink much, have no tatoos, no wacky collections, other than Porsche books. I enjoy this like someone else might love to golf or fish. The journey is for me often more satisfying than the destination. You can spend alot more, (ah, Chappy...) or alot less. If you steal some ideas from these pages, go for it. If you come up with better solutions, share them.
2- I didn't want anyone to think the new motor is because I blew up the old one. It was on its last rpm's awhile ago. If you're thinking of a turbo, either make sure your motor is healthy, or do like I did, work out the bugs of your turbo system on a sick motor, if it blows, it was gonna go anyway. Then build the motor you want the turbo to be on.
"My intent in making this comment was not to imply that you needed a large wad of cash, or a bottomless pit of stuff to break, but to get the point across that if you build it, you'll gain a better understanding of how it works, and if/when it breaks, you'll be in a better situation to understand the failure mode and how to repair/avoid it again in the future.
My SDS is a fine example. I am more interested in the overall engineering of the turbo system than the workings of the EFI. I could have built myself a mega-squirt system, but knew of others who had and ended up with problems getting the build right, then working thru the screens and screens of programing, and if one little thing is off, say the voltage range for the TPS on the system set up does not match the actual range of the TPS used, more trouble shooting to find and fix this, IF you don't pop a motor trying to tune around the problem. I elected to spend a little more and go with a proven system, and had great fun designing the layout of the wiring harness, fuel lines, linkages, and ecu location. Much more fun than I would have had tracking down a diode that I installed backwards one night at 9pm. If the SDS fails, I won't know where to start, but with the beyond excellent customer service they have shown me, I won't have to. I chose not to get more educated by the been there done that school for the efi part of the project, but I did a TON of research on what unit to buy.
Whats that got to do w/a turbo on a 914? EvilEd did not make a kit for his system, he used an idea for CIS, that I think, but may not recall completely, was a retro-fit offered as a kit for for bus engines, and morphed that into a very good 914 system, but for the most part, its a one off build. Chappy has done amazing things with his turbo system, and in his quest for fire, or rather power, had moved up into bigger and better engines. He was more interested in building the perfect 914, so he applied his efforts in that direction, farming out the motor build.
My system is loosely based on the kits from STS. Google STS turbo and you'll get to their site. My turbo car has been an evolution. I bought the ITB's from Jake several years before I used them, as I was thinking NA at that time. So step one was to mount the ITB's, get fuel and linkages figured out, install and tune the SDS. I strongly considered selling the ITB's and going CIS for the turbo, when the turbo bug bit, as I had been following Ed's build closely, but went SDS for several reasons: Its a great system that has all the features I need, and few I don't, service/support is excellent, and it controls spark and fuel. That was probably the big reason I didn't go CIS, I wanted to be able to fine tune the ignition curve for NA and boosted operation. I also liked the clean look of the engine compartment with the ITB's and the harness/fuel lines tucked up out of the way, and there was LOTS of room for an intercooler as well.
As far as the system not being reliable, well, draw your own conclusions. The motor in the car currently is probably 12 or more yrs into its last re-build, and was using some oil prior to the turbo. I was figuring that with running a dozen auto crosses and schools a year, for the last 10 yrs, that I had maybe a yr or 2 left in the motor before it would be really needing a re-build, just on general principles and accumulated beatings/mileage. If I'm finishing top 10 in 100+ car grids I'm not being any to easy on the hardware to do this. So putting the turbo on it was not at all the cause of my doing a new motor, it was part of the plan. Using a tired motor for the test subject, if I really messed up and popped it, not much lost. I have proven to myself the system as it is installed all works as it should. The turbo and motor have stood up to 11.5psi on pump gas. My school of hard knocks intercooler plenum and fan set up will be improved upon for the new motor, and with better heads and cam, the whole system should breath much better, which should spool the turbo sooner, and its all good in the end. When will it be "done"? Never. And for me, thats part of the fun.
Whose system is best? Blonde, brunette, or red head? Chappy has made the most amazing street 914 I could imagine. Trunk space has been lost, mega horse power and super-coolness found. Ed's/Nein's set up tucks into the factory location, not even loosing the raintray, and has been as reliable as gravity for 7 yrs of boost. Outstanding! And while the cost of the "used" parts is less than what I have into mine, I suspect if there was a 10 page build thread there was plenty of machine work and trial and error to get it right. Mine is a little different still, and works fine, and should be a hoot with a stronger engine as the project continues to evolve.
Back to the project at hand: Draw thru would not need a RR FPR, but the carbon seal is a must. Consider your location also- while I do not have direct experience on this, I understand the draw thru systems can be prone to iceing and other issues in temps below 40-50 degrees or so. Read up on what Bell has to say on this. I considered a draw thru as well, but thought it to be a step backward from the CIS, and 2 steps back from the SDS, however depending on the budget, and intended use of the car, draw thru could be the way to go for this build. For me, driving to events in the early spring in 30 degree temps, draw thru was not an option, but the bug guys have been doing it for a while and making it work fine."
Posted by: RJMII Jan 16 2009, 09:57 PM
Dave,
You are awesome at answering questions! wow, and thank you!
Posted by: ottox914 Feb 2 2009, 09:55 AM
MORE HEAD PORN!
Progress has been slow at Hoffman automotive, but I'm in no hurry. Quality can take time, and I'm certainly aware that my heads aren't the only thing Len has on his plate. I can take a back seat to racers who need an emergency repair, or others who got their project in to him before mine.
Still way to busy at work, and my motor is not dropped yet. Always looking on the bright side, work seems to have slowed a little recently, and Nancy is gone overnight for her work for a couple nights this wk, so maybe, just maybe I can get in the garage and get things moving on my end. I'm so close- just need to disconnect 1 CV, don't forget that ground strap, and the wire to the oil temp sending unit in the sump plate, and she should be ready to drop.
Now a few pics:
Attached image(s)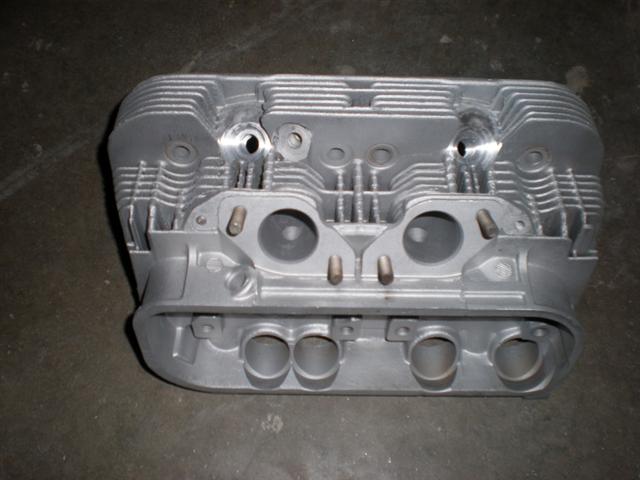
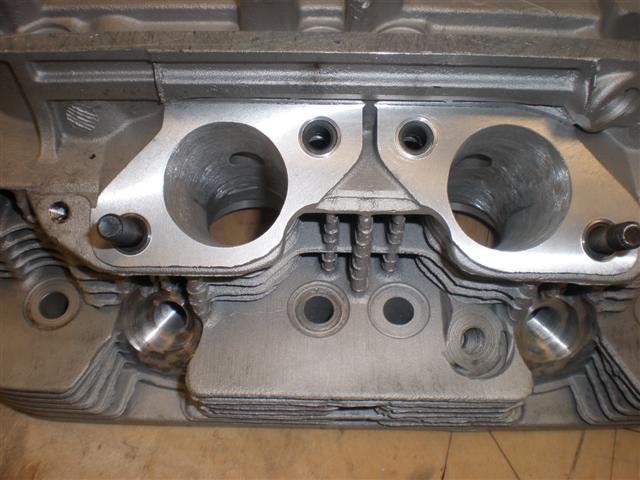
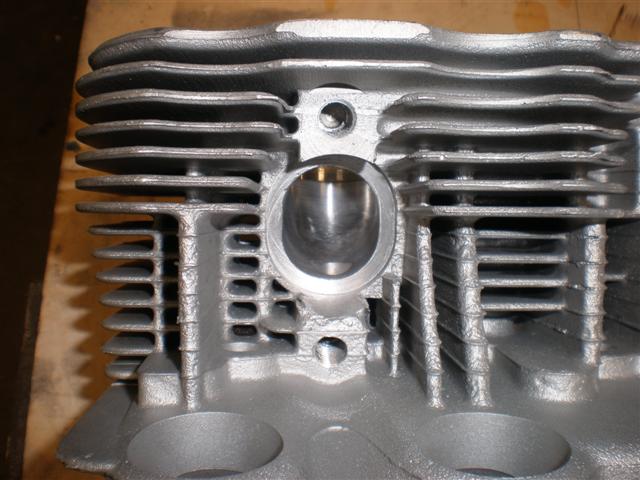
Posted by: Mark Henry Feb 2 2009, 03:58 PM
So....what valve sizes are you and Len going with?
Looking good 
Posted by: RJMII Feb 2 2009, 04:03 PM

:drool:
They look like they should be able to flow nicely!
Posted by: HAM Inc Feb 2 2009, 04:53 PM
We are going with 40 x 36mm valves. I want to make sure David has a very high I/E flow ratio for the turbo, and we want to make sure the engine is responsive at lower revs, hence the smaller intakes. This should be a very snappy combo!
I do not like large bores for turbo T4 engines. The small bore, long stroke set-up will keep as much head strength as possible and put the torque at the RPM's David says he want's it at (same place I like it too); down low and mid range. I'm eager to see how this combo suits him.
Posted by: ottox914 Feb 13 2009, 04:52 PM
Getting closer now... a little more head porn... talked to Len today, he expects them to be done soon now. Next steps, cc the chambers and get with Jake on the specs for the J & E pistons. These are the "magic bullet" that makes this all work, being sized for my cyls, and having a correct pin height to work with the crank and rods I'll be using. Bummer? 6-8 weeks or more for the J/E's to show up. I thought I was giving myself enough lead time, but, oh well, not going to hurry this along and mess something up. After all, I an always drive my wife's M car to auto cross while I get the 914 turbo motor built. Now, a couple pics of the heads, and the spare auto crosser...
Attached image(s)
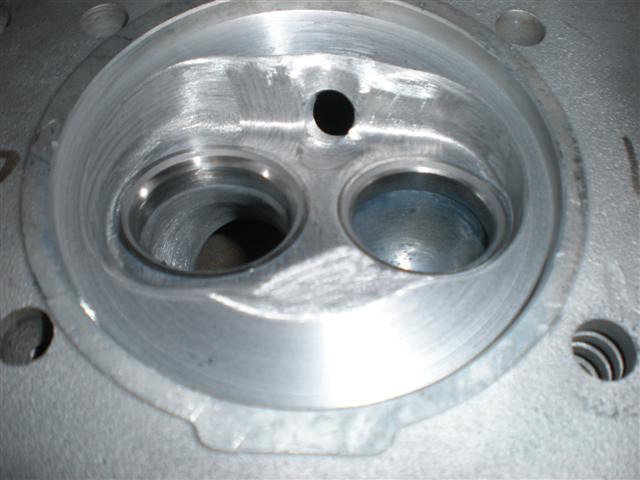
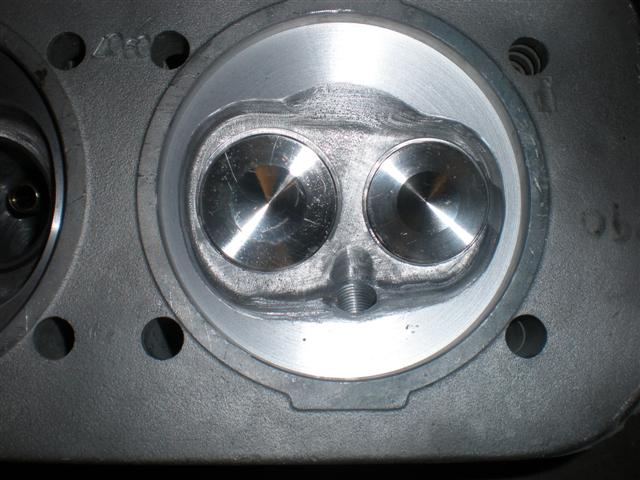
Posted by: ottox914 Nov 22 2009, 08:29 PM
Back from the dead- My wife needed to have BOTH her ACL's replaced this summer, so I've been a little busy of late. Taking care of her, doing everything she usually does around our house, and looking to suck up all the OT I can from work, as she is self employed and there is no ST or LT disability to claim. Finally got the engine tore down and the last parts sent to Jake for inspection.
The P/C's didn't look bad at all, they'll probably be sold, as will the 2.0 heads. I think the problem with the oil burning of the motor was an esxhaust valve guide, as when I took the kerry hunter apart, 3 of the 4 header tubes were bone dry inside, but one was had oil inside it. The heads, didn't look bad at all either. For a n/a motor, the guide might be just fine, but with some extra pressure from the boost, its weakness became apparent.
Now some pics: P/C's
Attached image(s)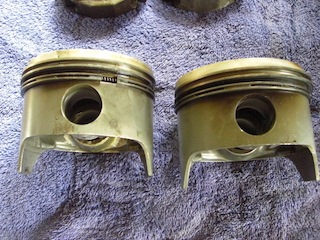
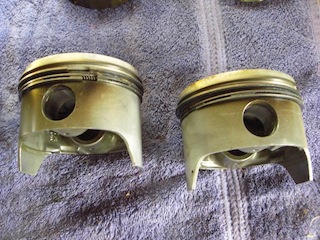

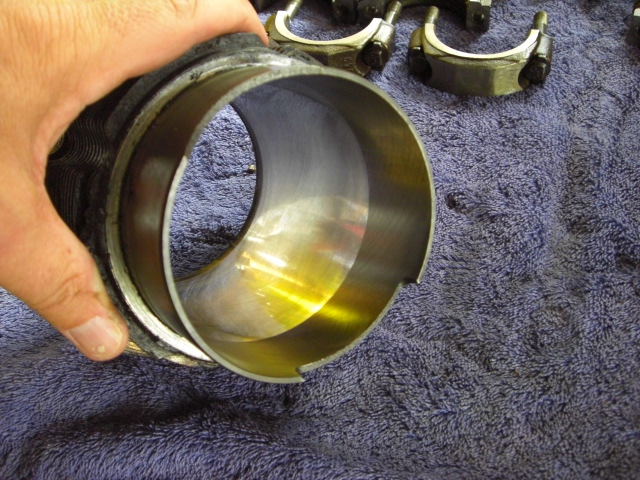
Posted by: ottox914 Nov 22 2009, 08:32 PM
...more pics, cam and lifters. (ouch!)
Attached image(s)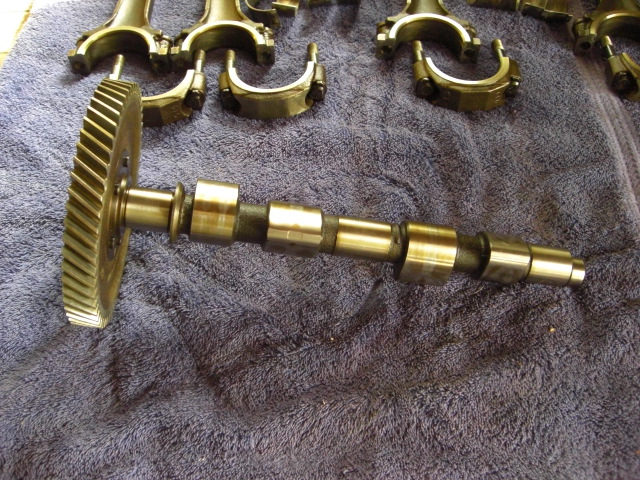
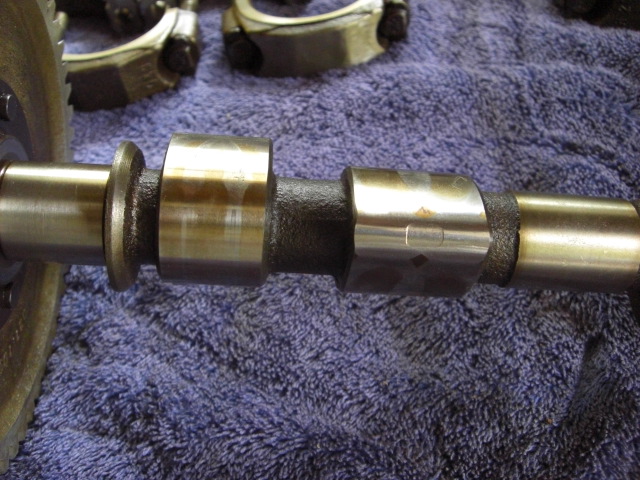
Posted by: ottox914 Nov 22 2009, 08:35 PM
cam and lifters.
Attached image(s)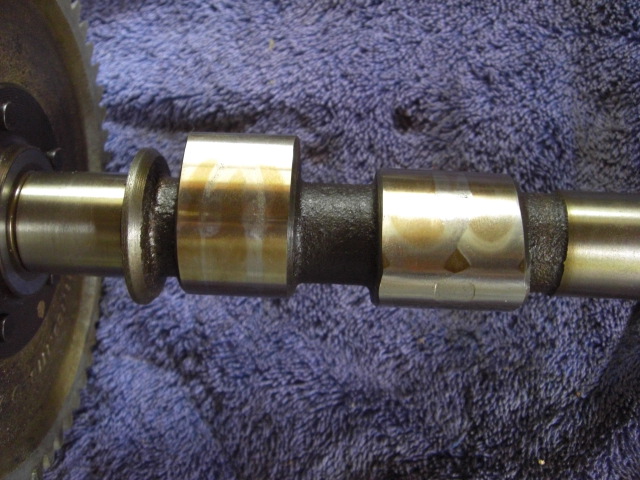
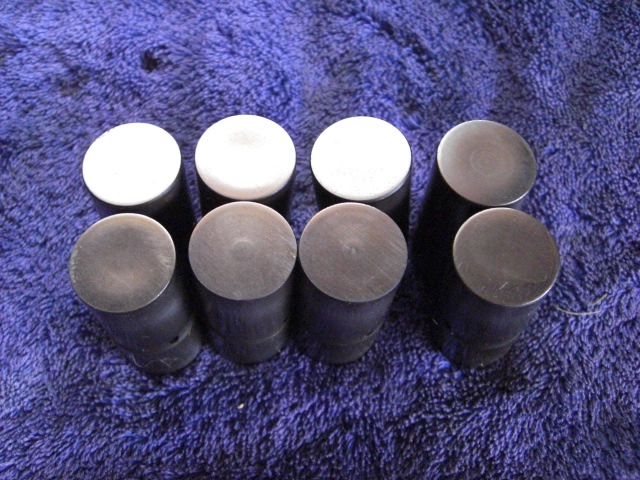
Posted by: ottox914 Nov 22 2009, 08:38 PM
bearings...
Attached image(s)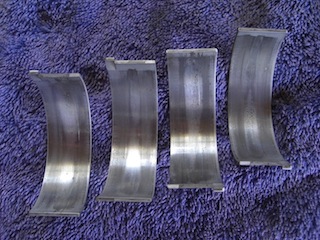

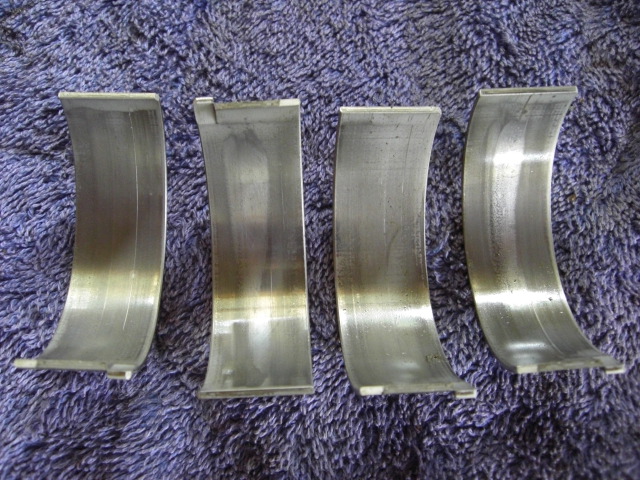
Posted by: ottox914 Nov 22 2009, 08:39 PM
crank and rods
Attached image(s)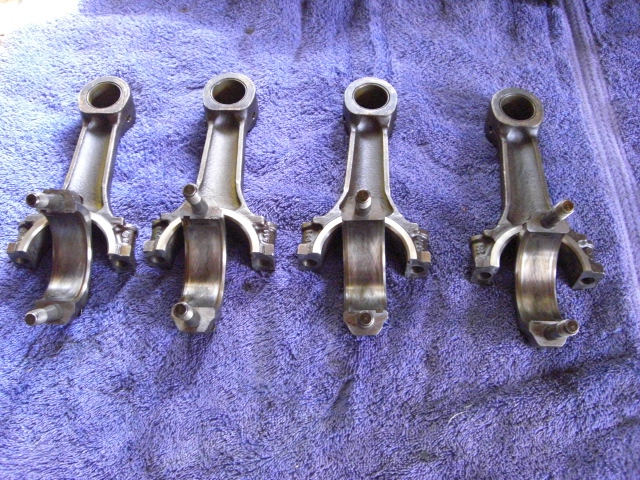
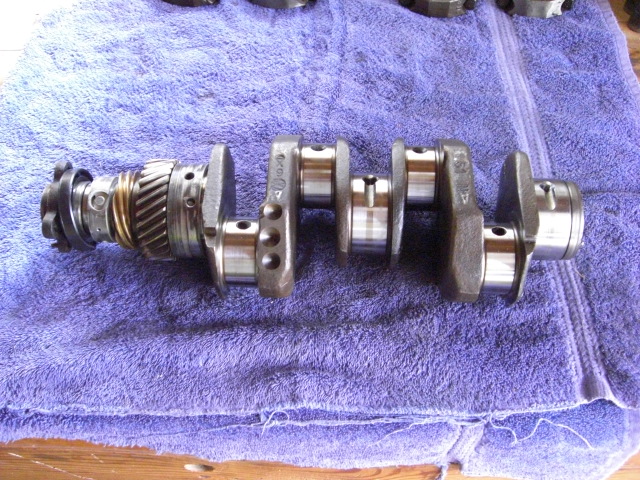
Posted by: ottox914 Nov 22 2009, 08:41 PM
crank and rods- close ups
Attached image(s)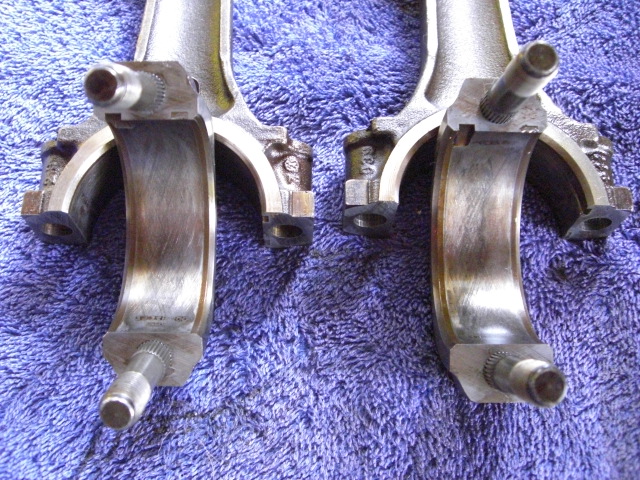
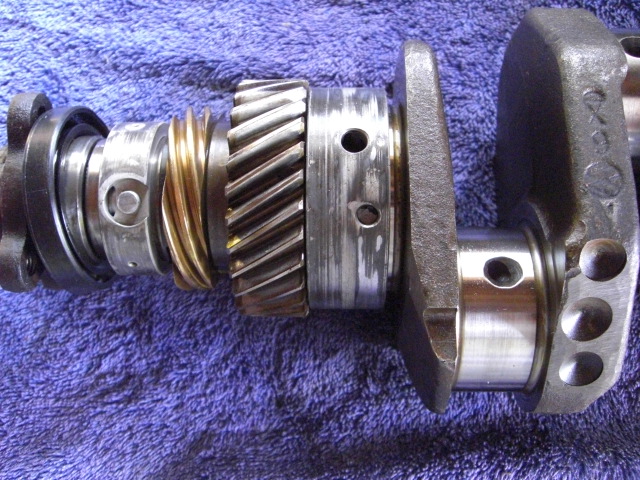
Posted by: ottox914 Nov 22 2009, 08:46 PM
Last but not least, the miata seen in prior pics has been replaced with this: a 2000 Audi TT. 180 HP, fwd model, 70K one owner miles, and note the back of the car- no "bird perch" spoiler. This is an un-modified car. Audi offered a factory "update" to the suspension, which served to basically dull the response of the car. You can tell the updated cars as they all have the rear spoiler, this one does not. Its not a 914, but its also NOT a miata...
Attached image(s)
Posted by: ottox914 Dec 22 2009, 07:40 PM
Getting closer... Len has been holding off on the heads until the rest of the parts are ready. Case, crank, rods have been sent to Jake for inspection and re-manufacture. While getting the bits and pieces together, I sent the exhaust system out for Jet Hot coating. Thats pretty cool stuff. I got the extra high temp coating, so its not a chrome bright finish, but still silver and shiny. They coat the inside and outside of the headers and collector. Should look nice with a turbo tacked on the back of it.
Attached image(s)
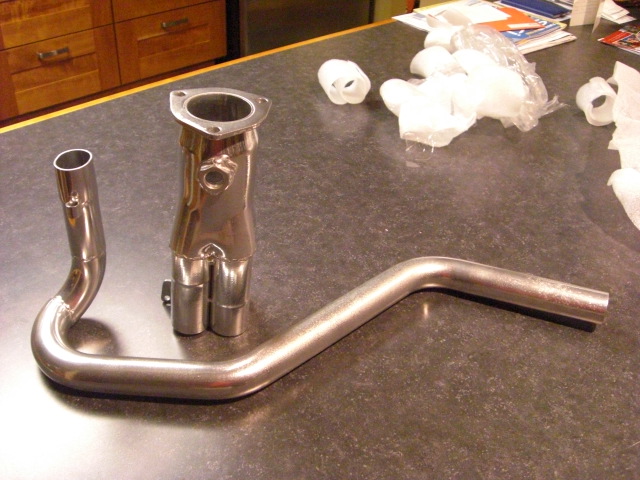
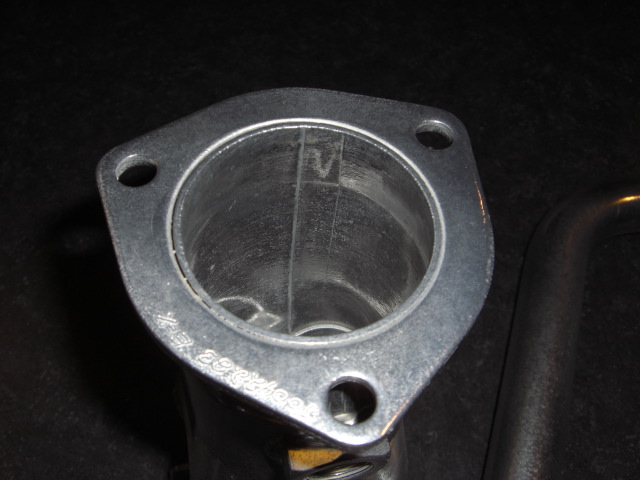
Posted by: ottox914 Dec 24 2009, 07:53 AM
Good news, bad news, and an plan...
Got a call back from the Blake in the shop, working on my parts yesterday...
Good news: The crank looks great, has not been messed with, is std/std, should need only light polishing to be ready for balance. The flywheel needs only a light cut to be ready. The rod big ends are in spec, need no work, the bushing in the small end showed minimal wear, was in spec as well. They test fit the new JE pistons and pins to the rods, everyone was happy, nothing to tight, nothing to loose. So polish the crank, assemble the flywheel, clutch, pressure plate, clutch disc, crankshaft, fan, and then balance/index the whole assembly, do an oil system mod to the rods so they will get some oil up on the underside of the pistons, balance the rods, and its all ready to come home.
Bad news: The case has its issues. The crankshaft bore was in spec, however the end bearing by the flywheel has enough wear on the thrust surface that this should be addressed. An odd and tricky bit of work, you need the right tools to get it done right. The shop to do this is in CA. So more shipping there and back, and as it was explained to me, to machine the case to resolve the thrust surface issues, the case will be align bored, the thrust surface cut, and a special ($$$) new bearing will be needed. The estimate, and this is just a guess, is 4-500 to get this done, shipped, and back to the shop in ACH, then they can check/confirm its done right, and more shipping back to me.
I have another case at my father-in-laws place, collecting dust in the barn. Over Christmas I'll be hauling that one home, taking it apart, and seeing if maybe an aircooled oriented shop in the twin cities can be found to have a look at case #2. If thats in better shape, I might be dollars ahead just to tap and plug that case and move on.
Posted by: ottox914 Jan 11 2010, 06:53 PM
UPDATE: Found a (sort of, he's a good 2 hrs drive time each way from my place) local aircooled machine shop to have a look at my spare case. Talked to the guy today, after leaving a ton of messages, he sounded excited by the turbo 914 project. He has been doing type 1 and type IV work forever, does air craft conversions of air cooled motors, comes well referenced by some other folks in the MN 914/Porsche community. He also does work on Model "A" motors. His machine shop sounds huge, and includes an engine dyno for the aircooled motors. He has used SDS on many of the aircraft conversions, and is familiar with that system, which, oddly enough, is what I'm running.
So, once I get my plan "B" motor torn down, it'll go to his place for inspection, and if it looks better than the 2.0 case that Jake and Co. should be sending back with my shiny new parts, I'll build off that one. Blake thinks a week or so to get the last of the work done on my stuff, so hopefully, soon, I'll have photos of a massIVe project to get started on.
And- anyone have any thoughts of the condition of the parts pictured above? I was suprised that no one chimed in on them. The pistons and cyls didn't look all that bad, but the cam and lifters looked a mess.
More updates to come!
Posted by: ottox914 Feb 5 2010, 07:40 AM
PARTS ON THE WAY!!!!!
Got an email from Len that the heads should be done and on the way monday or so. Can hardly wait to see the magic he has done to them. Of course I'll pitch up some pics when they arrive.
Posted by: rick 918-S Feb 5 2010, 08:16 AM
I  this project!
Posted by: ottox914 Feb 15 2010, 08:32 PM
Was expecting from MR. UPS a box on tuesday... found an odd large box at home today after returning home from a funeral... box is from some guy named Hoffman?
Attached image(s)
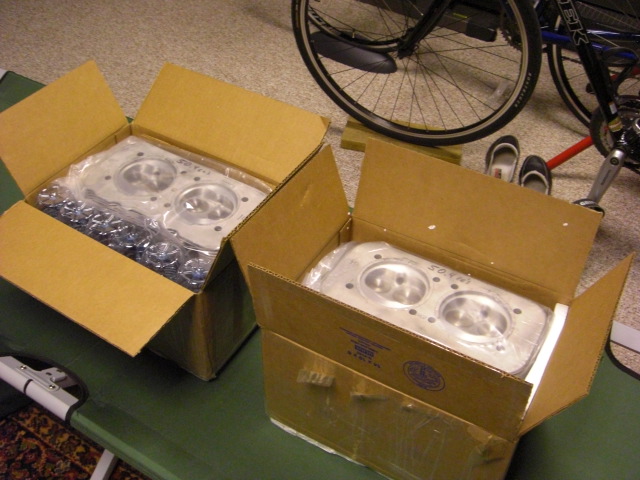
Posted by: ottox914 Feb 15 2010, 08:34 PM
MMmmmmmmm...... shiny new parts...
Attached image(s)
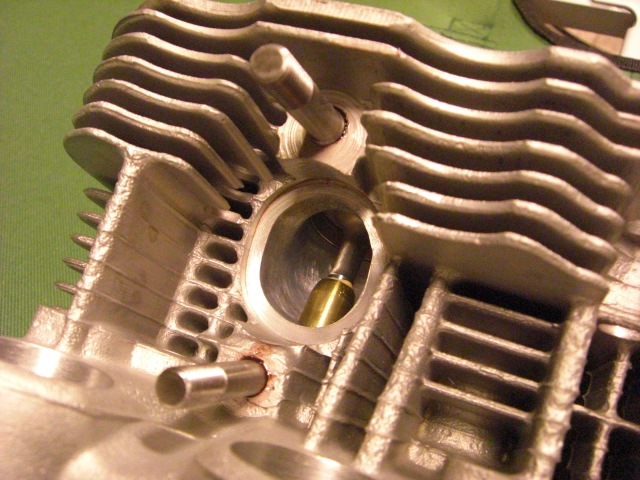
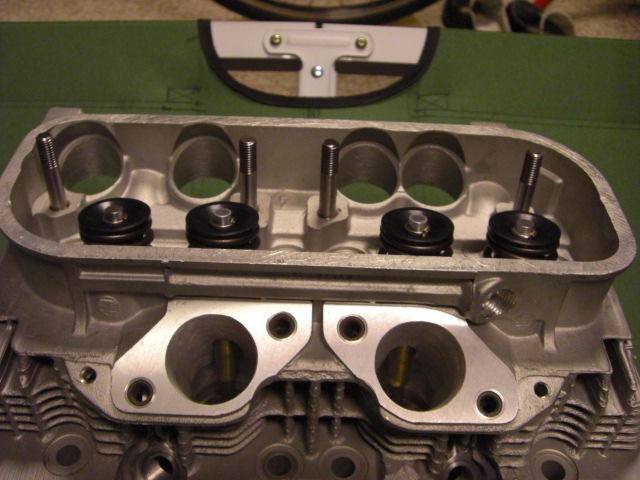
Posted by: ottox914 Feb 15 2010, 08:40 PM
Intake and exhaust:
Attached image(s)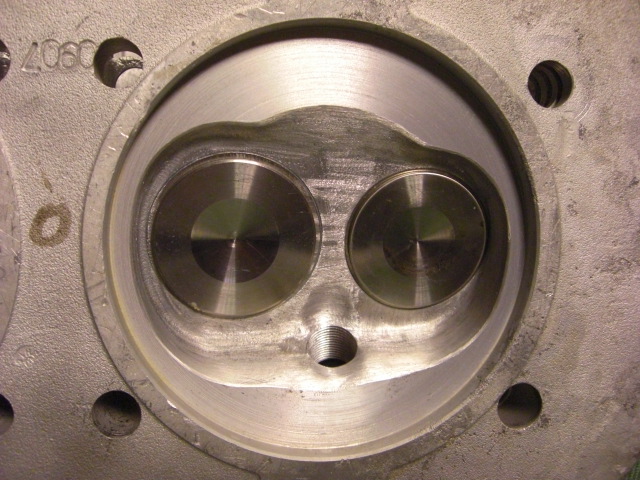
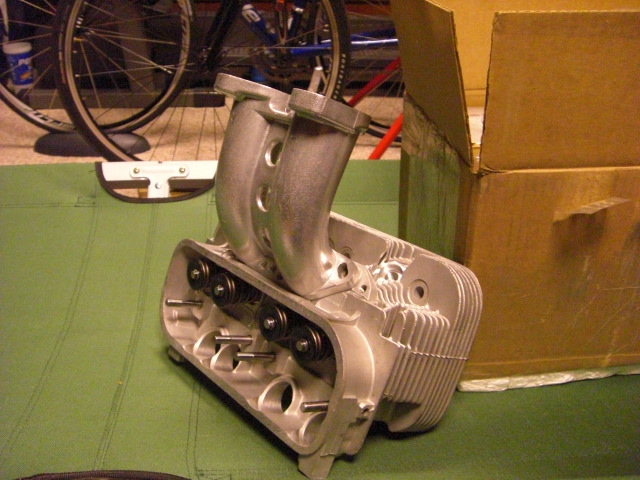
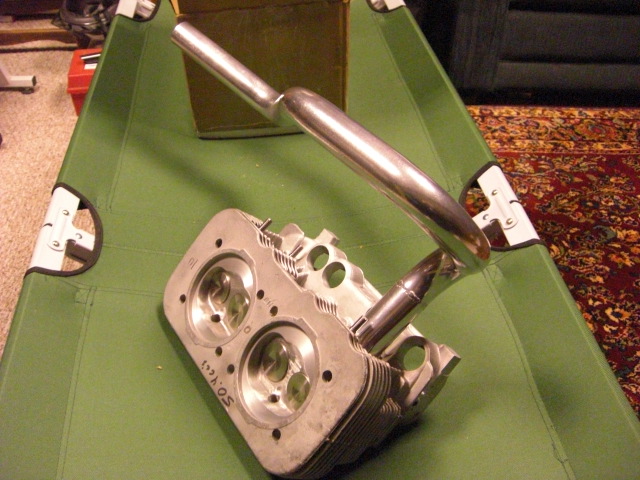
Posted by: rick 918-S Feb 15 2010, 11:44 PM
keep em coming Dave!
Posted by: HAM Inc Feb 18 2010, 10:47 AM
Glad to hear you like the heads Dave! I was very happy with the way they turned out! When do we get to hear it run?
BTW, I hope your cat wasn't offended by the scents left behind by my shop cats (Blanche & Blossom) rubbing on your box! My girls mark every package that enters or leaves the shop!
Posted by: Zardozz Feb 19 2010, 06:43 PM
Head porn, some of the best...
Posted by: ConeDodger Feb 19 2010, 06:49 PM
Now Dave, is that cot where you sleep now that your wife found the receipts for the new parts? 
Still waiting on that CD of turbo pics...
Posted by: ottox914 Mar 4 2010, 07:45 AM
MORE PARTS!!!!
(that darn wife)
Apparently Mr. Fed-x stopped by yesterday, and left 7 boxes in the garage. Mrs. Me sort of forgot to mention this last night..... GGGrrrrrrrrrr... A practical joke is one thing, but c'mon, these are 914 parts! Have meetings with the boss all day, so I just can't blow off work and tear into those boxes, but you can bet the cardboard will be flying this pm. And pics added.
Cone- haven't forgot about your cd, but wanted to set up and take a few more of the exhaust and IC routing, since with everything out of the car, its easier to follow the route from air cleaner to engine.
Posted by: ottox914 Mar 4 2010, 09:08 PM
parts, Parts, PARTS!!!!! I haven't had a chance to pull my invoice and see that every last little bit I ordered is here, but from my initial "tear into it all and drool" it looks like its all there. Those JE pistons are the silver bullet that makes it all work, matching the 2.0 crank and rods to the smaller bore we're going with, to promote a better jug to head seal. Still a long way to go- need to get the case situation figured out, then set up a clean room in the garage, start prepping parts, then finally put wrench to metal.
Big box is the case. Nice job, Fed-x. Balanced crank. The flywheel, clutch system, crank, and fan were balanced as an assembly. Cool.
Attached image(s)
Posted by: ottox914 Mar 4 2010, 09:12 PM
More fun parts-
Re-surface, balanced, lightened flywheel. New clutch and pressure plate to put the power down. Cam, bearings, other goodies to build a motor.
Attached image(s)
Posted by: ottox914 Mar 4 2010, 09:16 PM
My favorite picture- the silver bullet, the JE pistons, that make this all possible. Good to go to take the heat from some boost, set up to mate the 2.0 crank/rods to the smaller than 2.0 bore we are going with to (hopefully) get a better seal between the jugs and the head. Balanced rods with ARP bolts, and OEM 1.7 jugs bored out for the pistons.
Whoa. That was all pretty good. Almost as good as... Uh, I think I need a smoke.
Attached image(s)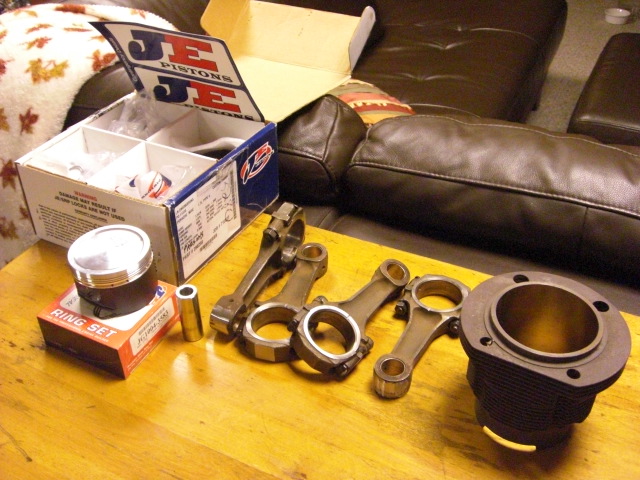
Posted by: jmill Mar 4 2010, 09:28 PM
Very nice. When you get that thing put back together you'll have to take a trip down South to my neck of the woods. Mine won't be running anytime soon otherwise I'd head up your way.
Posted by: ConeDodger Mar 4 2010, 11:18 PM
Nice Dave... Too bad you can't turbocharge a 914... 
Posted by: ottox914 Mar 6 2010, 07:32 PM
Nice Dave... Too bad you can't turbocharge a 914...
Wait a minute... no one ever told me THAT... Oh boy...
Posted by: ottox914 May 4 2010, 08:28 PM
Late Breaking News!
I have made contact with an old aircooled engine builder, with a shop full of cool machine tools. He's built everything from restoration 36hp vw's, to 400 hp sandrail engines, airplane conversions, turbo hondas, model A fords, Porsche 6 cyls, all manner of scca FV motors. He's done plenty of big money motors in the last 30yrs, but in his "retirement" likes projects that are a little out there, interesting and challenging, different. He agreed to assist and help build the turbo type IV.
AND, Mrs. Me agreed that taking a week off work to build the motor and get it installed would be a good thing, so...
The last week of May, so long as things calm down at his shop a little, we'll be building the long block. I'll need to get it back home and dress it with tin and cooling, and install it and the turbo goodies on my own. I designed it, built it, took it apart, I should be able to get it back together.
I'm equal parts excited and terrified. Can hardly wait to drive the car again and see how the mix of bits Jake and Len and I came up with works, but a little concerned that it all comes together and I don't do something bone-headed.
Oh, and lets "boost" up the votes for the yellow turbo car in the COTM. Voting ends tomorrow...
Thanks for your support and interest. More update coming nearer the end of May and into June.
Posted by: ConeDodger May 4 2010, 10:25 PM
Cool! If I might ask, who are we talking about here? I know a few of the oldsters in Minnesota.
Dave, you need to be less subtle... You are blazing new 914 territory.
VOTE FOR CAR #3 IN THE COTM THREAD GOING ON NOW!!!
Posted by: ottox914 May 5 2010, 09:39 AM
Cool! If I might ask, who are we talking about here? I know a few of the oldsters in Minnesota.
Dave, you need to be less subtle... You are blazing new 914 territory.
VOTE FOR CAR #3 IN THE COTM THREAD GOING ON NOW!!!
The guys name is: Dick Burns.
There is a little concern on Jakes site that some old timer is going to build the motor the way they did it 30 yrs ago... My plan is to build it (mostly)myself, with a laptop and Jakes dvd, in his shop, with every machine tool known to mankind available for use should something need a tweek, and someone there who knows how to use them all. And, when it time to measure for deck height, valve train geometry and such, the measuring tools and set ups should be right at hand, saving me time trying to figure out how to use whatever is in my garage to get the right info to be sure the build goes well.
Posted by: ConeDodger May 5 2010, 03:22 PM
I recall the name. I worked with Bill Jenkins at Dune Buggy Supply when I was in high school and just after getting back from the military.
I can't imagine you letting someone else build that motor... You have put too much design effort into it. I like using Mark's shop because he has a clean room. Small but clean
Posted by: tdiddy May 5 2010, 06:39 PM
I recall the name. I worked with Bill Jenkins at Dune Buggy Supply when I was in high school and just after getting back from the military.
I can't imagine you letting someone else build that motor... You have put too much design effort into it. I like using Mark's shop because he has a clean room. Small but clean
Dick built the align bore machine for dune buggy supply. The one thing I think may be different is the valvetrain geometry set up with the modified swivel foot rockers and the pushrods set to zero lash, there is a thread on jake's site covering that topic. I'd make sure to have that handy, but other than that I'll think you guys will do fine!
Posted by: ottox914 May 6 2010, 09:35 PM
I recall the name. I worked with Bill Jenkins at Dune Buggy Supply when I was in high school and just after getting back from the military.
I can't imagine you letting someone else build that motor... You have put too much design effort into it. I like using Mark's shop because he has a clean room. Small but clean
I'd love nothing more than to hang with you guys at Marks place and build turbo motors, but you're only about 1/2 a country to far to the west.
Posted by: ottox914 May 16 2010, 06:37 AM
I've had some questions on how the turbo lines are routed. There are plenty of photos of this in the thread, but the car sometimes gets in the way of seeing exactly whats going on here. So, I finally got around to taking some pics of the bits and pieces as they would be set up- without the car.
These first couple are the kerry hunter header to the turbo, and exhaust out the back of the car.
Attached image(s)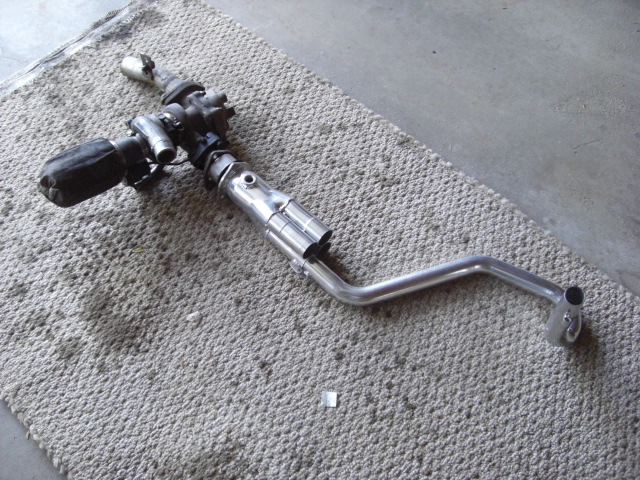
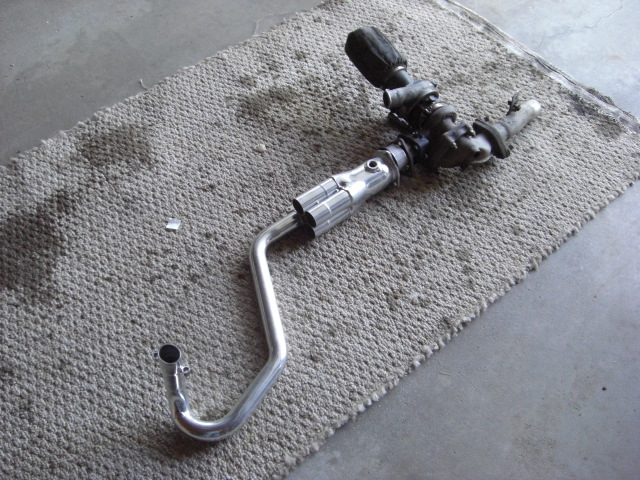
Posted by: ottox914 May 16 2010, 06:39 AM
A few more of the exhaust side of things-
Attached image(s)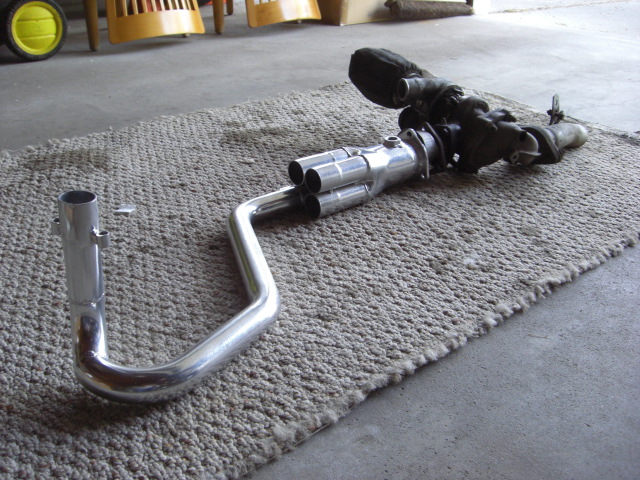
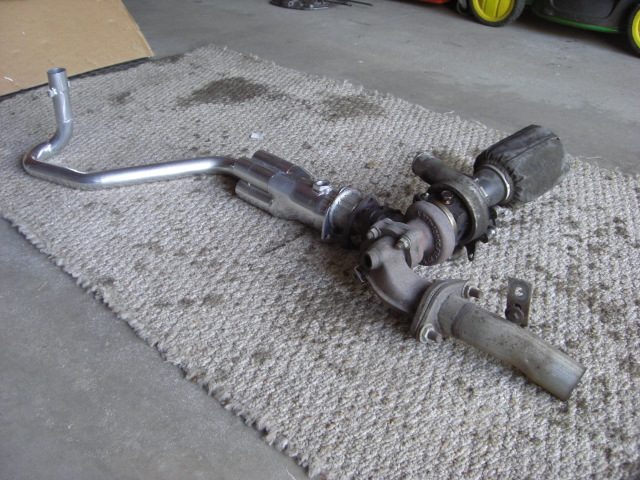
Posted by: ottox914 May 16 2010, 06:42 AM
Now we'll take the compressed air up to the intercooler. The long tube with the double bend goes under the back trunk, next to the starter, and thru the verticle back tin. The loose clamp on this piece is roughly where the pipe goes thru the back tin, by the starter.
Attached image(s)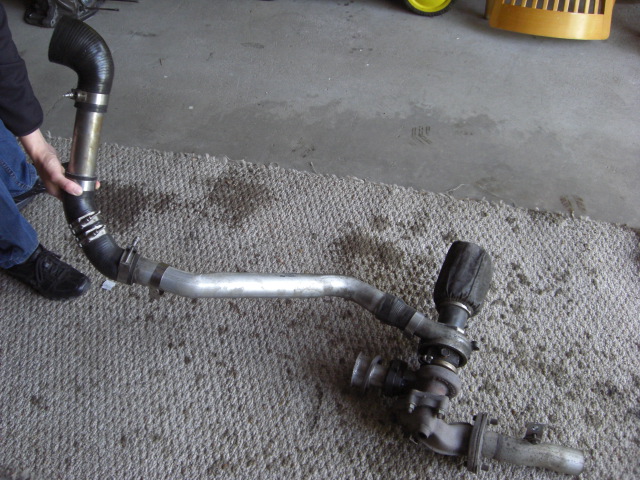
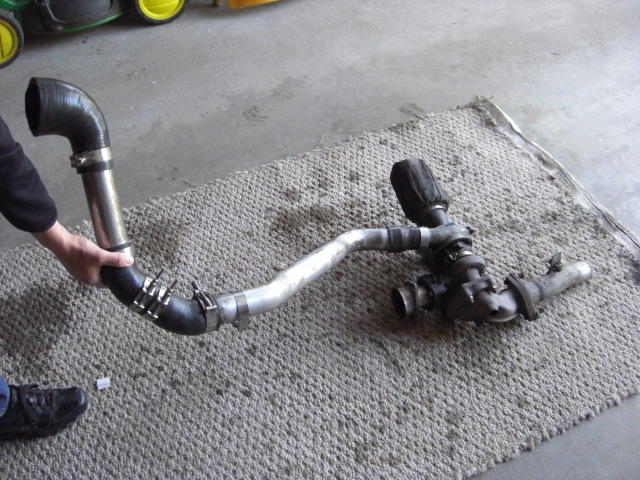
Posted by: ottox914 May 16 2010, 06:45 AM
Once thru the back tin the charge air goes thru the straight piece, with a 90 on one end, and 2-45's on the other, to bring the charge air up and into the intercooler, which mounts to the chassis of the car on 2 bars running across the engine compartment.
Attached image(s)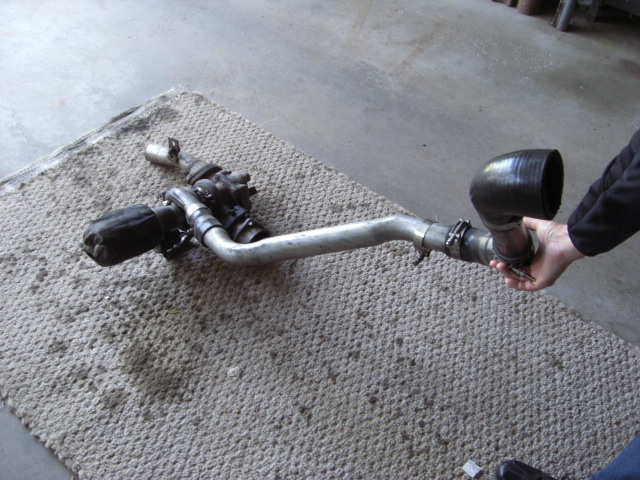
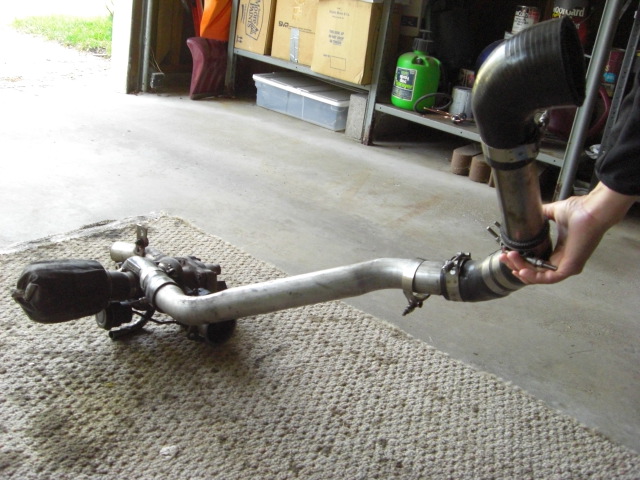
Posted by: ottox914 May 16 2010, 06:48 AM
The charge air then exits at the big end of the 90 degree fitting, and into a stock WRX intercooler. I'm running the air backwards thru the intercooler from how it is used in the WRX install, but doing this allows me to use the intercooler as a splitter of sorts, to divide up the charge and send it L and R to the ITB's.
Attached image(s)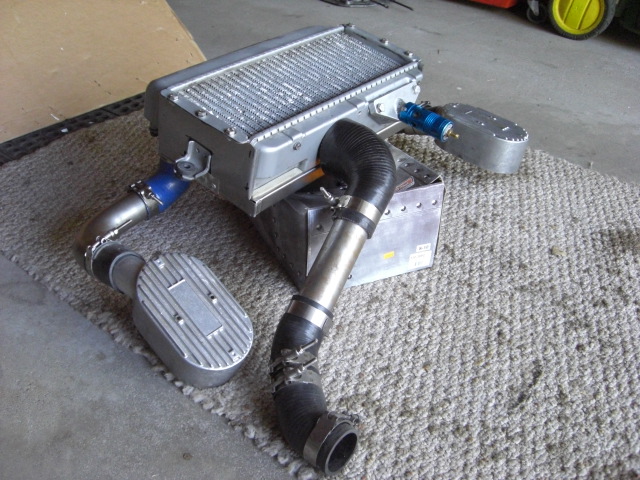
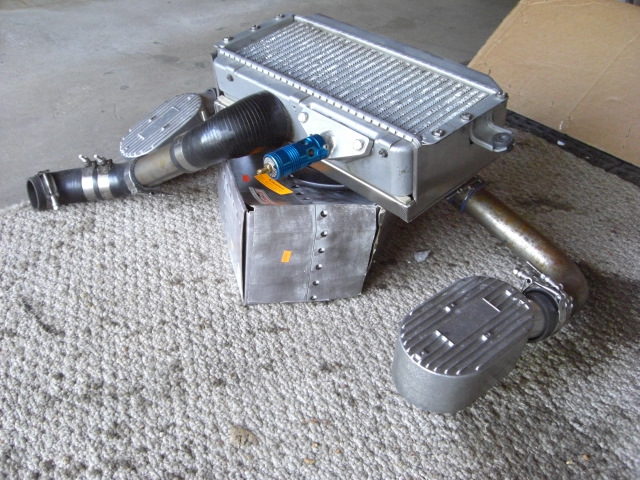
Posted by: ottox914 May 16 2010, 06:54 AM
...and the other side of the intercooler showing the routing to the hats on top of the ITB's. From there the charge air pushed thru the ITB's, and then thru Len's work of art heads, bounding off the JE pistons, making some MassIVe power to rocket thru the cones.
Attached image(s)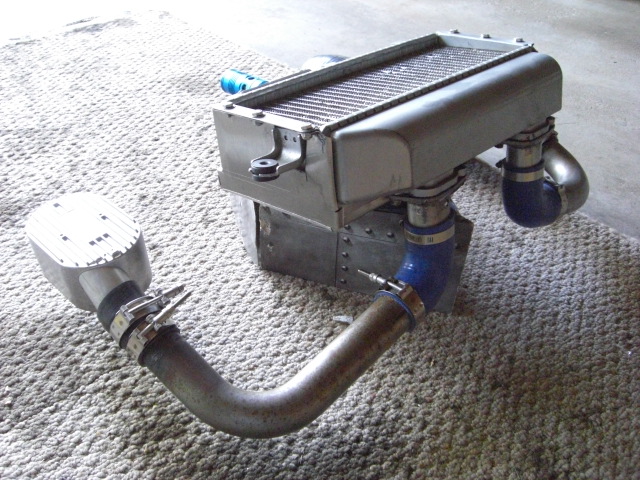
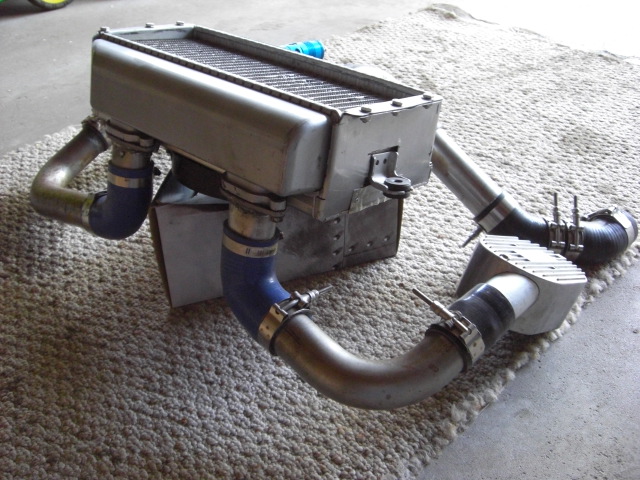
Posted by: corsepervita May 16 2010, 11:03 AM
At first when I saw this thread the first 5 or so pages I was going "uhhhh" and now that i've finished it i'm going "OHHHHHHHHH man, nice!"
this looks like a lot of fun!
Posted by: moparrob May 19 2010, 08:26 PM
Wow! That build has got me mesmerized. I really think that I want to try to tackle a similar build for my new, engine-less acquisition I picked up several weeks ago. In fact I went out today and bought Jay Miller's book "Turbo - Real World High Performance Turbocharger Systems" just to re-familiarize myself with the newer technology which currently exists -as compared to my 25 year old prior research. A lot has changed, and I realize I have a lot to learn.
Obviously, I have a lot of questions for you but I will not bother you with any specific questions until I have acquired a sufficient baseline of knowledge to properly phrase my questions. I did want to ask you though, knowing what you know now, would you change anything in the way you designed the project?
For instance, would you have chosen to mount the turbo elsewhere (even assuming you would need to build your own header?) Or would you have chosen a different turbo (assuming money was not an object within the range of reasonableness)? Would you suggest a different intercooler or mounting location, or perhaps a different cooling system?
Thanks in advance for your help.
Can't wait to see videos of it running!
Rob Rose
Posted by: nein14 May 20 2010, 02:41 PM
Wow! That build has got me mesmerized. I really think that I want to try to tackle a similar build for my new, engine-less acquisition I picked up several weeks ago. In fact I went out today and bought Jay Miller's book "Turbo - Real World High Performance Turbocharger Systems" just to re-familiarize myself with the newer technology which currently exists -as compared to my 25 year old prior research. A lot has changed, and I realize I have a lot to learn.
Obviously, I have a lot of questions for you but I will not bother you with any specific questions until I have acquired a sufficient baseline of knowledge to properly phrase my questions. I did want to ask you though, knowing what you know now, would you change anything in the way you designed the project?
For instance, would you have chosen to mount the turbo elsewhere (even assuming you would need to build your own header?) Or would you have chosen a different turbo (assuming money was not an object within the range of reasonableness)? Would you suggest a different intercooler or mounting location, or perhaps a different cooling system?
Thanks in advance for your help.
Can't wait to see videos of it running!
Rob Rose
It's been done before get a copy of June 02' Excellence magazine 2.0 4 cyl. w/CIS injection and a K 26 turbo still runnning strong

Posted by: ottox914 May 21 2010, 06:41 AM
That CIS car was kind of the inspiration to do what I have done.
What would I change? How much time and money do you have?
I designed the system with the ITB's because I bought those and put them on my 2.0, along with the SDS, thinking I would just build one of Jakes 2316 motors. But that plan got sidetracked with all this turbo silliness. So ITB's are really not needed.
In my perfect world, my perfect system uses Chris Foley's top mount cooling fan, (which is only now coming available), a fabricated even length exhaust to mount the turbo high and in the center of the car, so the oil can drain back in to the oil chimney on our cars. From there shoot the charge air from the turbo into a single throttle body mounted on the end of a subi intercooler ducted and mounted over the CF fan. Yes, this would be pre-heating the engine cooling air, but that IC seems well oversized for the job, I don't think the temp rise would be all that bad. Plus that CF system moves alot of air. Changing the belt would be a pain, and you'd have to do some work to the exhaust to keep the temps down in this area. From the intercooler some fabricated "stacks" would need to be made to support the IC, take the charge air into the heads and provide a place to mount the injectors, which could be mounted high up next to the IC to provide more distance for the fuel/air mixture to tumble and mix, and perhaps add a little cooling effect before getting into the head. A single exhaust from the turbo out the car, and as long as we are dreaming and fabricating here, you could make a heater tube wrapping around the single exhaust and blow some warm air back in the cabin. Turbo selection would depend on the motor you were dressing with all this cool stuff.
Sadly, the CF system was still a dream when I started the project, I don't have a shop full of cool machine tools and pipe benders, and I needed to build the car with as much off the shelf stuff that I already owned to keep the $$$ in line.
Maybe someday...
Posted by: ottox914 May 24 2010, 09:50 PM
Spent the 1/2 the day in Wayzata, MN got about 1/2 a motor built. Case is together, cam/crank/rods are all happy and smoothly moving about. I felt like a bit of a chump, as 95% of the work we did I could have knocked out on my own. Its that last 5% I need to be thankful for the help with. And some of the cool tools Dick has makes that 5% seem just sooooooo easy. But w/out the tool, sooooooo hard. Everything we have measured is nearly dead on for clearance. A good thing with the amount of new and machined parts going into this thing. And some of the BTDT that Dick brings is amazing. Setting the end play for the crank. He eyeballed it, measured a couple shims I brought, we screwed it all together, he grabs some crazy measuring tool, we check the endplay, and BAM, its right at the factory spec. First test fit. no real drama. It just works out. We caught a couple parts related problems that again, with his selection of cool tools and measuring devices, cost us 5-10 minutes, where as I might have caught the problem, and spend hours figuring out if my fix would work or cause more trouble. Should have a complete short block home in rice lake tomorrow night. Still need to dress it in cooling tin once I get it home, get some additional gauges wired into the car, get the engine and trans ready to install, so plenty of work left to do on my week of "mancation". Will it run by the weekend? I don't know, but as is usual for me, I'm going to take my time and try to get it as right as I can the first time before turning the key to wait for that never ending 20 min of cam break in.
Posted by: ottox914 May 27 2010, 06:46 AM
Monday morning. Full boxes, empty case.
Attached image(s)
Posted by: ottox914 May 27 2010, 06:48 AM
Tuesday night. (mostly) Empty boxes and full case. Now on to valve train geo...
Attached image(s)

Posted by: ottox914 May 28 2010, 09:21 PM
UPDATE: spent some time in the garage today, not as much as I might have liked, but as I noted before, I don't have all the parts needed to get it all back in the car, so whats the big deal anyway? Checked the valve lift and push rod tube length. When a new cam goes in, with a different base circle from stock, or different valves go in, (different stem length) you need to check and set up the correct push rod length. A dial gauge is mounted on the head to measure valve lift in the same plane as the valve stem. Insert an adjustable push rod with the same ends as the ones you will be building/using. Put the rocker arms on. Cycle the engine around by hand so the valve being measured goes from fully open, (zero out the gauge) to fully closed. This reading should be within 5% of the stated lift value on your cam card. (Per Jake) If this is not the case, take it all apart, and either make the adjustable push rod longer or shorter, rig it all up, test it again, and see what you get. If the lift value you get is less than the prior attempt, you adjusted the push rod the wrong way. Do it all again. A quarter turn makes a big difference. I ended up with a reading of .483, against a stated lift of .500, so as I was inside that 5% range, called it good enough and stopped. So now I know the cam will be performing to its full potential. Those Honda guys with DOHC heads don't know what they are missing here.
Next is to set up the gauge again, and check for the orientation of the valve adjusters at 1/2 lift. They should look like an extension of the valve stem, going straight out from the valve, no angle. Angle = side pressure on the guides, more wear, sooner re-build. I took an old push rod, cut it in 1/2, tapped threads to match the valve adjuster. Now I can screw this on the valve adjuster, and have a better visual reference to the relationship between the adjuster and the valve. If at 1/2 lift, (1/2 of your actual lift, not stated lift) the line is not straight between the valve stem and the PR tube/valve adjuster, you need to shim the rocker arm assembly out to get the correct geometry. So take off all the measuring gear, take the valve train off, add a shim of known thickness to each side of the rocker arm assembly, re-assemble the dial indicator, and check it all again. I haven't gotten this done yet, but maybe tomorrow, after wrapping up a paneling project at Nan's dads place.
Did the CR math, taking into account the bore, stroke, piston dish, deck height, chamber volume, and came up with 8.95:1. The prior CR was around 9:1, and with the heavy cast pistons (euro p/c's and light deck to the heads) and high rings, and 11psi, there was no damage to the pistons or rings when I tore it down. The pistons were ordered to be 8.5:1, but with no base shims or head gaskets, the CR got a little higher, which is fine by me. I expect 9:1 with the forged J & E's will be just fine up to the 15psi I hope to run once things are all broken in and tuned well.
Thats it for tonight.
Posted by: ottox914 Jun 16 2010, 10:08 PM
UPDATE: threw my back out last week, not much progress. Feeling better the last couple days, got the new CHT/EGT gauge in, new oil temp/pressure gauges, working on new harness belts for both seats. Should have them done and the interior back together by tomorrow night.
Its gonna happen this weekend. I have friday off to work on the motor, and sat/sun are open, with the exception of fathers day dinner with my dad.
So some questions about firing the beast up-
I have plenty of Brad Penn 30w break in and Mahle filters. I was planning on getting the motor buttoned up, soaking a filter full of 30w, filling the crank case. Since the SDS handles the spark, I have a filler plug in the dizzy hole. I was thinking of pulling that off, and getting a thick screwdriver, cutting off the handle, putting it in a corded drill, and spinning the motor over to circulate oil. Sound good? Should I spin it clock-wise, or counter clock wise? Once I was certain there was oil everywhere, add plugs, transmission, and install. After install, I was thinking of using the drill trick to spin it over some more, to get oil back to the turbo. I know it'll be harder with the plugs in, but its a pain to put them in with the tin in place and the engine in. Not impossible, just a bother. I was then thinking of doing the 20 min cam break in, with the full exhaust and turbo connected, but no intercooler or charge lines. This way I can run it at 2-2500 rpm, watch the gauges, and have an easier time keeping the AFR in line. I can also sync the ITB's at this time with no turbo hats on them. I'll have a couple small, high volume fans blowing on the motor topside, and a couple of those "Service Master" big air movers blowing air under the car as well. Should be a loud, scary 20 min.
I'm thinking slightly lean is better than pig rich, so I think I'll be shooting for a steady 15 to 16:1 or so AFR. Would leaner be better? If I could see oil temps around 200-225, that'd be great, as I don't plan to hook up the extra remote cooler until the 2nd oil change, to keep any metal bits or assembly lube out of the cooler. I'll be starting with the CHT under #3 plug, as that is where the CHT for the ecu is. I think I'd be looking for around 350 steady here. I'll be watching EGT as well, but not sure which header to put that on. I was thinking 3, since the CHT would be there, but have read that checking the header with the most bends would be better, and to mount the probe as close to the exhaust port as I can. Anyone with an idea what the EGT's should be, in general?
So 20 min to break in the cam, cool down, check valve clearances, new filter and oil, connect the rest of the intercooler system, set 5psi and go for a short beating run, some 1/2 to 3/4 throttle accelerations. Do this for a couple hundred miles, check valves and one more oil change, then start adding boost and tuning the SDS for more boost and rpm with the new motor. Get a good street tune and stop by the dyno for some fine tuning and sheets to share.
Anything else I should or should not be doing that anyone can think of? (other than prayer)
Posted by: lotus_65 Jun 17 2010, 04:44 AM
good luck, david!
i'm munching popcorn, enjoying this show-
thefleur
Posted by: jd74914 Jun 17 2010, 05:22 AM
I'm thinking slightly lean is better than pig rich, so I think I'll be shooting for a steady 15 to 16:1 or so AFR. Would leaner be better?
An AFR of 15-16:1 is very lean. I would not (I want to say ever, but that's not necessarily true) go any leaner. Usually you are shooting for 13-13.5:1 for longevity. You start getting pig rich at 10-11:1. Some people shoot for 12.5:1 at WOT, it all depends what you engine likes.
Good luck!
Posted by: ottox914 Jun 17 2010, 06:10 AM
I'm thinking slightly lean is better than pig rich, so I think I'll be shooting for a steady 15 to 16:1 or so AFR. Would leaner be better?
An AFR of 15-16:1 is very lean. I would not (I want to say ever, but that's not necessarily true) go any leaner. Usually you are shooting for 13-13.5:1 for longevity. You start getting pig rich at 10-11:1. Some people shoot for 12.5:1 at WOT, it all depends what you engine likes.
Good luck!
Keep in mind this lean AFR is for the 20 min cam break in only. I certainly don't want to run 10:1 and wash the cylinders down with fuel, wreck the oil, and cause myself un-needed pain. I'll be tuning for 14-15 at steady throttle, and 11-12 at WOT with boost.
-Dave
Posted by: jaxdream Jun 17 2010, 06:56 AM
I could be wrong , but I don't believe the drill trick will work on VW engines , maybe chevy / ford where the oil pump shaft engages the bottom of the distributor. The VW engine's oil pump is driven off the front of the cam , not the bottom of the distributor , you might wreck the brass gear on the cramk that drives the distributor. Check with others about the preoiling procedure, double check might save some grief .
My $.02
Jack / Jaxdream
Posted by: rick 918-S Jun 17 2010, 07:20 AM
Ya, doesn't the cam drive the pump not the dizzy? You may have to pull the plugs and crank the starter. Also maybe pull the oil line off the turbo so there is zero resistance when you start to crank the engine. A couple turns should produce a shot of oil coming out the turbo oil line. Then connect the line. You shouldn't have to guess if oil made it to the turbo using this method. Just a thought. I have no first hand experience with this.
Posted by: Root_Werks Jun 17 2010, 09:09 AM
Holy cow! TT's sure can haul a lot of 914 parts!
Nice updates to the thread. I have this one bookmarked.
Posted by: iamchappy Jun 17 2010, 09:17 AM
Good luck with it David, I dont like the idea of running it lean for the break in, 14 or mid 14 sounds better to me.
Posted by: ottox914 Jun 20 2010, 07:51 AM
Couple of comments:
Valvetrain geo sucks eggs the first time you have to do it. Getting the pushrod length went pretty well at Dick's shop, but getting the rest of the rocker arms to the right thickness for the swivel foot adjusters, and getting the shims right for the geo has been a bit of a pain given the tools in my garage. But while its not all physically DONE, I know how it all needs to be, so things are going faster and smoother.
My comments about lean running were not clear when I posted them- I was thinking of 14-15:1 for the 20 min cam break in only. Under boosted conditions and at WOT the mixture will need to be much richer, 11.5-12:1 or so, but we'll see what the motor likes. I have oil pressure, temp, CHT and EGT as well as wideband all wired in and ready, so getting a decent street tune should be very do-able, before taking it to a dyno for that last little bit of magic.
Posted by: ottox914 Jul 18 2010, 10:47 AM
Trouble shooting help?
Got everything together, filled the engine with oil, and set up a test for oil pressure. Hooked up the engine/trans to my truck battery, hooked up a remote starter, and hit it. After 10 sec. or so, no oil coming out of the turbo oil line. Huh? So I disconnected the line from the block to a "T" fitting that supplied the oil pressure sending unit and the line to the turbo. Cranked another 10 seconds, no oil there either. Yes, the crank case is full of oil, good, green Penn break in oil.
I've got a couple of ideas of things to check, but rather then color your opinions on what to look into next, I'll leave this open-
Where would you guys look, what would you check for next, and in what order, to find out whats going on here?
Posted by: ottox914 Jul 18 2010, 11:04 AM
Found this thread:
http://www.914world.com/bbs2/index.php?showtopic=61381&hl=
Says basically to remove the oil filter, crank it till you have a mess, put the filter back on and live happily ever after.
Why would pulling the oil filter make a difference?
I have a Mahle filter, primed and sat overnight filled with oil on the motor now.
Posted by: ConeDodger Jul 18 2010, 11:14 AM
Found this thread:
http://www.914world.com/bbs2/index.php?showtopic=61381&hl=
Says basically to remove the oil filter, crank it till you have a mess, put the filter back on and live happily ever after.
Why would pulling the oil filter make a difference?
I have a Mahle filter, primed and sat overnight filled with oil on the motor now.
Resistance? McMark has a method. Not sure he will share though.
Posted by: ottox914 Jul 18 2010, 12:18 PM
Oil pressure re-established. (crossing fingers) Should have engine in car and cam break in done yet today.
The Captain was right. Again.
Posted by: markb Jul 18 2010, 12:49 PM
The Captain was right. Again.
Don't ya just hate it when that happens?
Sounds like it won't be long now.
Posted by: silver74insocal Jul 18 2010, 04:17 PM
absolutely awesome and inspiring thread sir...
Posted by: ottox914 Jul 19 2010, 10:22 PM
Engine and trans are in the car.
A true test of a wife, as I was driving the jack, and she was trying to watch out and adjust the engine going up. We're still talking, so that must be a good thing.
Still need to connect a bunch of wires, clutch and throttle cables, axles, shift linkage, exhaust system. Have meetings out of town wed/thru, so with a little luck, I might get this thing lit off tomorrow evening- if not then, it'll have to be friday or saturday.
About 50/50 nervous and excited.
Posted by: ottox914 Jul 25 2010, 04:29 AM
At 10:14 am Saturday morning... it LIVES!!!!! (only now had a free second or two to post)
OK, I was an hour short of my planned blast off, but hey, thats how it went. EGT peaked around 1300, oil temps and pressure good, I used the SDS to run the AFR at 13.5-14.0 for the 20 min cam break in. It sounded a little rough for the first minute or 3, but got progressively smoother until 20 minutes had run. Can hardly wait to put it on the road and see how she runs.
We had a wedding to be part of, so the garage time was limited Saturday. Still need to: oil/filter change, check valves, connect clutch, mount intercooler and piping, fix a couple push rod tube leaks. I used the seals that came with the gasket kit from Jake, (viton?) a little assembly oil to lube them going in, and have a couple that dripped. Not alot, but a drip is a drip, and shouldn't be happening here.
Any suggestions? It might be something simple like the tension wire to retain the pushrod tubes might have popped out. Would just rotating the push rod tube 90-120 degrees possibly help it seal better? I certainly can pull the rockers, pushrods, and tubes, but if there is an simpler initial fix to try, I'd be all for giving it a try.
Being an insurance adjuster, with lots of hail in my area, (on my house as well) I don't expect much free time for the next month or more, but hopefully I can steal enough time to actually get it on the road and drive it!
Posted by: rick 918-S Jul 25 2010, 07:22 AM
Great news! I have no suggestions on the oil leaks. I'm chasing the carrot myself. (too much work) Great to read this though!
Posted by: type11969 Jul 25 2010, 07:56 AM
I use a little teflon thread sealant in the o-ring groove and on the o-ring on both sides of the tube - no leaks. I know I picked that up as a recommendation on some board.
Posted by: Mark Henry Jul 25 2010, 09:17 AM
I spin the tube as I gently push them in, most of the time if you have a leak you cut the O-ring as you installed it.
Posted by: ConeDodger Jul 25 2010, 10:07 AM
Jake uses a sealant on regular push rod tube seals. Not sure if he has bought into the Viton camp. Did you have to shim your push rod tubes?
Heck Dave, You're in Wisconsin - You don't have to go to the wedding just send beer and you will be forgiven.
Congratulations!!!
Posted by: Type 4 Unleashed Jul 25 2010, 01:25 PM
The Viton push rod seals are the way to go, I have a set that are going on their third motor or thied year of use, the black or red or green seals after a year get hard and leak, due to engine expansion when at engine operating temps, remember aluminum push rods expand with the motor and operating temps and still have .006" clearance when hot.
The Viton seals are brown and EMW usually has them in stock.
This is how I do it: Rocker arm shafte shims installed case side of the push rod tubes (8), which hold the tubes out slightly which have a tighter seal on the seal, I use bosch point grease to lube the seal and bore and I don't have leaks.
Head side: Tubes are pushed in very carefully because the bore & seal are dry no luberacation except for a little spit on the seal to help it slide in.
I don't use the holding wire for two reasons one it's not needed and two it get's in the way when adjusting push rods, I run the cromoly push rods which are adjusted to 0.0 lash but are still able to spin, but some are very hard to spin with the wire in the way, but with it gone it makes much easier. .
I place a bead of high temp silicone around the edge of the push rod tube and tube bore rocker side, and it doesn't leak.
I use the high temp red silicon which is more pliable than the black after it hardens which allows the tube to move slightly when the engine expands at operating temps.
I have a silicone tube applicator that is so cool to use, will post a pic later and where to buy.
Posted by: Type 4 Unleashed Jul 30 2010, 10:22 PM
A nice tool, that allows to apply a perfect bead with very little practice and allows to start & stopt beads as needed.
I believe they are under $20 a piece shipped I had bought several.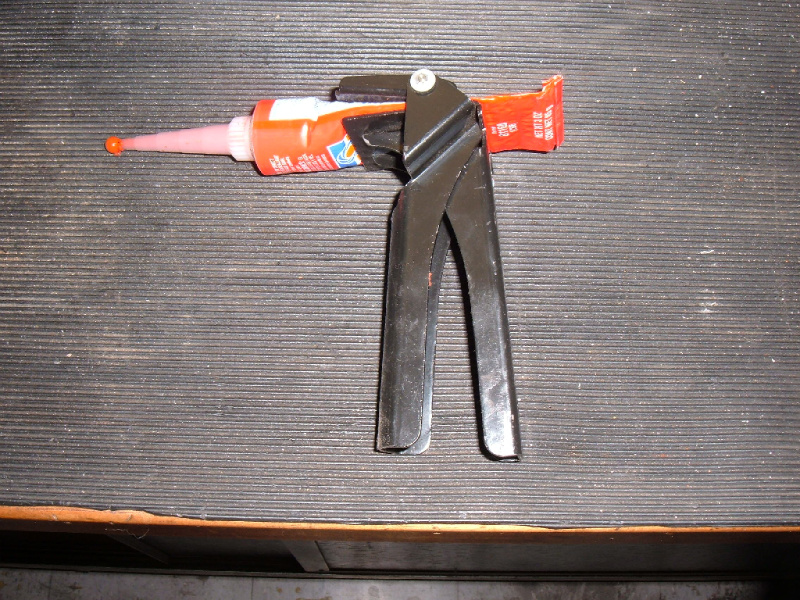
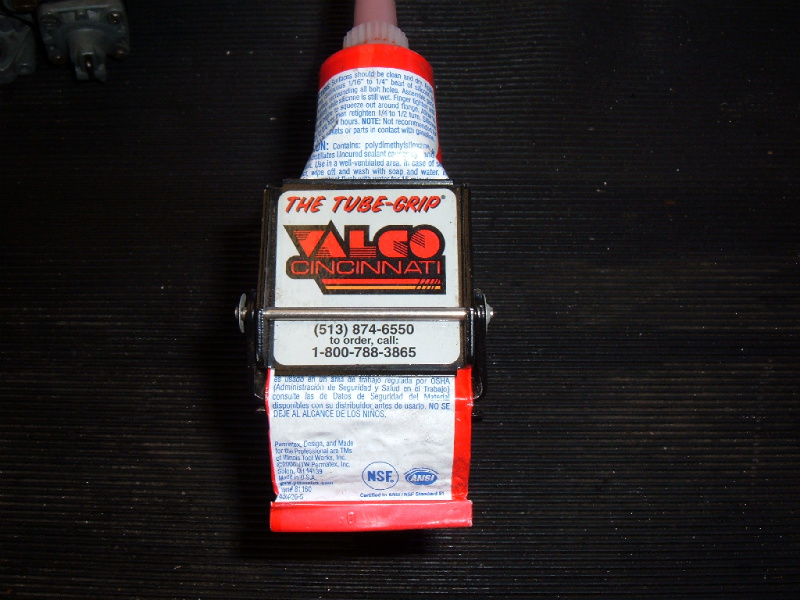
Posted by: ottox914 Sep 6 2010, 09:50 PM
Houston, we have a problem. At the last autocross event the 914T was at, the turbo got a little "chirpy" as I got beyond the surge line for the compressor at 4500+ rpms in 2nd gear. But I was only showing 4-5psi at the engine due to some pesky boost leaks. Lord only knows what the little turbo that could was actually putting out. FINALLY got the boost leaks sealed, and took it for spin. Turbo seemed more responsive, so thats a good thing. Instead of straining to show 5psi at 4500 rpm, she shot right up to 5psi and beyond, by 3k rpm. Cool. And was chirping by 3500 rpm and 6-7psi boost at around 11:1 afr's. Backed off the gas. Hitting the surge line of the compressor. Hmmmmm....... the old motor, a bone stock 2.0, would push that turbo up to 10-11 psi, the intake air temps were never more than, say 20 degrees or so of the ambient temps, so I don't think I was overheating the intake air. Hmmmmm...... Len assured me the new heads would flow much better than the old ones. Jake was sending me a "top secret" cam that should flow like crazy, to spool up the turbo. I could never get the 2 of them to commit to any flow numbers. I think they are quite a bit more than before.
So one evening this week I'll be putting the subie WRX turbo and exhaust pipe back in, and we'll see how that goes. Hopefully the injectors can keep up...
Posted by: Andyrew Sep 6 2010, 10:42 PM
What are you using to control the turbo? Ball and spring or electronic boost controller?
I have learned that a ball and spring will severely detriment the spool time. I gained 500rpm's in spool time from a ball and spring to a electric..
Posted by: Jake Raby Sep 7 2010, 05:33 AM
That cam isn't secret, it has ran with awesome results in several 914 Turbo engines including some producing 30 PSI boost making over 300 RWHP from a 2 liter engine.
Your engine will be much different than before.
I have been using the Turbosmart Eboost 2 with great luck as of late. I have gotten 507RWHP from a 2.4 street engine, 510 RWHp from a 2.3 drag race engine and just made 270 FWHP @20 PSI from a 1500 Land Speed engine using the eboost 2....
Posted by: ottox914 Sep 8 2010, 06:29 AM
What are you using to control the turbo? Ball and spring or electronic boost controller?
I have learned that a ball and spring will severely detriment the spool time. I gained 500rpm's in spool time from a ball and spring to a electric..
Still using a "boostvalve.com" ball and spring set up. In 2002 sport compact car did a boost controller show down, (unfortunately now that the mag is gone, so is the online copy of the results) and the boostvalve performed better than most of the EBC's they tested. So for now, cheep, stable and reliable will have to work for me, as many of the current crop of EBC's are $3-400+, and thats money I can spend elsewhere on the project, like for dyno time and other bits and pieces as needed. I am considering an EBC, probably the "gizzmo", as it has gotten good reviews and at under $300 seems a good value, doing what it needs to do, simple install, and reasonable to set up.
Jake- didn't mean to suggest your turbo cam grind is a secret- heck, if someone is thinking of doing a turbo motor right, call up the man and get the right cam. The specs are a little more of a guarded thing.
Posted by: Andyrew Sep 8 2010, 08:37 AM
My dad and I run the Apexi boost controller. Older tech, but we wouldnt go with anything else. However there are some other good options. Get one with RPM programable boost and gear correction (Aka first gear +10%, 5th gear minus 25%)
Posted by: d914 Sep 8 2010, 10:51 AM
I havent read the whole thread, you have a waste gate but do you also have a blow off valve??? I know dumb question.. But if the chirp from the turbo is after a lift?? the pressure hits the turbo... I'll go away again... Once a year I get these things right.. I think I'm over quota!!
Posted by: spare time toys Sep 8 2010, 10:56 AM
What are you using to control the turbo? Ball and spring or electronic boost controller?
I have learned that a ball and spring will severely detriment the spool time. I gained 500rpm's in spool time from a ball and spring to a electric..
Still using a "boostvalve.com" ball and spring set up. In 2002 sport compact car did a boost controller show down, (unfortunately now that the mag is gone, so is the online copy of the results) and the boostvalve performed better than most of the EBC's they tested. So for now, cheep, stable and reliable will have to work for me, as many of the current crop of EBC's are $3-400+, and thats money I can spend elsewhere on the project, like for dyno time and other bits and pieces as needed. I am considering an EBC, probably the "gizzmo", as it has gotten good reviews and at under $300 seems a good value, doing what it needs to do, simple install, and reasonable to set up.
Jake- didn't mean to suggest your turbo cam grind is a secret- heck, if someone is thinking of doing a turbo motor right, call up the man and get the right cam. The specs are a little more of a guarded thing.
Check this link it may be the art. you were thinking of saved at another site.
http://www.turbo-owners.com/forum/general-tech/181-sport-compact-car-comparison-boost-controllers.html
Posted by: ottox914 Sep 9 2010, 06:39 AM
I havent read the whole thread, you have a waste gate but do you also have a blow off valve??? I know dumb question.. But if the chirp from the turbo is after a lift?? the pressure hits the turbo... I'll go away again... Once a year I get these things right.. I think I'm over quota!!
You're right- and not so right. There are 2 sorts of surge you can get. One is what you describe, on throttle lift. Been there, had that, adjusted the BOV to take care of it. What I am now facing is more like this:
http://www.youtube.com/watch?v=nCj6Spwl1CU
Although not on a car/engine/turbo combo like THAT one. This is surge from over spinning the turbo- need a bigger one now.
STT- that is exactly the write up I was referencing. Not to say that EBC's haven't come along way since 2002, but for now, the extra 3-4-500 to get into one is money better spent on dyno time and other updates.
Posted by: ottox914 Oct 1 2010, 10:07 PM
Posting a little update- surge was really not what I thought- had a leak at the gasket between the intake and head. The car is/was LOUD, so much so that at our last autocross, (and keep in mind I'm on the board...) I was kicked off the grid for sound violations!!!!! In the 1st session I was at 95.5db at WOT in 2nd gear. 95 is the limit. In the 2nd session I took it easy runs 1 and 2, and I let'r buck for run 3. oooops, 97db on that one, and I'm done for the day.
So here is the solution:
OLD: http://www.youtube.com/watch?v=rGoTFrCu97k
(Car was just started and not warmed up yet.)
NEW: http://www.youtube.com/watch?v=1qV436Ydm_U
(Car was well warmed up...)
No surprise, the new system is more restrictive than the old, and the boost comes on slower and is a psi or 2 less than before. But. I have 12 more discs and an endcap with a 2" hole in it to try on event days, to see how close to 95db I'll end up with a freer flowing system. I can always pull some discs or put the solid end cap back on for the ride home.
Posted by: Root_Werks Oct 4 2010, 01:41 PM
Sounds good!
This would be a 914 I'd love to see in action.
Posted by: Andyrew Oct 4 2010, 06:04 PM
I personally dont like supertraps... But with that turbo location your kinda SOL...
Posted by: Woody Mar 17 2011, 04:18 PM
So how did this turn out? I am very intrigued.
Posted by: ottox914 Mar 17 2011, 07:55 PM
I suspect it will never be "done". Was chasing boost leaks last fall when winter came to WI. As the snow is going and garage temps raising, I should be back at it with a winters worth of ideas to try.
Updates will be posted as progress would warrant.
Posted by: Walter Oct 5 2011, 06:04 AM
I suspect it will never be "done". Was chasing boost leaks last fall when winter came to WI. As the snow is going and garage temps raising, I should be back at it with a winters worth of ideas to try.
Updates will be posted as progress would warrant.
Any warrents for updates yet?
Posted by: rick 918-S Oct 5 2011, 06:56 AM
Posted by: r_towle Oct 18 2011, 01:39 PM
couple of questions.
How did you address potential head/cylinder leaks?
Did you do anything special to the heads or the tops of the cylinders?
I did not see anything unique there.
Also,
What HP are you predicting at this point?
Rich
Posted by: ottox914 Jan 3 2013, 06:33 PM
Got a few PM's lately on project status, and holy cow- its been awhile! Sorry guys.
First of all, overview of 2012. I got a tough hand of cards in 2012.
Started in 12-2011. Lost my job of 8 yrs, after 20+ in the industry. Oddly enough I was the most tenured and highest paid of myself and my co-workers. Hmmmm... In March scored a position in a related field. This co. stated out front they had no real training program but they thought I'd do just fine. After exactly 90 days I was let go, and the blond at the desk next to me, with no more experience than I had, got my desk. Hmmmm... Was on UE till the end of the year, looking hard to replace a 60K job in my little town of 8000 people. Didn't find it. Thankfully my wife and I were smart with our $$$ when we had some, and the bottom didn't drop out of our world. UE ran out 12-12, and i took a job managing a small auto shop. That pays exactly the same as UE did- except that there are health benefits that are affordable. The COBRA we spent most of the year on was just under 1k/mo for health insurance. OUCH.
SO- bottom line, there wasn't much motivation or money to take the 914T up another level.
Time spent: Spent 2012 trying to get the small turbo to work. On paper, the 9B turbo should have been a perfect match to the 1.8 turbo motor. I have learned that "on paper" and "real world" are 2 very different things. I pulled the 9B and put the wrx turbo back on. Better results. Rebuilt the 9B and put it back on. Less better results. Seems something is up with how that turbo works with my overall system. I don't know if it is the turbo location, the 2 valve heads vs the 4 valve heads of more modern engines, volume of the intake system, or what. But. For whatever reason, the 9B wouldn't build much more than 5-6 psi, and all this would be from 5-7k rpm. So not much low end, which is what I was going for with the smaller turbo. So the 9B is out. So much of 2012 was turbo swapping, which costs zero dollars, since I already had both turbos. End of the driving season I was taking the car out for a little October beat'n run, and the boost went away and the car ran but poorly. Got it back home and checked things out. The old, dirty air cleaner had collapsed in on itself, and was stopping the turbo from spinning. So more $$$ to spend on a cheep air filter, so I could get it running and into storage. The air cleaner I found was about 2x as big as the one that failed.
WINNER!!!!!!! With 2x as much air getting in, the turbo woke up. With the engine spinning to 7k, I'll see 13psi at the top of 2nd and 3rd gears. Fun. The car revs much more freely, boost and speed build much faster. Where before the car just felt like a bigger NA motor, with smooth power building across the rpm band, it now had a noticeable p u s h back into the seat from 4k to redline. Over and over again. Sadly all this fun happened on the drive to storage.
Money spent: Spent a small amount of real money to have an exhaust shop modify the supertrap to have it fit much better with the wrx turbo, since that is the one we're going with. It looks much better, and is much quieter at an autox. Most I blew was an 86db, which is well under the 90db limit at most of our sites. There was also a set of new/never used star spec tires I picked up over the winter from a chump car team that had moved onto a different car. They were only 195's, but $300 for a basically new set 4 tires was a deal I couldn't pass up, as the existing tires were 5+ yrs old and hard as rocks. The big cost was the elephant bushings for the rear trailing arms. I had an odd "click" in the rt rear for a yr or so, and the handling was getting odder and more weird at the autocross. I was thinking it was a bad shock, but traced it to the trailing arm bushing. So this spring I have a big project, to remove the trailing arms, power coat, replace bushings and bearings, and get it back on the road.
Autocross: Made enough events in 2 separate series to win my class in both. Even with goofy handling of the "variable random toe" provided by the trailing arm bushing wear. So with a more buttoned down suspension and more boost, the car should be even more potent next season. And if I can find better work and some Rcomp budget...
Things I love about this project. Off the line it feels like any strong type IV. And then. The torque when the turbo starts pulling is amazing. I'd love the tq to come on sooner, but we'll see how things develop. The engine and turbo pull like crazy right to the fuel cut at 7k. Having the tq come on in the mid-upper end is probably thermally less taxing on the motor. It looks basically stock but for the panasports. AND, I CAN"T say enough about Len Hoffman's heads. I'm sure the cam from Jake has plenty to do with this as well, but the new motor runs SO cool. Engine temps are right where they were expected and rock solid. EGT, CHT, oil temps and pressures, I couldn't be happier with how stable and steady these have been. If I were track lapping the car it might be a different story, but for back road zipping around and the weekend of autox, perfect.
2013: I'd like to try another turbo. Really? Really. I've been thinking of a Ko3 as would be found on our Audi TT. Thats a smaller turbo, seems to perform well on the 1.8L TT motor. They were out there on all manner of 1.8T motor from Audi and VW, so there may be some used options cheep. Get those trailing arms re-done. If I choose not to try yet another turbo, some dyno time for sure. I'm as curious as the rest of the world to know what it puts out. I'd like to pull the OEM mufffler heat shield and re-do the air cleaner to pull it up and away from so much road grit. And find a better paying job so I can afford more goodies for the 914T.
I should be out to the farm this weekend, I'll try to snap a couple pics of the new muffler and air cleaner set ups.
Posted by: ottox914 Jan 3 2013, 07:26 PM
couple of questions.
How did you address potential head/cylinder leaks?
Did you do anything special to the heads or the tops of the cylinders?
I did not see anything unique there.
Also,
What HP are you predicting at this point?
Rich
Bad on me for taking so long, but the prior post is the story of 2012.
Nothing special on the heads/cylinder junction. Other than the wisdom of Len Hoffman. His suggestion was that he isn't really in favor of turbo type IV motors for just this reason. That junction is a potential problem area. His thoughts were that as I was building a budget motor here, lets use the 1.7 cyls as they have thicker walls, and therefore a thicker/wider sealing surface to the head. I got the cyls and heads to Len so he could check and be sure all the mating surfaces were going to be happy together. On my little motor, shooting for no more than 1bar boost, he thought this would be fine enough. If you were going for some larger cyl size, or crazy higher boost, there maybe other steps to take. And if you were paying to play at that level, you probably can and should take greater steps to preserve your investment.
As for HP. Anyones guess. I've only driven stock cars of all 3 engine sizes, and a 1600lb 200+hp autocross beast. My street car is somewhere in the middle. I'd like to guess 150+ or so at the wheels, but who knows how accurate the owners butt dyno really is. I really need to stop messing around here, tune the SDS to the turbo thats working, and see where we're at.
Posted by: Andyrew Jan 4 2013, 12:55 AM
2013: I'd like to try another turbo. Really? Really. I've been thinking of a Ko3 as would be found on our Audi TT. Thats a smaller turbo, seems to perform well on the 1.8L TT motor. They were out there on all manner of 1.8T motor from Audi and VW, so there may be some used options cheep.
What turbo do you have now? Where do you see full boost and how much PSI do you run?
I am a turbo guy, my Audi 1.8T's KO3 I replaced with a GT28R, which I replaced with a Comp Turbo CTB5356.
The KO3 is to small of a turbo for even just the 1.8t, Full boost under 2k, Boost starts to taper off after 5k, Shift at 5.5k Max power ~ 160AWHP (20psi).
The GT28R was a perfect sized turbo for the 1.8T as an autox'er or daily, Full boost under 2500, boost doesnt taper off even at 7200rpms shift at 7200 rpm's every time, max power 275AWHP(20psi)(This turbo gave INSTANT full boost above 4krpm's, aka any situation in an autox.).
The CTB5356 is a bit large, but with the increase in turbo technology its a very good sized turbo for daily driving, however a tad laggy for instant boost at autox. I would consider this an awesome track turbo. This turbo is designed to run extremely high boost pressures (35PSI) and still be efficient, which was the reason why I chose it. I run only 10psi at the moment and it makes the same power as the GT28R when I ran 20psi. Full (Low) boost ~4krpm, probably 4500 at high boost, boost probably wont taper off till 8500 rpms but my tune doesnt go past 7200 currently. I anticipate well over 400AWHP(25psi) when I crank the boost up. If I ran C16 and spent some time on the head I might see 500AWHP(35psi), but I dont think I'll get to that point any time soon.
I am a big fan of the right sized turbo for the job. You might want to look at the SR20DET turbo's that come stock. Some of them are ball bearing, but most are journal bearing and can be had CHEAP.
Small turbo's make excess heat. Excess heat means detonation. Get yourself a nicely sized turbo. I wouldnt throw a KO3 on anything more than a 1L Geo engine.
Also Audi TT's (225hp model) used a KO4, the 180hp model used a KO3. The KO3 has stopped being used in most engines due to its small size, the KO4 is almost the exact same size but is more efficient, however more desirable. Consider that if you REALLY need to go with a small turbo.
Posted by: ottox914 Jan 4 2013, 05:18 PM
http://www.914world.com/bbs2/index.php?showtopic=185613&hl=clutch&st=20
In my review of 2012 I don't know how I forgot the crazy clutch adventure.
Andyrew- thanks for your input on turbos. Yes, I agree, the right tool/turbo for the job, and I agree, smaller can = more heat. The intercooler set up I have, while unconventional, shows no more than 25-30 degrees above ambient temps for IAT, and for the short duration of an autox, I'm fine with that. I could always add water injection if needed, or go to an air-water set up. I've had experience with both.
The thing that is most vexing here for me is the airflow thru the engine. Even with Lens great heads and Jakes much upgraded cam, there just doesn't seem to be alot of flow to work with. I think its a combo of the 2 valve heads vs the 4 and 5 valve heads of more modern cars, along with the length of the exhaust system. STS with their rear mount turbos makes it work with a much smaller turbo than conventional wisdom would suggest. So what works better on your 1.8 5 valve TT head may likely be all wrong for my 1.8 2 valve rear mount turbo system.
For me a bunch of the fun is in the tinkering. So I may be looking for a good K03 or K04 to play with some more.
Posted by: tscrihfield Jan 5 2013, 12:13 AM
The K03 and k04 are great little turbos! The only issue is their hot to cold side sizing. This would be my only disagreement with Andy. The K03 was optimized for the 1.8 due to the unsquare engine design. Reason being they needed torque out of a smaller displacement. You have an 80mm bore and 86mm stroke. This means you need a little volume of air really fast without huge boost numbers. Granted, this turbo will not last long when ran hard, but the way it was designed it will be reliable. This turbo will produce 12-18 lbs paired with similar volume (meaning exhaust gas CFM to intake volume). The way you Would ultimately pair a turbo would be based not only on efficiency of displacement to turbo but also volume needed (volume of cylinders/intake) to volume produced (cold side) to volume created (after engine firing headed to hot side). There are better ways of wording it but this gets my point across.
My graduation project for my high performance class was building two NA engines (2.0zetec, 2.4ecotec) with turbos. I ran a number of tests to optimize stock (junkyard) engines & parts. I was very lucky to have a teacher who was very well versed in the forced induction world and willing to teach a punk a$$ kid like me.
To sum up, all of the type 4s are that the opposite of what a normal turbo engine "would" be. We are dealing with large bores and short strokes. So with this said you would ultimately want to find a turbo that matches this "backward" design just the same. The volume of air coming out of the type 4 in exhaust gas is low pressure and in short spurts in comparison to a typical turbo engine by design. So increase the size of the hot side by trim not by housing volume. This will allow more movement of the turbo earlier to maximiize the low end, but the waste gate will be working OT in the upper rpm to bleed off the unwanted pressure. But let's be honest, we aren't revving these little guys to 7-8 rpm under boost.
I know it is a lot of information, but I have been through this and I agree that tinkering is an absolute blast!
Ottox I have a 13b turbo that has been rebuilt with a little shaft play but very usable if you'd like to try it, I think it would be a great match for you. I have really enjoyed your thread and I admire your work. Hope to see this car one day!
Posted by: ottox914 Jan 24 2013, 11:39 AM
Better late than never? I finally got out to my father in laws farm for a few pics of the current supertrap muffler set up. I know its not as free flowing as the straight pipe was, but it seems to flow pretty well just the same, as it is basically a straight thru system. And the small reduction in sound is appreciated. At WOT in 2nd gear I've blown high 80's db at an autocross, and with some of our sites at a 94 or 96 db limit, I'm right where I need to be.
Andyrew: Good to know about your positive experience with the GT28r on the TT. If/when the turbo on my TT pops I know which direction to go now.
tscrihfield: I've wondered about something just like this, as I have been puzzling thru the project. In all the books I read researching this, and later internet surfing, I don't recall running into a discussion of the bore/stroke being a consideration in turbo sizing. Maybe I just missed it, but what you said is just about exactly what has been nagging at the back of my mind for a couple yrs now. So accepting your position that the b/s configuration of the motor will have a direct effect on the onset of boost for a given turbo, all other things considered equal, what would your opinion be of a correct turbo for my engine, a 1.85L 4 cyl with a b/s of: 90/71, and why. And if you would, get into more of the specs of the turbo you have on hand, what cars it was on, and why its a better choice for my engine. Oh, and would the K03/4 be a decent choice according to your thoughts. Funny, I always thought of the 1.7/1.8 motors with the 66 crank as the "short stroke" motors, and now it seems my "stroker 2.0" 71 crank really isn't all that long... My "small" turbo was a 9b, one of the 2 turbos on a mitzu 3000GT. The turbo that is on the car now is from a subi 2.0L wrx. It seems to make good power from mid to high rpms, once there is some airflow, but I wouldn't mind the onset to be a little sooner.
Fun stuff! Thanks for adding your info to the thread.
Attached thumbnail(s)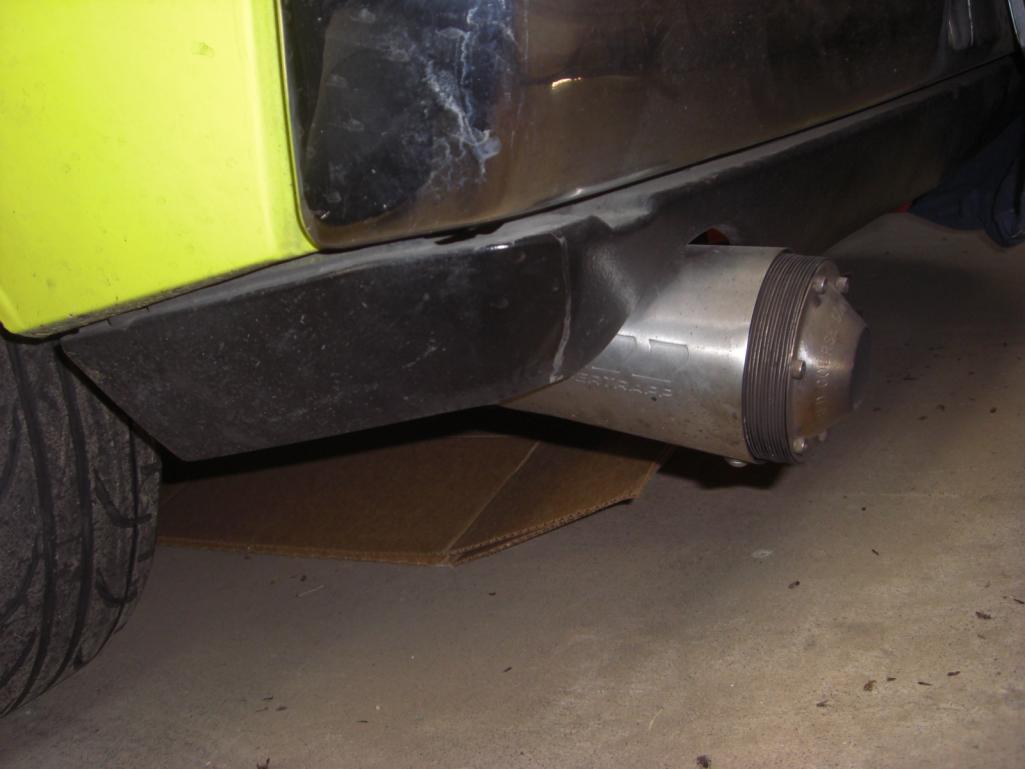
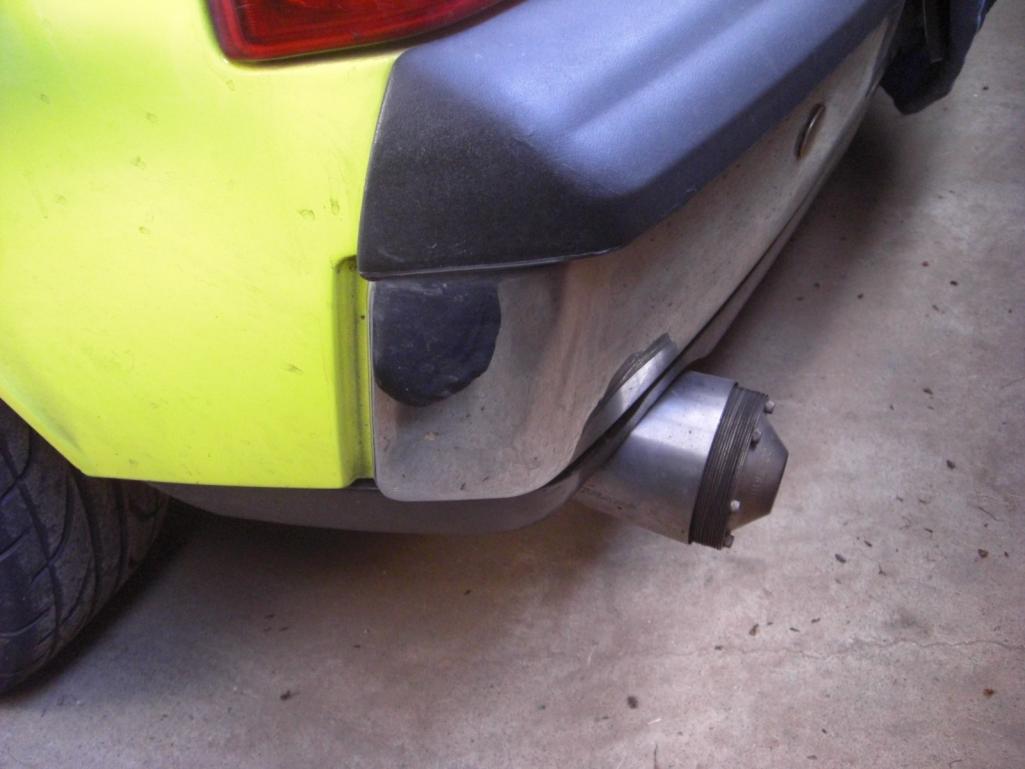
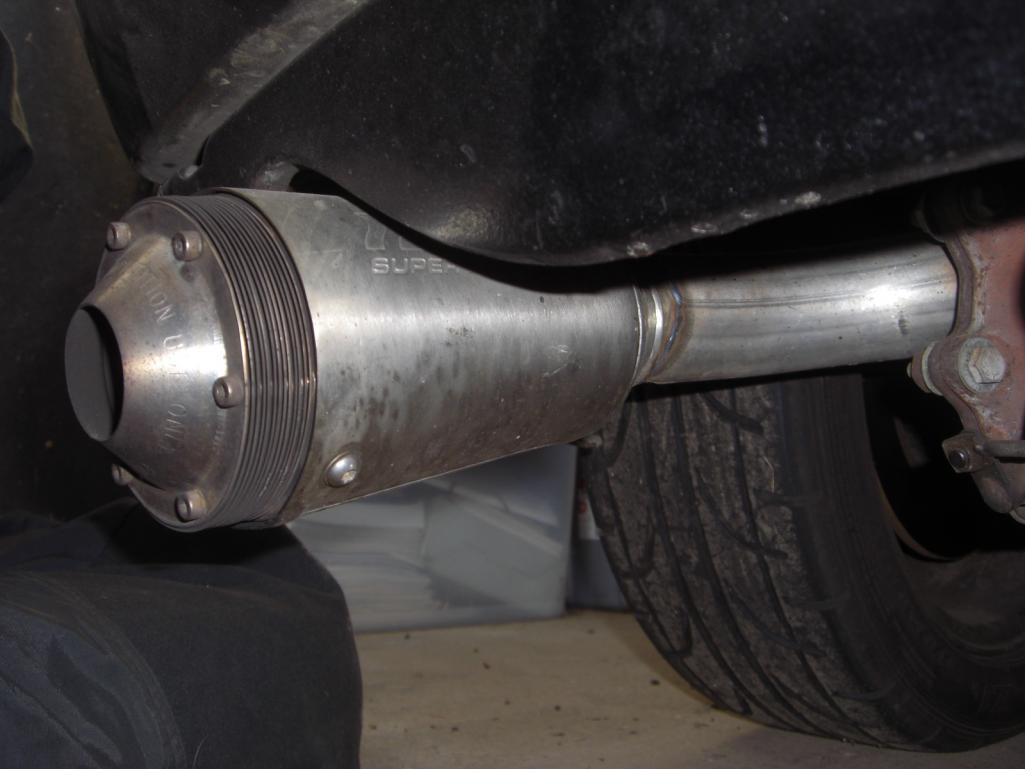
Posted by: McMark Jan 24 2013, 12:15 PM
Haven't run it yet...
But mine is a K03. There is a K04 that I should be able to jump to if this thing is too small, but I think we had the same thought process, "If it's on the small side for a modern 1.8 with modern CAD optimized flow, it might just work great for an old design Type 4." Mine is a tired, stock 1.7 though, so where your engine may slightly overwhelm the K03, I'm hoping my low flow engine will be perfect.
Who knows! One way to find out...
Attached image(s)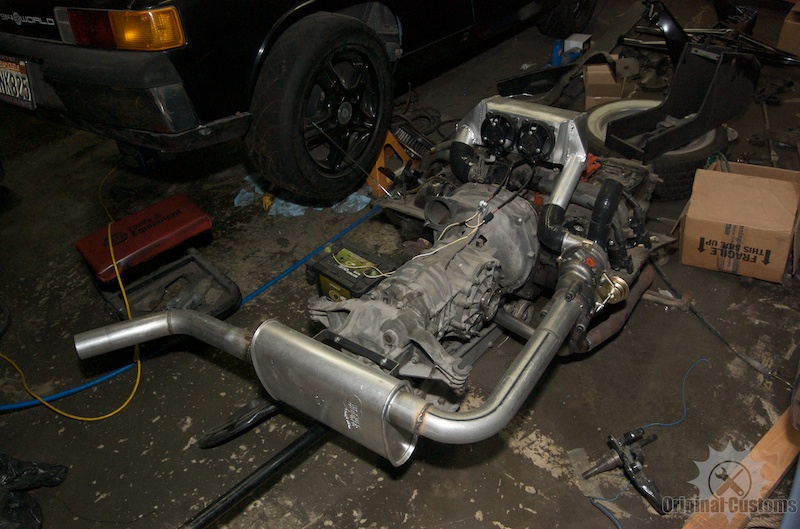
Posted by: Andyrew Jan 24 2013, 08:23 PM
Mark is that an OEM ko3 or a Chinese version?
If its chinese, just realize spool with not be as quick as it should be. Be sure to run oil though it without firing the engine (aka remove the plugs and keep cranking, let starter cool and do it again...)
Posted by: kg6dxn Jan 24 2013, 10:59 PM
Mark is that an OEM ko3 or a Chinese version?
If its chinese, just realize spool with not be as quick as it should be. Be sure to run oil though it without firing the engine (aka remove the plugs and keep cranking, let starter cool and do it again...)
He has a real KKK K03... Ask me how I know... The one pictured is not it...
Posted by: mittelmotor Jan 25 2013, 01:21 AM
Fun thread, ottox! I noticed your Direzza Star Specs in the photo...one of my favorite tires.
Posted by: Justinp71 Jan 25 2013, 10:18 AM
couple of questions.
How did you address potential head/cylinder leaks?
Did you do anything special to the heads or the tops of the cylinders?
I did not see anything unique there.
Also,
What HP are you predicting at this point?
Rich
Is the T4 much different than the T1 at the cyl/head mating? I did a turbo on my T1 and put some of the soft copper shims to lower the compression and figured it would get a better seal. No problems and those engines get turbo'd alot.
Posted by: tscrihfield Jan 25 2013, 06:28 PM
tscrihfield: I've wondered about something just like this, as I have been puzzling thru the project. In all the books I read researching this, and later internet surfing, I don't recall running into a discussion of the bore/stroke being a consideration in turbo sizing. Maybe I just missed it, but what you said is just about exactly what has been nagging at the back of my mind for a couple yrs now. So accepting your position that the b/s configuration of the motor will have a direct effect on the onset of boost for a given turbo, all other things considered equal, what would your opinion be of a correct turbo for my engine, a 1.85L 4 cyl with a b/s of: 90/71, and why. And if you would, get into more of the specs of the turbo you have on hand, what cars it was on, and why its a better choice for my engine. Oh, and would the K03/4 be a decent choice according to your thoughts. Funny, I always thought of the 1.7/1.8 motors with the 66 crank as the "short stroke" motors, and now it seems my "stroker 2.0" 71 crank really isn't all that long... My "small" turbo was a 9b, one of the 2 turbos on a mitzu 3000GT. The turbo that is on the car now is from a subi 2.0L wrx. It seems to make good power from mid to high rpms, once there is some airflow, but I wouldn't mind the onset to be a little sooner.
Hey Mark,
I have a question before I delve too deep into opinions. Have you ever had the heads flowed? Knowing the CFM on the exhaust runners helps but not necessary.
I have played with a few Numbers to calculate what I think might help. That engine is capable of moving somewhere in the neighborhood of 430 CFM max. This is assuming your heads flow at 1:1 rate with ability of volume able to move and have no restrictions in your intake/exhaust. The one big issue with this assumption is pressure will have to go somewhere if it does not exit through the exhaust. if it cannot go out the exhaust smoothly it will escape during the valve overlap period therefore pressurizing the intake while the turbo is trying to feed pressure in. This will cause what is known as compressor bind. If it is not audible it is a bear to hunt down and a lot of folks never know they have this issue when they have it.
I want to also state that the cam plays a part as well. But I will leave this out for lack of more overload.
Now we are still playing with a vacuum pump but the information I have gathered is this (and this is my theory behind the B/S difference). When I refer to this difference it is in leiu of the typical person trying to size the turbo. The only time you have a greater amount of CFM ability loss is when your bore exceeds stroke and this is what throws off so many folks CFM predictions (your simply dealing with a different beast). I don't have all of the answers behind it but my guess is that it has to do with common physics. Larger volumes of air are trying to exit the cylinder at the same time whereas a smaller bores with larger stroke has smaller volumes of air exiting the cylinder at that moment in time. If I was hosting a webinar this would be easier to demonstrate because I lack at conveying messages by form of writing. Non-the-less I hope you get it.
I would stick with a turbo that moves less CFM through the housing than your engine produces, remember you can always bleed of anything you don't need. This will allow the spool to happen quicker and peak faster. The one downside is heat. Now the good thing about this is you can go with a smaller housing with the same trim and see huge improvements with your current setup. The current turbo you are running is known as the TD04-13T. The turbo I have is the TD04-13G the biggest difference is Volute size which directly changes CFM flow. The 13T is rated at 385-400CFM and the 13G is rated at 345-360 CFM. it is originally off of 1G eclipses. My advice in any application with these cars is to run an external waste gate so you can get proper boost and bleed off the heat. But for both of these turbos you can get away with the stock waste gate built in the turbo and be fine, just don't crank them too high.
On the K03 it will actually flow less than the 13G and the 9b would be about the same. the K04 will flow about the same as your current turbo. I do agree with Andy on the SR20 turbos. Stay away from the base T25 turbos they are looking for too much volume and their journal bearings suck. The later 90's T28 had ball bearing but still a .80AR and 60 trim. This would spool a little later than the 13G and sooner than your current turbo but peak quicker than any above mentioned.
Please feel free to ask me anything on this. Most will be dialing in to find what the engine likes. I love this thread and it looks like you are on the right track!
Thomas
Posted by: ottox914 Jan 26 2013, 10:58 AM
McMark- get that thing in a car asap and let me know how it goes, and if I need to fund a K03 for my car.
I tired of doing all the R & D around here...


tscrihfield- Thank you for your post and insights. Just enough math to make your point and keep it interesting, not so much as to melt my limited brain cells.
So being as my 13T and your 13G are close cousins, can I expect the 13G to bolt right in place of my 13T? And if so, how might I get your 13G up to my place this spring? Do you ever have to travel for work to the twin cities area...
So far as airflow thru the motor, OUR (me, Len Hoffman, and Jake) thought process was that stock sized intake valves, would promote more velocity into the head at low flow/pressure rates for better cylinder filling and off boost performance, and that the turbo would push in as much as would fit once things got cooking along. The intake/exhaust ratio is around 85% as I recall, so there should be about as much flow out the exhaust as possible with out compromising the head castings. The exhaust is a standard kerry hunter 4:1 system. I'm not sure of the size of the tubes, but they are not gigantic. I don't expect to push much more than 14psi thru the motor, so lots of pressure is not in the cards. I'd just like to get to that 14 a little sooner.
Any thoughts on why the 9B would have been such a poor performing unit, barely able to make 5-6 psi, and all of that on the top end, vs the 13T making 12-13psi at top end, and spooling up nicely? There were NO changes to the car other than just swapping out one turbo for the other. How closely spec'd are the 9B and 13G?
Posted by: tscrihfield Jan 26 2013, 12:28 PM
McMark- get that thing in a car asap and let me know how it goes, and if I need to fund a K03 for my car.
I tired of doing all the R & D around here...
tscrihfield- Thank you for your post and insights. Just enough math to make your point and keep it interesting, not so much as to melt my limited brain cells.
So being as my 13T and your 13G are close cousins, can I expect the 13G to bolt right in place of my 13T? And if so, how might I get your 13G up to my place this spring? Do you ever have to travel for work to the twin cities area...
So far as airflow thru the motor, OUR (me, Len Hoffman, and Jake) thought process was that stock sized intake valves, would promote more velocity into the head at low flow/pressure rates for better cylinder filling and off boost performance, and that the turbo would push in as much as would fit once things got cooking along. The intake/exhaust ratio is around 85% as I recall, so there should be about as much flow out the exhaust as possible with out compromising the head castings. The exhaust is a standard kerry hunter 4:1 system. I'm not sure of the size of the tubes, but they are not gigantic. I don't expect to push much more than 14psi thru the motor, so lots of pressure is not in the cards. I'd just like to get to that 14 a little sooner.
Any thoughts on why the 9B would have been such a poor performing unit, barely able to make 5-6 psi, and all of that on the top end, vs the 13T making 12-13psi at top end, and spooling up nicely? There were NO changes to the car other than just swapping out one turbo for the other. How closely spec'd are the 9B and 13G?
I almost forgot to tell you that all of my CFM calculations were based on your engine @6000rpm.
On getting the 13g to you, I could ship it. I was just in Minneapolis a week ago... I may be up there in a month or so, but not sure yet. This is the turbo inlet...
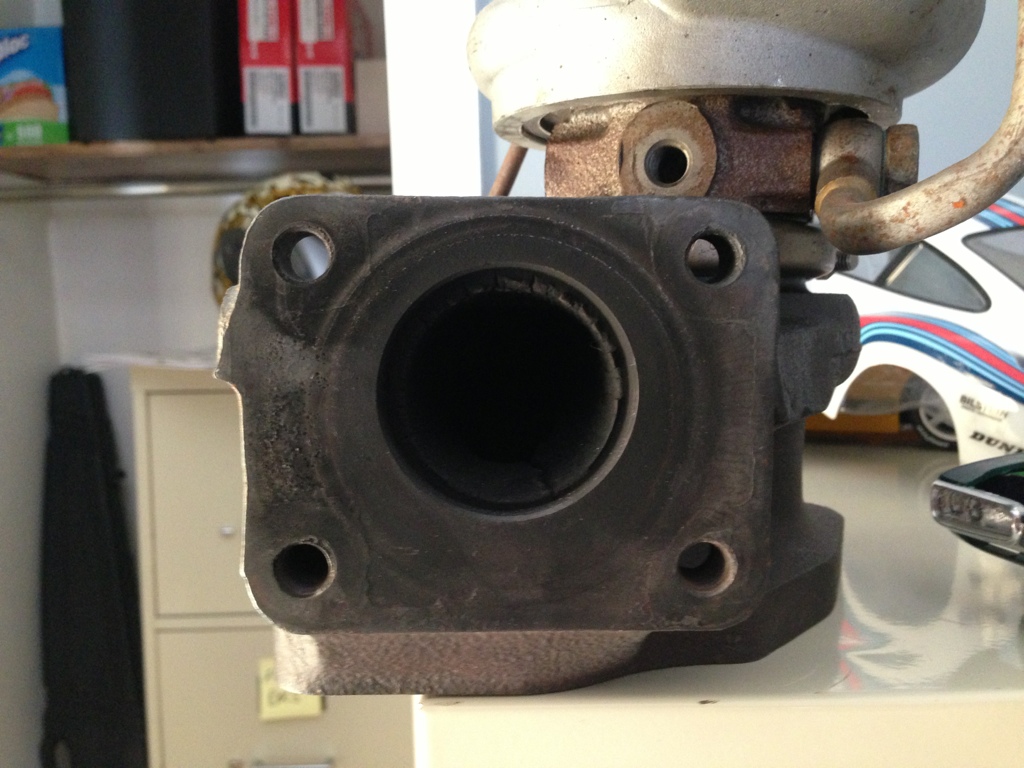
And the outlet...
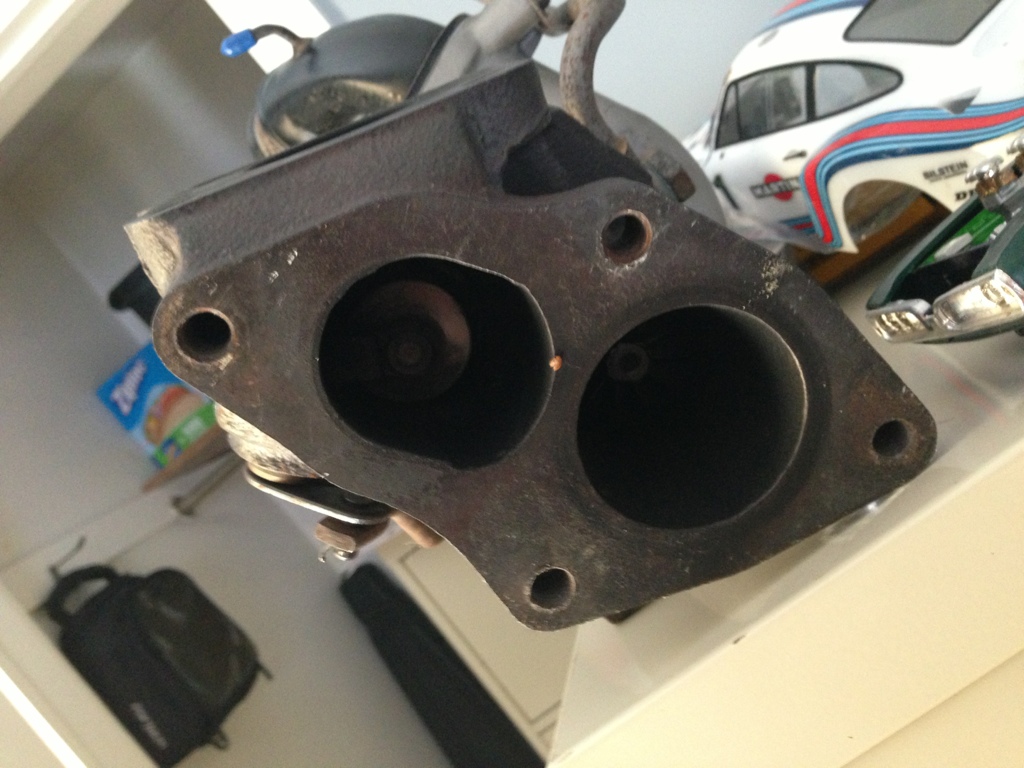
Knowing your efficiency in your heads tells me that the flow of your engine will be 365-370 CFM. This would explain the late spool for the 13T.
For the 9b, it sounds like that little guy was being worked to death! That turbo would have hit max boost when your engine hit 3400 rpm. After that it would have been fighting itself. That little guys max flow is 265CFM. The 9b is far away from the 13b by nearly 100CFM capability.
Thomas
Posted by: ottox914 Jun 9 2013, 09:18 PM
Back again. Started a new job in Feb, and getting my feet wet there has taken up a bunch of my time. That, and the cold, damp, no-fun weather in my neck of the woods have not encouraged garage time.
ANYWAY, thanks tscrihfield, (Thomas) for your info, and the offer of a turbo. Sent you a PM on that. Speaking of, anyone have any flanges that would work with the pictured turbo? The exhaust side is interesting, as depending on the flange, it looks like you could do a divorced waste gate set up. Hmmmmm..... interesting. More pics would be nice, of the turbo itself, so I could see what the options are to clock the housings to get the right orientation for my application. I'd be curious to see some of the maths used to determine the application of one turbo over another, and how the K03/K04 twins would fit as potential options. Any additional specs of the engine you would need for better calculations? If you need a couple bucks for the turbo, lets talk.
Dave
Posted by: ottox914 Jun 11 2013, 09:05 PM
Thomas has generously offered up the turbo pictured above for "development" purposes on the 914 turbo project. Don't know how soon it will show up, or when I'll have time to goof around with it on the car, but I'm excited!
I'll keep the updates coming as progress occurs.
Posted by: ddv005 Oct 30 2013, 10:54 AM
Thomas has generously offered up the turbo pictured above for "development" purposes on the 914 turbo project. Don't know how soon it will show up, or when I'll have time to goof around with it on the car, but I'm excited!
I'll keep the updates coming as progress occurs.
Any Updates : )
Posted by: ddv005 Oct 30 2013, 01:16 PM
Please see attachment
Attached image(s)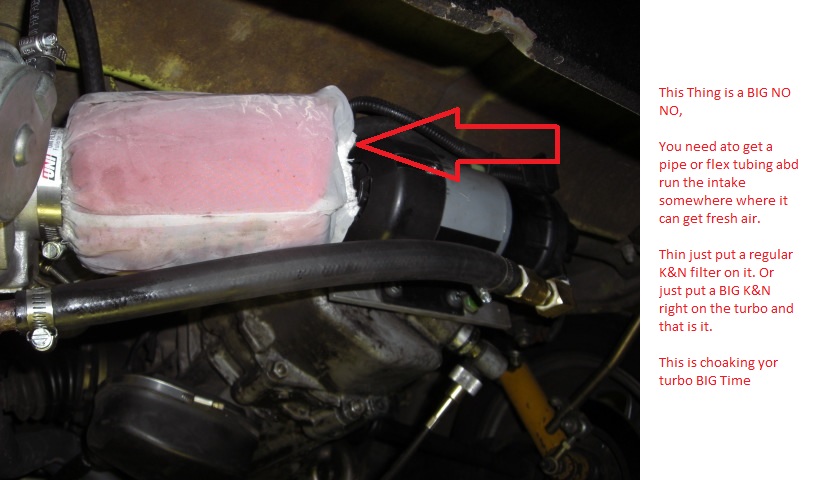
Posted by: effutuo101 Oct 30 2013, 03:16 PM
Man! I just got rid of my VF31 and VF 32. The 32 probably would have been perfect.
Posted by: jimkelly Nov 2 2013, 03:12 PM
the article is in my blog
jim
---------------------------------------------------------
[/quote]
It's been done before get a copy of June 02' Excellence magazine 2.0 4 cyl. w/CIS injection and a K 26 turbo still runnning strong
[/quote]
Powered by Invision Power Board (http://www.invisionboard.com)
© Invision Power Services (http://www.invisionpower.com)