Printable Version of Topic
Click here to view this topic in its original format
914World.com _ 914World Garage _ Euro turn signal installation project
Posted by: BigDBass Jan 5 2007, 10:05 PM
Hi all,
I haven't been around much lately. Maddie is a few days shy of 6 months old now and slays me daily with her two-toothed smile. Hope all is well in a good new year with my 914 friends.
While continuing to procrastinate 914 winter projects (ignition and exhaust) that will keep my car off the road come spring, I'm warming up by installing my Euro front turn signal lenses and Camp914's splendid Euro turn signal kit, available http://www.914world.com/bbs2/index.php?showtopic=2959.
This is what you get in the kit:
I started by removing my nearly flawless US lenses. The seals are nice and pliable. The chrome inside the bucket has a couple blemishes but still has a nice shine.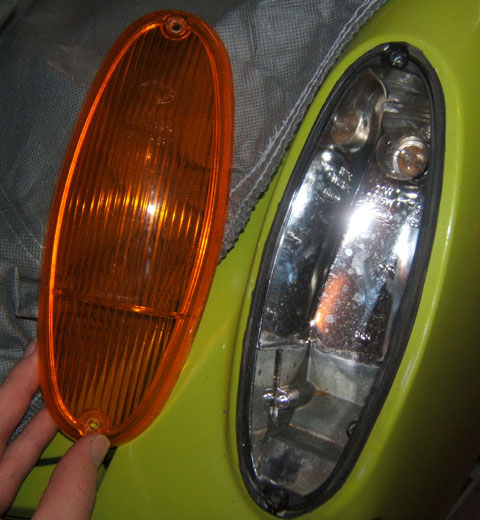
The top screw gave me a hard time and I found what looks to be solder or something near the tip.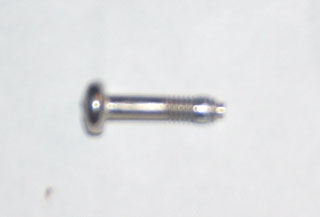
I tried to gently pull out the bucket, and to push it gently from the inside, but it didn't want to budge. Do I just need to use more force and push it out? Or maybe I'm missing something?
Thanks,
Dan
Posted by: Gint Jan 5 2007, 10:17 PM
There is a strap type bracket that goes across the back of the bucket assembly. You have to remove the nuts from the bracket and then the bracket itself from inside the fender before you can remove the bucket.
Posted by: ptravnic Jan 5 2007, 10:19 PM

Hi all,
I haven't been around much lately. Maddie is a few days shy of 6 months old now and slays me daily with her two-toothed smile. Hope all is well in a good new year with my 914 friends.
While continuing to procrastinate 914 winter projects (ignition and exhaust) that will keep my car off the road come spring, I'm warming up with installing my Euro front turn signal lenses and Camp914's splendid Euro turn signal kit.
I started by removing my nearly flawless US lenses. The top screw gave me a hard time and i found what looks to be solder or something near the tip.
The seals are nice and pliable.
The chrome inside the bucket has a couple blemishes but still has a nice shine.
I tried to gently pull out the bucket, and to push it gently from the inside, but it didn't want to budge. Do I just need to use more force and push it out? Or maybe I'm missing something?
Thanks,
Dan
There's a 10mm nut on the underside of the the bucket. It is accessed via the fender well. It's easiest to get at if you turn the wheel as far as it will go to the right (when you are removing the driver side bucket) and opposite for the passenger side.
It'll be obvious to you once you peek into the wheel well.
-pt
Posted by: BigDBass Jan 5 2007, 11:09 PM
Great, I'll check that bracket out in the morning.
Posted by: rmital Jan 6 2007, 09:09 AM
Dan...keep posting (your warm-up project )
...with pics of course.
got the kit too, haven't had the time to put them in yet.
Posted by: BigDBass Jan 6 2007, 05:07 PM
Sure enough I found the bracket inside the wheelwell. (By the way, the Haynes manual has much better coverage of the turn signal buckets than Lasher/Clymmer.) I removed the 10mm nut and the bracket came out easily. There were no washers on my assembly, so I will probably stick one on there when I put it back together.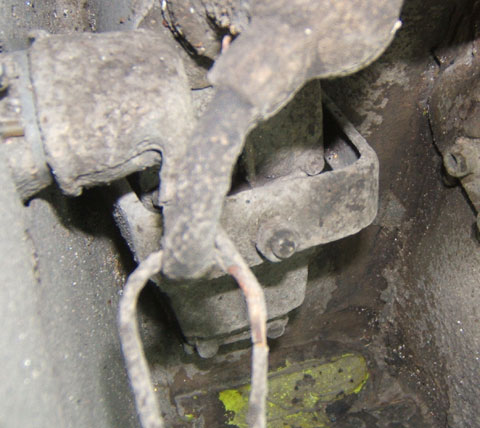
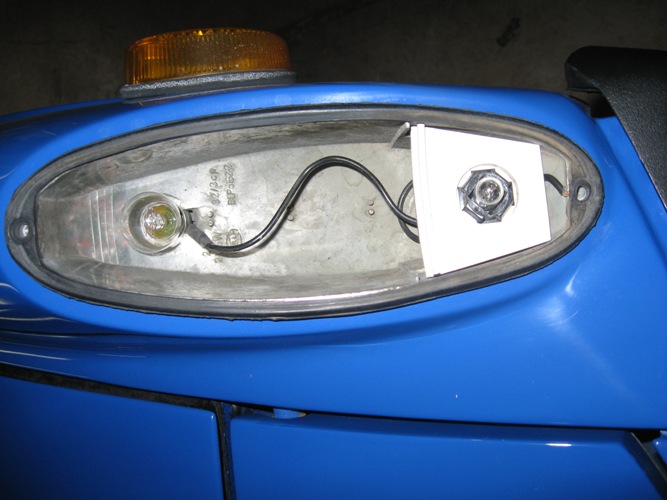
After gently working off the rubber boot and the wires, I got the bucket out. I removed the blinker bulb and ran the longer wire of the new bulb fixture through the slit at the bottom of the blinker socket.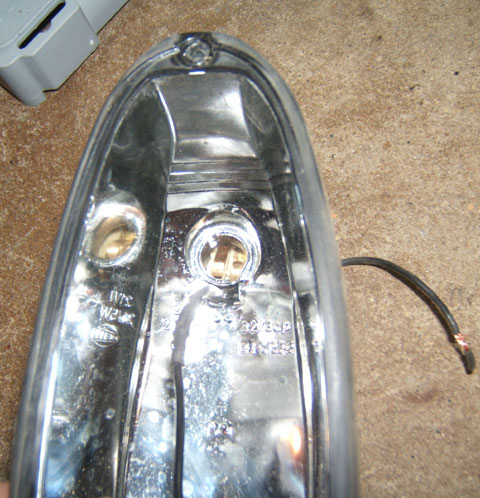
I threaded that wire out the little hole in the back near the other terminals: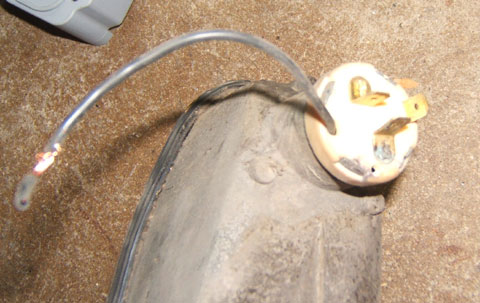
I then crimped on the blue connector. Soldering the wire on is probably a better option, but I have yet to learn how to solder.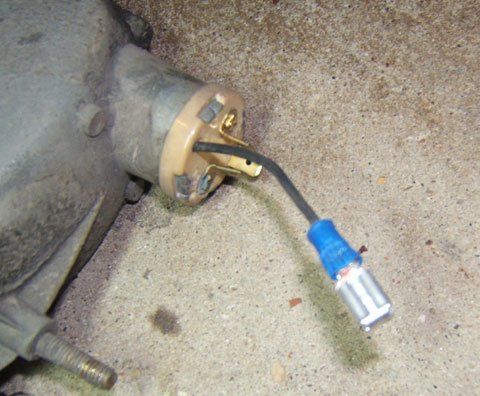
Posted by: msglaigaie Jan 6 2007, 05:42 PM
Soldering is pretty easy once you try it a few times. Make sure everything is as clean as you can, wire to connector, heat connector. Don't heat the wire, the insulation melts. Touch solder to the connector and Voi-oh-lah, it's on. Practice a bit on scraps and you will amaze youself at your genius. It makes a better connection and it really is easy. Now if welding steel and aluminum could be as easy...... Good luck, MSG L
Posted by: BigDBass Jan 6 2007, 06:51 PM
Yeah, maybe I'll teach myself to solder and redo the connections in the future.
The wire slips between small "nubs" down the center of the bucket. I had to trim back about 1/4" of heatshrink material to get the wire to sit cleanly.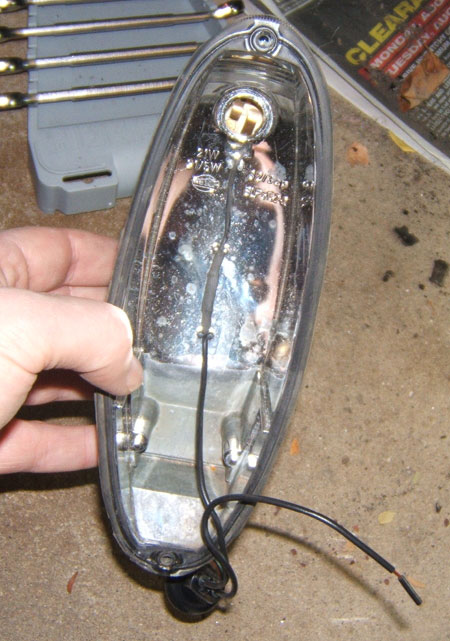
The new bulb/socket slips right into the white plastic bulb holder, then twists to lock in place.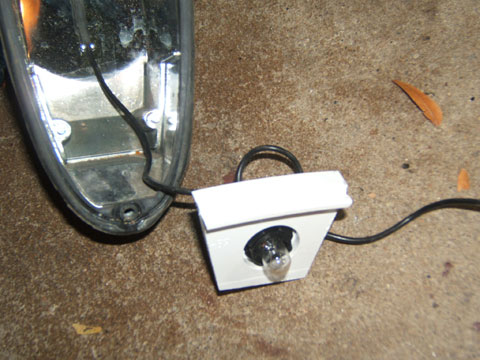
Excellence magazine suggested painting these white pieces silver in their Dec 2006 issue. I will pick up a rattle can of silver paint and do this when the weather warms up.
The white plastic bulb holder slides into the bottom of the bucket with the extra wire coiled behind. I left the ground wire for the circuit sticking out under this piece. This ground wire will go into the bottom screw hole for the lens, I guess I'll stick it in behind the rubber seal.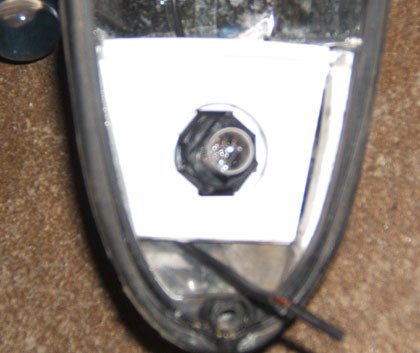
Posted by: Trevorg7 Jan 6 2007, 07:15 PM
Good work. I've got this kit installed too and it is sharp.
T
Posted by: BigDBass Jan 6 2007, 08:08 PM
I'm having a hard time getting the bucket reinstalled. I can't get enough of the wiring out of the hole to connect it up.
This install woulda been a bit easier if my little girl would let me have more than 5 minutes at a time to work on it. It also dawned on me that I'm not sure I will have enough room in the garage to work on the passenger side!
Posted by: iamchappy Jan 6 2007, 08:19 PM
Dan your are the man, juggling a baby in one arm and teener wrenching with the other.
Good luck to you and yours, enjoy her while shes still young.
Posted by: Trevorg7 Jan 6 2007, 08:51 PM
I'm having a hard time getting the bucket reinstalled. I can't get enough of the wiring out of the hole to connect it up.
This install woulda been a bit easier if my little girl would let me have more than 5 minutes at a time to work on it. It also dawned on me that I'm not sure I will have enough room in the garage to work on the passenger side!
Enjoy the time with your girl...they grow up fast.
If I recall correctly I did not remove the bucket to install. I turn the front wheels and worked from undernieth...I think. Using the lenght of the wire to work.
T
Posted by: 914-8 Jan 6 2007, 09:34 PM
You have the bottom piece installed wrong. Kinda defeats the purpose doing it that way.
Posted by: Andyrew Jan 6 2007, 09:45 PM
I was gona say... Thats not how I installed my bottom piece!! I superglued it in.. werks fine.
The bottom piece needs to go perpendicular to the bottom of the housing.. Top \____I_/ Bottom
Top being top of fender when installed
Posted by: Trevorg7 Jan 6 2007, 09:55 PM
Really? I don't think its wrong. I put mine in the same way and they work great.
Maybe Craig can chime in...CCLCHIMEINONWHICHWAYITSHOULDGO
T
Posted by: 914-8 Jan 6 2007, 09:56 PM
LOL, if you think that's correct, what do you think the purpose of the mod is?? 
Posted by: 914-8 Jan 6 2007, 10:16 PM
Here's how a euro should look lit up.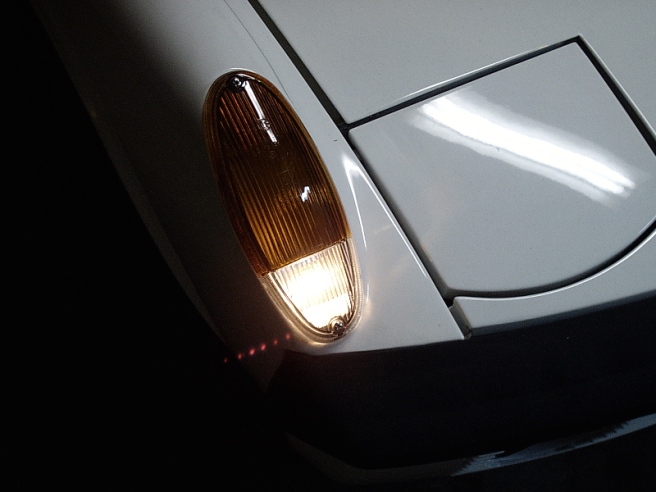
Posted by: BigDBass Jan 6 2007, 10:21 PM
To reinstall the bucket, I had to turn the rubber boot inside out in order to have enough slack on the wires to connect to the appropriate terminals.
I don't see how you could install this without removing the bucket. The blue double spade connector feeds the added bulb from the side marker light circuit.
Hopefully Craig or someone else in the know will comment on the orientation of the bottom piece. I tried it in just about every position I could think of and this way had the best fit. It gives the new bulb the same outward facing orientation as the upper turn signal bulb.
I definitely want to paint the plastic pieces silver. The white is quite visible through the clear part of the lens.
Posted by: 914-8 Jan 6 2007, 10:27 PM
Hopefully Craig or someone else in the know will comment on the orientation of the bottom piece. I tried it in just about every position I could think of and this way had the best fit. It gives the new bulb the same outward facing orientation as the upper turn signal bulb.
Someone in the know did comment on it. Me. And Andyrew, too.
This is what you are trying the emulate:
Two SEPARATE light compartments. The Euro lens is two colors for a reason.
Posted by: BigDBass Jan 6 2007, 10:40 PM
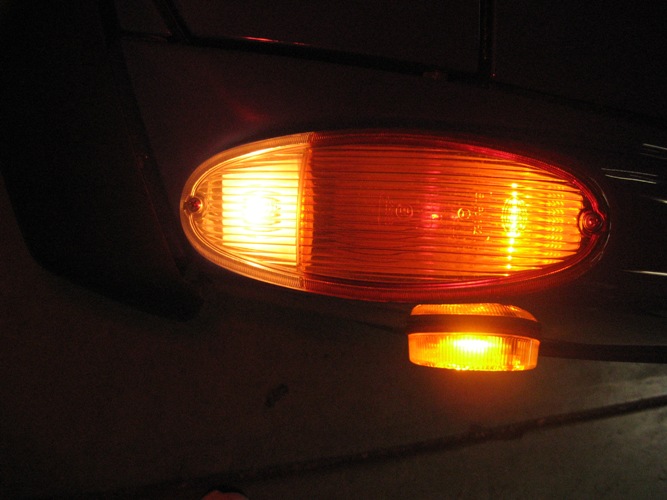
Here it is finished with the parking lights off. Notice how visible the white piece is through the clear part of the lens:
Here it is with the parking lights on. The lower bulb (and side marker) is lit. The upper bulb is lit, but dimly. When the blinker is turned on the upper bulb gets much brighter while the lower bulb stays at full brightness.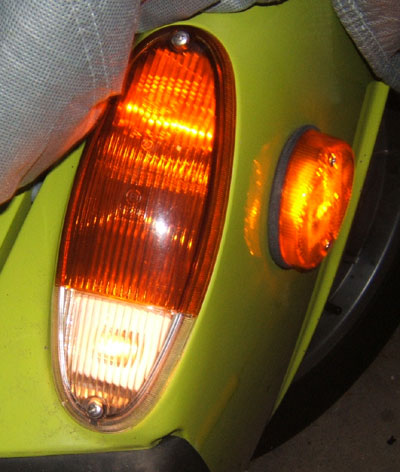
I believe this is in accord with how the mod is intended to work.
(Now I need to decide if I should keep the nearly perfect original US lenses or just sell them...)
Posted by: Trevorg7 Jan 6 2007, 10:41 PM
Dan - Here are some pictures of mine, from Camp914, installed. As I said before I thought I didn't take the buckets out but now thinking more I likely did. Anyway, I hope these pictures help although I know your current issue are the connectors. I do recall turning the boot inside out.
T
Attached image(s)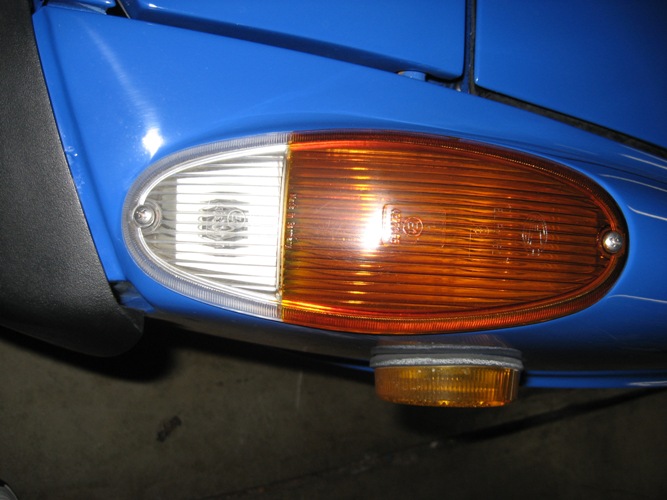

Posted by: BigDBass Jan 6 2007, 10:45 PM
Someone in the know did comment on it. Me. And Andyrew, too.
This is what you are trying the emulate:
Two SEPARATE light compartments. The Euro lens is two colors for a reason.
Installing it the way you have it basically acheives nothing.
Hmm, the two separate light compartments is what I ended up with. Perhaps one of my pictures was misleading? Light doesn't seem to be "bleeding" between the two. When I do the other side tomorrow I'll see if it will fit nicely with the piece perpendicular so that it divides them more drastically.
Posted by: 914-8 Jan 6 2007, 10:46 PM
Ah, Tervor's last pic helps, makes it much closer.
The bottom line is you want there to be two separate chambers. There should be little or no light bleed from the bottom chamber (the clear section) to the top chamber (the amber section).
I think in your last pic, it looks like you have the plastic piece pushed way down in the housing, so there is a big gap between the plastic piece and the turn signal lens. Optical illusion?
Neat kit!
Posted by: 914-8 Jan 6 2007, 10:50 PM
Although on Trevor's pictures, it looks like when the lights are on, BOTH compartments are lit brightly. I believe only the bottom should be lit, like on the pic of the white car that I posted on the first page. The top should operate only as a turn signal, I think.
Like this:
Or this: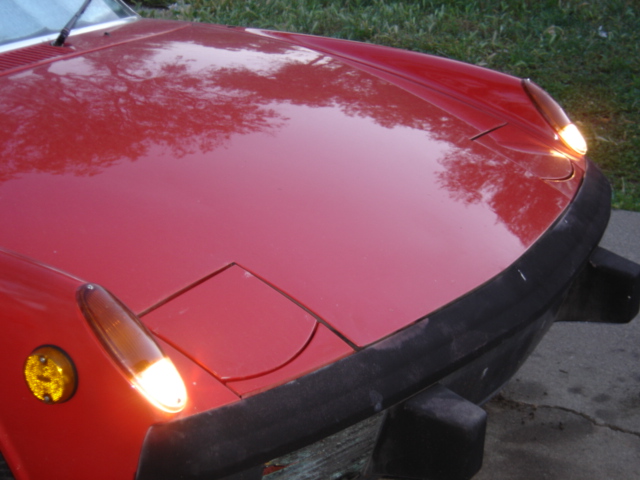
Not like this:
Posted by: BigDBass Jan 6 2007, 10:52 PM
Yeah, it looks like we're all right! 
Trevor's fourth picture shows how the white piece functions to divide the compartment. It's just hard to tell from the angle of the one I posted (and Trevor's 2nd picture.)
Thanks 914-8 for the photo of a Martin Baker's Euro bucket conversion to show the goal, and Trevor for the additional Camp914 install pictures.
This is now the illustrated how-to thread I would have liked to find before doing my install. 
Posted by: Martin Baker Jan 6 2007, 10:52 PM
......
Posted by: Martin Baker Jan 6 2007, 10:57 PM
...
Posted by: BigDBass Jan 6 2007, 11:01 PM
I'm guessing that the upper part being lit is due to the US lamp being wired differently.
Posted by: Trevorg7 Jan 6 2007, 11:04 PM
There is a lot of room to push the plastic piece down. Mine is near the top but not hard mounted there.
My 4th picture is with the headlights all the way on (no key in or motor on so the headlights don't come up). I think that is why the euro and parking/flashers are all on.
T
Posted by: 914-8 Jan 6 2007, 11:05 PM
Martin,
Just to be 100% clear, with the Euro setup, when running with the lights on, the bottom part should be constantly lit, and the top part should ONLY light up when the turn signals or emergency flashers are activated, correct?
What do you mean by "remove the 5 watt side of the 1157 bulb before installing it." ?
That Camp914 kit is very neat.
Posted by: Trevorg7 Jan 6 2007, 11:07 PM
Martin,
Just to be 100% clear, with the Euro setup, when running with the lights on, the bottom part should be constantly lit, and the top part should ONLY light up when the turn signals or emergency flashers are activated, correct?
What do you mean by "remove the 5 watt side of the 1157 bulb before installing it." ?
That Camp914 kit is very neat.
I'm sure they can be wired either way and maybe I did mine wrong but the bottom and top are lit when the headlights are on.
T
Posted by: 914-8 Jan 6 2007, 11:07 PM
There is a lot of room to push the plastic piece down. Mine is near the top but not hard mounted there.
My 4th picture is with the headlights all the way on (no key in or motor on so the headlights don't come up). I think that is why the euro and parking/flashers are all on.
T
Yeah, I think if you push the plastic piece down, there is going to be a lot of light bleed between the two chambers, kinda killing the effect. Seems like it should be secured up as close to the lens as possible to keep the bleed to a minimum.
The way you have it wired now, when you are running the car normally with the headlights on, does the top amber chamber stay totally dark, only going on when the turnsignal or emergency flasher is activated?
Posted by: 914-8 Jan 6 2007, 11:11 PM
Martin,
Just to be 100% clear, with the Euro setup, when running with the lights on, the bottom part should be constantly lit, and the top part should ONLY light up when the turn signals or emergency flashers are activated, correct?
What do you mean by "remove the 5 watt side of the 1157 bulb before installing it." ?
That Camp914 kit is very neat.
I'm sure they can be wired either way and maybe I did mine wrong but the bottom and top are lit when the headlights are on.
T
Oops, our posts crossed.
Yeah, I think yours need to be modified a bit to make it work like a true Euro.
I think Martin's "remove the 5 watt side of the 1157 bulb before installing it" is the way to do it, but I don't quite understand what he means by that sentence! Bend back one of the prongs so it doesn't make contact with the bulb?
Posted by: Martin Baker Jan 6 2007, 11:12 PM
...
Posted by: Trevorg7 Jan 6 2007, 11:12 PM
There is a lot of room to push the plastic piece down. Mine is near the top but not hard mounted there.
My 4th picture is with the headlights all the way on (no key in or motor on so the headlights don't come up). I think that is why the euro and parking/flashers are all on.
T
Yeah, I think if you push the plastic piece down, there is going to be a lot of light bleed between the two chambers, kinda killing the effect. Seems like it should be secured up as close to the lens as possible to keep the bleed to a minimum.
The way you have it wired now, when you are running the car normally with the headlights on, does the top amber chamber stay totally dark, only going on when the turnsignal or emergency flasher is activated?
Agreed, keeping it close to the top is key.
With the headlights on the top amber is lit solid and flashes with the directional.
T
Posted by: 914-8 Jan 6 2007, 11:15 PM
There is a lot of room to push the plastic piece down. Mine is near the top but not hard mounted there.
My 4th picture is with the headlights all the way on (no key in or motor on so the headlights don't come up). I think that is why the euro and parking/flashers are all on.
T
Yeah, I think if you push the plastic piece down, there is going to be a lot of light bleed between the two chambers, kinda killing the effect. Seems like it should be secured up as close to the lens as possible to keep the bleed to a minimum.
The way you have it wired now, when you are running the car normally with the headlights on, does the top amber chamber stay totally dark, only going on when the turnsignal or emergency flasher is activated?
Agreed, keeping it close to the top is key.
With the headlights on the top amber is lit solid and flashes when with the directional.
T
OK, I think we've finally got it. The way yours is running right now is kind of a "hybrid" US/Euro setup.
To get "full Euro":
1) Keep the plastic piece up as high as possible with some adhesive or something.
2) Modify the upper bulb like Martin says.
And it should function like the Euro system should.
Posted by: martinef1963 Jan 6 2007, 11:16 PM
Does anyone on this thread know the size of both the indicator bulb, and the one used w/ the kit?
I have the kit installed on my car, however I had a front end ding(er) and busted the lenses and lights.
I have another question in regards to the maximum wattage on the bulbs that can be used. I believe the top bulb was a 35W (right?) - if so can I go higher, and if I can how high?
thanks 
Posted by: Martin Baker Jan 6 2007, 11:18 PM
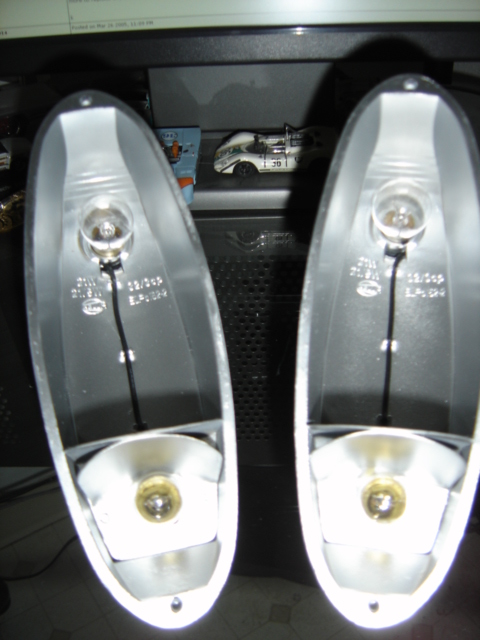
There is actually two parts to a real euro signal, the divider, and the refractor. It makes quite a bit of light for a 5 watt bulb. I was a little surprised after making the first set after seeing how the actual ones are made.
Attached image(s)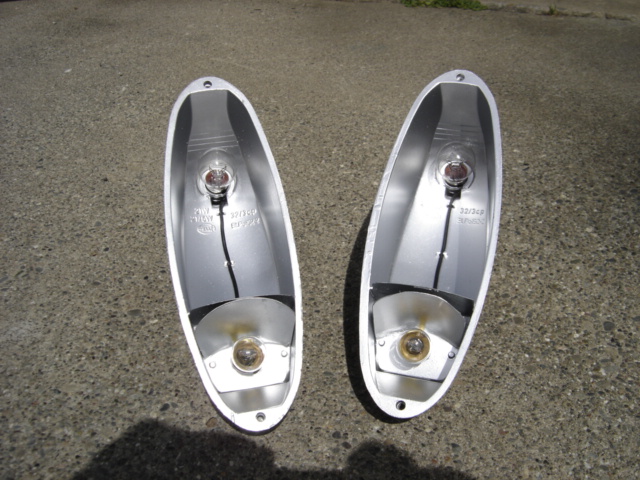
Posted by: Trevorg7 Jan 6 2007, 11:20 PM
There is a lot of room to push the plastic piece down. Mine is near the top but not hard mounted there.
My 4th picture is with the headlights all the way on (no key in or motor on so the headlights don't come up). I think that is why the euro and parking/flashers are all on.
T
Yeah, I think if you push the plastic piece down, there is going to be a lot of light bleed between the two chambers, kinda killing the effect. Seems like it should be secured up as close to the lens as possible to keep the bleed to a minimum.
The way you have it wired now, when you are running the car normally with the headlights on, does the top amber chamber stay totally dark, only going on when the turnsignal or emergency flasher is activated?
Agreed, keeping it close to the top is key.
With the headlights on the top amber is lit solid and flashes when with the directional.
T
OK, I think we've finally got it. The way yours is running right now is kind of a "hybrid" US/Euro setup.
To get "full Euro":
1) Keep the plastic piece up as high as possible with some adhesive or something.
2) Modify the upper bulb like Martin says.
And it should function like the Euro system should.
Yep that is it.
Maybe I'm getting old but I'd rather have more light visable so people see me. I've been run off the road too many times from folks that didn't see me. So I'll likely keep mine as is but that is a cool mod that Martin did.
T
Posted by: Martin Baker Jan 6 2007, 11:23 PM
35 watt will melt the lense in just a minute or two...6 watt max for the lower bulb, 20 watt for the flasher, as it stay cool since it is on and off. I did a little bit of testing on this deal. Plus I looked to see what the factory used. The good German engineers are seldom incorrect. Here's the real deal...
Attached image(s)
Posted by: type4org Jan 7 2007, 05:13 AM
35 watt will melt the lense in just a minute or two...6 watt max for the lower bulb, 20 watt for the flasher, as it stay cool since it is on and off. I did a little bit of testing on this deal. Plus I looked to see what the factory used. The good German engineers are seldom incorrect. Here's the real deal...
I bought one of Martin's setups and it is beautiful. I only made one mistake: I bought what were supposedly new Hella lenses from a large vendor (no, not AA), but those lenses have an incorrect amber tint. The technical inspector here in Germany wrote it up as a defect. I'm now thinking those must be cheap knock-offs. I don't recall that being mentioned when I bought them, though

Posted by: Martin Baker Jan 7 2007, 10:09 AM
Awesome, I am glad you are happy with them, and the fact that they passed TUV, even better! Sorry about your lense's. Is it possible you could help me out in buying some Hazet tools? I am looking to buy a 1/4 drive set. I will pay you or your time. Thanks in advance.
Martin
Posted by: type4org Jan 7 2007, 10:23 AM
Awesome, I am glad you are happy with them, and the fact that they passed TUV, even better! Sorry about your lense's. Is it possible you could help me out in buying some Hazet tools? I am looking to buy a 1/4 drive set. I will pay you or your time. Thanks in advance.
Martin
I can try, given specific details (via PM). I'd think you could get even good-quality 1/4 drive sets in the US, though.
Posted by: Martin Baker Jan 7 2007, 01:05 PM
//////////
Posted by: BigDBass Jan 7 2007, 09:52 PM
For the time being I'm going to live with the 5 watt light from the blinker.
It really brought a smile to my face when I turned on the lights for the first time. Seemingly a little project but it brings my 914 that much closer to my vision for it.
Thanks to all for the input. Hopefully this thread can help the next guy get their euro turn signal bling on!
Posted by: boxstr Jan 7 2007, 10:52 PM
Dan, Thank you for the write up. One thing you can do if you want is spray paint the white bulb holders silver. But then it may not matter since you are not driving around with your lenses off all the time, they just do what they should do and that is get the job done.
CCLINCAMP914EUROLITES
Powered by Invision Power Board (http://www.invisionboard.com)
© Invision Power Services (http://www.invisionpower.com)