Printable Version of Topic
Click here to view this topic in its original format
914World.com _ 914World Garage _ Re-keying your locks
Posted by: markb Jan 10 2007, 05:50 PM
I was re-keying a lock for someone today, and thought it might be a good time to take some pictures & explain how you can do this yourself. It’s not rocket science, if I can do it, anyone can do it. Please correct me if I’m wrong, or use the wrong terminology.
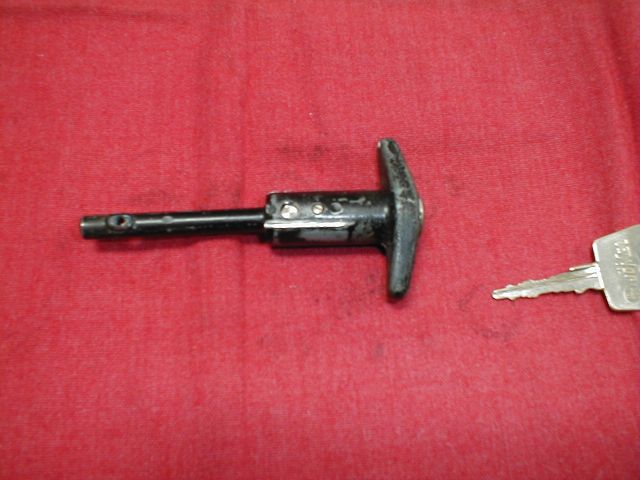
I’ll start with a door handle, because that seems to be what needs to be re-keyed the most.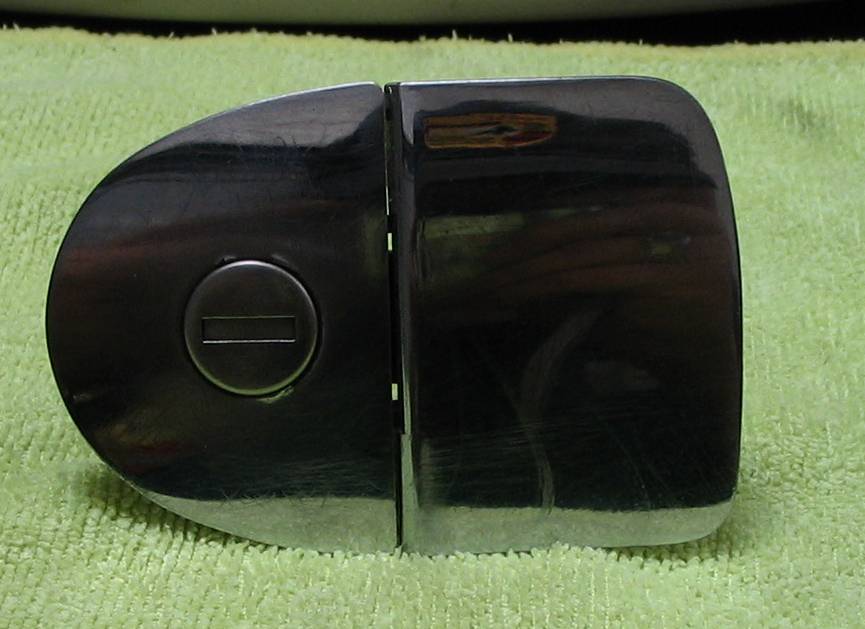
Your standard 914 door handle.
Posted by: markb Jan 10 2007, 05:55 PM
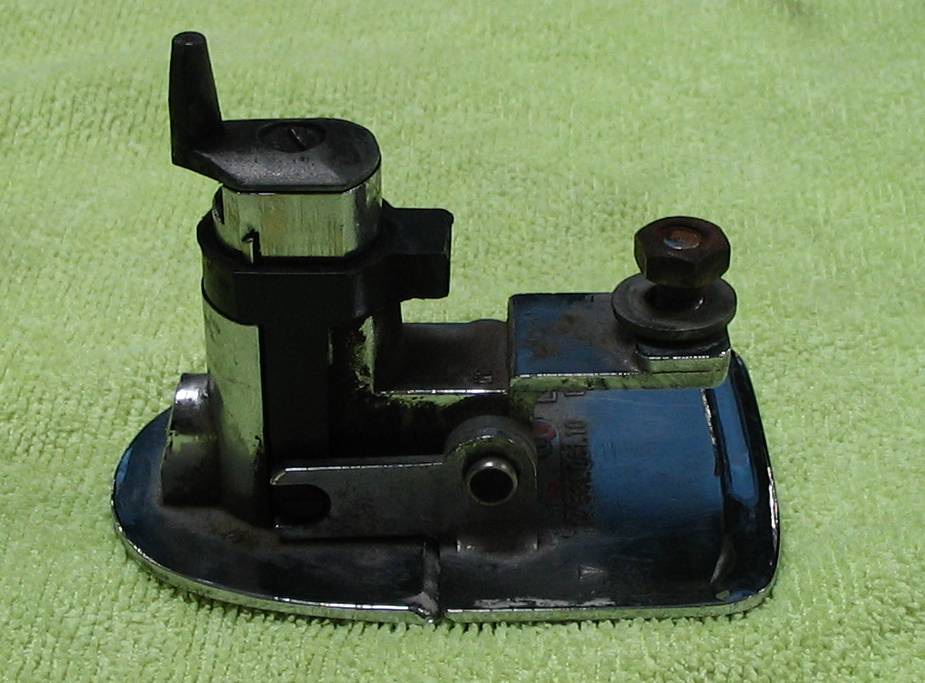
Remove the screw that holds the tumbler in place.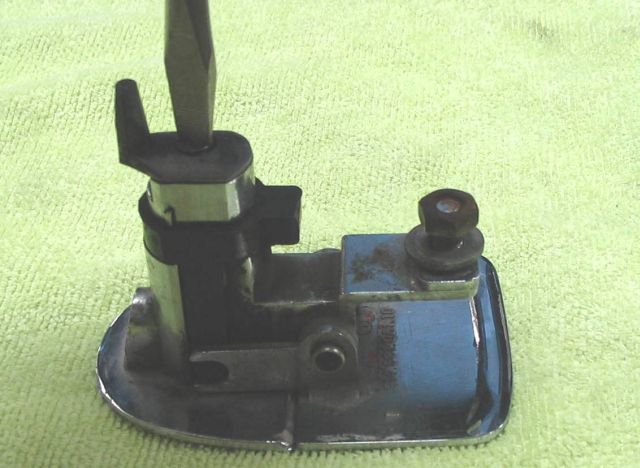
Once the screw is removed, remove the lever and spring.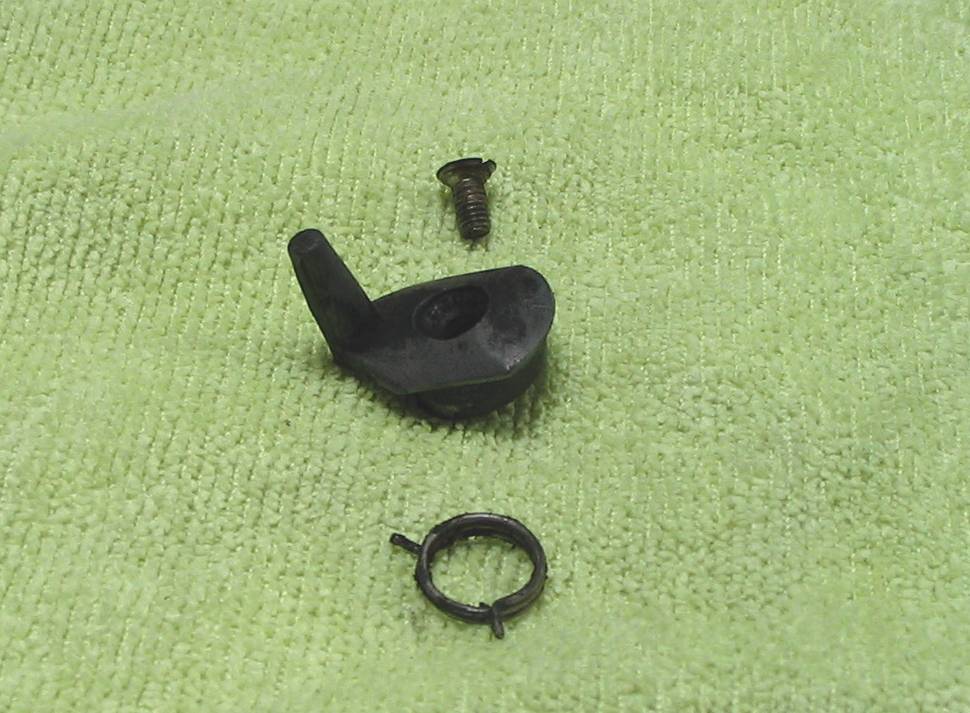
Insert the key in the tumbler and remove the tumbler.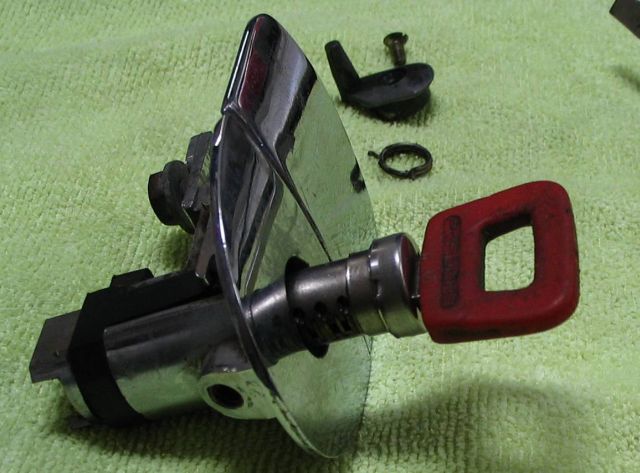
Posted by: markb Jan 10 2007, 05:58 PM
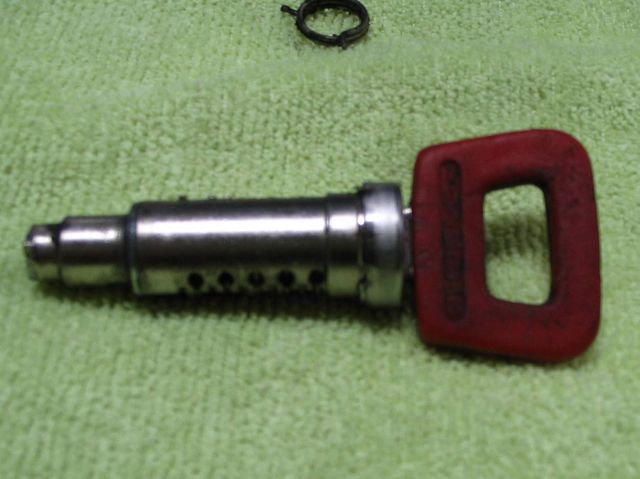
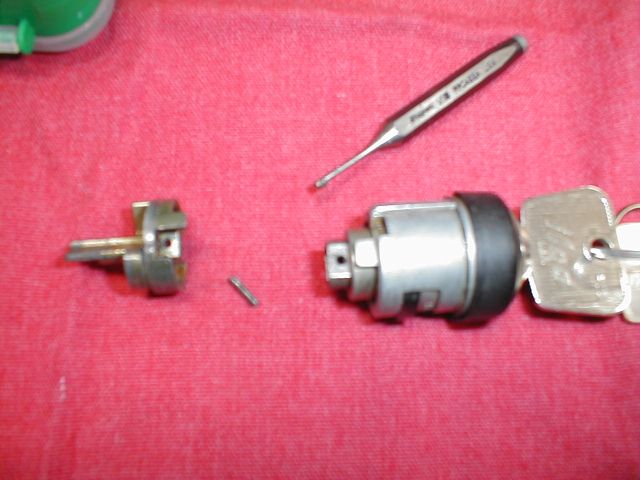
Once the tumbler is removed, you can see how the wafers sit. When you remove the key from the tumbler, make sure to hold the wafers lightly in place with your fingers (these little puppies can go flying).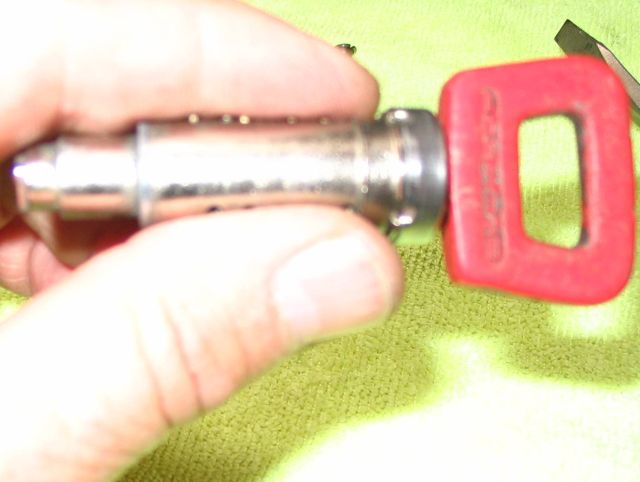
This is what you should have.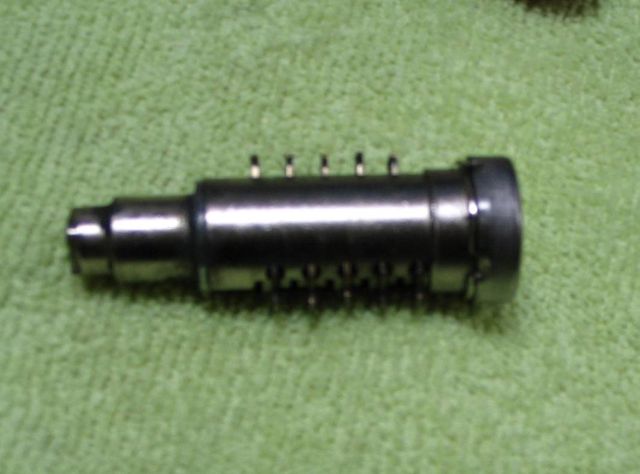
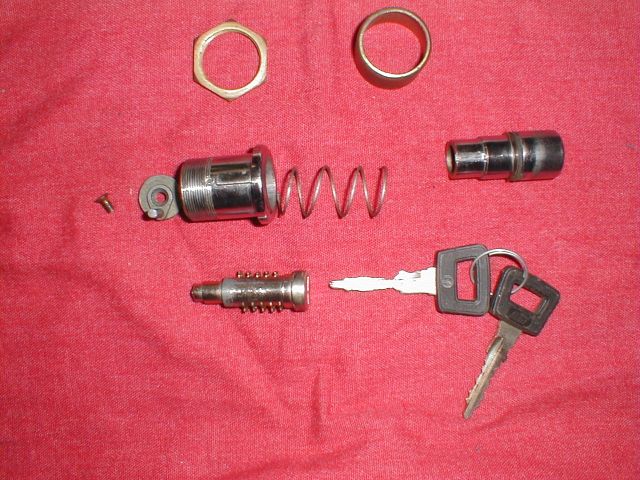
Posted by: markb Jan 10 2007, 06:03 PM
This might be a good time to discuss the wafers
There are 5 different wafers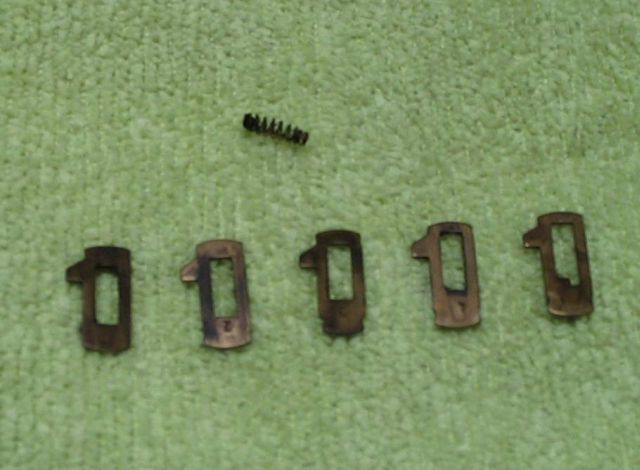
From left to right, they are numbered 1, 2, 3, and 4. The last wafer is the infamous “valet” wafer. This is the one that keeps the valet key from working the trunks & glovebox locks. Notice the “ledge” on the wafer.
Here are the keys, so you can see the difference. The valet key has 2 slots, where the normal key has only one.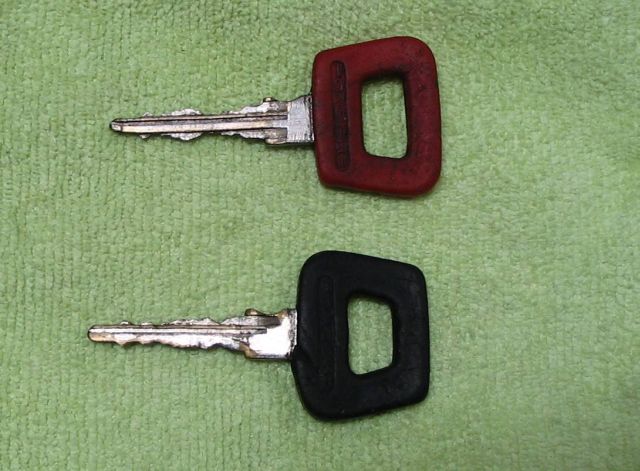
Ever wanted to see a brand new key? Here you go.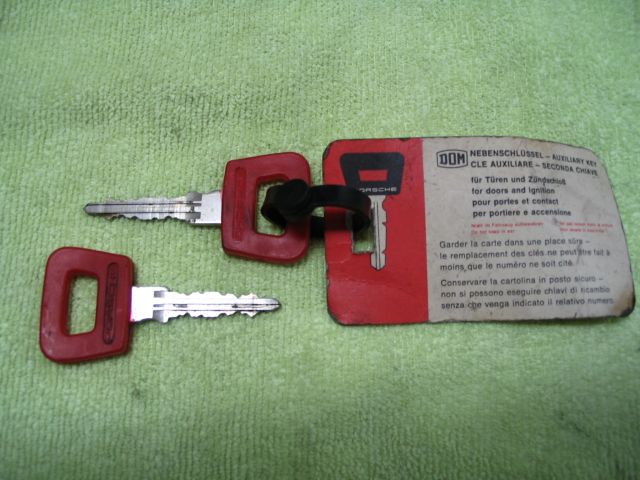
Posted by: markb Jan 10 2007, 06:11 PM
Before you start replacing wafers, wipe the accumulated gunk off of the parts. I’ve been told it’s better to put the wafers back in dry, and lube things up once it’s back together.
Now you need to move the wafers around until they are flush with the tumbler. Put the key in the tumbler, and look to see which wafers are not flush. Now look to see if they are not flush at the bottom of the wafer, or the top. One at a time, replace with other wafers that aren’t flush, until you have them all flush. Be careful not to lose any of the springs. They’re pretty small, and probably full of old lubricant, so they may come out when you remove the wafer.
Many times you can just rearrange the wafers without having to have spares. If you do need spares, I would rob them from another lock that usually isn’t used. For instance, when was the last time you locked your glovebox? Or your front trunk? These would be the ones I would rob for wafers. Just make sure you’re not using one of the valet wafers. If you’re like me, and have a few broken door handles lying around, you can rob them for parts.
Before: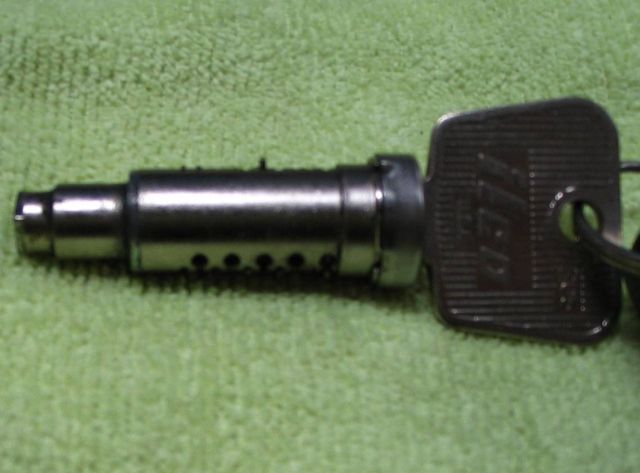
After:
Posted by: markb Jan 10 2007, 06:22 PM
Since you have the door handle out, you should check the plastic actuator (these have a tendency to break) to see if it needs to be replaced. Yup, this one is broken. The originals were white, the replacements are black.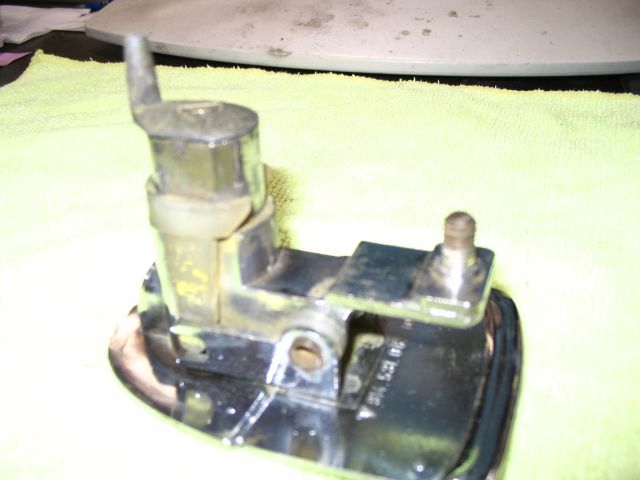
Wipe it all down to remove the old lube, and re-lube with a good lubricant. I like either of these: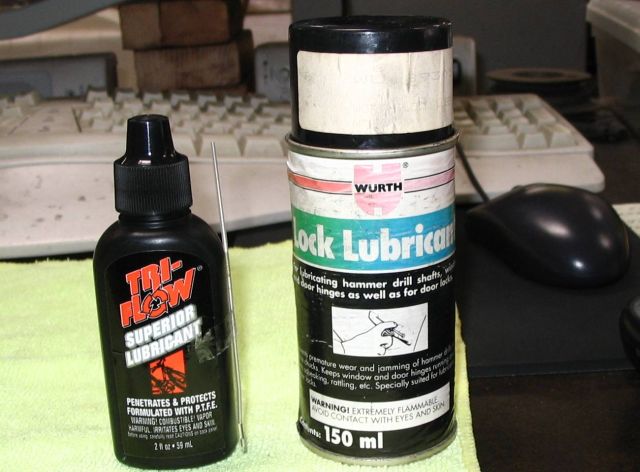
DO NOT USE GRAPHITE!!! It’s an abrasive, and it gums things up.
Once you have all the wafers in flush, put the tumbler back in the handle. There is a small seal that fits around the outer edge of the tumbler where it meets the handle, and helps to keep dirt & water out of the handle. If the seal is still good, re-use it. If it’s in pieces, go ahead and reassemble without it. I haven’t had any problems with any handles that didn’t have this seal. The tumbler only fits in one way, so check to make sure it fits correctly, and make very sure the key rotates the tumbler easily, and with the key in either way. Once that is done, put the spring in place, and use the lever to help seat the spring. Put the screw back in, and you now have a re-keyed door handle!
That's all for now. I'll do more later on each of the locks on a 914. Here's a picture of all that we'll eventually cover.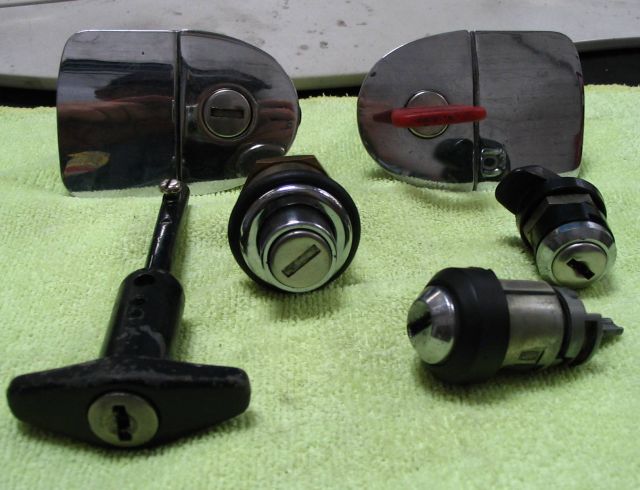
Posted by: mikez Jan 10 2007, 06:47 PM
Good write up....
Posted by: markb Jan 10 2007, 06:49 PM
Thanks. My brain hurts now, so I have to wait awhile before I do more. 
Posted by: cooltimes Jan 10 2007, 07:00 PM
Mark, nice lesson. Couple of questions.
Are you setting the tumbler wafers for one universal key for all your locks or for a new key for each lock?
Can we save this to our own system or is it going to the classics?
Thanks
Cooley
Posted by: markb Jan 10 2007, 07:04 PM
I'm keying a whole set to one key at the moment. When you rearrange the wafers, it's for whatever key you want to use. I don't think there is a universal key.
You may save this however you like.
Posted by: Brian_Boss Jan 10 2007, 08:39 PM
One additional thought to a great write up. If, after optimally rearranging the wafers, you end up with one or two that don't match the key and you don't have a spare cylinder, just leave them out - it won't hurt anything. The locks have more tumblers than most cars, even with a couple missing.
Posted by: markb Jan 10 2007, 08:41 PM
I just re-read the how-to over on Pelican. You might want to reference that one also when you start to re-key.
Posted by: 914Sixer Jan 10 2007, 10:25 PM
One thing I have noticed over the years, the pins do not always have numbers stamped on them.
Posted by: markb Jan 10 2007, 10:30 PM

One thing I have noticed over the years, the pins do not always have numbers stamped on them.
I noticed that. I went thru & cleaned all of the ones I had, so I could find some that had numbers. I guess the only real way to tell is to compare them.
Posted by: hwgunner Jan 10 2007, 10:57 PM
Mark, you are the man. I'm still going to pay you to do it when its time though. Remember, I part 'em out for a reason.
Posted by: markb Jan 11 2007, 07:35 PM
Ok, moving on to the ignition switch. tumbler There are differences in the early (70-71) and the later (72-76), and I believe there are even differences in the 72-74 to 75-76, but I haven’t knowingly done the 75-76 years, so I can’t state that for a fact. What I’ll do is show the 70-71 and the 72-up side by side.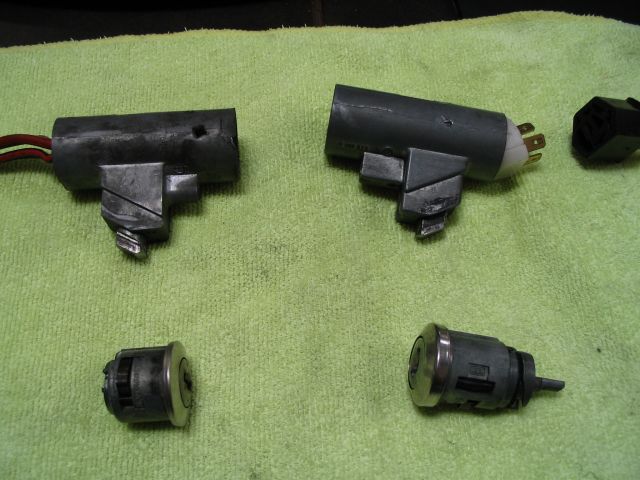
On the left is the early switch, tumbler & housing, and on the right the later switch, tumbler & housing. If I get the names for things wrong, someone please correct me.
I’m going to start with the later tumbler, because they seem to be the most common in use.
To remove the tumbler from the housing, there is a small hole that you put a small punch tip or screwdriver tip into that will release the tumbler. If you look at the early switch, you can see this hole. I *believe* the hole has to be drilled in a new housing, but I’ve never run across one that didn’t have the hole.
I’ll be using a standard Porsche tumbler to re-key.
These are the tools I tend to use for re-keying ignition tumblers.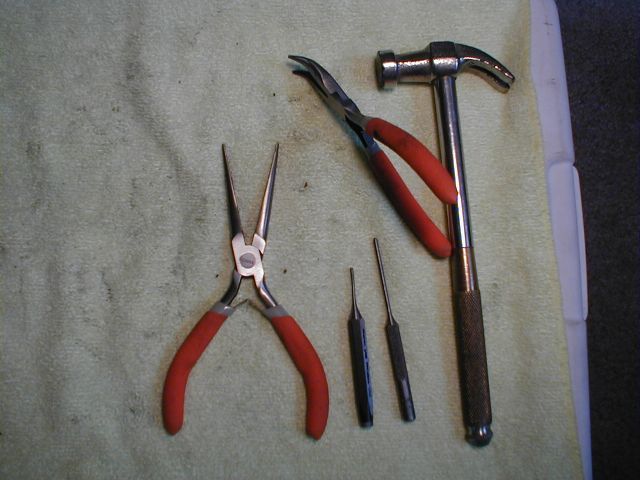
A couple of small needlenose pliers, one set curved, at least on punch, 1/16 in size, and a small hammer.
Posted by: markb Jan 11 2007, 07:40 PM
At the tip of the punch, you’ll see a pin. There’s one on each side that have to be removed. That’s where the small needlenose pliers come into play. These can be real fun to get out, so be patient. You *can* use the punch to knock them through, and if you choose to do it this way, make sure the key is out of the tumbler, because it may be in the way (I bent a punch trying to push a pin past the key). I prefer to take my time and pull them out.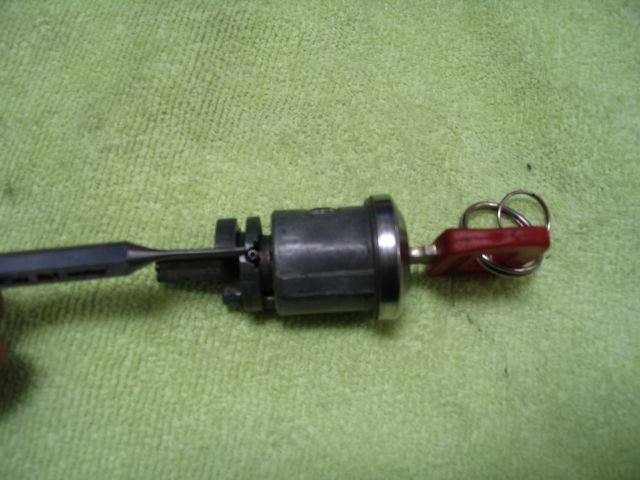
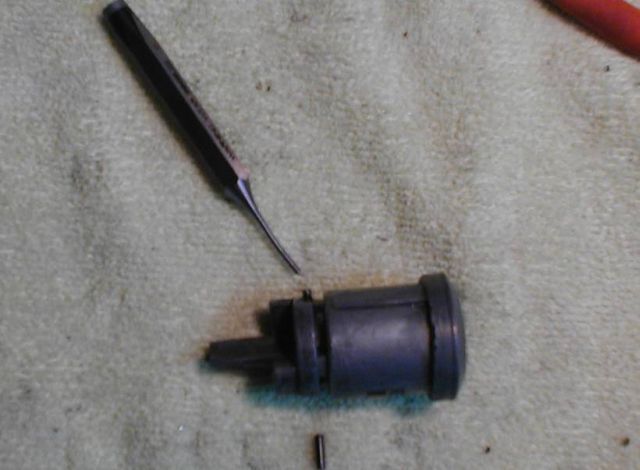
Once the pins are out, the tumbler is in 3 pieces. Take the time to clean everything up before you continue.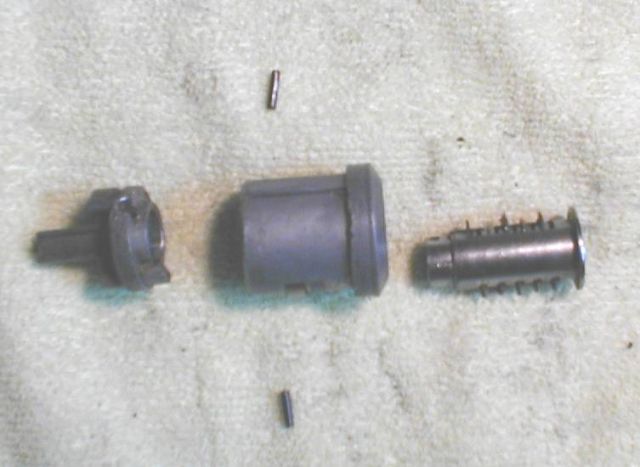
Posted by: markb Jan 11 2007, 07:46 PM
Now you re-key the tumbler by replacing the wafers as we did with the door key. Again, it’s trial and error until they are all flush with the tumbler housing. Make sure you DO NOT use one of the valet wafers in this tumbler! 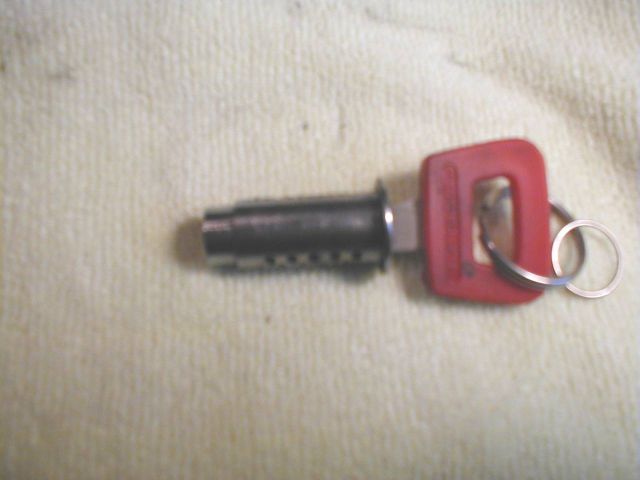
Sorry for the blurry pictures, I must have gotten some lessons from SirAndy.
The pieces only go back together one way, so make sure you have it together properly before you put the pins in. 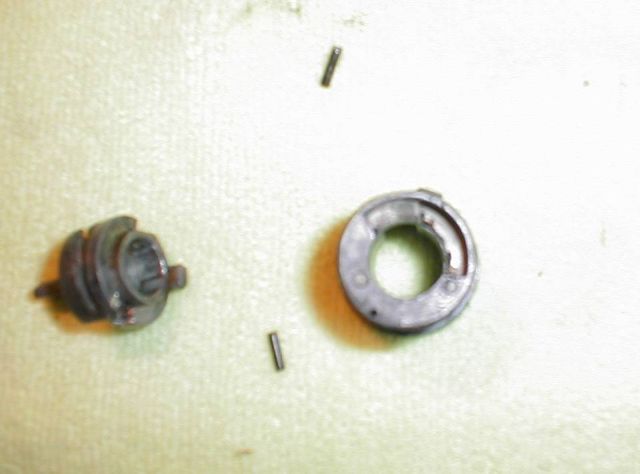
The end piece on the left only goes into the middle piece one way, and also only goes onto the tumbler one way.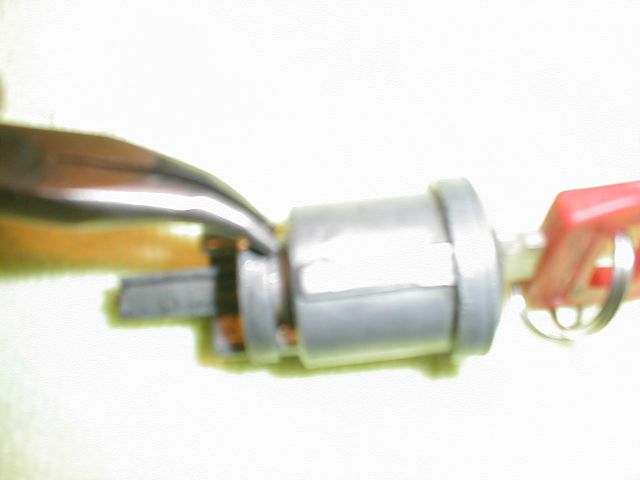
I put the pins in using the curved pliers, then tap *lightly* with the small hammer. DON’T FORCE IT!!! You can bend a pin that way. Gentle is the keyword here, and tap the pins in a little at a time, checking the key each time. If the pin goes in too far, it can keep the key from going in all the way. The pins should be about flush with the top of the tumbler housing. As you’re testing the key, keep a slight pressure on the opposite end, it seems it’s needs some resistance to operate properly.
Once the pins are in place, make sure everything turns easily, and the key goes in & out smoothly. Now you can lubricate the tumbler, and re-insert in the housing.
That’s pretty much all there is to it. I’ll be doing a write-up on the early ignition switch next time.
Posted by: porsche913b_sp Jan 12 2007, 09:39 AM
Great Write Up, thanks. I need to get off my but and do it.
Cant wait to see the write up for the early ignition sw.
Ted
Posted by: Bartlett 914 Jan 12 2007, 12:48 PM
If you have a glove box or a front trunk lock but no key, can the tumbler be removed?
Posted by: markb Jan 13 2007, 01:35 AM
If you have a glove box or a front trunk lock but no key, can the tumbler be removed?
Yep. You need to have *A* key to insert to get the tumbler out, but they will come out without the proper key.
Posted by: evan Jan 13 2007, 02:11 PM
Ok, so now after reading all this, I feel confident that I am quite capable of screwing up my locks all by myself. I have one key with a red rubber top looks original and another larger key looks like a copy. The red key works the doors and front trunk and ignition as well does the plain key. However, neither key works the rear trunk. Will the above instructions make it so the rear trunk lock works with the red key? And if my door locks are really hard to turn where I am afraid that I may break the key, will this procedure loosen them up?
evan
 awesome work for the thread. thanks
Posted by: markb Jan 13 2007, 03:38 PM
Re-keying the rear trunk lock is pretty easy, so you should be able to do it without much trouble. Eventually I'll do a walk-thru on each lock, but I'm too lazy at the moment.
If your keys are getting hard to turn, spray the inside of the tumblers with either of the items shown above, and see how they do. A lot of gunk gets built up in these in 30+ years. If it doesn't loosen them up, there may be other problems (like the door mechanisms needing to be lubed).
Posted by: craig downs Jan 13 2007, 03:49 PM
Excellent thread. I would like to see this make it to the classic section
Posted by: dflesburg Jan 13 2007, 10:20 PM
911 ignition switch?
Posted by: markb Jan 13 2007, 10:24 PM
I've done an SC switch. Maybe after all the 914 ones I'll do one. Pain in the butt, but once you find out how to drill *next to* the blind pin to get it out, it's not too bad. 
Posted by: So.Cal.914 Jan 14 2007, 12:30 AM
Thanks, informative thread.
Posted by: DEC Jan 14 2007, 07:41 AM
I love this place.... 
Thanks for sharing, very interesting doing.
This expands my knowledge.

Posted by: r_towle Jan 16 2007, 01:54 PM
get off your ass and do the rest of the locks...come on hup hup hup
Posted by: markb Jan 16 2007, 02:32 PM
Geez, pushy!
I'm waiting for an early column I've got coming, so I can do an early ignition switch. I got to do a late one today, and finally figured out the trick for getting it apart. If you don't have the original key, you're SOL. Learn something new every day.
Posted by: Instru-Mental Jan 16 2007, 03:25 PM
Thanks Mark!
This was an awesome thread. I experimented on my Brother-in-laws Jetta on the weekend (he had three different keys) It worked great rekeying all to the ignition key!
Now for the Teener.....
Cheers
Posted by: r_towle Jan 16 2007, 03:31 PM
I did one better...
This thread inspired me.
I went and looked through my pile of keys.
As all of you guys, my car has locks from several different cars...
I found the key that unlocks my car...wwwhooooo
Now, I can finally lock my car.
But, I would love to do the rear trunk...so do that one next...please...
Rich
Attached image(s)
Posted by: John Jan 16 2007, 04:19 PM
I've been following along this thread and there is some really good info here.
I have but a couple questions:
1. If all you have to make a key from, where/how can you obtain a "good" new key?
(Mine are so worn you must jiggle them in the locks to get them to work)
2. Apart from other 30 year old tumblers, where does one get new lock pins? Are they Porsche parts or simply a german metric standard lock pin? Perhaps I just need to raid all my lock stashes.
3. Are all the lock pins (with the exception of the valet flagged pin) the same? (i.e. can I use a rear trunk lock pin in an ignition lock tumbler?)
There you have it. My questions.
Thanks
Posted by: markb Jan 16 2007, 09:28 PM
I'm really glad this is making sense, I'm never sure I convey my thoughts well.
John, to answer your questions:
1: To have a brand new key made, if you already have a key that kinda works, take it to a good locksmith and have him hand cut a new key. Or, (if all the locks are keyed the same), take the passenger door handle or the glove box lock to a locksmith and have them make a key for it. Pricey, but you get a brand new key.
2: The lock "pins" are called wafers. I don't really know if you can get them new, but I haven't had any problems using used ones. If you really want "newish" wafers to use, take apart the glovebox lock and the front trunk lock, these are the least used locks on the car. Re-key the ignition & drivers door lock with these wafers.
3: Yes, with the exception of the valet wafer, they're all the same. *With an exception* If you have a later VW ignition switch, the wafers *may* be different. I've seen wider, thinner, and taller wafers.
I'll do all the others once I get that early ignition switch done. I kind of want to keep it close to the other ignition switch in this thread. Patience, grasshopper!  (sorry Barry )
Posted by: markb Jan 23 2007, 05:18 PM
The Early Switch
Since these are quite a bit different than the ones we’ve just seen, I’ll show taking the column apart too.
Take the steering wheel off, then this is what you see: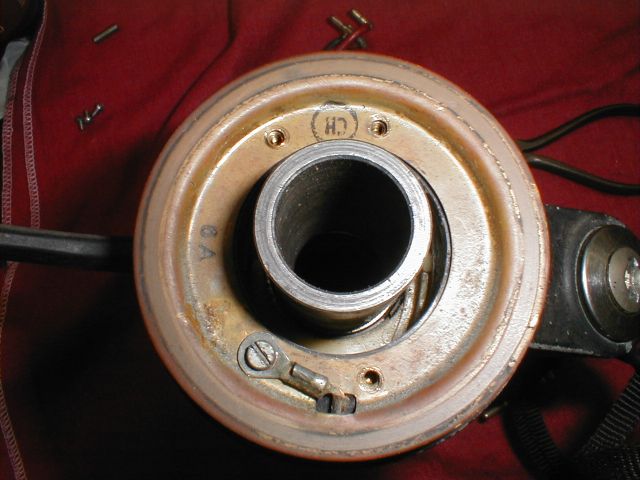
There are 4 screws holding the horn plate on (OK, so I took 3 out, sue me )
The last one has the horn wire attached to it.
Here is the switch housing. 4 more screws hold it on at the corners.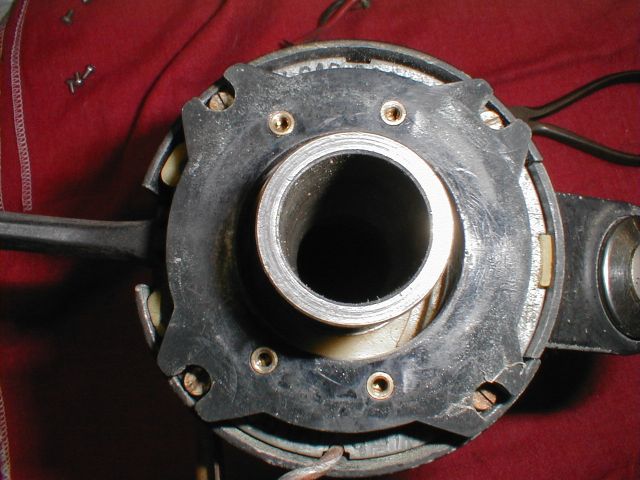
The turn signal switch does not need to come all the way off. Just pull it far enough out so you can get to the 2 bolts holding on the piece that retains the switch.
Here you can see the 2 bolts that hold the ignition switch retainer in place.
Remove them.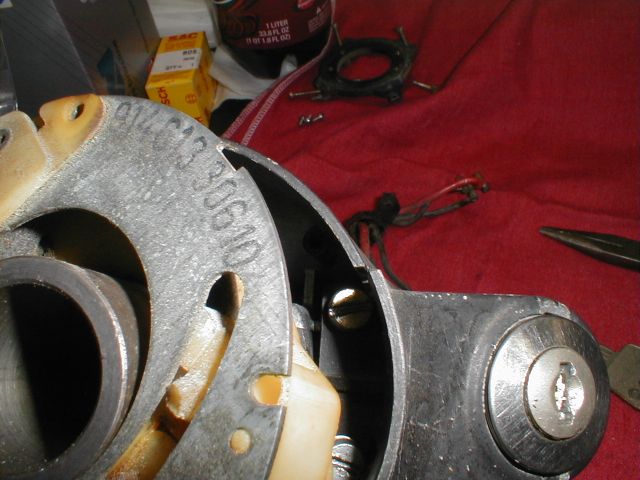
Posted by: markb Jan 23 2007, 05:24 PM
Now you can get to the housing. This housing has the wires hard-wired onto it, so make sure they’re straight, and use a pair of pliers to gently pull the housing forward. The key needs to be turned to release the steering wheel lock. You don’t need to remove the whole housing to pull the switch (Yes, I know, the key on this one is broken off).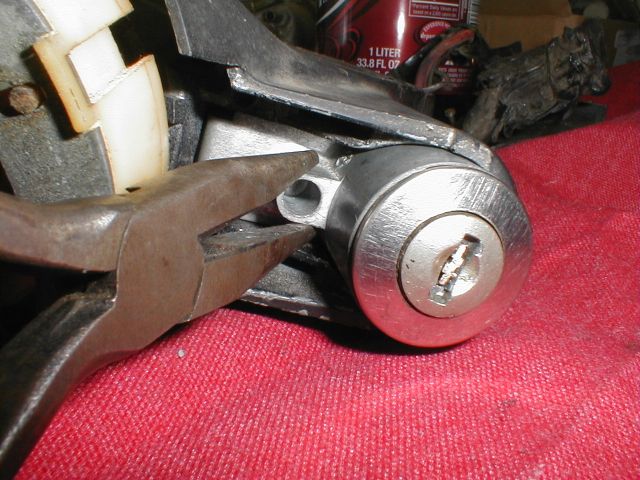
Once the housing is pulled forward, you can access the hole that you use to release the tumbler.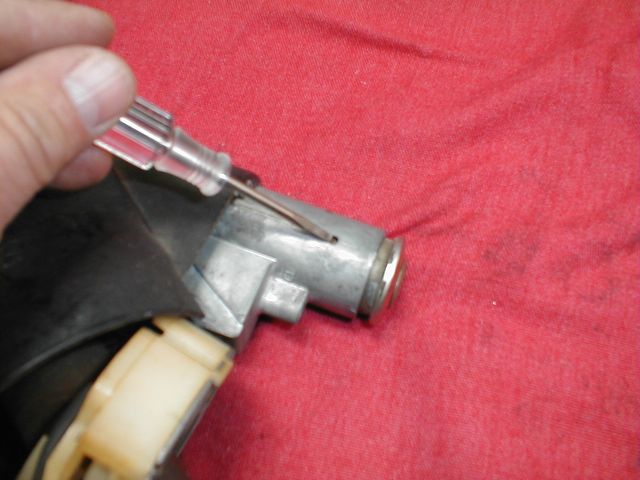
This tumbler is much smaller than later years.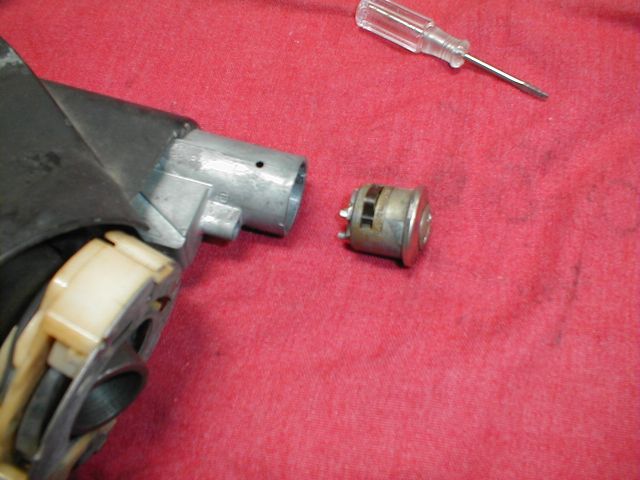
Here is a rear view of 3 tumblers. Left to right:
An unbroken tumbler, next is a broken one. This has happened to me a couple of times when pulling the tumbler apart. It develops a crack at one of the holes when you pry the back off. Notice the holes are different sizes so it only fits on one way. The last is a JB Weld fix done by a PO. I’ve used the same method myself, and it seems to work OK.
Once you’ve pried the back off, you see the 3 pieces.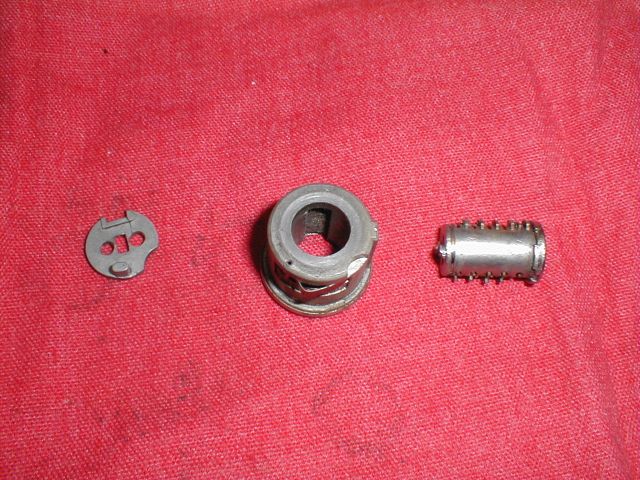
Re-key the tumbler. Assembly is just the reverse of disassembly.
When you reassemble the tumbler, tap the pins that hold the back on with a punch or chisel to spread the pins slightly. If the pins don’t spread enough to hold the back on well, you may need to JB Weld it as shown above.
Not as tricky as the later (75-76) are going to be.
Posted by: markb Jan 23 2007, 05:30 PM
The Later (75-76) Switch
On this one, it seems the whole dern thing needs to come out of the column.
I didn’t do that, so I’m afraid you’re on your own there.
This is what it looks like off of the column.
Sorry again for the blurry pics, I forgot to set the macro on the camera.
This is where the release is (in that recess)
Once again, turn the key to release the steering wheel lock, and pull the tumbler free.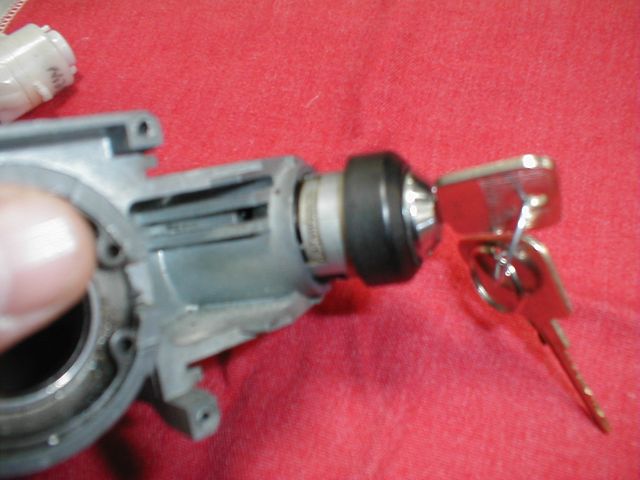
Posted by: markb Jan 23 2007, 05:36 PM
Here is the pin that needs to be pushed through.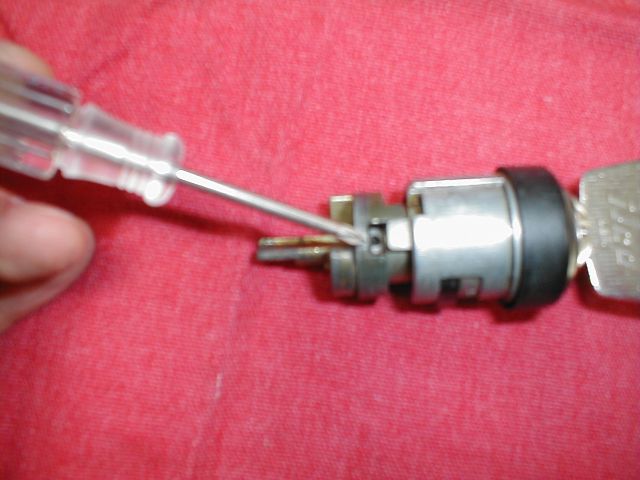
Now it gets a little more complicated than what we’ve done before.
You have to have a working key to get the tumbler any farther apart. Turn the key to release the rear of the tumbler.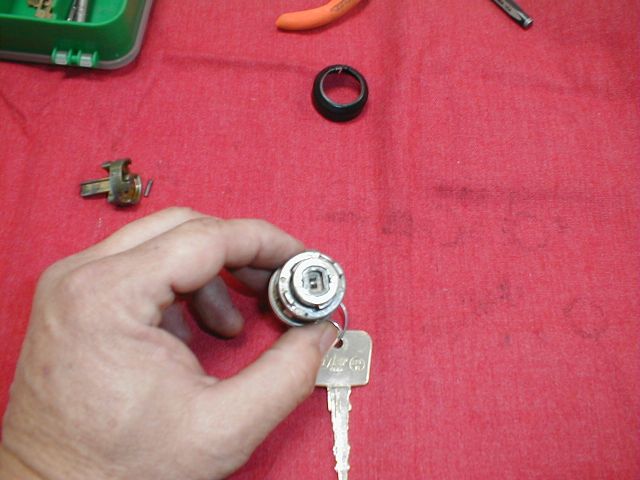
There are 2 “ears” that fit into a slot, that need to line up with their release slots.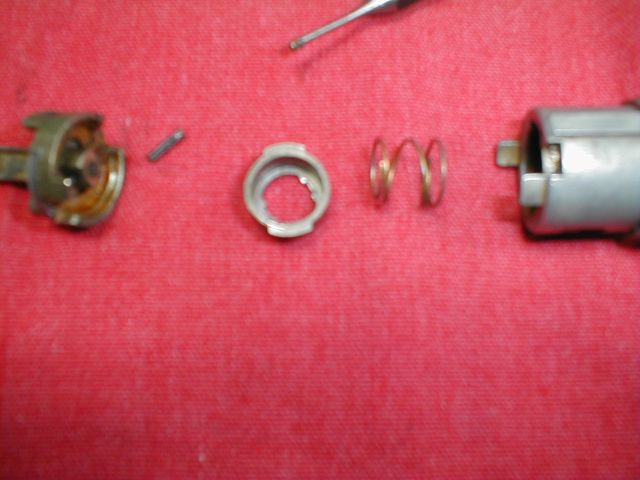
Once the rear is out, then you can line up the “ears” with their slots for the front of the tumbler.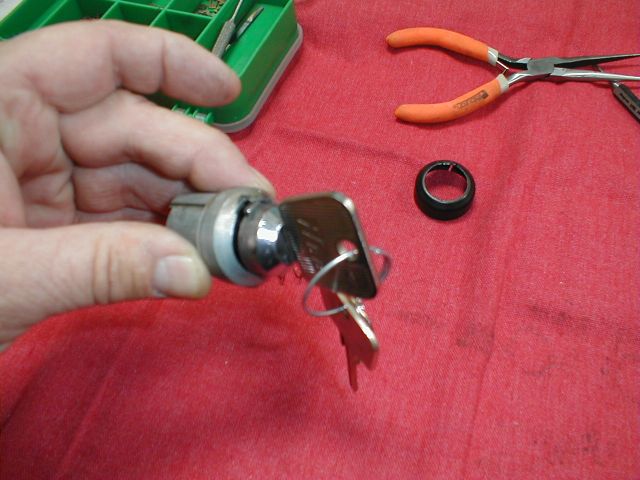
Posted by: markb Jan 23 2007, 05:41 PM
Now you have the tumbler apart.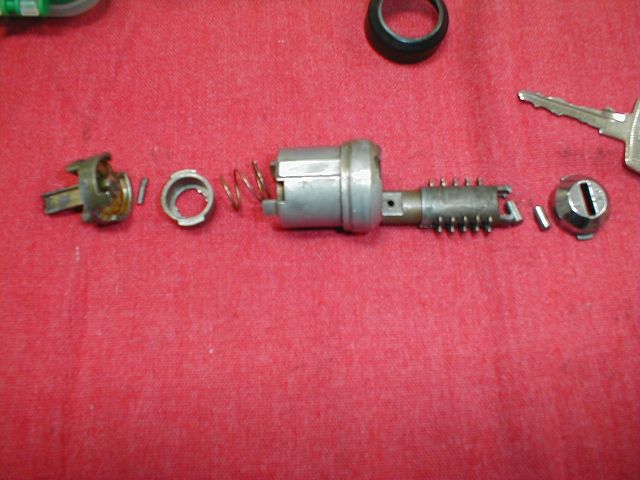
Notice the 2 pins that fit into slots at the very front of the tumbler.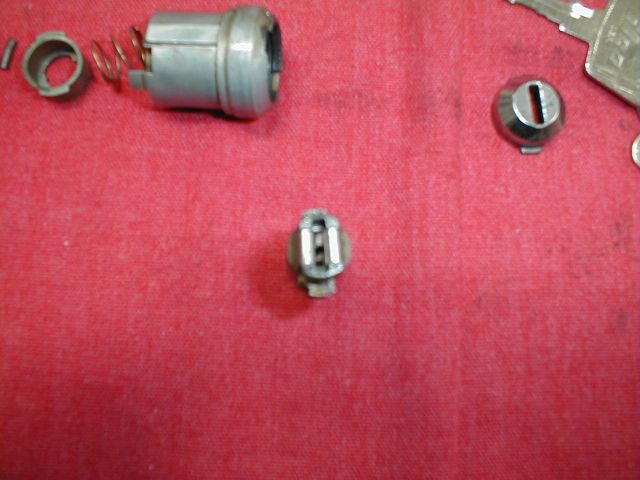
Put the pins and the front piece back on, and re-key the tumbler as explained previously.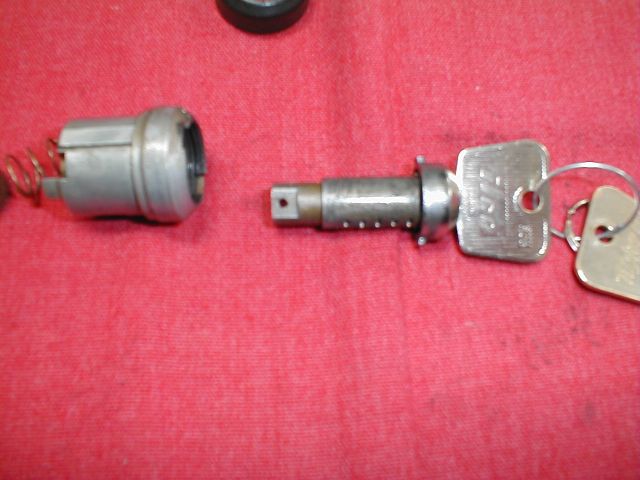
Now you can begin to reassemble. Put the front piece on, getting the “ears” in their slots.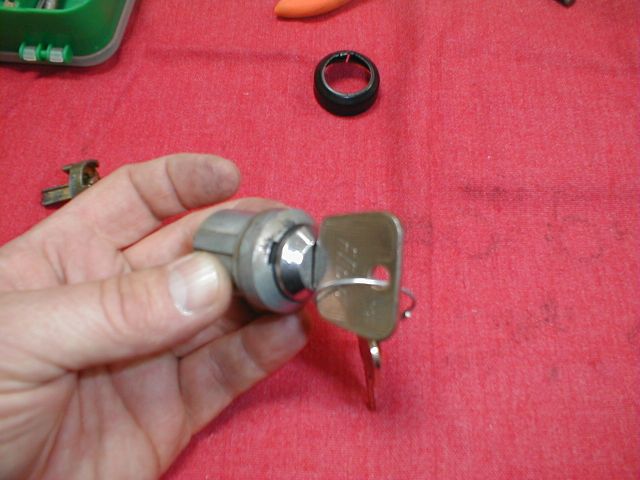
Posted by: markb Jan 23 2007, 05:46 PM
Once the front part is on, put the spring and rear piece in place.
The rear piece is what I found I needed to get the “ears” in their slots first, the replace the front “ears”.
Now you can put the pin in, and assemble back in the housing. Make sure the pin is in far enough to allow the end piece to fully retract, or the steering lock won’t engage. The tumbler will fit back together 2 ways, only one of which is correct, so make sure it’s correct when it goes back into the housing.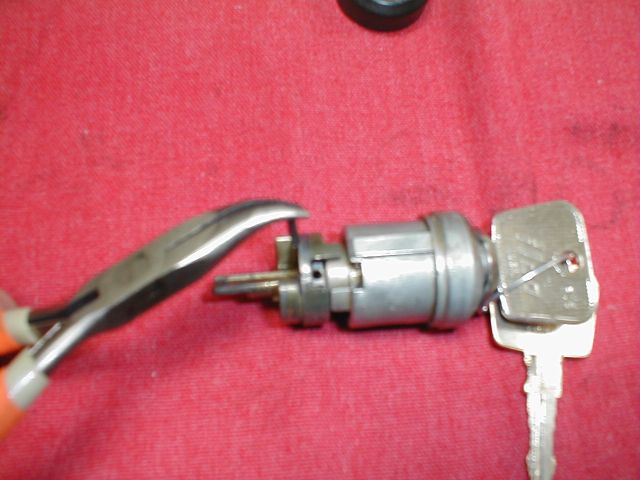
Posted by: markb Jan 23 2007, 05:49 PM
The Front Trunk Lock
I did not have a key for this lock, so I had to use a cutoff wheel to get it out of it’s housing. That’s why there are grooves in it. Please ignore them.
The first pic is showing where the screw that holds it to the housing is located. The cable in the front trunk needs to be disconnected, then this screw needs to be taken out. You need a key, or at least have the handle unlocked, to remove it. Then the handle will pull far enough forward to get the cable off of the handle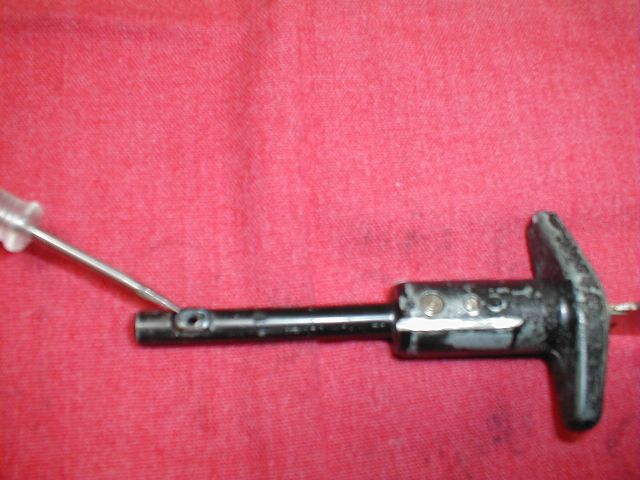
Here is the small screw that releases the tumbler.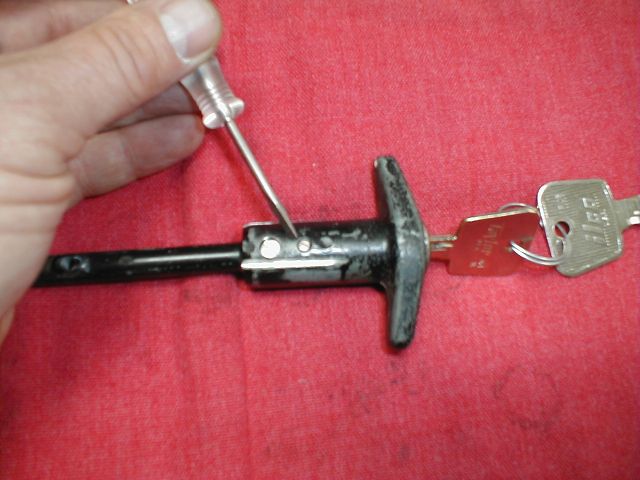
Posted by: markb Jan 23 2007, 05:53 PM
Note the locking pin, it needs go back in the same way it came out.
Re-key in the normal way.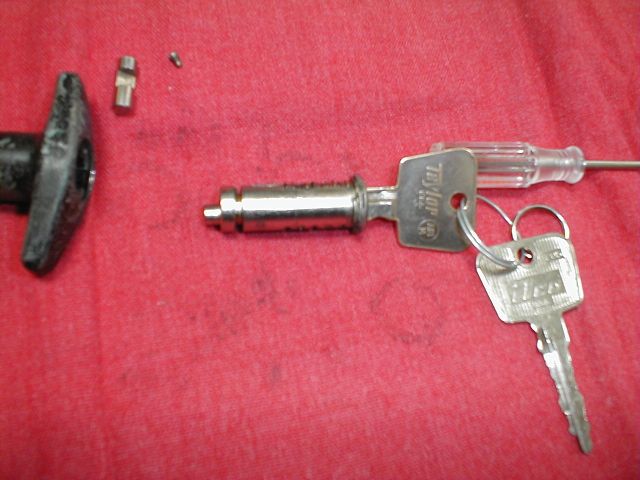
Reassemble, making sure the locking pin is in correctly.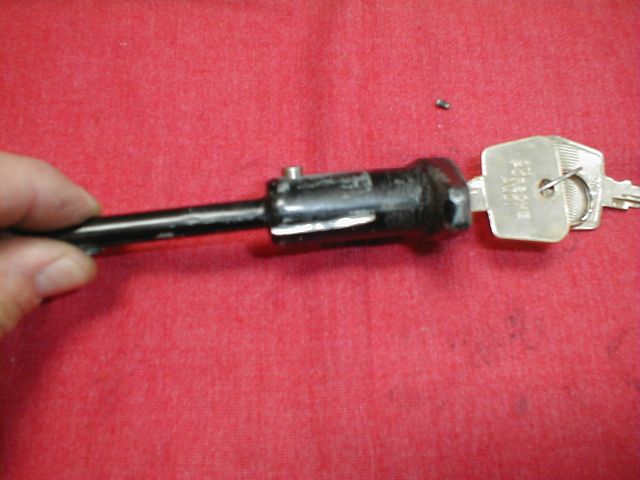
Put it back in the car, and you’re done. This is a very simple, but time consuming lock.
Posted by: dflesburg Jan 23 2007, 07:22 PM
okay all my locks are set, except my 911 ignition tumbler... PLEASE!
Posted by: markb Jan 23 2007, 07:37 PM
okay all my locks are set, except my 911 ignition tumbler... PLEASE!
OK ALREADY!!
I'll take home a couple of 911 switches & work something up.
Posted by: rezron Jan 26 2007, 10:13 PM
Great job on the "How to " thread! If a person has a little patience
it's actually pretty easy! I've rekeyed a few locks already with no problems!
Thanks,
Ron
Posted by: markb Jan 26 2007, 10:31 PM
Glad to hear it! This really isn't that hard once you see what it looks like torn down. My goal is to have everyone with single-key cars!
Posted by: jim_hoyland Feb 17 2007, 05:52 PM
I finally got my truck and glve box locks done. One question Mark: The wafers used on the doors should have completely square openings right ?
Also, stopped by Balport Lock Shop in Newport. The guy there has done Porsche locks for many years. He said the wafers can be purchased from suppliers by locksmiths. The guy was really helpfull.
Posted by: markb Feb 17 2007, 07:03 PM
Since the lock cyls are curved, I would think the wafers would need to be slightly rounded, but I could be way off base there.
It's nice to know the wafers are available. I'll have to check with my local locksmith & see if he can get me some.
I really need to get ambitious again & finish this thread. Sorry it's taking so long.
Posted by: jim_hoyland Feb 17 2007, 09:28 PM
Sorry, I wasn't clear. I'm asking whether the doors get al square center wafers. That is they do not have the little step in the center area.
I know you refer to one type as the valet wafer--just confused over which is which anf what tumberls get what.
Also, in post 42: Does a screw attach the cable to the pull handle.
Posted by: markb Feb 17 2007, 10:20 PM
Correct, the doors & ignition switch get all square ones. No valet wafer. That being said, you can put a valet wafer in any of them if you want, or delete the valet wafers from any or all. It just depends on what you want to do.
It's been a while since I actually pulled a front trunk handle, but I think the cable end is threaded onto the handle. The screw keeps the handle from pulling all the way out of the housing.
Please correct me if I'm not remembering this right.
Posted by: PRS914-6 Feb 18 2007, 06:34 PM
Great thread......I took all my locks down to a locksmith to re-key. The "master locksmith" could not figure out how the valet key worked and even called me and told me that the locks were worn out because both keys fit in all the locks. I told him they are supposed to and the functions had something to do with the wafers but wasn't sure what. He told me I was wrong.....
You just can't find good work anymore........
Thanks for the great thread!
Posted by: jim_hoyland Feb 18 2007, 09:44 PM
My guess, having just done this is that if both keys ( Red and Black) fit all locks, then all the wafers had perfectly rectangular openings. That is, none of the wafers have a "step" inside the retangular hole.
I have heard a lot of cars that had the so-called valet wafers in the locks ( the ones with a step in the opening) were converted so that either the red or black would work.
Mark' thread is really helpfull--hopefully it will go classic
jim
Posted by: markb Feb 21 2007, 01:43 PM
Moving on to the rear trunk lock.
You will need a 32mm wrench to remove the nut.
Remove the nut and spacer sleeve, and the lock will pull out of the car.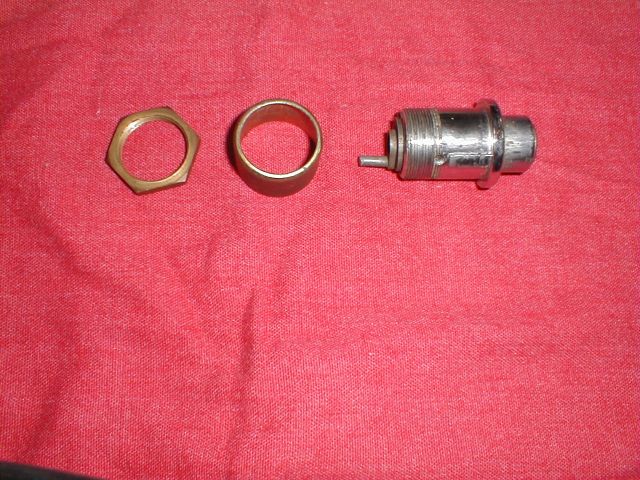
Remove the screw that holds the mechanism in.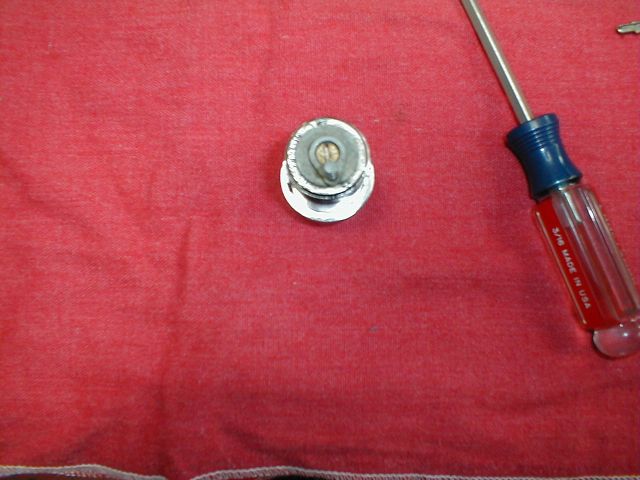
Insert the key and remove the tumbler.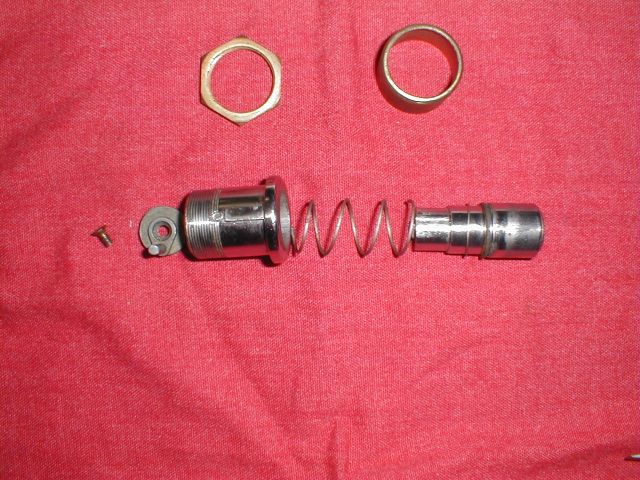
Posted by: markb Feb 21 2007, 01:45 PM
Clean and re-key in the normal fashion.
Fit the mechanism back into the housing, making sure to line up the slots.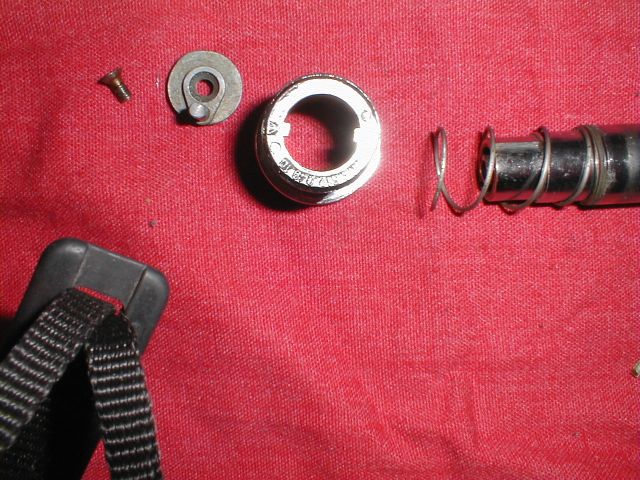
Reassembly is the reverse of disassembly.
Posted by: mrhurtalot Feb 21 2007, 02:05 PM
i used my cyl. from the trunk lock (got a pull cable) in the passenger door! worked great.
btw i used this Tutorial to learn how to rekey a lock and it WORKS LIKE A CHARM! thanks!
Posted by: markb Feb 21 2007, 04:22 PM
And now for the dreaded glovebox lock.
It’s a pain in the a$$ to get out of the car. You need to take the strap loose that holds the glovebox in place, and to do that you should remove your radio to give you better access to the small nut holding the strap in place.
Once you can get to the lock, from the glovebox side, you can get a small screwdriver on the nut.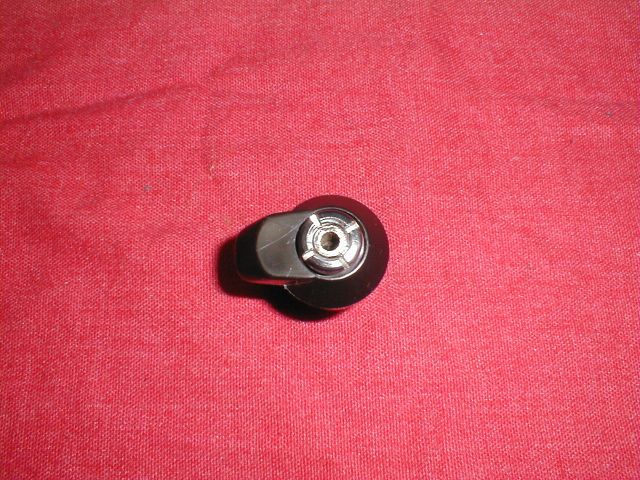
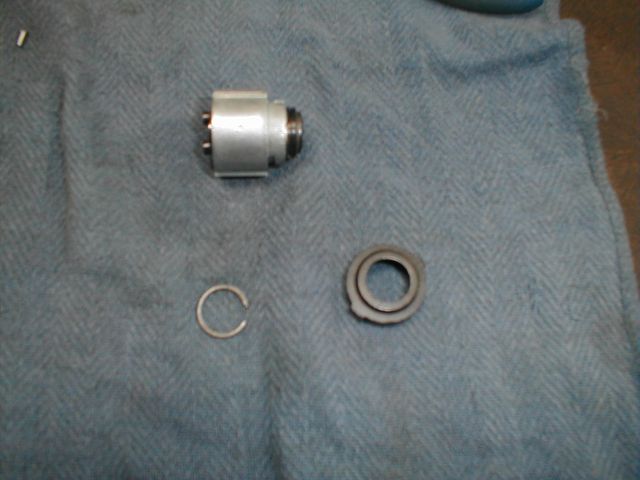
Once the nut is off, you can pull off the latch. There is a wavy lock washer in there, don’t lose it when you pull off the latch.
Now you can remove the 24mm nut, and take the lock itself out. There’s a locking sleeve that will come out with the nut.
Posted by: markb Feb 21 2007, 04:24 PM
You will need a pair of snap-ring pliers to remove the snap-ring.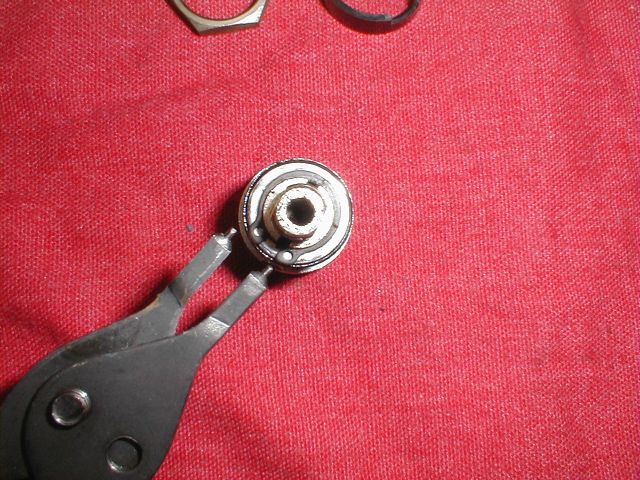
Insert the key & remove the tumbler.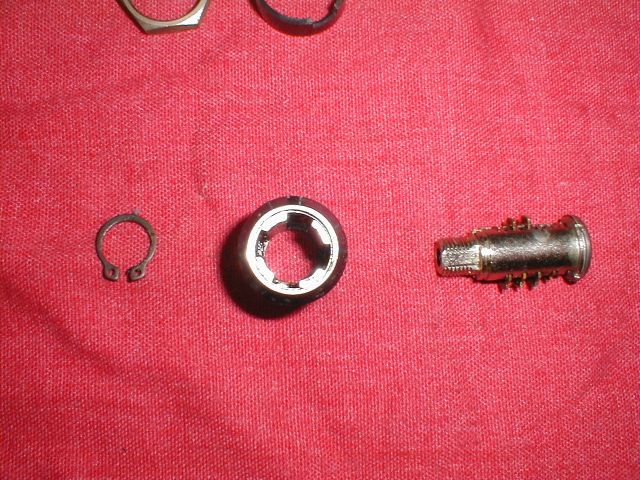
Clean and re-key as described above.
Once again, reassembly is the reverse of disassembly.
That’s it for the normal 914/4 locks.
I’ll tackle the 914/6 ignition next time.
Posted by: jim_hoyland Feb 21 2007, 08:50 PM
Mark,
Got the hood lock in but having trouble with the pull cable. Is the cable replaceable ? Any sources out there ?
Jim
Posted by: markb Feb 21 2007, 09:39 PM
I'm sure the cable can be replaced. I've even heard you can pull the old cable out while leaving the sheath in, and just thread a new cable in the old sheath. That would make it pretty easy.
I'd call Dave at GPR, but that's only because he's always the first one I call.
Posted by: jim_hoyland Feb 21 2007, 09:55 PM
That the trick I missed-leaving the sheath in place.... 
I'm sure the cable can be replaced. I've even heard you can pull the old cable out while leaving the sheath in, and just thread a new cable in the old sheath. That would make it pretty easy.
I'd call Dave at GPR, but that's only because he's always the first one I call.
Posted by: markb Feb 21 2007, 10:10 PM
Uh-oh. IIRC, it will be easiest to have 2 people to thread that baby back in, but it's been a really long time since I put one in.
Posted by: dyw914 Feb 22 2007, 12:51 PM
Mark, great thread. I was disassembling my trunk lock last night and noticed there is a rubber?/plastic? gasket between the cylinder and the housing near the top where the key is inserted. I’m guessing it’s used to keep dirt from getting into the lock cylinder. Do you know if this gasket is still available?
David
Posted by: 7T Porsha Feb 22 2007, 01:19 PM
My handles are good...are the lock cylinders available by themselves?
Posted by: markb Feb 22 2007, 02:21 PM
Mark, great thread. I was disassembling my trunk lock last night and noticed there is a rubber?/plastic? gasket between the cylinder and the housing near the top where the key is inserted. I’m guessing it’s used to keep dirt from getting into the lock cylinder. Do you know if this gasket is still available?
David
I'm sure you're correct as to thier use, but I have no idea whether they are still available. You might check with our parts folks (GPR, Pelican, etc) to see.
Posted by: markb Feb 22 2007, 02:23 PM
My handles are good...are the lock cylinders available by themselves?
As I mentioned above, check with the parts places, I'll bet they can hunt them down for you. More than likely I'll have a couple from broken handles if you want a used one.
Posted by: 914Sixer Feb 23 2007, 08:54 AM
The 75-76 steering column requires you to mark and then drill hole to remove pin holding ignition lock. The only place I have seen the demensions is the the factory manuals. Good pictorial.
Posted by: bd1308 Feb 23 2007, 02:11 PM
A dremel makes any key suddenly work.
I took the lazy way out LOL
Posted by: jim_hoyland Feb 23 2007, 09:36 PM
Yup; just learned about this today.Why didthey make that change ? The '74 has a hole.
The 75-76 steering column requires you to mark and then drill hole to remove pin holding ignition lock. The only place I have seen the demensions is the the factory manuals. Good pictorial.
Posted by: markb Feb 24 2007, 12:46 AM
Jim, were you able to take any pics you could post?
Yup; just learned about this today.Why didthey make that change ? The '74 has a hole.
The 75-76 steering column requires you to mark and then drill hole to remove pin holding ignition lock. The only place I have seen the demensions is the the factory manuals. Good pictorial.
Posted by: markb Jun 14 2007, 11:22 PM
I guess it's time for a little update. I finally got around to digging out my 911SC ignition switch, and after a bit of tinkering, I've figured out how to re-key it. Look at the end of this thread for the update.
Posted by: orange914 Jun 14 2007, 11:43 PM
not trying to hijack the thread but have a door lock that locks but doesnt unlock. with key turned normally in unlock direction, the screwed on tab on the inner door side "jumps" back to neutral. the screw is tight and moves with tab. like something is releasing internally  oh, and it does have a good plastic piece
now back to your regularly schedualed program
Posted by: markb Jun 14 2007, 11:47 PM
It sounds like you need to clean & lube everything in the door and the handle. The actuator on the handle is not working the lock mechanism. Either that or your handle itself may be broken (corners rounded).
Posted by: orange914 Jun 15 2007, 12:23 AM
It sounds like you need to clean & lube everything in the door and the handle. The actuator on the handle is not working the lock mechanism.
the handle is out and in hand. the key turns the inner screwed on tab to lock but when turned to unlock it moves a short way and pops back nuetral position. as if internally slipping. the screw is not loose and stays with the tab
Posted by: markb Jun 15 2007, 12:27 AM
I bet the edges of the tumbler have rounded off. The actuator (the piece screwed on the end) is probably slipping because of that. Pull the actuator off & look at the edges. You may need a new tumbler.
Posted by: markb Jun 19 2007, 01:15 PM
OK, hopefully I can now finish this thread.
This is what I've done to re-key a 914-6 (this one is actually a 911) ignition switch.
There is a "blind" pin that needs to be removed. I was lucky with this one, in that it was removable without drilling. I talked to a local locksmith, and he advised drilling a small hole next to the pin, and use a small pick or awl to remove it.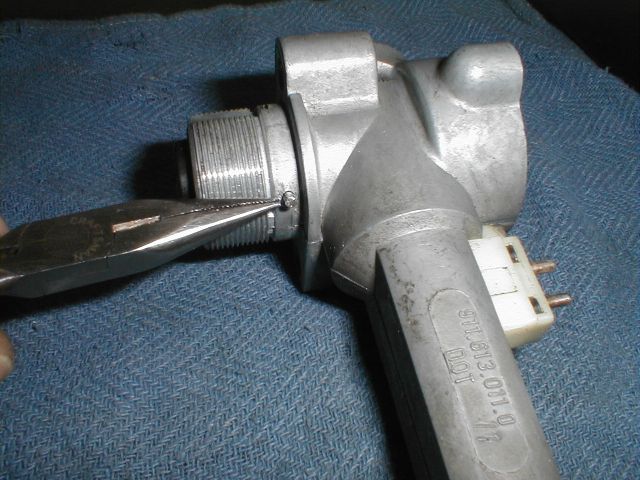
Once the pin is removed, the assembly will slide out.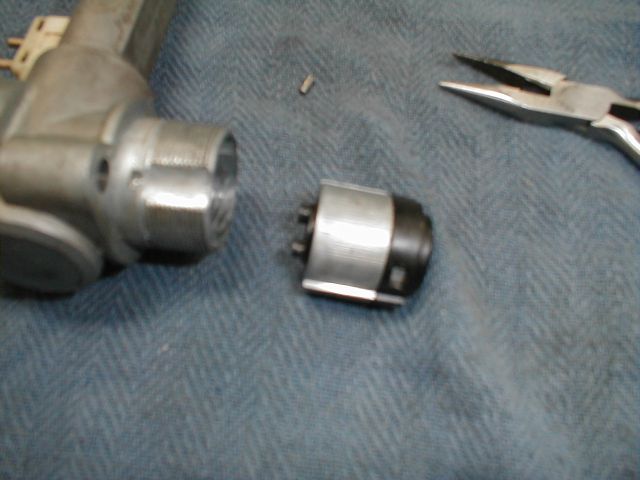
There is a black piece at the front of the assembly that twists off.
To remove the tumbler, remove the circlip (kind of a pain in the a$$).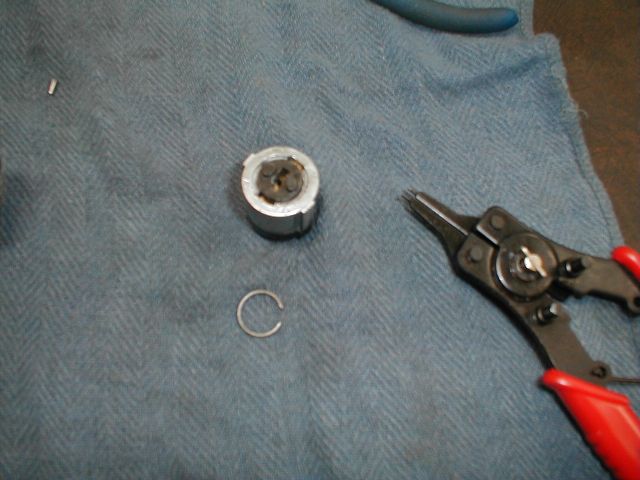
Now you can re-key it as explained above.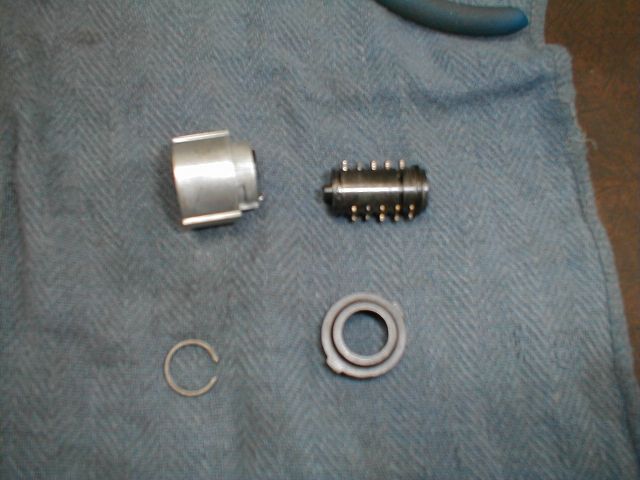
Put it back together & drive that puppy! 

Posted by: dflesburg Jun 19 2007, 04:14 PM
sweet.
Posted by: dflesburg Jul 6 2007, 12:16 PM
oh, and Thank you
Posted by: markb Jul 6 2007, 04:20 PM
You're welcome.
Posted by: JPB Jul 6 2007, 06:48 PM
Cool thread! For the record, you can stick your key in that tumbler doohicky and then them brass pieces all get sucked in. If you gerind the remaining brass pieces flush, the key you are using will work. You can us one key for all your cars! If this has been said before then oooh well. Are you using genuin Porsche tools on that or VW? 
Posted by: 96740 May 12 2008, 09:05 AM
Great thread. Someone over at 914.club gave me a link to this. I'm going to probably have to do this to mine here soon. A couple questions... Where do you get the new set of keys? and are they allready cut and do the wafers just work around that?
Roy.
Posted by: PRS914-6 May 12 2008, 09:26 AM
If you go to a locksmith and order 1 master kit you will get a new set of keys and new wafers that work for that key. From there you just duplicate the wafers and keys for the remainder of locks. This way you aren't starting off with a worn out key. Good Luck
Posted by: 96740 May 12 2008, 01:25 PM
If you go to a locksmith and order 1 master kit you will get a new set of keys and new wafers that work for that key. From there you just duplicate the wafers and keys for the remainder of locks. This way you aren't starting off with a worn out key. Good Luck
Thanks for the 411.
Posted by: Lavanaut Dec 5 2008, 02:08 PM
The keys I bought have a 3-digit code on the tag, I'm assuming this relates to the wafer numbers. How though? I'm a bit confused since there are 5 wafers but only 3 numbers on the tag.
Mark, this write-up is killer, I followed it step by step and didn't have any issues. Thanks for putting it together.
Reid
Posted by: markb Dec 5 2008, 02:13 PM
The tag I have here has 4 numbers. Interesting that yours only has 3.
Glad I could be of assistance.
Posted by: nicabr Mar 24 2011, 07:11 AM
Great information!  Helped me a lot when I was re-keying my trunk lock yesterday evening.
Nicklas
_________________________________
VW-Porsche 914/4 1971
Posted by: jim_hoyland Sep 3 2016, 06:55 AM
Glad this thread is available ! I just had to use it for rekeying an ignition switch; thanks markb !
Posted by: FlacaProductions Jun 1 2019, 08:43 AM
I had a new key cut and it seems that it's juuuust a bit "off" - it works fine in one orientation (both in the doors and in the ignition) but if you flip it over, it won't turn - easily, anyway. You can wiggle it around and gently put a little pull on it and it MIGHT turn.
I had a door lock cylinder out at the time and noticed that it doesn't quite suck in the wafers to the point where they are flush with the cylinder. Does this mean the key was cut too far/deep or not far enough?
I'm wondering if a little gentle overall filing/smoothing might help but not sure which side to do since it turns one way, but not the other...
Posted by: fiacra Jun 1 2019, 11:40 AM
Thank you for this tutorial! All seems clearly explained and documented. My question is about key codes.... When I needed a new key for my Honda years ago I just brought the key code in to the locksmith and they cut a new key. I don't have the key code for any of my 914's. Does the key code correspond with the numbers on the wafers? In other words, if I know the sequence and numbers on the wafers can I bring that number to a locksmith and have a new key cut? If so, which end do you start the number from? Anybody have an answer to this?
Posted by: bbrock Jun 1 2019, 12:03 PM
Thank you for this tutorial! All seems clearly explained and documented. My question is about key codes.... When I needed a new key for my Honda years ago I just brought the key code in to the locksmith and they cut a new key. I don't have the key code for any of my 914's. Does the key code correspond with the numbers on the wafers? In other words, if I know the sequence and numbers on the wafers can I bring that number to a locksmith and have a new key cut? If so, which end do you start the number from? Anybody have an answer to this?
Yes. I did exactly that a couple years ago. Read the wafer numbers shoulder to tip (thanks @http://www.914world.com/bbs2/index.php?showuser=8156 for answering that in another thread) and take that and your locks to the locksmith. My locksmith cut a blank from code on one side only and then cut additional blanks on both sides using that master the usual way. He said that would give me a non-working master that would never get worn so I could have additional keys cut the cheap way with confidence.
I thought that was a great idea but just two days ago I took two genuine blanks to him with the master. He got a little freaked out over the cost of those blanks so didn't want to trust the master without cutting another cheap blank and testing in the locks. He didn't want to believe me when I told him he had already done that and the master is fine. I appreciate his wanting to be careful but dude, you've already done this. I'm going to take all my keys and locks back in so he can cut the new blanks without having an ulcer.
Posted by: fiacra Jun 1 2019, 01:00 PM
Thanks Brent! Appreciate the info. I just came back to this thread after spending some time reading your restoration thread! Impressive......and thank you for documenting everything.
Powered by Invision Power Board (http://www.invisionboard.com)
© Invision Power Services (http://www.invisionpower.com)