Printable Version of Topic
Click here to view this topic in its original format
914World.com _ 914World Garage _ Gas tank and AN fittings
Posted by: Phoenix-MN May 19 2007, 06:14 PM
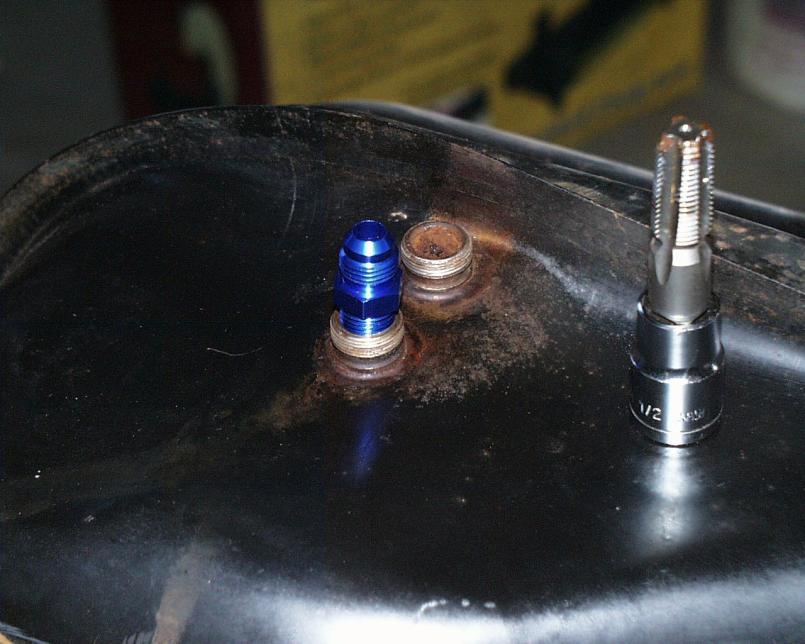
I was working on getting my fuel tank, fuel pump, and lines intalled today and I have been trying to figure out how to adapt the tank fittings to AN. After getting the tank on the bench and removing the stock fittings and tubes it looked like a 1/4npt pipe thread fitting might fit in the opening of the stock fitting. I dug out my taps and low and behold the 1/4npt tap threaded the hole in the stock fitting quite nicely. Could it realy be this easy? What am I missing? Anyone else done it this way?
Posted by: John May 19 2007, 07:04 PM
That could work, but you may run into clearance issues under the tank (which is why the original fittings make a fairly sharp bend just after exiting the tank).
I like the simple approach. Just make sure it does not leak.
Posted by: Phoenix-MN May 19 2007, 07:27 PM
Here is a comparison of the stock tubes and 90deg. -6 AN fittings. It looks like there should be space for this, I'll have to drop the tank into position to check to be sure.
Attached thumbnail(s)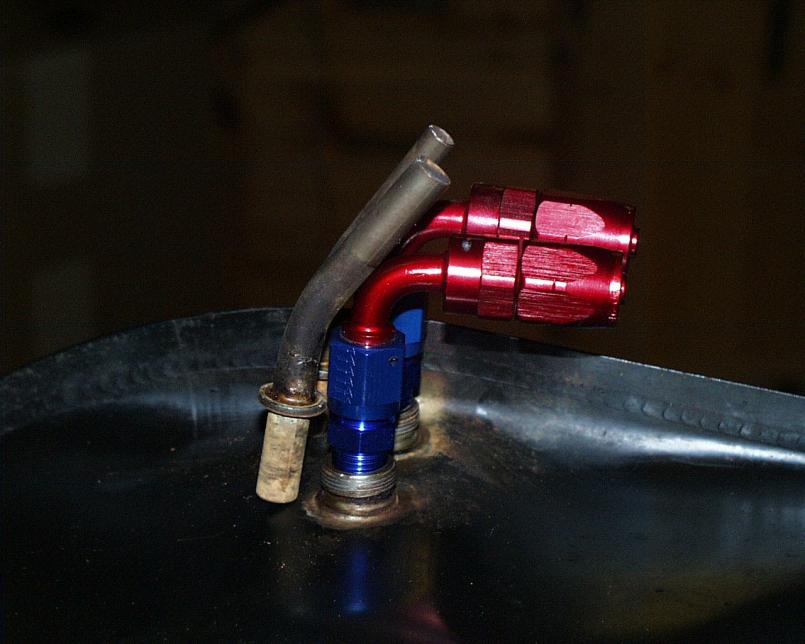
Posted by: John May 19 2007, 08:15 PM
Looks good to me. Like I said, just make sure it doesn't leak.
I prefer steel fittings, but that is just me.
Posted by: rjames May 19 2007, 08:25 PM
You'll have plenty of room under the tank with that setup, in fact, it should be even better than stock with respect to fuel hose routing with the 90 degree bends. Looks great!
Posted by: Phoenix-MN May 19 2007, 08:35 PM
John,
The aluminum -6AN to 1/4npt fittings are ones I had on hand. I agree with you on using steel fittings on the tank, I'll be ordering some up Monday.
rjames,
You are correct, I dropped the tank into position and there is all kinds of room 
Posted by: Gint May 19 2007, 09:18 PM
Keep this thread updated please! I'm dying to know how that all works out in the end.
Just to be clear, did the AN fittings screw right into the factory fittinga without being tapped?
Posted by: sixnotfour May 19 2007, 09:36 PM
It would be great to have an elevated pickup tube, like the factory , So you dont have every little piece of dirt in the system. 
Posted by: John May 19 2007, 09:41 PM

Keep this thread updated please! I'm dying to know how that all works out in the end.
Just to be clear, did the AN fittings screw right into the factory fittinga without being tapped?
I think he used the 1/4"NPT tap on the inside of the fittings. (That's how I would have tried doing this.)
I too want to know how this works out. I may be doing this with my current (long term) project car.
Posted by: Phoenix-MN May 19 2007, 10:02 PM
Yes, the inside of the tank fitting was threaded with a 1/4npt tap. If an elevated pickup tube was wanted you could use a peice of brass tubing and a steel AN fitting and solder them together. My self I don't thik I will use an elevated pickup, just start out with a good clean tank and use a filter before the fuel pump and it should be good to go.
Next step is to figure out where to mount the pre filter, the pump, and where to cut holes for the -6 hose.
Attached thumbnail(s)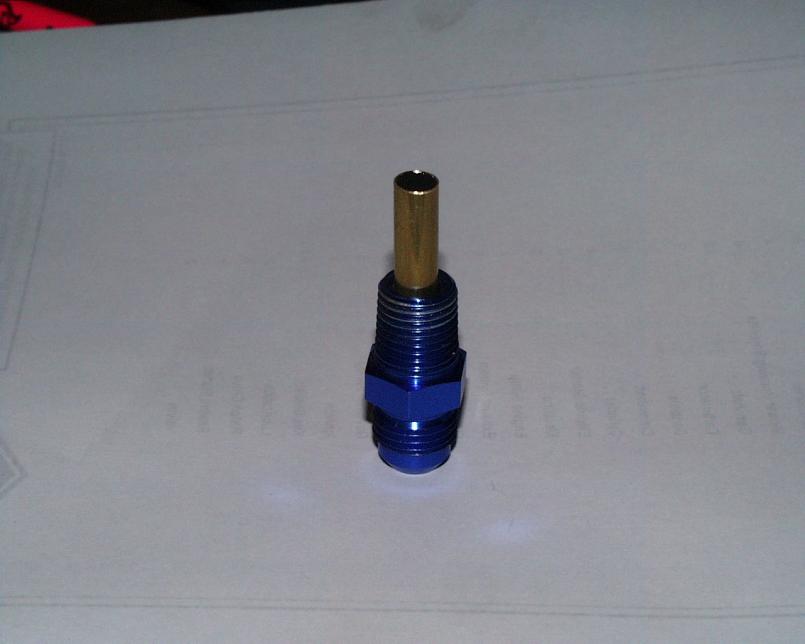
Posted by: andys May 19 2007, 11:38 PM
Paul,
The tap drill size for a 1/4NPT is 7/16" (.4375). What is the inside diameter of the tank fitting? Were you able to get reasonably full thread form?
Your method greatly simplifies the challenge of plumbing to the tank. I applaud your thinking out-of-the-box! I'll drag my tank out maybe tomorrow and take a look. I know I have some -6 in aluminum, but I too would prefer steel for this application.
Andys
Posted by: Phoenix-MN May 20 2007, 07:54 AM
andys,
The id. of the stock fittings is a little larger than 7/16", I didn't measure the exact size. I think the threads that are cut will be fine, they are just a little deeper on the tap so the fitting screws in a little bit more, but far from bottoming out. The final test will be to put some fitting on with caps, fill the tank and see if it leaks before putting it in the car.
Attached thumbnail(s)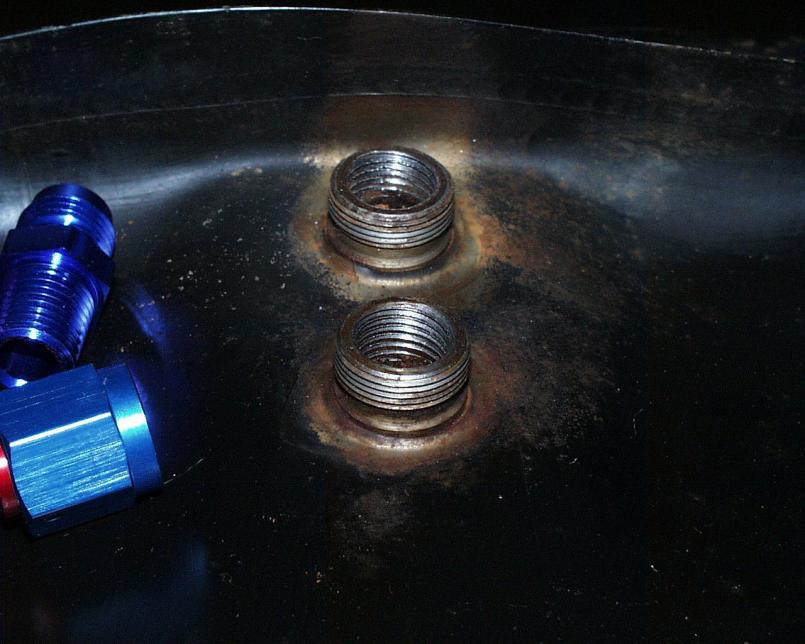
Posted by: rick 918-S May 20 2007, 09:25 AM
You may want to use a sealant on the threads. I would use POR 15. I sealed 1/8" holes in the Healey gas tank with the stuff. Gas won't touch it and if you ever used the stuff and tried to put the lid back on the can and reuse it later you know how well it bonds metal to metal...
Posted by: JB 914 May 20 2007, 10:39 AM
You may want to use a sealant on the threads. I would use POR 15. I sealed 1/8" holes in the Healey gas tank with the stuff. Gas won't touch it and if you ever used the stuff and tried to put the lid back on the can and reuse it later you know how well it bonds metal to metal...

i had a gallon of it. had to buy some empty quart containers from Home Depot to transfer the contents after
 the sealed can.
tough stuff
Posted by: JB 914 May 20 2007, 11:09 AM
another thougth would be to use POR PATCH which is a thick POR-15 that comes in a tube. it can be used as a seam sealer or on small repairs.
Posted by: turbo914v8 May 20 2007, 02:10 PM
I have done this mod and it works great. I just used blue lock tight no leaks. Good luck with the remainder of your project.
Posted by: Cap'n Krusty May 22 2007, 03:48 PM
By the looks of what little of the inside of your tank is visible in the picture, you NEED that screen. Rust city. Better get it cleaned and coated before you use it. The Cap'n
Posted by: Phoenix-MN May 29 2007, 07:23 AM
Yup, the inside of the tank is nasty. I found a local place that looks like it's the "ticket"
http://www.gastankrenu.com/index.htm
They seem to have several other locations as well. This place was recomended by a local Porsche shop.
Paul
Posted by: Phoenix-MN Jun 30 2007, 11:42 AM
Update -
I installed Tangerine Racing SS fuel lines today, they fit perfect, took about 20 minutes to put them both in (the engine is out). It's real nice when after-market parts work this well.
Posted by: Phoenix-MN Jun 30 2007, 11:46 AM
'nother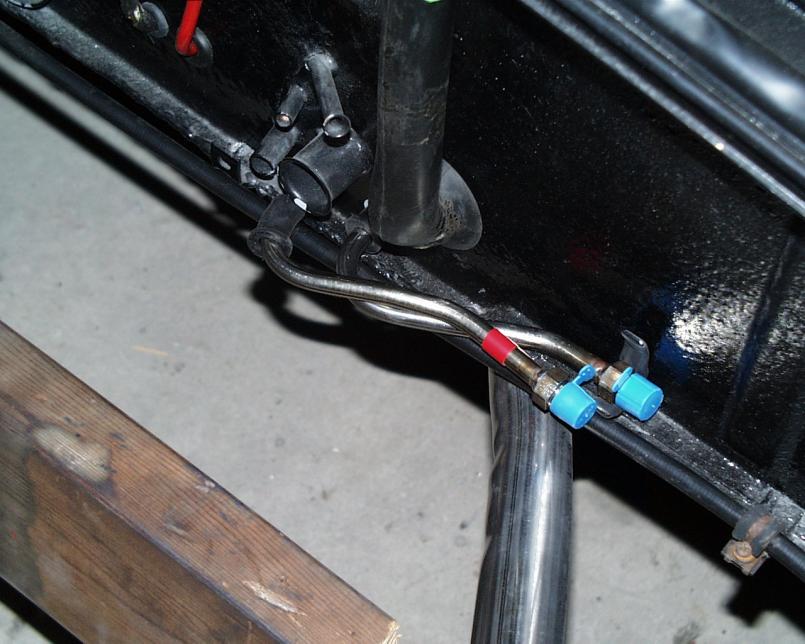
Posted by: neo914-6 Jun 30 2007, 04:30 PM
Update -
I installed Tangerine Racing SS fuel lines today, they fit perfect, took about 20 minutes to put them both in (the engine is out). It's real nice when after-market parts work this well.
Where did you get the grommets? Any tips on installation?
Posted by: Phoenix-MN Jun 30 2007, 06:34 PM
Update -
I installed Tangerine Racing SS fuel lines today, they fit perfect, took about 20 minutes to put them both in (the engine is out). It's real nice when after-market parts work this well.
Where did you get the grommets? Any tips on installation?
My tub is a '71 so it has separate holes for each line in the front. The holes are slightly oblong but I just used a grommet that was for a 1" hole and a 1/16" panel.
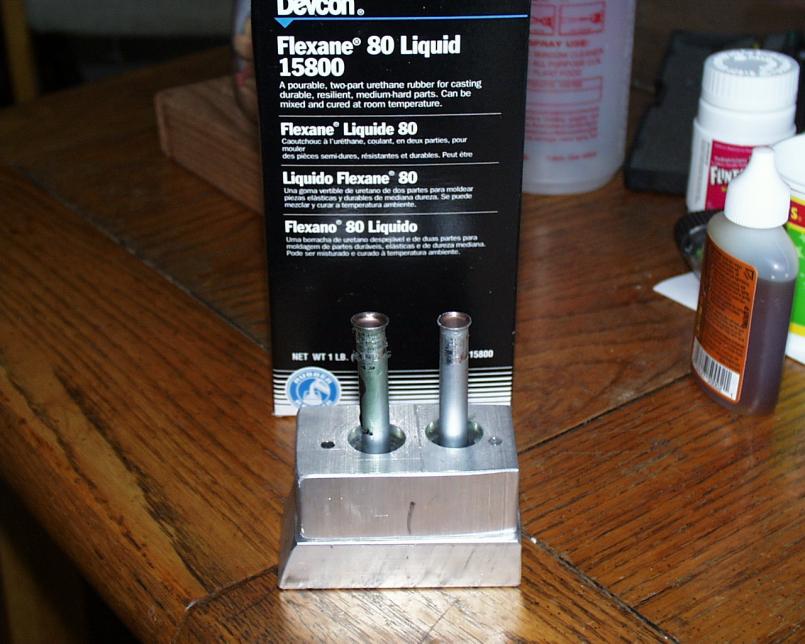
For the rear (you are going to think I'm nuts) I machines a mold out of aluminum to fit the firewall openings and for the 3/8" fuel lines. I used Devcon Flexane 80 to make the grommets.
I realy don't have any tips or tricks, they just slid in but like I said, the engine is out so having room to move around under the car was not a problem.
Paul
Posted by: iamchappy Jun 30 2007, 07:22 PM
My god Paul, you've got to get a life!
I think I may have to have an intervention on you, frequent visits and beer delivery...
Posted by: Phoenix-MN Jun 30 2007, 08:10 PM
My god Paul, you've got to get a life!
I think I may have to have an intervention on you, frequent visits and beer delivery...
Just to re-enforce this fact (that I am nuts) When I rebuilt my front calipers one of the bolts snaped off. The bolt is a 9mm, try to find one of those in the U.S.! NOT - but you can buy 9mm taps and dies.
Well my solution was to take a 10mm bolt chuck it up in a lathe turn it down to 9mm and the run a die over it.
mmmm Beer would be good, just no straight jackets.

Posted by: iamchappy Jun 30 2007, 09:10 PM
Ok stranger, I will make a visit soon.....
I have been sand blasting away on my car to clean up trunk and engine bay. Why I started to paint it Signal Orange instead of Black again has set me back some.
I am nuts toooooooooooooooooooooooo.............
Posted by: neo914-6 Jun 30 2007, 10:04 PM
Where did you get the grommets? Any tips on installation?
For the rear (you are going to think I'm nuts) I machines a mold out of aluminum to fit the firewall openings and for the 3/8" fuel lines. I used Devcon Flexane 80 to make the grommets.
Paul
Not nuts, just a really good problem solver. Hey that means you can make more! I'll take one

Felix
Posted by: iamchappy Jun 30 2007, 10:08 PM
Paul im a little nuts too, when i saw that Devcon stuff I started thinking about all of the things i would like to make with it.
Im going to drink another beer and call it a night.
Posted by: Phoenix-MN Jul 1 2007, 08:43 AM
Where did you get the grommets? Any tips on installation?
For the rear (you are going to think I'm nuts) I machines a mold out of aluminum to fit the firewall openings and for the 3/8" fuel lines. I used Devcon Flexane 80 to make the grommets.
Paul
Not nuts, just a really good problem solver. Hey that means you can make more! I'll take one
Felix
I guess I could make some
 the molds are for 3/8" line only. If that will work I'll make up a few, how's $3.00 shipped (USPS) each sound?
Paul
Posted by: neo914-6 Jul 1 2007, 12:07 PM
Where did you get the grommets? Any tips on installation?
For the rear (you are going to think I'm nuts) I machines a mold out of aluminum to fit the firewall openings and for the 3/8" fuel lines. I used Devcon Flexane 80 to make the grommets.
Paul
Not nuts, just a really good problem solver. Hey that means you can make more! I'll take one
Felix
I guess I could make some
the molds are for 3/8" line only. If that will work I'll make up a few, how's $3.00 shipped (USPS) each sound?Paul
Thanks, shoot me your PayPal or mailing addy...
that's $6, right?
Posted by: andys Jul 18 2007, 02:12 PM
I wanted to keep the thread alive since I'm starting to configure my V8 fuel delivery system.
After giving some thought to the AN/tank fitting, I too am concerned about not having a raised tube and screen filter in the tank. Any small fragment will potentially settle to the bottom where the opening in the AN fitting is only 3/8" or so. A raised tube by itself I think would be of benefit, but I would like to add a screen as well. So, where to buy one? I would consider adapting the VW screen, but the tube is a bit small in diameter for a V8 EFI system (3/8" would be better).
I will likely add a coarse filter ahead of the EFI pump anyway, but that will be of no help should the tank get clogged.
Any ideas?
Thanks,
Andys
PS: Phoenix-NM, how did your AN install work out? Any leaks?
Posted by: Phoenix-MN Jul 18 2007, 02:32 PM
Andys,
I haven't put the tank in the car yet but while in the many stages of cleaning I had npt plugs installed. The tank has set overnight with many different "cleaning solutions" in it several times without a drop coming out. I feel confident that there will be no leaking problems. I too have been thinking about the sock filter in the tank. I'm going to try the brass tube idea from the ealier post and figure out a way to attach the stock filter screen to it.
Additional note about cleaning - I used several methods.
1st Washing soda/water electrolysis method
2nd quick wash with muritic acid (hardware store variety)
3rd Overnight soak with weak solution of phosphoric acid
4th KBS tank cleaning/coating kit
The tank cleaned up nicely.
Paul
Posted by: Phoenix-MN Jul 19 2007, 07:51 PM
Here's how I did a filter screen.
Steel AN fitting drilled out to .345 in.
Short piece of .343 o.d brass tubing
Stainless steel wire cloth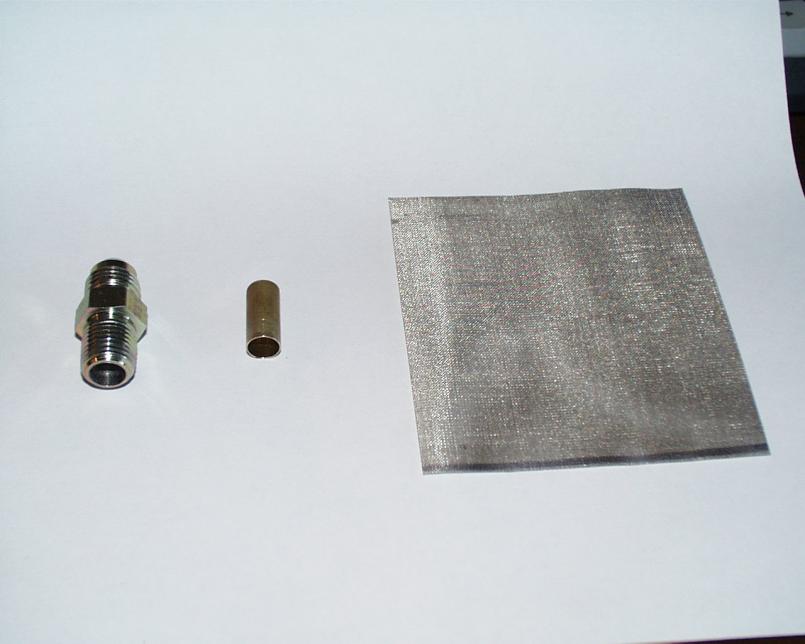
Posted by: Phoenix-MN Jul 19 2007, 07:55 PM
Next - silver soldered the tube to the AN fitting and rolled the wire cloth into a tube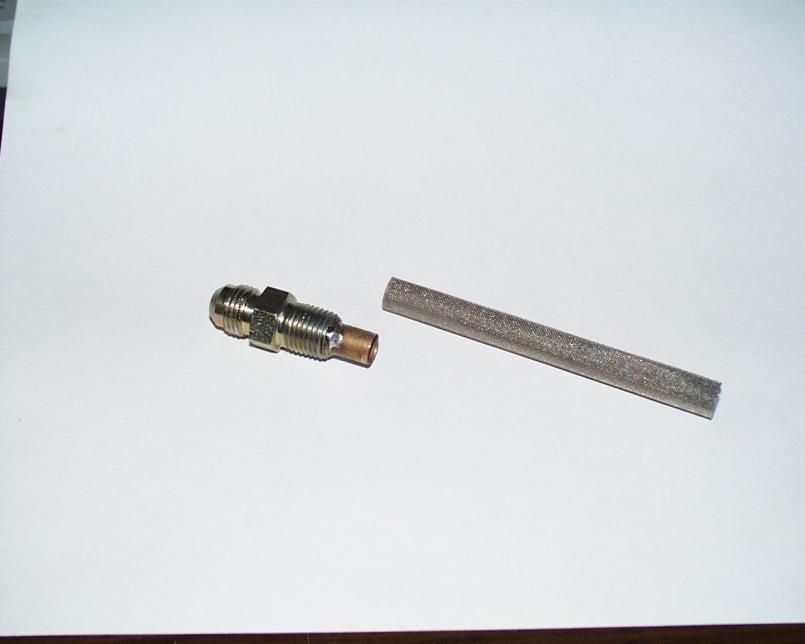
Posted by: Phoenix-MN Jul 19 2007, 07:59 PM
Finally - Soldered the wire tube to the brass and crimped and soldered the end. It's rugged, removable, and easily cleaned. 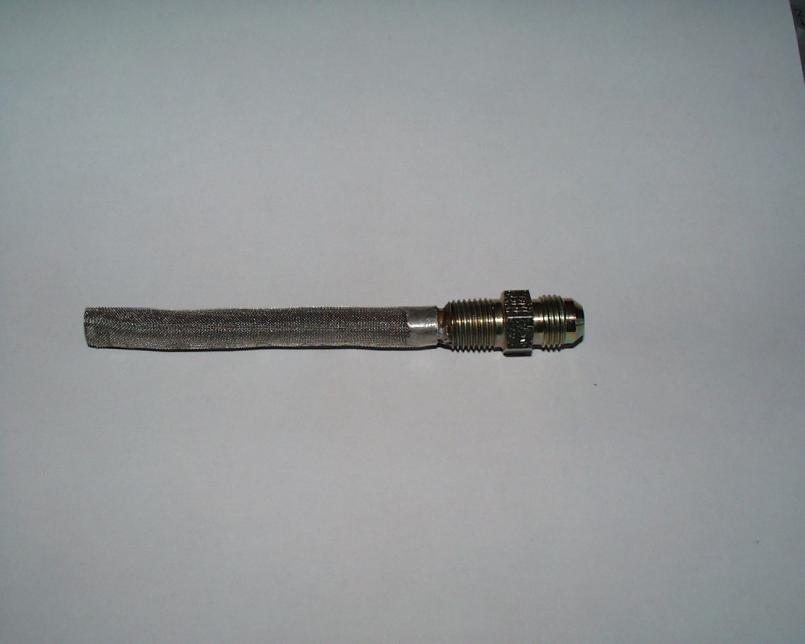
Posted by: iamchappy Jul 19 2007, 10:59 PM
Nice job Paul, you always amaze me....
Posted by: iamchappy Jul 19 2007, 11:01 PM
Nice job Paul, you always amaze me....
Posted by: skline Jul 19 2007, 11:10 PM
That is very impressive, can you make another one for me?
Posted by: andys Jul 19 2007, 11:20 PM
Paul,
Nice job.
What mesh is the screen? Also, did you solder the seam along its length?
I considered buying screen from McMaster-Carr (probably 50X what I need), but thought it easier to buy the VW screen and solder it to the AN fitting.
BTW, are you going to use braided hose? I'm thinking rubber (AN Twist-Tite), as it's more flexible and not prone to abrading anything that it comes in contact with.
Andys
Posted by: retrofit Jul 20 2007, 12:13 AM
Finally - Soldered the wire tube to the brass and crimped and soldered the end. It's rugged, removable, and easily cleaned.
Most excellent ingenuity!

Put me down for one should you decide to make up a batch.
Everyone should order this from you-rust is inevitable...
AK
Posted by: Phoenix-MN Jul 20 2007, 07:30 AM
skline,
Sorry, I really don't want to get into making these for others, if you have a soldering skills, a drill press, and time, it's a pretty simple part to make youself.
andys,
I don't know the mesh count on the wire screen, it's was from a piece that I had laying around. It isn't as fine as the stock screen but it is a lot finer that "window screen". I tacked the seam about every 1/2in. and it holds well, I can post a picture of the seam tonight. If you do get a piece from McMaster be sure it is a stainless steel alloy that can be silver soldered using the correct flux.
I'm using both the socketless hose and braided hose. The socketless for connecting to the SS 3/8in. lines in the tunnel and stainless braided for the rest of the car (boy! the $$ add up quick). The Aeroquip AQP socketless hose and fittings really grip and make a solid seal, the stuff works real good. If I was to do it all over again I would probably use the socketless hose throughout.
Paul
Posted by: Phoenix-MN Jul 20 2007, 07:52 AM
Hi-jacking my own thread 
Chappy, are you orange yet?
Posted by: jsteele22 Jul 20 2007, 01:39 PM
I'm using both the socketless hose and braided hose. The socketless for connecting to the SS 3/8in. lines in the tunnel and stainless braided for the rest of the car (boy! the $$ add up quick). The Aeroquip AQP socketless hose and fittings really grip and make a solid seal, the stuff works real good. If I was to do it all over again I would probably use the socketless hose throughout.
Paul
Paul, that "socketless" hose and fittings sound interesting. I read the blurb on them at summit racing, and they say you just slide the hose onto the barbed fitting, and that's it. No hose clamp ? How hard is it to get the hose over the barb ?
Posted by: Phoenix-MN Jul 20 2007, 01:45 PM
The socketless stuff does take a little "grunt" to put them together. Anyone with strong hands can put this stuff together. I used a little oil to lube it up and once together and sitting for a day the only way to get the hose off the connector is to cut it off.
Posted by: andys Jul 20 2007, 03:46 PM
The socketless stuff does take a little "grunt" to put them together. Anyone with strong hands can put this stuff together. I used a little oil to lube it up and once together and sitting for a day the only way to get the hose off the connector is to cut it off.
For socketless and assorted other hard to install rubber hoses, etc, I use K-Y , hold the comments...........
 After some amout of time, it simply disappears and it's not nearly as messy as using oil. Also good on assorted water hoses that are not resistant to oils.
 Andys
Posted by: jsteele22 Jul 20 2007, 04:02 PM
The socketless stuff does take a little "grunt" to put them together. Anyone with strong hands can put this stuff together. I used a little oil to lube it up and once together and sitting for a day the only way to get the hose off the connector is to cut it off.
For socketless and assorted other hard to install rubber hoses, etc, I use K-Y , hold the comments...........
After some amout of time, it simply disappears and it's not nearly as messy as using oil. Also good on assorted water hoses that are not resistant to oils. Andys
Hmm, never thought about using K-Y for that
Does it still take a little grunt ?
I would think if its socketless .....
Do you still need strong hands ?
I hope you never have to cut off the hose !
Sorry, I tried to hold it back, but I couldn't.
Posted by: Phoenix-MN Jul 20 2007, 06:42 PM
Boy, it's a good thing we're not talking about rear end lube 
andys, here's the seam of the screen showing the tacks along it's length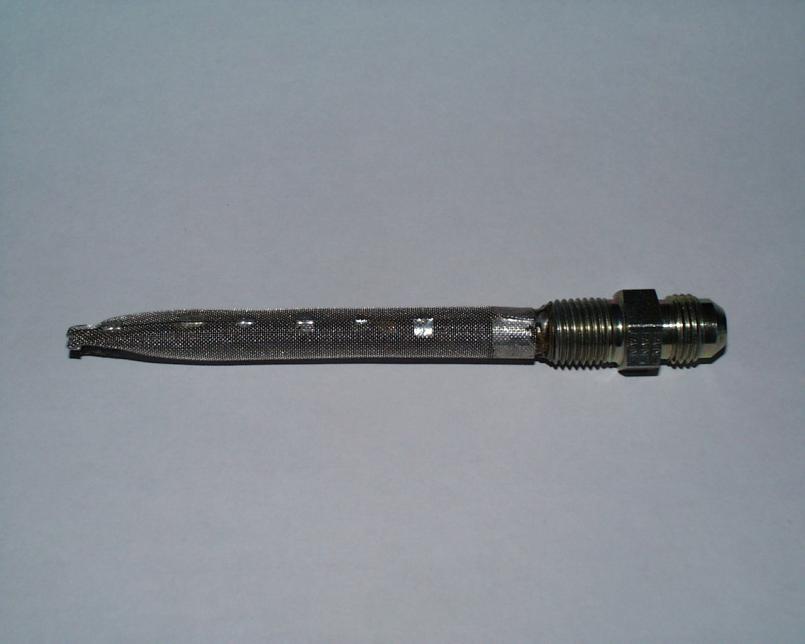
Posted by: kconway Apr 7 2011, 11:46 PM
Bumpin this...wondering if there is any more to add or anyone else that has done this. Super clean job!
Posted by: jim912928 Apr 8 2011, 06:43 AM
CB Performance (VW shop) sells AN 6 tank adapters (same size and thread as our 914 tanks). I used the stock tank screen, cut the extension that goes outside of the existing tank off so you only had the extension going inside and then the CB adapter. Then I went AN all the way back to the engine. I created a thread on plumbing the fuel system for my 3.2l conversion which shows the components for the tank, fuel pump, tunnel and engine compartment.
Link: http://www.914world.com/bbs2/index.php?showtopic=116619&hl=fuel
Powered by Invision Power Board (http://www.invisionboard.com)
© Invision Power Services (http://www.invisionpower.com)