Printable Version of Topic
Click here to view this topic in its original format
914World.com _ 914World Garage _ What the World needs now is... a progress thread
Posted by: Vacca Rabite May 21 2007, 09:18 AM
So, when I started this restoration in October of 2005, I started a progress thread on the Subaru Board (NASIOC) that I active on. I have been meaning to create a thread here, but I never got around to it. I figured the kids over in ricer land would find it more amusing to see a classic resto in action then the folks here that have lived it.
But, I now post more here then I post in NASIOC OT, and feel more involved in the community then I did when I started. So, for the sake of ease, I am going to port over my posts from NASIOC, and posts from today on will be unique here.
As I get ready to paint (JUNE 9th - 13th are PAINT DAYS!) this thread will get more active. :-)
Zach
PS, it kinda fun for me to do this. Looking over the old posts brings back memories of the ride...
Posted by: Vacca Rabite May 21 2007, 09:19 AM
First posted on 10-2-2005
Woot, I have a 30 year old sports car.
In other news, I'm poor for the rest of the month.... er... couple of years....
Porsche parts will be featured on my christmas list. :-)
And so ends the 914 vs power wagon debate.
At least for me. :-)
Zach
Posted by: Vacca Rabite May 21 2007, 09:21 AM
First Posted 10-2-2005
Yeah. There is very little rust on it. Hell holes, longs, battery tray are just about pristine. A little bit of rust int the trunk, due to a poorly sealed rear spoiler leaking. I am going to start tearing it apart tomorrow. Start the good old frame up restoration.
Jackstands, HO!
Zach
Posted by: Vacca Rabite May 21 2007, 09:23 AM
First Posted 10-2-2005
Originally Posted by MattSEG
didn't buy it from someone in albuquerque on ebay did you?
No, I got it from a guy in Rockville MD. Great guy too. We agreed on a price that we were both ahppy with, he helped load the thing. I was ready to go. He said "Hey, Wait!"
Mike took me into the basement, which was full of porsche parts and said "Take what you need." I waled out with 2 new seats and cushions (dusty, but no tears) a straight, uncracked lower dash, and car cover, and some other parts. When I left, Mike said "As you start working, you will find things that you need. Call me, if I have them I'll just send them to you."
The guy had two other 914s in his garage - one a rust bucket parts car, the other a 914-6 race car. He had to get rid of this one, as he was expecting another 914 and a 944 to come in a week. I think that he was less concerned about the money, and more concerned tht he felt that the car would go to someone that would do it justice.
Zach
Posted by: Vacca Rabite May 21 2007, 09:24 AM
First Posted 10-4-2005
Well, last night I went out and started buying the tools that I would need to restore the car.
The shopping list included
* 2 Craftsman metric wrench sets (7mm-17mm)
* 4 new jackstands (I suppse my old ones were good, but, well, I was in a buying mood)
* an angle grinder
* wire brush cup for the angle grinder
* Breaker bar (I had been just using a lenght of pipe for this )
* bunch of drill bits
* and a tool box
I was very lucky to have happened to walk into a sale at Sears, so the grinder, tool box, and wrenches were on sale.
I still need to find some triple square wrenches, and a 17mm allen wrench.
These (along with the various clamps, vice grips, etc that I have allready) will be the basics for the tear down. As I tear the car apart, I'll update with pictures and such.
Zach
Posted by: Vacca Rabite May 21 2007, 09:25 AM
First Posted 10-4-2005
Originally Posted by wrigh003
So you bought an ancient Porsche that's notorious for rust, then went to Sears and bought a bunch of tools.
Did something bad happen to you last week?
Not at all. This is somehting that I have been planning to do for about 3 or 4 years. But, until this spring, I was living in an apartment. As you said, notorius for rust. If I had started then, it would have rusted away faster then I could have restored it.
Bought a house with a detached garage that I could put 4 cars in - or my car, Erins car, a project car, and a workshop. Then I started looking for cars that would be a good candidate for a restoration. Meaning, I did not care if the engine worked, but the body and frame had to be is good condition. Air cooled engines are easy, VW air cooled engines are easier. Rust repair is a pain in the butt, and I don't know how to weld yet.
The tools I got as I did not have metric tools.
I used to repair and drive WWII british armored cars, so I know that I can do this. I also like building things and takeing them apart. I know it is not an investment.
Zach
Posted by: Vacca Rabite May 21 2007, 09:26 AM
914 Update 10-12-05
Well, so far, the car is still in pieces (haha - of course it is...). The interior is out except for the shifter, pedal cluster, and the dash. I am trying to figure out the dash, and going through the tedious process of marking were all the wires connect. Each wire gets a red tag of electical tape, with a sharpie number written on it, and the associated bit on the back of the dash also gets a red tag with the number. In theory, next year when I am putting everything back together, the numbers will match up and everything will work. Arn't theories grand?
I have also taken out several bit of the car that I never intend to put back in - for the cause of weight savings. Like the "factory" A/C fittings, vents, and dash panel. Using a heat gun and a three-way paint scraper I removed all that nasty "rust preventing" and sound proofing tar from the cabin floor pans (about 10 pounds worth, not to be returned!). It never did much rust proofing, but rather trapped water under it and ruuusted the floor pans. I knew to expect this, and the floor pans look better then expected. Lots of surface rust, but I have not been able to poke through the worst of it with a screw driver and a hammer. I think I dodged a bullet on needing to replace the floor pans!
As soon as I get the dash out, and the shifter and pedal cluster out, the interior tub will be hit with a wire wheel on an angle grinder. This will strip the remaining tar bits, pull out the seam sealer, and clear the rust off the metal. This will be the final test to see exactly how deep it is, but I am hopefull.
I only work on the car a couple hours every other night or so - other wise my household duties won't get done and Erin will get (understandably) pissy. Keeping the natives happy is one of my primary goals with the restoration.
Its kind of perverted, but I kinda hope to find that replacing a floor panel to be needed. Why? Because it gives me the excuse I need to justify buying a MIG welder and learning to weld. I am really trying to be finacially tight on what I buy to do the restoration. So far, so good. But buying a $400 welder "on spec" might open the flood gates in a way I don't want them opened.
I have taken pics, but I did not bring them to work to resize and upload, I'll try and get that done. For the time being just picture a 914, on jackstands without doors, rockers, a hood or an interior.
:-)
Zach
Posted by: Vacca Rabite May 21 2007, 09:29 AM
Posted 12-08-2005
Luke asked for them, and that was enough to get me to post them up.
These are from my 914 Flickr page here:http://www.flickr.com/photos/17886282@N00/sets/1537526/
All of these pics were taken the saturday after Thanksgiving. I suckered my buddy Ross to brave the cold and help get the engine out of the 914.
Me unblolting somehting - either heat exchanger or engine crossbar.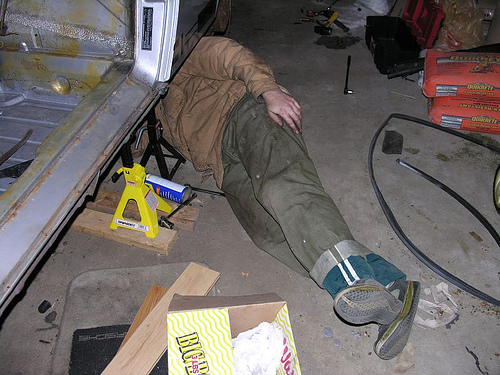
What do you mean it caught on somehting?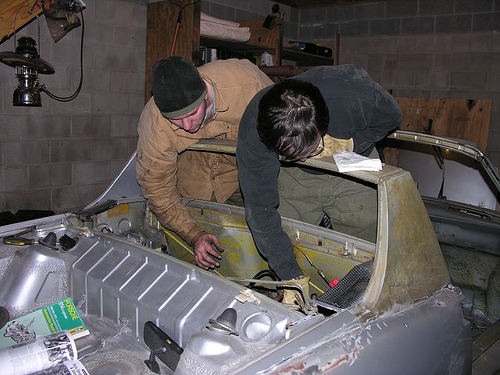
Ross throws the horns before the engine is out. Could have jinxed the whole thing!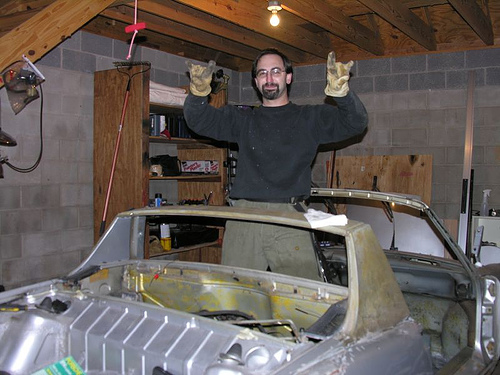
And ITS OUT!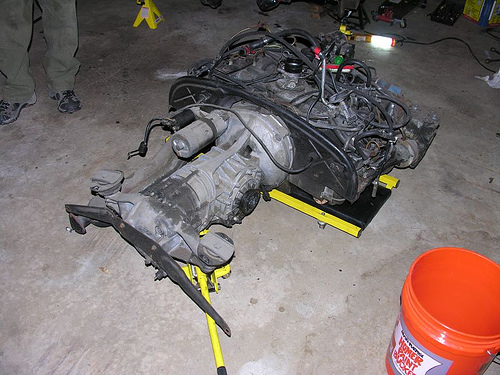
This is the proper time to throw the horns.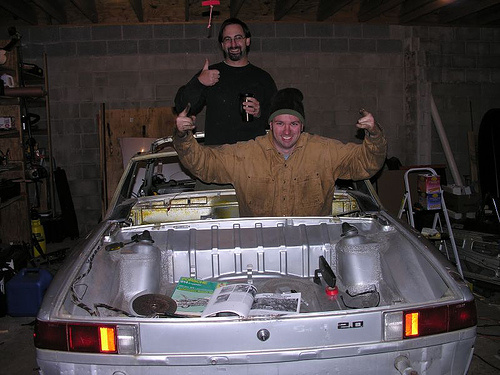
Zach
Posted by: Vacca Rabite May 21 2007, 09:31 AM
Posted 12-8-2005
Other stuff done since the 10-12-05 update:
The floor pans were found to be in really good shape. I wire brushed them, hit them with Metal Ready and then 2 coats of silver Por15. I used the silver as it is supposed to fill pits a little better, and be a little stronger.
The only bits still left on the car right now are the suspension. Everything else is out.
It ended up being a very good thing that the car would not start when I bought it. The fuel ring on the passenger side was very cracked and was leaking fuel. Looked like the driver side had been updated, but not the passenger. I am converting the fuel system to stainless steel through the tunnel, but will probably stay with (new) rubber injector hose out of the tunnel.
I ended up cutting out that section of the rear trunk with the rust. I have not found a replacement for it yet, but am looking.
The front trunk also ended up being pretty rusted. I took out the A/C condenser in the front, and was going to weld the hole closed. However, while cleaning up the area around it (getting rid of the "rust proofing") my angle grinder went right through it a couple of places. Luckily, the trunk panel that I picked up to replace the A/C can be used to replace the front trunk floor. :-) All of the A/C stuff is out of the car (including all the hoses and fittings), and I don't think that it will be going back in.
There was also some battery tray rust, so I am planning on cutting out the battery tray and welding a new one in after that is fixed.
The only other bit of significant rust that I found was on the engine firewall. tree debris, mud, and probably battery acid had collected in the bottom passenger corner of the firewall. It rusted through an area 2inch tall by 3inch wide. The only thing keeping it together was paint. When I touched the angle grinder to it, the whole section exploded. But that has been the only significant spot. Its totally flat, so that will just be a sheet metal weld.
The engine did not start due to the fact that the wire harness was burned at the ignition coil. Given the fuel leak, this was a good thing. Several wires on the engine wire harness were scarred, bald and somewhat burned, so I am going to pony up for a new one.
I have the engine out and mostly stripped. I have not taken the heads off, and probably won't at this time. The entire power robbing exhaust system on that car is going to be binned. Initially I wanted to put headers on it, but Erin convinced me that heat was a good thing. :-) I have not decided what I want for the actual exhaust. I know that the Bursch 2.0 exhausts are supposed to preform the best, but I really like the looks of the 4 tipped Monza (indulge the little ricer in me - the both flow about the same). Either way, it will be a while before the engine is back in the car, so I have time to ponder it.
It looks like all of the 75/76 model year smog stuff had been capped off, but left bolted in. I am going to find out what I can get away with in PA, and try to avoid putting back all that back on when I re mount the engine.
I ground all the paint bubbles down to bare metal. No rust was found, looks like a crappy respray. Not an issue, as I was going to repaint anyhow.
So far the biggest goof up on my part was the windshield. The rear glass was just about ready to fall out on its own. But the front took more time. I spent a lot of time slowly cutting away the butyl tape around the windshield. But it sealed behind me again. Needless, I ended up cracking the windshield. Doh.
The last big disassembly task is to remove the suspension, and then scrape the bottom of the car down to bare steel. This will also be por-15ed. I know I will probably find some surprises, but I doubt it will be through. About the only place that I have not been able to inspect is the center tunnel.
Now it is getting really cold in the garage, so I will probably take a break on the car and work on setting up some heat in there. It will take me a while, but the car is going to be in top notch shape by the time that I am done with it.
Zach
Posted by: Vacca Rabite May 21 2007, 09:32 AM
Posted 12-08-2005
Originally Posted by Anglophile
I see you've stripped the vinyl off the rear pillar/roll bar. Ever consider leaving it that way (painted the same color as the body I mean)? I've seen a few like that, it can look really good if the metal is prepped right.
Always hated vinyl roofs myself.
That is my current plan. I am going to get rid of the bottom trim piece, fill the mounting holes and sand the glue off the sail panels. I have also been considering blocking and sanding the targa top till it is smooth, and painting that the body color as well.
All of the crome trim is either going to be painted black (if the top stays black) or body color. The crome trim around the windshield will be replaced with modern black rubber trim.
Excepting the seats, there may be no vinyl in or on that car when I am done.
Zach
Posted by: Vacca Rabite May 21 2007, 09:34 AM
Update for 12-16-05
Well, today I tackled one of the cars "problem areas." And if you know 914s, i'll give you one guess as to what is was.
When I bought the car, I could not see any rust in the hell hole area. As I dug into it over the past couple of months, I found some, and then some more. So, today I took care of it.
The day started with the hell hole looking like this (keep in mind, this is _LIGHT_ rust for a 914 hell hole):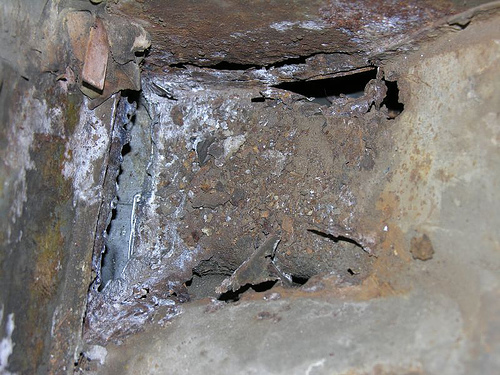
4 hours later, it looked like this: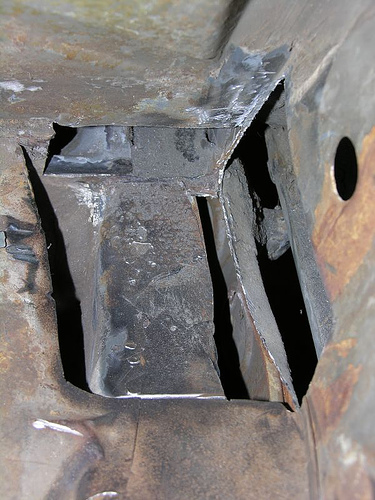
And from the cabin side:
I tried to grind it out with my angle grinder and a 4 1/2 inch cutting disk. But my grinder is too bulky to get int here. So, I swapped over to a dremel, and burned through about 15 heavy duty cutting disks. The I used my grinder to wire brush it, then hit it withthe dremel again.
Last part of this repair will be to cut some patches out of sheet steel, and weld them in. But, alas, I have yet to buy a welder. I looked at them today, but I refuse to buy one till after all my Christmas holiday shopping is over.
Anyhow, patches will be welded in, and the hole mess will be POR-15ed. Hopefully that will be that for rust in the hell hole. At least for the next 30 years.
Zach
Posted by: Vacca Rabite May 21 2007, 09:37 AM
Posted 03-06-2006
I did more work on the 914 this weekend, and remembered to take some pictures. Hopefully, as spring startes to warm up my garage, I'll be able to spend more time out there on the car.
The mission: get the crappy, rusty front trunk out and replaced with a new clean one.
The task this weekend started when a body panel that I got from a salvage car showed up in the mail. The weather was nice, so off to work I went.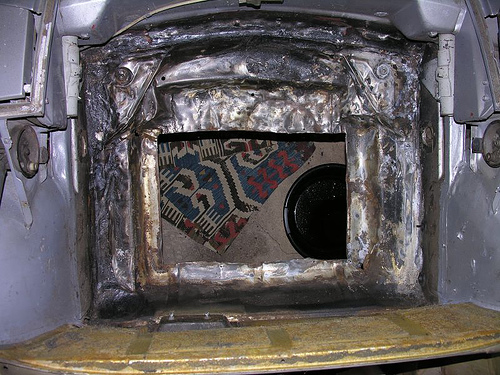
This was what needed to come out. The big hole in the bottom was a cut out for the dealer installed AC (which will notr be going back in). Notice how crumpled this metal is. There are rust holes at the top left and bottom right corners. The top left suspension triangle is really rusty. What is left there is a patch work of steel welded and brazed in. This car has had several front enders... The more I dig into this car, the more I think it was raced pretty hard. There is lots of front end work on it.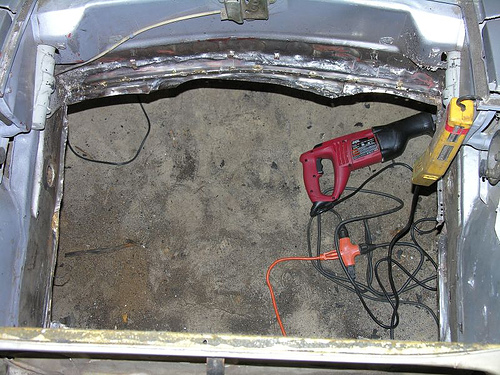
Almost all the metal is cut out. The front still needs to be cut away. At the factory this area was attached by spot welding. But the DPO brazed it on. The spot weld are drilled, but i need to grind off the brazing as well.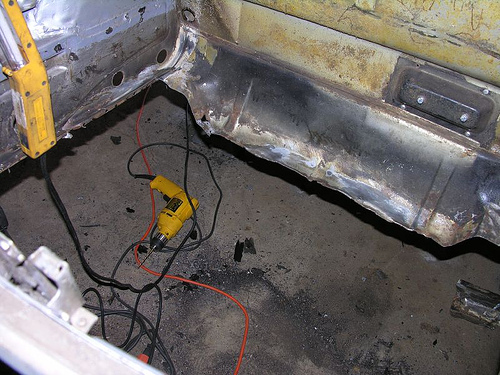
Here it is looking at it from the front. You can still see a rust hole near the top left. The drilled holes along the left are spot welds that I drilled out. Before I cut that last bit out, I need to take very precise measurements so that I can replicate the cut on the new panel. The goal is not to have to have a gap when I weld in the new piece.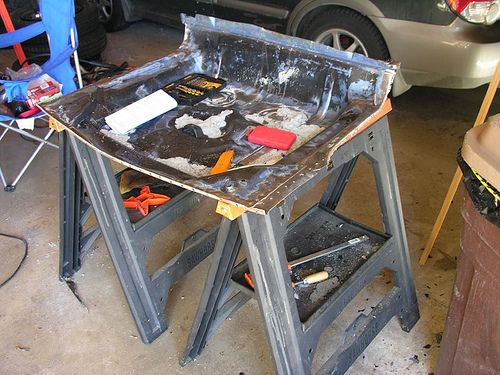
This is the part to be welded up after a lot of cleaning. The guy who was cutting up his car left much of the fenders, nose and fuel wall on. the fenders and nose I took off (drilling out the spot welds) and when I get my measurments for the back rise, I'll make the same cut here. If doen right, it will make a very tight fit and be easy to weld in. All the white junk in it is ground out seam sealer. I wanted to take it all out to make sure that there was no rust hiding under there. Before the piece gets welded into the car, it will be bare metal, and right after welding it will get the POR-15 treatment.
Around 1AM Erin came out and asked if I was planning to come to bed. Time had gotten away from me. I work pretty slow, but I am teaching myself all this stuff as I go along. Sunday I had other tasks to do, but today is supposed to be nice out. Maybe I'll have the new front trunk welded in by this weekend. If so, it will be one of the big steps in my restoration.
Along the way this weekend, I realized that I had gotten a 2 for 1 deal on my sawzall. I bought one, on sale. Put it away without opening it. Saturday night, I take off the cellophane and 2 bozes of saws come out! They were packaged in bundles of 2, and never unpacked at the store. The checkout person just rang the barcode, and neither of us ever new any better!
Also, while wire wheeling the seam sealer out of the new piece, I felt something hit me in the forehead. Not too uncommon (and I was wearing goggles, a hat, and ear muffs). My neighbor stopped by to chat, and while brushing the dirt off my face, I felt something that was not right. Reached up and pulled out a 1/2 inch piece of wire that had embedded itself in my forehead.
Zach
Posted by: Vacca Rabite May 21 2007, 09:40 AM
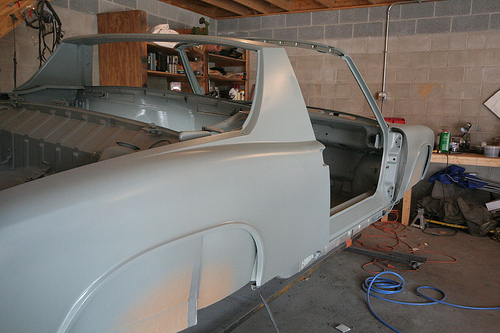
So, I have alsmot had the car for a year now. It pretty different from the way it looked when I bought it.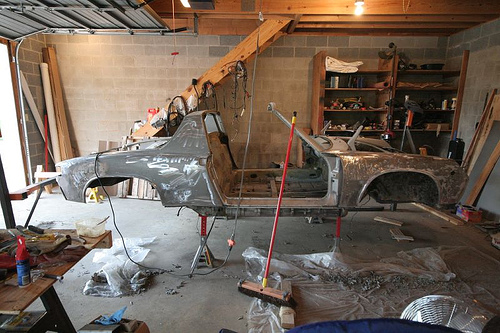
That was today. I have begun stripping the old paint and bondo off the car. It had several coats of paint on it, and the most recent job was pretty crappy. I've stripped about 1/4 of the car at theis point and the good news is there was ZERO rust under the paint. The bad news is that there was a ton of bondo on the front. This was expected, and I am going to try and work the lumps back into shape with a hammer and a shrinking disk.
The front trunk is welded back into place.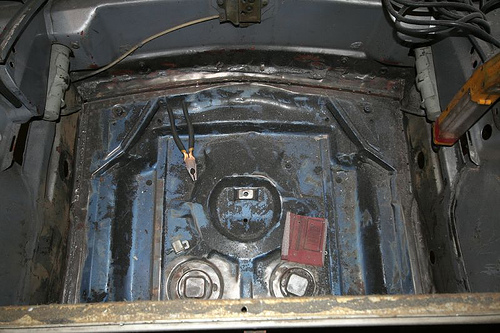
The back rise (not pictured) has a slight gap to it. I'll need to patch it, and I will get to that soonish.
The hell hole is totally fixed, por-15ed and seam sealed. It should never be a rust magnate again. The single biggest weak point for these cars has been tended to.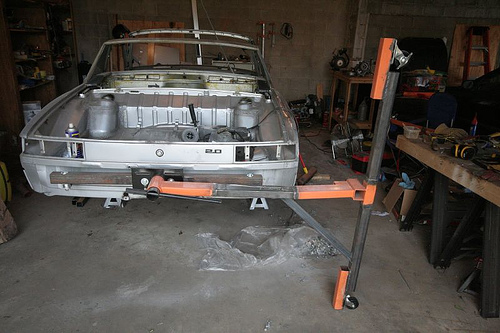
This pic is part of the rotisserie that I built. It should be on it by the end of the month. I just need to bribe enough freinds to come over and muscle the thing up. The tub alone can be lifted by 4 people at this point, so it should be pretty easy.
By the end of the month I will have had this thing for a year. I've not bought a lot for it this summer, as all my money has been being saved for my wedding and honeymoon. I have a bunch of winter projects to keep me busy, and I want to have all the body work done for a spring painting.
I'll probably bump this for the day crew tomorrow, but I thought I'd update tonight.
Zach
Posted by: Vacca Rabite May 21 2007, 09:41 AM
Posted 12-19-2006
Hey everyone,
I just got 2 big boxes from Eastwoods today. Looks like my week off for the holidays is going to involve a lot of body work on the 914.
for the past 2 weeks I have been stripping it while time permitted. I have been using a combo of chemical stripper (aircraft stripper - DON'T let that stuff touch bare skin) and mechanical stripping with 3M stripper pads chucked on a bit.
The passinge side of the car was in pretty good shape, but the drivers side of the car.... man, dent city. I am going to do what I can to pull the dents. but I have resigned myself to just using body filler and smoothign them over again. The good news is that there is no rust on the body under the paint and bondo. I got a gallon of some much lighter filler then the bondo that was on there, and body rasps and some long blocks. If I can get the final paint jkob to look good at 10 feet, I'll be happy. It will be my first time at this, and I have been reading a lot about paint techniques.
I am going to need to rig up a few heat lamps in my garage to raise the metal temps above the air temps, so that condensation does not get trapped between the putty and the metal as it cures.I amy take off friday to do some last minute shopping as well as run to HD to get heat lamps and stuff to hang them on.
No pics tonight. Nothing new at least. Hopefully i have something to show by new years.
Zach
Posted by: Vacca Rabite May 21 2007, 09:42 AM
Posted 1-29-2007
So, I just came in from another chilling session of sanding body filler. I have showered, but I still feel the dust in my eyes, and I think I need to replace my resperator. But the good news is that I have the body mostly smooth. Or, at least as smooth as I will probably get it. There will still be some bumps and waves, but I have fixed most of the major stuff.
I took the duck tail off the rear trunk lid, and put that on some saw horses to start stripping it. Then I will just have the doors.
Does anyone have a ****ing clue how to take apart the door from a 76 914? I can not find a screw that is (i'm told) holding the top bit of trim on. I need to get the doors down to metal, and I really don't want to break any of the trim or glass doing it. I have gone up to look at them several times, and each time come back frusterated.
I also stripped off the undercoating from the bottom of the car. New stuff will be put on in the spring. The good news - no hidden rust.
I imagine that I am going to spend the rest of the cold months with body filler and sand paper, and sometimes a hammer. I keep finding little high spots.
Anyhow. No pics, as it does not look much different from how it looked in December. But it is making progress, and every day is getting closer to paint.
Zach
Posted by: Vacca Rabite May 21 2007, 09:43 AM
With this post, the thread is current to today. (5-21-2007)
It has been forever since I updated this thread, so I figured it was time.
Over the past few months, I have gotten a TON done on the car, but none of it actually looks any different.
All the rust on the rear engine shelf has been ground off, treated and painted with rust encapsulator.
I pressure washed and totally degreased the engine bay.
Body filler is done and sanded - the car is as smooth as it is going to get.
The undercoat is painted.
The ears have been welded back onto the under body.
The engine compartment has been painted with the same chassie black paint used to paint the underside. I'm not too pleased with the black engine compartment though. I think that I am going to paint it rattle can silver. Being able to see what you are working on FTW. The black makes it look like a cave, and will hide oil and grease build up that I would rather clean off.
I cleaned out the channels where the front and rear trunk seals go, and found a little rust. Ground out the rust, and hit is with some encapsulator.
Yesterday was spent scrubbing the cabin side of the firewall with lacquer thinner. The factory used this fiberous glue to hold the sound deading in, and the remnants have to come off before I paint. I'll need to do the same in the front trunk, where the carpet was glued onto the fuel wall. i am not sure that i am going to recarpet that wall or not, so I need to scrub it clean.
I still have a lot of work to do. I need to clear out the area where the windshield sets in. Butyl tape leaves a sticky black residue that paint will not stick to. Infact, I need to examine the car, and wash of the butyl where ever I see traces of it.
I need to sand all over the car to knock off the flash rust. The car has been sitting as bare metal since ~October, and got power washed. So, it does have a little surface rust on it. An hour or two of sanding will have it bright steel again.
I have taken a 5 day weekend the 2nd week of June to paint my car.Day 1 will be sanding, cleaning, and spraying epoxy primer.
Day 2 will be spraying high build primer and sanding.
Day 3 will be as day 2.
day 4 will spray color and color sand. I chose Conda Green, which was used on 911s in 1970 and 1971.
Day 5 will be a second coat of color, and more color sanding, and fainally buffing.
Day 5 will also be my 32nd birthday (June 13).
If you are curious what Conda Green will look like, here is pic I took of a Conda Green 914 from the Hershey Swap Meet in April: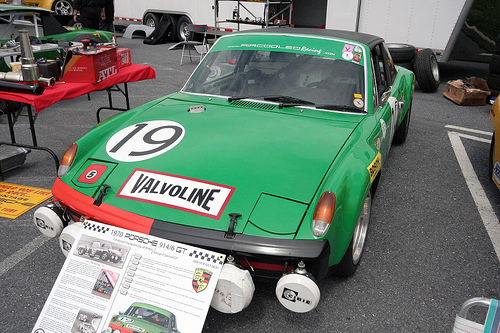
mine won't have all the racer graphics, and the roof will be body color.
Zach
Posted by: Vacca Rabite May 24 2007, 09:22 PM
Okay, so I am pretty frusterated tonight.
I need to bump up my painting schedule. I am going to be in class two of the 5 days I took off to paint my car. I had hoped to get the car prepped enough to paint the Epoxy sealer tomorrow. But it seems every time I start working on paint prep, I find another dozen things to do.
I am running out of time to get this done. I am glad that I have tomorrow off, but I seripously doubt that I will have it sealed by the days end. I just ended up doing some more welding to fill up the holed drilled into the rear end of the car for the 2.0 badge. I am thinking I sould dig the filler out of the front trunk, and weld those holes from the badge too. Worried that the filler is going to eventually come loose.
It just seems like I am never going to get this freak'n car painted.
Zach
Posted by: ptravnic May 24 2007, 10:59 PM
Zach - Damn fine work so far. Keep on keepin' on!
-pt
Posted by: rick 918-S May 25 2007, 07:43 AM
![popcorn[1].gif](style_emoticons/default/popcorn[1].gif)

Posted by: RoninEclipse2G May 25 2007, 10:10 AM
I love following the progress of builds. I want to be able to do this one day, I just need a garage.
(Shameless self promotion)
Anyone want to buy a Subaru? I need to sell it so i can aford to save for a down on a real house with a garage!
Posted by: Vacca Rabite May 25 2007, 01:39 PM
I'm taking a little break from the work, though I have gotten a lot done today.
The front trunk and gas tank area both got scrubbed with lacquer thinner and vacumed. I got all the glue off the wall of the front trunk.
After lunch, I am going to scrub the cabin and rear trunk. Then I'll give all three areas one final cleaning with wax and grease remover, mask and spray the first coat of sealer on the interior spaces.
Depending on what time it is when that is done, I'll sand off flash rust from the exterior and epoxy seal them as well. However, I thin that will probably be a job left for sunday.
I am hopeful, though, that by the time I head back to work Tuesday, the car will be fully coated in epoxy sealer.
It would be great if I get all this done. But right now, I am going to go have have lunch before I go back out to continue my work. I've still got a lot to do.
Posted by: Dr Evil May 25 2007, 01:53 PM
You know better than that, Zach
Posted by: RoninEclipse2G May 25 2007, 01:55 PM
hey Zach, how did you build your rotisserie? it looked like you cannibalized a couple 1/2 ton engine stands.
Posted by: Vacca Rabite May 25 2007, 03:51 PM

You know better than that, Zach
Too busy for a camera. I have pretty much only stopped today to eat poop and pee. Eating an early dinner now, then go out to finish wrapping the garage in plastic.
hey Zach, how did you build your rotisserie? it looked like you cannibalized a couple 1/2 ton engine stands.
It is made from 2 x 700 pound engine stands from Harbor Freight. The rest was stock steel from the local steel yard, and the plans were a combo of the AA plans, and plans from another member here, and me just winging it.
Zach
Posted by: Vacca Rabite May 25 2007, 09:16 PM
So. I got the front trunk painted with Epoxy Primer. I need to tune the guns better, but the damn guns did not come with ANY instructions. Even though I usually like to just wing it, this is a little more then I like to just wing.
So I was able to put down paint. I did not do much paint prep to the trunk other then cleaning the hell out of it, so it looks rough. But it is sealed. I am treating the trunks as "proof of concept" so hopefully the rear trunk will look better when I paint it sunday. I am hopefull that I will be able to seal the rest of the car sunday, but I need to find gun directions online somewhere. I'll have a seperate post about that in a moment.
Gotta get ready for my parade tomorrow.
Later
Zach
Posted by: Dr Evil May 26 2007, 01:16 AM
Parade tomorrow? 


![whip[1].gif](style_emoticons/default/whip[1].gif) This kind of parade?
This kind of parade?
Posted by: Vacca Rabite May 26 2007, 06:05 AM
Parade tomorrow?
This kind of parade?
More like this, but hopefully with more blue coats. The Chestertown parade usually draws about 20 guys, due to the party afterwards.
Zach
Posted by: JPB May 26 2007, 07:28 AM
Nice work home skillet and interesting use of the old roticeroid. Glad to see your more of a pig slicer than a pig staber. 
Posted by: ptravnic May 26 2007, 08:38 AM
I have pretty much only stopped today to eat poop and pee.
Did no one else pick up on this?
Zach - you eat poop and pee?
 Whatever gets a rise in your Levi's...
Posted by: Zimms May 27 2007, 06:53 AM
Zach,
Did you MIG weld the rotisserie yourself and if so, did you do much welding prior to welding it? I am going the same route, but need to pick up some welding skills.
Thanks,
Mark
Posted by: JPB May 27 2007, 07:02 AM
I have pretty much only stopped today to eat poop and pee.
Did no one else pick up on this?
Zach - you eat poop and pee?
Whatever gets a rise in your Levi's...I picked up on it but he made an error, its, eat poop and drink pee or sumthinlikedat. Them skivillwar boys really like to keep it real don't they? Colonel Sanders didn't know a thing about war but he made a hell of a good bucket of fried chicken!!!!:rotfl:
Posted by: Vacca Rabite May 27 2007, 10:39 AM
Zach,
Did you MIG weld the rotisserie yourself and if so, did you do much welding prior to welding it? I am going the same route, but need to pick up some welding skills.
Thanks,
Mark
Due to the thickness for the metal, I used flux cored wire at a high temp setting and a low wire speed.
This was my first major welding project. I practiced a little, and had done a little sheet metal welding on my car. However, the thickess of the metal (1/8 inch wall thickness, 1/4 inch for a 2x2 that I got for free from a neighbor) anf CLEAN metal makes for very easy welding. Welding thick metal is way easier then welding thin metal. If you make good cuts (I used a power miter saw with a metal cutting blade) the welding goes together like a snap. I did not bother to grind down the welds. In fact, I made them a little thicker. Afte the first pass, I wire brush the seam, and then lay a second bead, really melting it in good. Probably not needed, but it made me feel better.
On a lincoln 140 (or HD1400 - same welder, but sold via Home Depot) for 1/8 inch thick steel I was using temp D (the hottest) and wire speed between 2 and 3. For my welder, 1/8" steel is around the max that true MIG could weld, so I felt safer with flux core, which my welder is rated to 5/12 inch thickness.
I have to admit, most of my freinds think it is more cool that I welded something from scratch that can supprt a car and is useful, then the fact that I am restoring a 30 year old car.
Zach
Posted by: Dr Evil May 27 2007, 11:33 AM
I thought the car was on it to prove that your welds could hold, your restoring the car? 
Posted by: Vacca Rabite May 27 2007, 05:57 PM
I had to come in and post this.
I just caught a bird.
I just re-plasticed off the garage, so I can seal the rest of the car (a breeze blew into the garage this morning, and took down much of the plastic). I was sanding some paint ripples out of the front trunk, when I heard flapping. I looked around, and a bird was trying to exit the garage though the clear plastic I have taped to the garage door. I walked over and caught it. I tried to get Erin to take a pic of me with the bird, but she would not (women  ). So I let it go.
I am now masking off the rest underside of the car, so I can seal the rest of it. I'll probably mask until dinner time, eat and the go out and seal the rest of the car.
These past few days I have gotten so much done, between the house and the car.
I am making one choice that I know I am going to regret later. I am not putting in an Engman stiff kit while I have the car unpainted. I had intended to do this, but never got around to it. I know once I have the car sorted, I am going to want one, but it will have to be a winter project for some future time. Right now, I need to start taking the antibiotics to kill the DWD, and get this puppy done. I really want to drive it to Hershey next year.
Zach
Posted by: Zimms May 27 2007, 08:24 PM
Thanks for the info. I welded some thin sheet, and the results were nothing to write home about. I was getting fearful of welding something that would hold a lot of weight over me.
Posted by: Vacca Rabite May 27 2007, 11:18 PM
I no longer need to worry about flash rust. :-)
My car is encased in epoxy primer.
I need to shower, and I will take some pics tomorrow when there is sun.
I need to get better at painting. I think I have too much pressure going into the gun. When I put on the second coat of epoxy, I am going to try 20 psi instead of 30.
Zach
Posted by: Vacca Rabite May 28 2007, 01:06 PM
So, painting.... Its fun, but it looks that I am going to be as slow a painter as I was a welder and a body man.
Pics:
First, the paint booth, to make sure that I don't paint my wife's car. Its not perfect, but it works well enough. You can see the 914 behind the plastic.
2 coats of epoxy sealer/primer yeilded this: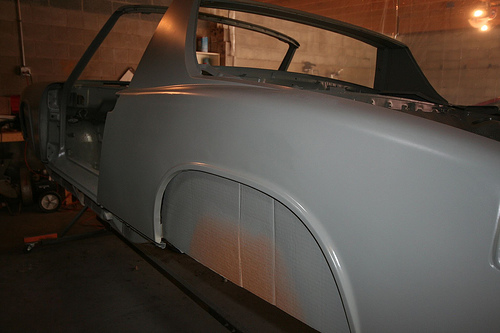

I'll be the first to admit it is not perfect. This morning I went out to look at last night first coat, and found all sorts of body irregularities that I could not see when it was steel and body putty. So, I mixed up more filler, and went to work leveling things out. I also found a few pinholes in the filler that I am going to need to close. I had not seen them before, and was hoping not to need a glaze. After sanding the filler down, I put on another thin coat on one or two spots that warrented it, and sanded it again.
I wiped the car down again with wax and grease remover, and then dusted with a tack cloth.
Last night, I had the pressure set at 30 PSI at the hose, and that was too high, got runs too fast. So I set it this time for 20 PSI. My test spray looked okay, but as soon as I put it on the car I saw it was crap. Not enough pressure to atomize the spray, so I am going to need to sand that out. I raised it to 25 PSI and that seemed to work well. Nice spray, but not laying so fat that it runs.
Somehow, I found dust, again, on the same quarter panel fender that I needed to sand any how. So, that will have to be sanded out too.
The rest of the car went well, except for a run at the rear where I was not paying attention. *sigh*
There are areas where the paint lays differently over the body filler then the metal. I hope that is just how sealer works, and when I spray the sandable primer that will just cover over.
So, its not perfect, and I still have a long way to go, but MAN do I feel happy to see the car one color!
Zach
Posted by: Vacca Rabite May 29 2007, 09:06 AM
So, last night after the folks went home from the Memorial Day cookout at my place, I went back into the garage, sanded the orange peel from the car, and put on another thin coat of epoxy sealer to cover where I sanded through. This simply resulted in more orange peel. After I spent several minutes cursing Eastwoods for not packaging instructions with the paint guns I bought (Devilbiss Startlingline), I cleaned the guns, put them away and went inside. While I was not able to find directions for the Startingline guns, I was able to find directions for the FinishLine guns, which are also Devilbiss gravity fed HVLP guns with a similar layout. So, now that I have 3 coats of paint on the car (which I need to sand smooth again) I now know that I totally bollocked up tuning the guns.
This is a bit of a rant.
Eastwoods Automotive has been my goto company whenever I have needed something for this resto that was tool related, and that I did not want to buy locally. I know they are a little more expensive then if I shopped around, but they have EVERYTHING, and they tell you exactly what it is used for, and it is a PA company so I like to support them. That said, I feel that they totally dropped the ball with this paint gun set, by not putting in a simple 8 page instruction booklet.
They heavily advertised the 3 gun Startline set as _THE_ gun set for the beginning hobbiest painter. Hey, thats me. For under $200 you got 2 production sized HVLP guns (one with a primer tip, and one with a finish tip) a touchup HVLP gun, paint cups for all three guns, a regulator, a cleaning brush, and a free gun stand. But then, they go and cripple you by not including any documentation on how to use, clean, store, etc. the equipment you just bought. You just get a slip of paper that says to tighten the packing nut on the gun. Given that the guns are being targeted towards folks that have never done this before, the result is almost catastrophic. There was not even anything in or on the box which said which gun was the primer nozzle, and which had the paint/clear nozzle. I had to figure that out by looking at each nozzle, and just using the biggest for the primer.
I do realize that there is a learning curve to painting, and deal on these guns was smokin', but the time spent printing an 8 page PDF doc on what the parts were, how to clean, and how to tune and pattern the guns would have been invaluable. I know how to do it now, but it cost me a lot of sanding time (and more to come, as I sand off last nights bad paint). I am not the only one to complain about this either. There are many complaints on the Eastwood site about the lack of instructions.
There, rant over.
Classes start tomorrow, so I doubt that I am going to have any time to work on the car this week, but I do hope to be able to sneak in to the garage and sand it smooth before the weekend. We will see.
Zach
Posted by: Vacca Rabite Jun 3 2007, 07:29 PM
So, I did not get any work done on the car this weekend. I had planned to work on more painting today, but the (much needed) rain held me off. I had homework to do anyhow.
BUT, I did do some other rather important work.
As of Friday night, this is how I had my "shop" part of the garage separated from the rest of the garage: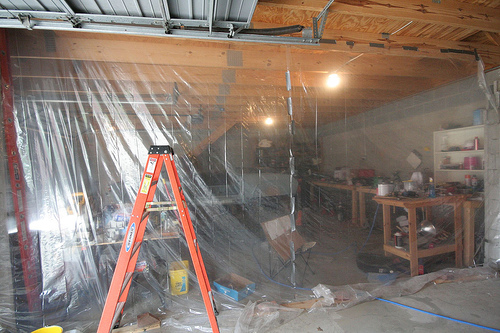
As of Saturday night, it looked like this: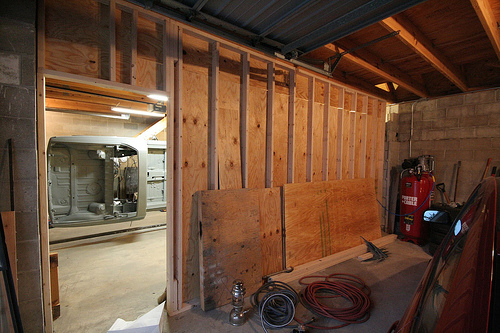
I love it when I get to build things. This has freed up _SO_ much room in my shop - which I can now consider a shop as it is a separate room from the garage.
The inside now looks as such: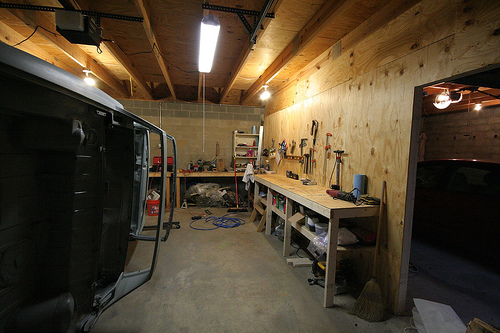
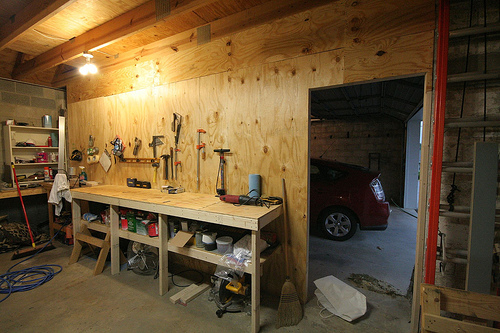
Aside from the obvious wall and workbench, I added doublers to the existing light fixtures (as well as putting in CFLs instead of incandescents) and 2 hanging shop fluorescent light banks as well. I can actually see what is going on in there.
For painting, I am just going to put plastic over the door to the garage.
I still have shelving to hang in the garage part, in order to more efficently use the space, but that will have to wait for a drier, less busy day.
Zach
Posted by: Dr Evil Jun 3 2007, 07:43 PM
Boioioioioioioioioioioing! I am sooo fricken jealous.
Posted by: stepuptotheMike Jun 3 2007, 09:12 PM
progress progress progress..... looking great.
Mike
Posted by: RoninEclipse2G Jun 4 2007, 05:17 PM
![]() cmon Zach, we know you've been up to something...
cmon Zach, we know you've been up to something...
Posted by: Dr Evil Jun 4 2007, 05:20 PM
NO ZACH HERE, ONLY ZOOL
Posted by: RoninEclipse2G Jun 4 2007, 05:23 PM
oh go study something.
Posted by: Vacca Rabite Jun 4 2007, 05:28 PM
Indeed I have. Sadly, its grad school. Posting while waiting for class to start now.
I don't have class tomorrow, so I am going to try and squirt some epoxy sealer on the doors and both hoods, and the one or two places that I sanded down to bare metal after the last round of body sealing. The in class Wednesday after work.
I have monday - wednesday of next week off, and I fully intend to have a painting frenzy going on. Hopefully, by the time I sit down in class on wednesday June 13, I'll have a nice green car, nice and color sanded.
Well, 5 minutes till start of class, so I gotta seem interested. Looks like we are talking about Robert Mugabe today. Fun.
Zach
Posted by: iamchappy Jun 4 2007, 05:32 PM
Zack, just a suggestion, try cutting back on the paint feed adjustment and work slower.
and dont expect a smooth finish from primer sealer, a little grain or peal is no problem and should be expected, your filler primer will take car of that and when it's sanded smooth you will have a nice base to lay down the top coat. Top coat paint is way different than sealer or primer it will lay down smooth.
Posted by: Vacca Rabite Jun 11 2007, 11:20 AM
Well, I just broke down and bought a pair of fiberglass rocker covers.
As I started stripping mine, the passenger rocker cover just exploded in a poof of rust and bondo. Yuck. I figured the time it would take to fix it, vs the time it would take to just get some of the fiberglass ones and paint them and put them on would make it worth my while.
I looked at just buying a new steel passenger side cover, but that was more expensive then the fiberglass set.
Okay, back to work. I need to sand the engine cover, then epoxy prime the doors, front an rear trunk lids, and the engine cover. my goal is to have that done before I go clean up for class at 5.
Zach
Posted by: ptravnic Jun 11 2007, 08:46 PM
Zach - Ur work room kicks ass! It'd look better if it had MY 914 in there getting all that attention....
I've got one hell of a farmers tan from working in the driveway...
Just m $0.02
Posted by: Vacca Rabite Jun 14 2007, 10:15 AM
So after several days of work, the car looks annoyingly the same.
My weekend was spent camping. 2 days of work gone.  Camping was good, and I forgot that it was on the calendar, so that was fine.
Monday, I epoxy primed the doors, trunk lids (both sides), engine lid and duck tail. I waited for that to dry, and put on a second coat. Cleaned my air brush and showered up for class.
Tuesday, I did some more body filler work where I noticed it needed it. I realized that I had forgotten to fix some deepish surface rust in the door seal channel, so those went off to the side. I started spraying on coats of high build primer, and was getting runs all over the place. Huh. So, by trial and error I learned what the "packing" bolt does. I also learned that the primer needs to be thinned out considerably, or it will not flow very well out of the paint gun. I was busy until around 11pm. I was planning on working very late into the night, but decided against it.
Also on Tuesday, I shot a rabbit from out of my garden (we grow rabbits in the garden too, you see). I was skinning it for dinner, and was wrist deep in gore then I hear a voice from around the corner. Some masonry guy who Erin had called to give an estimate for repointing our brickwork was standing there, staring at my gutting a rabbit. He took a quick look around the house, and said he would come back the next day to do a full estimate. He never showed. I guess I scared him off. Pansy. I made a rabbit soup, and laughed about the entire encounter.
Wednesday, I got up fairly early, and set up the shop area to make it easier to paint. I sanded the the F&R trunk lids, engine lid, and duck tail. I found some low spots, and filled them in with more body filler. On the body of the car, I sanded off the runs (there were not as many as I had remembered) but it still took a little time. I mixed up more build primer, and put two coats on the three lids and the duck tail. NO RUNS. Okay, I am getting the hang of this. I cleaned out my gun. I called Erin to see if I had time to mix and spray the body of the car again, but I did not. Oh well.
So, the car is not green yet. the body still needs another 2 coats of build primer, and everything needs sanding. And then I can make it green.
Except for the doors, which still need some rust ground out. Oh, and the headlamp lids and the little pieces that go in front of them - I totally forgot about all that stuff. I don't think I am going to bother stripping those pieces. Just sand them smooth, seal, prime and paint. Oh, and the rocker covers that I had to order Monday. Those will need done too.
I did get a lot done. But it does not really seem like it. The car is still grey, and seems like it has been grey forever (but its really just been a few weeks).
I am antzy. I want to get this puppy DONE.
Zach
Posted by: Dr Evil Jun 14 2007, 10:20 AM
That rabbit story still has me laughing 
Posted by: jasons Jun 14 2007, 10:23 AM
Also on Tuesday, I shot a rabbit from out of my garden (we grow rabbits in the garden too, you see). I was skinning it for dinner, and was wrist deep in gore.....
What did you shoot it with, a muzzle loader or a slingshot? Somehow I visualize you in your period outfit capping the varmit.
Posted by: Vacca Rabite Jun 14 2007, 10:30 AM
What did you shoot it with, a muzzle loader or a slingshot? Somehow I visualize you in your period outfit capping the varmit.
Nah, we are not allowed to shoot firearms within the city limits of Dallastown. Granted, I live next to farms, and hear them shooting all the time. But I bought a RWS 350 Magnum .22 air rifle to cull the rabbits. Its not a firearm, so I am within the letter of the law, if not the spirit of the law.
Its a hell of an air rifle too. You don't see many .22s that will push a pellet at 1050fps. Usually, ~800 is the top end for a 22. Has enough power to put a lead hollow point 14 grain pellet through a metal mason jar lid at 45 yards. I was impressed.
*edit* Is it possible to be a liberal yuppie hill billy? it sounds like thats what i am...*/edit*
Zach
Posted by: sendjonathanmail Jun 14 2007, 02:02 PM
so, hows the paint coming along  thx for the heads up on the 2.0 ---JON
Posted by: Vacca Rabite Jul 3 2007, 07:21 PM
So, an update.
I was stricken with a sinus infection monday, and I headed for home about noonish. Get home ~1, go to bed. Wake up at 8:45 and make a doc appointment for 11:45. Back to sleep till 11. I _NEVER_ sleep like this.
Anyway, I go and get meds and start feeling better, so I figure I'll use the time to do some sanding. I have not really done more then look at my car for the past 2 weeks, so if I can get the body sanded down to 400, that would have me ready for color.
I get the body smooth, and I notice that there are still a few slight depressions on the drivers rear quarter panel. I made a choice. I am not putting any more plastic there.
On the front turn signal, I found a little high spot, where it sanded down to metal. Opps. I went to go mix some primer to shoot over the metal, and realized that I was out of paint filters.
That pretty much ended my evening. I could have done more sanding (both trunks, doors, roof and duck tail all need sanded) but I was feeling tired and ready to head in.
I'll go tothe paint shop thursday and get some filters in the morning and spray the bits that went down to metal. While that is drying, I'll sand the other stuff. By this weekend, I might be ready to start making the car GREEN!
Zach
Posted by: sendjonathanmail Jul 3 2007, 08:23 PM
nice...cant wait to see the conda green -JON
Posted by: iamchappy Jul 3 2007, 08:59 PM
Zach I too have been under the gun to get my car painted, enough is enough it aint getting done unless I do it. After having the car sit in the body shop for 8 months with nothing happening I brought it home and I have been working hard on it. I sand blasted the front trunk the other day totally miserable, Hot dirty dusty work, blasted the inner door panels yesterday and cleaned them up and sprayed them with Dupont Variprime etch primer. This week I hope to get the rest of the rear trunk and engine bay finished.
I feel for ya, I am going through the same thing now, hang in there with me brother...
Conda Green car next to Signal orange car is the ticket.


Attached image(s)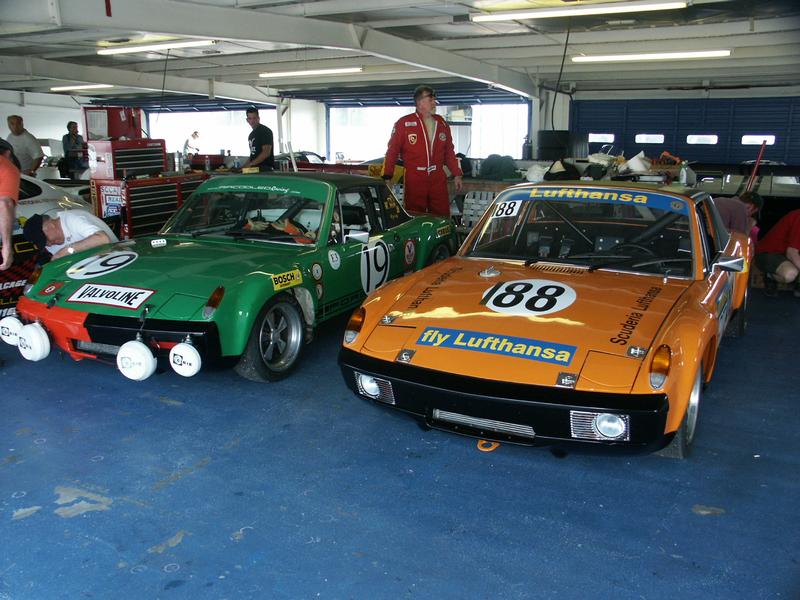
Posted by: Vacca Rabite Jul 4 2007, 11:55 AM
^^^ That Aircooled Racing car was the one that solidified Conda Green for me, when I saw it at Hershey.
Today I did not have much time to do much of anything, and am still feeling a little under the weather (but am no longer contagious, and feeling way better then yesterday). But I was also a little cabin feverish. So, I spent 2 hours clearing the rust from both doors. There was a lot of rust under the seals. I ground that out using a 2 inch wire wheel, and then hit it with some of that 2 part Eastwood Rust Converter (that stuff that turns rust black). Once that is dried, I think that I am just going to squirt a little JB Weld in there to fill the pin holes and add a little strength, then re-epoxy prime the area and then I can sand the primer.
It was one of those tasks that has been lingering, simple but I kept putting it off. Now its done, and I need to go shower up for a 4th of July party.
Zach
Posted by: Vacca Rabite Jul 6 2007, 12:45 PM
So, I totally lied earlier, about not putting on any more body filler and just painting it.
I was sanding away on the car, and I kept finding little depressions. Suddenly I found myself marking them with a pencil.
Yeah, I just put more plastic on the damn car.  The rear trunk needed quite a bit, and the rear drivers quarter panel needed some, but not much. I'm waiting for that to dry, and do some chores around the house. Then back out for more sanding, and shooting more primer.
I really have to admire body shops that can do in a few days what it has taken me WEEKS to get accomplished on my own.
On the side of things. I shot my first coat of primer today that did not have any runs or orange peel. I have to admit, I'm getting better. I'm getting better all the time (I couldn't get no worse...).
Zach
Posted by: sendjonathanmail Jul 6 2007, 12:47 PM
when are you planning on paint?
Posted by: Vacca Rabite Jul 6 2007, 02:53 PM
Depends on when I can get the sanding done. if I have time to get to it tonight, then I will paint tonight or tomorrow AM. if I don't have time to get to it tonight, then it will happen sometime next week. I can't start sanding for another 2 hours (primer needs to fully cure) but then I can see about putting on some green.
Zach
Posted by: Vacca Rabite Jul 14 2007, 12:49 PM
My tub is green.
Pics later.
Demolition Derby now.
Zach
Posted by: stepuptotheMike Jul 15 2007, 09:35 AM
Well just touch me in the morning and walk away 
Isn't there a rule about making a color change, telling people about it and then not posting a pic? I can't hold my breath this long. 
Congrats on getting some color on
Mike
Posted by: jd74914 Jul 15 2007, 09:48 AM
Zach, what kind of compressor are you using?
Posted by: iamchappy Jul 15 2007, 12:02 PM
Your tub is green.... Great Job!
I hope mine is Orange this week....
Posted by: Vacca Rabite Jul 15 2007, 09:34 PM
Yeah, I know. Totally tardy.
It was too late when I got back from the demolition derby last night, and then I got up this morning to do 30 miles on my bike. Never made it into the garage today.
Here is a few pics from the derby to tide you over. I'll get some pics tomorrow after work (when I get more paint on the car too!)
Rubbin' is Racin'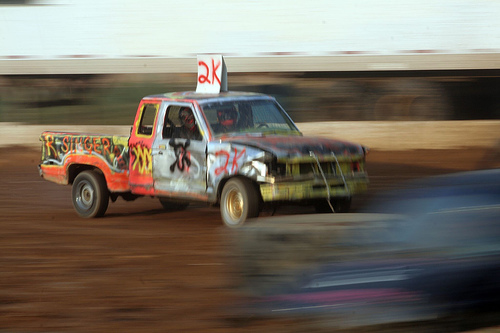
When I got home, I noticed I had this crazy sunburn on the back of my neck. I can't possibly explain it.
Zach
Posted by: Vacca Rabite Jul 15 2007, 09:41 PM
Zach, what kind of compressor are you using?
A Porter Cable 60 Gallon compressor. 7hp Peak, 3hp running. So far, it will run all my air tools just fine, though it will run continously on grinders and sanders.
I bought it early in the spring from here:
http://portercable.cpoworkshop.com/compressors/cplc7060v.html
At the time, it was something like $5 shipping, $449 NEW. it was the best deal that I could find. Amazon wanted $150 to ship the same unit. CRAZY I tells ya, CRAZY!
Zach
Posted by: sendjonathanmail Jul 15 2007, 09:42 PM
great pics man...cant wait to see the greeeeeeeen
Posted by: jd74914 Jul 16 2007, 12:22 AM
Zach, what kind of compressor are you using?
A Porter Cable 60 Gallon compressor. 7hp Peak, 3hp running. So far, it will run all my air tools just fine, though it will run continously on grinders and sanders.
I bought it early in the spring from here:
http://portercable.cpoworkshop.com/compressors/cplc7060v.html
At the time, it was something like $5 shipping, $449 NEW. it was the best deal that I could find. Amazon wanted $150 to ship the same unit. CRAZY I tells ya, CRAZY!
Zach
Thanks . . . shipping is up to 11$ for me now
It came ready to rumble right? (meaning with a regulator . . . all you need to add is the air line and tools)
Posted by: Vacca Rabite Jul 16 2007, 06:53 AM
Thanks . . . shipping is up to 11$ for me now
It came ready to rumble right? (meaning with a regulator . . . all you need to add is the air line and tools)
No. In the pic, the meter is just the pressure in the tank. The regulator, line filter and water trap, and fitings were all sourced from the local Home Depot. Remember to use plumbers tape when attaching the fittings and couplers, or there will be notable air leaks at all the joins.
Also, the compressor needs to be direct wired - I think that most larger compressors do. It does not ship with a plug. I ran a new circut from the fuse box in my garage to the compressor.
It also ships dry (no oil in it) but mine came with a quart of compressor oil to fill it.
Zach
Posted by: Vacca Rabite Jul 16 2007, 08:28 PM
Today after work I put more paint on the car, and also painted the top and both trunks. I still need to do the doors.
I took 3 pics, but only one fo them got anywhere near the actual color of the paint.
So, here it is.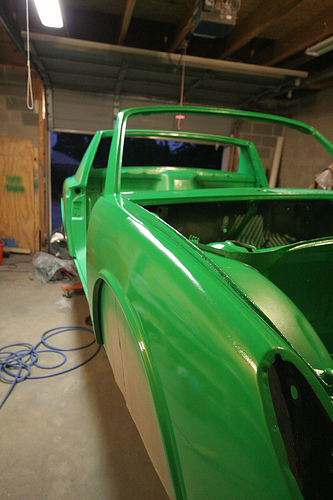
I still need to do a lot of wet sanding. Likely, that will start when I get back from Cancun, as I doubt I'll have time to do much of it until then.
I have gotten MUCH better at painting. No runs or sags. Not much orange peel (but there is a little). I can see more places that should be filled and leveled, and I may or may not go back and do it. I should, I have PLENTY of paint. but I want to get the painting done and start getting it back together. *impatient*
its really nice to see the car as one color again. *REALLY NICE*.
There are some parts that I have not even begun to prep yet (the fiber glass rockers, the headlamp covers, and the little parts that go in front of the eyebrow.) I'll got to them eventually.
Zach
Posted by: iamchappy Jul 16 2007, 08:55 PM
Looking good. I got mine almost ready for paint I should see it Orange by the end of the week. Thanks for the motivation.
The first time I painted a 914, I wore a plastic Yellow Devo suit I had left over from Halloween. It was a sauna in that outfit and sweat kept dripping from out of the wrists onto the paint. It really, really sucked.
Attached image(s)
Posted by: Vacca Rabite Jul 20 2007, 08:25 PM
Wet sanding SUCKS!
After I drop off DrEvil's tools to some stranger at the airport tomorrow (still a chance, man. 40,000 small unmarked pesos, and you may see them again - the clock is ticking) I am going to pick up a cheap air DA from Harbor Freight that I can destroy wet sanding.
I have a green line above where my rubber gloves are, with green smears on my hands where the water dribbled under the gloves. This is a messy job.
And I have that panicky feeling as I am looking at the mess I am making. Oh crap oh crap oh crap what am I doing to my paint.
man, I hope this works!
Zach
Posted by: stepuptotheMike Jul 20 2007, 09:16 PM
But it looks like so much fun on TV
I mean... it only takes american hotrod a couple of hours. What's yer problem man?
Posted by: iamchappy Jul 20 2007, 09:32 PM
My body guy never wet sands only dry sands.
A little trick I like is to use a couple of drops of Dawn dishwashing liquid in the water keeps the paper from loading up and sands, smoother and cleaner.
I was only able to get the trunks and engine bay in etch primer and interior floor pans in Por15 the rest of the body is all in primer. I can see light at the end of the tunnel finally. Sunday should I should see some color in the trunks and engine bay....
Keep up the good work Zack, it helps me stay on my toes.....
Posted by: scotty b Jul 20 2007, 11:41 PM
Zach wet sand but do it by hand DO NOT use a da !! DA is WAAAYYY to easy to break through. Wet sand by hand starting with 1000 grit and progress at least to 1500. If you go higher the end result will be that much better. Sand with the 100 grit periodically wiping the spot DRY until the orange peel is ALMOST gone then proceed to the 1500. By doing this you will lessen the chances of burning through. Once you are done with the 1000, all you want to do with the subsequent grits is remove the previous sanding scratches. Do not try to eliminate all of the orange peel with the 1000. I can't stress enough how many times people try to do that and ruin the paint job by sanding to much. Chappy I may be wrong because I don't know your guy but I would be willing to bet he wet sands the FINAL coat be it 2 stage or single stage. I've been doing this for several years and have yet to know of anyone who dry sands the last coat prior to buffing. Paper won't sand as well,is harsher on the paint and loads up super quick.
Posted by: Dr Evil Jul 21 2007, 12:46 AM
Harbor Freight has 1000, 1500, 2000 grit paper for cheap
Posted by: jasons Jul 21 2007, 08:43 AM
Zach wet sand but do it by hand DO NOT use a da !! DA is WAAAYYY to easy to break through. Wet sand by hand starting with 1000 grit and progress at least to 1500.
And, I thought when you wet sanded, you were supposed to sand in one direction?
Zach, if you don't have a polisher, HF sells a decent polisher for about $30. You will want to buy some good bonnets and a good velcro disc from your bodyshop supply.
OH and one more thing, when I wet-sand I try to start soaking the paper a few hours before I need it so it gets really saturated. And I do add some dish soap to the water.
Posted by: Vacca Rabite Jul 21 2007, 12:56 PM
Well, I had to sprint back home today from the airport to make it by 1, so I did not have time to swing by HF.
But I think that I am going to have to sand the current paint almost all the way back to primer and shoot another coat. last night I did the passinger quarter panel, and it looks way better after wetsanding now.
Fact is, I made an error when laying down the initial paint. I painted and went to bed. A few days later I added 2 more coats, but did not knock the shine off the initial base coat. So while color sanding, I was getting all these weird patterns where the base coat shine was comming through.
Live and learn, I suppose.
So with my test panel, I wet sanded down with 400 grit paper, and then 800. Dried everything, and shot it with a semi-heavy coat and let that dry over night. Wet sanded with 800 this morning and it looked MUCH better.
So now I need to do that for the rest of the tub. Weeeee.
I wonder how much I can get done before I leave for Cancun tuesday morning.
In the realm of good news, while I was waiting at the airport to give Mikes tools away, there was a Stearman and 2 AT-6 giving rides. I brought my camera, just cause there is usually something cool there. Now I have a new background for my PC.
Zach
Posted by: Dr Evil Jul 21 2007, 01:08 PM
Thanks for driving my tools to the airport, Zach. You should have seen Josh trying to land on the postage stamp of a runway we have here took 3 times, but he did it without incident
Posted by: Vacca Rabite Jul 23 2007, 01:44 PM
So this weekend felt like a total disaster in the realm of automotive restoration. The paint issues have me totally bummed out. Saturday, I could not bring myself to do more wetsanding to really knock down the paint like I need too. So I thought I would clean my tranny case.
The transmission that came with the car turned out to be fubar. But the case was clean. DrEvil and I got a parts tranny to rebuild the mine. but due to galling, I could not use my nice, shiny case. I had to use the parts case - which was covered from stem to stern in 1/2 inch of compacted dirt and oil. I took out the diff and speedo gears, and started spraying it down with breakclean. I scrubbed with a wire brush. I sprayed it with my power washer. After 3 hours of working, the tranny was as clean as it was going to get. I was covered with grease and dirt from the toes to my head.
I also cleaned out the central diff. Bits of brass and steel came out of it from a bearing failure. I cleaned it as well as I could, but it does not turn easily all the way around. Mike, I'll want you to look at it, but hopefully we will be able to use the Diff out of the other tranny I have.
And then I saw my driveway.
HOLY CRAP! MY WIFE IS GOING TO KILL ME! It looked like the freak'n Exxon Valdeze ran aground at the top of my driveway. I then spent another hour trying to clean up the mess, which just seemed to spread it around.
I was tired when I was cleaning the case (it was so fugg'n gross), and about at the end of my rope when I realized that the driveway was just going to have to be stained.
For some reason my wife did not kill me. Instead, I cleaned up as well as I could (I still have spots of dirt on me, 2 days and 3 showers later) and we went to a local bar for dinner, an Elvis impersonator, and a metric fuch tonne of beer.
Sunday Erin and I went on a 40 mile bike ride (training for the 100 miler, we are right on track). When ever I thought about my car, I got mad. So I decided that I was not going to even look at the car until I get back from Cancun.
I wanted to be further along that I am right now, but the paint killed that. The car is going to come off the rotesserie Aug4, whether it is really ready too or not. But until then, I am just not going to touch it, or look at it, or even think about it.
Zach
Posted by: Dr Evil Jul 23 2007, 01:59 PM
Bummer, I know how you feel. I thought you were going to spray it in the grass behind your garage. Live and learn. I am not clear in what you are saying with the diff, the ring gear looked good to me when I was there. Are the spider gears in the center binding? I would not have power washed it, you should spray some WD40 or gear oil on it so it does not corrode while you are on vacation.
We will get it figured out. Take a break.
Posted by: Vacca Rabite Jul 23 2007, 02:06 PM
I was worried about killing the grass. I had no idea how much of a mess I was making until several hours passed by.
I did not powerwash the diff. Just sprayed it with brakeclean and worked out all the broken race/bearing parts. Hopefully it is fine, and I just got to a saturation point and did not want to deal with it. Water did not touch it, so hopefully there will be no corrosion. I tried to be careful not to power wash anything that was made of steel.
Zach
Posted by: Dr Evil Jul 23 2007, 02:46 PM
Its all good, Homey. We will make it work.
Posted by: Vacca Rabite Aug 12 2007, 10:23 PM
Okay, I got back from vacation, and it was WAY to hot to try and do any work in the garage. Plus, I was too busy getting back into the work swing again.
Anyhow, this weekend the temps broke, and I got a lot done on the 914.
I totally wet sanded the tub with 400 paper, in some spaces all the way down to primer. I had messed up the paint by letting it dry between coats , so this was needed. I filled some dimples I found with filler (it seems I am always finding more dimples) and spot primed over the filler. Sand some more. Then I shot it again with several coats of paint (I hate tossing good paint, so I just kept putting on coats - probably 1 wet and 4 thin coats on the tub). It looks _SO_ much better! There is orange peel, but not very much of it. This took most of Saturday.
Today was supposed to be a riding day (60 miles) but Erin said that we had too much to do around the house I think she was just too sleepy to ride. Anyway, as soon as I was released from chores I headed back out to the garage.
My doors are still in primer, so I sanded them smooth. There were some areas that needed more filler, so I fixed them and sanded them smooth. I was hoping to get them shot with color, but then I remembered that I had not even started prepping the headlight covers and eyebrows. I decided that I was going to try just knocking off the shine from the old paint, and then caoting them in epoxy. So that is what I did. Block sanded with 180 grit till the shine was removed from the old paint, and then mixed up an ounce of epoxy and shot them.
Tomorrow, after I get home from work and cut the grass, I'll spot prime the area on the doors that needed more filler, and hit the head light covers and eyebrows with sanding primer. If the weather stays below 90, I might actually have all the green painting down on the car, and will be able to start putting it back together. I think that I am going to get the seals on, and then re-attach the hoods and doors before I color sand. That way it is all done at once. Also, I need the hoods and tops on the car when I paint the black stripes so that everything will be alligned correctly.
I remember being pretty burned out on the car before I left for vacation, but right now I feel totally energized about it.
Zach
Posted by: Dr Evil Aug 13 2007, 12:06 AM
Sooo, its a race then, eh? I think I can beat you to the finish line with my car......
Ninja, DRIVE! 

What, no clear coat?
Posted by: Vacca Rabite Aug 13 2007, 03:42 PM
Sooo, its a race then, eh? I think I can beat you to the finish line with my car......
Ninja, DRIVE!
What, no clear coat?
Nope, no clear. The paint is a single stage.
If I can totally rebuild my car before you can get you built car running, I am so never letting you live it down.
Zach
Posted by: iamchappy Aug 13 2007, 04:05 PM
Zach I dropped my car off at the body shop today, it looks like they will paint it for me,
i had it all in primer which needed to be blocked once more.
I ran out of time on it.
Word is my mother is not expected to live much longer so i will be leaving for Florida Wednesday to be there.
When i return hopefully i can start to assemble my years worth of goodies purchased for the car.
The restoration threads make it tough on all of us, there are so many guys building and restoring these cars to the highest degree that the bar has been set so high it makes things difficult to refurbish a car less than that. I finally drew the line, with
the realization that my car is going to be really really nice but it doesn't have to be perfect. Set backs happen I was up late last night putting the final touches on my custom GT valance, when i got to the body shop with it installed on the car it had stress cracks in two places.
Good luck with yours and take pride in the job that you have done, it will be sooooo
nice.
Chap
Posted by: Vacca Rabite Aug 13 2007, 05:05 PM
Oh, my car is still going to have its sticking points with me, body wise. But I decided to draw the line and forge ahead. The drivers side rear quarter panel is wavy. It had 3/8 an inch of old bondo that covered up what looked like someone just hit the hell out of it with a hammer. Though the title on it is clear, it is also clear that my car was in a colision at some point, and the entire drivers side was pretty messed up. I got it pretty smooth, but you can tell that there are still waves in my bondo job. But I needed to move on, if I ever wanted to get the car painted.
I have had several points where I just wanted to take the car to a pro and have them fix the body. In the end I figured that the imperfections would just be my fingerprint on the project.
In a way I am lucky. I can't afford to pay somone to do it for me. It forces me to persevere.
Zach
Posted by: Vacca Rabite Aug 15 2007, 08:39 PM
This is a learning process. This is a learning process. This is a learning process.
And I have plenty of extra paint.
So, I was prepping to spray my last coat of green today. The doors are primed and smooth, as are the eyebrows and headlamp covers. I need to spray the undersides of the trunk lids and the edges of the targa top as well. I was hopeing to just be able to shoot them all tonight. But it was not to be.
After I "finished" my primer sanding on the doors, I started positioning tings to get painted. My restoration bay is *REALLY* crowded right now, so I needed to think it out.
As I was moving panels around, I looked at the targa top, and saw these little gray dots. Huh. I figured some sanding dust has gotten under the plastic, but the dots did not wash out. Then I looked at the other trunk lids... The rear trunk lid had the gray dots, and the front trunk lid had some light spots where I could see through the paint.
Deep breaths. I've beaten all the other roadblocks, I can beat this one too. It just pushes me back a little further.
I know what happened (pretty sure it is solvent pops), and I suppose this is all part of the learning curve with painting, just like blowing holes is part of the learning curve with welding. Sadly, this means that all of my first round of color painting had to be redone.
SO!
I need to do to these panels the same thing that I did to the tub. Wet sand them all with 400 and then 800 grit paper, and reshoot. Then I will have to reshoot them again to get the underside.
No problem. I can do the wet sanding tomorrow, and then shoot them over the weekend.
The good news is that I still have _plenty_ of paint. I had bought an entire gallon of color, and if I knew what I was doing from the start I would not have needed nearly that much - 3 quarts at the most to shoot the entire car and have a little extra. As it is, I have extra paint to reshoot all these goofs.
I'm not letting myself get discouraged. Its just part of the learning curve. The next time I paint a car (and there wil be a next time, I know) I will know better.
Damn, do I ever work slow.
Zach
Posted by: stepuptotheMike Aug 15 2007, 09:01 PM
so what caused the solvent pops? How would they have been avoided?
Hang in there.... this has been a great thread and has been a great help as I'm still a long ways away from even thinking about buying paint
-Mike
Posted by: Vacca Rabite Aug 15 2007, 10:07 PM
Solvent pops form when something goes wrong. Too much solvent (reducer) mixed in the paint, the paint is shot too heavy, or it is too hot (or a combo - inb my case probably too hot and too heavy) The result is the same, the solvent seperates form the paint, and pops to the top of the coat, leaving a void. It needs to be sanded out and reshot.
These things happen. Every time that I need to correct something, I need to remind myself that I am starting from ZERO prior experience with HVLP guns, or auto painting. Also, I need to remind myself that every time I correct something, it looks way better then the last time.
This is taking me a lot longer then most people, but I don't care. in the end, there won't be a single process in auto restoration that I won't understand.
Zach
Posted by: Vacca Rabite Aug 17 2007, 11:36 PM
So, tonight I sanded the trunk lids down largely down to primer, and reprimed, using up the last of my 2K sanding primer in the process. That took about 3 hours.
Tomorrow Dr. Evils woman is coming over to hang out with mine, before we have to go to the wedding of one of my wifes friends. I am going to NEED some garage time, its going to be freak'n estrogen fest at chez Nall. Depending on what time I get out of bed, I'll sand the primer, clean and shoot color. Tomorrow the temps are supposed to be unseasonably cool, so getting a chance to paint will be a _really_ good thing.
Zach
Posted by: Spoke Aug 18 2007, 06:53 AM
Lookin' good. Keep up the good work. Remember, it's a hobby and as such, does not need to be completed on any given timetable or does it need to be completed the first time around.
I always try to keep in mind that my forte is not auto painting, or bodywork, or welding, or whatever I do on my car and any job I tackle will take much much longer to complete and will require do-overs. But in the end, I have the satisfaction of saying I did it.
Love the green color. Can't wait to see it all together. There's something about seeing a tub with no rust and painted from stem to stern just like it came out of the factory.
Spoke
Posted by: JPB Aug 18 2007, 07:40 AM
Sounds like you have what it takes to do a great job. If you overmill your paint a little bit, you can color sand it down to a perfect finish. Nice to see you are having fun with it.
Posted by: Vacca Rabite Aug 21 2007, 09:37 AM
Last night I further confirmed that my car will never be a CW car.
I put on gas shocks in the rear trunk, and ordered another set from CAMP for the front trunk.
my thought it that I want to get the panels aligned before I color sand everything. Rational being that if I color sand, and then ding the panel, it will be more work then if the panel gets dinged before color sanding.
And as I did ding the panel getting the front and rear trunks mounted again, I think I made the right choice. I had new seals for the rear trunk, and have decided that the front trunk also needs new seals - they look too ratty.
I am pleased with the gas shocks, but I see room for improvement. The rear ones were not from CAMP, and one of them was plenty strong enough to hold up the stock rear trunk (though I installed both). Also, I want to put some rubber washers where they bolt in, to form gaskets to keep water from getting to the metal there. I had to move the shocks inboard about 1/4 inch each from the indicated position on the instructions in order to keep them from binding on closing. I have not yet tested to make sure that the targa still fits in, and I will need to do that before I consider the job "done."
I bought these shocks a while back (over a year ago, everything seems to blend in time now...), and since then have heard that the camp kit is a better kit. However, I like the fact that this kit did not require any cutting of the trunk to make them fit. If the targa dose not fit, however... Well, I will dive off that bridge when I get there.
From this point forward, I will be color sanding, and sanding out a few fish eyes in the front trunk hood and targa top. Frankly, I am tempted just to let them be. my bondo job on the rear driver quarter panel is not as smooth as I had hoped (hey, it was a lot of bondo) so the paint job won't be perfect. but I know myself, and I will end up sanding out all the little imperfections, even if I am the only one that knows they are there.
I would not be surprised if I ended up working the rear quarter as well, trying to get it smoother. But that is not going to be a "right now" project.
Zach
Posted by: Vacca Rabite Oct 22 2007, 09:05 AM
A special reply for McMark :^)
http://www.youtube.com/watch?v=PbnVnjfgM8A
http://www.youtube.com/watch?v=mGTtKbEM33Q
My motor ran for the first time Satruday at Root's place. I was very happy, until Chris busted out a leak down tester to try out for the first time.
All the cylinders held compression between 180 and 120 PSI. GREAT.
Cylinders 2-4 passed leakdown between 15-18%.
Well, 3 out of 4 ain't bad.
Cylinder 1 had a leak down of 45% Crap.
But wait, it held 120 PSI compression, what the hell.
Turns out that there is a slight (SLIGHT) gap where the head was amchined to the cylinder. I am going to try to lap it into shape, instead of taking the head to get cut to fix it.
Also, the #2 spark plug hole has been helicoiled, and the coil was unwinding. I'm going to time-cert it, since I already have the head off.
I have my pedal cluster rebuilt and almost back together. it looks AWESOME- I just need to finsh re-assemblly and put it in the car.
The wire harness is in my basement. An ENGMAN fuse panel is ready to go in. The wires look good for the most part. I;ll need to do a little fixing, but then the harness can go back in the car.
So, my goals fro before Xmas:
Fix the head.
Get the pedal cluster back installed.
get the wireharness back in.
install my SS tunnel line (and sell the return line since I went to carbs.)
fix the two big scratches that I put in my paint by (1) dropping the duck-tail and (2) hitting the car while installing a drill press in the restoration bay last week.
Progress is being made. Slowly.
Zach
Posted by: McMark Oct 22 2007, 12:18 PM

Bummer about the leak down. I think I need to get one of those gauges.
Posted by: Vacca Rabite Nov 13 2007, 06:42 PM
So... Progress?
Well, not really. I have been buried with work and classes. But my last final for the semester is Nov17th, so I should be abel to get working again after that.
But, I have gotten some small tasks done.
I got my windshield in. Glued in with black rubber trim instead of butyl tape and silver trim. I used PPG glass, and it kinda sucked. Alon the edges, you can see where they glued the layers of glass together. I also had to go around the entire windshield with a razor to remove all the dried glue that had squished out. Are these really the best ones out there?
I painted on the duPont frit paint - not as well as I would have lked, but it looks good enough. The car will never be a show car.
That was about 2 weeks ago.
Every now and again I go in the garage and think about doing some work, but remember that I have a ton of other chores to do and don't get anything done.
Tonight I poked my head in and pretended I was working for about 15 minutes, before heading back inside.
Soon... soon...
Zach
Posted by: Bogaat Nov 14 2007, 11:09 AM
So... Progress?
I got my windshield in. Glued in with black rubber trim instead of butyl tape and silver trim. I used PPG glass, and it kinda sucked. Alon the edges, you can see where they glued the layers of glass together. I also had to go around the entire windshield with a razor to remove all the dried glue that had squished out. Are these really the best ones out there?
Zach
Dude, don't even get me started on PPG glass. My glass guy came out with 5 different ones and none of them fit! To clarify, they fit so tight that any insertion of the alum trim would crack the glass. Three of them had a high spot in the middle top and had to be pushed down to seal. This would probably have cracked given a little time. They left no where near the side/top clearance that the original did. I got them to order one from George and it should be going in the car later today. I am hoping it fits a whole lot better. I am tired of dealing with the windshield. I should plug Safelite though...these guys have lost so much cash on this and they are going to honor the original quote...even with the higher priced AA glass/shipping. They haven't even mentioned giving up. Keep it up man...
 . I should hopefully be taking mine for it's maiden voyage later this evening...just need glass and CV joints
 Posted by: dakotaewing Nov 14 2007, 12:44 PM
Zach, dude....
Posted by: Vacca Rabite Nov 15 2007, 09:52 AM
No pics. Its dark by the time I get home, and I have been keeping my camera at work lately.
Yesterday I dropped my Cyl 1&2 head at a local shop to have a spark plug insert installed. Some of you may remember my posting on it from last week or so. The plug had been helicoiled, but the coil was coming out. I was going to do the insert myself until I saw the price of the install kits. OUCH! For a 1 off job, it was way cheaper to have my local shop do it.
I'll get the head back today, but a grad school final on Monday will keep me from putting the head back on. I really need to be studying. The course is billed as the hardest one in the program, and I believe it!
I was thinking I'd put the motor back in over turkey day, but then I remembered that the good Dr is not done with my tranny yet. So, I guess that will have to wait to go back in for a little while longer.
I put my SS fuel line into the tunnel last night, but did not have time to force it through the grommet at the front, so I guess that job is only 1/2 done. I still need to seal the insides of the gas tank, so I am not in a big rush there.
zach
Posted by: Dr Evil Nov 15 2007, 10:28 AM
Dude, your tranny is only a few hours from completion. The fact that is is in YOUR garage and not mine is why it is not done I can do it the weekend after TG.
Posted by: Vacca Rabite Nov 15 2007, 10:46 AM
Mike, i am so not complaining. Just sayig that I was starting to put the cart before the horse. It will get done when it does.
Zach
Posted by: Vacca Rabite Nov 21 2007, 10:46 AM
So, more progress made, and still no PICS (looser!)
All of the silver trim pieces that I am keeping (save the door handles, and those might change too when I find the buggers) are now the same color green as the body.
I was going to paint them flat black, but I started thingking about it, and thought they would look better as body color. I painted them last night in my basement.
I also took all my engine tin to my favorite FLAPS (Broadway Autoparts, in Red Lion, Pa - if you live near there, you should shop there). I asked them for a referral to have the stuff degreased and bead blasted. "Oh, we do that. Just drop it on by." I love these guys. Their shop is a little farther away from me then the local Autozone, but I will drive that extra 1/2 mile every time. They actually know what they are talking about, have a machinist on staff, and have low prices. I also had them punch the roll in out of my pedal cluster, and install the timecert in my stripped spark plug.
When I get my tin back, I think I am going to paint it some sort of really loud, obnoxious color that contrasts with the obnoxious conda green the rest of my car is. Black is for sissies! I am thinking high temp candy apple red or something like that - so it will always be like Christmas in my engine bay. .
Now that grad school is done until January, i have time to actually get work done. And I have a lot of work to do. I am behind my schedule to have the car done by mid April!
Zach
Posted by: Vacca Rabite Nov 25 2007, 08:10 PM
I'm becoming a DAPO! Well, not yet I supposed, but if I ever sell the car.
Today I painted the engine tin.
Ford Red! Krylon! Somebody stop me!
I got my tin back from the bead blaster. Man did it look pretty. I got the reddest hi-temp paint I could find from my favorite FLAPS, which happened to be Krylon Ford Red engine paint. Not as brite as I had hoped, but it will keep the tin from rusting, and will show me if I have a bad leak somewhere. And make my bay look festive, and thats what really counts.
I welded shut a hole that I know that I don't need in the tin, and painted it. In the basement. On a laundry rack that I did not think my darling wife ever used.
Turns out, she does use it. So I got in a spot of trouble for that one. But I did a ton of household chores, and that seemed to make it all better.
I also put the head back on my T4. I forgot to borrow the leak down tester from Mike (who borrowed it from Chris). So, I'll send them both an email and see if I can get it to do leak down and see if I have made things better or made them worse.
I get the last two bits from Broadway Autoparts tomorrow, and will paint them, then put them on the engine and maybe remember to take a picture Tuesday.
Also, I am ready to put back together my doors, and glue the trim back on. The doors are a huge PITA, but I guess I do need to do it. One less thing to worry about.
I need to make a chart of the work to be done over the next month. its quite a lot. Hopefully, I can take a big chunk out before classes start again.
Zach
Posted by: Gint Nov 25 2007, 10:33 PM
I went through the last 24 post od this thread and guess what I didn't find? 
Posted by: koozy Nov 25 2007, 11:28 PM
Oh man, I also read through the thing thinking "oh yea... here comes the pics" and..... "uh... what the...???" Yikes.... no pics. I'm soooooo ready for a picture of that thing. I'm a hair away from tearing into mine. I'll be pulling the motor next weekend. Maybe I'll start a progress thread too. Looks like it's theraputic to sit and type after working something out. Zach, nice job bro. Keep it up and take a look at mine when I start it so you can yell at me when I am about to do something stupid.
Posted by: Vacca Rabite Nov 26 2007, 09:40 AM
I went through the last 24 post od this thread and guess what I didn't find?
I will. I promise. I just want to get something done that is picture worthy. Everything of late has been dippy little stuff that does not really look much different from what I did in June.
Zach
Posted by: Vacca Rabite Nov 26 2007, 06:45 PM
LOTS of imperfections, and a ton of paint work still to do to even everything out. But the painting is pretty much done, and I am getting towards putting it back together. Hey, its the first time I ever painted a car. A ton of stuff I learned, and a ton of things that I will want to do when I get mad and repaint it down the line. When (if) ScottyB comes up a few weekends from now as (hopefully) planned, I hope he will be able to give me some pointers on how to fix some of the weaker points without needing to re-shoot it.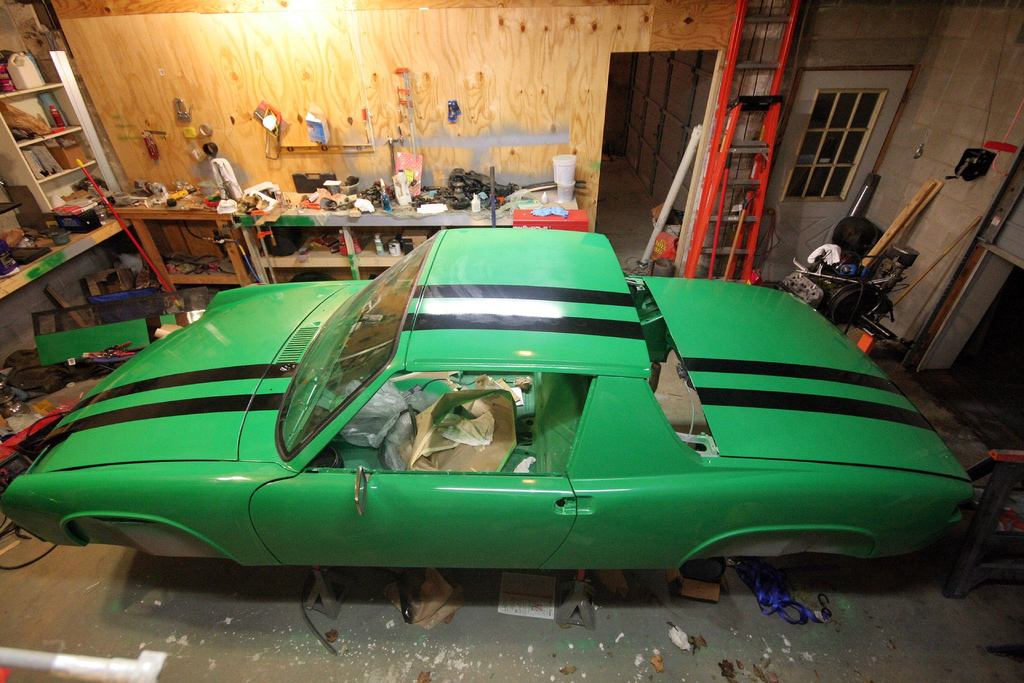
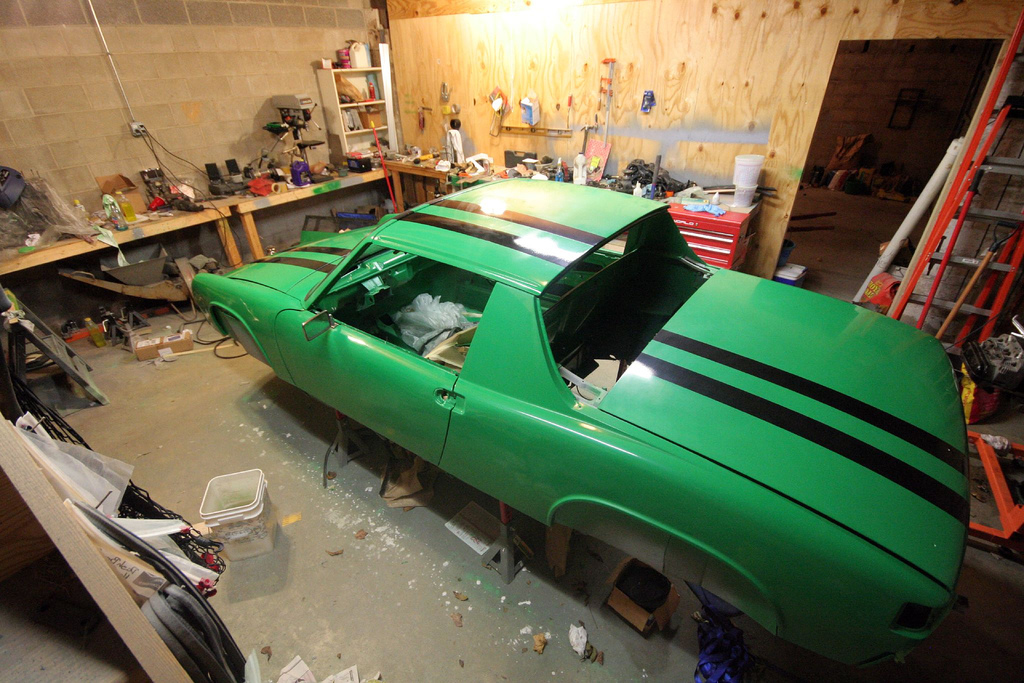
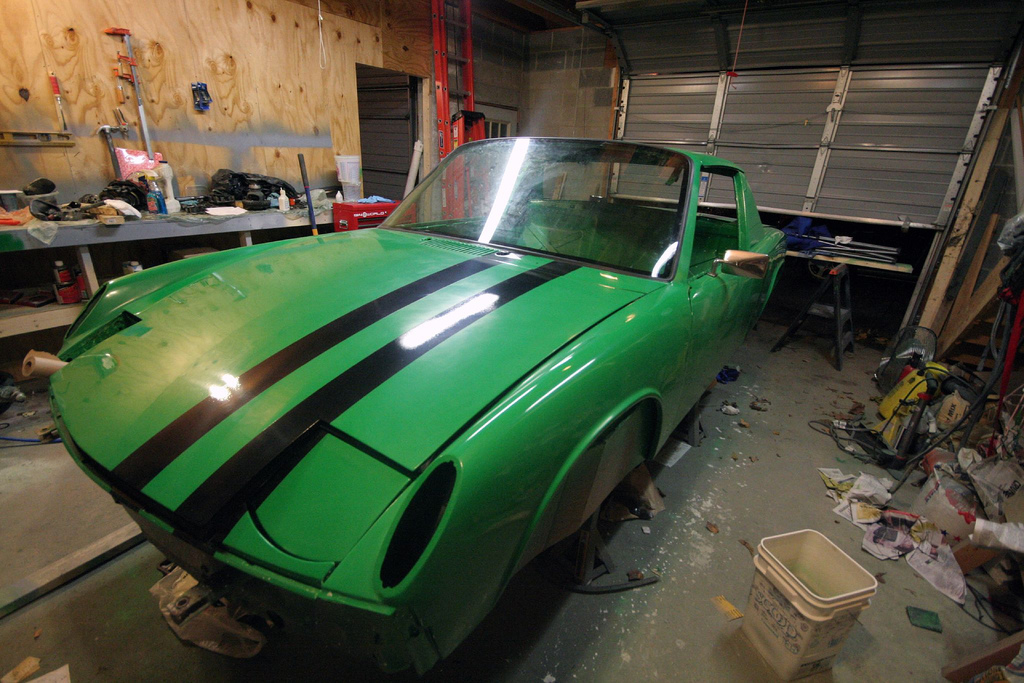
I am going to go back into the basement and put another coat of paint on my engine tin. I need to be done painting before Erin gets home from class, or its  for me.
Zach
Posted by: sendjonathanmail Nov 26 2007, 06:56 PM
looks good zach...nice stripes
-JON
Posted by: scotty b Nov 26 2007, 06:58 PM
Absolutely Zach. I'll also help you string some lights on the car. Green car w/ red engine tin HAS to have some lights hung on it 
Posted by: jd74914 Nov 26 2007, 07:03 PM
From this chair it looks pretty good Zach 
I really like the color and the stripes. Are the stripes painted on or decals?
The assembly from this point is the fun part . . . my car looked like yours about 3 months ago, now its complete save for the front bumper. I found that the assembly got a lot faster the close I got to finished.
Posted by: Vacca Rabite Nov 26 2007, 07:12 PM
No decals. I painted the stripes on.
It looks better in pictures then it does in real life. There are quite a few "iffy" areas. They might just need color sanding and re buffing.
As for Christmas lights.... Don't think for a moment that I have not considered putting a short string of LED lights in the engine bay. I figure they would wire into the trunk light. Probably pull less power then the trunk light too.
Zach
Posted by: scotty b Nov 26 2007, 07:15 PM
How about an inflatable snow globe in the front trunk ? 
Posted by: snflupigus Nov 28 2007, 07:45 PM
has anybody ever seen a progress thread that didnt just sort of leave you hanging because it wasnt done yet... I guess thats why the call em progress threads. LOL
Posted by: Vacca Rabite Dec 8 2007, 12:42 PM
Its really (REALLY) nice out right now, and supposed to get crappy later AND I cleaned the garage last night so I thought I would take some pics of the engine in is freshly painted tin.
The patient is being patient. Has a little while yet before the motor goes back in.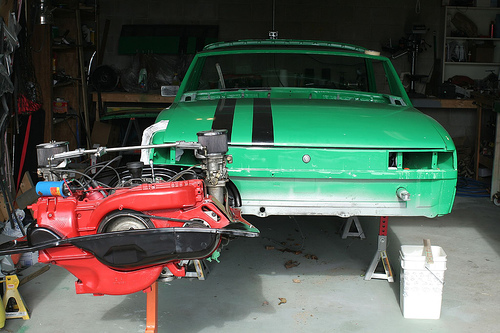
Motor on my kit-bashed engine stand. Not pretty, but it works.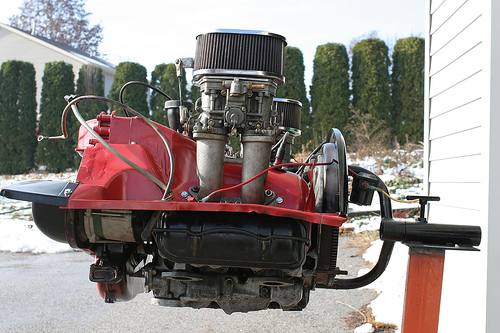
Some welding. My butt welding sucks (as can be seen  ) so I decided to just spot weld the heater vents closed. So much easier, and it looks nicer too. I did the butt welding as practice. I need to practice more. I'll paint the vent plugs when the weather warms up a little.
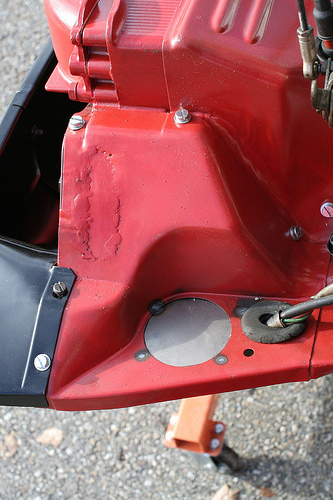
Passenger side (also needs painted):
From the front (yes, the coil needs to be secured. I need to get the part.)
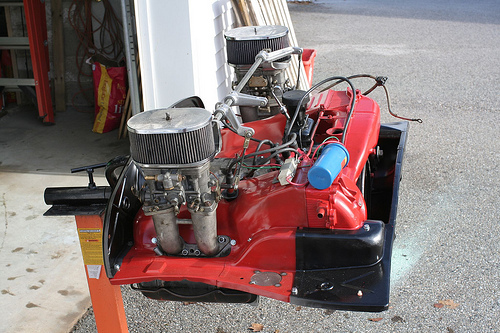
Thats all I've got right now.
Posted by: sendjonathanmail Dec 8 2007, 01:34 PM
still have that rotisserie?
-JON
Posted by: Vacca Rabite Dec 8 2007, 01:36 PM
Nope, sold the rotisserie back in September or so.
Zach
Posted by: Headrage Dec 8 2007, 07:16 PM
How are you going to access the alternator in the event the belt breaks or needs adjustment with the access hole welded shut?
Posted by: Vacca Rabite Dec 9 2007, 02:15 AM
Find a way. With all the FI stuff gone, Engine drops would be a snap. If I broke a belt on the road, I'd just get home on the battery. The car won't have much that draws anything. Heats gone. Radios gone. FI gone. Battery just needed for lights and ignition.
Posted by: Gint Dec 9 2007, 12:25 PM
Can't see 'em from my garage.
 Looks good.
Posted by: Vacca Rabite Jan 5 2008, 10:22 AM
Well, I was in the garage last night for a few hours fiddling with stuff.
The bucket of water that I have been using for color sanding was a solid block of ice. *brrrr*
Anyhow, I re-ran all the rear wires, and got the front wires started.
I fixed the dents in my dash board with a hammer, clamps, and a mapp torch.
I fiddled and prodded with my engine.
Does not sound like much, but that was about 4 hours of time in the garage for me.
And I looked at suspension prices on line. Its a good chunk of $$ to upgrade from my current KYBs.
Zach
Posted by: Dr Evil Jan 7 2008, 07:26 AM
I may have some shox for ya....we will see.
Posted by: Vacca Rabite Jan 8 2008, 09:57 PM
I am not really sure if this is progress or regression, but: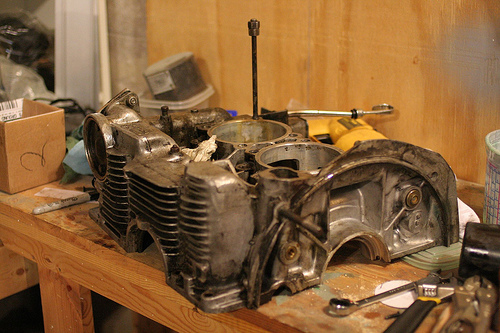
Head stud won't budge, I'm leaving it for the machineist to take care of.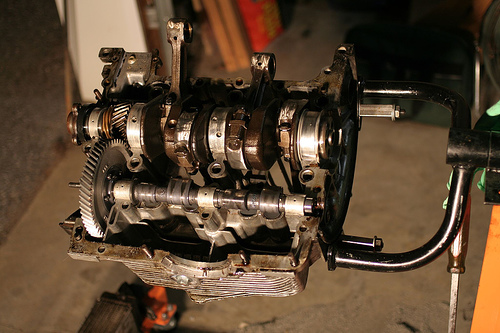
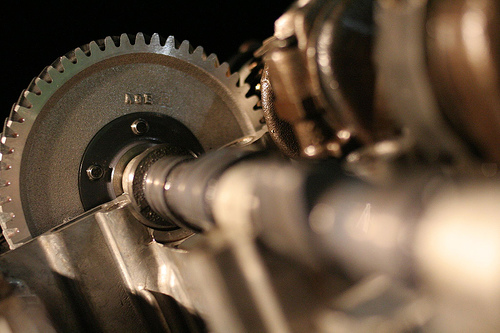
I had to split the case to get the 1&2 cylinder registers decked.
So, word to the wise, if it does not split easily, search for the hidden bolt. You won't see the one thats still in there, but its there, all the same. Took me an hour tonight to find the last nut.
Zach
Posted by: Dr Evil Jan 9 2008, 04:21 PM
Ooooo. I hope this ends well
Posted by: Vacca Rabite Jan 17 2008, 02:00 PM
I just bought most of the parts I need to finish the car. And I still need more stink'n parts. I need parts from Jake for my motor (what, I don't exactly know yet, so I have not orederd), and I need stuff to finish up my doors.
Mike, does your parts supply have roll bar seals and a passinger side fuzzy strip? Used is okay, so long as it is in tact.
Things I need:
In cabin sound proofing (fat mat probably)
In cabin carpet
Dash face recovering
door panels (seriously thinking about the applebiz ones)
passinger door fuzzy strip
roll bar seals (I THOUGHT I had some, somewhere)
Engine compartment to engine tin cooling seals.
Do you need a pedal board? is it a "nice" thing, or a "you need this" thing.
I have three months to finish this car. Man, I have to get busy!
Zach
Posted by: Gint Jan 17 2008, 06:08 PM
Do you need a pedal board? is it a "nice" thing, or a "you need this" thing.
I have three months to finish this car. Man, I have to get busy!
Zach
You need that thing. The stops keep your heavy foot from stretching/breaking the throttle and clutch cables.
Good luck!
Posted by: Twise Jan 17 2008, 06:56 PM
door panels (seriously thinking about the applebiz ones)
Whats this ??? I am looking for door panels too...
Posted by: Vacca Rabite Jan 18 2008, 01:36 PM
door panels (seriously thinking about the applebiz ones)
Whats this ??? I am looking for door panels too...
Check out this thread:
http://www.914world.com/bbs2/index.php?showtopic=79249&hl=
On to other topics...
Just placed an order with AA for some of the stuff I need. Bleeding money, but if I don't get it now, I won't...
Put a PM to Engman to see if his pedal plates are in stock or not.
Man, I'll spend as much in parts for this car as I did for the car.
The car is quickly approaching $8K. 2 for the car. 2 for the motor. And 3.5 in parts/paint/tranny work.
After this month, though, I don't think that there will be any other large outlays of money.
At least, not till I start over.
Zach
Posted by: Bogaat Jan 18 2008, 01:40 PM
door panels (seriously thinking about the applebiz ones)
Whats this ??? I am looking for door panels too...
Check out this thread:
http://www.914world.com/bbs2/index.php?showtopic=79249&hl=
On to other topics...
Just placed an order with AA for some of the stuff I need. Bleeding money, but if I don't get it now, I won't...
Put a PM to Engman to see if his pedal plates are in stock or not.
Man, I'll spend as much in parts for this car as I did for the car.
The car is quickly approaching $8K. 2 for the car. 2 for the motor. And 3.5 in parts/paint/tranny work.
After this month, though, I don't think that there will be any other large outlays of money.
At least, not till I start over.
Zach
Dude, I put right over 14k into mine before I considered it done... I feel your pain. I wish I only had to spend 8k
Posted by: Dr Evil Jan 18 2008, 01:46 PM
Dude, door panels are easy as hell to make for low $$. I can help.
Posted by: Vacca Rabite Jan 18 2008, 01:50 PM
Dude, door panels are easy as hell to make for low $$. I can help.
Then I will learn.
I was prety much going to try and get the appbiz ones a birthday present, and drive around w/o panels for a while.
Making my own works too. Just kinda stressing about running out of time. You know how that goes.
Zach
Posted by: Dr Evil Jan 18 2008, 01:54 PM
Running out of time = just get the important stuff done.
- Engine
- Tranny (x)
- Suspention
- Steering
Pretty short list. I may be able to help you this weekend.
Posted by: Vacca Rabite Jan 18 2008, 02:01 PM
My task for this weekend is to run the new brake hard lines, plug in the master cylinder, and attach the clutch cable to the pedal cluster, reinstall the dash and get the electric wires plugged into the places they need to go. Oh, an tear down the suspension so I can get the rotors re-surfaced and rebuild the brake calipers.
And host Erins folks for dinner, interview 3 more potential infant care places, and manage a planning meeting over on the Eastern Shore.
Nothing like a packed weekend. *head asplode*
Engine will happen in early February, hopefully. I was not able to get to Josh's yesterday due to the weather. Just going from work to my mom's (2 miles) to shovel her walk took an hour. Also, I am waiting on the cylinder that got punched out at Aircooled. Monday will be two weeks, so I will give a call and see whats what.
Suspension will happen ASAP. I am waiting on parts from Pelican and AA
Zach
Posted by: Dr Evil Jan 18 2008, 08:26 PM
So, ya dont want me to come over? You should leave your garage unlocked and maybe I can come over even if you arent there and un-fuch your car
Posted by: Vacca Rabite Jan 18 2008, 09:56 PM
Not this weekend. Monday, if you have off for MLK day, would be cool. I'm busy that day till around noon, but would love help if I could get it.
I just got in from a few hours of puttering. I swear I work at the pace of a snail. I got done a little of the hard line replacement, and a little of the dash wiring.
Zach
Posted by: Vacca Rabite Jan 19 2008, 04:46 PM
I got 2 new stickers for my tool box in the mail today. Wanna see 'um?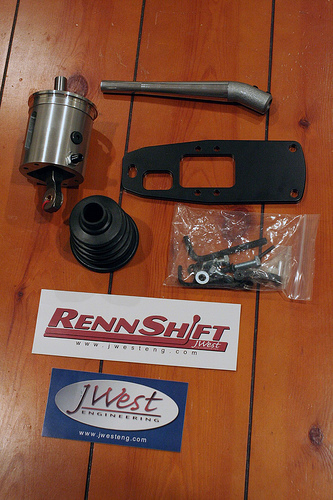
I did not intend to buy one of these right now. But it was there, and I was spending money anyhow. And it'll be the perfect compliment to my freshly Dr. Eviled tranny.
Zach
Posted by: Dr Evil Jan 19 2008, 05:05 PM
Oh, you suck! Damn rich bastards (mine was a gift)
Posted by: Vacca Rabite Jan 19 2008, 05:13 PM
Oh, you suck! Damn rich bastards (mine was a gift)
No, not rich.
Scraping the bottom of the barrel this month. But anything for the car not bought by then middle of February probably won't get bought.
I needed to buy everything I still needed now.
Hey, Mike. What can I take that will clear out my head withought making me feel like I've been sniffing glue? I'm clogged up solid.
Zach
Posted by: Dr Evil Jan 19 2008, 06:49 PM
What to take depends. Headache? Coryza due to allergy? Viral sinusitis? Bacterial sinusitis? What color is the sputum? Swollen nodes? I'd have to put my hands on ya to tell you for sure (and not in the fun way like you like it).
Posted by: Dr. Roger Jan 19 2008, 07:49 PM
Zach, Right on.
Always good to see some progress happening with anyone here.
Posted by: Vacca Rabite Jan 19 2008, 07:51 PM
Right now I am taking day quill, lots of hot tea, and cold ease. Its helping. At least I can breathe again.
I still have the "wobbly stuffy head" feeling, I guess 'cause my congestion is mucking with my equilibrium.
I pretty much have a classic, gross, hard on head cold. If there are any over the counter tricks that you have learned, man, lay them on me.
Back to the garage I go. More work to do. I am warm again.
Zach
Posted by: Dr Evil Jan 19 2008, 08:17 PM
The common cold stuff is:
Dextromethorphan - anti tussive (stops cough), makes ya feel goofy
Phenylephrine - decongestant, replaced pseudoephedrine
Pseudoephedrine - good for drying you out and making you feel a bit like you are on speed
Then you have the histamine receptor antagonists like diphenhydramine (Benadryl, 1st gen = sleepy), acrivastine and Cetirizine (bendryl alergy and One a day, second gen, less sleepy), the best one is fexophenidine (Allegra,3rd gen, non drowsy, may not be appropriate for your symptoms. Enough info?
Posted by: Vacca Rabite Jan 19 2008, 10:07 PM
In for the night.
I got the hard line run through the tunnel, and realized that I had misplaced the 90 degree bend that attaches to the next line. I decided that I was not in the right mental place to be working on brakes, and I'd go back into it tomorrow when my head is clearer (and after I have run to FLAPS to get a new 90 degree bend).
Zach
Posted by: bandjoey Jan 19 2008, 10:36 PM
This is great...I'm just starting on my car. 1. How did you get your wife to understand the importance of this project for 2 years? 2. I like your rotisserie. Can you post a picture of how you attached it to the car, or a drawing/description? How did you get the car off the ground and on the rack? Ps. I'll give you the master bedroom and all the bar-b-q and beer you can eat for moving into my house and doing my car. GREAT Inspiration. Bandjoey
Posted by: Vacca Rabite Jan 19 2008, 11:09 PM
This is great...I'm just starting on my car. 1. How did you get your wife to understand the importance of this project for 2 years? 2. I like your rotisserie. Can you post a picture of how you attached it to the car, or a drawing/description? How did you get the car off the ground and on the rack? Ps. I'll give you the master bedroom and all the bar-b-q and beer you can eat for moving into my house and doing my car. GREAT Inspiration. Bandjoey
First off, let me say

1) My wife is the awesomest person that I know. I was pretty up front when I met her that I need hobbies, and she also knew that I had been thinking about restoring an old car since the before we met. Part of the criteria when we bought this house was that it had a garage that was big enough for her car, and also for me to restore another at the same time. I make sure that my end of the bills get paid, and that I make time for her, and everything is cool.
2) the Rot attached directly to the bumper attachment points for a 75-76 914.
If you look at the picture below, you can see at the far right that the cross bar for the rot is simply laid over the bumper mounts, and then through bolted. I put some stout washers between the ears of the bumper mount so that they would not collapse. Don't know that I even needed to do that, but it made me feel good.
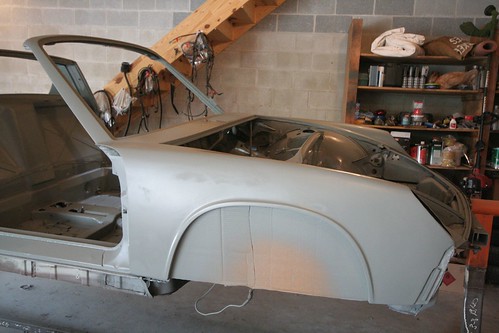
3) At the rate I work, I'd be living at your house for over 2 years. If I can do this stuff, anyone can. It just takes determination, time, a will to learn, and a little cash now and again. Or, you know, a lot of cash to pay someone else to do all the work.
Start a progress thread. Take lots of pics. Stick with it.
Good luck!
Zach
Posted by: Vacca Rabite Jan 22 2008, 08:07 AM
I stopped by Josh's place last night and got the "new" case, crank, rods, rod bearings, lightened flywheel, other assorted small parts, and ideas.
I got to see, take some crappy cell phone pictures, and measure, his cable pull headlight system that I want to implement. I'd post pics, but not without Josh's permission, and the pics are crappy cell phone pics, not the usual quality that I put up.
I folded into Josh's car. My ass was almost too big to get in the damn seat. Looking at his car made me wish I had gone ahead and build my wiring harness from scratch as I had planned to do, but its in the car now and I am not taking it back out.
Any how, I need to have the case checked for trueness, then I'll slap my motor back together.
Over the weekend I also started installing my brake hardline kit. One of the rear lines was too long, and the other too short, so the guy is sending me a longer left rear line, and I will bend the right rear line to fit. The front lines ar pretty much done. But before bend and plug the passenger front line into the master cylinder, I need to install the steering column and rods, to make sure that the brake line does not get in the way.
I got the first big box of parts from Pelican yesterday, but did not have time to go through it. It was too cold, and I was running like a freshly beheaded chicken all freak'n day. I interviewed the last 4 day care centers, and put down deposits at 2 of them. At least one of those two should have a crib ready in late August when we need it.
I should have another 2 boxes of parts inbound this week.
I'm in class tonight and Wednesday, so Thursday will be my next chance to work on the car. Assuming that I have my turbo tie rods by then, my task will be rebuilding the front suspension and front brake calipers.
Lots of work, and very little time to do it. But I am seeing small bits of progress.
Zach
Posted by: Vacca Rabite Jan 25 2008, 07:20 AM
I got my punched out cylinder back from Air Cooled Racing last night. Woo-hoo, I have 4 cylinders again!
My brake hardlines are in the car. Soft lines are not attached yet.
I got another box of parts from Pelican. I still have a box inbound from AA. Hopefully, I will be able to get some serious work done tonight.
On my way home tonight I have to stop by true Value to get some lite pneumatic shocks and some stock steel to fab my headlamp system (using Josh's setup as the model, not the "official" gt system.)
Zach
Posted by: Headrage Jan 25 2008, 09:39 AM
Hey Zach,
You gonna need the dial indicator and mount again?
It's still in the box and ready to mail...
Posted by: Vacca Rabite Jan 25 2008, 09:46 AM
I think that you may be confusing me with another boardie, but I appreciate the offer!
Actually, I borrowed one from DrEvil last time Erin and I were up to visit him. What I will need is a leakdown tester, though. Probably not till the first weekend in February, though. I should prolly go out and just buy one.
Zach
Posted by: Vacca Rabite Jan 26 2008, 11:53 AM
So last night I spent about 5 hours in the garage resulting in....
nothing.
In fact, I think that I managed to cock the dowel pin on the rear main bearing while I was getting the case back together. its a bitch getting everything lined up by your self.
Anyhow, I did not get everything torqued down before I tested the crank to make sure it spun freely (and, obviously, it did not.) Hopefully I did not screw up the bearing. The Engine is re-split, but it was 2am and I did not have it in me to keep going.
I'm about to head out of town for the evening, but when I get home tomorrow I'll take a look and see if I need a new bearing. for now, though, its time to go visit friends, and pollute his mountain range with some lead.
Zach
Posted by: Vacca Rabite Feb 4 2008, 09:39 PM
So, more little chunks or progress.
Front calipers have been FTRed.
Turbo tie rods are installed.
Steering rack (and tie rods) and A arms are back in the car.
re-installed the mater cylinder (had to take it out again to do the steering rack - D'OH! )
Finished my brake hardline install, excepting the lines that run to the rear calipers (they still have to be rebuilt).
New bearings were ordered from Jake to replace the ones that I noobied up .
The front rotors are off. I thought I was going to have to replace them, but I might be able to have them turned one more time, so I am going to look into that first. I'm going to order new wheel bearings tomorrow at work.
I need to take apart the rear calipers and rotors. I bought a Mcpherson spring compressor to remove the stock springs and put on my 140#s when they come in this week. I have a feeling that I am going to have to bolt a jig to the floor to get the castleated nuts off.
I have a couple tasks that I am ignoring that need to get done before I can get much farther. To be honest, I'm a little intimidated by one, and the other is just uncomfortable. Dash wiring is the first, and attaching the clutch and throttle cables to the pedal cluster is the second.
I need to re-locate the bits to connect my front sway bar again. The main bar is still in, but the linkages to the A Arms are somewhere in the garage. *grumble*
Zach
Posted by: Spoke Feb 4 2008, 10:05 PM
I'm going to order new wheel bearings tomorrow at work...I have a feeling that I am going to have to bolt a jig to the floor to get the castleated nuts off.
Nice work Zach! Can't wait to see the completed car and/or engine.
When a front bearing went on my 71, I called my local NAPA parts store and they had them! A few bucks more but I was able to pick them up that afternoon and had them on that night.
What castellated nuts are you referring? If they're the ones on the drive shaft, I had that same issue when I bought my 5-lug suspension. I ended up mounting a tire on the assembly and had my buddy sit on the wheel while I jumped on the breaker bar. It worked!
Good luck with your engine.
Posted by: angerosa Feb 5 2008, 10:27 AM
Zach, I just spent way too much time reading your post from the beginning at work. Congrats! Can't wait to see it!
Posted by: tdgray Feb 5 2008, 11:39 AM
Zach... I found that the wheel bearings were available from my FLAPS. Just went down and picked them up.
Posted by: Vacca Rabite Feb 5 2008, 11:49 AM
I'll check my FLAPS thursday, since tuesday and wednesday nights are for mah grad school'n.
Zach
Posted by: Vacca Rabite Feb 5 2008, 09:04 PM
I skipped class tonight.
So, looks like I had a DAPO brake job done at some point in time. 1 front rotor is worn, one looks like it has never been tuned. The two on the rear look like they have never been turned. Either there was something way funky going with dragging brake pads, or at some point the PO bought 3 new rotors and left on the old worn fourth one.
I guess I pretty much have to buy 2 new fronties now. Can't have rotors with unequal wear.
I put the front struts on, and can't find the locking pins. Grumble. It is in a tin around here somewhere. Oh yeah, and I chipped some paint on my fender when the strut slipped out of my hand. I'd love to get the car out of my garage before my paint job is totally ruined.
I got the rear calipers off an am getting ready to rebuild them. I could NOT get the castelated nuts off the rear wheels. I have a feeling that I am going to have to mount them back on the car, put the wheels back on, and put the car on the ground to remove them. Maybe Thursday.
Zach
Posted by: Dr Evil Feb 5 2008, 09:35 PM
I skipped class tonight.
So, looks like I had a DAPO brake job done at some point in time. 1 front rotor is worn, one looks like it has never been tuned. The two on the rear look like they have never been turned. Either there was something way funky going with dragging brake pads, or at some point the PO bought 3 new rotors and left on the old worn fourth one.
I guess I pretty much have to buy 2 new fronties now. Can't have rotors with unequal wear.
I put the front struts on, and can't find the locking pins. Grumble. It is in a tin around here somewhere. Oh yeah, and I chipped some paint on my fender when the strut slipped out of my hand. I'd love to get the car out of my garage before my paint job is totally ruined.
I got the rear calipers off an am getting ready to rebuild them. I could NOT get the castellated nuts off the rear wheels. I have a feeling that I am going to have to mount them back on the car, put the wheels back on, and put the car on the ground to remove them. Maybe Thursday.
Zach
Dude, I have broken 2 1/2" breaker bars trying to get those castellated nuts off. I recommend getting a nut splitter and replacing the nuts. It will be easier while the parts are off the car. I will be off this weekend and will be seeing you on Sat anyway. Maybe I can come over early....then I can work on my own damn car on Sun. Ya wanna work late on Sat as well? I may have access to two good used rotors if you are interested...you have seen the stash.
Posted by: Vacca Rabite Feb 5 2008, 09:57 PM
Sat would be awesome.
But I don't think I'm supposed to know I'll be seeing you Saturday evening. Yeah, I know whats going on, but I'm not supposed to know whats going on, so I have to play dumb. As far as I know, its just dinner with Ross and Laura.
Working after the party would be great, if you have the time to spare.
I nearly pulled a nut splitter out, but was worried about hurting the bolt. I have a feeling that is how I am going to need to take those bitches off though.
Zach
Posted by: Gint Feb 5 2008, 10:43 PM
I actually bought that big ass 1/2" impact from H.F. that someone posted about a month or two ago. It did remove an axle nut off of the car after a little heat and some PB Blaster. And not much of either of those. Surprised me...
Found the link: http://www.harborfreight.com/cpi/ctaf/displayitem.taf?Itemnumber=2623
Posted by: Dr Evil Feb 7 2008, 12:44 PM
Sat would be awesome.
But I don't think I'm supposed to know I'll be seeing you Saturday evening. Yeah, I know whats going on, but I'm not supposed to know whats going on, so I have to play dumb. As far as I know, its just dinner with Ross and Laura.
Working after the party would be great, if you have the time to spare.
I nearly pulled a nut splitter out, but was worried about hurting the bolt. I have a feeling that is how I am going to need to take those bitches off though.
Zach
Not sure what you are referring to, but I was mistaken. I am going to BRIAN and Erin's house, not Zach and Erin's house on Sat. I just say "OK" when I am told where I am going. At least I will be local. Maybe we can work something out for Sun since I will be around the house on Sat and can work on my own stuff then.
Posted by: Vacca Rabite Feb 8 2008, 09:56 PM
So, my plans tonight (friday) were to get the engine case back together and get my rear brakes rebuilt. Instead, I'm drunk on some nice single malt, and watching movies with my wife.
These things happen sime times. Tonight is good. :-)
Tomoorw, back to wrk.
Zach
Posted by: Vacca Rabite May 13 2008, 09:58 AM
I have been VERY remiss in updating this thread. I have a few other threads lingering around the garage that hint to progress, but some ghas been made.
1) The engine has been run! Breifly. I had a rocker start to back off. When I fixed that I decided that I should rebuild the carbs. I am still waiting on the carb rebuild kits to come in. With the headers and the turbo muffler, the 2056 sounds REALLY mean.
2) I just got the axle nut bit for my impact gun to remove the rear axle nuts. I need to get the control arms on the car in order to take those nuts ff. then get the rear brake disks turned and reinstalled.
3) The front end of the car is done! Sort of. I need to get alignment done, and hook up the brakes, but the front suspension is back on.
4) I still need to sand out a few runs in my paint and re-buff.
5) I got the eastwood gastank sealant kit int he mail last week, during the monsoon. I need to seal the tank, and get it back in the car.
6) I need to rehook the electric bits back up, and see what works and what blows fuses. I am not looking forward to that part.
Once these bits are done, the car will be driveable! I am on the final leg now. I can feel it.
Zach
Posted by: Vacca Rabite May 15 2008, 08:10 AM
My carb rebiuld kits came in.
I took one carb apart, and it was REALLY clean inside. I probably did not need the rebuild. But now that the gaskets are messed up, I need to rebuild it any way, and if I do one, I might as well do both.
I also went through my scrap bin and fabbed a tool to intsall the shifter bushing through the firewall. I had tried to install it for hour with various combos of hammers, screw drivers, and doweling. it took me 1/2 hour to make the tool, and 5 minutes to do the install. I wish I thought of these things sooner, it went really smooth.
I need to install the new rubber seals I have in the engine bay. I keep putting that job off as it does not look fun.
I re-did the push rod o-rings on the 1/2 head, and reinstalled without cutting any of them. I need to check the o-rings on the 3/4 head, as I have a drip coming from one of them.
I seem to have fixed the leak from around the oil pump. Not a single drip for a week, so that is pretty good.
But I did find that I have a slight drip from the ?taco plate? I think thats what it is called. I'll re-seal that during the first oil change.
Once I get the 1/2 side tin back on, and the carbs back on, I can finish running in the motor. I think that is going to go pretty smooth now. I might have it done this weekend, depending. A lot is on tap though, and I can't leave Erin with the baby for too long.
I got 1200* heat cloth sleeving around the speedo cable, and that needs to be installed. I also fabbed up a easy tie point that got bolted into one of the diff bolts. This is to keep the speedo cable off the headers.
Closer every day (at least ones Ifeel I can get free to work).
Zach
Posted by: Dr Evil May 15 2008, 10:16 AM
For installing the firewall bushing, did you try soaking it in boiling water for a few minutes before installing it?
The engine bay rubbers are actually not hard to install. Use a putty knife and wiggle the bead into the channel rather than trying to slide it in from one end to the other. It took me less than 1hr when I did all of mine.
Posted by: Vacca Rabite May 15 2008, 10:54 AM
For installing the firewall bushing, did you try soaking it in boiling water for a few minutes before installing it?
Umm... No?
I melt in water. Too dangerous. Once the tool got made, it pressed in really easy.
Zach
Posted by: Dr Evil May 15 2008, 12:25 PM
 Next you can install the rear end by pulling it through the front ventilation
Posted by: Vacca Rabite May 18 2008, 08:16 AM
I rebuilt the fist carb, and got the second taken apart. The fist one was pretty clean, all told. The second had lots of fuel varnish in it, so it is a good thing that I am cleaning it out. This task should be done today!
Zach
Posted by: scotty b May 18 2008, 08:28 AM
R
Posted by: Vacca Rabite May 18 2008, 09:46 AM
I don't believe in fingers. I have to make due with fists. Don't poke fun at my alternative lifestyle.
Posted by: scotty b May 18 2008, 11:04 AM
does your fist run better after the rebuild? You adjusted the thumb linkage correctly right?
Posted by: Vacca Rabite May 18 2008, 11:24 AM
I'll let you know after I get it running again. I am tuning the carb mix screws to the same values they were before I took them off (1.5 turns out). Next time I run the engine, I am going to do it with the linkage off. It was idling around 2000 RPM, so I will let it continue to do that to get the rings seated. Then I'll start adjusting the mix screws until I get the idle to around 800 or so. When I get idle set, then I'll start worrying about the linkage.
Zach
Posted by: Vacca Rabite May 18 2008, 07:21 PM
Both carbs are rebuilt. The engine is all back together. I ran the new speedo cable.
I was tempted to start it, but I had been outside for a while and felt I was at a good stopping point. Now I am posting progress and burping a baby.
Zach
Posted by: Vacca Rabite May 25 2008, 04:51 PM
I just finished running the motor on my test stand for 20 minutes at 3K rpm.
Ran like a friggen top.
But it is LOUD. Like "My ears are ringing, I should have worn earplugs" loud. I think that maybe I should replace the turbo muffler with something a little more tame.
I am up loading video to Flickr now. It has some problems that I need to fix. Pushrod tubes are STILL leaking. Taco plate is leaking. Oil pump is leaking a lot. So, I am going to have to do a partial tear down to fix those issues.
I think that the rings are mated in. The motor smoked for the first five minutes. Then it all went away, except where oil was dripping on the header pipes.
I'd like to get help on these damn pushrod tube seals, and when I replace the oil pump seal. I am clearly doing something wrong.
I'll post the vids when they finish processing on Flickr in an hour or so. Very excited.
Zach
Posted by: Vacca Rabite May 25 2008, 05:24 PM
Videos!
About 1 minute in.
http://www.flickr.com/photos/vacca_rabite/2521832117/
About 7 minutes in.
http://www.flickr.com/photos/vacca_rabite/2521837477/
About 10 minutes in - and then it ran like this for the rest of the break in session of 20 minutes.
http://www.flickr.com/photos/vacca_rabite/2521861265/
By the end of the break in, the only real smoke was from the oil burning off the #4 exhaust pipe from a frick'n leaking push rod tube.
Let me know what you think.
Zach
Posted by: Gint May 25 2008, 08:54 PM
That thing's pissin oil... Other than that, sounds good.
Posted by: Dr. Roger May 25 2008, 09:27 PM

Posted by: Dr Evil May 26 2008, 08:23 PM
Zach,
I can help you this weekend as I am staying local. I have a bunch of pushrod o-rings I think, if you cant score some by then ( you may not need to). We can get that leak fixed easy. The others may need new seals as the current ones may be buggered up. I will help you to put the oil pump seal in
Posted by: Vacca Rabite May 26 2008, 08:45 PM
Zach,
I can help you this weekend as I am staying local. I have a bunch of pushrod o-rings I think, if you cant score some by then ( you may not need to). We can get that leak fixed easy. The others may need new seals as the current ones may be buggered up. I will help you to put the oil pump seal in
Awesome!
I have a new oil pump gasket inbound from Pelican, but it may not be here till the 6th. If you have a new one of those around, it would be rad to get all this knocked out.
I *think* that I have more pushrod tube seals from the gasket set. As it turns out, I had fixed the leaky ones on the 1/2 head - it ran dry for the entire break in. But all 4 are leaking on the 3/4 head.
Zach
Posted by: Eric_Shea May 26 2008, 08:51 PM
My fist girlfriend has always been there for me.
Calipers make it for the big weekend?
Posted by: Vacca Rabite May 26 2008, 09:12 PM
My fist girlfriend has always been there for me.
Calipers make it for the big weekend?
Nope.
Wish they had, would have been the motivation needed to get the rear suspension back on. You still need to give me an address to send my cores to. They are ready to go, just need to know where.
Zach
Posted by: Dr Evil May 26 2008, 09:44 PM
Nope, no oil pump seals. You can get it at your local air cooled VW shop, no?
Posted by: Vacca Rabite May 26 2008, 10:13 PM
If and when he is open. I'll call and find out if the Bug Wolrd dude will be there, or if the crotchety guys will deal with me.
Zach
Posted by: Dr Evil Jun 1 2008, 04:17 PM
Update, surprised that he didnt post all the work we got done yesterday. Rear suspension on, front suspension almost completely on (needs one bolt), front light assemblies, front wire harness routed and connected to the turn signals, some of the engine bay seals in (he had to weld a seal track back on after I molded it back into place), and the car was on the ground with wheels attached
Last few miles of the marathon now.
Posted by: Vacca Rabite Jun 1 2008, 06:38 PM
Update, surprised that he didnt post all the work we got done yesterday.
you know, babies....
typing one handed, kid in the other...
Pics l8r.
Zach
Posted by: Vacca Rabite Jun 1 2008, 07:08 PM
Yeah, we got a ton done yesterday. I have pics uploading into Flickr to host up in a moment.
Inlaws came over before Mike left. A soon as Mike went to go get his woman, I turned into a plumber, and spent the rest of the night (no really, till around 10pm - which is late for e these days) sweating in some new valves and copper pipe in the basement. The joys of home ownership. :-) But. now my valves don't leak, and I learned a new skill.
I did not post before now, as I had to repay Erin for watching the kid all day yesterday by watching him all day today. Payoff was that Erins mom came over and watched the kiddo, and I got to take my woman on an honest-to-god date. Good old dinner and a movie. Iron Man was awesome.
Are my pics uploaded yet? I am sure you are tired of hearing about my life as a family man...
Nope, 29% complete.
Anyhow.
MY CAR WAS 100% OFF JACKSTANDS FOR THE FIRST TIME IN ALMOST 3 YEARS! Emphasis on "was." The ass end is back in the air, after I knocked the axle nuts off. Air torque wrench took them off in seconds. Mike did not think it would work.
Showed Him. 
Took the rear disks off to get turned, and I am going to repack the bearings while I am in there. Disks go to the machine shop to get turned tomorrow. Then I put them back on, along with my new Eric Shea rear brakes.
Mike found some rust that I missed int he engine bay, so I ground it off and hit it with Eastwoods Rust Converter. Rattle can primed it this AM. Not pretty, but better then rusty.
I was not able to source the seals locally that I needed for the engine, so that was a non-starter. (hahaha - I kill me)
Mike got the engine bay seals in, except where I needed to re-weld the seal track in and fix the rust. Stupid A/C install. I wish I could beat the guy that installed it back int he way back.
Pics are loaded.
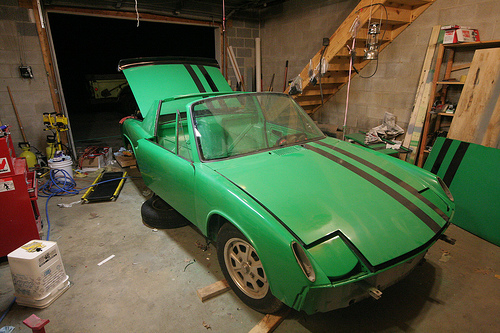
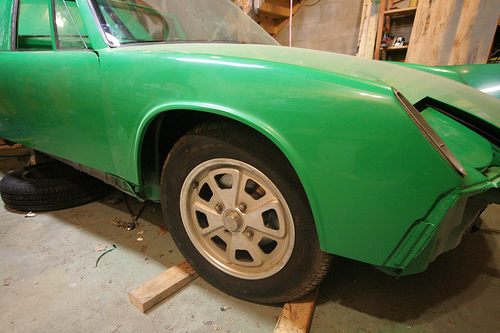
There, pics of where I left it last night. Holy cow, I forgot how low this bitch was.
The wheels will be black. The fronts still need brakes on, so it will have to go back up. But not as high, and not as long. Brakes are rebuilt, and sitting in the trunk, just need to plug them in. AND I GOT TO SEE THE CAR ROLL!
I told Mike to scram after he *tried* (and failed) to beat up my truck. It was tougher then him. The roll cage he wanted to cut off laughed at his puny efforts. Ate a new saw blade, and I can barely see the scratch that Mike put in it. No pic, it was dark. I'll cut it off with an air cutter.
For the Porsche, at least, I see the light at the end of the tunnel. Especially if people come over to keep me focused on work. I'll give you food and beer. I'm off classes till the end of June.
Yeah, thats a hint. Blatant, huh.
Help me get this thing drivable by ECC in September!
Zach
Posted by: sendjonathanmail Jun 1 2008, 07:22 PM
Hey Zach, the car is looking great! Its come a long way since I last saw it on the rotisserie. Are you using the later bumpers front and back?
Posted by: Vacca Rabite Jun 1 2008, 07:28 PM
For the sake of getting it on the road, the big bumpers will be going on. I view this as a short term solution, though. I still want to make a fiberglass copy of the BBBs and mount them. right now, I only want to do what is needed to get this car drivable.
Due to PA rules, it takes a month to get antique tags. Since I bought the car out of state, the Notary has to look at the car. There for, if I want to take the car to the ECC, I need to have it drivable by the end of July.
At least drivable enough to make it 1 mile down the road so the notary can see that the vin tags match. *stupid PA rules - if I bought the car in PA, I would not need to do this...*
Zach
Posted by: Dr Evil Jun 1 2008, 09:23 PM
Zach, FYI, you dont repack teh rear bearings....in case you were planning to
Posted by: Vacca Rabite Jun 1 2008, 09:27 PM
Zach, FYI, you dont repack teh rear bearings....in case you were planning to
What keeps the bearings lubed then? Don't they need grease?
I guess I'll just put the axle nuts on and call it a day. Well, I'll do that in a few days.
Zach
Posted by: Dr Evil Jun 1 2008, 09:44 PM
Sealed bearings.
Posted by: Vacca Rabite Jun 2 2008, 10:13 AM
After reading Purple's brake thread this AM, and feeling his frusteration reach at me through the monitor, I have decided to do my brakes next. My system is totally dry, hopefully I will not need a new MC or prop valve. They are the only parts of the system that have not been either bought new or rehabbed.
Ive put in new brake lines - they are run. I have new rubber lines (front and rear). new rear calipers (Eric Shea). Rear rotors are getting turned at the shop this afternoon. New front rotors. I rebuilt my front calipers. This weekend, I want to hook it all back up, and try to get it bled out. I suppose you all should expect questions. And I will be annoyed if I have to buy a new MC.
Every weekend, I get another step closer.
Zach
Posted by: okieflyr Jun 2 2008, 09:03 PM
I bought my teener out of state, and for the PA antique registration process, told my tag agent I couldn't drive to her because there was no tag for the car. I gave her all the required items for the application, and a pencil rubbing of the VIN on the tub.
She was satisfied(as all my ladies are) and I had my tag and registration in about a week and a half. At our local agent,you never know what kind of mood they are in until you get there though..... 
Posted by: Vacca Rabite Jun 12 2008, 10:48 PM
So I actually got a little work done today, but that was accompanied by a half step back...
First, the step back. I have taken the plate off the oil pump to reseal it, as it was leaking when I broke the engine in. Harkening back to Gint's thread about his leaky rebuild, I started doubting that I put the gasket behind the hub on the crank - and that was the real cause of my leak. I found the o ring in my gasket set, which solidified my doubts. So out comes the puller, and I sent my hub shooting across the garage when it popped off. I also bent the retaining bolt in the process.
And, of course, the o-ring was in place. I am guessing that I re-used the old one, so I replaced it with the new one. But, lacking a retaining bolt I had no way to bolt the hub back on. HD did not have them, so I ordered 5 from McMaster-Carr.
In the realm of good news, my rear brakes are fully attached to the car! It went smoothly, excepting 1 bolt - which took an hour and a half to finally get to catch and turn in. I'll need to adjust the rears tomorrow, and I guess attach the parking brakes. The Eric Shea rears, new hard and flex lines, and freshly turned rear calipers look really sharp. My home-rebuilt non-cad plated front calipers are going to look dingy.
I was getting ready to put the front brakes on when I started feeling sick to my stomach. This happens to me when I am working on my back on a creeper too long. I dunno why, but I decided to come inside for the evening.
I'll finish up my front brakes tomorrow.
Zach
Posted by: plymouth37 Jun 12 2008, 10:56 PM
It is so cool to watch your car come along! You have really come a long way.
Keep up the good work, when you have the time what with the kiddo and all!
Posted by: Gint Jun 13 2008, 09:15 AM
Posted by: Vacca Rabite Jun 19 2008, 10:03 AM
Slowly, the car is coming together.
Brakes are adjusted, but still dry. I am going to buy a pressure bleeder to bleed them. I need to send Eric my rear cores.
The leaky pushrod tubes have all been resealed. The hub bolt has been replaced (and now I have 4 extra hub bolts.) I have yet to put the oil pump back together. I spent an hour cleaning up the pump backing plate, but I admit to being fearful of putting the o-ring on poorly again. It is such a PITA to get it to stay in the groove long enough to get the plate on.
I need to run a compression check on cyl 2. I am fearful that it is leaking some where. It may be just a poorly adjusted valve from when the rocker backed off. But turning the engine over by hand with the plugs in, I can hear a leak from somewhere. Until I am proven otherwise, I am going to assume it is just a valve adjustment issue for my own sanity.
The cabin seals are back in securely. This makes me happy. The doors are a little better adjusted, but could still be adjusted more. Allthe engine bay seals are installed.
As I see it, I have 3 major tasks, and several minor ones.
1) Electric stuff needs to get hooked up (and tested)
2) Brakes need to be bleed in
3) Engine needs to be sorted out and installed.
Minor projects at this point include
1) paint touch up (color sanding, and repainting some scratches that have occured during re-installation.)
2) interior niceties.
3) Wheel Alignment
4) sound proofing
Of the major tasks, #1 is the one that daunts me. I am bad with electrics. #3 is very annoying to me, as I have put a lot of time into the motor this winter, and I don't know whats wrong with it now (air leak, not oil.) #2 is easy, and I am not concerned about it.
My mother-in-law has been living with us this week. While that has its own limitations, it does allow me to spend about 1.5 hours a night after dinner in the garage - and I have been taking advantage of that. When she goes back home on Friday, I'll have to go back to scraping time together for the garage.
Tonight, i am goign to try and get the oil pump resealed, and adjust the #2 cylinder to see if the air leak goes away. Otherwise, I have to pull the tin off the 1/2 side and see what is what.
Zach
Posted by: Vacca Rabite Jun 29 2008, 07:46 AM
Pressure Bleeder came in Yesterday, but I had to go to a wedding, so I did not get to it.
But, I gotmy turn signals hooked up Friday evening.
This includes my Euro Parking light kit from Camp914. This was made eaiser since I shaved my front "pimple" parking lights, so I just used the hot and ground leads from there.
I also located the fog/driving light leads for when I am ready to to that upgrade. I've got the lights, just need to wire them in.
Today, I hope to dick around with my motor some more. Run it, look for leaks, and sync my carbs. I am going to be pissed if I have to go into round three trying to seal up that oil pump, but we will see.
As yet, nothing has changed that is picture worthy.
Zach
Posted by: Vacca Rabite Jul 3 2008, 09:45 PM
My car is REALLY fighting me.
I went out to the garage to pressurize the brake lines. This was goign to be a mile stone event, as it meant that the first, 100% working part of the car would be completed.
I poured my brake fluid into the tank. Did not hear any drips, so I thought all was well. To be safe, I took a look.
I did not see drips. I saw a PUDDLE. A rapidly expanding puddle. Brake fluid was not dripping out of the MC, it was POURING out.
So, instead of toasting my success on my first completed system on the 914, I went to the Jeep and installed one of my new lockout hubs. While the 914 has done nothing but make my life hard, the Jeep tempts me with easy jobs.
Oh well. Another $250 to Pelican for a new 19mm MC. May as well upgrade of I am replacing it.
GRUMBLE GRUMBLE!
Zach
*grumble*
Posted by: Gint Jul 3 2008, 09:58 PM
Hang in there... "endeavor to persevere" ...it will all be worth it when it's done.
Posted by: sendjonathanmail Oct 9 2008, 09:20 AM
![]() any updates?
any updates?
Posted by: Vacca Rabite Oct 9 2008, 02:53 PM
None at the moment. Too much school.
I'm planning to work on it the weekend of the 8th (of november). Probably very little until then.
Zach
Posted by: MrKona Oct 9 2008, 03:38 PM
None at the moment. Too much school.
I'm planning to work on it the weekend of the 8th (of november). Probably very little until then.
Zach
I know how you feel... between, work, school, and family, my engine rebuild has come to a halt. It's there waiting for me. Sometimes I go into the garage, take the plastic cover off the engine, and just look at it.
Your car is waiting patiently for you when you get the time...
Posted by: Vacca Rabite Oct 12 2008, 08:14 PM
So, a little got done today.
My goal was to get everything in place in the gas area, but I ran into snags.
I got the windshield wiper assembly cleaned up and reinstalled (with a delay while I figured out what wires went where).
I got the left and right vents back in.
I was hoping to get the blower and fresh air box in, but I noticed that my drain hose was totally worse then I expected, so that needs to get replaced.
I started futzing with the gas tank, to get it in. I capped off the return hose. I replaced the strainer sock. I vaccumed out all the grit from the tank I could find. Very little rust in it, so I am not going to seal it. I went to run all the under tank lines.. And it was an epic failure.
Well, not truly epic, as nothing burned.
Since I converted to carbs, a lot of the stock stuff did not work.
New cuts of 7mm hose would not fit over my new SS tunnel fuel line. The 75-76 filter uses hose WAY to big to mate to the fuel pump.
So, I need to get 8mm lines, and a different fuel filter.
Or just get 3/8 lines, and stick with the regular old NAPA filter.
At least I have the good kind of fuel hose clamps.
Zach
Posted by: Vacca Rabite Nov 9 2008, 03:37 PM
A BIG moment yesterday...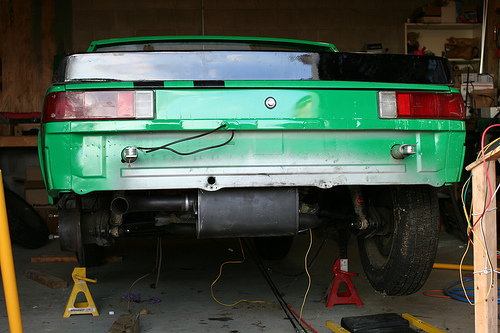
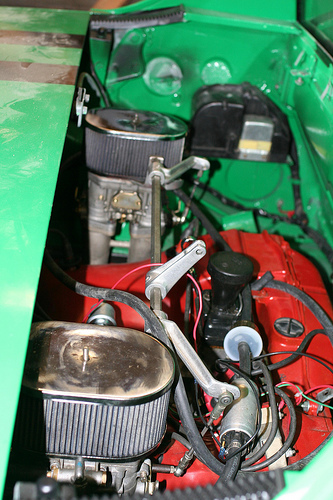
My engine still needs some tuning.
After nearly three years of seperation...
My engine is IN THE FREAK'N CAR!
Zach
Posted by: sendjonathanmail Nov 9 2008, 04:01 PM

Congrats! Getting closer and closer to the finished product!
Posted by: markb Nov 9 2008, 04:24 PM
Posted by: rick 918-S Nov 9 2008, 04:30 PM
Posted by: Dr Evil Nov 9 2008, 05:44 PM
Posted by: Gint Nov 9 2008, 06:51 PM
Grats!
Posted by: Vacca Rabite Nov 9 2008, 07:08 PM
Special thanks to ScottyB and DrEvil. We got a ton of stuff done this weekend on my car. While I was working on the bumpers Mike and Scotty were just "Lets put the engine in the car." "Okay" And it was done.
Then we had a party. :-)
Zach
Posted by: wilchek Nov 9 2008, 07:22 PM
Awesome, remember it is the journey not the destination that we remember.
Posted by: jsayre914 Nov 9 2008, 11:03 PM
sorry I missed the party, looks great soon you will be passing my subaru on I83. 
Posted by: Vacca Rabite Nov 16 2008, 08:10 PM
So, after working a bit on Saturday...
The oil puke tank is installed and hoses are run.
The venting system is hooked up - though its not adjusted, and I'll probably leave it that way so long as it is powered off.
The gas tank is in. *this is a small milestone for me!*
The fuel pump is set up for the front of the car mount. I need to re-run the fuel line that goes from the pump to the tunnel, but that is a small job.
The carbs are still in progress. I need to buy a few parts yet, but the vents and jetting is supposed to be good. I probably have some air leaks to fix.
I put new windshield wipers on.
The past two weekends have been good, but that is probably all that I will be able to do before Thanksgiving weekend. My family is flying out to Texas on Tuesday - Saturday to meet up with my Dad and Granny. They wanna meet the little guy.
Zach
Posted by: Vacca Rabite Dec 29 2008, 05:10 PM
So, day one progress.
Carbs are re-rebuilt. This will *hopefully* cure the air leaks that were plaguing me earlier. one of the needle jets was bent and had to be replaced. Also, one of the pump diaphrams was leaking so I replaced it as well.
I fixed what I hope is my last oil leak. There was a leak where the oil pressure relief valve exits the bottom of the case. I replaced the crush washer. That was kind of a bitch of a task.
I started hooking up my CVs to the tranny when I realized that I probably needed a gasket there. Go me. I need the gasket before I can continue.
I dropped the clutch return pully down an inch via the Tangerine methode. I went to run my clutch cable, but I could not find the heat shield tubing that I need to put the clutch cable in. So, that will need to wait.
Rear bumper is back on the car.
And now for the work that I need to undo. I need to remove the throttle cable and re-run it. It got twisted around the clutch cable. I guess I'll try and do that tonight after little guy goes to bed.
I went to polish off my e-brakes and found that I had been sent the wrong clips. *grumble* I'll need to source the right ones.
I connected my fuel pump up, but there is a fuel hose caught under the tank somewhere I am going to need to fix.
I wanted to get all my "under the car" work done today, but as normal, I did not start with all the bits and bobs in line. Now I must wait for a few dollars worth of parts. What I would not give for a DEPENDABLE VW bug house near me. There are two that I know of, that are NEVER open.
I got stuff done today, but it really does not seem like it. I hate trying to wiggle in behind the pedal cluster.
Zach
Posted by: r_towle Dec 29 2008, 05:29 PM
Congrats on making some time.
On the accel cable..
Take the front tunnel cover off and rest a mirror in there so you can see the cable and tube...
hands and knees lean in to the pedal cluster.
remove the cable from the ball and twist it around so its off the clutch cable and then snap it back on.
Its about 15 minute job with alot of swearing..
The board needs to be out.
Rich
Posted by: Dr Evil Dec 31 2008, 01:09 PM
Need help? I am back
Posted by: jsayre914 Dec 31 2008, 02:03 PM
Well... in Zachs defense
He was helping me with my car all morning, We got my battery tray welded back on and got me a new hood. I need to get myself one of those welders. The tray looks great thanks zach, I willpost pics later in my own thread.
The ultimate sacrafice.... to put a friends needs befor his own 
thanks again
Posted by: Vacca Rabite Dec 31 2008, 02:10 PM
Eh, NP. :-)
Last night I was able to get my throttle cable fixed, and I fabricated a new throttle-cable-holder-thingy. I was also able the figure out how to get the wires to the rear bumper lights. I don't see how the heck those things are supposed to work, but I think I have them in now.
Today I spent the entire day trying to replace the pads and calipers on my subaru. The rears were no problem. The frints, however, have been fighting me tooth, nail, washer and bolt. in fact, I just had a frozen bolt snap off inside my caliper. Mother fucker!
Time to see if I can drill it out.
Zach
Posted by: johnnie5 Jan 2 2009, 07:53 PM
Zach,
Sorry about the busted bolt, that sucks.
How about showing us a pic of what you did with your throttle cable bracket! 
Posted by: Vacca Rabite Jan 2 2009, 08:18 PM
I will do that Sunday.
I am done with my garage until Sunday. That silly bolt required traipsing though PA for 4 hours to find $13 worth of parts. A 3 or 4 hour job turned into 3 days. I'm dine till Sunady.
Zach
Posted by: Vacca Rabite Jan 18 2009, 09:47 PM
Work tonight.
Tonight I hoped to have my front bumpers all mounted up. I finished the wiring needed to make the horns and lights work (just crimping on ends, really) Then I made some backing plates to stiffen up the area the bumpers are bolting bolting into.
Then, disaster.
The front drivers fender had been cut off and replaced at some time in the cars past, and does not seem to be quiiiiiiite on right. When bolted on, that fender lip sat too high on the bumper. when I had on the shocks, there was some play there that I suppose made it workable. Now that it is a steel bracket, not so much. It looks like if I shim it and add a longer bolt to one side, I can make it work. Or I can just cut off my brackets and add the shocks back.
Of course, in an act of overconfidence and bravado, I think that I got rid of the front shocks and the mounting bolts last month. So I may have to make the shims.
I'm super pissed about this. Everything worked perfect except this one corner. Angry and cold, I came inside to bitch about my setback online.
Another annoyance tonight, I discovered that I was out of M8 washers. when I ordered hardware, I ordered as many washes as nuts. I have plenty of M8 nuts left. Oh well. I'll try to slip out to True Value tomorrow and buy some more.
Zach
Posted by: ericread Jan 18 2009, 11:02 PM
No pictures since November 9???
Posted by: Vacca Rabite Jan 20 2009, 08:07 AM
Well, instead of trying to shim, I knocked the bolts I welded to the bumper out (there were only lightly tacked in case I needed to move them) and drilled two new holes in my bracket 1/4 inch lower, which should move the corner up into alignment.
Then I zipped over to the hardware store (True Value - love their hardware supply) and got some more M8 bolts and 5/16 washers (which work just fine as M8 washers, for a fraction of the cost - even when buying grade8).
When I got home, I got put on daddy duty, so I was unable to test the new set up. Later, once I was free to do as I wished, I realized the snow was squeeking again, and that I was friggn' tired so I just went to bed ~9.
Zach
Posted by: Vacca Rabite Mar 17 2009, 07:39 PM
It has been a while since I updated this thread.
Today, I added something cool to my car.
A license plate.
I just need to get it aligned and I can drive it.
Okay, so its only legal for 10 days. I don't have my antique tags yet, so I just got regular tags for while I am waiting. In 10 days it needs to be inspected or I could get an inspection ticket. I have no intensions of getting the inspection. I HOPE my antique tags come in soon.
I still tried to get it out of the garage today for a little spin around the block, but it looks like I will have to do some shimming to get the car out... It is sort of blocked in by the truck.
Zach
Posted by: r_towle Mar 17 2009, 07:44 PM
That is so awesome to hear. I knew you would do it.
Great great great news.
Rich
Posted by: iamchappy Mar 17 2009, 08:05 PM
Zach heat it up!
Posted by: flippa Mar 17 2009, 09:44 PM
At least a few current ones. Lets see it!
Posted by: Dr Evil Mar 17 2009, 10:01 PM
How about the mc?
Posted by: sendjonathanmail Mar 18 2009, 05:49 AM
Its been awhile since we've seen what the car looks like!
Posted by: Vacca Rabite Mar 18 2009, 06:11 AM
The master cylinder still needs to be replaced. New one slated to arrive on the 25th. I *REALLY* don't want to go through the whole bleeding process again. But I guess stopping is important.
My good camera is still in limbo. The shop that fixed it after the flood has been paid by insurance, but they are dragging thier feet and I don't have the time to go and raise hell. As of yesterday, they promised to have everyhting back to me on Friday.
I did get some pics with the tiny cam, that were needed for the PA antique tags.
Drivers side. Note how close the truck is. it could be amusing getting the car out of the garage.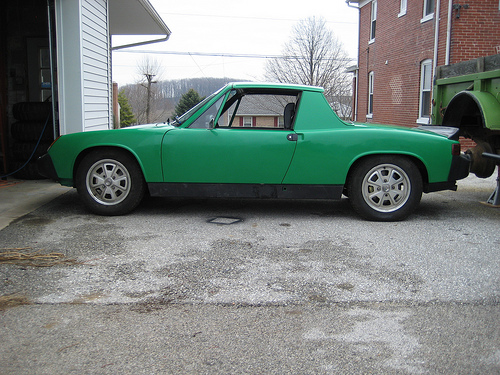
Pass side (Note the Evil Bus in the background):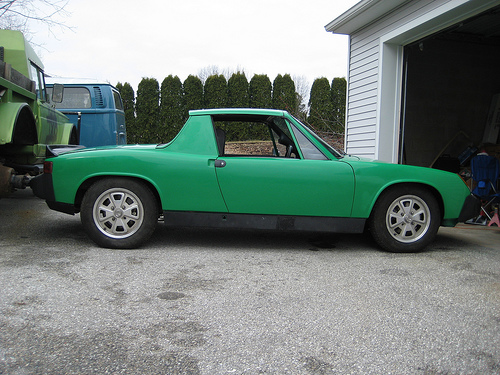
Ass end: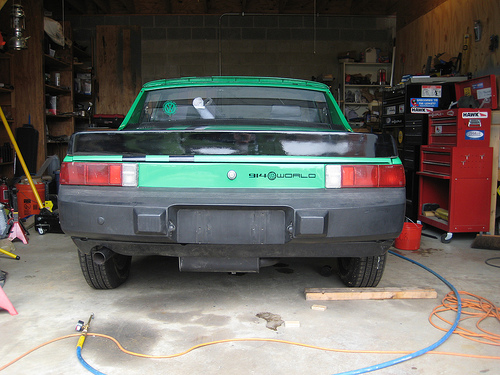
Front end (I think this looks bitch'n, but it NEEDS a spoiler: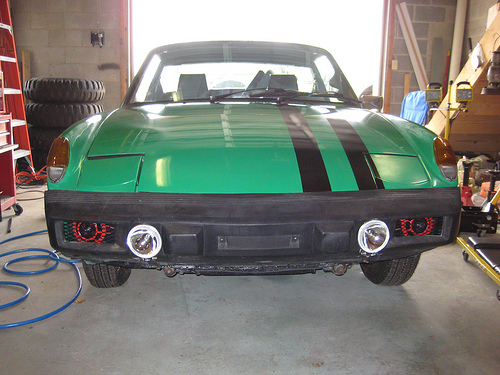
Zach
Posted by: type11969 Mar 18 2009, 08:55 AM
Nice, drive that thing!
Posted by: al weidman Mar 21 2009, 12:09 AM
Zach,
Sorry about the busted bolt, that sucks.
How about showing us a pic of what you did with your throttle cable bracket!
Johnnie, here is a pic of the bracket I made for mine. Simple and it has worked flawlessy. Al.
Posted by: al weidman Mar 21 2009, 12:12 AM
Zach,
Sorry about the busted bolt, that sucks.
How about showing us a pic of what you did with your throttle cable bracket!
Johnnie, here is a pic of the bracket I made for mine. Simple and it has worked flawlessy. Al.
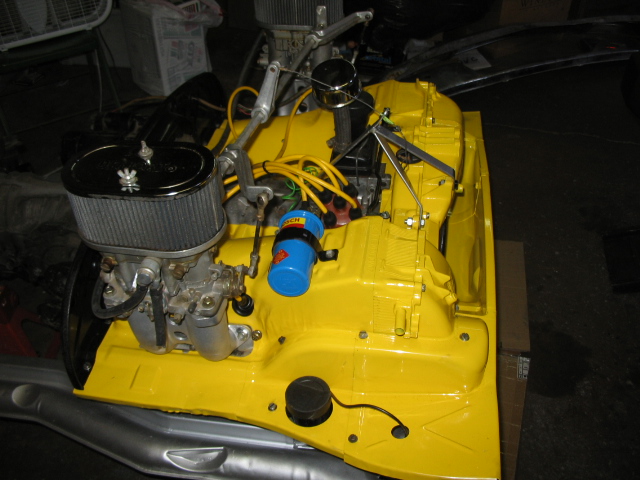
Posted by: johnnie5 Mar 21 2009, 08:52 AM
Zach,
Sorry about the busted bolt, that sucks.
How about showing us a pic of what you did with your throttle cable bracket!
Johnnie, here is a pic of the bracket I made for mine. Simple and it has worked flawlessy. Al.
Very cool Al... where did you attach the 'support' piece that goes over the dizzy?
I fabricated a single bracket out of aluminum and then copied it with 4130. I also welded ridges/edges onto it for strength.
Attached image(s)
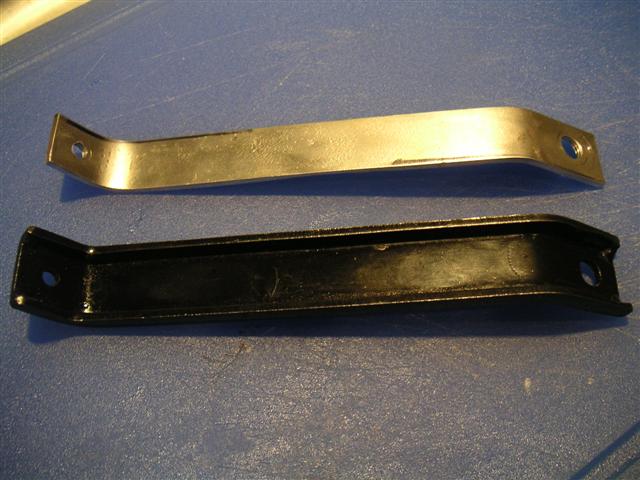
Posted by: jsayre914 Apr 5 2009, 04:03 PM
Whats left Zach??
Posted by: Vacca Rabite Apr 5 2009, 06:39 PM
Funny you should ask.
I just got back in the house after my allotted 2 hours of garage time. Now I have to go back to homework time.
But, I got the old A Arm out. It was way fubar. I moved the ball joint over to the new arm. Also moved over the torsion bar. I need some bits before I put it back together, though so I just closed up shop and came in.
After I get that back in and all bolted up. I need to re-bleed the brakes. Then get it alligned. Then hope PA get me my damn title! Then drive it and see what breaks along the way.
Zach (sees the light at the end of the tunnel, hopes it is not a train.)
Posted by: Dr Evil Apr 5 2009, 06:44 PM
Glad it was a 914 A arm
Posted by: al weidman Apr 11 2009, 12:23 AM
Zach,
Sorry about the busted bolt, that sucks.
How about showing us a pic of what you did with your throttle cable bracket!
Johnnie, here is a pic of the bracket I made for mine. Simple and it has worked flawlessy. Al.
Very cool Al... where did you attach the 'support' piece that goes over the dizzy?
I fabricated a single bracket out of aluminum and then copied it with 4130. I also welded ridges/edges onto it for strength.
The support is twisted and drilled so it attaches to a case half bolt. Al.
Posted by: Vacca Rabite Apr 13 2009, 12:11 PM
Today my car drove off my property for the first time.
I got the brakes bled and the new wheels and tires on, and started working on attaching the hitch on my Subaru.
I got tired of laying down with an m12 bolt that may or may not have stripped out on the suby, so I thought: well, the 914 should be drivable, even though the tags arn't legal any longer....
so I wiggled it out of the garage (green truck is sort of parking it in) and took it for a little spin around the neighborhood. Not far, as I don't know how much gas it actually has, and the alignment is still off. I never actually got out of second gear, actually. But still. For all the ups and down that this car has put me through over the past 2 months, I REALLY feel good right now.
I still doubt that the car will be able to DRIVE to Hershey, due to PA dragging its feet on the title and correct (historic) tags. But I got to drive it, on the street.
It sounds like it wants to go fast.
Zach
Posted by: ChrisNPDrider Apr 13 2009, 12:25 PM
Congrats!
Haven read all 12 pages...ARE those red things up front HORNS?
Speakers?
Posted by: pktzygt Apr 13 2009, 12:41 PM
Congrats!
Haven read all 12 pages...ARE those red things up front HORNS?
Speakers?
I'm not going to go back through the thread, but I think I remember that he had hella horns, which are red and black disks.
I still doubt that the car will be able to DRIVE to Hershey, due to PA dragging its feet on the title and correct (historic) tags. But I got to drive it, on the street.
Do they put restrictions on what time of day and where you can drive your car with those historic plates in PA? I wanted to do that, but they told me I couldn't drive at night. I quickly decided to put regular plates on the thing.
Posted by: Vacca Rabite Apr 13 2009, 02:59 PM
Congrats!
Haven read all 12 pages...ARE those red things up front HORNS?
Speakers?
I'm not going to go back through the thread, but I think I remember that he had hella horns, which are red and black disks.
I still doubt that the car will be able to DRIVE to Hershey, due to PA dragging its feet on the title and correct (historic) tags. But I got to drive it, on the street.
Do they put restrictions on what time of day and where you can drive your car with those historic plates in PA? I wanted to do that, but they told me I couldn't drive at night. I quickly decided to put regular plates on the thing.
Yes, Hella Supertones. They are horns, they are loud, and they look cool. I want people to hear me when they cut me off, even when they are on the phone with the radio on.
PA will not allow you to drive at night on antique tags IF the car did not originally come with head lights. If the car came from the factory with head lights, you are good to go.
Zach
Posted by: Spoke Apr 13 2009, 03:09 PM
Here's some info from the PA DMV. I register my 911 (86) and 914 (71) as regular vehicles since I like driving them to work on nice days and don't want any restrictions on when I can drive the cars. In PA, one pays for yearly registration and vehicle inspection. I like the inspections since if you can't pass state inspection then perhaps your car shouldn't be on the road...
From PA DMV:
USE OF COLLECTIBLE REGISTRATION PLATES
The use of collectible plates is governed by Section 1340 of the Pennsylvania Vehicle Code which states: “It is unlawful for any person to operate a motorcycle or vehicle with antique, classic or collectible registration plates for general daily transportation. Permitted use shall be limited to participation in club activities, exhibits, tours,
parades, occasional transportation and similar uses”.
Permitted use is limited to participation in club activities, exhibits, tours, parades, occasional transportation and similar uses. Occasional transportation and similar uses is defined as one day a week.
DEFINITION OF ANTIQUE AND CLASSIC MOTOR VEHICLES
Antique Motor Vehicle - A motor vehicle, but not a reproduction thereof, manufactured more than 25 years prior to the current year which has been maintained in or restored to a condition which is substantially in conformance with manufacturer specifications.
Classic Motor Vehicle - A motor vehicle, but not a reproduction thereof, manufactured at least 15 years prior to the current year which has been maintained in or restored to a condition which is substantially in conformity with manufacturer specifications and appearance. Any classic motor vehicle registered under Section 1340 (relating to antique, classic and collectible plates) on the effective date of the amendment to this definition which fails to qualify as a classic motor vehicle pursuant to these provisions may retain such classic registration unless another type of registration is applied for and issued for the vehicle.
USE OF ANTIQUE AND CLASSIC REGISTRATION PLATES
The use of antique and classic plates is governed by Section 1340 of the Pennsylvania Vehicle Code which states: “It is unlawful for any person to operate a motorcycle or vehicle with antique and classic registration plates for general daily transportation. Permitted use shall be limited to participation in club activities, exhibits, tours, parades, occasional transportation and similar uses.” Occasional transportation and similar uses is defined as one day a week.
Although buses and trucks are eligible for Antique and Classic plates, buses MAY NOT be used to transport passengers and trucks MAY NOT haul cargo.
Antique and Classic plates are not available for motorized pedalcycles.
Posted by: Vacca Rabite Apr 16 2009, 04:13 PM
Spoke is spot on. Which is why I don't mind the antique plates for my 914, but will eventually get my truck unbranded.
I'll probably never drive the 914 a lot, it will be a toy. Bt the M715 I would like to use to tow and haul crap around with. I would have titled it as a regualr truck to begin with, the the title office wanted an extra $300 to remove the "A" brand from the title. Seeing as how I am not driving the truck at all yet, I did not see the need to do this.
Zach
Posted by: Cevan Apr 16 2009, 07:29 PM
I'll probably never drive the 914 a lot, it will be a toy.
You may take those words back. That's what I thought and I put 4000 miles on mine last year in 8 months.
Posted by: carr914 Apr 16 2009, 08:31 PM
Today my car drove off my property for the first time.
But I got to drive it, on the street.
It sounds like it wants to go fast.
Zach
No Fuchin Way - We want pictures of this Major event.
Congrats
T.C.
Posted by: MikeSpraggi Apr 17 2009, 02:49 AM
Zach, congrats on your achievement. It's been a long road, but the feeling one experiences driving the car after such a project is, well, euphoric. Mike S.
Posted by: jt914-6 Apr 17 2009, 06:55 AM
Zach
Congrats on getting the car going. Within the last month I've got my "project" 914-6 conversion going too. A 13 year ordeal. There were times I wondered if I was ever going to finish. Now that it is done it has been worth it. I'll remind myself just how worth it has been when I get it out on the track in a couple of weeks for a PCA DE. I know what you've been going through. Built mine from the body and the wiring harness up. Enjoy the fruits of your labor......
Posted by: Vacca Rabite Apr 21 2009, 04:33 PM
I am scheduled for a 4 wheel alignment tomorrow at 9:30!
Here are some pictures I took today after putting on the RennMetal tow Bar Bracket.
The space under the bumper is going to get one of Mike's new spoilers, as soon as they are ready. Right now, I'm not putting anything there.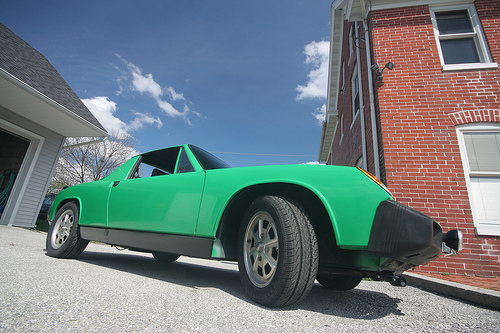
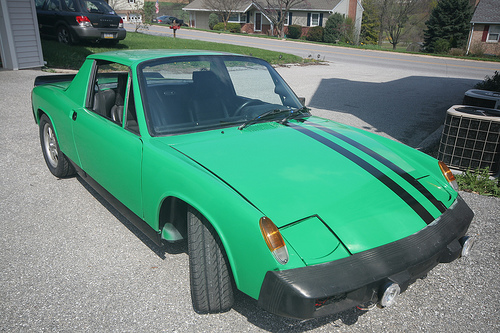
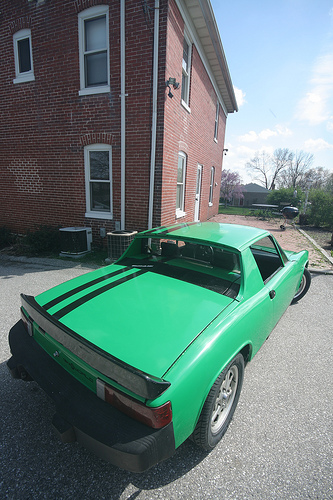
The front hood seal is new, and has not yet settled in, which is why the hood seems to be bulding a little.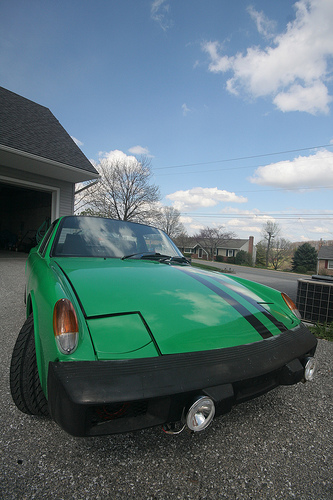
Nice profile shot.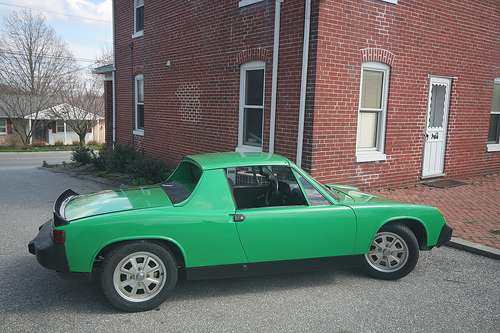
Wish me luck on the alignment tomorrow. If PA would get me my title, I'd be able to just DRIVE it!
Zach
Posted by: rjames Apr 21 2009, 05:48 PM
Looks great Zach, and just in time for spring!
Enjoy it!!
Posted by: type11969 Apr 21 2009, 06:32 PM
Cool, congrats!
Posted by: plas76targa Apr 21 2009, 06:38 PM
Zach, car looks great! I do believe the GT front valence works best with the tow bracket you have. I have to get one or if the style you refer to DOES work I may reconsider. See you Saturday!
Posted by: Vacca Rabite Apr 21 2009, 07:13 PM
Zach, car looks great! I do believe the GT front valence works best with the tow bracket you have. I have to get one or if the style you refer to DOES work I may reconsider. See you Saturday!
According to Mr. Lee of RennMetal, the tow bar works witht he FlexDam spoiler, which is what Mike is basing his spoiler off of. Of course, I'd have to remove the spoiler for towing.
Zach
Posted by: Spoke Apr 21 2009, 08:17 PM
Yeah Baby! Looking good Zach. Why tow it? Drive it to the alignment.
Posted by: Vacca Rabite Apr 22 2009, 05:37 AM
Yeah Baby! Looking good Zach. Why tow it? Drive it to the alignment.
I am tempted too, but I'd be going by several police hide outs in Red Lion, and I can't afford to get pulled over right now. PA still has not send my Antique tags, and I never got the car inspected for the regular ones.
Also, I have some tuning issues that I want to get sorted at the MEI before I start putting miles on the car.
Zach
Posted by: Gint Apr 22 2009, 06:32 AM
Grats...
Posted by: Vacca Rabite Apr 22 2009, 09:09 AM
Alignment shop was a bucket of FAIL.
I get there with the car, the guy looks at his computer and says: "oh, we can't do this. We don't have a spreader bar." They call other local shops, that also don't have a spreader bar. I ended up towing the car hope w/o getting anything done to it. And now I am PISSED.
Why couldn't the guy tell me that he did not have what was needed when I called and asked if they could do it YESTERDAY? I told them what kind of car it was, its not like this was a surprise.
Mike knows of a shop that did his car up near him, so I will try and get an appointment there Friday. My son is sick, so I don't think I'll be able to much more running around today.
Zach
Posted by: Vacca Rabite Apr 22 2009, 02:43 PM
Okay, there is a shop that comes recommended in Camp Hill PA that I am going to drag my car to tonight. Wife gets home from class ~10pm, so I sould be at the shop at 11 and home around 12:30am. Car is 2/3 of the way between my place and Palmyra, so I'll just pick it up on my way to Dr Evil's on Friday.
Zach
Posted by: Vacca Rabite Apr 23 2009, 07:45 AM
Car is now at Auto Camp. I left the house at 10:15pm last night, and got the car there around 11:30pm. The shop was HARD to find, and I drove past it several times. By midnight, I had my 914 un-hooked from my Subaru, keys in the drop box, and was on my way home. Got home at 12:45 AM and was really tired. Kinda weird to not have it at home right now.
My plan is to pick it up Friday afternoon on the way to Palmyra. I just need to be sure I am at the shop by 5:30, or the next time I can get the car is Tuesday (which would keep it from showing at Hershey).
My 914 was at the top end of the limit that my Subaru can tow, and I could tell. A better alignment should help reduce rolling resistance too. But I went slow (not over 55, usually 50 on I-83.)
Doing this at night was actually kinda nice, as there were less cars on the road. 'll be happy when I can just drive this thing, and not have to pull it. :-)
This place came well recommended, so I hope they do a good job. If they call back and say "sorry" like the last shop, I don't know what I'll do.
Zach
Posted by: ws91420 Apr 23 2009, 07:49 AM
One question did you provide them with shims for the rear if they need them?
Posted by: Thomas J Bliznik Apr 23 2009, 07:57 AM
Car is now at Auto Camp. I left the house at 10:15pm last night, and got the car there around 11:30pm. The shop was HARD to find, and I drove past it several times. By midnight, I had my 914 un-hooked from my Subaru, keys in the drop box, and was on my way home. Got home at 12:45 AM and was really tired. Kinda weird to not have it at home right now.
My plan is to pick it up Friday afternoon on the way to Palmyra. I just need to be sure I am at the shop by 5:30, or the next time I can get the car is Tuesday (which would keep it from showing at Hershey).
My 914 was at the top end of the limit that my Subaru can tow, and I could tell. A better alignment should help reduce rolling resistance too. But I went slow (not over 55, usually 50 on I-83.)
Doing this at night was actually kinda nice, as there were less cars on the road. 'll be happy when I can just drive this thing, and not have to pull it. :-)
This place came well recommended, so I hope they do a good job. If they call back and say "sorry" like the last shop, I don't know what I'll do.
Zach
Hi Zach,
I've been following your progress & finally want to say great workmanship, it's a beautiful car. I like the green paint, but not wild about the black strips?? It shouts race car, I am a bad boy ride.
Post a picture of the little one when you take him/her for the first 914 ride. Can't remember if it's a boy or girl??

Tom
Posted by: Vacca Rabite Apr 23 2009, 07:58 AM
One question did you provide them with shims for the rear if they need them?
They have the shims that were on the car when I got the car. back end should be pretty close to right, if it is not, then we will have to work out something else.
Zach
Posted by: Dr Evil Apr 23 2009, 11:11 AM
I can get some probably if they need some. I think they are equipped, though. Also, if I have to, I pay for it and have it out side for you to pick up.....or I'll just drive it home cause I am not a pussy
Posted by: Dr Evil Apr 23 2009, 08:52 PM
Paul said he saw your car and it was aligned, but it took some time
Posted by: Dr Evil Apr 23 2009, 09:02 PM
Oh ya, bring the beer I have none 
Posted by: Vacca Rabite Apr 24 2009, 07:16 AM
Paul said he saw your car and it was aligned, but it took some time
What did Paul think of my car?
Vince said it took 4 hours to get it right, but that is not uncommon with restorations.
Not to mention, my cars been beat up all to hell before I got it.
zach
Posted by: Vacca Rabite Apr 28 2009, 09:27 PM
I just pulled my exhaust off to take it to the powder coater sometime next week.
Also getting ready to drop my engine. Since I am dropping it to examin the pump, i am also going to upgrade the cam (going RAT) which will also buy me some schooling on what CR to shoot for. When I rebuild the engine the first time, I just set the deck height at .040 and called it a day, but did not really understand the benefits of going much higher or lower (power to heat ratio).
I'm also going to pull all the galley plugs just to make sure there is no oil blockage.
And, I want to see if I can seal that annoying oil leak. Still don't know where it is coming from. When I build the engine in late 2007/ early 2008 I learned a lot, and told myself there were things I'd like to try differently the second time around. Now I get to do that. It should not take me nearly as long to do this again as it did the first time. Most of the "WTF am I doing" fear is gone.
Most of it...
Zach
Posted by: Vacca Rabite Jul 1 2009, 02:46 PM
Today has been a very good day.
Today I got a call from the ceramic coater saying the exhaust for my 914 was ready to be picked up. I got my 914 engine back from Jake's where I sent for dynamic balancing, ready to begin rebuilding. And I got a PM from a machinist on the 715zone saying that my driveshaft relocation kit had shipped.
Today is the first day of a twelve day vacation. By the end of it, I may very well have both the 914 and the 715 on the road!
tomorrow, I gotta get up early. I got a lot of stuff to do!
Posted by: type11969 Jul 1 2009, 02:54 PM
Sweet, good luck!
Posted by: Vacca Rabite Jul 28 2009, 10:43 AM
I've not updated this thread in a long time...
Since the start of July, I got the engine in. Fucked it up by loosing the dizzy spring down the case. Took the engine back out. Got the spring. Put the engine back in (with the dizzy installed so as not to go through THAT again.
Right now I need to re-wire some wires that did not survive sessions of angry engine gymnastics. I need to find someone to hold the shifter in place so I can get the cone screw in at the fire wall. Exhaust needs to go back on.
I noticed that the (NEW) Terry throttle cable is tearing the sheath away from the pressed on nipple. I guess I need to replace it. *grumble* Exhaust needs to go back on after the shifter bar is in. Then it needs to be run to break in the cam and set timing.
Then I can try driving it again.
Zach
Posted by: Dr Evil Jul 28 2009, 10:56 AM
I'm on my way over so I can help with the wires and linkage tonight.
Posted by: Vacca Rabite Jul 28 2009, 11:03 AM
Cool. I've got Theo duty tonight, but I'll be able to leave him in his play room for short stints while dinner is cooking to get the cone screw in.
If the weather is nice, I'll make grilled chicken tonight. you are welcome to some, as always.
Zach
Posted by: jsayre914 Jul 30 2009, 05:11 PM
is it runnin
Posted by: Vacca Rabite Jul 30 2009, 07:11 PM
Not yet. I gave the car some pity time on Tuesday, and have not even been in the garage since then.
Its possible that Mike has come over all stealthy like and done everything for me (like that time he put my engine in and I did not know till a few days later). Barring that, I'll be putting in time tomorrow.
I have new exhaust gaskets for the Eurorace coming in from Paragon, and a new throttle cable coming in from AutoAtlanta. neither were here today, hopefully both will be here tomorrow.
I want to drive the car to Plasket's cookout on the 14th. Which means I have this weekend and next weekend to get it up and running and drivable.
Zach
Posted by: ghuff Jul 30 2009, 07:30 PM
Good luck. My move and kids have been eating into my modify/fix cars time but the 914 is finally in a garage and I have space.
I am not affiliated with these guys at all, but if you need something easy in a pinch germanautoparts.com is in NY and I receive my orders from them sometimes the next day. Really good place for stuff you need in a pinch and they have a ton of oem 914 parts.
Posted by: Dr Evil Jul 30 2009, 09:54 PM
I am wanting to come out tomorrow I have lots of bus stuff to do, andnew parts!
Posted by: Vacca Rabite Aug 1 2009, 07:13 AM
So I got an hour or two of work on the car done last night after my little boy went to bed, but before I collapsed in exhaustion.
Carbs are back on. Fuel is hooked up. Everyhting but the exhaust is done under the car (I am still waiting for gaskets - but if worst comes to worst I can use the copper ones I modded - but I don't want to.)
Before I run the car I need to:
I need to replace 4 wires, once I am positive where they go.
Hook the battery up (hope nothing lets smoke out)
bolt the exhaust back on.
Sparkplugs in (going to buy new ones)
plug wires in (easy)
and then it is ready to run.
I'll get new plugs today. After that is it just about an afternoons work, as I spent about an hour last night with wire diagrams and I am pretty sure I know where my 4 errants go.
Zach
Posted by: tat2dphreak Aug 1 2009, 09:32 AM
kick ass man! get it on the road!
Posted by: Vacca Rabite Aug 13 2009, 08:41 AM
Mike came over last night, and we got some good work done.
We got the rebuild started for the first time! YEA!
Then had to shut it down due to a loud ticking noise and a big oil leak. BOO!
The clicking noise (and oil leak) was due to an adjuster screw impacting the valve cover. The new Elephant foot screws that I am using were a bit longer, and one needed to be clearanced ~.01 inches. We figured the impacts were causing the valve cover to dislodge enough to leak. also, I needed to torque down the oil pressure relief cover a bit more, as that had a slight leak. No biggie.
Anyway, we fixed that, reset the valves and ran it again, but only for a minute as it it was near 10pm and I like my neighbors. Ticking was gone, and we could not see any new oil leaks (but we need to run it more to find them probably).
the good bits!
Engine sounded GREAT. Oil pressure came right up to about 50psi within a second of starting the car, which it never used to do before.
The amusing bits:
a mouse has been hording sunflower seeds in my muffler. I tried to get them out, but on start up I do have a debris field of sunflower seeds behind my tail pipe.
I also came to the conclusion that I am not going to get this car finished myself this summer - even as close as it is. So, I swallowed my pride and gave Mike a list of things to do. It only needs about a day, but my schedule has been so hectic of late that I don't even get to look at the car for weeks at a time. I NEED to drive it to Matt's party next weekend, and this is the only way it is going to get done.
Mikes project is at my place anyhow, so he is there frequently.
Off to a meeting.
Zach
Posted by: ghuff Aug 13 2009, 09:26 AM
My advice for that is to break your sleep up over two periods if possible with an understanding wife.
My wife lets me pass out for a few hours sometimes in the evening in order to go work on the 914 late so I can get more complete without being interrupted.
2 hour nap for me in the evening leads to 4-6 hours of night work on a good night, then another 4-5 hours of sleep before I have to get up and go to the gym then work for my days on.
Works for me, may or may not for you in the future. Good you have capable friends to help!
Posted by: Vacca Rabite Aug 13 2009, 11:01 AM
My day is ~16 hours long 4 days a week. No time for naps. It will remain this way until I I am done with grad school in Dec. of 2010. The nights when I am not in class, my wife is (we are both grad students and both work full time). When home alone, I need to be paying attention to my curious, safe cracking, toddler son. On the weekends, almost all my time goes into keeping the house up and doing homework.
As it is, the schedule that my wife and I keep in order to both finish grad school has been negatively impacting our health, putting strain on our relationship, and has relegated non-essential projects to just about stasis. I end up relaxing more at work then at home.
But, the light is visible at the end of the tunnel. I have made the decision that I will be done with grad school when I have this degree, instead of chasing another degree that I want as well. We have gotten our home upkeep pretty damned efficient, and we know that this year or two of hell will open a lot of doors for our families future. Its hard, but the payoff will be worth it.
In the mean time, I farm out my punch out list, and get to hang out with a friend at the same time. Its worth it.
Zach
Posted by: Dr Evil Aug 13 2009, 11:59 AM
I should be heading over shortly to attack that work list. No biggie. How do I reposition your headers if I need to? I may just bend your shift bar slightly. It will be easier for me.
Posted by: Vacca Rabite Aug 13 2009, 12:19 PM
I should be heading over shortly to attack that work list. No biggie. How do I reposition your headers if I need to? I may just bend your shift bar slightly. It will be easier for me.
Bend the bar if need be. Heat it with the torch and bend it in the vice. I am at the end of travel in the given slots for the headers, and I am not sure what moving them further will do in terms of leaks at the heads.
Theo and I are not going to the pool as we had hoped due to the forcasted weather, so I will be around to help a little.
Zach
Posted by: plas76targa Aug 13 2009, 12:49 PM
Zach, thought I'd reiterate here that my BBQ is 8/22. You corrected yourself in the other post. Thought I'd mention that here to ensure readers don't get the wrong date. Hope the extra time allows you to complete the car!
Mice - I hate mice! Found a second nest near the break reservour. Previous one was well camped in the glove box.
Posted by: Vacca Rabite Aug 14 2009, 07:52 AM
Mike ran in the cam for 20 minutes last night without much in the way of drama.
Except for the oil leak that is still there.
We know that part of it is a leaking rocker cover seal. But there is also a leak somewhere else that only manifests when the engine is pressurized. Our guess was the pressure relief screw cover thing, so Mike removed it. We are going to give it a fresh crush washer and some case sealant just to be sure.
Of course, I complicated everything by a big spurt of oil when I filled it up.
And my other big fear is that the oil pump is not fully sealed, though I took pains to make sure it was totally clean after we pulled it to get that spring last month.
And yet, after 20 minutes of running, there was a depressingly large oil slick under the car. Some, if not most, is from the pass side rocker cover. Drivers side seems to be sealed fine.
Our plan is to wash the oil off with a little carb cleaner, replace the gaskets on the rockers, new crush washer on the oil pressure cover, runn it and see where we are. maybe run it on ramps so we get a better view of where the oil may be coming from.
Zach
Posted by: plas76targa Aug 14 2009, 08:00 AM
Keep up the good work Zach. I have drip pans under the 911 you can use when you bring the car here next weekend
Posted by: Dr Evil Aug 19 2009, 01:50 PM
So, engine is back in and so far no leaks. All that is left to do is:
- Timing
- Carb adj
- Throttle cable install finish
- Clutch cable adjust
- Move the pass side parking brake cable under engine bar to avoid the header
- Adjust shift linkage
Posted by: Vacca Rabite Sep 19 2009, 01:18 PM
It WORKS!
It all just works!
No more popping. No more backfires. Charging system is charging. Head temps live between get to about 300 and 350. Oil temps got to about 210 and stayed there. Oil pressure was ~80 at start up, 40 when warm and driving, and around 10 when warm and idling at a stop.
I took off my exhaust last night and put it back together using a thick smear of copper RTV on the OD of the header pipes where they fit into the slip fits 4to1 connector. That solved my exhaust leaks.
All off the popping and backfireing from last week is GONE! The car is driving like a top. I just got back from a 30 minute drive around the backroads. The carbs seem to be just about perfect. Maybe a tad rich, but I have power all the way through the powerband. Cruising around in 4th at around 2K was fine.
I am so freaking happy right now.
Its time to give it a bath and wash all the garage dust off.
Tomorrow I am going to drive it to Erin's parents house 45 minutes away. Erin and Theo will be following in the Subaru for support, but I think I am ready to start venturing outside the 10 mile radius of my home that I have been testing it in.
Zach
Posted by: Vacca Rabite Sep 19 2009, 04:40 PM
Some pictures from today after a bath.
closeup of the finished shifter knob that I made a while back. It is starting to get further polished by the oils in my hands when I use it.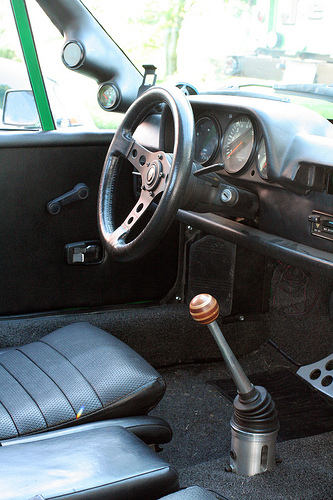
My interior is still a work in progress. Its passable right now, but I look forward to getting my seats recovered.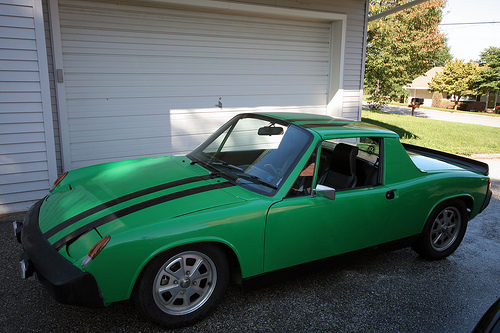
My ride, all clean from a bath. It ain't perfect, but I like it.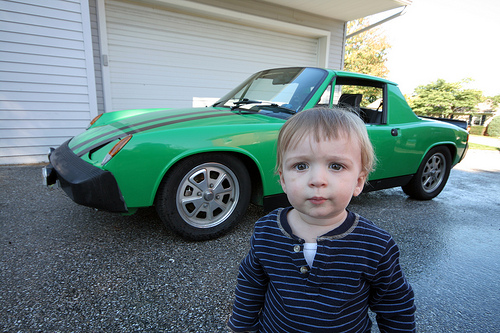
My son saw a camera and came running. Kick ass. 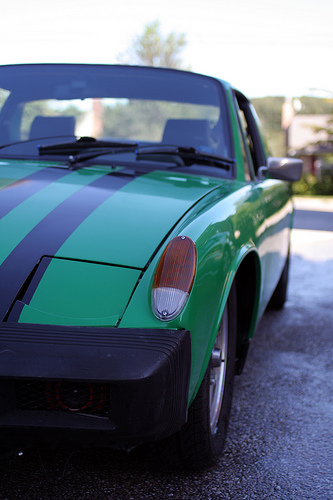
If I fix that headlight, I can't get it aligned right. I guess I'll just live with it.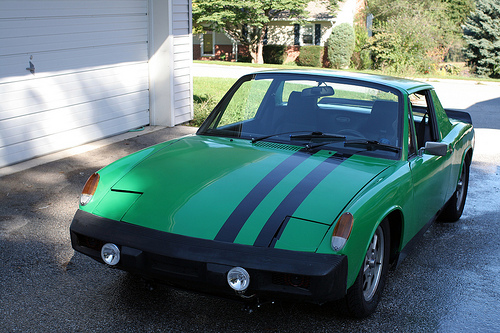
My car. I really like the look of the front bumper with the ralley style driving lights. Now I need to wire them to turn on with the parking lights.
Happy day, today was.
Zach
Posted by: type11969 Sep 19 2009, 06:50 PM
Nice, congrats!
Posted by: jsayre914 Sep 20 2009, 11:29 AM
That is awesome.
what is the deal with the driver side eyelid, looks like it needs a little adjustment 
i have not had so much motivation, i am currently repainting my bathroom, and hallway upstairs. then i will clean up the engine bay a little. I still need to get the engine mounted on the stand, clean it up, and put it back togeather. Then We Can Race
Posted by: sendjonathanmail Sep 20 2009, 07:56 PM
Wow Zach that looks great! Its come a very long way since I last saw it sitting on the rotisserie in your garage, how long ago was that? It's almost time to paint ours too, hope it comes out as well.
Posted by: Mary Shortridge Sep 26 2009, 05:31 PM
Oh my gosh, I just found your thread! This is AWESOME!
I'll be THRILLED if Buttercup comes close to that!
I was so pleased to see your shifter knob...dad plans to work on that for me.
Thanks for the inspiration!
Posted by: OU8AVW Sep 26 2009, 10:31 PM
Bravo!
Posted by: seebobgo Sep 26 2009, 11:02 PM

Posted by: Vacca Rabite Dec 15 2009, 02:05 PM
Well....
I might be going five lug. If I do, I'll have a lot of pretty much brand new suspension parts for sale.
Zach
Posted by: Spoke Dec 16 2009, 05:06 PM
Well....
I might be going five lug.
This will transform the look of your car. For me it was one of the funnest jobs as the front end (if you do a 911 front end) is a drop-in change. Are you going to use a 911 front end with underbody sway bar or just changing struts & hubs?
Posted by: r_towle Dec 16 2009, 06:51 PM
Zach,
Let me know if you are serious. I just picked up a 72 911 with 6 inch fuchs.....I may consider selling off the front end and wheels if you are really considering it.
We may sell it whole, but I want the rear suspension tube and arms for a special project.....
Rich
Posted by: Vacca Rabite Dec 16 2009, 07:26 PM
Scotty was able to more or less steal a 911 front end, and he offered it to Mike, who mentioned it to me. As I simply can't seem to leave well enough alone, I said I'd take it. It will probably be my 2010 winter project, so I will have a bunch of nearly brand new /4 suspension bits for sale.
I will be looking for wheels, and other assorted bits. I am trying to decide now if I want to go flares or not. See above about not being able to leave well enough alone...
Zach
Posted by: scotty b Dec 16 2009, 07:34 PM

I am trying to decide now if I want to go flares or not. See above about not being able to leave well enough alone...
Zach
DRIVE 914 !!
FIX JEEP !!!!!
FLARE 914 IN A YEAR OR TWO !!!
Posted by: Vacca Rabite Dec 16 2009, 08:41 PM
lol
I still intend to make 2010 the year of the Jeep. Flares, if they come, will be a later addition.
Zach
Posted by: sendjonathanmail Dec 16 2009, 08:53 PM
Zach, your 914 would look sick with flares
Sell the jeep and build a /6?
Posted by: scotty b Dec 16 2009, 08:56 PM
 You should flare the Jeep !
Posted by: Vacca Rabite Dec 16 2009, 09:09 PM
Jeep already has flares!
Can't sell it, though I am really tempted too sometimes. My son loves it, and I am looking forward to one day having a truck to do truck things with.
Zach
Posted by: Vacca Rabite Apr 3 2010, 02:53 PM
Just an update to show pictures of the brackets I made. I needed a better way to hold the VDO pressure and idiot light sender. I also needed to make a throttle cable bracket since I moved the linkage from the front of the carbs to the back of the carbs.
So, here is the throttle cable bracket I made. Yellow makes it faster.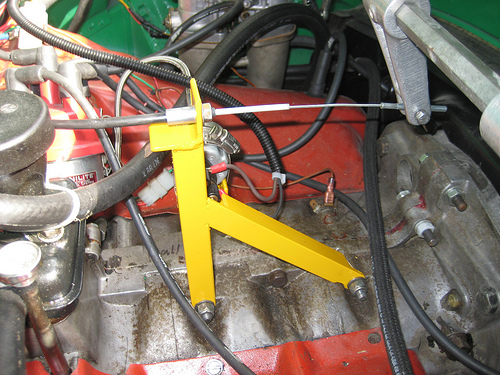
And here is the VDO bracket: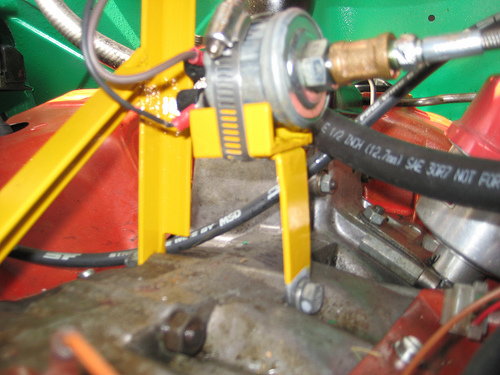
There is an unpainted contact point in the channel of the VDO sender bracket that presses against the sender. Then the bracket grounds against the case. Works perfectly.
Zach
Posted by: ghuff Apr 3 2010, 03:03 PM
That is a slick bracket. Good work. just be sure to coat it with something to dissuade corrosion and enhance the connection.
Posted by: Vacca Rabite Apr 5 2010, 03:56 PM
I went for the first drive of 2010 - just a few miles blasting around the backroads of PA. Got the back to slide out a little on one turn that I took a bit hotter then I like. Engine sounded GREAT! I think I have the 40s tuned in pretty well. No flat spots up to 4K, though I did not try any freeway miles.
Zach
Posted by: jeffdon Apr 5 2010, 04:09 PM
I went for the first drive of 2010 - just a few miles blasting around the backroads of PA. Got the back to slide out a little on one turn that I took a bit hotter then I like. Engine sounded GREAT! I think I have the 40s tuned in pretty well. No flat spots up to 4K, though I did not try any freeway miles.
Zach
Good on you! I plan on having mine on the road June/July.....
Currently....
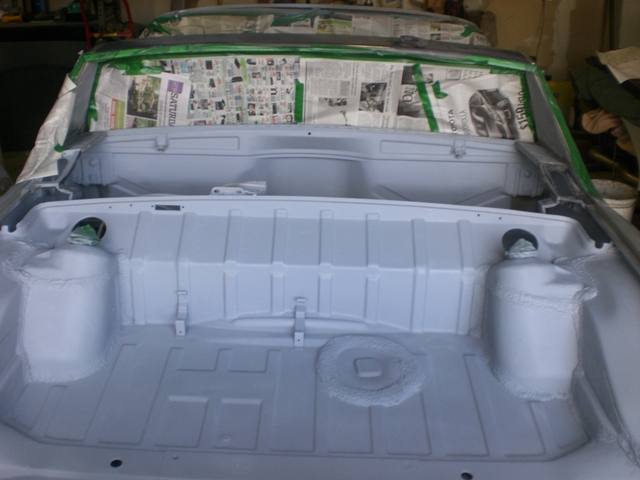
Posted by: jsayre914 Apr 5 2010, 04:27 PM
great news zach, now i need to get mine running 2 1/2 weeks left till hershey 
i saw 2 914s over the easter weekend, these things are everywhere nowdays the orange one was driving 83 south right past the pa74 exit on SAT about 2ish. The red one was comming from the direction of your house on 74 sunday and looked very modified.
pm me your email so i can send you some photos of your kid
Posted by: Vacca Rabite Mar 6 2011, 12:54 PM
So, for the entire winter of 2010/2011 my car has sat. Its been too cold, and I have been to busy/stressed to get out and work on it.
Today, FINALLY, I got out to the garage.
I pulled the leaky ass Eurorace off again to try and get it to seal. I am going to try a pipe expander and get the pipes to be a nice tight fit in the slip fit. Right now they wobble worse then a baby who is learning to walk...
Also, I welded in an exhaust bung for a 4 wire tailpipe sniffer. Something that I have been meaning to do since last summer.
It feels SO good to have finally gotten out there and done a little work. And now I have motivation to move my ass if I want the car on the road again my Hershey...
Zach
Posted by: SGB Mar 8 2011, 10:57 AM
DO IT.
DO IT NOW.
Posted by: scotty b Jun 27 2011, 03:16 PM
lol
I still intend to make 2010 the year of the Jeep. Flares, if they come, will be a later addition.
Zach
Are either of these things done yet
Posted by: r_towle Jun 27 2011, 03:27 PM
mean friend...
Posted by: Vacca Rabite Jun 27 2011, 03:36 PM
lol
I still intend to make 2010 the year of the Jeep. Flares, if they come, will be a later addition.
Zach
Are either of these things done yet
Engine for the jeep is at the machinist doing whatever magic they do so that I can rebuild it. Mike still has the transmission. Hey. Wait-a-second! Who am I explaining myself to YOU! The king of too many projects and not enough time!
And I have a 914 with flares now (even if I have not seen it with my own eyes, I've been told its nice.) so I am not feeling the need to add flares to my street car.
Well, I'm not planning on doing it today.
Viscous rumors aside, I HAVE driven my car this year. Just not driven it very far, and then started taking it apart again like a bull headed fool.
Since this thread has been bumped, a little update.
I am de-racering my car, trying to turn it more into a street car that does not scare off my son.
The Eurorace is gone. Off the car, in storage until next spring where I will sell it at Hershey. In place are SSI 2.0 exchangers and some muffler that I thought was a Bursch, but Joe thinks is a Seabring. It was dirt cheap (as in free), attached to the SSIs and not rusted. I want heat, at least enough to defog the windshield.
GT lid came off, and will be donated to the race car or sold. In place will go the stock unit and a rain tray - more for intake noise abatement then for rain protection.
Thermostat has been hooked up. That seemed to take forever, but its in place now.
I need to adapt my carbs to the cable linkage I got from Tangereen. When the carbs are done the car is back on the road.
Now, I'm going to go get a burrito and work on my car!
Zach
Posted by: scotty b Jun 27 2011, 03:39 PM
lol
I still intend to make 2010 the year of the Jeep. Flares, if they come, will be a later addition.
Zach
Are either of these things done yet
And I have a 914 with flares now (even if I have not seen it with my own eyes, I've been told its nice.)
Zach
 Whahaaaaa ?
Posted by: Vacca Rabite Jun 27 2011, 04:13 PM
All I need is a weekend to book to come down and put some time in on the race car. When works for you?
Posted by: scotty b Jun 27 2011, 04:21 PM
All I need is a weekend to book to come down and put some time in on the race car. When works for you?
Oh THAT flared car. I had forgotten all about it

Posted by: MDG Jun 27 2011, 06:39 PM
Oh THAT flared car. I had forgotten all about it
Uh-oh. Zach wants to SEE the car Scotty.
Sounds like Mr. B has a quick trip to the pawn shop coming soon . . . .
Posted by: mepstein Jun 27 2011, 06:44 PM
Oh THAT flared car. I had forgotten all about it
Uh-oh. Zach wants to SEE the car Scotty.
Sounds like Mr. B has a quick trip to the pawn shop coming soon . . . .
Pawn a project 914? You'd have to give the pawn shop money to take it.
Powered by Invision Power Board (http://www.invisionboard.com)
© Invision Power Services (http://www.invisionpower.com)