Printable Version of Topic
Click here to view this topic in its original format
914World.com _ 914World Garage _ The eurorace header just showed up
Posted by: purple Oct 3 2007, 10:12 PM
Hey guys, this is something of a continuation thread of these last two threads.
http://www.914world.com/bbs2/index.php?showtopic=76498
http://www.914world.com/bbs2/index.php?showtopic=76175
The eurorace header showed up today! YES!!!
Here is a pic of it sitting in the garage somewhat assembled.
Now I have a couple questions:
1: Do I use only new copper gaskets?
2: Is there a specific procedure to preparing the gaskets prior to install?
3: Should I use those copper nuts or just double nut the stub pipes to the exhaust ports?
4: Should I do a little dance after putting it all on without any pulled studs?
I'll post a pic of the dual motorcycle exhaust once I launch my other computer.
If Jake signs in....how much will this help my engine over that dual motorcycle exhaust?
Attached thumbnail(s)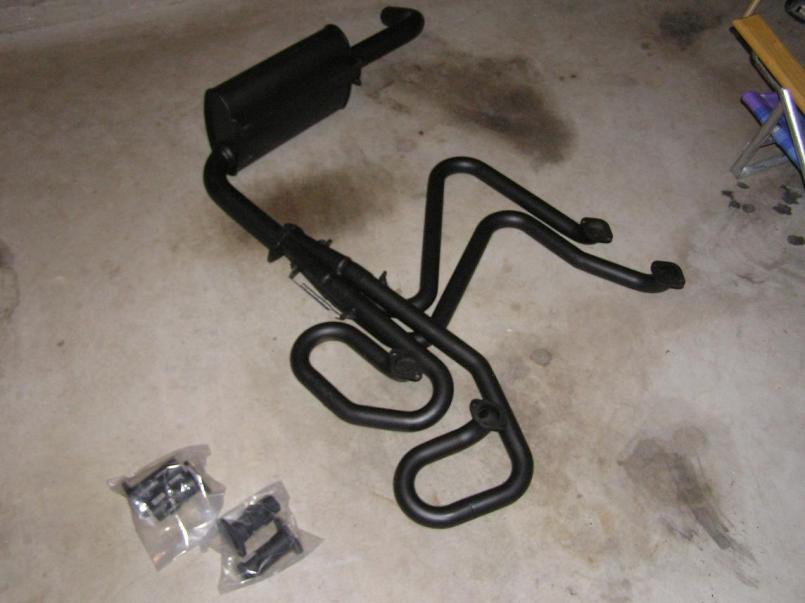
Posted by: Twystd1 Oct 3 2007, 11:18 PM
I don't think you have to wait for Jake to tell you that the dual motorcycle exhaust on a TYPE IV simply sucks... I will tell you they suck..!!!!! 

I would ONLY use NEW copper crush rings if I were you. In that way. You start with a known GOOD set of copper rings/gaskets.
Jake sells the good ones. They are made of some copper alloy that works better than the stock items according to a long conversation I had with Len Hoffman on that exact subject. I respect Lens advice in a big way.
I would also throw a file on all 12 flange surfaces to make sure they are flat. High and marks will show up instantly with judicious use of a flat file. Make em flat if they aren't already.
I just did Aarons that way. I found 3 of the flanges were a wee bit NOT FLAT. I simply filed em flat. Easy Peasy........
Do this BEFORE you mock up the exhaust.
Also make sure your primary pipes / collector slip into each other without to much force. You might have to sand a bit of the grime away to make them a easy slip fit. Cause thats a bitch to do under the car. Check it now.
You can double nut or use the copper PLATED nuts. Your choice.
Check to see if the stub pipes have numbers on them. If so. That MAY mean they are made to fin a particular header pipe. Some have em. Some don't. Check before installation..!!!!
NOTE: If you have a hard time getting the copper rings to stay put when installing your stubs.
Ya might wanna use some thick style super Glue to hold em in, whilst installing the stubs. Thats the way I do it anyway. As well as many others.
Once you have your stubs bolted up. Start bolting the primary pipes to each appropriate stub pipe. BUT LEAVE THE NUTS AND BOLTS LOOSE. As you will need some maneuvering room to get all 4 pipes into the collector. Wiggle room is important at this juncture.
Once it's all mocked up and fits correctly. THEN tighten the primary pipes to the stub pipes and then the collector.
Hope that helps.
And then do a dance in effigy to the EuroRace..
Cheers,
Clayton
Posted by: purple Oct 4 2007, 06:46 AM
My hat's off to you Clayton for your exemplary explanation!
Thanks!
p.s. I knew they were copper plated nuts, i just wanted you guys to know exactly what I'm talking about.
Posted by: purple Oct 4 2007, 09:26 AM
This is a pic of the original exhaust viewed from the back of the car.
The mufflers are from a suzuki.
One goes to one bank, the other goes to the other bank.
How do I dispose of these things? Can they be recycled?
Attached image(s)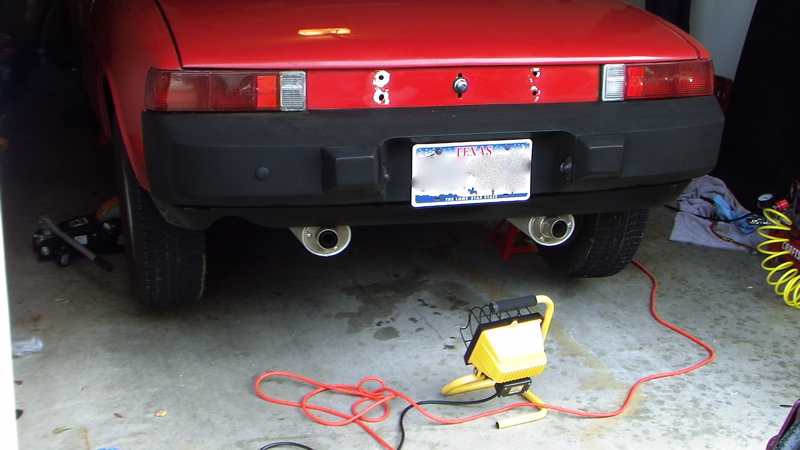
Posted by: Demick Oct 4 2007, 10:33 AM
How are you going to double nut the stub pipes to the heads? The only way a double nut provides any locking power is to tighten the nuts against one another. That means getting a wrench on both at the same time. Not sure how you would accomplish that. Simply installing one nut and then installing a 2nd one under it does very little to lock them together.
Do it right and use nuts with a built-in locking feature - like the copper plated nuts have.
Posted by: Joe Ricard Oct 4 2007, 12:17 PM
Word
Copper nuts are good.
Motor Cycle mufflers are meant for Motorcycles.
Have we steered you wrong so far?
Posted by: ChrisNPDrider Oct 4 2007, 12:36 PM
Twystd1 got most of it - I still gotta say RIGHT ON for hookin me up with my Eurorace last year 
You got it mocked up on the floor - perfect. Take it slow and loose on the install to ensure everything fits. For the stub pipe connections buy some copper RTV and several lengths of bolts. A thin layer of the copper high temp silicone = no leaks on those flat surface interfaces. There are a couple places where the bend of the pipe is too tight to fit long bolts, so you need a short bolt for the tight spot. I also dipped my bolts in milk of magnesia as an anti-seize as recommended by Jake and others.
Headers rock 
Posted by: jd74914 Oct 4 2007, 12:54 PM
Make sure you anneal the new copper gaskets. 
What are you planning to do with the bike mufflers? If they are going into the trash could you send me a PM.
Posted by: purple Oct 4 2007, 01:15 PM
I ordered the copper nuts from pelican, the copper rings from Jake this morning.
The bike mufflers have been PMed off me by Rand already, but if he doesnt like the pics I'm sending I'll put you next on the list.
Question, what does annealing mean? Do I need a blowtorch for that?
http://en.wikipedia.org/wiki/Annealing_%28metallurgy%29
is that what I need to do? Heat it until glowing and then let it cool slowly?
I'd need a MAP torch to do that dont I?
Why milk of magnesia?
Thanks guys!
Posted by: purple Oct 4 2007, 01:24 PM
Demick, did you get that phrase in your sig from Phil Hendrie?
Posted by: Demick Oct 4 2007, 01:29 PM
No idea who Phil Hendrie is. I got it from Adam Savage (Mythbusters)
Posted by: purple Oct 4 2007, 01:42 PM
oh yeah, that's where I heard that.
Phil Hendrie is a comic genius, he satirizes talk radio
http://www.philhendrieshow.com/
enjoy some clips, they're funny!
Posted by: jd74914 Oct 4 2007, 03:28 PM
If you drop the copper gaskets on the ground they will make a pinging sound. What you want to do is heat them until they slightly change color and so that they don't make that sharp sound when dropped. This means that the molecules have been rearranged and the metal is effectively "softer" or more mailable so they seal better.
Posted by: jasons Oct 4 2007, 07:17 PM
I don't know if anyone has given you this advice yet but..... You will need to get a heat shield sleeve to wrap your clutch and speedo cable. Otherwise, they will drag on the exhaust and smell like burnt rubber.
Here is one example....
http://www.hrpworld.com/index.cfm?form_prod_id=133,53,363_4489&action=product
Posted by: Twystd1 Oct 4 2007, 09:08 PM
Good call jasons... I forgot about that...
AND I would ask Jake FIRST before you anneal the Jakes crush rings.
I put em in right out of the bag... 2 sets on 2 different engines.NO LEAKS. End of story.
That was as per Len Hoffman.
Clayton
Posted by: Aaron Cox Oct 4 2007, 11:44 PM
back to the heat sleeving....
i still managed to melt cables with that, use a bailing wire solution AND heat sleeve to keep it off the header.
Posted by: purple Oct 5 2007, 09:35 AM
Good call on the sleeving guys. I was wondering if I'd have to re-kagigger the clutch linkage angle or something on accounta this header.
Well, Jake hasn't stepped in yet, so I dunno if I have to anneal his rings. I think I'll put them on and see what happens
Posted by: Jake Raby Oct 5 2007, 09:55 AM
No annealing necessary, just install and retighten them after a few minutes of run time.
The Type 4 is all about exhaust- period. Dual mufflers and crazy half assed hodge podge backyard excuses are what make for untunable engines and catastrophic failures.
Every time I see a TIV without a collector, running dual mufflers with an owner that believes "it's OK" it makes me want to go ballistic!
Posted by: purple Oct 5 2007, 10:06 AM
Thanks Jake,
every time you read one of my threads it's as if someone sh!t in your cereal, BONG! 
Hopefully I'll have a thread you'll be happy about some day
If you're ever in Houston, go down Richmond avenue near the Galleria, there is a speed shop there. Vent your spleen there 
Posted by: ChrisNPDrider Oct 5 2007, 10:43 AM
Oh yeah - tha cables.
I bought the cable heat shield and no worries so far. Clutch cable came off and slipped inside OK, speedo cable I tore open the sleeve and stapled it back together. Worked great. The 2 cables are now bundled and tied up away from the header against the engine mount, engine tin mount tab on case, and clutch pulley bracket hole. I also used fiber insulating heat wrap onthe header and collector so both the header and cables are wrapped. Heat kills! 
Posted by: purple Oct 15 2007, 02:15 PM
I installed the header this weekend and I'm curious where you got the heat shielding.
btw, it seems to idle friggen great! havent driven it yet though....need to get the cables un-heated first
Posted by: jasons Oct 15 2007, 09:42 PM

I installed the header this weekend and I'm curious where you got the heat shielding.
I posted a link to one place up above, but you can probably get it from summit racing, I got mine from "anglo american roadracing" but I think they are out of business.
Posted by: Type 4 Unleashed Oct 16 2007, 01:35 AM
I used Earl's Flame Guard, I forget if it was 1" or 1 1/4", I ran both the Speedo & clutch thru it, the Speedo, I used a length of bailing wire thru the shield, then pulled the speedo cable end right thru.
Also, seen done by some one else, But they I believe put a slot, I just drilled a hole about 1" down & 1/4" to the left of the original hole of the clutch pulley bracket, which angels the clutch cable over the header.
Also, as long as the Flame guard doesn't toch the Header it will not burn
Two last things, 2 hangers, one bolted to the tranny side cover above the clutch fork, and the other an L bracket sheetmetal screwed to the side of the case where heater box tin usta screw to the case, they keep the shield and cables from header..
Link & Pic
http://www.anplumbing.com/shop/index.php?shop=Accessories&dept=Flame!_Guard
Posted by: purple Feb 24 2008, 11:30 AM
I'm resurrecting this thread...but can someone out there show me what the clutch cable plate looks like when they drilled it to make it rotate to clear the headers?
I think i've melted 2 clutch cables trying to get this right. I have the summit heat shield on there, but i didnt rotate the pulley bracket because i didnt know where to drill it.
I also have the cables zip tied to the case, but i'm thinking this is a far from optimal solution. any input would be greatly apprecieated!
Posted by: Type 4 Unleashed Feb 24 2008, 07:23 PM
Sorry I didn't get any pics.
But all I did was to use the stud as a scribe, I left the nut on the back stud, tightened a little, then just moved the plate up and down allowing the stud to scribe a mark on the back, to where the cable would clear the exh tubes, marked it then drilled a hole. I then used a hammer to flatten the area around the freshly drilled hole, so the spring washer and nut would have a flat area to tighten against.
Posted by: purple Feb 25 2008, 08:16 AM
Sorry I didn't get any pics.
But all I did was to use the stud as a scribe, I left the nut on the back stud, tightened a little, then just moved the plate up and down allowing the stud to scribe a mark on the back, to where the cable would clear the exh tubes, marked it then drilled a hole. I then used a hammer to flatten the area around the freshly drilled hole, so the spring washer and nut would have a flat area to tighten against.
Ahhhh-so
that's how that works for tightening the nut against something flat.
thanks!
Posted by: chris914 Jun 4 2008, 04:29 PM
I was wondering how this all worked out?
Because I’m about to do the same thing, with the same headers and cables.
Here are my choices so far:
http://store.summitracing.com/partdetail.asp?part=THE%2D14010&FROM=MG
http://store.summitracing.com/partdetail.asp?part=DEI%2D010419&FROM=MG
http://store.summitracing.com/partdetail.asp?part=THE%2D17100&FROM=MG
http://store.summitracing.com/partdetail.asp?part=dei-010429
Posted by: purple Jun 4 2008, 04:54 PM
works great! ended up running the clutch cable underneath the header, havent caught it on anything (yet)
the only issue i guess is to not let it idle too much in one spot, the heat from the pipe may start to warp the console cover on a sideshifter a bit. not much, but it did do it to me
also, dont wrap the thing. it will destroy itself FAST if you do that.
Posted by: sean_v8_914 Jun 4 2008, 09:33 PM
that header is a waste of money
http://www.youtube.com/watch?v=wAn8rgrcGRU&NR=1
Posted by: Todd Enlund Jun 4 2008, 09:38 PM
Copper nuts are good.
Better than brass balls?
Posted by: JmuRiz Jun 5 2008, 01:58 PM
Wow, old thread resurrected, what'd you end up doing with the motorcycle exhausts? Just curious
Posted by: purple Jun 5 2008, 03:53 PM
that header is a waste of money
http://www.youtube.com/watch?v=wAn8rgrcGRU&NR=1
thanks man, great to hear 800 bucks was wasted

anyway, wtf is up with the laugh track? Its like i'm watching a live motion video of the flintstones (painfully unfunny, yet these douchebags are laughing like groucho marx is in the house) wtf?
Posted by: purple Jun 5 2008, 03:54 PM
Wow, old thread resurrected, what'd you end up doing with the motorcycle exhausts? Just curious
I gave them to Rand, on this board. I have the left side head-pipe and the other side head-pipe went to france to johannes rousell.
I believe "flung to the 4 cornerns of the earth" describes it

Powered by Invision Power Board (http://www.invisionboard.com)
© Invision Power Services (http://www.invisionpower.com)