Printable Version of Topic
Click here to view this topic in its original format
914World.com _ 914World Garage _ Battery tray replacement
Posted by: swood Dec 27 2003, 01:14 PM
Mine isn't terrible, in fact the tray isn't rusted through in any place. But I have the replacement, and I want to paint underneath. So I'm trying to figure out how to remove it, I'll try drilling out the spot welds. (Couldn't find that specific bit).
But without a spot welder, how do you weld it back on? Most of it will need to be painted first anyways, so would you tack the base on first from the inside then the tray underside? Not to be a CW, but I wouldn't want to see weld beads.


Posted by: Andyrew Dec 27 2003, 01:32 PM
Get a die grinder if you dont already have one.. and grind off the beads..
I welded mine with a mig (cheap one at that) by just giving it small holding welds while my dad held it in place..
Then I gave it good solid welds, made sure both sides where red hot.
The other people here will help you better.
Andrew
Posted by: SirAndy Dec 27 2003, 01:58 PM
drill holes into the new tray where the original spot-weld locations are.
then weld on the new tray by filling up the holes.
then grind it down until it looks flush. then paint ...
that's what i did.
Andy
Posted by: redshift Dec 27 2003, 02:35 PM
I took out my life-savings... and I... well... paid someone.
M
Posted by: swood Dec 27 2003, 04:38 PM
Got her out. The hell hole phase 1. Next, remove surface rust then acid etch prime.
Igotta re weld the trunk hinge mount. They were welded previously and they're cracking. Torsion bars are (OW!) off, and going to ebay. Gonna put on the trunk shocks instead. 
Attached image(s)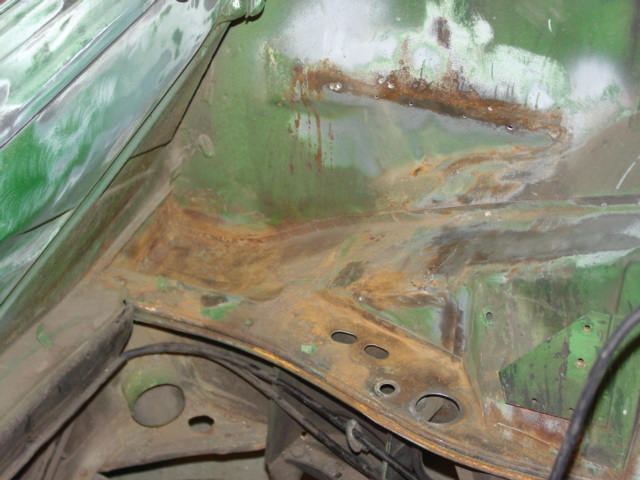
Posted by: swood Dec 27 2003, 04:38 PM
watgasfgb aw4t
Attached image(s)
Posted by: swood Dec 27 2003, 04:40 PM
Attached image(s)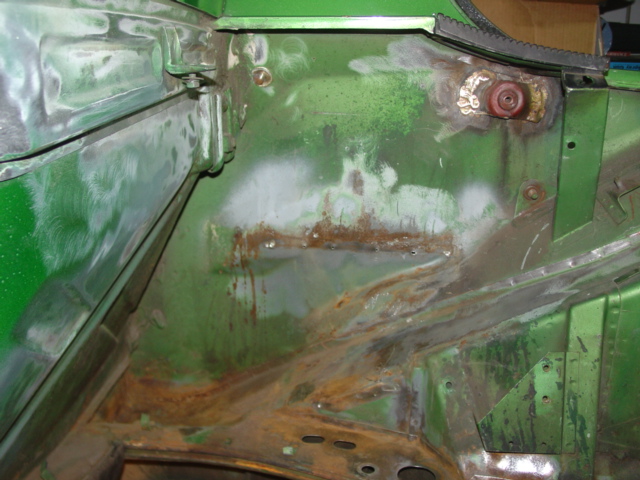
Posted by: Gint Dec 27 2003, 04:44 PM
That's doesn't look to bad. Nice work. 
Posted by: redshift Dec 27 2003, 04:50 PM
Just what I was thinking. I'd wire brush it, blow it out real good, oshpo it, and etching primer.. not bad..
M
Posted by: swood Dec 27 2003, 04:53 PM
Time to reward myself with a turdunken samich! 
Posted by: redshift Dec 27 2003, 04:56 PM
 m
m
Posted by: RustyWa Dec 27 2003, 05:11 PM
What color is that?
It looks like you have a few small holes where the battery tray was up against the inner fender well. Are you planning on replacing that metal?
Post pics of your progress...maybe even all the steps, if you have time to do that, including painting.  This would make a good Classic thread if most of the steps with photos were included.
I'm planning on doing the same thing this winter.
Posted by: seanery Dec 27 2003, 06:21 PM
that's a clean hell hole!
Posted by: swood Dec 27 2003, 07:00 PM
It looks like you have a few small holes where the battery tray was up against the inner fender well. Are you planning on replacing that metal?
Post pics of your progress...maybe even all the steps, if you have time to do that, including painting.
This would make a good Classic thread if most of the steps with photos were included.I'm planning on doing the same thing this winter.
Palma Green Metallic. Your car is my cars idol.
I wasn't able to see where the spot welds were to grind them down, releasing the tray. So I just ripped it off. I'll do as Andy suggested and drill a hole in the new metal over the old spot welds, in this case the holes, and just fill them.
I'm not worthy to create a Classic thread.

But I'll post pics as I go.
Posted by: boxstr Dec 27 2003, 10:00 PM
Since the motor is out and you are in the mood. I would look at all of the little tabs and brackets and studs and dohickies. Grind them off, or remove thenm however. But you will be glad when it is painted that you took the time now to do it.
CCLINENGINEBYTHEBAY
Posted by: Brad Roberts Dec 27 2003, 10:05 PM
When you get the new pivots... make sure you weld the "nut" to the metal on the backside.. otherwise they will spin in the holder 2-3 years from now.
For some reason.. someone braised yours on.
B
Posted by: swood Dec 27 2003, 10:06 PM
I agree. Tabs and doohickies are outta there! That's why I pm'd you about the trunk shocks before I set them free. (Serious sparkage on that task)
For an FI'd engine bay, I want it to look sharp as it can with all the hoses, wires, etc, etc.
This is a task I want to do once.
Posted by: swood Dec 27 2003, 10:07 PM
For some reason.. someone braised yours on.
B
I knew the attachment looked suspect. B-do you think I should pull these and re-weld? I thought they just needed a better weld.
Oh yeah, are replacement pivots available?
Posted by: steve@ottosvenice.com Dec 27 2003, 10:08 PM
I suggest using fastners to secure it,that way you can remove it to clean and repair any future rust. Steve
Posted by: swood Dec 27 2003, 10:10 PM
Hmm. Like bolt it to the body? What do you have in mind?
Posted by: Brad Roberts Dec 27 2003, 10:17 PM
Um.. I have NEVER seen one last that was bolted in... (battery tray or pivot) too much weight trying to balance on the triangle.
Restoration design has them in stock (pivots)
If you pull those off.. your going to have a big mess on your hands. You cannot MIG weld thru brass. You will have to grind ALL of it off. You may be able to reuse those (though they are cheap to purchase new).
Ask Steve is he carry's them new.
B
Posted by: swood Dec 27 2003, 10:22 PM
If you pull those off.. your going to have a big mess on your hands. You cannot MIG weld thru brass. You will have to grind ALL of it off. You may be able to reuse those (though they are cheap to purchase new).
I've never welded a thing in my life. So I don't know what I'm looking at there. I'd rather not pull it and start fresh. I can see the braze cracking from the top down.
Posted by: Brad Roberts Dec 27 2003, 10:30 PM
The braze looks like  .. I personally would pull it off and clean the area up and have them welded in.
Basically I take the new ones and drill 6 1/8 inch holes in them. Three on one side and three on the other and "spot" weld them to the tub. Then I run a short quick bead down the sides.
B
Posted by: swood Dec 27 2003, 10:34 PM
10-4!
Posted by: RustyWa Dec 27 2003, 11:25 PM
I thought it looked like L95K but, I couldn't verify...damn color blindness.

I didn't realize that the tray was welded at the inner fender. I thought it was only welded to the support.
Posted by: seanery Dec 28 2003, 12:16 AM
it'll cost ya maybe $20 to have a shop weld 'em on for ya.
Posted by: SirAndy Dec 28 2003, 12:41 AM
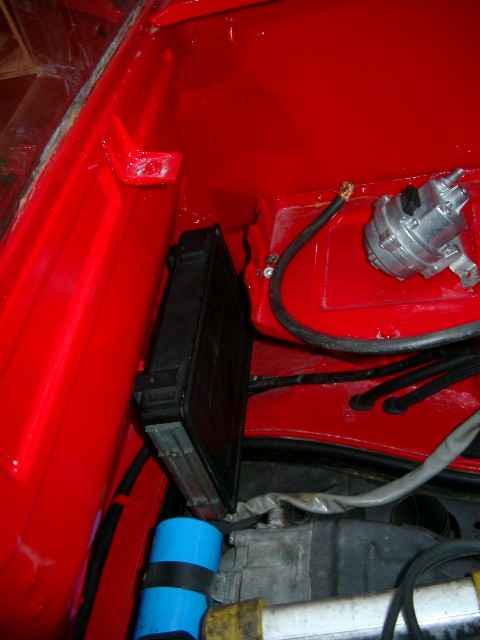
ahhh, you asked!
time to dig out one of my crappy pictures again.
if you look closely, you can see the spot welds on the top ...
Attached image(s)
Posted by: RustyWa Dec 28 2003, 02:21 AM
Ah yes....looky there... Thanks!
Posted by: DNHunt Dec 28 2003, 08:50 AM
I had one of the trunk pivots pop riveted in. It was done by the local Porsche dealership and lasted 15 years or so. I'm kinda surprised it worked as well as it did. It certainly is a quick and easy solution.
When I redid my engine bay recently, I noticed the pivot was slightly loose so I drilled out the pop rivets. I welded up the holes in the wheel well and welded in the pivot.
Dave
Powered by Invision Power Board (http://www.invisionboard.com)
© Invision Power Services (http://www.invisionpower.com)