Printable Version of Topic
Click here to view this topic in its original format
914World.com _ 914World Garage _ Fixing poor leakdown
Posted by: Vacca Rabite Oct 24 2007, 07:00 AM
So, at the Sterling meet I did a leakdown test on my motor, and found a problem with Cylinder 1. 45% leakdown, but 120 lbs of compression. Was tempted just to let sleeping dogs lie, but pulled the head off.
What was going on was clear as soon as we did that, the head was not totaly sealed to the cylinder, off by a very small amount. Instead of having the head recut, I decided to try and lap the two of them together.
So, last night I hand lapped them, using ground graphite to check for even contact. I got good contact after the third round of hand lapping (lap, clean, check).
Now I need to get the jug back on the block. I have a ring compressor on the piston, but I can't ficgure out how to get the head back on. Do I have to take the piston head off the rod?
If so, how do I get it off. It looks like that tis a spring keeper that needs to be removed. Is there anyhting on the rod the needs to be loosened before I can pull the pin out to remove the piston head?
Obviously, if there is a trick to getting the jug back on without pulling off the piston head, I'd like to do that.
Zach
Posted by: Brando Oct 24 2007, 07:24 AM
DO NOT take off the piston. If you do that then install the head, how will you get it in the cylinder?
After you get the cylinder seated down all the way to the block, simply line up the head, studs going through the holes. You may have to move the studs a bit (they will give a little bit) to align them with the holes. It should drop right on then.
Posted by: Vacca Rabite Oct 24 2007, 07:30 AM
Maybe I was not clear.
How do I get the cylinder on? The head is easy. I understand that part.
If I take off the ring compresor, the piston rings expand and the cylinder won't go over the piston. It stops at the rings.
Zach
Posted by: type47 Oct 24 2007, 07:54 AM
it may be difficult to install the jugs on to an engine with the pistons connected to the rods. if one was rebuilding an engine, then the pistons can be installed into the cylinders on the bench, then push the piston toward the bottom of the cylinder to expose the piston pin holes but not so far as to free the rings, then, with the crank turned to expose as much of the rod as possible, mount the piston on the rod and insert the wrist pin. you have your piston already on the rod on the "short-long" block. you can try to use the ring compressor to compress the rings (guess that sounds kinda "duh") and put the cylinder on the piston and attempt/try to basically "push" the ring compressor "off" the rings by pushing the cylinder onto the piston. you are probably doing this exact thing but it's hard to do it this way as you are experiencing. if this doesn't work, you can remove the piston from the rod (easily done to tap out the wrist pin) and assemble on the bench (as mentioned before) then mount on the rod. there is one or 2 problems encountered (or at least, that i encountered): one is having the clearance to get the wrist pin "out the other side of the piston" before it hits the next cylinder and two is depending on the cylinder, the oil filter tower gets in the way of installing the p/c next to it and can only be accessed from the side opposite side of the p/c. i don't think you'll have that problem as that is #4 p/c (i think) next to the oil filter tower and i seem to recall you were removing #2 (?) cylinder.
Posted by: blitZ Oct 24 2007, 07:54 AM
You need to take the piston off the rod. Remove the retaining clip on the side of the piston facing outward from the case. Remove the wrist pin. The piston should be pushed in from the top of the cylinder. Once in, slide it down so the holes for the wrist pin show and the rings are still in the cylinder. Then you can attach the piston back to the rod. Check your pistons as they may need to go in a particular direction, should be an arrow.
Posted by: geniusanthony Oct 24 2007, 07:58 AM
Lemme try and work this out in my head. Cylinder 1 p/c, If you remove the circlip from between the cylinders with a pair of 90 degree cirlip pliers
Note on pliers: get a pair in which the jaws close all the way not just almost, I got a pair from home depot with interchangable pins I think Vise grip brand perhaps, point is they had enough slop in the end that in trying to remove the circlip, they would not fully compress the clip to remove it from the groove in the piston.
Moving on, pull the inside circlip, drive the wristpin from the oil cooler side with a drift that fits inside of the circlip on the driven side...a deep 10mm socket sounds about right for diameter. once that wristpin is out, pull the piston off. Mark which way is up on the piston with a marker or paint pen. Remove the remaining circlip, put it back in the other side (the inside of the cylinders side) and you are ready to compress the rings (offset the gaps 120 degrees first) and noting that the upmarking on the piston is pointing the same way as when remove. Drive the piston into the cylinder slowly, if you meet stiff resistance STOP and make sure that a ring hasn't come unseated.
Any spacers that were under the cylinder should be back in place now, and with rod 1 at TDC or close, and the piston in the bore at the bottom so that the wristpin hole is fully exposed. Put the pin into the piston a bit then slide the rod in place and finish inserting the pin and reinstalling the circlip. Seat the jug and you are done.
Experts feel free to chime in as its been awhile.
Posted by: Vacca Rabite Oct 24 2007, 08:02 AM
Okay, I thought that was what I'd have to do. Getting room to tap out the pin is going to be interesting.
Zach
Posted by: type47 Oct 24 2007, 08:06 AM
i reread your first post and i'm sure you know that to put the cylinder on the piston or the piston on the cylinder, (if you have the p/c on the bench) you compress the rings with the ring compressor (duh again) and hold them compressed with one hand, put the piston on top of the cylinder with your second hand and with your third hand, gently tap the piston into the top of the cylinder, the ring compressor will keep the rings flush with the sides of the piston allowing them to not prevent the piston from sliding into the cylinder. if a ring slips out of the compressor and expands, you start over. i had to start over several times when i did it.
Posted by: geniusanthony Oct 24 2007, 08:07 AM
Talk about some fast replies eh??
The best non-club club ever
Posted by: Dave_Darling Oct 24 2007, 09:37 AM
We put the cylinders onto the pistons, not the pistons in the cylinders, right? Don't you compress the rings, slide the cylinder as far onto the piston as we can, then tap the cylinder so it slides the ring compressor down while going over the piston?
--DD
Posted by: Cap'n Krusty Oct 24 2007, 11:11 AM
Well, isn't this confusing? First the question, then the mostly CLUELESS answers. As I understand the question, you removed one cylinder and effectively cut it to seat in the head. How did you assure it was perpendicular to the head when you did that? How do you know the cylinder height is EXACTLY the same as the one next to it? How do you know the top and bottom seating surfaces are EXACTLY parallel? How do you know the head has BOTH cylinder mating surfaces EXACTLY parallel and the same depth? What were you thinking? They don't exactly make those things out back of the house with a hacksaw and a file, even in China .................
As for installing the cylinder over the piston, the CORRECT procedure at this point is to compress the rings with a ring compressor (after making sure the rings are properly aligned) and slip the cylinder down over the piston, making sure you con't catch any rings in the process. Then install the head. however, I think you've just wasted a WHOLE BUNCH OF TIME, not to mention introducing a bunch of variables that weren't there before. Of course that's just my opinion, I could be wrong, even after 37 years of Porsche engine building.
The Cap'n
Posted by: type47 Oct 24 2007, 11:24 AM

As for installing the cylinder over the piston, the CORRECT procedure at this point is to compress the rings with a ring compressor (after making sure the rings are properly aligned) and slip the cylinder down over the piston, making sure you con't catch any rings in the process. Then install the head. however,The Cap'n
 wouldn't you attach the piston to the connecting rod via the wrist pin before you install the head?
geez Cap'n, i always read your very informative responses but your tone, even on an internet is read as very condescending. i'm here to learn and might appreciate a little more of a lighter attitude. not a sermon, just a thought.....
Posted by: Vacca Rabite Oct 24 2007, 11:31 AM
^^^
If I have to have the head recut, then I do.
My goal here was to try and mate the cylinder to the head better, as it was off by a very small amount. I did this by getting some lapping compound, and lapping the cylinder to the head by hand. When I get it back together I'll redo compression and leakdown. It might fix it, it might have made it worse. If it made it worse, the head will need to go to the machine shop any way. I won't figure that out until I get it back together. Either way, I removed a very, very small amount of metal through lapping.
All told, if I wasted time, then I suppose I'll never get these 2 hours back. Given the amount of time that I have spent working on this car in general, I'm cool with that. I'd rather be able to do it myself anyway.
Zach
Posted by: brer Oct 24 2007, 11:38 AM
I used to love the book "how to keep your aircooled VW alive"
step 1: pull your hair back and put it in a ponytail.
Posted by: Cap'n Krusty Oct 24 2007, 01:24 PM
As for installing the cylinder over the piston, the CORRECT procedure at this point is to compress the rings with a ring compressor (after making sure the rings are properly aligned) and slip the cylinder down over the piston, making sure you con't catch any rings in the process. Then install the head. however,The Cap'n
wouldn't you attach the piston to the connecting rod via the wrist pin before you install the head?geez Cap'n, i always read your very informative responses but your tone, even on an internet is read as very condescending. i'm here to learn and might appreciate a little more of a lighter attitude. not a sermon, just a thought.....
Condescending? I meant it to sound exasperated. We DO NOT NEED flat out wrong answers getting into the archives, and we DO NOT NEED people doing procedures without thinking them out, and maybe getting GOOD answers BEFORE they do things that can further exacerbate the problem. I am pretty careful NOT to answer questions I'm not familiar with, and when I make an error in my answer, I IMMEDIATELY retract or correct that answer upon being reliably informed I'm in error.
As for the reply from the original poster that he's ready to have it head cut, if need be, he's ALREADY likely caused further damage by grinding on the cylinder, something that cutting the head isn't going to fix. I call things like this a "can'o worms", don't you? That "small amount" is rather nebulous, as .001" can be a "small amount", as can .010". How do we know? Both introduce randomness to an otherwise precise equation.
I wouldn't remove/have removed the piston in the first place. One, you can easily damage the circlip, two, you can easily lose the circlip, and Murphy says it'll fly into the opening where the cylinder mounts into the case.
The Cap'n
Posted by: Elliot Cannon Oct 24 2007, 02:58 PM
It is sometimes hard to tell if someone is condescending, angry, scolding etc. on a forum like this. You read the written words of someone and interpret them as you like or as you perceive them to be. Try not to be so sensitive. We're lucky to have someone like Capn Krusty offer his advise and wisdom of 37 years in the business. Take his advise and ignore what you might perceive as condescention etc. I know mechanics who REFUSE to offer free advice because they don't think people should work on their own cars. Their knowledge is in many cases their only marketable asset. Many don't give it for free. Thanks Capn. Keep the info coming. I apreciate it much. Seems I learn something every time you post.
Cheers, Elliot
As for installing the cylinder over the piston, the CORRECT procedure at this point is to compress the rings with a ring compressor (after making sure the rings are properly aligned) and slip the cylinder down over the piston, making sure you con't catch any rings in the process. Then install the head. however,The Cap'n
wouldn't you attach the piston to the connecting rod via the wrist pin before you install the head?geez Cap'n, i always read your very informative responses but your tone, even on an internet is read as very condescending. i'm here to learn and might appreciate a little more of a lighter attitude. not a sermon, just a thought.....
Posted by: scotty b Oct 24 2007, 06:54 PM
Cap'n he has done no damage. The blowby was VERY minimal all he did was use some valve grinding compund between the cylinder and it's mating surface in the head. I told him to use a sharpie marker to give it some color and only lap until all of the marker was gone. I'm not you but I have done this procedure MANY times myself with no ill effects.
Assumptions are the mother of all Fuchups right???
Zach the cylinder CAN be put back on like you have it with some care. First you need a flywheel lock to keep the engine from moving. Make certain your rings are sitting correctly (notches NOT lined up, preferably equally seperated) put the compressor on the rings, slip the cylinder onto the very end of the cylinder and gently tap it over each ring. Waxth CAREFULLY to make sure the ring is fully compressed and that it doesn't get cocked or slip out. A second set of hands is almost a necessity to keep the studs lined up with the holes in the cylinder. Make sure the flat part of the cylinder is on the INSIDE ( center of the case)
Posted by: KELTY360 Oct 24 2007, 07:26 PM
geez Cap'n, i always read your very informative responses but your tone, even on an internet is read as very condescending. i'm here to learn and might appreciate a little more of a lighter attitude. not a sermon, just a thought.....
With a name like Cap'n Krusty what did you expect....sweet nothings whispered in the ear?
I really appreciate the Cap'ns straight forward style. The best mechanics I've ever found were a little crusty, but honest and fair. Besides, ya gotta love a guy who uses 'exacerbate' in a sentence.
Posted by: jimkelly Oct 24 2007, 09:01 PM
i am pretty sure a type4 don't need no stinking rings 
but don't take my word for it - i could be wrong 
free advice is free for a reason 
Posted by: orange914 Oct 25 2007, 07:58 PM
Talk about some fast replies eh??
The best non-club club ever

i'd be sunk with out em'
Posted by: Twystd1 Oct 25 2007, 09:02 PM
Man..... The Capt. nailed it.
Clayton
Posted by: jaminM3 Oct 26 2007, 05:29 PM
In the Jake Assembly video he installs the piston down into the cylinders and comments that the Type 1 guys like to install the cylinders down onto the piston.. 
Posted by: So.Cal.914 Oct 26 2007, 05:53 PM
I don't think it really matters which way you install them as long as you are
careful with the rings. I have always installed the jug onto the piston. But in this
case, in his situation I would put the jug onto the piston and leave the wristpin
alone.
Posted by: kwales Oct 26 2007, 07:36 PM
Done it both ways. You can slide the cylinder onto the piston attached to the rod if you have one of those steel strip ring compressors. I bent one up from a steel strip but you have to unwrap it from between the studs when you remove it.
I personaly like putting the piston into the cylinder with one circlip in place and pushing the con rod into the assembled piston and rod end.
Seems like the last one I did had NPR cylinders which had an inner bevel at the base of the cylinder so the cylinder could compress the ring as you slipped it onto the piston.
Ken
Posted by: DNHunt Oct 27 2007, 07:11 AM
I've done it both ways. I find getting the wrist pin retaining clips in the most challenging part so I usually install the piston on the rod first so I have as much room as possible for the toughest procedure. Pistons with short pin heights are really tough to get on the rods if you load them first. Circlips (KB retainer) and wirelocks (JE retainer) are really tough without room. Stock not so bad.
Dave
Posted by: Vacca Rabite Oct 31 2007, 09:31 AM
So, here is what I ended up doing.
I took out the circlip on the outside end of the cylinder pin, leaving the one in place facing the #2 jug. I used a small flatheaded screwdriver to start pushing the pin out, and then a pair of 90degree angled needle nosed pliers to finish pushing the pin out (pushing out the pin towards the open side, obviously).
I pulled the piston off, aligned the rings properly, and put the piston in the jug, and then put the piston and jug back on the engine. Went back on fairly easy.
Then I realised I had forgotten to put the little spacer ring between the jug and the block, so I got to take the piston off again to put the spacer back on.
The piston ang jug are back in place, and I just need to fix the bad helicoil on the #2 spark plug before I replace the head. Trying to decide if I want to do the time cert myself, or farm it out to the bug shop down the street.
Zach
Posted by: Jake Raby Oct 31 2007, 11:10 AM
Typically any leak at the sealing surfaces will effect the future ability of those surfaces to seat in the future, sometimes lapping doesn't cure the issue..
This sounds like it may be one of the cases like we are seeing frequently these days that have a collapsed register, needing mill deck work to remedy the problem..
The GA cases are the absolute worst.
Posted by: Vacca Rabite Oct 31 2007, 11:57 AM
Typically any leak at the sealing surfaces will effect the future ability of those surfaces to seat in the future, sometimes lapping doesn't cure the issue..
This sounds like it may be one of the cases like we are seeing frequently these days that have a collapsed register, needing mill deck work to remedy the problem..
The GA cases are the absolute worst.
Collapsed register?
Sorry, I don't know what this is yet. (learning every day)
Zach
Posted by: type47 Oct 31 2007, 01:03 PM
for the purposes of a quick (not necessarily accurate....oh, Cap'n..) reply, i think the register is the opening in the case what the cylinder fits into. i would have called it the "hole in the case". register sounds more....... official
Posted by: Twystd1 Oct 31 2007, 08:58 PM
yup
Posted by: DNHunt Nov 1 2007, 11:09 AM
I think Jake has cases routinely decked now so every part of the cylinder register is equal distance from the case parting line. I think with kits the builder is responsible for this. This leaves no irregularities that affect the seating of the cylinders to the case. As important, all cylinders start the same distance from the centerline. If the cylinders are clean and the same height, the deck will be the same and if the sealing surface of the heads are equal, it should seal better. It removes a variable. Spending a week with Jake taught me it's all about reducing variables and getting things clean. The hobbist can control some of this but, not all. Jake's remove some of the variables especially regarding the combination of parts.
Dave
Posted by: Jake Raby Nov 1 2007, 11:25 AM
Today with most cases being over 30 years old we have noted that the cylinder seating areas of most all cases have shifted creating irregularities that position the cylinder unevenly. This makes for uneven deck heights and uneven cylinder head clamping loads that can make for head leaks.
Today we deck every single register on engines we build and have a variance of 1/2 of one thousandth for this critical aspect of the engine blueprint process. I have seen some cases that have a .020 difference in cylinder seating surfaces and to make it worse many of them are collapsed in the center of the registers. All it takes is .005 or less to cause a head/ cylinder leak...
FYI- GA code cases are THE WORST about this...
The 2008 engine kit program is being refined currently to include the necessary case machining to eliminate this problem for kit builders.
Posted by: scotty b Nov 1 2007, 07:50 PM
Jake the area that was leaking on Zach's engine was on the inside of the cylinder and was an area about 3/8" wide. seemed to me to be very little leakage but enough to cause a loss in compression ( and leakdown ) that is why I told him to lap it. Being that it lapped out fairly easily would you still suspect a deformed register?
Posted by: Vacca Rabite Dec 20 2007, 05:09 PM
Well, tonight I re-leak downed the cylinder and the lapping I did back in October had zero effect. No worse, but no better.
How do I fix it?
How do I test to figure out what the actual problem is?
Posted by: Dr Evil Dec 20 2007, 06:26 PM
Take the engine to your machinist and have them check the measurements. It will be cheaper and easier in the long run. The cylinders have to be checked and the head has to be checked so that it can all be made true.
Posted by: Dr Evil Dec 20 2007, 08:02 PM
OK, I had more than a second to think on this and here are some things you can do to help effect your repair:
- With each piston on that side at TDC measure the distance from the top of the piston to the top of the cylinder and compare.
- Do you have base gaskets on both cylinders? You can shim the cylinder that has the lower piston to cylinder top clearance.
- If you check the cylinder top to piston clearance and everything is cricket then you need to have your head worked on. It can be fly cut to bring the levels within spec. I dont remember, did you check the cylinder to make sure it was cool? I ask because, well, you know  Do these simple tasks and get back with the measurements.
Posted by: Vacca Rabite Dec 20 2007, 10:36 PM
No gaskets at the base of either of the cylinders. I'll be pulling the head maybe tomorrow.
How can I get an accraute measurement without the cylinder moving with the head off?
Zach
Posted by: Dr Evil Dec 21 2007, 12:07 AM
They make special tools for this....but you can just put a deep socket on two of the corners of the cylinder, catty corner to one another and hold them down with the nuts. You get the idea, I am sure you can make it work. No base gaskets, eh? Hmmm. This may be a good sign as it gives you some wiggle room to move the shorter cylinder up to the hight of the taller one.
Posted by: type11969 Dec 21 2007, 06:44 AM
Drop a straight edge across the cylinder tops too. Careful when tightening the socket on the head stud, you can crack a fin if you torque it down too much. I've used this method before but I question how accurate it is considering you cannot get the cylinders properly torqued to the case this way.
If a register is collapsed and a cylinder is sitting on an angle the case will have to be decked. You should be able to see this with a straight edge at the cylinder tops.
I would measure the cylinder length with the cylinders off the engine with a set of calipers. If you compare side to side from the piston tops, you can be introducing error from different con rod lengths, piston pin heights, and differences in cyl to case torque. With the cylinders off you can also drop a straight edge across the cylinder registers check the registers again.
-Chris
Posted by: Vacca Rabite Dec 27 2007, 12:15 AM
Well I had time to work tonight, so I did more testing - just to make sure. I also did some experimenting with the leakdown tester.
1) the directions say not to run the leak down tester above 80 psi - but they don't say that you get a false reading if you run it below 80 psi. I was running it tonight at 70 PSI to be nice to the tool, and could not figure out why all my measurements were 10% higher. But it back at 80PSI and it was golden.
2) The leak down tester was leaking in 2 places. I put in some fresh teflon tape and that was fixed. I was REALLY hoping that was the cause of my leakdown - jsut the tool being out of whack. But, it wasn't.
I checked the valves for bubbles, and they were sealed tight.
The cylinder to head join only bubbled in 1 location - between the cylinders. Everywhere else seemed to be fine.
Tomorrow morning I am going to pull the head and start taking measurements. I really hope I just need to get the head recut a little.
Zach
Posted by: Jake Raby Dec 27 2007, 09:58 AM
Use an open flame around the sealing surface to check for leaks... When the flame flickers you have a leak....
You said this was a second hand kit of mine, who did you buy iit from and what serial number was the kit???
Posted by: Vacca Rabite Dec 27 2007, 07:30 PM
I got the engine from Evan Thompson. I havn't got a clue what the SN is.
Zach
Posted by: Vacca Rabite Dec 27 2007, 07:31 PM
I pulled the heads, and then made some spacers out of some 1 inch square tube steel stock i had laying around, and used them to re-tighten the cylinders down. I did not tighten them to spec, as I was concerned about breaking a cooling fin, but I got them to where the cylinders could not move.
I put a level with a good straight edge across the cylinder bank and looked for gap. If the level was square on the #2 cylinder, then there was a bit of gap on the #1 cylinder. This was somewhat expected, all things considering.
Using feeler gauges, I measured the gap. Where the bubbles were forming (#1 cylinder, facing the #2 cylinder) there was a .007 inch gap. On the opposite edge (facing the flywheel) was a .005 inch gap. In my leakdown-bubble tests, in the spot with the .005 gap showed no leak (no bubbles).
I don't think I can manipulate my calipers accurately enough to measure the lip of the inside of the #1 cylinder.
It seems pretty clear to me that the cylinder is either sitting slightly cocked, or is not squared off at the top. I'll have to measure that tomorrow.
Zach
Posted by: Vacca Rabite Dec 29 2007, 12:08 AM
Okay, so I measured deck height today with Josh's help.
#1 was the same as #2. I don't have to get my case decked!
Its a problem with how the heads were cut. The heads need to be recut, taking as little material off as possible. I took off the tin and all the other bits today, the heads will come off tomorrow after I do some baby shopping with the missus.
Zach
Posted by: orange914 Dec 29 2007, 12:10 AM
Okay, so I measured deck height today with Josh's help.
#1 was the same as #2. I don't have to get my case decked!
Its a problem with how the heads were cut. The heads need to be recut, taking as little material off as possible. Zach
how many cc's are they now? are you running carbs or f.i.?
mike
Posted by: degreeoff Dec 29 2007, 07:18 AM
Just dont forget to swap the heads and check to see if the difference is in the fact that the heads was swapped ?? as there was a CHT hole where there shouldnt have been one. It'll take 10 min to do as an xtra precaution and settle the matter once and for all.
Josh
Posted by: Borderline Dec 29 2007, 12:22 PM
I pulled the heads, and then made some spacers out of some 1 inch square tube steel stock i had laying around, and used them to re-tighten the cylinders down. I did not tighten them to spec, as I was concerned about breaking a cooling fin, but I got them to where the cylinders could not move.
I put a level with a good straight edge across the cylinder bank and looked for gap. If the level was square on the #2 cylinder, then there was a bit of gap on the #1 cylinder. This was somewhat expected, all things considering.
Using feeler gauges, I measured the gap. Where the bubbles were forming (#1 cylinder, facing the #2 cylinder) there was a .007 inch gap. On the opposite edge (facing the flywheel) was a .005 inch gap. In my leakdown-bubble tests, in the spot with the .005 gap showed no leak (no bubbles).
I don't think I can manipulate my calipers accurately enough to measure the lip of the inside of the #1 cylinder.
It seems pretty clear to me that the cylinder is either sitting slightly cocked, or is not squared off at the top. I'll have to measure that tomorrow.
Zach
#1 was the same as #2. I don't have to get my case decked!
Its a problem with how the heads were cut. The heads need to be recut, taking as little material off as possible. Zach
OK, with the risk of being chastised by the Cap'n, I'll stick in my $.02:
How did you come to the conclusion that the head needs machining? You found the problem: the top surfaces of the two cylinders are not even. You found gaps of .007 and .005. Now you have to find out what is causing that variation. Just because the deck hts are the same, doesn't mean the problem is in the head. The top surfaces of the cylinders must be even. I would check both cylinder lengths and check the top ends for flatness. You may need to have the case decked. How did you measure the deck hts? If you want things to be right, you've got to measure everything until you find the source of the problem. The person that assembled the engine may have shortened one cylinder because the deck hts weren't even, not thinking about the heads sealing. You're on the right track, just keep measuring..
Just trying to help.
Posted by: Dr Evil Dec 29 2007, 12:33 PM
I agree that you need to have the cylinder lengths checked. It sounds like the one may have an uneven head surface. If this is the case you can have that fixed and then place a gasket under the cylinder to even up the heights. You should also have the head surface check, of course. It sounds like this is what you are going to be doing. IIRC, you checked the registers using a straight edge and going at it from various angles.
Posted by: Vacca Rabite Dec 30 2007, 10:03 PM
Bzzt. I'm wrong again.
Now I think that the heads are fine...
I swapped the heads (put 3&4 bank on the 1&2 side, and vice versa) and re-did the leak down. So the #1 cylinder head was now on the #4 cylinder, and the #4 cylinder head was now on the #1 cylinder.
I re-did leak down on Cylinder 1&2&4. I skipped doing leakdown on three.
Cylinder 1 (Head 4) still leaked at 55%.
Cylinder 2 (head 3) was cool at 7%
Cylinder 4 (head 1 - which I thought was the leaky one) was also cool at 7%
I measured the #1 cylinder from behind the shim to the mating lip, but was not able to get a measurement I was able to replicate from time to time.
But I now either need to go back to either that the cylinder needs shimmed up about .005 inches, or the case needs decked.
*edit* actually, I need to get the cylinder measured by someone who can replicate the measurement. Mine seemed to vary too much for me to put any stock in it. */edit*
I had negated my previous theory as Josh had suggested that they way I went about it was inaccurate. But, I am going to try my spacer before I deck the case. Now I just need to find a .005 inch cylinder spacer.
I also talked to Evan yesterday, and checked out a lead he had remembered, but it, much like communism, was a red herring. Would have been sweet if it worked though.
Zach
Posted by: Jake Raby Dec 30 2007, 10:14 PM
You cannot shim just one cylinder! Both cylinders must have the same deck surface.
Pull the cylinders and put a piece of 1,000 grit sand paper on a perfectly flat piece of glass.. Use some Dykem machinist dye on top of the cylinder to use as a control..
Make a pass over the 1,000 grit and see if any portion of the seating surface appears to be even or erratic.. You may have a warped cylinder seating surface..
My bet is still a drooped case register...
Posted by: Vacca Rabite Dec 30 2007, 10:37 PM
I'm going to try this - not now but tomorrow morning. I have a lot of 1000 grit paper from painting.
Wet sand or dry? Or does it not matter? Will a sharpie marker work in-place of machineist dye?
Zach
Posted by: Jake Raby Dec 30 2007, 10:46 PM
Dry.. The Sharpie will work if you apply it heavily.. Let it dry for an hour before the process.
Posted by: scotty b Dec 31 2007, 03:30 PM
Zach a shim isn't the answer. Remember when we pulled the head and saw the leakage it was only in that small area. Shimming wouldn't correct a tilt. Do as Jake says. Since the head swap yielded the same results you have a register or jug issue.
Posted by: davep Dec 31 2007, 04:19 PM
I put a level with a good straight edge across the cylinder bank and looked for gap. If the level was square on the #2 cylinder, then there was a bit of gap on the #1 cylinder.
from this statement I'd say that either cylinder 2 is too tall or cylinder 1 is too short. If the gap is not even from one side to the other of cylinder 1, then one of the two is not sitting square (register droop) or the cylinders have unequal heights, not square, or some combination. I'd pull each cylinder, place on a flat (like glass) and use a height guage to ensure (a) equal height while spinning the cylinder, and (
 equal height for each cylinder. Since the bottom seating surface is not the bottom of the cylinder, you have to invert the cylinder on the glass and measure the height of (a) & ( to the seating surface. If there is any variation, then do as Jake suggests. If there is no variation, then suspect a drooped case register or two.
Posted by: Jake Raby Dec 31 2007, 05:03 PM
Are these Chinese cylinders??
Posted by: Brando Dec 31 2007, 05:06 PM
Did you ever check your piston rings?
I've seen destroyed rings yield the same type of results.
I agree it may be a bad cylinder or bad case register as well.
Posted by: scotty b Dec 31 2007, 05:18 PM
Did you ever check your piston rings?
I've seen destroyed rings yield the same type of results.
I agree it may be a bad cylinder or bad case register as well.
Doubtful. The inside of the barrels looked fine with no signs of scoring. As to what Dave mentioned I believe that to be the problem. The blowby inside the head was confined to a smal area on the inside of #1. Area was about 1/4" wide. Were the whle cylinder off I would have expected to see blow by in several areas around the chamber
Posted by: Vacca Rabite Dec 31 2007, 06:58 PM
My rings are golden. As on good, not gold colored. :-)
'
Are the Chinese Cylinders... Dunno, let me go see if they say anything.
Not Chinese. Cyl #1 is stamped: "039 101 ?01C 18 15 17 VW" The "?" is either a 3, 8 or 9, I can't tell.
Pistons are Keith Blacks
So, today I tried the 1000grit sandpaper on glass. There were two very shallow depressions where the ink stayed, but neither of them were where the leak was. However, I polished the cylinder until it was level, and put the head back down. 70% leak, worse not better. But that made sence as I had just removed a little metal.
I measured the cylinder and got 6.008 inches. I measured several times, and was able to replicate the measurement at different points. Good, I think I have it level now.
I pulled the #2 cylinder off, and measured it. I noticed right off that it had 2 spacers to the #1 cylinders single spacer. I measured it at 6.020 inches. One of the spacers was .010 inches, so I removed it and remeasured. As expected, the cylinder (#2) was now at 6.010 inches.
I was going to put it all back on the block and re-leak it, but my wife let me know that I should consider heading in for dinner. We had cancelled our NYE plans for the evening, so after dinner I'll head back out and put everything back together.
I guess I am going to need to re-measure deck height since I polished one cylinder, and took a base shim off another.
Or, I suppose I could buy a .010 shim to bring the shorter cylinder up, which is what I probably need to do.
Right now I think that I should be within .002 inches of one to the other, which should even out the leak down, right?
Jake, would you like me to continue posting this on your forums too?
Zach
Posted by: scotty b Dec 31 2007, 07:04 PM
NOW we're getting somewhere !! 
Posted by: davep Dec 31 2007, 07:54 PM
Well, it appears most of your problem was the extra base shim on cylinder 2. However, you said the gap was .005 to .007 and you took out .010 . So you should still have an error of .003 to .005 even though the cylinders are .002 different. Wow, lots of tiny errors all over.
What I would try at this point would be to clamp the cylinders down and remeasure the evenness of the two cylinders in place. If you get an error, then try switching the cylinders. One combo should be the the better of the two, so use that combo and assemble. Then do the leakdown test again.
Posted by: Jake Raby Dec 31 2007, 08:27 PM
No!!
Thats half assed!
You MUST have equal cylinder lengths and equal case decks.. Adding a shim will tweak the head when the engine fires up and expands...
Sure, feel free to post on my forums as well.
Posted by: Vacca Rabite Dec 31 2007, 09:36 PM
Well, I just put the cylinders back on, put the head back on, and re-leaked it.
No change. Still 70% leak on No1.
I guess I am going to start tearing down the case to get it decked. I've checked everything else. I think.
To add insult to injury, while putting the #1 cylinder back on it slipped out of my fingers and I broke three fins (oily fingers from lubing the piston to help it slide in).
I am utterly demoralized right now. I so thought I would have this licked today. Instead, I have managed to make everything worse.
Zach
Posted by: Jake Raby Dec 31 2007, 10:04 PM
Welcome to the world of mechanical manipulation.
Try it everyday, all day...
And people wonder why I am so intense...
Posted by: Vacca Rabite Dec 31 2007, 10:31 PM
Do I need to replace the cylinder? If you added up the broken fin pieces it added up to 5 inches of broken fins. 3 inches from 1 fin, 1 inch from the 2 other fins.
Zach
Posted by: Dr Evil Jan 1 2008, 11:10 AM
New cylinder time  I am impressed with your perseverance on this, Zach. I am now more free to give you a hand and will be seeing you in a few hours so we can talk.
Posted by: degreeoff Jan 1 2008, 11:16 AM
Hey Zach,
Remember I told you I have that case laying around?Well I will give it to you and ask for a small donation of $100 to buy my rods crank and light flywheel to go with it. There are already oversized bearings on the thing to match the case which was line bored . The whole assembly only has a couple thousand miles on it. Just a thought.
Josh
Posted by: root Jan 1 2008, 11:38 AM
Zach,
Real sorry about the cylinder drop! Shit happens!
For what it's worth,
in my eye's you are the Great "CHILI GOD" of Eastern Pennsylvania! 
Keep at it you'll get there  .............wish I was closer to help!
root
Posted by: Jake Raby Jan 1 2008, 12:59 PM
Yep, that cylinder is toast..
Posted by: scotty b Jan 1 2008, 08:06 PM
Damn........
Posted by: Dr Evil Jan 1 2008, 08:16 PM
I got him fixed up. I gave him 2 cylinders (so if he drops one he is still ok  ). Now he just has to have them punched out and then he can fool with this some more.
Posted by: scotty b Jan 1 2008, 08:34 PM
Damn cool
Posted by: Brando Jan 2 2008, 01:31 AM
Glad you're on the right path now  Things will go together so much easier when the case's measurements are all exact and equal.
No change. Still 70% leak on No1.
I guess I am going to start tearing down the case to get it decked. I've checked everything else.
Posted by: Vacca Rabite Jan 2 2008, 09:52 AM
Yup, got some used jugs from Mike, and a dial guage to really take accurate readings when I go back to measure deck height. I am only going to get one of them punched out, and return the unused one, once I get this puppy sorted.
I am going to be checking out day care places after work today, so I will probably drop the cylinder off to the machine shop tomorrow after work. I am also going to have them make sure that the cylinder mating surfaces are both perfectly square to each other.
Just to be sure, when I ask for the cylinder to be bored out, I want them to bore it to 96mm, right? I think thats right, but better to ask first. (2056 engine). Is there anything special that I should be asking them to do while they have the jug?
Zach
Posted by: r_towle Jan 2 2008, 10:19 AM
Bring the piston that you will be using in that cylinder to the machine shop.
Read the specs on the rings, and the piston to determine the proper bore (clearance) for that piston and ring set.
Then you will know the bore dimension.
Cylinders are bored for specific pistons, not generic.
rich
Posted by: Vacca Rabite Jan 2 2008, 10:30 AM
THANKS!
I did not know that.
Zach
Posted by: davep Jan 2 2008, 03:27 PM
Perhaps Jake will chime in on this for the definitive answer. He uses very specific piston to cylinder clearances that depend on the specific cylinder and specific piston.
For boring out the cylinder I understand that the cylinder MUST be clamped in a fixture just as it will be on the engine; that is, the cylinder will be clamped with equal force to what it sees between the case and head. Apparently there can be a small amount of warping of the cylinder when it is clamped as opposed to when it is sitting free. Thus the cylinder must be clamped when it is bored so that it remains perfectly cylindrical when it is installed on the engine.
Posted by: scotty b Jan 2 2008, 06:49 PM
Probably would be a god idea to have BOTH of the cylinders for that side trued up and assured they are both even with one another. Little more $$ but it would let you know that, THAT will not be an issue upon reassembly. Remember, you still haven't solved the initial blow by problem
Posted by: Twystd1 Jan 2 2008, 08:53 PM
You will also need to know what plateau finish to put on the cylinders for your specific ring pack.
Or hopefully your machinist knows the right finish.
Even if you take the piston with you to show the machinist.
Does your machinist know what clearance the piston to cylinder should be...????
IMHO... YOU need to know this stuff before you see the machinist.
Personally, I have all my cylinders bored and honed in boring jig that is torqued to about 60 Lbs. for boring and 35-40 lbs for honing.
(SOMETIMES CALLED A HONING OR TORQUE PLATE)
This are basically a 1.5 inch thick plate of aluminum with the center milled out to access the cylinders. There is plate at the top AND the bottom of the cylinders held together by 4 hardened pieces of all thread. Then torqued to a given spec. Before any machining AND measuring takes place.
I have different plates for different bores. (Like big bores 101' 103s etc.)
If ya want to do this nats ass..... It's a good place to start.
And I would think that most GOOD aircooled machinists also do something along those lines. And have the plates available.
Cause they aint cheap to make for a one time dealio. (Time consuming)
Also... It looks like you are going to incorporate the existing "Used" rings on your pistons.
Have your machinist CHECK the rings closely for both circumferential wear and also the top edge of the top 2 rings.
If they aren't close to perfect. They MAY not seat well on a new surface.
Then again... They may work just fine.
I use new rings on fresh cylinders. PERIOD.
They are cheap insurance for good leakdown numbers and and low oil consumption.
Then again... I'm a nut case that way. Do it right..... ONCE.
Clayton
Cheers,
Posted by: Vacca Rabite Jan 3 2008, 03:37 PM
I just dropped Cyl 1&2 and piston 1 off at http://www.aircooledracing.com. I could not get ahold of the local guy at Bug World - he is really part time these days.
Anyhow, Steve at Air Cooled was very cool, and we ended up talking for about an hour as he showed me all the stuff he was working on at his shop. If you happen to be in the big GT-headlight group buy, I saw the kits. VERY nice!
So, the cylinder should be punched out in 2 weeks or so. I asked him to bore out the new cylinder, check the rings on the piston to be sure they were still good to use, make sure the new cylinder was squared on both mating surfaces, and cut the "new" cylinder to the same height as the #2 cylinder.
There are several VERY NICE 914s at Air Cooled. He is already getting his stuff ready for the Hershey meet in April.
Zach
Posted by: Vacca Rabite Jan 4 2008, 09:06 PM
I am impatient. I want to get back to work on my engine.
I guess I'll go out and work on my wiring instead.
Zach
Posted by: orange914 Jan 5 2008, 12:46 AM
I am impatient. I want to get back to work on my engine.
I guess I'll go out and work on my wiring instead.
Zach
kuddos to ya'. your perserverance is good for us all. your doing it right as frustrating as it may be. i'm in the middle of a 2056 cylinder cluster thanks to the football players at u.s.p.s.... you insure the cylinders, then after estemates and 3 mo.'s sending them to be whatevered, they "might" even prorate the insured value.
good things come to those that wait, i guess mine will be REAL good

have you figured if the registers a flat? what i'm wondering is did you determine no leakage at rings/valves and ONLY at head to cyl?
mike
Posted by: Vacca Rabite Jan 5 2008, 10:15 AM
The leak is at the head, no question.
Okay, a question.
I have all the head studs out of the 1&2 bank except for 1, which will not budge, and I am afraid of snapping it. I have been soaking it for 2 days in Liquid Wrench, tapping with a hammer, and heating the case where the stud is with a MAPP torch and I still can't get it to move. I have tried vice grips and double nutting the top.
What else can I try. I really don't want to break this puppy.
Zach
Posted by: DNHunt Jan 5 2008, 11:55 AM
Patience Grasshoppa
Keep soaking and heating and tapping. Time will loosen it for you. Also it never hurts to try a clockwise rotation.
Dave
Posted by: type11969 Jan 5 2008, 01:02 PM
Get a good penetrant like PB Blaster or Kroil, they work much better than Liquid Wrench. Also try getting some parrafin, heat the boss, touch the parrafin to the stud and let it wick into the case (tilt the case up to use gravity to help if you can). Get a couple of vice grips, like 3 or 4, on the stud as close to the base as possible (don't try double nutting, you will snap the stud due to the twist). Use all of them at once to try to spin it out.
I still broke a stud trying all of this, but this is the advice I got from people as the best way to try to get it free. I know people have said that it is a bitch to get the studs out if they snapped but a machinist buddy of mine got it out cleanly no problem.
You may also want to try some liquid nitrogen on the stud to try to get the temp differential that much higher, only problem is ALs high thermal conductivity. Good luck!
Posted by: Twystd1 Jan 5 2008, 02:37 PM
I tried the liquid oxygen trick ONCE.
The stud snapped immediately with very little pressure. I guess that particular kind of steel doesn't like getting sub zero +. Thankfully we had an EDM machine across the street.... Insta fix.
C
Posted by: type11969 Jan 5 2008, 02:54 PM
Thats good to know!
Posted by: Dr Evil Jan 7 2008, 08:25 AM
Why are you removing the head studs?
Posted by: type11969 Jan 7 2008, 08:33 AM
decking the case I would imagine
Posted by: Vacca Rabite Jan 7 2008, 08:38 AM
Mainly I was removing the head studs so I could get some accurate measurements of the case registers without the studs getting in the way.
Posted by: Dr Evil Jan 7 2008, 10:00 AM
I could be wrong, but I didnt think that was necessary (stud removal). More chance for damage from the evolution. What gave you this idea?
Posted by: type11969 Jan 7 2008, 10:15 AM
If you've gone to the trouble of pulling the studs then I'd get the case decked (most time consuming part = completed!). Or is your shortblock already assembled?
Not sure what measurements you want to take but to check for a dropped register you should just have to drop a straight edge across the two registers at the register centerlines and check for a gap. I think the registers are prone to collapsing at the 3 and 9 o'clock positions or the area in between the two.
Posted by: Brando Jan 7 2008, 03:12 PM
When heating, apply flame to the stud not the case. Get the steel glowing and then SLOWLY try to back it out.
Posted by: Dr Evil Jan 7 2008, 04:25 PM
Why would you want to expand the stud and not the case?
Posted by: Twystd1 Jan 7 2008, 04:47 PM
Just keep tapping the stud. And tweaking it every day. It will start to move eventually. Heat is your friend. Just keep it going.
Have ya tried 4 vise grips and 2 people..??????
If all else fails. Just bear down hard with a rattle gun and double nut or a stud extractor.
You WILL bend the stud. Get another stud form me or Jake or whoever.
Thats the worst case scenario. No big deal.
Note: If your case register is collapsing. What makes you think it won't continue to collapse after the decking...??????
I'll bet you the following will happen.
If you have the block line honed. You wil also find out that the block is distorted from the main bearing collapsing. Thus the deformation of the block.
Thats has been my experience on the last 2 GA block I threw away.
I hope Jake tells us more about what and WHY is going on with these 2.0 blocks. He is the only one I know that actually has the answers.
Me... I'm just doing a bit of guess work and trying to surmise the facts. He knows the facts.
If I didn't have the luxury and use of of a couple of high end machine shops and Jakes descriptions of our block issues. I would be seriously screwed. ONLY because of his knowledge. Do I have a clue to any of this.
Again... The word grateful come to mind. Else my shit would blow up and I wouldn't have a clue as to the why's of it.
I have an EA block sitting around here somewhere if shit hits the fan on yours.
Or I think you can buy a decked block from Jake if needed. (At least you used to be able to)
So there is more food for thought.
Clayton
Posted by: Vacca Rabite Jan 7 2008, 06:27 PM
I am spraying the stud with PB Blaster and tapping the stud every morning when I walk into the garage to drive to work, and every evening when I get home. I'll try to turn it again either Friday or Saturday.
Zach
Posted by: Spoke Jan 7 2008, 09:42 PM
Any way to get an impact wrench on it? It would seem that thousands of little poundings would be better than one big torque with a wrench or vice grip.
Posted by: orange914 Jan 7 2008, 11:45 PM
I am spraying the stud with PB Blaster and tapping the stud every morning when I walk into the garage to drive to work, and every evening when I get home. I'll try to turn it again either Friday or Saturday.
Zach
keep a hammer by them and give them a couple hits to help "shock" the penatrant in
Posted by: type11969 Jan 8 2008, 06:54 AM
Any way to get an impact wrench on it? It would seem that thousands of little poundings would be better than one big torque with a wrench or vice grip.
The stud twists too much, the torque doesn't get transfered to the threads in the base if you double nut it at the top. Thats why you have to grab it as close to the base as you can with vice grips.
-Chris
Posted by: Vacca Rabite Jan 8 2008, 08:55 AM
What is the best way to split the case? I have all the bolt undone but two.
However, the case is glues together with RVT I think, and I'd like to know the best way to split it without marring the mating surfaces.
If I can't get that last head stud out by this weekend, I am going to send the case half to the machinist and let him worry about it.
Zach
Posted by: type47 Jan 8 2008, 10:49 AM
What is the best way to split the case?
this may help split the case but i'm not answering the question about the best way. there is a tool that has 2 arced sides and a bolt/nut that pushes the 2 arcs apart. this tool can fit into the oil pump hole and help persuade the 2 case halves to separate. of course, in the hands of a hack like me, one could cause all sorts of problems using the tool; imagine what you would do to the case if you were using the tool to try to split the cases and had missed removing one of the bolts that holds the case together..... the best way? a rubber mallet with gentle strokes on parts of the case that won't break off or get damaged.
Posted by: MrKona Jan 8 2008, 04:35 PM
What is the best way to split the case?
this may help split the case but i'm not answering the question about the best way. there is a tool that has 2 arced sides and a bolt/nut that pushes the 2 arcs apart. this tool can fit into the oil pump hole and help persuade the 2 case halves to separate. of course, in the hands of a hack like me, one could cause all sorts of problems using the tool; imagine what you would do to the case if you were using the tool to try to split the cases and had missed removing one of the bolts that holds the case together..... the best way? a rubber mallet with gentle strokes on parts of the case that won't break off or get damaged.
Here's the http://www.vintageworldtools.com/volkswagentools.html
Top of the page.
Posted by: Jake Raby Jan 8 2008, 04:40 PM
You don't need a tool.. You need my video. I show the easy way to do it with things you already have in the garage...
Posted by: type11969 Jan 8 2008, 05:06 PM
There are a couple of bosses on one side of the case that are not on the other, you can tap them with a rubber mallet or a block of wood and a hammer to split it very easily. If its not coming apart, you probably missed something. One is on the top of the case close to the bell housing. Another is on the pulley end of the case close to the breather tower. Don't use any machined surfaces to split the case and you will be fine.
-Chris
Posted by: Headrage Jan 8 2008, 05:07 PM
a rubber mallet with gentle strokes on parts of the case that won't break off or get damaged.
That's how I did mine.
Posted by: scotty b Jan 8 2008, 07:17 PM
Before you try to split the case make certain you have gotten the 13mm bolt in between ( and below )the cylinders !! I have a case here that is broken internally because the P.O. split the case with that bolt still tightend down  Amazingly enough there is no other VISIBLE damage to the case or mating surface Some people shouldn't even try.
Posted by: Vacca Rabite Jan 8 2008, 09:50 PM
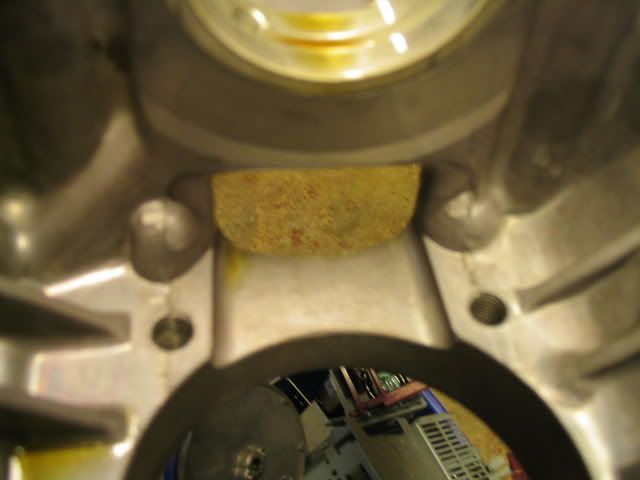
Amazingly enough there is no other VISIBLE damage to the case or mating surface Some people shouldn't even try.It took me an hour of cursing to find that very bolt this evening. I was _SO SURE_ I had taken out all the bolts, and the little bastard still would not budge. It was hiding in the shadows, and I only found it after tracing the area with my fingers to see if anything could possibly be there.
But I managed not to break the case. :-)
Proof!


This is the half that needs to go get decked. I am going to leave the head stud in for the machineist to worry about, and just assume that I am going to have to buy a new stud.

Zach
Posted by: Vacca Rabite Jan 8 2008, 10:08 PM
Oh, and when I was removing the top half from the bottom, the two 1/4 inch studs the align the crank bearings to the case dropped out and were lost I looked for them for about 20 minutes, but I think they were consumed by bears.
Can I get them readily, or are they specific to my engine?
Zach
Posted by: Vacca Rabite Jan 8 2008, 10:11 PM
One final question before going to bed.
Now that the case is split, is there anything special that I should do while I am in there? What is required to full flow the oil system? I have to say, I am amazed at the relative simplicity of this motor. I expected more.
Zach
Posted by: SGB Jan 8 2008, 10:20 PM
uh-oh!
"while I'm in there"
Posted by: DNHunt Jan 9 2008, 07:50 AM
Well lets see.
First, please tell me you stored and label the lifters so they can go in the same bores.
Look at it really close. I agree it looks simple but, when it goes back together, you will be thankful if you have a good image of what it looks like. Buy Jake's video
Then, I would order the appropriate gasket kit, Main and front seals (they are not in the gasket kit) , remove and label the rods. Take the crank, and rods to the machinist to get checked and depending on what he says you will have a direction. Best case, you can just get new bearings. Dowel pins are available, I think Jake has them from the store. Buy his video if you don't have it cause it will answer some questions you will have. Get sealants together.
With the measurements from the machinist you can order new bearings.
Buy plenty of brake or carb cleaner and solvent cause when the case comes back you get to clean. Even it was tanked and all don't trust it . I like to use rifle cleaning stuff on the oil passages. Even with fanatical cleaning there will be more. I cleaned my case for hours and when I changed the oil down at Jakes I found a piece of aluminum in the sump. It was from tapping the galley plugs. I was lucky cause I only got a raised eyebrow. Incidentally, they check how clean stuff is with white lint free tissue kind of like large thick lens paper and carb cleaner. If there is any grey on the tissue you clean some more. I spent 2 hours cleaning cylinders that were freshly conditioned. Point is it can't be too clean. This just tedious and time consuming.
Some one will disagree with me on new bearings, checking the rods and crank and say run it as is. You have to decide that, I can only tell you what i would do.
Look at the end play shims. If they are worn they will have a slight bulge on 1 side and a concavity on the other. What was the end play anyway. If you change bearings you will have to reset it. You should check it regardless. If it was out of spec or very close that might push you more toward new bearings.
The best thing is you can clean and inspect everything.
Dave
Posted by: Vacca Rabite Jan 9 2008, 10:02 AM
Hey Dave,
I know what lifters go to what cylinder. But not which ones go to In or Ex. But, i am going to rework the rod geo anyhow, as I think they were cut a bit too long when the engine was built. There is very little (none on Cly 3) room to adjust gap the way things are set up now.
I have an email to Jake making sure that i order the right stuff off his site, but the DVD will be ordered by the end of the day (speak of the devil, got his response while writing this.)
Zach
Posted by: type47 Jan 9 2008, 11:49 AM
the two 1/4 inch studs the align the crank bearings to the case
dowel pins. available from busdepot (PA) and from Jake....
Posted by: slowtwitch Jan 11 2008, 07:04 AM
I hope Jake tells us more about what and WHY is going on with these 2.0 blocks. He is the only one I know that actually has the answers.
Me... I'm just doing a bit of guess work and trying to surmise the facts. He knows the facts.
Clayton
First of all, I want to say hi 914world, This is my first post here. I don't own a 914, but, I am building a couple of type 4 engines
Anyway, I'm sure Jake has a definite answer to the collapsed register problem. I'm just a rank beginner at this type 4 stuff, but the one problem that I see, is the difference in the amount of material in the register areas, between the 2.0 GE cases and 1.7 EA/W cases.Here a shot of a GE 2.0 case...
and here's a shot of a 1.7 EA case...

Seems like VW wanted to save a couple of bucks in material cost
pete
Posted by: Vacca Rabite Jan 11 2008, 07:39 AM
GE is a bus case. GA is the 2.0 914 case.
I only know as the case my engine is built on is a GE bus case. There are a few things that you need to do in order to use a GE case in a 914. Most important is a block off plate for one of the oil galleys.
Zach
Posted by: degreeoff Jan 11 2008, 07:47 AM
Zach, Look man come down and get my case....its sitting next to my shop over @ the edge of a leaf pile...take it its yours FREE....take it with you to the machinist...its a true 2.0 914 case that has already been line bored....you SHOULD IMHO buy the matching crank(12lb)/flywheell/rods......$100 with new bearings @ 2000 miles ago......Hell I will even throw in the SCAT C-25 cam and lifters.....IO am out for the weekend but feel free to call if you want my addy for the case!!
Josh
Posted by: type11969 Jan 11 2008, 08:00 AM
Bus cases lead hard lives. If you are going to spend money on casework I would consider spending it on a 914 2.0 or even better, 1.7L case. I have a t4 case in my basement that is yours if you want it (couldn't sell it at Hershey for $20). Not sure what it is but I can check. All the head studs are out too! No machining has been done on it, only catch is an oil cooler stud is broken off flush but it didn't break when trying to spin it out so it hopefully won't be tough to get out.
Didn't see Josh's post, seems like a good route too. Take mine though, I need to get rid of some of this crap!
Let me know.
Chris
Posted by: degreeoff Jan 11 2008, 08:08 AM
Yeah my next step is to throw dirt in it and make it a planter.....LMAO! BTW Zach its all from the same engine AKA machined together by my guy in Falls Chaurch VA.
Posted by: type11969 Jan 11 2008, 08:14 AM
Thats a good deal, I'm tempted to buy it but then I would have even more shit.
The first step is admitting you have a problem, right?
Posted by: Vacca Rabite Jan 11 2008, 08:21 AM
Hey Josh,
I already have a RAT cam and gear, and LN ceramic lifters. Would there be an advantage to the ones that you have?
Zach
Posted by: type11969 Jan 11 2008, 08:43 AM
ceramics . . . can't beat em
eventually I'll run that set I have sitting on my shelf!
Posted by: slowtwitch Jan 11 2008, 08:43 AM
GE is a bus case. GA is the 2.0 914 case.
I only know as the case my engine is built on is a GE bus case. There are a few things that you need to do in order to use a GE case in a 914. Most important is a block off plate for one of the oil galleys.
Zach
Zach, My bad... That is a GA case. I wanted to use it for a stroked 2.0 build, but, after doing the carbon paper trick and checking the deck heights, I went with an older W case.
pete
Posted by: Vacca Rabite Jan 11 2008, 08:58 AM
Okay, just talked to Josh on the phone, and I am going to get his case and flywheel sometime next week.
I love this place.
Zach
Posted by: orange914 Jan 12 2008, 12:24 AM
First of all, I want to say hi 914world, This is my first post here.
the one problem that I see, is the difference in the amount of material in the register areas, between the 2.0 GE cases and 1.7 EA/W cases.
Here a shot of a GE 2.0 case...
and here's a shot of a 1.7 EA case...
Seems like VW wanted to save a couple of bucks in material cost
pete

does the GE case have the groves for the windage tray? i think all 914 cases do although the EA 1.7 didnt have a windage tray, just the groves. i wonder if the GA's are thin at the registers like the GE's??
mike
Posted by: slowtwitch Jan 12 2008, 05:02 PM
First of all, I want to say hi 914world, This is my first post here.
the one problem that I see, is the difference in the amount of material in the register areas, between the 2.0 GE cases and 1.7 EA/W cases.
Here a shot of a GE 2.0 case...
and here's a shot of a 1.7 EA case...
Seems like VW wanted to save a couple of bucks in material cost
pete
does the GE case have the groves for the windage tray? i think all 914 cases do although the EA 1.7 didnt have a windage tray, just the groves. i wonder if the GA's are thin at the registers like the GE's??
mike
Thanks for the welcome. I think i have a couple GE cases in the garage, I'll check tomorrow. I checked 2 CB cases, that i have in the basement shop and found that one has the stout register and the other does not...
pete
Posted by: Jake Raby Jan 12 2008, 11:38 PM
The register difference is not for specific case codes, but more from different casting runs.. This is the reason why I build all my high output and race engines from 1.7 cases that have the added material behind the register...
All cases after the W0 series had the windage tray, no matter if they were for a 914 or a Bus. The GE case does have a windage tray slot, but it uses a short oil pick up tube that needs to be modified to attach the windage tray to it.
Posted by: orange914 Jan 17 2008, 03:20 PM
I hope Jake tells us more about what and WHY is going on with these 2.0 blocks. He is the only one I know that actually has the answers.
Me... I'm just doing a bit of guess work and trying to surmise the facts. He knows the facts.
Clayton
Here a shot of a GE 2.0 case...
and here's a shot of a 1.7 EA case...
Seems like VW wanted to save a couple of bucks in material cost
pete
heres a shot of my g.a. case. i guess g.a.'s are thin too. what were they thinking? G.E. and G.A. they got cheap on and E.A. lower h.p. was thicker?

Posted by: 904svo Jan 17 2008, 03:42 PM
First of all, I want to say hi 914world, This is my first post here.
the one problem that I see, is the difference in the amount of material in the register areas, between the 2.0 GE cases and 1.7 EA/W cases.
Here a shot of a GE 2.0 case...
and here's a shot of a 1.7 EA case...
Seems like VW wanted to save a couple of bucks in material cost
pete
does the GE case have the groves for the windage tray? i think all 914 cases do although the EA 1.7 didnt have a windage tray, just the groves. i wonder if the GA's are thin at the registers like the GE's??
mike
Thanks for the welcome. I think i have a couple GE cases in the garage, I'll check tomorrow. I checked 2 CB cases, that i have in the basement shop and found that one has the stout register and the other does not...
pete
Andalusia,Pa Thats where I grew up and when to school many,many years ago. Use to live on Locust Ave, then 95 made us move. Is the Speed shop still on
Bristol Pike? Use to work for them when I was a teenager.
Posted by: gjones Jan 20 2008, 10:26 AM
So, at the Sterling meet I did a leakdown test on my motor, and found a problem with Cylinder 1. 45% leakdown, but 120 lbs of compression. Was tempted just to let sleeping dogs lie, but pulled the head off.
What was going on was clear as soon as we did that, the head was not totaly sealed to the cylinder, off by a very small amount. Instead of having the head recut, I decided to try and lap the two of them together.
So, last night I hand lapped them, using ground graphite to check for even contact. I got good contact after the third round of hand lapping (lap, clean, check).
Now I need to get the jug back on the block. I have a ring compressor on the piston, but I can't ficgure out how to get the head back on. Do I have to take the piston head off the rod?
If so, how do I get it off. It looks like that tis a spring keeper that needs to be removed. Is there anyhting on the rod the needs to be loosened before I can pull the pin out to remove the piston head?
Obviously, if there is a trick to getting the jug back on without pulling off the piston head, I'd like to do that.
Zach
Did lapping it ever resolve the issue- I believe I have the same situation??
Posted by: Vacca Rabite Jan 20 2008, 11:15 AM
Nope, lapping did not work.
Did you try the bubble test to make sure that it is actually a head leak?
Zach
Posted by: gjones Jan 20 2008, 09:49 PM
Nope, lapping did not work.
Did you try the bubble test to make sure that it is actually a head leak?
Zach
No I did not- when I do the leak down no air comes out of the intake and the exhaust valves. When it is running I can cup the carb throat completely and it doesn't stumble or choke out at all. Checked for vaccum leaks none found- just don't know what else it could be???????
Posted by: Vacca Rabite Jan 20 2008, 11:26 PM
Do a leak down test. While you are pressurizing the cylinder, squirt some windex (or other liquid spray cleaner) at the joint. If you see bubbles, that is where the leak is. It is an easy test.
Zach
Posted by: gjones Jan 25 2008, 06:35 PM
Do a leak down test. While you are pressurizing the cylinder, squirt some windex (or other liquid spray cleaner) at the joint. If you see bubbles, that is where the leak is. It is an easy test.
Zach
What did you have to do to finally fix your head leak?
Posted by: Vacca Rabite Jan 25 2008, 07:10 PM
I did 2 things.
1) I had the half with the droppy registers fixed (case decked). Cheap work, especially if you pull the studs first.
2) I got a second case.
I have yet to rebuild my engine, as I got my stuff back from the machineist today.
I decided to give my old case one more try, as it had the galley plug mod done, and the machineist said he could deck it cheap. If it is still wonky, I am going to use the second case and be done with it.
Zach
Posted by: Dr Evil Jan 25 2008, 08:47 PM
Need help this WE?
Posted by: Vacca Rabite Jan 26 2008, 12:46 AM
Sunday work for you? If so, YES.
Zach
Posted by: Jake Raby Jan 26 2008, 12:48 AM
So you only decked one case half??
If so now you'll have to do rocker geometry on BOTH halves and will have to set CR seperately as well, needing more shim on the decked side. I'd never deck just one case half- if one half has droop syndrome, the other is close behind.
Posted by: Dr Evil Jan 26 2008, 09:42 AM
He was gonna have to do geo on both anyway. I already gave him some adjustable rods.
Zach, cant do Sun, I am going wedding ring shopping with the lil woman
Powered by Invision Power Board (http://www.invisionboard.com)
© Invision Power Services (http://www.invisionpower.com)