Printable Version of Topic
Click here to view this topic in its original format
914World.com _ 914World Garage _ Richard's progress thread
Posted by: Richard Casto Oct 31 2007, 09:13 PM
A little history first...
This is my third 914 and it will be a keeper. First two are from my college days in the late 1980's but both of those are gone (1st was totalled in a crash, the second had terminal rust and eventually became a parts car) Fast forward roughly 20 years. Got married, had two kids and I decided I could not continue to put off building my dream car. While I had always wanted an original 914/6, I also wanted a general purpose fun car (Street, Autocross and Track) that would have had more power and safety features than a stock 914/6. I can't afford to have multiple 914s (a stock 914/4, a 914/4 with a modern Type IV, a stock 914/6, a 914/6 GT Clone, a track only 914, etc.), so rather than molest a "real" 914/6 to build my dream "six", I decided to start with a regular 914/4 and do a six swap.
This car was purchased in 8/2005. Over the past two years I have disassembled the entire car and am now at the point of doing repair and refurbishment. Which is why I picked now as the time to do the progress thread (who wants to read about the dis-assembly of a car!)
Goals for the car...
- While I appreciate 914/6 GTs, I have no desire to spend the time and money to make this a "GT Clone".
- While I appreciate 914s that have SBC or Subaru engine swaps or even big modern Type IV engines, I wanted to keep the spirit of the 914/6 which means a Porsche flat six. I am looking for "safe" power and torque. So this excludes building up a wild 2.x engine. So I either going to do a 3.0 or 3.2 (90% sure it will be a 3.2).
- Again, with the spirit of building something like a 914/6, I will be doing a five lug conversion. I already have a complete front end including 3.5" struts.
- I will be using a 901 transmission in the near term and when I can afford it, I will be moving up to a 915 transmission.
- I don't think the wide body look works for every car and I tend to like the narrow body style better, but I am a big fan of plenty of rubber on a car. So I am doing steel flairs.
- I am not a huge fan of the 916 front and rear bumpers, so I am keeping the stock style front and rear bumpers.
- This will be used at track events, so I want a full cage. But at the same time I want to be able to put the top on the car. This is going to be a challenge as I am also 6'5". So getting me into a seat, with helmet on that fits under the top of the cage and with the top fitting is going to be a challenge.
- I really want to minimize how much I modify the body itself. I wanted mods to be "bolt on" vs. cut and weld. This is currently stopping me from doing a "GT Style" front oil cooler. I most likely will put a cooler in the rear with ducts and thermostat controlled fan. I know that in a way this is more complicated than the front cooler, but it is what I want. The only exceptions to this rule so far is the flairs and the installation of the cage. The flairs I think are in the spirit of the car as they are the steel repro of the factory flairs and the cage is a safety item. I haven't decided about things like cutting an access hole for the engine (set timing, etc.), mods to the floorboard to get the seat to fit as well as "stiffening" or "reinforcement" kits. I want this car to be SCCA SM2 legal for autocross. But I may just say "screw it" and do some of these factory stiffening kits even if it puts me into XP class.
- I want to keep the "bling" factor down on the car. So the interior and exterior will have a very "stock" look (no rear wings, etc.) I am also going to go with the factory color of "Irish Green" as you don't seem to see many in that color.
- Ideally I would like to refurbish or replace as much as I can as I reassemble the car, but due to funds, some stuff may be put back that I will replace at a later date. The dash cover is a simple example of this. Mine is cracked, but I may not be able to get it recovered until later.
- Do as much of the work myself as I can. For me the trip there is just as important as the destination. I want to know this car inside and out when I am done.
- I want to do any rust repair "the right way". What I mean by this is that I will only be in doing surgery on this car once. So if I see rust, I am going to fix it once and fix it right. And the resulting repair will hopefully look as close to factory original as I can make it.
- I would like to be done by the end of 2008. As with anything, time and money have a big impact on this.
I have my own website that contains a higher level of detail on specific sections of the car as well as a more detailed general Blog. I currently host this at home and sometimes the server is down, but it is up most of the time. You can find that here...
http://motorsport.zyyz.com/project_914.htm
Posted by: Richard Casto Oct 31 2007, 09:18 PM
In 2005 when I decided to get back on the horse, a local friend who autocrosses with me who had a 914 (jdogg on this forum) put me in touch with this car. It is a 1972 1.7 The body is generally in good shape for an East Coast car. Might be a parts car on the West Coast.  It had some visiable hell hole issues, but the longitudinals generally seemed strong and the biggest issues with the body was front and rear trunk rust in the usual places. The PO also had backed into it a few weeks previously and hit the driver side front fender. I bought the entire car as well as his parts stash for $800.
Car as I purchased it in August of 2005.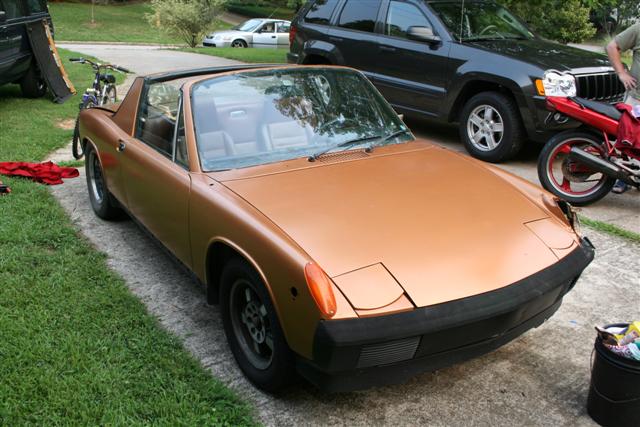
I spent much of late 2005 and early 2006 totally redoing my garage. This included additional 220v wiring for air compressor and welder as well as additional 110v for additional outlets around the perimeter of the garage, a new heavy duty work bench, epoxy covering for the floor, on the wall (above head) storage for tools, etc. I basically didn't want to do the work in a junk pile.
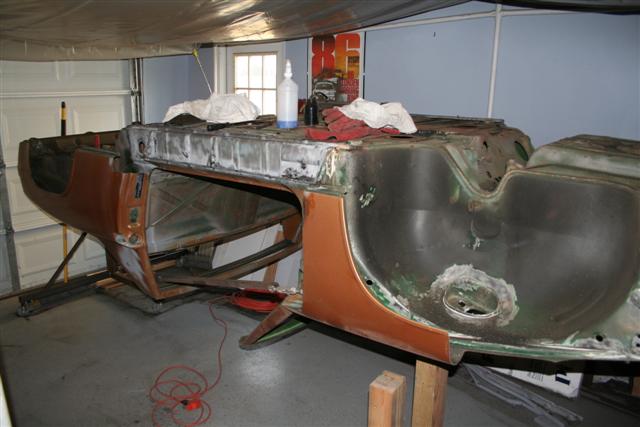
By August of 2006, the garage work was pretty much finished and I started on the car. Photos below show car on jack stands, but mostly complete. Within a few weeks the engine and transmission was out and I was busy tearing into the car.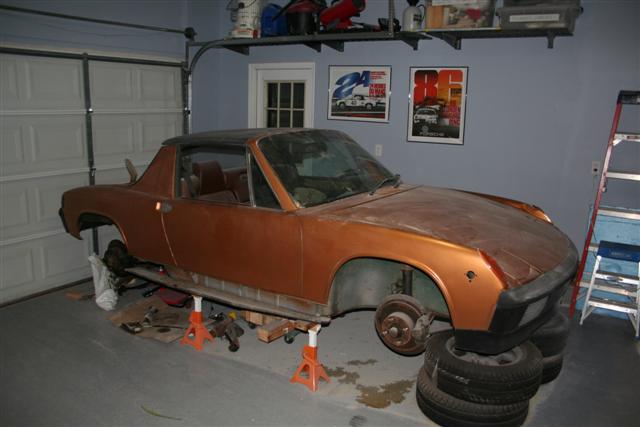
Here is the kids in the front trunk. Hopefully they will not be in High School when the car finally is on the road. 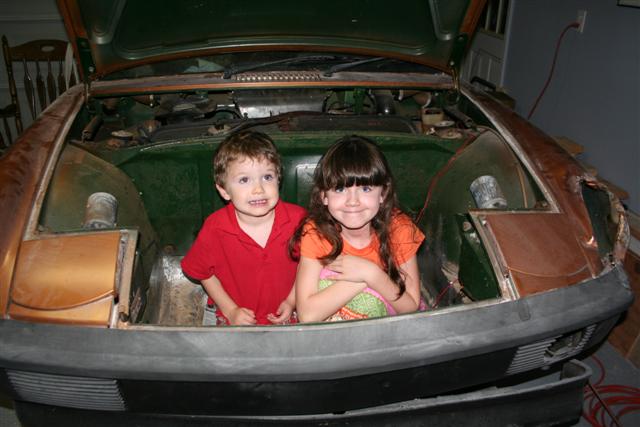
Posted by: Richard Casto Oct 31 2007, 09:26 PM
Fast forward to June of this year. Over the spring I took a welding class at a local community college and learned how to weld. My first project was to build my rotisserie. 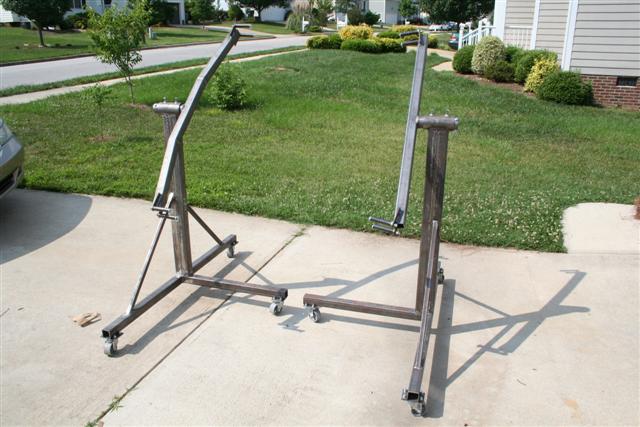
Car is totallly stripped by this point. I decided to really start looking into what I would need to do from a rust repair perspective. I know I have to replace part of the rear and front trunks and will work on those later. but I didn't know how bad the hell hole issue was as well as potential damage to the outer longitudinal on the passenger side.
At this point forward I will be standing on the shoulders of giants. While there are a huge number of web pages and threads on various forum that I have bookmarked as resources, I have found two that stand out. The first is Michelko's repair thread has been a huge inspiration to me and others...
http://www.914world.com/bbs2/index.php?showtopic=16748
The second is Armando Serrano's site. It has been great as I share his apparent desire to do the repairs to as close to factory spec as possible...
http://www.pbase.com/9146gt
Armando has many photos that show work in progress just like in Michelko's thread and a picture is truely worth a thousand words. My goal is to do work as nice as they have as well as document what I have done to help others. I am an Admin over at http://www.roadglue.com/ and my focus there is on the 914 wiki http://www.roadglue.com/wiki/. I hope to eventually document some things I have learned along the way on the wiki.
Like Michelko, I cut out the area of the body above the passenger side jack receiver so that I could get better access. I may eventually need to do the same on the driver side when I replace the missing jack receiver.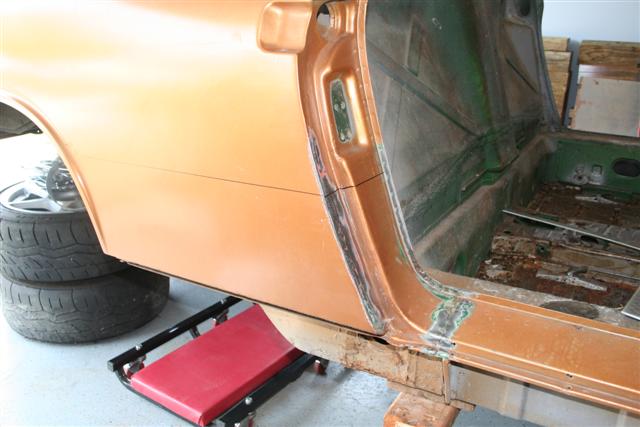
After using my knotted wire brush on my angle grinder I found that the small bubbles on the longitudinal was more like significant pinholes. How bad will it be on the inside? I will find out.
Posted by: Richard Casto Oct 31 2007, 09:32 PM
Sometime earlier I had realized that in addition to the regular hell hole rust, the inner suspension console for the passenger side had terminal problems. Also in the spirit of this being more like a 914/6, I decided to "delete" the 914/4 specific engine mount pods. The one on the passenger side was toast anyhow, so instead of rebuilding it from scratch (replacements do not exists as far as I know), I would just remove both of them anyhow.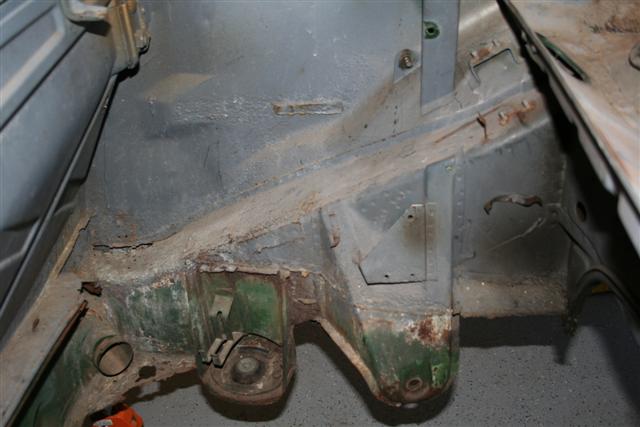
A short time later, I had some friends help me mount the car on my rotisserie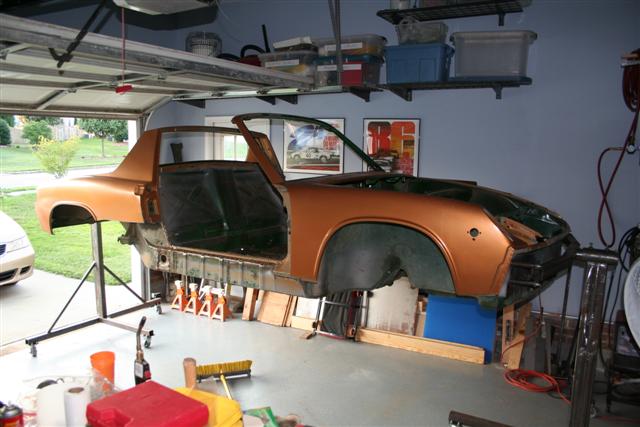
Posted by: Richard Casto Oct 31 2007, 09:47 PM
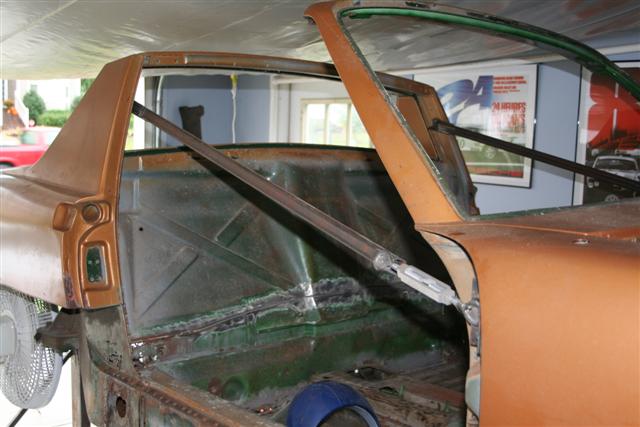
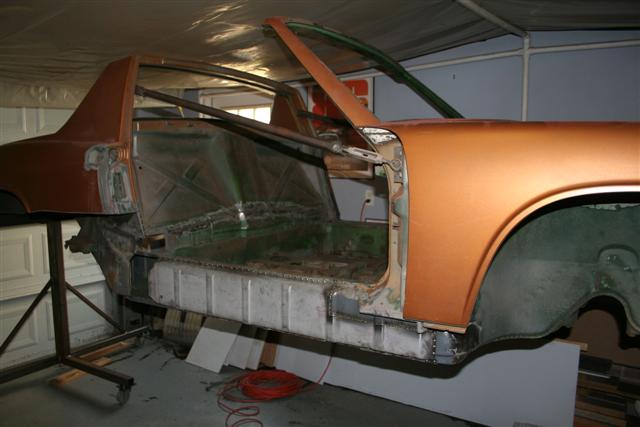
This past week, I decided to dive in and really start cutting out the rusty spots.
The car is supported on the rotisserie. I also have the standard braces between the shoulder seatbelt mounts and door frame, I also built some extra long jack stands to support the front and rear of the longitudinal while I work on the passenger longitudinal and hell hole.
It was kind of scary and exciting to cut into the car. 
It is about as bad as I expected. With the car on the rotisserie and doing 360 barrel roles you could hear all kinds of rust rolling around inside. A lot of this flaky rust also comes from the hell hole area and it has just migrated to the lowest part of the car. Still, I am not happy because I am pretty sure I am going to have to rebuild the bottom part of the inner longitudinal. I have the outside repro part from Restoration Design, but I see a lot of fabrication work in my future.
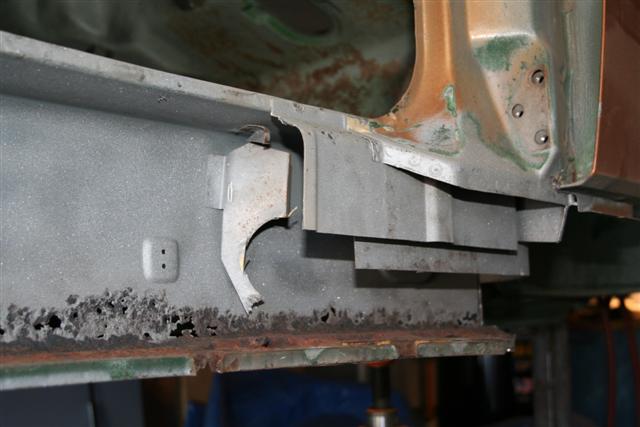
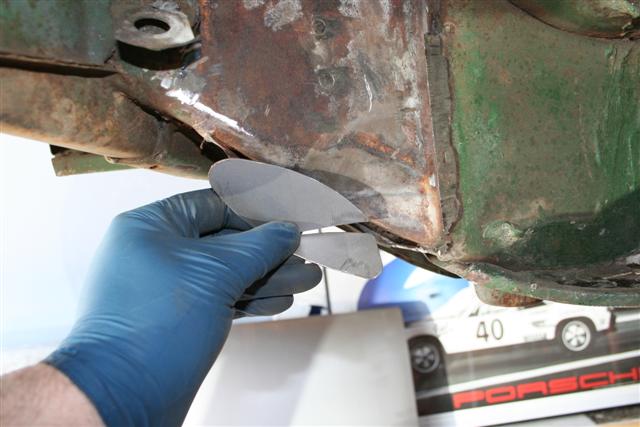
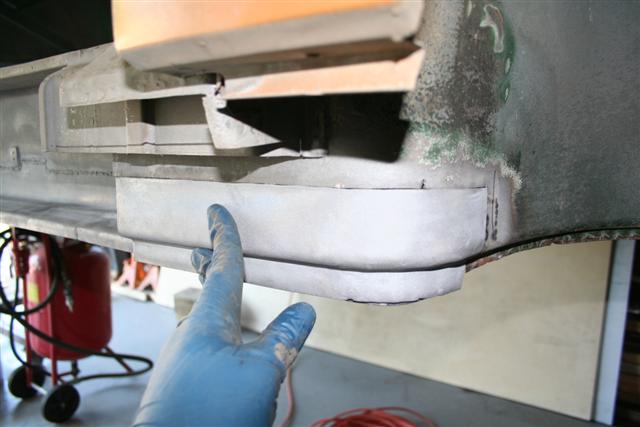
This photo really shows what I am trying to fix. You can see my fingers through the gap behind the straight edge. This is behind the jack receiver point (jack receiver was mostly removed by the PO) and under the hell hole. The double walled section here has rusted through enough that the bottom is no longer strong. The car has been jacked up on this and because of the weakness, it has collapsed/crushed part of the box section here. That is what is causing the gap. Much of this area needs to be replaced.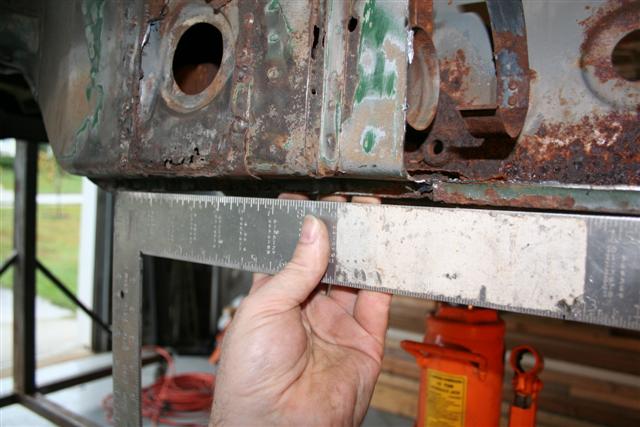
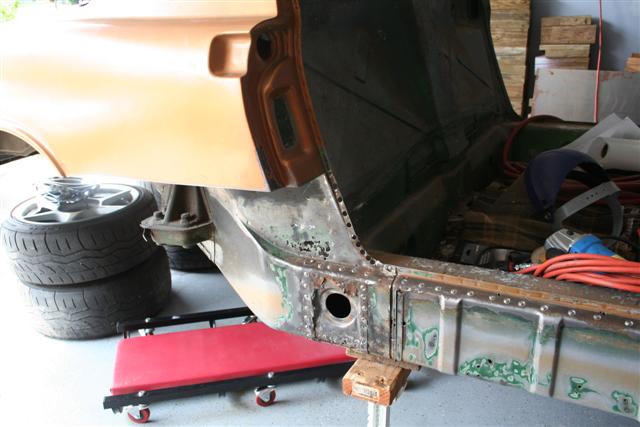
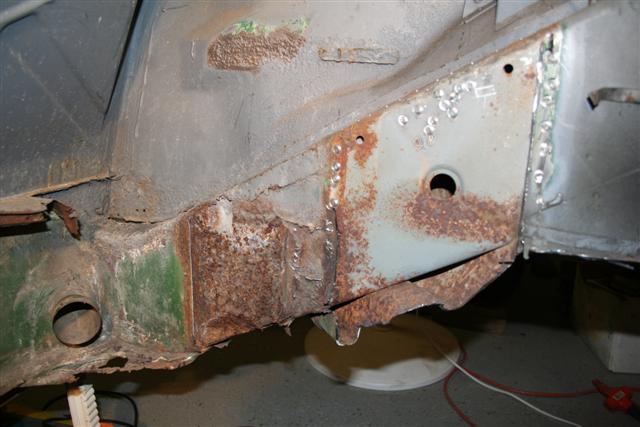
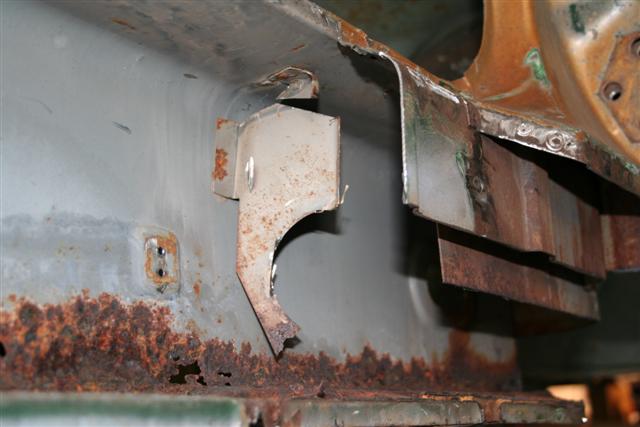
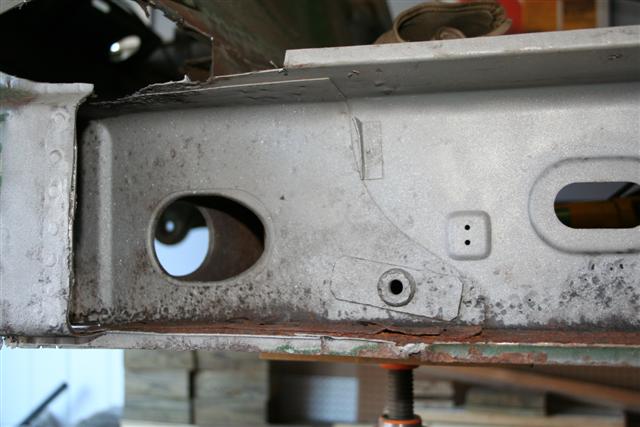
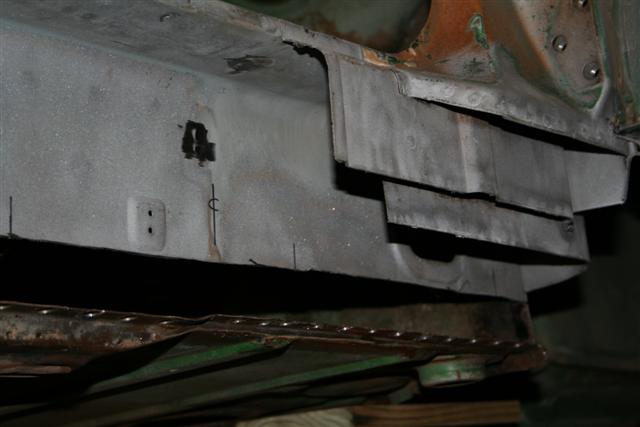
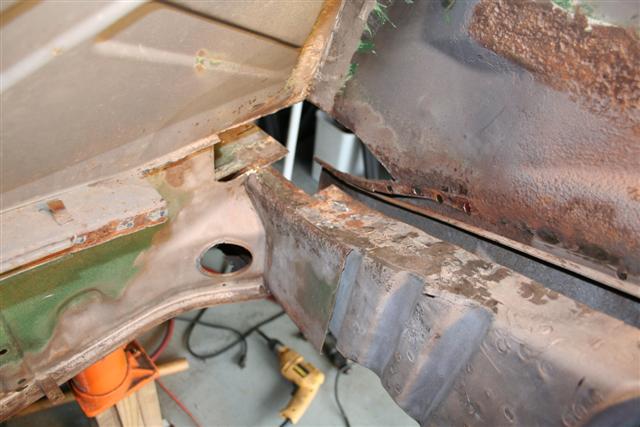
Here we are looking inside of that hole (I actually cut more of the area off around where the jack receiver mounts after the photo above). We are looking back toward where the rear suspension console mounts. There is some debris up in the top as a result of doing barrel rolls on the rotisserie. But after I vaccumed that out, it looks like the inner corrugated wall of this section is in good shape other than the very bottom that you can't see in this photo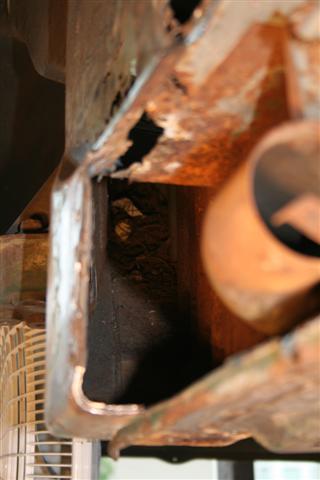
Posted by: Richard Casto Oct 31 2007, 09:57 PM
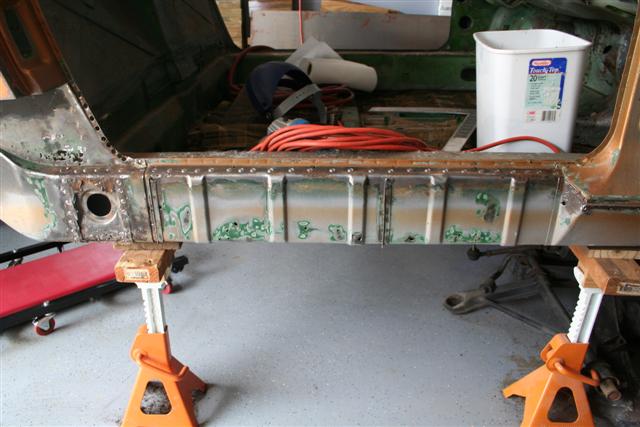
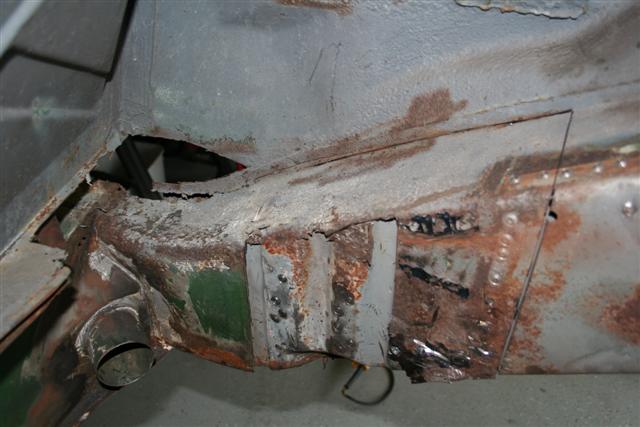
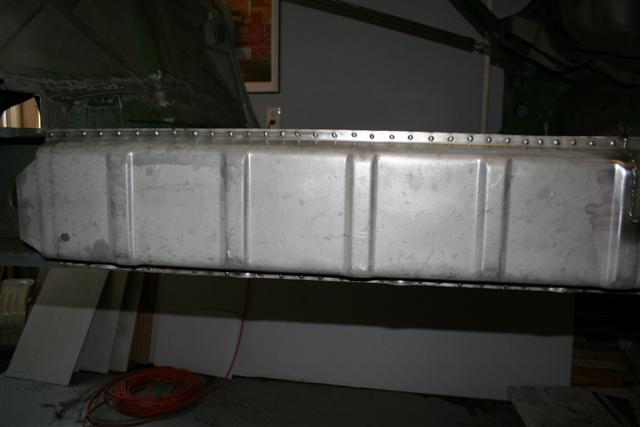
In the hell hole area, as mentioned earlier I have deleted the 914/4 engine mount pods. This section is nearly all double walled on the inside. The inner wall also has a corrogated style stamping (I assume for extra strength). I am hoping that this inner part continues to remain in good shape. As you can see, I have already cut along the corrogated section to help me peel of the outer skin. The outer skin is spot welded in place and I am using Blair Rotabroach spot weld bits to remove the spot welds. It is a hard job in rusted/pitted areas where you don't know exactly where the spot well is.
I have also marked out my cutting plan. I am looking to keep as much "good" metal as possible. But at the same time I would like my cuts to be straight lines as much as I can to make it easier to fabricate the replacement parts.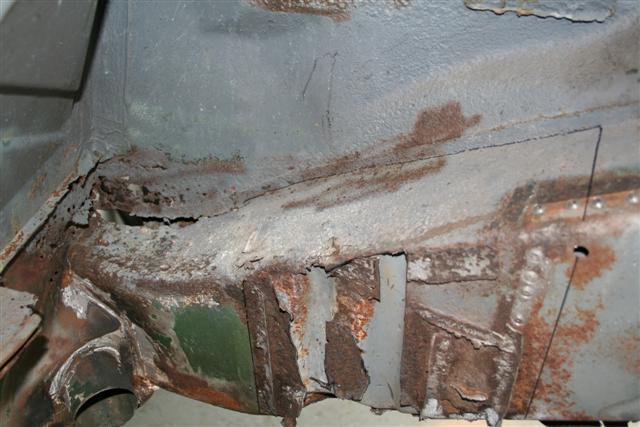
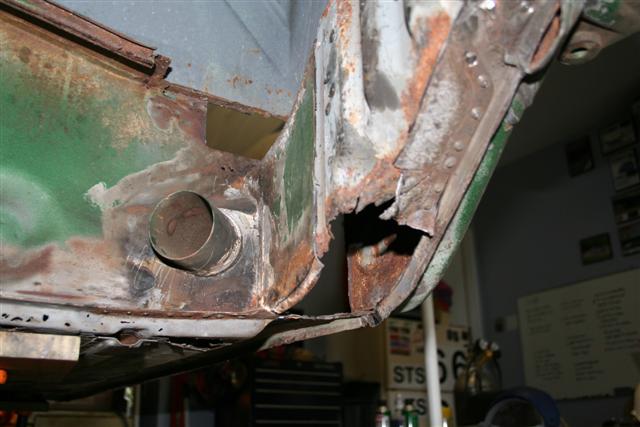
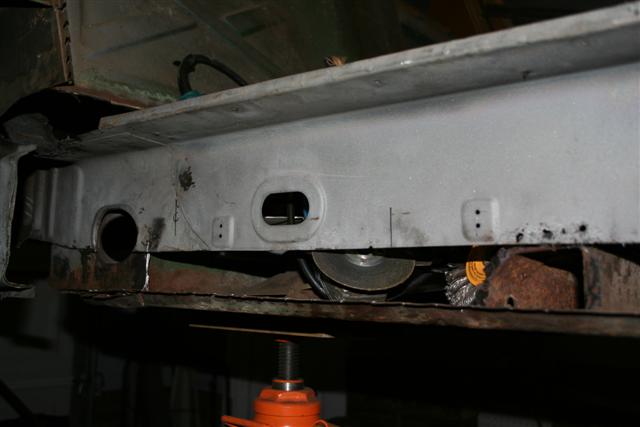
View from the bottom looking up. Donut and backing plate have already been removed.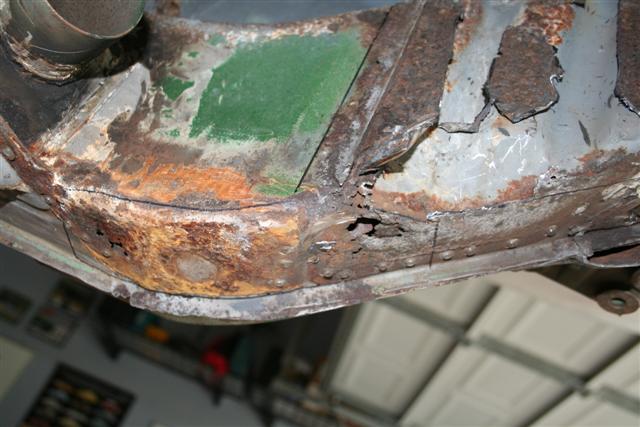
You can see more of the outer suspension console in this photo. I am 99% sure that the outer console is in great shape.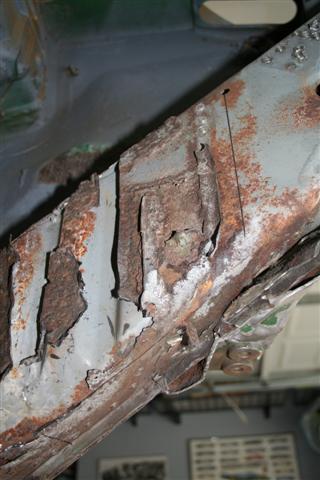
Posted by: Richard Casto Oct 31 2007, 10:01 PM
More cutting. I probably am going to be cutting a bit more out and then I may media blast the entire area back to grey metal to get a better idea how bad the rust is. I want to determine what is just surface rust that will clean up and what is cancer. Then do some more cutting to remove any cancer I missed the first time and then start fabricating my replacement parts.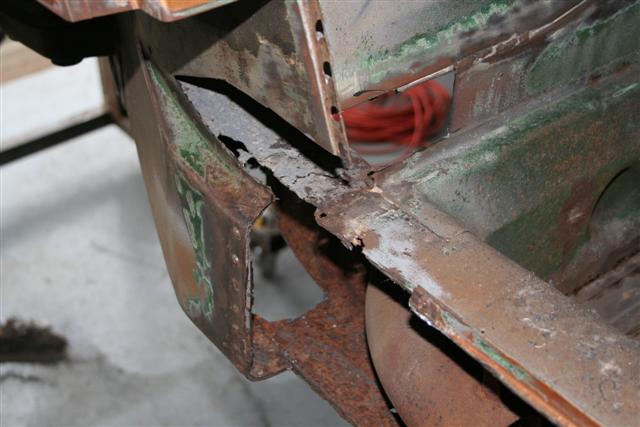
This is pretty much it for now. Hopefully I will be able to update about once a week or so.  Wish me luck!
Posted by: rick 918-S Oct 31 2007, 10:36 PM
Good start. we'll be watching ![popcorn[1].gif](style_emoticons/default/popcorn[1].gif)
Posted by: TeenerTim Nov 1 2007, 08:01 AM
You REALLY need to tack in some bracing with the car on the rotisserie and the longitudinal cut like that. The doors may not fit when you're done or it might even buckle in the middle. Good Luck.
Posted by: iamchappy Nov 1 2007, 08:08 AM
What an ambitious start, I wish you the courage to continue and persevere...
Posted by: URY914 Nov 1 2007, 08:24 AM
Great job so far. But yes add some door opening braces. It's about to fold up on you.
Posted by: jdogg Nov 1 2007, 09:50 AM
Richard-
Great progress!!! With the patient, methodical approach you've demonstrated so far, this project is going to be outstanding!!!

Great job so far. But yes add some door opening braces. It's about to fold up on you.
He did mention he had bracing from where the shoulder belts strap in to the door hinge area.
Posted by: Richard Casto Nov 1 2007, 10:30 AM
Richard-
Great progress!!! With the patient, methodical approach you've demonstrated so far, this project is going to be outstanding!!!
Great job so far. But yes add some door opening braces. It's about to fold up on you.
He did mention he had bracing from where the shoulder belts strap in to the door hinge area.
OMG it broke in half last night!!!

Actually thanks for the warnings guys. Sorry, I should have shown the braces as I wouldn't want anyone to read this and then cut like I have without something to hold the car up. They just don't happen to be visible in the photos above.
In addition to the braces shown in the photo below, I also have two support columns on the floor. One for the front and one for the rear of the passenger side longitudinal. As I go I keep checking to make sure everything continues to be tight and well supported.
Posted by: roadster fan Nov 1 2007, 12:32 PM
Richard,
Awesome pics of your progress, keep em coming! I really like the simplicity of your rotisserie and looked at your construction photos on your progress site. Could you take pictures of your rotisserie with a tape measure next to different parts and maybe the specifications of the round stock you used for the pivot axles? I am getting ready to build one the measurements could speed up the design stage.
Keep up the great work, you are saving another one from us California heathens who cut up cars with bad hell holes!
Jim
Posted by: Richard Casto Nov 1 2007, 12:47 PM
Richard,
Awesome pics of your progress, keep em coming! I really like the simplicity of your rotisserie and looked at your construction photos on your progress site. Could you take pictures of your rotisserie with a tape measure next to different parts and maybe the specifications of the round stock you used for the pivot axles? I am getting ready to build one the measurements could speed up the design stage.
Keep up the great work, you are saving another one from us California heathens who cut up cars with bad hell holes!
Jim
Jim,
As I designed and built it I tried to keep track of all of that stuff and I think I have 90% of it already. My plan was (is) to put a complete "How To" up on the 914 wiki. Problem is that the closer I got to finishing it, the more I thought about moving onto the next stage vs. documenting the design.
 This is probably a good kick in the pants to get me to finish putting that together. I will try to get that done this weekend and when I do that I will post the link for the entire thing with all measurements, cut plans, etc.
I am pretty happy with it so far. The only thing it is missing is an adjustment to balance the car. but that would add more material/complexity. And as it is right now, it is pretty easy to rotate and lock into position.
Richard
Posted by: tdgray Nov 1 2007, 04:04 PM
Great Start 

Keep it up... believe me been there and done that. See the tag below my signature for the proof.
Remember slow and steady wins the race.
I'll be checking this thread often! 
Posted by: dfwteenerpr Nov 1 2007, 09:16 PM
This is fascinating to see. I have a 74 and a 76 that both have some accident damage on the right rear and the doors don't fit right. I would love to be able to fix them as you're doing, but I'm petrified of getting it wrong. But I also have a rusty shell, I could cut into that to learn without fear of ruining the car, I may have to do that to boost my confidence.
Posted by: jaminM3 Nov 1 2007, 09:21 PM
Nice!!
I am starting a very similar project, my car even has the banged up front fender. I decided to start with the fender instead of the longs and jack points. I will be updating my thread too... 
Posted by: Rand Nov 1 2007, 09:41 PM
Way to go Richard! I love the way you're thinking with your goal list. I will enjoy following your progress.
Posted by: Richard Casto Nov 6 2007, 04:17 PM
Richard,
Awesome pics of your progress, keep em coming! I really like the simplicity of your rotisserie and looked at your construction photos on your progress site. Could you take pictures of your rotisserie with a tape measure next to different parts and maybe the specifications of the round stock you used for the pivot axles? I am getting ready to build one the measurements could speed up the design stage.
Keep up the great work, you are saving another one from us California heathens who cut up cars with bad hell holes!
Jim
Jim,
As I designed and built it I tried to keep track of all of that stuff and I think I have 90% of it already. My plan was (is) to put a complete "How To" up on the 914 wiki. Problem is that the closer I got to finishing it, the more I thought about moving onto the next stage vs. documenting the design.
This is probably a good kick in the pants to get me to finish putting that together. I will try to get that done this weekend and when I do that I will post the link for the entire thing with all measurements, cut plans, etc.I am pretty happy with it so far. The only thing it is missing is an adjustment to balance the car. but that would add more material/complexity. And as it is right now, it is pretty easy to rotate and lock into position.
Richard
I finished my "How To" article earlier this week. I need to read through it again as I am sure it needs a few tweaks. Here it is...
"How to build an automotive rotisserie for a Porsche 914"
http://www.roadglue.com/wiki/index.php/How_to_build_an_automotive_rotisserie_for_a_Porsche_914
Posted by: BIGKAT_83 Nov 6 2007, 05:31 PM
Great write up on the rotisserie build.....It sure sould be in the classic threads here.
Bob
Posted by: Eric_Ciampa Nov 6 2007, 09:18 PM
just a thought... you might want to include some pictures of a 914 on the rotisserie. Couldn't hurt
Posted by: roadster fan Nov 9 2007, 01:56 AM
Richard,
Thanks for doing the write up on the rotisserie construction details. I was wondering if you are able to roll the rotisserie with your car on it out of your garage door. The clearance looks tight, can you measure the height of the opening. If it clears by a mile I guess it wont matter much because I think garage doors are pretty standard in size. I would hate to build it and not be able to get the car out of the garage if need be with it on the rotisserie.
Again, great write up at the 914 wiki. Thanks.
Jim
Posted by: Richard Casto Nov 9 2007, 10:09 AM
Richard,
Thanks for doing the write up on the rotisserie construction details. I was wondering if you are able to roll the rotisserie with your car on it out of your garage door. The clearance looks tight, can you measure the height of the opening. If it clears by a mile I guess it wont matter much because I think garage doors are pretty standard in size. I would hate to build it and not be able to get the car out of the garage if need be with it on the rotisserie.
Again, great write up at the 914 wiki. Thanks.
Jim
Jim
The casters I picked lift the bottom of the stands 4" off the floor (I mention this because caster choice will impact ultimate height). With the car in an upright position (mine is locked in that position now), and including casters in the measurement, it is 78 1/2" from floor to top of windsheild frame (high point). My Garage door opening is about 82" in height. This gives me a few inches of clearance to roll the car outside if I want. I have actually not rolled it out however.
I think that most garage doors are either 6'6" or 7' in height. A 6'6" might be tight. If someone had a shorter door and needed to roll it outside, they could built probably use slightly shorter stands. I wanted mine to have some clearance with GT flairs on. So if you wanted less clearance, you might be able to drop the stand an inch, and if you wanted to build this for narrow body only, you could drop another inch or two.
If my car wasn't locked into position right now, I would rotate it and measure the exact amount of clearance I have now so I determine exactly how much shorter the stands could be.
Richard
Posted by: roadster fan Nov 10 2007, 03:35 AM
Richard,
That is exactly the info I needed. I will measure the garage door in the a.m. and put together the material list.
Again, thanks for taking the time to document and share the details on your rotisserie build. Good luck with your project, I will be watching with anticipation
Jim
Posted by: Richard Casto Dec 30 2007, 10:58 PM
Sorry for the lack of an update. Between various home projects (replace water heater, fix dry-rot on front of house), family birthdays and the holidays, the time I usually have to work on the car has been sucked away recently. But I have done some work.
As always my site has more in the way of photos and text. My signature line should always have an up-to-date link. Here are a few quick links...
Main page...
http://motorsport.zyyz.com/project_914.htm
Passenger Longitudinal repair...
http://motorsport.zyyz.com/project_914_03_04.htm
Hell Hole repair...
http://motorsport.zyyz.com/project_914_03_06.htm
Enough of that. On with the update!
Posted by: Richard Casto Dec 30 2007, 11:10 PM
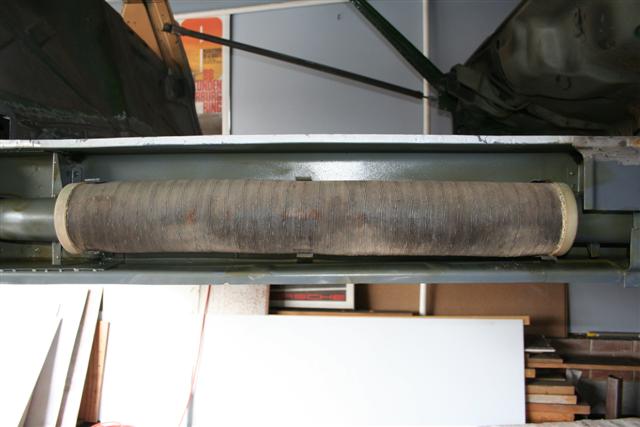
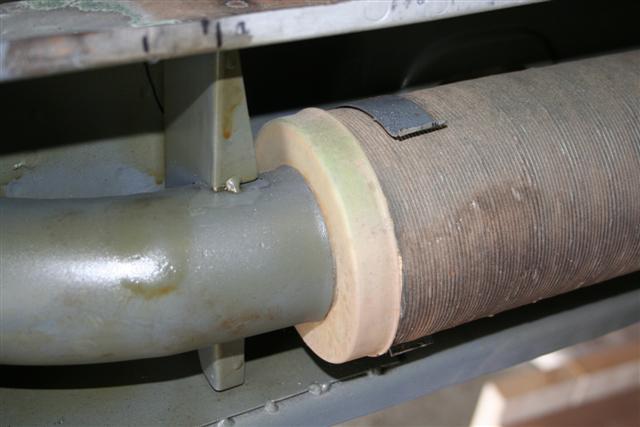
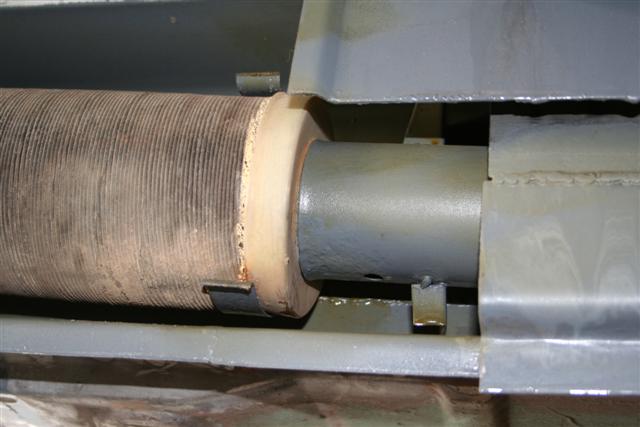
I am still working on the passenger side longitudinal and hell hold area. I am working on removing the bottom (rusted) section of the inner longitudinal so that I can fabricate and weld in a replacement. Doing anything in this area is like peeling an onion.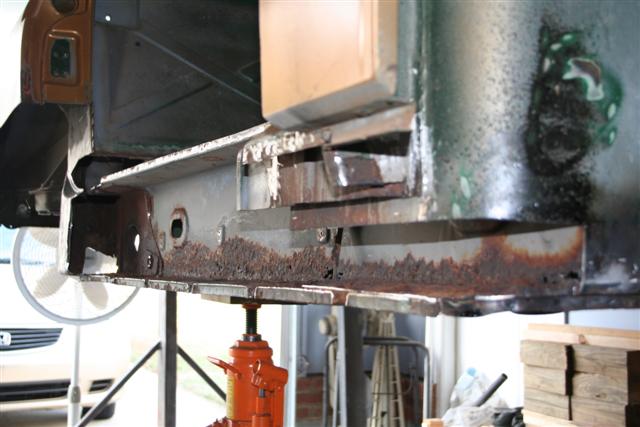
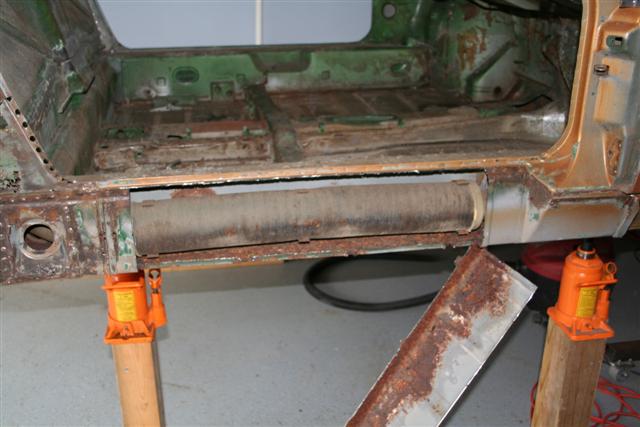
Here I have removed the clamps that hold in the flexiable heater hose as well as removed the two heater pipes. The one going into the passenger compartment was a total pain in the ass to remove. These have small stick weld beads where they enter/exit the car as well as brazed connections (to small brackets) inside the longitudinal. I am going to fabricate replacement brackets, so the existing ones have been chopped up badly in an effort to remove the pipes.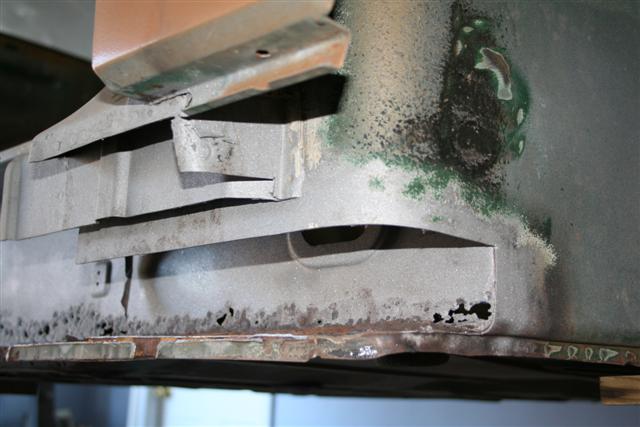
I then needed to determine where to cut horizontally. But I wanted to make sure I knew where the rust really ended, so I media blasted the general area. With that done I was able to see where the bad stuff really was and what needed to be cut out and what I will keep.
Posted by: Richard Casto Dec 30 2007, 11:26 PM
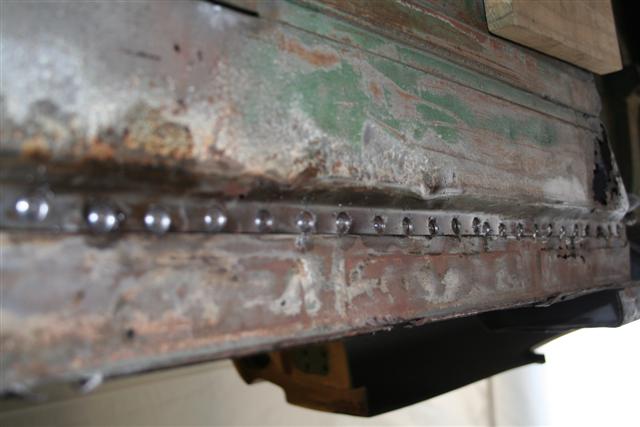
I drilled out the spot welds on the bottom. These are where the floor attaches to the longitudinal.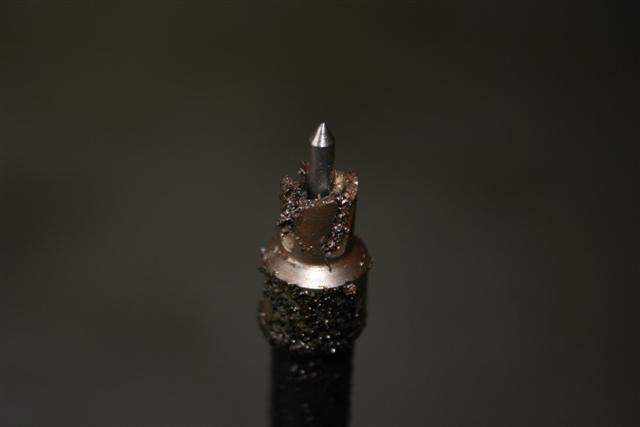
I love my Blair Rotabroach spot weld bit. I have learned that if you don't use cutting oil they die a quick death. But if you keep them cool and oiled, they work pretty well. A quick Haiku to show my love. 
My Blair Rotabroach
Cutting oil is your friend
You last a long time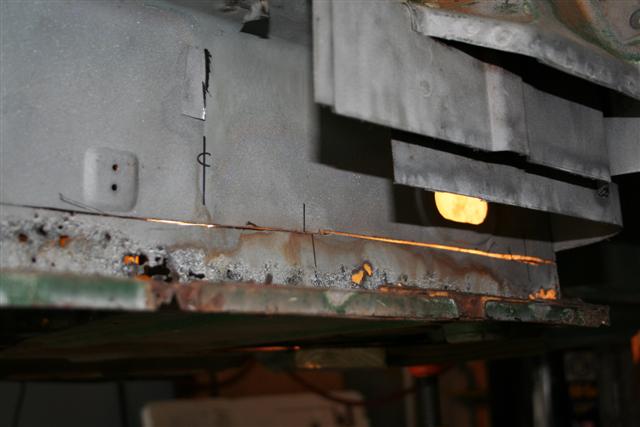
Bottom section cut out and I also grinded off the last bits of the heater pipe bracket. Before I cut I put in some vertical registration marks to help align the replacement once fabricated.
Posted by: Richard Casto Dec 30 2007, 11:30 PM
Thats pretty much it for tonight. Over the next few weeks I am going to finish cleaning up that section (grinding off any remaining flanges, etc.) so that the replacement will fit nicely. I also will probably finish up removing any rusted areas from the hell hole area. Once that is done I will start to fabricate the replacements, test fit and then weld in!
Posted by: michelko Dec 31 2007, 03:11 AM
Hi Richard,
nice project. i love that kind of stuff. Keep the pic´s coming. You are on the right way, keep that cars alive. 

Posted by: Richard Casto Jan 2 2008, 09:48 AM
Hi Richard,
nice project. i love that kind of stuff. Keep the pic´s coming. You are on the right way, keep that cars alive.
Michelko,
Your project is one of my inspirations.
I am less afraid of "digging into hell" knowning that others have done it and have made it work. I think I am just now getting into the fun part.
Richard
Posted by: John Jan 2 2008, 12:34 PM
It looks like you are making good progress with your project.
I have a few questions:
What are you using to media blast? What protective gear do you need? How much of a mess does it make? How much of the media are you able to recover? I am assuming that you are doing this in an open space in your garage.
Posted by: Richard Casto Jan 2 2008, 02:10 PM
It looks like you are making good progress with your project.
I have a few questions:
What are you using to media blast? What protective gear do you need? How much of a mess does it make? How much of the media are you able to recover? I am assuming that you are doing this in an open space in your garage.
Blaster: 40lb pressure pot from HF. I generally like it so far. This is my first pressure pot blaster. I think to make it work right, you have to screen/filter your media, don’t go crazy with the pressure (generally been using 30-60 psi), get a good ratio of air vs. media and then work on your technique. This is what I am using…
http://www.harborfreight.com/cpi/ctaf/displayitem.taf?Itemnumber=34202
Media: Coal slag 30/60 grit in the areas with rust. I am probably going to use paint stripper as much as I can on the panels and then media blast what that doesn’t remove. I may try some aluminum oxide on the panels as well, but so far I like the coal slag (Black Diamond and Black Beauty are common brand names of Coal slag).
Gear: The protective mask/hood that came with the blaster, leather gloves and respirator. You will require a good shower when you are done as you will have dust and grit in everything.
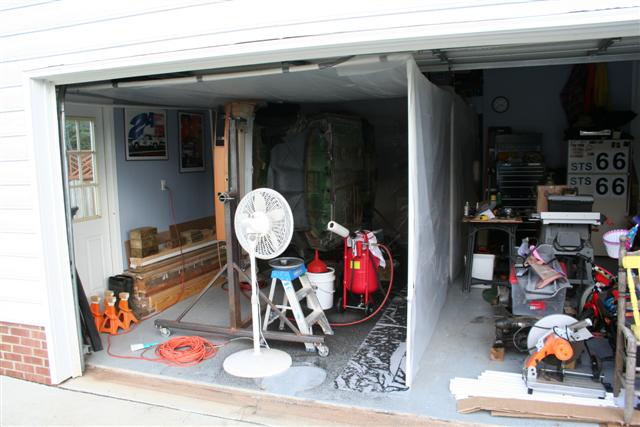
Mess: I built a tent (PVC pipe and 6 mil plastic) in the garage to keep the mess down. When not blasting, I roll the sides of the tent up and tie them in place. I used 6 mil plastic because that is what I had around, but I think it is overly heavy and at some point I am going to replace this with lighter plastic. I probably will also re-engineer some of it to make it a bit higher, but toward the door of the garage I can only make it so high as I like to be able to open/close my garage door. This entire thing will be converted to my paint booth in the future (will need to clean it all up, new plastic, etc.). If you keep the area pretty clear it is pretty easy to sweep up the media and reuse. In addition to what is in the pressure pot, I have a clean 5 gallon bucket and as I sweep up the media, I filter it and put it back into the bucket. I bought two 50 lbs bags of media and I am guessing that while I have cycled it through a number of times, I probably still have 80% of it left.
Here is a picture of the tent…
Posted by: Richard Casto Feb 26 2008, 10:58 PM
Time for an update
As always my site has more in the way of photos and text. My signature line should always have an up-to-date link. Here are a few quick links...
Main page...
http://motorsport.zyyz.com/project_914.htm
Passenger Longitudinal repair...
http://motorsport.zyyz.com/project_914_03_04.htm
Hell Hole repair...
http://motorsport.zyyz.com/project_914_03_06.htm
Floorboard repair...
http://motorsport.zyyz.com/project_914_03_18.htm
Enough of that. On with the update!
Posted by: Richard Casto Feb 26 2008, 11:01 PM
Last month I had been working on cleaning up stuff in the hell hole area so I could start to fabricate parts. I had some places that I needed to finish cutting and/or grinding off the rusted areas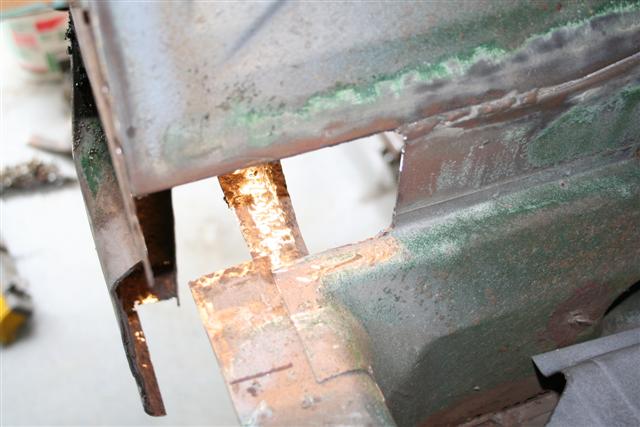
Posted by: Richard Casto Feb 26 2008, 11:09 PM
Earlier this month I started to fabricate replacement parts. I am using a metal brake to make the basic bends and then doing some hammer forming to do the rest.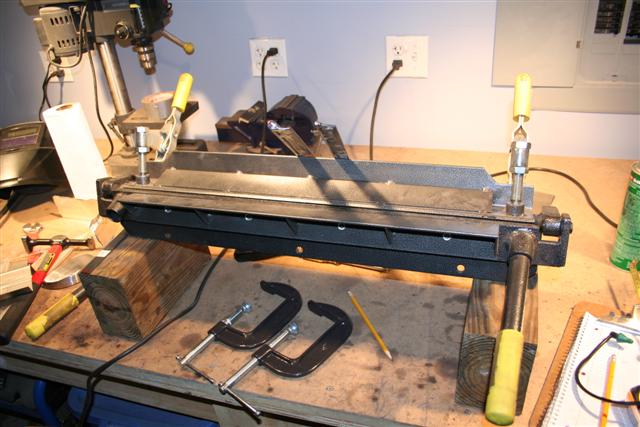
Here is a small metal brake from Harbor Freight. I have been too lazy to mount it to my bench. But it seems to be working OK so far. I also created some forms (steel rod welded to a thin bar) that I can use on the brake to do bends with a few mm radius vs. a sharp bend.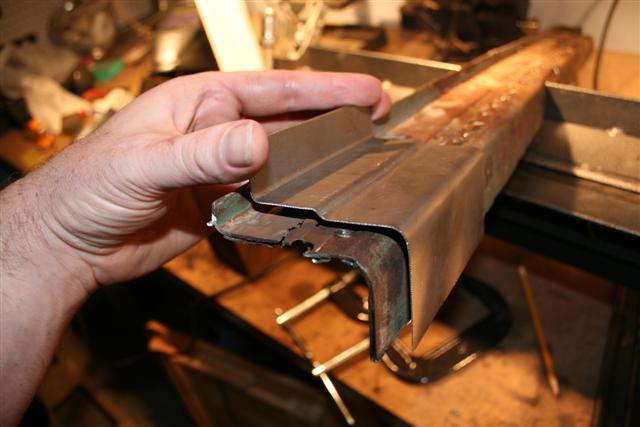
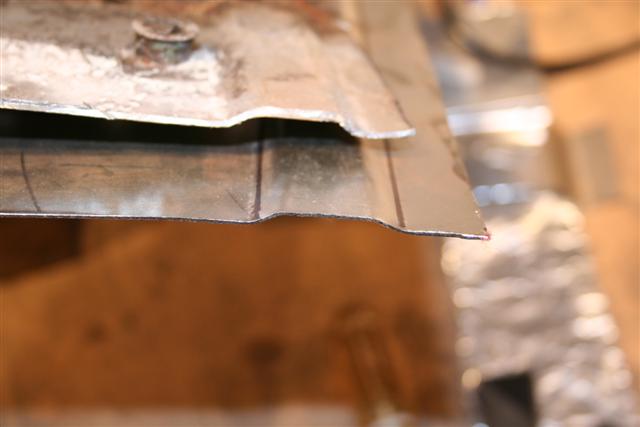
Here is a test I made with thinner gauge scrap. It is not dimensionally correct, but I wanted to make sure I could get the technique down first.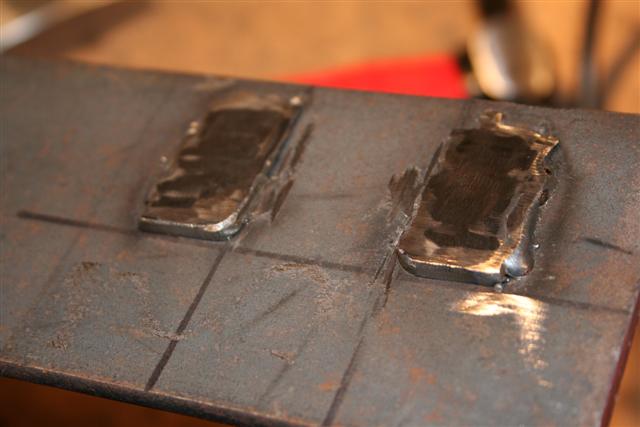
Here is the "form" I created so that I could hammer form some "channels"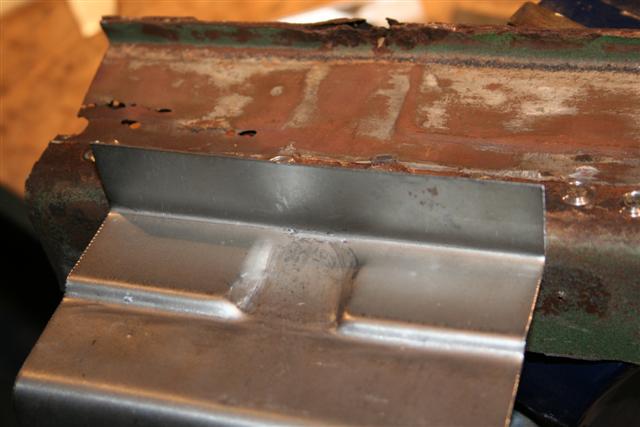
This is the test part after doing the hammer forming. The orig part is just above it. The channel in the test part is too deep. I can fix that when I do the real thing.
Posted by: Richard Casto Feb 26 2008, 11:12 PM
Here is the actual part I plan to put on the car. I adjusted the measurements from the test part and this one is a good match. I haven't hammer formed the channels into it yet.
It was around this time that I realized that I really need to fix part of the floor before I weld in the replacement for the lower passenger longitudinal. So I started work on just the floor near that longitudinal.
Posted by: Richard Casto Feb 26 2008, 11:16 PM
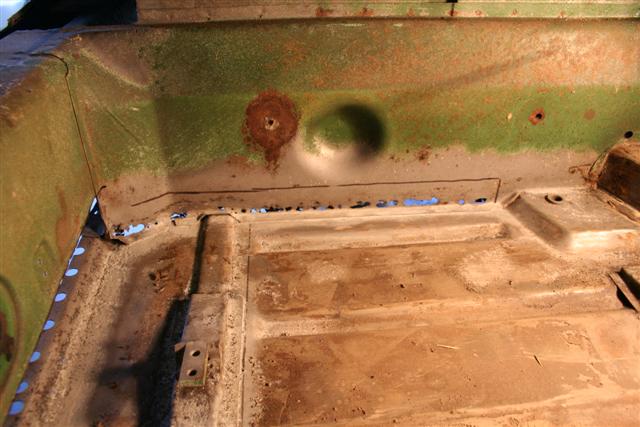
Here I have marked up the lower section of the bulkhead. It is rusted through where it connects to the floor.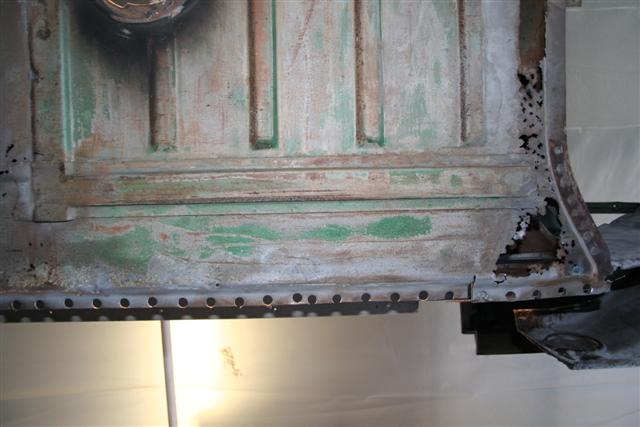
Here you can see how it rusted through right under the bulkhead. This is the hollow area right behind the seat at the bottom. The floor also has pin holes and pitting all along the area that it mates with the longitudinal.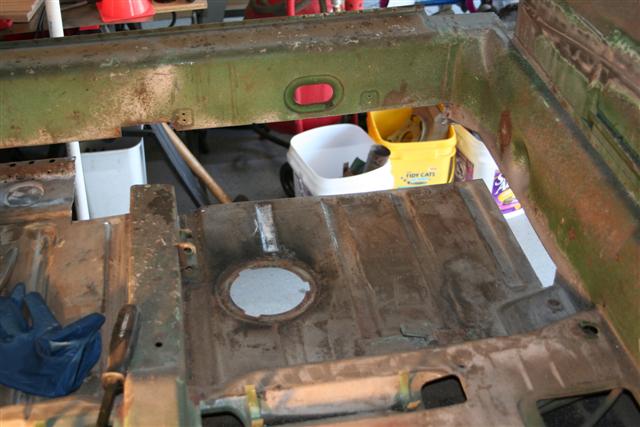
Its all cut out. I didn't do the section near the front. I will do it after I get this back section replaced.
Posted by: Lou W Feb 26 2008, 11:16 PM
Richard, this is amazing, you're doing a great job.
Posted by: Richard Casto Feb 26 2008, 11:22 PM
By using a combination of the metal brake and hammer forming, I create the "hump" that the seat hinge part mounts to. Under the car there is a reinforcement welde over this and it creates a small box section.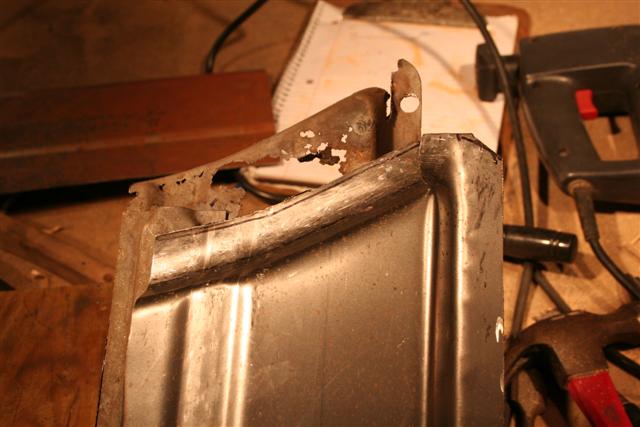

So far this part is just simple straight bends. But at the end that is under the bulkhead it has a complex curve. I don't have a photo of it, but I create an Oak form by cutting it into the proper shape. Then I lay the metal over this and hammer it over the form. I then do a rough trim of the flange. I will do the final sizing of the flange areas (where the spot welding would be) when I do final fit up.
I still need to do some more work on this part, but it is pretty much in the correct shape. So far the hammer forming has gone much smoother than I could have hoped for.
Posted by: Richard Casto Feb 26 2008, 11:24 PM
Thats it for now. Any comments or questions are welcome!
Posted by: michelko Feb 27 2008, 03:02 AM
Hi richard,
your metal working skills are amazing
Keep on the good work.
Gerflag:
Posted by: jeeperjohn56 Feb 27 2008, 09:47 AM
Hey Richard, Your doing a great job of metal work, do you have metal working in your trade? keep the pic's coming, I might have to look at this thread some day, your doing a great job keep up the good work. John 
Posted by: Richard Casto Feb 27 2008, 11:02 AM
Hey Richard, Your doing a great job of metal work, do you have metal working in your trade?
Nope. No metal forming experience prior to the stuff you see here. Everything is self tough based upon reading how other people have done stuff and from this book...
"Sheet Metal Handbook: How to Form and Shape Sheet Metal for Competition, Custom and Restoration Use" by Ron Fournier
http://www.amazon.com/Sheet-Metal-Handbook-Competition-Restoration/dp/0895867575
I am learning as I go!
Richard
Posted by: BenNC Feb 27 2008, 11:53 AM
Richard, it looks like your having too much fun with the metal shaping. I'm starting to think that you don't have enough rust on your car to keep you occupied.
I'll stop by with some strong oxidizer's
Posted by: Richard Casto Feb 27 2008, 01:02 PM
Richard, it looks like your having too much fun with the metal shaping. I'm starting to think that you don't have enough rust on your car to keep you occupied.
I'll stop by with some strong oxidizer's
Ben,
You know there is a strong urge to keep digging in deeper. Since I plan to do this just once it is hard for me to decide what to leave and what to fix. How much pitting from is OK and how much is not? Luckily I think I am dealing with the worst parts of the car right now. Since you have seen the car in person, you know I have front and rear trunk issues, but I have replacement parts for those, so less metal fabrication is a good thing. I hope those areas go quickly. All of this is also good practice for when I weld on the metal flares. Hopefully by then my skill at welding sheet metal will be good enough that the flares will look really nice.
I am having fun when it works out right. Not so much when I run into issues.
 I will have much more fun when I am finished with the body work!
Richard
Posted by: Richard Casto Mar 10 2008, 07:50 PM
I reached a cool milestone this weekend. I actually put something onto the car vs. unbolting or cutting something off!
As always my site has more in the way of photos and text. My signature line should always have an up-to-date link. Here are a few quick links...
Main page...
http://motorsport.zyyz.com/project_914.htm
Floorboard repair...
http://motorsport.zyyz.com/project_914_03_18.htm
Posted by: Richard Casto Mar 10 2008, 07:52 PM
First I needed to mostly finish up the replacement floor section. I had to do this in two sections as my metal brake wasn't wide enough to do it all at once. It is a pain, but it is more practice butt welding thin metal.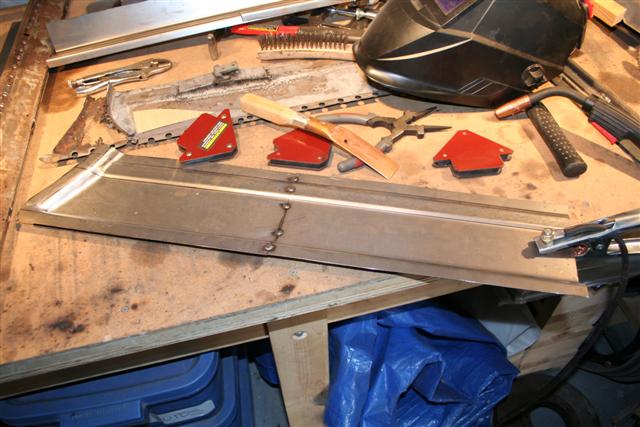
Tack welded in place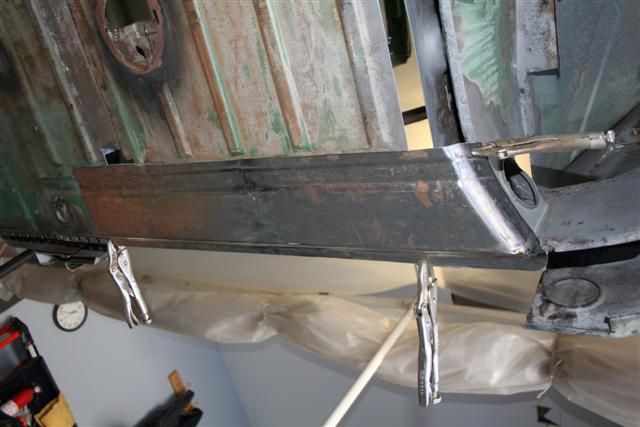
Test fit so I can mark up final trim.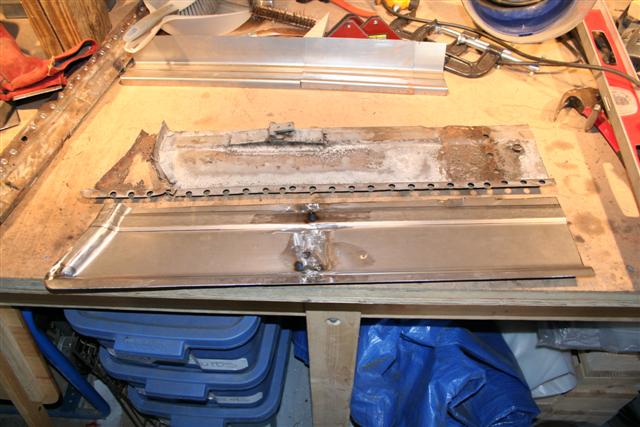
After final trim, but next to the old section.
Posted by: Richard Casto Mar 10 2008, 07:57 PM
Now for the fun stuff!!
I don't want to just weld that floor section in place as I want to finish up inside the hollow bulkhead behind the passenger seat. To do that I need to replace the section that I cut where the bulkhead meets the floor. Once that is in place I can paint the inside of the bulkhead with POR15 and then seal it up!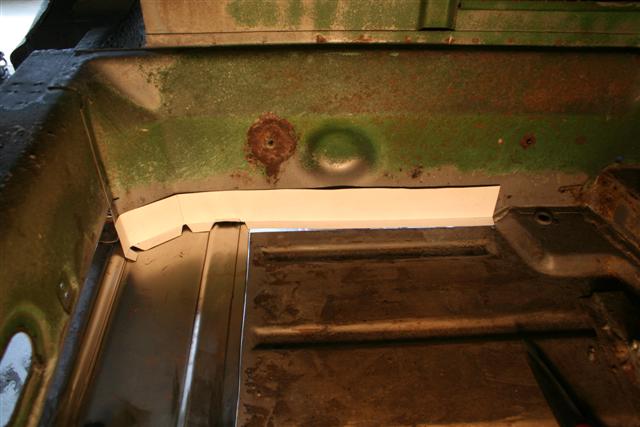
Test fit of paper template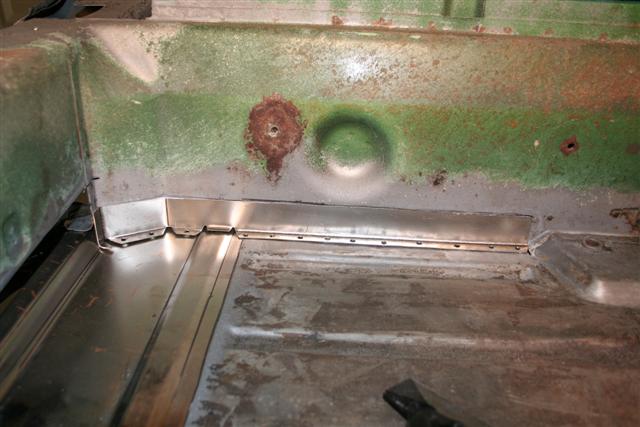
Test fit of actual part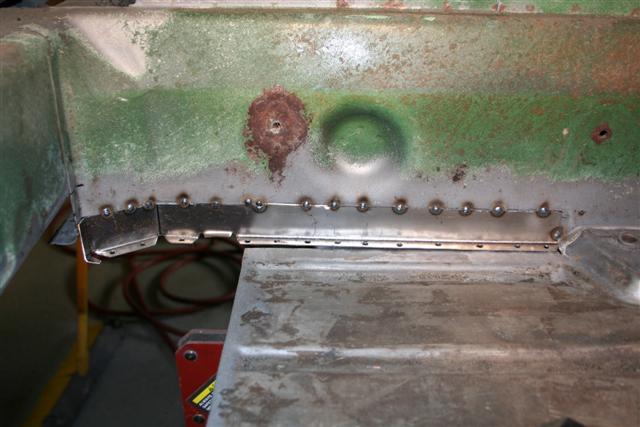
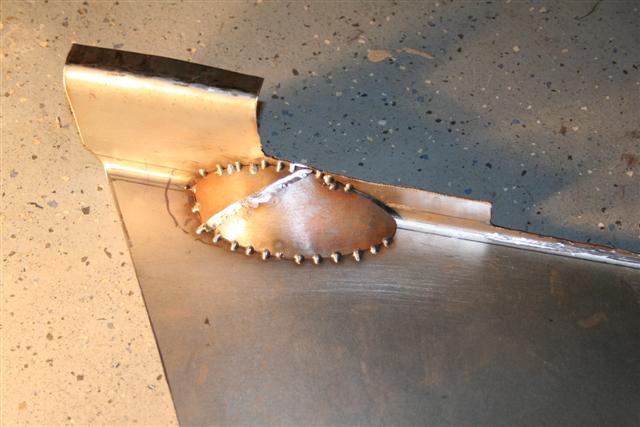
Tack weld the new part into place. I had to take car to make sure it was flush prior to tacking into place. I used magnetic weld aids to hold in place. Holes on flanges are for welding to floor later.
Posted by: Richard Casto Mar 10 2008, 08:03 PM
All welded up. What has worked best for me is short 1/4" to 1/2" beads that don't heat up the metal too much. This prevents warping and burn through. I also am using a copper backing/chill plate.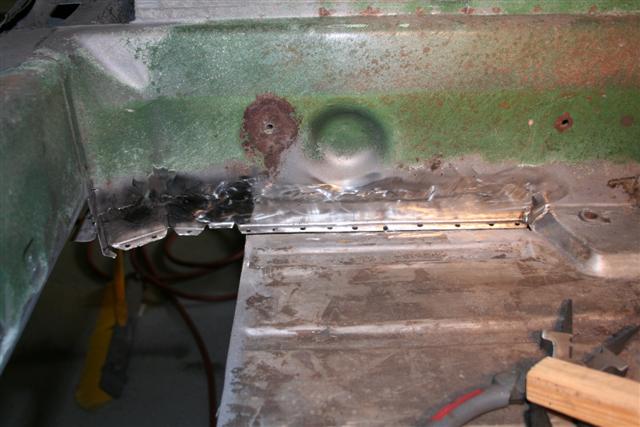
Mostly ground down. Some work still needs to be done prior to painting. Looks pretty good!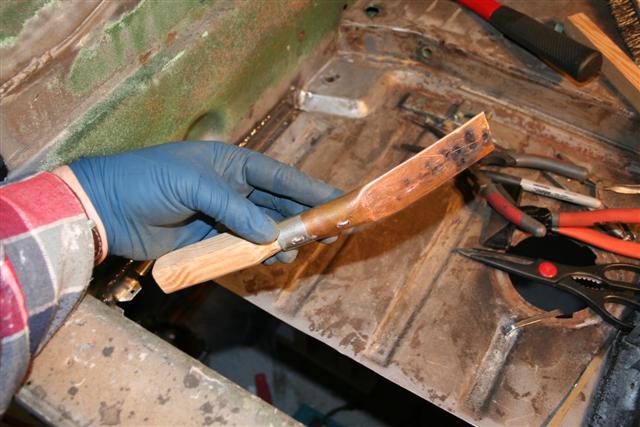
Here is the home made copper backing/chill plate. I made it based upon a description I read here on the forum somewhere (can't remember who or what thread). It is basically a copper pipe with a wooden handle in one end and then hammered flat on the other. It works well when but welding thin metal. I can put this behind the two sections and as I weld it can help take some of the heat. If I do manage to blow through a section, I can use this a a backing plate to weld against. It has worked well so far!
Posted by: Richard Casto Mar 10 2008, 08:05 PM
Thats it for now. I am pretty excited to be welding on the car! 
I hope to accelerate now that I am at the point of making stuff and welding it in. Hell hole is next!!
Posted by: Rand Mar 10 2008, 08:10 PM
That's choice Richard! And I wasn't even going to comment about the gloves.  Just kudos about the backing plate tool you made. Carbon also works, but that pic shows a priceless practical example of a great tool for backing butt welds. Nicely done.
Posted by: roadster fan Mar 10 2008, 11:44 PM
Hey Richard,
It's been awhile since I checked your progress. Awesome work!
I am getting ready to start my rotisserie build, inspired by yours. Keep welding, it will be done in no time.
Jim
Posted by: jdogg Mar 11 2008, 12:31 PM
Holy shit, Richard!!! Great stuff!!! You've got patience I could only dream of!!!
Posted by: Richard Casto Jul 7 2008, 12:13 PM
Its been awhile since I have posted an update. As usual I am having a hard time finding the time to work on the car. But I have made some progress. here is what I have been working on...
* A new "skin" for the area near the passenger rear inner suspension console
* Replacement for the bottom inside of the passenger inner longitudinal.
* Testing out ways to clean and protect magnesium parts (i.e. the transmission case)
As always my site has more in the way of photos and text. My signature line should always have an up-to-date link. Here are a few quick links...
Main page...
http://motorsport.zyyz.com/project_914.htm
Passenger side suspension console repair...
http://motorsport.zyyz.com/project_914_03_02.htm
Passenger Longitudinal repair...
http://motorsport.zyyz.com/project_914_03_04.htm
Transmission repair...
http://motorsport.zyyz.com/project_914_03_14.htm
Posted by: Richard Casto Jul 7 2008, 12:14 PM
For the new skin, I want to replicate the indent that is located right where the four cylinder engine mounts are located. So I am making a mirror image of the driver side.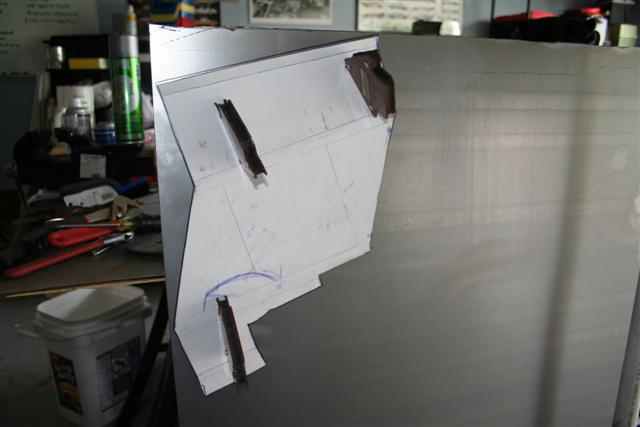
Here is my paper template I made. I am using 18g steel.
Here is the skin bent to fit with the indent parts tack welded into place. Needs to have final weld and trim.
Posted by: Richard Casto Jul 7 2008, 12:35 PM
Back of skin with tack welds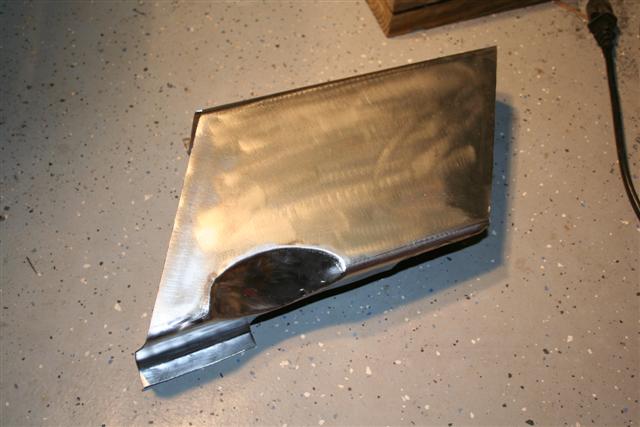
99% Finished product.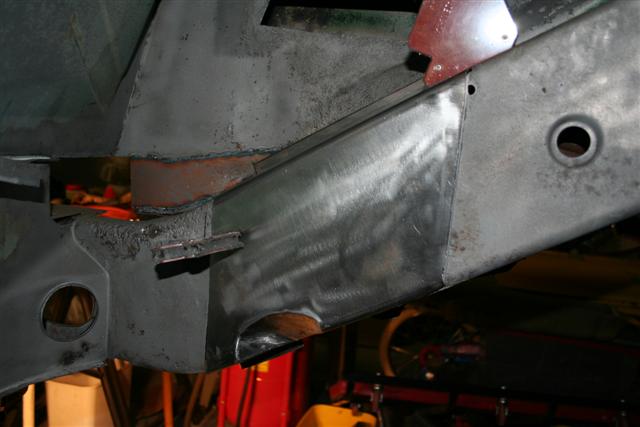
Test fit. I have actually not welded this in place yet.
Posted by: Richard Casto Jul 7 2008, 12:40 PM
On the left is part of the double wall that will be right behind the new skin. On the right is the inner double wall that is where the passenger seatbelt mount passes through.
This is the first time I have used weld through primer. I had researched to try to determine what primers are good. It seems like people like "U-Pol Weld #2". This is the product from the UK that is supposed to be good. I don't have anything to compare it to, but I can say that it is not easy to weld on. If you spray, let it dry and then weld, it is hard to get a good arc started. Then the pool may tend to lay on top of it a bit. So while I am still using it, if I have to weld a rosette plug, what I now do is take an air powered die grinder and rough up the surface (effectively grinding off the primer) on the inside of the rosette hole. I am then able to weld it up just fine.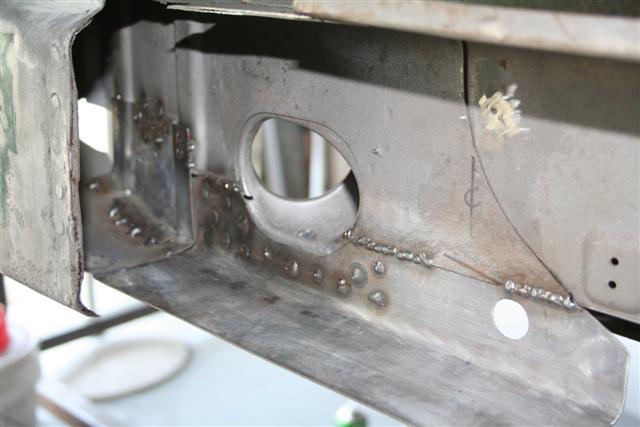
Here are both welded into place. I have not ground down the welds at this point.
Posted by: Richard Casto Jul 7 2008, 12:48 PM
Here I am starting a test to see what is the best way to clean and protect magnesium parts. With a target of trying to replicate what the factor did, but with easy to find supplies. The factory wants you to clean with "Stoddard Solvent" which is a type of mineral spirits. For coatings, it appears they did a chromate conversion to protect the parts during manufacturing (post casting and machining) and then follow that up (post assembly) with "Tectyl" which is a waxy coating. Chromate conversion is not easy to do at home due to environmental issues and Tectyl is nearly impossible to obtain in small quantities.
My cleaners are...
A. Soap and Water (dish soap)
B. Simple Green (straight)
C. Mineral Spirits
D. Glass Bead Blasting
My coatings are...
W. Nothing (unprotected)
X. Gibbs Brand Penetrating Oil/Lubricant
Y. CRC Heavy Duty Corrosion Inhibitor
Z. Gibbs + CRC
My test part is the magnesium differential cover from a 914 transmission. The cast in webbing naturally segments the part into 10 sections. Starting with #1 being the most upper right segment, I numbed them 1-10 in a clockwise fashion. 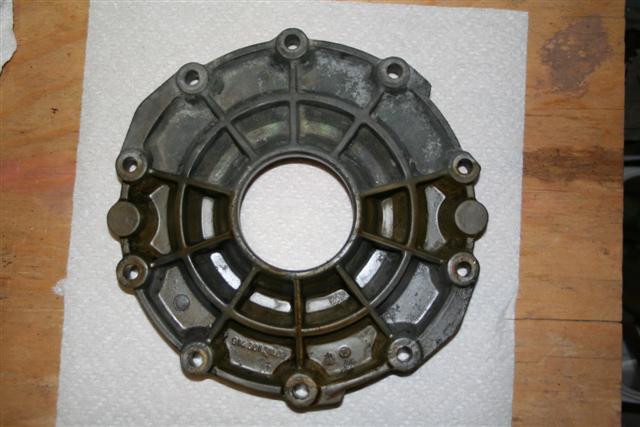
Here is the outside after coating. Here is the key for the segments...
1. B, W
2. B, W
3. B, Y
4. B, X
5. B, Z
6. C, Z
7. C, X
8. C, Y
9. C, W
10 C, W 
Here is the inside after coating. Here is the key for the segments...
1. D, W
2. D, W
3. D, Y
4. D, X
5. D, Z
6. A, Z
7. A, X
8. A, Y
9. A, W
10. A, W
I am going to let this weather outside and see what works the best.
Posted by: Richard Casto Jul 7 2008, 12:57 PM
Ok, back to the passenger longitudinal. I had started on reproducing this section a few months ago, but was using 20g steel by mistake. I have redone that work with 18g. My metal brake is not wide enough to do the bends in once section, so I have broken this up into three sections and then welded them together. Even if I could do it as one, it would be hard as the first 1/3rd is different than the back 2/3rds.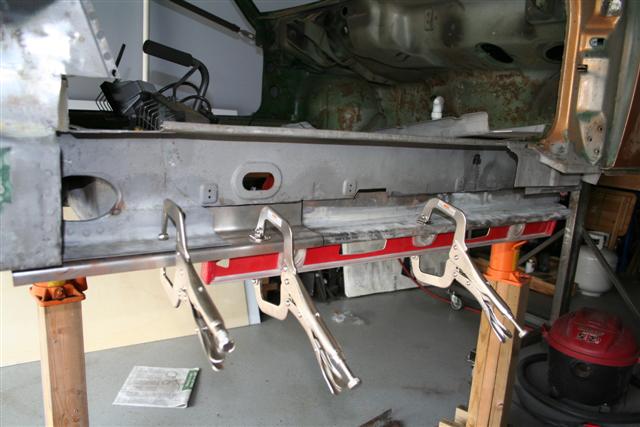
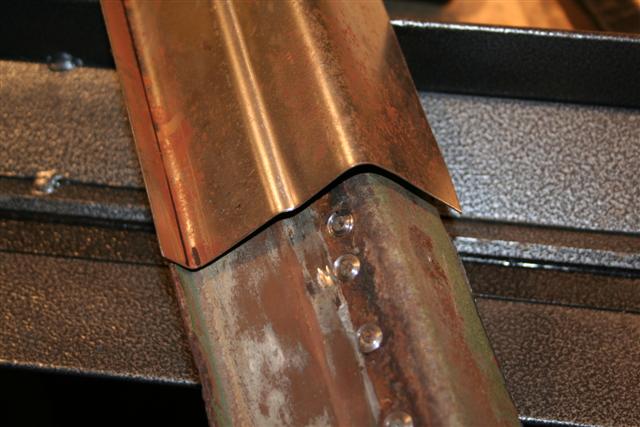
Here I have the first 2/3rds done and am test fitting so I can trim the back 1/3rd and them mate them together. I am using the level as a straight edge. This shows where this also go when done.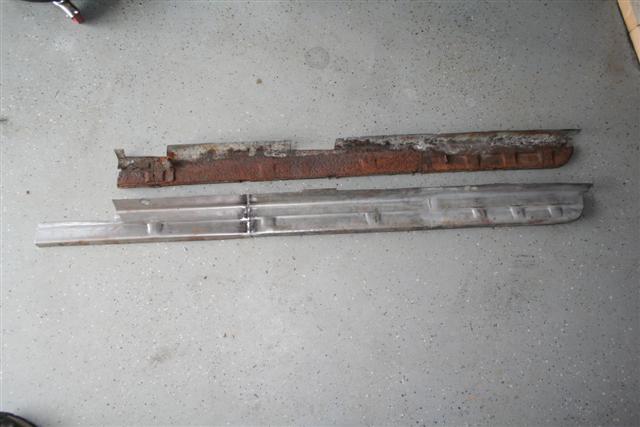
Ok, here is is mostly done. I have some final grinding that still needs to be done on the recent weld, but otherwise, it is ready to go in.
This shows the old rusted section and what would be the "inside" that you will not see.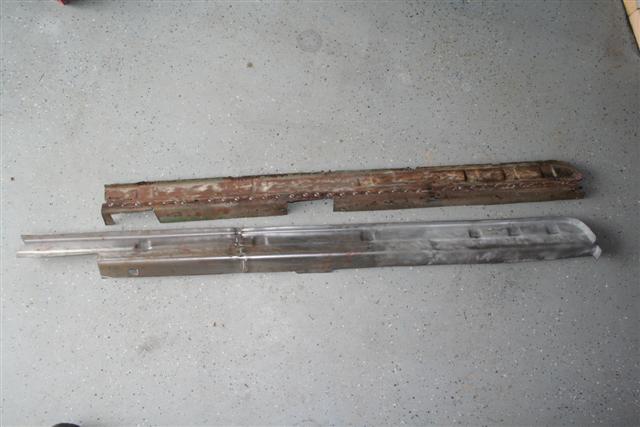
Again the same rusted section and new section. This shows the outside (which would be the very bottom on the longitudinal where the floor pan is connected.
The curved section is the very front of the longitudinal where you curve into the wheel well.
Posted by: Richard Casto Jul 7 2008, 01:02 PM
Thats it for today.
I am taking off next week and hope to get the passenger longitudinal back together. I have yet to fabricate the section directly behind the jack receiver tube. I have the restoration design outer longitudinal as well as the receiver tube and pyramid.
I also am shopping for a seat and since I can't test fit the seat in the car, I am driving to a place that has the seat I am looking for and am going to fabricate the wooden replica of the driver floor area. Mostly the width between the longitudinal and the center tunnel as well as the cross member. This will allow me to lay the box on the floor, place the seat in the box and then sit in the seat.
Posted by: Cupomeat Jul 8 2008, 10:41 AM
This is great stuff, thanks!
It gives me inspiration to start digging into the small holes that have appeared on my lower inner trailing arm mount. Heck, what is the worst I can find, LOL?
Excellent work that impresses and inspires me. 
eric
Posted by: Richard Casto Jul 22 2008, 09:45 PM
Made some progress last week. I had taken the week off for vacation and worked about four hours a day over five days. I made more progress than these pictures show...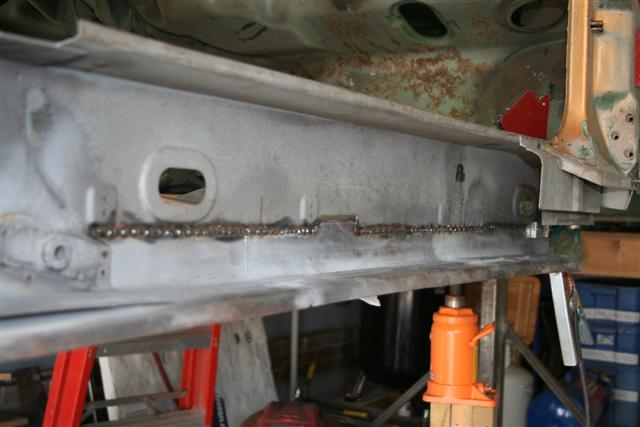
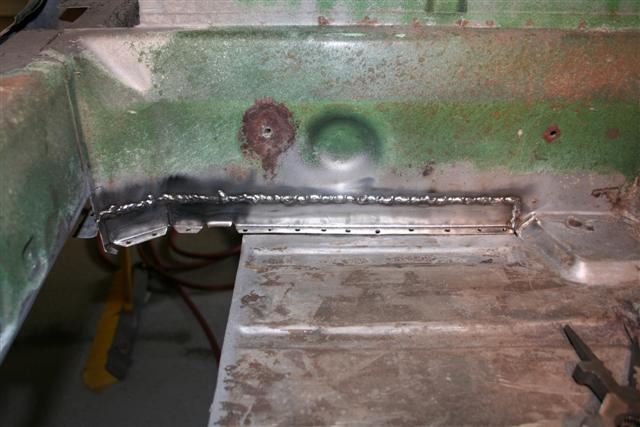
Here the part I fabricated is welded in. When butt welding thin sheet metal, you have to do short welds and space them apart and let it cool. Rinse and repeat until you are done. You should alternate back and forth between front and back as when the weld cool they will pull the metal toward the weld. That will help cut down on warping.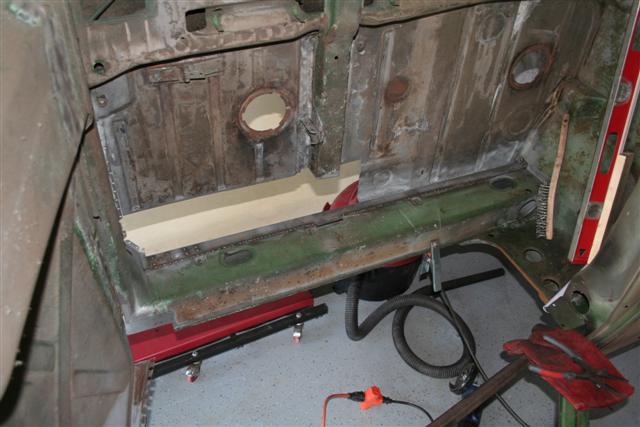
With it welded in place the car is strong enough that I don't need to support it with jacks and can now rotate freely on the rotisserie. This also allows me to put this section level with the floor so I don't have to weld out of position.
Posted by: Richard Casto Jul 22 2008, 09:50 PM
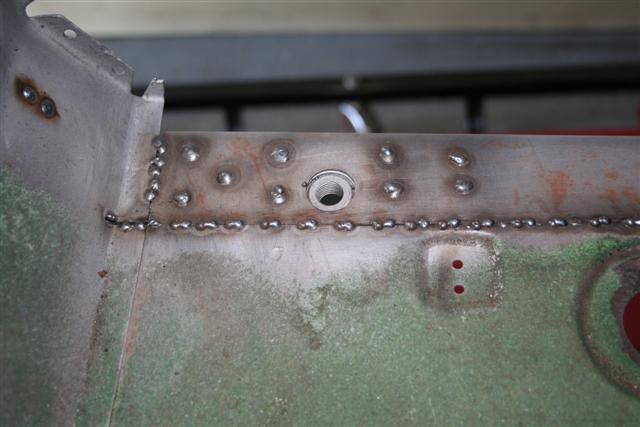
Close up of the rosette "spot welds" near the passenger seat belt anchor. Also you can see the unfinished but welds on the joining seam. Upper left is some welds in a previous butt weld that had some pinholes.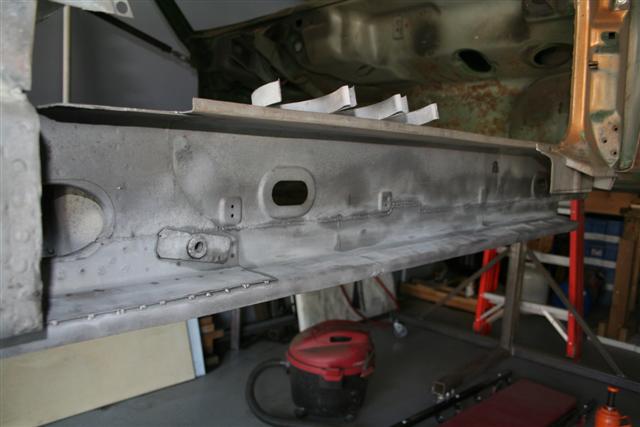
All done. I grinded down the butt weld on the interior all the way to achieve a smooth finish, but on the inside I didn't grind it down flush as there is no need. This will be hidden and I just dressed up the welds. I then lightly media blased the welds to remove all oxidation and then sprayed with Metal Ready. Metal Ready is great stuff.
Posted by: SGB Jul 22 2008, 09:56 PM
"thass purty"
Posted by: Richard Casto Jul 22 2008, 09:58 PM
Next I fabricated this piece. As you can see it is part of the front fender well as well as the base for what the front of the outer longitudinal welds onto. I just need to drill holes in the bottom for the rosette welds and then butt weld the top and side.
I don't have photos, but I also refurbished the front and rear metal pipes for the heater tube. That is about as far as I got last week. Next steps are...
* Fabricate new brackets for the pipes (have template from old)
* Weld in floor section
* Weld floor to longitudinal
* Finish welding in section (skin) behind inner rear suspension console
* Clean and wash out interior of box section near rear suspension console
* Final Metal Ready treatment
* POR 15 hard to reach places
* Weld in heater tube brackets and pipes
* POR 15 remaining places
* Weld in section shown above
* Weld in outer longitudinal
At that point it will be done other than the area around the jack point and stuff like the sill plate and other surface items.
Thats it for now!
Posted by: 3d914 Jul 23 2008, 08:40 PM
Richard,
THis is awesome stuff. I have taken on a similar rebuild project, but have begun to cringe at the idea of digging into the Hell Hole!
I have a couple of questions . . .
1) Are there any cross-section drawings or photos that show the layers of metal for the rear passenger longs - near where the battery tray leaks?
Or do I just have to cut through one layer at a time?
2) You may have mentioned it in a previous posting (and if so point me to the page) - but what type & model of welder are you using (Mig, Tig, Flux)?
Thanks & keep up the great job!
Posted by: Richard Casto Jul 24 2008, 08:54 AM
Richard,
THis is awesome stuff. I have taken on a similar rebuild project, but have begun to cringe at the idea of digging into the Hell Hole!
I have a couple of questions . . .
1) Are there any cross-section drawings or photos that show the layers of metal for the rear passenger longs - near where the battery tray leaks?
Or do I just have to cut through one layer at a time?
2) You may have mentioned it in a previous posting (and if so point me to the page) - but what type & model of welder are you using (Mig, Tig, Flux)?
Thanks & keep up the great job!
Hey don't be afraid. It is scary, but you will sleep better at night knowing it is done.
I have felt depressed at times when it was all torn and cut apart, but now that it is going back together I feel much better. Regarding question #1. Here are two good threads...
http://www.914world.com/bbs2/index.php?showtopic=66790
http://www.914world.com/bbs2/index.php?showtopic=66637
The first is AA showing a bunch of repro parts welded together. Look for the post #13 from McMark. He talks about how the repro parts are not 100% accurate in that the section below the battery on the inside is two layers. The inner layer has a corrogated shape (which the repro has as well). Then there is an outer skin that covers this. Both make a "C" shape and it is the outer skin that has the flang that is spot welded to the rest of the car.
In the second you can see some nice detail photos taken from where the jack receiver would be back into the inside of the hell hole. You can see the corrogated metal and how the "C" is built and how the corrogated part is not as wide as the rest. I have some similar photos in this thread and on my site, but I think these are a bit better than mine.
Regarding #2. I am using a basic 220V Lincoln MIG unit with non-flux .025 wire (using gas). Because this is thin metal welding so a 110V unit would be just fine. I really expensive unit with more flexability on settings would work even better (with regards to setting on the welder), but I think that successfully welding thin sheet metal is 90% technique. Just practice a lot and get used to what setting/technique work well for you.
Good luck on your car!
Richard
Posted by: Richard Casto Nov 11 2008, 03:01 PM
It has been quite awhile since I have updated this thread. Here is some progress over the late summer and early fall.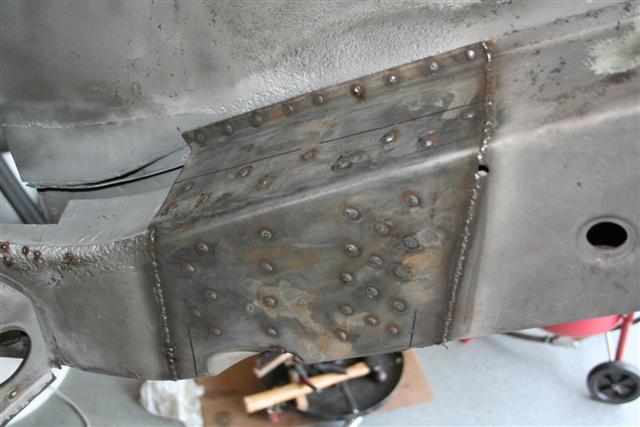
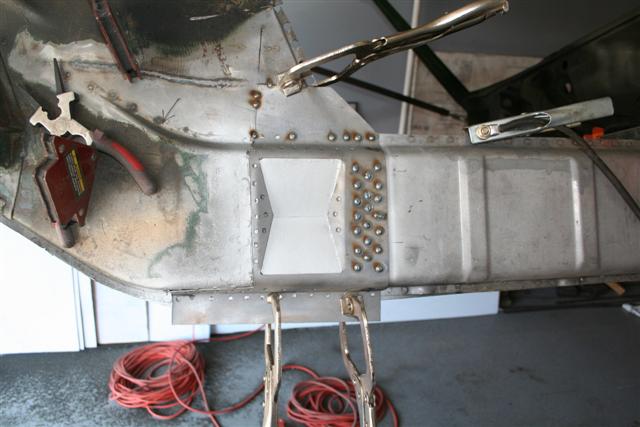
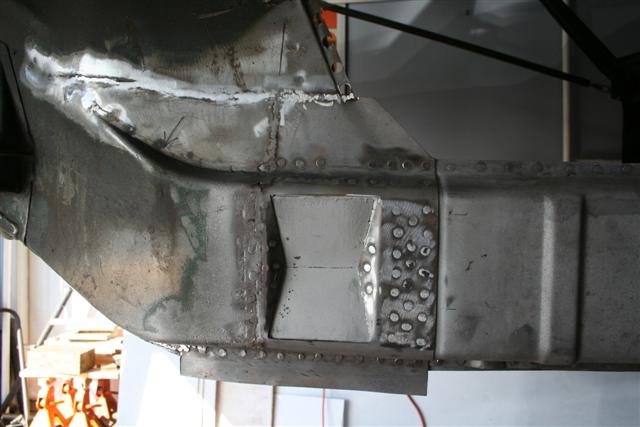
Welded in the replacement skin for the area directly behind the 4-cyl engine mount. Also part of the suspension console covers this.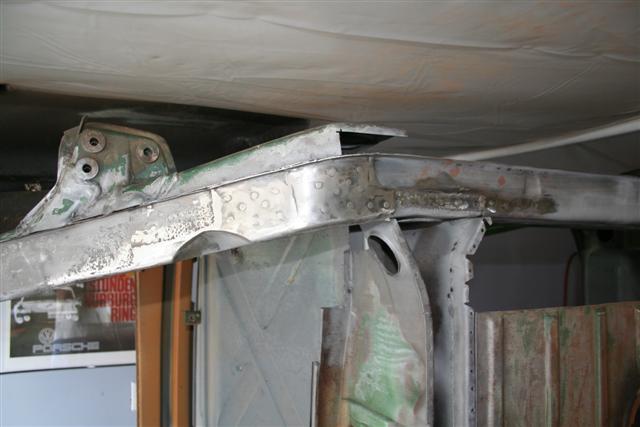
View from below. I will do some final grinding of welds when doing prep for paint.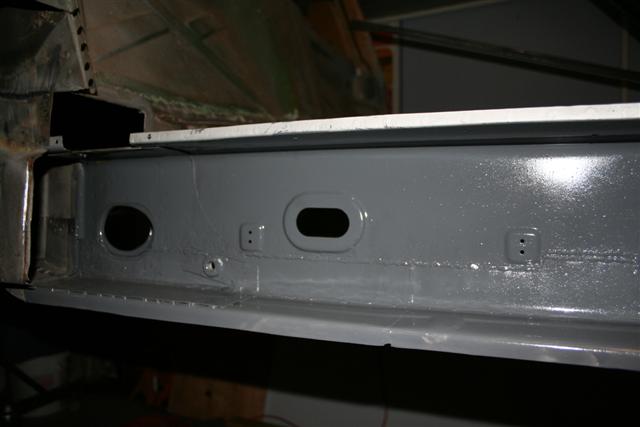
Working toward finishing the passenger longitudinal. Here I have painted the interior with POR-15.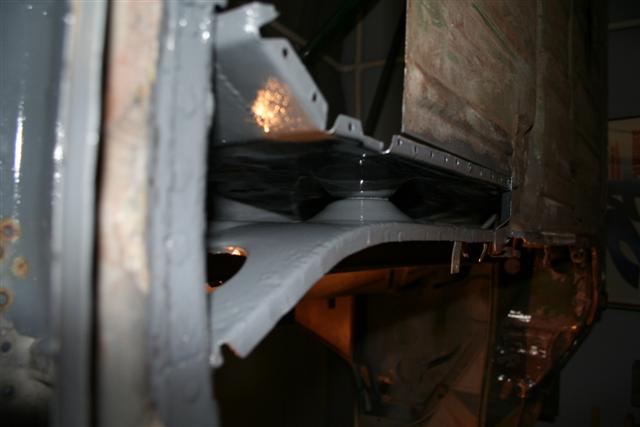
More POR-15, but this is a shot from under the car into the hollow bulkhead behind the seats.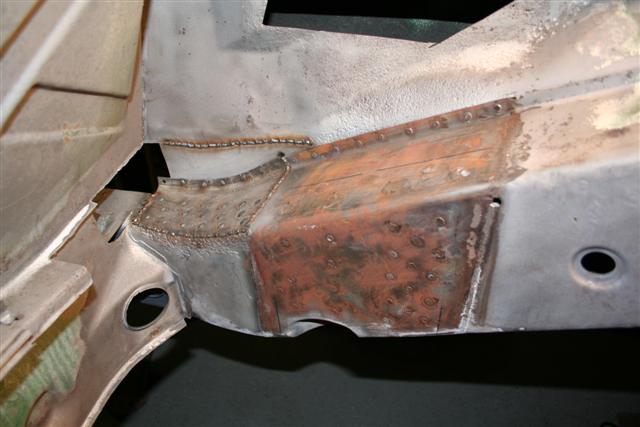
Some flash rust on the part I put on above, but here I have welded in the main "Hell Hole" repair section.
Posted by: Richard Casto Nov 11 2008, 03:11 PM
Now we move onto the inner passenger suspension console. This is a part I sourced from Restoration Design awhile back. First I drilled all of my plug weld hold, media blasted the replacement part, treated with Metal Ready, painted the interior non weldable areas with POR-15 and then finally the interior weldable areas with U-POL weldable primer.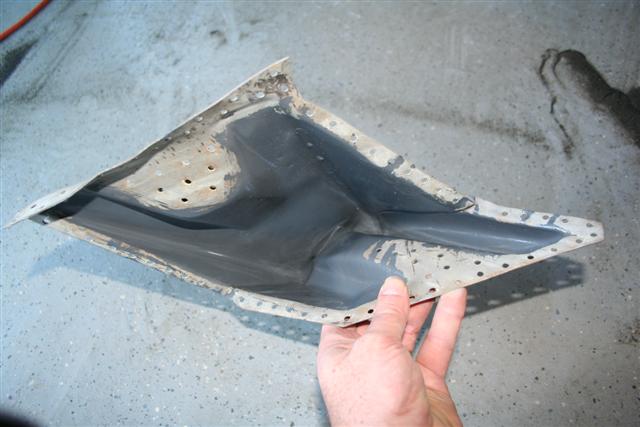
With POR-15. Not I bent the upper flange out so I could get a good tight fit on the bottom.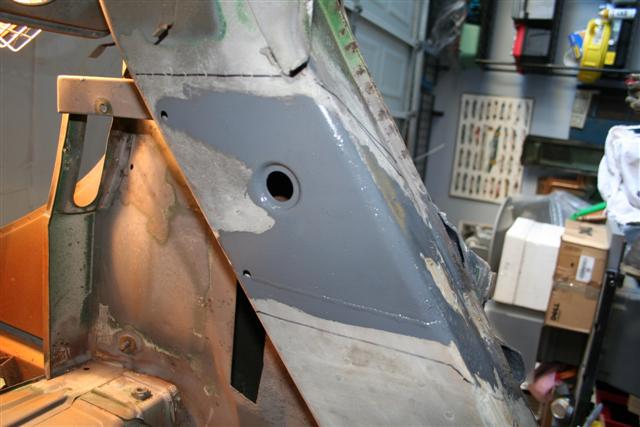
More POR-15 on non-weldable areas. This shot doesn't show the weldable primer that I am about to spray on.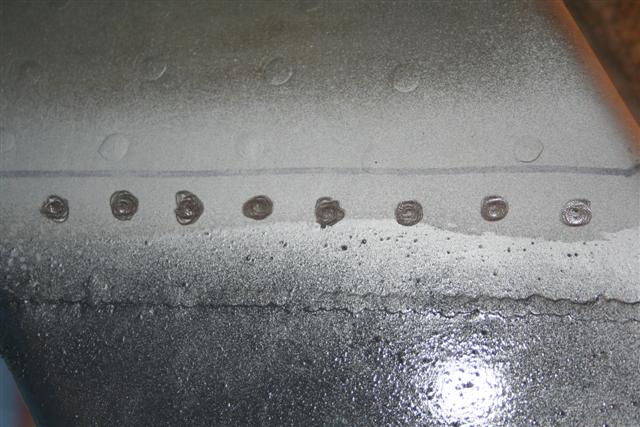
Here is weldable primer, but I don't really like it that much. So I used an air die grinder with a stone and knock off the paint on the spots I will be doing my plug weld.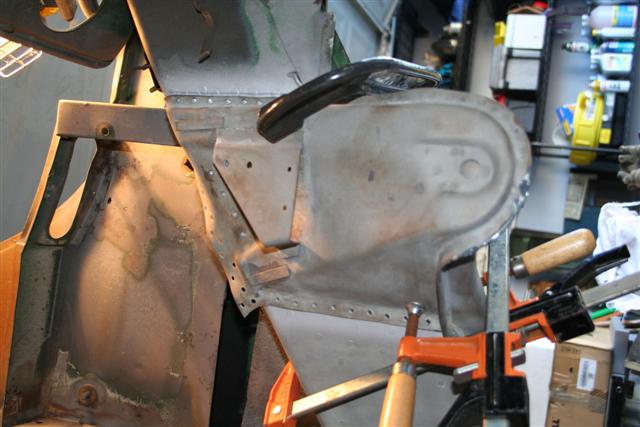
Clamped into place. At this point I measure to make sure it is in the correct location (use the good driver side as a guide), then tack weld one or two places, remeasure to make sure it hasn't moved and then do more plug welds. Again you can see the top flange bent up for the moment.
All done except for welding down the plug welds.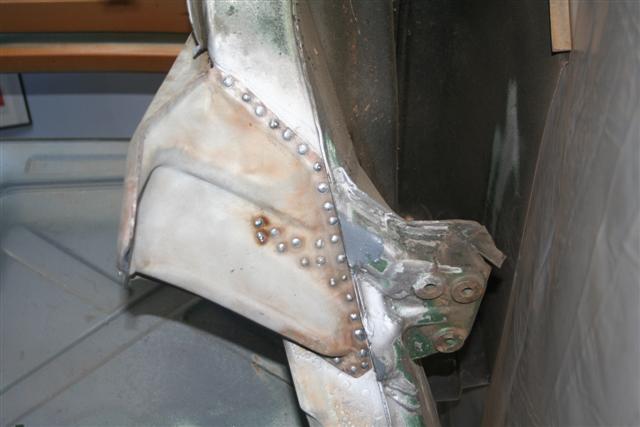
Shot from below. I will eventually need to rebuild the "bridge" that goes between the inner and out consoles.
Posted by: Richard Casto Nov 11 2008, 03:18 PM
I generally do the welding stuff on the weekends when I can be noisy. If I work at night, I need something a bit quieter to work on. So I decided to refurbish the front suspension. I sourced a 911 front end that uses OEM Koni style struts. I have about 90% or so of what I need to rebuild much of the front suspension. First task is to disassemble the struts, strip and then powder coat them.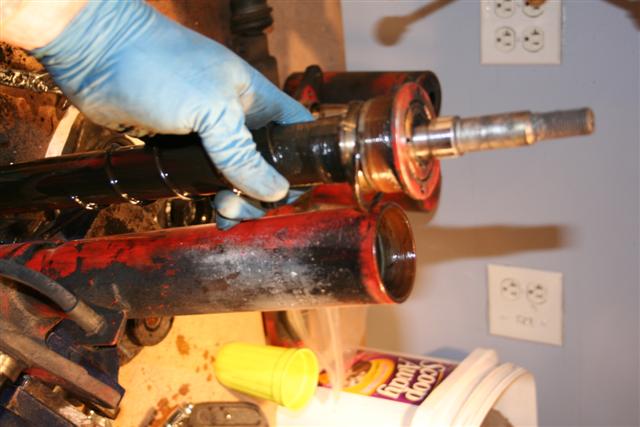
Here is the OEM Koni strut. This is not an insert in the style of the current self contained Koni inserts, but rather this is the shock internals along with the shock oil that had to be drained. I will be putting in newer Koni "yellow" sport inserts into this strut.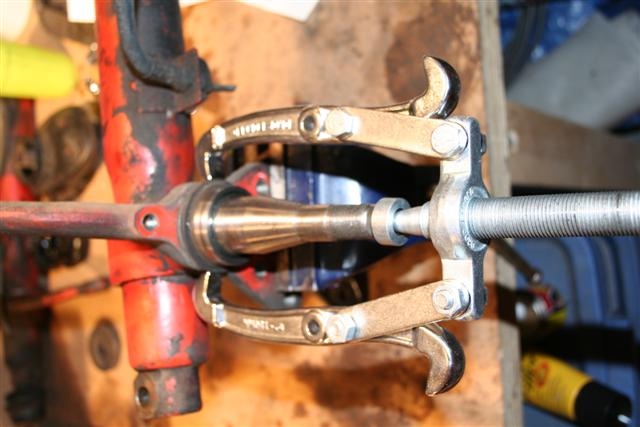
Here is something that I don't think many people do when redoing a strut. I am pulling off this ring that is on the spindle. Why am I doing this?...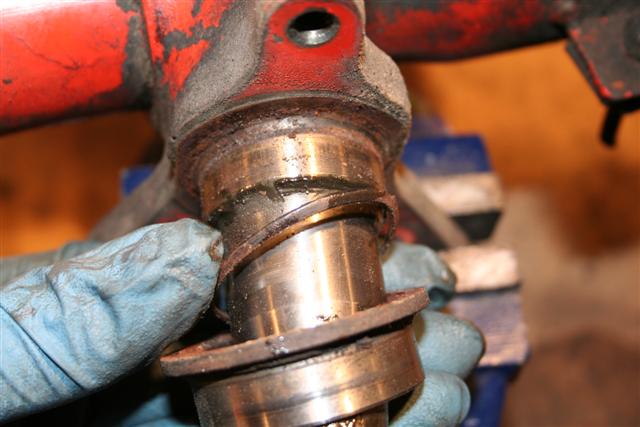
Because there is an O-ring behind it that I want to replace. This O-ring looks to be pretty dead.
Posted by: Travis Neff Nov 11 2008, 03:20 PM
Great attention to detail!
Posted by: Richard Casto Nov 11 2008, 03:22 PM
Great attention to detail!
Thanks! I think this car is a keeper so I am trying to do it right.
Posted by: Richard Casto Nov 11 2008, 03:34 PM
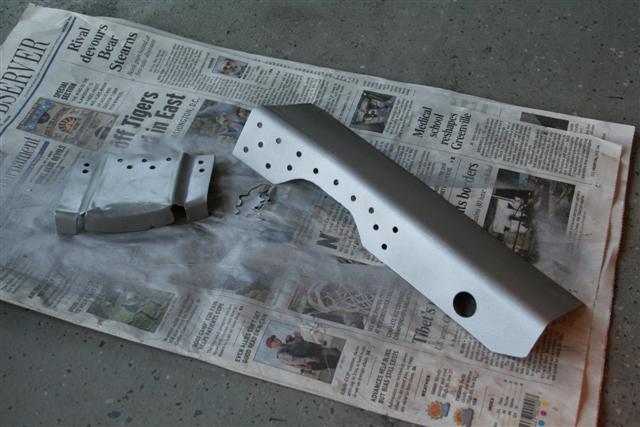
Now comes the fun that I have been looking forward to for a long time. I have had a Caswell powder coating kit and a junk yard oven for over a year, but have not had a chance to try it all out yet. So my first powder coating is with my strut dust covers as well as the special gland nuts that allow you to use a Koni insert in the OEM Koni strut
First I stripped the old paint off with Jasco. Then I washed them with soap and water and solvents to get the grease and oil off. Then I glass bead blasted them. Then I treated them with Metal Ready. I then washed them in water one last time then oven dried them.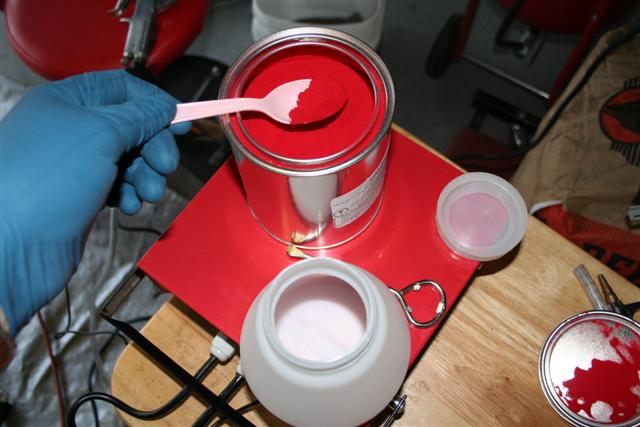
Powder goes into cup.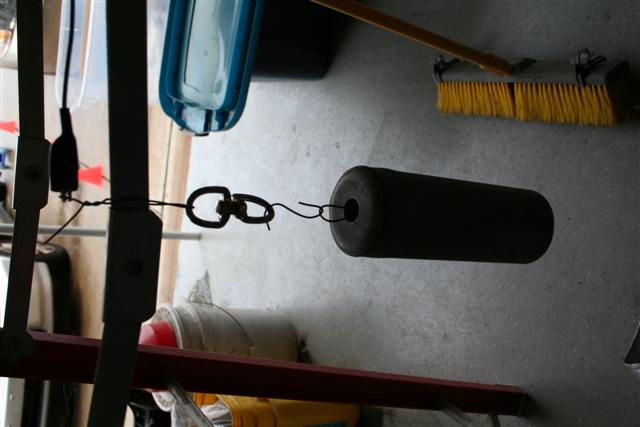
Hang part. Ground it to your corona gun. Make sure you have a swivel so you can rotate part as needed.
Gun all loaded and ready to go.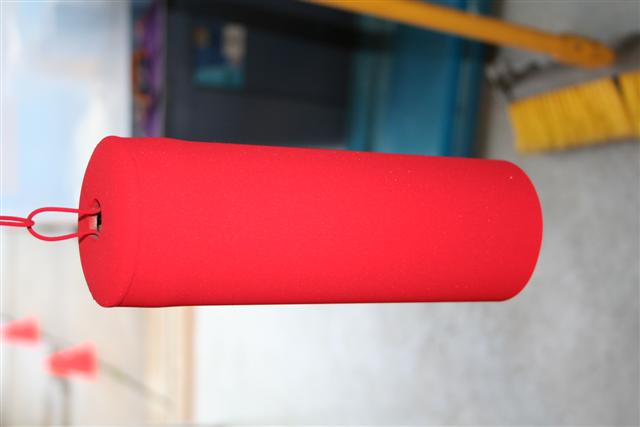
Part is now coated with powder. Sorry no action shots as I couldn't take photos and use the gun at the same time. Powder can just be wiped or blown off at this point. So you have to be carefull as you...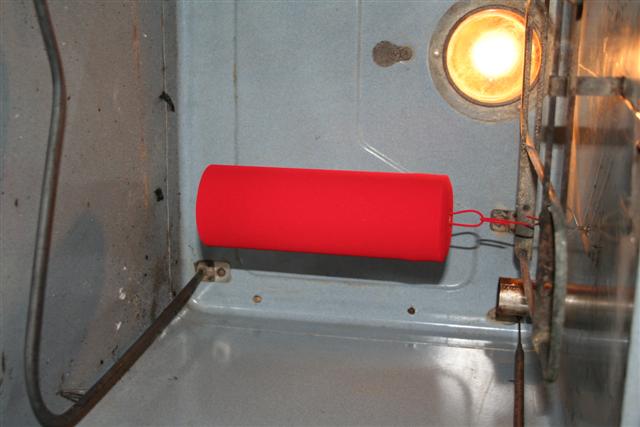
...transfer into the oven. I drilled holes in the top of the oven to install some loops that I can hang parts from. Oven was pre-heated to about 400 F prior to me putting the part in.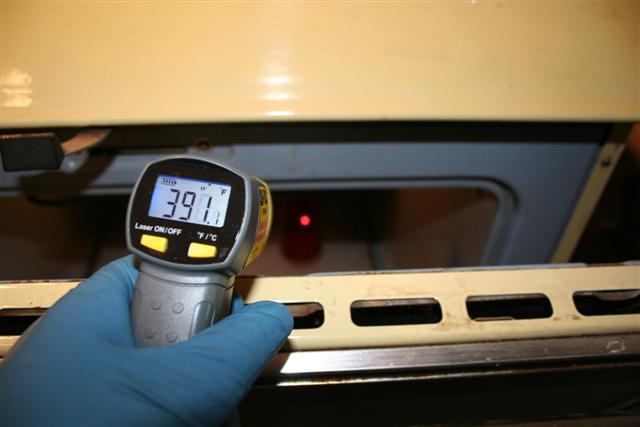
Powder spec says 392 F for 10 minutes. Within just a few minutes that part has warmed up to 390-400 F and the powder will melt. Crack open the oven just a bit and check temp with IR thermo. Once you are sure part is at cure temp, let it bake for 10 minutes. After 10 minutes, turn off oven, crack door a bit and allow it to cool down slowly.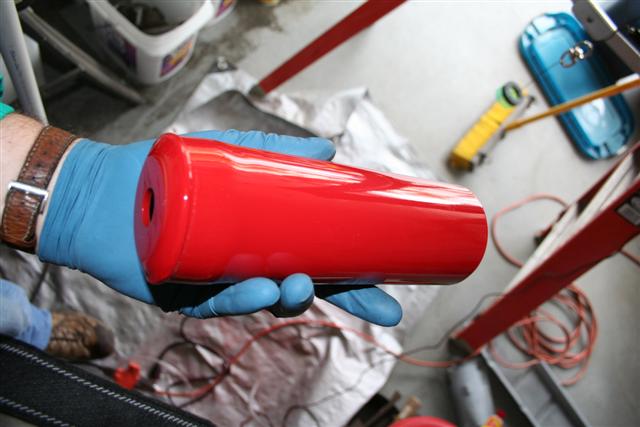
Finished product looks awsome! Especially as this is my very first part!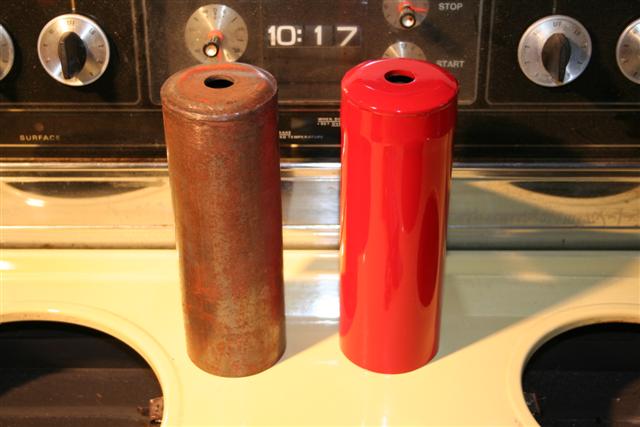
Other cover that has been stripped with Jasco, but prior to media blasting, etc.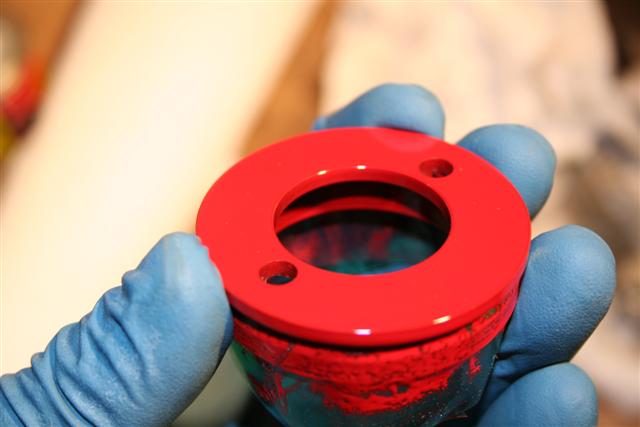
Here is one of the gland nuts. I used high temp green silicone tape to cover the threads. You can see some of the cured paint on the tape, but once you pull the tape off you can see that the threads are untouched by paint.
Posted by: Richard Casto Nov 11 2008, 03:37 PM
Ok, that is it for now. I hope to work on powder coating the struts tonight, but that is on the assumption that I don't run into problems getting the holes and mating surfaces taped up and that the strut hangs in the oven correctly.
Posted by: r_towle Nov 11 2008, 03:39 PM
this is awesome and I love the work...great detail.
One question. The high temp tape.
where do you get it and what temp can it handle???
Rich
Posted by: Richard Casto Nov 11 2008, 03:45 PM
this is awesome and I love the work...great detail.
One question. The high temp tape.
where do you get it and what temp can it handle???
Rich
Rich,
I bought my supplies (kit, powder and tape) from Caswell. Here is the link to the tape...
http://www.caswellplating.com/powder/powder_tape.html
I used the green tape which is rated to 400F. They also have tape rated to 600F. You can also use silicon plugs for things like bolt holes, etc. that you don't want paint in. I didn't buy the silicon plugs and am going to try to use tape for this. I will post here as to how well that works.
Richard
Posted by: charliew Jan 5 2009, 09:34 PM
I wonder if in a emergency and you don't have a appropriate plug for a hole if you could use a quetip and just clean the hole out before curing?
Posted by: Richard Casto Jan 6 2009, 07:42 AM
I wonder if in a emergency and you don't have a appropriate plug for a hole if you could use a quetip and just clean the hole out before curing?
I think that would work but you would have to be really careful to not accidently knock off some nearby powder. So far I have had pretty good luck with using the high-temp tape. I just create a "cone" shape like a plug, but the sticky side out and insert it into the hole. Or if the hole is really large just tape up the inside. Even if they shrink a bit in the oven thats fine as really the goal is to keep the powder off prior to going into the oven.
I need to update my thread with the photos from when I did the struts as you can see how I did this. The struts have a lot of holes to cover up..
Posted by: Gint Jan 17 2009, 09:13 AM
Very nice work.
How's that diff cover coming along?
Posted by: Richard Casto Jan 17 2009, 07:48 PM
Very nice work.
How's that diff cover coming along?
Thats a good question. It has been hanging outside for a few months. I will try to take a few photos of it tomorrow or Monday and post them. I will say that the "CRC Heavy Duty Corrosion Inhibitor" looks to be doing pretty good while "Gibbs Brand Penetrating Oil/Lubricant" is only doing so-so.
Posted by: Gint Jan 17 2009, 09:41 PM
That's what I was curious about. I bought some (Gibbs) a while back but haven't had a chance to use it for much.
Posted by: Richard Casto Jan 21 2009, 09:51 AM
Here are the photos of the diff cover. It sat in my garage for about two months and then outside hanging under my back porch for about six months. Roughly in these photos the top 1/2 are untreated. The bottom half are Gibbs, CRC Heavy Duty Corrosion Inhibitor (waxy "Tectyl" like coating) or a mix of the two. Around 3 and 9 o'clock are Gibbs + CRC. Just below that is Gibbs alone and at the very bottom is CRC alone.
Observations...
- CRC Heavy Duty Corrosion Inhibitor is working really well.
- Gibbs Brand Penetrating Oil/Lubricant does provide some protection. But not as good as the CRC product.
- Gibbs + CRC together seem to work fine, but I can't tell any difference than just using the CRC product by itself.
- Areas that were cleaned via media blasting corroded the most.
- The chromate conversion (even if mostly gone) is still providing some protection.
- Areas that might get abraded via handling, weather, etc. have the most corrosion. Specially the Gibbs protected area show corrosion in raised areas that are most likely are due to the Gibbs being either soaked up or abraded/weathered away. You can see this clearly on the inside on the right hand side (that was media blasted) at approximately 4-5 o'clock position. On the raised ring, you can see magnesium corrosion in the Gibbs area.
My conclusion so far are...
- Media blasting is the best at cleaning, but it removes the chromate conversion that may still provide some corrosion protection.
- Gibbs Brand Penetrating Oil/Lubricant works, but it's not a miracle product.
- CRC Heavy Duty Corrosion Inhibitor seems to work the best. This is not surprising since Porsche also used a waxy protectant (Tectyl) on the magnesium transmissions parts.

outside
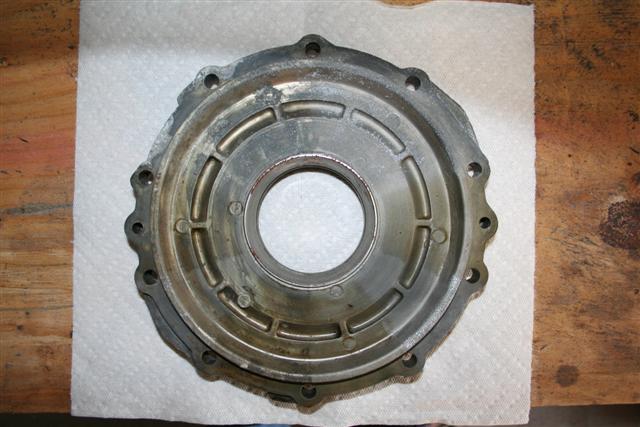
inside
Posted by: Richard Casto Jan 21 2009, 09:55 AM
It may be hard to see the corrosion from the last six months in the photos above, but if you want to download 8 MP images you can find those at the following link on my site...
http://motorsport.zyyz.com/project_914_03_14.htm
Just click on each thumbnail image to open up the larger image.
Posted by: Richard Casto Jan 21 2009, 10:46 AM
Ok, back to fabrication and welding!!
Now I need to work on putting the metal heater tubes back in. First I need to fabricate replacement brackets. I created a template based upon the remnants of the original rusted brackets. The same template works for both the front and rear bracket. However both have the "tabs" folded in a different direction.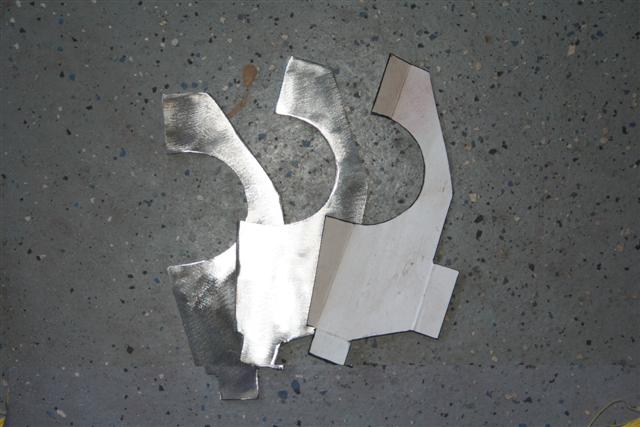
Paper template plus two brackets cut out.
With tabs bent
Posted by: Richard Casto Jan 21 2009, 10:49 AM
Brackets and the metal heater tubes all welded into place. Everything has been painted in POR-15. It all went together pretty well. I have test fitted the actual heater tube and it fits fine. I have the three "U clips" that hold the tube in place ready to go. Those are riveted into place. However before I put them on, I want to finish some welding on the interior side of the longitudinals. Those welds will burn through some of the POR-15 and I want to touch that up before I close this section up.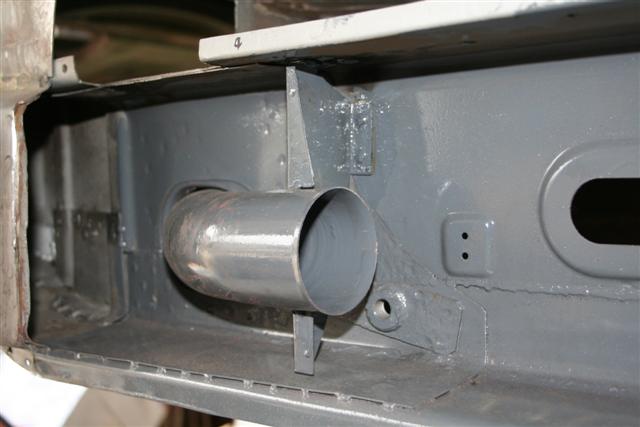
Posted by: Richard Casto Jan 21 2009, 10:57 AM
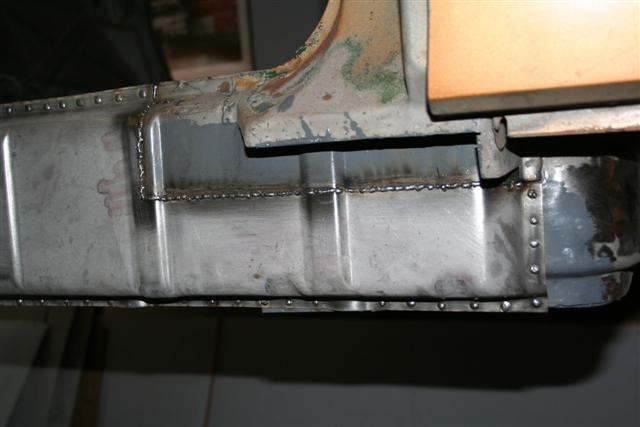
It's hard to believe that it's been nearly a year since I created the replacement floor section, but it is now welded in.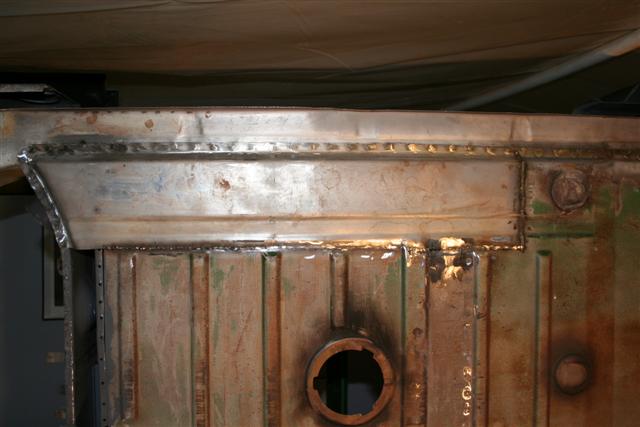
After welding, but before I finished grinding down the welds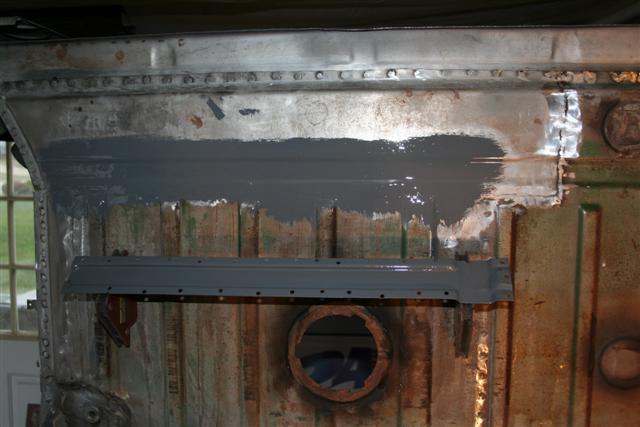
Welds grinded flush, treated with Metal Ready and POR-15. I also removed the factory "U channel" reinforcement from the old floor. It was in pretty good shape. I media blasted it, treated with Metal Ready and POR-15. It just needs to be welded. When I test fit, I mark the locations that the plug welds will be done and then grind the POR-15 off a small circle so I am getting a good weld. You can't weld through POR-15.
You can also see that I welded in the last floor patch on the passenger side right under the firewall bulkhead.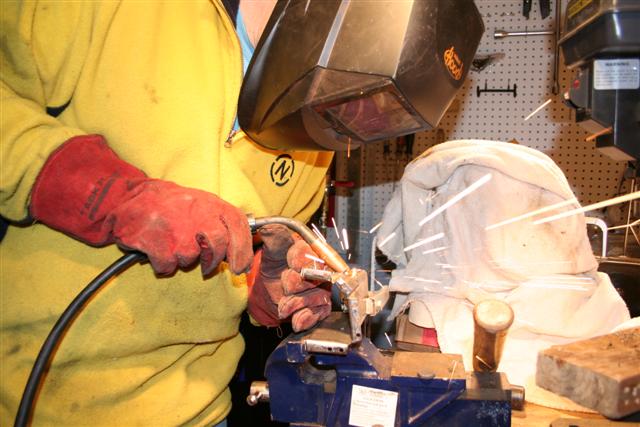
Action shot of me working on fabricating the small section of the cross member that is on the interior of the car. This is the box section that runs left to right. I had to cut out the passenger side as it was swiss cheese and could not be repaired.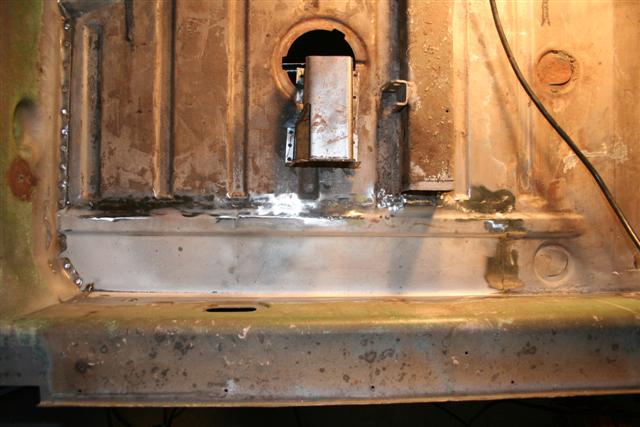
Here is a top view of the replacement floor section and the replacement end for the box section (it still needed work)
Well, that's it for now. I hope to finish up much of the interior of the passenger longitudinal in the very near future. Then I need to work on recreating the section right under the jack receiver tube. I have the replacement tube and pyramid, but I need to fabricate the section below that.
Comments and questions are welcome!
Posted by: FourBlades Jan 21 2009, 11:21 AM
Its looking good man!
Did you say the metal heater tubes would be welded on all joints?
You would hate to develop any play where they could clank every time you hit a bump.
John
Posted by: Richard Casto Jan 21 2009, 11:30 AM
Its looking good man!
Did you say the metal heater tubes would be welded on all joints?
You would hate to develop any play where they could clank every time you hit a bump.
John
Thanks!
When I removed the pipes, they seemed to be welded in place on both end. For the front, there was two small stick weld beads run (total pain to grind so I could remove the pipe) where the pipe enters the passenger area as well as two on the brackets. Actually the pipe to bracket connection were brazed and not arc welded at the factory. For the rear it was a similar thing. Two or three small arc weld beads in the engine compartment area and one or two on the bracket. I have the front welded in place 100%. I actually haven't welded the rear in the engine compartment area, but it's on my to-do list.
The brackets themselves are attached in two places. On the side and top of the longitudinal. It's all pretty solid.
Posted by: Richard Casto Mar 31 2009, 07:14 PM
Ok, it's been months since I have updated this. Instead of going into a lot of details on how and what I am doing, I will just point you to my 914 blog instead...
http://motorsport.zyyz.com/project_914_Blog.htm
I think that tonight I am just going to post a bunch of photos. I always enjoy other people's progress threads when they have lots of photos. So here it goes...
Posted by: Richard Casto Mar 31 2009, 07:19 PM
Car is upside down so this is driver side...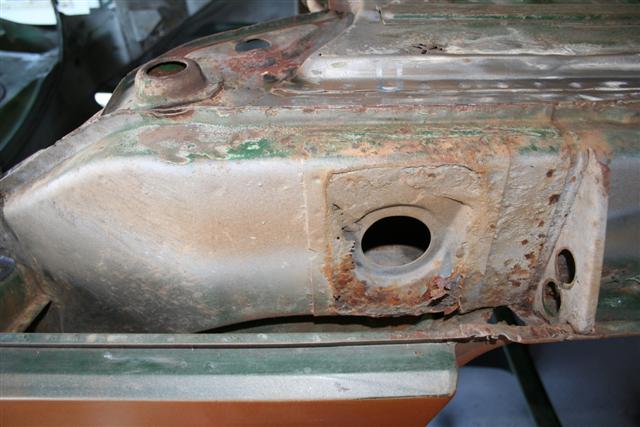
PO removed most of jack point tube and pyramid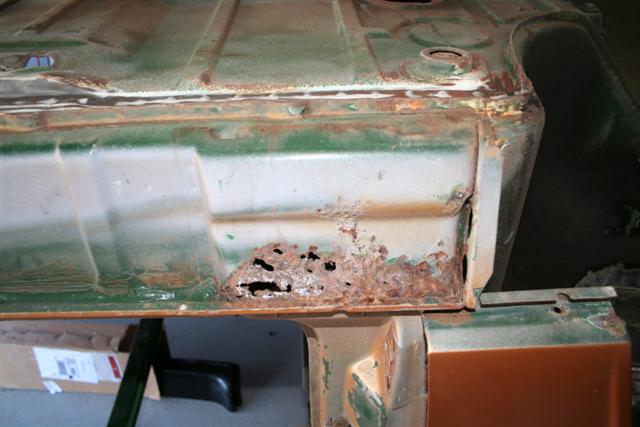
Gotta fix the front as well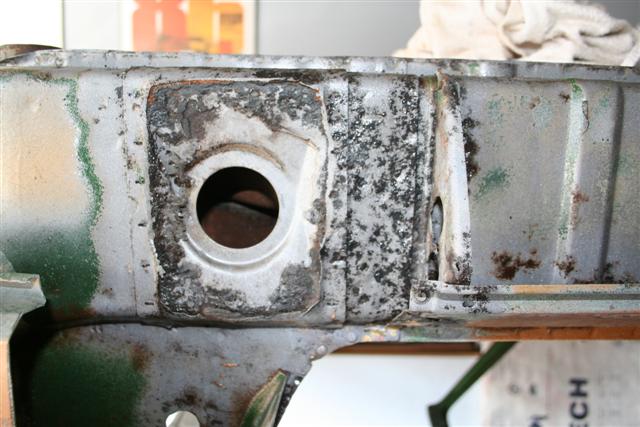
Quick media blasting to see extend of damage.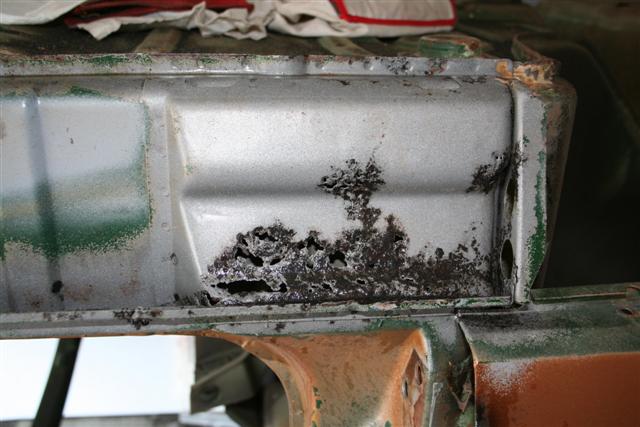
Same for front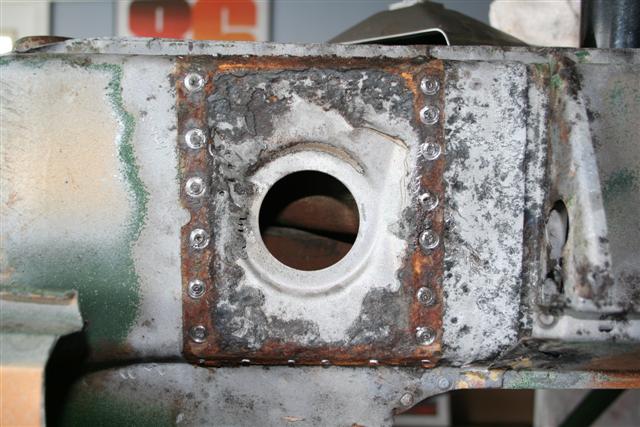
Drill out spot welds of whats left of the pyramid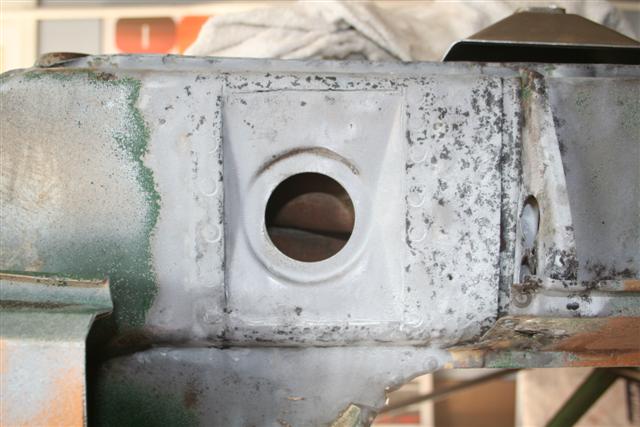
More media blasting
Posted by: Richard Casto Mar 31 2009, 07:24 PM
Media blasted and treated with Metal Ready. I have decided at this point I am going to remove and replace the driver side sill.
POR-15 on the inside of where I am welding back my crossmember on the passenger side.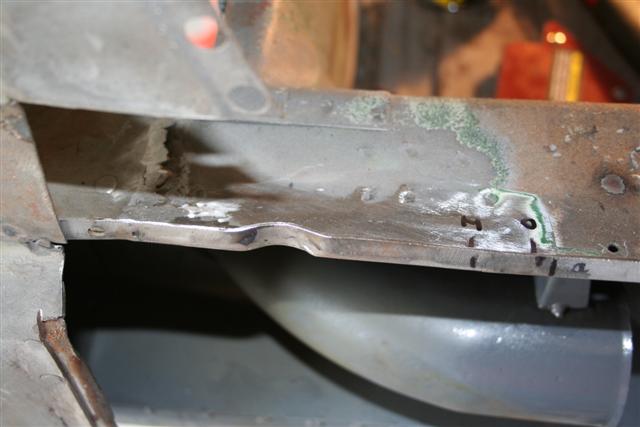
Replicated the half-moon bump out. Getting ready to weld outside of longitudinal back into place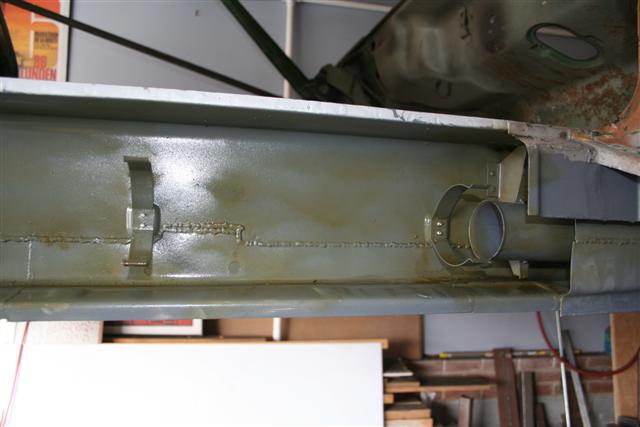
Spray inside with CRC anti-corrosion. I will probably go back and do a proper cavity wax at some point.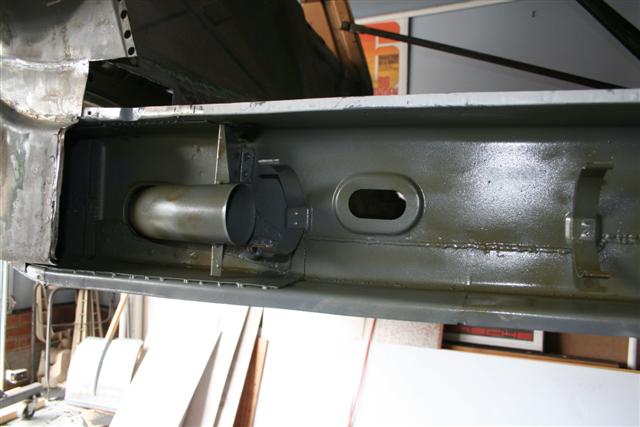
Heater tube back in place.
Posted by: Richard Casto Mar 31 2009, 07:29 PM
All welded on. Fabrication takes a lot of time. Welding it together goes quick!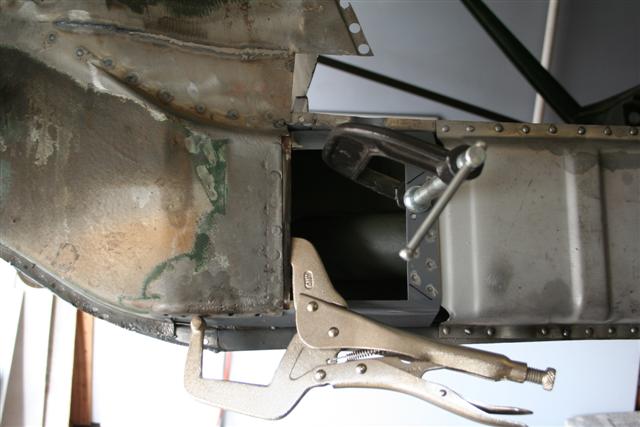
Now for the double wall section where the jack receiver is located. 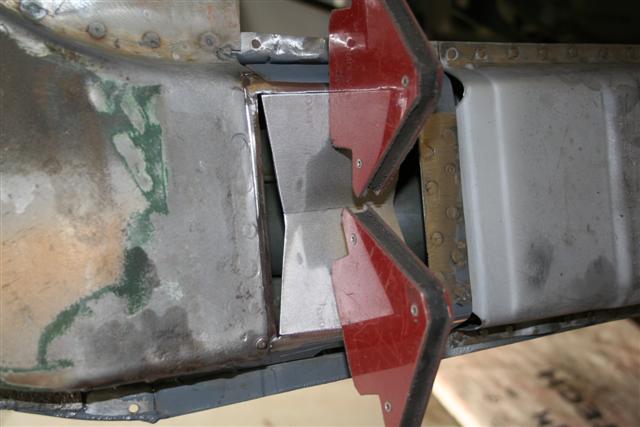
Replicate the bump in recess for the receiver tube. This is just the inner layer of the double wall
Posted by: Richard Casto Mar 31 2009, 07:35 PM
Just need to grind down the welds and add in the rest of the inner layer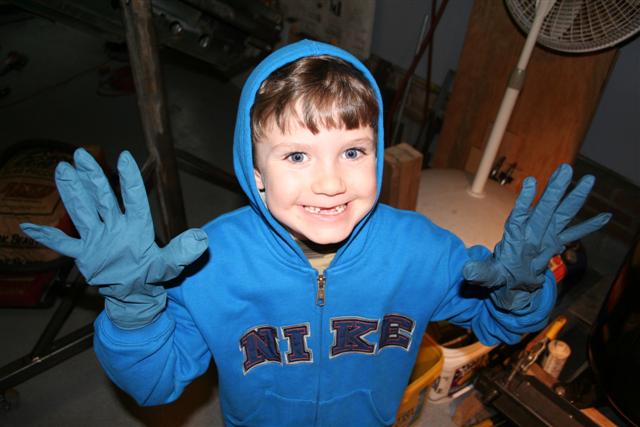
My son wanted help. He can't really help with the welding yet, so we decided to work on taking apart the rear swing arms. All he wants for Christmas is his two front teeth. 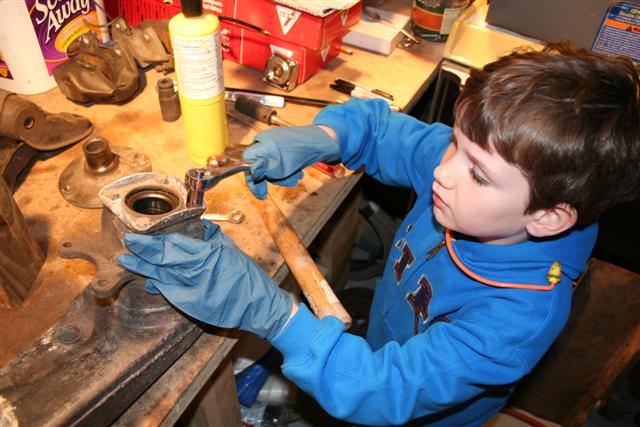
He used the impact wrench right before this. I wish I had a picture of that.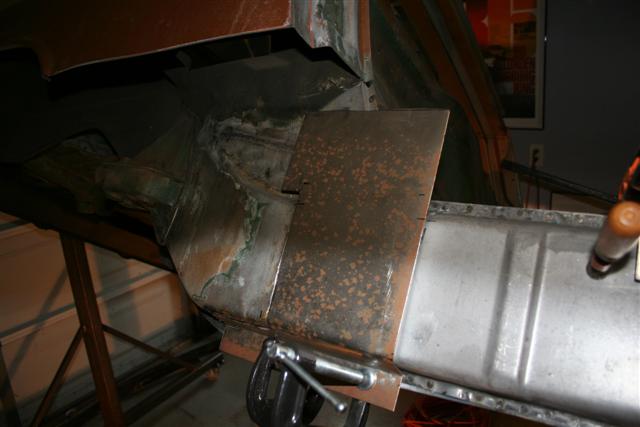
First two bends on the fabrication of the outside layer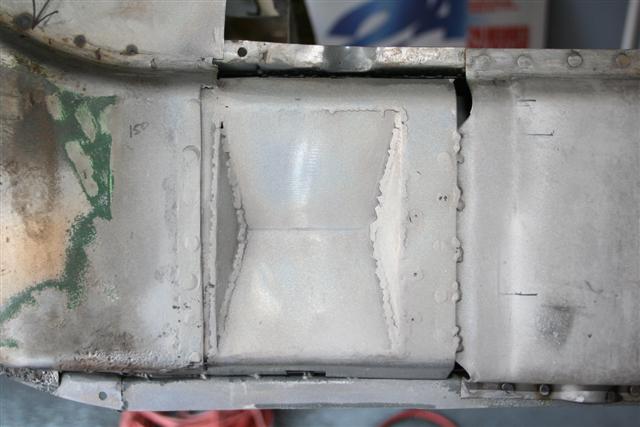
Inside layer just about all ready to go. I painted it with weldable primer right after this.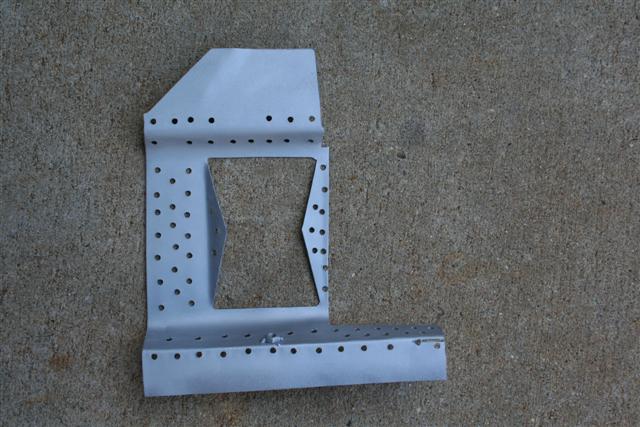
Here is the main section for the outside. It's ready and painted. Just need to weld.
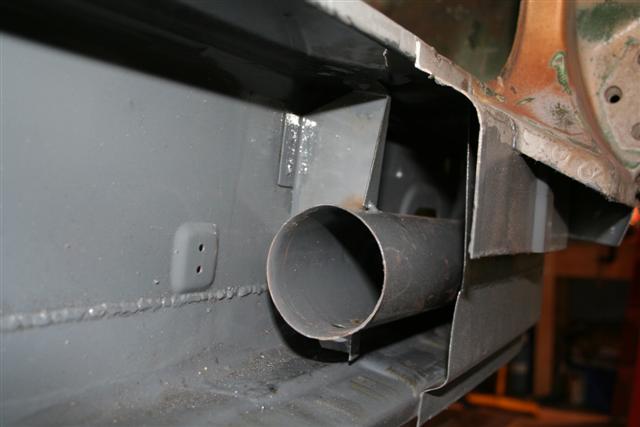
Posted by: Richard Casto Mar 31 2009, 07:41 PM
About 1/2 done with my welding.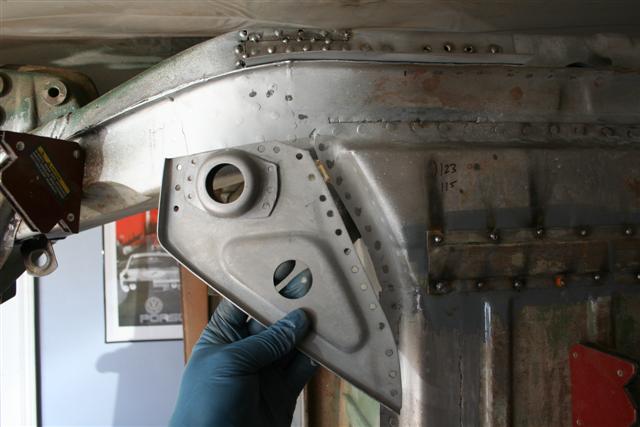
While the car was rotated to get at the bottom of the stuff above, I decided it was a good time to put on the replacement donut and triangle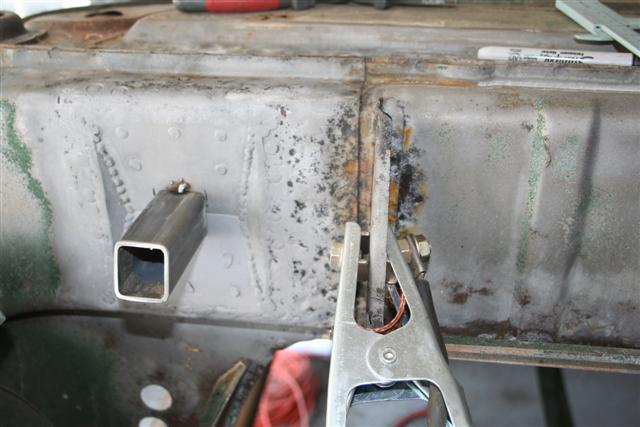
Jumping ahead a bit, I have prepared both the driver and passenger side for the receiver tube. I measured (based upon location of previous pyramid) and tacked into place.
Double check that it's in the right place and then...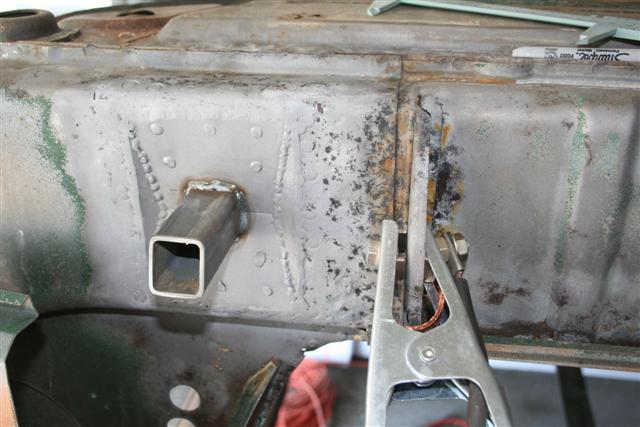
Finish welding the tube
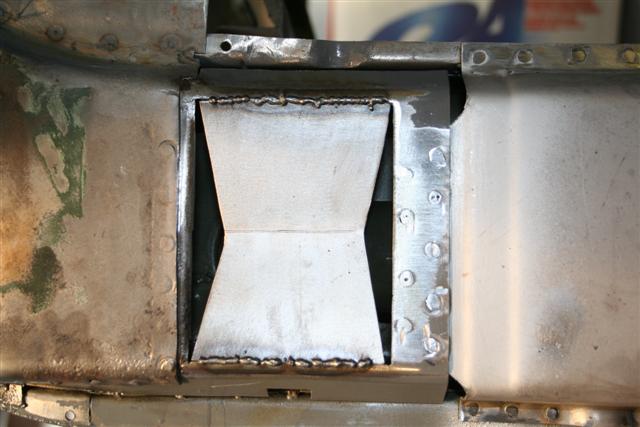
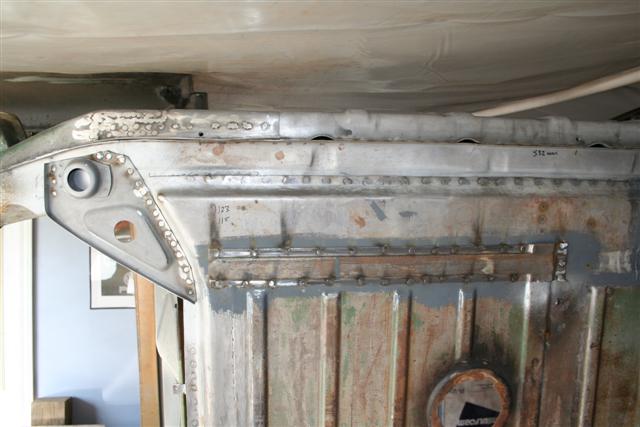
Posted by: Richard Casto Mar 31 2009, 07:46 PM
Mostly welded and about 90% ground down. Just missing the bow-tie.
Note this is not a perfect replica of the shape of the factory stamping. They have a flat spot that you weld the tub to. I decided it was going to be too difficut to replace that flat spot and was not going to be seen anyhow.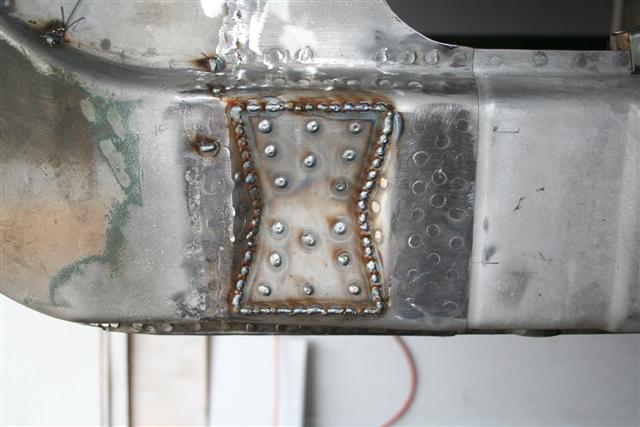
Bow-tie in place. This is the reverse pyramid that creates about a 13mm recess for the receiver tube.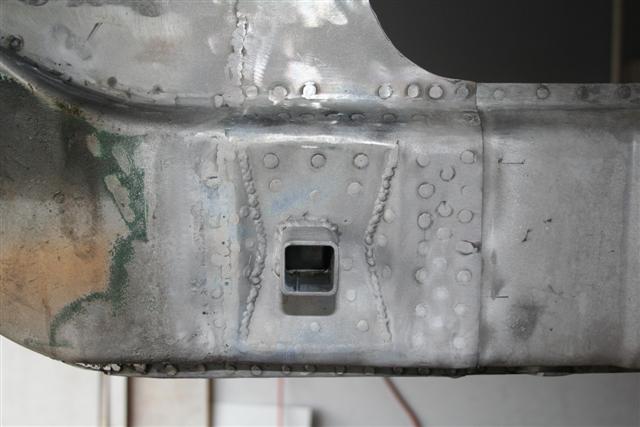
Tube welded in, welds ground down, media blasted and treated with Metal Ready.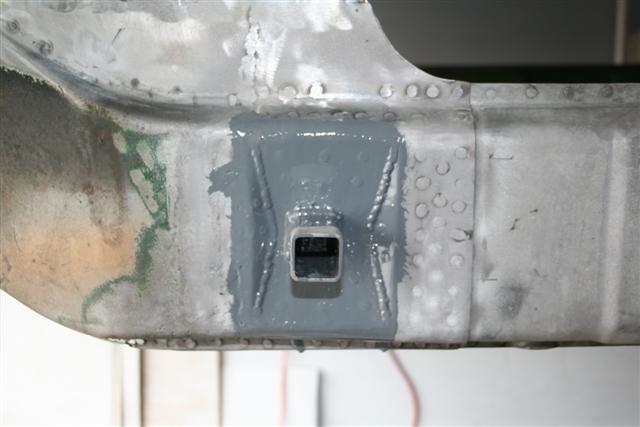
POR-15 on the inside. I will grind off some of the POR-15 for my rosette welds on the pyramid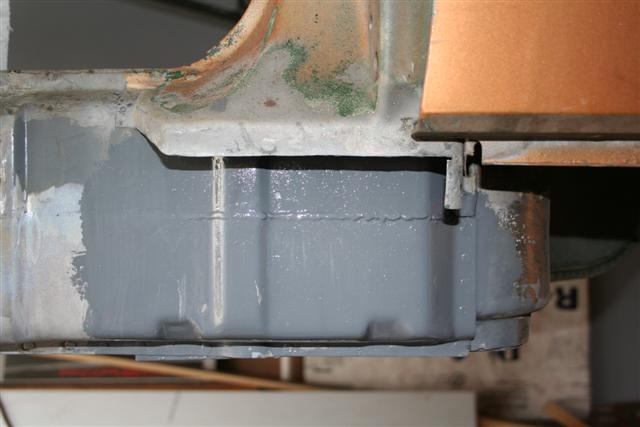
Same for the front. I need to fabricate the section that covers this.
Posted by: Richard Casto Mar 31 2009, 07:50 PM
Well that is it for now. I am going to continue to focus on the passenger and driver side longitudinal. I had tried to order the sill plates from Restoration Design, but Bill was out of them. That's unfortunate as his price is very good on those. Alternative is AA. They probably have them in stock, but they are pricey if you compare to RD. I am kicking myself that I didn't know this prior to the AA Valentine Day sale. Budget continues to be tight, but I am just going to bite the bullet and order them from AA. Bill said it may be months before he gets to doing the sills. 
Questions and comments are welcome! Enjoy the photos!
Posted by: veltror Apr 1 2009, 05:34 PM
Excellent work, it really is encouraging to see this sort of stuff, i still have a long way to go on mine.
Posted by: FourBlades Apr 1 2009, 07:19 PM
Really nice quality work Richard!
Thanks for all the great pictures too, it is always educational to see how
someone approaches repairs like that. I don't think I have seen anyone
reconstruct the inside of the jacking point so thoroughly, that looks like
the best way to do it...I can't remember now what I did, but I am sure
it was a hack job compared to yours...
Keep it up, you are on a roll now.
John
Posted by: dlo914 Apr 1 2009, 09:38 PM
Nice welds! ...what are you using? I'm so glad the longs the 75 project only has one rust area on the passenger side jack pyramid. We ended up deleting the pyramid since we're not gonna use it. And probably also weld up the hole on the rocker panel.
Posted by: Richard Casto Apr 2 2009, 02:42 PM
Nice welds!
...what are you using? Thanks! All I can say is that good welding comes from using the proper technique (having a good teacher) and practice, practice, practice. I am getting much better at welding thin metal. Having the rotisserie help me reduce the amount of "out of position" (such as upside down) welding I have to do. So that helps a great deal.
The welder is a basic 220V Lincoln MIG welder (can't remember the model) using Argon/CO2 Gas and .025 wire. It's the type you would find at a HomeDepot or Lowes for about $650 +/-.
Posted by: jdogg Mar 23 2010, 06:40 AM
Updates?!?!?
Posted by: Richard Casto Mar 23 2010, 07:32 AM
Updates?!?!?
Hey Jason, it's been awhile since we have talked! How is it going? Give me a call or shoot me an email sometime.
It is creeping up on a year since my last post in this thread. 2009 was a rough year for me various reasons so I haven't been working on the car much. Work and other personal stuff had been taking up my time over the past few months. But it seems to have improved recently.
It's actually been a bit embarrassing recently as I really don't have much excuse these days to not work on the car. I have co-workers asking how it's going and just the other day a neighbor said he is looking forward to seeing it done. I have been shamed by enough people recently that it has nudged me into activity. So I actually did work on it for the first time in months this past Sunday. I have started to replace the front left fender that the PO crunched. So expect some updates soon.
Richard
Posted by: rwilner Mar 25 2011, 12:09 PM
Hey Richard
Been over a year since an update on this thread. Just wondering -- did you abandon the project or have you made progress?
Posted by: Richard Casto Mar 25 2011, 12:54 PM
Hey Richard
Been over a year since an update on this thread. Just wondering -- did you abandon the project or have you made progress?
Haha
Well, no, I haven't abandoned it, but I have been horrible about doing updates. A number of things (ranging from the death of my dad over a year ago to starting up the transmission repair business about a year ago) has gotten in the way. But I am back working on the car. I just need to update this thread. I also haven't updated my personal website either. I have been waiting to update it as I wanted to convert it to a new content management system. But that is no excuse for not listing updates here.I will try to get something up in the next few weeks. I bought a newer larger media blasting cabinet awhile back for many reasons. One is to start cleaning transmissions, but I also have some other parts (such as suspension) that wouldn't fit into my older smaller cabinet. I also am about 90% done with welding in a new floor for the front truck area and just a few weeks ago welded on the replacement driver side front fender (the PO had backed his car into it and crumpled it a bit).
I also just bought a Caswell electroplating kit, so I am going to be re-plating a number of parts (including my front/rear calipers that are completely disassembled). I hope to have the platting tanks setup in the next few weeks. I probably will do some small amount of re-plating via Blue Sky Motorsports as well.
Along with getting the calipers and other misc braking parts plated and put back together, I will probably work on finishing up my 911 e-brake setup. My plan has been to use the 928 style cable pull along with the 911 e-brakes. This will require some custom cables, but will not require a bellcrank on the swing arm.
My new goal is to have all bodywork stuff addressed within the next 12 months.
Richard
Posted by: rwilner Mar 25 2011, 12:57 PM
Well, I for one am glad you decided to delay working on the car to start up your transmission business as it got my car back on the road!
I hope to see the car in person some day.
Posted by: Richard Casto Mar 25 2011, 01:03 PM
Well, I for one am glad you decided to delay working on the car to start up your
transmission business as it got my car back on the road! I hope to see the car in person some day.
I am glad the transmission is working out for you. I saw your thread about the taco plate leak and it sounds like you fixed that. Is the car off the jackstands and on the road now?
Richard
Posted by: rwilner Mar 25 2011, 01:06 PM
Well, I for one am glad you decided to delay working on the car to start up your
transmission business as it got my car back on the road! I hope to see the car in person some day.
I am glad the transmission is working out for you. I saw your thread about the taco plate leak and it sounds like you fixed that. Is the car off the jackstands and on the road now?
Richard
It was on the ground to run it and make sure all was sorted. It's still tight shifting but if I'm not a pansy with it, the gears are engaging. I'm pretty sure it's the tight new synchros.
I've got it back up in the air now just to check all the fasteners and also replace my rear bumper top. Should happen today and then I should be good to go for the season!
Posted by: r_towle Mar 25 2011, 01:15 PM
Well, I for one am glad you decided to delay working on the car to start up your
transmission business as it got my car back on the road! I hope to see the car in person some day.
I am glad the transmission is working out for you. I saw your thread about the taco plate leak and it sounds like you fixed that. Is the car off the jackstands and on the road now?
Richard
It was on the ground to run it and make sure all was sorted. It's still tight shifting but if I'm not a pansy with it, the gears are engaging. I'm pretty sure it's the tight new synchros.
I've got it back up in the air now just to check all the fasteners and also replace my rear bumper top. Should happen today and then I should be good to go for the season!
Weather and temps have alot to do with shifting on these boxes.
Get it warmed up and it will shifter even better...
You do that by DRIVING it...lol
Rich
Posted by: rwilner Mar 25 2011, 01:17 PM
You do that by DRIVING it...lol
I'm just waiting for it to stop snowing.
ENOUGH SNOW ALREADY
Posted by: r_towle Mar 25 2011, 01:19 PM
Today only...get out there.
Rich
Powered by Invision Power Board (http://www.invisionboard.com)
© Invision Power Services (http://www.invisionpower.com)