Printable Version of Topic
Click here to view this topic in its original format
914World.com _ 914World Garage _ early parking brake handle
Posted by: roadster fan Dec 15 2007, 10:49 PM
The parking brake handle on my 71 was missing some parts and was not functioning. I have it just about done, but can't figure out how the pawl(?) (blue item in picture below) is supposed to maintain contact with the other toothed part. The pushbutton releases/pushes the top of the pawl disengaging it from the other part, but I do not see what is supposed to put tension on the pawl to reingage it with the other toothed part.
I assume there is a spring of some sort missing but I do not see where it would mount. the fixed handle on my 73 has a slightly different pushrod that engages the top of the pawl, and releases and engages both.
Anybody have the answer to this one? I know you are out there! 
Jim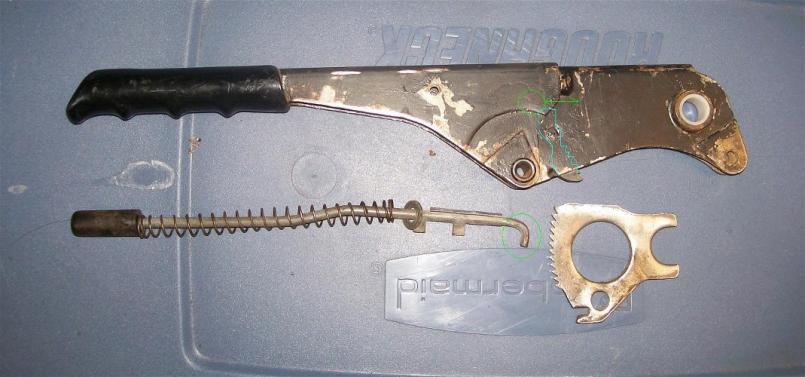
Posted by: Wilhelm Dec 16 2007, 03:54 AM
If you look at this posting your answers will be found.
http://www.914world.com/bbs2/index.php?showtopic=57387&hl=pawl
When my early handle was not working the little spring thingy was rusted out and I was just as frustrated after spending a few hours thinking "how does this work, what engineer designed this, what drugs was he on, and where can I get some of that stuff?" Out of frustration more than anything welded a small loop to the side tip of the pawl and ran a small spring backwards to the side of the handle. The spring pulls the pawl back keeping it in constant engagement. At this point since this fix works so well and I'm not a concurs guy and basically a lazy ass I've not decided to do the "proper" fix. If I can get off My lazy ass in the am, I'll try to post a pic of my lazy ass fix. Of course I immediately found the posting of the correct way to fix the pawl spring after I jerryrigged mine.
Posted by: roadster fan Dec 16 2007, 12:21 PM
Thanks for the thread link, that answers the question. Now I just need to make one as I dont see one listed in the parts diagram.
Post a pic of your improvised solution if you get a chance, just in case I can't make the correct piece.
I was hoping someone had seen this before, I was starting to think I was losing my mind.
Jim
Posted by: roadster fan Dec 17 2007, 12:50 AM
So I sat down at the table tonite and tried to make the spring as depicted in the thread Wilhelm shared.
Couldn't do it, for two reasons. Didn't have a long enough piece of spring steel, and all my prototypes kept flying out after I bent the handle a couple of times.
I ended up making a spring of a different type and have added pics below. Best part is I made it out of the clip from the cap of a roller ball ink pen. Free ninety Free, my favorite price.
easy to make again if it ever breaks. No shortage of materials 
Jim

Posted by: roadster fan Dec 17 2007, 12:51 AM
last one
Posted by: plas76targa Dec 17 2007, 08:28 PM
Jim,
How do you get that bear to stay in place? This thread is just what I've been looking for too. Any other suggestions for materials to make either spring?
Posted by: roadster fan Dec 17 2007, 11:09 PM
I ended up taking the clip for a zebra m-301 mechanical pencil and bending it to shape. I attempted to make the factory style but it requires quite a bit more material and I could never get my prototype to stay in very long (bent from thick wire coat hanger). A flat piece of spring steel may work for the factory style, but I didn't have any on hand.
So I took the clip off the pencil and got to bending with needle nose pliers. The spring I ended up with works great, is retained by the crimps at the bottom of the handle, and was cheap to make. I installed the handle in the car today and could not be happier. It is really nice to have a parking brake, talk about peace of mind.
The graph paper above is 8 squares to an inch, if you want to make a similiar piece. once it is bent, it snaps into place with a little fiddling, and is held in with spring tension. Hope this helps. The photo below is the type of pencil I stole the clip from. It is the right width and length to make the piece. There are other pens and pencils with a similiar clip, the key is finding one with a flat profile, many are not. Go raid the office! Oh, and the steel doesn't like to be bent back and forth, it will break. Bend one direction only, plan ahead.
Jim
Posted by: Wilhelm Dec 18 2007, 12:00 PM

Thanks for the thread link, that answers the question. Now I just need to make one as I dont see one listed in the parts diagram.
Post a pic of your improvised solution if you get a chance, just in case I can't make the correct piece.
I was hoping someone had seen this before, I was starting to think I was losing my mind.
Jim
Sorry for the delay, I worked the last 3 night shifts and only becoming semi-human again. Also took 30 seconds to pop the seat about and another 5 minutes trying to get a decent picture while the rain was dripping off the roof and down the back of my pants. Oh the sacrifices we make for our fellow teeners!! Hopefully from the post you can see a hook welded to the tip of the pawl and another hook welded to the back of the housing. Between these runs the spring to apply the tension for the pawl. This is all covered by a boot and is not seen. This car will be my next project when the new shop is built and I have another dry spot to park it other than under tarpage.


Posted by: roadster fan Dec 18 2007, 02:57 PM
Nice simple fix. thanks for the pics. Your solution is nice because you can make it work with just about any length spring.
Jim
Posted by: garyf0 Nov 12 2009, 02:06 PM
[quote name='Wilhelm' date='Dec 18 2007, 01:00 PM' post='978221']
[quote name='roadster fan' post='977502' date='Dec 16 2007, 10:21 AM']
Thanks for the thread link, that answers the question. Now I just need to make one as I dont see one listed in the parts diagram.
Post a pic of your improvised solution if you get a chance, just in case I can't make the correct piece.
I was hoping someone had seen this before, I was starting to think I was losing my mind.
Jim
[/quote]
Sorry for the delay, I worked the last 3 night shifts and only becoming semi-human again. Also took 30 seconds to pop the seat about and another 5 minutes trying to get a decent picture while the rain was dripping off the roof and down the back of my pants. Oh the sacrifices we make for our fellow teeners!! Hopefully from the post you can see a hook welded to the tip of the pawl and another hook welded to the back of the housing. Between these runs the spring to apply the tension for the pawl. This is all covered by a boot and is not seen. This car will be my next project when the new shop is built and I have another dry spot to park it other than under tarpage.
Hi- these are the kind of pictures I have been looking for to help me reinstall my parking brake- could you give me some kind of location for the large gear part tapped hole and the post that the handle is pivoting on- like from the pan up and from the main cross support under the seat?
thanks
Gary
Powered by Invision Power Board (http://www.invisionboard.com)
© Invision Power Services (http://www.invisionpower.com)