Printable Version of Topic
Click here to view this topic in its original format
914World.com _ 914World Garage _ Exhaust stud install after installing TimeCert
Posted by: rjames Jan 7 2008, 11:44 PM
Trying to keep calm after spending the evening freezing my ass off in the garage and hoping I didn't F things up worse than they were before I started.
I stripped an exhaust stud a while back and jk.76-914 was super kind enough to lend me his TimeCert kit, which worked like a champ. (I'll be sending it back to you very soon, btw). I got the new TimeCert installed, and then went to install the 9 x 8 step stud that I ordered from Jake's site. I was able to get the new exaust stud installed just a little over 1/2 way before it wouldn't turn anymore and after exerting a bit more force, it instead began to turn the insert as well. An attempt at removing the stud just unthreaded the instert completely. Luckily I had another instert to install as I couldn't get the old one off of the stud. BTW, I had to destroy the stud to get it out by using vice grips to unscrew it- it was in there that tight. I REALLY hope I didn't strip the new threads I made for the instert as I probably turned the insert about 1/4-1/2 a turn before I realized it was turning along with the stud. 
I ordered an extra 9 x 8 stud, and upon further examination it looks like the 9mm end isn't perfectly 9mm. I don't have a micrometer, but just by eyeballing it I can tell that it widens after a few threads and stays wider before tapering off again near the end of the threads. It's subtle, but it's enough to keep it from screwing in to my newly installed TimeCert.
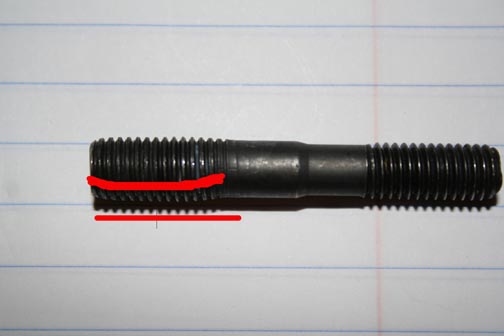
Has anyone else run into this problem? Am I doing something wrong? Are all exhaust studs not created equal? Pics below.  In the second photo, you can kind of see the curve of the 9mm side when comparing it to the straight line I drew. The 8mm side does not seem to suffer from this problem.
Since I bought the step studs from Jake, and I'm sure he's installed a few of these, maybe he'll chime in and explain what I'm doing wrong here.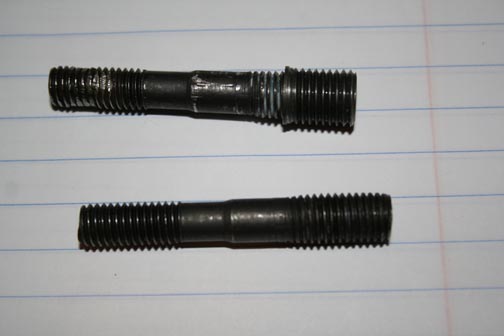
Posted by: sixnotfour Jan 7 2008, 11:51 PM
Did you run the form tap down into the Timesert after you installed it ?
Posted by: rjames Jan 7 2008, 11:57 PM

Did you run the form tap down into the Timesert after you installed it ?
I used the insert driver to install the insert, if that's what you mean. It seats the instert, gets harder to turn, and then breaks free after a few more turns. I followed the instructions to the letter. I believe it's the step stud that's wider in the middle which is keeping it from being able to fit into the instert all the way.
Posted by: sixnotfour Jan 8 2008, 12:04 AM

Posted by: Jake Raby Jan 8 2008, 12:06 AM
Timeserts are too small from time to time...
We used and sold 2,000 of those studs last year, none were noted too large. Our only gripe was that some were threaded with left hand threads!
We are awaiting a new batch, if the stud is goofy we'll send you replacements as soon as we get them in..
Posted by: Tom Jan 8 2008, 12:17 AM
Robert,
Before trying to put the next insert in, try to thread the new stud into it. If it is tight before inserting it , it will not get any looser after inserting it. Make sure all of the parts are good. If the stud is a little tight, try putting the proper size nut on that end to see if it is the stud or insert that is incorrectly sized. Try another 9mm bolt in the insert also.
Hope all works out well.
Tom
Posted by: rjames Jan 8 2008, 01:08 AM
Robert,
Before trying to put the next insert in, try to thread the new stud into it. If it is tight before inserting it , it will not get any looser after inserting it. Make sure all of the parts are good. If the stud is a little tight, try putting the proper size nut on that end to see if it is the stud or insert that is incorrectly sized. Try another 9mm bolt in the insert also.
Hope all works out well.
Tom
Thanks for the quick replies everyone, I appreciate it. It's one of those evenings when I wonder if the car is worth the time and effort. Jake, how did you keep from getting discouraged when you first started out working with engines?!
I don't think I'd be able to thread a 9mm bolt into an insert before installing it, as I think that the driver tool that you use to seat the insert opens it up a tad more (which is in part how it seats the insert, I think).
Regardless, I already installed the 2nd (and last) instert I had because I was anxious to find out if I had stripped the new threads I'd tapped. My guess is that they are ok as the insert seemed to seat fine, but I probably 'pushed' the threads just a bit when I was trying to install the stud when it wouldn't go any further. Either way, the insert seated with the insert tool ok.
I did try threading a 9mm nut on the stud and had a very hard time getting it to go on (so much so that I had to hold the stud with a pair of vice grips while using a socket to thread the nut the rest of the way. But I couldn't be sure it was the stud as the nut was in bad shape to begin with.
I'll hit the hardware store tomorrow and grab a 9mm bolt and see if it threads into the installed insert ok. I'm assuming that it should go in without too much resistance, right? I'm really afraid of trying to screw anything into the insert and messing things up permanently.
Posted by: Jake Raby Jan 8 2008, 01:22 AM
I did get discouraged.. I have had the same tranny in and out of a car 5 times in one day trying to repair it... Back in the old days I had to patch everything up, half ass rigging it do I could get to school- but I never got left on the side of the road..
I have an odd disorder, one that keeps me focused enough to never give up and rarely get discouraged enough to walk away...(no matter what I am working with) I am blessed (even though my family doesn't think so, having to live with me)
Let me know if you need another stud...
Posted by: Blood red 914-6gt Jan 8 2008, 01:26 AM
I did get discouraged.. I have had the same tranny in and out of a car 5 times in one day trying to repair it... Back in the old days I had to patch everything up, half ass rigging it do I could get to school- but I never got left on the side of the road..
I have an odd disorder, one that keeps me focused enough to never give up and rarely get discouraged enough to walk away...(no matter what I am working with) I am blessed (even though my family doesn't think so, having to live with me)
Let me know if you need another stud...
I wish more people had your disorder

Posted by: Twystd1 Jan 8 2008, 01:49 AM
Robert,
Do you have the proper die's of the appropriate pitch you can run over the stud threads before installing?
In the pic you showed. The stud threads look wrong. They look cut wrong from one end to the other.
The stud doesn't look like rolled threads. They look cut. That might be why the threads don't fit the insert that well.
Might be the camera was at a bad angle... I dunno for sure.
Can't hurt to run a die over the threads. You can hold down the stud with a double nut in a vise. And do both ends. Use new nuts if possible. (not mine thank you)
A stretched nut will screw up the assembly as well.
Just a thought.
Clayton
Posted by: jk76.914 Jan 8 2008, 05:42 AM
Well, I'm glad to hear that the kit worked at least. I did the exact same job with the exact same kit, and didn't have any problem. The stud screwed in all the way with my fingers. My insert is almost certainly from the same lot as yours, since it came with the same kit..... So, my first guess is the same as your first guess- the stud. Try another, and be sure to try it on the insert before installing the insert.
Good luck!
Jim
Posted by: rjames Jan 8 2008, 11:14 AM
I'll have to buy another stud because the two I bought were exactly the same, and the photo doesn't lie- I really think that the stud is bad, or at least bad for this application.
Jake, I'd love to take you up on your offer to replace the studs, but I do want to make sure that 1) a bolt will screw into the insert easily (will verify tonight or tomorrow) and 2) that the replacement studs aren't the same as I already have.
The local VW shop didn't have a step stud in stock so I'm at the mercy of mail order for testing.
Also I don't have a die set to attempt to correct the threads on the stud, and actually I think I'd rather just use a stud that fits correctly instead of trying to make one fit.
Jim, the kit worked perfectly, and was really very easy. I just hope I didn't mess things up by trying to instert a stud that was actually turning the insert as well. The last instert is already in, and like you I think the inserts are fine. Especialy since the insert driver had no problem installing it, and after it was seated the driver itself turned easily. I'll be hitting home depot for a 9mm bolt tonight to verify my assumptions about the studs and will report back.
Posted by: Cap'n Krusty Jan 8 2008, 02:22 PM
Hello????? You're screwing (or attempting to screw) a 9mm stud into an 8mm hole Duuuuhhhhh!!!!. That's somewhat like trying to pour 2 gallons of gas into a one gallon can. Itain'tgonnahappen in this universe. The 8mm insert is so you can repair the hole and use the stock 8mm stud. Yes, the original studs are 8mm on both ends, the REPAIR stud is 9mm on one end, 8mm on the other. The Cap'n, staring in disbelief that this thread even got this far .................
BTW, I've never seen a 9mm nut, not that they may not exist.
Posted by: jk76.914 Jan 8 2008, 06:04 PM
I'll have to buy another stud because the two I bought were exactly the same, and the photo doesn't lie- I really think that the stud is bad, or at least bad for this application.
Jake, I'd love to take you up on your offer to replace the studs, but I do want to make sure that 1) a bolt will screw into the insert easily (will verify tonight or tomorrow) and 2) that the replacement studs aren't the same as I already have.
The local VW shop didn't have a step stud in stock so I'm at the mercy of mail order for testing.
Also I don't have a die set to attempt to correct the threads on the stud, and actually I think I'd rather just use a stud that fits correctly instead of trying to make one fit.
Jim, the kit worked perfectly, and was really very easy. I just hope I didn't mess things up by trying to instert a stud that was actually turning the insert as well. The last instert is already in, and like you I think the inserts are fine. Especialy since the insert driver had no problem installing it, and after it was seated the driver itself turned easily. I'll be hitting home depot for a 9mm bolt tonight to verify my assumptions about the studs and will report back.
Well, see what Jake comes up with first. I'll be stopping by Bel-Metric sometime in the next 2 weeks, so worse come to worst, I can pick one up from them and send it off to you. They've always delat with me when I show up in person. Good luck finding a 9mm x 1.0 bolt at Home Depot....
Jim
Posted by: jk76.914 Jan 8 2008, 06:11 PM
Hello????? You're screwing (or attempting to screw) a 9mm stud into an 8mm hole Duuuuhhhhh!!!!. That's somewhat like trying to pour 2 gallons of gas into a one gallon can. Itain'tgonnahappen in this universe. The 8mm insert is so you can repair the hole and use the stock 8mm stud. Yes, the original studs are 8mm on both ends, the REPAIR stud is 9mm on one end, 8mm on the other. The Cap'n, staring in disbelief that this thread even got this far .................
BTW, I've never seen a 9mm nut, not that they may not exist.
HELLO????? It's a 9mm TimeCert. That's 9mm ID, NOT OD. I know, because it's my kit and I lent it to Robert. BTW, I got it at Bel-Metric, here in Mass, and they have 9mm nuts.

Posted by: jk76.914 Jan 8 2008, 06:12 PM
I'll have to buy another stud because the two I bought were exactly the same, and the photo doesn't lie- I really think that the stud is bad, or at least bad for this application.
Jake, I'd love to take you up on your offer to replace the studs, but I do want to make sure that 1) a bolt will screw into the insert easily (will verify tonight or tomorrow) and 2) that the replacement studs aren't the same as I already have.
The local VW shop didn't have a step stud in stock so I'm at the mercy of mail order for testing.
Also I don't have a die set to attempt to correct the threads on the stud, and actually I think I'd rather just use a stud that fits correctly instead of trying to make one fit.
Jim, the kit worked perfectly, and was really very easy. I just hope I didn't mess things up by trying to instert a stud that was actually turning the insert as well. The last instert is already in, and like you I think the inserts are fine. Especialy since the insert driver had no problem installing it, and after it was seated the driver itself turned easily. I'll be hitting home depot for a 9mm bolt tonight to verify my assumptions about the studs and will report back.
Well, see what Jake comes up with first. I'll be stopping by Bel-Metric sometime in the next 2 weeks, so worse come to worst, I can pick one up from them and send it off to you. They've always delat with me when I show up in person. Good luck finding a 9mm x 1.0 bolt at Home Depot....
Jim
Oops. That's 9mm x 1.25, not 9mm x 1.0!
Posted by: rjames Jan 8 2008, 07:08 PM
Whoa, easy there Cap'n yer gonna pull something. 
Thanks for the offer Jim, I'll keep you posted, and yeah, Home Depot probably won't be of any help.
Posted by: Cap'n Krusty Jan 8 2008, 08:04 PM
Hello????? You're screwing (or attempting to screw) a 9mm stud into an 8mm hole Duuuuhhhhh!!!!. That's somewhat like trying to pour 2 gallons of gas into a one gallon can. Itain'tgonnahappen in this universe. The 8mm insert is so you can repair the hole and use the stock 8mm stud. Yes, the original studs are 8mm on both ends, the REPAIR stud is 9mm on one end, 8mm on the other. The Cap'n, staring in disbelief that this thread even got this far .................
BTW, I've never seen a 9mm nut, not that they may not exist.
HELLO????? It's a 9mm TimeCert. That's 9mm ID, NOT OD. I know, because it's my kit and I lent it to Robert. BTW, I got it at Bel-Metric, here in Mass, and they have 9mm nuts.
Well, I checked the time Sert Catalog, and there it is, big as life.
MY APOLOGIES!!!! Right here, right now.
Still sounds like the wrong stud being screwed into the hole. The wrong thread, perhaps? I'm at a bit of a loss as to the sense of using an oversize insert and stud when you coulda gone with the standard size. The Cap'n, trying hard to be tactfully humble.
Posted by: jk76.914 Jan 9 2008, 05:39 AM
Well, I checked the time Sert Catalog, and there it is, big as life.
MY APOLOGIES!!!! Right here, right now.
Still sounds like the wrong stud being screwed into the hole. The wrong thread, perhaps? I'm at a bit of a loss as to the sense of using an oversize insert and stud when you coulda gone with the standard size. The Cap'n, trying hard to be tactfully humble.
Well I used 9mm because I originally had a pulled 8mm stud, which I tapped out to oversize (9mm). It pulled again. Looking at the numbers, when the original 8mm stud pulled, it broached out a rough bore 8mm hole, and 8mm is larger than the minor dimension on the 9mm thread, which means the new 9mm threads didn't have full depth. So when Rich posted for advice back when, I put my 2 cents in and recommended either tap to oversize 10mm, or 9mm time cert (which taps to slightly larger than 10mm) and get full bite on the replacement. The 8mm time cert taps to slightly larger than 9mm in the head, which I think leaves him open to pulling it again like I did with my original approach. Also, time certs aren't cheap, but I had my 9mm kit and extra inserts which I offered to lend him. That's the story....
Posted by: rjames Jan 9 2008, 02:32 PM
I just picked up another step stud from a local type IV engine rebuilder. Just judging it by eye (and without the other on hand to compare it to) it doesn't appear to be thicker in the middle of the threads like the exhaust stud I was trying to use. I'll know for sure when I get home and will post the results. I'm anxious to close this thread with positive results and my new (to me) exhaust system installed.
Posted by: rjames Jan 10 2008, 10:33 AM
I tried installing another step stud which visually looks different in the non-threaded area between the two ends when comparing it to the one I got from Jake, which tells me that it most likely came from a different manufacturer.
It did screw in about 4 more threads than the one I got from Jake did, but still won't thread into the insert completely, and leaves about 7 threads exposed.
I'm perplexed as the TimeCert driver that seats the insert is clearly marked 9mm x 1.25, and can easily be screwed in completely by hand, yet the 2 studs I have that are supposedly 9mm x 1.25 as well can not be screwed in further than 1/2 way. Someone is lying.  Not sure how tight the tolerences are on the insert, but clearly the studs do differ (even if just by a small amount).
Trying to find locally a 9mm x 1.125 bold to test the insert, or the appropriate nut to test the stud (or chase the threads) is proving to be impossible, although I have one more hardware shop to try on my way home from work today.
Posted by: Vacca Rabite Jan 10 2008, 10:45 AM
Since you have a good stud for testing, try threading a 9X1.125 nut on it and see what the results are.
Or get a 9x1.125 bolt from your local hardware store and try threading that into the cert. Infact, if the cert is not yet installed, take it with you to the store and you won't even have to buy the test bolt.
Test both, and find out which end is wrong.
Also, if you have a 9x1.125 thread die, run the stud through that just clean up the threads. It can't hurt.
Zach
Posted by: Jake Raby Jan 10 2008, 10:53 AM
We have those studs made so the manufacturers are certainly different..
It sounds like the time sert is installed into a tapped hole that is tapered and gets smaller the deeper it goes into the head. Did you use the time sert tap or just a regular tap?
Posted by: rjames Jan 10 2008, 11:35 AM
We have those studs made so the manufacturers are certainly different..
It sounds like the time sert is installed into a tapped hole that is tapered and gets smaller the deeper it goes into the head. Did you use the time sert tap or just a regular tap?
I used the 9mm x 1.25 time sert kit, whch includes their drill (to drill out the old 8mm threads), their tap, and their driver which is used to seat the insert. The driver is clearly marked 9 x 1.25, which after seating the insert now threads in by hand. So either their insert is not truly 9 x 1.25, or the studs I have are slighly larger than 9 x 1.25. The threads spacing on the studs line up exactly with the threads on the insert driver, which tells me it's not the thread spacing, but the diameters that are different, even if only slightly.
As I mentioned in a previous post, I'm trying to hunt down a 9mm x 1.25 nut to test out the stud, and a 9 mm x 1.25 bolt to test out the instert. At the very least if I could find the right nut I could try and chase the threads on one of the studs. However, these sizes seem to be particular to engine related stuff as I'm having a hard time finding them.
Posted by: KELTY360 Jan 10 2008, 11:45 AM
Trying to find locally a 9mm x 1.125 bold to test the insert, or the appropriate nut to test the stud (or chase the threads) is proving to be impossible, although I have one more hardware shop to try on my way home from work today.
Have you tried Tacoma Screw Products for the bolt you need?
Posted by: davep Jan 10 2008, 11:54 AM
7mm fasteners are rare
9mm fasteners are extremely rare, and probably custom only
so let your fingers do the searching
Posted by: rjames Jan 10 2008, 01:17 PM
7mm fasteners are rare
9mm fasteners are extremely rare, and probably custom only
so let your fingers do the searching
great.
I've called and left a message with them and am awaiting a return call.
And here I thought tapping the new threads and installing the Timesert was going to be the hardest part of this whole process!
Posted by: Phoenix-MN Jan 10 2008, 01:55 PM
7mm fasteners are rare
9mm fasteners are extremely rare, and probably custom only
so let your fingers do the searching
great.
I've called and left a message with them and am awaiting a return call.
And here I thought tapping the new threads and installing the Timesert was going to be the hardest part of this whole process!
Yup, it's always the easy stuff that comes back to bite you. I needed a 9mm bolt for a A-Caliper but could not find one. You can buy 9mm tap and dies all over the place but no one has nuts and bolts. My solution - turn down a 10mm bolt to 9mm and ran a 9mm die over it.

Posted by: rjames Jan 10 2008, 03:00 PM
7mm fasteners are rare
9mm fasteners are extremely rare, and probably custom only
so let your fingers do the searching
great.
I've called and left a message with them and am awaiting a return call.
And here I thought tapping the new threads and installing the Timesert was going to be the hardest part of this whole process!
Yup, it's always the easy stuff that comes back to bite you. I needed a 9mm bolt for a A-Caliper but could not find one. You can buy 9mm tap and dies all over the place but no one has nuts and bolts. My solution - turn down a 10mm bolt to 9mm and ran a 9mm die over it.
Send me that bolt! Just kidding!
Looks like that's the direction I'll be heading. Just heard back from Tacoma Screw and found out that what I'm looking for is a big rarity and they don't have it. Looks like I'll be buying a die set now.
Posted by: Phoenix-MN Jan 10 2008, 03:12 PM
If you have a 911 front A-Caliper laying around those have 9mm Ribe bolts and a 9mm nut holding the halves together.
Posted by: davep Jan 10 2008, 03:36 PM
Trust ATE to use unobtainable hardware for bolting the caliper halves together. Even Ribe will not sell that hardware to you unless you are ATE. BTDT.
Posted by: Jake Raby Jan 10 2008, 03:57 PM
Just let me send you a replacement!
Posted by: rjames Jan 10 2008, 06:03 PM
Just let me send you a replacement!
The fact that I have 3 9mm step studs, from two different manufacturers and neither of them fit makes me think that finding a perfect 9mm stud isn't possible.
However, I'm open to receiving another one to try, Jake- thanks.
I couldn't PM you through this site, I sent an email to parts@aircooled technology.com
Let me know if that isn't the right contact route.
Thanks!
Posted by: jk76.914 Jan 10 2008, 08:26 PM
It leaves about 6 threads exposed, eh? If you look in from the other end, how close is it from bottoming out? The way the time certs lock is the ID tapers slightly in at that bottom, so when you keep screwing after you feel resistance, it expands the OD and locks it in place. If you're within a few threads of the bottom, you may just be starting into the portion where the resistance starts, and the insert expands. See pic-
Nother question- how did the threads look in the aluminum? They're either fine, or ruined from turning the time cert after its flange was seated.
Jim
Posted by: jk76.914 Jan 10 2008, 09:20 PM
It leaves about 6 threads exposed, eh? If you look in from the other end, how close is it from bottoming out? The way the time certs lock is the ID tapers slightly in at that bottom, so when you keep screwing after you feel resistance, it expands the OD and locks it in place. If you're within a few threads of the bottom, you may just be starting into the portion where the resistance starts, and the insert expands. See pic-
Nother question- how did the threads look in the aluminum? They're either fine, or ruined from turning the time cert after its flange was seated.
Jim
Hmmm. I just looked at your original pic. Looks like the stud stuck about where the threads taper down at the lock point. Key question is how the aluminum threads look in the head. You may have stopped turning when the install tool got to the taper, rather than continuing until the Sert expanded and locked itself into the head. Sort of maybe sounds like that could have happenned???

If I count threads on the bare stud and on the OD of the Sert, looks like its screwed in to about 2 or 3 threads shy of the end. That could very well mean that the tool hadn't cold formed the end yet and locked it to the head. The fact that the Sert unscrewed so easily also suggests that it hadn't locked yet.
Posted by: rjames Jan 11 2008, 11:16 AM
It leaves about 6 threads exposed, eh? If you look in from the other end, how close is it from bottoming out? The way the time certs lock is the ID tapers slightly in at that bottom, so when you keep screwing after you feel resistance, it expands the OD and locks it in place. If you're within a few threads of the bottom, you may just be starting into the portion where the resistance starts, and the insert expands.
Nope, the driver tool after breaking free fully went through the entire timecert and to the end of the hole in the case.
Threads looked fine to me in the aluminum. No metal shavings came out with the insert, and the fact that the 2nd insert I installed using the driver tool seemed to seat just fine (driver tool 'broke free' and now can be screwed in to the full length of the hole easily) makes me think the threads are ok.
If this is true than it means that the driver tool is not cut correctly for the insert or both inserts are faulty, because the driver did break free and screws all the way through the insert (on both the insert that I removed and the one that is currently installed.
It didn't unscrew that easily, I just didn't realize that the stud was supposed to screw in easily, and therefore I applied enough torque on it to get it stuck in the insert, so when I went to unscrew the stud (using vicegrips) it unscrewed the insert too. Even after getting both pieces out I had to stick the stud in a vice and use vicegrips on the insert to remove it from the stud.
As an experiment I tried screwing the insert the rest of the way onto the stud using a vice and vicegrips, and I couldn't get it on the stud much further than what you see in the pick. After removing the used insert from the stud, I can screw the insert all the way down the length of the timecert driver with no problem, which tells me that it was 'expanded' by the driver.
This leaves only a couple of conclusions: either the stud isn't 9mm for its entire length, the stud threads are the wrong size (not 1.25), or the timecert & timecert driver aren't exactly 9mm ID. Regardless of the dimensions however, the studs I have and the timcert/timecert driver don't match each other.
With another stud I found locally, I was able to get the insert screwed on several threads farther than the original stud I had just using my fingers, or if I force it I can get it on the rest of the way, but it takes a vice & vice grips to do so. So the two studs I have are different dimensions, and neither of them match the insert.
One additional note, I can insert the stud through the bottom end of the insert for a few threads, which tells me that things are getting hung up at the same place in the insert (somewhere near the middle) and at the same place on the stud (several threads down).
I started wondering if the threads on the stud weren't 1.25, but they seem to match up with the threads on the driver tool.
If I get another stud from Jake and run into the same issue (which is what I'm expecting will happen) I'm thinking the next step will be to try and recut the threads of the stud to 9mm. Assuming that 9mm x 1.25 dies are easy to find and also assuming that the insert matches those dimensions accurately.
ACK!
Posted by: jk76.914 Jan 11 2008, 12:01 PM
Wow. Well, you've done anything I can think of and more. Sounds like the original installation was perfect. Those also sound like the correct next steps. I found a 9mm x 1.25 tap at my local Tru-Value hardware store. Not sure about a die, but if Tru-Value has the tap, then they may have a die too.
Also, if this is a winter project and you can put it on ice for a couple of weeks, I'm glad to pick up a stud at BelMetric when I go up. I'm waiting to get a new outer CV joint for my Audi in the mail, and then I need to go up and get boot strap-clamps and crimping tool from it. That's my hold up. It's about an hour round trip. They also have loose Serts (without the tools). There is a longer one available in case your aluminum threads are damaged, though it sounds like your installation was fine.
Good luck,
Jim
Posted by: rjames Jan 11 2008, 01:50 PM
Wow. Well, you've done anything I can think of and more. Sounds like the original installation was perfect. Those also sound like the correct next steps. I found a 9mm x 1.25 tap at my local Tru-Value hardware store. Not sure about a die, but if Tru-Value has the tap, then they may have a die too.
Also, if this is a winter project and you can put it on ice for a couple of weeks, I'm glad to pick up a stud at BelMetric when I go up. I'm waiting to get a new outer CV joint for my Audi in the mail, and then I need to go up and get boot strap-clamps and crimping tool from it. That's my hold up. It's about an hour round trip. They also have loose Serts (without the tools). There is a longer one available in case your aluminum threads are damaged, though it sounds like your installation was fine.
Good luck,
Jim
Jim, I really appreciate the help on all this, thank you. I've given up on being in a hurry to get this finished, just want it done right. There's a True Value hardware within 30 minutes of my place, so I'll try them for a die. I'm awaiting to hear back from Jake regarding another stud, but may take you up on your offer to pick up an additional insert & stud just in case. I'll keep you posted, and let me know if you if you go to Bell before I get back to you.

Posted by: rjames Jan 22 2008, 04:01 PM
Well, the exhaust stud saga is going better now.
To bring anyone interested up to speed:
After stripping out an exhaust stud, I installed a timecert that would
take a 9x1.25 step stud.
Ordered said stud from the Type IV store and they didn't fit the insert.
Bought a step stud from a local type IV engine rebuilder and that one didn't fit either.
Ordered a replacement from the TYPE IV store, and SUCCESS! It fit! It also looks complete different from the other studs that didn't fit- I'll post pics tomorrow.
(BTW, the TYPE IV store has awesome customer service.)
Here's my Q:
I have only tightened the new exhaust stud nuts to 14 foot pounds. I was afraid to go any farther now that I know how easily they can be stripped out. I also know that spec is 18 pounds. The question is, should I get back under there and tighten them to spec? Do I have to?
Posted by: davep Jan 22 2008, 08:35 PM
You may want to wait until you have heat cycled it a few times. (a couple of short drives) I typically would mount all the parts loosely first, getting every part aligned nicely ( HX's, muffler and hanger). Then I go around tightening things up snug, and finally a round of torquing to spec. If you tighten the HX's before mounting the muffler, then chances are it will not mate up. After some heat cycling you will find most fasteners will loosen up. So you have to back anyways to finish up the job.
Posted by: Jake Raby Jan 23 2008, 10:57 AM
Glad we were able to satisfy you... Sorry for the issue, we actually found a few more studs with the same issue.
Posted by: rjames Jan 23 2008, 12:49 PM
Glad we were able to satisfy you... Sorry for the issue, we actually found a few more studs with the same issue.
No worries, apparently yours wasn't the only shop that received 9x1.25 studs that weren't really 9x1.25
I really appreciated the quick turnaround.Yup, I did find out that things didn't line up
. I guess I'll be loosening the exhaust bolts again to get things to things to line up so I can get the muffler on. I wish the muffler was supported more by the hanger than it is. Maybe I'm thinking about it wrong, but it seems like only having 1 bolt on each side going through the hanger puts unnecessary strain on the exchangers. The hanger takes care of a lot of downward force from the muffler's weight, but with it being fastened by only 1 bolt at the bottom on each side of the muffler, the exchangers would bear a lot of the fore/aft force when the car is breaking and accelerating.

Posted by: rjames Jan 23 2008, 04:22 PM
Turns out I have a 1.7/1.8 style exhaust.  Not sure how I missed that when I bought all the other parts for the backdate. Luckily I got it used and it wasn't too much $.
Off to post an ad for a 2.0 muffler... Maybe I'll have this thing on the road by summertime. ack.
Powered by Invision Power Board (http://www.invisionboard.com)
© Invision Power Services (http://www.invisionpower.com)