Printable Version of Topic
Click here to view this topic in its original format
914World.com _ 914World Garage _ engine shroud and alternator on a /6
Posted by: krk Jan 10 2004, 05:20 PM
Folks,
Today, I'm taking advantage of the weather and trying to get to the alternator in my /6 -- which is apparently dead. Anyway, i have shop manuals which, and this is unusual, are almost useless for this.
The carbs and manifolds are out. All shroud bolts (that I can find) are out.
The shop manual thinks I can remove the shroud -- but there are "issues". for example, there is a wiring thing that goes through roughly the center of the shroud. (hopefully there
are detachable ends behind it somehow).
Are there tricks at this stage that I should be aware of? I found the secret bold behind the distributor, and the other two secret bolts accessed under the car at the back. Did I miss something?
Just taking a break -- almost time to go back at it. Any BTDT appreciated of course!
kim.
Posted by: ArtechnikA Jan 10 2004, 05:31 PM
are detachable ends behind it somehow).
not BTDT yet - just about got all the parts i need to play mix-n-match-the-fan-and-pulley games (but evidently i need a new set of alternator pulley adjusting washers ...)
anyway - the wires to the alternator have either push-on connectors, or you have to unbolt them from the alternator body once you get in there. the fan swapping article on the Pelican site strongly recommends disconnecting the POSITIVE cable from the battery (too) because one of those wires to the alternator connects DIRECTLY to the battery and will arc, spark, and weld itself to the body if it touches ...
Posted by: krk Jan 10 2004, 05:46 PM
Ah -- the battery -- good reminder.
I'm a little further now -- but there is a fair chunk of wiring harness that goes in roughly about dead center behind the bulge of the fan. it's basically the last thing in the way right now.
(I'm gonna go out and disconnect the battery now!)
[edit: oh i've shot a few pics on the way -- i"ll post them if they seem to have info]
kim.
Posted by: krk Jan 10 2004, 06:38 PM
I must be fairly far off course by now.
(The battery is disconnected) The sticking point is the cabling that goes through the shroud. There is a baffle system immediately behind the fan (the alternator is in the center of the fan) and the cable goes through the back of the baffle and (from touch) splits into two).
But how to get the cabling disconnected? The baffling system is held on by a myriad of bolts around its edge. It's conceivable that I could get to each bolt and remove it -- but reassembly would be a nightmare. I must be missing something.
kim.
Posted by: Jeroen Jan 10 2004, 07:06 PM
Hey Kim,
BTDT... but it's been almost 4 years, so the details are kinda blurry 
Can you slide the shroud over the wiring?
The wires are bolt on and not push on for sure...
cheers,
Jeroen
Posted by: bwilless Jan 10 2004, 09:16 PM
I just did this on my 3.0, on an engine stand. There are ~8 bolts holding the baffle thing on. You have to remove these bolts, to slide the baffle back, to disconnect the wires. Mine had nuts on the wiring connections. It was not easy on the stand, I imagine in the car it will be difficult.
Have fun 
Posted by: Gint Jan 10 2004, 11:51 PM
I tried once to pull of my shroud when the motor was in the car. No joy! I never did get it off. In fact, the motor is on a stand, and it still hasn't come off.
Please!?!?!?!
Posted by: meursault Jan 11 2004, 12:28 AM
Or you could just take off the fan belt, remove the bolt(s) from the wide steel strap that holds the fan housing on, and remove the nut from the ground strap where it attaches to the case half. Then, assuming all other electrical connections on the engine wiring harness are disconnected, you can carefully lift out the shroud and fan/alternator as an entire unit. Fun, eh, removing all that stuff just to get to the alternator?
On my original six, it looked like some yokel cut the fiberglass shroud to get to the alternator, then reglassed it back together when he'd finished the work. 
Posted by: krk Jan 11 2004, 02:43 AM
Thx guys!
I shall be trying again in the morning. The shroud on mine does have a stress fracture that looks to me like a PO somewhere was trying what I'm trying now. I'm being gentle, of course, but I think it's close.
I caught The Brad™ on the phone tonight -- I was talking about getting the fan belt off and he reminded me that there's a tool in my original tool kit that should help. (I'd not thought of the toolkit as having useful tools in it!  )
)
Gint, I shall post pics on the morrow -- Carl and Meridith stopped by on a cruise in his beautiful /6 -- so there are actually gonna be pics of a running 914! Not mine, of course, but close enough for jazz.
kim.
Posted by: si2t3m Jan 11 2004, 07:42 AM
BTDT.
Replaced the alternator of my 3.0 while it was in the car.
Only 3 wires go in the big hole in the shroud. When i took my alt out, i kinda puched the wires in to get me more room to pull the shroud away from the alt/fan housing. I then removed the small bolts for the air duct behind the alt (this was no fun). Removed the wires from the alt and finally got the shroud out of the way to remove the alt & fan housing.
I did have the belt and housing strap removed so i could tilt the housing to get to the bolts behing de shroud.
HTH
Marc-André
Posted by: seanery Jan 11 2004, 09:23 AM
I put the shroud on my 2.7 on on a stand, and took it off on a stand. There aint no way Id do that in the car PITA. (in my nextdoor neighbor's hillbilly voice)
Posted by: ! Jan 11 2004, 09:50 AM
On one of my /6 conversions....we had an access port cut in the firewall between the seats. For some reason that ride used to like to eat fan belts.....
Posted by: krk Jan 11 2004, 09:52 AM
Replaced the alternator of my 3.0 while it was in the car.
Only 3 wires go in the big hole in the shroud. When i took my alt out, i kinda puched the wires in to get me more room to pull the shroud away from the alt/fan housing. I then removed the small bolts for the air duct behind the alt (this was no fun). Removed the wires from the alt and finally got the shroud out of the way to remove the alt & fan housing.
I did have the belt and housing strap removed so i could tilt the housing to get to the bolts behing de shroud.
HTH
Marc-André
This is the approach I will take this morning. (thx, btw -- helps to know it's been successfully done before!)
As an aside, why wouldn't I cut the wires and install quick connects? I'm not going to this time, but it just seems to me that there must be modern connectors with the right properties to use somewhere in the middle of these three lines.....
Anyway, dawn is here and it should start warming up out there. Must get at 'er.
kim.
Posted by: Gint Jan 11 2004, 12:38 PM
I always like to see pics of Carl's car, but I want to see pics of your shroud/fan/alternator work. Please?!?!
Check out http://www.posi-lock.com/. I absolutely love these things.
Posted by: krk Jan 11 2004, 12:59 PM
I always like to see pics of Carl's car, but I want to see pics of your shroud/fan/alternator work. Please?!?!
Check out http://www.posi-lock.com/. I absolutely love these things.
I'm shootin' extra pics just for you, mon ami.
A gorilla tightened fan belt nut.

This will be a mess to reassemble.
Wonder who has an alternator on a Sunday afternoon....
kim.
Posted by: Gint Jan 11 2004, 01:01 PM
A gorilla tightened fan belt nut.
Thanks! I knew I could count on you Kim.
The factory tool actually works really well.
Posted by: krk Jan 11 2004, 02:17 PM
A gorilla tightened fan belt nut.
Thanks! I knew I could count on you Kim.
The factory tool actually works really well.
It does indeed! (hm... do I have to admit that I didn't notice the correct 22m wrench is also in the factory kit? I was standing at the table reading two manuals and the kit was there with fan belts and the frikk'n wrench -- right under my nose -- and at some point I noticed it... duh...) The awkward part is getting the force on the wrench -- eventually I worked it out and it came loose.
Ok, the alternator is out.
Now we start with the pics.
One at a time, of course.
A couple of opening shots so I can remember what it looked like before I got DWD.
kim.
Attached thumbnail(s)
Posted by: krk Jan 11 2004, 02:18 PM
sdfg
Attached thumbnail(s)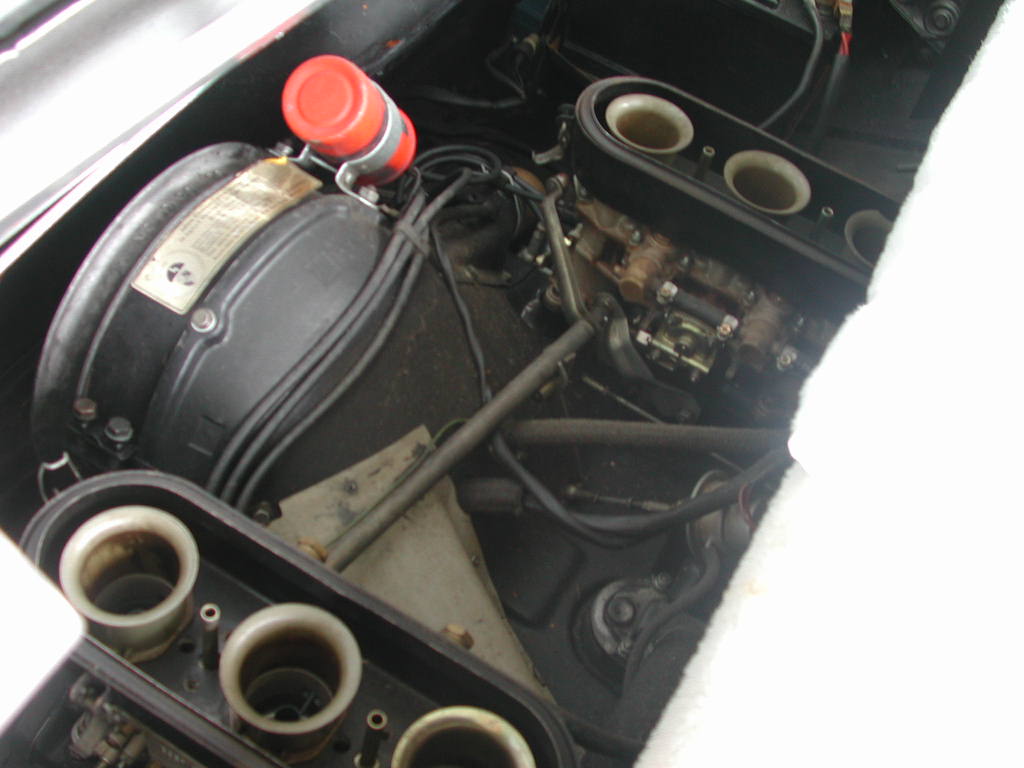
Posted by: krk Jan 11 2004, 02:19 PM
What's in that box from Brad?
Attached thumbnail(s)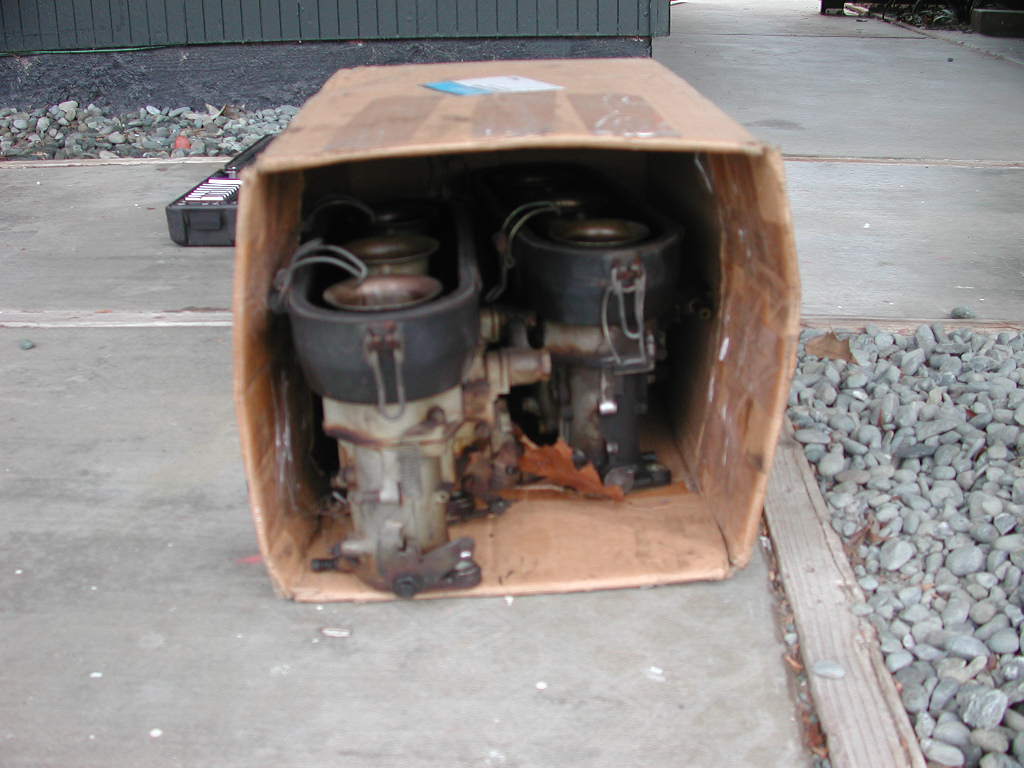
Posted by: krk Jan 11 2004, 02:20 PM
You need to see a flowering plant.
Attached thumbnail(s)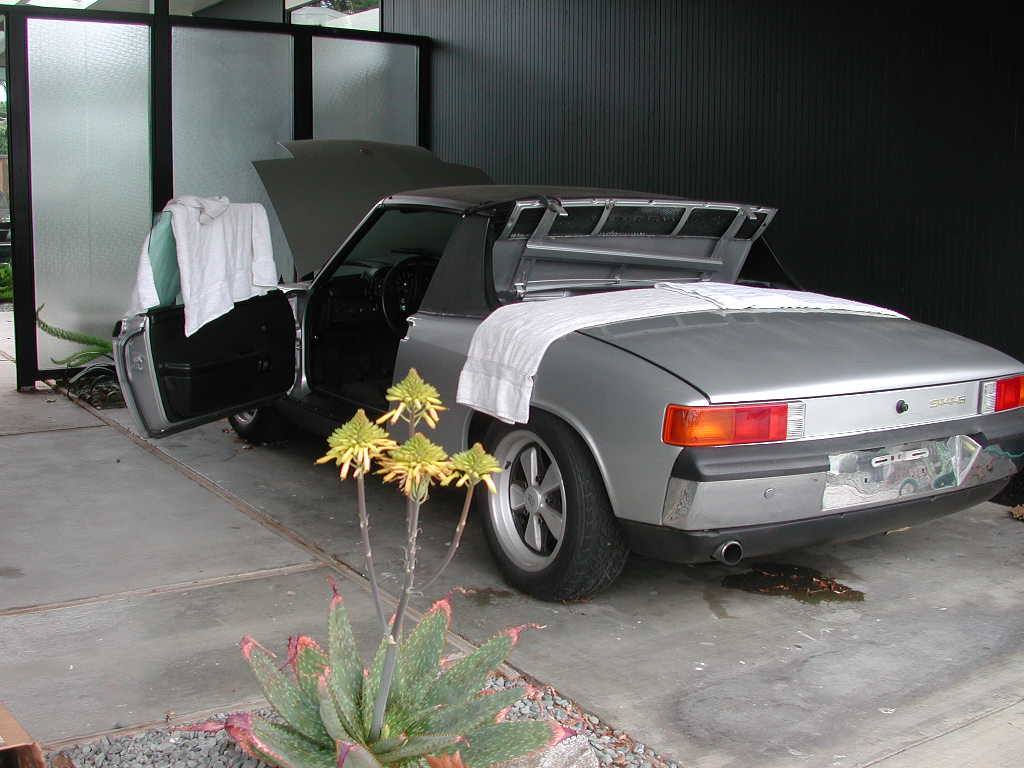
Posted by: krk Jan 11 2004, 02:20 PM
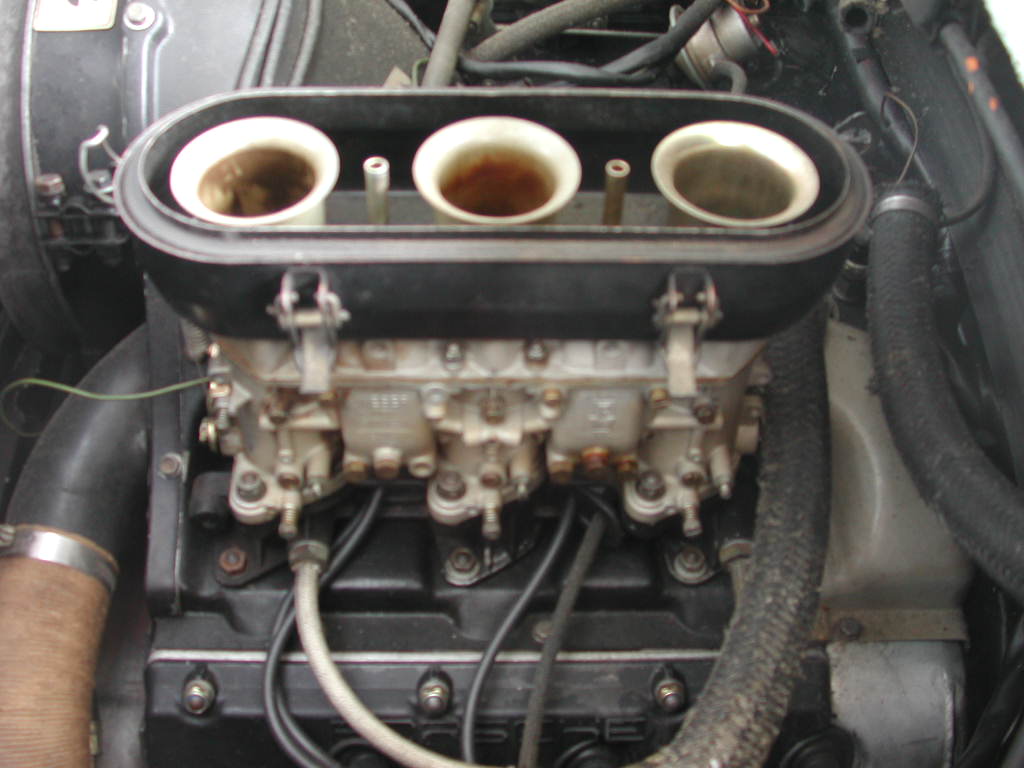
Carbs out.
[can't add the pic under edit? oh well]
Posted by: krk Jan 11 2004, 02:22 PM
carbs out.
Attached thumbnail(s)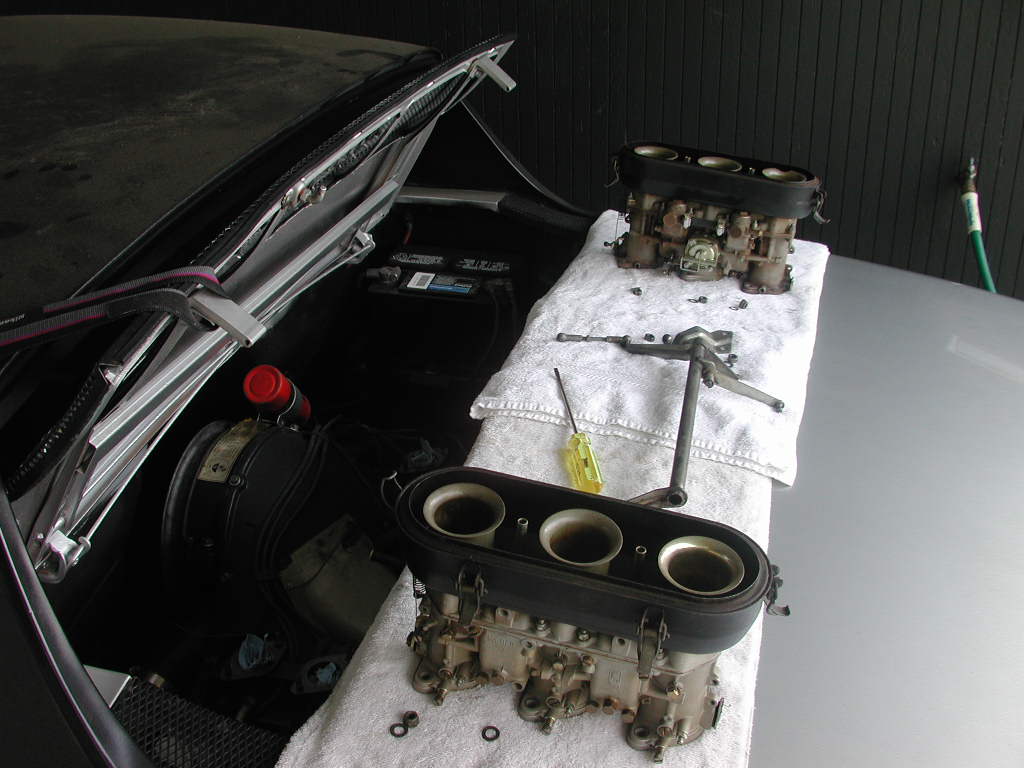
Posted by: krk Jan 11 2004, 02:22 PM
sadfafsd
Attached thumbnail(s)
Posted by: krk Jan 11 2004, 02:23 PM
The clean carbs have worn throttle shafts.
The dirty ones do too, but much less so.
Attached thumbnail(s)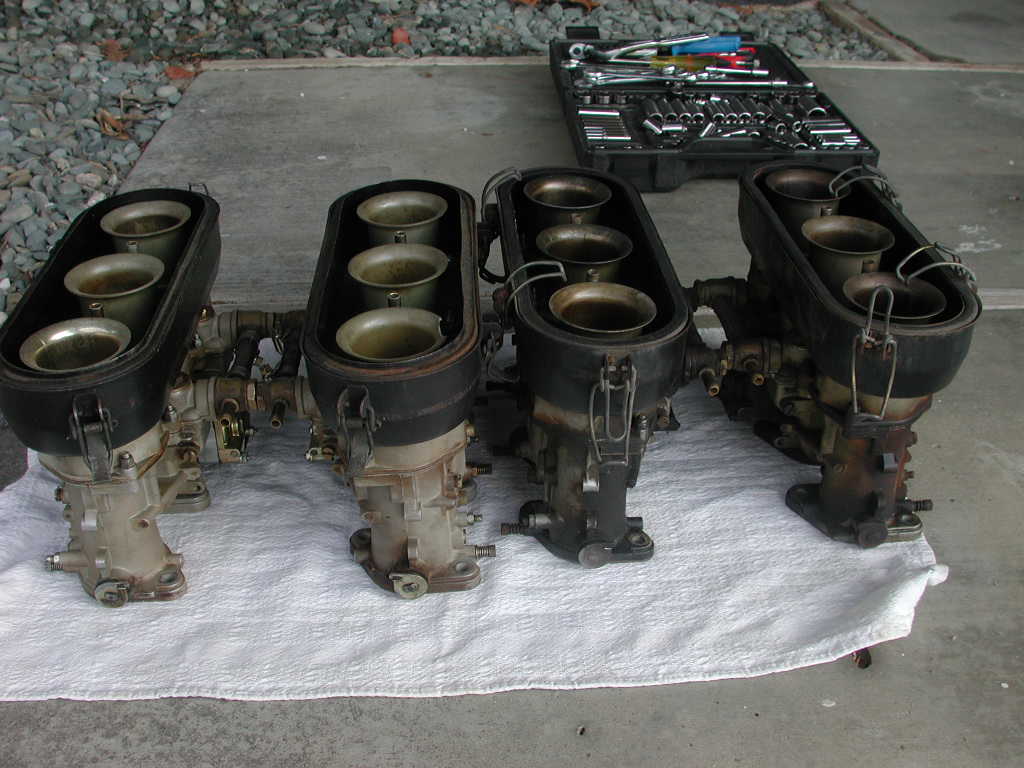
Posted by: krk Jan 11 2004, 02:25 PM
Interrupted -- Carl and Meridith drop by.
Attached thumbnail(s)
Posted by: krk Jan 11 2004, 02:26 PM
bye bye...
Attached thumbnail(s)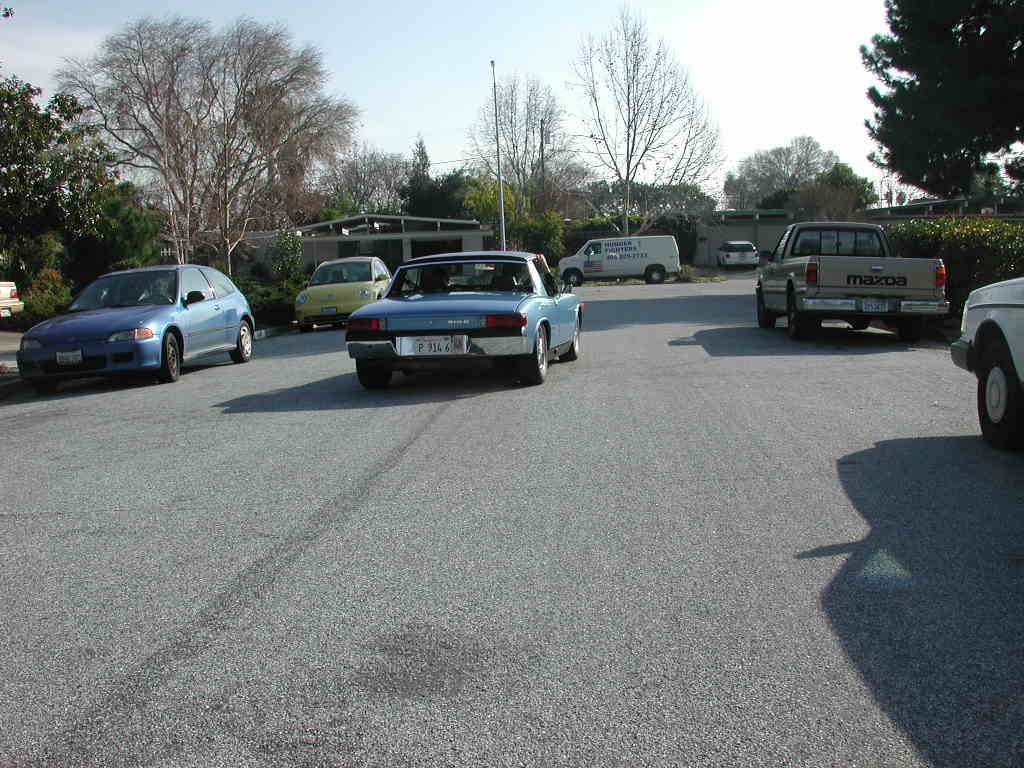
Posted by: krk Jan 11 2004, 02:27 PM
Intake manifolds next.
Attached thumbnail(s)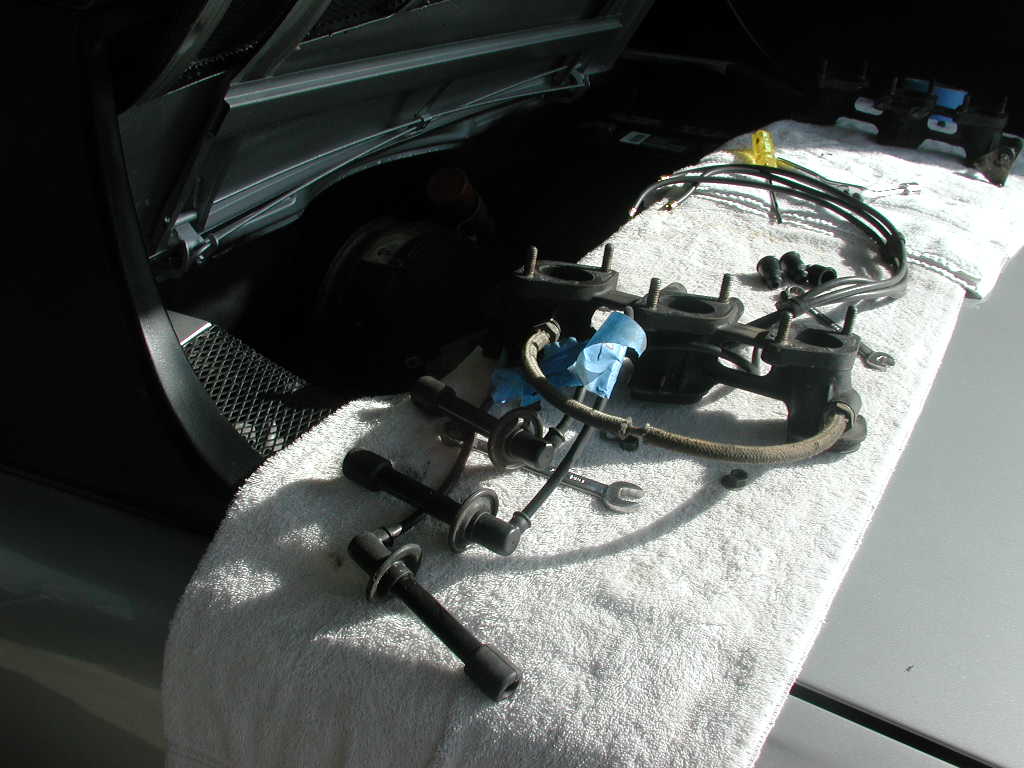
Posted by: krk Jan 11 2004, 02:27 PM
asdf
Attached thumbnail(s)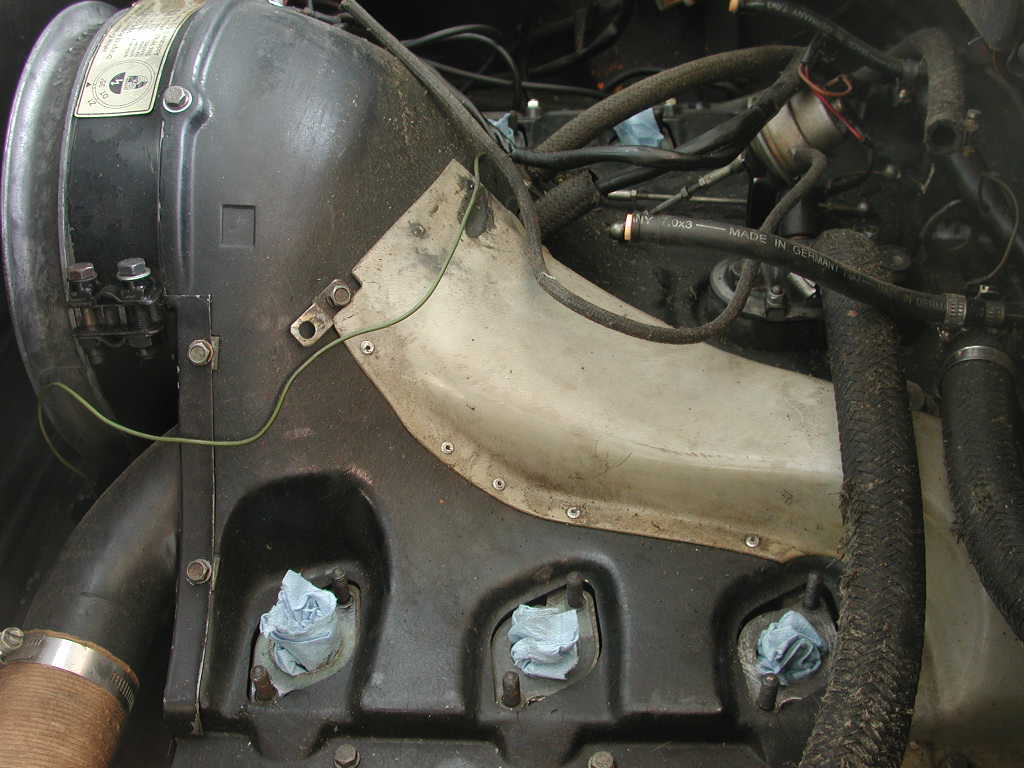
Posted by: krk Jan 11 2004, 02:30 PM
Now it gets interesting. Most obvious things have been unbolted/etc -- the cable in the center of the shroud is the culprit -- it winds through the air diverter gadget bolted to the back of the fan/alternator, underneath the shroud, and ends up bolted to the back of the alternator itself.
Attached thumbnail(s)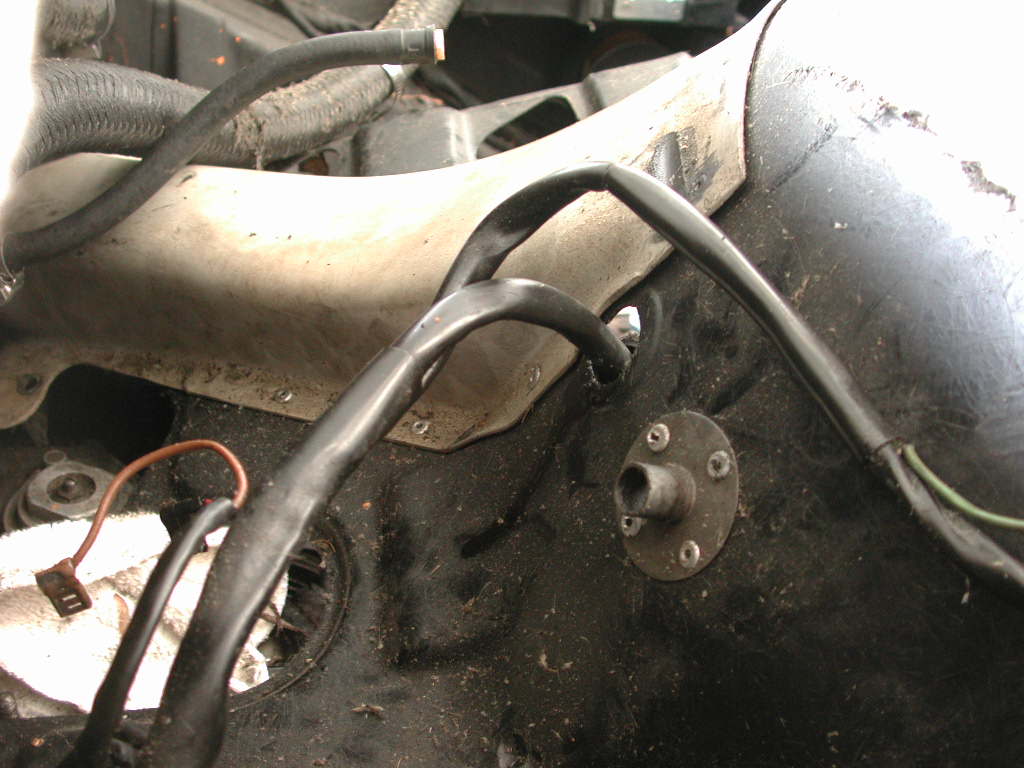
Posted by: krk Jan 11 2004, 02:33 PM
Now we unbolt all shroud bolts. Most are visible. There are a coupel that are not. Front edge of the shroud has bolts (most interesting one is behind the dizzy) and there are two that are accessed from under the car on the drivers side, just up from the rear wheel.
Once those are off (and various wires are unhooked) the shroud will lift and can be weasled to the back of the engine. A camera can be shoved under the shroud and a couple of pics will show the diverter and the wires/etc.
Attached thumbnail(s)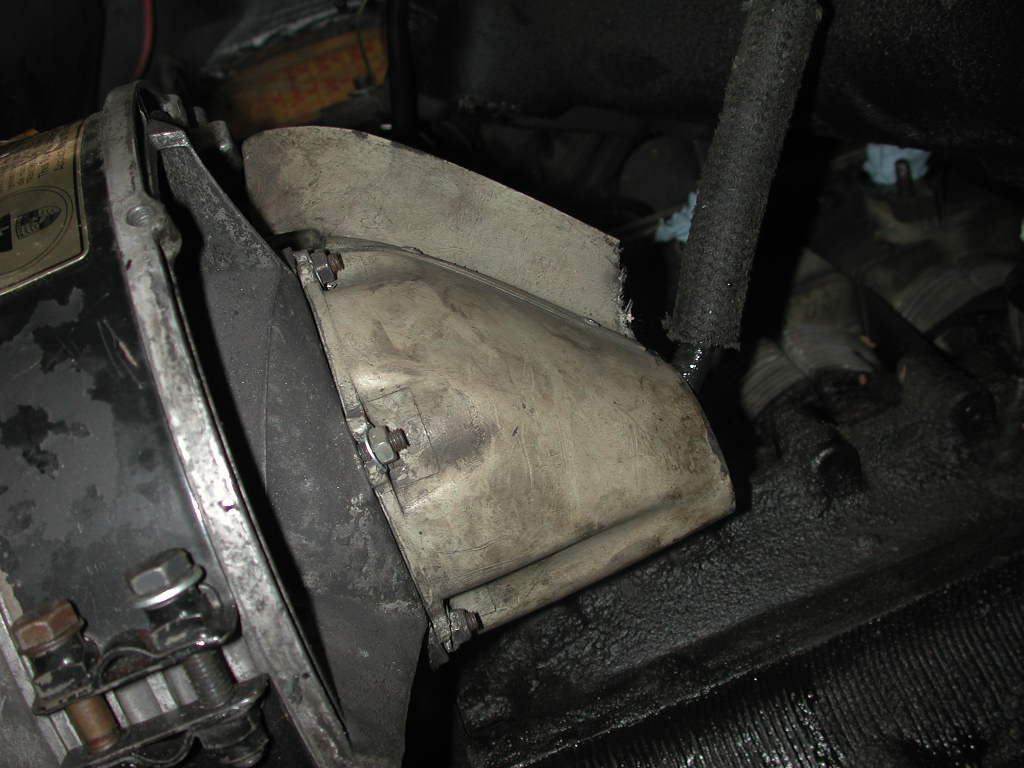
Posted by: krk Jan 11 2004, 02:33 PM
another angle.
Attached thumbnail(s)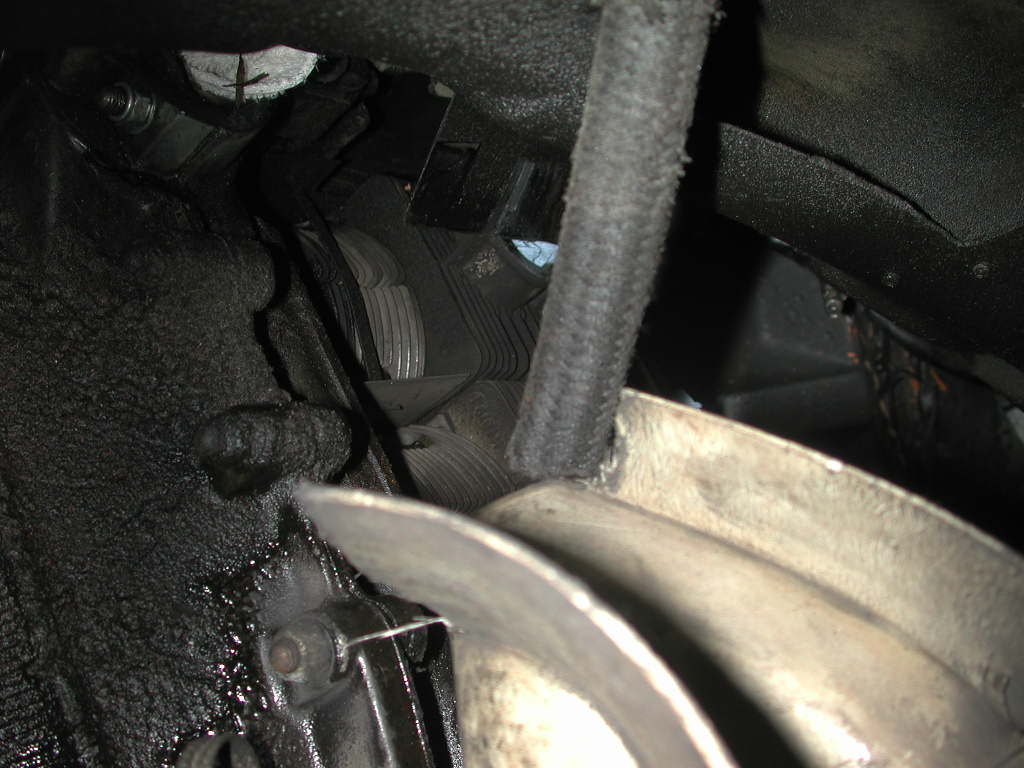
Posted by: krk Jan 11 2004, 02:35 PM
Now, after disconnecting the fan belt, and unbolting the retaining straps, the unit is movable, and you can see the nuts you have to remove to get at the back of the alternator.
Attached thumbnail(s)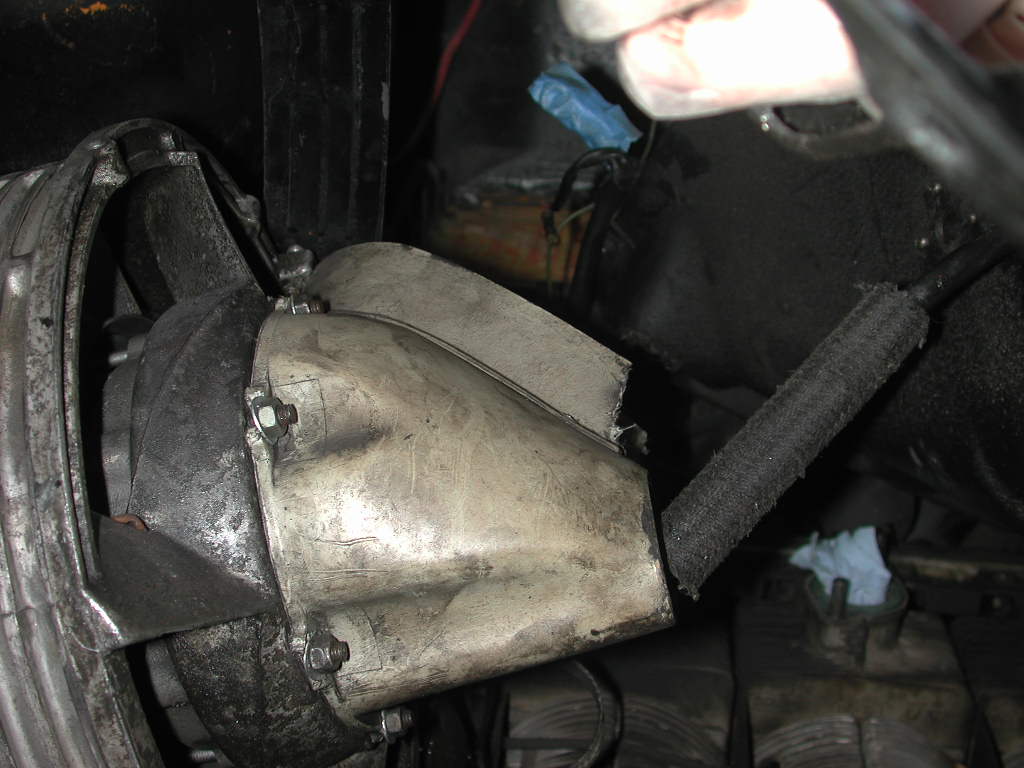
Posted by: krk Jan 11 2004, 02:37 PM
Remove the nuts, and slide the diverter gadget back along the wires, revealing the back of the alternator.
Attached thumbnail(s)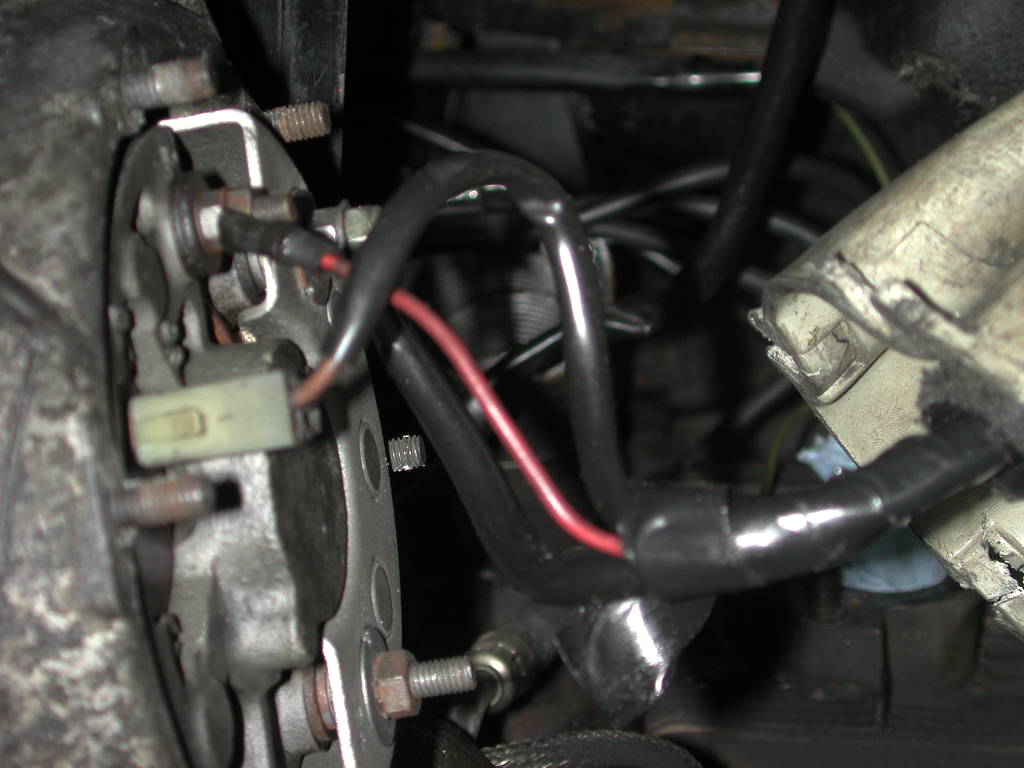
Posted by: krk Jan 11 2004, 02:38 PM
And voila! The alternator, she is out!
Attached thumbnail(s)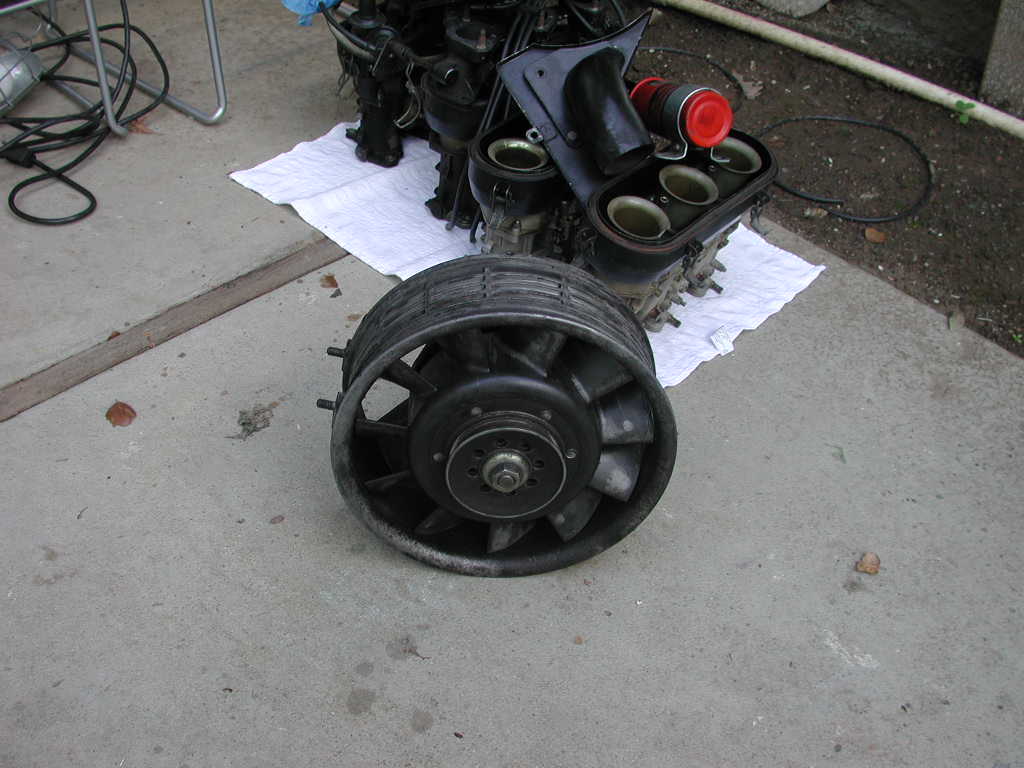
Posted by: krk Jan 11 2004, 02:39 PM
And it's serial number.
(mike I've other pics from other angles -- these show most thing tho -- if you want more, let me know)
kim.
Attached thumbnail(s)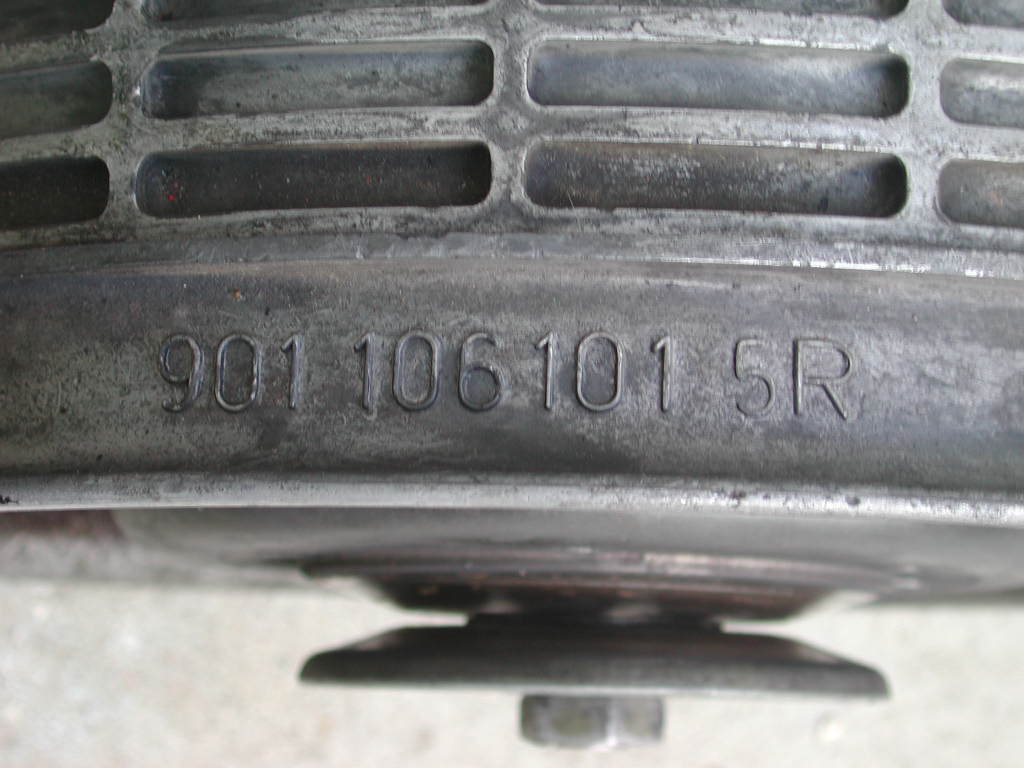
Posted by: Gint Jan 11 2004, 02:42 PM

That will do nicely KiM, thanks. now that you've showed me yours, I'll show you mine when I tear it apart to seal the motor after the car goes to the shop.
Posted by: ! Jan 11 2004, 02:48 PM
Just a thought.....would it be easier for future jobs to put a wiring disconnect where the harness goes thru the cowling? Of course your will never use it per Murphy's Law, but it would help if if ever needed R&R again.....
BTW....you could prolly sell BOTH sets of Wberes and almost have enuff for a nice purty set of PMOs..... 
Posted by: krk Jan 11 2004, 03:03 PM
That will do nicely KiM, thanks. now that you've showed me yours, I'll show you mine when I tear it apart to seal the motor after the car goes to the shop.
I can't wait to see yours.. hmm... wait a sec... maybe I can
kim.
Posted by: krk Jan 11 2004, 03:09 PM
BTW....you could prolly sell BOTH sets of Wberes and almost have enuff for a nice purty set of PMOs.....
Yeh, I was mumbling about that earier -- as long as the connectors withstand the thrill of being in the engine compartment (which should be doable) -- it would just seem to make
sense to make this section of wiring split-able in the middle. (You could pull the shroud without all this fuss if you wanted to ensure the top of the engine was clean and the air pathways good and so forth. You could also R&R the shroud itself (perhaps install a spanky new carbon fiber one
 )
)Just seems to make sense to me. We'll see.
First I have to sort out this stupid alternator. I'm sure there's a more modern replacement?
Re: PMO's -- they are purty. But if I unload both webers, at least one formerly-running-car has a new issue.....
kim.
Posted by: ArtechnikA Jan 12 2004, 07:40 AM
i nominate this thread for Classic status !!!
Posted by: Gint Jan 12 2004, 08:15 AM
Agreed! I will resize pictures (sometime today, when I get some) and move it.
Posted by: boxstr Jan 12 2004, 10:24 AM
Just got to this thread. Curious, why did you not remove the engine lid cover?
CCLINBTDT
Posted by: krk Jan 12 2004, 11:19 AM
CCLINBTDT
Should have! (did not occur to me until someone else mentioned it -- and I was mostly done) I may yet pop it off for the reassembly steps -- it's funny, the entire procedure was not that bad once you knew what to do. I'm sure next time it would go much more quickly.
We'll see how putting it all back together goes
.kim.
Posted by: krk Jan 24 2004, 06:54 PM
Alrighty then.
First, I have a new alternator. $129 w/core. Old one was burnt out. They swapped the new one into the fan assembly as part of the deal -- took all of 7 minutes and I'm back in business.
So the dangerous part starts now. I figured, hey, as long as I'm in there.... and see if it runs. But I took the fan shroud off completely, mostly to tease Gint, but also to get a look underneath for a visual inspection. I think I've got two or three issues to contend with.
First the shroud itself is cracked -- looks like a PO tried to force it out and fractured the fiberglass. I'll clean it off tonight and see what the repair looks like. (doesn't look all that hard) I'll post pics of that later.
I have two possibly more serious issues to ask about.
The first is what appears to be an oil leak on the top of the engine. The front two bolts on top of the case appear to have reasonably fresh oil on them. (It's not completely fresh, and the engine hasn't run for any length of time in a couple of months, so it's a little hard to say) The pic from the drivers side shows the top two bolts, and on to the case just above the cylinders.
It may be nothing (there was an oil leak on top of the engine a while ago as one of the oil lines was not tight enough) but I got'sta ask.
kim.
Attached thumbnail(s)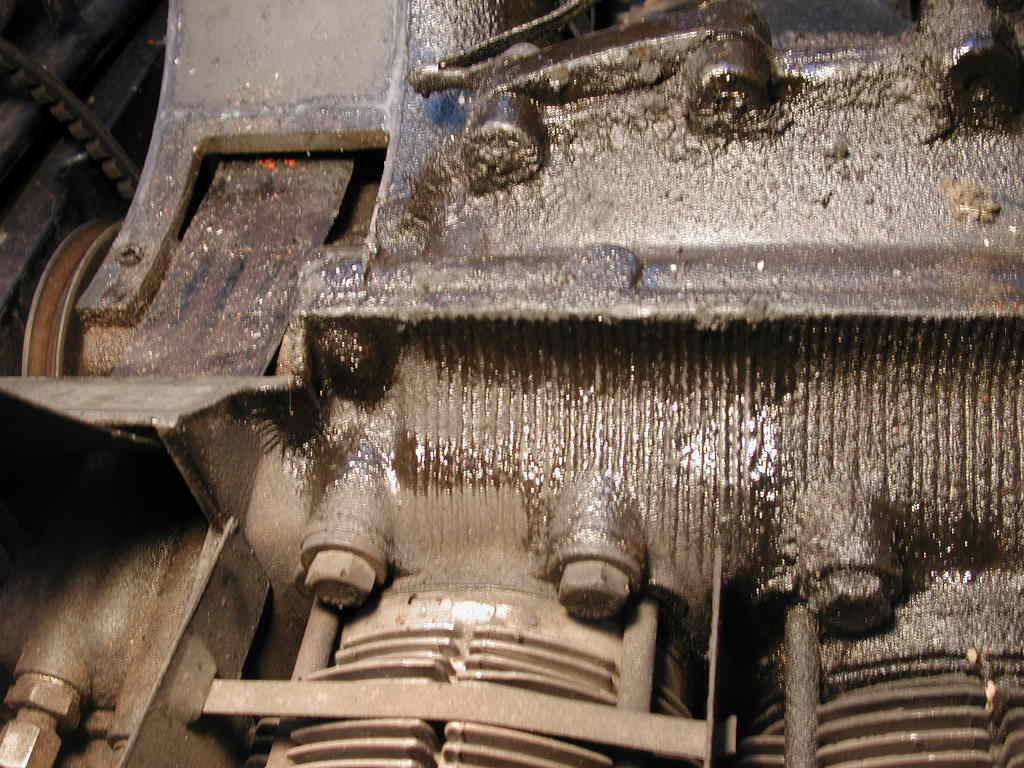
Posted by: krk Jan 24 2004, 06:56 PM
The next thing I can see is that there is crap on the top of the oil cooler. Now, on the morrow, I intend to mess with my shopvac and see what sort of clean up I can affect. But I was wondering if there are other things I could/should be doing to clean this guy out since I can get at the top of him?
kim.
Attached thumbnail(s)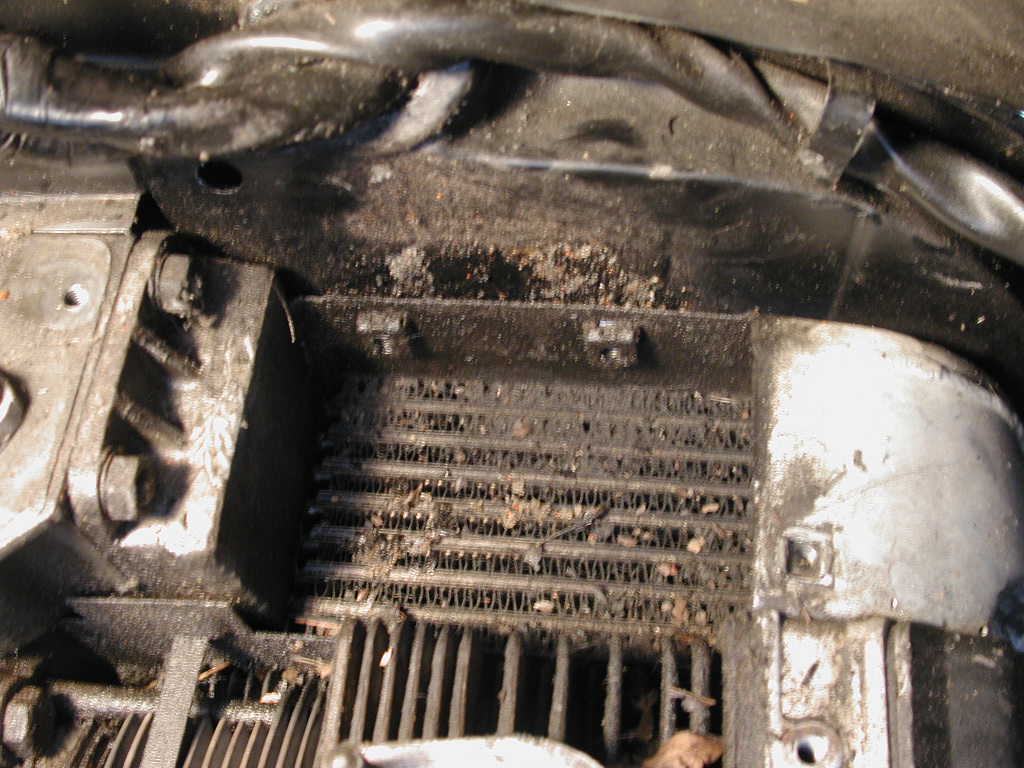
Posted by: Gint Jan 24 2004, 08:12 PM
Nice work Kim. Anybody make 911 engine shrouds?
Oil cooler cleaning - Get a case of brake cleaner and apply it liberally down the cooler.
Posted by: J P Stein Jan 24 2004, 08:20 PM
OK, so what is the question?
It appears that you're not the first one to be rootin' around in there. Your cylinders look to be aluminum
rather than iron.
I would say you have an oil leak(at least one).
The leak at the case split can be fixed only by splitting the case unless you get real lucky. The bolts/nuts may be loose, but tightening them will only slow it down....better than nuthin'. The fan blows any leaks all over creation......like into the oil cooler 
By all means, clean the thing off...best you can.
BTW, I take off the trunk lid for any serious engine room work. By kneeling in the trunk, you can really get after "stuff".
Shop vacs and voliatle fumes are a real bad combo. Use care.
Posted by: seanery Jan 24 2004, 08:48 PM
911 Engine shrouds? AIR makes a CF one.
Posted by: krk Jan 24 2004, 08:50 PM
JP:
great point on the shopvac/fume issue. I'll be mindful.
On your other point (am I the first? doubtful....), I'll have to dig out the docs from the purchase -- we're in a house reno situation and not all paper can be easily found. You ask "my point?" -- you've supplied it. I wouldn't have spotted what you easily did! (i.e. aluminum cylinders)
Gint:
If I fire brake cleaner down the cooler, will it land in a reasonably predictable area under the car? (i.e. we're in my car port -- I'm trying not to hose up the surface under it. It's already marked the tranny area as it's own .... but that's the next project. )
kim.
Posted by: Gint Jan 24 2004, 08:53 PM
Put some plastic under it. Brake cleaner will evaporate, eventually.
Posted by: krk Jan 24 2004, 08:56 PM
Cool. I do wanna clean the top of this puppy off -- just seems sensible to start clean, as they say. Thx.
kim.
Posted by: krk Jan 25 2004, 12:58 AM
Alrighty then. Somewhere in the past, a PO with more grunt than thinking fractured the shroud around the fan area. (I have some sympathy -- before I found all the secret bolts, I was thinking of using mere violence to rip the sucker out)
Anywho, I've added some 'glass to repair the shroud. (hm... it's prolly a halloween feeling, but the word "shroud" seems to remind me of things like "the shroud of turin" and so forth -- it must be git'n late!) In the morning, we'll tune up the repairs from a cosmetic point of view.
It also gave me a chance to wash up other bits before they go back on. JP is right -- any stray oil (or anything else for that matter) is nicely routed down the a channel in the shroud directly into the oil cooler. The channel in the shroud had a reasonable layer of crap in it -- not enough to choke air -- but enough that a cleaning was in order.
So tomorrow, with some luck, and after I take care of some "honey do's" (a new cabinet needs to be picked up, which means I need a truck, which means... well you get the idea), the next piece of work will be to clean off the top of the engine, and reinstall everything.
kim.
Posted by: Gint Jan 25 2004, 01:03 AM
I know I don't have to ask for pics of the "clean" upper side before shroud re-install?
Posted by: krk Jan 25 2004, 01:22 AM
Damn, Gint, I was gonna cheat a bit -- pics will make me actually clean all that crap up!
But yeh, I'll shoot the reassembly process. (mostly cause I can't remember how it all goes back together -- this way I get to ask questions )
kim.
Posted by: krk Feb 9 2004, 08:42 PM
Reassembly has begun. The alternator is seated, and the diffuser (or whatever it's called) attached, including the ground strap (Thanks Carl!!!! I couldn't remember where it went, and none of the photos had it -- and talking with him reminded me where it went)
So I have the shroud and it's bits (the two "other" pieces") tacked in to place. But I have a couple of parts that I have no recollection of where they go, and in scoping around, couldn't see any possiblities. I normally group parts and bag them -- but this time I did not label them (shame on me) so I have a pic of three parts that I just don't know where they belong. And I don't wanna tighten things down without knowing they don't somehow go "underneath".
Here's the pic. Any help appreciated as always!
kim.
Attached thumbnail(s)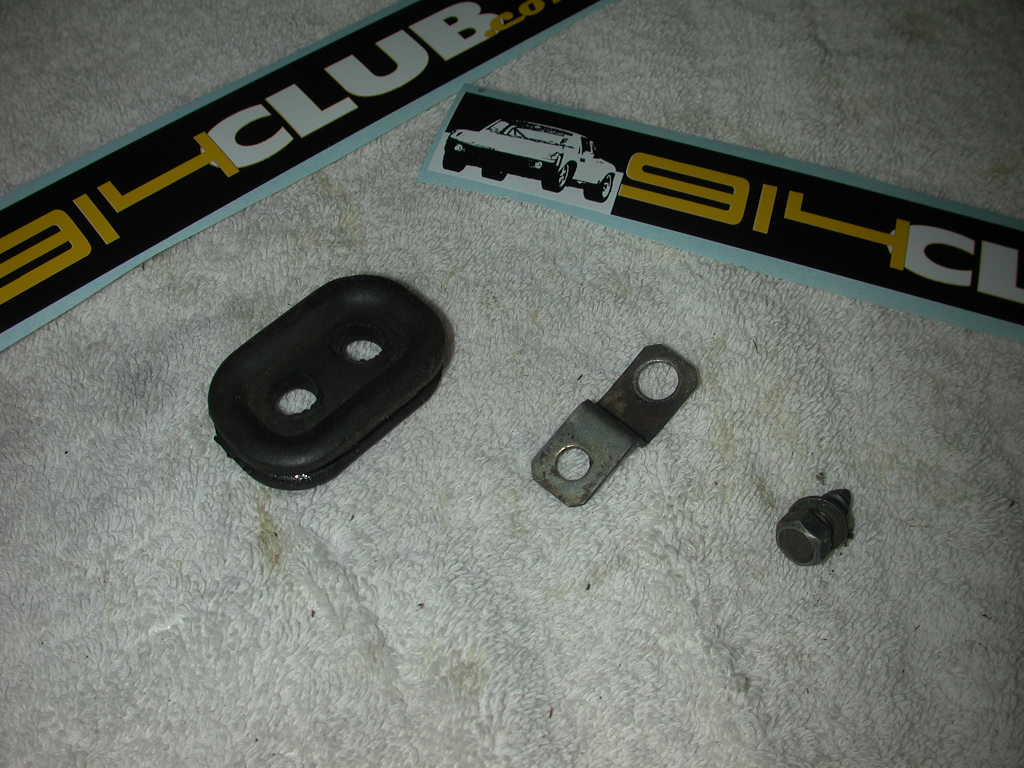
Posted by: ArtechnikA Feb 9 2004, 08:48 PM
the sheet metal capscrew i can't help you with, but it probably is used to attach the Z bracket to the fan housing, where it would have been used to hold a plug wire separator. the square grommet sits in a center manifold hole and is used as a plugwire separator.
Posted by: krk Feb 9 2004, 08:53 PM
Rich,
Thx muchly. That makes perfect sense. (the other bits will no doubt find homes in a similar area -- I package neighbors together)
kim.
Posted by: Gint Feb 9 2004, 10:09 PM
Rich is absolutely correct on all counts.
Posted by: krk Feb 9 2004, 10:54 PM
Ok, putting in screws from the sides are clearly the ugly ones. There is one under the dizzy that is just blind, and the surface isn't a level fit. I've no idea how I hit that one. But there are two on the back of the oil cooler that tonight I can't even find. (If the damn shroud went "outside" em and hide 'em, I'll whack something.) Ah well -- too late and too dark. Tomorrow we'll see what I've screwed up this time.
I love this.
kim.
Posted by: Brad Roberts Feb 10 2004, 12:03 AM
Dont ever buy the Carbon Fiber shrouds. We spent a solid 8 hours drilling/cutting to make the damn thing fit. They come with NO holes in them for fasteners or INTAKE manifolds.
Good job Kim. Looks like you are well on your way.
B
Posted by: krk Feb 10 2004, 09:45 AM
I noticed you had a carbon fiber one on one of the cars -- meant to ask you about that. Mind you, I was a lot more enthusiastic about the idea before I started this bit of silliness -- I'll be reluctant to remove it anytime soon (and certainly not for one with that much work to fit)!
It's getting light outside -- can I start again now? (actually not -- it got below 40F here last night so "it's cold out there campers!")
kim.
Posted by: krk Feb 10 2004, 06:29 PM
So I took a couple of hours of this afternoon -- weather is just too darn nice to let go. Finding and installing all of the shroud screws was a bit of fun. Had 4 left over at one point. Then down to 1. Got them all in finally and tightened it down.
Intake manifolds went on easy, as well as other bits of things (some trippy throttle manipulator that's likely a smog device of some kind -- vacuum line, plus two wires.)
I'm hooking up the last bits of electrical and I find I didn't shoot a pic of the coil wiring. In particular, there is a brown wire on the negative side of the coil that has to go somewhere. Anyone got a clue for me?
(after that, it's on to carbs/linkage/etc)
kim.
Posted by: krk Feb 10 2004, 07:12 PM
I'm hooking up the last bits of electrical and I find I didn't shoot a pic of the coil wiring. In particular, there is a brown wire on the negative side of the coil that has to go somewhere. Anyone got a clue for me?
It goes back to the post on the alternator fan housing.
kim.
Posted by: Gint Feb 10 2004, 08:53 PM
You got it. It's a ground wire.
Posted by: krk Feb 10 2004, 09:20 PM
So at the end of a long day, there's good news and bad.
The good news. Got everything reassembled, and with a fully charged battery, the machine came back to life. (to me this was a minor miracle -- I haven't done this much reassembly in some time...) The wiring seems correct.
And it runs. (Gint, brake cleaner on exhaust stinks -- but it did work really well -- I'll post pics later)
And it now has an exhaust leak it's never had before. (how can a sitting car on its sorry butt acquire an exhaust leak? too much effort to smile in the morning as I rust? must be spite)
One of the carbs leaks at the accelerator pump. I guessedI would have to revisit the miserable suckers, so that wasn't that much of a surprise. I have complete carb kits, but I wanted to find out if the charging problem was solved, and I wanted to see how the jetting worked before ripping them to bits. Most of this was trial anyway -- tho I really don't wanna take that frik'n schroud off again.
But here's the real ugly part -- the original problem continues to exist. The alternator light does not come off at any rpm. I suppose I could have something wrong that blew up a perfectly good alternator -- clues welcomed! -- but other than that, it seems the problem may be elsewhere.
I'll look at it again in the morning.
But thanks  for all your help! There's no way I'd have got this far flying solo.
kim.
Posted by: Gint Feb 10 2004, 10:09 PM
Ouch. 
Posted by: Gint Feb 10 2004, 10:11 PM
What exactly was the original problem? Other than the light being on?
Posted by: krk Feb 10 2004, 11:31 PM
Alternator light never goes off. At any rpm.
kim.
Posted by: krk Feb 10 2004, 11:34 PM
That was 2 degrees too glib. Grotty bits are detailed here:
http://www.914world.com/bbs2/index.php?act=ST&f=2&t=8123&hl=voltage+regulator
kim.
Posted by: Gint Feb 11 2004, 07:24 AM
"glibass" Thanks for the refresher link.
Now I remember (he says after reading the full description - again). Sorry I'm not an automotive electrical genius. Have you asked your alternator vendor (Auto Lectrics, Campbell) about your symptoms? They're in the business apparently; they might have some valuable insight.
I did pull a Bosch reman alternator out of my step-son's Cherokeee last night though (from underneath the car). Not quite as much fun as your job was, but it wasn't pretty either either.
Posted by: ArtechnikA Feb 11 2004, 07:41 AM
rust never sleeps...
Posted by: krk Feb 11 2004, 09:13 AM
rust never sleeps...
Heh. It's funny. Apparently rust (and this car) are active i my dream state too. I woke up minutes ago thinking "you don't suppose that the brake cleaner that I put down the oil cleaner could have leached over to the end of the exhaust manifold and munched part of a gasket or something?"
Wadda ya think? Should I just go back to bed now?
kim.
Posted by: Eric_Shea Feb 11 2004, 09:26 AM
Blown diods (sic) from misc. reverse current?
You coming tonight?
Posted by: krk Feb 11 2004, 09:31 AM
You coming tonight?
Possible -- I'm thinking that I should check the fan belt once it warms up a bit outside. If it's not on right (or at all) or too loose, it ain't gonna turn the alternator up to speed. (I should have thought of that last night -- could have checked then)
re: tonight -- don't know. Right now, i don't have a car/ride to get there.
kim.
Posted by: Eric_Shea Feb 11 2004, 09:35 AM
How far from the San Mateo Marriott?
Posted by: krk Feb 11 2004, 09:40 AM
How far from the San Mateo Marriott?
In traffic, prolly 45 min give or take. But it's due south, directly away from The City™ which is probably an hour + back in traffic.
kim.
Posted by: krk Feb 11 2004, 01:18 PM
You coming tonight?
Possible -- I'm thinking that I should check the fan belt once it warms up a bit outside. If it's not on right (or at all) or too loose, it ain't gonna turn the alternator up to speed. (I should have thought of that last night -- could have checked then)
Some good news. I hosed the install of the fan belt. With the fan belt in and at appropriate tension, the alternator works fine, and the charging light behaves appropriately!
So the car starts and runs. The passenger side carb leaks gas like a good friend of an oil producing nation -- it's more than the little drips around the accelerator pump cover. I expected to redo them anyway -- I was mostly interested in seeing if the initial jetting/etc would at least work for a while. I'll work on buttoning them up next.
The car sounds good. I've not even played with the synchrometer/etc at all, so I'm sure things are out of balance, but even then, it sounds way better than before.
On the exhaust leak, I'm not sure. I'd forgotten all the interesting noises that webers make on a running car. heh. The noise sounds like a leak, but it is not there on start up -- only after the car warms up a bit.
kim.
Posted by: Gint Feb 11 2004, 10:21 PM
Nice work Kim.
I can't wait to hear that in my own garage.
Posted by: krk Feb 11 2004, 10:49 PM
You want my car? After all this high quality mechanical attention? [I'm thinking we should have fed you the beer ]
kim.
Posted by: Gint Feb 11 2004, 10:53 PM
I've finally learned my lesson (Ha!). One is plenty, thanks.
Posted by: krk Mar 16 2004, 08:57 PM
And you thought this thread was dead. Shame on you. No "fixing a 914 thread" is ever really dead. Not 'till the great red one silences the beast.
So, I have two missions tonight, based on a camera card that is getting full and a list of things that need to be updated. A couple of final pics on this thread is one of them.
The /6 runs pretty well now. That's credit to David Modderman (of Modderman Porsche Service in Mountainview) who got this puppy when I ran out of time. He retuned the carbs and the car runs pretty well. (I'm driving it daily, and the roof has been in the trunk for a week now since I got it back -- gotta love CA!) Accelerator sticks a bit (I have some worn parts to replace) and there are engine oil leaks I have to look at. C'est la vie.
But I do have some final pics of cleaning the oil cooler with Brake Cleaner. This was suggested by Gint earlier -- my wrench said "be really careful -- it's very flamable and if the exhaust is hot you will not enjoy the experience!" I mentioned earlier that the brake cleaner may have messed with the exhaust -- I was totally wrong.
So here are the pics (before/after) of the oil cleaning exercise in one place.
First the before. For those new to this part, the /6 has a channel to funnel air from the fan into the top of the oil cooler. On an 914, it is visible on the top of the shroud from the fan, back to the rear of the engine on the driver's side. Oil leaks, or any other crap entering the fan, are well funnelled to the top of the cooler.
Before Pic.
Attached thumbnail(s)
Posted by: krk Mar 16 2004, 08:58 PM
Nother before.
Attached thumbnail(s)
Posted by: krk Mar 16 2004, 09:02 PM
My cleaning approach: First I used a shop vac with an appropriate attachment to clean off as much debris from the top that I could. Next step is to spray cans of brake cleaner down until you are bored. I used a turkey pan to catch the drippings. It will drain over the exhaust on the drivers side.
I used up 2 large cans of brake cleaner. It's not obvious when you should stop. I quit when it didn't seem to be draining anything with particles in it. But it's very subjective.
Posted by: krk Mar 16 2004, 09:03 PM
Oops. The Pic!!!!!!!
Attached thumbnail(s)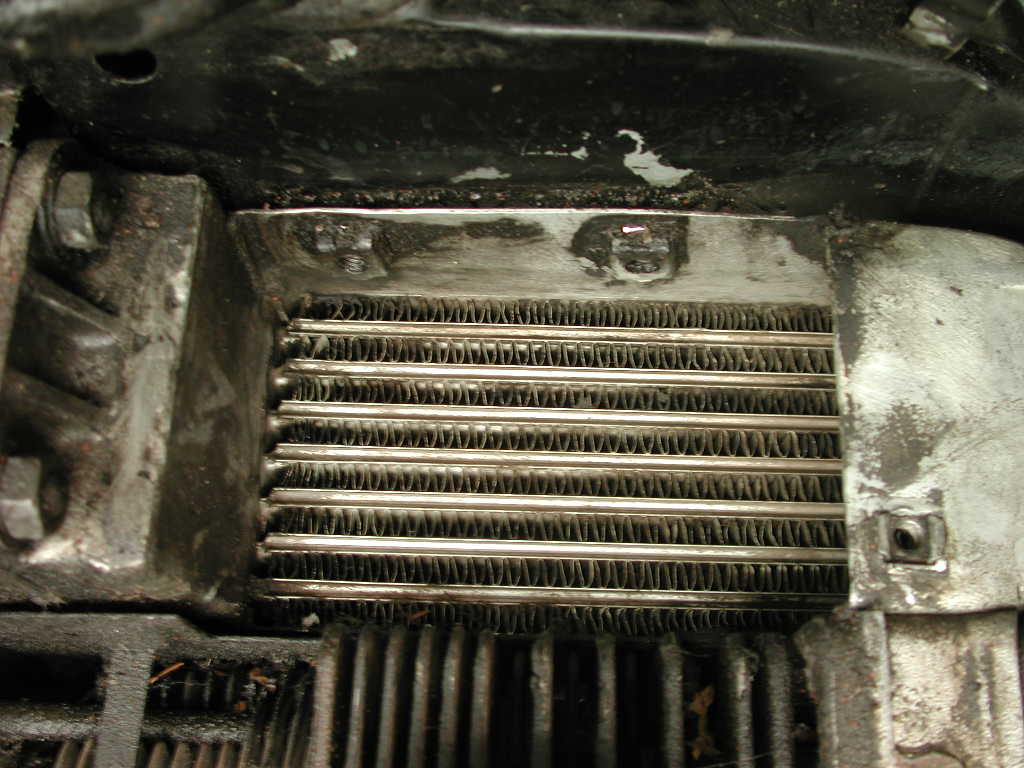
Posted by: krk Mar 16 2004, 09:05 PM
And finally, for the really perverse -- you need to see what drained out.
Here is the turkey pan.
I know -- nothing stirs the soul like someone cleaning old crap out of something. What a great way to end a thread!
love, kim.
Attached thumbnail(s)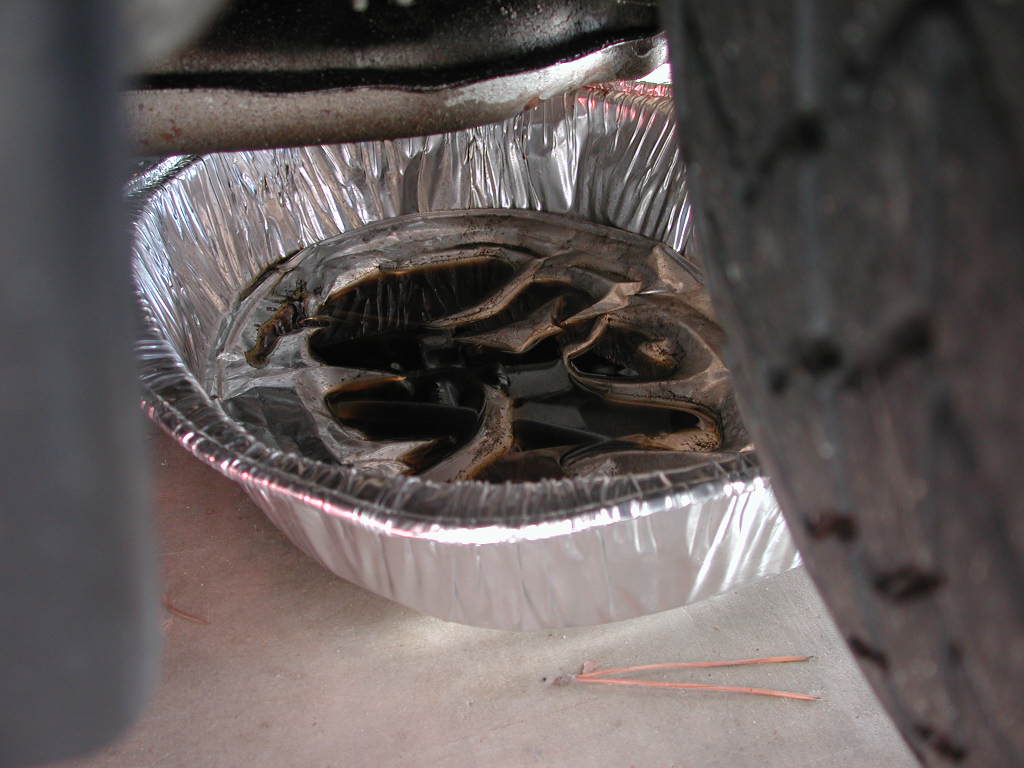
Posted by: Carl Mar 16 2004, 11:35 PM
Well, THAT gives a whole new meaning to basting the Butterball.
Are you gonna save that for Thanksgiving with the in-laws?
That "before" photo looks like the cholesterol buildup after a lifetime of Big Macs.
Good job getting the job done.
C
Posted by: krk Mar 17 2004, 12:07 AM
Carl,
I'm not sure it's safe to pick on hamburgers on this board. You know how politically correct we are.
But there is no doubt that the car runs cooler. Even after only a week of being back in service, the temp gauge tells the story. Gum up your cooler and you will pay. I had no idea of course, so I was looking into under car flaps (prolly will still install them) and so forth, but if your cooler is plugged up, none of that will matter.
kim.
Posted by: Gint Mar 17 2004, 12:09 AM
It looks great... now. Nice work Kim. I'll be tearing into my leaks and grime in a month or so.
Posted by: krk Mar 17 2004, 12:12 AM
I have one last pic. There are old webers and new webers. The carb on the left is an old one, and the newer on is on the right. The tell-tale is the quality of surfacing that is done on the outside casting. Inside these carbs look pretty much the same. They got chinzy over time and the outer casting was left rougher.
Attached thumbnail(s)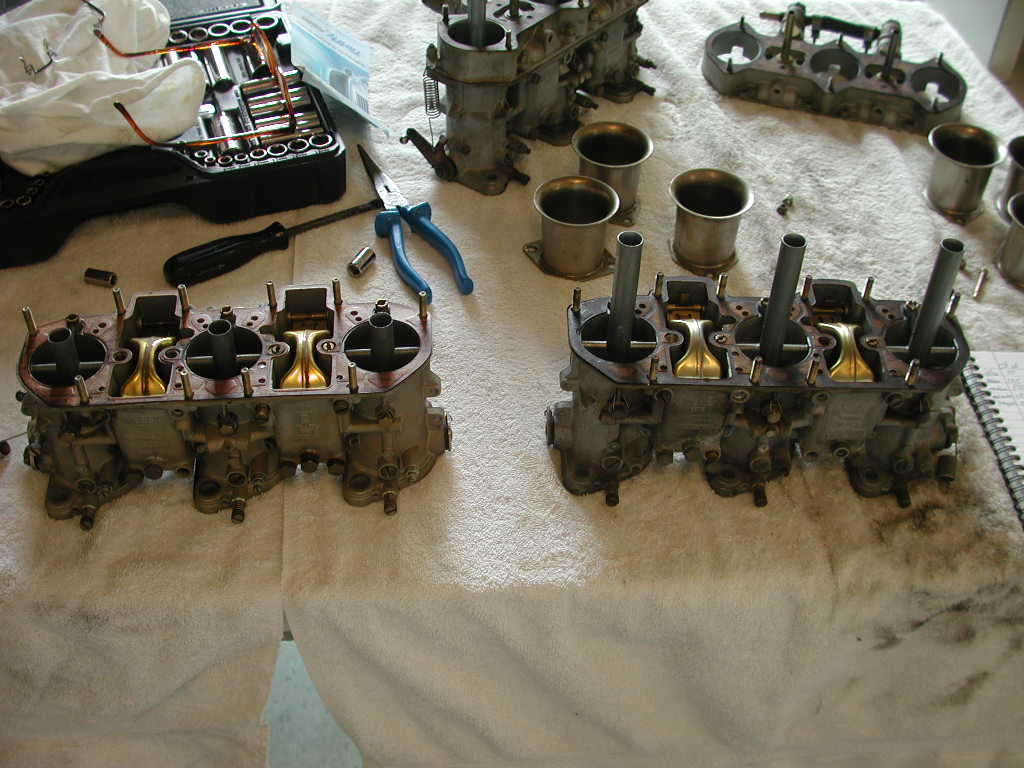
Posted by: krk Mar 17 2004, 12:14 AM
I'm not sure I envy you or not
It's certainly *way* easier if the engine is out of the car, so I suspect you're way ahead of the game!
kim.
Posted by: Al Meredith Jan 15 2008, 08:54 PM
Since I have a 914-6 that I am restoring now, It would be cheaper in the long run to install a rebuilt / new alternator at rebuild than to have to change one later. NEXT THOUGHT ! How about for a "quick disconnect" of the wires using a Trailor Plug. The kind with the large contacts for trailer braking since the main hot wire goes throught there.
Posted by: Gint Jan 15 2008, 09:21 PM
The time has come to move this thread to the Lapuwali Classic Thread Forum.
Powered by Invision Power Board (http://www.invisionboard.com)
© Invision Power Services (http://www.invisionpower.com)