Printable Version of Topic
Click here to view this topic in its original format
914World.com _ 914World Garage _ Peter's Progress
Posted by: pjf Mar 21 2008, 07:37 PM
Hi All. I've been around for awhile and even made a few posts but I finally got around to starting this restoration thread. My only claim to fame I would say is I was the guy who loaned Willam Harris some beat up steel wheels to finish his paint job. Still don't know why he returned them in favor of his pristine Fuchs.... Anyway, more years back than I'd care to admit I got the idea to restore a 914 and convert it to electric. I've worked on cars on an off and even graduated from the Somerville High Adult Ed Welding Night Course so I figured I'd go for it. A fairly ignorant Ebay winning bid later and I found myself the owner of a 76 from Texas. When the owner said that the right side door had a "latch problem" and the door wouldn't open I figured simple door repair, right? This was before discovering 914World and all the great information here. Things like don't buy 914s that have doors that don't open and don’t get POR-15 on your hootus. The thread by Michelko particularly inspired me to tackle the right side long. You guys are great and I want to thank everyone for their very helpful posts. (I got a “rebate” from the seller by the way).
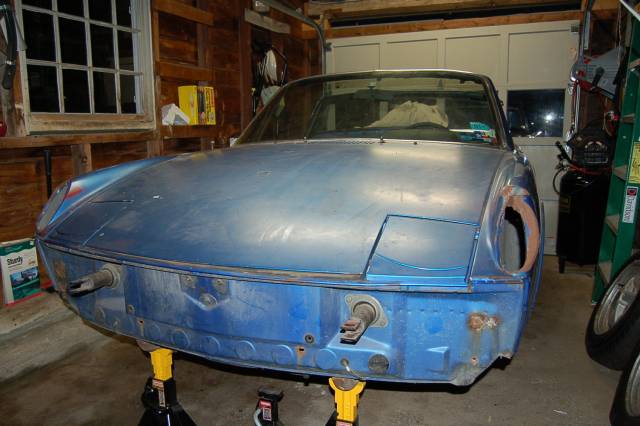
Anyway here’s the car stripped down. As you can see space is no problem.
Posted by: pjf Mar 21 2008, 07:52 PM
Posted by: pjf Mar 21 2008, 08:02 PM
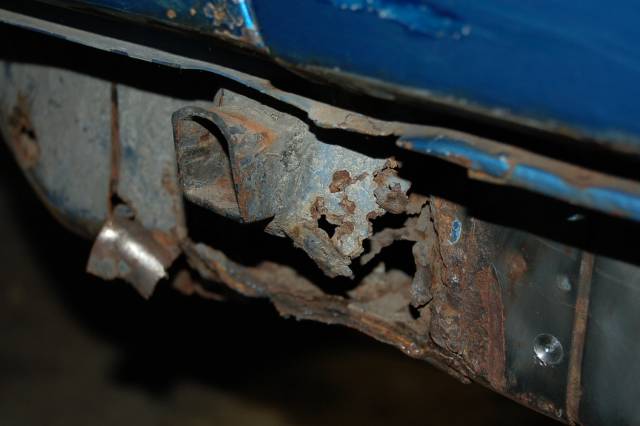
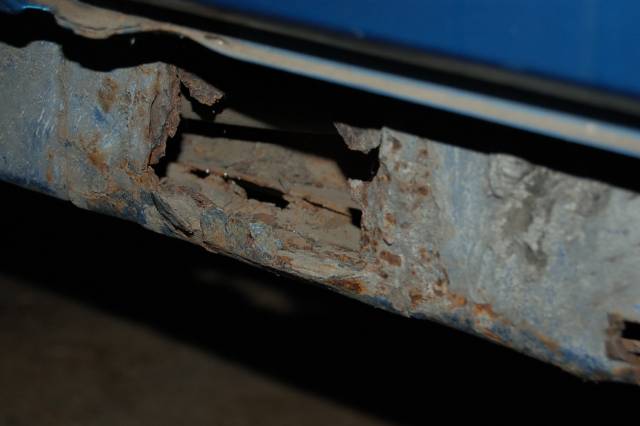
Here's the worst first. The right side long is in tough shape. I have pictures of it opened up so you can see the extent of the rust. As far as I can tell, a leaky rear window caused a lot of the damage here and in other areas. The good new is that the hell hole isn't that bad.
Posted by: pjf Mar 21 2008, 08:04 PM
Posted by: pjf Mar 21 2008, 08:07 PM
The left side long. The jackpost is gone but this side is actually in better shape than the right believe it or not.
Posted by: pjf Mar 21 2008, 08:08 PM
Posted by: pjf Mar 21 2008, 08:12 PM
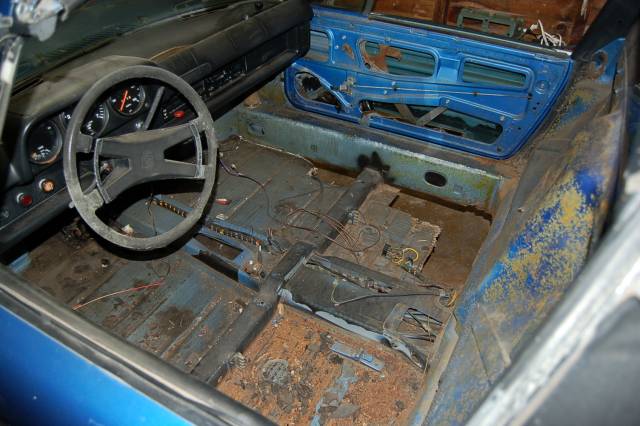
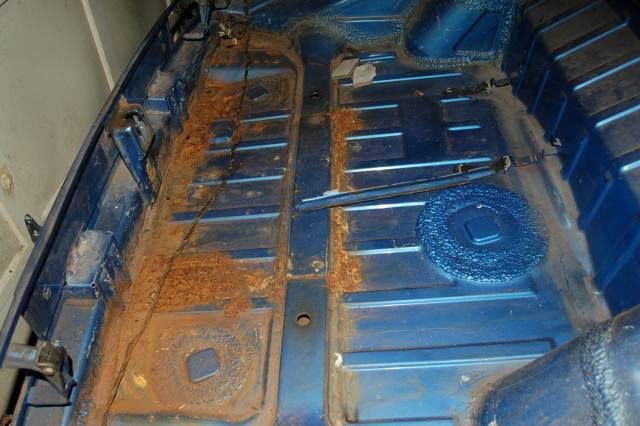
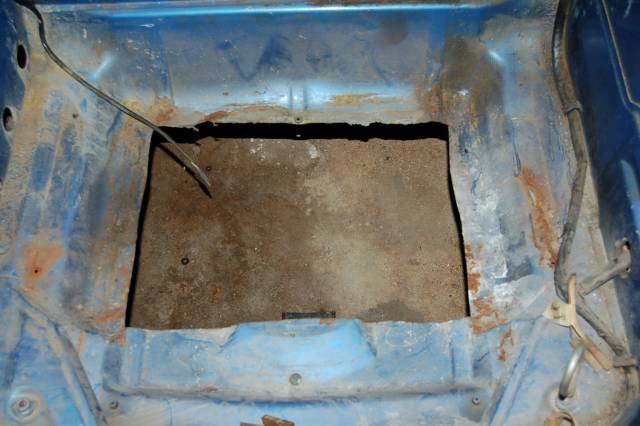
The floor looked great until the tar came up and then you could see the damage from the pooling of the water from the leaky rear window. The bottom edge of the longs and rear firewall are in pretty good shape considering.
Posted by: pjf Mar 21 2008, 08:13 PM
Posted by: pjf Mar 21 2008, 08:16 PM
The hell hole has surface rust as you can see and there is some patching to do in the corner at the rear firewall but some decent metal here.
Posted by: pjf Mar 21 2008, 08:18 PM
Posted by: pjf Mar 21 2008, 08:19 PM
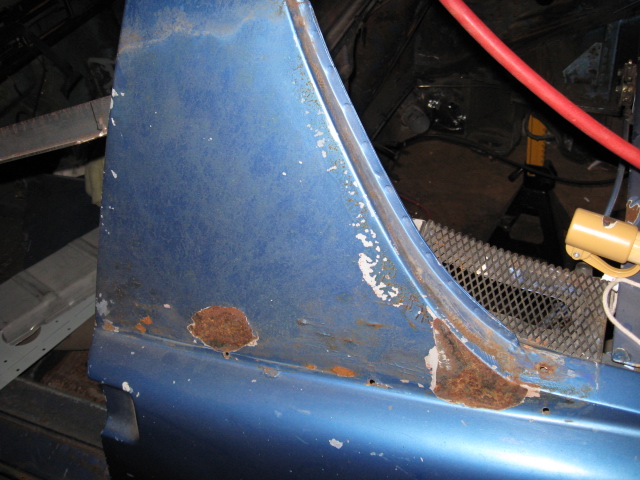
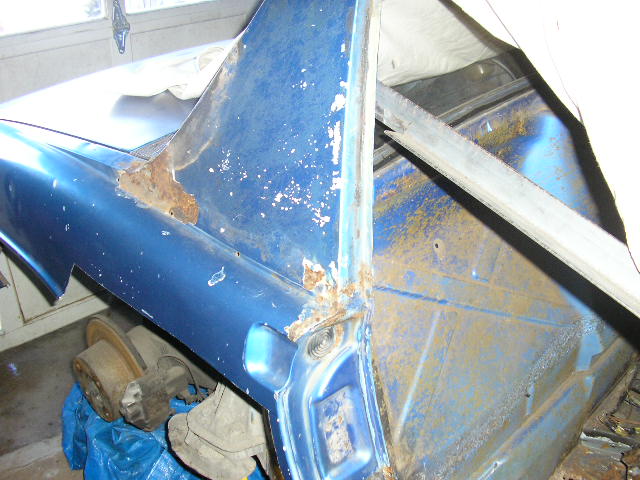
Sail panels need work as you can see.
Posted by: pjf Mar 21 2008, 08:21 PM
Posted by: pjf Mar 21 2008, 08:22 PM
Posted by: pjf Mar 21 2008, 08:26 PM
Last but not least are the trunks. The usual rusty rear and a decent hole in the front to fill.
Posted by: pjf Mar 21 2008, 08:28 PM
Posted by: pjf Mar 21 2008, 08:30 PM
Posted by: pjf Mar 21 2008, 08:34 PM
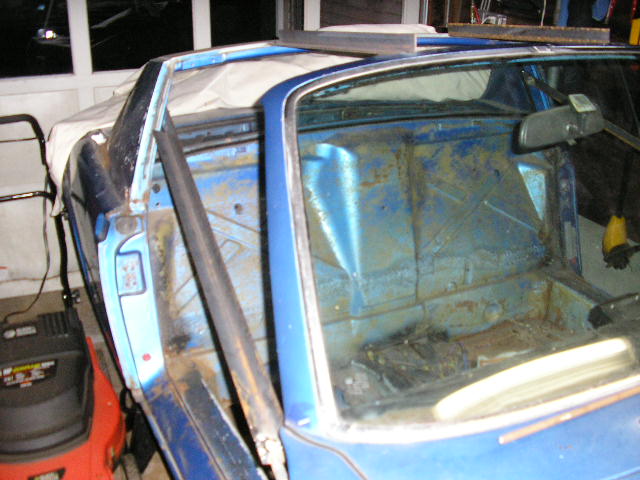
Before tearing into the longs I welded up some door braces and put two pieces bridging the windsheld and rear rollbar. Before doing this I was able to open up the right side door spacing a bit with jacks. The left was OK.
Posted by: pjf Mar 21 2008, 08:35 PM
Posted by: Van Mar 21 2008, 08:59 PM
Great idea to put those door hinge-to-seat belt braces in!
Posted by: pjf Mar 21 2008, 09:25 PM
Thanks. Hopefully, the bracing will hold thing in position. I cut a metal rod that fits between two marked points so I can check the door opening. So far so good. The right side long was the first thing I worked on and its just about done. Tommorrow I'll try to post up to where I currently am with it.
Posted by: 1970 Neun vierzehn Mar 21 2008, 09:57 PM
Hooray, another one being saved 
You know, of course, there will be lots of this ![popcorn[1].gif](style_emoticons/default/popcorn[1].gif) going on now.
going on now.
Keep the faith and the pics coming.
Paul
Posted by: pjf Mar 22 2008, 05:48 PM
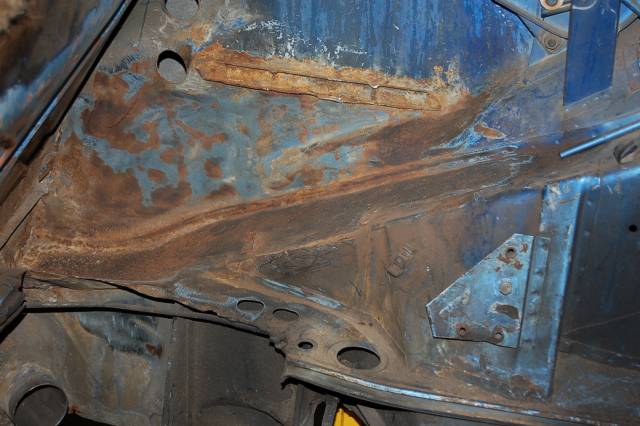
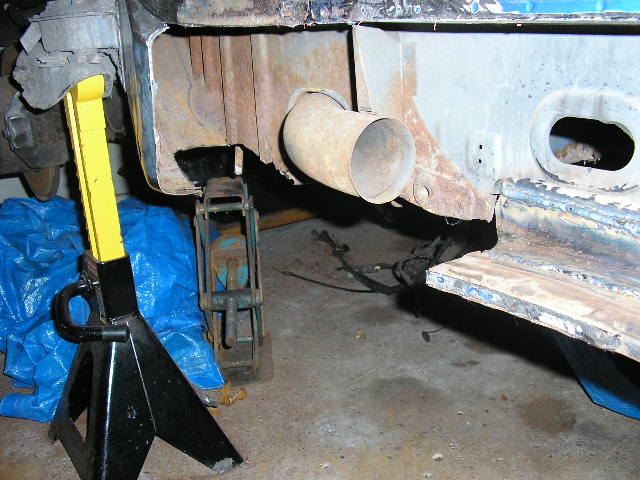
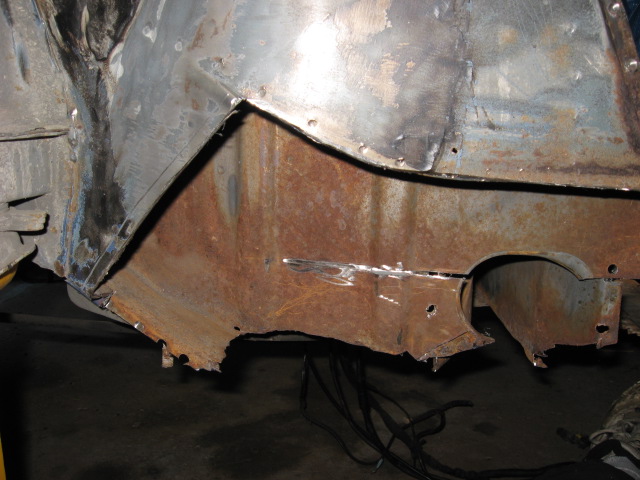
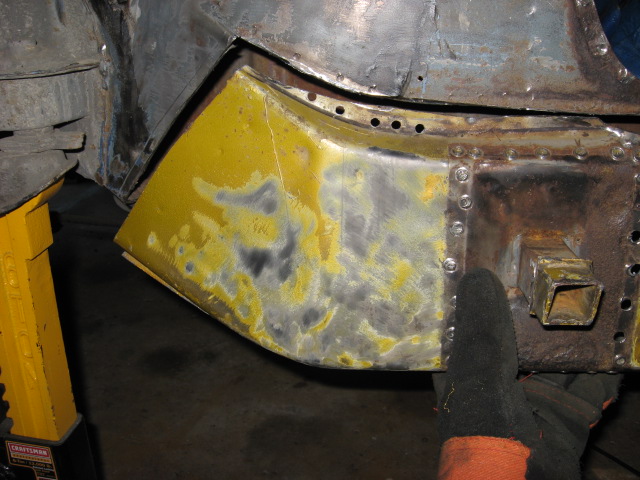
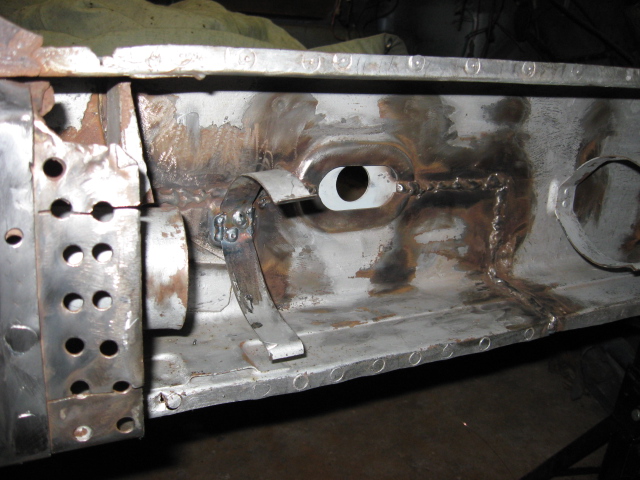
Here's a shot that gives you an idea of how much I had to cut away to get to good metal on the right side long. The jackpost area is gone as well as part of the inner wheelhouse to its left. A good part of the bottom edge was shot as well. Under the oval cutout on the right you can see that the bottom edge is OK but its the inside wall under the oval cutout that has to be replaced. In the picture is a patch piece I welded in but it distorted the bottom edge and I wasn't happy with the way it came out. I ended up cutting off all off the bottom edge that wasn't attached to original inner wall metal.
Posted by: pjf Mar 22 2008, 05:49 PM
Posted by: pjf Mar 22 2008, 06:03 PM
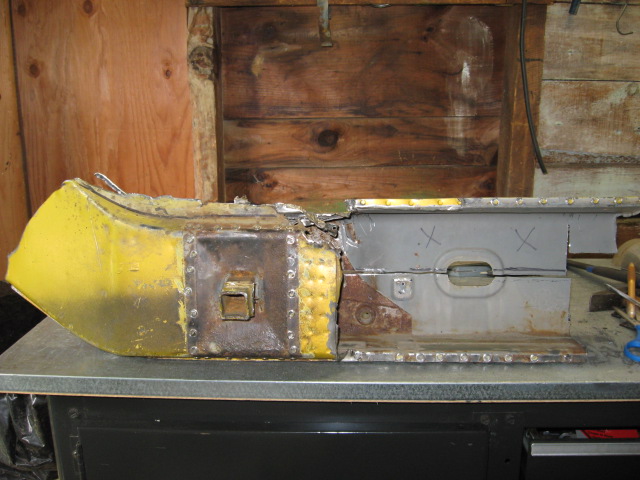
Now what? When I looked at the cost of the inner long piece plus the outer wheelhouse piece I thought they're had to be another way. I didn't need as much metal as both these pieces provided and I wanted all the reinforcing layers of the original. What I really wanted was a rust-free roller from CA but then I thought why not get just the metal from a CA car that I needed? I hadn't seen this done anywhere but I thought if I could graft in the metal from a good long into my crappy one that might work. Just to be sure I'd get an outer long reinforcement overlay from RD and a long stiff kit from Engman. These pieces would essentially sleeve the transplanted piece (and supply the extra stiffness I wanted anyway). Now where to get the piece? This is where Hellsbend came in. I was getting a sail panel replacement piece from him and I asked and he was willing to cut and send me the long piece I needed from a 914 he was cutting up. I'd like to stop and thank Hellsbend here. The piece he sent me really fit in well and for my money made a good repair. THANKS! I literally couldn't have done this without you. The following is the piece he sent me with some cuts I made to get it ready.
Posted by: pjf Mar 22 2008, 06:03 PM
Posted by: pjf Mar 22 2008, 06:08 PM
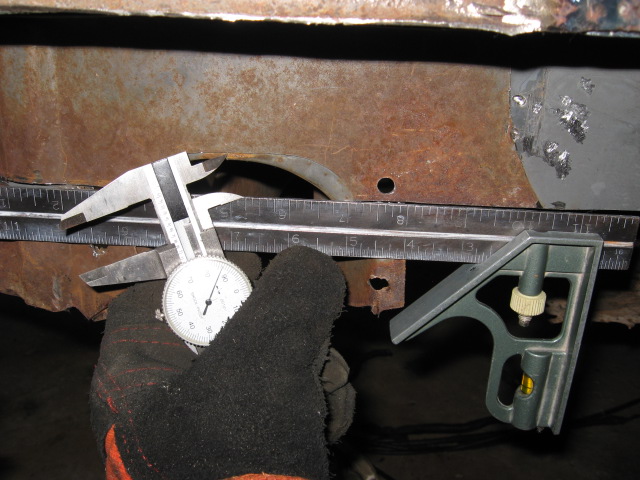
The tricky part of this was cutting the car and Hellbend's piece to match eachother. I used the oval cutout on the inner wall as a reference point and made measurements on the car that I then transferred to the graft piece.
Posted by: pjf Mar 22 2008, 06:09 PM
Posted by: pjf Mar 22 2008, 06:13 PM
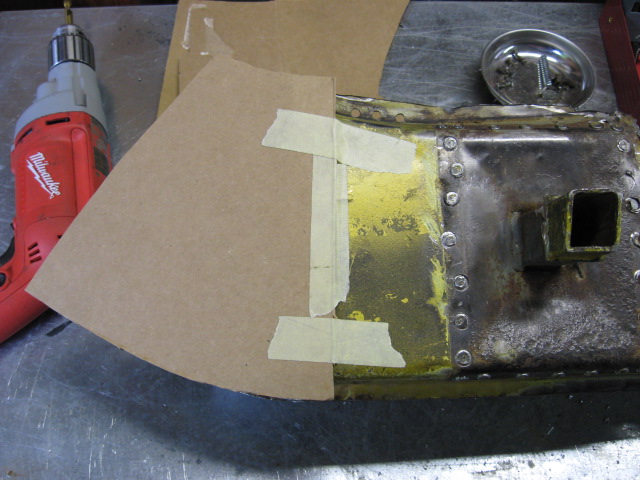
This worked for the right part but for the left inner wheelhouse part I reversed thiings and first traced the outline on the graft piece as you can see here.
Posted by: pjf Mar 22 2008, 06:14 PM
Posted by: pjf Mar 22 2008, 06:47 PM
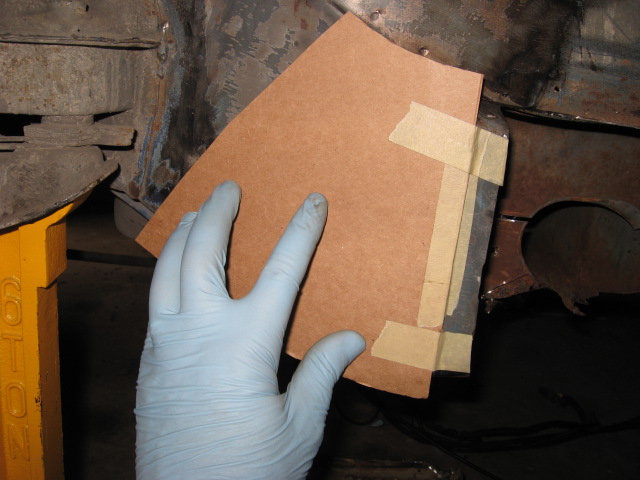
I next transferred the pattern piece to the car and made the cuts.
Posted by: pjf Mar 22 2008, 06:48 PM
Posted by: pjf Mar 22 2008, 06:49 PM
Posted by: pjf Mar 22 2008, 06:50 PM
Posted by: pjf Mar 22 2008, 06:52 PM
Posted by: pjf Mar 22 2008, 06:58 PM
Posted by: pjf Mar 22 2008, 07:12 PM
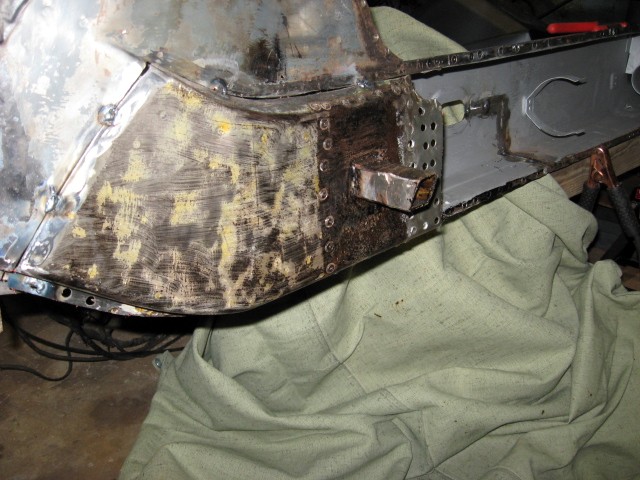
The welds were then completed and the reinforcing plate for the jackpost put in. The hole in the wheehouse (as well as others) were patched later.
Posted by: pjf Mar 22 2008, 07:12 PM
Posted by: pjf Mar 22 2008, 07:14 PM
Posted by: pjf Mar 22 2008, 07:15 PM
Posted by: pjf Mar 22 2008, 07:23 PM
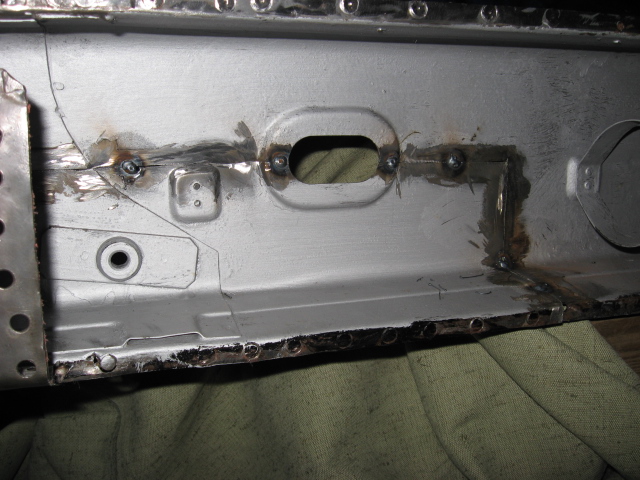
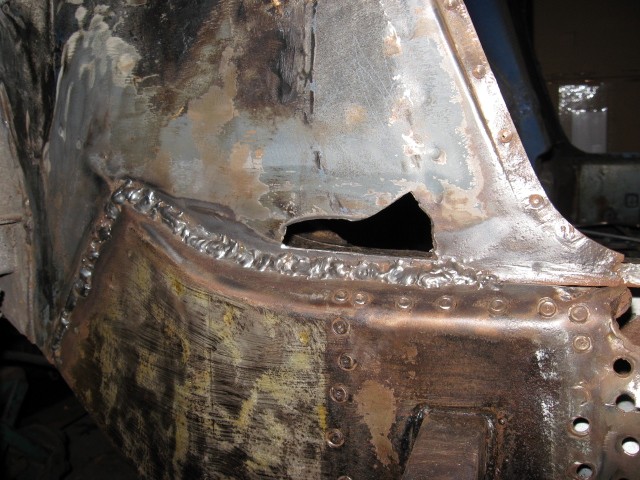
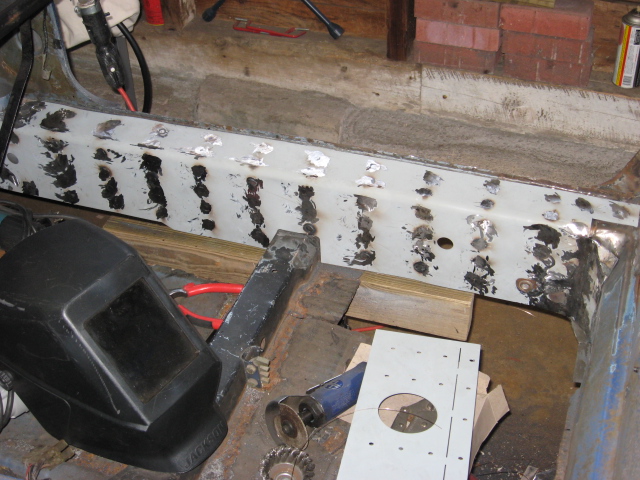
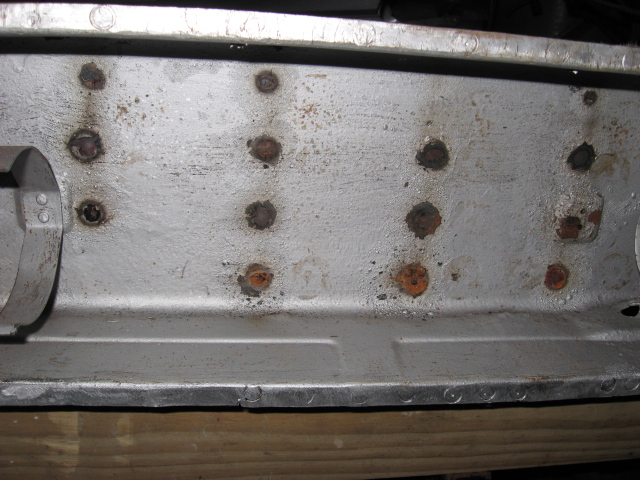
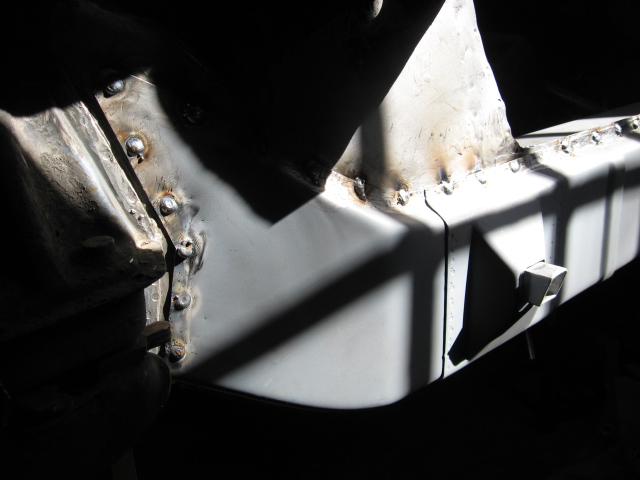
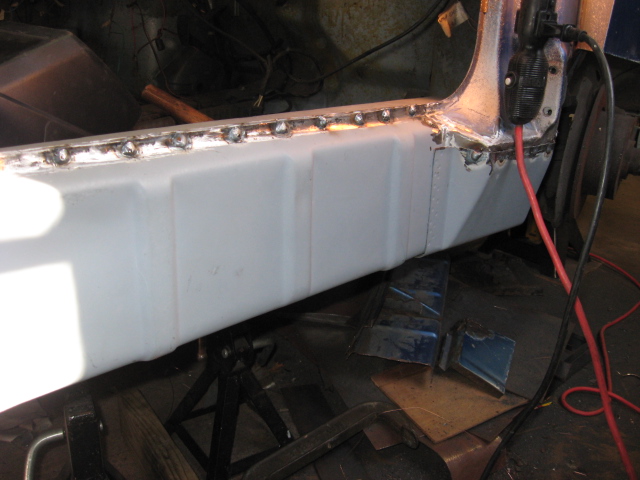
I was all ready to weld in the outer long piece from RD when it occurred to me that if I afterwards welded on the Engman kit, the Engman welds would burn through to the inside of the long and I would have all these bubbled paint rusty spots on the inside of my longs. I couldn't get at them because the outer long piece would be in place. This meant stopping and ordering the Engman kit, welding the right side piece in, and then putting on the outside long piece. In the first picture you can see the Engman piece welded and in the second you can see the spots I got on the other side. The second picture is taken some time after the welding took place so some rust had a chance to form. So AFTER the Engman kit piece was on I put on the RD outer long piece.
Posted by: pjf Mar 22 2008, 07:24 PM
Posted by: pjf Mar 22 2008, 07:25 PM
Posted by: pjf Mar 22 2008, 07:34 PM
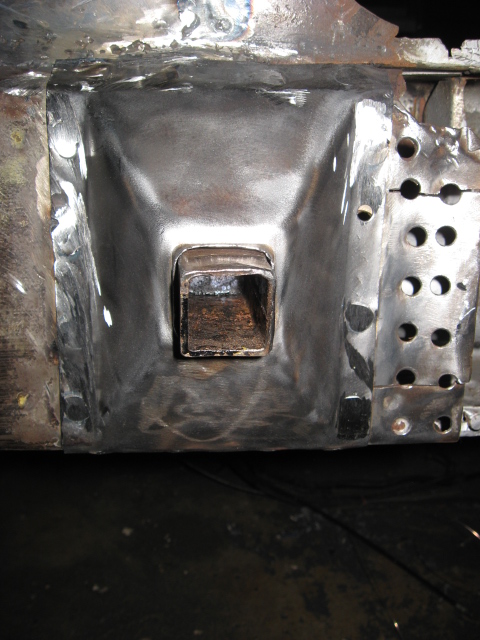
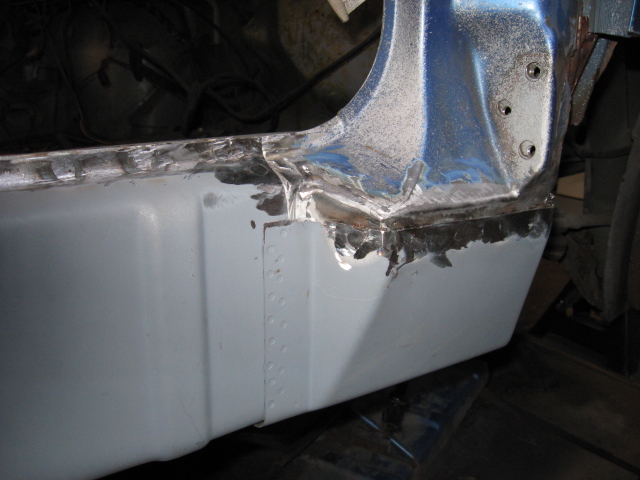
I had to repair the box at the front of the long and then it was on with the outer long piece.
Posted by: pjf Mar 22 2008, 07:36 PM

Posted by: pjf Mar 22 2008, 07:37 PM
Posted by: pjf Mar 22 2008, 07:38 PM
Posted by: pjf Mar 22 2008, 07:43 PM
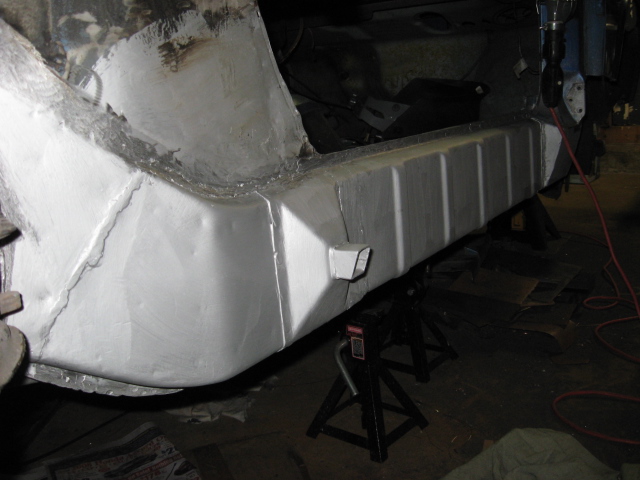
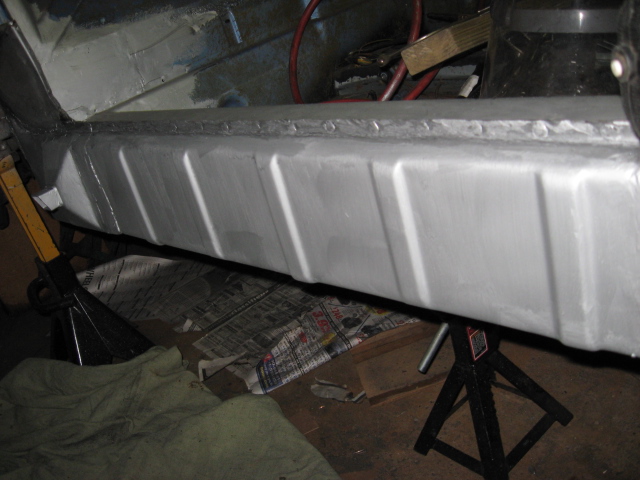
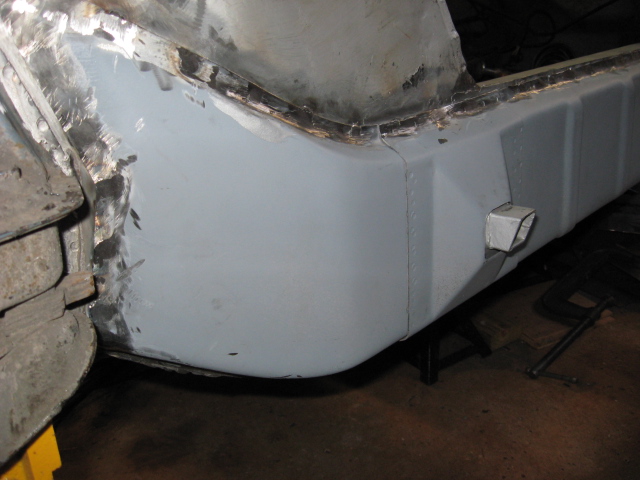
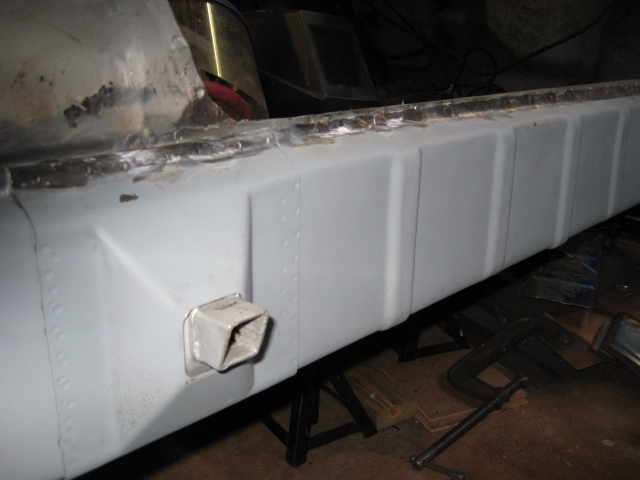
Lastly for added support (in case I blew a weld or two) I put on an RD long reinforcing overlay piece. It runs from just forward of the suspension console all the way to around the front of the box at the front of the long. Its also double thick at the jackpost. This brings me up to date with my restoration. I have to next paint the overlay piece and then its on to the left side long!
Posted by: pjf Mar 22 2008, 07:44 PM
Posted by: pjf Mar 22 2008, 07:45 PM
Posted by: pjf Mar 22 2008, 07:46 PM
Posted by: pjf Mar 22 2008, 07:47 PM
Posted by: pjf Mar 22 2008, 07:47 PM
Posted by: FourBlades Mar 22 2008, 09:13 PM
Nice work Peter!!!
How long has this project taken you so far?
I am working on a very similar resto to yours right now.
How much would you say the RA clamshell pieces weigh? I was thinking of using
them along with the inner long kit but I was starting to wonder if that was overkill in my case. I made some inner long repair pieces that wrap around the top of the long and the bottom because there is no floor in my car right now.
Good luck,
John
Posted by: pjf Mar 23 2008, 07:05 PM
Thanks John. I saw your thread and will be following along. Nice work too! I've been working on the right side long for some time but only in earnest for the past few months. Trying to balance this with the rest of my life is tough so I don't get out to the garage as much as I'd like. I weighed the left side overlay and it weighs just under 7lbs.
Posted by: SirAndy Mar 24 2008, 11:29 AM
very nice work! 
glad to see another one saved from the rust-monster ...
 Andy
Andy
Posted by: FourBlades Mar 24 2008, 07:56 PM
7 pounds per clamshell seems very reasonable for making you car a lot stronger and stiffer. I may have to rethink doing them.
Finding time is always a challenge. I try to work one night after work and weld on at least one more patch or new part. I try to work one afternoon on the weekend.
I'm trying to work ahead and have then engine and other parts I need ready when I finally finish the body work and paint.
John
Posted by: Richard Casto Mar 25 2008, 07:08 AM
Peter,
It looks great! I am doing a similar repair right now, but you are just a bit farther along than I am.
Richard
Posted by: DEC Mar 25 2008, 11:50 AM
great job 
Posted by: charliew Mar 25 2008, 04:41 PM
Your work looks very good Peter who makes the outer long piece?
Thanks,
Charliew
Posted by: tdgray Mar 26 2008, 09:47 AM
Nice work Peter...been there done that... tough job.
Keep up the good work.
Posted by: pjf Mar 26 2008, 10:33 AM

Your work looks very good Peter who makes the outer long piece?
Thanks,
Charliew
Thanks. The last piece I added to the long comes from Restoration Design (http://www.restoration-design.com/). Its part number P346R, frame stiffener. Not cheap ($150) but for me I think its going to be worth it. I checked with AutoAtlanta recently and they no longer carry them.
Posted by: charliew Mar 26 2008, 12:01 PM
Thanks Peter I just ordered a set but it looks like maybe they are out of stock. Maybe they make them as needed. Also it looked like there are some triangle supports that go on top to support the sill. Will I need to remove those and put them on top of the new outers? If its obvious don't bother with replying I will go back and study the threads when I have time. I haven't taken the car apart yet. I'm just getting as many stiffener parts as I can. I love to fabricate. Also it looks like you used weld through primer, great job.
Charliew
Posted by: pjf Mar 26 2008, 03:36 PM
Too bad about the overlays for the longs. I think you'll be happy with them when they finally do show up. I think anything you can do to stiffen the car will be worth it. They eventually learned (I'm told) that a car has to be good and stiff to give a good ride. Yes, you need supporting triangles on the overlay (2 on each side I believe) to support the sill. The triangles used to come with the new sills but for some reason that stopped happening. In the "Bring out the dead" thread you can see how to fabricate them from scratch. I'm going to try to salvage the ones I took off before making up new ones. Yes, I did try to use weld-thru primer whenever possible. The stuff I used really didn't interfere with the weld. I was expecting some effect but there wasn't any I could tell.
Posted by: pjf Mar 28 2008, 08:46 PM
I found out yesterday that AutoAtlanta will be getting some sill triangles in the future and they are going to send me 4 for the 2 sills I bought from them. No idea when they'll come in but if you order sills from them you should be able to get the triangles for the sills even if they come later. I would get a commitment from them about the triangles before you order.
Posted by: pjf Mar 28 2008, 08:58 PM
Tonight I started the left side long by drilling out the spot welds for the sill near the back where the long is rusted out. After 7 spot welds it occurs to me that I'm going to remove the whole outer long piece so I don't have to remove the sill. It can come off with the long piece. I hate it when I do unnecessary work. So next I started drilling out the spot welds of the top edge of the outer long as you can see. 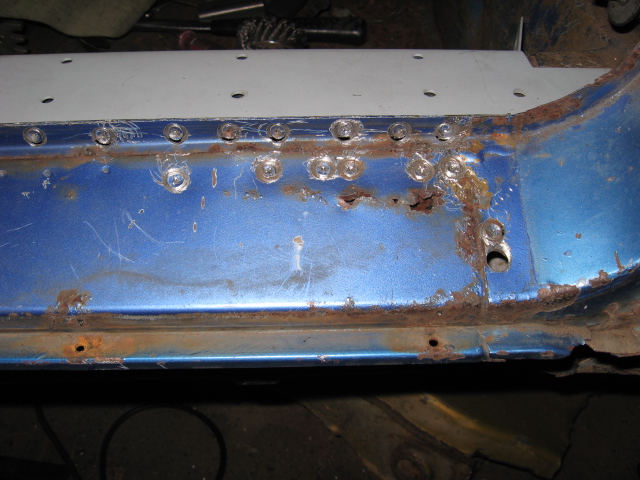
Posted by: pjf Mar 28 2008, 09:12 PM
Then another epiphany hits me. I should be welding on the Engman inner reinforcement piece before I open up the long. That way it will be as strong as possible to resist any warping due to the welds. The hardest part of putting in one of these I've found is preparing the area to accept the piece. In particular there is seam sealer in the corners (especially the front bottom) that is really stubborn. It prevents the piece from mating up well with the inner long. I tried an air chisel, wood chisel and hammer, even pryed at it with a screwdriver. The stuff is just soft enough to stick in place. In a moment of desperation I grabbed my drill with the spot weld cutter still in it and voila! It ground out the crap in no time and was small enough to fully reach into the corner. 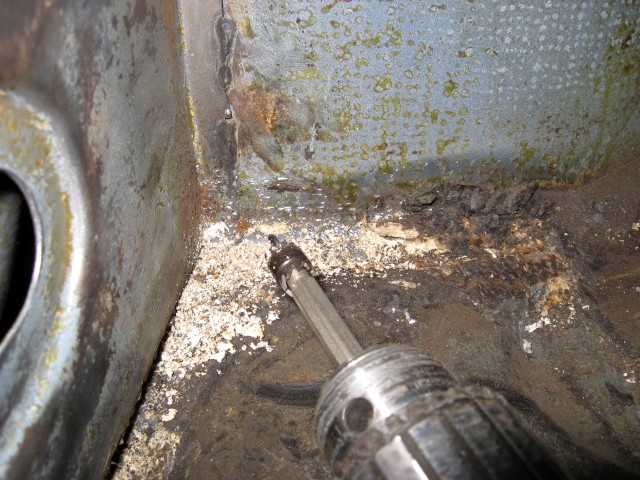
Posted by: pjf Mar 28 2008, 09:18 PM
Here's the Engman piece laid up in place. I found that the front vertical edge of the Engman piece needed to be ground down a small amount to fit. I remember the other side was the same way. Here's the piece laid up. It just has to be pressed slightly to come up flush with the inner long. I next have to clean up things and mark and grind where the welds will hit the inner long. 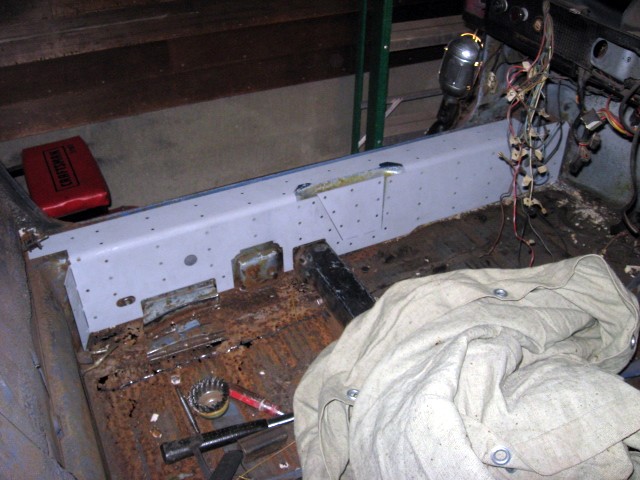
Posted by: charliew Mar 29 2008, 09:30 AM
Paul good pictures, A couple of suggestions, if you have a die grinder a set of carbide burrs will really help you out when you need to elongate holes in brackets and other things but I bet you would love what they do to the sealer. I never used them for that but I bet they would work, if the sealer sticks to the burr you could alternate cutters and soak them in laquer thinner or whatever removes the sealer. I guess they would also work in a drill.
The other thing is are you going to use a tube rollbar? If you are will you use a plate that welds to the long? Would it not be a good thing to weld the plate to the original long and then cut the Engman long to fit around it and therefore both pieces would be tied together to the plate?
I haven't decided on a rolbar or not but I think I will install some drilled and tapped plates for the future.
Another question, I don't see any door gap braces. Do you not think the door gaps will change while you are doing this procedure?
Oh yeah, David at Restoration Design called and said they were starting to tool up for some more outer long addons so it won't be long to get them. I guess I'll need some new sills and triangles to put back on them. I don't think I can remove the originals without destroying them.
Going great keep at it.
Charliew
Posted by: pjf Mar 29 2008, 09:15 PM
I do have some burrs and have used them to elongate the hole on the Engman piece that fits over the seatbelt attachement point. For some reason it was slightly off on both sides. I suppose the burrs would work but I don't have one in a shape that will get the last bit out of a tight corner like the one at the bottom of the forward end. I know its tool abuse but I was desperate. I don't plan on using a tube rollbar but if I did I agree that attaching it to the original metal makes sense and then tying the Engman piece to it. As far as bracing goes, I have braces in on both doors and between the windshield and rollbar. The brace on the left side picture is just out of the field of view so you can't see it. I wouldn't think about working on either long without bracing. As it is I'm going to look at finding a local Celette bench in case I even suspect that any of the dimensions have changed. Hopefully I can afford it as I'm sure its going to be $$$$$$. I'm glad Restoration Design is tooling up and they can make the long overlays for you. They've always treated me well. They don't have sills though (at least when I asked recently). Every place that had them only has the sill. Watch out though as the website pictures can show the triangles attached to the sill and you think you're getting the whole enchalada. Only AutoAtlanta has offered to send me the triangles once they get them in stock. I looks to me that when the sill is gone, the triangles aren't worth much either. Good luck with your project.
Posted by: 9146986 Mar 30 2008, 09:32 AM
Can I suggest more welding practice?
If your weld beads are that high and proud you may not be getting sufficient penetration. Flatter welds with correct penetration don't require as much grinding, and are much stronger.
Heck of a project!
Posted by: charliew Mar 30 2008, 02:53 PM
You can see the penetration on his previous post. It's hard to get good welds on old metal through a small hole. A little more heat might be better and maybe less wire. That old metal may be thinner than it looks. Fixing a blowthrough is a pain. I always seem to put on too much wire and end up grinding more than most. My best friend is a fabricator by trade and he is pretty gentle with me when I ask for his input. I am amazed at watching him wave the gun around and then look at his perfect beads. I don't jump around near as much but my beads don't have the nice even width and height his do. He can't see any better than me but it sure looks like it by his welds. I wish I could tig like him but there isn't enough time left to get his experience.
Lookin good Peter
Charliew
Posted by: pjf Mar 30 2008, 04:37 PM
Advice well taken. I have to admit looking back at my photos that there are some pretty high welds in there. Whenever possible I check the backside of a weld for evidence that I got the penetration I know I have to have for the weld to be worth anything. With these rosette welds I try to burn in the center as much as possible for penetration but with old metal underneath blowing through is always a problem and you can't use as much heat as you'd like. With the welds at the rear end of the long overlay this was particularly a problem. This meant less heat and more buildup than I wanted. Before the buildup though I tried to apply as much heat as possible without blowing through. Its a balancing act. Hopefully there are enough redundant welds (repaired long then overlay) and they are of sufficient quality that there is a good amount of strength in this critical area. Needless to say I'm going to have my fingers crossed when I drive over my first section of rough road!
Posted by: charliew Mar 30 2008, 10:04 PM
Peter you can try setting the heat for the new metal and starting on the new metal and trailing off on the old metal keeping most of the heat on the new metal, it's like welding two thicknesses of sheetmetal, always concentrate the bulk of the heat on the thicker piece.
Charliew
Powered by Invision Power Board (http://www.invisionboard.com)
© Invision Power Services (http://www.invisionpower.com)