Printable Version of Topic
Click here to view this topic in its original format
914World.com _ 914World Garage _ Tie-rod removal
Posted by: watsonrx13 Jan 19 2004, 03:42 PM
I used Brad's method of tie-rod removal (courtsey of Jeroen):
1. with the car on jack stands, jack up the a-arm.
2. put another jack stand under the hub of the brake disc, so it supports the whole assembly.
3. remove jack.
4. get the BFH (5 lb sledge hammer) and give a couple of good whacks on the a-arm, the tension on the torsion bar helps pushing the a-arm down.
This procedure worked wonderfully on the passenger's side (3 blows and it was off).
But after repeated blows, PB blaster, repeated blows, nothing. This went on for about 2 hours.
Ok, let's get the tie-rod removal tool (not the tuning fork type).
Attached removal tool and tighten. After tightening 3 times, and the tools sliding off the rod, I added a c-clamp to keep the arms from expanding. Again, I tighten the screw down until I couldn't tighten anymore. I added PB blaster and let it sit for 2 hours, while I removed the passenger's side brake. I went back to the driver's side tie-rod, but no movement using the removal tool.
Can the tie-rod threaded shaft be bent enough that I should cut it off?
Should I try again tomorrow? (I'm leaving the removal tool and c-clamp attached overnight)
Attached image(s)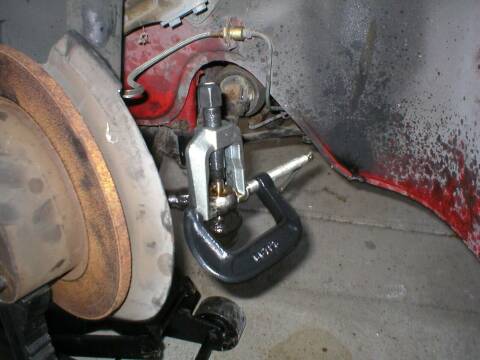
Posted by: ChrisReale Jan 19 2004, 04:07 PM
Try turning the steering wheel a bit to eleviate any pressure the tie rod has on it. Then attack with BFH.
Posted by: J P Stein Jan 19 2004, 04:14 PM
With the set-up you have pictured (I've used this same thing) smack the top of the removal tool....a 5 pounder works gud. This has worked for me on stuborn ones. Some support under the arm itself keeps it from bouncing.
Posted by: rhodyguy Jan 19 2004, 04:15 PM
put a piece of lumber, 4x4 works well, under the arm as close to the end as you can. you need to back it up smack the top of the tie rod end. after you spray the end tap LIGHTLY around the knuckle. the vibrations can help the fluid seep in. when i did mine i put the sharpe point of the air chisel in the dimple on top. took a minute or two, but i felt better about that than smacking it with 3# hammer.
kevin
Posted by: r_towle Jan 19 2004, 04:24 PM
IF your not planning on re-using the tie rod....Tuning fork works great.
Rich
Posted by: Aaron Cox Jan 19 2004, 04:36 PM
pickle fork? right
Posted by: Gint Jan 19 2004, 05:37 PM
A trick an old mechanic taught me is to smack the side of the arm where the hole is that the tie rod goes in to. Did that make sense? The theory is, that by whacking the metal around the hole, you temporarily change the shape of the hole ever so slightly. If you can do this while leaving the removal tool on the rod end, you will also be applying removal pressure to the end.
I've had this work on stubborn ends a few times. Not necessarily on 914 tie rods, but it has worked for me in the past. IIWM, and I wasn't planning on using the tie rod again, the pneumatic chisel and pickle fork would probably get it out.
Posted by: Joe Ricard Jan 19 2004, 08:27 PM
Little grease upon reassembly will ensure it comes apart 10 years from now.
Once you put the pickle fork to it you might as well go buy a new tie rod end. Turbo of course.
Posted by: RustyWa Jan 19 2004, 10:53 PM
I ended up having to drill one of those buggers out. I started small and worked my way up. It worked gud...and fast.
Posted by: steve@ottosvenice.com Jan 19 2004, 10:56 PM
You need this style tool. Steve
Attached image(s)
Posted by: iiibdsiil Jan 19 2004, 11:10 PM
Yeah, that style with an impact gun.
- Brett Smith
Posted by: ArtechnikA Jan 20 2004, 07:24 AM
i had one so stuck i had to pull the upright and move the whole assembly to the press, where it took A LOT of pressure to get un-stuck. definitely use anti-sieze when they go back together, however you get it out...
Posted by: watsonrx13 Jan 20 2004, 04:27 PM
JP,
Your technique worked perfectly, one smack on the top of the removal tool with the BFH and it was FREE.
Thanks again to everyone who made recommendations.
Attached image(s)
Powered by Invision Power Board (http://www.invisionboard.com)
© Invision Power Services (http://www.invisionpower.com)