Printable Version of Topic
Click here to view this topic in its original format
914World.com _ 914World Garage _ Renagade seats
Posted by: F4i Jan 30 2004, 12:06 AM
This is my attempt at stock seats with a bolster. It would cost me way too much to ship seats to renagade so I am doing this and having them recovered in leather. Does anyone know how renegade does their bolster? Is it just dense foam or something like this?
Attached image(s)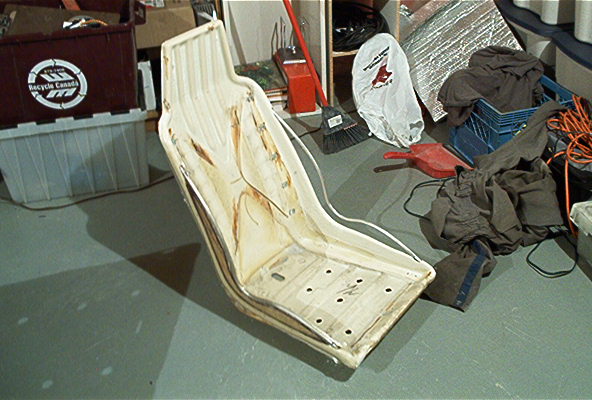
Posted by: iiibdsiil Jan 30 2004, 12:11 AM
They use sheet metal, errr aluminum to make the bolsters. You have the angles right, just it looks like a tube on my laptop.
- Brett Smith
Posted by: F4i Jan 30 2004, 12:17 AM
3/8" solid alum. rod. +fiberglass when finished. Should be strong.
Posted by: Demick Jan 30 2004, 09:39 AM
The renegade seat bolsters are fairly flexible, so I don't think they could be fiberglassed in place. I made my own high bolsterd seat as well. Stripped an original seat down to the shell. Created the bolster shape with foam-core glued into place. Cut some 1/2 inch plastic pipe lengthwise to make a half-round profile and glued that to the top of the foam-core just to round off the edge of the foam-core. Then I fiberglassed it all into place. Covered it with layers of foam (foam is 1-4 layers thick in various areas to get correct contour). Then I upholstered the seat. It ended up very tight - so I can't even sit in it unless I take my wallet out. But it does give good support.
Pic shows half of seat covered in foam ready for upholstry. Other half is fiberglassed and ready for foam.
Demick
Attached image(s)
Posted by: Demick Jan 30 2004, 09:41 AM
This shows the new vs. original contour of the seat
Attached image(s)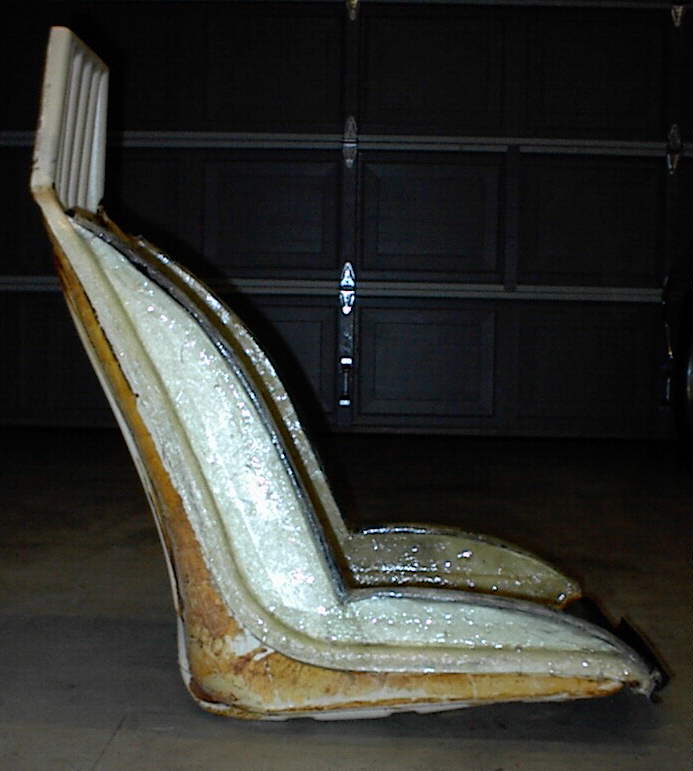
Posted by: Demick Jan 30 2004, 09:43 AM
And the final product.
Ended up being too much work though. Just buy a renegade seat - well worth the money.
Attached image(s)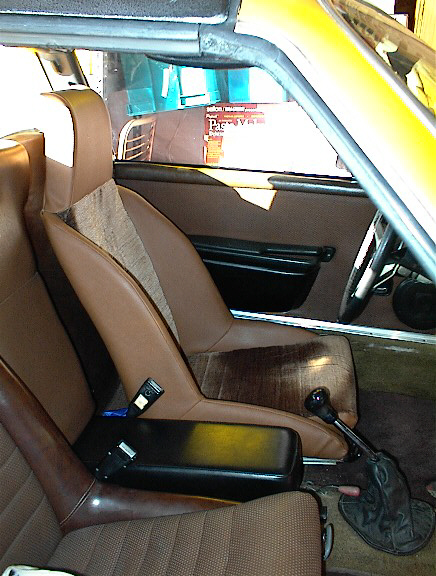
Posted by: F4i Jan 30 2004, 10:15 AM
I think your seat looks very good. To me it's worth the work because of shipping. I am only doing the fiberglass work. They are being recovered by a shop. My bolsters are not quite as large as yours and the renegade. And they are only 3/8" wide. I also bent them out just a little. Hopefully I don't have any fitment issues. You do not realize just how narrow a stock seat is until you raise the edges.
Posted by: Demick Jan 30 2004, 10:37 AM
The shape and fiberglass work was easy. The foam work was pretty easy as well. It was the upholstry work that put me over the edge. Total cost was a little over $100 in materials:
$20 for fiberglass materials
$60 for upholstry materials
$30 for foam
That and about 25 hours of labor.
Demick
Posted by: F4i Jan 30 2004, 01:17 PM
Sounds like the major grief is in the recovering.
A local shop can recover the door panels, seats, backpad & centre cushion for $1200.00 Cdn. It will be
in leather as I already have a hyde. The door panel lower and the centre of the seat will be in fabric
supplied by them.
Renegade seat recover will run $700.00 US plus shipping both ways. So I can do the whole car for what
it would cost from renegade. Plus I get a warranty
Posted by: pjhaun Feb 7 2004, 10:53 AM
I bought a couple GT Pontiac Feiro seats on ebay for $50. They have speakers in the head rest. I had them reupholstered for $350 each. They are unblieveably comfortable. They fit a little tight but it is not a problem. See attachment:
Attached image(s)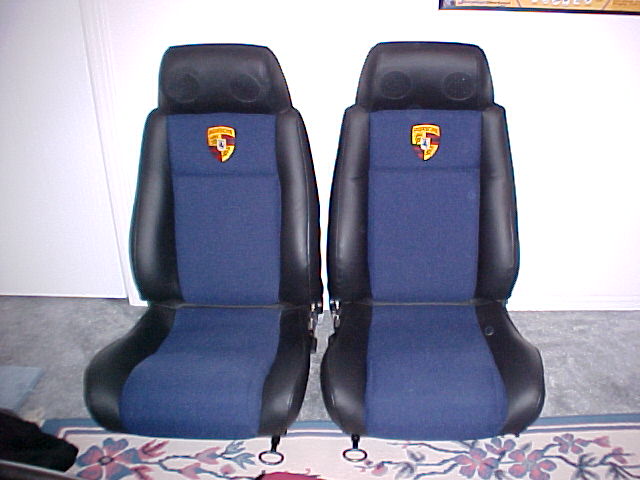
Posted by: East coaster Feb 7 2004, 11:02 AM
Do you have any pics of the fiero seats installed with the backpad??
Does anyone in the Northeast have a Renegade seat, I'd love to check one out and see how/if I fit in it?
Posted by: F4i Feb 7 2004, 11:15 AM
I like the speakers. What a good idea. Reminds me of a video game chair. How appropriate
Posted by: pjhaun Feb 7 2004, 11:23 AM
Here is a view from the right:
Attached image(s)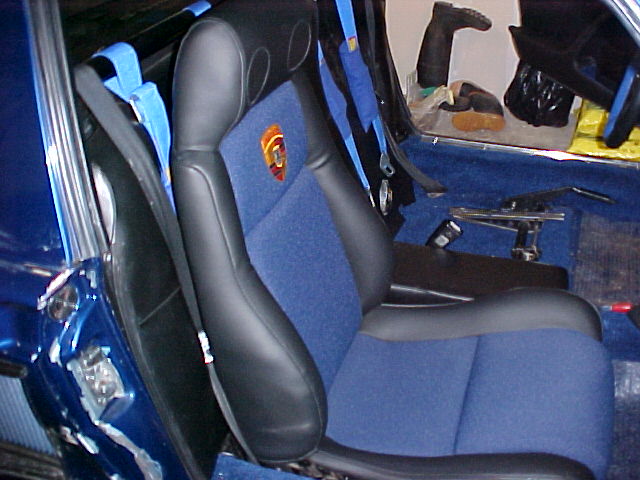
Posted by: pjhaun Feb 7 2004, 11:25 AM
Here is a view from the left:
Attached image(s)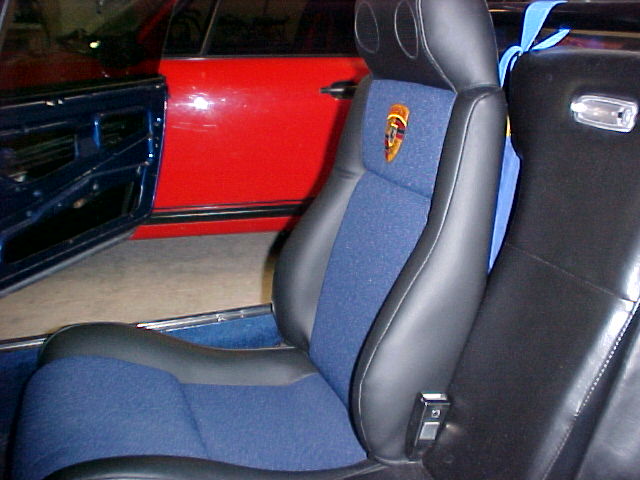
Posted by: joea9146 Feb 7 2004, 12:15 PM
Whats the hieght of the seats look like from the floor.... do you modify
the rails or have to do anything to lower the seats ?
Posted by: Brad Roberts Feb 7 2004, 12:22 PM
The Renegade seats are weak. After 1 year of getting in and out of the car 2-3 days a week the lower drivers side left bolster cannot handle the stress of day to day in/out of a human. It flattens out and makes no attempt to support your ass/legs.
I have to be careful what seats we use because we have to be under the roll cage a certain distance and most of my drivers are 6 foot+. The Fiero seats above are great for people who are short or small in stature. We have to mount or seats on the floor.
B
Posted by: F4i Feb 7 2004, 12:47 PM
Brad it was you're comments about the renegade seats that helped prompt me making my own. That and
the cost. I spoke with the upholsterer about what to use for bolstering and he felt that aluminium would be
too weak. He said to make it strong. I can stand on them.
Posted by: Brad Roberts Feb 7 2004, 12:53 PM
Sounds like you are on the right track. I know a guy in Arlington Texas was making seats for us also at some point. It is a lot of work. Good luck and keep us updated.
B
Posted by: Van914 Feb 7 2004, 03:17 PM
Brad,
How are you mounting the seats to the floor? Are you using a seat mount or bolting through the floor?
Thanks
Van
Trying to keep my head off the roof.

Posted by: Brad Roberts Feb 7 2004, 11:05 PM
Hey Van (my brothers name is Van also)
I only use FIA approved seats on FIA brackets. We cut the cross brace out that holds the stock seat tilt bracket (it doesnt really do much) or just notch it for the seat brackets.
B
Posted by: Scott Carlberg Feb 8 2004, 01:09 AM
Brad,
Andy has told me about doing that, Seats to the floor, is there ANY way of keeping
the adjustability when doing that?
Is is not possible to bolt the 'adjustable-part' of the seat to the floor, with
the seat?
Sc
Posted by: Brad Roberts Feb 8 2004, 01:13 AM
The adjuster adds a min of 2 inches to the seat heigth. I honestly dont care whether people besides me can drive my cars...soo they get mounted where I want them. Think about how many other people drive your car.
B
Posted by: Scott Carlberg Feb 8 2004, 01:24 AM
True, very true....
but what about when it comes time to sell?
Just bolt the adjuster back in?
Course IF you've put a much better seat in, you could just leave it, but
the new owner's legs might not be the same length as your own.
Posted by: Brad Roberts Feb 8 2004, 02:02 AM
I would offer to re-mount the seat for the new owner or install the OE peices.
B
Posted by: Van914 Feb 8 2004, 06:38 AM
Brad,
Can you post any pictures of the seat brackets. My seats are OMP and are now mounted to the stock mounts with a little fabrication of the sliders.
Thanks
Van
Posted by: Brad Roberts Feb 8 2004, 11:31 AM
Van,
When I posted I looked for a shots in my pic collection and didnt find anything. They are billet alum mounts that have 5 slots in the front and 3 in the rear for "tilting" the seat. They bolt to the sides of the seat and bolt flat to the floor. In SCCA we have to run a seat back brace if we dont use a FIA approved seat. Installing a seat back brace in a 914 is not much fun so we run the FIA approved seats which are actually crash tested unlike all the aluminum dirt track seats you see people using.
B
Posted by: F4i Feb 23 2004, 06:44 PM
Got em back today. special thanks to seanery and Jeroen! 
Attached image(s)
Posted by: Qarl Feb 23 2004, 06:51 PM
Nice job!!!

Posted by: seanery Feb 23 2004, 06:51 PM
Dude,
they look sweet!
Posted by: Aaron Cox Feb 23 2004, 06:56 PM
righteous! what was the cost of recovering + new logo in seat
Posted by: F4i Feb 23 2004, 07:44 PM
$1500.00 for the work +75 for the logo.
Posted by: BIGKAT_83 Feb 23 2004, 07:45 PM
Must be seat week. I started on mine Sunday and ordered the fiberglass supplies today.
I sure like that logo
Attached image(s)

Posted by: F4i Feb 23 2004, 08:02 PM
You may want to check for e-brake handle clearence with that wood. There isn't a lot of room there. Nice bolstering.
Posted by: BIGKAT_83 Feb 23 2004, 08:09 PM
I mounted the seat in the car and checked the adjusters, but did not think about the ebrakes. I've not yet added ebrakes to my 5 lug conversion. Thanks for the info back to the basement to check this.
<_< Bob
Posted by: F4i Feb 23 2004, 08:14 PM
the factory even left out the foam on the drivers side at the bottom by the e-brake.
Posted by: boxstr Feb 23 2004, 08:22 PM
My V8 914 has a MICO inline brake switch, activated with igniton on, push a button under the dash, Acts just like the park brake is on, I even tried to see if I could break it loose. Car running in gear, let out clutch, stayed in place. Deactivate the brake, by pushing on the brake pedal brakes off. Works for me.
CCLINMICOLAND
Posted by: BIGKAT_83 Feb 23 2004, 08:25 PM
Georgia Ebrake system............Lol
Attached image(s)
Posted by: r_towle Feb 23 2004, 09:24 PM
CAMPNEEDHELPHERE,
I need something like your ebrake.
My rear brakes are not the stock caliper...
My car has no alternator, so I do not want to turn it off to check my time after each run (Its how we do it in our group)
So, an inline switch that can be turned on or off while the car is runnig would be great...I just need to put a safety cover over the switch so there is no chance of hittiing it during a run. 
Where did you get it, what is it? what color? are they free? can you install it in ten minutes, or ten hours???
Rich
Posted by: Andyrew Feb 23 2004, 10:05 PM
I bent my ebrake handle to allow my seat to fit.. Ebrake works, it just rubs the seat when engaged..
It is a problem..
Andrew
Posted by: boxstr Feb 23 2004, 10:25 PM
Rich, Good evening. The MICO brake lock was on the car when I purchased it. Iwould say looking at the instructions it would fall into the weekend project category.
It is a switch that looks like a brake lite switch, which installs in line in the brake system.
I have an address for the company on east and west coast, also ph. numbers.
I would be happy to fax the information that I have or try calling the MICO Co.
MICO EAST
1911 Lee Blvd.
No. Mankato, Minnesota PH 507-625-6426
MICO WEST
701 East Francis
Ontario, Calif. PH 714-947-9058
CCLINMICOVILLE
Posted by: mike_the_man Feb 24 2004, 11:54 AM
Dylan,
Those seats look awesome! Do you have more pics of your progress building them? I've been thinking about doing the same thing, and any tips or tricks would be greatly appreciated.
Thanks,
Posted by: Jeroen Feb 24 2004, 05:06 PM
Man the e-mail notifications suck right now...
I just stumbled back into this thread
The seat look awsome!!!
cheers,
Jeroen
Posted by: F4i Feb 24 2004, 07:01 PM
Thanks for the compliments. Mike what do you want to know? My part was the easy part. I put the seat
on it's side and traced out a pattern I liked. Then I checked for any kind of interference. You do not want
bolsters in your armpits. I then traced the pattern on some wood and cut it out. I bought some 3/8" rod
from crappy tire and bent 4 of them to the pattern. I drilled the holes and installed the rod. Fiberglassed it
up and off it went to the upholsterers. The only tip I can offer is to watch out for the e-brake handle
Posted by: mike_the_man Feb 25 2004, 11:56 AM
Thanks Dylan,
Sounds like a good project for next winter. Where abouts in Alberta are you? I might be out there next month to do some skiing. It's always good to get together with a fellow teener, and I'd really like to check out your seats in person.
Posted by: F4i Feb 25 2004, 08:36 PM
Calgary. If you are out skiing you should not be too far from here. Send me a pm before you come out and we can go for a beer. Maybe soloracer, Dave and other cowtown guys would be up for it too.
Posted by: BIGKAT_83 Mar 21 2004, 04:24 PM
Finished the first seat one more to go. I love my companys work at home program.
Attached image(s)
Posted by: seanery Mar 21 2004, 04:31 PM
That looks nice!
good job!
Posted by: F4i Mar 21 2004, 06:21 PM
Very nice !
Posted by: tat2dphreak Mar 21 2004, 07:27 PM

holy crap that ROCKS! very nice!
Powered by Invision Power Board (http://www.invisionboard.com)
© Invision Power Services (http://www.invisionpower.com)