Printable Version of Topic
Click here to view this topic in its original format
914World.com _ 914World Garage _ FI assistance
Posted by: watsonrx13 Sep 2 2008, 06:15 PM
OK, I have finally gotten my second project car running.... The first time since I've owned the car (purchased 2 1/2 years ago)... 
Anyway, I've done the following to the '74 2.0l engine:
New:
Spark plugs and wires
Distributor cap
Points and condensor
Vacuum and fuel hoses
Intake runner boots
Other:
Tested and rebuilt fuel injectors and new seals
Timed the engine
Adjusted the valves
I hooked all vacuum hoses, per AA's diagram. When I started it, it ran at 3000 rpm. I disconnected the AAR and plugged the hoses. I've gotten it down to 1500 rpm, but it was 'hunting'. I soaked the AAR valve overnight and washed out the PCV with carb cleaner. I hooked both back up, but it ran at 3000 rpm again.
So my questions are:
1. How do I test the AAR valve to verify it's working?
1a. If I remove it permanently, do I just plug the line to the CSV and wrap the electrical wire (the plastic plug is missing)?
2. I've ordered the TB gasket, do I need to remove the runners before I remove the TB/base?
3. After I remove the TB/base and check for pin holes, anything else to check?
4. Any other suggestions?
4a. BTW, I tried spraying carb cleaner around the TB, injectors, runners, but didn't hear any difference in the engine sound.
Also, I researched this subject and found Jack's (championgt1) http://www.914world.com/bbs2/index.php?showtopic=80281&, but there was no resolution, at least in that thread...
-- Rob
Posted by: Maltese Falcon Sep 2 2008, 07:02 PM
The AAR was the culprit on our 2.0 resto project also.
I found it helpful to remove it , bench test it and determine that it was bad... I was lucky enough to have a spare. Otto's Venice sells reconditioned units , or try to source one from the board here. When bench testing and running 12V to the unit, the bottom (solenoid location) should get warm, proll'y hot to the touch. In approx 1 minute you should not be able to blow much air thru the ports...if you can --then the diaphram is worn out. If you are not feeling any heat on the unit...then the solenoid is worn out. The design problem to the unit is that it requires constant voltage to it (after warm up) to keep it in its proper cyclic position= lots of heat= eventual failure. Some people have modified the 1.8 style AAR ( still available) to work on the 2.0s
My .02 cents
Marty
Posted by: watsonrx13 Sep 2 2008, 07:13 PM
Thanks Marty.... So, if I hook up a positive lead from the battery to the red wire, what do I hook the negative wire to? Which port do I 'blow' thru, either one?
-- Rob
Posted by: Maltese Falcon Sep 2 2008, 07:20 PM

Thanks Marty.... So, if I hook up a positive lead from the battery to the red wire, what do I hook the negative wire to? Which port do I 'blow' thru, either one?
-- Rob
The unit basically is neg.grounded by sitting (via bracket) on the upper engine case. use a jumper wire for -neg .
Marty
Posted by: jim_hoyland Sep 2 2008, 09:25 PM
Here is an AAR with the hole open about 1/3 at room temp. It's from a 1.8
Like Marty said, hook it up to a battery and see how long it takes to completely close. Mine closed in 1 min 15 sec. I write the time to close on the AAR. Then I can compare to spares etc.
When you blow thru it, some air will pass, not to worry.
Attached image(s)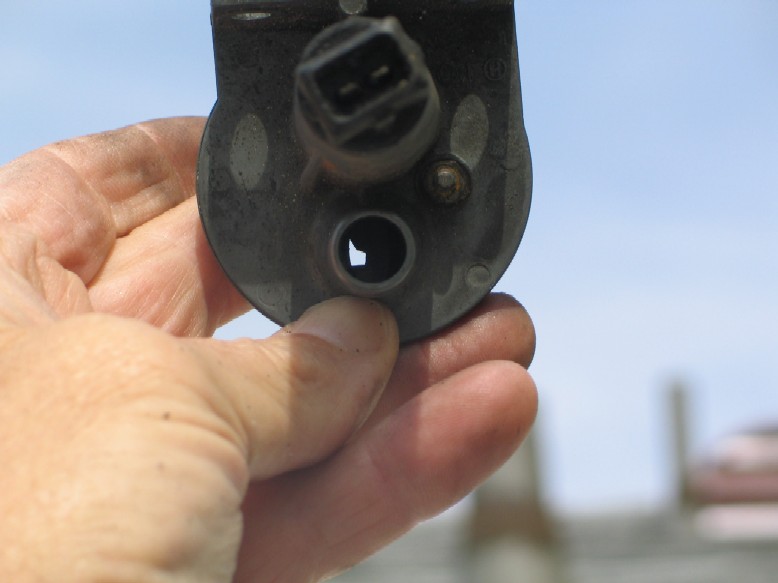
Posted by: championgt1 Sep 2 2008, 10:10 PM
When I had my high idle issue( 3500 rpm ) it ended up being cracks in the intake plenum around the support tubes. Replaced the plenum, problem solved. Good luck you will get it!
Posted by: tdgray Sep 3 2008, 02:23 PM
Same thing as the last caller... I found that my AAR did virtually nothing with my idle... it was more about the hoses to the plenum and the MPS
Posted by: r_towle Sep 3 2008, 02:38 PM
3000 rpm???
Have you verified the timing is correct?
What mark on the fan are you using???
Sounds like your timing may be off.
Rich
Posted by: watsonrx13 Sep 3 2008, 06:18 PM
OK, time for an update....
Jim/Marty, my AAR looks different from your's, but I did hook it up to a battery and noticed that the bottom started getting warm, but the valve didn't move. I've blocked off the top port, turned it upside down and filled with PB blaster and I'll let it soak overnight. If this doesn't work I'll try to get another one....
Jack, I took the plenum off the car, what a PITA, and removed the TB. The plenum looks really good, I even tried the flashlight in the dark, no pin holes. But, since I had the plenum off, I removed the paint around the support tubes and liberally spread jb weld to seal any unseen holes. I'll let it dry overnight, paint it and then when the new TB gasket arrives, I'll reinstall everything...
Rich, I purchased an adjustable timing light, set it at 27 and found the TDC mark, also removed the vacuum hose from the distributor.
I agree with everyone, this certainly appears to be a vacuum leak, I just need to track it down.
At one point during the testing, I had the PRMs down to 1500, but it was hunting, any suggestions?
-- Rob
Posted by: Maltese Falcon Sep 3 2008, 10:14 PM
Rob, now is a good time to do a simple check on your MPS. Check to see if it can hold vacuum--at least 25 to 30 in.Hg. See if you know someone at a service station and borrow their vacuum tester . You don't even need to remove the MPS for the test. Another culprit might be the rubber couplers at the 4 manifold inlet tubes--especially if dried out (sitting for years). Either replace them, or install 8 (#28) clamps onto the hose coupler ends.
Marty
Posted by: roadster fan Sep 4 2008, 02:08 AM
From Brad Anders D-jet page
Check the following areas for a vacuum leak:
1. Intake runner-to-head gasket/spacer
2. Injector seals
3. Intake runner boots
4. Air plenum (e.g. cracks or rust holes)
5. Throttle body gasket
6. Throttle body shaft (worn body or shaft)
7. Distributor vacuum adv/ret cell
8. Auxiliary air regulator (stuck open or leaky)
9. Deceleration valve
10. Manifold pressure sensor
11. Vacuum hose cracks
12. Cold-start valve gasket to plenum
a worn out pcv valve will cause a high idle also, but not that high.
Over advanced timing also, but you seem to have that under control.
Check the compatibility of all the components in your FI system. Many times previous owners have swapped incorrect parts into the mix. Be methodical and you will get it.
Jim
Posted by: watsonrx13 Sep 8 2008, 07:18 AM
Update:
Well, I didn't work on the car this weekend, I'm still waiting for the TB gasket to arrive...
Anyway, I noticed in one of the ads that someone was selling the phenolic spacers for intake manifolds and they mentioned that some of the spacers were missing the gasket, so I got to thinking. When I 'cleaned' these spacers, I removed a paper gasket material, but didn't replace, so can this be part of my vacuum leak issues? If so, can I just make a paper gasket and attach to the spacer?
-- Rob
Posted by: roadster fan Sep 8 2008, 04:49 PM
Update:
Well, I didn't work on the car this weekend, I'm still waiting for the TB gasket to arrive...
Anyway, I noticed in one of the ads that someone was selling the phenolic spacers for intake manifolds and they mentioned that some of the spacers were missing the gasket, so I got to thinking. When I 'cleaned' these spacers, I removed a paper gasket material, but didn't replace, so can this be part of my vacuum leak issues? If so, can I just make a paper gasket and attach to the spacer?
-- Rob
 number 1 in my list above
 Jim
Posted by: jim_hoyland Sep 8 2008, 05:15 PM
Suggestion:
The AAR has should close after a 1 - 2 minutese. See what kind of RPMs you get with the AAR out, but plug the intake and out hoses. I used rubber stoppers
Posted by: watsonrx13 Sep 8 2008, 05:59 PM
Update:
Well, I didn't work on the car this weekend, I'm still waiting for the TB gasket to arrive...
Anyway, I noticed in one of the ads that someone was selling the phenolic spacers for intake manifolds and they mentioned that some of the spacers were missing the gasket, so I got to thinking. When I 'cleaned' these spacers, I removed a paper gasket material, but didn't replace, so can this be part of my vacuum leak issues? If so, can I just make a paper gasket and attach to the spacer?
-- Rob
number 1 in my list above Jim
Yea Jim, that's what got me thinking... Unfortunately, this is the first time I've done anything with FI. The Porsche parts listing doesn't have any listing for the gaskets, but I guess through experience others have noticed that the paper gasket is actually part of the spacer..... Oh well, live and learn....
Once I finally get this thing purring, I'm going to make a list of all of the things to check that's related to the vacuum lines....
I'm still waiting on the TB gasket, but I want to thank everyone for their suggestions and experiences.... This board rocks....

-- Rob
Posted by: watsonrx13 Sep 8 2008, 05:59 PM
Suggestion:
The AAR has should close after a 1 - 2 minutese. See what kind of RPMs you get with the AAR out, but plug the intake and out hoses. I used rubber stoppers
Jim, once I get everything back together, I'll report back....
-- Rob
Posted by: Spoke Sep 8 2008, 08:26 PM
As far as finding vacuum leaks, one way to check suspected items like gaskets, seals and hoses is to spray the item with carb cleaner. If there is a leak, the immediate spray will temporarily clog the leak and the engine speed will change.
Posted by: watsonrx13 Sep 8 2008, 08:42 PM
As far as finding vacuum leaks, one way to check suspected items like gaskets, seals and hoses is to spray the item with carb cleaner. If there is a leak, the immediate spray will temporarily clog the leak and the engine speed will change.
I tried it last week, but never heard any change in engine speed....

-- Rob
Posted by: Thomas J Bliznik Sep 9 2008, 10:56 AM
Update:
Well, I didn't work on the car this weekend, I'm still waiting for the TB gasket to arrive...
Anyway, I noticed in one of the ads that someone was selling the phenolic spacers for intake manifolds and they mentioned that some of the spacers were missing the gasket, so I got to thinking. When I 'cleaned' these spacers, I removed a paper gasket material, but didn't replace, so can this be part of my vacuum leak issues? If so, can I just make a paper gasket and attach to the spacer?
-- Rob
Hi Rob,
Good subject!!!
Who makes the TB Throttle Body Gaskets?? I need one & can't find a supplier on the vendor list for my 1974 2.0 liter F.I. re-do.
I am also checking out all my AAR valves & will probally need one. They are expensive & wondering who has the best rebuilt prices & quality??
I was thinking Otto's or maybe AA.
FYI: I just purchased a $75.00 dollar "Vacuum Line Kit" from AA and dissappointed they are not supplied in factory color anymore. They are all black/grey standard (correct) hose sizes without instructions in the package. I need to call George and tell him about this issue. Now I have to do a search on the subject. I am in the process of dyeing the hoses with the the proper CW colors (redish, brown, green & standard colors).

Tom
Posted by: watsonrx13 Sep 9 2008, 11:03 AM
Hi Rob,
Good subject!!!
Who makes the TB Throttle Body Gaskets?? I need one & can't find a supplier on the vendor list for my 1974 2.0 liter F.I. re-do.
I am also checking out all my AAR valves & will probally need one. They are expensive & wondering who has the best rebuilt prices & quality??
I was thinking Otto's or maybe AA.
FYI: I just purchased a $75.00 dollar "Vacuum Line Kit" from AA and dissappointed they are not supplied in factory color anymore. They are all black/grey standard (correct) hose sizes without instructions in the package. I need to call George and tell him about this issue. Now I have to do a search on the subject. I am in the process of dyeing the hoses with the the proper CW colors (redish, brown, green & standard colors).
Tom
Yea Tom, I was disappointed also about the color of the vacuum hoses I bought from AA.... let me know what you're using to dye the hoses....
I'm still soaking my AAR valve, hoping it will unstuck the valve. The base fells like it's heating up....
tod914 had some of the TB gaskets made, he's in the http://www.914world.com/bbs2/index.php?showtopic=56278
-- Rob
Posted by: Thomas J Bliznik Sep 9 2008, 11:10 AM
Hi Rob,
Good subject!!!
Who makes the TB Throttle Body Gaskets?? I need one & can't find a supplier on the vendor list for my 1974 2.0 liter F.I. re-do.
I am also checking out all my AAR valves & will probally need one. They are expensive & wondering who has the best rebuilt prices & quality??
I was thinking Otto's or maybe AA.
FYI: I just purchased a $75.00 dollar "Vacuum Line Kit" from AA and dissappointed they are not supplied in factory color anymore. They are all black/grey standard (correct) hose sizes without instructions in the package. I need to call George and tell him about this issue. Now I have to do a search on the subject. I am in the process of dyeing the hoses with the the proper CW colors (redish, brown, green & standard colors).
Tom
Yea Tom, I was disappointed also about the color of the vacuum hoses I bought from AA.... let me know what you're using to dye the hoses....
I'm still soaking my AAR valve, hoping it will unstuck the valve. The base fells like it's heating up....
tod914 had some of the TB gaskets made, he's in the http://www.914world.com/bbs2/index.php?showtopic=56278
-- Rob
Rob,
Thanks for the info.
I went to a local fabric/sewing center to buy dye (red, brown & green). The ladies in the store gave me the royal treatment because I was the only guy in the store.
Note to our single guys, great hang out because the store was full of hot looking women. They all wanted to help me!
 I'll post a photo of the completed vacuum line kit when completed.
 T
Posted by: tod914 Sep 10 2008, 05:01 PM
Thanks for the referal Rob, let me know when they arrive. Quick question, my AAR was taking about 7 minutes to get hot when I hooked
it up directly to the battery. It closed fine. Heats up much quicker
on on the car. Is 7 minutes too long?
Posted by: tod914 Sep 10 2008, 05:08 PM
Rob on my 75, after I had the plenium pc'd, I had to double up on gaskets for the cold start valve. Check that for air leaks too, especially
if you removed it.
Posted by: watsonrx13 Sep 10 2008, 08:33 PM
Rob on my 75, after I had the plenium pc'd, I had to double up on gaskets for the cold start valve. Check that for air leaks too, especially
if you removed it.
Thanks for the insight Tod, I've already created gaskets for both sides....
-- Rob
Posted by: watsonrx13 Sep 14 2008, 04:05 PM
SUCCESS
The engine is now idling at 900 rpm. I want to thank everyone who contributed to the success of this...
Using Jim's (roadster fan) suggestions I was able to successfully get the engine to run correctly, here's his suggestions and my solutions:
1. Intake runner-to-head gasket/spacer
created new gaskets 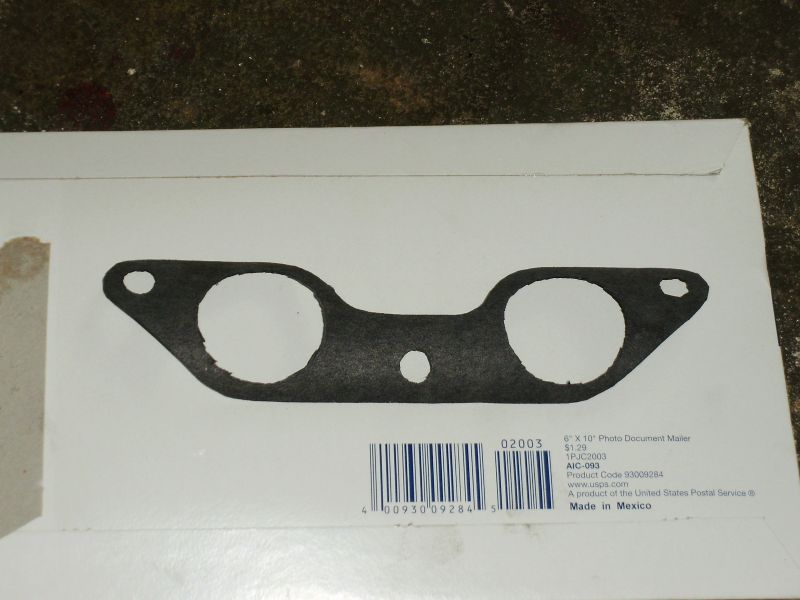
2. Injector seals
sent injectors to Cruizn Performance for testing and rebuilding, including new seals
3. Intake runner boots
new boots from AA
4. Air plenum (e.g. cracks or rust holes)
inspected, but didn't find and holes. Used JB Weld to seal the support tubes where they attach to the plenum
5. Throttle body gasket
new from tod914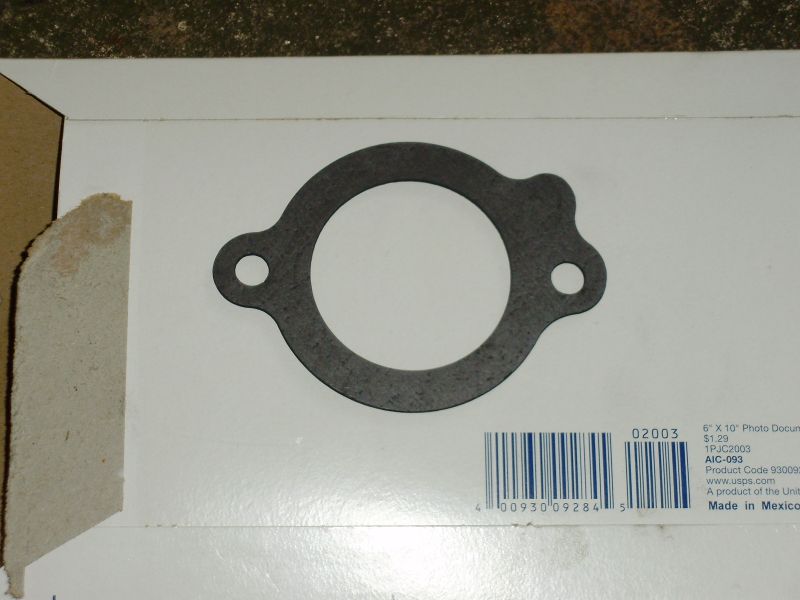
6. Throttle body shaft (worn body or shaft)
looks good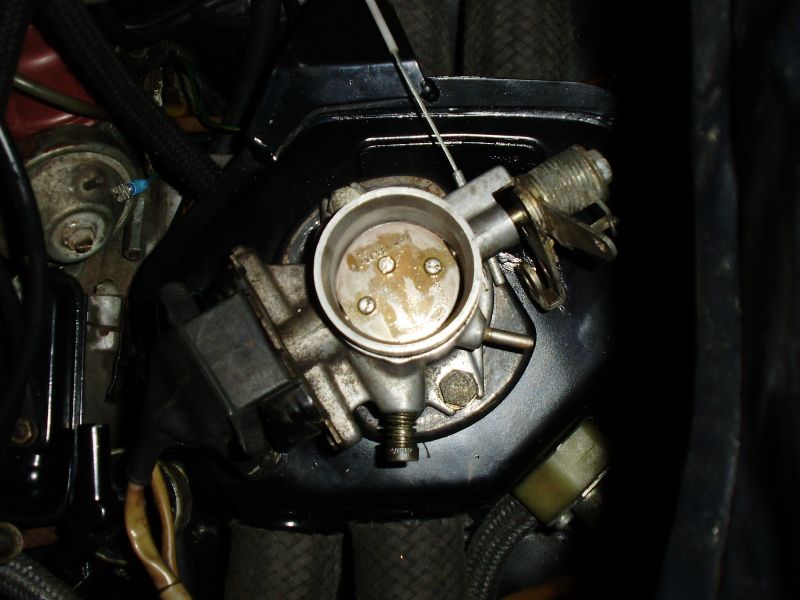
7. Distributor vacuum adv/ret cell
new hose
8. Auxiliary air regulator (stuck open or leaky)
soaked in PB blaster to free up stuck valve
9. Deceleration valve
added a hose clamp to the smallest hose that connects to 'F' connection on the TB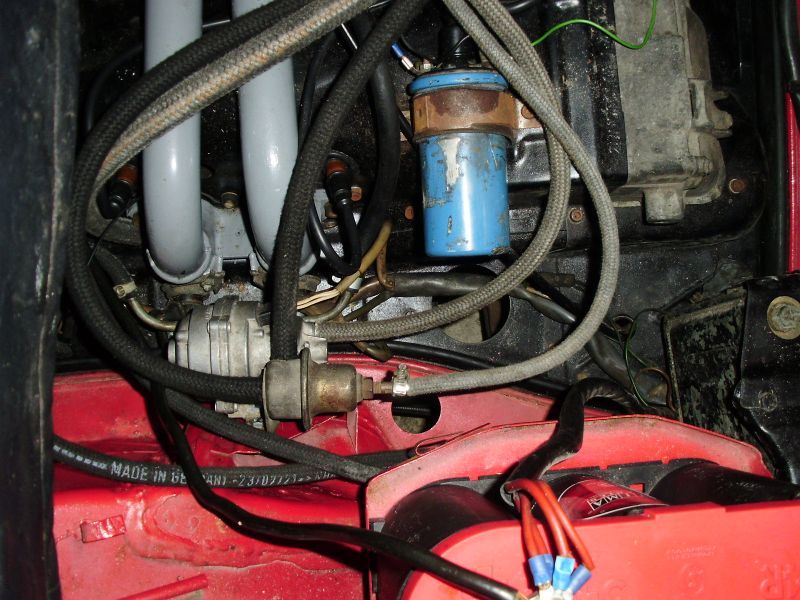
10. Manifold pressure sensor
tested MPS, held vacuum between 25-30 hg
11. Vacuum hose cracks
replaced ALL vacuum hoses from AA
Posted by: watsonrx13 Sep 14 2008, 04:06 PM
12. Cold-start valve gasket to plenum
created new gaskets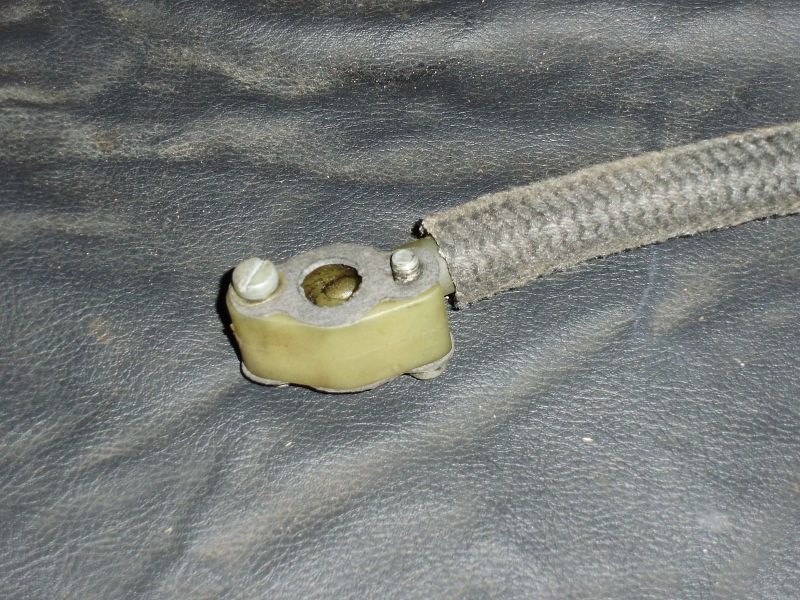
-- Rob
Posted by: KELTY360 Sep 14 2008, 04:20 PM
Good pics. Nice to see solutions that keep FI working solid. 
Posted by: Maltese Falcon Sep 14 2008, 10:27 PM
You're welcome Rob, and happy 9-14 to you !
Marty
Powered by Invision Power Board (http://www.invisionboard.com)
© Invision Power Services (http://www.invisionpower.com)