Printable Version of Topic
Click here to view this topic in its original format
914World.com _ 914World Garage _ Bcheney 6 Conversion
Posted by: bcheney Sep 13 2008, 03:24 PM
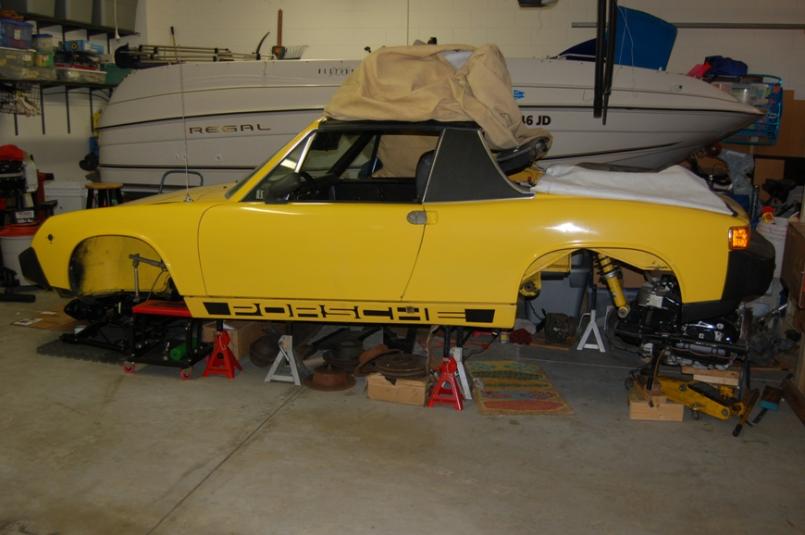
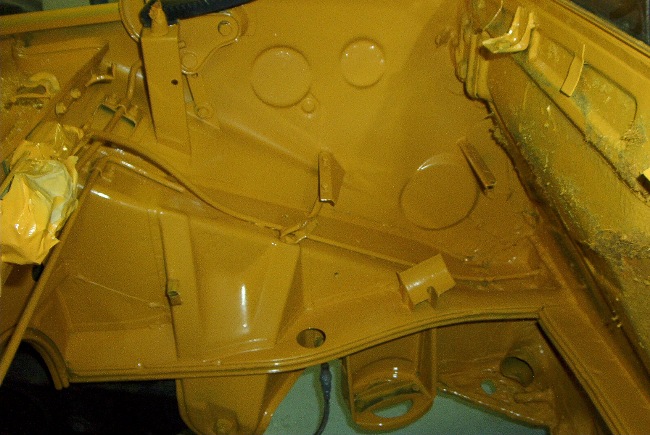
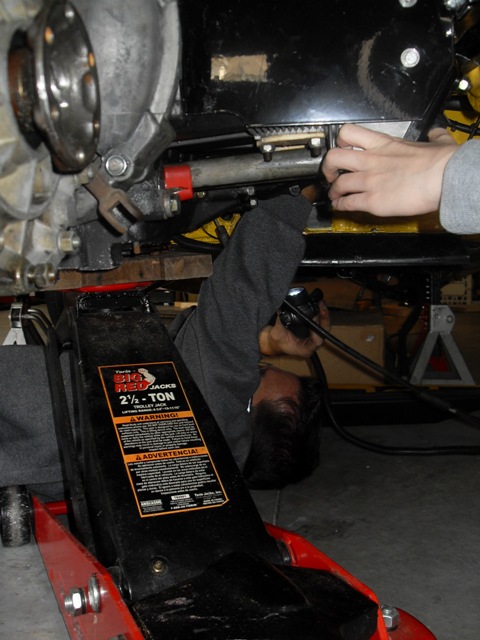
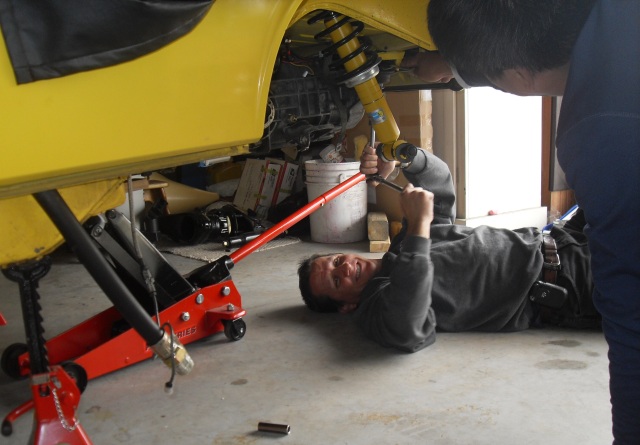
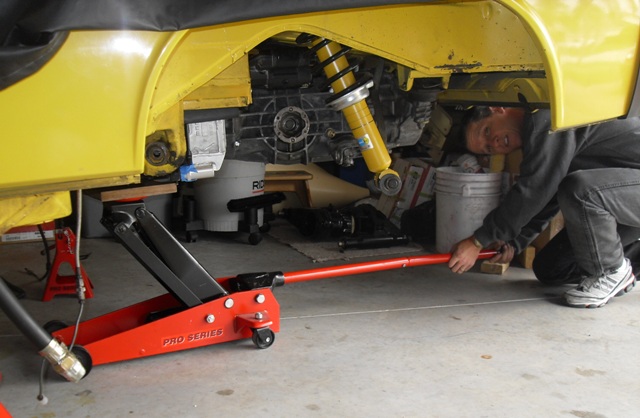
My Porsche fascination began back in the early 70's racing 917 Can Am slot cars in the basement of my house when I was 7 or 8 yrs old...When I was Freshman in college (1982-83)I began a searching for a 912. I couldn't find one in my price range. I met a woman taking some college courses and after studying on campus one evening I walked her out to her car. When when she stopped at a yellow 914 with For Sale sign in the back window I said "is this yours?" She replied..."no it belongs to my husband...he bought it new in 1975 at the dealer in Sarasota, FL. and he just ordered a new 911SC so this is up for sale". I asked her for the price and she told me she would have to let me know the next day. Within three days I purchased the car for $4750.00 with a loan from my dad. I drove it for a the balance of my college years at the University of Florida. Much fun...many autocrosses and few DE's with PCA. The car sat on jackstands in my aunts garage from 1988 until 2001. It had battery tray rot and needed an inner wheelhouse, rear floor pan etc. I began working on its restoration. About two years ago I decided to convert it to a six after picking up a motor and many conversion pieces from a guy who had planned to convert his 75 914 to a six...Within about a month I found out that another local guy here in Orlando by the name of Rick purchased the 75 roller from Jim.. the guy I bought the conversion bits from. After meeting him through PM on this site he told me he planned to convert the roller to a six as well ! The world of 914's is crazy...Here are a few pics of the car. I will begin posting more as the project progresses. Today I rough installed the RJ bulkhead mount.
Posted by: FourBlades Sep 13 2008, 03:30 PM
Can't wait to see more pictures. ![popcorn[1].gif](style_emoticons/default/popcorn[1].gif)
I am in Melbourne doing a Raby 2270 in a rusty wreck.
Let me know if you need parts, I may have some rust repair stuff for you.
John
Posted by: bcheney Sep 13 2008, 03:31 PM
another pic
Attached thumbnail(s)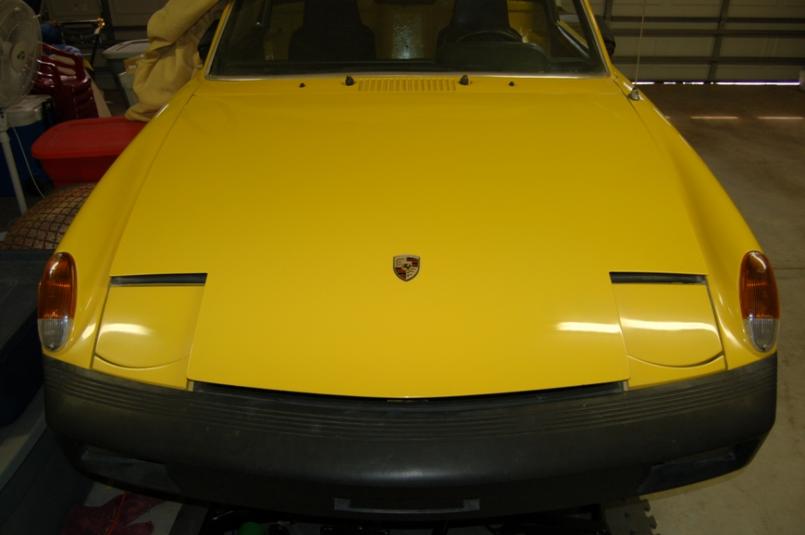
Posted by: bcheney Sep 13 2008, 03:32 PM
pic
Attached thumbnail(s)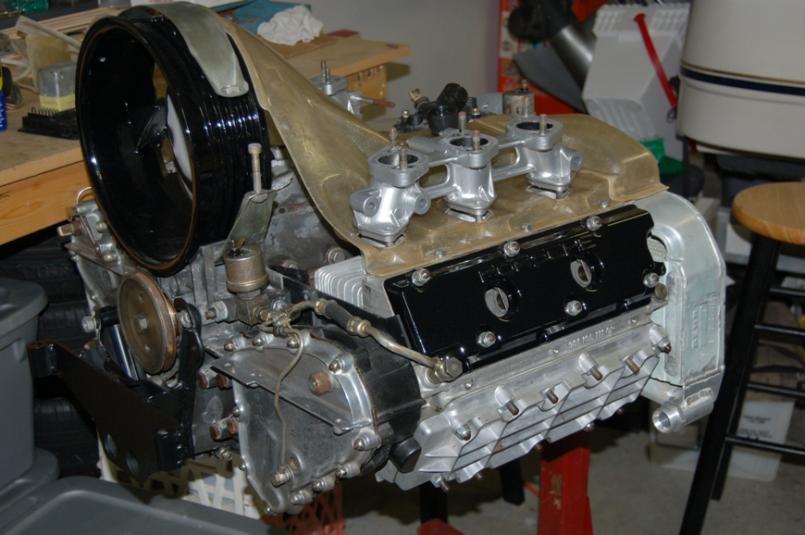
Posted by: rfuerst911sc Sep 13 2008, 03:34 PM
Hey Brian it's about time you get going on that conversion  How did the Rich Johnson mount install go? As you stated you purchased all the /6 conversion parts and I bought the roller.........................small world. Your car looks good and soon we'll drive them over to Tampa and give TC a hand with his " dealership of 914's " he has
  If you need anything just holler.
Posted by: bcheney Sep 13 2008, 03:43 PM
pic
Attached thumbnail(s)
Posted by: bcheney Sep 13 2008, 03:44 PM
pic
Attached thumbnail(s)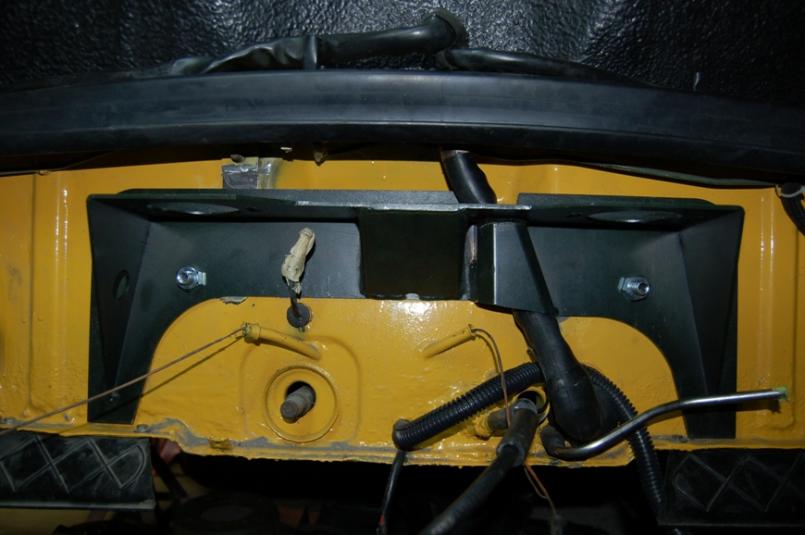
Posted by: bcheney Sep 13 2008, 04:01 PM
Thanks Fourblades and Rick! I really want to get this thing done. Here is a list of a few parts that are sitting in my garage awaiting installation
1. Powdercoated front suspension with M-Calipers 911 vented rotors and Bilstein
Sports
2. Powderoated 5 bolt conversion rear trailing arms compliments of Eric Shea at
PMB with 914/4 V-Caliper kits, vented 911 rotors and Bilstein Sports
3 GT engine lid from "Sergio" PCA7GGR on this site
4. 4-6x16 Fuchs
and many, many more
I want to be done before Rick. So, I really need some encouragement from my 914 brothers...carr914, URY914, SMG, rfuerst911sc, Glenn at Pelican Parts, 914rrr, and watsonrx13. Rick says he'll be done by Christmas.
Posted by: scotty b Sep 13 2008, 05:11 PM
Nice car and don't take this the wrong way but that hood crest is riding a bit high. 
Posted by: carr914 Sep 13 2008, 06:06 PM
Brian Git-R-Done. I took a ride over to URY's house today for the 1st time with the Mega-Phones sticking out the back. Afterword, I had two young chicks that wanted rides. I gave a ride to the one that I knew was of age. 
T.C.
Posted by: watsonrx13 Sep 15 2008, 06:53 AM
Brian, looks great....Glad to see you working on the car... I've finally figured out the FI on my second project car and hopefully will have it drivable (insured) soon. The weather should be turning cooler so I'll arrange another TBB. Let us know if you need some help in the near future...
-- Rob
Posted by: bcheney Sep 15 2008, 07:15 AM
Will do Rob. Glad to hear about the FI. Keep pluggin away!
Posted by: brant Sep 15 2008, 09:34 AM
Brian,
what color is that
(name or code)
it looks great
I like!
keep up the good work
brant
Posted by: roadster fan Sep 15 2008, 02:33 PM
Keep posting pics of the progress, looks like a nice ride!
Jim
Posted by: URY914 Sep 15 2008, 07:22 PM
B,
Wow, now you've advanced to posting pics and thinking about your car stage of the -6 conversion. Maybe another 8-9 years it will see the light of day.
Keep up the hard work. I know you'll git 'er done before Miller gets his Vette running. 
Posted by: bcheney Sep 15 2008, 07:47 PM
Thanks for the compliments guys. The paint code is L13K Summer (Sunflower) Yellow. Millers vette will never run again....
Posted by: bcheney Sep 21 2008, 05:50 PM
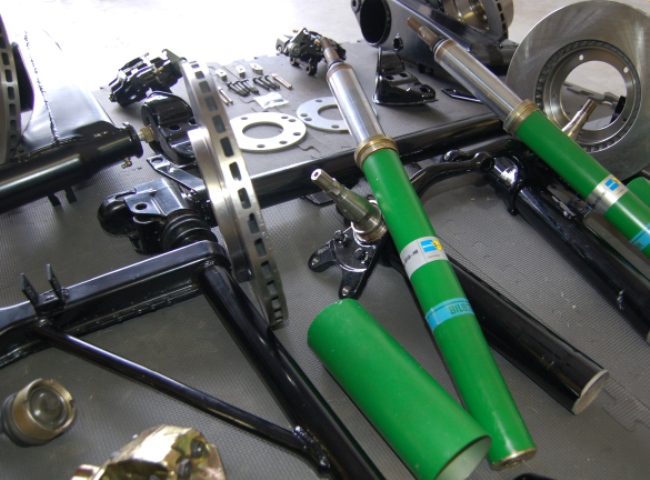
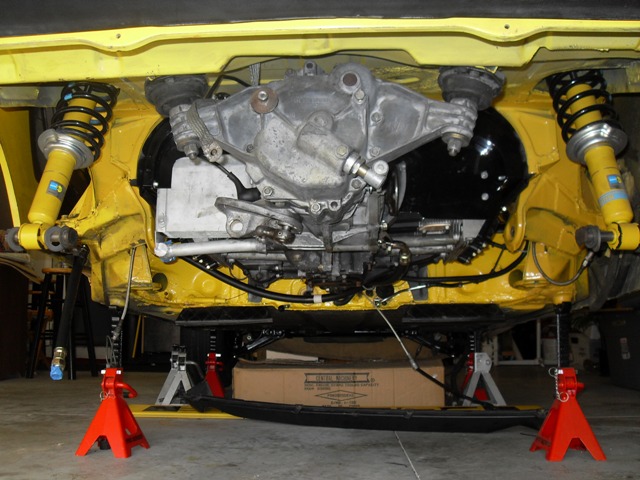
Pics of refurbished suspension, M-Front calipers (V-Caliper Rear Kits) with new strut inserts and vented discs
Attached image(s)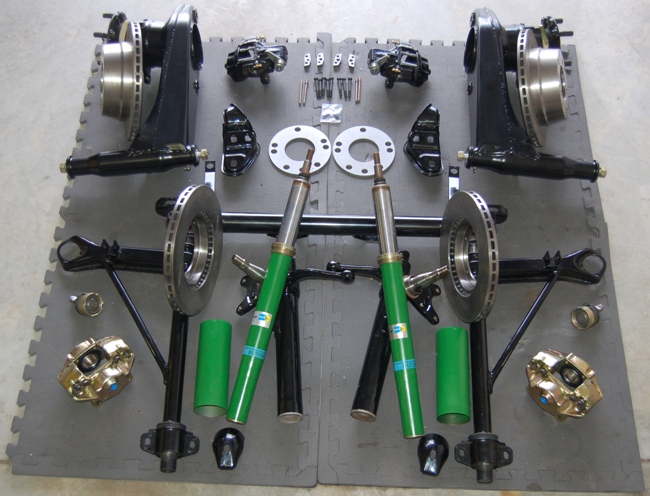
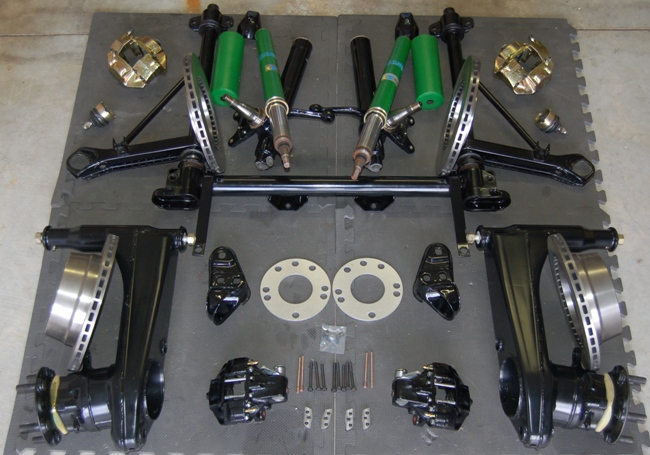
Posted by: bcheney Sep 21 2008, 05:51 PM
Pics of refurbished suspension, M-Front calipers (V-Caliper Rear Kits) with new strut inserts and vented discs
Attached image(s)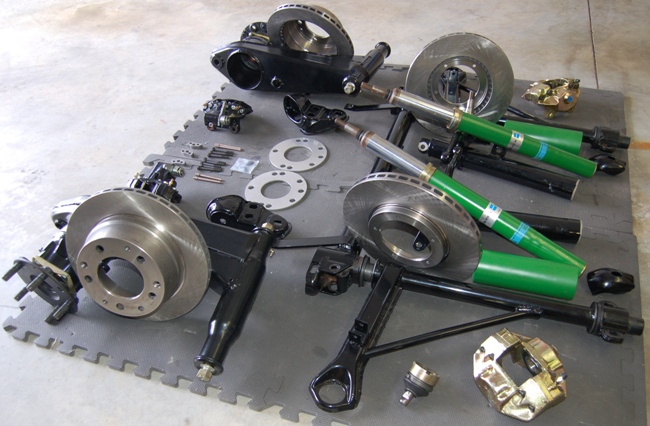
Posted by: bcheney Sep 21 2008, 06:03 PM
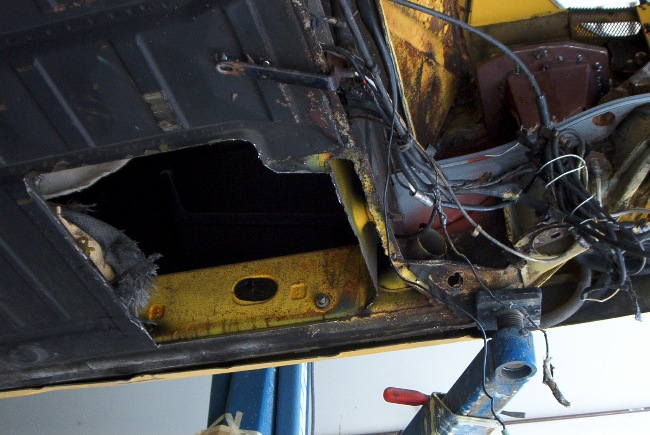
Here are some BEFORE pics of the rust issues...Battery Tray and Inner Wheel House
Attached image(s)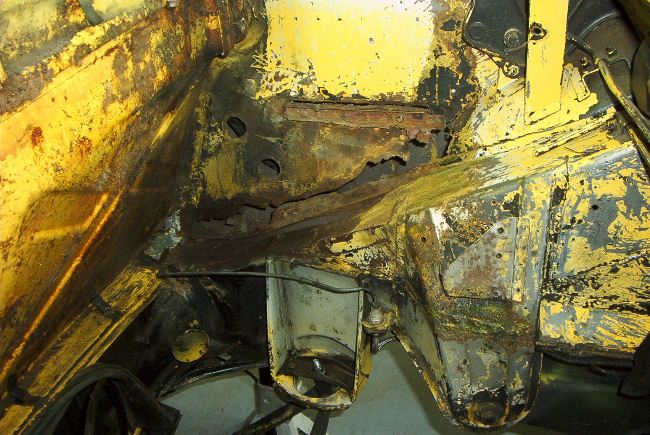
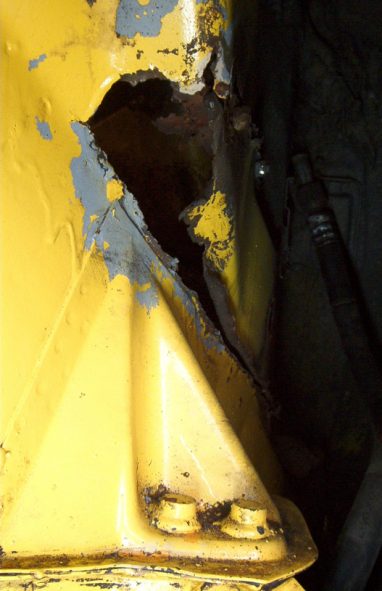
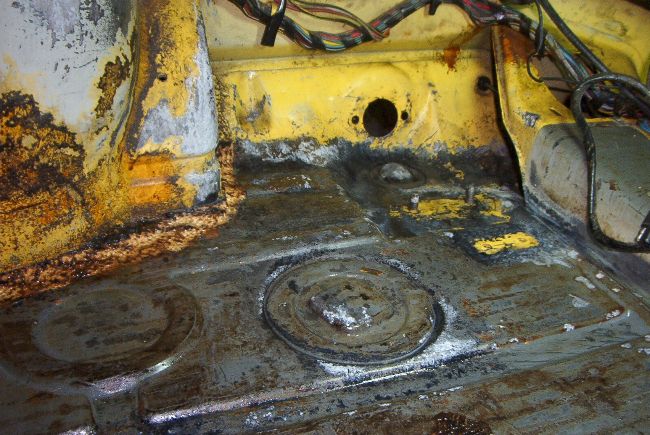
Posted by: bcheney Sep 21 2008, 07:49 PM
More BEFORE
Attached image(s)
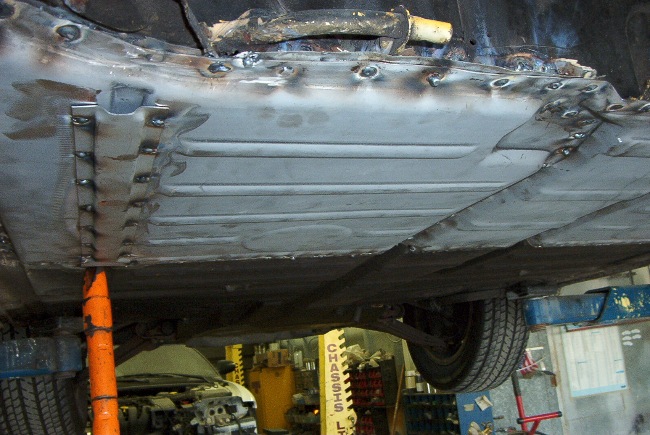
Posted by: bcheney Sep 21 2008, 07:50 PM
AFTER...
Attached image(s)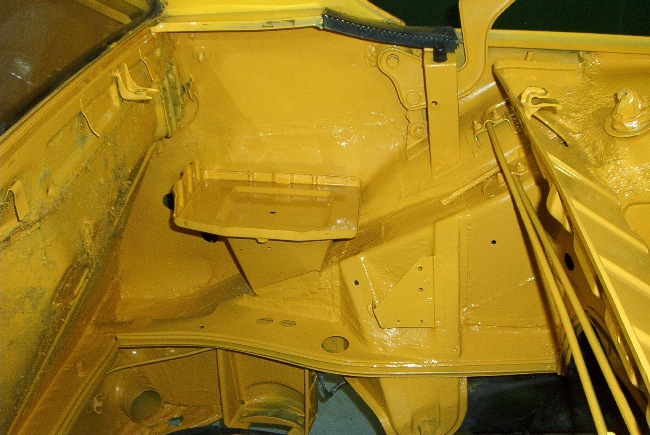
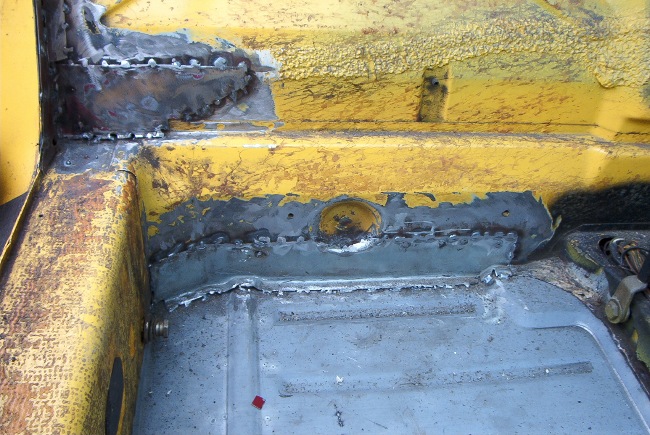
Posted by: bcheney Sep 21 2008, 07:54 PM
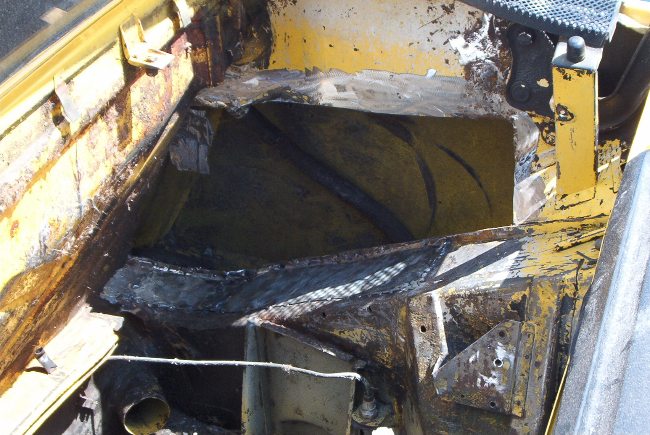
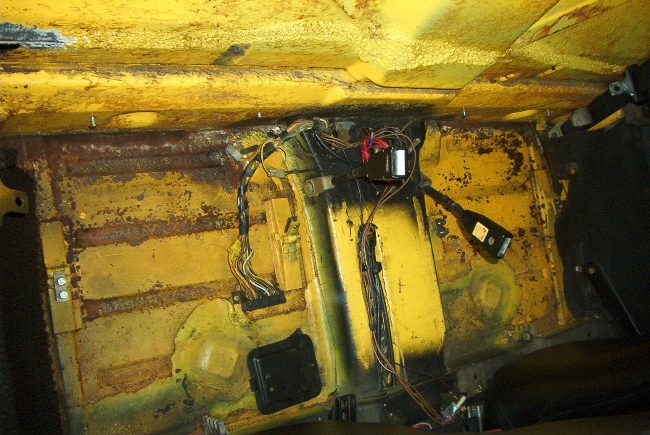
Now how bout a new rear floor...first some BEFORE pics..
Attached image(s)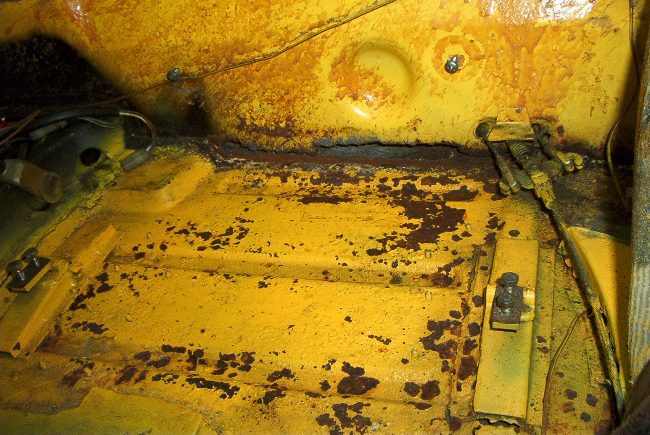
Posted by: greenie Sep 21 2008, 07:56 PM
Wow!
Beautiful work, you are doing a first class job.
I'm going to follow this closely, keep posting lots of pics as you go along.
Posted by: bcheney Sep 21 2008, 07:57 PM
Let's cut that bad floor out!
Attached image(s)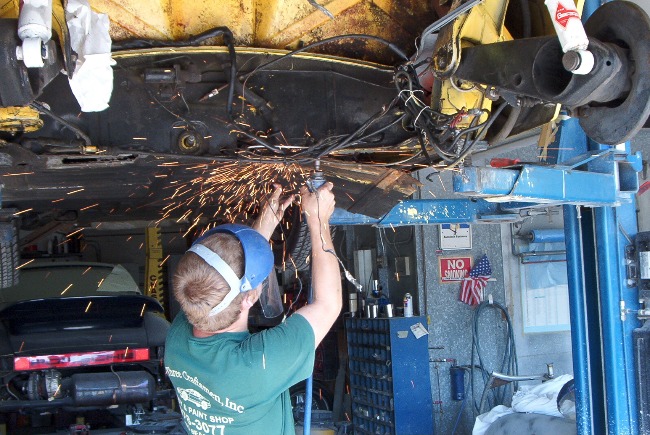
Posted by: bcheney Sep 21 2008, 07:58 PM
Big escape hatch!!
Attached image(s)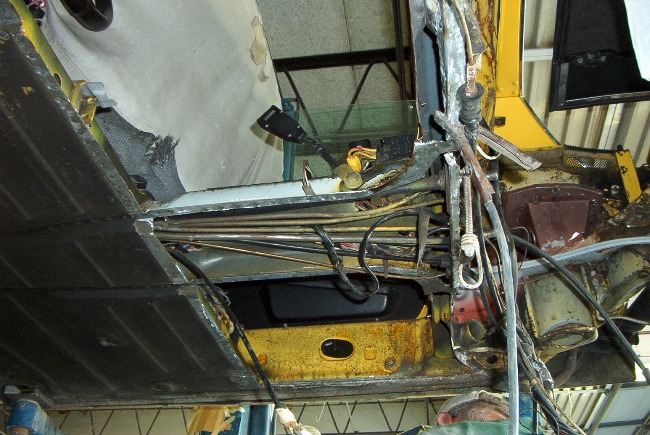
Posted by: bcheney Sep 21 2008, 08:04 PM
Time to close the gaps...
Attached image(s)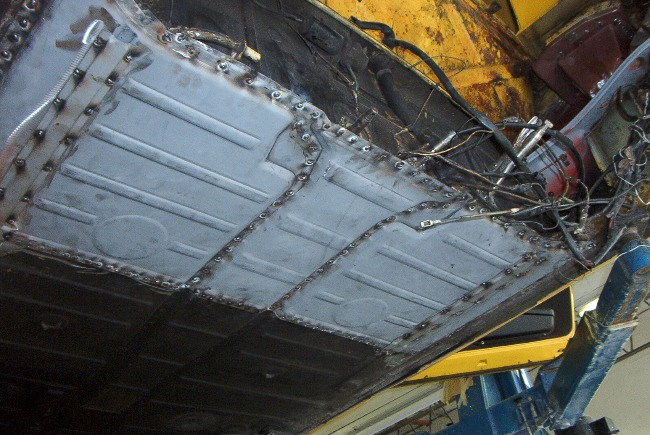
Posted by: bcheney Sep 21 2008, 08:06 PM
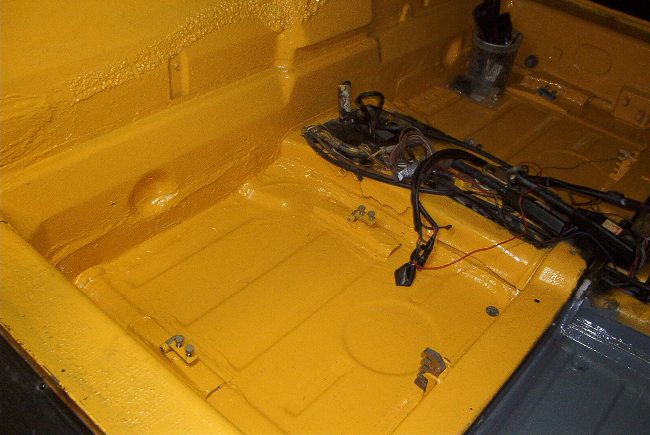
Here is how it turned out on the interior side..
Attached image(s)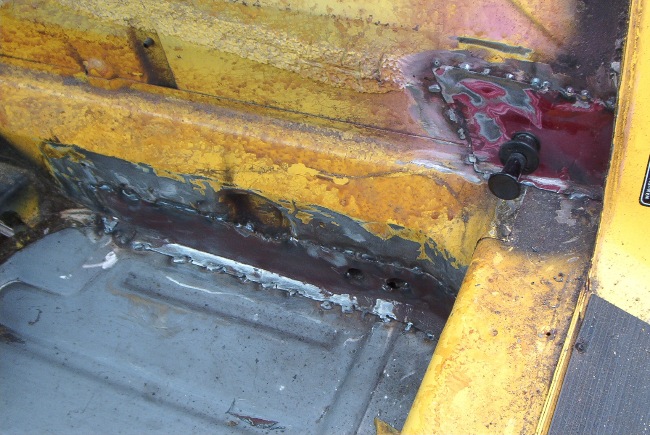
Posted by: bcheney Sep 21 2008, 08:07 PM
continued..
Attached image(s)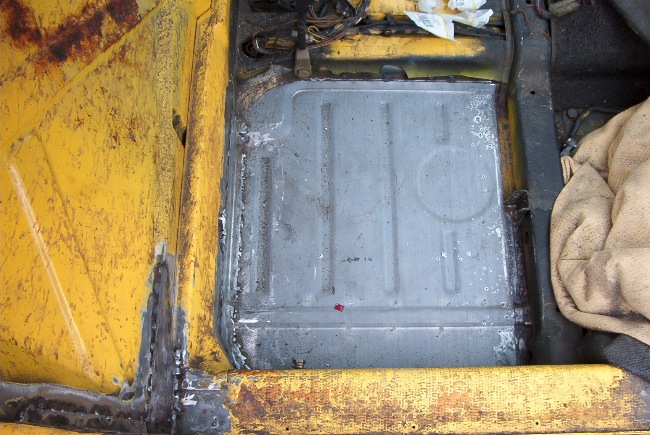
Posted by: URY914 Sep 21 2008, 08:14 PM
WOW, Nice work. 
Posted by: bcheney Sep 21 2008, 08:19 PM
The front floors were not as bad as the rear...surface rust only...So, I stripped them down to the metal and used POR Metal Ready treatment and final coated them with POR15. It turned out very nice.
Attached image(s)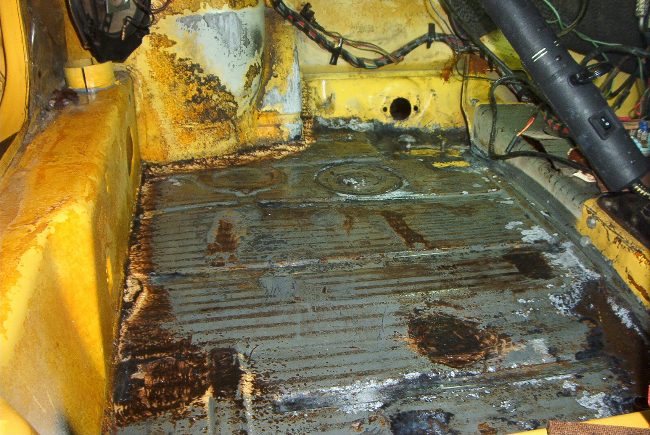

Posted by: bcheney Sep 21 2008, 08:20 PM
The front floors were not as bad as the rear...surface rust only...So, I stripped them down to the metal and used POR Metal Ready treatment and final coated them with POR15. It turned out very nice.
[/quote]
Attached image(s)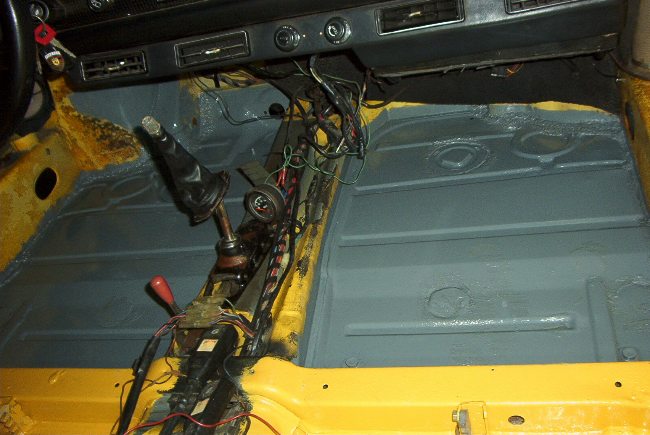
Posted by: Justinp71 Sep 21 2008, 11:00 PM
Nice Work!
What size motor are you going with?
Posted by: bcheney Sep 22 2008, 04:32 AM
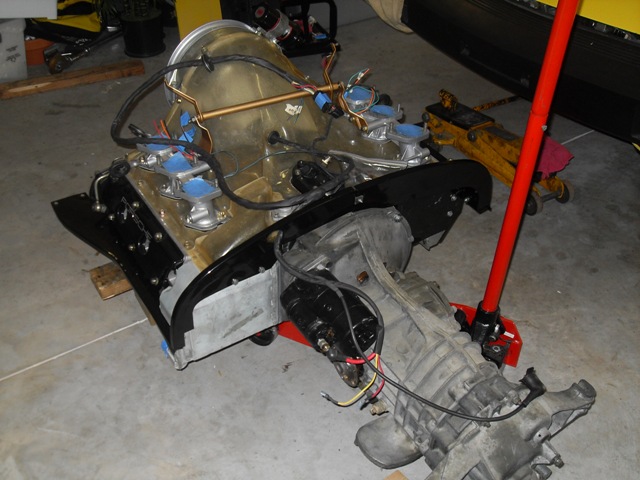
Just a freshly re-built 2.2 with E-cams and Webers. It's an original six case.
Posted by: watsonrx13 Sep 22 2008, 06:24 AM
B, great job.... I love before and after pics.... 
-- Rob
Posted by: bcheney Oct 5 2008, 07:05 PM
Well I got my 6 headers back from JET-HOT this past week. They really look nice and are supposed to do a great job of holding heat inside the pipes giving the engine and tranny get a little break from the temps.
Attached image(s)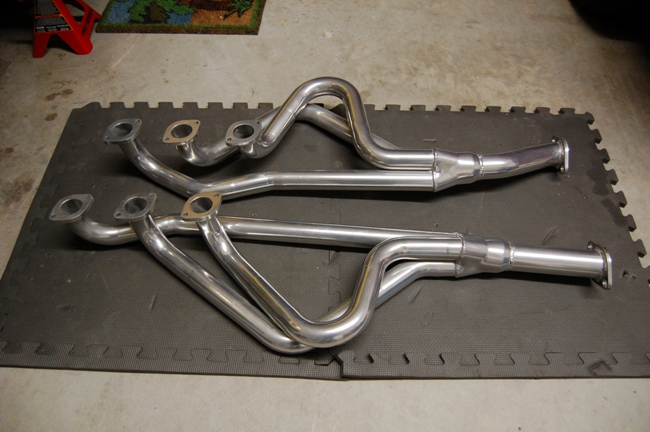
Posted by: bcheney Oct 5 2008, 07:08 PM
Had some time this afternoon...So, I installed the front suspension and steering rack.
Attached image(s)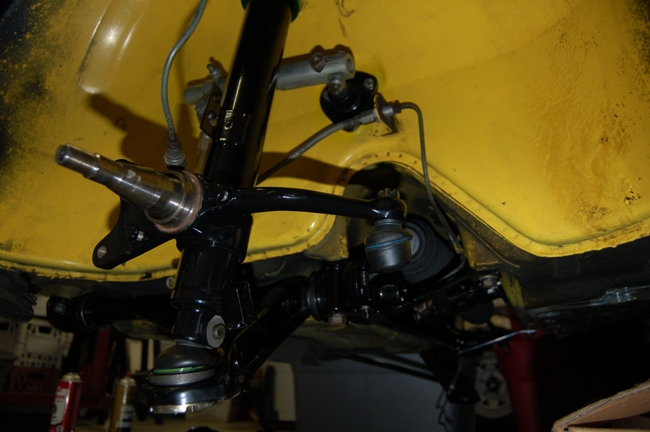
Posted by: jc914 Oct 5 2008, 08:14 PM
Nice work in restoring the car
Posted by: carr914 Oct 6 2008, 07:56 AM
Brian, Paul and I are thinking about starting a Lottery to see who picks a date closest to the completion date of this project.
I'm thinking around your daughter HS Graduation She's the one on the left in Pink
Your buddy, T.C. 
Posted by: Root_Werks Oct 6 2008, 08:04 AM
Great progress! You're doing some really clean work.
Posted by: bcheney Oct 6 2008, 08:42 PM
TC..you are right that is my daugther in the pink. She traded off turning in FTD with my other daughter the day that pic was taken at the Porsche Parade in Charlotte this past summer. Thanks for stirring the pot...I continue to need that so the car gets done. Dan, I appreciate the kind words. I am really trying to do a nice job. It won't be a concours car... I am not much for garage queens. Definately want to catch up with you on how to wire this car up as I am using a internally regulated alternator and a MSD box.
Posted by: URY914 Oct 6 2008, 09:11 PM
Brian, is that you in the background with the bald head?
Posted by: bcheney Oct 7 2008, 05:15 PM
No...that's a guy trying to calculate how many more months it will take me to get my car running so I can come over to Tampa and do donuts in your front yard!
Posted by: URY914 Oct 7 2008, 06:56 PM

No...that's a guy trying to calculate how many more months it will take me to get my car running so I can come over to Tampa and do donuts in your front yard!
OMG, I'll be retired and living in The Villages by then.

Posted by: bcheney Dec 6 2008, 02:04 PM
Here is a picture of the holiday progress on my 6 conversion....If you look closely on the far left you can see the fresh 2.2 under its red blanket sleeping peacfully....Someday I will drive this car...
Posted by: URY914 Dec 6 2008, 03:23 PM
Where's the car?
Posted by: bcheney Dec 23 2009, 07:23 AM
I'm back on this project....It has been a long year with many distractions. I'm awaiting an engine wiring harness from Patrick Motorsports....it should arrive just after Christmas! That will allow me to get moving on the engine install. My sideshifter shift rod is being modified by Rich Johnson as we speak...I have a set of headers that don't allow use of the stock shift rod without some slight changes. I installed the sleeves for my elephant bushings the other day. Front suspension is ready to bolt up. I hope you all have a Merry Christmas and Happy Holidays!
Attached image(s)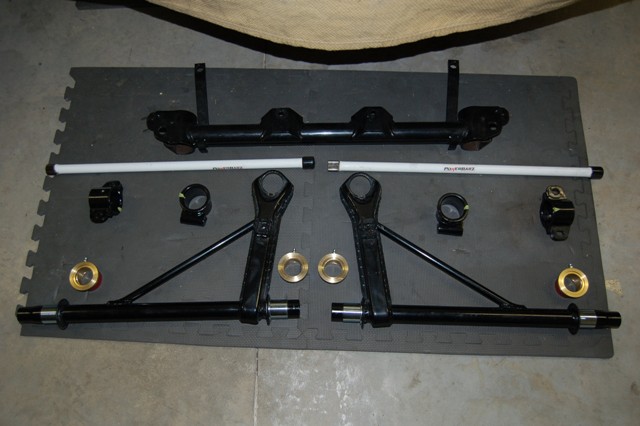
Posted by: Justinp71 Dec 23 2009, 10:54 AM
Keep up the good work! 
Posted by: bcheney Dec 28 2009, 08:24 PM
Today I got both control arms installed with the Elephant Poly Bronze bushings. Here is a picture of my "freshened up" Leistritz Sport muffler with Wurth Zinc coating for that OEM look! I then went to work on cleaning up my front hubs...got'em ready for install tomorrow with Zimmerman discs and rebuilt and plated M-Calipers.
Attached image(s)
Posted by: campbellcj Dec 29 2009, 12:23 AM
Looking good! I know how it is to have these projects stall-out. I just got back to work on my -6 conversion this past summer after it basically sat for 3+ years.
Keep us posted on your progress!
Posted by: rfuerst911sc Dec 29 2009, 05:52 AM
Brian if you're not careful you might finish your car by 2012 !!! Looking good keep going. 
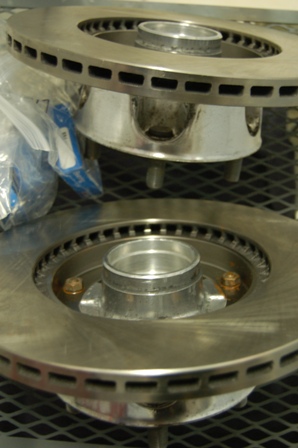
Posted by: bcheney Dec 29 2009, 04:47 PM
More progress today... I got the the front hubs, bearings, discs and M-calipers installed. It feels good to actually move this project forward!!
Attached image(s)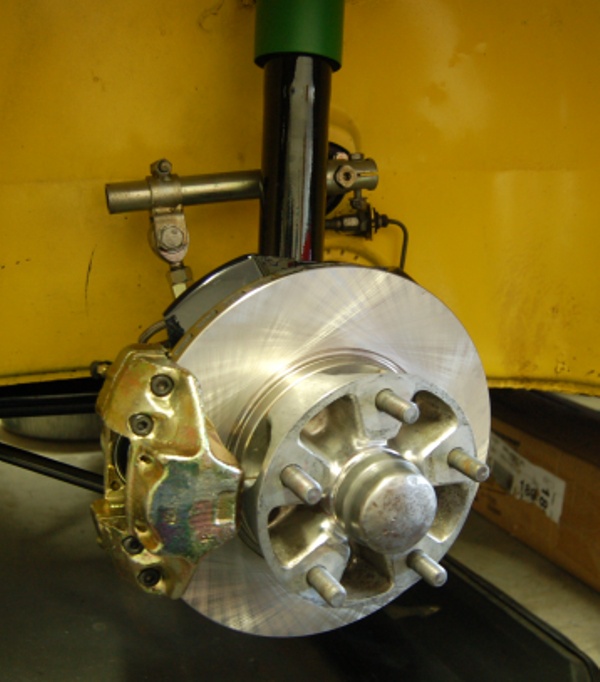
Posted by: bcheney Apr 4 2010, 05:37 PM
OK....it's not much to report...however, it is progress. I cut the hole in the engine shelf for the oil tank to engine oil line today. Cleaned up the and painted the exposed metal surfaces from the cut. TC bet me that I wouldn't get anything done this weekend....
Posted by: effutuo101 Apr 4 2010, 06:30 PM
Very nice! I love reading about another car being brought back. I love my 2.2. You have to peddle it a little harder then by 2.0 4cly, but the result is well worth it!
Might have to see about changing over to fuel injection. That might be fun.
Posted by: rfuerst911sc Apr 4 2010, 06:31 PM
Keep going Brian. Today I messed with the carb settings specifically opened up the idle jet settings. Opened them up about half a turn each and that really transformed how she ran. Can't wait to have our yellow cars side by side. What does TC owe you ?
Posted by: URY914 Apr 4 2010, 07:16 PM
Well done B!!!
Posted by: bcheney Oct 25 2010, 05:26 PM
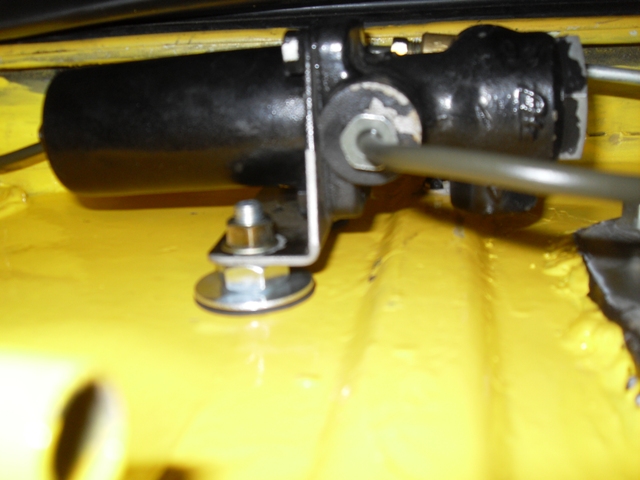
Ok... thanks to words of encouragement from Eric Shea and some parts from Bruce Stone I have made some progress on my -6 conversion. I relocated and changed my brake pressure regulator due to the fact that I'm using a RJ -6 Engine mount. My car is a 75. I had to obtain an early model 70-72 brake pressure regulator since the one that came stock on a 75 had one output line that came out of the regulator facing the firewall. This set up would not work in the relocated postion (too many tight bends would have been needed with the new hard lines. I never learned how to weld...So, I used through bolts, neoprene and regular washers, wavy's a "spacer nut" and a couple of yellow zinc nuts to mount it up. Here are a few shots to prove I actually work on this conversion from time to time.
Attached image(s)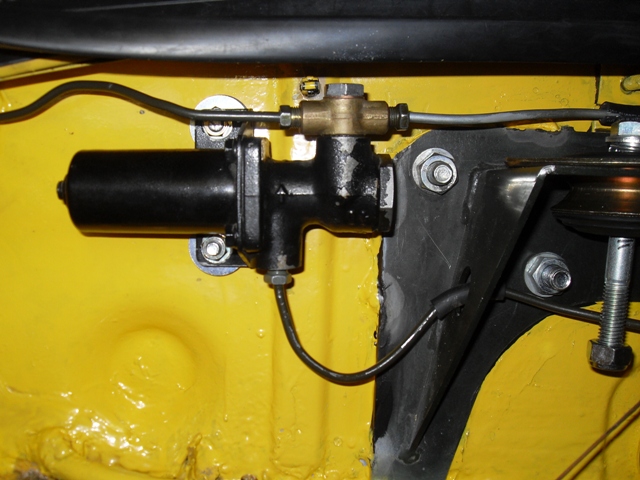
Posted by: MikeSpraggi Oct 26 2010, 01:40 AM
I was following your thread as well and have vowed not to give a completion date again for any of my 914 projects. I've been trying to get this completed, literally for years. Stuff just happens to divert our best intentions and laid out plans. The point is to just keep on moving forward with these projects, even if it's only in the mind. I have "driven" my project many, many mental miles on various tracks. For me, it's what keeps me going and reading other threads like yours to know there really is hope. Keep up the good work.
Posted by: Bee Jay Oct 26 2010, 11:58 AM
Hi Brian. Nice project. I just started on my six conversion and a conversion thread. The summer is gone, so let's get going. My goal is to have a running six by the summer.
Bee Jay
Posted by: markb Oct 26 2010, 04:40 PM
We had a customer who did a complete restore on his 914. When he was asked for a completion date, his answer was always "Monday". It went like that for years. He had to actually bring the car over to show us before we would believe it was done.
Posted by: bcheney Nov 6 2010, 08:18 PM
Well...I had some issues the last few weeks that needed attention and I finally was able to get the accessories mounted up to my motor. It's starting to take shape. I purchased heat insulators, gaskets and new studs for the intake manifolds from PMO via Pelican. They intalled nicely. I want to ring in the new year with this sucker in the car. Wish me some luck...enjoy the engine PORN 
Attached image(s)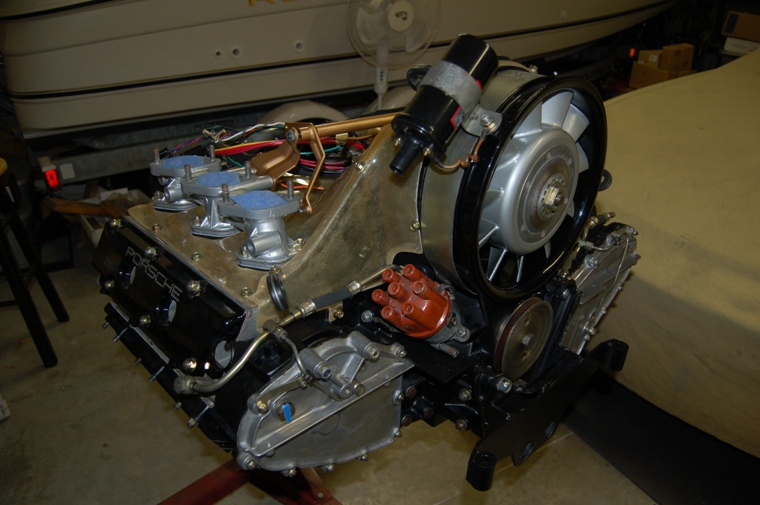
Posted by: carr914 Nov 7 2010, 06:35 AM
Well Brian, you know that you are going to get an extra few days this week on me in our contest. I want a ride when I get back 
Posted by: URY914 Nov 7 2010, 06:38 AM
Did you make that coil bracket yourself?
Posted by: bcheney Nov 7 2010, 07:43 AM
Paul, The coil bracket is actually a stock piece that came with the core motor I purchased many moons ago now. I just cleaned it up a bit.
Posted by: URY914 Nov 7 2010, 05:34 PM
Powder coat it.
Posted by: bcheney Jan 6 2012, 11:11 PM
Been working on the 6 conversion over the last week...Hope to have some nice progress pics over the next few days!
Posted by: bcheney Jan 7 2012, 02:11 PM
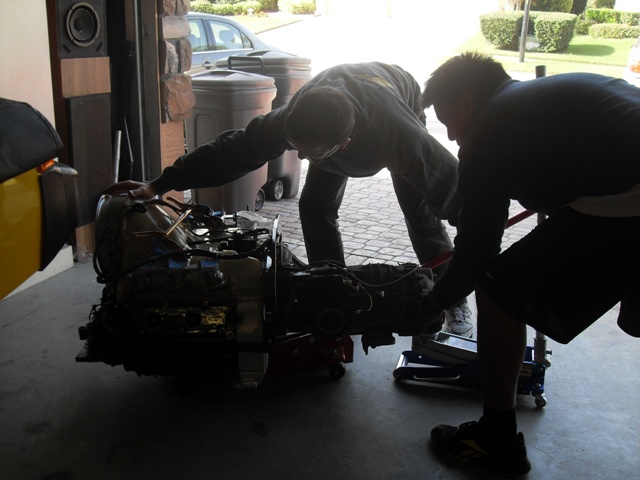
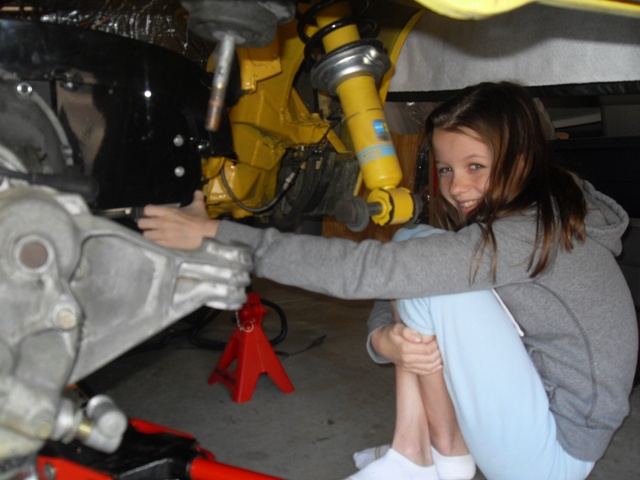
I started posting information about my 6 Conversion in September of 2008. As many of you know these projects take time, persistence, patience etc..etc... I took some time off over the holidays this year. My goal was to have the engine bay final prepped and the engine/tranny installed. Today was the day it got done! My good friend Christopher helped earlier in the week but couldnt make it today...So, another 914 buddy (Mike) answered the bell and helped me out today along our First Mechanic (Sara) my youngest daughter. Enjoy the pics and drink a celebration beer for me today!!
Attached image(s)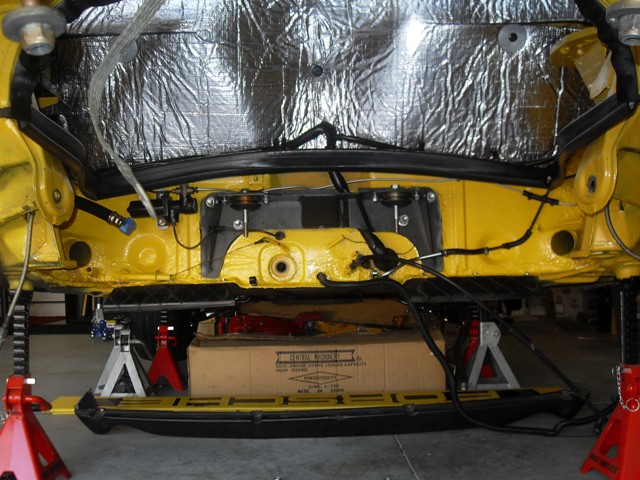

Posted by: mdan Jan 7 2012, 02:14 PM
Nice ! 
I started posting information about my 6 Conversion in September of 2008. As many of you know these projects take time, persistence, patience etc..etc... I took some time off over the holidays this year. My goal was to have the engine bay final prepped and the engine/tranny installed. Today was the day it got done! My good friend Christopher helped earlier in the week but couldnt make it today...So, another 914 buddy (Mike) answered the bell and helped my out today along our First Mechanic (Sara) my youngest daughter. Enjoy the pics and drink a celebration beer for me today!!
Posted by: Socalandy Jan 7 2012, 03:11 PM
looks good!!
Posted by: rgalla9146 Jan 7 2012, 03:29 PM
looks good!!
Great job. Looks beautiful. The fun is near !
Posted by: bigkensteele Jan 7 2012, 04:58 PM
Congrats!
Pretty soon, Sara will want to 
Posted by: rfuerst911sc Jan 7 2012, 06:24 PM
Excellent When is that bad boy going to fire up ?
Posted by: URY914 Jan 7 2012, 09:26 PM
Nice job Brian.
Looks like you have enough jackstands too.
Posted by: JRust Jan 7 2012, 09:32 PM
Beautiful  . Nothing like seeing a six find a new home in a 914
  . Great job & way to get your daughter started down the path to a 914
Posted by: bcheney Jan 25 2012, 04:45 PM
Making progress...Here is the next issue. I mocked up the headers onto the motor. They are snugged up with regular nuts and the drivers side header does not align correctly to the muffler hanger. I bought the headers as part of a stalled out conversion from a world member many years ago. They were new...never installed. I sent them off to Jet Hot to be coated. I am hoping to figure out how to solve the mystery of how the header got "bent" or... maybe there is some other explanation? Have a look at the pics and let me know if you have experienced this. The hangar can get bent back enough to align with the header flange...But, getting it to move downward requires too much pressure in my opinion and I'm afraid of stressing the exhaust studs or heads if I try to force this one into place
Attached image(s)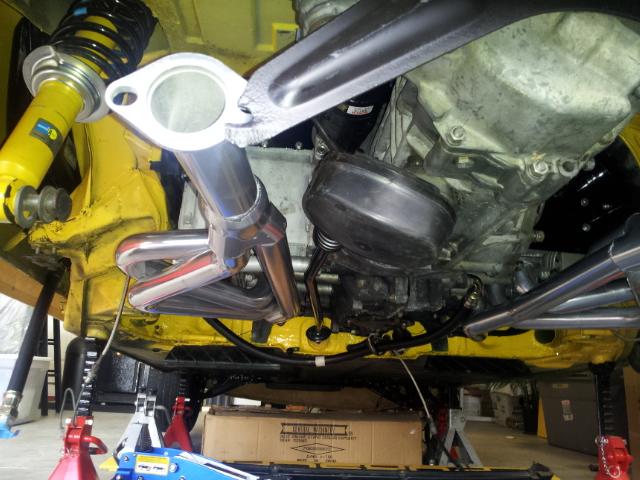
Posted by: mepstein Jan 25 2012, 04:54 PM
I would make a new hanger to fit. A flat plate of stainless steel would look good and probably could be made for a reasonable price.
Posted by: rfuerst911sc Jan 25 2012, 04:59 PM
Bend the bracket back so it's touching the header flange. Make some reference marks and cut off the " ear " on the bracket. Then either reposition the part you cut off or use a large washer and weld it in place. Paint as required and problem solved. Or possibly slot the upper mounting holes of the bracket so you can slide it a little to line up ?
Shouldn't your ground strap go from the chassis to the transmission ? Not to the bracket ?
Posted by: bcheney Jan 25 2012, 05:00 PM
I thought about modifying the existing hanger as well. It will just bother me that the muffler won't be level and will look a bit "off". Very curious to know how it could have gotten bent....
Posted by: bcheney Jan 25 2012, 05:04 PM
Bend the bracket back so it's touching the header flange. Make some reference marks and cut off the " ear " on the bracket. Then either reposition the part you cut off or use a large washer and weld it in place. Paint as required and problem solved. Or possibly slot the upper mounting holes of the bracket so you can slide it a little to line up ?
Shouldn't your ground strap go from the chassis to the transmission ? Not to the bracket ?
I guess this may be all I can do unless I have the headers cut/bent...just a shame that it will end up looking hacked...I thought I remember the ground strap mounting the way I have it. I can change that if necessary. Thanks for chiming in Rick. Can you believe it got bent this much...I had it laying around tucked away. The only time it was out of my sight was when it was at Jet Hot getting coated. Maybe it was bent before I every bought it. Damn...
Posted by: kconway Jan 25 2012, 05:20 PM
Why don't you use a GT hanger that grabs the muffler and supports it from the bolts on the transaxle? Eric Shea might still have one available.
Posted by: bcheney Jan 25 2012, 06:03 PM
I'm not familiar with this type of hanger. Where can I find a pic...Maybe Armando's site?? This would solve the hanger issue but wouldnt address the muffler not being level...
Posted by: URY914 Jan 25 2012, 06:31 PM
What are you going to use for a muffler?
Posted by: AZ914 Jan 25 2012, 06:48 PM
Maybe a dumb question but is your hanger square to the headers? Or is it that one header just isn't long enough?
Posted by: AZ914 Jan 25 2012, 06:50 PM
What are you going to use for a muffler?
I'll be selling a slightly used (<750 mile) Triad 914/6 muffler if interested. Looks great, sounds nice, just too loud under load for my tastes.
Posted by: bcheney Jan 25 2012, 07:12 PM
What are you going to use for a muffler?
I'll be selling a slightly used (<750 mile) Triad 914/6 muffler if interested. Looks great, sounds nice, just too loud under load for my tastes.
I haven't decided on which muffler to hang yet. I have two....2 in 1 out...and 2 in 2 out sport type. I have pics posted earlier in this thread.
Posted by: bcheney Jan 25 2012, 07:15 PM
Maybe a dumb question but is your hanger square to the headers? Or is it that one header just isn't long enough?
The bracket can be bent back in to be flush with the header flange. The big problem is the horizontal positon being to high.
Posted by: kconway Jan 25 2012, 07:46 PM
I'm not familiar with this type of hanger. Where can I find a pic...Maybe Armando's site?? This would solve the hanger issue but wouldnt address the muffler not being level...
Yes, I think Armando got those from Eric. I have an unused Engman hanger if interested. I think the GT bracket provides better support though.
Posted by: carr914 Jan 25 2012, 08:43 PM
[quote name='bcheney' date='Jan 25 2012, 08:12 PM' post='1611760']
[quote name='AZ914' post='1611750' date='Jan 25 2012, 05:50 PM']
[quote name='URY914' post='1611728' date='Jan 25 2012, 05:31 PM']
What are you going to use for a muffler?
[/quote]
. I have two....2 in 1 out...and 2 in 2 out[/quote]

Posted by: rfuerst911sc Jan 26 2012, 05:54 PM
Brian when you measure from the floor to each header flange is there a difference left vs. right ? If yes is the difference aprox. the amount in the pic ? How does the other side line up ? How tight do you have the header hardware ? I would loosen the header hardware and slightly tweek the header so it lines up. Leave the mounting bracket loose also. Then slowly tighten each one to see how it goes. You may find that it will all go together. Remember you are using various aftermarket parts ( engine mount, headers etc. ) and it doesn't take much stack up tolerance to give you what you have. Mine was off a little bit and it worked for me and I have no leaks. Hope this helps.
Posted by: bigkensteele Jan 26 2012, 08:15 PM
Brian when you measure from the floor to each header flange is there a difference left vs. right ? If yes is the difference aprox. the amount in the pic ? How does the other side line up ? How tight do you have the header hardware ? I would loosen the header hardware and slightly tweek the header so it lines up. Leave the mounting bracket loose also. Then slowly tighten each one to see how it goes. You may find that it will all go together. Remember you are using various aftermarket parts ( engine mount, headers etc. ) and it doesn't take much stack up tolerance to give you what you have. Mine was off a little bit and it worked for me and I have no leaks. Hope this helps.
 I had the same thing when I backdated my 4 with SSI exchangers. I loosened them at the heads, and they were willing to line up with the bracket. I put the muffler on to hold everything in place and tightened them back up at the heads. Problem solved.
Posted by: bcheney Jan 26 2012, 10:31 PM
Brian when you measure from the floor to each header flange is there a difference left vs. right ? If yes is the difference aprox. the amount in the pic ? How does the other side line up ? How tight do you have the header hardware ? I would loosen the header hardware and slightly tweek the header so it lines up. Leave the mounting bracket loose also. Then slowly tighten each one to see how it goes. You may find that it will all go together. Remember you are using various aftermarket parts ( engine mount, headers etc. ) and it doesn't take much stack up tolerance to give you what you have. Mine was off a little bit and it worked for me and I have no leaks. Hope this helps.
Great advice Rick. I will work more on these suckers and see what I can come up with. They are mounted tight...without gaskets. I know the gaskets will make up some difference but didnt think it be enough. I will keep my thoughts positive and keep you posted.
Posted by: Series9 Jan 27 2012, 08:23 AM
I thought about modifying the existing hanger as well. It will just bother me that the muffler won't be level and will look a bit "off". Very curious to know how it could have gotten bent....
This is really common.
1. Cut the old hanger so you have about an inch of free space between the end and the flange.
2. Get some 1/8" mild steel stock and cut/round/drill so you have a tab that will bolt to the header.
3. Mount the muffler, put the car on the ground, and level it by jacking.
4. Clamp the tabs to the hanger and tack weld.
5. Disassemble and fully weld the new joints.
James Ellisor's was done like this. Ask him for pictures.
-OR-
Bring it up and I'll do it for you in return for lunch.
Posted by: Series9 Jan 27 2012, 08:29 AM
What are you going to use for a muffler?
I'll be selling a slightly used (<750 mile) Triad 914/6 muffler if interested. Looks great, sounds nice, just too loud under load for my tastes.

Posted by: AZ914 Jan 27 2012, 09:02 AM
What are you going to use for a muffler?
I'll be selling a slightly used (<750 mile) Triad 914/6 muffler if interested. Looks great, sounds nice, just too loud under load for my tastes.
HEY NOW!
Posted by: OU8AVW Jan 27 2012, 10:30 AM
I would pull the header, bolt it to a strong support like a table or work bench like a jig and bend it until it fits. If you mount it well to your support the integrity of the flanges will stay intact and allow you to put the required pressure on the thing to bend it. We're only talking about a small bend over a long run. That's how we make boat railings fit.
I agree, having the muffler askew is unacceptable considering the quality of the rest of the car.
Posted by: bcheney Feb 22 2012, 06:06 AM
[quote name='Series9' date='Jan 27 2012, 07:29 AM' post='1612722']
[quote name='AZ914' post='1611750' date='Jan 25 2012, 07:50 PM']
[quote name='URY914' post='1611728' date='Jan 25 2012, 05:31 PM']
What are you going to use for a muffler?
[/quote]
I'll be selling a slightly used (<750 mile) Triad 914/6 muffler if interested. Looks great, sounds nice, just too loud under load for my tastes.
[/quote]
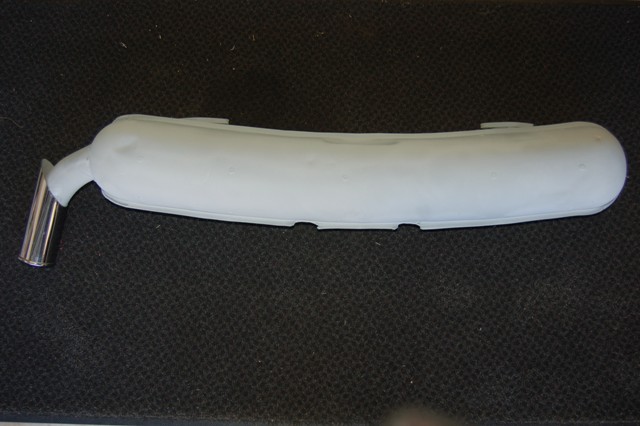
Been delayed once again with the project. I will be rubbing on this muffler set up in the weeks ahead and appreciate the comments/suggestions. I'm sure a solution will be found with all your help. Here are some pics of the two different mufflers I have to use on the car. Just not sure which one will be fitted first....I know the sound of the sport will be nice...just not sure if it will be too loud.
Attached image(s)
Posted by: ellisor3 Feb 22 2012, 06:28 AM
Very Nice Brian. Looks like you will be ready for the Ramble in the fall.
Posted by: Cracker Feb 22 2012, 07:35 AM
WOW! I've been down for 2.5 months and am ready to get back on the road! Impressed with your patience and attention to detail...very nicely done. Enjoy the finished product and great story.
PS - Someone mentioned the "Ramble" in the fall, what are the dates???
Cracker
Posted by: Eric_Shea Feb 22 2012, 08:05 AM
If it's a daily driver, you may not like the sport muffler "at speed". Around town they're perfect.
Also...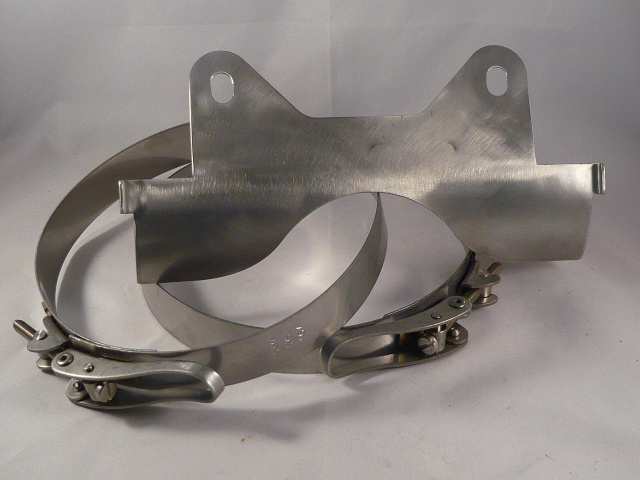
Posted by: JmuRiz Feb 22 2012, 09:07 AM
So, you experts think that a muffler hanger like that is better than modding the stock 2.0/4 exhaust hanger?
Posted by: 9146986 Feb 22 2012, 01:07 PM
It's better 'cause Eric sells them!
Seriously, I like the stock 2.0 muffler hangers. It does look like Eric's gives more support, but I've yet to install one.
Choose your muffler carefully. I've been in a couple 6 conversions that had an unbearable drone at cruising speed.
I'm a big fan of the stock 6 exhaust system, but hey that's just me.
Posted by: bcheney Aug 4 2012, 09:23 AM
Here is the latest on my build. Had to go away from using the OEM Hard oil line because it does clear the RJ bulkhead mount. So, I went to with a Patrick hardline, AN tank adaptor and aeroquip line ($270 all in from PMS shipped). I may end up changing the support for the hardline to the engine case as it was all I had on hand. Overall I am pretty happy with how this came together. I haven't build up aeroquip lines in many years so that was fun.
Attached thumbnail(s)
Attached image(s)

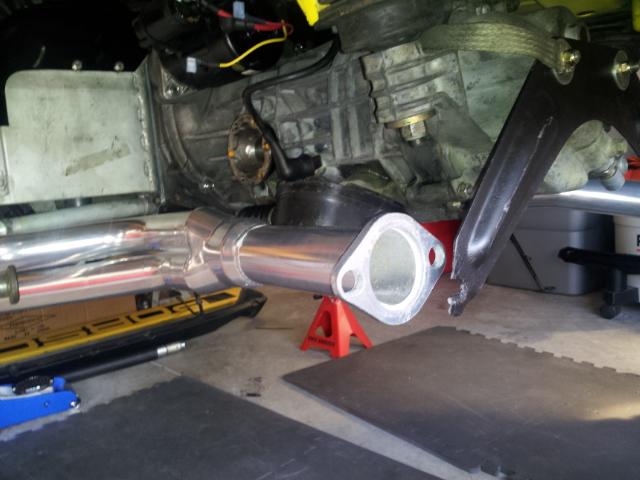
Posted by: bcheney Aug 4 2012, 11:17 AM
Exhaust test fitted.
Attached thumbnail(s)
Posted by: FourBlades Aug 5 2012, 10:15 AM
You are almost there!
John
Posted by: rfuerst911sc Aug 5 2012, 04:37 PM
Nice work Brian but get the damn thing done already we're not getting any younger !!!
Posted by: bcheney Aug 5 2012, 09:04 PM
[quote name='rfuerst911sc' date='Aug 5 2012, 06:37 PM' post='1719711']
Nice work Brian but get the damn thing done already we're not getting any younger !!!
Rick, that is so true...I turned 48 today!! I really want to have it running in time for the Tropical Ramble in November.
Posted by: bcheney Aug 14 2012, 08:54 PM
OK I am trying to keep the ball rolling on this project. A few years ago I had Patrick Motorsports build me up and engine bay wiring harness. I decided to keep the stock relay board from my 75 2.0 in place. PMS built the harness and retained the relay board connector with the necessary modifications/pin outs. They also sent me a wiring harness pigtail (pictured below) as I told them I was going to run a MSD box and tach adapter. Tonight I took everything out of the boxes, laid them on the garage floor and labled them for easy reading and identification. My question is...Is everything here and should I take a leap of faith with some help from all of you to wire this sucker up or... should I suck it up...break out my wallet and just let a professional handle this part of my project??
Attached thumbnail(s)


Posted by: carr914 Aug 15 2012, 03:44 AM
What are you going to run for a Dizzy?
Posted by: URY914 Aug 15 2012, 04:19 AM
Take everything to Joe and write him a blank check.
Posted by: carr914 Aug 15 2012, 04:34 AM

Posted by: bcheney Aug 15 2012, 05:13 AM
What are you going to run for a Dizzy?
Stock Dizzy with points.
Posted by: FourBlades Aug 15 2012, 06:14 AM
These are not too hard to figure out, can't be because I did mine.
John
Posted by: bcheney Aug 15 2012, 06:20 AM
These are not too hard to figure out, can't be because I did mine.
John
Did you solder on connectors or use waterproof crimp style and then heat shrink?
Posted by: bcheney Sep 17 2012, 05:52 PM
I continue to make progress. Spent yesterday installing all the brake lines. Additionally, I finally removed the AC hoses that were in the car from years ago. They were a real bugger to get out....Last week installed the hand throttle kit I bought from the group buy...still have to install the wing plate on the pedal end. Next up is installing the MSD box in the trunk. I still dont feel comfortable tackling the engine harness wiring....need some more encouragment.
Posted by: bcheney Oct 3 2012, 07:04 AM
Getting closer and closer...The Tropical Ramble is the goal for roll out! November 9th is coming
Posted by: FourBlades Oct 3 2012, 01:36 PM
Did not notice your question until now.
I always crimp and heat shrink connectors and don't solder.
John
Posted by: bcheney Oct 10 2012, 09:15 PM
My 6 conversion is finally off the jackstands! Here are a few pics for your viewing pleasure...
Attached image(s)


Posted by: BKLA Oct 10 2012, 10:21 PM
Sweet!!!!!!
Posted by: URY914 Oct 11 2012, 04:29 AM
Nice carbs! 
Posted by: carr914 Oct 11 2012, 12:24 PM
Yep, off jackstands & onto the Tow-Truck!
Posted by: bcheney Nov 1 2012, 07:20 PM
Well things are progressing. The shop that built my Motor (Formerly Zotz Garage NOW German Excellence) was tasked with checking out the engine and dash gauge wiring, getting the engine fired up, tuning the carbs and aligning the front and rear suspension. The motor fired today for the first time! A sweet sound to my ears after so many years of work on this project. There a few more details to work out....and the plan is to drive the car up to the Tropical Ramble next week! Click the YouTube link below and enjoy the sound.
http://www.youtube.com/watch?v=TPVVWOyUlJE&feature=player_detailpage
Posted by: mepstein Nov 1 2012, 08:03 PM
Congrats!
Posted by: oldschool Nov 1 2012, 10:05 PM
Well things are progressing. The shop that built my Motor (Formerly Zotz Garage NOW German Excellence) was tasked with checking out the engine and dash gauge wiring, getting the engine fired up, tuning the carbs and aligning the front and rear suspension. The motor fired today for the first time! A sweet sound to my ears after so many years of work on this project. There a few more details to work out....and the plan is to drive the car up to the Tropical Ramble next week! Click the YouTube link below and enjoy the sound.
http://www.youtube.com/watch?v=TPVVWOyUlJE&feature=player_detailpage
sweet.......6
Posted by: rfuerst911sc Nov 2 2012, 02:22 PM
Congrats Brian it sounds good. Tell Donnie I said hi.
Posted by: URY914 Nov 2 2012, 02:34 PM
WOW! And some said this day would NEVER happen. I'll tell Miller on Sunday if I see him.
Posted by: Trekkor Nov 2 2012, 03:21 PM
Exciting!
KT
Posted by: carr914 Nov 2 2012, 05:43 PM
But will it make it to the Tropical Ramble?
Posted by: bcheney Nov 2 2012, 07:25 PM
But will it make it to the Tropical Ramble?
That is the goal...we had several challenges this week but we cleared some hurdles today and Monday could be the final day at the shop. I am staying positive!
Posted by: bcheney Nov 11 2012, 09:26 AM
Everthing came together and I drove the car for the first time Thursday night! It has a 2.2 E Spec motor built on an original 914/6 case. It drives fantastic and sounds great!! Stayed up late to get it ready for the Tropical Ramble the next day...Joe having the Tropical Ramble as my final goal to get the car done was awesome! As you all know it has been an incredible journey to get this ride back on the road. Many folks to thank...Harro Zitza - RIP (Zotz Racing), Don Northrop & Rick Brian Bell (German Excellence), TC, Rick F, Paul W, Rob W, Rich Johnson, Eric (PMB), Jonathon (GPR), Glenn Sager (Pelican), James (Patrick Motorsports), Joe (Series 9), Serigo Meza, Tom (B.A.M.), Adam Masters, Christopher Nye, Mike Danganan, my daughters Amanda & Sara and my wife Leslie. Here are a few pics from the last few days...I couldn't have been more fun!
Attached thumbnail(s)
Attached image(s)

Posted by: bcheney Nov 11 2012, 09:30 AM
**
Attached image(s)


Posted by: Socalandy Nov 11 2012, 10:31 AM
Congrats Looks and sounds Awesome!!!
Posted by: Eric_Shea Nov 11 2012, 11:17 AM
Change your signature! 
I have crank case breather hose btw.
Posted by: brant Nov 11 2012, 11:18 AM
really nice job
Posted by: URY914 Nov 11 2012, 11:51 AM
So I rode with Brian to dinner on Saturday nite at the Ramble. I got out of the car in the parking lot and closed the door on the seat belt and it was caught in the door. I went to open the door and when I pulled the handle I felt the plastic slider tab break off. 
Yep, that's right. I'm the guy that fixes broken door handles and I broke his. 

Brian, PM me your address and I'll send you a couple of replacement sliders. SORRY! 
Posted by: carr914 Nov 11 2012, 05:04 PM
So I rode with Brian to dinner on Saturday nite at the Ramble. I got out of the car in the parking lot and closed the door on the seat belt and it was caught in the door. I went to open the door and when I pulled the handle I felt the plastic slider tab break off.
Yep, that's right. I'm the guy that fixes broken door handles and I broke his.
Brian, PM me your address and I'll send you a couple of replacement sliders. SORRY!
Posted by: ellisor3 Nov 11 2012, 06:34 PM
Very nice job Brian. She ran flawlessly this weekend. Well, until you let Paul in.
Posted by: bcheney Nov 12 2012, 06:50 AM
Thanks for the nice compliments guys. Here are a few more pics. Still working on the interior...
Attached image(s)


Posted by: FourBlades Nov 12 2012, 07:44 AM
That is a great sounding and looking car!
John
Posted by: bcheney Nov 14 2012, 05:49 PM
Here are links to YouTube videos of my car on some acceleration runs! Let me know what you think!
http://www.youtube.com/watch?v=ifA9YqVVHCs
http://www.youtube.com/watch?v=awtaTBptpwY
Posted by: KENNY Nov 14 2012, 06:03 PM
I love the Sound of the car Brian and it looks awesom .
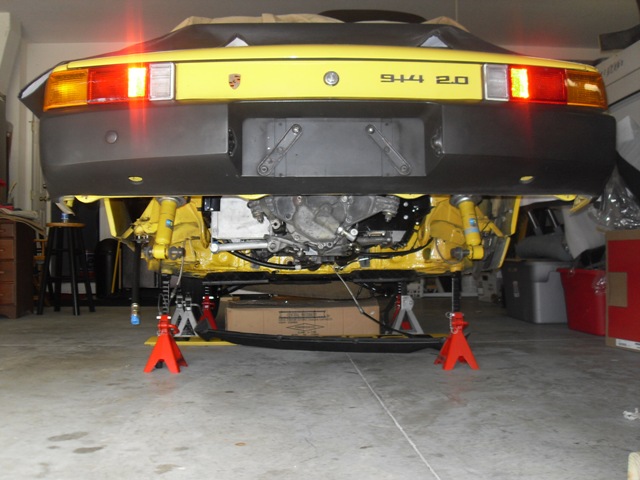
Posted by: bcheney Feb 17 2013, 09:56 PM
Lights on
Attached image(s)
Posted by: carr914 Feb 18 2013, 09:43 AM
Lights on, But Nobody's Home
Powered by Invision Power Board (http://www.invisionboard.com)
© Invision Power Services (http://www.invisionpower.com)