Printable Version of Topic
Click here to view this topic in its original format
914World.com _ 914World Garage _ My First Build Thread
Posted by: skeates Sep 15 2008, 12:09 AM
So...technically I started this restoration a month ago, but now it has a thread 
A little history...This was my first car. I picked it up for $1200 back in high school and had it towed home with mice in the glove box and hoses going to no where in the engine compartment! My dad and I had it up and running off and on for three years before I shipped off to southern California for college. It has sat in the 'rents driveway for 5 years now  waiting for the restoration that it deserves
Well...now that I'm edumacated and have a "real" job (and also have moved back to Northern California) my pockets are slightly deeper than in high school and the build has commenced!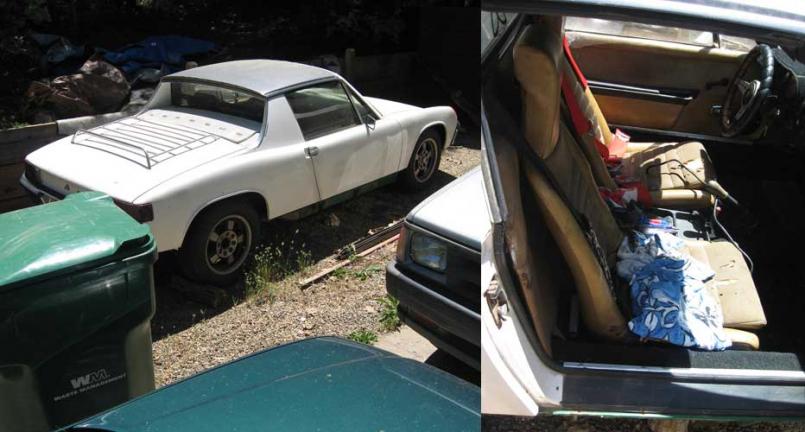
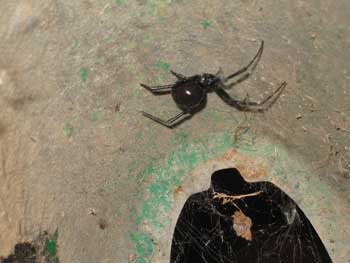
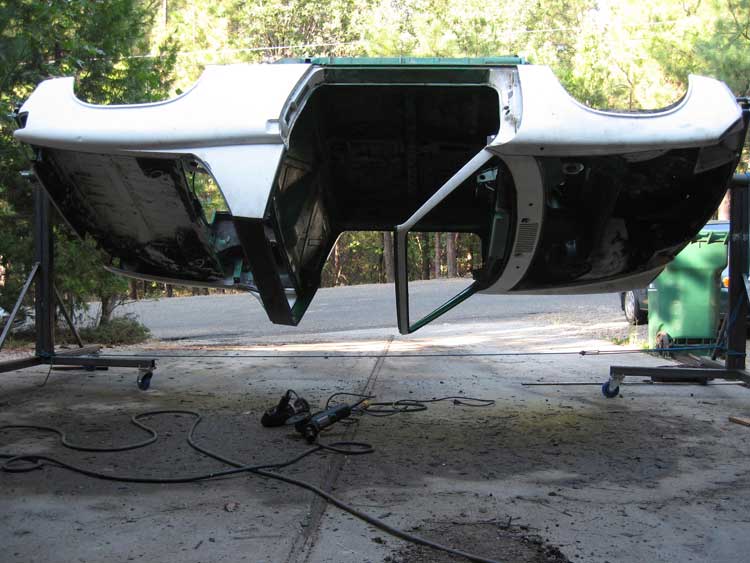
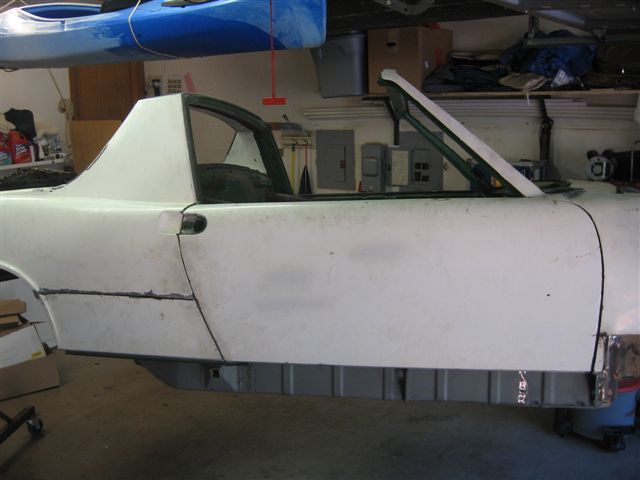
So far I have stripped it to a tub, built me a rotisserie and washed off about 30 years of road grime and PO molestation. Along the way I even made a new friend! 
Posted by: skeates Sep 15 2008, 12:17 AM
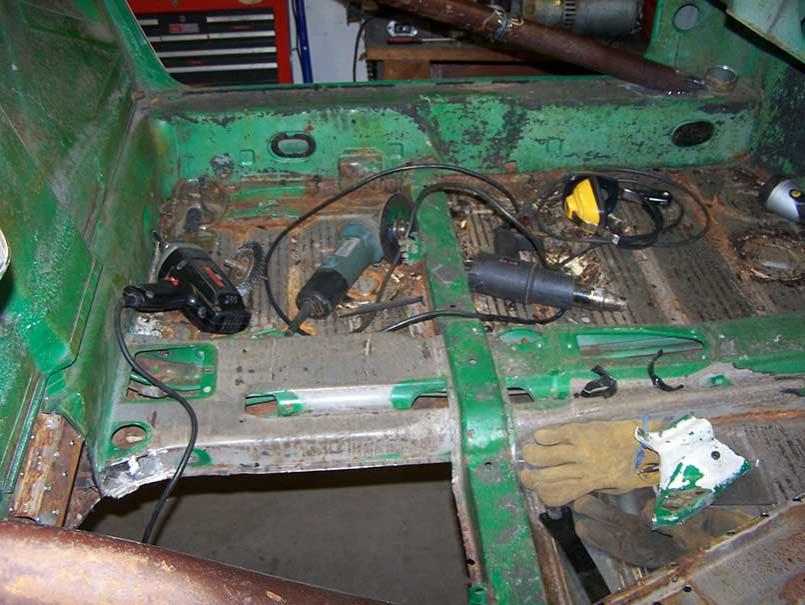
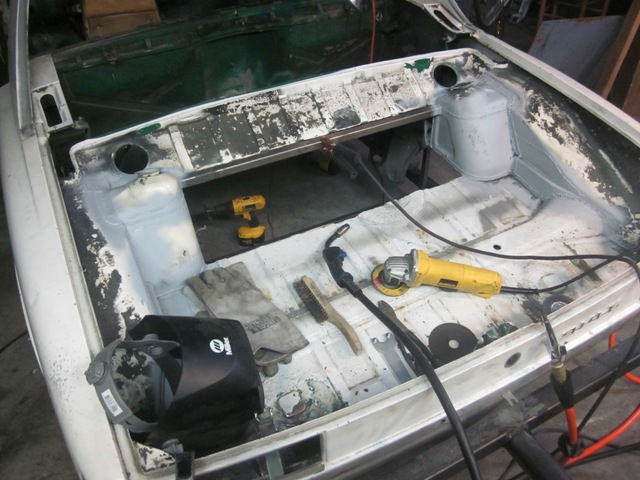
Here are some picks of the car as it currently sits. Notice the prodigious amount of grime that I now get to sweep up 
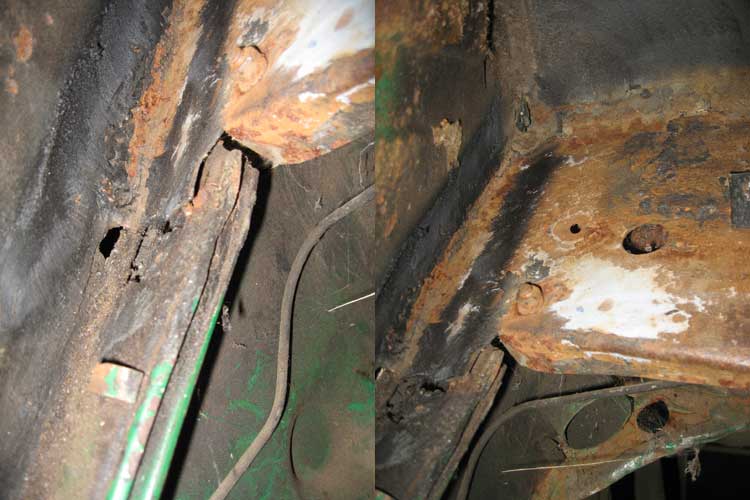
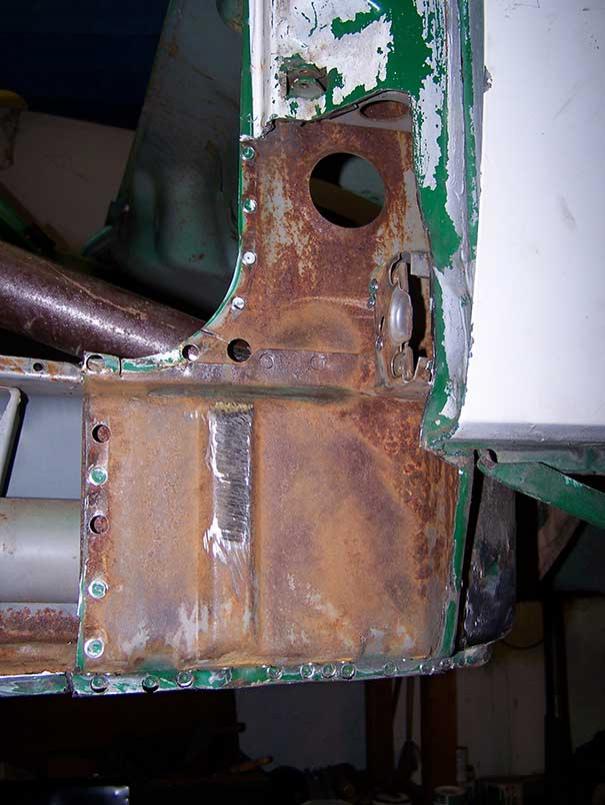
I've started looking closer at the rust spots and am pleasantly surprised that there is not more  ....though it helps to start with low expectations. It looks like I will need to replace the engine shelf under the battery tray (which seems to have already been replaced by a PO). Does anybody know what the best way is to check the inside of the longs for rust? I figure I'll have to cut the exterior off, just wondering where to do it at.
Here are some close-ups of the hell-hole and the engine shelf under the battery tray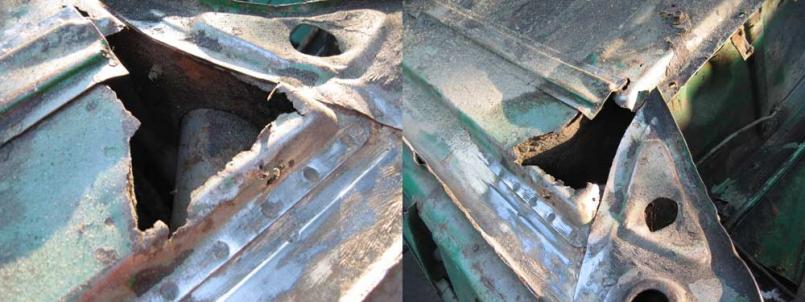
Posted by: 749142 Sep 15 2008, 12:26 AM
i dont know anything about the longs but just wanted to say congrats on getting started keep it up
Posted by: roadster fan Sep 15 2008, 02:53 PM
Looks good!
Before you get too carried away cutting out metal, I think you should brace the door openings while it is on the rotisserie.
The longs have some rust inside, they all do. There have been several threads about it, I will search and post some links.
Glad you got started on the build, keep us posted.
Jim
Posted by: jcd914 Sep 16 2008, 12:32 AM

You should get some bracing in the door ways to keep it straight from the beginning.
There are some dimensions in the 914info section here so you can measure and set the distance from the windshield frame to the roll bar.
AND 
What part of sacto are you in?
I'm out in Carm.
Good Luck
Jim
Posted by: skeates Sep 16 2008, 10:13 AM
Thanks for the welcome. My wife and I are in East Sac.
Yeah, my next step is to get some metal and brace the door gaps before I go to town on the metal work. Those measurements would be really helpful, I might take a little break from work today and do some searching
Posted by: skeates Sep 22 2008, 11:24 PM
I started the big dig into the hell hole this weekend and have yet to get to the bottom the proverbial rabbit hole. Before any cutting started I made use of some scrap metal to make the braces for the door jams.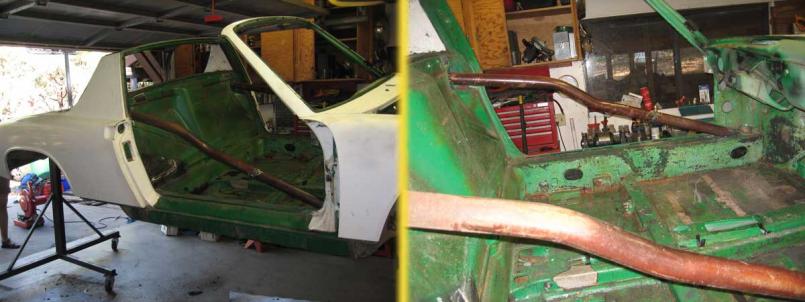
I know they are a bit ... thick ... but hey, the metal was free. Donated from the old roll bar out of my dad's old Jeep (After he upgraded).
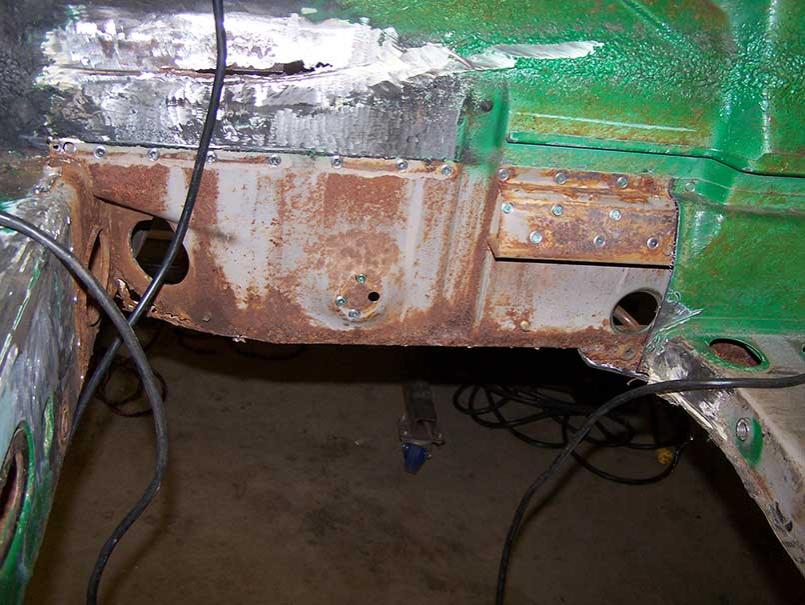
I cut out what was left of the battery tray and started into a past owner patch job only to find a treasure trove of rust. Its as if the guy who did the patch just welded in some metal w/o touching the rust beneath it  Every cut only seemed to expose more.
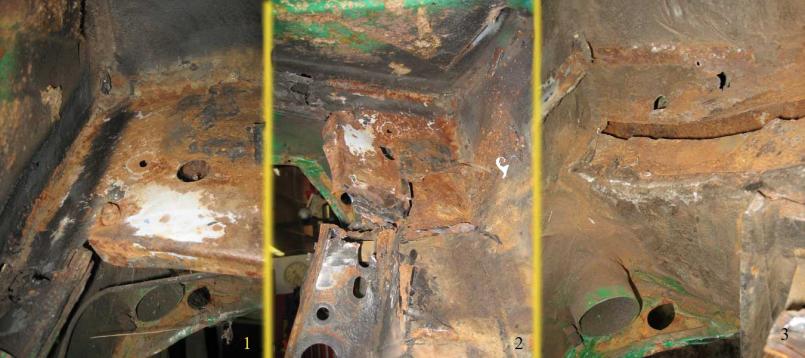
Posted by: skeates Sep 22 2008, 11:30 PM
Next weekend I plan on breaking out the sandblaster to really clean up this area and see what needs to be cut and what can be salvaged. I'm really curious now how much rust I will discover when I open up the passenger long. Hopefully I'll be able to put a bit more time into the car next weekend, but its hard when the weather is so nice and you live close to such high quality crack!
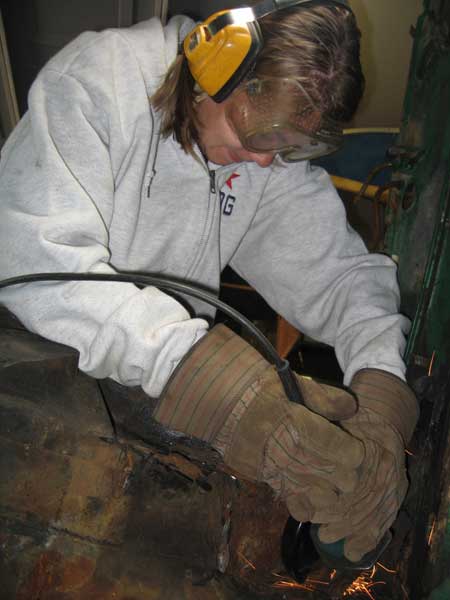
...one cool thing happened this weekend though. The wife came out and wanted to help work on the car! 
Posted by: rick 918-S Sep 23 2008, 12:02 AM
Lots of compliments will keep your helper around. Keep the pics coming! ![popcorn[1].gif](style_emoticons/default/popcorn[1].gif)
Posted by: LarryR Sep 23 2008, 12:08 AM

So far I have stripped it to a tub, built me a rotisserie and washed off about 30 years of road grime and PO molestation. Along the way I even made a new friend!
Yikes man what is it about black widows and 914's I killed 4 of them when I started on mine a couple weeks ago... I blasted the under carriage with 4 cans of raid have been watching for new webs before I slide under it

Posted by: skeates Sep 23 2008, 09:40 AM
Yeah, I thought I had gotten rid the creepy crawlys before I started, but I noticed that lovely lady when my hand was about 4 inches from it.  Its definitely one of the bigger black widows I've seen (at least around here).
Posted by: skeates Sep 25 2008, 10:58 PM
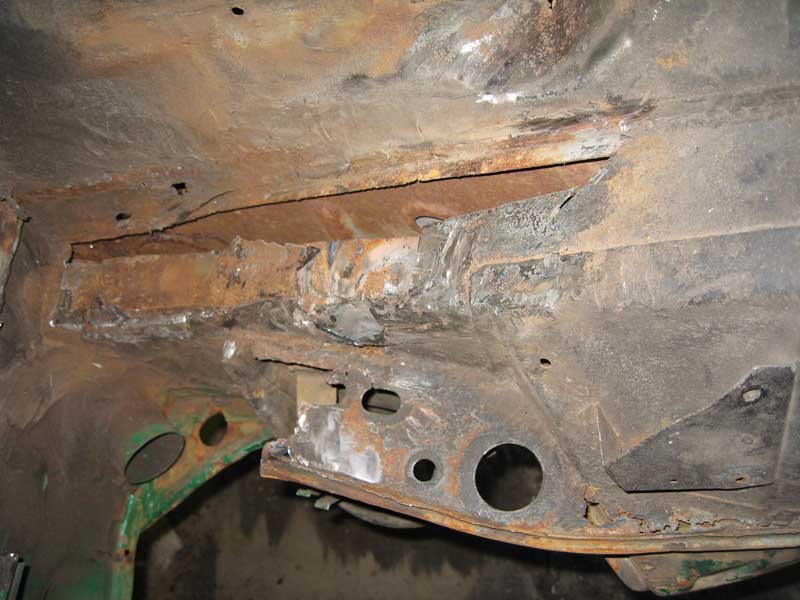
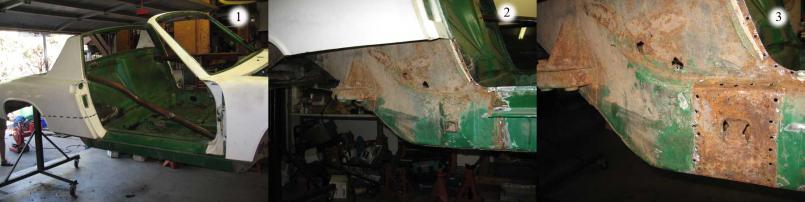
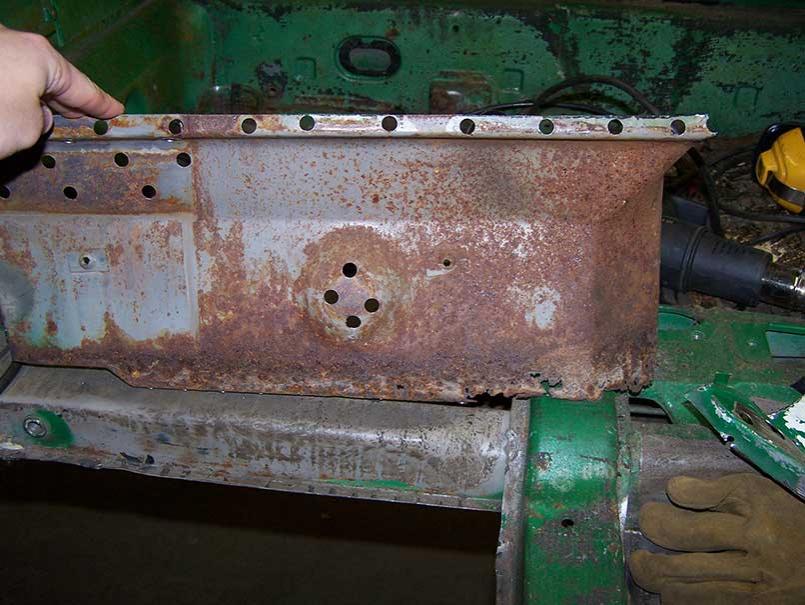
Got a little bit of work done yesterday on the car. I feel as if I'm finally nearing the bottom of the rabbit hole here with the passenger side longs. I spent a few hours and two drill bits removing spot welds on the passenger rear fender and the passenger jack plate. And before I knew it I had  the rear fender back to expose the rest of the long up to the outer suspension console. I have to admit, I was really nervous making the first cut seeing as how this was my first time and all...
  ...Anyways, I bet you can't guess what I found under there! Looks like I will be replacing a bit of metal under there. I can't wait to see what inside the longs, but maybe I should get a tetanus shot before going further
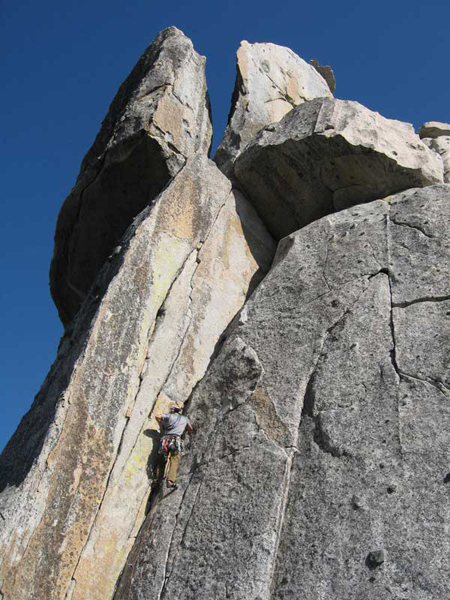
I also got a little bored tonight and had though It play with photoshop. This is the look I'm hoping to end up with at the end all this. 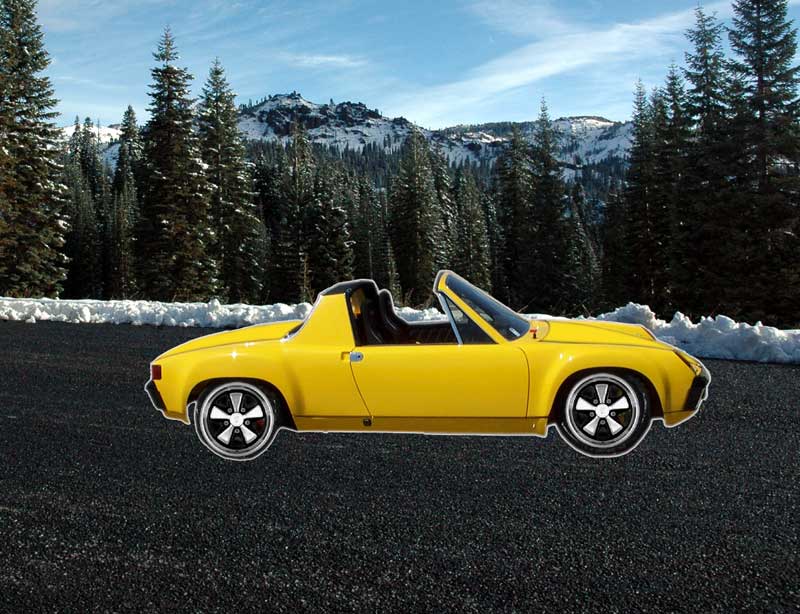
Posted by: jc914 Sep 26 2008, 02:17 PM
Good job so far keep posting pics. I wish I could do what you are doing to restore mine.
Posted by: biosurfer1 Sep 26 2008, 04:41 PM
I'm out in Roseville and don't have many plans for Sunday morning if you need a hand.
Keep up the good work!
Posted by: skeates Jan 1 2009, 01:17 AM
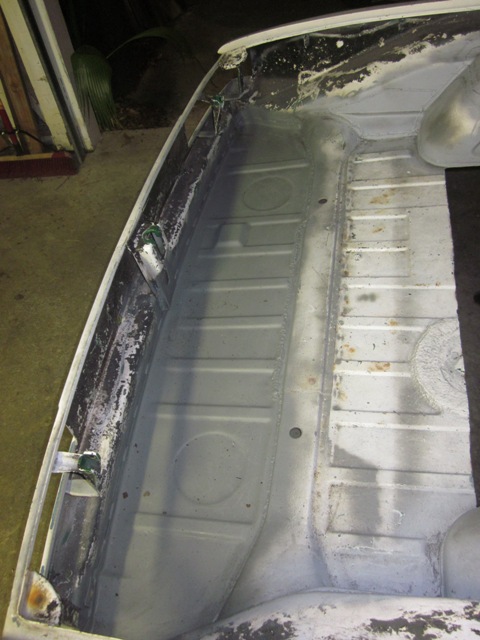
Ok....its been a whjile since I've last posted. And I cant say that I've gotten that much farther. I think though, that I've finally reached rock bottom! the cancer (in this section at least) has almost all been cut out of the hell hole and now I can start thinking about putting things back together. There were some casualties however... As I peeled back the layers, the rust continued to extend deeper into the car until had finally cut out the right side engine mount and the top of the suspension console on the same side (see pics)...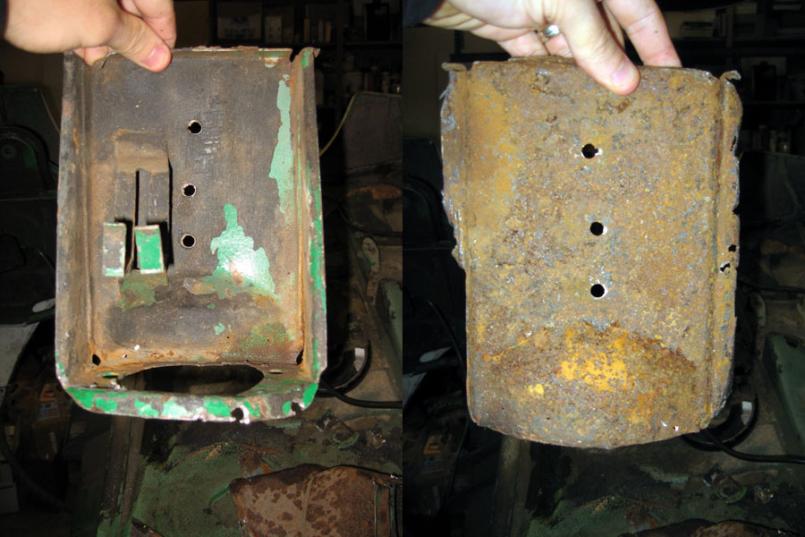
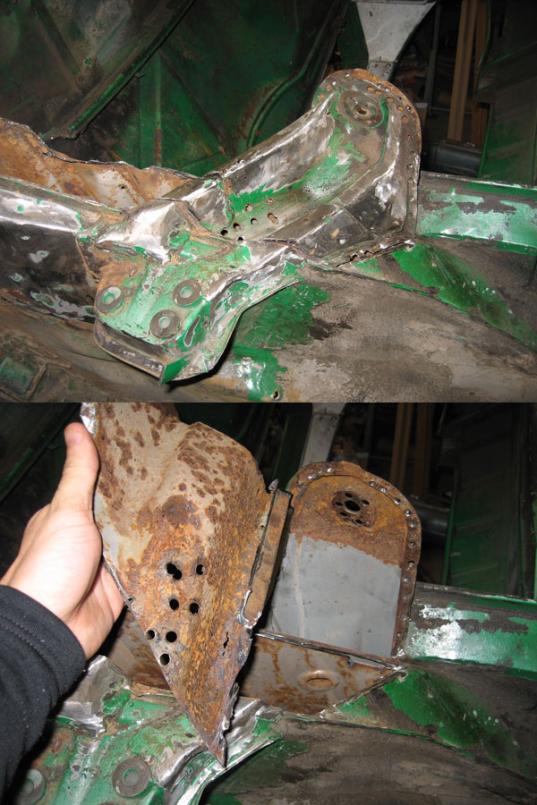
These pieces (to me at least) look pretty dismal. I'm hoping against hope that after a thorough sand blasting the engine mount can be reinforced and salvaged. The suspension console, on the other hand, has rusted through in many of the awkwardly shaped sections such that I'm thinking replacement is in order . After a bit of research I've decided to forgo POR15 in favor of a different product called "Rust Bullet"  . I've ordered a quart (supposed to cover 25 sq. ft) and will use it to protect the inside of the passenger long. I cant wait to start patching this thing back together!
...some pics of the Hell hole now missing much of its metal...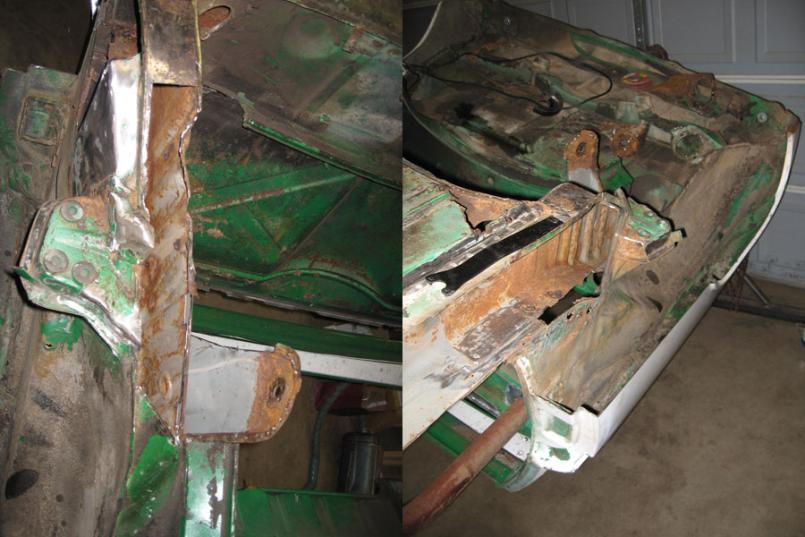
Posted by: Cheapsnake Jan 2 2009, 08:32 AM
Nice work Skeates. Looks very much like the condition and stage of my project. I too have just started patching rust and hope to have some pics up on my build thread after the weekend. Not a lot of fun while you're doing it, but great satisfaction when you can stand back and admire the results.
I too am trying the Rust Bullet for the first time, heard good things about it. Keep up the good work and keep the pics coming.
Tom
Posted by: skeates Mar 15 2009, 03:35 PM
Ok kids, I know its been a while - but here are some more pics...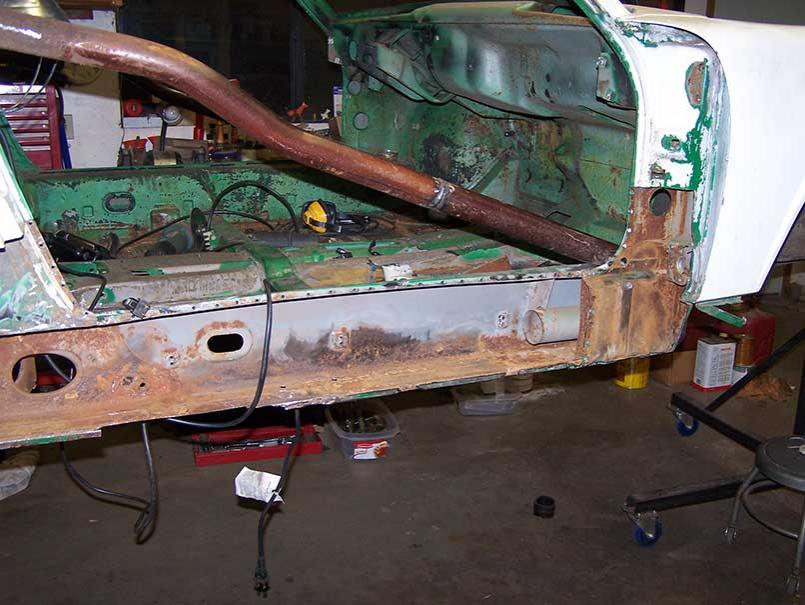
I have to admit, I'm really starting to wonder if my car came from the factory with some of this rust! As soon as I think I'm getting to the end of it It just keeps going! As you can see I'm almost thru to the inner most section of the front long. I'm honestly a bit stumped on how to proceed there. It looks like the next piece I need to remove is sandwiched in by the front fender. Are my only options to either remover the front fender or to just cut it out? Unfortunately it looks like the rust goes all the way into the corner...so I think I will need to spend some time researching the other build threads for ideas. Is there a point at which you just say "screw it!", spray on some POR-15 and then  to forget about it?
I have also removed the rear passenger floor pan and lower firewall to reveal more cancer. Again, it seems to extend even deeper into the side of the car I was hoping would not need to be molested by my cutting wheel. This project has quickly turned into much more than I wanted, but there's no turning back now. Thankfully I've managed to locate an entire long (including suspension console) that I will be picking up in April. I just need to decide the best way to cut out the current one and weld in the new.
Posted by: skeates Aug 1 2010, 05:56 PM
Its been so long since I've posted on this thread that I was curious if it was still around. After a little break in work on the 14er (...not my choice) I've finally started work on her again!
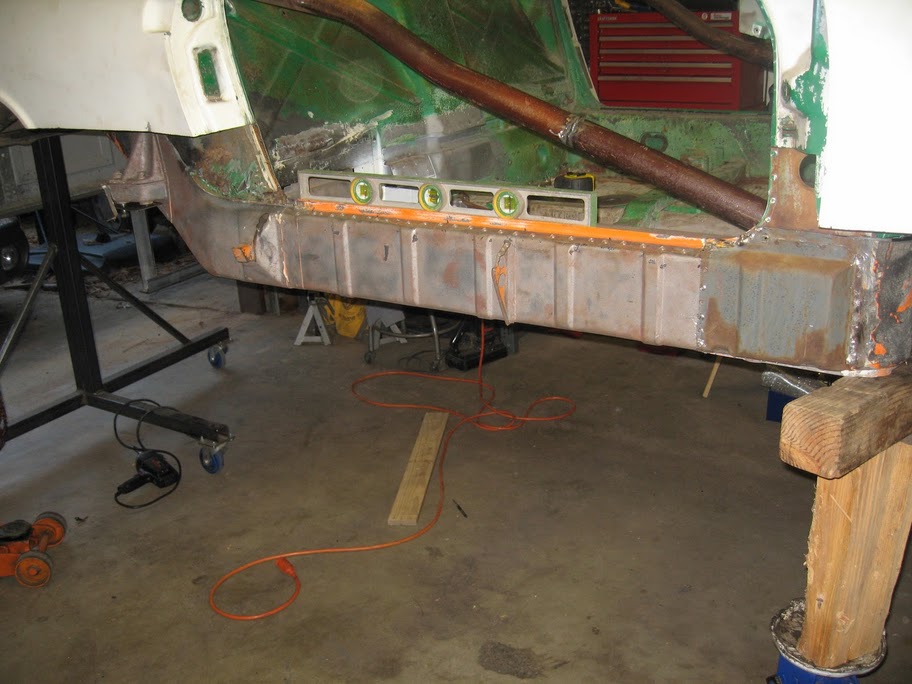
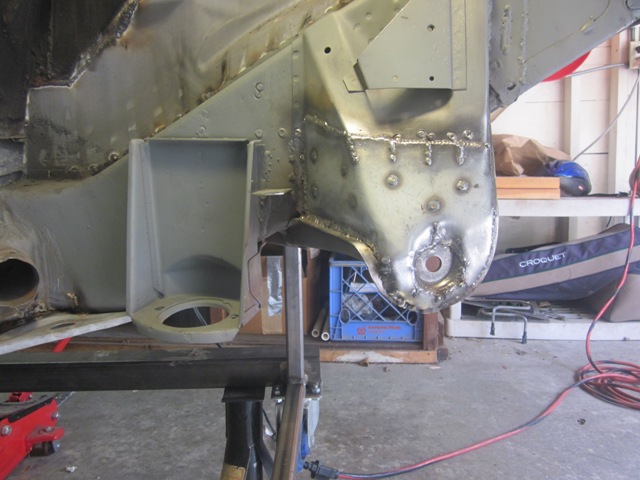
Since my last post I was able to pick-up a replacement passenger long from a parts car in So Cal, and have used it to replace the rusted one. A couple of pictures of the process are included below. In the first picture you can see the jig I made to make sure that the suspension console on the new piece aligns correctly. You can also see the fancy tools I used to mock the new piece in place. 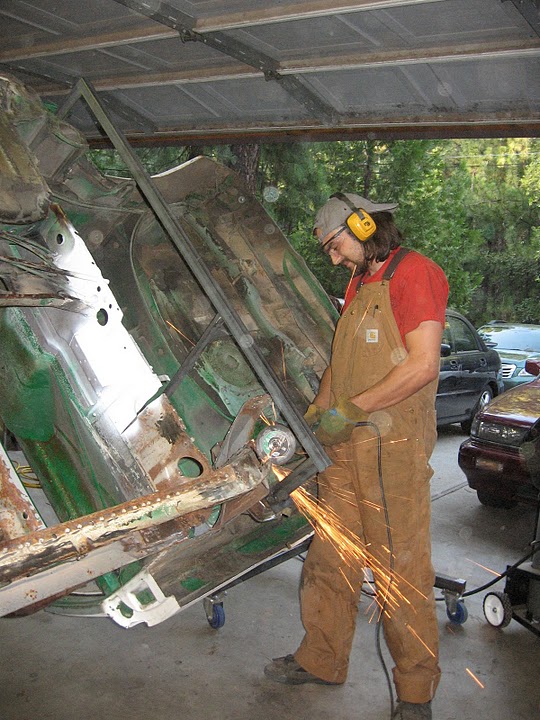
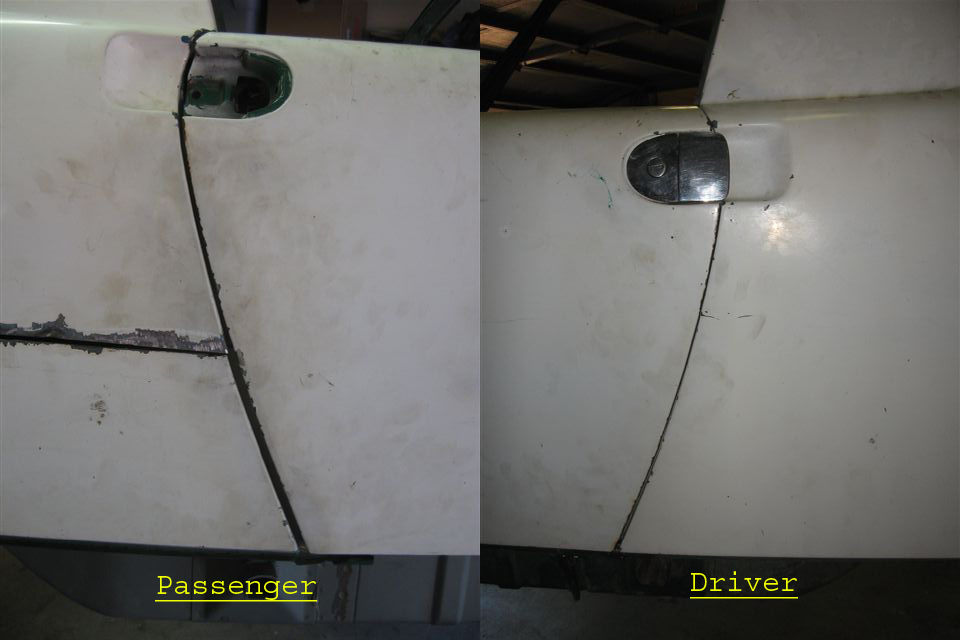
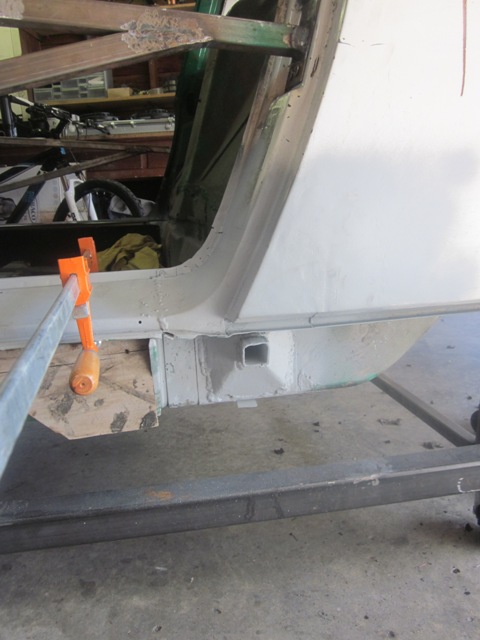
Once the new long was in place I decided that I should start piecing back together the passenger door jam, and also check how the door gaps were holding up. After tacking in the lower door post I went to fit both the passenger and driver's doors. Unfortunately, neither one wanted to line up well (though the driver's side would at least close...). After a lot of measuring and comparing against that handy body measurement reference here on 914World I decided that the passenger side of the front cowl had sagged a bit and moved forward in the whole long replacement process. Half an inch makes a big difference! So, using a scissor jack and a jig, I proceeded to push out the door gap on the passenger side until I was getting the appropriate measurements. When I put the doors back on they fit whole lot better, but still, far from perfectly. Both sides now close, but they both need to be lifted in order to do so. The passenger side is still a whole lot worse than the driver's side (At least it closes now). The frustrating thing is that I can't find which measurements are off! Every measurement I do to compare the two sides are withing 1/32" from each-other. Here are some pics comparing the two sides:
Posted by: skeates Aug 1 2010, 06:08 PM
Some pics of the passenger door open and closed: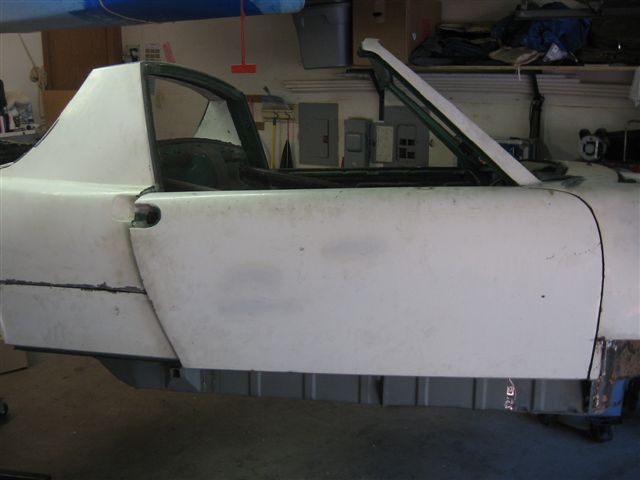
Notice how when the door is open it sags below the body line, but once closed things line up decently well. So, the problem I now have is that:
1) The passenger door sags when open,
2) The drivers side rear door gap is close to non-existent,
3) the passenger side rear door gap seems to be too wide now,
4) The passenger side front gap seems ok when the door is open, but once closed the door is lifted and the gap starts smaller at the top and widens at the bottom.
I'm really not sure where to go from here. All of the measurements I do seem to identical from passenger side to driver's side, but there is this huge difference in how the doors are fitting! Anyone in the Sacramento area good at this sorta thing?
Posted by: scotty b Aug 1 2010, 06:20 PM
Now that it is too late I can tell you that bracing is WAY to light duty. What has happened is you have braced the chassis ( barely ) to prevent a inward pinch and nothing more. As a result you have actually twisted the tub. This is exactly why I and others get on people for not properly bracing a car. You not only cut out and welded in a lot of metal which was detrimental, but you also did this on a rotisserie, which in itself put a fair amount of stress on the center of the car because there is no support running the length of the body. Unfortunately at this point about the only option you have is to take it to a frame shop, prefferably one with a Cellete bench, and have it pulled back into shape. Expensive lesson learned  . Hopefully this will keep someone else from doing the same. Sorry man
Look for a thread from me soon on proper bracing, this is getting out of hand
Posted by: jmill Aug 1 2010, 06:42 PM
Look for a thread from me soon on proper bracing, this is getting out of hand
That would be great Scotty. It would be an instant classic.
Posted by: skeates Aug 1 2010, 06:50 PM
I was hoping was hoping for a slightly less nihilistic response...despite what I now understand to be less than adequate bracing, the new piece fit in without any tweaks and all of the measurements I've done (though not extensive) have been within 1/32" of factory. Is a frame shop the only way out? Anyone know what it would cost to take this to a shop to have fixed?
Posted by: rick 918-S Aug 3 2010, 06:40 PM
I was hoping was hoping for a slightly less nihilistic response...despite what I now understand to be less than adequate bracing, the new piece fit in without any tweaks and all of the measurements I've done (though not extensive) have been within 1/32" of factory. Is a frame shop the only way out? Anyone know what it would cost to take this to a shop to have fixed?
I read this post Sunday but had just had a chunk of steel removed from my eye and couldn't really stand the scratching stinging pain long enough to reply. I'm not sure you can get the gaps perfect but let me ask you some questions and see if we can work through this. Lets just start with what is good.
It looks like you can align the right door to the fender. Cool, now remove the latch and check to see how the door closes without the latch.
Q) with the door aligned to the fender in the closed position what is the gap like under the door? Is it even with the long or sagging and touching the long at the back of the door?
Answer this and don't race ahead.
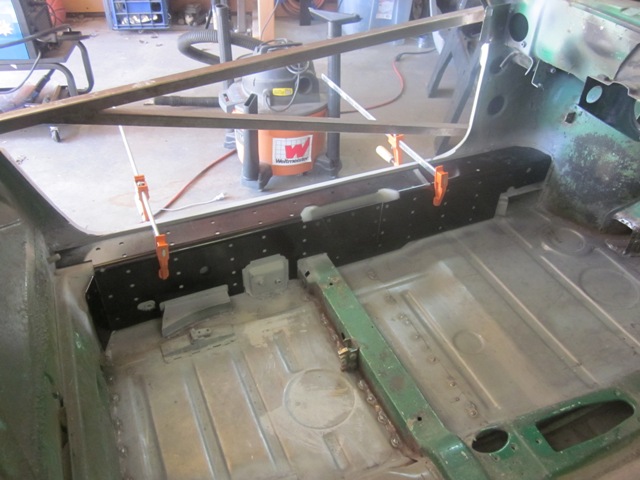
Posted by: skeates Feb 7 2013, 12:44 AM
Hello all – I’ve been in lurking mode for a while (I guess two years is a while…) but have slowly made progress on my project. Thanks Rick for the response - I seem to have missed it until just now! When I ran into the door gap issues work essentially stopped until I got the car off of the rotisserie and down to Sac. I was very relieved to find that once the car was off the rotisserie the door gap problem disappeared! I even took it by a Porsche Restoration shop in West Sac and they took a loot at it for me. I know that without putting it onto a rack with the precise measurements I’ll never know how close (or far off I really am), but the door gaps are lining up now and every measurement I can take seems to be within spec and symmetric to within a couple 32nds of an inch…so, I’ve pressed onwards and hope to be a bit more diligent at posting my progress.
Since bringing the car down I have made some “upgrades” to the bracing on the car – again paying very close attention to the dimensions and all the measurements were symmetrical from driver to passenger side. Now I have a dolly that attaches at all of the suspension points and braces in each of the doors:
I’ve also made the following progress on the car:
- Replaced passenger and driver floor pans (both rusted pretty bad)
- Replaced the rear trunk floor pan
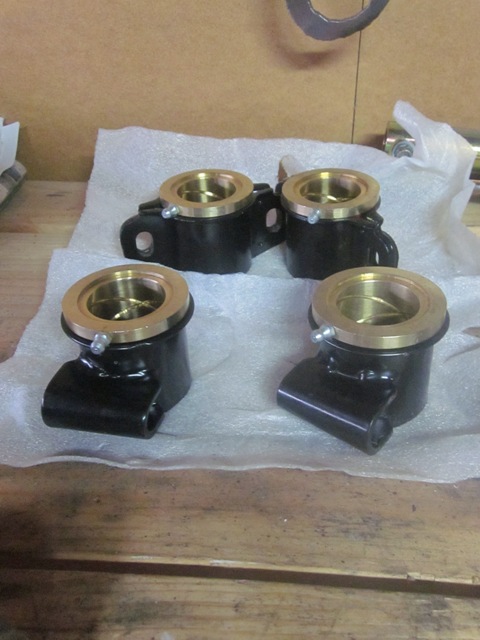
- Disassembled rear suspension consoles
- Got all suspension parts powder coated
- Drilled holes for the front through body sway bar
- Seam welded the rear suspension consoles
- Decided to go the Suby motor + Transmission route
- Removed rear trunk firewall section to weld inside seams and make room for Suby motor
- Plumed the coolant lines through where the heater tubes used to be (more on this later)
- Inspected the driver’s side long for rust (only surface stuff found!)
- Ordered lots of parts…with many more left to be ordered.
I've got pictures of everything listed above, but since my laptop battery is dying fast here I'll have to post them tomorrow.
Posted by: Cairo94507 Feb 7 2013, 07:33 AM
Cool - Very nice to see this thread come back to life. Looking forward to seeing more pictures of the car as it moves along. Hopefully no more big nasty spiders in the car.
Posted by: skeates Mar 4 2013, 12:14 AM
So As promised, here are some pics of the progress I've made since bringing the car down to sactown. The First pic is one more shot of the dolly that I made (basically cannibalized the rotisserie). It attaches to the rear suspension consoles and then to where the front cross-member mounts. It has worked out very well...but does make it a bit harder to get to the stuff underneath. I can't seem to find any pictures of the passenger door jam reconstruction, but there is one of the rear quarter panel being made whole again. I realized in the process of putting together the door jam that some of the door sagging shown in the photos before was due to the pieces only being spot welded in place. Door opens and closes like a champ now! I know, I know, I got lucky - so I suppose I'm celebrating that too.
Next up was the rear trunk. Since I am going to be going the Subaru engine + Transmission route I figured I'd be proactive and make some space. I plan on creating an access panel that will screw in place to enable access to the motor/transmission for servicing and repair. While back there I seam welded the rear suspension consoles (including the inner firewall) and added a brace between the two towers to compensate for the missing metal. Also had to replace the rear panel in the trunk.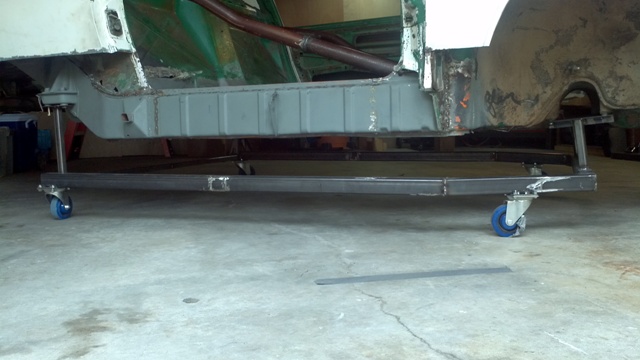


Attached image(s)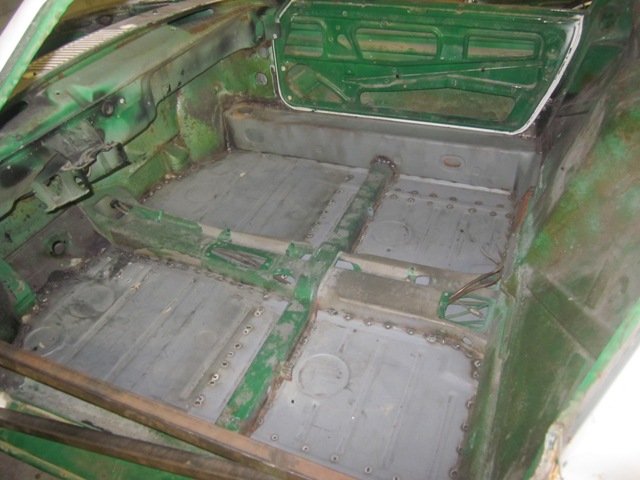
Posted by: skeates Mar 4 2013, 12:45 AM
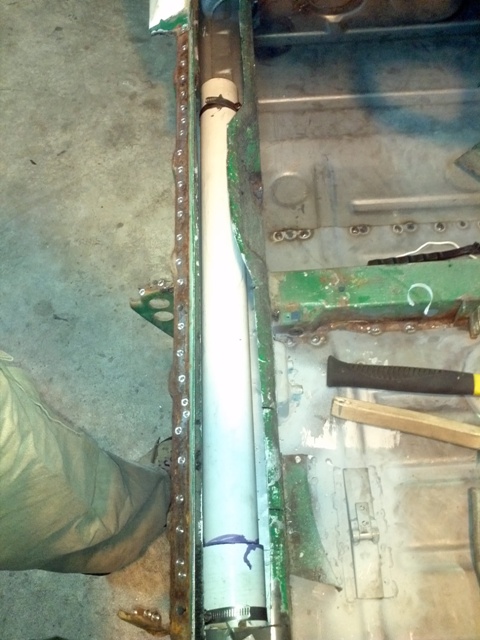
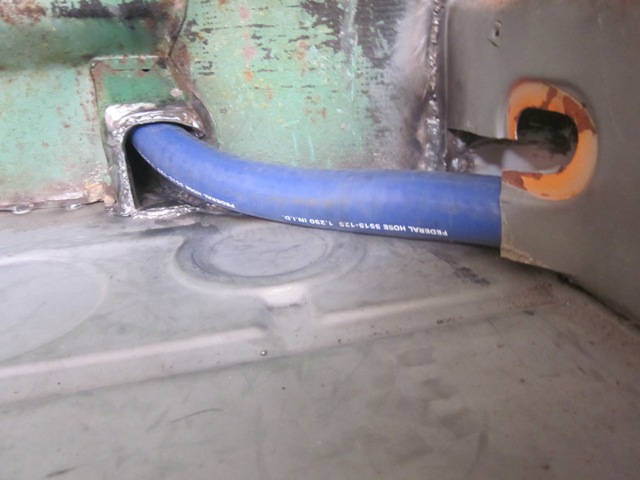
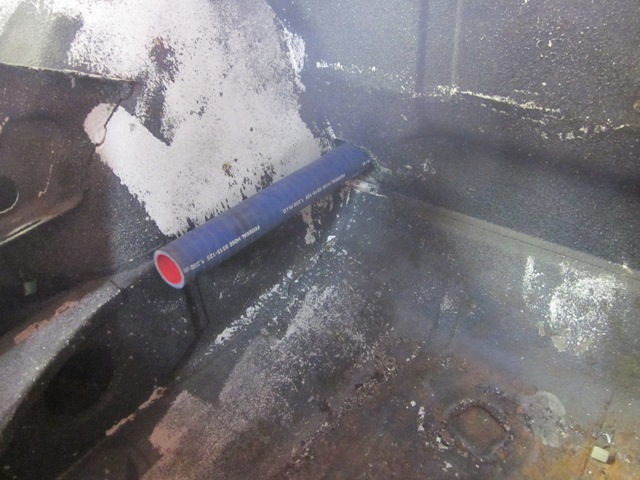
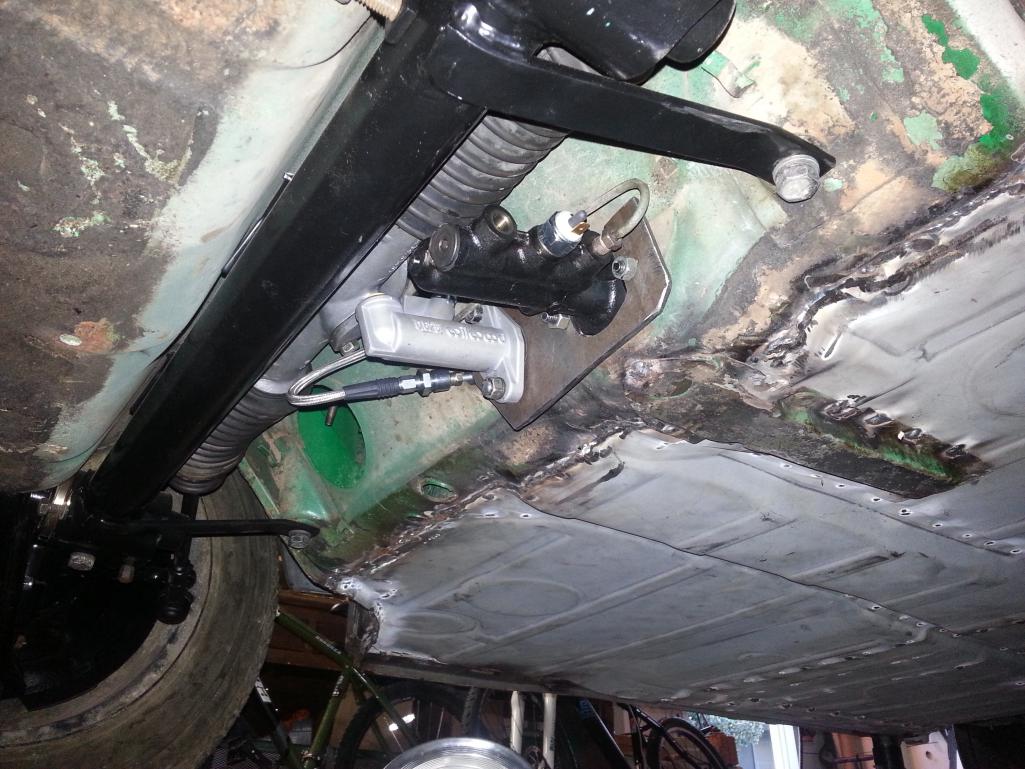
With the rear trunk mods and rust repair finished (minus the cover panel) I focused my attention to pluming the coolant lines. For this I had the following criteria in mind:
1) Protect the hoses!
2) Keep the car nice and flat underneath
3) Limit heat from hoses to cabin
4) Enable easy future servicing
5) Limit number of connections (i.e. future leaks)
6) Hide the evidence
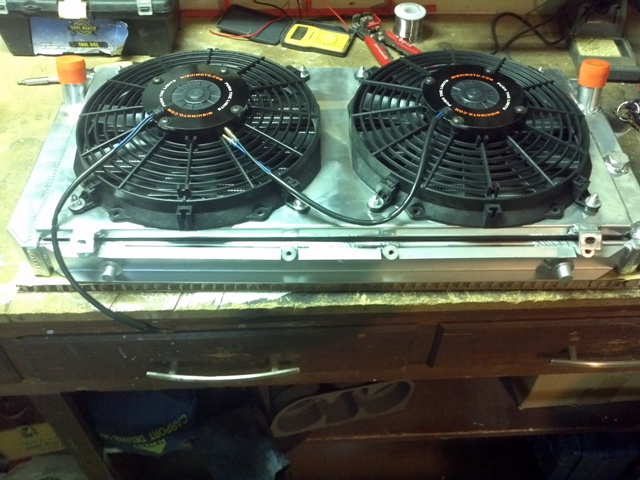
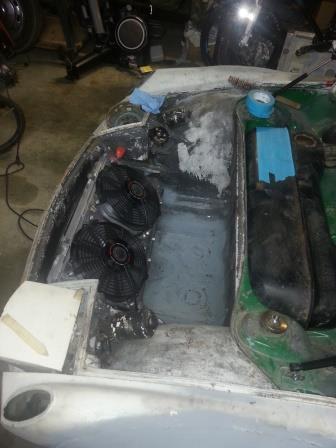
I played around with some different ideas but finally came to the conclusion that routing the coolant lines through the longs made the most sense. In order to enable installation and removal of the hoses from the engine bay I knew I would need to run a chase down the tubes (FYI the original heater tubes had been chewed up long ago by mice). Ideally this chase would also be used to help insulate the cabin as well. In the end I went with PVC pipe for the chase (I know, it seems kinda hokey but I think it makes sense). The PVC was the only readily available rigid pipe material I could think of that could offer some insulation without absorbing moisture or trapping water against the metal. For the sections the route through the cabin I plan to "get my fiberglass on" and make some cover panels. I also plan on adding some foam insulation behind the panels. Also, a gratuitous picture of the new radiator and cooling shroud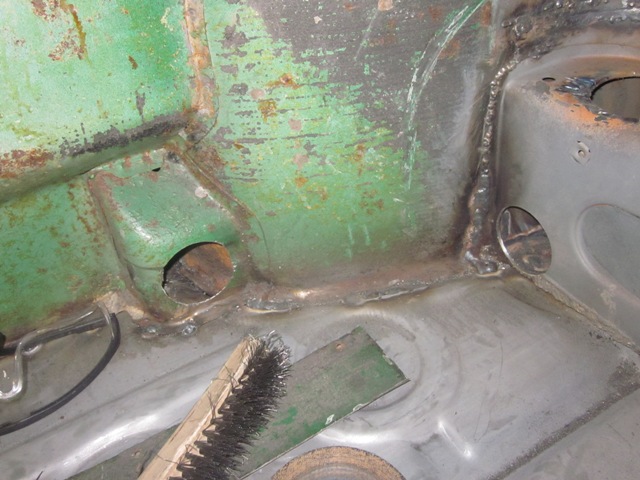
Posted by: skeates Mar 24 2013, 10:14 PM
Got some time in over the last couple of weeks on the teener. Sometimes I feel like I spend hours in the garage ticking-off a lots of "to-dos" and yet at the end of the day you'd have to know exactly where to look to notice any differences! The tub is almost ready to begin bolting all the new pretty parts to it. Here's the cliff notes version:
- Finished installing Elephant front bushings
- Rebuilt pedal cluster
- welded on a missing chunk of body panel
- Picked up some autobody hammers & dollies (and started learning how to use them)
- Ground down a bunch of welds to make room for long stiffening kit
- Tacked in the long stiffening kit
- Disassembled the steering rack for cleaning
- Dry fitted front sway bar
I've got flares and the rest of my suspension ordered and hopefully on their way soon. I'm hoping to have this thing back on wheels before June...that way I can still use my birthday as an excuse to buy the drivetrain 

Posted by: skeates Mar 24 2013, 10:19 PM
Here are some picks at my first ever attempt to do body work. There's still a ways to go, but I was really excited to get it somewhat smooth in the hour I worked at it. The pic was taken after I had put a fresh spray of primer on it to check for high/low spots - so it probably makes the panel look better than it really is.
Before & After 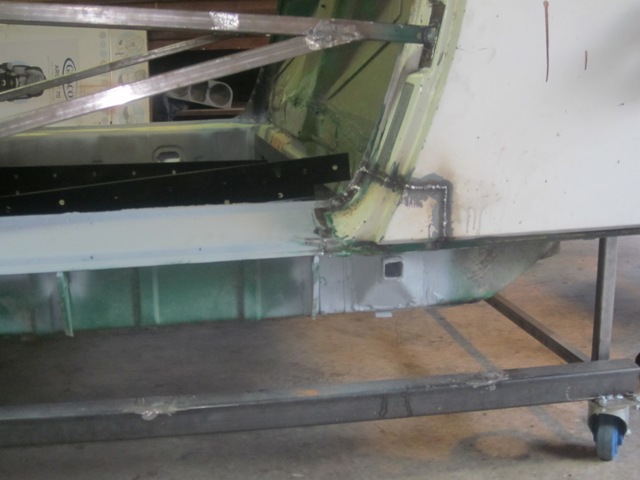
Posted by: skeates Apr 15 2013, 04:35 PM
A little more progress to report:
- Mocked-up the flares and stared at them for a while (haven't actually welded anything yet)
- Built some scab plates to re-enforce the rear suspension pick-ups.
- Took the car off of the dolly to start fitting new suspension components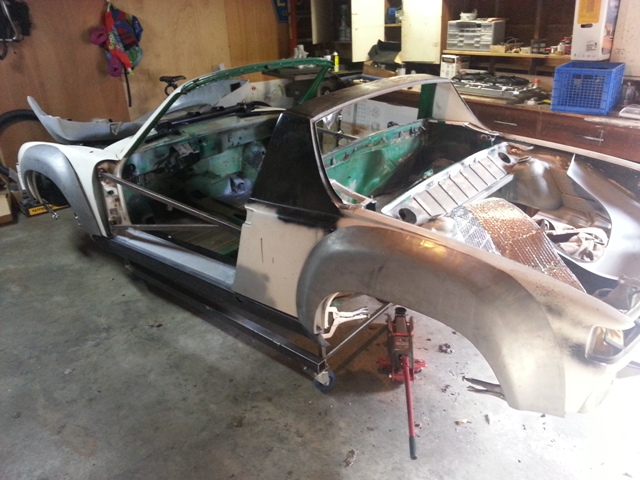
Posted by: skeates Apr 15 2013, 04:46 PM
When I was fitting the front A-arms I found some binding in their movement once all bolted down. I did some searches and this sounds like a pretty normal experience for folks who have gone to the bronze bushings. Does that sound right? Instead of purchasing the low-friction mounting kit (cause I'm a CSOB and also because I don't want to press out the bushings) I went ahead and ordered some self aligning washers from McMaster-Carr and will modify the rear mounts to accept them. Most of the mis-alignment looks to be in the vertical direction anyways.
Also - Today I received my 5-lug conversion parts from Eric! So - hopefully by the end of the weekend I'll have my suspenders back together! Now I need to source some wheels to roll the thing around on. What have others been doing for this? Cheap 5-lug donuts? Looks like I'll be making my June deadline for a roller!
Posted by: saigon71 Apr 15 2013, 07:34 PM
Great work man!
Posted by: skeates Oct 14 2013, 10:50 PM
It's been a while since I've posted any progress on my project, but I have slowly been chipping away at it. Got the suspension and wheels back on in June and now it's finally starting to look like a car again! I've also managed to get the flares welded on and a radiator mount started. I just want to say how much respect I have for all you auto-body folks. It takes a whole lot of time and patience to weld in 4 silly little metal panels!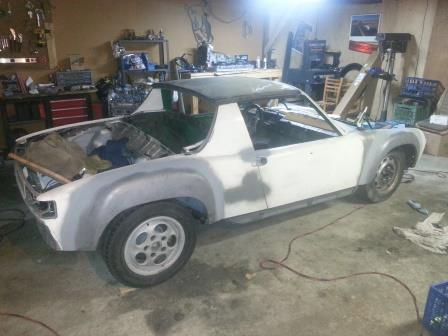
I still have a lot of finish work to do on the flares but needed a break from body work so I've distracted myself lately with some new toys I picked up from a local wrecking yard. Since they had been on the lot for a while they actually very willing to negotiate on price.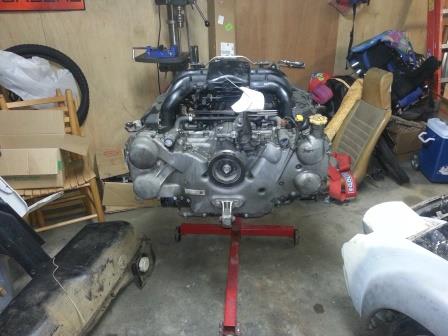
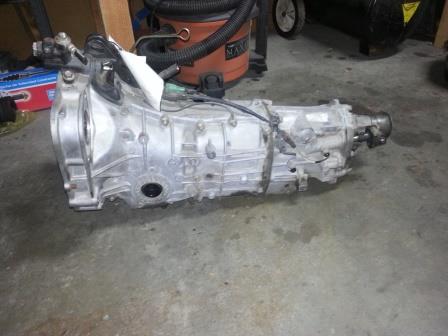
The engine is an EZ36 out of a 2010 Legacy. I debated between the EZ30R and EZ36 for a while but in the end I decided since I wasn't building it up or adding forced induction that the EZ36 is just an all around better engine. It also helps that I happened to have the Factory Service Manual for the engine (my other car is a 2010 outback). The tranny is out of a 2007 Legacy GT and has what I think are the best stock gear ratios out of the 5-speed suby boxes you can get (at least for use with the 6 cyl motor). BTW, If anyone wants some good info on Subaru transmissions let me know - I found some awesome threads on 'em!
Engine with-out manifold and half cleaned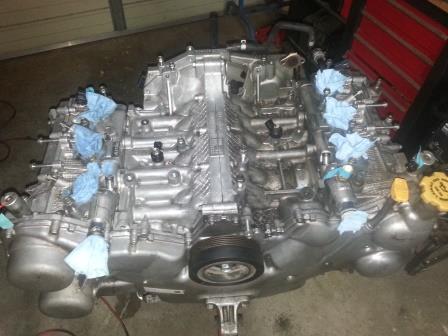
Engine Harness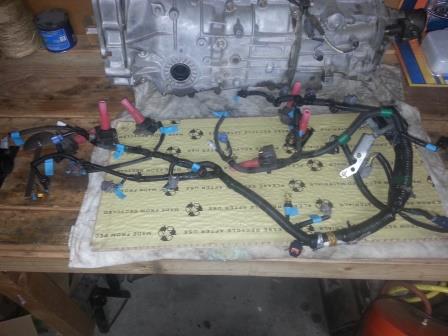
Posted by: arkitect Oct 14 2013, 11:22 PM
Glad to see your back on track. I know the time these teeners take to be put back together. Looks like your doing an excellant job. Look forward to seeing the subaru engine in place.
Dave
Posted by: OllieG Oct 15 2013, 04:52 AM
Great thread and work!...I'm doing a VERY similar project although not as far ahead as you. Will be following with enthusiasm.
Ollie.
Posted by: skeates Oct 15 2013, 06:34 AM
Thanks for the encouragement! Sometimes it's hard to keep the momentum going on these projects...especially when you've got two young kiddos nipping at your knees.
Posted by: Cairo94507 Oct 15 2013, 06:56 AM
Wow you have definitely been busy. That car is coming along quite nicely. I am jealous.
Posted by: skeates Oct 28 2013, 01:21 PM
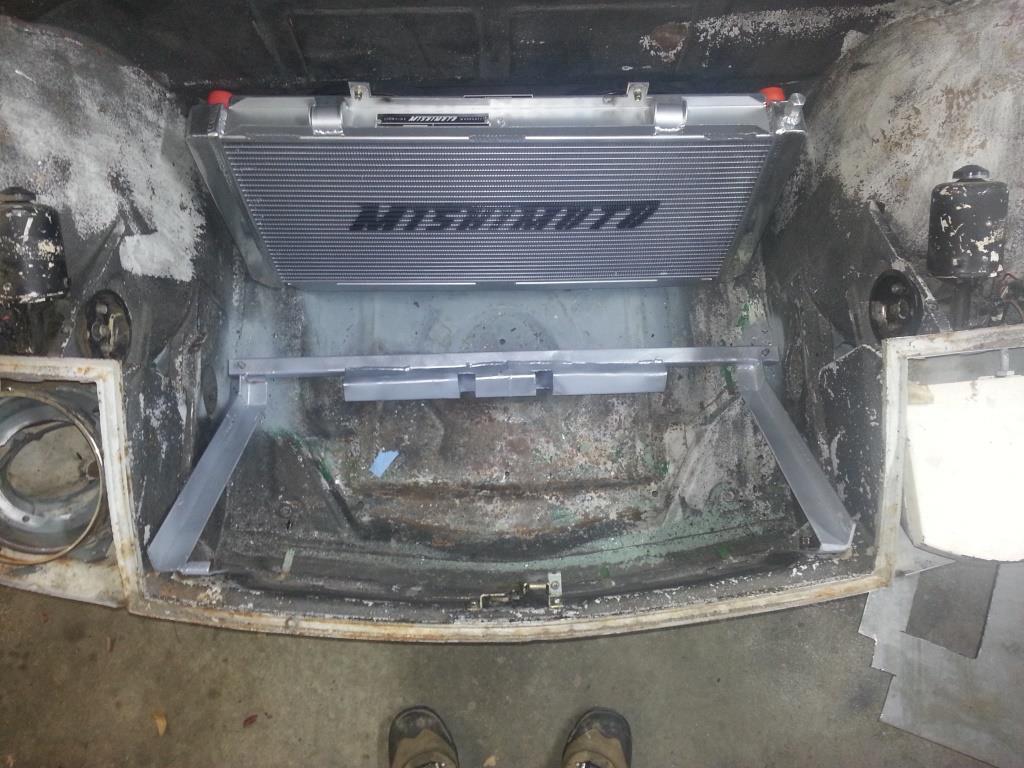
Got some time this weekend to work on the car and managed to build my radiator mount. It would have been a whole lot easier (and less time consuming) if I had a sheet metal break. It would have also ended up looking better too. But I was able to get the job done with the tools at my disposal. It needs a few more "tweaks" but overall I'm happy with it. The next step is to get my fiberglass on and make a shroud.
Here's everything in place: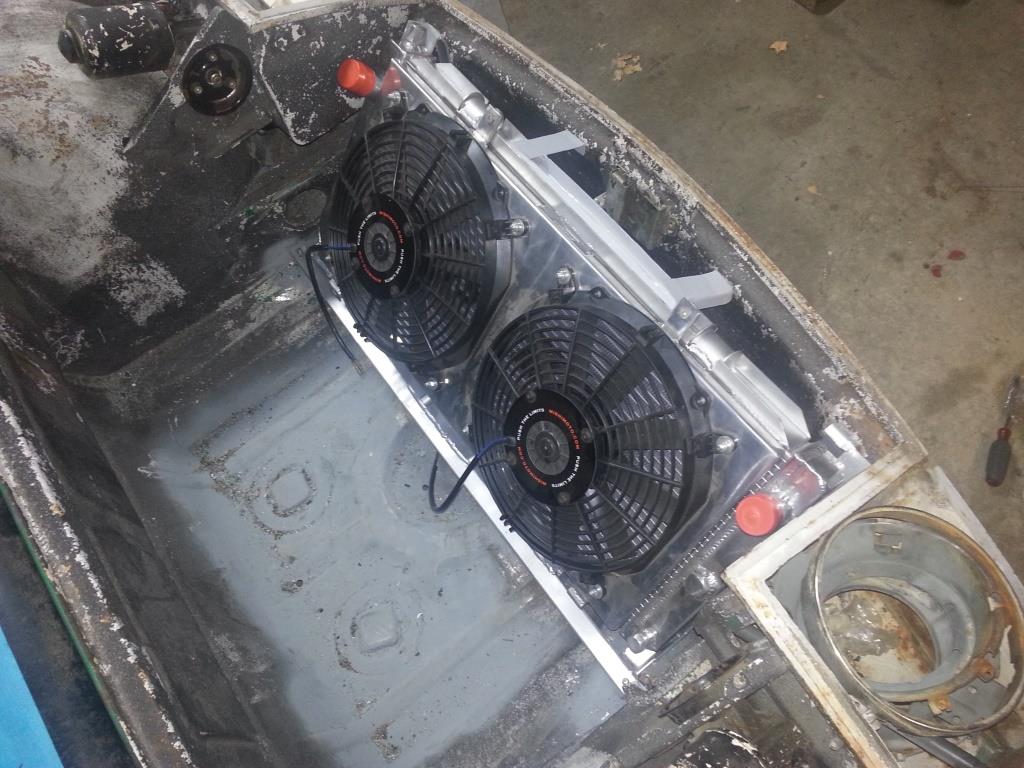
And with the radiator removed: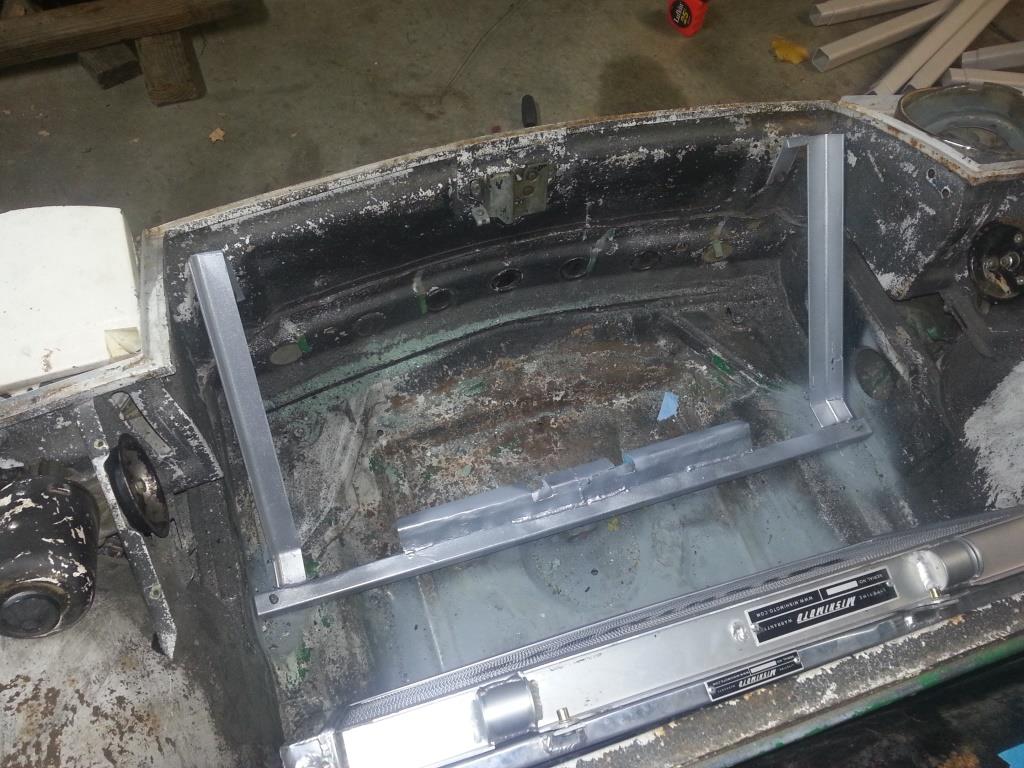
I also made it so that the whole assembly is removable: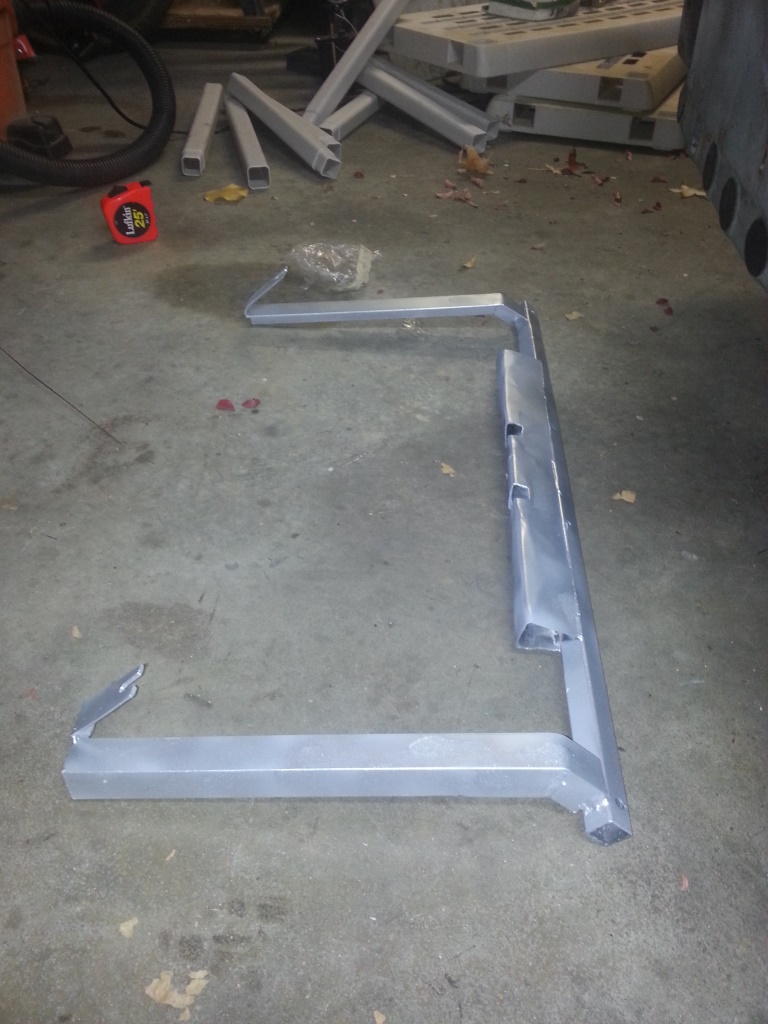
Posted by: skeates Oct 28 2013, 02:28 PM
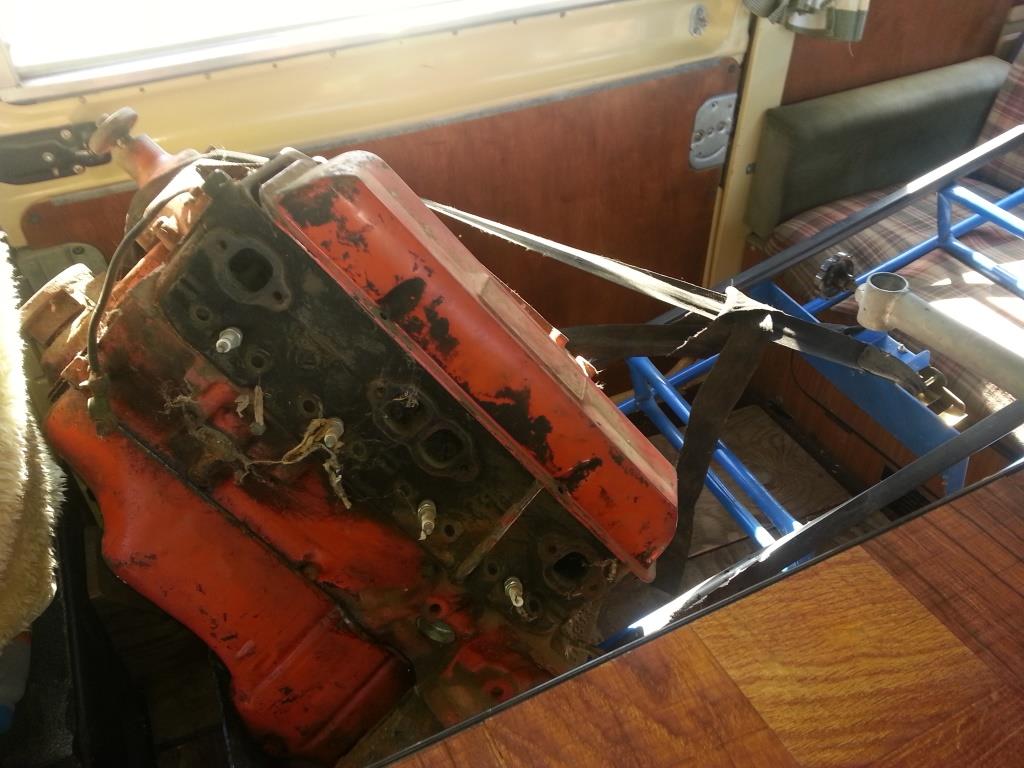
I was also able to run some errands out at the parts yard and tear into the transmission a bit. When I went to return an engine core (for the subi motor I bought) I wrangled one of the mechanics there to babysit me while looking for some odds and ends. In the end I walked out of there with two front axles, two little stub axle deals for the early style DOJs, and a set of motor mounts for the engine! Paid $100 for parts that would have been closer to $400 anywhere else.
If anyone was wondering what a small-block V8 looks like in a VW bus here you go  :
:
Posted by: Dr Evil Oct 28 2013, 02:34 PM
Dang, how have I missed this. You are doing exactly what I want to do. I agree with the EZ3.6 all the way. Keep it up!
Posted by: Eric_Shea Oct 28 2013, 03:13 PM
Nice build.
Posted by: 76-914 Oct 28 2013, 06:29 PM
If anyone wants some good info on Subaru transmissions let me know - I found some awesome threads on 'em!
[/quote]
You got my attention. What tranny info do you have.
Posted by: skeates Oct 28 2013, 08:51 PM
You got my attention. What tranny info do you have.
Here are some good links to get you started:
Gear ratios for various tranny codes: http://www.catherineandken.co.uk/sti/trans.html
Overview of Subaru transmissions, weaknesses, and upgrade paths: http://forums.nasioc.com/forums/showthread.php?t=665334
More gear ratio discussion: http://www.rs25.com/forums/f8/t100042-learning-choose-your-gear-sets-ratios.html#post1598005
It seems like all the discussion about the weak spots in the Subaru transmissions come down to two theory's. The first is that the case flexes under load because of it's split design and messes up the gear mesh. The second theory is that it is shock loading the gears which aren't quite beefy enough. It was interesting to read that many of the failures were actually 3rd and 4th gear, not first! Either way since we use it in 2 wheel drive in the 914 the transmissions would be under quite a bit less stress. Less stress because excess torque is "dispelled" by wheel spin. With two tires we don't have enough traction to apply the full torque of the engine on hard launches (unless you are running wide slicks of course). Thus it should be able to handle quite a bit more torque/HP than in an all wheel drive application. I suppose I'll find out soon enough with the EZ36!
I noticed that some of the gear ratios in the thread I listed contradict with each other, particularly on the final drive. I ended up feeling fairly confident that the Legacy GT (Turbo) box had a 3.9 final drive ratio and had slightly taller gear ratios than the WRX boxes. Since my engine should have a lot more torque than the WRX (at least at the lower RPMs) I wanted the taller gears. Plus it minimizes my RPMs while cruising on the freeway. That said, the '06 - '07 WRX's had a 3.7 final drive ratio which actually makes 4th and 5th effectively taller than the Legacy GT. However, I felt that the lower FD would add more stress to the gears...of course, I was more or less at the mercy of the dismantler in terms of what they had available.
Way I figure it, if you are running a 6 cylinder or turbo then you ought to be fine with almost any transmission post 2003. In 2003 they "upgraded" the gears by making them thicker. Prior to then only the WRX transmissions had the thicker gears. You are probably already aware that you also need to make sure that you are matching the slave cylinder, fly wheel and clutch (push vs. pull type), but that has been discussed here at some length in some of the other Subaru threads. I can find those links for you if you want.
Hope that helps!
Posted by: skeates Jan 20 2014, 07:34 PM
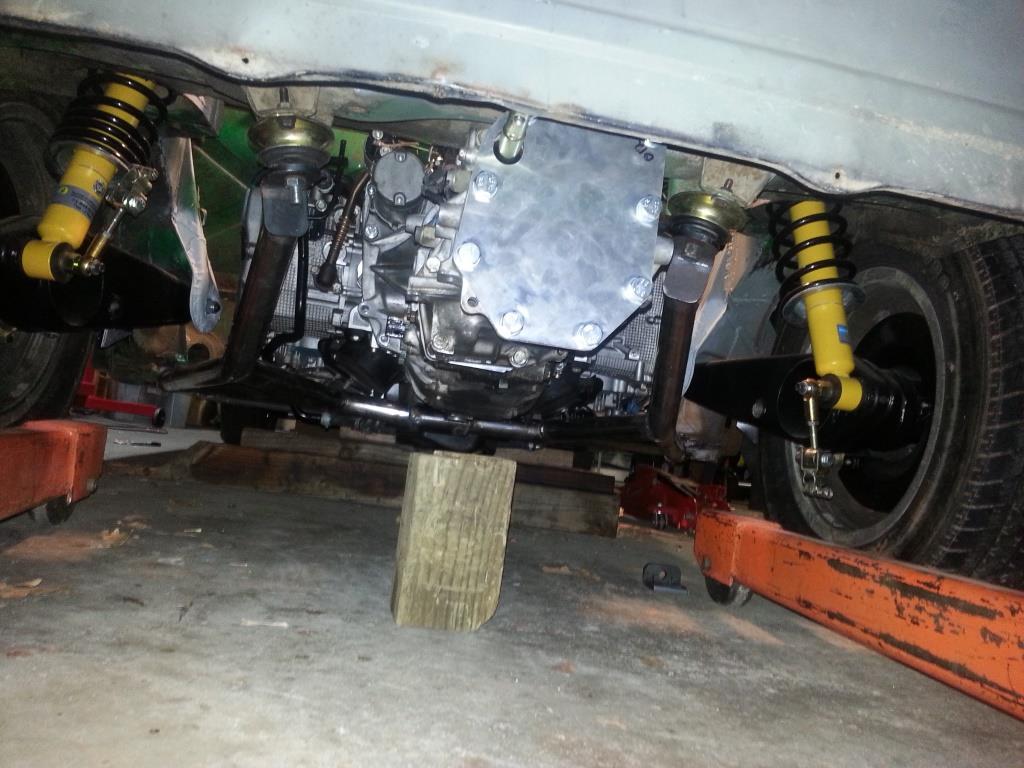
I've been slowly making progress behind the scenes. This week was a big'n! Still gotta do the final fitment, but hell - this is the first time the car has had an engine in it in 4 years! And it's very purdy drive train if I don't say so myself: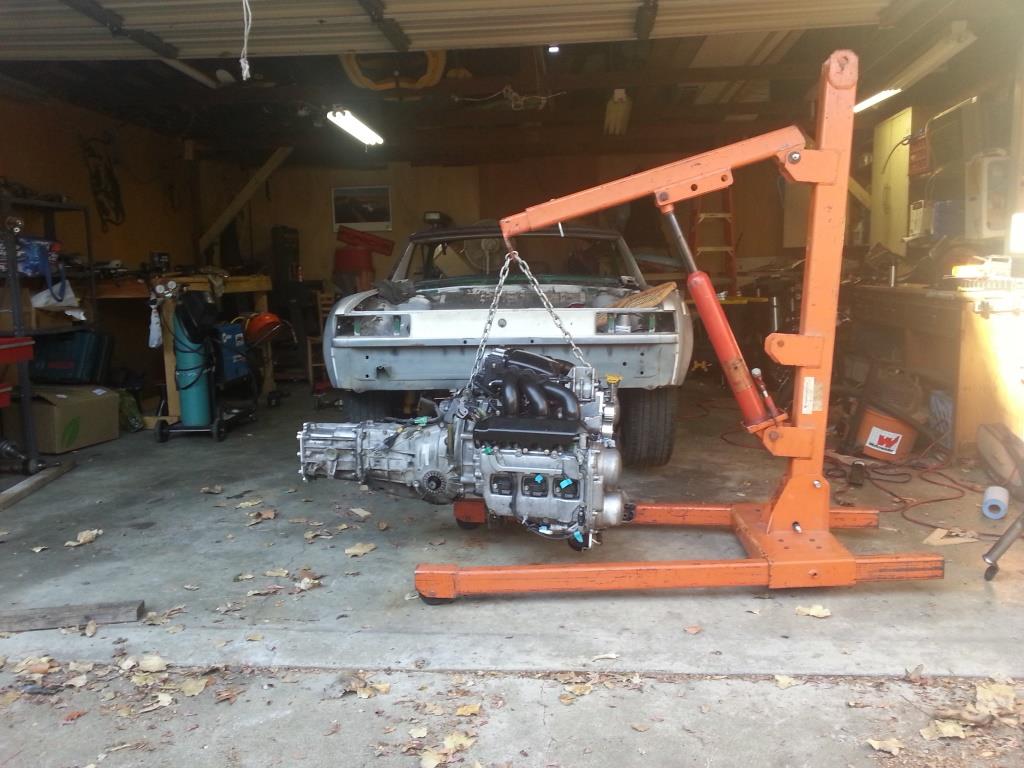
Posted by: 76-914 Jan 20 2014, 08:05 PM
 Congrat's, That's a major milestone.
Posted by: skeates Feb 22 2014, 09:04 PM
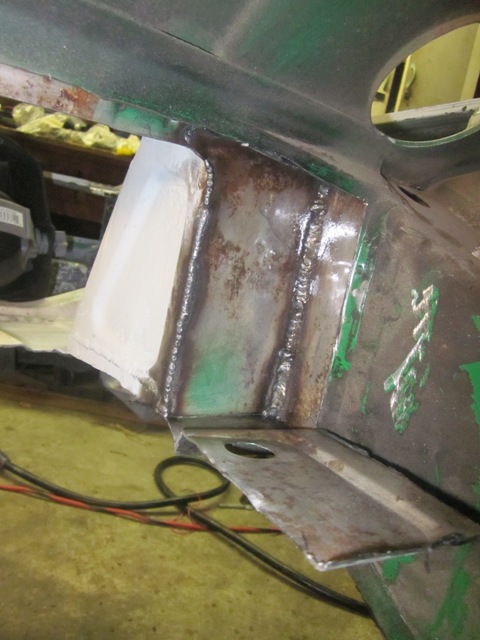
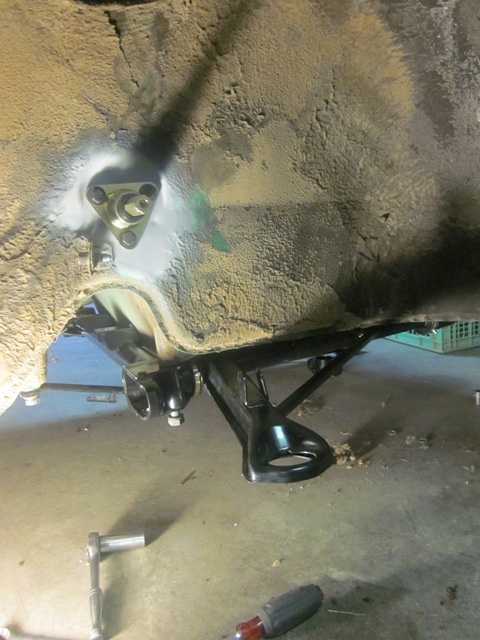
So - as soon as I got the engine in it was time to take it out again! While the main engine supports/cradle were all done, I still had one more mount to fabricate which supports the front of the engine. I was actually a bit surprised to see it there when I picked up the motor since I hadn't seen it on the other Subaru engine conversions around here. Apparently at some point (maybe '08?) Subaru added a front engine mount to their engines. Honestly, I was pretty happy to see it there since the whole cantilevered engine thing never sat well with me. While the engine was out I figured I'd get all the clutch stuff sorted out too.
Front Mount: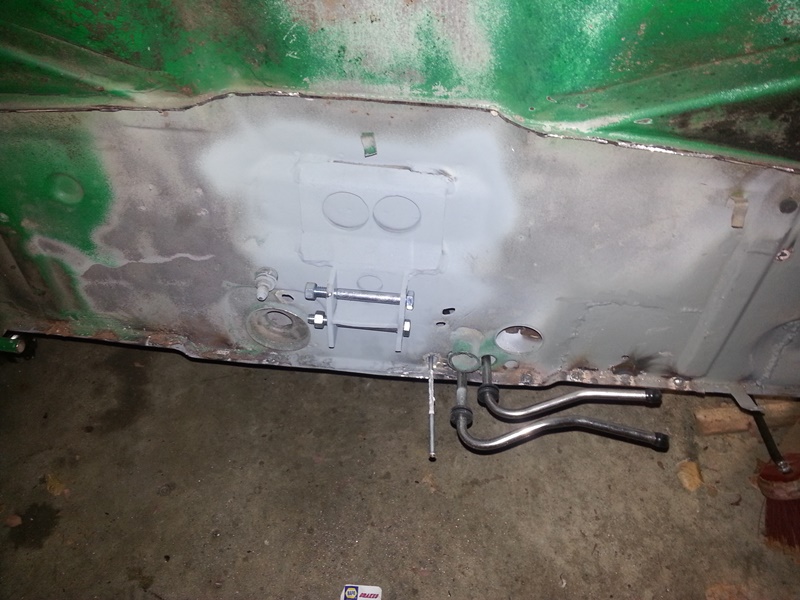
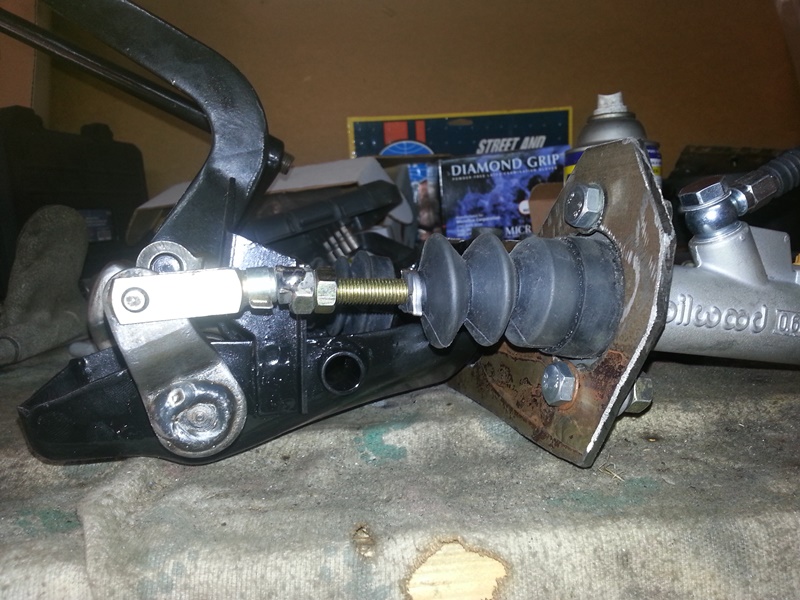
Here's the pedal cluster all fitted up. You'll probably notice that I borrowed the design from 76-914. It works great! The only difference is that I ended up using the original clutch clevis and pin by making a very high tech metric to SAE adapter (welded an M6 bolt to a 5/16" nut). Now the only pedal left to figure out is the electronic gas pedal.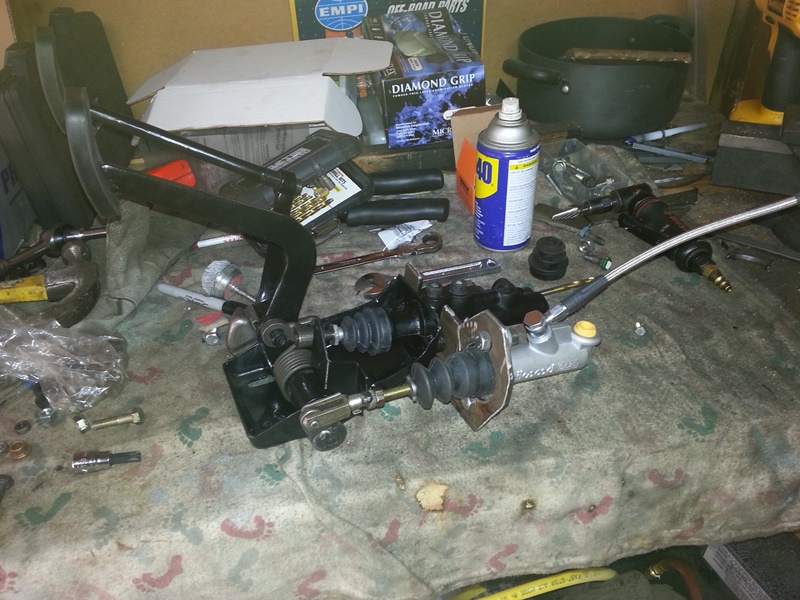
While the engine was out I figured I'd get the clutch and flywheel installed too - no sense in pulling this thing out more times than I need to. So - I ponied up for the Exedy OEM clutch & flywheel kit. The flywheel is a lightened one and at 12.5 lbs I am a little bit worried about its street-ability, but I figure that's not hard to change down the road if it becomes a problem. At this point the price was right! One thing I found interesting is that the flex plate on the automatics are attached by 14 mm hex bolts, but the flywheels for the manuals use M10 Torx bolts! Weird...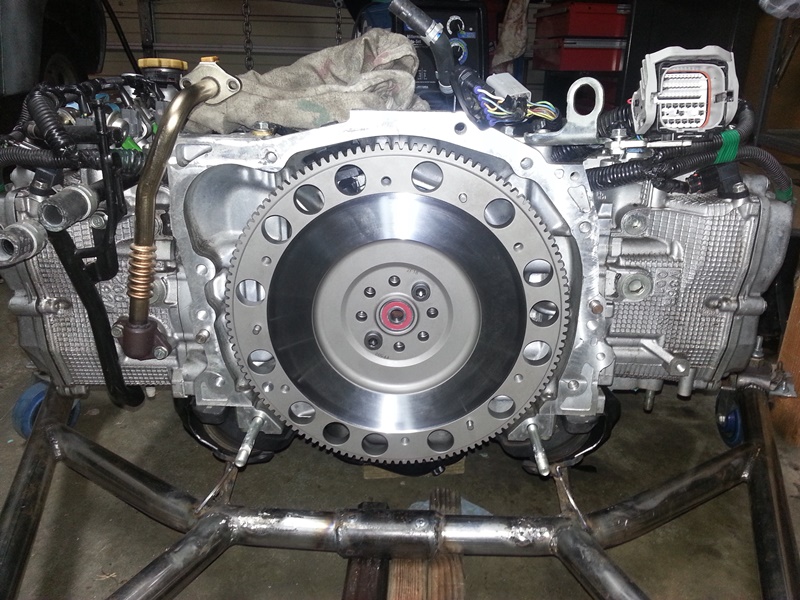
and here the engine sits ready to be installed..again...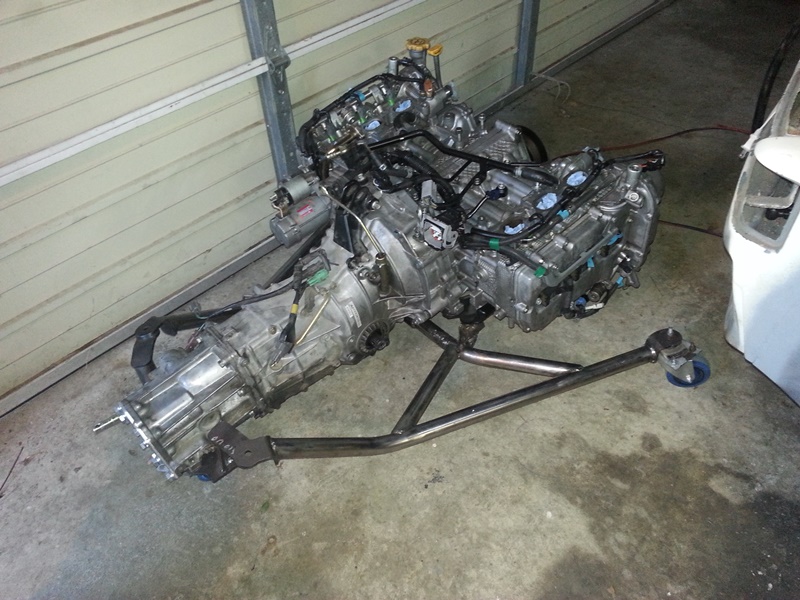
Posted by: sixnotfour Feb 22 2014, 10:25 PM
The front mount is awesome..good work
Posted by: Socalandy Feb 22 2014, 10:34 PM
Awesome work, keep the progress pics coming!!!
Posted by: rick 918-S Feb 23 2014, 07:30 AM
Glad to see in your absences you were able to get the chassis figured out. I like the Suby 6 engines.
Posted by: 76-914 Feb 23 2014, 09:11 AM
Deja vu.
Posted by: abnrdo Feb 23 2014, 03:03 PM
Nice work man! Keep it up, your giving me inspiration. What long stiffening kit did you use? Is that a ColdWater engine mount?
-Jim
Posted by: skeates Feb 24 2014, 02:42 PM
Glad to see in your absences you were able to get the chassis figured out. I like the Suby 6 engines.
Yeah - I was really relieved to see that I hadn't royally hosed the chassis as much as it initially looked like. Now that I've got the car back on wheels and the doors on again I'm not too thrilled about the door gaps on the driver's side - but I can't remember how bad they were when I started the project (should have taken pictures). I figure though that's something that I can address when I do the final tear-down for bodywork.
Posted by: skeates Feb 24 2014, 02:47 PM
Nice work man! Keep it up, your giving me inspiration. What long stiffening kit did you use? Is that a ColdWater engine mount?
-Jim
Thanks! The long kit is one that I purchased second hand (un-installed obviously) from someone on the board. It is one of the Engman long kits. The engine cradle is one of Ian's (Coldwater), though I'll add the caveat that is was a prototype from his initial development of this product (and therefore significantly discounted). The prototype didn't have the mounts for a 6-cyl and needed some "tweaks" for it to bolt up correctly. If you look closely you'll be able to see my additions. His current cradles are going to be a lot more polished than mine.
Posted by: skeates Feb 24 2014, 02:59 PM
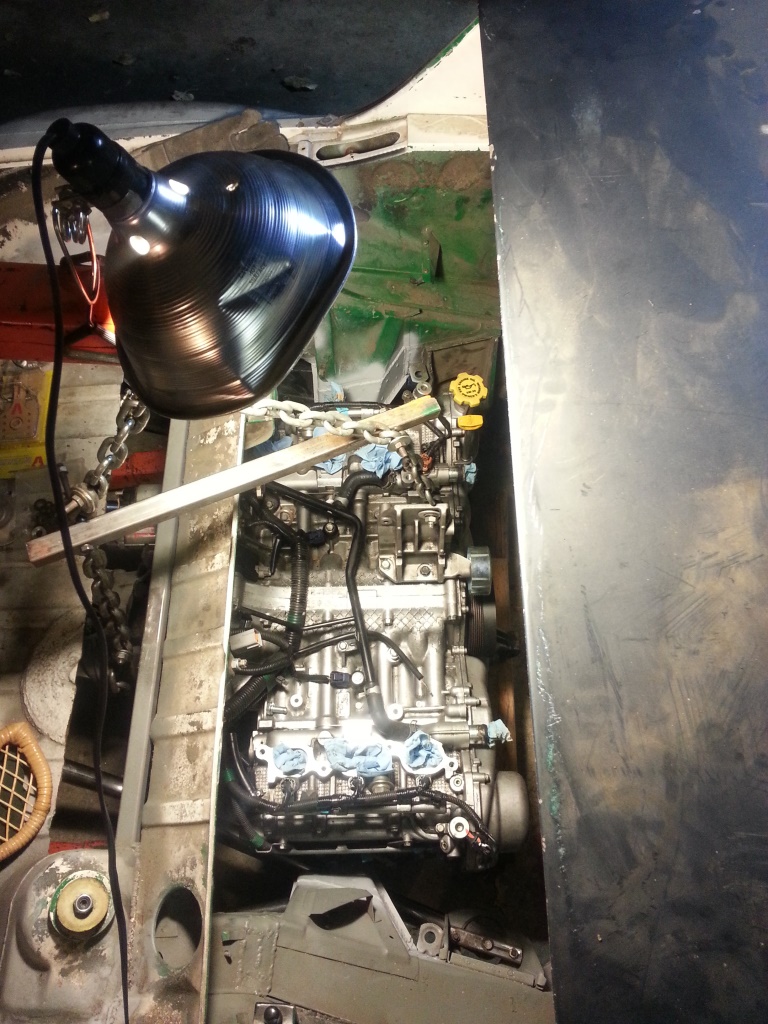
Got a few more hours in yesterday. Re-installed the engine (I'm starting to get the feeling that I'll be very good at this soon), finished drilling the holes for the front engine mount plates and even got the nutserts installed for the fuel pump.
Here's the front engine mount. Only thing left here to do is trim down excess metal and paint! 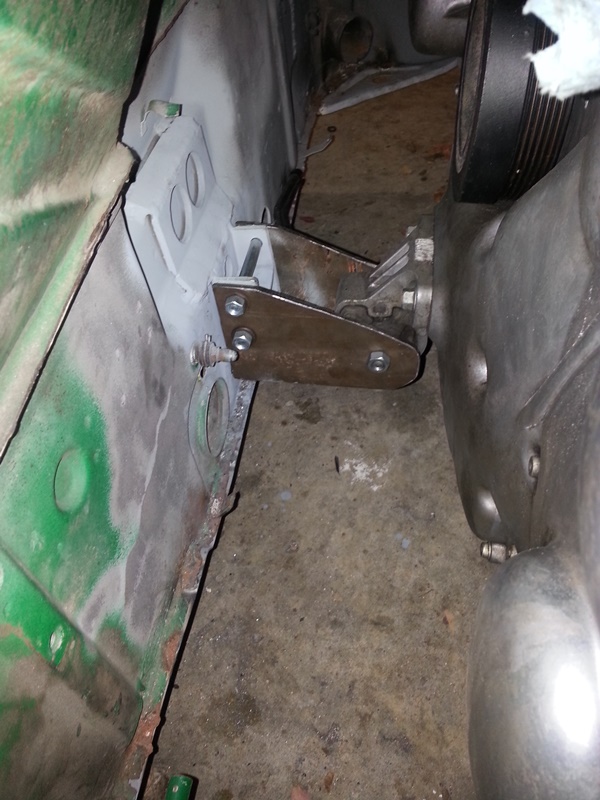
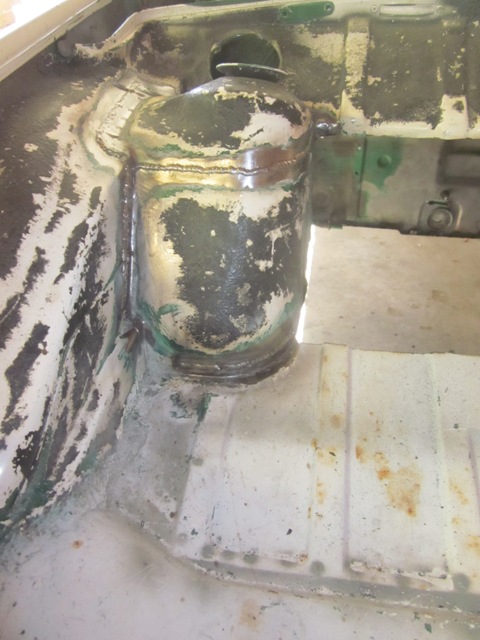
Nutserts for the fuel pump. It looks a bit messy right now on the top side since I used the extra epoxy to fill in holes left by the original fuel sender. Tonight I should be able to remove the tape I used as a backing material and sand it all down nice and smooth. I probably would have been OK welding it (It's been empty for 4+ years), but I just didn't feel like trying it alone at 11 PM without a fire extinguisher. Since the holes are all located where the gasket material covers this is more for good measure anyways. This pic really brings out the "patina" inside my gas tank! 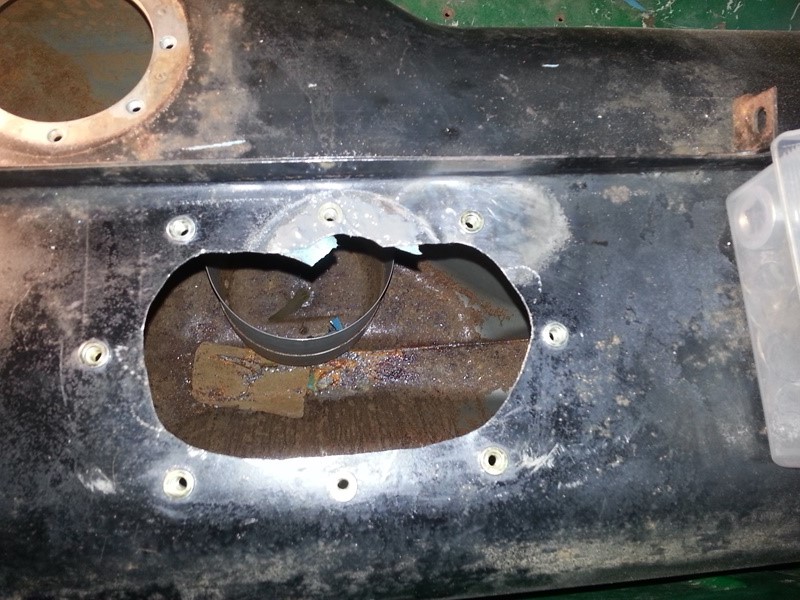
Posted by: ruby914 Sep 24 2014, 11:08 AM
Somehow I missed a lot of your progress. The car is looking good. I think the front mount is great.
I am currently replacing my 901 with a Suby transmission. I am looking for some sort of pitch mount replacement. There is not a lot of room at the aft firewall, about 1.5".
I thought I could make it work but the Suby pitch mount is too long.
The front mount should solve this for you.
I don't understand how we have so many conversions built with out a pitch mount and we don't see problems. Not just with breaking motor mounts but with a jerky feeling motor. At one time I felt a lot of wheel hop in a rolling 2nd gear burnout. I don't know if this could be from the motor rocking back and forth or something else? If I come up with something before I put everything back together I hope to feel some solid improvement. If not, at least I will feel everything is locked in place better.
Powered by Invision Power Board (http://www.invisionboard.com)
© Invision Power Services (http://www.invisionpower.com)