Printable Version of Topic
Click here to view this topic in its original format
914World.com _ 914World Garage _ Setting up IDA's for a stock /6
Posted by: krk Feb 7 2004, 03:55 PM
Folks,
I picked up a set of IDA's in good condition that were set up for a 2.8 (maybe an RSR?) -- anyway, the IDA"s on my /6 have throttle shaft issues, so I figured I'd just swap some parts back 'n forth to get the correct setup for my stock 2.0L /6.
Turns out my original IDA's weren't exactly stock either.
There are several parameters here.
Idle jets are currently at 55 on both carbs. (stock is 45) I'll be using 55 initially.
Mains are 125 on my current set, 155 on the new ones, stock is 105. I'll be using the 125's.
Emulsion tube on mine are F26's (same as 911L), and on the new ones they are F3's (911S). The originals used F1's. I've no clue which one I'll use -- if I'm lazy, I'll leave the F3's in there.
Air correctors are 180 on both IDA's. Original's used 170s. I'll use 180s.
Pump Jet is 50 everywhere.
In the picture you will see two different auxillary venturis -- the shorts ones are stock /6, and the tall ones I've not seen before. No clue what to use.
Lastly, and I've not got this far as I have to cut wires, but from an eyeball estimate, the actual venturis on the originals were quite a bit more restricted. I'll pop both of them out shortly to see what they are --- i'll use whatever is closest to the manual I guess.
Comments welcomed.
kim.
Attached image(s)
Posted by: d914 Feb 7 2004, 04:08 PM
I have extrs 32 and 34 venturis and extra 135's and 160's for mains.
Swap or buy the 155's.
Looking for a different emultion tube. Have f3's need a f9 or 23 I think???
Posted by: J P Stein Feb 7 2004, 05:07 PM
I ain't got all the answers here, but a few.
The tall secondary venturis improve mid-range torque in an engine with a lot of cam...or so I'm told.
Prolly won't do much for a T cam/motor.
The primary venturis for a stock T motor were 27mm, IIRC, and the carbs should be IDTs. Some folks switched to 30mm for more top end. The f27s tubes will prolly work fine...thas bout it from me.
Posted by: krk Feb 7 2004, 05:23 PM
Thx for the data!
The IDA's that came with the car are clearly not the original's (not IDT's), so I"m not surprised to find things that a different from stock. My main goal is to have a set of carbs that should be reasonable once I put the alternator (and all the other crap) back on the car. (it started off as a quck morning project while the air temp got warm enough in the car port -- now my house smells of gas. Sheesh)
I believe the current engine has a stock cam (or something near stock) so I'll use the stock secondaries (damn - means I have to take both sets apart... ah well.. it's a saturday)
Your recollections on the stock venturi's agrees with the P manual. I have a choice between 30's (just took one out of the original ida's) or the new ones, which are unlabled, but clearly larger. I'm thinking the 30's make the most sense.
For Emulsion Tubes, I'm picking twixed F3's and F26's (dunno if there was a typo in your post) I'm leaning to the F26's since I have to dismantle all anyway -- this engine is not an S engine.
kim.
Posted by: TimT Feb 7 2004, 05:45 PM
definately uise those tall secondary venturis, they help out alot in midrange and transitions,
30 mm main venturis
125 mains
180 air correctors
F3 emulsion tube
it should work well
you may have to do some plug cuts and adjust the size of the mains..
Posted by: krk Feb 7 2004, 06:00 PM
Hey Tim, Thx for the comments!
That sounds like a doable combo.
Just to keep the thread up to date, the new IDA's have 34 venturies (the last one I took out had a number stamped on it) The firs t two came out easy, and the next one was not happy about leaving home.
I can almost assemble one carb. wheehoooo.
kim.
Posted by: krk Feb 7 2004, 06:49 PM
As I chug along looking at the build list, there is another small question -- the intake manifolds could use a touch of paint -- how hot does it get that close to the engine? Any paint recommendations?
kim.
Posted by: seanery Feb 7 2004, 06:56 PM
mine haven't been painted, just clean cast aluminum. You could send them out to Jet-Hott and get them coated.
Posted by: krk Feb 7 2004, 07:04 PM
Seanery,
Heh.  I'm assembling. I can spray them now. Or just put 'em on. I have several different rattle cans around...
kim.
Posted by: mskala Feb 7 2004, 08:46 PM
For a totally stock engine, I'm using 55 idle, 120 main, 170 air, tall secondary,
30mm venturi. I did test the 125 using my data collection stuff and it made
zero difference. I got most of my numbers from Jon Lowe's recommendations,
but I went to 170 air since it smoothed out something or other, can't remember.
Oh yeah, F1 tube. F2 and F3 were originally for the E and S, I believe. F26 is
listed in my old Clymer book as original (maybe in europe?). F1 was original.
Posted by: campbellcj Feb 7 2004, 09:12 PM
Well I think I finally got my 40's sorted out today ! 
Richard @ PMO was a great help and supplied some parts including his sweet AN-6 solid fuel bars with 2 day turnaround.
My engine is a factory -6 built to 2.2S specs, except that the heads are a "mystery" and may well be stock 9146/2.0T.
The main problem was just the setup of the carbs. I wish I would have checked that out sooner -- knew it was running very rich but figured the jetting was way off and I didn't want to deal with it at that point esp since rich = "safe". Well, the PO had the mixture screws about 6 turns open (baseline is 2 turns)! And, the idle jets were 55's but I found 1 50 and 1 45! (They may have been reamed out, I dunno). Air idles were too far open also, I think. Venturis were a bit too large for this motor too; they were 34's at least.
Also I tweaked the linkage rods to finally eliminate a tiny bit of preload that was causing the idle to wander; sometimes it would come back down nicely, sometimes not.
Lastly Richard suggested going to a click or two hotter plugs, so I went to a BP7ES (I had 8's which are very cold.) I have a set of BP6ES's here too but probably will not need them. BTW www.sparkplugs.com is pretty cool -- huge selection and very prompt delivery.
Anyways, this is what I have in 'em now and the car is running way smoother and with noticably more pull and sharper throttle response.
32 venturis/chokes
4.5 aux venturis
180 air correction
F26 emulsion
55 idles
130 mains
This is the 2.0S setup except for the F26 vs F3 emulsion tubes. Richard said I should try those if the car wasn't happy with the F26's but I am not seeing any reason to change at the moment and am not sure what the actual diff would be?
Posted by: krk Feb 7 2004, 09:14 PM
marc, thx for the details on your setup. Hopefully, this means I'll be close (lol). Do you have a pointer to Jon's stuff?
kim.
Posted by: krk Feb 7 2004, 09:23 PM
Chris,
Thanks a ton for posting. I can't wait to have problems from a running 914 , but it is good to hear of BTDT! As a status, I've moved all the internal bits over, and this evening, I'll move the jetting bits over. Tomorrow, I'll move back to assembling the grotty bits under the fan shroud and as long as I don't screw anything up, we'll have something to talk further on!
kim.
Posted by: campbellcj Feb 7 2004, 09:30 PM
Since we are on this subject, can somebody take a crack at explaining what the emulsion tubes do, and what effect a change has on the tuning?
I am starting to get a vague grasp of Weber operation after reading several write-ups, but the emulsion tubes are still pretty mysterious to me.
TIA,
Posted by: krk Feb 8 2004, 12:52 AM
I'm with you -- these are largely mysterious things to me as well.
I can certainly write up the bits that I have. Doesn't mean I necessarily understand all of it tho -- there isn' t a lot written that I've encountered so far and I don't have much btdt of consequence.
They are mostly reassembled -- the last venturi was a bit of a pain to get out, but the rest has gone smoothly. Some small bits to go, and they are ready for install. Tomorrow should (knock on something somewhere) see it all back on the car.
kim.
Posted by: Carl Feb 8 2004, 01:17 AM
As I understand it, the emulsion tubes slow the flow of fuel to the main jets by bleeding air into the chamber that feeds the mains. The air mixes with the gas making it less dense. As engine speed increases, the fuel level in the chamber is drawn down thereby exposing more of the holes in the emulsion tubes. As more holes are exposed, more air is drawn through the holes and the engine runs leaner.
Without the tubes, the vacuum through the carbs would draw too much fuel through the mains and the engine would run rich. Why this wouldn't be solved with smaller mains, I don't know.
The number on the emulsion tube has no bearing on a measurement or size. It only relates to the experimental sequence the factory went through to make them work. For example, F1 was their first successful design, F3 was the third and F26 was the 26th.
I think I read this stuff in a book somewhere ...
Carl
Posted by: si2t3m Feb 8 2004, 07:28 AM
Here is some info i collected about the Emulsion tubes:
-----------------------
The emulsion tube emulsifies air from the corrector jet with fuel from the main fuel jet and therefore controls the mixture emanating from the nozzle at all engine speeds with the main circuit in operation.
The controlling factors of the emulsion tube are its diameter and the location of the emulsion holes. These factors are included in the code number of the emulsion tube which is always preceded by the letter F. Unfortunately the code numbers do not follow in any particular sequence which would indicate the applicable characteristics, but the following chart shows the emulsion tubes to be wired to correct mixture faults, together with the most common types:
Posted by: si2t3m Feb 8 2004, 07:28 AM
and a chart
Attached image(s)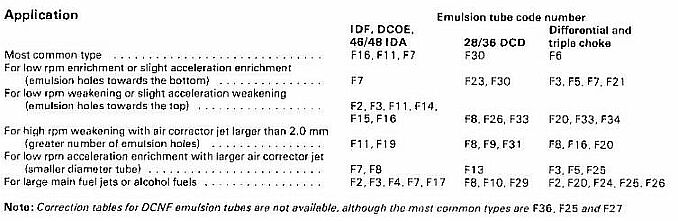
Posted by: si2t3m Feb 8 2004, 07:30 AM
and finally an interesting write up:
http://jimsvw.xenetech.com/Tech_How_To_s/Emulsion_Tubes_again___/emulsion_tubes_again___.html
Found this a while back when someone posted on the bird board. I kept the stuff handy for my Weber Zen!
HTH
Marc-André
Posted by: TimT Feb 8 2004, 08:38 AM
hey!! I believe I posted that chart on the pelican thread 
Posted by: Gint Feb 8 2004, 10:53 AM
Excellent info! I've taken the liberty of resizing the pics in this thread to make it more readable. Purely slefish you understand, as I will use it later for reference due to the quality of the information. I may even move this thread to the "Classics" section.
As usual, Kim asks questions and receives responses that I (and almost certainly others) can use as future reference. Kim, If you need the numbers from my carbs, just say the word and I'll traipse (sp?) through the snow and dig 'em out of the shed and take them apart.
Thanks all!
Posted by: ArtechnikA Feb 8 2004, 11:30 AM
As usual, Kim asks questions and receives responses that I (and almost certainly others) can use as future reference.
yup - i am more than a little tempted to go pull the carbs from my car just so the information can be added here. at one time there was a standard "upgrade kit" of jets, venturiis, and emulsion tubes that was spot-on for the 2,0 /6 - and produced noticeable difference in my E-cammed but otherwise stock engine. i did add the tall '906' secondary preatomisers - mine were pretty rough with casting flash on the support struts but a couple of hours with needle files cleaned them up nicely. (at full chat, air moves through there at just about Mach 0,5...)
i have to go pull a strut and the front antiroll bar from the car, so another few minutes pulling the induction would not be a huge hardship ...
Posted by: campbellcj Feb 8 2004, 11:39 AM
Guys I PDF'd the nice write-up from the web link above, so it can be permanently archived with this thread.
Attached File(s) emulsion_tubes.pdf ( 88.73k )
Number of downloads: 635
emulsion_tubes.pdf ( 88.73k )
Number of downloads: 635
Posted by: krk Feb 8 2004, 12:14 PM
http://jimsvw.xenetech.com/Tech_How_To_s/Emulsion_Tubes_again___/emulsion_tubes_again___.html
Found this a while back when someone posted on the bird board. I kept the stuff handy for my Weber Zen!
HTH
Marc-André
Marc,
This was an excellent pointer to a good read!
kim.
Posted by: krk Feb 8 2004, 12:19 PM
As usual, Kim asks questions and receives responses that I (and almost certainly others) can use as future reference. Kim, If you need the numbers from my carbs, just say the word and I'll traipse (sp?) through the snow and dig 'em out of the shed and take them apart.
Thanks all!
Doh. I was thinking of taking my time and shooting the pics -- but mostly I was trying to do the least I could to get back to assembling the car. I ended up taking nearly everything apart. I decided the main venturies needed to be the stock ones and a lot comes apart to get to them. I meant to shoot pics of the two emultion tubes, as they would be an interesting comparison after having read the emulsion link from Marc. It was too late of course, as one of the sets had been reassembled already.
Anyway, I'm pretty sure that the carbs will be apart again in the future and I'll shoot some of the missing pics then.
This has been a great thread tho -- I definitely appreciate the wisdom/info/btdt that y'all have been posting!
Once the car runs, I'm sure I'll be re-reading this
.Back to the garage!
kim.
Posted by: krk Feb 8 2004, 01:24 PM
Another question.
I don't think these newer IDA's have been on a car for a while. One of them moves pretty freely, but one is a bit stiff. Is there some sort of lubrication I should be applying before install? Or will it loosen up a bit with gas/etc?
It's sure nice to have no end play on the throttle shaft -- when you compare the new ones with the old ones, you can get a real sense for how much play is present. Not sure if I can shoot a pic that shows...
kim.
Posted by: si2t3m Feb 8 2004, 05:51 PM
Hi Kim,
So you've got this stiff shaft... 
There should be some teflon stripes (dunno what PMO calls them) in the throttle shaft bores at each end of the carbs. When i took my carbs apart, the old ones were crusty and desintegrating. I don't know if this could be the issue. You could also disconnect the rod that goes to the accel pump. Could be that one that is sticky.
Marc-André
Posted by: krk Feb 8 2004, 06:29 PM
Hey Marc,
It might just be your avatar .
The shaft seems stiff the whole way -- but I can easily pop off the accel pump lever to check tho. I've just connected the alternator, and realised I left out the air deflector that is supposed to be behind it. doh. Good think I noticed now -- always keep all your parts in one place!
I also discovered I should have labeled all the nice ziplog bags of parts -- took a second to find the correct nuts to reattach it -- hm -- that could also be your avatar  -- but I'm sure I'll be confused further as I assemble things. (I'm also sure I didn't take enough pic's)
kim.
Posted by: Carl Feb 8 2004, 07:14 PM
Here are photos of the examples I've got. F1 on the left, F26 on the right.
C
Attached image(s)
Posted by: Carl Feb 8 2004, 07:31 PM
Kim,
You looked into the cost and time required to put new bushings in the throttle shafts of your carbs. You talked to Pierce Manifold as I recall. What was the time and $$ required to do the job? I checked mine today after leaving your place. They need to be done.
C
Posted by: Gint Feb 8 2004, 08:40 PM
Talking to Kim Monday, he told me of Eurometrix web site and now I can't remember the domain.
The last time I spoke with Matt (Eurometrix) it was about a $700 job. But Kim told me his web site priced the job much higher. I can't find it now though.
Posted by: Gint Feb 8 2004, 08:44 PM
Hah!
http://eurometrix.ws/
BTW - I've seen an example of Matt's work on a set of P-car throttle bodies. Gorgeous! Jewel-like. I'm going to call him next week and send mine out for the full monty.
Posted by: krk Feb 8 2004, 09:50 PM
You looked into the cost and time required to put new bushings in the throttle shafts of your carbs. You talked to Pierce Manifold as I recall. What was the time and $$ required to do the job? I checked mine today after leaving your place. They need to be done.
C
Pierce was 400-600 per carb. Pricing can vary with how much eye candy you wanna do. This is consistent with both the numbers are the Eurometrix site (starts at 500 or s, and goes up), and Bieker.
Just to say it out loud, all of these three have great reputations. I've talked with Matt from Euro, and (I've forgotten the name of the guy from Pierce), and also traded email with Bieker. They were all patient with my questions, and answered them all to my satisfaction.
My problem was that the queue for any of them was so long (mid-April for Pierce) -- I need carbs to get this puppy rolling, so I opted for a different route. I'll post more on this -- it should work fine for now, but I will probably still get my original carbs done. It's an eye candy thing...
kim.
Posted by: krk Feb 8 2004, 10:04 PM
-- but I'm sure I'll be confused further as I assemble things. (I'm also sure I didn't take enough pic's)It turns out that it is also quite possible to assemble it all with the deflector cone off by one hole (60 degrees) of rotation. You discover this when you try to assemble the shroud -- I've taken it apart (again) and this time hopefully, the shroud will be happy. I'll find that out tomorrow -- it's night time. A less productive day than I'd hoped for.
kim.
Posted by: krk Feb 9 2004, 05:37 PM
Alrighty then. I'm skipping out of work a bit early today to see if I can catch up.
I used some good old fashioned motor oil, applied with a q-tip to each side of the throttle shaft -- both carbs are fine now.
Now back to see what my adventure in the dark screwed up last night.....
kim.
Posted by: Carl Feb 9 2004, 10:26 PM
Yep, you can always tell the Canadians, you just can't tell 'em much.

Powered by Invision Power Board (http://www.invisionboard.com)
© Invision Power Services (http://www.invisionpower.com)